Embed Size (px)
Citation preview

GMAA00272010 10/10
English
CAMILEO™ S30 User’s Guide

5
5.375 x 8.375 ver 2.3
Additional Information © Copyright 2010 TOSHIBA CORPORATION. All rights reserved. TOSHIBA reserves the right to make technical changes. TOSHIBA assumes no liability for damages incurred directly or indirectly from errors, omissions or discrepancies between this product and the documentation.
TrademarksCAMILEO is a trademark of Toshiba America Information Systems, Inc. and/or Toshiba Corporation.
Adobe is either a registered trademark or trademark of Adobe Systems Incorporated in the United States and/or other countries.
ArcSoft and MediaImpression are registered trademarks of ArcSoft, Inc.
Facebook is a registered trademark of Facebook Inc.
HDMI, the HDMI Logo and High-Definition Multimedia Interface are trademarks or registered trademarks of HDMI Licensing, LLC.
Intel, Intel Core, Celeron, Centrino and Pentium are trademarks or registered trademarks of Intel Corporation or its subsidiaries in the United States and other countries.
Microsoft, Windows, and Windows Vista are either registered trademarks or trademarks of Microsoft Corporation in the United States and/or other countries.
Picasa is a trademark of Google Inc.
Secure Digital and SD are trademarks of SD Card Association.
YouTube and the YouTube logo are registered trademarks of Google, Inc.
All other brand and product names are trademarks or registered trademarks of their respective companies.

6
5.375 x 8.375 ver 2.3
ContentsChapter 1: Getting to Know Your Camcorder.............................9
Overview ..................................................................9Check the Components .....................................10System Requirements.......................................10Front/Side views ...............................................11Rear view ..........................................................12Underside view .................................................12
Chapter 2: Getting Started......................................................... 13Loading the battery .................................................13
Charging the battery .........................................14Inserting and removing an SD™ Card (optional).....19
Protecting data on an SD™ Card.......................20Turning the camcorder on and getting started .......20Turning off the camcorder ......................................20
Chapter 3: Record Mode........................................................... 21Button functions .....................................................21LCD touch screen information ................................22
Notification icons ..............................................22Touch function icons ........................................24
7Contents
5.375 x 8.375 ver 2.3
Video recording ......................................................25Photo recording ......................................................26Taking close up photos/videos................................26Using digital zoom ..................................................26Menu options/operations ........................................27
Video Setting options........................................28Photo setting options........................................32Photo Effects ....................................................36Deleting files .....................................................39
Chapter 4: Playback Mode........................................................ 41Button functions .....................................................41LCD touch screen information ................................42
Notification icons ..............................................42Touch function icons ........................................43
Playback mode operations ......................................44Video Playback..................................................45Photo Playback .................................................45Delete a file in Playback mode ..........................46
Chapter 5: Camcorder Settings................................................ 47Settings Menu.........................................................47
Sound ...............................................................48TV .....................................................................48Language ..........................................................49Time Setting......................................................49Format ..............................................................50Default Setting ..................................................50
Chapter 6: Viewing Photos and Videos on TV..................................................... 52
Connecting to a high-definition 16:9 (wide) TV.......52Connecting to a non-high-definition 4:3 TV ...........53
8 Contents
5.375 x 8.375 ver 2.3
Chapter 7: Viewing Photos and Videos on a Computer......................................54
Installing bundled software.....................................54Transferring photos or videos to a computer..........55
Chapter 8: Uploading Video Files to the Internet.....................56CAMILEO UPLOADER..............................................56ArcSoft MediaImpression .......................................60
Chapter 9: Specifications...........................................................63Operating Environment Conditions .........................64
Chapter 10: Troubleshooting.....................................................65
Chapter 11: Other Information..................................................67Toshiba Support .....................................................67
Before you call ..................................................67Contacting Toshiba .................................................68
Toshiba’s technical support Web site................68Toshiba voice contact .......................................68
Warranty .................................................................69Online Warranty Information.............................69Warranty Service ..............................................69
9
Chapter 1
Getting to Know Your CamcorderOverview
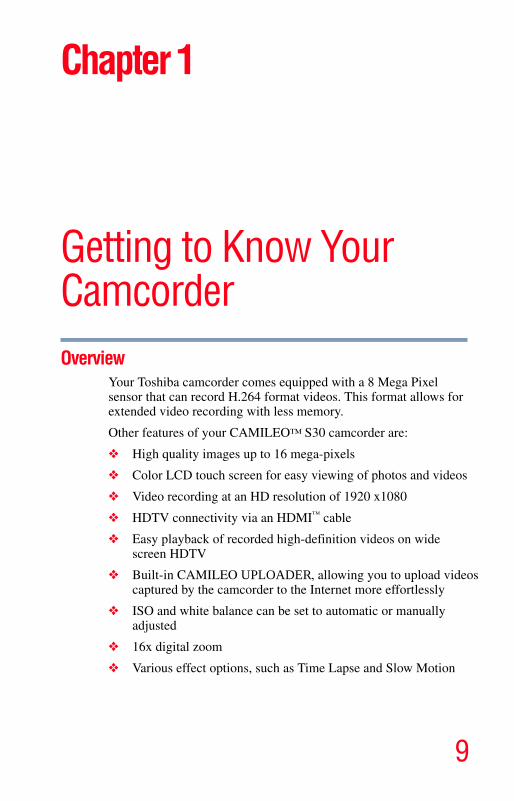
Your Toshiba camcorder comes equipped with a 8 Mega Pixel sensor that can record H.264 format videos. This format allows for extended video recording with less memory.
Other features of your CAMILEO™ S30 camcorder are:
❖ High quality images up to 16 mega-pixels
❖ Color LCD touch screen for easy viewing of photos and videos
❖ Video recording at an HD resolution of 1920 x1080
❖ HDTV connectivity via an HDMI™ cable
❖ Easy playback of recorded high-definition videos on wide screen HDTV
❖ Built-in CAMILEO UPLOADER, allowing you to upload videos captured by the camcorder to the Internet more effortlessly
❖ ISO and white balance can be set to automatic or manually adjusted
❖ 16x digital zoom
❖ Various effect options, such as Time Lapse and Slow Motion
10 Getting to Know Your CamcorderOverview
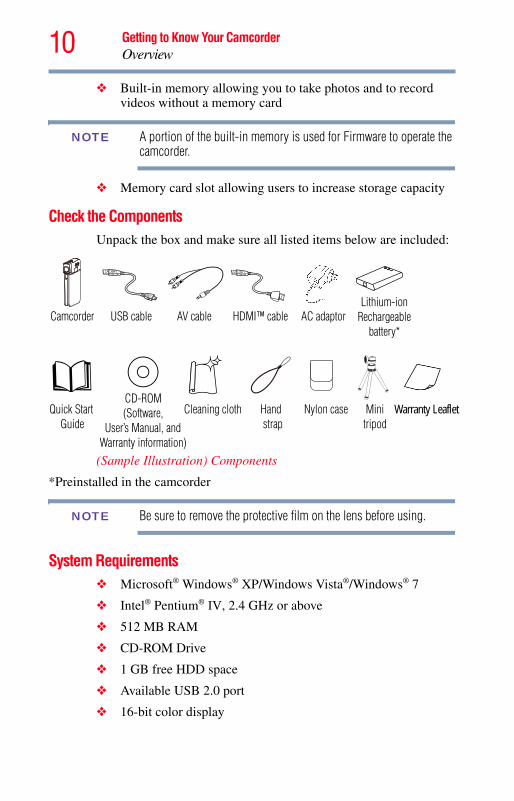
❖ Built-in memory allowing you to take photos and to record videos without a memory card
A portion of the built-in memory is used for Firmware to operate the camcorder.
❖ Memory card slot allowing users to increase storage capacity
Check the ComponentsUnpack the box and make sure all listed items below are included:
(Sample Illustration) Components
*Preinstalled in the camcorder
Be sure to remove the protective film on the lens before using.
System Requirements❖ Microsoft® Windows® XP/Windows Vista®/Windows® 7
❖ Intel® Pentium® IV, 2.4 GHz or above
❖ 512 MB RAM
❖ CD-ROM Drive
❖ 1 GB free HDD space
❖ Available USB 2.0 port
❖ 16-bit color display
NOTE
Camcorder USB cable AV cable
Quick Start Guide
CD-ROM(Software,
User’s Manual, and
Cleaning cloth Hand Nylon case Mini Warranty Leaflet
HDMI™ cable AC adaptorLithium-ion
Rechargeablebattery*
tripod strap
Warranty information)
NOTE
11Getting to Know Your CamcorderOverview
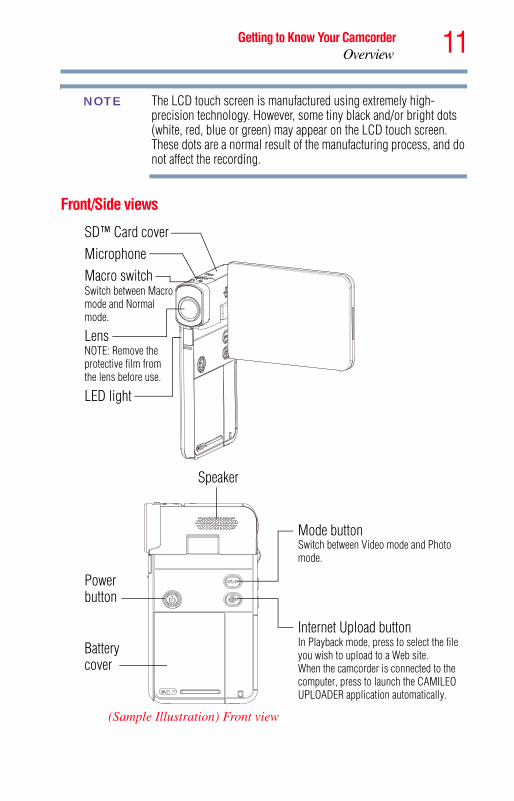
The LCD touch screen is manufactured using extremely high-precision technology. However, some tiny black and/or bright dots (white, red, blue or green) may appear on the LCD touch screen. These dots are a normal result of the manufacturing process, and do not affect the recording.
Front/Side views
(Sample Illustration) Front view
NOTE
Switch between Macro
SD™ Card cover
Macro switch
LensNOTE: Remove the
Microphone
LED light
mode and Normal
protective film fromthe lens before use.
mode.
Switch between Video mode and Photo
Power
Speaker
Battery
Mode button
mode.
Internet Upload buttonIn Playback mode, press to select the fileyou wish to upload to a Web site.When the camcorder is connected to thecomputer, press to launch the CAMILEOUPLOADER application automatically.
button
cover
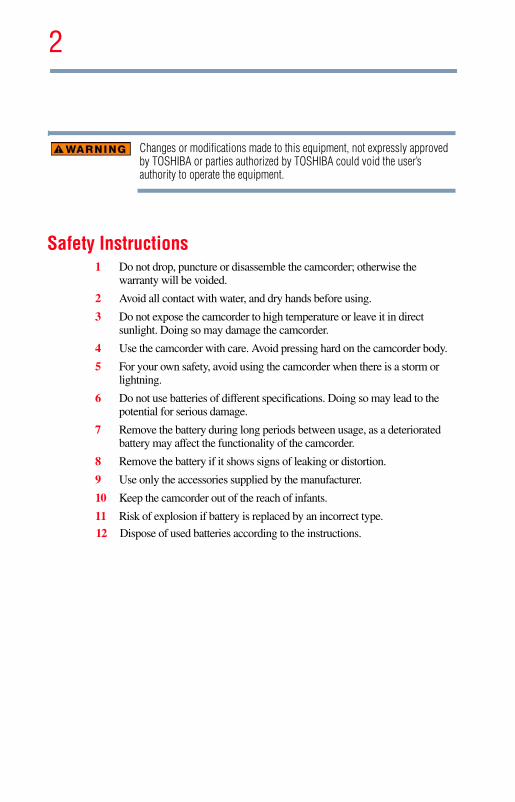
12 Getting to Know Your CamcorderOverview
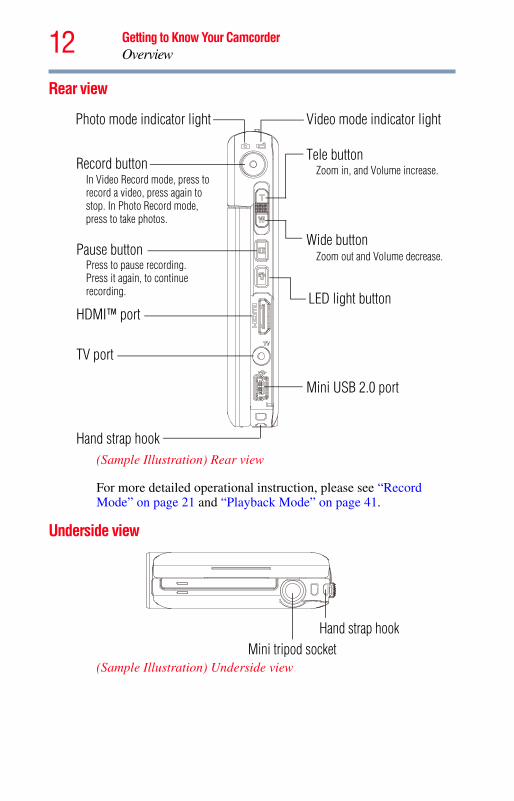
Rear view
(Sample Illustration) Rear view
For more detailed operational instruction, please see “Record Mode” on page 21 and “Playback Mode” on page 41.
Underside view
(Sample Illustration) Underside view
Video mode indicator light
Tele button
Wide button
TV port
Record buttonIn Video Record mode, press to
Press to pause recording.Pause button
Mini USB 2.0 port
Hand strap hook
Photo mode indicator light
HDMI™ port
Zoom out and Volume decrease.
record a video, press again tostop. In Photo Record mode,press to take photos.
Press it again, to continue
Zoom in, and Volume increase.
recording. LED light button
Hand strap hookMini tripod socket
13
Chapter 2
Getting StartedLoading the battery
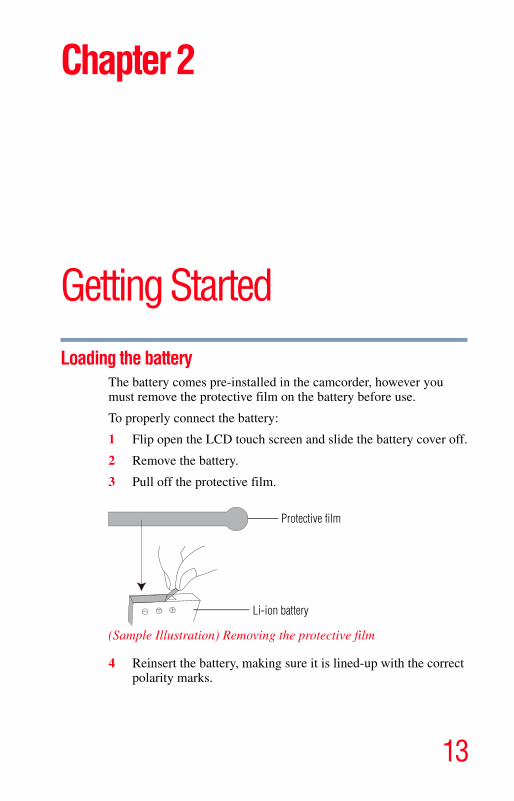
The battery comes pre-installed in the camcorder, however you must remove the protective film on the battery before use.
To properly connect the battery:
1 Flip open the LCD touch screen and slide the battery cover off.
2 Remove the battery.
3 Pull off the protective film.
(Sample Illustration) Removing the protective film
4 Reinsert the battery, making sure it is lined-up with the correct polarity marks.
Protective film
Li-ion battery
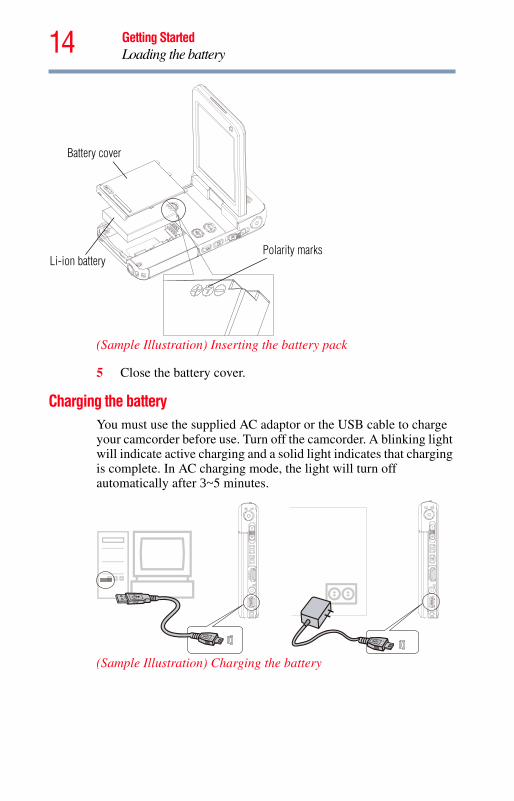
14 Getting StartedLoading the battery
(Sample Illustration) Inserting the battery pack
5 Close the battery cover.
Charging the batteryYou must use the supplied AC adaptor or the USB cable to charge your camcorder before use. Turn off the camcorder. A blinking light will indicate active charging and a solid light indicates that charging is complete. In AC charging mode, the light will turn off automatically after 3~5 minutes.
(Sample Illustration) Charging the battery
Polarity marksLi-ion battery
Battery cover
15Getting StartedLoading the battery
Handling of the battery pack❖ Never attempt to dispose of a battery pack by burning or by
throwing it into a fire, and never allow exposure to a heating apparatus (e.g., microwave oven). Heat can cause a battery pack to explode and/or release caustic liquid, both which may possibly cause serious injury.
❖ Never attempt to disassemble, tamper with or repair a battery pack. The battery pack could overheat and ignite. Leakage of the caustic alkaline solution or other electrolytic substances could cause fire, possibly resulting in death or serious injury.
❖ Never short-circuit the battery pack by either accidentally or intentionally bringing the battery terminals in contact with another conductive object. This could cause serious injury or a fire, and could also damage the battery pack and product. Always wrap the battery pack in plastic (or place it in a plastic bag) whenever transporting it, to avoid exposing the terminals to another conductive object which could result in serious injury. Always cover the metal terminals with insulating tape when disposing of the battery pack, to prevent accidental short-circuiting which could result in serious injury.
16 Getting StartedLoading the battery
❖ Never drive a nail or any other sharp object into the battery pack, hit battery pack with a hammer or other object or step on it. Doing so could cause a fire or explosion possibly resulting in serious injury.
❖ Never charge the battery pack by a method other than as instructed. Doing so could cause a fire or explosion possibly resulting in serious injury.
❖ Never connect the battery pack to a plug socket or a car cigarette plug socket. The battery pack could rupture or ignite causing a fire or explosion possibly resulting in serious injury.
❖ Never allow a battery pack to become wet. A wet battery pack will overheat or ignite causing rupture or fire, possibly resulting in death or serious injury.
❖ Never store a battery pack in an area of high humidity. This could cause a fire or explosion possibly resulting in serious injury.
❖ Never expose a battery pack to abnormal shock, vibration or pressure. Never use a battery pack which has been exposed to abnormal shock even if the appearance is normal. The battery pack’s internal protective device could fail, causing it to overheat or ignite resulting in caustic liquid leakage, or explosion or fire, possibly resulting in death or serious injury.
❖ Never subject a battery pack to heat, and never store it or use it near a heat source. The battery pack could ignite or explode when heated or burned, possibly resulting in death or serious injury. Subjecting a battery pack to heat could also cause caustic liquid to leak. It can also cause failure, malfunction, or loss of stored data.
Use of correct battery pack❖ Always use the battery pack supplied. Other battery packs have
different voltage and terminal polarities. Use of non-conforming battery packs could generate smoke or cause fire or rupture, possibly resulting in serious injury.
17Getting StartedLoading the battery
Battery safety❖ Never allow caustic electrolyte fluid leaked from the battery pack
to contact your eyes, body or clothing. Use appropriate protective gloves when handling a damaged battery.If caustic electrolyte fluid from the battery pack should contact your eyes, immediately wash your eyes with large amounts of running water and obtain prompt medical attention, to help prevent permanent eye damage.If electrolyte fluid should contact any part of your body, immediately wash it off under running water to help prevent skin rashes.If electrolyte fluid should contact your clothes, promptly remove them to help prevent the electrolyte fluid from contacting your body, possibly resulting in serious injury.
Battery pack warning indicators❖ Always immediately turn the power off and disconnect the power
cable/cord plug from the plug socket and stop using the battery pack if you observe any of the following conditions:❖ Offensive or unusual odor❖ Excessive heat❖ Discoloration❖ Deformation, cracks or leaks❖ Smoke❖ Other unusual event during use, such as abnormal soundIn such an event, carefully and immediately remove the battery pack from the product. In some instances, you might have to wait for the product to cool down before removing the battery pack, in order to avoid any possible minor injury due to heat exposure. Do not turn on the product’s power again until an authorized Toshiba service provider has checked it for safety. Continued use could cause a fire or rupture possibly resulting in serious injury or product failure including but not limited to the loss of data.
18 Getting StartedLoading the battery
Disposal of used battery packs❖ Always dispose of used battery packs in compliance with all
applicable laws and regulations. Put insulating tape, such as cellophane tape, on the electrode during transportation to avoid a possible short circuit, fire or electric shock. Failure to do so could possibly result in serious injury.
Inserting the battery pack❖ When installing a battery pack or before moving the product,
always make sure the battery pack is inserted correctly and securely. If the battery falls out, while you are carrying the product, you could be injured or the battery pack could be damaged.
Do not use an impaired or exhausted battery pack❖ Never continue to use a battery pack after its recharging
capability has become impaired, or after the warning message indicating that the battery pack power is exhausted has been displayed.Continued use of an exhausted or impaired battery pack could result in the loss of data or damage to the product.
Handling of the battery pack❖ Never attempt to install batteries in reverse polarity.
❖ Make sure the battery is securely installed in the product before attempting to charge the battery pack.
❖ Improper installation could generate smoke or fire, or cause the battery pack to rupture.
NOTE
19Getting StartedInserting and removing an SD™ Card (optional)
❖ The battery pack is lithium ion batteries, which can explode if not replaced, used, handled or disposed of properly. Dispose of the battery as required by local ordinances or regulations. Use only batteries recommended by TOSHIBA as replacements.
❖ Charge the battery pack only in an ambient temperature between 5 and 35 degrees Celsius. Otherwise, the electrolyte solution might leak, battery pack performance might deteriorate and the battery life might be shortened.
❖ Never install or remove the battery pack without first turning off the power and disconnecting the AC adaptor.
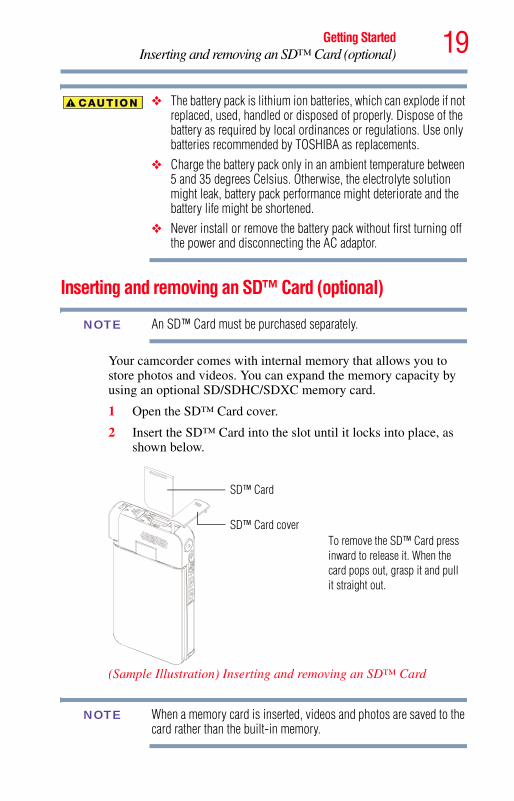
Inserting and removing an SD™ Card (optional)
An SD™ Card must be purchased separately.
Your camcorder comes with internal memory that allows you to store photos and videos. You can expand the memory capacity by using an optional SD/SDHC/SDXC memory card.
1 Open the SD™ Card cover.
2 Insert the SD™ Card into the slot until it locks into place, as shown below.
(Sample Illustration) Inserting and removing an SD™ Card
When a memory card is inserted, videos and photos are saved to the card rather than the built-in memory.
NOTE
SD™ Card
SD™ Card coverTo remove the SD™ Card pressinward to release it. When thecard pops out, grasp it and pullit straight out.
NOTE
20 Getting StartedTurning the camcorder on and getting started
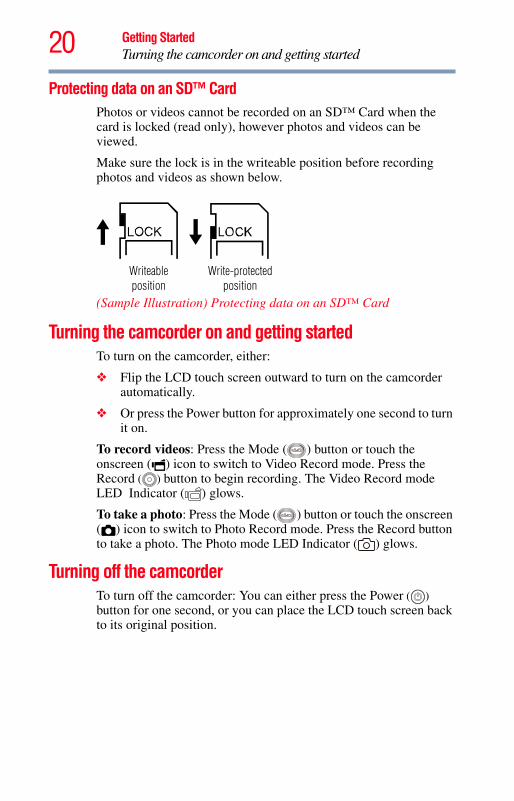
Protecting data on an SD™ CardPhotos or videos cannot be recorded on an SD™ Card when the card is locked (read only), however photos and videos can be viewed.
Make sure the lock is in the writeable position before recording photos and videos as shown below.
(Sample Illustration) Protecting data on an SD™ Card
Turning the camcorder on and getting started To turn on the camcorder, either:
❖ Flip the LCD touch screen outward to turn on the camcorder automatically.
❖ Or press the Power button for approximately one second to turn it on.
To record videos: Press the Mode ( ) button or touch the onscreen ( ) icon to switch to Video Record mode. Press the Record ( ) button to begin recording. The Video Record mode LED Indicator ( ) glows.
To take a photo: Press the Mode ( ) button or touch the onscreen ( ) icon to switch to Photo Record mode. Press the Record button to take a photo. The Photo mode LED Indicator ( ) glows.
Turning off the camcorderTo turn off the camcorder: You can either press the Power ( ) button for one second, or you can place the LCD touch screen back to its original position.
Write-protectedWriteableposition position
21
Chapter 3
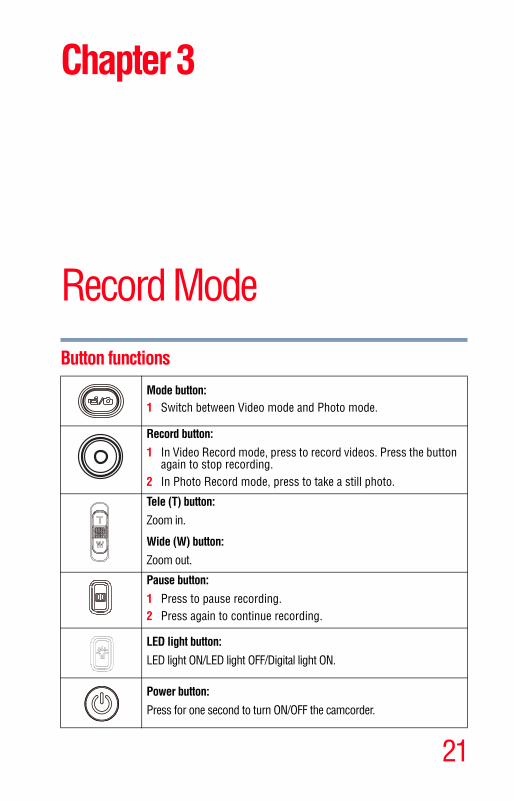
Record ModeButton functions
Mode button:1 Switch between Video mode and Photo mode.
Record button:
1 In Video Record mode, press to record videos. Press the button again to stop recording.
2 In Photo Record mode, press to take a still photo.
Tele (T) button:
Zoom in.
Wide (W) button:
Zoom out.
Pause button:
1 Press to pause recording.2 Press again to continue recording.
LED light button:
LED light ON/LED light OFF/Digital light ON.
Power button:
Press for one second to turn ON/OFF the camcorder.
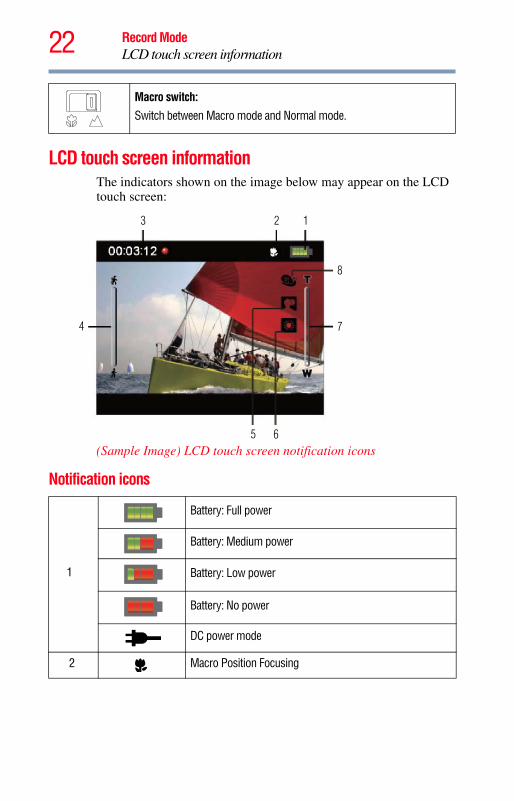
22 Record ModeLCD touch screen information
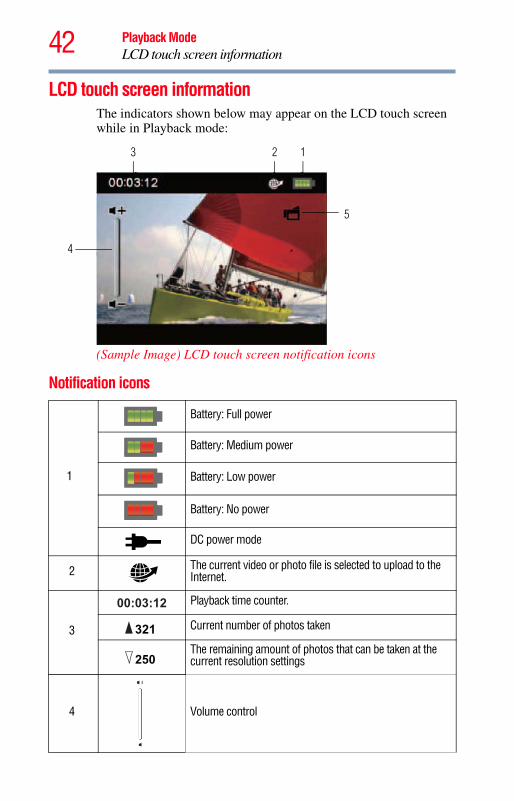
LCD touch screen informationThe indicators shown on the image below may appear on the LCD touch screen:
(Sample Image) LCD touch screen notification icons
Notification icons
Macro switch:
Switch between Macro mode and Normal mode.
1
Battery: Full power
Battery: Medium power
Battery: Low power
Battery: No power
DC power mode
2 Macro Position Focusing
3 2 1
65
8
4 7
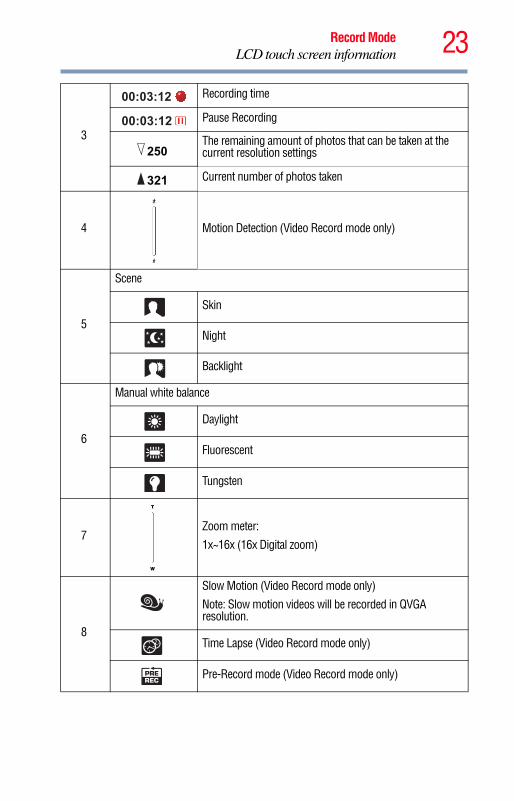
23Record ModeLCD touch screen information
3
Recording time
Pause Recording
The remaining amount of photos that can be taken at the current resolution settings
Current number of photos taken
4 Motion Detection (Video Record mode only)
5
Scene
Skin
Night
Backlight
6
Manual white balance
Daylight
Fluorescent
Tungsten
7Zoom meter:
1x~16x (16x Digital zoom)
8
Slow Motion (Video Record mode only)
Note: Slow motion videos will be recorded in QVGA resolution.
Time Lapse (Video Record mode only)
Pre-Record mode (Video Record mode only)
00:03:12
00:03:12
250
321
24 Record ModeLCD touch screen information
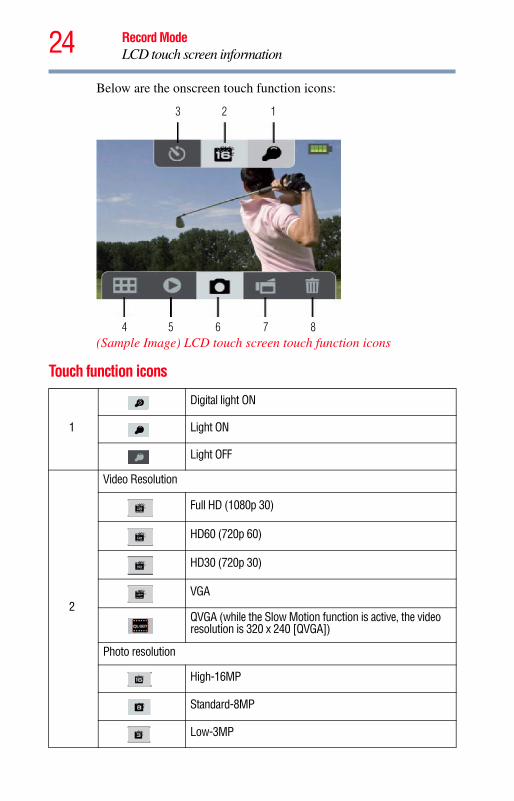
Below are the onscreen touch function icons:
(Sample Image) LCD touch screen touch function icons
Touch function icons
1
Digital light ON
Light ON
Light OFF
2
Video Resolution
Full HD (1080p 30)
HD60 (720p 60)
HD30 (720p 30)
VGA
QVGA (while the Slow Motion function is active, the video resolution is 320 x 240 [QVGA])
Photo resolution
High-16MP
Standard-8MP
Low-3MP
3 2 1
87654
60p
30p
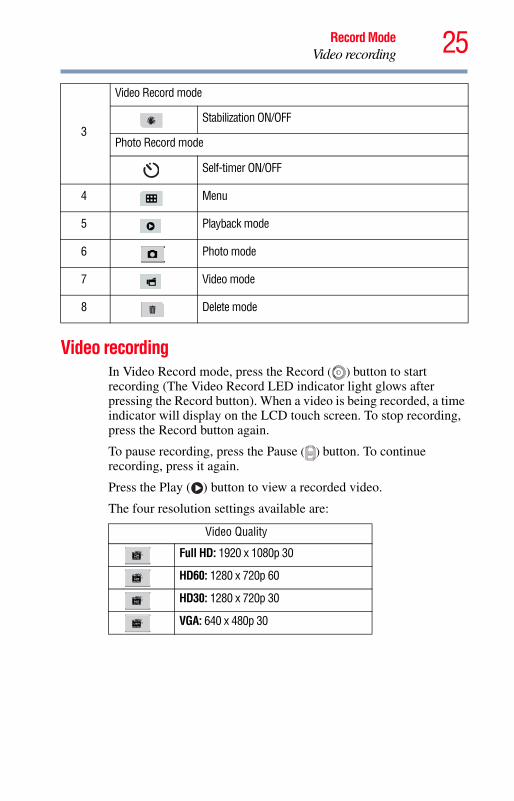
25Record ModeVideo recording
Video recordingIn Video Record mode, press the Record ( ) button to start recording (The Video Record LED indicator light glows after pressing the Record button). When a video is being recorded, a time indicator will display on the LCD touch screen. To stop recording, press the Record button again.
To pause recording, press the Pause ( ) button. To continue recording, press it again.
Press the Play ( ) button to view a recorded video.
The four resolution settings available are:
3
Video Record mode
Stabilization ON/OFF
Photo Record mode
Self-timer ON/OFF
4 Menu
5 Playback mode
6 Photo mode
7 Video mode
8 Delete mode
Video Quality
Full HD: 1920 x 1080p 30
HD60: 1280 x 720p 60
HD30: 1280 x 720p 30
VGA: 640 x 480p 30
60p
30p
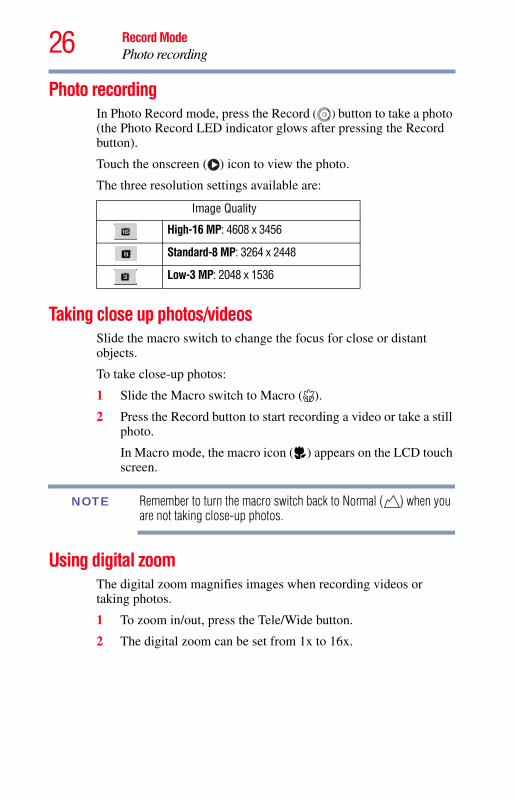
26 Record ModePhoto recording
Photo recordingIn Photo Record mode, press the Record ( ) button to take a photo (the Photo Record LED indicator glows after pressing the Record button).
Touch the onscreen ( ) icon to view the photo.
The three resolution settings available are:
Taking close up photos/videosSlide the macro switch to change the focus for close or distant objects.
To take close-up photos:
1 Slide the Macro switch to Macro ( ).
2 Press the Record button to start recording a video or take a still photo.
In Macro mode, the macro icon ( ) appears on the LCD touch screen.
Remember to turn the macro switch back to Normal ( ) when you are not taking close-up photos.
Using digital zoomThe digital zoom magnifies images when recording videos or taking photos.
1 To zoom in/out, press the Tele/Wide button.
2 The digital zoom can be set from 1x to 16x.
Image Quality
High-16 MP: 4608 x 3456
Standard-8 MP: 3264 x 2448
Low-3 MP: 2048 x 1536
NOTE
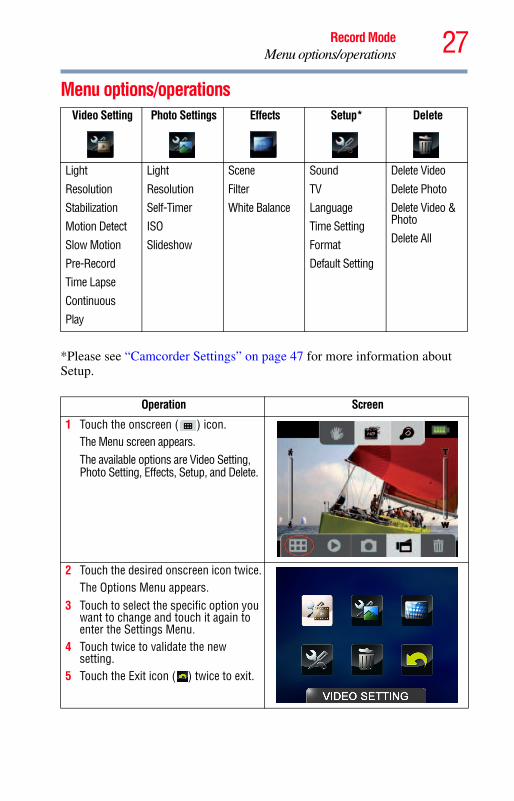
27Record ModeMenu options/operations
Menu options/operations
*Please see “Camcorder Settings” on page 47 for more information about Setup.
Video Setting Photo Settings Effects Setup* Delete
Light
Resolution
Stabilization
Motion Detect
Slow Motion
Pre-Record
Time Lapse
Continuous
Play
Light
Resolution
Self-Timer
ISO
Slideshow
Scene
Filter
White Balance
Sound
TV
Language
Time Setting
Format
Default Setting
Delete Video
Delete Photo
Delete Video & Photo
Delete All
Operation Screen
1 Touch the onscreen ( ) icon.The Menu screen appears.The available options are Video Setting, Photo Setting, Effects, Setup, and Delete.
2 Touch the desired onscreen icon twice.The Options Menu appears.
3 Touch to select the specific option you want to change and touch it again to enter the Settings Menu.
4 Touch twice to validate the new setting.
5 Touch the Exit icon ( ) twice to exit.
28 Record ModeMenu options/operations
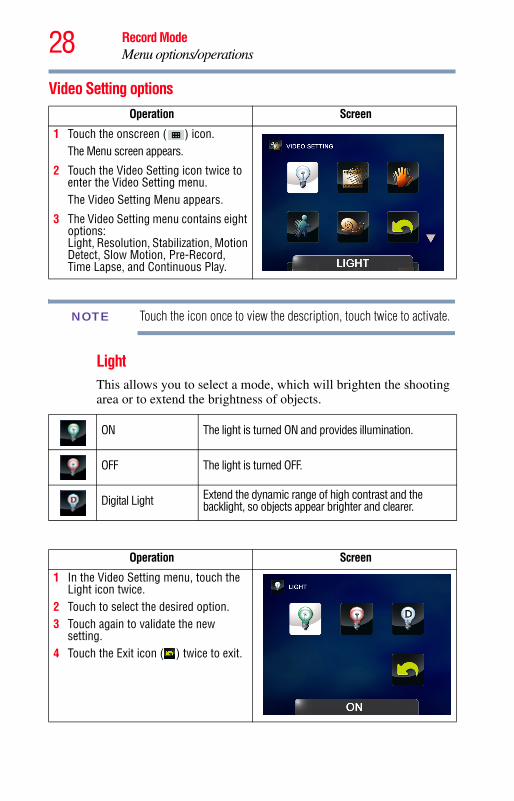
Video Setting options
Touch the icon once to view the description, touch twice to activate.
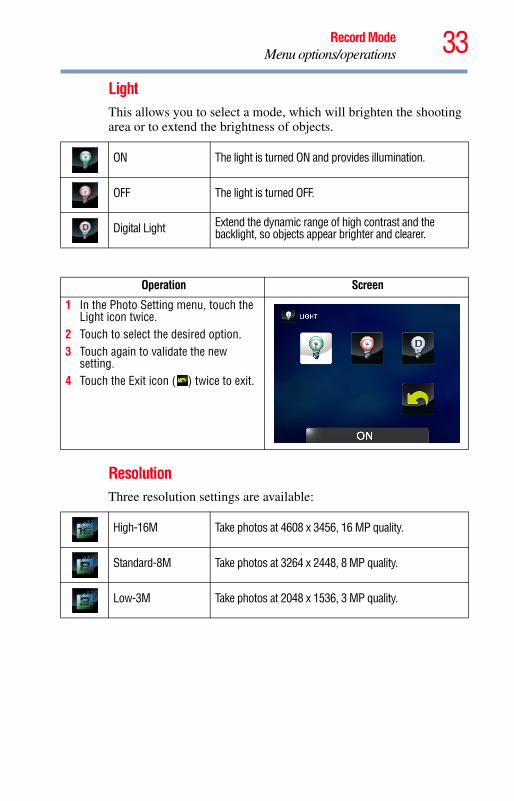
LightThis allows you to select a mode, which will brighten the shooting area or to extend the brightness of objects.
Operation Screen
1 Touch the onscreen ( ) icon.The Menu screen appears.
2 Touch the Video Setting icon twice to enter the Video Setting menu.The Video Setting Menu appears.
3 The Video Setting menu contains eight options: Light, Resolution, Stabilization, Motion Detect, Slow Motion, Pre-Record, Time Lapse, and Continuous Play.
ON The light is turned ON and provides illumination.
OFF The light is turned OFF.
Digital Light Extend the dynamic range of high contrast and the backlight, so objects appear brighter and clearer.
Operation Screen
1 In the Video Setting menu, touch the Light icon twice.
2 Touch to select the desired option.3 Touch again to validate the new
setting.4 Touch the Exit icon ( ) twice to exit.
NOTE
29Record ModeMenu options/operations
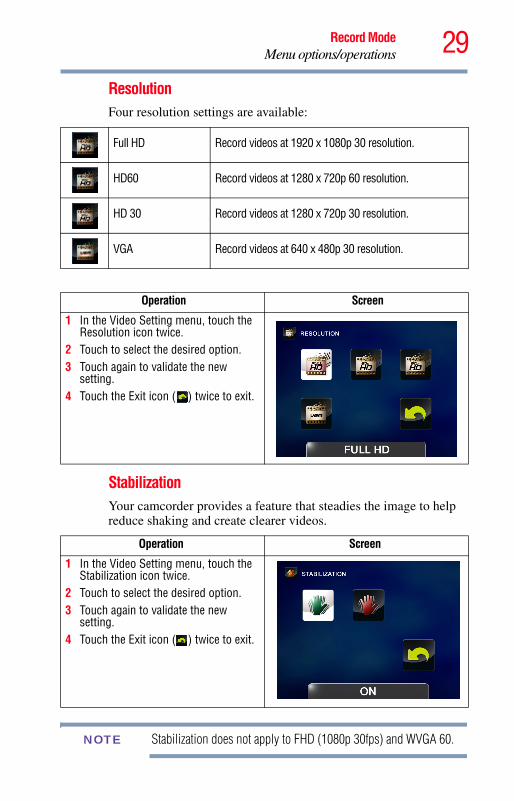
ResolutionFour resolution settings are available:
StabilizationYour camcorder provides a feature that steadies the image to help reduce shaking and create clearer videos.
Stabilization does not apply to FHD (1080p 30fps) and WVGA 60.
Full HD Record videos at 1920 x 1080p 30 resolution.
HD60 Record videos at 1280 x 720p 60 resolution.
HD 30 Record videos at 1280 x 720p 30 resolution.
VGA Record videos at 640 x 480p 30 resolution.
Operation Screen
1 In the Video Setting menu, touch the Resolution icon twice.
2 Touch to select the desired option.3 Touch again to validate the new
setting.4 Touch the Exit icon ( ) twice to exit.
Operation Screen
1 In the Video Setting menu, touch the Stabilization icon twice.
2 Touch to select the desired option.3 Touch again to validate the new
setting.4 Touch the Exit icon ( ) twice to exit.
NOTE
30 Record ModeMenu options/operations
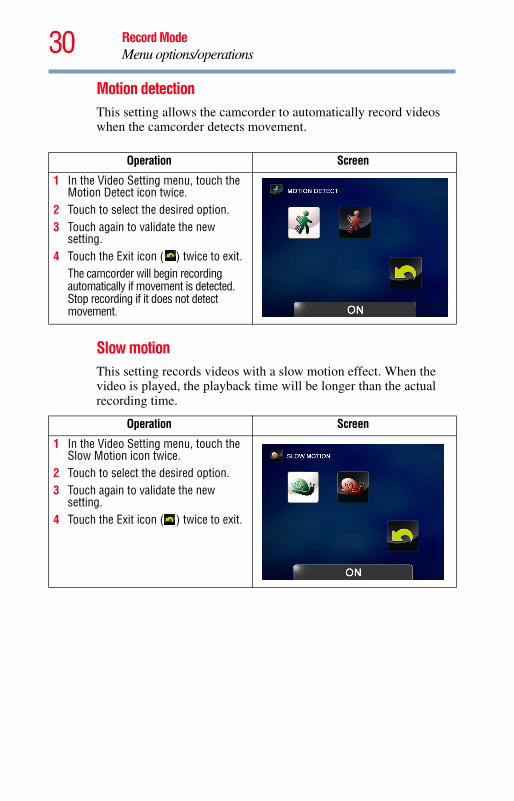
Motion detectionThis setting allows the camcorder to automatically record videos when the camcorder detects movement.
Slow motionThis setting records videos with a slow motion effect. When the video is played, the playback time will be longer than the actual recording time.
Operation Screen
1 In the Video Setting menu, touch the Motion Detect icon twice.
2 Touch to select the desired option.3 Touch again to validate the new
setting.4 Touch the Exit icon ( ) twice to exit.
The camcorder will begin recording automatically if movement is detected. Stop recording if it does not detect movement.
Operation Screen
1 In the Video Setting menu, touch the Slow Motion icon twice.
2 Touch to select the desired option.3 Touch again to validate the new
setting.4 Touch the Exit icon ( ) twice to exit.
31Record ModeMenu options/operations
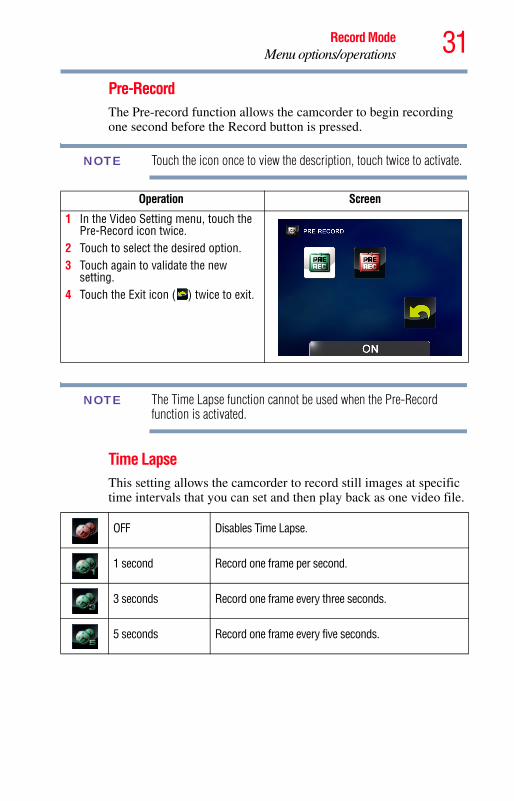
Pre-RecordThe Pre-record function allows the camcorder to begin recording one second before the Record button is pressed.
Touch the icon once to view the description, touch twice to activate.
The Time Lapse function cannot be used when the Pre-Record function is activated.
Time LapseThis setting allows the camcorder to record still images at specific time intervals that you can set and then play back as one video file.
Operation Screen
1 In the Video Setting menu, touch the Pre-Record icon twice.
2 Touch to select the desired option.3 Touch again to validate the new
setting.4 Touch the Exit icon ( ) twice to exit.
OFF Disables Time Lapse.
1 second Record one frame per second.
3 seconds Record one frame every three seconds.
5 seconds Record one frame every five seconds.
NOTE
NOTE
32 Record ModeMenu options/operations
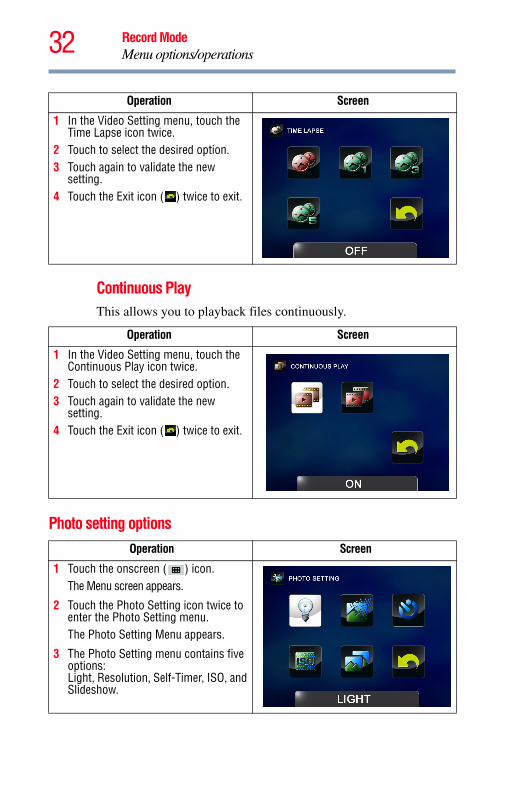
Continuous PlayThis allows you to playback files continuously.
Photo setting options
Operation Screen
1 In the Video Setting menu, touch the Time Lapse icon twice.
2 Touch to select the desired option.3 Touch again to validate the new
setting.4 Touch the Exit icon ( ) twice to exit.
Operation Screen
1 In the Video Setting menu, touch the Continuous Play icon twice.
2 Touch to select the desired option.3 Touch again to validate the new
setting.4 Touch the Exit icon ( ) twice to exit.
Operation Screen
1 Touch the onscreen ( ) icon.The Menu screen appears.
2 Touch the Photo Setting icon twice to enter the Photo Setting menu.The Photo Setting Menu appears.
3 The Photo Setting menu contains five options: Light, Resolution, Self-Timer, ISO, and Slideshow.
33Record ModeMenu options/operations
LightThis allows you to select a mode, which will brighten the shooting area or to extend the brightness of objects.
ResolutionThree resolution settings are available:
ON The light is turned ON and provides illumination.
OFF The light is turned OFF.
Digital Light Extend the dynamic range of high contrast and the backlight, so objects appear brighter and clearer.
Operation Screen
1 In the Photo Setting menu, touch the Light icon twice.
2 Touch to select the desired option.3 Touch again to validate the new
setting.4 Touch the Exit icon ( ) twice to exit.
High-16M Take photos at 4608 x 3456, 16 MP quality.
Standard-8M Take photos at 3264 x 2448, 8 MP quality.
Low-3M Take photos at 2048 x 1536, 3 MP quality.
34 Record ModeMenu options/operations
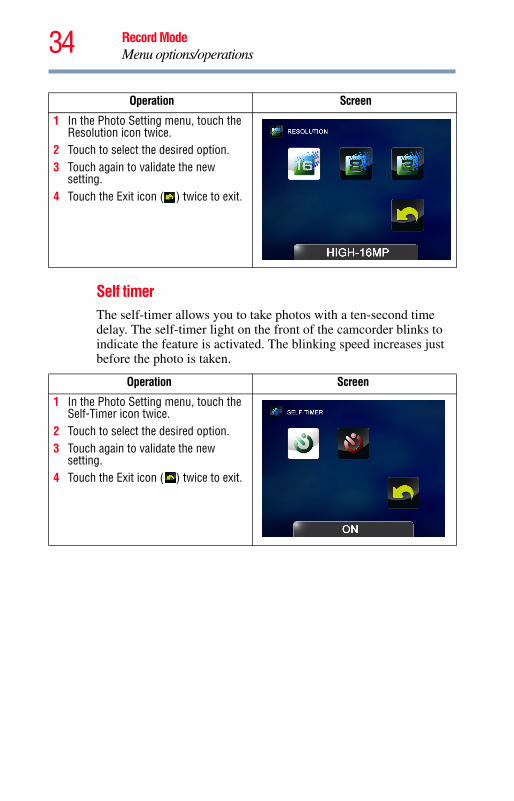
Self timerThe self-timer allows you to take photos with a ten-second time delay. The self-timer light on the front of the camcorder blinks to indicate the feature is activated. The blinking speed increases just before the photo is taken.
Operation Screen
1 In the Photo Setting menu, touch the Resolution icon twice.
2 Touch to select the desired option.3 Touch again to validate the new
setting.4 Touch the Exit icon ( ) twice to exit.
Operation Screen
1 In the Photo Setting menu, touch the Self-Timer icon twice.
2 Touch to select the desired option.3 Touch again to validate the new
setting.4 Touch the Exit icon ( ) twice to exit.
35Record ModeMenu options/operations
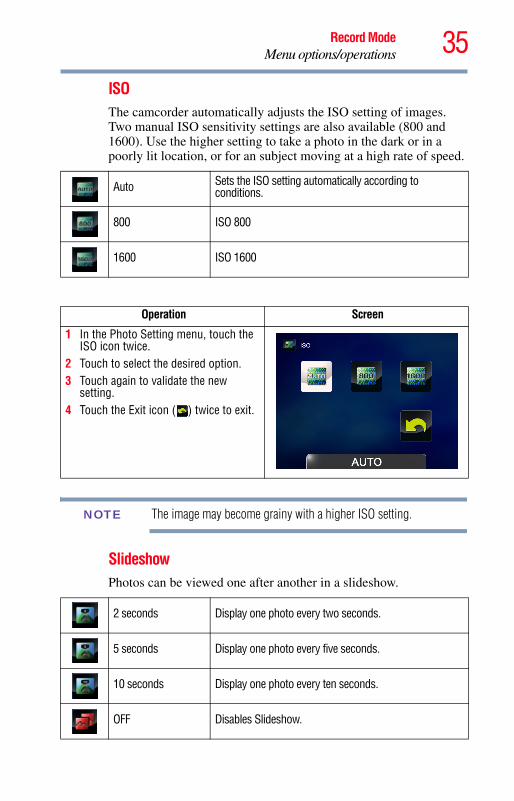
ISOThe camcorder automatically adjusts the ISO setting of images. Two manual ISO sensitivity settings are also available (800 and 1600). Use the higher setting to take a photo in the dark or in a poorly lit location, or for an subject moving at a high rate of speed.
The image may become grainy with a higher ISO setting.
SlideshowPhotos can be viewed one after another in a slideshow.
Auto Sets the ISO setting automatically according to conditions.
800 ISO 800
1600 ISO 1600
Operation Screen
1 In the Photo Setting menu, touch the ISO icon twice.
2 Touch to select the desired option.3 Touch again to validate the new
setting.4 Touch the Exit icon ( ) twice to exit.
2 seconds Display one photo every two seconds.
5 seconds Display one photo every five seconds.
10 seconds Display one photo every ten seconds.
OFF Disables Slideshow.
NOTE
36 Record ModeMenu options/operations
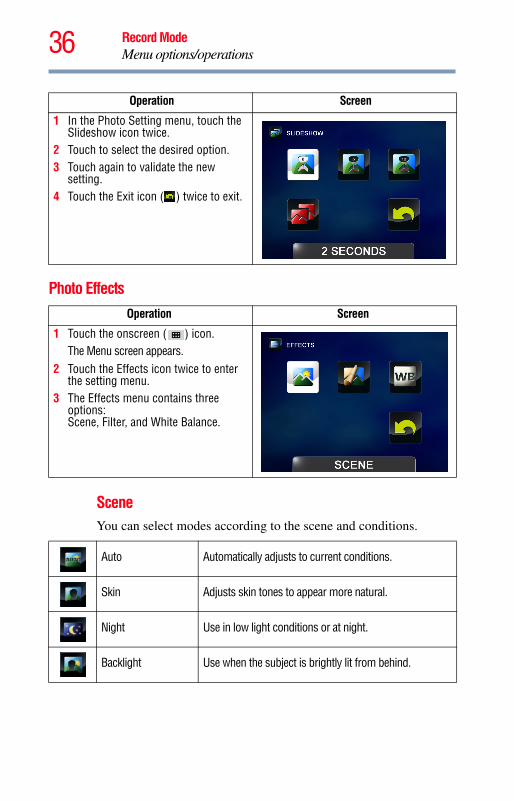
Photo Effects
SceneYou can select modes according to the scene and conditions.
Operation Screen
1 In the Photo Setting menu, touch the Slideshow icon twice.
2 Touch to select the desired option.3 Touch again to validate the new
setting.4 Touch the Exit icon ( ) twice to exit.
Operation Screen
1 Touch the onscreen ( ) icon.The Menu screen appears.
2 Touch the Effects icon twice to enter the setting menu.
3 The Effects menu contains three options:Scene, Filter, and White Balance.
Auto Automatically adjusts to current conditions.
Skin Adjusts skin tones to appear more natural.
Night Use in low light conditions or at night.
Backlight Use when the subject is brightly lit from behind.
37Record ModeMenu options/operations
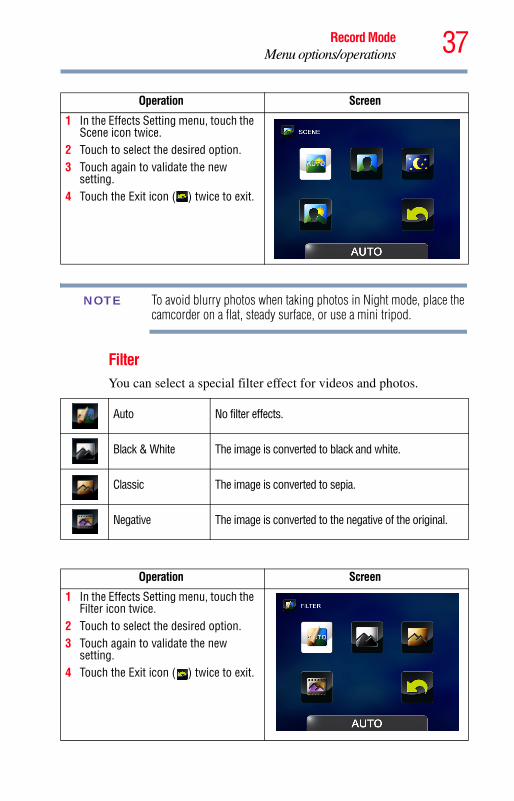
To avoid blurry photos when taking photos in Night mode, place the camcorder on a flat, steady surface, or use a mini tripod.
FilterYou can select a special filter effect for videos and photos.
Operation Screen
1 In the Effects Setting menu, touch the Scene icon twice.
2 Touch to select the desired option.3 Touch again to validate the new
setting.4 Touch the Exit icon ( ) twice to exit.
Auto No filter effects.
Black & White The image is converted to black and white.
Classic The image is converted to sepia.
Negative The image is converted to the negative of the original.
Operation Screen
1 In the Effects Setting menu, touch the Filter icon twice.
2 Touch to select the desired option.3 Touch again to validate the new
setting.4 Touch the Exit icon ( ) twice to exit.
NOTE
38 Record ModeMenu options/operations
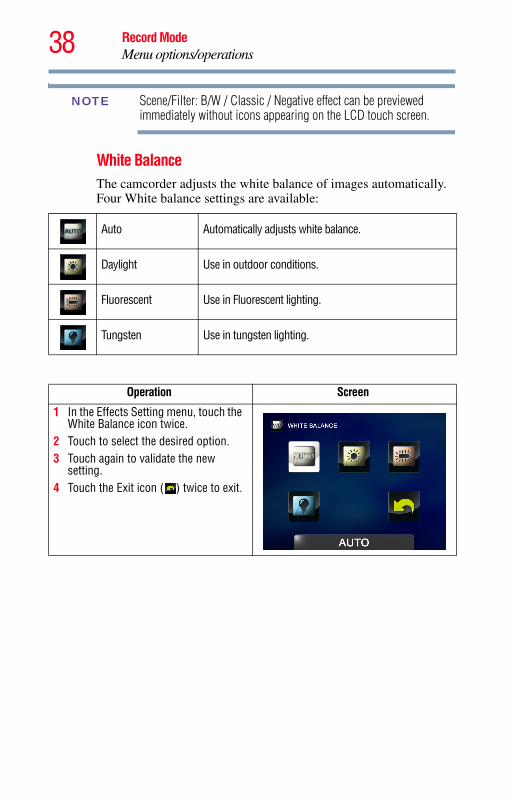
Scene/Filter: B/W / Classic / Negative effect can be previewed immediately without icons appearing on the LCD touch screen.
White BalanceThe camcorder adjusts the white balance of images automatically. Four White balance settings are available:
Auto Automatically adjusts white balance.
Daylight Use in outdoor conditions.
Fluorescent Use in Fluorescent lighting.
Tungsten Use in tungsten lighting.
Operation Screen
1 In the Effects Setting menu, touch the White Balance icon twice.
2 Touch to select the desired option.3 Touch again to validate the new
setting.4 Touch the Exit icon ( ) twice to exit.
NOTE
39Record ModeMenu options/operations
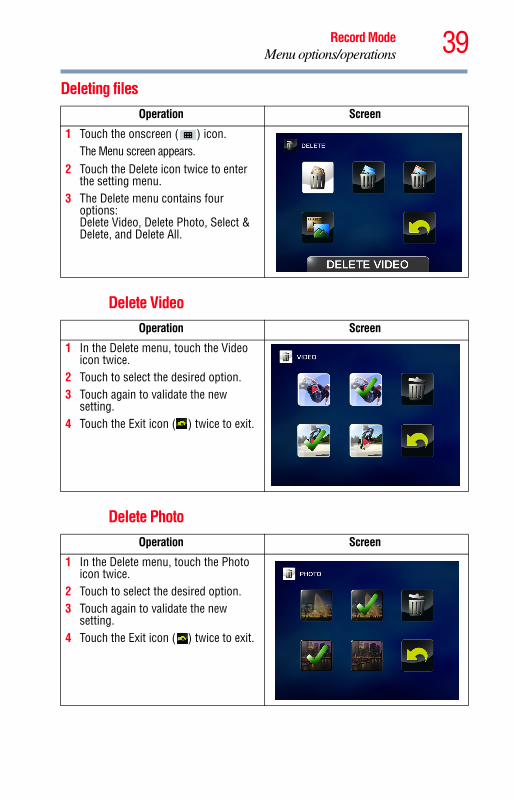
Deleting files
Delete Video
Delete Photo
Operation Screen
1 Touch the onscreen ( ) icon.The Menu screen appears.
2 Touch the Delete icon twice to enter the setting menu.
3 The Delete menu contains four options:Delete Video, Delete Photo, Select & Delete, and Delete All.
Operation Screen
1 In the Delete menu, touch the Video icon twice.
2 Touch to select the desired option.3 Touch again to validate the new
setting.4 Touch the Exit icon ( ) twice to exit.
Operation Screen
1 In the Delete menu, touch the Photo icon twice.
2 Touch to select the desired option.3 Touch again to validate the new
setting.4 Touch the Exit icon ( ) twice to exit.
40 Record ModeMenu options/operations
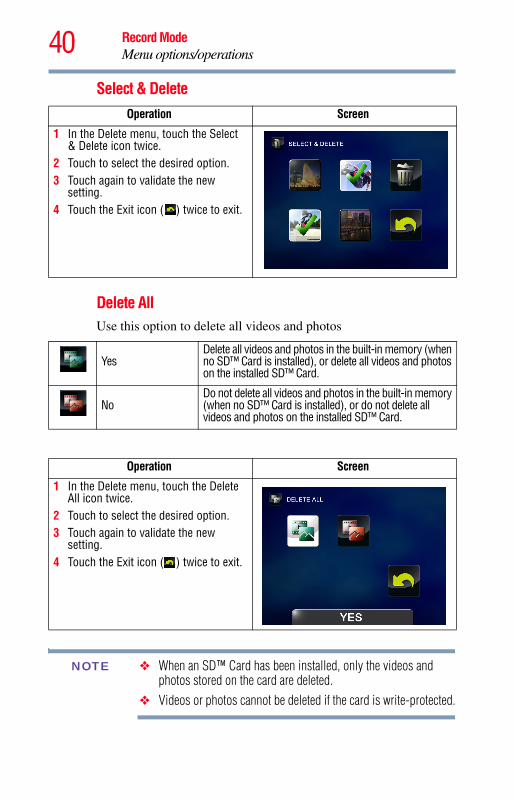
Select & Delete
Delete AllUse this option to delete all videos and photos
❖ When an SD™ Card has been installed, only the videos and photos stored on the card are deleted.
❖ Videos or photos cannot be deleted if the card is write-protected.
Operation Screen
1 In the Delete menu, touch the Select & Delete icon twice.
2 Touch to select the desired option.3 Touch again to validate the new
setting.4 Touch the Exit icon ( ) twice to exit.
YesDelete all videos and photos in the built-in memory (when no SD™ Card is installed), or delete all videos and photos on the installed SD™ Card.
NoDo not delete all videos and photos in the built-in memory (when no SD™ Card is installed), or do not delete all videos and photos on the installed SD™ Card.
Operation Screen
1 In the Delete menu, touch the Delete All icon twice.
2 Touch to select the desired option.3 Touch again to validate the new
setting.4 Touch the Exit icon ( ) twice to exit.
NOTE

41
Chapter 4
Playback ModeButton functions
The buttons have the following functions in Playback mode.
Record button:
1 Press to enter Record mode.
Tele (T) button:
Zoom in.
Wide (W) button:
Zoom out.
Pause button:
1 Press to pause recording.2 Press is again to continue recording.
Internet upload button:
In Playback mode, press to activate the Internet upload function.
42 Playback ModeLCD touch screen information
LCD touch screen informationThe indicators shown below may appear on the LCD touch screen while in Playback mode:
(Sample Image) LCD touch screen notification icons
Notification icons
1
Battery: Full power
Battery: Medium power
Battery: Low power
Battery: No power
DC power mode
2 The current video or photo file is selected to upload to the Internet.
3
Playback time counter.
Current number of photos taken
The remaining amount of photos that can be taken at the current resolution settings
4 Volume control
3 2 1
5
4
00:03:12
321
250

43Playback ModeLCD touch screen information
Below are the onscreen touch function icons:
(Sample Image) LCD touch screen touch function icons
Touch function icons
5Video Playback mode
Photo Playback mode
1
Video Playback mode
Continuous play ON/OFF.
Photo Playback mode
Slideshow ON/OFF.
2 Select & Play thumbnail screen ON.
3 Menu ON.
4 Return to Record mode.
5 Return to the previous file. Video fast rewind.
6Play a video or photo file.
Pause.
7 Advance to the next file. Video fast forward.
3 2 1
87654

44 Playback ModePlayback mode operations
Playback mode operationsTo viewing and manage videos and photos in the built-in memory or on an SD™ Card, use the Playback mode.
8Delete the current file.
Stop video play. Stop photo slideshow.
Operation Screen
1 In Record mode, press the Playback button or touch the onscreen ( ) icon to switch to Playback mode.
2 Touch the onscreen ( ) icon to view the previous video/photo, or touch the onscreen ( ) icon to view the next video/photo.
3 Touch the onscreen ( ) icon.The Menu screen appears.
4 Touch the onscreen ( ) icon to open the thumbnail screen for videos and photos.The Select & Play screen appears.
5 In the Select & Play screen, select the file(s) you want to play, and then touch ( ) to confirm. Check marks will appear on the selected file(s).
6 Touch the onscreen ( ) icon to play the selected files. (Video: full length. Photo: displays for 2 seconds.)
45Playback ModePlayback mode operations
Video Playback
Photo Playback
Operation Screen
1 In the Video Playback mode, touch the ( ) or ( ) icon to play or pause the video.
2 Touch the ( ) icon to view the previous video, or touch the ( ) icon to view the next video. While playing a video, touch the ( ) or ( ) icon to fast rewind/forward the video.
3 In the Continuous Play On mode the ( ) icon is highlighted. Touch the ( ) icon to play all video files continuously. Touch the ( ) icon to stop the video.
4 Use the Tele/Wide buttons to adjust the volume.
5 Press the Internet upload button to select the current video to upload to the Internet.
Operation Screen
1 In the Photo Playback mode, touch the ( ) icon to view the previous photo, or touch the ( ) icon to view the next photo.
2 In the Slideshow On mode the ( ) icon is highlighted. Touch the ( ) or ( ) icon to play or pause the slideshow. Touch the ( ) icon to stop the slideshow.
3 Press the Internet upload button to select the current photo to upload to the Internet.

46 Playback ModePlayback mode operations
Delete a file in Playback mode
❖ When an SD™ Card has been installed, only the videos and photos stored on the card are deleted.
❖ Videos or photos cannot be deleted if the card is write-protected.
Operation Screen
1 In the Playback mode, touch the ( ) icon.
2 Touch the ( ) icon to delete the current photo.
3 Touch the Exit icon ( ) twice to exit.
NOTE
47
Chapter 5
Camcorder SettingsSettings Menu
Operation Screen
1 Touch the onscreen ( ) icon.The Menu screen appears.
2 Touch the Setup ( ) icon twice to enter the setting menu.
3 The Setup Menu contains six options:Sound (operation sound), TV, Language, Time Setting, Format, and Default Setting (scroll down to view).
48 Camcorder SettingsSettings Menu
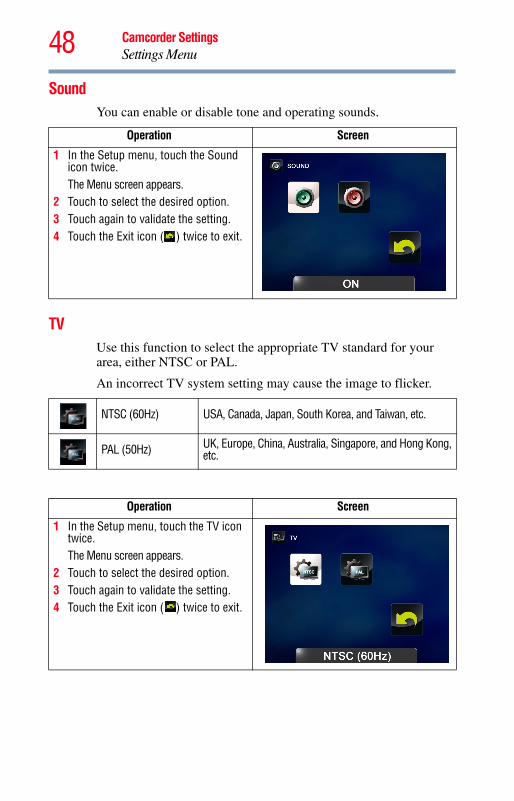
SoundYou can enable or disable tone and operating sounds.
TVUse this function to select the appropriate TV standard for your area, either NTSC or PAL.
An incorrect TV system setting may cause the image to flicker.
Operation Screen
1 In the Setup menu, touch the Sound icon twice.The Menu screen appears.
2 Touch to select the desired option. 3 Touch again to validate the setting.4 Touch the Exit icon ( ) twice to exit.
NTSC (60Hz) USA, Canada, Japan, South Korea, and Taiwan, etc.
PAL (50Hz) UK, Europe, China, Australia, Singapore, and Hong Kong, etc.
Operation Screen
1 In the Setup menu, touch the TV icon twice.The Menu screen appears.
2 Touch to select the desired option. 3 Touch again to validate the setting.4 Touch the Exit icon ( ) twice to exit.
49Camcorder SettingsSettings Menu
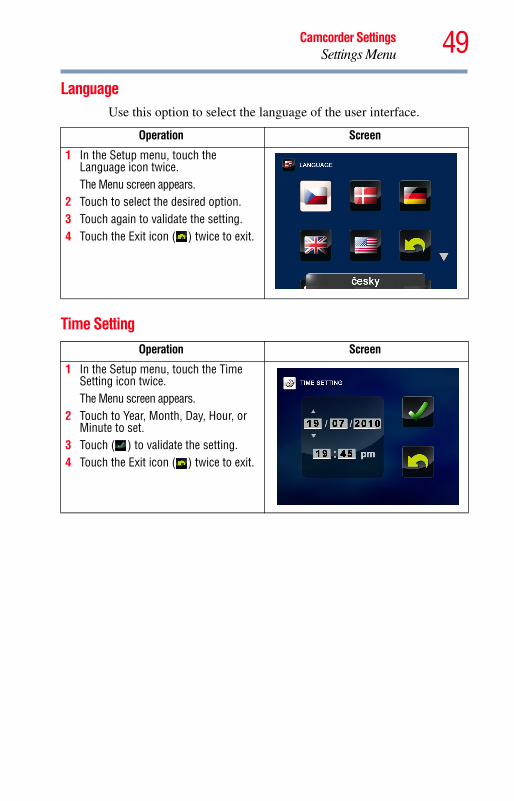
LanguageUse this option to select the language of the user interface.
Time Setting
Operation Screen
1 In the Setup menu, touch the Language icon twice.The Menu screen appears.
2 Touch to select the desired option. 3 Touch again to validate the setting.4 Touch the Exit icon ( ) twice to exit.
Operation Screen
1 In the Setup menu, touch the Time Setting icon twice.The Menu screen appears.
2 Touch to Year, Month, Day, Hour, or Minute to set.
3 Touch ( ) to validate the setting.4 Touch the Exit icon ( ) twice to exit.
50 Camcorder SettingsSettings Menu
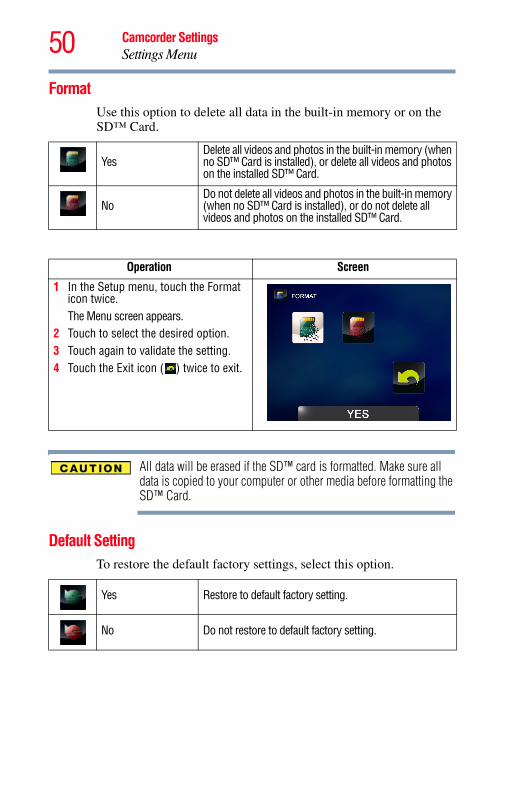
FormatUse this option to delete all data in the built-in memory or on the SD™ Card.
All data will be erased if the SD™ card is formatted. Make sure all data is copied to your computer or other media before formatting the SD™ Card.
Default SettingTo restore the default factory settings, select this option.
YesDelete all videos and photos in the built-in memory (when no SD™ Card is installed), or delete all videos and photos on the installed SD™ Card.
NoDo not delete all videos and photos in the built-in memory (when no SD™ Card is installed), or do not delete all videos and photos on the installed SD™ Card.
Operation Screen
1 In the Setup menu, touch the Format icon twice.The Menu screen appears.
2 Touch to select the desired option. 3 Touch again to validate the setting.4 Touch the Exit icon ( ) twice to exit.
Yes Restore to default factory setting.
No Do not restore to default factory setting.
51Camcorder SettingsSettings Menu
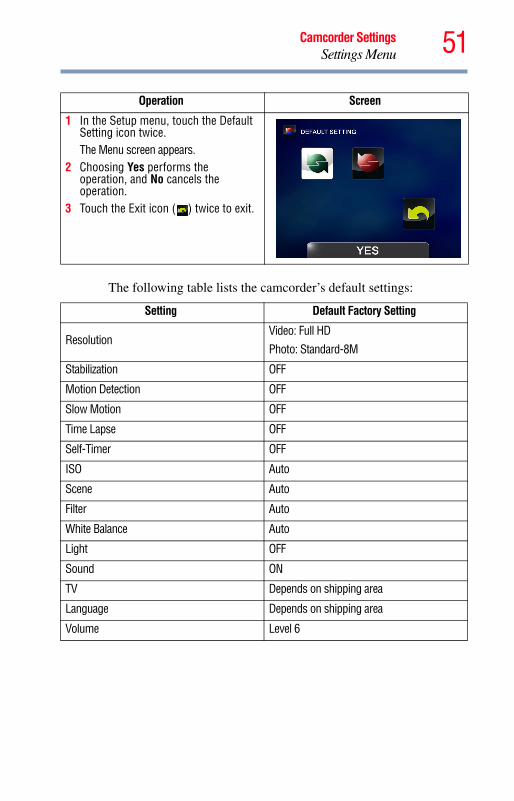
The following table lists the camcorder’s default settings:
Operation Screen
1 In the Setup menu, touch the Default Setting icon twice.The Menu screen appears.
2 Choosing Yes performs the operation, and No cancels the operation.
3 Touch the Exit icon ( ) twice to exit.
Setting Default Factory Setting
ResolutionVideo: Full HD
Photo: Standard-8M
Stabilization OFF
Motion Detection OFF
Slow Motion OFF
Time Lapse OFF
Self-Timer OFF
ISO Auto
Scene Auto
Filter Auto
White Balance Auto
Light OFF
Sound ON
TV Depends on shipping area
Language Depends on shipping area
Volume Level 6
52
Chapter 6
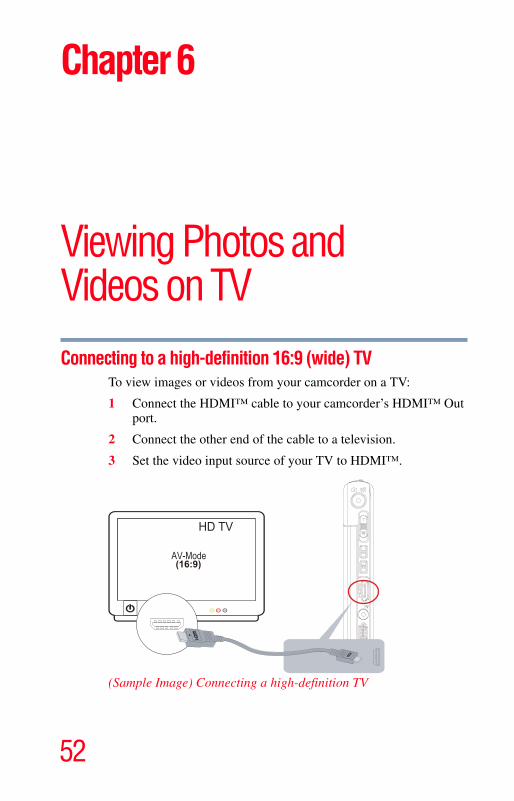
Viewing Photos and Videos on TVConnecting to a high-definition 16:9 (wide) TV
To view images or videos from your camcorder on a TV:
1 Connect the HDMI™ cable to your camcorder’s HDMI™ Out port.
2 Connect the other end of the cable to a television.
3 Set the video input source of your TV to HDMI™.
(Sample Image) Connecting a high-definition TV
(16:9)
53Viewing Photos and Videos on TVConnecting to a non-high-definition 4:3 TV
4 The steps for viewing stored photos and video on a TV are exactly the same as for viewing them on the LCD touch screen.
The LCD touch screen does not display when the camcorder is connected to an HDTV.
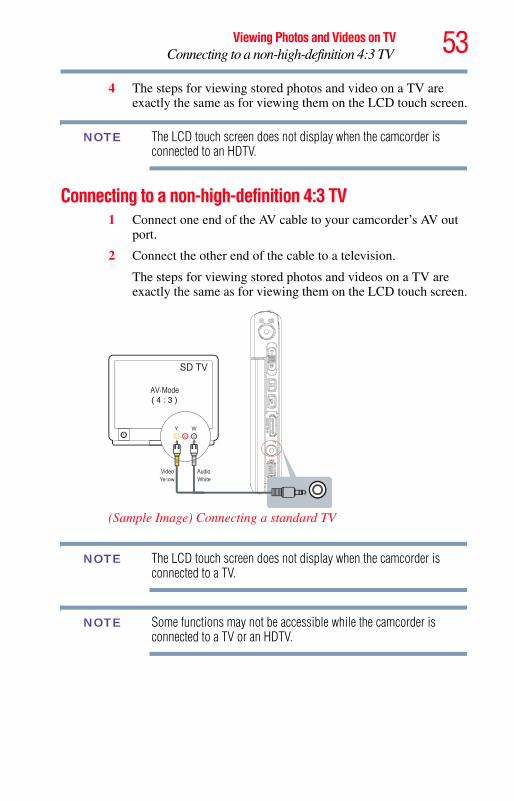
Connecting to a non-high-definition 4:3 TV 1 Connect one end of the AV cable to your camcorder’s AV out
port.
2 Connect the other end of the cable to a television.
The steps for viewing stored photos and videos on a TV are exactly the same as for viewing them on the LCD touch screen.
(Sample Image) Connecting a standard TV
The LCD touch screen does not display when the camcorder is connected to a TV.
Some functions may not be accessible while the camcorder is connected to a TV or an HDTV.
NOTE
( 4 : 3 )
NOTE
NOTE
54
Chapter 7
Viewing Photos and Videos on a ComputerInstalling bundled software
The CD-ROM supplied with your camcorder contains two software applications.
❖ ArcSoft MediaImpression® is a user-friendly application that helps manage your media, burn videos onto DVD, and upload videos to the Internet easily.
❖ Adobe® Reader® is a popular program that is needed to view the User’s Manual. Many users will find they already have this software installed on their computer.
To install the bundled software:
1 Insert the CD-ROM into your computer’s optical disc drive. The autorun screen appears.
2 Click “Install Application Software”. Follow the on-screen instructions to complete the installation.
Detailed information can be found in the online help of all the bundled software.
NOTE
55Viewing Photos and Videos on a ComputerTransferring photos or videos to a computer
Transferring photos or videos to a computerYou can transfer photos or videos stored on your camcorder to a computer and send them via email to friends or post them on the Internet.
To do this:
1 Connect the computer and camcorder with the supplied mini USB 2.0 cable.
The LED lights up.
2 The videos and photos can be found on your computer at “My Computer\ Removable Disk\DCIM\100MEDIA.”
3 In this folder, you can view, delete, move, or copy any video/photo you want.
4 Use the bundled ArcSoft application software to edit the videos or photos.

56
Chapter 8
Uploading Video Files to the Internet
The built-in CAMILEO UPLOADER application offers an easy way to upload your video clips to social media Web sites instantly. It helps you share them with your family and friends on these Web sites. The bundled software, ArcSoft MediaImpression, can also be used to upload your video clips to Web sites.
You must have internet access to upload videos to a Web site.
CAMILEO UPLOADERTo upload files to the Internet:
1 Select the video clip files in Video Playback mode by pressing the Internet upload ( ) button.
NOTE
57Uploading Video Files to the InternetCAMILEO UPLOADER
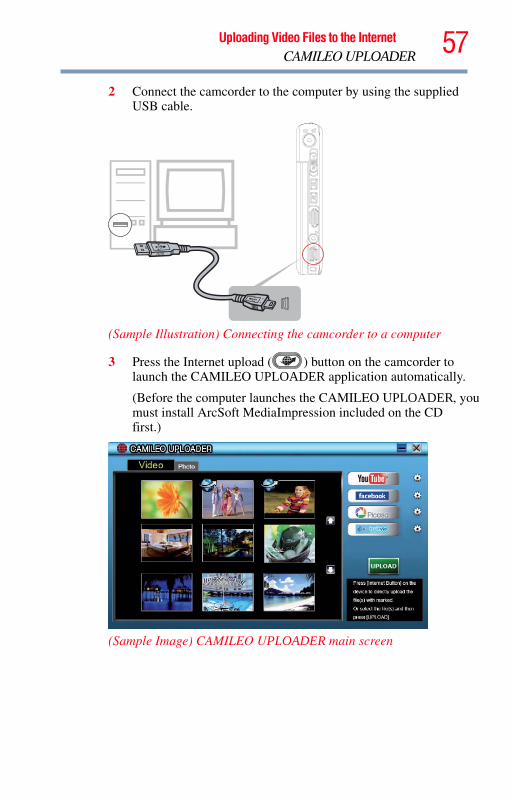
2 Connect the camcorder to the computer by using the supplied USB cable.
(Sample Illustration) Connecting the camcorder to a computer
3 Press the Internet upload ( ) button on the camcorder to launch the CAMILEO UPLOADER application automatically.
(Before the computer launches the CAMILEO UPLOADER, you must install ArcSoft MediaImpression included on the CD first.)
(Sample Image) CAMILEO UPLOADER main screen
58 Uploading Video Files to the InternetCAMILEO UPLOADER
Some social media Web sites may not be accessible in certain regions.
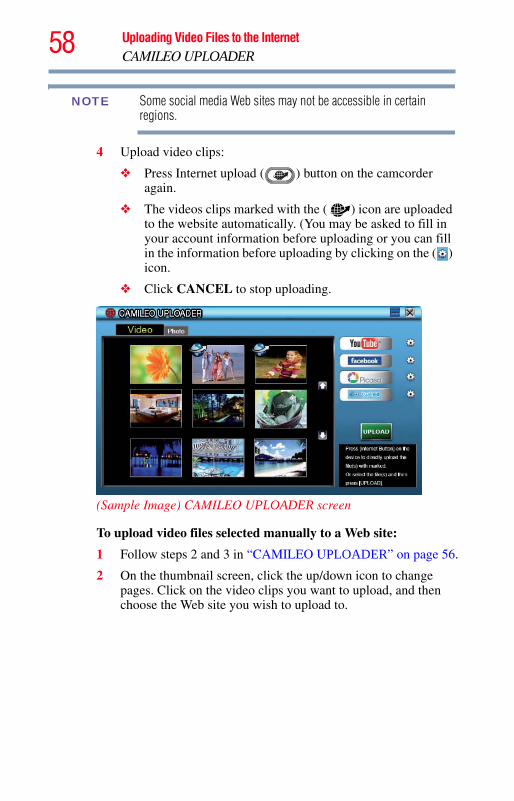
4 Upload video clips:
❖ Press Internet upload ( ) button on the camcorder again.
❖ The videos clips marked with the ( ) icon are uploaded to the website automatically. (You may be asked to fill in your account information before uploading or you can fill in the information before uploading by clicking on the ( ) icon.
❖ Click CANCEL to stop uploading.
(Sample Image) CAMILEO UPLOADER screen
To upload video files selected manually to a Web site:
1 Follow steps 2 and 3 in “CAMILEO UPLOADER” on page 56.
2 On the thumbnail screen, click the up/down icon to change pages. Click on the video clips you want to upload, and then choose the Web site you wish to upload to.
NOTE
59Uploading Video Files to the InternetCAMILEO UPLOADER
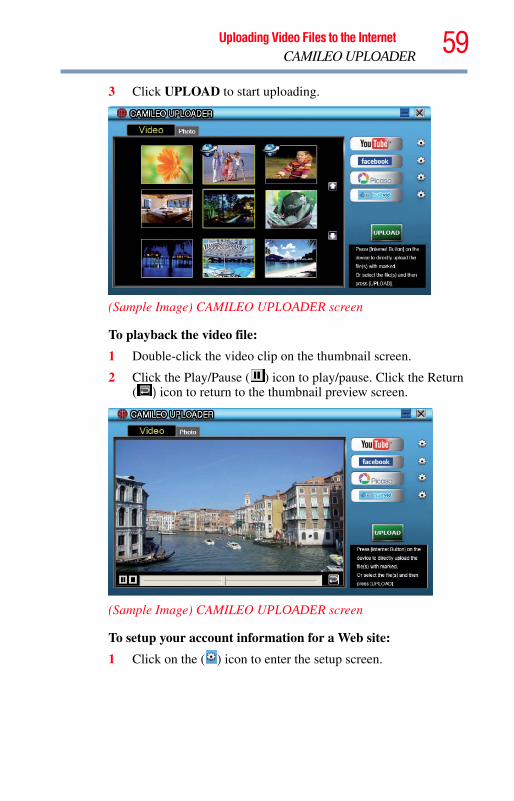
3 Click UPLOAD to start uploading.
(Sample Image) CAMILEO UPLOADER screen
To playback the video file:
1 Double-click the video clip on the thumbnail screen.
2 Click the Play/Pause ( ) icon to play/pause. Click the Return ( ) icon to return to the thumbnail preview screen.
(Sample Image) CAMILEO UPLOADER screen
To setup your account information for a Web site:
1 Click on the ( ) icon to enter the setup screen.
60 Uploading Video Files to the InternetArcSoft MediaImpression
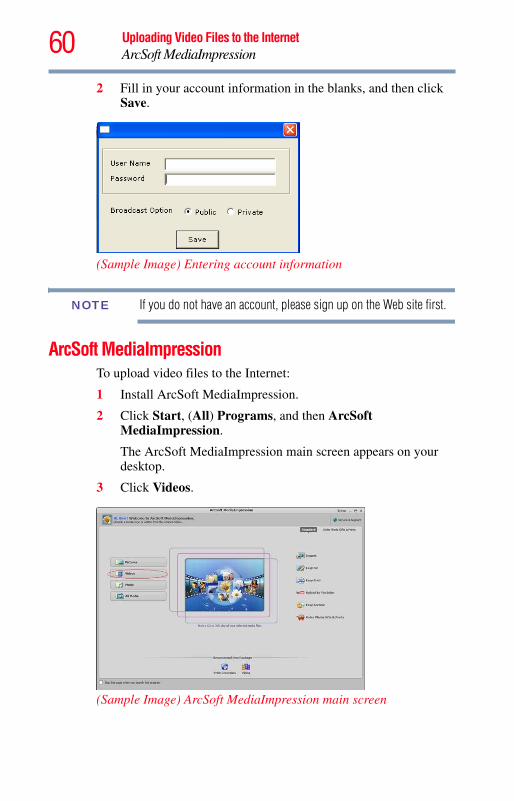
2 Fill in your account information in the blanks, and then click Save.
(Sample Image) Entering account information
If you do not have an account, please sign up on the Web site first.
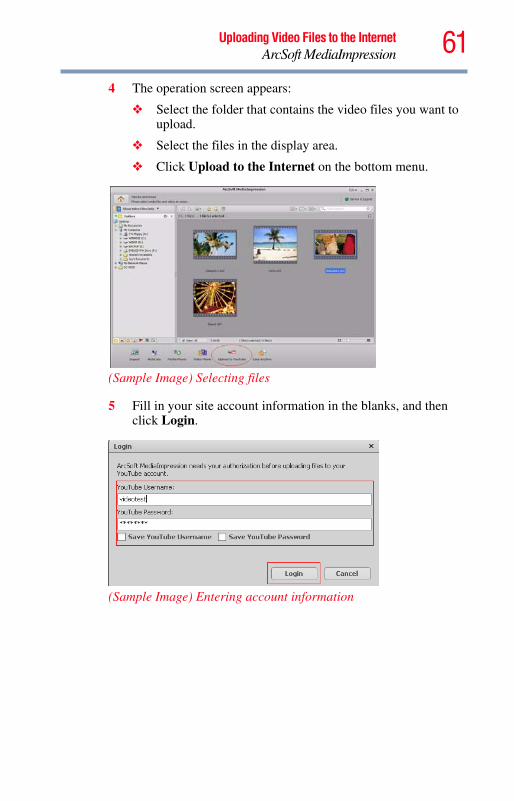
ArcSoft MediaImpressionTo upload video files to the Internet:
1 Install ArcSoft MediaImpression.
2 Click Start, (All) Programs, and then ArcSoft MediaImpression.
The ArcSoft MediaImpression main screen appears on your desktop.
3 Click Videos.
(Sample Image) ArcSoft MediaImpression main screen
NOTE
61Uploading Video Files to the InternetArcSoft MediaImpression
4 The operation screen appears:
❖ Select the folder that contains the video files you want to upload.
❖ Select the files in the display area.
❖ Click Upload to the Internet on the bottom menu.
(Sample Image) Selecting files
5 Fill in your site account information in the blanks, and then click Login.
(Sample Image) Entering account information
62 Uploading Video Files to the InternetArcSoft MediaImpression
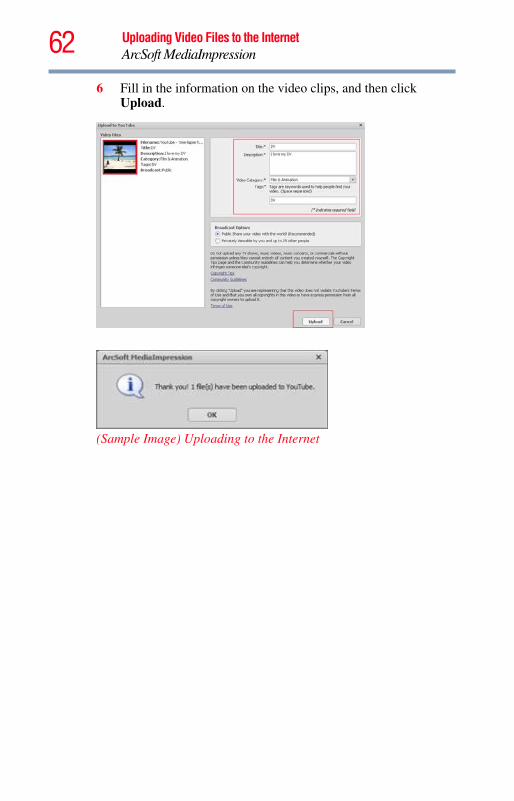
6 Fill in the information on the video clips, and then click Upload.
(Sample Image) Uploading to the Internet
63
Chapter 9
Specifications
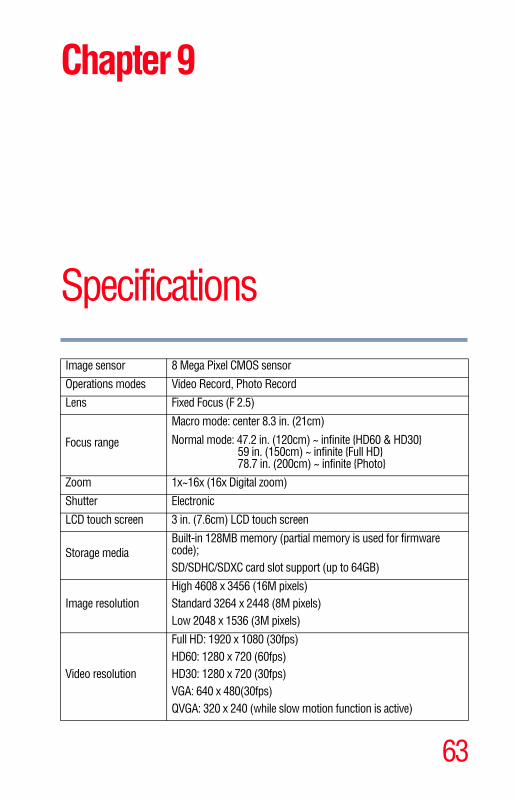
Image sensor 8 Mega Pixel CMOS sensor
Operations modes Video Record, Photo Record
Lens Fixed Focus (F 2.5)
Focus range
Macro mode: center 8.3 in. (21cm)
Normal mode: 47.2 in. (120cm) ~ infinite {HD60 & HD30}59 in. (150cm) ~ infinite {Full HD}78.7 in. (200cm) ~ infinite {Photo}
Zoom 1x~16x (16x Digital zoom)
Shutter Electronic
LCD touch screen 3 in. (7.6cm) LCD touch screen
Storage mediaBuilt-in 128MB memory (partial memory is used for firmware code);SD/SDHC/SDXC card slot support (up to 64GB)
Image resolutionHigh 4608 x 3456 (16M pixels) Standard 3264 x 2448 (8M pixels)Low 2048 x 1536 (3M pixels)
Video resolution
Full HD: 1920 x 1080 (30fps)HD60: 1280 x 720 (60fps)HD30: 1280 x 720 (30fps)VGA: 640 x 480(30fps)QVGA: 320 x 240 (while slow motion function is active)
64 SpecificationsOperating Environment Conditions
Operating Environment Conditions Operating temperature: 41° to 95° F (5° to 35° C)
Operating humidity: 20 to 80% (no condensation allowed)
White balance Auto/Manual (Daylight, Fluorescent, Tungsten)
ISO Auto/800/1600
Self-timer 10 second delay
Light Light ON/Light OFF/Digital Light ON
File formatPhoto: JPG
Video: MP4
Image play Single image/slideshow
PC interface Mini USB 2.0 port
TV out NTSC/PAL selectable, HDMI™
Battery Lithium-ion rechargeable battery
Dimensions 2.36 in. (W) x 4.33 in. (H) x 0.75 in. (D)60mm (W) x 110mm (H) x 19mm (D)/
Weight 4.16 oz. (without battery) (118g)
65
Chapter 10
Troubleshooting1 If the LCD touch screen preview is not clear while shooting,
how can the focus be adjusted?
Try switching between Macro and Normal modes.
2 The files on the memory card do not display properly when the LCD touch screen shows the “!” marking.
The “!” symbol indicates that the SD™ card is too low of a speed or contains corrupted files. To solve this problem, format the SD™ card using the camcorder instead of a computer (Refer to “Format” on page 50).
3 Why do some of my indoor photos look blurry and dark?
The camcorder extends photo exposure time under low-light/indoor conditions. Keep the camcorder (and the target subject) steady for several seconds when taking photos. The shutter sounds when a photo is taken.
4 How do I charge the battery?
You must use the supplied AC adaptor or the USB cable.
The camcorder must be turned OFF. A blinking light confirms the camcorder is currently charging. A steady light indicates that charging has been completed. The light turns off automatically after 3~5 minutes (In AC charging mode).

66 Troubleshooting
5 After connecting the USB cable to the computer:
❖ The disk “DV” indicates the internal memory of the camcorder.
❖ “Removable Disk” indicates the external memory (SD/SDHC/SDXC card installed in the camcorder).
❖ The disk “DVAP” indicates the built-in CAMILEO UPLOADER application is saved to the disk.
Do not format the disk or delete the application inside. The CAMILEO UPLOADER application may not function.
67
Chapter 11
Other InformationToshiba Support
If you require help or are having problems operating your product, you may need to contact Toshiba for additional technical assistance.
Before you callSince some problems may be related to software, it is important that you investigate other sources of assistance first. Try the following before contacting Toshiba:
❖ Review the documentation supplied with your product.
❖ If a problem occurs when you are running software applications, consult the software documentation for troubleshooting suggestions. Contact the software company’s technical support department for assistance.
❖ Consult the reseller or dealer from whom you purchased your product. They are your best resource for current information and support.
TOSHIBA Support
Need help?For the latest driver updates, user’s manuals & FAQ’s please have a look at the TOSHIBA options & services support page:www.mytoshiba.com.auwww.mytoshiba.co.nzToshiba Support Centre:Australia : 13 30 70New Zealand: 0800 445 439
Expert staff provides technical assistance during normal business hours, 5 days a week, excluding public holidays.Be sure to have the following information available before you call:
• Product serial number and part number• Place of purchase• Applicable error messages or fault symptoms• Operating system (if applicable)• Installed third-party hardware and software (if applicable)

Expressed Limited Warranty (Australia & New Zealand)TOSHIBA CAMILEO HD CAMCORDER
TOSHIBA (AUSTRALIA) PTY LIMITED (“Toshiba”) makes the following expressed limited warranty to original purchaser in Australia or New Zealand of this Toshiba Camileo HD Camcorder (“Camcorder”)
This expressly stated limited warranty applies to Camcorder sold by Toshiba through its authorised channel partners and applies only to a Camcorder for which you have a receipted sales invoice or other proof of purchase.
Toshiba warrants this Camcorder and its parts against defects in materials and/or workmanship from the date of purchase by you for 12 months.
Terms and conditions apply. Please visit Toshiba’s website to obtain a copy:www.mytoshiba.com.au or www.mytoshiba.co.nz
If you do not have internet access please contact the Toshiba Support Centre and we will post you a copy to your postal address.
How to Obtain ServicePlease visit Toshiba’s website for answers to commonly asked technical questions, tutorials, easily downloadable software drivers and other support related enquiries. You will also find information regarding booking a service for your Camcorder.
If further assistance is required, contact the Toshiba Support Centre;
Australia: Toll free 13 30 70 Mon-Fri 9.00am-5.00pm (AEST).New Zealand: Toll Free 0800 445 439 Mon-Fri 9.00am -5.00pm (AEST).