Embed Size (px)
Citation preview

Flowchart and Reference GuidesThis Guide
Shooting with the Camera
Software Starter Guide
Installing the Software
Software Starter Guide
Connecting the Camera to a Computer
Software Starter Guide
Downloading Images to a Computer
Camera User Guide
• This guide covers both the PowerShot S30 and PowerShot S40 digital cameras.• Please start by reading the Precaution on the reverse side of this cover.• Please see the User Guide that accompanies each printer.
ENGLISH

PrecautionCamera Body TemperatureIf your camera is used for prolonged periods, the camera body may becomewarm. Please be aware of this and take care when operating the camera for anextended period.About the LCD MonitorThe LCD monitor is produced with extremely high-precision manufacturingtechniques. More than 99.99% of the pixels operate to specification. Less than0.01% of the pixels may occasionally misfire or appear as red or black dots. Thishas no effect on the recorded image and does not constitute a malfunction.
Please read through the “Read This First” section (p. 4) before using your camera.
Video FormatPlease set the camera’s video signal format to the one used in your region before using itwith a TV monitor (p. 138).Language SettingPlease see page 25 to change the language setting.
Charging the Date/Time Battery• The camera has a built-in rechargeable lithium battery that maintains the date, time
and other camera settings. This battery recharges when the main battery pack isinserted into the camera. When you first purchase the camera, place a chargedbattery pack in it or use the AC adapter kit (sold separately) for at least 4 hours tocharge the date/time battery. It will charge even when the camera power is set to Off.
• If the Set Date/Time menu appears when the camera power is turned on, it meansthat the date/time battery charge is depleted. Recharge it as described above.
Disclaimer• While every effort has been made to ensure that the information contained in this guide
is accurate and complete, no liability can be accepted for any errors or omissions.• Canon Inc. reserves the right to change the specifications of the hardware and software
described herein at any time without prior notice.• No part of this guide may be reproduced, transmitted, transcribed, stored in a retrieval
system, or translated into any language in any form, by any means, without the priorwritten permission of Canon Inc.
• Canon Inc. makes no warranties for damages resulting from corrupted or lost data dueto a mistaken operation or malfunction of the camera, the software, theCompactFlash™ cards (CF cards), personal computers, peripheral devices, or use of non-Canon CF cards.
Trademark Acknowledgements• Canon, PowerShot and Bubble Jet are trademarks of Canon, Inc.• CompactFlash is a trademark of SanDisk Corporation.• Other names and products not mentioned above may be registered trademarks or
trademarks of their respective companies.
Copyright ©2002 Canon Inc. All rights reserved.

Table of Contents 1
Read this First ............................................................................. 4Quick Start .................................................................................. 8Components Guide................................................................... 10
Front View ................................................................................... 10Back / Bottom View ...................................................................... 11Controls ....................................................................................... 12Shooting Mode Dial ...................................................................... 13Operating the Multicotroller .......................................................... 14
Preparing the Camera .............................................................. 15Charging the Battery Pack ............................................................. 15Installing the Battery Pack ............................................................. 17Using a Household Power Source .................................................. 19Installing a CF Card ....................................................................... 21Setting the Date / Time ................................................................. 24Setting the Language.................................................................... 25Attaching the Strap ...................................................................... 26Using the Soft Case (Optional) ...................................................... 26
Basic Functions.......................................................................... 27Turning the Power On / Off ........................................................... 27Switching between Shooting and Replaying ................................... 29Switching the LCD Monitor Display Mode ...................................... 30Pressing the Shutter Button ........................................................... 34Using the Optical Viewfinder to Shoot ........................................... 36Adjusting the Zoom (Focal Length) ................................................ 37Selecting Menus and Settings ........................................................ 38
Customizing the Camera (My Camera Settings) ...................... 41Changing My Camera Settings ...................................................... 41Customizing My Camera Settings .................................................. 43
Shooting - Letting the Camera Select Settings ......................... 44Auto Mode .......................................................................... 44
Checking an Image Right after Shooting ........................................ 46Using the Flash .................................................................... 47Portrait Mode ...................................................................... 49Landscape Mode ................................................................. 49Night Scene Mode ............................................................... 50Fast Shutter ......................................................................... 50Slow Shutter ........................................................................ 51Changing the Color Effect .................................................... 52Stitch Assist Mode................................................................ 53Movie Mode ........................................................................ 56Macro Mode........................................................................ 57
Table of Contents
2 Table of Contents
Self-Timer ............................................................................ 58Continuous Mode ................................................................ 59
Digital Zoom ................................................................................ 60
Shooting - Selecting Particular Effects ..................................... 61Changing the Resolution and Compression .................................... 61Changing the File Format .............................................................. 64
Program AE ......................................................................... 65Setting the Shutter Speed ..................................................... 66Setting the Aperture ............................................................ 68Manually Setting the Shutter Speed and Aperture ................. 70Selecting an AF frame .......................................................... 71Adjusting the Exposure Compensation .................................. 73Setting the White Balance .................................................... 74Auto Exposure Bracketing (AEB Mode) .................................. 77Adjusting the Flash Output (Flash Exposure Compensation) .... 78Locking the Exposure Setting (AE Lock) ................................. 79Locking the Flash Exposure Setting (FE Lock) .......................... 81Switching Between Light Metering Modes ............................ 82
Shooting Problem Subjects for the Autofocus ................................ 84Manually Setting Image Characteristics .......................................... 87Resetting the File Number ............................................................. 89Functions Available in Each Shooting Mode ................................... 90
Replaying .................................................................................. 92Viewing Images Singly (Single Image Replay) .................................. 92
Magnifying Images .............................................................. 93Viewing Nine Images at a Time (Index Replay) ....................... 94 Jumping Between Images ................................................. 95
Viewing Movies ............................................................................ 96Rotating Images in the Display ...................................................... 97Attaching Sound Annotations to Images ........................................ 98Automated Playback (Slide Show) .................................................. 99Protecting Images ....................................................................... 103
Erasing .................................................................................... 104Erasing Images Singly .................................................................. 104Erasing All Images ...................................................................... 105Formatting a CF Card ................................................................. 106
Print Settings (DPOF Print Settings) ........................................ 107Selecting Images for Printing ....................................................... 107Setting the Print Style .................................................................. 109Resetting the Print Settings ......................................................... 111
Table of Contents 3
Icon Conventions in the Text○ ○ ○ ○ ○ ○ ○ ○ ○ ○ ○ ○ ○ ○ ○ ○ ○ ○ ○ ○ ○
This mark denotes topics about issues that may affect the camera’s operation.
○ ○ ○ ○ ○ ○ ○ ○ ○ ○ ○ ○ ○ ○ ○ ○ ○ ○ ○ ○ ○
This mark denotes additional topics that complement the basic operatingprocedures.
○ ○ ○ ○ ○ ○ ○ ○ ○ ○ ○ ○ ○ ○ ○ ○ ○ ○ ○ ○ ○
This mark denotes tips about the camera and photography.
Printing with a Direct Print Compatible Printer (Optional) ... 112Connecting a Direct Print Compatible Printer to the Camera ......... 112Printing ...................................................................................... 114Printing with DPOF Print Settings ................................................. 119
Printing with the Direct Print Compatible Bubble Jet Printer(Optional) ............................................................................... 121
Connecting Bubble Jet Printer to the Camera ............................... 121Printing ...................................................................................... 123Printing with DPOF Print Settings ................................................. 128
Image Transfer Settings (DPOF Transfer Order) ..................... 130Selecting Images for Transferring ................................................. 130Resetting the Transfer Settings .................................................... 132
List of Menu Options .............................................................. 133Rec. Menu ................................................................................. 133Play Menu .................................................................................. 136Set up Menu .............................................................................. 137My Camera Menu ...................................................................... 139Resetting all of the Settings to Default ......................................... 141
Shooting / Replaying with a TV Monitor ................................ 142Appendices ............................................................................. 143
Camera Care and Maintenance ................................................... 143Troubleshooting.......................................................................... 144List of Messages ......................................................................... 147Specifications ............................................................................. 151
Index ....................................................................................... 155

4 Read This First
Please Read
Test ShotsBefore you try to photograph important subjects, we highly recommend that youshoot several trial images to confirm that the camera is operating and beingoperated correctly. Please note that Canon Inc., its subsidiaries and affiliates, and itsdistributors are not liable for any consequential damages arising from anymalfunction of a camera or accessory, including CompactFlash™ cards, that results inthe failure of an image to be recorded or to be recorded in a format that is machinesensible.
Warning Against Copyright InfringementPlease note that Canon digital cameras are intended for personal use and shouldnever be used in a manner that infringes upon or contravenes international ordomestic copyright laws and regulations. Please be advised that in certain cases thecopying of images from performances, exhibitions, or commercial properties bymeans of a camera or other device may contravene copyright or other legal rightseven if the image was shot for personal use.
Warranty LimitationsThis camera’s warranty is only effective in the country of sale. If a problem ariseswhile the camera is in use abroad, please convey it back to the country of sale beforeproceeding with a warranty claim to a Canon Customer Support Help Desk.
Safety Precautions
• Before using the camera, please ensure that you read and understand the safetyprecautions described below. Always ensure that the camera is operated correctly.
• The safety precautions noted on the following pages are intended to instruct you inthe safe and correct operation of the camera and its accessories to prevent injuries ordamage to yourself, other persons and equipment.
• In the next few pages, the term “equipment” refers primarily to the camera, itspower supply accessories and an optional compact power adapter.
Read this First
Read This First 5
Warnings
• Do not aim the camera directly into the sun or at other intense light sources whichcould damage your eyesight.
• Do not trigger the flash in close proximity to human or animal eyes. Exposure to theintense light produced by the flash may damage eyesight. In particular, remain at leastone meter (39 inches) away from infants when using the flash.
• Store this equipment out of the reach of children and infants. Accidental damage tothe camera or batteries by a child could result in serious injury. In addition, placementof the strap around the child’s neck could result in asphyxiation.
• Do not attempt to disassemble or alter any part of the equipment that is not expresslydescribed in this guide. Disassembly or alteration may result in high-voltage electricalshock. Internal inspections, alterations and repairs should be conducted by qualifiedservice personnel authorized by your camera distributor or a Canon Customer SupportHelp Desk.
• To avoid the risk of high-voltage electrical shock, do not touch the flash portion of thecamera if it has been damaged. Similarly, never touch internal portions of theequipment that become exposed as a result of damage. There is a risk of high-voltageelectrical shock. Please take the first opportunity to consult your camera distributor or aCanon Customer Support Help Desk.
• Stop operating the equipment immediately if it emits smoke or noxious fumes. Failure to doso may result in fire or electrical shock. Immediately turn the camera’s power off, removethe camera battery and unplug the power cord from the electrical outlet. Confirm thatsmoke or fume emissions have ceased. Please consult your camera distributor or the closestCanon Customer Support Help Desk.
• Stop operating the equipment if it is dropped or the casing is damaged. Failure to do somay result in fire or electrical shock. Immediately turn the camera’s power off, remove thecamera battery and unplug the power cord from the electrical outlet. Please consult yourcamera distributor or the closest Canon Customer Support Help Desk.
• Do not allow the equipment to come into contact with, or become immersed in, wateror other liquids. Do not allow liquids to enter the interior. The camera has not beenwaterproofed. If the exterior comes into contact with liquids or salt air, wipe it dry witha soft, absorbent cloth. In the event that water or other foreign substances enter theinterior, immediately turn the camera’s power off and remove the camera battery orunplug the power cord from the electrical outlet. Continued use of the equipment mayresult in fire or electrical shock. Please consult your camera distributor or the closestCanon Customer Support Help Desk.
• Do not use substances containing alcohol, benzene, thinners or other flammablesubstances to clean or maintain the equipment. The use of these substances may leadto fire.

6 Read This First
• Remove the power cord on a regular periodic basis and wipe away the dust and dirtthat collects on the plug, the exterior of the electrical outlet and the surround area. Industy, humid or greasy environments, the dust that collects around the plug over longperiods of time may become saturated with humidity and short-circuit, leading to fire.
• Do not cut, damage, alter or place heavy items on the power adapter cord. Any of theseactions may cause an electrical short circuit, which may lead to fire or electrical shock.
• Do not handle the power cord if your hands are wet. Handling it with wet hands maylead to electrical shock. When unplugging the cord, ensure that you hold the solidportion of the plug. Pulling on the flexible portion of the cord may damage or expose thewire and insulation, creating the potential for fires or electrical shocks.
• Use of power sources not expressly recommended for this equipment may lead tooverheating, distortion of the equipment, fire, electrical shock or other hazards. Useonly the recommended power accessories.
• Do not place the batteries near a heat source or expose them to direct flame or heat.Neither should you immerse them in water. Such exposure may damage the batteries andlead to the leakage of corrosive liquids, fire, electrical shock, explosion or serious injury.
• Do not attempt to disassemble, alter or apply heat to the batteries. There is serious riskof injury due to an explosion. Immediately flush with water any area of the body,including the eyes and mouth, or clothing, that comes into contact with the innercontents of a battery. If the eyes or mouth contact these substances, immediately flushwith water and seek medical assistance.
• Avoid dropping or subjecting the batteries to severe impacts that could damage thecasings. It could lead to leakage and injury.
• Do not short-circuit the battery terminals with metallic objects, such as key holders. Itcould lead to overheating, burns and other injuries. Use the supplied terminal cover totransport or store the battery pack.
• Before you discard a battery, cover the terminals with tape or other insulators toprevent direct contact with other objects. Contact with the metallic components ofother materials in waste containers may lead to fire or explosions. Discard the batteriesin specialized waste facilities if available in your area.
• Use NB-2L battery pack only. Use of other batteries may cause explosions or leaks,resulting in fire, injury and damage to the surroundings.
• Use the supplied battery charger to charge the NB-2L battery pack. Use of otherbattery chargers may cause the unit to overheat and distort, resulting in fire orelectrical shock.
• Disconnect the battery charger or the compact power adapter from both the cameraand electrical outlet after recharging and when the camera is not in use to avoid firesand other hazards.
• The battery charger and the camera terminal of the optional compact power adapterare designed for exclusive use with this camera. Do not use it with other products .There is a risk of fire and other hazards.

Read This First 7
• Always keep the terminals of the battery charger clean. Do not place metal objectson top of the terminals. There is a risk of fire and other hazards.
Cautions
• Avoid using, placing or storing the equipment in places subject to strong sunlight orhigh temperatures, such as the dashboard or trunk (boot) of a car. Exposure to intensesunlight and heat may cause the batteries to leak, overheat or explode, resulting in fire,burns or other injuries. High temperatures may also cause deformation of the casing.Ensure that there is good ventilation when using the compact power adapter to chargethe battery pack or power the camera.
• Do not store the equipment in humid or dusty areas. Storage in such areas could leadto fire, electrical shock or other damage.
• Be careful not to bang the camera or subject it to strong impacts or shocks that couldlead to injury or damage the equipment when wearing or holding it by the strap.
• Be careful not to cover the flash with your fingers when shooting. In addition, do nottouch the surface of the flash after taking several pictures in rapid succession. Eitheraction could result in burns.
• If your camera is used for prolonged periods, the camera body may become warm.Please take care when operating the camera for an extended period as your handsmay experience a burning sensation.
Preventing Malfunctions
■ Avoid Strong Magnetic FieldsNever place the camera in close proximity to electric motors or other equipmentgenerating strong electromagnetic fields. Exposure to strong magnetic fields maycause malfunctions or corrupt image data.
■ Avoid Condensation Related ProblemsMoving the equipment rapidly between hot and cold temperatures may causecondensation (water droplets) to form on its external and internal surfaces. You canavoid this by placing the equipment in an airtight, resealable plastic bag and letting itadjust to temperature changes slowly before removing it from the bag.
■ If Condensation Forms Inside the CameraStop using the camera immediately if you detect condensation. Continued use maydamage the equipment. Remove the CF card, and battery or a household powersource, from the camera and wait until the moisture evaporates completely beforeresuming use.
8 Quick Start
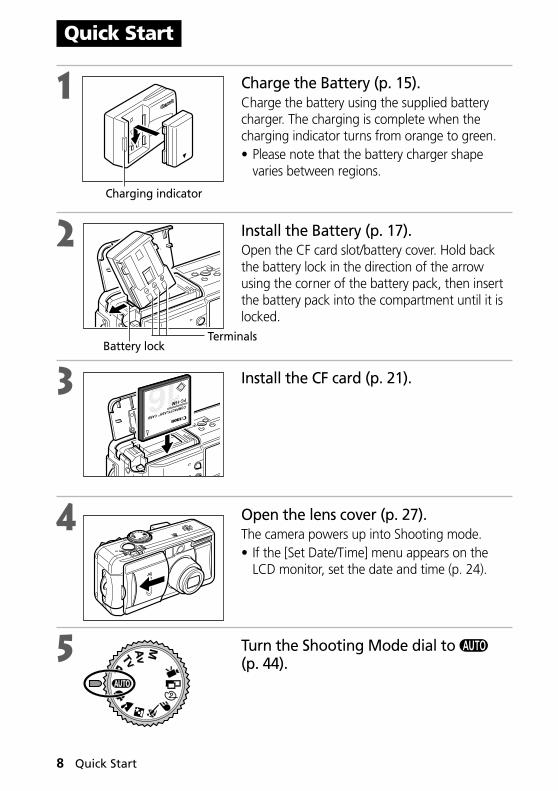
1 Charge the Battery (p. 15).Charge the battery using the supplied batterycharger. The charging is complete when thecharging indicator turns from orange to green.• Please note that the battery charger shape
varies between regions.
2 Install the Battery (p. 17).Open the CF card slot/battery cover. Hold backthe battery lock in the direction of the arrowusing the corner of the battery pack, then insertthe battery pack into the compartment until it islocked.
3 Install the CF card (p. 21).
4 Open the lens cover (p. 27).The camera powers up into Shooting mode.• If the [Set Date/Time] menu appears on the
LCD monitor, set the date and time (p. 24).
5 Turn the Shooting Mode dial to (p. 44).
Quick Start
Charging indicator
Battery lockTerminals
Quick Start 9
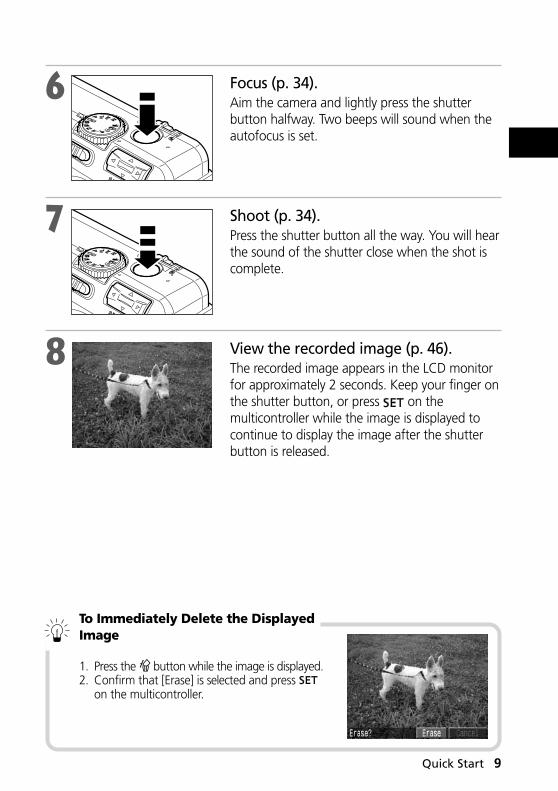
6 Focus (p. 34).Aim the camera and lightly press the shutterbutton halfway. Two beeps will sound when theautofocus is set.
7 Shoot (p. 34).Press the shutter button all the way. You will hearthe sound of the shutter close when the shot iscomplete.
8 View the recorded image (p. 46).The recorded image appears in the LCD monitorfor approximately 2 seconds. Keep your finger onthe shutter button, or press on themulticontroller while the image is displayed tocontinue to display the image after the shutterbutton is released.
To Immediately Delete the DisplayedImage
1. Press the button while the image is displayed.2. Confirm that [Erase] is selected and press
on the multicontroller.

10 Components Guide
* To connect the camera to a computer or printer, use one of the following cables.• Computer: USB Interface Cable IFC-300PCU (supplied with this camera)• Direct Print Compatible Printer (optional): Direct Interface Cable DIF-100 (supplied
with Direct Print compatible printers)• Bubble Jet Printer with the direct print function (optional): Bubble Jet Printer-
digital camera connection cable (supplied with the Direct Print compatible BubbleJet Printer)
Front View
Components Guide
Lens
Lens Cover(p. 27)
Speaker
Flash (p. 47)
Microphone
(Audio/VideoOut) Terminal(p. 142)
Terminal*(p. 112, 121)
Optical Viewfinder Window (p. 36)
Zoom Lever(p. 37, 39)
Shooting Mode Dial
Terminal cover
Shutter button(p. 34)
AF-Auxiliary Light Emitter
Red-Eye Reduction Lamp (p. 47)Self-Timer Lamp (p. 58)

Components Guide 11
Back / Bottom View
Viewfinder (p. 36)
Strap Eyelet (p. 26)
DC Coupler Cable Cover(p. 19)
CF Card Slot/Battery Cover(p. 17, 21)
Tripod Socket
• The LCD monitor is covered with a thin plastic film for protection againstscratches during shipment. Remove it before using the camera.

12 Components Guide
Controls
● Upper IndicatorThe indicators shine or flash when the shutter button is pressed or thefollowing operations are underway.• Green: Ready to record / Ready to communicate (during a computer
connection)• Flashing Green: Powering up / Recording to CF card / Reading CF card / Erasing from CF card/
Transmitting data (during a computer connection)• Orange: Ready to record (flash on)• Flashing Orange: Ready to record (camera shake warning)
● Lower Indicator• Yellow: Macro mode / Manual focus mode• Flashing Yellow: Focusing difficulty (although you can press the shutter button, try using
focus lock or adjusting the focus manually, p. 86)
(Exposure) / (White Balance) / (AEB) / (Flash Exposure
Compensation) Button (p. 73, 74, 77, 78)
(Flash) / (Index)Button (p. 47, 94)
(Macro) / (Jump)
Button (p. 57, 95)
Power/Mode Indicator (p. 27)
Power/Replay Lever (p. 27, 29)
Multicontroller (p. 14, 71)
(Menu) Button (p. 38)
(Display) Button (p. 30)
LCD Monitor (p. 30)
(Light Metering) / (Microphone) Button
(p. 79, 81, 82, 98)
(Manual Focus) / (Single image erase)
Button (p. 85, 86, 104)

Components Guide 13
Shooting Mode Dial
Use the shooting mode dial to switch between the shooting modes.
• : Auto (p. 44)The camera automatically selects settings.
• Image ZoneThe camera automatically selects settings according tothe image composition type.
: Portrait (p. 49): Landscape (p. 49): Night Scene (p. 50): Fast Shutter Speed (p. 50): Slow Shutter Speed (p. 51): Color Effects (p. 52): Stitch Assist (p. 53): Movie (p. 56)
• Creative ZoneThe user selects exposure, aperture or other settings toachieve special effects.
: Program AE (p. 65): Shutter Speed-Priority AE (p. 66): Aperture-Priority AE (p. 68): Manual Exposure (p. 70)
Image Zone
Crea
tive Zone
Auto

14 Components Guide
Operating the Multicontroller
The multicontroller is used to select choices, images and menus on the LCDmonitor and confirm the selection.
Moving the cursor on the LCD monitor up anddown.Use C or D to select a menu item on the LCDmonitor.
Moving the cursor on the LCD monitor leftand right.Use B or A to select a menu item on the LCDmonitor.
Confirming a menu selection or selecting anAF frame.Press or .

Preparing the Camera 15
Charging the Battery Pack
Recharge Battery Pack NB-2L (supplied) with Battery Charger CB-2LT or CB-2LTE before you use thecamera for the first time and subsequently when the “Charge the battery pack” message is displayed.
1 Align the edge of the battery pack withthe line on the battery charger, then slidethe battery in the direction of the arrow.
2 Battery charger model names and typesvary by region.
(For CB-2LT)Plug the battery charger into anelectrical outlet.
(For CB-2LTE)Attach the power cord to the batterycharger and plug it into an electricaloutlet.(For CB-2LT and CB-2LTE)• The charging indicator will shine orange while
the battery pack is charging. It will change to asteady green when the charge is complete.
• After charging, unplug the battery charger andremove the battery pack from it.
○ ○ ○ ○ ○ ○ ○ ○ ○ ○ ○ ○ ○ ○ ○ ○ ○ ○ ○ ○ ○ ○
• To protect and prolong the life of the battery pack, do not charge it for 24 hoursor longer at a time.
○ ○ ○ ○ ○ ○ ○ ○ ○ ○ ○ ○ ○ ○ ○ ○ ○ ○ ○ ○ ○ ○
• This is a lithium ion battery pack so there is no need to completely use ordischarge it before recharging. It can be recharged at any time.
• It takes approximately 80 minutes to bring a fully discharged battery pack to fullcharge (based on standard Canon testing criteria). Charge it within a temperaturerange of 5 to 40º C (32 to 104º F).
• Charging times will vary according to the surrounding humidity and battery packcharge state.
• You may hear a noise during charging. This is not a malfunction.
Preparing the Camera
Charging IndicatorCB-2LT
Charging IndicatorCB-2LTE

16 Preparing the Camera
Charging the Battery Pack (continued)
Battery Pack Handling Precautions• Keep the battery pack and camera terminals ( ) clean at all times. Dirty
terminals may cause a poor contact between the battery pack and camera. Polishthe terminals with a tissue or a dry cloth before charging or using the battery pack.
• Do not cover the battery charger with anything, such as a tablecloth, cushion orblanket, when it is charging. Heat will build up internally and possibly lead to fire.
• Do not charge batteries other than Battery Pack NB-2L with the supplied batterycharger.
• The battery pack continues to discharge a small amount when left in the camera(even with the power turned off) or battery charger. This shortens the battery life.Remove it from the camera, attach the supplied terminal adapter and store it atroom temperature (30° C/86° F or less) in a dry place. Charge it before use.
• Even charged battery packs continue to discharge naturally. You are advised tocharge the battery on the day of use, or one day before, to ensure a full charge.
• Since storing a fully charged battery pack for long periods of time (about 1 year)can shorten its lifecycle or affect performance, you are recommended to use thebattery pack in the camera until it is completely discharged and to store it atroom temperature (30° C/ 86° F or less). If you do not use the battery pack forlong periods of time, charge it fully and discharge it fully in the camera at leastonce a year before returning it to storage.
• The camera consumes the battery charge when the power is on even when afunction is not being used. To conserve the battery charge, be particularlyattentive in turning the camera off.
• Although the battery pack’s maximum operating range is 0 to 40º C (32 to 104º F),the optimal range is 10 to 30º C (50 to 86º F). At cold temperatures, such as thoseexperienced when skiing, performance will temporarily decline, reducing theusable time before recharging.
• If the usable time of a battery pack diminishes substantially even when fullycharged, it should be replaced.

Preparing the Camera 17
Installing the Battery Pack
Install Battery Pack NB-2L (supplied) into the camera as follows. Use a householdpower source to power the camera for extended periods (p. 19).
1 Turn off the camera (p. 27, 29).• Check that the power/mode indicator is not lit.
2 Slide the CF card slot/battery cover inthe direction of the arrow to open thecover.
3 Hold back the battery lock in thedirection of the arrow with the cornerof the battery pack, then insert thebattery pack into the compartmentuntil it is locked.• To remove the battery pack, release the battery
lock.
4 Close the CF card slot/battery coverthen slide it to the original positionuntil it clicks.
○ ○ ○ ○ ○ ○ ○ ○ ○ ○ ○ ○ ○ ○ ○ ○ ○ ○ ○ ○ ○ ○
• Charge the battery pack before using it the first time (p. 15).• When the upper indicator on the left side of the viewfinder is flashing green, the
CF card is being written to, read, erased or transmitted to. Therefore, never turnoff the camera or open the CF card slot/battery cover while this indicator isflashing green.
• Remove the battery pack when the camera is not in use.
Battery lock
18 Preparing the Camera
Installing the Battery Pack (continued)
○ ○ ○ ○ ○ ○ ○ ○ ○ ○ ○ ○ ○ ○ ○ ○ ○ ○ ○ ○ ○ ○
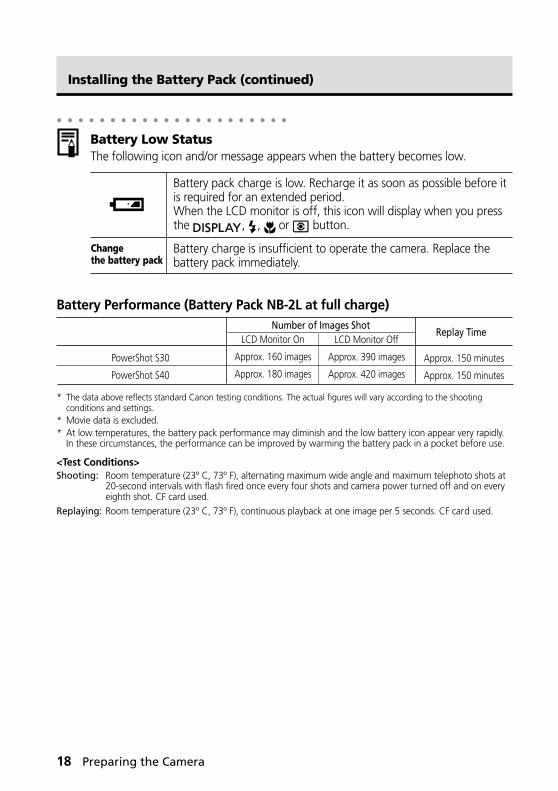
Battery Low StatusThe following icon and/or message appears when the battery becomes low.
Battery Performance (Battery Pack NB-2L at full charge)
* The data above reflects standard Canon testing conditions. The actual figures will vary according to the shootingconditions and settings.
* Movie data is excluded.* At low temperatures, the battery pack performance may diminish and the low battery icon appear very rapidly.
In these circumstances, the performance can be improved by warming the battery pack in a pocket before use.
<Test Conditions>Shooting: Room temperature (23º C, 73º F), alternating maximum wide angle and maximum telephoto shots at
20-second intervals with flash fired once every four shots and camera power turned off and on everyeighth shot. CF card used.
Replaying: Room temperature (23º C, 73º F), continuous playback at one image per 5 seconds. CF card used.
PowerShot S30
PowerShot S40
Number of Images ShotLCD Monitor On
Approx. 160 images
Approx. 180 images
Replay TimeLCD Monitor Off
Approx. 390 images
Approx. 420 images
Approx. 150 minutes
Approx. 150 minutes
Battery pack charge is low. Recharge it as soon as possible before itis required for an extended period.When the LCD monitor is off, this icon will display when you pressthe , , or button.
Battery charge is insufficient to operate the camera. Replace thebattery pack immediately.
Changethe battery pack
Preparing the Camera 19
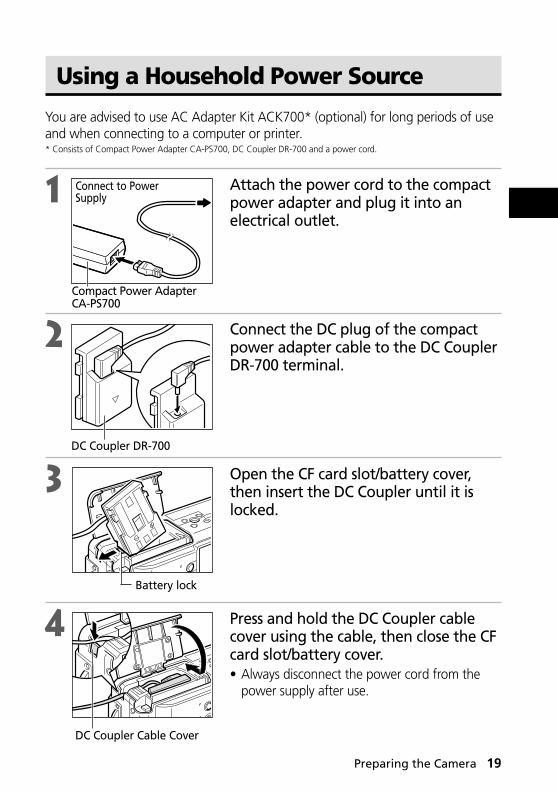
Using a Household Power Source
You are advised to use AC Adapter Kit ACK700* (optional) for long periods of useand when connecting to a computer or printer.* Consists of Compact Power Adapter CA-PS700, DC Coupler DR-700 and a power cord.
1 Attach the power cord to the compactpower adapter and plug it into anelectrical outlet.
2 Connect the DC plug of the compactpower adapter cable to the DC CouplerDR-700 terminal.
3 Open the CF card slot/battery cover,then insert the DC Coupler until it islocked.
4 Press and hold the DC Coupler cablecover using the cable, then close the CFcard slot/battery cover.• Always disconnect the power cord from the
power supply after use.
Compact Power AdapterCA-PS700
Connect to PowerSupply
DC Coupler DR-700
DC Coupler Cable Cover
Battery lock

20 Preparing the Camera
Using a Household Power Source (continued)
○ ○ ○ ○ ○ ○ ○ ○ ○ ○ ○ ○ ○ ○ ○ ○ ○ ○ ○ ○ ○ ○
• Always turn the camera’s power off before connecting or disconnecting thecompact power adapter.
• Use of any adapter other than AC Adapter Kit ACK700 may cause malfunction ofthe camera or AC adapter kit.

Preparing the Camera 21
Installing a CF Card
1 Turn off the camera (p. 27, 29).• Check that the power/mode indicator is not lit.
2 Slide the CF card slot/battery cover inthe direction of the arrow to open thecover.
3 Insert the CF card with the label facingout and the arrow pointing in.• Push the card in until the CF card eject button
fully extends.• To remove the CF card, push the CF card eject
button and pull the card out.
○ ○ ○ ○ ○ ○ ○ ○ ○ ○ ○ ○ ○ ○ ○ ○ ○ ○ ○ ○ ○ ○
• When the indicator on the left side of the viewfinder flashes green, the camera iswriting, reading, erasing or transmitting an image to or from the card. Do notperform the following, for image data may be lost or corrupted:- Do not shake the camera.- Do not turn off the power or open the CF card slot/battery cover.- Do not remove the CF card.
• Never open the CF card slot/battery cover when the power is on.• Please note that CF cards formatted in or edited with other manufacturer’s
cameras or application programs may not operate correctly in the camera.
CF card Eject Button
22 Preparing the Camera
Installing a CF Card (continued)
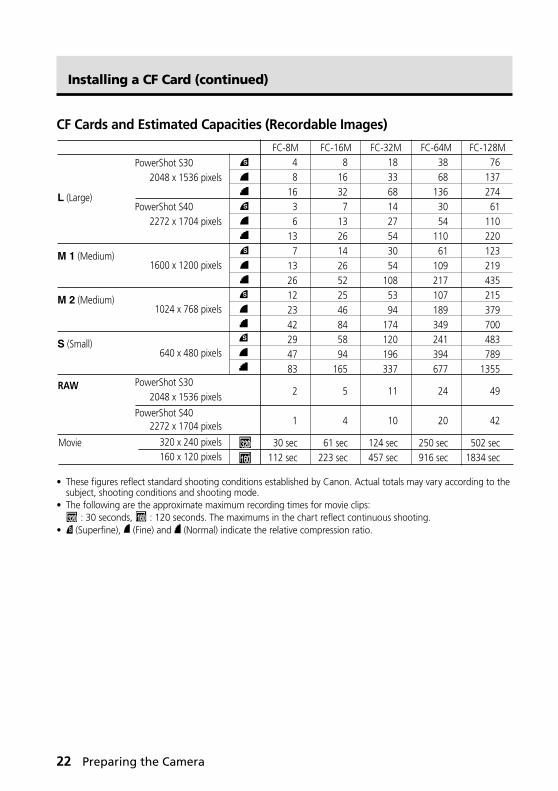
CF Cards and Estimated Capacities (Recordable Images)
• These figures reflect standard shooting conditions established by Canon. Actual totals may vary according to thesubject, shooting conditions and shooting mode.
• The following are the approximate maximum recording times for movie clips: : 30 seconds, : 120 seconds. The maximums in the chart reflect continuous shooting.
• (Superfine), (Fine) and (Normal) indicate the relative compression ratio.
FC-64M3868
1363054
11061
109217107189349241394677
24
20
250 sec916 sec
L (Large)
M 1 (Medium)
M 2 (Medium)
S (Small)
FC-8M48
1636
137
1326122342294783
2
1
30 sec112 sec
FC-16M8
16327
13261426522546845894
165
5
4
61 sec223 sec
FC-32M1833681427543054
1085394
174120196337
11
10
124 sec457 sec
FC-128M76
13727461
110220123219435215379700483789
1355
49
42
502 sec1834 sec
RAW
Movie
PowerShot S302048 x 1536 pixels
PowerShot S402272 x 1704 pixels
1600 x 1200 pixels
1024 x 768 pixels
640 x 480 pixels
PowerShot S302048 x 1536 pixels
PowerShot S402272 x 1704 pixels
320 x 240 pixels160 x 120 pixels
Preparing the Camera 23
CF Card Handling Precautions• CF cards are high-precision electronic devices. Do not bend, force, or subject
them to shocks or vibration.• Do not attempt to disassemble or alter a CF card.• Moving a CF card rapidly between temperature extremes may cause condensation
to form in the card, leading to potential malfunctions. To avoid condensationformation, place the CF card in a sealed plastic bag before moving it into adifferent temperature zone and allow it to adjust slowly to the new temperature. Ifcondensation forms on the CF card, put it aside until the water droplets haveevaporated completely.
• Place the CF card in the supplied case for storage.• Do not use or store CF cards in the following types of locations.
• Locations subject to dust or sand• Locations subject to high humidity and high temperatures
Microdrives are a recording medium with a hard disk. Their merits are a largecapacity and a low price per megabyte of capacity. However, they are relativelymore susceptible to vibrations and shocks than CF cards, which use durableflash memories. Please be careful, therefore, not to subject the camera tovibrations or shocks when using a microdrive, especially while recording orreplaying.

24 Preparing the Camera
Setting the Date / Time
The Set Date/Time menu will appear the first time the camera power is turned onor whenever the built-in rechargeable lithium battery charge is low. Start from Step5 to set the date and time.
1 Turn on the camera (p. 27).
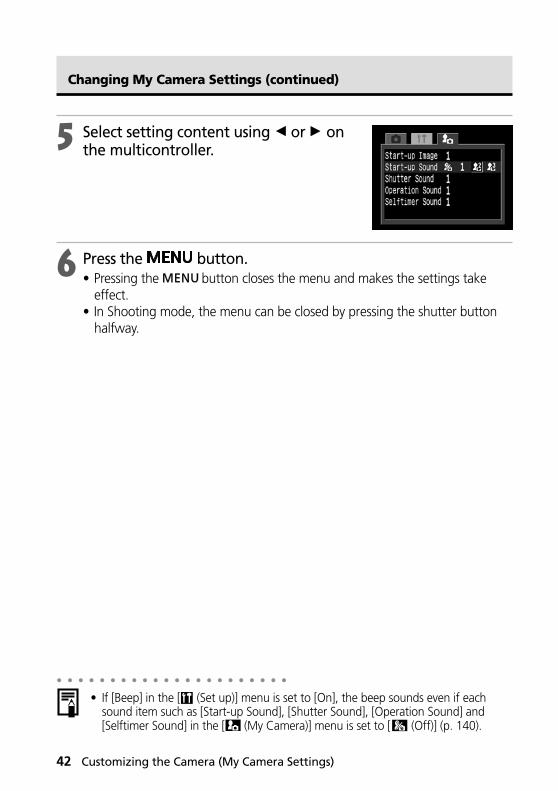
2 Press the button.• The [ (Rec.)] or [ (Play)] menu appears.
3 Select the [ (Set up)] menu using A onthe multicontroller.• Pressing the button also switches
between menus.
4 Select [Date/Time] using C or D on themulticontroller, then press .• The factory default for the date format may differ from that shown here in
some regions.
5 Set the date and time.• Select the item using B or A on the multicontroller.• Set the values using C or D on the multicontroller.• The date can be set up to the year 2030.
6 Press .• After adjusting the settings, press the button to close the menu window.
○ ○ ○ ○ ○ ○ ○ ○ ○ ○ ○ ○ ○ ○ ○ ○ ○ ○ ○ ○ ○ ○
• You may need to reset the date and time if the battery pack is removed for aboutthree weeks.
(Rec.) Menu.
Preparing the Camera 25
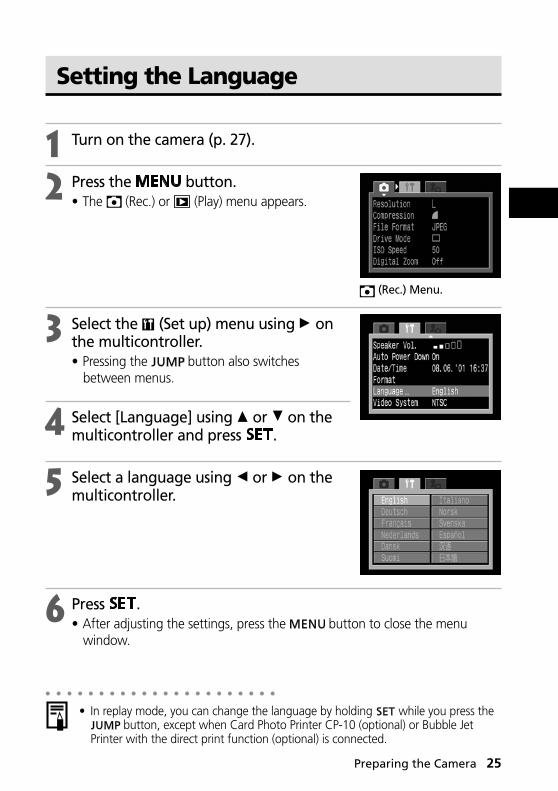
Setting the Language
1 Turn on the camera (p. 27).
2 Press the button.• The (Rec.) or (Play) menu appears.
3 Select the (Set up) menu using A onthe multicontroller.• Pressing the button also switches
between menus.
4 Select [Language] using C or D on themulticontroller and press .
5 Select a language using B or A on themulticontroller.
6 Press .• After adjusting the settings, press the button to close the menu
window.
○ ○ ○ ○ ○ ○ ○ ○ ○ ○ ○ ○ ○ ○ ○ ○ ○ ○ ○ ○ ○ ○
• In replay mode, you can change the language by holding while you press the button, except when Card Photo Printer CP-10 (optional) or Bubble Jet
Printer with the direct print function (optional) is connected.
(Rec.) Menu.
26 Preparing the Camera
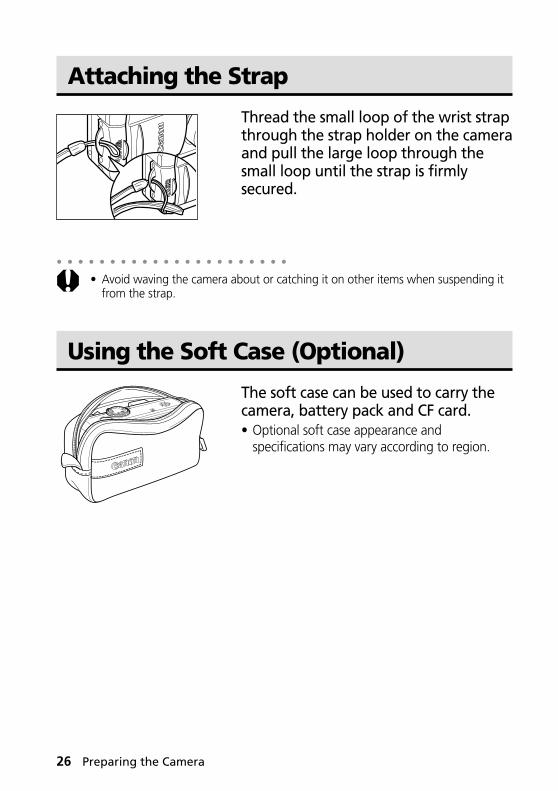
Attaching the Strap
Thread the small loop of the wrist strapthrough the strap holder on the cameraand pull the large loop through thesmall loop until the strap is firmlysecured.
○ ○ ○ ○ ○ ○ ○ ○ ○ ○ ○ ○ ○ ○ ○ ○ ○ ○ ○ ○ ○ ○
• Avoid waving the camera about or catching it on other items when suspending itfrom the strap.
Using the Soft Case (Optional)
The soft case can be used to carry thecamera, battery pack and CF card.• Optional soft case appearance and
specifications may vary according to region.
Basic Functions 27
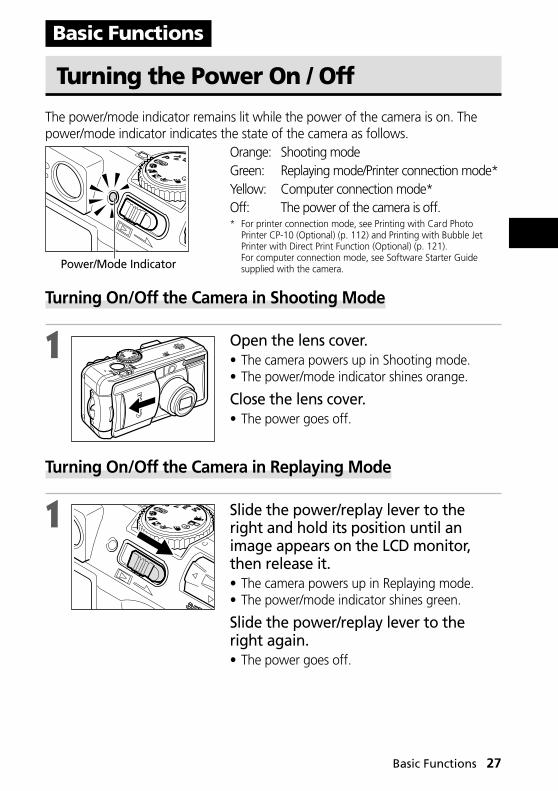
Turning the Power On / Off
The power/mode indicator remains lit while the power of the camera is on. Thepower/mode indicator indicates the state of the camera as follows.
Orange: Shooting modeGreen: Replaying mode/Printer connection mode*Yellow: Computer connection mode*Off: The power of the camera is off.* For printer connection mode, see Printing with Card Photo
Printer CP-10 (Optional) (p. 112) and Printing with Bubble JetPrinter with Direct Print Function (Optional) (p. 121).For computer connection mode, see Software Starter Guidesupplied with the camera.
Turning On/Off the Camera in Shooting Mode
1 Open the lens cover.• The camera powers up in Shooting mode.• The power/mode indicator shines orange.
Close the lens cover.• The power goes off.
Turning On/Off the Camera in Replaying Mode
1 Slide the power/replay lever to theright and hold its position until animage appears on the LCD monitor,then release it.• The camera powers up in Replaying mode.• The power/mode indicator shines green.
Slide the power/replay lever to theright again.• The power goes off.
Basic Functions
Power/Mode Indicator

28 Basic Functions
Turning the Power On / Off (continued)
○ ○ ○ ○ ○ ○ ○ ○ ○ ○ ○ ○ ○ ○ ○ ○ ○ ○ ○ ○ ○ ○
• You will hear a startup sound and see the startup image when the power comeson. (To change the startup sound and image, see below and pages 41 and 139.)
• The startup image does not appear when the LCD monitor is off or the terminal is connected to a TV.
○ ○ ○ ○ ○ ○ ○ ○ ○ ○ ○ ○ ○ ○ ○ ○ ○ ○ ○ ○ ○ ○
Turning on the camera without the startup sound and imagePress and hold the button, then turn on the power.
Power Save FunctionThe camera is equipped with a power save function. If [Auto Power Down] is set to[Off], the power goes off according to the following conditions.
Shooting Mode: Powers down approximately three minutes after the lasttime a camera control is accessed. The LCD monitor will shutoff approximately three minutes after the last time a cameracontrol is accessed even if the power save function is turnedoff.
Replaying Mode: Powers down approximately five minutes after the last timea camera control is accessed.
Printer Connection Mode:Powers down approximately five minutes after the last timea camera control is accessed on the camera or something isprinted on the printer.
PC Connection Mode: Displays a warning message on the computer screenapproximately 5 minutes after a control is last accessed. Thecamera will power down if no controls are used after 1additional minute.It will not activate when the camera is powered from ahousehold power source.
• The following are the ways to restore the power.– If the power save function is activated while the camera is in Shooting mode,
press the shutter button halfway.– If the power save function is activated while the camera is in Replaying mode,
slide the power/replay lever to the right again.• Please note that the camera continues to consume a minimal amount of power
even when the power save function shuts it down.• The power save function is disabled while a slide show plays on the camera (p. 99).• You can turn off the power save function in the [ (Set up)] menu (p. 138).
Basic Functions 29
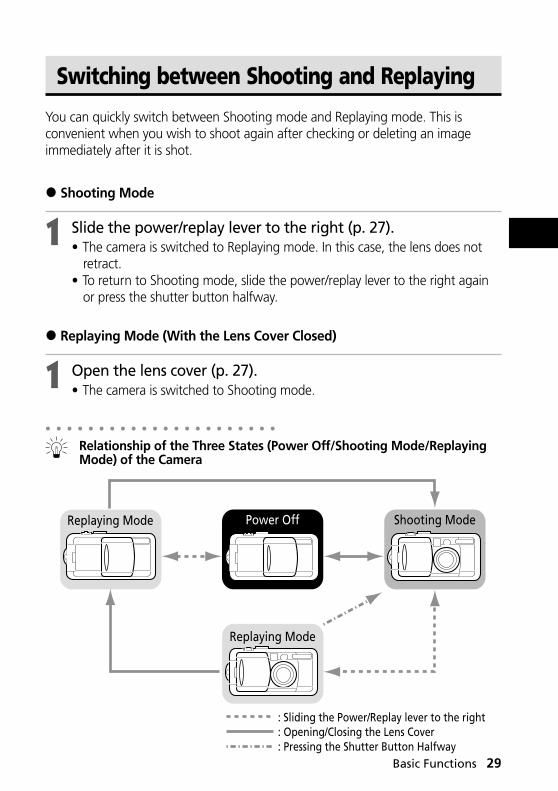
Switching between Shooting and Replaying
You can quickly switch between Shooting mode and Replaying mode. This isconvenient when you wish to shoot again after checking or deleting an imageimmediately after it is shot.
2 Shooting Mode
1 Slide the power/replay lever to the right (p. 27).• The camera is switched to Replaying mode. In this case, the lens does not
retract.• To return to Shooting mode, slide the power/replay lever to the right again
or press the shutter button halfway.
2 Replaying Mode (With the Lens Cover Closed)
1 Open the lens cover (p. 27).• The camera is switched to Shooting mode.
○ ○ ○ ○ ○ ○ ○ ○ ○ ○ ○ ○ ○ ○ ○ ○ ○ ○ ○ ○ ○ ○
Relationship of the Three States (Power Off/Shooting Mode/ReplayingMode) of the Camera
Replaying Mode Power Off
Replaying Mode
Shooting Mode
: Sliding the Power/Replay lever to the right: Opening/Closing the Lens Cover: Pressing the Shutter Button Halfway
30 Basic Functions
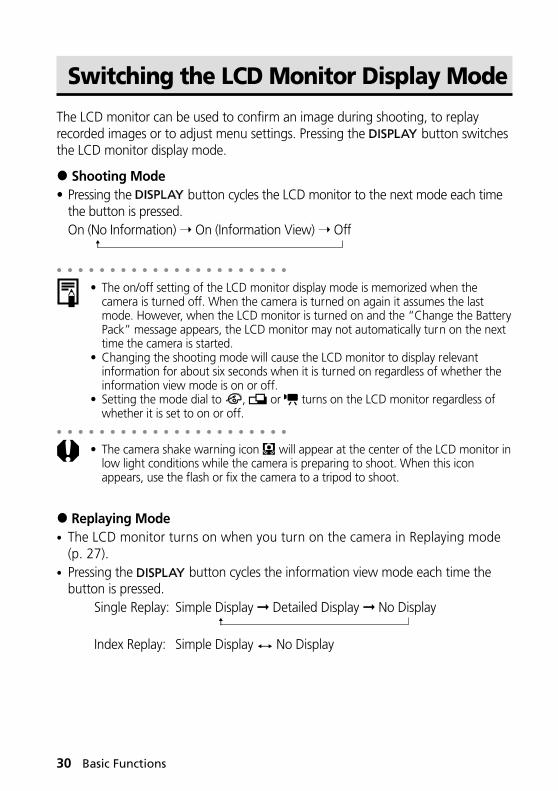
Switching the LCD Monitor Display Mode
The LCD monitor can be used to confirm an image during shooting, to replayrecorded images or to adjust menu settings. Pressing the button switchesthe LCD monitor display mode.
2 Shooting Mode• Pressing the button cycles the LCD monitor to the next mode each time
the button is pressed.On (No Information) ➝ On (Information View) ➝ Off
○ ○ ○ ○ ○ ○ ○ ○ ○ ○ ○ ○ ○ ○ ○ ○ ○ ○ ○ ○ ○ ○
• The on/off setting of the LCD monitor display mode is memorized when thecamera is turned off. When the camera is turned on again it assumes the lastmode. However, when the LCD monitor is turned on and the “Change the BatteryPack” message appears, the LCD monitor may not automatically turn on the nexttime the camera is started.
• Changing the shooting mode will cause the LCD monitor to display relevantinformation for about six seconds when it is turned on regardless of whether theinformation view mode is on or off.
• Setting the mode dial to , or turns on the LCD monitor regardless ofwhether it is set to on or off.
○ ○ ○ ○ ○ ○ ○ ○ ○ ○ ○ ○ ○ ○ ○ ○ ○ ○ ○ ○ ○ ○
• The camera shake warning icon will appear at the center of the LCD monitor inlow light conditions while the camera is preparing to shoot. When this iconappears, use the flash or fix the camera to a tripod to shoot.
2 Replaying Mode• The LCD monitor turns on when you turn on the camera in Replaying mode
(p. 27).• Pressing the button cycles the information view mode each time the
button is pressed.Single Replay: Simple Display ➞ Detailed Display ➞ No Display
Index Replay: Simple Display No Display
Basic Functions 31
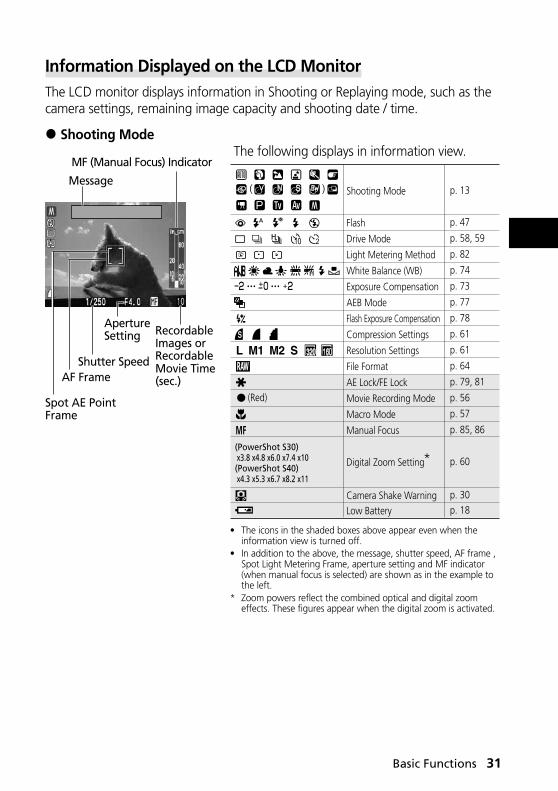
Information Displayed on the LCD MonitorThe LCD monitor displays information in Shooting or Replaying mode, such as thecamera settings, remaining image capacity and shooting date / time.
2 Shooting ModeThe following displays in information view.
• The icons in the shaded boxes above appear even when theinformation view is turned off.
• In addition to the above, the message, shutter speed, AF frame ,Spot Light Metering Frame, aperture setting and MF indicator(when manual focus is selected) are shown as in the example tothe left.
* Zoom powers reflect the combined optical and digital zoomeffects. These figures appear when the digital zoom is activated.
Shutter Speed
ApertureSetting
MF (Manual Focus) Indicator
Shooting Mode
Flash
Drive Mode
Light Metering Method
White Balance (WB)
Exposure Compensation
AEB Mode
Flash Exposure Compensation
Compression Settings
Resolution Settings
File Format
AE Lock/FE Lock
Movie Recording Mode
Macro Mode
Manual Focus
Digital Zoom Setting
Camera Shake WarningLow Battery
p. 13
p. 47
p. 58, 59
p. 82
p. 74
p. 73
p. 77
p. 78
p. 61
p. 61
p. 64
p. 79, 81
p. 56
p. 57
p. 85, 86
p. 60
p. 30p. 18
• • • • • •
(PowerShot S30) x3.8 x4.8 x6.0 x7.4 x10(PowerShot S40) x4.3 x5.3 x6.7 x8.2 x11
L M1 M2 S
*
( )
(Red)
Message
RecordableImages orRecordableMovie Time(sec.)AF Frame
Spot AE PointFrame

32 Basic Functions
Switching the LCD Monitor Display Mode (continued)
2 Replaying ModeIn simple display mode, the following informationappears.
In detailed display mode, the followinginformation also appears.
• In addition to the above, the ISO speed, shutter speed, aperturesetting, histogram and overexposure warning appear.
••• •••
••• •••
( ) Shooting Mode
Resolution SettingsExposure levelFlash Exposure CompensationWhite BalanceLight Metering MethodMacro ModeManual Focus
p. 13
p. 61p. 73p. 78p. 74p. 82p. 57p. 85, 86
File Number
Image Numberand Total(Display Image/Total)
ShootingDate / Time
Aperture SettingShutter Speed
ISO Speed Setting
L M1 M2 S Compression SettingsResolution SettingsFile FormatSound annotation (wav file)MovieProtection Status
p. 61p. 61p. 64p. 98p. 96p. 103
Histogram

Basic Functions 33
○ ○ ○ ○ ○ ○ ○ ○ ○ ○ ○ ○ ○ ○ ○ ○ ○ ○ ○ ○ ○ ○
About the HistogramThe histogram is a graph that allows you to judge the brightness of the recordedimage. The greater the bias toward the left in the graph, the darker the image. Thegreater the bias toward to the right, the brighter the image. If the image is dark,adjust the exposure compensation to a positive number. Similarly, adjust theexposure compensation to a negative number if the image is bright (p. 73).
Overexposure WarningIn detailed display mode, overexposed portions of the image flash. You can use thehistogram as a guide to set the exposure compensation to a negative setting andretake the image.
The following information may also appear with some image files.
○ ○ ○ ○ ○ ○ ○ ○ ○ ○ ○ ○ ○ ○ ○ ○ ○ ○ ○ ○ ○ ○
• Please note that image information recorded by this camera may not displaycorrectly on other cameras and image information recorded by other cameras maynot display correctly on this camera.
Notice Concerning ShootingWhen using this camera to shoot scenes containing extremely bright subjects, avertical, red bar of light may appear on the LCD monitor. It will not be recordedwhen shooting still photos, but will be recorded when shooting movies. This is anormal occurrence in devices containing CCDs and does not consitute amalfunction.
An audio file other than a wav file, or a file with an unrecognized format, is attached.
A JPEG file not supported by “Design rule for Camera File system” (DCF) standards.
A file with an unrecognized format.
Dark Image Balanced Image Bright Image
Histogram Examples

34 Basic Functions
Pressing the Shutter Button
The shutter button features a two-stage action.● Pressing Halfway
Pressing halfway automatically sets the exposure,focus and white balance.• The indicators shine or flash as follows.
• Green: Metering complete (two beepssound)
• Orange: Flash will fire• Flashing Orange: Camera shake warning /
Insufficient exposure• Yellow: Macro mode/Manual focus mode• Flashing Yellow: Focusing difficulty* (single
beep sounds)* Use the focus lock, or focus manually, to shoot when the
indicator flashes yellow (p. 86).
• The AF frame appears as follows when the LCDmonitor is on.• Green: Metering complete• Yellow: Focusing difficulty
● Pressing FullyPressing fully releases the shutter.• The upper indicator flashes green while the
image is recording onto the CF card.• You will hear the shutter sound when the shot
is complete. Do not move the camera until youhear this sound.
Indicators
AF Frame
Basic Functions 35
○ ○ ○ ○ ○ ○ ○ ○ ○ ○ ○ ○ ○ ○ ○ ○ ○ ○ ○ ○ ○ ○
• If the orange or yellow indicator flashes while you press halfway, you can still pressfully to take the shot.
• Images are first saved into the camera’s internal memory before being recordedonto the CF card, allowing the next images to be taken immediately as long assufficient space is available in the internal memory.
• The beep and shutter sound can be set On / Off in the Set up menu (p. 116).• When the shutter sound is set to Off, but the beep is set to On, one beep will
sound when the shutter button is fully pressed.• There is no shutter sound in movie mode.
36 Basic Functions
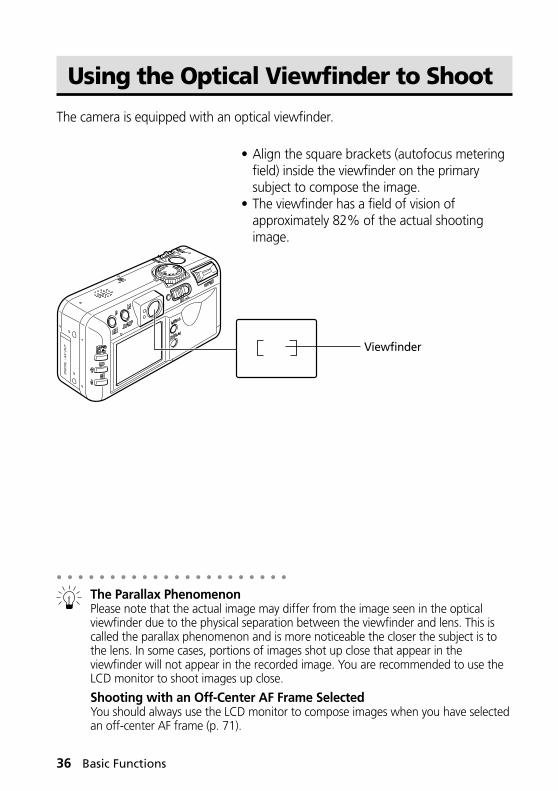
Using the Optical Viewfinder to Shoot
The camera is equipped with an optical viewfinder.
• Align the square brackets (autofocus meteringfield) inside the viewfinder on the primarysubject to compose the image.
• The viewfinder has a field of vision ofapproximately 82% of the actual shootingimage.
Viewfinder
○ ○ ○ ○ ○ ○ ○ ○ ○ ○ ○ ○ ○ ○ ○ ○ ○ ○ ○ ○ ○ ○
The Parallax PhenomenonPlease note that the actual image may differ from the image seen in the opticalviewfinder due to the physical separation between the viewfinder and lens. This iscalled the parallax phenomenon and is more noticeable the closer the subject is tothe lens. In some cases, portions of images shot up close that appear in theviewfinder will not appear in the recorded image. You are recommended to use theLCD monitor to shoot images up close.
Shooting with an Off-Center AF Frame SelectedYou should always use the LCD monitor to compose images when you have selectedan off-center AF frame (p. 71).
Basic Functions 37
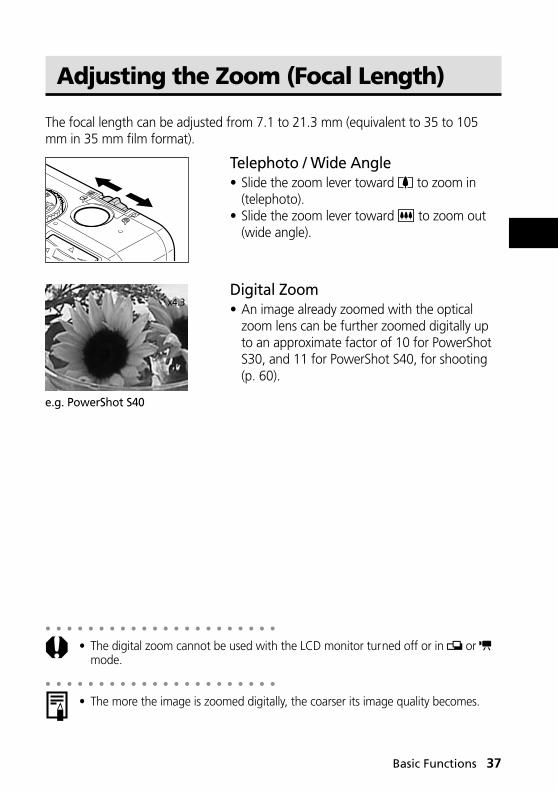
Adjusting the Zoom (Focal Length)
The focal length can be adjusted from 7.1 to 21.3 mm (equivalent to 35 to 105mm in 35 mm film format).
Telephoto / Wide Angle• Slide the zoom lever toward to zoom in
(telephoto).• Slide the zoom lever toward to zoom out
(wide angle).
Digital Zoom• An image already zoomed with the optical
zoom lens can be further zoomed digitally upto an approximate factor of 10 for PowerShotS30, and 11 for PowerShot S40, for shooting(p. 60).
○ ○ ○ ○ ○ ○ ○ ○ ○ ○ ○ ○ ○ ○ ○ ○ ○ ○ ○ ○ ○ ○
• The digital zoom cannot be used with the LCD monitor turned off or in or mode.
○ ○ ○ ○ ○ ○ ○ ○ ○ ○ ○ ○ ○ ○ ○ ○ ○ ○ ○ ○ ○ ○
• The more the image is zoomed digitally, the coarser its image quality becomes.
e.g. PowerShot S40
x4.3

38 Basic Functions
Selecting Menus and Settings
Menus are used to adjust shooting, replaying, date / time and electronic soundsettings. Watch the LCD monitor while performing the following procedures.
1 Press the button.• In Shooting mode, the [ (Rec.)] menu appears. In Replaying mode, the
[ (Play)] menu appears.
2 Switch between menu tabs using B or Aon the multicontroller.• The menu switches as follows:
[ (Rec.)] [ (Play)] [ (Set up)] [(My Camera)]
• Pressing the button also switchesbetween the menu tabs.
3 Select a menu item using C or D on themulticontroller.
4 Select setting contents using B or A onthe multicontroller.• Press for items followed by an ellipsis (...)
then select a setting. Press again to confirmthe setting.
5 Press the button.• Pressing the button closes the menu and makes the settings take effect.• In Shooting mode, the menu can be closed by pressing the shutter button
halfway.○ ○ ○ ○ ○ ○ ○ ○ ○ ○ ○ ○ ○ ○ ○ ○ ○ ○ ○ ○ ○ ○
• If the camera is protected by Digital Camera Waterproof Case WP-DC300 (optional),select a menu item using B or A after pressing and holding the button.

Basic Functions 39
Menu Settings and Factory DefaultsThis chart shows the options for each menu and the default settings.
Menu Item
Resolution (Movie)
Compression
File Format
Drive Mode
ISO Speed
Digital Zoom
Spot AE Point
Review
File No. Reset
Contrast
Sharpness
Saturation
Protect
Rotate
Erase all
Slide Show
Print Order
Transfer Order
Available Settings
L 2048 x 1536 / M1 1600 x 1200 /
M2 1024 x 768 / S 640 x 480
L 2272 x 1704 / M1 1600 x 1200 /
M2 1024 x 768 / S 640 x 480
320 x 240* / 160 x 120
(Superfine) / (Fine*) / (Normal)
JPEG* / RAW
* / / / /
50* / 100 / 200 / 400 / 800 / AUTO
(ISO 800 available on PowerShot S30 only)
On / Off*
Center* / AF Point
Off / 2 sec.* / 10 sec.
On / Off*
– / 0* / +
– / 0* / +
– / 0* / +
Turns image protection on and off
Rotates the image in the display
Erases all images on the CF card
Replays selected images in a slide show
Sets the print settings
Sets the transfer settings
p. 61
p. 61
p. 61
p. 64
p. 58, 59
p. 87
p. 60
p. 82
p. 46
p. 89
p. 87
p. 87
p. 87
p. 103
p. 97
p. 105
p. 99
p. 107
p. 130
PowerShot S30
PowerShot S40
Resolution(Still picture)
Rec.Menu(Red)
PlayMenu(Blue)
ReferencePage

40 Basic Functions
* Default values. Default languages and video system settings vary between regions.• Some menu items are not available in certain shooting modes.• You can apply a desired image and sound to and in the [ (My Camera)] menu by connecting the
camera to the computer. For details, see Software Starter Guide.• The default of all the settings changed by the menu and button operations except for [Date/T ime], [Language]
and [Video System] can be restored all at once (p. 141).
Menu Item
Beep
LCD Brightness
Speaker Vol.
Auto Power Down
Date/Time
Format
Language
Video System
Start-up Image
Start-up Sound
Shutter Sound
Operation Sound
Selftimer Sound
Available Settings
On* / Off
Normal / Bright*
Off / 1 / 2* / 3 / 4 / 5
On* / Off
Sets the date and time
Formats the CF card
English* / Deutsch / Français / Nederlands /
Dansk / Suomi / Italiano / Norsk / Svenska /
Español / Chinese / Japanese
NTSC / PAL
/ 1* / /
/ 1* / /
/ 1 */ /
/ 1* / /
/ 1 */ /
p. 137
p. 137
p. 137
p. 138
p. 24
p. 106
p. 25
p. 138
p. 41, 139
p. 41, 139
p. 41, 139
p. 41, 140
p. 41, 140
ReferencePage
Set up Menu(Yellow)
MyCameraMenu(Blue)
Selecting Menus and Settings (continued)
Customizing the Camera (My Camera Settings) 41
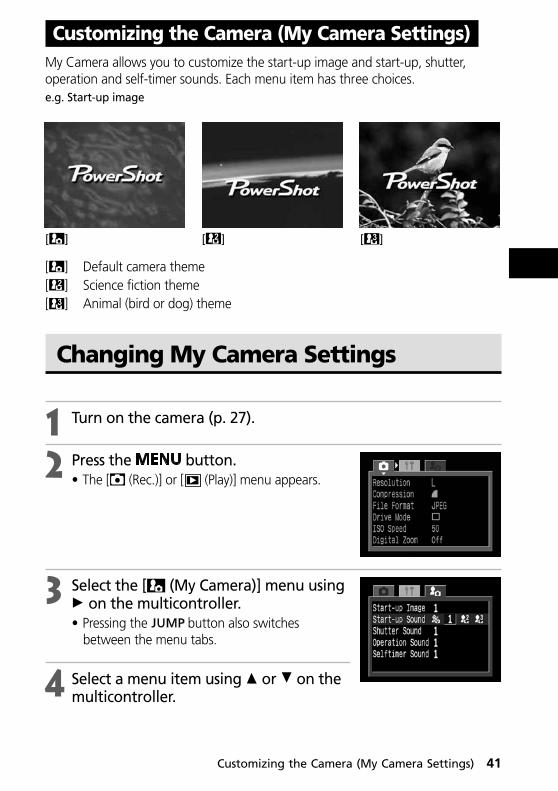
My Camera allows you to customize the start-up image and start-up, shutter,operation and self-timer sounds. Each menu item has three choices.e.g. Start-up image
[ ] [ ] [ ]
[ ] Default camera theme[ ] Science fiction theme[ ] Animal (bird or dog) theme
Changing My Camera Settings
1 Turn on the camera (p. 27).
2 Press the button.• The [ (Rec.)] or [ (Play)] menu appears.
3 Select the [ (My Camera)] menu usingA on the multicontroller.• Pressing the button also switches
between the menu tabs.
4 Select a menu item using C or D on themulticontroller.
Customizing the Camera (My Camera Settings)
42 Customizing the Camera (My Camera Settings)
Changing My Camera Settings (continued)
5 Select setting content using B or A onthe multicontroller.
6 Press the button.• Pressing the button closes the menu and makes the settings take
effect.• In Shooting mode, the menu can be closed by pressing the shutter button
halfway.
○ ○ ○ ○ ○ ○ ○ ○ ○ ○ ○ ○ ○ ○ ○ ○ ○ ○ ○ ○ ○ ○
• If [Beep] in the [ (Set up)] menu is set to [On], the beep sounds even if eachsound item such as [Start-up Sound], [Shutter Sound], [Operation Sound] and[Selftimer Sound] in the [ (My Camera)] menu is set to [ (Off)] (p. 140).

Customizing the Camera (My Camera Settings) 43
Customizing My Camera Settings
You can customize the contents of menu [ ] and [ ] using the supplied softwareand storing these to your camera.
File format of My Camera Settings
● Start-up Image• Recording image format JPEG (Base line JPEG)• Sampling rate 4 : 1 : 1• Image size 320 x 240 pixels• File capacity 20 KB or less
● Start-up Sound, Shutter Sound, Operation Sound and Selftimer Sound• Recording format WAVE (monaural)• Standardizing bit 8 bit• Sampling frequency 11.025 kHz and 8.000 kHz• Recording time
11.025 kHz 8.000 kHz
Start-up Sound 1.0 sec. or less 1.3 sec. or less
Shutter Sound 0.3 sec. or less 0.4 sec. or less
Operation Sound 0.3 sec. or less 0.4 sec. or less
Selftimer Sound 2.0 sec. or less 2.0 sec. or less
Any file format other than those described above cannot be used with this camera.
An example of this function is to record “Say cheese” as the Selftimer sounds sothe camera will replay this sound two seconds before the photo is taken.
See the Software Starter Guide of the supplied software as well as theZoomBrowser EX or ImageBrowser Software Guide (both are in pdf format)included in the Solution Disk.

44 Shooting - Letting the Camera Select Settings
Auto Mode
In this mode, all you have to do is press the shutter button and let the camera doeverything else.
1 Check that the camera is in Shooting mode (p. 27).
2 Turn the shooting mode dial to .
3 Aim the camera at the subject.
4 Use the zoom lever to achieve the desired composition(relative subject size in the viewfinder).
5 Press the shutter button halfway (p. 34).• Two beeps will sound when the camera has
finished metering, and the indicator beside theviewfinder will shine green or orange. If the LCDmonitor is on, the AF frame will appear green.
• The shutter speed and aperture settings areautomatically determined and show on the LCDmonitor if it is on.
• The yellow indicator will flash and the beep will sound one time if thesubject is difficult to focus on. The AF frame will also appear yellow.
6 Press the shutter button all the way (p. 34).• You will hear the sound of the shutter when the shutter activates.• The picture appears for two seconds on the LCD monitor, if it is on.
Shooting - Letting the Camera Select Settings
AF Frame
Shooting - Letting the Camera Select Settings 45
○ ○ ○ ○ ○ ○ ○ ○ ○ ○ ○ ○ ○ ○ ○ ○ ○ ○ ○ ○ ○ ○
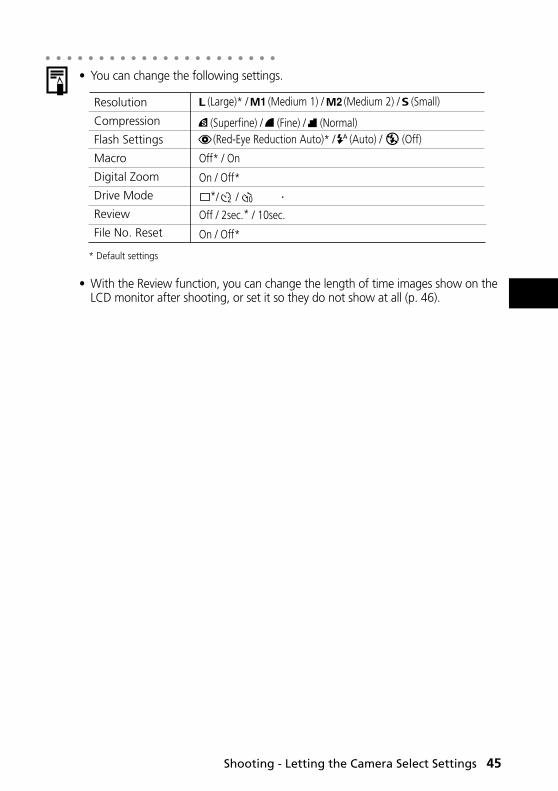
• You can change the following settings.
* Default settings
• With the Review function, you can change the length of time images show on theLCD monitor after shooting, or set it so they do not show at all (p. 46).
Resolution
Compression
Flash Settings
Macro
Digital Zoom
Drive Mode
Review
File No. Reset
Off* / On
On / Off*
On / Off*
Off / 2sec.* / 10sec.
(Large)* / (Medium 1) / (Medium 2) / (Small)
(Superfine) / (Fine) / (Normal) (Red-Eye Reduction Auto)* / (Auto) / (Off)
*/ /

46 Shooting - Letting the Camera Select Settings
Checking an Image Right after Shooting
Checking the ImageAfter a photo is taken, the image displays on the LCD monitor for two seconds.There are two ways to display the image for longer.
2Keeping the Shutter Button PressedThe image continues to appear on the LCD monitor as long as you keep theshutter button fully depressed.
2Pressing If you press while the image is displayed on the LCD monitor, it will continue todisplay even after the shutter button is released. Press the shutter button halfwayagain to stop displaying it.○ ○ ○ ○ ○ ○ ○ ○ ○ ○ ○ ○ ○ ○ ○ ○ ○ ○ ○ ○ ○ ○
• You can perform the following while images are displayed.– Erasing Images Singly (p. 9, 104)– Displaying Images in detailed display mode (p. 30)– Magnifying Images (p. 93)– Attaching Sound Annotations (p. 98)
Changing the Image Display DurationThe length of time images are displayed after a photo has been taken can bechanged from 2 seconds to 10 seconds or turned off.
1 In the [ (Rec.)] menu, select [Review].• See Selecting Menus and Settings (p. 38).
2 Select a Review setting and press the button.
• With the [Off] option, the image will notautomatically display.
• With the [2 sec.] or [10 sec.] options, the imagewill appear for the time selected.
• You can continue to display the image as long asthe shutter button is fully held pressed regardlessof the Review setting.
• Another picture can be taken even while the last is displayed.
Shooting - Letting the Camera Select Settings 47
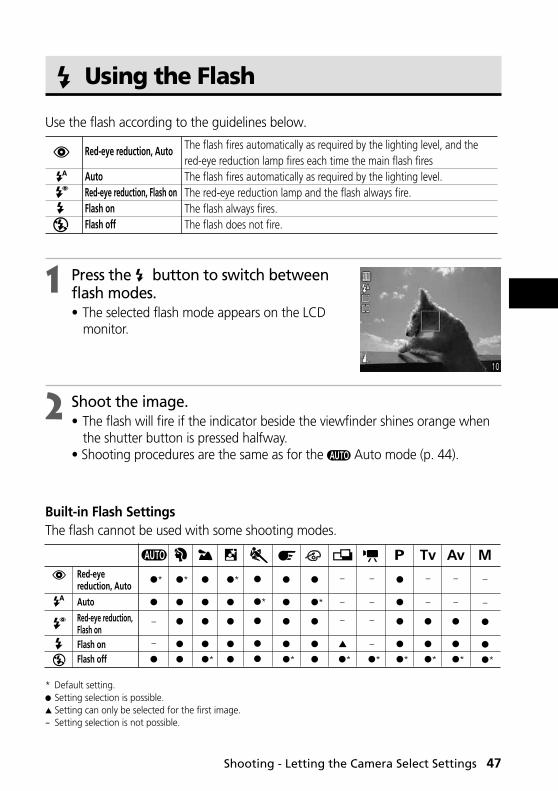
Using the Flash
Use the flash according to the guidelines below.
1 Press the button to switch betweenflash modes.• The selected flash mode appears on the LCD
monitor.
2 Shoot the image.• The flash will fire if the indicator beside the viewfinder shines orange when
the shutter button is pressed halfway.• Shooting procedures are the same as for the Auto mode (p. 44).
Built-in Flash SettingsThe flash cannot be used with some shooting modes.
●*
●
–
–
●
–
–
–
–
●*
●
●
●
●
●*
–
–
●
●
●*
–
–
●
●
●*
–
–
●
●
●*
–
–
–
▲
●*
●
●*
●
●
●
●*
●
●
●
●
●
●*
●
●
●
●
●
●
●
●*
●
●
●
●
●*
●*
●
●
●
●
Red-eyereduction, Auto
Auto
Red-eye reduction, Flash onFlash onFlash off
Red-eye reduction, Auto
AutoRed-eye reduction, Flash onFlash onFlash off
The flash fires automatically as required by the lighting level, and the red-eye reduction lamp fires each time the main flash firesThe flash fires automatically as required by the lighting level.The red-eye reduction lamp and the flash always fire.The flash always fires.The flash does not fire.
* Default setting.● Setting selection is possible.▲ Setting can only be selected for the first image.- Setting selection is not possible.

48 Shooting - Letting the Camera Select Settings
Using the Flash (continued)
○ ○ ○ ○ ○ ○ ○ ○ ○ ○ ○ ○ ○ ○ ○ ○ ○ ○ ○ ○ ○ ○
• When shooting with a high ISO sensitivitiy and using the built-in flash, there ismore of a chance of overexposure the closer you are to the subject.
○ ○ ○ ○ ○ ○ ○ ○ ○ ○ ○ ○ ○ ○ ○ ○ ○ ○ ○ ○ ○ ○
• The fastest shutter speed for flash synchronization is 1/250 second. The cameraautomatically resets the shutter speed to 1/250 second if a faster speed is selected.
• The flash may take up to approximately 10 seconds to charge in some cases.Actual times will vary according to usage and the battery charge.
• In mode, the flash fires at full intensity. The flash intensity is automaticallyadjusted except in mode.
• The flash setting is saved when the camera is turned off in the , , and shooting modes.
• The flash will fire twice. A pre-flash will fire and will be followed by the main flash.The pre-flash is used by the camera to obtain the subject’s exposure data so thatthe main flash can be set to the optimal intensity for the shot.
○ ○ ○ ○ ○ ○ ○ ○ ○ ○ ○ ○ ○ ○ ○ ○ ○ ○ ○ ○ ○ ○
About the Red-Eye Reduction FunctionLight reflecting back from eyes can make them appear red when the flash is used indark areas. Under these conditions, use the red-eye reduction mode. For this modeto be effective, the subject must be looking right at the red-eye reduction lamp. Tryasking them to look directly at the lamp. Even better results can be obtained byshooting with the lens set to the wide angle, increasing the lighting in indoorsettings or approaching closer to the subject.

Shooting - Letting the Camera Select Settings 49
Portrait Mode
Use this mode when you want the subject to appear sharp and the background to blur.
1 Turn the shooting mode dial to .• Shooting procedures are the same as for the Auto
Mode (p. 44).
○ ○ ○ ○ ○ ○ ○ ○ ○ ○ ○ ○ ○ ○ ○ ○ ○ ○ ○ ○ ○ ○
• The AEB, AE lock, FE Lock, light metering, file format (RAW), and imageadjustment (ISO speed, contrast, sharpness and saturation) settings cannot beadjusted in this mode.
• You can set the AF frame to either the auto (AiAF) selection or manual center (p. 71).○ ○ ○ ○ ○ ○ ○ ○ ○ ○ ○ ○ ○ ○ ○ ○ ○ ○ ○ ○ ○ ○
• To best achieve the effect of the background gradually fading, compose the imageso that the upper half of the subject’s body fills most of the viewfinder or LCDmonitor.
• The background gets increasingly indistinct the more you adjust the focal lengthtoward telephoto.
Landscape Mode
Use this mode to shoot expansive landscape scenes.
1 Turn the shooting mode dial to .• Shooting procedures are the same as for the Auto
Mode (p. 44).
○ ○ ○ ○ ○ ○ ○ ○ ○ ○ ○ ○ ○ ○ ○ ○ ○ ○ ○ ○ ○ ○
• The macro, AEB, AE lock, FE Lock, light metering, file format (RAW), and imageadjustment (ISO speed, contrast, sharpness and saturation) settings cannot beadjusted in this mode.
• You can set the AF frame to either the auto (AiAF) selection or manual center (p. 71).○ ○ ○ ○ ○ ○ ○ ○ ○ ○ ○ ○ ○ ○ ○ ○ ○ ○ ○ ○ ○ ○
• Since a slow shutter speed is often selected in mode, use a tripod to shoot ifthe (camera shake warning) icon appears on the LCD monitor.

50 Shooting - Letting the Camera Select Settings
Night Scene Mode
Use this mode to capture human subjects against the backdrop of an evening sky ornight scene. The people are illuminated with light from the flash while the backdropis captured at a slow shutter speed so that both appear correctly exposed.
1 Turn the shooting mode dial to .• Shooting procedures are the same as for the Auto
mode (p. 44).
○ ○ ○ ○ ○ ○ ○ ○ ○ ○ ○ ○ ○ ○ ○ ○ ○ ○ ○ ○ ○ ○
• The macro, AEB, AE lock, FE Lock, light metering, file format (RAW), and imageadjustment (ISO speed, contrast, sharpness and saturation) settings cannot beadjusted in this mode.
• You can set the AF frame to either the auto (AiAF) selection or manual center (p. 71).• Always use a tripod to prevent camera shake in this mode.
○ ○ ○ ○ ○ ○ ○ ○ ○ ○ ○ ○ ○ ○ ○ ○ ○ ○ ○ ○ ○ ○
• Warn people to stay still for a few seconds after the flash fires because of the slowshutter speed.
• Using the mode in daylight will produce an effect similar to that of the mode.
Fast Shutter
Use this mode to shoot fast moving objects such as sports figures.
1 Turn the shooting mode dial to .• Shooting procedures are the same as for the Auto
mode (p. 44).
○ ○ ○ ○ ○ ○ ○ ○ ○ ○ ○ ○ ○ ○ ○ ○ ○ ○ ○ ○ ○ ○
• The AEB, AE lock, FE lock, light metering, file format (RAW), and imageadjustment (ISO speed, contrast, sharpness and saturation) settings cannot beadjusted in this mode.
• You can set the AF frame to either the auto (AiAF) selection or manual center (p. 71).○ ○ ○ ○ ○ ○ ○ ○ ○ ○ ○ ○ ○ ○ ○ ○ ○ ○ ○ ○ ○ ○
• Noise in the recorded image may increase if you shoot dark subjects.

Shooting - Letting the Camera Select Settings 51
Slow Shutter
Use this mode to shoot moving objects to make them appear blurred such as riverrapids.
1 Turn the shooting mode dial to .• Shooting procedures are the same as for the Auto
mode (p. 44).
○ ○ ○ ○ ○ ○ ○ ○ ○ ○ ○ ○ ○ ○ ○ ○ ○ ○ ○ ○ ○ ○
• The AEB, AE lock, FE lock, light metering, file format (RAW), and imageadjustment (ISO speed, contrast, sharpness and saturation) settings cannot beadjusted in this mode.
• You can set the AF frame to either the auto (AiAF) selection or manual center (p. 71).• Always use a tripod to prevent camera shake in this mode.
52 Shooting - Letting the Camera Select Settings
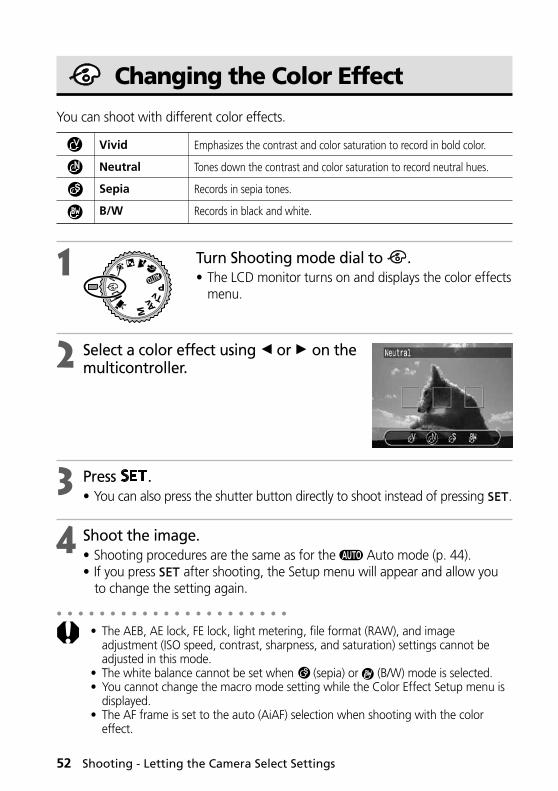
Changing the Color Effect
You can shoot with different color effects.
1 Turn Shooting mode dial to .• The LCD monitor turns on and displays the color effects
menu.
2 Select a color effect using B or A on themulticontroller.
3 Press .• You can also press the shutter button directly to shoot instead of pressing .
4 Shoot the image.• Shooting procedures are the same as for the Auto mode (p. 44).• If you press after shooting, the Setup menu will appear and allow you
to change the setting again.
○ ○ ○ ○ ○ ○ ○ ○ ○ ○ ○ ○ ○ ○ ○ ○ ○ ○ ○ ○ ○ ○
• The AEB, AE lock, FE lock, light metering, file format (RAW), and imageadjustment (ISO speed, contrast, sharpness, and saturation) settings cannot beadjusted in this mode.
• The white balance cannot be set when (sepia) or (B/W) mode is selected.• You cannot change the macro mode setting while the Color Effect Setup menu is
displayed.• The AF frame is set to the auto (AiAF) selection when shooting with the color
effect.
Emphasizes the contrast and color saturation to record in bold color.
Tones down the contrast and color saturation to record neutral hues.
Records in sepia tones.
Records in black and white.
Vivid
Neutral
Sepia
B/W
Shooting - Letting the Camera Select Settings 53
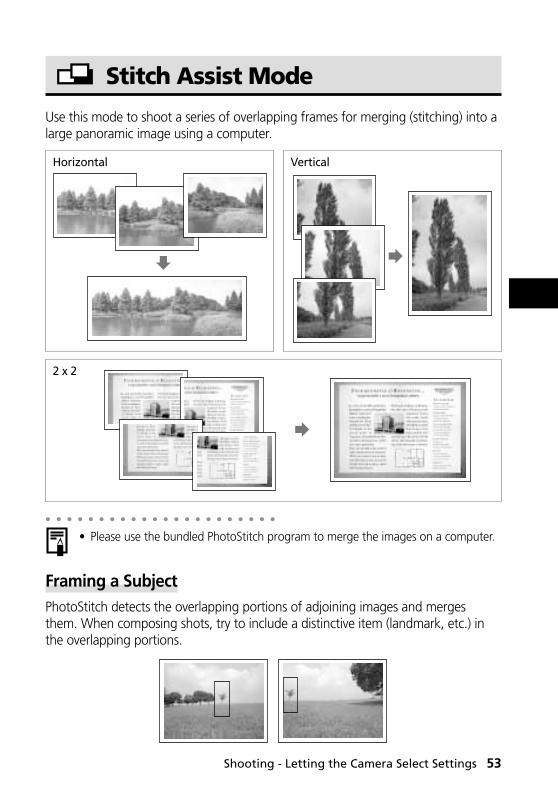
Stitch Assist Mode
Use this mode to shoot a series of overlapping frames for merging (stitching) into alarge panoramic image using a computer.
○ ○ ○ ○ ○ ○ ○ ○ ○ ○ ○ ○ ○ ○ ○ ○ ○ ○ ○ ○ ○ ○
• Please use the bundled PhotoStitch program to merge the images on a computer.
Framing a SubjectPhotoStitch detects the overlapping portions of adjoining images and mergesthem. When composing shots, try to include a distinctive item (landmark, etc.) inthe overlapping portions.
Horizontal Vertical
2 x 2
54 Shooting - Letting the Camera Select Settings
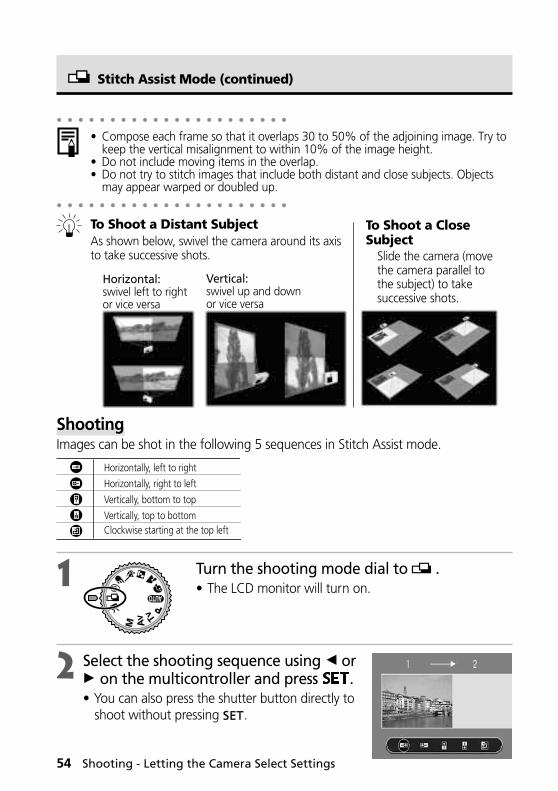
ShootingImages can be shot in the following 5 sequences in Stitch Assist mode.
1 Turn the shooting mode dial to .• The LCD monitor will turn on.
2 Select the shooting sequence using B orA on the multicontroller and press .• You can also press the shutter button directly to
shoot without pressing .
Horizontally, left to right
Horizontally, right to left
Vertically, bottom to top
Vertically, top to bottomClockwise starting at the top left
Horizontal:swivel left to rightor vice versa
Vertical:swivel up and downor vice versa
To Shoot a CloseSubject
Slide the camera (movethe camera parallel tothe subject) to takesuccessive shots.
Stitch Assist Mode (continued)
○ ○ ○ ○ ○ ○ ○ ○ ○ ○ ○ ○ ○ ○ ○ ○ ○ ○ ○ ○ ○ ○
• Compose each frame so that it overlaps 30 to 50% of the adjoining image. Try tokeep the vertical misalignment to within 10% of the image height.
• Do not include moving items in the overlap.• Do not try to stitch images that include both distant and close subjects. Objects
may appear warped or doubled up.○ ○ ○ ○ ○ ○ ○ ○ ○ ○ ○ ○ ○ ○ ○ ○ ○ ○ ○ ○ ○ ○
To Shoot a Distant SubjectAs shown below, swivel the camera around its axisto take successive shots.
Shooting - Letting the Camera Select Settings 55
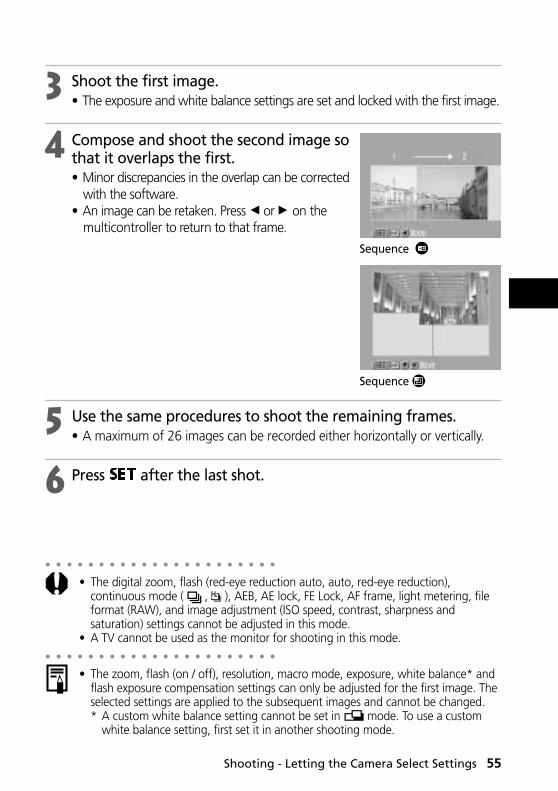
3 Shoot the first image.• The exposure and white balance settings are set and locked with the first image.
4 Compose and shoot the second image sothat it overlaps the first.• Minor discrepancies in the overlap can be corrected
with the software.• An image can be retaken. Press B or A on the
multicontroller to return to that frame.
5 Use the same procedures to shoot the remaining frames.• A maximum of 26 images can be recorded either horizontally or vertically.
6 Press after the last shot.
○ ○ ○ ○ ○ ○ ○ ○ ○ ○ ○ ○ ○ ○ ○ ○ ○ ○ ○ ○ ○ ○
• The digital zoom, flash (red-eye reduction auto, auto, red-eye reduction),continuous mode ( , ), AEB, AE lock, FE Lock, AF frame, light metering, fileformat (RAW), and image adjustment (ISO speed, contrast, sharpness andsaturation) settings cannot be adjusted in this mode.
• A TV cannot be used as the monitor for shooting in this mode.○ ○ ○ ○ ○ ○ ○ ○ ○ ○ ○ ○ ○ ○ ○ ○ ○ ○ ○ ○ ○ ○
• The zoom, flash (on / off), resolution, macro mode, exposure, white balance* andflash exposure compensation settings can only be adjusted for the first image. Theselected settings are applied to the subsequent images and cannot be changed.* A custom white balance setting cannot be set in mode. To use a custom
white balance setting, first set it in another shooting mode.
Sequence
Sequence
56 Shooting - Letting the Camera Select Settings
Movie Mode
Use this mode to shoot movie frames. The resolution can be set to 320 x 240pixels (default setting) or 160 x 120 pixels in [Resolution] of the [ (Rec.)] menu(p. 61).
1 Turn the shooting mode dial to .• The LCD monitor turns on and displays the maximum
recording time (in seconds).
2 Press the shutter button all the way.• Shooting and sound recording starts simultaneously.• During the shooting a red circle appears in the upper right of the LCD monitor.
3 Press the shutter button all the way to stop recording the movie.• The maximum length of individual movie clips (approximately 15 frames/
second) is about 30 seconds* at the (320 × 240) setting and about 120seconds* at the (160 × 120) setting. The clip will end automatically after thistime elapses or when the CF card becomes full.* The data reflects standard Canon testing conditions. The actual figures will vary according to the
shooting objects and conditions.
○ ○ ○ ○ ○ ○ ○ ○ ○ ○ ○ ○ ○ ○ ○ ○ ○ ○ ○ ○ ○ ○
• Be careful not to touch the microphone while shooting.• The AE, AF, white balance and zoom settings are set and locked to the settings of
the first frame.• If the indicator on the left side of the viewfinder flashes green after a shot, this
indicates that the movie is being written to the CF card. You cannot shoot againuntil it stops flashing.
• The digital zoom, flash, continuous mode, AEB, flash exposure compensation, AElock, FE Lock, light metering, AF mode (single), compression, file format (RAW),and image adjustment (ISO speed, contrast, sharpness and saturation) settingscannot be adjusted in this mode.
○ ○ ○ ○ ○ ○ ○ ○ ○ ○ ○ ○ ○ ○ ○ ○ ○ ○ ○ ○ ○ ○
• Sound is recorded monaurally.• There is no shutter sound in movie mode.
○ ○ ○ ○ ○ ○ ○ ○ ○ ○ ○ ○ ○ ○ ○ ○ ○ ○ ○ ○ ○ ○
• QuickTime 3.0 or higher is required to replay movie files (AVI / Motion JPEG) on acomputer.

Shooting - Letting the Camera Select Settings 57
Macro Mode
Use the macro mode to shoot close-ups of subjects in the range of 10 to 80 cm(3.9 in. to 2.7 ft.) at maximum wide angle and 30 to 80 cm (1.0 ft. to 2.7 ft.) atmaximum telephoto.
1 Press the button to turn the LCD monitor on.
2 Press the button.• The icon appears on the LCD monitor.• Press the button again to cancel the macro
mode.
3 Shoot the image.• The indicator beside the viewfinder will shine yellow when the shutter
button is pressed halfway.• Shooting procedures are the same as for the Auto Mode (p. 44).
○ ○ ○ ○ ○ ○ ○ ○ ○ ○ ○ ○ ○ ○ ○ ○ ○ ○ ○ ○ ○ ○
• The macro mode cannot be selected in the and shooting modes.
○ ○ ○ ○ ○ ○ ○ ○ ○ ○ ○ ○ ○ ○ ○ ○ ○ ○ ○ ○ ○ ○
• Always use the LCD monitor to compose images in macro mode. Shooting withthe viewfinder is possible, though, the parallax phenomenon (p. 36) may causeimages composed with the optical viewfinder to be off-center.
• When the lens is zoomed out to the maximum wide angle, the recordable area isapproximately 108 × 80 mm (4.25 in. × 3.15 in.) at the closest focal distance, andat maximum telephoto, it is approximately 111 × 83 mm (4.37 in. × 3.27 in.).
• Use of the built-in flash may not provide an appropriate amount of light.• Turning the camera off cancels the setting.
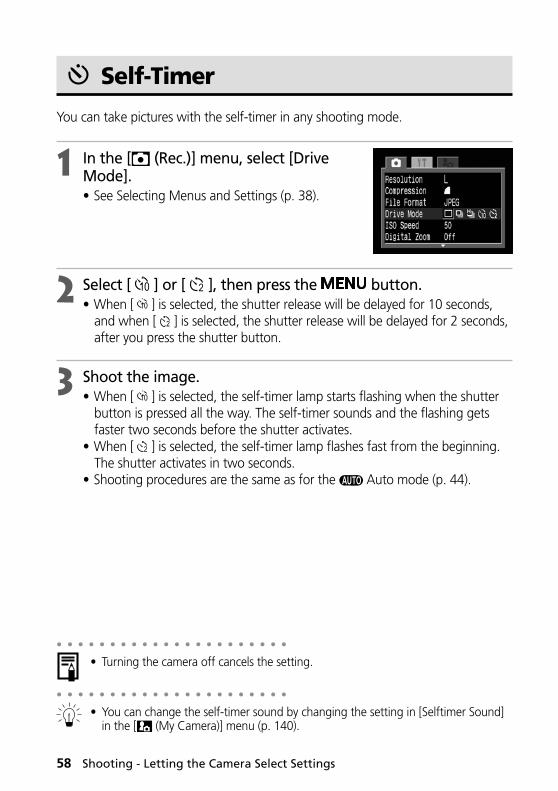
58 Shooting - Letting the Camera Select Settings
Self-Timer
You can take pictures with the self-timer in any shooting mode.
1 In the [ (Rec.)] menu, select [DriveMode].• See Selecting Menus and Settings (p. 38).
2 Select [ ] or [ ], then press the button.• When [ ] is selected, the shutter release will be delayed for 10 seconds,
and when [ ] is selected, the shutter release will be delayed for 2 seconds,after you press the shutter button.
3 Shoot the image.• When [ ] is selected, the self-timer lamp starts flashing when the shutter
button is pressed all the way. The self-timer sounds and the flashing getsfaster two seconds before the shutter activates.
• When [ ] is selected, the self-timer lamp flashes fast from the beginning.The shutter activates in two seconds.
• Shooting procedures are the same as for the Auto mode (p. 44).
○ ○ ○ ○ ○ ○ ○ ○ ○ ○ ○ ○ ○ ○ ○ ○ ○ ○ ○ ○ ○ ○
• Turning the camera off cancels the setting.
○ ○ ○ ○ ○ ○ ○ ○ ○ ○ ○ ○ ○ ○ ○ ○ ○ ○ ○ ○ ○ ○
• You can change the self-timer sound by changing the setting in [Selftimer Sound]in the [ (My Camera)] menu (p. 140).
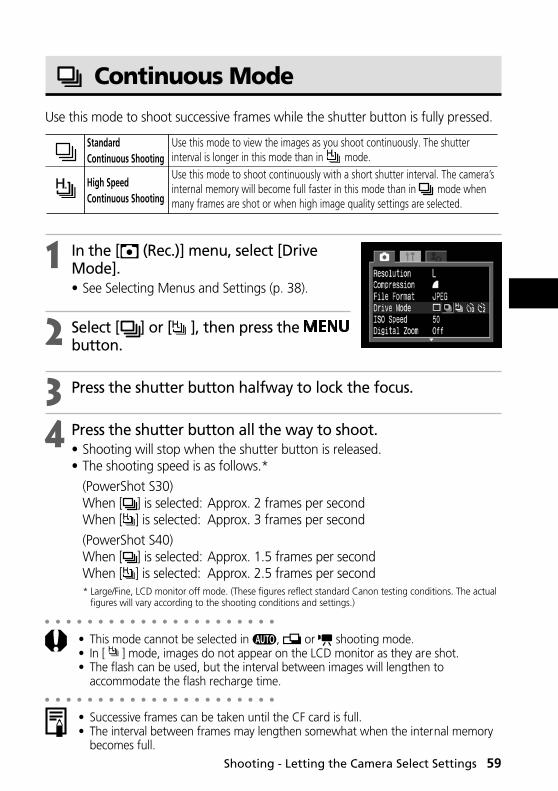
Shooting - Letting the Camera Select Settings 59
Continuous Mode
Use this mode to shoot successive frames while the shutter button is fully pressed.
1 In the [ (Rec.)] menu, select [DriveMode].• See Selecting Menus and Settings (p. 38).
2 Select [ ] or [ ], then press the button.
3 Press the shutter button halfway to lock the focus.
4 Press the shutter button all the way to shoot.• Shooting will stop when the shutter button is released.• The shooting speed is as follows.*
(PowerShot S30)When [ ] is selected: Approx. 2 frames per secondWhen [ ] is selected: Approx. 3 frames per second
(PowerShot S40)When [ ] is selected: Approx. 1.5 frames per secondWhen [ ] is selected: Approx. 2.5 frames per second* Large/Fine, LCD monitor off mode. (These figures reflect standard Canon testing conditions. The actual
figures will vary according to the shooting conditions and settings.)
○ ○ ○ ○ ○ ○ ○ ○ ○ ○ ○ ○ ○ ○ ○ ○ ○ ○ ○ ○ ○ ○
• This mode cannot be selected in , or shooting mode.• In [ ] mode, images do not appear on the LCD monitor as they are shot.• The flash can be used, but the interval between images will lengthen to
accommodate the flash recharge time.○ ○ ○ ○ ○ ○ ○ ○ ○ ○ ○ ○ ○ ○ ○ ○ ○ ○ ○ ○ ○ ○
• Successive frames can be taken until the CF card is full.• The interval between frames may lengthen somewhat when the internal memory
becomes full.
StandardContinuous Shooting
High Speed Continuous Shooting
Use this mode to view the images as you shoot continuously. The shutter interval is longer in this mode than in mode.Use this mode to shoot continuously with a short shutter interval. The camera’sinternal memory will become full faster in this mode than in mode when many frames are shot or when high image quality settings are selected.

60 Shooting - Letting the Camera Select Settings
Digital Zoom
With the combined optical and digital zoom functions, images can bezoomed as follows.PowerShot S30: 3.8 times, 4.8 times, 6.0 times, 7.4 times, and 10 timesPowerShot S40: 4.3 times, 5.3 times, 6.7 times, 8.2 times, and 11 times
1 Press the button to turn the LCD monitor on.
2 Turn the shooting mode dial to any shooting mode except for or .
3 In the [ (Rec.)] menu, select [DigitalZoom].• See Selecting Menus and Settings (p. 38).
4 Select [On] and press the button.
5 Slide the zoom lever toward and holdit.• The lens will zoom to the maximum optical
telephoto setting and stop. Release the lever andslide it toward again to further zoom theimage digitally.
• Slide the lever toward to zoom back out.
6 Shoot the image.• Shooting procedures are the same as for the
Auto mode (p. 44).○ ○ ○ ○ ○ ○ ○ ○ ○ ○ ○ ○ ○ ○ ○ ○ ○ ○ ○ ○ ○ ○
• This mode cannot be selected in the and shooting modes or for the RAWfile format.
• Images become coarser the more they are digitally zoomed.• The digital zoom On/Off setting is memorized even when the camera power is
turned off so you can skip steps 3 and 4 if you wish to use the same option thenext time.
The combinedmagnificationsof the opticalzoom anddigital zoomare displayed.
e.g. PowerShot S40
x4.3

Shooting - Selecting Particular Effects 61
Camera settings such as image resolution and compression, shutter speed andaperture can be freely changed for shooting.○ ○ ○ ○ ○ ○ ○ ○ ○ ○ ○ ○ ○ ○ ○ ○ ○ ○ ○ ○ ○ ○
• Please see Auto Mode (p. 44) for shooting procedures once you havechanged a setting.
Changing the Resolution and Compression
You can change the resolution and compression (excluding movies) settings to suitthe purpose of the image you are about to shoot. The resolution gets higher in theorder S (Small), M2 (Medium 2), M1 (Medium 1), and L (Large). Use a higherresolution if you wish to make a large print. Conversely, use a lower resolution ifyou wish to print on small objects, such as labels, to send images electronically, orto fit more images on a CF card.The compression gets higher in the order (Superfine), (Fine) and (Normal).Select (Superfine) for a higher quality image, or (Normal) if you wish to fit moreimages on a CF card. The (Fine) setting provides adequate quality for standardshots. To record the CCD output without compression, select the RAW file format(p. 64).
L (Large)M1 (Medium 1)M2 (Medium 2)S (Small)
PowerShot S30 PowerShot S40 2048 x 1536 pixels 2272 x 1704 pixels
1600 x 1200 pixels1024 x 768 pixels640 x 480 pixels
Resolution (excluding ) Resolution ( )320 x 240 pixels160 x 120 pixels
SuperfineFineNormal
Compression (excluding )
• Common to PowerShot S30 and PowerShot S40
Shooting - Selecting Particular Effects

62 Shooting - Selecting Particular Effects
* This figure reflects standard shooting conditions established by Canon. Actual figures may vary according tothe subject and shooting conditions.
* Please see the list of CF cards and their approximate capacities (p. 22).
Approximate File Size for One Image
PowerShot S30
L (2048 x 1536)M1 (1600 x 1200)M2 (1024 x 768)S (640 x 480)RAW (2048 x 1536)
(320 x 240)(160 x 120)
PowerShot S40
L (2272 x 1704)M1 (1600 x 1200)M2 (1024 x 768)S (640 x 480)RAW (2272 x 1704)
(320 x 240)(160 x 120)
Unit : KB
Unit : KB / sec.
Unit : KB
Unit : KB / sec.
16021002
570249
24060
24060
893558320150
2469
445278170
84
1116558320150
2862
556278170
84
20021002
570249
Changing the Resolution and Compression (continued)
1 Turn the shooting mode dial to the desired shooting mode.
2 In the [ (Rec.)] menu, select [Resolution] or [Compression].• See Selecting Menus and Settings (p. 38).
3 Select a resolution or compression setting and press the button.
4 Shoot the image.
Resolution (excluding ) Compression
e.g. PowerShot S40
The number ofrecordableimages(only displayedwhen theresolution,compression orfile format ischanged)

Shooting - Selecting Particular Effects 63
○ ○ ○ ○ ○ ○ ○ ○ ○ ○ ○ ○ ○ ○ ○ ○ ○ ○ ○ ○ ○ ○
• In mode, the resolution can be set for the first frame only.• The resolution and compression settings are affected by the shooting mode
selection as follows (only the resolution in mode).
• The resolution and compression settings are memorized even when the camerapower is turned off.
Initial Shooting Mode
Next Shooting Mode Resolution and Compression after Change
Settings change to those of the next mode
Settings do not change
Settings change to those of the next mode
Settings do not change
Settings change to those of the next mode
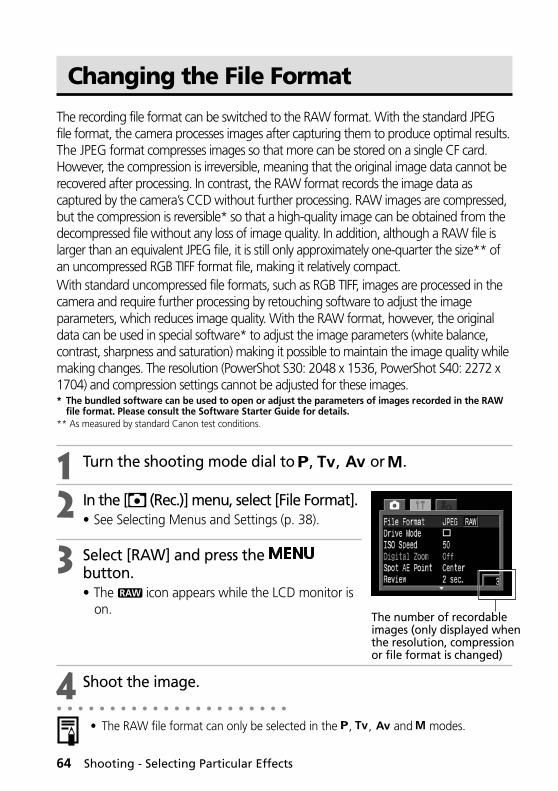
64 Shooting - Selecting Particular Effects
Changing the File Format
The recording file format can be switched to the RAW format. With the standard JPEGfile format, the camera processes images after capturing them to produce optimal results.The JPEG format compresses images so that more can be stored on a single CF card.However, the compression is irreversible, meaning that the original image data cannot berecovered after processing. In contrast, the RAW format records the image data ascaptured by the camera’s CCD without further processing. RAW images are compressed,but the compression is reversible* so that a high-quality image can be obtained from thedecompressed file without any loss of image quality. In addition, although a RAW file islarger than an equivalent JPEG file, it is still only approximately one-quarter the size** ofan uncompressed RGB TIFF format file, making it relatively compact.With standard uncompressed file formats, such as RGB TIFF, images are processed in thecamera and require further processing by retouching software to adjust the imageparameters, which reduces image quality. With the RAW format, however, the originaldata can be used in special software* to adjust the image parameters (white balance,contrast, sharpness and saturation) making it possible to maintain the image quality whilemaking changes. The resolution (PowerShot S30: 2048 x 1536, PowerShot S40: 2272 x1704) and compression settings cannot be adjusted for these images.* The bundled software can be used to open or adjust the parameters of images recorded in the RAW
file format. Please consult the Software Starter Guide for details.** As measured by standard Canon test conditions.
1 Turn the shooting mode dial to , , or .
2 In the [ (Rec.)] menu, select [File Format].• See Selecting Menus and Settings (p. 38).
3 Select [RAW] and press the button.• The icon appears while the LCD monitor is
on.
4 Shoot the image.○ ○ ○ ○ ○ ○ ○ ○ ○ ○ ○ ○ ○ ○ ○ ○ ○ ○ ○ ○ ○ ○
• The RAW file format can only be selected in the , , and modes.
The number of recordableimages (only displayed whenthe resolution, compressionor file format is changed)
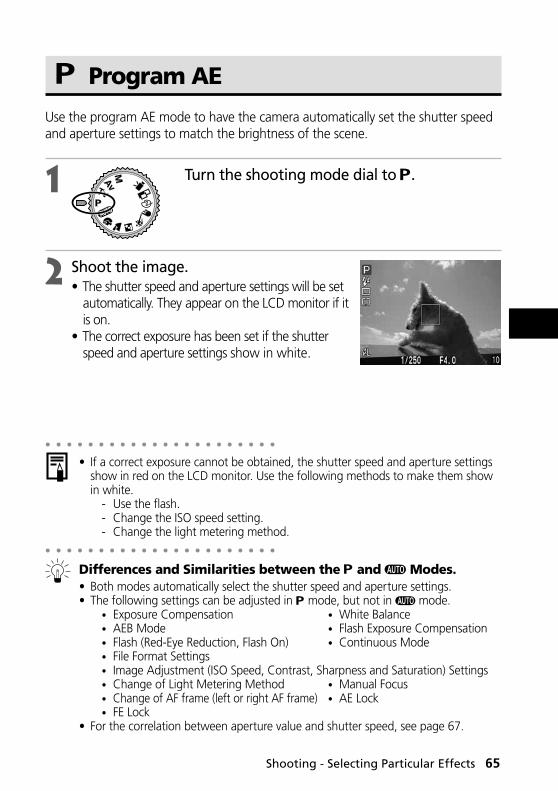
Shooting - Selecting Particular Effects 65
Program AE
Use the program AE mode to have the camera automatically set the shutter speedand aperture settings to match the brightness of the scene.
1 Turn the shooting mode dial to .
2 Shoot the image.• The shutter speed and aperture settings will be set
automatically. They appear on the LCD monitor if itis on.
• The correct exposure has been set if the shutterspeed and aperture settings show in white.
○ ○ ○ ○ ○ ○ ○ ○ ○ ○ ○ ○ ○ ○ ○ ○ ○ ○ ○ ○ ○ ○
• If a correct exposure cannot be obtained, the shutter speed and aperture settingsshow in red on the LCD monitor. Use the following methods to make them showin white.
- Use the flash.- Change the ISO speed setting.- Change the light metering method.
○ ○ ○ ○ ○ ○ ○ ○ ○ ○ ○ ○ ○ ○ ○ ○ ○ ○ ○ ○ ○ ○
Differences and Similarities between the and Modes.• Both modes automatically select the shutter speed and aperture settings.• The following settings can be adjusted in mode, but not in mode.
• Exposure Compensation • White Balance• AEB Mode • Flash Exposure Compensation• Flash (Red-Eye Reduction, Flash On) • Continuous Mode• File Format Settings• Image Adjustment (ISO Speed, Contrast, Sharpness and Saturation) Settings• Change of Light Metering Method • Manual Focus• Change of AF frame (left or right AF frame) • AE Lock• FE Lock
• For the correlation between aperture value and shutter speed, see page 67.
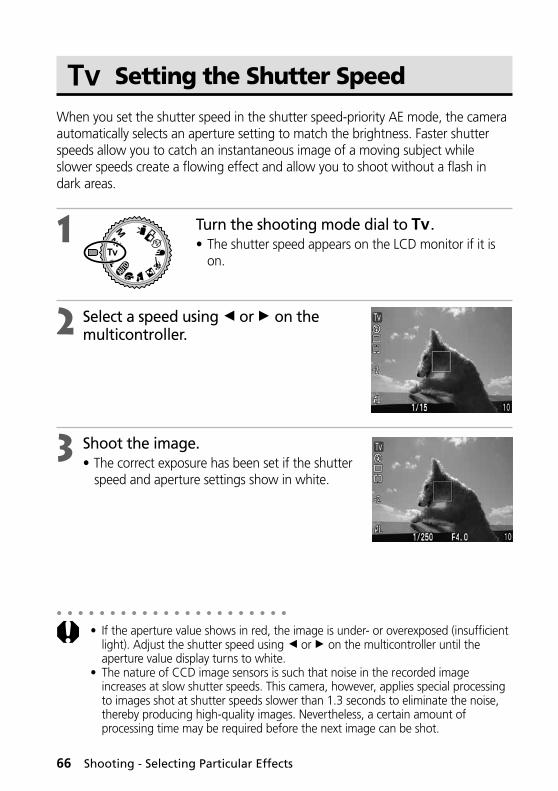
66 Shooting - Selecting Particular Effects
○ ○ ○ ○ ○ ○ ○ ○ ○ ○ ○ ○ ○ ○ ○ ○ ○ ○ ○ ○ ○ ○
• If the aperture value shows in red, the image is under- or overexposed (insufficientlight). Adjust the shutter speed using B or A on the multicontroller until theaperture value display turns to white.
• The nature of CCD image sensors is such that noise in the recorded imageincreases at slow shutter speeds. This camera, however, applies special processingto images shot at shutter speeds slower than 1.3 seconds to eliminate the noise,thereby producing high-quality images. Nevertheless, a certain amount ofprocessing time may be required before the next image can be shot.
Setting the Shutter Speed
When you set the shutter speed in the shutter speed-priority AE mode, the cameraautomatically selects an aperture setting to match the brightness. Faster shutterspeeds allow you to catch an instantaneous image of a moving subject whileslower speeds create a flowing effect and allow you to shoot without a flash indark areas.
1 Turn the shooting mode dial to .• The shutter speed appears on the LCD monitor if it is
on.
2 Select a speed using B or A on themulticontroller.
3 Shoot the image.• The correct exposure has been set if the shutter
speed and aperture settings show in white.
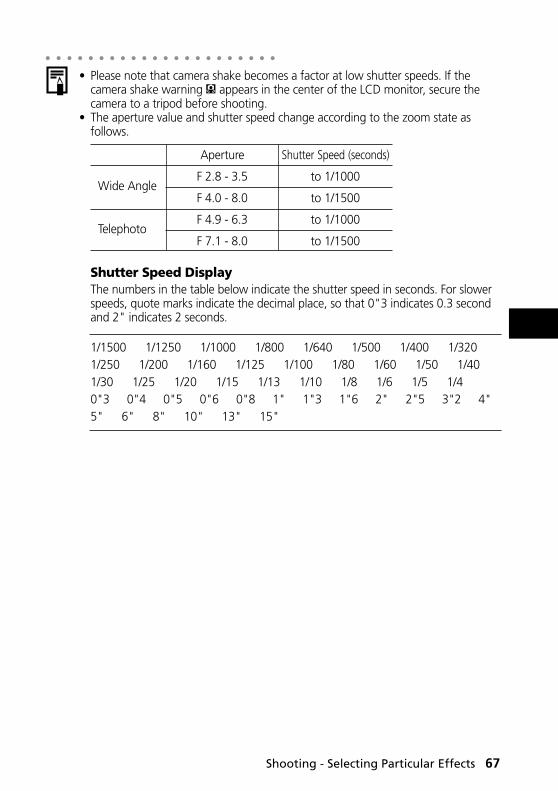
Shooting - Selecting Particular Effects 67
○ ○ ○ ○ ○ ○ ○ ○ ○ ○ ○ ○ ○ ○ ○ ○ ○ ○ ○ ○ ○ ○
• Please note that camera shake becomes a factor at low shutter speeds. If thecamera shake warning appears in the center of the LCD monitor, secure thecamera to a tripod before shooting.
• The aperture value and shutter speed change according to the zoom state asfollows.
Aperture Shutter Speed (seconds)
Wide AngleF 2.8 - 3.5 to 1/1000
F 4.0 - 8.0 to 1/1500
TelephotoF 4.9 - 6.3 to 1/1000
F 7.1 - 8.0 to 1/1500
Shutter Speed DisplayThe numbers in the table below indicate the shutter speed in seconds. For slowerspeeds, quote marks indicate the decimal place, so that 0"3 indicates 0.3 secondand 2" indicates 2 seconds.
1/1500 1/1250 1/1000 1/800 1/640 1/500 1/400 1/3201/250 1/200 1/160 1/125 1/100 1/80 1/60 1/50 1/401/30 1/25 1/20 1/15 1/13 1/10 1/8 1/6 1/5 1/40"3 0"4 0"5 0"6 0"8 1" 1"3 1"6 2" 2"5 3"2 4"5" 6" 8" 10" 13" 15"

68 Shooting - Selecting Particular Effects
Setting the Aperture
When you set the aperture in the aperture-priority AE mode, the cameraautomatically selects a shutter speed to match the brightness. Selecting a loweraperture value (opening the aperture) allows you to fade the background andcreate a beautiful portrait. A higher aperture value (closing it) brings the entirerange from foreground to background into focus. The larger the aperture value,the greater the range of the image brought into clear focus.
1 Turn the shooting mode dial to .• The aperture setting appears on the LCD monitor if it is
on.
2 Select a value using B or A on themulticontroller.
3 Shoot the image.• The correct exposure has been set if the shutter
speed and aperture settings show in white.
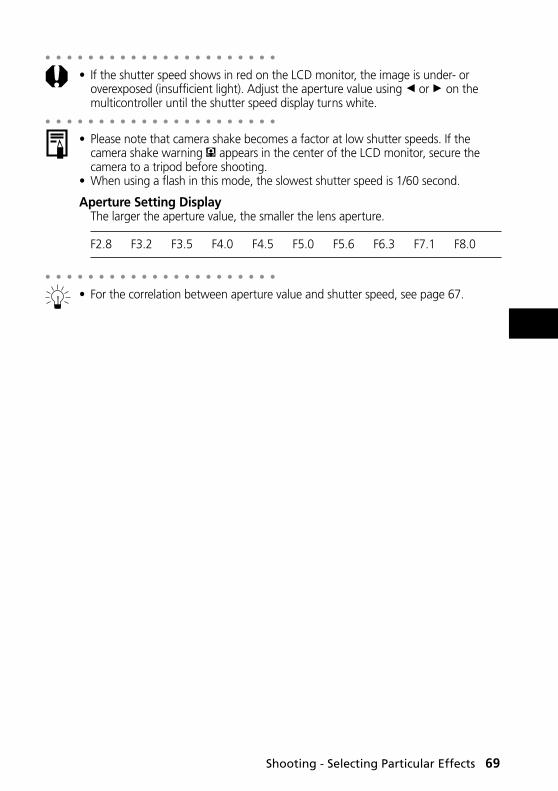
Shooting - Selecting Particular Effects 69
○ ○ ○ ○ ○ ○ ○ ○ ○ ○ ○ ○ ○ ○ ○ ○ ○ ○ ○ ○ ○ ○
• If the shutter speed shows in red on the LCD monitor, the image is under- oroverexposed (insufficient light). Adjust the aperture value using B or A on themulticontroller until the shutter speed display turns white.
○ ○ ○ ○ ○ ○ ○ ○ ○ ○ ○ ○ ○ ○ ○ ○ ○ ○ ○ ○ ○ ○
• Please note that camera shake becomes a factor at low shutter speeds. If thecamera shake warning appears in the center of the LCD monitor, secure thecamera to a tripod before shooting.
• When using a flash in this mode, the slowest shutter speed is 1/60 second.
Aperture Setting DisplayThe larger the aperture value, the smaller the lens aperture.
F2.8 F3.2 F3.5 F4.0 F4.5 F5.0 F5.6 F6.3 F7.1 F8.0
○ ○ ○ ○ ○ ○ ○ ○ ○ ○ ○ ○ ○ ○ ○ ○ ○ ○ ○ ○ ○ ○
• For the correlation between aperture value and shutter speed, see page 67.

70 Shooting - Selecting Particular Effects
Manually Setting the Shutter Speed and Aperture
You can manually set the shutter speed and aperture to achieve a particular effect.This is convenient for shooting fireworks and other images where it is difficult toset the correct exposure automatically.
1 Turn the shooting mode dial to .• The shutter speed and aperture settings appears on the
LCD monitor if it is on.
2 Select a shutter speed using B or A onthe multicontroller.
3 Select an aperture setting using C or Don the multicontroller.
4 Shoot the image.• When you press the shutter button halfway, a number indicating the
difference between the standard exposure* and the selected exposureappears on the LCD monitor. If the difference is more than ±2 steps, “-2”or “+2” appears in red.* The standard exposure is calculated by the AE function according to the selected metering method.
○ ○ ○ ○ ○ ○ ○ ○ ○ ○ ○ ○ ○ ○ ○ ○ ○ ○ ○ ○ ○ ○
• The exposure compensation, AE lock, FE lock, flash exposure compensation, AEBand ISO speed (AUTO) settings cannot be adjusted in this mode.
○ ○ ○ ○ ○ ○ ○ ○ ○ ○ ○ ○ ○ ○ ○ ○ ○ ○ ○ ○ ○ ○
• If you wish to change the exposure, adjust the shutter speed using B or A on themulticontroller, or adjust the aperture using C or D on the multicontroller.
• When you select a fast shutter speed or shoot a subject in a dark place, set theflash to (Red-Eye Reduction, Flash On) or (Flash On) so that the LCD monitordoes not darken and you can check the image before shooting.
○ ○ ○ ○ ○ ○ ○ ○ ○ ○ ○ ○ ○ ○ ○ ○ ○ ○ ○ ○ ○ ○
• For the correlation between aperture value and shutter speed, see page 67.

Shooting - Selecting Particular Effects 71
Selecting an AF Frame
The AF frame indicates the area of the composition on which the camera focuses.You can set the AF frame in the following way.
1 Press .• The three frames appear on the LCD monitor.
2 Select the AF frame using B or A on themulticontroller.• The selected frame appears green.
3 Press .• You can immediately shoot the image using the selected AF frame by
pressing the shutter button instead of pressing .
4 Shoot the image.
○ ○ ○ ○ ○ ○ ○ ○ ○ ○ ○ ○ ○ ○ ○ ○ ○ ○ ○ ○ ○ ○
Shooting Modes and Selectable AF Frames
The camera automatically selects the AF frame to focus according to the shooting conditions.Manually select one of the three AF frames. This is convenient for focusing accurately on an off-center subject to obtain the composition you desire.
Auto Selection (AiAF)
ManualSelection
indicates the selected AF frame which appears green on the LCD monitor.
P Tv Av M
*
* In the macro modes, the AF frame always set to “ ”.• The camera resumes the auto selection mode after you turn off the camera.
Shooting Mode AF Frames

72 Shooting - Selecting Particular Effects
Selecting an AF Frame (continued)
○ ○ ○ ○ ○ ○ ○ ○ ○ ○ ○ ○ ○ ○ ○ ○ ○ ○ ○ ○ ○ ○
• If any particular AF frame is selected, it is recommended that you use the LCDmonitor to check the AF frame while shooting.
• When the Spot AE Point is selected as the light metering method, you can use theselected AF frame as the Spot AE Point (p. 82).
• For an explanation of the AF frame colors, please refer to page 34.• If the shooting mode is changed, the AF frame may also change depending on the
shooting mode. See the table below.
○ ○ ○ ○ ○ ○ ○ ○ ○ ○ ○ ○ ○ ○ ○ ○ ○ ○ ○ ○ ○ ○
• AiAF* has a wide range of measuring for accurate focusing. AiAF focuses on theobject even if it is not exactly at the center area.* “Ai” stands for “Artificial intelligence” and “AF” stands for “Auto Focus.”
Initial Shooting Mode AF frames after changeNext Shooting Mode
No change
P Tv Av M
P Tv Av M P Tv Av M
P Tv Av M

Shooting - Selecting Particular Effects 73
Adjusting the Exposure Compensation
Adjust the exposure compensation setting to avoid making the subject too darkwhen it is backlit or shot against a bright background.
1 Press the button once.• The icon and exposure compensation bar will
appear on the LCD monitor if it is on.
2 Select a setting using B or A on the multicontroller.• The settings can be adjusted in 1/3 steps in the range of -2EV to +2EV.
3 Press .• You can also take the picture with the set exposure compensation value by
pressing the shutter button without pressing .• To cancel the exposure compensation, return the setting to using B or A
on the multicontroller.
4 Shoot the image.• If you pressed the shutter button at Step 3, the exposure compensation bar
will reappear after the shot, allowing you to change the setting for the nextshot.
○ ○ ○ ○ ○ ○ ○ ○ ○ ○ ○ ○ ○ ○ ○ ○ ○ ○ ○ ○ ○ ○
• This setting cannot be adjusted in the and shooting modes. In mode, itcan only be adjusted for the first image.
• The macro mode cannot be set while the exposure compensation bar appears onthe LCD monitor.
○ ○ ○ ○ ○ ○ ○ ○ ○ ○ ○ ○ ○ ○ ○ ○ ○ ○ ○ ○ ○ ○
• The selected shooting mode will determine whether or not the exposurecompensation setting is cancelled when the camera is turned off (p. 90).

74 Shooting - Selecting Particular Effects
Setting the White Balance
When the white balance mode is set to match the light source, the camera canreproduce colors more accurately. Set the white balance mode to a natural orartificial light setting according to the circumstances.
1 Press the button twice.• The balance setting menu appears on the LCD
monitor.
2 Select a setting using B or A on themulticontroller.• Please see the next page regarding the custom setting.
3 Press .• You can also take the picture in the set white balance mode by pressing the
shutter button without pressing .
4 Shoot the image.• If you pressed the shutter button at Step 3, the current white balance mode will
reappear after the shot, allowing you to change the setting for the next shot.○ ○ ○ ○ ○ ○ ○ ○ ○ ○ ○ ○ ○ ○ ○ ○ ○ ○ ○ ○ ○ ○
• This setting cannot be adjusted in the and (Sepia and B/W) shootingmodes. In mode, it can only be adjusted for the first image.
• The metering mode (p. 82) cannot be changed and the macro mode cannot be setwhile the white balance setting menu appears on the LCD monitor.
○ ○ ○ ○ ○ ○ ○ ○ ○ ○ ○ ○ ○ ○ ○ ○ ○ ○ ○ ○ ○ ○
• The selected shooting mode will determine whether or not the white balancesetting is cancelled when the camera is turned off (p. 90).
AutoDaylightCloudyTungstenFluorescentFluorescent HFlash
Custom
Settings are automatically set by the cameraFor recording outdoors on a bright dayFor recording under overcast, shady or twilight skiesFor recording under tungsten and bulb-type 3-wavelength fluorescent lightingFor recording under warm-white, cool-white or warm-white (3-wavelength) fluorescent lightingFor recording under daylight fluorescent, or daylight fluorescent-type 3-wavelength fluorescent lightingFor flash photographyFor setting a custom value with a white sheet of paper, etc., to obtain the optimal white balance for the conditions

Shooting - Selecting Particular Effects 75
Setting a Custom White BalanceYou can set a custom white balance to obtain the optimal setting for the shootingconditions by having the camera evaluate a subject such as a white piece of paperor cloth, or a photo-quality gray card.
1 Press the button twice.• The WB setting menu appears on the LCD monitor if it is on.
2 Select using B or A on themulticontroller.
3 Aim the camera at the white paper orcloth, or gray card and press the button.• Aim the camera so that the white paper or cloth,
or gray card, completely fills the frame on theLCD monitor screen or the entire viewfinderbefore pressing the button. When you pressthe button, the camera reads the whitebalance data.
4 Press .• You can also take the picture with the white balance set to the selected
value by pressing the shutter button without pressing .
5 Shoot the image.• If you pressed the shutter button at Step 4, the white balance mode will
reappear after the shot, allowing you to change the setting for the nextshot.

76 Shooting - Selecting Particular Effects
Setting the White Balance (continued)
○ ○ ○ ○ ○ ○ ○ ○ ○ ○ ○ ○ ○ ○ ○ ○ ○ ○ ○ ○ ○ ○
• To set and use a custom white balance setting, it is advisable to select the shooting mode and set the exposure compensation and flash exposurecompensation to zero (±0). The correct white balance may not be obtained whenthe exposure is incorrect (image is completely black or white).
• It is also advisable to use the LCD monitor to compose the shot and to zoom in tothe maximum telephoto setting.
• Since the white balance data cannot be read in mode, preset the whitebalance in another shooting mode first before selecting mode.
• If the flash fires when setting a custom white balance with the flash set to red-eyereduction auto or auto, make sure you also use the flash when you go to shoot.The correct white balance cannot be obtained unless the flash is used consistently.To ensure consistency, set the flash to on or off as appropriate.
• The selected shooting mode will determine whether or not the custom whitebalance setting is cancelled when the camera is turned off.

Shooting - Selecting Particular Effects 77
Auto Exposure Bracketing (AEB Mode)
In this mode, the camera automatically changes the exposure within a set range to takethree shots after you press the shutter button once. You can adjust AEB settings in 1/3EVsteps within the range of -2EV to +2EV of the standard exposure setting. AEB settings canbe combined with exposure compensation settings (p. 73) to extend the adjustmentrange. The images are shot in the following order: Standard exposure,underexposure and overexposure.
1 Press the button threetimes.• The icon and the exposure compensation bar
appear on the LCD monitor.
2 Expand or contract the range using B orA on the multicontroller.• Use A to expand the range and B to contract it.
3 Press .• You can also take the picture with the set exposure compensation value by
pressing the shutter button without pressing .• To cancel the AEB setting, return the setting to using B or A on the
multicontroller.
4 Shoot the image.• If you pressed the shutter button at Step 3, the icon and the exposure
compensation bar will reappear after the shot, allowing you to change thesetting for the next shot.
○ ○ ○ ○ ○ ○ ○ ○ ○ ○ ○ ○ ○ ○ ○ ○ ○ ○ ○ ○ ○ ○
• The AEB mode cannot be used for flash photography. If the flash fires, only oneimage gets recorded.
• The macro mode cannot be set while the exposure compensation bar appears onthe LCD monitor.
○ ○ ○ ○ ○ ○ ○ ○ ○ ○ ○ ○ ○ ○ ○ ○ ○ ○ ○ ○ ○ ○
• This function can only be selected in the , and shooting modes.• The selected shooting mode will determine whether or not the AEB setting is
cancelled when the camera is turned off.
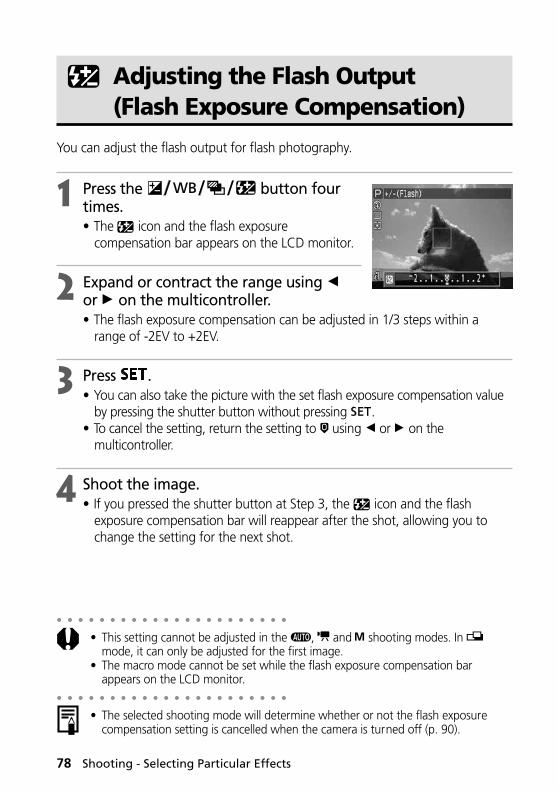
78 Shooting - Selecting Particular Effects
Adjusting the Flash Output(Flash Exposure Compensation)
You can adjust the flash output for flash photography.
1 Press the button fourtimes.• The icon and the flash exposure
compensation bar appears on the LCD monitor.
2 Expand or contract the range using Bor A on the multicontroller.• The flash exposure compensation can be adjusted in 1/3 steps within a
range of -2EV to +2EV.
3 Press .• You can also take the picture with the set flash exposure compensation value
by pressing the shutter button without pressing .• To cancel the setting, return the setting to using B or A on the
multicontroller.
4 Shoot the image.• If you pressed the shutter button at Step 3, the icon and the flash
exposure compensation bar will reappear after the shot, allowing you tochange the setting for the next shot.
○ ○ ○ ○ ○ ○ ○ ○ ○ ○ ○ ○ ○ ○ ○ ○ ○ ○ ○ ○ ○ ○
• This setting cannot be adjusted in the , and shooting modes. In mode, it can only be adjusted for the first image.
• The macro mode cannot be set while the flash exposure compensation barappears on the LCD monitor.
○ ○ ○ ○ ○ ○ ○ ○ ○ ○ ○ ○ ○ ○ ○ ○ ○ ○ ○ ○ ○ ○
• The selected shooting mode will determine whether or not the flash exposurecompensation setting is cancelled when the camera is turned off (p. 90).
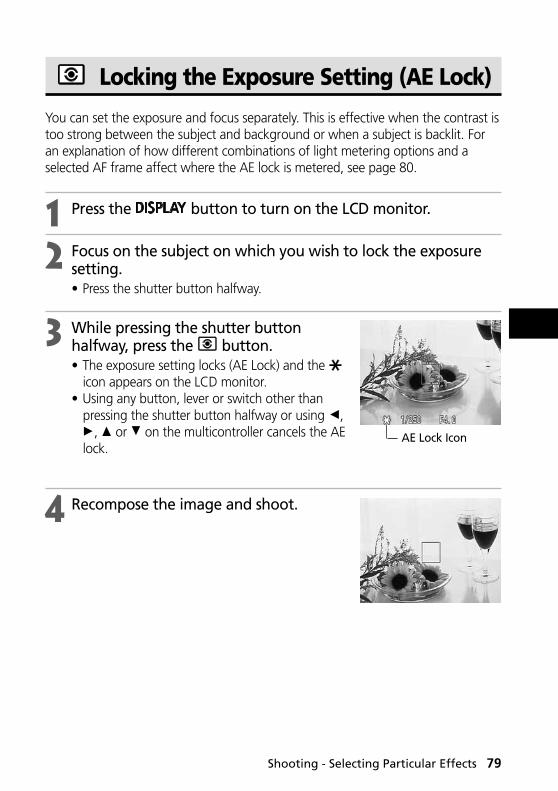
Shooting - Selecting Particular Effects 79
Locking the Exposure Setting (AE Lock)
You can set the exposure and focus separately. This is effective when the contrast istoo strong between the subject and background or when a subject is backlit. Foran explanation of how different combinations of light metering options and aselected AF frame affect where the AE lock is metered, see page 80.
1 Press the button to turn on the LCD monitor.
2 Focus on the subject on which you wish to lock the exposuresetting.• Press the shutter button halfway.
3 While pressing the shutter buttonhalfway, press the button.• The exposure setting locks (AE Lock) and the
icon appears on the LCD monitor.• Using any button, lever or switch other than
pressing the shutter button halfway or using B,A, C or D on the multicontroller cancels the AElock.
4 Recompose the image and shoot.
AE Lock Icon
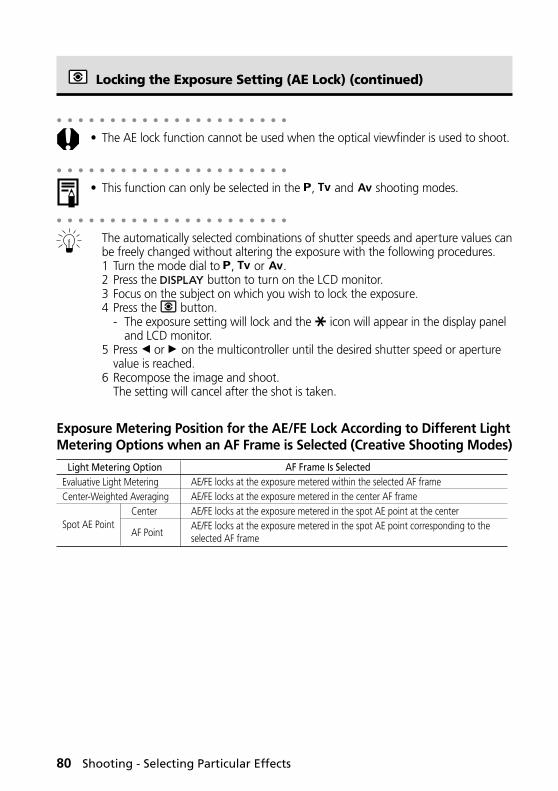
80 Shooting - Selecting Particular Effects
Locking the Exposure Setting (AE Lock) (continued)
○ ○ ○ ○ ○ ○ ○ ○ ○ ○ ○ ○ ○ ○ ○ ○ ○ ○ ○ ○ ○ ○
• The AE lock function cannot be used when the optical viewfinder is used to shoot.
○ ○ ○ ○ ○ ○ ○ ○ ○ ○ ○ ○ ○ ○ ○ ○ ○ ○ ○ ○ ○ ○
• This function can only be selected in the , and shooting modes.
○ ○ ○ ○ ○ ○ ○ ○ ○ ○ ○ ○ ○ ○ ○ ○ ○ ○ ○ ○ ○ ○
The automatically selected combinations of shutter speeds and aperture values canbe freely changed without altering the exposure with the following procedures.1 Turn the mode dial to , or .2 Press the button to turn on the LCD monitor.3 Focus on the subject on which you wish to lock the exposure.4 Press the button.
- The exposure setting will lock and the icon will appear in the display paneland LCD monitor.
5 Press B or A on the multicontroller until the desired shutter speed or aperturevalue is reached.
6 Recompose the image and shoot.The setting will cancel after the shot is taken.
Exposure Metering Position for the AE/FE Lock According to Different LightMetering Options when an AF Frame is Selected (Creative Shooting Modes)
Light Metering OptionEvaluative Light MeteringCenter-Weighted Averaging
Spot AE Point Center
AF Point
AF Frame Is SelectedAE/FE locks at the exposure metered within the selected AF frameAE/FE locks at the exposure metered in the center AF frameAE/FE locks at the exposure metered in the spot AE point at the center AE/FE locks at the exposure metered in the spot AE point corresponding to the selected AF frame
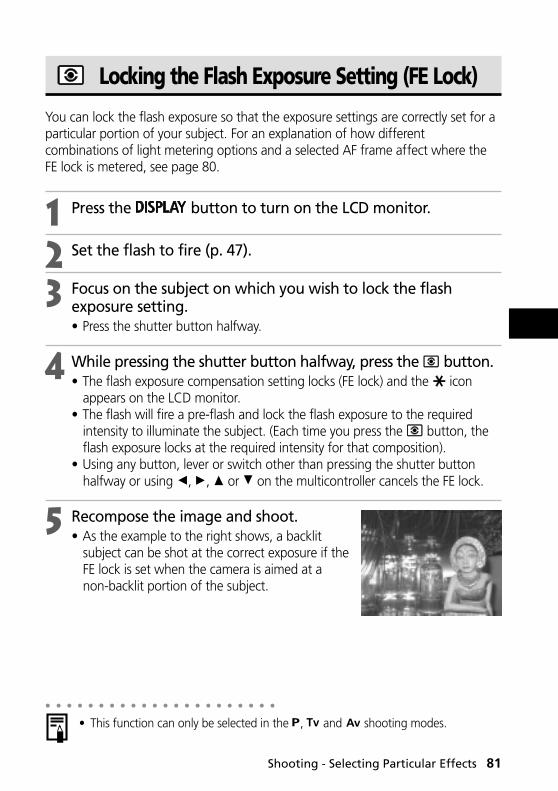
Shooting - Selecting Particular Effects 81
Locking the Flash Exposure Setting (FE Lock)
You can lock the flash exposure so that the exposure settings are correctly set for aparticular portion of your subject. For an explanation of how differentcombinations of light metering options and a selected AF frame affect where theFE lock is metered, see page 80.
1 Press the button to turn on the LCD monitor.
2 Set the flash to fire (p. 47).
3 Focus on the subject on which you wish to lock the flashexposure setting.• Press the shutter button halfway.
4 While pressing the shutter button halfway, press the button.• The flash exposure compensation setting locks (FE lock) and the icon
appears on the LCD monitor.• The flash will fire a pre-flash and lock the flash exposure to the required
intensity to illuminate the subject. (Each time you press the button, theflash exposure locks at the required intensity for that composition).
• Using any button, lever or switch other than pressing the shutter buttonhalfway or using B, A, C or D on the multicontroller cancels the FE lock.
5 Recompose the image and shoot.• As the example to the right shows, a backlit
subject can be shot at the correct exposure if theFE lock is set when the camera is aimed at anon-backlit portion of the subject.
○ ○ ○ ○ ○ ○ ○ ○ ○ ○ ○ ○ ○ ○ ○ ○ ○ ○ ○ ○ ○ ○
• This function can only be selected in the , and shooting modes.
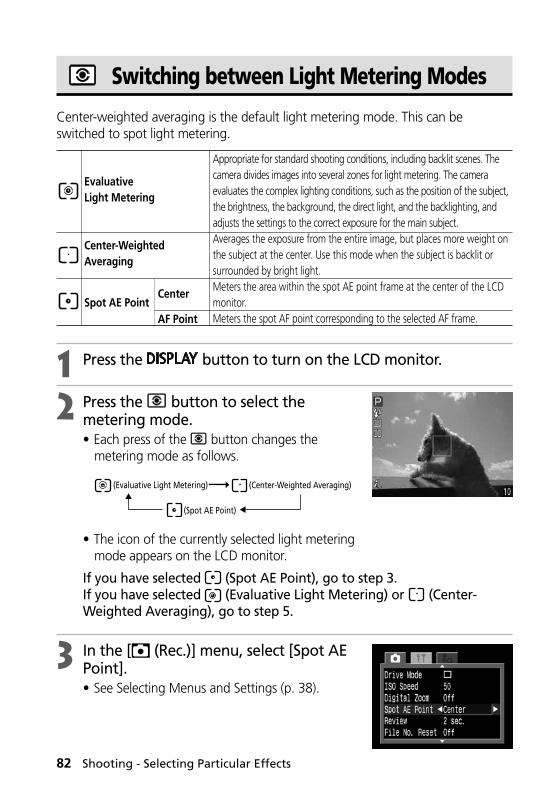
82 Shooting - Selecting Particular Effects
Switching between Light Metering Modes
Center-weighted averaging is the default light metering mode. This can beswitched to spot light metering.
1 Press the button to turn on the LCD monitor.
2 Press the button to select themetering mode.• Each press of the button changes the
metering mode as follows.
• The icon of the currently selected light meteringmode appears on the LCD monitor.
If you have selected (Spot AE Point), go to step 3.If you have selected (Evaluative Light Metering) or (Center-Weighted Averaging), go to step 5.
3 In the [ (Rec.)] menu, select [Spot AEPoint].• See Selecting Menus and Settings (p. 38).
EvaluativeLight Metering
Center-WeightedAveraging
Spot AE PointCenter
AF Point
Appropriate for standard shooting conditions, including backlit scenes. The camera divides images into several zones for light metering. The camera evaluates the complex lighting conditions, such as the position of the subject, the brightness, the background, the direct light, and the backlighting, and adjusts the settings to the correct exposure for the main subject.Averages the exposure from the entire image, but places more weight on the subject at the center. Use this mode when the subject is backlit or surrounded by bright light.Meters the area within the spot AE point frame at the center of the LCD monitor.Meters the spot AF point corresponding to the selected AF frame.
(Evaluative Light Metering) (Center-Weighted Averaging)
(Spot AE Point)

Shooting - Selecting Particular Effects 83
4 Select the [Center] or [AF Point] option,then press the button.• When [Spot AE Point] is set to [Center], the spot
AE point frame appears at the center of the LCDmonitor, and when [Spot AE Point] is set to [AFPoint], it appears inside the selected AF frame.
5 Shoot the image.
Spot AE Point Frame
○ ○ ○ ○ ○ ○ ○ ○ ○ ○ ○ ○ ○ ○ ○ ○ ○ ○ ○ ○ ○ ○
• The light metering mode cannot be changed while the white balance settingmenu appears on the LCD monitor.
○ ○ ○ ○ ○ ○ ○ ○ ○ ○ ○ ○ ○ ○ ○ ○ ○ ○ ○ ○ ○ ○
• This function can only be selected in the , , and shooting modes.• The setting is cancelled when the camera power is turned off. However, the [Spot
AE Point] option selected in the menu remains selected.
e.g. Center

84 Shooting - Selecting Particular Effects
Shooting Problem Subjects for the Autofocus
The autofocus may not work well on the following types of subjects.• Subjects with extremely low contrast to the surroundings• Subjects mixing close and far objects• Subjects with extremely bright objects at the center of the composition• Subjects that are moving quickly
To shoot these subjects, first aim the camera at an object at a similar distance, lock thefocus and recompose the image with the desired subject, or use the manual focus.○ ○ ○ ○ ○ ○ ○ ○ ○ ○ ○ ○ ○ ○ ○ ○ ○ ○ ○ ○ ○ ○
• When shooting through glass, get as close as possible to avoid reflections off theglass.
Shooting with Focus Lock
Focus Lock Method 1
1 Press the button to turn on the LCD monitor.
2 Aim the AF frame at an object at a similar distance to thesubject you wish to shoot.
3 Press the shutter button halfway to lock the focus.• The AE setting will also lock when you do this. The exposure may
occasionally be incorrect if the difference between the two items is toogreat. Use Method 2 or the AE lock procedure when this happens.
4 Keep it pressed while you recompose the image and press theshutter button all the way to shoot the image.

Shooting - Selecting Particular Effects 85
Focus Lock Method 2
1 Press the button to turn on the LCD monitor.
2 Press the shutter button halfway to lock the focus. Keep itpressed and press the button.
• The icon appears on the LCD monitor.• The focus setting will lock even if the shutter button and the button are
released.• The manual focus setting will cancel if the button is pressed again.
3 Recompose the image and press the shutter button all the wayto shoot the image.
○ ○ ○ ○ ○ ○ ○ ○ ○ ○ ○ ○ ○ ○ ○ ○ ○ ○ ○ ○ ○ ○
• Focus lock cannot be used while the shooting mode is set to .
○ ○ ○ ○ ○ ○ ○ ○ ○ ○ ○ ○ ○ ○ ○ ○ ○ ○ ○ ○ ○ ○
• Method 2 is convenient because you can let go of the shutter button torecompose the image.
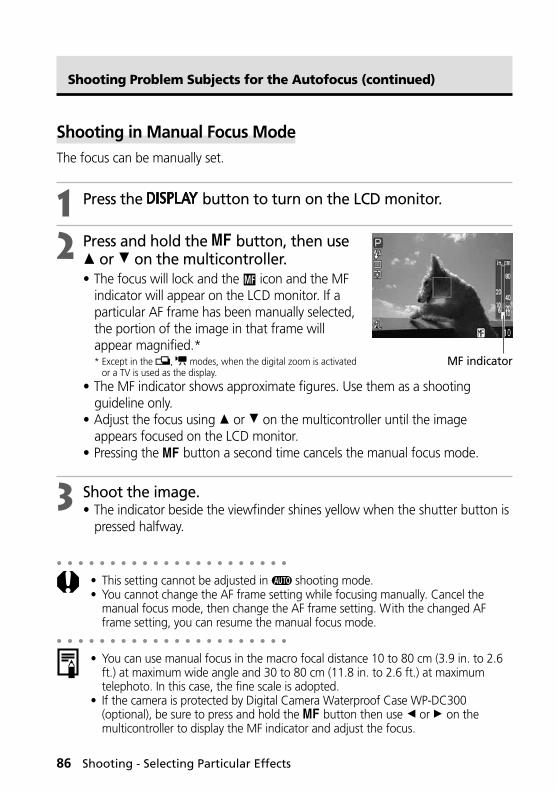
86 Shooting - Selecting Particular Effects
Shooting Problem Subjects for the Autofocus (continued)
Shooting in Manual Focus ModeThe focus can be manually set.
1 Press the button to turn on the LCD monitor.
2 Press and hold the button, then useC or D on the multicontroller.• The focus will lock and the icon and the MF
indicator will appear on the LCD monitor. If aparticular AF frame has been manually selected,the portion of the image in that frame willappear magnified.** Except in the , modes, when the digital zoom is activated
or a TV is used as the display.
• The MF indicator shows approximate figures. Use them as a shootingguideline only.
• Adjust the focus using C or D on the multicontroller until the imageappears focused on the LCD monitor.
• Pressing the button a second time cancels the manual focus mode.
3 Shoot the image.• The indicator beside the viewfinder shines yellow when the shutter button is
pressed halfway.
○ ○ ○ ○ ○ ○ ○ ○ ○ ○ ○ ○ ○ ○ ○ ○ ○ ○ ○ ○ ○ ○
• This setting cannot be adjusted in shooting mode.• You cannot change the AF frame setting while focusing manually. Cancel the
manual focus mode, then change the AF frame setting. With the changed AFframe setting, you can resume the manual focus mode.
○ ○ ○ ○ ○ ○ ○ ○ ○ ○ ○ ○ ○ ○ ○ ○ ○ ○ ○ ○ ○ ○
• You can use manual focus in the macro focal distance 10 to 80 cm (3.9 in. to 2.6ft.) at maximum wide angle and 30 to 80 cm (11.8 in. to 2.6 ft.) at maximumtelephoto. In this case, the fine scale is adopted.
• If the camera is protected by Digital Camera Waterproof Case WP-DC300(optional), be sure to press and hold the button then use B or A on themulticontroller to display the MF indicator and adjust the focus.
MF indicator

Shooting - Selecting Particular Effects 87
Manually Setting Image Characteristics
The ISO speed, contrast, sharpness and saturation settings can be adjusted for shooting.
1 In the [ (Rec.)] menu, select one of the above items.• See Selecting Menus and Settings (p. 38).
2 Select a value for the item and press the button.ISO speed• Switch speeds when you are shooting in dark areas
or want to use a fast shutter speed.• You can select from 50 (default setting), 100, 200,
400, 800 (only for PowerShot S30) and AUTO.• When AUTO is selected, the camera automatically
adjusts ISO between 50 and 150 only.• Higher ISO speeds increase the image noise. To take
clean images, use as low an ISO speed as possible.
Contrast• Select from - (Weak), 0 (Neutral) and + (Strong).• This function allows you to adjust the degree of
brightness.
Sharpness• Select from - (Weak), 0 (Neutral) and + (Strong).• This function allows you to adjust how sharply
outlines are defined.
Saturation• Select from - (Weak), 0 (Neutral) and + (Strong).• This function allows you to adjust the color
depth.
88 Shooting - Selecting Particular Effects
Manually Setting Image Characteristics (continued)
3 Shoot the image.
○ ○ ○ ○ ○ ○ ○ ○ ○ ○ ○ ○ ○ ○ ○ ○ ○ ○ ○ ○ ○ ○
• These functions can only be selected in the , , and shooting modes. Inthe mode, however, the ISO speed cannot be set to [Auto].
• These settings are memorized even when the camera power is turned off.
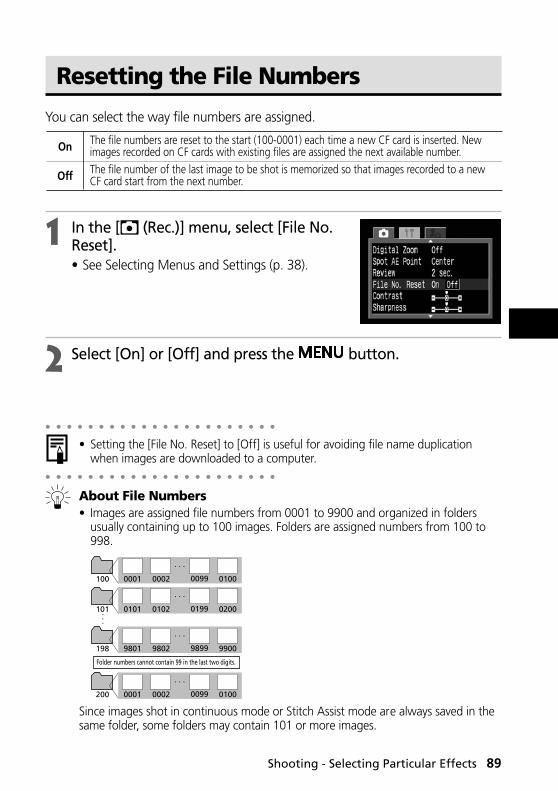
Shooting - Selecting Particular Effects 89
Resetting the File Numbers
You can select the way file numbers are assigned.
1 In the [ (Rec.)] menu, select [File No.Reset].• See Selecting Menus and Settings (p. 38).
2 Select [On] or [Off] and press the button.
○ ○ ○ ○ ○ ○ ○ ○ ○ ○ ○ ○ ○ ○ ○ ○ ○ ○ ○ ○ ○ ○
• Setting the [File No. Reset] to [Off] is useful for avoiding file name duplicationwhen images are downloaded to a computer.
○ ○ ○ ○ ○ ○ ○ ○ ○ ○ ○ ○ ○ ○ ○ ○ ○ ○ ○ ○ ○ ○
About File Numbers• Images are assigned file numbers from 0001 to 9900 and organized in folders
usually containing up to 100 images. Folders are assigned numbers from 100 to998.
Since images shot in continuous mode or Stitch Assist mode are always saved in thesame folder, some folders may contain 101 or more images.
The file numbers are reset to the start (100-0001) each time a new CF card is inserted. New images recorded on CF cards with existing files are assigned the next available number.The file number of the last image to be shot is memorized so that images recorded to a new CF card start from the next number.
On
Off
100 0001 0002 0099 0100
101 0101 0102 0199 0200
198 9801 9802 9899 9900
200 0001 0002 0099 0100
Folder numbers cannot contain 99 in the last two digits.

90 Shooting - Selecting Particular Effects
Functions Available in Each Shooting ModeThis chart shows the functions available in each shooting mode.
●
●
–
–
●
●
●
–
–
●
●
●
●
–
–
–
–
–
●
–
–
–
–
–
●
●
●
●
–
–
●
●
●
●
–
●
●
●
●
●
●
●
●
●
●
●
●
●
●
●
–
●
–
●
–
–
–
–
●
●
●
●
●
–
–
●
●
●
●
–
●
●
●
●
●
–
●
●
●
●
●
●
●
●
●
–
●
–
●
–
–
–
–
●
●
●
●
●
–
–
●
●
●
●
–
●
●
●
●
●
–
●
●
●
●
●
●
●
●
●
–
●
–
●
–
–
–
–
●
●
●
●
●
–
–
●
●
●
●
–
●
●
●
●
●
●
●
●
●
●
●
●
●
●
●
–
●
–
●
–
–
–
–
●
●
●
●
●
–
–
●
●
●
●
–
●
●
●
●
●
●
●
●
●
●
●
●
●
●
●
–
●
–
●
–
–
–
–
●
●
●
●
●
–
–
●
●
●
●
–
●
●
●
●
●
●
●
●
●
●
●
●
–
●
●
–
●
–
●
–
–
–
–
●
●
●
●
●
–
–
●
●
●
●
–
●
●
●
●
●
●
●
●
●
●
●
–
●
●
●
●
●
●
●
●
●
●
●
●
●
●
●
●
–
–
●
●
●
●
●
–
–
●
●
●
●
●
●
●
●
●
–
●
●
●
●
●
●
●
●
●
●
●
●
●
●
●
●
–
–
●
●
●
●
●
–
–
●
●
●
●
●
●
●
●
●
–
●
●
●
●
●
●
●
●
●
●
●
●
●
●
●
●
–
–
●
●
●
●
●
–
–
●
●
●
●
●
●
●
●
●
–
●
–
●
–
–
–
●
●
●
●
●
●
●
●
●
●
–
–
●
●
●
●
●
–
–
–
▲
▲
●
●
–
–
●
●
●
–
▲
▲
–
▲
–
●
–
–
–
–
●
▲
▲
▲
▲
–
–
●
●
●
●
–
–
–
–
–
●
●
●
–
–
●
●
●
–
●
●
–
–
–
●
–
–
–
–
●
–
–
–
–
●
●
–
–
–
–
–
p. 47
p. 57
–
p. 59
p. 59
p. 58
p. 58
p. 71
p. 71
p. 73
p. 74
p. 77
p. 78
p. 79, 81
p. 82
p. 86
p. 61
p. 61
p. 64
ReferencePage
Red-Eye Reduction, AutoAuto
Flash Red-Eye Reduction, Flash OnOnOff
Macro ModeSingle ShotNormal Continuous Mode
Drive Mode High Speed Continuous ModeSelf-Timer (10 sec.)Self-Timer (2 sec.)
AF Frame AutoManual
Exposure CompensationWhite BalanceAEB ModeFlash Exposure CompensationAE Lock/FE Lock
Evaluative MeteringCenter-Weighted AveragingSpot Metering
CenterAF Point
Manual FocusLargeMedium 1
Resolution Medium 2SmallMovieMovieSuperfine
Compression FineNormal
File JPEGFormat RAW
LightMetertingMethod
(4)
1
2
(1) (1) (1)
(2) (2) (3) (3) (2) (2)

Shooting - Selecting Particular Effects 91
–
●
–
–
–
–
●
–
–
–
–
●
–
–
–
–
●
–
–
–
–
●
–
–
–
–
●
–
–
–
–
●
–
–
–
●
●
●
●
●
●
●
●
●
●
●
●
●
●
●
–
●
●
●
●
–
–
–
–
–
–
–
–
–
–
p. 87p. 60
p. 87
ISO SpeedDigital ZoomContrastSharpnessSaturation
ReferencePage
(5) (5) (5) (5) (5) (5) (5) (5) (6)(5)
* Default setting.● Setting selection is possible.▲ Setting can only be selected for the first image.- Setting selection is not possible.
(Shaded Area) Setting remains in effect even when the camera is turned off.The default for all of the settings changed by the menu and button operations can be restored all at once exceptfor [Date/Time], [Language] and [Video System] (p. 141).
(1) In Macro mode, the AF frame is set to the center.(2) The AF frame can only be set to the center. In Macro mode, the AF frame is also set to the center.(3) The AF frame can only be set to the center.(4) The sepia and B/W modes cannot be set.(5) The ISO speed is automatically set between the equivalent of 50 and 150.(6) [AUTO] cannot be selected.
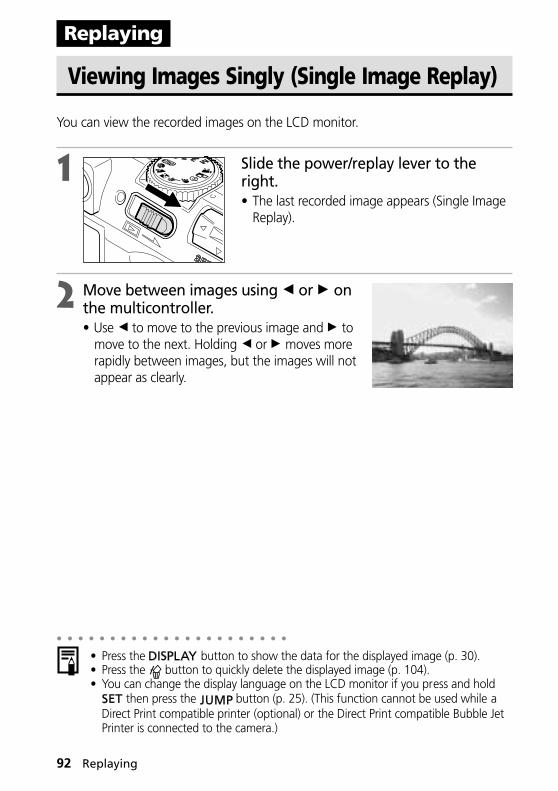
92 Replaying
Viewing Images Singly (Single Image Replay)
You can view the recorded images on the LCD monitor.
1 Slide the power/replay lever to theright.• The last recorded image appears (Single Image
Replay).
2 Move between images using B or A onthe multicontroller.• Use B to move to the previous image and A to
move to the next. Holding B or A moves morerapidly between images, but the images will notappear as clearly.
○ ○ ○ ○ ○ ○ ○ ○ ○ ○ ○ ○ ○ ○ ○ ○ ○ ○ ○ ○ ○ ○
• Press the button to show the data for the displayed image (p. 30).• Press the button to quickly delete the displayed image (p. 104).• You can change the display language on the LCD monitor if you press and hold
then press the button (p. 25). (This function cannot be used while aDirect Print compatible printer (optional) or the Direct Print compatible Bubble JetPrinter is connected to the camera.)
Replaying
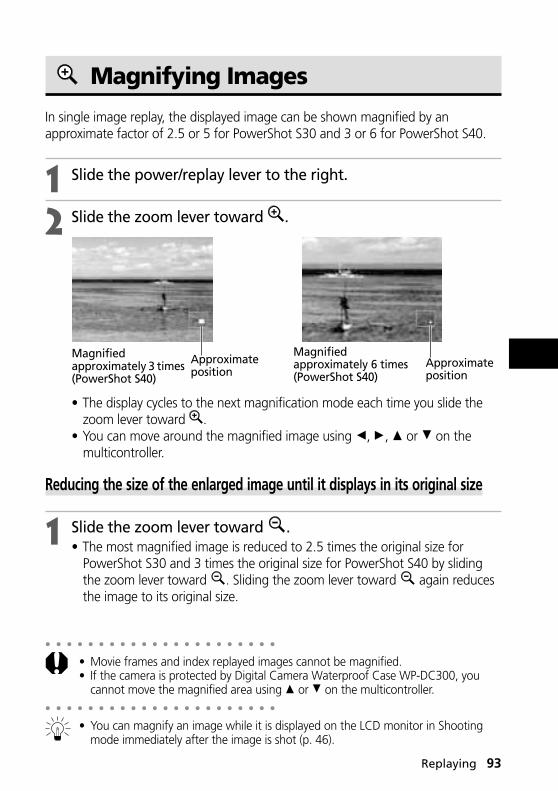
Replaying 93
Magnifying Images
In single image replay, the displayed image can be shown magnified by anapproximate factor of 2.5 or 5 for PowerShot S30 and 3 or 6 for PowerShot S40.
1 Slide the power/replay lever to the right.
2 Slide the zoom lever toward .
• The display cycles to the next magnification mode each time you slide thezoom lever toward .
• You can move around the magnified image using B, A, C or D on themulticontroller.
Reducing the size of the enlarged image until it displays in its original size
1 Slide the zoom lever toward .• The most magnified image is reduced to 2.5 times the original size for
PowerShot S30 and 3 times the original size for PowerShot S40 by slidingthe zoom lever toward . Sliding the zoom lever toward again reducesthe image to its original size.
Magnifiedapproximately 3 times(PowerShot S40)
Approximateposition
○ ○ ○ ○ ○ ○ ○ ○ ○ ○ ○ ○ ○ ○ ○ ○ ○ ○ ○ ○ ○ ○
• Movie frames and index replayed images cannot be magnified.• If the camera is protected by Digital Camera Waterproof Case WP-DC300, you
cannot move the magnified area using C or D on the multicontroller.○ ○ ○ ○ ○ ○ ○ ○ ○ ○ ○ ○ ○ ○ ○ ○ ○ ○ ○ ○ ○ ○
• You can magnify an image while it is displayed on the LCD monitor in Shootingmode immediately after the image is shot (p. 46).
Magnifiedapproximately 6 times(PowerShot S40)
Approximateposition

94 Replaying
Viewing Nine Images at a Time(Index Replay)
Up to nine images can be viewed at once in Index Replay.
1 Slide the power/replay lever to the right.
2 Press the button.• Nine images appear at once (Index Replay).
3 Change the image selection using B, A, C or D on themulticontroller.
4 Press the button.• Index replay cancels and the display reverts to single image replay.
○ ○ ○ ○ ○ ○ ○ ○ ○ ○ ○ ○ ○ ○ ○ ○ ○ ○ ○ ○ ○ ○
• Press the button to show the data for the displayed image (p. 30).
Movie FrameSelected Image
The C operation in this rowdisplays the previous set ofnine images.
The D operation in this rowdisplays the next set of nineimages.

Replaying 95
Jumping Between Images
The display can be advanced or set back 9 images in either single image replay orindex replay.
1 Press the button while in single replay (p. 92) or indexreplay (p. 94).• The jump bar appears.
2 The displayed image(s) change.
Single Replay• Jump 9 images behind or ahead using B or A
on the multicontroller.
Index Replay• Jump to the previous or next set of nine images
using B or A on the multicontroller.
3 Press the button.• The jump bar disappears and the jump mode cancels.
Jump Bar
Jump Bar
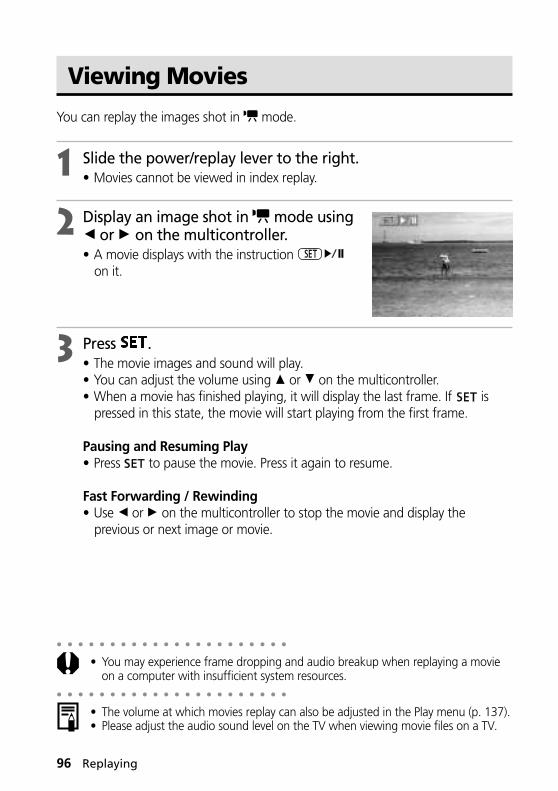
96 Replaying
Viewing Movies
You can replay the images shot in mode.
1 Slide the power/replay lever to the right.• Movies cannot be viewed in index replay.
2 Display an image shot in mode usingB or A on the multicontroller.• A movie displays with the instruction
on it.
3 Press .• The movie images and sound will play.• You can adjust the volume using C or D on the multicontroller.• When a movie has finished playing, it will display the last frame. If is
pressed in this state, the movie will start playing from the first frame.
Pausing and Resuming Play• Press to pause the movie. Press it again to resume.
Fast Forwarding / Rewinding• Use B or A on the multicontroller to stop the movie and display the
previous or next image or movie.
○ ○ ○ ○ ○ ○ ○ ○ ○ ○ ○ ○ ○ ○ ○ ○ ○ ○ ○ ○ ○ ○
• You may experience frame dropping and audio breakup when replaying a movieon a computer with insufficient system resources.
○ ○ ○ ○ ○ ○ ○ ○ ○ ○ ○ ○ ○ ○ ○ ○ ○ ○ ○ ○ ○ ○
• The volume at which movies replay can also be adjusted in the Play menu (p. 137).• Please adjust the audio sound level on the TV when viewing movie files on a TV.

Replaying 97
Rotating Images in the Display
Images can be rotated 90º and 270º clockwise on the LCD monitor.
Original 90º 270º
1 In the [ (Play)] menu, select [Rotate]and press .• See Selecting Menus and Settings (p. 38).
2 Select an image you want to rotateusing B or A on the multicontroller andpress .• The image cycles to the next orientation (90º ➝
270º ➝ original) each time is pressed.
3 Press the button.• The Play menu appears again. Press the button again to close the
menu.
○ ○ ○ ○ ○ ○ ○ ○ ○ ○ ○ ○ ○ ○ ○ ○ ○ ○ ○ ○ ○ ○
• Movie images cannot be rotated.
○ ○ ○ ○ ○ ○ ○ ○ ○ ○ ○ ○ ○ ○ ○ ○ ○ ○ ○ ○ ○ ○
• When images are downloaded to a computer, the orientation of images rotatedby the camera will depend upon the software used to download the images.
○ ○ ○ ○ ○ ○ ○ ○ ○ ○ ○ ○ ○ ○ ○ ○ ○ ○ ○ ○ ○ ○
• Images can be magnified when rotated (p. 93).

98 Replaying
Attaching Sound Annotations to Images
In replay mode (including single replay, index replay, magnifying replay and the replayimmediately after shooting in Shooting mode) you can attach sound annotations (up to60 seconds) to an image. The sound data is saved in WAVE format.
1 Press the button while replaying images.• The A / V panel appears.
2 Select using B or A on themulticontroller, then press .• The recording starts and the elapsed time is displayed.
Speak towards the microphone of the camera.• To stop recording, press . To restart recording,
press again.• You can add as many sound annotations as you
like until their total time reaches 60 seconds.
Playing back the Sound AnnotationsSelect in step 2 above. Images with sound annotations are displayed with the
mark. To start playback, press . To stop playback, press again. You canadjust the volume using C or D on the multicontroller.
Erasing the Sound AnnotationsSelect in step 2 above.○ ○ ○ ○ ○ ○ ○ ○ ○ ○ ○ ○ ○ ○ ○ ○ ○ ○ ○ ○ ○ ○
• You cannot attach sound annotation to movies.• If there is no space for recording on the CF card, the message “CF card full”
appears and you cannot continue recording.• You cannot attach sound annotations to an image if it already has any
incompatible sound file. Such an image displayed with the mark and themessage “Unidentified sound file” appears.
○ ○ ○ ○ ○ ○ ○ ○ ○ ○ ○ ○ ○ ○ ○ ○ ○ ○ ○ ○ ○ ○
• The volume can be adjusted in the Play menu (p. 137).
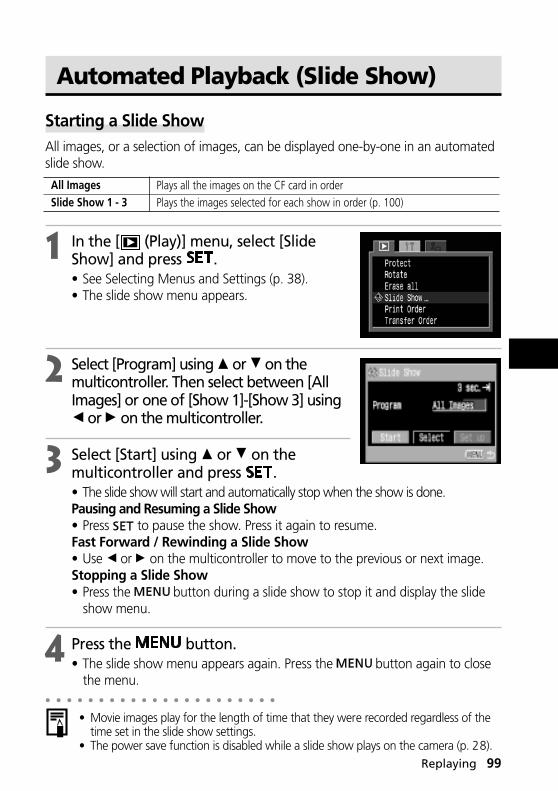
Replaying 99
Automated Playback (Slide Show)
Starting a Slide ShowAll images, or a selection of images, can be displayed one-by-one in an automatedslide show.
1 In the [ (Play)] menu, select [SlideShow] and press .• See Selecting Menus and Settings (p. 38).• The slide show menu appears.
2 Select [Program] using C or D on themulticontroller. Then select between [AllImages] or one of [Show 1]-[Show 3] usingB or A on the multicontroller.
3 Select [Start] using C or D on themulticontroller and press .• The slide show will start and automatically stop when the show is done.Pausing and Resuming a Slide Show• Press to pause the show. Press it again to resume.Fast Forward / Rewinding a Slide Show• Use B or A on the multicontroller to move to the previous or next image.Stopping a Slide Show• Press the button during a slide show to stop it and display the slide
show menu.
4 Press the button.• The slide show menu appears again. Press the button again to close
the menu.○ ○ ○ ○ ○ ○ ○ ○ ○ ○ ○ ○ ○ ○ ○ ○ ○ ○ ○ ○ ○ ○
• Movie images play for the length of time that they were recorded regardless of thetime set in the slide show settings.
• The power save function is disabled while a slide show plays on the camera (p. 28).
Plays all the images on the CF card in orderPlays the images selected for each show in order (p. 100)
All ImagesSlide Show 1 - 3
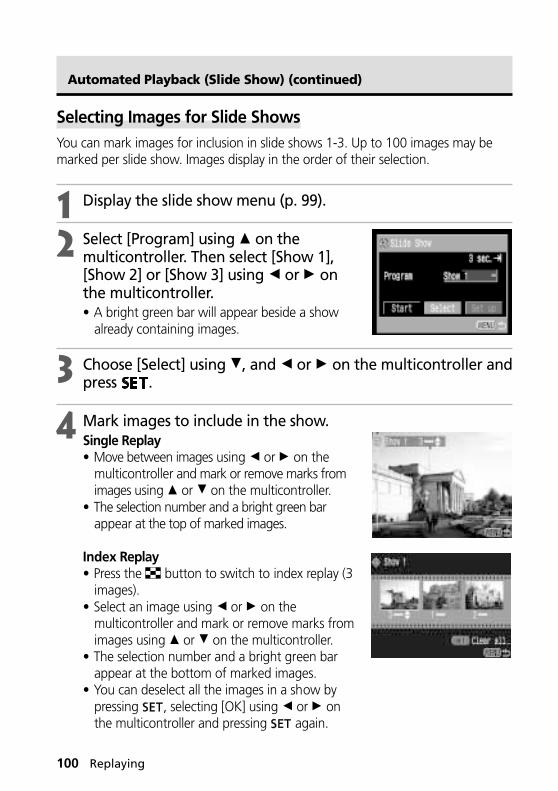
100 Replaying
Automated Playback (Slide Show) (continued)
Selecting Images for Slide ShowsYou can mark images for inclusion in slide shows 1-3. Up to 100 images may bemarked per slide show. Images display in the order of their selection.
1 Display the slide show menu (p. 99).
2 Select [Program] using C on themulticontroller. Then select [Show 1],[Show 2] or [Show 3] using B or A onthe multicontroller.• A bright green bar will appear beside a show
already containing images.
3 Choose [Select] using D, and B or A on the multicontroller andpress .
4 Mark images to include in the show.Single Replay• Move between images using B or A on the
multicontroller and mark or remove marks fromimages using C or D on the multicontroller.
• The selection number and a bright green barappear at the top of marked images.
Index Replay• Press the button to switch to index replay (3
images).• Select an image using B or A on the
multicontroller and mark or remove marks fromimages using C or D on the multicontroller.
• The selection number and a bright green barappear at the bottom of marked images.
• You can deselect all the images in a show bypressing , selecting [OK] using B or A onthe multicontroller and pressing again.
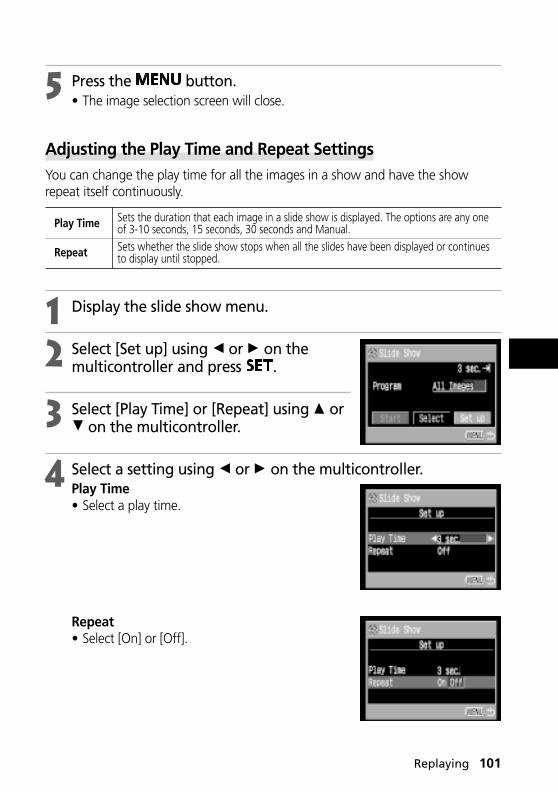
Replaying 101
5 Press the button.• The image selection screen will close.
Adjusting the Play Time and Repeat SettingsYou can change the play time for all the images in a show and have the showrepeat itself continuously.
1 Display the slide show menu.
2 Select [Set up] using B or A on themulticontroller and press .
3 Select [Play Time] or [Repeat] using C orD on the multicontroller.
4 Select a setting using B or A on the multicontroller.Play Time• Select a play time.
Repeat• Select [On] or [Off].
Sets the duration that each image in a slide show is displayed. The options are any one of 3-10 seconds, 15 seconds, 30 seconds and Manual.Sets whether the slide show stops when all the slides have been displayed or continues to display until stopped.
Play Time
Repeat
102 Replaying
Automated Playback (Slide Show) (continued)
5 Press the button.• The set up menu closes.
○ ○ ○ ○ ○ ○ ○ ○ ○ ○ ○ ○ ○ ○ ○ ○ ○ ○ ○ ○ ○ ○
• The display interval may vary somewhat for some images.• Slide shows can be easily edited on a computer with the supplied software. See
the Software Starter Guide.
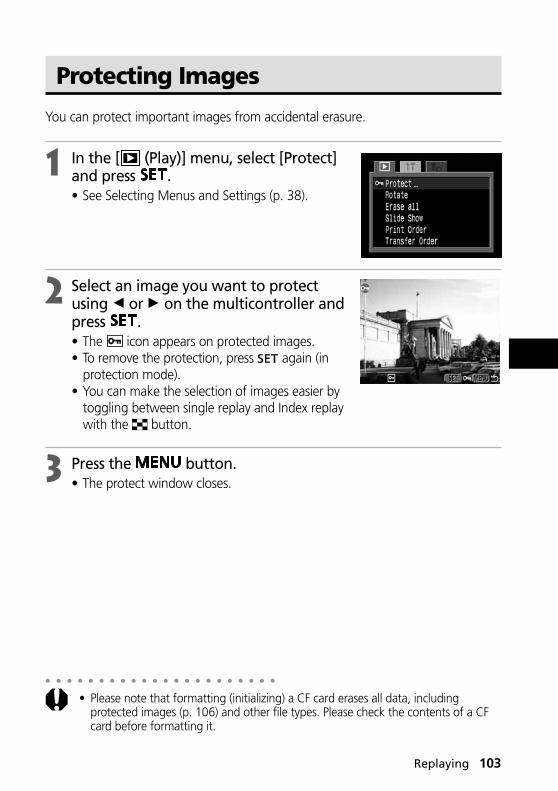
Replaying 103
Protecting Images
You can protect important images from accidental erasure.
1 In the [ (Play)] menu, select [Protect]and press .• See Selecting Menus and Settings (p. 38).
2 Select an image you want to protectusing B or A on the multicontroller andpress .• The icon appears on protected images.• To remove the protection, press again (in
protection mode).• You can make the selection of images easier by
toggling between single replay and Index replaywith the button.
3 Press the button.• The protect window closes.
○ ○ ○ ○ ○ ○ ○ ○ ○ ○ ○ ○ ○ ○ ○ ○ ○ ○ ○ ○ ○ ○
• Please note that formatting (initializing) a CF card erases all data, includingprotected images (p. 106) and other file types. Please check the contents of a CFcard before formatting it.

104 Erasing
Erasing Images Singly
○ ○ ○ ○ ○ ○ ○ ○ ○ ○ ○ ○ ○ ○ ○ ○ ○ ○ ○ ○ ○ ○
• Please note that erased images cannot be recovered. Exercise caution beforeerasing a file.
1 Set the camera to the replay mode (p. 29).
2 Select the image you wish to erase using B or A on themulticontroller and press the button.
3 Select [Erase] using B or A on themulticontroller and press .• To cancel instead of erasing, select [Cancel] and
press .
○ ○ ○ ○ ○ ○ ○ ○ ○ ○ ○ ○ ○ ○ ○ ○ ○ ○ ○ ○ ○ ○
• Protected images cannot be erased with the erase function (p. 103).
Erasing

Erasing 105
Erasing All Images
○ ○ ○ ○ ○ ○ ○ ○ ○ ○ ○ ○ ○ ○ ○ ○ ○ ○ ○ ○ ○ ○
• Please note that erased images cannot be recovered. Exercise caution beforeerasing a file.
1 In the [ (Play)] menu, select [Erase all]and press .• See Selecting Menus and Settings (p. 38).
2 Select [OK] using B or A on themulticontroller and press .• To cancel instead of erasing, select [Cancel] and
press .
○ ○ ○ ○ ○ ○ ○ ○ ○ ○ ○ ○ ○ ○ ○ ○ ○ ○ ○ ○ ○ ○
• Protected images cannot be erased with the erase function (p. 103).

106 Erasing
Formatting a CF Card
You should format a new CF card or one from which you wish to erase all imagesand other data.○ ○ ○ ○ ○ ○ ○ ○ ○ ○ ○ ○ ○ ○ ○ ○ ○ ○ ○ ○ ○ ○
• Please note that formatting (initializing) a CF card erases all data, includingprotected images and other file types. Please check the contents of the CF cardbefore formatting it.
1 In the [ (Set up)] menu, select [Format]and press .• See Selecting Menus and Settings (p. 38).
2 Select [OK] using B or A on themulticontroller and press .• To cancel formatting instead, select [Cancel] and
press .
○ ○ ○ ○ ○ ○ ○ ○ ○ ○ ○ ○ ○ ○ ○ ○ ○ ○ ○ ○ ○ ○
• If the camera does not work properly, the inserted CF card may be malfunctioning.Formatting the CF card may solve the problem.
• When a non-Canon brand CF card is malfunctioning, reformatting it may solve theproblem.
• CF cards formatted in another camera, computer or peripheral device may notoperate correctly. When that happens, reformat the CF card with this camera.

Print Settings (DPOF Print Settings) 107
Images on a CF card can be individually selected for printing in a specified numberof copies. You can also select the print type and whether or not to print the dateand file number. These settings are compatible with the Digital Print Order Format(DPOF) standards so that images can be printed on DPOF-compliant digital printersor at participating photo labs.○ ○ ○ ○ ○ ○ ○ ○ ○ ○ ○ ○ ○ ○ ○ ○ ○ ○ ○ ○ ○ ○
• The mark appears on images that have had print marks set by another DPOF-compliant camera. These settings will be overwritten by any print marks set byyour camera.
• Print settings cannot be set for movie images or RAW images.• The output of some digital printers or photo lab services may not reflect the
specified print settings.○ ○ ○ ○ ○ ○ ○ ○ ○ ○ ○ ○ ○ ○ ○ ○ ○ ○ ○ ○ ○ ○
• After you have set the DPOF settings, you can connect a Direct Print compatibleprinter (optional) or the Direct Print compatible Bubble Jet Printer (optional) andprint directly from the camera (p. 112, 121).
Selecting Images for Printing
There are two ways to select images.• Singly• All images on a CF card (the number of copies is set to one per image)
1 In the [ (Play)] menu, select [PrintOrder] and press .• See Selecting Menus and Settings (p. 38).• The Print Order menu appears.
2 Select [Order] using B or A on themulticontroller and press .
Print Settings (DPOF Print Settings)

108 Print Settings (DPOF Print Settings)
Selecting Images for Printing (continued)
3 Select images for printing.Single Images• When the print type (p. 99) is set to [Standard] or
[Both], select an image using B or A on themulticontroller. You can set the number of copies(up to 99) to be printed using C or D on themulticontroller.
• When the print type (p. 99) is set to [Index], select animage using B or A on the multicontroller andmark or remove marks from images using C or Don the multicontroller.
• You can use the same procedures to select images inindex replay (3 images). Press the button toswitch between single replay and index replay.
All the Images on a CF Card• Press the button to switch to index replay (three
images).• You can set one copy of each image to print by
pressing , then selecting [Mark All] using C orD on the multicontroller, and pressing again.
• When the print type is set to [Standard] or [Both],the setting for the number of print copies can bechanged for each image. When [Index] is selected,the print settings can be deleted. For the instructionson changing settings, please reread Step 3 from thebeginning.
• You can cancel all the settings by selecting [Clear all].
4 Press the button.• The selection mode will turn off and the Print Order menu will reappear.
○ ○ ○ ○ ○ ○ ○ ○ ○ ○ ○ ○ ○ ○ ○ ○ ○ ○ ○ ○ ○ ○
• Images are printed in order from oldest to newest by the shooting date.• A maximum of 998 images can be marked per CF card.• When [Print Type] is set to [Both], the number of copies can be set. When it is set
to [Index], the number of copies cannot be set (only one copy will be printed).• Print settings can also be assigned to images with the supplied software programs
on a computer.
Number of Copies

Print Settings (DPOF Print Settings) 109
Setting the Print Style
The following print settings can be selected.
1 Display the Print Order menu (p. 107).
2 Select [Set up] using B or A on themulticontroller and press .
3 Select [Print Type], [Date] or [File No.] using C or D on themulticontroller.
4 Select a setting using B or A on the multicontroller.Print Type• Select [Standard], [Index] or [Both].
Date• Select [On] or [Off].
Prints one image per pagePrints the selected images together at a reduced size in an index formatPrints the images in both the standard and index formatsAdds the date to the printAdds the file number to the print
StandardPrint Type Index
BothDateFile No.
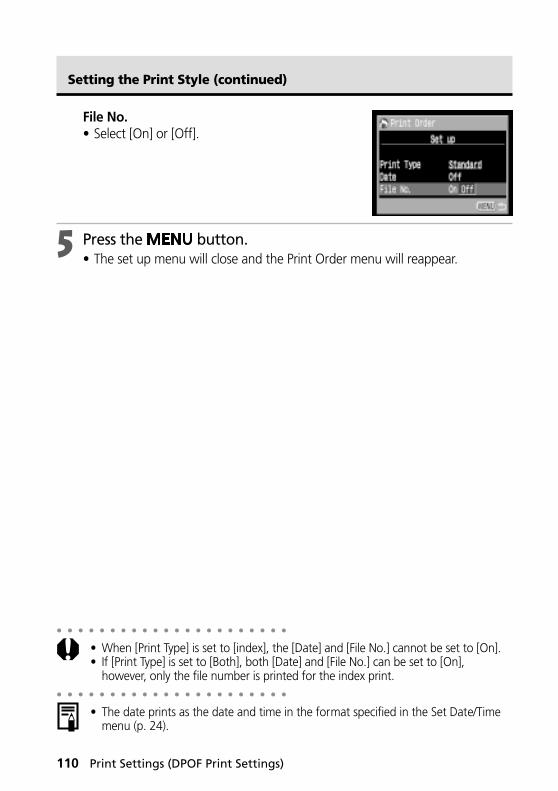
110 Print Settings (DPOF Print Settings)
○ ○ ○ ○ ○ ○ ○ ○ ○ ○ ○ ○ ○ ○ ○ ○ ○ ○ ○ ○ ○ ○
• When [Print Type] is set to [index], the [Date] and [File No.] cannot be set to [On].• If [Print Type] is set to [Both], both [Date] and [File No.] can be set to [On],
however, only the file number is printed for the index print.○ ○ ○ ○ ○ ○ ○ ○ ○ ○ ○ ○ ○ ○ ○ ○ ○ ○ ○ ○ ○ ○
• The date prints as the date and time in the format specified in the Set Date/Timemenu (p. 24).
Setting the Print Style (continued)
File No.• Select [On] or [Off].
5 Press the button.• The set up menu will close and the Print Order menu will reappear.

Print Settings (DPOF Print Settings) 111
Resetting the Print Settings
The print settings can all be removed at once. The print type is reset to [Standard]and the date and file number options are set to [Off].
1 Display the Print Order menu (p. 107).
2 Select [Reset] using B or A on themulticontroller and press .
3 Select [OK] using B or A on themulticontroller and press .
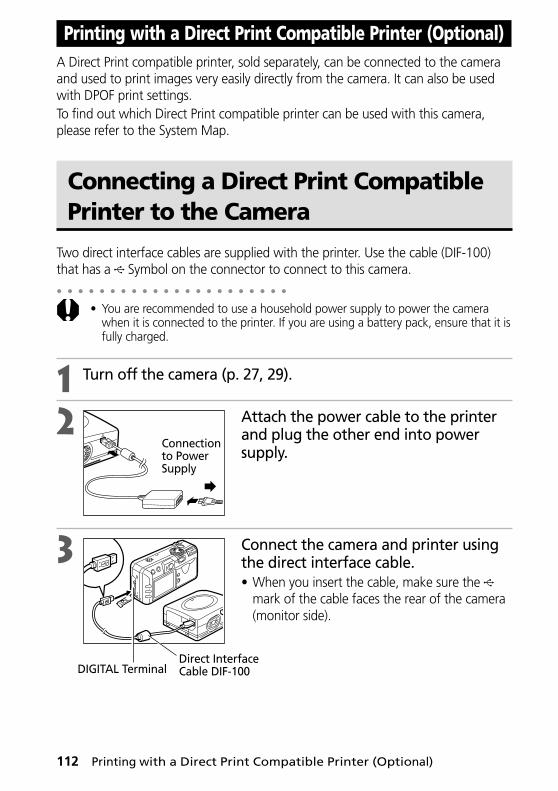
112 Printing with a Direct Print Compatible Printer (Optional)
A Direct Print compatible printer, sold separately, can be connected to the cameraand used to print images very easily directly from the camera. It can also be usedwith DPOF print settings.To find out which Direct Print compatible printer can be used with this camera,please refer to the System Map.
Connecting a Direct Print CompatiblePrinter to the Camera
Two direct interface cables are supplied with the printer. Use the cable (DIF-100)that has a Symbol on the connector to connect to this camera.○ ○ ○ ○ ○ ○ ○ ○ ○ ○ ○ ○ ○ ○ ○ ○ ○ ○ ○ ○ ○ ○
• You are recommended to use a household power supply to power the camerawhen it is connected to the printer. If you are using a battery pack, ensure that it isfully charged.
1 Turn off the camera (p. 27, 29).
2 Attach the power cable to the printerand plug the other end into powersupply.
3 Connect the camera and printer usingthe direct interface cable.• When you insert the cable, make sure the
mark of the cable faces the rear of the camera(monitor side).
Printing with a Direct Print Compatible Printer (Optional)
Connectionto PowerSupply
Direct InterfaceCable DIF-100DIGITAL Terminal

Printing with a Direct Print Compatible Printer (Optional) 113
○ ○ ○ ○ ○ ○ ○ ○ ○ ○ ○ ○ ○ ○ ○ ○ ○ ○ ○ ○ ○ ○
• When you detach the cable from the camera, hold the plug and do not pull thecable.
○ ○ ○ ○ ○ ○ ○ ○ ○ ○ ○ ○ ○ ○ ○ ○ ○ ○ ○ ○ ○ ○
• Please see the Card Photo Printer CP-10 manual for instructions on loading paperand installing ink cartridges.
• The following operations cannot be conducted while the printer is connected.- Replaying movies- Setting the language using and the button combination.
• When the printer is disconnected, the symbol will disappear from the LCDmonitor and the camera will revert to standard replay mode.
4 Slide the power/replay lever to the rightto turn on the camera.• appears on the camera LCD monitor and the
power/mode indicator is lit in green when theprinter is properly connected to the camera.

114 Printing with a Direct Print Compatible Printer (Optional)
Printing
An image can be printed when displayed in single replay or selected in index replay.
1 Choose an image using B or A on the multicontroller andpress .
2 Set the number of prints, the print style and cropping settingsas required.• Selecting the number of copies (p. 115)• Setting the Print Style (p. 115)• Trimming (Printing a Portion of an image) (p. 117)
3 Choose [Print] using C, D, B or A on themulticontroller and press .• You can also select [Print] by pressing the
button.• The image will start to print and, when it is
completely finished, the display will revert tostandard replay mode.
○ ○ ○ ○ ○ ○ ○ ○ ○ ○ ○ ○ ○ ○ ○ ○ ○ ○ ○ ○ ○ ○
• You cannot print movies or images recorded in the RAW format.
○ ○ ○ ○ ○ ○ ○ ○ ○ ○ ○ ○ ○ ○ ○ ○ ○ ○ ○ ○ ○ ○
Cancel Printing• To cancel printing between images printed, press . A confirmation dialog
appears. Select [OK] using B or A on the multicontroller and press .• A print in progress cannot be stopped. Wait until the current image is printed and
then cancel before the next one starts. The display will revert to standard replaymode.
Printing Errors• An error message appears if an error occurs for some reason during the printing
process (p. 149). Select [Stop] or [Resume] using B or A on the multicontrollerand press .
• The [Resume] option may not appear with some error messages. Select the [Stop]option in that case.

Printing with a Direct Print Compatible Printer (Optional) 115
Selecting the Number of Copies
1 In Replaying mode, press and selectthe [Copies] option using C or D on themulticontroller.
2 Specify the desired number of copies using B or A on themulticontroller.• You can specify from 1 to 99 prints.
Setting the Print StyleYou can select from among the following print styles.
1 In the print setting menu, choose [Style]using C or D on the multicontroller andpress again.
Prints one image per page.Prints eight copies of the same image on one page.Prints right to the edges of the page.Prints with a border.Prints the image's creation date.
ImageStandardMultiple
BordersBorderlessBordered
DateOnly selectable when printing with credit-card size paper.

116 Printing with a Direct Print Compatible Printer (Optional)
Printing (continued)
2 Choose [Image], [Borders] or [Date]using C or D on the multicontroller.
3 Set the selection using B or A on the multicontroller.
4 Press the button.• If [Borderless] or [Multiple] is selected as the print
style, the center portion of the recorded image(the image displayed on the LCD monitor) isprinted at an enlarged size. As a result, theimage’s top, bottom and sides may be croppedslightly. If you have not specified a trimmingsetting, a frame will appear around the area ofthe image that will be printed, allowing you tocheck the portion that will be cropped.
○ ○ ○ ○ ○ ○ ○ ○ ○ ○ ○ ○ ○ ○ ○ ○ ○ ○ ○ ○ ○ ○
• The date and borders settings cannot be selected when the [multiple] option isselected. (The image will be printed with the Date set to [Off] and the Borders setto [Borderless].)
• With the [Bordered] option, the border is printed in practically the same space asthe recorded image.
Image Borders Date
Choose [On] or [Off].Choose [Standard]or [Multiple].
Choose [Borderless] or[Bordered].
Print Area Frame
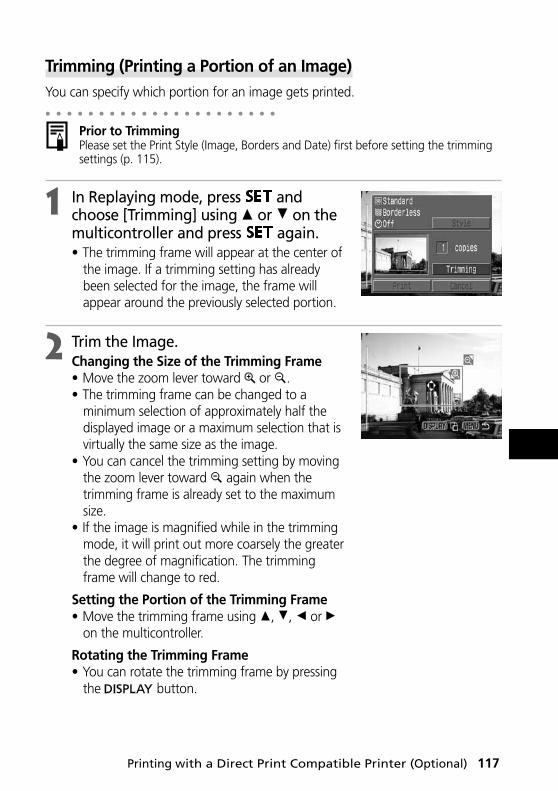
Printing with a Direct Print Compatible Printer (Optional) 117
Trimming (Printing a Portion of an Image)You can specify which portion for an image gets printed.○ ○ ○ ○ ○ ○ ○ ○ ○ ○ ○ ○ ○ ○ ○ ○ ○ ○ ○ ○ ○ ○
Prior to TrimmingPlease set the Print Style (Image, Borders and Date) first before setting the trimmingsettings (p. 115).
1 In Replaying mode, press andchoose [Trimming] using C or D on themulticontroller and press again.• The trimming frame will appear at the center of
the image. If a trimming setting has alreadybeen selected for the image, the frame willappear around the previously selected portion.
2 Trim the Image.Changing the Size of the Trimming Frame• Move the zoom lever toward or .• The trimming frame can be changed to a
minimum selection of approximately half thedisplayed image or a maximum selection that isvirtually the same size as the image.
• You can cancel the trimming setting by movingthe zoom lever toward again when thetrimming frame is already set to the maximumsize.
• If the image is magnified while in the trimmingmode, it will print out more coarsely the greaterthe degree of magnification. The trimmingframe will change to red.
Setting the Portion of the Trimming Frame• Move the trimming frame using C, D, B or A
on the multicontroller.
Rotating the Trimming Frame• You can rotate the trimming frame by pressing
the button.

118 Printing with a Direct Print Compatible Printer (Optional)
Printing (continued)
3 Press the button to close thesetting menu.
○ ○ ○ ○ ○ ○ ○ ○ ○ ○ ○ ○ ○ ○ ○ ○ ○ ○ ○ ○ ○ ○
• The trimming setting only applies to one image.• The trimming setting is cancelled with the following operations.
- When you set the trimming settings for another image.- When you close the Print mode (when you turn the camera power off, change
the camera mode, or detach the DIF-100 direct interface cable).- When you try to expand the trimming frame beyond its maximum size.
○ ○ ○ ○ ○ ○ ○ ○ ○ ○ ○ ○ ○ ○ ○ ○ ○ ○ ○ ○ ○ ○
• The selected Image Settings and Border setting determine the shape of thetrimming frame.
• Please use the LCD monitor to set the trimming settings. The trimming frame maynot display correctly on a TV monitor.
Trimming Frame

Printing with a Direct Print Compatible Printer (Optional) 119
Printing with DPOF Print Settings
You can use the DPOF print settings to print with a Direct Print compatible printer (optional).
1 In the [ (Play)] menu, select [Print Order] and press .• See Selecting Menus and Settings (p. 38).• The Print Order menu appears.
2 Select [Print] using C, D, B or A on themulticontroller and press .
3 Set the print style settings as required.• See Setting the Print Settings (p. 115).• A print style cannot be set if the print type is set
to [Index] in the DPOF print setting.
4 Select [OK] using C, D, B or A on themulticontroller and press .• The image will start to print and, when it is
completely finished, the display will revert to thestandard replay mode.
120 Printing with a Direct Print Compatible Printer (Optional)
Printing with DPOF Print Settings (continued)
○ ○ ○ ○ ○ ○ ○ ○ ○ ○ ○ ○ ○ ○ ○ ○ ○ ○ ○ ○ ○ ○
• To print the date, set the [Date] setting in the print order menu in Step 2 on theprevious page to [On]. You cannot set the date to print with the [Style] menu inStep 3 on the previous page. If the print type is set to [Index], the date will notprint even if the [Date] setting is set to [On] in Step 2.
• When the print type is set to [Both], it is possible to have both the [Date] and [FileNo.] options set to [On], but only the file number will print on the Index print.
• When the print type is set to [Standard], file numbers will not be printed even ifthey are set to [On].
○ ○ ○ ○ ○ ○ ○ ○ ○ ○ ○ ○ ○ ○ ○ ○ ○ ○ ○ ○ ○ ○
• The maximum number of images printed on one page in the Index print typedepends upon the selected paper size.- Card Size: 20 images- L Size: 42 images- Postcard Size: 63 images
Cancel Printing• To cancel printing between images, press . A confirmation dialog appears.
Select [OK] using B or A on the multicontroller and press .• A print in progress cannot be stopped. Wait until the current image is printed and
then cancel before the next one starts. The display will revert to standard replaymode.
Restarting Printing• In the Print Order menu, select [Resume] using B or A on the multicontroller and
press . The remaining images can be printed.• Printing cannot be restarted under the following circumstances.
- If the print settings have been changed before restarting.- If the image for which the print settings were set has been deleted before
restarting.- If there was very little free space on the CF card when the printing was
cancelled.If these circumstances apply, you can select [OK] in the Print Order menu andreprint starting from the first image. If printing was cancelled because the camerabattery became discharged, you are recommended to power the camera with ahousehold power source. If you must use a battery pack, ensure that it is fullycharged for printing. After replacing the spent battery pack, turn the camerapower on again.
Printing Errors• An error message appears if an error occurs for some reason during the printing
process (p. 149). Choose [Stop] or [Resume] using B or A on the multicontrollerand press .
• The [Resume] option may not appear with some error messages. Select the [Stop]option in that case.

Printing with the Direct Print Compatible Bubble Jet Printer (Optional) 121
By connecting the Direct Print compatible Bubble Jet Printer* (optional) to thecamera, you can print images very easily directly from the camera. It can also beused with the DPOF print settings.* Not sold in some regions
To find out if your Bubble Jet Printer supports the direct print function,or for general information about Bubble Jet Printers or connectioncables, please also refer to the Quick Start Guide supplied with yourBubble Jet Printer.
Connecting Bubble Jet Printer to the Camera
Be sure to turn off the camera before connecting to Bubble Jet Printer.○ ○ ○ ○ ○ ○ ○ ○ ○ ○ ○ ○ ○ ○ ○ ○ ○ ○ ○ ○ ○ ○
• You are recommended to use a household power supply to power the camerawhen it is connected to the printer. If you are using a battery pack, ensure that it isfully charged. The printing may stop if the camera battery is discharged even if it isnot complete; therefore, early replacement of the low battery with a fully chargedone is recommended.
1 Connect the camera and printer usingthe cable.• When you insert the cable, make sure the
“Canon” logo on the cable faces the front ofthe camera (lens side).
2 Slide the power/replay lever to the rightto turn on the camera.• appears on the camera LCD monitor and the
power/mode indicator is lit green when theprinter is properly connected to the camera.
Printing with the Direct Print Compatible Bubble Jet Printer (Optional)
To BubbleJet Printer
DIGITALTerminal
Bubble Jet Printer -digital cameraconnection cable

122 Printing with the Direct Print Compatible Bubble Jet Printer (Optional)
Connecting Bubble Jet Printer to the Camera (continued)
○ ○ ○ ○ ○ ○ ○ ○ ○ ○ ○ ○ ○ ○ ○ ○ ○ ○ ○ ○ ○ ○
• When you detach the cable from the camera, hold the plug and do not pull by thecable.
○ ○ ○ ○ ○ ○ ○ ○ ○ ○ ○ ○ ○ ○ ○ ○ ○ ○ ○ ○ ○ ○
• Please see the Bubble Jet Printer Quick Start Guide manual for instructions toinstall paper and ink cartridges.
• The following operations cannot be performed while the printer is connected.- Replaying movies- Setting the language using the and the button combination.
• When the printer is disconnected, the symbol will disappear from the LCDmonitor and the camera will revert to standard replay mode.
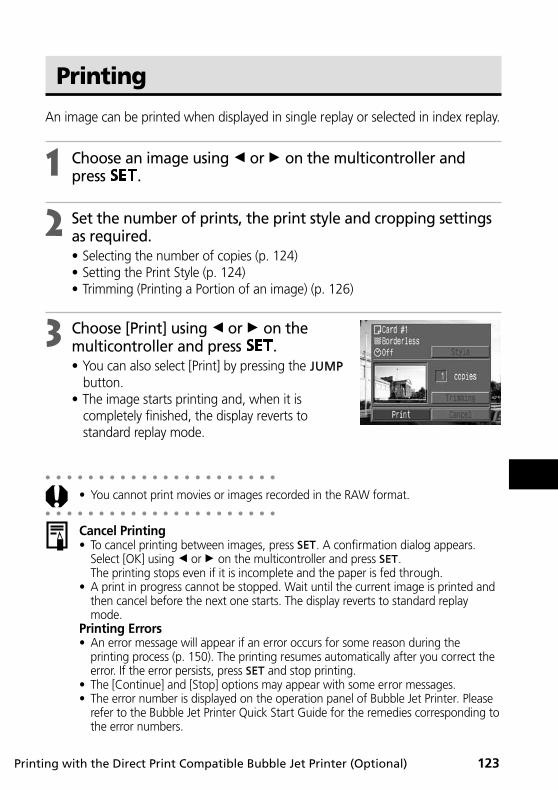
Printing with the Direct Print Compatible Bubble Jet Printer (Optional) 123
Printing
An image can be printed when displayed in single replay or selected in index replay.
1 Choose an image using B or A on the multicontroller andpress .
2 Set the number of prints, the print style and cropping settingsas required.• Selecting the number of copies (p. 124)• Setting the Print Style (p. 124)• Trimming (Printing a Portion of an image) (p. 126)
3 Choose [Print] using B or A on themulticontroller and press .• You can also select [Print] by pressing the
button.• The image starts printing and, when it is
completely finished, the display reverts tostandard replay mode.
○ ○ ○ ○ ○ ○ ○ ○ ○ ○ ○ ○ ○ ○ ○ ○ ○ ○ ○ ○ ○ ○
• You cannot print movies or images recorded in the RAW format.○ ○ ○ ○ ○ ○ ○ ○ ○ ○ ○ ○ ○ ○ ○ ○ ○ ○ ○ ○ ○ ○
Cancel Printing• To cancel printing between images, press . A confirmation dialog appears.
Select [OK] using B or A on the multicontroller and press .The printing stops even if it is incomplete and the paper is fed through.
• A print in progress cannot be stopped. Wait until the current image is printed andthen cancel before the next one starts. The display reverts to standard replaymode.
Printing Errors• An error message will appear if an error occurs for some reason during the
printing process (p. 150). The printing resumes automatically after you correct theerror. If the error persists, press and stop printing.
• The [Continue] and [Stop] options may appear with some error messages.• The error number is displayed on the operation panel of Bubble Jet Printer. Please
refer to the Bubble Jet Printer Quick Start Guide for the remedies corresponding tothe error numbers.

124 Printing with the Direct Print Compatible Bubble Jet Printer (Optional)
Printing (continued)
Selecting the Number of Copies
1 In Replaying mode, press and selectthe [Copies] option using C or D on themulticontroller.
2 Specify the desired number of copies using B or A on themulticontroller.• You can specify from 1 to 99 prints.
Setting the Print StyleYou can select from among the following print styles.
1 In the print setting menu, choose [Style]using C or D on the multicontroller andpress .
Select the paper size from the following.[Card #1], [Card #2], [Card #3], [LTR] or [A4]For the usable paper type, please refer to the Bubble Jet Printer User Guide.Prints right to the edges of the page.Prints with a border.Prints the image's creation date.
Paper
BordersBorderlessBordered
Date

Printing with the Direct Print Compatible Bubble Jet Printer (Optional) 125
2 Choose [Paper], [Borders] or [Date] usingC or D on the multicontroller.
3 Set the selection using B or A on the multicontroller.
4 Press the button.• The setting is complete and the Print Order
menu resumes.• If [Borderless] is selected as the print style, the
center portion of the recorded image (the imagedisplayed on the LCD monitor) is printed at anenlarged size. As a result, the image’s top,bottom and sides may be cropped slightly. If youhave not specified a trimming setting, a framewill appear around the area of the image thatwill be printed, allowing you to check theportion that will be cropped.
○ ○ ○ ○ ○ ○ ○ ○ ○ ○ ○ ○ ○ ○ ○ ○ ○ ○ ○ ○ ○ ○
• If you use the DPOF print settings for printing, cannot be set. The date isprinted according to the DPOF print setting.
• With the [Bordered] option, the image area remains relatively unchanged from therecorded image when it is printed.
Paper Borders Date
Choose [On] or [Off].Choose [Card #1], [Card #2],[Card #3], [LTR] or [A4].
Choose [Borderless] or[Bordered].
Print Area Frame

126 Printing with the Direct Print Compatible Bubble Jet Printer (Optional)
Printing (continued)
Trimming (Printing a Portion of an Image)You can specify which portion of an image gets printed.○ ○ ○ ○ ○ ○ ○ ○ ○ ○ ○ ○ ○ ○ ○ ○ ○ ○ ○ ○ ○ ○
Prior to TrimmingPlease set the Print Style (Paper, Borders and Date) first before setting the trimmingsettings (p. 124).
1 In Replaying mode, press andchoose [Trimming] using C or D on themulticontroller and press again.• The trimming frame appears at the center of the
image. If a trimming setting has already beenselected for the image, the frame will appeararound the previously selected portion.
2 Trim the Image.Changing the Size of the Trimming Frame• Move the zoom lever toward or .• The trimming frame can be changed to a
minimum selection of approximately half thedisplayed image or a maximum selection that isvirtually the same size as the image.
• You can cancel the trimming setting by moving the zoom lever toward again when the trimming frame is already set to the maximum size.
Setting the Portion of the Trimming Frame• Move the trimming frame using C, D, B or A on the multicontroller.
Rotating the Trimming Frame• You can rotate the trimming frame by pressing the button.
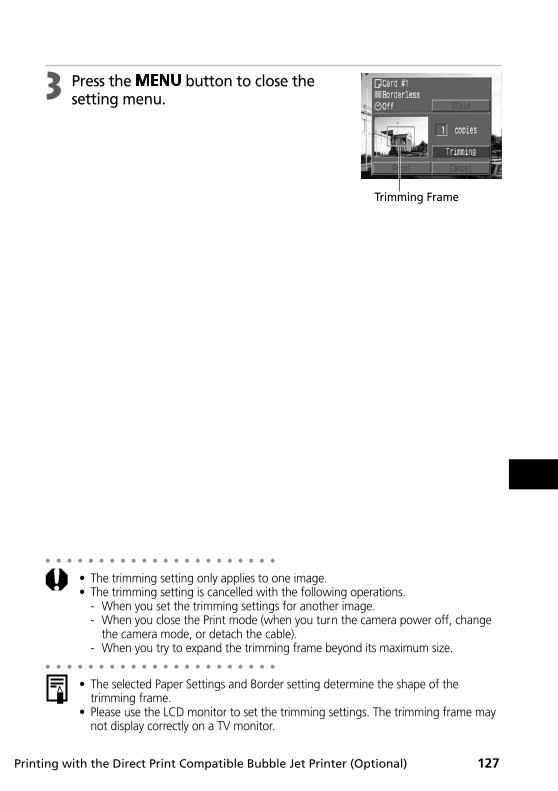
Printing with the Direct Print Compatible Bubble Jet Printer (Optional) 127
○ ○ ○ ○ ○ ○ ○ ○ ○ ○ ○ ○ ○ ○ ○ ○ ○ ○ ○ ○ ○ ○
• The trimming setting only applies to one image.• The trimming setting is cancelled with the following operations.
- When you set the trimming settings for another image.- When you close the Print mode (when you turn the camera power off, change
the camera mode, or detach the cable).- When you try to expand the trimming frame beyond its maximum size.
○ ○ ○ ○ ○ ○ ○ ○ ○ ○ ○ ○ ○ ○ ○ ○ ○ ○ ○ ○ ○ ○
• The selected Paper Settings and Border setting determine the shape of thetrimming frame.
• Please use the LCD monitor to set the trimming settings. The trimming frame maynot display correctly on a TV monitor.
Trimming Frame
3 Press the button to close thesetting menu.
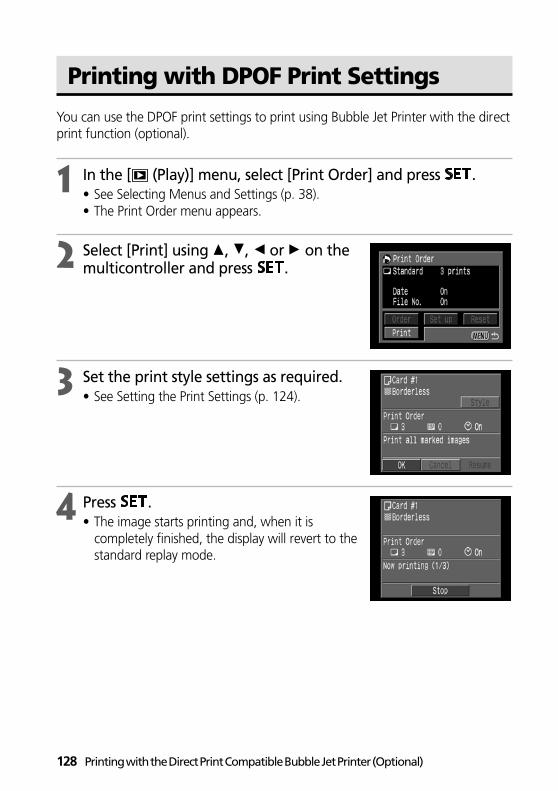
128 Printing with the Direct Print Compatible Bubble Jet Printer (Optional)
Printing with DPOF Print Settings
You can use the DPOF print settings to print using Bubble Jet Printer with the directprint function (optional).
1 In the [ (Play)] menu, select [Print Order] and press .• See Selecting Menus and Settings (p. 38).• The Print Order menu appears.
2 Select [Print] using C, D, B or A on themulticontroller and press .
3 Set the print style settings as required.• See Setting the Print Settings (p. 124).
4 Press .• The image starts printing and, when it is
completely finished, the display will revert to thestandard replay mode.

Printing with the Direct Print Compatible Bubble Jet Printer (Optional) 129
○ ○ ○ ○ ○ ○ ○ ○ ○ ○ ○ ○ ○ ○ ○ ○ ○ ○ ○ ○ ○ ○
• To print the date, set the DPOF [Date] setting to [On]. The date will not print with thePrint Style date setting under these circumstances (p. 109). If the print type is set to[Index], the date will not print even if the [Date] setting is set to [On] in Step 2.
• The file number will not print.○ ○ ○ ○ ○ ○ ○ ○ ○ ○ ○ ○ ○ ○ ○ ○ ○ ○ ○ ○ ○ ○
Cancel Printing• To cancel printing between images printed, press . A confirmation dialog
appears. Select [OK] using B or A on the multicontroller and press .The printing stops even if it is incomplete and the paper is fed through.
Restarting Printing• In the Print Order menu, select [Resume] using B or A on the multicontroller and
press . The remaining images can be printed.• Printing cannot be restarted under the following circumstances.
- If the print settings have been changed before restarting.- If the image for which the print settings were set has been deleted before
restarting.- If there was very little free space on the CF card when the printing was
cancelled.If these circumstances apply, you can select [OK] in the Print Order menu andreprint starting from the first image. If printing was cancelled because the camerabattery became discharged, you are recommended to power the camera with ahousehold power source. If you must use a battery pack, ensure that it is fullycharged for printing. After replacing the spent battery pack, turn the camerapower on again.
Printing Errors• An error message appears if an error occurs for some reason during the printing
process (p. 150). The printing resumes automatically after you correct the error. Ifthe error persists, press and stop printing.
• The [Continue] and [Stop] options may appear with some error messages.• The error number is displayed on the operation panel of Bubble Jet Printer. Please
refer to the Bubble Jet Printer Quick Start Guide for the remedies corresponding tothe error numbers.
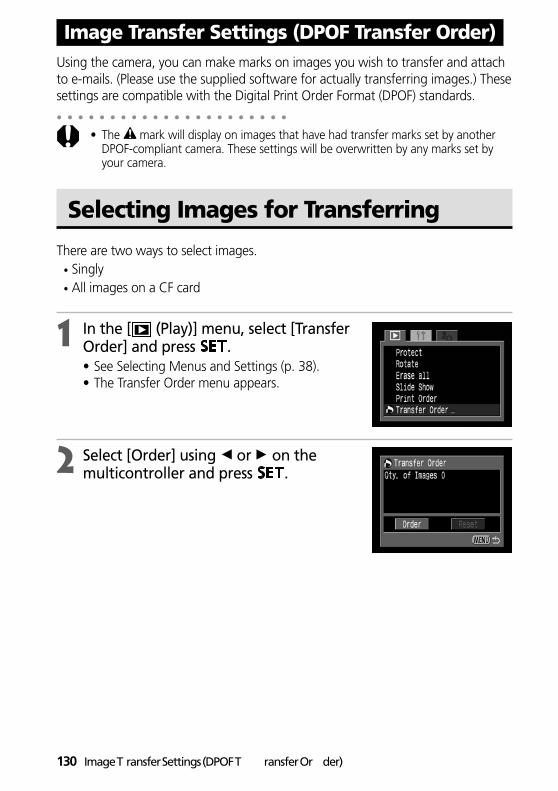
130 Image T ransfer Settings (DPOF T ransfer Or der)
Using the camera, you can make marks on images you wish to transfer and attachto e-mails. (Please use the supplied software for actually transferring images.) Thesesettings are compatible with the Digital Print Order Format (DPOF) standards.○ ○ ○ ○ ○ ○ ○ ○ ○ ○ ○ ○ ○ ○ ○ ○ ○ ○ ○ ○ ○ ○
• The mark will display on images that have had transfer marks set by anotherDPOF-compliant camera. These settings will be overwritten by any marks set byyour camera.
Selecting Images for Transferring
There are two ways to select images.• Singly• All images on a CF card
1 In the [ (Play)] menu, select [TransferOrder] and press .• See Selecting Menus and Settings (p. 38).• The Transfer Order menu appears.
2 Select [Order] using B or A on themulticontroller and press .
Image Transfer Settings (DPOF Transfer Order)

Image Transfer Settings (DPOF Transfer Order) 131
3 Select images for transferring.Single Images• Select an image using B or A on the
multicontroller and mark or remove marks fromimages using C or D on the multicontroller.
• You can use the same procedures to select images inindex replay (3 images). Press the button toswitch between single replay and index replay.
All the Images on a CF Card• Press the button to switch to index replay (three
images). Then press , and select [Mark All]using C or D on the multicontroller and press again. (If you select [Clear All] instead of [MarkAll], you can remove marks from all the images.)
• You can mark or remove a mark from eachimage after marking or removing marks from allthe images.
4 Press the button.• The selection mode will turn off and the Transfer Order menu will reappear.
○ ○ ○ ○ ○ ○ ○ ○ ○ ○ ○ ○ ○ ○ ○ ○ ○ ○ ○ ○ ○ ○
• Images are transferred in order from oldest to newest by the shooting date.• A maximum of 998 images can be marked per CF card.• Transfer settings can also be assigned to images with the supplied software
programs on a computer.

132 Image T ransfer Settings (DPOF T ransfer Or der)
Resetting the Transfer Settings
The transfer marks can all be removed at once.
1 Display the Transfer Order menu (p. 130).
2 Select [Reset] using B or A on themulticontroller and press .
3 Select [OK] using B or A on themulticontroller and press .

List of Menu Options 133
The chart below lists menu items and settings. See Selecting Menus and Settings(p. 38) to learn how to select a setting.
Rec. Menu* Some items may not appear in certain shooting modes (p. 90).
Resolution
(Excluding )
Resolution ( )
Compression
File Format
Drive Mode
p. 61
p. 61
p. 61
p. 64
p. 59
Reference Page
Sets the number of pixels used to record images to CF cards.
• Large
PowerShot S30 (2048 x 1536 pixels)
PowerShot S40 (2272 x 1704 pixels)
• Medium 1 (1600 x 1200 pixels)
• Medium 2 (1024 x 768 pixels)
• Small (640 x 480 pixels)
Sets the resolution of the frames as they are
recorded to the CF card.
• (320 x 240 pixels)
• (160 x 120 pixels)
Sets the relative compression ratio used to record
images to CF cards.
• Superfine
• Fine
• Normal
Sets the file format used to record images to CF
cards.
• JPEG
• RAW
Sets the single shooting, continuous shooting and its option, or self-
timer shooting and its duration. There is no combination of the self-
timer shooting and continuous shooting (only single shooting).
• Single Shooting
• Standard Continuous Shooting
• High-speed Continuous Shooting
• 10 sec Self-Timer
• 2 sec Self-Timer
Item Menu Screen Settings Content
List of Menu Options
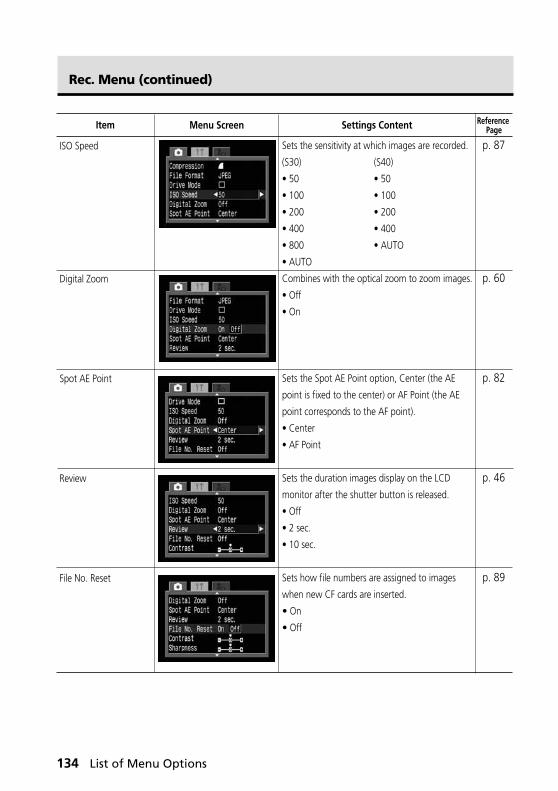
134 List of Menu Options
Rec. Menu (continued)
ISO Speed
Digital Zoom
Spot AE Point
Review
File No. Reset
p. 87
p. 60
p. 82
p. 46
p. 89
Sets the sensitivity at which images are recorded.
(S30) (S40)
• 50 • 50
• 100 • 100
• 200 • 200
• 400 • 400
• 800 • AUTO
• AUTO
Combines with the optical zoom to zoom images.
• Off
• On
Sets the Spot AE Point option, Center (the AE
point is fixed to the center) or AF Point (the AE
point corresponds to the AF point).
• Center
• AF Point
Sets the duration images display on the LCD
monitor after the shutter button is released.
• Off
• 2 sec.
• 10 sec.
Sets how file numbers are assigned to images
when new CF cards are inserted.
• On
• Off
Reference PageItem Menu Screen Settings Content

List of Menu Options 135
p. 87
p. 87
p. 87
Adjusts the image contrast.
• –
• 0
• +
Adjusts the image sharpness.
• –
• 0
• +
Adjusts the image saturation.
• –
• 0
• +
ReferencePageItem Menu Screen Settings Content
Contrast
Sharpness
Saturation
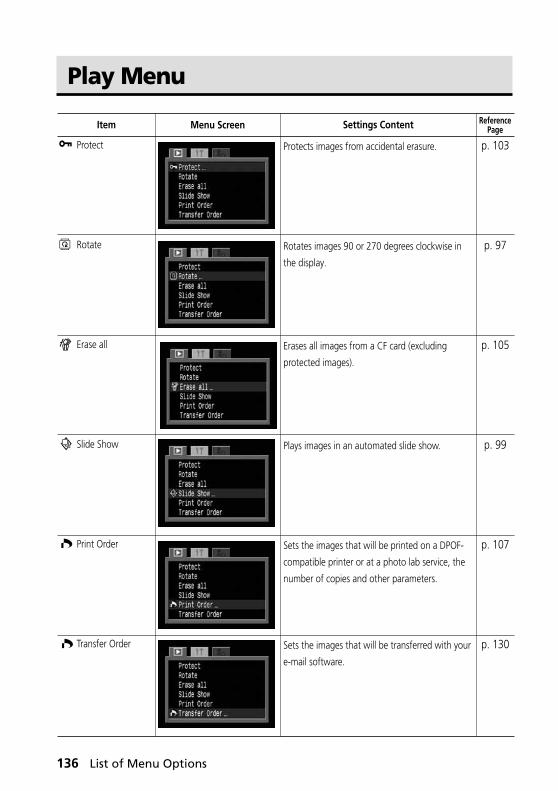
136 List of Menu Options
Protect
Rotate
Erase all
Slide Show
Print Order
Transfer Order
p. 103
p. 97
p. 105
p. 99
p. 107
p. 130
Protects images from accidental erasure.
Rotates images 90 or 270 degrees clockwise in
the display.
Erases all images from a CF card (excluding
protected images).
Plays images in an automated slide show.
Sets the images that will be printed on a DPOF-
compatible printer or at a photo lab service, the
number of copies and other parameters.
Sets the images that will be transferred with your
e-mail software.
ReferencePageItem Menu Screen Settings Content
Play Menu

List of Menu Options 137
Set up Menu
Sets whether or not the beep sounds when the
shutter button is pressed or when a menu
operation is performed.
• On
• Off (Still beeps to warn of an error even when
set to Off)
See also “How the [Beep] setting in the [ (Set
up)] menu and each sound setting in the [
(My Camera)] menu are related” on page 140.
Sets the brightness level of the LCD monitor.
• (Normal)
• (Bright)
Adjusts the sound volume when the shutter
button is pressed all the way. The beep does not
sound while a movie is being shot.
• (Off)
• (1)
• (2)
• (3)
• (4)
• (5)
Adjusts the sound volume when a movie is
played* and the startup sound when power
comes on.* After adjusting the sound volume through the menu, turn
the camera off and back on again in order for the new volume to take effect when playing movies.
• (Off)
• (1)
• (2)
• (3)
• (4)
• (5)
p. 34
p. 30
p. 34
p. 28, 96, 98
ReferencePageItem Menu Screen Settings Content
Beep
LCD Brightness
Speaker Vol.
(Shooting)
Playback Vol. (Replay)

138 List of Menu Options
Sets whether or not the camera automatically
powers down after a specified period of time
elapses without something being pressed.
• On
• Off
Sets the date, time and date format.
Formats (initializes) a CF card.
Sets the language used in the menus and
messages on the LCD monitor. The menu may
appear differently in some regions.
• English • Italiano
• Deutsch • Norsk
• Français • Svenska
• Nederlands • Español
• Dansk • Chinese
• Suomi • Japanese
You can change the language during image
replay by holding the button and
pressing the button.
Sets the video output signal standard.
• NTSC
• PAL
p. 28
p. 24
p. 106
p. 25
p. 142
Auto Power Down
Date/Time
Format
Language
Video System
ReferencePageItem Menu Screen Settings Content
Set up Menu (continued)

List of Menu Options 139
Sets the start-up image when you turn on the
camera.
•
• 1
•
•
Sets the start-up sound when you turn on the
camera.
See also “How the [Beep] setting in the [ (Set
up)] menu and each sound setting in the [
(My Camera)] menu are related” on page 140.
•
• 1
•
•
Sets the shutter sound when you depress the
shutter button. There is no shutter sound while a
movie is being shot.
See also “How the [Beep] setting in the [ (Set
up)] menu and each sound setting in the [
(My Camera)] menu are related” on page 140.
•
• 1
•
•
Start-up Image
Start-up Sound
Shutter Sound
ReferencePageItem Menu Screen Settings Content
p. 40
p. 40
p. 40
My Camera Menu
You can select the start-up image and start-up, shutter, operation, and self-timersounds. You can customize [ ] and [ ] of each item using the supplied software.For details, please refer to the Software Starter Guide.
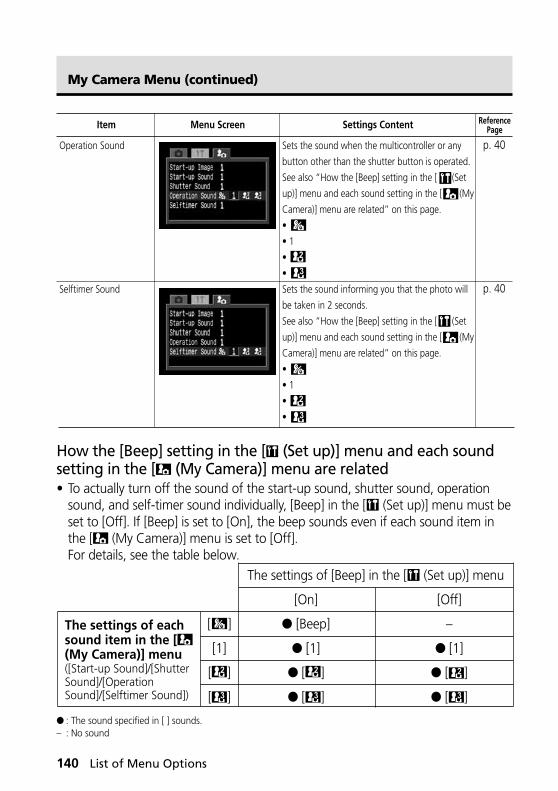
140 List of Menu Options
The settings of [Beep] in the [ (Set up)] menu
[On] [Off]
[ ] ● [Beep] –
[1] ● [1] ● [1]
[ ] ● [ ] ● [ ]
[ ] ● [ ] ● [ ]
Sets the sound when the multicontroller or any
button other than the shutter button is operated.
See also “How the [Beep] setting in the [ (Set
up)] menu and each sound setting in the [ (My
Camera)] menu are related” on this page.
•
• 1
•
•
Sets the sound informing you that the photo will
be taken in 2 seconds.
See also “How the [Beep] setting in the [ (Set
up)] menu and each sound setting in the [ (My
Camera)] menu are related” on this page.
•
• 1
•
•
ReferencePageItem Menu Screen Settings Content
Operation Sound
Selftimer Sound
p. 40
p. 40
My Camera Menu (continued)
How the [Beep] setting in the [ (Set up)] menu and each soundsetting in the [ (My Camera)] menu are related• To actually turn off the sound of the start-up sound, shutter sound, operation
sound, and self-timer sound individually, [Beep] in the [ (Set up)] menu must beset to [Off]. If [Beep] is set to [On], the beep sounds even if each sound item inthe [ (My Camera)] menu is set to [Off].For details, see the table below.
● : The sound specified in [ ] sounds.– : No sound
The settings of eachsound item in the [(My Camera)] menu([Start-up Sound]/[ShutterSound]/[OperationSound]/[Selftimer Sound])

List of Menu Options 141
Resetting all of the Settings to Default
You can reset all of the menu and button operation settings to default except for[Date/Time], [Language], and [Video System].
1 Turn on the camera.• You can turn on the camera into either Shooting or Replaying mode.
2 Press the button for longer than5 seconds.• The message “Reset settings to default?”
appears on the LCD monitor.
3 Select [OK] using B or A on themulticontroller, then press .• The screen on the right hand appears while
resetting. The normal screen resumes whenresetting is complete.
• To cancel resetting, select [Cancel] instead of[OK].

142 Shooting / Replaying with a TV Monitor
A video-compatible television connected via the supplied AV cable AVC-DC100 canbe used to view images as you shoot or replay them.
1 Turn off the camera (p. 27, 29).
2 Attach AV Cable AVC-DC100 to the terminal on the camera.
3 Plug the other ends of the AV cable tothe video in and audio in jacks on the TV.
4 Turn on the TV and switch it to Video mode.
5 Turn on the camera in Shooting mode or Replaying mode(p. 27).• The image will appear on the TV. Shoot or replay images as usual.• If the images are not appearing on the TV when shooting, press the
button.
○ ○ ○ ○ ○ ○ ○ ○ ○ ○ ○ ○ ○ ○ ○ ○ ○ ○ ○ ○ ○ ○
• No image will appear on the LCD monitor when the camera is connected to a TVmonitor.
• The video output signal can be switched (NTSC or PAL) to accommodate differentregional standards (p. 138). The default setting will vary between regions.NTSC: Japan, U.S.A., Canada, Taiwan, etc.PAL: Europe, Asia (excluding Taiwan), Oceania, etc.If an incorrect video system is set, the output image will not display properly.
• You can plug the AV cable into either the left or right input jack on the TV. Pleaseconsult the TV’s manual for details.
• A TV monitor cannot be used in mode.
Shooting / Replaying with a TV Monitor
To theVideo In Jack
To theAudio In Jack
YellowPlug
BlackPlug

Appendices 143
Camera Care and Maintenance
Use the following procedures to clean the camera body, lens, viewfinder, LCDmonitor and other parts.
Camera body Wipe the body clean with a soft cloth or eyeglasslens wiper.
Lens First use a lens blower brush to remove dust anddirt, then remove any remaining dirt by wiping thelens lightly with a soft cloth.• Never use synthetic cleansers on the camera body
or lens. If dirt remains, contact the nearest CanonCustomer Support Help Desk.
Viewfinder Use a lens blower brush to remove dust and dirt.If necessary, gently wipe the viewfinder and LCDmonitor with a soft cloth or an eyeglass lens wiperto remove stubborn dirt.
LCD monitor Use a lens blower brush to remove dust and dirt.If necessary, gently wipe the viewfinder and LCDmonitor with a soft cloth or an eyeglass lens wiperto remove stubborn dirt.• Never rub or press forcefully on the LCD monitor.
These actions may damage it or lead to otherproblems.
○ ○ ○ ○ ○ ○ ○ ○ ○ ○ ○ ○ ○ ○ ○ ○ ○ ○ ○ ○ ○ ○
• Never use thinners, benzene, synthetic cleansers or water to clean the camera.These substances may distort or damage the equipment.
Appendices

144 Appendices
Troubleshooting
Problem Cause Solution
Power is not turned on
CF card slot/battery cover openedInsufficient battery volatge
Poor contact between camera and battery terminalsCamera is in replaying or computer/printer modeFlash is charging (flashing orange indicator)
CF card full
CF card not formatted correctly
CF card slot/battery cover opened with camera onCF card slot/battery cover opened while camera was recording to CF card (warning signal)Switched to replaying mode from shooting mode
• Turn on the camera. See Turning the Power On / Off (p. 27).
• Confirm that the CF card slot/battery cover is securely closed.
• Fully charge the battery or use a household power source.
• Wipe the terminals with a clean, dry cloth.
• Switch the camera to Shooting mode.See Switching between Shooting and Replaying (p. 29).
• Wait until the orange indicator stops flashing and shines steadily, signaling that the flash is charged, then press the shutter button.
• Insert a new CF card.• If required, download the images to a computer and
erase them from the CF card to make space.• Format CF card. See Formatting a CF card (p. 106).• If reformatting doesn't work, the CF card logic circuits
may be damaged. Contact the nearest Canon Customer Support Help Desk.
• Close the CF card slot/battery cover, then turn off the camera.
• Close the CF card slot/battery cover, then close the lens cover.
• The lens does not retract in this case. To let the lens retract, close the lens cover.
Camera willnot operate
Camera willnot record
Lens will not retract

Appendices 145
Problem Cause Solution
Battery pack capacity reduced because of disuse for one year or more after being fully chargedBattery life exceededBattery life exceededPoor contact between battery charger and batteryCamera moved
Autofocus function hampered by obstruction to AF auxiliary light emitterSubject out of focal range
Insufficient light for shootingSubject dark in comparison to the background
Subject too far for flash to reach
• Replace the battery pack with a new one.
• Replace the battery pack with a new one.• Replace the battery pack with a new one.• Clean the battery terminals with a clean dry cloth.• Insert the charger plug firmly into the electrical outlet.• Be careful not to move the camera when pressing the
shutter button.• Use a tripod at slow shutter speeds when the camera
shake warning appears.• Be careful not to block the AF auxiliary light emitter
with your finger or other items.
• Ensure that there is at least 80 cm (2.7 ft.) between the camera lens and subject.
• Use the macro mode to shoot close-ups between 10 and 80 cm (3.9 in. and 2.7 ft.) at maximum wide angle and 30 and 80 cm (12 in. and 2.7 ft.) at maximum telephoto.
• Set the flash to on.• Set the exposure compensation to a positive (+) setting.• Use the AE lock or spot metering function.
See Locking the Exposure Setting (AE Lock) (p. 79) and Switching between Metering Modes (p. 82)
• To use the built-in flash, shoot within the following rages:When sensitivity is set to AUTO: 35 cm - 4.8 m (1.15 ft. - 15.75 ft.) (W) 35 cm - 3.0 m (1.15 ft. - 9.84 ft.) (T)When sensitivity is set to ISO 100 equivalent: 55 cm - 4.0 m (1.8 ft. - 13.1 ft.) (W) 55 cm - 2.5 m (1.8 ft. - 8.2 ft.) (T)
• Raise the ISO sensitivity and then shoot. See Manually Setting Image Characteristics (p. 87)
Battery pack consumedquickly
Battery pack will not charge
Image is blurred or out of focus
Subject in recordedimage is too dark
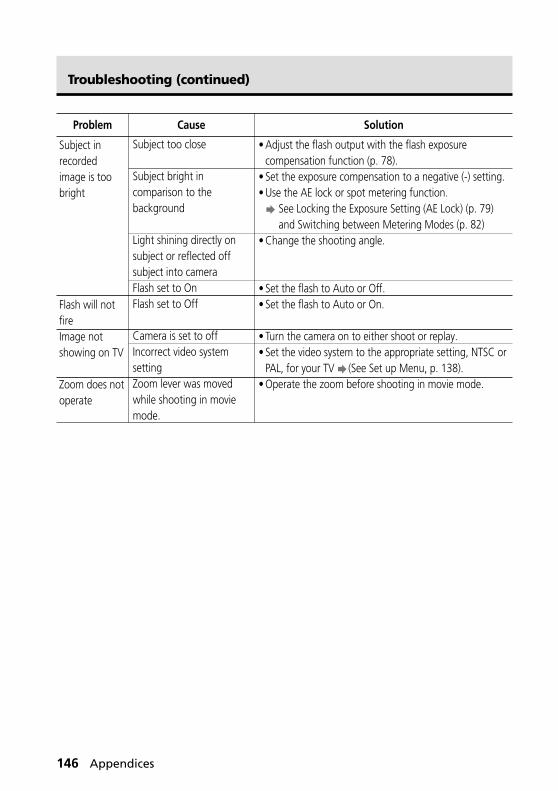
146 Appendices
Problem Cause Solution
Subject too close
Subject bright in comparison to the background
Light shining directly on subject or reflected off subject into camera Flash set to OnFlash set to Off
Camera is set to offIncorrect video system settingZoom lever was moved while shooting in movie mode.
• Adjust the flash output with the flash exposure compensation function (p. 78).
• Set the exposure compensation to a negative (-) setting.• Use the AE lock or spot metering function.
See Locking the Exposure Setting (AE Lock) (p. 79) and Switching between Metering Modes (p. 82)
• Change the shooting angle.
• Set the flash to Auto or Off.• Set the flash to Auto or On.
• Turn the camera on to either shoot or replay.• Set the video system to the appropriate setting, NTSC or
PAL, for your TV (See Set up Menu, p. 138).• Operate the zoom before shooting in movie mode.
Subject in recordedimage is too bright
Flash will not fireImage not showing on TV
Zoom does not operate
Troubleshooting (continued)

Appendices 147
List of Messages
The following messages may appear on the LCD monitor.
Reset settings to default? Do you wish to reset all the camera and menu settingsto default?
Resetting Resetting all the camera and menu settings to default
Busy... Image is being recorded to, or read from, CF card.
No CF card: You attempted to shoot or replay images without a CFcard installed.
Cannot record!: You attempted to shoot an image without a CF cardinstalled.
CF card error!: CF card has experienced an anomaly.
CF card full: CF card is too full to save more images or printsettings.
Naming error!: The file could not be created because there is a file withthe same name as the directory that the camera isattempting to create, or the highest possible filenumber has already been reached. In the Rec. menu,please set [File No.] Reset to [On]. After you save all theimages you wish to retain onto a computer, format theCF card (p. 102). Please note that formatting will eraseall the existing images and other data.
Change the battery pack: Battery charge is insufficient to operate the camera.Replace it immediately with a charged battery pack orrecharge it.
No image: No images recorded on CF card.
Image too large: You attempted to replay an image larger than 3200 x2400 pixels.
Incompatible JPEG format: You attempted to replay an incompatible JPEG file.
Corrupted data: You attempted to replay an image with corrupted data.
RAW: You attempted to replay an image recorded in anincompatible RAW format.

148 Appendices
List of Messages (continued)
Cannot magnify!: You attempted to magnify an image that wasphotographed with another camera, recorded in adifferent format, or edited on a computer.
Cannot rotate: You attempted to rotate an image that wasphotographed with another camera, recorded in adifferent format, or edited on a computer.
Unidentified Image You attempted to replay an image that was recordedin a special format (proprietary format used by thecamera of another manufacturer, etc.).
Unidentified Sound Data Cannot attach sound annotation to the imagebecause the image has some sound file recorded in aninappropriate format.
Protected!: You attempted to erase a protected image.
Too many marks: Too many images have been marked for printing orfor inclusion in a slide show. Cannot process anymore.
Cannot mark image: You attempted to set the print settings for an non-JPEG file.
Cannot complete!: Couldn’t save the print or slide show settings.
Cannot edit: Slide show settings file is corrupted
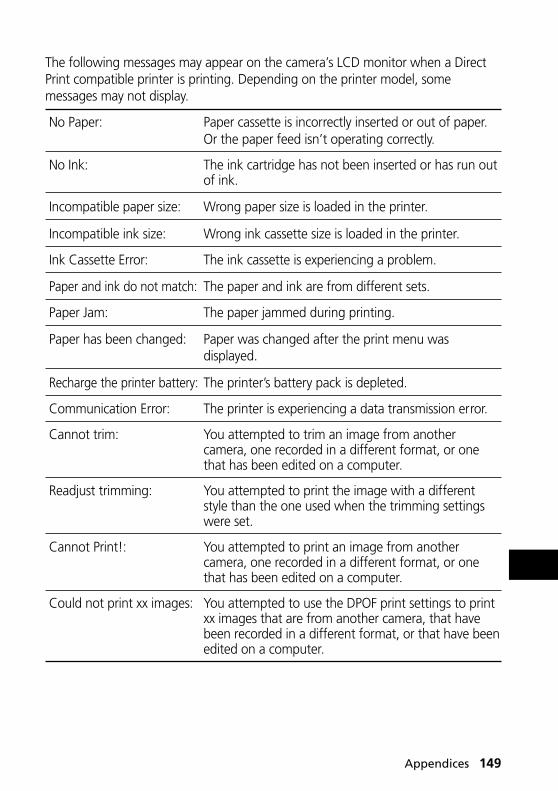
Appendices 149
The following messages may appear on the camera’s LCD monitor when a DirectPrint compatible printer is printing. Depending on the printer model, somemessages may not display.
No Paper: Paper cassette is incorrectly inserted or out of paper.Or the paper feed isn’t operating correctly.
No Ink: The ink cartridge has not been inserted or has run outof ink.
Incompatible paper size: Wrong paper size is loaded in the printer.
Incompatible ink size: Wrong ink cassette size is loaded in the printer.
Ink Cassette Error: The ink cassette is experiencing a problem.
Paper and ink do not match: The paper and ink are from different sets.
Paper Jam: The paper jammed during printing.
Paper has been changed: Paper was changed after the print menu wasdisplayed.
Recharge the printer battery: The printer’s battery pack is depleted.
Communication Error: The printer is experiencing a data transmission error.
Cannot trim: You attempted to trim an image from anothercamera, one recorded in a different format, or onethat has been edited on a computer.
Readjust trimming: You attempted to print the image with a differentstyle than the one used when the trimming settingswere set.
Cannot Print!: You attempted to print an image from anothercamera, one recorded in a different format, or onethat has been edited on a computer.
Could not print xx images: You attempted to use the DPOF print settings to printxx images that are from another camera, that havebeen recorded in a different format, or that have beenedited on a computer.

150 Appendices
List of Messages (continued)
The following messages may appear when the camera is connected to the DirectPrint compatible Bubble Jet Printer.
Check the error number displayed on the control panel of Bubble Jet Printer andrefer to the Bubble Jet Printer Quick Start Guide.
Printer in use: The printer is printing the data from the memory cardinserted in the computer or printer. The printerautomatically starts printing the images from thecamera after completing the current printing.
Printer warming up: Printer is warming up. When it is ready, the printerstarts printing automatically.
No printhead No print head is installed in the printer.
Printer cover open Close the printer cover securely.
Media type error You selected a paper type incompatible with theprinter. Select a compatible paper type in the PrintStyle menu.
Paper lever error Adjust the paper selection lever to the proper position.
Low ink level The ink tank needs to be replaced soon. Prepare anew ink tank. If you select [Continue] in the errorscreen, you can restart printing.
Waste tank full You can restart printing by pressing the RESUME/CANCEL button on Bubble Jet Printer. Please requestreplacement of the waste tank to the shop where youpurchased the printer or your nearest Canon customersupport center listed in the Bubble Jet Quick StartGuide.
Printer error Turn off the printer, then turn it on again. If the errorpersists, please consult your nearest Canon customersupport center listed in the Bubble Jet Quick StartGuide.
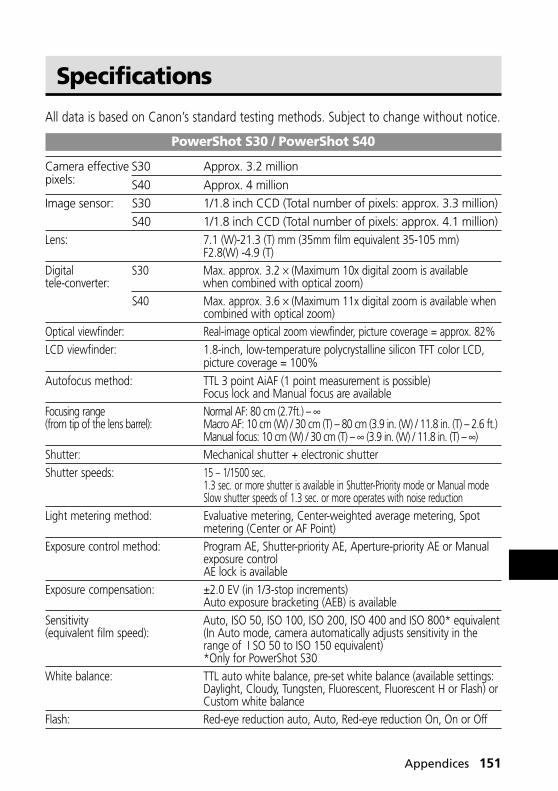
Appendices 151
Specifications
All data is based on Canon’s standard testing methods. Subject to change without notice.
PowerShot S30 / PowerShot S40
Camera effective S30 Approx. 3.2 millionpixels: S40 Approx. 4 millionImage sensor: S30 1/1.8 inch CCD (Total number of pixels: approx. 3.3 million)
S40 1/1.8 inch CCD (Total number of pixels: approx. 4.1 million)Lens: 7.1 (W)-21.3 (T) mm (35mm film equivalent 35-105 mm)
F2.8(W) -4.9 (T)Digital S30 Max. approx. 3.2 × (Maximum 10x digital zoom is availabletele-converter: when combined with optical zoom)
S40 Max. approx. 3.6 × (Maximum 11x digital zoom is available whencombined with optical zoom)
Optical viewfinder: Real-image optical zoom viewfinder, picture coverage = approx. 82%LCD viewfinder: 1.8-inch, low-temperature polycrystalline silicon TFT color LCD,
picture coverage = 100%Autofocus method: TTL 3 point AiAF (1 point measurement is possible)
Focus lock and Manual focus are availableFocusing range Normal AF: 80 cm (2.7ft.) – ∞(from tip of the lens barrel): Macro AF: 10 cm (W) / 30 cm (T) – 80 cm (3.9 in. (W) / 11.8 in. (T) – 2.6 ft.)
Manual focus: 10 cm (W) / 30 cm (T) – ∞ (3.9 in. (W) / 11.8 in. (T) – ∞)Shutter: Mechanical shutter + electronic shutterShutter speeds: 15 – 1/1500 sec.
1.3 sec. or more shutter is available in Shutter-Priority mode or Manual modeSlow shutter speeds of 1.3 sec. or more operates with noise reduction
Light metering method: Evaluative metering, Center-weighted average metering, Spotmetering (Center or AF Point)
Exposure control method: Program AE, Shutter-priority AE, Aperture-priority AE or Manualexposure controlAE lock is available
Exposure compensation: ±2.0 EV (in 1/3-stop increments)Auto exposure bracketing (AEB) is available
Sensitivity Auto, ISO 50, ISO 100, ISO 200, ISO 400 and ISO 800* equivalent(equivalent film speed): (In Auto mode, camera automatically adjusts sensitivity in the
range of I SO 50 to ISO 150 equivalent)*Only for PowerShot S30
White balance: TTL auto white balance, pre-set white balance (available settings:Daylight, Cloudy, Tungsten, Fluorescent, Fluorescent H or Flash) orCustom white balance
Flash: Red-eye reduction auto, Auto, Red-eye reduction On, On or Off
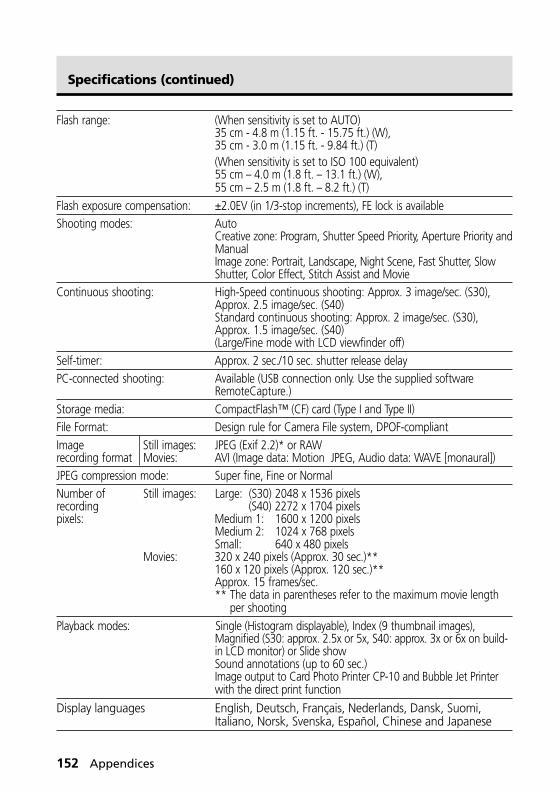
152 Appendices
Specifications (continued)
Flash range: (When sensitivity is set to AUTO)35 cm - 4.8 m (1.15 ft. - 15.75 ft.) (W),35 cm - 3.0 m (1.15 ft. - 9.84 ft.) (T)(When sensitivity is set to ISO 100 equivalent)55 cm – 4.0 m (1.8 ft. – 13.1 ft.) (W),55 cm – 2.5 m (1.8 ft. – 8.2 ft.) (T)
Flash exposure compensation: ±2.0EV (in 1/3-stop increments), FE lock is availableShooting modes: Auto
Creative zone: Program, Shutter Speed Priority, Aperture Priority andManualImage zone: Portrait, Landscape, Night Scene, Fast Shutter, SlowShutter, Color Effect, Stitch Assist and Movie
Continuous shooting: High-Speed continuous shooting: Approx. 3 image/sec. (S30),Approx. 2.5 image/sec. (S40)Standard continuous shooting: Approx. 2 image/sec. (S30),Approx. 1.5 image/sec. (S40)(Large/Fine mode with LCD viewfinder off)
Self-timer: Approx. 2 sec./10 sec. shutter release delayPC-connected shooting: Available (USB connection only. Use the supplied software
RemoteCapture.)Storage media: CompactFlash™ (CF) card (Type I and Type II)File Format: Design rule for Camera File system, DPOF-compliantImage Still images: JPEG (Exif 2.2)* or RAWrecording format Movies: AVI (Image data: Motion JPEG, Audio data: WAVE [monaural])JPEG compression mode: Super fine, Fine or NormalNumber of Still images: Large: (S30) 2048 x 1536 pixelsrecording (S40) 2272 x 1704 pixelspixels: Medium 1: 1600 x 1200 pixels
Medium 2: 1024 x 768 pixelsSmall: 640 x 480 pixels
Movies: 320 x 240 pixels (Approx. 30 sec.)**160 x 120 pixels (Approx. 120 sec.)**Approx. 15 frames/sec.** The data in parentheses refer to the maximum movie length
per shootingPlayback modes: Single (Histogram displayable), Index (9 thumbnail images),
Magnified (S30: approx. 2.5x or 5x, S40: approx. 3x or 6x on build-in LCD monitor) or Slide showSound annotations (up to 60 sec.)Image output to Card Photo Printer CP-10 and Bubble Jet Printerwith the direct print function
Display languages English, Deutsch, Français, Nederlands, Dansk, Suomi,Italiano, Norsk, Svenska, Español, Chinese and Japanese
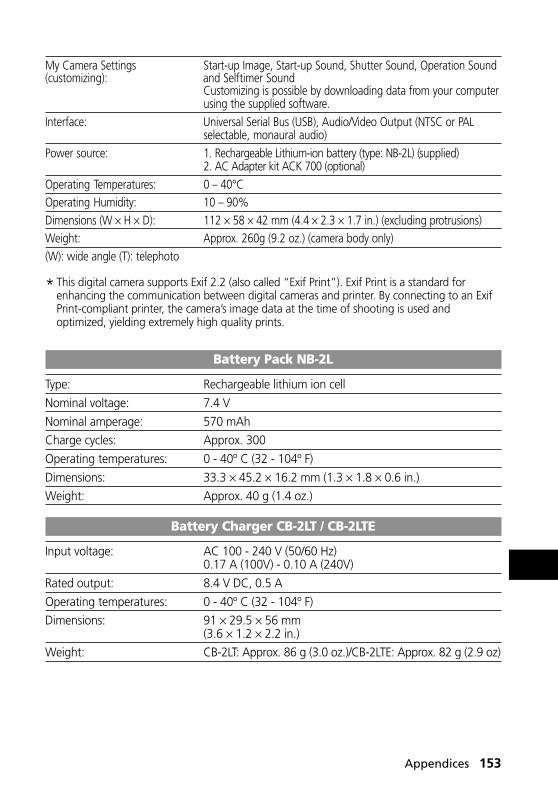
Appendices 153
My Camera Settings Start-up Image, Start-up Sound, Shutter Sound, Operation Sound(customizing): and Selftimer Sound
Customizing is possible by downloading data from your computerusing the supplied software.
Interface: Universal Serial Bus (USB), Audio/Video Output (NTSC or PALselectable, monaural audio)
Power source: 1. Rechargeable Lithium-ion battery (type: NB-2L) (supplied)2. AC Adapter kit ACK 700 (optional)
Operating Temperatures: 0 – 40°COperating Humidity: 10 – 90%Dimensions (W × H × D): 112 × 58 × 42 mm (4.4 × 2.3 × 1.7 in.) (excluding protrusions)Weight: Approx. 260g (9.2 oz.) (camera body only)(W): wide angle (T): telephoto
*This digital camera supports Exif 2.2 (also called “Exif Print”). Exif Print is a standard forenhancing the communication between digital cameras and printer. By connecting to an ExifPrint-compliant printer, the camera’s image data at the time of shooting is used andoptimized, yielding extremely high quality prints.
Battery Pack NB-2L
Type: Rechargeable lithium ion cell
Nominal voltage: 7.4 V
Nominal amperage: 570 mAh
Charge cycles: Approx. 300
Operating temperatures: 0 - 40º C (32 - 104º F)
Dimensions: 33.3 × 45.2 × 16.2 mm (1.3 × 1.8 × 0.6 in.)
Weight: Approx. 40 g (1.4 oz.)
Battery Charger CB-2LT / CB-2LTE
Input voltage: AC 100 - 240 V (50/60 Hz)0.17 A (100V) - 0.10 A (240V)
Rated output: 8.4 V DC, 0.5 A
Operating temperatures: 0 - 40º C (32 - 104º F)
Dimensions: 91 × 29.5 × 56 mm(3.6 × 1.2 × 2.2 in.)
Weight: CB-2LT: Approx. 86 g (3.0 oz.)/CB-2LTE: Approx. 82 g (2.9 oz)
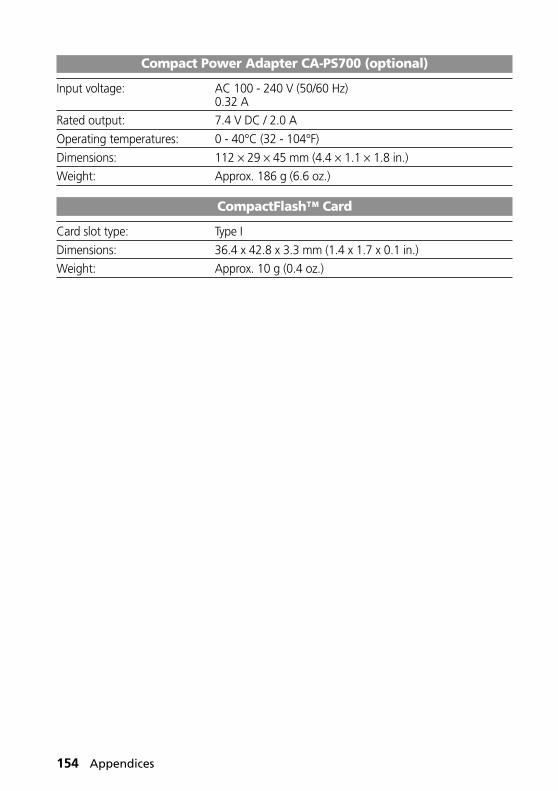
154 Appendices
Compact Power Adapter CA-PS700 (optional)
Input voltage: AC 100 - 240 V (50/60 Hz)0.32 A
Rated output: 7.4 V DC / 2.0 A
Operating temperatures: 0 - 40°C (32 - 104°F)
Dimensions: 112 × 29 × 45 mm (4.4 × 1.1 × 1.8 in.)
Weight: Approx. 186 g (6.6 oz.)
CompactFlash™ Card
Card slot type: Type I
Dimensions: 36.4 x 42.8 x 3.3 mm (1.4 x 1.7 x 0.1 in.)
Weight: Approx. 10 g (0.4 oz.)

Index 155
AAC Adapter Kit 19AEB Mode 77AE Lock 79AF Frame
Auto Selection 71Manual Selection 71
Aperture-Priority AE ( ) 68Aperture Settings 65, 66, 68, 70Auto Mode ( ) 44Auto Exposure Bracketing (AEB Mode) 77Auto Replay (Slide Show) 99, 136A/V Out Terminal 10, 142
BBattery Pack
Charging 15Handling Precautions 16Installing 17Low Status 18Performance 18
Battery charger 15Beep 137, 139, 140Black and White Mode 52Brightness
LCD Monitor 137
CCamera Care and Maintenance 143CF Card
Formatting 106Handling 23Installing 21Recording Capacity 22
Cleaning 143Color Effect 52CompactFlash™ Card 21, 22, 23, 106Compact Power Adapter 19Components Guide 10Compression 61, 133Continuous Mode ( ) 59Contrast 87, 135Creative Zone 13
DDate/Time 24, 138DC Coupler 19Digital Print Order Format (DPOF) Settings
Print Settings 107, 119, 128Transfer Order 130
Digital Terminal 10, 112, 121Digital Zoom 37, 60, 134Display Modes 30 - 33
Detailed 30, 32Simple 30, 32
DPOFPrint Settings 107, 119, 128Transfer Order 130
EErasing
All Images 105Displayed Images 9Single Images 104
ExposureAEB 77AE Lock 79Aperture-Priority AE ( ) 68Compensation 73Flash Exposure Compensation 78Shutter Speed-Priority AE ( ) 66White Balance 74
Exposure Compensation 73
FFast Shutter 50FE Lock 81File Format 64, 133File No. Reset 89File Numbers 89Flash 47Flash Exposure Compensation 78Focal Length 37Focus
Lock 84Manual 86
Format 106
HHistogram 33Household Power Source 19
IImage Characteristics 87
Contrast 87ISO Speed 87Saturation 87Sharpness 87
Image Zone 13Index Replay 94Indicators 12, 27Information View 31 - 33Interface
Cables 10, 112, 121ISO Speed 87
JJump 95
Index
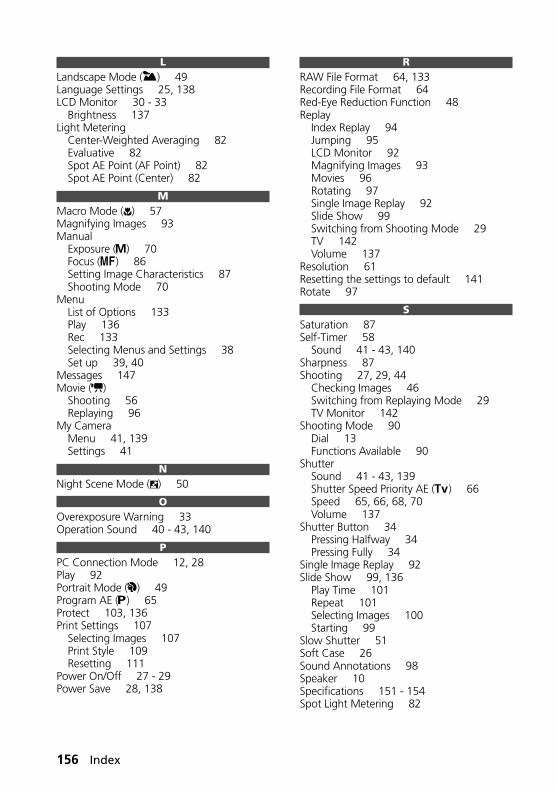
156 Index
LLandscape Mode ( ) 49Language Settings 25, 138LCD Monitor 30 - 33
Brightness 137Light Metering
Center-Weighted Averaging 82Evaluative 82Spot AE Point (AF Point) 82Spot AE Point (Center) 82
MMacro Mode ( ) 57Magnifying Images 93Manual
Exposure ( ) 70Focus ( ) 86Setting Image Characteristics 87Shooting Mode 70
MenuList of Options 133Play 136Rec 133Selecting Menus and Settings 38Set up 39, 40
Messages 147Movie ( )
Shooting 56Replaying 96
My CameraMenu 41, 139Settings 41
NNight Scene Mode ( ) 50
OOverexposure Warning 33Operation Sound 40 - 43, 140
PPC Connection Mode 12, 28Play 92Portrait Mode ( ) 49Program AE ( ) 65Protect 103, 136Print Settings 107
Selecting Images 107Print Style 109Resetting 111
Power On/Off 27 - 29Power Save 28, 138
RRAW File Format 64, 133Recording File Format 64Red-Eye Reduction Function 48Replay
Index Replay 94Jumping 95LCD Monitor 92Magnifying Images 93Movies 96Rotating 97Single Image Replay 92Slide Show 99Switching from Shooting Mode 29TV 142Volume 137
Resolution 61Resetting the settings to default 141Rotate 97
SSaturation 87Self-Timer 58
Sound 41 - 43, 140Sharpness 87Shooting 27, 29, 44
Checking Images 46Switching from Replaying Mode 29TV Monitor 142
Shooting Mode 90Dial 13Functions Available 90
ShutterSound 41 - 43, 139Shutter Speed Priority AE ( ) 66Speed 65, 66, 68, 70Volume 137
Shutter Button 34Pressing Halfway 34Pressing Fully 34
Single Image Replay 92Slide Show 99, 136
Play Time 101Repeat 101Selecting Images 100Starting 99
Slow Shutter 51Soft Case 26Sound Annotations 98Speaker 10Specifications 151 - 154Spot Light Metering 82

Index 157
Start-upImage 28, 41 - 43, 139Sound 28, 41 - 43, 139
Stitch Assist Mode ( ) 53Framing Subjects 53Shooting 54
Strap 26
TTelephoto 37Transfer Order
Reset 132Selecting Images 130
Troubleshooting 144 - 146
VVideo System 138, 142Viewfinder
LCD Monitor 12, 30Optical 10, 36
VolumeReplay 137Shooting 137
WWAV Files 32, 43, 98White Balance 74Wide Angle 37
ZZoom 37, 60, 93
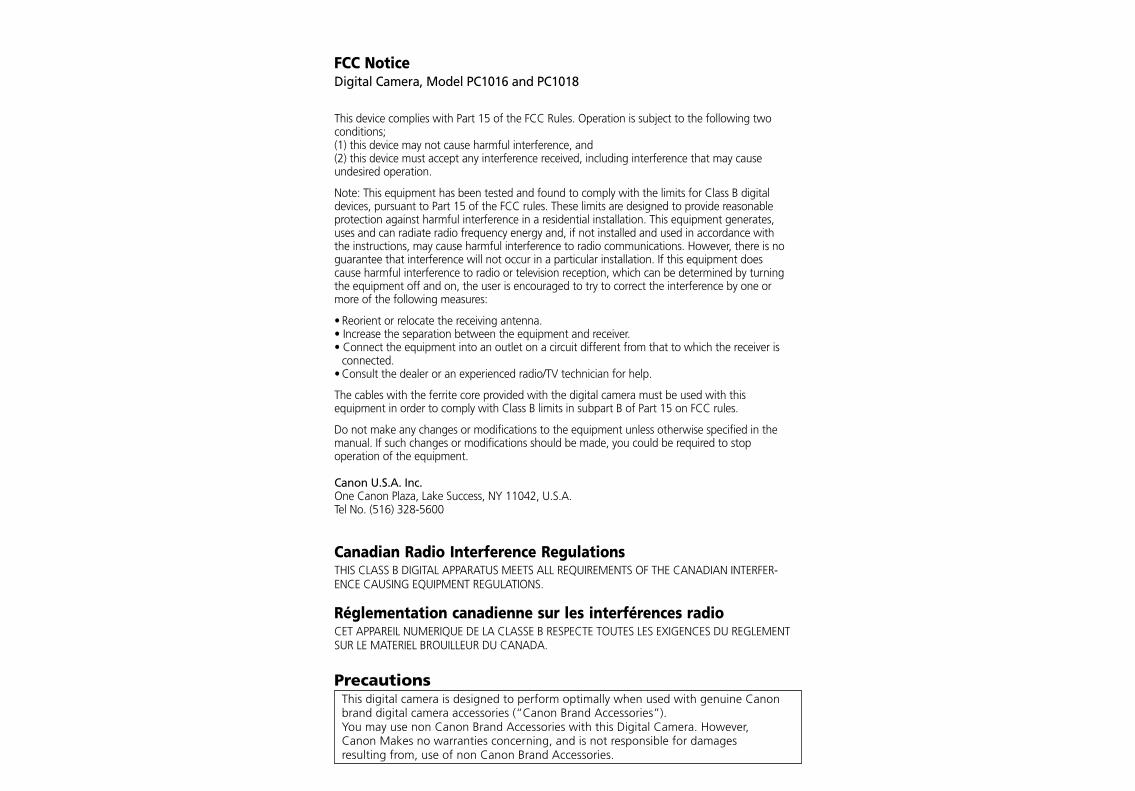
FCC NoticeDigital Camera, Model PC1016 and PC1018
This device complies with Part 15 of the FCC Rules. Operation is subject to the following twoconditions;(1) this device may not cause harmful interference, and(2) this device must accept any interference received, including interference that may causeundesired operation.
Note: This equipment has been tested and found to comply with the limits for Class B digitaldevices, pursuant to Part 15 of the FCC rules. These limits are designed to provide reasonableprotection against harmful interference in a residential installation. This equipment generates,uses and can radiate radio frequency energy and, if not installed and used in accordance withthe instructions, may cause harmful interference to radio communications. However, there is noguarantee that interference will not occur in a particular installation. If this equipment doescause harmful interference to radio or television reception, which can be determined by turningthe equipment off and on, the user is encouraged to try to correct the interference by one ormore of the following measures:
• Reorient or relocate the receiving antenna.• Increase the separation between the equipment and receiver.• Connect the equipment into an outlet on a circuit different from that to which the receiver is
connected.• Consult the dealer or an experienced radio/TV technician for help.
The cables with the ferrite core provided with the digital camera must be used with thisequipment in order to comply with Class B limits in subpart B of Part 15 on FCC rules.
Do not make any changes or modifications to the equipment unless otherwise specified in themanual. If such changes or modifications should be made, you could be required to stopoperation of the equipment.
Canon U.S.A. Inc.One Canon Plaza, Lake Success, NY 11042, U.S.A.Tel No. (516) 328-5600
Canadian Radio Interference RegulationsTHIS CLASS B DIGITAL APPARATUS MEETS ALL REQUIREMENTS OF THE CANADIAN INTERFER-ENCE CAUSING EQUIPMENT REGULATIONS.
Réglementation canadienne sur les interférences radioCET APPAREIL NUMERIQUE DE LA CLASSE B RESPECTE TOUTES LES EXIGENCES DU REGLEMENTSUR LE MATERIEL BROUILLEUR DU CANADA.
PrecautionsThis digital camera is designed to perform optimally when used with genuine Canonbrand digital camera accessories (“Canon Brand Accessories”).You may use non Canon Brand Accessories with this Digital Camera. However,Canon Makes no warranties concerning, and is not responsible for damagesresulting from, use of non Canon Brand Accessories.
CDI-E055-010 XXXXXXX © 2002 CANON INC. PRINTED IN JAPAN