Embed Size (px)
Citation preview
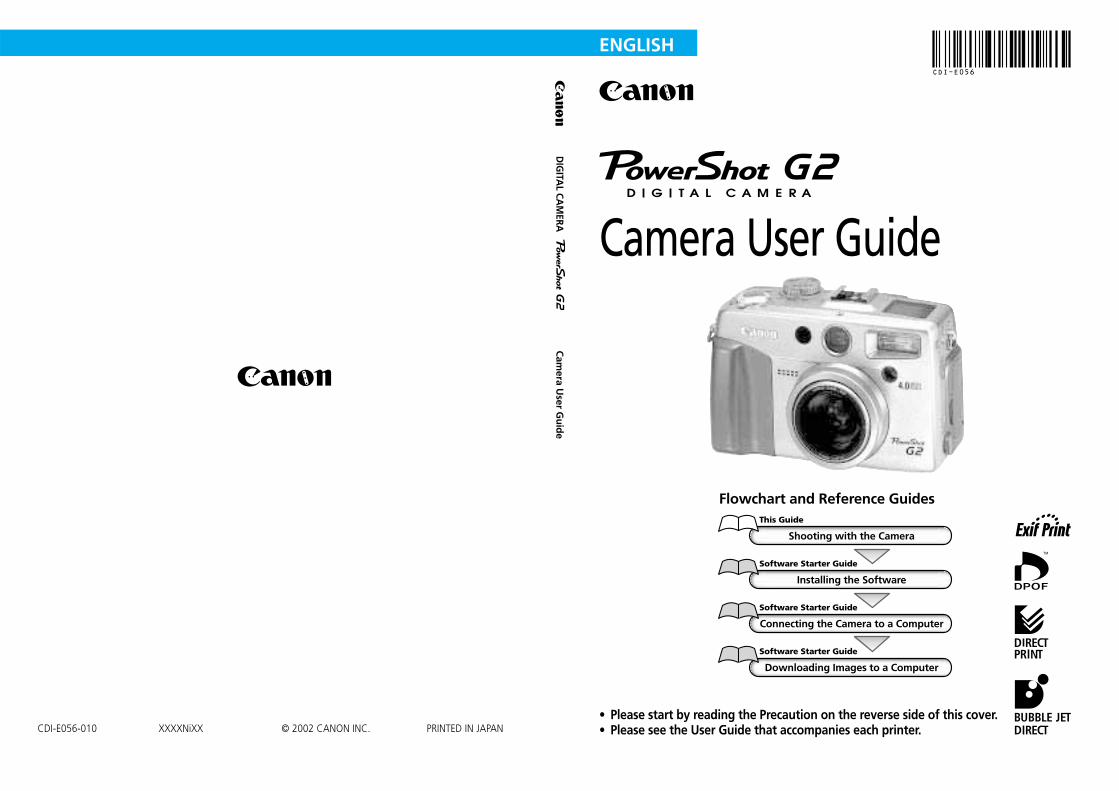
Flowchart and Reference GuidesThis Guide
Shooting with the Camera
Software Starter Guide
Installing the Software
Software Starter Guide
Connecting the Camera to a Computer
Software Starter Guide
Downloading Images to a Computer
• Please start by reading the Precaution on the reverse side of this cover.• Please see the User Guide that accompanies each printer.
DIG
ITAL CA
MERA
Cam
era User G
uid
e
CDI-E056-010 XXXXNiXX © 2002 CANON INC. PRINTED IN JAPAN
ENGLISH
Camera User Guide
CDI-E056
PrecautionCamera Body TemperatureIf your camera is used for prolonged periods, the camera body may becomewarm. Please be aware of this and take care when operating the camera for anextended period.
LCD MonitorThe LCD monitor is produced with extremely high-precision manufacturingtechniques. More than 99.99% of the pixels operate to specification. Less than0.01% of the pixels may occasionally misfire or appear as red or black dots. Thishas no effect on the recorded image and does not constitute a malfunction.
Video FormatPlease set the camera’s video signal format to the one used in your region beforeusing it with a TV monitor (p. 119).
Please read the handling and safety precautions starting on page 4 before using the camera.
Trademark Acknowledgements• Canon and PowerShot are trademarks of Canon, Inc.• CompactFlash is a trademark of SanDisk Corporation.• Other names and products not mentioned above may be registered trademarks or
trademarks of their respective companies.
Copyright ©2002 Canon Inc. All rights reserved.
Icon Conventions in the Text
This mark denotes issues that may affect the camera’s operation.
This mark denotes additional topics that complement the basic operatingprocedures.
This mark denotes tips about the camera and photography.
Table of Contents 1
Table of Contents
Read this First ............................................................................. 4
Quick Start .................................................................................. 8
Components Guide ................................................................... 10Front View ................................................................................... 10Back View .................................................................................... 11Controls ....................................................................................... 12Main Dial / Mode Dial ................................................................... 13Display Panel ................................................................................ 15
Preparing the Camera .............................................................. 16Charging the Battery Pack ............................................................. 16Installing the Battery Pack ............................................................. 18Using a Household Power Source .................................................. 20Using a Charge Adapter / Car Battery Cable Kit (Optional) .............. 21Installing a CF Card ....................................................................... 24Setting the Date / Time ................................................................. 26Setting the Language .................................................................... 27Attaching the Strap ...................................................................... 28Attaching the Lens Cap ................................................................ 28Using the Soft Case (Optional) ...................................................... 28
Basic Functions.......................................................................... 29Turning the Power On ................................................................... 29Switching between Shooting and Replaying ................................... 30Using the LCD Monitor ................................................................. 31Pressing the Shutter Button ........................................................... 36Using the Optical Viewfinder to shoot ........................................... 37Adjusting the Zoom ...................................................................... 38Selecting Menus and Settings ........................................................ 39
Shooting - Letting the Camera Select Settings ......................... 41Auto Mode .......................................................................... 41
Checking an Image Right after Shooting ........................................ 42Using the Built-In Flash ......................................................... 43Pan Focus Mode .................................................................. 46Portrait Mode ...................................................................... 46Landscape Mode ................................................................. 47Night Scene Mode ............................................................... 47Changing the Color Effect .................................................... 48

2 Table of Contents
Stitch Assist Mode................................................................ 49Movie Mode ........................................................................ 52Macro Mode........................................................................ 53Self-Timer ............................................................................ 54Continuous Mode ................................................................ 55
Digital Zoom ................................................................................ 57
Shooting - Selecting Particular Effects ..................................... 58Changing the Resolution and Compression .................................... 58Changing the File Format .............................................................. 60
Program AE ......................................................................... 61Setting the Shutter Speed ..................................................... 62Setting the Aperture ............................................................ 64Manually Setting the Shutter Speed and Aperture ................. 66Selecting an AF Frame .......................................................... 68Adjusting the Exposure Compensation .................................. 69Setting the White Balance .................................................... 70Auto Exposure Bracketing (AEB Mode) .................................. 73Adjusting the Flash Output (Flash Exposure Compensation) .... 74Locking the Exposure Setting (AE Lock) ................................. 75Locking the Flash Exposure Setting (FE Lock) .......................... 77Switching between Metering Modes ..................................... 78
Shooting Problem Subjects for the Autofocus ................................ 80Switching between Focus Settings ................................................. 82Manually Setting Image Characteristics .......................................... 83Resetting the File Number ............................................................. 84Functions Available in Each Shooting Mode ................................... 85
Replaying .................................................................................. 86Viewing Images Singly (Single Image Replay) .................................. 86
Magnifying Images .............................................................. 87Viewing Nine Images at a Time (Index Replay) ....................... 88 Jumping between Images ................................................. 89
Viewing Movies ............................................................................ 90Rotating Images in the Display ...................................................... 91Automated Playback (Slide Show) .................................................. 92Protecting Images ......................................................................... 96
Erasing ...................................................................................... 97Erasing Images Singly .................................................................... 97Erasing All Images ........................................................................ 98Formatting a CF Card ................................................................... 99
Table of Contents 3
Print Settings (DPOF Settings) ................................................ 100Selecting Images for Printing ....................................................... 100Setting the Print Style .................................................................. 103Resetting the Print Settings ......................................................... 105
Printing with a Direct Print Compatible Printer (Optional) ... 106Connecting a Direct Print Compatible Printer to the Camera ......... 106Printing ...................................................................................... 108Printing with DPOF Print Settings ................................................. 112
List of Menu Options .............................................................. 114Rec. Menu ................................................................................. 114Play Menu .................................................................................. 117Set up Menu .............................................................................. 118
Shooting / Replaying with a TV Monitor ................................ 120
Using the Wireless Controller ................................................. 121Installing the Battery ................................................................... 121Shooting / Replaying ................................................................... 122
Using an Externally Mounted Flash (Optional) ...................... 123
Using Conversion Lenses (Optional) / Close-up Lenses (Optional) .............................................. 127
Mounting the Lenses .................................................................. 128
Appendices ............................................................................. 130Replacing the Date Battery .......................................................... 130Camera Care and Maintenance ................................................... 132Troubleshooting.......................................................................... 133List of Error / Message Codes ...................................................... 135List of Messages ......................................................................... 136Specifications ............................................................................. 138
Index ....................................................................................... 143
Additional Information (Printing Functions) .............................. 1Printing with the Direct Print Compatible Bubble Jet Printer (Optional) ..... 2
Connecting Bubble Jet Printer to the Camera .......................... 2Printing ................................................................................. 4Printing with DPOF Settings .................................................... 9
List of Messages (Continued from p. 137) ...................................... 11
4 Read This First
Read this First
Please Read
Test ShotsBefore you try to photograph important subjects, we highly recommend that youshoot several trial images to confirm that the camera is operating and beingoperated correctly. Please note that Canon Inc., its subsidiaries and affiliates, and itsdistributors are not liable for any consequential damages arising from anymalfunction of a camera or accessory, including CompactFlash™ cards, that results inthe failure of an image to be recorded or to be recorded in a format that is machinesensible.
Warning Against Copyright InfringementPlease note that Canon digital cameras are intended for personal use and shouldnever be used in a manner that infringes upon or contravenes international ordomestic copyright laws and regulations. Please be advised that in certain cases thecopying of images from performances, exhibitions, or commercial properties bymeans of a camera or other device may contravene copyright or other legal rightseven if the image was shot for personal use.
Warranty LimitationsThis camera’s warranty is only effective in the country of sale. If a problem ariseswhile the camera is in use abroad, please convey it back to the country of sale beforeproceeding with a warranty claim to a Canon Customer Support Help Desk.
Safety Precautions
• Before using the camera, please ensure that you read and understand the safetyprecautions described below. Always ensure that the camera is operated correctly.
• The safety precautions noted on the following pages are intended to instruct you inthe safe and correct operation of the camera and its accessories to prevent injuries ordamage to yourself, other persons and equipment.
• In the next few pages, the term “equipment” refers primarily to the camera and itspower supply accessories.
Read This First 5
Warnings
• Do not aim the camera directly into the sun or at other intense light sources that couldinjure your eyesight.
• Do not trigger the flash in close proximity to human or animal eyes. Exposure to theintense light produced by the flash may injure eyesight. In particular, remain at leastone meter (39 inches) away from infants when using the flash.
• Store this equipment out of the reach of children and infants. Accidental damage tothe camera or batteries by a child could result in serious injury. In addition, placementof the strap around the child’s neck could result in asphyxiation.
• Be particularly careful to keep the date batteries used in the camera and wirelesscontroller out of the reach of children. Seek medical assistance immediately if a childswallows a battery.
• Do not attempt to disassemble or alter any part of the equipment that is not expresslydescribed in this guide. Disassembly or alteration may result in high-voltage electricalshock. Internal inspections, alterations and repairs should be conducted by qualifiedservice personnel authorized by your camera distributor or the closest Canon CustomerSupport Help Desk.
• To avoid the risk of high-voltage electrical shock, do not touch the flash portion of thecamera if it has been damaged. Similarly, never touch internal portions of theequipment that become exposed as a result of damage. There is a risk of high-voltageelectrical shock. Please take the first opportunity to consult your camera distributor orthe closest Canon Customer Support Help Desk.
• Stop operating the equipment immediately if it emits smoke or noxious fumes. Failure to doso may result in fire or electrical shock. Immediately turn the camera’s power off, removethe camera battery and unplug the power cord from the electrical outlet. Confirm thatsmoke or fume emissions have ceased. Please consult your camera distributor or the closestCanon Customer Support Help Desk.
• Stop operating the equipment if it is dropped or the casing is damaged. Failure to do somay result in fire or electrical shock. Immediately turn the camera’s power off, remove thecamera battery and unplug the power cord from the electrical outlet. Please consult yourcamera distributor or the closest Canon Customer Support Help Desk.
• Do not allow the equipment to come into contact with, or become immersed in, wateror other liquids. Do not allow liquids to enter the interior. The camera has not beenwaterproofed. If the exterior comes into contact with liquids or salt air, wipe it dry witha soft, absorbent cloth. If water or other foreign substances enter the interior,immediately turn the camera’s power off and remove the camera battery or unplug thepower cord from the electrical outlet. Continued use of the equipment may result infire or electrical shock. Please consult your camera distributor or the closest CanonCustomer Support Help Desk.
6 Read This First
• Do not use substances containing alcohol, benzene, thinners or other flammablesubstances to clean or maintain the equipment. The use of these substances may leadto fire.
• Remove the power cord on a regular periodic basis and wipe away the dust and dirtthat collects on the plug, the exterior of the electrical outlet and the surround area. Industy, humid or greasy environments, the dust that collects around the plug over longperiods of time may become saturated with humidity and short-circuit, leading to fire.
• Do not cut, damage, alter or place heavy items on the power adapter cord. Any of theseactions may cause an electrical short circuit, which may lead to fire or electrical shock.Replace a broken or damaged power adapter cord.
• Do not handle the power cord if your hands are wet. Handling it with wet hands maylead to electrical shock. When unplugging the cord, ensure that you hold the solidportion of the plug. Pulling on the flexible portion of the cord may damage or expose thewire and insulation, creating the potential for fires or electrical shocks.
• Use of power sources not expressly recommended for this equipment may lead tooverheating, distortion of the equipment, fire, electrical shock or other hazards. Useonly the recommended power accessories.
• Do not place the batteries near a heat source or expose them to direct flame or heat.Neither should you immerse them in water. Such exposure may damage the batteries andlead to the leakage of corrosive liquids, fire, electrical shock, explosion or serious injury.
• Do not attempt to disassemble, alter or apply heat to the batteries. There is serious riskof injury due to an explosion. Immediately flush with water any area of the body -including the eyes and mouth, or clothing - that comes into contact with the innercontents of a battery. If the eyes or mouth contact these substances, immediately flushwith water and seek medical assistance.
• Avoid dropping or subjecting the batteries to severe impacts that could damage thecasings. It could lead to leakage and injury.
• Do not short-circuit the battery terminals with metallic objects, such as key holders. Itcould lead to overheating, burns and other injuries. Use the supplied terminal cover totransport or store the battery pack.
• Before you discard a battery, cover the terminals with tape or other insulators toprevent direct contact with other objects. Contact with the metallic components ofother materials in waste containers may lead to fire or explosions. Discard the batteriesin specialized waste facilities if available in your area.
• Use of batteries not expressly recommended for this equipment may cause explosionsor leaks, resulting in fire, injury and damage to the surroundings. Use onlyrecommended batteries and accessories.
• Disconnect the compact power adapter from both the camera and electrical outlet afterrecharging and when the camera is not in use to avoid fires and other hazards. Continuoususe over a long period of time may cause the unit to overheat and distort, resulting in fire.
Read This First 7
• The camera terminal of the supplied compact power cord is designed for exclusive usewith your camera. Do not use it with other products or batteries. There is a risk of fireand other hazards.
• Exercise due caution when screwing on the separately sold wide converter lens, tele-converter lens, close-up lens and conversion lens adapter. If they loosen, fall off andshatter, the glass shards may cause an injury. Never aim the lenses at the sun orstrong light sources. There is a risk of damage to eyesight.
Cautions
• Avoid using, placing or storing the equipment in places subject to strong sunlight orhigh temperatures, such as the dashboard or trunk (boot) of a car. Exposure to intensesunlight and heat may cause the batteries to leak, overheat or explode, resulting in fire,burns or other injuries. High temperatures may also cause deformation of the casing.Ensure that there is good ventilation when using the compact power adapter to chargethe battery pack or power the camera.
• Do not store the equipment in humid or dusty areas. Storage in such areas could leadto fire, electrical shock or other damage.
• Be careful not to bang the camera or subject it to strong impacts or shocks that couldlead to injury or damage the equipment when wearing or holding it by the strap.
• Be careful not to cover the flash with your fingers when shooting. In addition, do nottouch the surface of the flash after taking several pictures in rapid succession. Eitheraction could result in burns.
• If your camera is used for prolonged periods, the camera body may become warm.Please take care when operating the camera for extended periods as your hands mayexperience a burning sensation.
Preventing Malfunctions
Avoid Strong Magnetic FieldsNever place the camera in close proximity to electric motors or other equipmentgenerating strong electromagnetic fields. Exposure to strong magnetic fields may causemalfunctions or corrupt image data.
Avoid Condensation Related ProblemsMoving the equipment rapidly between hot and cold temperatures may causecondensation (water droplets) to form on its external and internal surfaces. You canavoid this by placing the equipment in an airtight, resealable plastic bag and letting itadjust to temperature changes slowly before removing it from the bag.
If Condensation Forms Inside the CameraStop using the camera immediately if you detect condensation. Continued use maydamage the equipment. Remove the CF card and battery or Compact Power Adapter(if connected) from the camera and wait until the moisture evaporates completelybefore resuming use.
8 Quick Start
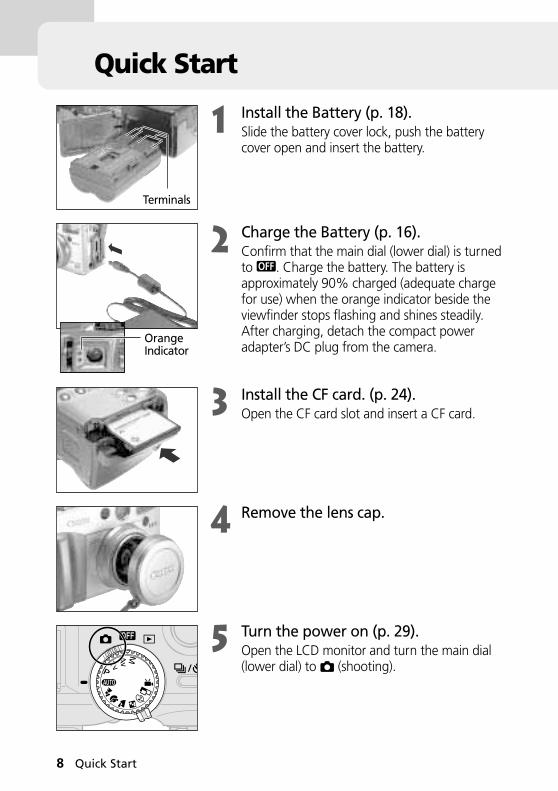
Quick Start
1 Install the Battery (p. 18).Slide the battery cover lock, push the batterycover open and insert the battery.
2 Charge the Battery (p. 16).Confirm that the main dial (lower dial) is turnedto . Charge the battery. The battery isapproximately 90% charged (adequate chargefor use) when the orange indicator beside theviewfinder stops flashing and shines steadily.After charging, detach the compact poweradapter’s DC plug from the camera.
3 Install the CF card. (p. 24).Open the CF card slot and insert a CF card.
4 Remove the lens cap.
5 Turn the power on (p. 29).Open the LCD monitor and turn the main dial(lower dial) to (shooting).
Terminals
OrangeIndicator
Quick Start 9
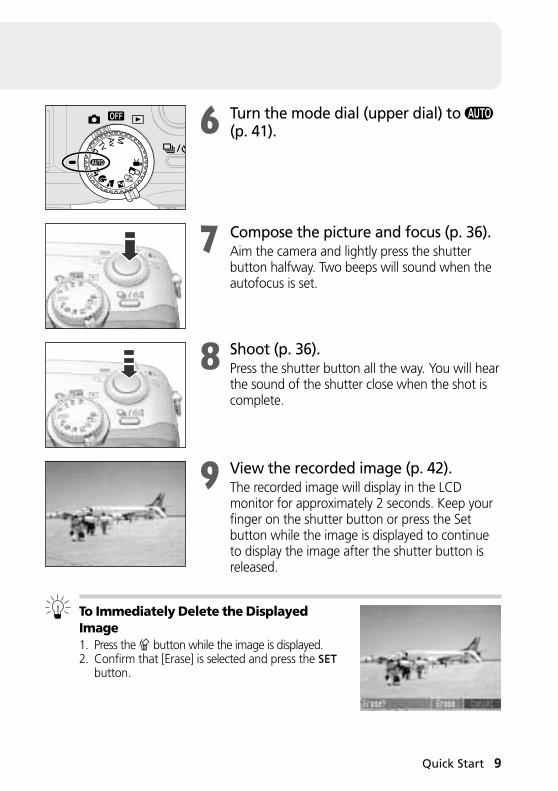
6 Turn the mode dial (upper dial) to (p. 41).
7 Compose the picture and focus (p. 36).Aim the camera and lightly press the shutterbutton halfway. Two beeps will sound when theautofocus is set.
8 Shoot (p. 36).Press the shutter button all the way. You will hearthe sound of the shutter close when the shot iscomplete.
9 View the recorded image (p. 42).The recorded image will display in the LCDmonitor for approximately 2 seconds. Keep yourfinger on the shutter button or press the Setbutton while the image is displayed to continueto display the image after the shutter button isreleased.
To Immediately Delete the DisplayedImage1. Press the button while the image is displayed.2. Confirm that [Erase] is selected and press the
button.
10 Components Guide
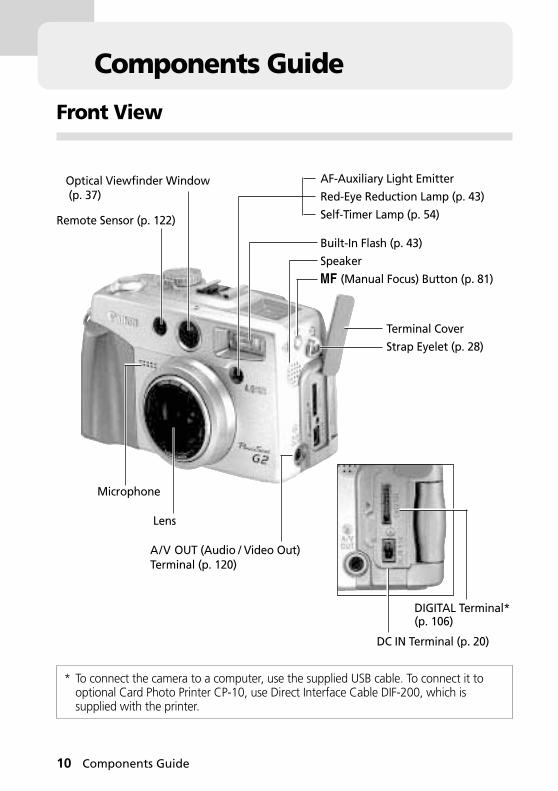
Microphone
Lens
A/V OUT (Audio / Video Out) Terminal (p. 120)
Optical Viewfinder Window (p. 37)
Remote Sensor (p. 122)
Components Guide
Front View
AF-Auxiliary Light Emitter
Red-Eye Reduction Lamp (p. 43)
Self-Timer Lamp (p. 54)
Built-In Flash (p. 43)
Speaker
(Manual Focus) Button (p. 81)
Terminal Cover
Strap Eyelet (p. 28)
DIGITAL Terminal*(p. 106)
DC IN Terminal (p. 20)
* To connect the camera to a computer, use the supplied USB cable. To connect it tooptional Card Photo Printer CP-10, use Direct Interface Cable DIF-200, which issupplied with the printer.

Components Guide 11
Back View
Viewfinder (p. 37)
Strap Eyelet (p. 28)
CF Card Slot Cover(p. 24)
Battery Cover (p. 18)
Battery Cover Lock (p. 18)
Tripod Socket
12 Components Guide
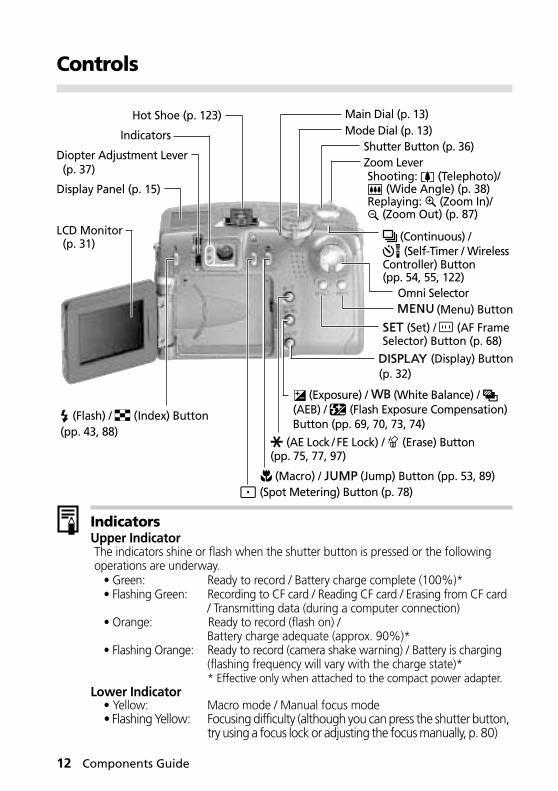
Controls
IndicatorsUpper IndicatorThe indicators shine or flash when the shutter button is pressed or the followingoperations are underway.
• Green: Ready to record / Battery charge complete (100%)*• Flashing Green: Recording to CF card / Reading CF card / Erasing from CF card
/ Transmitting data (during a computer connection)• Orange: Ready to record (flash on) /
Battery charge adequate (approx. 90%)*• Flashing Orange: Ready to record (camera shake warning) / Battery is charging
(flashing frequency will vary with the charge state)** Effective only when attached to the compact power adapter.
Lower Indicator• Yellow: Macro mode / Manual focus mode• Flashing Yellow: Focusing difficulty (although you can press the shutter button,
try using a focus lock or adjusting the focus manually, p. 80)
Hot Shoe (p. 123)
Indicators
Diopter Adjustment Lever (p. 37)
Display Panel (p. 15)
(Macro) / (Jump) Button (pp. 53, 89) (Spot Metering) Button (p. 78)
LCD Monitor (p. 31)
(Exposure) / (White Balance) / (AEB) / (Flash Exposure Compensation)Button (pp. 69, 70, 73, 74)
(AE Lock / FE Lock) / (Erase) Button(pp. 75, 77, 97)
Main Dial (p. 13)Mode Dial (p. 13)
Shutter Button (p. 36)Zoom LeverShooting: (Telephoto)/
(Wide Angle) (p. 38)Replaying: (Zoom In)/
(Zoom Out) (p. 87)
(Continuous) / (Self-Timer / Wireless
Controller) Button(pp. 54, 55, 122)
Omni Selector (Menu) Button
(Set) / (AF FrameSelector) Button (p. 68)
(Display) Button(p. 32)
(Flash) / (Index) Button(pp. 43, 88)
Components Guide 13
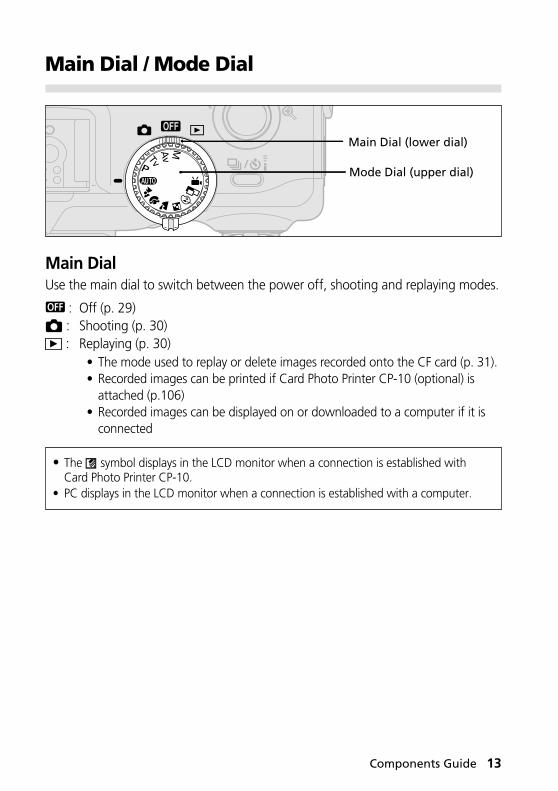
Main Dial (lower dial)
Mode Dial (upper dial)
Main Dial / Mode Dial
Main DialUse the main dial to switch between the power off, shooting and replaying modes.
: Off (p. 29) : Shooting (p. 30) : Replaying (p. 30)
• The mode used to replay or delete images recorded onto the CF card (p. 31).• Recorded images can be printed if Card Photo Printer CP-10 (optional) is
attached (p.106)• Recorded images can be displayed on or downloaded to a computer if it is
connected
• The symbol displays in the LCD monitor when a connection is established withCard Photo Printer CP-10.
• PC displays in the LCD monitor when a connection is established with a computer.
14 Components Guide
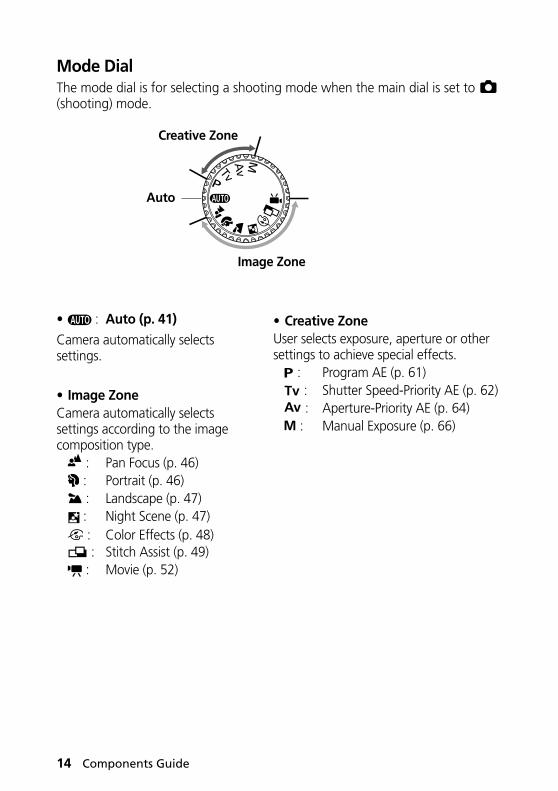
• : Auto (p. 41)
Camera automatically selectssettings.
• Image ZoneCamera automatically selectssettings according to the imagecomposition type.
: Pan Focus (p. 46) : Portrait (p. 46) : Landscape (p. 47) : Night Scene (p. 47) : Color Effects (p. 48) : Stitch Assist (p. 49)
: Movie (p. 52)
• Creative ZoneUser selects exposure, aperture or othersettings to achieve special effects.
: Program AE (p. 61) : Shutter Speed-Priority AE (p. 62) : Aperture-Priority AE (p. 64)
: Manual Exposure (p. 66)
Mode DialThe mode dial is for selecting a shooting mode when the main dial is set to (shooting) mode.
Auto
Creative Zone
Image Zone
Components Guide 15
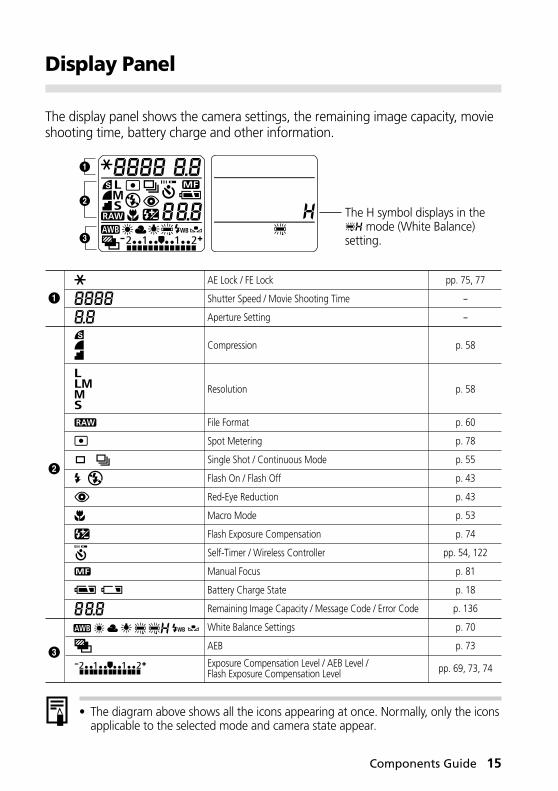
Display Panel
The display panel shows the camera settings, the remaining image capacity, movieshooting time, battery charge and other information.
• The diagram above shows all the icons appearing at once. Normally, only the iconsapplicable to the selected mode and camera state appear.
AE Lock / FE Lock
Shutter Speed / Movie Shooting Time
Aperture Setting
Compression
Resolution
File Format
Spot Metering
Single Shot / Continuous Mode
Flash On / Flash Off
Red-Eye Reduction
Macro Mode
Flash Exposure Compensation
Self-Timer / Wireless Controller
Manual Focus
Battery Charge State
Remaining Image Capacity / Message Code / Error Code
White Balance Settings
AEB
Exposure Compensation Level / AEB Level / Flash Exposure Compensation Level
pp. 75, 77
-
-
p. 58
p. 58
p. 60
p. 78
p. 55
p. 43
p. 43
p. 53
p. 74
pp. 54, 122
p. 81
p. 18
p. 136
p. 70
p. 73
pp. 69, 73, 74
The H symbol displays in the mode (White Balance)
setting.

16 Preparing the Camera
Preparing the Camera
Charging the Battery PackUse the following procedures to charge the battery pack the first time andsubsequently when the low battery icon ( ) and Lb ( ) message flash.
1 Turn the main dial to .
2 Slide the battery cover lock in thedirection of the arrow and open thebattery cover.
3 Insert Battery Pack BP-511 and close thebattery cover.
4 Attach the power cord to the compactpower adapter and plug it into anelectrical outlet.
5 Connect the DC plug of the compactpower adapter to the camera’s DC INterminal.• The indicator beside the viewfinder will flash
orange while the battery pack is charging andchange to steady orange when it isapproximately 90% charged, which is adequatefor use. If it is charged for approximately 2 morehours, it will become fully charged and theindicator will switch to green.
OrangeIndicator
Connect to anElectrical Outlet...
Terminals
Preparing the Camera 17
• After charging the battery, remove it from the camera if the camera will not be used.
• If the main dial is set to any position other than while charging, the batterypack will stop charging and the household electrical current will power thecamera.
• This is a lithium ion battery pack so there is no need to completely use ordischarge it before recharging. It can be charged at any charge state.
• It takes approximately 80 minutes to bring a fully discharged battery pack to acharge state of approximately 90% (adequate charge for use). It takesapproximately 2 more hours to charge it fully (based on standard Canon testingcriteria). Charge it within a temperature range of 5 to 40º C (41 to 104º F).
• Charging times will vary according to the surrounding humidity and battery packcharge state.
• Battery Pack BP-512 (optional) can also be used in this camera.
Battery Pack Handling Precautions• Keep the battery pack and camera terminals ( ) clean at all times. Dirty
terminals may cause a poor contact between the battery pack and camera. Polish theterminals with a tissue or a dry cloth before charging or using the battery pack.
• Do not cover the compact power adapter with anything, such as a tablecloth, cushionor blanket, when it is charging. Heat will build up internally and possibly lead to fire.
• Do not charge batteries other than Battery Pack BP-511 or Battery Pack BP-512 withthe supplied equipment. It could damage the camera.
• The battery pack continues to discharge a small amount when left in the camera evenwith the power turned off. This shortens the battery life. Remove it from the camera,attach the supplied terminal adapter and store it at room temperature (30ºC/86ºFor less) in a dry place. Charge it before use.
• Even charged battery packs continue to discharge naturally. You are advised to chargethe battery on the day of use, or one day before, to ensure a full charge. Since storing afully charged battery pack for long periods of time (about 1 year) can shorten itslifecycle or affect performance, you are recommended to use the battery pack in thecamera until the LB symbol displays and to store it at room temperature (30º C/86º F orless). If you do not use the battery pack for long periods of time, charge it fully anddischarge it fully in the camera at least once a year before returning it to storage.
• The camera consumes the battery charge when the power is on even when a functionis not being used. To conserve the battery charge, be particularly attentive in turning thepower off.
• Although the battery pack’s maximum operating range is 0 to 40º C (32 to 104º F), theoptimal range is 10 to 30º C (50 to 86º F). At cold temperatures, such as thoseexperienced on ski hills, performance will temporarily decline, reducing the usable timebefore recharging.
• If the usable time of a battery pack diminishes substantially even when fully charged, itshould be replaced.
18 Preparing the Camera
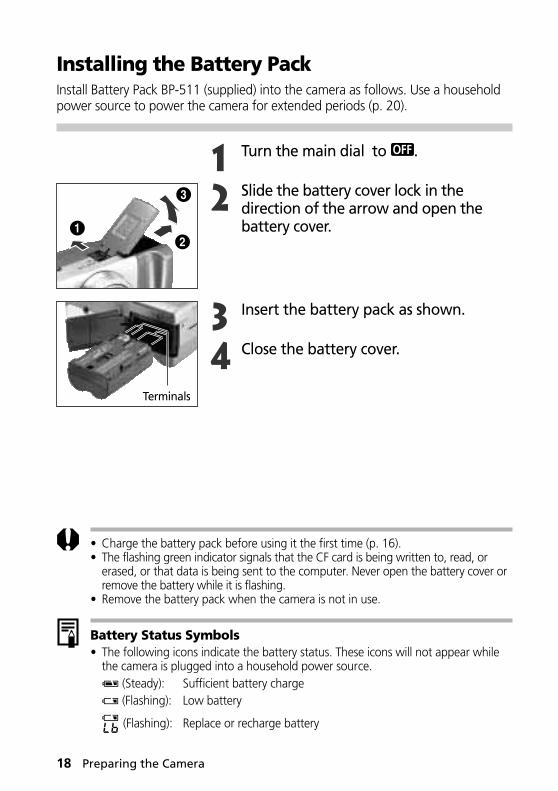
Installing the Battery PackInstall Battery Pack BP-511 (supplied) into the camera as follows. Use a householdpower source to power the camera for extended periods (p. 20).
1 Turn the main dial to .
2 Slide the battery cover lock in thedirection of the arrow and open thebattery cover.
3 Insert the battery pack as shown.
4 Close the battery cover.
• Charge the battery pack before using it the first time (p. 16).• The flashing green indicator signals that the CF card is being written to, read, or
erased, or that data is being sent to the computer. Never open the battery cover orremove the battery while it is flashing.
• Remove the battery pack when the camera is not in use.
Battery Status Symbols• The following icons indicate the battery status. These icons will not appear while
the camera is plugged into a household power source. (Steady): Sufficient battery charge (Flashing): Low battery
(Flashing): Replace or recharge battery
Terminals
Preparing the Camera 19
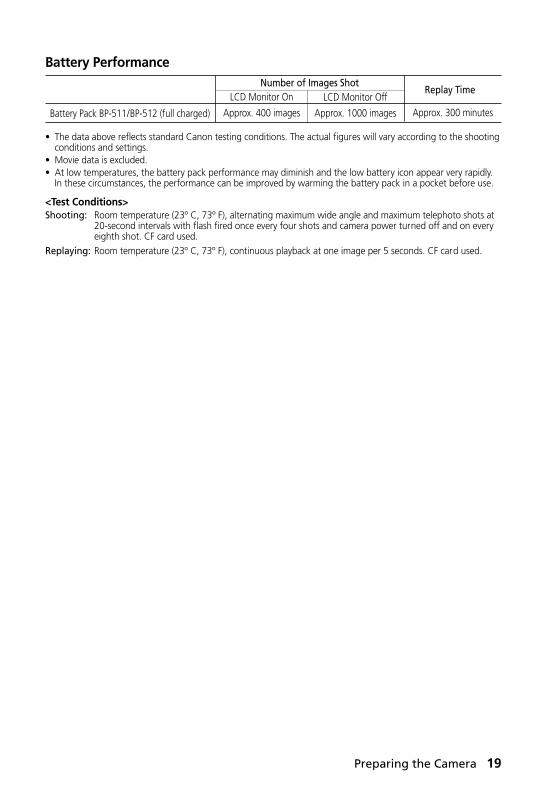
Battery Performance
• The data above reflects standard Canon testing conditions. The actual figures will vary according to the shootingconditions and settings.
• Movie data is excluded.• At low temperatures, the battery pack performance may diminish and the low battery icon appear very rapidly.
In these circumstances, the performance can be improved by warming the battery pack in a pocket before use.
<Test Conditions>Shooting: Room temperature (23º C, 73º F), alternating maximum wide angle and maximum telephoto shots at
20-second intervals with flash fired once every four shots and camera power turned off and on everyeighth shot. CF card used.
Replaying: Room temperature (23º C, 73º F), continuous playback at one image per 5 seconds. CF card used.
Battery Pack BP-511/BP-512 (full charged)
Number of Images ShotLCD Monitor On
Approx. 400 images
Replay TimeLCD Monitor Off
Approx. 1000 images Approx. 300 minutes
20 Preparing the Camera
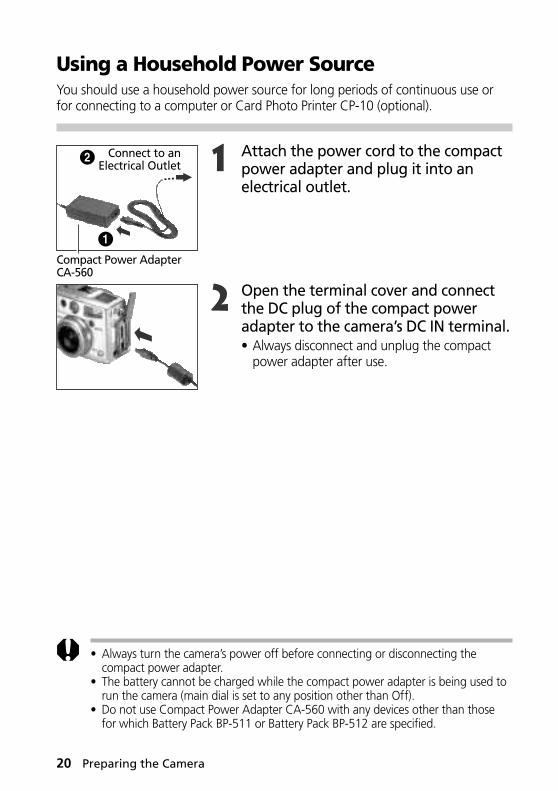
Using a Household Power SourceYou should use a household power source for long periods of continuous use orfor connecting to a computer or Card Photo Printer CP-10 (optional).
1 Attach the power cord to the compactpower adapter and plug it into anelectrical outlet.
2 Open the terminal cover and connectthe DC plug of the compact poweradapter to the camera’s DC IN terminal.• Always disconnect and unplug the compact
power adapter after use.
• Always turn the camera’s power off before connecting or disconnecting thecompact power adapter.
• The battery cannot be charged while the compact power adapter is being used torun the camera (main dial is set to any position other than Off).
• Do not use Compact Power Adapter CA-560 with any devices other than thosefor which Battery Pack BP-511 or Battery Pack BP-512 are specified.
Connect to anElectrical Outlet...
Compact Power AdapterCA-560
Preparing the Camera 21
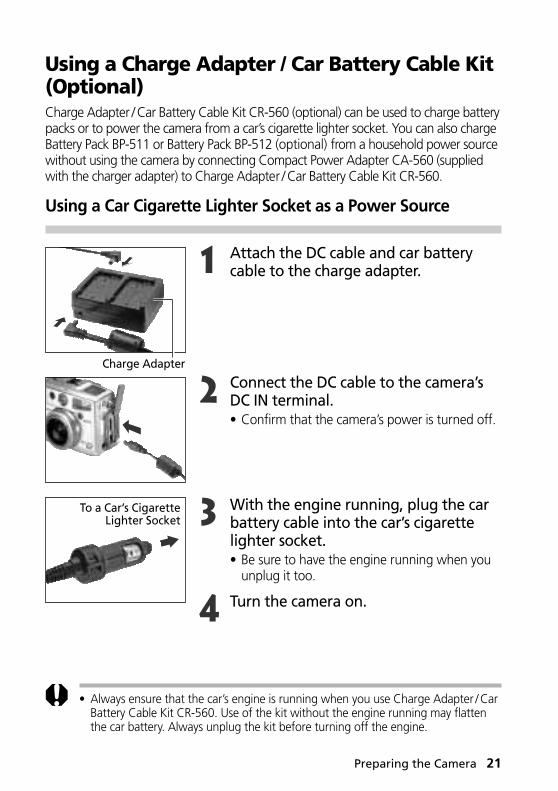
Using a Charge Adapter / Car Battery Cable Kit(Optional)Charge Adapter /Car Battery Cable Kit CR-560 (optional) can be used to charge batterypacks or to power the camera from a car’s cigarette lighter socket. You can also chargeBattery Pack BP-511 or Battery Pack BP-512 (optional) from a household power sourcewithout using the camera by connecting Compact Power Adapter CA-560 (suppliedwith the charger adapter) to Charge Adapter / Car Battery Cable Kit CR-560.
Using a Car Cigarette Lighter Socket as a Power Source
1 Attach the DC cable and car batterycable to the charge adapter.
2 Connect the DC cable to the camera’sDC IN terminal.• Confirm that the camera’s power is turned off.
3 With the engine running, plug the carbattery cable into the car’s cigarettelighter socket.• Be sure to have the engine running when you
unplug it too.
4 Turn the camera on.
• Always ensure that the car’s engine is running when you use Charge Adapter /CarBattery Cable Kit CR-560. Use of the kit without the engine running may flattenthe car battery. Always unplug the kit before turning off the engine.
Charge Adapter
To a Car’s CigaretteLighter Socket
22 Preparing the Camera
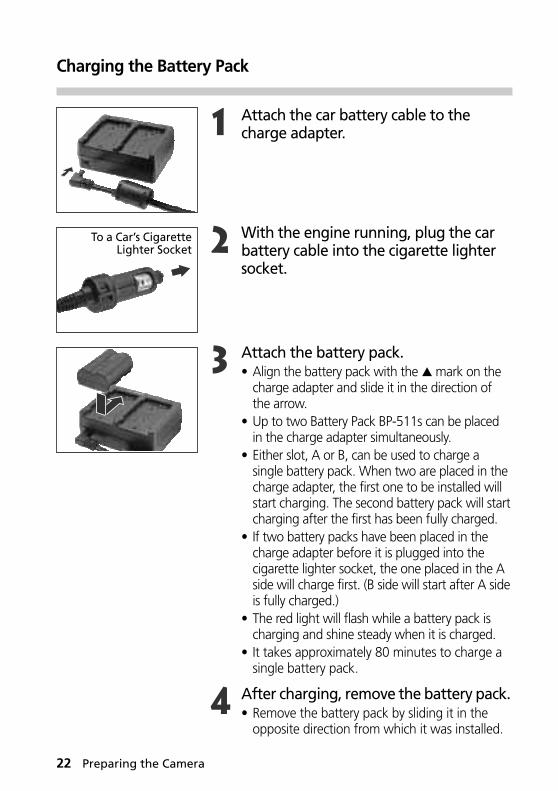
Charging the Battery Pack
1 Attach the car battery cable to thecharge adapter.
2 With the engine running, plug the carbattery cable into the cigarette lightersocket.
3 Attach the battery pack.• Align the battery pack with the ▲ mark on the
charge adapter and slide it in the direction ofthe arrow.
• Up to two Battery Pack BP-511s can be placedin the charge adapter simultaneously.
• Either slot, A or B, can be used to charge asingle battery pack. When two are placed in thecharge adapter, the first one to be installed willstart charging. The second battery pack will startcharging after the first has been fully charged.
• If two battery packs have been placed in thecharge adapter before it is plugged into thecigarette lighter socket, the one placed in the Aside will charge first. (B side will start after A sideis fully charged.)
• The red light will flash while a battery pack ischarging and shine steady when it is charged.
• It takes approximately 80 minutes to charge asingle battery pack.
4 After charging, remove the battery pack.• Remove the battery pack by sliding it in the
opposite direction from which it was installed.
To a Car’s CigaretteLighter Socket
Preparing the Camera 23
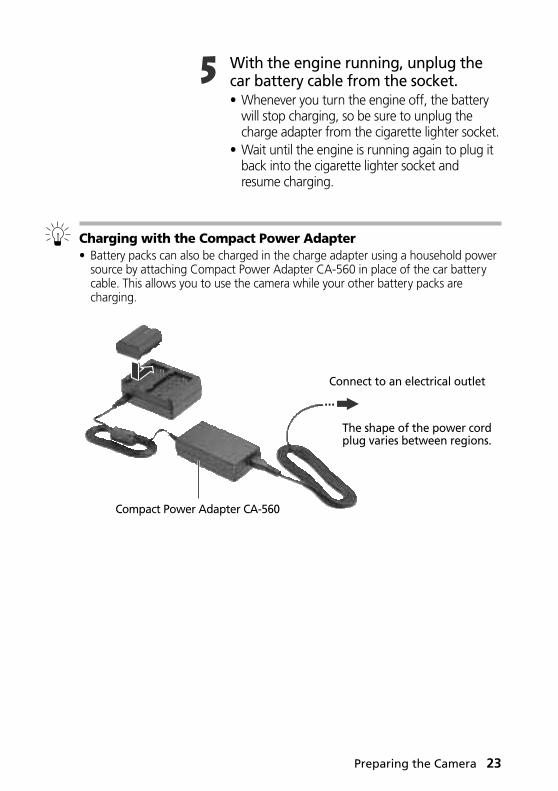
5 With the engine running, unplug thecar battery cable from the socket.• Whenever you turn the engine off, the battery
will stop charging, so be sure to unplug thecharge adapter from the cigarette lighter socket.
• Wait until the engine is running again to plug itback into the cigarette lighter socket andresume charging.
Charging with the Compact Power Adapter• Battery packs can also be charged in the charge adapter using a household power
source by attaching Compact Power Adapter CA-560 in place of the car batterycable. This allows you to use the camera while your other battery packs arecharging.
...
Compact Power Adapter CA-560
The shape of the power cordplug varies between regions.
Connect to an electrical outlet
24 Preparing the Camera
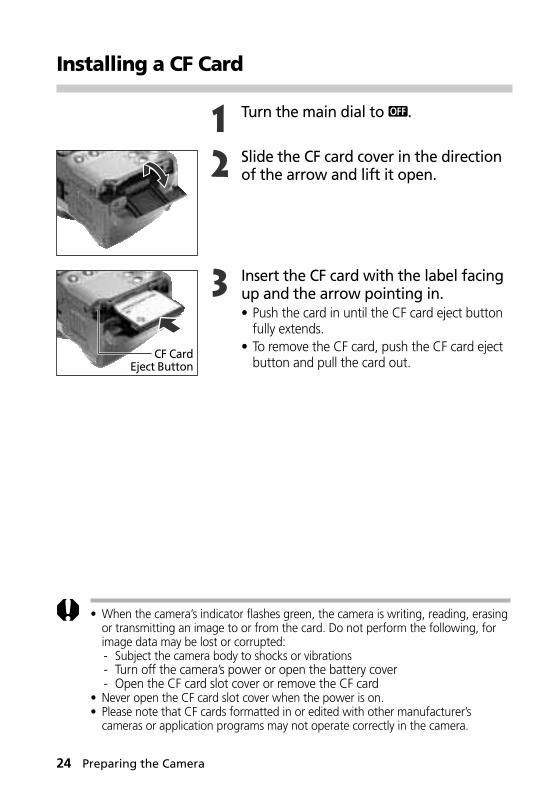
Installing a CF Card
1 Turn the main dial to .
2 Slide the CF card cover in the directionof the arrow and lift it open.
3 Insert the CF card with the label facingup and the arrow pointing in.• Push the card in until the CF card eject button
fully extends.• To remove the CF card, push the CF card eject
button and pull the card out.CF Card
Eject Button
• When the camera’s indicator flashes green, the camera is writing, reading, erasingor transmitting an image to or from the card. Do not perform the following, forimage data may be lost or corrupted:- Subject the camera body to shocks or vibrations- Turn off the camera’s power or open the battery cover- Open the CF card slot cover or remove the CF card
• Never open the CF card slot cover when the power is on.• Please note that CF cards formatted in or edited with other manufacturer’s
cameras or application programs may not operate correctly in the camera.
Preparing the Camera 25
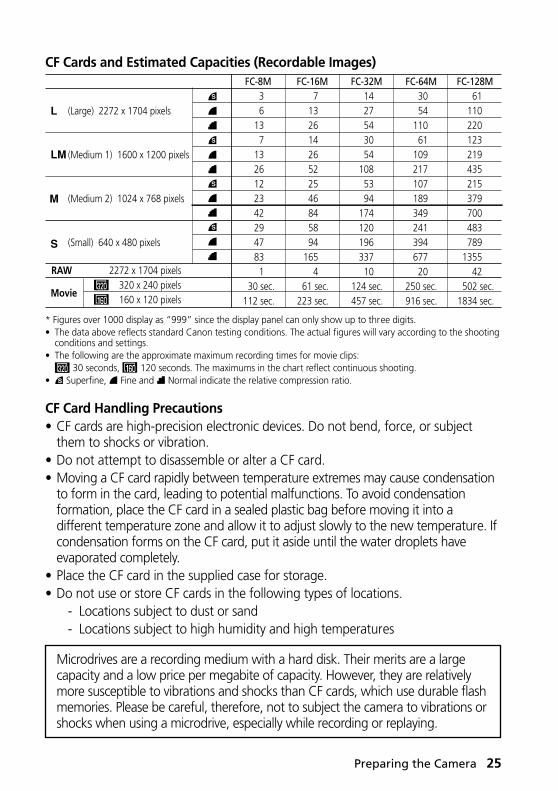
CF Cards and Estimated Capacities (Recordable Images)
CF Card Handling Precautions• CF cards are high-precision electronic devices. Do not bend, force, or subject
them to shocks or vibration.• Do not attempt to disassemble or alter a CF card.• Moving a CF card rapidly between temperature extremes may cause condensation
to form in the card, leading to potential malfunctions. To avoid condensationformation, place the CF card in a sealed plastic bag before moving it into adifferent temperature zone and allow it to adjust slowly to the new temperature. Ifcondensation forms on the CF card, put it aside until the water droplets haveevaporated completely.
• Place the CF card in the supplied case for storage.• Do not use or store CF cards in the following types of locations.
- Locations subject to dust or sand- Locations subject to high humidity and high temperatures
Microdrives are a recording medium with a hard disk. Their merits are a largecapacity and a low price per megabite of capacity. However, they are relativelymore susceptible to vibrations and shocks than CF cards, which use durable flashmemories. Please be careful, therefore, not to subject the camera to vibrations orshocks when using a microdrive, especially while recording or replaying.
(Large) 2272 x 1704 pixels
(Medium 1) 1600 x 1200 pixels
(Medium 2) 1024 x 768 pixels
(Small) 640 x 480 pixels
RAW 2272 x 1704 pixels
Movie 320 x 240 pixels 160 x 120 pixels
FC-8M36
137
13261223422947831
30 sec.112 sec.
FC-16M7
13261426522546845894
1654
61 sec.223 sec.
FC-32M1427543054
1085394
17412019633710
124 sec.457 sec.
FC-64M3054
11061
10921710718934924139467720
250 sec.916 sec.
FC-128M61
110220123219435215379700483789
135542
502 sec.1834 sec.
* Figures over 1000 display as “999” since the display panel can only show up to three digits.• The data above reflects standard Canon testing conditions. The actual figures will vary according to the shooting
conditions and settings.• The following are the approximate maximum recording times for movie clips:
30 seconds, 120 seconds. The maximums in the chart reflect continuous shooting.• Superfine, Fine and Normal indicate the relative compression ratio.
26 Preparing the Camera
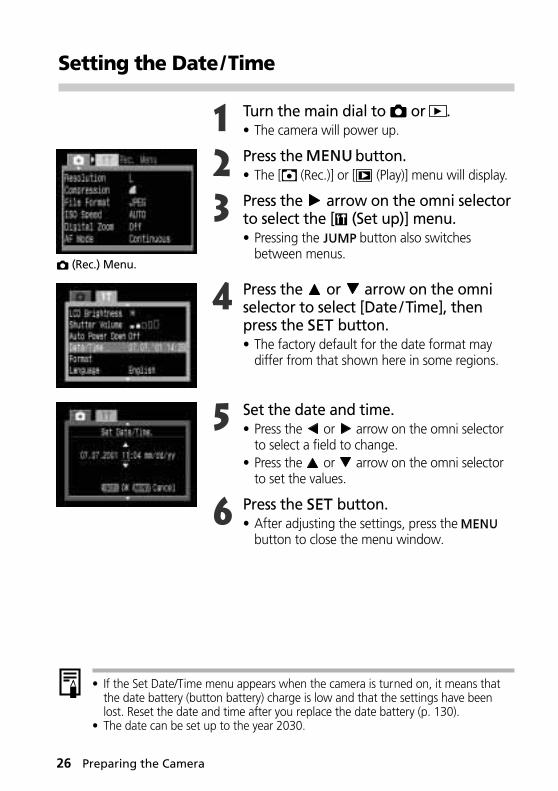
Setting the Date/Time
1 Turn the main dial to or .• The camera will power up.
2 Press the button.• The [ (Rec.)] or [ (Play)] menu will display.
3 Press the arrow on the omni selectorto select the [ (Set up)] menu.• Pressing the button also switches
between menus.
4 Press the or arrow on the omniselector to select [Date /Time], thenpress the button.• The factory default for the date format may
differ from that shown here in some regions.
5 Set the date and time.• Press the or arrow on the omni selector
to select a field to change.• Press the or arrow on the omni selector
to set the values.
6 Press the button.• After adjusting the settings, press the
button to close the menu window.
• If the Set Date/Time menu appears when the camera is turned on, it means thatthe date battery (button battery) charge is low and that the settings have beenlost. Reset the date and time after you replace the date battery (p. 130).
• The date can be set up to the year 2030.
(Rec.) Menu.
Preparing the Camera 27
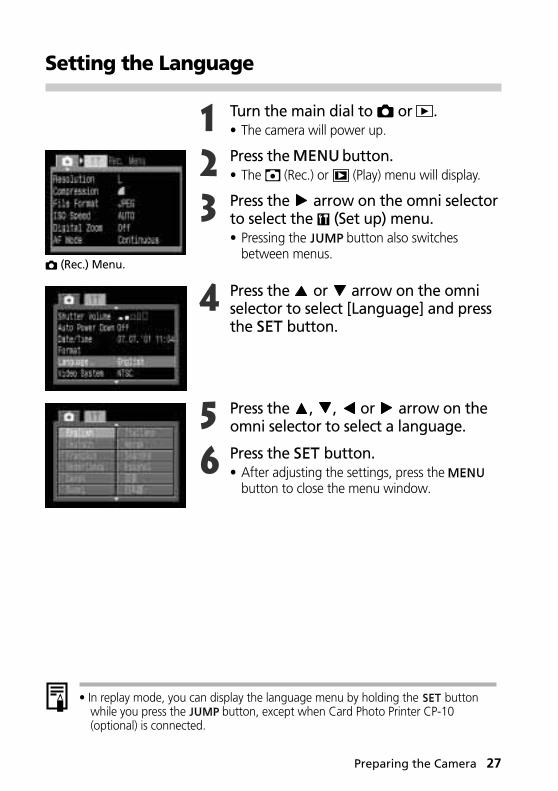
Setting the Language
1 Turn the main dial to or .• The camera will power up.
2 Press the button.• The (Rec.) or (Play) menu will display.
3 Press the arrow on the omni selectorto select the (Set up) menu.• Pressing the button also switches
between menus.
4 Press the or arrow on the omniselector to select [Language] and pressthe button.
5 Press the , , or arrow on theomni selector to select a language.
6 Press the button.• After adjusting the settings, press the
button to close the menu window.
(Rec.) Menu.
• In replay mode, you can display the language menu by holding the buttonwhile you press the button, except when Card Photo Printer CP-10(optional) is connected.
28 Preparing the Camera
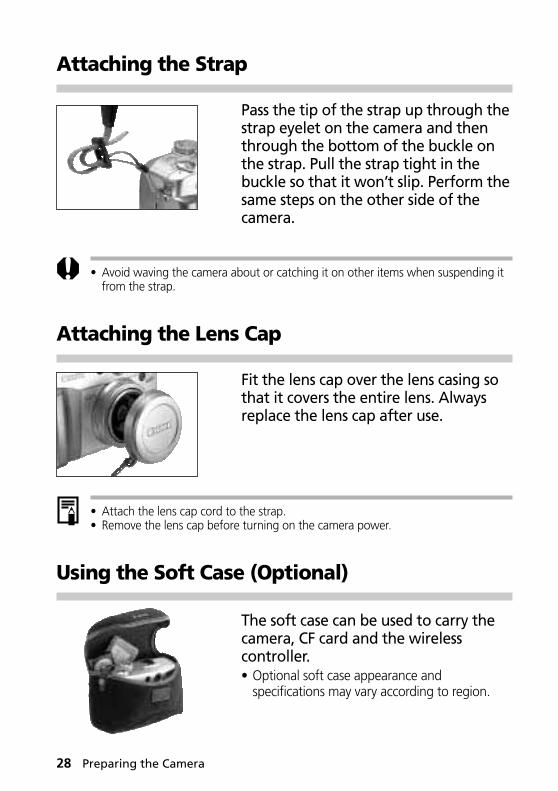
Attaching the Strap
Pass the tip of the strap up through thestrap eyelet on the camera and thenthrough the bottom of the buckle onthe strap. Pull the strap tight in thebuckle so that it won’t slip. Perform thesame steps on the other side of thecamera.
• Avoid waving the camera about or catching it on other items when suspending itfrom the strap.
Attaching the Lens Cap
Fit the lens cap over the lens casing sothat it covers the entire lens. Alwaysreplace the lens cap after use.
• Attach the lens cap cord to the strap.• Remove the lens cap before turning on the camera power.
Using the Soft Case (Optional)
The soft case can be used to carry thecamera, CF card and the wirelesscontroller.• Optional soft case appearance and
specifications may vary according to region.
Basic Functions 29
Basic Functions
Turning the Power On
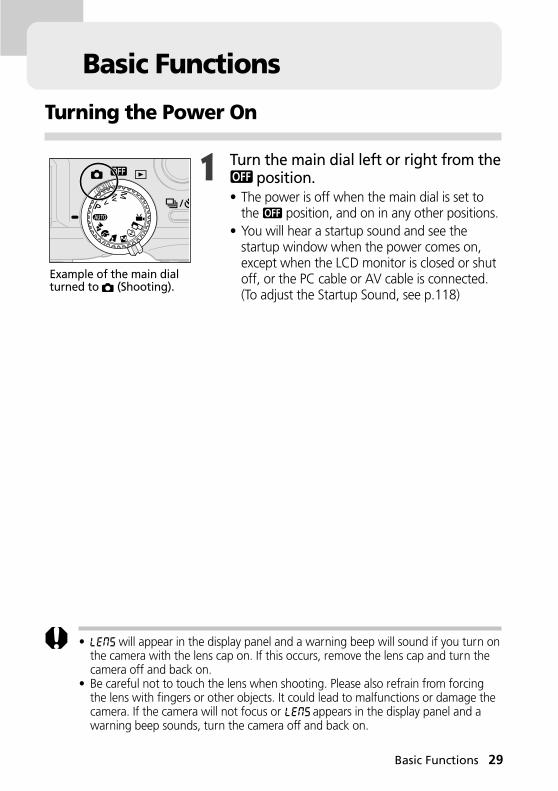
1 Turn the main dial left or right from the position.
• The power is off when the main dial is set tothe position, and on in any other positions.
• You will hear a startup sound and see thestartup window when the power comes on,except when the LCD monitor is closed or shutoff, or the PC cable or AV cable is connected.(To adjust the Startup Sound, see p.118)
Example of the main dialturned to (Shooting).
• will appear in the display panel and a warning beep will sound if you turn onthe camera with the lens cap on. If this occurs, remove the lens cap and turn thecamera off and back on.
• Be careful not to touch the lens when shooting. Please also refrain from forcingthe lens with fingers or other objects. It could lead to malfunctions or damage thecamera. If the camera will not focus or appears in the display panel and awarning beep sounds, turn the camera off and back on.

30 Basic Functions
Power Save FunctionThe camera features a power save function that turns the camera off under thefollowing conditions when it is set to on.
Shooting Mode: powers down approximately 3 minutes after a control is lastaccessed. The LCD monitor will shut off approximately 3minutes after a control is last accessed even if the powersave function is turned off.
Replaying Mode: powers down approximately 5 minutes after a control is lastaccessed.
Card Photo Printer CP-10 (optional) Connection:powers down approximately 5 minutes after a control is lastaccessed on the camera or something is printed on the printer.
PC Connection: displays a warning message on the computer screenapproximately 5 minutes after a control is last accessed.The camera will power down if no controls are used after1 additional minute.It will not activate when the camera is powered from ahousehold power source.
• Pressing the shutter button halfway will restore power when the camera shutsdown with the power save function.
• Please note that the camera continues to consume a minimal amount of powereven when the power save function shuts it down.
• The power save function is disabled while a slide show plays on the camera (p. 86).• You can turn off the power save function in the Set up menu (p. 104).
Switching between Shooting and Replaying
Shooting• Turn the main dial to .
Replaying• Open the LCD monitor and turn the main dial
to . If you switch rapidly to replay modedirectly from shooting mode, the lens may notretract. This is convenient when you wish toshoot again after checking or deleting animage immediately after it is shot.
• Be careful not to touch the lens while in replaymode.
31
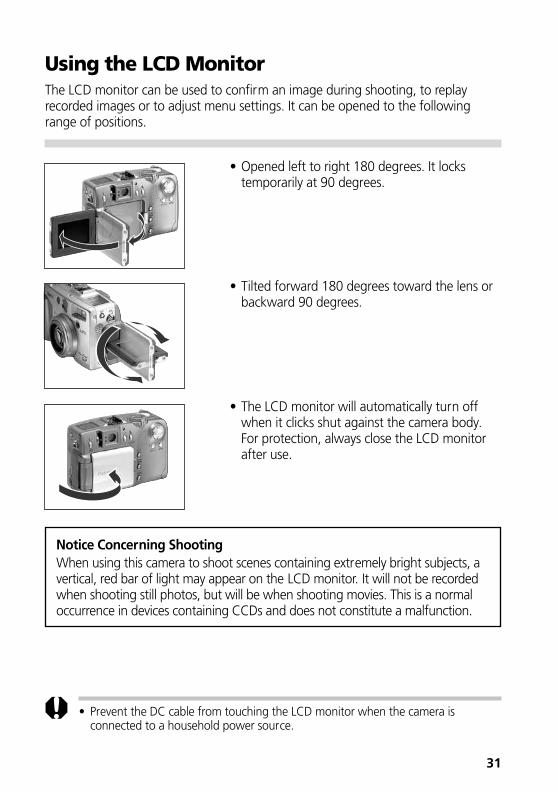
Using the LCD MonitorThe LCD monitor can be used to confirm an image during shooting, to replayrecorded images or to adjust menu settings. It can be opened to the followingrange of positions.
• Opened left to right 180 degrees. It lockstemporarily at 90 degrees.
• Tilted forward 180 degrees toward the lens orbackward 90 degrees.
• The LCD monitor will automatically turn offwhen it clicks shut against the camera body.For protection, always close the LCD monitorafter use.
• Prevent the DC cable from touching the LCD monitor when the camera isconnected to a household power source.
Notice Concerning ShootingWhen using this camera to shoot scenes containing extremely bright subjects, avertical, red bar of light may appear on the LCD monitor. It will not be recordedwhen shooting still photos, but will be when shooting movies. This is a normaloccurrence in devices containing CCDs and does not constitute a malfunction.
32 Basic Functions
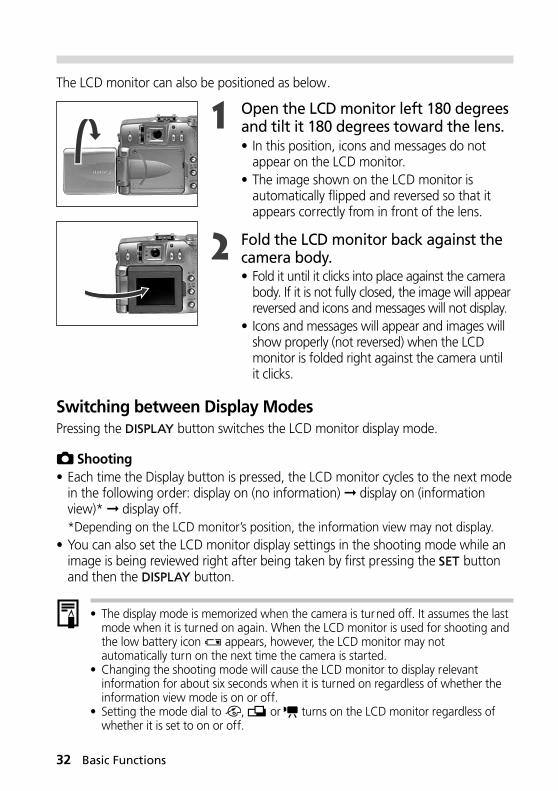
2 Fold the LCD monitor back against thecamera body.• Fold it until it clicks into place against the camera
body. If it is not fully closed, the image will appearreversed and icons and messages will not display.
• Icons and messages will appear and images willshow properly (not reversed) when the LCDmonitor is folded right against the camera untilit clicks.
Switching between Display ModesPressing the button switches the LCD monitor display mode.
Shooting• Each time the Display button is pressed, the LCD monitor cycles to the next mode
in the following order: display on (no information) ➞ display on (informationview)* ➞ display off.*Depending on the LCD monitor’s position, the information view may not display.
• You can also set the LCD monitor display settings in the shooting mode while animage is being reviewed right after being taken by first pressing the buttonand then the button.
• The display mode is memorized when the camera is turned off. It assumes the lastmode when it is turned on again. When the LCD monitor is used for shooting andthe low battery icon appears, however, the LCD monitor may notautomatically turn on the next time the camera is started.
• Changing the shooting mode will cause the LCD monitor to display relevantinformation for about six seconds when it is turned on regardless of whether theinformation view mode is on or off.
• Setting the mode dial to , or turns on the LCD monitor regardless ofwhether it is set to on or off.
The LCD monitor can also be positioned as below.
1 Open the LCD monitor left 180 degreesand tilt it 180 degrees toward the lens.• In this position, icons and messages do not
appear on the LCD monitor.• The image shown on the LCD monitor is
automatically flipped and reversed so that itappears correctly from in front of the lens.
33
• The camera shake warning icon will appear at the center of the LCD monitor inlow light conditions while the camera is preparing to shoot. When this iconappears, use the flash or fix the camera to a tripod to shoot.
Replaying• The LCD monitor turns on when the main dial is turned to .• Pressing the button switches the information view mode.
Single Replay: Simple Display Detailed Display No Display
Index Replay: Simple Display No Display
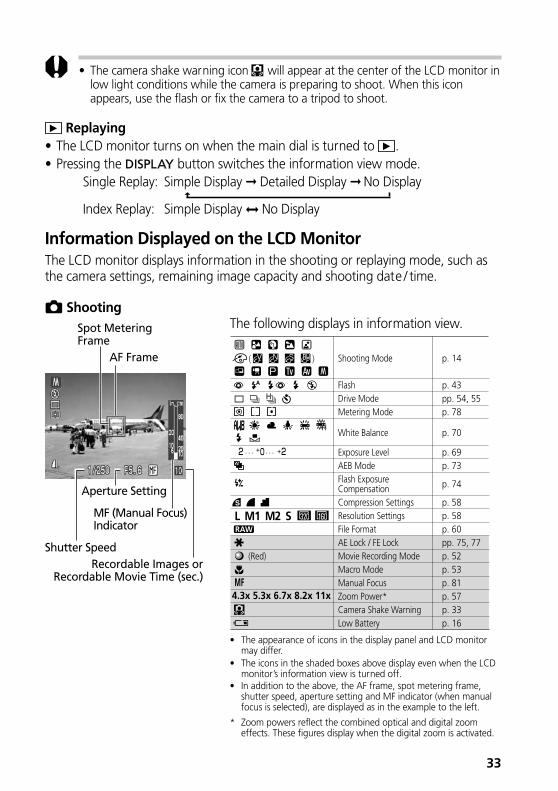
Information Displayed on the LCD MonitorThe LCD monitor displays information in the shooting or replaying mode, such asthe camera settings, remaining image capacity and shooting date / time.
ShootingThe following displays in information view.
• The appearance of icons in the display panel and LCD monitormay differ.
• The icons in the shaded boxes above display even when the LCDmonitor’s information view is turned off.
• In addition to the above, the AF frame, spot metering frame,shutter speed, aperture setting and MF indicator (when manualfocus is selected), are displayed as in the example to the left.
* Zoom powers reflect the combined optical and digital zoomeffects. These figures display when the digital zoom is activated.
Shutter Speed
Aperture Setting
MF (Manual Focus)Indicator
Spot MeteringFrame
AF Frame Shooting Mode
FlashDrive ModeMetering Mode
White Balance
Exposure LevelAEB ModeFlash ExposureCompensationCompression SettingsResolution SettingsFile FormatAE Lock / FE LockMovie Recording ModeMacro ModeManual FocusZoom Power*Camera Shake WarningLow Battery
p. 14
p. 43pp. 54, 55p. 78
p. 70
p. 69p. 73
p. 74
p. 58p. 58p. 60pp. 75, 77p. 52p. 53p. 81p. 57p. 33p. 16
.. . . . .
4.3x 5.3x 6.7x 8.2x 11x
(Red)
( )
L M1 M2 S
Recordable Images orRecordable Movie Time (sec.)
34 Basic Functions
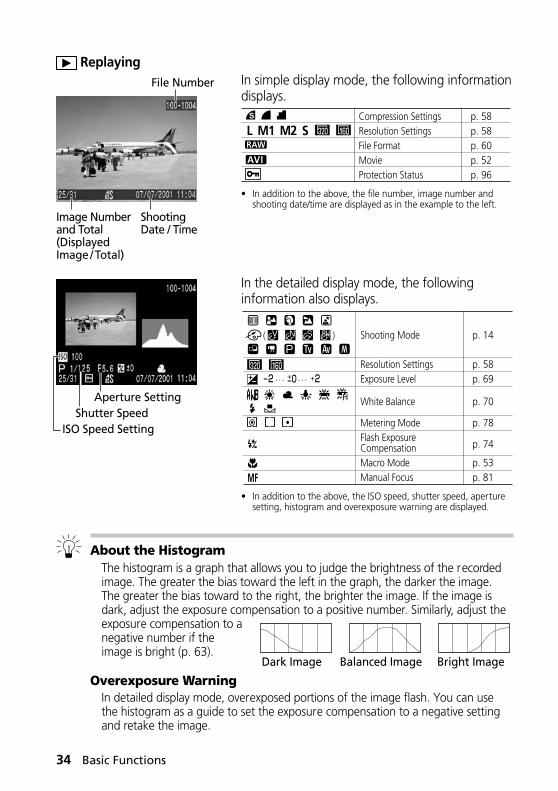
ReplayingIn simple display mode, the following informationdisplays.
• In addition to the above, the file number, image number andshooting date/time are displayed as in the example to the left.
In the detailed display mode, the followinginformation also displays.
• In addition to the above, the ISO speed, shutter speed, aperturesetting, histogram and overexposure warning are displayed.
About the HistogramThe histogram is a graph that allows you to judge the brightness of the recordedimage. The greater the bias toward the left in the graph, the darker the image.The greater the bias toward to the right, the brighter the image. If the image isdark, adjust the exposure compensation to a positive number. Similarly, adjust theexposure compensation to anegative number if theimage is bright (p. 63).
Overexposure WarningIn detailed display mode, overexposed portions of the image flash. You can usethe histogram as a guide to set the exposure compensation to a negative settingand retake the image.
Dark Image Balanced Image Bright Image
Compression SettingsResolution SettingsFile FormatMovieProtection Status
p. 58p. 58p. 60p. 52p. 96
L M1 M2 S
Shooting Mode
Resolution SettingsExposure Level
White Balance
Metering ModeFlash ExposureCompensationMacro ModeManual Focus
p. 14
p. 58p. 69
p. 70
p. 78
p. 74
p. 53p. 81
.. . . . .
( )
File Number
Image Numberand Total(DisplayedImage / Total)
ShootingDate / Time
Aperture SettingShutter Speed
ISO Speed Setting
Basic Functions 35
The following information may also appear with some image files.
Audio file is attached (wav file).
An audio file other than a wav file or a file with an unrecognized format is attached.
A JPEG file not supported by “Design rule for Camera File system” standards.
A file with an unrecognized format.
• Please note that image information recorded by this camera may not displaycorrectly on other cameras and image information recorded by other cameras maynot display correctly on this camera.
36 Basic Functions
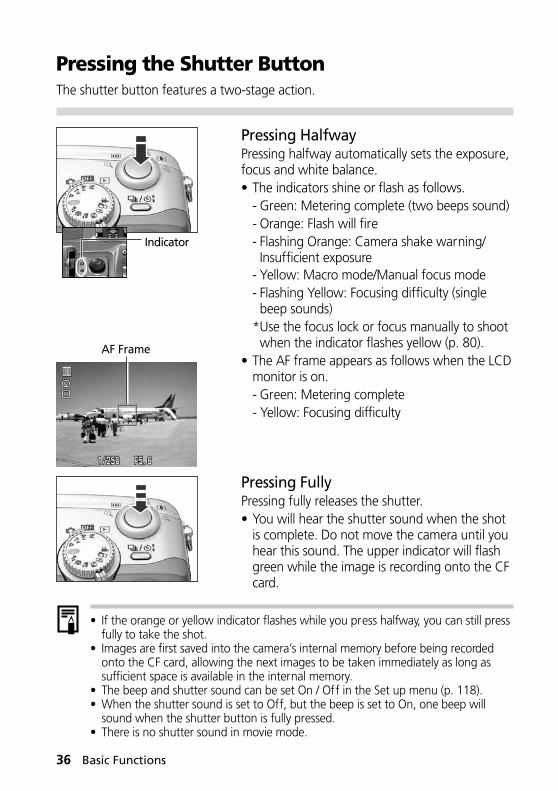
Pressing the Shutter ButtonThe shutter button features a two-stage action.
Pressing HalfwayPressing halfway automatically sets the exposure,focus and white balance.• The indicators shine or flash as follows.
- Green: Metering complete (two beeps sound)- Orange: Flash will fire- Flashing Orange: Camera shake warning/Insufficient exposure
- Yellow: Macro mode/Manual focus mode- Flashing Yellow: Focusing difficulty (singlebeep sounds)
*Use the focus lock or focus manually to shootwhen the indicator flashes yellow (p. 80).
• The AF frame appears as follows when the LCDmonitor is on.- Green: Metering complete- Yellow: Focusing difficulty
Pressing FullyPressing fully releases the shutter.• You will hear the shutter sound when the shot
is complete. Do not move the camera until youhear this sound. The upper indicator will flashgreen while the image is recording onto the CFcard.
• If the orange or yellow indicator flashes while you press halfway, you can still pressfully to take the shot.
• Images are first saved into the camera’s internal memory before being recordedonto the CF card, allowing the next images to be taken immediately as long assufficient space is available in the internal memory.
• The beep and shutter sound can be set On / Off in the Set up menu (p. 118).• When the shutter sound is set to Off, but the beep is set to On, one beep will
sound when the shutter button is fully pressed.• There is no shutter sound in movie mode.
Indicator
AF Frame
37
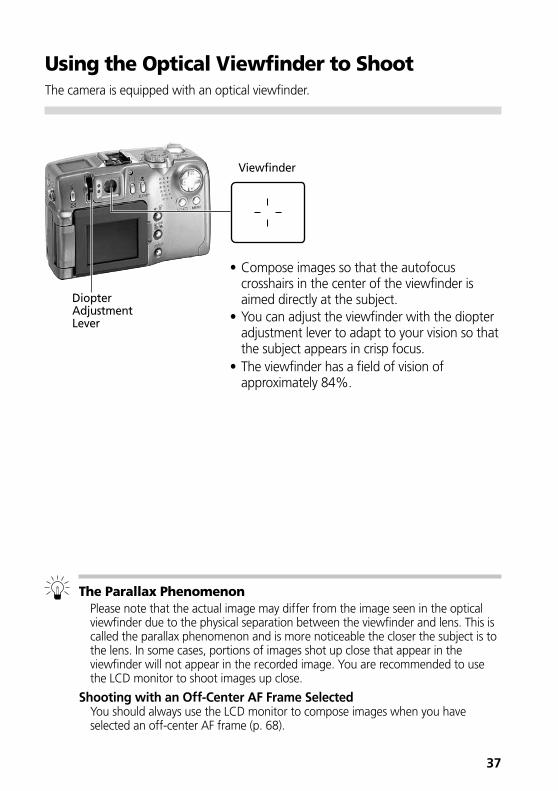
Using the Optical Viewfinder to ShootThe camera is equipped with an optical viewfinder.
• Compose images so that the autofocuscrosshairs in the center of the viewfinder isaimed directly at the subject.
• You can adjust the viewfinder with the diopteradjustment lever to adapt to your vision so thatthe subject appears in crisp focus.
• The viewfinder has a field of vision ofapproximately 84%.
Viewfinder
DiopterAdjustmentLever
The Parallax PhenomenonPlease note that the actual image may differ from the image seen in the opticalviewfinder due to the physical separation between the viewfinder and lens. This iscalled the parallax phenomenon and is more noticeable the closer the subject is tothe lens. In some cases, portions of images shot up close that appear in theviewfinder will not appear in the recorded image. You are recommended to usethe LCD monitor to shoot images up close.
Shooting with an Off-Center AF Frame SelectedYou should always use the LCD monitor to compose images when you haveselected an off-center AF frame (p. 68).
38 Basic Functions
Adjusting the ZoomThe zoom can be adjusted from 34 mm to 102 mm (equivalent to 35 mm filmformat).
Telephoto / Wide Angle• Press the zoom lever toward to zoom in
(telephoto).
• Press the zoom lever toward to zoom out(wide angle).
Digital Zoom• An image already zoomed with the optical
zoom lens can be further zoomed digitally up toan approximate factor of 11 for shooting (p. 57).
• The digital zoom cannot be used with the LCD monitor turned off or in the , or modes.
• The more the image is zoomed digitally, the coarser its image quality becomes.
Basic Functions 39
Selecting Menus and SettingsMenus are used to adjust shooting, replaying, date / time and beep sound settings.Watch the LCD monitor while performing the following procedures.
1 Press the button.• In mode, the [ (Rec.)] menu will appear.
In mode, the [ (Play)] menu will appear.
2 Press the or arrow on the omniselector to switch between menu tabs.• Pressing the arrow displays the [ (Set up)]
menu, while the arrow displays either the[ (Rec.)] or [ (Play)] menu.
• Pressing the button also switchesbetween the menu tabs.
3 Press the or arrow on the omniselector to select a menu item.
4 Press the or arrow on the omniselector to select setting contents.• Press the button for items followed by an
ellipsis (...) and then select a setting. Press the button again to confirm the setting.
5 Press the button.• Pressing the button closes the menu
and makes the settings take effect.• In shooting mode, the menu can be closed by
pressing the shutter button halfway.
40 Basic Functions
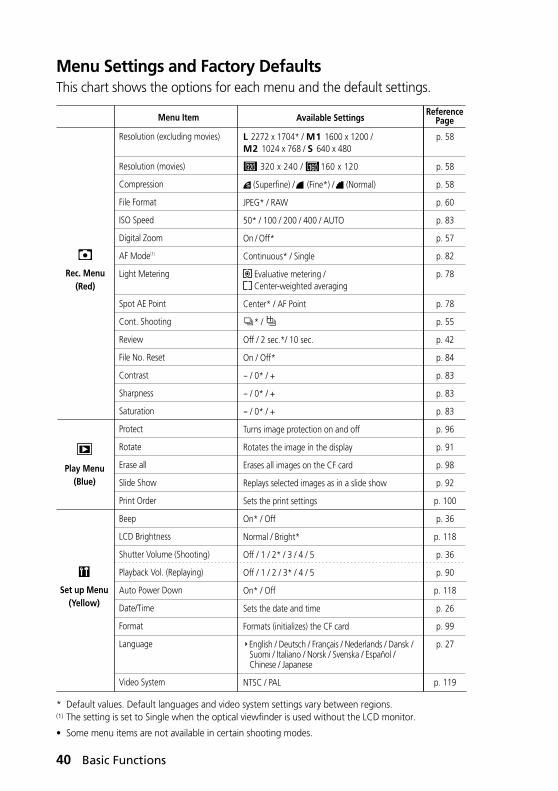
Menu Settings and Factory DefaultsThis chart shows the options for each menu and the default settings.
* Default values. Default languages and video system settings vary between regions.(1) The setting is set to Single when the optical viewfinder is used without the LCD monitor.
• Some menu items are not available in certain shooting modes.
Resolution (excluding movies)
Resolution (movies)
Compression
File Format
ISO Speed
Digital Zoom
AF Mode(1)
Light Metering
Spot AE Point
Cont. Shooting
Review
File No. Reset
Contrast
Sharpness
Saturation
Protect
Rotate
Erase all
Slide Show
Print Order
Beep
LCD Brightness
Shutter Volume (Shooting)
Playback Vol. (Replaying)
Auto Power Down
Date/Time
Format
Language
Video System
L 2272 x 1704* / M1 1600 x 1200 / M2 1024 x 768 / S 640 x 480
320 x 240 / 160 x 120
(Superfine) / (Fine*) / (Normal)
JPEG* / RAW
50* / 100 / 200 / 400 / AUTO
On / Off*
Continuous* / Single
Evaluative metering / Center-weighted averaging
Center* / AF Point
* /
Off / 2 sec.*/ 10 sec.
On / Off*
- / 0* / +
- / 0* / +
- / 0* / +
Turns image protection on and off
Rotates the image in the display
Erases all images on the CF card
Replays selected images as in a slide show
Sets the print settings
On* / Off
Normal / Bright*
Off / 1 / 2* / 3 / 4 / 5
Off / 1 / 2 / 3* / 4 / 5
On* / Off
Sets the date and time
Formats (initializes) the CF card
�English / Deutsch / Français / Nederlands / Dansk / Suomi / Italiano / Norsk / Svenska / Español / Chinese / Japanese
NTSC / PAL
p. 58
p. 58
p. 58
p. 60
p. 83
p. 57
p. 82
p. 78
p. 78
p. 55
p. 42
p. 84
p. 83
p. 83
p. 83
p. 96
p. 91
p. 98
p. 92
p. 100
p. 36
p. 118
p. 36
p. 90
p. 118
p. 26
p. 99
p. 27
p. 119
Rec. Menu(Red)
Set up Menu(Yellow)
ReferencePageMenu Item Available Settings
Play Menu(Blue)
Shooting - Letting the Camera Select Settings 41
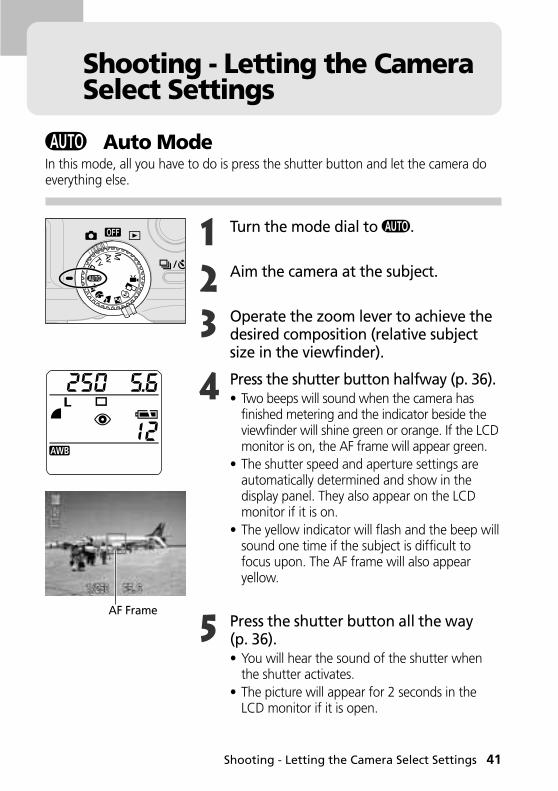
Shooting - Letting the CameraSelect Settings
Auto ModeIn this mode, all you have to do is press the shutter button and let the camera doeverything else.
1 Turn the mode dial to .
2 Aim the camera at the subject.
3 Operate the zoom lever to achieve thedesired composition (relative subjectsize in the viewfinder).
4 Press the shutter button halfway (p. 36).• Two beeps will sound when the camera has
finished metering and the indicator beside theviewfinder will shine green or orange. If the LCDmonitor is on, the AF frame will appear green.
• The shutter speed and aperture settings areautomatically determined and show in thedisplay panel. They also appear on the LCDmonitor if it is on.
• The yellow indicator will flash and the beep willsound one time if the subject is difficult tofocus upon. The AF frame will also appearyellow.
5 Press the shutter button all the way(p. 36).• You will hear the sound of the shutter when
the shutter activates.• The picture will appear for 2 seconds in the
LCD monitor if it is open.
AF Frame

42 Shooting - Letting the Camera Select Settings
• You can change the following settings.- Resolution: L (Large)* / M1 (Medium 1) / M2 (Medium 2) / S (Small)- Compression: (Superfine) / (Fine)* / (Normal)- Flash: (Red-Eye Reduction Auto)* / (Auto) / (Off)- Drive Method: Single* / Self-Timer- Macro: Off* / On- Digital Zoom: Off* / On- AF Mode: Continuous* / Single- Review: Off / 2 sec* / 10 sec.- File No. Reset: Off* / On * Default settings
• With the Review function, you can change the length of time images show in theLCD monitor after shooting, or set it so they do not show at all (p. 39).
Checking an Image Right after ShootingChecking the ImageThe following explains ways to view the photographed image in addition toviewing it for 2 seconds in the LCD monitor when it has been opened.
Keeping the Shutter Button PressedThe image will continue to display in the LCD monitor as long as you keep theshutter button fully depressed.
Pressing the ButtonIf you press the button while the image is displayed in the LCD monitor, it willcontinue to display even after the shutter button is released. Press the shutterbutton halfway again to stop displaying it.
• You can perform the following while images are displayed.- Erasing Images (p. 9)- Displaying Images in the Detailed Display Mode (p. 33)- Magnifying Images (p. 87)
Shooting - Letting the Camera Select Settings 43
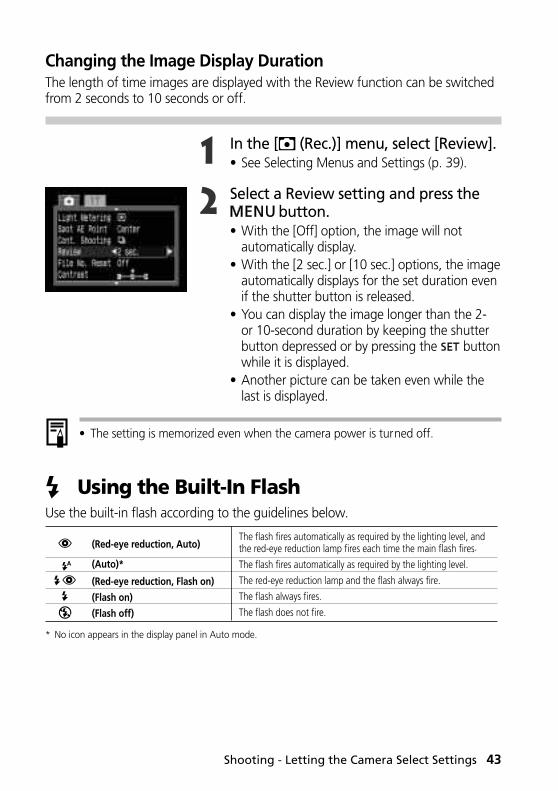
Changing the Image Display DurationThe length of time images are displayed with the Review function can be switchedfrom 2 seconds to 10 seconds or off.
1 In the [ (Rec.)] menu, select [Review].• See Selecting Menus and Settings (p. 39).
2 Select a Review setting and press the button.
• With the [Off] option, the image will notautomatically display.
• With the [2 sec.] or [10 sec.] options, the imageautomatically displays for the set duration evenif the shutter button is released.
• You can display the image longer than the 2-or 10-second duration by keeping the shutterbutton depressed or by pressing the buttonwhile it is displayed.
• Another picture can be taken even while thelast is displayed.
• The setting is memorized even when the camera power is turned off.
Using the Built-In FlashUse the built-in flash according to the guidelines below.
* No icon appears in the display panel in Auto mode.
(Red-eye reduction, Auto)
(Auto)*
(Red-eye reduction, Flash on)
(Flash on)
(Flash off)
The flash fires automatically as required by the lighting level, and the red-eye reduction lamp fires each time the main flash fires.
The flash fires automatically as required by the lighting level.
The red-eye reduction lamp and the flash always fire.
The flash always fires.
The flash does not fire.

44 Shooting - Letting the Camera Select Settings
1 Press the button to switch betweenflash modes.• The selected flash mode will show in the
display panel. It will also appear on the LCDmonitor if it is on.
2 Shoot the image.• The flash will fire if the indicator beside the
viewfinder shines orange when the shutterbutton is pressed halfway.
• Shooting procedures are the same as for the Auto mode (p. 41).
Built-in Flash SettingsThe flash cannot be used with some shooting modes.
(Red-eye reduction,Auto)
(Auto)
(Red-eye reduction,Flash on)
(Flash on)
(Flash off)
●*
●
-
-
●
-
-
-
-
●*
●
●
●
●
●*
-
-
●
●
●*
-
-
●
●
●*
-
-
●
●
●*
-
-
-
▲
▲*
●
●*
●
●
●
●*
●
●
●
●
●
●
●
●
●*
●*
●
●
●
●
●
●*
●
●
●
* Default setting.● Setting selection is possible.▲ Setting can only be selected for the first image.- Setting selection is not possible.
Shooting - Letting the Camera Select Settings 45
• The fastest shutter speed for flash synchronization is 1/250 second. The cameraautomatically resets the shutter speed to 1/250 second if a faster speed is selected.
• The flash may take up to approximately 10 seconds to charge in some cases.Actual times will vary according to usage and the battery charge.
• The flash intensity is automatically adjusted except in the mode.• In the mode, the flash fires at full intensity.• The flash setting is saved when the camera is turned off in the , , and
shooting modes.• The flash will fire twice. A pre-flash will fire and will be followed by the main flash.
The pre-flash is used by the camera to obtain the subject’s exposure data so thatthe main flash can be set to the optimal intensity for the shot.
About the Red-Eye Reduction Function• Light reflecting back from eyes can make them appear red when the flash is used
in dark areas. Under these conditions, use the red-eye reduction mode. For thismode to be effective, the subject must be looking right at the red-eye reductionlamp. Try asking them to look directly at the lamp. Even better results can beobtained by shooting with the lens set to the wide angle, increasing the lighting inindoor settings or approaching closer to the subject.
46 Shooting - Letting the Camera Select Settings
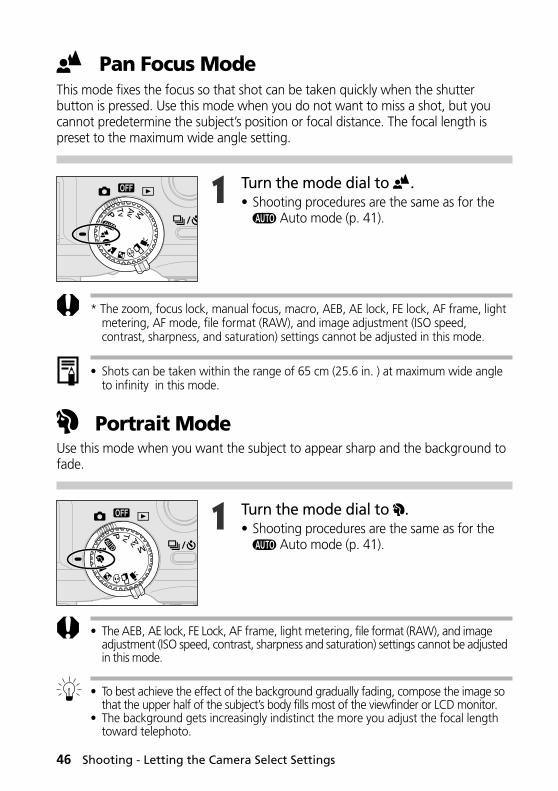
Pan Focus ModeThis mode fixes the focus so that shot can be taken quickly when the shutterbutton is pressed. Use this mode when you do not want to miss a shot, but youcannot predetermine the subject’s position or focal distance. The focal length ispreset to the maximum wide angle setting.
1 Turn the mode dial to .• Shooting procedures are the same as for the
Auto mode (p. 41).
.
* The zoom, focus lock, manual focus, macro, AEB, AE lock, FE lock, AF frame, lightmetering, AF mode, file format (RAW), and image adjustment (ISO speed,contrast, sharpness, and saturation) settings cannot be adjusted in this mode.
• Shots can be taken within the range of 65 cm (25.6 in. ) at maximum wide angleto infinity in this mode.
Portrait ModeUse this mode when you want the subject to appear sharp and the background tofade.
1 Turn the mode dial to .• Shooting procedures are the same as for the
Auto mode (p. 41).
.
• The AEB, AE lock, FE Lock, AF frame, light metering, file format (RAW), and imageadjustment (ISO speed, contrast, sharpness and saturation) settings cannot be adjustedin this mode.
• To best achieve the effect of the background gradually fading, compose the image sothat the upper half of the subject’s body fills most of the viewfinder or LCD monitor.
• The background gets increasingly indistinct the more you adjust the focal lengthtoward telephoto.
Shooting - Letting the Camera Select Settings 47
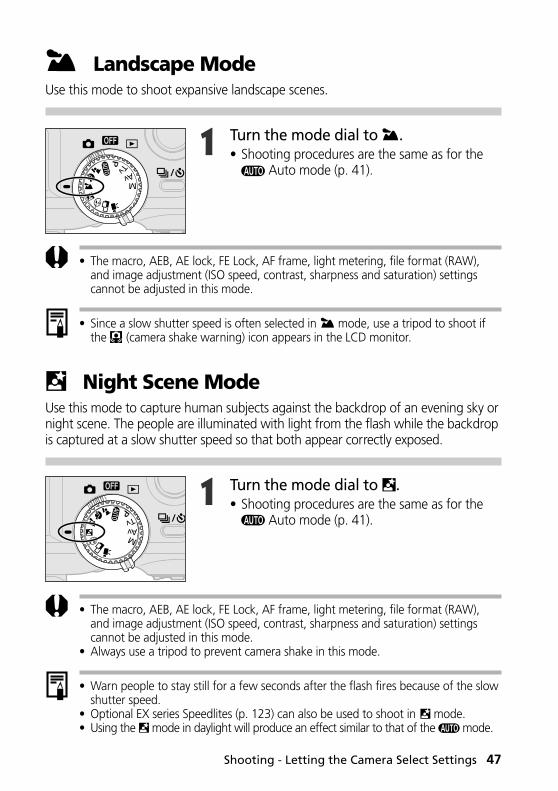
Landscape ModeUse this mode to shoot expansive landscape scenes.
1 Turn the mode dial to .• Shooting procedures are the same as for the
Auto mode (p. 41).
• The macro, AEB, AE lock, FE Lock, AF frame, light metering, file format (RAW),and image adjustment (ISO speed, contrast, sharpness and saturation) settingscannot be adjusted in this mode.
• Since a slow shutter speed is often selected in mode, use a tripod to shoot ifthe (camera shake warning) icon appears in the LCD monitor.
Night Scene ModeUse this mode to capture human subjects against the backdrop of an evening sky ornight scene. The people are illuminated with light from the flash while the backdropis captured at a slow shutter speed so that both appear correctly exposed.
1 Turn the mode dial to .• Shooting procedures are the same as for the
Auto mode (p. 41).
• The macro, AEB, AE lock, FE Lock, AF frame, light metering, file format (RAW),and image adjustment (ISO speed, contrast, sharpness and saturation) settingscannot be adjusted in this mode.
• Always use a tripod to prevent camera shake in this mode.
• Warn people to stay still for a few seconds after the flash fires because of the slowshutter speed.
• Optional EX series Speedlites (p. 123) can also be used to shoot in mode.• Using the mode in daylight will produce an effect similar to that of the mode.
48 Shooting - Letting the Camera Select Settings
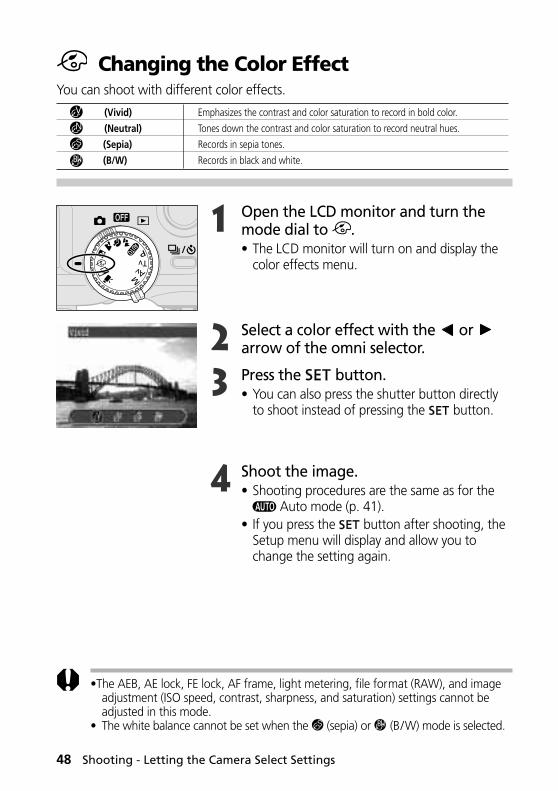
Changing the Color EffectYou can shoot with different color effects.
1 Open the LCD monitor and turn themode dial to .• The LCD monitor will turn on and display the
color effects menu.
2 Select a color effect with the or arrow of the omni selector.
3 Press the button.• You can also press the shutter button directly
to shoot instead of pressing the button.
4 Shoot the image.• Shooting procedures are the same as for the
Auto mode (p. 41).• If you press the button after shooting, the
Setup menu will display and allow you tochange the setting again.
•The AEB, AE lock, FE lock, AF frame, light metering, file format (RAW), and imageadjustment (ISO speed, contrast, sharpness, and saturation) settings cannot beadjusted in this mode.
• The white balance cannot be set when the (sepia) or (B/W) mode is selected.
(Vivid)
(Neutral)
(Sepia)
(B/W)
Emphasizes the contrast and color saturation to record in bold color.
Tones down the contrast and color saturation to record neutral hues.
Records in sepia tones.
Records in black and white.

Shooting - Letting the Camera Select Settings 49
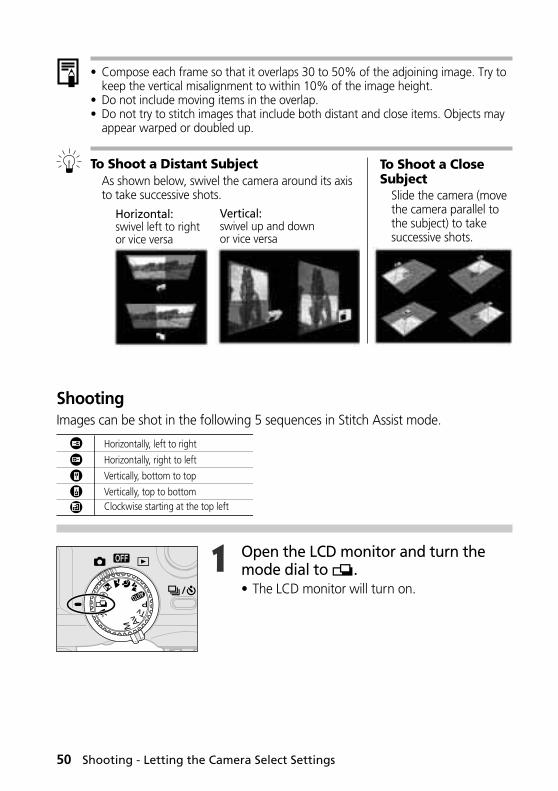
Stitch Assist ModeUse this mode to shoot a series of overlapping frames for merging (stitching) into alarge panoramic image on the computer.
• Please use the bundled PhotoStitch program to merge the images on a computer.
Framing a SubjectPhotoStitch detects the overlapping portions of adjoining images and mergesthem. When composing shots, try to include a distinctive item (landmark, etc.) inthe overlapping portions.
VerticalHorizontal
2 x 2
50 Shooting - Letting the Camera Select Settings
• Compose each frame so that it overlaps 30 to 50% of the adjoining image. Try tokeep the vertical misalignment to within 10% of the image height.
• Do not include moving items in the overlap.• Do not try to stitch images that include both distant and close items. Objects may
appear warped or doubled up.
To Shoot a Distant SubjectAs shown below, swivel the camera around its axisto take successive shots.
ShootingImages can be shot in the following 5 sequences in Stitch Assist mode.
1 Open the LCD monitor and turn themode dial to .• The LCD monitor will turn on.
Horizontal:swivel left to rightor vice versa
Vertical:swivel up and downor vice versa
To Shoot a CloseSubject
Slide the camera (movethe camera parallel tothe subject) to takesuccessive shots.
Horizontally, left to right
Horizontally, right to left
Vertically, bottom to top
Vertically, top to bottomClockwise starting at the top left
Shooting - Letting the Camera Select Settings 51
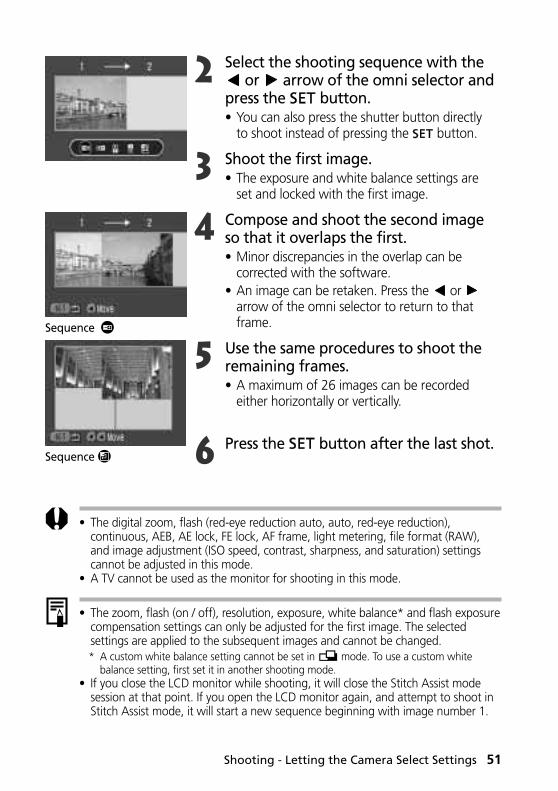
2 Select the shooting sequence with the or arrow of the omni selector and
press the button.• You can also press the shutter button directly
to shoot instead of pressing the button.
3 Shoot the first image.• The exposure and white balance settings are
set and locked with the first image.
4 Compose and shoot the second imageso that it overlaps the first.• Minor discrepancies in the overlap can be
corrected with the software.• An image can be retaken. Press the or
arrow of the omni selector to return to thatframe.
5 Use the same procedures to shoot theremaining frames.• A maximum of 26 images can be recorded
either horizontally or vertically.
6 Press the button after the last shot.
Sequence
Sequence
• The digital zoom, flash (red-eye reduction auto, auto, red-eye reduction),continuous, AEB, AE lock, FE lock, AF frame, light metering, file format (RAW),and image adjustment (ISO speed, contrast, sharpness, and saturation) settingscannot be adjusted in this mode.
• A TV cannot be used as the monitor for shooting in this mode.
• The zoom, flash (on / off), resolution, exposure, white balance* and flash exposurecompensation settings can only be adjusted for the first image. The selectedsettings are applied to the subsequent images and cannot be changed.* A custom white balance setting cannot be set in mode. To use a custom white
balance setting, first set it in another shooting mode.• If you close the LCD monitor while shooting, it will close the Stitch Assist mode
session at that point. If you open the LCD monitor again, and attempt to shoot inStitch Assist mode, it will start a new sequence beginning with image number 1.
52 Shooting - Letting the Camera Select Settings
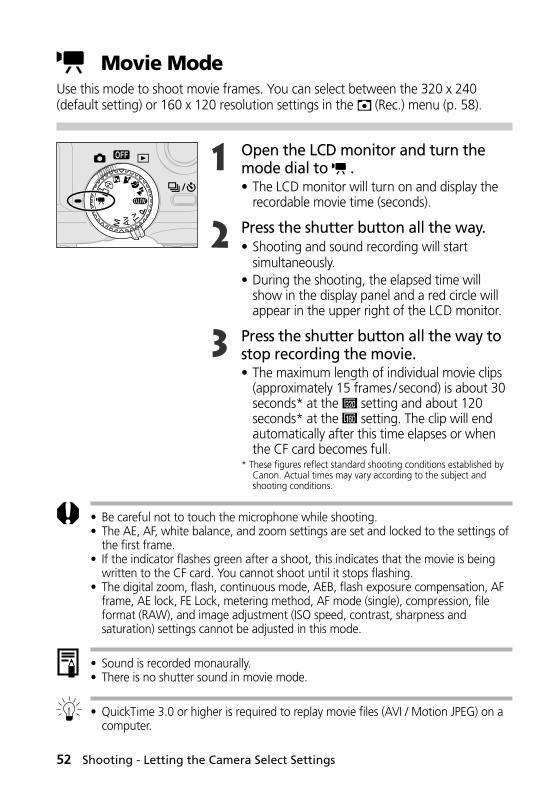
Movie ModeUse this mode to shoot movie frames. You can select between the 320 x 240(default setting) or 160 x 120 resolution settings in the (Rec.) menu (p. 58).
1 Open the LCD monitor and turn themode dial to .• The LCD monitor will turn on and display the
recordable movie time (seconds).
2 Press the shutter button all the way.• Shooting and sound recording will start
simultaneously.• During the shooting, the elapsed time will
show in the display panel and a red circle willappear in the upper right of the LCD monitor.
3 Press the shutter button all the way tostop recording the movie.• The maximum length of individual movie clips
(approximately 15 frames / second) is about 30seconds* at the setting and about 120seconds* at the setting. The clip will endautomatically after this time elapses or whenthe CF card becomes full.
* These figures reflect standard shooting conditions established byCanon. Actual times may vary according to the subject andshooting conditions.
• Be careful not to touch the microphone while shooting.• The AE, AF, white balance, and zoom settings are set and locked to the settings of
the first frame.• If the indicator flashes green after a shoot, this indicates that the movie is being
written to the CF card. You cannot shoot until it stops flashing.• The digital zoom, flash, continuous mode, AEB, flash exposure compensation, AF
frame, AE lock, FE Lock, metering method, AF mode (single), compression, fileformat (RAW), and image adjustment (ISO speed, contrast, sharpness andsaturation) settings cannot be adjusted in this mode.
• Sound is recorded monaurally.• There is no shutter sound in movie mode.
• QuickTime 3.0 or higher is required to replay movie files (AVI / Motion JPEG) on acomputer.

Shooting - Letting the Camera Select Settings 53
Macro ModeUse the macro mode to shoot close-ups of subjects in the range of 6 to 70 cm(2.4 in. to 2.3 ft.) at maximum wide angle and 20 to 70 cm (7.9 in. to 2.3 ft.) atmaximum telephoto.
1 Press the button.• The LCD monitor will turn on.
2 Press the button.• The icon will show in the display panel or the
LCD monitor.• Press the button again to cancel the macro
mode.
3 Shoot the image.• The indicator beside the viewfinder will shine
yellow when the shutter button is pressedhalfway.
• Shooting procedures are the same as for the Auto mode (p. 41).
• The macro mode cannot be selected in the , and shooting modes.• Please use the separately sold Macro Ring Lite MR-14EX for flash photography in
the macro mode. Shoot from a focal distance greater than 20 cm (8 in.). To shootcloser, use the or mode and set the aperture to a higher value.
• Always use the LCD monitor to compose images in macro mode. The parallaxphenomenon may cause images composed with the optical viewfinder to be off-center.
• When the lens is zoomed to the maximum wide angle, the recordable area isapproximately 60 x 82 mm (2.36 x 3.2 in.) at the closest focal distance, and atmaximum telephoto, it is approximately 62 x 84 mm (2.44 x 3.2 in.), roughly thesize of a business card. If optional Close-up Lens 250D (p. 128) is used in macromode, the recordable area is approximately 38 x 50 mm (1.5 x 2 in.) atmaximum telephoto.
• Turning the camera off cancels the setting.
54 Shooting - Letting the Camera Select Settings
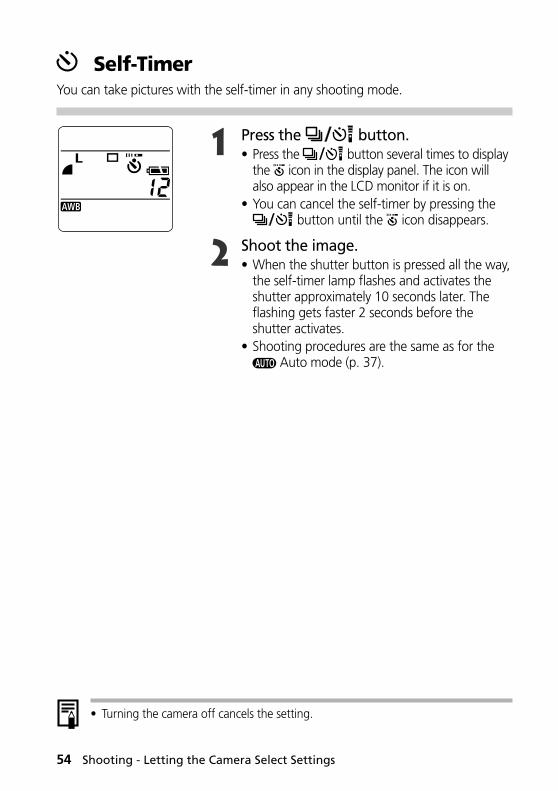
Self-TimerYou can take pictures with the self-timer in any shooting mode.
1 Press the button.• Press the button several times to display
the icon in the display panel. The icon willalso appear in the LCD monitor if it is on.
• You can cancel the self-timer by pressing the button until the icon disappears.
2 Shoot the image.• When the shutter button is pressed all the way,
the self-timer lamp flashes and activates theshutter approximately 10 seconds later. Theflashing gets faster 2 seconds before theshutter activates.
• Shooting procedures are the same as for the Auto mode (p. 37).
• Turning the camera off cancels the setting.

Shooting - Letting the Camera Select Settings 55
Continuous ModeUse this mode to shoot successive frames while the shutter button is pressed fully.
1 Press the button.• Press the button several times to display
the icon in the display panel. The icon willalso appear in the LCD monitor if it is on.
• You can cancel the continuous mode bypressing the button until the icondisappears.
2 In the [ (Rec.)] menu, select [Cont.Shooting].• See Selecting Menus and Settings (p. 35).
3 Select or and press the button.
4 Press the shutter button halfway tolock the focus.
5 Press the shutter button all the way toshoot.• Shooting will cease when the shutter button is
released.• The shoot speed is approximately 1.5 frames /
second* in mode and 2.5 frames/second*in mode.
* Large/Fine, LCD monitor off mode. (These figuresreflect standard Canon testing conditions. The actualfigures will vary according to the shooting conditionsand settings.)
Use this mode to view the images as you shoot continuously. The shutter interval is longer in this mode than the mode.
Use this mode to shoot continuously with a short shutter interval. The camera’s internal memory will become full faster in this mode than the mode when many frames are shot or when high image quality settings are selected.
56 Shooting - Letting the Camera Select Settings
• This mode cannot be selected in the , or shooting mode.• In mode, images do not appear on the LCD monitor as they are shot.• An externally mounted flash will not fire in this mode.• The built-in flash can be used, but the interval between images will lengthen to
accommodate the flash recharge time.
• Successive frames can be shot until the CF card is filled.• The interval between frames may lengthen somewhat when the internal memory
gets full.• Turning the camera off restores the standard shooting mode. However, the
selected continuous shooting option will remain effective the next time continuousshooting is activated, making it possible to skip steps 2 and 3 above if you wish touse the same option.

Shooting - Letting the Camera Select Settings 57
Digital ZoomImages can be zoomed up to approximately 11 times with the combined opticaland digital zoom functions.
1 Press the button to turn theLCD monitor on.
2 Turn the mode dial to any shootingmode except for , or .
3 In the [ (Rec.)] menu, select [DigitalZoom].• See Selecting Menus and Settings (p. 39).
4 Select [On] and press the button.
5 Move the zoom lever in the direction ofthe symbol.• The lens will zoom to the maximum optical
telephoto setting and stop. Release the leverand move it toward the symbol again. Youcan further zoom it digitally to 4.3, 5.3, 6.7,8.2 or 11 times.
• Move it toward the symbol to zoom backout.
6 Shoot the image.• Shooting procedures are the same as for the
Auto mode (p. 41).
• This mode cannot be selected in the , or shooting modes or for theRAW file format.
• Images become coarser the more they are digitally zoomed.• The digital zoom On/Off setting is memorized even when the camera power is
turned off so you can skip steps 3 and 4 if you wish to use the same option thenext time.
Zoom Setting
58 Shooting - Selecting Particular Effects
Shooting - Selecting ParticularEffects
Camera settings- such as image resolution and compression, shutter speed andaperture- can be freely changed for shooting.
• Please see “Auto Mode” (p. 41) for shooting procedures once you have changed asetting.
Changing the Resolution and CompressionYou can change the resolution and compression (excluding movies) settings tosuit the purpose of the image you are about to shoot. The resolution gets higherin the order S (Small), M2 (Medium 2), M1 (Medium 1), and L (Large). Use ahigher resolution if you wish to make a large print. Conversely, use a lowerresolution if you wish to print on small objects, such as labels, to send imageselectronically, or to fit more images on a CF card.The compression gets higher in the order (Superfine), (Fine) and (Normal).Select (Superfine) for a higher quality image, or (Normal) if you wish to fitmore images on a CF card. The (Fine) setting provides adequate quality forstandard shots. To record the CCD output without compression, select the RAWfile format (p. 60).
You can select from among the following resolutions to shoot movies.
1 Turn the mode dial to a shooting modeother than .
2 In the [ (Rec.)] menu, select [Resolution]or [Compression].• See Selecting Menus and Settings (p. 39).
Compression
2272 x 1704 pixels
1600 x 1200 pixels
1024 x 768 pixels
640 x 480 pixels
Superfine
Fine
Normal
L
LM (M1)
M (M2)
S
Large
Medium 1
Medium 2
Small
Resolution
The symbol in brackets ( ) is shown on the LCD monitor.
320 x 240 pixels
160 x 120 pixels
Resolution
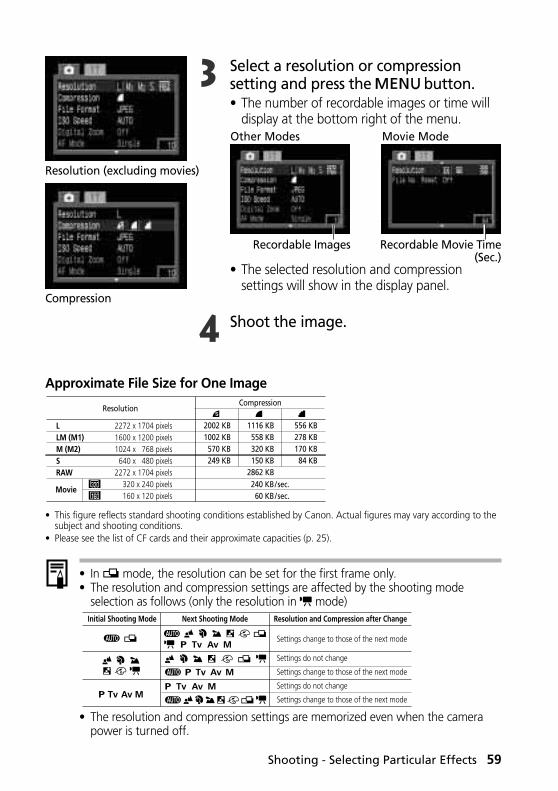
Shooting - Selecting Particular Effects 59
3 Select a resolution or compressionsetting and press the button.• The number of recordable images or time will
display at the bottom right of the menu.
• The selected resolution and compressionsettings will show in the display panel.
4 Shoot the image.
Resolution (excluding movies)
Compression
Approximate File Size for One Image
• This figure reflects standard shooting conditions established by Canon. Actual figures may vary according to thesubject and shooting conditions.
• Please see the list of CF cards and their approximate capacities (p. 25).
• In mode, the resolution can be set for the first frame only.• The resolution and compression settings are affected by the shooting mode
selection as follows (only the resolution in mode)
• The resolution and compression settings are memorized even when the camerapower is turned off.
Settings change to those of the next mode
Settings do not change
Settings change to those of the next mode
Settings do not change
Settings change to those of the next mode
Next Shooting ModeInitial Shooting Mode Resolution and Compression after Change
L 2272 x 1704 pixelsLM (M1) 1600 x 1200 pixelsM (M2) 1024 x 768 pixelsS 640 x 480 pixelsRAW 2272 x 1704 pixels
Movie 320 x 240 pixels
160 x 120 pixels
2002 KB1002 KB570 KB249 KB
1116 KB558 KB320 KB150 KB
2862 KB
556 KB278 KB170 KB84 KB
ResolutionCompression
240 KB/sec.60 KB/sec.
Recordable Movie Time(Sec.)
Recordable Images
Other Modes Movie Mode
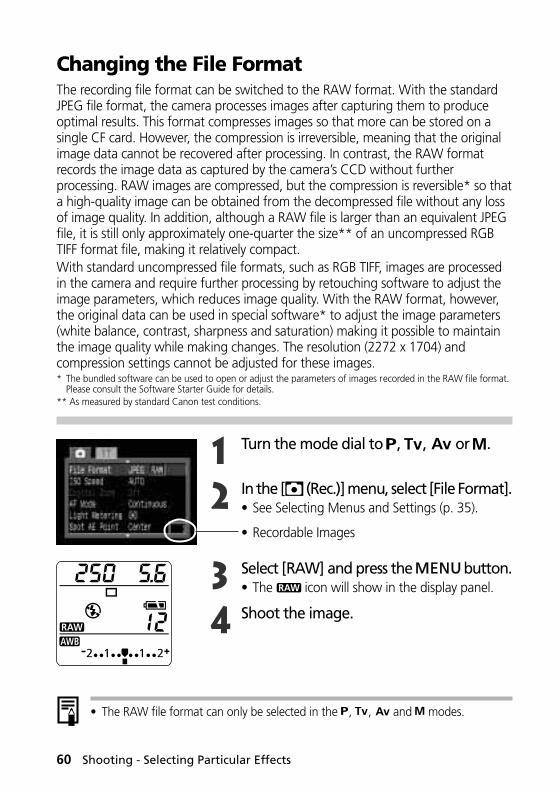
60 Shooting - Selecting Particular Effects
Changing the File FormatThe recording file format can be switched to the RAW format. With the standardJPEG file format, the camera processes images after capturing them to produceoptimal results. This format compresses images so that more can be stored on asingle CF card. However, the compression is irreversible, meaning that the originalimage data cannot be recovered after processing. In contrast, the RAW formatrecords the image data as captured by the camera’s CCD without furtherprocessing. RAW images are compressed, but the compression is reversible* so thata high-quality image can be obtained from the decompressed file without any lossof image quality. In addition, although a RAW file is larger than an equivalent JPEGfile, it is still only approximately one-quarter the size** of an uncompressed RGBTIFF format file, making it relatively compact.With standard uncompressed file formats, such as RGB TIFF, images are processedin the camera and require further processing by retouching software to adjust theimage parameters, which reduces image quality. With the RAW format, however,the original data can be used in special software* to adjust the image parameters(white balance, contrast, sharpness and saturation) making it possible to maintainthe image quality while making changes. The resolution (2272 x 1704) andcompression settings cannot be adjusted for these images.* The bundled software can be used to open or adjust the parameters of images recorded in the RAW file format.
Please consult the Software Starter Guide for details.** As measured by standard Canon test conditions.
1 Turn the mode dial to , , or .
2 In the [ (Rec.)] menu, select [File Format].• See Selecting Menus and Settings (p. 35).
• Recordable Images
3 Select [RAW] and press the button.• The icon will show in the display panel.
4 Shoot the image.
• The RAW file format can only be selected in the , , and modes.
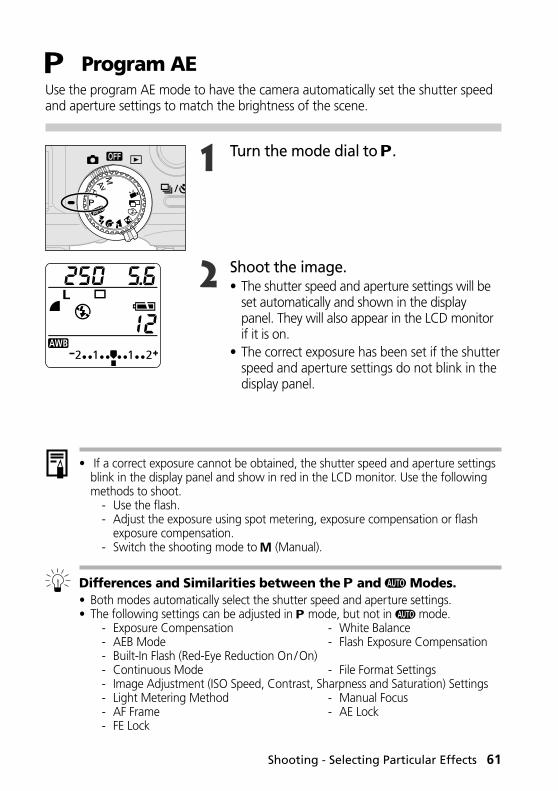
Shooting - Selecting Particular Effects 61
Program AEUse the program AE mode to have the camera automatically set the shutter speedand aperture settings to match the brightness of the scene.
1 Turn the mode dial to .
2 Shoot the image.• The shutter speed and aperture settings will be
set automatically and shown in the displaypanel. They will also appear in the LCD monitorif it is on.
• The correct exposure has been set if the shutterspeed and aperture settings do not blink in thedisplay panel.
• If a correct exposure cannot be obtained, the shutter speed and aperture settingsblink in the display panel and show in red in the LCD monitor. Use the followingmethods to shoot.
- Use the flash.- Adjust the exposure using spot metering, exposure compensation or flash
exposure compensation.- Switch the shooting mode to (Manual).
Differences and Similarities between the and Modes.• Both modes automatically select the shutter speed and aperture settings.• The following settings can be adjusted in mode, but not in mode.
- Exposure Compensation - White Balance- AEB Mode - Flash Exposure Compensation- Built-In Flash (Red-Eye Reduction On/On)- Continuous Mode - File Format Settings- Image Adjustment (ISO Speed, Contrast, Sharpness and Saturation) Settings- Light Metering Method - Manual Focus- AF Frame - AE Lock- FE Lock
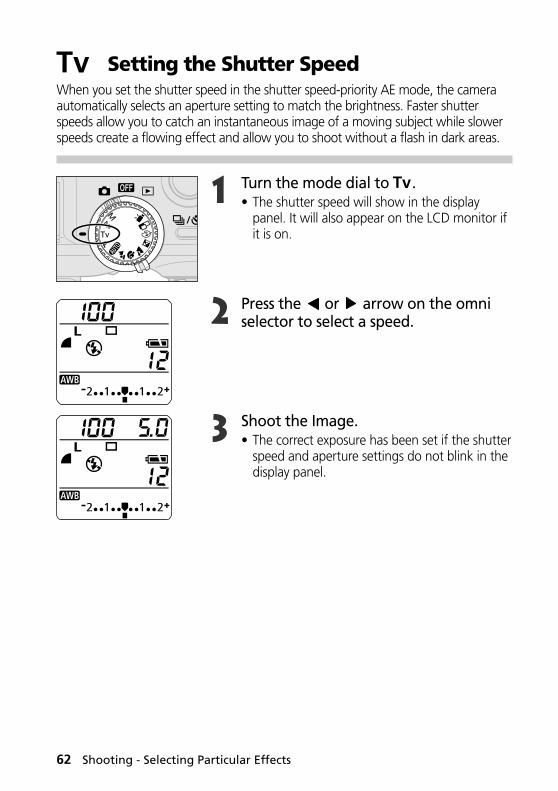
62 Shooting - Selecting Particular Effects
Setting the Shutter SpeedWhen you set the shutter speed in the shutter speed-priority AE mode, the cameraautomatically selects an aperture setting to match the brightness. Faster shutterspeeds allow you to catch an instantaneous image of a moving subject while slowerspeeds create a flowing effect and allow you to shoot without a flash in dark areas.
1 Turn the mode dial to .• The shutter speed will show in the display
panel. It will also appear on the LCD monitor ifit is on.
2 Press the or arrow on the omniselector to select a speed.
3 Shoot the Image.• The correct exposure has been set if the shutter
speed and aperture settings do not blink in thedisplay panel.
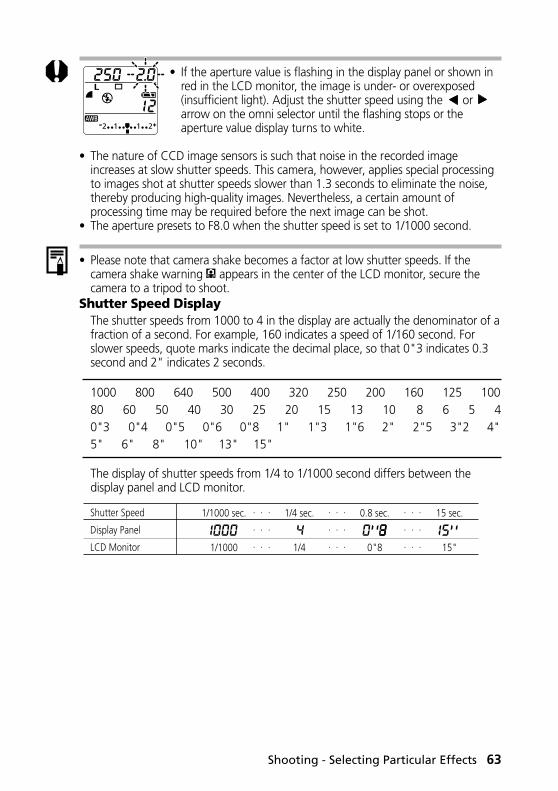
Shooting - Selecting Particular Effects 63
• If the aperture value is flashing in the display panel or shown inred in the LCD monitor, the image is under- or overexposed(insufficient light). Adjust the shutter speed using the or arrow on the omni selector until the flashing stops or theaperture value display turns to white.
• The nature of CCD image sensors is such that noise in the recorded imageincreases at slow shutter speeds. This camera, however, applies special processingto images shot at shutter speeds slower than 1.3 seconds to eliminate the noise,thereby producing high-quality images. Nevertheless, a certain amount ofprocessing time may be required before the next image can be shot.
• The aperture presets to F8.0 when the shutter speed is set to 1/1000 second.
• Please note that camera shake becomes a factor at low shutter speeds. If thecamera shake warning appears in the center of the LCD monitor, secure thecamera to a tripod to shoot.
Shutter Speed DisplayThe shutter speeds from 1000 to 4 in the display are actually the denominator of afraction of a second. For example, 160 indicates a speed of 1/160 second. Forslower speeds, quote marks indicate the decimal place, so that 0"3 indicates 0.3second and 2" indicates 2 seconds.
1000 800 640 500 400 320 250 200 160 125 10080 60 50 40 30 25 20 15 13 10 8 6 5 40"3 0"4 0"5 0"6 0"8 1" 1"3 1"6 2" 2"5 3"2 4"5" 6" 8" 10" 13" 15"
The display of shutter speeds from 1/4 to 1/1000 second differs between thedisplay panel and LCD monitor.
1/1000 sec. . . . 1/4 sec. . . . 0.8 sec. . . . 15 sec.. . . . . . . . .
1/1000 . . . 1/4 . . . 0"8 . . . 15"
Shutter Speed
Display Panel
LCD Monitor
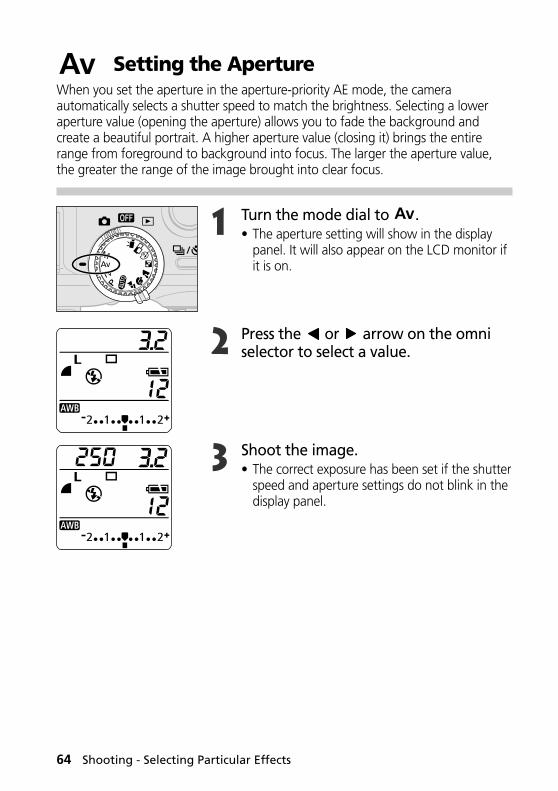
64 Shooting - Selecting Particular Effects
Setting the ApertureWhen you set the aperture in the aperture-priority AE mode, the cameraautomatically selects a shutter speed to match the brightness. Selecting a loweraperture value (opening the aperture) allows you to fade the background andcreate a beautiful portrait. A higher aperture value (closing it) brings the entirerange from foreground to background into focus. The larger the aperture value,the greater the range of the image brought into clear focus.
1 Turn the mode dial to .• The aperture setting will show in the display
panel. It will also appear on the LCD monitor ifit is on.
2 Press the or arrow on the omniselector to select a value.
3 Shoot the image.• The correct exposure has been set if the shutter
speed and aperture settings do not blink in thedisplay panel.
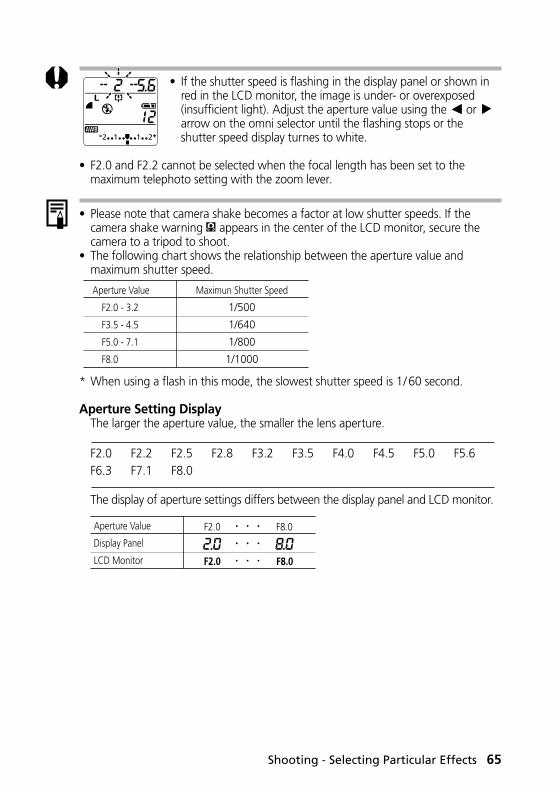
Shooting - Selecting Particular Effects 65
• If the shutter speed is flashing in the display panel or shown inred in the LCD monitor, the image is under- or overexposed(insufficient light). Adjust the aperture value using the or arrow on the omni selector until the flashing stops or theshutter speed display turnes to white.
• F2.0 and F2.2 cannot be selected when the focal length has been set to themaximum telephoto setting with the zoom lever.
• Please note that camera shake becomes a factor at low shutter speeds. If thecamera shake warning appears in the center of the LCD monitor, secure thecamera to a tripod to shoot.
• The following chart shows the relationship between the aperture value andmaximum shutter speed.
* When using a flash in this mode, the slowest shutter speed is 1/ 60 second.
Aperture Setting DisplayThe larger the aperture value, the smaller the lens aperture.
F2.0 F2.2 F2.5 F2.8 F3.2 F3.5 F4.0 F4.5 F5.0 F5.6F6.3 F7.1 F8.0
The display of aperture settings differs between the display panel and LCD monitor.
Maximun Shutter Speed
1/500
1/640
1/800
1/1000
Aperture Value
F2.0 - 3.2
F3.5 - 4.5
F5.0 - 7.1
F8.0
F8.0
F8.0
. . .
. . .
. . .
F2.0
F2.0
Aperture Value
Display Panel
LCD Monitor
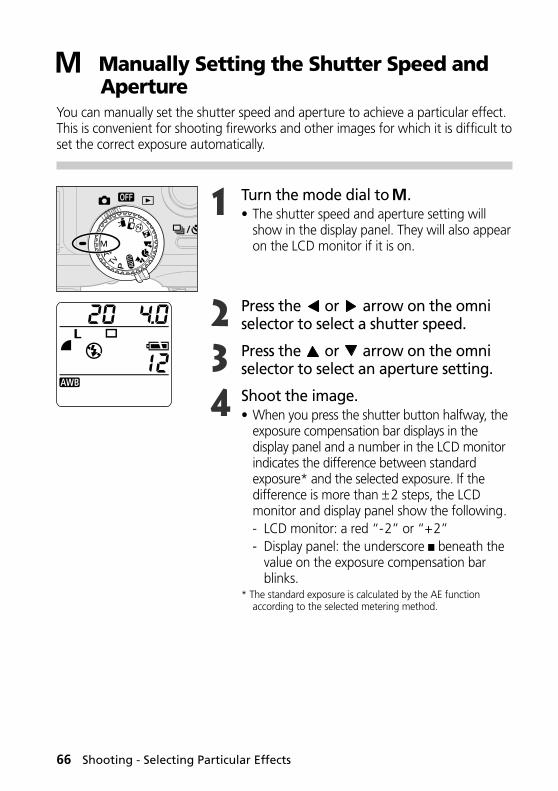
66 Shooting - Selecting Particular Effects
Manually Setting the Shutter Speed and ApertureYou can manually set the shutter speed and aperture to achieve a particular effect.This is convenient for shooting fireworks and other images for which it is difficult toset the correct exposure automatically.
1 Turn the mode dial to .• The shutter speed and aperture setting will
show in the display panel. They will also appearon the LCD monitor if it is on.
2 Press the or arrow on the omniselector to select a shutter speed.
3 Press the or arrow on the omniselector to select an aperture setting.
4 Shoot the image.• When you press the shutter button halfway, the
exposure compensation bar displays in thedisplay panel and a number in the LCD monitorindicates the difference between standardexposure* and the selected exposure. If thedifference is more than ± 2 steps, the LCDmonitor and display panel show the following.- LCD monitor: a red “-2” or “+2”- Display panel: the underscore ■ beneath the
value on the exposure compensation barblinks.
* The standard exposure is calculated by the AE functionaccording to the selected metering method.
Shooting - Selecting Particular Effects 67
• The exposure compensation, AE Lock, FE Lock, flash exposure compensation, AEBand ISO speed (Auto) settings cannot be adjusted in this mode.
• The 1/1000 second shutter speed can be selected when the aperture is set to F8.0.• If you wish to change the exposure, press the or arrow on the omni selector
to adjust the shutter speed, or the or arrow to adjust the aperture.• The LCD monitor will not darken if you select a fast shutter speed, set the flash to
(Red-Eye Reduction Auto) or (Flash On) to shoot a subject in a dark place, orattach an external flash, so that you can check the image before shooting.
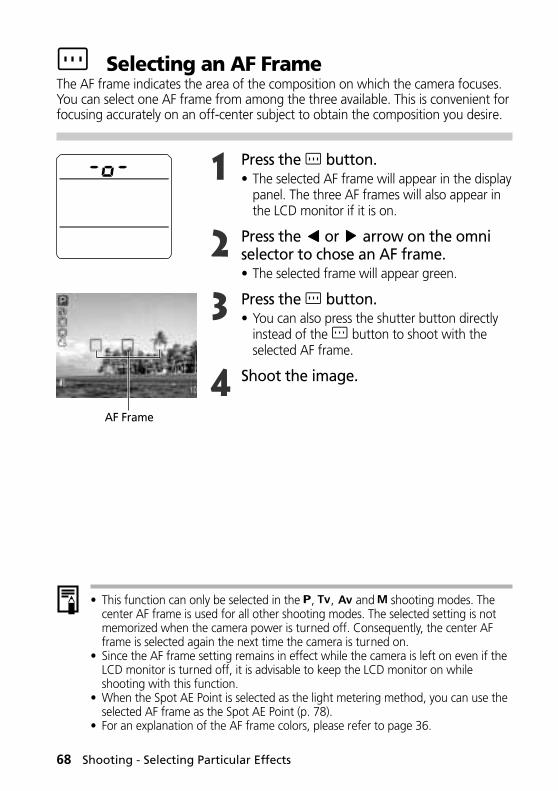
68 Shooting - Selecting Particular Effects
Selecting an AF FrameThe AF frame indicates the area of the composition on which the camera focuses.You can select one AF frame from among the three available. This is convenient forfocusing accurately on an off-center subject to obtain the composition you desire.
1 Press the button.• The selected AF frame will appear in the display
panel. The three AF frames will also appear inthe LCD monitor if it is on.
2 Press the or arrow on the omniselector to chose an AF frame.• The selected frame will appear green.
3 Press the button.• You can also press the shutter button directly
instead of the button to shoot with theselected AF frame.
4 Shoot the image.
AF Frame
• This function can only be selected in the , , and shooting modes. Thecenter AF frame is used for all other shooting modes. The selected setting is notmemorized when the camera power is turned off. Consequently, the center AFframe is selected again the next time the camera is turned on.
• Since the AF frame setting remains in effect while the camera is left on even if theLCD monitor is turned off, it is advisable to keep the LCD monitor on whileshooting with this function.
• When the Spot AE Point is selected as the light metering method, you can use theselected AF frame as the Spot AE Point (p. 78).
• For an explanation of the AF frame colors, please refer to page 36.
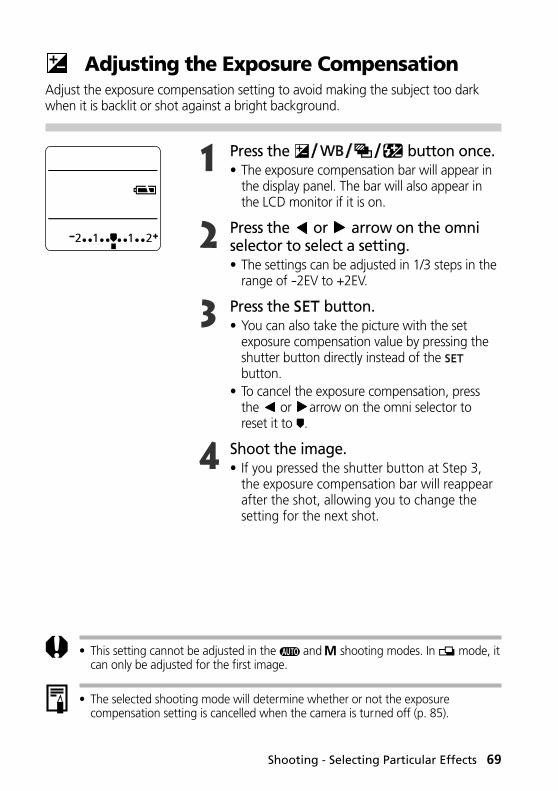
Shooting - Selecting Particular Effects 69
Adjusting the Exposure CompensationAdjust the exposure compensation setting to avoid making the subject too darkwhen it is backlit or shot against a bright background.
1 Press the button once.• The exposure compensation bar will appear in
the display panel. The bar will also appear inthe LCD monitor if it is on.
2 Press the or arrow on the omniselector to select a setting.• The settings can be adjusted in 1/3 steps in the
range of -2EV to +2EV.
3 Press the button.• You can also take the picture with the set
exposure compensation value by pressing theshutter button directly instead of the button.
• To cancel the exposure compensation, pressthe or arrow on the omni selector toreset it to .
4 Shoot the image.• If you pressed the shutter button at Step 3,
the exposure compensation bar will reappearafter the shot, allowing you to change thesetting for the next shot.
• This setting cannot be adjusted in the and shooting modes. In mode, itcan only be adjusted for the first image.
• The selected shooting mode will determine whether or not the exposurecompensation setting is cancelled when the camera is turned off (p. 85).
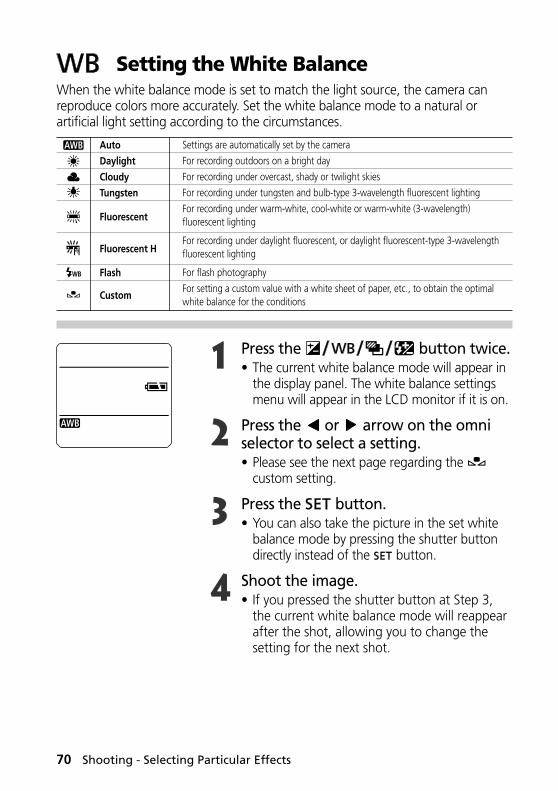
70 Shooting - Selecting Particular Effects
Setting the White BalanceWhen the white balance mode is set to match the light source, the camera canreproduce colors more accurately. Set the white balance mode to a natural orartificial light setting according to the circumstances.
1 Press the button twice.• The current white balance mode will appear in
the display panel. The white balance settingsmenu will appear in the LCD monitor if it is on.
2 Press the or arrow on the omniselector to select a setting.• Please see the next page regarding the
custom setting.
3 Press the button.• You can also take the picture in the set white
balance mode by pressing the shutter buttondirectly instead of the button.
4 Shoot the image.• If you pressed the shutter button at Step 3,
the current white balance mode will reappearafter the shot, allowing you to change thesetting for the next shot.
Settings are automatically set by the camera
For recording outdoors on a bright day
For recording under overcast, shady or twilight skies
For recording under tungsten and bulb-type 3-wavelength fluorescent lighting
For recording under warm-white, cool-white or warm-white (3-wavelength) fluorescent lighting
For recording under daylight fluorescent, or daylight fluorescent-type 3-wavelength fluorescent lighting
For flash photography
For setting a custom value with a white sheet of paper, etc., to obtain the optimal white balance for the conditions
Auto
Daylight
Cloudy
Tungsten
Fluorescent
Fluorescent H
Flash
Custom
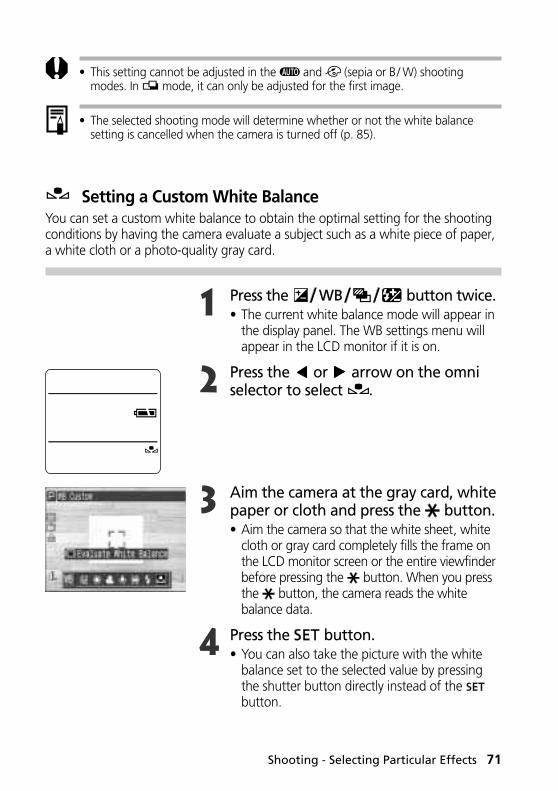
Shooting - Selecting Particular Effects 71
• This setting cannot be adjusted in the and (sepia or B/ W) shootingmodes. In mode, it can only be adjusted for the first image.
• The selected shooting mode will determine whether or not the white balancesetting is cancelled when the camera is turned off (p. 85).
Setting a Custom White BalanceYou can set a custom white balance to obtain the optimal setting for the shootingconditions by having the camera evaluate a subject such as a white piece of paper,a white cloth or a photo-quality gray card.
1 Press the button twice.• The current white balance mode will appear in
the display panel. The WB settings menu willappear in the LCD monitor if it is on.
2 Press the or arrow on the omniselector to select .
3 Aim the camera at the gray card, whitepaper or cloth and press the button.• Aim the camera so that the white sheet, white
cloth or gray card completely fills the frame onthe LCD monitor screen or the entire viewfinderbefore pressing the button. When you pressthe button, the camera reads the whitebalance data.
4 Press the button.• You can also take the picture with the white
balance set to the selected value by pressingthe shutter button directly instead of the button.
72 Shooting - Selecting Particular Effects
5 Shoot the image.• If you pressed the shutter button at Step 4,
the white balance mode will reappear afterthe shot, allowing you to change the settingfor the next shot.
• To set and use a custom white balance setting, it is advisable to select the shooting mode and set the exposure compensation and flash exposurecompensation to zero (±0). The correct white balance may not be obtained whenthe exposure is incorrect (image is completely black or white).
• It is also desirable to use the LCD monitor to compose the shot and to zoom in tothe maximum telephoto setting.
• Since the white data cannot be read in the mode, pre-set the white balance inanother shooting mode first before selecting the mode.
• If the flash fires when setting a custom white balance with the flash set to auto orred-eye reduction auto, use the flash when you go to shoot too. The correct whitebalance cannot be obtained unless the flash is used consistently. To ensureconsistency, set the flash to on or off as appropriate.
• The selected custom white balance setting will be memorized even when thecamera’s power is turned off.
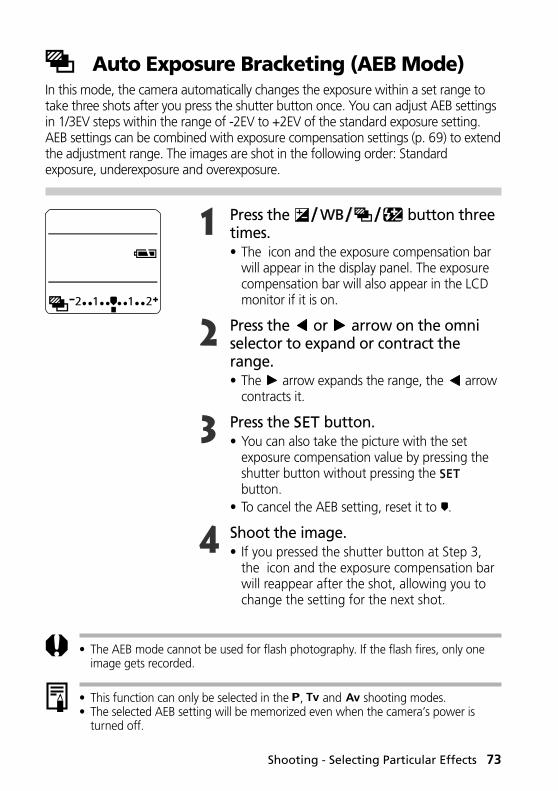
Shooting - Selecting Particular Effects 73
Auto Exposure Bracketing (AEB Mode)In this mode, the camera automatically changes the exposure within a set range totake three shots after you press the shutter button once. You can adjust AEB settingsin 1/3EV steps within the range of -2EV to +2EV of the standard exposure setting.AEB settings can be combined with exposure compensation settings (p. 69) to extendthe adjustment range. The images are shot in the following order: Standardexposure, underexposure and overexposure.
1 Press the button threetimes.• The icon and the exposure compensation bar
will appear in the display panel. The exposurecompensation bar will also appear in the LCDmonitor if it is on.
2 Press the or arrow on the omniselector to expand or contract therange.• The arrow expands the range, the arrow
contracts it.
3 Press the button.• You can also take the picture with the set
exposure compensation value by pressing theshutter button without pressing the button.
• To cancel the AEB setting, reset it to .
4 Shoot the image.• If you pressed the shutter button at Step 3,
the icon and the exposure compensation barwill reappear after the shot, allowing you tochange the setting for the next shot.
• The AEB mode cannot be used for flash photography. If the flash fires, only oneimage gets recorded.
• This function can only be selected in the , and shooting modes.• The selected AEB setting will be memorized even when the camera’s power is
turned off.
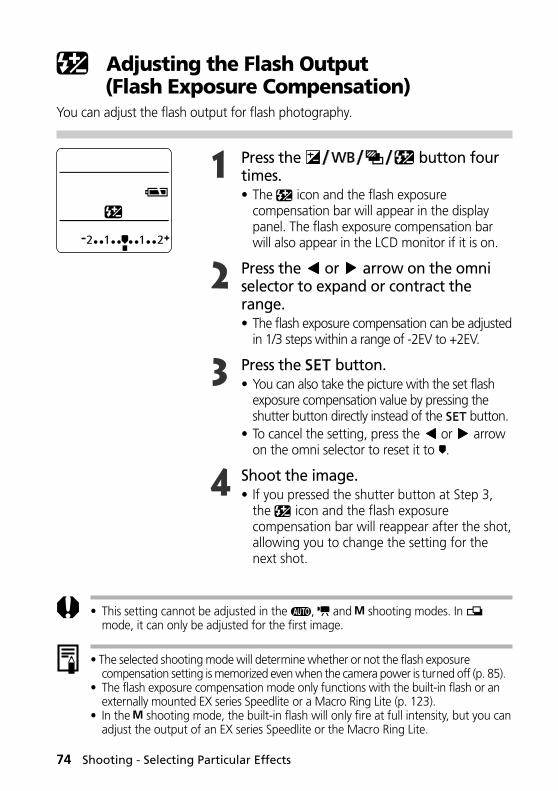
74 Shooting - Selecting Particular Effects
Adjusting the Flash Output (Flash Exposure Compensation)
You can adjust the flash output for flash photography.
1 Press the button fourtimes.• The icon and the flash exposure
compensation bar will appear in the displaypanel. The flash exposure compensation barwill also appear in the LCD monitor if it is on.
2 Press the or arrow on the omniselector to expand or contract therange.• The flash exposure compensation can be adjusted
in 1/3 steps within a range of -2EV to +2EV.
3 Press the button.• You can also take the picture with the set flash
exposure compensation value by pressing theshutter button directly instead of the button.
• To cancel the setting, press the or arrowon the omni selector to reset it to .
4 Shoot the image.• If you pressed the shutter button at Step 3,
the icon and the flash exposurecompensation bar will reappear after the shot,allowing you to change the setting for thenext shot.
• This setting cannot be adjusted in the , and shooting modes. In mode, it can only be adjusted for the first image.
• The selected shooting mode will determine whether or not the flash exposurecompensation setting is memorized even when the camera power is turned off (p. 85).
• The flash exposure compensation mode only functions with the built-in flash or anexternally mounted EX series Speedlite or a Macro Ring Lite (p. 123).
• In the shooting mode, the built-in flash will only fire at full intensity, but you canadjust the output of an EX series Speedlite or the Macro Ring Lite.
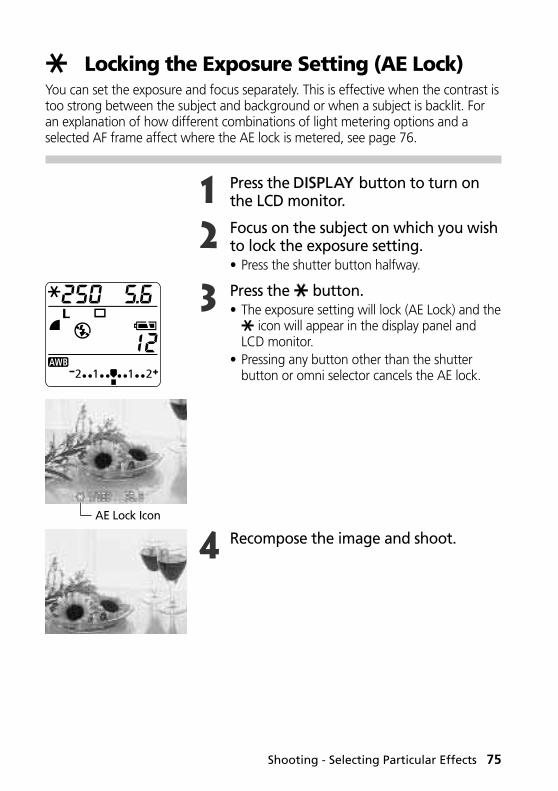
Shooting - Selecting Particular Effects 75
Locking the Exposure Setting (AE Lock)You can set the exposure and focus separately. This is effective when the contrast istoo strong between the subject and background or when a subject is backlit. Foran explanation of how different combinations of light metering options and aselected AF frame affect where the AE lock is metered, see page 76.
1 Press the button to turn onthe LCD monitor.
2 Focus on the subject on which you wishto lock the exposure setting.• Press the shutter button halfway.
3 Press the button.• The exposure setting will lock (AE Lock) and the
icon will appear in the display panel andLCD monitor.
• Pressing any button other than the shutterbutton or omni selector cancels the AE lock.
4 Recompose the image and shoot.
AE Lock Icon
76 Shooting - Selecting Particular Effects
• The AE lock function cannot be used when the optical viewfinder is used to shoot.
• This function can only be selected in the , and shooting modes.
• The automatically selected combinations of shutter speeds and aperture values canbe freely changed without altering the exposure with the following procedures.1 Turn the mode dial to , or .2 Press the button to turn on the LCD monitor.3 Focus on the subject on which you wish to lock the exposure.4 Press the button.
- The exposure setting will lock and the icon will appear in the display paneland LCD monitor.
5 Press the or arrows on the omni selector until the desired shutter speed oraperture value is reached.
6 Recompose the image and shoot. The setting will cancel after the shot is taken.
Exposure Metering Position for the AE/FE Lock According to Different LightMetering Options when an AF Frame is Selected (Creative Shooting Modes)
Light Metering OptionEvaluative MeteringCenter-Weighted Averaging
Spot AE Point Center
AF Point
AF Frame Is SelectedAE/FE locks at the exposure metered within the selected AF frameAE/FE locks at the exposure metered in the center AF frameAE/FE locks at the exposure metered in the spot AE point at the center AE/FE locks at the exposure metered in the spot AE point corresponding to the selected AF frame
Shooting - Selecting Particular Effects 77
Locking the Flash Exposure Setting (FE Lock)You can lock the flash exposure so that the exposure settings are correctly set fora particular portion of your subject. For an explanation of how differentcombinations of light metering options and a selected AF frame affect where theFE lock is metered, see page 76.
1 Press the button to turn onthe LCD monitor.
2 Set the built-in flash to fire.• If you are using an externally mounted flash,
please refer to its manual for settinginstructions.
3 Focus on the subject on which you wishto lock the flash exposure setting.• Press the shutter button halfway.
4 Press the button.• The flash exposure compensation setting will
lock (FE lock) and the icon will appear in theLCD monitor and display panel.
• The flash will fire a pre-flash and lock the flashexposure to the required intensity to illuminatethe subject. (Each time you press the button,the flash exposure locks at the required intensityfor that composition).
• Pressing any button other than the shutterbutton or omni selector cancels the FE lock.
5 Recompose the image and shoot.• As the example to the left shows, a backlit
subject can be shot at the correct exposure ifthe FE lock is set when the camera is aimed ata non-backlit portion of the subject.
• This function can only be selected in the , and shooting modes.• The FE lock only functions with the built-in flash, an externally mounted EX series
Speedlite or a Macro Ring Lite (p. 123).
78 Shooting - Selecting Particular Effects
Switching between Metering ModesYou can switch between metering modes to shoot. Evaluative metering is thedefault mode.
Selecting a Light Metering Option
1 Turn the mode dial to , , or .
2 In the [ (Rec.)] menu, select [LightMetering].• See Selecting Menus and Settings (p. 39).
3 Select the [ (Evaluative Metering)] or[ (Center-Weighted Averaging)]option.• The symbol of the selected option will appear
in the LCD monitor.
4 Press the button.
Appropriate for standard shooting conditions, including backlit scenes. The camera divides images into several zones for metering. The camera evaluates the complex lighting conditions, such as the position of the subject, the brightness, the direct light, and the backlighting, and adjusts the settings to the correct exposure for the main subject.
Averages the exposure from the entire image, but places more weight on the subject at the center. Use this mode when the subject is backlit or surrounded by bright light.
Meters the area within the spot AE point frame at the center of the LCD monitor.
Meters the spot AF point corresponding to the selected AF frame.
EvaluativeMetering
Center-Weighted Averaging
Center
AF Point
Metering Mode
Spot AE Point
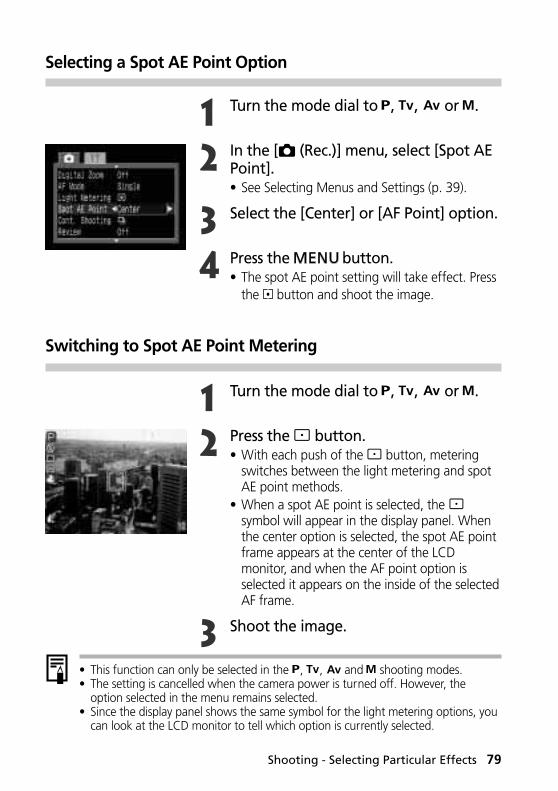
Shooting - Selecting Particular Effects 79
Selecting a Spot AE Point Option
1 Turn the mode dial to , , or .
2 In the [ (Rec.)] menu, select [Spot AEPoint].• See Selecting Menus and Settings (p. 39).
3 Select the [Center] or [AF Point] option.
4 Press the button.• The spot AE point setting will take effect. Press
the button and shoot the image.
Switching to Spot AE Point Metering
1 Turn the mode dial to , , or .
2 Press the button.• With each push of the button, metering
switches between the light metering and spotAE point methods.
• When a spot AE point is selected, the symbol will appear in the display panel. Whenthe center option is selected, the spot AE pointframe appears at the center of the LCDmonitor, and when the AF point option isselected it appears on the inside of the selectedAF frame.
3 Shoot the image.
• This function can only be selected in the , , and shooting modes.• The setting is cancelled when the camera power is turned off. However, the
option selected in the menu remains selected.• Since the display panel shows the same symbol for the light metering options, you
can look at the LCD monitor to tell which option is currently selected.
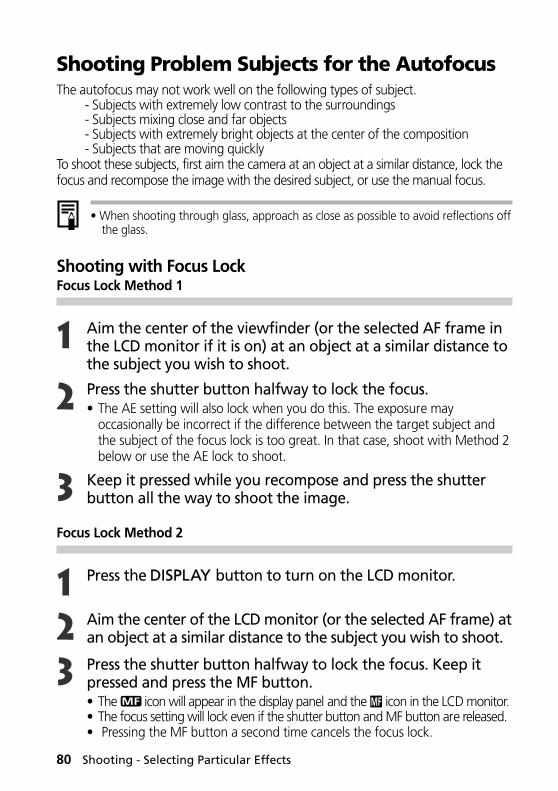
80 Shooting - Selecting Particular Effects
Shooting Problem Subjects for the AutofocusThe autofocus may not work well on the following types of subject.
- Subjects with extremely low contrast to the surroundings- Subjects mixing close and far objects- Subjects with extremely bright objects at the center of the composition- Subjects that are moving quickly
To shoot these subjects, first aim the camera at an object at a similar distance, lock thefocus and recompose the image with the desired subject, or use the manual focus.
• When shooting through glass, approach as close as possible to avoid reflections offthe glass.
Shooting with Focus LockFocus Lock Method 1
1 Aim the center of the viewfinder (or the selected AF frame inthe LCD monitor if it is on) at an object at a similar distance tothe subject you wish to shoot.
2 Press the shutter button halfway to lock the focus.• The AE setting will also lock when you do this. The exposure may
occasionally be incorrect if the difference between the target subject andthe subject of the focus lock is too great. In that case, shoot with Method 2below or use the AE lock to shoot.
3 Keep it pressed while you recompose and press the shutterbutton all the way to shoot the image.
Focus Lock Method 2
1 Press the button to turn on the LCD monitor.
2 Aim the center of the LCD monitor (or the selected AF frame) atan object at a similar distance to the subject you wish to shoot.
3 Press the shutter button halfway to lock the focus. Keep itpressed and press the MF button.• The icon will appear in the display panel and the icon in the LCD monitor.• The focus setting will lock even if the shutter button and MF button are released.• Pressing the MF button a second time cancels the focus lock.
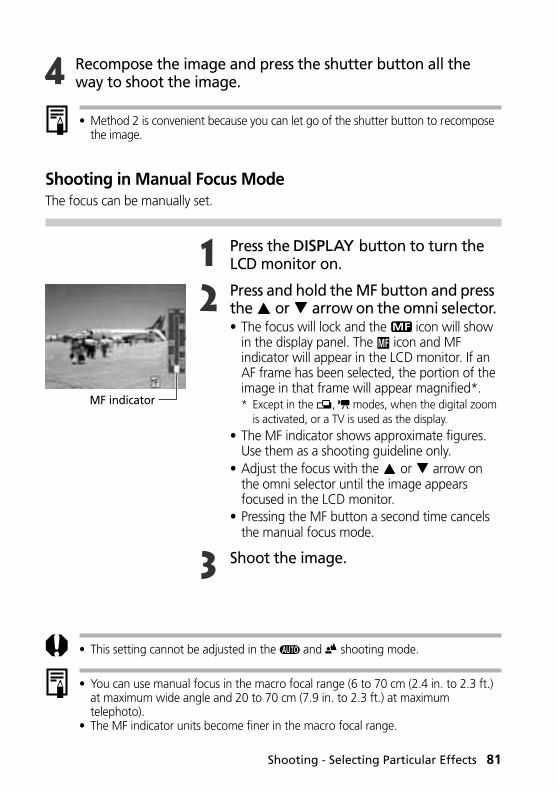
Shooting - Selecting Particular Effects 81
4 Recompose the image and press the shutter button all theway to shoot the image.
• Method 2 is convenient because you can let go of the shutter button to recomposethe image.
Shooting in Manual Focus ModeThe focus can be manually set.
1 Press the button to turn theLCD monitor on.
2 Press and hold the MF button and pressthe or arrow on the omni selector.• The focus will lock and the icon will show
in the display panel. The icon and MFindicator will appear in the LCD monitor. If anAF frame has been selected, the portion of theimage in that frame will appear magnified*.* Except in the , modes, when the digital zoom
is activated, or a TV is used as the display.• The MF indicator shows approximate figures.
Use them as a shooting guideline only.• Adjust the focus with the or arrow on
the omni selector until the image appearsfocused in the LCD monitor.
• Pressing the MF button a second time cancelsthe manual focus mode.
3 Shoot the image.
MF indicator
• This setting cannot be adjusted in the and shooting mode.
• You can use manual focus in the macro focal range (6 to 70 cm (2.4 in. to 2.3 ft.)at maximum wide angle and 20 to 70 cm (7.9 in. to 2.3 ft.) at maximumtelephoto).
• The MF indicator units become finer in the macro focal range.
82 Shooting - Selecting Particular Effects
Switching between Focus SettingsYou can switch between focus settings to shoot.
1 In the [ (Rec.)] menu, select [AF Mode].• See Selecting Menus and Settings (p. 39).
2 Select [Continuous] or [Single] andpress the button.
3 Shoot the image.
The camera is continually focusing on whatever it is aimed even when the shutter button is not pressed, allowing you to shoot without missing opportunities.
The camera only focuses when the shutter button is pressed halfway, conserving battery power.
Continuous
Single
• These settings cannot be adjusted in the shooting mode.• When the LCD monitor is off, the setting locks in the Single mode.
• The setting is memorized even when the camera power is turned off.
Shooting - Selecting Particular Effects 83
Manually Setting Image CharacteristicsThe ISO speed, contrast, sharpness and saturation settings can be adjusted for shooting.
1 In the [ (Rec.)] menu, select one ofthe above items.• See Selecting Menus and Settings (p. 39).
2 Select a value for the item and pressthe button.
ISO speed• Switch speeds when you are shooting in dark
areas or want to use a fast shutter speed.• You can select from 50, 100, 200, 400 and
AUTO.• The default setting is ISO 50.• Higher ISO speeds increase the image noise. To
take clean images, use as low an ISO speed aspossible.
Contrast• Select from - (Weak), 0 (Neutral) and + (Strong).• This function allows you to adjust the degree of
brightness.
Sharpness• Select from - (Weak), 0 (Neutral) and + (Strong).• This function allows you to adjust how sharply
outlines are defined.
Saturation• Select from - (Low), 0 (Neutral) and + (High)• This function allows you to adjust the color
depth.
3 Shoot the image.
• These functions can only be selected in the , , and shooting modes. Inthe mode, however, the ISO speed cannot be set to [Auto].
• These settings are memorized even when the camera power is turned off.
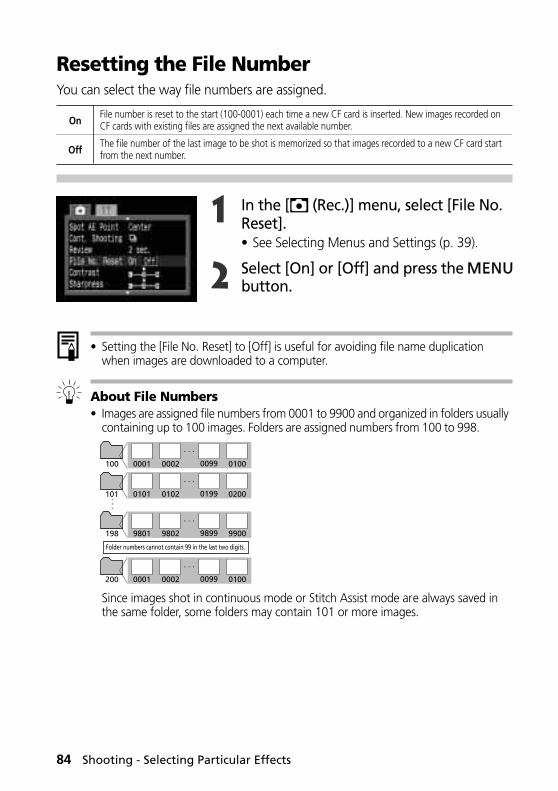
84 Shooting - Selecting Particular Effects
Resetting the File NumberYou can select the way file numbers are assigned.
1 In the [ (Rec.)] menu, select [File No.Reset].• See Selecting Menus and Settings (p. 39).
2 Select [On] or [Off] and press the button.
• Setting the [File No. Reset] to [Off] is useful for avoiding file name duplicationwhen images are downloaded to a computer.
About File Numbers• Images are assigned file numbers from 0001 to 9900 and organized in folders usually
containing up to 100 images. Folders are assigned numbers from 100 to 998.
Since images shot in continuous mode or Stitch Assist mode are always saved inthe same folder, some folders may contain 101 or more images.
File number is reset to the start (100-0001) each time a new CF card is inserted. New images recorded on CF cards with existing files are assigned the next available number.
The file number of the last image to be shot is memorized so that images recorded to a new CF card start from the next number.
On
Off
100 0001 0002 0099 0100
101 0101 0102 0199 0200
198 9801 9802 9899 9900
200 0001 0002 0099 0100
Folder numbers cannot contain 99 in the last two digits.

Shooting - Selecting Particular Effects 85
Functions Available in Each Shooting ModeThis chart shows the functions available in each shooting mode.
* Default setting. ● Setting selection is possible. ▲ Setting can only be selected for the first image. - Setting selection is not possible.
(Shaded Area) Setting is memorized even when the camera power is turned off. (1) AF frame is fixed at the center position. (2) The [sepia] and [B/W] options cannot be selected. (3) Please refer to page 74. (4) ISO 50-100 equivalents are set automatically. (5) [Auto] cannot be selected.
ReferencePage
Auto
Red-Eye Reduction, Auto
Flash Red-Eye Reduction, Flash On
On
Off
Macro Mode
Single Shot
Drive Mode Continuous
Self-Timer
AF Frame
Exposure Compensation
White Balance
AEB Mode
Flash Exposure Compensation
AE Lock / FE Lock
Spot AE Point
Light Metering
Spot AE Point Frame
Manual Focus
Large
Medium 1
ResolutionMedium 2
Small
Movie (320/160)
Superfine
Compression Fine
Normal
File FormatJPEG
RAW
ISO Speed
Digital Zoom Function
Focus SettingsContinuous
Single
Contrast, Sharpness, Saturation
p. 43
p. 53
-
p. 55
p. 54
p. 68
p. 69
p. 70
p. 73
p. 74
p. 75, 77
p. 78
p. 78
p. 79
p. 81
p. 58
p. 58
p. 60
p. 83
p. 57
p. 82
p. 83
●
●*
-
-
●
●
●*
-
●
-(1)
-
-
-
-
-
-
-
-
-
●*
●
●
●
-
●
●*
●
●
-
-(4)
●
●*
●
-
●*
●
●
●
●
-
●*
●
●
-(1)
●
●
-
●
-
-
-
-
-
●*
●
●
●
-
●
●*
●
●
-
-(4)
-
-
-
-
●
●*
●
●
●
●
●*
●
●
-(1)
●
●
-
●
-
-
-
-
●
●*
●
●
●
-
●
●*
●
●
-
-(4)
●
●*
●
-
●
●
●
●
●*
-
●*
●
●
-(1)
●
●
-
●
-
-
-
-
●
●*
●
●
●
-
●
●*
●
●
-
-(4)
●
●*
●
-
●
●*
●
●
●
-
●*
●
●
-(1)
●
●
-
●
-
-
-
-
●
●*
●
●
●
-
●
●*
●
●
-
-(4)
●
●*
●
-
●
●*
●
●
●
●
●*
●
●
-(1)
●
●(2)
-
●
-
-
-
-
●
●*
●
●
●
-
●
●*
●
●
-
-(4)
●
●*
●
-
●
●
●
●
●*
●
●*
●
●
●
●
●
●
●
●
●
●
●
●
●*
●
●
●
-
●
●*
●
●*
●
●
●
●*
●
●
-
-
●
●
●*
●
●*
●
●
●
●
●
●
●
●
●
●
●
●
●*
●
●
●
-
●
●*
●
●*
●
●
●
●*
●
●
-
-
●
●
●*
●
●*
●
●
●
●
●
●
●
●
●
●
●
●
●*
●
●
●
-
●
●*
●
●*
●
●
●
●*
●
●
-
-
●
●
●*
●
●*
●
●
●
-
●
-
-(3)
-
●
●
●
●
●*
●
●
●
-
●
●*
●
●*
●
●(5)
●
●*
●
●
-
-
-
▲
▲*
●
●*
-
●
-(1)
▲
▲
-
▲
-
-
-
-
●
▲*
▲
▲
▲
-
●
●*
●
●
-
-(4)
-
●*
●
-
-
-
-
-
●*
●
●*
-
●
-(1)
●
●
-
-
-
-
-
-
●
-
-
-
-
●
-
-
-
-
-
-(3)
-
●
-
-
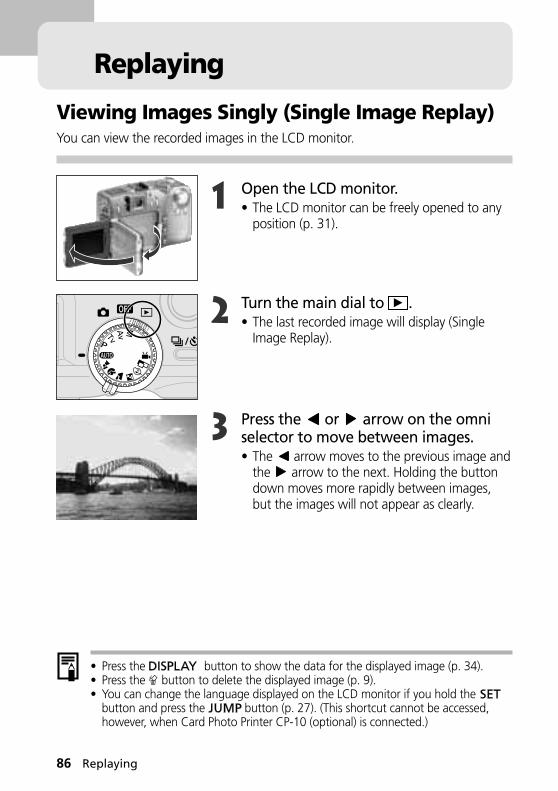
86 Replaying
Replaying
Viewing Images Singly (Single Image Replay)You can view the recorded images in the LCD monitor.
1 Open the LCD monitor.• The LCD monitor can be freely opened to any
position (p. 31).
2 Turn the main dial to .• The last recorded image will display (Single
Image Replay).
3 Press the or arrow on the omniselector to move between images.• The arrow moves to the previous image and
the arrow to the next. Holding the buttondown moves more rapidly between images,but the images will not appear as clearly.
• Press the button to show the data for the displayed image (p. 34).• Press the button to delete the displayed image (p. 9).• You can change the language displayed on the LCD monitor if you hold the
button and press the button (p. 27). (This shortcut cannot be accessed,however, when Card Photo Printer CP-10 (optional) is connected.)
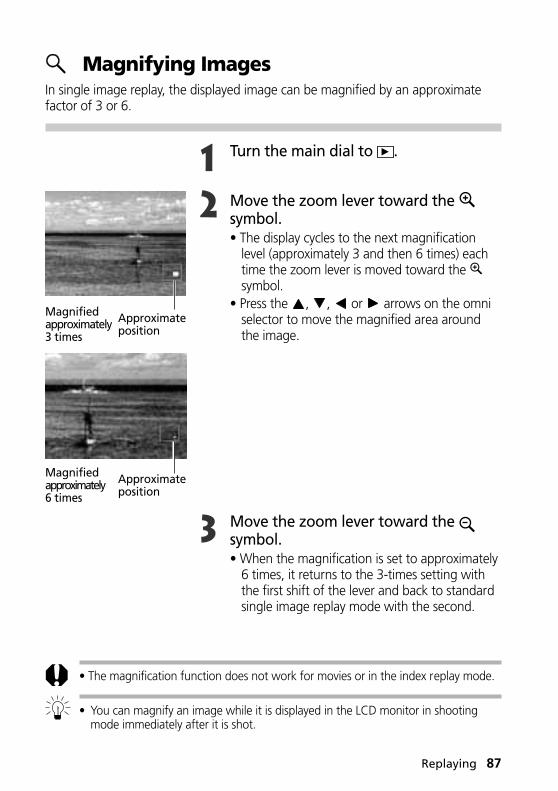
Replaying 87
Magnifying ImagesIn single image replay, the displayed image can be magnified by an approximatefactor of 3 or 6.
1 Turn the main dial to .
2 Move the zoom lever toward the symbol.• The display cycles to the next magnification
level (approximately 3 and then 6 times) eachtime the zoom lever is moved toward the symbol.
• Press the , , or arrows on the omniselector to move the magnified area aroundthe image.
3 Move the zoom lever toward the symbol.• When the magnification is set to approximately
6 times, it returns to the 3-times setting withthe first shift of the lever and back to standardsingle image replay mode with the second.
Magnifiedapproximately3 times
Approximateposition
• The magnification function does not work for movies or in the index replay mode.
• You can magnify an image while it is displayed in the LCD monitor in shootingmode immediately after it is shot.
Magnifiedapproximately6 times
Approximateposition
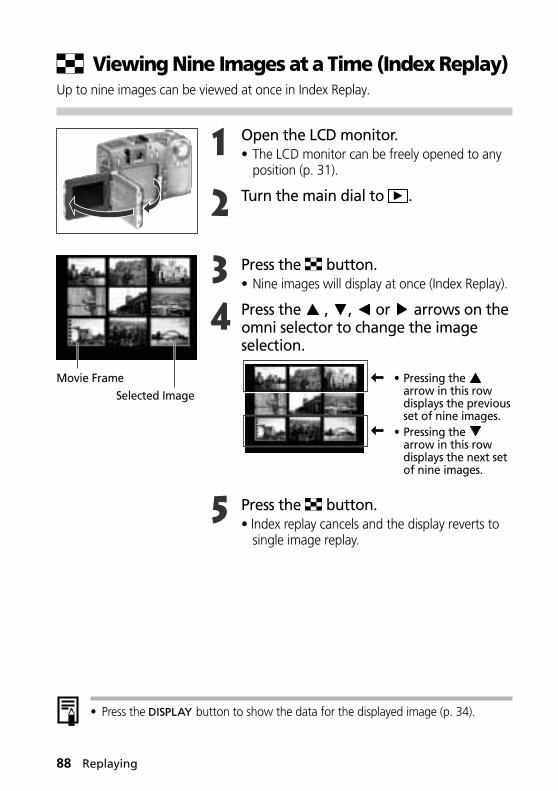
88 Replaying
Viewing Nine Images at a Time (Index Replay)Up to nine images can be viewed at once in Index Replay.
1 Open the LCD monitor.• The LCD monitor can be freely opened to any
position (p. 31).
2 Turn the main dial to .
3 Press the button.• Nine images will display at once (Index Replay).
4 Press the , , or arrows on theomni selector to change the imageselection.
5 Press the button.• Index replay cancels and the display reverts to
single image replay.
Movie FrameSelected Image
• Pressing the arrow in this rowdisplays the previousset of nine images.
• Pressing the arrow in this rowdisplays the next setof nine images.
• Press the button to show the data for the displayed image (p. 34).
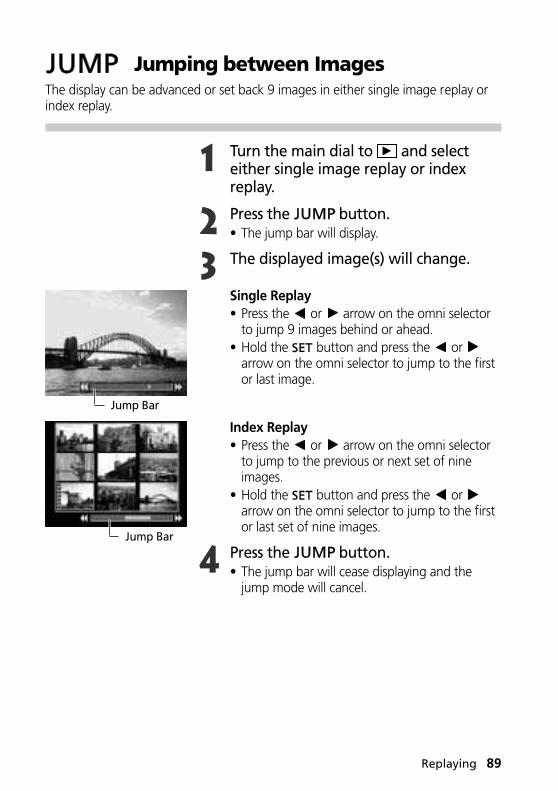
Replaying 89
Jumping between ImagesThe display can be advanced or set back 9 images in either single image replay orindex replay.
1 Turn the main dial to and selecteither single image replay or indexreplay.
2 Press the button.• The jump bar will display.
3 The displayed image(s) will change.
Single Replay• Press the or arrow on the omni selector
to jump 9 images behind or ahead.• Hold the button and press the or
arrow on the omni selector to jump to the firstor last image.
Index Replay• Press the or arrow on the omni selector
to jump to the previous or next set of nineimages.
• Hold the button and press the or arrow on the omni selector to jump to the firstor last set of nine images.
4 Press the button.• The jump bar will cease displaying and the
jump mode will cancel.
Jump Bar
Jump Bar
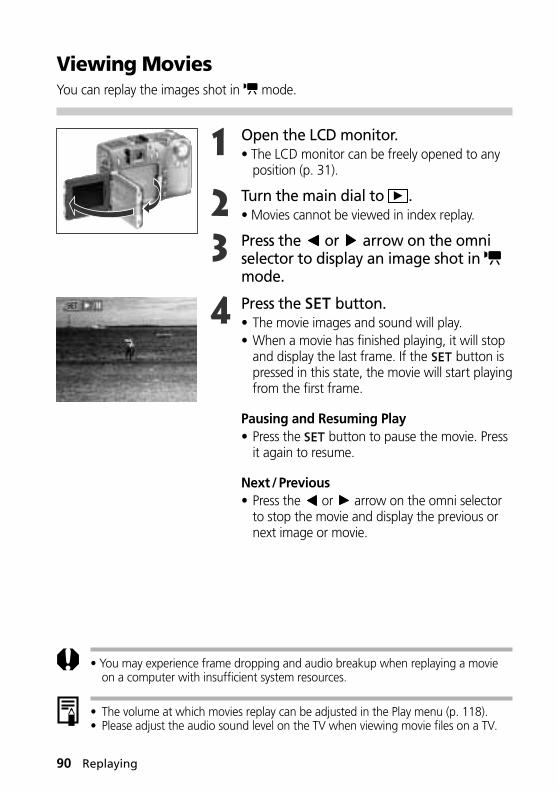
90 Replaying
Viewing MoviesYou can replay the images shot in mode.
1 Open the LCD monitor.• The LCD monitor can be freely opened to any
position (p. 31).
2 Turn the main dial to .• Movies cannot be viewed in index replay.
3 Press the or arrow on the omniselector to display an image shot in mode.
4 Press the button.• The movie images and sound will play.• When a movie has finished playing, it will stop
and display the last frame. If the button ispressed in this state, the movie will start playingfrom the first frame.
Pausing and Resuming Play• Press the button to pause the movie. Press
it again to resume.
Next /Previous• Press the or arrow on the omni selector
to stop the movie and display the previous ornext image or movie.
• You may experience frame dropping and audio breakup when replaying a movieon a computer with insufficient system resources.
• The volume at which movies replay can be adjusted in the Play menu (p. 118).• Please adjust the audio sound level on the TV when viewing movie files on a TV.
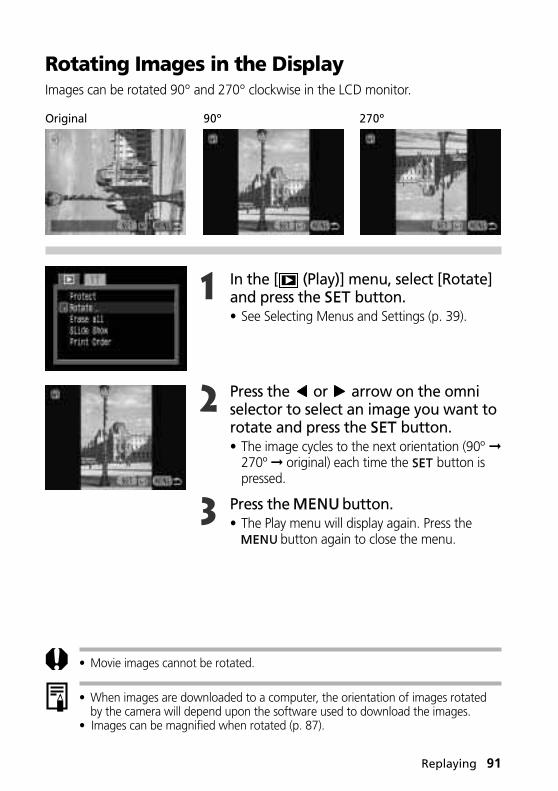
Replaying 91
Rotating Images in the DisplayImages can be rotated 90º and 270º clockwise in the LCD monitor.
Original 90º 270º
1 In the [ (Play)] menu, select [Rotate]and press the button.• See Selecting Menus and Settings (p. 39).
2 Press the or arrow on the omniselector to select an image you want torotate and press the button.• The image cycles to the next orientation (90º ➞
270º ➞ original) each time the button ispressed.
3 Press the button.• The Play menu will display again. Press the
button again to close the menu.
• Movie images cannot be rotated.
• When images are downloaded to a computer, the orientation of images rotatedby the camera will depend upon the software used to download the images.
• Images can be magnified when rotated (p. 87).
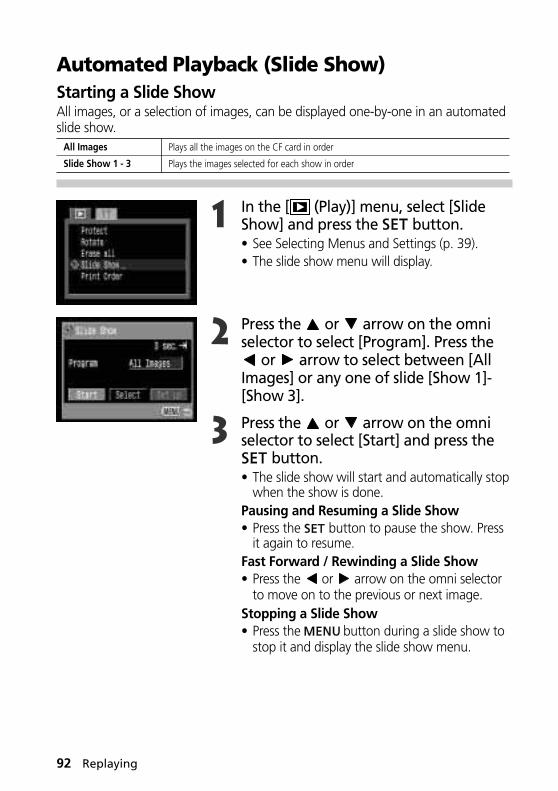
92 Replaying
Automated Playback (Slide Show)Starting a Slide ShowAll images, or a selection of images, can be displayed one-by-one in an automatedslide show.
1 In the [ (Play)] menu, select [SlideShow] and press the button.• See Selecting Menus and Settings (p. 39).• The slide show menu will display.
2 Press the or arrow on the omniselector to select [Program]. Press the
or arrow to select between [AllImages] or any one of slide [Show 1]-[Show 3].
3 Press the or arrow on the omniselector to select [Start] and press the
button.• The slide show will start and automatically stop
when the show is done.Pausing and Resuming a Slide Show• Press the button to pause the show. Press
it again to resume.Fast Forward / Rewinding a Slide Show• Press the or arrow on the omni selector
to move on to the previous or next image.Stopping a Slide Show• Press the button during a slide show to
stop it and display the slide show menu.
Plays all the images on the CF card in order
Plays the images selected for each show in order
All Images
Slide Show 1 - 3
Replaying 93
4 Press the button.• The Slide Show menu will display again. Press
the button again to close the menu.
• Movie images play for the length of time that they were recorded regardless of thetime set in the slide show settings.
• The power save function is disabled while a slide show plays on the camera (p. 30).
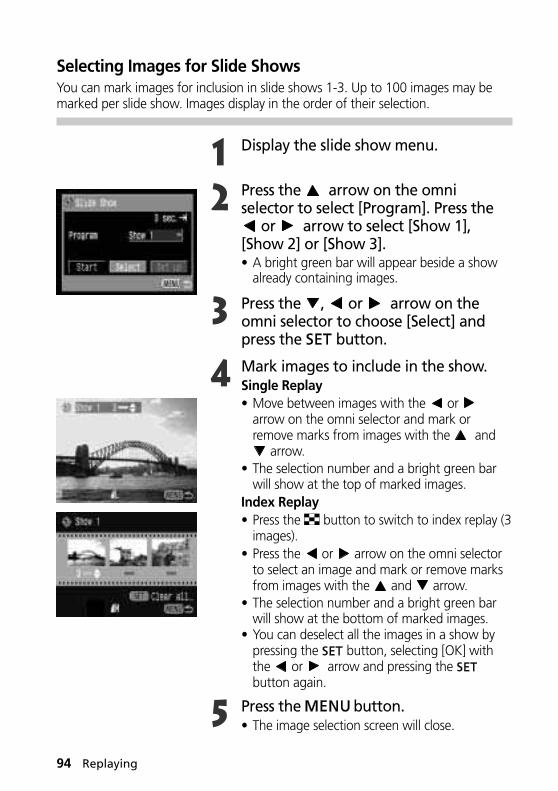
94 Replaying
Selecting Images for Slide ShowsYou can mark images for inclusion in slide shows 1-3. Up to 100 images may bemarked per slide show. Images display in the order of their selection.
1 Display the slide show menu.
2 Press the arrow on the omniselector to select [Program]. Press the
or arrow to select [Show 1],[Show 2] or [Show 3].• A bright green bar will appear beside a show
already containing images.
3 Press the , or arrow on theomni selector to choose [Select] andpress the button.
4 Mark images to include in the show.Single Replay• Move between images with the or
arrow on the omni selector and mark orremove marks from images with the and
arrow.• The selection number and a bright green bar
will show at the top of marked images.Index Replay• Press the button to switch to index replay (3
images).• Press the or arrow on the omni selector
to select an image and mark or remove marksfrom images with the and arrow.
• The selection number and a bright green barwill show at the bottom of marked images.
• You can deselect all the images in a show bypressing the button, selecting [OK] withthe or arrow and pressing the button again.
5 Press the button.• The image selection screen will close.
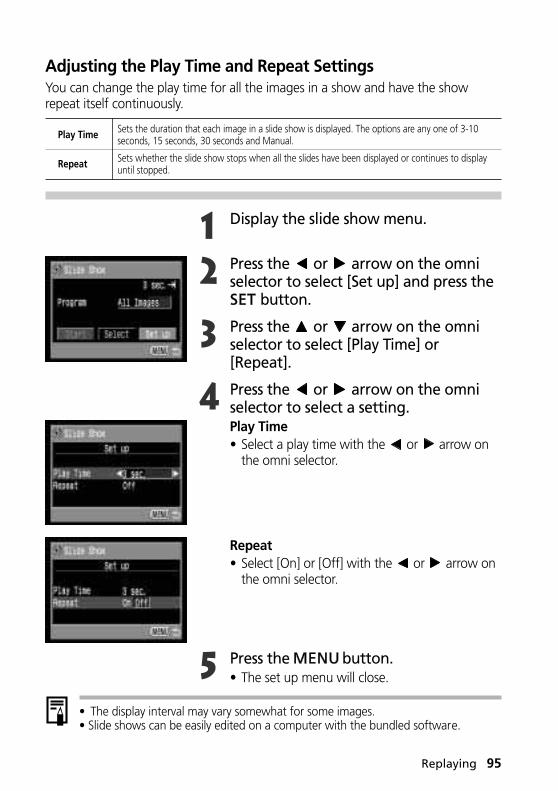
Replaying 95
Adjusting the Play Time and Repeat SettingsYou can change the play time for all the images in a show and have the showrepeat itself continuously.
1 Display the slide show menu.
2 Press the or arrow on the omniselector to select [Set up] and press the
button.
3 Press the or arrow on the omniselector to select [Play Time] or[Repeat].
4 Press the or arrow on the omniselector to select a setting.Play Time• Select a play time with the or arrow on
the omni selector.
Repeat• Select [On] or [Off] with the or arrow on
the omni selector.
5 Press the button.• The set up menu will close.
Sets the duration that each image in a slide show is displayed. The options are any one of 3-10 seconds, 15 seconds, 30 seconds and Manual.
Sets whether the slide show stops when all the slides have been displayed or continues to display until stopped.
Play Time
Repeat
• The display interval may vary somewhat for some images.• Slide shows can be easily edited on a computer with the bundled software.
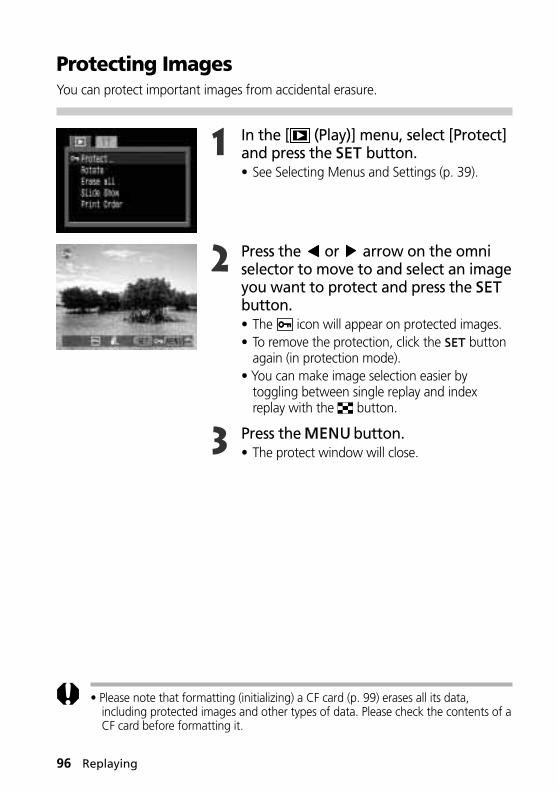
96 Replaying
Protecting ImagesYou can protect important images from accidental erasure.
1 In the [ (Play)] menu, select [Protect]and press the button.• See Selecting Menus and Settings (p. 39).
2 Press the or arrow on the omniselector to move to and select an imageyou want to protect and press the button.• The icon will appear on protected images.• To remove the protection, click the button
again (in protection mode).• You can make image selection easier by
toggling between single replay and indexreplay with the button.
3 Press the button.• The protect window will close.
• Please note that formatting (initializing) a CF card (p. 99) erases all its data,including protected images and other types of data. Please check the contents of aCF card before formatting it.
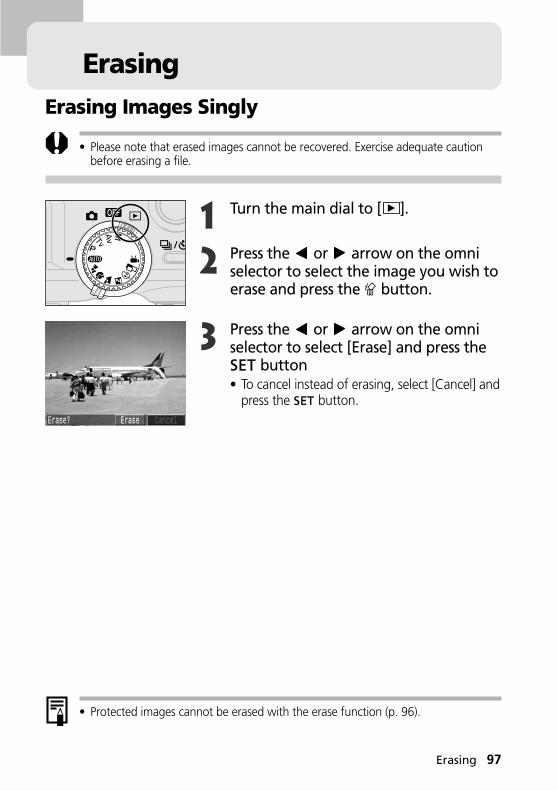
Erasing 97
ErasingErasing Images Singly
• Please note that erased images cannot be recovered. Exercise adequate cautionbefore erasing a file.
1 Turn the main dial to [ ].
2 Press the or arrow on the omniselector to select the image you wish toerase and press the button.
3 Press the or arrow on the omniselector to select [Erase] and press the
button• To cancel instead of erasing, select [Cancel] and
press the button.
• Protected images cannot be erased with the erase function (p. 96).
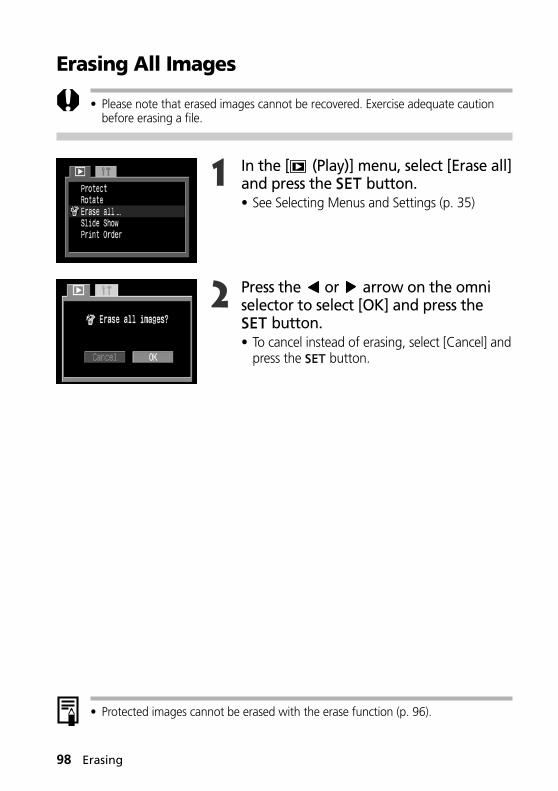
98 Erasing
Erasing All Images
• Please note that erased images cannot be recovered. Exercise adequate cautionbefore erasing a file.
1 In the [ (Play)] menu, select [Erase all]and press the button.• See Selecting Menus and Settings (p. 35)
2 Press the or arrow on the omniselector to select [OK] and press the
button.• To cancel instead of erasing, select [Cancel] and
press the button.
• Protected images cannot be erased with the erase function (p. 96).
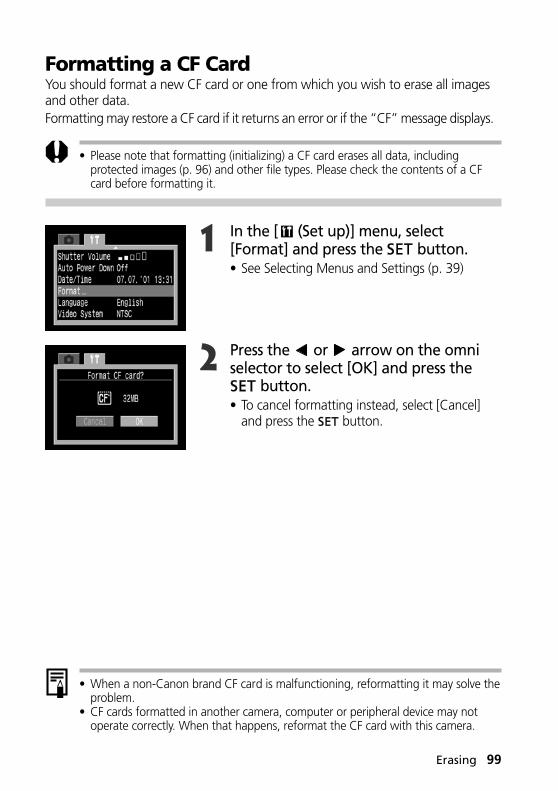
Erasing 99
Formatting a CF CardYou should format a new CF card or one from which you wish to erase all imagesand other data.Formatting may restore a CF card if it returns an error or if the “CF” message displays.
• Please note that formatting (initializing) a CF card erases all data, includingprotected images (p. 96) and other file types. Please check the contents of a CFcard before formatting it.
1 In the [ (Set up)] menu, select[Format] and press the button.• See Selecting Menus and Settings (p. 39)
2 Press the or arrow on the omniselector to select [OK] and press the
button.• To cancel formatting instead, select [Cancel]
and press the button.
• When a non-Canon brand CF card is malfunctioning, reformatting it may solve theproblem.
• CF cards formatted in another camera, computer or peripheral device may notoperate correctly. When that happens, reformat the CF card with this camera.

100 Print Settings (DPOF Settings)
Print Settings (DPOF Settings)Images on a CF card can be individually selected for printing in a specified numberof copies. You can also select the print type and whether or not to print the dateand file number. These settings are compatible with the Digital Print Order Format(DPOF) standards so that images can be printed on DPOF-compliant digital printersor at participating photo labs.
• The mark will display on images that have had print marks set by anotherDPOF-compliant camera. These settings will be overwritten by any set by yourcamera.
• Print settings cannot be set for movie images or RAW images.• The output of some digital printers or photo lab services may not reflect the
specified print settings.
• After you have set the DPOF settings, you can connect Card Photo Printer CP-10(optional) and print directly from the camera (p. 112).
Selecting Images for PrintingThere are two ways to select images.
- Singly- All images on a CF card (the number of copies is set to one per image)
1 In the [ (Play)] menu, select [PrintOrder] and press the button.• See Selecting Menus and Settings (p. 39).• The Print Order menu will display.
2 Press the or arrow on the omniselector to select [Order] and press the
button.
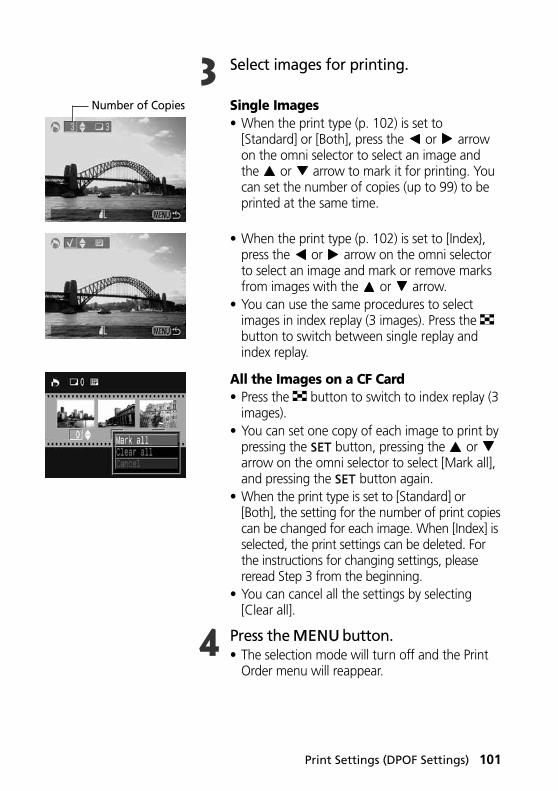
Print Settings (DPOF Settings) 101
3 Select images for printing.
Single Images• When the print type (p. 102) is set to
[Standard] or [Both], press the or arrowon the omni selector to select an image andthe or arrow to mark it for printing. Youcan set the number of copies (up to 99) to beprinted at the same time.
• When the print type (p. 102) is set to [Index},press the or arrow on the omni selectorto select an image and mark or remove marksfrom images with the or arrow.
• You can use the same procedures to selectimages in index replay (3 images). Press the button to switch between single replay andindex replay.
All the Images on a CF Card• Press the button to switch to index replay (3
images).• You can set one copy of each image to print by
pressing the button, pressing the or arrow on the omni selector to select [Mark all],and pressing the button again.
• When the print type is set to [Standard] or[Both], the setting for the number of print copiescan be changed for each image. When [Index] isselected, the print settings can be deleted. Forthe instructions for changing settings, pleasereread Step 3 from the beginning.
• You can cancel all the settings by selecting[Clear all].
4 Press the button.• The selection mode will turn off and the Print
Order menu will reappear.
Number of Copies
102 Print Settings (DPOF Settings)
• Images are printed in order from oldest to newest by the shooting date.• A maximum of 998 images can be marked per CF card.• When [Both] is selected, the number of copies can be set, but applies to standard
prints only. Only one copy can be set to print with the [Index] setting.• Print settings can also be assigned to images with the bundled software programs
on a computer.

Print Settings (DPOF Settings) 103
Setting the Print StyleThe following print settings can be selected.
1 Display the Print Order menu.
2 Press the or arrow on the omniselector to select [Set up] and press the
button.
3 Press the or arrow on the omniselector to select [Print Type], [Date] or[File No.]
4 Press the or arrow on the omniselector to select a setting.
Print Type• Select [Standard], [Index] or [Both].
Date• Select [On] or [Off].
Prints one image per page
Prints the selected images together at a reduced size in an index format
Prints the images in both the standard and index formats
Adds the date to the print
Adds the file number to the print
Standard
Print Type Index
Both
Date
File No.
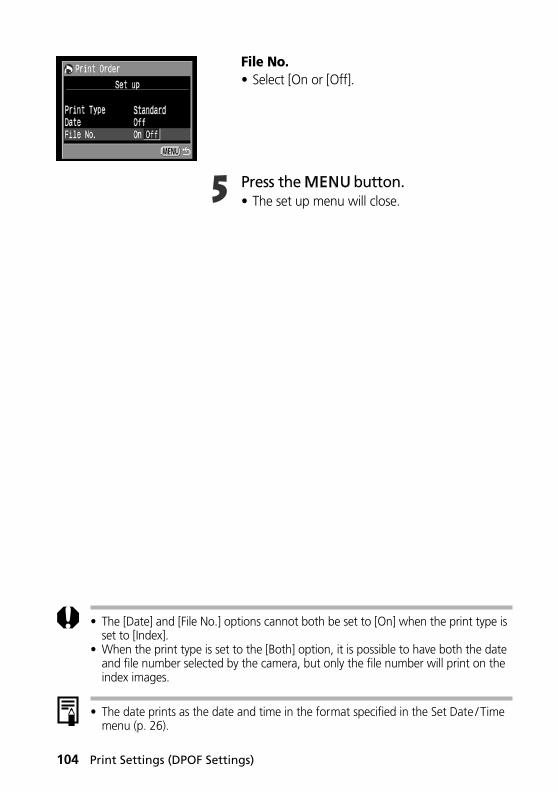
104 Print Settings (DPOF Settings)
File No.• Select [On or [Off].
5 Press the button.• The set up menu will close.
• The [Date] and [File No.] options cannot both be set to [On] when the print type isset to [Index].
• When the print type is set to the [Both] option, it is possible to have both the dateand file number selected by the camera, but only the file number will print on theindex images.
• The date prints as the date and time in the format specified in the Set Date / Timemenu (p. 26).
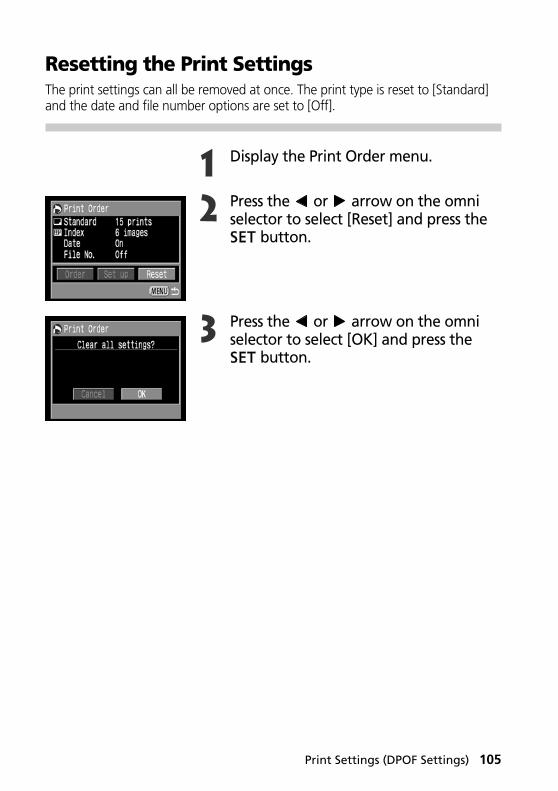
Print Settings (DPOF Settings) 105
Resetting the Print SettingsThe print settings can all be removed at once. The print type is reset to [Standard]and the date and file number options are set to [Off].
1 Display the Print Order menu.
2 Press the or arrow on the omniselector to select [Reset] and press the
button.
3 Press the or arrow on the omniselector to select [OK] and press the
button.
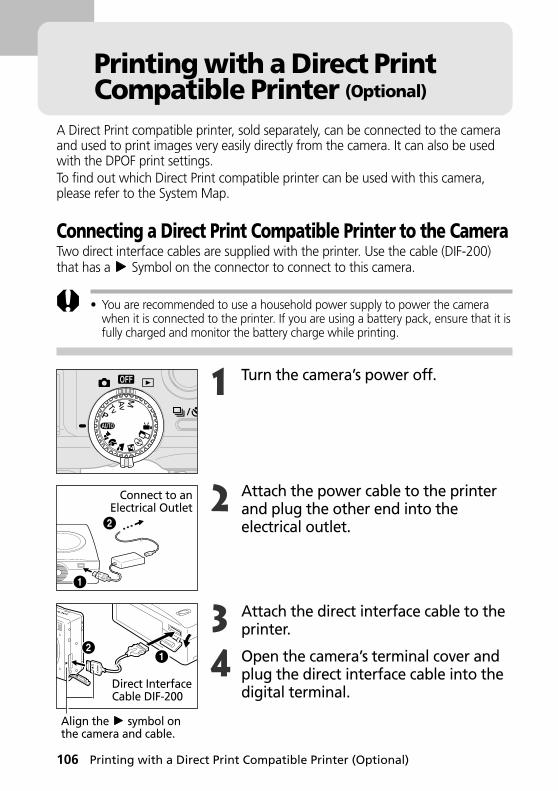
106 Printing with a Direct Print Compatible Printer (Optional)
Printing with a Direct PrintCompatible Printer (Optional)
A Direct Print compatible printer, sold separately, can be connected to the cameraand used to print images very easily directly from the camera. It can also be usedwith the DPOF print settings.To find out which Direct Print compatible printer can be used with this camera,please refer to the System Map.
Connecting a Direct Print Compatible Printer to the CameraTwo direct interface cables are supplied with the printer. Use the cable (DIF-200)that has a Symbol on the connector to connect to this camera.
• You are recommended to use a household power supply to power the camerawhen it is connected to the printer. If you are using a battery pack, ensure that it isfully charged and monitor the battery charge while printing.
1 Turn the camera’s power off.
2 Attach the power cable to the printerand plug the other end into theelectrical outlet.
3 Attach the direct interface cable to theprinter.
4 Open the camera’s terminal cover andplug the direct interface cable into thedigital terminal.
Align the symbol onthe camera and cable.
Direct InterfaceCable DIF-200
...Connect to an
Electrical Outlet
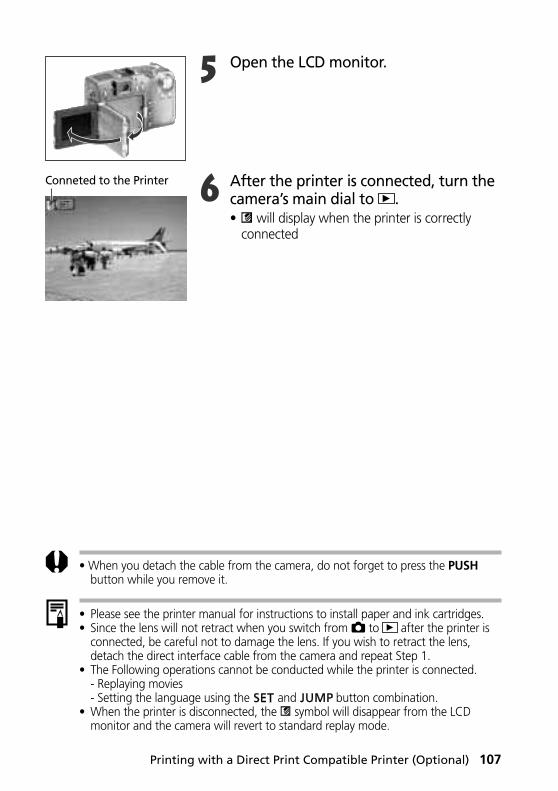
Printing with a Direct Print Compatible Printer (Optional) 107
5 Open the LCD monitor.
6 After the printer is connected, turn thecamera’s main dial to .• will display when the printer is correctly
connected
• When you detach the cable from the camera, do not forget to press the PUSHbutton while you remove it.
• Please see the printer manual for instructions to install paper and ink cartridges.• Since the lens will not retract when you switch from to after the printer is
connected, be careful not to damage the lens. If you wish to retract the lens,detach the direct interface cable from the camera and repeat Step 1.
• The Following operations cannot be conducted while the printer is connected.- Replaying movies- Setting the language using the and button combination.
• When the printer is disconnected, the symbol will disappear from the LCDmonitor and the camera will revert to standard replay mode.
Conneted to the Printer
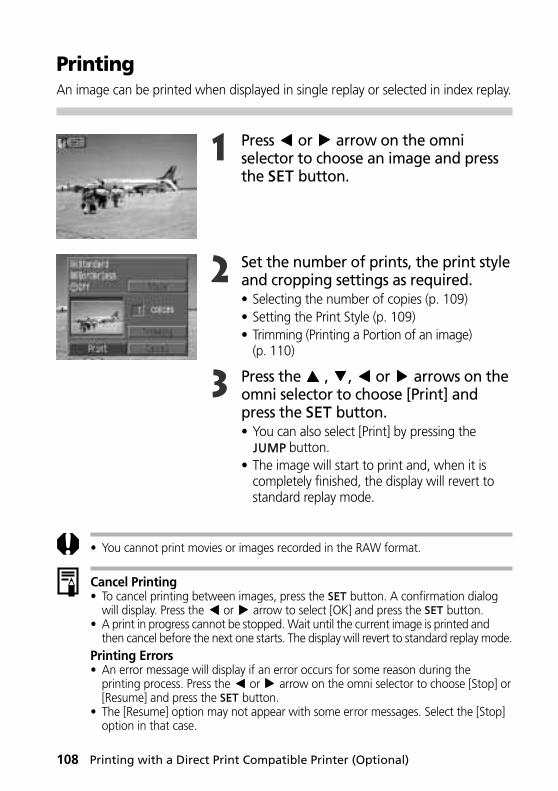
108 Printing with a Direct Print Compatible Printer (Optional)
PrintingAn image can be printed when displayed in single replay or selected in index replay.
1 Press or arrow on the omniselector to choose an image and pressthe button.
2 Set the number of prints, the print styleand cropping settings as required.• Selecting the number of copies (p. 109)• Setting the Print Style (p. 109)• Trimming (Printing a Portion of an image)
(p. 110)
3 Press the , , or arrows on theomni selector to choose [Print] andpress the button.• You can also select [Print] by pressing the
button.• The image will start to print and, when it is
completely finished, the display will revert tostandard replay mode.
• You cannot print movies or images recorded in the RAW format.
Cancel Printing• To cancel printing between images, press the button. A confirmation dialog
will display. Press the or arrow to select [OK] and press the button.• A print in progress cannot be stopped. Wait until the current image is printed and
then cancel before the next one starts. The display will revert to standard replay mode.Printing Errors• An error message will display if an error occurs for some reason during the
printing process. Press the or arrow on the omni selector to choose [Stop] or[Resume] and press the button.
• The [Resume] option may not appear with some error messages. Select the [Stop]option in that case.
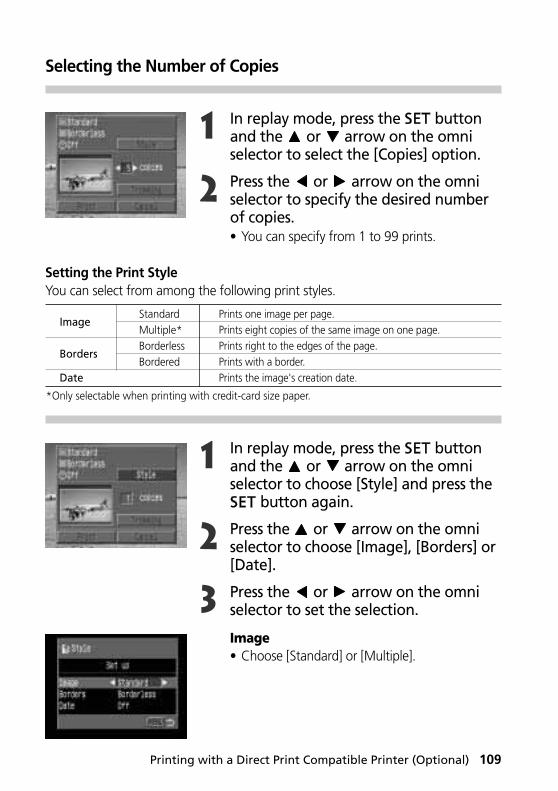
Printing with a Direct Print Compatible Printer (Optional) 109
Selecting the Number of Copies
1 In replay mode, press the buttonand the or arrow on the omniselector to select the [Copies] option.
2 Press the or arrow on the omniselector to specify the desired numberof copies.• You can specify from 1 to 99 prints.
Setting the Print StyleYou can select from among the following print styles.
1 In replay mode, press the buttonand the or arrow on the omniselector to choose [Style] and press the
button again.
2 Press the or arrow on the omniselector to choose [Image], [Borders] or[Date].
3 Press the or arrow on the omniselector to set the selection.
Image• Choose [Standard] or [Multiple].
Prints one image per page.Prints eight copies of the same image on one page.Prints right to the edges of the page.Prints with a border.Prints the image's creation date.
ImageStandardMultiple*
BordersBorderlessBordered
Date
*Only selectable when printing with credit-card size paper.
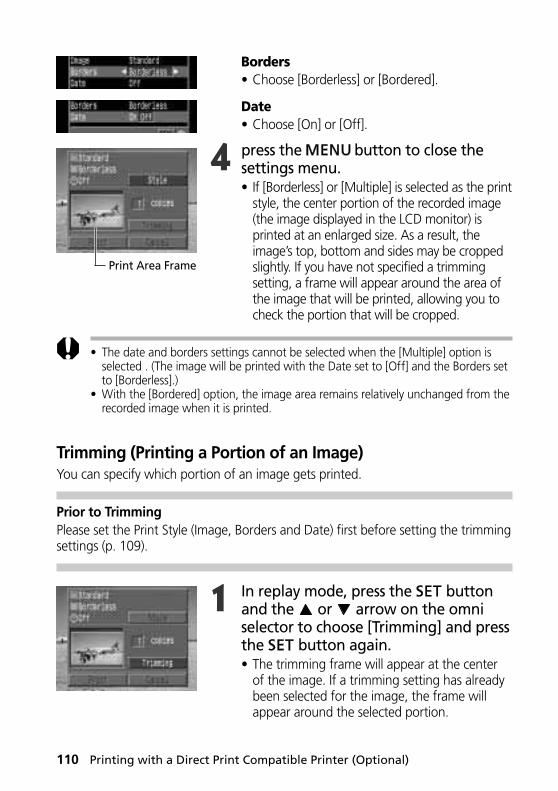
110 Printing with a Direct Print Compatible Printer (Optional)
Borders• Choose [Borderless] or [Bordered].
Date• Choose [On] or [Off].
4 press the button to close thesettings menu.• If [Borderless] or [Multiple] is selected as the print
style, the center portion of the recorded image(the image displayed in the LCD monitor) isprinted at an enlarged size. As a result, theimage’s top, bottom and sides may be croppedslightly. If you have not specified a trimmingsetting, a frame will appear around the area ofthe image that will be printed, allowing you tocheck the portion that will be cropped.
• The date and borders settings cannot be selected when the [Multiple] option isselected . (The image will be printed with the Date set to [Off] and the Borders setto [Borderless].)
• With the [Bordered] option, the image area remains relatively unchanged from therecorded image when it is printed.
Trimming (Printing a Portion of an Image)You can specify which portion of an image gets printed.
Prior to TrimmingPlease set the Print Style (Image, Borders and Date) first before setting the trimmingsettings (p. 109).
1 In replay mode, press the buttonand the or arrow on the omniselector to choose [Trimming] and pressthe button again.• The trimming frame will appear at the center
of the image. If a trimming setting has alreadybeen selected for the image, the frame willappear around the selected portion.
Print Area Frame
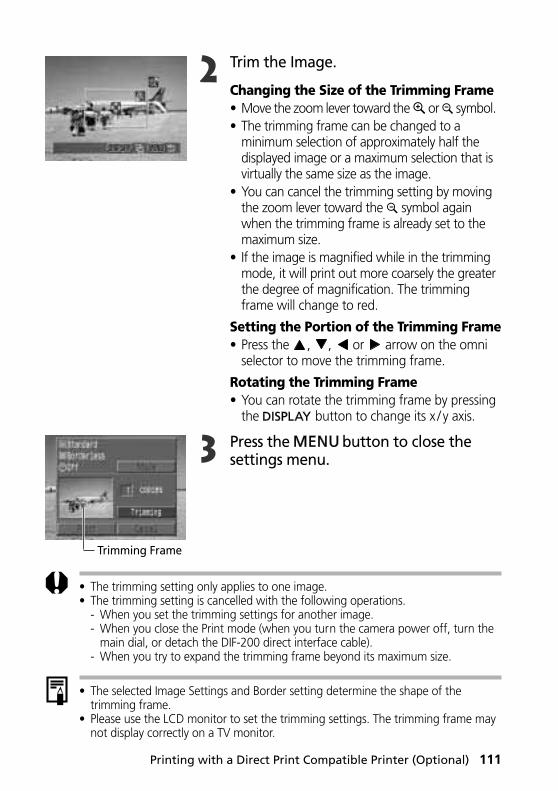
Printing with a Direct Print Compatible Printer (Optional) 111
2 Trim the Image.
Changing the Size of the Trimming Frame• Move the zoom lever toward the or symbol.• The trimming frame can be changed to a
minimum selection of approximately half thedisplayed image or a maximum selection that isvirtually the same size as the image.
• You can cancel the trimming setting by movingthe zoom lever toward the symbol againwhen the trimming frame is already set to themaximum size.
• If the image is magnified while in the trimmingmode, it will print out more coarsely the greaterthe degree of magnification. The trimmingframe will change to red.
Setting the Portion of the Trimming Frame• Press the , , or arrow on the omni
selector to move the trimming frame.
Rotating the Trimming Frame• You can rotate the trimming frame by pressing
the button to change its x / y axis.
3 Press the button to close thesettings menu.
• The trimming setting only applies to one image.• The trimming setting is cancelled with the following operations.
- When you set the trimming settings for another image.- When you close the Print mode (when you turn the camera power off, turn the
main dial, or detach the DIF-200 direct interface cable).- When you try to expand the trimming frame beyond its maximum size.
• The selected Image Settings and Border setting determine the shape of thetrimming frame.
• Please use the LCD monitor to set the trimming settings. The trimming frame maynot display correctly on a TV monitor.
Trimming Frame
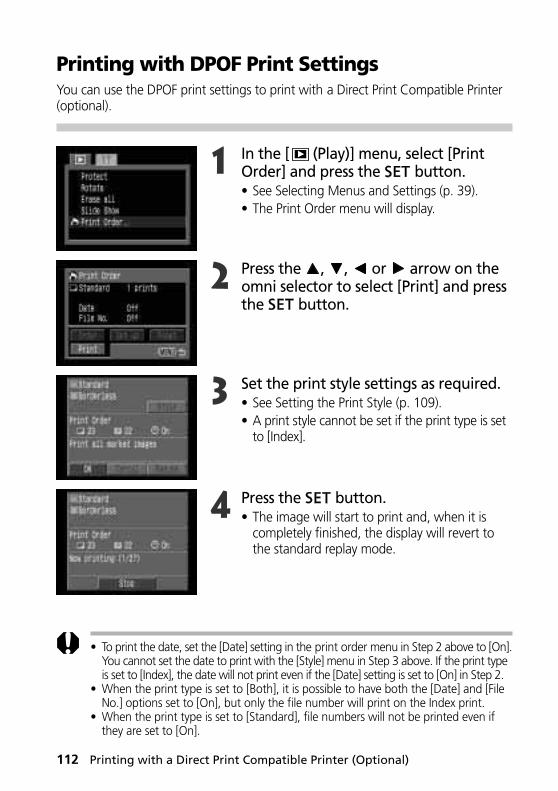
112 Printing with a Direct Print Compatible Printer (Optional)
Printing with DPOF Print SettingsYou can use the DPOF print settings to print with a Direct Print Compatible Printer(optional).
1 In the [ (Play)] menu, select [PrintOrder] and press the button.• See Selecting Menus and Settings (p. 39).• The Print Order menu will display.
2 Press the , , or arrow on theomni selector to select [Print] and pressthe button.
3 Set the print style settings as required.• See Setting the Print Style (p. 109).• A print style cannot be set if the print type is set
to [Index].
4 Press the button.• The image will start to print and, when it is
completely finished, the display will revert tothe standard replay mode.
• To print the date, set the [Date] setting in the print order menu in Step 2 above to [On].You cannot set the date to print with the [Style] menu in Step 3 above. If the print typeis set to [Index], the date will not print even if the [Date] setting is set to [On] in Step 2.
• When the print type is set to [Both], it is possible to have both the [Date] and [FileNo.] options set to [On], but only the file number will print on the Index print.
• When the print type is set to [Standard], file numbers will not be printed even ifthey are set to [On].
Printing with a Direct Print Compatible Printer (Optional) 113
• The maximum number of images printed on one page in the Index print typedepends upon the selected paper size.
- Card Size: 20 images- L Size: 42 images- Postcard Size: 63 images
Cancel Printing• To cancel printing between images, press the button. A confirmation dialog will
display. Press the or arrow to select [OK] and press the button.• A print in progress cannot be stopped. Wait until the current image is printed and
then cancel before the next one starts. The display will revert to standard replaymode.
Restarting Printing• In the Print Order menu, press the or arrow on the omni selector to select
[Resume] and press the button. The remaining images can be printed.• Printing cannot be restarted under the following circumstances.
- When you set the trimming settings for another image.- If the print settings have been changed before restarting.- If the image for which the print settings were set has been deleted before
restarting.- If there was very little free space on the CF card when the printing was cancelled.
If these circumstances apply, you can select [OK] in the Print Order menu and reprintstarting from the first image. If printing was cancelled because the camera batterycharge became depleted, you are recommended to power the camera with ahousehold power source. If you must use a battery pack, ensure that it is fully chargedfor printing. After replacing the spent battery pack, turn the camera power on again.Printing Errors• An error message will display if an error occurs for some reason during the
printing process. Press the or arrow on the omni selector to choose [Stop] or[Resume] and press the button.
• The [Resume] option may not appear with some error messages. Select the [Stop]option in that case.
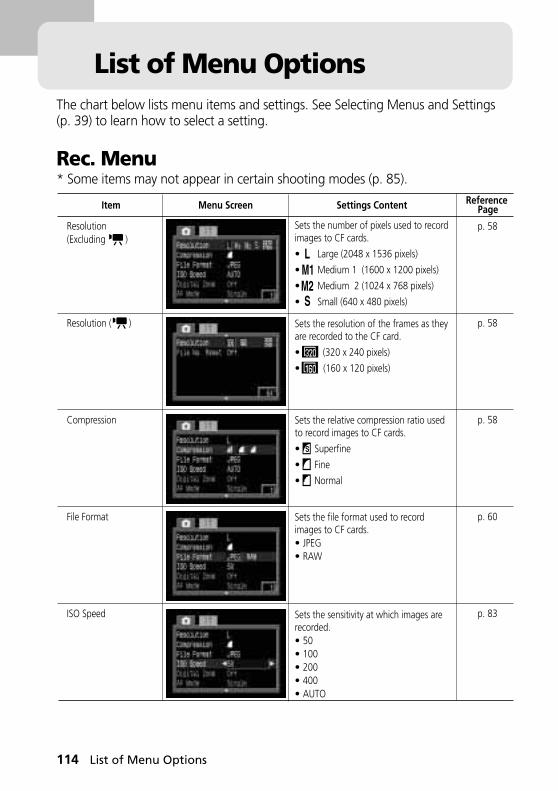
114 List of Menu Options
List of Menu OptionsThe chart below lists menu items and settings. See Selecting Menus and Settings(p. 39) to learn how to select a setting.
Rec. Menu* Some items may not appear in certain shooting modes (p. 85).
Resolution(Excluding )
Resolution ( )
Compression
File Format
ISO Speed
p. 58
p. 58
p. 58
p. 60
p. 83
Reference Page
Sets the number of pixels used to record images to CF cards.
• Large (2048 x 1536 pixels)
• Medium 1 (1600 x 1200 pixels)
• Medium 2 (1024 x 768 pixels)
• Small (640 x 480 pixels)
Sets the resolution of the frames as they are recorded to the CF card.
• (320 x 240 pixels)
• (160 x 120 pixels)
Sets the relative compression ratio used to record images to CF cards.
• Superfine
• Fine
• Normal
Sets the file format used to record images to CF cards.• JPEG• RAW
Sets the sensitivity at which images are recorded.• 50• 100• 200• 400• AUTO
Item Menu Screen Settings Content
List of Menu Options 115
Digital Zoom
AF Mode
Light Metering
Spot AE Point
Cont. Shooting
Review
p. 57
p. 82
p. 78
p. 79
p. 55
p. 42
ReferencePage
Combines with the optical zoom to zoom images up to an approximate factor of 11.• Off• On
Sets the frequency of autofocus activation. When the LCD monitor is off, this setting locks in single mode. • Continuous• Single
Switches between two metering options.• (Evaluative Metering)• (Center-Weighted Averaging)
Sets the point at which the camera meters when the spot metering option is selected.• Center• AF Point
Sets the continuous shooting option.••
Sets the duration images display on the LCD monitor after the shutter button is released. • Off• 2 sec.• 10 sec.
Item Menu Screen Settings Content
116 List of Menu Options
File No. Reset
Contrast
Sharpness
Saturation
p. 84
p. 83
p. 83
p. 83
ReferencePage
Sets how file numbers are assigned to images when new CF cards are inserted.• On• Off
Adjusts the image contrast.• -• 0• +
Adjusts the image sharpness.• -• 0• +
Adjusts the image saturation.• -• 0• +
Item Menu Screen Settings Content

List of Menu Options 117
Play Menu
Protect...
Rotate...
Erase all...
Slide Show...
Print Order...
p. 96
p. 91
p. 98
p. 92
p. 100
ReferencePage
Protects images from accidental erasure.
Rotates images 90 or 270 degrees clockwise in the display.
Erases all images from a CF card (excluding protected images).
Plays images in an automated slide show.
Sets the images that will be printed on a DPOF-compatible printer or at a photo lab service, the number of copies and other parameters.
Item Menu Screen Settings Content
118 List of Menu Options
Sets whether or not the beep sounds when the shutter button is pressed or when a menu operation is performed.• On • Off (Still beeps to warn of an error even when set to Off)
Sets the brightness level of the LCD monitor.
• (Normal)
• (Bright)
Adjusts the sound volume when the shutter button is pressed all the way. The beep does not sound while a movie is being shot.
Adjusts the sound volume when a movie is played.
Sets whether or not the camera automatically powers down after a specified period of time elapses without something being pressed.• On• Off
Beep
LCD Brightness
Shutter Volume(Shooting)
Playback Vol. (Replay)
Auto Power Down
p. 36
-
p. 36
p. 90
p. 30
ReferencePageItem Menu Screen Settings Content
• (Off)
• (1)
• (2)
• (3)
• (4)
• (5)
• (Off)
• (1)
• (2)
• (3)
• (4)
• (5)
Set up Menu
List of Menu Options 119
Date/Time...
Format...
Language...
Video System
p. 26
p. 99
p. 27
-
ReferencePage
Sets the date, time and date format.
Formats (initializes) a CF card.
Sets the language used in the menus and messages on the LCD monitor.
• English • Italiano• Deutsch • Norsk• Français • Svenska• Nederlands • Español• Dansk • Chinese• Suomi • JapaneseYou can change the language during image replay by holding the button and pressing the button.
Sets the video output signal standard.• NTSC• PAL
Item Menu Screen Settings Content
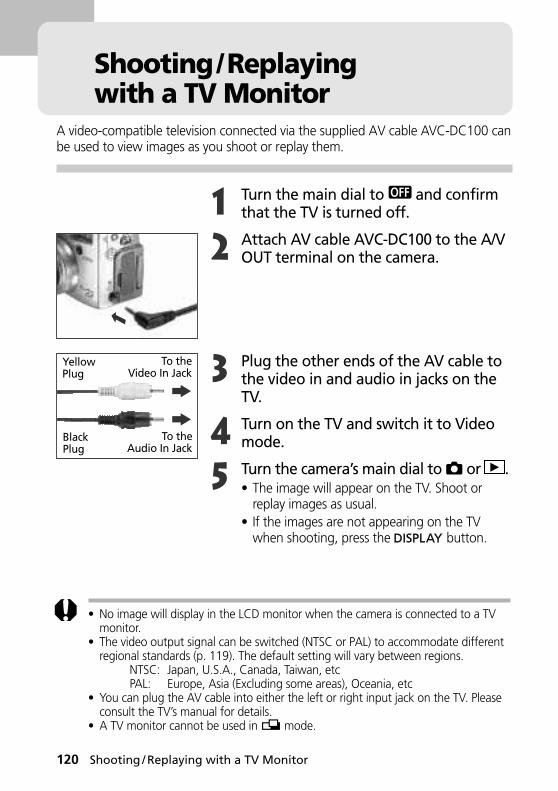
120 Shooting / Replaying with a TV Monitor
Shooting/Replayingwith a TV Monitor
A video-compatible television connected via the supplied AV cable AVC-DC100 canbe used to view images as you shoot or replay them.
1 Turn the main dial to and confirmthat the TV is turned off.
2 Attach AV cable AVC-DC100 to the A/VOUT terminal on the camera.
3 Plug the other ends of the AV cable tothe video in and audio in jacks on theTV.
4 Turn on the TV and switch it to Videomode.
5 Turn the camera’s main dial to or .• The image will appear on the TV. Shoot or
replay images as usual.• If the images are not appearing on the TV
when shooting, press the button.
YellowPlug
To theVideo In Jack
BlackPlug
To theAudio In Jack
• No image will display in the LCD monitor when the camera is connected to a TVmonitor.
• The video output signal can be switched (NTSC or PAL) to accommodate differentregional standards (p. 119). The default setting will vary between regions.
NTSC: Japan, U.S.A., Canada, Taiwan, etcPAL: Europe, Asia (Excluding some areas), Oceania, etc
• You can plug the AV cable into either the left or right input jack on the TV. Pleaseconsult the TV’s manual for details.
• A TV monitor cannot be used in mode.
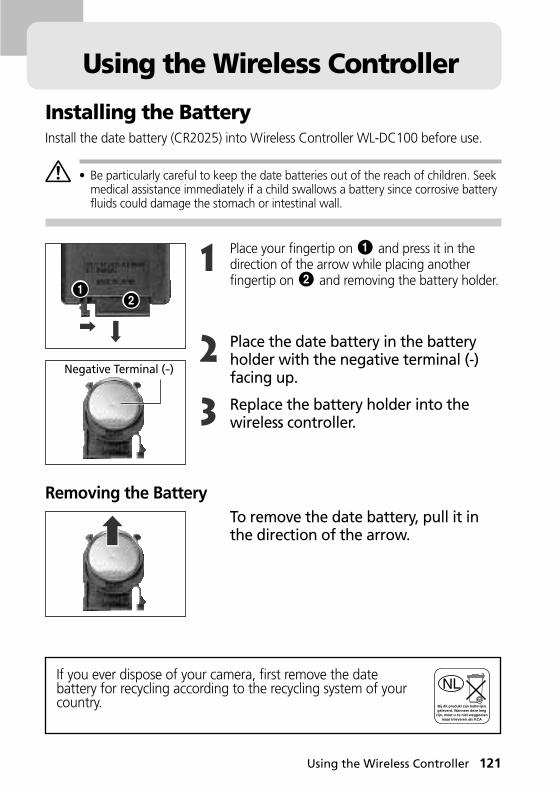
Using the Wireless Controller 121
Using the Wireless Controller
Installing the BatteryInstall the date battery (CR2025) into Wireless Controller WL-DC100 before use.
• Be particularly careful to keep the date batteries out of the reach of children. Seekmedical assistance immediately if a child swallows a battery since corrosive batteryfluids could damage the stomach or intestinal wall.
1 Place your fingertip on and press it in thedirection of the arrow while placing anotherfingertip on and removing the battery holder.
2 Place the date battery in the batteryholder with the negative terminal (-)facing up.
3 Replace the battery holder into thewireless controller.
Removing the BatteryTo remove the date battery, pull it inthe direction of the arrow.
Negative Terminal (-)
If you ever dispose of your camera, first remove the datebattery for recycling according to the recycling system of yourcountry. Bij dit produkt zijn batterijen
geleverd. Wanneer deze leegzijn, moet u ze niet weggoolen
maar inleveren als KCA
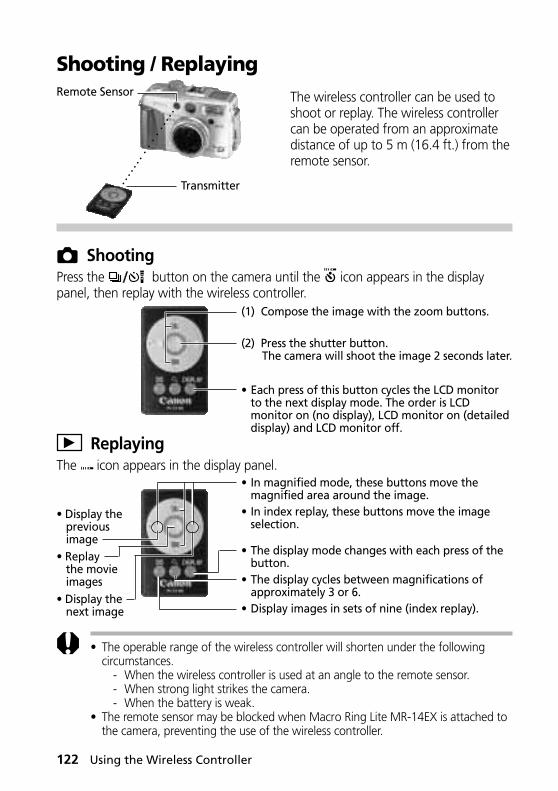
122 Using the Wireless Controller
Shooting / ReplayingThe wireless controller can be used toshoot or replay. The wireless controllercan be operated from an approximatedistance of up to 5 m (16.4 ft.) from theremote sensor.
ShootingPress the button on the camera until the icon appears in the displaypanel, then replay with the wireless controller.
ReplayingThe icon appears in the display panel.
................
• Each press of this button cycles the LCD monitorto the next display mode. The order is LCDmonitor on (no display), LCD monitor on (detaileddisplay) and LCD monitor off.
(1) Compose the image with the zoom buttons.
(2) Press the shutter button.The camera will shoot the image 2 seconds later.
• Display thepreviousimage
• In magnified mode, these buttons move themagnified area around the image.
• In index replay, these buttons move the imageselection.
• The display mode changes with each press of thebutton.
• The display cycles between magnifications ofapproximately 3 or 6.
• Display images in sets of nine (index replay).
• Replaythe movieimages
• The operable range of the wireless controller will shorten under the followingcircumstances.
- When the wireless controller is used at an angle to the remote sensor.- When strong light strikes the camera.- When the battery is weak.
• The remote sensor may be blocked when Macro Ring Lite MR-14EX is attached tothe camera, preventing the use of the wireless controller.
• Display thenext image
Remote Sensor
Transmitter
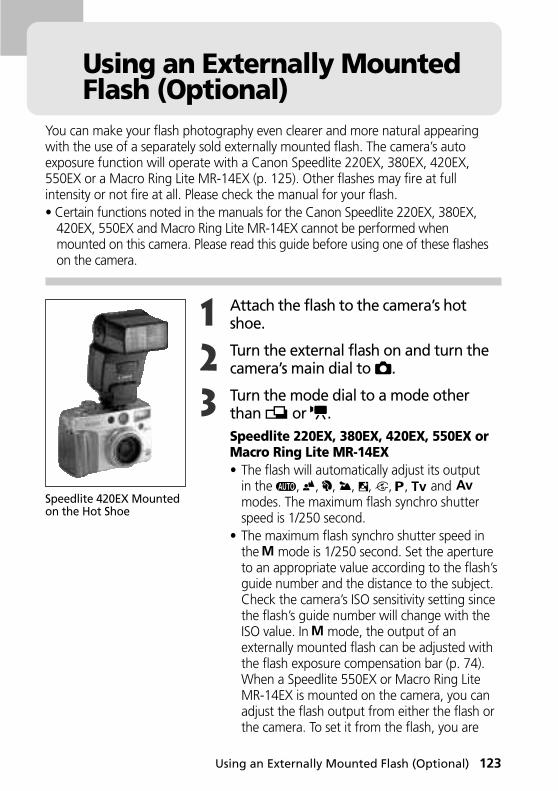
Using an Externally Mounted Flash (Optional) 123
Using an Externally MountedFlash (Optional)
You can make your flash photography even clearer and more natural appearingwith the use of a separately sold externally mounted flash. The camera’s autoexposure function will operate with a Canon Speedlite 220EX, 380EX, 420EX,550EX or a Macro Ring Lite MR-14EX (p. 125). Other flashes may fire at fullintensity or not fire at all. Please check the manual for your flash.• Certain functions noted in the manuals for the Canon Speedlite 220EX, 380EX,
420EX, 550EX and Macro Ring Lite MR-14EX cannot be performed whenmounted on this camera. Please read this guide before using one of these flasheson the camera.
1 Attach the flash to the camera’s hotshoe.
2 Turn the external flash on and turn thecamera’s main dial to .
3 Turn the mode dial to a mode otherthan or .Speedlite 220EX, 380EX, 420EX, 550EX orMacro Ring Lite MR-14EX• The flash will automatically adjust its output
in the , , , , , , , and modes. The maximum flash synchro shutterspeed is 1/250 second.
• The maximum flash synchro shutter speed inthe mode is 1/250 second. Set the apertureto an appropriate value according to the flash’sguide number and the distance to the subject.Check the camera’s ISO sensitivity setting sincethe flash’s guide number will change with theISO value. In mode, the output of anexternally mounted flash can be adjusted withthe flash exposure compensation bar (p. 74).When a Speedlite 550EX or Macro Ring LiteMR-14EX is mounted on the camera, you canadjust the flash output from either the flash orthe camera. To set it from the flash, you are
Speedlite 420EX Mountedon the Hot Shoe

124 Using an Externally Mounted Flash (Optional)
recommended to use the flash’s manual mode.You can also adjust the flash output even whenthe camera is set to the E-TTL automatic flashexposure compensation mode by changing theflash exposure compensation setting. In thissituation, the +2 step setting fires the flash atfull intensity.To shoot with the flash, you are recommended toset the white balance to the (Flash) setting.
Other Canon Flashes• Since other flashes fire at full strength, set the
shutter speed and aperture accordingly. Set theshutter speed to 1/250 second (maximum flashsynchro shutter speed) or slower, and set theaperture to a value appropriate to the flash’sguide number and the distance to the subject.You are recommended to set the white balanceto (Flash) to shoot.
4 Press the shutter button halfway tofocus.• The flash is charged when its pilot lamp lights up.
5 Press the shutter button all the way toshoot the image.
• The flash will not fire in , or continuous mode.• The AEB mode cannot be used for flash photography. If the flash fires, only one
image gets recorded.• Please note that proprietary high-voltage flashes with multi contacts or flash
accessories made by other manufacturers may cause a camera malfunction.
• The following functions can be used with a Speedlite 220EX, 380EX, 420EX or550EX.
- Auto Exposure (Use the E-TTL mode with a 550EX)- FE Lock (Not available in mode)- Daylight Synchro- Slow Synchro- Flash Exposure Compensation (When Speedlite 550EX is used, the 550EX’s
flash exposure compensation setting takes precedence when the flash is set toE-TTL mode and a flash exposure compensation value other than 0 is set. Thecamera’s flash exposure compensation setting will not activate unless the550EX’s flash exposure compensation is set to 0.)
- Auto Zoom (Not available with the 220EX)
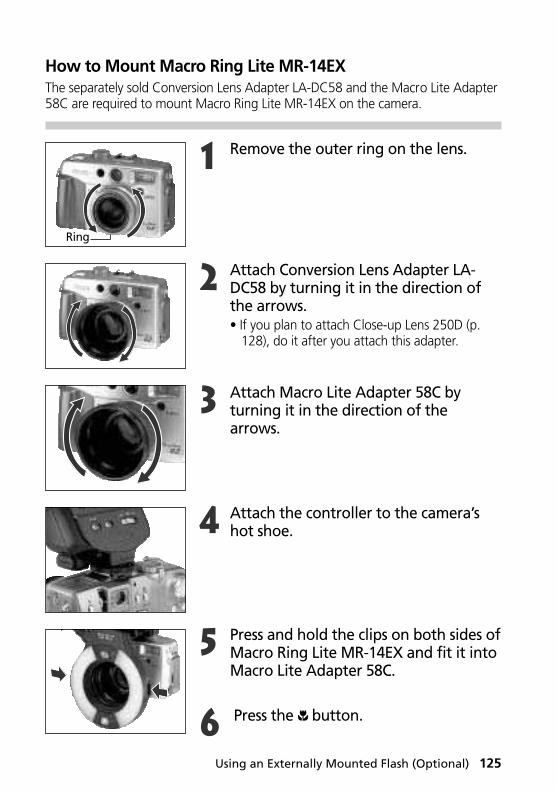
Using an Externally Mounted Flash (Optional) 125
How to Mount Macro Ring Lite MR-14EXThe separately sold Conversion Lens Adapter LA-DC58 and the Macro Lite Adapter58C are required to mount Macro Ring Lite MR-14EX on the camera.
1 Remove the outer ring on the lens.
2 Attach Conversion Lens Adapter LA-DC58 by turning it in the direction ofthe arrows.• If you plan to attach Close-up Lens 250D (p.
128), do it after you attach this adapter.
3 Attach Macro Lite Adapter 58C byturning it in the direction of thearrows.
4 Attach the controller to the camera’shot shoe.
5 Press and hold the clips on both sides ofMacro Ring Lite MR-14EX and fit it intoMacro Lite Adapter 58C.
6 Press the button.
Ring
126 Using an Externally Mounted Flash (Optional)
• Shoot from a distance of at least 20 cm (8 in.) from the subject in macro mode. Toshoot closer up, use the or mode and set the aperture to a higher value.
• When you are using Macro Ring Lite MR-14EX, you can shoot in E-TTL automaticflash exposure compensation mode just by setting the camera’s shooting mode to
, or . You are recommended to use the mode for full-fledged macroflash photography. Since the aperture cannot be set freely in mode, it is notrecommended.
• The following functions can be used with Macro Ring Lite MR-14EX mounted.- E-TTL Automatic Flash Exposure Compensation- FE Lock
• When Macro Ring Lite MR-14EX is used, the MR-14EX’s flash exposurecompensation setting takes precedence when the flash is set to E-TTL mode and aflash exposure compensation value other than 0 is set. The camera’s flash exposurecompensation setting will not activate unless the MR-14EX’s flash exposurecompensation is set to 0.
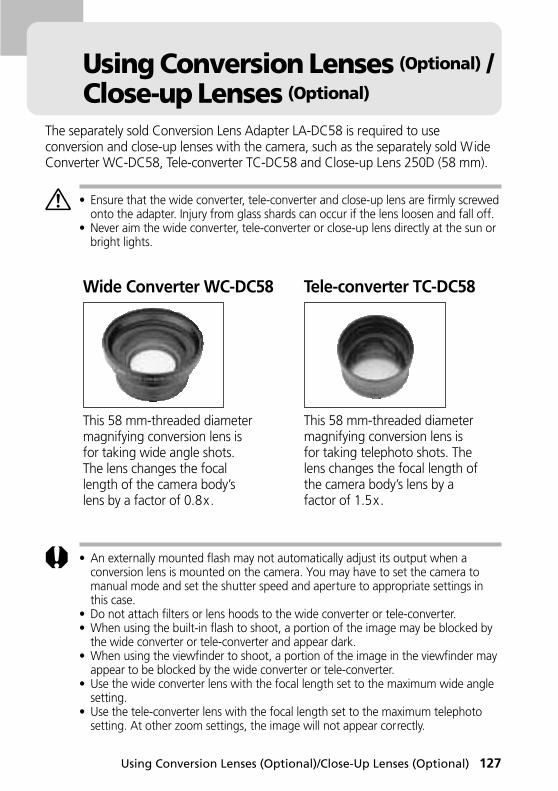
Using Conversion Lenses (Optional)/Close-Up Lenses (Optional) 127
Using Conversion Lenses (Optional) /Close-up Lenses (Optional)
The separately sold Conversion Lens Adapter LA-DC58 is required to useconversion and close-up lenses with the camera, such as the separately sold WideConverter WC-DC58, Tele-converter TC-DC58 and Close-up Lens 250D (58 mm).
• Ensure that the wide converter, tele-converter and close-up lens are firmly screwedonto the adapter. Injury from glass shards can occur if the lens loosen and fall off.
• Never aim the wide converter, tele-converter or close-up lens directly at the sun orbright lights.
Wide Converter WC-DC58
This 58 mm-threaded diametermagnifying conversion lens isfor taking wide angle shots.The lens changes the focallength of the camera body’slens by a factor of 0.8x.
Tele-converter TC-DC58
This 58 mm-threaded diametermagnifying conversion lens isfor taking telephoto shots. Thelens changes the focal length ofthe camera body’s lens by afactor of 1.5x.
• An externally mounted flash may not automatically adjust its output when aconversion lens is mounted on the camera. You may have to set the camera tomanual mode and set the shutter speed and aperture to appropriate settings inthis case.
• Do not attach filters or lens hoods to the wide converter or tele-converter.• When using the built-in flash to shoot, a portion of the image may be blocked by
the wide converter or tele-converter and appear dark.• When using the viewfinder to shoot, a portion of the image in the viewfinder may
appear to be blocked by the wide converter or tele-converter.• Use the wide converter lens with the focal length set to the maximum wide angle
setting.• Use the tele-converter lens with the focal length set to the maximum telephoto
setting. At other zoom settings, the image will not appear correctly.

128 Using Conversion Lenses (Optional) / Close-Up Lenses (Optional)
Close-up Lens 250D (58 mm)This lens with a 58 mm-threaded diameter makesmacro shooting easier. With the camera in macromode, it can shoot subjects in the range of 12 to20 cm (4.7 to 7.9 in) from the lens tip.
• You are recommended to use Macro Ring Lite MR-14EX for flash photographywith the close-up lens mounted on the camera.
• Set the focal length of the camera’s lens to telephoto when using the close-up lens.
Mounting the Lenses
1 Remove the ring from around the lenson the camera body.
2 Screw on Conversion Lens AdapterLA-DC58 in the direction of the arrows.
3 Screw on the lens in the direction ofthe arrows.
Ring
Wide-Converter WC-DC58mounted
Using Conversion Lenses (Optional) / Close-Up Lenses (Optional) 129
• Since the image seen in the viewfinder does not change when a conversion lens isinstalled, use the LCD monitor to compose images.
• Please note that the images will not merge properly with the PhotoStitch programon a computer when they are shot in mode with a conversion or close-up lens.
• To protect the conversion lenses, hold them with one hand while you screw them onwith the other hand.
• Completely remove all dust and dirt from conversion lenses with a lens blower brushbefore use. The camera may focus on any dirt that remains.
• Exercise due caution when handling the conversion lenses since it is easy to dirtythem with fingerprints.
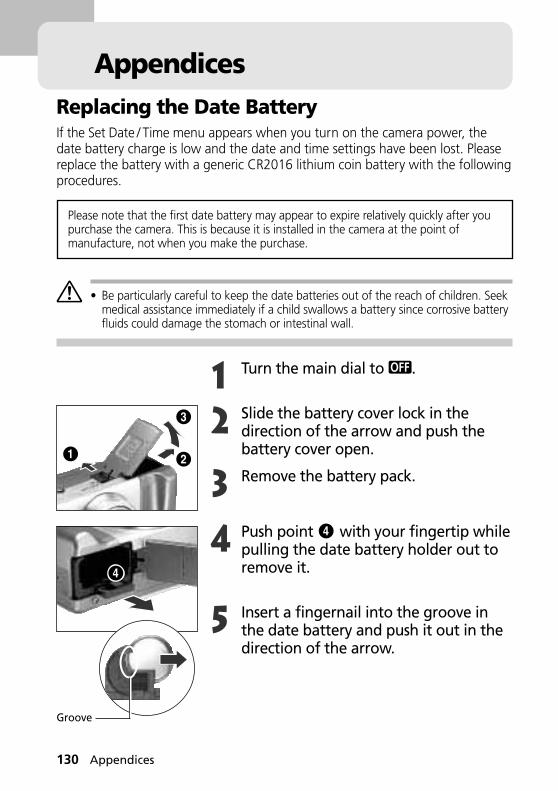
130 Appendices
AppendicesReplacing the Date BatteryIf the Set Date / Time menu appears when you turn on the camera power, thedate battery charge is low and the date and time settings have been lost. Pleasereplace the battery with a generic CR2016 lithium coin battery with the followingprocedures.
Please note that the first date battery may appear to expire relatively quickly after youpurchase the camera. This is because it is installed in the camera at the point ofmanufacture, not when you make the purchase.
• Be particularly careful to keep the date batteries out of the reach of children. Seekmedical assistance immediately if a child swallows a battery since corrosive batteryfluids could damage the stomach or intestinal wall.
1 Turn the main dial to .
2 Slide the battery cover lock in thedirection of the arrow and push thebattery cover open.
3 Remove the battery pack.
4 Push point with your fingertip whilepulling the date battery holder out toremove it.
5 Insert a fingernail into the groove inthe date battery and push it out in thedirection of the arrow.
Groove

Appendices 131
6 Place a new date battery into the datebattery holder with the negativeterminal (-) facing upward.
7 Replace the date battery holder,replace the battery pack and close thebattery cover.
Negative Terminal (-)
If you ever dispose of your camera, first remove the datebattery for recycling according to the recycling system of yourcountry. Bij dit produkt zijn batterijen
geleverd. Wanneer deze leegzijn, moet u ze niet weggoolen
maar inleveren als KCA

132 Appendices
Camera Care and MaintenanceUse the following procedures to clean the camera body, lens, viewfinder, LCDmonitor and other parts.
Camera body Wipe the body clean with a soft cloth or eyeglasslens wiper.
Lens First use a lens blower brush to remove dust and dirt,then remove any remaining dirt by wiping the lenslightly with a soft cloth.• Never use synthetic cleansers on the camera body
or lens. If dirt remains, contact the nearest CanonCustomer Support Help Desk.
Viewfinder / LCD monitor Use a lens blower brush to remove dust and dirt. Ifnecessary, gently wipe the viewfinder and LCDmonitor with a soft cloth or an eyeglass lens wiper toremove stubborn dirt.• Never rub or press forcefully on the LCD monitor.
These actions may damage it or lead to otherproblems.
• Never use thinners, benzene, synthetic cleansers or water to clean the camera.These substances may distort or damage the equipment.
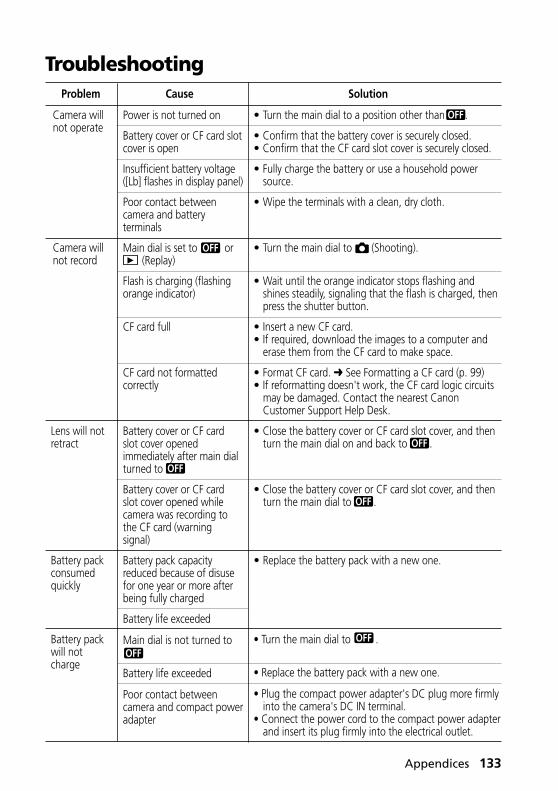
Appendices 133
TroubleshootingProblem Cause Solution
Power is not turned on
Battery cover or CF card slot cover is open
Insufficient battery voltage ([Lb] flashes in display panel)
Poor contact between camera and battery terminals
Main dial is set to or (Replay)
Flash is charging (flashing orange indicator)
CF card full
CF card not formatted correctly
Battery cover or CF card slot cover opened immediately after main dial turned to
Battery cover or CF card slot cover opened while camera was recording to the CF card (warning signal)
Battery pack capacity reduced because of disuse for one year or more after being fully charged
Battery life exceeded
Main dial is not turned to
Battery life exceeded
Poor contact between camera and compact power adapter
• Turn the main dial to a position other than .
• Confirm that the battery cover is securely closed.• Confirm that the CF card slot cover is securely closed.
• Fully charge the battery or use a household power source.
• Wipe the terminals with a clean, dry cloth.
• Turn the main dial to (Shooting).
• Wait until the orange indicator stops flashing and shines steadily, signaling that the flash is charged, then press the shutter button.
• Insert a new CF card.• If required, download the images to a computer and
erase them from the CF card to make space.
• Format CF card. ➜ See Formatting a CF card (p. 99)• If reformatting doesn't work, the CF card logic circuits
may be damaged. Contact the nearest Canon Customer Support Help Desk.
• Close the battery cover or CF card slot cover, and then turn the main dial on and back to .
• Close the battery cover or CF card slot cover, and then turn the main dial to .
• Replace the battery pack with a new one.
• Turn the main dial to .
• Replace the battery pack with a new one.
• Plug the compact power adapter's DC plug more firmly into the camera's DC IN terminal.
• Connect the power cord to the compact power adapter and insert its plug firmly into the electrical outlet.
Camera will not operate
Camera will not record
Lens will not retract
Battery pack consumedquickly
Battery pack will not charge
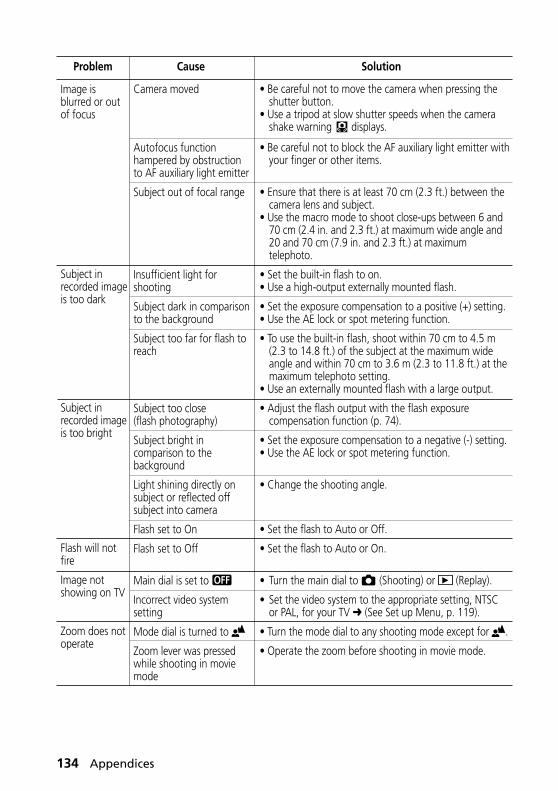
134 Appendices
Problem Cause Solution
Camera moved
Autofocus function hampered by obstruction to AF auxiliary light emitter
Subject out of focal range
Insufficient light for shooting
Subject dark in comparison to the background
Subject too far for flash to reach
Subject too close(flash photography)
Subject bright in comparison to the background
Light shining directly on subject or reflected off subject into camera
Flash set to On
Flash set to Off
Main dial is set to
Incorrect video system setting
Mode dial is turned to
Zoom lever was pressed while shooting in movie mode
• Be careful not to move the camera when pressing the shutter button.
• Use a tripod at slow shutter speeds when the camera shake warning displays.
• Be careful not to block the AF auxiliary light emitter with your finger or other items.
• Ensure that there is at least 70 cm (2.3 ft.) between the camera lens and subject.
• Use the macro mode to shoot close-ups between 6 and 70 cm (2.4 in. and 2.3 ft.) at maximum wide angle and 20 and 70 cm (7.9 in. and 2.3 ft.) at maximum telephoto.
• Set the built-in flash to on.• Use a high-output externally mounted flash.
• Set the exposure compensation to a positive (+) setting.• Use the AE lock or spot metering function.
• To use the built-in flash, shoot within 70 cm to 4.5 m (2.3 to 14.8 ft.) of the subject at the maximum wide angle and within 70 cm to 3.6 m (2.3 to 11.8 ft.) at the maximum telephoto setting.
• Use an externally mounted flash with a large output.
• Adjust the flash output with the flash exposure compensation function (p. 74).
• Set the exposure compensation to a negative (-) setting.• Use the AE lock or spot metering function.
• Change the shooting angle.
• Set the flash to Auto or Off.
• Set the flash to Auto or On.
• Turn the main dial to (Shooting) or (Replay).
• Set the video system to the appropriate setting, NTSC or PAL, for your TV ➜ (See Set up Menu, p. 119).
• Turn the mode dial to any shooting mode except for .
• Operate the zoom before shooting in movie mode.
Image is blurred or out of focus
Subject in recorded image is too dark
Subject in recorded image is too bright
Flash will not fire
Image not showing on TV
Zoom does not operate

Appendices 135
List of Error / Message CodesThe following error and message codes may appear on the display panel.
Error Codes
: The camera has experienced a problem. Turn the main dial to ,wait a second, and then try shooting or replaying. If the error codeappears repeatedly, there is a problem. Note the error code numberand take the camera in for servicing. If an error code appearsimmediately after a shot, there is a chance that the image was notrecorded. Check the image in replay mode.
Message Codes
: Replaying image.
: Connected to computer in PC connection mode.
: Adequate battery charge.
: Low battery charge. Charge the battery as soon as possible to use forany length of time.
: Battery charge low, camera will not operate. Immediately recharge orreplace the battery pack with a charged one.Could also indicate that the battery cover is open. Close the coversecurely.
: No CF card in camera, CF card slot cover is open, or CF card error.
: Power turned on with lens cap on. Remove cap, then turn power offand on again.
(xx: number)
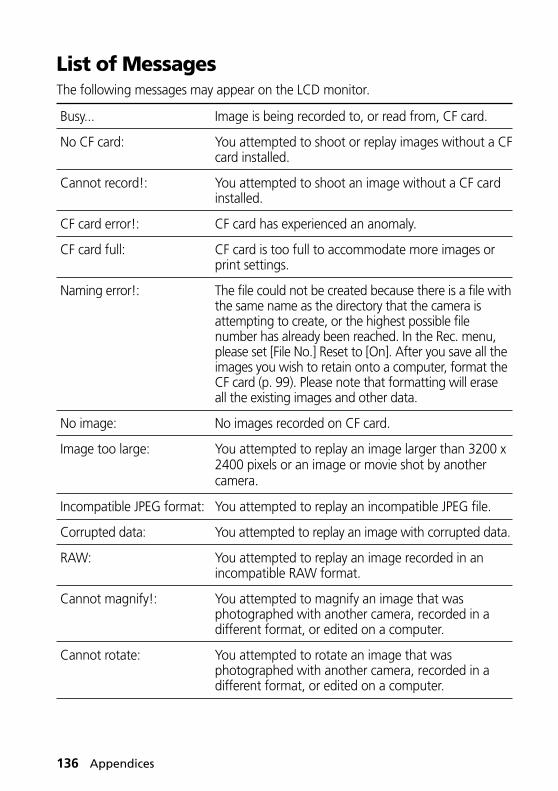
136 Appendices
List of MessagesThe following messages may appear on the LCD monitor.
Busy... Image is being recorded to, or read from, CF card.
No CF card: You attempted to shoot or replay images without a CFcard installed.
Cannot record!: You attempted to shoot an image without a CF cardinstalled.
CF card error!: CF card has experienced an anomaly.
CF card full: CF card is too full to accommodate more images orprint settings.
Naming error!: The file could not be created because there is a file withthe same name as the directory that the camera isattempting to create, or the highest possible filenumber has already been reached. In the Rec. menu,please set [File No.] Reset to [On]. After you save all theimages you wish to retain onto a computer, format theCF card (p. 99). Please note that formatting will eraseall the existing images and other data.
No image: No images recorded on CF card.
Image too large: You attempted to replay an image larger than 3200 x2400 pixels or an image or movie shot by anothercamera.
Incompatible JPEG format: You attempted to replay an incompatible JPEG file.
Corrupted data: You attempted to replay an image with corrupted data.
RAW: You attempted to replay an image recorded in anincompatible RAW format.
Cannot magnify!: You attempted to magnify an image that wasphotographed with another camera, recorded in adifferent format, or edited on a computer.
Cannot rotate: You attempted to rotate an image that wasphotographed with another camera, recorded in adifferent format, or edited on a computer.
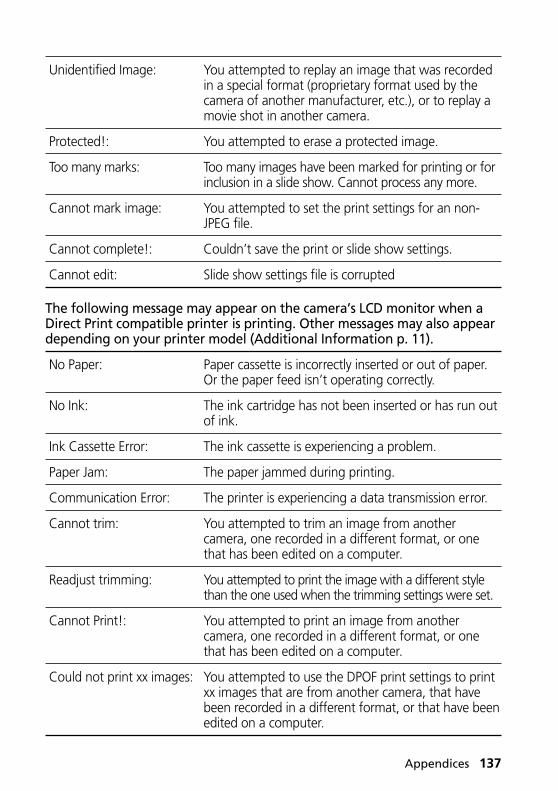
Appendices 137
Unidentified Image: You attempted to replay an image that was recordedin a special format (proprietary format used by thecamera of another manufacturer, etc.), or to replay amovie shot in another camera.
Protected!: You attempted to erase a protected image.
Too many marks: Too many images have been marked for printing or forinclusion in a slide show. Cannot process any more.
Cannot mark image: You attempted to set the print settings for an non-JPEG file.
Cannot complete!: Couldn’t save the print or slide show settings.
Cannot edit: Slide show settings file is corrupted
The following message may appear on the camera’s LCD monitor when aDirect Print compatible printer is printing. Other messages may also appeardepending on your printer model (Additional Information p. 11).
No Paper: Paper cassette is incorrectly inserted or out of paper.Or the paper feed isn’t operating correctly.
No Ink: The ink cartridge has not been inserted or has run outof ink.
Ink Cassette Error: The ink cassette is experiencing a problem.
Paper Jam: The paper jammed during printing.
Communication Error: The printer is experiencing a data transmission error.
Cannot trim: You attempted to trim an image from anothercamera, one recorded in a different format, or onethat has been edited on a computer.
Readjust trimming: You attempted to print the image with a different stylethan the one used when the trimming settings were set.
Cannot Print!: You attempted to print an image from anothercamera, one recorded in a different format, or onethat has been edited on a computer.
Could not print xx images: You attempted to use the DPOF print settings to printxx images that are from another camera, that havebeen recorded in a different format, or that have beenedited on a computer.
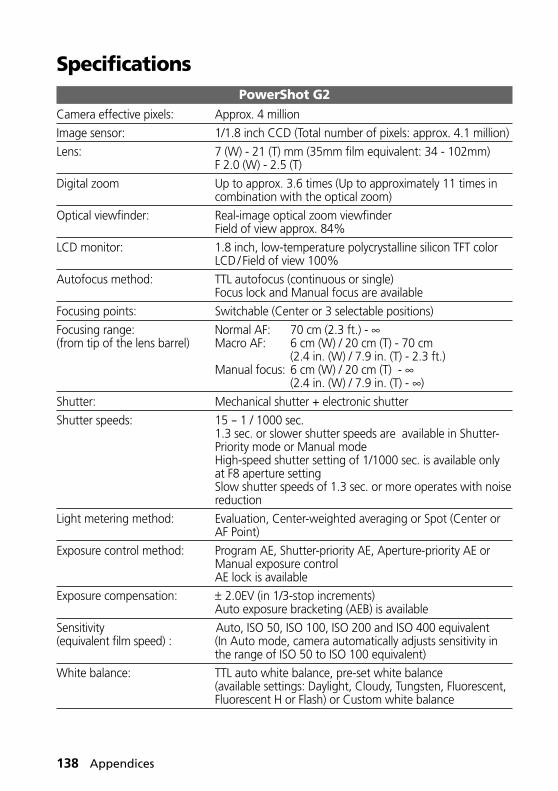
138 Appendices
SpecificationsPowerShot G2
Camera effective pixels: Approx. 4 million
Image sensor: 1/1.8 inch CCD (Total number of pixels: approx. 4.1 million)
Lens: 7 (W) - 21 (T) mm (35mm film equivalent: 34 - 102mm)F 2.0 (W) - 2.5 (T)
Digital zoom Up to approx. 3.6 times (Up to approximately 11 times incombination with the optical zoom)
Optical viewfinder: Real-image optical zoom viewfinderField of view approx. 84%
LCD monitor: 1.8 inch, low-temperature polycrystalline silicon TFT colorLCD / Field of view 100%
Autofocus method: TTL autofocus (continuous or single)Focus lock and Manual focus are available
Focusing points: Switchable (Center or 3 selectable positions)
Focusing range: Normal AF: 70 cm (2.3 ft.) - ∞(from tip of the lens barrel) Macro AF: 6 cm (W) / 20 cm (T) - 70 cm
(2.4 in. (W) / 7.9 in. (T) - 2.3 ft.)Manual focus: 6 cm (W) / 20 cm (T) - ∞
(2.4 in. (W) / 7.9 in. (T) - ∞)
Shutter: Mechanical shutter + electronic shutter
Shutter speeds: 15 - 1 / 1000 sec.1.3 sec. or slower shutter speeds are available in Shutter-Priority mode or Manual modeHigh-speed shutter setting of 1/1000 sec. is available onlyat F8 aperture settingSlow shutter speeds of 1.3 sec. or more operates with noisereduction
Light metering method: Evaluation, Center-weighted averaging or Spot (Center orAF Point)
Exposure control method: Program AE, Shutter-priority AE, Aperture-priority AE orManual exposure controlAE lock is available
Exposure compensation: ± 2.0EV (in 1/3-stop increments)Auto exposure bracketing (AEB) is available
Sensitivity Auto, ISO 50, ISO 100, ISO 200 and ISO 400 equivalent(equivalent film speed) : (In Auto mode, camera automatically adjusts sensitivity in
the range of ISO 50 to ISO 100 equivalent)
White balance: TTL auto white balance, pre-set white balance(available settings: Daylight, Cloudy, Tungsten, Fluorescent,Fluorescent H or Flash) or Custom white balance
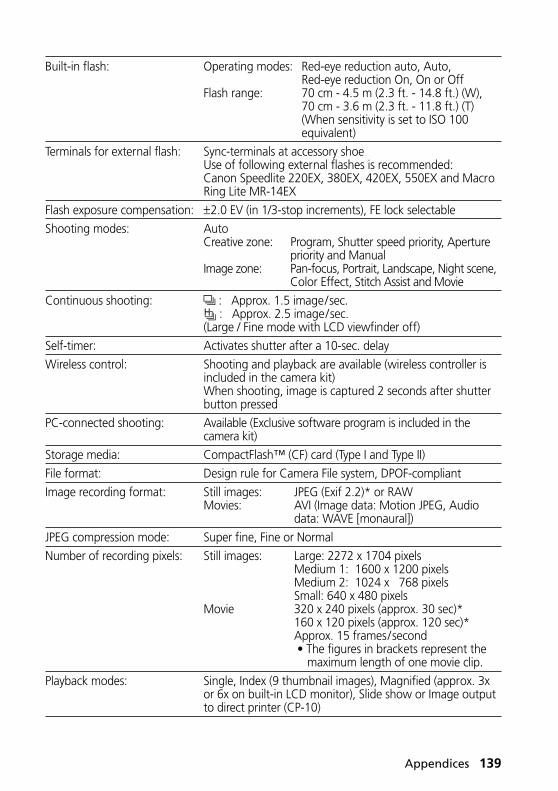
Appendices 139
Built-in flash: Operating modes: Red-eye reduction auto, Auto,Red-eye reduction On, On or Off
Flash range: 70 cm - 4.5 m (2.3 ft. - 14.8 ft.) (W),70 cm - 3.6 m (2.3 ft. - 11.8 ft.) (T)(When sensitivity is set to ISO 100equivalent)
Terminals for external flash: Sync-terminals at accessory shoeUse of following external flashes is recommended:Canon Speedlite 220EX, 380EX, 420EX, 550EX and MacroRing Lite MR-14EX
Flash exposure compensation: ±2.0 EV (in 1/3-stop increments), FE lock selectable
Shooting modes: AutoCreative zone: Program, Shutter speed priority, Aperture
priority and ManualImage zone: Pan-focus, Portrait, Landscape, Night scene,
Color Effect, Stitch Assist and Movie
Continuous shooting: : Approx. 1.5 image/sec. : Approx. 2.5 image/sec.
(Large / Fine mode with LCD viewfinder off)
Self-timer: Activates shutter after a 10-sec. delay
Wireless control: Shooting and playback are available (wireless controller isincluded in the camera kit)When shooting, image is captured 2 seconds after shutterbutton pressed
PC-connected shooting: Available (Exclusive software program is included in thecamera kit)
Storage media: CompactFlash™ (CF) card (Type I and Type II)
File format: Design rule for Camera File system, DPOF-compliant
Image recording format: Still images: JPEG (Exif 2.2)* or RAWMovies: AVI (Image data: Motion JPEG, Audio
data: WAVE [monaural])
JPEG compression mode: Super fine, Fine or Normal
Number of recording pixels: Still images: Large: 2272 x 1704 pixelsMedium 1: 1600 x 1200 pixelsMedium 2: 1024 x 768 pixelsSmall: 640 x 480 pixels
Movie 320 x 240 pixels (approx. 30 sec)*160 x 120 pixels (approx. 120 sec)*Approx. 15 frames/second• The figures in brackets represent the
maximum length of one movie clip.
Playback modes: Single, Index (9 thumbnail images), Magnified (approx. 3xor 6x on built-in LCD monitor), Slide show or Image outputto direct printer (CP-10)
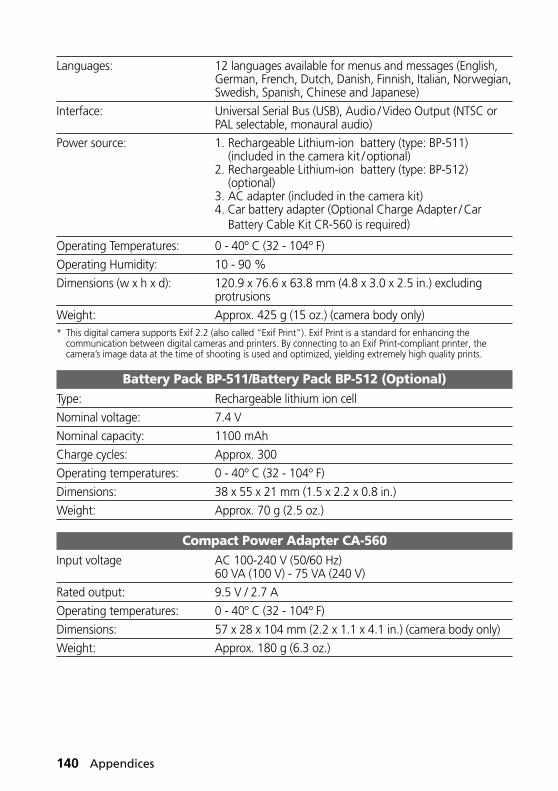
140 Appendices
Languages: 12 languages available for menus and messages (English,German, French, Dutch, Danish, Finnish, Italian, Norwegian,Swedish, Spanish, Chinese and Japanese)
Interface: Universal Serial Bus (USB), Audio /Video Output (NTSC orPAL selectable, monaural audio)
Power source: 1. Rechargeable Lithium-ion battery (type: BP-511)(included in the camera kit / optional)
2. Rechargeable Lithium-ion battery (type: BP-512)(optional)
3. AC adapter (included in the camera kit)4. Car battery adapter (Optional Charge Adapter / Car
Battery Cable Kit CR-560 is required)
Operating Temperatures: 0 - 40º C (32 - 104º F)
Operating Humidity: 10 - 90 %
Dimensions (w x h x d): 120.9 x 76.6 x 63.8 mm (4.8 x 3.0 x 2.5 in.) excludingprotrusions
Weight: Approx. 425 g (15 oz.) (camera body only)* This digital camera supports Exif 2.2 (also called “Exif Print”). Exif Print is a standard for enhancing the
communication between digital cameras and printers. By connecting to an Exif Print-compliant printer, thecamera’s image data at the time of shooting is used and optimized, yielding extremely high quality prints.
Battery Pack BP-511/Battery Pack BP-512 (Optional)Type: Rechargeable lithium ion cell
Nominal voltage: 7.4 V
Nominal capacity: 1100 mAh
Charge cycles: Approx. 300
Operating temperatures: 0 - 40º C (32 - 104º F)
Dimensions: 38 x 55 x 21 mm (1.5 x 2.2 x 0.8 in.)
Weight: Approx. 70 g (2.5 oz.)
Compact Power Adapter CA-560Input voltage AC 100-240 V (50/60 Hz)
60 VA (100 V) - 75 VA (240 V)
Rated output: 9.5 V / 2.7 A
Operating temperatures: 0 - 40º C (32 - 104º F)
Dimensions: 57 x 28 x 104 mm (2.2 x 1.1 x 4.1 in.) (camera body only)
Weight: Approx. 180 g (6.3 oz.)
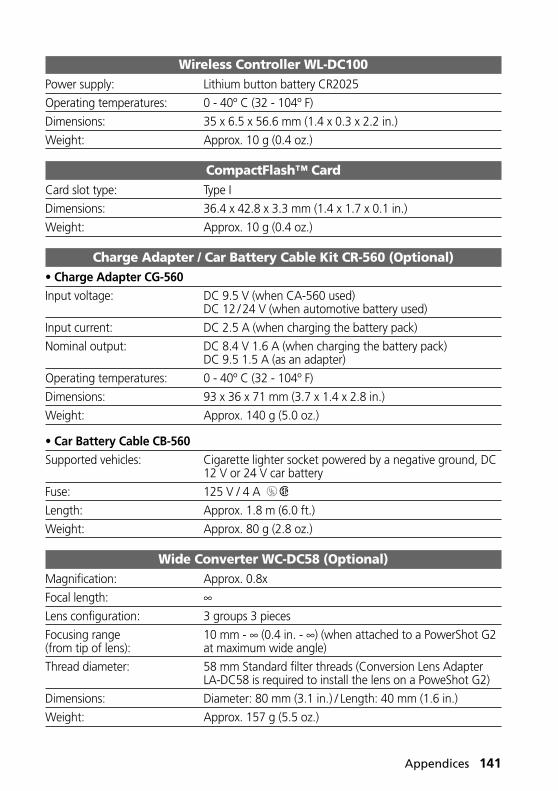
Appendices 141
Wireless Controller WL-DC100Power supply: Lithium button battery CR2025
Operating temperatures: 0 - 40º C (32 - 104º F)
Dimensions: 35 x 6.5 x 56.6 mm (1.4 x 0.3 x 2.2 in.)
Weight: Approx. 10 g (0.4 oz.)
CompactFlash™ CardCard slot type: Type I
Dimensions: 36.4 x 42.8 x 3.3 mm (1.4 x 1.7 x 0.1 in.)
Weight: Approx. 10 g (0.4 oz.)
Charge Adapter / Car Battery Cable Kit CR-560 (Optional)• Charge Adapter CG-560Input voltage: DC 9.5 V (when CA-560 used)
DC 12 / 24 V (when automotive battery used)
Input current: DC 2.5 A (when charging the battery pack)
Nominal output: DC 8.4 V 1.6 A (when charging the battery pack)DC 9.5 1.5 A (as an adapter)
Operating temperatures: 0 - 40º C (32 - 104º F)
Dimensions: 93 x 36 x 71 mm (3.7 x 1.4 x 2.8 in.)
Weight: Approx. 140 g (5.0 oz.)
• Car Battery Cable CB-560Supported vehicles: Cigarette lighter socket powered by a negative ground, DC
12 V or 24 V car battery
Fuse: 125 V / 4 A
Length: Approx. 1.8 m (6.0 ft.)
Weight: Approx. 80 g (2.8 oz.)
Wide Converter WC-DC58 (Optional)Magnification: Approx. 0.8x
Focal length: ∞Lens configuration: 3 groups 3 pieces
Focusing range 10 mm - ∞ (0.4 in. - ∞) (when attached to a PowerShot G2(from tip of lens): at maximum wide angle)
Thread diameter: 58 mm Standard filter threads (Conversion Lens AdapterLA-DC58 is required to install the lens on a PoweShot G2)
Dimensions: Diameter: 80 mm (3.1 in.) / Length: 40 mm (1.6 in.)
Weight: Approx. 157 g (5.5 oz.)
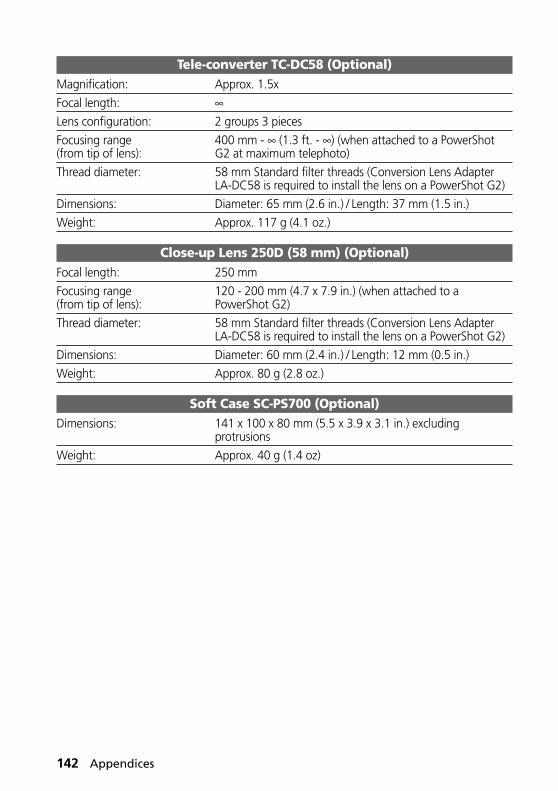
142 Appendices
Tele-converter TC-DC58 (Optional)Magnification: Approx. 1.5x
Focal length: ∞Lens configuration: 2 groups 3 pieces
Focusing range 400 mm - ∞ (1.3 ft. - ∞) (when attached to a PowerShot(from tip of lens): G2 at maximum telephoto)
Thread diameter: 58 mm Standard filter threads (Conversion Lens AdapterLA-DC58 is required to install the lens on a PowerShot G2)
Dimensions: Diameter: 65 mm (2.6 in.) / Length: 37 mm (1.5 in.)
Weight: Approx. 117 g (4.1 oz.)
Close-up Lens 250D (58 mm) (Optional)Focal length: 250 mm
Focusing range 120 - 200 mm (4.7 x 7.9 in.) (when attached to a(from tip of lens): PowerShot G2)
Thread diameter: 58 mm Standard filter threads (Conversion Lens AdapterLA-DC58 is required to install the lens on a PowerShot G2)
Dimensions: Diameter: 60 mm (2.4 in.) / Length: 12 mm (0.5 in.)
Weight: Approx. 80 g (2.8 oz.)
Soft Case SC-PS700 (Optional)Dimensions: 141 x 100 x 80 mm (5.5 x 3.9 x 3.1 in.) excluding
protrusions
Weight: Approx. 40 g (1.4 oz)
Index 143
Index
A
AEB Shooting 73AE Lock 75AF Mode 115Aperture 64, 66Aperture Priority AE ( ) 64Auto ( ) 41Auto Replay (Slide Show) 92AV Cable 120
B
BatteryHandling 17Household Power Source 20Installation 18Performance 19Recharging 16Status 18
Beep 118Built-In Flash 43
C
Care and Maintenance 132CF Card
Formatting 119Handling 25Inserting 24Recordable Images 25
Charger Adapter/Car Battery Cable Kit 21Close-up Lens 127Color Effect ( ) 48Color Saturation 83, 116Compact Power Adapter 16, 20, 23Compression 58, 114Continuous Shooting 55Contrast 83, 116Conversion Lens 127Conversion Lens Adapter 125, 128Creative Zone 14
D
Date / Time 26, 119Date Battery 130Detailed Display Mode 34Digital Zoom 38, 57, 115Display Panel 15
DPOF 100Diopter Adjustment 37
E
Erasing 97All Images 98, 117Displayed Image 9Single Images 97
Exposure Compensation 69Externally Mounted Flash 123
F
FE Lock 77File Number 84Flash
Built-In 43Externally Mounted 123
Flash Exposure Compensation 74Focusing
Autofocus 41Manual Focus 81
Focus Lock 80Formatting 99
I
Image Characteristics 83Image Zone 14Indicator 12Information View 33ISO Sensitivity 83, 114
L
Landscape ( ) 47Language 119LCD Monitor 31
Brightness 118Detailed Display Mode 34Magnify 87Rotate 91, 117Simple Display Mode 34
Lens Cap 28
M
Macro Mode ( ) 53Magnify 87Main Dial 13Manual Exposure ( ) 66Manual Focus 81

144 Index
MenuRec. 114Replay 117Selecting and Setting 39Settings Categories 40Setup 118
Metering Method 78Mode Dial 13Movie
Replaying 90Shooting ( ) 52
N
Night Scene ( ) 47Number Reset Function 116
P
Pan Focus ( ) 46Playback Volume 118Portrait ( ) 46Power On/Off 29Power Save Function 29, 118Print Settings 100
Print Style 103Reset 105Selecting Images 100
Program AE ( ) 61Protect 96, 117
R
RAW 60Recordable Images 59Recording Format 60, 114Red-Eye Reduction Function 45Replaying 86
Index Replay 88Single Replay 86Switching between Sets of 9 Images 89Using a TV 120
Replay Mode 30Rotate 91, 117
S
Self-Timer 54Sharpness 83, 116Shooting
Image Review 42, 115Using a TV 120
Shooting Mode 30Aperture Priority AE ( ) 64Auto ( ) 41
Landscape 47List of Modes 85Macro Mode 53Manual Exposure ( ) 66Movie 52Night Scene ( ) 47Pan Focus ( ) 46Portrait ( ) 46Program AE ( ) 61Shutter Speed Priority AE ( ) 62Stitch Assist Mode ( ) 49
Shutter ButtonPressing Fully 36Pressing Halfway 36
Shutter Volume 118Shutter Speed 62, 66, 76Shutter Speed Priority AE ( ) 62Simple Display Mode 34Slide Show 92, 117
Play Time 95Repeat 95Selecting Images 94Starting 92
Soft Case 28Stitch Assist Mode ( ) 49
Composing 49Shooting 50
Strap 28
T
Tele-converter Lens 127Telephoto 38
V
Video System 119Viewfinder 37
W
White Balance ( ) 70Wide Angle 38Wide Converter Lens 127Wireless Controller
Battery Installation 121Replaying 122Shooting 122
Z
Zooming 38Digital 38, 57, 115
145
Disclaimer• While every effort has been made to ensure that the information contained in this
guide is accurate and complete, no liability can be accepted for any errors or omissions.• Canon Inc. reserves the right to change the specifications of the hardware and software
described herein at any time without prior notice.• No part of this guide may be reproduced, transmitted, transcribed, stored in a retrieval
system, or translated into any language in any form, by any means, without the priorwritten permission of Canon Inc.
• Canon Inc. makes no warranties for damages resulting from corrupted or lost data dueto a mistaken operation or malfunction of the camera, the software, theCompactFlash™ cards (CF cards), personal computers, peripheral devices, or use ofnon-Canon CF cards.

146
Additional Information (Printing Functions) 1
Additional Information(Printing Functions)With enhanced print functions and an increased number of printers ableto yield fast and beautiful prints, printing has never been so easy. Bysimply connecting the camera to the printer, you’re ready to print. Formore details, please read the following.
Printing with the Direct Print CompatibleBubble Jet Printer (Optional) ................................................ 2
Connecting Bubble Jet Printer to the Camera ............................. 2Printing .................................................................................... 4Printing with DPOF Settings ....................................................... 9
List of Messages (Continued from p. 137) ........................... 11
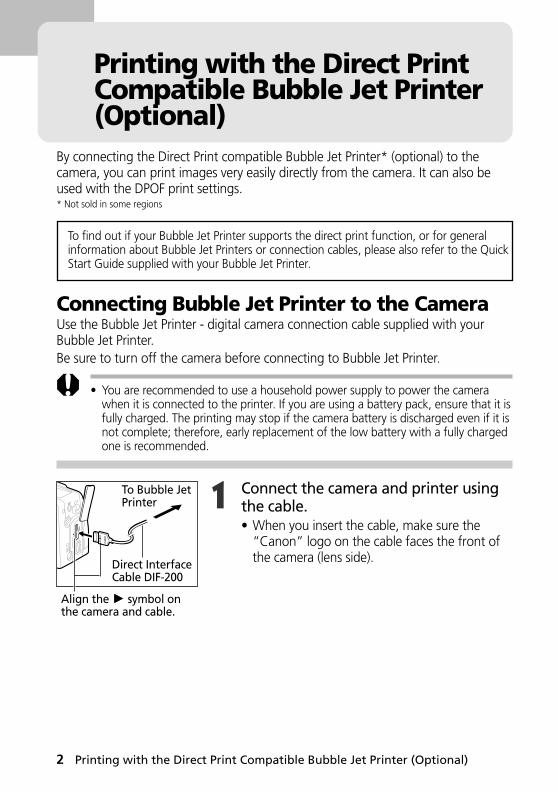
2 Printing with the Direct Print Compatible Bubble Jet Printer (Optional)
Printing with the Direct PrintCompatible Bubble Jet Printer(Optional)
By connecting the Direct Print compatible Bubble Jet Printer* (optional) to thecamera, you can print images very easily directly from the camera. It can also beused with the DPOF print settings.* Not sold in some regions
To find out if your Bubble Jet Printer supports the direct print function, or for generalinformation about Bubble Jet Printers or connection cables, please also refer to the QuickStart Guide supplied with your Bubble Jet Printer.
Connecting Bubble Jet Printer to the CameraUse the Bubble Jet Printer - digital camera connection cable supplied with yourBubble Jet Printer.Be sure to turn off the camera before connecting to Bubble Jet Printer.
• You are recommended to use a household power supply to power the camerawhen it is connected to the printer. If you are using a battery pack, ensure that it isfully charged. The printing may stop if the camera battery is discharged even if it isnot complete; therefore, early replacement of the low battery with a fully chargedone is recommended.
1 Connect the camera and printer usingthe cable.• When you insert the cable, make sure the
“Canon” logo on the cable faces the front ofthe camera (lens side).
Align the symbol onthe camera and cable.
Direct InterfaceCable DIF-200
To Bubble JetPrinter
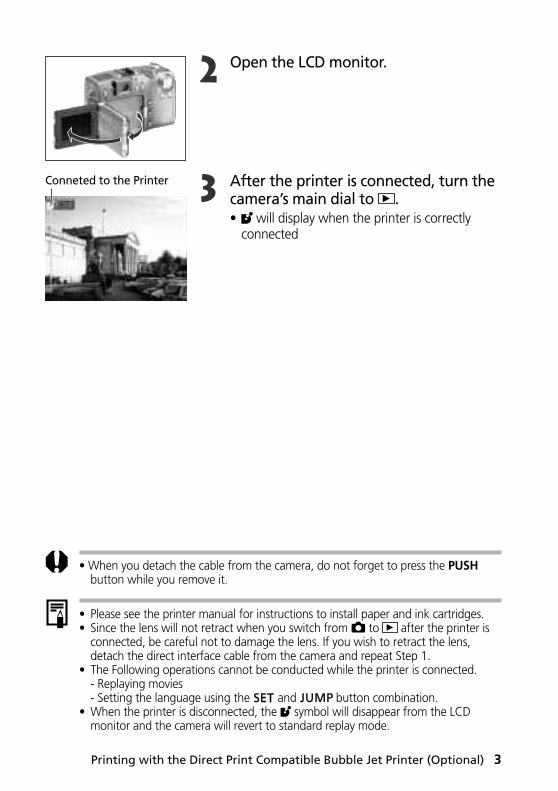
Printing with the Direct Print Compatible Bubble Jet Printer (Optional) 3
2 Open the LCD monitor.
3 After the printer is connected, turn thecamera’s main dial to .• will display when the printer is correctly
connected
• When you detach the cable from the camera, do not forget to press the PUSHbutton while you remove it.
• Please see the printer manual for instructions to install paper and ink cartridges.• Since the lens will not retract when you switch from to after the printer is
connected, be careful not to damage the lens. If you wish to retract the lens,detach the direct interface cable from the camera and repeat Step 1.
• The Following operations cannot be conducted while the printer is connected.- Replaying movies- Setting the language using the and button combination.
• When the printer is disconnected, the symbol will disappear from the LCDmonitor and the camera will revert to standard replay mode.
Conneted to the Printer
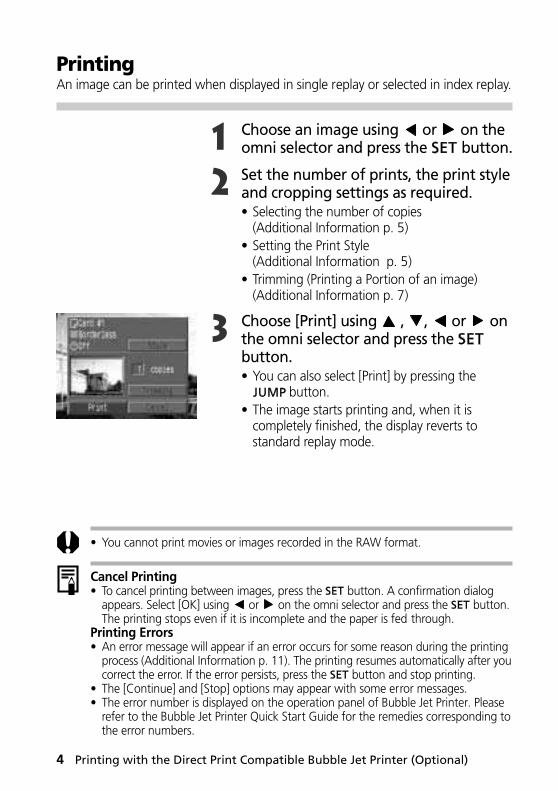
4 Printing with the Direct Print Compatible Bubble Jet Printer (Optional)
PrintingAn image can be printed when displayed in single replay or selected in index replay.
1 Choose an image using or on theomni selector and press the button.
2 Set the number of prints, the print styleand cropping settings as required.• Selecting the number of copies
(Additional Information p. 5)• Setting the Print Style
(Additional Information p. 5)• Trimming (Printing a Portion of an image)
(Additional Information p. 7)
3 Choose [Print] using , , or onthe omni selector and press the button.• You can also select [Print] by pressing the
button.• The image starts printing and, when it is
completely finished, the display reverts tostandard replay mode.
• You cannot print movies or images recorded in the RAW format.
Cancel Printing• To cancel printing between images, press the button. A confirmation dialog
appears. Select [OK] using or on the omni selector and press the button.The printing stops even if it is incomplete and the paper is fed through.
Printing Errors• An error message will appear if an error occurs for some reason during the printing
process (Additional Information p. 11). The printing resumes automatically after youcorrect the error. If the error persists, press the button and stop printing.
• The [Continue] and [Stop] options may appear with some error messages.• The error number is displayed on the operation panel of Bubble Jet Printer. Please
refer to the Bubble Jet Printer Quick Start Guide for the remedies corresponding tothe error numbers.
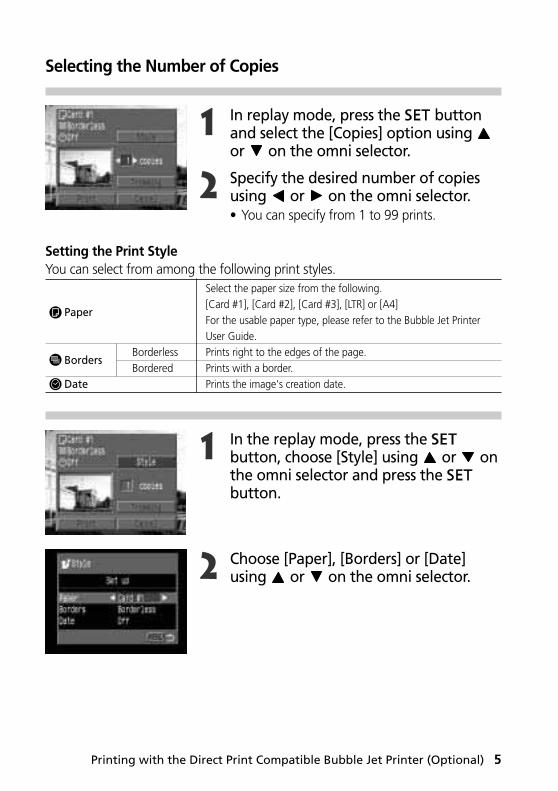
Printing with the Direct Print Compatible Bubble Jet Printer (Optional) 5
Selecting the Number of Copies
1 In replay mode, press the buttonand select the [Copies] option using or on the omni selector.
2 Specify the desired number of copiesusing or on the omni selector.• You can specify from 1 to 99 prints.
Setting the Print StyleYou can select from among the following print styles.
1 In the replay mode, press the button, choose [Style] using or onthe omni selector and press the button.
2 Choose [Paper], [Borders] or [Date]using or on the omni selector.
Select the paper size from the following.[Card #1], [Card #2], [Card #3], [LTR] or [A4]For the usable paper type, please refer to the Bubble Jet Printer User Guide.Prints right to the edges of the page.Prints with a border.Prints the image's creation date.
Paper
BordersBorderlessBordered
Date
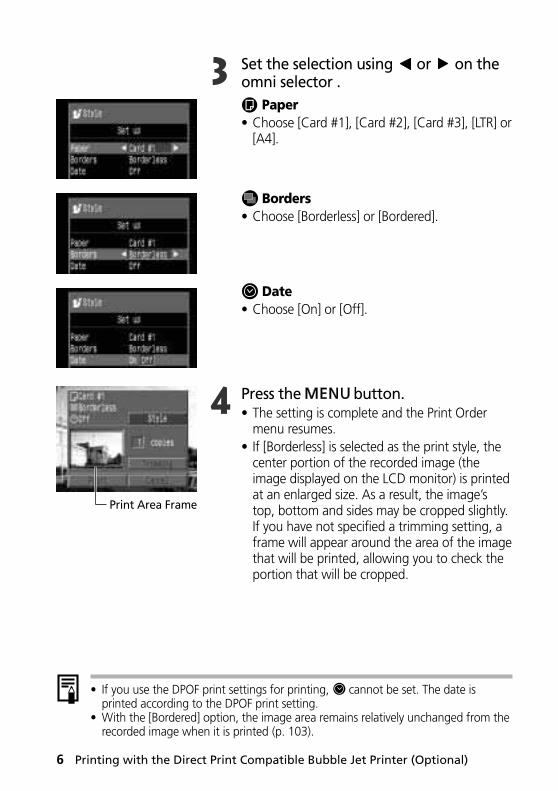
6 Printing with the Direct Print Compatible Bubble Jet Printer (Optional)
3 Set the selection using or on theomni selector .
Paper• Choose [Card #1], [Card #2], [Card #3], [LTR] or
[A4].
Borders• Choose [Borderless] or [Bordered].
Date• Choose [On] or [Off].
4 Press the button.• The setting is complete and the Print Order
menu resumes.• If [Borderless] is selected as the print style, the
center portion of the recorded image (theimage displayed on the LCD monitor) is printedat an enlarged size. As a result, the image’stop, bottom and sides may be cropped slightly.If you have not specified a trimming setting, aframe will appear around the area of the imagethat will be printed, allowing you to check theportion that will be cropped.
• If you use the DPOF print settings for printing, cannot be set. The date isprinted according to the DPOF print setting.
• With the [Bordered] option, the image area remains relatively unchanged from therecorded image when it is printed (p. 103).
Print Area Frame
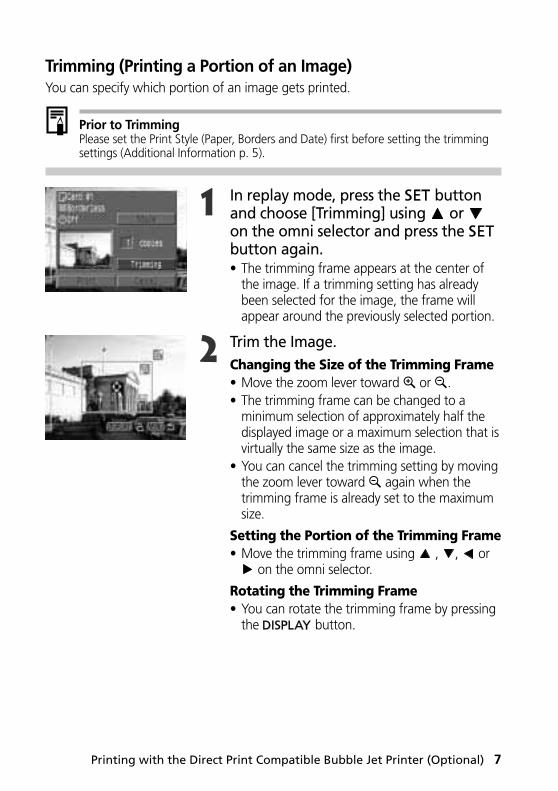
Printing with the Direct Print Compatible Bubble Jet Printer (Optional) 7
Trimming (Printing a Portion of an Image)You can specify which portion of an image gets printed.
Prior to TrimmingPlease set the Print Style (Paper, Borders and Date) first before setting the trimmingsettings (Additional Information p. 5).
1 In replay mode, press the buttonand choose [Trimming] using or on the omni selector and press the button again.• The trimming frame appears at the center of
the image. If a trimming setting has alreadybeen selected for the image, the frame willappear around the previously selected portion.
2 Trim the Image.Changing the Size of the Trimming Frame• Move the zoom lever toward or .• The trimming frame can be changed to a
minimum selection of approximately half thedisplayed image or a maximum selection that isvirtually the same size as the image.
• You can cancel the trimming setting by movingthe zoom lever toward again when thetrimming frame is already set to the maximumsize.
Setting the Portion of the Trimming Frame• Move the trimming frame using , , or
on the omni selector.
Rotating the Trimming Frame• You can rotate the trimming frame by pressing
the button.
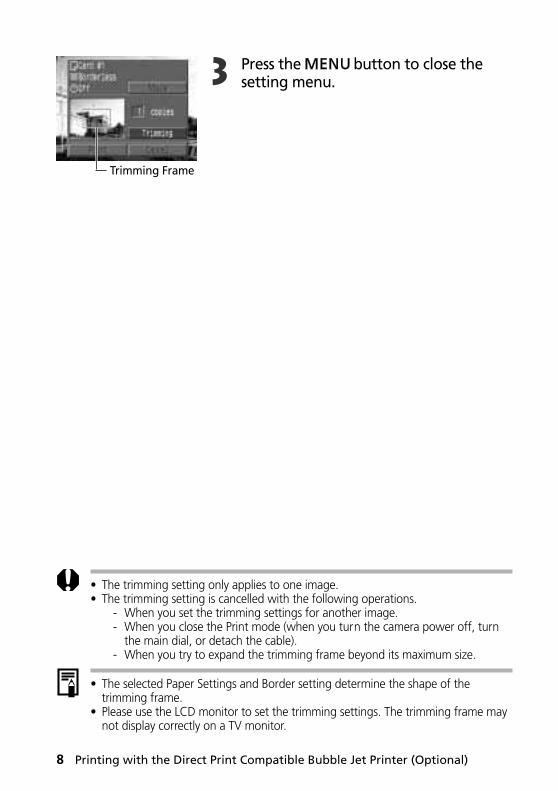
8 Printing with the Direct Print Compatible Bubble Jet Printer (Optional)
3 Press the button to close thesetting menu.
Trimming Frame
• The trimming setting only applies to one image.• The trimming setting is cancelled with the following operations.
- When you set the trimming settings for another image.- When you close the Print mode (when you turn the camera power off, turn
the main dial, or detach the cable).- When you try to expand the trimming frame beyond its maximum size.
• The selected Paper Settings and Border setting determine the shape of thetrimming frame.
• Please use the LCD monitor to set the trimming settings. The trimming frame maynot display correctly on a TV monitor.
Printing with the Direct Print Compatible Bubble Jet Printer (Optional) 9
Printing with DPOF Print Settings on Bubble Jet PrinterYou can use the DPOF print settings to print using Bubble Jet Printer with the directprint function (optional).
1 In the [ (Play)] menu, select [PrintOrder] and press the button.• See Selecting Menus and Settings (p. 39).• The Print Order menu appears.
2 Select [Print] using , , or onthe omni selector and press the button.
3 Set the print style settings as required.• See Setting the Print Style (p. 109).
4 Select [OK] using , , or on theomni selector and press the button.• The image starts printing and, when it is
completely finished, the display will revert tothe standard replay mode.
10 Printing with the Direct Print Compatible Bubble Jet Printer (Optional)
• To print the date, set the [Date] setting in the print order menu in Step 2 to [On]. Youcannot set the date to print with the [Style] menu in Step 3 (p. 109). If the print type isset to [Index], the date will not print even if the [Date] setting is set to [On] in Step 2.
• The file number will not print.
Cancel Printing• To cancel printing during printing, press the button. A confirmation dialog
appears. Select [OK] using or on the omni selector and press the button.The printing stops even if it is incomplete and the paper is fed through.
Restarting Printing• In the Print Order menu, select [Resume] using or on the omni selector and
press the button. The remaining images can be printed.• Printing cannot be restarted under the following circumstances.
- If the print settings have been changed before restarting.- If the image for which the print settings were set has been deleted before
restarting.- If there was very little free space on the CF card when the printing was
cancelled.If these circumstances apply, you can select [OK] in the Print Order menu andreprint starting from the first image. If printing was cancelled because the camerabattery became discharged, you are recommended to power the camera with ahousehold power source. If you must use a battery pack, ensure that it is fullycharged for printing. After replacing the spent battery pack, turn the camerapower on again.
Printing Errors• An error message appears if an error occurs for some reason during the printing
process (Additional Information p. 12). The printing resumes automatically afteryou correct the error. If the error persists, press the button and stop printing.
• The [Continue] and [Stop] options may appear with some error messages.• The error number is displayed on the operation panel of Bubble Jet Printer. Please
refer to the Bubble Jet Printer Quick Start Guide for the remedies corresponding tothe error numbers.
Printing with the Direct Print Compatible Bubble Jet Printer (Optional) 11
List of Messages (continued from p. 137)
Messages that appear on the LCD monitor when printing with a Direct Printcompatible printer (optional) are listed on p. 137, but the messages below may alsoappear.
Incompatible paper size: Wrong paper size is loaded in the printer.
Incompatible ink size: Wrong ink cassette size is loaded in the printer.
Paper has been changed: Paper was changed after the print menu wasdisplayed.
Paper and ink The paper and ink are from different sets.do not match:
Recharge the The printer’s battery pack is depleted.printer battery:
12 Printing with the Direct Print Compatible Bubble Jet Printer (Optional)
The following messages may appear when the camera is connected to the DirectPrint compatible Bubble Jet Printer.
Check the error number displayed on the control panel of Bubble Jet Printer and referto the Bubble Jet Printer Quick Start Guide.
Printer in use: The printer is printing the data from the memory cardinserted in the computer or printer. The printerautomatically starts printing the images from thecamera after completing the current printing.
Printer warming up: Printer is warming up. When it is ready, the printerstarts printing automatically.
No printhead: No print head is installed in the printer.
Printer cover open: Close the printer cover securely.
Media type error: A paper incompatible with the Print Style has beenselected. Set a paper compatible with the Print Styleyou chose.
Paper level error: Adjust the paper selection lever to the proper position.
Low ink level: The ink tank needs to be replaced soon. Prepare anew ink tank. If you select [Continue] in the errorscreen, you can restart printing.
Waste tank full: You can restart printing by pressing the RESUME/CANCEL button on Bubble Jet Printer. Please requestreplacement of the waste tank to the shop where youpurchased the printer or your nearest Canon customersupport center listed in the Bubble Jet Quick StartGuide.
Printer error: Turn off the printer, then turn it on again. If the errorpersists, please consult your nearest Canon customersupport center listed in the Bubble Jet Quick StartGuide.

13

14
FCC NoticeDigital Camera, Model PC1015
This device complies with Part 15 of the FCC Rules. Operation is subject to the following twoconditions;(1) this device may not cause harmful interference, and(2) this device must accept any interference received, including interference that may cause undesiredoperation.Note: This equipment has been tested and found to comply with the limits for Class B digital devices,pursuant to Part 15 of the FCC rules. These limits are designed to provide reasonable protectionagainst harmful interference in a residential installation. This equipment generates, uses and canradiate radio frequency energy and, if not installed and used in accordance with the instructions, maycause harmful interference to radio communications. However, there is no guarantee that interferencewill not occur in a particular installation. If this equipment does cause harmful interference to radio ortelevision reception, which can be determined by turning the equipment off and on, the user isencouraged to try to correct the interference by one or more of the following measures:• Reorient or relocate the receiving antenna.• Increase the separation between the equipment and receiver.• Connect the equipment into an outlet on a circuit different from that to which the receiver is
connected.• Consult the dealer or an experienced radio/TV technician for help.The cable with the ferrite core provided with the digital camera must be used with this equipment inorder to comply with Class B limits in Subpart B of Part 15 of FCC rules.Do not make any changes or modifications to the equipment unless otherwise specified in themanual. If such changes or modifications should be made, you could be required to stop operation ofthe equipment.Canon U.S.A. Inc.One Canon Plaza, Lake Success, NY 11042, U.S.A.Tel No. (516) 328-5600
Canadian Radio Interference RegulationsTHIS CLASS B DIGITAL APPARATUS MEETS ALL REQUIREMENTS OF THE CANADIAN INTERFER-ENCE CAUSING EQUIPMENT REGULATIONS.
Réglementation canadienne sur les interférences radioCET APPAREIL NUMERIQUE DE LA CLASSE B RESPECTE TOUTES LES EXIGENCES DUREGLEMENT SUR LE MATERIEL BROUILLEUR DU CANADA.
Precautions
This digital camera is designed to perform optimally when used with genuine Canonbrand digital camera accessories (“Canon Brand Accessories”).You may use non Canon Brand Accessories with this digital camera. However, Canonmakes no warranties concerning, and is not responsible for damages resulting from, useof non Canon Brand Accessories.