Embed Size (px)
Citation preview
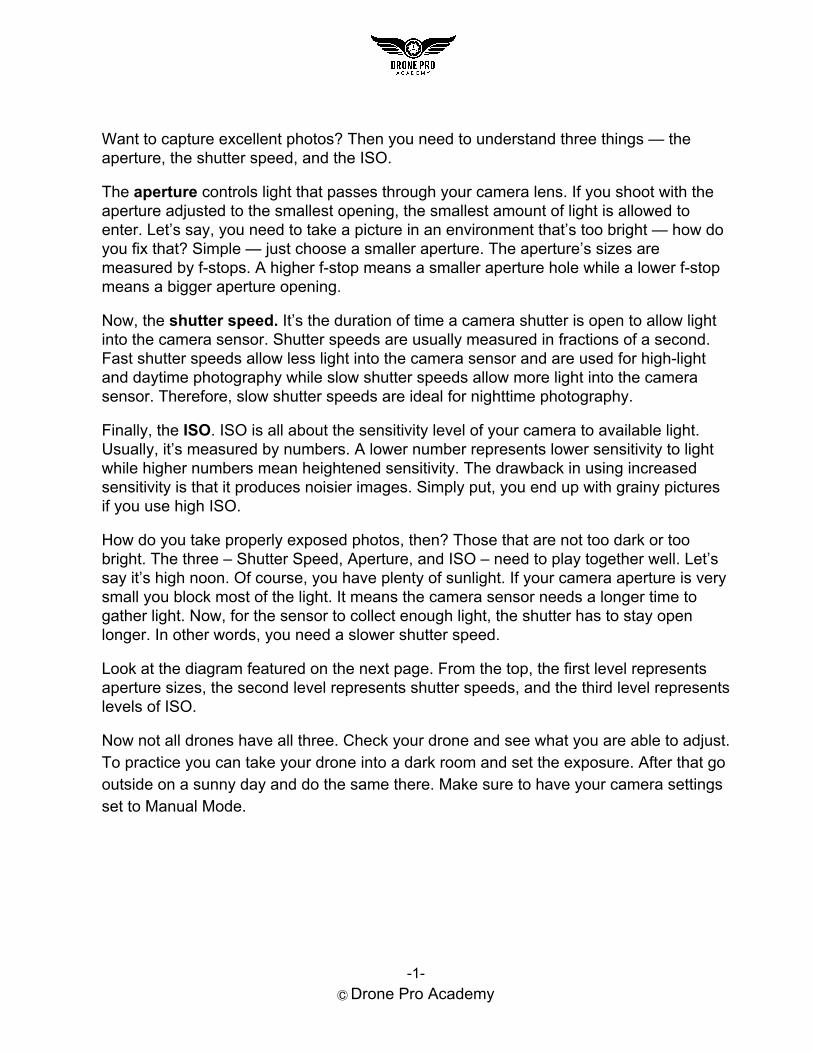
Camera Settings Cheat Sheet
Want to capture excellent photos? Then you need to understand three things — the aperture, the shutter speed, and the ISO.
The aperture controls light that passes through your camera lens. If you shoot with the aperture adjusted to the smallest opening, the smallest amount of light is allowed to enter. Let’s say, you need to take a picture in an environment that’s too bright — how do you fix that? Simple — just choose a smaller aperture. The aperture’s sizes are measured by f-stops. A higher f-stop means a smaller aperture hole while a lower f-stop means a bigger aperture opening.
Now, the shutter speed. It’s the duration of time a camera shutter is open to allow light into the camera sensor. Shutter speeds are usually measured in fractions of a second. Fast shutter speeds allow less light into the camera sensor and are used for high-light and daytime photography while slow shutter speeds allow more light into the camera sensor. Therefore, slow shutter speeds are ideal for nighttime photography.
Finally, the ISO. ISO is all about the sensitivity level of your camera to available light. Usually, it’s measured by numbers. A lower number represents lower sensitivity to light while higher numbers mean heightened sensitivity. The drawback in using increased sensitivity is that it produces noisier images. Simply put, you end up with grainy pictures if you use high ISO.
How do you take properly exposed photos, then? Those that are not too dark or too bright. The three – Shutter Speed, Aperture, and ISO – need to play together well. Let’s say it’s high noon. Of course, you have plenty of sunlight. If your camera aperture is very small you block most of the light. It means the camera sensor needs a longer time to gather light. Now, for the sensor to collect enough light, the shutter has to stay open longer. In other words, you need a slower shutter speed.
Look at the diagram featured on the next page. From the top, the first level represents aperture sizes, the second level represents shutter speeds, and the third level represents levels of ISO.
Now not all drones have all three. Check your drone and see what you are able to adjust. To practice you can take your drone into a dark room and set the exposure. After that go outside on a sunny day and do the same there. Make sure to have your camera settings set to Manual Mode.
-1- Ⓒ Drone Pro Academy
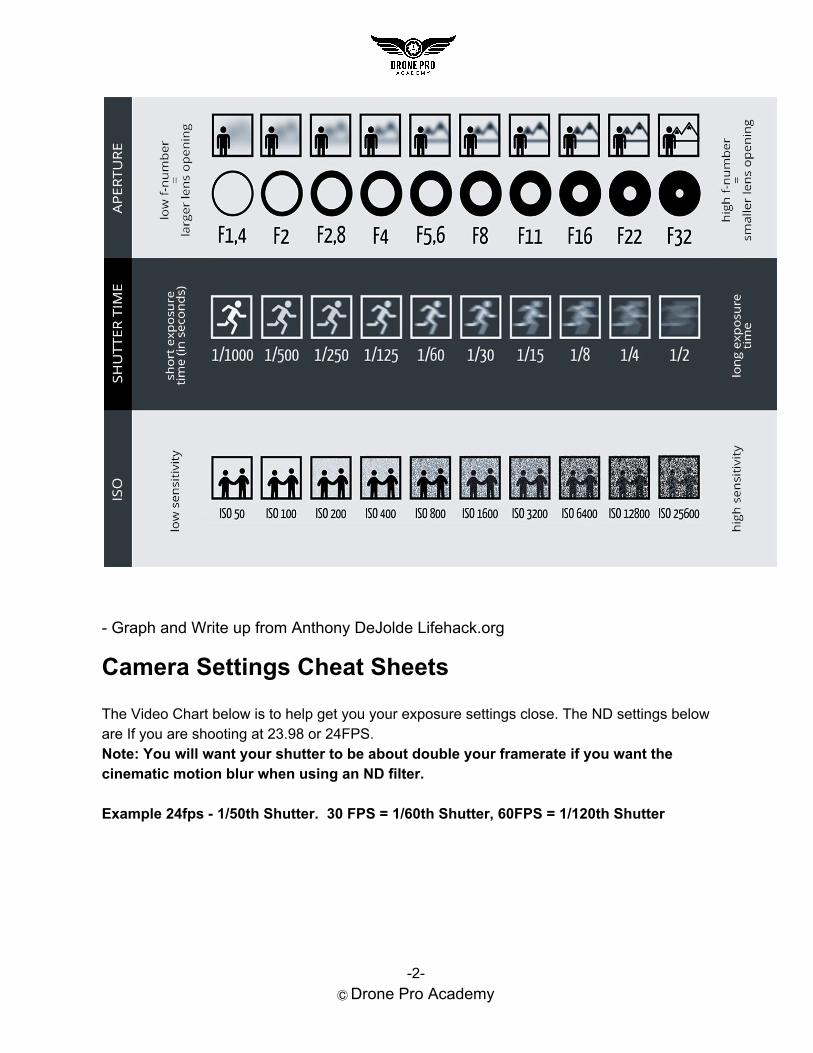
- Graph and Write up from Anthony DeJolde Lifehack.org
Camera Settings Cheat Sheets The Video Chart below is to help get you your exposure settings close. The ND settings below are If you are shooting at 23.98 or 24FPS. Note: You will want your shutter to be about double your framerate if you want the cinematic motion blur when using an ND filter. Example 24fps - 1/50th Shutter. 30 FPS = 1/60th Shutter, 60FPS = 1/120th Shutter
-2- Ⓒ Drone Pro Academy
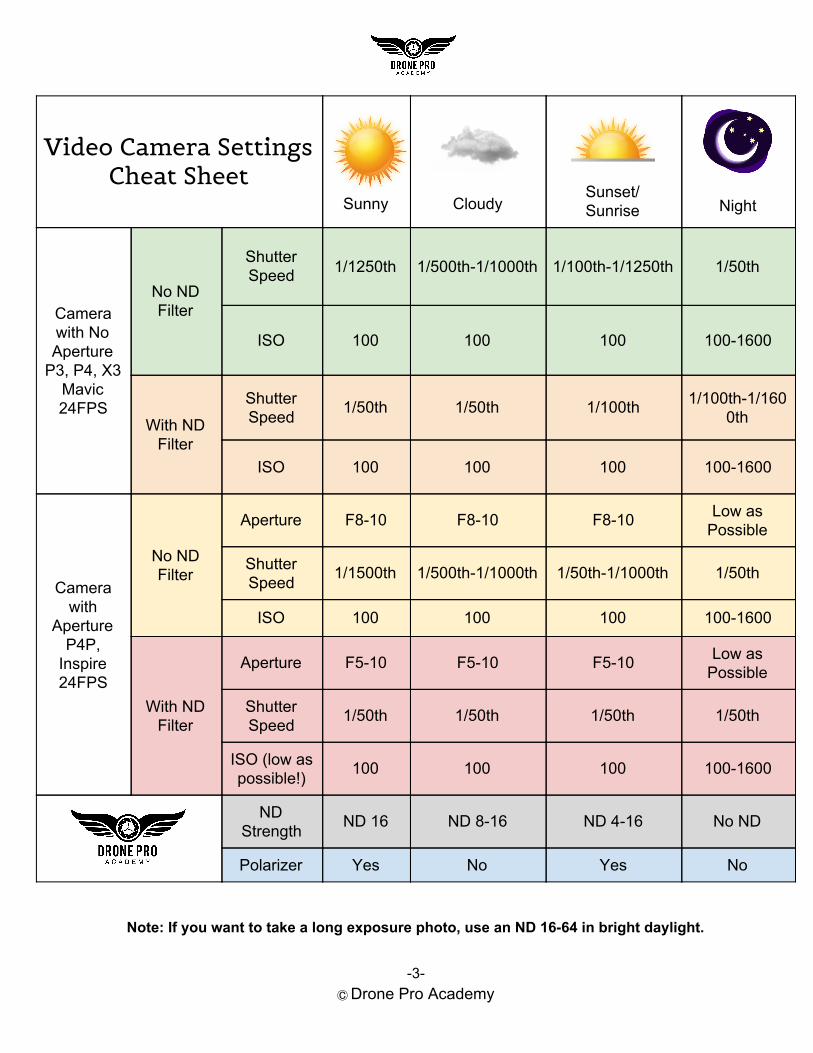
Video Camera Settings Cheat Sheet
Sunny
Cloudy
Sunset/ Sunrise
Night
Camera with No Aperture
P3, P4, X3 Mavic 24FPS
No ND Filter
Shutter Speed 1/1250th 1/500th-1/1000th 1/100th-1/1250th 1/50th
ISO 100 100 100 100-1600
With ND Filter
Shutter Speed 1/50th 1/50th 1/100th 1/100th-1/160
0th
ISO 100 100 100 100-1600
Camera with
Aperture P4P,
Inspire 24FPS
No ND Filter
Aperture F8-10 F8-10 F8-10 Low as Possible
Shutter Speed 1/1500th 1/500th-1/1000th 1/50th-1/1000th 1/50th
ISO 100 100 100 100-1600
With ND Filter
Aperture F5-10 F5-10 F5-10 Low as Possible
Shutter Speed 1/50th 1/50th 1/50th 1/50th
ISO (low as possible!) 100 100 100 100-1600
ND Strength ND 16 ND 8-16 ND 4-16 No ND
Polarizer Yes No Yes No
Note: If you want to take a long exposure photo, use an ND 16-64 in bright daylight.
-3- Ⓒ Drone Pro Academy
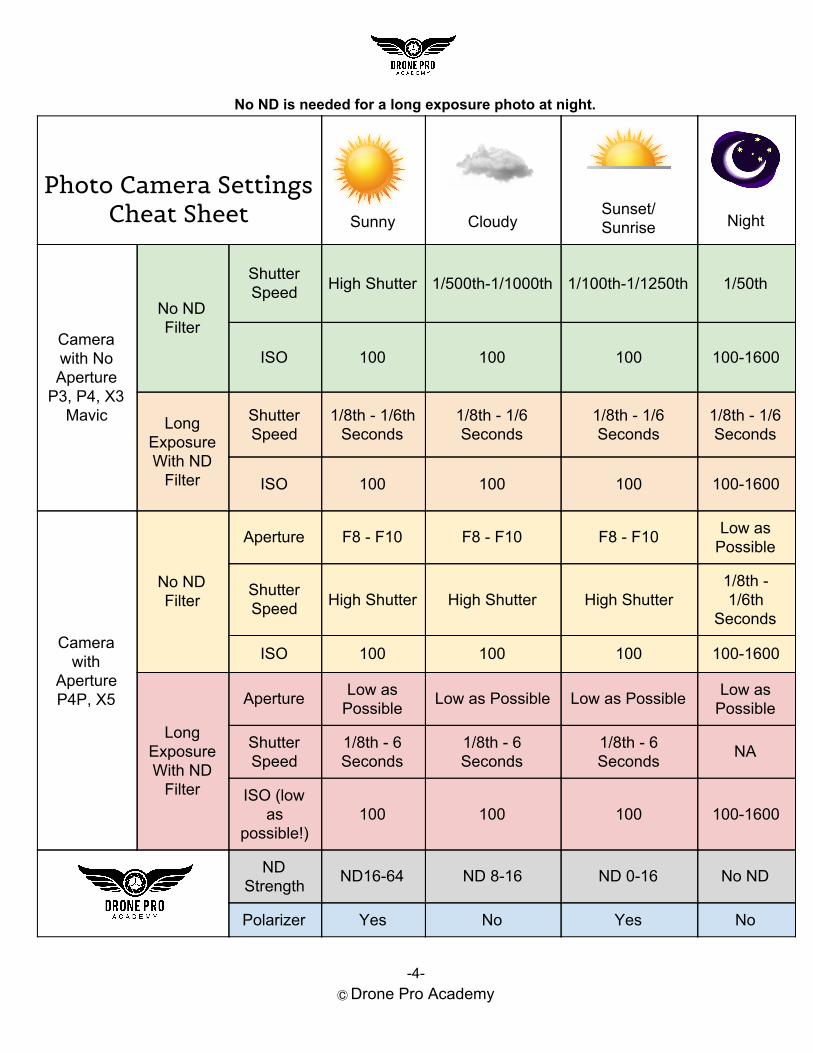
No ND is needed for a long exposure photo at night.
Photo Camera Settings
Cheat Sheet Sunny
Cloudy
Sunset/ Sunrise
Night
Camera with No Aperture
P3, P4, X3 Mavic
No ND Filter
Shutter Speed High Shutter 1/500th-1/1000th 1/100th-1/1250th 1/50th
ISO 100 100 100 100-1600
Long Exposure With ND
Filter
Shutter Speed
1/8th - 1/6th Seconds
1/8th - 1/6 Seconds
1/8th - 1/6 Seconds
1/8th - 1/6 Seconds
ISO 100 100 100 100-1600
Camera with
Aperture P4P, X5
No ND Filter
Aperture F8 - F10 F8 - F10 F8 - F10 Low as Possible
Shutter Speed High Shutter High Shutter High Shutter
1/8th - 1/6th
Seconds
ISO 100 100 100 100-1600
Long Exposure With ND
Filter
Aperture Low as Possible Low as Possible Low as Possible Low as
Possible
Shutter Speed
1/8th - 6 Seconds
1/8th - 6 Seconds
1/8th - 6 Seconds NA
ISO (low as
possible!) 100 100 100 100-1600
ND Strength ND16-64 ND 8-16 ND 0-16 No ND
Polarizer Yes No Yes No
-4- Ⓒ Drone Pro Academy
-5- Ⓒ Drone Pro Academy