Embed Size (px)
Citation preview

Camera Clinic
An informal presentation on how to do effective digital photography

Camera Clinic is sponsored by the Camera Culture group in the MIT Media Lab. The presentation began as a series of supplemental class sessions for MIT students enrolled in Ramesh Raskar’s fall 2010 class on Computational Camera and Photography (MAS 131/531).
The goal of the presentation is to provide students and other members of the MIT community with an opportunity to learn more about basic digital camera operation, exposure control, effective shooting techniques, and the esthetics of good photography.
I’d like to give a big Camera Clinic tip of the hat to Ramesh Raskar for inviting me to do the presentation, and I’d like to give extra special acknowledgement to Taya Leary for her eager help and enthusiasm in scheduling and promoting today’s session.
Randall Warniers [email protected]

Jacques-Henri Lartigue 1911
Anyone can make an excellent picture at any time.
A fundamental theorem of photography.

Carry your camera with you wherever you go. You never know who or what you are going to see.

The fun part—
Once you have a camera, memory cards, and computer, all digital photography is free!
You can shoot a thousand images as easily and cheaply as you shoot a dozen.
The only additional cost is hard drive storage on the computer, and that’s less than a dime a gigabyte these days.
So take lots of shots! !
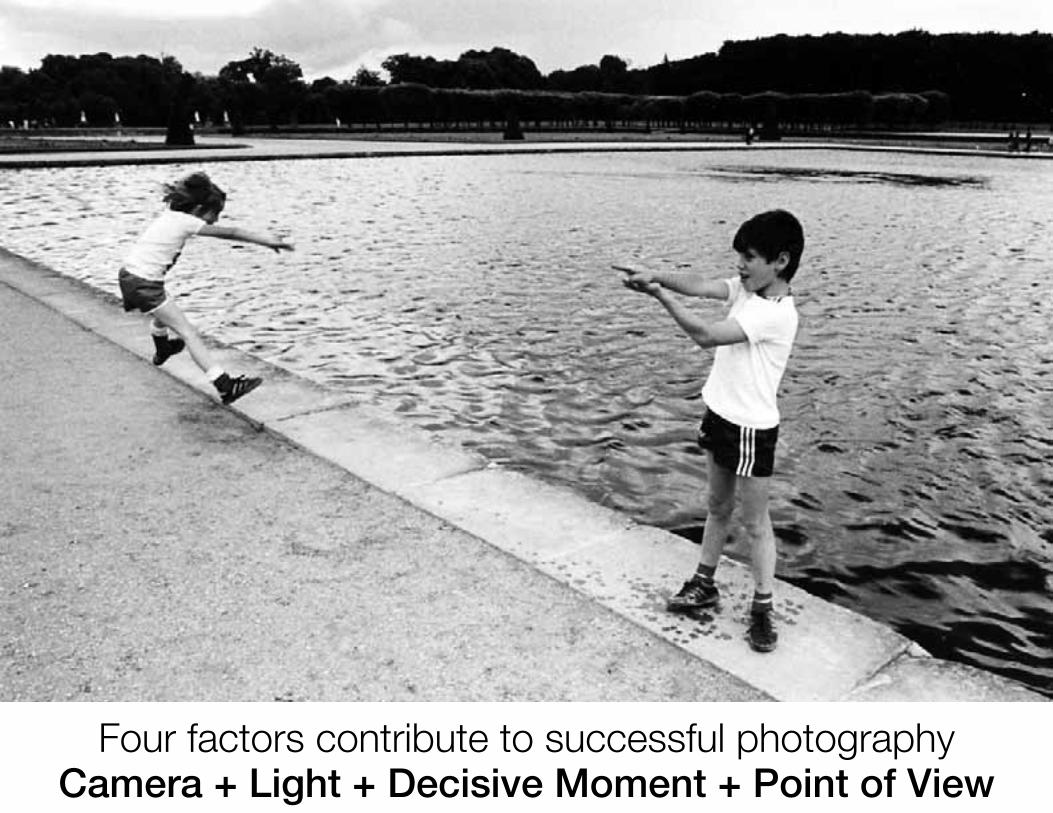
Four factors contribute to successful photographyCamera + Light + Decisive Moment + Point of View

These four factors lead to
The four fundamental rules of good photography
1. Know your equipment thoroughly
2. Notice the light
3. Be prepared to photograph quickly
4. Find a good place to stand
Whatever you do to enhance your skills in these four areas will improve your photographs.

The ideal goal
Your eye sees the visual opportunities.
Your camera and lens are aligned with your vision and your way of seeing.
Your method of working records what you see, quickly and easily.

Canon PowerShot S100 ($400)
Nikon CoolPix S8200 ($300)
Canon PowerShot G12 ($500)
Fuji X10 ($600)
Panasonic Lumix G2 ($800)
Sony NEX-7 ($1400) Canon EOS 1D X ($6800 body only)Nikon D7000 ($1200 body only)
Canon EOS Rebel T3i ($900) Nikon D4 ($6000 body only)
Choose a camera that fits what you want to do
Olympus PEN-EPL2 ($600)
compact point and shootinterchangeable-lens compactdigital single lens reflex (DSLR)

35 mm “full frame”36 x 24 mm
APS-H (Canon)28.7 x 19 mm
APS-C (Nikon)23.6 x 15.7 mm
APS-C (Canon)22.2 x 14.8 mm
CX (Nikon)13.2 x 8.8 mm
Four-Thirds System (Olympus)17.3 x 13 mm
1/1.7”7.6 x 5.7 mm
1/1.8”7.18 x 5.32 mm
1/2.5”5.76 x 4.29 mm
Top-of-the-line digital SLR cameras have a “full-frame” digital sensor, equal in size and shape to a 35-mm film frame. Less expensive mid-range digital SLR cameras have a 60–80% smaller APS-size sensor. Interchangeable lens compact cameras have APS, Micro 4/3, and CX-size sensors. Compact point-and-shoot cameras have very small sensors. In general, bigger sensors produce better image quality.
The digital sensor

Canon 7D APS-C CMOS sensor
18 MP55 mm lens
Canon EOS 1Ds Mark III full-frame CMOS sensor21 MP85 mm lens
Bigger digital sensors produce better image quality
Canon 7D digital SLR at $1500 has acceptable but disappointing quality. Top-of-the-line Canon EOS 1Ds digital SLR at $6500 is superb!

1
Thank you for your purchase of a Nikon D200 single-lens refl ex (SLR) digital camera with interchangeable lenses. This manual has been written to help you enjoy taking pictures with your Nikon digital camera. Read this manual thoroughly before use, and keep it handy when using the product. The documentation for this product also includes the manuals listed below. Please be sure to read all instructions thoroughly to get the most from the cam era.• Quick Start Guide: The Quick Start Guide takes you through the process of un-
packing and set ting up your Nikon digital camera, taking your fi rst photographs, and trans fer ring them to your computer.
• Software manual (on CD): The software manual contains information on using the software provided with your camera. For information on view ing the soft-ware manual, see the Quick Start Guide.
To make it easier to fi nd the information you need, the following sym bols and con ven tions are used:
This icon indicates that more infor-mation is available elsewhere in this manual or in the Quick Start Guide.
This icon marks notes, information that should be read before using the cam-era.
This icon marks tips, additional infor-mation that may be helpful when us-ing the camera.
This icon marks cautions, information that should be read before use to pre-vent damage to the camera.
This icon marks settings that can be fi ne-tuned from the Custom Set tings menu.
This icon marks settings that can be ad-justed using camera menus.
An AF-S DX 18–70 mm f/3.5–4.5G ED lens is used in this manual for illustrative purposes. The parts of the lens are shown below.
Lens
Zoom ring Mounting index: 8
Focus ring: 60 A-M mode switch: 60
Intro
du
ction
CPU contacts: 176Focal length scale
Introduction
Rule 1: Know Your Equipment Thoroughly
2
Intro
du
ction
—G
etting
to K
now
the C
amera
Take a few moments to familiarize yourself with camera controls and displays. You may fi nd it helpful to bookmark this section and refer to it as you read through the rest of the manual.
Camera Body
Accessory shoe: 180
Getting to Know the Camera
(fl ash sync mode)button: 78[ Flash compensa-tion: 80]
Lens release button: 8
Focus-mode selector: 19, 51
Built-in fl ash: 76
Connector cover: 106
Video connector: 106
DC-IN connector for optional EH-6 AC adapter: 181
USB connector: 108, 111
Eyelet for camera strap: 9
Flash sync terminal: 180
Flash pop-up button: 78
10-pin remoteterminal: 182
3
Intro
du
ction
—G
etting
to K
now
the C
amera
AF-assist illuminator: 58[Self-timer lamp: 83]
[Red-eye reduction lamp: 77]
Sub-command dial: 170
Eyelet for camera strap: 9
Depth-of-fi eld preview button: 62
FUNC. button: 170
Battery-chamber cover: 11
Battery-chamber cover latch: 11 Tripod socket
Mode dial lock release: 26
QUAL (image quality/size) button: 29, 32
[ ● (reset) button: 97]
WB (white balance) button: 35–44
ISO (ISO sensitivity) button: 33Mode dial: 26
Power switch: 17[Illuminator switch: 5]
(exposurecompensation)button: 72[ ● (reset)button: 97]
Control panel: 5
(focal plane mark): 60
(exposure mode) button: 62
[ (format) button: 14]
Shutter-release button: 20
4
Intro
du
ction
—G
etting
to K
now
the C
amera
The multi selector is used for menu navigation and to control the display of photo in-formation during playback.
Camera Body (continued)
(playback) button: 22, 98
(menu)button: 24
(thumbnail) button: 102
(protect ) button: 104
[ ? (help) button: 24]
(enter) button: 24[ (playback zoom)
button: 103]
(delete) button: 22, 105[ (format) button: 14]
Monitor: 9, 116, 184
Viewfi nder eyepiece cup
Viewfi nder eyepiece: 83, 90, 181
View more photo infoMove cursor down
View previous photoReturn to previous menu
Cancel
Playback ( 98)Menu navigation ( 24)
View next photoDisplay sub-menu
Make selection
View more photo infoMove cursor up
Multi selector
(AE / AF lock) button: 56, 70
Main command dial: 170
AF-area mode selector: 54
Focus selector lock: 53
Diopter adjustment control: 16, 181
(AF-ON)button: 52
Memory card slot cover: 14
Card slot cover latch: 14
Memory card access lamp:
14
(bracketing) button: 43, 73
Change number ofimages displayed
Make selection
Metering selector: 61
1
Thank you for your purchase of a Nikon D200 single-lens refl ex (SLR) digital camera with interchangeable lenses. This manual has been written to help you enjoy taking pictures with your Nikon digital camera. Read this manual thoroughly before use, and keep it handy when using the product. The documentation for this product also includes the manuals listed below. Please be sure to read all instructions thoroughly to get the most from the cam era.• Quick Start Guide: The Quick Start Guide takes you through the process of un-
packing and set ting up your Nikon digital camera, taking your fi rst photographs, and trans fer ring them to your computer.
• Software manual (on CD): The software manual contains information on using the software provided with your camera. For information on view ing the soft-ware manual, see the Quick Start Guide.
To make it easier to fi nd the information you need, the following sym bols and con ven tions are used:
This icon indicates that more infor-mation is available elsewhere in this manual or in the Quick Start Guide.
This icon marks notes, information that should be read before using the cam-era.
This icon marks tips, additional infor-mation that may be helpful when us-ing the camera.
This icon marks cautions, information that should be read before use to pre-vent damage to the camera.
This icon marks settings that can be fi ne-tuned from the Custom Set tings menu.
This icon marks settings that can be ad-justed using camera menus.
An AF-S DX 18–70 mm f/3.5–4.5G ED lens is used in this manual for illustrative purposes. The parts of the lens are shown below.
Lens
Zoom ring Mounting index: 8
Focus ring: 60 A-M mode switch: 60
Intro
du
ction
CPU contacts: 176Focal length scale
Introduction

Two ways to learn how to use your camera
Step 1. Find your camera user manual.Step 2. Read it from cover to cover.
OR
Step 1. Use the review of your camera on the website www.dpreview.com as your instruction manual.Step 2. Download a pdf of your camera user manual for reference.Step 3. Ask for help when you are confused.

Structure and resolution of the digital image2560 pixels wide
1920 pixels tall
366 pixels per inch (ppi) at 7 × 5.25 inches
The resolution of an image can be expressed in three different ways: (1) the total number of pixels in the image, expressed in megapixels; (2) the number of pixels in the horizontal and vertical dimensions; and (3) the physical dimensions of the image along with the number of pixels per inch (ppi).
Each square pixel has a specific color value defined by the color space of the image (usually RGB), the bit depth of the pixel, and the component values of the color channels.
4.9 megapixels(i.e., 4,915,200 pixels)
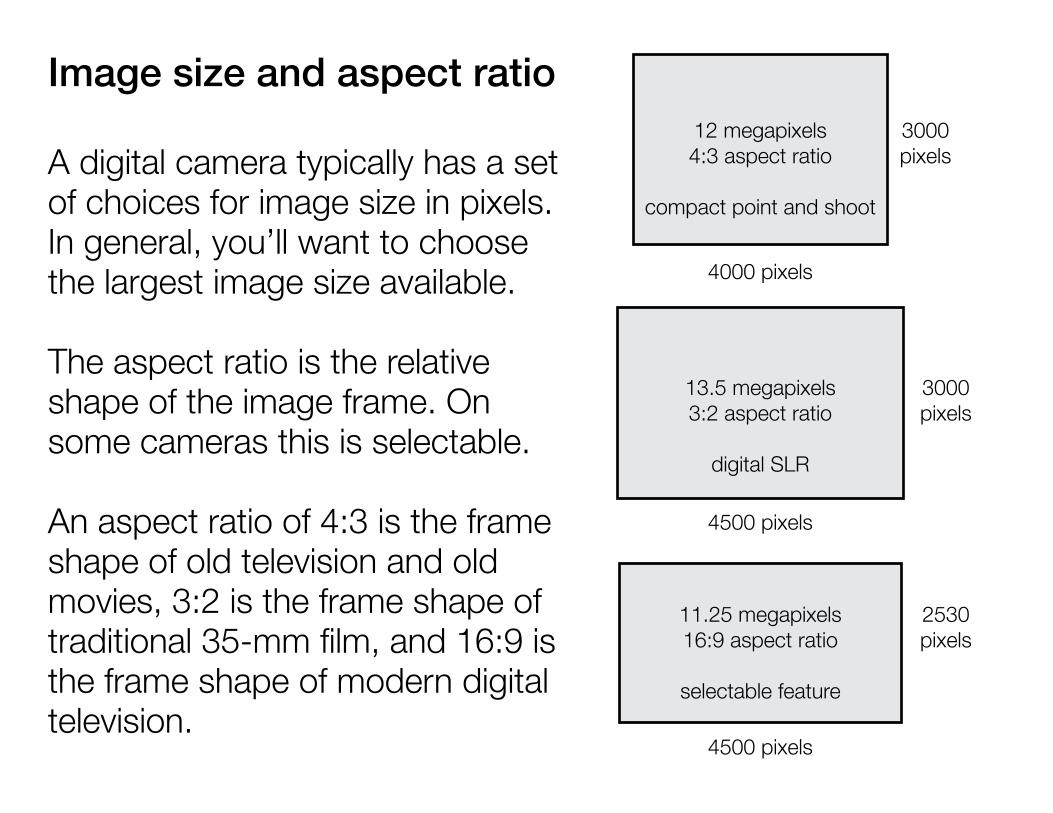
Image size and aspect ratio
A digital camera typically has a set of choices for image size in pixels. In general, you’ll want to choose the largest image size available.
The aspect ratio is the relative shape of the image frame. On some cameras this is selectable.
An aspect ratio of 4:3 is the frame shape of old television and old movies, 3:2 is the frame shape of traditional 35-mm film, and 16:9 is the frame shape of modern digital television.
3000 pixels
4000 pixels
3000 pixels
4500 pixels
2530 pixels
4500 pixels
12 megapixels4:3 aspect ratio
compact point and shoot
13.5 megapixels3:2 aspect ratio
digital SLR
11.25 megapixels16:9 aspect ratio
selectable feature

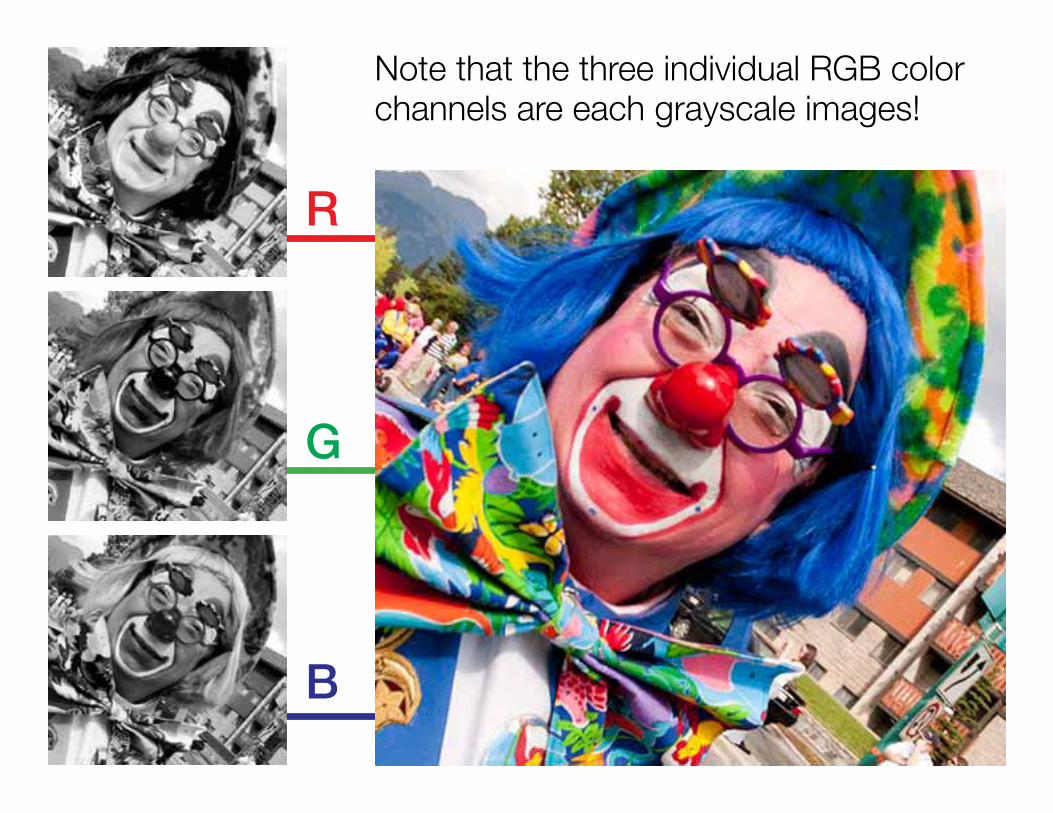
Where does color come from?
A digital sensor is a rectangular grid of sensor sites that record light intensities. On this grid of sensor sites is a Bayer pattern of red, green, and blue filters. Each sensor site records the light intensity in its given red, green, or blue portion of the visible spectrum.
The filtered intensity values are then processed into red, green, and blue primary images, or channels, which define the final RGB image.
Light
FilterSensor
Pattern
Bayer filters
Sensor sites
R
G
B
Note that the three individual RGB color channels are each grayscale images!

What is the ISO value?The ISO value, or exposure index, represents the quantity of light that is needed to expose an image properly. This value ranges from 100 to 3200 on most digital cameras. The ISO setting in digital photography is identical to the familiar ISO exposure index (or speed) of film. Lower ISO values require more light for a proper exposure, while higher ISO values require less light. Unfortunately, high ISO values often result in excessive digital noise, so use high ISO settings sparingly.
How does this quantity of light change as the ISO value changes? As the ISO value doubles, the amount of light needed to expose an image is reduced by half. The red bars below represent the quantity of light needed at each ISO setting.
10020040080016003200640012,80025,600
The ISO value is not an arbitrary number. It is determined by the f16 rule. To obtain a proper exposure in sunny daylight conditions, use a lens aperture setting of f16 and a camera shutter speed of 1/ISO.

What does digital noise look like?
ISO 100—minimal digital noise ISO 1600—excessive digital noise
Digital noise is the price photographers pay for using a high ISO setting to make a picture. It looks like visual algae, producing splotches of red, green, or blue in an image. This noise occurs most noticably in shadow areas of a scene, and is most unappealing in skin tones. Every camera handles digital noise differently, so test the ISO settings on your camera to see where high ISO values become unacceptable.

A noisy image may be acceptable for certain low-resolution uses, such as online, but it is unacceptable when you are looking for good image quality and fine detail.

White BalanceLight has an overall color temperature, which depends on the source of the light and the lighting conditions. In any shooting situation you must choose a white balance setting that most closely matches the specific light illumination you are in.
Typical white balance choices are daylight, fluorescent, tungsten, incandescent, cloudy, shade, and flash. Digital cameras also have a setting for auto white balance, which lets the camera choose the approximate color temperature for you. In most cases, auto white balance is an effective choice, and your color photographs will look natural in nearly all lighting conditions.
You also have options to correct color temperature after the image is made. If you end up with an unwanted color cast, you can remove it in Photoshop (or other image editing applications), or you can shoot pictures in RAW format, which allows you to set the white balance after the picture has been taken.

Shade Tungsten
Fluorescent Daylight
Tungsten white balance in daylight produces an excessively blue image
Shade white balance in daylight produces an excessively warm image with too much red.
Fluorescent white balance in daylight produces an excessively blue-green image.
Daylight white balance in daylight produces a natural color rendering in this image.

Choices of JPEG compression on your camera
JPEG compression shrinks the storage size of image files, and allows more images to be written on a memory card. Cameras typically have two to four choices for JPEG compression.
Nikon cameras have three compression settings: Fine, Normal, and Basic. This table shows the size differences among these JPEG settings for a camera with 10.8 megapixel images.
Ratio File Size Images (1 GB)Uncompressed 1:1 32 MB ~31RAW 1:2 16 MB ~62JPEG Fine 1:4 8 MB ~125JPEG Normal 1:8 4 MB ~250JPEG Basic 1:16 2 MB ~500
Important! Compression changes only file size, not pixel count.

Image compression is not a free lunch
A modest amount of JPEG compression reduces image file size while maintaining acceptable image quality. This is good! Too much JPEG compression, however, particularly in an image editing application, can produce unacceptable image compression artifacts. In general, excessive JPEG compression —anything greater than about 1:30—should be avoided.
1:60 1:30 1:2

The RAW format is a powerful option for precision photography, but you have to know what you are doing.
A RAW file contains unprocessed image data direct from the camera sensor. The file is processed, or “developed,” on the computer rather than in the camera.
Good. RAW files give you greater control over the parameters of image development, primarily white balance and exposure, which leads to higher quality photographs.
Not so good. RAW files are much larger than JPEGs, and each image requires detailed and time-consuming attention in RAW processing software such as Adobe Camera Raw, Adobe Lightroom, or Apple Aperture.

Three important details for camera operation
Use recommended memory cards. Your camera manufacturer will recommend specific memory cards with certain capacities and write speeds for your camera. Follow these recommendations! Your camera manufacturer may not honor the camera warranty if you have camera problems while using a non-recommended memory card. In addition, if your camera has a movie mode, the memory card needs to have a specific Speed Rating (usually 6 or 10) to record video accurately.
Turn off digital zoom. Your camera may have a digital zoom option in addition to the optical zoom of the lens. Find the menu setting for digital zoom and turn it off! It’s not a true zoom at all, but a form of in-camera image cropping that attempts to simulate a longer telephoto setting. The picture quality is almost always compromised.
Auto sharpening and noise reduction. Image sharpening and noise reduction are best done on the computer, rather than in the camera. Set your camera settings for these two features to OFF or LOW.
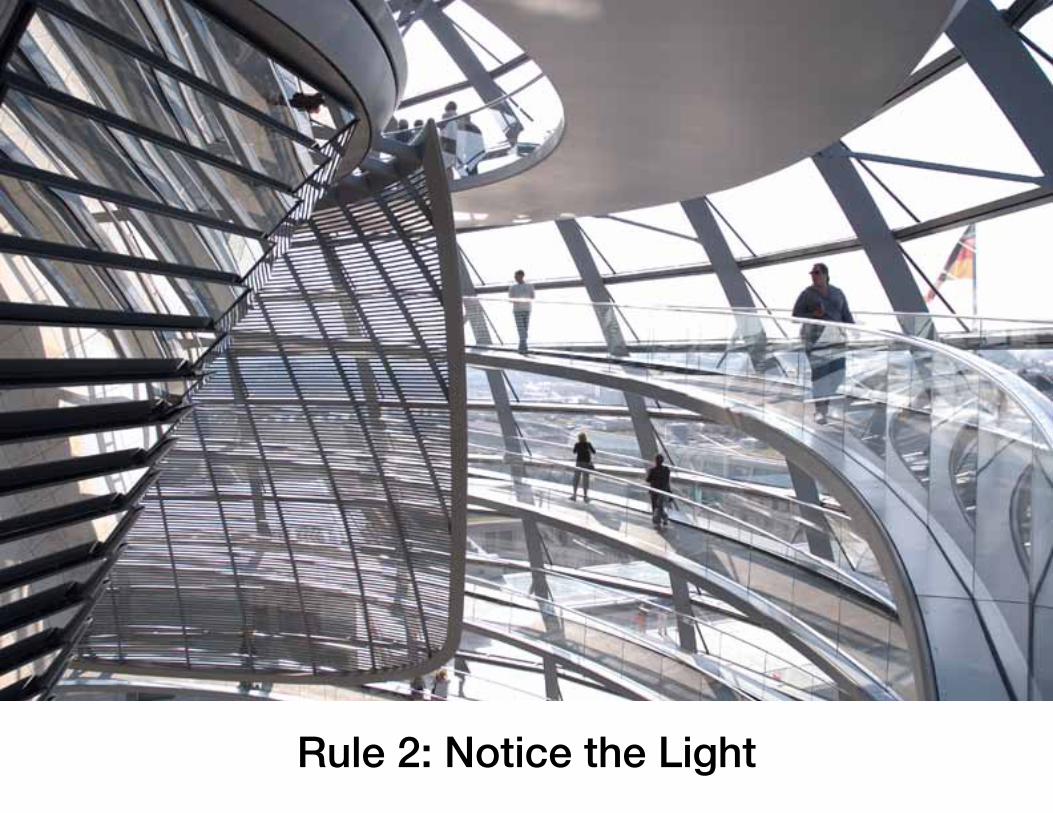
Rule 2: Notice the Light

Treat light as an ally. Let the light “draw” the picture for you. When the light is beautiful, your picture will be beautiful as well.

Natural light in the early morning and in the late afternoon, when the sun is low in the sky, is best for people photography.
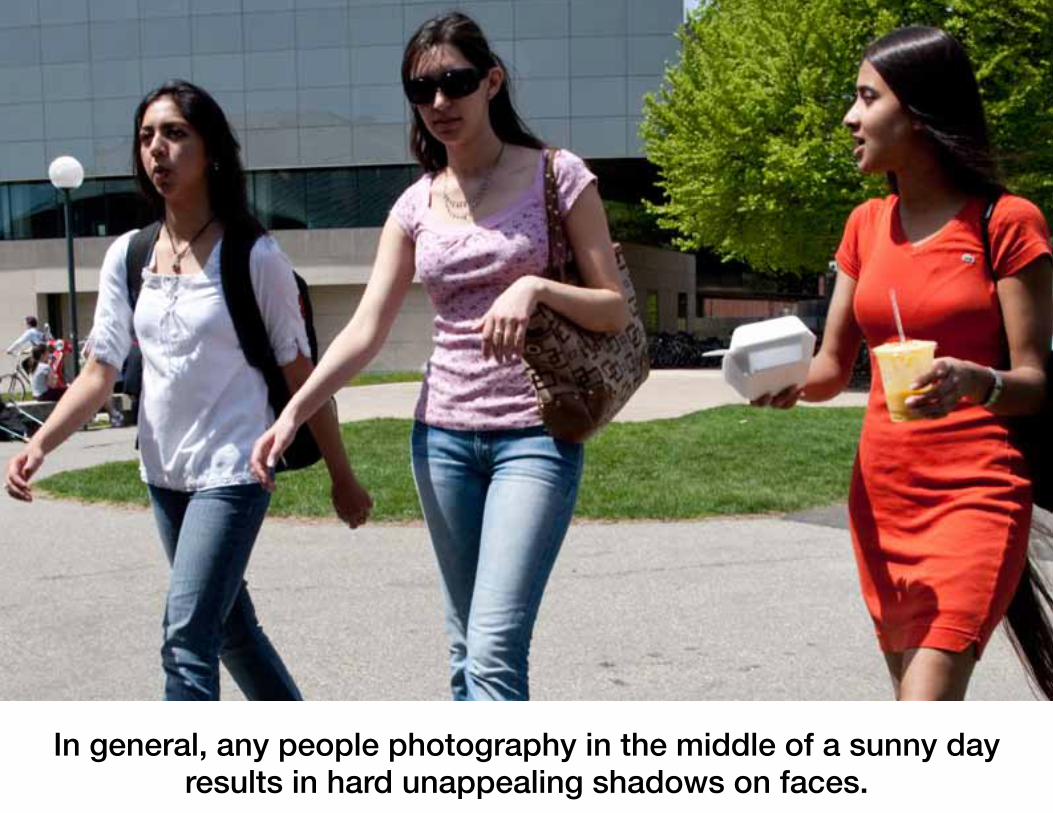
In general, any people photography in the middle of a sunny day results in hard unappealing shadows on faces.

A bright sunny day may not be best for people photography, but it’s great for photographing architecture!

Light comes from many sources and many directions, including reflections.

Soft hazy light, when the sun is slightly obscured by clouds, is the best light for people photography.

Large windows with indirect daylight illumination is ideal for photographing people indoors.

Measuring the light

The human eye sees more dynamic range than the camera sensor can accurately record.

The limited dynamic range of a digital sensor cannot capture bright highlight details and dim shadow details at the same time.
A scene can have a dynamic range of up to 10 stops, while a camera has a dynamic range of 5 to 6 stops.

A qualitative description of dynamic range
a high-contrast scene in nature
the human eye
film
digital sensor
monitor
paper
highlightsshadows

The goal of good exposure is to capture as much of the highlight detail and shadow detail as possible, and render it in an image.
highlights
shadows
midtones

Fundamentals of Exposure
Understanding exposure is an important component of effective photography. Every effort you make to learn exposure techniques will result in better photographs in a larger variety of shooting situations.
For any image, your exposure is the combination of camera shutter speed and lens aperture setting. This allows a specific quantity of light to enter the camera. If this quantity of light is measured accurately, your image will be well exposed. If not, your image will be underexposed (not enough light) or overexposed (too much light).
Shutter speeds typically range from as fast as 1/8000th of a second to as slow as thirty seconds or longer, depending on the camera. Lens aperture settings are more restricted.
A suitable choice of ISO value, an accurate camera meter measurement of the light, and an appropriate selection of shutter speed and lens aperture, all contribute to a well-exposed photograph.
+

Metering optionsThere are three traditional methods that a camera might use to measure the amount of light in a scene: spot metering, center-weighted averaging, and matrix metering (or evaluative metering).
In general, matrix metering is the best choice for most lighting situations.
spot
center weighted
matrix, evaluative, or multisegment

Incident light versus reflected light
A hand-held light meter measures incident light, which is the light illuminating or “falling on” a scene. This measurement isn’t affected by the tonal values of clothing or other objects in the scene.
A built-in camera meter measures reflected light, which is the light that “bounces off” the surfaces in a scene. This measurement is strongly affected by the tonal values of objects in the scene.
For example, a bride’s white dress reflects much more light than a groom’s dark tuxedo. As a result, a camera meter measures the reflected light differently for the bride than for the groom, even though the incident light is the same for both.

The camera meter sees a scene as a midtone gray
By design, a camera meter measures the light intensities in a scene and determines an exposure value that is interpreted as a midtone gray. This often leads to undesired underexposure or overexposure.
When the scene is black…
When the scene is white…
When the scene is gray…
…the camera meter seesaverage midtone gray.
Result: underexposure
…the camera meter seesaverage midtone gray.
Result: good exposure
…the camera meter seesaverage midtone gray.
Result: overexposure

Metering and exposure work together hand in handThe camera metering system determines the quantity of light entering the camera in a given scene.
Then …
The camera electronics (or the photographer) determines the proper exposure setting (the best combination of lens aperture and camera shutter speed) to record that scene accurately on the imaging sensor.
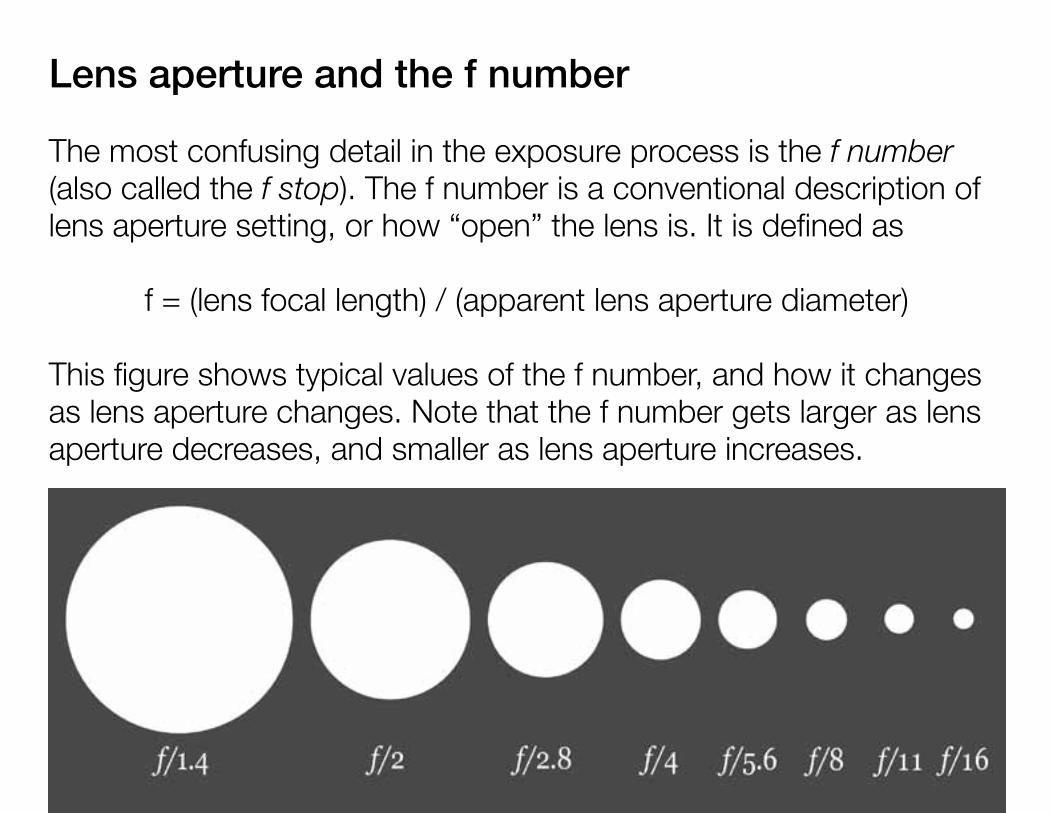
Lens aperture and the f number
The most confusing detail in the exposure process is the f number (also called the f stop). The f number is a conventional description of lens aperture setting, or how “open” the lens is. It is defined as
f = (lens focal length) / (apparent lens aperture diameter)
This figure shows typical values of the f number, and how it changes as lens aperture changes. Note that the f number gets larger as lens aperture decreases, and smaller as lens aperture increases.
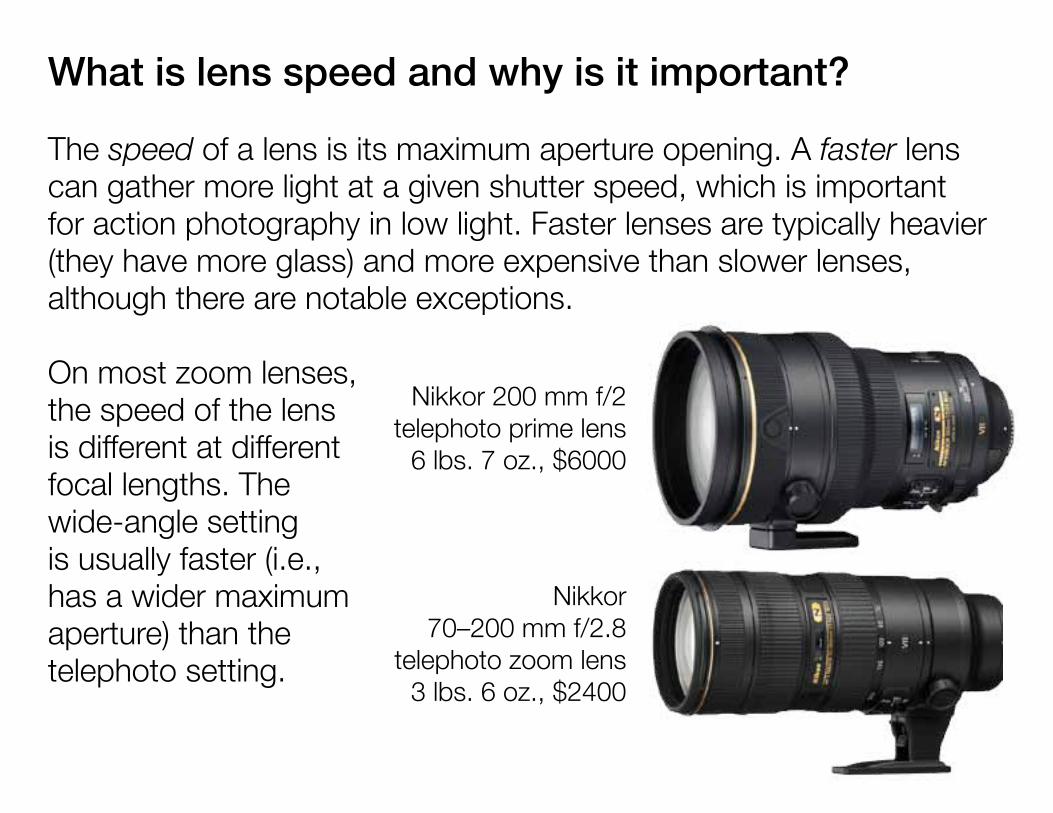
What is lens speed and why is it important?
The speed of a lens is its maximum aperture opening. A faster lens can gather more light at a given shutter speed, which is important for action photography in low light. Faster lenses are typically heavier (they have more glass) and more expensive than slower lenses, although there are notable exceptions.
On most zoom lenses, the speed of the lens is different at different focal lengths. The wide-angle setting is usually faster (i.e., has a wider maximum aperture) than the telephoto setting.
Nikkor 200 mm f/2 telephoto prime lens
6 lbs. 7 oz., $6000
Nikkor 70–200 mm f/2.8
telephoto zoom lens3 lbs. 6 oz., $2400

Vibration reduction (VR) or image stabilization (IS) is a powerful new feature found on many new cameras and lenses. It is implemented either in the lens (e.g., Canon and Nikon) or in the camera body.
The top image is an enlarged portion of a telephoto image taken at a slow shutter speed with vibration reduction off.
The bottom image was taken with vibration reduction on. The difference in image clarity and detail is substantial.
VR off
VR on

Exposure modes in the cameraProper exposure of an image is a combination of lens aperture and shutter speed such that the amount of light in the scene (measured by the camera meter) is accurately recorded on the imaging sensor. A digital camera has some or all of the following exposure modes.
Auto the camera makes all the decisions for you.
Scene modes predefined auto modes for specific situations, such as sunsets, action, fireworks, flowers, pets, portraits, mountains, and so on.
Program the camera chooses aperture and shutter speed.Shutter Priority* you choose the shutter, camera chooses aperture.Aperture Priority* you choose the aperture, camera chooses shutter.Manual you choose both aperture and shutter speed.*On Nikon cameras. On different cameras these PSAM exposure modes can have different names. For example, on Canon cameras, Shutter Priority is called Time Value (TV) and Aperture Priority is called Aperture Value (AV).

HOORAY FOR
AUTOSometimes you don’t want to pay attention to exposure.
In Auto mode the camera does all the exposure work for you!

THE DREADED MANUAL
MODE
Don’t worry, it won’t hurt you.

In manual mode you control your exposure settings.
This is called “getting in touch with your inner Ansel Adams.”

What is the correct exposure in manual mode?
Your camera doesn’t determine exposure for you in manual mode, so how do you know what the correct exposure should be?
The answer is in your viewfinder display, which indicates exposure information as well as many of your current camera settings.
This example from a Nikon D40 shows the general idea. The lighted indicators called “Electronic Analog Exposure Display” tell you whether you are underexposed or overexposed. Adjust the current aperture and shutter speed settings until the lighted indicators “zero out” at the centerline.

The power of the histogram
An important indicator of exposure is the histogram, which shows in a general way the distribution of tonal values in an image.
good exposure
overexposure
underexposure

The law of reciprocity
You aren’t locked into using one shutter speed and one f stop for your exposure. Once you determine a good exposure setting, the law of reciprocity allows you to choose other combinations of shutter speed and aperture to get the same total exposure.
Here’s an example: f2.8 1/2000 f4 1/1000 f5.6 1/500 f8 1/250 f11 1/125 f16 1/60 f22 1/30
Each of these exposure pairs allows the same amount of light to enter the camera. Depending on the shooting situation, certain exposure pairs will be better than others.

Five examples of reciprocal exposures.The quantity of light that enters the camera is identical in each of these exposures. Note how the depth of field shrinks as the f number gets smaller (i.e., the aperture increases in size).
1/30 at f22 1/60 at f16
1/125 at f11 1/250 at f8
1/500 at f5.6

How the ISO value affects exposure
The ISO value you choose on your camera affects the exposure settings in a specific way. For a given shooting situation, as ISO doubles, you need one stop less light to make a good exposure. Here’s an example for a low-light shooting situation.
ISO aperture shutter ISO aperture shutter 100 f4 1/30 100 f4 1/30 200 f4 1/60 200 f5.6 1/30 400 f4 1/125 400 f8 1/30 800 f4 1/250 800 f11 1/30 1600 f4 1/500 1600 f16 1/30 3200 f4 1/1000 3200 f22 1/30 6400 f4 1/2000 6400 f32 1/30
As you change ISO, you can change either aperture or shutter speed proportionately, depending on which setting is most important in the shooting situation.
OR

Question: Why should I learn all this stuff about f stops and manual exposure mode if the camera will do all the exposure work for me?
Answer: The camera meter can be fooled by certain lighting conditions. You should know what exposure choices to make in these conditions. The most difficult conditions for a camera meter to measure are night scenes, backlit scenes, snow scenes, and sunsets.

Bright lights at night always fool a camera meter. For excellent night photography, stabilize your camera (a tripod is best) and make a set of bracketed exposures.
Exposure problem 1

A bright background causes the dimly lit foreground to be underexposed, as shown in the upper image.
By recognizing the exposure problem caused by bright lighting in the background, you can measure only the interior light (for example, with your spot meter) or use manual exposure mode to set a proper exposure, as shown in the lower image.
The underexposed upper image can be tonally adjusted in Photoshop, and somewhat recovered as a photograph, but the result will have excessive digital noise. Getting a correct exposure at the moment of image capture is always best!
Exposure problem 2

White snow is recorded by the camera meter as a midtone gray value. As a result, a beautiful winter scene looks dull and gray. This is not a camera malfunction. Evaluating the light as midtone gray value is exactly how the camera meter is designed to read light.
The underexposed image on the left can be corrected in Photoshop, but the results are not always satisfactory. A better way to expose this scene is to add two stops of light in manual exposure mode, or use exposure compensation and add two stops of light to the camera meter reading, to get the properly exposed image on the right.
Exposure problem 3

Sunsets are challenging to photograph. If you include the setting sun in the frame, the picture will come out underexposed. It’s best to measure the light with the sun OUT of the picture, lock the exposure, and then reframe the shot to include the sun.
Exposure problem 4

Three important exposure features on your camera
Exposure compensation. You can bias all camera exposures by a fixed f stop value, typically ranging from –3 to +3 stops. This can be an effective solution for good exposure in difficult lighting conditions. For most shooting situations this value should be set to zero.
Exposure lock and focus lock. You can lock a camera exposure and focus distance for a specific exposure situation or for a desired focus distance. This feature is especially effective for sunset scenes or strong backlighting.
Exposure bracketing. You can take a series of precisely varied exposure settings to get a good exposure in difficult lighting conditions such as night photography. Some cameras have auto exposure bracketing as a feature, which automates the process. If you have such a feature, be sure to turn it off when you are done using it. You don’t want your camera to automatically bracket your exposures in regular shooting situations.

Example of exposure compensation. Strong backlighting in a scene, when measured by the camera meter, results in a heavily underexposed image. By adding exposure compensation, one stop at a time, you can bias the camera meter for the extreme lighting conditions. The plus direction adds light to a scene; the minus direction removes light. Don’t forget to reset exposure compensation to 0 when you are finished shooting in these conditions!
0 +1 +2
+3 +4 +5

Create an HDR image from separate exposures
A common method for creating a high dynamic range (HDR) image is to capture a set of bracketed exposures and merge the images in HDR software such as Merge to HDR Pro in Photoshop.
+3 +2 +1
0 –1 –2

The merged HDR image created from six separate exposures.

Some current work in HDR tries for an intense surrealistic look.
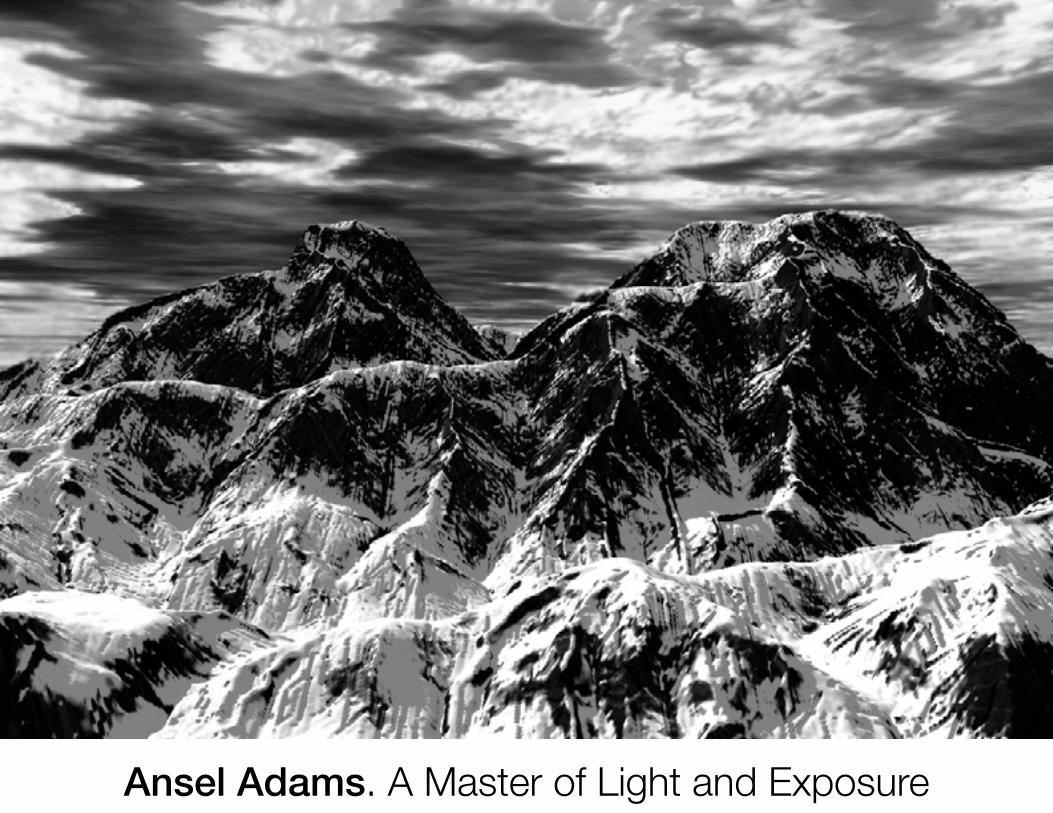
Ansel Adams. A Master of Light and Exposure

Ansel Adams developed the Zone System, which allowed him to carefully control film exposure, negative development, and image printing in order to clearly render the full spectrum of image details—from highlights to shadows—in the final print.

Perfection!

Rule 3: Be Prepared to Photograph Quickly

Anticipate an opportunity, like a baseball player anticipates a pitch.

Have your camera in your hand and ready to use. Great photo opportunities can be literally a second away.

Unposed and natural is always better than posed and forced.
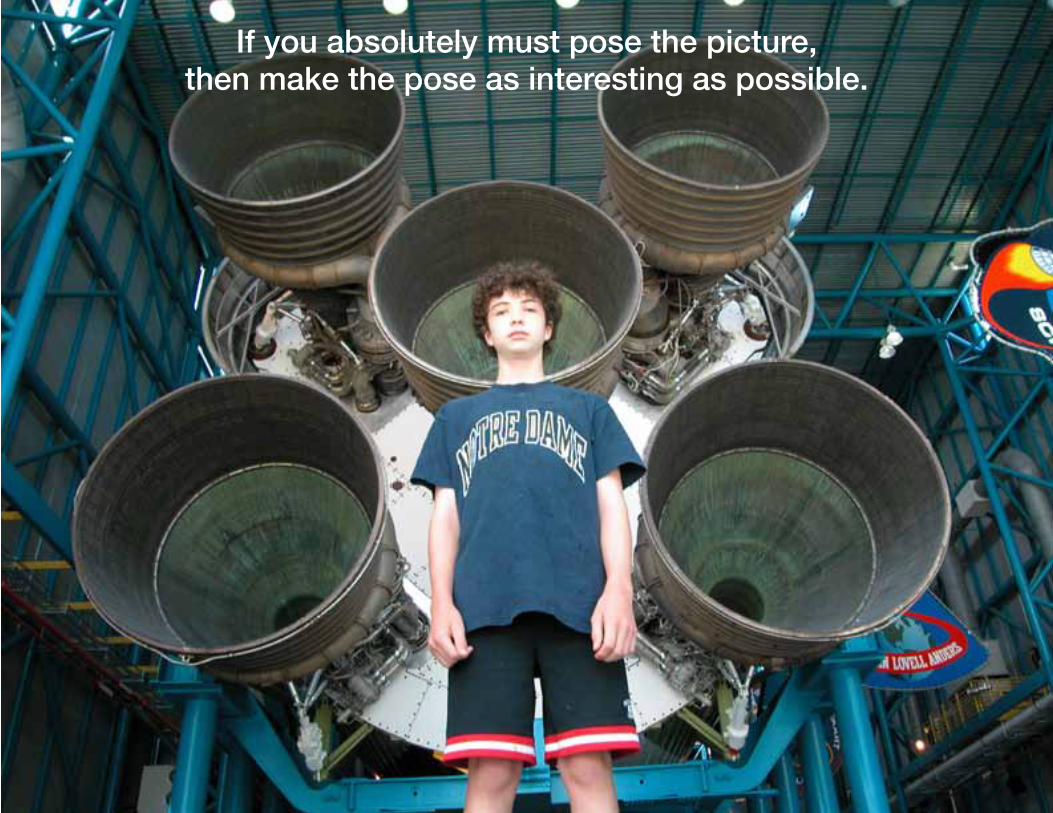
If you absolutely must pose the picture, then make the pose as interesting as possible.

Let the light and your intuition guide you. Your spontaneous instincts are often better than carefully considered judgments.

Helen Levitt. A Master of Photographing Quickly


Rule 4: Find a Good Place to Stand

A camera sees differently from you and me
A camera is inclusive. It sees everything in front of the lens and records all detail in its line of sight. It sees objectively.
Our eyes and brains are exclusive. We pay attention to important details in a scene and ignore the rest. We see subjectively.
This difference in how a camera sees a scene and how we see a scene can cause compositional surprises in a picture.
Train yourself to see a scene the way a camera sees.

Image composition and lens perspective
The perspective of the lens is determined by the focal length.
Each focal length has a grammar, or inherent meaning. Wide angle is cool and ironic, normal is most like human vision, and telephoto is intimate and revealing.
wide angle (21–35mm)
normal (45–55mm) telephoto (85–300mm)

Depth of field
When a lens focuses at a specific distance, there is a region in front of that distance and behind that distance that is acceptably in focus. That region of acceptable focus is called the depth of field.
large depth of field
shallow depth of field

How a lens creates depth of field
Depth of field is an optical property of lenses, as shown in these images prepared by Fredo Durand of CSAIL.
The amount of depth of field in a picture is determined by (1) the lens aperture, (2) the lens focal length, and (3) the focus distance.
1. Lens aperture and depth of field
3. Focus distance and depth of field2. Lens focal length and depth of field

What is wrong with this picture? (Answer: practically everything.)

Some traditional rules of composition
1. A photograph should have a strong center of interest.2. Keep compositions simple; avoid busy backgrounds.3. Place a subject slightly off-center rather than in the middle.4. Don’t place the horizon line in the middle of a picture.5. Leading lines should lead the eye into the frame.6. Include an interesting object in the foreground of a scene.7. Frame a subject by zooming in or moving closer.8. Look for interesting angles.9. Look for reflections. 10. Silhouettes.11. Symmetry.12. Light. etc., etc., etc.

Traditional rules are fine for static scenes, when you have the time to “compose” how the scene looks in your viewfinder.

Most photographic opportunities are dynamic. How do you “compose” a picture when the scene is changing rapidly?

Get close to the action! Give yourself complete permission to go where you want to go and do the pictures you want to do.

Find a revealing perspective.

Try different points of view and take plenty of pictures.

Good composition in photography is a direct result of good old-fashioned camera position at a decisive moment.

How do you find a decisive moment? Do what Henri Cartier-Bresson did—wander and observe!

Walk around and look for interesting people, places, things, and activities.

Pay attention to foreground subjects and background geometry. Put your camera in a position where they “fit” together.

… or strong graphic forms …Look for bold geometry …
… or lively street activity … … or strong color.
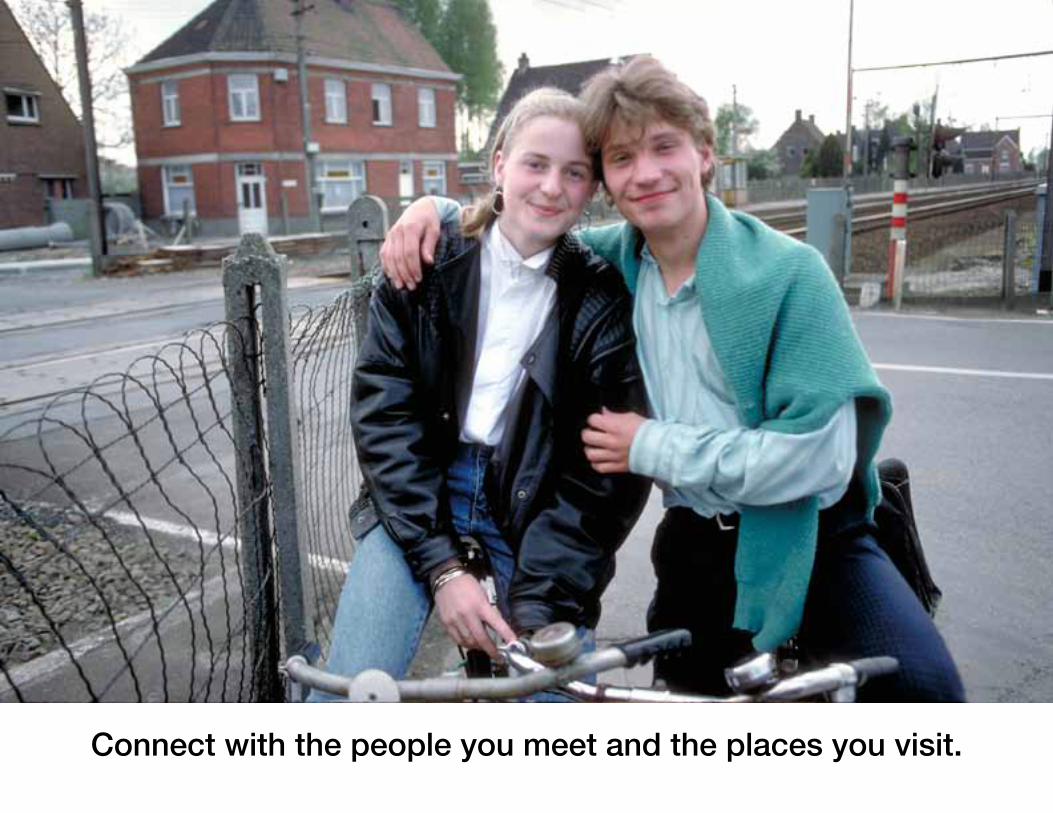
Connect with the people you meet and the places you visit.

Photograph children at their own level. This allows the camera to see the world from their perspective.

Don’t forget the quiet moments when nothing seems to happen.

Can you photograph with your camera at your hip? You can be less obtrusive and get a great point of view at the same time.

The key to shooting from the hip is to use a wide-angle lens and keep your camera level.

A lower point of view “looks up” at people and ennobles them. It also helps isolate people from busy backgrounds.

Photographs gain value over time, so don’t forget to record the small moments.

Henri Cartier-Bresson A Master of Camera Position and Image Composition


Henri Cartier-Bresson

Great photographic possibilities are everywhere around you. All you have to do is look!
![IAP antagonists sensitize murine osteosarcoma cells to ... · IAP activity within cells can be reduced by Smac/ Diablo, a natural IAP antagonist protein [14, 15]. A number of “IAP](https://img.pdfslide.us/doc/110x75/5c25d3f409d3f28d198c1460/iap-antagonists-sensitize-murine-osteosarcoma-cells-to-iap-activity-within.jpg)