Embed Size (px)
Citation preview
© Design and Specifications are subject to change without notice2011 All rights reserved.
FOOT-SPA
PLEASE SAVE THIS MANUALFOR FUTURE REFERENCE
OWNER MANUAL
Manufactured by Gulfstream Inc.For distribution by Yes Nails Productions Inc.
TM
® ®Cleanjet Gulfstream IncTM , Camellia , are trademarks of Gulfstream Inc.
Chair 9600
Chair 9700
Patent Pending
Patent #D610697, #D600950
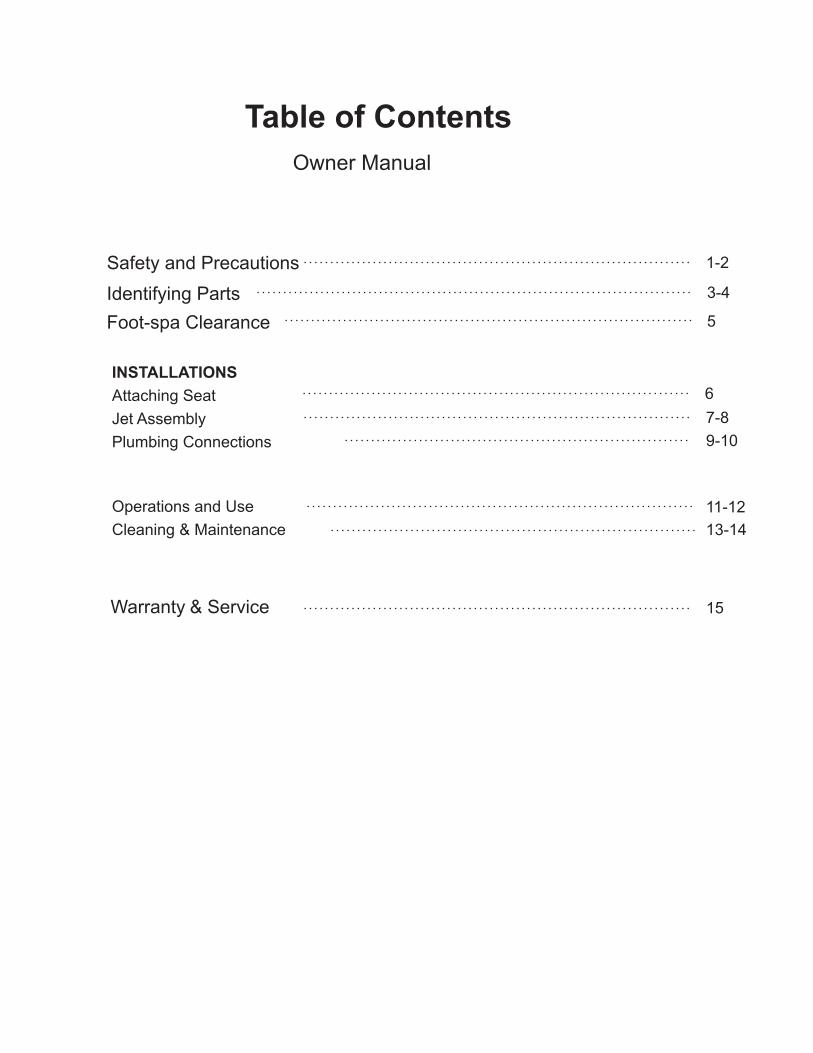
Table of Contents
Safety and Precautions
INSTALLATIONS
Attaching Seat
Jet Assembly
Plumbing Connections
1-2
Identifying Parts 3-4
7-8
9-10
Warranty & Service 15
6
Owner Manual
Operations and Use
Cleaning & Maintenance
11-12
13-14
Foot-spa Clearance 5
SAFETY & PRECAUTION
1
Thank you for purchasing the La spa from Gulfstream Plastics Ltd. Please read instructions before installing the spa. Carefully follow the instructions, your foot-spa will give you years of beauty and service.
Camellia carefully the
This product is to be connected to a branch circuit outlet protected by a Class A GROUND FAULT CIRCUITINTERRUPTER (GFCI), and the GFCI shall be tested regularly for continued protection and correct operation. If a Class A GFCI protected outlet is not available, DO NOT USE THIS PRODUCT! Pleasecontact a licensed electrician for installation of a Class A GFCI according to local electric codes, or equivalent.
THIS PRODUCT IS FOR IN DOOR USE ONLYDISCONNECT POWER SUPPLY CORD BEFORE SERVICING AND CLEANING!
Foot-spa must be installed by a licensed plumber and electrician in accordance with local codes. Plumbing and Electrical Installation instructions must be adhered to in order for the warranty to be in effect and to insure the utmost in safety. Chair and spa have a maximum seating capacity of 350 pounds.The foot-spa is not intended to be stood in or used as a step. The portable foot-spa model is movable, standing in tub or using as a step may cause severe damage to the unit as well as possible serious injury to the person.
BASIC PRECAUTIONS SHOULD ALWAYS BE OBSERVED, INCLUDING THE FOLLOWING:
1. Read and follow all instructions2. DANGER. To reduce the risk of injury, do not permit children to use this unit unless they are supervised at all times 3. Use this unit only for its intended use as described in this manual. Do not use attachments that are not recommended by the manufacturer.4. Never drop or insert any object into any opening.5. Do not block jets during whirlpool operation.6. The unit must be connected to an electrical supply circuit that is protected by a ground fault circuit interrupter.7. The clean jet motor is magnetically driven and is insulated twice. Therefore it does not require to be bonded. Save these instructions
1. Excessive water temperature is dangerous and should be checked BEFORE use.
2. Maximum temperature of the water should never exceed 100 degrees F.
3. Always enter and exit the Foot Spa slowly and carefully.
4. NEVER bring and / or operate any electrical devices into or near the Foot Spa.
If a crack occurs in the glass bowl, DO NOT manually handle the bowl unless the proper attire is worn. Under no circumstances must the bowl be used by your customers as you can be held accountable for any injury that may occur. Gulfstream is not liable for any injury that may occur.
Warning!
Warning!
Warning!
SAFETY & PRECAUTION
2
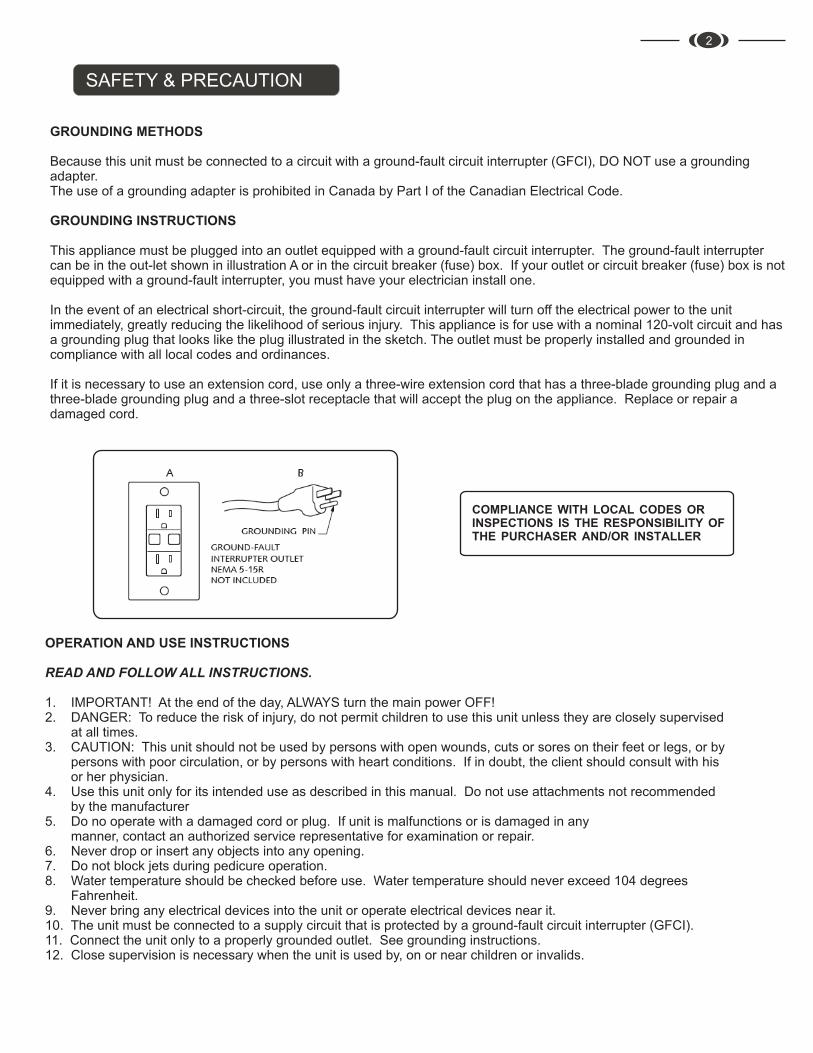
GROUNDING METHODS
Because this unit must be connected to a circuit with a ground-fault circuit interrupter (GFCI), DO NOT use a grounding adapter.The use of a grounding adapter is prohibited in Canada by Part I of the Canadian Electrical Code.
GROUNDING INSTRUCTIONS
This appliance must be plugged into an outlet equipped with a ground-fault circuit interrupter. The ground-fault interrupter can be in the out-let shown in illustration A or in the circuit breaker (fuse) box. If your outlet or circuit breaker (fuse) box is not equipped with a ground-fault interrupter, you must have your electrician install one.
In the event of an electrical short-circuit, the ground-fault circuit interrupter will turn off the electrical power to the unit immediately, greatly reducing the likelihood of serious injury. This appliance is for use with a nominal 120-volt circuit and has a grounding plug that looks like the plug illustrated in the sketch. The outlet must be properly installed and grounded in compliance with all local codes and ordinances.
If it is necessary to use an extension cord, use only a three-wire extension cord that has a three-blade grounding plug and a three-blade grounding plug and a three-slot receptacle that will accept the plug on the appliance. Replace or repair a damaged cord.
OPERATION AND USE INSTRUCTIONS
READ AND FOLLOW ALL INSTRUCTIONS.
1. IMPORTANT! At the end of the day, ALWAYS turn the main power OFF!2. DANGER: To reduce the risk of injury, do not permit children to use this unit unless they are closely supervised at all times.3. CAUTION: This unit should not be used by persons with open wounds, cuts or sores on their feet or legs, or by persons with poor circulation, or by persons with heart conditions. If in doubt, the client should consult with his or her physician.4. Use this unit only for its intended use as described in this manual. Do not use attachments not recommended by the manufacturer5. Do no operate with a damaged cord or plug. If unit is malfunctions or is damaged in any manner, contact an authorized service representative for examination or repair.6. Never drop or insert any objects into any opening.7. Do not block jets during pedicure operation.8. Water temperature should be checked before use. Water temperature should never exceed 104 degrees Fahrenheit.9. Never bring any electrical devices into the unit or operate electrical devices near it.10. The unit must be connected to a supply circuit that is protected by a ground-fault circuit interrupter (GFCI).11. Connect the unit only to a properly grounded outlet. See grounding instructions.12. Close supervision is necessary when the unit is used by, on or near children or invalids.
COMPLIANCE WITH LOCAL CODES OR INSPECTIONS IS THE RESPONSIBILITY OF THE PURCHASER AND/OR INSTALLER
IDENTIFY YOUR FOOT-SPA
3
1
2
3
4
5
6
7
8
12
13 14
15
10
11
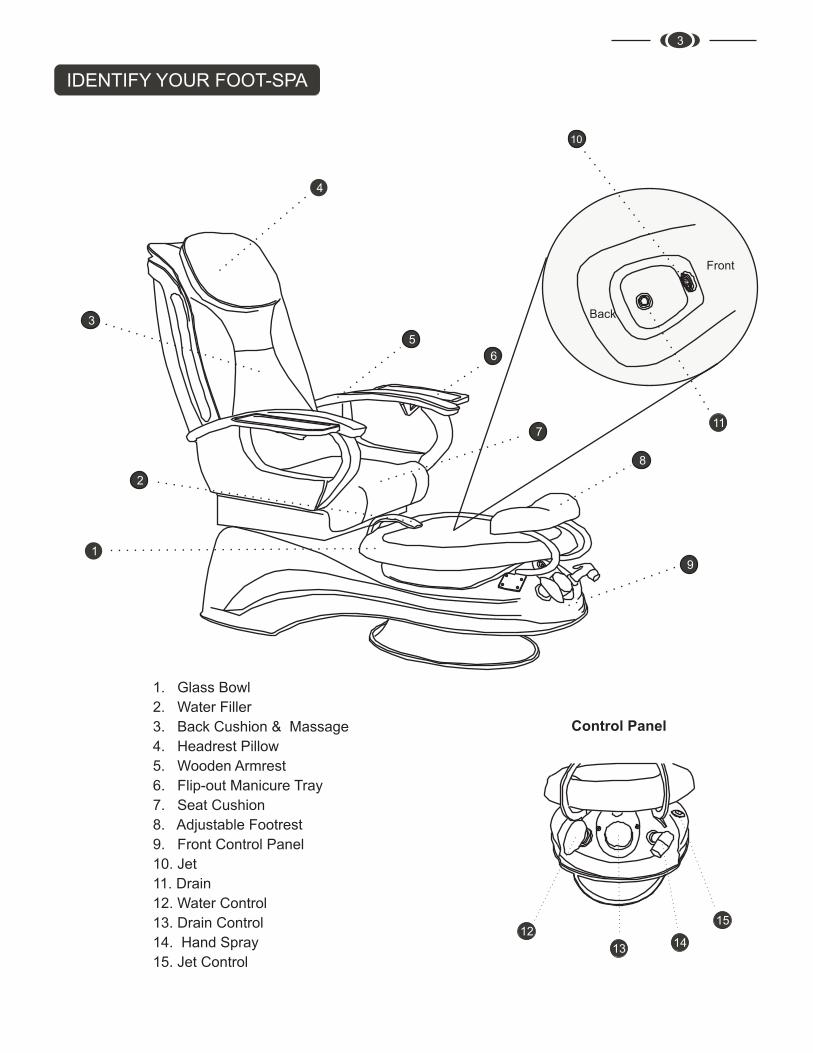
1. Glass Bowl
2. Water Filler
3. Back Cushion & Massage
4. Headrest Pillow
5. Wooden Armrest
6. Flip-out Manicure Tray
7. Seat Cushion
8. Adjustable Footrest
9. Front Control Panel
10. Jet
11. Drain
12. Water Control
13. Drain Control
14. Hand Spray
15. Jet Control
9
Control Panel
Front
Back
4
IDENTIFY YOUR FOOT-SPA
1
2
3
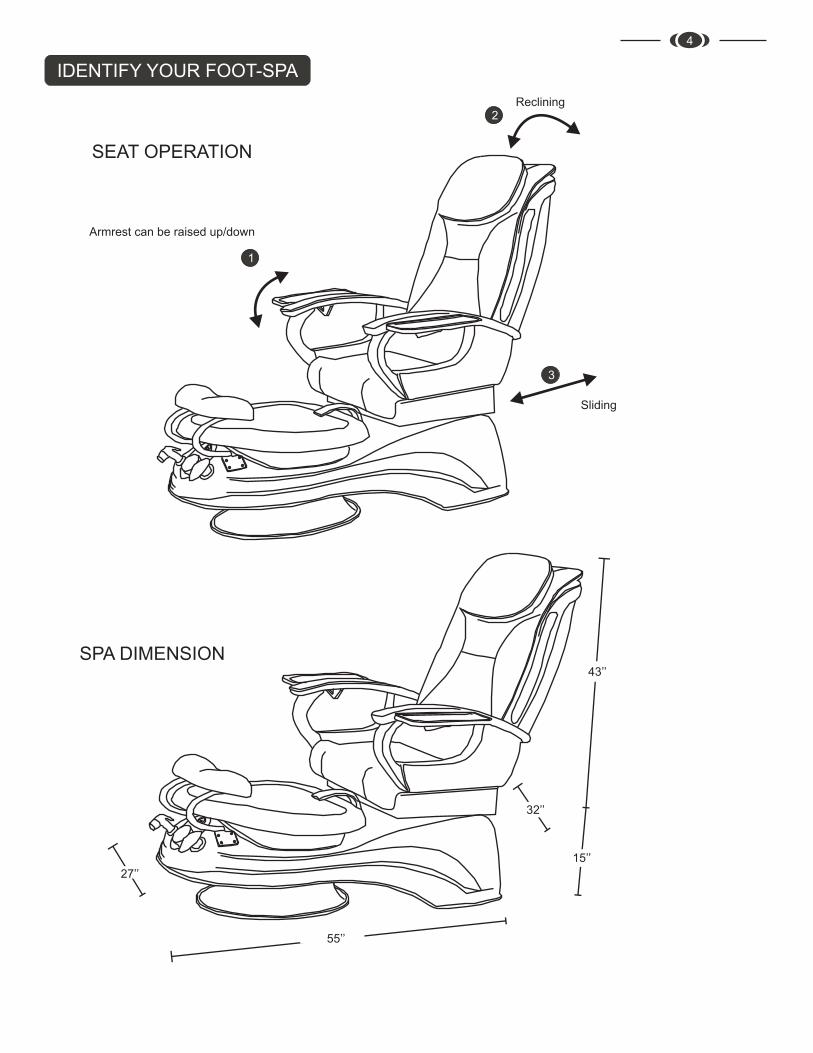
Armrest can be raised up/down
Reclining
Sliding
55’’
27’’
32’’
43’’
15’’
SEAT OPERATION
SPA DIMENSION
5
FOOT-SPA CLEARANCE
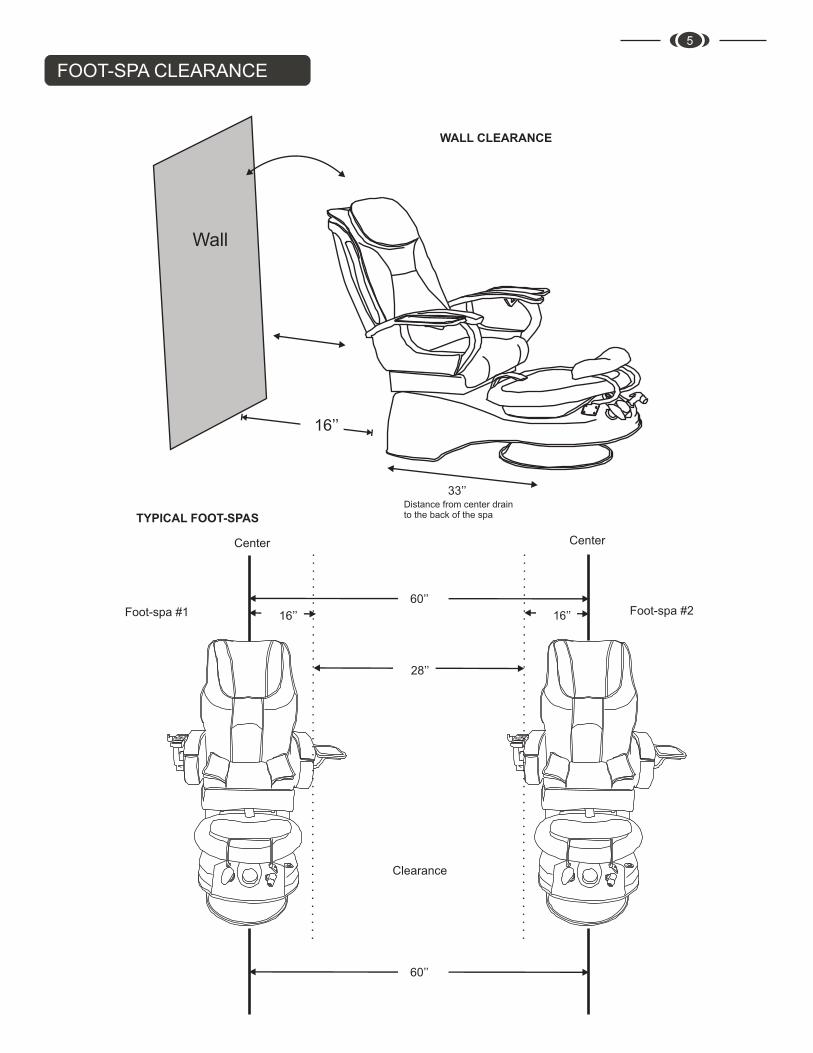
Wall
16’’
60’’
60’’
16’’ 16’’
28’’
Foot-spa #1
Center Center
Foot-spa #2
Clearance
WALL CLEARANCE
TYPICAL FOOT-SPAS
33’’Distance from center drainto the back of the spa
6INSTALLATIONS
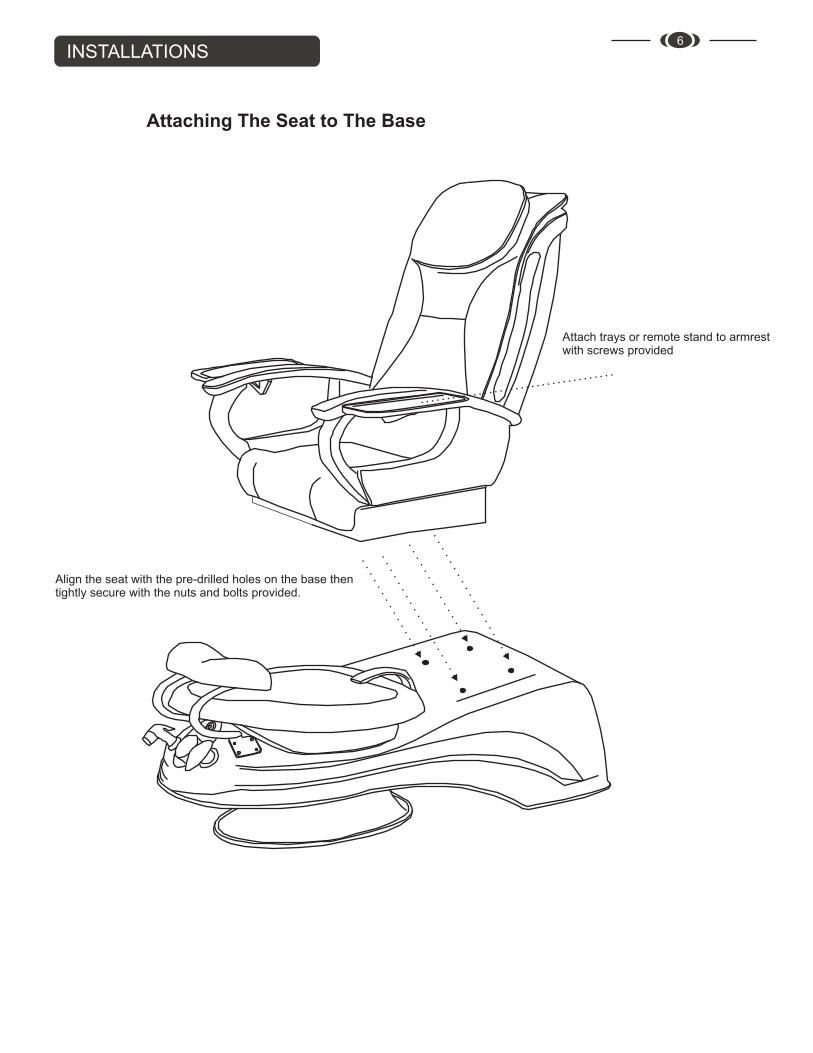
Align the seat with the pre-drilled holes on the base thentightly secure with the nuts and bolts provided.
Attach trays or remote stand to armrestwith screws provided
Attaching The Seat to The Base
7INSTALLATIONS
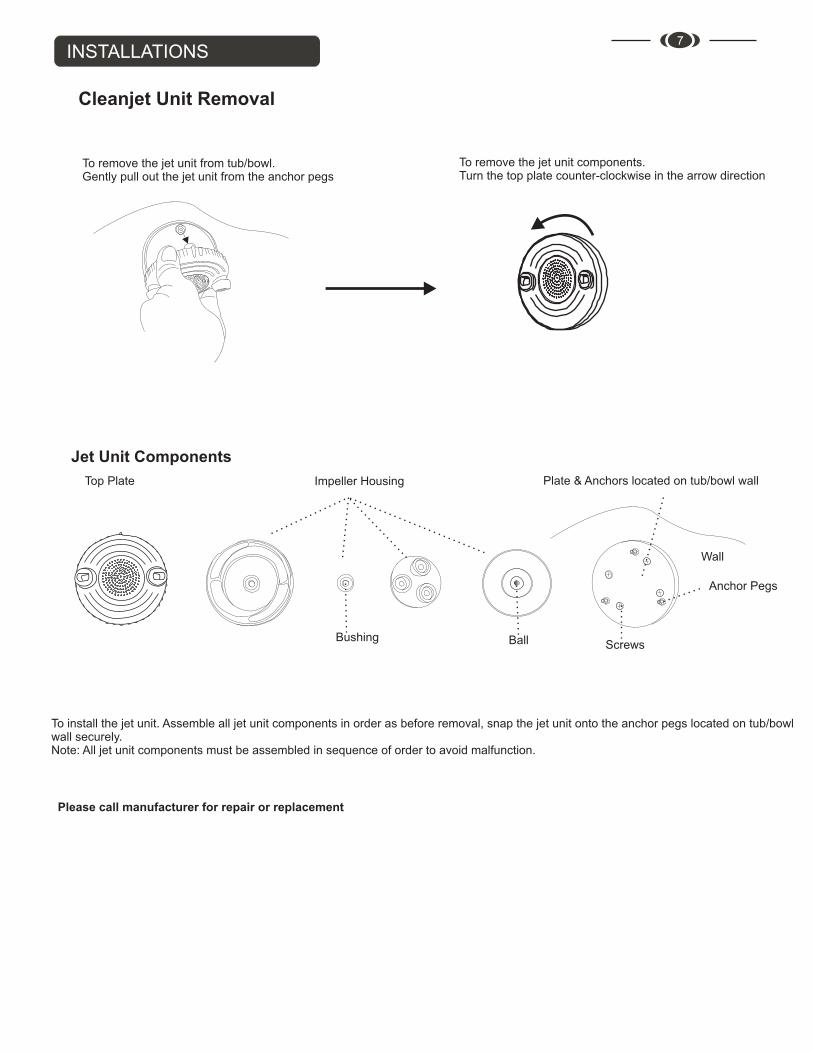
Cleanjet Unit Removal
Plate & Anchors located on tub/bowl wallImpeller HousingTop Plate
Wall
BallBushing
Anchor Pegs
To remove the jet unit from tub/bowl. Gently pull out the jet unit from the anchor pegs
To remove the jet unit components.Turn the top plate counter-clockwise in the arrow direction
Jet Unit Components
To install the jet unit. Assemble all jet unit components in order as before removal, snap the jet unit onto the anchor pegs located on tub/bowlwall securely.Note: All jet unit components must be assembled in sequence of order to avoid malfunction.
Screws
Please call manufacturer for repair or replacement
8INSTALLATIONS
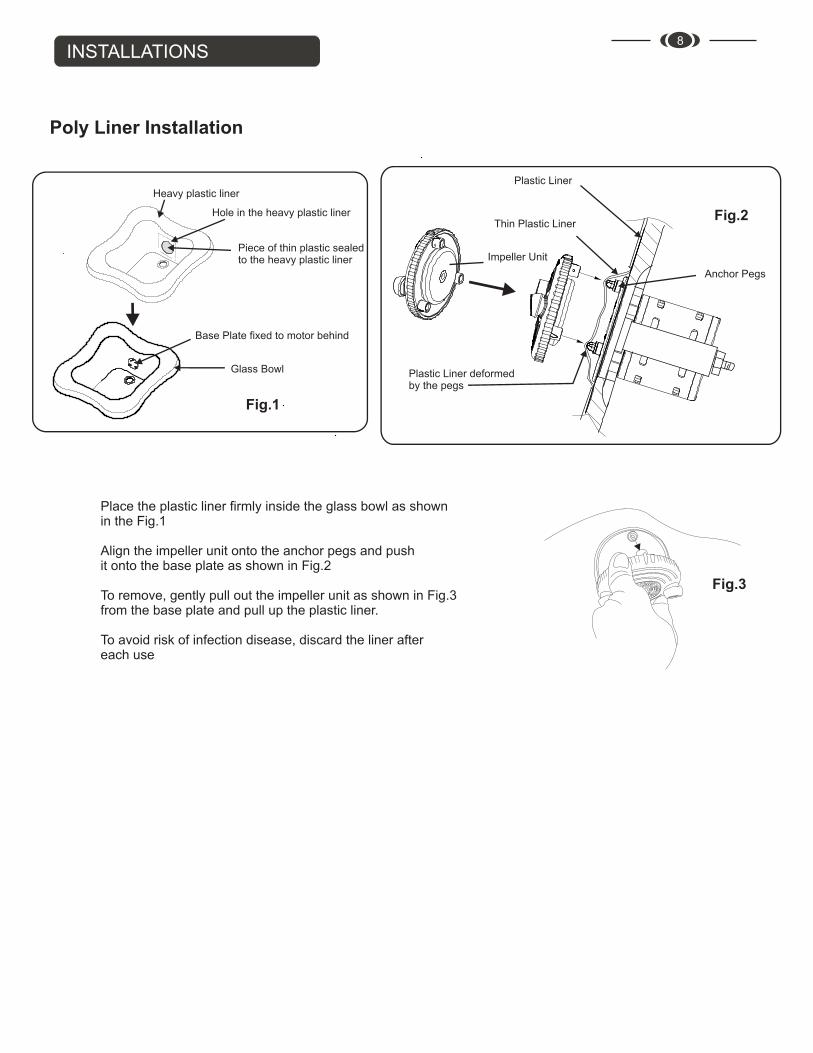
Place the plastic liner firmly inside the glass bowl as shownin the Fig.1
Align the impeller unit onto the anchor pegs and pushit onto the base plate as shown in Fig.2
To remove, gently pull out the impeller unit as shown in Fig.3from the base plate and pull up the plastic liner.
To avoid risk of infection disease, discard the liner aftereach use
Fig.2
Plastic Liner deformedby the pegs
Thin Plastic Liner
Impeller Unit
Plastic Liner
Hole in the heavy plastic liner
Heavy plastic liner
Piece of thin plastic sealedto the heavy plastic liner
Base Plate fixed to motor behind
Fig.1
Glass Bowl
Fig.3
Poly Liner Installation
Anchor Pegs
INSTALLATIONS 9
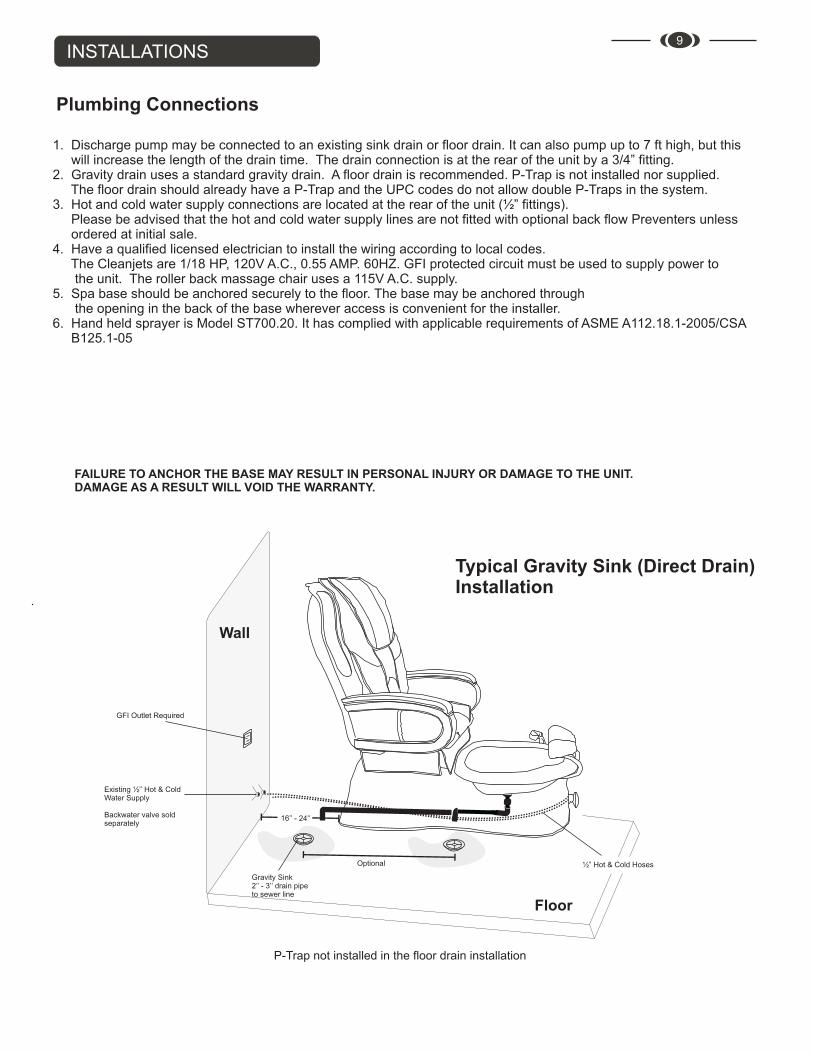
FAILURE TO ANCHOR THE BASE MAY RESULT IN PERSONAL INJURY OR DAMAGE TO THE UNIT. DAMAGE AS A RESULT WILL VOID THE WARRANTY.
Plumbing Connections
GFI Outlet Required
Existing Hot & ColdWater Supply
Backwater valve soldseparately
½’’
Floor
Wall
16’’ - 24’’
½” Hot & Cold HosesOptional
Typical Gravity Sink (Direct Drain)Installation
Gravity Sink2’’ - 3’’ drain pipeto sewer line
1. Discharge pump may be connected to an existing sink drain or floor drain. will increase the length of the drain time. The drain connection is at the rear of the unit by a 3/4” fitting.2. Gravity drain uses a standard gravity drain. A floor drain is recommended. P-Trap is not installed nor supplied. The floor drain should already have a P-Trap and the UPC codes do not allow double P-Traps in the system.3. Hot and cold water supply connections are located at the rear of the unit (½” fittings). Please be advised that the hot and cold water supply lines are not fitted with optional back flow Preventers unless ordered at initial sale.4. Have a qualified licensed electrician to install the wiring according to local codes. The Cleanjets are 1/18 HP, 120V A.C., 0.55 AMP. 60HZ. GFI protected circuit must be used to supply power to the unit. The roller back massage chair uses a 115V A.C. supply.5. Spa base should be anchored securely to the floor. The base may be anchored through the opening in the back of the base wherever access is convenient for the installer.6. Hand held sprayer is Model ST700.20. It has complied with applicable requirements of ASME A112.18.1-2005/CSA B125.1-05
It can also pump up to 7 ft high, but this
P-Trap not installed in the floor drain installation
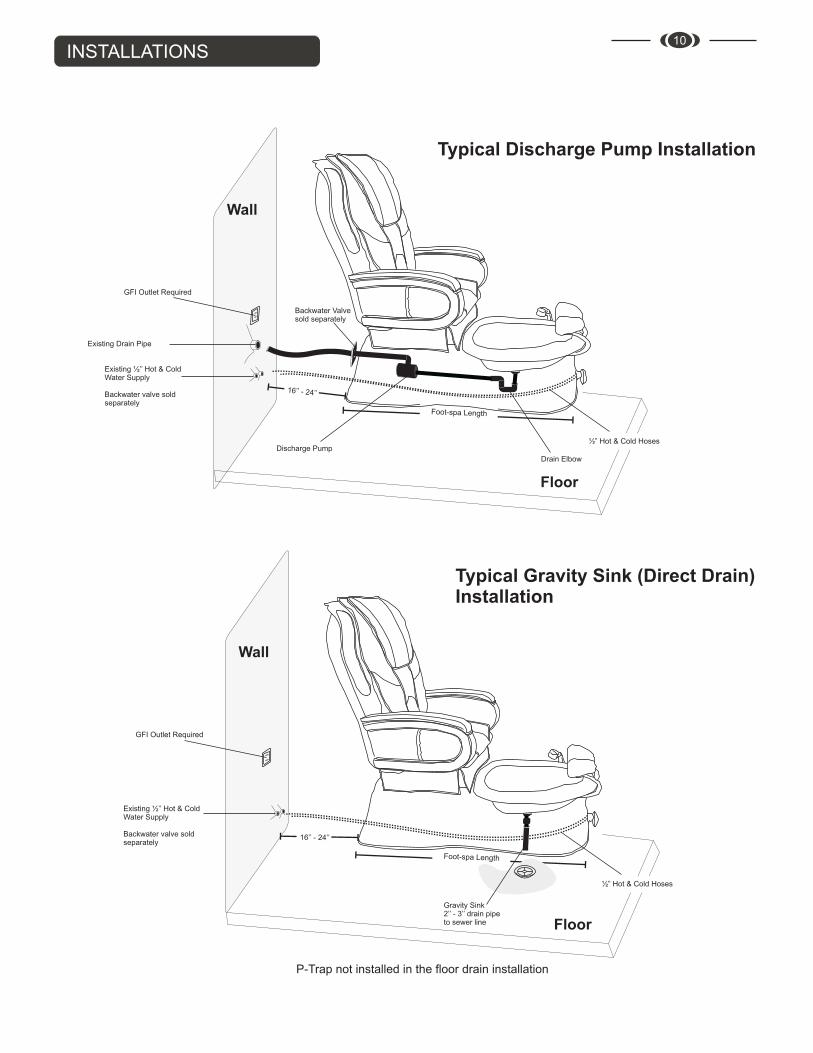
INSTALLATIONS 10
Foot-spa Length
GFI Outlet Required
Existing Drain Pipe
Discharge Pump
Drain Elbow
Floor
Wall
16’’ - 24’’
Foot-spa Length
½” Hot & Cold Hoses
Typical Discharge Pump Installation
Existing Hot & ColdWater Supply
Backwater valve soldseparately
½’’
GFI Outlet Required
Existing Hot & ColdWater Supply
Backwater valve soldseparately
½’’
Floor
Wall
16’’ - 24’’
½” Hot & Cold Hoses
Typical Gravity Sink (Direct Drain)Installation
Gravity Sink2’’ - 3’’ drain pipeto sewer line
Backwater Valvesold separately
P-Trap not installed in the floor drain installation

1. To fill water: The foot-spa is provided with a single hot and cold mixing valve located on the front of your spa. This is a pressure balance valve that requires you to lift the handle to start the water flow and to adjust to the temperature that is desired. The clean jet motor must be completely submerged in water. CAUTION: DO NOT USE FOAMING, SUDSING OR MINERAL OIL BASED ADDITIVES IN THE WATER.
2. To start whirlpool: Press the jet button as shown. This will start your Clean Jet motor. You may stop the whirlpool function at any time by pressing the button again.
3. The foot-spa is equipped with a hand held sprayer. To activate the hand shower, pull the hand shower from the receptacle and depress the thumb control on the sprayer handle. This will turn on the water. When you release pressure on the thumb control this will turn the water off.
4. To drain whirlpool tub: The spa is equipped with a built in optional discharge pump. Open the drain plug by turning the control knob as shown. Press discharge pump timer button as shown (pump will run for approx. 2 min.) Average time for drain 1. minute
5. 9600 & 9700 chairs Shiatsu Roller back massage is equipped with a state of-the-art massage system. The massage system is easy to use; the remote has a one touch power that starts select your own massage. You can also adjust the front to rear position of the chair and the reclining back. By using the remote your client can adjust the back to the most comfortable position.
13
Control Panel
Jet (On/Off)
Water Control
Drain Control
Hand Spray
OPERATIONS & USE11
BASIC PRECAUTIONS SHOULD ALWAYS BE OBSERVED, INCLUDING THE FOLLOWING:
1. Read and follow all instructions2. DANGER. To reduce the risk of injury, do not permit children to use this unit unless they are supervised at all times 3. Use this unit only for its intended use as described in this manual. Do not use attachments that are not Recommended by the manufacturer.4. Never drop or insert any object into any opening.5. Do not block jets during whirlpool operation.6. The unit must be connected to an electrical supply circuit that is protected by a ground fault circuit interrupter.7. The clean jet motor is magnetically driven and is insulated twice. Therefore it does not require to be bonded. Save these instructions

OPERATIONS & USE12
9620, 9700, 9600 Shiatsu Remote Control
Please refer to instruction manual for operations
LCD
TimingAuto
NeckShoulder
Power
Pause
KneadingKnocking
Width
LowerAdjustment
Incline
SeatForward
SeatBackward
Recline
Intensity
Air On/Off
Back Waist
Kneading
UpperAdjustment
Speed
Knocking
Timing
UpperBody Knead Flap
KneadFlap
NeckShoulder Press Knock
BackWaist
BackStretching
Speed Width
SeatOn/Off
IntensityMode
SeatForward
SeatBackward
SeatIncline
SeatRecline
Power
LCD
TT960
Manual
Gulfstream Inc. highly recommends the following cleaning regimen. You should always contact your local governing
agency for their specific cleaning and disinfecting requirements and regulations for pedicure spas. For your clients
safety, always use the regulations as a minimum standard for cleaning and disinfecting. Combining your states
standards with the regimen listed below will provide your clients with a safe and healthy pedicure spa environment
experience.
Routine maintenance:
Powdered cleansers or abrasives are NOT RECOMMENDED. A clean towel or sponge, are all that are usually
needed. A soft bristled brush may be used when excessive residue is present. Use a mild soap and water solution to
clean the upholstery, but do not over wet. Wipe dry with a clean towel. No internal maintenance of the spa
components is necessary. Remove clean jet caps and spray with disinfectant after each use. For extra protection, our
recommendation is that the system be flushed daily or weekly depending on use. To flush the clean jet system fill spa
with hot water to just above the jets. Add disinfectant. Run whirlpool for 15 minutes, drain and then wipe dry with
clean soft cloth.
NOTE: Cleaning or sanitizing is NOT disinfecting. According to the Centers for Disease Control and Prevention (CDC), and
the US Environmental Protection Agency (EPA), disinfecting occurs only when there is a reduction of pathogenic
microbes at 99.999%. Sanitizing is only a reduction of 99.9%. Cleaning of whirlpool pedicure spas requires surfactant
and chelating detergents that are low-foaming and have the ability to remove body oils, organic oil additives, mineral
oil, skin cells, nail clippings etc that can accumulate both in the basin and the jets which may become a fertile area for
micro organisms to grow.
The use of oil based products can build up in the whirlpool system causing clogging in the jets. Adherence to the
above cleaning will minimize build up. Gulfstream Inc. does not recommend the use of mineral oil based products.
TESTING/FLUSHING FOOT SPA
After foot spa has been installed, fill tub with water just above the jets. Carefully check for leaks at drain and over
flow. After checking underside for leaks turn on system by pushing whirlpool button and watch for leaks as water
circulates. Let tub run full cycle. Open drain plug for water discharge.
CLEANING & MAINTENANCE13
Please refer the diagrams to remove jet covers for cleaning
CLEANING & MAINTENANCE14
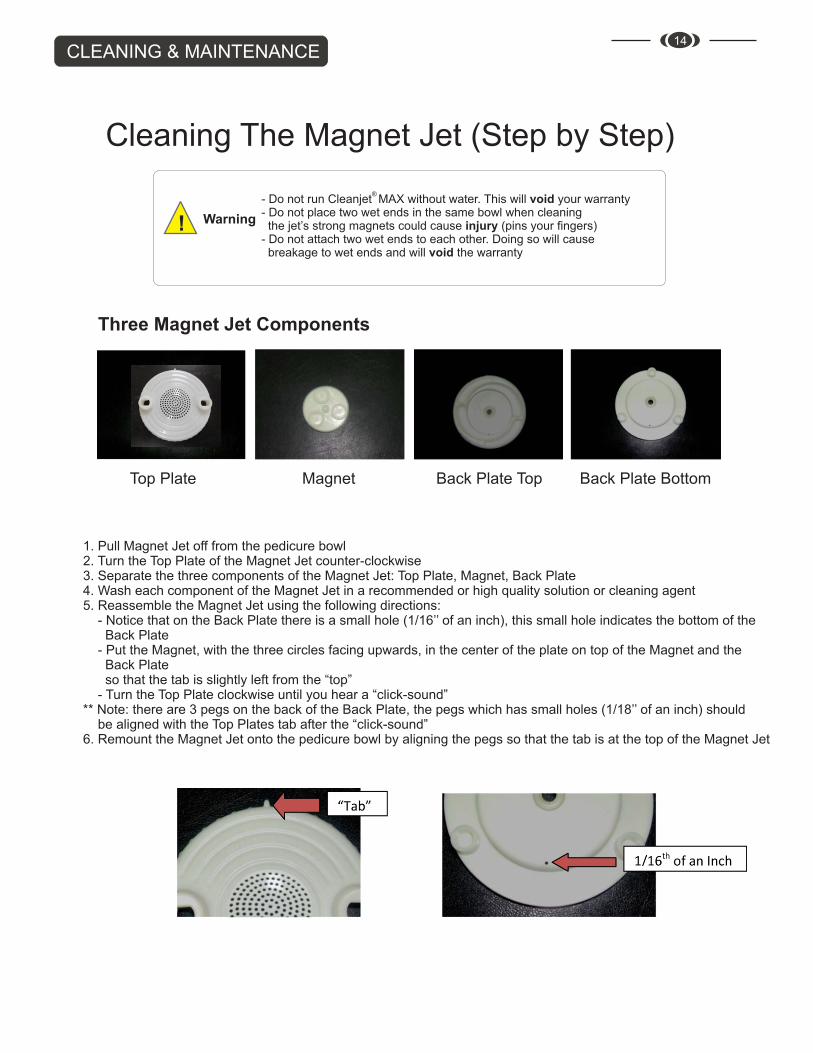
Cleaning The Magnet Jet (Step by Step)
1. Pull Magnet Jet off from the pedicure bowl2. Turn the Top Plate of the Magnet Jet counter-clockwise3. Separate the three components of the Magnet Jet: Top Plate, Magnet, Back Plate4. Wash each component of the Magnet Jet in a recommended or high quality solution or cleaning agent5. Reassemble the Magnet Jet using the following directions: - Notice that on the Back Plate there is a small hole (1/16’’ of an inch), this small hole indicates the bottom of the Back Plate - Put the Magnet, with the three circles facing upwards, in the center of the plate on top of the Magnet and the Back Plate so that the tab is slightly left from the “top” - Turn the Top Plate clockwise until you hear a “click-sound”** Note: there are 3 pegs on the back of the Back Plate, the pegs which has small holes (1/18’’ of an inch) should be aligned with the Top Plates tab after the “click-sound”6. Remount the Magnet Jet onto the pedicure bowl by aligning the pegs so that the tab is at the top of the Magnet Jet
Top Plate Magnet Back Plate Top Back Plate Bottom
Three Magnet Jet Components
Warning!
- Do not run MAX without water. This will void your warranty- Do not place two wet ends in the same bowl when cleaning the jet’s strong magnets could cause injury (pins your fingers)- Do not attach two wet ends to each other. Doing so will cause breakage to wet ends and will void the warranty
®Cleanjet
Gulfstream warrants to the original purchaser that the new pedicure spa will be free from defect during the Standard Warranty Period
(listed below). The shipping date and the uniquely-coded Serial Number on the back of each spa chair will justify the start of the
warranty period for the product. The warranty is null and void if the pedicure spa is taken from its initial place of installation, or it is not
installed in accordance with federal, state or local codes and ordinances. Also, this warranty does no apply if the pedicure spa has been
subject to misapplication, improper installation or maintenance, negligence, improper cleaning or other circumstances beyond
Gulfstream's control.
1. Limited Three(3) Years warranty on Spa Shell.2. Limited One(1) Year warranty on the Whirlpool Pump.3. Limited One(1) Year warranty on the Clean Jet.4. Limited One(1) Year warranty on the Glass Bowl.5. Limited One(1) Year Parts-Only warranty which covers the Hydraulic System, Discharge Pump, Massage System and All electrical Components.6. Gulfstream will pay standard shipping charges on all replacement parts during the first 90 days of the stated Warranty Period.
Warranty
1. Damage to pump parts and/or motor parts due to obstruction in plumbing lines etc.2. Staining, fading or discoloration of plastic surfaces due to exposure and/or the use of harmful cleaning agents or chemicals.3. Staining, fading or discoloration caused by improper or poor water additives not related to the maintenance of proper water are not covered by this warranty.4. Staining, fading or discoloration of the seat, armrests or footrests.5. Freight damage, misuse, neglect, accident, natural disaster and abuse.6. Unauthorized repairs.
Exclusions
No dealer or other person has any authority to bind Gulfstream Inc. to changes or additions to this warranty or its products.
Accordingly, Gulfstream Inc. is not responsible for such warranties or representations.
1. The Dealer shall forward all warranty-related matters to our Customer Service Department. 2. Serial Numbers and Original Invoice must accompany all warranty claims.3. Customers are responsible for shipping defective parts back to Gulfstream. These parts must be packaged correctly in order to protect against any further damage.4. All parts are to be shipped by UPS Ground Service average 2-5 days.5. All defective parts must be shipped back to Gulfstream within 30 days of receiving the new replacement parts or warranty will be void.6. Any warranty claim that cannot be determined over the phone, the customer must send photos and original invoice directly to Gulfstream before any repairs can be performed.7. Any service performed on the product without Gulfstreams authorization will also void the Warranty.8. Each service call from the customer will be assigned a Claim Number. The Claim Number will stay open until the problem is resolved.
Service
WARRANTY & SERVICE15
© Design and Specifications are subject to change without notice2011 All rights reserved.
Manufacturer of Acrylic BathWhirlpool & Pedicure Foot Spas
Gulfstream Inc.
Cambridge, Ontario, Canada N1R 5X5
Tel.: 519-622-0950
Fax: 519-622-6926
www.gulfstreaminc.com