Embed Size (px)
Citation preview
Thank You for choosing MVC 100. Superior quality of this product is guaranteed by application of strict standards.
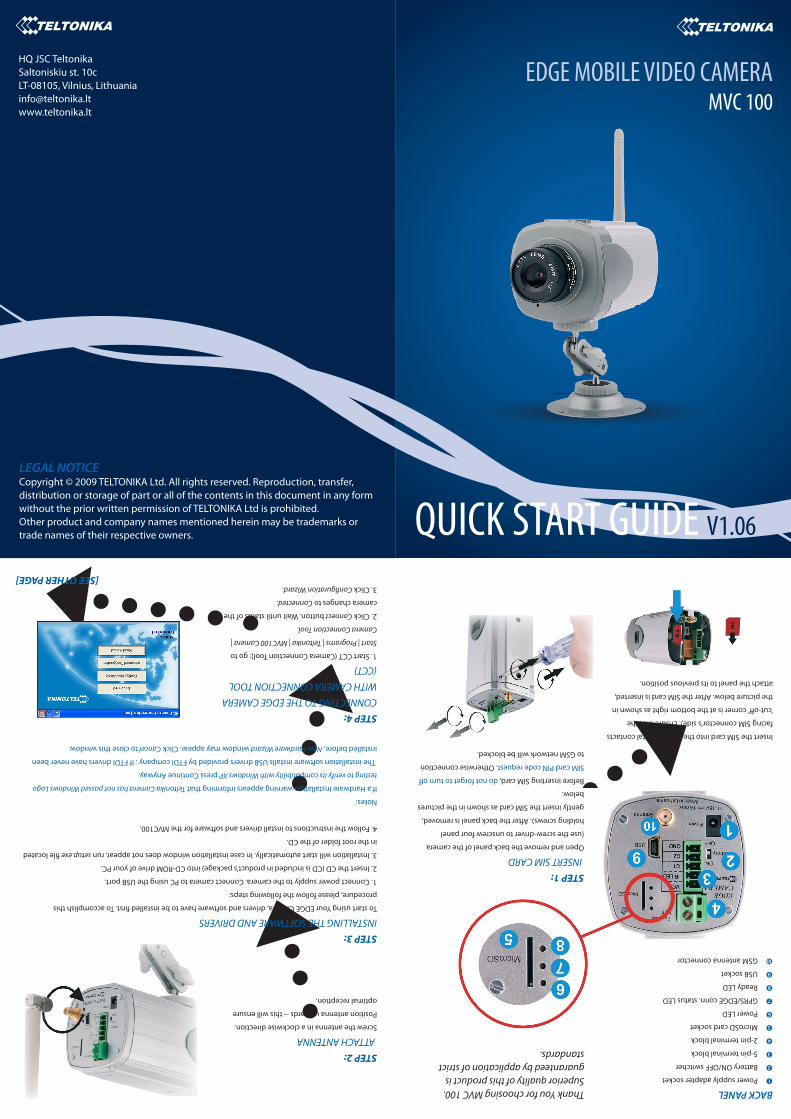
BACK PANEL Power supply adapter socket
Battery ON/OFF switcher
5-pin terminal block
2-pin terminal block
MicroSD card socket
Power LED
GPRS/EDGE conn. status LED
Ready LED
USB socket
GSM antenna connector
STEP 1: INSERT SIM CARDOpen and remove the back panel of the camera
(use the screw-driver to unscrew four panel
holding screws). After the back panel is removed,
gently insert the SIM card as shown in the pictures
below.
Before inserting SIM card, do not forget to turn o�
SIM card PIN code request. Otherwise connection
to GSM network will be blocked.
Insert the SIM card into the holder (metal contacts
facing SIM connector’s side). Ensure that the
‘cut-o�’ corner is at the bottom right as shown in
the picture below. After the SIM card is inserted,
attach the panel to its previous position.
STEP 2: ATTACH ANTENNAScrew the antenna in a clockwise direction.
Position antenna upwards -- this will ensure
optimal reception.
STEP 3: INSTALLING THE SOFTWARE AND DRIVERSTo start using Your EDGE Camera, drivers and software have to be installed �rst. To accomplish this
procedure, please follow the following steps:
1. Connect power supply to the camera. Connect camera to PC using the USB port.
2. Insert the CD (CD is included in product’s package) into CD-ROM drive of your PC.
3. Installation will start automatically. In case installation window does not appear, run setup.exe �le located
in the root folder of the CD.
4. Follow the instructions to install drivers and software for the MVC100.
Notes:
If a Hardware Installation warning appears informing that Teltonika Camera has not passed Windows Logo
testing to verify its compatibility with Windows XP press Continue Anyway.
The installation software installs USB drivers provided by FTDI company . If FTDI drivers have never been
installed before, New Hardware Wizard window may appear. Click Cancel to close this window.
STEP 4: CONNECTING TO THE EDGE CAMERA WITH CAMERA CONNECTION TOOL (CCT)1. Start CCT (Camera Connection Tool): go to
Start | Programs | Teltonika | MVC100 Camera |
Camera Connection Tool.
2. Click Connect button. Wait until status of the
camera changes to Connected.
3. Click Con�guration Wizard.[SEE OTHER PAGE]
LEGAL NOTICECopyright © 2009 TELTONIKA Ltd. All rights reserved. Reproduction, transfer, distribution or storage of part or all of the contents in this document in any form without the prior written permission of TELTONIKA Ltd is prohibited. Other product and company names mentioned herein may be trademarks or trade names of their respective owners.
HQ JSC TeltonikaSaltoniskiu st. 10cLT-08105, Vilnius, [email protected]
EDGE MOBILE VIDEO CAMERAMVC 100
QUICK START GUIDE V1.06
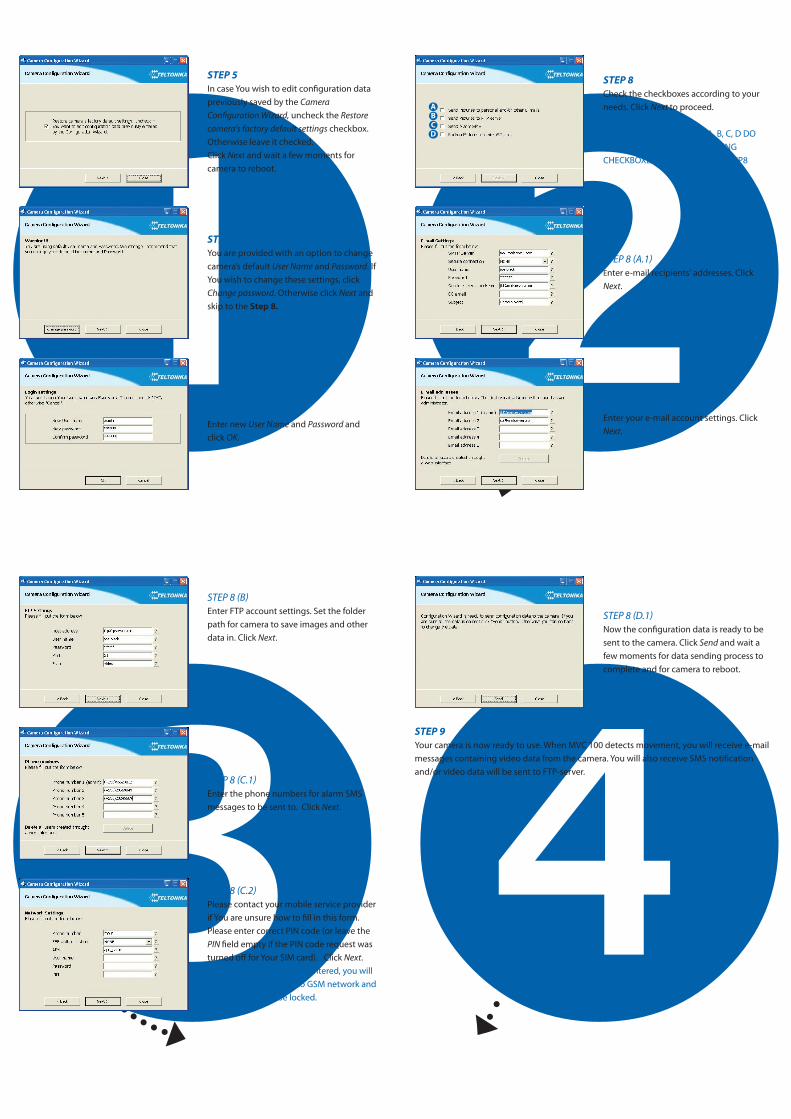
STEP 5In case You wish to edit con�guration data previously saved by the Camera Con�guration Wizard, uncheck the Restore camera's factory default settings checkbox. Otherwise leave it checked.Click Next and wait a few moments for camera to reboot.
STEP 6You are provided with an option to change camera’s default User Name and Password. If You wish to change these settings, click Change password. Otherwise click Next and skip to the Step 8.
STEP 7Enter new User Name and Password and click OK.
STEP 8 (B)Enter FTP account settings. Set the folder path for camera to save images and other data in. Click Next.
STEP 8 (C.1)Enter the phone numbers for alarm SMS messages to be sent to. Click Next.
STEP 8 (C.2)Please contact your mobile service provider if You are unsure how to �ll in this form. Please enter correct PIN code (or leave the PIN �eld empty if the PIN code request was turned o� for Your SIM card). Click Next.Note: if wrong PIN code is entered, you will not be able to connect to GSM network and your SIM card will be locked.
STEP 8 (D.1)Now the con�guration data is ready to be sent to the camera. Click Send and wait a few moments for data sending process to complete and for camera to reboot.
STEP 9Your camera is now ready to use. When MVC 100 detects movement, you will receive e-mail messages containing video data from the camera. You will also receive SMS noti�cation and/or video data will be sent to FTP-server.
STEP 8 (A.1)Enter e-mail recipients' addresses. Click Next.
STEP 8 (A.2)Enter your e-mail account settings. Click Next.
STEP 8Check the checkboxes according to your needs. Click Next to proceed.
NOTE: WINDOWS IN STEPS A, B, C, D DO APPEAR ONLY IF CORRESPONDING CHECKBOXES ARE CHECKED IN STEP8
ABCD