Embed Size (px)
DESCRIPTION
CADENCE Sim Compare User MANUAL AND TCL COMMANDS
Citation preview
Using SimCompare
Product Version 12.1June 2012
© 1995–2012 Cadence Design Systems, Inc. All rights reserved.
Cadence Design Systems, Inc. (Cadence), 2655 Seely Ave., San Jose, CA 95134, USA.
Open SystemC, Open SystemC Initiative, OSCI, SystemC, and SystemC Initiative are trademarks or registered trademarks of Open SystemC Initiative, Inc. in the United States and other countries and are used with permission.
Trademarks: Trademarks and service marks of Cadence Design Systems, Inc. contained in this document are attributed to Cadence with the appropriate symbol. For queries regarding Cadence’s trademarks, contact the corporate legal department at the address shown above or call 800.862.4522.
Restricted Permission: This publication is protected by copyright law and international treaties and contains trade secrets and proprietary information owned by Cadence. Unauthorized reproduction or distribution of this publication, or any portion of it, may result in civil and criminal penalties. Except as specified in this permission statement, this publication may not be copied, reproduced, modified, published, uploaded, posted, transmitted, or distributed in any way, without prior written permission from Cadence. Unless otherwise agreed to by Cadence in writing, this statement grants Cadence customers permission to print one (1) hard copy of this publication subject to the following conditions:
1. The publication may be used only in accordance with a written agreement between Cadence and its customer.
2. The publication may not be modified in any way. 3. Any authorized copy of the publication or portion thereof must include all original copyright,
trademark, and other proprietary notices and this permission statement. 4. The information contained in this document cannot be used in the development of like products or
software, whether for internal or external use, and shall not be used for the benefit of any other party, whether or not for consideration.
Disclaimer: Information in this publication is subject to change without notice and does not represent a commitment on the part of Cadence. Except as may be explicitly set forth in such agreement, Cadence does not make, and expressly disclaims, any representations or warranties as to the completeness, accuracy or usefulness of the information contained in this document. Cadence does not warrant that use of such information will not infringe any third party rights, nor does Cadence assume any liability for damages or costs of any kind that may result from use of such information.
Restricted Rights: Use, duplication, or disclosure by the Government is subject to restrictions as set forth in FAR52.227-14 and DFAR252.227-7013 et seq. or its successor.
Using SimCompare
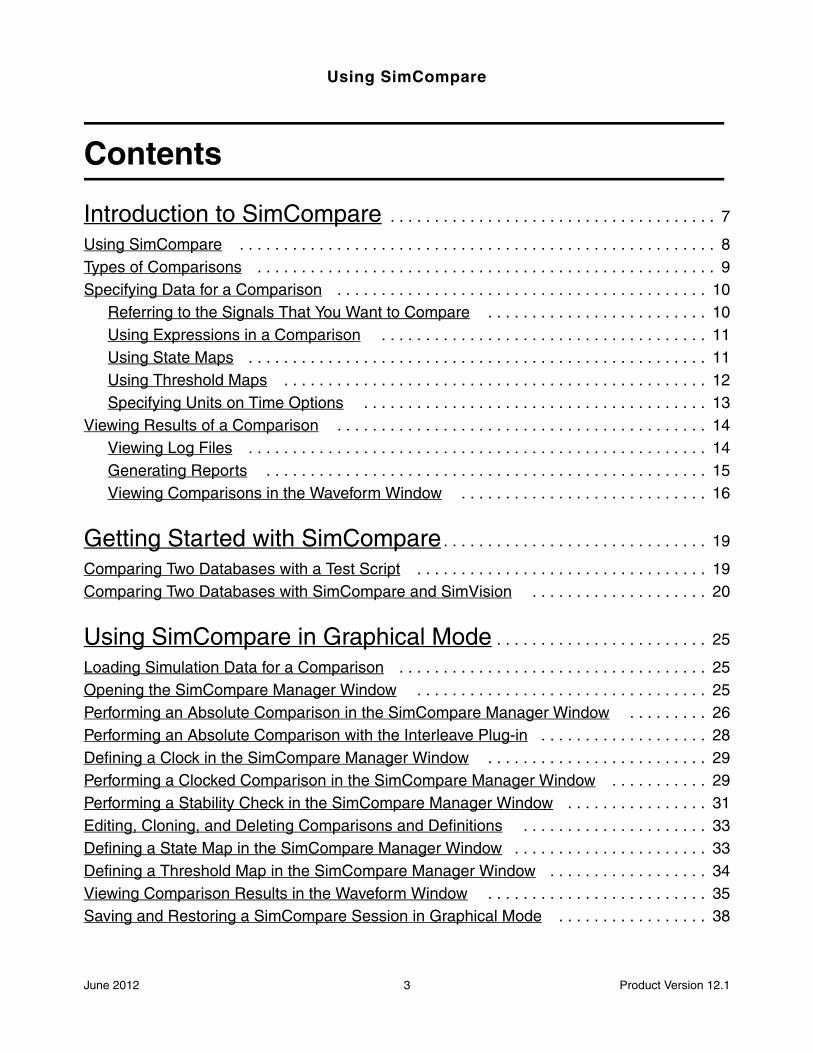
Contents
Introduction to SimCompare . . . . . . . . . . . . . . . . . . . . . . . . . . . . . . . . . . . . . 7
Using SimCompare . . . . . . . . . . . . . . . . . . . . . . . . . . . . . . . . . . . . . . . . . . . . . . . . . . . . . . 8Types of Comparisons . . . . . . . . . . . . . . . . . . . . . . . . . . . . . . . . . . . . . . . . . . . . . . . . . . . . 9Specifying Data for a Comparison . . . . . . . . . . . . . . . . . . . . . . . . . . . . . . . . . . . . . . . . . . 10
Referring to the Signals That You Want to Compare . . . . . . . . . . . . . . . . . . . . . . . . . 10Using Expressions in a Comparison . . . . . . . . . . . . . . . . . . . . . . . . . . . . . . . . . . . . . 11Using State Maps . . . . . . . . . . . . . . . . . . . . . . . . . . . . . . . . . . . . . . . . . . . . . . . . . . . . 11Using Threshold Maps . . . . . . . . . . . . . . . . . . . . . . . . . . . . . . . . . . . . . . . . . . . . . . . . 12Specifying Units on Time Options . . . . . . . . . . . . . . . . . . . . . . . . . . . . . . . . . . . . . . . 13
Viewing Results of a Comparison . . . . . . . . . . . . . . . . . . . . . . . . . . . . . . . . . . . . . . . . . . 14Viewing Log Files . . . . . . . . . . . . . . . . . . . . . . . . . . . . . . . . . . . . . . . . . . . . . . . . . . . . 14Generating Reports . . . . . . . . . . . . . . . . . . . . . . . . . . . . . . . . . . . . . . . . . . . . . . . . . . 15Viewing Comparisons in the Waveform Window . . . . . . . . . . . . . . . . . . . . . . . . . . . . 16
Getting Started with SimCompare. . . . . . . . . . . . . . . . . . . . . . . . . . . . . . 19
Comparing Two Databases with a Test Script . . . . . . . . . . . . . . . . . . . . . . . . . . . . . . . . . 19Comparing Two Databases with SimCompare and SimVision . . . . . . . . . . . . . . . . . . . . 20
Using SimCompare in Graphical Mode . . . . . . . . . . . . . . . . . . . . . . . . 25
Loading Simulation Data for a Comparison . . . . . . . . . . . . . . . . . . . . . . . . . . . . . . . . . . . 25Opening the SimCompare Manager Window . . . . . . . . . . . . . . . . . . . . . . . . . . . . . . . . . 25Performing an Absolute Comparison in the SimCompare Manager Window . . . . . . . . . 26Performing an Absolute Comparison with the Interleave Plug-in . . . . . . . . . . . . . . . . . . . 28Defining a Clock in the SimCompare Manager Window . . . . . . . . . . . . . . . . . . . . . . . . . 29Performing a Clocked Comparison in the SimCompare Manager Window . . . . . . . . . . . 29Performing a Stability Check in the SimCompare Manager Window . . . . . . . . . . . . . . . . 31Editing, Cloning, and Deleting Comparisons and Definitions . . . . . . . . . . . . . . . . . . . . . 33Defining a State Map in the SimCompare Manager Window . . . . . . . . . . . . . . . . . . . . . . 33Defining a Threshold Map in the SimCompare Manager Window . . . . . . . . . . . . . . . . . . 34Viewing Comparison Results in the Waveform Window . . . . . . . . . . . . . . . . . . . . . . . . . 35Saving and Restoring a SimCompare Session in Graphical Mode . . . . . . . . . . . . . . . . . 38
June 2012 3 Product Version 12.1
Using SimCompare
Using SimCompare Commands . . . . . . . . . . . . . . . . . . . . . . . . . . . . . . . . 41
Specifying Simulation Databases to Compare . . . . . . . . . . . . . . . . . . . . . . . . . . . . . . . . 41Converting Databases to SST2 Format . . . . . . . . . . . . . . . . . . . . . . . . . . . . . . . . . . . 42
Performing an Absolute Comparison with the compare Command . . . . . . . . . . . . . . . . . 42Specifying the Levels of Hierarchy to Compare . . . . . . . . . . . . . . . . . . . . . . . . . . . . . 43Specifying a Tolerance Window with the -pos, -neg, and -tol Options . . . . . . . . . . . . 43Specifying a Condition Expression with the -when Option . . . . . . . . . . . . . . . . . . . . . 44
Defining a Clock with the clkdef Command . . . . . . . . . . . . . . . . . . . . . . . . . . . . . . . . . . . 45Performing a Clocked Comparison with the clkcompare Command . . . . . . . . . . . . . . . . 46Performing a Stability Check with the stability Command . . . . . . . . . . . . . . . . . . . . . . . . 47Defining a State Map with the statemap Command . . . . . . . . . . . . . . . . . . . . . . . . . . . . 48Defining a Threshold Map with the threshold Command . . . . . . . . . . . . . . . . . . . . . . . . . 49Specifying a Y-Tolerance for Analog Signals . . . . . . . . . . . . . . . . . . . . . . . . . . . . . . . . . . 50Generating Comparison Reports . . . . . . . . . . . . . . . . . . . . . . . . . . . . . . . . . . . . . . . . . . . 50Saving and Restoring a SimCompare Session in Tcl Mode . . . . . . . . . . . . . . . . . . . . . . 53Using SimCompare Command Files in Tcl Mode . . . . . . . . . . . . . . . . . . . . . . . . . . . . . . 54
Using SimCompare in Batch Mode. . . . . . . . . . . . . . . . . . . . . . . . . . . . . 57
Running a Comparison from the Command Line . . . . . . . . . . . . . . . . . . . . . . . . . . . . . . 57Using Command Files . . . . . . . . . . . . . . . . . . . . . . . . . . . . . . . . . . . . . . . . . . . . . . . . . . . 57
Specifying Mulitple Command Files . . . . . . . . . . . . . . . . . . . . . . . . . . . . . . . . . . . . . . 58Controlling Comparison Settings . . . . . . . . . . . . . . . . . . . . . . . . . . . . . . . . . . . . . . . . 58
Setting up Regression Tests . . . . . . . . . . . . . . . . . . . . . . . . . . . . . . . . . . . . . . . . . . . . . . 59
Comparing Transactions . . . . . . . . . . . . . . . . . . . . . . . . . . . . . . . . . . . . . . . . . 61
Referencing Streams and Transactions . . . . . . . . . . . . . . . . . . . . . . . . . . . . . . . . . . . . . . 61Referencing Specific Transactions . . . . . . . . . . . . . . . . . . . . . . . . . . . . . . . . . . . . . . . 62The Attribute Exists Function . . . . . . . . . . . . . . . . . . . . . . . . . . . . . . . . . . . . . . . . . . . 63
How Attribute Values are Compared . . . . . . . . . . . . . . . . . . . . . . . . . . . . . . . . . . . . . . . . 63Comparing Transactions with SimCompare Commands . . . . . . . . . . . . . . . . . . . . . . . . . 64
Comparing Transactions with Different Type Names . . . . . . . . . . . . . . . . . . . . . . . . . 64Comparing Transactions with Different Attribute Names . . . . . . . . . . . . . . . . . . . . . . 64Comparing Transactions with Different Attribute Values . . . . . . . . . . . . . . . . . . . . . . . 66Viewing Transaction Comparison Results in the Report File . . . . . . . . . . . . . . . . . . . 67
Comparing Transactions in GUI Mode . . . . . . . . . . . . . . . . . . . . . . . . . . . . . . . . . . . . . . . 70
June 2012 4 Product Version 12.1
Using SimCompare
Defining a Transaction Type Map in the SimCompare Manager Window . . . . . . . . . . 73Defining an Attribute Name Map in the SimCompare Manager Window . . . . . . . . . . 74Defining an Attribute Value Map in the SimCompare Manager Window . . . . . . . . . . 76
June 2012 5 Product Version 12.1
Using SimCompare
June 2012 6 Product Version 12.1
Using SimCompare
Introduction to SimCompare
SimCompare is a comprehensive tool for comparing simulation results. SimCompare can compare simulation results from the same or different simulators across the entire design hierarchy, portions of the hierarchy, or single signals.
Video
See a demo: Signal Comparison Using SimCompare(with audio)
You can use SimCompare in many application areas to help verify and analyze your simulation results.
■ Verification applications:
❑ Compare simulations that you have performed at different levels of abstraction (RTL versus gate or behavioral versus RTL)
❑ Compare simulations before and after design optimizations (for speed, area, or power)
❑ Compare simulations before and after you make technology changes (shrink or vendor)
❑ Compare simulations that you have performed using different clock rates
❑ Compare different versions of your simulations for regression testing purposes
■ Test vector applications:
❑ Compare your best-case and worst-case timing simulations
❑ Compare simulations before and after you perform backannotation
❑ Compare simulations before and after you perform clock-tree insertion
■ Multi-simulator applications:
❑ Compare simulations that you have performed on different simulators
❑ Compare cycle-based and event-based simulations
June 2012 7 Product Version 12.1
Using SimCompareIntroduction to SimCompare
Using SimCompare
SimCompare runs in any of the following modes:
■ Graphical Mode
In graphical mode, you run SimCompare in the SimVision analysis environment. This gives you access to other SimVision debugging tools while running a comparison. You can specify comparisons in the SimCompare Manager window and view simulation results in the Waveform window. The Comparison Results sidebar lets you choose the results that you want to view.
While graphical mode provides a visual user interface, a good understanding of the SimCompare commands is important to use the tool effectively.
■ Tcl Command Mode
The SimCompare Tcl command interpreter is helpful when developing comparisons. You can find out immediately whether the commands you issue are syntactically correct and whether they produce the desired results.
■ Batch Mode
In batch mode, you specify the databases, signals, and options for the comparison directly on the simcompare command-line, or place them in a command file. Batch mode is useful for regression testing, when you can run a series of tests overnight and examine the results the next day.
Regardless of the mode you choose, SimCompare takes as input either one or two databases containing the simulation data that you want to compare. You can also specify a command file, which contains SimCompare Tcl commands. SimCompare runs these commands at startup. SimCompare logs each command that you run, and it can generate a report of the comparison results in several formats.
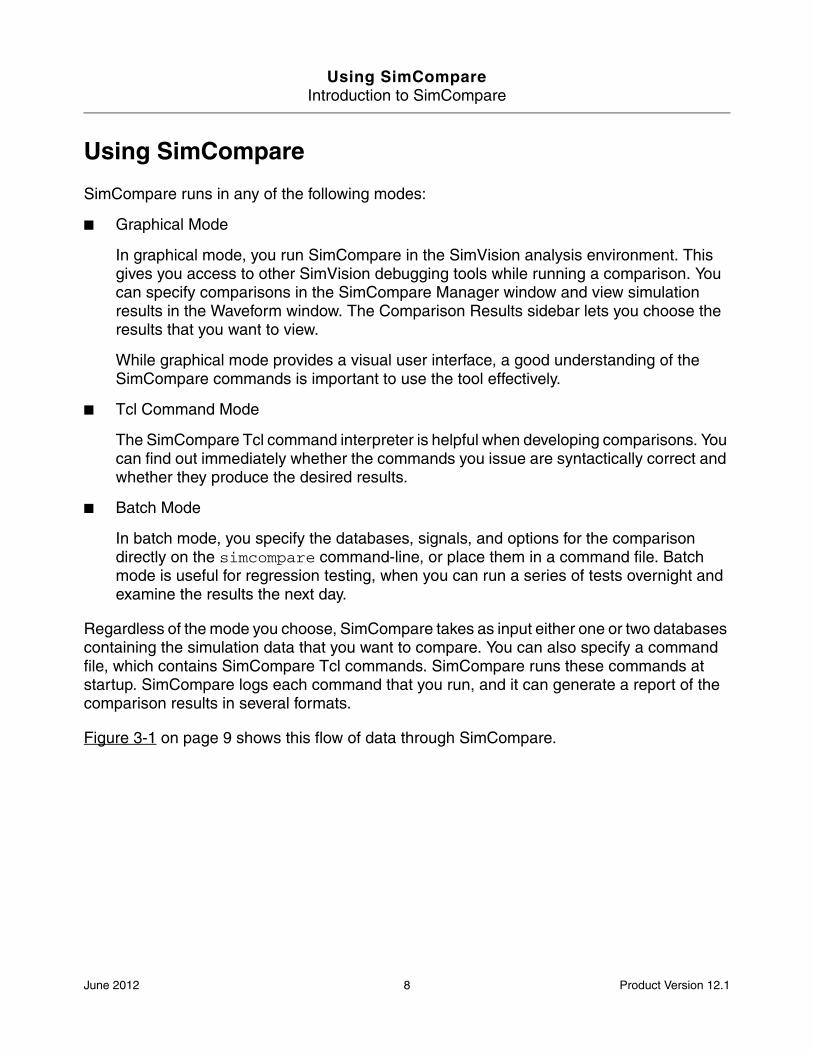
Figure 3-1 on page 9 shows this flow of data through SimCompare.
June 2012 8 Product Version 12.1
Using SimCompareIntroduction to SimCompare
Figure 3-1 Flow of Data through SimCompare
Types of Comparisons
If all you want to do is compare two signals in the SimVision Waveform window, select them and choose Edit – Create – Quick Diff. SimVision highlights in red the areas of the waveforms that do not match.
Use SimCompare when you want to perform more complex comparisons. SimCompare can perform the following types of comparison:
■ Absolute Comparisons
An absolute comparison finds all of the differences between two signals at any point in time. An absolute comparison is an event-matching comparison. That is, every event in the golden simulation must match an event in the test simulation. You can specify a tolerance window to facilitate this type of match.
Golden Database Test DatabaseOptional
CommandFile
Optional
SimCompare
Comparison Waveforms
LogFile
ComparisonReport
June 2012 9 Product Version 12.1
Using SimCompareIntroduction to SimCompare
■ Clocked Comparisons
A clocked comparison performs a clock-edge sample comparison and stability check. It checks signal values only on clock edges, either the positive edge, negative edge, both edges, or the union of a set of edges that you specify. This is useful for comparing signals that have many uninteresting transitions before stabilizing.
■ Stability Checks
A stability check checks for setup and hold violations without comparing the signal values.
Specifying Data for a Comparison
When you probe signals during simulation, the signal value transitions are recorded in a database. SimCompare uses the information in the database to perform the comparison.
SimCompare can accept databases in either SST2 or VCD format. If the database is in VCD format, SimCompare converts it to SST2 format before performing the comparison.
You can specify one or two simulation databases for the comparison:
■ When you specify two databases, one is the golden database containing the expected signal values, the other is the test database whose signal values are compared to the corresponding signals in the golden database.
■ When you specify one database, SimCompare compares two specified signals in that database.
Referring to the Signals That You Want to Compare
You refer to databases by their logical names. The logical name g is the default for the golden database; t is the default for the test dataabse.
When you are comparing two signals that have the same name in both the golden and test databases, you do not need to specify the database logical name; you specify only the signal’s hierarchical name. For example, the following compares top.s1 in the golden database to top.s1 in the test database:
compare top.s1
If the signals have different names, SimCompare assumes that the first is the golden signal and the second is the test signal, unless you specify the database logical name. For example, the following compares top.sig1 in the golden database to test.signalA in the test database:
June 2012 10 Product Version 12.1
Using SimCompareIntroduction to SimCompare
compare top.sig1 test.signalA
If you want SimCompare to treat the test database as the golden database, and vice versa, you would specify the database logical name, as follows:
compare t::top.sig1 g::test.signalA
The first signal specified on the command line is treated as the golden signal; the second is treated as the test signal.
When comparing two signals in the same database, you need to include the database logical name only if you have loaded more than one database into SimCompare. For example:
compare t::signalA t::signalB
Always place the :: separator between the logical name and the hierarchical signal name.
Using Expressions in a Comparison
You can use an expression anywhere a signal name occurs in a comparison. An expression can perform arithmetic or logical operations, such as adding signals together before performing the comparison.
When you run SimCompare in batch or Tcl mode, you specify an expression as an argument to a SimCompare Tcl comparison command. When you run SimCompare in the SimVision analysis environment, you can use the Expression Calculator to create the expression. The Expression Calculator guides you through the process of defining the expression and ensures that it is syntactically correct.
For information on the operators that you can use in an expression, see the Expression Calculator Quick Reference. For information on the Expression Calculator, see “Using the Expression Calculator”.
Using State Maps
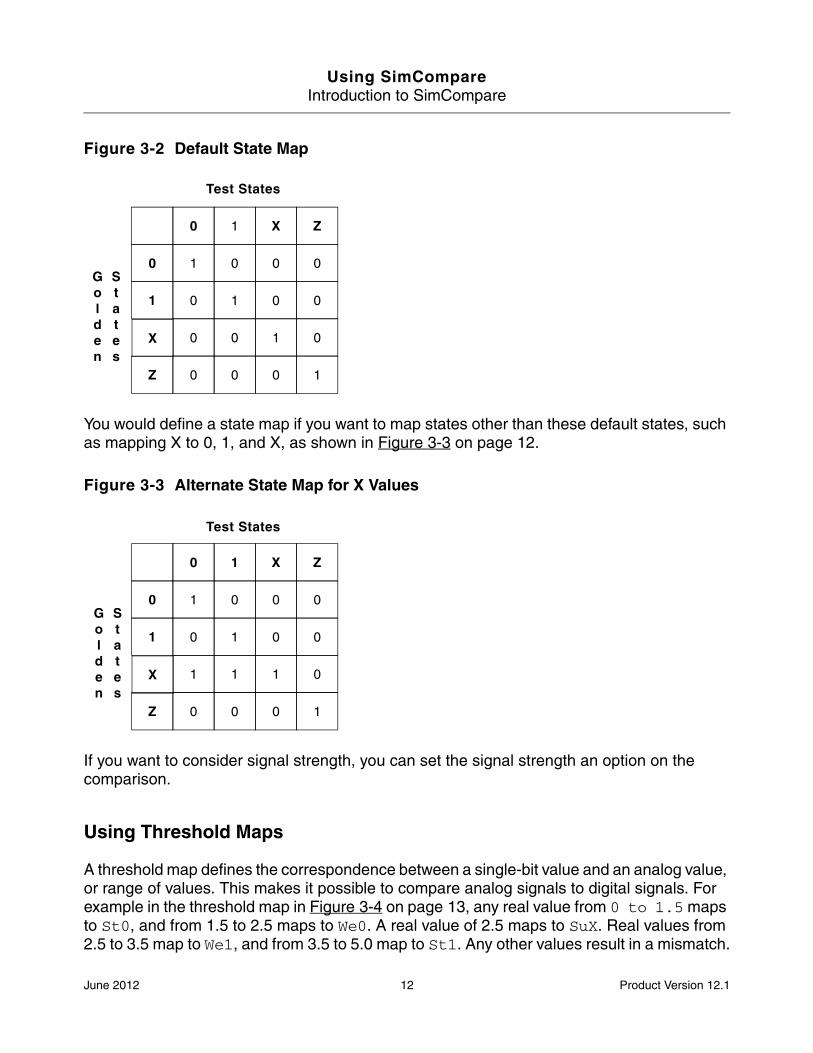
A state map is a table that defines pairs of values that match. A value of 1 in the table body tells SimCompare to treat the two corresponding values as a match; a value of 0 in the table body tells SimCompare to treat the two corresponding values as a mismatch.
Each state map usually has at least one 1 in each row, because each golden state probably matches at least one test state. For example, the state map in Figure 3-2 on page 12 specifies that 0 maps to 0, 1 maps to 1, X maps to X, and Z maps to Z in the golden and test signals that are being compared. This is the default state mapping; values must match exactly, but strength is ignored.
June 2012 11 Product Version 12.1
Using SimCompareIntroduction to SimCompare
Figure 3-2 Default State Map
You would define a state map if you want to map states other than these default states, such as mapping X to 0, 1, and X, as shown in Figure 3-3 on page 12.
Figure 3-3 Alternate State Map for X Values
If you want to consider signal strength, you can set the signal strength an option on the comparison.
Using Threshold Maps
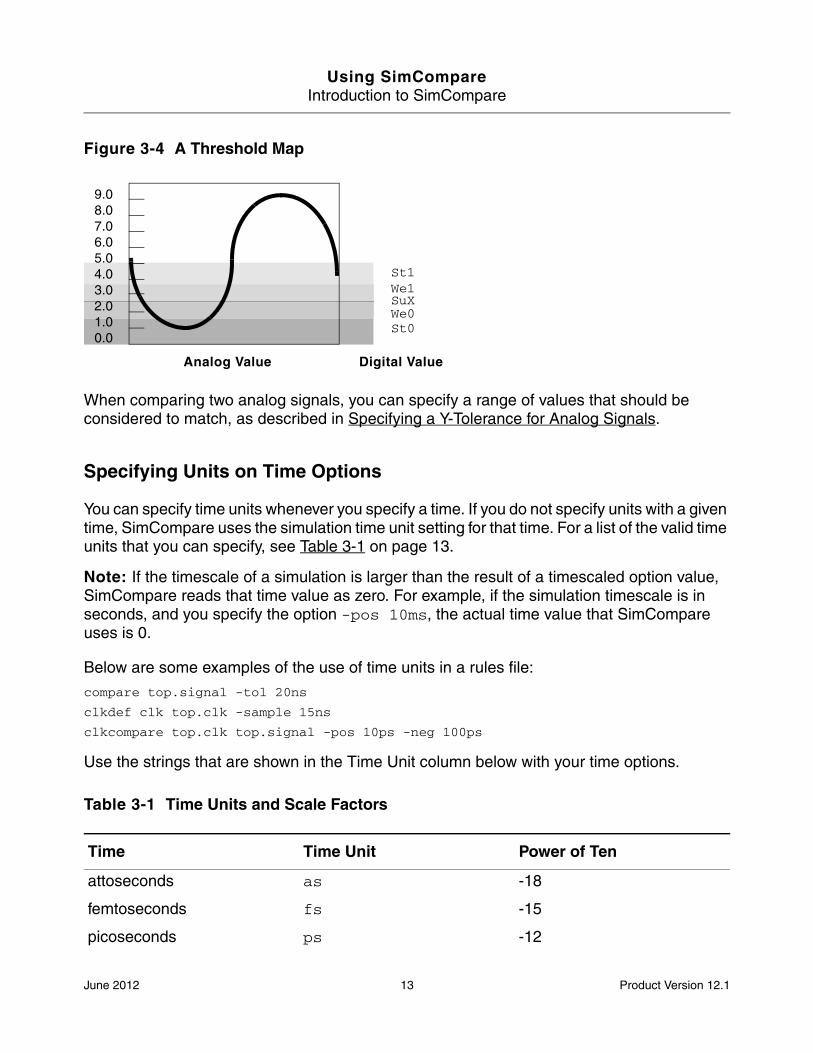
A threshold map defines the correspondence between a single-bit value and an analog value, or range of values. This makes it possible to compare analog signals to digital signals. For example in the threshold map in Figure 3-4 on page 13, any real value from 0 to 1.5 maps to St0, and from 1.5 to 2.5 maps to We0. A real value of 2.5 maps to SuX. Real values from 2.5 to 3.5 map to We1, and from 3.5 to 5.0 map to St1. Any other values result in a mismatch.
X Z
0
X
Z
1
10
1 0 0 0
0 1 0 0
0 0 1 0
0 0 0 1
Golden
States
Test States
X Z
0
X
Z
1
10
1 0 0 0
0 1 0 0
1 1 1 0
0 0 0 1
Golden
States
Test States
June 2012 12 Product Version 12.1
Using SimCompareIntroduction to SimCompare
Figure 3-4 A Threshold Map
When comparing two analog signals, you can specify a range of values that should be considered to match, as described in Specifying a Y-Tolerance for Analog Signals.
Specifying Units on Time Options
You can specify time units whenever you specify a time. If you do not specify units with a given time, SimCompare uses the simulation time unit setting for that time. For a list of the valid time units that you can specify, see Table 3-1 on page 13.
Note: If the timescale of a simulation is larger than the result of a timescaled option value, SimCompare reads that time value as zero. For example, if the simulation timescale is in seconds, and you specify the option -pos 10ms, the actual time value that SimCompare uses is 0.
Below are some examples of the use of time units in a rules file:
compare top.signal -tol 20ns
clkdef clk top.clk -sample 15ns
clkcompare top.clk top.signal -pos 10ps -neg 100ps
Use the strings that are shown in the Time Unit column below with your time options.
Table 3-1 Time Units and Scale Factors
Time Time Unit Power of Ten
attoseconds as -18
femtoseconds fs -15
picoseconds ps -12
9.08.07.06.05.04.03.02.01.00.0
St0
St1
SuX
Digital ValueAnalog Value
We0
We1
June 2012 13 Product Version 12.1
Using SimCompareIntroduction to SimCompare
Viewing Results of a Comparison
SimCompare produces log files, reports, and comparison waveforms to help you analyze the results of a comparison.
Viewing Log Files
When running SimCompare in Tcl and batch modes, the log file keeps track of all the SimCompare commands that were performed, and any messages returned by SimCompare.
For example:
sc> golden golden.trnsc> test test.trnsc> compare .Summary of compare set c1 (hierarchical): Successful compares: 102/114 Hierarchy miscompares: 1 Expression miscompares: 77 Max error limit reached: 3/114
nanoseconds ns -9
microseconds us -6
milliseconds ms -3
centiseconds cs -2
deciseconds ds -1
seconds s 0
decaseconds Ds 1
hectoseconds hs 2
kiloseconds ks 3
megaseconds Ms 6
gigaseconds Gs 9
teraseconds Ts 12
petaseconds Ps 15
exaseconds Es 18
Time Time Unit Power of Ten
June 2012 14 Product Version 12.1
Using SimCompareIntroduction to SimCompare
By default, SimCompare names the log file simcompare.log. You can specify a different log file name with the -logfile option on the simcompare command.
Note: The log file does not record commands that you perform in graphical mode.
Generating Reports
When running SimCompare in Tcl or batch mode, you can request a report of the comparison results from a specific comparison, all comparisons that you have performed in the session, or a report of the most recent comparison.
SimCompare can produce reports in several formats. A summary report shows only the total number of comparisons, the number of hierarchy and expression miscompares, and the maximum error count reached during the comparison. For example:
Summary of compare set c1 (hierarchical): Successful compares: 102/114 Hierarchy miscompares: 1 Expression miscompares: 77 Max error limit reached: 3/114
A full report shows information about each comparison. For example, when the signal values match, the full report returns the following type of information:
Compare set name: c1:top.golden
Comparison parameters: Golden expression: g::top.golden Test expression: t::top.golden
Comparison summary: No problems found.
When the signals do not match, the report displays the following type of information:
Compare set name: c1:top.goodBus
Comparison parameters: Golden expression: g::top.goodBus Test expression: t::top.goodBus[0:2]
Comparison summary: Max error limit reached: Yes Expression miscompares: 10
Miscompare details: Error Type From To Golden/Test Values ------------------------------------------------- Miscompare 0ps 70ps 0 2 Miscompare 70ps 250ps 1 3 Miscompare 250ps 480ps 1 5 Miscompare 480ps 720ps 0 6 Miscompare 720ps 960ps 1
June 2012 15 Product Version 12.1
Using SimCompareIntroduction to SimCompare
7 Miscompare 960ps 1.05ns 0 2 Miscompare 1.05ns 1.42ns 0 4 Miscompare 1.68ns 2.22ns 1 7 Miscompare 2.22ns 2.5ns 0 4 Miscompare 2.5ns 2.57ns 0 2
SimCompare can report the results in either hierarchical order or time order.
■ In hierarchical order, SimCompare shows mismatches ordered according to the design hierarchy. When you view mismatches in hierarchical order, they may be clustered around a module or design unit, which can lead you to where a problem occurs in the design.
■ In time order, SimCompare shows mismatches in the order in which they occur over simulation time. When you view mismatches in time order, you can identify mismatches that are clustered in time. This can help you determine which error occurred first and possibly caused other mismatches. Time order is provided by the Comparescan report style.
Viewing Comparisons in the Waveform Window
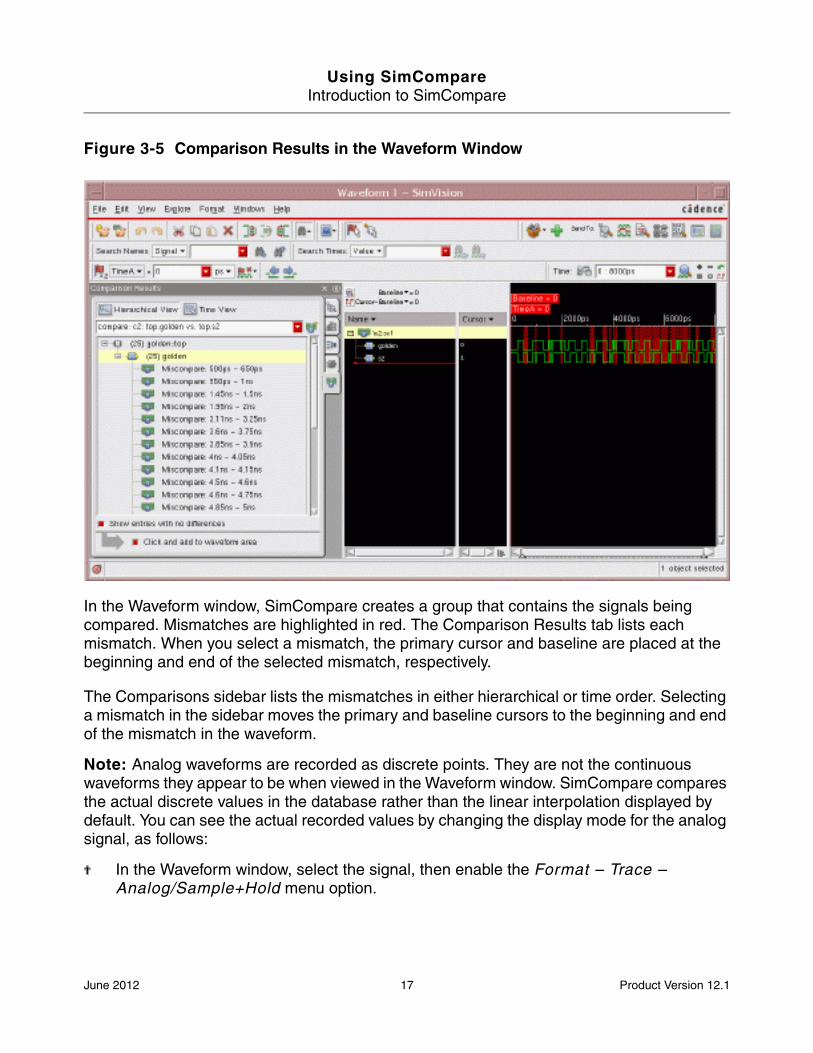
When you run SimCompare with SimVision, SimCompare can display comparison results in the Waveform window, as shown in Figure 3-5 on page 17.
June 2012 16 Product Version 12.1
Using SimCompareIntroduction to SimCompare
Figure 3-5 Comparison Results in the Waveform Window
In the Waveform window, SimCompare creates a group that contains the signals being compared. Mismatches are highlighted in red. The Comparison Results tab lists each mismatch. When you select a mismatch, the primary cursor and baseline are placed at the beginning and end of the selected mismatch, respectively.
The Comparisons sidebar lists the mismatches in either hierarchical or time order. Selecting a mismatch in the sidebar moves the primary and baseline cursors to the beginning and end of the mismatch in the waveform.
Note: Analog waveforms are recorded as discrete points. They are not the continuous waveforms they appear to be when viewed in the Waveform window. SimCompare compares the actual discrete values in the database rather than the linear interpolation displayed by default. You can see the actual recorded values by changing the display mode for the analog signal, as follows:
✟ In the Waveform window, select the signal, then enable the Format – Trace – Analog/Sample+Hold menu option.
June 2012 17 Product Version 12.1
Using SimCompareIntroduction to SimCompare
June 2012 18 Product Version 12.1
Using SimCompare
Getting Started with SimCompare
Suppose you have a golden database that contains simulation results that you know are correct. However, you must make some changes to the design and want to be sure these changes do not produce incorrect simulation data. You can use SimCompare to ensure the integrity of the simulation results.
This chapter shows how to use SimCompare in batch mode to detect when design changes produce different simulation results. It also shows how to use SimCompare with SimVision to locate the cause of those differences.
If you want to follow the steps described in this chapter, copy the example files to your working directory, as follows:
cd your_working_directorycp -r your_install_dir/doc/SimCompareUser/examples .
Note: your_working_directory refers to the directory in which you want to perform the comparison; your_install_dir refers to the top of your Cadence installation hierarchy.
Your working directory should contain the following files:
■ hello.v—Source code for the test design
■ golden.shm—Golden simulation results
■ run_test—Test script
■ ncsim.tcl—Simulator Tcl commands
■ simcompare.tcl—SimCompare Tcl commands
Comparing Two Databases with a Test Script
The run_test script compares a golden database to a test simulation database. The script first calls irun to compile, elaborate, and simulate the test design, as follows:
irun -access rwc -input ncsim.tcl hello.v
The input file, ncsim.tcl, contains simulator commands to create the test database, probe the signals in the design, and run the simulation, as follows:
June 2012 19 Product Version 12.1
Using SimCompareGetting Started with SimCompare
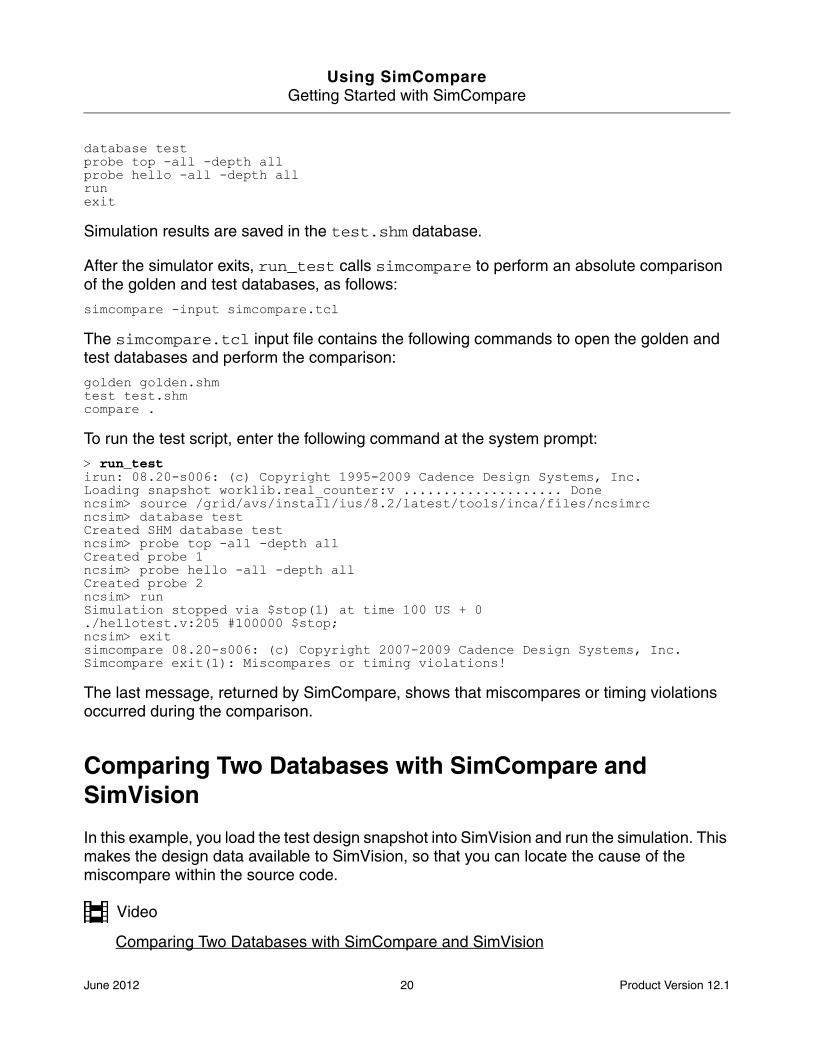
database testprobe top -all -depth allprobe hello -all -depth allrunexit
Simulation results are saved in the test.shm database.
After the simulator exits, run_test calls simcompare to perform an absolute comparison of the golden and test databases, as follows:
simcompare -input simcompare.tcl
The simcompare.tcl input file contains the following commands to open the golden and test databases and perform the comparison:
golden golden.shmtest test.shmcompare .
To run the test script, enter the following command at the system prompt:
> run_testirun: 08.20-s006: (c) Copyright 1995-2009 Cadence Design Systems, Inc.Loading snapshot worklib.real_counter:v .................... Donencsim> source /grid/avs/install/ius/8.2/latest/tools/inca/files/ncsimrcncsim> database testCreated SHM database testncsim> probe top -all -depth allCreated probe 1ncsim> probe hello -all -depth allCreated probe 2ncsim> runSimulation stopped via $stop(1) at time 100 US + 0./hellotest.v:205 #100000 $stop;ncsim> exitsimcompare 08.20-s006: (c) Copyright 2007-2009 Cadence Design Systems, Inc.Simcompare exit(1): Miscompares or timing violations!
The last message, returned by SimCompare, shows that miscompares or timing violations occurred during the comparison.
Comparing Two Databases with SimCompare and SimVision
In this example, you load the test design snapshot into SimVision and run the simulation. This makes the design data available to SimVision, so that you can locate the cause of the miscompare within the source code.
Video
Comparing Two Databases with SimCompare and SimVision
June 2012 20 Product Version 12.1
Using SimCompareGetting Started with SimCompare
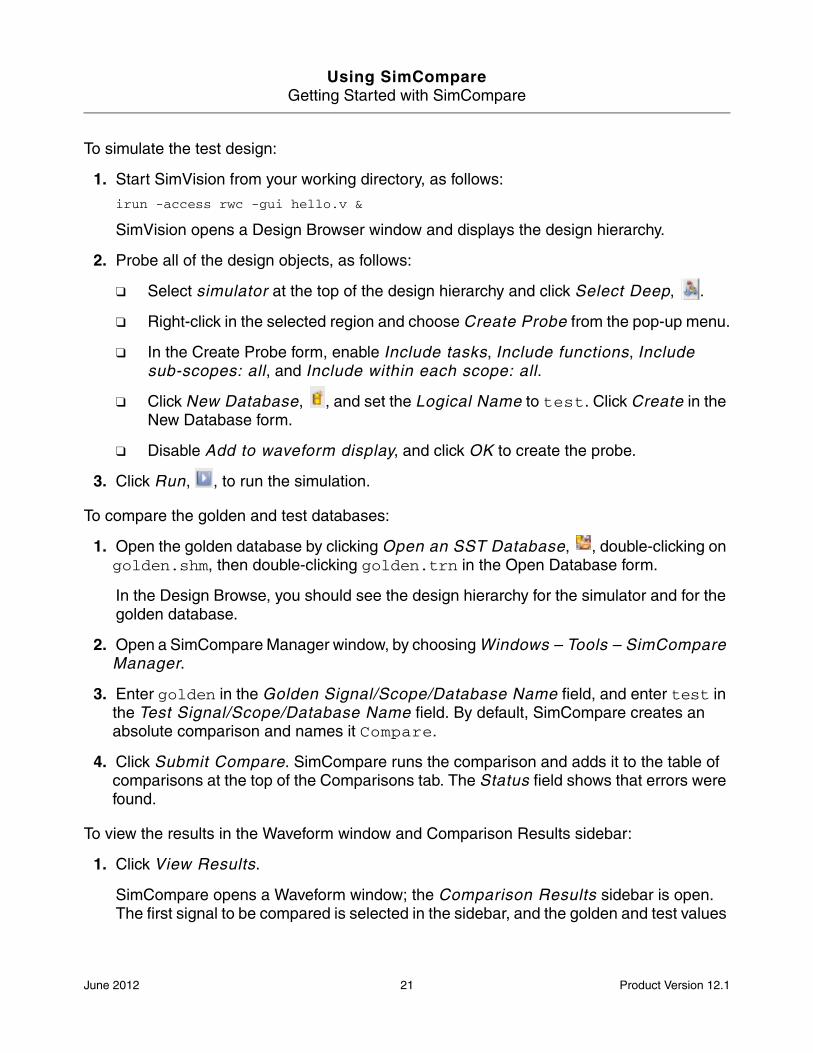
To simulate the test design:
1. Start SimVision from your working directory, as follows:
irun -access rwc -gui hello.v &
SimVision opens a Design Browser window and displays the design hierarchy.
2. Probe all of the design objects, as follows:
❑ Select simulator at the top of the design hierarchy and click Select Deep, .
❑ Right-click in the selected region and choose Create Probe from the pop-up menu.
❑ In the Create Probe form, enable Include tasks, Include functions, Include sub-scopes: all, and Include within each scope: all.
❑ Click New Database, , and set the Logical Name to test. Click Create in the New Database form.
❑ Disable Add to waveform display, and click OK to create the probe.
3. Click Run, , to run the simulation.
To compare the golden and test databases:
1. Open the golden database by clicking Open an SST Database, , double-clicking on golden.shm, then double-clicking golden.trn in the Open Database form.
In the Design Browse, you should see the design hierarchy for the simulator and for the golden database.
2. Open a SimCompare Manager window, by choosing Windows – Tools – SimCompare Manager.
3. Enter golden in the Golden Signal/Scope/Database Name field, and enter test in the Test Signal/Scope/Database Name field. By default, SimCompare creates an absolute comparison and names it Compare.
4. Click Submit Compare. SimCompare runs the comparison and adds it to the table of comparisons at the top of the Comparisons tab. The Status field shows that errors were found.
To view the results in the Waveform window and Comparison Results sidebar:
1. Click View Results.
SimCompare opens a Waveform window; the Comparison Results sidebar is open. The first signal to be compared is selected in the sidebar, and the golden and test values
June 2012 21 Product Version 12.1
Using SimCompareGetting Started with SimCompare
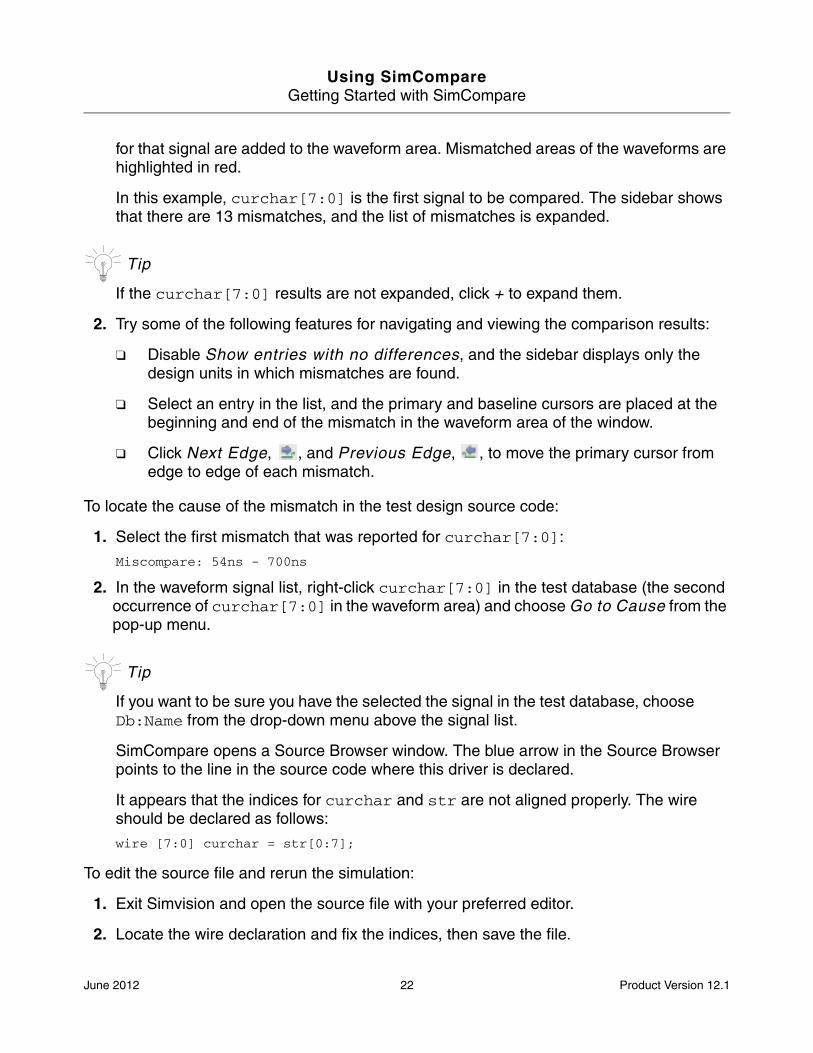
for that signal are added to the waveform area. Mismatched areas of the waveforms are highlighted in red.
In this example, curchar[7:0] is the first signal to be compared. The sidebar shows that there are 13 mismatches, and the list of mismatches is expanded.
Tip
If the curchar[7:0] results are not expanded, click + to expand them.
2. Try some of the following features for navigating and viewing the comparison results:
❑ Disable Show entries with no differences, and the sidebar displays only the design units in which mismatches are found.
❑ Select an entry in the list, and the primary and baseline cursors are placed at the beginning and end of the mismatch in the waveform area of the window.
❑ Click Next Edge, , and Previous Edge, , to move the primary cursor from edge to edge of each mismatch.
To locate the cause of the mismatch in the test design source code:
1. Select the first mismatch that was reported for curchar[7:0]:
Miscompare: 54ns - 700ns
2. In the waveform signal list, right-click curchar[7:0] in the test database (the second occurrence of curchar[7:0] in the waveform area) and choose Go to Cause from the pop-up menu.
Tip
If you want to be sure you have the selected the signal in the test database, choose Db:Name from the drop-down menu above the signal list.
SimCompare opens a Source Browser window. The blue arrow in the Source Browser points to the line in the source code where this driver is declared.
It appears that the indices for curchar and str are not aligned properly. The wire should be declared as follows:
wire [7:0] curchar = str[0:7];
To edit the source file and rerun the simulation:
1. Exit Simvision and open the source file with your preferred editor.
2. Locate the wire declaration and fix the indices, then save the file.
June 2012 22 Product Version 12.1
Using SimCompareGetting Started with SimCompare
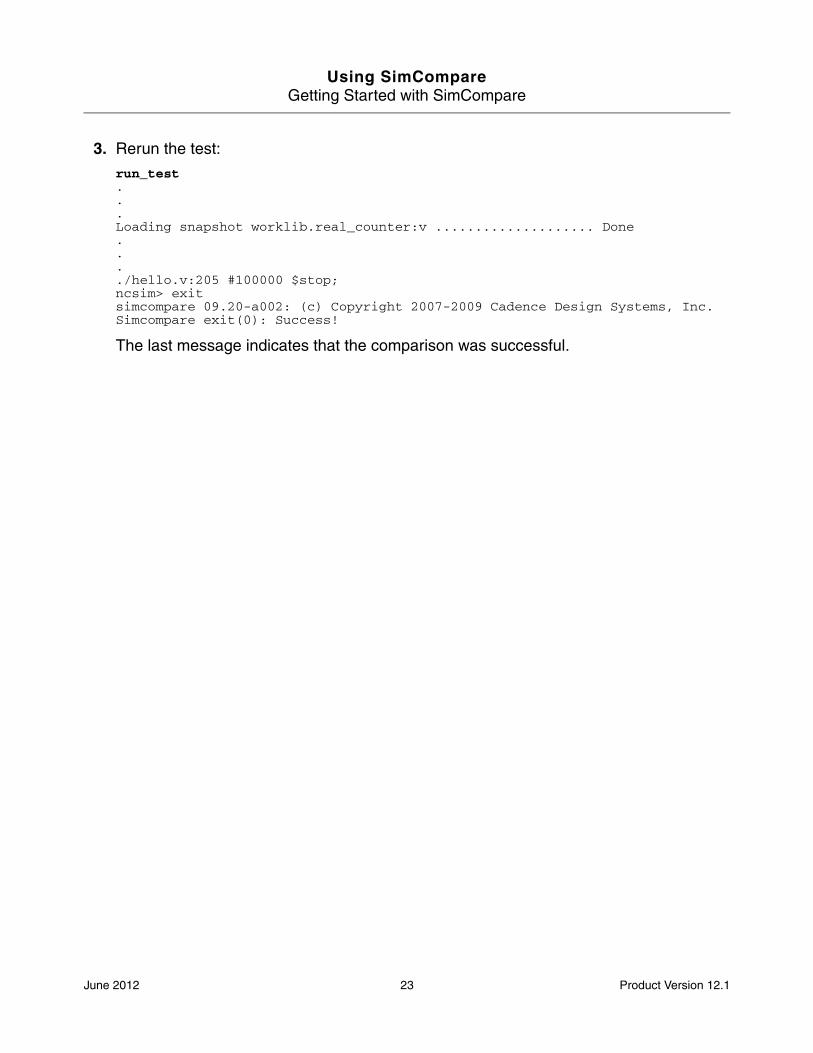
3. Rerun the test:
run_test...Loading snapshot worklib.real_counter:v .................... Done..../hello.v:205 #100000 $stop;ncsim> exitsimcompare 09.20-a002: (c) Copyright 2007-2009 Cadence Design Systems, Inc.Simcompare exit(0): Success!
The last message indicates that the comparison was successful.
June 2012 23 Product Version 12.1

Using SimCompareGetting Started with SimCompare
June 2012 24 Product Version 12.1
Using SimCompare
Using SimCompare in Graphical Mode
To run SimCompare in graphical mode, start SimVision in post-processing mode, as follows:
simvision
When it starts, SimVision displays the Design Browser window. The SimCompare tab is in the Design Browser sidebar, and the Windows – Tools menu lets you open a SimCompare Manager window.
Loading Simulation Data for a Comparison
Open each database that you want to compare.
To open a simulation database:
➤ Choose File – Open Database, or click Open an SST2 Database, , and select the database from the Open Database form.
Opening the SimCompare Manager Window
To open the SimCompare Manager window:
➤ Choose Windows – Tools – SimCompare Manager. The SimCompare Manager window opens, as shown in Figure 5-1 on page 26.
June 2012 25 Product Version 12.1
Using SimCompareUsing SimCompare in Graphical Mode
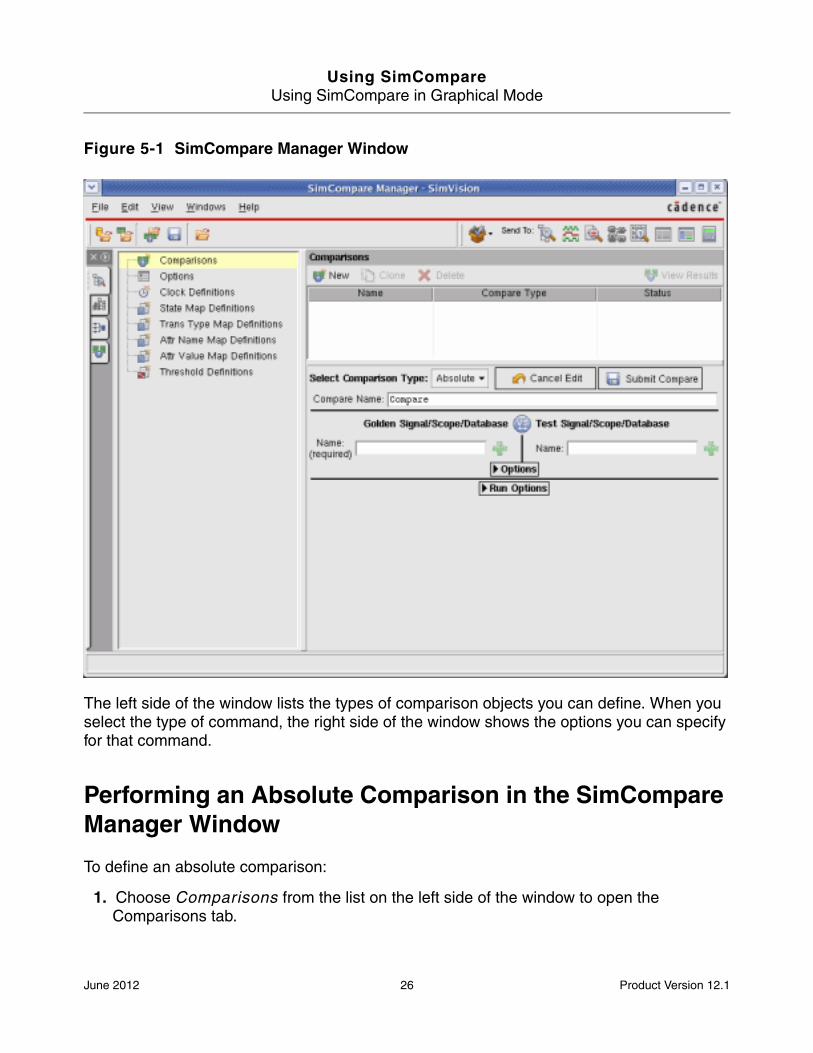
Figure 5-1 SimCompare Manager Window
The left side of the window lists the types of comparison objects you can define. When you select the type of command, the right side of the window shows the options you can specify for that command.
Performing an Absolute Comparison in the SimCompare Manager Window
To define an absolute comparison:
1. Choose Comparisons from the list on the left side of the window to open the Comparisons tab.
June 2012 26 Product Version 12.1
Using SimCompareUsing SimCompare in Graphical Mode
2. If a comparison definition is already displayed in the edit area of the Comparisons tab, click New, . This clears the edit fields, and the comparison is assigned a name.
3. Edit the Comparison Name, if you do not want to use the default name.
4. Choose Absolute from the Select Comparison Type menu.
5. In the GoldenSignal/Scope/Database field, enter the name of the golden signal that you want to compare, or select the scope in the Design Browser and click Add, .
6. In the Test/Signal/Scope/Database field, enter the name of the test signal, or select the scope in the Design Browser and click Add, .
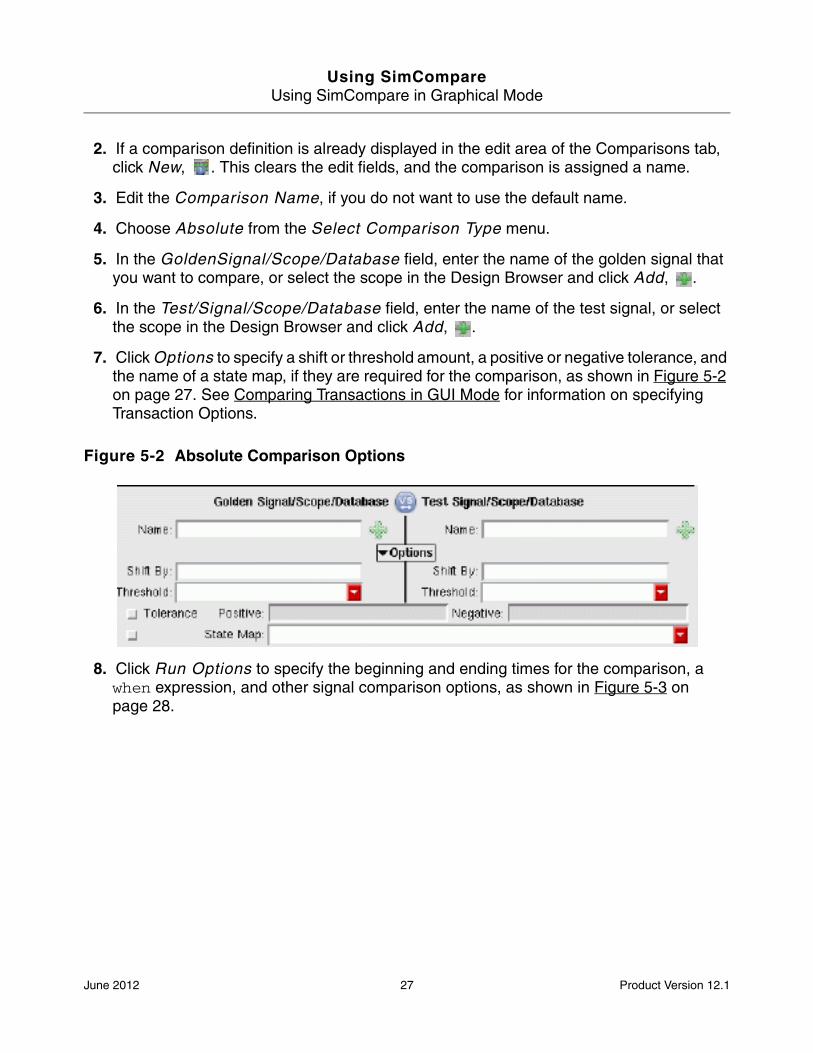
7. Click Options to specify a shift or threshold amount, a positive or negative tolerance, and the name of a state map, if they are required for the comparison, as shown in Figure 5-2 on page 27. See Comparing Transactions in GUI Mode for information on specifying Transaction Options.
Figure 5-2 Absolute Comparison Options
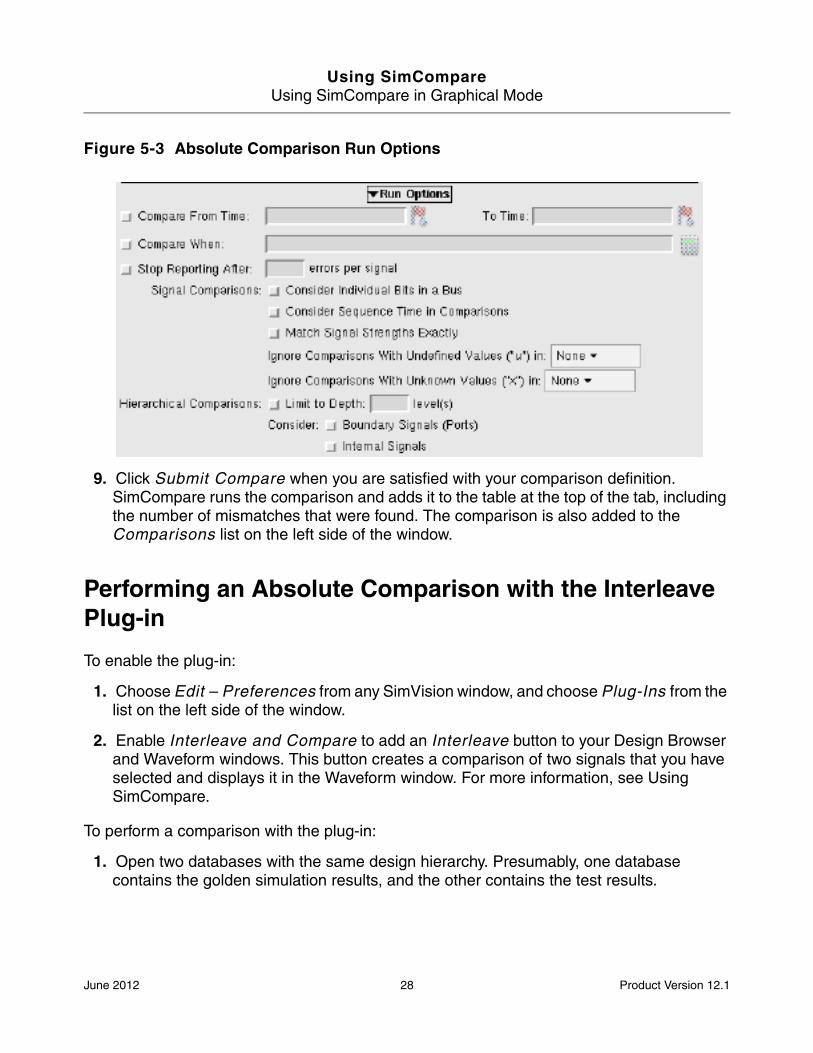
8. Click Run Options to specify the beginning and ending times for the comparison, a when expression, and other signal comparison options, as shown in Figure 5-3 on page 28.
June 2012 27 Product Version 12.1
Using SimCompareUsing SimCompare in Graphical Mode
Figure 5-3 Absolute Comparison Run Options
9. Click Submit Compare when you are satisfied with your comparison definition. SimCompare runs the comparison and adds it to the table at the top of the tab, including the number of mismatches that were found. The comparison is also added to the Comparisons list on the left side of the window.
Performing an Absolute Comparison with the Interleave Plug-in
To enable the plug-in:
1. Choose Edit – Preferences from any SimVision window, and choose Plug-Ins from the list on the left side of the window.
2. Enable Interleave and Compare to add an Interleave button to your Design Browser and Waveform windows. This button creates a comparison of two signals that you have selected and displays it in the Waveform window. For more information, see Using SimCompare.
To perform a comparison with the plug-in:
1. Open two databases with the same design hierarchy. Presumably, one database contains the golden simulation results, and the other contains the test results.
June 2012 28 Product Version 12.1
Using SimCompareUsing SimCompare in Graphical Mode
2. In the Design Browser window or Design Browser sidebar of the Waveform window, select the name of the signal that you want to compare. You need to select the signal in only on database, if the signal has the same name in both databases.
3. Click Interleave. SimCompare performs the comparison and displays the results in the Waveform window. It also adds the comparison to the SimCompare Manager window, so that you can modify and rerun the comparison, as described in Performing an Absolute Comparison in the SimCompare Manager Window.
Defining a Clock in the SimCompare Manager Window
To create a clock definition:
1. Select Clock Definitions from the list on the left side of the window to open the Clock Definitions tab.
2. If a clock definition is already displayed in the edit area of the tab, click New, . This clears the edit fields, and the clock definition is assigned a name.
3. Edit Clock Definition Name, or let SimCompare assign a unique name to it.
4. Specify the name of the clock signal. If you have selected the signal in another SimVision window, you can add it to the Clock Signal Name field by clicking Add, .
5. You can also specify a clock shift, a setup time, a hold time, and choose the clock edge on which the comparison is made.
6. Click Save Changes when you are satisfied with your clock definition. SimCompare adds it to the table at the top of the tab and to the Clock Definitions list on the left side of the window.
Performing a Clocked Comparison in the SimCompare Manager Window
To define a clocked comparison:
1. Choose Comparisons from the list on the left side of the window to open the Comparisons tab.
2. If a comparison definition is already displayed in the edit area of the Comparisons tab, click New, . This clears the edit fields, and the comparison is assigned a name.
3. Edit the Comparison Name, if you do not want to use the default name.
June 2012 29 Product Version 12.1
Using SimCompareUsing SimCompare in Graphical Mode
4. From the Select Comparison Type menu, choose Clocked.
5. Enter the names of the golden and test signals, or signal expressions.
6. Click on the Clock field and specify the clock signal, or choose a clock from the list of clock definitions that you have created. (See Defining a Clock in the SimCompare Manager Window.)
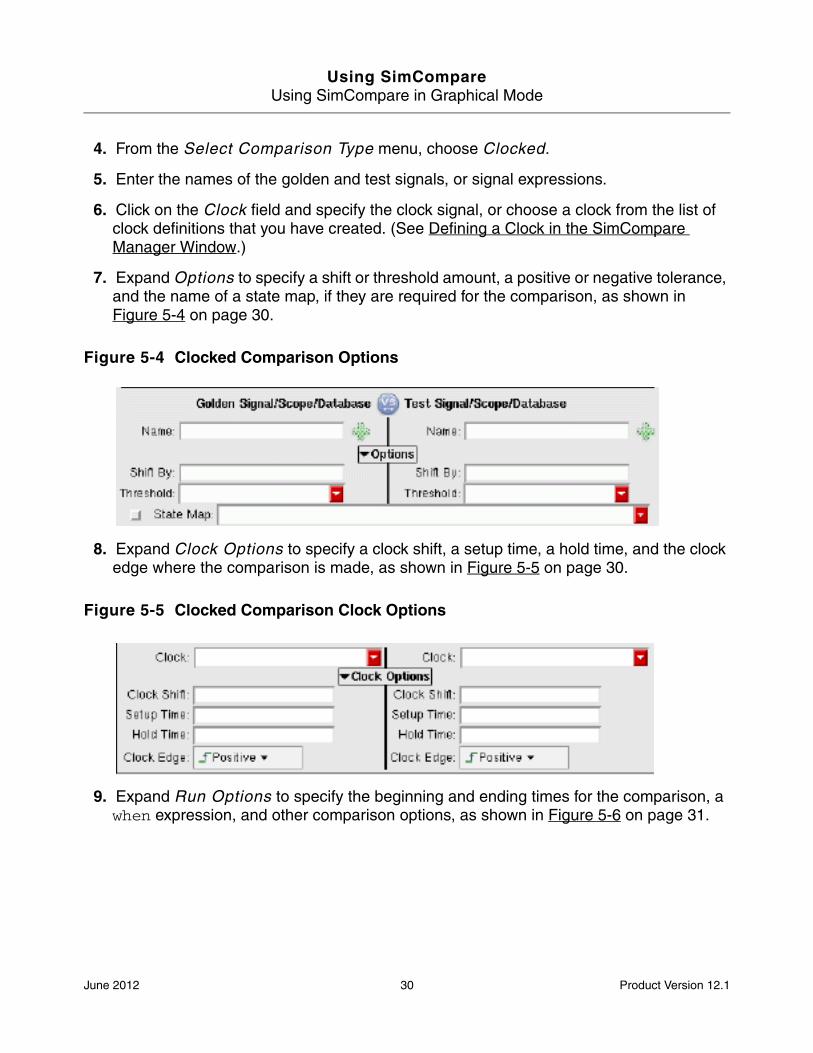
7. Expand Options to specify a shift or threshold amount, a positive or negative tolerance, and the name of a state map, if they are required for the comparison, as shown in Figure 5-4 on page 30.
Figure 5-4 Clocked Comparison Options
8. Expand Clock Options to specify a clock shift, a setup time, a hold time, and the clock edge where the comparison is made, as shown in Figure 5-5 on page 30.
Figure 5-5 Clocked Comparison Clock Options
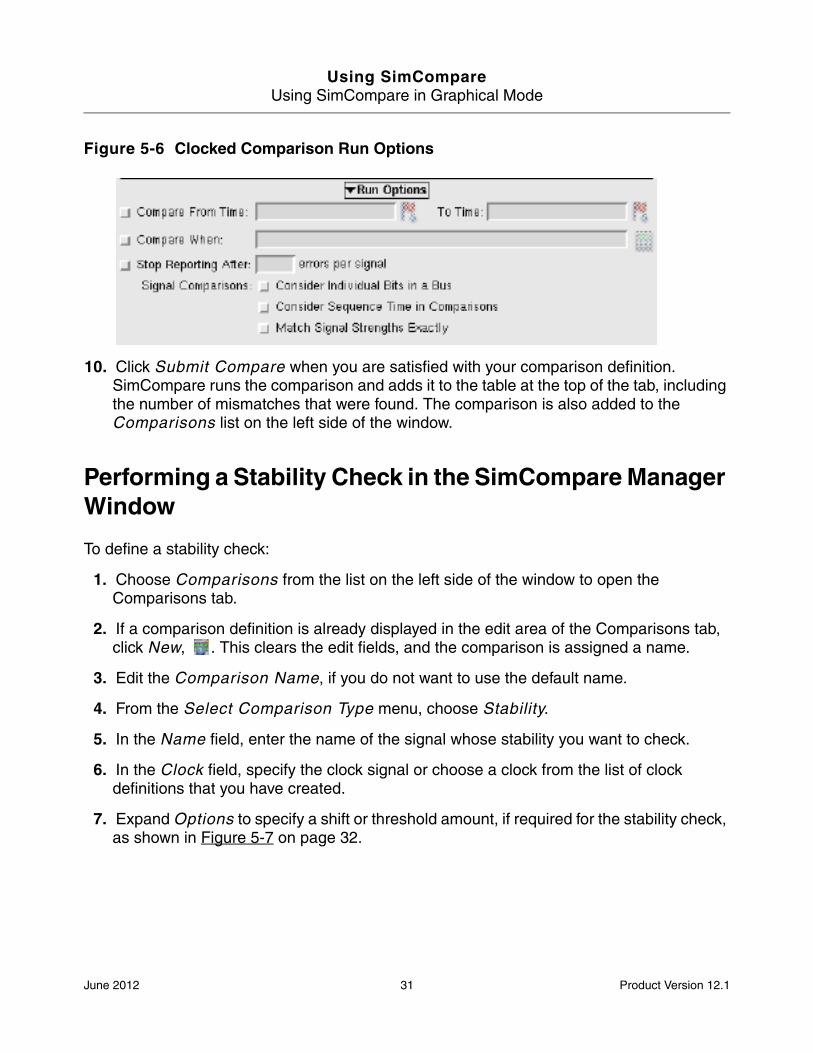
9. Expand Run Options to specify the beginning and ending times for the comparison, a when expression, and other comparison options, as shown in Figure 5-6 on page 31.
June 2012 30 Product Version 12.1
Using SimCompareUsing SimCompare in Graphical Mode
Figure 5-6 Clocked Comparison Run Options
10. Click Submit Compare when you are satisfied with your comparison definition. SimCompare runs the comparison and adds it to the table at the top of the tab, including the number of mismatches that were found. The comparison is also added to the Comparisons list on the left side of the window.
Performing a Stability Check in the SimCompare Manager Window
To define a stability check:
1. Choose Comparisons from the list on the left side of the window to open the Comparisons tab.
2. If a comparison definition is already displayed in the edit area of the Comparisons tab, click New, . This clears the edit fields, and the comparison is assigned a name.
3. Edit the Comparison Name, if you do not want to use the default name.
4. From the Select Comparison Type menu, choose Stability.
5. In the Name field, enter the name of the signal whose stability you want to check.
6. In the Clock field, specify the clock signal or choose a clock from the list of clock definitions that you have created.
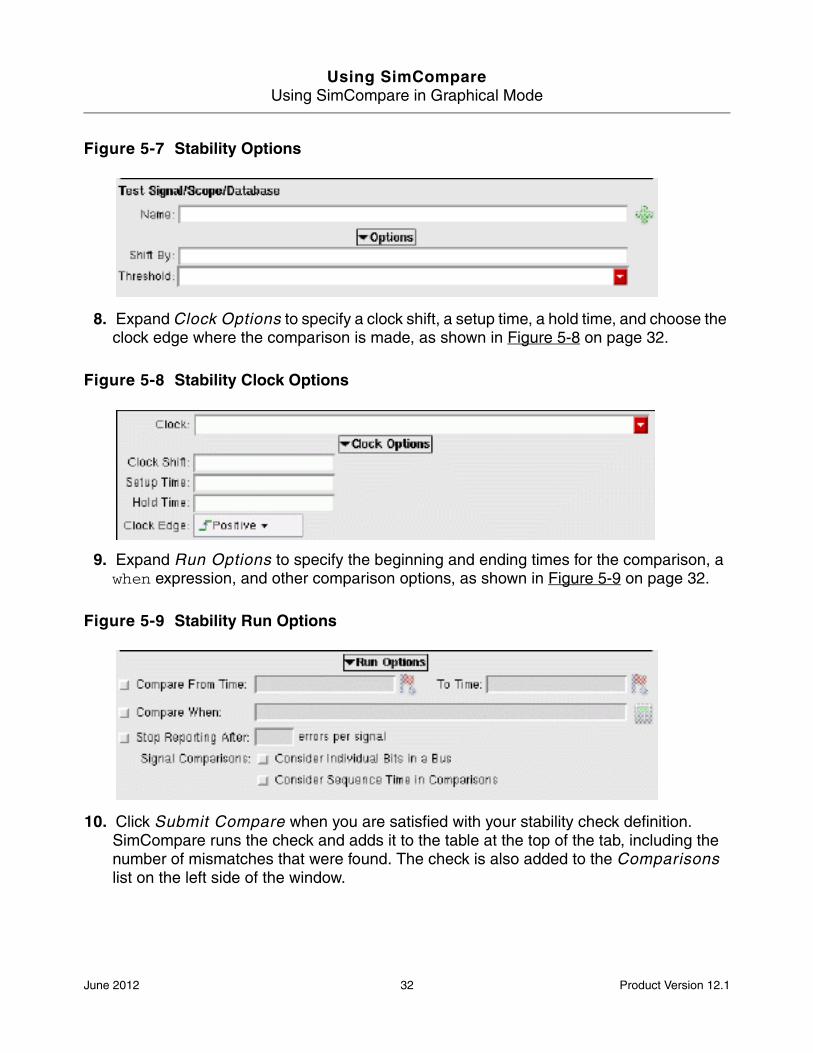
7. Expand Options to specify a shift or threshold amount, if required for the stability check, as shown in Figure 5-7 on page 32.
June 2012 31 Product Version 12.1
Using SimCompareUsing SimCompare in Graphical Mode
Figure 5-7 Stability Options
8. Expand Clock Options to specify a clock shift, a setup time, a hold time, and choose the clock edge where the comparison is made, as shown in Figure 5-8 on page 32.
Figure 5-8 Stability Clock Options
9. Expand Run Options to specify the beginning and ending times for the comparison, a when expression, and other comparison options, as shown in Figure 5-9 on page 32.
Figure 5-9 Stability Run Options
10. Click Submit Compare when you are satisfied with your stability check definition. SimCompare runs the check and adds it to the table at the top of the tab, including the number of mismatches that were found. The check is also added to the Comparisons list on the left side of the window.
June 2012 32 Product Version 12.1
Using SimCompareUsing SimCompare in Graphical Mode
Editing, Cloning, and Deleting Comparisons and Definitions
You can edit, clone, or delete any comparison, or clock, state map, threshold map, attribute value map, attribute name map, or transaction type map definition.
To edit a comparison or definition:
1. Select the object you want to edit, either from the list on the left side of the window, or from the table in the tab area of the window, then click Begin Edit.
2. Make any changes you want, then click Submit.
To clone a comparison or definition:
1. Select the object you want to clone and click Clone.
2. Make any changes you want, then click Submit. The cloned definition is added to the at the top of the window. It is given the same name as the original, with the -N suffix, where N is a sequentially assigned number.
To delete a single comparison or definition:
➤ Select the object, either from the list on the left side of the window, or from the table in the tabbed area of the window, then click Delete, .
To delete multiple comparions or definitions:
1. In the table in the tabbed area of thd window, drag the mouse cursor or Shift-click to select objects that are adjacent to each other in the table. Ctrl-click to select objects that are not adjacent to each other.
2. Click Delete, .
Defining a State Map in the SimCompare Manager Window
To define a state map:
1. Choose State Map Definitions from the list on the left side of the window. SimCompare opens the State Map Definitions tab.
2. If a state map is already defined in the edit area of the Comparisons tab, click New, . This clears the edit fields, and the state map is assigned a name.
June 2012 33 Product Version 12.1
Using SimCompareUsing SimCompare in Graphical Mode
3. Edit the State Map Name, if you do not want to use the default name.
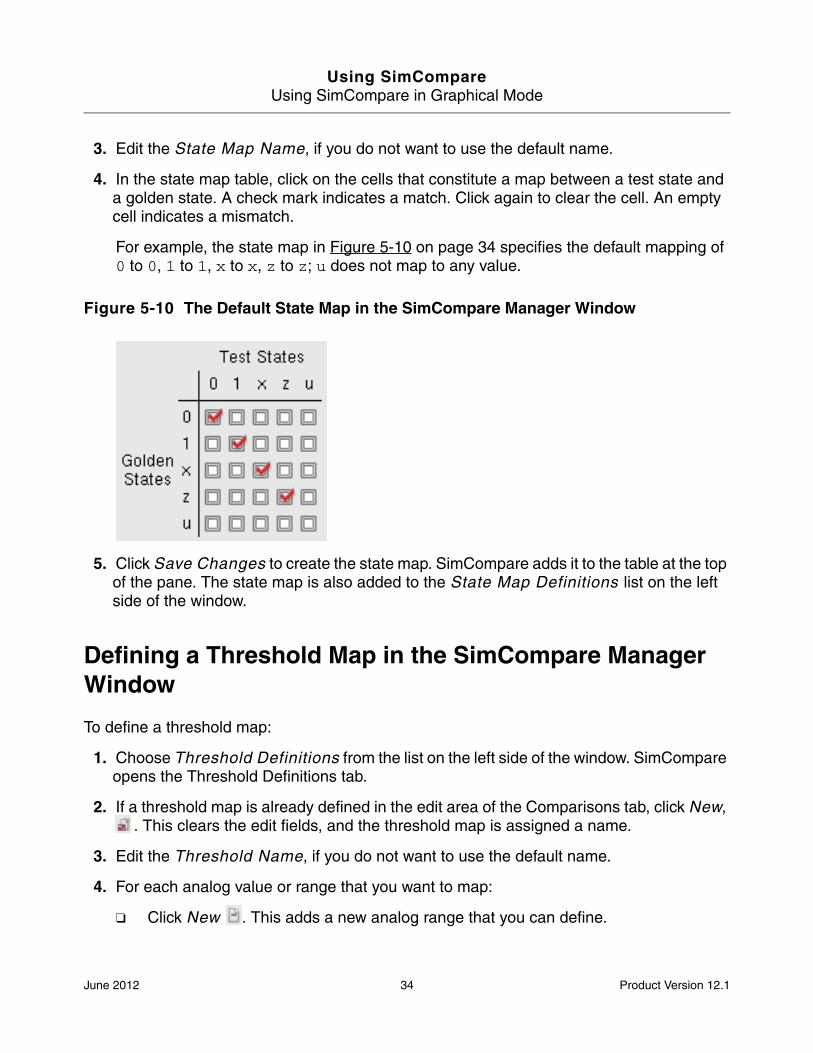
4. In the state map table, click on the cells that constitute a map between a test state and a golden state. A check mark indicates a match. Click again to clear the cell. An empty cell indicates a mismatch.
For example, the state map in Figure 5-10 on page 34 specifies the default mapping of 0 to 0, 1 to 1, x to x, z to z; u does not map to any value.
Figure 5-10 The Default State Map in the SimCompare Manager Window
5. Click Save Changes to create the state map. SimCompare adds it to the table at the top of the pane. The state map is also added to the State Map Definitions list on the left side of the window.
Defining a Threshold Map in the SimCompare Manager Window
To define a threshold map:
1. Choose Threshold Definitions from the list on the left side of the window. SimCompare opens the Threshold Definitions tab.
2. If a threshold map is already defined in the edit area of the Comparisons tab, click New, . This clears the edit fields, and the threshold map is assigned a name.
3. Edit the Threshold Name, if you do not want to use the default name.
4. For each analog value or range that you want to map:
❑ Click New . This adds a new analog range that you can define.
June 2012 34 Product Version 12.1
Using SimCompareUsing SimCompare in Graphical Mode
❑ In the Digital Value field, select the strength and the bit value that you want to map.
❑ Select either Greater than, Single value or Range, and then specify the analog value that you want to map to the digital value.
The Clone, , and Delete, , buttons let you copy and delete individual mapping values.
5. Click Save Changes when you are satisfied with the threshold map definition. SimCompare adds the threshold map to the table at the top of the tab and to the list of Threshold Definitions on the left side of the window.
Use the Clone, , and Delete, , buttons above the list of threshold map definitions to copy and delete threshold maps.
Viewing Comparison Results in the Waveform Window
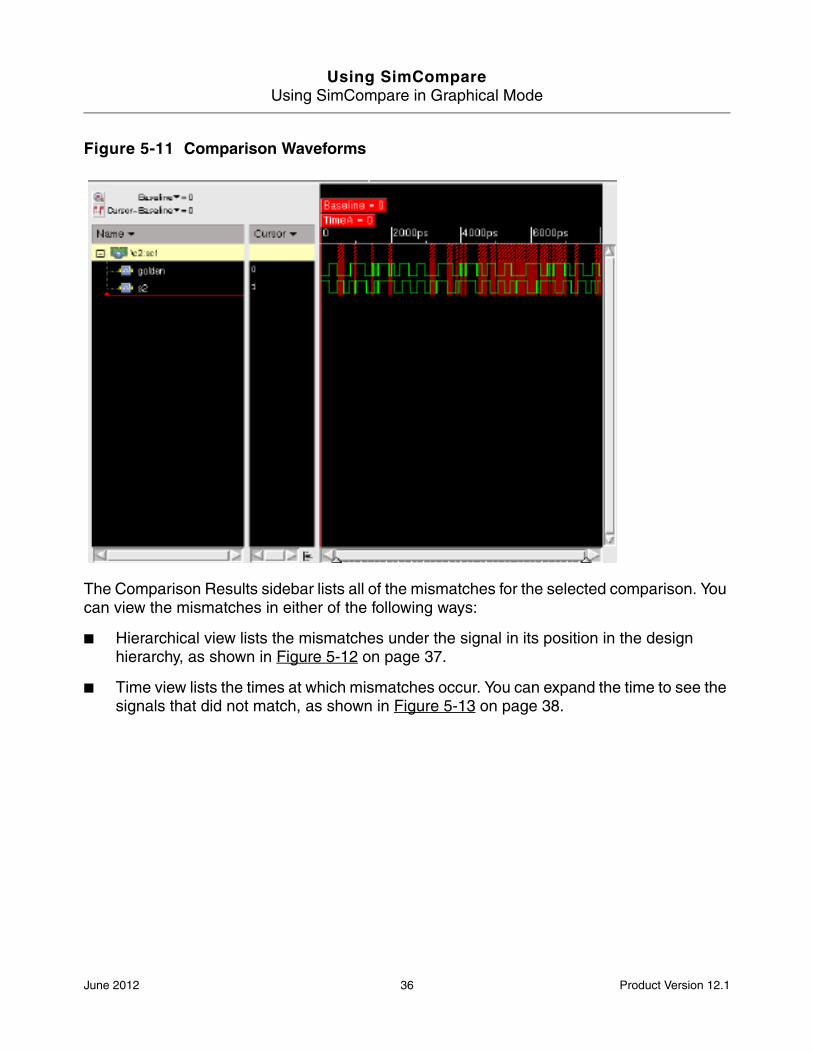
To view comparison results:
➤ Select a comparison and click View Results. SimCompare creates a group in the Waveform window containing the signals in the comparison. Mismatches are highlighted in red, as shown in Figure 5-11 on page 36.
June 2012 35 Product Version 12.1
Using SimCompareUsing SimCompare in Graphical Mode
Figure 5-11 Comparison Waveforms
The Comparison Results sidebar lists all of the mismatches for the selected comparison. You can view the mismatches in either of the following ways:
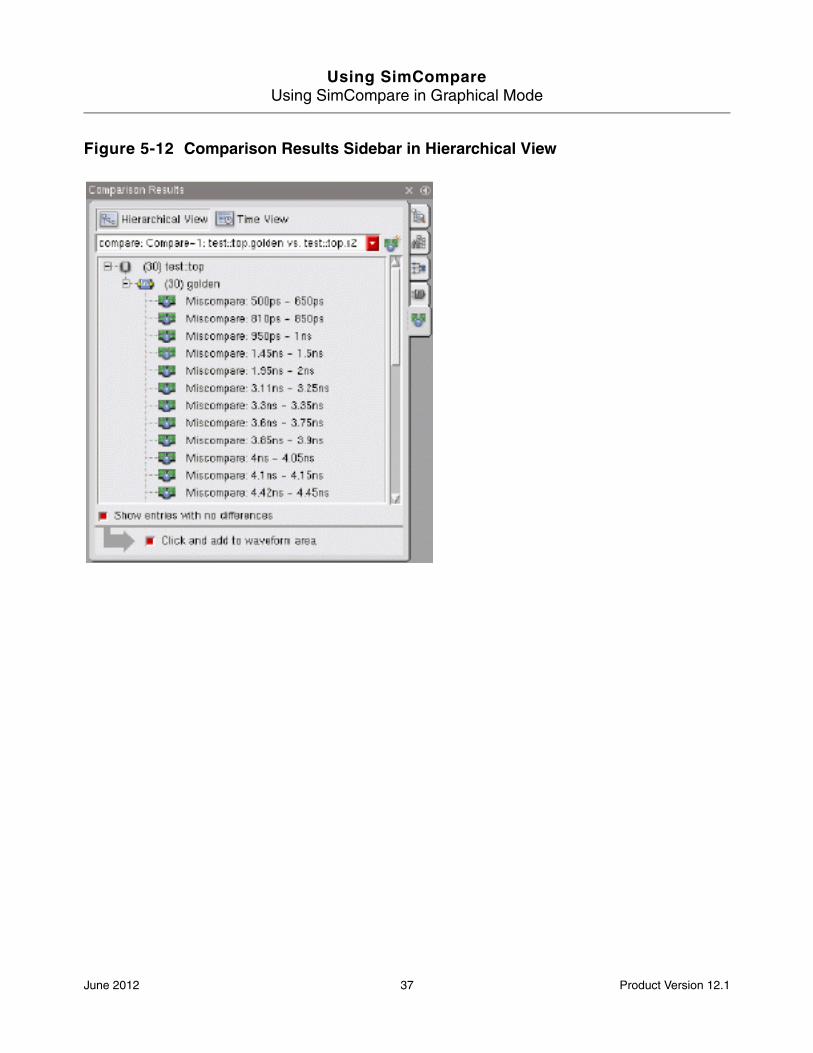
■ Hierarchical view lists the mismatches under the signal in its position in the design hierarchy, as shown in Figure 5-12 on page 37.
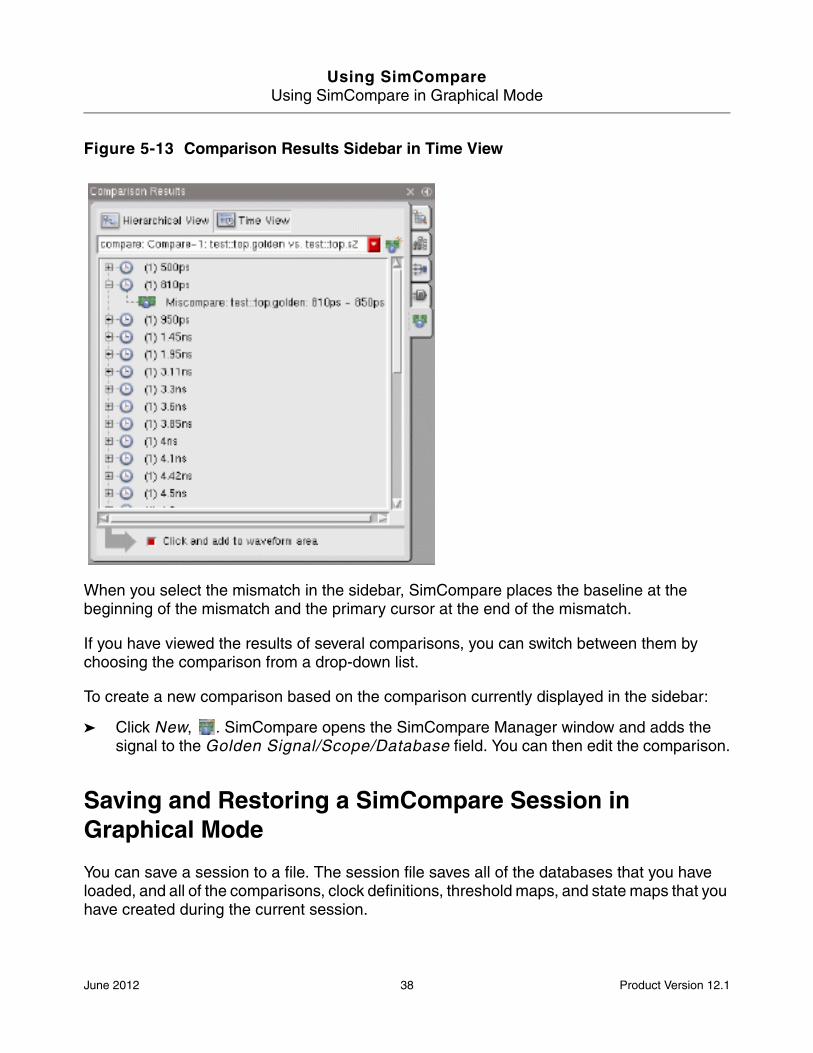
■ Time view lists the times at which mismatches occur. You can expand the time to see the signals that did not match, as shown in Figure 5-13 on page 38.
June 2012 36 Product Version 12.1
Using SimCompareUsing SimCompare in Graphical Mode
Figure 5-12 Comparison Results Sidebar in Hierarchical View
June 2012 37 Product Version 12.1
Using SimCompareUsing SimCompare in Graphical Mode
Figure 5-13 Comparison Results Sidebar in Time View
When you select the mismatch in the sidebar, SimCompare places the baseline at the beginning of the mismatch and the primary cursor at the end of the mismatch.
If you have viewed the results of several comparisons, you can switch between them by choosing the comparison from a drop-down list.
To create a new comparison based on the comparison currently displayed in the sidebar:
➤ Click New, . SimCompare opens the SimCompare Manager window and adds the signal to the Golden Signal/Scope/Database field. You can then edit the comparison.
Saving and Restoring a SimCompare Session in Graphical Mode
You can save a session to a file. The session file saves all of the databases that you have loaded, and all of the comparisons, clock definitions, threshold maps, and state maps that you have created during the current session.
June 2012 38 Product Version 12.1
Using SimCompareUsing SimCompare in Graphical Mode
To save a comparison session:
➤ In the SimCompare Manager window, click Save Comparison Session, or choose File – Save SimCompare Session. The default name for a session file is simcompare.scsf. You can specify a different name in the Save SimCompare Session form.
To restore a session:
1. Start SimVision in post-processing mode.
2. Choose Windows – Tools – SimCompare Manager.
3. Click Restore Comparison Session.
All of the comparison objects you previously saved are loaded into the SimCompare Manager window.
The format of the session file is specific to SimVision; you cannot use this file in Tcl mode or batch mode. However, you can source into SimVision the same SimCompare command files that you use in Tcl or batch modes.
To source a SimCompare command file:
➤ Choose File – Source SimCompare Command Script. This executes all of the commands in the command file.
See SimCompare Reference for information about the commands you can place in a command file.
June 2012 39 Product Version 12.1
Using SimCompareUsing SimCompare in Graphical Mode
June 2012 40 Product Version 12.1
Using SimCompare
Using SimCompare Commands
SimCompare commands let you perform any comparison function. You can enter commands interactively at the SimCompare Tcl prompt or write them in a command file. You can run the command file at the Tcl prompt, or use it to run the comparison in batch mode.
This chapter describes how to use SimCompare commands to perform basic comparisons. For information on all SimCompare commands, see SimCompare Reference.
Specifying Simulation Databases to Compare
You can use the compareattr command to specify the simulation databases that you want to compare. You can open as many databases as you like and refer to them by their logical names.
SimCompare recognizes g and t as default logical names that refer to the golden and test databases, respectively. When you use these default logical names, you can define the golden and test databases in any order. When you specify any other logical name, the first database command defines the golden database, and the second database command defines the test database.
You can also use the golden and test commands to specify the databases that you want to compare. The golden command assigns the logical name, g, to the golden database; the test command assigns the logical name, t, to the test database.
Therefore, if you have two database, named golden.trn and test.trn, there are several ways to specify these databases for comparison.
With the database command:
database golden.trn
database test.trn
This is equivalent to the following commands:
database g golden.trn
database t test.trn
In the following example, SimCompare assumes that the first is the golden database and the second is the test database because the default logical names are not used:
June 2012 41 Product Version 12.1
Using SimCompareUsing SimCompare Commands
database first golden.trn
database second test.trn
With the golden and test commands:
golden golden.trn
test test.trn
Converting Databases to SST2 Format
SimCompare requires databases to be in SST2 format. If your database is in VCD format, you can use the SimCompare translate command to convert it to SST2 format. For example, the following command translates the test.vcd database into the SST2 design and transition files, test.dsn and test.trn:
translate test.vcd
The following example translates the multex.vcd database to SST2 format and names the database files tx3_multex.dsn and tx3_multex.trn:
translate multex.vcd tx3_multex
To convert other database formats, use simvisdbutil. The simvisdbutil utility can translate any of the following database formats into SST2 format:
■ VCD
■ EVCD
■ HSPICE list
■ HSPICE transient output
■ Nutmeg
■ Epic
■ Qsim
Performing an Absolute Comparison with the compare Command
The compare command performs an absolute comparison of either two signals or all signals in two modules.
The following example compares signalA in the golden database with signalA in the test database for an exact match—that is, a match within a window of 0 time units. SimCompare
June 2012 42 Product Version 12.1
Using SimCompareUsing SimCompare Commands
reports an error if either the golden or test database does not exist, or if signalA does not exist in both databases:
compare signalA
The following example compares signalA in the golden database with signalB in the test database:
compare signalA signalB
The following example compares signalA with signalB in the test database:
compare t::signalA t::signalB
Specifying the Levels of Hierarchy to Compare
The -depth option lets you compare only the top-level of the hierarchy, or all levels down to a specific depth in the hierarchy.
When you specify a depth of 1, SimCompare compares only the top level of the design hierarchy. For example, the following compares the top-level design unit, top, in the golden and test databases:
compare -depth 1 top
The following example compares the design units for a depth of three levels of hierarchy, beginning with top:
compare -depth 3 top
If you want to compare objects at different levels in the hierarchy in the golden and test databases, specify their hierarchical names explicitly. For example:
compare test.cpu.adder3 test.cpu.module2.module87.adder4
compare test.cpu.clk test.memory.refresh.clock
Specifying a Tolerance Window with the -pos, -neg, and -tol Options
A tolerance window defines the amount of time before or after the golden event occurs in which the test event can occur and still be considered a match.
The following options define the tolerance window:
■ Use the -pos option to specify a window that occurs after the golden event.
■ Use the -neg option to specify a window that occurs before the golden event.
■ Use the -tol option to specify a window that occurs both before and after the event.
June 2012 43 Product Version 12.1
Using SimCompareUsing SimCompare Commands
The default timescale for the tolerance window is the lowest time unit in the simulation databases. For example, if the golden database has a timescale of 1 ns and the test database has a timescale of 100 ns, the default timescale is 1 ns. You can always avoid timescale problems by specifying your times with units.
The following example compares signalB in the golden database with signalB in the test database for a match within a window of 5 time units after the golden signal:
compare signalB -pos 5
The following example compares signalC in the golden database with signalC in the test database for a match within a window of 10 time units before the golden signal:
compare signalC -neg 10
The following example compares signalD in the golden database with signalE in the test database for a match within a tolerance window of ten time units before the golden signal and five time units after the golden signal:
compare signalD signalE -pos 5 -neg 10
The following example compares signalF in the golden and test databases within a tolerance window of 10 time units before and 10 time units after the golden signal:
compare -tol 10 signalF
If you want to use a different tolerance window for each signal, you need to compare the signals separately. For example:
compare -pos 45ns top.clk
compare -neg 30ns top.sum
compare -tol 15ns top.data
Specifying a Condition Expression with the -when Option
The -when option lets you specify a condition that must be true before the comparison occurs. For example, the following compares signalA in the golden database with signalB in the test database only when the value of data[23:32] is 1:
compare signalA signalB -when "data[23:32] == 1"
The -when expression can be quite complex, which allows you to define specific events to be compared. For example, the following compares signalA and signalB only when data[23:32] is equal to the value of addr[23:32], and reset is 0, and the value of cnt is greater than 10:
compare signalA signalB -when \"(data[23:32] == addr[23:32]) && !reset && (cnt > 10)"
June 2012 44 Product Version 12.1
Using SimCompareUsing SimCompare Commands
Defining a Clock with the clkdef Command
You use the clkdef command to define the clocks that you want to use in clkcompare and stability commands.
A clock definition can be as simple as specifying the name of a clock signal, or it can be complex, including information about setup and hold times, the edge that triggers the clock, and the amount of time by which you want to shift the clock.
Because you can also define a clock on the clkcompare and stability command lines, clkdef is most useful when your clock definition is complex or when the same clock definition is used in several comparisons. After you define the clock, you can refer to it by its symbolic name, rather than specifying the clock characteristics on each command that uses it.
For example, the following commands define a clock named c1 from the golden database, and a clock named c2 from the test database:
clkdef c1 g::top.clockgen.clk3clkdef c2 t::top.clockgen.clk2
Subsequent clkcompare and stability commands can refer to the clock definition by the names c1 and c2.
You use the -setup and -hold options to specify a period of required signal stability around a clock edge. For example, the following command defines two symbolic clocks, c3 and c4 These two clocks are based on the same signal from the golden simulation, but have different setup times:
clkdef c3 top.clockgen.clk1 -setup 100clkdef c4 top.clockgen.clk1 -setup 200
The -posedge, -negedge, and -bothedge options specify the active edge, or edges, of the clock. The comparison occurs only on the specified edge, or edges. For example, in the following commands, a clocked comparison triggers on the positive edge of the symbolic clock c5, on the negative edge of c6, and on both edges of c7:
clkdef c5 t::top.clockgen.clk3 -posedgeclkdef c6 t::top.clockgen.clk3 -negedgeclkdef c7 t::top.clockgen.clk3 -bothedge
You can combine these options in any way necessary to define the clock. The following example defines a clock named c8 with a setup time of 100 units, a hold time of 120 units, and a shift of 400 units. A clocked comparison triggers only on the positive edge of c8:
clkdef c8 top.clockgen.clk4 -setup 100 -hold 120 -shift 400 -posedge
June 2012 45 Product Version 12.1
Using SimCompareUsing SimCompare Commands
Performing a Clocked Comparison with the clkcompare Command
You use the clkcompare command to perform a clocked comparison. When performing a clocked comparison, you must specify the clock to be used. This can be a clock signal in the design or the name of a clock definition, previously defined with the clkdef command. You must also specify the signal to be compared, or an expression that specifies the signal to be compared.
The same options available to the clkdef command to specify clock characteristics—such as setup and hold times and period—are also options to the clkcompare command. Other options let you control the comparison, such as specifying a start and end time for the comparison.
In the following example, the value of signalA in the golden database is compared with the value of signalA in the test database when both signals are on the edge of clk1 from the golden database:
clkcompare clk1 top.signalA -valt top.signalA
In this example, clk1 could be either a signal in the design or the symbolic name of a clock, previously defined with the clkdef command.
In the following example, the value of signalA in the golden database is compared with the value of signalB in the test database when both signalA and signalB are on the edge of clk1 from the golden database. These commands are all equivalent:
clkcompare clk1 signalA -valt signalBclkcompare clk1 g::signalA -valt signalBclkcompare clk1 signalA -valt t::signalBclkcompare clk1 g::signalA -valt t::signalB
In the following example, test.trn is the golden database. The value of top.sig1 in test.trn is compared with the value of top.sig2 in test.trn when both signals are on the edge of clock top.clk from test.trn:
golden test.trnclkcompare top.clk top.sig1 -valt top.sig2
The following commands perform the same comparison. However, the clkcompare command refers to the signals and clocks by the database prefix, because test.trn is not the golden database:
golden golden.trntest test.trnclkcompare t::top.clk t::top.sig1 -valt t::top.sig2
June 2012 46 Product Version 12.1
Using SimCompareUsing SimCompare Commands
In the following example, the value of top.sig1 in golden.trn is compared with the value of top.sig1 in test.trn when both signals are on the edge of top.clk from golden.trn:
golden golden.trntest test.trnclkcompare top.clk top.sig1
In the following commands, signalA and clk1 are drawn from the golden database, signalB and clk2 from the test database. The value of signalA at the active edge of clk1 is compared with the value of signalB at the active edge of clk2:
clkcompare clk1 signalA -clkt clk2 -valt signalB clkcompare clk1 g::signalA -clkt clk2 -valt signalB clkcompare clk1 signalA -clkt clk2 -valt t::signalB clkcompare g::clk1 g::signalA -clkt t::clk2 -valt t::signalB
In the following example, all of the signals are drawn from the golden database, test.trn. The value of top.sig1 at the active edge of top.clk1 is compared with the value of top.sig2 at the active edge of top.clk2:
golden test.trnclkcompare top.clk1 top.sig1 -clkt top.clk2 -valt top.sig2
The following example compares the values of signalA with the values of signalB when both signals are at the active edge of clock c1, using a setup time of 100 units and a hold time of 50 units for signalA, and using a setup time of 1200 units and a hold time of 300 units for signalB.
clkcompare c1 signalA -valt signalB \ -setupg 100 -holdg 50 \ -setupt 1200 -holdt 300
Performing a Stability Check with the stability Command
The stability command checks the timing constraints between a clock expression and a value expression. The stability command checks that signals do not change within a specific window of time around an event.
You can define the clock with the clkdef command or specify the clock directly on the command line. The clock argument can be any single-bit signal in either the golden or test database.
For example, the following command checks the timing constraints between the signals top.c2 and top.goodBus:
stability top.c2 top.goodBus
June 2012 47 Product Version 12.1
Using SimCompareUsing SimCompare Commands
In the following example, the clkdef command defines a clock, c3, based on the signal top.c3 and a setup and hold time of 20 time units. The stability command uses that clock to perform a stability check on the signal top.bus1.
clkdef clk3 top.c3 -setup 20 -hold 20stability clk3 top.bus1
The following example performs a stability check on signal cpu.shifter.z1, using the clock that is defined as c5.
stability c5 cpu.shifter.z1
The following example defines a setup time of 20 ns. In this example, the hold time is 0:
stability top.clk top.sig1 -setup 20ns
The following example defines a hold time of 10 ns. In this example, the setup time is 0:
stability top.clk top.sig1 -hold 10ns
The following example defines both setup and hold times. This example defines a region of stability for the data signal that extends 20 ns before the active clock edge, and 10 ns after:
stability top.clk top.sig1 -setup 20ns -hold 10ns
Defining a State Map with the statemap Command
You use the statemap command to define a pair of values that should match. The arguments to the statemap command form a table that defines which pairs of values match. A 1 in the table body tells SimCompare to treat these two values as a match; a 0 in the table body tells SimCompare to treat these two values as a mismatch.
For example, you can define a state map that specifies the default state mapping behavior, in which 0 matches 0 but no other state, 1 matches 1 but no other state, x matches only another x, and z matches only another z:
statemap Default 01xz 0:1000 1:0100 x:0010 z:0001
If you know that an X in the golden database should match 0, 1, and X in the test database, you would define a state map such as the following:
statemap GoldXMatches01 01xz
0:1000 1:0100 x:1110 z:0001
June 2012 48 Product Version 12.1
Using SimCompareUsing SimCompare Commands
The 1’s in the first three positions in the row labeled X specify that X matches 0, 1, and X, respectively.
In the following example, an x state in the golden signal matches any state in the test signal.
statemap GoldXMatchesAll 01xz
0:1000 1:0100 x:1111 z:0001
In AllXsMatch, an x state in the golden signal matches any state in the test signal, and an x state in the test signal matches any state in the golden signal.
statemap AllXsMatch 01xz
0:1010 1:0110 x:1111 z:0011
Defining a Threshold Map with the threshold Command
Use the threshold command when you want to compare analog signal values to digital signal values.
The digital value is specified first, followed by the analog value in parentheses. The analog value can be either a single value or a range of values. To define a range of values, use <, >, or = symbols.
For example, the following threshold map, newMap, any real value from 0 to 2.0 maps to 0, any real value from 3.0 to 5.0 maps to St1, and the value 2.5 maps to SuX. Any other values result in mismatches.
threshold newMap0(0:2.0)St1(3.0:5.0)SuX(2.5)
The following example maps any real value less than 2.5 to 0, maps any real value greater than 3.0 to St1, and maps the value 2.5 to Sux.
threshold YYY 0(<2.5) St1(>3.0) Sux(2.5)
There can be unmapped regions in a threshold map. Values that fall in those regions are not mapped, and their actual values are used in the comparison. This practice is not common, but could be useful if you are comparing two similar analog signals.
June 2012 49 Product Version 12.1
Using SimCompareUsing SimCompare Commands
Specifying a Y-Tolerance for Analog Signals
Sometimes a modification to an analog circuit results in signal values that are almost but not quite the same as in the golden simulation. When comparing these analog signals, you can specify a y-tolerance, or range of values that should be considered to match. The tolerance is applied to the golden signal. That is, if the value of the test signal is within the y-tolerance region of the golden signal, it is considered a match.
There are three options that you can use with the simcompare command, and with the the compare and clkcompare Tcl commands to specify the y-tolerance:
■ -yneg—Specifies the negative y-tolerance, or the range of values below the golden signal value.
■ -ypos—Specifies the positive y-tolerance, or the range of values above the golden signal value.
■ -ytol—Specifies the positive and negative y-tolerance, or the range of values above and below the golden signal value.
For example, suppose the original value was 1.46, and the new value is 1.46001. You can use a y-tolerance to specify that values within .00001 of each other should be considered to match, as follows:
compare g::SignalA t::SignalA -ytol .00001
You can also use a percentage to specify the y-tolerance, as follows:
compare g::SignalA t::SignalA -ytol 1%
If you specify both a percentage and a value, SimCompare uses the y-tolerance that results in the largest y-tolerance range.
Note: The y-tolerance is applied only to reals and wreals; it is ignored for digital signals, integers, and other non-real objects. Therefore, you can use the y-tolerance options in a hierarchical comparison, and the tolerance values will not be applied to non-real objects.
Generating Comparison Reports
You use the report command to report results of a specific comparison or all comparisons you have performed in a SimCompare session.
When you perform a comparison, SimCompare displays a summary report, which includes the name of the comparison set, and a summary of the number of mismatches found. For example, the following compares the signals top.sstfile in the golden and test
June 2012 50 Product Version 12.1
Using SimCompareUsing SimCompare Commands
databases. The summary report indicates that no mismatches were found. For example, in Tcl mode:
sc> compare top.sstfile
Summary of compare set c3: No problems found.
When you issue the report command, SimCompare returns additional information about the signals that were compared, as follows:
sc> report
================================================================================
Compare set name: c1:top.sstfile[0:256]
Comparison parameters:
Golden expression: g::top.sstfile[0:256] Test expression: t::top.sstfile[0:256]
Comparison summary:
No problems found.
When mismatches are found, the summary report indicates the number of mismatches and a statement about whether the maximum error limit was reached. For example:
sc> compare top.s2
Summary of compare set c5: Expression miscompares: 10 Max error limit reached.
By default, the report command lists the details of each mismatch, including the beginning and ending times, and the values of the signals. For example:
sc> report
================================================================================
Compare set name: c1:top.ss2
Comparison parameters:
Golden expression: g::top.ss2 Test expression: t::top.ss2
Comparison summary:
Max error limit reached: Yes Expression miscompares: 10
Miscompare details:
Error Type From To Golden/Test Values ------------------------------------------------- Miscompare 1ns 1.1ns 1 0 Miscompare 1.78ns 1.97ns 1
June 2012 51 Product Version 12.1
Using SimCompareUsing SimCompare Commands
0 Miscompare 2.55ns 2.75ns 0 1 Miscompare 2.75ns 2.95ns 1 0 Miscompare 2.95ns 3.11ns 0 1 Miscompare 3.15ns 3.25ns 1 0 Miscompare 3.3ns 3.31ns 1 0 Miscompare 3.45ns 3.6ns 1 0
1 Miscompare 3.85ns 3.9ns 1 0
You can use the -detail option to generate the same summary report returned by the compare command. For example:
sc> report -detail summary
================================================================================
Compare set name: c2Compare command: compare top.ss2Max error limit reached: YesExpression miscompares: 10
In the default report format, mismatches are listed hierarchically—by the design unit in which the mismatch occurs. To order the report by the time at which the errors occurred, use the -style comparescan option to generate the report, as follows:
sc> report -style comparescan
*** Summary: Compare Complete. Processed 1 variable. No variables matched. Info: stdin: No Setup errors. Info: stdin: No Hold errors. Info: stdin: No Clock Compare errors. Info: stdin: No Missed Clock errors. Info: stdin: 10 Absolute Compare errors on 1 variable. Info: stdin: 1 Maximum Per Signal error on 1 variable. Info: stdin: No mismatched endtime comparison warnings.top.ss2: Signal compare mismatch with top.ss2, between 1ns and 1.1nstop.ss2: Signal compare mismatch with top.ss2, between 1.78ns and 1.97nstop.ss2: Signal compare mismatch with top.ss2, between 2.55ns and 2.75nstop.ss2: Signal compare mismatch with top.ss2, between 2.75ns and 2.95nstop.ss2: Signal compare mismatch with top.ss2, between 2.95ns and 3.11nstop.ss2: Signal compare mismatch with top.ss2, between 3.15ns and 3.25nstop.ss2: Signal compare mismatch with top.ss2, between 3.3ns and 3.31nstop.ss2: Signal compare mismatch with top.ss2, between 3.45ns and 3.6nstop.ss2: Signal compare mismatch with top.ss2, between 3.6ns and 3.8nstop.ss2: Signal compare mismatch with top.ss2, between 3.85ns and 3.9nstop.ss2: Maximum per signal error count 10 exceeded
June 2012 52 Product Version 12.1
Using SimCompareUsing SimCompare Commands
Saving and Restoring a SimCompare Session in Tcl Mode
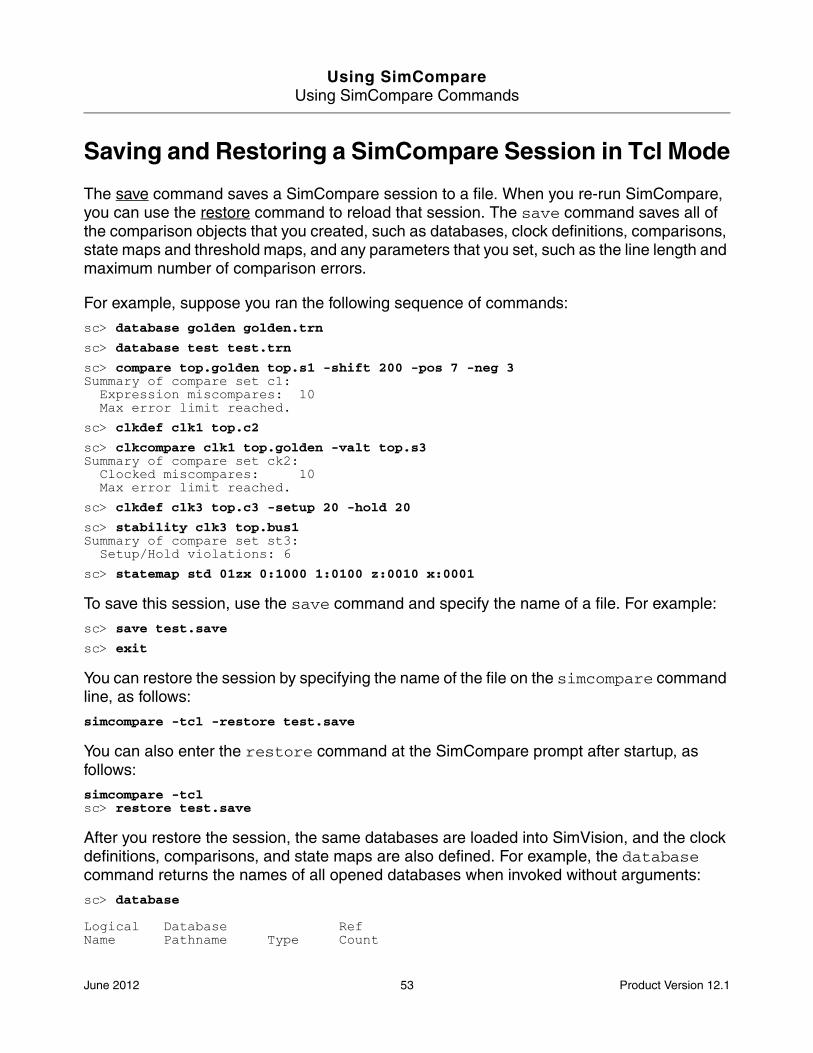
The save command saves a SimCompare session to a file. When you re-run SimCompare, you can use the restore command to reload that session. The save command saves all of the comparison objects that you created, such as databases, clock definitions, comparisons, state maps and threshold maps, and any parameters that you set, such as the line length and maximum number of comparison errors.
For example, suppose you ran the following sequence of commands:
sc> database golden golden.trn
sc> database test test.trn
sc> compare top.golden top.s1 -shift 200 -pos 7 -neg 3Summary of compare set c1: Expression miscompares: 10 Max error limit reached.
sc> clkdef clk1 top.c2
sc> clkcompare clk1 top.golden -valt top.s3Summary of compare set ck2: Clocked miscompares: 10 Max error limit reached.
sc> clkdef clk3 top.c3 -setup 20 -hold 20
sc> stability clk3 top.bus1Summary of compare set st3: Setup/Hold violations: 6
sc> statemap std 01zx 0:1000 1:0100 z:0010 x:0001
To save this session, use the save command and specify the name of a file. For example:
sc> save test.save
sc> exit
You can restore the session by specifying the name of the file on the simcompare command line, as follows:
simcompare -tcl -restore test.save
You can also enter the restore command at the SimCompare prompt after startup, as follows:
simcompare -tclsc> restore test.save
After you restore the session, the same databases are loaded into SimVision, and the clock definitions, comparisons, and state maps are also defined. For example, the database command returns the names of all opened databases when invoked without arguments:
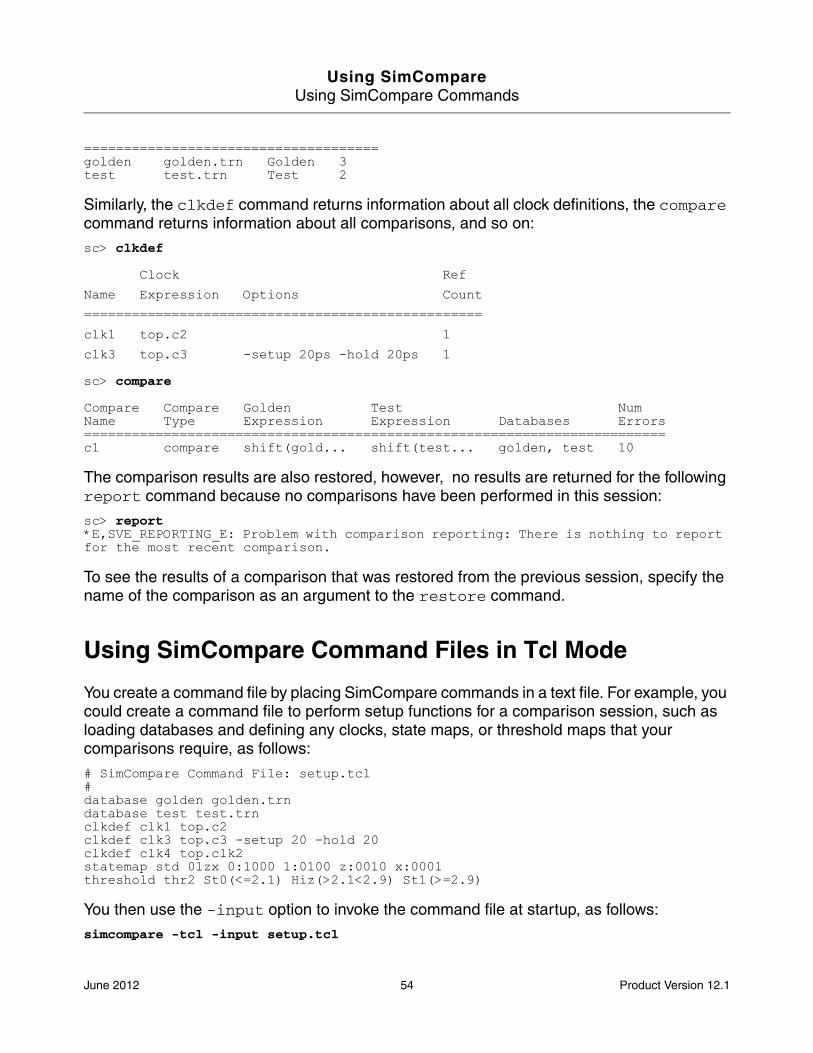
sc> database
Logical Database RefName Pathname Type Count
June 2012 53 Product Version 12.1
Using SimCompareUsing SimCompare Commands
=====================================golden golden.trn Golden 3test test.trn Test 2
Similarly, the clkdef command returns information about all clock definitions, the compare command returns information about all comparisons, and so on:
sc> clkdef
Clock Ref
Name Expression Options Count
==================================================
clk1 top.c2 1
clk3 top.c3 -setup 20ps -hold 20ps 1
sc> compare
Compare Compare Golden Test NumName Type Expression Expression Databases Errors=========================================================================c1 compare shift(gold... shift(test... golden, test 10
The comparison results are also restored, however, no results are returned for the following report command because no comparisons have been performed in this session:
sc> report*E,SVE_REPORTING_E: Problem with comparison reporting: There is nothing to report for the most recent comparison.
To see the results of a comparison that was restored from the previous session, specify the name of the comparison as an argument to the restore command.
Using SimCompare Command Files in Tcl Mode
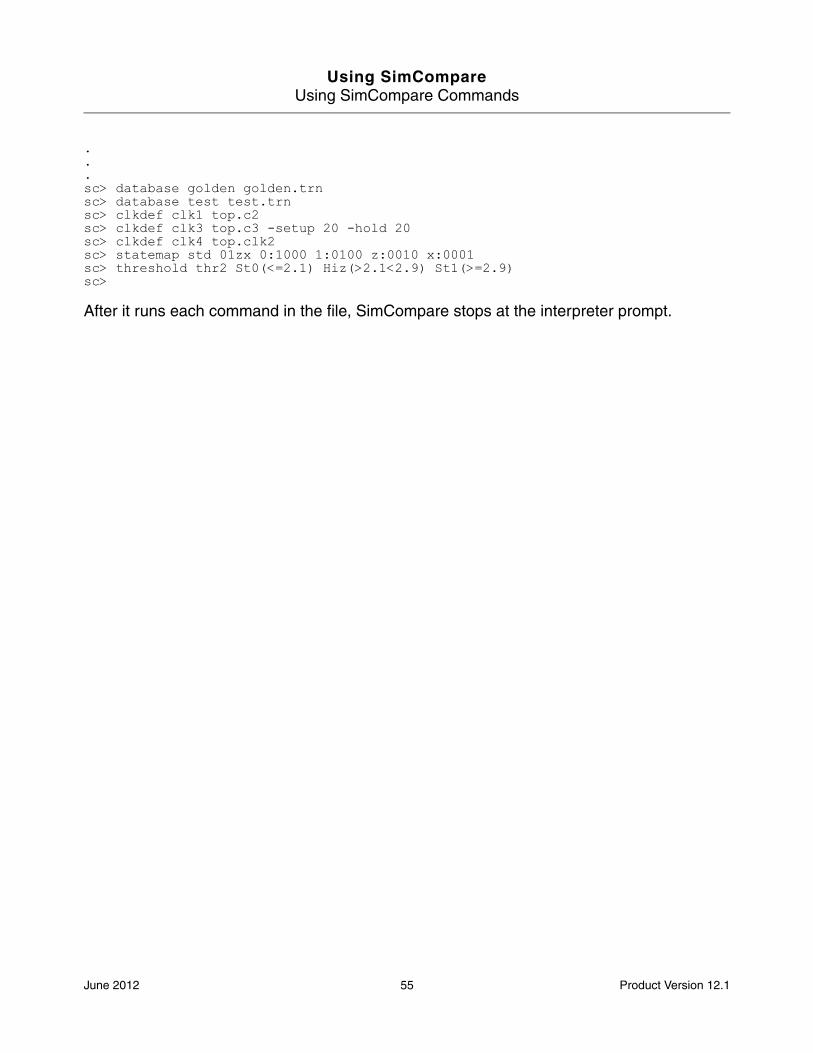
You create a command file by placing SimCompare commands in a text file. For example, you could create a command file to perform setup functions for a comparison session, such as loading databases and defining any clocks, state maps, or threshold maps that your comparisons require, as follows:
# SimCompare Command File: setup.tcl#database golden golden.trndatabase test test.trnclkdef clk1 top.c2clkdef clk3 top.c3 -setup 20 -hold 20clkdef clk4 top.clk2statemap std 01zx 0:1000 1:0100 z:0010 x:0001threshold thr2 St0(<=2.1) Hiz(>2.1<2.9) St1(>=2.9)
You then use the -input option to invoke the command file at startup, as follows:
simcompare -tcl -input setup.tcl
June 2012 54 Product Version 12.1
Using SimCompareUsing SimCompare Commands
.
.
.sc> database golden golden.trnsc> database test test.trnsc> clkdef clk1 top.c2sc> clkdef clk3 top.c3 -setup 20 -hold 20sc> clkdef clk4 top.clk2sc> statemap std 01zx 0:1000 1:0100 z:0010 x:0001sc> threshold thr2 St0(<=2.1) Hiz(>2.1<2.9) St1(>=2.9)sc>
After it runs each command in the file, SimCompare stops at the interpreter prompt.
June 2012 55 Product Version 12.1
Using SimCompareUsing SimCompare Commands
June 2012 56 Product Version 12.1
Using SimCompare
Using SimCompare in Batch Mode
Batch mode is the default mode for the simcompare command. In batch mode, you can specify the databases and comparison options on the simcompare command line or in a command file. Batch mode is useful for creating regression tests that run from scripts or Makefiles.
Running a Comparison from the Command Line
In its simplest form, the simcompare command compares all of the signals in a golden database to their corresponding signals in a test database. For example:
simcompare golden.trn test.trn
Simcompare exit(1): Miscompares or timing violations!
In this example, the exit status message indicates that errors were found. You can find out more about the comparison results by looking at the simcompare.log file. This file contains a summary report of the comparison. For example:
sc> compare .Summary of compare set c1 (hierarchical): Successful compares: 67/77 Expression miscompares: 100 Total error limit reached: 4/77Simcompare exit(1): Miscompares or timing violations!
If you want even more information, use the -report option on the command line, as follows:
simcompare -report myreport.rpt golden.trn test.trn
When you run this command, SimCompare creates a full report of all comparisons that were performed. For information about the format of a full report, see “Generating Reports” on page 15.
Using Command Files
You create a command file by placing SimCompare commands in a text file. To execute the commands at startup, use the command file as an argument to the -input option on the simcompare command line. For example:
simcompare -input demo.tcl
Simcompare exit(1): Miscompares or timing violations!
June 2012 57 Product Version 12.1
Using SimCompareUsing SimCompare in Batch Mode
In this example, SimCompare runs the commands in the file named demo.tcl, and then exits. The status message indicates that the commands produced errors.
You can examine the simcompare.log file to see what commands were run and any errors that occurred. If you include one or more report commands in the command file, they generate reports of the comparison results.
Specifying Mulitple Command Files
To invoke more than one command file, specify them with multiple -input options. For example, you could create one command file to set up your comparison environment (open the golden and test databases, create clock definitions, and so on):
# SimCompare Command File: setup.tcl#golden golden.trntest test.trnclkdef clk1 top.c2clkdef clk3 top.c3 -setup 20 -hold 20clkdef clk4 top.clk2statemap std 01zx 0:1000 1:0100 z:0010 x:0001threshold thr2 St0(<=2.1) Hiz(>2.1<2.9) St1(>=2.9)
And create another command file to perform the comparisons and generate a report:
# SimCompare Command File: comparisons.tcl# compare top.golden top.s1 -shift 200 -pos 7 -neg 3clkcompare clk1 top.golden -valt top.s3stability clk1 top.goodBusreport -all -detail full -output myreport.rpt
You specify these command files on the command line, as follows:
simcompare -input setup.tcl -input comparisons.tcl
Simcompare exit(1): Miscompares or timing violations!
The file, myreport.rpt, contains the detailed comparison results.
Controlling Comparison Settings
Some command-line options perform the same function as comparison options:
■ The -checkstrength command-line option and the checkstrength command determine whether stength is included in the comparison.
■ The -sequencetime command-line option and the sequencetime command determine whether transitions that occur in sequence time are compared.
June 2012 58 Product Version 12.1
Using SimCompareUsing SimCompare in Batch Mode
■ The -maxerrors command-line option and the maxerrors command determine the number of errors that are allowed before a comparison stops.
You can include these options multiple times on the command line and in command files. This lets you turn these option settings on and off during a SimComparison session as needed, according to the following rules:
■ All options you specify on the command line are interpreted before any command files are invoked or any comparisons are performed. Therefore, if you set one of these options more than once on a command line, the last setting is the one that is used (until it is reset).
■ Options you specify in command files are set in the order in which they are encountered and remain in effect until they are reset, either later in the same command file or in a subsequent command file. This means that settings in command files can override the same settings on the command line, and can be overridden by settings in the same or subsequent command files.
Setting up Regression Tests
Batch mode is useful for creating regression tests that run automatically from scripts or Makefiles.
For example, the following script compares the signals in the golden.trn and test.trn databases and displays a status message on completion:
#! /bin/sh simcompare golden.trn test.trn -nostdout status=$? if [ $status -ne 0 ] ; then echo “Failure!” ; else echo “Success!” ; fi
To use the same comparison as a target in a Makefile, the variables need an extra $, as follows:
compare_target:simcompare golden.trn test.trn -nostdoutstatus=$$?if [ $$status -ne 0 ] ; then echo “Failure!” ;else echo “Success!” ;fi
June 2012 59 Product Version 12.1

Using SimCompareUsing SimCompare in Batch Mode
June 2012 60 Product Version 12.1
Using SimCompare
Comparing Transactions
Transactions represent simulation activity at a higher level of abstraction than signals. While signals convey more detail about a simulation, such as individual clock cycles, transactions represent data or events at the architectural level. Transaction streams represent sequences of transactions, possibly overlapping.
SimCompare compares transaction streams that you record in an SST2 database. When you perform a comparison of two transaction streams, you can specify comparison criteria, such as the transaction types and attributes that you want to compare. There is no restriction on the type of transaction that you can compare.
SimCompare compares both signals and transactions during a comparison. Transaction comparison results are displayed along with signal comparison results in the SimVision Waveform window and in the Comparison sidebar. In Tcl or batch mode, they are written to the same report file.
While signal comparisons are time-based, transaction comparisons are order-based. In an order-based comparison, time is ignored and the order of transactions becomes the most important comparison criteria. SimCompare compare the first transaction in the golden database to the first transaction in the test database. If they match, the second transaction in the golden and test databases are compared, and so on.
Referencing Streams and Transactions
Streams and transactions are part of the design hierarchy, and so they are referred to in the same way as signals—by specifying the hierarchical path to the stream in dot notation. For example, the following path refers to a stream named strm, located in the top.ebox.cache hierarchy:top.ebox.cache.strm
Transaction attributes are referenced by specifying the hierarchical path to the attribute. For example, the following path refers to the attribute called addr, located in the top.ebox.cache.strm hierarchy:top.ebox.cache.strm.addr
June 2012 61 Product Version 12.1
Using SimCompareComparing Transactions
Referencing Specific Transactions
Specific transactions can be referenced by supplying an expression between doubled square brackets, as follows:[[trans_type=="mytx"]]
The transaction type is the value of the trans_type attribute, such as mytx. The double-bracket syntax selects only those transactions that satisfy the expression.
Streams that are referenced in this way are called filtered streams. For example, the following line specifies a filtered stream of transactions of type mytx:top.ebox.cache.strm[[trans_type=="mytx"]]
Filter expressions can be any legal expression, though the operator set is slightly restricted.
The following comparison operators can be used in the filter expression:
■ Equality: ==
■ Inequality: !=
■ Less than: <
■ Less than or equal: <=
■ Greater than: >
■ Greater than or equal: >=
The following logical operators can be used to combine expressions:
■ Not: !
■ And: &&
■ Or: ||
Typically, the expression references a transaction attribute, such as trans_type, a predefined attribute that exists for all transaction. You can also reference user-defined attributes, as well as hidden attributes, such as begin_time and end_time.
Attribute can also be filtered by using strings (bracketed by double quotes), or values in one of the following Verilog-style radices:
■ Binary—For example: b11011001
■ Octal—For example: o331
■ Decimal—For example: 217
June 2012 62 Product Version 12.1
Using SimCompareComparing Transactions
■ Hex—For example: ‘hd9
The following example compares the value of the extracted attribute data for all transactions of type mytx that include the addr attribute:top.ebox.cache.strm[[trans_type=="mytx" && exists(addr)]].data
Note: It is possible for a transaction filter expression to select no transactions. With no transactions or attributes to compare, no miscompares can ever be reported. When this happens, a warning is issued to indicate a possible problem in the filter expression.
The Attribute Exists Function
You can use the exists function in a filter to query the database for the existence of an attribute.
The function has the following syntax, where attribute_name is the name of the attribute you want to find:exists(<attribute_name>)
The function returns true if the specified attribute exists.
For example, the following command calls the exists function to search both databases for an attribute named at. compare golden[[exists(at)]]
The following command calls the exists function to compare transactions that include the at attribute in the golden stream with transactions that include the attr attribute in the test stream.compare golden[[exists(at)]] test[[exists(attr)]]
For more information on the exists function, see “Filtering a Stream Based on a Condition,” in the SimVision User Guide.
How Attribute Values are Compared
When comparing transaction attribute values, numeric integer values are compared independent of type (signed or unsigned, 2-state or 4-state) and radix. The underlying bits in each number are compared—with sign extension if required, and always taking sign into account. This means that for two numeric attributes to be compared properly, they must have the same underlying binary bit pattern, and they must have the same sign.
For example, an 8-bit -1 is equal to a 16-bit -1, but a signed 8-bit -1 (with all eight bits set) is not equal to an unsigned 8-bit 255 (with all eight bits also set). The comparison of the
June 2012 63 Product Version 12.1

Using SimCompareComparing Transactions
signed value to an unsigned value, when one is negative and the other is positive but they otherwise have identical bit patterns, is unequal because of the difference in sign.
Comparing Transactions with SimCompare Commands
The SimCompare commands to perform transaction comparisons are:
■ compare—Performs a comparison of transactions and signals.
■ transtypemap—Creates a mapping between transactions that have different names but are the same.
■ attrnamemap—Creates a mapping between transaction attributes that have different names but are the same.
■ attrvaluemap—Creates a mapping between transaction attribute values that are different but should be considered equal.
The following sections show how to perform transaction comparisons with these commands. For more information about the commands and their options, see SimCompare Reference.
Comparing Transactions with Different Type Names
Sometimes transactions are in reality the same type but have different type names in the golden and test streams. These transactions can be mapped to each other by using the transtypemap command. For example:transtypemap tmap \read => rd \write => wrt
The example maps transactions of type read and write in the golden stream to transactions of type rd and wrt in the test stream.
This map can be applied to a compare command by using the -transtypemap option. For example, the following command causes transactions of type read and write in the golden stream to be compared with transactions of type rd and wrt in the test stream:compare top.mystrm -transtypemap tmap
Comparing Transactions with Different Attribute Names
Comparing transactions that should compare successfully, except that the attribute names are different, could require many compare commands. For example, when the attribute names are the same, a single compare command is sufficient, as follows:
June 2012 64 Product Version 12.1
Using SimCompareComparing Transactions
compare top.mystrm
However, when the attribute names are different in the golden and test databases, then a list of statements similar to the following might be necessary:compare top.mystrm.read top.mystrm.rdcompare top.mystrm.write top.mystrm.wrtcompare top.mystrm.error top.mystrm.errcompare top.mystrm.full top.mystrm.flcompare top.mystrm.overflow top.mystrm.of
Each compare command requires SimCompare to scan the transaction stream. This is inefficient.
The attrnamemap command lets you define a table that maps golden attribute names to test attribute names. You refer to the mapping table by using the -attrnamemap option, as illustrated in the following line:compare top.mystrm -attrnamemap burstmap
Conflicts in mapping between the same two attributes always resolve in the same order, but conflicts between another pair of attributes may not resolve in the same order as the first pair. For example, a conflict between iomap and burstmap may resolve to iomap first and burstmap second, and that order is maintained every time the map runs. However, a conflict between two other attributes in a different mapping table, such as buscycle and wrt, may resolve to wrt first and buscycle second, and that order will be maintained every time that map runs.
Note: When both the -attrnamemap and -attrvaluemap options are applied in the same compare command, the -attrnamemap options are applied before the -attrvaluemap options.
There are several ways to refer to the transaction types that you want to map:
■ To create a map that applies to a specific transaction type, specify the transaction name. For example, the following attrnamemap command applies only to the buscycle transaction type:attrnamemap burstmap buscycle \read => rd \write => wrt \error => err \full => fl \overflow => of
■ To create a map that applies to all transaction types, specify the asterisk (*) wildcard character for the transaction name.
For example, the following attrnamemap map defines a table named burst that maps the same set of attribute names as in the list above. However, the asterisk (*) means that the map applies to all transaction types:attrnamemap burstmap * \read => rd \write => wrt \error => err \
June 2012 65 Product Version 12.1
Using SimCompareComparing Transactions
full => fl \overflow => of
There are several ways to map attributes within the mapping table:
■ To specify that a golden attribute name maps to a test attribute name, separate the golden and test atttribute names by =>. For example:read => rd
■ To specify that a golden attribute name maps to no test attribute name, specify ~ for the test attribute:read => ~
■ To specify that no golden attribute name maps to any test attribute name, specify ~ for the golden attribute:~ => rd
■ To specify that one attribute name maps to another, but you do not want to compare them, use the ~~ notation, as follows:read ~~ rd
Attribute tables can be combined on a compare command line. For example, the following example defines an additional mapping table, iomap and then uses two -attrnamemap options to specify both maps:attrnamemap iomap * \read => rd \write => wrtattrnamemap burstmap tcycle \error => err \full => fl \overflow => of
compare top.mystrm -attrnamemap iomap -attrnamemap burstmap
Comparing Transactions with Different Attribute Values
Attribute values for matching transactions in the golden and test databases might be different. This is handled by associating an attribute value map with an attribute using the attrvaluemap command.
For example, the following command defines a map table called readmap for an attribute named read in transactions of type buscycle:attrvaluemap readmap buscycle:read \yes => true \no => false
The following command applies the mapping to the read attribute in all transactions:attrvaluemap readmap read \yes => true \no => false
A compare command refers to the table using the -attrvaluemap option, as follows:
June 2012 66 Product Version 12.1
Using SimCompareComparing Transactions
compare top.mystrm -attrvaluemap readmap
Attribute value maps can be combined on a compare command line. For example, the following defines two mapping tables, readmap and writemap. The compare command then uses two -attvaluemap options to specify both maps:attrvaluemap readmap buscycle:read \yes => true \no => false
attrvaluemap writemap write \thru => on \block => off
compare top.mystrm -attrvaluemap readmap -attrvaluemap writemap
Substituting the asterisk (*) wildcard character for the attribute name causes the map to apply to all attributes. For example, the following map applies to all attributes of all transactions because the transaction type is unspecified:attrvaluemap invertlogicmap * \0 => 0 \1 => 0
compare top.mystrm -attrvaluemap invertlogicmap
Note: When both the -attrnamemap and -attrvaluemap options are applied in the same compare command, the -attrnamemap options are applied before the -attrvaluemap options.
Tip
While numerical values can be included in the map table, it is not practical to represent general relationships. For example, if one attribute value is always one higher than the other, for the set of integers smaller than 2^32, it is far too many integers to represent in a map table. However, small ranges of mapped numbers are reasonable. For example:attrvaluemap regmap regaddr \0 => 3 \1 => 2 \2 => 1 \3 => 0
compare top.mystrm -attrvaluemap regmap
Viewing Transaction Comparison Results in the Report File
Transaction comparison results are returned by the report command. For each mismatch, the report lists the name of the comparison set, the comparison parameters, the number of transaction mismatches in the comparison set, and a list of the transactions that did not match. The transactions in the golden database are listed first and marked with a left angle bracket; the transactions in the test database are listed next and marked with a right angle bracket.
For example:
June 2012 67 Product Version 12.1
Using SimCompareComparing Transactions
================================================================================
Compare set name: c1:cpu0.trst_send
Comparison parameters:
Golden expression: g::cpu0.trst_sendTest expression: t::cpu0.trst_send
Comparison summary:
Transaction miscompares: 18
Miscompare details:
-----[ Golden transactions 1-18 replaced by test transactions 1-18 ]< Tx type: Sent Message; directive=SNDMSG; dst_addr=04; message=When I was a boy ...< Tx type: Sent Message; directive=SNDMSG; dst_addr=04; message=There are times ...< Tx type: Sent Message; directive=SNDMSG; dst_addr=05; message=I am not sure of ...
.
.
.---> Tx type: Sent Message X; directive=SNDMSG; dst_addr=04; message=When I was a boy ...> Tx type: Sent Message X; directive=SNDMSG; dst_addr=04; message=There are times ...> Tx type: Sent Message X; directive=SNDMSG; dst_addr=05; message=I am not sure of ...
.
.
.================================================================================
If you specify the -reportbe option, the report file contains beginning and ending times for transaction differences. For example:Miscompare details:
-----[ Golden transactions 1-18 replaced by test transactions 1-18 ]< Tx type: Sent Message (39000000-195000000); directive=SNDMSG; dst_addr=04; message=When I ...< Tx type: Sent Message (195000000-474000000); directive=SNDMSG; dst_addr=04; message=There ...< Tx type: Sent Message (474000000-7515000000); directive=SNDMSG; dst_addr=05; message=I am ... . . . ---> Tx type: Sent Message X (39000000-195000000); directive=SNDMSG; dst_addr=04; message=When I ...> Tx type: Sent Message X (195000000-474000000); directive=SNDMSG; dst_addr=04; message=There ... > Tx type: Sent Message X (474000000-7515000000); directive=SNDMSG; dst_addr=05; message=I am ... . . . ================================================================================
You can use the -diffdetails option if you want the report to include details about attribute differences. When you use this option, SimCompare creates a table for each transaction mismatch. The report lists attribute names, transactions in the golden database, transactions in the test database, and an indication of the reason for the mismatch, as shown in Figure 8-1 on page 69.
June 2012 68 Product Version 12.1
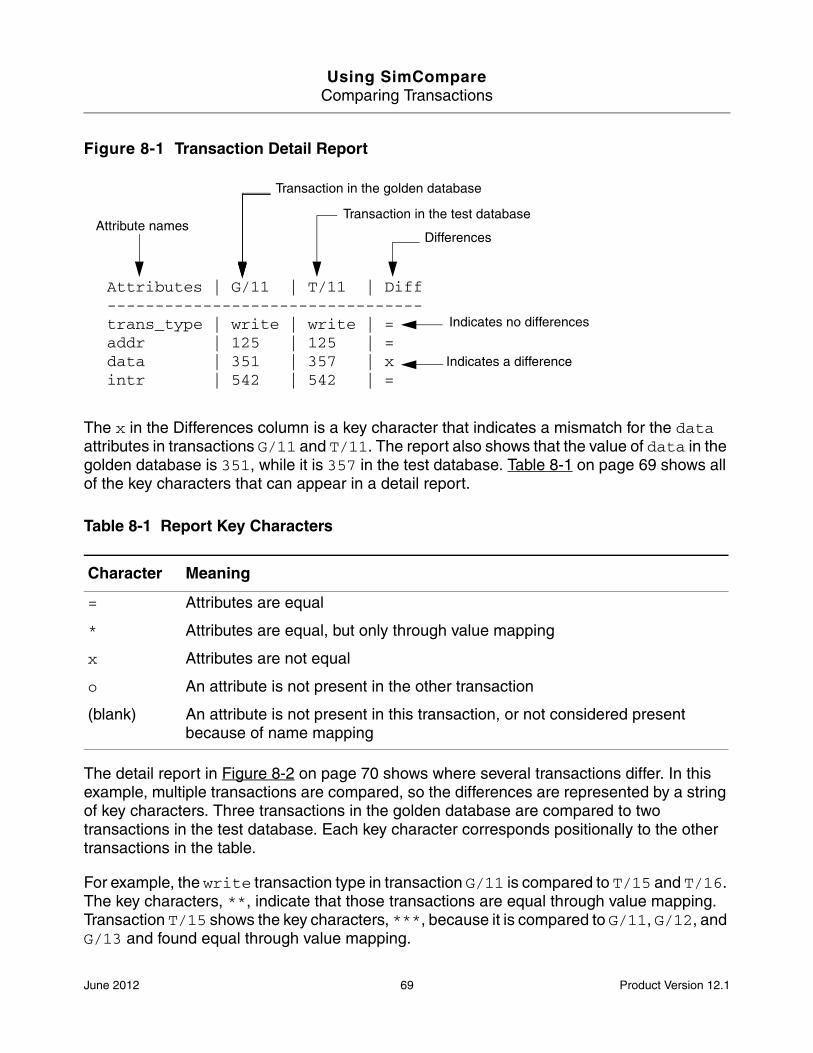
Using SimCompareComparing Transactions
Figure 8-1 Transaction Detail Report
The x in the Differences column is a key character that indicates a mismatch for the data attributes in transactions G/11 and T/11. The report also shows that the value of data in the golden database is 351, while it is 357 in the test database. Table 8-1 on page 69 shows all of the key characters that can appear in a detail report.
Table 8-1 Report Key Characters
The detail report in Figure 8-2 on page 70 shows where several transactions differ. In this example, multiple transactions are compared, so the differences are represented by a string of key characters. Three transactions in the golden database are compared to two transactions in the test database. Each key character corresponds positionally to the other transactions in the table.
For example, the write transaction type in transaction G/11 is compared to T/15 and T/16. The key characters, **, indicate that those transactions are equal through value mapping. Transaction T/15 shows the key characters, ***, because it is compared to G/11, G/12, and G/13 and found equal through value mapping.
Character Meaning
= Attributes are equal
* Attributes are equal, but only through value mapping
x Attributes are not equal
o An attribute is not present in the other transaction
(blank) An attribute is not present in this transaction, or not considered present because of name mapping
Transaction in the golden database
Transaction in the test database
Indicates no differences
Differences Attribute names
Attributes | G/11 | T/11 | Diff --------------------------------- trans_type | write | write | = addr | 125 | 125 | = data | 351 | 357 | x intr | 542 | 542 | =
Indicates a difference
June 2012 69 Product Version 12.1
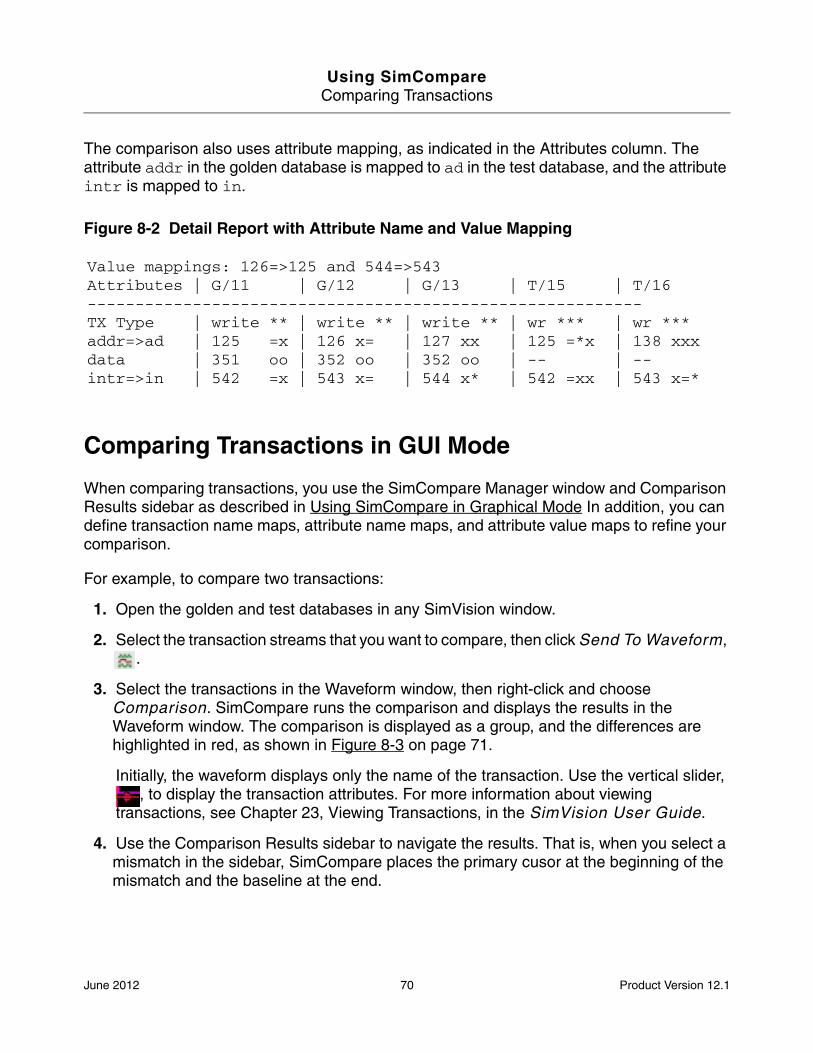
Using SimCompareComparing Transactions
The comparison also uses attribute mapping, as indicated in the Attributes column. The attribute addr in the golden database is mapped to ad in the test database, and the attribute intr is mapped to in.
Figure 8-2 Detail Report with Attribute Name and Value Mapping
Comparing Transactions in GUI Mode
When comparing transactions, you use the SimCompare Manager window and Comparison Results sidebar as described in Using SimCompare in Graphical Mode In addition, you can define transaction name maps, attribute name maps, and attribute value maps to refine your comparison.
For example, to compare two transactions:
1. Open the golden and test databases in any SimVision window.
2. Select the transaction streams that you want to compare, then click Send To Waveform, .
3. Select the transactions in the Waveform window, then right-click and choose Comparison. SimCompare runs the comparison and displays the results in the Waveform window. The comparison is displayed as a group, and the differences are highlighted in red, as shown in Figure 8-3 on page 71.
Initially, the waveform displays only the name of the transaction. Use the vertical slider, , to display the transaction attributes. For more information about viewing
transactions, see Chapter 23, Viewing Transactions, in the SimVision User Guide.
4. Use the Comparison Results sidebar to navigate the results. That is, when you select a mismatch in the sidebar, SimCompare places the primary cusor at the beginning of the mismatch and the baseline at the end.
Value mappings: 126=>125 and 544=>543Attributes | G/11 | G/12 | G/13 | T/15 | T/16----------------------------------------------------------TX Type | write ** | write ** | write ** | wr *** | wr ***addr=>ad | 125 =x | 126 x= | 127 xx | 125 =*x | 138 xxxdata | 351 oo | 352 oo | 352 oo | -- | --intr=>in | 542 =x | 543 x= | 544 x* | 542 =xx | 543 x=*
June 2012 70 Product Version 12.1
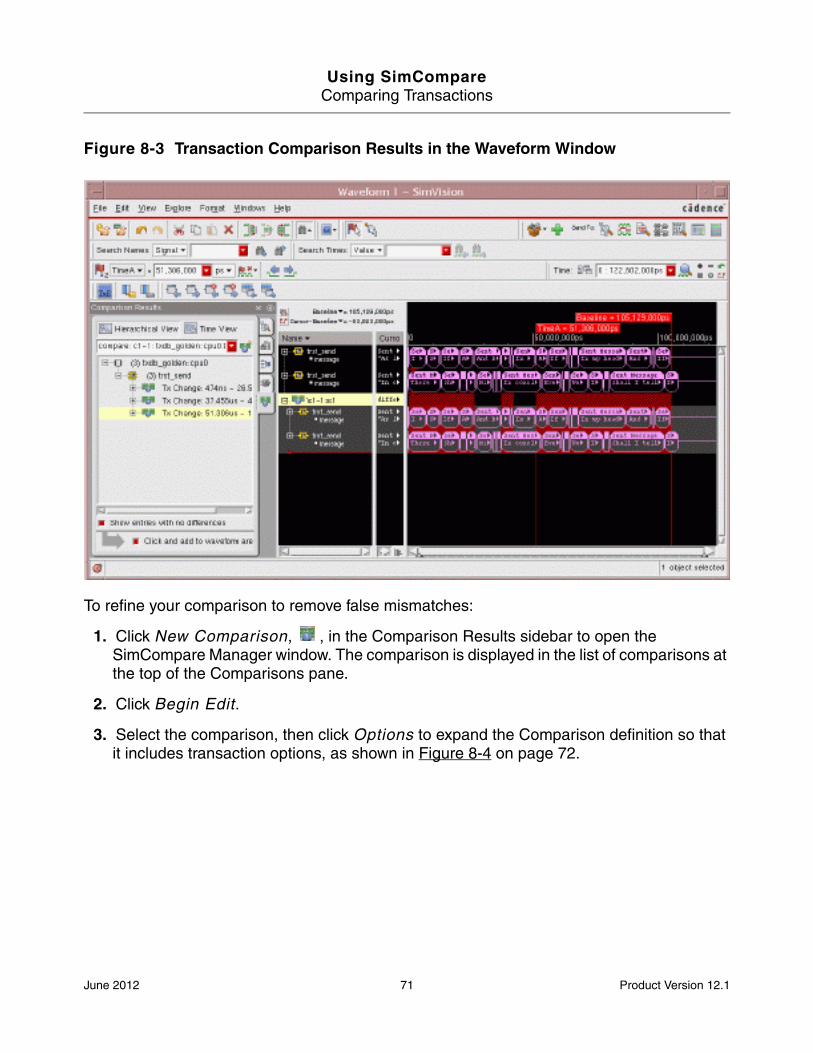
Using SimCompareComparing Transactions
Figure 8-3 Transaction Comparison Results in the Waveform Window
To refine your comparison to remove false mismatches:
1. Click New Comparison, , in the Comparison Results sidebar to open the SimCompare Manager window. The comparison is displayed in the list of comparisons at the top of the Comparisons pane.
2. Click Begin Edit.
3. Select the comparison, then click Options to expand the Comparison definition so that it includes transaction options, as shown in Figure 8-4 on page 72.
June 2012 71 Product Version 12.1
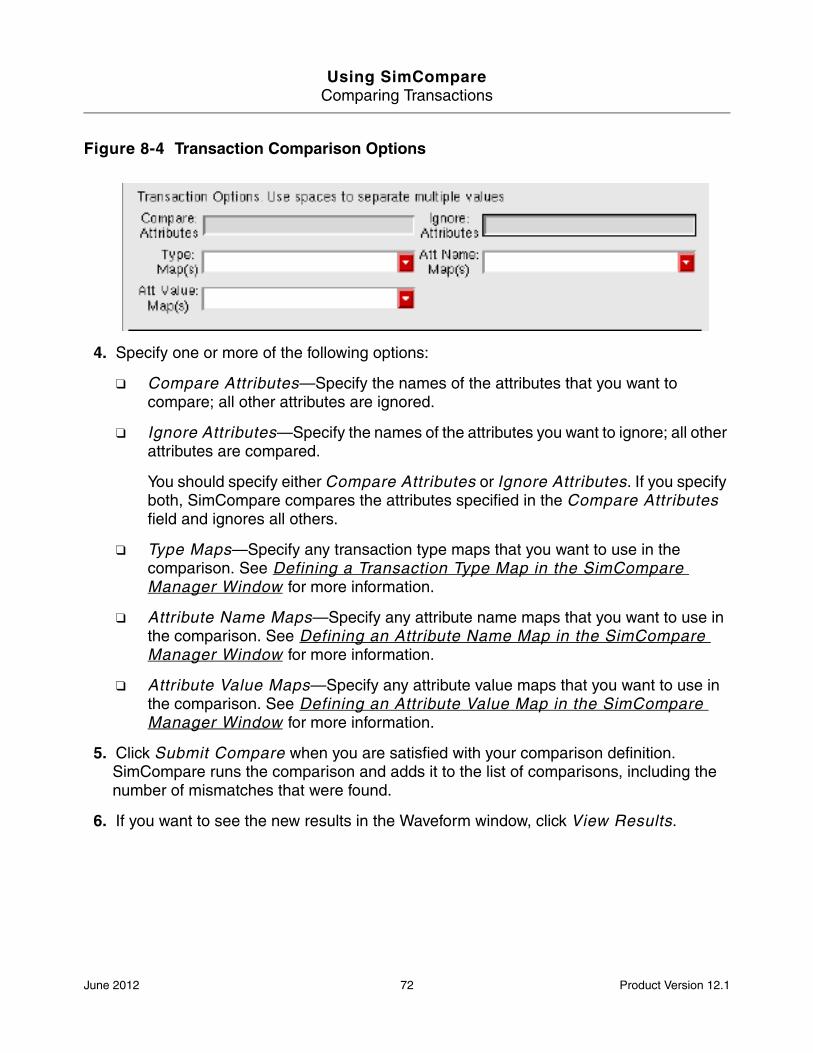
Using SimCompareComparing Transactions
Figure 8-4 Transaction Comparison Options
4. Specify one or more of the following options:
❑ Compare Attributes—Specify the names of the attributes that you want to compare; all other attributes are ignored.
❑ Ignore Attributes—Specify the names of the attributes you want to ignore; all other attributes are compared.
You should specify either Compare Attributes or Ignore Attributes. If you specify both, SimCompare compares the attributes specified in the Compare Attributes field and ignores all others.
❑ Type Maps—Specify any transaction type maps that you want to use in the comparison. See Defining a Transaction Type Map in the SimCompare Manager Window for more information.
❑ Attribute Name Maps—Specify any attribute name maps that you want to use in the comparison. See Defining an Attribute Name Map in the SimCompare Manager Window for more information.
❑ Attribute Value Maps—Specify any attribute value maps that you want to use in the comparison. See Defining an Attribute Value Map in the SimCompare Manager Window for more information.
5. Click Submit Compare when you are satisfied with your comparison definition. SimCompare runs the comparison and adds it to the list of comparisons, including the number of mismatches that were found.
6. If you want to see the new results in the Waveform window, click View Results.
June 2012 72 Product Version 12.1
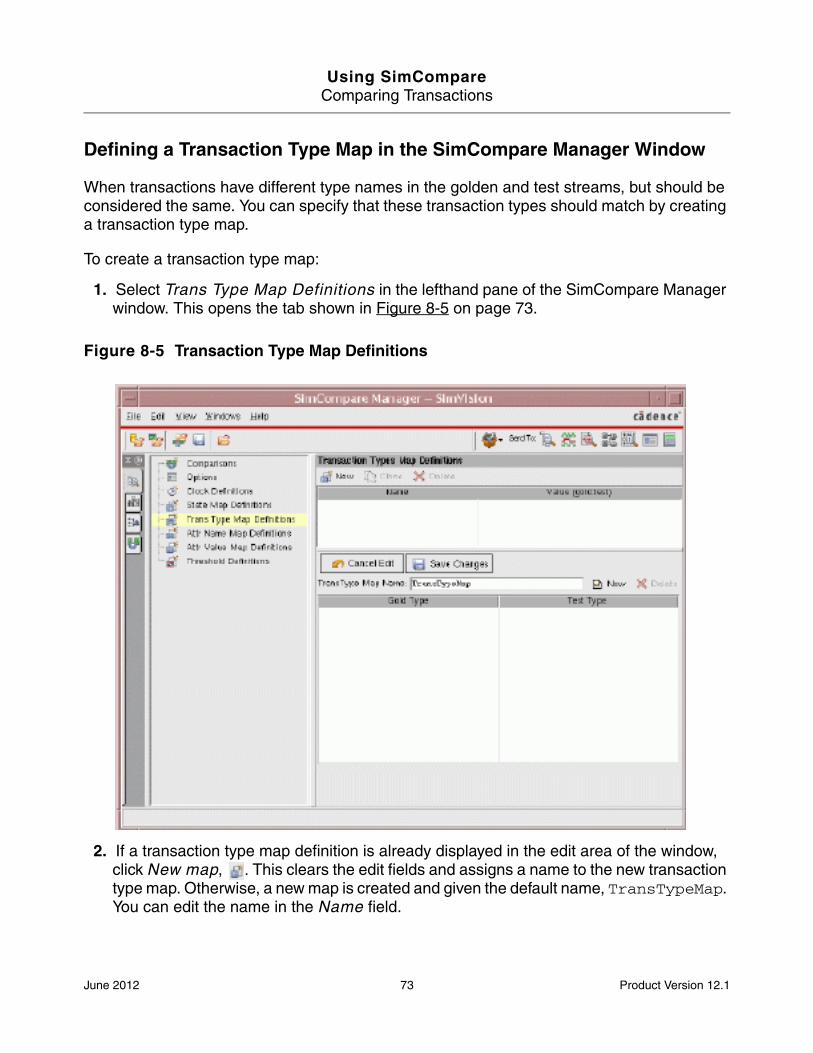
Using SimCompareComparing Transactions
Defining a Transaction Type Map in the SimCompare Manager Window
When transactions have different type names in the golden and test streams, but should be considered the same. You can specify that these transaction types should match by creating a transaction type map.
To create a transaction type map:
1. Select Trans Type Map Definitions in the lefthand pane of the SimCompare Manager window. This opens the tab shown in Figure 8-5 on page 73.
Figure 8-5 Transaction Type Map Definitions
2. If a transaction type map definition is already displayed in the edit area of the window, click New map, . This clears the edit fields and assigns a name to the new transaction type map. Otherwise, a new map is created and given the default name, TransTypeMap. You can edit the name in the Name field.
June 2012 73 Product Version 12.1
Using SimCompareComparing Transactions
3. Click New map entry, , to add a line to the map. SimCompare adds the string OldType in the Golden Type field and NewType in the Test Type field. Change these strings to the golden type name and test type name, respectively. Press Tab to move from the Golden Type field to the Test Type field, and press Return to complete the entry.
Important
If your transaction type names contain spaces, you must enclose them in quotation marks. Otherwise, SimCompare issues an error message when you save your changes.
4. Repeat Step 3 for each type that you want to map.
5. Click Save Changes when you have entered all of the transaction types that you want to map. SimCompare adds the map to the list at the top of the tab.
To use a transaction type map in a comparison
✟ Enter the map name in the Type Map(s) field of the Transaction Options area of the Comparison tab, as described in step 4 on page 72.
Defining an Attribute Name Map in the SimCompare Manager Window
Sometimes attributes have different names in the golden and test databases, but should be considered the same. You can specify that these attributes should match by creating an attribute name map.
To create an attribute name map:
1. Select Attr Name Map Definitions in the lefthand pane of the SimCompare Manager window. This opens the tab shown in Figure 8-6 on page 75.
June 2012 74 Product Version 12.1
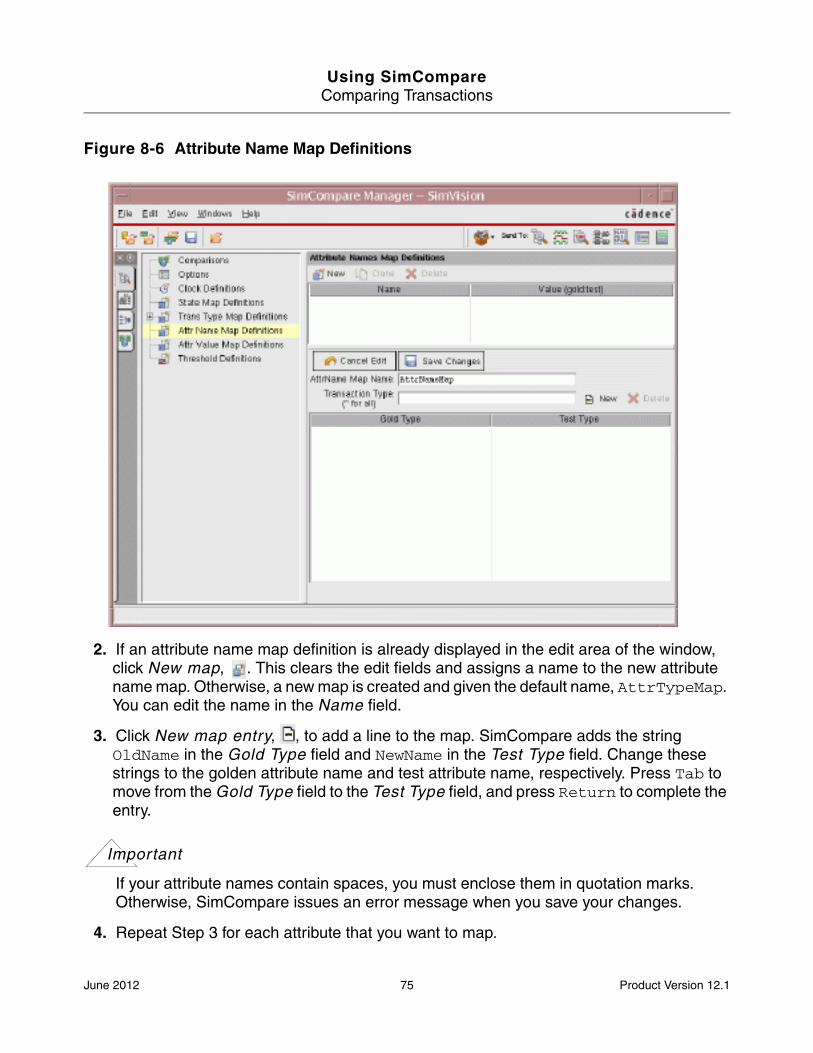
Using SimCompareComparing Transactions
Figure 8-6 Attribute Name Map Definitions
2. If an attribute name map definition is already displayed in the edit area of the window, click New map, . This clears the edit fields and assigns a name to the new attribute name map. Otherwise, a new map is created and given the default name, AttrTypeMap. You can edit the name in the Name field.
3. Click New map entry, , to add a line to the map. SimCompare adds the string OldName in the Gold Type field and NewName in the Test Type field. Change these strings to the golden attribute name and test attribute name, respectively. Press Tab to move from the Gold Type field to the Test Type field, and press Return to complete the entry.
Important
If your attribute names contain spaces, you must enclose them in quotation marks. Otherwise, SimCompare issues an error message when you save your changes.
4. Repeat Step 3 for each attribute that you want to map.
June 2012 75 Product Version 12.1
Using SimCompareComparing Transactions
5. Click Save Changes when you have entered all of the attributes that you want to map. SimCompare adds the map to the list at the top of the tab.
To use a attribute name map in a comparison
✟ Enter the map name in the Att Name Map(s) field of the Transaction Options area of the Comparison tab, as described in step 4 on page 72.
Defining an Attribute Value Map in the SimCompare Manager Window
Sometimes attribute values are different in the golden and test databases, but should be considered the same during a comparison. You can specify that these attributes should match by creating an attribute value map.
To create an attribute value map:
1. Select Attr Value Map Definitions in the lefthand pane of the SimCompare Manager window. This opens the tab shown in Figure 8-6 on page 75.
2. If an attribute value map definition is already displayed in the edit area of the window, click New map, . This clears the edit fields and assigns a name to the new attribute value map. Otherwise, a new map is created and given the default name, AttrValueMap. You can edit the name in the Name field.
3. Click New map entry, , to add a line to the map. SimCompare adds the string OldName in the Gold Type field and NewName in the Test Type field. Change these strings to the golden attribute value and test attribute value, respectively. Press Tab to move from the Gold Type field to the Test Type field, and press Return to complete the entry.
4. Repeat Step 3 for each attribute value that you want to map.
5. Click Save Changes when you have entered all of the values that you want to map. SimCompare adds the map to the list at the top of the tab.
To use a attribute value map in a comparison
✟ Enter the map name in the Att Value Map(s) field of the Transaction Options area of the Comparison tab, as described in step 4 on page 72.
June 2012 76 Product Version 12.1
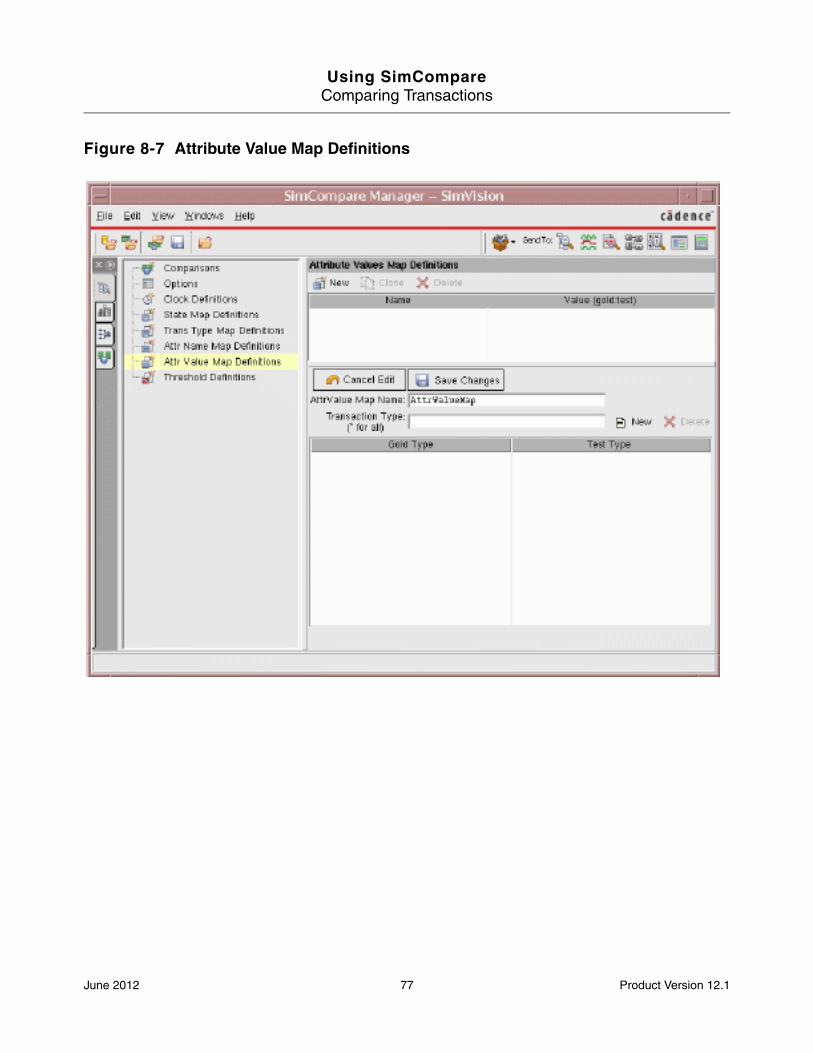
Using SimCompareComparing Transactions
Figure 8-7 Attribute Value Map Definitions
June 2012 77 Product Version 12.1
Using SimCompareComparing Transactions
June 2012 78 Product Version 12.1