Embed Size (px)
Citation preview

CAD/CAM PREPARATION GUIDELINES & TISSUE MANAGEMENT TECHNIQUES RECOMMENDATIONS FOR OPTIMAL SCANNING, DESIGNING, AND MILLING
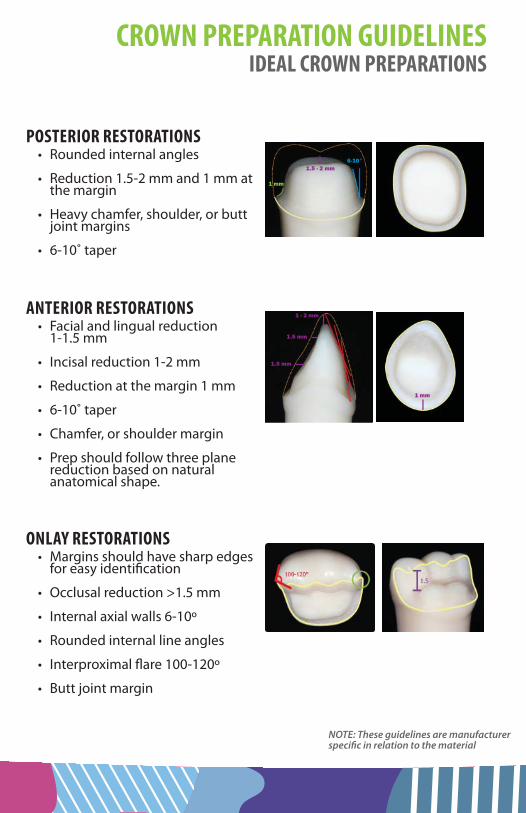
POSTERIOR RESTORATIONS• Rounded internal angles
• Reduction 1.5-2 mm and 1 mm at the margin
• Heavy chamfer, shoulder, or butt joint margins
• 6-10˚ taper
1.5 - 2 mm
1 mm
6-10°
1 - 2 mm
1.5 mm
1.5 mm
1 mm
ANTERIOR RESTORATIONS• Facial and lingual reduction
1-1.5 mm
• Incisal reduction 1-2 mm
• Reduction at the margin 1 mm
• 6-10˚ taper
• Chamfer, or shoulder margin
• Prep should follow three plane reduction based on natural anatomical shape.
ONLAY RESTORATIONS• Margins should have sharp edges
for easy identifi cation
• Occlusal reduction >1.5 mm
• Internal axial walls 6-10º
• Rounded internal line angles
• Interproximal fl are 100-120º
• Butt joint margin
NOTE: These guidelines are manufacturer specifi c in relation to the material
CROWN PREPARATION GUIDELINESIDEAL CROWN PREPARATIONS
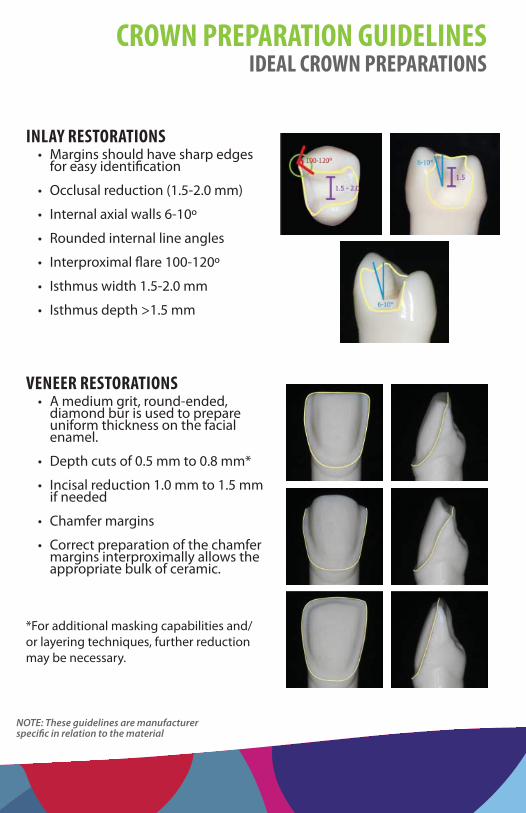
INLAY RESTORATIONS• Margins should have sharp edges
for easy identifi cation
• Occlusal reduction (1.5-2.0 mm)
• Internal axial walls 6-10º
• Rounded internal line angles
• Interproximal fl are 100-120º
• Isthmus width 1.5-2.0 mm
• Isthmus depth >1.5 mm
VENEER RESTORATIONS• A medium grit, round-ended,
diamond bur is used to prepare uniform thickness on the facial enamel.
• Depth cuts of 0.5 mm to 0.8 mm*
• Incisal reduction 1.0 mm to 1.5 mm if needed
• Chamfer margins
• Correct preparation of the chamfer margins interproximally allows the appropriate bulk of ceramic.
*For additional masking capabilities and/or layering techniques, further reduction may be necessary.
NOTE: These guidelines are manufacturer specifi c in relation to the material
CROWN PREPARATION GUIDELINESIDEAL CROWN PREPARATIONS
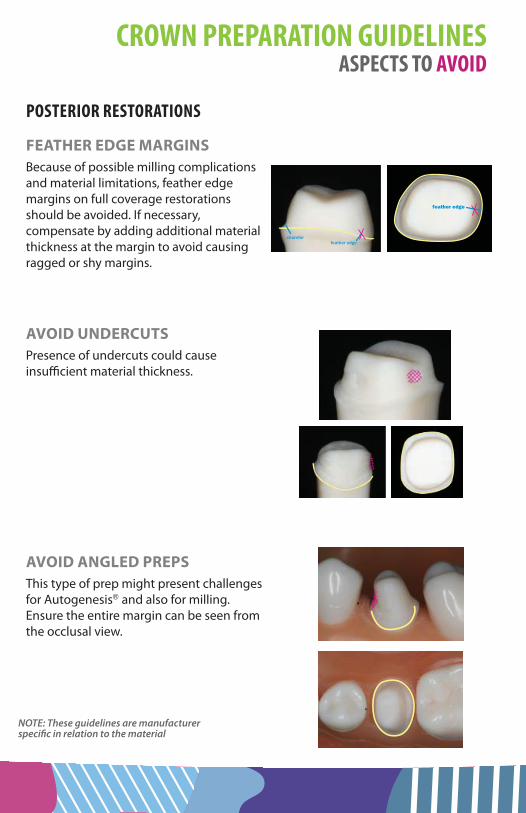
POSTERIOR RESTORATIONS
FEATHER EDGE MARGINSBecause of possible milling complications and material limitations, feather edge margins on full coverage restorations should be avoided. If necessary, compensate by adding additional material thickness at the margin to avoid causing ragged or shy margins.
AVOID UNDERCUTSPresence of undercuts could cause insuffi cient material thickness.
AVOID ANGLED PREPSThis type of prep might present challenges for Autogenesis® and also for milling. Ensure the entire margin can be seen from the occlusal view.
chamferfeather edge
feather edge
NOTE: These guidelines are manufacturer specifi c in relation to the material
CROWN PREPARATION GUIDELINESASPECTS TO AVOID
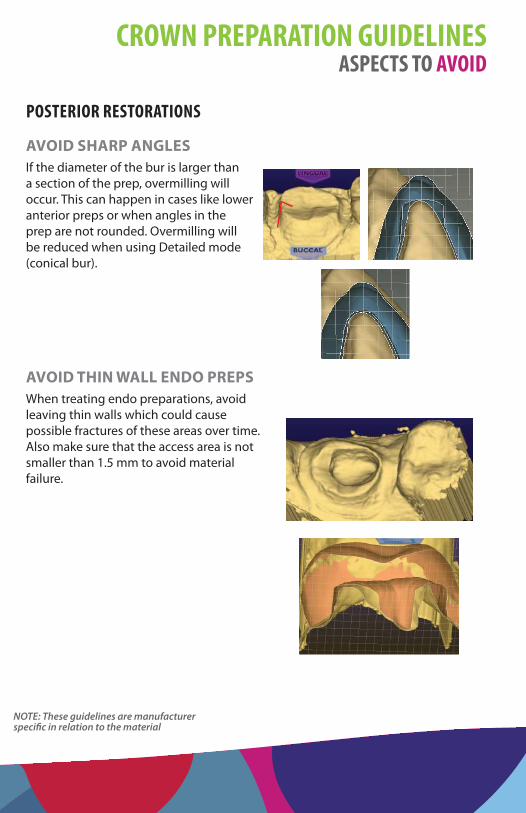
POSTERIOR RESTORATIONS
AVOID SHARP ANGLESIf the diameter of the bur is larger than a section of the prep, overmilling will occur. This can happen in cases like lower anterior preps or when angles in the prep are not rounded. Overmilling will be reduced when using Detailed mode (conical bur).
AVOID THIN WALL ENDO PREPSWhen treating endo preparations, avoid leaving thin walls which could cause possible fractures of these areas over time. Also make sure that the access area is not smaller than 1.5 mm to avoid material failure.
NOTE: These guidelines are manufacturer specifi c in relation to the material
CROWN PREPARATION GUIDELINESASPECTS TO AVOID
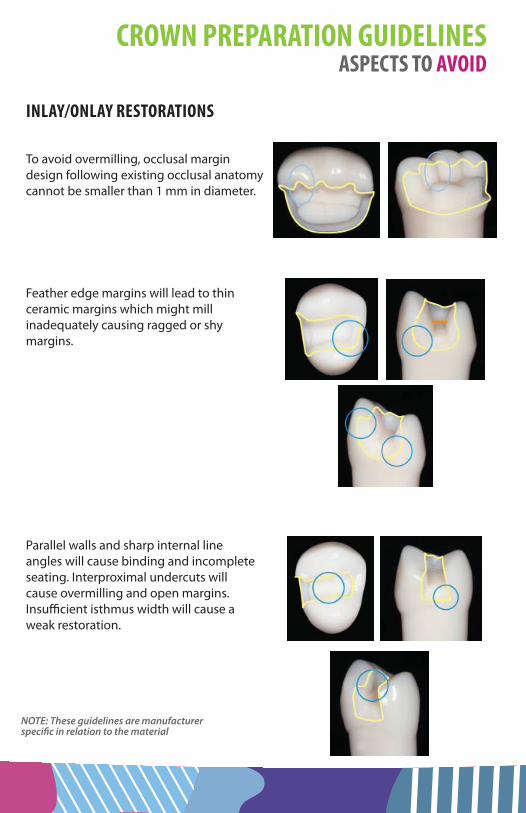
INLAY/ONLAY RESTORATIONS
To avoid overmilling, occlusal margin design following existing occlusal anatomy cannot be smaller than 1 mm in diameter.
Feather edge margins will lead to thin ceramic margins which might mill inadequately causing ragged or shy margins.
Parallel walls and sharp internal line angles will cause binding and incomplete seating. Interproximal undercuts will cause overmilling and open margins. Insuffi cient isthmus width will cause a weak restoration.
NOTE: These guidelines are manufacturer specifi c in relation to the material
CROWN PREPARATION GUIDELINESASPECTS TO AVOID

ANTERIOR RESTORATIONS
This type of preparation with rounded incisal edges may cause hang-ups or chipping of the margin.
Anterior preparations with undercuts may cause a bad proposal on Autogenesis™ due to inaccurate insertion axis.
= rounded edge
= undercuts
= insertion axis
NOTE: These guidelines are manufacturer specifi c in relation to the material
CROWN PREPARATION GUIDELINESASPECTS TO AVOID
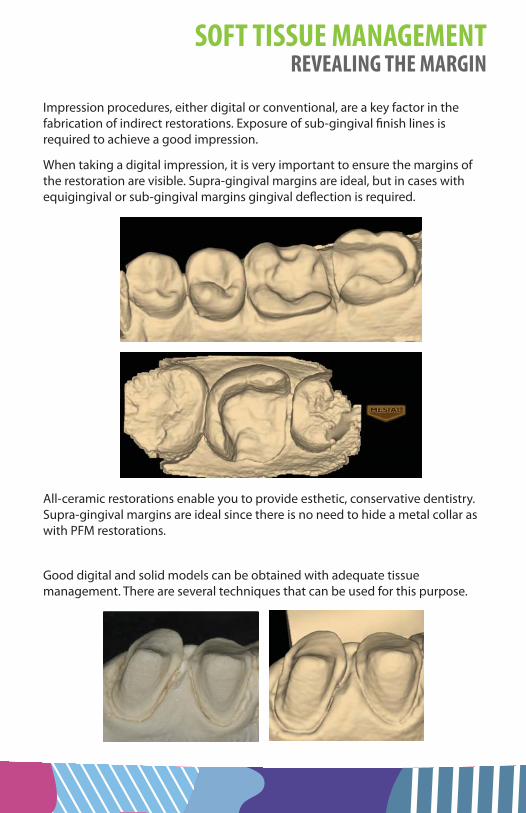
Impression procedures, either digital or conventional, are a key factor in the fabrication of indirect restorations. Exposure of sub-gingival fi nish lines is required to achieve a good impression.
When taking a digital impression, it is very important to ensure the margins of the restoration are visible. Supra-gingival margins are ideal, but in cases with equigingival or sub-gingival margins gingival defl ection is required.
All-ceramic restorations enable you to provide esthetic, conservative dentistry. Supra-gingival margins are ideal since there is no need to hide a metal collar as with PFM restorations.
Good digital and solid models can be obtained with adequate tissue management. There are several techniques that can be used for this purpose.
SOFT TISSUE MANAGEMENTREVEALING THE MARGIN
RETRACTION PASTE Paste retraction products (such as Traxodent™ or Expasyl™) are another option for revealing the margin. The paste is injected into the sulcus, exerting a stable, non-damaging pressure. See the manufacturer’s recommendations for how long to leave the paste in place and how long the sulcus will remain open when the paste is removed. The open sulcus time limit is important to keep in mind and you should be aware of how long the scanning process will take, especially for cases with multiple restorations.
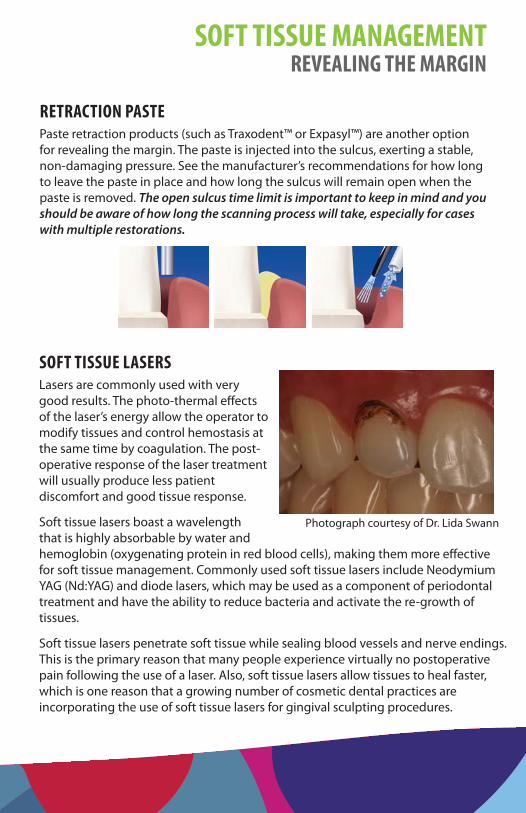
SOFT TISSUE LASERS Lasers are commonly used with very good results. The photo-thermal eff ects of the laser’s energy allow the operator to modify tissues and control hemostasis at the same time by coagulation. The post-operative response of the laser treatment will usually produce less patient discomfort and good tissue response.
Soft tissue lasers boast a wavelength that is highly absorbable by water and hemoglobin (oxygenating protein in red blood cells), making them more eff ective for soft tissue management. Commonly used soft tissue lasers include Neodymium YAG (Nd:YAG) and diode lasers, which may be used as a component of periodontal treatment and have the ability to reduce bacteria and activate the re-growth of tissues.
Soft tissue lasers penetrate soft tissue while sealing blood vessels and nerve endings. This is the primary reason that many people experience virtually no postoperative pain following the use of a laser. Also, soft tissue lasers allow tissues to heal faster, which is one reason that a growing number of cosmetic dental practices are incorporating the use of soft tissue lasers for gingival sculpting procedures.
Photograph courtesy of Dr. Lida Swann
SOFT TISSUE MANAGEMENTREVEALING THE MARGIN

CORDTissue retraction with cord will also create good results. Some dentists combine tissue retraction and hemostasis into a single procedure; however, with this method, gingival tissue may be over retracted and the result may be the loss of gingival crest height.
If you use this technique, ensure before taking the optical image that the cord is not covering the margin of the preparation.
Double cord technique will be indicated when possible. The smaller cord can be left in place in many cases to keep the sulcus open while the scanning procedure takes place.
Photograph by Dr. Lida Swann
Screenshot with ICE View
SOFT TISSUE MANAGEMENTREVEALING THE MARGIN
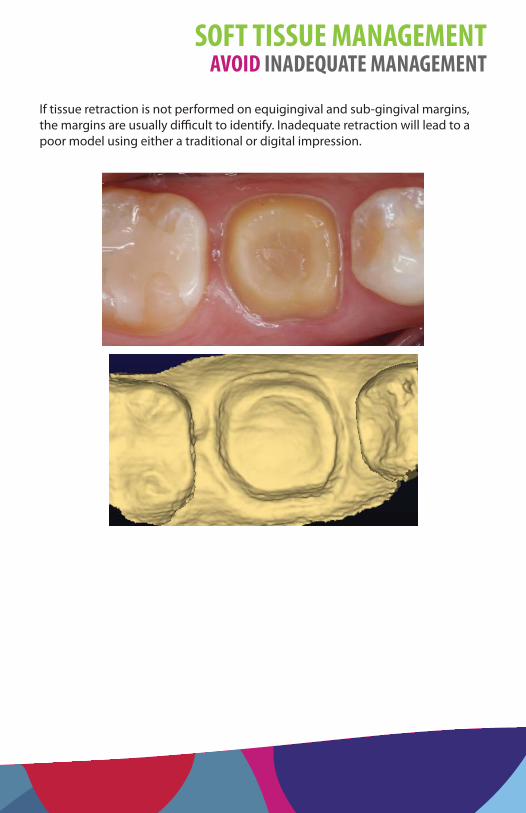
If tissue retraction is not performed on equigingival and sub-gingival margins, the margins are usually diffi cult to identify. Inadequate retraction will lead to a poor model using either a traditional or digital impression.
SOFT TISSUE MANAGEMENTAVOID INADEQUATE MANAGEMENT

630 International PkwyRichardson, Texas 75081
www.e4d.com
Customer Support: 800.537.6070
© 2014 E4D Technologies, All rights reserved. 11510200.C