Embed Size (px)
Citation preview
Installation Guide 1.52
CA CloudMinder™

This Documentation, which includes embedded help systems and electronically distributed materials, (hereinafter referred to as the “Documentation”) is for your informational purposes only and is subject to change or withdrawal by CA at any time. This Documentation is proprietary information of CA and may not be copied, transferred, reproduced, disclosed, modified or duplicated, in whole or in part, without the prior written consent of CA.
If you are a licensed user of the software product(s) addressed in the Documentation, you may print or otherwise make available a reasonable number of copies of the Documentation for internal use by you and your employees in connection with that software, provided that all CA copyright notices and legends are affixed to each reproduced copy.
The right to print or otherwise make available copies of the Documentation is limited to the period during which the applicable license for such software remains in full force and effect. Should the license terminate for any reason, it is your responsibility to certify in writing to CA that all copies and partial copies of the Documentation have been returned to CA or destroyed.
TO THE EXTENT PERMITTED BY APPLICABLE LAW, CA PROVIDES THIS DOCUMENTATION “AS IS” WITHOUT WARRANTY OF ANY KIND, INCLUDING WITHOUT LIMITATION, ANY IMPLIED WARRANTIES OF MERCHANTABILITY, FITNESS FOR A PARTICULAR PURPOSE, OR NONINFRINGEMENT. IN NO EVENT WILL CA BE LIABLE TO YOU OR ANY THIRD PARTY FOR ANY LOSS OR DAMAGE, DIRECT OR INDIRECT, FROM THE USE OF THIS DOCUMENTATION, INCLUDING WITHOUT LIMITATION, LOST PROFITS, LOST INVESTMENT, BUSINESS INTERRUPTION, GOODWILL, OR LOST DATA, EVEN IF CA IS EXPRESSLY ADVISED IN ADVANCE OF THE POSSIBILITY OF SUCH LOSS OR DAMAGE.
The use of any software product referenced in the Documentation is governed by the applicable license agreement and such license agreement is not modified in any way by the terms of this notice.
The manufacturer of this Documentation is CA.
Provided with “Restricted Rights.” Use, duplication or disclosure by the United States Government is subject to the restrictions set forth in FAR Sections 12.212, 52.227-14, and 52.227-19(c)(1) - (2) and DFARS Section 252.227-7014(b)(3), as applicable, or their successors.
Copyright © 2014 CA. All rights reserved. All trademarks, trade names, service marks, and logos referenced herein belong to their respective companies.
CA Technologies Product References
This document references the following CA Technologies products:
■ CA CloudMinder™ Identity Management
■ CA CloudMinder™ Advanced Authentication
■ CA CloudMinder™ Single Sign-On
■ CA Directory
■ CA IdentityMinder™
■ CA AuthMinder™
■ CA RiskMinder™
■ CA SiteMinder®
■ CA SiteMinder® for Secure Proxy Server
■ CA Layer 7

Contents 5
Contents
Chapter 1: Installation Overview 7
Standalone Architecture .............................................................................................................................................. 8
High Availability Architecture ....................................................................................................................................... 9
Order of Component Installation ................................................................................................................................. 9
How to Deploy CA CloudMinder ................................................................................................................................ 11
Chapter 2: Prerequisite Installation 13
Database Installation.................................................................................................................................................. 13
Database Configuration.............................................................................................................................................. 14
Port Communication Tables ....................................................................................................................................... 16
Product ISO Images .................................................................................................................................................... 18
Chapter 3: Server Installation 19
Properties Files ........................................................................................................................................................... 19
Directory Server ......................................................................................................................................................... 20
Standalone Directory Server ............................................................................................................................... 20
High-Availability: Directory Server 2 ................................................................................................................... 26
Provisioning Server..................................................................................................................................................... 29
Standalone Provisioning Server .......................................................................................................................... 29
High-Availability: Provisioning Server 2 .............................................................................................................. 38
Connector Server........................................................................................................................................................ 41
Standalone CA IAM CS......................................................................................................................................... 41
High-Availability: CA IAM CS 2............................................................................................................................. 49
SiteMinder Policy Server ............................................................................................................................................ 52
Standalone Policy Server ..................................................................................................................................... 52
High-Availability: SiteMinder Policy Server 2 ...................................................................................................... 66
CSP Console ................................................................................................................................................................ 69
CSP Console Pre-Installation Steps...................................................................................................................... 70
Configure the CSP Console Properties File .......................................................................................................... 73
Install and Verify the CSP Console ...................................................................................................................... 75
Secure Proxy Server ................................................................................................................................................... 76
Standalone Secure Proxy Server ......................................................................................................................... 76
High-Availability: Secure Proxy Server 2 ............................................................................................................. 84
Identity Management Server ..................................................................................................................................... 87
Standalone Identity Management Server ........................................................................................................... 87
High-Availability: Identity Management Server 2 ............................................................................................. 103

6 Installation Guide
Report Server ........................................................................................................................................................... 107
Standalone Report Server ................................................................................................................................. 108
High Availability Report Server on PostgreSQL ................................................................................................. 116
High Availability Report Server on Oracle ......................................................................................................... 130
Layer 7 Gateway Server............................................................................................................................................ 139
Layer 7 Gateway Server Pre-Installation Steps ................................................................................................. 140
Deploy the First Layer 7 Gateway ..................................................................................................................... 141
Deploy the Second Layer 7 Gateway................................................................................................................. 144
Configure Database Replication ........................................................................................................................ 147
Create an Internal Database ............................................................................................................................. 148
Configure the Gateway 1 Database .................................................................................................................. 149
Configure the Gateway 2 Database .................................................................................................................. 151
Reboot Both Gateways ..................................................................................................................................... 152
Harden the Gateway Servers ............................................................................................................................ 152
Install the PostgreSQL JDBC Driver ................................................................................................................... 153
Install Mobile Access Gateways (MAG) and Siteminder Assertion Packages ................................................... 154
Install the Layer 7 License File ........................................................................................................................... 155
Import the Certificate for the Gateway ............................................................................................................ 155
Create Cluster Property: siteminder12.agent.configuration ............................................................................ 156
Create Cluster Property: token.salt................................................................................................................... 158
Restart Gateways .............................................................................................................................................. 158
Steps to Address OAuth Security Vulnerability ................................................................................................. 159
Chapter 4: Initial Configuration 161
Server Configuration ................................................................................................................................................ 162
High Availability: Load Balancing.............................................................................................................................. 164
High-Availability: Network Peers for Connector Servers ......................................................................................... 170
Password Synchronization ....................................................................................................................................... 172
Maximum Number of Tenants ................................................................................................................................. 173
Chapter 5: Logs 177
Provisioning Server Logs........................................................................................................................................... 177
CA IAM CS Logs ......................................................................................................................................................... 178
CA Directory Logs ..................................................................................................................................................... 179
CA SiteMinder Logs .................................................................................................................................................. 181
Chapter 1: Installation Overview 7
Chapter 1: Installation Overview
This section contains the following topics:
Standalone Architecture (see page 8) High Availability Architecture (see page 9) Order of Component Installation (see page 9) How to Deploy CA CloudMinder (see page 11)
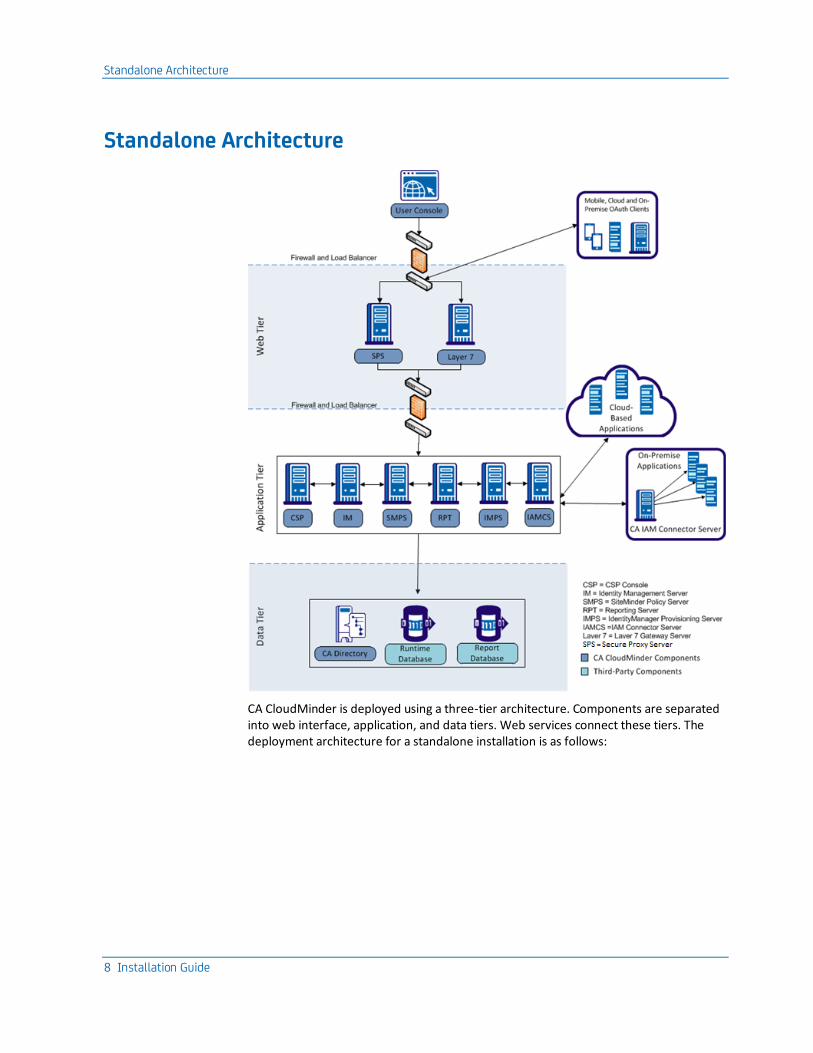
Standalone Architecture
8 Installation Guide
Standalone Architecture
CA CloudMinder is deployed using a three-tier architecture. Components are separated into web interface, application, and data tiers. Web services connect these tiers. The deployment architecture for a standalone installation is as follows:
High Availability Architecture
Chapter 1: Installation Overview 9
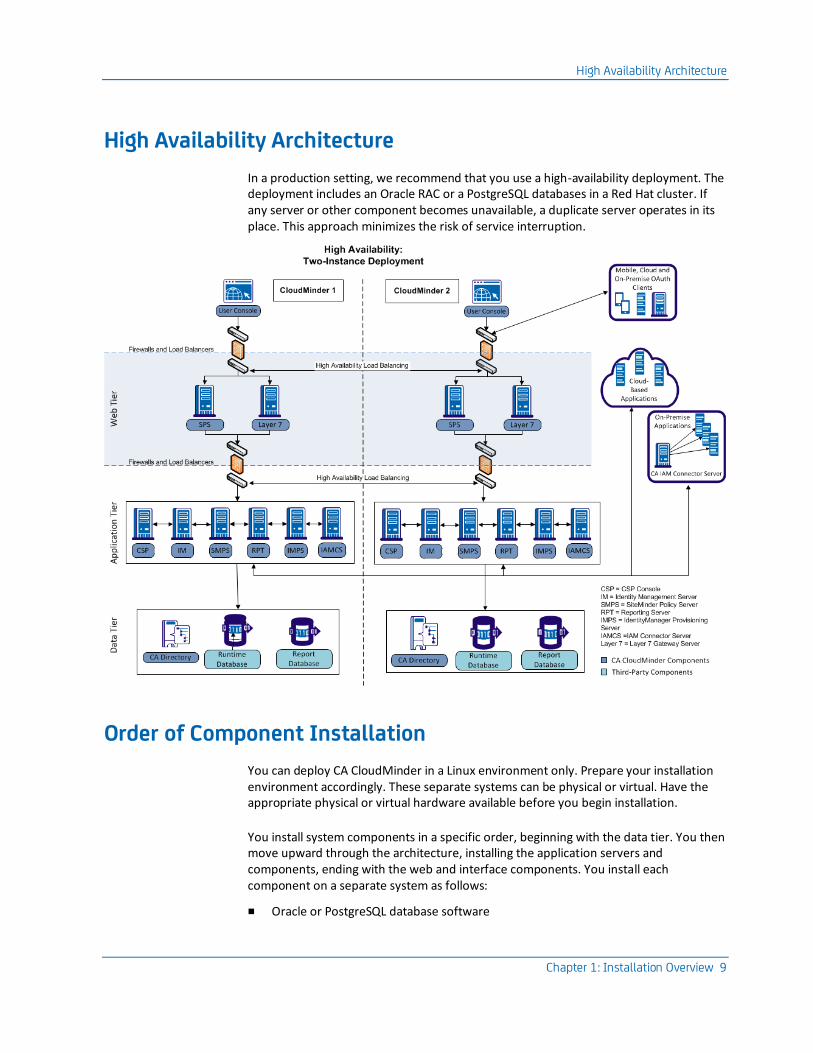
High Availability Architecture
In a production setting, we recommend that you use a high-availability deployment. The deployment includes an Oracle RAC or a PostgreSQL databases in a Red Hat cluster. If any server or other component becomes unavailable, a duplicate server operates in its place. This approach minimizes the risk of service interruption.
Order of Component Installation
You can deploy CA CloudMinder in a Linux environment only. Prepare your installation environment accordingly. These separate systems can be physical or virtual. Have the appropriate physical or virtual hardware available before you begin installation.
You install system components in a specific order, beginning with the data tier. You then move upward through the architecture, installing the application servers and components, ending with the web and interface components. You install each component on a separate system as follows:
■ Oracle or PostgreSQL database software
Order of Component Installation
10 Installation Guide
■ CA Directory server
■ Provisioning Server
■ CA IAM Connector Server CA IAM CS
■ CA SiteMinder® Policy server
■ CSP console
■ Secure Proxy server
■ Identity Management server
■ Business Objects server, if you plan to install CA Business Intelligence to enable reporting for your environment.
■ Layer 7 Gateway
Install each component and confirm that it is running before you install the next component. For example, for a two-instance high-availability deployment, first you install two instances of CA Directory server. Then, you install two instances of Provisioning server as the next procedure.
How to Deploy CA CloudMinder
Chapter 1: Installation Overview 11
How to Deploy CA CloudMinder
As a hosting administrator, you need an understanding of the high-level procedures for installing and configuring CA CloudMinder. This overview describes the process for creating a CA CloudMinder environment and includes links to detailed instructions.
1. Install CA CloudMinder, including:
■ Installing all server components (see page 19)
■ Configuring load-balancing and high availability (see page 161)
■ Accessing logs (see page 177)
2. Create tenants.
3. Replace default user accounts.
For security reasons, we recommend that you replace default user accounts and passwords with your own secure administrator accounts.
4. Configure the authentication method for the tenant.
■ Standard authentication
■ Advanced authentication, if applicable
5. Configure single sign-on, if applicable.
6. Configure your tenant user environment, including:
■ Assigning roles and adding administrators
■ Creating groups
■ Configuring managed endpoints to connect the system to external resources
■ Configuring provisioning to give users accounts in external resources
■ Configuring services to give users protected access to external resources
7. Add users to the tenant
In the SSO Getting Started Guide, the following topics describe how to configure common combinations of services:
■ SSO Using Advanced Authentication and Provisioning
■ SSO Using a Third-Party IdP and Self-Registration
■ SSO Using an OAuth Authentication Scheme and Self-Registration

Chapter 2: Prerequisite Installation 13
Chapter 2: Prerequisite Installation
Be sure to perform the following procedures before you begin the server installation.
Database Installation
Install Oracle or PostgreSQL database software for Identity Management runtime data and for reporting data.
PostgreSQL
■ You can download the PostgreSQL software from http://www.postgresql.org/
Install the PostgreSQL client (postgresql-8.4.7-2.el6.x86_64) on the systems with the SiteMinder Policy Server and the Identity Management server.
■ Install SQLAnywhere as the runtime database for reporting.
For Business Objects, use the CA Business Intelligence Installation Guide to perform a custom installation and choose SQLAnywhere for the Business Objects(CMS and the Audit database).
Oracle
■ You can purchase the software from Oracle. Install an Oracle 11g database.
■ Configure the database with all services (such as listener and DB) running.
■ For good performance, the Oracle database requires the following settings:
■ Sessions=772
■ Processes=500
■ Configure the Oracle database with a UTF-8 encoded character set. If you plan to enable Advanced Authentication for your environment, install the AL32UTF8 Oracle database character set.
■ Create an Oracle user with the username CamAdmin and privileges to create tablespaces and users. Assign the CamAdmin user the DBA and Connect roles in Oracle. The CamAdmin user is used to create other base CA CloudMinder system users. Make a note of the password for CamAdmin for later use during installation.
■ If you plan to install CA Business Intelligence for reporting, install and configure an additional logical database to house reporting data; install the new database on the same Oracle RAC server as the runtime database.
Database Configuration
14 Installation Guide
Database Configuration
Follow these steps:
1. Perform the following steps on all Oracle and PostgreSQL servers:
a. Edit the /etc/ntp.conf file
Add "server <_ntp_server>" to the list of servers
Where <_ntp_server> is the IP address of your NTP server.
b. Restart the ntpd service as follows:
service ntpd restart
c. Enable the ntpd service as follows:
chkconfig ntpd on
2. Increase the processes and sessions for the Oracle database servers as follows:
a. Launch SQL Plus and connect as the Oracle system database administrator.
b. Under SQL Plus, run the following commands:
alter system set processes=500 scope=spfile;
alter system set sessions=824 SCOPE=spfile;
ALTER SYSTEM SET EVENT='44951 TRACE NAME CONTEXT FOREVER, LEVEL
1024' scope=spfile;
shutdown immediate
startup

Database Configuration
Chapter 2: Prerequisite Installation 15
3. To enable on the Oracle database transactions for Workpoint 3.5, execute the following commands, substituting an appropriate value for Identity Management user:
ALTER SYSTEM SET JAVA_POOL_SIZE=120M scope=spfile;
ALTER SYSTEM SET SHARED_POOL_SIZE=240M scope=spfile;
create pfile from spfile;
shutdown immediate;
startup;
@$ORACLE_HOME\javavm\install\initjvm.sql;
@$ORACLE_HOME\javavm\install\initxa.sql;
grant select,insert,update,delete on DBA_PENDING_TRANSACTIONS to
Identity Management user;
grant select,insert,update,delete on DBA_PENDING_TRANSACTIONS to
system;
shutdown immediate;
startup;
Note: You can ignore errors such as "ORA-29539: Java system classes already installed." However, you may receive a disconnect message from the database. This error is mostly observed while executing the following command:
@$ORACLE_HOME\javavm\install\initjvm.sql;
If you receive this error, continue with the next SQL command:
@$ORACLE_HOME\javavm\install\initjvm.sql;
4. To enable on the PostgreSQL database transactions for Workpoint 3.5, follow these steps:
a. Execute the following commands:
export POSTGRES_HOME=PostgreSQL Installation directory
cd $POSTGRES_HOME/data
b. Set max_connections to a value based on the number of users to be updated with the bulk loader task. The value should be greater than the number of connections you enable in your connection pool.
c. Update postgresql.conf to set max_prepared_transactions to the max_connections value or higher.
If you set max_prepared_transactions to 0, you disable transactions.
d. Restart the database as follows:
cd $POSTGRES_HOME/bin
./pg_ctl restart -D $POSTGRES_HOME/data -m fast
Port Communication Tables
16 Installation Guide
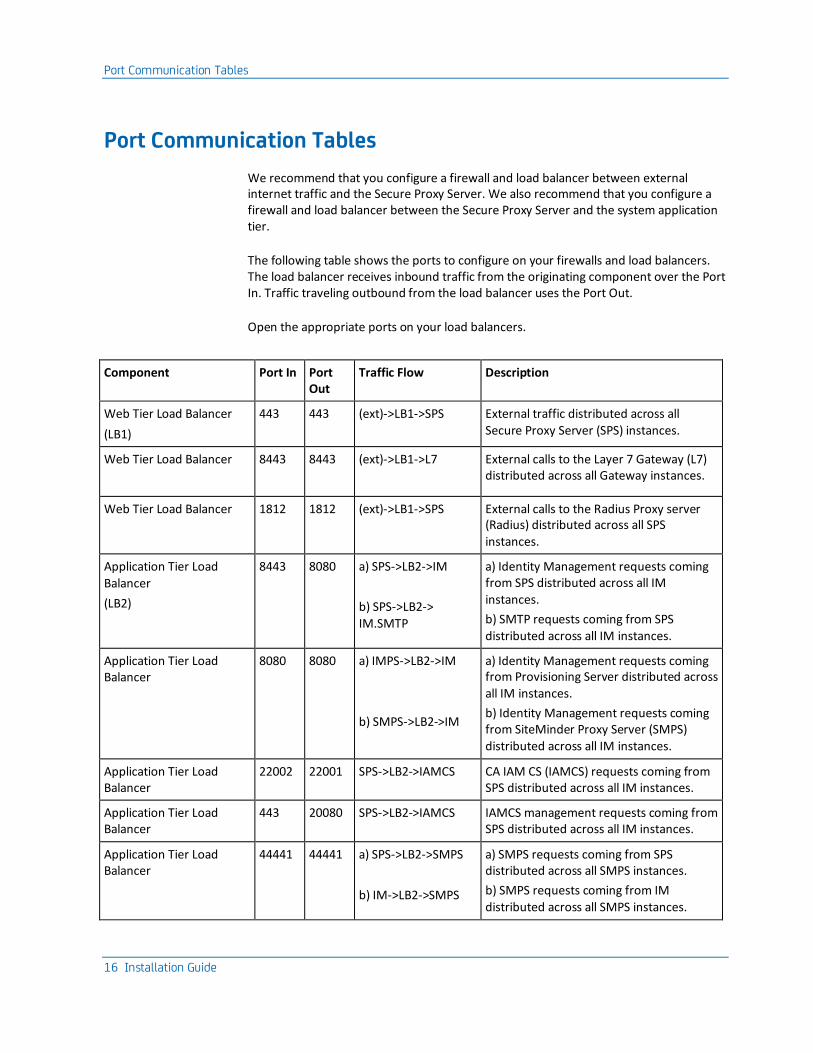
Port Communication Tables
We recommend that you configure a firewall and load balancer between external internet traffic and the Secure Proxy Server. We also recommend that you configure a firewall and load balancer between the Secure Proxy Server and the system application tier.
The following table shows the ports to configure on your firewalls and load balancers. The load balancer receives inbound traffic from the originating component over the Port In. Traffic traveling outbound from the load balancer uses the Port Out.
Open the appropriate ports on your load balancers.
Component Port In Port Out
Traffic Flow Description
Web Tier Load Balancer
(LB1)
443 443 (ext)->LB1->SPS External traffic distributed across all Secure Proxy Server (SPS) instances.
Web Tier Load Balancer 8443 8443 (ext)->LB1->L7 External calls to the Layer 7 Gateway (L7) distributed across all Gateway instances.
Web Tier Load Balancer 1812 1812 (ext)->LB1->SPS External calls to the Radius Proxy server (Radius) distributed across all SPS
instances.
Application Tier Load
Balancer
(LB2)
8443 8080 a) SPS->LB2->IM
b) SPS->LB2->
IM.SMTP
a) Identity Management requests coming from SPS distributed across all IM
instances.
b) SMTP requests coming from SPS
distributed across all IM instances.
Application Tier Load Balancer
8080 8080 a) IMPS->LB2->IM
b) SMPS->LB2->IM
a) Identity Management requests coming from Provisioning Server distributed across all IM instances.
b) Identity Management requests coming from SiteMinder Proxy Server (SMPS) distributed across all IM instances.
Application Tier Load Balancer
22002 22001 SPS->LB2->IAMCS CA IAM CS (IAMCS) requests coming from SPS distributed across all IM instances.
Application Tier Load Balancer
443 20080 SPS->LB2->IAMCS IAMCS management requests coming from SPS distributed across all IM instances.
Application Tier Load Balancer
44441 44441 a) SPS->LB2->SMPS
b) IM->LB2->SMPS
a) SMPS requests coming from SPS distributed across all SMPS instances.
b) SMPS requests coming from IM
distributed across all SMPS instances.
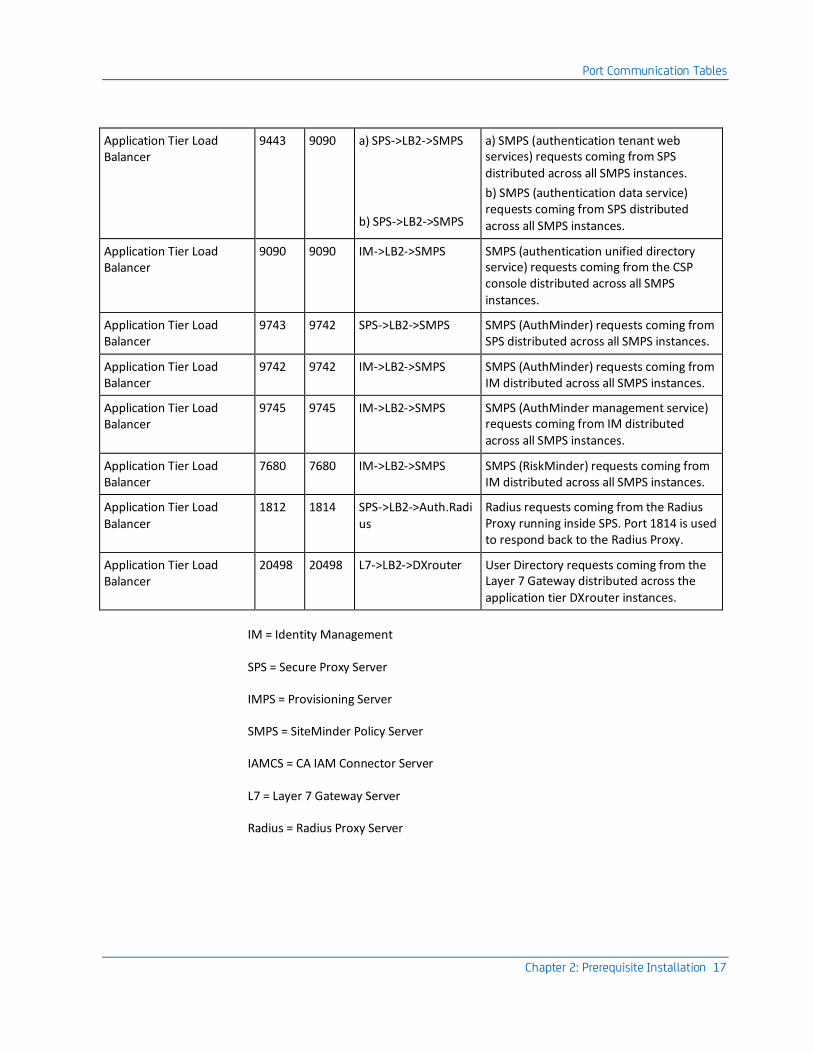
Port Communication Tables
Chapter 2: Prerequisite Installation 17
Application Tier Load Balancer
9443 9090 a) SPS->LB2->SMPS
b) SPS->LB2->SMPS
a) SMPS (authentication tenant web services) requests coming from SPS
distributed across all SMPS instances.
b) SMPS (authentication data service) requests coming from SPS distributed across all SMPS instances.
Application Tier Load Balancer
9090 9090 IM->LB2->SMPS SMPS (authentication unified directory service) requests coming from the CSP console distributed across all SMPS instances.
Application Tier Load Balancer
9743 9742 SPS->LB2->SMPS SMPS (AuthMinder) requests coming from SPS distributed across all SMPS instances.
Application Tier Load Balancer
9742 9742 IM->LB2->SMPS SMPS (AuthMinder) requests coming from IM distributed across all SMPS instances.
Application Tier Load Balancer
9745 9745 IM->LB2->SMPS SMPS (AuthMinder management service) requests coming from IM distributed across all SMPS instances.
Application Tier Load Balancer
7680 7680 IM->LB2->SMPS SMPS (RiskMinder) requests coming from IM distributed across all SMPS instances.
Application Tier Load
Balancer
1812 1814 SPS->LB2->Auth.Radi
us
Radius requests coming from the Radius Proxy running inside SPS. Port 1814 is used to respond back to the Radius Proxy.
Application Tier Load Balancer
20498 20498 L7->LB2->DXrouter User Directory requests coming from the Layer 7 Gateway distributed across the application tier DXrouter instances.
IM = Identity Management
SPS = Secure Proxy Server
IMPS = Provisioning Server
SMPS = SiteMinder Policy Server
IAMCS = CA IAM Connector Server
L7 = Layer 7 Gateway Server
Radius = Radius Proxy Server
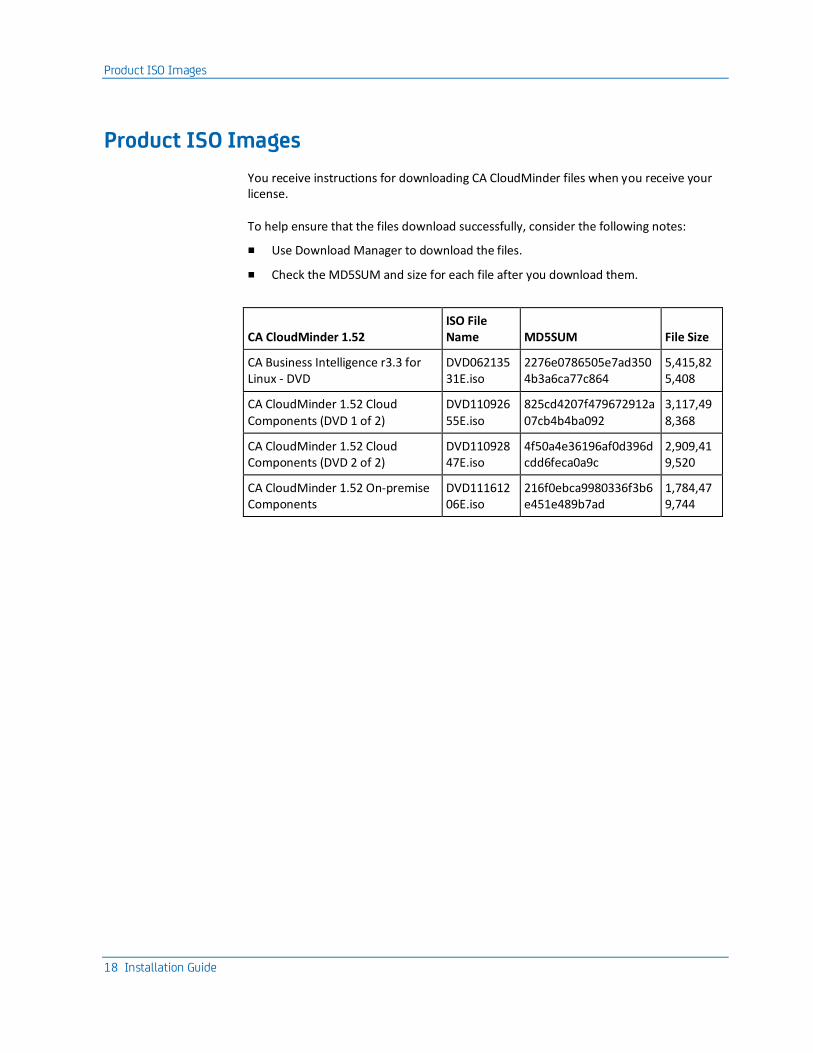
Product ISO Images
18 Installation Guide
Product ISO Images
You receive instructions for downloading CA CloudMinder files when you receive your license.
To help ensure that the files download successfully, consider the following notes:
■ Use Download Manager to download the files.
■ Check the MD5SUM and size for each file after you download them.
CA CloudMinder 1.52 ISO File Name MD5SUM File Size
CA Business Intelligence r3.3 for Linux - DVD
DVD06213531E.iso
2276e0786505e7ad3504b3a6ca77c864
5,415,825,408
CA CloudMinder 1.52 Cloud
Components (DVD 1 of 2)
DVD110926
55E.iso
825cd4207f479672912a
07cb4b4ba092
3,117,49
8,368
CA CloudMinder 1.52 Cloud Components (DVD 2 of 2)
DVD11092847E.iso
4f50a4e36196af0d396dcdd6feca0a9c
2,909,419,520
CA CloudMinder 1.52 On-premise Components
DVD11161206E.iso
216f0ebca9980336f3b6e451e489b7ad
1,784,479,744
Chapter 3: Server Installation 19
Chapter 3: Server Installation
Be sure that you have performed the prerequisite installation (see page 13) procedures before you begin the server installation.
This section contains the following topics:
Properties Files (see page 19) Directory Server (see page 20) Provisioning Server (see page 29) Connector Server (see page 41) SiteMinder Policy Server (see page 52) CSP Console (see page 69) Secure Proxy Server (see page 76) Identity Management Server (see page 87) Report Server (see page 107) Layer 7 Gateway Server (see page 139)
Properties Files
Each server component has a properties file, with the exception of the Layer 7 Gateway servers. Before installing a component, complete the properties file with information such as system and database user names, passwords, and host names. During installation, the properties file distributes the information, enabling components to function properly and communicate with one another.
You need the properties.sh files during future upgrades and for general reference. The installation of the server backs up the properties.sh file to this location with an appropriate time stamp:
/opt/CA/config/
If you prefer to use a different location, set the TARGET environment variable to that location.
Important! For security purposes, the backed up file excludes all passwords; therefore, make separate arrangements to recall the passwords you need.
Directory Server
20 Installation Guide
Directory Server
Standalone Directory Server
Use this procedure to install a CA Directory Server.
After you complete this procedure, continue with the Directory Server 2 procedure for a high-availability deployment. Otherwise, continue with installing the Provisioning Server after you complete this procedure.
The Provisioning Directory is installed as part of CA Directory Kit.
CA Directory Pre-Installation Steps
To prepare for installation, confirm that your server environment is properly prepared. Then install the required packages.
Follow these steps:
1. Install 64-bit Linux RHEL 6.1.
2. Download, but do not install, a 64-bit JDK to your local system or to a file share. You can also use a JRE in place of a JDK.
Note: The system installer can install the JDK automatically. We recommend that you download a JDK and allow the system to install it.
3. Verify that the systems where you plan to install CA Directory and the Provisioning Server can ping each other. For a high availability installation, make sure each system can ping the three other systems. I.e., each CA Directory system can ping the other, and can ping both Provisioning Server systems, and vice versa.
4. Be sure that this system has sufficient disk space for the number of tenants it will support.
When you deploy a tenant, an LDIF file is uploaded through DSA Management. The upload process requires twice the amount of space. For example, if the DSA data store is 2.5 GB, the system needs 5 GB available while the LDIF is loading.
5. Obtain the Directory Server ISO image from the CA Support site and extract it.
6. Copy the kit (CAM-DIR_kit-date.zip) to / (the root folder).
7. Unzip the kit.
8. Install the following packages:
■ binutils-2*x86_64*
■ glibc-2*x86_64* nss-softokn-freebl-3*x86_64*
Directory Server
Chapter 3: Server Installation 21
■ glibc-2*i686* nss-softokn-freebl-3*i686*
■ compat-libstdc++-33*x86_64*
■ glibc-common-2*x86_64*
■ glibc-devel-2*x86_64*
■ glibc-devel-2*i686*
■ glibc-headers-2*x86_64*
■ elfutils-libelf-0*x86_64*
■ elfutils-libelf-devel-0*x86_64*
■ gcc-4*x86_64*
■ gcc-c++-4*x86_64*
■ ksh-*x86_64*
■ libaio-0*x86_64*
■ libaio-devel-0*x86_64*
■ libaio-0*i686*
■ libaio-devel-0*i686*
■ libgcc-4*x86_64*
■ libgcc-4*i686*
■ libstdc++-4*x86_64*
■ libstdc++-4*i686*
■ libstdc++-devel-4*x86_64*
■ make-3.81*x86_64*
■ numactl-devel-2*x86_64*
■ sysstat-9*x86_64*
■ compat-libstdc++-33*i686*
■ compat-libcap*
■ unixODBC*
■ libstdc++*
■ compat-libstdc++-33.i686
■ compat-libstdc++-296.i686
■ glibc.i686
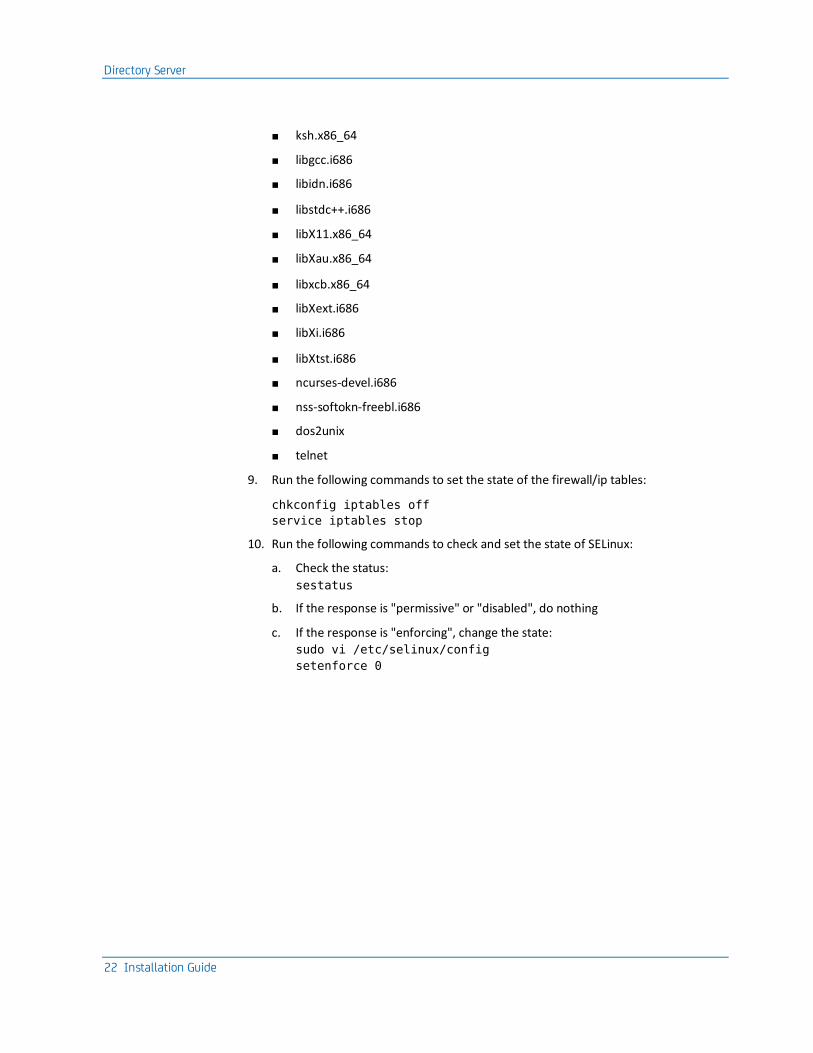
Directory Server
22 Installation Guide
■ ksh.x86_64
■ libgcc.i686
■ libidn.i686
■ libstdc++.i686
■ libX11.x86_64
■ libXau.x86_64
■ libxcb.x86_64
■ libXext.i686
■ libXi.i686
■ libXtst.i686
■ ncurses-devel.i686
■ nss-softokn-freebl.i686
■ dos2unix
■ telnet
9. Run the following commands to set the state of the firewall/ip tables:
chkconfig iptables off
service iptables stop
10. Run the following commands to check and set the state of SELinux:
a. Check the status:
sestatus
b. If the response is "permissive" or "disabled", do nothing
c. If the response is "enforcing", change the state:
sudo vi /etc/selinux/config
setenforce 0
Directory Server
Chapter 3: Server Installation 23
Configure the CA Directory Properties File
Set the parameters for the CA Directory server installation. Parameters pass information required to enable successful communication and function among system components.
You need the following information to complete the CA Directory parameters.
■ The host names of the systems where you plan to install the CA Directory Servers
■ The host names of the systems where you plan to install the IdentityMinder Provisioning Servers
Follow these steps:
1. Navigate to /tmp/properties.sh.
2. In the properties.sh file, set the following parameters.
_Environment
Leave as the default, CHANGE_ME_LATER.
_SoftwareVersion
Leave as the default, STATIC.
_impd_fips_mode
Leave as the default, false.
_DomainSuffix
Set this to your network domain.
_impd_shared_secret
A password shared by the Provisioning Directory and Provisioning Server. Use any password, but it must match the password for _impd_shared_secret in the properties file you will create during Provisioning Server installation.
Make a note of this password so you can use it later during the installation process.
_imps_hostname
Enter the host names of systems where you plan to install the Provisioning Server, separated by commas.

Directory Server
24 Installation Guide
_ha_host_list
For a high-availability deployment, enter the host names of other systems where you plan to install CA Directory (other than the system on which you are currently installing CA Directory).
In a single-instance deployment, leave this parameter blank.
_ha_primary_host
For a high-availability deployment, enter the host name of the system where you install the first CA Directory. Use the same value for the second CA Directory installation.
In a single-instance deployment, leave this parameter blank.
_dir_webservice_details
Leave as default, true.
_dir_webservices_port
Port used by Web Services. Leave as the default, 9080, unless you cannot use this port in your environment. If you must change the web services port, enter a new port number.
Note: If you must change the web services port, use the same port for web services on all servers.
_dir_webservices_secure_port
Port used by Web Services. Leave as the default, 9443, unless you cannot use this port in your environment. If you must change the web services port, enter a new port number.
Note: If you must change the web services port, use the same port for web services on all servers.
_dir_webservices_username
User name for Web Services. Leave as the default, dsaweb.
_dir_webservices_password
The password for Web Services. Create any password, but it must match the password for _impd_shared_secret in the properties file you create during Provisioning Server installation.
Make a note of this password so you can use it later during the installation process.
_COMP_CLASS
Leave as the default, ca_cam.directory.
_COMP_NAME
Leave as the default, main.directory.
Directory Server
Chapter 3: Server Installation 25
_APP_NAME
Leave as the default, directory_server.
JAVA64_LOCATION
Location of an existing 64-bit JRE if preinstalled. Set this parameter if you choose to install your JRE separately. In this case, symbolically link /opt/java64 to your JRE.
However, instead of installing a JRE separately, the system installer can do this automatically. We recommend that you download a JRE and allow the system to install it.
See the JAVA64_KIT parameter.
JAVA64_KIT
Location of a 64-bit JRE that you download to the local system or to a file share. If this parameter is set, the server kit installs this JRE automatically.
USER_JAVA64
Leave blank for installation. This parameter is intended for upgrades, not installation.
_ntp_server
IP address or host name of the NTP server to use to synchronize the server time.
3. Back up the properties.sh file. Rename it to a logical name, for example, directory1properties.sh.
Note: This file is critical for upgrades. We recommend that you back up this file. This file contains passwords, so be sure to save it in a secure location.
Important! The original properties.sh file resides in a temp folder. If the server is shut down, the properties.sh file is discarded. Therefore, rename and back up this file before proceeding with any further installation or use of the system.

Directory Server
26 Installation Guide
Install and Verify the CA Directory Server
After you set the CA Directory parameters and back up the properties.sh file, run the installation program.
Verify the installation before proceeding with further installation steps.
Follow these steps:
1. Navigate to:
/opt/CA/saas/repo/application/
2. Run:
./appliance_local.sh config
When installation is complete, verify the installation as follows.
3. On the CA Directory server system, check that Java is running:
ps -ef | grep java
The output shows the following:
java -Xms256m -Xmx1024m -cp ./lib/*
com.ca.directory.dxagent.service.DxAgentService
4. Log in as the DSA user:
su – dsa
5. Check the Directory Server status by issuing the dxserver command:
dxserver status
The output shows that the four impd processes have started:
<dir1 host>-impd-notify started
<dir1 host>-impd-main started
<dir1 host>-impd-inc started
<dir1 host>-impd-co started
6. For a high-availability deployment, continue with installing a second CA Directory server. For a single-instance deployment, continue with installing the Provisioning Server.
High-Availability: Directory Server 2
Prepare a second system that is separate from the one on which you installed the first CA Directory instance.
Confirm that your server environment is properly prepared and install the required packages. Follow the same steps (see page 20) as you did for the first instance.
Directory Server
Chapter 3: Server Installation 27
Configure the Second CA Directory Properties File
Set the parameters for the second CA Directory server instance.
Copy the properties file from the first CA Directory Server instance and change only the parameters that are different for the second instance. Remember to rename and back up the new properties file after you complete the parameters.
You need the following information to complete the CA Directory parameters.
General Information:
The host names of the systems where you plan to install the CA Directory Servers.
Follow these steps:
1. On the first CA Directory Server system, copy the properties.sh file that you just configured.
2. Navigate to /tmp/properties.sh on the second CA Directory Server system. Replace the properties.sh file with the configured copy from the first CA Directory Server system.
3. Change the following parameter values:
_ha_host_list
Enter the host names of other CA Directory systems in your environment, other than the system on which you are currently installing. In a two-instance high-availability deployment, enter the host name of the system where you installed the first CA Directory instance.
In a single-instance deployment, leave this parameter blank.
_ha_primary_host
Enter the host name of the system where you installed the first CA Directory instance.
For example, Directory1 (where the system on which you are currently installing is Directory2)
Note: The primary host is always the system where you installed the first CA Directory instance.
4. Leave all other parameter values as you set them for the first CA Directory Server.
5. Back up the properties.sh file. Rename it to a logical name, for example, directory2properties.sh.
Note: This file is critical for upgrades. We recommend that you back up this file. This file contains passwords, so be sure to save it in a secure location.
Directory Server
28 Installation Guide
Important! The original properties.sh file resides in a temp folder. If the server is restarted, the properties.sh file is discarded. Therefore, rename and back up this file before proceeding with any further use of this component and the system on which it is installed.
Install and Verify the Second CA Directory Server
After you set the parameters for the second CA Directory instance and back up the properties.sh file, run the installation program.
Verify the installation before proceeding with further installation steps.
Follow these steps:
1. Navigate to:
/opt/CA/saas/repo/application/
2. Run:
./appliance_local.sh config
When installation is complete, verify the installation as follows.
3. On the CA Directory server system, check that Java is running:
ps -ef | grep java
The output shows the following:
java -Xms256m -Xmx1024m -cp ./lib/*
com.ca.directory.dxagent.service.DxAgentService
4. Log in as the DSA user:
su – dsa
5. Check the Directory Server status by issuing the dxserver command:
dxserver status
The output shows that the four impd processes have started:
<dir2 host>-impd-notify started
<dir2 host>-impd-main started
<dir2 host>-impd-inc started
<dir2 host>-impd-co started
Continue with installing the Provisioning Server.
Provisioning Server
Chapter 3: Server Installation 29
Provisioning Server
Standalone Provisioning Server
Use this procedure to install a Provisioning Server.
For a high-availability deployment, after you complete this procedure, continue with the Provisioning Server 2 procedure. Otherwise, after you complete this procedure continue with installing the CA IAM CS.
More Information:
Provisioning Server Pre-Installation Steps (see page 29) Configure the Provisioning Server Properties File (see page 31) Install and Verify the Provisioning Server (see page 36)
Provisioning Server Pre-Installation Steps
To prepare for installation, confirm that your server environment is properly prepared. Then install the required packages.
Follow these steps:
1. Install 64-bit Linux RHEL 6.1.
2. Download, but do not install, a 64-bit JDK to your local system or to a file share. You can also use a JRE in place of a JDK.
Note: The system installer can install the JDK automatically. We recommend that you download a JDK and allow the system to install it.
3. Verify that the systems where you previously installed CA Directory, and the systems where you plan to install the Provisioning Server, can ping each other. For a high availability installation, make sure each system can ping the three other systems. I.e., each Provisioning Server system can ping the other, and can ping both CA Directory systems, and vice versa.
4. Obtain the Provisioning Server ISO image from the CA Support site and extract it.
5. Copy the kit (CAM-IMPS_kit-date.zip) to / (the root folder).
6. Unzip the kit.
7. Install the following packages:
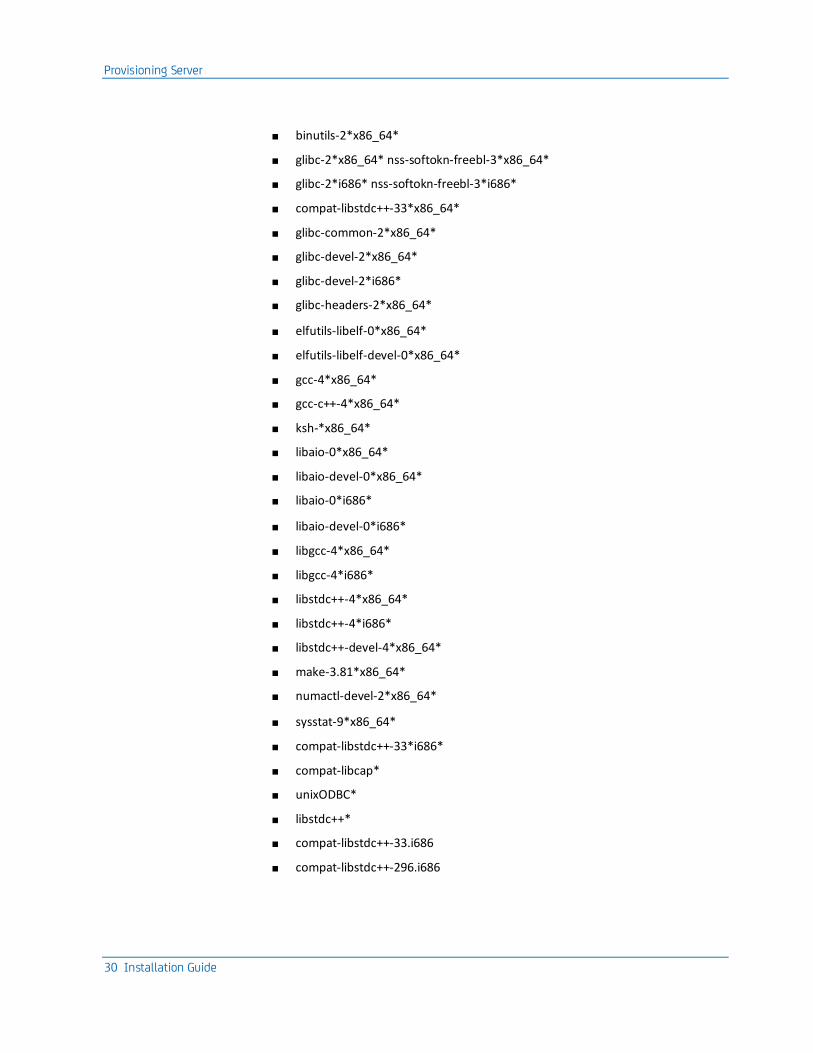
Provisioning Server
30 Installation Guide
■ binutils-2*x86_64*
■ glibc-2*x86_64* nss-softokn-freebl-3*x86_64*
■ glibc-2*i686* nss-softokn-freebl-3*i686*
■ compat-libstdc++-33*x86_64*
■ glibc-common-2*x86_64*
■ glibc-devel-2*x86_64*
■ glibc-devel-2*i686*
■ glibc-headers-2*x86_64*
■ elfutils-libelf-0*x86_64*
■ elfutils-libelf-devel-0*x86_64*
■ gcc-4*x86_64*
■ gcc-c++-4*x86_64*
■ ksh-*x86_64*
■ libaio-0*x86_64*
■ libaio-devel-0*x86_64*
■ libaio-0*i686*
■ libaio-devel-0*i686*
■ libgcc-4*x86_64*
■ libgcc-4*i686*
■ libstdc++-4*x86_64*
■ libstdc++-4*i686*
■ libstdc++-devel-4*x86_64*
■ make-3.81*x86_64*
■ numactl-devel-2*x86_64*
■ sysstat-9*x86_64*
■ compat-libstdc++-33*i686*
■ compat-libcap*
■ unixODBC*
■ libstdc++*
■ compat-libstdc++-33.i686
■ compat-libstdc++-296.i686
Provisioning Server
Chapter 3: Server Installation 31
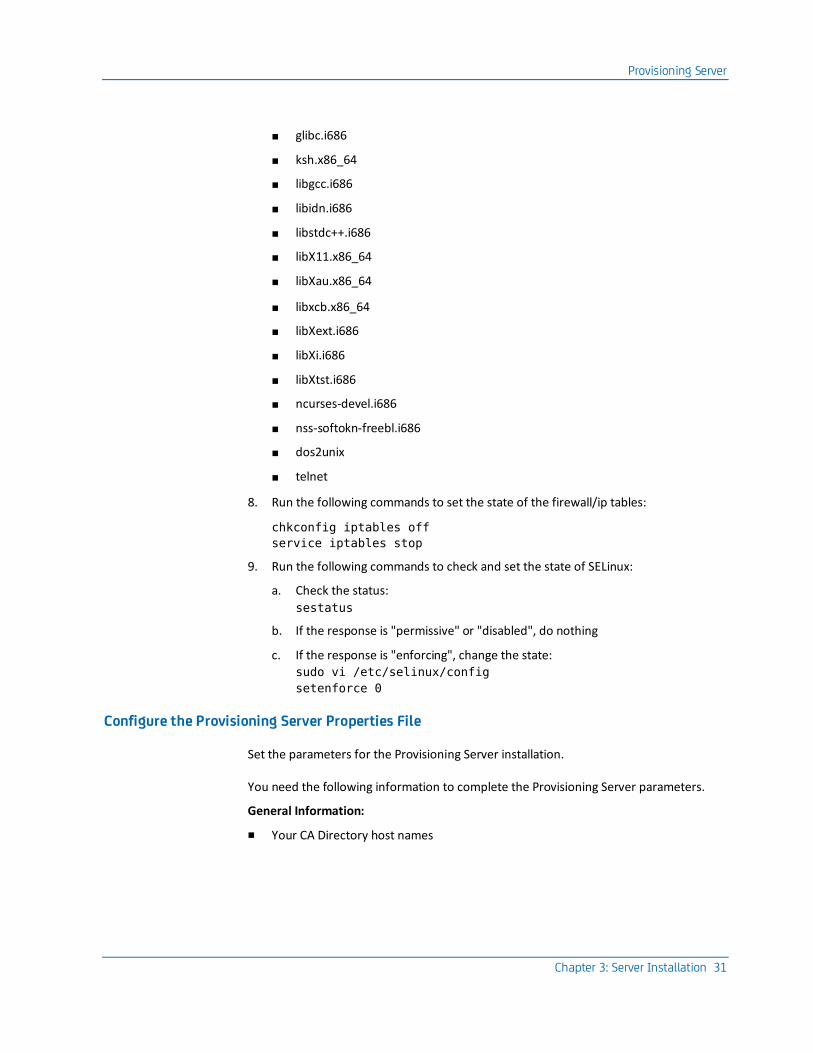
■ glibc.i686
■ ksh.x86_64
■ libgcc.i686
■ libidn.i686
■ libstdc++.i686
■ libX11.x86_64
■ libXau.x86_64
■ libxcb.x86_64
■ libXext.i686
■ libXi.i686
■ libXtst.i686
■ ncurses-devel.i686
■ nss-softokn-freebl.i686
■ dos2unix
■ telnet
8. Run the following commands to set the state of the firewall/ip tables:
chkconfig iptables off
service iptables stop
9. Run the following commands to check and set the state of SELinux:
a. Check the status:
sestatus
b. If the response is "permissive" or "disabled", do nothing
c. If the response is "enforcing", change the state:
sudo vi /etc/selinux/config
setenforce 0
Configure the Provisioning Server Properties File
Set the parameters for the Provisioning Server installation.
You need the following information to complete the Provisioning Server parameters.
General Information:
■ Your CA Directory host names
Provisioning Server
32 Installation Guide
From the CA Directory properties file:
■ _impd_shared_secret
■ _dir_webservices_password
Follow these steps:
1. Navigate to /tmp/properties.sh.
2. In the properties.sh file, set the following parameters.
_Environment
Leave as the default, CHANGE_ME_LATER.
_SoftwareVersion
Leave as the default, STATIC.
_DomainSuffix
Set this to your network domain.
_impd_shared_secret
Enter the same password you entered for _impd_shared_secret in the properties files for CA Directory.
_impd_hostname
Host name of the system where you installed the primary CA Directory instance.
_impd_bind_pwd
A password which the Provisioning Server uses to connect to the Provisioning Directory. Create any password.
Make a note of this password so you can use it later during the installation process.
_impd_ha_hosts
For a high-availability deployment, enter the host name of the alternate CA Directory server.
For example, Directory2 (where the primary CA Directory server is Directory1)
Note: If you have three or more instances of CA Directory, separate the entries with commas. For example: Directory2, Directory3.
In a single-instance deployment, leave this parameter blank.
_impd_root_domain_pwd
Enter the same password you entered for _impd_shared_secret in the properties files for CA Directory.
Provisioning Server
Chapter 3: Server Installation 33
_impd_parent_domain_pwd
Enter the same password you entered for _impd_shared_secret in the properties files for CA Directory.
_impd_etaadmin_pwd
Enter the same password you entered for _impd_shared_secret in the properties files for CA Directory.
_provisioning_server_pwd
The Provisioning Server password. Create any password. Use the same password on all Provisioning Servers.
Make a note of this password so you can use it later during the installation process.
_provisioning_repository_pwd
Enter the same password you entered for _impd_shared_secret in the properties files for CA Directory.
_connector_server_pwd
The password used to access the CA IAM CS. Create any password. This must match the password for _connector_server_pwd in the properties file you will create during CA IAM CS installation.
Make a note of this password so you can use it later during the installation process.
_provisioning_domain
Leave as the default value.
Important! The following six parameters are required only during CA IAM CS installation. If you are currently installing the Provisioning Server, leave the following six parameters blank.
_http_proxy_enabled
Addresses whether you need a proxy to connect to the internet. Set to True if you need to enable a proxy to connect to the internet. For example, set to True if the Provisioning Server is on a protected intranet. Set to False if the Provisioning Server has direct access to the internet and no proxy is enabled.
_http_proxy_user
The Proxy User required for authentication.
Provisioning Server
34 Installation Guide
_http_proxy_pwd
The password for the Proxy User.
_http_proxy_domain
The proxy domain required for authentication.
_http_proxy_port
The proxy port required for authentication.
_http_proxy_server
The proxy server required for authentication.
_install_imps
Set to True to install the Provisioning Server.
Note: This parameter allows you to install a Provisioning Server through this installer. Set this to False to prevent a Provisioning Server from installing.
Also see the _install_jcs parameter.
_impd_skip_snapshot
Leave as the default value, false. This setting allows tenant deployment to succeed.
_dir_webservices_port
Port used by Web Services. Leave as the default, 9080, unless you cannot use this port in your environment. If you must change the web services port, enter a new port number.
Note: If you must change the web services port, use the same port for web services on all servers.
_dir_webservices_username
User name for Web Services. Leave as the default, dsaweb.
_dir_webservices_password
Enter the same password you entered for _dir_webservices_password in the properties file for the first CA Directory instance.
_dir_webservices_secure_port
Port used by Web Services. Leave as the default, 9443, unless you cannot use this port in your environment. If you must change the web services port, enter a new port number.
Note: If you must change the web services port, use the same port for web services on all servers.
Provisioning Server
Chapter 3: Server Installation 35
_imps_fips_keyfile
Leave as the default, false.
_COMP_CLASS
Leave as the default, ca_cam.directory.
_COMP_NAME
Leave as the default, main.directory.
_APP_NAME
Leave as the default, directory_server.
JAVA64_LOCATION
Location of an existing 64-bit JRE if preinstalled. Set this parameter if you choose to install your JRE separately. In this case, symbolically link /opt/java64 to your JRE.
However, instead of installing a JRE separately, the system installer can do this automatically. We recommend that you download a JRE and allow the system to install it.
See the JAVA64_KIT parameter.
JAVA64_KIT
Location of a 64-bit JRE that you download to the local system or to a file share. If this parameter is set, the server kit installs this JRE automatically.
USER_JAVA64
Leave blank for installation. This parameter is intended for upgrades, not installation.
_install_jcs
Set to False to install the Provisioning Server.
Note: This parameter allows you to install either a CA IAM CS through this installer. Set this to False to prevent a CA IAM CS from installing.
Also see the _install_imps parameter.
_ntp_server
IP address or host name of the NTP server to use to synchronize the server time.
_remote_imps_hostname
Enter the host name of the primary Provisioning Server system.
Note: This parameter is not needed when the Provisioning Server and CA IAM CS are on the same system.
Provisioning Server
36 Installation Guide
3. Back up the properties.sh file. Rename it to a logical name. Example: provisioning1properties.sh.
Note: This file is critical for upgrades. We recommend that you back up this file. This file contains passwords, so be sure to save it in a secure location.
Important! The original properties.sh file resides in a temp folder. If the server is shut down, the properties.sh file is discarded. Therefore, rename and back up this file before proceeding with any further installation or use of the system.
Install and Verify the Provisioning Server
After you set the Provisioning Server parameters and back up the properties.sh file, run the installation program.
Verify the installation before proceeding with further installation steps.
Follow these steps:
1. Navigate to:
/opt/CA/saas/repo/application/
2. Run:
./appliance_local.sh config
When installation is complete, verify the installation as follows.
3. On the CA Directory Server system, check that Java is running:
ps -ef | grep java
The output shows the following:
/opt/CA/Directory/dxserver/dsamgmt/jvm/bin/java -Xms256m
-Xmx1024m -cp /opt/CA/Directory/dxserver/dsamgmt/lib/*
com.ca.directory.dxagent.service.DxAgentService
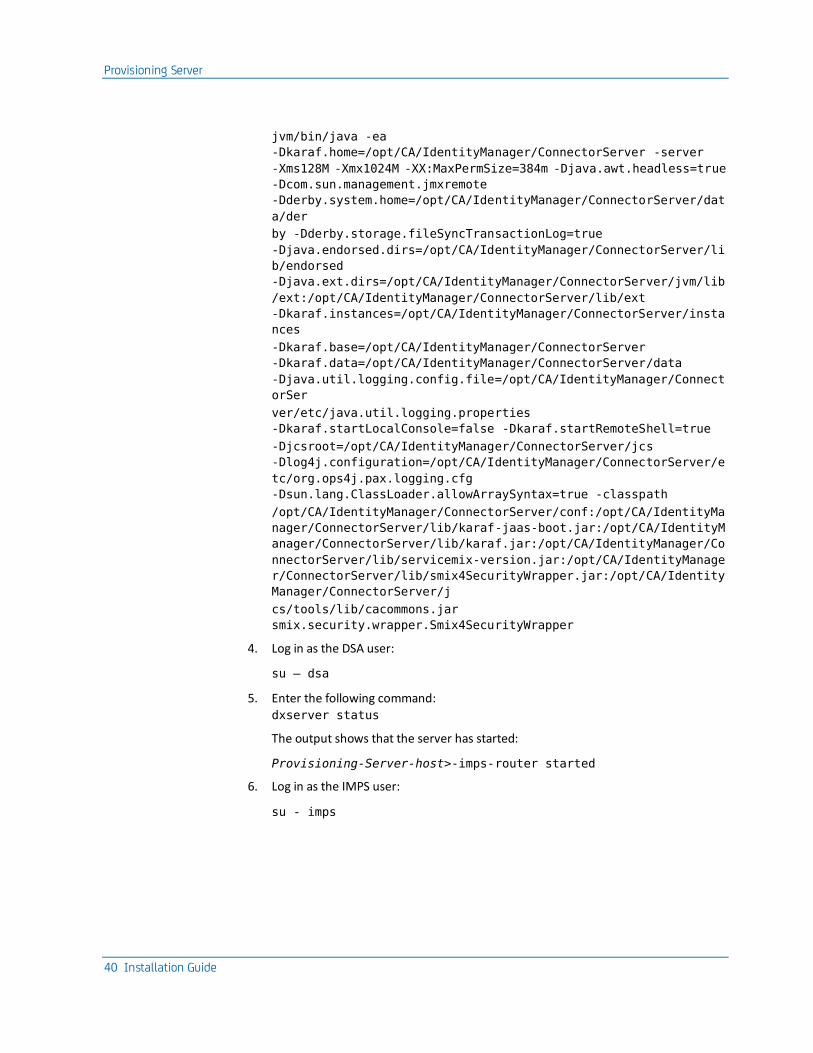
jvm/bin/java -ea
-Dkaraf.home=/opt/CA/IdentityManager/ConnectorServer -server
-Xms128M -Xmx1024M -XX:MaxPermSize=384m -Djava.awt.headless=true
-Dcom.sun.management.jmxremote
-Dderby.system.home=/opt/CA/IdentityManager/ConnectorServer/dat
a/der
by -Dderby.storage.fileSyncTransactionLog=true
-Djava.endorsed.dirs=/opt/CA/IdentityManager/ConnectorServer/li
b/endorsed
-Djava.ext.dirs=/opt/CA/IdentityManager/ConnectorServer/jvm/lib
/ext:/opt/CA/IdentityManager/ConnectorServer/lib/ext
-Dkaraf.instances=/opt/CA/IdentityManager/ConnectorServer/insta
nces
Provisioning Server
Chapter 3: Server Installation 37
-Dkaraf.base=/opt/CA/IdentityManager/ConnectorServer
-Dkaraf.data=/opt/CA/IdentityManager/ConnectorServer/data
-Djava.util.logging.config.file=/opt/CA/IdentityManager/Connect
orSer
ver/etc/java.util.logging.properties
-Dkaraf.startLocalConsole=false -Dkaraf.startRemoteShell=true
-Djcsroot=/opt/CA/IdentityManager/ConnectorServer/jcs
-Dlog4j.configuration=/opt/CA/IdentityManager/ConnectorServer/e
tc/org.ops4j.pax.logging.cfg
-Dsun.lang.ClassLoader.allowArraySyntax=true -classpath
/opt/CA/IdentityManager/ConnectorServer/conf:/opt/CA/IdentityMa
nager/ConnectorServer/lib/karaf-jaas-boot.jar:/opt/CA/IdentityM
anager/ConnectorServer/lib/karaf.jar:/opt/CA/IdentityManager/Co
nnectorServer/lib/servicemix-version.jar:/opt/CA/IdentityManage
r/ConnectorServer/lib/smix4SecurityWrapper.jar:/opt/CA/Identity
Manager/ConnectorServer/j
cs/tools/lib/cacommons.jar
smix.security.wrapper.Smix4SecurityWrapper
4. Log in as the DSA user:
su – dsa
5. Enter the following command:
dxserver status
The output shows that the server has started:
<Provisioning-Server-host>-imps-router started
6. Log in as the IMPS user:
su - imps
7. Navigate to /opt/CA/IdentityManager/ProvisioningServer/bin.
8. Enter the following command:
./imps status
The output shows the following:
im_ps is running
Provisioning Server
38 Installation Guide
9. For a high-availability deployment, continue with installing a second Provisioning Server. For a single-instance deployment, continue with installing the CA IAM CS.
Note: The following error in /tmp/imps_server_install.log indicates that a required RHEL package is not installed:
(October 31, 2014 2:12:37 PM), Install, com.ca.etrust.install.admin.ConfigureAdminServer, err, ProductException: (error code = 200; message="Java error"; exception = [ProductException: (error code = 200; message="Java error"; exception = [javax.naming.NamingException: javax.naming.NamingException: javax.naming.CommunicationException: myserver05:20390 [Root exception is java.net.ConnectException: Connection refused]])])
If this error occurs, verify that the packages in Provisioning Server Pre-Installation Steps (see page 29) and CA Directory Pre-Installation Step (see page 20)s are installed correctly.
High-Availability: Provisioning Server 2
Prepare a second system that is separate from the one on which you installed the first Provisioning Server instance.
Confirm that your server environment is properly prepared and install the required packages. Follow the same steps (see page 29) as you did for the first instance.
Configure the Second Provisioning Server Properties File
Set the parameters for the second Provisioning Server instance.
Copy the properties file from the first Provisioning Server instance and change only the parameters that are different for the second instance. Remember to rename and back up the new properties file after you complete the parameters.
You need the following information to complete the Provisioning Server parameters.
From the properties file of your first Provisioning Server instance:
■ _impd_bind_pwd
Provisioning Server
Chapter 3: Server Installation 39
Follow these steps:
1. On the first Provisioning Server system, copy the properties.sh file that you just configured.
2. Navigate to /tmp/properties.sh on the second Provisioning Server system. Replace the properties.sh file with the configured copy from the first Provisioning Server system.
3. Change the following parameter values:
_impd_bind_pwd
Enter the same password you entered for _impd_bind_pwd in the properties file for the first Provisioning Server instance.
4. Leave all other parameter values as you set them for the first Provisioning Server.
5. Back up the properties.sh file. Rename it to a logical name. Example: provisioning2properties.sh.
Note: This file is critical for upgrades. We recommend that you back up this file. This file contains passwords, so be sure to save it in a secure location.
Important! The original properties.sh file resides in a temp folder. If the server is shut down, the properties.sh file is discarded. Therefore, rename and back up this file before proceeding with any further installation or use of the system.
Install and Verify the Second Provisioning Server
After you set the parameters for the second Provisioning Server instance and back up the properties.sh file, run the installation program.
Verify the installation before proceeding with further installation steps.
Follow these steps:
1. Navigate to:
/opt/CA/saas/repo/application/
2. Run:
./appliance_local.sh config
When installation is complete, verify the installation as follows.
3. On the CA Directory Server system, check that Java is running:
ps -ef | grep java
The output shows the following:
/opt/CA/Directory/dxserver/dsamgmt/jvm/bin/java -Xms256m
-Xmx1024m -cp /opt/CA/Directory/dxserver/dsamgmt/lib/*
com.ca.directory.dxagent.service.DxAgentService
Provisioning Server
40 Installation Guide
jvm/bin/java -ea
-Dkaraf.home=/opt/CA/IdentityManager/ConnectorServer -server
-Xms128M -Xmx1024M -XX:MaxPermSize=384m -Djava.awt.headless=true
-Dcom.sun.management.jmxremote
-Dderby.system.home=/opt/CA/IdentityManager/ConnectorServer/dat
a/der
by -Dderby.storage.fileSyncTransactionLog=true
-Djava.endorsed.dirs=/opt/CA/IdentityManager/ConnectorServer/li
b/endorsed
-Djava.ext.dirs=/opt/CA/IdentityManager/ConnectorServer/jvm/lib
/ext:/opt/CA/IdentityManager/ConnectorServer/lib/ext
-Dkaraf.instances=/opt/CA/IdentityManager/ConnectorServer/insta
nces
-Dkaraf.base=/opt/CA/IdentityManager/ConnectorServer
-Dkaraf.data=/opt/CA/IdentityManager/ConnectorServer/data
-Djava.util.logging.config.file=/opt/CA/IdentityManager/Connect
orSer
ver/etc/java.util.logging.properties
-Dkaraf.startLocalConsole=false -Dkaraf.startRemoteShell=true
-Djcsroot=/opt/CA/IdentityManager/ConnectorServer/jcs
-Dlog4j.configuration=/opt/CA/IdentityManager/ConnectorServer/e
tc/org.ops4j.pax.logging.cfg
-Dsun.lang.ClassLoader.allowArraySyntax=true -classpath
/opt/CA/IdentityManager/ConnectorServer/conf:/opt/CA/IdentityMa
nager/ConnectorServer/lib/karaf-jaas-boot.jar:/opt/CA/IdentityM
anager/ConnectorServer/lib/karaf.jar:/opt/CA/IdentityManager/Co
nnectorServer/lib/servicemix-version.jar:/opt/CA/IdentityManage
r/ConnectorServer/lib/smix4SecurityWrapper.jar:/opt/CA/Identity
Manager/ConnectorServer/j
cs/tools/lib/cacommons.jar
smix.security.wrapper.Smix4SecurityWrapper
4. Log in as the DSA user:
su – dsa
5. Enter the following command:
dxserver status
The output shows that the server has started:
Provisioning-Server-host>-imps-router started
6. Log in as the IMPS user:
su - imps

Connector Server
Chapter 3: Server Installation 41
7. Navigate to /opt/CA/IdentityManager/ProvisioningServer/bin.
8. Enter the following command:
./imps status
The output shows the following:
im_ps is running
Continue with installing the CA IAM CS.
Connector Server
Standalone CA IAM CS
Use this procedure to install a CA IAM CS.
For a high-availability deployment, after you complete this procedure, continue with the CA IAM CS 2 procedure. Otherwise, after you complete this procedure continue with installing the SiteMinder Policy Server.
Note: You install the CA IAM CS using the same server kit as you used to install the Provisioning Server. However, several steps and parameters are different from the Provisioning Server installation. Follow the instructions in this section carefully.
CA IAM CS Pre-Installation Steps
To prepare for installation, confirm that your server environment is properly prepared. Then install the required packages.
Follow these steps:
1. Install 64-bit Linux RHEL 6.1.
2. Download, but do not install, a 64-bit JDK to your local system or to a file share. You can also use a JRE in place of a JDK.
Note: The system installer can install the JDK automatically. We recommend that you download a JDK and allow the system to install it.
3. Obtain the Provisioning Server ISO image from the CA Support site and extract it.
4. Copy the kit (CAM-IMPS_kit-date.zip) to / (the root folder).
5. Unzip the kit.
Connector Server
42 Installation Guide
6. Install the following packages:
■ binutils-2*x86_64*
■ glibc-2*x86_64* nss-softokn-freebl-3*x86_64*
■ glibc-2*i686* nss-softokn-freebl-3*i686*
■ compat-libstdc++-33*x86_64*
■ glibc-common-2*x86_64*
■ glibc-devel-2*x86_64*
■ glibc-devel-2*i686*
■ glibc-headers-2*x86_64*
■ elfutils-libelf-0*x86_64*
■ elfutils-libelf-devel-0*x86_64*
■ gcc-4*x86_64*
■ gcc-c++-4*x86_64*
■ ksh-*x86_64*
■ libaio-0*x86_64*
■ libaio-devel-0*x86_64*
■ libaio-0*i686*
■ libaio-devel-0*i686*
■ libgcc-4*x86_64*
■ libgcc-4*i686*
■ libstdc++-4*x86_64*
■ libstdc++-4*i686*
■ libstdc++-devel-4*x86_64*
■ make-3.81*x86_64*
■ numactl-devel-2*x86_64*
■ sysstat-9*x86_64*
■ compat-libstdc++-33*i686*
■ compat-libcap*
■ unixODBC*
■ libstdc++*
■ compat-libstdc++-33.i686
■ compat-libstdc++-296.i686
Connector Server
Chapter 3: Server Installation 43
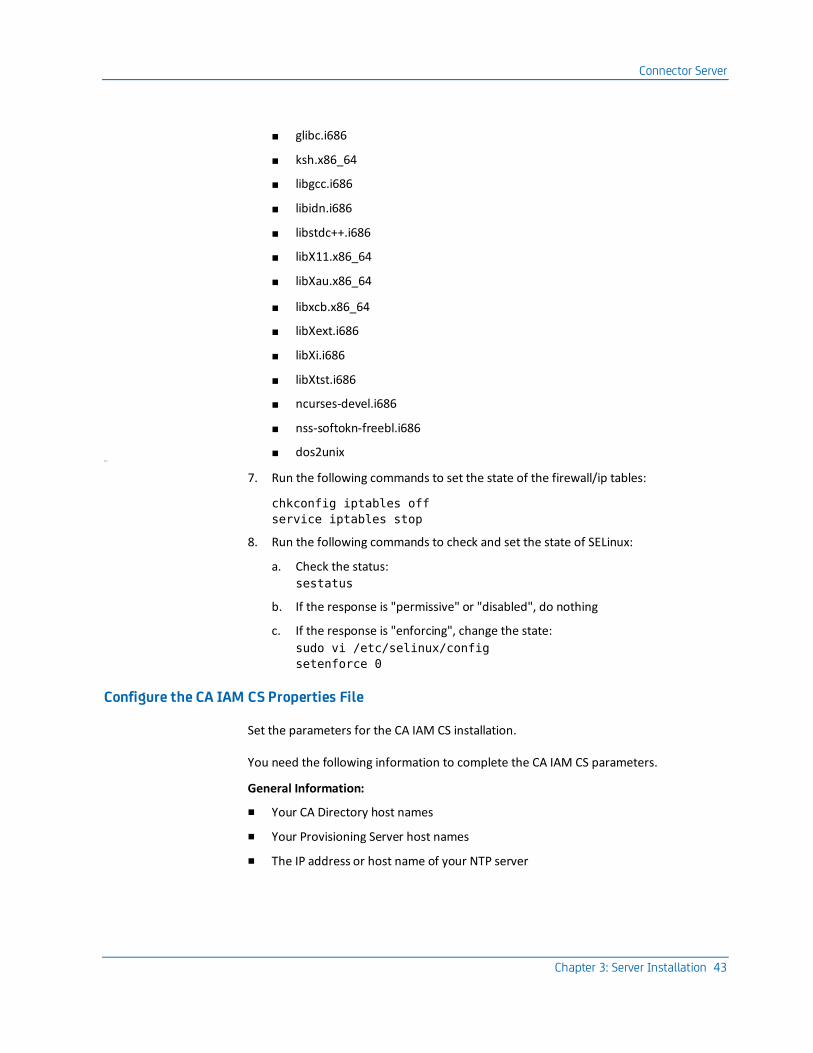
■ glibc.i686
■ ksh.x86_64
■ libgcc.i686
■ libidn.i686
■ libstdc++.i686
■ libX11.x86_64
■ libXau.x86_64
■ libxcb.x86_64
■ libXext.i686
■ libXi.i686
■ libXtst.i686
■ ncurses-devel.i686
■ nss-softokn-freebl.i686
■ dos2unix te ln e t
7. Run the following commands to set the state of the firewall/ip tables:
chkconfig iptables off
service iptables stop
8. Run the following commands to check and set the state of SELinux:
a. Check the status:
sestatus
b. If the response is "permissive" or "disabled", do nothing
c. If the response is "enforcing", change the state:
sudo vi /etc/selinux/config
setenforce 0
Configure the CA IAM CS Properties File
Set the parameters for the CA IAM CS installation.
You need the following information to complete the CA IAM CS parameters.
General Information:
■ Your CA Directory host names
■ Your Provisioning Server host names
■ The IP address or host name of your NTP server

Connector Server
44 Installation Guide
From the CA Directory properties file:
■ _impd_shared_secret
■ _dir_webservices_password
From your Provisioning Server properties file:
■ _impd_bind_pwd
■ _provisioning_server_pwd
■ _connector_server_pwd
Follow these steps:
1. Navigate to /tmp/properties.sh.
2. In the properties.sh file, set the following parameters.
_Environment
Leave as the default, CHANGE_ME_LATER.
_SoftwareVersion
Leave as the default, STATIC.
_DomainSuffix
Set this to your network domain.
_impd_shared_secret
Enter the same password you entered for _impd_shared_secret in the properties files for CA Directory.
_impd_hostname
Host name of the system where you installed the primary CA Directory instance.
_impd_bind_pwd
Enter the same password you entered for _impd_bind_pwd in the properties file for the Provisioning Servers.
Connector Server
Chapter 3: Server Installation 45
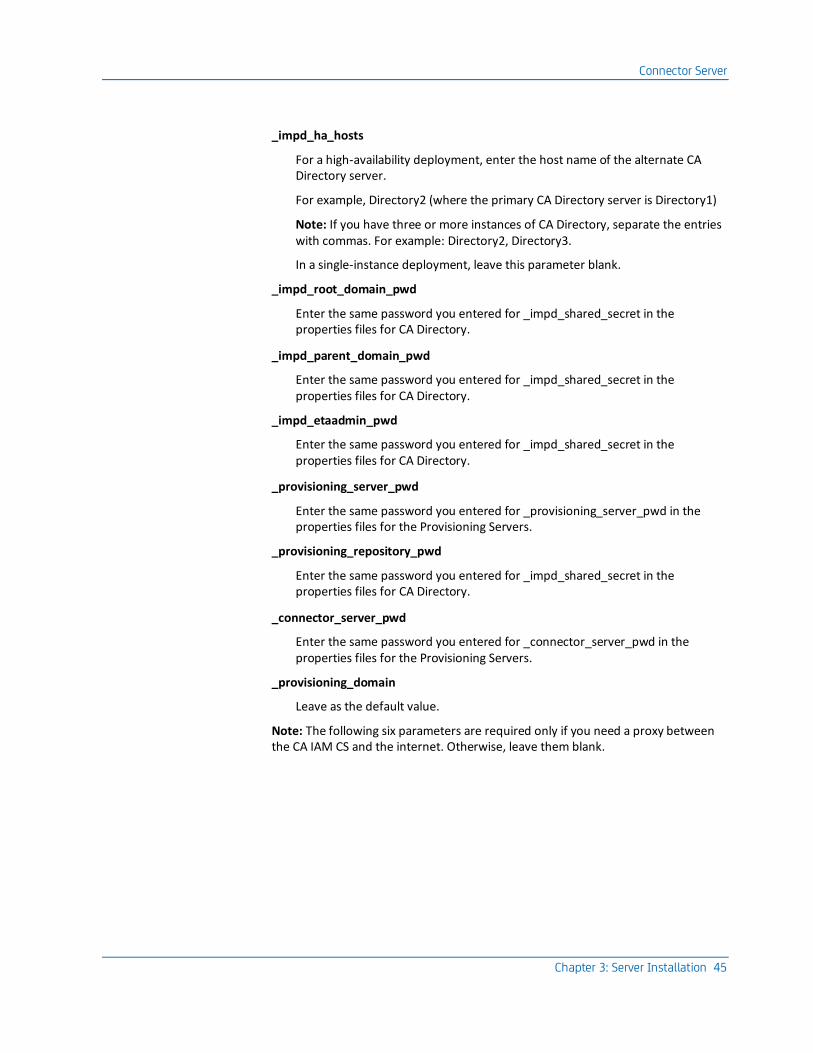
_impd_ha_hosts
For a high-availability deployment, enter the host name of the alternate CA Directory server.
For example, Directory2 (where the primary CA Directory server is Directory1)
Note: If you have three or more instances of CA Directory, separate the entries with commas. For example: Directory2, Directory3.
In a single-instance deployment, leave this parameter blank.
_impd_root_domain_pwd
Enter the same password you entered for _impd_shared_secret in the properties files for CA Directory.
_impd_parent_domain_pwd
Enter the same password you entered for _impd_shared_secret in the properties files for CA Directory.
_impd_etaadmin_pwd
Enter the same password you entered for _impd_shared_secret in the properties files for CA Directory.
_provisioning_server_pwd
Enter the same password you entered for _provisioning_server_pwd in the properties files for the Provisioning Servers.
_provisioning_repository_pwd
Enter the same password you entered for _impd_shared_secret in the properties files for CA Directory.
_connector_server_pwd
Enter the same password you entered for _connector_server_pwd in the properties files for the Provisioning Servers.
_provisioning_domain
Leave as the default value.
Note: The following six parameters are required only if you need a proxy between the CA IAM CS and the internet. Otherwise, leave them blank.
Connector Server
46 Installation Guide
_http_proxy_enabled
Addresses whether you need a proxy to connect to the internet. Set to True if you need to enable a proxy to connect to the internet. For example, set to True if the Provisioning Server is on a protected intranet. Set to False if the Provisioning Server has direct access to the internet and no proxy is enabled.
_http_proxy_user
The Proxy User required for authentication.
_http_proxy_pwd
The password for the Proxy User.
_http_proxy_domain
The proxy domain required for authentication.
_http_proxy_port
The proxy port required for authentication.
_http_proxy_server
The proxy server required for authentication.
_install_imps
Set to False to install the CA IAM CS.
Note: This parameter allows you to install a Provisioning Server through this installer. Set this to False to prevent a Provisioning Server from installing.
Also see the _install_jcs parameter.
_impd_skip_snapshot
Leave as the default value, false. This setting allows tenant deployment to succeed.
_dir_webservices_port
Port used by Web Services. Leave as the default, 9080, unless you cannot use this port in your environment. If you must change the web services port, enter a new port number.
Note: If you must change the web services port, use the same port for web services on all servers.
_dir_webservices_username
User name for Web Services. Leave as the default, dsaweb.
Connector Server
Chapter 3: Server Installation 47
_dir_webservices_password
Enter the same password you entered for _dir_webservices_password in the properties file for the first CA Directory instance.
_dir_webservices_secure_port
Port used by Web Services. Leave as the default, 9443, unless you cannot use this port in your environment. If you must change the web services port, enter a new port number.
Note: If you must change the web services port, use the same port for web services on all servers.
_imps_fips_keyfile
Leave as the default, false.
_COMP_CLASS
Leave as the default, ca_cam.directory.
_COMP_NAME
Leave as the default, main.directory.
_APP_NAME
Leave as the default, directory_server.
JAVA64_LOCATION
Location of an existing 64-bit JRE if preinstalled. Set this parameter if you choose to install your JRE separately. In this case, symbolically link /opt/java64 to your JRE.
However, instead of installing a JRE separately, the system installer can do this automatically. We recommend that you download a JRE and allow the system to install it.
See the JAVA64_KIT parameter.
JAVA64_KIT
Location of a 64-bit JRE that you download to the local system or to a file share. If this parameter is set, the server kit will install this JRE automatically.
USER_JAVA64
Leave blank for installation. This parameter is intended for upgrades, not installation.
_install_jcs
Set to True to install the CA IAM CS.
Note: This parameter allows you to install an CA IAM CS through this installer. Set this to False to prevent an CA IAM CS from installing.
Also see the _install_imps parameter.
Connector Server
48 Installation Guide
_ntp_server
IP address or host name of the NTP user to use to synchronize the server time.
_remote_imps_hostname
Enter the host name of the primary Provisioning Server system.
Note: This parameter is not needed when the Provisioning Server and CA IAM CS are on the same system.
3. Back up the properties.sh file. Rename it to a logical name, for example, connectorserver1properties.sh.
Note: This file is critical for upgrades. We recommend that you back up this file. This file contains passwords, so be sure to save it in a secure location.
Important! The original properties.sh file resides in a temp folder. If the server is shut down, the properties.sh file is discarded. Therefore, rename and back up this file before proceeding with any further installation or use of the system.
Install and Verify the CA IAM CS
After you set the CA IAM CS parameters and back up the properties.sh file, run the installation program.
Verify the installation before proceeding with further installation steps.
Follow these steps:
1. Navigate to:
/opt/CA/saas/repo/application/
2. Run:
./appliance_local.sh config
When installation is complete, verify the installation as follows.
3. Check that Java is running:
ps -ef | grep java
The output shows the following:
/opt/CA/Directory/dxserver/dsamgmt/jvm/bin/java -Xms256m
-Xmx1024m -cp /opt/CA/Directory/dxserver/dsamgmt/lib/*
com.ca.directory.dxagent.service.DxAgentService
jvm/bin/java -ea
-Dkaraf.home=/opt/CA/IdentityManager/ConnectorServer -server
-Xms128M -Xmx1024M -XX:MaxPermSize=384m -Djava.awt.headless=true
-Dcom.sun.management.jmxremote
-Dderby.system.home=/opt/CA/IdentityManager/ConnectorServer/dat
a/der
Connector Server
Chapter 3: Server Installation 49
by -Dderby.storage.fileSyncTransactionLog=true
-Djava.endorsed.dirs=/opt/CA/IdentityManager/ConnectorServer/li
b/endorsed
-Djava.ext.dirs=/opt/CA/IdentityManager/ConnectorServer/jvm/lib
/ext:/opt/CA/IdentityManager/ConnectorServer/lib/ext
-Dkaraf.instances=/opt/CA/IdentityManager/ConnectorServer/insta
nces
-Dkaraf.base=/opt/CA/IdentityManager/ConnectorServer
-Dkaraf.data=/opt/CA/IdentityManager/ConnectorServer/data
-Djava.util.logging.config.file=/opt/CA/IdentityManager/Connect
orSer
ver/etc/java.util.logging.properties
-Dkaraf.startLocalConsole=false -Dkaraf.startRemoteShell=true
-Djcsroot=/opt/CA/IdentityManager/ConnectorServer/jcs
-Dlog4j.configuration=/opt/CA/IdentityManager/ConnectorServer/e
tc/org.ops4j.pax.logging.cfg
-Dsun.lang.ClassLoader.allowArraySyntax=true -classpath
/opt/CA/IdentityManager/ConnectorServer/conf:/opt/CA/IdentityMa
nager/ConnectorServer/lib/karaf-jaas-boot.jar:/opt/CA/IdentityM
anager/ConnectorServer/lib/karaf.jar:/opt/CA/IdentityManager/Co
nnectorServer/lib/servicemix-version.jar:/opt/CA/IdentityManage
r/ConnectorServer/lib/smix4SecurityWrapper.jar:/opt/CA/Identity
Manager/ConnectorServer/j
cs/tools/lib/cacommons.jar
smix.security.wrapper.Smix4SecurityWrapper
4. Log in as the root user.
su - root
5. Enter the following command:
service im_jcs status
The output shows the following:
jcs is running
6. For a high-availability deployment, continue with installing a second CA IAM CS. For a single-instance deployment, continue with installing the SiteMinder Policy Server.
High-Availability: CA IAM CS 2
Prepare a second system that is separate from the one on which you installed the first CA IAM CS instance.
Confirm that your server environment is properly prepared and install the required packages. Follow the same steps (see page 41) as you did for the first instance.
Connector Server
50 Installation Guide
Configure the Second CA IAM CS Properties File
Set the parameters for the second CA IAM CS instance.
Copy the properties file from the first CA IAM CS instance and change only the parameters that are different for the second instance. Remember to rename and back up the new properties file after you complete the parameters.
You need the following information to complete the CA IAM CS parameters.
General Information:
■ Your Provisioning Server host names
Follow these steps:
1. On the first CA IAM CS system, copy the properties.sh file that you just configured.
2. Navigate to /tmp/properties.sh on the second CA IAM CS system. Replace the properties.sh file with the configured copy from the first CA IAM CS system.
3. Change the following parameter values:
_remote_imps_hostname
Enter the host name of the failover (second) Provisioning Server system.
Note: This parameter is not needed when the Provisioning Server and CA IAM CS are on the same system.
4. Leave all other parameter values as you set them for the first CA IAM CS.
5. Back up the properties.sh file. Rename it to a logical name, for example, connectorserver2properties.sh.
Note: This file is critical for upgrades. We recommend that you back up this file. This file contains passwords, so be sure to save it in a secure location.
Important! The original properties.sh file resides in a temp folder. If the server is shut down, the properties.sh file is discarded. Therefore, rename and back up this file before proceeding with any further installation or use of the system.

Connector Server
Chapter 3: Server Installation 51
Install and Verify the Second CA IAM CS
After you set the parameters for the second CA IAM CS instance and back up the properties.sh file, run the installation program.
Verify the installation before proceeding with further installation steps.
Follow these steps:
1. Navigate to:
/opt/CA/saas/repo/application/
2. Run:
./appliance_local.sh config
When installation is complete, verify the installation as follows.
3. Check that Java is running:
ps -ef | grep java
The output shows the following:
/opt/CA/Directory/dxserver/dsamgmt/jvm/bin/java -Xms256m
-Xmx1024m -cp /opt/CA/Directory/dxserver/dsamgmt/lib/*
com.ca.directory.dxagent.service.DxAgentService
jvm/bin/java -ea
-Dkaraf.home=/opt/CA/IdentityManager/ConnectorServer -server
-Xms128M -Xmx1024M -XX:MaxPermSize=384m -Djava.awt.headless=true
-Dcom.sun.management.jmxremote
-Dderby.system.home=/opt/CA/IdentityManager/ConnectorServer/dat
a/der
by -Dderby.storage.fileSyncTransactionLog=true
-Djava.endorsed.dirs=/opt/CA/IdentityManager/ConnectorServer/li
b/endorsed
-Djava.ext.dirs=/opt/CA/IdentityManager/ConnectorServer/jvm/lib
/ext:/opt/CA/IdentityManager/ConnectorServer/lib/ext
-Dkaraf.instances=/opt/CA/IdentityManager/ConnectorServer/insta
nces
-Dkaraf.base=/opt/CA/IdentityManager/ConnectorServer
-Dkaraf.data=/opt/CA/IdentityManager/ConnectorServer/data
-Djava.util.logging.config.file=/opt/CA/IdentityManager/Connect
orSer
ver/etc/java.util.logging.properties
-Dkaraf.startLocalConsole=false -Dkaraf.startRemoteShell=true
-Djcsroot=/opt/CA/IdentityManager/ConnectorServer/jcs
-Dlog4j.configuration=/opt/CA/IdentityManager/ConnectorServer/e
tc/org.ops4j.pax.logging.cfg
-Dsun.lang.ClassLoader.allowArraySyntax=true -classpath
SiteMinder Policy Server
52 Installation Guide
/opt/CA/IdentityManager/ConnectorServer/conf:/opt/CA/IdentityMa
nager/ConnectorServer/lib/karaf-jaas-boot.jar:/opt/CA/IdentityM
anager/ConnectorServer/lib/karaf.jar:/opt/CA/IdentityManager/Co
nnectorServer/lib/servicemix-version.jar:/opt/CA/IdentityManage
r/ConnectorServer/lib/smix4SecurityWrapper.jar:/opt/CA/Identity
Manager/ConnectorServer/j
cs/tools/lib/cacommons.jar
smix.security.wrapper.Smix4SecurityWrapper
4. Log in as the root user.
su - root
5. Enter the following command:
service im_jcs status
The output shows the following:
jcs is running
Continue with installing the SiteMinder Policy Server.
SiteMinder Policy Server
Standalone Policy Server
Use this procedure to install a SiteMinder Policy Server.
For a high-availability deployment, after you complete this procedure, continue with the SiteMinder Policy Server 2 procedure. Otherwise, after you complete this procedure continue with installing the CSP console.
SiteMinder Policy Server Pre-Installation Steps
To prepare for installation, confirm that your server environment is properly prepared. Then install the required packages.
Follow these steps:
1. Install 64-bit Linux RHEL 6.1.
2. Download, but do not install, a 32-bit JDK and a 64-bit JDK to your local system or to a file share.
Note: The system installer can install the JDK automatically. We recommend that you download a JDK and allow the system to install it.
Important! The SiteMinder Policy Server installation requires a JDK, rather than a JRE.

SiteMinder Policy Server
Chapter 3: Server Installation 53
3. Download, but do not install, JBoss 5.1.0 to your local system or to a file share.
Note: The system installer JBoss automatically.
4. Obtain the SiteMinder Policy Server ISO image from the CA Support site and extract it.
5. Copy the kit (CAM-SMPS_kit-date.zip) to / (the root folder).
6. Unzip the kit.
7. Install the following packages required for Advanced Authentication
■ binutils-2*x86_64*
■ glibc-2*x86_64* nss-softokn-freebl-3*x86_64*
■ glibc-2*i686* nss-softokn-freebl-3*i686*
■ compat-libstdc++-33*x86_64*
■ glibc-common-2*x86_64*
■ glibc-devel-2*x86_64*
■ glibc-devel-2*i686*
■ glibc-headers-2*x86_64*
■ elfutils-libelf-0*x86_64*
■ elfutils-libelf-devel-0*x86_64*
■ gcc-4*x86_64*
■ gcc-c++-4*x86_64*
■ ksh-*x86_64*
■ libaio-0*x86_64*
■ libaio-devel-0*x86_64*
■ libaio-0*i686*
■ libaio-devel-0*i686*
■ libgcc-4*x86_64*
■ libgcc-4*i686*
■ libstdc++-4*x86_64*
■ libstdc++-4*i686*
■ libstdc++-devel-4*x86_64*
■ make-3.81*x86_64*
■ numactl-devel-2*x86_64*
■ sysstat-9*x86_64*
SiteMinder Policy Server
54 Installation Guide
■ compat-libstdc++-33*i686*
■ compat-libcap*
■ unixODBC*
■ libstdc++*
■ compat-libstdc++-33.i686
■ compat-libstdc++-296.i686
■ glibc.i686
■ ksh.x86_64
■ libgcc.i686
■ libidn.i686
■ libstdc++.i686
■ libX11.x86_64
■ libXau.x86_64
■ libxcb.x86_64
■ libXext.i686
■ libXi.i686
■ libXtst.i686
■ ncurses-devel.i686
■ nss-softokn-freebl.i686
■ dos2unix
■ telnet
8. Issue the following command:
rpm –i compat-libtermcap-2.0.8-49.el6.i686.rpm
SiteMinder Policy Server
Chapter 3: Server Installation 55
9. Install the Korn shell packages at /bin/ksh.
10. Run the following commands to set the state of the firewall/ip tables:
chkconfig iptables off
service iptables stop
11. Run the following commands to check and set the state of SELinux:
a. Check the status:
sestatus
b. If the response is "permissive" or "disabled", do nothing
c. If the response is "enforcing", change the state: sudo vi /etc/selinux/config
setenforce 0
Configure the SiteMinder Policy Server Properties File
Set the parameters for the SiteMinder Policy Server installation.
You need the following information to complete the SiteMinder Policy Server parameters.
General Information:
■ Your Provisioning Server host names
■ The host names of the systems where you plan to install the SiteMinder Policy Servers
■ Fully Qualified Domain Name of your SiteMinder Policy Server system, or in a high-availability deployment, the SiteMinder Policy Server load balancer
■ Fully Qualified Domain Name of your Secure Proxy Server system, or in a high-availability deployment, the Secure Proxy Server load balancer
■ The file path to your JBoss kit. The kit should be in zip file format.
■ License.dat file for SiteMinder. Contact customer support to download this file from the CA Support site.
■ The IP address or host name of your NTP server
From your Oracle installation:
■ Password for your CamAdmin user
■ The host name of your Oracle Server or RAC
■ Your Oracle SID, or if a RAC configuration, your Oracle Service name
From your CSP DSA installation:
■ _csp_dir_host
SiteMinder Policy Server
56 Installation Guide
From the CA Directory properties file:
■ _dir_webservices_password
Follow these steps:
1. Navigate to /tmp/properties.sh.
2. In the properties.sh file, set the following parameters.
_Environment
Leave as the default, VMWare
_db_schema_user
Database user with DBA privileges for Oracle and Postgres. The default is caadmin. For an upgrade on Oracle, _oracle_schema_user is used if db_schema_user is not set.
_db_schema_password
Password for user defined by db_schema_user. If this property is blank on an upgrade from Oracle, _Oracle_schema_password is used.
_oracle_schema_user
An Oracle database user with DBA and Connect privileges. This property remains for backwards compatibility with CA CloudMinder 1.5. If it is set and db_schema_user is not set, db_schema_user uses this value.
For upgrade, you can leave this unchanged or set it to the value used for _db_schema_user.
_oracle_schema_password
The password for the oracle_schema_user. This property remains for backwards compatibility with CA CloudMinder 1.5. If it is set and db_schema_password is not set, db_schema_password uses this value.
For upgrade, you can leave this unchanged or set it to the value used for _db_schema_password.
_db_server
Hostname of Oracle and Postgres database server. For an Oracle RAC setup, use the RAC host name.
_database_name
For Oracle, the SID or Service name (use the Service name for an Oracle RAC setup); for PostgreSQL, the default database name..
SiteMinder Policy Server
Chapter 3: Server Installation 57
_ps_tablespace_filename
For Oracle,enter the path to the tablespace file as follows:
<path_to_PS_tablespace_file>/<name_of_PS_tablespace_file.dbf>
This property is not used for PostgreSQL. Make a note of this value so you can use it later during the installation process.
_ps_tablespace_filesize
For Oracle, the size of the table space for the SiteMinder Policy Server database. We recommend an initial size of 1000MB. This property is not used for PostgreSQL.
_ps_ha_hosts
For a high-availability deployment, enter the host name where you plan to install the second SiteMinder Policy Server.
Note: If you have three or more instances of SiteMinder Policy Server, separate the entries with commas. For example: PolicyServer2, PolicyServer3. Do not include the host name on which you are currently installing.
In a single-instance deployment, leave this parameter blank.
_ps_db_user
A user name for the Oracle or PostgreSQL database user for the Policy Server database. Create any user name.
Make a note of this user name so you can use it later during the installation process.
_ps_db_password
A password for the Oracle or PostgreSQL database user for the SiteMinder Policy Server database. Create any password.
Make a note of this password so you can use it later during the installation process.
_ps_tablespace_name
Table space name for the Policy Server database. Create any table space name.
Make a note of this name so you can use it later during the installation process. This property is not used for PostgreSQL.
_aa_db_user
A user name for the Advanced Authentication Oracle or PostgreSQL database. Create any user name.
Make a note of this user name so you can use it later during the installation process. Use the same value for _im_webfort_user when you install the Identity Management Server.
SiteMinder Policy Server
58 Installation Guide
_aa_db_password
A password for the aa_db_user. Create any password.
Make a note of this password so you can use it later during the installation process. Use the same value for _im_webfort_password when you install the Identity Management Server.
_aa_tablespace_filename
Enter a name for the Oracle tablespace file for the Advanced Authentication database, in one of the following formats. This property is not used for PostgreSQL.
■ For an Oracle RAC setup, enter only the tablespace file name. Do not include the file name extension:
<name_of_AA_tablespace_file>
■ For a non-RAC setup, enter the full path to the tablespace file. Include the file name extension:
<path_to_AA_tablespace_file>/<name_of_AA_tablespace_file.dbf>
_aa_tablespace_filesize
The size of the file for the table space for the Advanced Authentication database. We recommend an initial size of 1000MB. This property is not used for PostgreSQL.
_aa_tablespace_name
The name of the Advanced Authentication table space. This property is not used for PostgreSQL.
_aa_tomcat_user
The name of a user who starts the Advanced Authentication Tomcat service. Leave as the default, root.
_ps_encryption_key
An encryption key for the Policy Server. Enter any string for the encryption key.
Note: This key is used in encryption processes by the SiteMinder policy server. Choose a string that fulfills typical password best practices.
_ps_admin_password
A password for the default SiteMinder user. Create any password.
Make a note of this password so you can use it later during the installation process. Use the same value for _generic_password when you install the Identity Management Server.
_sm_audit_cleanup_days
Leave as the default, 10.
SiteMinder Policy Server
Chapter 3: Server Installation 59
_ps_license_data
Enter the path on your local system or in a file share to the license.dat file for your SiteMinder Policy Server. Enter the path in the following format:
<path_to_license.dat_file>/license.dat
_dir_webservices_username
User name for Web Services. Leave as the default, dsaweb.
_dir_webservices_password
Enter the same password you entered for _dir_webservices_password in the properties file for the first CA Directory instance.
_csp_console
Set to false if you are installing a SiteMinder Policy Server.
Note: This parameter allows you to install a CSP Console through this installer. Set this to False to prevent a CSP Console from installing.
Important! Set this to true only once for your entire deployment. You only need one CSP Console instance, even in a high-availability deployment.
We recommend that you install a CSP console on a system separate from your SiteMinder Policy Server.
_csp_deploy_dsa
Set to false if you are installing a SiteMinder Policy Server.
Note: This parameter allows you to install a CSP DSA through this installer. Set this to False to prevent a CSP Console from installing.
Important! Set this to true only once for your entire deployment. You only need one CSP DSA instance, even in a high-availability deployment.
We recommend that you install a CSP DSA on the same system on which you install the CSP Console. Install the CSP Console and CSP DSA on a system separate from your SiteMinder Policy Server.
_csp_dir_webservices_port
Port used by Web Services. Leave as the default, 9080, unless you cannot use this port in your environment. If you must change the web services port, enter a new port number.
Note: If you must change the web services port, use the same port for web services on all servers.
SiteMinder Policy Server
60 Installation Guide
_csp_dir_webservices_username
User name for Web Services. Leave as the default, dsaweb.
_csp_dir_webservices_password
Enter the same password you entered for _dir_webservices_password in the properties file for the first CA Directory instance.
_csp_id
Leave as the default, cacsp.
_csp_dir_host
Enter the host name of the system where you plan to install the CSP DSA.
_csp_dir_port
Port used for CSP DSA. Leave as the default, 50000, unless you cannot use this port in your environment. If you must change the web services port, enter a new port number.
Note: If you must change the CSP DSA port, use the same port for the CSP DSA on all SiteMinder Policy Servers.
_csp_dir_password
The administrator password for the default user cspadmin in the CSP DSA. Create any password.
Make a note of this password for future use.
Note: The installation automatically creates the cspadmin user name. You choose the password to apply to this account.
_csp_webservice_cfg_id
Leave as the default, cspwebservice.
_csp_webservice_cfg_secret
Leave as the default. Internal use, do not change.
_aa_dsn_name
Required. The ODBC data source name. Enter any name for the data source.
_aa_tws_base_url
Required. Enter the URL for Tenant Web Sevices, using the following format:
http://<internal_host:internal_tomcat_port>/tenant-services/cm/tenantws
■ For a non-high-availability deployment, the internal host is the fully-qualified domain name of the SiteMinder Policy Server.
■ For a high-availability deployment, use the fully-qualified domain name of the SiteMinder Policy Server load balancer.
■ The port number is 9090 by default. _
SiteMinder Policy Server
Chapter 3: Server Installation 61
aa_im_base_url
Required. Enter the base URL for the Identity Management Server, using the following format:
https://<external_host>/iam/im/
■ For a non-high-availability deployment, the external host is the fully-qualified domain name of the Secure Proxy Server.
■ For a high-availability deployment, use the fully-qualified domain name of the Secure Proxy Server load balancer.
■ If your Secure Proxy Server is not using the https protocol, begin the base URL with http://
This information is used for browser redirect.
_aa_tws_config_id
Required. The configuration id for Tenant Web Services. The default value, tenantwebservices, is pre-populated.
If you want to use a different value, you must update the value here and in the Identity Management Server properties file.
_aa_tws_shared_secret
Required. The plain shared secret used by Tenant Web Services. The default value, firewall, is pre-populated.
We recommend that you change this value. Enter any value.
Note: You must update the value here and in the Identity Management Server properties file.
_aa_tomcat_host_address
Required. Enter the internal host address.
■ For a non-high-availability deployment, the internal host is the fully-qualified domain name of the SiteMinder Policy Server.
■ For a high-availability deployment, use the fully-qualified domain name of the SiteMinder Policy Server load balancer.
_shim_aaui_host_port
Required. Enter the external host address, such as the domain exposed to the outside world. Supply the host name even though the parameter name ends with _port.
■ For a non-high-availability deployment, the external host is the fully-qualified domain name of the Secure Proxy Server.
■ For a high-availability deployment, use the fully-qualified domain name of the Secure Proxy Server load balancer.
SiteMinder Policy Server
62 Installation Guide
_shim_sm_webagent_host_port
Required. Enter the external host address, such as the domain exposed to the outside world. Supply the host name even though the parameter name ends with _port.
■ For a non-high-availability deployment, the external host is the fully-qualified domain name of the Secure Proxy Server.
■ For a high-availability deployment, use the fully-qualified domain name of the Secure Proxy Server load balancer.
_tws_imdb_user
Required. A user name in the Identity Management data store. Enter any user name.
Make a note of this user name so you can use it later during the installation process. Use the same value for _im_db_user when you install the Identity Management Server. This user is created during Identity Management installation.
_tws_imdb_pwd
A password for the user defined in _tws_imdb_user. Enter any password.
Make a note of this password so you can use it later during the installation process. Use the same value for _im_db_password when you install the Identity Management Server.
_tws_im_ws_host
Enter the host name of the system where you plan to install the Identity Management Server. This is used in TWS for accessing the web services deployed in the Identity Management Server.
_haprefimps
Enter the host name of the primary IdentityMinder Provisioning Server. This is the first Provisioning Server you installed.
_hafoimps
Enter the host name of the secondary or failover IdentityMinder Provisioning Server. This is the second Provisioning Server you installed.
_advanced_auth
Set to true to enable advanced authentication.
SiteMinder Policy Server
Chapter 3: Server Installation 63
USER_INSTALL_DIR
Default location of your SiteMinder installation. For example: /opt/CA.
JAVA64_LOCATION
Location of an existing 64-bit JRE if preinstalled. Set this parameter if you choose to install your JRE separately. In this case, symbolically link /opt/java64 to your JRE.
However, instead of installing a JRE separately, the system installer can do this automatically. We recommend that you download a JRE and allow the system to install it.
See the JAVA64_KIT parameter.
JAVA64_KIT
Location of a 64-bit JRE that you download to the local system or to a file share. If this parameter is set, the server kit will install this JRE automatically.
USER_JAVA64
Leave blank for installation. This parameter is intended for upgrades, not installation.
JAVA32_LOCATION
Location of an existing 32-bit JRE if preinstalled. Set this parameter if you choose to install your JRE separately. In this case, symbolically link /opt/java32 to your JRE.
However, instead of installing a JRE separately, the system installer can do this automatically. We recommend that you download a JRE and allow the system to install it.
See the JAVA32_KIT parameter.
JAVA32_KIT
Location of a 32-bit JRE that you download to the local system or to a file share. If this parameter is set, the server kit will install this JRE automatically.
USER_JAVA32
Leave blank for installation. This parameter is intended for upgrades, not installation.
JBOSS_KIT
Enter the file path, on the local system or a file share, of the JBoss to install. The JBoss kit should be in zip file format. JBOSS can be either the community version or the Enterprise Application Platform (EAP).
_ntp_server
IP address or host name of the NTP server to use to synchronize the server time.
SiteMinder Policy Server
64 Installation Guide
_aa_report_tablespace_filename
Required. The path for the orcl_aa_report.dbf file, in the following format:
<Path on Oracle Server>/orcl_aa_report.dbf
_aa_report_tablespace_filesize
Required. The size of the file for the table space for Advanced Authentication reports. Leave as the default, 20M.
AA_CATALINA_LOG_DIR
Leave as the default, $USER_INSTALL_DIR/AdvancedAuth/Tomcat/logs
This is the location of catalina.log.
3. Back up the properties.sh file. Rename it to a logical name, for example, policyserver1properties.sh.
Note: This file is critical for upgrades. We recommend that you back up this file. This file contains passwords, so be sure to save it in a secure location.
Important! The original properties.sh file resides in a temp folder. If the server is shut down, the properties.sh file is discarded. Therefore, rename and back up this file before proceeding with any further installation or use of the system.
Install and Verify the SiteMinder Policy Server
After you set the Policy Server parameters and back up the properties.sh file, run the installation program.
Verify the installation before proceeding with further installation steps.
Follow these steps:
1. Navigate to:
/opt/CA/saas/repo/application/
2. Before the next step, be sure that you unset the DISPLAY variable.
Important! Unless you unset the DISPLAY variable, the installation will complete, but CA SiteMinder services will not start.
3. Run:
./appliance_local.sh config
When installation is complete, verify the installation as follows.
4. Issue this command to check if Java is running:
ps –ef|grep java
SiteMinder Policy Server
Chapter 3: Server Installation 65
The response is as follows:
"java -Xms256m -Xmx1024m -cp ./lib/*
com.ca.directory.dxagent.service.DxAgentService"
"/opt/32/jdk1.6.0_31/jre/bin/java -Xrs
-Dnete.ps.root=/opt/CA/siteminder -classpath
/opt/CA/siteminder/lib/smconapi.jar:/opt/CA/siteminder/monitor/
smmon.jar com.netegrity.smmonagent.SmMonAgentRun"
"/opt/CA/siteminder/adminui/runtime/bin/java
-Dprogram.name=run.sh -server -Xms128m -Xmx1024m
-XX:MaxPermSize=256m -Dorg.jboss.resolver.warning=true
-Dsun.rmi.dgc.client.gcInterval=3600000
-Dsun.rmi.dgc.server.gcInterval=3600000 -disableassertions
-Djboss.platform.mbeanserver=true
-Dderby.system.home=/opt/CA/siteminder/adminui/server/default/d
ata/derby
-Djavax.net.ssl.keyStore=/opt/CA/siteminder/adminui/server/defa
ult/conf/keyStore.jks -Djavax.net.ssl.keyStoreType=jks
-Djavax.net.ssl.keyStorePassword=changeit
-Djavax.net.ssl.trustStore=/opt/CA/siteminder/adminui/server/de
fault/conf/trustStore.jks -Djavax.net.ssl.trustStoreType=jks
-Djavax.net.ssl.trustStorePassword=changeit
-Djava.net.preferIPv4Stack=true
-Djava.endorsed.dirs=/opt/CA/siteminder/adminui/lib/endorsed
-classpath
/opt/CA/siteminder/adminui/bin/run.jar:/opt/CA/siteminder/admin
ui/runtime/lib/tools.jar org.jboss.Main"
5. Inspect the /opt/CA/siteminder/registry/sm.registry file.
It should have the following highlighted entry (usually at second line in file):
HKEY_LOCAL_SYSTEM\SOFTWARE\Netegrity\SiteMinder\CurrentVersion=
813012936
ImsInstalled= 8.0; REG_SZ
InstallKey=
{RC2}Xemlc/LaIcFzZdUpcR+CSlR9A6SNgg0YDQOwEsqfvKk=; REG_SZ
Label= 758; REG_SZ
Language= EN; REG_SZ
Location= /opt/CA/siteminder; REG_SZ
MasterKeyFile= /opt/CA/siteminder/bin/EncryptionKey.txt;
REG_SZ
Update= 00.00; REG_SZ
Version= 12.51; REG_SZ

SiteMinder Policy Server
66 Installation Guide
6. Issue this command to confirm that SiteMinder is running:
ps –ef|grep sm
The response is as follows:
"/opt/CA/siteminder/bin/smexec"
"smpolicysrv"
"/opt/32/jdk1.6.0_31/jre/bin/java -Xrs
-Dnete.ps.root=/opt/CA/siteminder -classpath
/opt/CA/siteminder/lib/smconapi.jar:/opt/CA/siteminder/monitor/
smmon.jar com.netegrity.smmonagent.SmMonAgentRun"
7. For a high-availability deployment, continue with installing a second SiteMinder Policy Server. For a single-instance deployment, continue with installing the CSP Console.
Update the SiteMinder Realm for the Tenant
Follow these steps:
1. Log in to the CSP console
2. Click Policies, Domain, Domains.
3. Select tenantDomain.
4. Go to the Realms tab.
5. Modify realm tenant_chsforms_realm_es.
6. Locate the Persistent Session option under Session.
7. Select to enable Persistent Session.
8. Click Ok and then Submit.
High-Availability: SiteMinder Policy Server 2
Prepare a second system that is separate from the one on which you installed the first SiteMinder Policy Server instance.
Confirm that your server environment is properly prepared and install the required packages. Follow the same steps (see page 52) as you did for the first instance.
SiteMinder Policy Server
Chapter 3: Server Installation 67
Configure the Second SiteMinder Policy Properties File
Set the parameters for the second SiteMinder Policy Server instance.
Copy the properties file from the first SiteMinder Policy Server instance and change only the parameters that are different for the second instance. Remember to rename and back up the new properties file after you complete the parameters.
You need the following information to complete the SiteMinder Policy Server parameters.
General Information:
■ The host names of the systems where you plan to install the SiteMinder Policy Servers
■ License.dat file for SiteMinder. Contact customer support to download this file from the CA Support site
Follow these steps:
1. On the first SiteMinder Policy Server system, copy the properties.sh file that you just configured.
2. Navigate to /tmp/properties.sh on the second SiteMinder Policy Server system. Replace the properties.sh file with the configured copy from the first SiteMinder Policy Server system.
3. Change the following parameter values:
_ps_ha_hosts
For a high-availability deployment, enter the host name where you installed the first SiteMinder Policy Server.
Note: If you have three or more instances of SiteMinder Policy Server, separate the entries with commas. For example: PolicyServer1, PolicyServer3. Do not include the host name on which you are currently installing.
In a single-instance deployment, leave this parameter blank.
_ps_license_data
Enter the path on your local system or in a file share to the license.dat file for your SiteMinder Policy Server. Enter the path in the following format:
<path_to_license.dat_file>/license.dat
SiteMinder Policy Server
68 Installation Guide
4. Leave all other parameter values as you set them for the first SiteMinder Policy Server.
5. Back up the properties.sh file. Rename it to a logical name, for example, policyserver2properties.sh.
Note: This file is critical for upgrades. We recommend that you back up this file. This file contains passwords, so be sure to save it in a secure location.
Important! The original properties.sh file resides in a temp folder. If the server is shut down, the properties.sh file is discarded. Therefore, rename and back up this file before proceeding with any further installation or use of the system.
Install and Verify the Second SiteMinder Policy Server
After you set the parameters for the second Policy Server instance and back up the properties.sh file, run the installation program.
Verify the installation before proceeding with further installation steps.
Follow these steps:
1. Navigate to:
/opt/CA/saas/repo/application/
2. Run:
./appliance_local.sh config
When installation is complete, verify the installation as follows.
3. Issue this command to check if Java is running:
ps –ef|grep java
The response is as follows:
"java -Xms256m -Xmx1024m -cp ./lib/*
com.ca.directory.dxagent.service.DxAgentService"
"/opt/32/jdk1.6.0_31/jre/bin/java -Xrs
-Dnete.ps.root=/opt/CA/siteminder -classpath
/opt/CA/siteminder/lib/smconapi.jar:/opt/CA/siteminder/monitor/
smmon.jar com.netegrity.smmonagent.SmMonAgentRun"
"/opt/CA/siteminder/adminui/runtime/bin/java
-Dprogram.name=run.sh -server -Xms128m -Xmx1024m
-XX:MaxPermSize=256m -Dorg.jboss.resolver.warning=true
-Dsun.rmi.dgc.client.gcInterval=3600000
-Dsun.rmi.dgc.server.gcInterval=3600000 -disableassertions
-Djboss.platform.mbeanserver=true
-Dderby.system.home=/opt/CA/siteminder/adminui/server/default/d
ata/derby
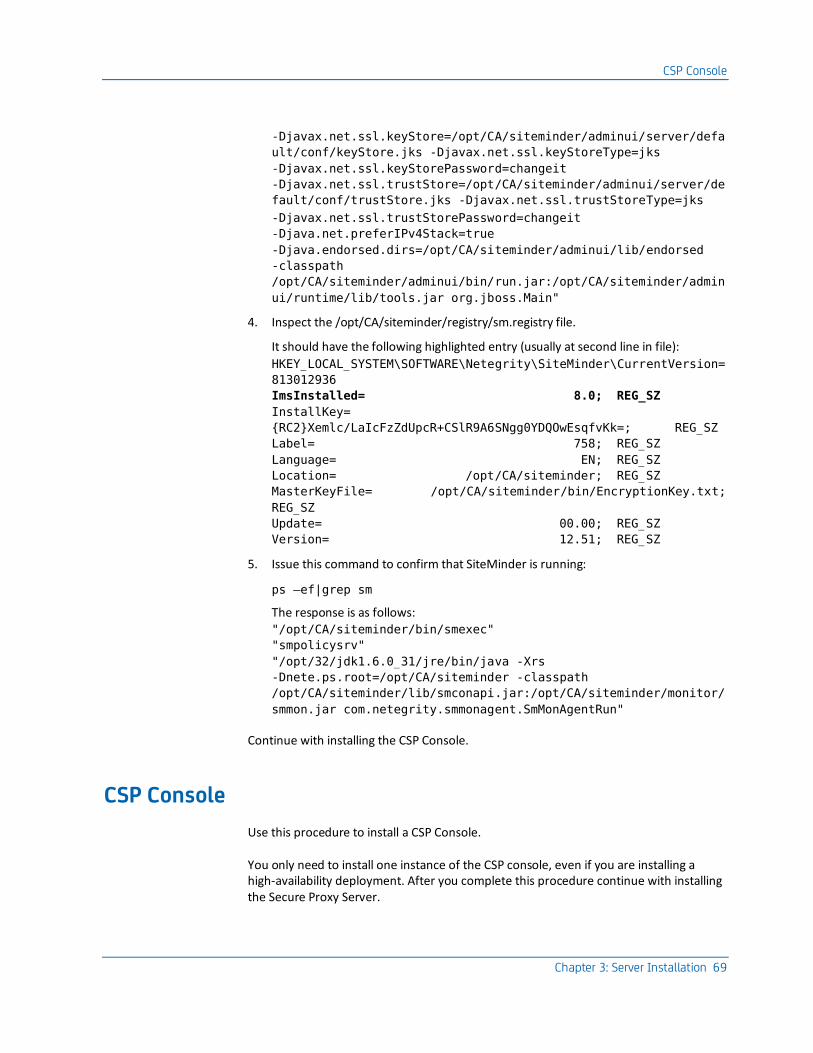
CSP Console
Chapter 3: Server Installation 69
-Djavax.net.ssl.keyStore=/opt/CA/siteminder/adminui/server/defa
ult/conf/keyStore.jks -Djavax.net.ssl.keyStoreType=jks
-Djavax.net.ssl.keyStorePassword=changeit
-Djavax.net.ssl.trustStore=/opt/CA/siteminder/adminui/server/de
fault/conf/trustStore.jks -Djavax.net.ssl.trustStoreType=jks
-Djavax.net.ssl.trustStorePassword=changeit
-Djava.net.preferIPv4Stack=true
-Djava.endorsed.dirs=/opt/CA/siteminder/adminui/lib/endorsed
-classpath
/opt/CA/siteminder/adminui/bin/run.jar:/opt/CA/siteminder/admin
ui/runtime/lib/tools.jar org.jboss.Main"
4. Inspect the /opt/CA/siteminder/registry/sm.registry file.
It should have the following highlighted entry (usually at second line in file):
HKEY_LOCAL_SYSTEM\SOFTWARE\Netegrity\SiteMinder\CurrentVersion=
813012936
ImsInstalled= 8.0; REG_SZ
InstallKey=
{RC2}Xemlc/LaIcFzZdUpcR+CSlR9A6SNgg0YDQOwEsqfvKk=; REG_SZ
Label= 758; REG_SZ
Language= EN; REG_SZ
Location= /opt/CA/siteminder; REG_SZ
MasterKeyFile= /opt/CA/siteminder/bin/EncryptionKey.txt;
REG_SZ
Update= 00.00; REG_SZ
Version= 12.51; REG_SZ
5. Issue this command to confirm that SiteMinder is running:
ps –ef|grep sm
The response is as follows:
"/opt/CA/siteminder/bin/smexec"
"smpolicysrv"
"/opt/32/jdk1.6.0_31/jre/bin/java -Xrs
-Dnete.ps.root=/opt/CA/siteminder -classpath
/opt/CA/siteminder/lib/smconapi.jar:/opt/CA/siteminder/monitor/
smmon.jar com.netegrity.smmonagent.SmMonAgentRun"
Continue with installing the CSP Console.
CSP Console
Use this procedure to install a CSP Console.
You only need to install one instance of the CSP console, even if you are installing a high-availability deployment. After you complete this procedure continue with installing the Secure Proxy Server.
CSP Console
70 Installation Guide
CSP Console Pre-Installation Steps
To prepare for installation, confirm that your server environment is properly prepared. Then install the required packages.
Important! The host name of the machine where you install the CSP Console must contain lower case letters only. If the host name includes upper case letters, the CSP Console does not open, and a looping error occurs in the log.
Follow these steps:
1. Install 64-bit Linux RHEL 6.1.
2. Download, but do not install, a 32-bit JDK and a 64-bit JDK to your local system or to a file share.
Note: The system installer can install the JDK automatically. We recommend that you download a JDK and allow the system to install it.
Important! The CSP console installation requires a JDK, rather than a JRE.
3. Download, but do not install, JBoss 5.1.0 to your local system or to a file share.
Note: The system installs JBoss automatically.
4. Verify Oracle is configured as follows:
■ The Oracle Database server is available with all Oracle services (listener, DB, and so on) running
■ Oracle has a user with username "CamAdmin" with the privileges to create tablespace and user. CamAdmin has the DBA and Connect Oracle roles. Make a note of the password for CamAdmin for later use during installation.
■ The Oracle Database uses a UTF-8 encoded character set. If you plan to enable Advanced Authentication for your environment, install the AL32UTF8 Oracle database character set.
5. Obtain the SiteMinder Policy Server ISO image from the CA Support site and extract it.
6. Copy the kit (CAM-SMPS_kit-date.zip) to / (the root folder).
7. Unzip the kit.
8. Install the following packages required for Advanced Authentication:
■ yum install -y binutils-2*x86_64*
■ yum install -y glibc-2*x86_64* nss-softokn-freebl-3*x86_64*
■ glibc-2*i686* nss-softokn-freebl-3*i686*
■ compat-libstdc++-33*x86_64*
■ glibc-common-2*x86_64*
■ glibc-devel-2*x86_64*

CSP Console
Chapter 3: Server Installation 71
■ glibc-devel-2*i686*
■ glibc-headers-2*x86_64*
■ elfutils-libelf-0*x86_64*
■ elfutils-libelf-devel-0*x86_64*
■ gcc-4*x86_64*
■ gcc-c++-4*x86_64*
■ ksh-*x86_64*
■ libaio-0*x86_64*
■ libaio-devel-0*x86_64*
■ libaio-0*i686*
■ libaio-devel-0*i686*
■ libgcc-4*x86_64*
■ libgcc-4*i686*
■ libstdc++-4*x86_64*
■ libstdc++-4*i686*
■ libstdc++-devel-4*x86_64*
■ make-3.81*x86_64*
■ numactl-devel-2*x86_64*
■ sysstat-9*x86_64*
■ compat-libstdc++-33*i686*
■ compat-libcap*
■ unixODBC*
■ libstdc++*
■ compat-libstdc++-33.i686
■ compat-libstdc++-296.i686
■ glibc.i686
■ ksh.x86_64
■ libgcc.i686
■ libidn.i686
■ libstdc++.i686
CSP Console
72 Installation Guide
■ libX11.x86_64
■ libXau.x86_64
■ libxcb.x86_64
■ libXext.i686
■ libXi.i686
■ libXtst.i686
■ ncurses-devel.i686
■ nss-softokn-freebl.i686
■ dos2unix
■ telnet
9. Execute the following command:
rpm –i compat-libtermcap-2.0.8-49.el6.i686.rpm
10. Make sure that the following soft link still exists. Reverting a virtual machine snapshot removes this link.
mv /dev/random /dev/random.orig
ln -s /dev/urandom /dev/random
11. Install the Korn shell packages at /bin/ksh.
12. Run the following commands to set the state of the firewall/ip tables:
chkconfig iptables off
service iptables stop
13. Run the following commands to check and set the state of SELinux:
a. Check the status:
sestatus
b. If the response is "permissive" or "disabled", do nothing
c. If the response is "enforcing", change the state:
sudo vi /etc/selinux/config
setenforce 0
CSP Console
Chapter 3: Server Installation 73
Configure the CSP Console Properties File
Set the parameters for the CSP console installation.
The SiteMinder Policy Server installation and the CSP console installation are very similar. Copy the properties file from the first SiteMinder Policy Server instance and change only the parameters that are different for CSP console installation. Remember to rename and back up the new properties file after you complete the parameters.
You need the following information to complete the CSP console parameters.
General Information:
■ The host names of the systems where you plan to install the SiteMinder Policy Servers
■ License.dat file for SiteMinder. Contact customer support to download this file from the CA Support site
Follow these steps:
1. On the first SiteMinder Policy Server system, copy the properties.sh file that you recently configured.
2. Navigate to /tmp/properties.sh on the CSP console system. Replace the properties.sh file with the configured copy from the first SiteMinder Policy Server system.
3. Change the following parameter values:
_ps_ha_hosts
For a high-availability deployment, enter the host name where you installed the first SiteMinder Policy Server.
Note: If you have three or more instances of SiteMinder Policy Server, separate the entries with commas. For example: PolicyServer1, PolicyServer3. Do not include the host name on which you are currently installing.
In a single-instance deployment, leave this parameter blank.
CSP Console
74 Installation Guide
_ps_license_data
Enter the path on your local system or in a file share to the license.dat file for your SiteMinder Policy Server. Enter the path in the following format:
<path_to_license.dat_file>/license.dat
_csp_console
Required. Set to true to install the CSP console.
Note: This parameter allows you to install a CSP console through this installer. Set this to False to prevent a CSP console from installing.
Important! Set this to true only once for your entire deployment. You only need one CSP console instance, even in a high-availability deployment.
We recommend that you install a CSP console on a system that is separate from your SiteMinder Policy Server.
_csp_deploy_dsa
Required. Set to true to install the CSP DSA.
Note: This parameter allows you to install a CSP DSA through this installer. Set this to False to prevent a CSP DSA from installing.
Important! Set this to true only once for your entire deployment. You only need one CSP DSA instance, even in a high-availability deployment.
We recommend that you install a CSP DSA on the same system on which you install the CSP Console. Install the CSP Console and CSP DSA on a system that is separate from your SiteMinder Policy Server.
4. Leave all other parameter values as you set them for the first SiteMinder Policy Server.
5. Back up the properties.sh file. Rename it to a logical name, for example, cspconsoleproperties.sh.
Note: This file is critical for upgrades. We recommend that you back up this file. This file contains passwords, so be sure to save it in a secure location.
Important! The original properties.sh file resides in a temp folder. If the server is shut down, the properties.sh file is discarded. Therefore, rename and back up this file before proceeding with any further installation or use of the system.
CSP Console
Chapter 3: Server Installation 75
Install and Verify the CSP Console
After you set the CSP console parameters and back up the properties.sh file, run the installation program.
Verify the installation before proceeding with further installation steps.
Follow these steps:
1. Navigate to:
/opt/CA/saas/repo/application/
2. Run:
./appliance_local.sh config
When installation is complete, verify the installation as follows.
3. Issue this command to check if Java is running:
ps –ef|grep java
The response is as follows:
"java -Xms256m -Xmx1024m -cp ./lib/*
com.ca.directory.dxagent.service.DxAgentService"
"/opt/32/jdk1.6.0_31/jre/bin/java -Xrs
-Dnete.ps.root=/opt/CA/siteminder -classpath
/opt/CA/siteminder/lib/smconapi.jar:/opt/CA/siteminder/monitor/
smmon.jar com.netegrity.smmonagent.SmMonAgentRun"
"/opt/CA/siteminder/adminui/runtime/bin/java
-Dprogram.name=run.sh -server -Xms128m -Xmx1024m
-XX:MaxPermSize=256m -Dorg.jboss.resolver.warning=true
-Dsun.rmi.dgc.client.gcInterval=3600000
-Dsun.rmi.dgc.server.gcInterval=3600000 -disableassertions
-Djboss.platform.mbeanserver=true
-Dderby.system.home=/opt/CA/siteminder/adminui/server/default/d
ata/derby
-Djavax.net.ssl.keyStore=/opt/CA/siteminder/adminui/server/defa
ult/conf/keyStore.jks -Djavax.net.ssl.keyStoreType=jks
-Djavax.net.ssl.keyStorePassword=changeit
-Djavax.net.ssl.trustStore=/opt/CA/siteminder/adminui/server/de
fault/conf/trustStore.jks -Djavax.net.ssl.trustStoreType=jks
-Djavax.net.ssl.trustStorePassword=changeit
-Djava.net.preferIPv4Stack=true
-Djava.endorsed.dirs=/opt/CA/siteminder/adminui/lib/endorsed
-classpath
/opt/CA/siteminder/adminui/bin/run.jar:/opt/CA/siteminder/admin
ui/runtime/lib/tools.jar org.jboss.Main"
Secure Proxy Server
76 Installation Guide
4. Inspect the /opt/CA/siteminder/registry/sm.registry file.
It should have the following highlighted entry (usually at second line in file):
HKEY_LOCAL_SYSTEM\SOFTWARE\Netegrity\SiteMinder\CurrentVersion=
813012936
ImsInstalled= 8.0; REG_SZ
InstallKey=
{RC2}Xemlc/LaIcFzZdUpcR+CSlR9A6SNgg0YDQOwEsqfvKk=; REG_SZ
Label= 758; REG_SZ
Language= EN; REG_SZ
Location= /opt/CA/siteminder; REG_SZ
MasterKeyFile= /opt/CA/siteminder/bin/EncryptionKey.txt;
REG_SZ
Update= 00.00; REG_SZ
Version= 12.51; REG_SZ
5. Issue this command to confirm that SiteMinder is running:
ps –ef|grep sm
The response is as follows:
"/opt/CA/siteminder/bin/smexec"
"smpolicysrv"
"/opt/32/jdk1.6.0_31/jre/bin/java -Xrs
-Dnete.ps.root=/opt/CA/siteminder -classpath
/opt/CA/siteminder/lib/smconapi.jar:/opt/CA/siteminder/monitor/
smmon.jar com.netegrity.smmonagent.SmMonAgentRun"
Continue with installing the Secure Proxy Server.
Secure Proxy Server
Standalone Secure Proxy Server
Use this procedure to install a Secure Proxy Server.
For a high-availability deployment, after you complete this procedure, continue with the Secure Proxy Server 2 procedure. Otherwise, continue with installing the Identity Management Server after you complete this procedure.
Secure Proxy Server
Chapter 3: Server Installation 77
Secure Proxy Server Pre-Installation Steps
To prepare for the installation, confirm that your server environment is properly prepared. Then install the required packages.
Follow these steps:
1. Install 64-bit Linux RHEL 6.1.
2. Download, but do not install, a 32-bit JDK and a 64-bit JDK to your local system or to a file share. You can also use a JRE in place of a JDK.
Note: The system installer can install the JDK automatically. We recommend that you download a JDK and allow the system to install it.
3. Obtain the Secure Proxy Server ISO image from the CA Support site and extract it.
4. Copy the kit (CAM-SPS_kit-date.zip) to / (the root folder).
5. Unzip the kit.
6. Install the 32-bit version of the libkeyutils.so.1 library.
7. Install the following packages:
■ binutils-2*x86_64*
■ glibc-2*x86_64* nss-softokn-freebl-3*x86_64*
■ glibc-2*i686* nss-softokn-freebl-3*i686*
■ compat-libstdc++-33*x86_64*
■ glibc-common-2*x86_64*
■ glibc-devel-2*x86_64*
■ glibc-devel-2*i686*
■ glibc-headers-2*x86_64*
■ elfutils-libelf-0*x86_64*
■ elfutils-libelf-devel-0*x86_64*
■ gcc-4*x86_64*
■ gcc-c++-4*x86_64*
■ ksh-*x86_64*
■ libaio-0*x86_64*
■ libaio-devel-0*x86_64*
■ libaio-0*i686*
■ libaio-devel-0*i686*
■ libgcc-4*x86_64*
■ libgcc-4*i686*

Secure Proxy Server
78 Installation Guide
■ libstdc++-4*x86_64*
■ libstdc++-4*i686*
■ libstdc++-devel-4*x86_64*
■ make-3.81*x86_64*
■ numactl-devel-2*x86_64*
■ sysstat-9*x86_64*
■ compat-libstdc++-33*i686*
■ compat-libcap*
■ unixODBC*
■ libstdc++*
■ compat-libstdc++-33.i686
■ compat-libstdc++-296.i686
■ glibc.i686
■ ksh.x86_64
■ libgcc.i686
■ libidn.i686
■ libstdc++.i686
■ libX11.x86_64
■ libXau.x86_64
■ libxcb.x86_64
■ libXext.i686
■ libXi.i686
■ libXtst.i686
■ ncurses-devel.i686
■ nss-softokn-freebl.i686
■ dos2unix
■ telnet
8. Run the following commands:
rpm –i compat-expat1-1.95.8-8.el6.i686.rpm
rpm –i libuuid-2.17.2-12.el6.i686.rpm
rpm –i apr-1.3.9-3.el6.i686.rpm
rpm –i db4-4.7.25-16.el6.i686.rpm
rpm –i expat-2.0.1-9.1.el6.i686.rpm
rpm –i apr-util-1.3.9-3.el6_0.1.i686.rpm

Secure Proxy Server
Chapter 3: Server Installation 79
9. Run the following commands to set the state of the firewall/ip tables:
chkconfig iptables off
service iptables stop
10. Run the following commands to check and set the state of SELinux:
a. Check the status:
sestatus
b. If the response is "permissive" or "disabled", do nothing
c. If the response is "enforcing", change the state:
sudo vi /etc/selinux/config
setenforce 0
Configure the Secure Proxy Server Properties File
Set the parameters for the Secure Proxy Server installation.
You need the following information to complete the CSP console parameters.
General Information:
■ Your primary SiteMinder Policy Server host name
■ Your primary CA IAM CS host name
■ The host name of the system where you plan to install the primary Identity Management Server
■ The domain name for your installation, for example, forwardinc.com
■ The path to your Secure Proxy Server certificate file and key file, if it already exists
From the SiteMinder Policy Server properties file:
■ _ps_admin_password
Follow these steps:
1. Navigate to /tmp/properties.sh.
2. In the properties.sh file, set the following parameters.
_Environment
Leave as the default, VMWare.
_policy_server_hostname
Enter the host name for the first SiteMinder Policy Server you installed.
Secure Proxy Server
80 Installation Guide
_im_hostname
Enter the host name of the system where you plan to install the first Identity Management Server.
_jcs_hostname
Enter the host name for the first CA IAM CS you installed.
policy_server_password
Password for the default SiteMinder Policy Server user. Enter the same password you entered for _ps_admin_password in the properties file for the Policy Server.
_DomainSuffix
Enter the domain name for your installation, for example, forwardinc.com
JAVA64_LOCATION
Location of an existing 64-bit JRE if preinstalled. Set this parameter if you choose to install your JRE separately. In this case, symbolically link /opt/java64 to your JRE.
However, instead of installing a JRE separately, the system installer can do this automatically. We recommend that you download a JRE and allow the system to install it.
See the JAVA64_KIT parameter.
JAVA64_KIT
Location of a 64-bit JRE that you download to the local system or to a file share. If this parameter is set, the server kit will install this JRE automatically.
USER_JAVA64
Leave blank for installation. This parameter is intended for upgrades, not installation.
JAVA32_LOCATION
Location of an existing 32-bit JRE if preinstalled. Set this parameter if you choose to install your JRE separately. In this case, symbolically link /opt/java32 to your JRE.
However, instead of installing a JRE separately, the system installer can do this automatically. We recommend that you download a JRE and allow the system to install it.
Secure Proxy Server
Chapter 3: Server Installation 81
See the JAVA32_KIT parameter.
JAVA32_KIT
Location of a 32-bit JRE that you download to the local system or to a file share. If this parameter is set, the server kit will install this JRE automatically.
USER_JAVA32
Leave blank for installation. This parameter is intended for upgrades, not installation.
_ntp_server
Required. IP address or host name of the NTP user to use to synchronize the server time.
SSL_ENABLE
Required. Set to yes to run the Secure Proxy Server in SSL mode.
CERT_SPS
Enter the path to your Secure Proxy Server certificate file. Leave this value blank if you want the installer to create a self-signed certificate.
Note: A production installation should not use a self-signed certificate.
An example for an existing certificate file could be:
/opt/mycerts/MySPS.crt
Secure Proxy Server
82 Installation Guide
KEY_SPS
Enter the path to your Secure Proxy Server key file. Leave this value blank if you want the installer to create a key.
_cert_passwd
The password of the Secure Proxy Server self-signed certificate that the install will generate. Create any password.
The value is required only if you want the installer to create a self-signed certificate. If your certificate already exists, leave this value blank.
SSL_SUBJECT
The subject of the certificate that the install will generate. The value is required only if you want the installer to create a self-signed certificate. The following shows an example format:
/C=IN/ST=AP/L=HYD/CN=XYZ
Where C = country name, ST = state, L = City, and CN = common name
3. Back up the properties.sh file. Rename it to a logical name, for example, secureproxyserver1properties.sh.
Note: This file is critical for upgrades. We recommend that you back up this file. This file contains passwords, so be sure to save it in a secure location.
Important! The original properties.sh file resides in a temp folder. If the server is shut down, the properties.sh file is discarded. Therefore, rename and back up this file before proceeding with any further installation or use of the system.
Proxy UI for the Secure Proxy Server
This procedure enables the CSP administrator to access the proxy UI.
Follow these steps:
1. Log in to the CSP console.
2. Navigate to policies, Domain, Domains and edit domain DOMAIN-SPSADMINUI-cam-agent
3. Add the following user directory on the General tab:
cacsp Directory
4. Click Submit.
5. Navigate to policies, Domain, Domains and edit domain DOMAIN-SPSADMINUI-cam-agent
Secure Proxy Server
Chapter 3: Server Installation 83
6. Navigate to Policies and edit "POLICY-SPSADMINUI-cam-agent. Make these changes on the Users tab.
a. Add users and Add All.
b. Click Ok and Submit.
The Proxy UI can be accessed from following URLs:
■ https://Primary SPS Hostname:8443/proxyui/
■ https://Secondary SPS Hostname:8443/proxyui/
Install and Verify the Secure Proxy Server
After you set the Secure Proxy Server parameters and back up the properties.sh file, run the installation program.
Verify the installation before proceeding with further installation steps.
Follow these steps:
1. Navigate to:
/opt/CA/saas/repo/application/
2. Run:
./appliance_local.sh config
When installation is complete, verify the installation as follows.
3. Make sure that services are running. Enter this command:
ps –ef | grep httpd
The response should be instances of the following line:
/opt/CA/secure-proxy/httpd/bin/httpd -d
/opt/CA/secure-proxy/httpd -k start
4. Check that Java is running. Enter the following command:
ps –ef | grep java
The response should be similar to the following, ending with server.conf:
/opt/jdk1.6.0_31/32/bin/java -ms256m -mx512m -server
-Dcatalina.base=/opt/CA/secure-proxy/Tomcat
-Dcatalina.home=/opt/CA/secure-proxy/Tomcat
-Djava.io.tmpdir=/opt/CA/secure-proxy/Tomcat/temp
-DHTTPClient.log.mask=0
-DHTTPClient.Modules=HTTPClient.RetryModule|org.tigris.noodle.N
oodleCookieModule|HTTPClient.DefaultModule
-Dlogger.properties=/opt/CA/secure-proxy/Tomcat/properties/logg
er.properties -DNETE_WA_ROOT=/opt/CA/webagent
-DPWD=/opt/CA/secure-proxy -classpath
Secure Proxy Server
84 Installation Guide
/opt/CA/secure-proxy/Tomcat/bin/proxybootstrap.jar:/opt/CA/secu
re-proxy/Tomcat/properties:/opt/jdk1.6.0_31/32/lib/tools.jar:/o
pt/CA/secure-proxy/Tomcat/bin/bootstrap.jar:
com.netegrity.proxy.ProxyBootstrap -config
/opt/CA/secure-proxy/proxy-engine/conf/server.conf
5. Start the Secure Proxy Server as follows:
a. Navigate to /opt/CA/secure-proxy/proxy-engine
b. Issue these commands:
./sps-ctl stop
./sps-ctl startssl
The Secure Proxy Server starts.
6. For a high-availability deployment, continue with installing a second Secure Policy Server. For a single-instance deployment, continue with installing the Identity Management Server.
High-Availability: Secure Proxy Server 2
Prepare a second system that is separate from the one on which you installed the first Secure Proxy Server instance.
Confirm that your server environment is properly prepared and install the required packages. Follow the same steps (see page 77) as you did for the first instance.
Configure the Second Secure Proxy Server Properties File
Set the parameters for the second Secure Proxy Server instance.
Copy the properties file from the first Secure Proxy Server instance and change only the parameters that are different for the second instance. Remember to rename and back up the new properties file after you complete the parameters.
You need the following information to complete the Secure Proxy Server parameters.
General Information:
■ Your second (failover) SiteMinder Policy Server host name
■ Your second (failover) CA IAM CS host name
■ The host name of the system where you plan to install the second (failover) Identity Management Server
From the SiteMinder Policy Server properties file:
■ _ps_admin_password
Secure Proxy Server
Chapter 3: Server Installation 85
Follow these steps:
1. On the first Secure Proxy Server system, copy the properties.sh file that you just configured.
2. Navigate to /tmp/properties.sh on the second Secure Proxy Server system. Replace the properties.sh file with the configured copy from the first Secure Proxy Server system.
3. Change the following parameter values:
_policy_server_hostname
Enter the host name for the second SiteMinder Policy Server you installed.
_im_hostname
Enter the host name of the system where you plan to install the second Identity Management Server.
_jcs_hostname
Enter the host name for the second CA IAM CS you installed.
4. Leave all other parameter values as you set them for the first SiteMinder Policy Server.
5. Back up the properties.sh file. Rename it to a logical name, for example, secureproxyserver2properties.sh.
Note: This file is critical for upgrades. We recommend that you back up this file. This file contains passwords, so be sure to save it in a secure location.
Important! The original properties.sh file resides in a temp folder. If the server is shut down, the properties.sh file is discarded. Therefore, rename and back up this file before proceeding with any further installation or use of the system.
Secure Proxy Server
86 Installation Guide
Install and Verify the Second Secure Proxy Server
After you set the parameters for the second Secure Proxy Server and back up the properties.sh file, run the installation program.
Verify the installation before proceeding with further installation steps.
Follow these steps:
1. Navigate to:
/opt/CA/saas/repo/application/
2. Run:
./appliance_local.sh config
When installation is complete, verify the installation as follows.
3. Make sure that services are running. Enter this command:
ps –ef | grep httpd
The response should be instances of the following line:
/opt/CA/secure-proxy/httpd/bin/httpd -d
/opt/CA/secure-proxy/httpd -k start
4. Check that Java is running. Enter the following command:
ps –ef | grep java
The response should be similar to the following, ending with server.conf:
/opt/jdk1.6.0_31/32/bin/java -ms256m -mx512m -server
-Dcatalina.base=/opt/CA/secure-proxy/Tomcat
-Dcatalina.home=/opt/CA/secure-proxy/Tomcat
-Djava.io.tmpdir=/opt/CA/secure-proxy/Tomcat/temp
-DHTTPClient.log.mask=0
-DHTTPClient.Modules=HTTPClient.RetryModule|org.tigris.noodle.N
oodleCookieModule|HTTPClient.DefaultModule
-Dlogger.properties=/opt/CA/secure-proxy/Tomcat/properties/logg
er.properties -DNETE_WA_ROOT=/opt/CA/webagent
-DPWD=/opt/CA/secure-proxy -classpath
/opt/CA/secure-proxy/Tomcat/bin/proxybootstrap.jar:/opt/CA/secu
re-proxy/Tomcat/properties:/opt/jdk1.6.0_31/32/lib/tools.jar:/o
pt/CA/secure-proxy/Tomcat/bin/bootstrap.jar:
com.netegrity.proxy.ProxyBootstrap -config
/opt/CA/secure-proxy/proxy-engine/conf/server.conf
Identity Management Server
Chapter 3: Server Installation 87
5. Start the Secure Proxy Server as follows:
a. Navigate to /opt/CA/secure-proxy/proxy-engine
b. Issue these commands:
./sps-ctl stop
./sps-ctl startssl
The Secure Proxy Server starts.
Continue with installing the Identity Management Server.
Identity Management Server
Standalone Identity Management Server
Use this procedure to install an Identity Management Server.
After you complete this procedure, continue with the Identity Management Server 2 procedure in a high availability deployment. Otherwise, after you complete this procedure continue with installing the Report Server.
Identity Management Server Pre-Installation Steps
To prepare for installation, confirm that your server environment is properly prepared. Then install the required packages.
Note: For installation a high-availability JBoss cluster, all nodes on the cluster must be on the same subnet.
Follow these steps:
1. Install 64-bit Linux RHEL 6.1.
2. Download, but do not install, a 64-bit JDK to your local system or to a file share.
Note: The system installer can install the JDK automatically. We recommend that you download a JDK and allow the system to install it.
Important! The Identity Management installation requires a JDK, rather than a JRE.
3. Download, but do not install, JBoss 5.1.0 to your local system or to a file share.
Note: The system installer JBoss automatically.
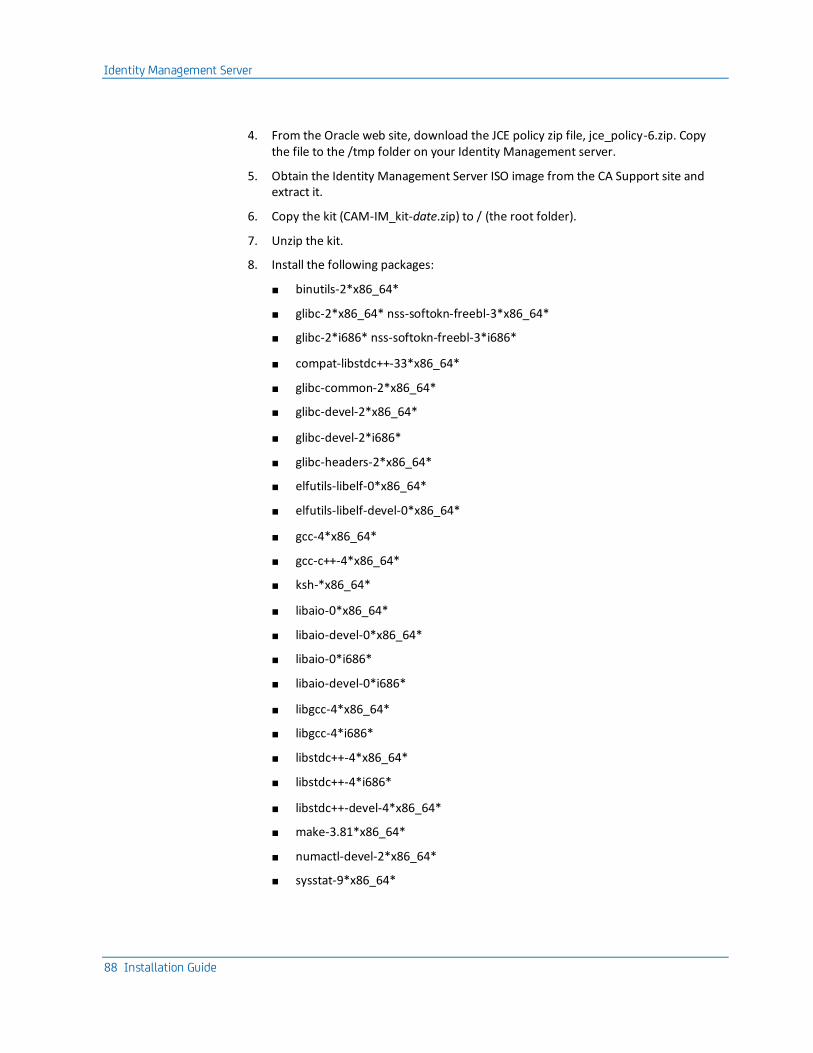
Identity Management Server
88 Installation Guide
4. From the Oracle web site, download the JCE policy zip file, jce_policy-6.zip. Copy the file to the /tmp folder on your Identity Management server.
5. Obtain the Identity Management Server ISO image from the CA Support site and extract it.
6. Copy the kit (CAM-IM_kit-date.zip) to / (the root folder).
7. Unzip the kit.
8. Install the following packages:
■ binutils-2*x86_64*
■ glibc-2*x86_64* nss-softokn-freebl-3*x86_64*
■ glibc-2*i686* nss-softokn-freebl-3*i686*
■ compat-libstdc++-33*x86_64*
■ glibc-common-2*x86_64*
■ glibc-devel-2*x86_64*
■ glibc-devel-2*i686*
■ glibc-headers-2*x86_64*
■ elfutils-libelf-0*x86_64*
■ elfutils-libelf-devel-0*x86_64*
■ gcc-4*x86_64*
■ gcc-c++-4*x86_64*
■ ksh-*x86_64*
■ libaio-0*x86_64*
■ libaio-devel-0*x86_64*
■ libaio-0*i686*
■ libaio-devel-0*i686*
■ libgcc-4*x86_64*
■ libgcc-4*i686*
■ libstdc++-4*x86_64*
■ libstdc++-4*i686*
■ libstdc++-devel-4*x86_64*
■ make-3.81*x86_64*
■ numactl-devel-2*x86_64*
■ sysstat-9*x86_64*
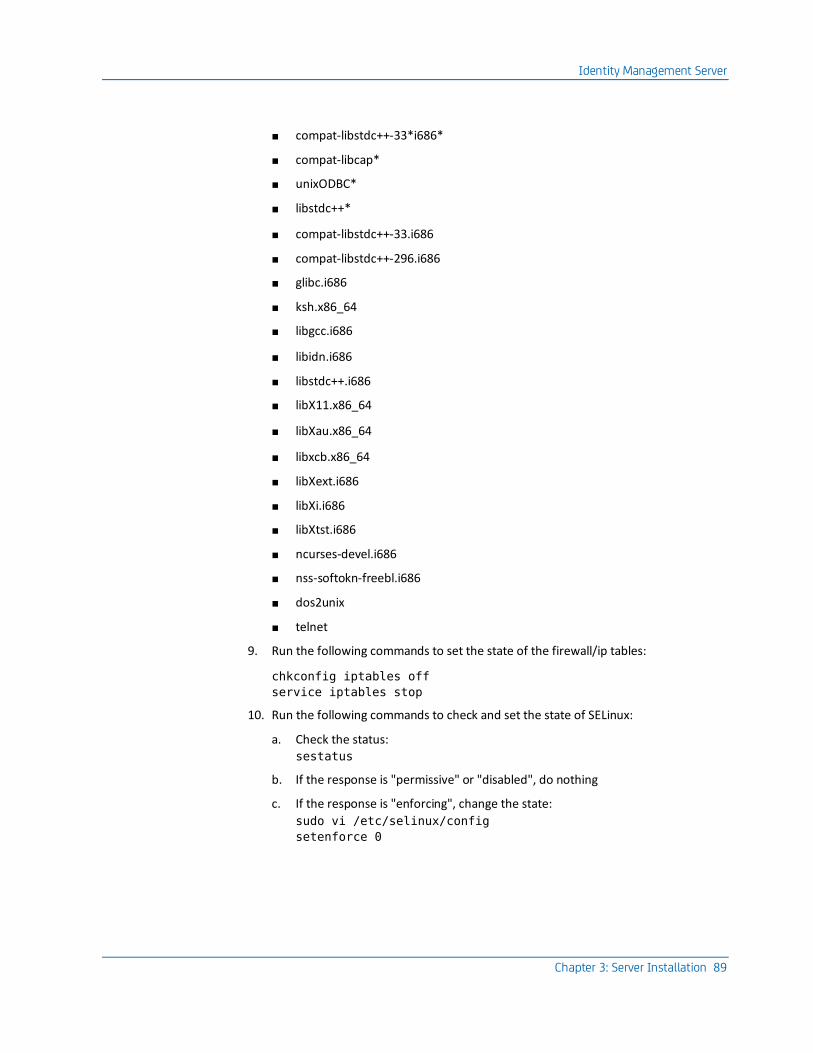
Identity Management Server
Chapter 3: Server Installation 89
■ compat-libstdc++-33*i686*
■ compat-libcap*
■ unixODBC*
■ libstdc++*
■ compat-libstdc++-33.i686
■ compat-libstdc++-296.i686
■ glibc.i686
■ ksh.x86_64
■ libgcc.i686
■ libidn.i686
■ libstdc++.i686
■ libX11.x86_64
■ libXau.x86_64
■ libxcb.x86_64
■ libXext.i686
■ libXi.i686
■ libXtst.i686
■ ncurses-devel.i686
■ nss-softokn-freebl.i686
■ dos2unix
■ telnet
9. Run the following commands to set the state of the firewall/ip tables:
chkconfig iptables off
service iptables stop
10. Run the following commands to check and set the state of SELinux:
a. Check the status:
sestatus
b. If the response is "permissive" or "disabled", do nothing
c. If the response is "enforcing", change the state:
sudo vi /etc/selinux/config
setenforce 0
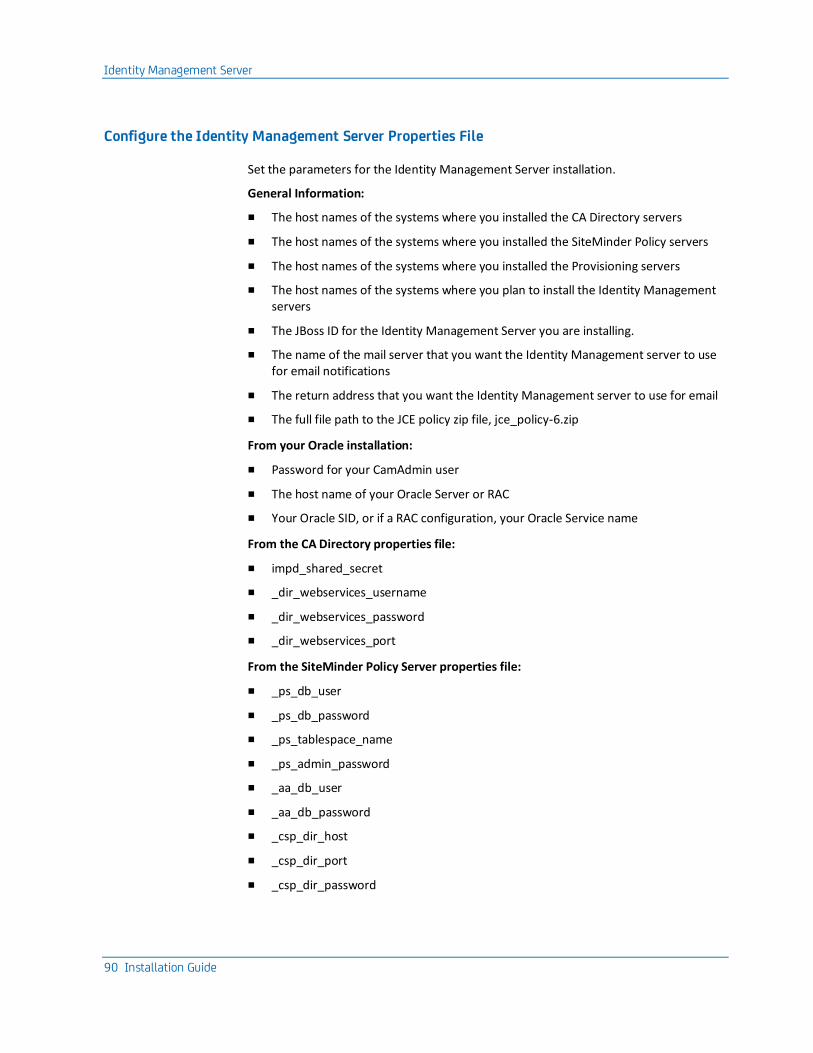
Identity Management Server
90 Installation Guide
Configure the Identity Management Server Properties File
Set the parameters for the Identity Management Server installation.
General Information:
■ The host names of the systems where you installed the CA Directory servers
■ The host names of the systems where you installed the SiteMinder Policy servers
■ The host names of the systems where you installed the Provisioning servers
■ The host names of the systems where you plan to install the Identity Management servers
■ The JBoss ID for the Identity Management Server you are installing.
■ The name of the mail server that you want the Identity Management server to use for email notifications
■ The return address that you want the Identity Management server to use for email
■ The full file path to the JCE policy zip file, jce_policy-6.zip
From your Oracle installation:
■ Password for your CamAdmin user
■ The host name of your Oracle Server or RAC
■ Your Oracle SID, or if a RAC configuration, your Oracle Service name
From the CA Directory properties file:
■ impd_shared_secret
■ _dir_webservices_username
■ _dir_webservices_password
■ _dir_webservices_port
From the SiteMinder Policy Server properties file:
■ _ps_db_user
■ _ps_db_password
■ _ps_tablespace_name
■ _ps_admin_password
■ _aa_db_user
■ _aa_db_password
■ _csp_dir_host
■ _csp_dir_port
■ _csp_dir_password
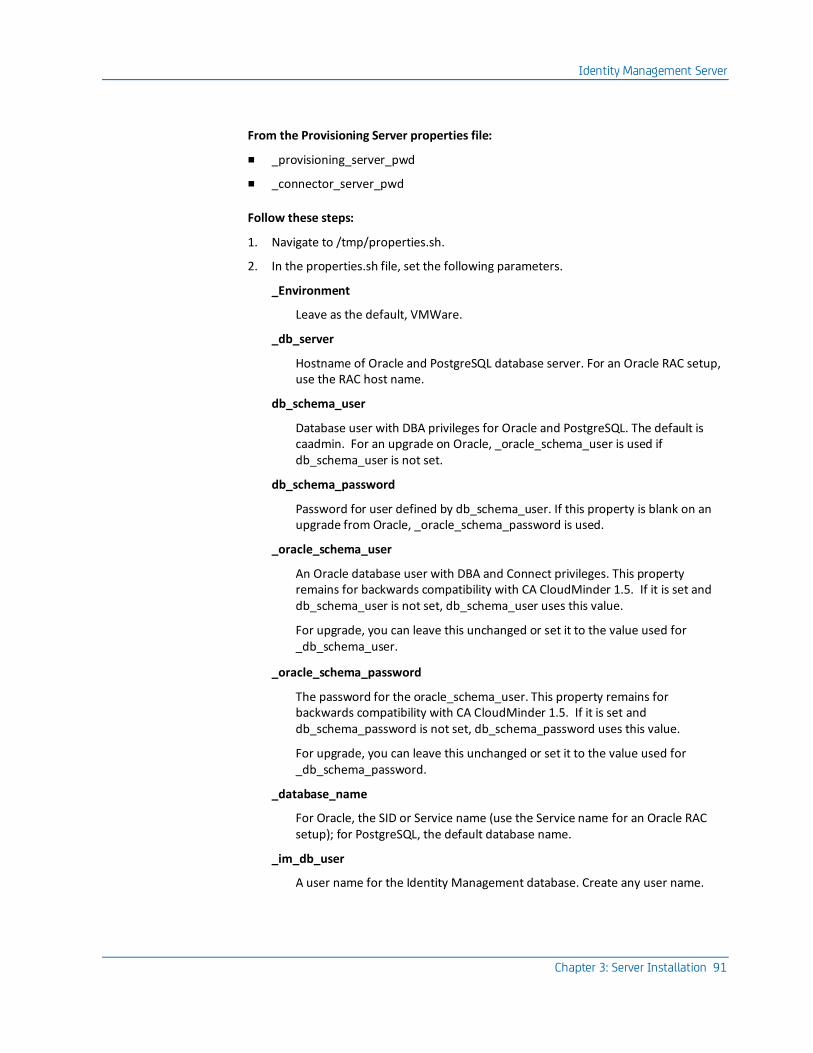
Identity Management Server
Chapter 3: Server Installation 91
From the Provisioning Server properties file:
■ _provisioning_server_pwd
■ _connector_server_pwd
Follow these steps:
1. Navigate to /tmp/properties.sh.
2. In the properties.sh file, set the following parameters.
_Environment
Leave as the default, VMWare.
_db_server
Hostname of Oracle and PostgreSQL database server. For an Oracle RAC setup, use the RAC host name.
db_schema_user
Database user with DBA privileges for Oracle and PostgreSQL. The default is caadmin. For an upgrade on Oracle, _oracle_schema_user is used if db_schema_user is not set.
db_schema_password
Password for user defined by db_schema_user. If this property is blank on an upgrade from Oracle, _oracle_schema_password is used.
_oracle_schema_user
An Oracle database user with DBA and Connect privileges. This property remains for backwards compatibility with CA CloudMinder 1.5. If it is set and db_schema_user is not set, db_schema_user uses this value.
For upgrade, you can leave this unchanged or set it to the value used for _db_schema_user.
_oracle_schema_password
The password for the oracle_schema_user. This property remains for backwards compatibility with CA CloudMinder 1.5. If it is set and db_schema_password is not set, db_schema_password uses this value.
For upgrade, you can leave this unchanged or set it to the value used for _db_schema_password.
_database_name
For Oracle, the SID or Service name (use the Service name for an Oracle RAC setup); for PostgreSQL, the default database name.
_im_db_user
A user name for the Identity Management database. Create any user name.
Identity Management Server
92 Installation Guide
_im_db_password
A password you for the Identity Management Oracle or PostgreSQL database user. Create any password.
_im_tablespace_name
Table space name for the Identity Management Oracle or PostgreSQL database. Create any table space name.
_im_tablespace_filename
Enter a name for the Oracle tablespace file for the Identity Management server, in one of the following formats.
■ For an Oracle RAC setup, enter only the tablespace file name. Do not include the file name extension:
<name_of_IM_tablespace_file>
■ For a non-RAC setup, enter the full path to the tablespace file. Include the file name extension:
<path_to_IM_tablespace_file>/<name_of_IM_tablespace_file.dbf>
_im_tablespace_filesize
The size of the table space for the Identity Management database. We recommend an initial size of 1000MB. This property is not used for PostgreSQL.
_ps_db_user
Enter the same user name you entered for _ps_db_user in the properties file for the first SiteMinder Policy Server instance. This property is used for Oracle and PostgreSQL.
_ps_db_password
Enter the same password you entered for _ps_db_password in the properties file for the first SiteMinder Policy Server instance. This property is used for Oracle and PostgreSQL.
_ps_tablespace_name
Enter the same name you entered for _ps_tablespace_name in the properties file for the first SiteMinder Policy Server instance. This property is not used for PostgreSQL.
_generic_username
The default SiteMinder Policy Server user name.
Identity Management Server
Chapter 3: Server Installation 93
_generic_password
Enter the same password you entered for _ps_admin_password in the properties file for the first SiteMinder Policy Server installation. This is the password for the default SiteMinder Policy Server user.
_agent_name
The name of the agent which the Identity Management Server uses to communicate with the SiteMinder Policy Server. For internal use. Leave as the default, camadmin.
_agent_password
A password you create for the agent used by the Identity Management Server to communicate with the SiteMinder Policy Server.
_sm_host
Enter the host address of the SiteMinder Policy Server load balancer VIP.
_use_siteminder
Set to the value "True" so that the Identity Management Server is installed with SiteMinder integration enabled.
_use_clustering
Set to the value "True" to enable high availability installation of the Identity Management servers.
Set to the value "False" to disable high availability installation, for example, in a test environment.
_mail_server
Enter the name of the mail server that you want the Identity Management server to use for email notifications.
_sendmail_smart_relay_host
This is used for the sendmail configuration of the relay host. Leave blank or specify the local host.
_email_return_address
Enter the return address that you want the Identity Management server to use for email.
_cluster_sucker_password
A password used by JBoss cluster. Leave as the default setting or create any password.
_cluster_peer_host
Enter the host name of the server on which you are currently installing Identity Management.
Identity Management Server
94 Installation Guide
_jboss_server_id
Enter a JBoss ID for the Identity Management Server you are installing. Create any unique ID. We recommend a value of "1" for your first Identity Management instance, "2" for your second instance, etc.
_uarm_user_id
Internal use only. Do not change.
_uarm_password
Internal use only. Do not change.
_uarm_dev_user_id
Internal use only. Do not change.
_multicast_groupname
Enter a unique name you create for this Identity Management cluster. Choose a different multicast groupname for each cluster you run.
All the Identity Management Servers in the cluster share the same value for this parameter. This can be any text string, but we recommend a short name, because it is included in every message sent around the cluster.
_multicast_address
Enter a unique multicast address you create for this Identity Management cluster. Choose a different multicast address for each cluster you run.
All the Identity Management servers in the cluster share the same value for this parameter. By default, JBoss AS uses UDP multicast for most intra-cluster communication. Consider a multicast address of the form 239.255.x.y. See JBoss documentation for additional guidelines.
_im_fips_mode
Set to the value "False" to install without FIPS mode. CA CloudMinder 1.5 does not currently support FIPS mode.
_im_fips_key_location
"/tmp"
Location of the FIPS key.
Leave as the default. CA CloudMinder 1.5 does not currently support FIPS mode.
Identity Management Server
Chapter 3: Server Installation 95
_im_webfort_user
Enter the same name you entered for _aa_db_user in the properties file for the first SiteMinder Policy Server instance. This is the advanced authentication database user name. If webfort is not used, set this property to the same value as _im_db_user. This property applies for both Oracle and PostgreSQL.
_im_webfort_password
Enter the same name you entered for _aa_db_password in the properties file for the first SiteMinder Policy Server instance. This is the advanced authentication database user password. If webfort is not used, set this property to the same value as _im_db_password. This property applies for both Oracle and PostgreSQL.
_TenantProvDirPassword
Enter the same value you entered for impd_shared_secret in the properties file for the first Directory Server instance.
_TenantProvServerSecret
Enter the same value you entered for _provisioning_server_pwd in the properties file for the first Provisioning Server instance.
_TenantProvDirectorySecret
Enter the same value you entered for impd_shared_secret in the properties file for the first Directory Server instance.
_TenantProvJCSPassword
Enter the same value you entered for _connector_server_pwd in the properties file for the first Provisioning Server instance.
_cspHostName
Enter the host name where you installed the first (primary) SiteMinder Policy Server.
_cspHostPort
Enter 8080, or enter the CSP console Port if it is installed on a non-default port.
_cspContextPath
Internal use. Do not change.
Identity Management Server
96 Installation Guide
_cspAlias
Internal use. Do not change.
_cspSecure
Set to the value "True" to enable SSL on the CSP console (use HTTPS).
Set to the value "False" to disable SSL on the CSP console (use HTTP).
_cspConfigurationId
Internal use. Do not change.
_cspConfigurationSecret
Internal use. Do not change.
_envBaseURL
Enter the base URL for your CA CloudMinder environment, in the following format:
<SPS>.<YOURDOMAIN>/iam/im
Where SPS is your Secure Proxy Server, and YOURDOMAIN is the domain address for your environment.
For example:
cloudminderspsvip1.forwardinc.com/iam/im
_dirHosts
Enter all CA Directory host names in your environment, separated by commas.
_internalBaseURL
Set this Hosting Container to specify Internal Base URL when you do not want the notifications from Provisioning Server to go to the Environment Base URL.
You can specify an internal Identity Management Server load balancer here. This load balancer is used as the Provisioning Server notification URL for any tenants deployed. Tenants deployed when no Internal Base URL has been specified have a Provisioning Server notification URL that is derived from the Environment Base URL.
Identity Management Server
Chapter 3: Server Installation 97
_dirDsaMgmtUser
Enter the same value as you entered for _dir_webservices_username in the properties file for the first CA Directory instance. Be sure to uncomment this parameter (remove # from the parameter name).
_dirDsaMgmtPassword
Enter the same value as you entered for _dir_webservices_password in the properties file for the first CA Directory instance. Be sure to uncomment this parameter (remove # from the parameter name).
_dirDsaMgmtPort
Enter the same value as you entered for _dir_webservices_port in the properties file for the first CA Directory instance. Be sure to uncomment this parameter (remove # from the parameter name).
_tenantDsaRouterHosts
Enter the host names for all hosts with a DSA router in your installation, separated by commas.
For Example:
Identity Management Server1, Identity Management Server2, SiteMinder Policy Server1, SiteMinder Policy Server2, Provisioning Server1, Provisioning Server2
_tenantDsaRouterMgmtUser
Leave as default, blank.
_tenantDsaRouterMgmtPassword
Leave as default, blank.
_tenantDsaRouterMgmtPort
Leave as default, blank.
_impsHosts
Enter the host names for all Provisioning Servers, separated by commas.
For Example:
Provisioning Server1, Provisioning Server2
_impsDsaMgmtUser
Leave as default, blank.
Identity Management Server
98 Installation Guide
_impsDsaMgmtPassword
Leave as default, blank.
_impsDsaMgmtPort
Leave as default, blank.
_impsTenantServiceHost
Enter the host name of the first (primary) Provisioning Server.
Note: If the CA IAM CS is on a separate server, enter the host name of the CA IAM CS instead.
_impsTenantServicePassword
Enter the same password as you entered for _connector_server_pwd in the properties file for the first instance of the Provisioning Server. This is the password used to access the CA IAM CS.
_haprefimps
Enter the host name of the first (primary) Provisioning Server.
_hafoimps
Enter the host name of the second (failover) Provisioning Server.
_CSPDeployDir
Internal use. Do not change.
_CSPID
Internal use. Do not change.
_CSPName
Internal use. Do not change.
_CSPDirPassword
Enter the same password you entered for _csp_dir_password in the properties file for the first SiteMinder Policy Server instance.
_CSPDirHost
Enter the same host name you entered for _csp_dir_host in the properties file for the first SiteMinder Policy Server instance.
_CSPDirPort
Enter the same password you entered for _csp_dir_port in the properties file for the first SiteMinder Policy Server instance.
Identity Management Server
Chapter 3: Server Installation 99
_authMinderHost
Enter the host name for the first (primary) SiteMinder Policy Server.
JAVA64_LOCATION
Location of an existing 64-bit JRE if preinstalled. Set this parameter if you choose to install your JRE separately. In this case, symbolically link /opt/java64 to your JRE.
However, instead of installing a JRE separately, the system installer can do this automatically. We recommend that you download a JRE and allow the system to install it.
See the JAVA64_KIT parameter.
JAVA64_KIT
Location of a 64-bit JRE that you download to the local system or to a file share. If this parameter is set, the server kit will install this JRE automatically.
JBOSS_KIT
Enter the file path, on the local system or a file share, of the JBoss to install. The JBoss kit should be in zip file format. JBOSS can be either the community version or the Enterprise Application Platform (EAP).
_ntp_server
IP address or host name of the NTP server to use to synchronize the server time.
_jce_zip_file
Enter the full file path to the JCE policy zip file. You downloaded the jce_policy-6.zip file from the Oracle web site during the Identity Management pre-installation steps.
_secure_session_cookie
The server kit configures JBoss to use session cookies with secure and httpOnly attributes if two conditions are met:
1. property _secure_session_cookie is set to true in properties.sh:
_secure_session_cookie=true; export _secure_session_cookie
2. property _envBaseURL starts with https in properties.sh:
_envBaseURL=https://webserver.ca.com; export _envBaseURL

Identity Management Server
100 Installation Guide
If both conditions are not met, the session cookie will be left as is. The server kit contains a script that can be used to reconfigure the session cookie based on these conditions at any time:
configSessionCookie.sh
This script reads the properties and either enables the attributes in the JBoss session cookie or disables them depending on the values of the two properties. A JBoss restart is then required for the settings to take effect.
The User Console does not work properly without HTTPS if configured with secure session cookies.
1. Back up the properties.sh file. Rename it to a logical name, for example, identitymanager1properties.sh.
Note: This file is critical for upgrades. We recommend that you back up this file. This file contains passwords, so be sure to save it in a secure location.
Important! The original properties.sh file resides in a temp folder. If the server is shut down, the properties.sh file is discarded. Therefore, rename and back up this file before proceeding with any further installation or use of the system.
Install and Verify the Identity Management Server
After you set the Identity Management Server parameters and back up the properties.sh file, run the installation program.
Verify the installation before proceeding with further installation steps.
Follow these steps:
1. Navigate to:
/opt/CA/saas/repo/application/
2. Run:
./appliance_local.sh config
When installation is complete, set up JBoss. Then verify the installation as follows.
Identity Management Server
Chapter 3: Server Installation 101
Setup Using JBoss EAP
If you are using JBoss EAP, do the following:
1. Edit the file /opt/jboss-eap-5.1.2/jboss-as/server/all/conf/props/jmx-console-users.properties
2. Uncomment the line "#admin=admin"
3. Run the following command:
dos2unix ../conf/props/jmx-console-users.properties
4. Stop and Start the Identity Management Server using JBoss, using the following steps:
cd /etc/init.d/im stop
cd /etc/init.d/im start
JBoss Configuration
The recommended memory for the Identity Management Server on JBoss is 6GB (6144). This is physical memory rather than swap space.
During installation, the system allocates memory to JBoss. The installation process calculates the memory allocation based on the physical memory of the system, as follows:
■ Less than 8G, memory minus 2G is allocated
■ More than 8G, memory divided by 2 is allocated
■ The minimum memory allocated is 1G
After installation is complete, check your overall system memory and check the memory allocated to JBoss. The JBoss memory allocation is found in the run.sh file on the Identity Management Server.
If you do not have sufficient memory on the system, increase the max memory used by JBoss as follows:
1. Edit the file /opt/jboss-5.1.0.GA/bin/run.sh as follows:
JAVA_OPTS="$IDM_OPTS $DEBUG_OPTS
-Djava.security.policy=workpoint_client.policy -Xms256m
–Xmx6144m -XX:MaxPermSize=256m -XX:ReservedCodeCacheSize=50m"
In this example, the memory allocated is 6GB (6144).
2. Restart JBoss.
Verify the Server Installation
1. Issue this command to check if Java is running:
ps –ef|grep java
Identity Management Server
102 Installation Guide
The response includes the following:
java -Xms256m -Xmx4096m -cp ./lib/*
com.ca.directory.dxagent.service.DxAgentService
2. Verify that the /opt/jboss-5.1.0.GA/bin/run.sh file has the multicast_address and multicast_groupname that were set in /tmp/properties.sh file.
3. Verify that the following folders are present.
For the community edition of JBoss:
/opt/jboss-5.1.0.GA/server/all/deploy/iam_im.ear/user_console.w
ar/META-INF/csp
/opt/jboss-5.1.0.GA/server/all/deploy/iam_im.ear/user_console.w
ar/META-INF/tenant
For JBoss EAP:
/opt/jboss-eap-5.1.2/jboss-as//server/all/deploy/iam_im.ear/use
r_console.war/META-INF/csp
/opt/jboss-eap-5.1.2/jboss-as//server/all/deploy/iam_im.ear/use
r_console.war/META-INF
4. Verify that the following files are present.
For the community edition of JBoss:
/opt/jboss-5.1.0.GA/server/all/deploy/iam_im.ear/user_console.w
ar/META-INF/csp/CSP.properties
/opt/jboss-5.1.0.GA/server/all/deploy/iam_im.ear/user_console.w
ar/META-INF/tenant/Container.properties
For JBoss EAP:
/opt/jboss-eap-5.1.2/jboss-as//server/all/deploy/iam_im.ear/use
r_console.war/META-INF/csp/CSP.properties
/opt/jboss-eap-5.1.2/jboss-as//server/all/deploy/iam_im.ear/use
r_console.war/META-INF/tenant/Container.properties
Identity Management Server
Chapter 3: Server Installation 103
5. For a high availability installation, edit the following file:
For the community edition of JBoss:
/opt/jbos-5.1.0.GA/server/all/deploy/iam_im.ear/policyserver.ra
r/META-INF/ra.xml
For JBoss EAP:
/opt/jboss-eap-5.1.2/jboss-as//server/all/deploy/iam_im.ear/pol
icyserver.rar/META-INF/ra.xml
This requires the following line:
<config-property-value>Your SiteMinder Policy Server1
Hostname,44441,44442,44443</config-property-value>
6. For a high-availability deployment, continue with installing a second Identity Management Server. For a single-instance deployment, continue with installing the Report Server.
High-Availability: Identity Management Server 2
Prepare a second system that is separate from the one on which you installed the first Identity Management Server instance.
Confirm that your server environment is properly prepared and install the required packages. Follow the same steps (see page 87) as you did for the first instance.
Identity Management Server
104 Installation Guide
Configure the Second Identity Management Server Properties File
Set the parameters for the second Identity Management Server instance.
Copy the properties file from the first Secure Proxy Server instance and change only the parameters that are different for the second instance. Remember to rename and back up the new properties file after you complete the parameters.
You need the following information to complete the Secure Proxy Server parameters.
General Information:
■ The host names of the systems where you are installing the Identity Management servers.
■ The JBoss ID for the Identity Management Server you are installing.
Follow these steps:
1. On the first Identity Management server system, copy the properties.sh file that you just configured.
2. Navigate to /tmp/properties.sh on the second Identity Management server system. Replace the properties.sh file with the configured copy from the first Identity Management system.
3. Change the following parameter values:
_cluster_peer_host
Enter the host name of the server on which you are currently installing Identity Management.
_jboss_server_id
Enter a JBoss ID for the Identity Management Server you are installing. Create any unique ID. We recommend a value of "1" for your first Identity Management instance, "2" for your second instance, etc.
4. Leave all other parameter values as you set them for the first Identity Management server.
5. Back up the properties.sh file. Rename it to a logical name, for example, identitymanager2properties.sh.
Note: This file is critical for upgrades. We recommend that you back up this file. This file contains passwords, so be sure to save it in a secure location.
Important! The original properties.sh file resides in a temp folder. If the server is shut down, the properties.sh file is discarded. Therefore, rename and back up this file before proceeding with any further installation or use of the system.
Identity Management Server
Chapter 3: Server Installation 105
Install and Verify the Second Identity Management Server
After you set the parameters for the Identity Management Server and back up the properties.sh file, run the installation program.
Verify the installation before proceeding with further installation steps.
Follow these steps:
1. Navigate to:
/opt/CA/saas/repo/application/
2. Run:
./appliance_local.sh config
When installation is complete, set up JBoss. Then verify the installation as follows.
Setup Using JBoss EAP
If you are using JBoss EAP, do the following:
1. Edit the file /opt/jboss-eap-5.1.2/jboss-as/server/all/conf/props/jmx-console-users.properties
2. Uncomment the line "#admin=admin"
3. Run the following command:
dos2unix ../conf/props/jmx-console-users.properties
4. Stop and Start the Identity Management Server using JBoss, using the following steps:
cd /etc/init.d/im stop
cd /etc/init.d/im start
JBoss Configuration
The recommended memory for the Identity Management Server on JBoss is 6GB (6144). This is physical memory rather than swap space.
During installation, the system allocates memory to JBoss. The installation process calculates the memory allocation based on the physical memory of the system, as follows:
■ Less than 8G, memory minus 2G is allocated
■ More than 8G, memory divided by 2 is allocated
■ The minimum memory allocated is 1G
Identity Management Server
106 Installation Guide
After installation is complete, check your overall system memory and check the memory allocated to JBoss. The JBoss memory allocation is found in the run.sh file on the Identity Management Server.
If you do not have sufficient memory on the system, increase the max memory used by JBoss as follows:
1. Edit the file /opt/jboss-5.1.0.GA/bin/run.sh as follows:
JAVA_OPTS="$IDM_OPTS $DEBUG_OPTS
-Djava.security.policy=workpoint_client.policy -Xms256m
–Xmx6144m -XX:MaxPermSize=256m -XX:ReservedCodeCacheSize=50m"
In this example, the memory allocated is 6GB (6144).
2. Restart JBoss.
Verify the Server Installation
1. Issue this command to check if Java is running:
ps –ef|grep java
The response includes the following:
java -Xms256m -Xmx4096m -cp ./lib/*
com.ca.directory.dxagent.service.DxAgentService
2. Verify that the /opt/jboss-5.1.0.GA/bin/run.sh file has the multicast_address and multicast_groupname that were set in /tmp/properties.sh file.
3. Verify that the following folders are present.
For the community edition of JBoss:
/opt/jboss-5.1.0.GA/server/all/deploy/iam_im.ear/user_console.w
ar/META-INF/csp
/opt/jboss-5.1.0.GA/server/all/deploy/iam_im.ear/user_console.w
ar/META-INF/tenant
For JBoss EAP:
/opt/jboss-eap-5.1.2/jboss-as//server/all/deploy/iam_im.ear/use
r_console.war/META-INF/csp
/opt/jboss-eap-5.1.2/jboss-as//server/all/deploy/iam_im.ear/use
r_console.war/META-INF
Report Server
Chapter 3: Server Installation 107
4. Verify that the following files are present.
For the community edition of JBoss:
/opt/jboss-5.1.0.GA/server/all/deploy/iam_im.ear/user_console.w
ar/META-INF/csp/CSP.properties
/opt/jboss-5.1.0.GA/server/all/deploy/iam_im.ear/user_console.w
ar/META-INF/tenant/Container.properties
For JBoss EAP:
/opt/jboss-eap-5.1.2/jboss-as//server/all/deploy/iam_im.ear/use
r_console.war/META-INF/csp/CSP.properties
/opt/jboss-eap-5.1.2/jboss-as//server/all/deploy/iam_im.ear/use
r_console.war/META-INF/tenant/Container.properties
5. For a high availability installation, edit the following file:
For the community edition of JBoss:
/opt/jbos-5.1.0.GA/server/all/deploy/iam_im.ear/policyserver.ra
r/META-INF/ra.xml
For JBoss EAP:
/opt/jboss-eap-5.1.2/jboss-as//server/all/deploy/iam_im.ear/pol
icyserver.rar/META-INF/ra.xml
This requires the following line:
<config-property-value>Your SiteMinder Policy Server1
Hostname,44441,44442,44443</config-property-value>
Continue with installing the Report Server.
Report Server
Tenant administration reports are drawn from data in the Business Objects database. They are visible in the reporting tasks which is accessible from the User Console.
Report Server
108 Installation Guide
Standalone Report Server
If you do not need high availability for the Report Server, use the following procedure for a standalone installation.
Prerequisites
If you are planning to use RHEL 6 for the Business Objects installation, these prerequisites exist:
■ Minimum patch requirements for RHEL 6: compat-libstdc++-33-3.2.3-69.el6.i686 (compatibility standard C++ library from GCC 3.3.4); glibc-2.12-1 (RedHat advisory RHBA-2007:0619-3); libXext.i386; libncurses.so.5, libXext-devel-1.1-3.el6.i686, libXext-devel-1.1-3.el6.x86_64
Note: Install both X86_64 & i636 patches for the above. We recommend using yum install package_name.
The hostname cannot have special characters such as '-' (a hyphen). It can be only alpha-numeric.
■ Oracle Client 32Bit (or you can use Instant Client. To download OracleLinuxClient.zip)
■ Open your Oracle server Enterprise Management Console or SQL console and create Tablespaces for CMS ("BO_CMS_TS") and Auditing ("BO_AUDIT_TS"). Also create 2 users, one for CMS ("BO_CMS_USER") and other for Auditing ("BO_AUDIT_USER") and give them dba privileges on respective Tablespaces.
■ locale en_US.utf8 (to be default locale for BO installation)
■ export LANG=en_US.utf8
Follow these steps:
1. Create a UNIX group (for example: bobje) to be used as a CA Business Intelligence User:
# groupadd -g 400 bobje
2. Create a folder to be used as home folder for CA Business Intelligence User:
# mkdir /home/bobje
3. Create a UNIX user (for example: bobje) to be used by the CA Business Intelligence installer for administrators:
# useradd -d /home/bobje -g bobje bobje
4. Set the password for the user created in step 3.
# passwd bobje
5. Change the ownership of the home directory as follows: # chown -R bobje:bobje /home/bobje
Report Server
Chapter 3: Server Installation 109
6. Download and copy the CABI3.3 to /home/bobje (or home folder created in step #2)
7. Extract the installer GZ file as follows:
gunzip cabi-version_number-linux.tar.gz
8. Extract the TAR file as follows: tar -xvf cabi-version_number-linux.tar
9. Give necessary permissions on CABI install folder and Installer media
copy OracleLinuxClient.zip to /tmp
10. Extract zip file and all other zip files in it
11. Rename the folder "instantclient_11_2" to "oracle" and move "oracle" folder to /opt/.
12. Go to /opt/oracle and create softlinks as below
ln -s libclntsh.so.11.1 libclntsh.so
ln -s libocci.so.11.1 libocci.so
13. Create a file "tnsnames.ora" with following content. Remember to replace parameters (specified between < and >) according to your setup
<your Oracle SID> =
(DESCRIPTION =
(ADDRESS = (PROTOCOL = TCP)(HOST = <Oracle Hostname>)(PORT =
1521))
(CONNECT_DATA =
(SERVER = DEDICATED)
(SERVICE_NAME = <your Oracle Service/SID name>)
14. Edit .bash_profile of both "root" (/root/.bash_profile) and "bobje" (/home/bobje/.bash_profile) (or CA Business object user created in step #3) and add the following.
Note: If /home/bobje/.bash_profile does not exist for bobje user, create one and change owner to bobje using command "chown bobje:bobje /home/bobje/.bash_profile"
export ORACLE_HOME=/opt/oracle
export PATH=$PATH:$ORACLE_HOME
export TNS_ADMIN=/opt/oracle
export LD_LIBRARY_PATH=$LD_LIBRARY_PATH:/opt/oracle
15. Go to the user home folder (/home/bobje).
16. Run the Cabi installer.
cabiinstall.sh
Note: CABI installation is console installation. Provide the necessary details in the screen, keeping note of the passwords, ports and usernames provided during the installation.
See the following section for a few important parameters to be given during installation.
Report Server
110 Installation Guide
Run the Installation Program
Follow these steps:
Run the BusinessObjects Enterprise installation program, supplying the following values:
1. Supply the credentials for a non-root user.
■ User Name: bobje
■ Group Name: bobje
2. Central Management Server port: (6400)
Important! The installation uses a static port of 6400. Do not change this port to a dynamic port.
3. Choose the Installation Type for your database software.
■ For Oracle, select New.
■ For PostgreSQL, select Custom.
4. Select 1 - Use an existing database (Oracle/DB2/Sybase/MySQL,SQLAnywhere)" for CMS Repository.
5. Select 2 - Oracle for Database Type
6. Provide CMS user details for the CMS Database
7. Provide Audit user details for the Audit Database
8. Select Yes to initialize the database.
9. Select 1 - Install Tomcat, deploy web applications
Note: In case of any database error during install, check the latest "/opt/CA/SharedComponents/CommonReporting3/setup/logs/dbcheck" for details. All installation logs exist here: "/opt/CA/SharedComponents/CommonReporting3/setup/logs/"
10. Confirm installation success by accessing the CMS console
http://hostname:8080/CmcApp
Post Installation for the Report Server
Starting and Stopping the Report Server
1. To start the server, SSH to the Business Objects system:
cd /opt/CA/SharedComponents/CommonReporting3/bobje/setup
source env.sh
cd ..
./startservers
./tomcatstartup.sh
Report Server
Chapter 3: Server Installation 111
2. To stop the server, SSH to Business Objects system:
cd /opt/CA/SharedComponents/CommonReporting3/bobje/setup
source env.sh
cd ..
./stopservers
./tomcatshutdown.sh
To Check the Installed Business Objects Server Version
1. Log in to CMS Console.
2. On the Home page, click Settings under the Manage section.
3. Check the Product Version is 12.5.0.1265, which applies to CA Business Intelligence 3.3.
Customize the mergeconnections script
1. Update Registry Entries as follows:
For reports, such as JDBC/XML, set the registry key to use the Crystal Enterprise/Report Application Server
For the Identity Management Server to change data sources for reports in the Report Server, run the mergeConnection script.
2. Check for Windows control characters in the mergeconnections script.
If you downloaded the software using FTP in binary mode, these characters do not appear in this script. If you used another download method, use the dos2unix command to remove these characters.
3. Copy the mergeconnections_3.0.cf script from the system with the Identity Management Admin toolkit to the Report Server. On the system with the toolkit, the default location for this script is as follows:
/opt/CA/IdentityManager/IAM_Suite/Identity_Manager/tools/Report
ServerTools
4. On the Report Server system, place the script in this location:
installation-directory/bobje/enterprise120/generic
5. Source in the environment variables for BusinessObjects Enterprise, as follows:
source installation-directory/bobje/setup/env.sh
6. Run the following script:
./configpatch.sh mergeconnections_3.0.cf
7. Select 1 as the option when prompted.
Note: Set the environment variable as follows before you run the script:
export _POSIX2_VERSION=199209
Report Server
112 Installation Guide
8. Restart crystal processing servers as follows:
9. Log in as the non-root user you used to install the Report Server.
10. Issue these commands:
cd /opt/CA/SharedComponents/CommonReporting3/bobje
./stopservers
./startservers
Copy the JDBC JAR Files
Follow these steps:
1. Navigate to the jdbcdrivers folder where the Identity Management Server Admin toolkit is installed. The default location is as follows:
[set the alternate Installation Path
variable]/tools/lib/jdbcdrivers
2. Copy ojdbc14.jar (for Oracle) or sqljdbc.jar (for SQL Server) or postgresql-9.3-1101.jdbc3.jar (for PostgreSQL) to the following location:
/opt/CA/SharedComponents/CommonReporting3/bobje/java/lib/extern
al
The ojdbc14.jar and the sqljdbc.jar files are in the following location:
/opt/CA/IdentityManager/IAM_Suite/IdentityManager/tools/ReportS
erverTools/
The postgresql-9.3-1101.jdbc3.jar is available at the following location:
/opt/reports
3. Open the jdbc.sbo file in this directory:
$CABI_HOME/bobje/enterprise120/linux_x86/dataAccess/RDBMS/conne
ctionServer/jdbc
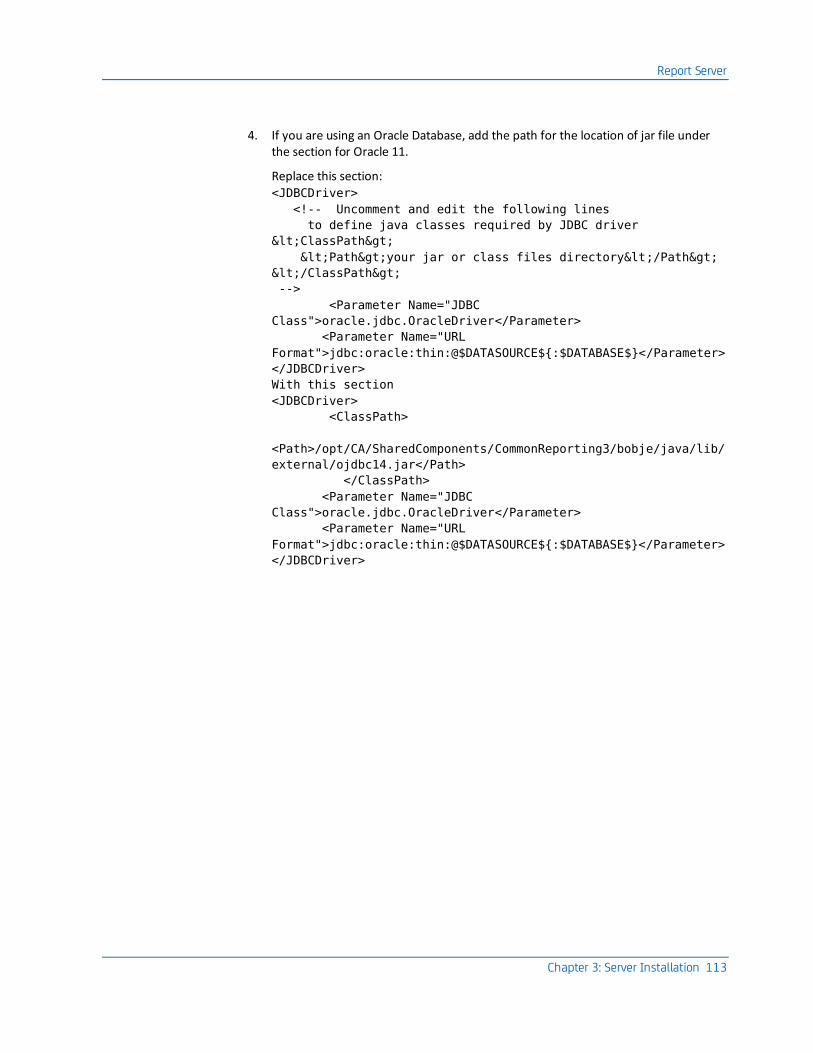
Report Server
Chapter 3: Server Installation 113
4. If you are using an Oracle Database, add the path for the location of jar file under the section for Oracle 11.
Replace this section:
<JDBCDriver>
<!-- Uncomment and edit the following lines
to define java classes required by JDBC driver
<ClassPath>
<Path>your jar or class files directory</Path>
</ClassPath>
-->
<Parameter Name="JDBC
Class">oracle.jdbc.OracleDriver</Parameter>
<Parameter Name="URL
Format">jdbc:oracle:thin:@$DATASOURCE${:$DATABASE$}</Parameter>
</JDBCDriver>
With this section
<JDBCDriver>
<ClassPath>
<Path>/opt/CA/SharedComponents/CommonReporting3/bobje/java/lib/
external/ojdbc14.jar</Path>
</ClassPath>
<Parameter Name="JDBC
Class">oracle.jdbc.OracleDriver</Parameter>
<Parameter Name="URL
Format">jdbc:oracle:thin:@$DATASOURCE${:$DATABASE$}</Parameter>
</JDBCDriver>
Report Server
114 Installation Guide
5. If you are using a PostgreSQL database, add the path for location of jar file under the section for PostgreSQL 8.
Replace this section:
<JDBCDriver>
<!-- Uncomment and edit the following lines
to define java classes required by JDBC driver
<ClassPath>
<Path>your jar or class files directory</Path>
</ClassPath>
-->
<Parameter Name="JDBC
Class">org.postgresql.Driver</Parameter>
<Parameter Name="URL
Format">jdbc:postgresql://$DATASOURCE$/$DATABASE$</Parameter>
</JDBCDriver>
With this section:
<JDBCDriver>
<ClassPath>
<Path>/opt/CA/SharedComponents/CommonReporting3/bobje/java/lib/
external/postgresql-9.3-1101.jdbc3.jar</Path>
</ClassPath>
<Parameter Name="JDBC
Class">org.postgresql.Driver</Parameter>
<Parameter Name="URL
Format">jdbc:postgresql://$DATASOURCE$/$DATABASE$</Parameter>
</JDBCDriver>
6. Save and close jdbc.sbo file.
7. Open the CRConfig.xml file, found in the following location:
/opt/CA/SharedComponents/CommonReporting3/bobje/java
8. Add the location of the JDBC JAR files to the Classpath.
– PostgreSQL - ${BOBJEDIR}/java/lib/external/postgresql-9.3-1101.jdbc3.jar
– Oracle - ${BOBJEDIR}/java/lib/external/ojdbc14.jar
For example:
<Classpath>${BOBJEDIR}/java/lib/external/postgresql-9.3-1101.jd
bc3.jar:${BOBJEDIR}/java/lib/sqljdbc.jar:${BOBJEDIR}/java/lib/o
jdbc14.jar:…</Classpath>
9. Save the file.
10. Restart the Report Server as follows:
cd /opt/CA/SharedComponents/CommonReporting3/bobje
./stopservers
./startservers
Report Server
Chapter 3: Server Installation 115
Deploy Default Reports
The Identity Management Server comes with default reports you can use for reporting. BIConfig is a utility that uses a specific XML format to install these default reports for the Identity Management Server.
Follow these steps:
1. Switch to using the Identity Management server.
2. Gather the following information about the Report Server:
■ Hostname
■ Administrator name
■ Administrator password
■ Snapshot database type
3. Download the CA Business Intelligence 3.3 BIConfig utility (biconfig_3_3_1_0.zip) from the CABI FTP site.
4. Locate the installer-root-directory/disk1/cabi/biconfig folder on the Business Objects report server.
5. Copy from the biconfig folder to the im_admin_tools_dir/ReportServerTools folder on the Identity Management server.
6. Set the JAVA_HOME variable to the 64-bit version of the JDK 6 update45 you installed.
7. On the Identity Management server, run the following command
For Oracle:
./biconfig.sh -h "hostname" -u "administrator_name" -p
"administrator_password" -f "oracle-biar.xml"
For PostgreSQL:
./biconfig.sh -h "hostname" -u "administrator_name" -p
"administrator_password" -f "postgres-biar.xml"
Note: Be sure that biconfig.sh has execute permissions.
8. View the biconfig.log file found in the location where you ran the biconfig command.
9. Verify that the default reports installed successfully. Inspect the end of the log file for status; a successful installation appears as follows:
ReportingDeployUtility - Reporting utility program terminated and
return code = 0
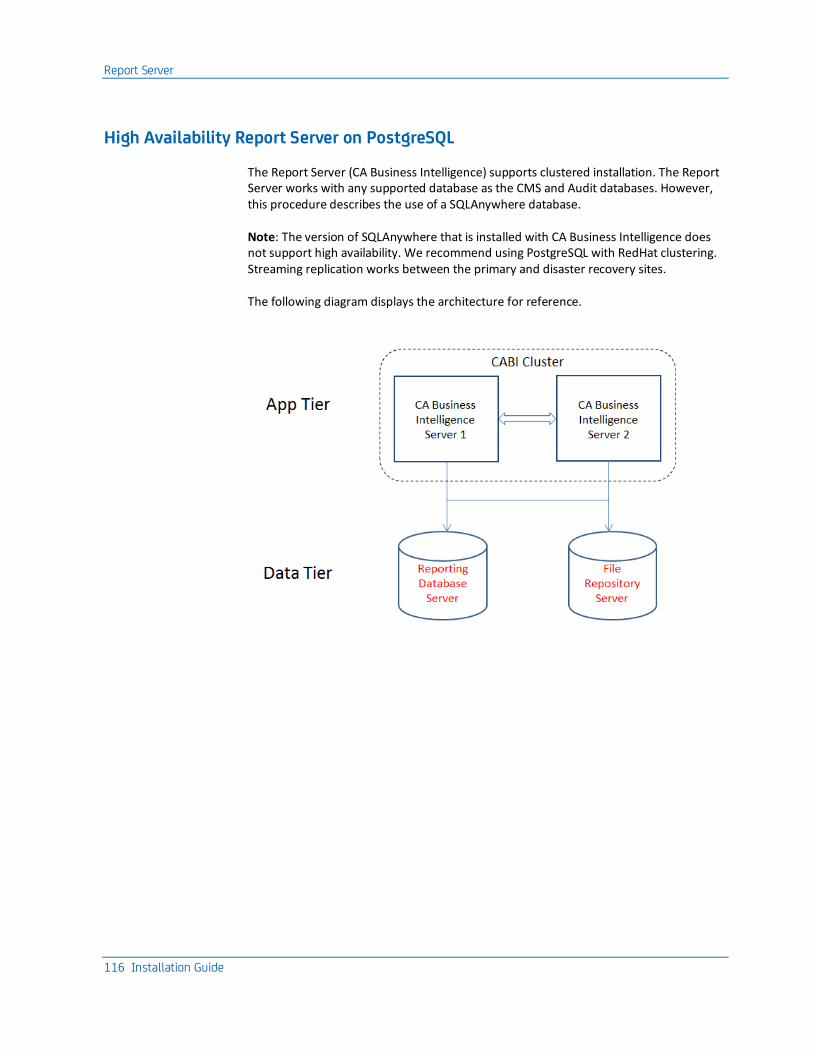
Report Server
116 Installation Guide
High Availability Report Server on PostgreSQL
The Report Server (CA Business Intelligence) supports clustered installation. The Report Server works with any supported database as the CMS and Audit databases. However, this procedure describes the use of a SQLAnywhere database.
Note: The version of SQLAnywhere that is installed with CA Business Intelligence does not support high availability. We recommend using PostgreSQL with RedHat clustering. Streaming replication works between the primary and disaster recovery sites.
The following diagram displays the architecture for reference.
Report Server
Chapter 3: Server Installation 117
Setup CABI Common File Share on File Repository Server
For the current CABI installation, the share is created on a separate Linux server and is shared using NFS. Therefore, you can access it directly from another computer or you can mount it on another Linux machine. However, we recommend you create this share on a high availability SAN or NAS storage.
To configure CABI in a clustered mode, it is important that the file repository servers are shared across the CMS Servers. In Linux, we can share folders across different machines using different methods like NFS or Samba. In this setup we will be using NFS.
You must log in to the machine as root and perform the steps below on the File Repository Server Machine to configure file sharing using NFS.
Follow these steps:
1. From the terminal, execute the following commands to start the nfs server.
service nfs status
2. After verifying the status of the nfs server, if the server is in stopped state , start the nfs server with the following command:
service nfs start
3. Create a directory to share across all the machines as the file repository:
mkdir -p /home/nfs/cabi
4. Create a group, bobje for example, for use as an NFS Share User:
groupadd -g 400 bobje
5. Create a user who is the owner of this share with the following command:
useradd -s /bin/bash bobje
To make this user the owner for the share, execute:
chown –R bobje:bobje /home/nfs/cabi
6. Once the directory has been created, share this location with the other machines:
a. Open /etc/exports file and add the following entry for each machine where the share has to be accessed.
■ /home/nfs/cabi Machine*(rw,all_squash,anonuid=501,anongid=501)
■ eg: /home/nfs/cabi lod0123(rw,all_squash) lod0124(rw,all_squash)
b. Run the command “exportfs –a”.
All the file shares that are listed in the /etc/exports file are exported.
c. Validate the folder is shared, by running: “showmount -e FileRepositoryServer”.
d. All folders shared from FileRepositoryServer are displayed.
e. Login as bobje using “su bobje”.

Report Server
118 Installation Guide
f. Create directories for the input and the output file repositories using the following commands:
cd /home/nfs/cabi
mkdir frsinput frsoutput
Report Server
Chapter 3: Server Installation 119
Prerequisites for SQL Anywhere Database
Follow these steps:
1. Ensure that the minimum patch requirements for RHEL 6 exists.
2. Execute the following command for all the below patches:
rpm -qa | grep package_name
compat-libstdc++-33-3.2.3-69.el6.i686 (compatibility standard
C++ library from GCC 3.3.4); glibc-2.12-1 (RedHat advisory
RHBA-2007:0619-3); libXext.i386; libncurses.so.5,
libXext-devel-1.1-3.el6.i686, libXext-devel-1.1-3.el6.x86_64.
3. Download and install missing patches by using the following command:
yum install package_name
4. Set the locale for database installation:
export LC_ALL=en_US.utf8
export LANG=en_US.utf8
5. Verify that the locale is set to UTF8:
locale
6. Create a UNIX group to be used as CA Business Intelligence User. For example:
groupadd -g 400 bobje
7. Create a UNIX user to be used by the CA Business Intelligence installer for administrators. For example:
useradd -d /home/bobje -g bobje bobje
8. Set the password for the user you just created.
passwd bobje
9. Edit /etc/hosts file and confirm that you have the following line:
127.0.0.1 localhost
10. Obtain the CABI installation program as follows:
a. Download and copy the CABI 3.3 installer to the /home/bobje directory.
b. Go to /home/bobje directory and extract the GZ installer file:
gunzip cabi_installer.gz
c. Extract the TAR installer file:
tar –xvf cabi_installer.tar
d. Assign sufficient permissions to the CABI install folder and installer media:
# chmod 777 /home/bobje/
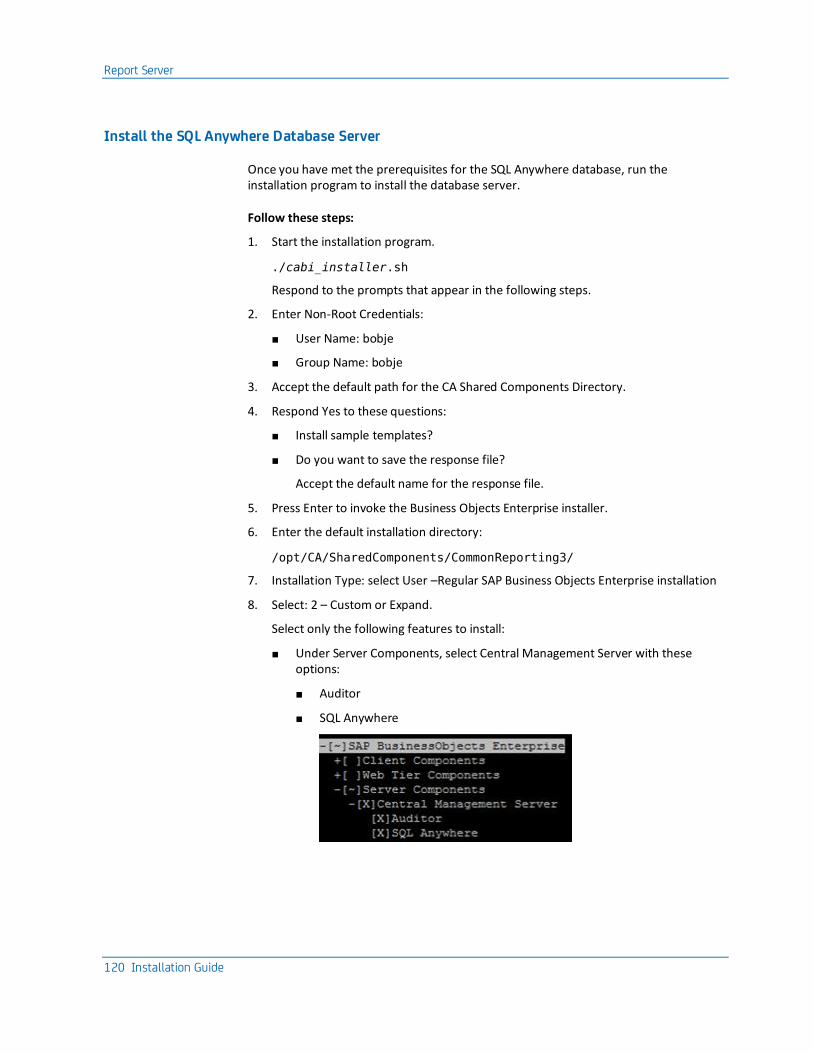
Report Server
120 Installation Guide
Install the SQL Anywhere Database Server
Once you have met the prerequisites for the SQL Anywhere database, run the installation program to install the database server.
Follow these steps:
1. Start the installation program.
./cabi_installer.sh
Respond to the prompts that appear in the following steps.
2. Enter Non-Root Credentials:
■ User Name: bobje
■ Group Name: bobje
3. Accept the default path for the CA Shared Components Directory.
4. Respond Yes to these questions:
■ Install sample templates?
■ Do you want to save the response file?
Accept the default name for the response file.
5. Press Enter to invoke the Business Objects Enterprise installer.
6. Enter the default installation directory:
/opt/CA/SharedComponents/CommonReporting3/
7. Installation Type: select User –Regular SAP Business Objects Enterprise installation
8. Select: 2 – Custom or Expand.
Select only the following features to install:
■ Under Server Components, select Central Management Server with these options:
■ Auditor
■ SQL Anywhere
Report Server
Chapter 3: Server Installation 121
■ Under Database Access, select SQL Anywhere
9. Enter the following information for new CMS:
■ Host name of the local system
■ CMS port number, using the default port: 6400
■ Administrator password
10. Enter information about the SQL Anywhere database:
■ Host name
■ Port number
■ Administrator password
■ CMS database name
■ Audit database name
■ User ID and password for the database user
11. Respond to the final questions to complete the installation.
Report Server
122 Installation Guide
Configure the SQL Anywhere Database
Perform these steps on the SQL Anywhere database server, replacing each $VARIABLE with an appropriate value.
Follow these steps:
1. Execute the following commands to set the environment of SQL Anywhere:
cd $INSTALLATION_DIR/bobje/SQLAW/Bin/
source sa_config.sh
2. Execute the following commands to create CMS and AUDIT databases:
a. Create a Database directory using the below command:
mkdir -p $DATABASE_DIR
b. Create the CMS database in the directory created above, and set the Admin and password for this database:
./dbinit -o "$DATABASE_DIR/cms_check.log" -dba
$ADMIN_UID,$ADMIN_PWD "$DATABASE_DIR/CM.db"
c. Create the AUDIT database in the directory created above, and set the Admin and password for this database:
./dbinit -o "$DATABASE_DIR/audit_check.log" -dba
$ADMIN_UID,$ADMIN_PWD "$DATABASE_DIR/AUDIT/.db"
3. To stop the SQL Anywhere Database created during installation:
./dbstop -y -c "uid=$ADMIN_UID;pwd=$ADMIN_PWD"
$SQLANYWHERE_SERVER
Or use the following:
./dbstop -y -c "uid=$ADMIN_UID;pwd=$ADMIN_PWD" $Database_Name
4. To start SQL Anywhere to host CMS and Audit databases created above:
./dbspawn ./dbsrv12 -n "$SQLANYWHERE_SERVER" -x
\""tcpip(port=$SQLANYWHERE_PORT)"\" "$DATABASE_DIR/cms.db"
"$DATABASE_DIR/audit.db"
5. Verify that the required services are running on the SQL Anywhere port:
netstat –an | grep $SQLANYWHERE_PORT
6. Create Business Object Enterprise User and assign privileges on both the databases(CMS & AUDIT) using the following commands:
./dbisqlc -q -c
"uid=$ADMIN_UID;pwd=$ADMIN_PWD;server=$SQLANYWHERE_SERVER;host=
$SQLANYWHERE_HOST:$SQLANYWHERE_PORT;dbn=cms" CREATE USER
"$BOE_CMS_UID" IDENTIFIED BY "$BOE_CMS_PWD"
Report Server
Chapter 3: Server Installation 123
./dbisqlc -q -c
"uid=$ADMIN_UID;pwd=$ADMIN_PWD;server=$SQLANYWHERE_SERVER;host=
$SQLANYWHERE_HOST:$SQLANYWHERE_PORT;dbn=$cms" GRANT RESOURCE,
VALIDATE, PROFILE, READFILE TO "$BOE_CMS_UID"
./dbisqlc -q -c
"uid=$ADMIN_UID;pwd=$ADMIN_PWD;server=$SQLANYWHERE_SERVER;host=
$SQLANYWHERE_HOST:$SQLANYWHERE_PORT;dbn=audit" CREATE USER
"$BOE_AUDIT_UID" IDENTIFIED BY "$BOE_AUDIT_PWD"
./dbisqlc -q -c
"uid=$ADMIN_UID;pwd=$ADMIN_PWD;server=$SQLANYWHERE_SERVER;host=
$SQLANYWHERE_HOST:$SQLANYWHERE_PORT;dbn=audit" GRANT RESOURCE,
VALIDATE, PROFILE, READFILE TO "$BOE_AUDIT_UID"
Configure the SQL Anywhere Client to Connect to the Remote Database
Perform these steps on the Report Server system.
Follow these steps:
1. Download and Install SQL Anywhere Client (32 bit).
2. Set the environment of SQL Anywhere:
cd $Installation_Dir/bin32/
source sa_config.sh
3. To connect and verify that the CMS DSN is accessible:
./dbping -c
"UID=$BOE_CMS_UID;PWD=$BOE_CMS_PWD;SERVER=$SQLANYWHERE_SERVER;L
INKS=TCPIP(HOST=$SQLANYWHERE_HOST;PORT=$SQLANYWHERE_PORT)"
4. To create CMS Data Source:
./dbdsn -w $CMSDataSource -c
"UID=$BOE_CMS_UID;PWD=$BOE_CMS_PWD;SERVER=$SQLANYWHERE_SERVER;h
ost=$SQLANYWHERE_HOST:$SQLANYWHERE_PORT;dbn=cms"
5. To connect and verify that the AUDIT DSN is accessible:
./dbping -c
"UID=$BOE_AUDIT_UID;PWD=$BOE_AUDIT_PWD;SERVER=$SQLANYWHERE_SERV
ER;LINKS=TCPIP(HOST=$SQLANYWHERE_HOST;PORT=$SQLANYWHERE_PORT)"
6. Create the audit DSN:
./dbdsn -w "AuditDataSource" -c
"UID=$BOE_AUDIT_UID;PWD=$BOE_AUDIT_PWD;SERVER=$SQLANYWHERE_SERV
ER;host=$SQLANYWHERE_HOST:$SQLANYWHERE_PORT;dbn=cms"
Report Server
124 Installation Guide
Install the First Report Server with the Remote Database
Follow these steps:
1. Obtain the CABI installation program as follows:
a. Download and copy the CABI 3.3 installer to the /home/bobje directory.
b. Go to /home/bobje directory and extract the GZ installer file:
gunzip cabi_installer.gz
c. Extract the TAR installer file:
tar –xvf cabi_installer.tar
d. Assign sufficient permissions to the CABI install folder and installer media:
# chmod 777 /home/bobje/
2. Edit /etc/hosts file, commenting out the existing lines and adding the below line:
127.0.0.1 localhost
3. Start the installation program.
./cabi_installer.sh
Respond to the prompts that appear.
4. Enter Non-Root Credentials:
■ User Name: bobje
■ Group Name: bobje
5. Accept the default path for the CA Shared Components Directory.
6. Respond No to the question about installing sample templates.
7. Respond Yes to the question about saving the response file?
Accept the default name for the response file.
8. Press Enter to invoke the Business Objects Enterprise installer.
9. Enter the default installation directory:
/opt/CA/SharedComponents/CommonReporting3/
10. Select the Installation Type:
User – Regular SAP Business Objects Enterprise installation
11. Select: 2 – Custom or Expand.
Unselect the following components and press [Enter]:
■ Client Components
■ Server Components
■ Central Management Server
Report Server
Chapter 3: Server Installation 125
12. Select 1 – Yes – This is the first CMS in this deployment.
13. Select the choice to use an existing database.
14. Enter the following information for new CMS database.
■ For database type, select SQL Anywhere12
■ Supply the same information you provided when you installed the SQL Anywhere Database server.
15. Enter the following information for new audit database.
■ For database type, select SQL Anywhere12
■ Supply the same information you provided when you installed the SQL Anywhere Database server.
16. Respond Yes to reinitialize the database.
17. Assign any name for the service intelligence agent.
18. Select a Java application Server or install tomcat.
Use the default port for tomcat.
You will receive an installation complete message.
Post-Installation for the First Report Server
Perform the following steps after installing the first report server with a remote SQL Anywhere database.
Follow these steps:
1. Enter the following commands:
su bobje
cd /opt/CA/SharedComponents/CommonReporting3/bobje
./stopservers
./cmsdbsetup.sh
2. Enter the SIA Name provided during the first Report Server installation.
3. Enter 3 to change the cluster.
Enter the value for CA Business Intelligence cluster name.
4. Enter this command:
./startservers

Report Server
126 Installation Guide
Install the Second Report Server
Perform these steps to install a second report server with a remote SQL Anywhere database.
Follow these steps:
1. Begin the cabi_installer.sh program as you did for the first report server.
2. Respond No when you reach the question asking if this is the first CMS.
3. Enter the existing CMS Hostname as first Report Server name.
4. For CMS Database type, select 2 – SQL Anywhere12.
Enter the CMS Database details that you provided during the first Report Server installation.
5. For Auditing Database type, select 2 – SQL Anywhere12.
Enter the Audit Database details that you provided during the first Report Server installation.
6. Enter SIA for the second Report Server.
7. Wait until installation is completed.
Report Server
Chapter 3: Server Installation 127
Mount NFS Share Location on both CABI Servers
Perform the following steps on both CABI server machines to setup the NFS client. This is required to access the shared location available in the file repository server.
Follow these steps:
1. Login as a root.
2. Create a directory which will be used to mount the shared directory:
■ mkdir -p /home/nfs/cabi
3. Make the user ‘bobje’, the owner for this directory
■ chown –R bobje:bobje /home/nfs/cabi
4. Open /etc/fstab.
5. Mount the directory /home/nfs/cabi from the File repository server, to the directory /home/nfs/cabi in the current machine
■ FileRepositoryServer:/home/nfs/cabi /home/nfs/cabi nfs defaults 0 0
6. Mount all the shares:
■ mount -a
7. Verify the share has been mounted and its location by executing mount.
8. Login as bobje su –bobje.
9. Ensure that you have write permissions for the share by creating a file with the following commands:
cd /home/nfs/cabi
touch a
If you do not have permissions, this command will throw an error.
rm a
Note: Delete the file if it was created
10. Copy the file repositories from this machine to the share. cd /opt/CA/SharedComponents/CommonReporting3/bobje
11. Stop the servers by runing: ./stopservers”
12. Navigate to the location of the Input File repository:
cd data/frsinput”
13. Copy all the files from this directory to the share:
cp –r * /home/nfs/cabi/frsinput
14. Navigate to the Location of the Output File Repository:
cd ../frsoutput
15. Copy all the files from Output file repository to the share:
cp –r * /home/nfs/cabi/frsoutput
Report Server
128 Installation Guide
16. Remove the frsinput and frsoutput folders from /opt/CA/SharedComponents/CommonReporting3/bobje/data”
17. Add softlinks pointing to the NFS shared folders:
ln –s /home/nfs/cabi/frsinput
ln –s /home/nfs/cabi/frsoutput
18. Start the servers:
“cd /opt/CA/SharedComponents/CommonReporting3/bobje”
./startservers
Post-Installation for the First Report Server
Perform the following steps after installing the first report server with a remote SQL Anywhere database.
Follow these steps::
1. SSH to the Business Objects system, and enter the following commands:
su bobje
cd /opt/CA/SharedComponents/CommonReporting3/bobje
./stopservers
./cmsdbsetup.sh
2. Enter the SIA Name you provided during installation of the first Report Server.
3. Enter 3 to change the cluster.
Enter the value for the CA Business Intelligence cluster name.
4. Enter the following command:
./startservers
Report Server
Chapter 3: Server Installation 129
Configure Identity Management for High Availability Reporting
Make host entry changes on the Identity Management servers to enable high availability reporting.
Follow these steps:
1. Log in to the first Identity Management server.
2. Edit the /etc/hosts file.
3. Map the IP Address of the first Report Server to thjs virtual name:
cabiserver
4. Log in to the second Identity Management server.
5. Edit the /etc/hosts file.
6. Map the IP Address of the second Report Server to the same virtual name:
cabiserver
7. In the User Console, use the same virtual name, cabiserver, where you configure the Report server connection.
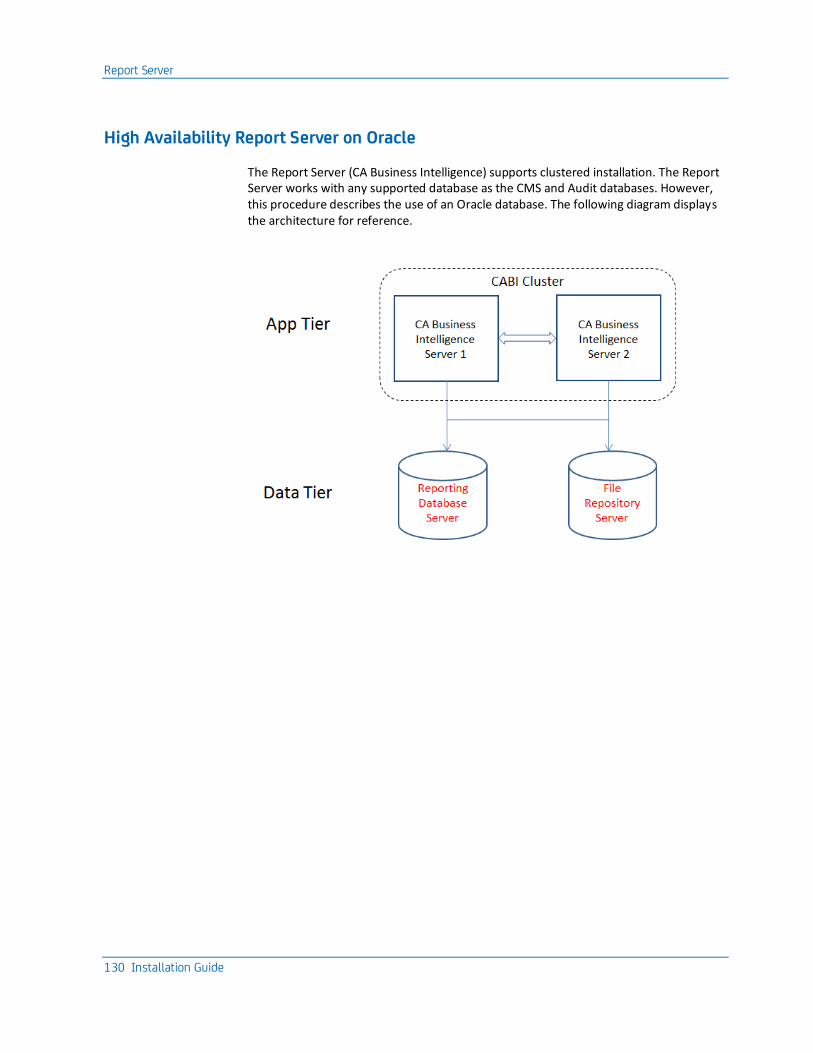
Report Server
130 Installation Guide
High Availability Report Server on Oracle
The Report Server (CA Business Intelligence) supports clustered installation. The Report Server works with any supported database as the CMS and Audit databases. However, this procedure describes the use of an Oracle database. The following diagram displays the architecture for reference.
Report Server
Chapter 3: Server Installation 131
Prerequisites for the High Availability Report Server on Oracle
If you are planning to use RHEL 6 for the Business Objects installation, you must complete these prerequisites:
1. Meet these minimum patch requirements for RHEL 6 exist.
2. Execute the following command for all the below patches:
rpm -qa | grep package_name
compat-libstdc++-33-3.2.3-69.el6.i686 (compatibility standard
C++ library from GCC 3.3.4); glibc-2.12-1 (RedHat advisory
RHBA-2007:0619-3); libXext.i386; libncurses.so.5,
libXext-devel-1.1-3.el6.i686, libXext-devel-1.1-3.el6.x86_64.
3. Download and install missing patches with the following command: yum install package_name
Note: Install both x86_64 & i636 patches.
4. Download Oracle Client 32Bit (OracleLinuxClient.zip).
5. Open your Oracle server Enterprise Management Console or SQL console and create Tablespaces for
■ CMS ("BO_CMS_TS")
■ Auditing ("BO_AUDIT_TS")
6. Create two users and give them dba privileges on the respective Tablespaces:
■ CMS ("BO_CMS_USER")
■ Auditing ("BO_AUDIT_USER")
7. Set the locale for database installation:
■ locale en_US.utf8 (The default locale for BO installation)
■ export LANG=en_US.utf8
Report Server
132 Installation Guide
Setup CABI Common File Share on File Repository Server
For the current CABI installation, the share is created on a separate Linux server and is shared using NFS. Therefore, you can access it directly from another computer or you can mount it on another Linux machine. However, we recommend you create this share on a high availability SAN or NAS storage.
To configure CABI in a clustered mode, it is important that the file repository servers are shared across the CMS Servers. In Linux, we can share folders across different machines using different methods like NFS or Samba. In this setup we will be using NFS.
You must log in to the machine as root and perform the steps below on the File Repository Server Machine to configure file sharing using NFS.
Follow these steps:
1. From the terminal, execute the following commands to start the nfs server.
service nfs status
2. After verifying the status of the nfs server, if the server is in stopped state , start the nfs server with the following command:
service nfs start
3. Create a directory to share across all the machines as the file repository:
mkdir -p /home/nfs/cabi
4. Create a group, bobje for example, for use as an NFS Share User:
groupadd -g 400 bobje
5. Create a user who is the owner of this share with the following command:
useradd -s /bin/bash bobje
To make this user the owner for the share, execute:
chown –R bobje:bobje /home/nfs/cabi
6. Once the directory has been created, share this location with the other machines:
a. Open /etc/exports file and add the following entry for each machine where the share has to be accessed.
■ /home/nfs/cabi Machine*(rw,all_squash,anonuid=501,anongid=501)
■ eg: /home/nfs/cabi lod0123(rw,all_squash) lod0124(rw,all_squash)
b. Run the command “exportfs –a”.
All the file shares that are listed in the /etc/exports file are exported.
c. Validate the folder is shared, by running: “showmount -e FileRepositoryServer”.
d. All folders shared from FileRepositoryServer are displayed.
e. Login as bobje using “su bobje”.

Report Server
Chapter 3: Server Installation 133
f. Create directories for the input and the output file repositories using the following commands:
cd /home/nfs/cabi
mkdir frsinput frsoutput
Report Server
134 Installation Guide
Install the First Report Server with the Remote Database
Important! 'bobje' is used as an example to help you with configuration.
Follow these steps:
1. Create a UNIX group to be used as a CA Business Intelligence User:
# groupadd -g 400 bobje
2. Create a Directory at /home/bobje, a UNIX user such as bobje, for use by the CA Business Intelligence installer for administrators, and set this user as owner of bobje directory:
# useradd -d /home/bobje -g bobje bobje
3. Set the password for the user created in step 2: # passwd bobje
4. Edit /etc/hosts file, and ensure you have the below line: 127.0.0.1 localhost
5. Download and copy the CABI3.3 installer to /home/bobje or the home folder you created in step 2.
6. Extract the installer GZ file as follows:
# gunzip <cabi-version_number-linux.tar.gz>
7. Extract the TAR file as follows:
tar -xvf <cabi-version_number-linux.tar>
8. Give permissions on the CABI install folder and Installer media:
# chmod 777 /home/bobje/
9. Copy OracleLinuxClient.zip to /tmp.
10. Extract the zip file and all other zip files in it.
11. Rename the folder instantclient_11_2 to oracle and move the folder oracle to /opt/.
12. Go to /opt/oracle and create softlinks:
ln -s libclntsh.so.11.1 libclntsh.so
ln -s libocci.so.11.1 libocci.so
13. Create a file tnsnames.ora with the content following this step.
Note: Replace parameters according to your setup:
<your Oracle SID> =
(DESCRIPTION =
(ADDRESS = (PROTOCOL = TCP)(HOST = <Oracle Hostname>)(PORT = 1521))
(CONNECT_DATA =
(SERVER = DEDICATED)
(SERVICE_NAME = <your Oracle Service/SID name>)))
Report Server
Chapter 3: Server Installation 135
14. Edit .bash_profile of both root, in /root/.bash_profile, and bobje, in /home/bobje/.bash_profile and add the following.
Note: If /home/bobje/.bash_profile does not exist for bobje user, create one and change the owner to bobje using the command chown –R bobje:bobje /home/bobje/.bash_profile.
export ORACLE_HOME=/opt/oracle
export PATH=$PATH:$ORACLE_HOME
export TNS_ADMIN=/opt/oracle
export LD_LIBRARY_PATH=$LD_LIBRARY_PATH:/opt/oracle
15. Go to the user home folder located at /home/bobje.
16. Start the installation program with the command below and follow the prompts:
./cabi_installer.sh
17. Enter Non-Root Credentials:
User Name: bobje
Group Name: bobje
18. Accept the default path for the CA Shared Components Directory.
19. Respond No to the question about installing sample templates.
20. Respond Yes to the question about saving the response file.
21. Accept the default name for the response file.
22. Press Enter to invoke the Business Objects Enterprise installer.
23. Enter the default installation directory:
/opt/CA/SharedComponents/CommonReporting3/
24. Select the Installation Type:
User – Regular SAP Business Objects Enterprise installation
25. Select: 2 – Custom or Expand.
26. Unselect the following components and press [Enter]:
■ Client Components
■ Server Components
■ Central Management Server
27. Select 1 – Yes – This is the first CMS in this deployment.
28. Select the choice to use an existing database.
29. Enter the following for a new CMS database:
■ For database type, select Oracle
■ For the CMS Database, enter CMS user details.

Report Server
136 Installation Guide
30. Enter the following information for new AUDIT database.
■ For database type, select Oracle
■ Provide AUDIT user details for the AUDIT Database
31. Respond Yes to initialize the database.
32. Assign any name for the service intelligence agent.
33. Select 1 - Install Tomcat, deploy web applications.
Note: In case of database error during install, check the latest logs for detais located here: /opt/CA/SharedComponents/CommonReporting3/setup/logs/dbcheck All installation logs are located here: /opt/CA/SharedComponents/CommonReporting3/setup/logs/
34. Confirm installation success by accessing the CMS console at http://<hostname>:8080/CmcApp.
Post-Installation for the First Report Server
Perform the following steps after installing the first report server with a remote SQL Anywhere database.
Follow these steps::
1. SSH to the Business Objects system, and enter the following commands:
su bobje
cd /opt/CA/SharedComponents/CommonReporting3/bobje
./stopservers
./cmsdbsetup.sh
2. Enter the SIA Name you provided during installation of the first Report Server.
3. Enter 3 to change the cluster.
Enter the value for the CA Business Intelligence cluster name.
4. Enter the following command:
./startservers

Report Server
Chapter 3: Server Installation 137
Install the Second Report Server
Perform these steps to install a second report server with a remote SQL Anywhere database.
Follow these steps:
1. Begin the cabi_installer.sh program as you did for the first report server.
2. Respond No when you reach the question asking if this is the first CMS.
3. Enter the existing CMS Hostname as first Report Server name.
4. For CMS Database type, select Oracle.
Enter the CMS Database details that you provided during the first Report Server installation.
5. For Auditing Database type, select Oracle.
Enter the Audit Database details that you provided during the first Report Server installation.
6. Enter SIA for the second Report Server.
7. Wait until installation is completed.
Report Server
138 Installation Guide
Mount NFS Share Location on both CABI Servers
Perform the following steps on both CABI server machines to setup the NFS client. This is required to access the shared location available in the file repository server.
Follow these steps:
1. Login as a root.
2. Create a directory which will be used to mount the shared directory:
■ mkdir -p /home/nfs/cabi
3. Make the user ‘bobje’, the owner for this directory
■ chown –R bobje:bobje /home/nfs/cabi
4. Open /etc/fstab.
5. Mount the directory /home/nfs/cabi from the File repository server, to the directory /home/nfs/cabi in the current machine
■ FileRepositoryServer:/home/nfs/cabi /home/nfs/cabi nfs defaults 0 0
6. Mount all the shares:
■ mount -a
7. Verify the share has been mounted and its location by executing mount.
8. Login as bobje su –bobje.
9. Ensure that you have write permissions for the share by creating a file with the following commands:
cd /home/nfs/cabi
touch a
If you do not have permissions, this command will throw an error.
rm a
Note: Delete the file if it was created
10. Copy the file repositories from this machine to the share. cd /opt/CA/SharedComponents/CommonReporting3/bobje
11. Stop the servers by runing: ./stopservers”
12. Navigate to the location of the Input File repository:
cd data/frsinput”
13. Copy all the files from this directory to the share:
cp –r * /home/nfs/cabi/frsinput
14. Navigate to the Location of the Output File Repository:
cd ../frsoutput
15. Copy all the files from Output file repository to the share:
cp –r * /home/nfs/cabi/frsoutput
Layer 7 Gateway Server
Chapter 3: Server Installation 139
16. Remove the frsinput and frsoutput folders from /opt/CA/SharedComponents/CommonReporting3/bobje/data”
17. Add softlinks pointing to the NFS shared folders:
ln –s /home/nfs/cabi/frsinput
ln –s /home/nfs/cabi/frsoutput
18. Start the servers:
“cd /opt/CA/SharedComponents/CommonReporting3/bobje”
./startservers
Configure Identity Management for High Availability Reporting
Make host entry changes on Identity Management servers to enable high availability reporting.
Follow these steps:
1. Log in to the first Identity Management server.
2. Edit the /etc/hosts file
3. Map the IP Address of the first Report Server to this virtual name:
cabiserver
4. Log in to the second Identity Management server.
5. Edit /etc/hosts file
6. Map the IP Address of the second Report Server to the same virtual name:
cabiserver
7. In the User Console, use the same virtual name, cabiserver, where you configure the Report server connection.
Layer 7 Gateway Server
Use this procedure to install the Layer 7 Gateway servers.
Note: These instructions assume you are installing two Gateway servers in a high-availability deployment.
For additional information, see the complete Layer 7 Installation and Maintenance Manual in the CA CloudMinder bookshelf.
Layer 7 Gateway Server
140 Installation Guide
Layer 7 Gateway Server Pre-Installation Steps
To prepare for installation, confirm that your server environments are properly prepared.
Follow these steps:
1. Install 64-bit Linux RHEL 5.9 on your Layer 7 gateway systems.
2. Obtain all required installation files for the Layer 7 Gateway server, as follows. Download these files to ~/download on your Gateway systems:
From CA Support:
■ add_slave_user.sh
■ create_slave.sh
■ harden.sh
■ my.cnf
■ ssg
■ ssg-7.1.1-3_noDB.noarch.rpm
From Oracle:
■ jdk-7u21-linux-x64.tar.gz
■ UnlimitedJCEPolicyJDK7.zip
From MySQL:
■ mysql-connector-java-5.1.20.tar.gz
■ mySQL-client-5.5.30-1.rhel5.x86_64.rpm
■ mySQL-server-5.5.30-1.rhel5.x86_64.rpm
Layer 7 Gateway Server
Chapter 3: Server Installation 141
Deploy the First Layer 7 Gateway
These steps describe how to deploy the first gateway server.
Important! Delete any previous installations or data before deploying the gateway. Residual test installations or MySQL data can cause installation problems.
Follow these steps:
1. Log in to the system as the root user.
2. Perform base system configuration:
a. Configure the network card for IPv4 with the following values:
■ Machine name
■ IP Address
■ Default gateway
■ DNS nameserver
b. Disable IPv6:
NETWORKING_IPV6=no in /etc/sysconfig/network
c. Configure the timezone:
/etc/sysconfig/clock
d. Install the NTP server, if you have not already done so:
yum install ntp
e. Enable NTP autostart:
/sbin/chkconfig ntpd on
f. Start the NTP Service:
service ntpd start
3. Reboot the machine:
sync;sync;reboot
4. Log in to the system as the root user.
5. Install the MySQL packages with the following commands:
cd ~/download
rpm -ivh MySQL-client-5.5.30-1.rhel5.x86_64.rpm
rpm -ivh MySQL-server-5.5.30-1.rhel5.x86_64.rpm
cp -p my.cnf /etc
service mysql start
Note: If the first RPM attempt fails, the base RedHat system may already have another version of MySQL installed. Use rpm -e to remove any conflicts.
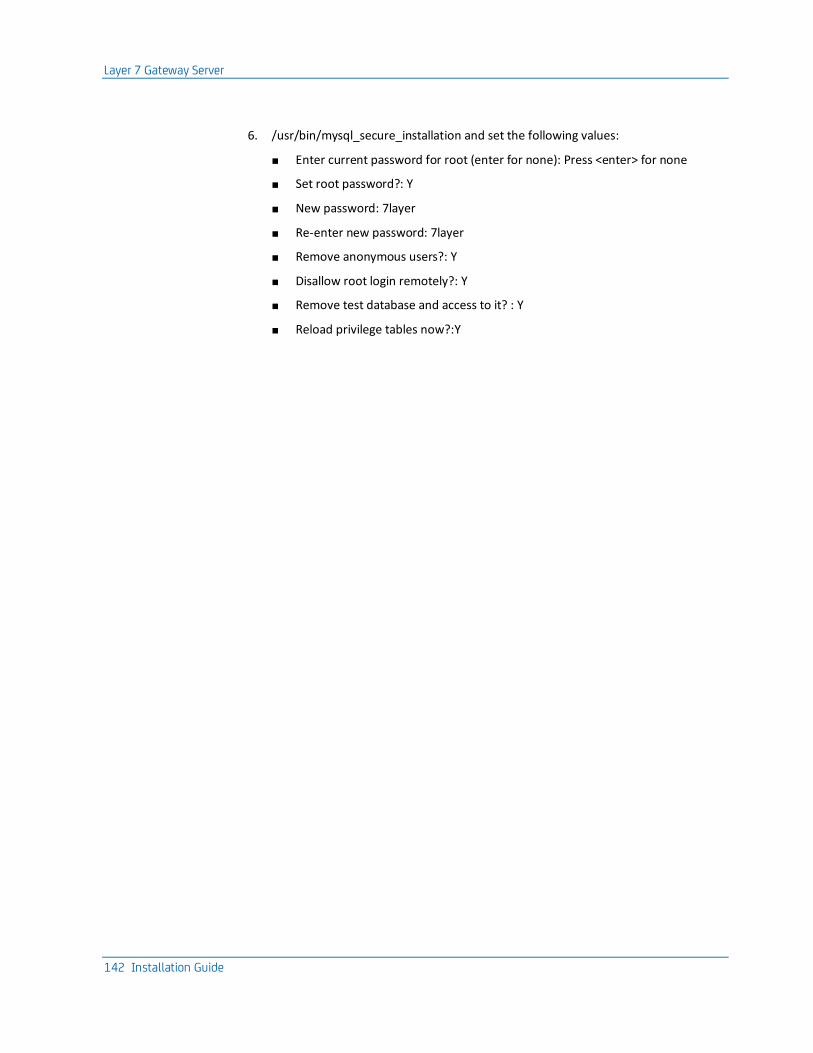
Layer 7 Gateway Server
142 Installation Guide
6. /usr/bin/mysql_secure_installation and set the following values:
■ Enter current password for root (enter for none): Press <enter> for none
■ Set root password?: Y
■ New password: 7layer
■ Re-enter new password: 7layer
■ Remove anonymous users?: Y
■ Disallow root login remotely?: Y
■ Remove test database and access to it? : Y
■ Reload privilege tables now?:Y
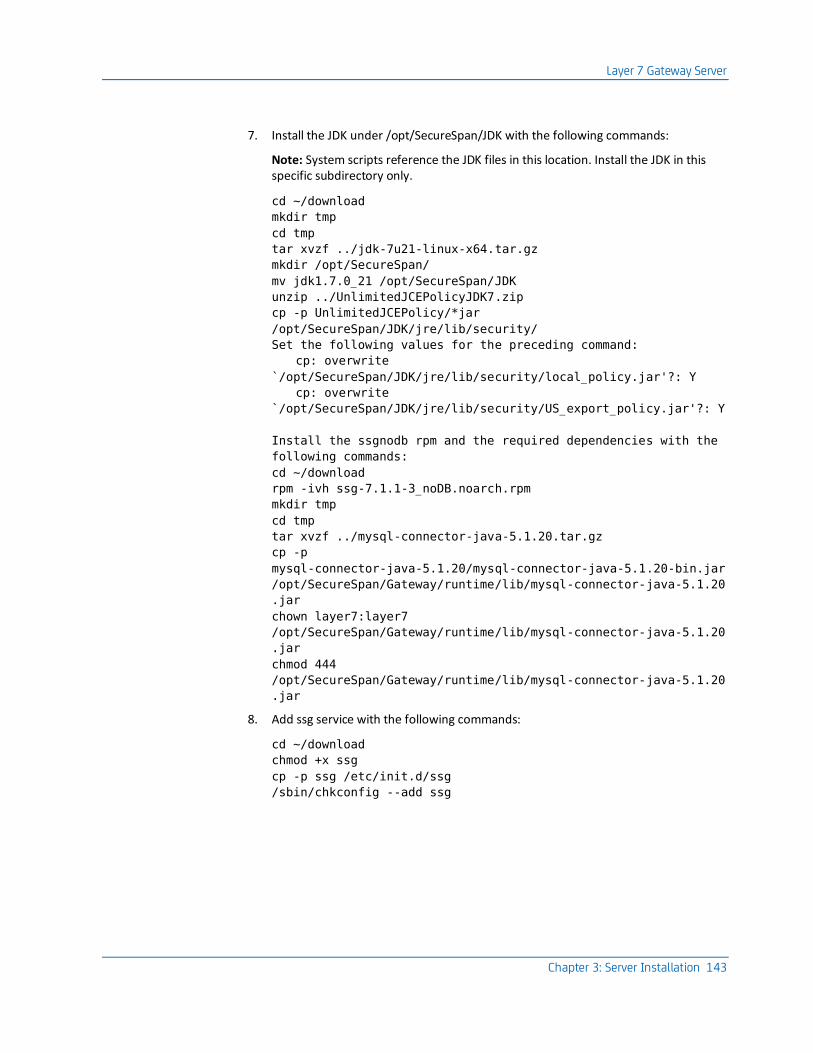
Layer 7 Gateway Server
Chapter 3: Server Installation 143
7. Install the JDK under /opt/SecureSpan/JDK with the following commands:
Note: System scripts reference the JDK files in this location. Install the JDK in this specific subdirectory only.
cd ~/download
mkdir tmp
cd tmp
tar xvzf ../jdk-7u21-linux-x64.tar.gz
mkdir /opt/SecureSpan/
mv jdk1.7.0_21 /opt/SecureSpan/JDK
unzip ../UnlimitedJCEPolicyJDK7.zip
cp -p UnlimitedJCEPolicy/*jar
/opt/SecureSpan/JDK/jre/lib/security/
Set the following values for the preceding command:
cp: overwrite
`/opt/SecureSpan/JDK/jre/lib/security/local_policy.jar'?: Y
cp: overwrite
`/opt/SecureSpan/JDK/jre/lib/security/US_export_policy.jar'?: Y
Install the ssgnodb rpm and the required dependencies with the
following commands:
cd ~/download
rpm -ivh ssg-7.1.1-3_noDB.noarch.rpm
mkdir tmp
cd tmp
tar xvzf ../mysql-connector-java-5.1.20.tar.gz
cp -p
mysql-connector-java-5.1.20/mysql-connector-java-5.1.20-bin.jar
/opt/SecureSpan/Gateway/runtime/lib/mysql-connector-java-5.1.20
.jar
chown layer7:layer7
/opt/SecureSpan/Gateway/runtime/lib/mysql-connector-java-5.1.20
.jar
chmod 444
/opt/SecureSpan/Gateway/runtime/lib/mysql-connector-java-5.1.20
.jar
8. Add ssg service with the following commands:
cd ~/download
chmod +x ssg
cp -p ssg /etc/init.d/ssg
/sbin/chkconfig --add ssg
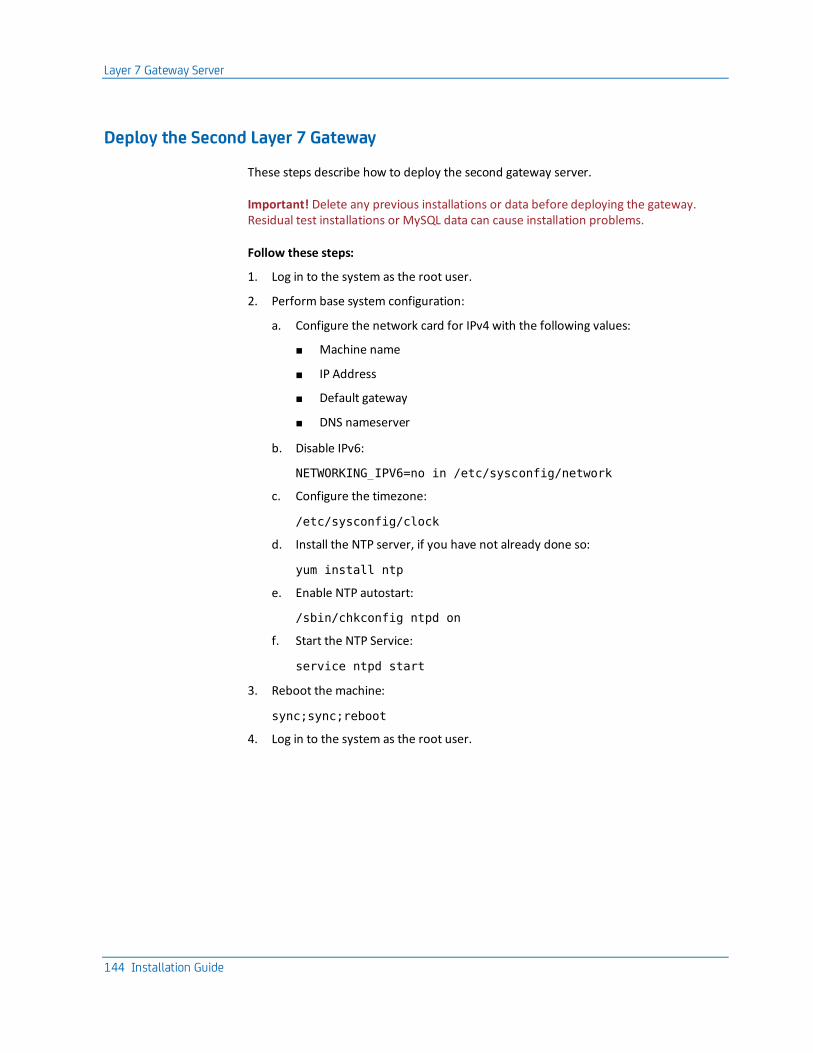
Layer 7 Gateway Server
144 Installation Guide
Deploy the Second Layer 7 Gateway
These steps describe how to deploy the second gateway server.
Important! Delete any previous installations or data before deploying the gateway. Residual test installations or MySQL data can cause installation problems.
Follow these steps:
1. Log in to the system as the root user.
2. Perform base system configuration:
a. Configure the network card for IPv4 with the following values:
■ Machine name
■ IP Address
■ Default gateway
■ DNS nameserver
b. Disable IPv6:
NETWORKING_IPV6=no in /etc/sysconfig/network
c. Configure the timezone:
/etc/sysconfig/clock
d. Install the NTP server, if you have not already done so:
yum install ntp
e. Enable NTP autostart:
/sbin/chkconfig ntpd on
f. Start the NTP Service:
service ntpd start
3. Reboot the machine:
sync;sync;reboot
4. Log in to the system as the root user.
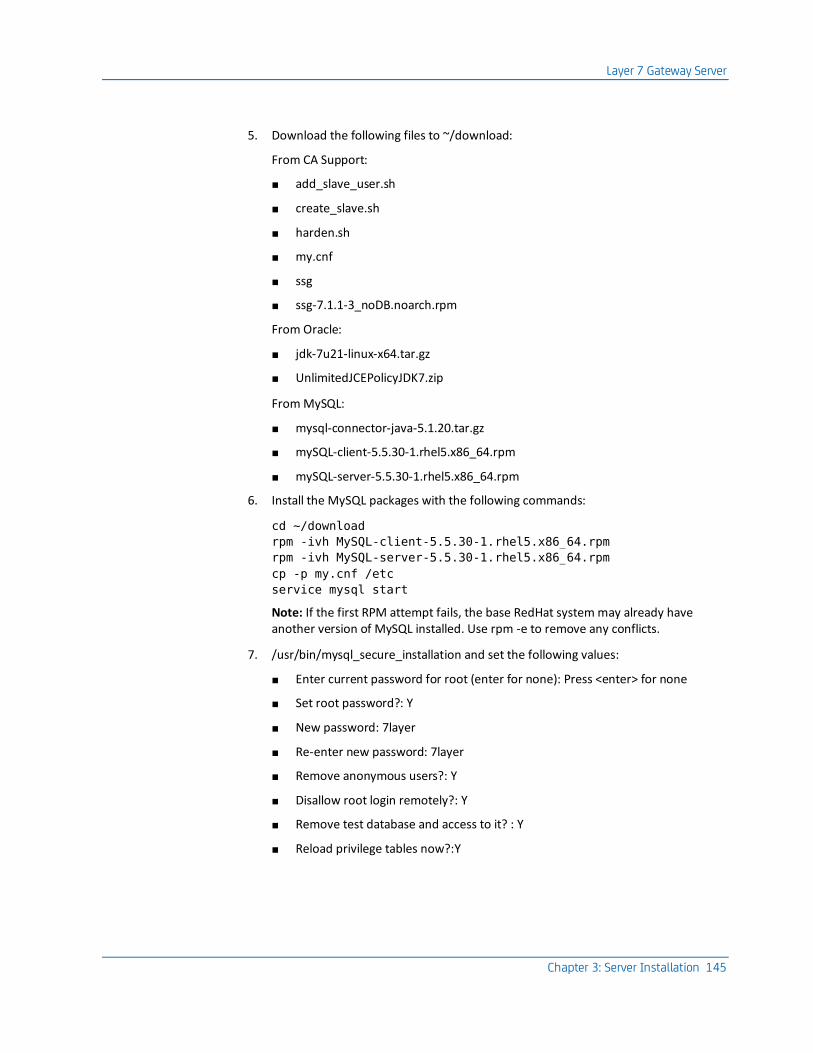
Layer 7 Gateway Server
Chapter 3: Server Installation 145
5. Download the following files to ~/download:
From CA Support:
■ add_slave_user.sh
■ create_slave.sh
■ harden.sh
■ my.cnf
■ ssg
■ ssg-7.1.1-3_noDB.noarch.rpm
From Oracle:
■ jdk-7u21-linux-x64.tar.gz
■ UnlimitedJCEPolicyJDK7.zip
From MySQL:
■ mysql-connector-java-5.1.20.tar.gz
■ mySQL-client-5.5.30-1.rhel5.x86_64.rpm
■ mySQL-server-5.5.30-1.rhel5.x86_64.rpm
6. Install the MySQL packages with the following commands:
cd ~/download
rpm -ivh MySQL-client-5.5.30-1.rhel5.x86_64.rpm
rpm -ivh MySQL-server-5.5.30-1.rhel5.x86_64.rpm
cp -p my.cnf /etc
service mysql start
Note: If the first RPM attempt fails, the base RedHat system may already have another version of MySQL installed. Use rpm -e to remove any conflicts.
7. /usr/bin/mysql_secure_installation and set the following values:
■ Enter current password for root (enter for none): Press <enter> for none
■ Set root password?: Y
■ New password: 7layer
■ Re-enter new password: 7layer
■ Remove anonymous users?: Y
■ Disallow root login remotely?: Y
■ Remove test database and access to it? : Y
■ Reload privilege tables now?:Y
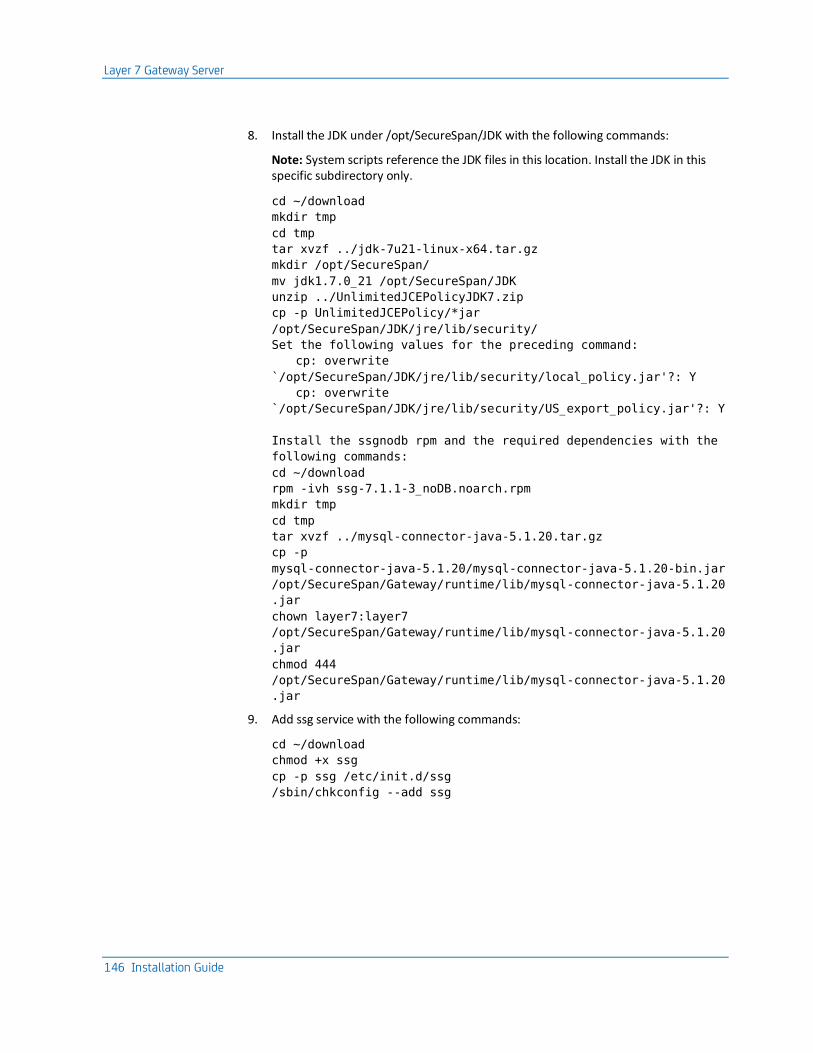
Layer 7 Gateway Server
146 Installation Guide
8. Install the JDK under /opt/SecureSpan/JDK with the following commands:
Note: System scripts reference the JDK files in this location. Install the JDK in this specific subdirectory only.
cd ~/download
mkdir tmp
cd tmp
tar xvzf ../jdk-7u21-linux-x64.tar.gz
mkdir /opt/SecureSpan/
mv jdk1.7.0_21 /opt/SecureSpan/JDK
unzip ../UnlimitedJCEPolicyJDK7.zip
cp -p UnlimitedJCEPolicy/*jar
/opt/SecureSpan/JDK/jre/lib/security/
Set the following values for the preceding command:
cp: overwrite
`/opt/SecureSpan/JDK/jre/lib/security/local_policy.jar'?: Y
cp: overwrite
`/opt/SecureSpan/JDK/jre/lib/security/US_export_policy.jar'?: Y
Install the ssgnodb rpm and the required dependencies with the
following commands:
cd ~/download
rpm -ivh ssg-7.1.1-3_noDB.noarch.rpm
mkdir tmp
cd tmp
tar xvzf ../mysql-connector-java-5.1.20.tar.gz
cp -p
mysql-connector-java-5.1.20/mysql-connector-java-5.1.20-bin.jar
/opt/SecureSpan/Gateway/runtime/lib/mysql-connector-java-5.1.20
.jar
chown layer7:layer7
/opt/SecureSpan/Gateway/runtime/lib/mysql-connector-java-5.1.20
.jar
chmod 444
/opt/SecureSpan/Gateway/runtime/lib/mysql-connector-java-5.1.20
.jar
9. Add ssg service with the following commands:
cd ~/download
chmod +x ssg
cp -p ssg /etc/init.d/ssg
/sbin/chkconfig --add ssg
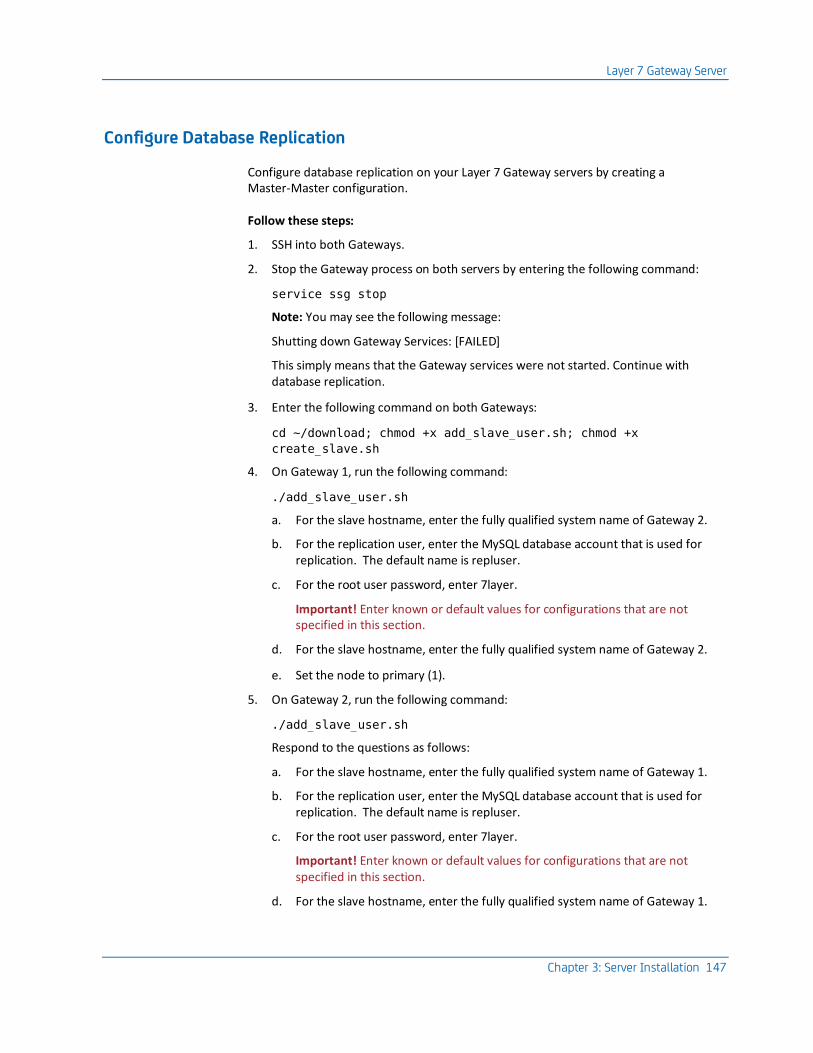
Layer 7 Gateway Server
Chapter 3: Server Installation 147
Configure Database Replication
Configure database replication on your Layer 7 Gateway servers by creating a Master-Master configuration.
Follow these steps:
1. SSH into both Gateways.
2. Stop the Gateway process on both servers by entering the following command:
service ssg stop
Note: You may see the following message:
Shutting down Gateway Services: [FAILED]
This simply means that the Gateway services were not started. Continue with database replication.
3. Enter the following command on both Gateways:
cd ~/download; chmod +x add_slave_user.sh; chmod +x
create_slave.sh
4. On Gateway 1, run the following command:
./add_slave_user.sh
a. For the slave hostname, enter the fully qualified system name of Gateway 2.
b. For the replication user, enter the MySQL database account that is used for replication. The default name is repluser.
c. For the root user password, enter 7layer.
Important! Enter known or default values for configurations that are not specified in this section.
d. For the slave hostname, enter the fully qualified system name of Gateway 2.
e. Set the node to primary (1).
5. On Gateway 2, run the following command:
./add_slave_user.sh
Respond to the questions as follows:
a. For the slave hostname, enter the fully qualified system name of Gateway 1.
b. For the replication user, enter the MySQL database account that is used for replication. The default name is repluser.
c. For the root user password, enter 7layer.
Important! Enter known or default values for configurations that are not specified in this section.
d. For the slave hostname, enter the fully qualified system name of Gateway 1.

Layer 7 Gateway Server
148 Installation Guide
e. Set the node to secondary (2).
6. On Gateway 1, run the following command:
./create_slave.sh
Note: This script uses port 3306. If required, change the port to 3307.
a. For the replication user, enter the MySQL database account that is used for replication. The default name is repluser.
b. Enter the hostname of Gateway 2 for MASTER
Important! Do not clone the database.
7. On Gateway 2, run the following command:
./create_slave.sh
Note: This script uses port 3306. If required, change the port to 3307.
a. For the replication user, enter the MySQL database account that is used for replication. The default name is repluser.
b. Enter the hostname of Gateway 1 for MASTER.
Important! Do not clone the database.
8. Verify replication with the following command:
mysql -p -e "show slave status\G"
Note: -p is required to prompt for root password.
Enter 7layer for the password.
■ For Gateway 1, MASTER is Gateway 2.
■ For Gateway 2, MASTER is Gateway 1.
Create an Internal Database
In a clustered configuration, you create an internal database on only Gateway 1. This database is replicated automatically to Gateway 2. The Gateway 1 database is the primary, while the Gateway 2 database is used for failover.
Follow these steps:
1. On Gateway 1, enter the following commands:
/opt/SecureSpan/Gateway/runtime/bin/setup.sh --jdk
/opt/SecureSpan/JDK
2. Select 2 Configure the Layer 7 Gateway.
3. Press Enter to accept the default Java VM Path.
4. Press Enter to accept the Java VM Memory Allocation [512].
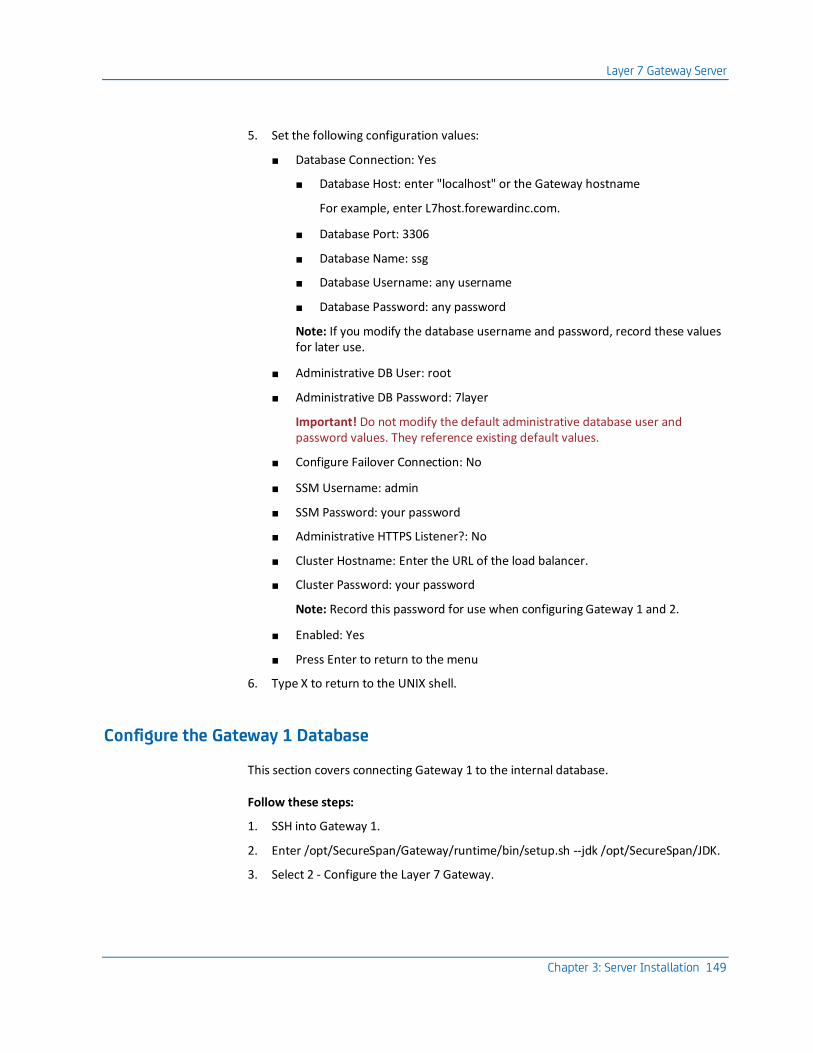
Layer 7 Gateway Server
Chapter 3: Server Installation 149
5. Set the following configuration values:
■ Database Connection: Yes
■ Database Host: enter "localhost" or the Gateway hostname
For example, enter L7host.forewardinc.com.
■ Database Port: 3306
■ Database Name: ssg
■ Database Username: any username
■ Database Password: any password
Note: If you modify the database username and password, record these values for later use.
■ Administrative DB User: root
■ Administrative DB Password: 7layer
Important! Do not modify the default administrative database user and password values. They reference existing default values.
■ Configure Failover Connection: No
■ SSM Username: admin
■ SSM Password: your password
■ Administrative HTTPS Listener?: No
■ Cluster Hostname: Enter the URL of the load balancer.
■ Cluster Password: your password
Note: Record this password for use when configuring Gateway 1 and 2.
■ Enabled: Yes
■ Press Enter to return to the menu
6. Type X to return to the UNIX shell.
Configure the Gateway 1 Database
This section covers connecting Gateway 1 to the internal database.
Follow these steps:
1. SSH into Gateway 1.
2. Enter /opt/SecureSpan/Gateway/runtime/bin/setup.sh --jdk /opt/SecureSpan/JDK.
3. Select 2 - Configure the Layer 7 Gateway.
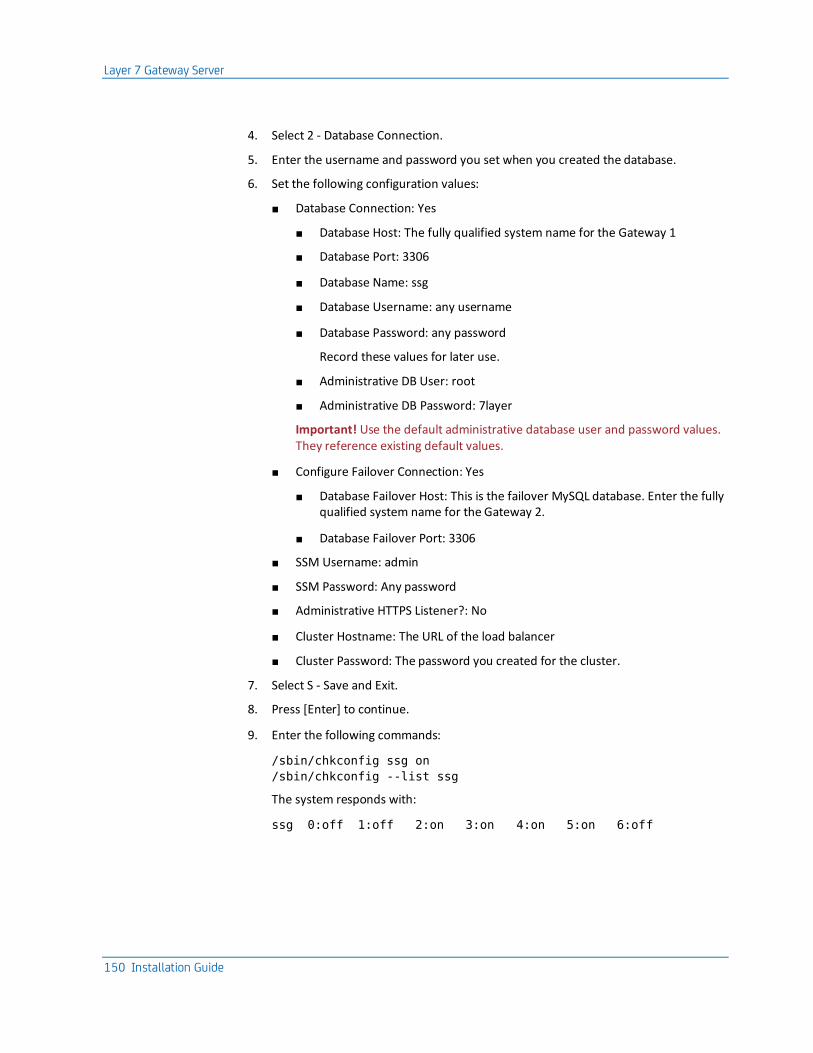
Layer 7 Gateway Server
150 Installation Guide
4. Select 2 - Database Connection.
5. Enter the username and password you set when you created the database.
6. Set the following configuration values:
■ Database Connection: Yes
■ Database Host: The fully qualified system name for the Gateway 1
■ Database Port: 3306
■ Database Name: ssg
■ Database Username: any username
■ Database Password: any password
Record these values for later use.
■ Administrative DB User: root
■ Administrative DB Password: 7layer
Important! Use the default administrative database user and password values. They reference existing default values.
■ Configure Failover Connection: Yes
■ Database Failover Host: This is the failover MySQL database. Enter the fully qualified system name for the Gateway 2.
■ Database Failover Port: 3306
■ SSM Username: admin
■ SSM Password: Any password
■ Administrative HTTPS Listener?: No
■ Cluster Hostname: The URL of the load balancer
■ Cluster Password: The password you created for the cluster.
7. Select S - Save and Exit.
8. Press [Enter] to continue.
9. Enter the following commands:
/sbin/chkconfig ssg on
/sbin/chkconfig --list ssg
The system responds with:
ssg 0:off 1:off 2:on 3:on 4:on 5:on 6:off
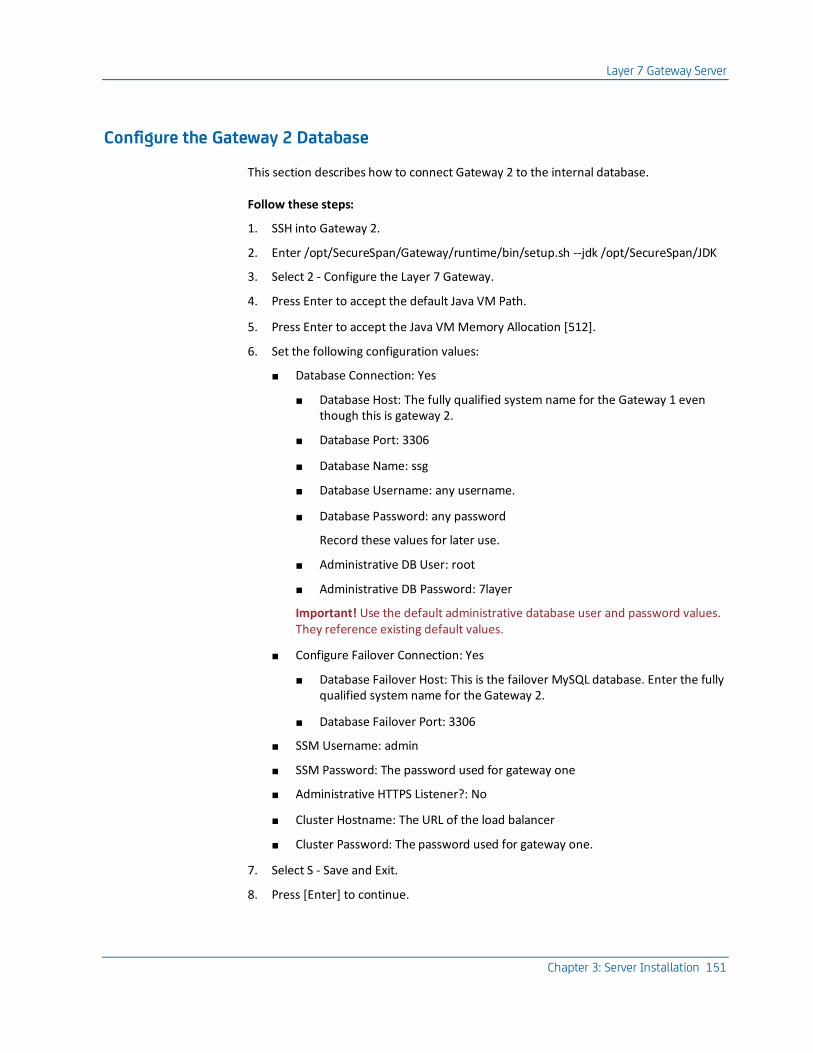
Layer 7 Gateway Server
Chapter 3: Server Installation 151
Configure the Gateway 2 Database
This section describes how to connect Gateway 2 to the internal database.
Follow these steps:
1. SSH into Gateway 2.
2. Enter /opt/SecureSpan/Gateway/runtime/bin/setup.sh --jdk /opt/SecureSpan/JDK
3. Select 2 - Configure the Layer 7 Gateway.
4. Press Enter to accept the default Java VM Path.
5. Press Enter to accept the Java VM Memory Allocation [512].
6. Set the following configuration values:
■ Database Connection: Yes
■ Database Host: The fully qualified system name for the Gateway 1 even though this is gateway 2.
■ Database Port: 3306
■ Database Name: ssg
■ Database Username: any username.
■ Database Password: any password
Record these values for later use.
■ Administrative DB User: root
■ Administrative DB Password: 7layer
Important! Use the default administrative database user and password values. They reference existing default values.
■ Configure Failover Connection: Yes
■ Database Failover Host: This is the failover MySQL database. Enter the fully qualified system name for the Gateway 2.
■ Database Failover Port: 3306
■ SSM Username: admin
■ SSM Password: The password used for gateway one
■ Administrative HTTPS Listener?: No
■ Cluster Hostname: The URL of the load balancer
■ Cluster Password: The password used for gateway one.
7. Select S - Save and Exit.
8. Press [Enter] to continue.
Layer 7 Gateway Server
152 Installation Guide
9. Enter the following commands:
/sbin/chkconfig ssg on
/sbin/chkconfig --list ssg
The system responds with:
ssg 0:off 1:off 2:on 3:on 4:on 5:on 6:off
Reboot Both Gateways
Reboot both Gateways by running the following command on both machines:
synch;synch;reboot
Harden the Gateway Servers
This section describes how to harden the Gateways. Perform the steps and commands on both systems.
Follow these steps:
1. SSH into the Gateway server as root user and enter the following commands:
useradd -m ssgconfig
passwd ssgconfig
Provide the password of your choice for the user ssgconfig.
cd ~/download
chmod +x harden.sh
cp -p harden.sh ~/harden.sh
cd ~
./harden.sh -h vmware
2. If ./harden.sh -h vmware fails, review error messages and manually resolve any conflicts. For example, you may need to run the following commands:
yum erase subscription-manager
yum erase yum-updatesd
yum erase yum-security
yum erase rhn-client-tools
echo "SINGLE=/sbin/sulogin" >> /etc/sysconfig/init
3. Review ~/harden.sh.log for hardening results, manually resolve conflicts, and re-run the hardening process as needed.
Once the harden.sh script has been run successfully, you can no longer log in as root. If you wish to gain root access to the system, log in as user ssconfig and run the su command to change your login ID to root. Typically, you must run the harden.sh script multiple times even if the script shows no error messages upon execution.
Layer 7 Gateway Server
Chapter 3: Server Installation 153
Install the PostgreSQL JDBC Driver
If any tenant OTK/OIDC database are PostgreSQL-driven, use this procedure on all Gateways in the cluster.
Follow these steps:
1. Connect with SSH.
2. Stop the service by running the following command:
service ssg stop
3. Install the JDBC driver by running the following commands:
cp postgresql-9.3-1100.jdbc41.jar
/opt/SecureSpan/Gateway/runtime/lib/ext/.
chown layer7:layer7
/opt/SecureSpan/Gateway/runtime/lib/ext/postgresql-9.3-1100.jdb
c41.jar
4. Expose the JDBC driver to the Gateway by modifying system properties. Edit this file:
/opt/SecureSpan/Gateway/node/default/etc/conf/system.properties
5. Add this line:
com.l7tech.server.jdbcDriver=com.mysql.jdbc.Driver\ncom.l7tech.
jdbc.mysql.MySQLDriver\
ncom.l7tech.jdbc.db2.DB2Driver\ncom.l7tech.jdbc.oracle.OracleDr
iver\
ncom.l7tech.jdbc.sqlserver.SQLServerDriver\norg.postgresql.Driv
er
6. Save and exit.
7. Start the service by running the following command:
service ssg start

Layer 7 Gateway Server
154 Installation Guide
Install Mobile Access Gateways (MAG) and Siteminder Assertion Packages
The steps for this procedure are different on the two Gateways of your high-availability deployment. Follow the instructions carefully.
On Gateway 1:
1. Connect with SSH.
2. Run the following commands:
■ service ssg stop
■ rpm -Uvh --nodeps ssg-mag-cloudminder_1.51-2.0-3.noarch.rpm
■ rpm -Uvh ssg-sm12-7.0-1.x86_64.rpm
3. Register the agent by running the following commands:
■ cd /opt/SecureSpan/siteminder/bin/
■ ./smreghost.sh -i <SITEMINDER-IP> -u <SITEMINDER-USER> -p <SITEMINDER-PASS> -hn <CLUSTER-HOSTNAME> -hc <SITEMINDER-CONFIG-SETTING> -cf <SITEMINDER-FIPS-MODE>
Note: The SiteMinder values refer to the existing SiteMinder deployment for this environment.
This command builds the SmHost.conf file.
An example of this command is as follows:
./smreghost.sh -i SMPSVIP -u siteminder -p <pwd> -hn layer7 -hc DefaultHostSettings -cf COMPAT
4. Restart the service by running the following command:
service ssg start
On Gateway 2:
1. Connect with SSH.
2. Run the following commands:
■ service ssg stop
■ rpm -Uvh --nodeps ssg-mag-2.0-1-cloudminder.noarch.rpm
■ rpm -Uvh ssg-mag-cloudminder_1.51-2.0-3.noarch.rpm
3. Restart the service by running the following command:
service ssg start
After installing the MAG and SiteMinder assertion packages, perform the remaining configuration steps on Gateway one only. No further configuration is necessary on Gateway 2.
Layer 7 Gateway Server
Chapter 3: Server Installation 155
Install the Layer 7 License File
Note: In a high-availability environment where you have installed two gateways, perform these steps on Gateway 1 only.
Upon initial login to the Gateway, the Layer 7 Policy Manager prompts you to install your license file.
Follow these steps:
1. Navigate to the Layer 7 Policy Manager web interface at the following URL:
https://<GATEWAY_ONE_HOSTNAME>:8443/ssg/webadmin
2. Log in using the credentials you created during installation for the Gateway admin user.
These are the credentials you entered for SSM username and SSM password.
Note: The Gateway includes a login security feature to prevent unauthorized access. After several failed login attempts, the system locks. After 20 minutes, the lockout timer expires and you may attempt login again.
The Cluster License window appears.
3. Click Install License.
4. Navigate to the location where you unpacked the Layer 7 tarball and select the following license file:
CA_Cloudminder_MSP_SSGv7_5yr.xml
5. Click I Agree to start the license installation.
The Cluster License window reappears.
Note: Installation is proceeding at this time. The system may seem unresponsive for several minutes while the installation completes. Do not attempt to interact with the system until installation is confirmed.
6. Verify that the license is valid and close the window.
Import the Certificate for the Gateway
Note: In a high-availability environment where you have installed two gateways, perform these steps on Gateway 1 only.
Import the digital certificate for the Layer 7 Gateway.
Follow these steps:
1. Select Manage, then Manage Certificates.
2. Click Add.
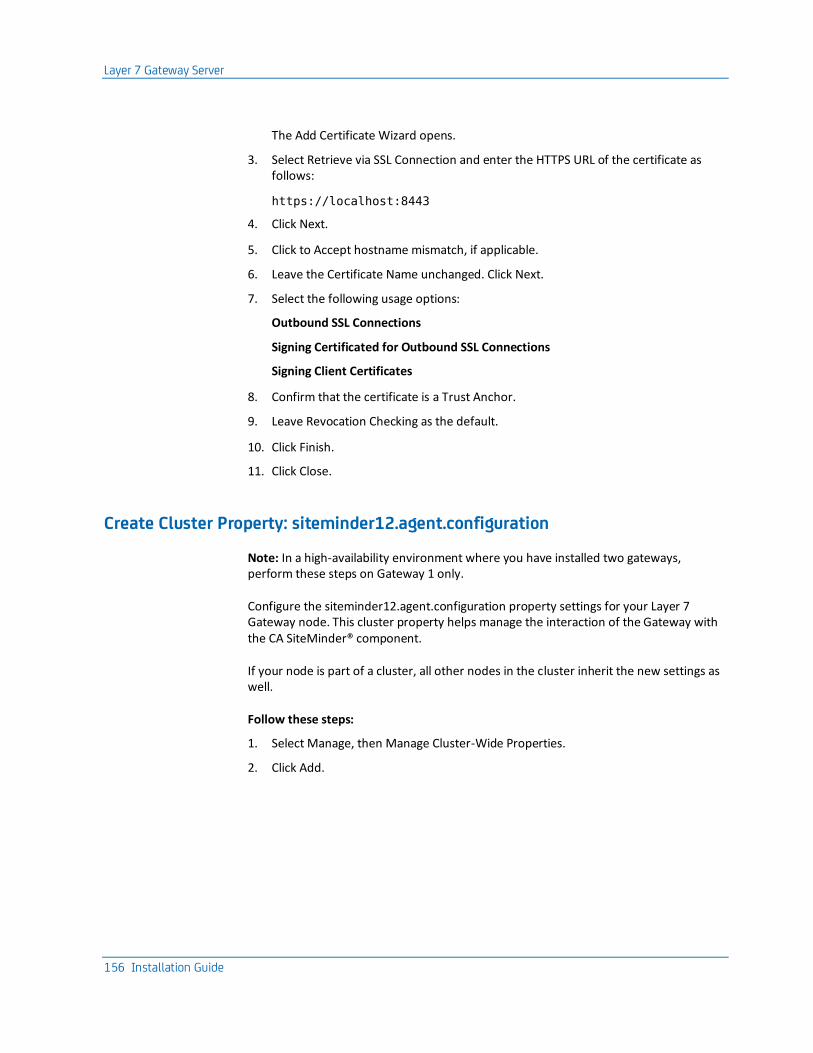
Layer 7 Gateway Server
156 Installation Guide
The Add Certificate Wizard opens.
3. Select Retrieve via SSL Connection and enter the HTTPS URL of the certificate as follows:
https://localhost:8443
4. Click Next.
5. Click to Accept hostname mismatch, if applicable.
6. Leave the Certificate Name unchanged. Click Next.
7. Select the following usage options:
Outbound SSL Connections
Signing Certificated for Outbound SSL Connections
Signing Client Certificates
8. Confirm that the certificate is a Trust Anchor.
9. Leave Revocation Checking as the default.
10. Click Finish.
11. Click Close.
Create Cluster Property: siteminder12.agent.configuration
Note: In a high-availability environment where you have installed two gateways, perform these steps on Gateway 1 only.
Configure the siteminder12.agent.configuration property settings for your Layer 7 Gateway node. This cluster property helps manage the interaction of the Gateway with the CA SiteMinder® component.
If your node is part of a cluster, all other nodes in the cluster inherit the new settings as well.
Follow these steps:
1. Select Manage, then Manage Cluster-Wide Properties.
2. Click Add.
Layer 7 Gateway Server
Chapter 3: Server Installation 157
3. In the Key field, enter:
siteminder12.agent.configuration
4. Navigate to the Layer 7 Gateway tarball and locate the following file in a text editor:
siteminder12.agent.configuration.txt
5. Save a copy of this file. Rename the copy to reflect the name of the tenant for which you are configuring OAuth. For example:
siteminder12.agent.configuration.forwardinc.txt
6. Open the file in a text editor.
7. Navigate to the following file:
SmHost.conf
Note: The SmHost.conf file is found in the same location as the smreghost script. The smreghost script runs during installation and creates the SmHost.conf file. You can find it on Gateway 1 in /opt/SecureSpan/siteminder/bin.
8. Open the file in a text editor.
9. In the SiteMinder agent configuration file, perform the following operations:
a. Replace <SITEMINDER-AGENT> with the configured Agent ID from SiteMinder.
This is the agent associated with all realms.
b. Replace <SITEMINDER-IP> with the VIP or host name for the CA SiteMinder® Policy Server listed in SmHost.conf.
c. Replace <SITEMINDER-SECRET> with the secret listed in SmHost.conf.
Copy and paste the secret, excluding the quotation marks (").
d. Replace <SITEMINDER-FIPSMODE> with the FIPS mode listed in SmHost.conf.
e. Replace <CLUSTER-HOSTNAME> with the host name listed in SmHost.conf.
f. If required, modify other parameters. If not, leave the parameters as the default values.
Note: The agent.ipcheck parameter must remain set to True.
g. Save the SiteMinder agent configuration file, then copy the contents of the file to your clipboard.
10. In the Policy Manager, in the Value field for the siteminder12.agent.configuration property, paste the updated contents of the siteminder12.agent.configuration.txt file.
11. Click Ok.
Layer 7 Gateway Server
158 Installation Guide
Create Cluster Property: token.salt
Note: In a high-availability environment where you have installed two gateways, perform these steps on Gateway 1 only.
Configure the token.salt property settings for your Layer 7 Gateway node. If your node is part of a cluster, all other nodes in the cluster inherit the new settings as well.
Salt enhances the security of the token store. It is a random string that the system uses to encrypt the token store.
Follow these steps:
1. Select Manage, then Manage Cluster-Wide Properties.
2. Examine the list of properties. If token.salt already exists, skip the remainder of this process.
If the property does not already exist, click Add.
3. In the Key field, enter:
token.salt
4. In the Value field, enter a random string that acts as salt for the token store. Generate a random string by running the following on the command line:
openssl rand -base64 32
5. Copy the output and paste it into the Value field.
6. Click Ok.
Restart Gateways
To complete the Layer 7 Gateway installation, restart the service on both Gateways by running the following command:
service ssg start
You have now completed the Layer 7 Gateway installation.
The Layer 7 Gateway is used to enable CloudMinder to act as an OAuth Authorization Server for an OAuth client. For example, if a tenant wants their users to access an OAuth client application through single sign-on, you can configure CloudMinder to validate the request for user authorization. Perform the necessary configuration for each tenant and each OAuth client application by following the steps in SSO with CloudMinder as an OAuth Authorization Server.
Layer 7 Gateway Server
Chapter 3: Server Installation 159
Steps to Address OAuth Security Vulnerability
A Gateway with OAuth installed may be vulnerable to unauthorized access due to the following issues:
■ OAuth SAML token grant type does not check signer of bearer token
■ OAuth validation and storage endpoints do not validate TLS client certificate
Important! No known exploitations of this vulnerability have occurred at sites running the affected software.
Note: OAuth policies may be vulnerable if the SAML token grant type policy branches are present, regardless of whether they are actually used.
Affected Product Versions
Important! CA CloudMinder 1.5x must be considered affected by this vulnerability.
All currently released versions of the OAuth Toolkit and CA Mobile API Gateway are affected:
■ OAuth Toolkit installed by CA API Gateway versions before 8.2
■ MAG Policies installed by CA Mobile API Gateway versions before 2.2
CA CloudMinder1.5x uses a Gateway version 7.1 with MAG version 2.0.1.
Solution
A two-part solution exists, involving the following components:
■ OAuth SAML Token Grant Type
■ Validation with Storage Endpoints
OAuth SAML Token Grant Type
The Gateway in CA CloudMinder 1.5x does not utilize the SAML grant type. Therefore, you add a "Stop Processing" assertion at the top of a specific policy to ensure that the vulnerable policy branch is never successfully executed.
Perform the following steps for each tenant:
1. In the Gateway Policy Manager or webadmin, open the policy that is named: <PREFIX> MAG-<version>/Policy Fragments/grant_types/OTK grant_type=SAML
2. Disable support for the SAML Token grant type by inserting a "Stop Processing" assertion at the top of the policy.
3. Save and activate the changes.
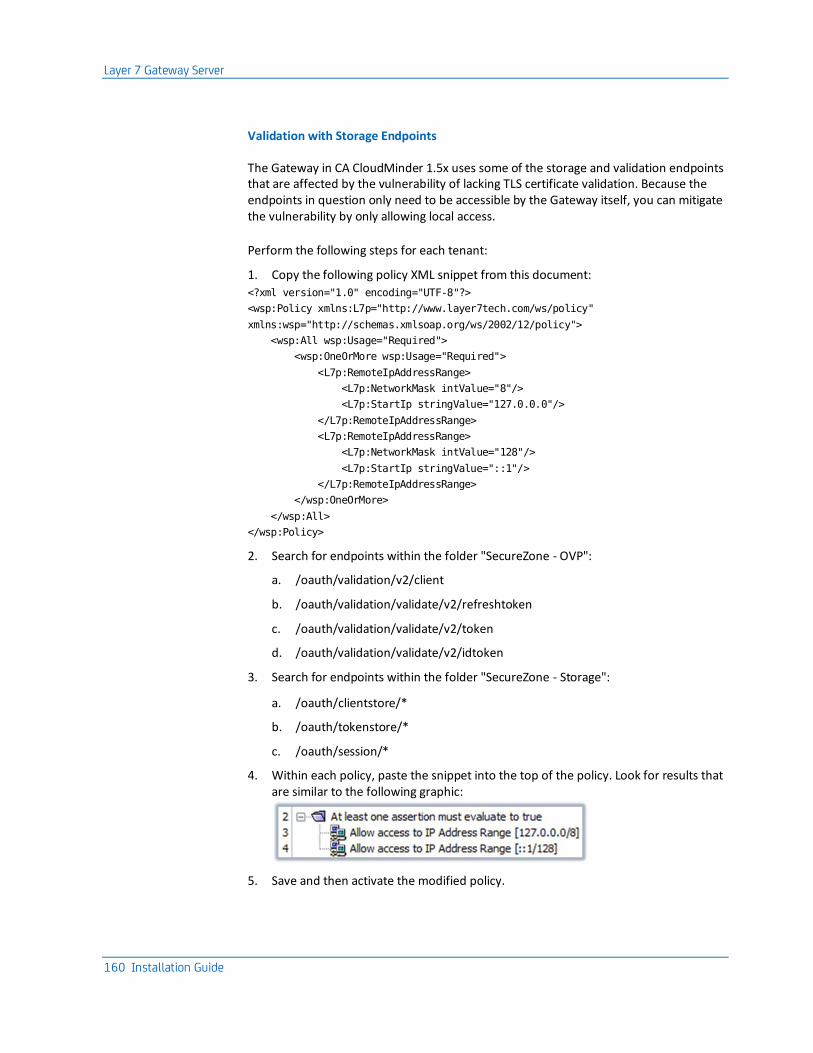
Layer 7 Gateway Server
160 Installation Guide
Validation with Storage Endpoints
The Gateway in CA CloudMinder 1.5x uses some of the storage and validation endpoints that are affected by the vulnerability of lacking TLS certificate validation. Because the endpoints in question only need to be accessible by the Gateway itself, you can mitigate the vulnerability by only allowing local access.
Perform the following steps for each tenant:
1. Copy the following policy XML snippet from this document:
<?xml version="1.0" encoding="UTF-8"?>
<wsp:Policy xmlns:L7p="http://www.layer7tech.com/ws/policy"
xmlns:wsp="http://schemas.xmlsoap.org/ws/2002/12/policy">
<wsp:All wsp:Usage="Required">
<wsp:OneOrMore wsp:Usage="Required">
<L7p:RemoteIpAddressRange>
<L7p:NetworkMask intValue="8"/>
<L7p:StartIp stringValue="127.0.0.0"/>
</L7p:RemoteIpAddressRange>
<L7p:RemoteIpAddressRange>
<L7p:NetworkMask intValue="128"/>
<L7p:StartIp stringValue="::1"/>
</L7p:RemoteIpAddressRange>
</wsp:OneOrMore>
</wsp:All>
</wsp:Policy>
2. Search for endpoints within the folder "SecureZone - OVP":
a. /oauth/validation/v2/client
b. /oauth/validation/validate/v2/refreshtoken
c. /oauth/validation/validate/v2/token
d. /oauth/validation/validate/v2/idtoken
3. Search for endpoints within the folder "SecureZone - Storage":
a. /oauth/clientstore/*
b. /oauth/tokenstore/*
c. /oauth/session/*
4. Within each policy, paste the snippet into the top of the policy. Look for results that are similar to the following graphic:
5. Save and then activate the modified policy.
Chapter 4: Initial Configuration 161
Chapter 4: Initial Configuration
The procedures in this chapter apply after installation of all components but before tenant creation. Tenant creation and management is described in the Administration Guide.
This section contains the following topics:
Server Configuration (see page 162) High Availability: Load Balancing (see page 164) High-Availability: Network Peers for Connector Servers (see page 170) Password Synchronization (see page 172) Maximum Number of Tenants (see page 173)

Server Configuration
162 Installation Guide
Server Configuration
Follow these steps after you have installed all components and you have confirmed that all servers are running.
Follow these steps:
1. For high-availability deployments, perform these steps on the second SiteMinder Policy Server system only:
a. Edit the following file:
/opt/CA/AdvancedAuth/conf/arcotcommon.ini
b. Search for InstanceId=1
c. Change the line to InstanceId=2
2. On all SiteMinder Policy Servers, restart Tomcat as follows:
a. Navigate to /opt/CA/AdvancedAuth/Tomcat/bin
b. (If Tomcat is already started) ./shutdown.sh
c. ./startup.sh
3. Bootstrap the AuthMinder/RiskMinder/Advanced Authentication UDS service:
a. Connect to http://<SiteMinder Policy Server>:9090/arcotadmin/mabamlogin.htm using the default password: master1234!
b. Change the default password to avoid any security loopholes.
c. Create a global administrator for use later for configurations that are currently unavailable from the CSP console.
Choose defaultorg as the organization and an appropriate username/password.
Select the global administrator role, and the following setting: manages all organizations.
Server Configuration
Chapter 4: Initial Configuration 163
d. Log out.
e. Start webfort and riskfort, if they are not currently running, using the following commands. In a high-availability deployment, start these servers on both SiteMinder Policy Server systems.
cd /opt/CA/AdvancedAuth/bin
./riskfortserver start
./webfortserver start
4. If you restarted the database in Step 1, restart webfort and riskfort on both SiteMinder Policy Servers:
cd /opt/CA/AdvancedAuth/bin
./riskfortserver stop
./webfortserver stop
./riskfortserver start
./webfortserver start
5. For each Identity Managementserver running JBoss EAP, perform these steps:
a. Edit the jmx-console-users.properties in this location:
/opt/boss-eap-5.1.2/jboss-as/server/all/conf/props/
b. Uncomment the "#admin=admin" line.
c. Restart each Identity Management server in this manner:
service im stop
service im start
6. If you installed a second policy server, set fix the CHS\TWS configuration as follows:
a. Edit the following file:
/opt/CA/AdvancedAuth/Tomcat/webapps/tenant-services/WEB-INF
/classes/resources/config.properties
Change IM_WEBSERVICE_HOST to the host of the second Identity Management server.
b. Restart Tomcat on the second policy server as follows:
/opt/CA/AdvancedAuth/Tomcat/bin/shutdown.sh
/opt/CA/AdvancedAuth/Tomcat/bin/startup.sh
7. On each Identity Management server rnnning JBoss EAP, perform these steps:
a. Restart each Identity Management server in this manner:
service im stop
service im start
b. Restart Tomcat on each policy server:
/opt/CA/AdvancedAuth/Tomcat/bin/shutdown.sh
/opt/CA/AdvancedAuth/Tomcat/bin/startup.sh
High Availability: Load Balancing
164 Installation Guide
High Availability: Load Balancing
To configure load balancing, make the following changes on each server.
Provisioning Servers
Create these VIPs/Pools on each server:
■ CA IAM CS Requests over port 22001 – Used to talk to on-premise CA IAM CS.
■ CA IAM CS over port 20080 – Used for accessing the Connector Server Admin console.
■ CA IAM CS over port 20410 – Used for configuring connxp for acquiring the endpoint required for Directory Sync.
■ CA IAM CS over port 20498 – Used for the Directory Sync from On-premise to Cloud.
SiteMinder Policy Server and Advanced Authentication
Make the following changes on each SiteMinder Policy Server.
Create these VIPs/Pools:
■ SiteMinder Policy Server over port 44441 – This is for the agent to communicate with the Policy Server
■ SiteMinder Policy Server over port 44442 - This is for the agent to communicate with the Policy Server
■ SiteMinder Policy Server over port 44443 - This is for the agent to communicate with the Policy Server
■ Authminder over port 9090 – Used for connecting to Arcot Admin Console
■ Authminder over port 9745 – Used by Authminder Admin Service
High Availability: Load Balancing
Chapter 4: Initial Configuration 165
■ Authminder over port 9742 – Used by Authminder server for issuance
■ Riskminder over port 7680 – Used by RiskMinder
Make the following file and configuration changes.
1. Log in to the Arcot Administration console as master admin.
a. Navigate to Services and Server Configurations, Administration Console, UDS Connectivity
b. Change the hostname from localhost to the internal host (SiteMinder Policy Server Load Balancer).
c. Refresh the caches of AuthMinder and RiskMinder (WebFort and RiskFort).
2. Edit /opt/CA/siteminder/arcot/conf/adaptershim.ini
a. For each authscheme entry, the following properties have the URL for end user browser redirects:
AuthSchemeParam, ArcotAFMLandingURL, ErrorPageURL, InitialFCCURL, FinalFCCURL
■ Replace all Secure Proxy Server hostnames with your Secure Proxy Server load balancer VIP in the URL.
■ Change http to https.
b. For each authscheme entry, the following properties have the URL for internal calls:
ArcotSMBaseURL
■ Replace all localhost with your SiteMinder Policy Server load balancer VIP.
■ Do not change http.
3. Edit /opt/CA/AdvancedAuth/Tomcat/webapps/tenant-services/WEB-INF/classes/resources/config.properties
■ Replace the internal Identity Management base URL with the Identity Management load balancer, as follows:
imBaseURL=http://<Identity Management load balancer VIP>:8080/iam/im
4. Copy the Secure Proxy Server load balancer SSL certificate and import it to the Java key store. Import it to the Java key store that is used by Tomcat.
Make these changes to the Advanced Authentication database:
1. In the table AOK_SYSTEM_DATA
a. Change com.ca.cm.sso.ShimTokenServer to your SiteMinder Policy Server load balancer VIP
b. Change com.ca.cm.uds to your SiteMinder Policy Server load balancer VIP
c. Change webfort to your SiteMinder Policy Server load balancer VIP
High Availability: Load Balancing
166 Installation Guide
2. In the table AOK_OVERLOADED_PROPS
a. Change tws.base.url to http://<SMPS LB VIP>:9090/tenant-services/cm/tenantws
3. Restart the SiteMinder Policy Server, Tomcat, and the Secure Policy Server.
Secure Proxy Server
Make the following changes on each Secure Proxy Server.
Create these VIPs/Pools:
Secure Proxy Server over port 443 with offload to port 80 on Secure Proxy Server – used for all communication through Secure Proxy Server.
Make the following file and configuration changes.
1. Edit /opt/CA/secure-proxy/proxy-engine/conf/server.conf
Add your Secure Proxy Server Load Balancer VIP with the domain to the hostnames under VirtualHost section
2. Edit /opt/CA/secure-proxy/proxy-engine/conf/proxyrules.xml
a. Change the Identity Management Server hostname to your Identity Management Server Load Balancer VIP
b. Change CA IAM CS hostname with port 20080 to your CA IAM CS Admin Load Balancer VIP
c. Change CA IAM CS hostname with port 20001 to your CA IAM CS Request Load Balancer VIP
3. Edit /opt/CA/secure-proxy/Tomcat/webapps//chs/WEB-INF/classes/config/chsConfig.properties
Change tenantwebservicebaseurl=http://SiteMinder Policy Server LB VIP:9090/tenant-services/cm/tenantws
4. Edit /opt/CA/secure-proxy/proxy-engine/conf/defaultagent/SmHost.conf
Change policyserver="SiteMinder Policy Server Load Balancer VIP,44441,44441,44441"
High Availability: Load Balancing
Chapter 4: Initial Configuration 167
5. Copy the Secure Proxy Server Load Balancer VIP SSL certificate and import it to the Java key store. Import it to the Java key store that is used by Tomcat.
Use the command: keytool -import -alias <any name> -keystore cacerts -file <certificate file>
6. Edit /opt/CA/secure-proxy/Tomcat/properties/instance.properties
The value of the property service.host should be the internal host (SiteMinder Policy Server Load Balancer)
7. Restart the Secure Proxy Server.
Identity Management Server
Make these changes on each Identity Management Server.
Create these VIPs/Pools on each server:
Identity Management Server over port 8080 - used for communicating with the Identity Management Server
Make the following file and configuration changes.
1. Edit /opt/jboss-5.1.0.GA/server/all/deploy/iam_im.ear/policyserver.rar/META-INF/ra.xml
Change <config-property-value>Secure Proxy Server Load Balancing VIP,44441,44441,44441</config-property-value>
2. Restart the Identity Management server by running the following commands:
/etc/init.d im stop
/etc/init.d/im start
3. If you have deployed any tenants, modify the Advanced Authentication Connection for the tenant:
a. Log in to the User Console.
b. Go to Advanced Authenication, Configure AuthMinder Connection
High Availability: Load Balancing
168 Installation Guide
c. Change the AuthMinder Host Name to the VIP for the SiteMinder Policy Server
http://<SiteMinder Policy Server Load Balancer VIP>
CSP console
Be sure to make the following changes before creating any tenant:
1. In the CSP console navigate to Infrastructure, Hosts, Host Configuration Objects
2. Click DefaultHostSettings, then click Modify.
a. Under Configuration Values, delete all individual hosts.
b. Add your SiteMinder Policy Server Load Balancer VIP. Enter port 44441 for all port values.
c. Uncheck Enable Failover.
d. Click Submit.
3. Navigate to Tenants, Manage Hosting Containers.
4. From the drop-down menu, select Modify Hosting Container for your host.
a. Change Environment Base URL to https://<Secure Policy Server Load Balancer VIP>/iam/im
b. Change Internal Base URL to http://<Identity Management Load Balancer VIP>:8080/iam/im
High Availability: Load Balancing
Chapter 4: Initial Configuration 169
c. Change AuthMinder Host to http://<SiteMinder Policy Server Load Balancer VIP>
5. Configure Siteminder to use the load balancer IP address.
a. Click Infrastructure, Agent, Agent Configuration Objects.
b. Modify the AgentConfigurationObject being configured for the Secure Proxy Server.
c. Set the CustomIpHeader to HTTP_ORIGINAL_IP.
d. Click Save.
Configure SSL from Secure Proxy Server to Identity Management Load Balancer
Network traffic coming from Secure Proxy Server to the load balancer must use SSL. Traffic coming from the load balancer to Identity Management is non-SSL. Perform the following steps to configure this transform from SSL to non-SSL through the load balancer.
1. Create a new virtual server for SSL traffic, port 8443, and assign it to the same pool that was being used for port 8080 to Identity Management.
2. Create a certificate for the Identity Management VIP.
3. Create SSL profile (client). Use the certificate created in the load balancer for the Identity Management VIP.
4. Export the certificate from the Identity Management load balancer to all Secure Proxy Servers:
/opt/CA/secure-proxy/SSL/certs
5. Run the following command from the above location, on all Secure Proxy Servers:
openssl x509 -in IM_LB1-<Your VIP>.crt -text >> ca-bundle.cert
6. Edit the following file on all Secure Proxy Servers:
/opt/CA/secure-proxy/proxy-engine/conf/proxyrules.xml
Update the file to use port 8443 (rather than port 8080), and to use https (rather than http), as follows:
<nete:case value="/iam/im/">
<nete:forward>https://<Identity_Management_fully_qualified_domain_name>:8443$0</nete:forward>
7. Restart the Secure Proxy Server using startssl.
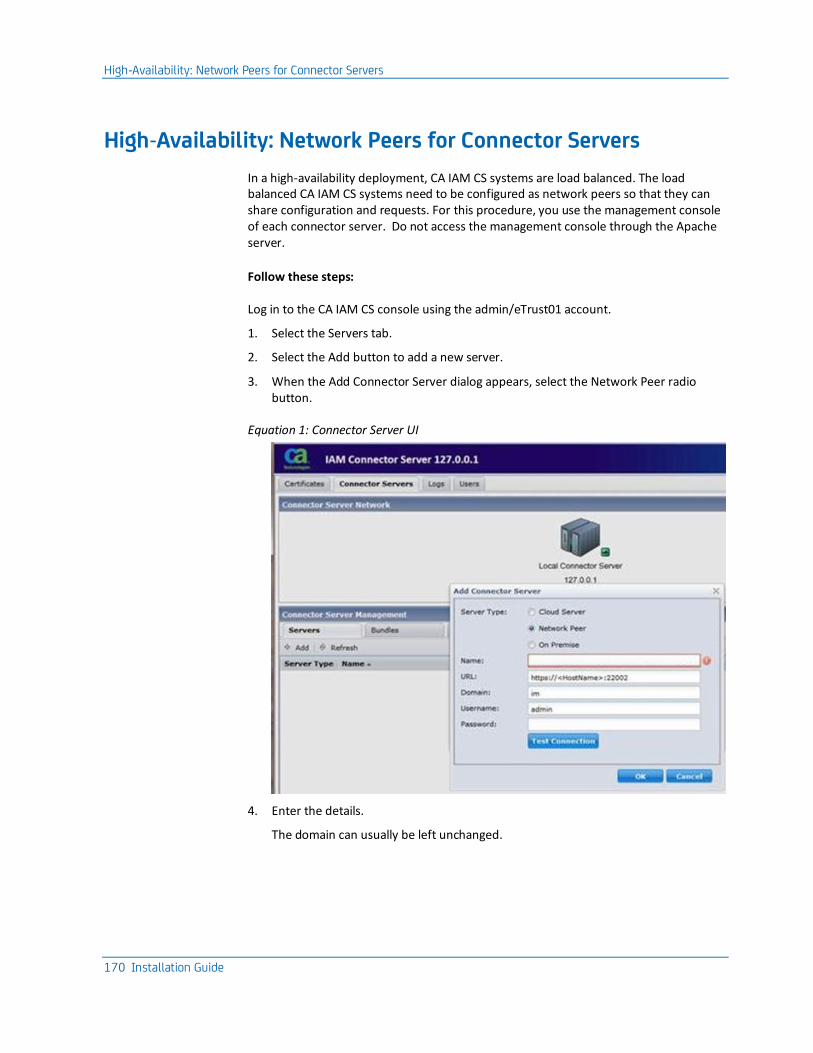
High-Availability: Network Peers for Connector Servers
170 Installation Guide
High-Availability: Network Peers for Connector Servers
In a high-availability deployment, CA IAM CS systems are load balanced. The load balanced CA IAM CS systems need to be configured as network peers so that they can share configuration and requests. For this procedure, you use the management console of each connector server. Do not access the management console through the Apache server.
Follow these steps:
Log in to the CA IAM CS console using the admin/eTrust01 account.
1. Select the Servers tab.
2. Select the Add button to add a new server.
3. When the Add Connector Server dialog appears, select the Network Peer radio button.
Equation 1: Connector Server UI
4. Enter the details.
The domain can usually be left unchanged.
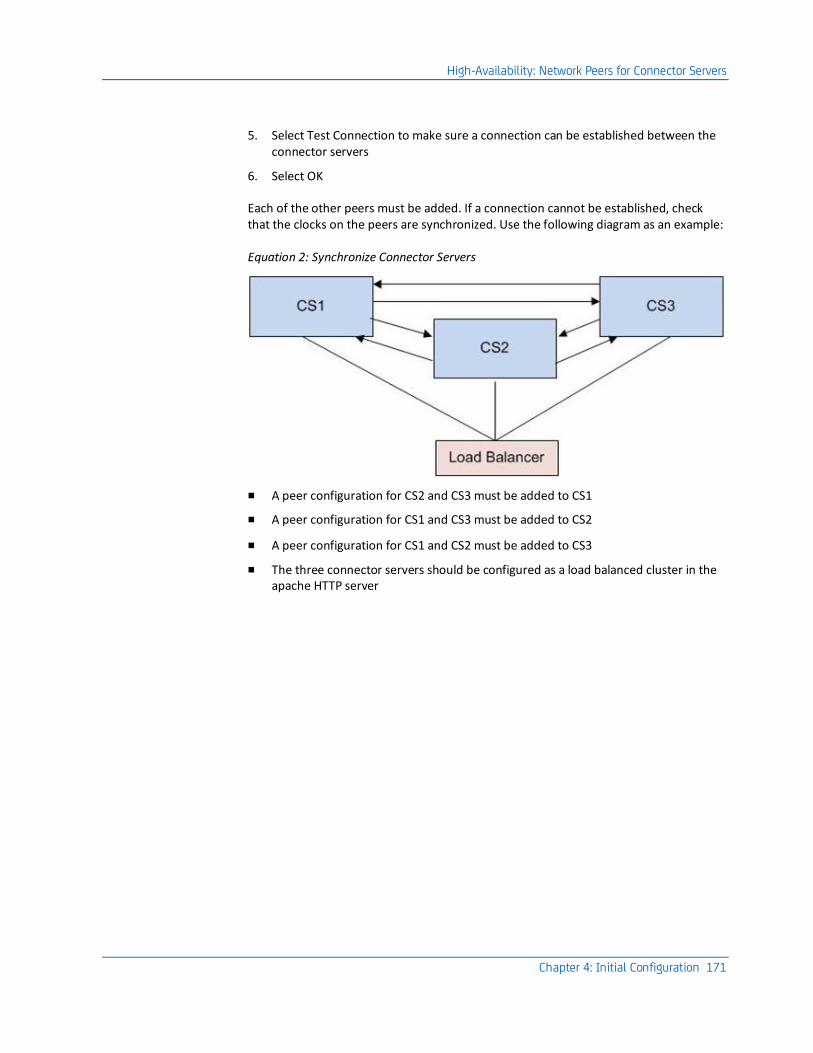
High-Availability: Network Peers for Connector Servers
Chapter 4: Initial Configuration 171
5. Select Test Connection to make sure a connection can be established between the connector servers
6. Select OK
Each of the other peers must be added. If a connection cannot be established, check that the clocks on the peers are synchronized. Use the following diagram as an example:
Equation 2: Synchronize Connector Servers
■ A peer configuration for CS2 and CS3 must be added to CS1
■ A peer configuration for CS1 and CS3 must be added to CS2
■ A peer configuration for CS1 and CS2 must be added to CS3
■ The three connector servers should be configured as a load balanced cluster in the apache HTTP server
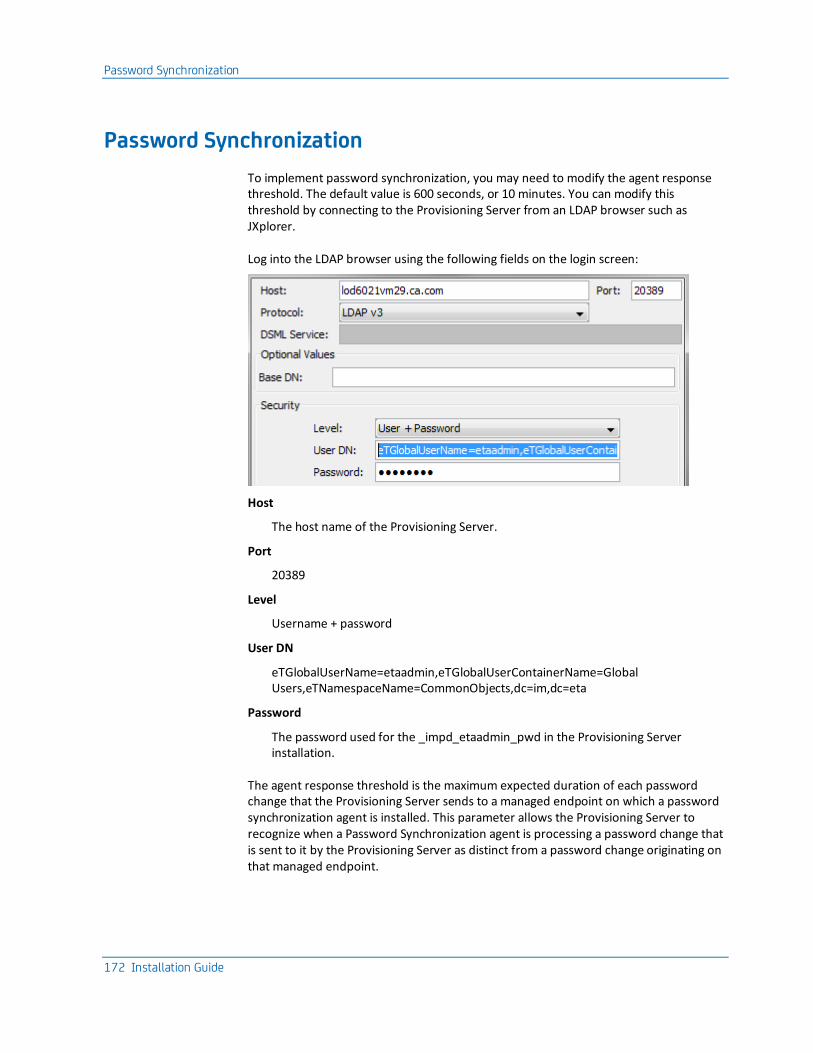
Password Synchronization
172 Installation Guide
Password Synchronization
To implement password synchronization, you may need to modify the agent response threshold. The default value is 600 seconds, or 10 minutes. You can modify this threshold by connecting to the Provisioning Server from an LDAP browser such as JXplorer.
Log into the LDAP browser using the following fields on the login screen:
Host
The host name of the Provisioning Server.
Port
20389
Level
Username + password
User DN
eTGlobalUserName=etaadmin,eTGlobalUserContainerName=Global Users,eTNamespaceName=CommonObjects,dc=im,dc=eta
Password
The password used for the _impd_etaadmin_pwd in the Provisioning Server installation.
The agent response threshold is the maximum expected duration of each password change that the Provisioning Server sends to a managed endpoint on which a password synchronization agent is installed. This parameter allows the Provisioning Server to recognize when a Password Synchronization agent is processing a password change that is sent to it by the Provisioning Server as distinct from a password change originating on that managed endpoint.
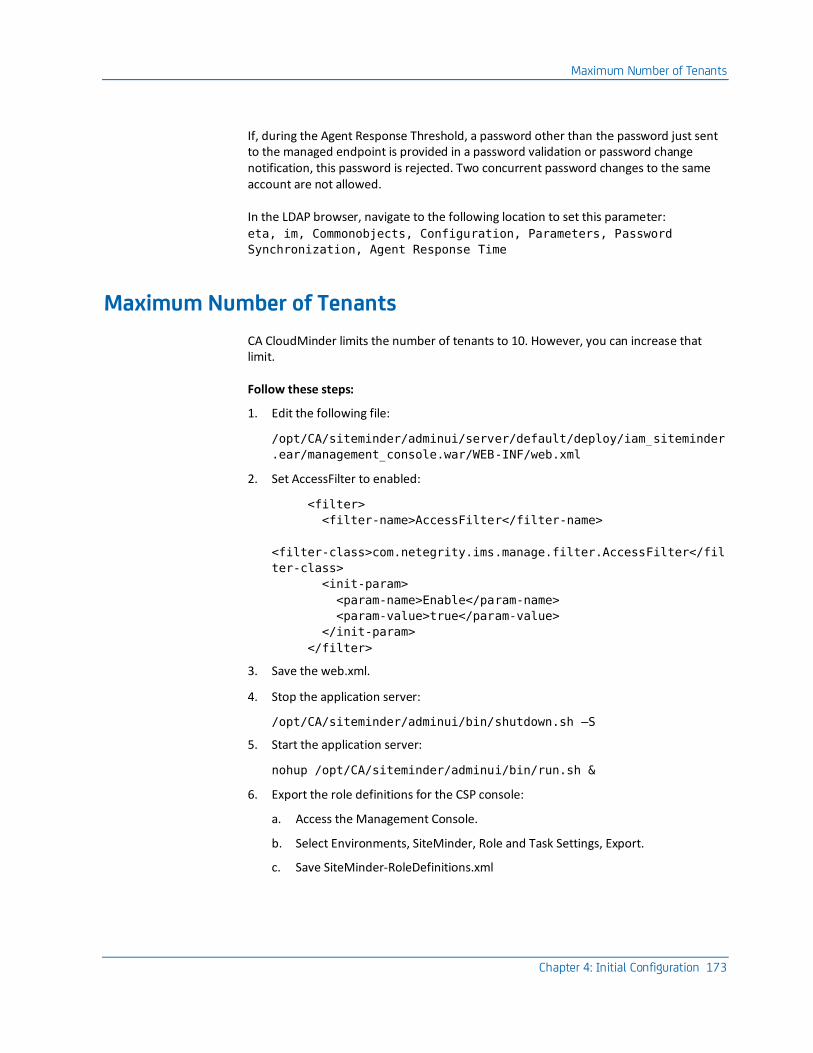
Maximum Number of Tenants
Chapter 4: Initial Configuration 173
If, during the Agent Response Threshold, a password other than the password just sent to the managed endpoint is provided in a password validation or password change notification, this password is rejected. Two concurrent password changes to the same account are not allowed.
In the LDAP browser, navigate to the following location to set this parameter: eta, im, Commonobjects, Configuration, Parameters, Password
Synchronization, Agent Response Time
Maximum Number of Tenants
CA CloudMinder limits the number of tenants to 10. However, you can increase that limit.
Follow these steps:
1. Edit the following file:
/opt/CA/siteminder/adminui/server/default/deploy/iam_siteminder
.ear/management_console.war/WEB-INF/web.xml
2. Set AccessFilter to enabled:
<filter>
<filter-name>AccessFilter</filter-name>
<filter-class>com.netegrity.ims.manage.filter.AccessFilter</fil
ter-class>
<init-param>
<param-name>Enable</param-name>
<param-value>true</param-value>
</init-param>
</filter>
3. Save the web.xml.
4. Stop the application server:
/opt/CA/siteminder/adminui/bin/shutdown.sh –S
5. Start the application server:
nohup /opt/CA/siteminder/adminui/bin/run.sh &
6. Export the role definitions for the CSP console:
a. Access the Management Console.
b. Select Environments, SiteMinder, Role and Task Settings, Export.
c. Save SiteMinder-RoleDefinitions.xml

Maximum Number of Tenants
174 Installation Guide
d. Edit SiteMinder-RoleDefinitions.xml
e. Edit the screen field for Maximum Tenants on Create Hosting Container Profile Screen to have options for all possible values of max tenants:
<ScreenField name="Maximum Tenants" permission="RWM"
attribute="maxTenants">
<PropertyDict name="Config">
<Property name="allowNonOptions">1</Property>
<Property name="CSSStyle"></Property>
<Property name="DefaultValue"></Property>
<Property
name="DefaultValueJavaScript"><![CDATA[]]></Property>
<Property name="FieldSpan">1</Property>
<Property
name="InitJavaScript"><![CDATA[]]></Property>
<Property name="LabelRight"></Property>
<Property name="LabelSpan">1</Property>
<Property name="Options"><![CDATA[1
220]]></Property>
<Property name="optionsMethod">Options</Property>
<Property name="SCREENLOGICAL">true</Property>
<Property name="Style">Dropdown</Property>
<Property
name="StyleClass">im-autoFormField</Property>
<Property name="ValidateOnChange">0</Property>
<Property
name="ValidationExpression"><![CDATA[]]></Property>
<Property name="ValidationJava"></Property>
<Property
name="ValidationJavaScript"><![CDATA[]]></Property>
</PropertyDict>
</ScreenField>
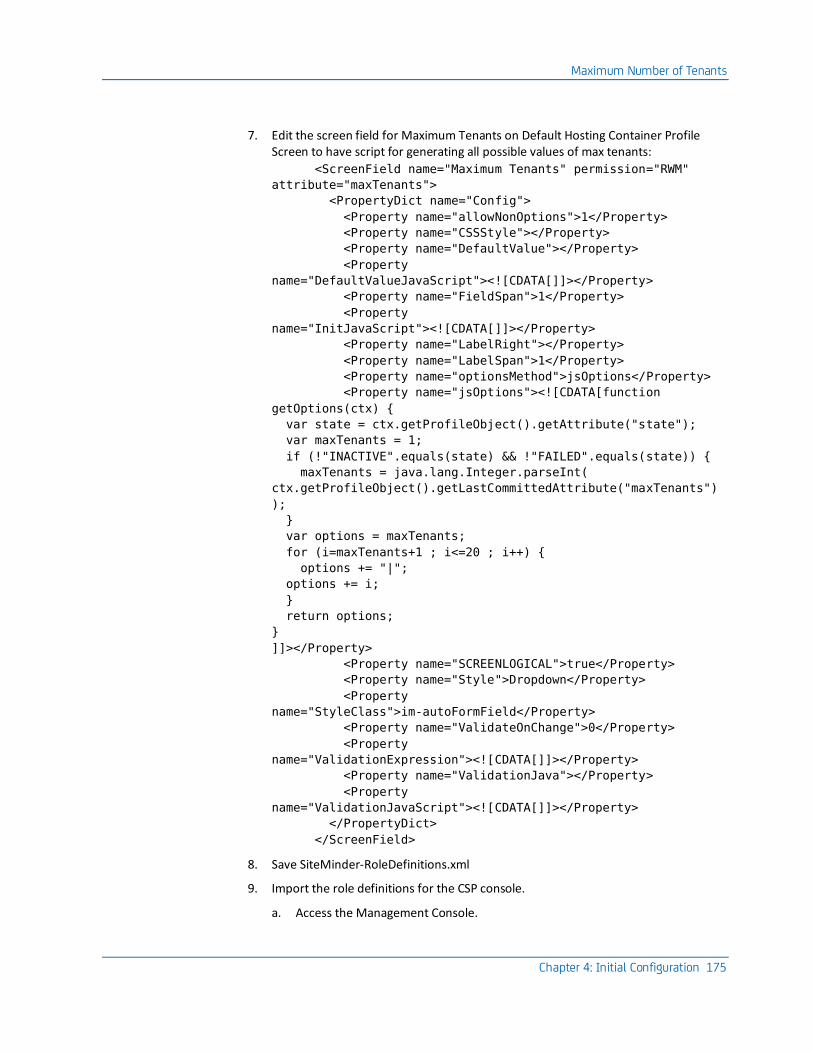
Maximum Number of Tenants
Chapter 4: Initial Configuration 175
7. Edit the screen field for Maximum Tenants on Default Hosting Container Profile Screen to have script for generating all possible values of max tenants:
<ScreenField name="Maximum Tenants" permission="RWM"
attribute="maxTenants">
<PropertyDict name="Config">
<Property name="allowNonOptions">1</Property>
<Property name="CSSStyle"></Property>
<Property name="DefaultValue"></Property>
<Property
name="DefaultValueJavaScript"><![CDATA[]]></Property>
<Property name="FieldSpan">1</Property>
<Property
name="InitJavaScript"><![CDATA[]]></Property>
<Property name="LabelRight"></Property>
<Property name="LabelSpan">1</Property>
<Property name="optionsMethod">jsOptions</Property>
<Property name="jsOptions"><![CDATA[function
getOptions(ctx) {
var state = ctx.getProfileObject().getAttribute("state");
var maxTenants = 1;
if (!"INACTIVE".equals(state) && !"FAILED".equals(state)) {
maxTenants = java.lang.Integer.parseInt(
ctx.getProfileObject().getLastCommittedAttribute("maxTenants")
);
}
var options = maxTenants;
for (i=maxTenants+1 ; i<=20 ; i++) {
options += "|";
options += i;
}
return options;
}
]]></Property>
<Property name="SCREENLOGICAL">true</Property>
<Property name="Style">Dropdown</Property>
<Property
name="StyleClass">im-autoFormField</Property>
<Property name="ValidateOnChange">0</Property>
<Property
name="ValidationExpression"><![CDATA[]]></Property>
<Property name="ValidationJava"></Property>
<Property
name="ValidationJavaScript"><![CDATA[]]></Property>
</PropertyDict>
</ScreenField>
8. Save SiteMinder-RoleDefinitions.xml
9. Import the role definitions for the CSP console.
a. Access the Management Console.

Maximum Number of Tenants
176 Installation Guide
b. Select Environments, SiteMinder, Role and Task Settings, Import.
c. Select SiteMinder-RoleDefinitions.xml and click Finish.
d. Restart the environment in the Management Console.
Chapter 5: Logs 177
Chapter 5: Logs
This section contains the following topics:
Provisioning Server Logs (see page 177) CA IAM CS Logs (see page 178) CA Directory Logs (see page 179) CA SiteMinder Logs (see page 181)
Provisioning Server Logs
The Provisioning Server generates logs in the following locations:
■ On the Provisioning Server:
– Location:
/opt/CA/IdentityManager/ProvisioningServer/logs
Logs:
Etanotifydate-time.log
Etatransdate-time.log
im_ps.log
■ On the Directory Server:
– Location:
/opt/CA/Directory/dxserver/logs
Logs
ProvisioningServerHostName-imps-router_date.log
ProvisioningServerHostName-imps-router_alarm.log
ProvisioningServerHostName-imps-router_diag_date.log
ProvisioningServerHostName-imps-router_stats_date.log
ProvisioningServerHostName-imps-router_time_date.log
ProvisioningServerHostName-imps-router_trace.log
ProvisioningServerHostName-imps-router_warn_date.log
CA IAM CS Logs
178 Installation Guide
CA IAM CS Logs
The CA IAM CS generates logs in the following locations:
■ On the Connector Server:
– Location:
/opt/CA/IdentityManager/ConnectorServer/jcs/logs
Logs:
jcs_daily.log
jcs_stderr.log
jcs_stdout.log
servicemix.log
■ On the Directory Server:
– Location:
/opt/CA/Directory/dxserver/logs
Logs:
ProvisioningServerHostName-imps-router_date.log
ProvisioningServerHostName-imps-router_alarm.log
ProvisioningServerHostName-imps-router_diag_date.log
ProvisioningServerHostName-imps-router_stats_date.log
ProvisioningServerHostName-imps-router_time_date.log
ProvisioningServerHostName-imps-router_trace.log
ProvisioningServerHostName-imps-router_warn_date.log
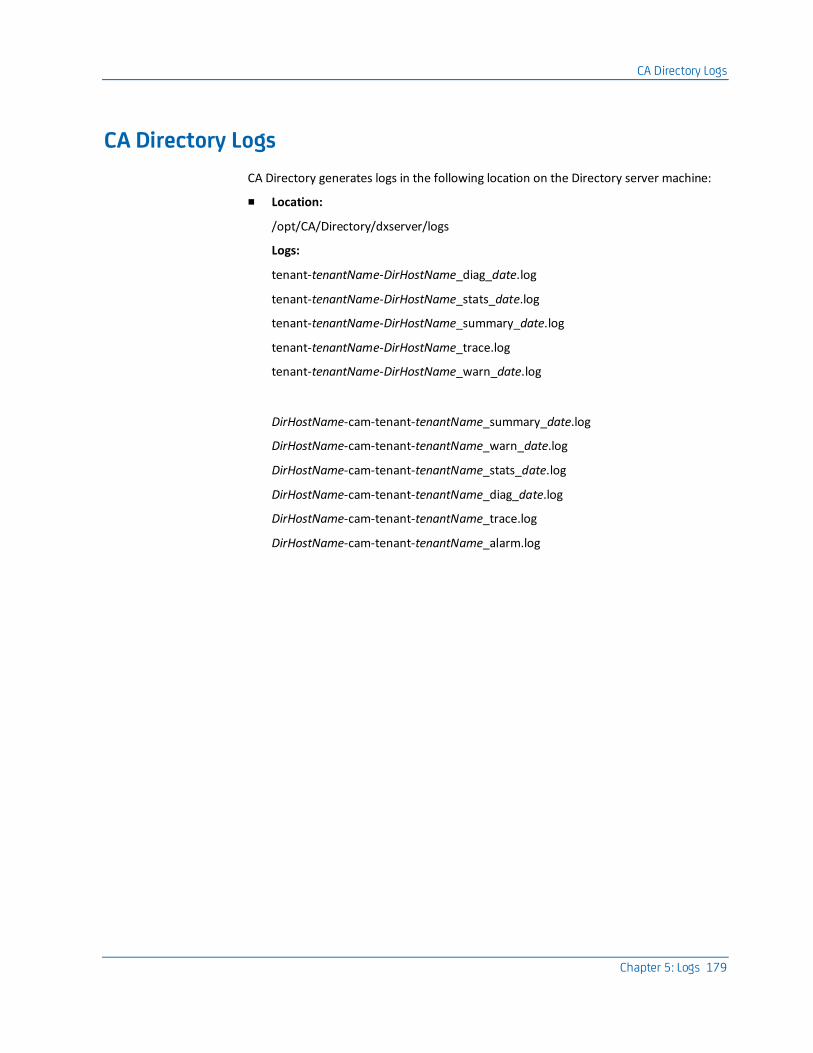
CA Directory Logs
Chapter 5: Logs 179
CA Directory Logs
CA Directory generates logs in the following location on the Directory server machine:
■ Location:
/opt/CA/Directory/dxserver/logs
Logs:
tenant-tenantName-DirHostName_diag_date.log
tenant-tenantName-DirHostName_stats_date.log
tenant-tenantName-DirHostName_summary_date.log
tenant-tenantName-DirHostName_trace.log
tenant-tenantName-DirHostName_warn_date.log
DirHostName-cam-tenant-tenantName_summary_date.log
DirHostName-cam-tenant-tenantName_warn_date.log
DirHostName-cam-tenant-tenantName_stats_date.log
DirHostName-cam-tenant-tenantName_diag_date.log
DirHostName-cam-tenant-tenantName_trace.log
DirHostName-cam-tenant-tenantName_alarm.log
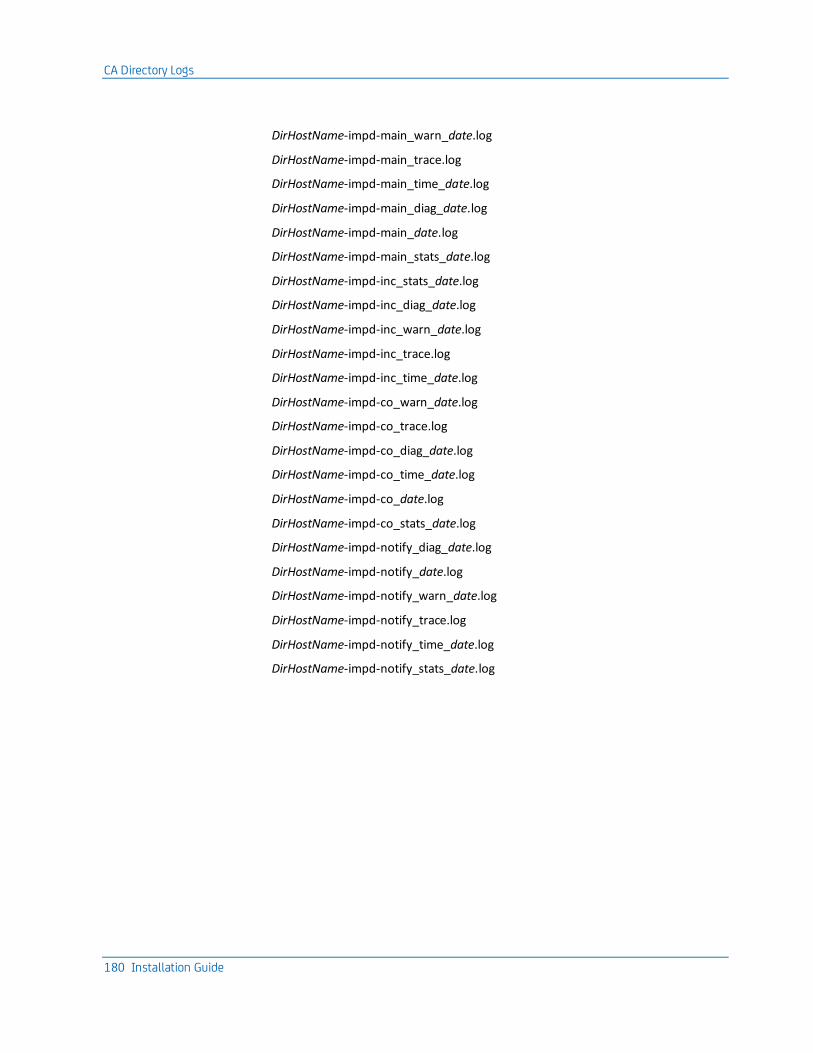
CA Directory Logs
180 Installation Guide
DirHostName-impd-main_warn_date.log
DirHostName-impd-main_trace.log
DirHostName-impd-main_time_date.log
DirHostName-impd-main_diag_date.log
DirHostName-impd-main_date.log
DirHostName-impd-main_stats_date.log
DirHostName-impd-inc_stats_date.log
DirHostName-impd-inc_diag_date.log
DirHostName-impd-inc_warn_date.log
DirHostName-impd-inc_trace.log
DirHostName-impd-inc_time_date.log
DirHostName-impd-co_warn_date.log
DirHostName-impd-co_trace.log
DirHostName-impd-co_diag_date.log
DirHostName-impd-co_time_date.log
DirHostName-impd-co_date.log
DirHostName-impd-co_stats_date.log
DirHostName-impd-notify_diag_date.log
DirHostName-impd-notify_date.log
DirHostName-impd-notify_warn_date.log
DirHostName-impd-notify_trace.log
DirHostName-impd-notify_time_date.log
DirHostName-impd-notify_stats_date.log
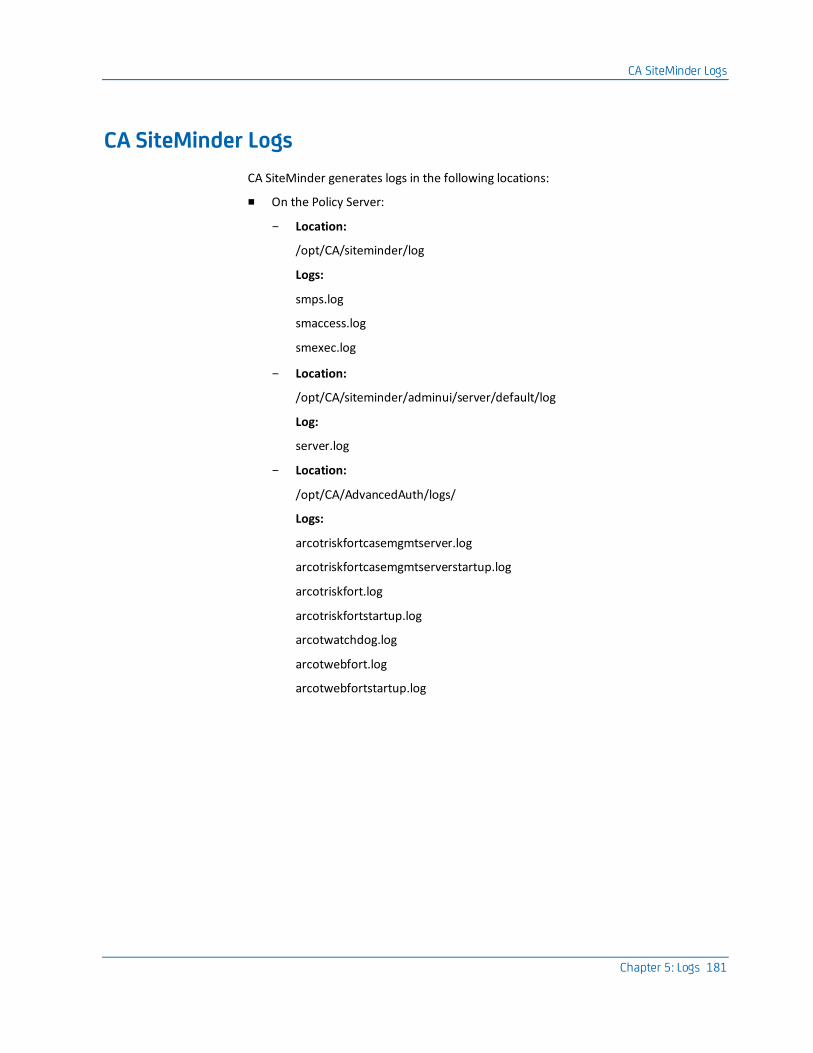
CA SiteMinder Logs
Chapter 5: Logs 181
CA SiteMinder Logs
CA SiteMinder generates logs in the following locations:
■ On the Policy Server:
– Location:
/opt/CA/siteminder/log
Logs:
smps.log
smaccess.log
smexec.log
– Location:
/opt/CA/siteminder/adminui/server/default/log
Log:
server.log
– Location:
/opt/CA/AdvancedAuth/logs/
Logs:
arcotriskfortcasemgmtserver.log
arcotriskfortcasemgmtserverstartup.log
arcotriskfort.log
arcotriskfortstartup.log
arcotwatchdog.log
arcotwebfort.log
arcotwebfortstartup.log

CA SiteMinder Logs
182 Installation Guide
– Location:
/opt/CA/AdvancedAuth/Tomcat/logs
Logs:
catalina.date.log
catalina.out
host-manager.date.log
localhost.date.log
localhost_access_log.date.txt
manager.date.log
cm-aads.log
– Location:
/opt/CA/
Log:
Twslogging.log
■ On the Directory Server:
– Location:
/opt/CA/Directory/dxserver/logs
Logs:
SMPSHostName-cam-tenant-router_trace.log
SMPSHostName-cam-tenant-router_alarm.log
SMPSHostName-cam-tenant-router_diag_date.log
SMPSHostName-cam-tenant-router_warn_date.log
SMPSHostName-cam-tenant-router_summary_date.log
SMPSHostName-cam-tenant-router_stats_date.log