Embed Size (px)
Citation preview
Agent for Microsoft SharePoint Server Guide
r15
CA ARCserve® Backup for
Windows
This documentation and any related computer software help programs (hereinafter referred to as the
"Documentation") are for your informational purposes only and are subject to change or withdrawal by CA at any time.
This Documentation may not be copied, transferred, reproduced, disclosed, modified or duplicated, in whole or in part,
without the prior written consent of CA. This Documentation is confidential and proprietary information of CA and may
not be used or disclosed by you except as may be permitted in a separate confidentiality agreement between you and
CA.
Notwithstanding the foregoing, if you are a licensed user of the software product(s) addressed in the Documentation,
you may print a reasonable number of copies of the Documentation for internal use by you and your employees in
connection with that software, provided that all CA copyright notices and legends are affixed to each reproduced copy.
The right to print copies of the Documentation is limited to the period during which the applicable license for such
software remains in full force and effect. Should the license terminate for any reason, it is your responsibility to certify
in writing to CA that all copies and partial copies of the Documentation have been returned to CA or destroyed.
TO THE EXTENT PERMITTED BY APPLICABLE LAW, CA PROVIDES THIS DOCUMENTATION "AS IS" WITHOUT
WARRANTY OF ANY KIND, INCLUDING WITHOUT LIMITATION, ANY IMPLIED WARRANTIES OF MERCHANTABILITY,
FITNESS FOR A PARTICULAR PURPOSE, OR NONINFRINGEMENT. IN NO EVENT WILL CA BE LIABLE TO THE END USER
OR ANY THIRD PARTY FOR ANY LOSS OR DAMAGE, DIRECT OR INDIRECT, FROM THE USE OF THIS DOCUMENTATION,
INCLUDING WITHOUT LIMITATION, LOST PROFITS, LOST INVESTMENT, BUSINESS INTERRUPTION, GOODWILL, OR
LOST DATA, EVEN IF CA IS EXPRESSLY ADVISED IN ADVANCE OF THE POSSIBILITY OF SUCH LOSS OR DAMAGE.
The use of any software product referenced in the Documentation is governed by the applicable license agreement and
is not modified in any way by the terms of this notice.
The manufacturer of this Documentation is CA.
Provided with "Restricted Rights." Use, duplication or disclosure by the United States Government is subject to the
restrictions set forth in FAR Sections 12.212, 52.227-14, and 52.227-19(c)(1) - (2) and DFARS Section
252.227-7014(b)(3), as applicable, or their successors.
Copyright © 2010 CA. All rights reserved. All trademarks, trade names, service marks, and logos referenced herein
belong to their respective companies.
CA Product References
This documentation set references the following CA products:
■ BrightStor® Enterprise Backup
■ CA Antivirus
■ CA ARCserve® Assured Recovery™
■ CA ARCserve® Backup Agent for Advantage™ Ingres®
■ CA ARCserve® Backup Agent for Novell Open Enterprise Server for Linux
■ CA ARCserve® Backup Agent for Open Files on NetWare
■ CA ARCserve® Backup Agent for Open Files on Windows
■ CA ARCserve® Backup Client Agent for FreeBSD
■ CA ARCserve® Backup Client Agent for Linux
■ CA ARCserve® Backup Client Agent for Mainframe Linux
■ CA ARCserve® Backup Client Agent for NetWare
■ CA ARCserve® Backup Client Agent for UNIX
■ CA ARCserve® Backup Client Agent for Windows
■ CA ARCserve® Backup Enterprise Option for AS/400
■ CA ARCserve® Backup Enterprise Option for Open VMS
■ CA ARCserve® Backup for Microsoft Windows Essential Business Server
■ CA ARCserve® Backup for Windows
■ CA ARCserve® Backup for Windows Agent for IBM Informix
■ CA ARCserve® Backup for Windows Agent for Lotus Domino
■ CA ARCserve® Backup for Windows Agent for Microsoft Exchange Server
■ CA ARCserve® Backup for Windows Agent for Microsoft SharePoint Server
■ CA ARCserve® Backup for Windows Agent for Microsoft SQL Server
■ CA ARCserve® Backup for Windows Agent for Oracle
■ CA ARCserve® Backup for Windows Agent for Sybase
■ CA ARCserve® Backup for Windows Agent for Virtual Machines
■ CA ARCserve® Backup for Windows Disaster Recovery Option
■ CA ARCserve® Backup for Windows Enterprise Module
■ CA ARCserve® Backup for Windows Enterprise Option for IBM 3494
■ CA ARCserve® Backup for Windows Enterprise Option for SAP R/3 for Oracle
■ CA ARCserve® Backup for Windows Enterprise Option for StorageTek ACSLS
■ CA ARCserve® Backup for Windows Image Option
■ CA ARCserve® Backup for Windows Microsoft Volume Shadow Copy Service
■ CA ARCserve® Backup for Windows NDMP NAS Option
■ CA ARCserve® Backup for Windows Serverless Backup Option
■ CA ARCserve® Backup for Windows Storage Area Network (SAN) Option
■ CA ARCserve® Backup for Windows Tape Library Option
■ CA ARCserve® Backup Patch Manager
■ CA ARCserve® Backup UNIX and Linux Data Mover
■ CA ARCserve® D2D
■ CA ARCserve® High Availability
■ CA ARCserve® Replication
■ CA VM:Tape for z/VM
■ CA 1® Tape Management
■ Common Services™
■ eTrust® Firewall
■ Unicenter® Network and Systems Management
■ Unicenter® Software Delivery
■ Unicenter® VM:Operator®
Contact CA
Contact Technical Support
For your convenience, CA provides one site where you can access the
information you need for your Home Office, Small Business, and Enterprise CA
products. At CA ARCserve Backup Support, you can access the following:
■ Online and telephone contact information for technical assistance and
customer services
■ Information about user communities and forums
■ Product and documentation downloads
■ CA Support policies and guidelines
■ Other helpful resources appropriate for your product
Provide Feedback
If you have comments or questions about CA product documentation, you can
send a message to [email protected].
If you would like to provide feedback about CA product documentation, complete
our short customer survey, which is also available on the CA Support website,
found at http://ca.com/docs.
Documentation Changes
The following documentation updates have been made since the last release of
this documentation:
■ Support for SharePoint 2003 Agent is dropped.
■ Added Agent for MS SharePoint Configuration Dialog (see page 20) and its
features to describe about the new Agent for Microsoft SharePoint Server.
■ Added Backing Up SharePoint 2010 Systems chapter.
■ Added Backup Options Dialog in SharePoint Server 2010 (see page 29) and
procedure on how to configure and perform backup operations using the
dialog.
■ Updated Backup Options Dialog in SharePoint Server 2007 (see page 38)
and procedure on how to configure and perform backup operations using the
dialog.
■ Added Restoring SharePoint 2010 Systems chapter.
■ Added Restore Options Dialog in SharePoint Server 2010 (see page 45) and
procedure on how to configure and perform restore operations using the
database level restore dialog.
■ Updated Restore Options Dialog in SharePoint Server 2007 (see page 65)
and procedure on how to configure and perform restore operations using the
database-level restore dialog.
■ Added Document-Level Restore Option Dialog in SharePoint 2010 (see
page 54) and described the configuration options in the dialog.
■ Added Document-Level Restore Option Dialog in SharePoint 2007 (see
page 74) and described the configuration options in the dialog.
■ Added Perform a Document-Level Restore in SharePoint 2010 (see page 58)
to describe how to perform granular restore using the Document-Level
Restore Option Dialog and the Agent for Microsoft SharePoint Server.
■ Added Perform a Document-Level Restore in SharePoint 2007 (see page 78)
to describe how to perform granular restore using the Document-Level
Restore Option Dialog and the Agent for Microsoft SharePoint Server.
■ Added Agent for Microsoft SharePoint Server Limitations (see page 82) to list
the Agent restore limitations.
■ Added Appendix Microsoft SharePoint Server 2010 (see page 86) Features to
list the SharePoint Server 2010 features supported by the Agent.
■ Added Appendix Microsoft SharePoint 2010 Data (see page 87) to list the
SharePoint Server 2010 data supported by the Agent.
■ Added Appendix Microsoft SharePoint Server 2007 Features (see page 89) to
list the SharePoint Server 2007 features supported by the Agent.

■ Added Appendix Microsoft SharePoint 2007 Data (see page 89) to list the
SharePoint Server 2007 data supported by the Agent.

Contents 9
Contents
Chapter 1: Introducing the Agent 13
Agent Features ............................................................................... 13
SharePoint Server 2010 Features .......................................................... 13
SharePoint Server 2007 Features .......................................................... 14
Microsoft SharePoint Server Support Matrix .................................................... 14
How the Agent Works on SharePoint Server Systems ........................................... 15
Chapter 2: Installing the Agent 17
Environmental Considerations ................................................................. 17
Installation Prerequisites ...................................................................... 17
Installation Considerations for Agent for Microsoft SharePoint Server ......................... 19
Install the Agent .............................................................................. 20
Agent for Microsoft SharePoint Configuration Dialog ......................................... 20
Configure the Agent on SharePoint Systems ................................................ 25
Chapter 3: Backing Up SharePoint 2010 Systems 27
SharePoint 2010 Backup Overview ............................................................. 27
Database-Level Backup Prerequisites in 2010 ................................................... 27
How to Perform a Full Backup in SharePoint 2010 ............................................... 28
Backup Considerations in 2010 ................................................................ 28
Backup Options Dialog in SharePoint Server 2010 .............................................. 29
Perform a Database-Level Backup in SharePoint Server 2010 .................................... 32
Chapter 4: Backing Up SharePoint 2007 Systems 35
SharePoint 2007 Backup Overview ............................................................. 35
Database-Level Backup Prerequisites .......................................................... 35
How to Perform a Full Backup ................................................................. 36
Backup Considerations ........................................................................ 36
Database-Level Agent Backup Option Dialog .................................................... 38
Perform a Database-Level Backup in SharePoint Server 2007 .................................... 40
Chapter 5: Restoring SharePoint 2010 Systems 43
Restore Overview in SharePoint Server 2010 ................................................... 43
Database-Level Restore Sets in SharePoint Server 2010 ........................................ 44
Database-Level Restore Option Dialog in SharePoint Server 2010 ................................ 45
10 Agent for Microsoft SharePoint Server Guide
Restore Configuration Settings in SharePoint Server 2010 ................................... 47
Database-Level Restore Prerequisites SharePoint Server 2010 ................................... 48
Perform a Database-Level Restore on SharePoint Server 2010 ................................... 50
Document-Level Restore Option Dialog in SharePoint 2010 ...................................... 54
SharePoint 2010 Agent Restore Configuration Dialog ........................................ 56
Destination folders for Document-level Restores ............................................ 57
Perform a Document-Level Restore to the Original Location in SharePoint 2010 ................... 58
Perform a Document-Level Restore to the Alternate Location in SharePoint 2010 ................. 59
Chapter 6: Restoring SharePoint 2007 Systems 63
Restore Overview ............................................................................. 63
Database-Level Restore Sets .................................................................. 64
Database-Level Restore Option Dialog SharePoint 2007 ......................................... 65
Restore Configuration Settings ............................................................. 67
Database-Level Restore Prerequisites .......................................................... 68
Perform a Database-Level Data Restore ........................................................ 70
Document-Level Restore Option Dialog in SharePoint 2007 ...................................... 74
SharePoint 2007 agent restore configuration dialog ......................................... 76
Perform a Document-Level Restore in SharePoint 2007 ......................................... 78
Perform a Document-Level Restore to Alternate Location in SharePoint 2007 ..................... 80
Agent for Microsoft SharePoint Server Limitations ............................................... 82
Chapter 7: Using Best Practices 83
How to Select the Proper Location ............................................................. 83
Set Access Permission on Dump Location....................................................... 84
Appendix A: Microsoft SharePoint Server Features used by the Agent 85
Microsoft SharePoint Server 2010 Features ..................................................... 86
Microsoft SharePoint 2010 Data ............................................................... 87
Microsoft SharePoint Server 2007 Features ..................................................... 89
Microsoft SharePoint 2007 Data ............................................................... 89
Appendix B: Disaster Recovery 91
How to Perform a Database-Level Disaster Recovery on SharePoint 2010 Systems ................ 91
How to Perform a Database-Level Disaster Recovery on SharePoint 2007 Systems ................ 92
Appendix C: Configuring Microsoft SQL Server Security Settings 93
Types of Microsoft SQL Authentication ......................................................... 93
Authentication Requirements .................................................................. 93
Contents 11
Check or Change the Microsoft SQL Server Authentication Method ............................... 94
Appendix D: Troubleshooting 95
AE9972 ...................................................................................... 95
Unable to restore a site collection to its original location ......................................... 95
Index 97

Chapter 1: Introducing the Agent 13
Chapter 1: Introducing the Agent
CA ARCserve Backup is a comprehensive, distributed storage solution for
applications, databases, distributed servers, and file systems. It provides backup
and restore capabilities for databases, business-critical applications, and
network clients.
Among the agents CA ARCserve Backup offers is the CA ARCserve Backup Agent
for Microsoft SharePoint Server. This agent let you back up and restore Microsoft
SharePoint Server 2010, Microsoft Office SharePoint Server 2007, Microsoft
SharePoint Foundation 2010, and Microsoft SharePoint Service 3.0 data.
Although SharePoint environments can be complex and distributed across a
number of machines, the agent provides full protection of SharePoint
installations by consolidating all SharePoint data into a single node in the
interface on the CA ARCserve Backup server. SharePoint content consists of
distributed SharePoint databases, Single Sign-On (SSO), and search indexes.
The agent lets you use the features of CA ARCserve Backup to easily manage the
backup and restore of all SharePoint data on your network.
This section contains the following topics:
Agent Features (see page 13)
Microsoft SharePoint Server Support Matrix (see page 14)
How the Agent Works on SharePoint Server Systems (see page 15)
Agent Features
The Agent for Microsoft SharePoint Server offers a number of features to
facilitate your backup and restore operations. It provides backup and restore
capabilities for Microsoft SharePoint Server 2010, Microsoft Office SharePoint
Server 2007, Microsoft SharePoint Foundation 2010, and Microsoft SharePoint
Service 3.0 installations.
SharePoint Server 2010 Features
The agent supports the following features for SharePoint Server 2010:
■ Backup and restore of the SharePoint Server 2010 farm and farm
components.
Note: For more information about the various farm components, see section
Microsoft SharePoint Server 2010 Features (see page 86).
Microsoft SharePoint Server Support Matrix
14 Agent for Microsoft SharePoint Server Guide
■ Enables SharePoint data to be restored to its original location or to an
alternate destination.
■ Supports backup to a wide array of storage devices.
■ Supports Configuration Settings Only Backup and Content and Configuration
Settings Backup options.
■ Supports Restore Configuration Settings only and Restore Content and
Configuration Settings options.
■ Supports database-level backup and database-level and document-level
restore for the failover database server.
■ Supports document-level or granular restores.
SharePoint Server 2007 Features
The agent supports the following features for SharePoint Server 2007:
■ Backup and restore of the SharePoint Server 2007 Farm and Farm
components. For more information about the supported farm components,
see section Microsoft SharePoint Server 2007 Features (see page 89).
■ Enables SharePoint data to be restored to its original location or to an
alternate destination.
■ Supports backup to a wide array of storage devices.
■ Supports document-level or granular restores.
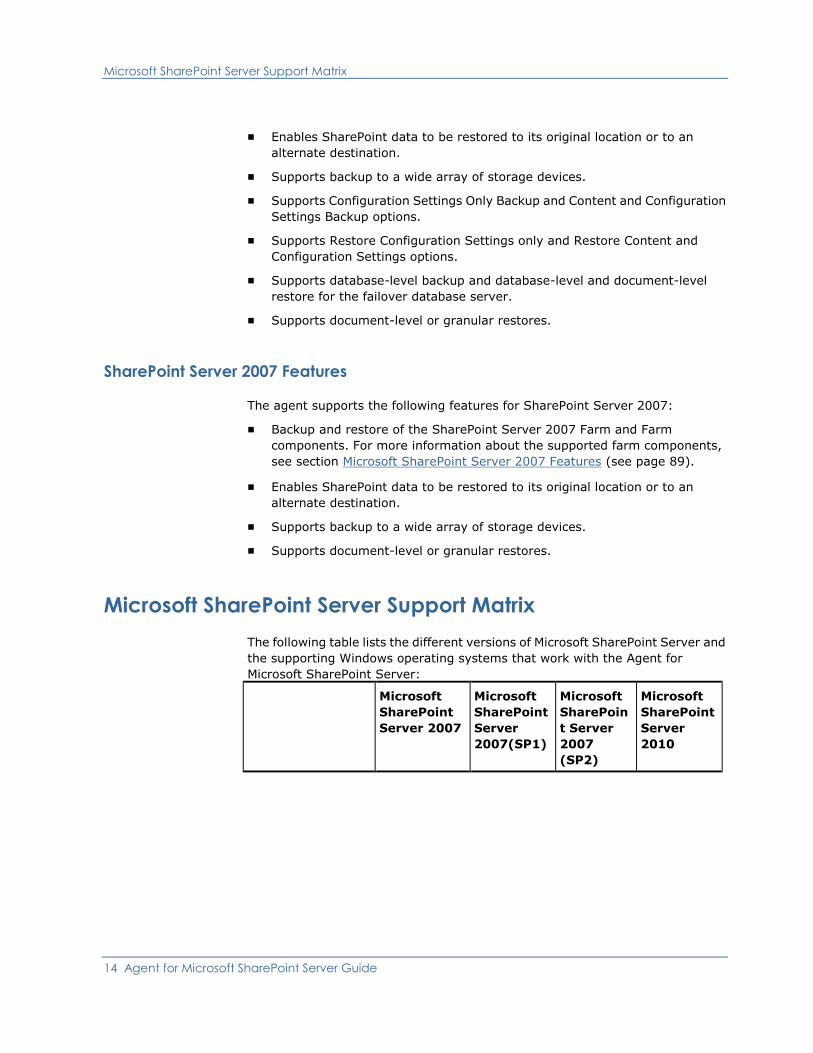
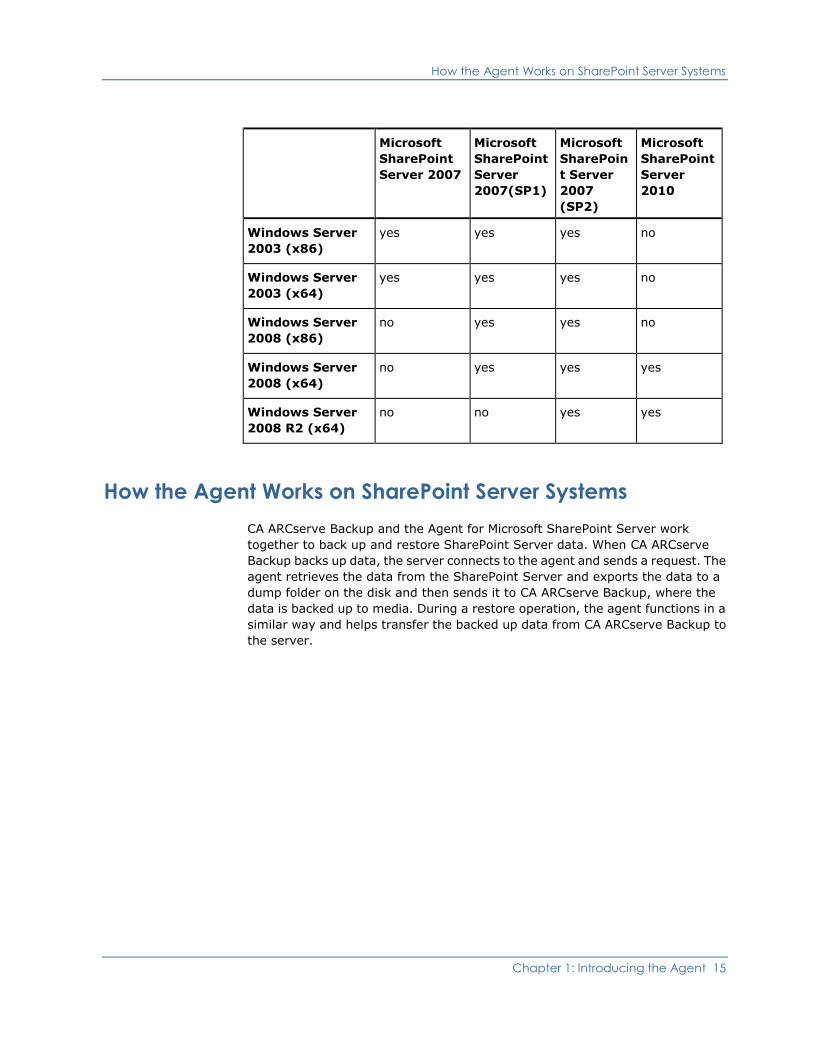
Microsoft SharePoint Server Support Matrix
The following table lists the different versions of Microsoft SharePoint Server and
the supporting Windows operating systems that work with the Agent for
Microsoft SharePoint Server:
Microsoft
SharePoint
Server 2007
Microsoft
SharePoint
Server
2007(SP1)
Microsoft
SharePoin
t Server
2007
(SP2)
Microsoft
SharePoint
Server
2010
How the Agent Works on SharePoint Server Systems
Chapter 1: Introducing the Agent 15
Microsoft
SharePoint
Server 2007
Microsoft
SharePoint
Server
2007(SP1)
Microsoft
SharePoin
t Server
2007
(SP2)
Microsoft
SharePoint
Server
2010
Windows Server
2003 (x86)
yes yes yes no
Windows Server
2003 (x64)
yes yes yes no
Windows Server
2008 (x86)
no yes yes no
Windows Server
2008 (x64)
no yes yes yes
Windows Server
2008 R2 (x64)
no no yes yes
How the Agent Works on SharePoint Server Systems
CA ARCserve Backup and the Agent for Microsoft SharePoint Server work
together to back up and restore SharePoint Server data. When CA ARCserve
Backup backs up data, the server connects to the agent and sends a request. The
agent retrieves the data from the SharePoint Server and exports the data to a
dump folder on the disk and then sends it to CA ARCserve Backup, where the
data is backed up to media. During a restore operation, the agent functions in a
similar way and helps transfer the backed up data from CA ARCserve Backup to
the server.

Chapter 2: Installing the Agent 17
Chapter 2: Installing the Agent
This chapter provides the information you need to install and configure the Agent
for Microsoft SharePoint Server on SharePoint 2010 and SharePoint 2007
systems. The information in this section assumes you are familiar with the
characteristics and requirements of your Microsoft SharePoint server farm.
This section contains the following topics:
Environmental Considerations (see page 17)
Installation Prerequisites (see page 17)
Install the Agent (see page 20)
Environmental Considerations
SharePoint environments can be complex and distributed across a number of
machines. The server farm configuration must be supported by Microsoft. As an
example, a distributed SharePoint environment could contain the following
components:
■ One or more Web-Front-End Servers.
■ One or more Application servers with Windows SharePoint Service Help
Search service enabled.
■ One or more Indexer Server with Office SharePoint Server Search service
enabled.
■ One or more Database Servers used by SharePoint Server Farm.
Installation Prerequisites
Before installing the agent on SharePoint Server systems, you must satisfy the
following prerequisites:
■ Verify that your system meets the minimum requirements needed to install
the Agent for Microsoft SharePoint Server. For a list of requirements, see
Readme.
■ Ensure that you have administrator privileges or the proper authority to
install software on the computers where you will be installing the product.
■ The user name entered in the Agent for Microsoft SharePoint Server
Configuration wizard must have administrative access to all machines in the
SharePoint Server farm.
Installation Prerequisites
18 Agent for Microsoft SharePoint Server Guide
■ Ensure that you are aware of the account which belongs to the Microsoft
SharePoint Server farm administrator group.
■ Verify that you have installed Microsoft SharePoint Server products or
Microsoft SharePoint Service 3.0 or later.
■ You must install the Agent for Microsoft SharePoint Server on the same
system on which the farm was originally created and ensure that the central
administration is running, or the backup and restore jobs might fail.
Installation Prerequisites
Chapter 2: Installing the Agent 19
Installation Considerations for Agent for Microsoft SharePoint Server
Consider the following when you install the agent:
■ Microsoft SharePoint Server products or Microsoft SharePoint Service 3.0 or
later must be installed before you install the Agent for Microsoft SharePoint
Server. The agent is supported on all operating systems on which Microsoft
Office SharePoint Server is supported.
■ The CA ARCserve Backup server must be able to ping all machines in the
SharePoint environment by name. If you do not use DNS (Domain Name
System) in your SharePoint environment, you must add all the machines in
the SharePoint environment into the hosts file on the CA ARCserve Backup
server.
■ You must run the Microsoft SQL Server Windows service as a domain account
or a local system account.
■ You must install the Agent for Microsoft SharePoint Server on the same
machine on which the farm was originally created and the Windows
SharePoint Service Administration service is running or your backup or
restore job might fail.
■ Jobs may not complete successfully when the CA ARCserve Backup server
and the agent server reside in different time zones. To ensure that jobs
complete successfully, you must synchronize the time zone on the agent
server with the CA ARCserve Backup server.
■ There is a known Microsoft issue that could lead to SharePoint 2007
behaving differently depending on how you deployed Windows SharePoint
Services 3.0 and Microsoft Office SharePoint Server 2007 on Windows
Server 2008 systems.
– If you upgrade Windows SharePoint Services 3.0 or Microsoft Office
SharePoint Server 2007 with Service Pack 1, you must install the CA
ARCserve Backup Agent for SharePoint Server on machines on which the
farm was originally created and the Central Administration Service is
running. Before you submit a backup or restore job, you must ensure
this service is running on the target machine or the jobs may fail.
– If you install Windows SharePoint Services 3.0 or Microsoft Office
SharePoint Server 2007 including Service Pack 1, you can install the CA
ARCserve Backup Agent for SharePoint Server on any machine on which
the farm was originally created and the Central Administration Service is
running. It is not a prerequisite to have Central Administration Service
running on the target machine for backup and restore jobs in this
situation.
Install the Agent
20 Agent for Microsoft SharePoint Server Guide
■ If you choose Server Farm Installation when upgrading the CA ARCserve
Backup Agent for Microsoft SharePoint Server to r15, you must use the same
Farm Administrator used to create the Farm, or you will need to launch the
Agent for Microsoft SharePoint Server configuration and configure again.
This restriction affects Server Farm Installations (Complete and Web Front
End) only. It does not affect SharePoint Single Server (standalone)
installations.
Install the Agent
The Agent for Microsoft SharePoint Server follows the standard installation
procedure for the system components, agents, and options of CA ARCserve
Backup.
For detailed procedures about installing CA ARCserve Backup, see the
Implementation Guide.
More information:
Agent for Microsoft SharePoint Configuration Dialog (see page 20)
Configure the Agent on SharePoint Systems (see page 25)
Agent for Microsoft SharePoint Configuration Dialog
You can open the Agent dialog and configure the options using the following
procedure:
To open the Agent for Microsoft SharePoint Configuration Dialog
1. From the Windows Start menu, select All Programs, CA, ARCserve Backup,
and Backup Agent Admin.
The ARCserve Backup Agent Admin dialog opens.
2. From the drop-down list, select CA ARCserve Backup Agent for Microsoft
SharePoint Server and click Configuration.
The Agent for Microsoft SharePoint Configuration dialog opens. The DB level
Configuration tab appears, by default.
Install the Agent
Chapter 2: Installing the Agent 21
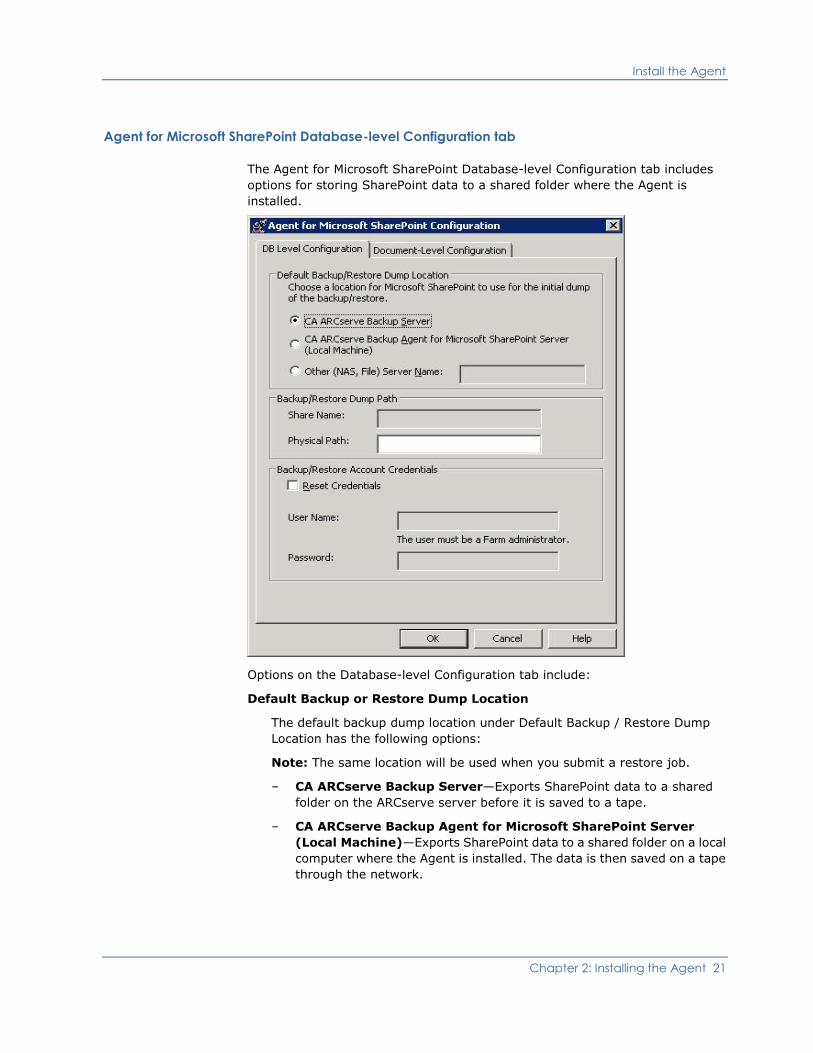
Agent for Microsoft SharePoint Database-level Configuration tab
The Agent for Microsoft SharePoint Database-level Configuration tab includes
options for storing SharePoint data to a shared folder where the Agent is
installed.
Options on the Database-level Configuration tab include:
Default Backup or Restore Dump Location
The default backup dump location under Default Backup / Restore Dump
Location has the following options:
Note: The same location will be used when you submit a restore job.
– CA ARCserve Backup Server—Exports SharePoint data to a shared
folder on the ARCserve server before it is saved to a tape.
– CA ARCserve Backup Agent for Microsoft SharePoint Server
(Local Machine)—Exports SharePoint data to a shared folder on a local
computer where the Agent is installed. The data is then saved on a tape
through the network.
Install the Agent
22 Agent for Microsoft SharePoint Server Guide
– Other (NAS, File) Server Name—Exports SharePoint data to a NAS
device or a public shared folder. You need to specify the server name, if
you select this option.
Note: You must specify the host name instead of an IP address.
Backup / Restore Dump Path
Specify the Share name and Physical Path under the Backup / Restore Dump
Path as follows:
– Share Name—Specifies the shared folder where the data must be
backed up, if you selected the Other (NAS, File) Server Name as the
backup/restore dump location. You must grant the necessary
permissions to the folder.
Note: The name should not contain the special character ‘$’ at the end.
– Physical Path—Specifies the path where you want the data to be
backed up, if you select the CA ARCserve Backup Server or CA ARCserve
Agent for SharePoint Server as the backup or restore dump location.
Backup or Restore Account Credentials
Specify the User name and password under the Backup/Restore Account
Credentials to install the COM+ components.
Note: The Reset Credentials option is enabled, if the COM+ component is
not installed. You must enter the user details to install these components.
– User Name—Defines the farm administrator user details.
– Password—Defines the farm administrator password details.
Install the Agent
Chapter 2: Installing the Agent 23
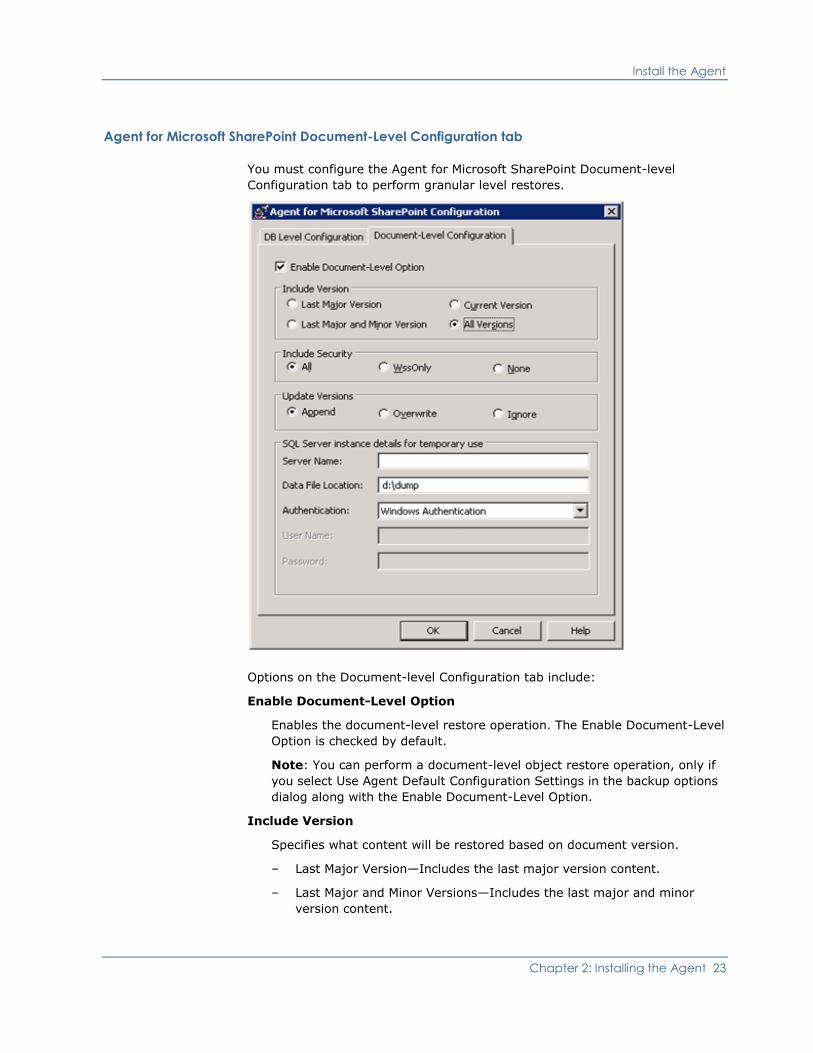
Agent for Microsoft SharePoint Document-Level Configuration tab
You must configure the Agent for Microsoft SharePoint Document-level
Configuration tab to perform granular level restores.
Options on the Document-level Configuration tab include:
Enable Document-Level Option
Enables the document-level restore operation. The Enable Document-Level
Option is checked by default.
Note: You can perform a document-level object restore operation, only if
you select Use Agent Default Configuration Settings in the backup options
dialog along with the Enable Document-Level Option.
Include Version
Specifies what content will be restored based on document version.
– Last Major Version—Includes the last major version content.
– Last Major and Minor Versions—Includes the last major and minor
version content.

Install the Agent
24 Agent for Microsoft SharePoint Server Guide
– Current Version—Includes content about the latest version.
– All Versions (default)—Includes content of all versions.
Include Security
Specifies whether user and security group information will be restored.
– All (default)—Includes user memberships and role assignments such as
out of the box roles like Web Designer, or any custom roles that extend
from the out of the box roles. The ACL for each object is migrated.
Also, user information defined in the DAP or LDAP servers is included.
– WssOnly—Includes user memberships and role assignments such as out
of the box roles like Web Designer, or any custom roles that extend from
the out of the box roles. The ACL for each object is migrated.
No user information defined in the DAP or LDAP servers is included.
– None— No user or group information is migrated.
Update Versions
Specifies how versioning is managed in the destination location when
restore.
– Append(default)— Appends the versions to the destination.
– Ignore— Ignores versioning and imports the updated file.
– Overwrite— Deletes existing version and imports as new versions.
SQL Server instance details for temporary use
Connects the agent to a SQL server instance.
– Server name— The SQL Server host name and instance name.
– Data File Location— This location is used to store the database file when
restore database backup dump to SQL Instance. This must be a local
path on the server which hosts the SQL Instance and the path should
exist.
Note: The SQL Server instance must have permissions to access the
Data File Location.
– Authentication—The authentication type for this SQL Instance. Select
the type of authentication to connect to the SQL server.
– Windows Authentication (default)— You can enter the user name and
password details to connect.
– SQL Server Authentication— This is the SQL Server authentication
mode. You must enter the login and password details.
Note: The version of the temporary SQL Server must be same as the
version of Microsoft SharePoint database Server.
Install the Agent
Chapter 2: Installing the Agent 25
Configure the Agent on SharePoint Systems
After you have installed the Agent for Microsoft SharePoint Server, the agent
installs SPSO12, an agent COM+ component on Microsoft SharePoint Server
2007 and SPSO14 agent COM+ component on the Microsoft SharePoint Server
2010. These components interact with the SharePoint Server to backup and
restore data.
Important! When configuring the Agent for Microsoft SharePoint Server, make
sure the Pagefile usage size does not exceed the physical memory, or
configuration will fail.
To configure the Agent on SharePoint systems
1. From the Windows Start menu, select All Programs, CA, ARCserve Backup,
and Backup Agent Admin.
The ARCserve Backup Agent Admin dialog opens.
2. From the drop-down list, select CA ARCserve Backup Agent for Microsoft
SharePoint Server and click Configuration.
The Agent for Microsoft SharePoint Configuration dialog opens.The DB level
Configuration tab appears, by default.
3. Select the database-level options in the DB level Configuration tab to
configure the Agent for database level backup and restore operations. For
more information about the database-level tab options, see Agent for
Microsoft SharePoint Database-level Configuration tab (see page 21).
The database-level configuration is complete.
4. Select the Document-Level Configuration tab.
The document-level configuration options appear.
5. Configure the Agent for document-level restores by selecting the options in
the tab. For more information about the document-level agent options, see
Agent for Microsoft SharePoint Server Document-level Configuration tab
(see page 23).
6. The document-level configuration is complete.
7. Click OK.
The Agent for Microsoft SharePoint Server is configured.

Chapter 3: Backing Up SharePoint 2010 Systems 27
Chapter 3: Backing Up SharePoint 2010
Systems
This chapter provides information for backing up data on SharePoint 2010
systems.
This section contains the following topics:
SharePoint 2010 Backup Overview (see page 27)
Database-Level Backup Prerequisites in 2010 (see page 27)
How to Perform a Full Backup in SharePoint 2010 (see page 28)
Backup Considerations in 2010 (see page 28)
Backup Options Dialog in SharePoint Server 2010 (see page 29)
Perform a Database-Level Backup in SharePoint Server 2010 (see page 32)
SharePoint 2010 Backup Overview
Database-level backup protects the SharePoint Server 2010 database files. It is
the fundamental backup for your SharePoint Server, and you should always use
it if you use one of the other granular backup types. You can use database-level
backups to restore SharePoint Server in the event of a system failure, database
corruption, or a disaster recovery scenario.
Database-Level Backup Prerequisites in 2010
Before performing a database-level backup on SharePoint Server 2010, you
must satisfy the following requirements:
■ Ensure that the Windows SharePoint Services Administrative service is
running on the front-end web server and the Application Server.
■ Ensure that Microsoft SQL Server is running.
How to Perform a Full Backup in SharePoint 2010
28 Agent for Microsoft SharePoint Server Guide
How to Perform a Full Backup in SharePoint 2010
If you want to take a full backup of the database you need to ensure certain Farm
management actions. If you perform one of these actions and then perform a
differential backup, you may not be able to successfully restore the database
that you backed up fully, earlier. To avoid this problem, always perform a full
database backup immediately after you have performed any change in the
topology of SharePoint 2010 farm or Windows SharePoint Farm such as the
following:
■ Adding a new web application, a new database into a normal web application
or SharePoint Service Provider Administration web application.
■ Canceling a full backup job while it is running.
■ Restoring the database from any backup.
Note: Ensure you restart the CA ARCserve SharePoint Agent Service under
Windows Services after updating the farm topology.
Backup Considerations in 2010
To run successful backups, consider the following:
■ If you perform a full backup of component A, and then a full backup of A’s
child component B, the differential backup of component A would fail. In
other words, a Farm-level full backup can be followed by a Farm-level
differential. However, you cannot do a Farm-level full backup followed by a
Web Application full backup, and then a Farm Differential backup. In this
case, the differential job would fail with an error message.
■ You cannot perform a backup by using both SharePoint Server 2010 and
tools such as Microsoft SQL Server tools, Central Administration website,
and so on. For example, if you perform a full backup using these tools, you
may not be able to restore the differential backup job.
■ If you try to protect SharePoint Server 2010 using the Agent for Microsoft
SharePoint Server and other agents, such as Client Agent and Agent for SQL
server, the SharePoint 2010 data may be backed up more than once. To
avoid this situation, you should exclude the SharePoint 2010 database and
files from the Client Agent and Agent for SQL Server backup job.
SharePoint Server 2010 does not support the following:
■ Data encryption and compression at the agent side under the Global
Options.
■ Multiplexing and Multistreaming backup jobs using single instance.
■ Backup agent data on two different machines that are in different CA
ARCserve Backup domain.
Backup Options Dialog in SharePoint Server 2010
Chapter 3: Backing Up SharePoint 2010 Systems 29
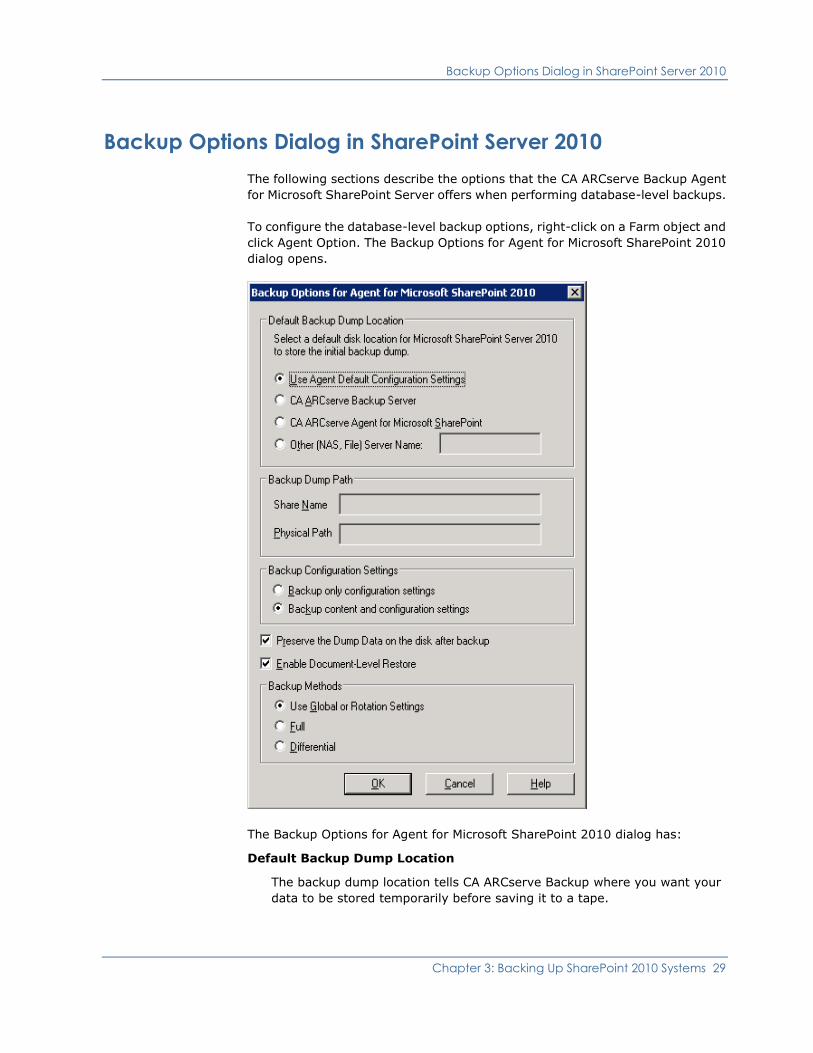
Backup Options Dialog in SharePoint Server 2010
The following sections describe the options that the CA ARCserve Backup Agent
for Microsoft SharePoint Server offers when performing database-level backups.
To configure the database-level backup options, right-click on a Farm object and
click Agent Option. The Backup Options for Agent for Microsoft SharePoint 2010
dialog opens.
The Backup Options for Agent for Microsoft SharePoint 2010 dialog has:
Default Backup Dump Location
The backup dump location tells CA ARCserve Backup where you want your
data to be stored temporarily before saving it to a tape.
Backup Options Dialog in SharePoint Server 2010
30 Agent for Microsoft SharePoint Server Guide
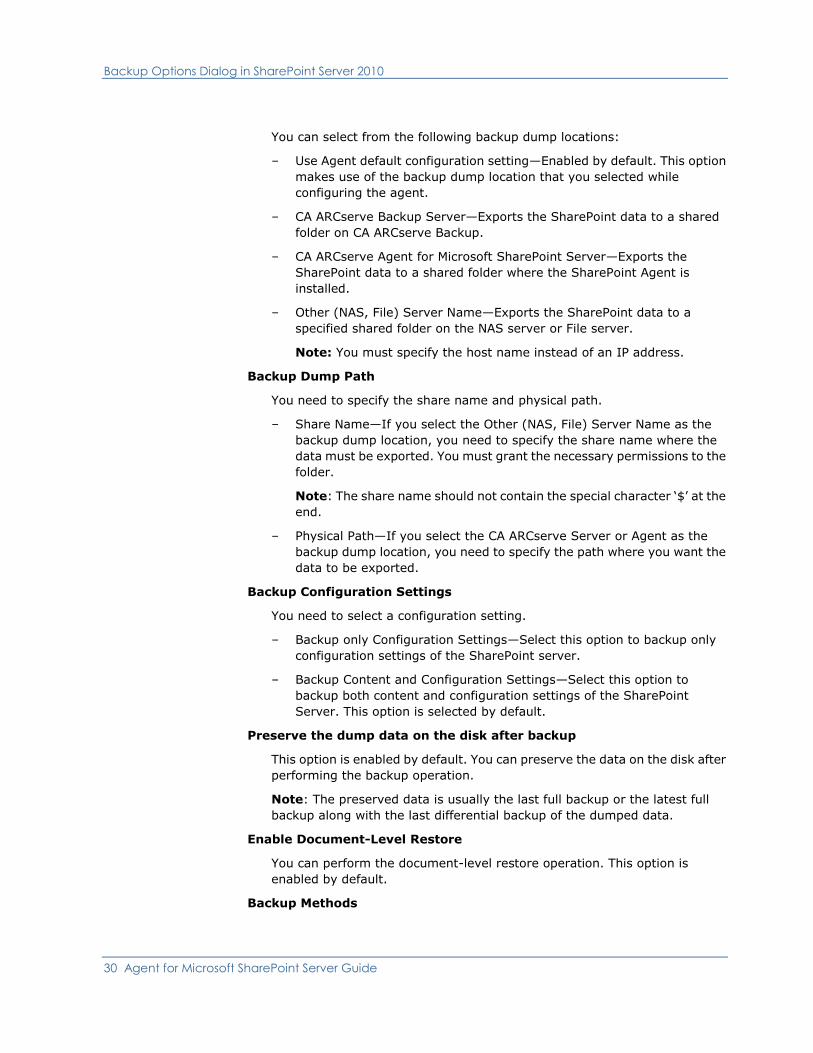
You can select from the following backup dump locations:
– Use Agent default configuration setting—Enabled by default. This option
makes use of the backup dump location that you selected while
configuring the agent.
– CA ARCserve Backup Server—Exports the SharePoint data to a shared
folder on CA ARCserve Backup.
– CA ARCserve Agent for Microsoft SharePoint Server—Exports the
SharePoint data to a shared folder where the SharePoint Agent is
installed.
– Other (NAS, File) Server Name—Exports the SharePoint data to a
specified shared folder on the NAS server or File server.
Note: You must specify the host name instead of an IP address.
Backup Dump Path
You need to specify the share name and physical path.
– Share Name—If you select the Other (NAS, File) Server Name as the
backup dump location, you need to specify the share name where the
data must be exported. You must grant the necessary permissions to the
folder.
Note: The share name should not contain the special character ‘$’ at the
end.
– Physical Path—If you select the CA ARCserve Server or Agent as the
backup dump location, you need to specify the path where you want the
data to be exported.
Backup Configuration Settings
You need to select a configuration setting.
– Backup only Configuration Settings—Select this option to backup only
configuration settings of the SharePoint server.
– Backup Content and Configuration Settings—Select this option to
backup both content and configuration settings of the SharePoint
Server. This option is selected by default.
Preserve the dump data on the disk after backup
This option is enabled by default. You can preserve the data on the disk after
performing the backup operation.
Note: The preserved data is usually the last full backup or the latest full
backup along with the last differential backup of the dumped data.
Enable Document-Level Restore
You can perform the document-level restore operation. This option is
enabled by default.
Backup Methods

Backup Options Dialog in SharePoint Server 2010
Chapter 3: Backing Up SharePoint 2010 Systems 31
When you submit a backup job, you must select a backup method. The
backup method tells CA ARCserve Backup how you want your data to be
backed up. You can select from the following backup methods:
– Use Global or Rotation setting—Enabled by default. If you do not disable
this, you must select a backup method on the Schedule tab.
– Full—It backs up the entire database and marks all of the files that have
been backed up in preparation for a subsequent incremental or
differential backup.
Note: Always perform a full backup when running the agent for the first
time, after upgrading to a Service Pack, and after performing a restore.
– Differential Backup—Backs up the files that have changed since the last
backup.
Note: The Backup Method options on the Schedule tab do not apply, if you
select the Full or Differential backup methods. Microsoft SharePoint 2010
does not support the Incremental Backup method. If you select Incremental
Backup on the Schedule tab, it will still consider it as Differential Backup.
Perform a Database-Level Backup in SharePoint Server 2010
32 Agent for Microsoft SharePoint Server Guide
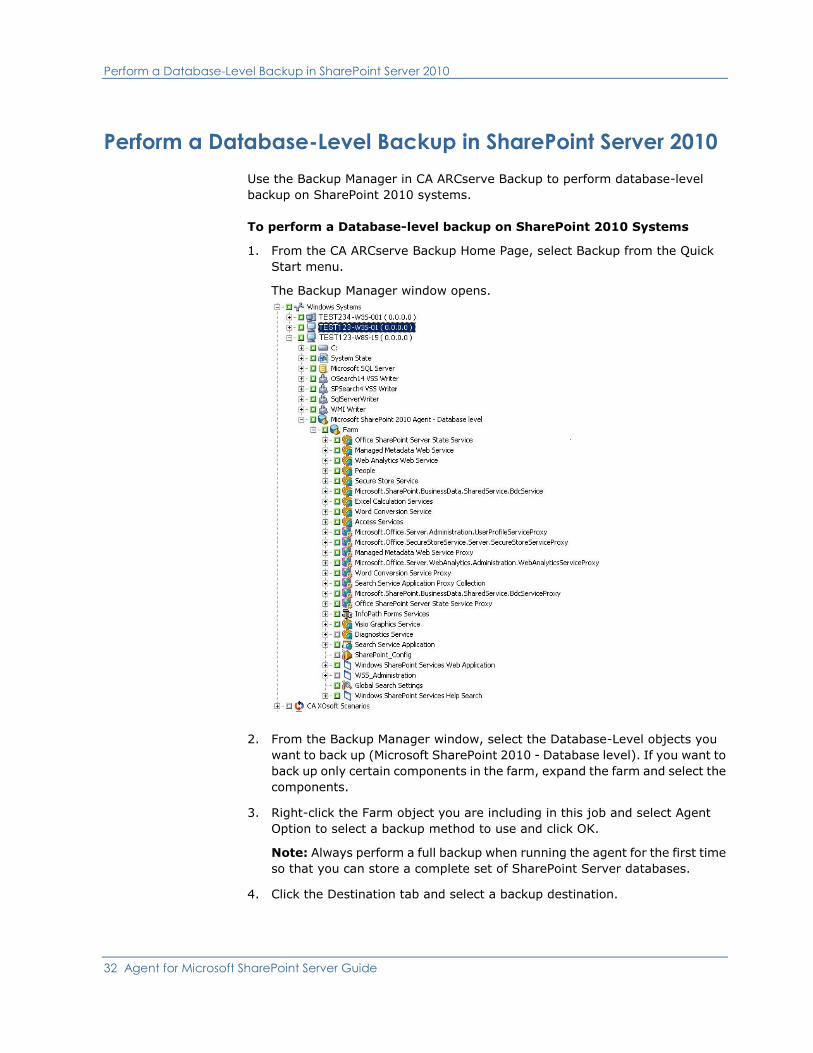
Perform a Database-Level Backup in SharePoint Server 2010
Use the Backup Manager in CA ARCserve Backup to perform database-level
backup on SharePoint 2010 systems.
To perform a Database-level backup on SharePoint 2010 Systems
1. From the CA ARCserve Backup Home Page, select Backup from the Quick
Start menu.
The Backup Manager window opens.
2. From the Backup Manager window, select the Database-Level objects you
want to back up (Microsoft SharePoint 2010 - Database level). If you want to
back up only certain components in the farm, expand the farm and select the
components.
3. Right-click the Farm object you are including in this job and select Agent
Option to select a backup method to use and click OK.
Note: Always perform a full backup when running the agent for the first time
so that you can store a complete set of SharePoint Server databases.
4. Click the Destination tab and select a backup destination.

Perform a Database-Level Backup in SharePoint Server 2010
Chapter 3: Backing Up SharePoint 2010 Systems 33
5. Click the Schedule tab.
If you want to use a Custom Schedule, select a Repeat Method. If you want
to use a rotation scheme, select the Use Rotation Scheme option and set up
your scheme. For more information on scheduling jobs and rotation
schemes, see the online help or the Administration Guide.
6. Click Submit on the toolbar.
The Security and Agent Information dialog opens.
7. From the Security and Agent Information dialog, ensure that the correct user
name and password are filled in for each object. If you need to enter or
modify a user name or password, click the Security button, make your
changes, and then click OK.
8. Click OK.
The Submit Job dialog opens.
9. From the Submit Job dialog, select Run Now to run the job immediately, or
select Run On and select a future date and time when you want the job to
run.
10. Enter a description for your job.
If you selected multiple sources to back up and want to set the priority in
which the job sessions initiate, click Source Priority. Use the Top, Up, Down,
and Bottom buttons to change the order in which the jobs are processed.
When you finish setting priorities, click OK.
11. Click OK.
The backup job is submitted.

Chapter 4: Backing Up SharePoint 2007 Systems 35
Chapter 4: Backing Up SharePoint 2007
Systems
This chapter provides information for backing up data on SharePoint 2007
systems.
This section contains the following topics:
SharePoint 2007 Backup Overview (see page 35)
Database-Level Backup Prerequisites (see page 35)
How to Perform a Full Backup (see page 36)
Backup Considerations (see page 36)
Database-Level Agent Backup Option Dialog (see page 38)
Perform a Database-Level Backup in SharePoint Server 2007 (see page 40)
SharePoint 2007 Backup Overview
Database-level backup protects the SharePoint Server 2007 database files. It is
the fundamental backup for your SharePoint Server, and you should always use
it if you use one of the other granular backup types. You can use database-level
backups to restore SharePoint Server in the event of a system failure, database
corruption, or a disaster recovery scenario.
Database-Level Backup Prerequisites
Before performing a database-level backup on SharePoint Server 2007, you
must satisfy the following requirements:
■ Ensure that the Windows SharePoint Services Administrative service is
running on the front-end web server and the Application Server.
■ Ensure that Microsoft SQL Server is running.
How to Perform a Full Backup
36 Agent for Microsoft SharePoint Server Guide
How to Perform a Full Backup
If you want to take a full backup of the database you need to ensure certain Farm
management actions. If you perform one of these actions and then perform a
differential backup, you may not be able to successfully restore the database
that you backed up fully, earlier. To avoid this problem, always perform a full
database backup immediately after you have performed any change in the
topology of SharePoint 2007 Farm or Windows SharePoint 3.0 Farm such as the
following:
■ Adding a new web application, a new SharePoint Service Provider, a new
database into a normal web application or SharePoint Service Provider
Administration web application.
■ Renaming the SharePoint Service Provider.
■ Deleting the SharePoint Service Provider so that its Administration web
application is detached from the SharePoint Service Provider.
■ Canceling a full backup job while it is running.
■ Restoring the database from any backup.
Backup Considerations
To run successful backups consider the following:
■ If you perform a full backup of component A, and then a full backup of A’s
child component B, the differential backup of component A would fail. In
other words, a Farm-level full backup can be followed by a Farm-level
differential. However, you cannot do a Farm-level full backup followed by a
SharePoint Provider Service full backup, and then a Farm Differential
backup. In this case, the differential job would fail with an error message.
■ You cannot perform a backup by using both SharePoint Server 2007 and
tools such as Microsoft SQL Server tools, Central Administration website,
and so on. For example, if you perform a full backup using these tools, you
may not be able to restore the differential backup job.
■ If you try to protect SharePoint Server 2007 using the Agent for SharePoint
and other agents, such as Client Agent and Agent for SQL server, the
SharePoint 2007 data may be backed up more than once. To avoid this
situation, you should exclude the SharePoint 2007 database and files from
the Client Agent and Agent for SQL Server backup job.

Backup Considerations
Chapter 4: Backing Up SharePoint 2007 Systems 37
SharePoint Server 2007 does not support the following:
■ Data encryption and compression at the agent side under the Global
Options.
■ Multiplexing and Multistreaming backup jobs.
■ Backup agent data on two different machines that are in different CA
ARCserve Backup domain.
Database-Level Agent Backup Option Dialog
38 Agent for Microsoft SharePoint Server Guide
Database-Level Agent Backup Option Dialog
The following sections describe the options that the CA ARCserve Backup Agent
for Microsoft SharePoint Server offers when performing database-level backups.
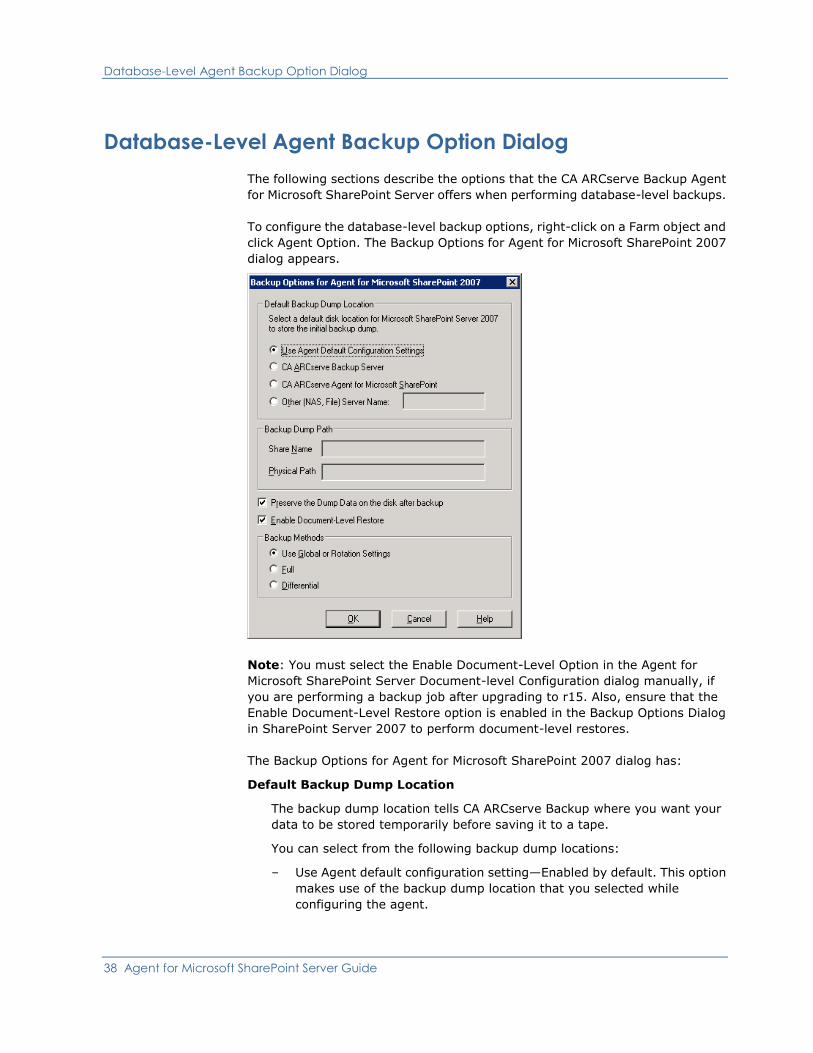
To configure the database-level backup options, right-click on a Farm object and
click Agent Option. The Backup Options for Agent for Microsoft SharePoint 2007
dialog appears.
Note: You must select the Enable Document-Level Option in the Agent for
Microsoft SharePoint Server Document-level Configuration dialog manually, if
you are performing a backup job after upgrading to r15. Also, ensure that the
Enable Document-Level Restore option is enabled in the Backup Options Dialog
in SharePoint Server 2007 to perform document-level restores.
The Backup Options for Agent for Microsoft SharePoint 2007 dialog has:
Default Backup Dump Location
The backup dump location tells CA ARCserve Backup where you want your
data to be stored temporarily before saving it to a tape.
You can select from the following backup dump locations:
– Use Agent default configuration setting—Enabled by default. This option
makes use of the backup dump location that you selected while
configuring the agent.
Database-Level Agent Backup Option Dialog
Chapter 4: Backing Up SharePoint 2007 Systems 39
– CA ARCserve Backup Server—Exports the SharePoint data to a shared
folder on CA ARCserve Backup.
– CA ARCserve Agent for Microsoft SharePoint Server—Exports the
SharePoint data to a shared folder where the SharePoint Agent is
installed.
– Other (NAS, File) Server Name—Exports the SharePoint data to a
specified shared folder on the NAS server or File server.
Note: You must specify the host name instead of an IP address.
Backup Dump Path
You need to specify the share name and physical path.
– Share Name—If you select the Other (NAS, File) Server Name as the
backup dump location, you need to specify the share name where the
data must be exported. You must grant the necessary permissions to the
folder.
Note: The share name should not contain the special character ‘$’ at the
end.
– Physical Path—If you select the CA ARCserve Server or Agent as the
backup dump location, you need to specify the path where you want the
data to be exported.
Preserve the dump data on the disk after backup
This option is enabled by default. You can preserve the data on the disk after
performing the backup operation.
– Note: The preserved data is usually the last full backup or the latest full
backup along with the last differential backup of the dumped data.
Enable Document-Level Restore
You can perform the document-level restore operation. This option is
enabled by default.
Backup Methods
When you submit a backup job, you must select a backup method. The
backup method tells CA ARCserve Backup how you want your data to be
backed up. You can select from the following backup methods:
– Use Global or Rotation setting—Enabled by default. If you do not disable
this, you must select a backup method on the Schedule tab.
– Full—It backs up the entire database and marks all of the files that have
been backed up in preparation for a subsequent incremental or
differential backup.
Note: Always perform a full backup when running the agent for the first
time, after upgrading to a Service Pack, and after performing a restore.
Perform a Database-Level Backup in SharePoint Server 2007
40 Agent for Microsoft SharePoint Server Guide
– Differential Backup—Backs up the files that have changed since the last
backup.
Note: The Backup Method options on the Schedule tab do not apply, if you
select the Full or Differential backup methods. SharePoint 2007 does not
support the Incremental Backup method. If you select Incremental Backup
on the Schedule tab, it will still consider it as Differential Backup.
Perform a Database-Level Backup in SharePoint Server 2007
Use the Backup Manager in CA ARCserve Backup to perform database-level
backup on SharePoint 2007 systems.
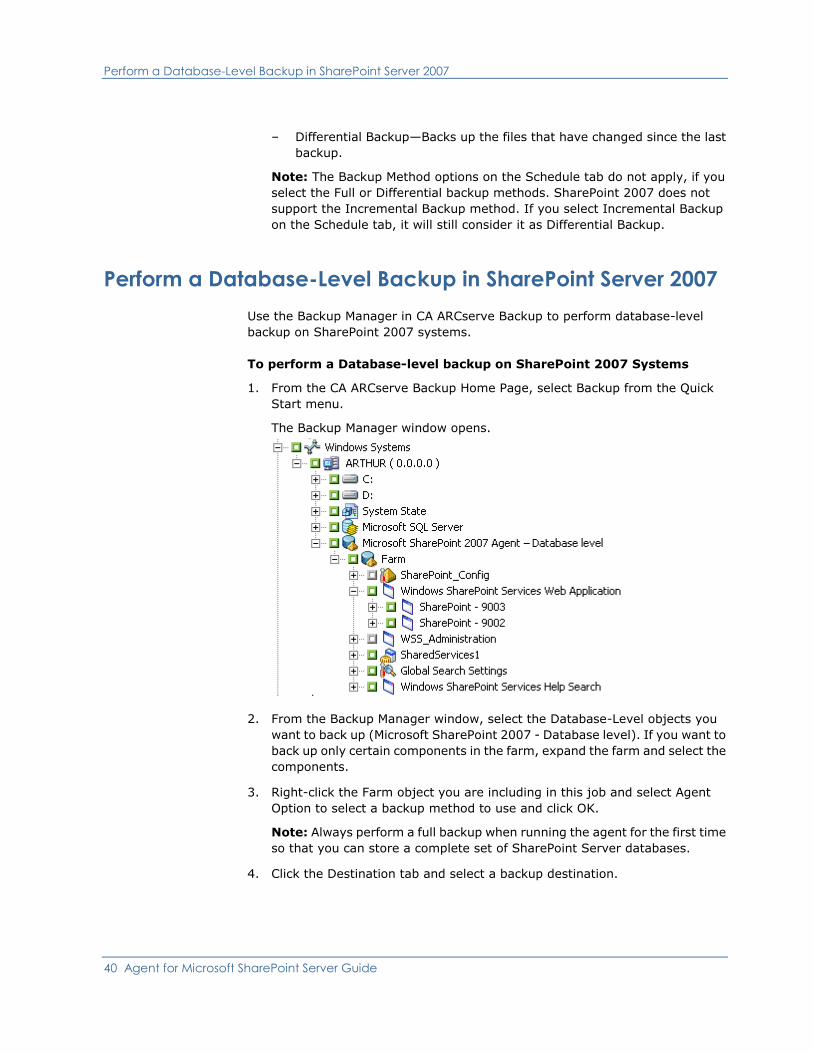
To perform a Database-level backup on SharePoint 2007 Systems
1. From the CA ARCserve Backup Home Page, select Backup from the Quick
Start menu.
The Backup Manager window opens.
2. From the Backup Manager window, select the Database-Level objects you
want to back up (Microsoft SharePoint 2007 - Database level). If you want to
back up only certain components in the farm, expand the farm and select the
components.
3. Right-click the Farm object you are including in this job and select Agent
Option to select a backup method to use and click OK.
Note: Always perform a full backup when running the agent for the first time
so that you can store a complete set of SharePoint Server databases.
4. Click the Destination tab and select a backup destination.
Perform a Database-Level Backup in SharePoint Server 2007
Chapter 4: Backing Up SharePoint 2007 Systems 41
5. Click the Schedule tab.
If you want to use a Custom Schedule, select a Repeat Method. If you want
to use a rotation scheme, select the Use Rotation Scheme option and set up
your scheme. For more information on scheduling jobs and rotation
schemes, see the online help or the Administration Guide.
6. Click Submit on the toolbar.
The Security and Agent Information dialog opens.
7. From the Security and Agent Information dialog, ensure that the correct user
name and password are filled in for each object. If you need to enter or
modify a user name or password, click the Security button, make your
changes, and then click OK.
8. Click OK.
The Submit Job dialog opens.
9. From the Submit Job dialog, select Run Now to run the job immediately, or
select Run On and select a future date and time when you want the job to
run.
10. Enter a description for your job.
If you selected multiple sources to back up and want to set the priority in
which the job sessions initiate, click Source Priority. Use the Top, Up, Down,
and Bottom buttons to change the order in which the jobs are processed.
When you finish setting priorities, click OK.
11. Click OK.
The backup job is submitted.

Chapter 5: Restoring SharePoint 2010 Systems 43
Chapter 5: Restoring SharePoint 2010
Systems
This chapter provides information for restoring data on SharePoint 2010
systems.
This section contains the following topics:
Restore Overview in SharePoint Server 2010 (see page 43)
Database-Level Restore Sets in SharePoint Server 2010 (see page 44)
Database-Level Restore Option Dialog in SharePoint Server 2010 (see page 45)
Database-Level Restore Prerequisites SharePoint Server 2010 (see page 48)
Perform a Database-Level Restore on SharePoint Server 2010 (see page 50)
Document-Level Restore Option Dialog in SharePoint 2010 (see page 54)
Perform a Document-Level Restore to the Original Location in SharePoint 2010
(see page 58)
Perform a Document-Level Restore to the Alternate Location in SharePoint 2010
(see page 59)
Restore Overview in SharePoint Server 2010
The following sections include information on the prerequisites you must meet
before you perform a restore, the features that the CA ARCserve Backup Agent
for Microsoft SharePoint Server offers when restoring, and the procedure for how
to perform a database-level and document-level restore in SharePoint 2010
Systems.
Database-Level Restore Sets in SharePoint Server 2010
44 Agent for Microsoft SharePoint Server Guide
Database-Level Restore Sets in SharePoint Server 2010
To restore a SharePoint Server, you must restore all of the sessions that, when
combined, completely restore the data. These sessions are called your restore
set, and it includes the following sessions:
■ If you backed up using only the full backup method, your restore set includes
only this full session.
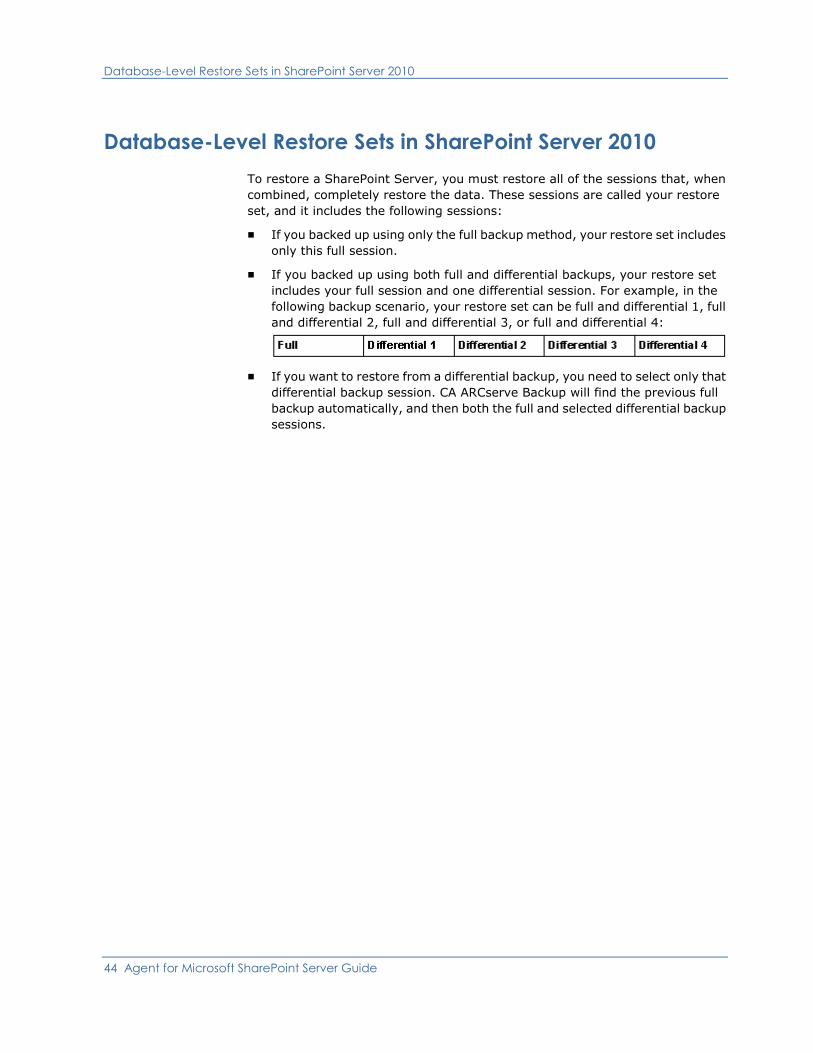
■ If you backed up using both full and differential backups, your restore set
includes your full session and one differential session. For example, in the
following backup scenario, your restore set can be full and differential 1, full
and differential 2, full and differential 3, or full and differential 4:
■ If you want to restore from a differential backup, you need to select only that
differential backup session. CA ARCserve Backup will find the previous full
backup automatically, and then both the full and selected differential backup
sessions.
Database-Level Restore Option Dialog in SharePoint Server 2010
Chapter 5: Restoring SharePoint 2010 Systems 45
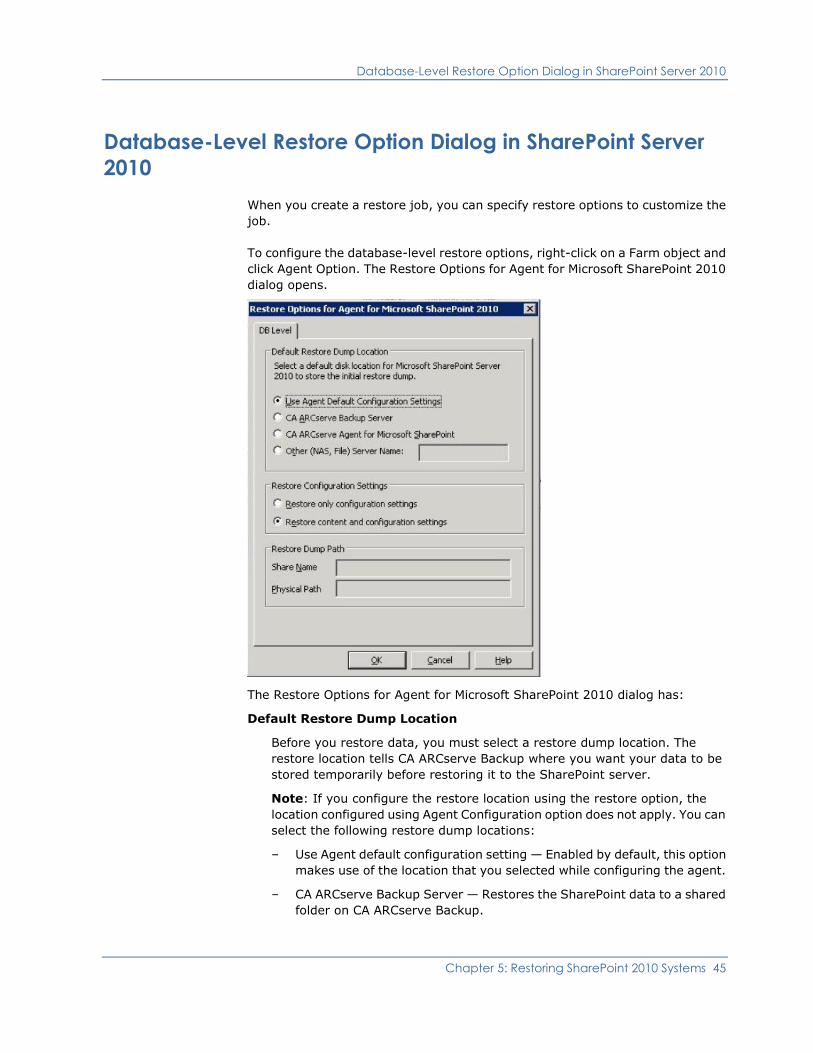
Database-Level Restore Option Dialog in SharePoint Server
2010
When you create a restore job, you can specify restore options to customize the
job.
To configure the database-level restore options, right-click on a Farm object and
click Agent Option. The Restore Options for Agent for Microsoft SharePoint 2010
dialog opens.
The Restore Options for Agent for Microsoft SharePoint 2010 dialog has:
Default Restore Dump Location
Before you restore data, you must select a restore dump location. The
restore location tells CA ARCserve Backup where you want your data to be
stored temporarily before restoring it to the SharePoint server.
Note: If you configure the restore location using the restore option, the
location configured using Agent Configuration option does not apply. You can
select the following restore dump locations:
– Use Agent default configuration setting — Enabled by default, this option
makes use of the location that you selected while configuring the agent.
– CA ARCserve Backup Server — Restores the SharePoint data to a shared
folder on CA ARCserve Backup.
Database-Level Restore Option Dialog in SharePoint Server 2010
46 Agent for Microsoft SharePoint Server Guide
– CA ARCserve Agent for Microsoft SharePoint Server — Restores the
SharePoint data to a shared folder where the SharePoint Agent is
installed.
– Other (NAS, File) Server Name — Restores the SharePoint data to a
specified shared folder on the NAS server or File server.
Note: You must specify the host name instead of an IP address.
Restore Configuration Settings
– Restore only configuration settings— Restores the configuration settings
while performing the database-level restore.
– Restore content and configuration settings —Restores the content and
configuration settings while performing the database-level restore. To
know more about the configuration settings options, see Restore
Configuration Settings in SharePoint Server 2010 (see page 47).
Restore Dump Path
– Share Name— If you select the Other (NAS, File) Server Name as the
default restore dump location, you need to specify the Server name
where the data must be restored. You must grant the necessary
permissions to the folder.
Note: The share name should not contain the special character ‘$’ at the
end.
– Physical Path — If you select the CA ARCserve Server or Agent as the
restore dump location, you need to specify the path where you want the
data to be restored.
For more information on these options and how you can configure them, see
Configure the Agent on SharePoint Systems (see page 25).
Database-Level Restore Option Dialog in SharePoint Server 2010
Chapter 5: Restoring SharePoint 2010 Systems 47
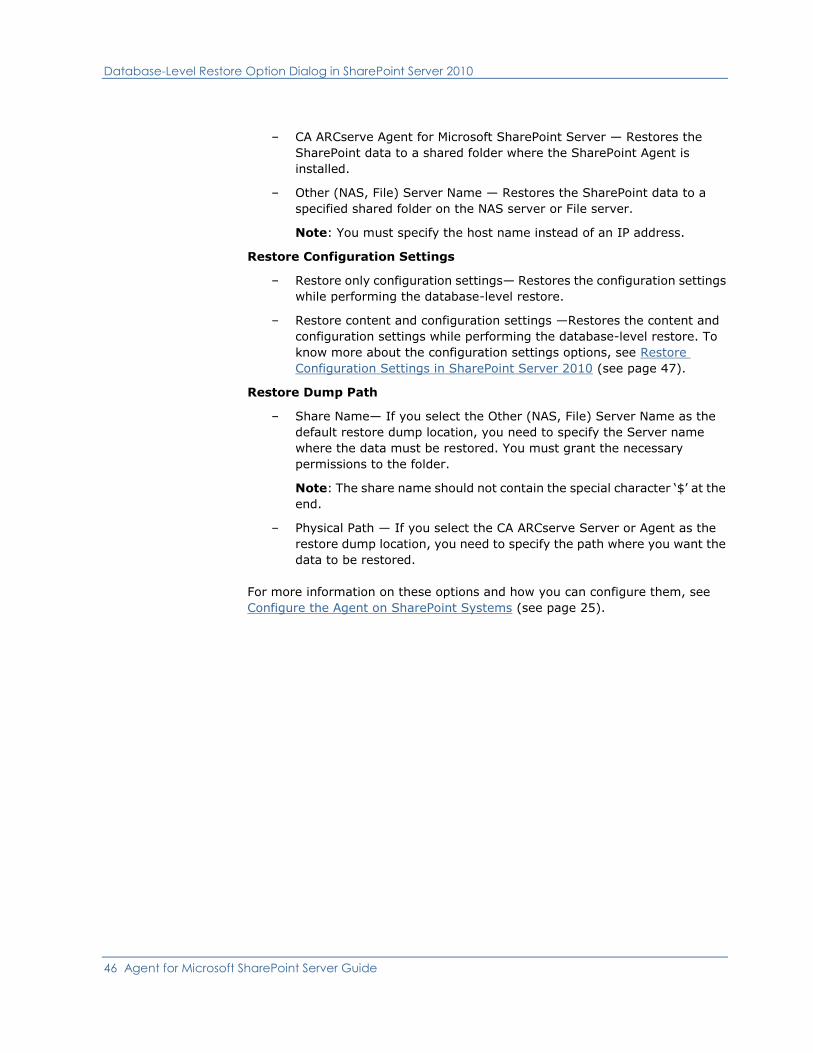
Restore Configuration Settings in SharePoint Server 2010
You can configure the restore settings using the Submit button on the Restore
Manager.
The dialog SharePoint 2010 agent restore configuration dialog appears.
.
Type of restore
Lets you to keep the same restore Name and Location after restore or a
different one.
Login names and passwords
Lets you to configure who can login to the Farm, Web Application, and
SharePoint Service Provider. This credential information is always required
to restore the data.
Name and Location
Database-Level Restore Prerequisites SharePoint Server 2010
48 Agent for Microsoft SharePoint Server Guide
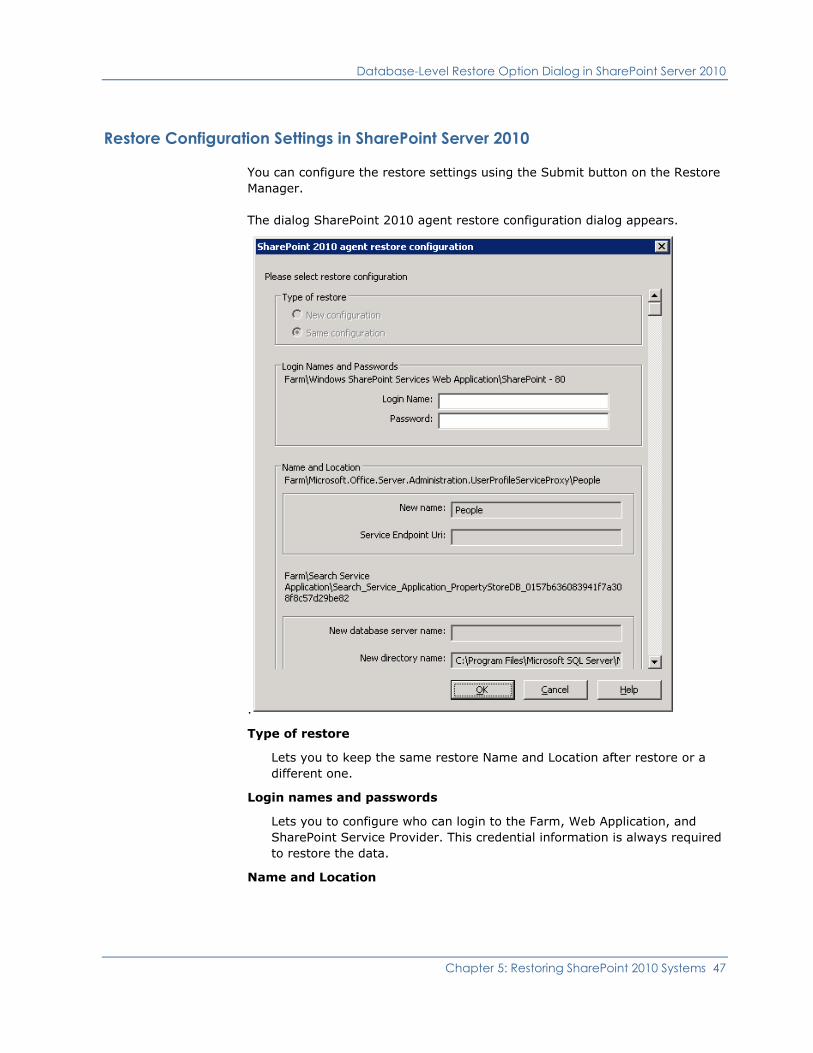
Lets you configure so that the name or location or both so that of one or
more components will have new name or location after a backup job has
been restored
Different components have different configuration items for name and location.
The following table lists the components and their configuration items:
Component
Type
Configuration
Item
Comment
Database
New database
Server Name
The SQL database server you want to
restore the database to. It could be an
alias name.
New directory
name
The new physical path that stores the
SQL database files.
New database
name
The new name of the database after
restore.
UserProfileAppli
cation
New server name The new My Site address of
UserProfileApplication after restore.
Shared Search
Index
New server name The computer name where the Office
Search Index service is running.
New directory
name
The new physical path where the index
files are stored.
Web Application
New web
application URL
The URL of the Web Application website
New web
application Name
The new name of the web application
that is displayed in IIS.
Database-Level Restore Prerequisites SharePoint Server 2010
Before performing a database-level restore on SharePoint Server 2010, you
must satisfy the following requirements:
■ Ensure that the Windows SharePoint Services Administrative service and
Windows SharePoint Services Timer service are running on all the Front-End
Web servers and Application servers.
■ Ensure to restart the Timer service on stand-alone installations.
Database-Level Restore Prerequisites SharePoint Server 2010
Chapter 5: Restoring SharePoint 2010 Systems 49
■ If you are restoring search services and indexes to a new location, ensure
that the search service is running before you start the restore.
■ Ensure that all web application content databases have unique names. If a
database with the same name is used by two web applications and then
restored, data in the second database is overwritten with data from the first
database.
■ Ensure that you do not perform more than one restore at the same time.
■ Ensure that all servers in Farm have the same time zone and daylight
savings time settings.
■ For stand alone installations, add the following accounts into the Local
Administrators Group before performing a restore job. Once the restore job
is completed, delete the accounts:
■ NT AUTHORITY\LOCAL SERVICE
■ NT AUTHORITY\NETWORK SERVICE
To add accounts to the Local Administrators Group
1. Open Control Panel and expand Administration Tools, Computer
Management, System Tools, Local Users and Groups, Groups,
Administrators.
2. Click Add.
3. Enter NETWORK SERVICE and LOCAL SERVICE.
4. Click OK.
Perform a Database-Level Restore on SharePoint Server 2010
50 Agent for Microsoft SharePoint Server Guide
Perform a Database-Level Restore on SharePoint Server 2010
Use the Backup Manager in CA ARCserve Backup to perform a Database-level
data restore.
Important! Treat all content database names as unique. Before you restore a
content database, make sure the name of the database does not exist in any
other web application. If you restore a content database whose name is used by
two different applications using the Restore by Session method, the database
restore job is listed as 'successful', but occurs under the second application,
overwriting whatever content existed in that database.
To restore a SharePoint Server 2010 database
1. From the CA ARCserve Backup Home Page, select Restore from the Quick
Start menu.
The Restore Manager window opens.
2. From the Restore Manager window, select Restore by Tree in the drop-down
list below the Source tab.
Note: Both Restore by Tree and Restore by Session are supported for
Database-Level restore.
Under the Microsoft SharePoint 2010 Agent - Database Level node there may
be more than one Farm object.
If you select multiple components under a Farm for a single backup job, you
see multiple Farm objects. Each node is associated with a component
selected to backup. For example, if you select a Web Application and a
shared service, two Farm objects are generated. One Farm object has the
Web Application and the other Farm object has the shared service.
If you back up the same Farm or component several times, you see only one
Farm object which displays the latest backup of this component.
3. From the directory tree, expand the Windows Systems object, expand the
farm containing the database that you backed up, and select the farm
object.

Perform a Database-Level Restore on SharePoint Server 2010
Chapter 5: Restoring SharePoint 2010 Systems 51
4. If the most recent backup is not the backup you want to restore, click Version
History as shown in the following graphic, select the version you want to
restore, and click Select.
Note: Version History is enabled for SharePoint 2010 Database-Level
objects and Farm objects and displays the backup history of the selected
components. Microsoft SharePoint 2010 identifies the Farm component
based on its ID, which is unique. This ID does not change even if the
component is renamed.
5. Right-click each farm object you are including in this job and select Agent
Option to select restore options. For more information about restore options,
see Database-Level Restore Option Dialog in SharePoint Server 2010 (see
page 45).
6. Click the Destination tab. You can restore the database objects to their
original location (the default) or you can restore the database objects to an
alternative location.
Note: If you are using Windows SharePoint 2010 and if you want to restore
an entire farm to an alternate farm, upgrade the Microsoft SharePoint RC
build to version 4747.1000 or higher. According to a known Microsoft issue,
the new location of the Web Analytics Service Application Reporting
Database does not work. Ensure that the original location directory of that
database exists on the destination farm before restore.
Perform a Database-Level Restore on SharePoint Server 2010
52 Agent for Microsoft SharePoint Server Guide
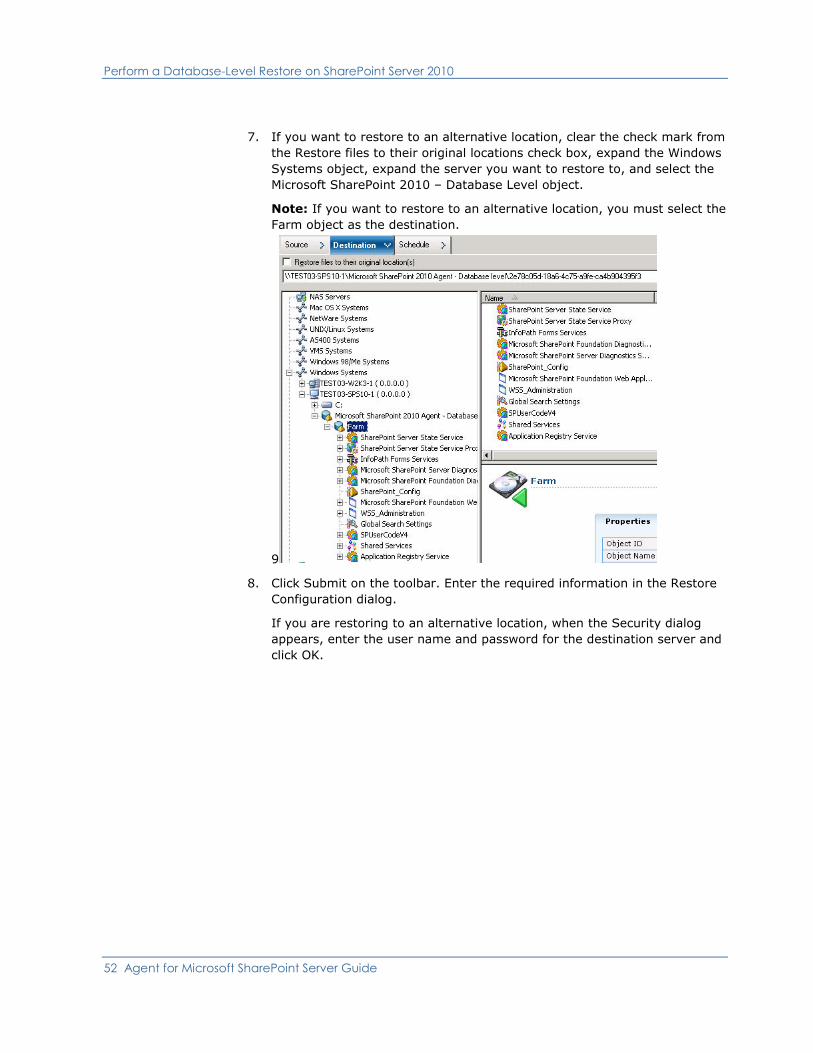
7. If you want to restore to an alternative location, clear the check mark from
the Restore files to their original locations check box, expand the Windows
Systems object, expand the server you want to restore to, and select the
Microsoft SharePoint 2010 – Database Level object.
Note: If you want to restore to an alternative location, you must select the
Farm object as the destination.
9
8. Click Submit on the toolbar. Enter the required information in the Restore
Configuration dialog.
If you are restoring to an alternative location, when the Security dialog
appears, enter the user name and password for the destination server and
click OK.

Perform a Database-Level Restore on SharePoint Server 2010
Chapter 5: Restoring SharePoint 2010 Systems 53
9. When the Session User Name and Password dialog opens, verify or change
the user name and password for the destination server. To change the user
name or password, select the session, click Edit, make your changes, and
then click OK.
Note: You must enter the user name in the following format:
DOMAIN\USERNAME
10. Click OK.
11. When the Submit Job dialog opens, select Run Now to run the job
immediately, or select Run On and select a future date and time when you
want the job to run.
12. Enter a description for your job and click OK.
Important! After you perform a restore, you must restart the Internet
Information Services (IIS).
Document-Level Restore Option Dialog in SharePoint 2010
54 Agent for Microsoft SharePoint Server Guide
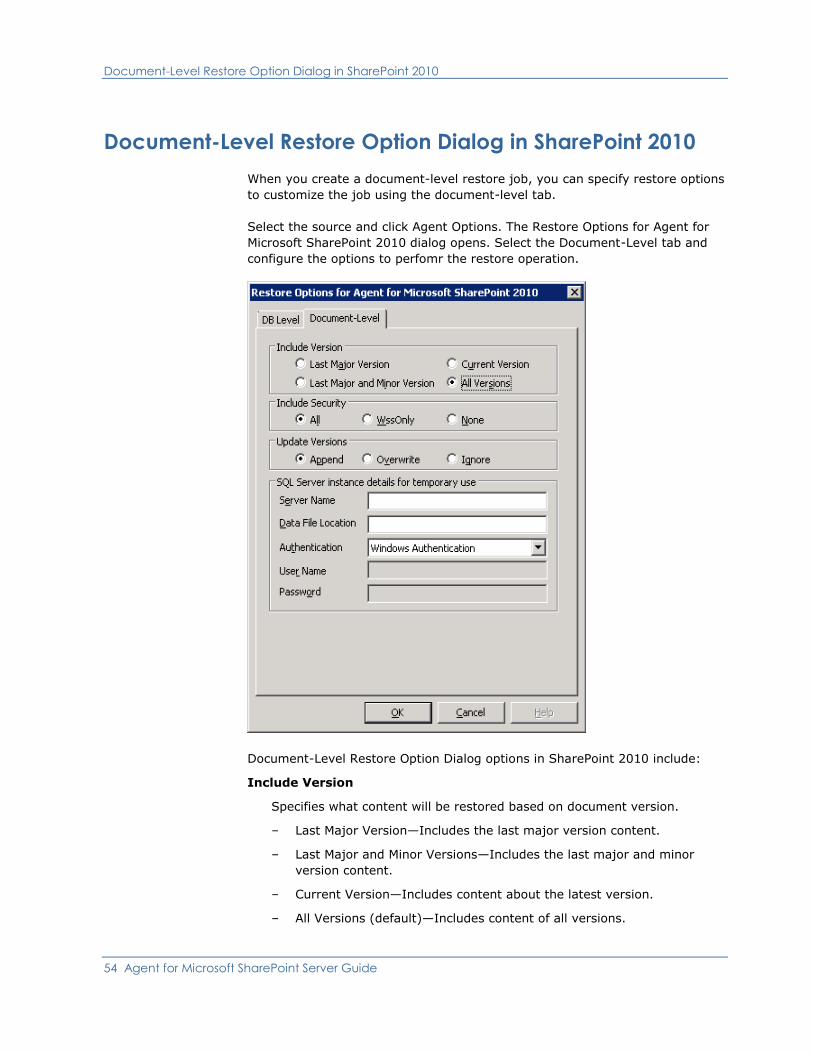
Document-Level Restore Option Dialog in SharePoint 2010
When you create a document-level restore job, you can specify restore options
to customize the job using the document-level tab.
Select the source and click Agent Options. The Restore Options for Agent for
Microsoft SharePoint 2010 dialog opens. Select the Document-Level tab and
configure the options to perfomr the restore operation.
Document-Level Restore Option Dialog options in SharePoint 2010 include:
Include Version
Specifies what content will be restored based on document version.
– Last Major Version—Includes the last major version content.
– Last Major and Minor Versions—Includes the last major and minor
version content.
– Current Version—Includes content about the latest version.
– All Versions (default)—Includes content of all versions.
Document-Level Restore Option Dialog in SharePoint 2010
Chapter 5: Restoring SharePoint 2010 Systems 55
Include Security
Specifies whether user and security group information will be restored.
– All (default)—Includes user memberships and role assignments such as
out of the box roles like Web Designer, or any custom roles that extend
from the out of the box roles. The ACL for each object is migrated.
Also, user information defined in the DAP or LDAP servers is included.
– WssOnly—Includes user memberships and role assignments such as out
of the box roles like Web Designer, or any custom roles that extend from
the out of the box roles. The ACL for each object is migrated.
No user information defined in the DAP or LDAP servers is included.
– None— No user or group information is migrated.
Update Versions
Specifies how versioning is managed in the destination location when
restore.
– Append(default)— Appends the versions to the destination.
– Ignore— Ignores versioning and imports the updated file.
– Overwrite— Deletes existing version and imports as new versions.
SQL Server instance details for temporary use
Connects the agent to a SQL server instance.
– Server name— The SQL Server host name and instance name.
– Data File Location— This location is used to store the database file when
restore database backup dump to SQL Instance. This must be a local
path on the server which hosts the SQL Instance and the path must
exists.
Note: The SQL Server instance must have permissions to access the
Data File Location.
– Authentication—The authentication type for this SQL Instance. Select
the type of authentication to connect to the SQL server.
– Windows Authentication (default)— You can enter the user name and
password details to connect.
– SQL Server Authentication— This is the SQL Server authentication
mode. You must enter the login and password details.
Note: The version of the temporary SQL Server must be same as the
version of Microsoft SharePoint database Server.
Document-Level Restore Option Dialog in SharePoint 2010
56 Agent for Microsoft SharePoint Server Guide
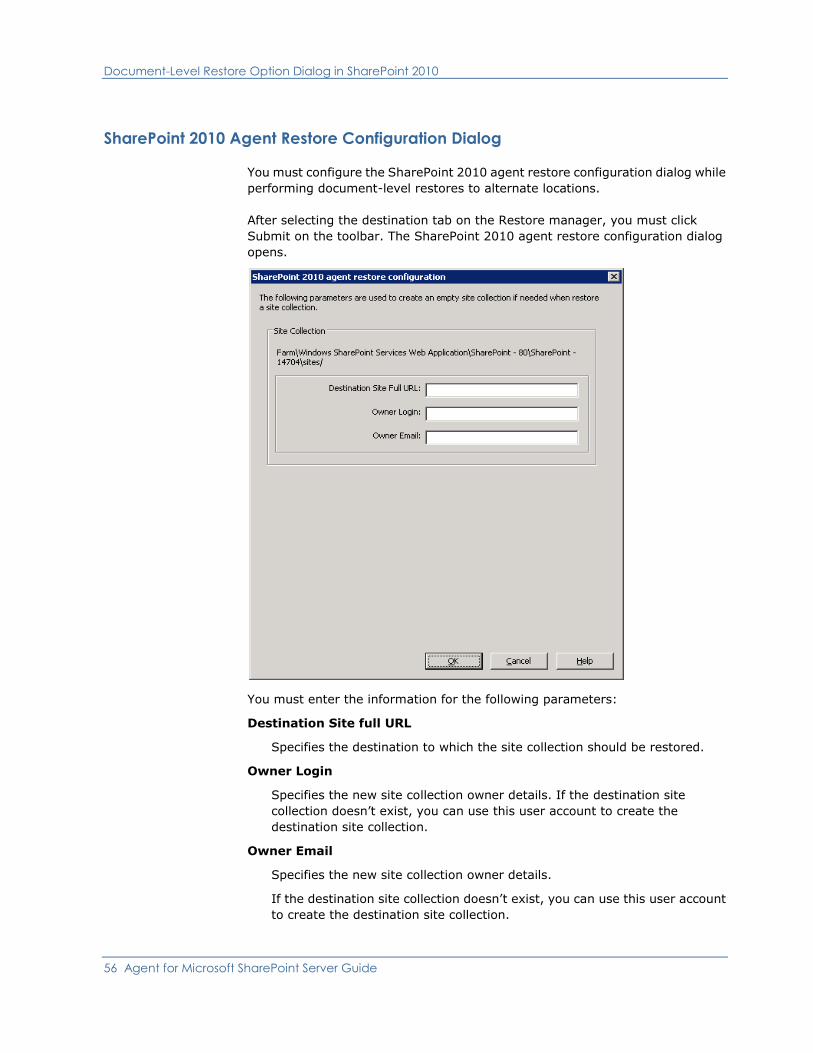
SharePoint 2010 Agent Restore Configuration Dialog
You must configure the SharePoint 2010 agent restore configuration dialog while
performing document-level restores to alternate locations.
After selecting the destination tab on the Restore manager, you must click
Submit on the toolbar. The SharePoint 2010 agent restore configuration dialog
opens.
You must enter the information for the following parameters:
Destination Site full URL
Specifies the destination to which the site collection should be restored.
Owner Login
Specifies the new site collection owner details. If the destination site
collection doesn’t exist, you can use this user account to create the
destination site collection.
Owner Email
Specifies the new site collection owner details.
If the destination site collection doesn’t exist, you can use this user account
to create the destination site collection.
Document-Level Restore Option Dialog in SharePoint 2010
Chapter 5: Restoring SharePoint 2010 Systems 57
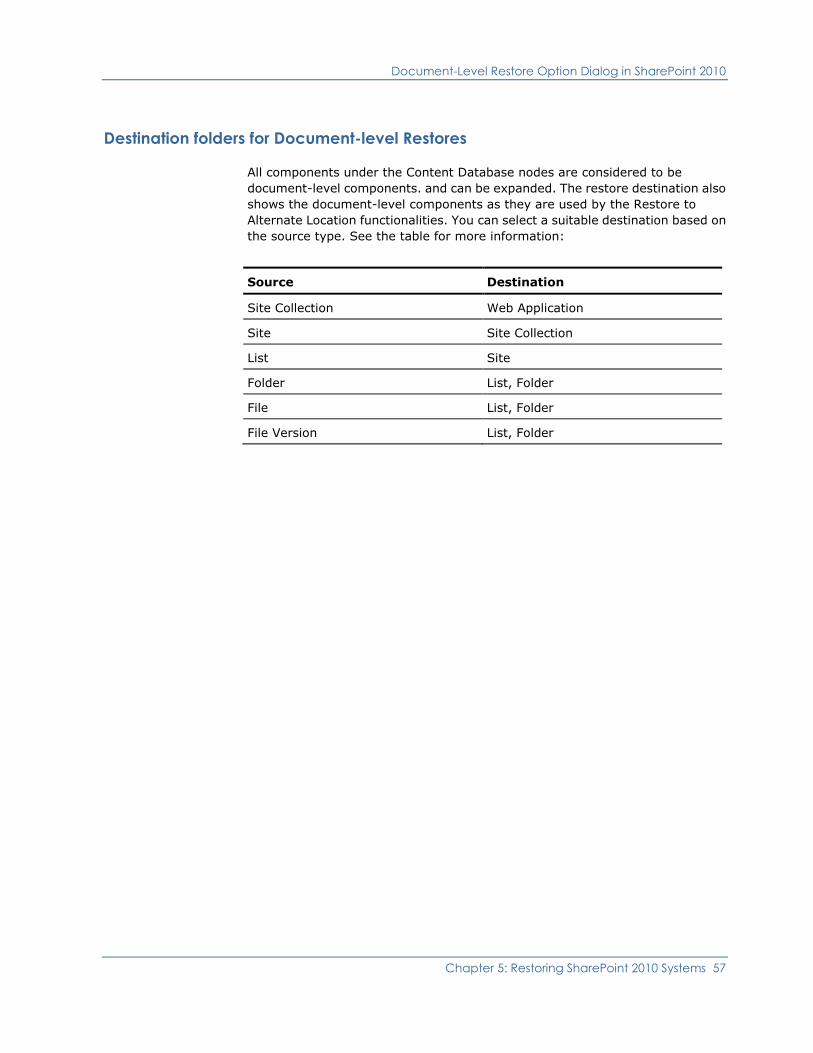
Destination folders for Document-level Restores
All components under the Content Database nodes are considered to be
document-level components. and can be expanded. The restore destination also
shows the document-level components as they are used by the Restore to
Alternate Location functionalities. You can select a suitable destination based on
the source type. See the table for more information:
Source Destination
Site Collection Web Application
Site Site Collection
List Site
Folder List, Folder
File List, Folder
File Version List, Folder
Perform a Document-Level Restore to the Original Location in SharePoint 2010
58 Agent for Microsoft SharePoint Server Guide
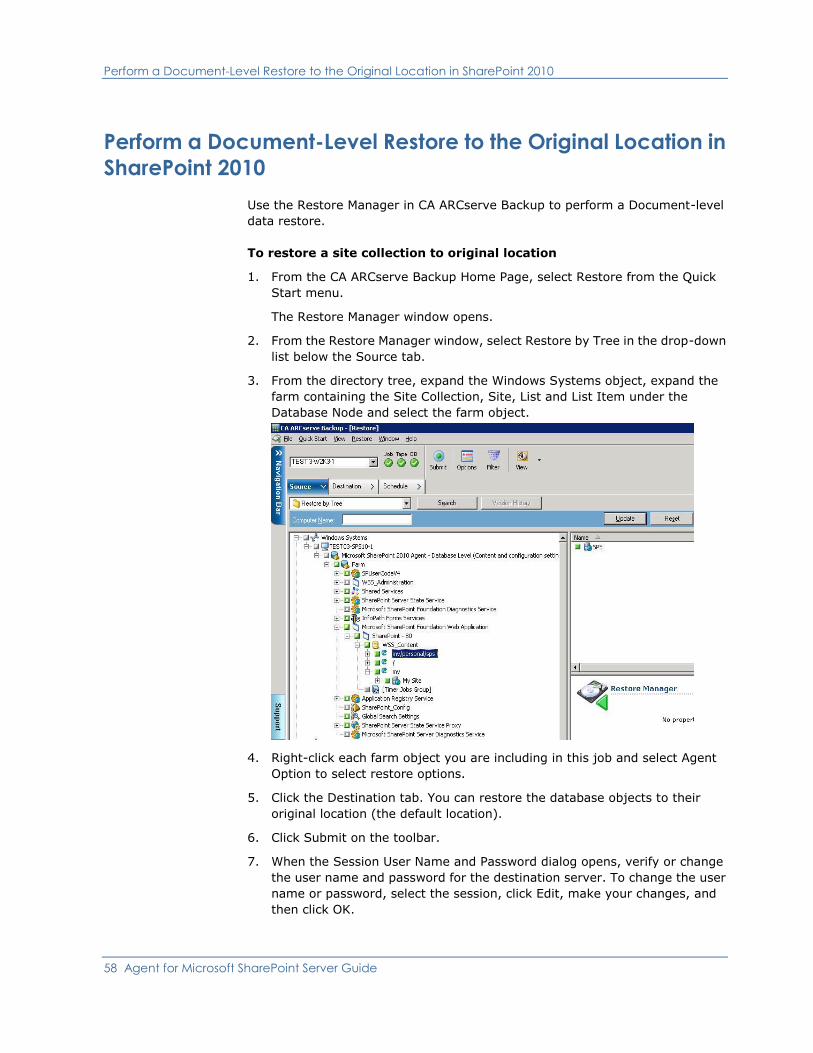
Perform a Document-Level Restore to the Original Location in
SharePoint 2010
Use the Restore Manager in CA ARCserve Backup to perform a Document-level
data restore.
To restore a site collection to original location
1. From the CA ARCserve Backup Home Page, select Restore from the Quick
Start menu.
The Restore Manager window opens.
2. From the Restore Manager window, select Restore by Tree in the drop-down
list below the Source tab.
3. From the directory tree, expand the Windows Systems object, expand the
farm containing the Site Collection, Site, List and List Item under the
Database Node and select the farm object.
4. Right-click each farm object you are including in this job and select Agent
Option to select restore options.
5. Click the Destination tab. You can restore the database objects to their
original location (the default location).
6. Click Submit on the toolbar.
7. When the Session User Name and Password dialog opens, verify or change
the user name and password for the destination server. To change the user
name or password, select the session, click Edit, make your changes, and
then click OK.
Perform a Document-Level Restore to the Alternate Location in SharePoint 2010
Chapter 5: Restoring SharePoint 2010 Systems 59
8. Click OK.
9. When the Submit Job dialog opens, select Run Now to run the job
immediately, or select Run On and select a future date and time when you
want the job to run.
10. Enter a description for your job and click OK.
The site collections are restored.
Perform a Document-Level Restore to the Alternate Location
in SharePoint 2010
Use the Restore Manager in CA ARCserve Backup to perform a Document-level
data restore.
To restore a site collection to alternate location
1. From the CA ARCserve Backup Home Page, select Restore from the Quick
Start menu.
The Restore Manager window opens.
2. From the Restore Manager window, select Restore by Tree in the drop-down
list below the Source tab.
Perform a Document-Level Restore to the Alternate Location in SharePoint 2010
60 Agent for Microsoft SharePoint Server Guide
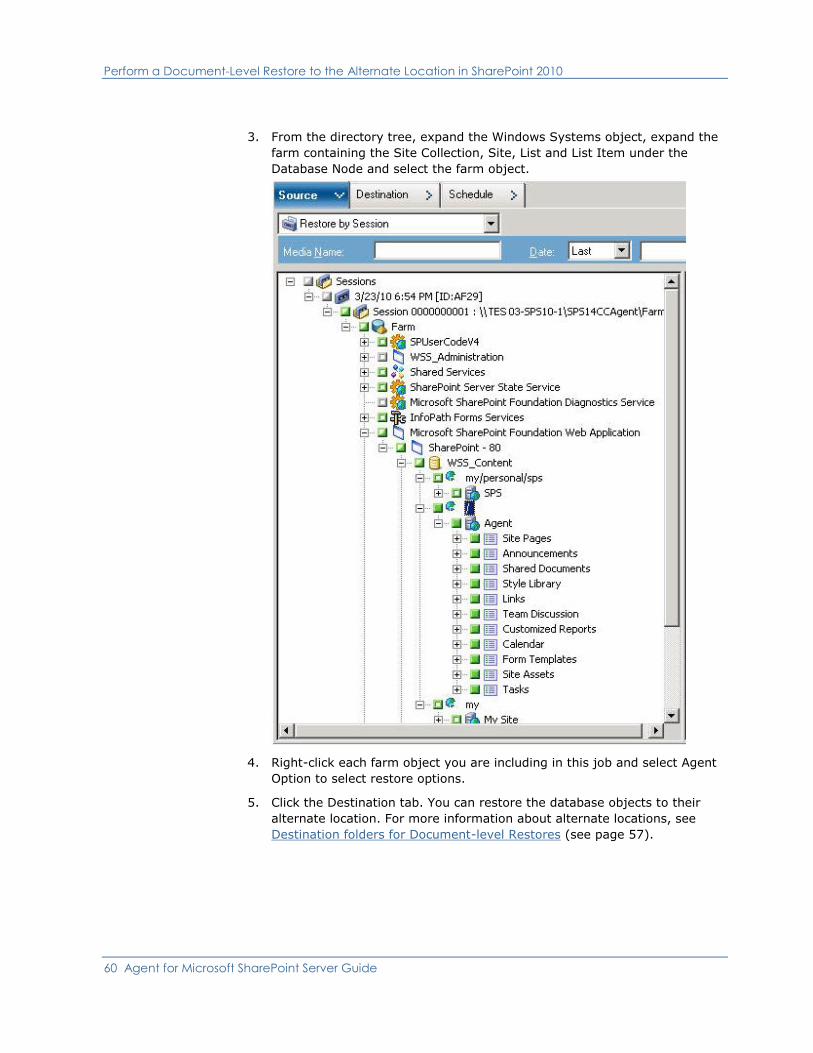
3. From the directory tree, expand the Windows Systems object, expand the
farm containing the Site Collection, Site, List and List Item under the
Database Node and select the farm object.
4. Right-click each farm object you are including in this job and select Agent
Option to select restore options.
5. Click the Destination tab. You can restore the database objects to their
alternate location. For more information about alternate locations, see
Destination folders for Document-level Restores (see page 57).

Perform a Document-Level Restore to the Alternate Location in SharePoint 2010
Chapter 5: Restoring SharePoint 2010 Systems 61
6. Click Submit on the toolbar.
The SharePoint 2010 agent restore configuration dialog opens.
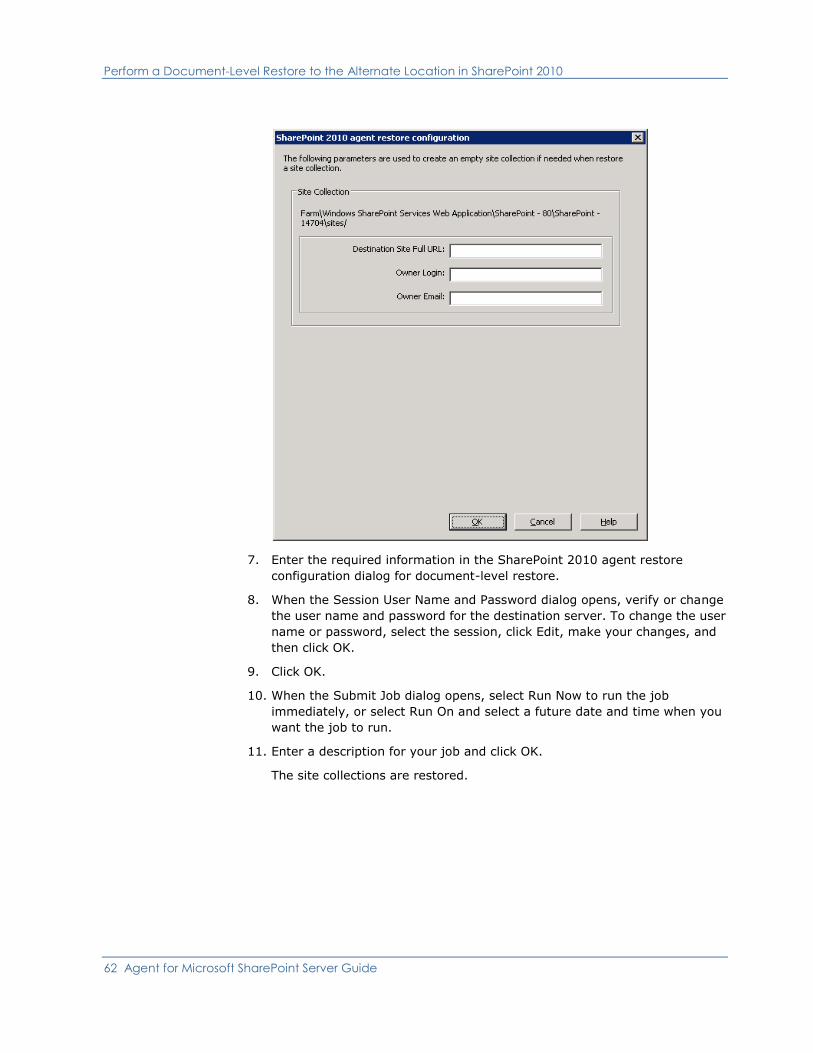
Perform a Document-Level Restore to the Alternate Location in SharePoint 2010
62 Agent for Microsoft SharePoint Server Guide
7. Enter the required information in the SharePoint 2010 agent restore
configuration dialog for document-level restore.
8. When the Session User Name and Password dialog opens, verify or change
the user name and password for the destination server. To change the user
name or password, select the session, click Edit, make your changes, and
then click OK.
9. Click OK.
10. When the Submit Job dialog opens, select Run Now to run the job
immediately, or select Run On and select a future date and time when you
want the job to run.
11. Enter a description for your job and click OK.
The site collections are restored.
Chapter 6: Restoring SharePoint 2007 Systems 63
Chapter 6: Restoring SharePoint 2007
Systems
This chapter provides information for restoring data on SharePoint 2007
systems.
This section contains the following topics:
Restore Overview (see page 63)
Database-Level Restore Sets (see page 64)
Database-Level Restore Option Dialog SharePoint 2007 (see page 65)
Database-Level Restore Prerequisites (see page 68)
Perform a Database-Level Data Restore (see page 70)
Document-Level Restore Option Dialog in SharePoint 2007 (see page 74)
Perform a Document-Level Restore in SharePoint 2007 (see page 78)
Perform a Document-Level Restore to Alternate Location in SharePoint 2007
(see page 80)
Agent for Microsoft SharePoint Server Limitations (see page 82)
Restore Overview
The following sections include information on the prerequisites you must meet
before you perform a restore, the features that the CA ARCserve Backup Agent
for Microsoft SharePoint Server, and the procedure for how to perform a
database-level and document-level restore.
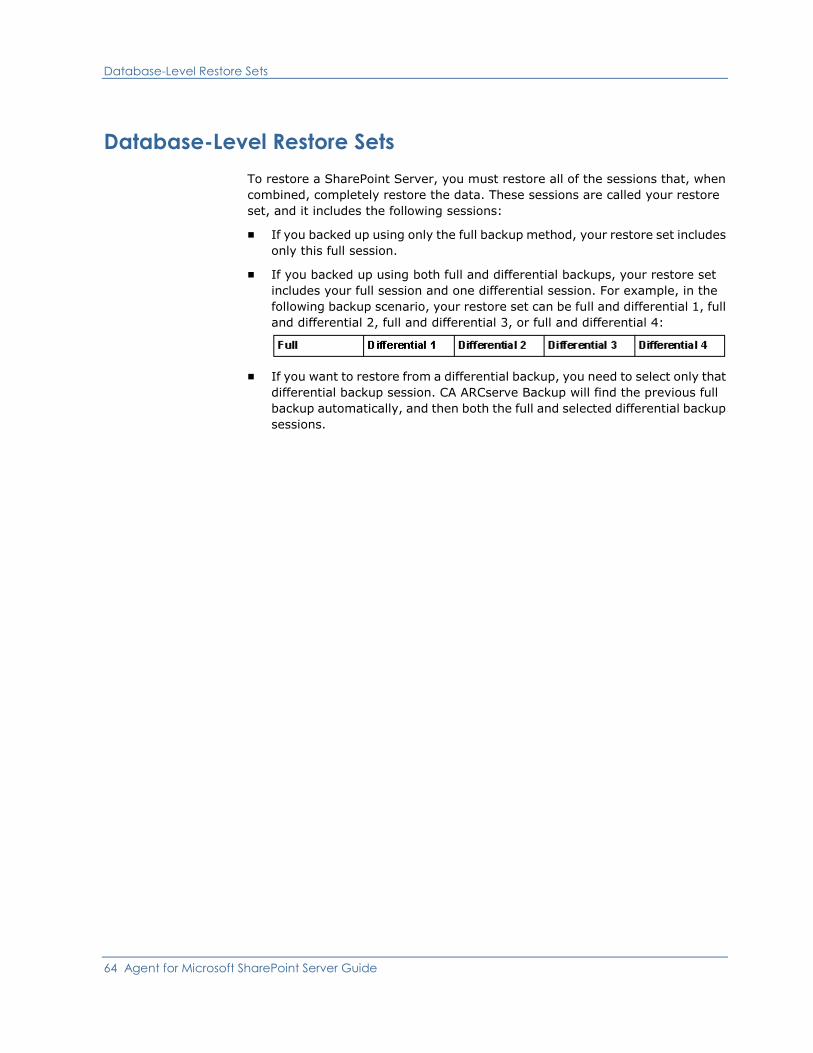
Database-Level Restore Sets
64 Agent for Microsoft SharePoint Server Guide
Database-Level Restore Sets
To restore a SharePoint Server, you must restore all of the sessions that, when
combined, completely restore the data. These sessions are called your restore
set, and it includes the following sessions:
■ If you backed up using only the full backup method, your restore set includes
only this full session.
■ If you backed up using both full and differential backups, your restore set
includes your full session and one differential session. For example, in the
following backup scenario, your restore set can be full and differential 1, full
and differential 2, full and differential 3, or full and differential 4:
■ If you want to restore from a differential backup, you need to select only that
differential backup session. CA ARCserve Backup will find the previous full
backup automatically, and then both the full and selected differential backup
sessions.
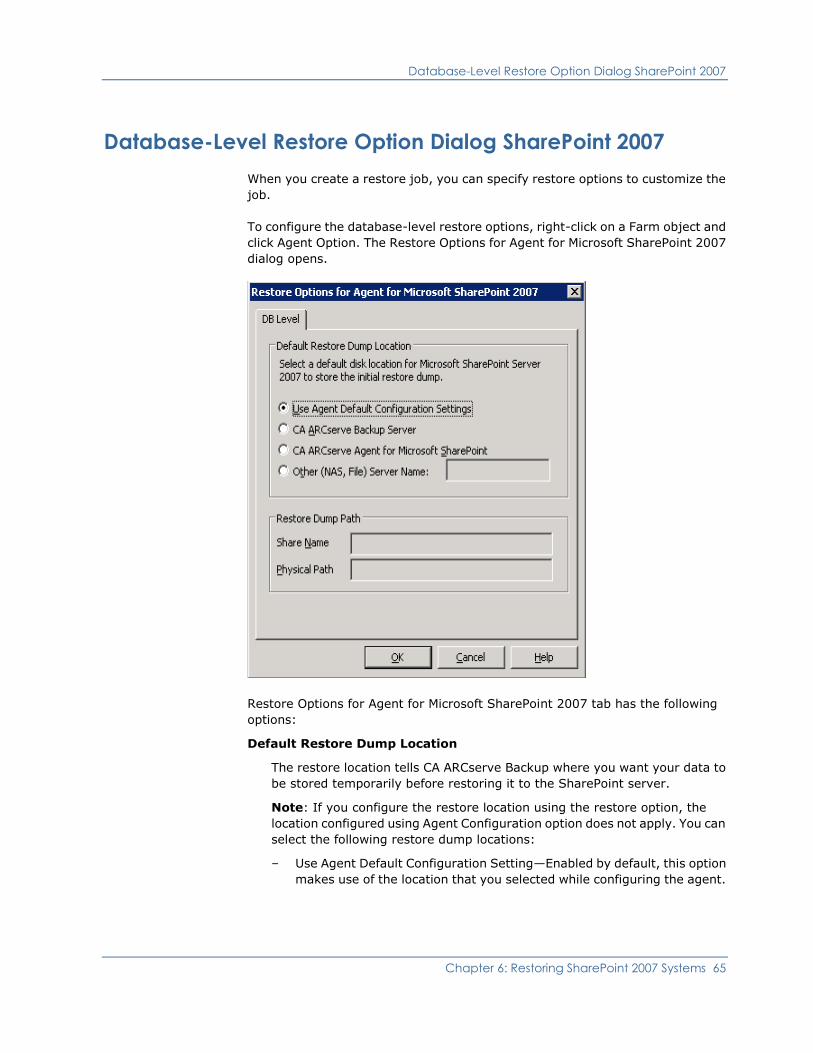
Database-Level Restore Option Dialog SharePoint 2007
Chapter 6: Restoring SharePoint 2007 Systems 65
Database-Level Restore Option Dialog SharePoint 2007
When you create a restore job, you can specify restore options to customize the
job.
To configure the database-level restore options, right-click on a Farm object and
click Agent Option. The Restore Options for Agent for Microsoft SharePoint 2007
dialog opens.
Restore Options for Agent for Microsoft SharePoint 2007 tab has the following
options:
Default Restore Dump Location
The restore location tells CA ARCserve Backup where you want your data to
be stored temporarily before restoring it to the SharePoint server.
Note: If you configure the restore location using the restore option, the
location configured using Agent Configuration option does not apply. You can
select the following restore dump locations:
– Use Agent Default Configuration Setting—Enabled by default, this option
makes use of the location that you selected while configuring the agent.
Database-Level Restore Option Dialog SharePoint 2007
66 Agent for Microsoft SharePoint Server Guide
– CA ARCserve Backup Server—Restores the SharePoint data to a shared
folder on CA ARCserve Backup.
– CA ARCserve Agent for Microsoft SharePoint—Restores the SharePoint
data to a shared folder where the SharePoint Agent is installed.
– Other (NAS, File) Server Name—Restores the SharePoint data to a
specified shared folder on the NAS server or File server.
Note: You must specify the host name instead of an IP address.
Restore Dump Path
– Share Name—If you select the Other (NAS, File) Server Name as the
default restore dump location, you need to specify the Server name
where the data must be restored. You must grant the necessary
permissions to the folder.
Note: The share name should not contain the special character ‘$’ at the
end.
– Physical Path—If you select the CA ARCserve Server or Agent as the
restore dump location, you need to specify the path where you want the
data to be restored.
For more information on these options and how you can configure them, see
Configure the Agent on SharePoint Systems (see page 25).
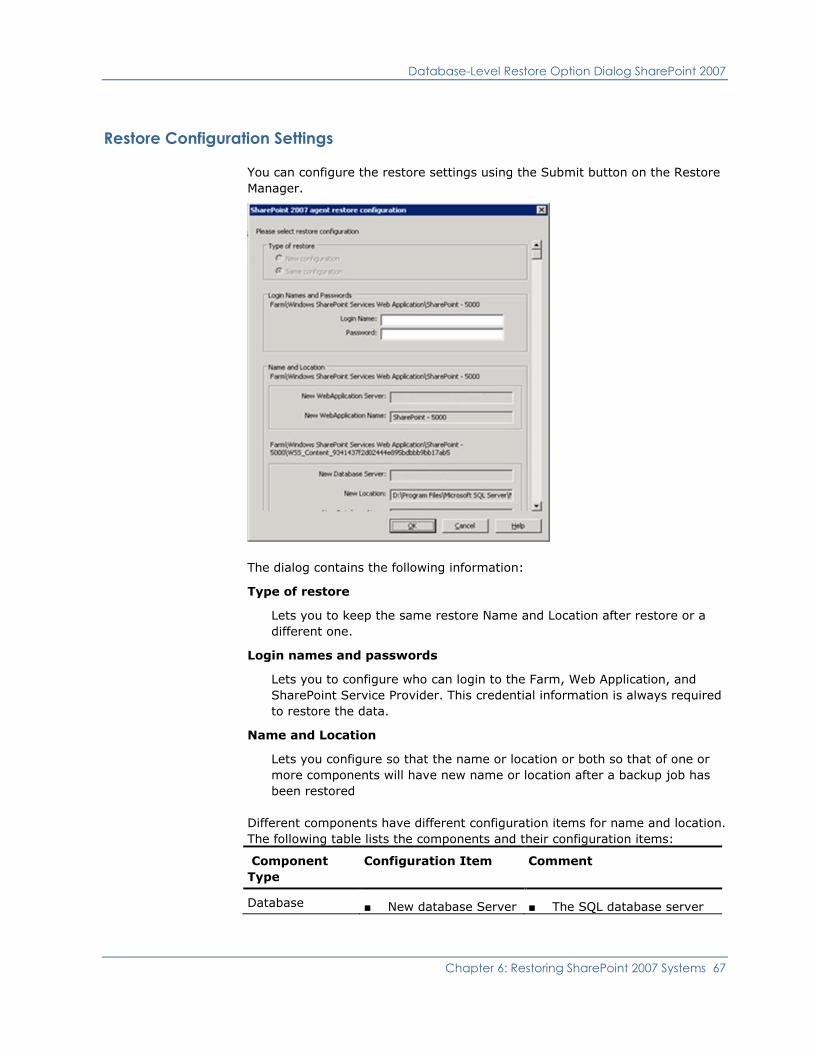
Database-Level Restore Option Dialog SharePoint 2007
Chapter 6: Restoring SharePoint 2007 Systems 67
Restore Configuration Settings
You can configure the restore settings using the Submit button on the Restore
Manager.
The dialog contains the following information:
Type of restore
Lets you to keep the same restore Name and Location after restore or a
different one.
Login names and passwords
Lets you to configure who can login to the Farm, Web Application, and
SharePoint Service Provider. This credential information is always required
to restore the data.
Name and Location
Lets you configure so that the name or location or both so that of one or
more components will have new name or location after a backup job has
been restored
Different components have different configuration items for name and location.
The following table lists the components and their configuration items:
Component
Type
Configuration Item Comment
Database ■ New database Server ■ The SQL database server
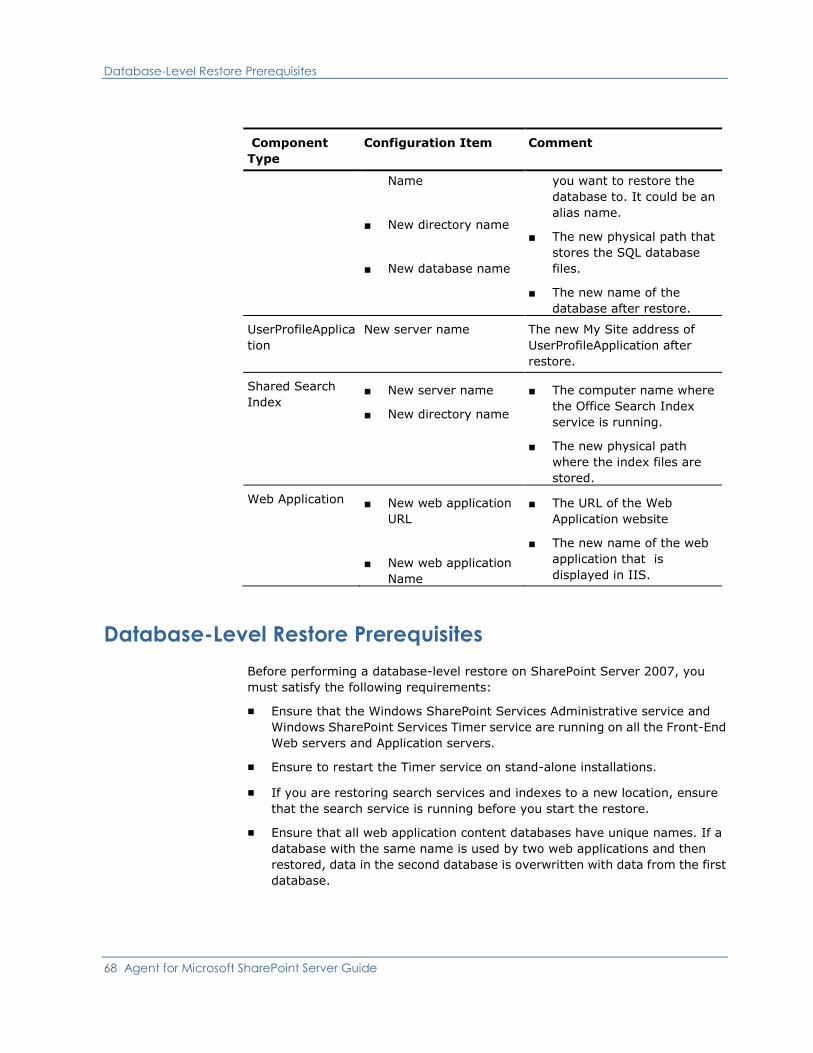
Database-Level Restore Prerequisites
68 Agent for Microsoft SharePoint Server Guide
Component
Type
Configuration Item Comment
Name
■ New directory name
■ New database name
you want to restore the
database to. It could be an
alias name.
■ The new physical path that
stores the SQL database
files.
■ The new name of the
database after restore.
UserProfileApplica
tion
New server name The new My Site address of
UserProfileApplication after
restore.
Shared Search
Index ■ New server name
■ New directory name
■ The computer name where
the Office Search Index
service is running.
■ The new physical path
where the index files are
stored.
Web Application ■ New web application
URL
■ New web application
Name
■ The URL of the Web
Application website
■ The new name of the web
application that is
displayed in IIS.
Database-Level Restore Prerequisites
Before performing a database-level restore on SharePoint Server 2007, you
must satisfy the following requirements:
■ Ensure that the Windows SharePoint Services Administrative service and
Windows SharePoint Services Timer service are running on all the Front-End
Web servers and Application servers.
■ Ensure to restart the Timer service on stand-alone installations.
■ If you are restoring search services and indexes to a new location, ensure
that the search service is running before you start the restore.
■ Ensure that all web application content databases have unique names. If a
database with the same name is used by two web applications and then
restored, data in the second database is overwritten with data from the first
database.
Database-Level Restore Prerequisites
Chapter 6: Restoring SharePoint 2007 Systems 69
■ Ensure that you do not perform more than one restore at the same time.
■ Ensure that all servers in Farm have the same time zone and daylight
savings time settings.
■ For stand-alone installations, please add the following accounts into the
Local Administrators Group before performing a restore job. Once the
restore job is completed, delete the accounts:
■ NT AUTHORITY\LOCAL SERVICE
■ NT AUTHORITY\NETWORK SERVICE
To add accounts to the Local Administrators Group
1. Open Control Panel and expand Administration Tools, Computer
Management, System Tools, Local Users and Groups, Groups,
Administrators.
2. Click Add.
3. Enter NETWORK SERVICE and LOCAL SERVICE.
4. Click OK.
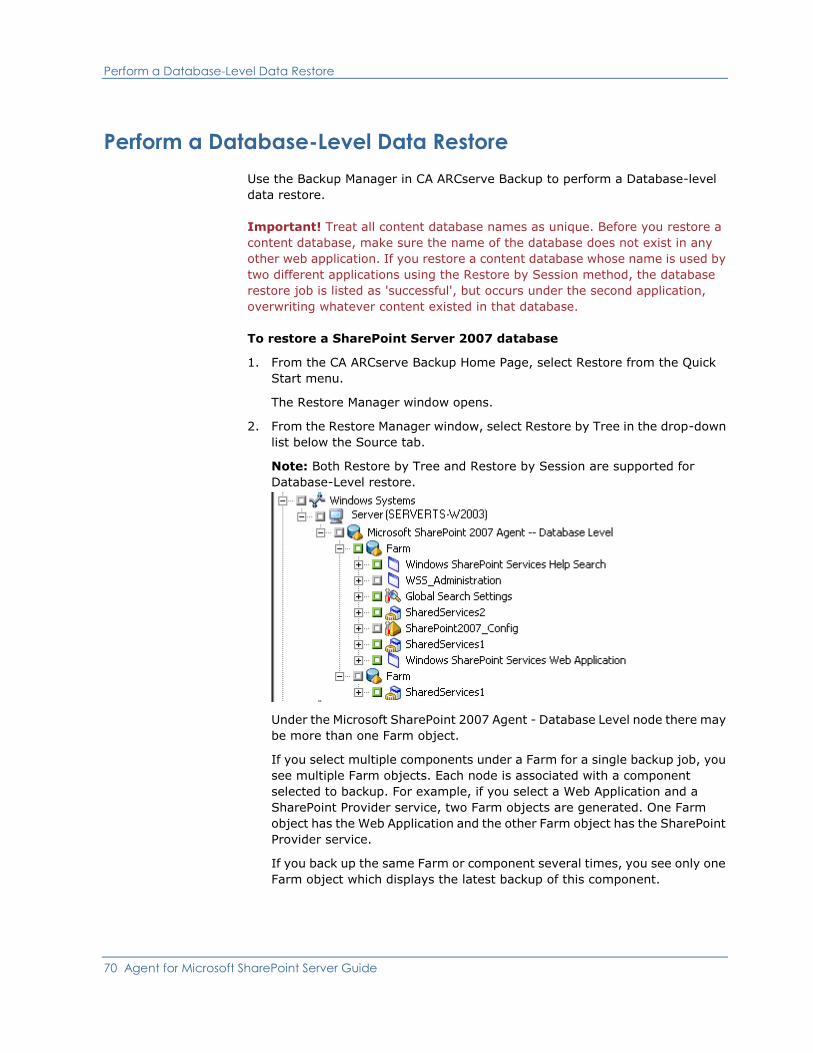
Perform a Database-Level Data Restore
70 Agent for Microsoft SharePoint Server Guide
Perform a Database-Level Data Restore
Use the Backup Manager in CA ARCserve Backup to perform a Database-level
data restore.
Important! Treat all content database names as unique. Before you restore a
content database, make sure the name of the database does not exist in any
other web application. If you restore a content database whose name is used by
two different applications using the Restore by Session method, the database
restore job is listed as 'successful', but occurs under the second application,
overwriting whatever content existed in that database.
To restore a SharePoint Server 2007 database
1. From the CA ARCserve Backup Home Page, select Restore from the Quick
Start menu.
The Restore Manager window opens.
2. From the Restore Manager window, select Restore by Tree in the drop-down
list below the Source tab.
Note: Both Restore by Tree and Restore by Session are supported for
Database-Level restore.
Under the Microsoft SharePoint 2007 Agent - Database Level node there may
be more than one Farm object.
If you select multiple components under a Farm for a single backup job, you
see multiple Farm objects. Each node is associated with a component
selected to backup. For example, if you select a Web Application and a
SharePoint Provider service, two Farm objects are generated. One Farm
object has the Web Application and the other Farm object has the SharePoint
Provider service.
If you back up the same Farm or component several times, you see only one
Farm object which displays the latest backup of this component.
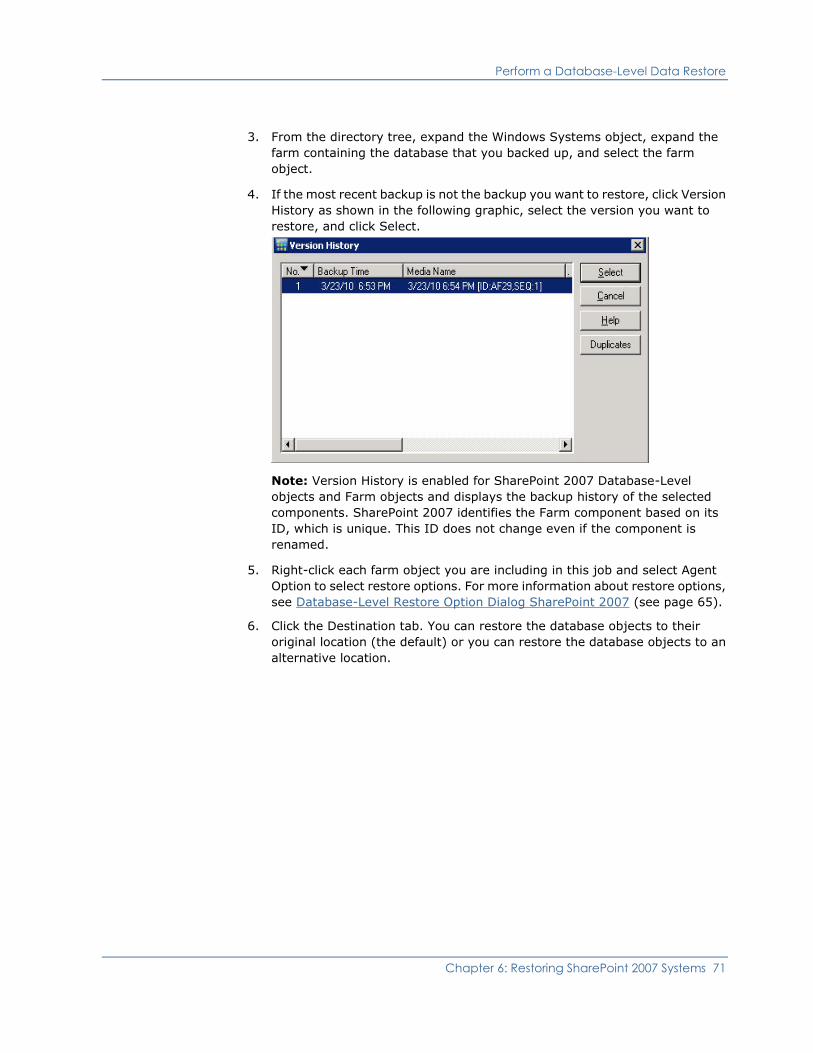
Perform a Database-Level Data Restore
Chapter 6: Restoring SharePoint 2007 Systems 71
3. From the directory tree, expand the Windows Systems object, expand the
farm containing the database that you backed up, and select the farm
object.
4. If the most recent backup is not the backup you want to restore, click Version
History as shown in the following graphic, select the version you want to
restore, and click Select.
Note: Version History is enabled for SharePoint 2007 Database-Level
objects and Farm objects and displays the backup history of the selected
components. SharePoint 2007 identifies the Farm component based on its
ID, which is unique. This ID does not change even if the component is
renamed.
5. Right-click each farm object you are including in this job and select Agent
Option to select restore options. For more information about restore options,
see Database-Level Restore Option Dialog SharePoint 2007 (see page 65).
6. Click the Destination tab. You can restore the database objects to their
original location (the default) or you can restore the database objects to an
alternative location.
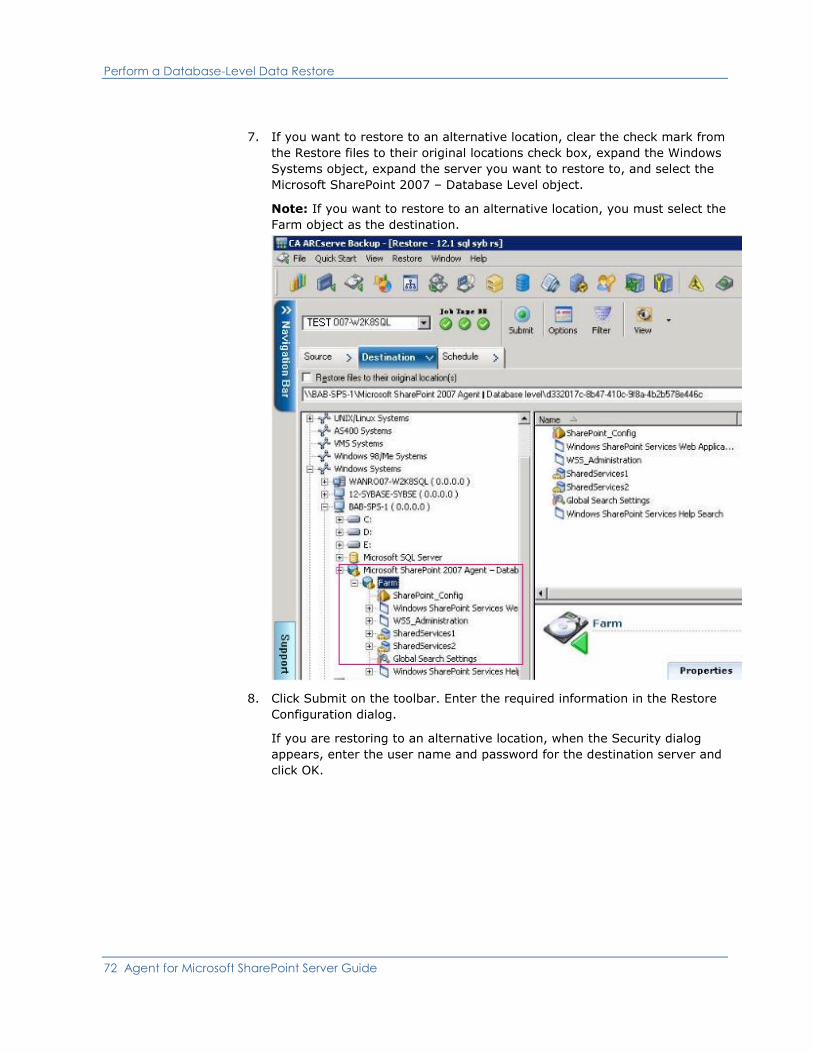
Perform a Database-Level Data Restore
72 Agent for Microsoft SharePoint Server Guide
7. If you want to restore to an alternative location, clear the check mark from
the Restore files to their original locations check box, expand the Windows
Systems object, expand the server you want to restore to, and select the
Microsoft SharePoint 2007 – Database Level object.
Note: If you want to restore to an alternative location, you must select the
Farm object as the destination.
8. Click Submit on the toolbar. Enter the required information in the Restore
Configuration dialog.
If you are restoring to an alternative location, when the Security dialog
appears, enter the user name and password for the destination server and
click OK.
Perform a Database-Level Data Restore
Chapter 6: Restoring SharePoint 2007 Systems 73
9. When the Session User Name and Password dialog opens, verify or change
the user name and password for the destination server. To change the user
name or password, select the session, click Edit, make your changes, and
then click OK.
Note: You must enter the user name in the following format:
DOMAIN\USERNAME
10. Click OK.
11. When the Submit Job dialog opens, select Run Now to run the job
immediately, or select Run On and select a future date and time when you
want the job to run.
12. Enter a description for your job and click OK.
Important! After you perform a restore, you must restart the Internet
Information Services (IIS).
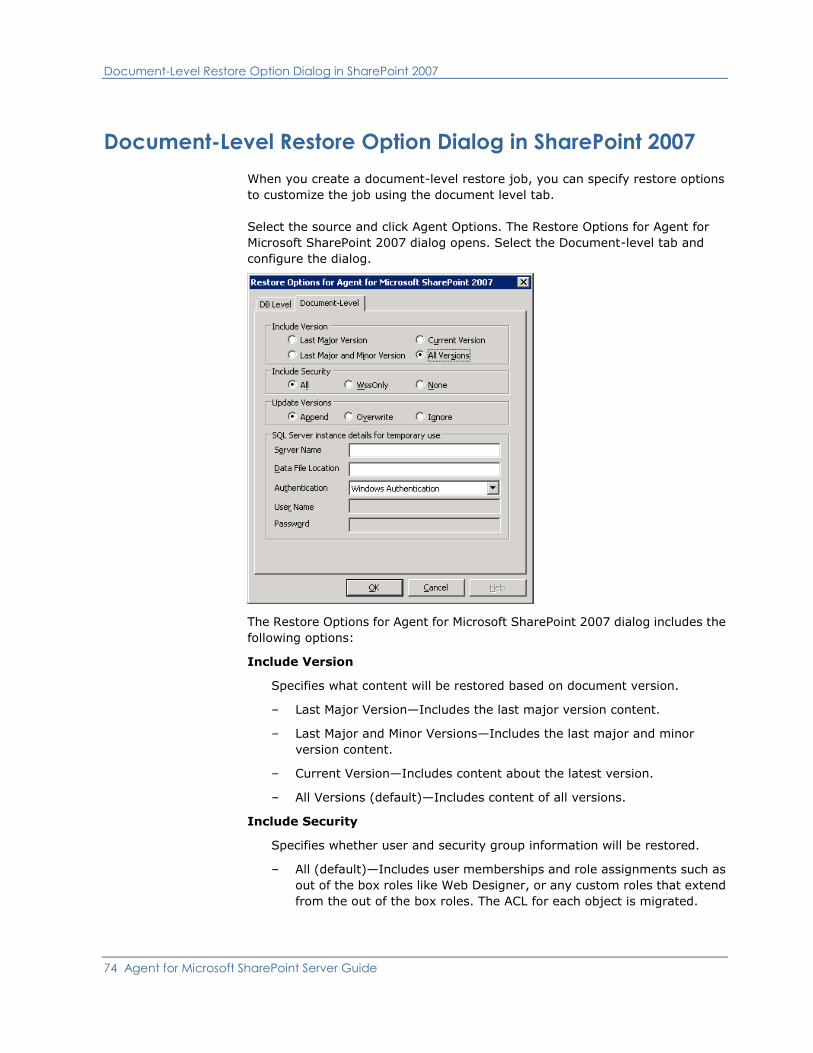
Document-Level Restore Option Dialog in SharePoint 2007
74 Agent for Microsoft SharePoint Server Guide
Document-Level Restore Option Dialog in SharePoint 2007
When you create a document-level restore job, you can specify restore options
to customize the job using the document level tab.
Select the source and click Agent Options. The Restore Options for Agent for
Microsoft SharePoint 2007 dialog opens. Select the Document-level tab and
configure the dialog.
The Restore Options for Agent for Microsoft SharePoint 2007 dialog includes the
following options:
Include Version
Specifies what content will be restored based on document version.
– Last Major Version—Includes the last major version content.
– Last Major and Minor Versions—Includes the last major and minor
version content.
– Current Version—Includes content about the latest version.
– All Versions (default)—Includes content of all versions.
Include Security
Specifies whether user and security group information will be restored.
– All (default)—Includes user memberships and role assignments such as
out of the box roles like Web Designer, or any custom roles that extend
from the out of the box roles. The ACL for each object is migrated.
Document-Level Restore Option Dialog in SharePoint 2007
Chapter 6: Restoring SharePoint 2007 Systems 75
Also, user information defined in the DAP or LDAP servers is included.
– WssOnly—Includes user memberships and role assignments such as out
of the box roles like Web Designer, or any custom roles that extend from
the out of the box roles. The ACL for each object is migrated.
No user information defined in the DAP or LDAP servers is included.
– None— No user or group information is migrated.
Update Versions
Specifies how versioning is managed in the destination location when
restore.
– Append(default)— Appends the versions to the destination.
– Ignore— Ignores versioning and imports the updated file.
– Overwrite— Deletes existing version and imports as new versions.
SQL Server instance details for temporary use
Connects the agent to a SQL server instance.
– Server name— The SQL Server host name and instance name.
– Data File Location— This location is used to store the database file when
restore database backup dump to SQL Instance. This must be a local
path on the server which hosts the SQL Instance and the path must
exists.
Note: The SQL Server instance must have permissions to access the
Data File Location.
– Authentication—The authentication type for this SQL Instance. Select
the type of authentication to connect to the SQL server.
– Windows Authentication (default)— You can enter the user name and
password details to connect.
– SQL Server Authentication— This is the SQL Server authentication
mode. You must enter the login and password details.
Note: The version of the temporary SQL Server must be same as the version of
Microsoft SharePoint database Server.
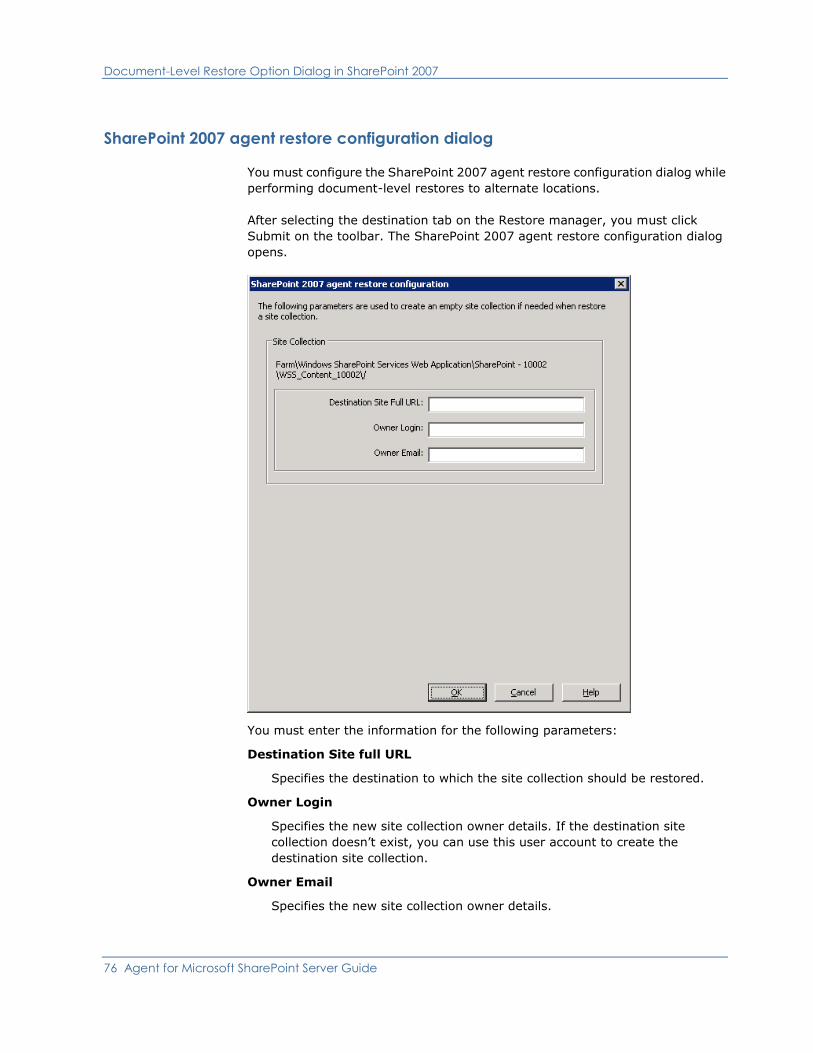
Document-Level Restore Option Dialog in SharePoint 2007
76 Agent for Microsoft SharePoint Server Guide
SharePoint 2007 agent restore configuration dialog
You must configure the SharePoint 2007 agent restore configuration dialog while
performing document-level restores to alternate locations.
After selecting the destination tab on the Restore manager, you must click
Submit on the toolbar. The SharePoint 2007 agent restore configuration dialog
opens.
You must enter the information for the following parameters:
Destination Site full URL
Specifies the destination to which the site collection should be restored.
Owner Login
Specifies the new site collection owner details. If the destination site
collection doesn’t exist, you can use this user account to create the
destination site collection.
Owner Email
Specifies the new site collection owner details.

Document-Level Restore Option Dialog in SharePoint 2007
Chapter 6: Restoring SharePoint 2007 Systems 77
If the destination site collection doesn’t exist, you can use this user account
to create the destination site collection.
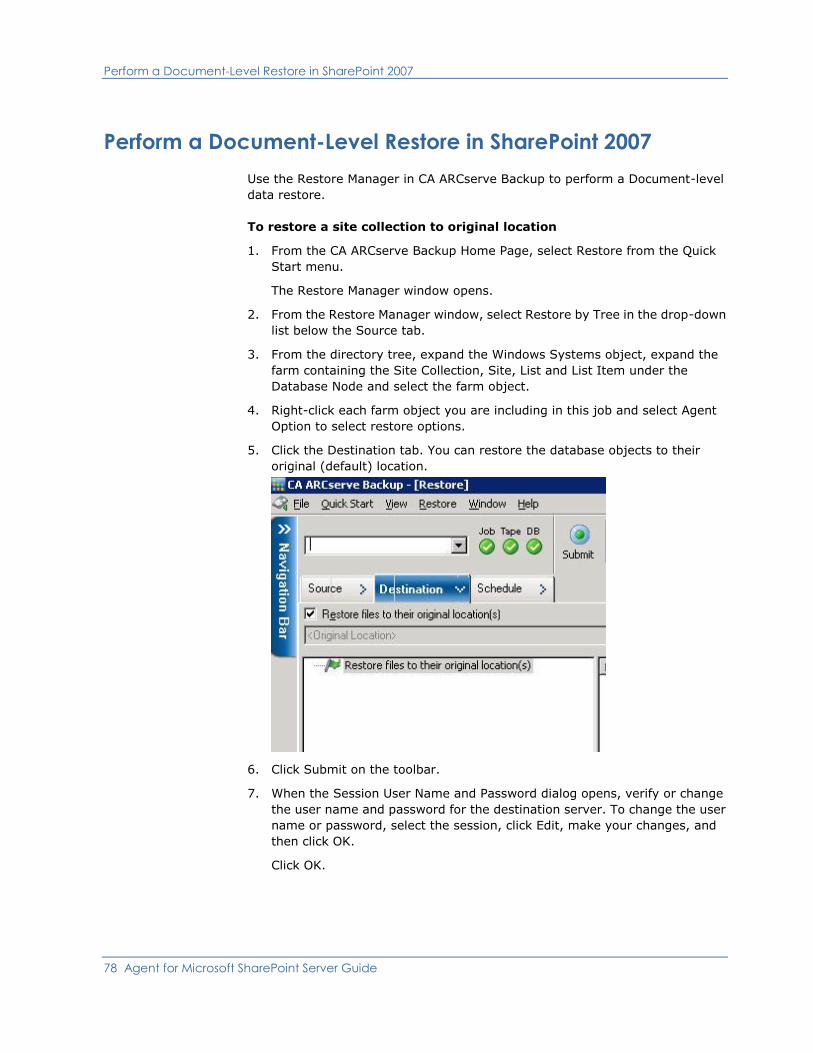
Perform a Document-Level Restore in SharePoint 2007
78 Agent for Microsoft SharePoint Server Guide
Perform a Document-Level Restore in SharePoint 2007
Use the Restore Manager in CA ARCserve Backup to perform a Document-level
data restore.
To restore a site collection to original location
1. From the CA ARCserve Backup Home Page, select Restore from the Quick
Start menu.
The Restore Manager window opens.
2. From the Restore Manager window, select Restore by Tree in the drop-down
list below the Source tab.
3. From the directory tree, expand the Windows Systems object, expand the
farm containing the Site Collection, Site, List and List Item under the
Database Node and select the farm object.
4. Right-click each farm object you are including in this job and select Agent
Option to select restore options.
5. Click the Destination tab. You can restore the database objects to their
original (default) location.
6. Click Submit on the toolbar.
7. When the Session User Name and Password dialog opens, verify or change
the user name and password for the destination server. To change the user
name or password, select the session, click Edit, make your changes, and
then click OK.
Click OK.
Perform a Document-Level Restore in SharePoint 2007
Chapter 6: Restoring SharePoint 2007 Systems 79
8. When the Submit Job dialog opens, select Run Now to run the job
immediately, or select Run On and select a future date and time when you
want the job to run.
9. Enter a description for your job and click OK.
The site collections are restored.
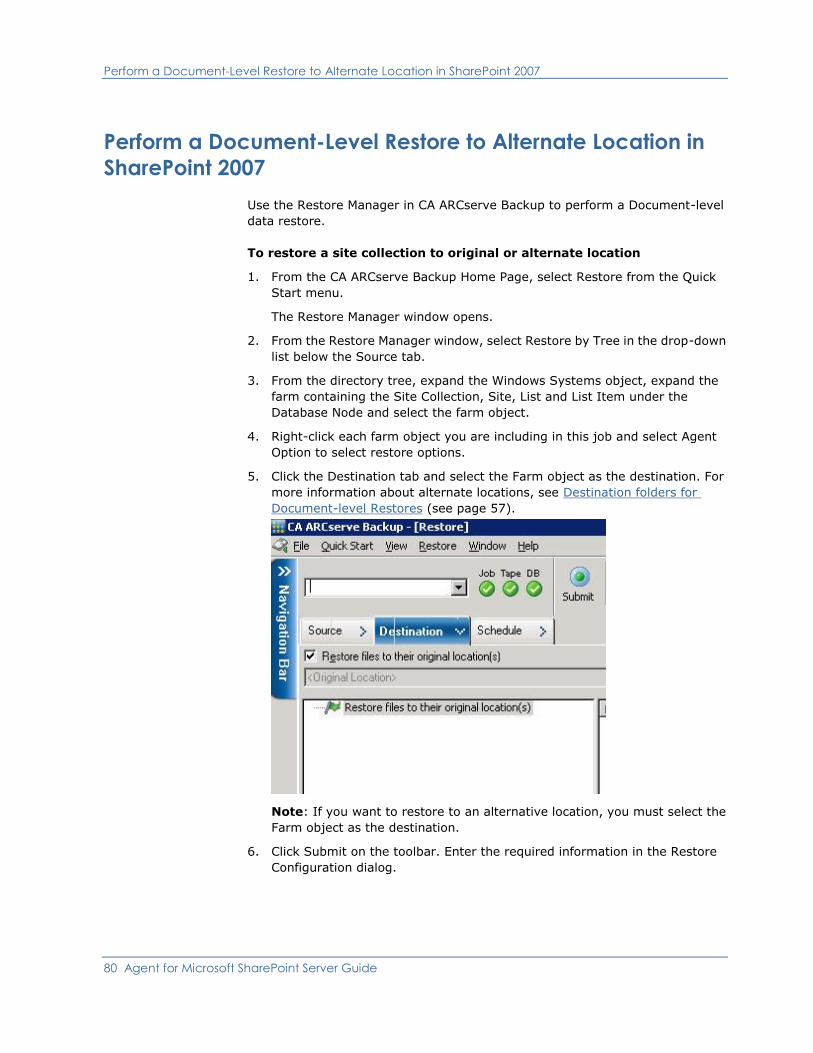
Perform a Document-Level Restore to Alternate Location in SharePoint 2007
80 Agent for Microsoft SharePoint Server Guide
Perform a Document-Level Restore to Alternate Location in
SharePoint 2007
Use the Restore Manager in CA ARCserve Backup to perform a Document-level
data restore.
To restore a site collection to original or alternate location
1. From the CA ARCserve Backup Home Page, select Restore from the Quick
Start menu.
The Restore Manager window opens.
2. From the Restore Manager window, select Restore by Tree in the drop-down
list below the Source tab.
3. From the directory tree, expand the Windows Systems object, expand the
farm containing the Site Collection, Site, List and List Item under the
Database Node and select the farm object.
4. Right-click each farm object you are including in this job and select Agent
Option to select restore options.
5. Click the Destination tab and select the Farm object as the destination. For
more information about alternate locations, see Destination folders for
Document-level Restores (see page 57).
Note: If you want to restore to an alternative location, you must select the
Farm object as the destination.
6. Click Submit on the toolbar. Enter the required information in the Restore
Configuration dialog.
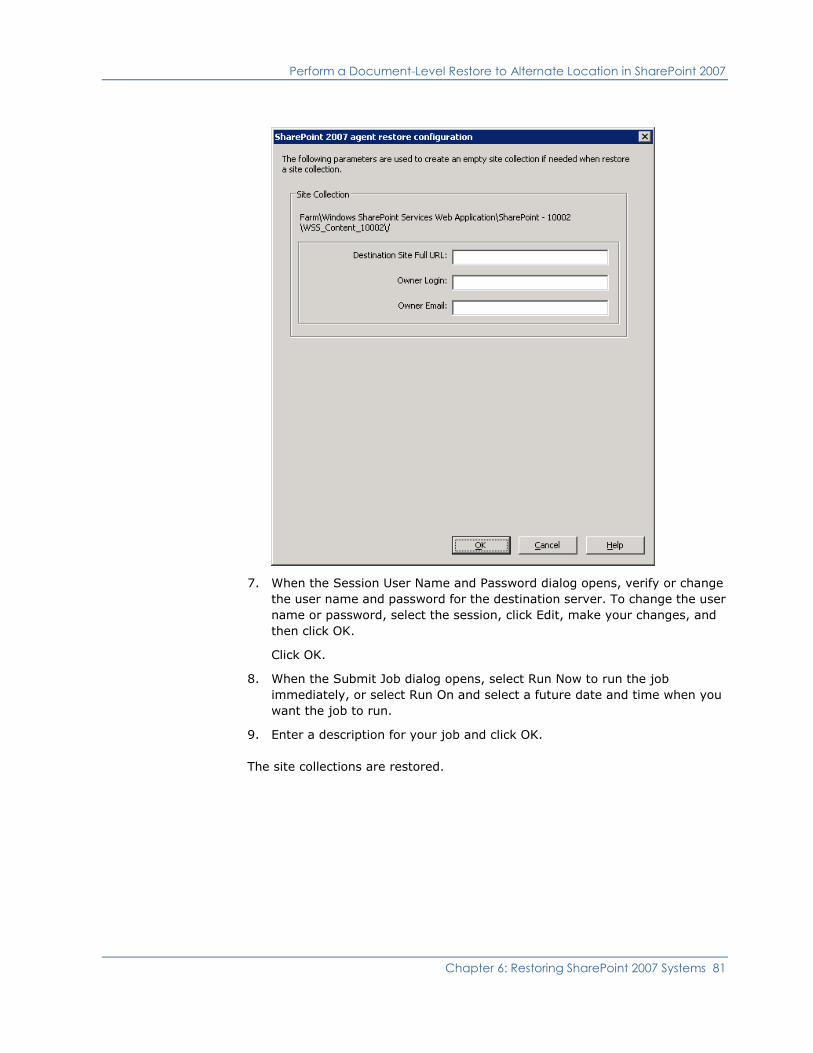
Perform a Document-Level Restore to Alternate Location in SharePoint 2007
Chapter 6: Restoring SharePoint 2007 Systems 81
7. When the Session User Name and Password dialog opens, verify or change
the user name and password for the destination server. To change the user
name or password, select the session, click Edit, make your changes, and
then click OK.
Click OK.
8. When the Submit Job dialog opens, select Run Now to run the job
immediately, or select Run On and select a future date and time when you
want the job to run.
9. Enter a description for your job and click OK.
The site collections are restored.
Agent for Microsoft SharePoint Server Limitations
82 Agent for Microsoft SharePoint Server Guide
Agent for Microsoft SharePoint Server Limitations
The Agent for Microsoft SharePoint Server cannot perform some of the
document-level or granular restore operations for the SharePoint Systems. The
agent cannot restore:
■ configuration or application data. So, any binaries developed for web
applications or application pages will not be restored.
■ customized site definitions, list definitions, content type definitions, filed
definitions.
■ alerts, audit trail, change log history, items in check-in/check-out state,
recycle bin items, recycle bin state, security state, workflow tasks and
workflow states.
■ external blob store (EBS).
■ list items such as Survey list to alternative location. You can restore only
complete surveys.
■ root web site.
■ item versions such as team discussion and PKI list.
Other limitations:
■ If a file has only one version, and it is in the check-out state, then the agent
cannot restore this file.
■ Restore operation on list/site/site collection to original location will not
restore list items from the Recycle Bin. However, you can perform these
steps and try to restore:
a. Clear the Recycle Bin, both at site-level and site-collection level
b. Restore those list items separately.
Note: The list does not include document library.
■ It is not recommended to restore from one domain to another domain as the
security settings are not compatible between two different domain.
Important! If you are restoring an object, list item or folder, list or web to an
original location then you must ensure the object’s parent location exists.

Chapter 7: Using Best Practices 83
Chapter 7: Using Best Practices
This section recommends best practices for using CA ARCserve Backup Agent for
Microsoft SharePoint Server on SharePoint 2007 systems.
This section contains the following topics:
How to Select the Proper Location (see page 83)
Set Access Permission on Dump Location (see page 84)
How to Select the Proper Location
You must select a proper location both for backup as well as restore. The
following considerations apply:
■ Available disk size—The Agent for SharePoint 2007 stores some data in a
dump location during backup and restore. You should ensure that there is
enough disk space to hold all the components that will be backed up. If you
want to know how much disk space is required for the backup job, open the
Backup Manager, select the component to be backed up, and then check the
disk space required.
■ Available Network Band-You must select an available network band for the
differential dump location depending on your network traffic and costs
involved. Consider the following:
– CA ARCserve Server costs less because the data is transferred once.
– CA ARCserve SharePoint Agent (Local Machine) and Other (NAS, File)
Server Name cost more as the data maybe transferred twice.
■ ARCserve Server and SharePoint 2007 Agent Location-CA ARCserve
SharePoint Agent (Local Machine) and Other (NAS, File) Server Name
support all of the following four scenarios:
– Agent and server are installed in a single windows domain.
– Agent and server are installed in two different domains and one domain
trusts another.
– Agent and server are installed in different Windows domains, and there
is no trust relationship.
– Either the agent or the server is installed in a workgroup and the other is
installed in a domain.
Note: CA ARCserve Server supports only the first two scenarios mentioned
above.
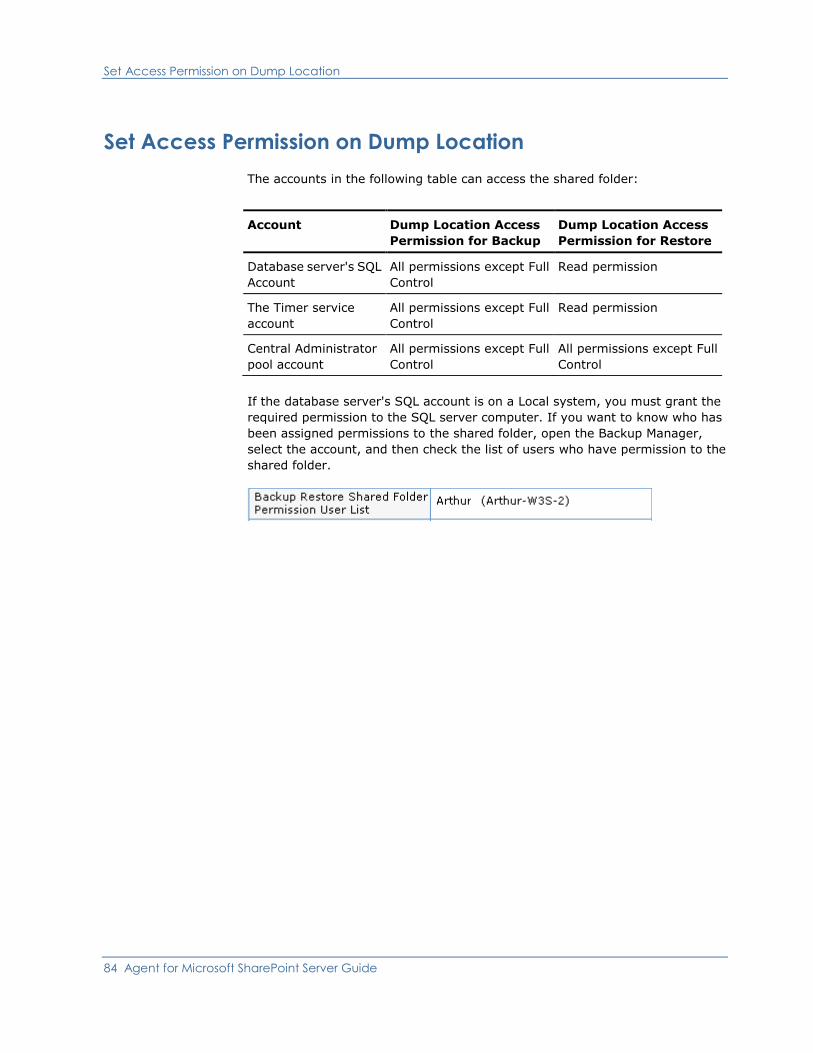
Set Access Permission on Dump Location
84 Agent for Microsoft SharePoint Server Guide
Set Access Permission on Dump Location
The accounts in the following table can access the shared folder:
Account Dump Location Access
Permission for Backup
Dump Location Access
Permission for Restore
Database server's SQL
Account
All permissions except Full
Control
Read permission
The Timer service
account
All permissions except Full
Control
Read permission
Central Administrator
pool account
All permissions except Full
Control
All permissions except Full
Control
If the database server's SQL account is on a Local system, you must grant the
required permission to the SQL server computer. If you want to know who has
been assigned permissions to the shared folder, open the Backup Manager,
select the account, and then check the list of users who have permission to the
shared folder.
Appendix A: Microsoft SharePoint Server Features used by the Agent 85
Appendix A: Microsoft SharePoint Server
Features used by the Agent
This section contains the following topics:
Microsoft SharePoint Server 2010 Features (see page 86)
Microsoft SharePoint 2010 Data (see page 87)
Microsoft SharePoint Server 2007 Features (see page 89)
Microsoft SharePoint 2007 Data (see page 89)
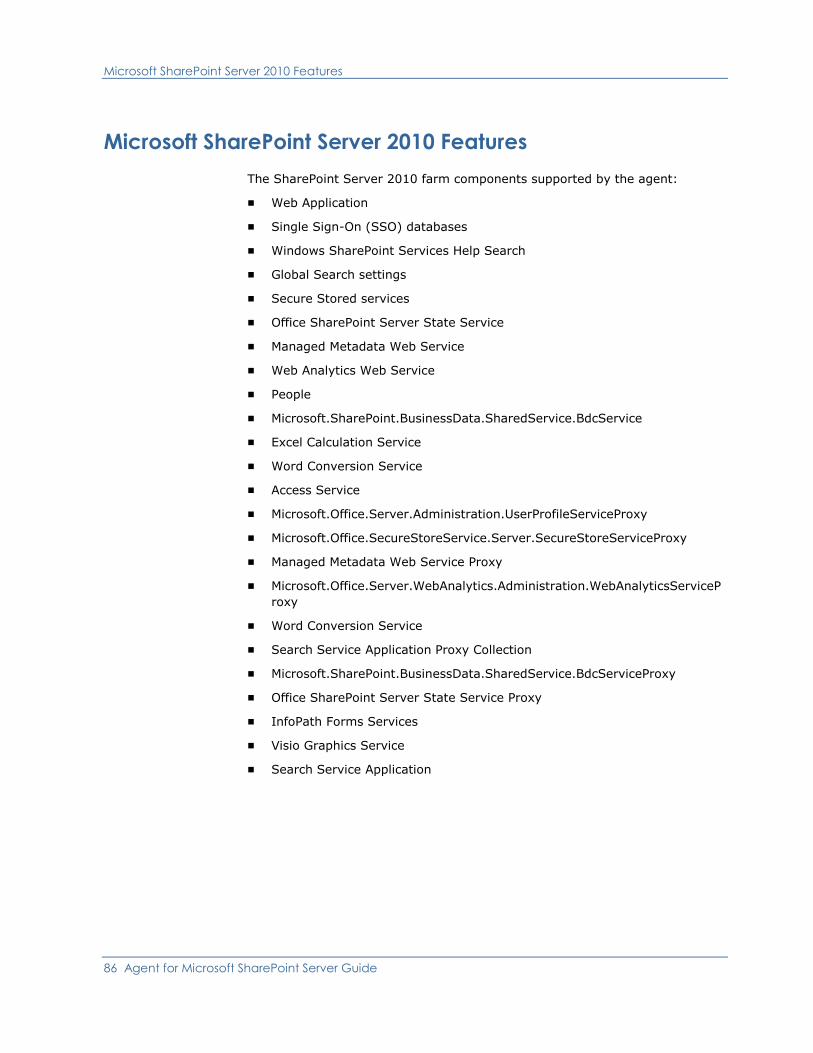
Microsoft SharePoint Server 2010 Features
86 Agent for Microsoft SharePoint Server Guide
Microsoft SharePoint Server 2010 Features
The SharePoint Server 2010 farm components supported by the agent:
■ Web Application
■ Single Sign-On (SSO) databases
■ Windows SharePoint Services Help Search
■ Global Search settings
■ Secure Stored services
■ Office SharePoint Server State Service
■ Managed Metadata Web Service
■ Web Analytics Web Service
■ People
■ Microsoft.SharePoint.BusinessData.SharedService.BdcService
■ Excel Calculation Service
■ Word Conversion Service
■ Access Service
■ Microsoft.Office.Server.Administration.UserProfileServiceProxy
■ Microsoft.Office.SecureStoreService.Server.SecureStoreServiceProxy
■ Managed Metadata Web Service Proxy
■ Microsoft.Office.Server.WebAnalytics.Administration.WebAnalyticsServiceP
roxy
■ Word Conversion Service
■ Search Service Application Proxy Collection
■ Microsoft.SharePoint.BusinessData.SharedService.BdcServiceProxy
■ Office SharePoint Server State Service Proxy
■ InfoPath Forms Services
■ Visio Graphics Service
■ Search Service Application
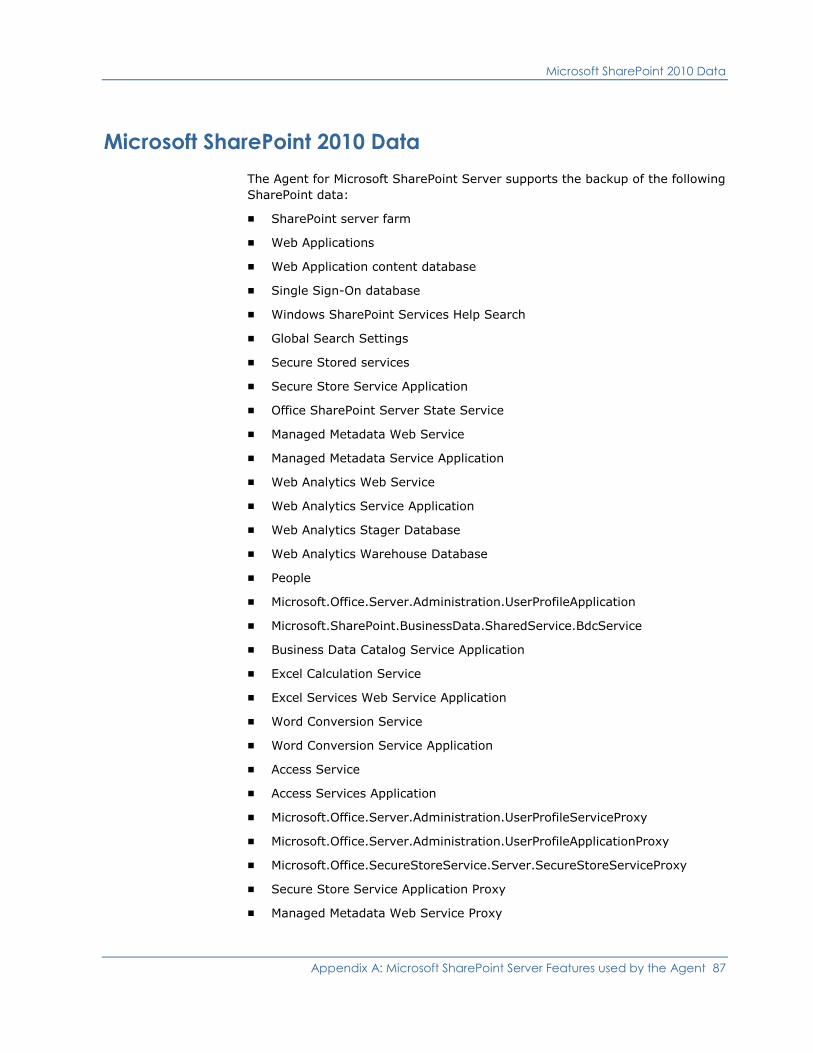
Microsoft SharePoint 2010 Data
Appendix A: Microsoft SharePoint Server Features used by the Agent 87
Microsoft SharePoint 2010 Data
The Agent for Microsoft SharePoint Server supports the backup of the following
SharePoint data:
■ SharePoint server farm
■ Web Applications
■ Web Application content database
■ Single Sign-On database
■ Windows SharePoint Services Help Search
■ Global Search Settings
■ Secure Stored services
■ Secure Store Service Application
■ Office SharePoint Server State Service
■ Managed Metadata Web Service
■ Managed Metadata Service Application
■ Web Analytics Web Service
■ Web Analytics Service Application
■ Web Analytics Stager Database
■ Web Analytics Warehouse Database
■ People
■ Microsoft.Office.Server.Administration.UserProfileApplication
■ Microsoft.SharePoint.BusinessData.SharedService.BdcService
■ Business Data Catalog Service Application
■ Excel Calculation Service
■ Excel Services Web Service Application
■ Word Conversion Service
■ Word Conversion Service Application
■ Access Service
■ Access Services Application
■ Microsoft.Office.Server.Administration.UserProfileServiceProxy
■ Microsoft.Office.Server.Administration.UserProfileApplicationProxy
■ Microsoft.Office.SecureStoreService.Server.SecureStoreServiceProxy
■ Secure Store Service Application Proxy
■ Managed Metadata Web Service Proxy
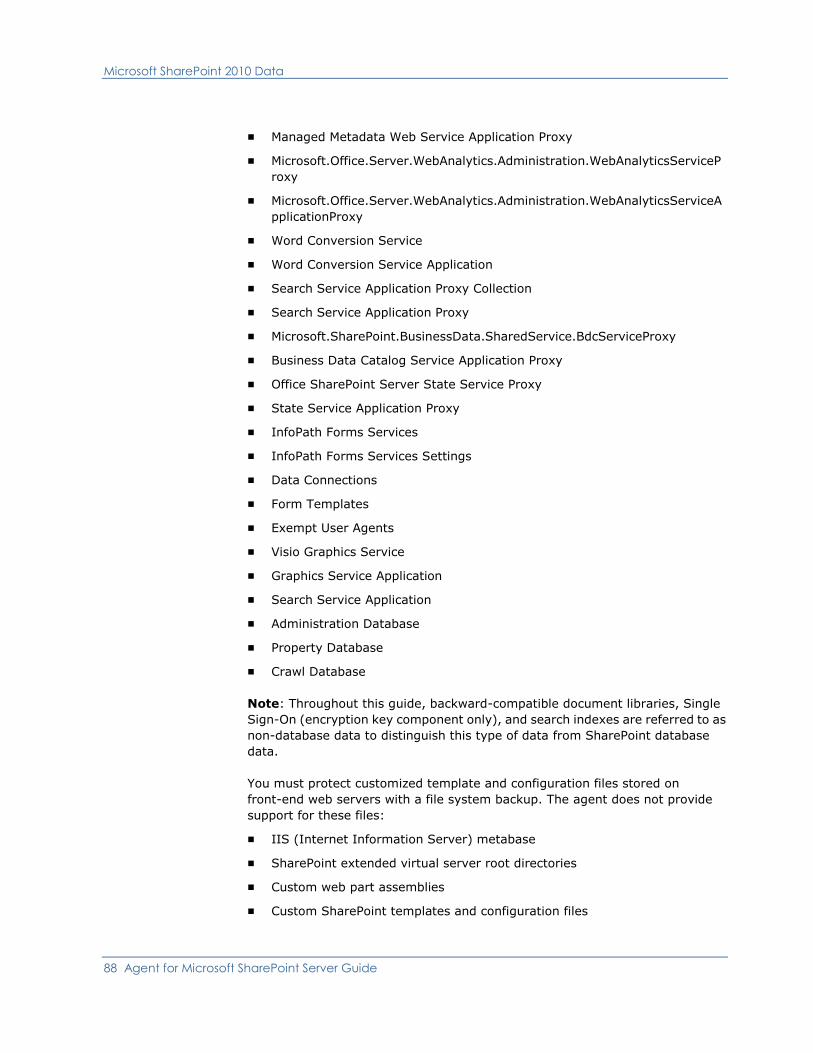
Microsoft SharePoint 2010 Data
88 Agent for Microsoft SharePoint Server Guide
■ Managed Metadata Web Service Application Proxy
■ Microsoft.Office.Server.WebAnalytics.Administration.WebAnalyticsServiceP
roxy
■ Microsoft.Office.Server.WebAnalytics.Administration.WebAnalyticsServiceA
pplicationProxy
■ Word Conversion Service
■ Word Conversion Service Application
■ Search Service Application Proxy Collection
■ Search Service Application Proxy
■ Microsoft.SharePoint.BusinessData.SharedService.BdcServiceProxy
■ Business Data Catalog Service Application Proxy
■ Office SharePoint Server State Service Proxy
■ State Service Application Proxy
■ InfoPath Forms Services
■ InfoPath Forms Services Settings
■ Data Connections
■ Form Templates
■ Exempt User Agents
■ Visio Graphics Service
■ Graphics Service Application
■ Search Service Application
■ Administration Database
■ Property Database
■ Crawl Database
Note: Throughout this guide, backward-compatible document libraries, Single
Sign-On (encryption key component only), and search indexes are referred to as
non-database data to distinguish this type of data from SharePoint database
data.
You must protect customized template and configuration files stored on
front-end web servers with a file system backup. The agent does not provide
support for these files:
■ IIS (Internet Information Server) metabase
■ SharePoint extended virtual server root directories
■ Custom web part assemblies
■ Custom SharePoint templates and configuration files
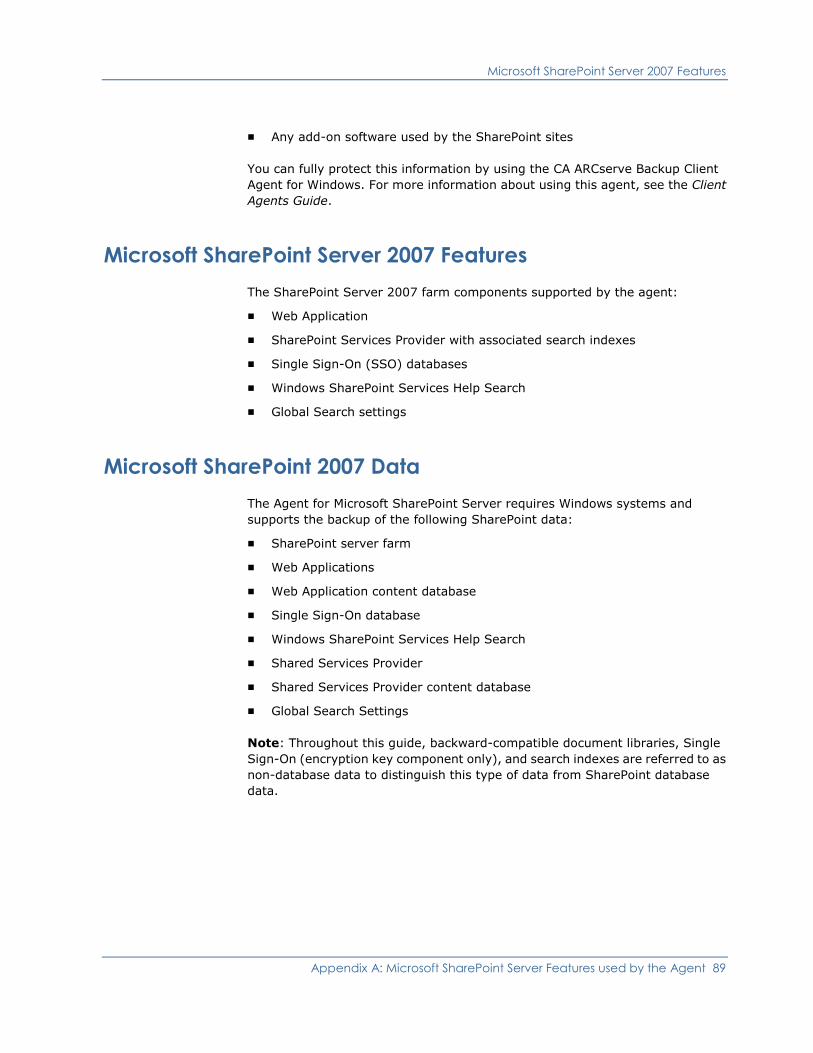
Microsoft SharePoint Server 2007 Features
Appendix A: Microsoft SharePoint Server Features used by the Agent 89
■ Any add-on software used by the SharePoint sites
You can fully protect this information by using the CA ARCserve Backup Client
Agent for Windows. For more information about using this agent, see the Client
Agents Guide.
Microsoft SharePoint Server 2007 Features
The SharePoint Server 2007 farm components supported by the agent:
■ Web Application
■ SharePoint Services Provider with associated search indexes
■ Single Sign-On (SSO) databases
■ Windows SharePoint Services Help Search
■ Global Search settings
Microsoft SharePoint 2007 Data
The Agent for Microsoft SharePoint Server requires Windows systems and
supports the backup of the following SharePoint data:
■ SharePoint server farm
■ Web Applications
■ Web Application content database
■ Single Sign-On database
■ Windows SharePoint Services Help Search
■ Shared Services Provider
■ Shared Services Provider content database
■ Global Search Settings
Note: Throughout this guide, backward-compatible document libraries, Single
Sign-On (encryption key component only), and search indexes are referred to as
non-database data to distinguish this type of data from SharePoint database
data.

Appendix B: Disaster Recovery 91
Appendix B: Disaster Recovery
This section contains the following topics:
How to Perform a Database-Level Disaster Recovery on SharePoint 2010
Systems (see page 91)
How to Perform a Database-Level Disaster Recovery on SharePoint 2007
Systems (see page 92)
How to Perform a Database-Level Disaster Recovery on
SharePoint 2010 Systems
If one or more computers in a farm crash, it can corrupt the entire farm or a few
components. If a disaster occurs, you must follow this process to restore the
SharePoint data:
1. Restore the operating system on your computer. The CA ARCserve Backup
Disaster Recovery Option provides an automated and efficient way for you to
complete these tasks. For more information, see the CA ARCserve Backup
Disaster Recovery Option Guide.
2. Ensure that the required applications are operational. SQL Server should be
running on the computer where Microsoft SQL Server is installed. The
front-end web server and Application server require SharePoint 2010.
3. Some of the considerations include:
– Stand-alone server — Microsoft SQL Server 2008 Express
– Database server for a single-server farm — SQL Server 2008
4. If you want to recover the entire farm, you must create the new farm using
Microsoft SharePoint products and the technologies configuration wizard. To
know more about SharePoint Products and the Technologies, see Microsoft
Documentation.
5. After creating the new Farm, ensure all backup operation services, are still
running on the SharePoint 2010 Central Admin before you start the backup
operation.
How to Perform a Database-Level Disaster Recovery on SharePoint 2007 Systems
92 Agent for Microsoft SharePoint Server Guide
How to Perform a Database-Level Disaster Recovery on
SharePoint 2007 Systems
If one or more computers in a farm crash, it can corrupt the entire farm or a few
components. If a disaster occurs, you must follow this process to restore the
SharePoint 2007 data:
1. Restore the operating system on your computer. The CA ARCserve Backup
Disaster Recovery Option provides an automated and efficient way for you to
complete these tasks. For more information, see the Disaster Recovery
Option Guide.
2. Ensure that the required applications are operational. SQL Server should be
running on the computer where Microsoft SQL Server is installed. The
front-end web server and Application server require SharePoint 2007.
3. If you want to recover the entire farm, you must create the new farm using
SharePoint Products and the Technologies Configuration wizard. To know
more about SharePoint Products and the Technologies, see Microsoft
Documentation.
4. After creating the new Farm, make sure that the following services in the
SharePoint 2007 Central Admin are running:
– Windows SharePoint Services Help Search, Office SharePoint Server
Search, and Excel Calculation Services for SharePoint 2007 Farm
– Windows SharePoint Services Search for Windows SharePoint Services
3.0 Farm
5. If the new Farm is a stand-alone setup, you must rename the default Shared
Service Provider (SharedService1) to a new name that does not exist in the
original Farm. After you perform the restore, you can delete the Shared
Service Provider.
6. Restore the Farm or its components. For instructions on how to restore the
databases to SharePoint 2007, see Perform a Database-Level Data Restore
(see page 70).
Appendix C: Configuring Microsoft SQL Server Security Settings 93
Appendix C: Configuring Microsoft SQL
Server Security Settings
This appendix explains how to configure Microsoft SQL Server security settings
for CA ARCserve Backup.
This section contains the following topics:
Types of Microsoft SQL Authentication (see page 93)
Authentication Requirements (see page 93)
Check or Change the Microsoft SQL Server Authentication Method (see page 94)
Types of Microsoft SQL Authentication
Microsoft SQL Server provides the following two types of user authentication:
■ Apply the Windows login identification
■ Use separate user credentials specific to Microsoft SQL Server
Although Microsoft recommends using only Windows authentication wherever
possible, in certain instances it is appropriate, or even necessary, to enable
Microsoft SQL Server-based authentication. For example, you must use
Microsoft SQL Server authentication for Microsoft SQL Server 2000 or 2005 when
the database is running in a cluster. For more information on clusters, see
Microsoft documentation.
Authentication Requirements
For Microsoft SQL Server authentication, you must specify a user account with
system administrator access privileges. By default, Microsoft SQL Server creates
an account with this level of access, called sa, but the Agent for Microsoft
SharePoint Server can use any account with equivalent privileges.
For Windows authentication, any account with administrator equivalency for the
machine on which the database is running typically has system administrator
access privileges for the database.
Note: A Windows or domain administrator does not automatically have system
administrator access privileges for the database if the BUILTIN\Administrators
login entry in Microsoft SQL Server has been removed or does not have this role,
or if a separate login entry for this user in Microsoft SQL Server does not have
this role.
Check or Change the Microsoft SQL Server Authentication Method
94 Agent for Microsoft SharePoint Server Guide
Check or Change the Microsoft SQL Server Authentication
Method
You can check or change the Microsoft SQL Server authentication method using
CA ARCserve Backup.
To check or change the Microsoft SQL Server authentication method
1. On the system where Microsoft SQL Server is running, open the SQL Server
Enterprise Manager.
2. In the Tree pane, expand the entries below Console Root until you reach the
database server.
3. Right-click the server name, and select Properties from the drop-down list.
The Properties dialog opens.
4. In the Properties dialog, click the Security tab.
5. Under Authentication, select one of the following options:
Microsoft SQL Server and Windows
Enables Microsoft SQL server-based authentication.
Windows Only
Enables only Windows user names and passwords.
6. Click OK.
The user authentication process is now set.
Appendix D: Troubleshooting 95
Appendix D: Troubleshooting
The following information is provided for troubleshooting backup and restore
issues using the CA ARCserve Backup Agent for Microsoft SharePoint Server:
This section contains the following topics:
AE9972 (see page 95)
Unable to restore a site collection to its original location (see page 95)
AE9972
If you receive an AE9972 Object <Component Name> failed error in event
OnRestore, perform the following tasks:
1. Start the SPAdmin Windows Service, displayed as Windows SharePoint
Services Administration.
2. Go the SharePoint 3.0 Central Administration website and select Operations,
Topology and Services, Services on Server.
3. Choose the agent machine server and select the Custom radio box.
4. Click Central Administration.
5. Click Start.
6. Run the job that previously failed, again.
Unable to restore a site collection to its original location
Restoring a site collection to its original location that has been deleted will fail,
when you delete the site collection URL.
You can perform the folowwing steps:
1. Perform restore to an alternative location.
2. Select the original SharePoint Server.
3. Enter the new URL parameter in the agent restore configuration dialog and
complete the restore process.
Unable to restore a site collection to its original location
96 Agent for Microsoft SharePoint Server Guide
More information:
Perform a Document-Level Restore to the Alternate Location in SharePoint 2010
(see page 59)
Perform a Document-Level Restore to Alternate Location in SharePoint 2007
(see page 80)
Index 97
Index
A
agent
configuration • 20, 21, 23, 25
features • 13
B
Backup Options Dialog in SharePoint Server
2010 • 29
C
configure the agent • 25
D
database-level agent backup option dialog • 38
database-level configuration tab • 21
database-level restore option dialog in
SharePoint Server 2010 • 45
disaster recovery • 91
document-level configuration tab • 23
document-level restore option dialog in
SharePoint 2010 • 54
E
encryption
encryption, support • 36
S
Single Sign-on
Single Sign-on, configuration • 17
Single Sign-on, database • 14, 17
SQL Server, authentication • 93