Embed Size (px)
Citation preview
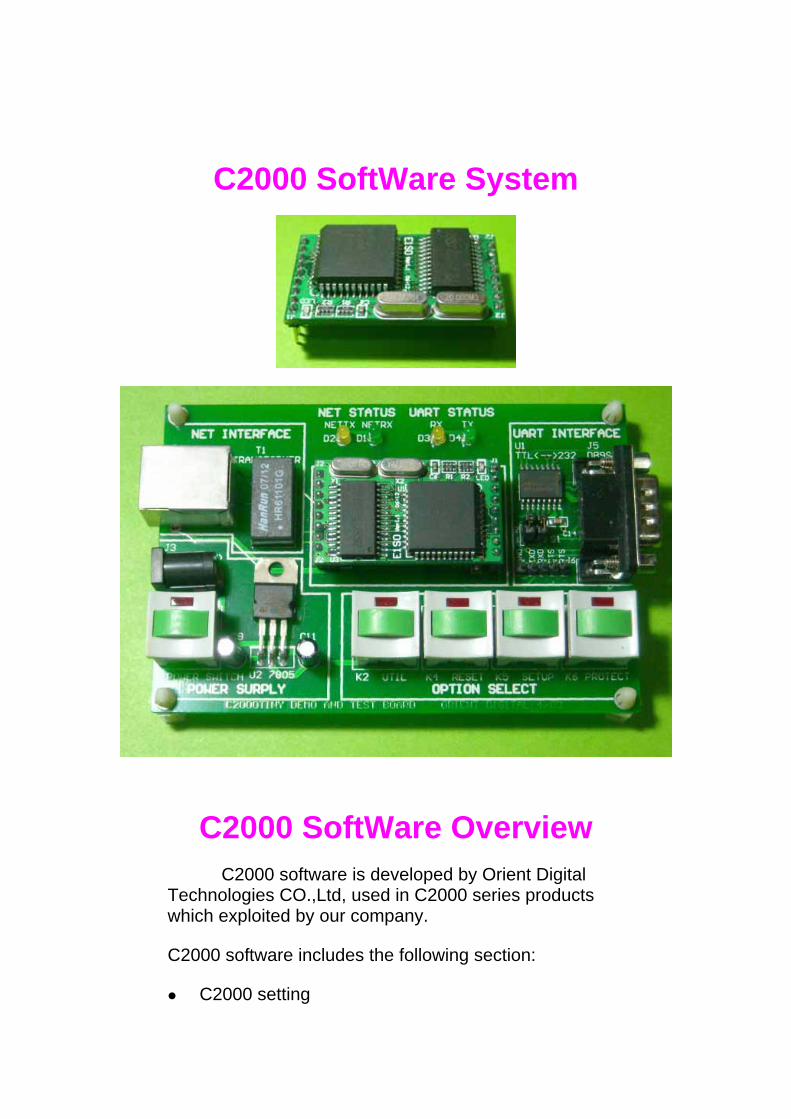
C2000 SoftWare System
C2000 SoftWare Overview
C2000 software is developed by Orient Digital Technologies CO.,Ltd, used in C2000 series products which exploited by our company.
C2000 software includes the following section:
C2000 setting
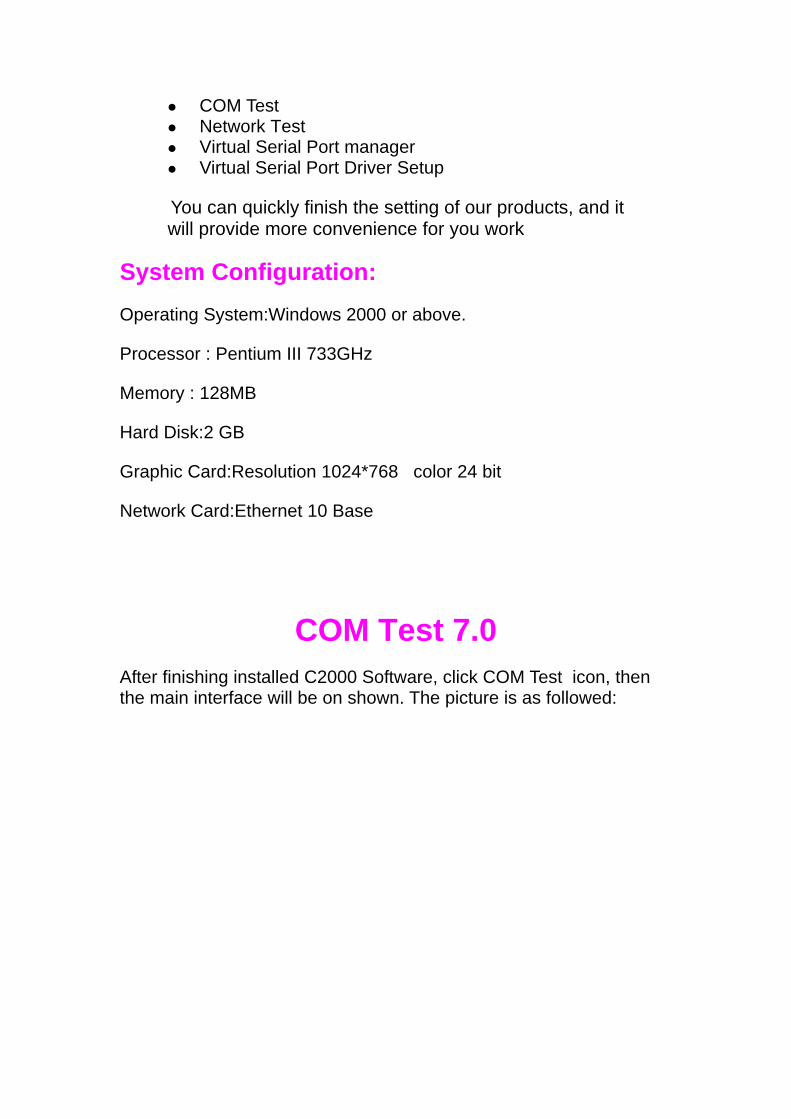
COM Test
Network Test Virtual Serial Port manager
Virtual Serial Port Driver Setup
You can quickly finish the setting of our products, and it will provide more convenience for you work
System Configuration: Operating System:Windows 2000 or above.
Processor : Pentium III 733GHz
Memory : 128MB
Hard Disk:2 GB
Graphic Card:Resolution 1024*768 color 24 bit
Network Card:Ethernet 10 Base
COM Test 7.0
After finishing installed C2000 Software, click COM Test icon, then the main interface will be on shown. The picture is as followed:
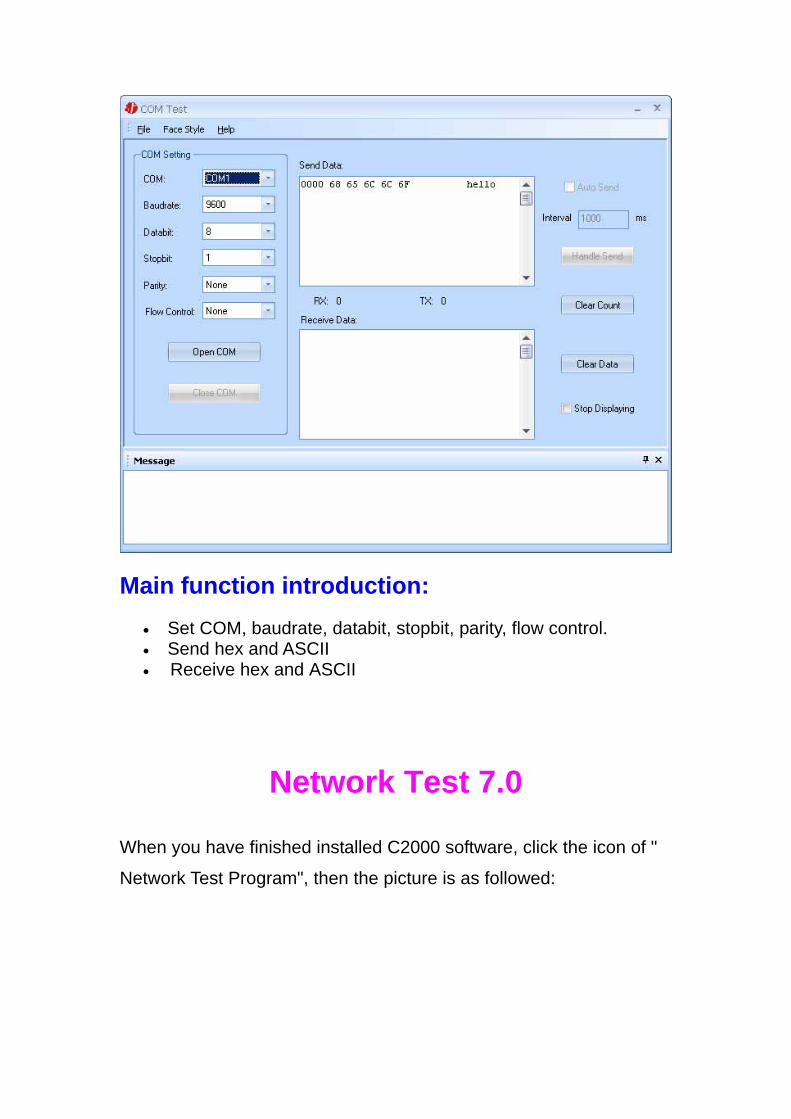
Main function introduction:
• Set COM, baudrate, databit, stopbit, parity, flow control. • Send hex and ASCII • Receive hex and ASCII
Network Test 7.0
When you have finished installed C2000 software, click the icon of "
Network Test Program", then the picture is as followed:
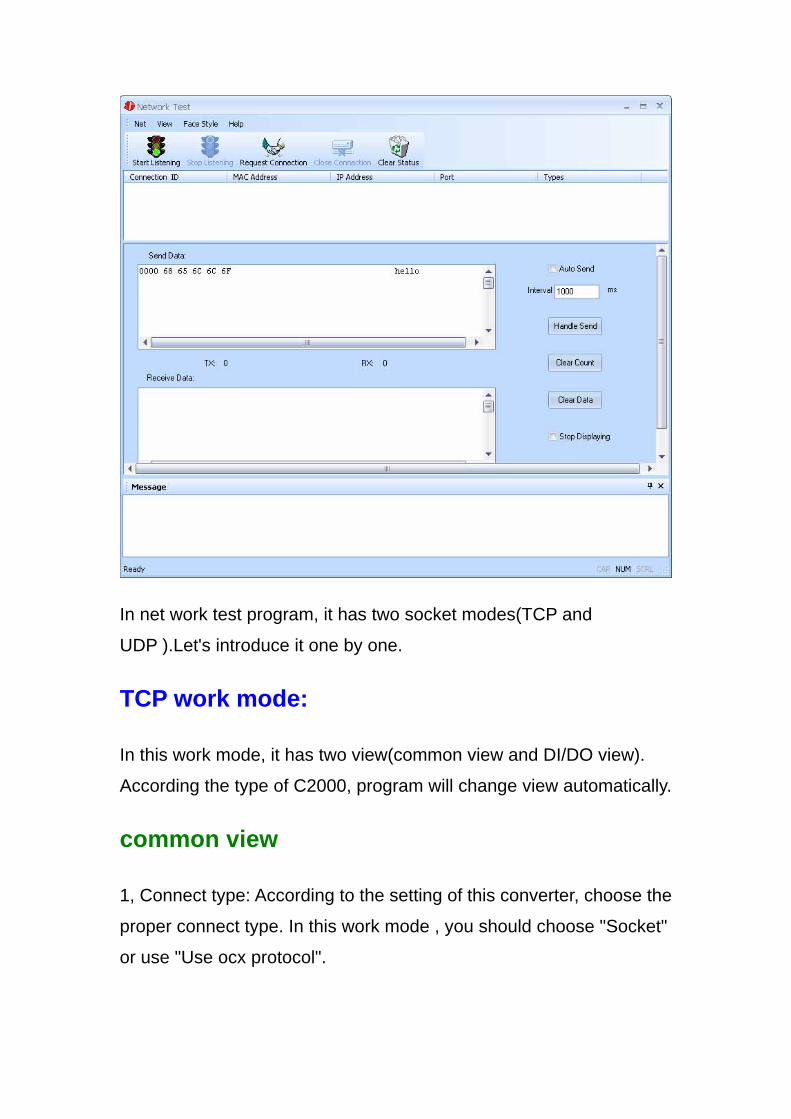
In net work test program, it has two socket modes(TCP and
UDP ).Let's introduce it one by one.
TCP work mode:
In this work mode, it has two view(common view and DI/DO view).
According the type of C2000, program will change view automatically.
common view
1, Connect type: According to the setting of this converter, choose the
proper connect type. In this work mode , you should choose "Socket"
or use "Use ocx protocol".
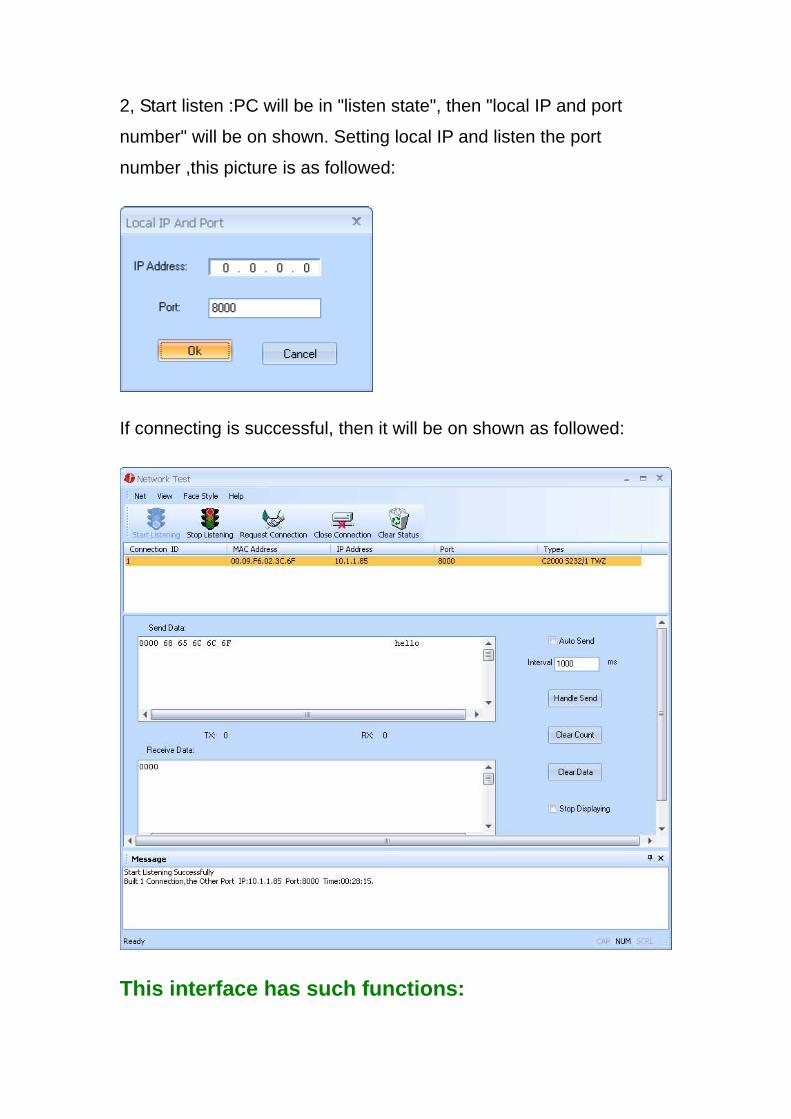
2, Start listen :PC will be in "listen state", then "local IP and port
number" will be on shown. Setting local IP and listen the port
number ,this picture is as followed:
If connecting is successful, then it will be on shown as followed:
This interface has such functions:
• Send hex and ASCII
• Receive hex and ASCII
DI/DO view
1, Connect type: When the equipment is C2000 Plus SW32 and you
use "use ocx protocol ",the program will automaticall change to
DI/DO view.
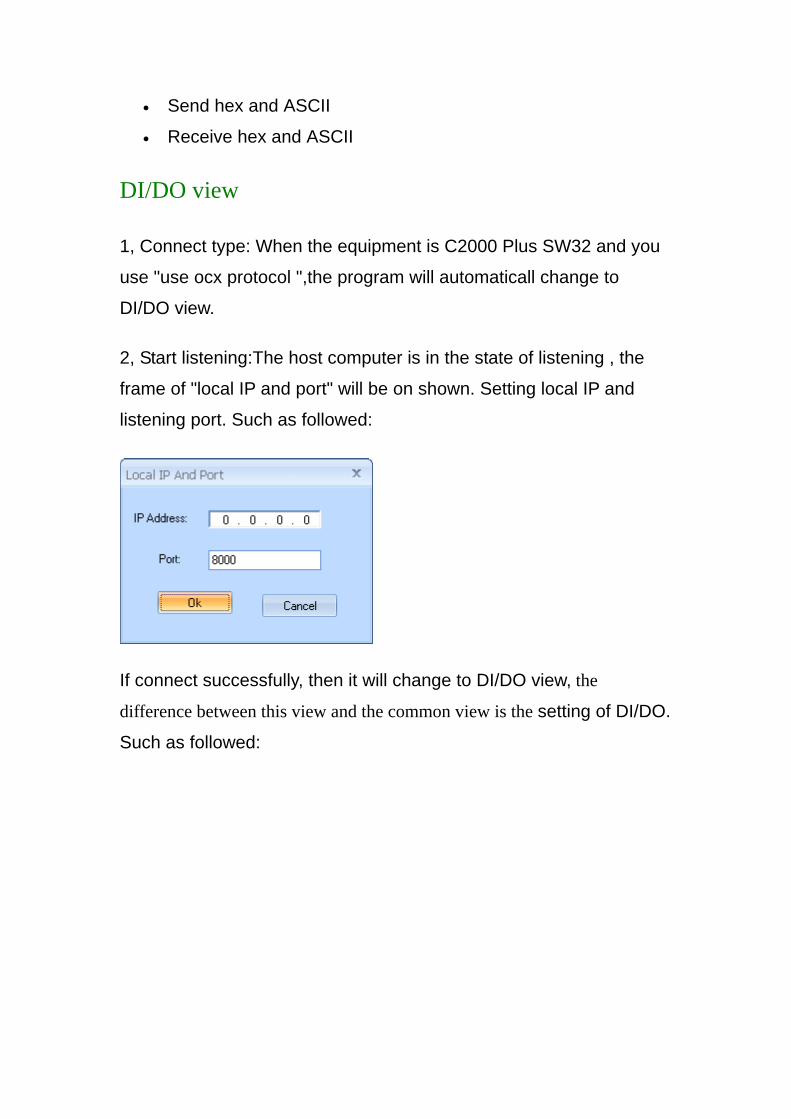
2, Start listening:The host computer is in the state of listening , the
frame of "local IP and port" will be on shown. Setting local IP and
listening port. Such as followed:
If connect successfully, then it will change to DI/DO view, the
difference between this view and the common view is the setting of DI/DO.
Such as followed:
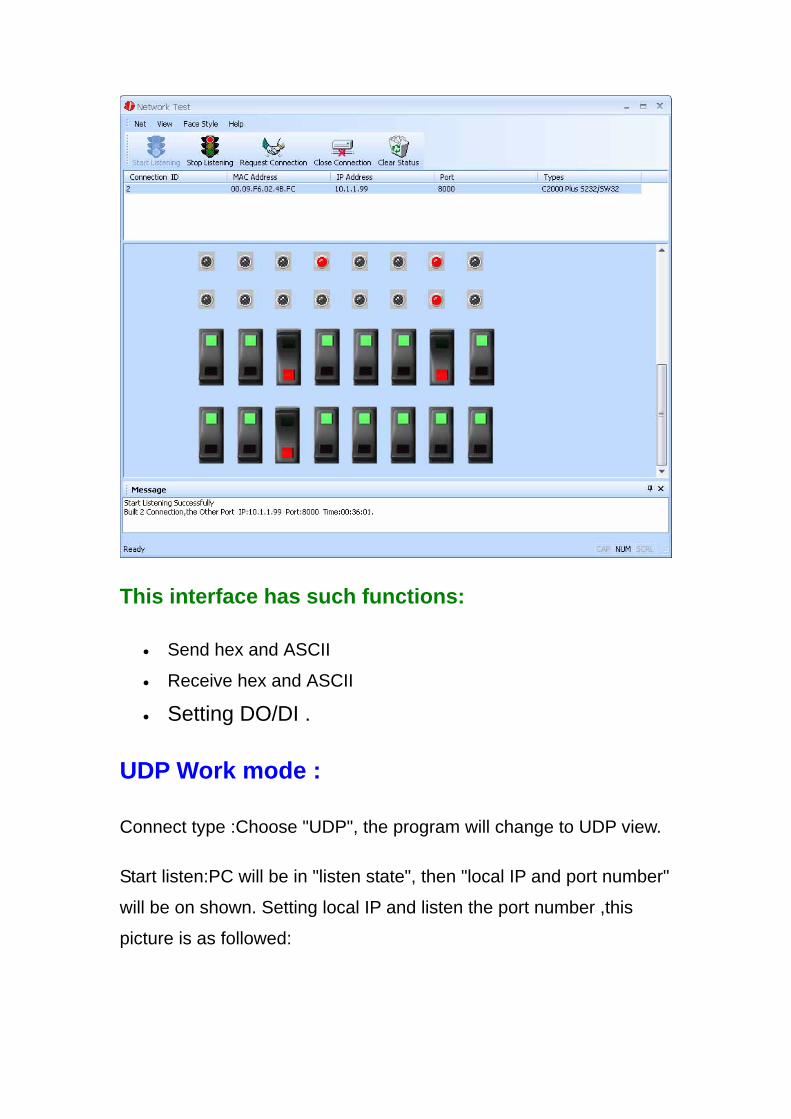
This interface has such functions:
• Send hex and ASCII
• Receive hex and ASCII
• Setting DO/DI .
UDP Work mode :
Connect type :Choose "UDP", the program will change to UDP view.
Start listen:PC will be in "listen state", then "local IP and port number"
will be on shown. Setting local IP and listen the port number ,this
picture is as followed:
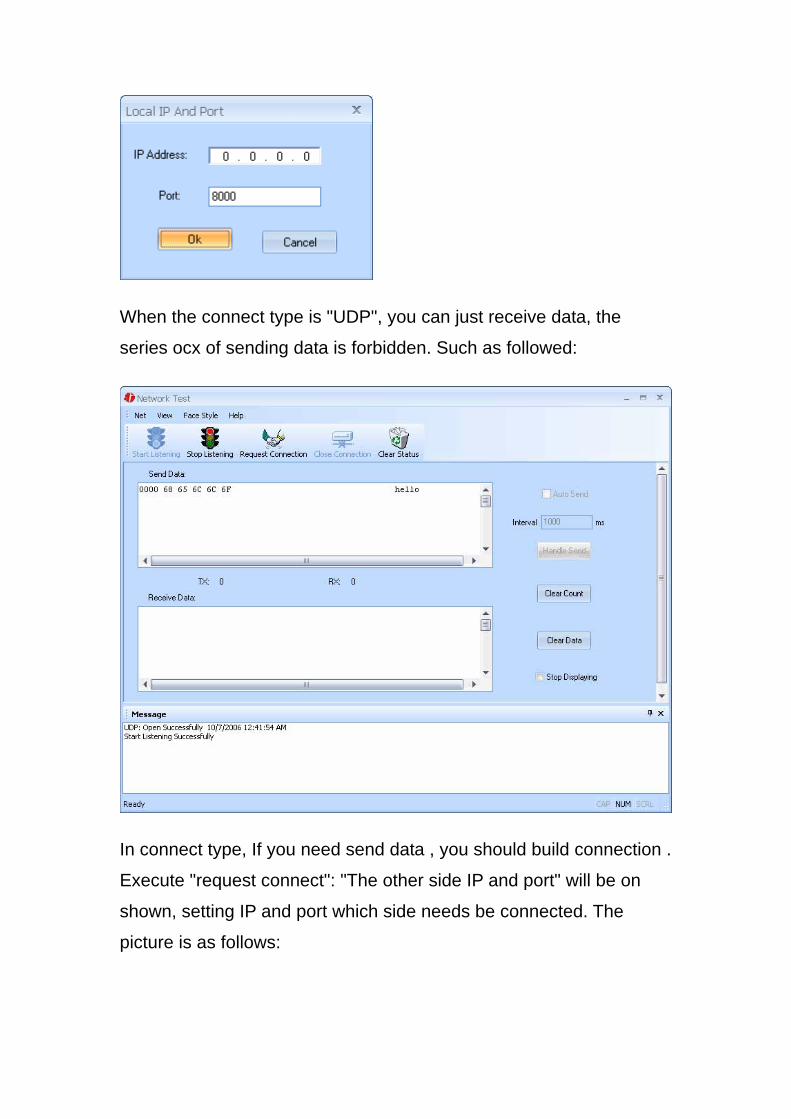
When the connect type is "UDP", you can just receive data, the
series ocx of sending data is forbidden. Such as followed:
In connect type, If you need send data , you should build connection .
Execute "request connect": "The other side IP and port" will be on
shown, setting IP and port which side needs be connected. The
picture is as follows:
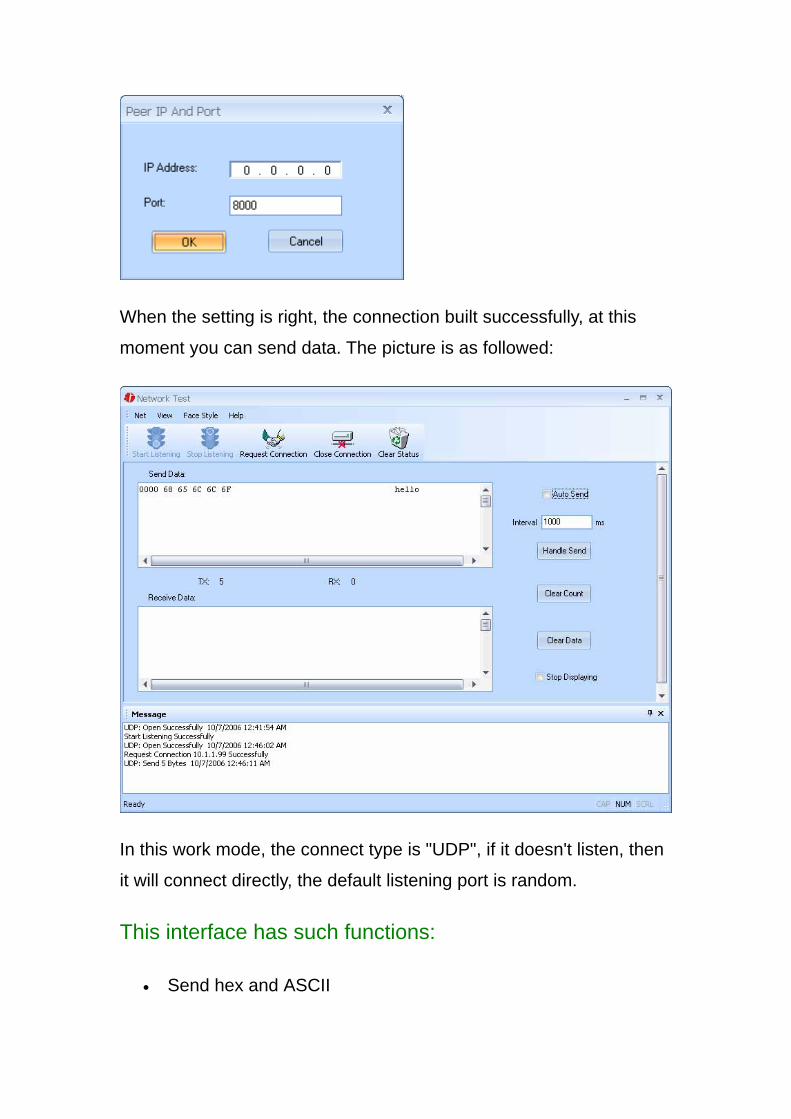
When the setting is right, the connection built successfully, at this
moment you can send data. The picture is as followed:
In this work mode, the connect type is "UDP", if it doesn't listen, then
it will connect directly, the default listening port is random.
This interface has such functions:
• Send hex and ASCII

• Receive hex and ASCII
C2000 Setting 7.0
When C2000 Software has been installed, clicking the setting icon of C2000,then the main interface is displayed, as shown in the figure below:
Setting Module
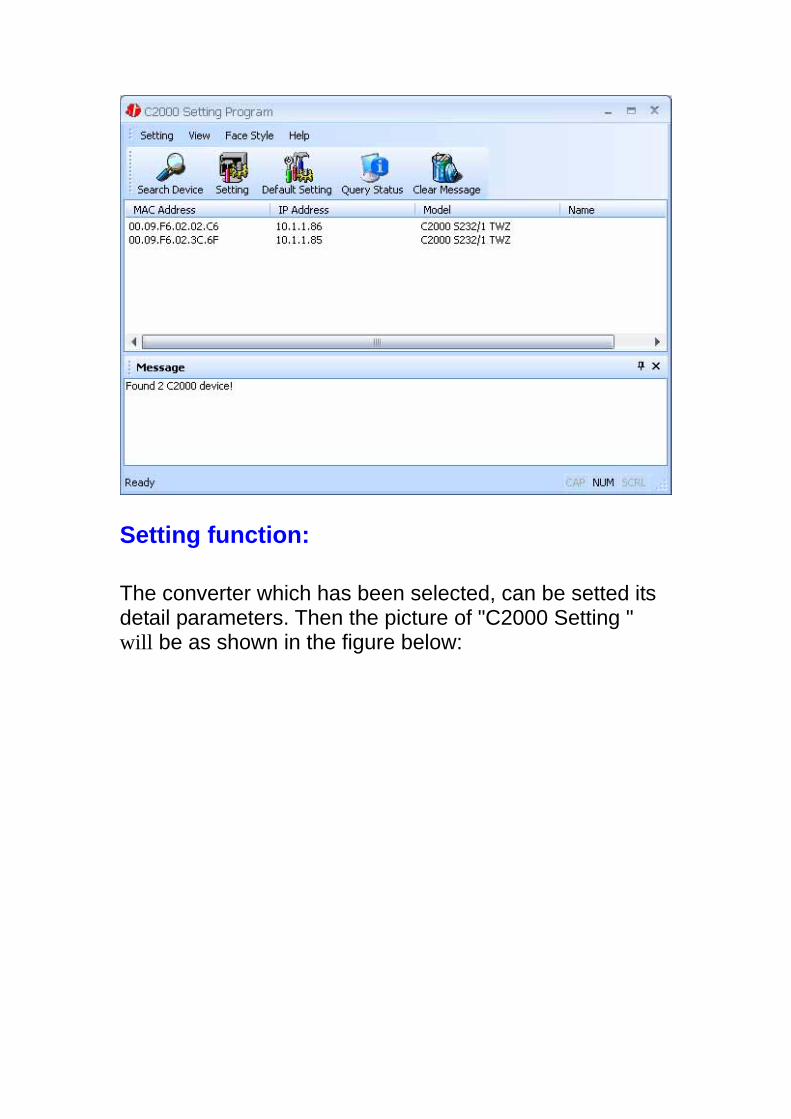
Searching Function:
Search: Searching all of the C2000 on the previous net, the result will be shown on the "message frame", as shown in the figure below:
Setting function:
The converter which has been selected, can be setted its detail parameters. Then the picture of "C2000 Setting " will be as shown in the figure below:
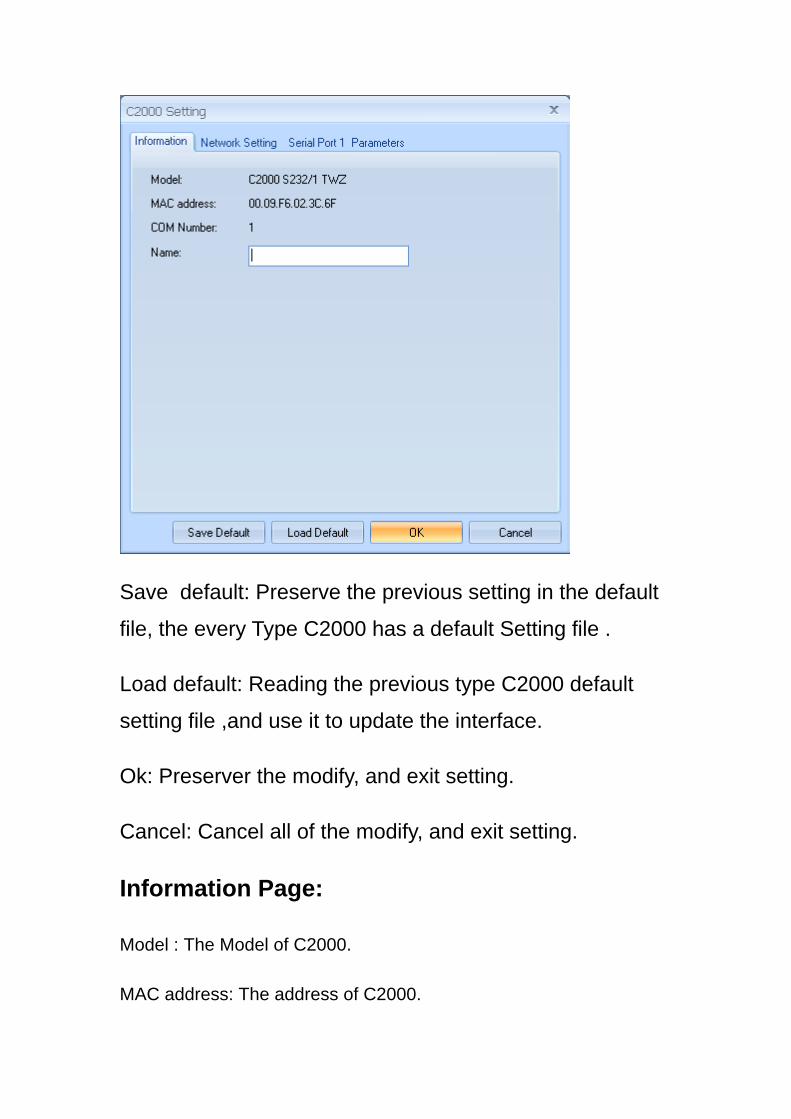
Save default: Preserve the previous setting in the default
file, the every Type C2000 has a default Setting file .
Load default: Reading the previous type C2000 default
setting file ,and use it to update the interface.
Ok: Preserver the modify, and exit setting.
Cancel: Cancel all of the modify, and exit setting.
Information Page:
Model : The Model of C2000.
MAC address: The address of C2000.
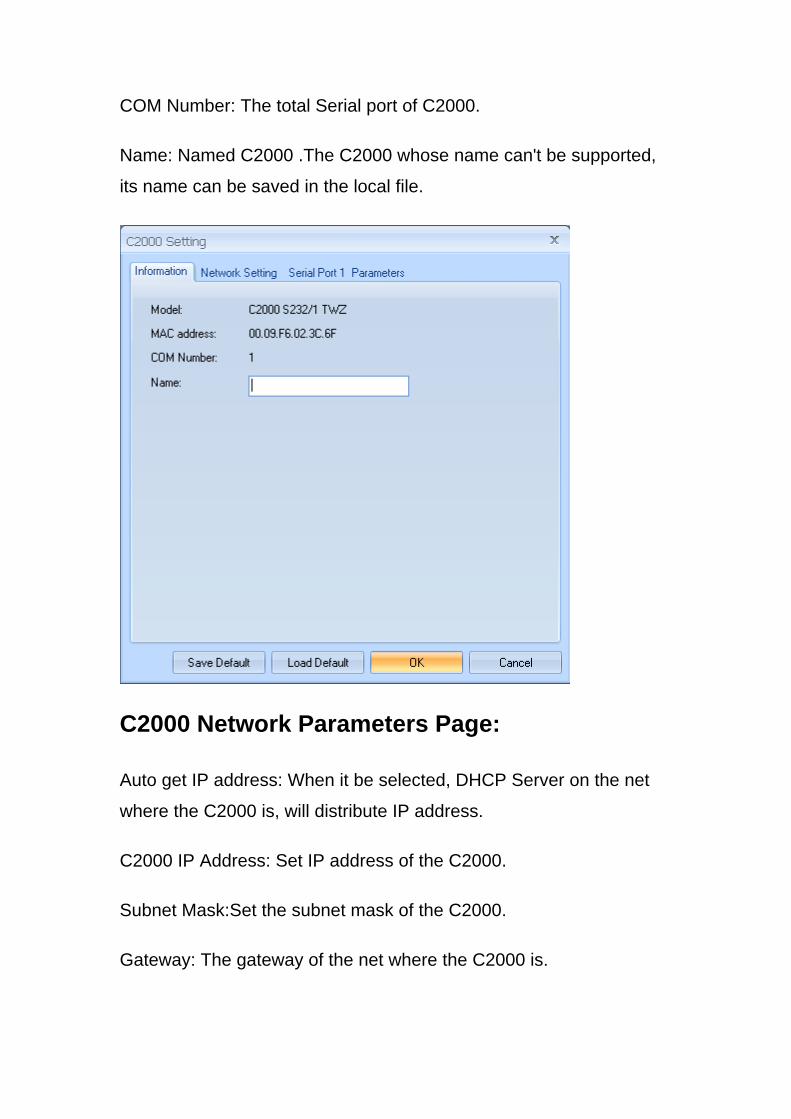
COM Number: The total Serial port of C2000.
Name: Named C2000 .The C2000 whose name can't be supported,
its name can be saved in the local file.
C2000 Network Parameters Page: Auto get IP address: When it be selected, DHCP Server on the net
where the C2000 is, will distribute IP address.
C2000 IP Address: Set IP address of the C2000.
Subnet Mask:Set the subnet mask of the C2000.
Gateway: The gateway of the net where the C2000 is.
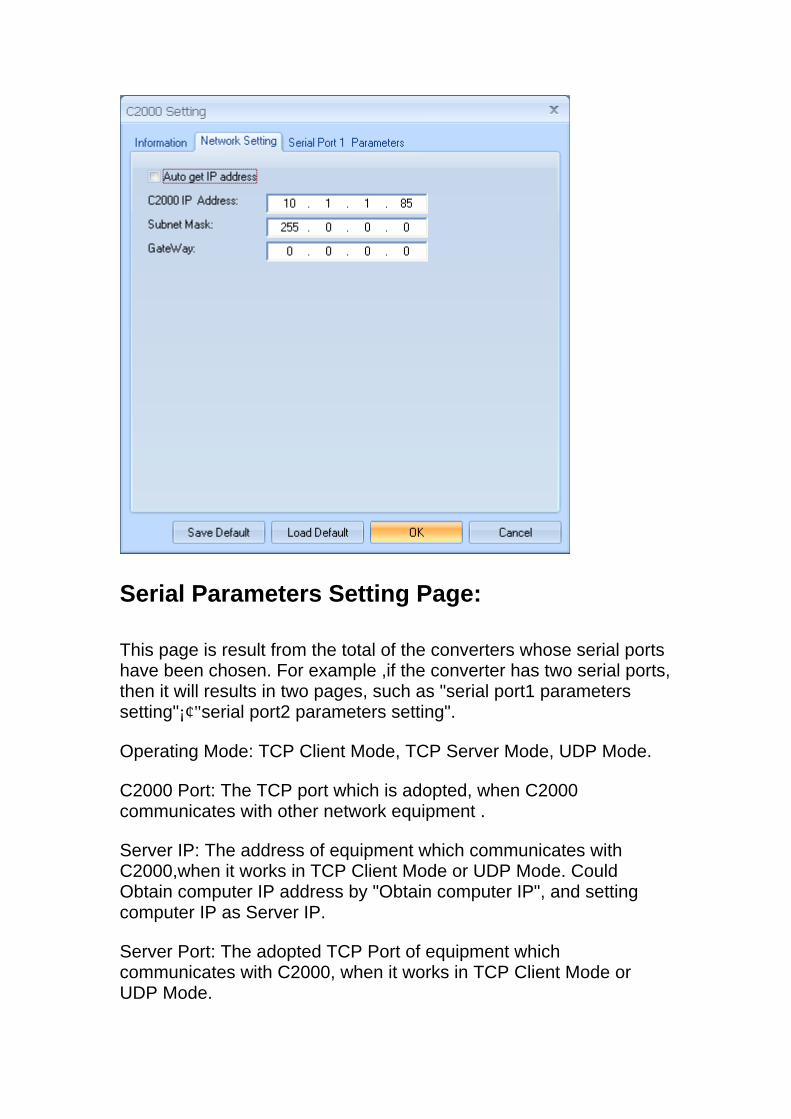
Serial Parameters Setting Page: This page is result from the total of the converters whose serial ports have been chosen. For example ,if the converter has two serial ports, then it will results in two pages, such as "serial port1 parameters setting"¡¢"serial port2 parameters setting".
Operating Mode: TCP Client Mode, TCP Server Mode, UDP Mode.
C2000 Port: The TCP port which is adopted, when C2000 communicates with other network equipment .
Server IP: The address of equipment which communicates with C2000,when it works in TCP Client Mode or UDP Mode. Could Obtain computer IP address by "Obtain computer IP", and setting computer IP as Server IP.
Server Port: The adopted TCP Port of equipment which communicates with C2000, when it works in TCP Client Mode or UDP Mode.
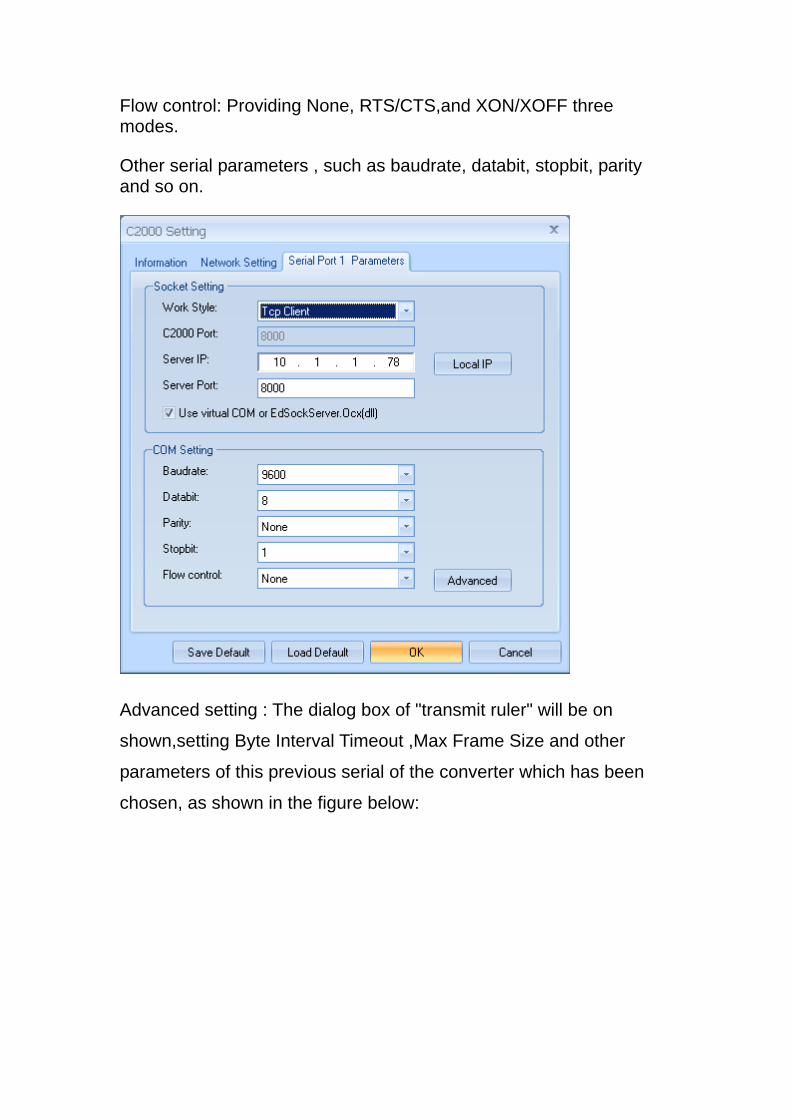
Flow control: Providing None, RTS/CTS,and XON/XOFF three modes.
Other serial parameters , such as baudrate, databit, stopbit, parity and so on.
Advanced setting : The dialog box of "transmit ruler" will be on
shown,setting Byte Interval Timeout ,Max Frame Size and other
parameters of this previous serial of the converter which has been
chosen, as shown in the figure below:
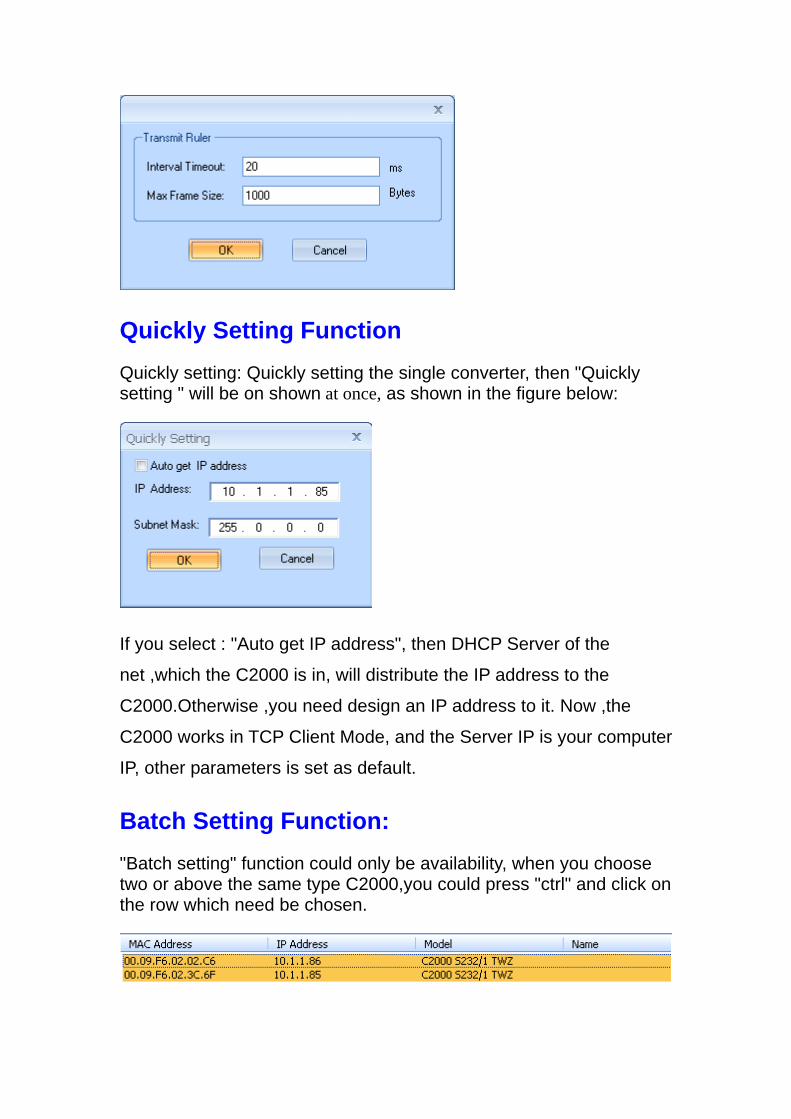
Quickly Setting Function
Quickly setting: Quickly setting the single converter, then "Quickly setting " will be on shown at once, as shown in the figure below:
If you select : "Auto get IP address", then DHCP Server of the
net ,which the C2000 is in, will distribute the IP address to the
C2000.Otherwise ,you need design an IP address to it. Now ,the
C2000 works in TCP Client Mode, and the Server IP is your computer
IP, other parameters is set as default.
Batch Setting Function:
"Batch setting" function could only be availability, when you choose two or above the same type C2000,you could press "ctrl" and click on the row which need be chosen.
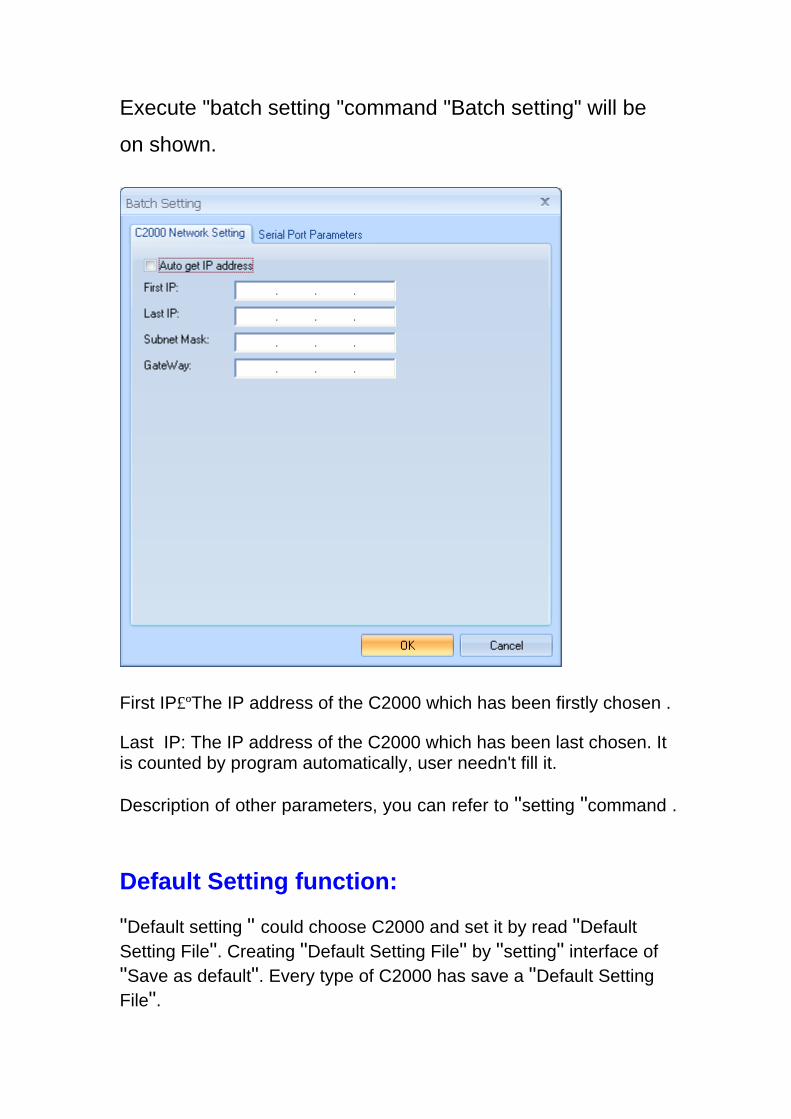
Execute "batch setting "command "Batch setting" will be
on shown.
First IP£ºThe IP address of the C2000 which has been firstly chosen .
Last IP: The IP address of the C2000 which has been last chosen. It is counted by program automatically, user needn't fill it.
Description of other parameters, you can refer to "setting "command .
Default Setting function:
"Default setting " could choose C2000 and set it by read "Default Setting File". Creating "Default Setting File" by "setting" interface of "Save as default". Every type of C2000 has save a "Default Setting File".
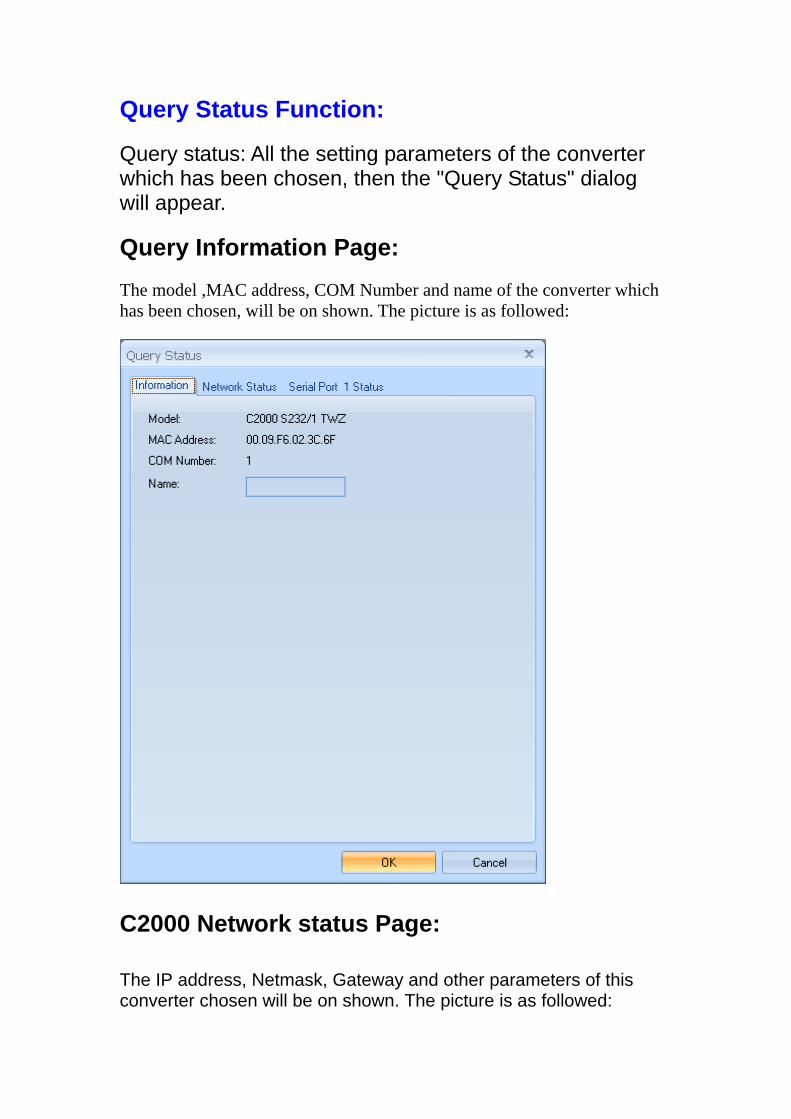
Query Status Function:
Query status: All the setting parameters of the converter which has been chosen, then the "Query Status" dialog will appear.
Query Information Page:
The model ,MAC address, COM Number and name of the converter which has been chosen, will be on shown. The picture is as followed:
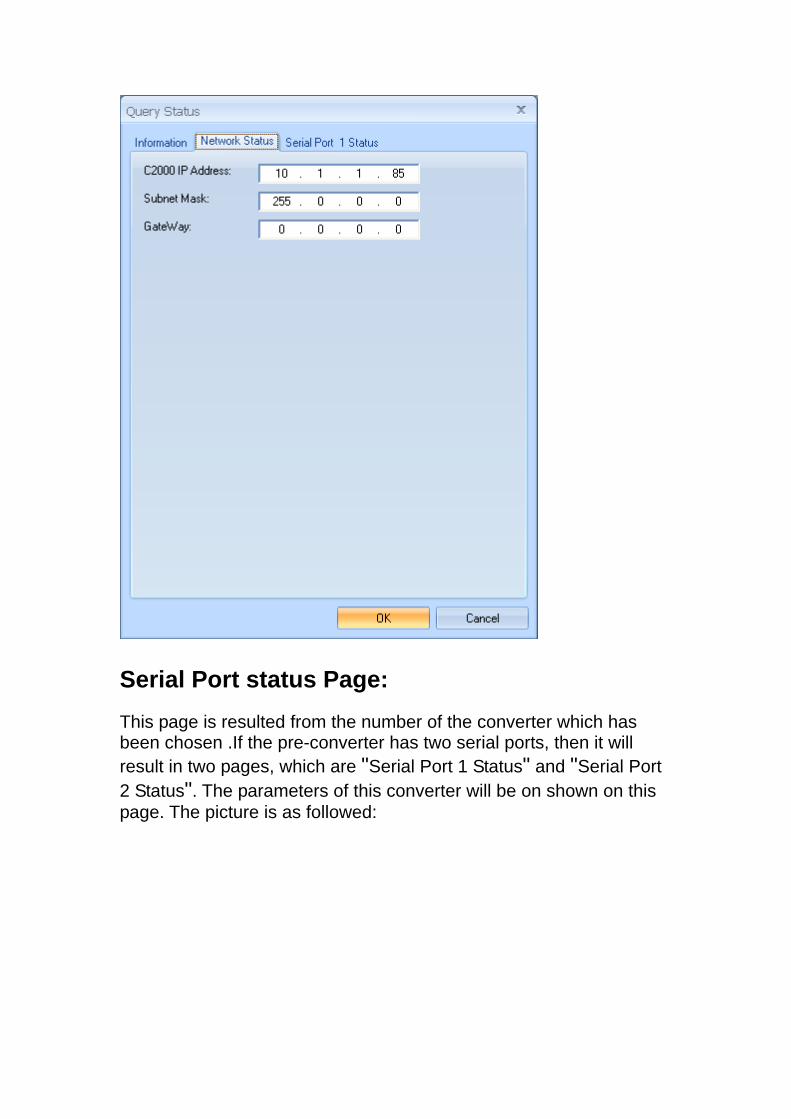
C2000 Network status Page:
The IP address, Netmask, Gateway and other parameters of this converter chosen will be on shown. The picture is as followed:
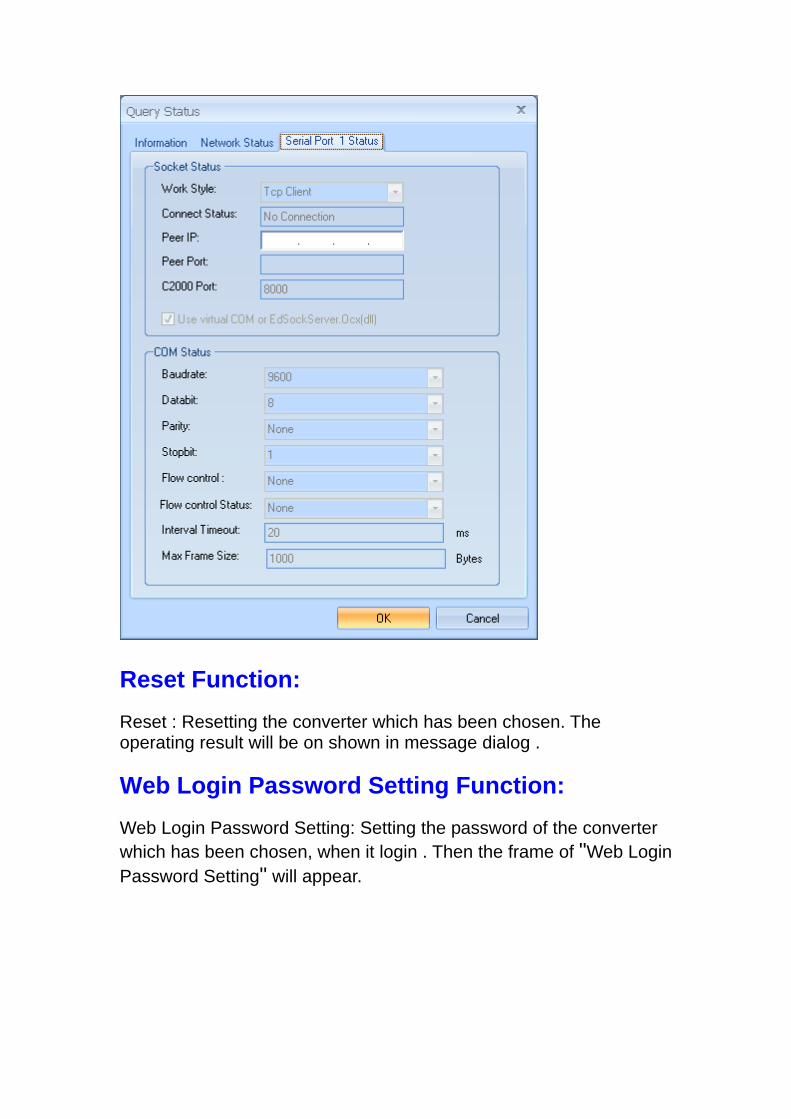
Serial Port status Page:
This page is resulted from the number of the converter which has been chosen .If the pre-converter has two serial ports, then it will result in two pages, which are "Serial Port 1 Status" and "Serial Port 2 Status". The parameters of this converter will be on shown on this page. The picture is as followed:
Reset Function:
Reset : Resetting the converter which has been chosen. The operating result will be on shown in message dialog .
Web Login Password Setting Function:
Web Login Password Setting: Setting the password of the converter which has been chosen, when it login . Then the frame of "Web Login Password Setting" will appear.

OK: The pre-passed will be applied in this converter.
Cancel: Close the frame of "Web Login Password Setting".
Clear Information Column Function
Clear Message: Clear all the information of "message dialog".
Exit Function
Exit: Exit program.
View Module
Tool Column: Display or hidden tool column.
Status Column: Display or hidden status column.
Interface Style Module:
1. Skin style:
XP LUNA: From software interface to "the heart of sea" style.
XP ROLAE: From software interface to "north scene" style.
Office 2007: From software interface to "romantic season "style.
Default: From software interface to "nostalgic affection".
2. Toolbar style:
Office XP: From toolbar to "Office XP" style.
Office 2000: From toolbar to "Office 2000" style.
Office 2003: From toolbar to "Office 2003" style.
Win XP: From toolbar to "Win XP" style.
Help Module:
Help : The help will appear.
Start Transmit: In TCP Client Mode, the C2000's server IP is as the same as the host computer, and it will connect with the host computer after transmitting. If the host computer wants to connect with the C2000 which works in TCP Server Mode, you should use "add the C2000 which works as server", then add it to the C2000 list .Now, the user's software which is based serial port can communicate with devices by using " Virtual Serial Port ".
Stop Transmit: Close all of the connection. Then, the use's software, which is based serial port, can't communicate with the devices.
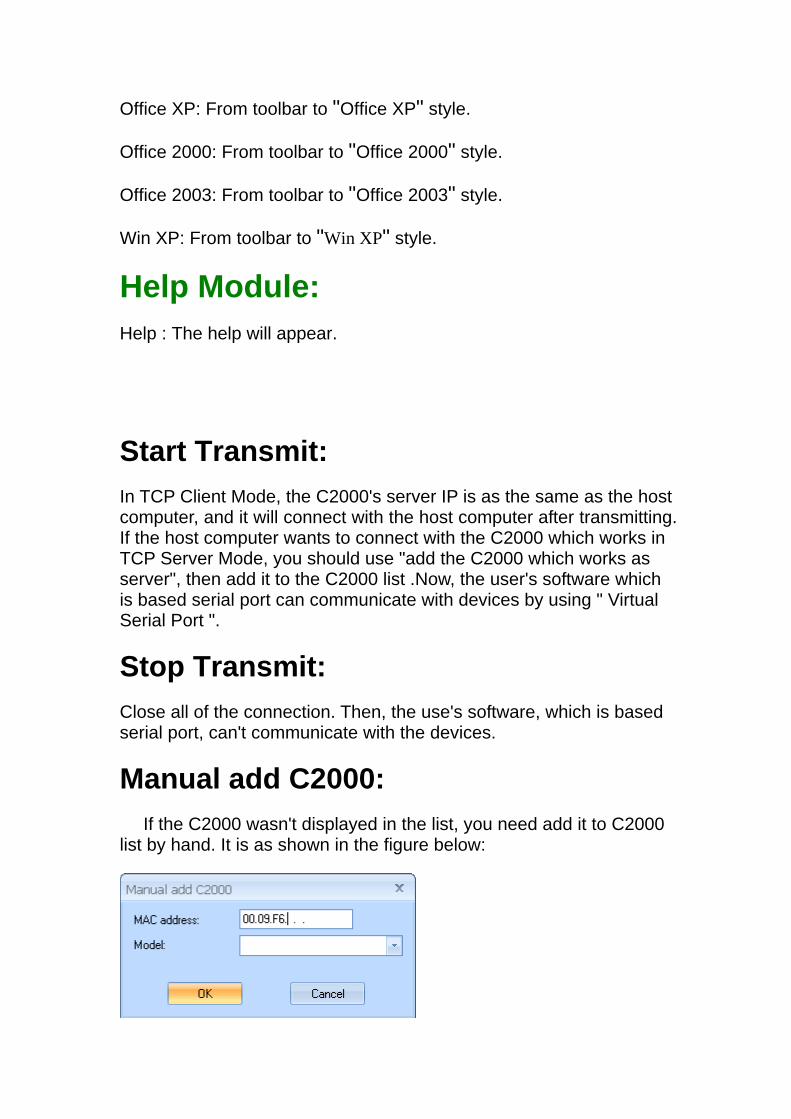
Manual add C2000:
If the C2000 wasn't displayed in the list, you need add it to C2000 list by hand. It is as shown in the figure below:
Fill the MAC address of the C2000 in the dialog "MAC Address", and
choose its type. Click on "confirm", then add it to C2000 list.
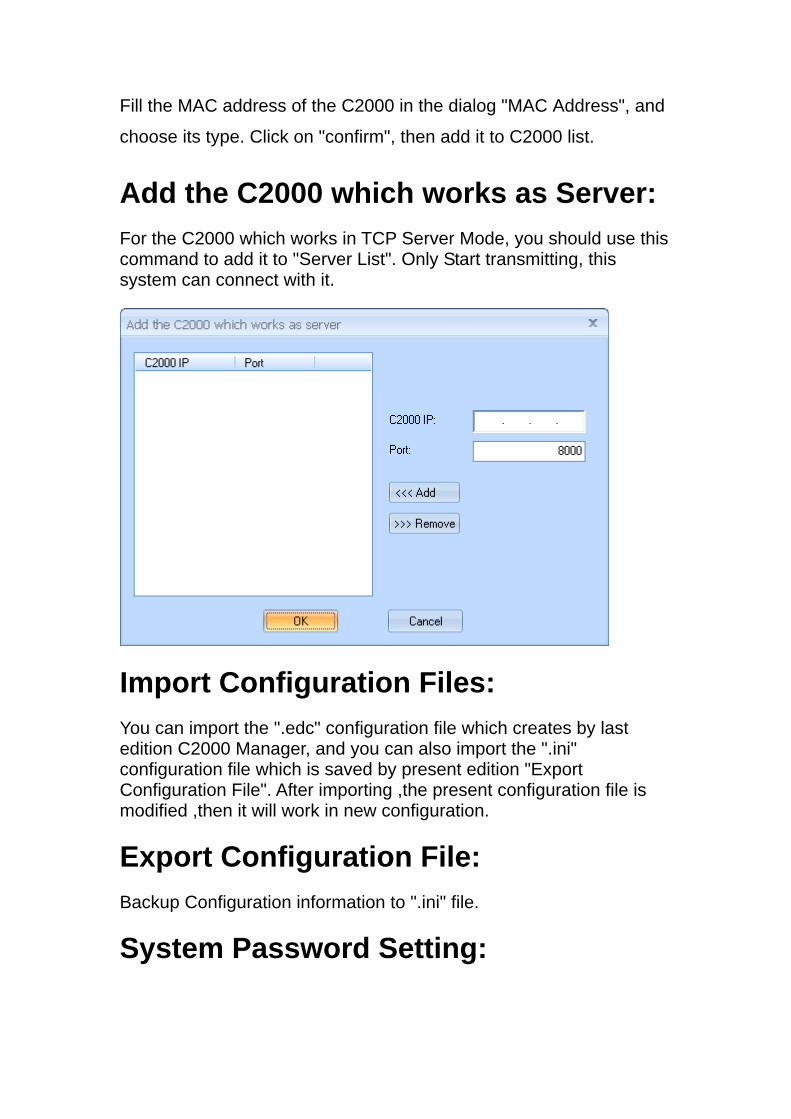
Add the C2000 which works as Server: For the C2000 which works in TCP Server Mode, you should use this command to add it to "Server List". Only Start transmitting, this system can connect with it.
Import Configuration Files: You can import the ".edc" configuration file which creates by last edition C2000 Manager, and you can also import the ".ini" configuration file which is saved by present edition "Export Configuration File". After importing ,the present configuration file is modified ,then it will work in new configuration.
Export Configuration File: Backup Configuration information to ".ini" file.
System Password Setting:
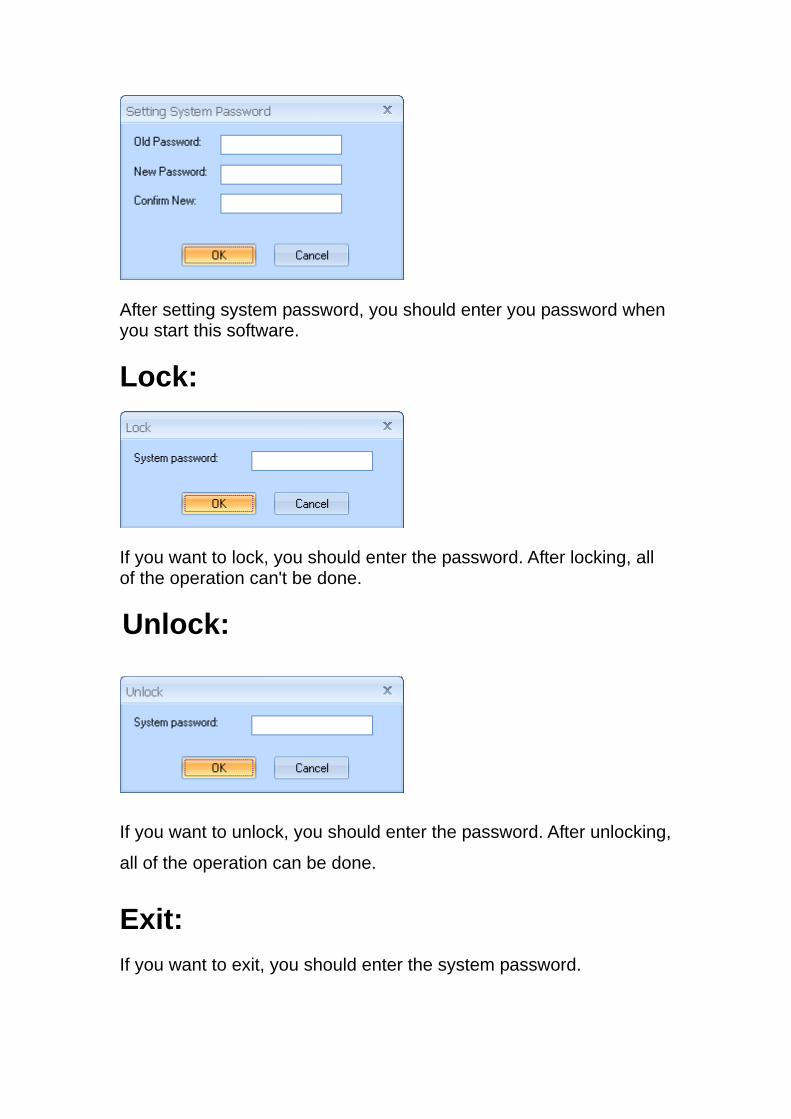
After setting system password, you should enter you password when you start this software.
Lock:
If you want to lock, you should enter the password. After locking, all of the operation can't be done.
Unlock:
If you want to unlock, you should enter the password. After unlocking,
all of the operation can be done.
Exit: If you want to exit, you should enter the system password.
©Copyright by Orient Digital All right reserved
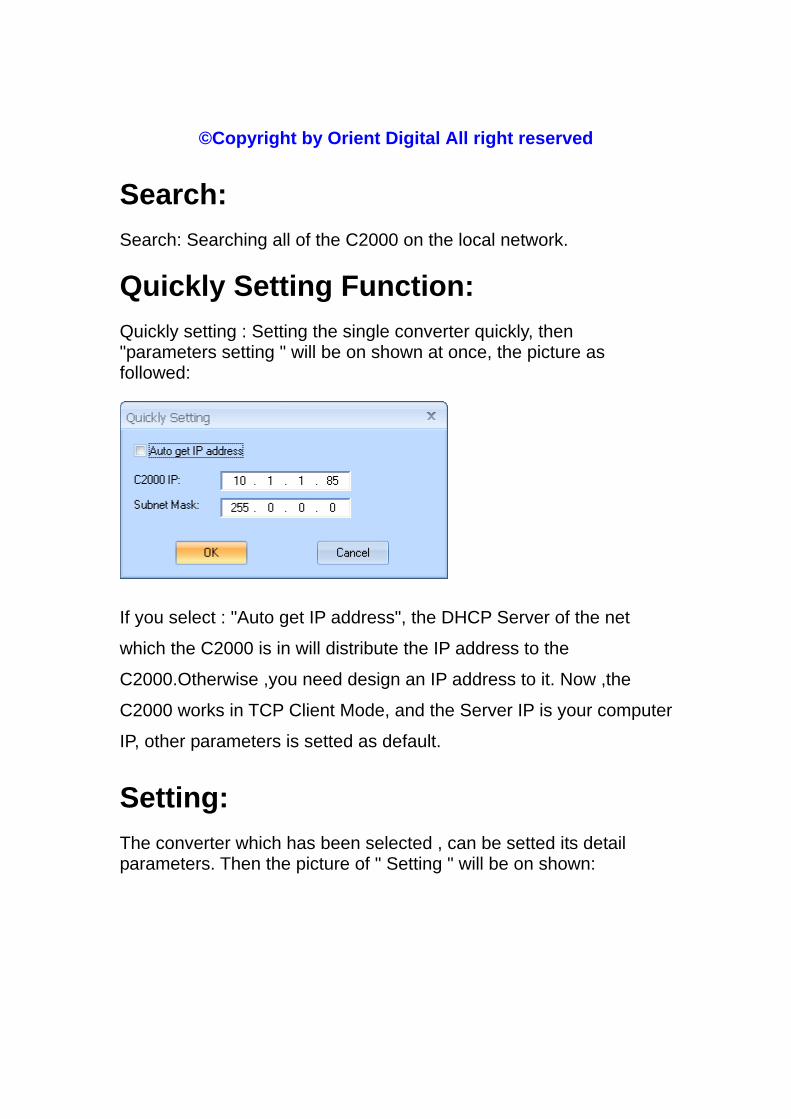
Search: Search: Searching all of the C2000 on the local network.
Quickly Setting Function: Quickly setting : Setting the single converter quickly, then "parameters setting " will be on shown at once, the picture as followed:
If you select : "Auto get IP address", the DHCP Server of the net
which the C2000 is in will distribute the IP address to the
C2000.Otherwise ,you need design an IP address to it. Now ,the
C2000 works in TCP Client Mode, and the Server IP is your computer
IP, other parameters is setted as default.
Setting: The converter which has been selected , can be setted its detail parameters. Then the picture of " Setting " will be on shown:
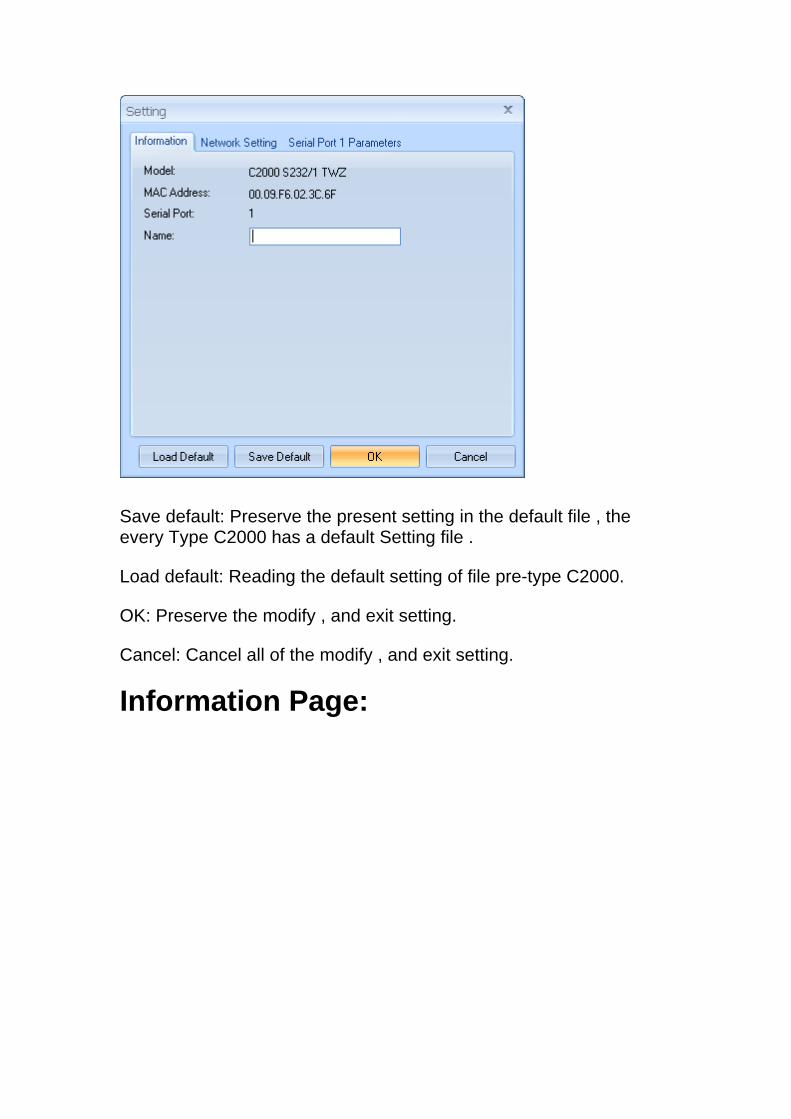
Save default: Preserve the present setting in the default file , the every Type C2000 has a default Setting file .
Load default: Reading the default setting of file pre-type C2000.
OK: Preserve the modify , and exit setting.
Cancel: Cancel all of the modify , and exit setting.
Information Page:
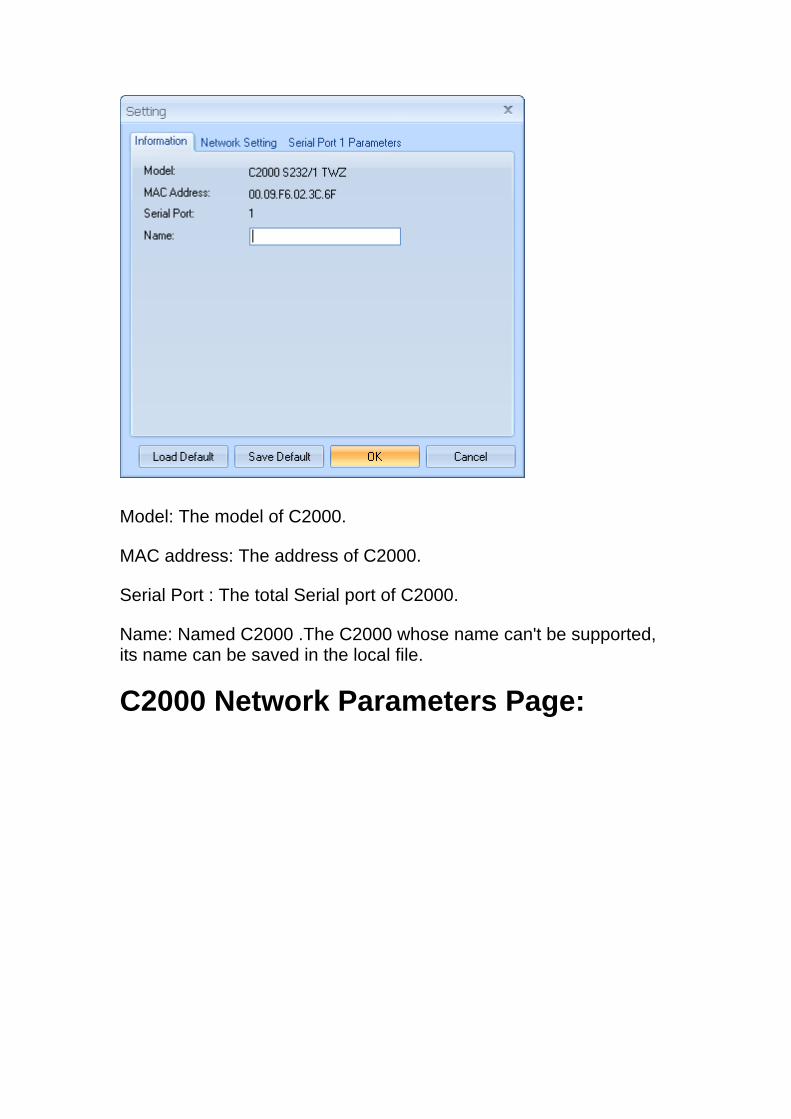
Model: The model of C2000.
MAC address: The address of C2000.
Serial Port : The total Serial port of C2000.
Name: Named C2000 .The C2000 whose name can't be supported, its name can be saved in the local file.
C2000 Network Parameters Page:
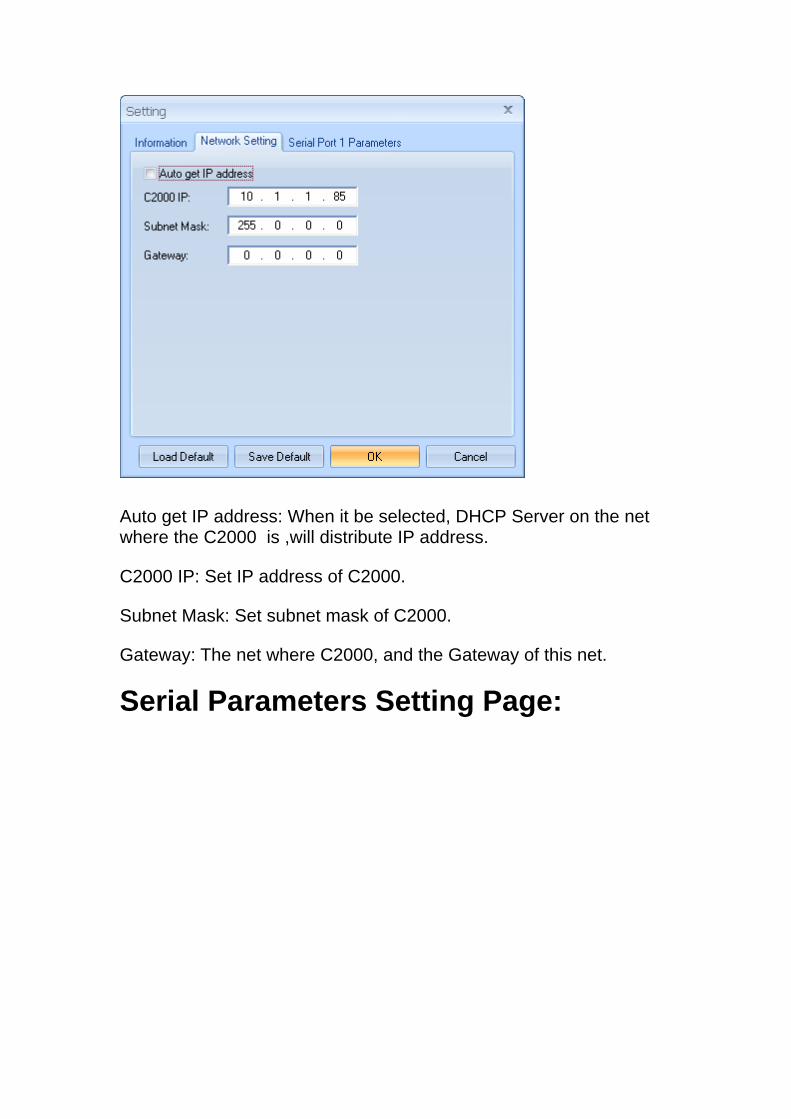
Auto get IP address: When it be selected, DHCP Server on the net where the C2000 is ,will distribute IP address.
C2000 IP: Set IP address of C2000.
Subnet Mask: Set subnet mask of C2000.
Gateway: The net where C2000, and the Gateway of this net.
Serial Parameters Setting Page:
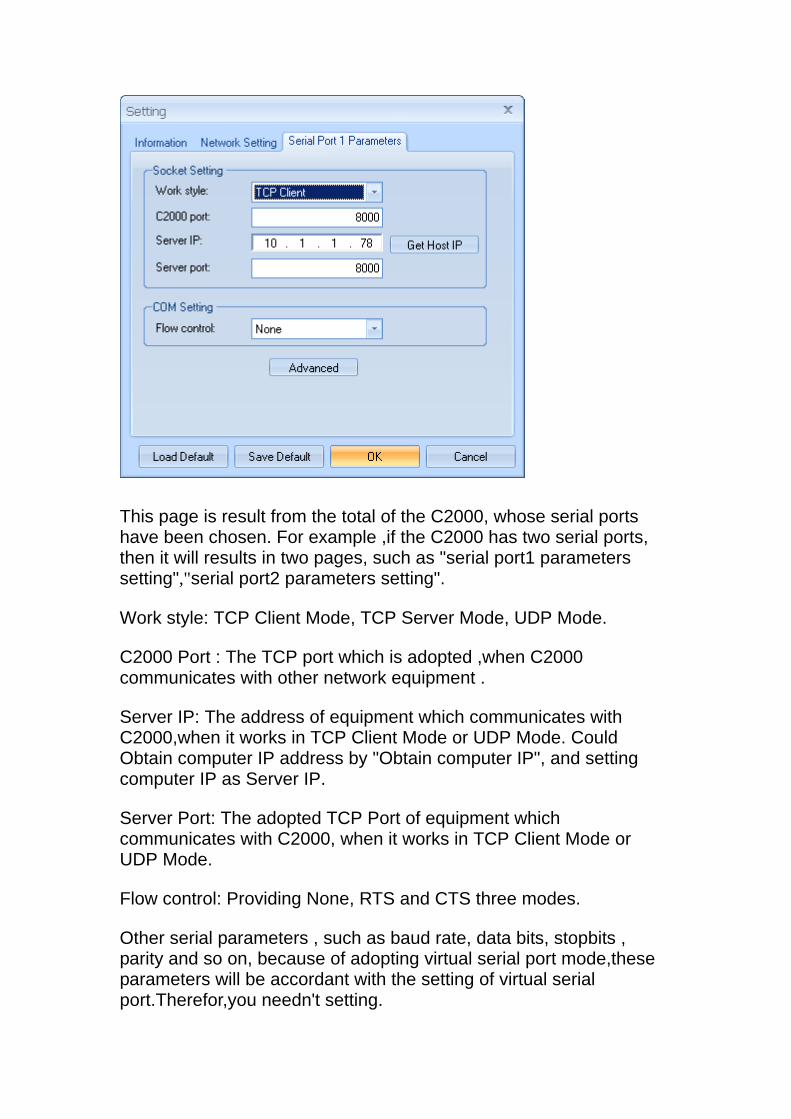
This page is result from the total of the C2000, whose serial ports have been chosen. For example ,if the C2000 has two serial ports, then it will results in two pages, such as "serial port1 parameters setting","serial port2 parameters setting".
Work style: TCP Client Mode, TCP Server Mode, UDP Mode.
C2000 Port : The TCP port which is adopted ,when C2000 communicates with other network equipment .
Server IP: The address of equipment which communicates with C2000,when it works in TCP Client Mode or UDP Mode. Could Obtain computer IP address by "Obtain computer IP", and setting computer IP as Server IP.
Server Port: The adopted TCP Port of equipment which communicates with C2000, when it works in TCP Client Mode or UDP Mode.
Flow control: Providing None, RTS and CTS three modes.
Other serial parameters , such as baud rate, data bits, stopbits , parity and so on, because of adopting virtual serial port mode,these parameters will be accordant with the setting of virtual serial port.Therefor,you needn't setting.
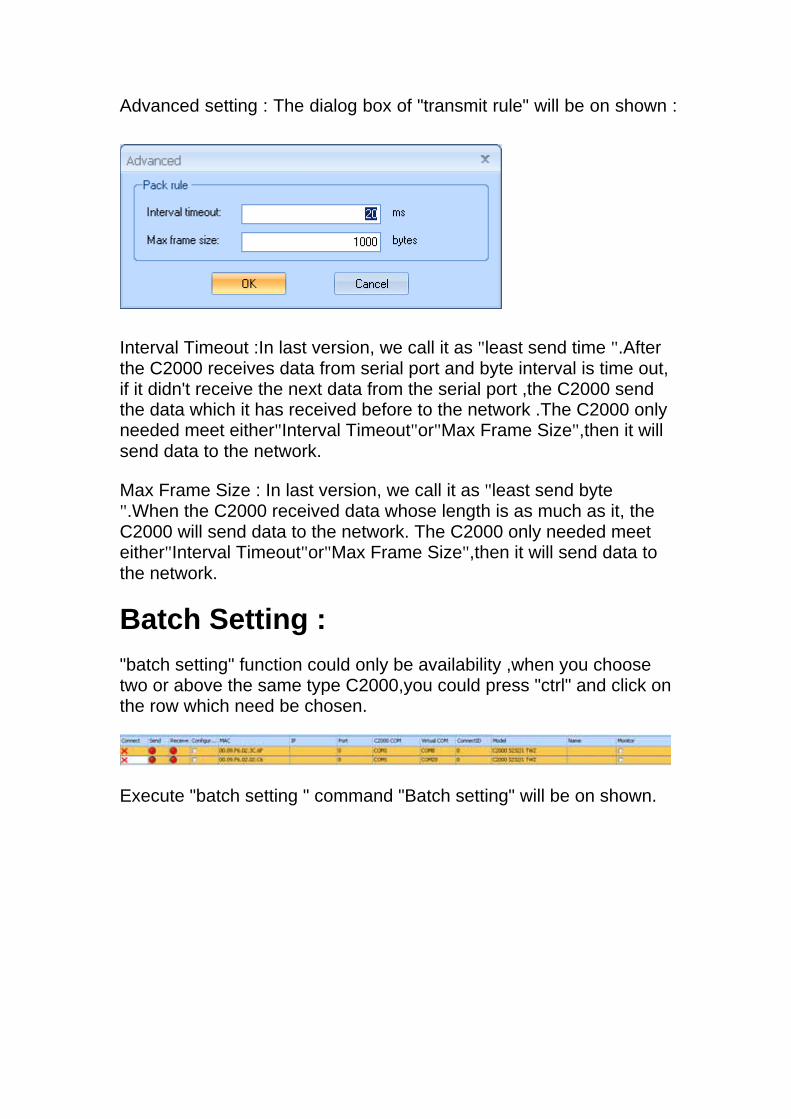
Advanced setting : The dialog box of "transmit rule" will be on shown :
Interval Timeout :In last version, we call it as "least send time ".After the C2000 receives data from serial port and byte interval is time out, if it didn't receive the next data from the serial port ,the C2000 send the data which it has received before to the network .The C2000 only needed meet either"Interval Timeout"or"Max Frame Size",then it will send data to the network.
Max Frame Size : In last version, we call it as "least send byte ".When the C2000 received data whose length is as much as it, the C2000 will send data to the network. The C2000 only needed meet either"Interval Timeout"or"Max Frame Size",then it will send data to the network.
Batch Setting : "batch setting" function could only be availability ,when you choose two or above the same type C2000,you could press "ctrl" and click on the row which need be chosen.
Execute "batch setting " command "Batch setting" will be on shown.
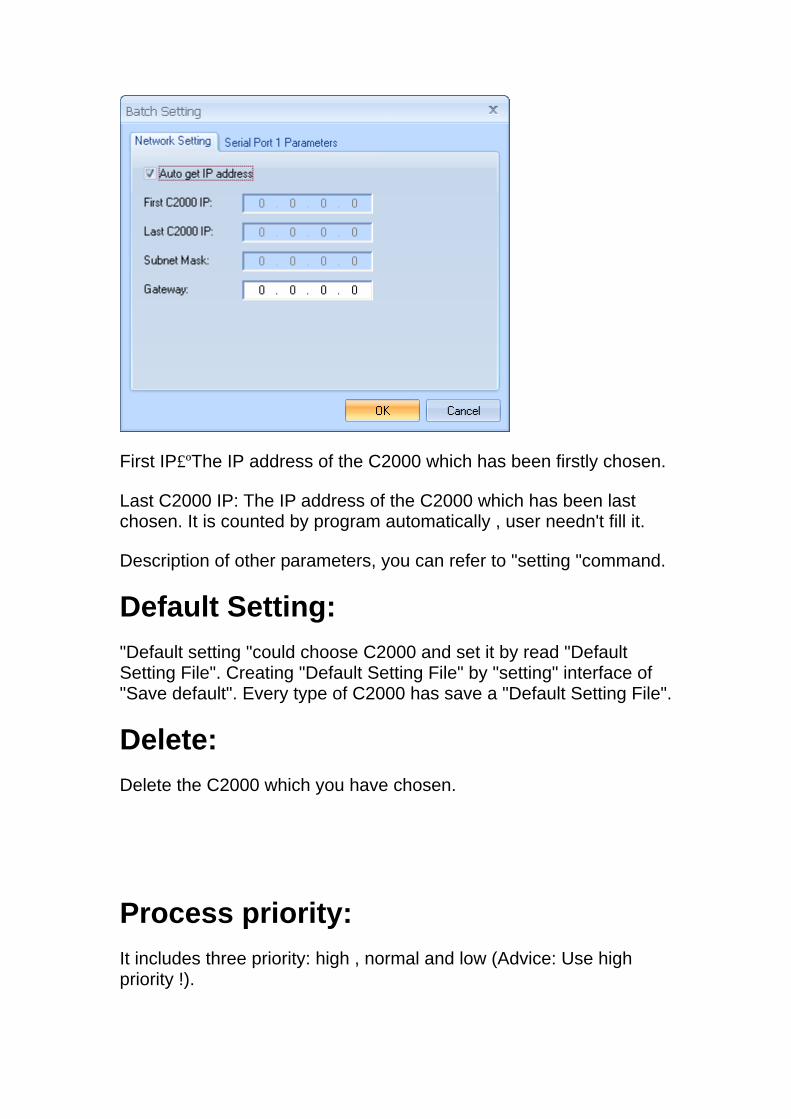
First IP£ºThe IP address of the C2000 which has been firstly chosen.
Last C2000 IP: The IP address of the C2000 which has been last chosen. It is counted by program automatically , user needn't fill it.
Description of other parameters, you can refer to "setting "command.
Default Setting: "Default setting "could choose C2000 and set it by read "Default Setting File". Creating "Default Setting File" by "setting" interface of "Save default". Every type of C2000 has save a "Default Setting File".
Delete: Delete the C2000 which you have chosen.
Process priority: It includes three priority: high , normal and low (Advice: Use high priority !).
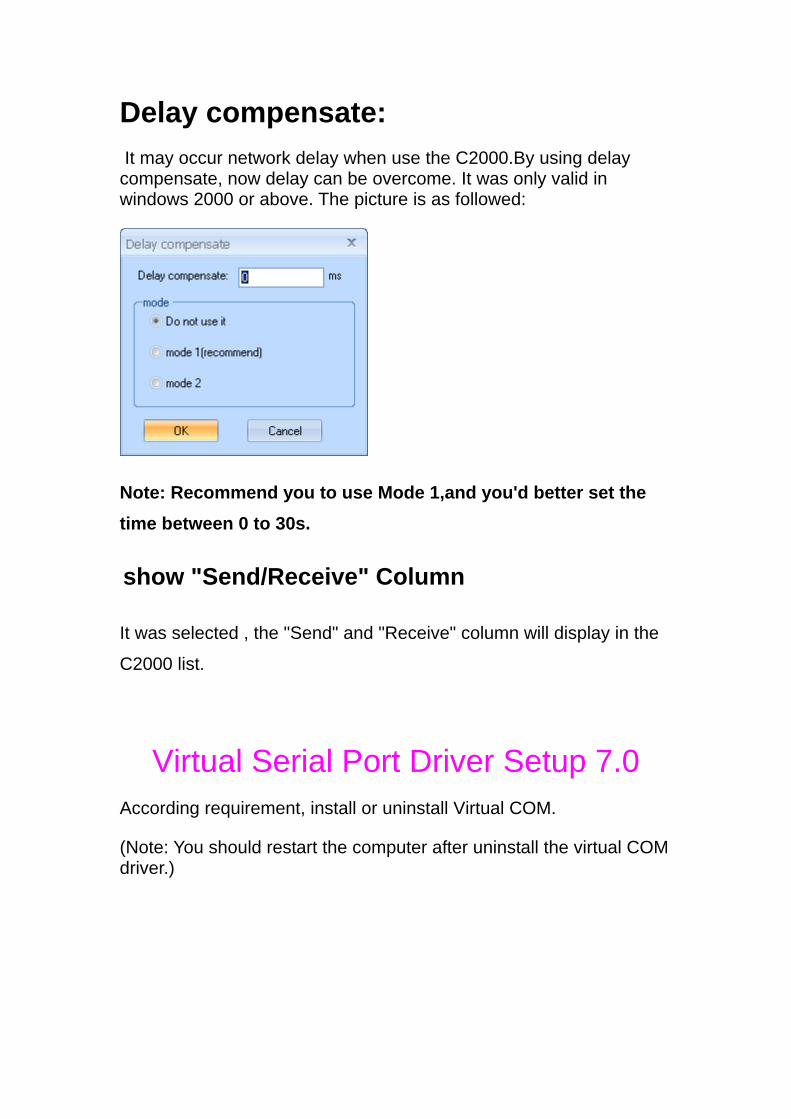
Delay compensate: It may occur network delay when use the C2000.By using delay compensate, now delay can be overcome. It was only valid in windows 2000 or above. The picture is as followed:
Note: Recommend you to use Mode 1,and you'd better set the time between 0 to 30s.
show "Send/Receive" Column
It was selected , the "Send" and "Receive" column will display in the
C2000 list.
Virtual Serial Port Driver Setup 7.0
According requirement, install or uninstall Virtual COM.
(Note: You should restart the computer after uninstall the virtual COM driver.)