Embed Size (px)
Citation preview

USER’S MANUALEngl ish
C Pen
The symbol on our products signifies that they have beencertified according to the EMC directive 89/336/EEC and theLow Voltage directive 73/23/EEC when applicable. The productsfulfill the requirements according to the following standards:
EN 50 081-1:1992 Electromagnetic compatibility, GenericEmission Standard.
EN 50 082-1:1992 Electromagnetic compatibility, GenericImmunity Standard.
Second edition (April 1999).
This manual is published by C Technologies AB, without any warranty.Improvements and changes to this manual necessitated by typographical errors,inaccuracies of current information, or improvements to programs and/orequipment, may be made by C Technologies AB at any time and without notice.Such changes will, however, be incorporated into new editions of this manual.
All rights reserved
© C Technologies AB, 1999
Part No. AM 251 022 R1A
Printed in Sweden
Contents
C PEN............................................................... 5The Battery .................................................................................. 6How C Pen Works ....................................................................... 7The Buttons ................................................................................. 9Turning On and Off ................................................................. 10The Main Menu ........................................................................ 11Reading text .............................................................................. 14Reading another line ............................................................... 16Stop reading ............................................................................. 16
NOTES............................................................ 17The Command menu ............................................................... 17Creating a new file or folder ................................................... 18The Text menu .......................................................................... 18The Edit menu .......................................................................... 19C Write ....................................................................................... 22Closing a text ............................................................................ 29Leaving Notes ........................................................................... 29
SETTINGS ....................................................... 30Text Language .......................................................................... 31Read Mode ................................................................................ 31Text Quality ............................................................................... 31C Write Feedback ..................................................................... 33System Settings ......................................................................... 34
STORAGE ....................................................... 35INFO............................................................... 35C ADDRESS ................................................... 36Enter a new contact ................................................................. 37View a contact .......................................................................... 39Edit a contact ............................................................................ 40Find a contact ........................................................................... 40Delete a contact ........................................................................ 41Exit C Address ........................................................................... 42
C Pen
C DICTIONARY ............................................... 43Dictionary license key .............................................................. 43Introduction .............................................................................. 44Translation screen ..................................................................... 45Word selection list .................................................................... 46Word selection screen .............................................................. 47Word edit box .......................................................................... 48Word references ....................................................................... 48Text Language .......................................................................... 49DICTIONARIES button .............................................................. 49INFO button .............................................................................. 50Removing dictionaries ............................................................. 50Exiting C Dictionary ................................................................. 50
CONNECTING TO A PC ................................... 51Installing software .................................................................... 51Getting help .............................................................................. 53C Pen viewer .............................................................................. 53Transferring files ....................................................................... 53C Address ................................................................................... 54C Dictionary ............................................................................... 54C Direct ...................................................................................... 55C Pen Edit .................................................................................. 55Storage ...................................................................................... 56Closing the connection ........................................................... 56
TROUBLESHOOTING ....................................... 57CARE & SAFETY ............................................. 59TECHNICAL SPECIFICATIONS ......................... 60Warranty .................................................................................... 61
5
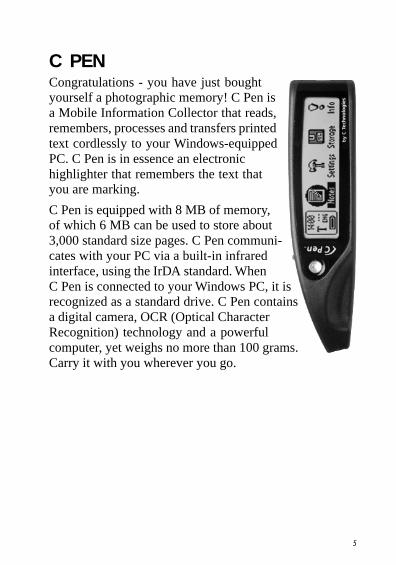
C PENCongratulations - you have just boughtyourself a photographic memory! C Pen isa Mobile Information Collector that reads,remembers, processes and transfers printedtext cordlessly to your Windows-equippedPC. C Pen is in essence an electronichighlighter that remembers the text thatyou are marking.
C Pen is equipped with 8 MB of memory,of which 6 MB can be used to store about3,000 standard size pages. C Pen communi-cates with your PC via a built-in infraredinterface, using the IrDA standard. WhenC Pen is connected to your Windows PC, it isrecognized as a standard drive. C Pen containsa digital camera, OCR (Optical CharacterRecognition) technology and a powerfulcomputer, yet weighs no more than 100 grams.Carry it with you wherever you go.

6
C Pen
The Battery
Attaching1. Place the battery as shown below.
2. Push down until you hear a click.
3. Secure the battery by pushing the locking catchforward.
To remove the battery, press the locking catch away fromthe reading end of the pen and lift the battery upwards.
Charging1. Connect the charger to C Pen.
2. Plug the charger into a mains socket.
When the battery is fully charged, the charging stopsautomatically. You cannot overcharge the battery. Whilecharging, you may use C Pen as usual, but the chargingtime will be longer. The normal charging time is 12hours.
Locking catch
7
How C Pen WorksAs C Pen is moved over the text, C Pen’s internal lightsource illuminates the characters and a camera takespictures of the text. These images are transformed tocomputer-readable text by an OCR-system.
What is OCR?Optical Character Recognition is the process of turningan image into computer-readable text. During OCR,C Pen analyzes the images taken by its camera andtranslates them into text characters. After OCR, you cantransmit the resulting text to your PC and use it in yourWindows applications.
However, you cannot always expect C Pen to achieve100 % correct character recognition. The result dependson a number of circumstances:
• The quality of the printed text you want to read withC Pen. You can calibrate C pen to optimize itsperformance under difficult conditions. See Calibra-tion under Settings/Text Quality, p. 32. High-qualityprinted text produces, of course, maximum OCRaccuracy. With lower-quality pages, e.g. poor faxcopies, OCR accuracy will be poorer.
• How you hold and move C Pen over the original text.Please read the Quick Start folder to learn how to useC Pen correctly. It is crucial that you follow theseinstructions in order to get optimal results.
• The language of the text C Pen is reading. The textlanguage should be set in Settings.

8
C Pen
• Anything that is not a printed character, and anycharacter distorted by a mark or smudge on the papercould be unrecognizable.
• Characters in the text should not overlap.
• Underlined text is difficult for C Pen to read becausethe underline changes the shape of descenders of theletters q, g, y, p, and j.
• C Pen can’t read red or yellow text on a white or redbackground, or white text on a red background.
• The size of the characters should be 7–20 points.
Read more about settings in the Settings chapter onp. 30.
NOTE: C Pen only recognizes machine-printed charac-ters such as laser-printed or typewritten text. C Pen doesnot recognise handwritten text.
!
9
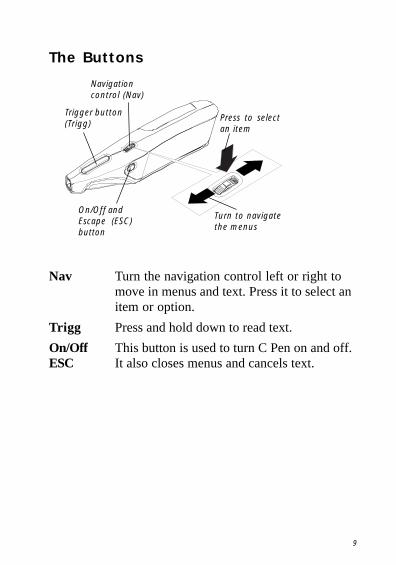
The Buttons
Nav Turn the navigation control left or right tomove in menus and text. Press it to select anitem or option.
Trigg Press and hold down to read text.
On/Off This button is used to turn C Pen on and off.ESC It also closes menus and cancels text.
Turn to navigatethe menus
Press to selectan item
Navigationcontrol (Nav)
Trigger button(Trigg)
On/Off andEscape (ESC)button
10
C Pen
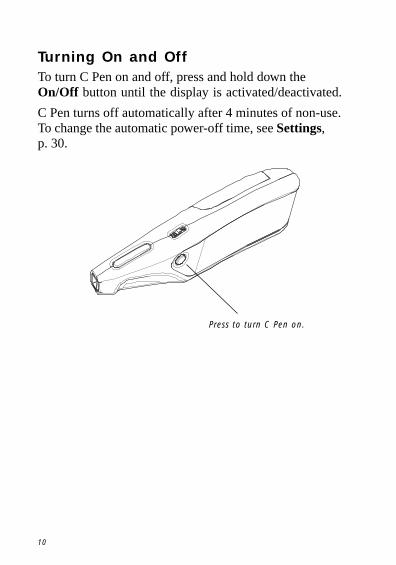
Turning On and OffTo turn C Pen on and off, press and hold down theOn/Off button until the display is activated/deactivated.
C Pen turns off automatically after 4 minutes of non-use.To change the automatic power-off time, see Settings,p. 30.
Press to turn C Pen on.
11
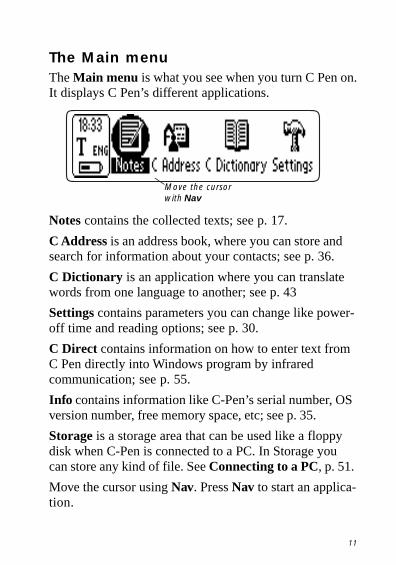
The Main menuThe Main menu is what you see when you turn C Pen on.It displays C Pen’s different applications.
Notes contains the collected texts; see p. 17.
C Address is an address book, where you can store andsearch for information about your contacts; see p. 36.
C Dictionary is an application where you can translatewords from one language to another; see p. 43
Settings contains parameters you can change like power-off time and reading options; see p. 30.
C Direct contains information on how to enter text fromC Pen directly into Windows program by infraredcommunication; see p. 55.
Info contains information like C-Pen’s serial number, OSversion number, free memory space, etc; see p. 35.
Storage is a storage area that can be used like a floppydisk when C-Pen is connected to a PC. In Storage youcan store any kind of file. See Connecting to a PC, p. 51.
Move the cursor using Nav. Press Nav to start an applica-tion.
Move the cursorwith Nav
12
C Pen
Using dialogsC Pen uses a number of graphic elements on the displayto give information. Some of these require interactionfrom the user. The graphic elements are:
Dialogs A dialog box appears when you need tomake selections or enter information. Adialog box contains one or moreelements like buttons, list boxes or editboxes.
Dialog Buttons An on-screen button, e.g. OK , CAN-CEL , YES or NO. To select a buttonthat appears in a dialog, use thenavigation control; turn Nav until thebutton you want to select is markedwith inverted colors, then press Nav.CANCEL will cancel any changes andclose the dialog.
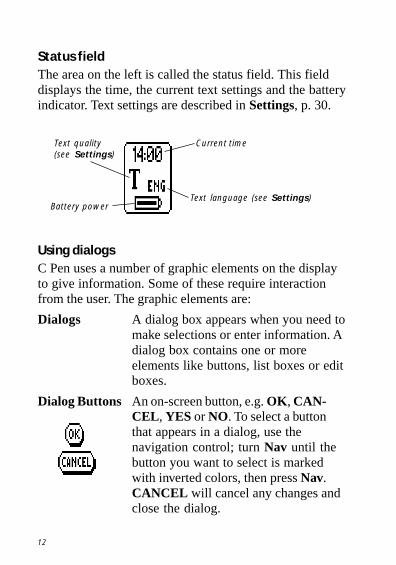
Status fieldThe area on the left is called the status field. This fielddisplays the time, the current text settings and the batteryindicator. Text settings are described in Settings, p. 30.
Text language (see Settings)
Current timeText quality(see Settings)
Battery power
13
List Box A list box contains a list of items thatcan be selected by the user.
Edit Box It is possible to enter and edit text in anedit box. Select the box and the textwill be highlighted. Use your C Pen toread a text or press Nav to enter editmode. In edit mode you can use theEdit menu or C Write for editing text,see p. 19 and p. 22.
Check box Check a box by clicking the item withNav. Normally, only one item in a listof check box items can be selected.
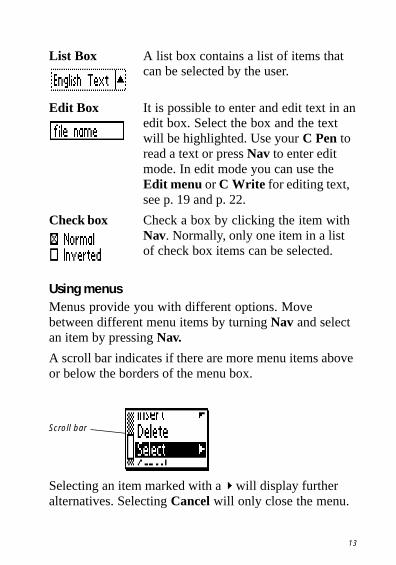
Using menusMenus provide you with different options. Movebetween different menu items by turning Nav and selectan item by pressing Nav.
A scroll bar indicates if there are more menu items aboveor below the borders of the menu box.
Selecting an item marked with a will display furtheralternatives. Selecting Cancel will only close the menu.
Scroll bar
14
C Pen
Reading textPlease follow the instructions in this chapter in order toget the best results from your C Pen. Take a few minutesto learn how to use C Pen correctly.
To read a line, follow the steps below.
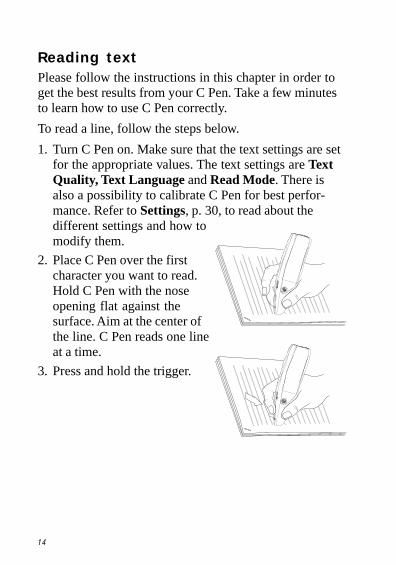
1. Turn C Pen on. Make sure that the text settings are setfor the appropriate values. The text settings are TextQuality, Text Language and Read Mode. There isalso a possibility to calibrate C Pen for best perfor-mance. Refer to Settings, p. 30, to read about thedifferent settings and how tomodify them.
2. Place C Pen over the firstcharacter you want to read.Hold C Pen with the noseopening flat against thesurface. Aim at the center ofthe line. C Pen reads one lineat a time.
3. Press and hold the trigger.
15
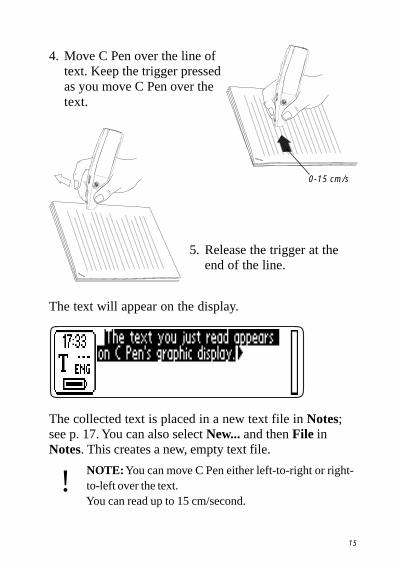
4. Move C Pen over the line oftext. Keep the trigger pressedas you move C Pen over thetext.
5. Release the trigger at theend of the line.
The text will appear on the display.
The collected text is placed in a new text file in Notes;see p. 17. You can also select New... and then File inNotes. This creates a new, empty text file.
NOTE: You can move C Pen either left-to-right or right-to-left over the text.You can read up to 15 cm/second.
0-15 cm/s
!
16
C Pen
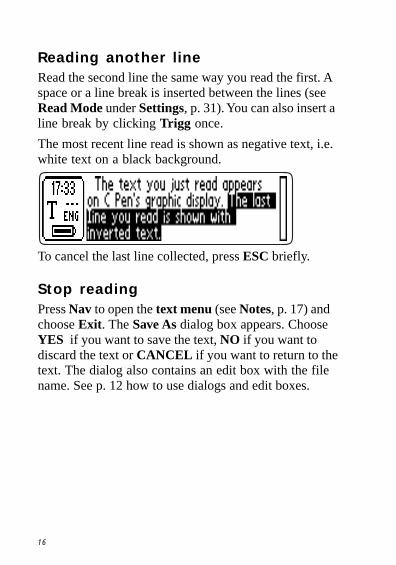
Reading another lineRead the second line the same way you read the first. Aspace or a line break is inserted between the lines (seeRead Mode under Settings, p. 31). You can also insert aline break by clicking Trigg once.
The most recent line read is shown as negative text, i.e.white text on a black background.
To cancel the last line collected, press ESC briefly.
Stop readingPress Nav to open the text menu (see Notes, p. 17) andchoose Exit . The Save As dialog box appears. ChooseYES if you want to save the text, NO if you want todiscard the text or CANCEL if you want to return to thetext. The dialog also contains an edit box with the filename. See p. 12 how to use dialogs and edit boxes.
17
NOTESNotes contains the text files you have read. Enter Notesby moving the cursor to the Notes icon in the mainmenu and by pressing Nav. Inside Notes, move betweenitems using Nav.
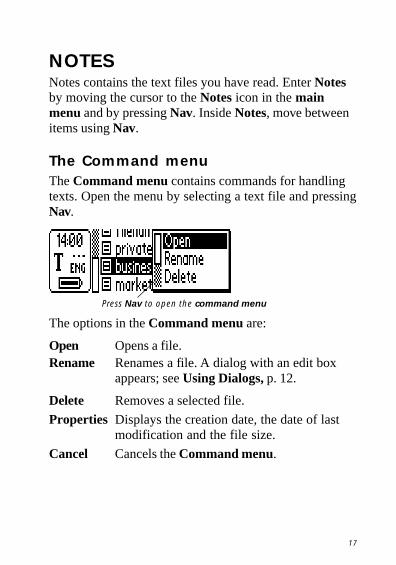
The Command menuThe Command menu contains commands for handlingtexts. Open the menu by selecting a text file and pressingNav.
The options in the Command menu are:
Open Opens a file.Rename Renames a file. A dialog with an edit box
appears; see Using Dialogs, p. 12.
Delete Removes a selected file.
Properties Displays the creation date, the date of lastmodification and the file size.
Cancel Cancels the Command menu.
Press Nav to open the command menu
18
C Pen
Creating a new file or folderTo create a new file, close the open text, if any, and read aline. You can also create a new file with the commandNew… in Notes. Select FILE in the dialog box and pressNav. The new file is placed in Notes.
Create a new folder with the command New... in Notes.Select FOLDER in the dialog box and press Nav. Adialog box appears. Select the edit box if you want toedit or read a folder name. Use your C pen to read a nameor press Nav to enter edit mode. To save the folder, selectOK and press Nav. The folder is placed in Notes.
The Text menuIn an open text you move the cursor line by line withNav. You can insert a new line at the cursor position (theflashing triangle) by reading a new line with C Pen.
Press Nav if you want to edit the text, change textsettings or stop working with the text. Pressing Navopens the Text menu.
The items in the Text menu are:
Exit Closes the text. If the text has been changedyou are prompted to save it before it is closed.
Press Nav to open the text menu
19
Edit Enters edit mode. You can edit text either byusing the Edit menu (see below) or by usingC Write (see p. 22).
Settings Sets the text settings of the text you arereading; see Settings, p. 30.
Select Selects a read line/word. After selecting areading, you automatically enter edit mode.
Cancel Closes the text menu.
The Edit menuIn edit mode you move the cursor one character at a timeby turning Nav. Move the cursor to a position where youwant to edit the text. Press Nav to open the Edit menu.
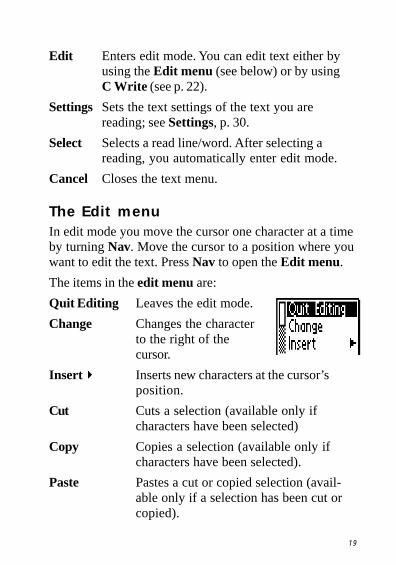
The items in the edit menu are:
Quit Editing Leaves the edit mode.
Change Changes the characterto the right of thecursor.
Insert Inserts new characters at the cursor’sposition.
Cut Cuts a selection (available only ifcharacters have been selected)
Copy Copies a selection (available only ifcharacters have been selected).
Paste Pastes a cut or copied selection (avail-able only if a selection has been cut orcopied).
20
C Pen
Delete Deletes a character or a selection.
Select Selects characters or a whole text.
Settings Sets the text settings of the text you arereading.
Cancel Closes the edit menu.
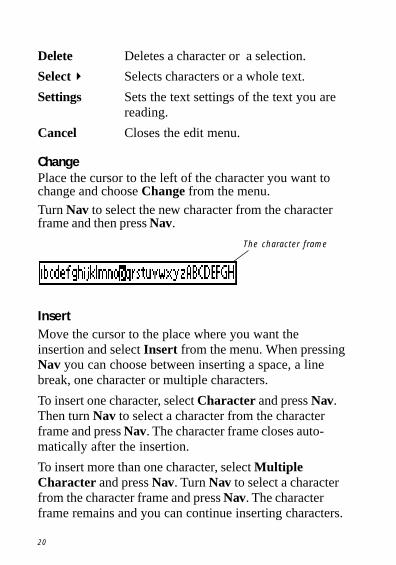
ChangePlace the cursor to the left of the character you want tochange and choose Change from the menu.
Turn Nav to select the new character from the characterframe and then press Nav.
InsertMove the cursor to the place where you want theinsertion and select Insert from the menu. When pressingNav you can choose between inserting a space, a linebreak, one character or multiple characters.
To insert one character, select Character and press Nav.Then turn Nav to select a character from the characterframe and press Nav. The character frame closes auto-matically after the insertion.
To insert more than one character, select MultipleCharacter and press Nav. Turn Nav to select a characterfrom the character frame and press Nav. The characterframe remains and you can continue inserting characters.
The character frame
21
When you are finished, press ESC to return to the textyou are editing.
SelectUse the Select command to edit more than one characterat a time. Choose Select > Characters and turn Nav toselect multiple characters. Press Nav and choose Cut,Copy or Delete from the menu.
If you select All, the whole text will be selected.
DeletePlace the cursor to the left of the character you want todelete and choose Delete from the menu.
If text is selected, the whole selection will be deleted.
SettingsYou can change text settings here. The text settings are
• Text Language: Select the language of the text youare reading
• C Write Feedback: Check the box if you wantC Write feedback on
• Read mode: Select Continuous or Separate lines
• Text Quality: Select Normal or Inverted
• Calibration: Select Default Setting if your C Pen iscalibrated and you want to revert to the factory setting.
Quit EditingQuit Edit mode by pressing Nav to open the Edit menuand selecting Quit Editing .
22
C Pen
C WriteC Write is a feature that allows you to draw characters byusing C Pen as an ordinary pen. C pen can track its ownmovement over a surface and recognize the movement asa letter, digit or a symbol. Using C Write is an alternativeto using the character frame when inserting characters ina text.
To be able to use C Write , the surface you “write” onmust have a distinct pattern. A printed text is the bestchoice.
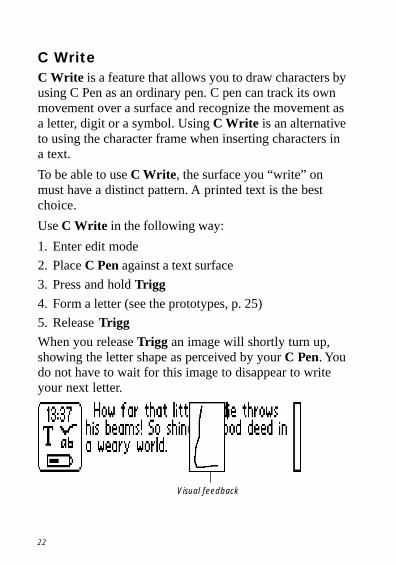
Use C Write in the following way:
1. Enter edit mode
2. Place C Pen against a text surface
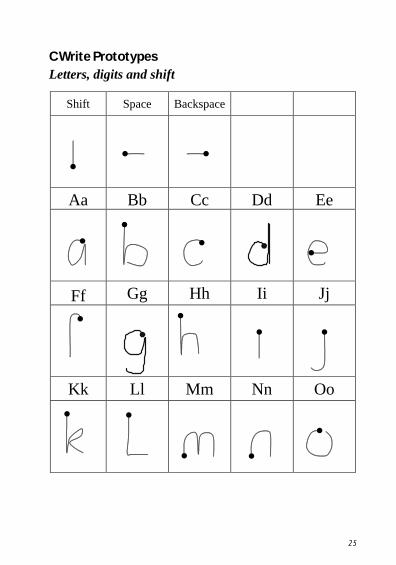
3. Press and hold Trigg4. Form a letter (see the prototypes, p. 25)
5. Release TriggWhen you release Trigg an image will shortly turn up,showing the letter shape as perceived by your C Pen. Youdo not have to wait for this image to disappear to writeyour next letter.
Visual feedback
23
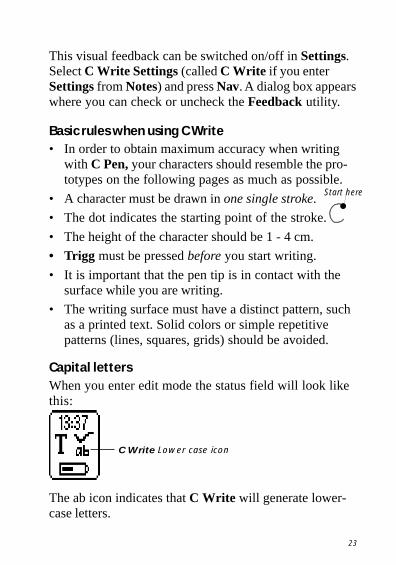
This visual feedback can be switched on/off in Settings.Select C Write Settings (called C Write if you enterSettings from Notes) and press Nav. A dialog box appearswhere you can check or uncheck the Feedback utility.
Basic rules when using C Write• In order to obtain maximum accuracy when writing
with C Pen, your characters should resemble the pro-totypes on the following pages as much as possible.
• A character must be drawn in one single stroke.
• The dot indicates the starting point of the stroke.
• The height of the character should be 1 - 4 cm.
• Trigg must be pressed before you start writing.
• It is important that the pen tip is in contact with thesurface while you are writing.
• The writing surface must have a distinct pattern, suchas a printed text. Solid colors or simple repetitivepatterns (lines, squares, grids) should be avoided.
Capital lettersWhen you enter edit mode the status field will look likethis:
The ab icon indicates that C Write will generate lower-case letters.
Start here
C Write Lower case icon
24
C Pen
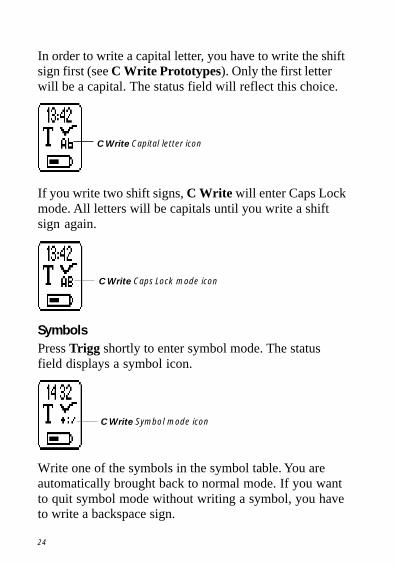
In order to write a capital letter, you have to write the shiftsign first (see C Write Prototypes). Only the first letterwill be a capital. The status field will reflect this choice.
C Write Capital letter icon
If you write two shift signs, C Write will enter Caps Lockmode. All letters will be capitals until you write a shiftsign again.
C Write Caps Lock mode icon
SymbolsPress Trigg shortly to enter symbol mode. The statusfield displays a symbol icon.
C Write Symbol mode icon
Write one of the symbols in the symbol table. You areautomatically brought back to normal mode. If you wantto quit symbol mode without writing a symbol, you haveto write a backspace sign.
25
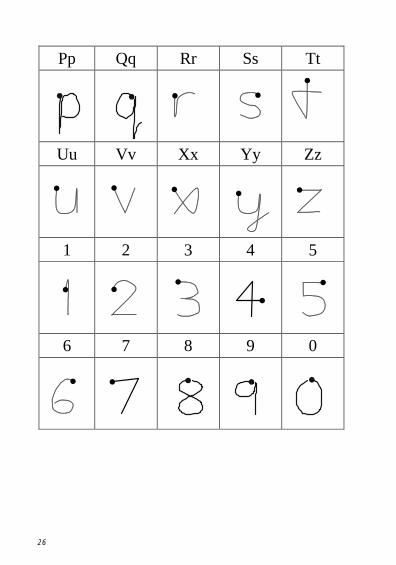
C Write PrototypesLetters, digits and shift
Shift Space Backspace
Aa Bb Cc Dd Ee
Ff Gg Hh Ii Jj
Kk Ll Mm Nn Oo
26
C Pen
Pp Qq Rr Ss Tt
Uu Vv Xx Yy Zz
1 2 3 4 5
6 7 8 9 0
27
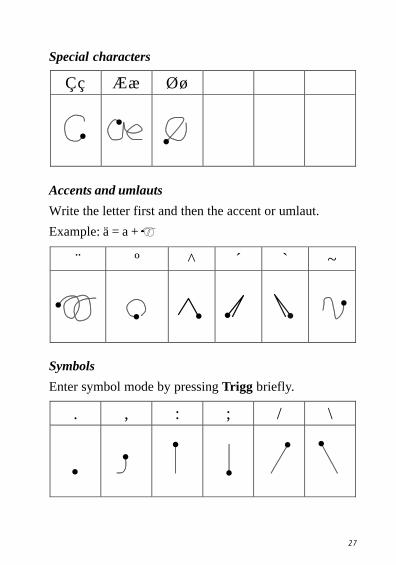
Special characters
Çç Ææ Øø
Accents and umlauts
Write the letter first and then the accent or umlaut.
Example: ä = a +
¨ º ^ ´ ` ~
Symbols
Enter symbol mode by pressing Trigg briefly.
. , : ; / \
28
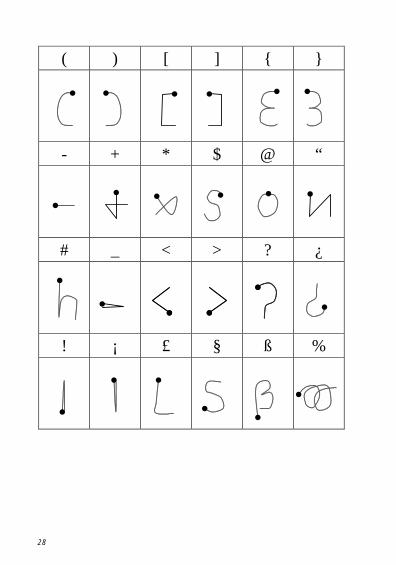
C Pen
( ) [ ] { }
- + * $ @ “
# _ < > ? ¿
! ¡ £ § ß %
29
Closing a textPress Nav to open the text menu, then select Exit . C Penprompts you to save before closing if changes have beenmade.
Leaving NotesTo leave Notes, close the open text and select Exit in theNotes application.
30
C Pen
SETTINGSSettings contains the parameters controlling C Pen. EnterSettings from the main menu by moving the cursor tothe Settings icon and pressing Nav. A list of the availablesettings appears.
To modify a setting:
1. Select the setting from the settings list with Nav. Adialog box appears.
2. Turn Nav to highlight the setting value. Press Nav tomodify.
3. Turn Nav to change the value and press Nav toconfirm.
4. Select the OK button to close the dialog and save thechanged setting.
5. Exit Settings by selecting Exit at the top of theSettings list.
The following settings are available:
• Text Language
• Read Mode
• Text Quality
• C Write Feedback
• System Settings
31
Text LanguageSelect the language of the text you are reading from thelist of check boxes. If you read text containing numbersonly, select Numbers Only as language.
Read ModeThis setting indicates how C Pen should format thereadings. The read modes are:
Continuous text:A space is inserted between twoseparate readings with C Pen. Suitablewhen you read a complete paragraphwhich will be used in a document onyour PC.
Separate lines: Each reading starts on a new line. TextQuality
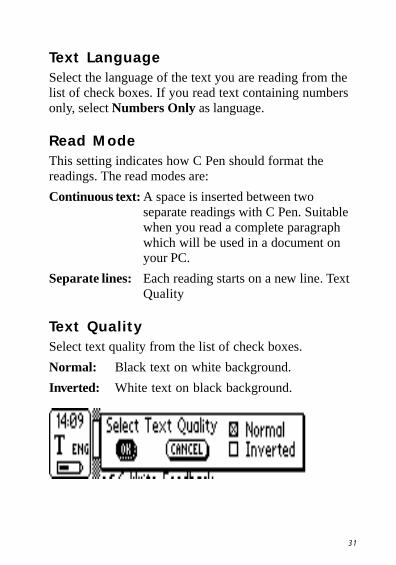
Text QualitySelect text quality from the list of check boxes.
Normal: Black text on white background.
Inverted: White text on black background.
32
C Pen
CalibrationC Pen’s reading ability can be adjusted to the presentcontrast between the text and its background in thefollowing way:
1. Hold C Pen with the pen tip flat against the surface.
2. Press Trigg for two seconds without moving C Pen.
3. A progress indicator appears on C Pen’s screen.
4. Move C Pen over the text, in circles or back and forth.Continue to move C Pen until the progress bar hasreached the end.
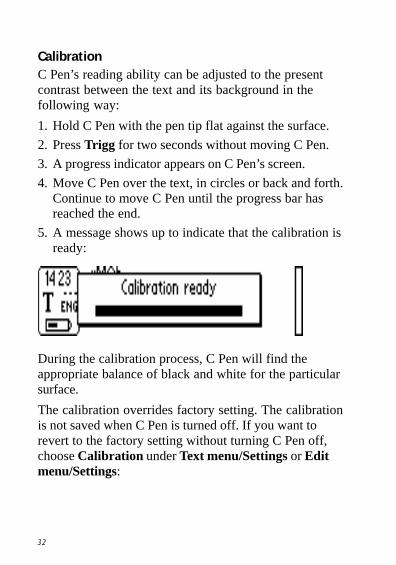
5. A message shows up to indicate that the calibration isready:
During the calibration process, C Pen will find theappropriate balance of black and white for the particularsurface.
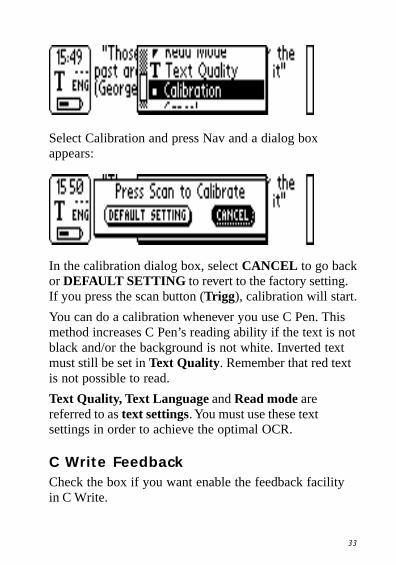
The calibration overrides factory setting. The calibrationis not saved when C Pen is turned off. If you want torevert to the factory setting without turning C Pen off,choose Calibration under Text menu/Settings or Editmenu/Settings:
33
Select Calibration and press Nav and a dialog boxappears:
In the calibration dialog box, select CANCEL to go backor DEFAULT SETTING to revert to the factory setting.If you press the scan button (Trigg ), calibration will start.
You can do a calibration whenever you use C Pen. Thismethod increases C Pen’s reading ability if the text is notblack and/or the background is not white. Inverted textmust still be set in Text Quality. Remember that red textis not possible to read.
Text Quality, Text Language and Read mode arereferred to as text settings. You must use these textsettings in order to achieve the optimal OCR.
C Write FeedbackCheck the box if you want enable the feedback facilityin C Write.
34
C Pen
System SettingsPIN code You can control the access of your C Pen by
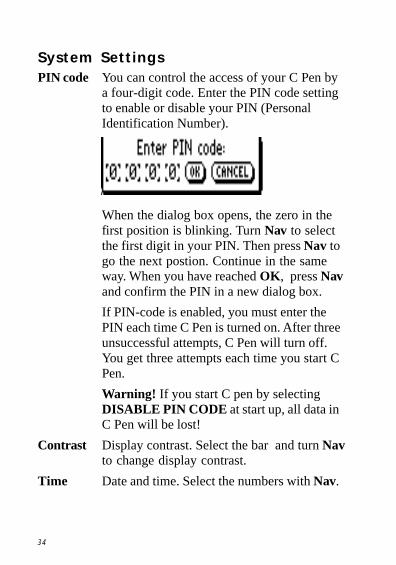
a four-digit code. Enter the PIN code settingto enable or disable your PIN (PersonalIdentification Number).
When the dialog box opens, the zero in thefirst position is blinking. Turn Nav to selectthe first digit in your PIN. Then press Nav togo the next postion. Continue in the sameway. When you have reached OK , press Navand confirm the PIN in a new dialog box.
If PIN-code is enabled, you must enter thePIN each time C Pen is turned on. After threeunsuccessful attempts, C Pen will turn off.You get three attempts each time you start CPen.
Warning! If you start C pen by selectingDISABLE PIN CODE at start up, all data inC Pen will be lost!
Contrast Display contrast. Select the bar and turn Navto change display contrast.
Time Date and time. Select the numbers with Nav.
35
Menu The language that C Pen uses in itsLanguage menus and dialog boxes. Select the desired
menu language in the list of check boxes.
Power-off The time of inactivity in minutes beforetime C Pen turns off automatically.
STORAGEStorage is a storage area that can be used as a floppydisk when C Pen is connected to a PC. See Connecting toa PC for how to use Storage, p. 56.
This application has the following menu items:
Delete Removes a file.
Properties Displays the file size, creation date and dateof last modification.
Cancel Cancels the command menu
INFOInfo contains a list of help and information topics. Selectone of the topics from the list to read the topic text.
36
C Pen
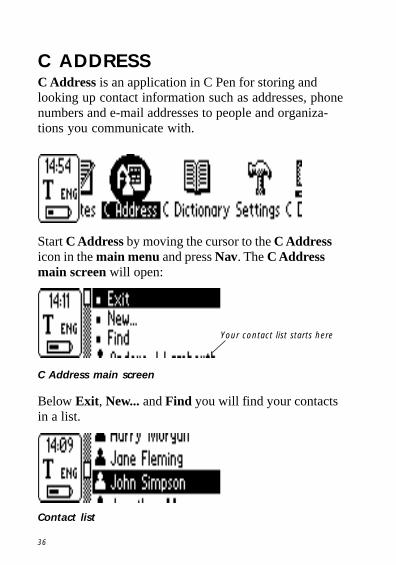
C ADDRESSC Address is an application in C Pen for storing andlooking up contact information such as addresses, phonenumbers and e-mail addresses to people and organiza-tions you communicate with.
Start C Address by moving the cursor to the C Addressicon in the main menu and press Nav. The C Addressmain screen will open:
Below Exit , New... and Find you will find your contactsin a list.
Your contact list starts here
C Address main screen
Contact list
37
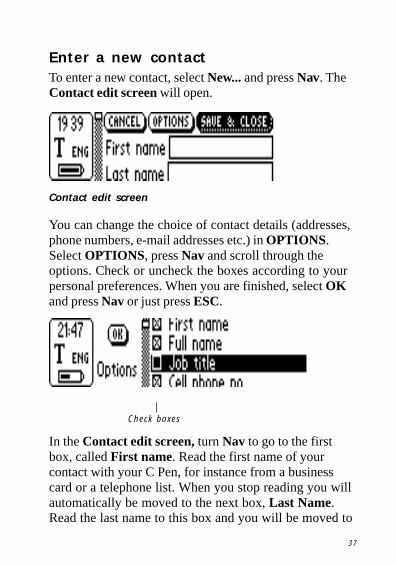
Enter a new contactTo enter a new contact, select New... and press Nav. TheContact edit screen will open.
You can change the choice of contact details (addresses,phone numbers, e-mail addresses etc.) in OPTIONS.Select OPTIONS, press Nav and scroll through theoptions. Check or uncheck the boxes according to yourpersonal preferences. When you are finished, select OKand press Nav or just press ESC.
In the Contact edit screen, turn Nav to go to the firstbox, called First name. Read the first name of yourcontact with your C Pen, for instance from a businesscard or a telephone list. When you stop reading you willautomatically be moved to the next box, Last Name.Read the last name to this box and you will be moved to
Contact edit screen
Check boxes
38
C Pen
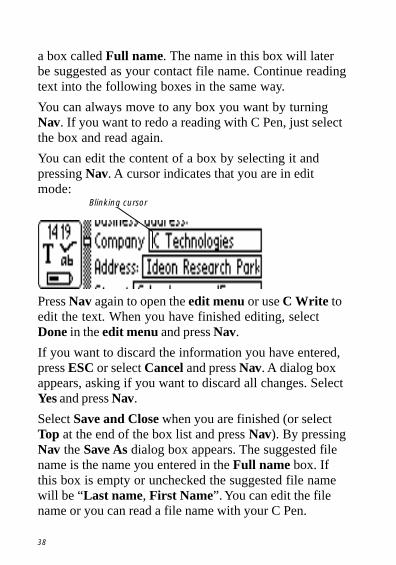
a box called Full name. The name in this box will laterbe suggested as your contact file name. Continue readingtext into the following boxes in the same way.
You can always move to any box you want by turningNav. If you want to redo a reading with C Pen, just selectthe box and read again.
You can edit the content of a box by selecting it andpressing Nav. A cursor indicates that you are in editmode:
Press Nav again to open the edit menu or use C Write toedit the text. When you have finished editing, selectDone in the edit menu and press Nav.
If you want to discard the information you have entered,press ESC or select Cancel and press Nav. A dialog boxappears, asking if you want to discard all changes. SelectYes and press Nav.
Select Save and Close when you are finished (or selectTop at the end of the box list and press Nav). By pressingNav the Save As dialog box appears. The suggested filename is the name you entered in the Full name box. Ifthis box is empty or unchecked the suggested file namewill be “Last name, First Name”. You can edit the filename or you can read a file name with your C Pen.
Blinking cursor
39
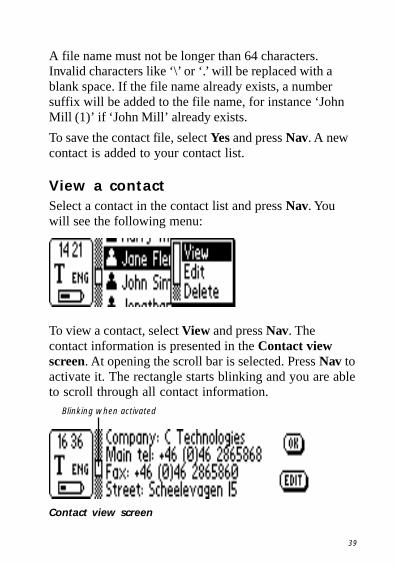
Contact view screen
A file name must not be longer than 64 characters.Invalid characters like ‘\’ or ‘.’ will be replaced with ablank space. If the file name already exists, a numbersuffix will be added to the file name, for instance ‘JohnMill (1)’ if ‘John Mill’ already exists.
To save the contact file, select Yes and press Nav. A newcontact is added to your contact list.
View a contactSelect a contact in the contact list and press Nav. Youwill see the following menu:
To view a contact, select View and press Nav. Thecontact information is presented in the Contact viewscreen. At opening the scroll bar is selected. Press Nav toactivate it. The rectangle starts blinking and you are ableto scroll through all contact information.
Blinking when activated

40
C Pen
To select OK or EDIT , first press Nav to deactivate thescroll bar - the rectangle stops blinking - then turn Navto go to the buttons. If the buttons are not visible, justturn Nav to the right to scroll the text sideways.
Edit a contactThere are two ways to edit a contact:
1. Select a contact in the contact list, press Nav, selectEDIT and press Nav again.
2. Select EDIT in the Contact view screen and press Nav.
In both cases the Contact edit screen will open, display-ing the previously entered information in the boxes.Editing and saving the text in a box can be performed inthe same way as described in Enter a new contact.
Find a contactTo find a contact, navigate to the C Address mainscreen, select Find and press Nav. The Find contactscreen will open. Enter the search text either by usingC Write or inserting characters from the character frame.
Find contact screen
41
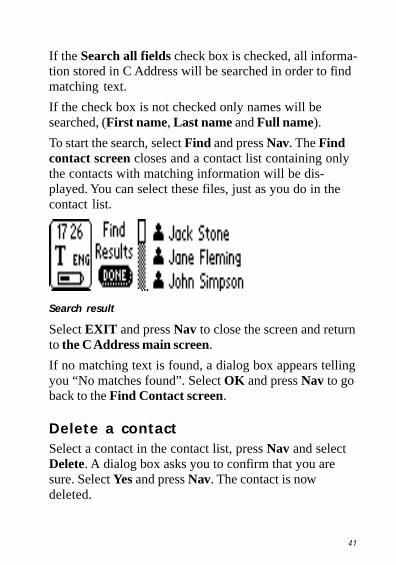
If the Search all fields check box is checked, all informa-tion stored in C Address will be searched in order to findmatching text.
If the check box is not checked only names will besearched, (First name, Last name and Full name).
To start the search, select Find and press Nav. The Findcontact screen closes and a contact list containing onlythe contacts with matching information will be dis-played. You can select these files, just as you do in thecontact list.
Select EXIT and press Nav to close the screen and returnto the C Address main screen.
If no matching text is found, a dialog box appears tellingyou “No matches found”. Select OK and press Nav to goback to the Find Contact screen.
Delete a contactSelect a contact in the contact list, press Nav and selectDelete. A dialog box asks you to confirm that you aresure. Select Yes and press Nav. The contact is nowdeleted.
Search result

42
C Pen
Exit C AddressYou can exit C Address from the C Address main screenby selecting EXIT and pressing Nav or by pressing ESC.

43
C DICTIONARYC Dictionary is an application where you can translate aword from one language to another. One word is trans-lated at a time, but you can read several words at thesame time and then select and translate word by word.
Dictionary license keyAfter a dictionary is installed, you must enter thedictionary key for this dictionary. The dictionary key isobtained when buying a dictionary fromhttp://www.cpen.com. A dialog box appears, letting youenter the dictionary key:
Turn Nav to enter the first digit in the dictionary key.Then press Nav to go to the next postion. Continue inthe same way until OK is selected. Press Nav and you areable to use the dictionary.
44
C Pen
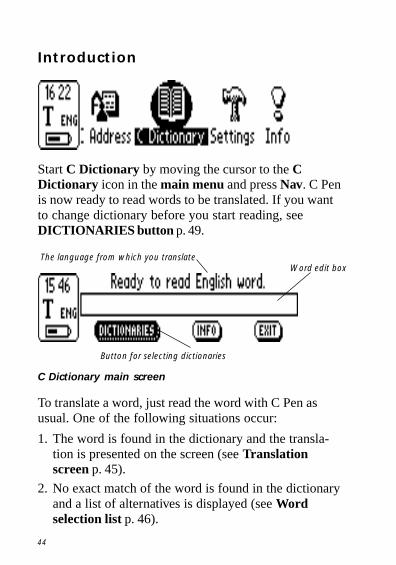
Introduction
Start C Dictionary by moving the cursor to the CDictionary icon in the main menu and press Nav. C Penis now ready to read words to be translated. If you wantto change dictionary before you start reading, seeDICTIONARIES button p. 49.
C Dictionary main screen
To translate a word, just read the word with C Pen asusual. One of the following situations occur:
1. The word is found in the dictionary and the transla-tion is presented on the screen (see Translationscreen p. 45).
2. No exact match of the word is found in the dictionaryand a list of alternatives is displayed (see Wordselection list p. 46).
The language from which you translateWord edit box
Button for selecting dictionaries
45
3. Several words are read and the words are shown in anew screen (see Word selection screen p. 47).
4. A dialog box appears, telling that the word cannot befound in the dictionary.
When you are reading a word it may happen that theword (or part of the word) in front of and/or behind yourlook up word is also included. If this is the caseC Dictionary acts according to the following rules:
• If two words are read, the longest word is looked up
• If three words are read, the middle word is looked up
• If more than three words are read, the Word selectionscreen (see p. 47) is displayed
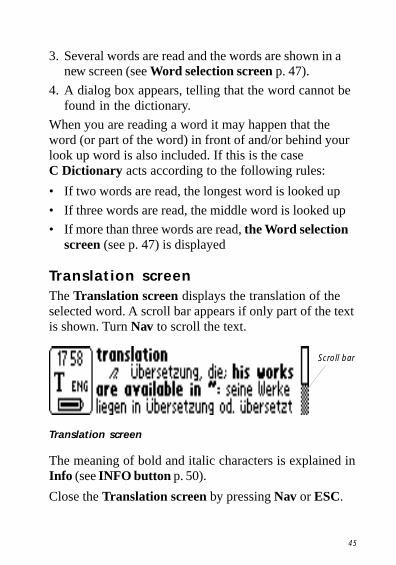
Translation screenThe Translation screen displays the translation of theselected word. A scroll bar appears if only part of the textis shown. Turn Nav to scroll the text.
Translation screen
The meaning of bold and italic characters is explained inInfo (see INFO button p. 50).
Close the Translation screen by pressing Nav or ESC.
Scroll bar
46
C Pen
Pressing Trigg briefly will delete the current reading andbring you back to the C Dictionary main screen.
You can start reading a new word without closing thescreen.
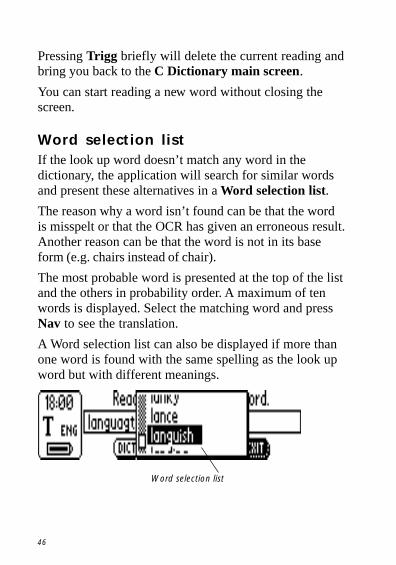
Word selection listIf the look up word doesn’t match any word in thedictionary, the application will search for similar wordsand present these alternatives in a Word selection list.
The reason why a word isn’t found can be that the wordis misspelt or that the OCR has given an erroneous result.Another reason can be that the word is not in its baseform (e.g. chairs instead of chair).
The most probable word is presented at the top of the listand the others in probability order. A maximum of tenwords is displayed. Select the matching word and pressNav to see the translation.
A Word selection list can also be displayed if more thanone word is found with the same spelling as the look upword but with different meanings.
Word selection list
47
Close the Word selection list by selecting Cancel andpress Nav or by pressing the ESC-button.
Pressing Trigg briefly will delete the current reading andbring you back to the C Dictionary main screen.
You can start reading a new word without closing the list.
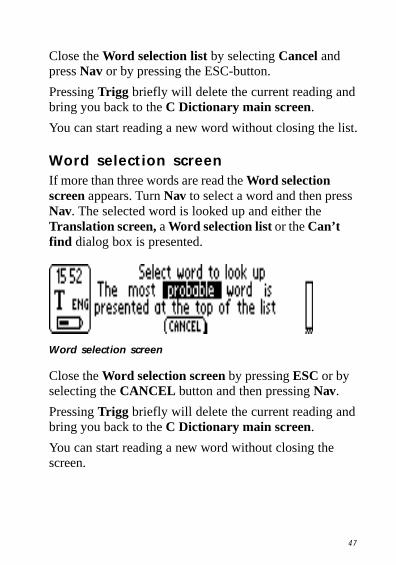
Word selection screenIf more than three words are read the Word selectionscreen appears. Turn Nav to select a word and then pressNav. The selected word is looked up and either theTranslation screen, a Word selection list or the Can’tfind dialog box is presented.
Word selection screen
Close the Word selection screen by pressing ESC or byselecting the CANCEL button and then pressing Nav.
Pressing Trigg briefly will delete the current reading andbring you back to the C Dictionary main screen.
You can start reading a new word without closing thescreen.
48
C Pen
Word edit boxThe read word or words are directed to an edit box whereyou can edit them in the usual way. To be able to do thisyou must first close dialogs, lists or screens that haveturned up after reading.
Turn Nav to select the edit box and then press Nav. Acursor indicates that you are in edit mode. Press Navagain to open the edit menu or use C Write to edit theword. When you have finished editing, select Done inthe edit menu, then press Nav and the edited word willnow be looked up in the dictionary.
You can also use the edit box to see the result of areading.
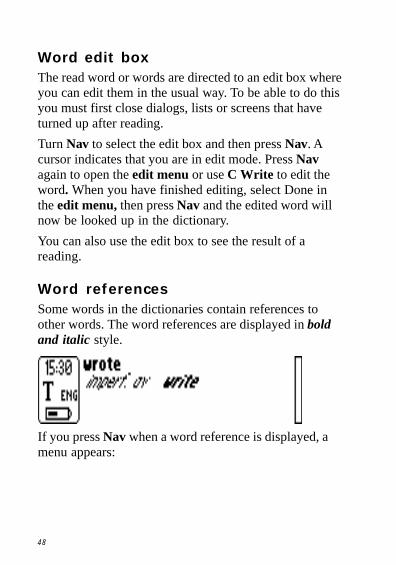
Word referencesSome words in the dictionaries contain references toother words. The word references are displayed in boldand italic style.
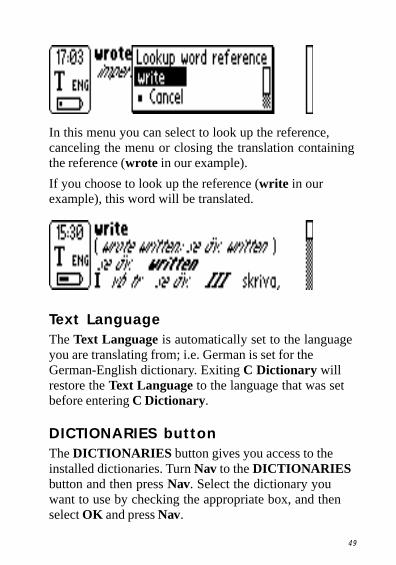
If you press Nav when a word reference is displayed, amenu appears:
49
In this menu you can select to look up the reference,canceling the menu or closing the translation containingthe reference (wrote in our example).
If you choose to look up the reference (write in ourexample), this word will be translated.
Text LanguageThe Text Language is automatically set to the languageyou are translating from; i.e. German is set for theGerman-English dictionary. Exiting C Dictionary willrestore the Text Language to the language that was setbefore entering C Dictionary.
DICTIONARIES buttonThe DICTIONARIES button gives you access to theinstalled dictionaries. Turn Nav to the DICTIONARIESbutton and then press Nav. Select the dictionary youwant to use by checking the appropriate box, and thenselect OK and press Nav.
50
C Pen
If you want to use the same dictionary the next time youuse your C Pen you do not have to repeat this procedure,since the dictionary setting is stored when C Pen isturned off.
INFO buttonThe INFO button displays information about thecurrently selected dictionary; number of words, manufac-turer of database, explanatory chart and abbreviations.
Removing dictionariesDictionaries are removed from the Host Computer.
Exiting C DictionaryYou can exit C Dictionary from the C Dictionary mainscreen by selecting EXIT and pressing Nav or bypressing ESC.

51
CONNECTING TO A PCC Pen can be connected to a PC by Infrared (IR) Commu-nication. To enable this communication certain hardwareand software must be installed on your PC and config-ured properly. The following are required:
1. IR port. Portable computers often have a built-in IRport. Refer to your computer’s manual to find outwhether your notebook is equipped with an IR portand if so, where it is located. Most desktop computersdo not have a built-in IR port. In this case you mustuse an external IR adapter. Refer to your retailer if youdon’t have an IR adapter.
2. Infrared drivers for Windows 95 (included on the C PenSoftware CD). If you use Windows 98 or Windows NT,please read the ReadMe file on the C Pen Software CD.
3. C Pen Windows Software. This software is installedusing the C Pen Software CD.
Installing softwareBoth the Infrared drivers and the C Pen WindowsSoftware are installed when you run the installationprogram on the CD-ROM. Infrared drivers are possiblyalready installed on your computer. The installationprogram automatically detects if infrared drivers areinstalled or not.
Infrared hardware on notebooks can be configured inmany different ways. Please refer to the ReadMe file onthe C Pen Software CD before installing infrared softwareon a notebook. If you have questions and the ReadMe
52
C Pen
file does not help, please refer to C Pen WindowsSoftware Help or your notebook’s retailer or manufac-turer.
To install C Pen Windows Software:
1. Put the C Pen Software CD into your computer’s CD-ROM drive and the installation program will startautomatically.
2. If the installation does not start, open the Start menu inthe Windows taskbar, select Run and typed:\setup.exe, where d: is the drive letter for your CD-ROM drive.
3. To install C Pen Windows Software, click on Install CPen.
To install Infrared drivers, click on Install Infrared(Windows 95 only).
The installation program also enables you to view the CPen Demo, which demonstrates how you should use CPen for best results. To play the demo, click on Demo.
To open the ReadMe file, click on ReadMe.
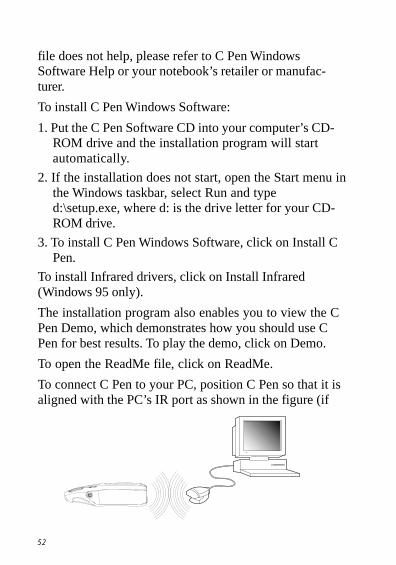
To connect C Pen to your PC, position C Pen so that it isaligned with the PC’s IR port as shown in the figure (if
53
C Pen is within range of the computer’s IR port, the On/Off button flashes with a green and red light). Theinstallation program will place the C Pen icon (My CPen) on your computer’s desktop. Double-click on theicon to connect to C Pen.
Getting helpTo get help using C Pen Windows Software, first open CPen Viewer (by double-clicking on My C Pen) and fromthe Help menu select C Pen Help Topics. You can alsopress F1 on your keyboard to enter C Pen WindowsSoftware Help.
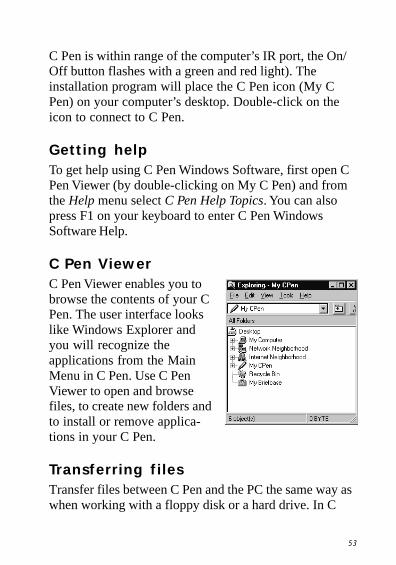
C Pen ViewerC Pen Viewer enables you tobrowse the contents of your CPen. The user interface lookslike Windows Explorer andyou will recognize theapplications from the MainMenu in C Pen. Use C PenViewer to open and browsefiles, to create new folders andto install or remove applica-tions in your C Pen.
Transferring filesTransfer files between C Pen and the PC the same way aswhen working with a floppy disk or a hard drive. In C
54
C Pen
Pen Viewer, find the file you want to transfer (e.g. a textfile in Notes) and drag the file to a folder on your PC.When transferring files from the PC to C Pen, rememberthat each application, except Storage, accepts only itsown kind of files. Notes, for example, may only containtext files. Storage accepts any kind of file.
C AddressC Address, the C Pen address book, is available in C PenViewer on your PC. Double-clicking on C Address in CPen Viewer presents the address files stored in C Pen,listed by their contact name. An address file can beopened by Netscape Communicator or MicrosoftOutlook on your PC by double-clicking on it andclicking Yes in the dialog. Please note that this will opena copy of the file and that your changes will be saved onyour hard drive, not in C Pen. To put an edited addressfile back into C Pen, simply drag it from a folder on yourPC and drop it into the C Address application in C PenViewer.
C DictionaryThe C Dictionary application is also available in C PenViewer. While translation of words is done in C Pen,installation and removal of dictionaries is done on yourPC. The number of dictionaries that can be installed in CPen depends on the amount of free memory in your CPen. For information on how to install and removedictionaries, please refer to the C Pen Windows SoftwareHelp.
55
C DirectC Direct gives you the opportunity to enter text fromyour C Pen at the cursor position in all Windows pro-grams.
To activate C Direct place C Pen in front of the IR-porton your PC, click the right mouse button on the C Penicon (My C Pen) and select C Direct from the menu. TheC Direct icon will appear in the system trayin the lower right corner of your screen.
The display on your C Pen will show “C Direct”. Whenyou read text now with C Pen, it will appear as usual onthe display. To transfer the text to the active applicationin Windows, direct C Pen’s IR-eye towards the IR-port ofthe PC. The text will disappear from C Pen’s display andbe transferred to the cursor position in Windows.
The easiest way to control C Direct is from the C Directicon in the system tray in Windows. By clicking the iconwith the right mouse button, you can choose Connect,Disconnect or Exit C Direct . For more information onhow to use C Direct, please refer to the C Pen WindowsSoftware Help.
C Pen EditC Pen Edit is a simple text editor that lets you edit filesstored in C Pen directly without having to first movethem to your PC. C Pen Edit provides basic text editing,such as cut, copy, paste, find and replace. C Pen Edit canopen and save files that reside either on your PC or inyour C Pen. If you double-click on a text file in Notes it
56
C Pen
is automatically opened in C Pen Edit and it can besaved directly back into C Pen.
StorageTo start using Storage, double-click its icon in C PenViewer. Files in Storage are opened if you double-clickon them. Text files (files with the extension .txt) areopened by C Pen Edit. Other file types are first copied toa temporary folder on your hard drive (as defined inSettings) and then opened by their default Windowsapplication. In this case, if you edit the file and save,your changes will be saved on your hard disk and not inC Pen.
Copying files is done according to Windows standard,i.e. either by using drag-and-drop or Copy/Paste in theEdit menu. You can delete files in Storage by selectingthe file(s) you wish to delete and then pressing Delete onyour keyboard. The Delete command is also available inthe File menu. Please note that this operation CANNOTBE UNDONE.
Closing the connectionClose the connection between your C Pen and your PCby selecting Disconnect C Pen from the File menu in CPen Viewer.
57
TROUBLESHOOTINGProblem: C Pen won’t turn on.
Solution: Battery is not charged. Charge battery or useAC/DC adapter.
You must press the On/Off button for twoseconds.
Problem: The text on the display does not match thetext you are reading.
Solutions: Make sure you have chosen the correctlanguage under Settings.
Make sure that you have chosen invertedtext if the text is white on black background,or normal text if you have black text onwhite background. These are also undersettings.
Make sure that you hold C Pen so that thenose is flat against the surface of the text youare reading. If you have an angle betweenthe nose and the surface, C Pen will takeincorrect pictures of the text.
Problem: A dialog box with the message “Nothingread” appears.
Solution: You must keep the trigger pressed as youmove C Pen over the text.
You must hold the nose opening flat againstthe surface before you press the trigger.
58
C Pen
Problem: The infrared communication to the PC doesnot work.
Solutions: Make sure that you have an external IRreceiver installed on your stationary PC. Ifyou have a portable PC, it is normallyequipped with a built-in IR receiver.
Check the infrared under the Control panelin Windows 95/98.
Problem: C Pen turns off itself too quickly.
Solution: Enter Settings and increase Power-off time;see Settings, p. 30.
59
CARE & SAFETY• Keep C Pen away from direct sunlight, heat, moisture
and dust.
• Do not expose C Pen to extreme variations in tempera-ture.
• Make sure that the camera opening is free from dust orany other objects.
• Clean C Pen with a dry cloth. Do not use detergents orother chemicals when cleaning C Pen.
• Do not use other batteries than the one supplied with CPen. Should you need a new battery, contact your localdealer.
• When charging, use the charger supplied with C Pen.The charger is specially designed for C Pen and shouldnot be used for other equipment.
• Make backup copies of the files in your C Pen regu-larly and keep the copies in a safe place.

60
C Pen
TECHNICAL SPECIFICATIONSSize: 150x38x23 mm
Weight: 100 g(with battery installed)
Display: 202x32 pixels,40 characters per row,4 rows
Processor: Intel© StrongARM™ 100 MHz proces-sor
Memory: 1 MB RAM8 MB flash memory, of which 6 MB canbe used for text files
Reading speed:max 15 cm/s (up to 75 characters/s)
Character sizes:7-18 points
61
INDEXBBattery 6Battery indicator 12Buttons 9
CC Address 36, 54C Dictionary 43, 54C Direct 55C Pen Edit 55C Pen Viewer 53C Write 22C Write Prototypes 25Calibration 32Command menu 17Connecting to a PC 51Contrast 34
DDate 34Dialog box 12
EEdit box 13Edit menu 19
FFile properties 17, 35
IInfo 35Infrared communication 51Installing software 51Inverted text 31
LLanguage, setting 30
MMain Menu 11Menus 13
NNavigation control, Nav 9Notes 17
OOCR 7
PPIN code 34
RRead Mode 31Reading text 14
SSettings 30Status field 12Storage 35, 56System Settings 34
TTechnical specifications 60Text, inverted 31Text Language 31Text menu 18Text Quality 31Text settings 33Time 34Transferring files 53Trigg 9Troubleshooting 57Turning on/off 10
62
C Pen
WarrantyC Technologies AB warrants that this product is free from defects in materials and function at the timeof original purchase and for a period of one year from that date. When the name C Technologies ismentioned in the following text, it means, unless otherwise stated, C Technologies AB (reg. number556532-3929), its subsidiaries and retailers.
If, during the warranty period, any defect in the product arises due to a deficiency in materials orfunction, C Technologies pledges to, at C Technologies' option, either repair or replace the defectiveproduct with the same or an equivalent model.
C Technologies, however, takes no responsibility for:
1. Damage caused during shipping, by accidents, malicious damage, modification, incorrect usage,force majeure or any cause beyond the control of C Technologies, including but not limited tolightning, water, fire, public disturbances, riots, strike, war or other similar conflicts.
2. C Technologies is not responsible for damage (including but not limited to direct or indirectpersonal injury, lost profits, fall in production, losses of or alterations to processed information orany other incidental or consequential damages) caused by the product or the usage of the productor because the product cannot be used.
3. Deficient maintenance or a repair performed by unauthorized persons.
4. Incompatibility due to technological developments.
5. Defects caused by external equipment or abnormal wear.
6. Defects caused by normal wear and tear.
7. Damage caused by the usage of inappropriate battery.
8. Damage arising in connection with or as a consequence of upgrading with additions to oralterations of the product, using software or hardware not produced by or approved in writing by CTechnologies.
If your C Pen product requires warranty service you should return the product to the dealer/retailer fromwhom it was purchased. The product must be packed in original packaging or with sufficient care soas to avoid shipping damage. The original purchaser must be able to show proof and date ofpurchase with receipt/invoice from point of purchase in order for this warranty to be valid.
Repair or exchange does not extend or renew the warranty period. Exchanged defective parts become theproperty of C Technologies. When the warranty period has expired, the warranty of exchanged/replacedparts also ceases.
This product is not to be regarded as having defects in materials or function if it must be rebuilt inorder to be modified in accordance with national or local technical safety regulations in a countryother than one that the product was meant to be used in.
C Technologies reserves all rights to the product, its hardware, software and trademark. Whoever buysor uses the product has no right to alter, disassemble, reverse engineer or in any other way use any partof the hardware or software in the product, except in the way and for the purposes permitted by law.
This warranty does not affect the purchaser's rights against the dealer arising from the sales/purchasecontract, nor the purchaser's legal rights according to existing, mandatory rules in applicable laws.
If there are no such applicable laws or mandatory rules, the purchaser's rights are limited to thosewhich are stated in this warranty. C Technologies shall not be liable for any incidental orconsequential damages for breach of any expressed or implied warranty of this product.