Embed Size (px)
Citation preview
Click here to buy the full 199-page “A Practical Guide to Networking, Privacy & Security in iOS 12” for only $20!
WelcomeWelcome to A Practical Guide to Networking, Privacy, & Security in iOS 12, version 1.1, written by Glenn Fleishman, published September 24, 2018, by Aperiodical LLC.
This book describes how to use your iPhone, iPod touch, or iPad with iOS 12 on Wi-Fi and cellular/mobile networks securely, making connections with ease while protecting your data and your privacy. It also covers Bluetooth, tracking an iOS device, the Apple Watch, managing passwords,Safari’s cookie protections, Personal Hotspot and Instant Hotspot, two-factor authentication with an Apple ID, using AirDrop and AirPlay, and solving con-nection problems.
Visit our updates page to check for new versions and re-download any of the ebook files. Use the password perpendicular. Sign up for our announcement email list, and you’ll be notified about free updates to this edition of the book, as well as receive a note and a discount coupon when we release future editions covering newer versions of Apple’s operating sys-tem. We will not sell, rent, or share your information.
Find us on the web at http://glennf.com/guides.
If you have the ebook edition and want to share it with a friend, I ask that you do so as you would with a physical book: “lend” it for a quick look, but ask your friend to buy a copy for careful reading or reference. Aperiodical LLC is a tiny independent publishing company—just Glenn!
Copyright ©2018 Aperiodical LLC. All rights reserved. More copyright info on page 198.
Click here to buy the full 199-page “A Practical Guide to Networking, Privacy & Security in iOS 12” for only $20!
IntroductionThe book is divided into three major sections:
Networking should be simple, and security should be automatic. And money should grow on trees. Despite how intuitive it is to pick up and use an iOS device, requiring little thought as to how it connects to a cellular or Wi-Fi network, it becomes quite complex as soon as you drill down to any details. This is especially true when connectivity fails, and you try to troubleshoot.
Privacy is a subject that deserves much more attention than it’s gotten in the past—and people are starting to pay attention. Your information is your own to choose how it’s shared, whether it’s your location, your food preference, or your address and phone number. iOS provides tools that enhance your ability to control that.
Security is an even denser area. Apple makes the default choices in iOS reasonably secure, but to ensure real protection for your data— when you select and use passwords, while your bits are traveling through the æther, or in the event that your device is stolen—you need to know how it all works.
Click here to buy the full 199-page “A Practical Guide to Networking, Privacy & Security in iOS 12” for only $20!
TABLE OF CONTENTS
N E T W O R K I N GConnect to a Wi-Fi Network . . . . . . . . . . . . . . . . . . . . . . . . . . . . . . . . . .8
Join a Network . . . . . . . . . . . . . . . . . . . . . . . . . . . . . . . . . . . . . . . . . . . . 8Managing Wi-Fi Connections . . . . . . . . . . . . . . . . . . . . . . . . . . . . . . . . .9Drill Down to Network Details . . . . . . . . . . . . . . . . . . . . . . . . . . . . . . . . 11Turn Wi-Fi Off. . . . . . . . . . . . . . . . . . . . . . . . . . . . . . . . . . . . . . . . . . . 15Capture the Page . . . . . . . . . . . . . . . . . . . . . . . . . . . . . . . . . . . . . . . . . 15Auto-Join and Auto-Login the Next Time . . . . . . . . . . . . . . . . . . . . . . . . 17
Wi-Fi Troubleshooting . . . . . . . . . . . . . . . . . . . . . . . . . . . . . . . . . . . . . 19Can’t See Wi-Fi Networks or a Network You Need . . . . . . . . . . . . . . . . . . 19No Wi-Fi Signal Strength in the Indicator . . . . . . . . . . . . . . . . . . . . . . . . 20Too Many Wi-Fi Networks . . . . . . . . . . . . . . . . . . . . . . . . . . . . . . . . . . 20Correct Password Not Accepted . . . . . . . . . . . . . . . . . . . . . . . . . . . . . . . 21No Internet Service after Connecting . . . . . . . . . . . . . . . . . . . . . . . . . . . 22
Check a Web Page with Safari . . . . . . . . . . . . . . . . . . . . . . . . . . . . . . . 22Check or Ask about the Base Station . . . . . . . . . . . . . . . . . . . . . . . . . . 22Check IP Address Settings . . . . . . . . . . . . . . . . . . . . . . . . . . . . . . . . . 23
Make a Mobile Hotspot . . . . . . . . . . . . . . . . . . . . . . . . . . . . . . . . . . . .24Turn On Personal Hotspot . . . . . . . . . . . . . . . . . . . . . . . . . . . . . . . . . . . 25
Turn On in iOS . . . . . . . . . . . . . . . . . . . . . . . . . . . . . . . . . . . . . . . . . 25Turn On via Another Device . . . . . . . . . . . . . . . . . . . . . . . . . . . . . . . . 26You Can’t Always Use Cell Data while Talking . . . . . . . . . . . . . . . . . . . 27Set a Wi-Fi Password . . . . . . . . . . . . . . . . . . . . . . . . . . . . . . . . . . . . 29Name Your Wi-Fi Network . . . . . . . . . . . . . . . . . . . . . . . . . . . . . . . . . 30Consider Turning Off Certain Radios . . . . . . . . . . . . . . . . . . . . . . . . . . 30
Connect to Personal Hotspot . . . . . . . . . . . . . . . . . . . . . . . . . . . . . . . . . 31Access via Wi-Fi . . . . . . . . . . . . . . . . . . . . . . . . . . . . . . . . . . . . . . . . 33Tether with USB in macOS . . . . . . . . . . . . . . . . . . . . . . . . . . . . . . . . . 37
Choose to Use Cellular Data or Wi-Fi . . . . . . . . . . . . . . . . . . . . . . . . . .44Which Network Are You On? . . . . . . . . . . . . . . . . . . . . . . . . . . . . . . . . . 44Select Which Service to Use . . . . . . . . . . . . . . . . . . . . . . . . . . . . . . . . . . 44
Manage Cell Data Usage . . . . . . . . . . . . . . . . . . . . . . . . . . . . . . . . . . . .48Carriers Shift to Throttling . . . . . . . . . . . . . . . . . . . . . . . . . . . . . . . . . . 48Keep Usage Restrained . . . . . . . . . . . . . . . . . . . . . . . . . . . . . . . . . . . . . 49
Tracking Cellular Usage on an iPhone . . . . . . . . . . . . . . . . . . . . . . . . . 49
Click here to buy the full 199-page “A Practical Guide to Networking, Privacy & Security in iOS 12” for only $20!
Check Cellular Usage on an iPad . . . . . . . . . . . . . . . . . . . . . . . . . . . . . 51Turn Cellular Data On Only When You Need It . . . . . . . . . . . . . . . . . . . 51Limit Your Activities on the Cell Network . . . . . . . . . . . . . . . . . . . . . . 53
Place Calls via Wi-Fi . . . . . . . . . . . . . . . . . . . . . . . . . . . . . . . . . . . . . .56Turn On Wi-Fi Calling . . . . . . . . . . . . . . . . . . . . . . . . . . . . . . . . . . . . . 56
Enable Wi-Fi Calling on Your Main Device . . . . . . . . . . . . . . . . . . . . . . 57Enable Wi-Fi Calling on Other Devices . . . . . . . . . . . . . . . . . . . . . . . . 58
Airplane Mode . . . . . . . . . . . . . . . . . . . . . . . . . . . . . . . . . . . . . . . . . . .62What’s Airplane Mode? . . . . . . . . . . . . . . . . . . . . . . . . . . . . . . . . . . . . . 62When Radios Turn Off and When They Don’t . . . . . . . . . . . . . . . . . . . . . 64
Set Up Bluetooth . . . . . . . . . . . . . . . . . . . . . . . . . . . . . . . . . . . . . . . . . .65Bluetooth Basics. . . . . . . . . . . . . . . . . . . . . . . . . . . . . . . . . . . . . . . . . . 65Pairing Any Device . . . . . . . . . . . . . . . . . . . . . . . . . . . . . . . . . . . . . . . .66Hands-Free Profile . . . . . . . . . . . . . . . . . . . . . . . . . . . . . . . . . . . . . . . .69Audio Devices . . . . . . . . . . . . . . . . . . . . . . . . . . . . . . . . . . . . . . . . . . .69
Exchange Files with AirDrop . . . . . . . . . . . . . . . . . . . . . . . . . . . . . . . . 72Configure AirDrop . . . . . . . . . . . . . . . . . . . . . . . . . . . . . . . . . . . . . . . . 72Share with AirDrop . . . . . . . . . . . . . . . . . . . . . . . . . . . . . . . . . . . . . . . . 73
Share via iOS . . . . . . . . . . . . . . . . . . . . . . . . . . . . . . . . . . . . . . . . . . 74Receive an Item in iOS . . . . . . . . . . . . . . . . . . . . . . . . . . . . . . . . . . . 75AirDrop and macOS . . . . . . . . . . . . . . . . . . . . . . . . . . . . . . . . . . . . . . 76
Stream Music and Video via AirPlay . . . . . . . . . . . . . . . . . . . . . . . . . . .78Select AirPlay Devices . . . . . . . . . . . . . . . . . . . . . . . . . . . . . . . . . . . . . . 78Ways to Use AirPlay . . . . . . . . . . . . . . . . . . . . . . . . . . . . . . . . . . . . . . . 80
Configure AirPlay for an AirPort Express . . . . . . . . . . . . . . . . . . . . . . . 81Configure an Apple TV for Audio and Video . . . . . . . . . . . . . . . . . . . . . 82Send Audio with Airfoil . . . . . . . . . . . . . . . . . . . . . . . . . . . . . . . . . . . 82Mirror an iOS Screen . . . . . . . . . . . . . . . . . . . . . . . . . . . . . . . . . . . . . 84
P R I VAC YPrivacy Leaks . . . . . . . . . . . . . . . . . . . . . . . . . . . . . . . . . . . . . . . . . . . .86
Where Data Lives . . . . . . . . . . . . . . . . . . . . . . . . . . . . . . . . . . . . . . . . . 86What Kinds of Data . . . . . . . . . . . . . . . . . . . . . . . . . . . . . . . . . . . . . . . 87
Behavior . . . . . . . . . . . . . . . . . . . . . . . . . . . . . . . . . . . . . . . . . . . . . . 87Differential Privacy . . . . . . . . . . . . . . . . . . . . . . . . . . . . . . . . . . . . . . 87Apps . . . . . . . . . . . . . . . . . . . . . . . . . . . . . . . . . . . . . . . . . . . . . . . . 88The Web and Web Searching . . . . . . . . . . . . . . . . . . . . . . . . . . . . . . . . 89Metadata . . . . . . . . . . . . . . . . . . . . . . . . . . . . . . . . . . . . . . . . . . . . . 90Sensors and Receivers . . . . . . . . . . . . . . . . . . . . . . . . . . . . . . . . . . . . 90
Data . . . . . . . . . . . . . . . . . . . . . . . . . . . . . . . . . . . . . . . . . . . . . . . . . . 91
Click here to buy the full 199-page “A Practical Guide to Networking, Privacy & Security in iOS 12” for only $20!
iOS Privacy Settings . . . . . . . . . . . . . . . . . . . . . . . . . . . . . . . . . . . . . . .93Setup without Much Sharing . . . . . . . . . . . . . . . . . . . . . . . . . . . . . . . . . 93Controlling System Privacy . . . . . . . . . . . . . . . . . . . . . . . . . . . . . . . . . . 95Siri . . . . . . . . . . . . . . . . . . . . . . . . . . . . . . . . . . . . . . . . . . . . . . . . . . .96
What Siri Knows about You . . . . . . . . . . . . . . . . . . . . . . . . . . . . . . . . 97Siri and On-device Searching . . . . . . . . . . . . . . . . . . . . . . . . . . . . . . . 98
Safari . . . . . . . . . . . . . . . . . . . . . . . . . . . . . . . . . . . . . . . . . . . . . . . . 100Apple’s Suggestions . . . . . . . . . . . . . . . . . . . . . . . . . . . . . . . . . . . . 101Sharing and Commenting . . . . . . . . . . . . . . . . . . . . . . . . . . . . . . . . 101Passwords and AutoFill . . . . . . . . . . . . . . . . . . . . . . . . . . . . . . . . . . 101Watching the Watchmen . . . . . . . . . . . . . . . . . . . . . . . . . . . . . . . . . 104
Location . . . . . . . . . . . . . . . . . . . . . . . . . . . . . . . . . . . . . . . . . . . . . . 108Opting In and Opting Out . . . . . . . . . . . . . . . . . . . . . . . . . . . . . . . . . 109iBeacon . . . . . . . . . . . . . . . . . . . . . . . . . . . . . . . . . . . . . . . . . . . . . 112Share My Location. . . . . . . . . . . . . . . . . . . . . . . . . . . . . . . . . . . . . . 112
Privacy Settings and Allowing Access . . . . . . . . . . . . . . . . . . . . . . . . . . 114
Keeping Creeps Away . . . . . . . . . . . . . . . . . . . . . . . . . . . . . . . . . . . . . 115Blocking Contacts by Phone, IM, and Video . . . . . . . . . . . . . . . . . . . . . . .115Call-Blocking Apps . . . . . . . . . . . . . . . . . . . . . . . . . . . . . . . . . . . . . . 116Manually Block Numbers and Email Addresses . . . . . . . . . . . . . . . . . . . 118Filter iMessages . . . . . . . . . . . . . . . . . . . . . . . . . . . . . . . . . . . . . . . . 119
Sort iMessage by Whether in Contacts . . . . . . . . . . . . . . . . . . . . . . . . 120Filter SMS with Third-Party Apps . . . . . . . . . . . . . . . . . . . . . . . . . . . 120
Content-Blocking Safari Extensions . . . . . . . . . . . . . . . . . . . . . . . . . 121How Content Blockers Work . . . . . . . . . . . . . . . . . . . . . . . . . . . . . . . . 121Blockers in Action . . . . . . . . . . . . . . . . . . . . . . . . . . . . . . . . . . . . . . . 123
S EC U R I T YCreate, Manage, and Use Strong Passwords . . . . . . . . . . . . . . . . . . . . 130
What Makes for a Good Password . . . . . . . . . . . . . . . . . . . . . . . . . . . . 130Learn iOS 12’s New Password Approach . . . . . . . . . . . . . . . . . . . . . . . . 132
Passwords & Accounts . . . . . . . . . . . . . . . . . . . . . . . . . . . . . . . . . . . 132iOS Help with SMS Login Codes . . . . . . . . . . . . . . . . . . . . . . . . . . . . 136
Use Passwords in Web Sites and Apps and Devices . . . . . . . . . . . . . . . . . 138Safari . . . . . . . . . . . . . . . . . . . . . . . . . . . . . . . . . . . . . . . . . . . . . . . 138Other Apps . . . . . . . . . . . . . . . . . . . . . . . . . . . . . . . . . . . . . . . . . . . 139
Use Third-Party Password Managers . . . . . . . . . . . . . . . . . . . . . . . . . . 140
Connect to a Secure Wi-Fi Network . . . . . . . . . . . . . . . . . . . . . . . . . . 143Connect to a Small Network . . . . . . . . . . . . . . . . . . . . . . . . . . . . . . . . 143
Share a Wi-Fi Password . . . . . . . . . . . . . . . . . . . . . . . . . . . . . . . . . . 144What’s Behind Simple Wireless Security . . . . . . . . . . . . . . . . . . . . . . 146
Click here to buy the full 199-page “A Practical Guide to Networking, Privacy & Security in iOS 12” for only $20!
Connect to a Corporate or Academic Network . . . . . . . . . . . . . . . . . . . . 146Outdated Methods . . . . . . . . . . . . . . . . . . . . . . . . . . . . . . . . . . . . . . . 147Viewing an Apple Base Station’s Stored Passwords . . . . . . . . . . . . . . . . 148
Use Two-Factor Authentication . . . . . . . . . . . . . . . . . . . . . . . . . . . . . 150Dancing a Two-Step . . . . . . . . . . . . . . . . . . . . . . . . . . . . . . . . . . . . . . 150Turn On Apple’s Two-Factor Authentication . . . . . . . . . . . . . . . . . . . . . .151
Enable Two-Factor . . . . . . . . . . . . . . . . . . . . . . . . . . . . . . . . . . . . . 152Disable Two-Factor . . . . . . . . . . . . . . . . . . . . . . . . . . . . . . . . . . . . . 153
Log In with 2FA to Apple Sites and Services . . . . . . . . . . . . . . . . . . . . . 153Add a Trusted Phone Number . . . . . . . . . . . . . . . . . . . . . . . . . . . . . . 155Manage Your Notification Email . . . . . . . . . . . . . . . . . . . . . . . . . . . . 157
Logins at Other Sites with Apple 2FA . . . . . . . . . . . . . . . . . . . . . . . . . . 157Remove a Trusted Device or Phone Number . . . . . . . . . . . . . . . . . . . . . 158
Remove a Trusted Device . . . . . . . . . . . . . . . . . . . . . . . . . . . . . . . . . 158Remove a Trusted Phone Number . . . . . . . . . . . . . . . . . . . . . . . . . . . 159
Recovering Account and Access . . . . . . . . . . . . . . . . . . . . . . . . . . . . . . 160Reset Your Password with a Trusted Device . . . . . . . . . . . . . . . . . . . . 160Recover via Find My iPhone with a Phone Number . . . . . . . . . . . . . . . 161Use a Recovery Key when Automatically Upgraded . . . . . . . . . . . . . . . 161Lost All Trusted Devices . . . . . . . . . . . . . . . . . . . . . . . . . . . . . . . . . 162
Transfer Data Securely . . . . . . . . . . . . . . . . . . . . . . . . . . . . . . . . . . . . 164Protect Particular Services . . . . . . . . . . . . . . . . . . . . . . . . . . . . . . . . . . 164Umbrella Protection with a VPN . . . . . . . . . . . . . . . . . . . . . . . . . . . . . . 166
Get VPN Service via an App . . . . . . . . . . . . . . . . . . . . . . . . . . . . . . . 166Configure a VPN Manually . . . . . . . . . . . . . . . . . . . . . . . . . . . . . . . . 170
Make a VPN Connection . . . . . . . . . . . . . . . . . . . . . . . . . . . . . . . . . . . .171
Protect Your Device . . . . . . . . . . . . . . . . . . . . . . . . . . . . . . . . . . . . . . 173Use a Passcode . . . . . . . . . . . . . . . . . . . . . . . . . . . . . . . . . . . . . . . . . . 173
Set up a Passcode . . . . . . . . . . . . . . . . . . . . . . . . . . . . . . . . . . . . . . 174When a Passcode Is Required . . . . . . . . . . . . . . . . . . . . . . . . . . . . . . 175Turning on a Passcode for Safety . . . . . . . . . . . . . . . . . . . . . . . . . . . 176
Use a Biometric Login . . . . . . . . . . . . . . . . . . . . . . . . . . . . . . . . . . . . . 176Use Touch ID . . . . . . . . . . . . . . . . . . . . . . . . . . . . . . . . . . . . . . . . . 177Use Face ID . . . . . . . . . . . . . . . . . . . . . . . . . . . . . . . . . . . . . . . . . . 177
Block Unwanted USB Connections . . . . . . . . . . . . . . . . . . . . . . . . . . . . 179
When Your Device Goes Missing . . . . . . . . . . . . . . . . . . . . . . . . . . . . 180Find My iPhone (and Other Devices) . . . . . . . . . . . . . . . . . . . . . . . . . . 180
How It Works . . . . . . . . . . . . . . . . . . . . . . . . . . . . . . . . . . . . . . . . . 181Enable Find My iPhone . . . . . . . . . . . . . . . . . . . . . . . . . . . . . . . . . . 182View Your Device’s Location . . . . . . . . . . . . . . . . . . . . . . . . . . . . . . . 182Take Remote Action . . . . . . . . . . . . . . . . . . . . . . . . . . . . . . . . . . . . 187
Click here to buy the full 199-page “A Practical Guide to Networking, Privacy & Security in iOS 12” for only $20!
NETWORKINGIt’s true that an iOS device can be used without a live network connection, but its natural state is always hooked up. In the first part of the book, you’ll learn how to work with the three types of iOS wireless communication—Wi-Fi, cellular, and Bluetooth—for general connectivity, with personal hotspots, for audio/video streaming, and for file transfer.
Click here to buy the full 199-page “A Practical Guide to Networking, Privacy & Security in iOS 12” for only $20!
8
Connect to a Wi-Fi Network
Wi-Fi works quite simply in iOS, but there’s a lot of hidden detail. In this chapter, you’ll learn how to interpret the Wi-Fi settings view, manipulate custom network settings, and troubleshoot common problems.
Join a NetworkOpen the Settings app and tap Wi-Fi to view nearby networks. Networks that use the same network name for both bands or on multiple base sta-tions appear as a single entry. Tap a network name to attempt to join it.
Not seeing an expected network? See Wi-Fi Troubleshooting.
The first time you tap a network name to connect, your device joins the network immediately unless encryption is enabled on the network. In that case, you are prompted for a password; once you’ve entered the password and tapped the Join button, you join the network.
Note: For more on connecting with a password or other methods, see Connect to a Secure Wi-Fi Network in the Security section of the book.
Once your iOS device joins a network, the network name and any asso-ciated login information is added to an internal network list. Unlike in macOS and Windows, you can’t examine this list and remove entries. The device uses this list to re-join a network when it is in range.
Click here to buy the full 199-page “A Practical Guide to Networking, Privacy & Security in iOS 12” for only $20!
9
Tip: Are you tired of your device popping up a list of nearby Wi-Fi networks while you’re trying to do something else? Turn off Ask to Join Networks, described a couple of pages ahead.
Tip: You can remove a stored network’s entry only when you’re connected to it. See Forget This Network.
Apple Watch Wi-Fi and CellularIn addition to communicating with a paired iPhone via Bluetooth, every Apple Watch can connect to its iPhone using Wi-Fi if they’re both on the same network. However, for an iPhone and Watch to be on the same Wi-Fi network, the network has to meet some very par-ticular criteria:
▸ The network must use the 2.4 gigahertz (GHz) band. (See Wi-Fi Troubleshooting.)
▸ For an open or hotspot network, it must not have a portal or login page.
▸ For password-protected networks, the iPhone associated with the Watch must have previ-ously connected to the network.
With watchOS 4 and later, you can connect without the iPhone nearby to a new Wi-Fi net-work as long as it has no password and no portal to use iPhone-free features, like maps.
Apple Watch Series 3 has an option for cellular networking—allowing access to notifications, email, texts, and more—even when the iPhone isn’t available. But owners aren’t required to activate it and pay for cell data access. When a Watch Series 3 has an active data plan, it only works on the carrier’s footprint—there’s no roaming available.
Managing Wi-Fi ConnectionsiOS centralizes Wi-Fi management in the compact space of the Wi-Fi settings view (Figure 1). To reach it, open the Settings app and tap Wi-Fi.
The Wi-Fi view always shows three elements, but optional fourth and fifth items may also appear:
Click here to buy the full 199-page “A Practical Guide to Networking, Privacy & Security in iOS 12” for only $20!
19
Wi-Fi TroubleshootingAlthough Wi-Fi generally works well, you may at times be unable to get a live network connection. Here is troubleshooting advice for common cases.
Can’t See Wi-Fi Networks or a Network You NeedIf your device can’t see any Wi-Fi networks or a network you think should be available, eliminate variables by trying the following:
■ With no Wi-Fi networks detected, be sure that Wi-Fi isn’t turned off. Swipe to reveal Control Center (or launch Settings). (This has happened to me more times than I’d like to admit.)
■ You may be connected to the wrong network. In Control Center, press and hold the Wi-Fi button to expand the networking panel; the name of the network you’re connected to appears under the Wi-Fi button.
■ It’s possible that you are out of range. Move the device closer to where you know (or think) a base station is located. Although every iOS device sports an excellent Wi-Fi radio, Wi-Fi reception can be blocked by thick obstructions, such as solid stone and brick walls, or by walls made of chicken wire covered by plaster.
■ Wi-Fi networks can operate over two frequency bands: 2.4 gigahertz (GHz) for the 802.11b, g, and n standards, and 5 GHz for the 802.11a, n, and ac standards. However, not all iPhones and iPod touches have 5 GHz radios. iPhones before the iPhone 5 and iPod touches before the 5th gen-eration can’t access 5 GHz networks, and neither can the Apple Watch. (All devices support 2.4 GHz, however.) It’s rare but possible a network you need only operates in the 5 GHz band.
Note: It’s also possible that the base station, not your handheld, is in trouble. And I have seen the Wi-Fi radio in an iOS device fail intermittently or completely, requiring that the device be entirely replaced.
Click here to buy the full 199-page “A Practical Guide to Networking, Privacy & Security in iOS 12” for only $20!
20
No Wi-Fi Signal Strength in the IndicatorYou’ve selected a network and, if necessary, entered a password, and tapped Join—but the signal-strength indicator in the upper left still shows gray radio waves instead of black. This means that an initial con-nection was made, but then you quickly moved too far away from the base station, or the base station was shut down or restarted with new information. If the connection process had failed while underway, you would have seen a notification alerting you.
Try connecting again. If that fails, restart your device: Press the Sleep/ Wake button until you see a red slider for powering down. Slide it, wait until the spinning indicator disappears and the screen goes entirely black, and then hold down the button again for a few seconds. An Apple icon appears and the device starts up.
Too Many Wi-Fi NetworksYou can find yourself swimming in a sea of Wi-Fi networks in your vicinity, which often makes it hard to select the one you want to join. If you know the network’s exact name, you can type it in:
1. Launch Settings.
2. Tap Wi-Fi.
3. Slide down until you can tap the Other button (Figure 4).
4. Enter the network name exactly and, if there’s a password:
a. Tap Security.
b. Select the method (almost certainly WPA2).
c. Tap Other Network to return to the previous screen.
d. Enter the password in the Password field.
5. Tap Join.
Click here to buy the full 199-page “A Practical Guide to Networking, Privacy & Security in iOS 12” for only $20!
24
Make a Mobile HotspotEvery iPhone and every iPad with cellular has, in addition to a Wi-Fi radio, a built-in data modem that lets the device access high-speed mobile data networks. This modem lets us use our iPhone or cellular iPad while we’re traveling instead of having to buy a separate cellular modem or router with a separate monthly service fee.
iOS’s Personal Hotspot lets you connect other devices to your phone or tablet as a conduit to the mobile Internet. While the name implies a Wi-Fi hotspot connection, which is one component of it, you may also tether via Bluetooth or USB with desktop computers and other devices to extend access. All three methods may even be used simultaneously.
Personal Hotspot’s availability varies by carrier, although operators around the world offer it: consult this list by Apple to check on yours.
Note: In this chapter, I talk about a mobile hotspot or Personal Hotspot to refer to all the features, but I use the term tethering when the discussion is specifically about Bluetooth or USB.
Which models? Every iPhone model and iPad with cellular that can use iOS 9 or later can make use of every option.
WARNING! Most cellular operators, including the four big U.S. carriers, put limits on Personal Hotspot use. They may offer a data rate lower than that of your phone (600 Kbps instead of LTE, for instance), cut you off after a certain amount of data, or throttle you to 128 Kbps or 3G speeds after a monthly cap is hit.
Click here to buy the full 199-page “A Practical Guide to Networking, Privacy & Security in iOS 12” for only $20!
25
Turn On Personal HotspotThere are two ways to turn on the Personal Hotspot feature: directly on your iOS device or through another computer or iOS device.
Whenever you use these methods, the device that turns on the Personal Hotspot then automatically connects to it.
WARNING! Devices that connect to a Personal Hotspot typically don’t treat it any differently than a regular Wi-Fi or Ethernet network—which can mean it’s easy to rack up huge amounts of usage. You will want to pause or dis-able sync services, like Dropbox, and online backup systems, like Backblaze. You may also want to avoid using any streaming video services or digital media downloads while connected via a Personal Hotspot.
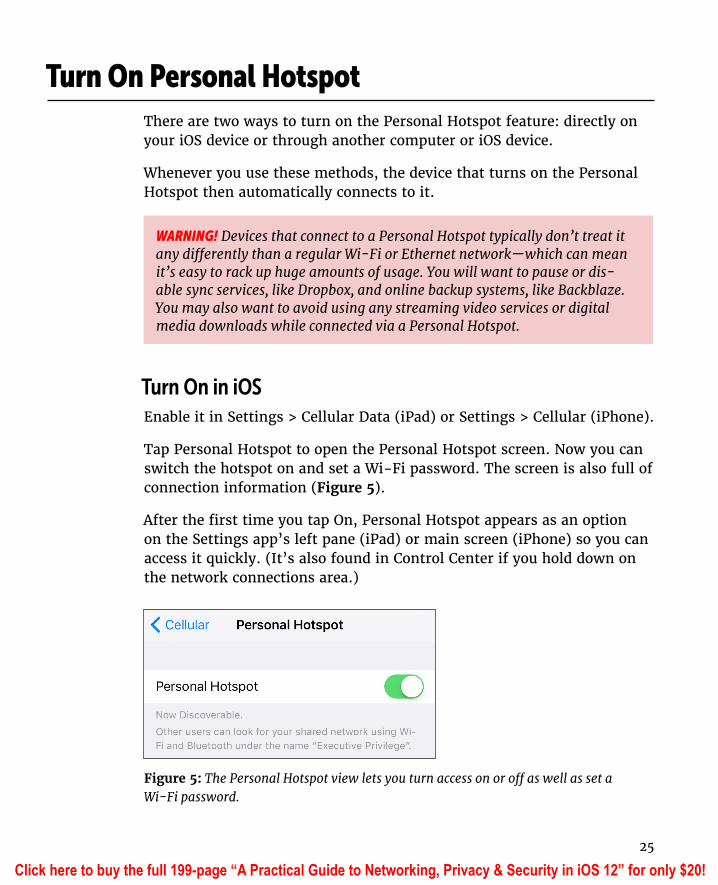
Turn On in iOSEnable it in Settings > Cellular Data (iPad) or Settings > Cellular (iPhone).
Tap Personal Hotspot to open the Personal Hotspot screen. Now you can switch the hotspot on and set a Wi-Fi password. The screen is also full of connection information (Figure 5).
After the first time you tap On, Personal Hotspot appears as an option on the Settings app’s left pane (iPad) or main screen (iPhone) so you can access it quickly. (It’s also found in Control Center if you hold down on the network connections area.)
Figure 5: The Personal Hotspot view lets you turn access on or off as well as set a Wi-Fi password.
Click here to buy the full 199-page “A Practical Guide to Networking, Privacy & Security in iOS 12” for only $20!
44
Choose to Use Cellular Data or Wi-Fi
There are plenty of good reasons to pay attention to whether a cellular iOS device is accessing the Internet via a Wi-Fi network or mobile broadband. You may need greater bandwidth than the cellular network can provide, or be budgeting data on a low-bandwidth plan or while traveling.
Whatever the reason, you can determine which network you’re on and set the type of network to which your device connects. With iOS 10 and later, you can enable a hybrid mode that taps into cellular data when Wi-Fi is flaky.
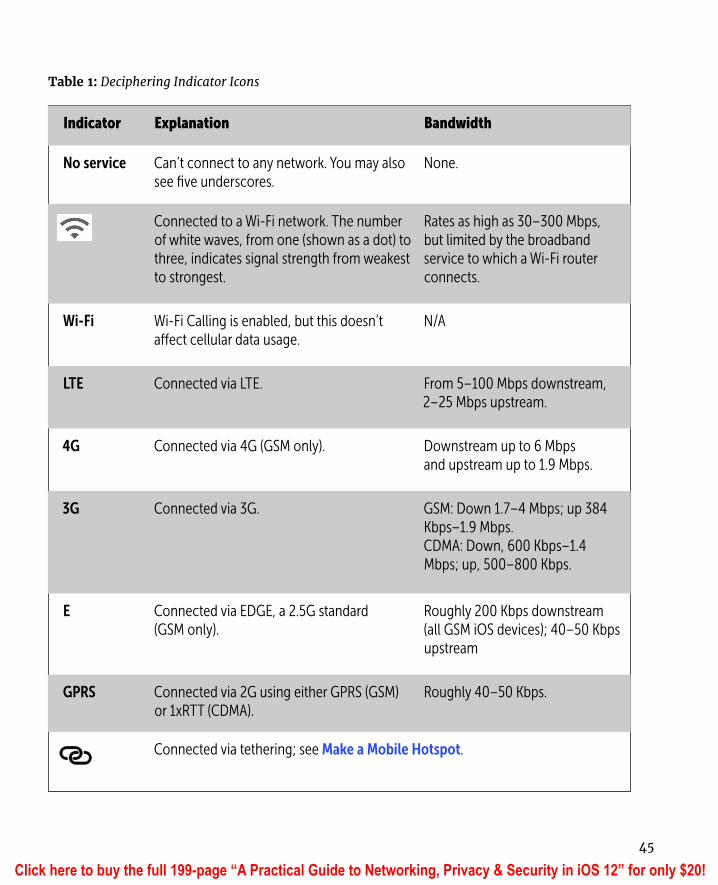
Which Network Are You On?iOS has an indicator in the status bar that shows which network connec-tion is active (Table 1). The range of bandwidth is huge (such as 30 to 300 Mbps as the top rate), because iOS 12 supports generations of cellular networks and Wi-Fi base stations. And each iOS device supports many rates for each standard while also offering backward-compatible support for older networks.
Select Which Service to UseYou can force a cellular device to use either cellular or Wi-Fi service instead of letting it automatically switch depending on whether or not a suitable Wi-Fi network is available. Because iOS doesn’t offer network profiles as in macOS, which would make it easy to switch, you must use the Settings app to enable or disable a service.
Click here to buy the full 199-page “A Practical Guide to Networking, Privacy & Security in iOS 12” for only $20!
45
Table 1: Deciphering Indicator Icons
Indicator Explanation Bandwidth
No service Can’t connect to any network. You may also see five underscores.
None.
Connected to a Wi-Fi network. The number of white waves, from one (shown as a dot) to three, indicates signal strength from weakest to strongest.
Rates as high as 30–300 Mbps, but limited by the broadband service to which a Wi-Fi router connects.
Wi-Fi Wi-Fi Calling is enabled, but this doesn’t affect cellular data usage.
N/A
LTE Connected via LTE. From 5–100 Mbps downstream, 2–25 Mbps upstream.
4G Connected via 4G (GSM only). Downstream up to 6 Mbps and upstream up to 1.9 Mbps.
3G Connected via 3G. GSM: Down 1.7–4 Mbps; up 384 Kbps–1.9 Mbps.CDMA: Down, 600 Kbps–1.4 Mbps; up, 500–800 Kbps.
E Connected via EDGE, a 2.5G standard (GSM only).
Roughly 200 Kbps downstream (all GSM iOS devices); 40–50 Kbps upstream
GPRS Connected via 2G using either GPRS (GSM) or 1xRTT (CDMA).
Roughly 40–50 Kbps.
Connected via tethering; see Make a Mobile Hotspot.
Click here to buy the full 199-page “A Practical Guide to Networking, Privacy & Security in iOS 12” for only $20!
48
Manage Cell Data UsageWhen Apple introduced the iPhone, it also managed to first get AT&T and then other carriers to offer unlimited data plans in the United States and in a few other countries. That didn’t last, as networks became congested with heavy data use and carriers started to offer limited plans and charge over-age fees for usage above a monthly limit.
But the pendulum swings both ways. When carriers started to compete heavily in mid-2016, the companies changed their phone and tablet plans to brting back unlimited data usage—with provisos.
Carriers Shift to ThrottlingBy mid-2016, all four major U.S. cellular carriers shifted phone, tablet, smartwatch, and other plans to remove overage fees and offer unlim-ited data by allowing LTE speeds up to either a firm set amount for some plans or squishier ones for others. After that point, data throttling kicks in, reducing data rates.
Limited-use plans from AT&T, for instance, pool 1 GB, 3 GB, and so forth each month. After you exceed that limit, your account throttles to 128 Kbps for the remainder of the billing period.
“Unlimited” plans from all four carriers rely on congestion throttling. In that scheme, you will get at least 128 Kbps or 3G after some amount of use, depending on the network. However, you can still achieve LTE rates if the area in which you’re using your device isn’t congested at the moment. (The one exception is Verizon’s lower-tier plan, where conges-tion throttling can happen at any time.)
Tethering for hotspot use also varies from carrier to carrier.
Click here to buy the full 199-page “A Practical Guide to Networking, Privacy & Security in iOS 12” for only $20!
49
Here are the details of major plans in September 2018, certain to change. (These plans also bundle a lot of other features depending on tier and carrier, including things like LTE data use in Mexico and Canada, world-wide unlimited calling, and free Gogo service on airplanes.)
■ AT&T: Mobile Share Flex plans have several tiers for pooled monthly data use, and throttle to 128 Kbps when the pool empties. Unused data rolls over to the next month. The plans include tethering. AT&T also has unlimited plans with 22 GB a month before congestion throttling may kick in. Unlimited plans come in two varieties: one has no hotspot use; the other (“Premium”) allows 15 GB before throttling to 128 Kbps.
■ Sprint: Unlimited Freedom includes 23 GB of usage per line before con-gestion throttling plus 10 GB of tethering before dropping to 128 Kbps.
■ T-Mobile: T-Mobile has a single plan with add-ons. The basic plan allows up to 50 GB of LTE data before congestion throttling comes into play. Tethering is limited to 512 Kbps (3G). The lower-tier add-on includes 10 GB of tethering at LTE before dropping down. The higher-tier add-on features unlimited LTE subject to the same monthly 50 GB total.
■ Verizon: In a lower-tier plan, Verizon offers unlimited LTE data, but could throttle for congestion at any time, and tethering can’t go faster than 600 Kbps. On a higher-tier plan, throttling only comes into play after 22 GB of use for each line, and tethering is at LTE rates for 15 GB of data, after which it drops to 600 Kbps.
Keep Usage RestrainedYou can have full-speed mobile access when you need it without breaking your limits if you ration usage. What you need is a strategy.
Tracking Cellular Usage on an iPhoneAn iPhone shows your locally tracked consumption of cellular data via Settings > Cellular > Cellular Data under Current Period. This number has two problems:
■ It’s not guaranteed to be accurate. Your carrier’s records are definitive (Figure 25). In practice, it’s pretty close.
Click here to buy the full 199-page “A Practical Guide to Networking, Privacy & Security in iOS 12” for only $20!
56
Place Calls via Wi-FiCellular phone calls are just data. The stream of audio data that composes them, however, can be routed in different ways depending on the gener-ations of cellular technology that a phone supports and on how carriers choose to configure their networks. Wi-Fi Calling effectively extends cellu-lar calling to home and office Wi-Fi networks. It’s seamless once enabled besides displaying a tiny Wi-Fi label in the status bar.
Wi-Fi Calling is great when a good cell signal isn’t available, often inside a building or house. Carriers that offered similar features used to provide incentives for using Wi-Fi, like unlimited domestic calling. But now they just extend your voice plan to Wi-Fi, whether it’s unlimited or otherwise.
Note: All four major U.S. carriers support Wi-Fi Calling, but it varies with smaller car-riers and with phone operators outside America. Consult Apple’s page that shows features supported by carriers worldwide.
Note: Wi-Fi Calling is distinct from Voice over LTE (VoLTE), a method of routing voice calls over LTE mobile networks. I discuss that in the Personal Hotspot chapter, in the section “You Can’t Always Use Cell Data while Talking.”
Turn On Wi-Fi CallingApple doesn’t turn on Wi-Fi Calling by default. Instead, you have to enable it, and then walk through a variety of steps that vary by carrier.
Note: Wi-Fi Calling may not work in iOS 12 with every carrier on an iPhone 5s, the old-est phone that can handle this latest operating system update.
Click here to buy the full 199-page “A Practical Guide to Networking, Privacy & Security in iOS 12” for only $20!
57
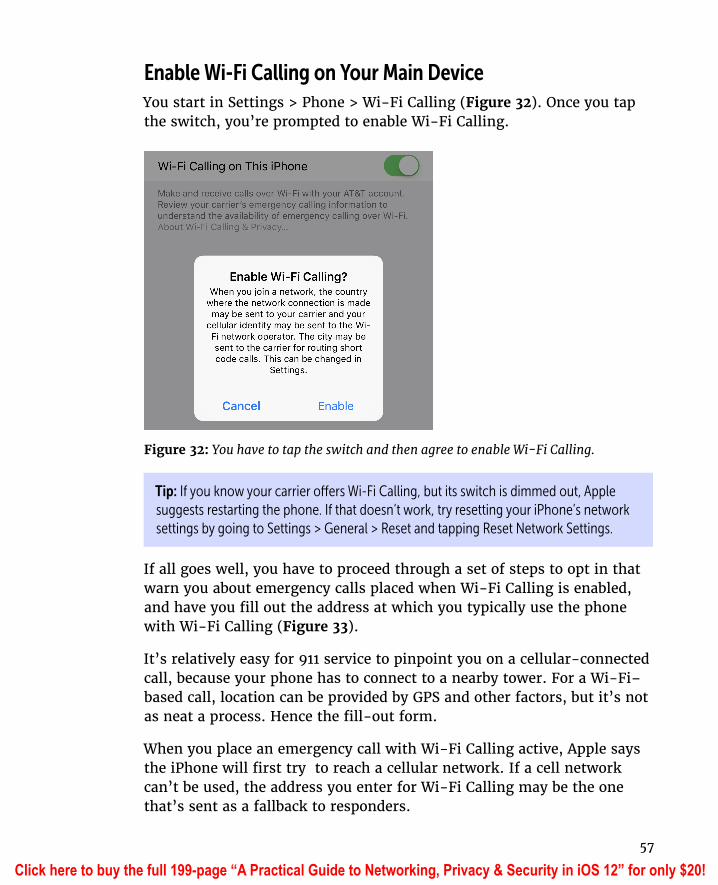
Enable Wi-Fi Calling on Your Main DeviceYou start in Settings > Phone > Wi-Fi Calling (Figure 32). Once you tap the switch, you’re prompted to enable Wi-Fi Calling.
Figure 32: You have to tap the switch and then agree to enable Wi-Fi Calling.
Tip: If you know your carrier offers Wi-Fi Calling, but its switch is dimmed out, Apple suggests restarting the phone. If that doesn’t work, try resetting your iPhone’s network settings by going to Settings > General > Reset and tapping Reset Network Settings.
If all goes well, you have to proceed through a set of steps to opt in that warn you about emergency calls placed when Wi-Fi Calling is enabled, and have you fill out the address at which you typically use the phone with Wi-Fi Calling (Figure 33).
It’s relatively easy for 911 service to pinpoint you on a cellular-connected call, because your phone has to connect to a nearby tower. For a Wi-Fi–based call, location can be provided by GPS and other factors, but it’s not as neat a process. Hence the fill-out form.
When you place an emergency call with Wi-Fi Calling active, Apple says the iPhone will first try to reach a cellular network. If a cell network can’t be used, the address you enter for Wi-Fi Calling may be the one that’s sent as a fallback to responders.
Click here to buy the full 199-page “A Practical Guide to Networking, Privacy & Security in iOS 12” for only $20!
62
Airplane ModeBefore you’re flying so high with some guy in the sky, you need to disable radio communications on your mobile device. The Airplane Mode switch makes this simple.
The U.S. allows the use of handheld personal electronics below 10,000 feet, even though laptops and other large devices are supposed to be stowed so they don’t become projectiles. (1,000-page books are still fine, bizarrely.)
Cellular radios remain banned, and one ostensibly isn’t supposed to use Bluetooth at all, and should not turn on Wi-Fi unless in a plane equipped with Wi-Fi service.
The FAA Caught Up with ScienceUntil a few years ago, the FAA enforced a kind of commercial urban myth: that the cellular radios in cell phones as well as the circuitry in personal electronics like an ebook reader could cause interference with the avionics (electronic flight systems) on commercial aircraft.
This was out of an abundance of caution even years after it was clearly proven that there was no such risk—and after it was shown that cell phones are routinely left on, or even used, in flight without any adverse effects.
What’s Airplane Mode?Airplane Mode in iOS, available to all iOS devices, is a simple way to set your device to a legally required quiet mode during flight. In the Settings app, tap the switch next to Airplane Mode. You see an airplane icon in the top status bar when the mode is active.
Click here to buy the full 199-page “A Practical Guide to Networking, Privacy & Security in iOS 12” for only $20!
63
Saves battery life, too: If you don’t need to use any of the radios for network access, peripherals, or location, Airplane Mode is an effective way to extend battery life, too.
When you turn on Airplane Mode in the Settings app—or by swiping to show Control Center and tapping the airplane icon—iOS turns off three separate radio systems on an iPhone or cellular iPad: cellular, Wi-Fi, and Bluetooth. On a Wi-Fi–only iPad or any iPod touch, Wi-Fi and Bluetooth are disabled.
GPS works in Airplane Mode: At one point, Airplane Mode disabled the GPS radio, even though there was no reason for that. The radio passively receives signals from satellites. That changed years ago. You can use GPS positioning with a map that has data stored offline, to track your path with GPS coordinates, and to geotag photos and other documents.
On flights on which Wi-Fi is available for Internet access, you can sepa-rately tap and re-enable Wi-Fi in the Settings app. Some people also use Airplane Mode to reduce battery usage by disabling its radios, and turn Wi-Fi on for local network access.
When you turn Airplane Mode back to Off, all your previous settings for access are flipped back on.
Tip: Airplane Mode can also help avoid international charges, because when an iPhone has its radios off, it cannot receive calls. Also, you can neither inadvertently place a call nor use data.
To Sleep, Perchance To TransmitWhen you push the Sleep/Wake button on the top or side of your iOS device to put it to sleep, you might think the entire device is suspended. But this standby mode is pretty active. Certain background operations continue, and a cellular iPad and any iPhone can receive email and other updates via push over a cellular data connection.
iOS also maintains Wi-Fi connections on a minimal continuous level. Sleep is more like lightly daydreaming for an iOS device. That’s a reason to use Airplane Mode: to prevent all of this from happening when you don’t intend it to.
Click here to buy the full 199-page “A Practical Guide to Networking, Privacy & Security in iOS 12” for only $20!
65
Set Up BluetoothBluetooth wireless networking lets you connect peripherals like battery-powered headphones, earpieces, headsets, and keyboards to an iOS device for listening to music and entering text. It’s also the glue that binds together devices for Continuity’s Handoff features and connects the Apple Watch with an iPhone by default.
While this book covers aspects of Bluetooth elsewhere, read this chapter to learn how to set up and manage Bluetooth devices.
Tethering: Bluetooth can provide Internet service to an iOS device from another piece of hardware, such as an iPhone with Personal Hotspot enabled, a laptop, or a cellular router with Bluetooth as an option. See the earlier chapter Make a Mobile Hotspot for details.
Bluetooth BasicsThe Bluetooth SIG, a trade group, certifies devices as Bluetooth compliant for particular profiles, which include things like text entry, stereo audio, file transfer, and modem access. Apple’s iOS devices work with any device that meets the Bluetooth spec for several profiles, including audio, peer-to-peer transfer, and external keyboards.
When you connect with Bluetooth, the process is known as pairing. Some devices can be paired with several hosts (like computers or mobile devices); others can pair with only one host at a time, and must be re-paired to switch. Bluetooth devices are discoverable when they are set to allow a pairing connection.
Bluetooth is handled from the Bluetooth view (Settings > Bluetooth). This view lets you turn Bluetooth on and off and displays a list of Bluetooth
Click here to buy the full 199-page “A Practical Guide to Networking, Privacy & Security in iOS 12” for only $20!
66
peripherals under My Devices and Other Devices. The My Devices list shows any devices that have been previously attached to the device and the current status of such devices. The Other Devices list displays any discoverable devices within range.
Bluetooth and Low Energy (LE)Bluetooth 4 brought a low-power mode called Bluetooth LE (sometimes called Bluetooth Smart) to the mix. It lets devices with tiny batteries that are meant to be changed infrequently communicate in tiny, power-conserving bursts. You could have Smart devices in your home’s alarm system, and an iOS app could let you tap to see if any windows are ajar, for instance.
Apple has used Bluetooth LE extensively in later releases of iOS and macOS to enable sig-naling between devices for AirDrop (see Exchange Files with AirDrop) and some of the Continuity features, like Instant Hotspot (see Turn On via Another Device).
Bluetooth LE is also used to communicate with the Apple Watch, and is a key part of HomeKit, Apple’s home-automation technology. With both the Watch and HomeKit, Wi-Fi is a fallback when Bluetooth signals don’t reach, but it consumes much more power on both ends.
Apple supports Bluetooth 5 in many of its devices, which builds on features in version 4, while increasing throughput and range.
Pairing Any DeviceTo start pairing, follow these general steps (the specifics for particular profiles are given later in this chapter):
1. Tap Settings > Bluetooth.
2. Activate Bluetooth discovery on the other device if required. This may require enabling a setting or holding down a button (sometimes a special pairing button) for several seconds.
On your iOS device in the Bluetooth view, the other device appears, natu-rally enough, in the Other Devices list (Figure 37).
3. Tap the desired device. iOS attempts to connect.
4. Depending on the device, iOS will do one of the following:
Click here to buy the full 199-page “A Practical Guide to Networking, Privacy & Security in iOS 12” for only $20!
72
Exchange Files with AirDrop
AirDrop lets you trade files, URLs, contact cards, and a few other kinds of things among Macs and iOS devices on the same Wi-Fi network. It’s a neat way to bypass email, text messaging, or a sync service like Dropbox.
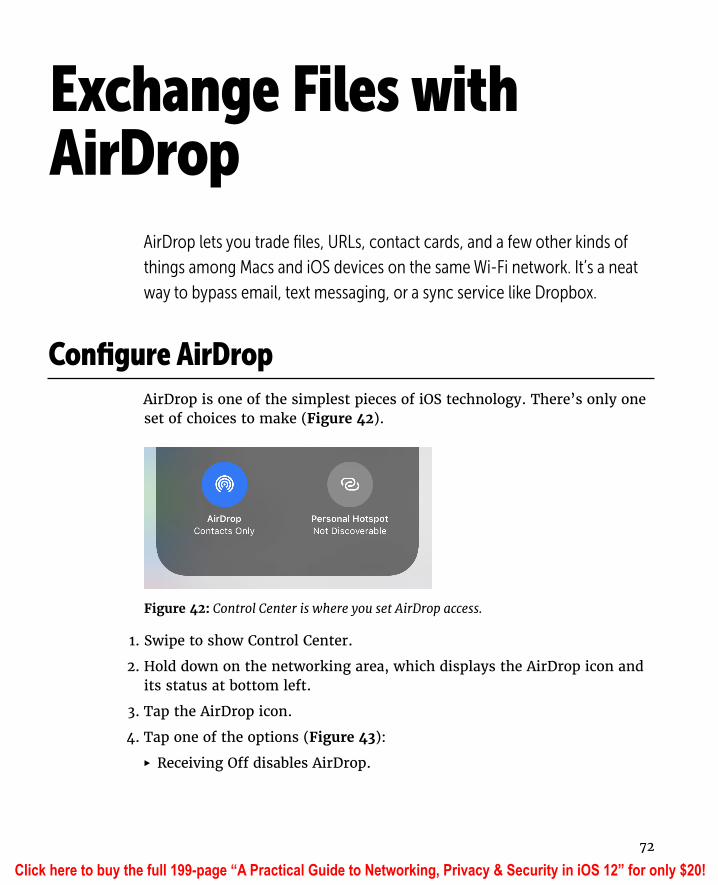
Configure AirDropAirDrop is one of the simplest pieces of iOS technology. There’s only one set of choices to make (Figure 42).
Figure 42: Control Center is where you set AirDrop access.
1. Swipe to show Control Center.
2. Hold down on the networking area, which displays the AirDrop icon and its status at bottom left.
3. Tap the AirDrop icon.
4. Tap one of the options (Figure 43):
▸ Receiving Off disables AirDrop.
Click here to buy the full 199-page “A Practical Guide to Networking, Privacy & Security in iOS 12” for only $20!
73
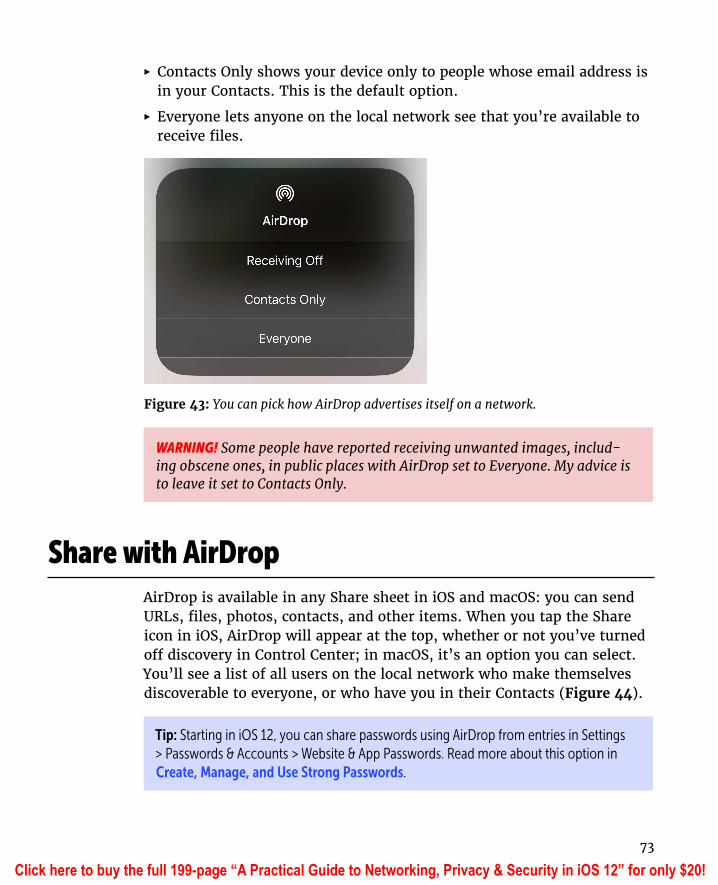
▸ Contacts Only shows your device only to people whose email address is in your Contacts. This is the default option.
▸ Everyone lets anyone on the local network see that you’re available to receive files.
Figure 43: You can pick how AirDrop advertises itself on a network.
WARNING! Some people have reported receiving unwanted images, includ-ing obscene ones, in public places with AirDrop set to Everyone. My advice is to leave it set to Contacts Only.
Share with AirDropAirDrop is available in any Share sheet in iOS and macOS: you can send URLs, files, photos, contacts, and other items. When you tap the Share icon in iOS, AirDrop will appear at the top, whether or not you’ve turned off discovery in Control Center; in macOS, it’s an option you can select. You’ll see a list of all users on the local network who make themselves discoverable to everyone, or who have you in their Contacts (Figure 44).
Tip: Starting in iOS 12, you can share passwords using AirDrop from entries in Settings > Passwords & Accounts > Website & App Passwords. Read more about this option in Create, Manage, and Use Strong Passwords.
Click here to buy the full 199-page “A Practical Guide to Networking, Privacy & Security in iOS 12” for only $20!
78
Stream Music and Video via AirPlay
Apple’s AirPlay technology lets you stream audio and video from Apple equipment to a variety of other hardware, including stereo receivers, computers, the Apple TV, HomePods, AirPort Express, and more.
What’s just as good is that Apple licenses the specification so that other companies can extend AirPlay to be more useful. In this chapter, you’ll learn how to set up AirPlay, but also how to use it more broadly than with Apple’s software and hardware.
AirPlay 2, a version that can pass audio to multiple speakers at once, appeared in 2018 in new versions of iOS, iTunes for macOS and Windows (but not macOS generally), and tvOS for AppleTV, as well as HomePod.
Select AirPlay DevicesThis chapter has to start a little backwards, because before you can use AirPlay, you need a destination—or two or more with AirPlay 2! It’s eas-ier to walk through how you can configure your iOS device to point to an AirPlay receiver, and then look at the many kinds of uses.
To select any AirPlay-compatible device on the same Wi-Fi network as your iOS device, follow these steps:
1. Swipe to reveal Control Center.
2. Tap the AirPlay icon at upper right. (If no AirPlay destinations are available—or powered on—the AirPlay icon doesn’t appear.)
Click here to buy the full 199-page “A Practical Guide to Networking, Privacy & Security in iOS 12” for only $20!
79
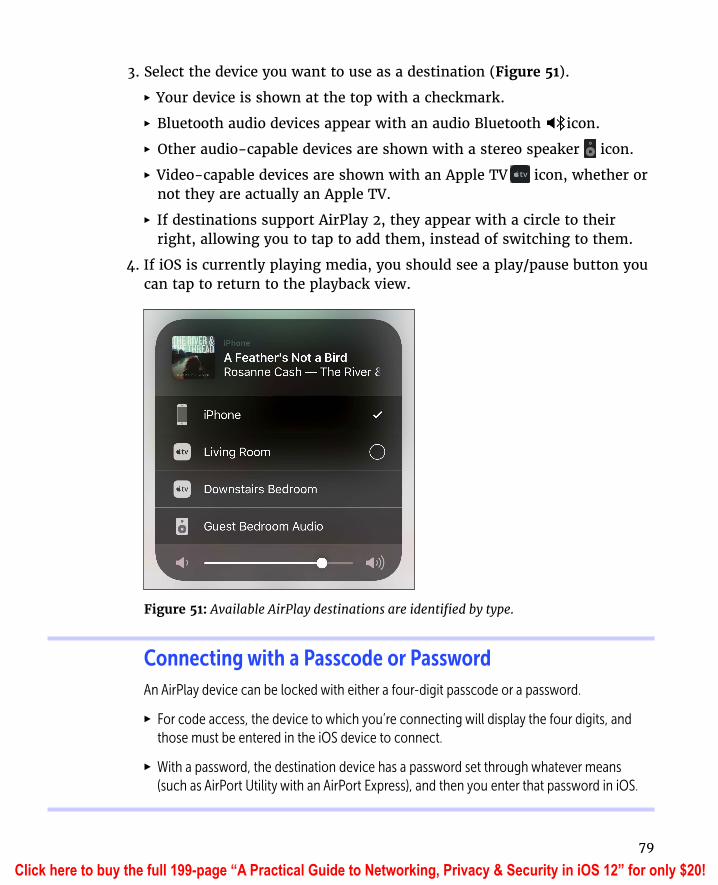
3. Select the device you want to use as a destination (Figure 51).
▸ Your device is shown at the top with a checkmark.
▸ Bluetooth audio devices appear with an audio Bluetooth icon.
▸ Other audio-capable devices are shown with a stereo speaker icon.
▸ Video-capable devices are shown with an Apple TV icon, whether or not they are actually an Apple TV.
▸ If destinations support AirPlay 2, they appear with a circle to their right, allowing you to tap to add them, instead of switching to them.
4. If iOS is currently playing media, you should see a play/pause button you can tap to return to the playback view.
Figure 51: Available AirPlay destinations are identified by type.
Connecting with a Passcode or PasswordAn AirPlay device can be locked with either a four-digit passcode or a password.
▸ For code access, the device to which you’re connecting will display the four digits, and those must be entered in the iOS device to connect.
▸ With a password, the destination device has a password set through whatever means (such as AirPort Utility with an AirPort Express), and then you enter that password in iOS.
Click here to buy the full 199-page “A Practical Guide to Networking, Privacy & Security in iOS 12” for only $20!
PRIVACYThe online world is a tough place to keep your personal and financial details private. Even companies we should be able to trust often push at the limits of reasonable and ethical use of our information—especially in tracking us and aggregating our online profile from a thousand little shards into one complete picture.
Our privacy encompasses our personal information (our name, address, phone number, height, weight, and eye color), our financial information (bank accounts, credit cards, purchases, credit score, and much more), and data about us, like our current location, our browsing habits, and our typical travel patterns.
Privacy and security are complementary concepts. In this section, you’ll learn how to use controls and filters to limit the ability of Apple and third parties to track you and to retain data to which you give them access. The next section, Security, addresses keeping information intended to be secret away from the prying eyes of others.
Click here to buy the full 199-page “A Practical Guide to Networking, Privacy & Security in iOS 12” for only $20!
86
Privacy LeaksWhat information, either owned by you or about you, should you be con-cerned about other people getting their hands on? In this chapter, I take a brief walk through a few different ways to slice that question so that you know in the coming chapters precisely what you want to allow, monitor, and block.
The difference here between privacy and security is that to constitute an invasion of privacy it doesn’t necessarily require that a malicious party or malware obtain the information discussed below. Where it tips into security issues, discussed in the last section of the book, is when you’re explicitly preventing unwanted intrusion that is malicious, criminal, or on behalf of government agencies.
Where Data LivesData is a monolithic term, but when we talk about your data being acces-sible to other parties, or leaking, we should define where it comes from:
Stored data on your device. iOS, apps, and remote systems may be able to access, with or without permission, information you have stored on your mobile hardware. This can include contacts, photos, and emails.
Device hardware. iOS offers highly granular permission control for every kind of hardware element, whether a microphone or an activity sensor. This information can be extremely private. An app that can record you speaking or that can shoot video without your knowledge and stream or upload it later would be terrifying.
Data in transit. Information traveling between your iOS device and a legitimate destination could be intercepted or tampered with.
Click here to buy the full 199-page “A Practical Guide to Networking, Privacy & Security in iOS 12” for only $20!
87
Information stored at a web site. Any interaction with a site can lead to it storing information about you, whether associated with an account and willingly provided or tracked and associated with a unique ID.
Cloud-stored data. Many services we use rely on data stored in the cloud, a collection of servers without a specific location, as information can be fluidly stored among whatever servers are available for primary storage and redundancy. Clouds may diffuse storage within a data center, among servers across a country, and even at locations around the globe.
What Kinds of DataBeyond where data is located, you should also consider the kinds of information that you store on your iPhone and iPad and how it might be used. Just the way in which you use the Internet could provide fodder for legitimate and illegitimate purposes.
BehaviorWhatever you do can be tracked, although Apple makes it hard for some of this information to leak or be requested by anyone other than itself. Almost all of the following requires permission from a user (discussed in the next chapter) unless a malicious app was installed, which is unlikely.
Differential PrivacyStarting in iOS 10 and macOS Sierra, Apple added differential privacy, a technique of acquiring data that, if implemented and operated well, strongly resists tracking back a particular behavior or response to any individual user. It accomplishes this by adding random noise to all data before it’s sent from your hardware.
The technique dates back decades to randomized response, which was developed to get honest answers to questions risky to answer. If an American survey subject were asked in the 1950s whether or not they were a member of the Communist Party, the safe answer was always
“no,” even if the interviewers assured them of privacy.
Click here to buy the full 199-page “A Practical Guide to Networking, Privacy & Security in iOS 12” for only $20!
93
iOS Privacy SettingsApple states repeatedly that it’s committed to keeping its customers’ data private, and it does seem to do a better job than other companies because it’s primarily interested in selling us stuff—hardware, software, and services
— rather than pushing advertising at us. (It did have a small ad business, iAds, that it shut down.) However, there are both centralized and scattered set-tings that let you control on a large scale and in small ways all sorts of data that leaks from your iOS device to Apple and beyond.
Setup without Much SharingIt’s a privacy conundrum: Apple encourages you to enter personal or pri-vate details and connect your iOS device to its services before it lets you choose how you want to share data. You can work around this a bit with a new device or when you erase one to start from scratch.
Note: Starting in iOS 11, you can set up one iOS device by having another one nearby and entering your existing device’s passcode. This may bypass some privacy settings you want to adjust by hand.
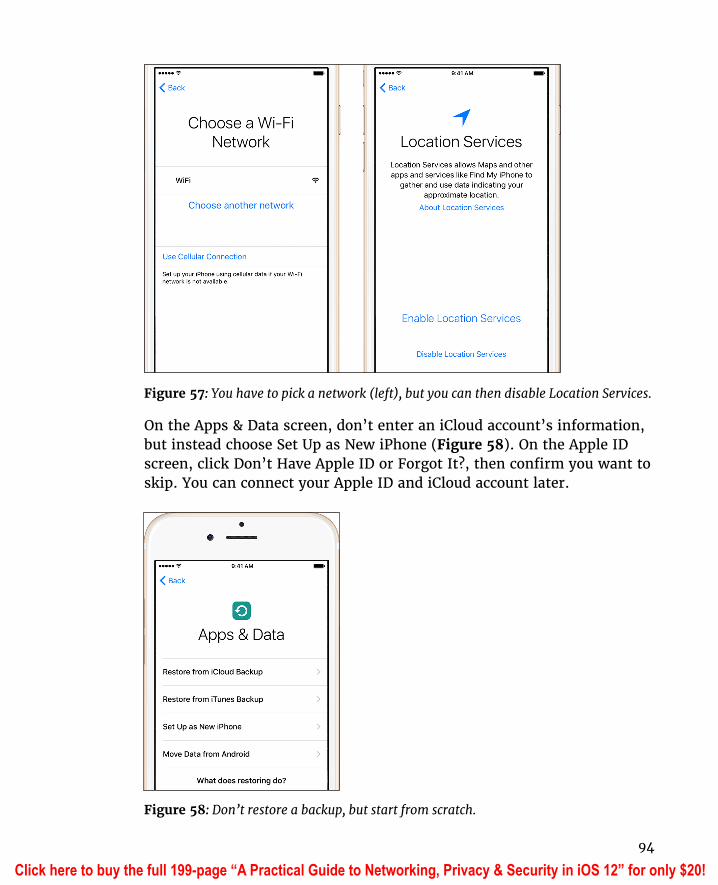
Start setup. On the Choose a Wi-Fi Network screen, Apple won’t let you proceed until you either select a Wi-Fi network or, on a device with an active mobile data plan, tap Use Cellular Connection (Figure 57, left). The moment you do this, some information about your activities starts trans-mitting immediately—although it’s not much at this point!
On the Location Services, choosing Disable Location Services ensures nothing related to your position is sent (Figure 57, right). (If cellular service is available, even if you chose Wi-Fi in the previous step, your device’s pings to cell towers are recorded, however—that’s unavoidable.)
Click here to buy the full 199-page “A Practical Guide to Networking, Privacy & Security in iOS 12” for only $20!
94
Figure 57: You have to pick a network (left), but you can then disable Location Services.
On the Apps & Data screen, don’t enter an iCloud account’s information, but instead choose Set Up as New iPhone (Figure 58). On the Apple ID screen, click Don’t Have Apple ID or Forgot It?, then confirm you want to skip. You can connect your Apple ID and iCloud account later.
Figure 58: Don’t restore a backup, but start from scratch.
Click here to buy the full 199-page “A Practical Guide to Networking, Privacy & Security in iOS 12” for only $20!
115
Keeping Creeps AwayThe Internet can be an unfortunately vile and random place at times. Many communications tools, like iMessage, are designed to be open by default. Others, like phone numbers, are routinely abused. In this chapter, I look at how to clamp down on who can reach you.
Blocking Contacts by Phone, IM, and VideoWhen iMessage first appeared, it was a great addition to instant-mes-saging offerings built by other companies, such as AOL. AOL Instant Messenger (AIM) was the basis of IM for OS X in iChat; Apple registered one’s .Mac, MobileMe, and iCloud account with AOL automatically. Over time, iChat added Google Chat and other options. But with the introduc-tion of Messages in iOS and then in OS X, Apple offered its own, in-house unified mobile and desktop IM.
But there was a problem. iMessage allows us to use any phone num-ber connected to an iPhone (even if we have multiple iPhones) and any email address. This meant, however, that not only could acquaintances who knew any of those email addresses or phone numbers reach you, but anyone could.
The same problem existed for phone calls, of course, as well as FaceTime audio and video. Yet people’s concerns seemed to center on iMessage, because a phone number can be harder to obtain, and people engaged in forms of harassment don’t typically want video evidence of it, either, which is easy to gather within FaceTime.
And until iOS 7, there wasn’t anything you could do to stop them, which was truly horrible for those being harassed, stalked, or just subject to boring unwanted attention. The only options were to stop using iMes-sage or disconnect your known email addresses, and even change your phone number.
Click here to buy the full 199-page “A Practical Guide to Networking, Privacy & Security in iOS 12” for only $20!
116
Starting with iOS 7, Apple has added several anti-harassment and block-ing tools that have started to become meaningful: manual call and mes-sage blocking, which extends to phone calls, iMessages, and FaceTime; sorting incoming iMessages by those in your Contacts list and those who aren’t; and third-party call-blocking apps that can flash an alert about a caller or block certain numbers altogether, as well as SMS filtering apps that try to mark and remove spam.
Carriers have also taken steps. An AT&T app for iOS works at the phone network level, blocking calls before they reach your phone.
Note: Caller ID is used to block phone calls, but unfortunately it’s not a secure method of identification. A harasser can turn off Caller ID or, with third-party services, change the number that appears.
Call-Blocking AppsThere’s a special place in hell for telemarketers who acquire numbers illegitimately, and an even worse place there for those who try to defraud. (I don’t much like legal and legitimate marketing calls from companies I do business with, either.)
Fortunately, many flimflammers seem to re-use the same phone num-bers as they appear via Caller ID. That makes Apple’s extensions for blocking and identifying incoming calls extremely handy. Starting in iOS 10, Apple lets app developers hook into the incoming call framework to either modify the Caller ID label or block the call entirely.
Several apps and systems already existed for Android, and some compa-nies had pre-existing relationships for licensing user-contributed data-bases of spammy, scammy, and scummy calls to phone carriers. You can find a variety of free, one-time fee, and subscription call-blocking apps in the App Store. Hiya, which I’ve used since the introduction of iOS 10, is free and simple (Figure 68). (Hiya sells its services to carriers, and uses the free app to continuously improve its database.)
Once installed and launched in iOS, you use Settings > Phone > Call Blocking & Identification to enable one. (Or more! Let them fight it out!)
Click here to buy the full 199-page “A Practical Guide to Networking, Privacy & Security in iOS 12” for only $20!
121
Content-Blocking Safari Extensions
Developers can create custom add-ins that monitor and block Safari-based connections for items on web pages known as content-blocking Safari extensions. Why block content? To reduce the time it takes to load a page that’s otherwise laden with advertising and trackers, to decrease bandwidth consumed over cellular connections, to suppress unwanted advertising, and to prevent the easiest ways of tracking your activities.
It’s not all about ads and behavior, though. Specialized blockers, and set-tings within more sophisticated blockers, can remove the display of com-ments on sites by blocking major content systems, keep popover boxes from obscuring your screen, remove social-network-related widgets and buttons, or blacklist entire categories of sites (such as those that show adult-oriented imagery).
Is it ethical? Many web sites depend on advertising to pay the bills. Block-ing ads from displaying, even if you never click them, can reduce revenue, because it makes the site’s audience reach seem smaller. Thus, by blocking the ads, you’re indirectly taking revenue. The flip side? No site fully dis-closes how you’ll be tracked and information about you sold and traded.
How Content Blockers WorkStarting in 2015, Apple let developers create apps that can block content from particular URLs or from patterns that match URLs. The app pro-
Click here to buy the full 199-page “A Practical Guide to Networking, Privacy & Security in iOS 12” for only $20!
122
vides the interface, if any is required. Some apps are just a set of filters you can’t manipulate, while others have extensive options and customi-zation. These filters apply to pages both in Safari and pages in browsers embedded in apps. (In 2016, Apple extended the feature to macOS.)
Content blockers don’t analyze what is on a web page, nor do they exam-ine other media and files referenced by a web page, such as Cascading Style Sheets (CSS) documents, images, video, JavaScript, and the like.
Rather, a blocker has a list of filters, which comprise these elements:
■ A specific URL or a pattern that can match a range of URLs.
■ A behavior: block the item entirely, block just associated browser cookies from being set, or block specific page elements (named items in CSS).
■ An optional content type to match: document (which is generic), image, style sheet (for CSS), font (fonts can be quite large), raw (anything not specified), SVG document (a browser-rendered vector image format), media (images, audio, and video), and pop-up windows.
■ An option to block only if it’s fed from the “first party” (the web site you’re visiting) or only from a third party, typically used for tracking.
Note: You can find the full technical details about how content-blocking extensions work at the Surfin’ Safari blog, a site maintained by Apple’s WebKit team.
Filters are set by the app, and then compiled by iOS every time they’re changed, so that they are handled very quickly in Safari. Apple created these as opposed to allowing JavaScript-based extensions, which are available in Safari for macOS, because JavaScript imposes a much heavier load per page, delaying viewing pages and burning battery life.
As noted in the list above, blocking behavior doesn’t have to keep an item from loading entirely: there are two alternatives.
Browser cookies are one way to feed to a browser a unique identifier that’s stored locally. Every time a browser makes a web-based request for a page or other item that matches the same domain, it also packages and includes the cookie as part of the set of headers sent to that web server. Cookies are often used to plop a long-term or per-session identi-fier into a browser after a login or during an otherwise anonymous visit.
Click here to buy the full 199-page “A Practical Guide to Networking, Privacy & Security in iOS 12” for only $20!
129
SECURITYSecurity encompasses many forms: What ways can you manage password use and create unique, secure logins? How do you deal with a device being stolen? How do you protect its contents when it’s out of your control? How do you prevent people from snooping on your network sessions? In this part of the book, you’ll get answers that will make you feel better when using a device in all situations.
Click here to buy the full 199-page “A Practical Guide to Networking, Privacy & Security in iOS 12” for only $20!
130
Create, Manage, and Use Strong Passwords
With iOS 12, passwords deserve their own chapter in this book. Apple’s upgrade makes changes large and small that improve your ability to create, manage, and fill in strong, unique passwords for every web site you visit and every up-to-date app you use.
This includes better tools to ensure you use strong, unique passwords for every login, a better display and interface for using and picking passwords, and full-fledged integration of third-party password managers.
Tip: For a lot more about the ins and outs of good password management, read Joe Kissell’s Take Control of Your Passwords.
What Makes for a Good PasswordMost of the advice you read about choose a good password is bad, includ-ing the “strength” indicators on web sites about the quality of password you picked. Fortunately, password generators, including from Apple and third parties, have gotten with the ticket. Here are the accurate facts:
■ Pick a long password made of words you can easily remember and type or tap when you need to enter it regularly, like with a password vault or your iOS passphrase.
■ When forced to use a complex password (letters, numbers, and symbols), it needs to be longer than 9 characters—preferably 12 to 14.
■ Use a unique password every time you create an account anywhere, and change old passwords that you’ve reused to new, unique ones.
Click here to buy the full 199-page “A Practical Guide to Networking, Privacy & Security in iOS 12” for only $20!
131
■ Rely on a password manager, such as iOS 12’s built-in one.
■ Sign up for Have I Been Pwned? to get notifications of breaches that include your email address.
Now, on to the particulars.
A long password made of randomly chosen words is as strong as a short one that’s a random collection of letters, numbers, and punctuation. For any password you have to enter, pick one that’s 20 or more characters long and that you can remember. Make up a story to help you remember, even. For instance, for rabbit-airplane-canada picture a rabbit flying an airplane to Canada.
Note: If you’d like to read more about using words in passphrases instead of incom-prehensible nonsense, read my 2015 Fast Company article, “Everything You Know About Passwords Is Wrong,” in which I talk to an expert researcher on password selection and cracking.
In many cases, a web site or app forces you to pick a password that con-tains uppercase and lowercase letters, numbers, and punctuation. You also rarely need to enter those by hand, and so a complicated password is fine—but make sure it’s long. A web site password checker might tell you Apple10! is very strong and acceptable, but it’s only 8 characters and includes a word found in a dictionary. It could take seconds to minutes for a cracker using common brute-force software to crack it. Pick 12 to 14 characters for complex passwords.
Apple’s suggested passwords combine complexity and simplicity by being relatively long but (unless a web site doesn’t allow it) comprising only letters and dashes.
Every password you use should be unique at every site and service. That sounds horrible, which is why you can use Apple or third-party software to generate them for you. In iOS 12 and recent versions of third-party software, you can see a list of all stored passwords that you have reused.
Finally, Have I Been Pwned? is a great resource run by an Australian security researcher and trainer, who carefully vets and collects informa-tion from database breaches. If he adds a breach to his site and you’ve registered with it, you receive email that warns you that your email
Click here to buy the full 199-page “A Practical Guide to Networking, Privacy & Security in iOS 12” for only $20!

143
Connect to a Secure Wi-Fi Network
Most home networks are secured, and business networks almost universally employ some way of keeping outsiders out. Connecting to these secured networks is often as easy as entering a password, but not always. This chapter helps you handle any difficult security situations you encounter.
If you’re setting up Wi-Fi security for a network, this chapter also discusses what sort of security to use and how users with iOS devices will connect.
Wi-Fi security divides into three main types: methods used for small net-works, methods for large ones, and outdated methods you should avoid.
Note: Cellular networks have their own security methods that users can’t affect.
WARNING! Public hotspots, whether free or fee, typically have no encryption protecting data; if they have security enabled, it’s via a shared password that provides no effective protection from other people on the network. When you connect, I recommend using only secured services or a virtual pri-vate network (VPN) connection. Read Transfer Data Securely for details.
Connect to a Small NetworkNearly all home and small-office networks that have wireless security enabled require the entry of a short password or passphrase. Enter the password when prompted, tap Join, and, if entered correctly, you’re done.
Click here to buy the full 199-page “A Practical Guide to Networking, Privacy & Security in iOS 12” for only $20!
144
The password is stored for the next time you’re near the same network, and it’s automatically supplied by iOS. If you don’t want to join the net-work automatically the next time you’re nearby, or don’t want to store the password on your device, launch Settings, tap Wi-Fi, tap the info button next to the network, and tap Forget This Network. (This only works while you’re connected to the network, however.)
If you have iCloud Keychain enabled, entering a Wi-Fi network password into any synchronized device means that you won’t have to enter it again. Thus, you might connect to a network via iOS that you’ve already con-nected to in macOS and not be prompted, and vice versa.
WARNING! Readers have told me that they can wind up in an iCloud Key-chain loop: they delete a network on one device, but iCloud Keychain resyncs it from another before the deletion takes place and syncs outward! There’s no real solution: persist at removing the network until it “sticks.”
Share a Wi-Fi PasswordiOS 11 added two easy ways to share a Wi-Fi password with someone in the vicinity: one relies on Bluetooth, the other on a QR Code.
Share a Wi-Fi password via BluetoothYou have a simple way to share a Wi-Fi password with someone nearby that requires just a single tap. Both the person already connected and the person connecting must have Bluetooth enabled, and the sharing person needs the iCloud account email in their contacts of the other person.
Let’s say you have the password and your friend Jo does not. When Jo tries to connect to the Wi-Fi network, they see the usual password entry field. However, if you’re near enough, your device shows a sheet with a large Wi-Fi logo that prompts you to share. Tap Share Password and Jo’s password field automatically fills in and they join the network.
Share Network Access with a QR CodeBack in iOS 11, Apple added a nifty visual way to share network details with a minimum of fuss: you can use a QR Code and the Camera app!
Click here to buy the full 199-page “A Practical Guide to Networking, Privacy & Security in iOS 12” for only $20!
150
Use Two-Factor Authentication
Apple’s two-factor authentication (2FA) for Apple ID lets you secure access to your accounts with a password plus something extra that you have under your control. In this chapter, you learn how to set up 2FA, how to secure your extra pieces against discovery or loss, and how to reset an account.
Dancing a Two-StepApple lets you tie in an Apple ID for several purposes in iOS: for iCloud synchronization, iCloud Drive, App Store purchases, iMessage, and more. However, without making an extra effort, an Apple ID is protected only by the password you set, and can be reset and potentially hijacked in a number of ways should someone gain access to your email or know your security questions for resetting a password.
The way around this is to use what’s called two-factor authentication (2FA). A factor is a bit of proof that you are who you say you are. Requir-ing two factors of different sorts makes it more likely that you are the legitimate owner of an account or have authorized access for a service.
A two-factor system generally employs something you know, such as a memorized password, coupled with something you have or possess phys-ically—such as a phone, a smartcard, or other hardware—or something you are, like a fingerprint or personal characteristic. Usually there’s an emergency backup, too: a one-time-use code or set of codes that can be used in a pinch, or a process to prove your identity.
In Apple’s implementation, when you enable two-factor authentication, you keep your existing password on your Apple ID, and add at least one
Click here to buy the full 199-page “A Practical Guide to Networking, Privacy & Security in iOS 12” for only $20!

151
phone number that can receive SMS (text) messages or voice calls, and one or more trusted iOS devices or Macs.
WARNING! If you’re running versions of macOS, iOS, watchOS, tvOS, or iTunes for Windows older than about four years, you may have trouble using 2FA. See the complete compatibility list at Apple’s 2FA FAQ.
WARNING! Once you turn on 2FA, if you can’t recall your password or lose access to your phone number and all your trusted devices, you have to go through a recovery process with Apple to regain access to your account, which can take up to a week. If you can’t prove to Apple you’re the legit-imate owner, you have to create a new Apple ID, which makes you lose access to any associated purchases, unsynced items, backups, and the like.
Tip: Apple added automatic second-factor filling via SMS in iOS 12 for other compa-nies’ sites. If you have a 2FA account at Twitter, PayPal, or wherever, you can log in via Safari with your password, and the code that then arrives as a text message becomes an autofill option.
Apple Stepped Back from Two-StepApple had a previous two-factor approach that it called “two-step verification,” which was stapled on top of existing software and systems. The two-step method was awkward, didn’t allow confirmation via a Mac, and required using Apple’s Apple ID site to manage.
Apple has allowed existing two-step users to keep the protection in place without upgrading to 2FA. However, that appears to be at an end. The moment you log into an iCloud account that uses two-step from any Mac starting with 10.13 High Sierra or any iOS 11 or later device, Apple upgrades your account to 2FA.
Turn On Apple’s Two-Factor AuthenticationYou enable two-factor setup on your account through iOS or macOS by logging in using an account that’s been approved for 2FA; by tapping an
Click here to buy the full 199-page “A Practical Guide to Networking, Privacy & Security in iOS 12” for only $20!
164
Transfer Data SecurelyThe data that travels to and from your iOS device isn’t secure even when you’re connected to a Wi-Fi network with a strong password. Any data you send that’s not encrypted could be sniffed by anyone else on that network.
The same is true for any point between you and your data’s destination or wherever you’re running an active session, whether you’re using a protected Wi-Fi network, an open one, or a cellular data connection: any party in between, for unencrypted services, can see exactly what you’re doing.
Encrypting our data in transit enables us to make decisions about how our data is being used and who sees it, preventing criminals, relatives, and gov-ernment agencies from overstepping our rights.
In this chapter, I help you understand what’s encrypted and what’s not, and how to secure individual services and your whole network connection.
TLS and SSL and what they mean: TLS (Transport Layer Security) appears a number of times in this chapter. It’s a way of securing a connection for both ends with strong encryption. TLS replaces SSL (Secure Sockets Layer), and when both older and newer protocols were used side by side, you’d see SSL/TLS or TLS/SSL as a label. However, SSL is now considered definitively broken from an encryption standpoint and increasingly out of use.
Protect Particular ServicesNearly every kind of service you can think of offers an encrypted option, and, fortunately, most modern services employ some kind of encryption by default. Here’s a laundry list of what you should consider:
Click here to buy the full 199-page “A Practical Guide to Networking, Privacy & Security in iOS 12” for only $20!
165
■ Email. There’s no good reason not to employ TLS. If your mail host doesn’t provide secured email for your incoming email (POP or IMAP; almost always IMAP in iOS) and for your outgoing email (SMTP), find a new host. Without security, email programs may send passwords in the clear or with weak encryption, and likely send all data in the clear. iOS will always attempt to configure your mail settings securely.
■ Secure access to web sites. A huge movement in the last couple of years has shifted a large percentage of all web sites to use secured connections for all requests, not just for commerce or banking.
▸ If you’re not sure a connection is secure, look in the security settings for a web site where it notes something like “Always use https” or
“Always use secure connection” and check that box. (A login is almost always secure, so your account name and password is rarely at risk.)
▸ For other web sites, try to always use the secured flavor by typing in or bookmarking https instead of http as the start of the URL. Many sites offer TLS sessions as an option reachable just by entering the URL in this fashion.
■ Transfer files securely. When making an FTP connection, use only a secured alternative to plain FTP, such as the SSH-based SFTP or one of several TLS-protected methods. FTP programs otherwise send passwords and data in the clear.
Tip: On a Mac, enable Remote Login and File Sharing in the Sharing preference pane to allow SFTP over a local network or via the remote Back to My Mac service.
What’s protected without any extra effort?
■ iMessage and FaceTime. Apple builds in end-to-end encryption in such a way that even the company can’t decipher your messages. In fact, it’s so secure, governments around the world—including both the U.S. and China—aren’t happy about it.
■ Other instant-messaging and audio/video chat services have various levels of protection. Signal from Whisper Systems is the best. Whatsapp from Facebook can be configured and used very securely.
■ Apple upped the requirements to use secured connections in iOS apps years ago, but you can’t easily check. And developers can obtain exemp-tions for unsecured connections or older security protocols.
Click here to buy the full 199-page “A Practical Guide to Networking, Privacy & Security in iOS 12” for only $20!
173
Protect Your DeviceNow that you know how to keep your data from being intercepted in transit, how can you prevent your stored data—on an iOS device—from being rifled if your device is out of your control?
Apple has three robust ways to secure a device: with a passcode; for newer hardware, its Touch ID fingerprint-recognition system; and Face ID, which first appeared in the iPhone X.
All devices that support iOS 8 and later include robust hardware encryption. When a device is on and locked, its data is inaccessible until a passcode is entered or Touch ID/Face ID accepted, which unlocks the encryption keys needed to read stored information.
WARNING: If you forget the passcode and Touch ID or Face ID isn’t available (such as after a reboot), your data stored only on the device is lost forever. iCloud and other cloud-stored data remains available as long as you have that account information.
Use a PasscodeYour best single protection against anyone unauthorized having access to data is enabling the passcode lock. This allows you to set a six-digit code required to wake and gain access to the device.
When Touch ID or Face ID are enabled, you must also have a passcode set, and Apple will ask you for that passcode on a regular basis.
Let’s start with setting up a strong passcode, and then move on to when you’ll be prompted for one.
Click here to buy the full 199-page “A Practical Guide to Networking, Privacy & Security in iOS 12” for only $20!
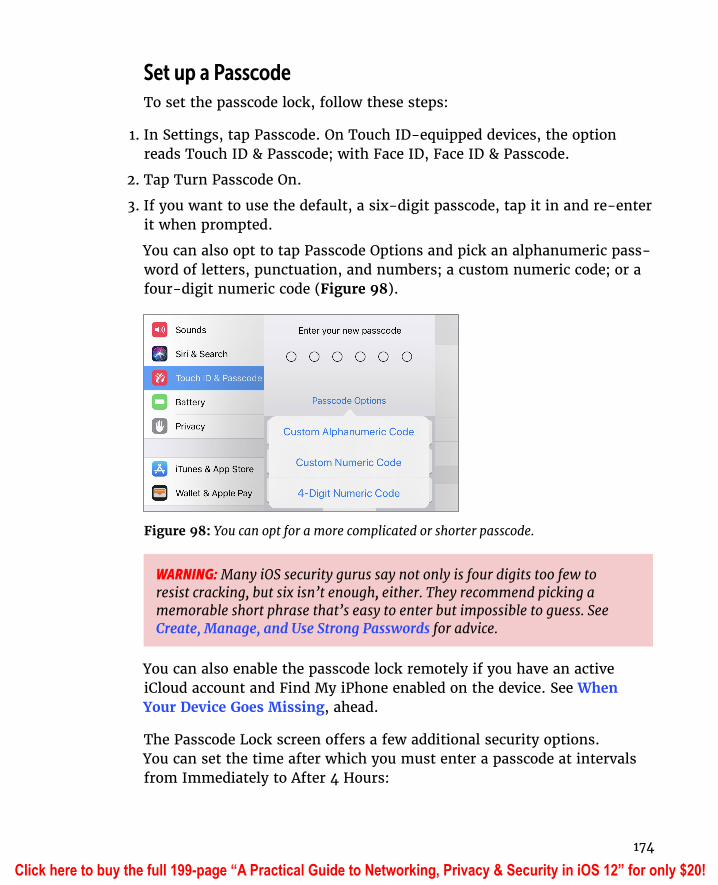
174
Set up a PasscodeTo set the passcode lock, follow these steps:
1. In Settings, tap Passcode. On Touch ID-equipped devices, the option reads Touch ID & Passcode; with Face ID, Face ID & Passcode.
2. Tap Turn Passcode On.
3. If you want to use the default, a six-digit passcode, tap it in and re-enter it when prompted.
You can also opt to tap Passcode Options and pick an alphanumeric pass-word of letters, punctuation, and numbers; a custom numeric code; or a four-digit numeric code (Figure 98).
Figure 98: You can opt for a more complicated or shorter passcode.
WARNING: Many iOS security gurus say not only is four digits too few to resist cracking, but six isn’t enough, either. They recommend picking a memorable short phrase that’s easy to enter but impossible to guess. See Create, Manage, and Use Strong Passwords for advice.
You can also enable the passcode lock remotely if you have an active iCloud account and Find My iPhone enabled on the device. See When Your Device Goes Missing, ahead.
The Passcode Lock screen offers a few additional security options. You can set the time after which you must enter a passcode at intervals from Immediately to After 4 Hours:
Click here to buy the full 199-page “A Practical Guide to Networking, Privacy & Security in iOS 12” for only $20!
180
When Your Device Goes Missing
Your mobile device is a desirable item for thieves. It’s compact, it has a high retained value, and there’s a huge market for used models.
Without freaking you out about theft, I want to tell you how you can protect your data when your device has disappeared, make it impossible for a thief to use your device, and find your device if it’s stolen or lost.
Find My iPhone (and Other Devices)Find My iPhone has a name that belies its utility: it works with every kind of iOS device, the Apple Watch, AirPods—and with Macs, too (as Find My Mac in the iCloud preference pane).
You can find the last reported position of any iOS device or Mac by en ab-ling the feature, which requires an iCloud account. You can also play a sound on the device, lock the device or mark it lost, or delete all its data!
Finding a device’s current location and taking a remote action can be accomplished via the iCloud web site or the free Find My iPhone app.
One name for clarity: For simplicity’s sake in the text ahead, I’m calling the service Find My iPhone.
With Family Sharing turned on, anyone in the family group can see where an iOS device is, unless the owner has disabled letting that per-son or anyone see his or her current location. With that user’s password, all Find My iPhone features are available through other Family Sharing members’ accounts.
Click here to buy the full 199-page “A Practical Guide to Networking, Privacy & Security in iOS 12” for only $20!
181
Note: U.S. phone carriers also offer phone-tracking services, which can work across a family account and different smartphones and dumb phones. Each comes with a sep-arate fee and various enhancements and limitations. If everyone in your family is using an iPhone, there may be no advantage.
How It WorksThe feature relies on a device sending Apple’s servers a regular update of location information derived from Wi-Fi, cellular, and GPS signals and data. All iOS devices and Macs running 10.7 Lion or later use the built-in Wi-Fi; iPhones and cellular iPads add cellular radios and GPS.
With Find My iPhone active, a device with GPS and cellular regularly sends updates derived from its GPS receiver and from ranging informa-tion it has about nearby cell phone towers that allow it to trilaterate.
Note: You may be more familiar with the term triangulation, which relies on using known fixed positions and measuring angles. Trilateration uses the intersection of geometric areas, such as the radius of signal strength from cell towers.
All iOS (and macOS) devices also scan for nearby Wi-Fi networks and send a snapshot of that information to an online system run by Apple whenever the device has an Internet connection. This system approxi-mates a position based on network details that it knows about from pre-vious scans sent by other devices, including the name and some less-ap-parent unique hardware identifiers. The position is inferred based on the relative signal strength of the Wi-Fi base stations detected.
That lookup requires an active connection, which is fine for a cellular device with an active cellular data plan. But a Wi-Fi–only device must be connected to a Wi-Fi network to retrieve and send Wi-Fi–based position information, as well as to respond to queries from Apple’s servers.
Note: Apple caches some information about location on the phone for up to seven days to avoid frequent network access to look up information, or to use Wi-Fi posi-tioning in an area you’ve been recently even if you don’t have current Internet access.
Click here to buy the full 199-page “A Practical Guide to Networking, Privacy & Security in iOS 12” for only $20!
195
Update History
version 1.1 (September 23, 2018) ■ Added the chapter Create, Manage, and Use Strong Passwords to better consolidate and expand information about iOS 12’s improved password management and third-party integration.
■ Created an expanded and new subsection on Wi-Fi password sharing in Connect to a Secure Wi-Fi Network for better clarity.
■ Updated throughout to include the iPhone XR and XS models, and the “alternate” face for Face ID in iOS 12.
■ Added note about Unwanted Communications feature for reporting junk calls and text messages.
version 1.0 (September 5, 2018)Initial release.
Click here to buy the full 199-page “A Practical Guide to Networking, Privacy & Security in iOS 12” for only $20!
196
AcknowledgmentsI dedicate this book as always to my wife, Lynn, and kids, Ben and Rex. On this journey through life, we are trying our best every day. They ground me and remind me to leave the house at times.
Thanks to Jeff Carlson for technical editing and proofreading on this edi-tion, and Charles Fleishman, Scout Festa, and Jeff for their varied editing assistance across the previous four!
Many thanks to longtime collaborators Adam and Tonya Engst, who saw this book through several earlier editions, and Joe Kissell, who helped distribute the iOS 11 and 12 books.
Click here to buy the full 199-page “A Practical Guide to Networking, Privacy & Security in iOS 12” for only $20!

197
About the AuthorGlenn Fleishman was trained as a type-setter, received a degree in art, and works as a journalist and programmer. Glenn appears regularly in Macworld, Fortune, the Economist, TidBITS, Fast Company, and other publications.
Glenn writes about security, privacy, nanosatellites, copyright, punctuation
conventions, printing history, crowdfunding, and much more.
He spent 2017 as the Designer in Residence at the School of Visual Concepts in Seattle printing a letterpress book of his writing, a Walt Whitman poetry folio, and other projects. In October 2012, he appeared on the Jeopardy! quiz show and managed to win—twice!
His blog is glog.glennf.com, and he overshares on Twitter at @glennf.
Click here to buy the full 199-page “A Practical Guide to Networking, Privacy & Security in iOS 12” for only $20!
198
Copyright and Fine PrintA Practical Guide to Networking, Privacy & Security in iOS 12Copyright ©2018, Glenn Fleishman. All rights reserved.
ISBN: 978-0-9994897-5-8 (ebook) 978-0-9994897-6-5 (print edition)Aperiodical LLC, 1904 E. McGraw St., Seattle, WA 98112-2629 USA
http://glennf.com/guides
Ebook edition: This electronic book doesn’t use copy protection because copy protection makes life harder for everyone. So we ask a favor of our readers. If you want to share your copy of this ebook with a friend, please do so as you would a physical book, mean-ing that if your friend uses it regularly, he or she should buy a copy. You have our per-mission to make a single print copy of this ebook for personal use. Please reference this page if a print service refuses to print the ebook for copyright reasons.
All editions: Although the author and Aperiodical LLC have made a reasonable effort to ensure the accuracy of the information herein, they assume no responsibility for errors or omissions. The information in this book is distributed “As Is,” without warranty of any kind. Neither Aperiodical LLC nor the author shall be liable to any person or entity for any special, indirect, incidental, or consequential damages, including without limita-tion lost revenues or lost profits, that may result (or that are alleged to result) from the use of these materials. In other words, use this information at your own risk.
Many of the designations used to distinguish products and services are claimed as trade-marks or service marks. Any trademarks, service marks, product names, or named fea-tures that appear in this title are assumed to be the property of their respective owners. All product names and services are used in an editorial fashion only, with no intention of infringement of the trademark. No such use, or the use of any trade name, is meant to convey endorsement or other affiliation with this title.
This title is an independent publication and has not been authorized, sponsored, or oth-erwise approved by Apple Inc. Because of the nature of this title, it uses terms that are the trademarks or that are the registered trademarks of Apple Inc.; to view a complete list of the trademarks and of the registered trademarks of Apple Inc., you can visit
http://www.apple.com/legal/trademark/appletmlist.html
Click here to buy the full 199-page “A Practical Guide to Networking, Privacy & Security in iOS 12” for only $20!
![homelessness nyc - New York – São Paulo Exchange | The ... · 2/6/2010 · homelessness [nyc] homelessness ... ... 199 2 199 3 199 4 199 5 199 6 199 7 199 8 199 9 200 0 200 1 200](https://img.pdfslide.us/doc/110x75/5c622b0c09d3f2223c8b45ae/homelessness-nyc-new-york-sao-paulo-exchange-the-262010-homelessness.jpg)