Embed Size (px)
Citation preview
c-h +
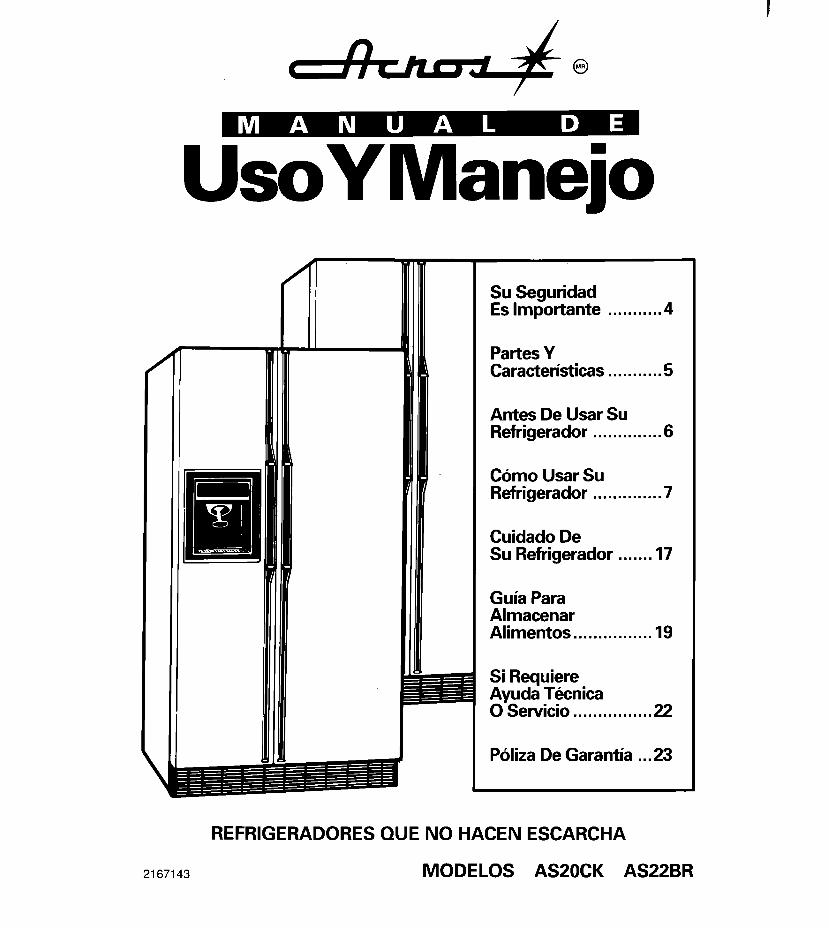
UseAndCare
Your Safety Is Important . . . . . . . . . . . . . . . 4
Parts And Features . . . .5
Before Using Your Refrigerator . . . . . . . . . . . . . . . 6
Using Your Refrigerator . . . . . . . . . . . .., .7
Caring For Your Refrigerator . . . . . . . . . . . . .I7
Food Storage Guide . . . . . . . . . . . . . . . . . . . . . . 19
If You Need Assistance Or Service . . . . . . . . . . . . . , . . . . . .22
Warranty . . . . . . . . . . . . . . . . . 23
2167143
NO-FROST REFRIGERATOR-FREEZERS a\qJc
MODELS AS20CK AS22BR
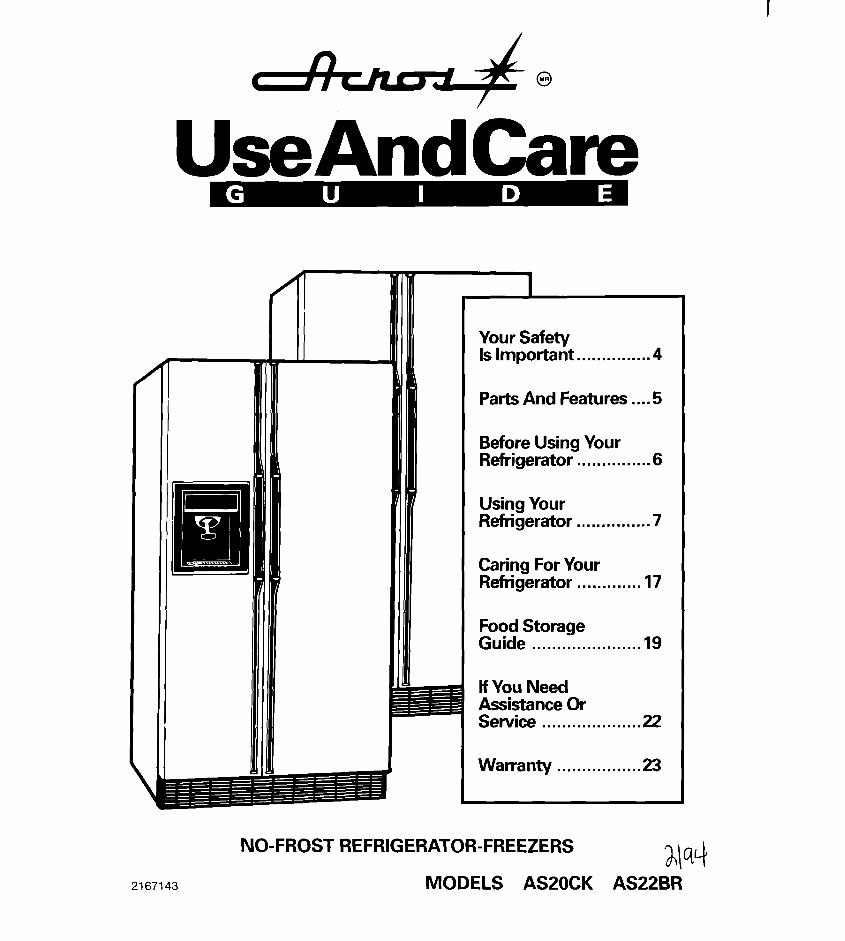
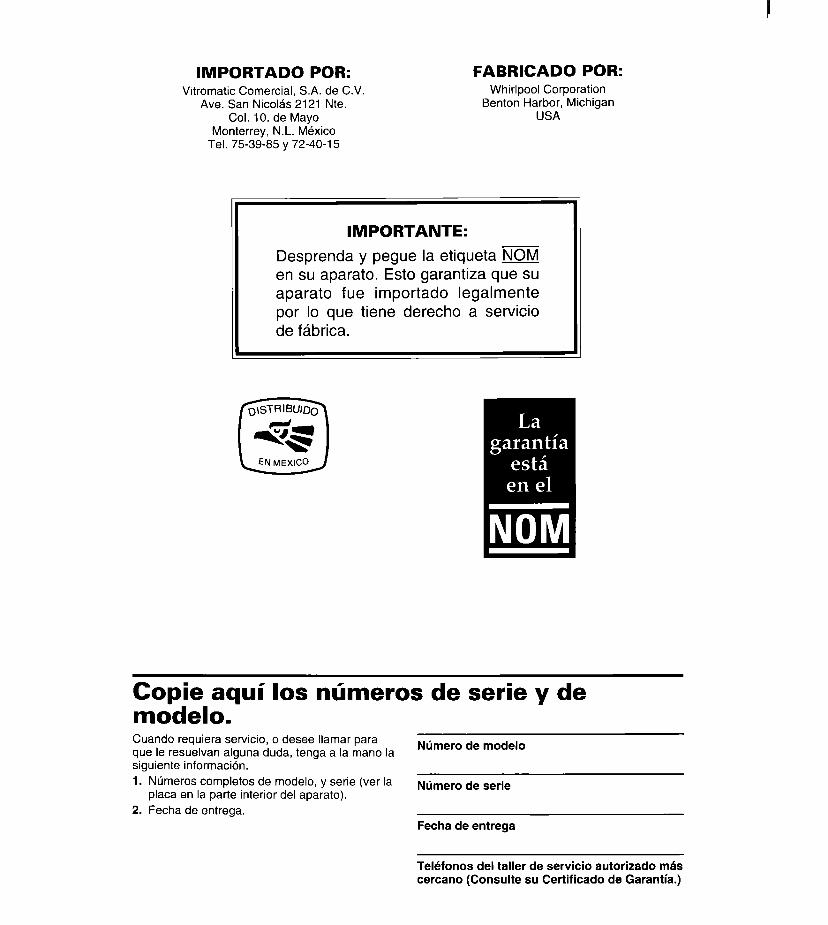
IMPORTED BY: MANUFACTURED BY: Vitromatic Comercial, S.A. de C.V.
Ave. San Nicolas 2121 Nte. Cal. 10. de Mayo
Monterrey, N.L. Mexico Tel. 75-39-85 and 72-40-l 5
Whirlpool Corporation Benton Harbor, Michigan
USA
IMPORTANT:
Peel the NOM label off and adhere it to your appliance. This guarantees that your appliance was imported legally and therefore has a right to factory service.
Copy your model and serial numbers here. When you need service or call with a question, have this information ready. 1. Complete model and serial numbers (from the
label located as shown). 2. Purchase date from sales slip.
Model Number
Serial Number
Purchase Date
Service Company and Telephone Number (Consult your Warranty.)

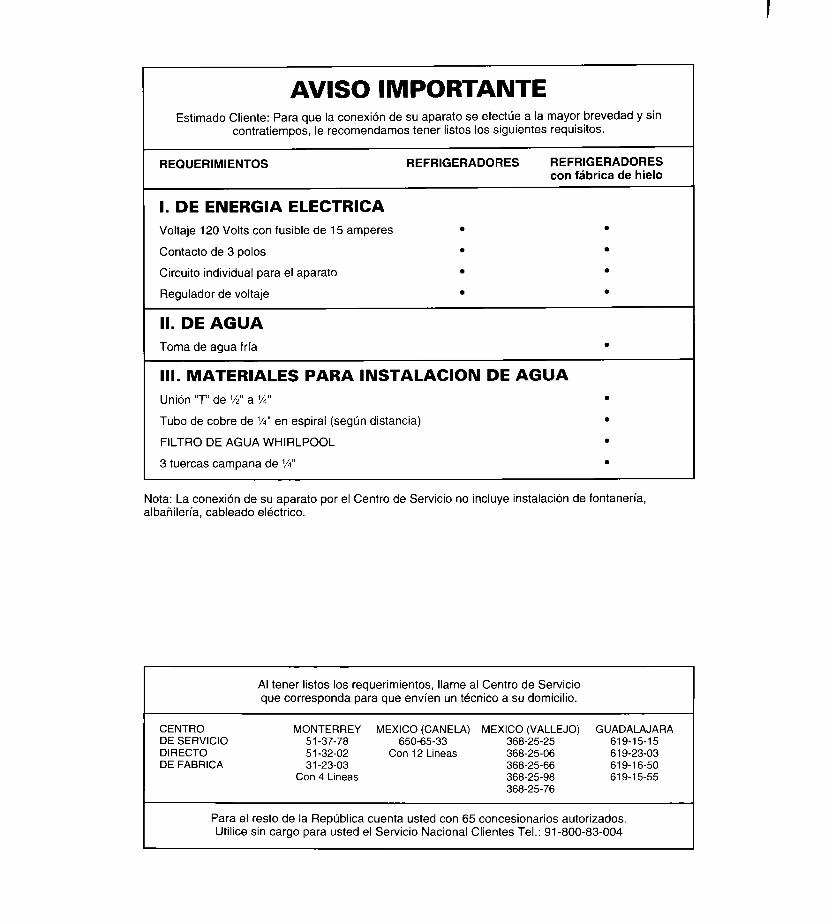
IMPORTANT NOTICE Dear Customer: In order to enable us to connect your appliance as soon as possible and without problems, we recommend that you have the following requirement ready.
REQUIREMENTS
I. ELECTRICAL POWER
Voltage 120 volts, 15 amp fuse
3 pole outlet
Individual circuit
Voltage regulator
II. WATER
REFRIGERATORS REFRIGERATORS with ice maker
. .
. .
. .
. .
Cold water intake
Ill. MATERIALS FOR WATER INSTALLATION
.
T junction from %” to l/4” .
Spiral caper tube l/4” (according to distance) .
WHIRLPOOL WATER FILTER .
l/4” pressure nuts (3) .
Note: The connection of your appliance by the service center does not include plumbing installation, masonry work, electric wiring, carpentry and/or installation of drying vent.
Once you have the requirements ready, call the corresponding service center and a technician will be sent to your home.
DIRECT MONTERREY MEXICO (CANELA) MEXICO (VALLEJO) GUADALAJARA FACTORY 51-37-78 650-65-33 368-25-25 619-15-15 SERVICE 51-32-02 With 12 Lines 368-25-06 61 g-23-03 CENTER 31-23-03 368-25-66 619-16-50
With 4 Lines 368-25-98 619-15-55 368-25-76
For the rest of the Republic you have 65 authorized dealers. Use the National Customer Service free of charge to you. Telephone: 91-800-83-004
I
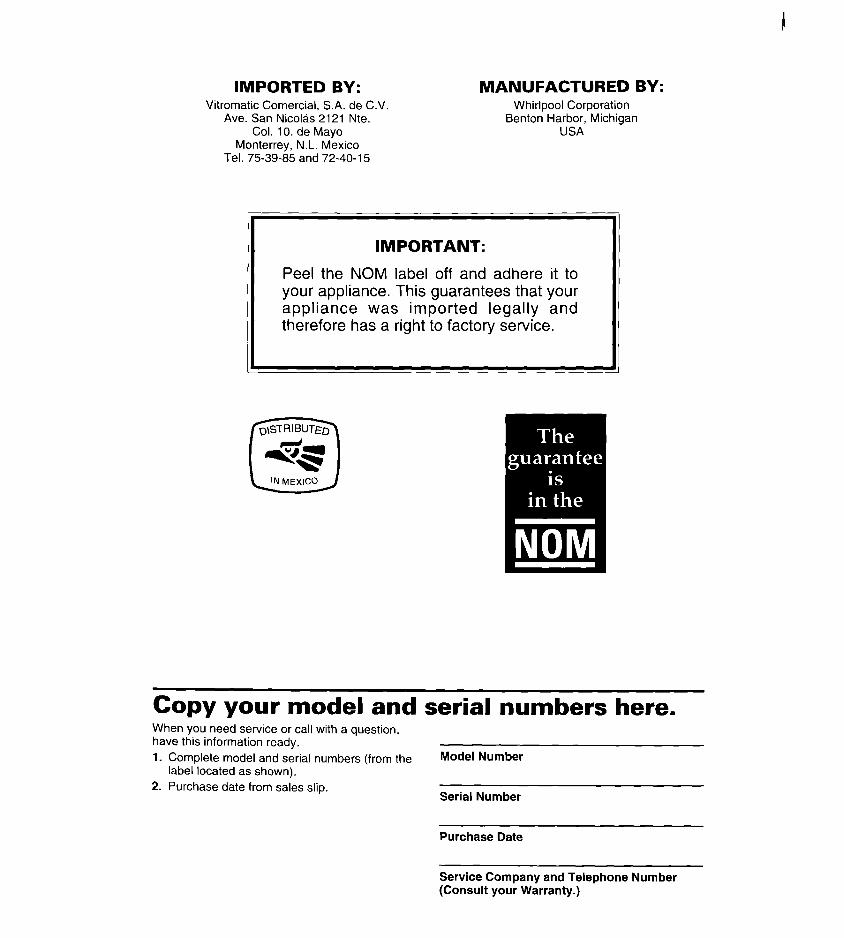
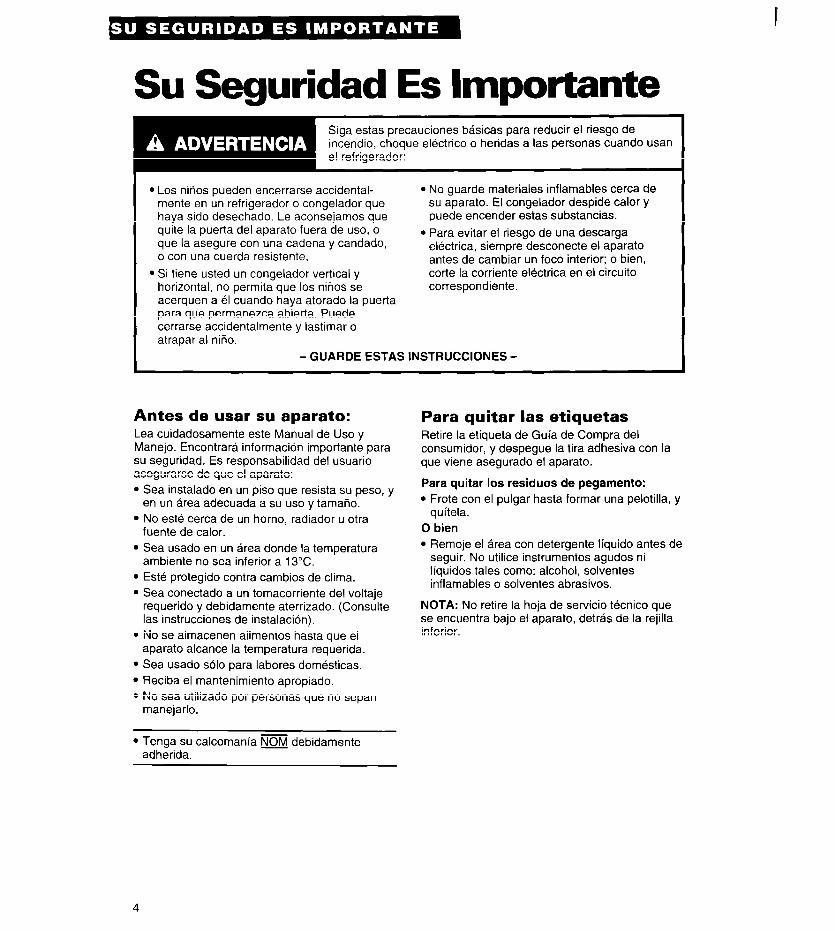
Your Safety Is Important To reduce the risk of fire, electrical shock, or injury when using your refrigerator, follow these basic precautions:
l Children can accidentally get locked in a l Do not store flammable materials close to refrigerator or freezer that has been dis- your appliance. The freezer gives off heat carded. We suggest that you remove the and could ignite these materials. door from an appliance that is out of service, or that you secure it with a chain and a lock
l To prevent the hazard of electric shocks,
or with a strong rope. always turn the power off at the correspond- ing circuit breaker.
l If you have a horizontal freezer, do not allow children to go near it when you have propped the lid up. It can accidentally drop and hurt or trap the child.
I - SAVE THESE INSTRUCTIONS -
Before using your refrigerator: Read this manual completely. It contains informa- tion about your safety. You are responsible for making sure that your refrigerator: l IS installed and leveled on a floor that will hold
the weight and in an area suitable for its size and use.
l IS not installed near an oven, radiator or other heat source.
l IS not installed in an area where the room temperature will fall below 13°C.
l IS kept out of the weather. l IS connected to the proper kind of outlet, with
the correct electrical supply and grounding. (Refer to the Installation Instructions.)
l IS not loaded with food before it has time to get properly cold.
l IS used only for the uses described in this manual.
l IS properly maintained . IS not used by anyone unable to operate it
properly.
l Have your NOM sticker attached to the appliance.
Remove labels: Remove the Consumer Buy Guide and any tape before using the refrigerator.
To remove any remaining glue: l Rub briskly with your thumb to make a ball,
then remove. OR l Soak area with liquid hand-dishwashing
detergent before removing glue as described above. Do not use sharp instruments, rubbing alcohol, flammable fluids or abrasive cleaners. These can damage the material. See “Your Safety Is Important” above.
NOTE: Do not remove the Tech Sheet fastened under the refrigerator at the front, behind the base grille.
4
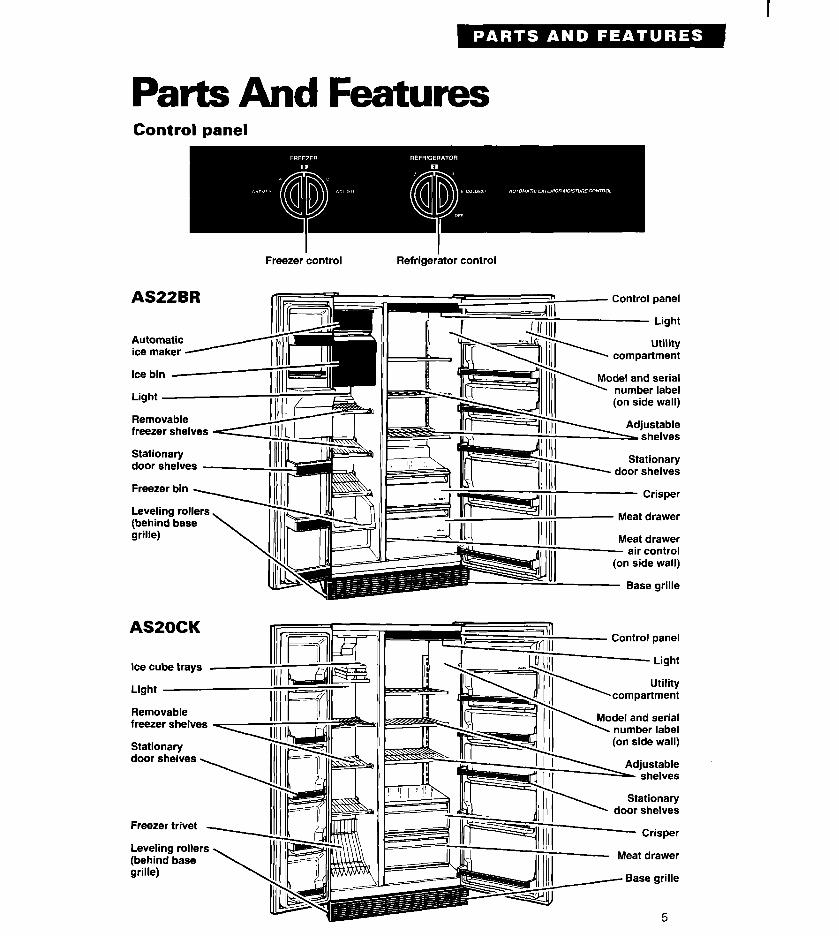
Parts And Features Control panel
AS22BR
I I Freezer control Refrigerator control
Control panel
Light
Removable freezer shelves
Stationary door shelves
ASZOCK
Ice cuba trays
I :-I.*
Utilitv
del and serial number label
door shelves
Meat drawer
Removable freezer shelves
Stationary door shelves
del and serial number label
Meat drawer
Freezer trivet 4 ;#p$g I
Leveling rollers (behind base grille)
Meat drawer - air control (on side wall)
- Base grille
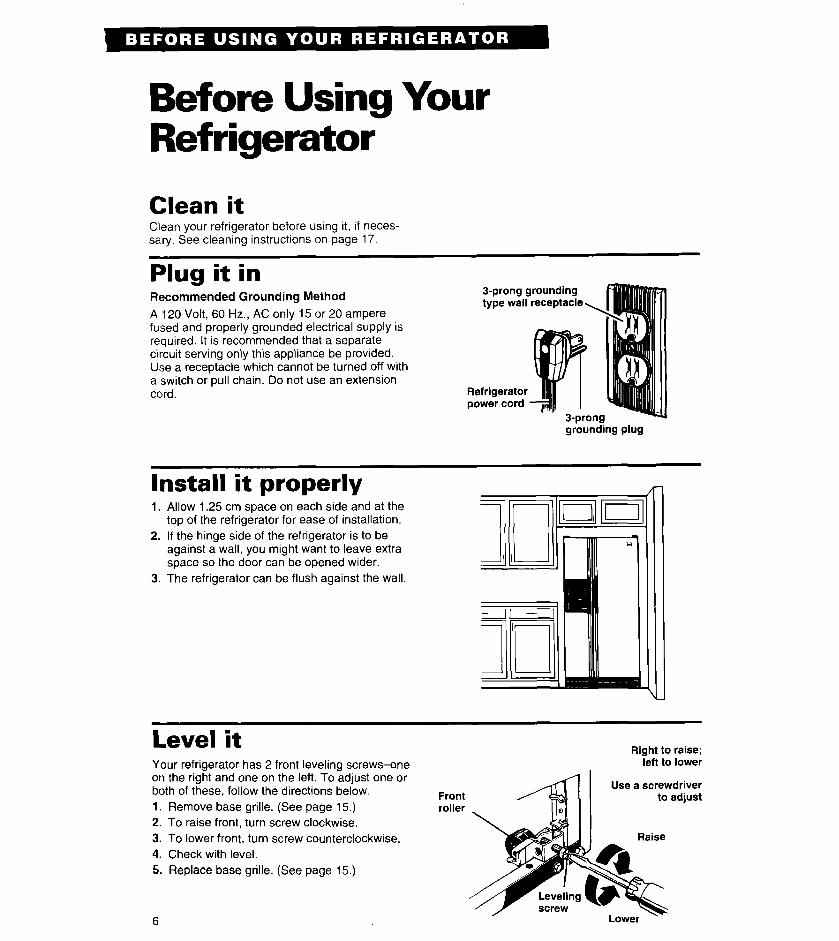
Before Using Your Refrigerator
Clean it Clean your refrigerator before using it, if neces- sary. See cleaning instructions on page 17.
Plug it in Recommended Grounding Method
A 120 Volt, 60 Hz., AC only 15 or 20 ampere fused and properly grounded electrical supply is required. It is recommended that a separate circuit serving only this appliance be provided. Use a receptacle which cannot be turned off with a switch or pull chain. Do not use an extension cord.
3-prong grounding type wall receptacle,
Refrigerator power cord
3-prong --u grounding plug
Install it properly 1. Allow 1.25 cm space on each side and at the
top of the refrigerator for ease of installation. 2. If the hinge side of the refrigerator is to be
against a wall, you might want to leave extra space so the door can be opened wider.
3. The refrigerator can be flush against the wall.
Level it Right to raise;
Your refrigerator has 2 front leveling screws-one on the right and one on the left. To adjust one or both of these, follow the directions below.
Remove base grille. (See page 15.) 1.
2.
3.
4.
5.
To raise front, turn screw clockwise. To lower front, turn screw counterclockwise. Check with level. Replace base grille. (See page 15.)
6
Front roller _
left to lower
Use a screwdriver to adjust
Using Your Refrigerator In This Section
Page Setting the controls ........................................... .7
Changing the control settings.. ........................ .8
Adjusting the refrigerator shelves ................... .8
Removing the crisper and crisper cover.. ....... .9
Removing the meat drawer and cover.. ........... .9
Adjusting the meat drawer temperature.. ........ .9
Removing the freezer shelves ......................... 10
Removing the freezer trivet (ASSOCK). .......... .10
Removing the freezer bin (AS22BR) ............... 10
Using the ice cube trays .................................. 11
Page Using the automatic ice maker . . . . . . . . . . . . . . . . . . . . . 11
Removing the ice maker storage bin . . . . . . . . . . . 12
Using the ice dispenser (AS22BR) . . . . . . . . . . . . . . . 13
Solving common ice maker/
dispenser problems . . . . . . . . . . . . . . . . . . . . . . . . . . . . . . . . . . . . . . . 14
Removing the base grille . . . . . . . . . . . . . . . . . . . . . . . . . . . . . . 15
Changing the light bulbs . . . . . . . . . . . . . . . . . . . . . . . . . . . . . . . 15
Understanding the sounds you may hear . ..16
Saving energy . . . . . . . . . . . . . . . . . . . . . . . . . . , . . . . . . . . . . . . . . . . . . . . . 16
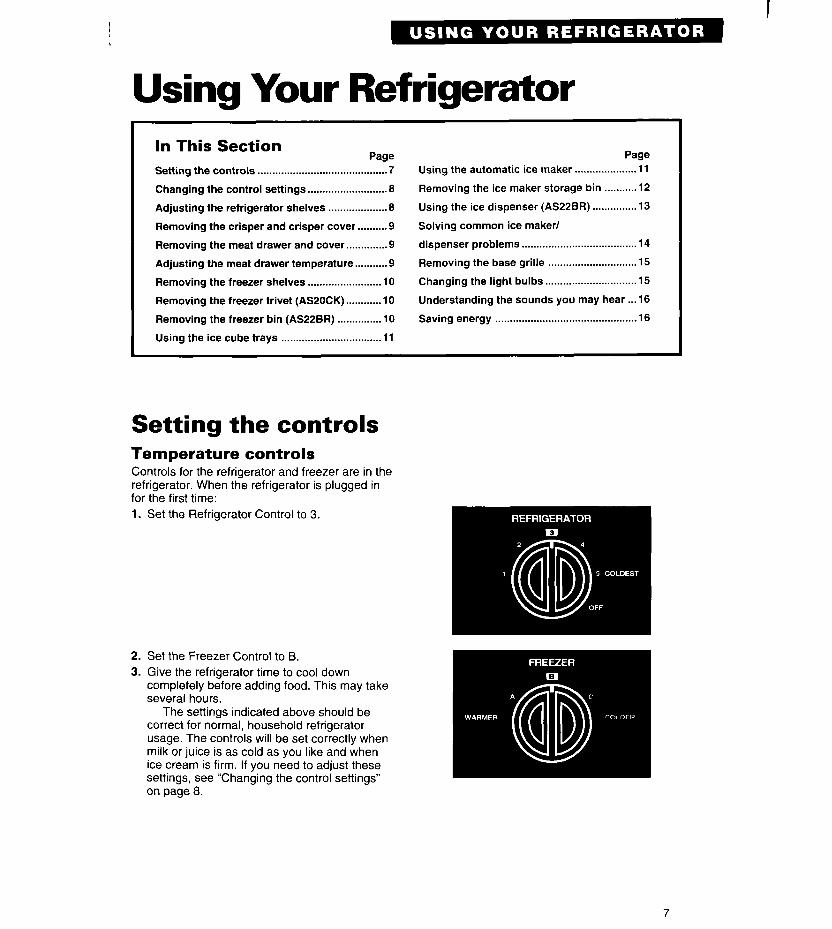
Setting the controls Temperature controls Controls for the refrigerator and freezer are in the refrigerator. When the refrigerator is plugged in for the first time: 1. Set the Refrigerator Control to 3.
2. Set the Freezer Control to B. 3. Give the refrigerator time to cool down
completely before adding food. This may take several hours.
The settings indicated above should be correct for normal, household refrigerator usage. The controls will be set correctly when milk or juice is as cold as you like and when ice cream is firm. If you need to adjust these settings, see “Changing the control settings” on page a.
7

Changing the control settings If you need to adjust temperatures in the refrigerator or freezer, use the settings listed in the chart below as a guide.
l Adjust the Refrigerator Control first. . Wait at least 24 hours between adjustments. l Then adjust the Freezer Control if needed.
CONDITION:
If Refrigerator Section is TOO WARM
If Freezer Section is TOO WARM
REASON:
Door opened often Large amount of food added Room temperature too warm
Door opened often Large amount of food added Very cold room temperature (can’t cycle often enough)
RECOMMENDED CONTROL SETrINGS:
Refrigerator 4 Freezer A
Refrigerator Freezer E
If Refrigerator Section is TOO COLD
Controls not set correctly Refrigerator 2 for your conditions Freezer B
If ICE isn’t MADE FAST ENOUGH
If BOTH SECTIONS are TOO WARM
Heavy ice usage Very cold room temperature (can’t cycle often enough)
Door opened often Large amount of food added Very warm or very cold room temperatures
Refrigerator 3 Freezer C
Refrigerator 4 Freezer B
Adjusting the refrigerator shelves Shelves can be adjusted to match the way you ,. use your rerngerator.
To remove shelves: 1. Remove items from shelf. 2. Tilt shelf up at front. 3. Lift back of shelf. 4. Pull shelf straight out.
To replace shelves: 1. Guide the rear shelf hooks into the slots in the
shelf supports on cabinet wall. 2. Tilt shelf up at front until hooks drop into slots.
Lower front of shelf to level position.
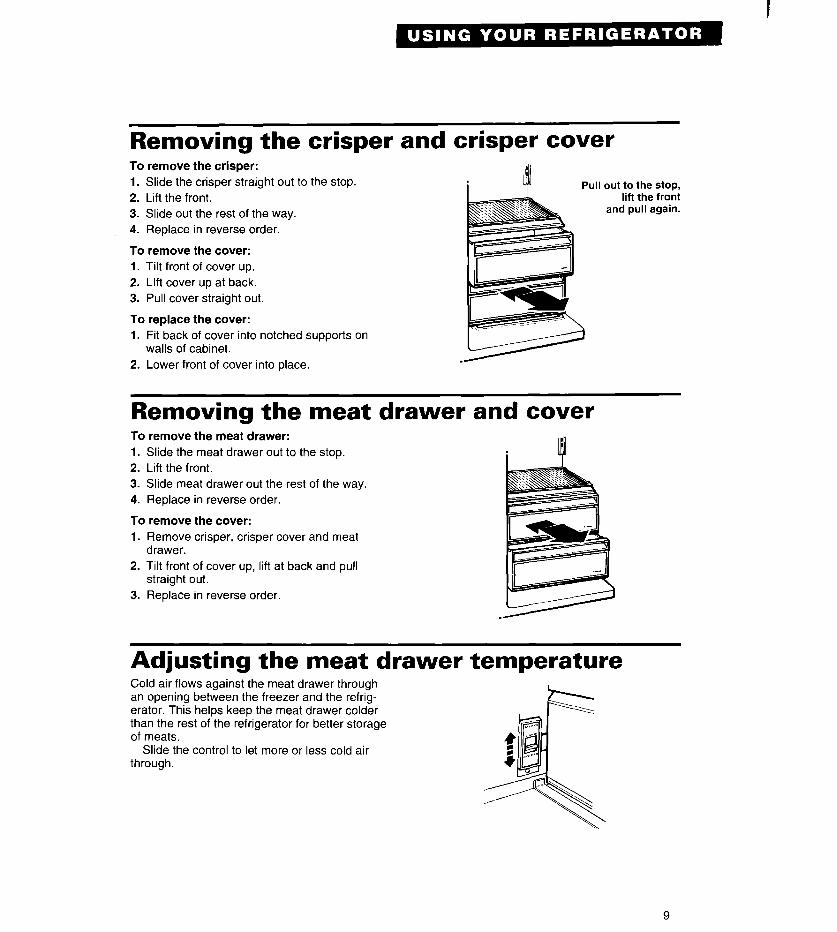
Removing the crisper and crisper cover To remove the crisper: 1. Slide the crisper straight out to the stop. 2. Lift the front. 3. Slide out the rest of the way. 4. Replace in reverse order.
To remove the cover: 1. Tilt front of cover up. 2. Llfl cover up at back. 3. Pull cover straight out.
To replace the cover: 1. Fit back of cover into notched supports on
walls of cabinet.
Pull out to the stop, lift the front
and pull again.
2. Lower front of cover into place.
Removing the meat drawer and cover To remove the meat drawer: 1. Slide the meat drawer out to the stop. 2. Lift the front. 3. Slide meat drawer out the rest of the way. 4. Replace in reverse order.
To remove the cover: 1. Remove crisper, crisper cover and meat
drawer. 2. Tilt front of cover up, lift at back and pull
straight out. 3. Replace in reverse order.
Adjusting the meat drawer temperature Cold air flows against the meat drawer through an opening between the freezer and the refrig- erator. This helps keep the meat drawer colder than the rest of the refrigerator for better storage of meats.
Slide the control to let more or less cold air through.
9
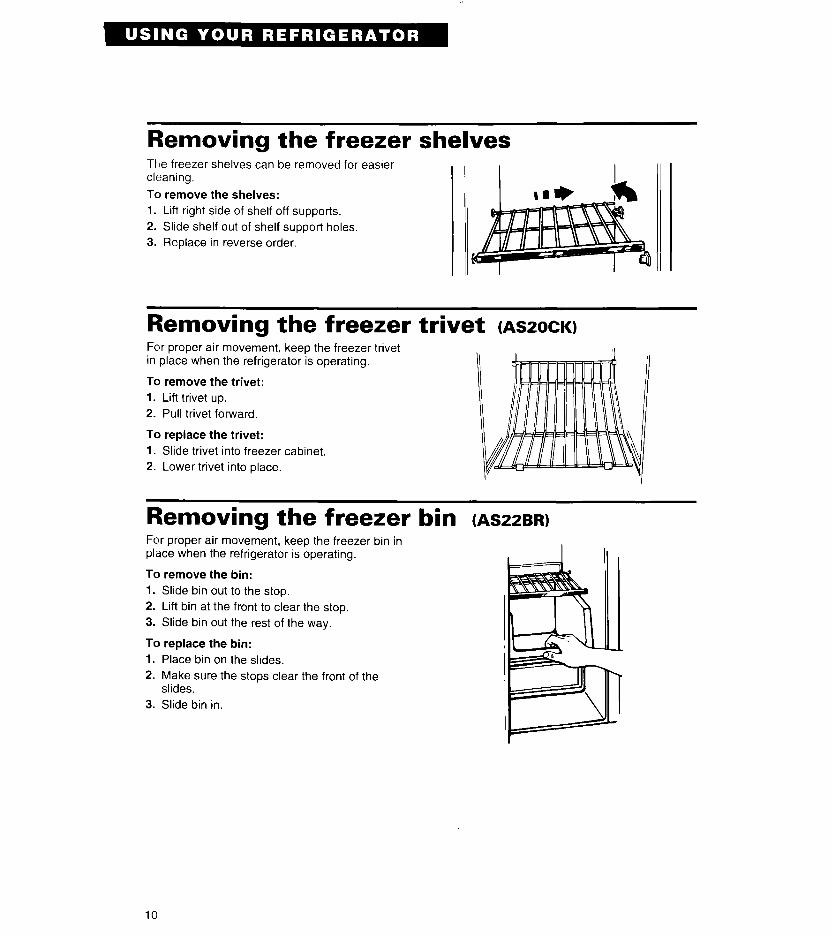
Removing the freezer shelves The freezer shelves can be removed for easier cleaning.
To remove the shelves: 1. Lift right side of shelf off supports. 2. Slide shelf out of shelf support holes. 3. Replace in reverse order.
Removing the freezer trivet (ASOCK) For proper air movement, keep the freezer trivet in place when the refrigerator is operating.
To remove the trivet: 1. Lift trivet up. 2. Pull trivet forward.
To replace the trivet: 1. Slide trivet into freezer cabinet. 2. Lower trivet into place.
Removing the freezer bin (ASZBRI For proper air movement, keep the freezer bin in place when the refrigerator is operating.
To remove the bin: 1. Slide bin out to the stop. 2. Lift bin at the front to clear the stop. 3. Slide bin out the rest of the way.
To replace the bin: 1. Place bin on the slides. 2. Make sure the stops clear the front of the
slides. 3. Slide bin in.
10
Using the ice cube trays If cubes are not used, they may shrink. The moving cold air starts a slow evaporation. The longer cubes are stored, the smaller they get.
To remove ice:
1. Hold tray at both ends. 2. Twist slightly.
Using the automatic ice maker If you have an automatic ice maker, or if you plan to add one later (Part No. IMKIT), there are a few things you will want to know: l The ON/OFF lever is a wire signal arm.
Down to make ice automatically. Up to shut off the ice maker.
l Shake the bin occasionally to keep cubes separated and to obtain increased storage capacity.
l It is normal for ice crescents to be attached by a corner. They will break apart easily.
l You will hear water running when ice maker is working. You’ll hear ice fall into the bin. Don’t let these sounds bother you. They are part of the normal operation of your refrigerator.
l The ice maker will not operate until the freezer is cold enough to make ice. This can take overnight.
l Because of new plumbing connections, the first ice may be discolored or off-flavored. Discard the first few batches of ice.
l If ice is not being made fast enough and more ice is needed, turn the Refrigerator Control toward a higher number. Wait a day and, if necessary, turn the Freezer Control toward A.
l If you remove the ice bin, raise the signal arm to shut off the ice maker. When you return the bin, push it in all the way and lower the signal arm to the ON position.
Raise signal arm to stop ice.
Lower signal arm to start it.
11
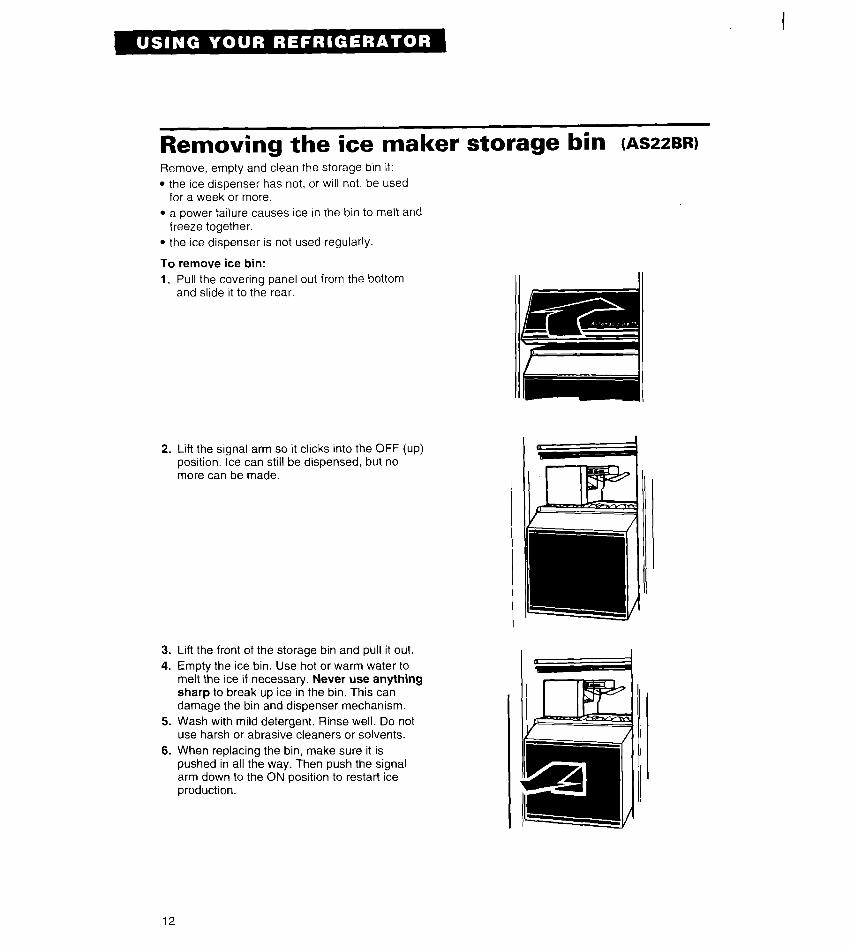
Removing the ice maker storage bin (ASZZBR) Remove, empty and clean the storage bin if: . the ice dispenser has not, or will not, be used
for a week or more. l a power failure causes ice in the bin to melt and
freeze together. l the ice dispenser is not used regularly.
To remove ice bin: 1. Pull the covering panel out from the bottom
and slide it to the rear.
2. Lift the signal arm so it clicks into the OFF (up) position. Ice can still be dispensed, but no more can be made.
3. Lift the front of the storage bin and pull it out. 4. Empty the ice bin. Use hot or warm water to
melt the ice if necessary. Never use anything sharp to break up ice in the bin. This can damage the bin and dispenser mechanism.
5. Wash with mild detergent. Rinse well. Do not use harsh or abrasive cleaners or solvents.
6. When replacing the bin, make sure it is pushed in all the way. Then push the signal arm down to the ON position to restart ice production.
12
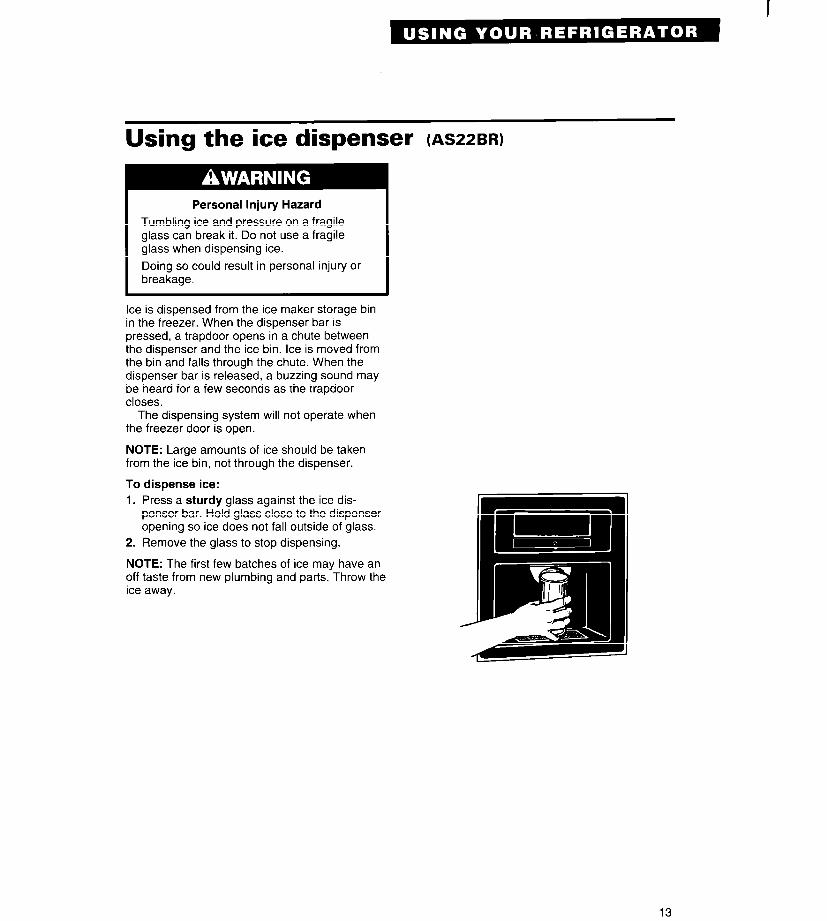
Personal Injury Hazard
Tumbling ice and pressure on a fragile glass can break it. Do not use a fragile glass when dispensing ice.
Doing so could result in personal injury or breakage.
using the ice dispenser (AS~~BR)
I
Ice is dispensed from the ice maker storage bin in the freezer. When the dispenser bar is pressed, a trapdoor opens in a chute between the dispenser and the ice bin. Ice is moved from the bin and falls through the chute. When the dispenser bar is released, a buzzing sound may be heard for a few seconds as the trapdoor closes.
The dispensing system will not operate when the freezer door is open.
NOTE: Large amounts of ice should be taken from the ice bin, not through the dispenser.
To dispense ice: 1. Press a sturdy glass against the ice dis-
penser bar. Hold glass close to the dispenser opening so ice does not fall outside of glass.
2. Remove the glass to stop dispensing.
NOTE: The first few batches of ice may have an off taste from new plumbing and parts. Throw the ice away.
13
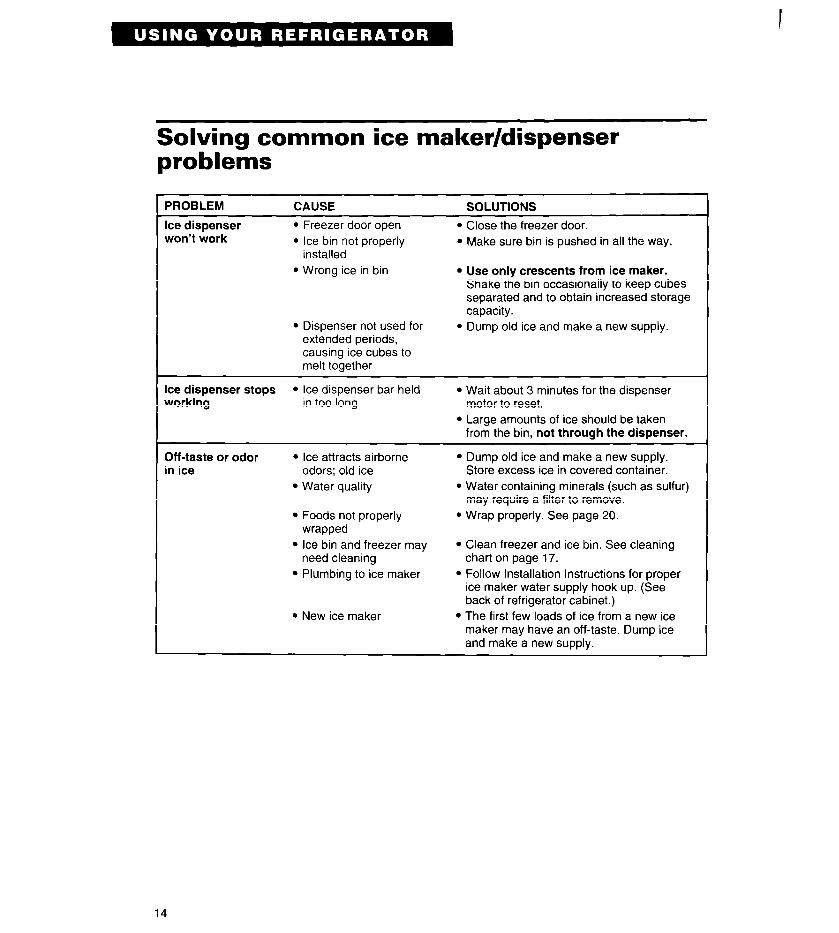
Solving common ice maker/dispenser problems
PROBLEM
Ice dispenser won’t work
CAUSE
l Freezer door open l Ice bin not properly
installed l Wrong ice in bin
l Dispenser not used for extended periods, causing ice cubes to melt together
SOLUTIONS
l Close the freezer door. l Make sure bin is pushed in all the way.
l Use only crescents from ice maker. Shake the bin occasionally to keep cubes separated and to obtain increased storage capacity.
l Dump old ice and make a new supply.
Ice dispenser stops l Ice dispenser bar held l Wait about 3 minutes for the dispenser working in too long motor to reset.
l Large amounts of ice should be taken from the bin, not through the dispenser.
Off-taste or odor in ice
l Ice attracts airborne odors; old ice
l Water quality
l Foods not properly wrapped
l Ice bin and freezer may need cleaning
l Plumbing to ice maker
l New ice maker
l Dump old ice and make a new supply. Store excess ice in covered container.
l Water containing minerals (such as sulfur) may require a filter to remove.
l Wrap properly. See page 20.
l Clean freezer and ice bin. See cleaning chart on page 17.
l Follow Installation Instructions for proper ice maker water supply hook up. (See back of refrigerator cabinet.)
l The first few loads of ice from a new ice maker may have an off-taste. Dump ice and make a new supply.
14
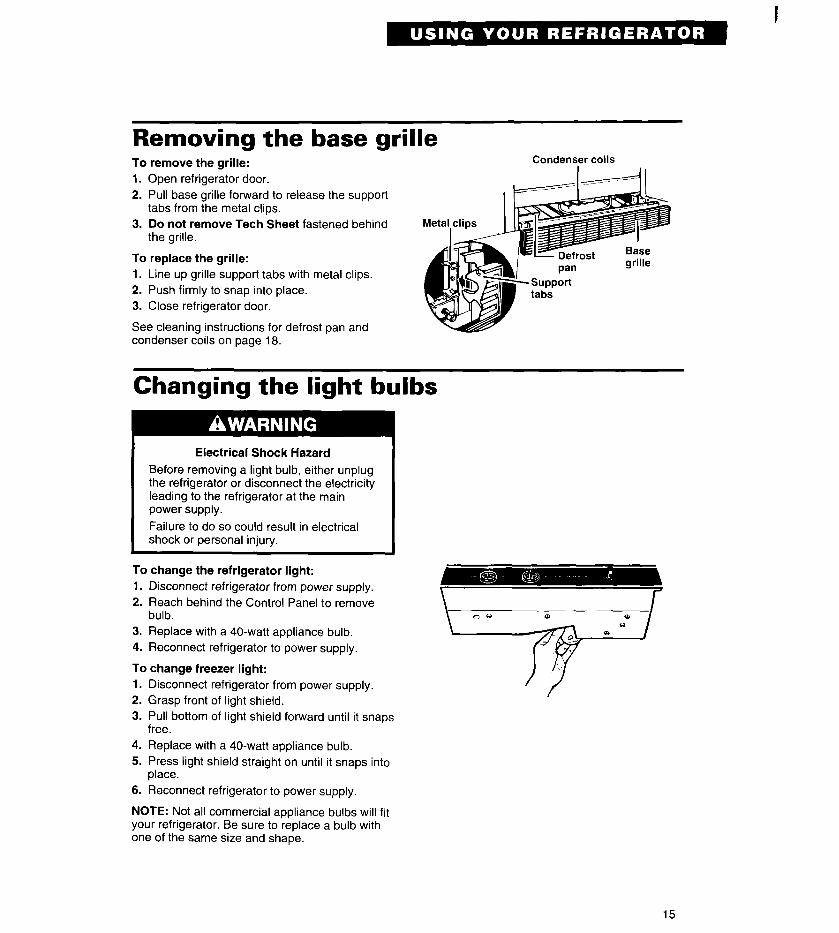
Removing the base grille To remove the grille: 1. Open refrigerator door. 2. Pull base grille forward to release the support
tabs from the metal clips.
Condenser coils
I
3. Do not remove Tech Sheet fastened behind the grille.
To replace the grille: 1. Line up grille support tabs with metal clips. 2. Push firmly to snap into place. 3. Close refrigerator door.
See cleaning instructions for defrost pan and condenser coils on page 18.
Changing the light bulbs
Electrical Shock Hazard
Before removing a light bulb, either unplug the refrigerator or disconnect the electricity leading to the refrigerator at the main power supply.
Failure to do so could result in electrical shock or personal injury.
To change the refrigerator light: 1. Disconnect refrigerator from power supply. 2. Reach behind the Control Panel to remove
bulb. 3. Replace with a 40-watt appliance bulb. 4. Reconnect refrigerator to power supply.
To change freezer light: 1. Disconnect refrigerator from power supply. 2. Grasp front of light shield. 3. Pull bottom of light shield forward until it snaps
free. 4. Replace with a 40-watt appliance bulb. 5. Press light shield straight on until it snaps into
place. 6. Reconnect refrigerator to power supply.
NOTE: Not all commercial appliance bulbs will fit your refrigerator. Be sure to replace a bulb with one of the same size and shape.
15
Understanding the sounds you may hear Your new refrigerator may make sounds that your old one didn’t. Because the sounds are new to you, you might be concerned about them. Don’t be. Most of the new sounds are normal. Hard surfaces like the floor, walls and cabinets can make the sounds seem louder.
The following describes the kinds of sounds that might be new to you, and what may be making them.
Slight hum, soft hiss You may hear the refrigerator’s fan motor and moving air.
Clicking or snapping sounds The thermostat makes a definite click when the refrigerator stops running. It also makes a sound when the refrigerator starts. The defrost timer will click when the defrost cycle starts.
Water sounds When the refrigerator stops running, you may hear gurgling in the tubing for a few minutes after it stops. You may also hear defrost water running into the defrost water pan.
Ice maker sounds l trickling water l thud (clatter of ice)
If your refrigerator has an ice maker, you may hear buzzing (from the water valve), trickling water and the clatter of ice dumped into the bin.
Running sounds Your refrigerator has a high-efficiency compres- sor and motor. It will run longer than older designs. It may even seem to run most of the time.
Saving energy l Check door gaskets for a tight seal. Level the
cabinet to be sure of a good seal. l Clean the condenser coils regularly. l Open the door as few times as possible. Think
about what you need before you open the door. Get everything out at one time. Keep food organized so you won’t have to search for what you want. Close door as soon as food is removed.
l Go ahead and fill up the refrigerator, but don’t overcrowd it so air movement is blocked.
l It is a waste of electricity to set the refrigerator and freezer to temperatures colder than they need to be. If ice cream is firm in the freezer and drinks are as cold as your family likes them, that’s cold enough.
l Make sure your refrigerator is not next to a heat source such as a range, water heater, furnace, radiator or in direct sunlight.
16
Caring For Your Refrigerator In This Section
Page Page
Cleaning your refrigerator . . . . . . . . . . . . . . . . . . . . . . . . . . . . . . . 17 Power interruptions . . . . . . . . . . . . . . . . . . . . . . . . . . . . . . . . . . . . . . . 19
Vacation and moving care . . . . . . . . . . . . . . . . . . . . . . . . . . . . . . . 18
Cleaning your refrigerator Both the refrigerator and freezer sections defrost automatically. But both should be cleaned about once a month to help prevent odors from building up. Spills should be wiped up right away.
Personal Injury Hazard
To clean your refrigerator, turn the Refrigerator Refrigeration system tubes are located near
Control to OFF, unplug it, take out all removable the defrost pan and can become hot. parts and clean the refrigerator according to the Remove and install defrost pan carefully. following directions. Failure to do so could result in personal
1 injury.
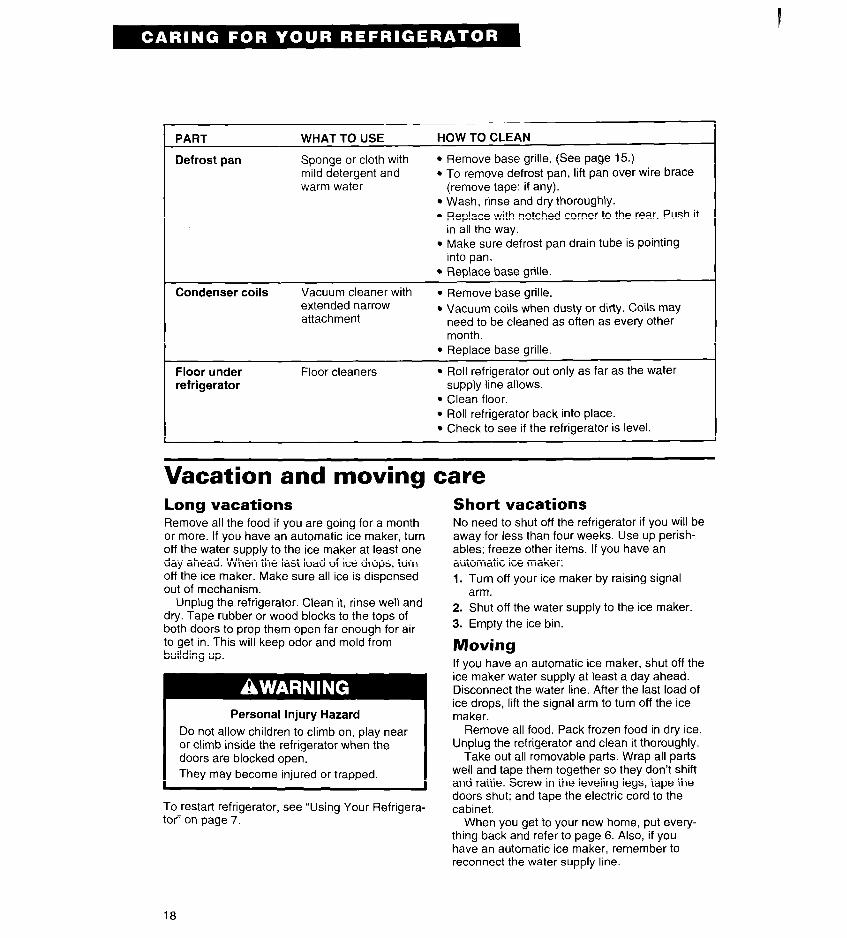
PART WHAT TO USE HOW TO CLEAN
Removable parts Sponge or cloth with l Hand wash, rinse and dry thoroughly. (shelves, crisper, etc.) mild detergent and
warm water
Outside
Inside walls (freezer should be allowed to warm up so cloth won’t stick)
Sponge, cloth or l Wash outside of cabinet. Do not use abra- paper towel with mild sive or harsh cleaners. detergent, warm water and an
l Rinse and dry thoroughly.
appliance wax (or l Wax painted metal surfaces at least twice a
good auto paste wax) year. Apply wax with a clean, soft cloth. Waxing painted metal surfaces provides rust protection. Do not wax plastic parts.
Sponge, soft cloth or l Wash with mixture of warm water and paper towel with - mild detergent, or baking soda or mild detergent and warm
- baking soda (26 g to 0.95 L of water).
water l Rinse and dry thoroughly.
Door liners and gaskets
Sponge, soft cloth or paper towel with mild detergent and warm water
l Wash, rinse and dry thoroughly.
DO NOT USE cleaning waxes, concentrated detergents, bleaches or cleaners containing petroleum on plastic parts.
Plastic parts (covers and panels)
Soft, clean sponge or l Wash, rinse and dry thoroughly. soft, clean cloth with mild detergent and
.DO NOT USE paper towels, window sprays,
warm water scouring cleansers or flammable fluids. These can scratch or damage material. See “Your Safety Is Important” on page 4.
continued on next page
17
PART WHAT TO USE HOW TO CLEAN
Defrost pan Sponge or cloth with mild detergent and warm water
l Remove base grille. (See page 15.) l To remove defrost pan, lift pan over wire brace
(remove tape; if any). l Wash, rinse and dry thoroughly. l Replace with notched corner to the rear. Push it
in all the way. l Make sure defrost pan drain tube is pointing
into pan. l Replace base grille.
Condenser coils Vacuum cleaner with extended narrow attachment
l Remove base grille. l Vacuum coils when dusty or dirty. Coils may
need to be cleaned as often as every other month.
l Replace base grille.
Floor under refrigerator
Floor cleaners l Roll refrigerator out only as far as the water supply line allows.
. Clean floor.
. Roll refrigerator back into place. l Check to see if the refrigerator is level.
Vacation and moving care Long vacations Remove all the food if you are going for a month or more. If you have an automatic ice maker, turn off the water supply to the ice maker at least one day ahead. When the last load of ice drops, turn off the ice maker. Make sure all ice is dispensed out of mechanism.
Unplug the refrigerator. Clean it, rinse well and dry. Tape rubber or wood blocks to the tops of both doors to prop them open far enough for air to get in. This will keep odor and mold from building up.
Personal Injury Hazard
Do not allow children to climb on, play near or climb inside the refrigerator when the doors are blocked open. They may become injured or trapped.
To restart refrigerator, see “Using Your Refrigera- tor” on page 7.
Short vacations No need to shut off the refrigerator if you will be away for less than four weeks. Use up perish- ables; freeze other items. If you have an automatic ice maker: 1. Turn off your ice maker by raising signal
arm. 2. Shut off the water supply to the ice maker. 3. Empty the ice bin.
Moving If you have an automatic ice maker, shut off the ice maker water supply at least a day ahead. Disconnect the water line. After the last load of ice drops, lift the signal arm to turn off the ice maker.
Remove all food. Pack frozen food in dry ice. Unplug the refrigerator and clean it thoroughly.
Take out all removable parts. Wrap all parts well and tape them together so they don’t shift and rattle. Screw in the leveling legs; tape the doors shut; and tape the electric cord to the cabinet.
When you get to your new home, put every- thing back and refer to page 6. Also, if you have an automatic ice maker, remember to reconnect the water supply line.
18
I
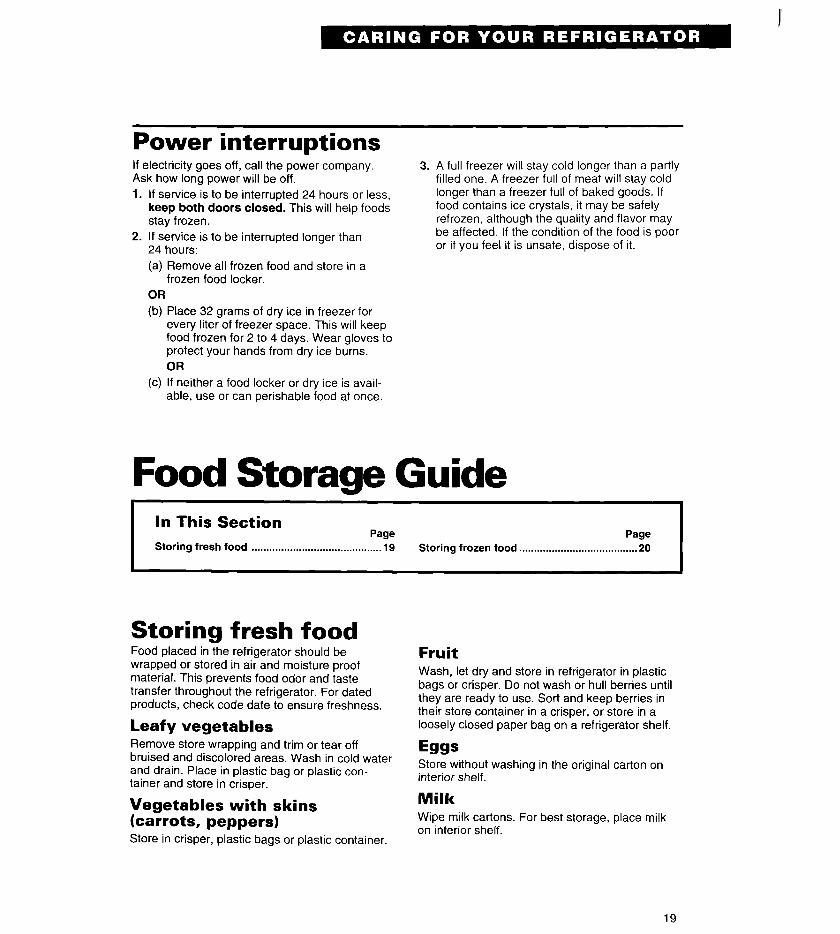
Power interruptions If electricity goes off, call the power company. Ask how long power will be off. 1. If service is to be interrupted 24 hours or less,
keep both doors closed. This will help foods stay frozen.
2. If service is to be interrupted longer than 24 hours: (a) Remove all frozen food and store in a
frozen food locker. OR
3. A full freezer will stay cold longer than a partly filled one. A freezer full of meat will stay cold longer than a freezer full of baked goods. If food contains ice crystals, it may be safely refrozen, although the quality and flavor may be affected. If the condition of the food is poor or if you feel it is unsafe, dispose of it.
(b) Place 32 grams of dry ice in freezer for every liter of freezer space. This will keep food frozen for 2 to 4 days. Wear gloves to protect your hands from dry ice burns. OR
(c) If neither a food locker or dry ice is avail- able, use or can perishable food at once.
Food Storage Guide In This Section
Page Storing fresh food . . . . . . . . . . . . . . . . . . . . . . . . . . . . . . . . . . . . . . . . . . . . 19
Page Storing frozen food . . . . . . . . . . . . . . . . . . . . . . . . . . . . . . . . . . . . . . . . 20
Storing fresh food Food placed in the refrigerator should be wrapped or stored in air and moisture proof material. This prevents food odor and taste transfer throughout the refrigerator. For dated products, check code date to ensure freshness.
Leafy vegetables Remove store wrapping and trim or tear off bruised and discolored areas. Wash in cold water and drain. Place in plastic bag or plastic con- tainer and store in crisper.
Vegetables with skins (carrots, peppers) Store in crisper, plastic bags or plastic container.
Fruit Wash, let dry and store in refrigerator in plastic bags or crisper. Do not wash or hull berries until they are ready to use. Sort and keep berries in their store container in a crisper, or store in a loosely closed paper bag on a refrigerator shelf.
Eggs Store without washing in the original carton on interior shelf.
Milk Wipe milk cartons. For best storage, place milk on interior shelf.
19
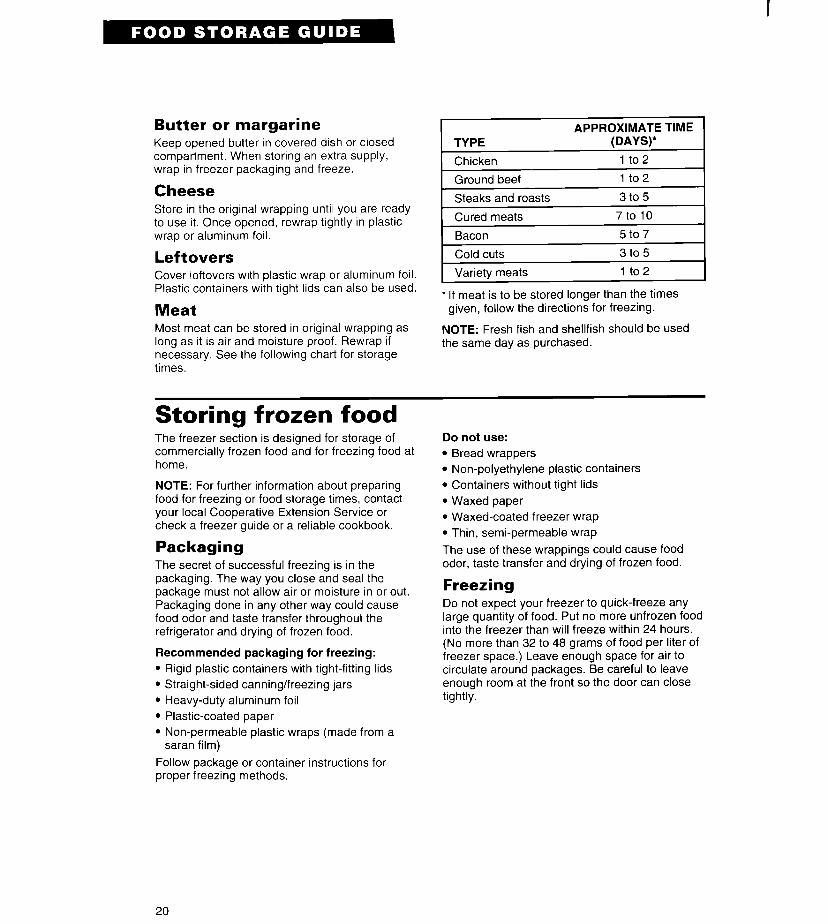
Butter or margarine Keep opened butter in covered dish or closed compartment. When storing an extra supply, wrap in freezer packaging and freeze.
Cheese Store in the original wrapping until you are ready to use it. Once opened, rewrap tightly in plastic wrap or aluminum foil.
Leftovers Cover leftovers with plastic wrap or aluminum foil. Plastic containers with tight lids can also be used.
Meat Most meat can be stored in original wrapping as long as it is air and moisture proof. Rewrap if necessary. See the following chart for storage times.
TYPE
Chicken
APPROXIMATE TIME (DAYS)
1 to2
Ground beef 1 to2
Steaks and roasts 3 to 5
Cured meats 7to10
Bacon 5 to 7
Cold cuts 3 to 5
Variety meats 1 to2
l If meat is to be stored longer than the times given, follow the directions for freezing.
NOTE: Fresh fish and shellfish should be used the same day as purchased.
Storing frozen food The freezer section is designed for storage of commercially frozen food and for freezing food at home.
NOTE: For further information about preparing food for freezing or food storage times, contact your local Cooperative Extension Service or check a freezer guide or a reliable cookbook.
Packaging The secret of successful freezing is in the packaging. The way you close and seal the package must not allow air or moisture in or out. Packaging done in any other way could cause food odor and taste transfer throughout the refrigerator and drying of frozen food.
Recommended packaging for freezing: l Rigid plastic containers with tight-fitting lids l Straight-sided canning/freezing jars l Heavy-duty aluminum foil l Plastic-coated paper l Non-permeable plastic wraps (made from a
Saran film)
Follow package or container instructions for proper freezing methods,
Do not use: l Bread wrappers l Non-polyethylene plastic containers l Containers without tight lids l Waxed paper l Waxed-coated freezer wrap l Thin, semi-permeable wrap
The use of these wrappings could cause food odor, taste transfer and drying of frozen food.
Freezing Do not expect your freezer to quick-freeze any large quantity of food. Put no more unfrozen food into the freezer than will freeze within 24 hours. (No more than 32 to 48 grams of food per liter of freezer space.) Leave enough space for air to circulate around packages. Be careful to leave enough room at the front so the door can close tightly.
20
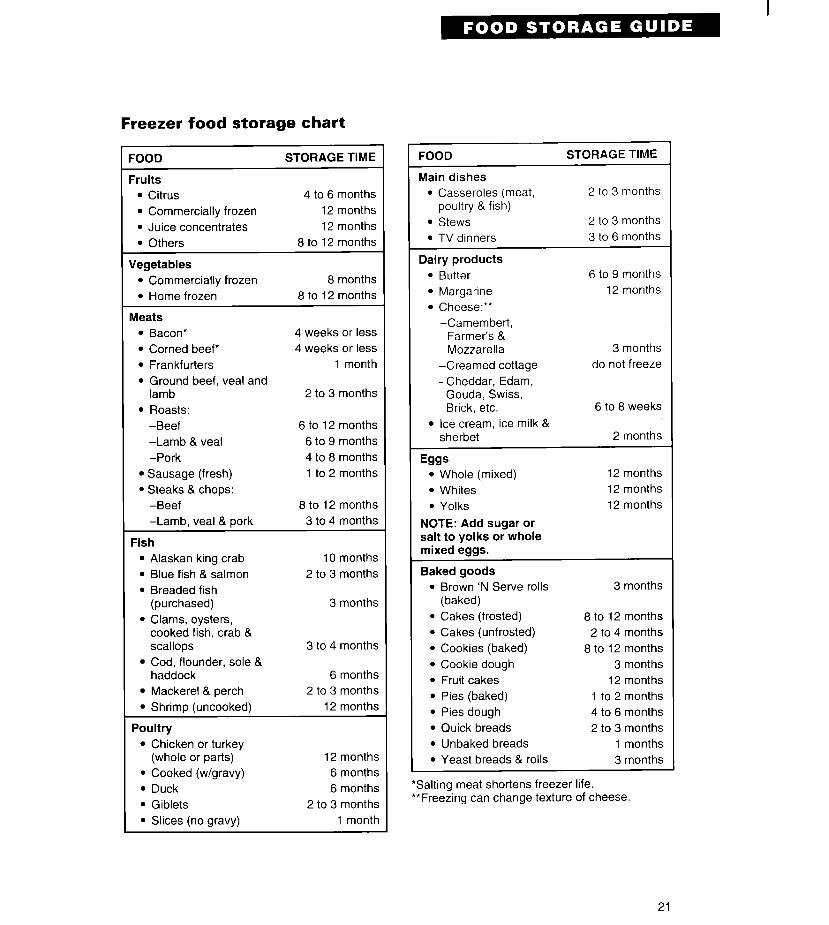
Freezer food storage chart
FOOD STORAGE TIME
Fruits l Citrus 4 to 6 months l Commercially frozen 12 months l Juice concentrates 12 months l Others 8 to 12 months
Vegetables l Commercially frozen 8 months l Home frozen 8 to 12 months
Meats l Bacon* 4 weeks or less l Corned beef* 4 weeks or less l Frankfurters 1 month l Ground beef, veal and
lamb 2 to 3 months l Roasts:
-Beef 6 to 12 months -Lamb & veal 6 to 9 months -Pork 4 to 8 months
l Sausage (fresh) 1 to 2 months 9 Steaks & chops:
-Beef 8 to 12 months -Lamb, veal & pork 3 to 4 months
Fish l Alaskan king crab 10 months l Blue fish & salmon 2 to 3 months l Breaded fish
(purchased) 3 months l Clams, oysters,
cooked fish, crab & scallops 3 to 4 months
l Cod, flounder, sole & haddock 6 months
l Mackerel & perch 2 to 3 months l Shrimp (uncooked) 12 months
Poultry l Chicken or turkey
(whole or parts) 12 months l Cooked (w/gravy) 6 months l Duck 6 months l Giblets 2 to 3 months l Slices (no gravy) 1 month
FOOD STORAGE TIME
Main dishes l Casseroles (meat, 2 to 3 months
poultry & fish) l Stews 2 to 3 months
9 TV dinners 3 to 6 months
Dairy products l Butter 6 to 9 months
l Margarine 12 months
l Cheese:** -Camembert,
Farmer’s & Mozzarella 3 months
-Creamed cottage do not freeze
-Cheddar, Edam, Gouda, Swiss, Brick, etc. 6 to 8 weeks
l Ice cream, ice milk & sherbet 2 months
Eggs l Whole (mixed) 12 months l Whites 12 months
. Yolks 12 months
NOTE: Add sugar or salt to yolks or whole mixed eggs.
Baked goods l Brown ‘N Serve rolls 3 months
(baked) l Cakes (frosted) 8 to 12 months l Cakes (unfrosted) 2 to 4 months l Cookies (baked) 8 to 12 months l Cookie dough 3 months l Fruit cakes 12 months l Pies (baked) 1 to 2 months l Pies dough 4 to 6 months l Quick breads 2 to 3 months l Unbaked breads 1 months l Yeast breads & rolls 3 months
*Salting meat shortens freezer life. “Freezing can change texture of cheese.
21
If You Need Assistance Or Service
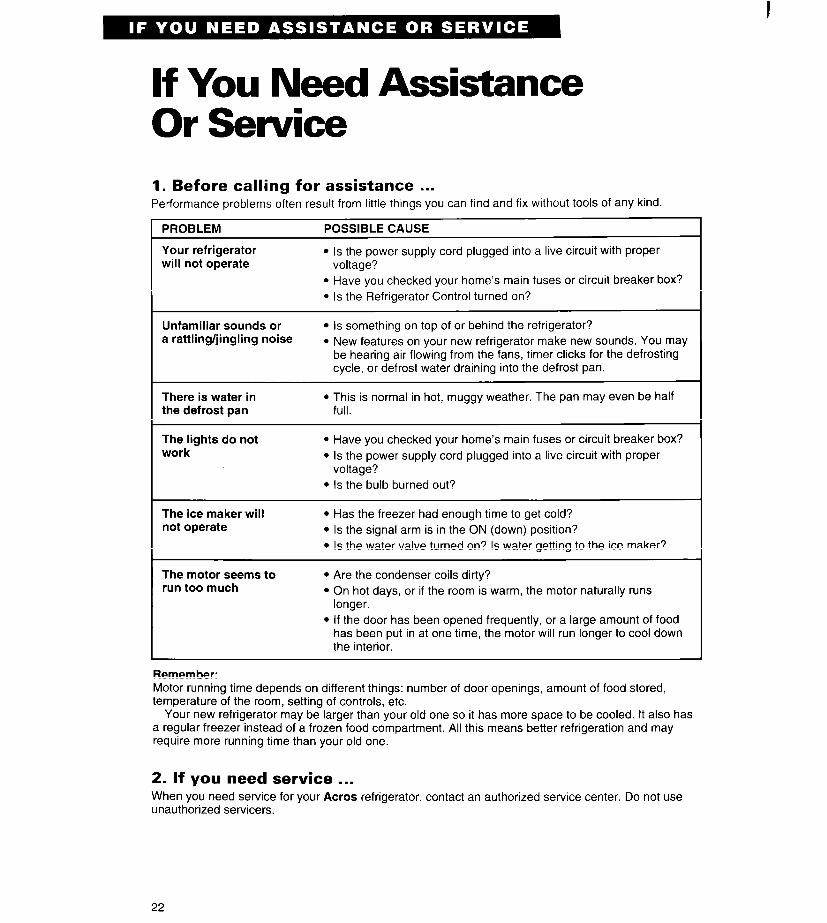
1. Before calling for assistance . . . Performance problems often result from little things you can find and fix without tools of any kind.
PROBLEM
Your refrigerator will not operate
POSSIBLE CAUSE
l Is the power supply cord plugged into a live circuit with proper voltage?
l Have you checked your home’s main fuses or circuit breaker box? l Is the Refrigerator Control turned on?
Unfamiliar sounds or a rattling/jingling noise
l Is something on top of or behind the refrigerator? l New features on your new refrigerator make new sounds. YOU may
be hearing air flowing from the fans, timer clicks for the defrosting cycle, or defrost water draining into the defrost pan.
There is water in l This is normal in hot, muggy weather. The pan may even be half the defrost pan full.
The lights do not work
l Have you checked your home’s main fuses or circuit breaker box? l Is the power supply cord plugged into a live circuit with proper
voltage? l Is the bulb burned out?
The ice maker will not operate
l Has the freezer had enough time to get cold? l Is the signal arm is in the ON (down) position? l Is the water valve turned on? Is water getting to the ice maker?
The motor seems to run too much
l Are the condenser coils dirty? l On hot days, or if the room is warm, the motor naturally runs
longer. l If the door has been opened frequently, or a large amount of food
has been put in at one time, the motor will run longer to cool down the interior.
Remember: Motor running time depends on different things: number of door openings, amount of food stored, temperature of the room, setting of controls, etc.
Your new refrigerator may be larger than your old one so it has more space to be cooled. It also has a regular freezer instead of a frozen food compartment. All this means better refrigeration and may require more running time than your old one.
2. If you need service . . . When you need service for your Acres refrigerator, contact an authorized service center. Do not use unauthorized servicers.
22
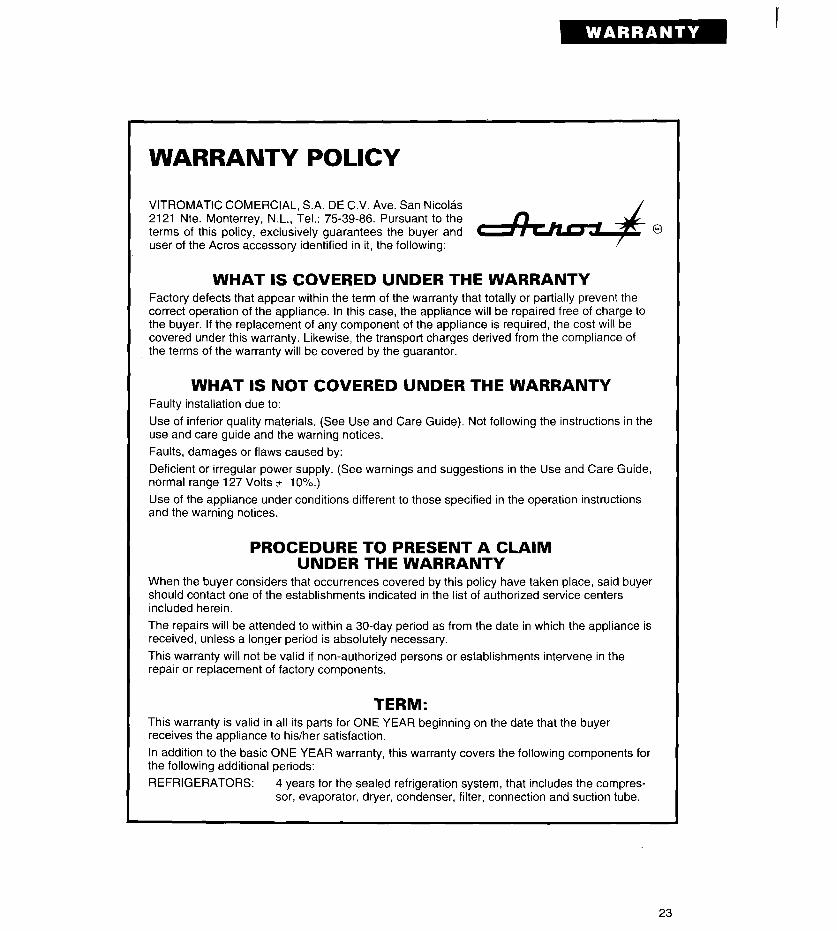
WARRANTY POLICY
VITROMATIC COMERCIAL, S.A. DE C.V. Ave. San Nicolas 2121 Nte. Monterrey, N.L., Tel.: 75-39-86. Pursuant to the terms of this policy, exclusively guarantees the buyer and user of the Acres accessory identified in it, the following:
WHAT IS COVERED UNDER THE WARRANTY Factory defects that appear within the term of the warranty that totally or partially prevent the correct operation of the appliance. In this case, the appliance will be repaired free of charge to the buyer. If the replacement of any component of the appliance is required, the cost will be covered under this warranty. Likewise, the transport charges derived from the compliance of the terms of the warranty will be covered by the guarantor.
WHAT IS NOT COVERED UNDER THE WARRANTY Faulty installation due to:
Use of inferior quality materials. (See Use and Care Guide). Not following the instructions in the use and care guide and the warning notices.
Faults, damages or flaws caused by:
Deficient or irregular power supply. (See warnings and suggestions in the Use and Care Guide, normal range 127 Volts r 1 O%.)
Use of the appliance under conditions different to those specified in the operation instructions and the warning notices.
PROCEDURE TO PRESENT A CLAIM UNDER THE WARRANTY
When the buyer considers that occurrences covered by this policy have taken place, said buyer should contact one of the establishments indicated in the list of authorized service centers included herein.
The repairs will be attended to within a 30-day period as from the date in which the appliance is received, unless a longer period is absolutely necessary.
This warranty will not be valid if non-authorized persons or establishments intervene in the repair or replacement of factory components.
TERM: This warranty is valid in all its parts for ONE YEAR beginning on the date that the buyer receives the appliance to his/her satisfaction.
In addition to the basic ONE YEAR warranty, this warranty covers the following components for the following additional periods:
REFRIGERATORS: 4 years for the sealed refrigeration system, that includes the compres- sor, evaporator, dryer, condenser, filter, connection and suction tube.
23
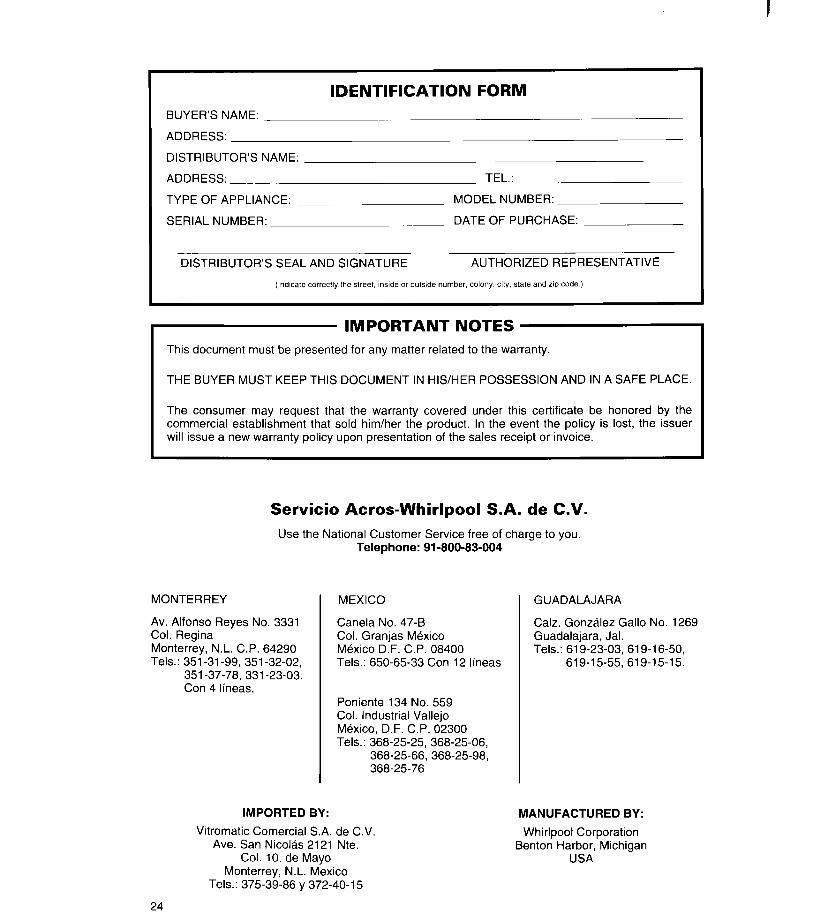
IDENTIFICATION FORM
BUYER’S NAME:
ADDRESS:
DISTRIBUTOR’S NAME:
ADDRESS: TEL.:
TYPE OF APPLIANCE: MODEL NUMBER:
SERIAL NUMBER: DATE OF PURCHASE:
DISTRIBUTOR’S SEAL AND SIGNATURE AUTHORIZED REPRESENTATIVE
(Indicate correctly Ihe street. inside or outslde number, colony, city, state and ZIP code.)
IMPORTANT NOTES
This document must be presented for any matter related to the warranty.
THE BUYER MUST KEEP THIS DOCUMENT IN HIS/HER POSSESSION AND IN A SAFE PLACE.
The consumer may request that the warranty covered under this certificate be honored by the commercial establishment that sold him/her the product. In the event the policy is lost, the issuer will issue a new warranty policy upon presentation of the sales receipt or invoice.
Servicio Acres-Whirlpool S.A. de C.V.
Use the National Customer Service free of charge to you. Telephone: 91-800-83-004
MONTERREY MEXICO
Av. Alfonso Reyes No. 3331 Col. Regina Monterrey, N.L. C.P. 64290 Tels.: 351-31-99, 351-32-02,
351-37-78, 331-23-03. Con 4 lineas.
Canela No. 47-B Col. Granjas Mexico Mexico D.F. C.P. 08400 Tels.: 650-65-33 Con 12 lineas
Poniente 134 No. 559 Col. Industrial Vallejo Mexico, D.F. C.P. 02300 Tels.: 368-25-25, 368-25-06,
368-25-66, 368-25-98, 368-25-76
GUADALAJARA
Calz. Gonzalez Gallo No. 1269 Guadalajara, Jal. Tels.: 61 g-23-03, 619-l 6-50,
619-15-55, 619-15-15.
IMPORTED BY:
Vitromatic Comercial S.A. de C.V. Ave. San Nicolas 2121 Nte.
Cal. 10. de Mayo Monterrey, N.L. Mexico
Tels.: 375-39-86 y 372-40-l 5
MANUFACTURED BY:
Whirlpool Corporation Benton Harbor, Michigan
USA
24
Printed on recycled paper- 10% post cOnSumer waste 50% recovered materials
UsoYManejo Su Seguridad Es Importante . . . . . . . . . . . 4
Partes Y Caracteristicas . . . . . . . . . . . 5
Antes De Usar Su Refrigerador . . . . . . . . . . . . . . 6
C6mo Usar Su Refkigerador . . . . . . . . . . . . . .7
Cuidado De Su Refrigerador . . . . . . .I7
Guia Para Almacenar Alimentos . . . . . . . . . . . . . . . .I9
Si Requiere Ayuda Tkcnica 0 Servicio . . . . . . . . . . . . . . . .22
P6liza De Garantia . . . 23
REFRIGERADORES QUE NO HACEN ESCARCHA
2167143 MODELOS AS20CK AS22BR
IMPORTADO POR: Vitromatic Comercial, S.A. de C.V.
Ave. San Nicolas 2121 Nte. Col. IO. de Mayo
Monterrey, N.L. Mexico Tel. 75-39-85 y 72-40-l 5
FABRICADO POR: Whirlpool Corporation
Benton Harbor, Michigan USA
IMPORTANTE:
Desprenda y pegue la etiqueta NOM en su aparato. Esto garantiza que su aparato fue importado legalmente por lo que tiene derecho a servicio de ftibrica.
Copie aqui 10s niimeros de serie y de modelo. Cuando requiera servicio, o desee llamar para que le resuelvan alguna duda, tenga a la mano la
Nlimero de modelo
siguiente information. 1. Numeros completes de modelo, y serie (ver la
placa en la pat-te interior del aparato). Nlimero de serie
2. Fecha de entrega. Fecha de entrega
Telefonos del taller de servicio autorizado m&s cercano (Consulte su Certificado de Garantia.)
AVIS0 IMPORTANTE Estimado Cliente: Para que la conexih de su aparato se efectlje a la mayor brevedad y Sin
contratiempos, le recomendamos tener listos 10s siguientes requisitos.
REQUERIMIENTOS REFRIGERADORES REFRIGERADORES con febrica de hielo
I. DE ENERGIA ELECTRICA Voltaje 120 Volts con fusible de 15 amperes
Contact0 de 3 polos
Circuit0 individual para el aparato
Regulador de voltaje
II. DE AGUA
. .
. .
. .
. .
Toma de agua fria .
Ill. MATERIALES PARA INSTALACION DE AGUA
Uni6n “T” de %” a l/4” .
Tubo de cobre de %” en espiral (segtin distancia) .
FILTRO DE AGUA WHIRLPOOL .
3 tuercas campana de Xi’ .
Nota: La conexih de su aparato por el Centro de Servicio no incluye instalacih de fontaneria, albafiileria, cableado ekctrico.
Al tener listos 10s requerimientos, llame al Centro de Servicio que corresponda para que envien un tkcnico a su domicilio.
CENTRO DE SERVICIO DIRECT0 DE FABRICA
MONTERREY MEXICO (CANELA) MEXICO (VALLEJO) GUADALAJARA 5 l-37-78 650-65-33 366-25-25 619-15-15 51-32-02 Con 12 Lineas 366-25-06 61 g-23-03 31-23-03 366-25-66 619-16-50
Con 4 Lineas 366-25-98 619-15-55 368-25-76
Para el resto de la Repliblica cuenta usted con 65 concesionarios autorizados. Utilice sin cargo para usted el Setvicio National Clientes Tel.: 91-800-83-004
Su Seguridad Es Importante Siga estas precauciones basicas para reducir el riesgo de incendio, choque electrico o heridas a las personas cuando usan
l Los nines pueden encerrarse accidental- mente en un refrigerador o congelador que haya sido desechado. Le aconsejamos que quite la puerta del aparato fuera de uso, o que la asegure con una cadena y candado, o con una cuerda resistente.
l Si tiene usted un congelador vertical y horizontal, no permita que 10s nirios se acerquen a el cuando haya atorado la puerta para que permanezca abierta. Puede cerrarse accidentalmente y lastimar o atrapar al niiio.
. No guarde materiales inflamables cerca de su aparato. El congelador despide calor y puede encender estas substancias.
l Para evitar el riesgo de una descarga electrica, siempre desconecte el aparato antes de cambiar un foco interior; o bien, torte la corriente electrica en el circuit0 correspondiente.
- GUARDE ESTAS INSTRUCCIONES -
Antes de usar su aparato: Lea cuidadosamente este Manual de Uso y Manejo. Encontrara information importante para su seguridad. Es responsabilidad del usuario asegurarse de que el aparato: l Sea instalado en un piso que resista su peso, y
en un area adecuada a su uso y tamano. l No este cerca de un horno, radiador u otra
fuente de calor.
Para quitar las etiquetas Retire la etiqueta de Guia de Compra del consumidor, y despegue la tira adhesiva con la que viene asegurado el aparato.
Para quitar 10s residuos de pegamento: l Frote con el pulgar hasta formar una pelotilla, y
quitela. 0 bien
l Sea usado en un area donde la temperatura ambiente no sea inferior a 13°C.
l Este protegido contra cambios de clima. l Sea conectado a un tomacorriente del voltaje
requerido y debidamente aterrizado. (Consulte las instrucciones de instalacion).
l No se almacenen alimentos hasta que el aparato alcance la temperatura requerida.
l Sea usado solo para labores domesticas. l Reciba el mantenimiento apropiado. l No sea utilizado por personas que no sepan
manejarlo.
l Remoje el area con detergente liquid0 antes de seguir. No utilice instrumentos agudos ni liquidos tales coma: alcohol, solventes inflamables o solventes abrasivos.
NOTA: No retire la hoja de ser-vicio tecnico que se encuentra bajo el aparato, detras de la rejilla inferior.
l Tenga su calcomania NOM debidamente adherida.
4
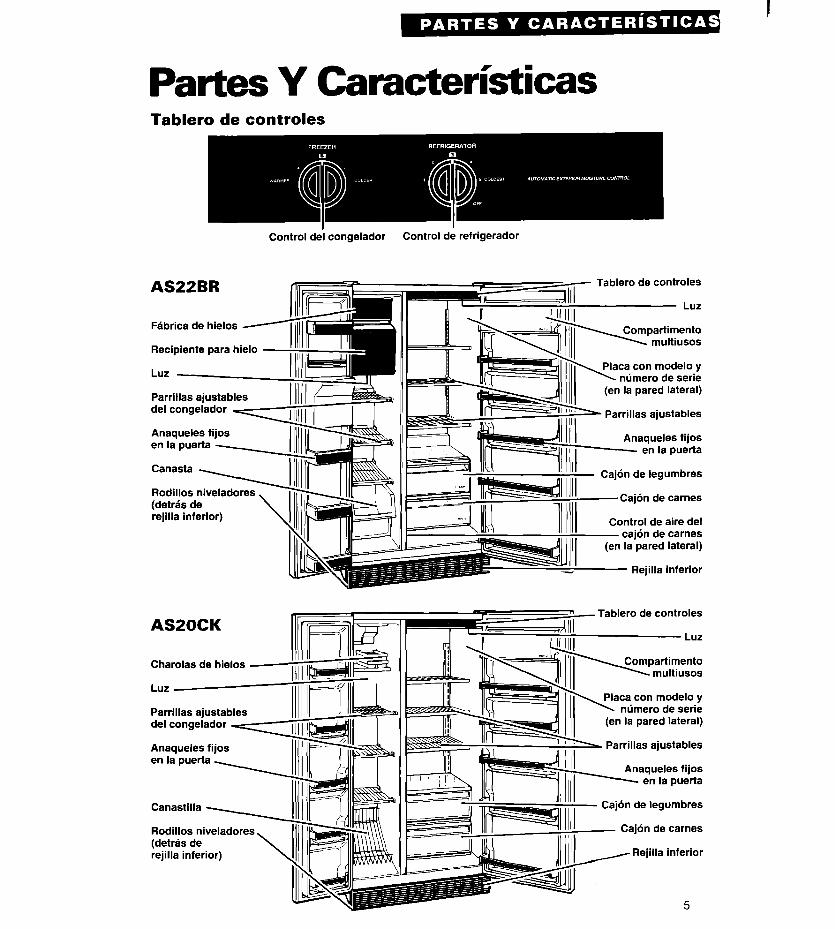
Partes Y Caracterkkas Tablero de controles
I I Control del congelador Control de refrigerador
AS22BR
Fdbrica de hielos l.llJf=
Recipiente para hielo I lllllh
Lur
Parrillas ajustables del congelador II
Anaqueles fijos
Tablero de controles
rejilla inferior)
ASZOCK
ca con modelo y numero de serie
en la pared lateral)
Parrillas ajustables
Cajon de legumbres
Cajon de carnes
Control de aire del cajon de carnes
(en la pared lateral)
Rejilla inferior
ca con modelo y numero de serie
(en la pared lateral)
Parrillas ajustables
Cajon de legumbres
Cajdn de carnes
Antes De Usar Su Refrigerador
Limpie su aparato Limpie su refrigerador antes de usarlo. Ver pagina 17.
Conecte el aparato M6todo de aterrizado que se recomienda
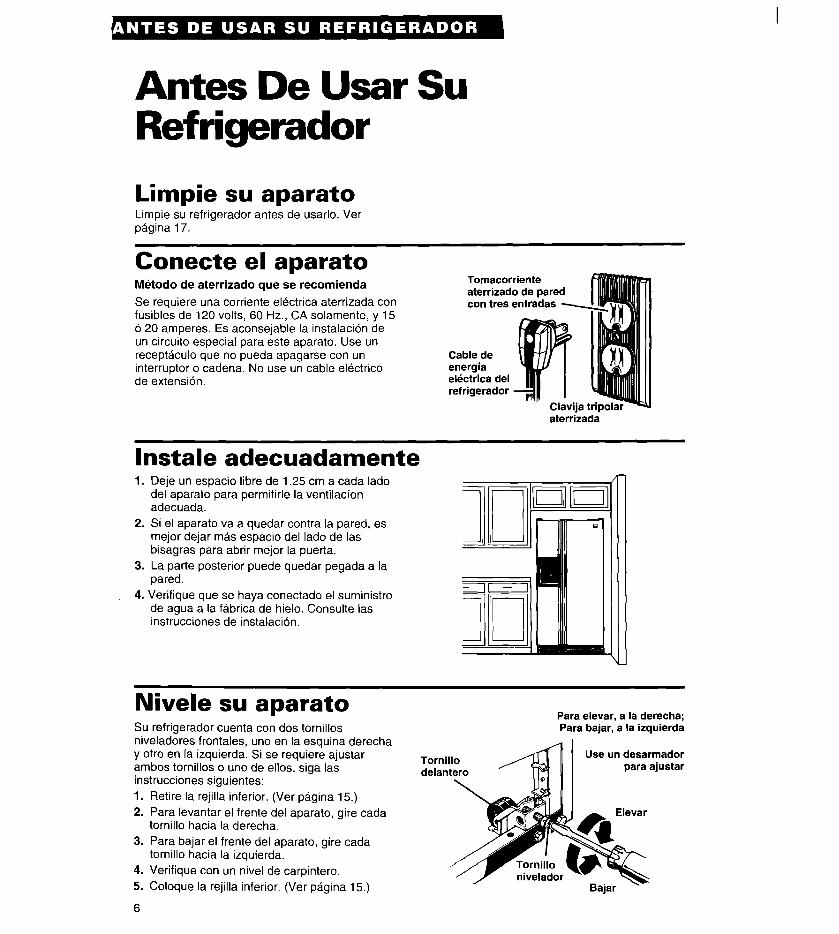
Se requiere una corriente electrica aterrizada con fusibles de 120 volts, 60 Hz., CA solamente, y 15 6 20 amperes. Es aconsejable la instalacion de un circuit0 especial para este aparato. Use un receptaculo que no pueda apagarse con un interruptor o cadena. No use un cable electrico de extension.
Tomacorriente aterrizado de pared con tres entradas -
Cable de energia elktrica del refrigerador
. ” Clavija aterrizada
lnstale adecuadamente 1. Deje un espacio libre de 1.25 cm a cada lado
del aparato para permitirle la ventilation adecuada.
2. Si el aparato va a quedar contra la pared, es mejor dejar mas espacio del lado de las bisagras para abrir mejor la puerta.
3. La pane posterior puede quedar pegada a la pared.
4. Verifique que se haya conectado el suministro de agua a la fabrica de hielo. Consulte las instrucciones de instalacion.
Nivele su aparato Su refrigerador cuenta con dos tornillos niveladores frontales, uno en la esquina derecha y otro en la izquierda. Si se requiere ajustar ambos tornillos o uno de ellos, siga las instrucciones siguientes: 1. Retire la rejilla inferior. (Ver pagina 15.) 2. Para levantar el frente del aparato, gire cada
tornillo hacia la derecha. 3. Para bajar el frente del aparato, gire cada
tornillo hacia la izquierda. 4. Verifique con un nivel de carpintero. 5. Coloque la rejilla inferior. (Ver pagina 15.)
6
C6mo Usar Su Refrigerador Contenido
Pagina Para poner en position 10s controles . . . . . . . . . . . . . . 7
Para cambiar de posicidn 10s controles . . . . . . . . . . . 8
Para ajustar las parrillas del enfriador . . . . . . . . . . . . . 8
Para quitar el cajon legumbrero y la cubierta . . 9
Para quitar el cajon para carnes y la cubierta .9
Para ajustar la temperatura del cajon
para carnes . . . . . . . . . . . . . . . . . . . . . . . . . . . . . . . . . . . . . . . . . . . . . . . . . . . . . . . . . 9
Para quitar las parrillas del congelador . . . . . . . . . 10
Para quitar la canastilla (ASSOCK) .,................ 10
Para quitar la canasta (AS22BR) . . . . . . . . . . . . . . . . . . . . . 10
Pdgina
Coma usar las charolas para hielo .............. 11
Para usar la fabrica de hielo ......................... 11 Para quitar el recipiente para hielo ............. .12
Para usar el despachador de hielo ............. .13
Problemas comunes de la fabrica de
hielo y del despachador de hielo ................. 14
Para quitar la rejilla inferior .......................... 15
Para cambiar 10s focos ................................ .15
Sonidos que puede escuchar ...................... .16
Para ahorrar energia ..................................... .16
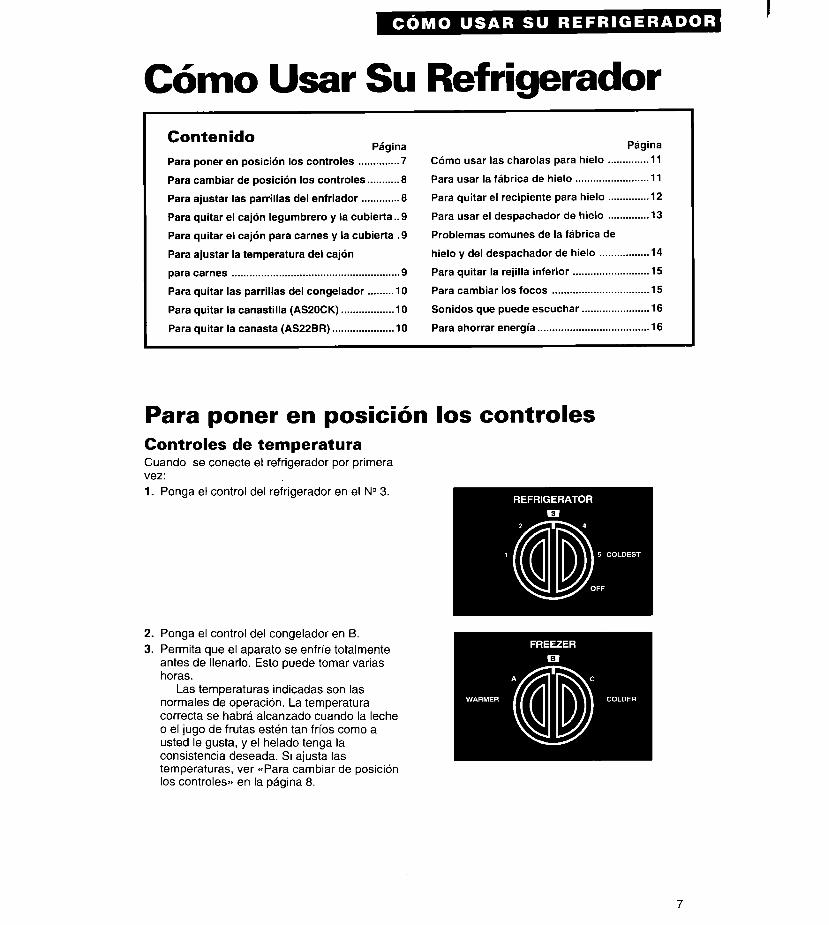
Para poner en posicih 10s controles Controles de temperatura Cuando se conecte el refrigerador por primera vez: 1. Ponga et control del refrigerador en el No 3.
2. Ponga el control del congelador en 6. 3. Permita que el aparato se enfrie totalmente
antes de Ilenarlo. Esto puede tomar varias horas.
Las temperaturas indicadas son las normales de operation. La temperatura correcta se habra alcanzado cuando la leche o el jugo de frutas esten tan frios coma a usted le gusta, y el helado tenga la consistencia deseada. Si ajusta las temperaturas, ver -Para cambiar de position 10s controlesp en la pagina 8.
7
Para cambiar de posici6n 10s controles Si ajusta la temperatura de su aparato, use las posiciones en la tabla abajo indicada.
l Ajuste el control del enfriador. l Espere por lo menos 24 horas. l Si es necesario, ajuste el control del congelador.
PROBLEMA:
La section del enfriador esta DEMASIADO CALIENTE
SE RECOMIENDA PONER CAUSA: EL CONTROL EN:
La puerta se abre con mucha frecuencia Enfriador 4 Se introdujo una gran cantidad de alimentos Congelador A La temperatura ambiente es alta (caliente)
La section del congelador esta DEMASIADO CALIENTE
La puerta se abre con mucha frecuencia Enfriador Se introdujo una gran cantidad de alimentos Congelador : La temperatura ambiente es baja (fria)
La section del No se puso correctamente el control Enfriador 2 enfriador esta DEMASIADO FRiA
Congelador B
EL HIELO NO SE Se ha usado demasiado hielo Enfriador FABRICA RAPID0 La temperatura ambiente es baja (fria) Congelador i
Ambas secciones La puerta se abre con mucha frecuencia Enfriador 4 estan DEMASIADO Se introdujo una gran cantidad de alimentos Congelador B CALIENTES La temperatura ambiente es alta (caliente)
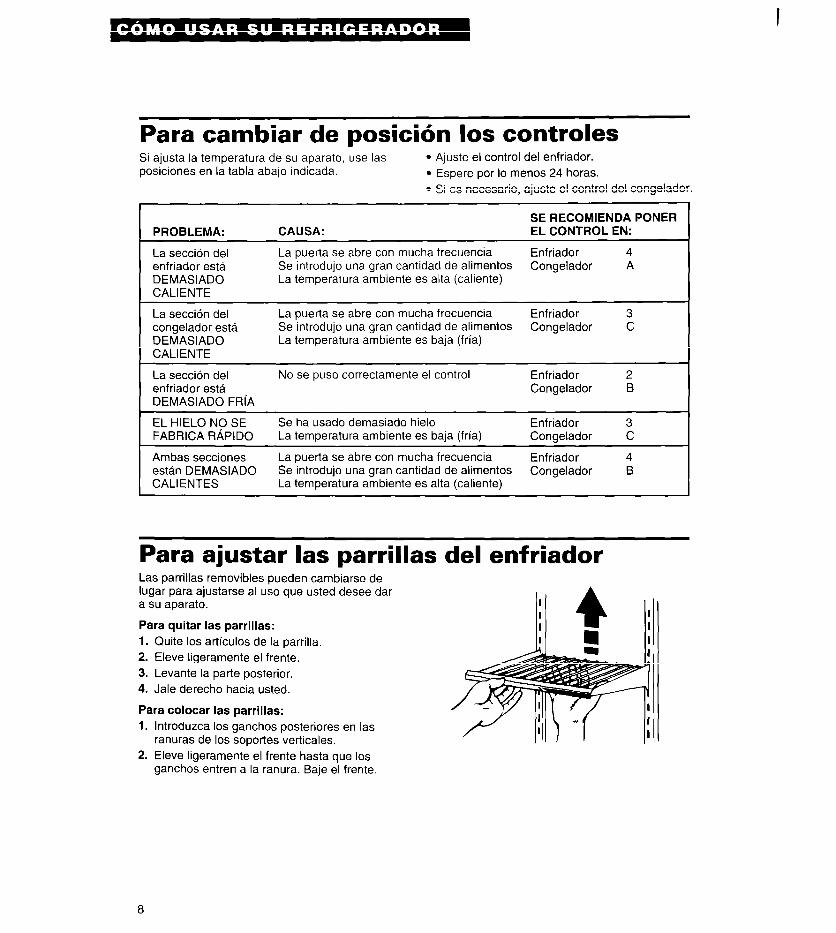
Para ajustar las parrillas del enfriador Las parrillas removibles pueden cambiarse de lugar para ajustarse al uso que usted desee dar a su aparato.
Para quitar las parrillas: 1. Quite 10s articulos de la parrilla. 2. Eleve ligeramente el frente. 3. Levante la parte posterior. 4. Jale derecho hacia usted.
Para colocar las parrillas: 1. lntroduzca 10s ganchos posteriores en las
ranuras de 10s soportes verticales. 2. Eleve ligeramente el frente hasta que 10s
ganchos entren a la ranura. Baje el frente
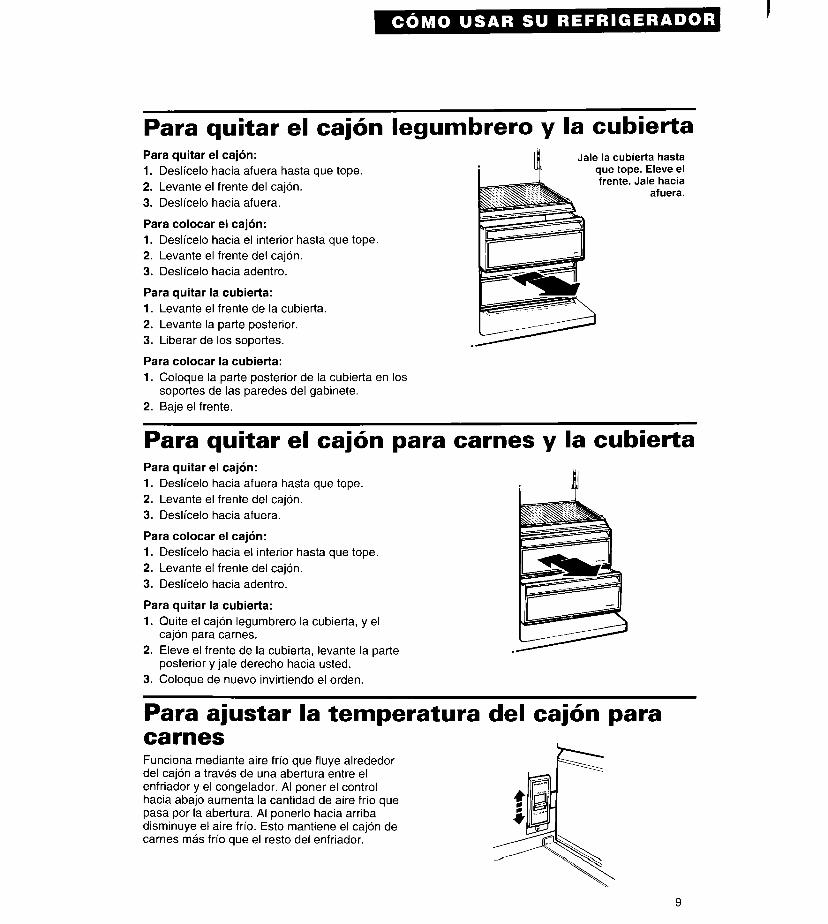
Para quitar el caj6n legumbrero y la cubierta Para quitar el caj6n: 1. Deslicelo hacia afuera hasta que tope. 2. Levante el frente del cajon.
Jale la cubietta hasta que tope. Eleve el frente. Jale hacia
afuera. 3. Deslicelo hacia afuera.
Para colocar el caj6n: 1. Deslicelo hacia el interior hasta que tope. 2. Levante el frente del cajon. 3. Deslicelo hacia adentro.
Para quitar la cubierta: 1. Levante el frente de la cubierta. 2. Levante la pane posterior. 3. Liberar de 10s soportes.
Para colocar la cubierta: 1. Coloque la parte posterior de la cubierta en 10s
sopot-tes de las paredes del gabinete. 2. Baje el frente.
Para quitar el caj6n para carnes y la cubierta Para quitar el caj6n: 1. Deslicelo hacia afuera hasta que tope. 2. Levante el frente del cajon. 3. Deslicelo hacia afuera.
Para colocar el caj6n: 1. Deslicelo hacia el interior hasta que tope. 2. Levante et frente del cajon. 3. Deslicelo hacia adentro.
Para quitar la cubierta: 1. Quite el cajon legumbrero la cubierta, y el
cajon para carries. 2. Eleve el frente de la cubierta, levante la parte
posterior y jale derecho hacia usted. 3. Coloque de nuevo invirtiendo el orden.
Para ajustar la temperatura del caj6n para
Funciona mediante aire frio que fluye alrededor del cajon a traves de una abertura entre el enfriador y el congelador. Al poner el control hacia abajo aumenta la cantidad de aire frio que pasa por la abertura. Al ponerlo hacia arriba disminuye el aire frio. Esto mantiene el cajon de carnes m&s frio que el resto del enfriador.
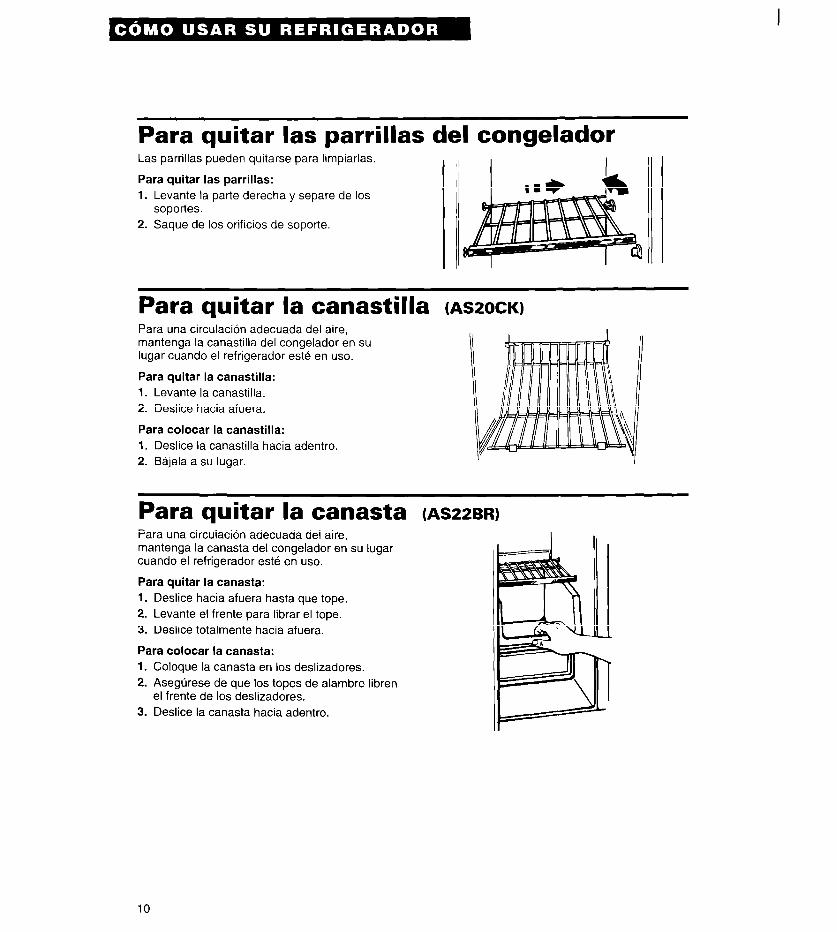
Para quitar las parrillas del congelador Las parrillas pueden quitarse para limpiarlas.
Para quitar las parrillas: 1. Levante la parte derecha y separe de 10s
soportes. 2. Saque de 10s orificios de sopot-te.
I II Para quitar la canastilla Para una circulation adecuada del aire, mantenga la canastilla del congelador en su lugar cuando el refrigerador este en uso.
Para quitar la canastilla: 1. Levante la canastilla. 2. Deslice hacia afuera.
Para colocar la canastilla: 1. Deslice la canastilla hacia adentro. 2. Bajela a su lugar.
Para quitar la canasta (AS~~BR) Para una circulation adecuada del aire, mantenga la canasta del congelador en su lugar cuando el refrigerador este en uso.
Para quitar la canasta: 1. Deslice hacia afuera hasta que tope. 2. Levante el frente para librar el tope. 3. Deslice totalmente hacia afuera.
Para colocar la canasta: 1. Coloque la canasta en 10s deslizadores. 2. Asegurese de que 10s topes de alambre libren
el frente de 10s deslizadores. 3. Deslice la canasta hacia adentro.
10
C6mo usar las charolas para hielo Si 10s cubes de hielo no se usan pueden reducir su tamano. El aire frio en movimiento inicia una evaporation lenta.
Para sacar el hielo:
1. Sostenga la charola por ambos extremos. 2. Retuerza ligeramente.
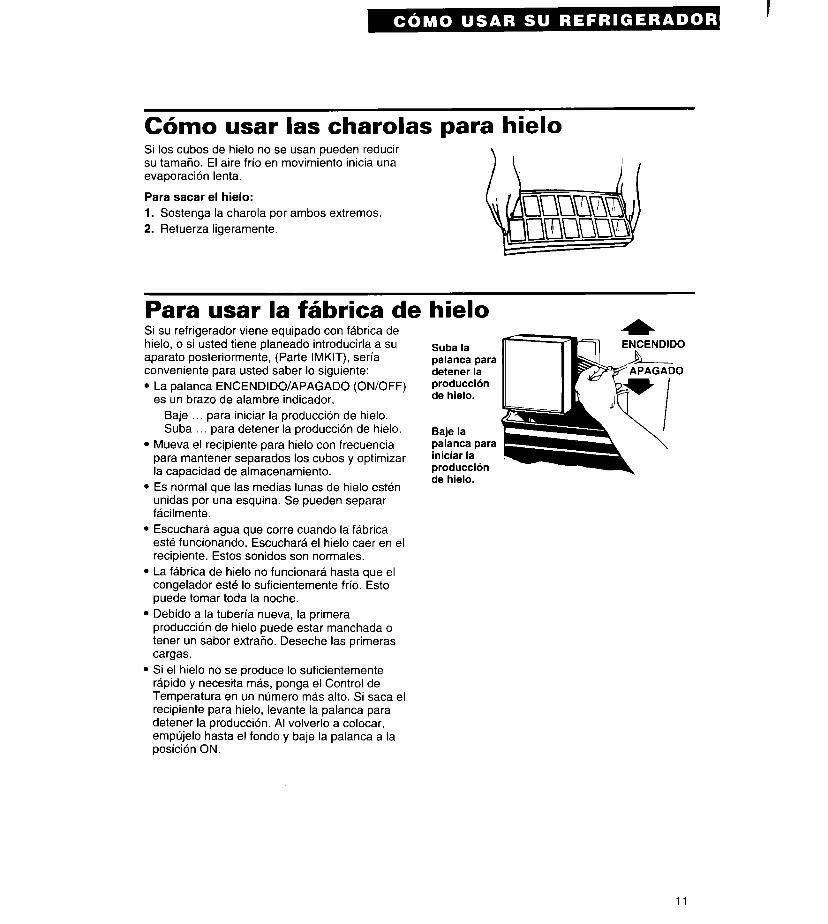
Para usar la fabrica de hielo Si su refrigerador viene equipado con fabrica de hielo, o si usted tiene planeado introducirla a su aparato posteriormente, (Pane IMKIT), seria conveniente para usted saber lo siguiente: l La palanca ENCENDIDO/APAGADO (ON/OFF)
es un brazo de alambre indicador. Baje para iniciar la production de hielo. Suba para detener la production de hielo.
l Mueva el recipiente para hielo con frecuencia para mantener separados 10s cubes y optimizar la capacidad de almacenamiento.
l Es normal que las medias lunas de hielo esten unidas por una esquina. Se pueden separar facilmente.
Suba la palanca para detener la producckn de hielo.
Baje la palanca para iniciar la producci6n de hielo.
l Escuchara agua que corre cuando la fabrica este funcionando. Escuchara el hielo caer en el recipiente. Estos sonidos son normales.
l La fabrica de hielo no funcionara hasta que el congelador este lo suficientemente frio. Esto puede tomar toda la noche.
l Debido a la tuberia nueva, la primera production de hielo puede estar manchada o tener un sabor extratio. Deseche las primeras cargas.
l Si el hielo no se produce lo suficientemente rapid0 y necesita m&s, ponga el Control de Temperatura en un numero mas alto. Si saca el recipiente para hielo, levante la palanca para detener la production. Al volverlo a colocar, empujelo hasta el fondo y baje la palanca a la position ON.
11
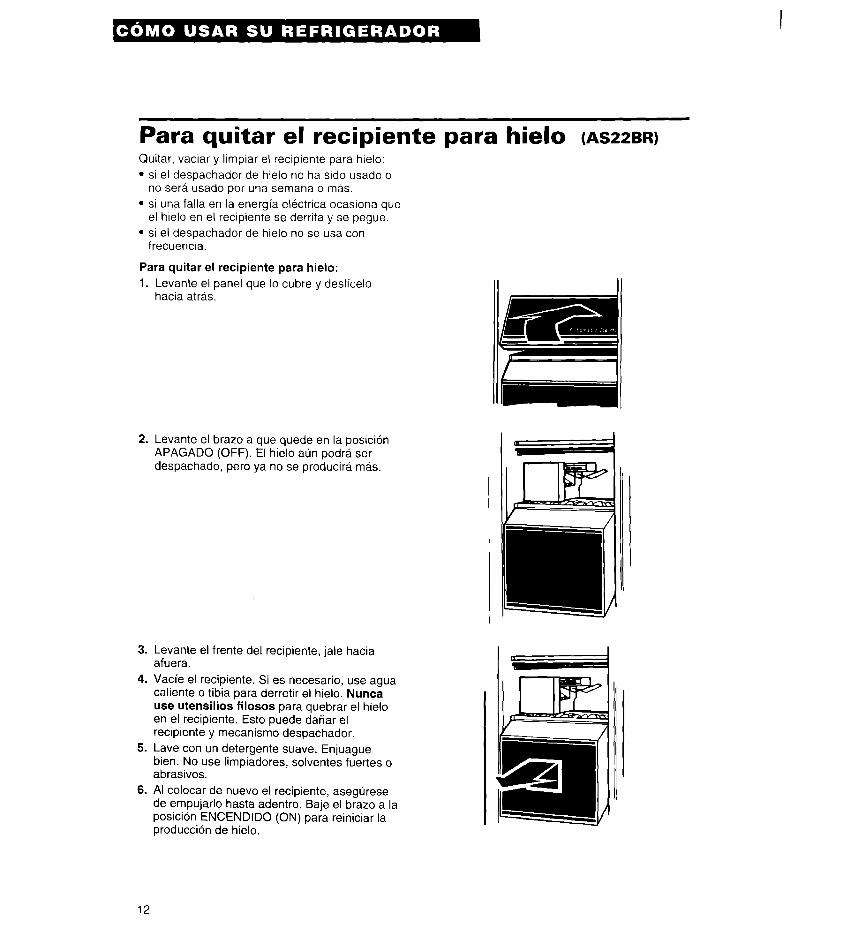
Para quitar el recipiente para hielo (~s22w Quitar, vaciar y limpiar el recipiente para hielo: l si el despachador de hielo no ha sido usado o
no sera usado por una semana o mas. l si una falla en la energia electrica ocasiona que
el hielo en el recipiente se derrita y se pegue. l si el despachador de hielo no se usa con
frecuencia.
Para quitar el recipiente para hielo: 1. Levante el panel que lo cubre y deslicelo
hacia atras.
2. Levante el brazo a que quede en la position APAGADO (OFF). El hielo aun podra ser despachado, pero ya no se producira mas.
3. Levante el frente del recipiente, jale hacia afuera.
4. Vacie el recipiente. Si es necesario, use agua caliente o tibia para derretir el hielo. Nunca use utensilios filosos para quebrar el hielo en el recipiente. Esto puede daiiar el recrprente y mecanismo despachador.
5. Lave con un detergente suave. Enjuague bien. No use limpiadores, solventes fuertes o abrasivos.
6. Al colocar de nuevo el recipiente, asegurese de empujarlo hasta adentro. Baje el brazo a la position ENCENDIDO (ON) para reiniciar la production de hielo.
d
I
/
I
/
L /
,
/
I m-
12
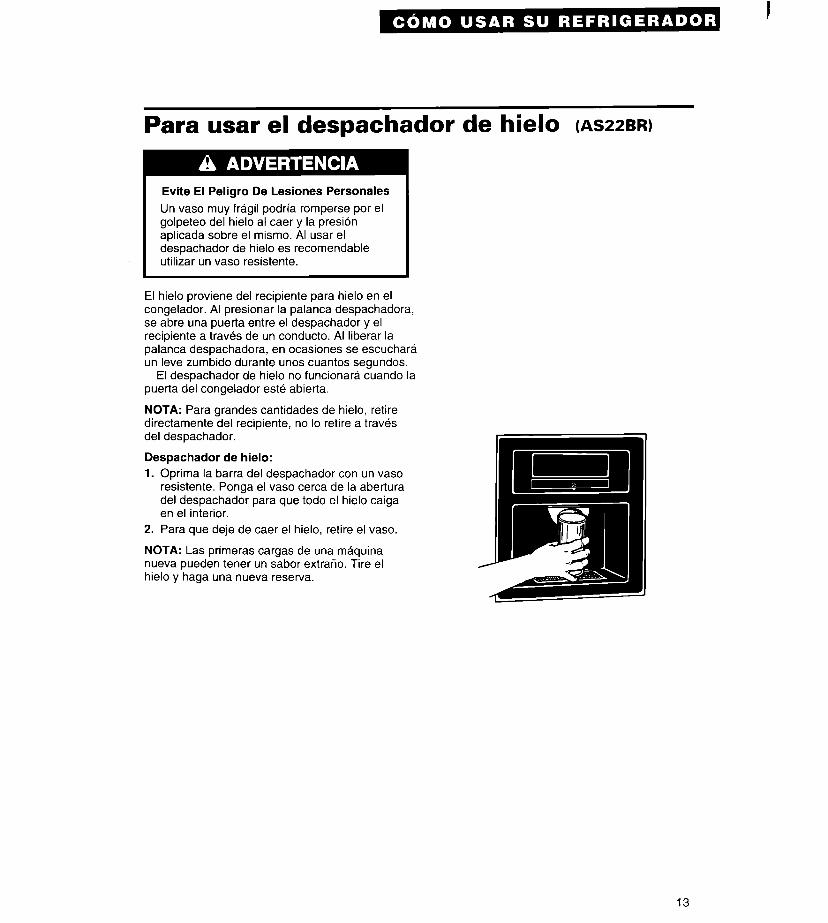
Para usar el despachador de hielo (ASZZBR)
Evite El Peligro De Lesiones Personales
Un vaso muy fragil podria romperse por el golpeteo del hielo al caer y la presion aplicada sobre el mismo. Al usar el despachador de hielo es recomendable utilizar un vaso resistente.
El hielo proviene del recipiente para hielo en el congelador. Al presionar la palanca despachadora, se abre una puetta entre el despachador y el recipiente a traves de un conducto. Al liberar la palanca despachadora, en ocasiones se escuchara un leve zumbido durante unos cuantos segundos.
El despachador de hielo no funcionara cuando la puerta del congelador este abierta.
NOTA: Para grandes cantidades de hielo, retire directamente del recipiente, no lo retire a traves del despachador.
Despachador de hielo: 1. Oprima la barra del despachador con un vaso
resistente. Ponga el vaso cerca de la abertura del despachador para que todo el hielo caiga en el interior.
2. Para que deje de caer el hielo, retire el vaso.
NOTA: Las primeras cargas de una maquina nueva pueden tener un sabor extrafio. Tire el hielo y haga una nueva reserva.
13
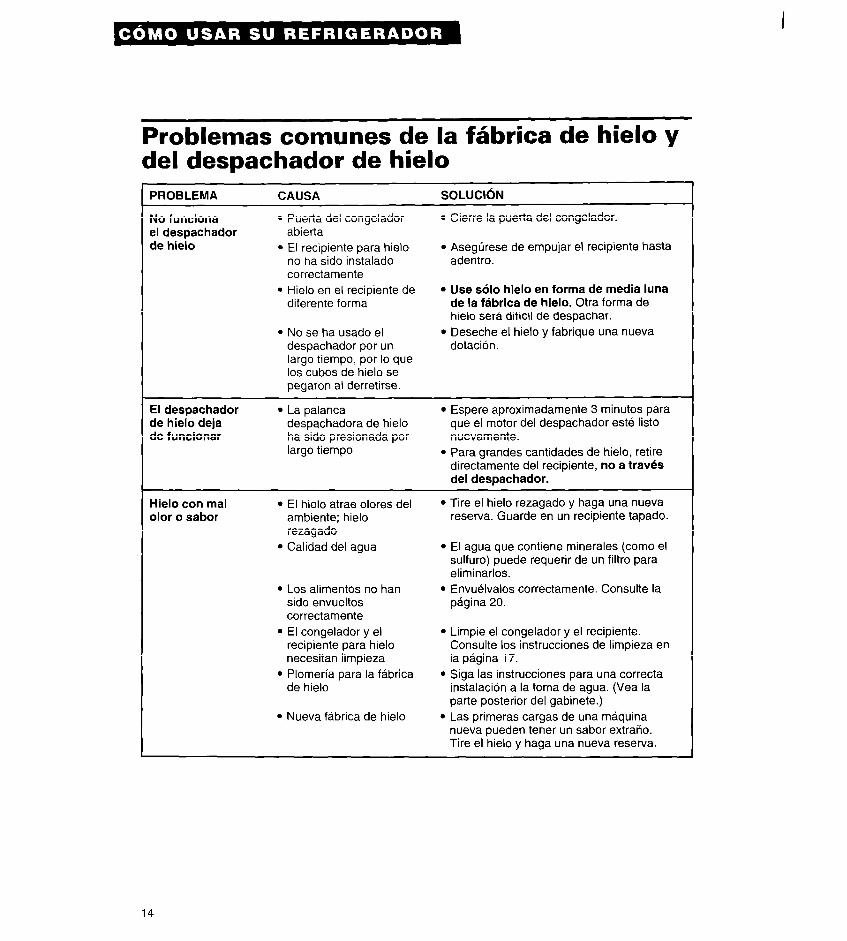
Problemas comunes de la fgbrica de hielo y del despachador de hielo
PROBLEMA
No funciona el despachador de hielo
CAUSA
. Puerta del congelador abierta
l El recipiente para hielo no ha sido instalado correctamente
. Hielo en el recipiente de diferente forma
l No se ha usado el despachador por un largo tiempo, por lo que 10s cubes de hielo se pegaron al derretirse.
SOLUCldN
l Cierre la puerta del congelador.
l Asegurese de empujar el recipiente hasta adentro.
l Use ~610 hielo en forma de media luna de la fabrica de hielo. Otra forma de hielo sera dificil de despachar.
l Deseche el hielo y fabrique una nueva dotacion.
El despachador de hielo deja de funcionar
l La palanca despachadora de hielo ha sido presionada por largo tiempo
l Espere aproximadamente 3 minutos para que el motor del despachador este list0 nuevamente.
l Para grandes cantidades de hielo, retire directamente del recipiente, no a travbs del despachador.
Hielo con mal olor o sabor
l El hielo atrae olores del ambiente; hielo rezagado
l Calidad del agua
l Los alimentos no han sido envueltos correctamente
l El congelador y el recipiente para hielo necesitan limpieza
l Plomeria para la fabrica de hielo
l Nueva fabrica de hielo
l Tire el hielo rezagado y haga una nueva reserva. Guarde en un recipiente tapado.
l El agua que contiene minerales (coma el sulfuro) puede requerir de un filtro para eliminarlos.
l Envuelvalos correctamente. Consulte la pagina 20.
l Limpie el congelador y el recipiente. Consulte 10s instrucciones de limpieza en la pagina 17.
l Siga las instrucciones para una correcta instalacion a la toma de agua. (Vea la parte posterior del gabinete.)
l Las primeras cargas de una maquina nueva pueden tener un sabor extrario. Tire el hielo y haga una nueva reserva.
14
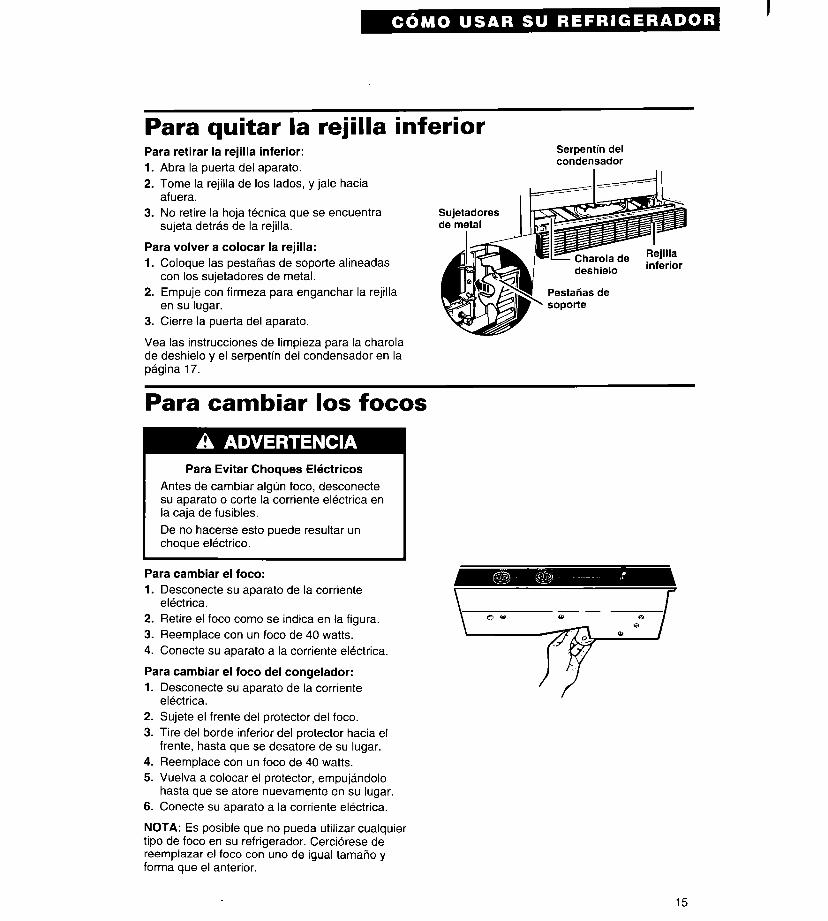
Para quitar la rejilla inferior Para retirar la rejilla inferior: 1. Abra la puerta del aparato. 2. Tome la rejilla de 10s lados, y jale hacia
afuera. 3. No retire la hoja tecnica que se encuentra
sujeta detras de la rejilla.
Para volver a colocar la rejilla: 1. Coloque las pestafias de soporte alineadas
con 10s sujetadores de metal. 2. Empuje con firmeza para enganchar la rejilla
en su lugar. 3. Cierre la puerta del aparato.
Vea las instrucciones de limpieza para la charola de deshielo y el serpentin del condensador en la pagina 17.
Serpentin del condensador
Para cambiar 10s focos
Para Evitar Choques Elkctricos
Antes de cambiar algun foco, desconecte su aparato 0 torte la corriente electrica en la caja de fusibles.
De no hacerse esto puede resultar un choque electrico.
Para cambiar el foco: 1. Desconecte su aparato de la corriente
electrica. 2. Retire el foco coma se indica en la figura. 3. Reemplace con un foco de 40 watts. 4. Conecte su aparato a la corriente electrica.
Para cambiar el foco del congelador: 1. Desconecte su aparato de la corriente
electrica. 2. Sujete el frente del protector del foco. 3. Tire del borde inferior del protector hacia el
frente, hasta que se desatore de su lugar. 4. Reemplace con un foco de 40 watts. 5. Vuelva a colocar el protector, empujandolo
hasta que se atore nuevamente en su lugar. 6. Conecte su aparato a la corriente electrica.
NOTA: Es posible que no pueda utilizar cualquier tipo de foco en su refrigerador. Cerciorese de reemplazar el foco con uno de igual tamano y forma que el anterior.
15
Es posible que su nuevo refrigerador produzca ruidos que le parezcan extratios. No se preocupe; la mayor parte de estos ruidos son normales del funcionamiento del aparato. Las superficies duras cercanas, tales coma el PISO,
las paredes y 10s gabinetes de la cocina, podrian cooperar a que el ruido parezca mas fuerte.
En 10s siguientes parrafos se describen 10s tipos de ruidos que le podrian parecer diferentes a 10s de su antiguo refrigerador, asi coma su causa probable.
Murmullo suave Motor del refrigerador y aire en movimiento.
Chasquidos El cronometro del deshielo produce un chasquido cuando el refrigerador deja de funcionar. Tambien suena cuando el refrigerador arranca.
Sonidos que puede escuchar
Para ahorrar energia . Revise 10s empaques de la puerta para
asegurarse de que hay un cerrado hermetico. Nivele el gabinete para que cierre bien.
l Limpie frecuentemente el serpentin del condensador.
l Abra la puerta lo menos que sea posible. Piense en lo que necesita antes de abrir la puerta. Saque todo al mismo tiempo. Mantenga ordenados 10s alimentos para que no tenga que buscar lo que necesita. Cierre la puet-ta tan pronto coma 10s haya sacado.
l Llene el refrigerador, pero tenga cuidado de no sobrecargarlo para no obstruir el movimiento del aire.
Sonidos de agua Cuando el refrigerador deja de funcionar, se puede oir un gorgoreo en la tuberia durante unos minutos. Tambien puede oirse el agua que cae en la charola de deshielo.
Sonidos de la febrica de hielo l agua goteando l golpeteo de hielo
Si su refrigerador tiene fabrica de hielo, puede escuchar un zumbido (de la valvula del agua), agua goteando y el golpeteo del hielo al caer al recipiente.
Sonidos del funcionamiento Su refrigerador tiene un motor y un compresor altamente eficientes. Funcionara mas tiempo que otros de disetios anteriores, y hasta parecera que funciona la mayor parte del tiempo.
Si pone el enfriador o congelador a una temperatura mas fria de la debida, desperdiciara electricidad. La temperatura es adecuada cuando el helado en el congelador esta firme y las bebidas en el refrigerador estan tan frias coma a usted le gusta. Asegurese de que su refrigerador no este junto a una fuente de calor, tal coma una estufa, calentador, horno, radiador, o recibiendo luz directa del sol.
16

Cuidado De Su Refrigerador Contenido
P6gina Phgina
Para limpiar su refrigerador . . . . . . . . . . . . . . . . . . . . . . . . . . . 17 lnterrupciones de corriente . .._...................... 19
Cuidado para vacaciones y/o al
cambiarse de casa . . . . . . . . . . . . . . . . . . . . . . . . . . . . . . . . . . . . . . . . . . . . 18
Para limniar su ref rigerador Los refrigeradores ;congeladores se deshielan automaticamente. Sin embargo, conviene hater una buena limpieza por lo menos una vez al mes para evitar la acumulacion de olores. Si se derrama algun liquido, limpielo inmediatamente.
Antes de iniciar la limpieza, ponga el control en APAGADO (OFF), desconecte el aparato y saque todas las piezas removibles. Limpie siguiendo las instrucciones de la tabla abajo indicada.
Para Evitar Lesiones Personales
Los tubos del sistema de refrigeration se encuentran situados cerca de la charola de deshielo. Estos tubos pueden llegar a calentarse y causar quemaduras.
Tenga cuidado al sacar y meter la charola para evitar el riesgo de lesiones personales.
PARTE
Piezas removibles (parrillas, cajones, etc.)
Exterior
UTILICE PROCEDIMIENTO
Esponja o trapo, l Lave, enjuague y seque bien. detergente suave y agua tibia
Esponja, trapo o l Lave el exterior del aparato. No use toalla de papel, limpiadores fuertes o abrasivos. detergente suave, agua tibia y cera para
l Enjuague y seque bien.
aparatos (0 cera para l Encere las superficies metalicas pintadas.
autos) Aplique la cera con un trapo limpio y suave. Encerar las superficies methlicas protege contra la oxidacih. No encere las partes plhticas.
Paredes interiores (permita que el congelador se caliente para que el trap0 no se pegue)
Esponja, trapo suave l Lave con agua tibia y o toalla de papel, - detergente suave, o bicarbonate de sodio o agua tibia y
- bicarbonate (26 g en 0.95 L de agua).
detergente suave l Enjuague y seque bien.
Interior y empaques de la puerta
Esponja, trapo o toalla de papel, detergente suave y agua tibia
l Lave, enjuague y seque bien.
NO USE ceras limpiadoras, detergentes concentrados, blanqueadores o limpiadores que contengan petroleo, en las partes plasticas.
Plhsticos oscuros Esponja limpia no 9 Lave, enjuague y seque bien. (cubiertas y tableros) rasposa, 0 un pario
suave, detergente NO USE toallas de papel, limpiadores para
suave y agua tibia ventanas, detergentes fuertes o solventes toxicos o inflamables. Pueden dafiar o rayar el material. Ver Su Seguridad Es Importante>> en pagina 4.
17
PARTE
Charola de deshielo
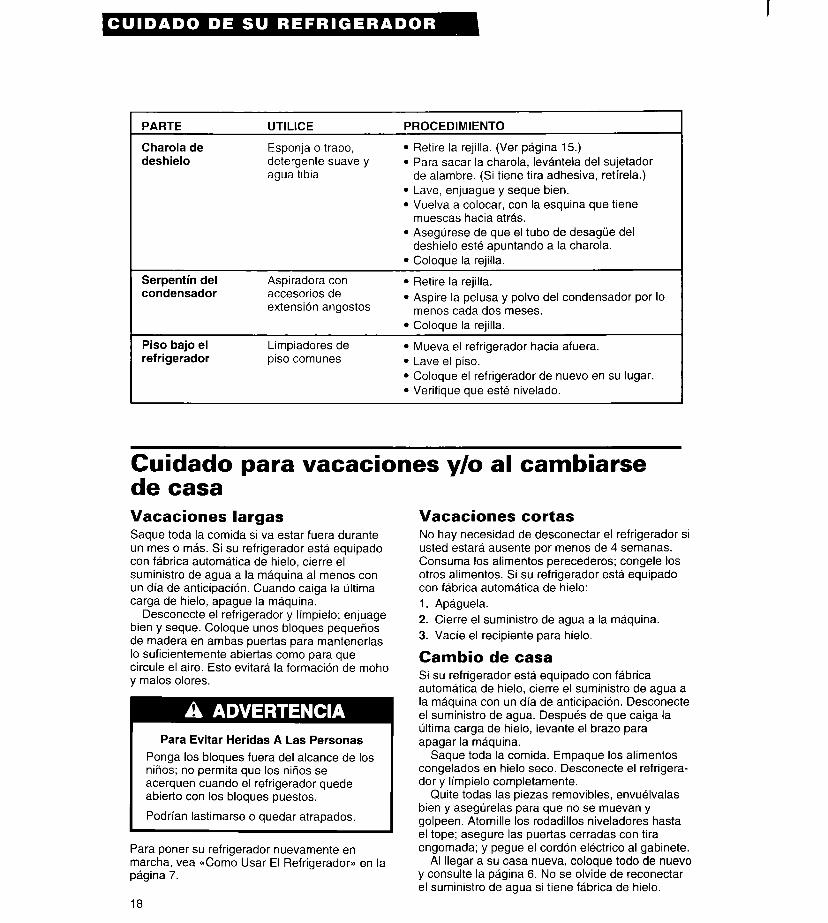
UTILICE
Esponja o trapo, detergente suave y agua tibia
PROCEDIMIENTO
l Retire la rejilla. (Ver pagina 15.) l Para sacar la charola, levantela del sujetador
de alambre. (Si tiene tira adhesiva, retirela.) 8 Lave, enjuague y seque bien. l Vuelva a colocar, con la esquina que tiene
muescas hacia atras.
Serpentin del condensador
Aspiradora con accesorios de extension angostos
l Asegurese de que el tubo de desague del deshielo este apuntando a la charola.
l Coloque la rejilla.
l Retire la rejilla. l Aspire la pelusa y polvo del condensador por lo
menos cada dos meses. l Coloque la rejilla.
Piso bajo el refrigerador
Limpiadores de piso comunes
l Mueva el refrigerador hacia afuera. l Lave el piso. l Coloque el refrigerador de nuevo en su lugar. l Verifique que este nivelado.
Cuidado para vacaciones y/o al cambiarse de casa Vacaciones largas Saque toda la comida si va estar fuera durante un mes o mas. Si su refrigerador esta equipado con fabrica automatica de hielo, cierre el suministro de agua a la maquina al menos con
Desconecte el refrigerador y limpielo; enjuage bien y seque. Coloque unos bloques pequefios de madera en ambas puertas para mantenerlas
un dia de anticipation. Cuando caiga la ultima
lo suficientemente abiertas coma para que
carga de hielo, apague la maquina.
circule el aire. Esto evitara la formation de moho y malos olores.
Para Evitar Heridas A Las Personas
Ponga 10s bloques fuera del alcance de 10s nitios; no permita que 10s nirios se acerquen cuando el refrigerador quede abierto con 10s bloques puestos.
Podrian lastimarse o quedar atrapados.
Para poner su refrigerador nuevamente en marcha, vea &omo Usar El Refrigeradow en la pagina 7.
Vacaciones cortas No hay necesidad de desconectar el refrigerador si usted estara ausente por menos de 4 semanas.
2. Cierre el suministro de agua a la maquina.
Consuma 10s alimentos perecederos; congele 10s
3. Vacie el recipiente para hielo.
otros alimentos. Si su refrigerador esta equipado con fabrica automatica de hielo: 1. Apaguela.
Cambio de casa Si su refrigerador esta equipado con fabrica automatica de hielo, cierre el suministro de agua a la maquina con un dia de anticipation. Desconecte el suministro de agua. Despues de que caiga la ultima carga de hielo, levante el brazo para apagar la maquina.
Saque toda la comida. Empaque 10s alimentos congelados en hielo seco. Desconecte el refrigera- dor y limpielo completamente.
Quite todas las piezas removibles, envuelvalas bien y asegurelas para que no se muevan y golpeen. Atornille 10s rodadillos niveladores hasta el tope; asegure las puet-tas cerradas con tira engomada; y pegue el cordon electrico al gabinete.
Al llegar a su casa nueva, coloque todo de nuevo y consulte la pagina 6. No se olvide de reconectar el suministro de agua si tiene fabrica de hielo.
18
lnterrupciones de corriente Si se interrumpe la corriente electrica, llame a la compariia de Iuz e investigue que tanto va a durar la interruption. 1. Si solo sera de 24 horas o menos, mantenga
bien cerradas ambas puertas para que se mantengan 10s alimentos congelados.
2. Si la interruption durara mas de 24 horas: (a) Saque todos 10s alimentos congelados y
guarde en una hielera especial para alimentos congelados.
0 BIEN
(b) Ponga en el congelador hielo seco, en la proportion de 32 gramos por cada litro de espacio. Los alimentos se mantendran congelados de 2 a 4 dias. Para evitar quemaduras, use guantes para manejar el hielo seco.
0 BIEN (c) Si no tiene disponibilidad de un congelador
portatil o de hielo seco, consuma o ponga en conserva inmediatamente 10s alimentos perecederos.
3. Si el congelador esta totalmente Ileno, se mantendra frio por mas tiempo que si estuviera parcialmente lleno. Si esta lleno de came congelada, durara frio mas tiempo que si estuviera lleno de alimentos horneados. Mientras 10s alimentos conserven cristales de hielo, se pueden recongelar, aunque es posible que se afecten la calidad y el sabor. Si 10s alimentos presentan un aspect0 de poca calidad o teme usted que seria peligroso consumirlos, es mejor desecharlos.
Gul’a Para Almacenar Alimentos
I . . . . . . . . . . . . . . . TI4~1~~ Alirnentos congelados . . . . . . . . . . . . . . . . . . . . . . . . . . . Y%
Alimentos frescos Para guardar 10s alimentos en el enfriador, se deberan utilizar envolturas o recipientes que eviten que entre la humedad o el aire. Esto evita que se esparzan olores en el gabinete o que 10s alimentos tomen sabor uno de otro. Ponga la fecha en 10s alimentos que guarde para garantizar su frescura.
Vegetales con hojas Quite el empaque de 10s vegetales y torte o arranque las areas golpeadas o manchadas. Lave con agua fria y deje secar. Guarde en bolsas o recipientes de plastico o en el cajon legumbrero.
Vegetales sin pelar (zanahoria, pimientos) Guarde en el caj6n legumbrero, en bolsas o recipientes de plastico.
Frutas Lave, deje secar y guarde en el enfriador en bolsas de plastic0 o en el cajon legumbrero. No
Huevos
lave o descabece las bayas hasta que las vaya a usar. Guardelas en su empaque en el cajon legumbrero o guarde en una bolsa de papel sin apretar en una parrilla del enfriador.
Guarde sin lavar en el carton original en una parrilla del enfriador.
Leche Limpie 10s botes de leche. Para un mejor almacenamiento, guarde la leche en una parrilla del enfriador.
19
Mantequilla Guarde la mantequilla abierta en un Plato tapado o en el compartimiento para lacteos. Cuando guarde una reserva extra, envuelva y congele.
Queso Guarde en la envoltura original hasta que lo vaya a usar. Una vez abierto, vuelva a envolver hermeticamente en envoltura plastica o papel aluminio.
Sobrantes Cubra con envoltura plastica o papel de aluminio para evitar que se resequen y despidan olores. Tambien se pueden guardar en recipientes de plastic0 con tapa.
Carne Por lo general, la came puede guardarse en su envoltura original, siempre y cuando esta sea a prueba de aire o humedad. Si es necesario, envuelva nuevamente. En la tabla adjunta se sugiere el tiempo que puede guardarse cada alimento.
TIP0
Poll0
TIEMPO APROXIMADO (DIAS)’
la2
Carne de res molida
Cones de came y asados
la2
3a5
Carnes curadas
Tocino
7a 10
5a7
Carnes frias
Carnes varias
3a5
la2
* Si la came ha de guardarse por mas tiempo que el indicado, siga las instrucciones para congelar.
NOTA: El pescado fresco y 10s mariscos deben usarse el dia que se compran.
Alimentos congelados El congelador esta disetiado para almacenar alimentos congelados comerciales y para congelar alimentos en el hogar.
No utilice: l Envolturas de pan de caja l Recipientes de plastico que no Sean de
NOTA: Si requiere mayor information acerca de la preparation de alimentos para congelar o el tiempo que se pueden mantener en el congelador, consulte una guia de congelation o un libro de cocina confiable.
polietileno l Recipientes cuya tapa no cierre
hermeticamente l Papel encerado l Envoltura para congelar con recubrimiento
Empaque encerado
El secret0 de congelar con exito esta en el empaque. La envoltura que se use debe ser a prueba de aire, humedad y vapor. La manera de cerrar y sellar el empaque no debe permitir la entrada o salida de aire, humedad o vapor.
l Envoltura delgada, semi permeable
Utilizar 10s materiales anteriores podria ocasionar que se transfieran 10s olores y sabores, y que se resequen 10s alimentos congelados.
Congele Recomendaciones para empaque: l Recipientes de plastico rigid0 con tapas
hermeticas l Frascos de lados rectos l Papel de aluminio grueso l Papel plastificado l Envolturas de plastico impermeable
Siga las instrucciones sobre 10s metodos adecuados de congelation que vienen en el paquete 0 recipiente.
No espere que su congelador congele de inmediato demasiaclos alimentos. Cuando congele alimentos, no ponga en el congelador una cantidad mayor de la que puede congelarse en 24 horas (no debera exceder de 32 a 48 gramos de aliment0 por litro de espacio). Deje suficiente espacio para que circule el aire alrededor de 10s paquetes. Tenga cuidado de dejar espacio suficiente al frente para que la puerta cierre hermeticamente.
20
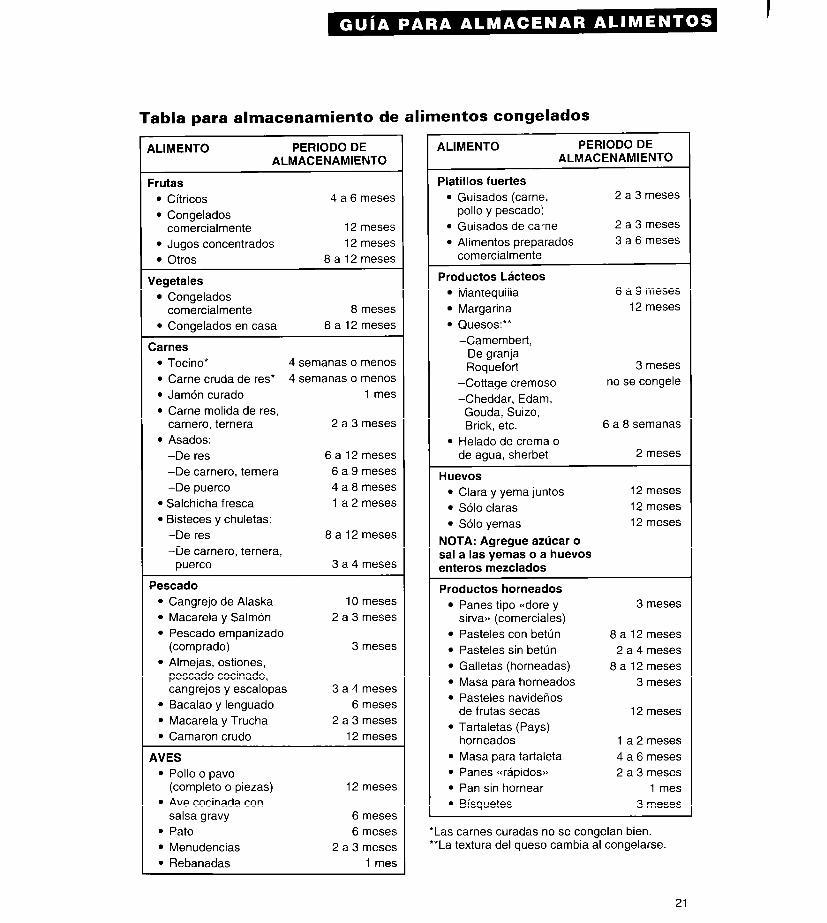
Tabla para almacenamiento de alimentos congelados
ALIMENT0 PERIOD0 DE ALMACENAMIENTO
Frutas l Cftricos 4 a 6 meses
l Congelados comercialmente 12 meses
l Jugos concentrados 12 meses
l Otros 8 a 12 meses
Vegetales l Congelados
comercialmente 8 meses
l Congelados en casa 8a12meses
Carnes l Tocino’ 4 semanas 0 menos
l Carne cruda de res’ 4 semanas 0 menos
l Jamon curado 1 mes
l Carne molida de res, carnero, ternera 2 a 3 meses
l Asados: -De res 6 a 12 meses -De carnero, ternera 6 a 9 meses
-De puerco 4 a 8 meses
l Salchicha fresca 1 a 2 meses
l Bisteces y chuletas: -De res 8a12meses
-De carnero, ternera, puerco 3 a 4 meses
Pescado l Cangrejo de Alaska 10 meses l Macarela y Salmon 2 a 3 meses l Pescado empanizado
(comprado) 3 meses l Almejas, ostiones,
pescado cocinado, cangrejos y escalopas 3 a 4 meses
l Bacalao y lenguado 6 meses l Macarela y Trucha 2 a 3 meses l Camaron crude 12 meses
AVES l Poll0 0 pavo
(complete 0 piezas) 12 meses l Ave cocinada con
salsa gravy 6 meses l Pat0 6 meses l Menudencias 2 a 3 meses l Rebanadas 1 mes
ALIMENT0 PERIOD0 DE ALMACENAMIENTO
Platillos fuertes l Guisados (came,
polio y pescado) l Guisados de came l Alimentos preparados
comercialmente
2 a 3 meses
2 a 3 meses 3 a 6 meses
Productos Lkteos l Mantequilla 6 a 9 meses
l Margarina 12 meses
l Quesos:‘* -Camembert,
De granja Roquefort 3 meses
-Cottage cremoso no se congele
-Cheddar, Edam, Gouda, Suizo, Brick, etc. 6 a 8 semanas
. Helado de crema o de agua, sherbet 2 meses
Huevos l Clara y yema juntos 12 meses
l Solo claras 12 meses
l Solo yemas 12 meses
NOTA: Agregue azljcar o sal a las yemas o a huevos enteros mezclados
Productos horneados l Panes tipo c<dore y
sirvaj, (comerciales) l Pasteles con betun l Pasteles sin betun l Galletas (horneadas) l Masa para horneados l Pasteles navidehos
de frutas secas l Tartaletas (Pays)
horneados l Masa para tanaleta 9 Panes <crapidos,, 9 Pan sin hornear l Bisquetes
3 meses
8a 12 meses 2 a 4 meses
8a12meses 3 meses
12 meses
1 a 2 meses 4 a 6 meses 2 a 3 meses
1 mes 3 meses
21
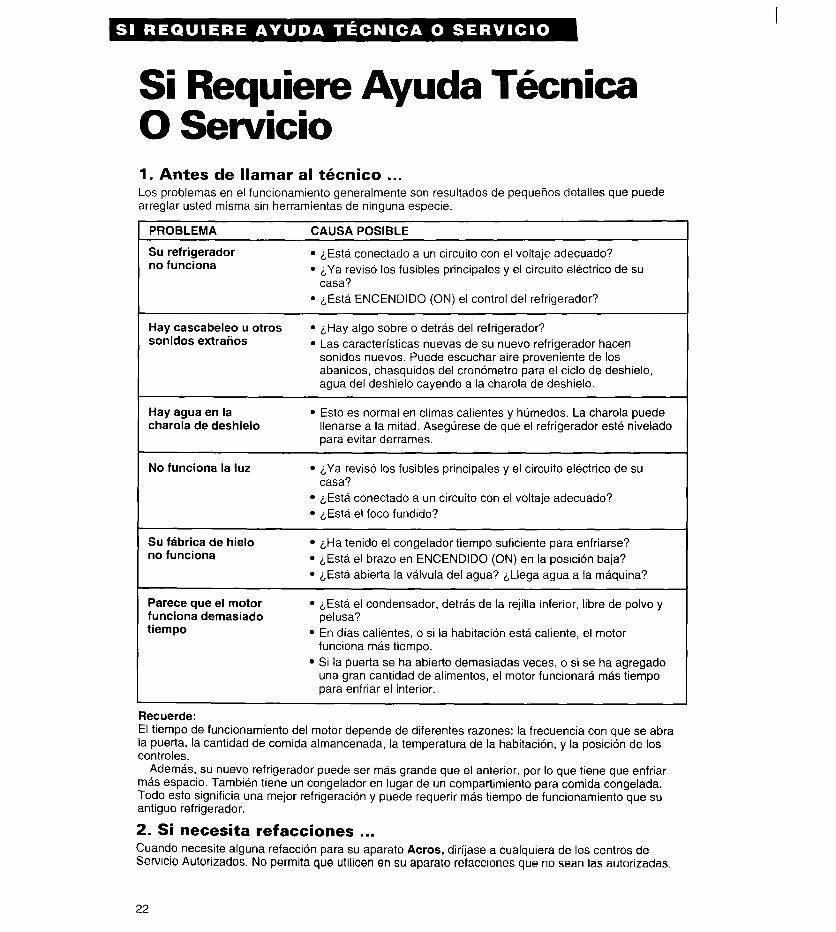
Si Requiere Ayuda Thnica 0 Servicio 1. Antes de llamar al tknico . . . Los problemas en el funcionamiento generalmente son resultados de pequenos detalles que puede arreglar usted misma sin herramientas de ninguna especie.
PROBLEMA
Su refrigerador no funciona
CAUSA POSIBLE
l LEsta conectado a un circuit0 con el voltaje adecuado? l LYa reviso 10s fusibles principales y el circuit0 electrico de su
casa? l LEsta ENCENDIDO (ON) el control del refrigerador?
Hay cascabeleo u otros sonidos extraiios
9 iHay algo sobre o detras del refrigerador? l Las caracteristicas nuevas de su nuevo refrigerador hacen
sonidos nuevos. Puede escuchar aire proveniente de 10s abanicos, chasquidos del cronometro para el ciclo de deshielo, agua del deshielo cayendo a la charola de deshielo.
Hay agua en la charola de deshielo
l Esto es normal en climas calientes y humedos. La charola puede llenarse a la mitad. Asegurese de que el refrigerador este nivelado para evitar derrames.
No funciona la luz l LYa reviso 10s fusibles principales y el circuit0 electrico de su casa?
l LEsta conectado a un circuit0 con el voltaje adecuado? l LEsta el foco fundido?
Su febrica de hielo no funciona
l LHa tenido el congelador tiempo suficiente para enfriarse? l LEsta el brazo en ENCENDIDO (ON) en la position baja? l LEsta abierta la valvula del agua? LLlega agua a la maquina?
Parece que el motor funciona demasiado tiempo
l LEsta el condensador, detras de la rejilla inferior, libre de polvo y pelusa?
l En dias calientes, o si la habitation esta caliente, el motor funciona mas tiempo.
l Si la puet-ta se ha abierto demasiadas veces, o si se ha agregado una gran cantidad de alimentos, el motor funcionara mas tiempo para enfriar el interior.
Recuerde: El tiempo de funcionamiento del motor depende de diferentes razones: la frecuencia con que se abra la puerta, la cantidad de comida almancenada, la temperatura de la habitation, y la position de 10s controles.
Ademas, su nuevo refrigerador puede ser m&s grande que el anterior, por lo que tiene que enfriar mas espacio. Tambien tiene un congelador en lugar de un compartimiento para comida congelada. Todo esto significia una mejor refrigeration y puede requerir mas tiempo de funcionamiento que su antiguo refrigerador.
2. Si necesita refacciones . . . Cuando necesite alguna refaccion para su aparato Acres, dirfjase a cualquiera de 10s centros de Servicio Autorizados. No permita que utilicen en su aparato refacciones que no Sean las autorizadas.
22
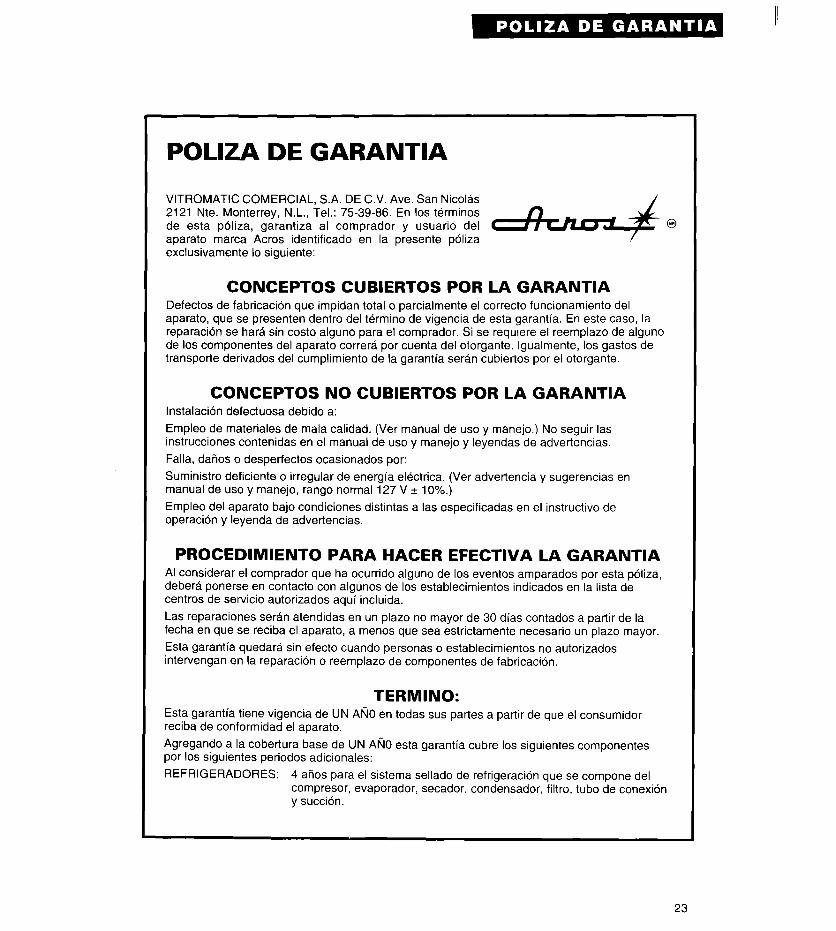
POLIZA DE GARANTIA
VITROMATIC COMERCIAL, S.A. DE C.V. Ave. San Nicolas 2121 Nte. Monterrey, N.L., Tel.: 75-39-66. En 10s terminos de esta poliza, garantiza al comprador y usuario del aparato marca Acres identificado en la presente polka exclusivamente lo siguiente:
CONCEPTOS CUBIERTOS POR LA GARANTIA Defectos de fabrication que impidan total o parcialmente el correct0 funcionamiento del aparato, que se presenten dentro del termino de vigencia de esta garantia. En este case, la reparation se hara sin costo alguno para el comprador. Si se requiere el reemplazo de alguno de 10s componentes del aparato correra por cuenta del otorgante. Igualmente, 10s gastos de transporte derivados del cumplimiento de la garantia seran cubiertos por el otorgante.
CONCEPTOS NO CUBIERTOS POR LA GARANTIA Instalacion defectuosa debido a:
Empleo de materiales de mala calidad. (Ver manual de uso y manejo.) No seguir las instrucciones contenidas en el manual de uso y manejo y leyendas de advertencias.
Falla, datios o desperfectos ocasionados por:
Suministro deficiente o irregular de energia electrica. (Ver advenencia y sugerencias en manual de uso y manejo, rango normal 127 V f 1 O%.)
Empleo del aparato bajo condiciones distintas a las especificadas en el instructive de operation y leyenda de advet-tencias.
PROCEDIMIENTO PARA HACER EFECTIVA LA GARANTIA Al considerar el comprador que ha ocurrido alguno de 10s eventos amparados por esta poliza, debera ponerse en contact0 con algunos de 10s establecimientos indicados en la lista de centros de servicio autorizados aqui incluida.
Las reparaciones seran atendidas en un plazo no mayor de 30 dias contados a partir de la fecha en que se reciba el aparato, a menos que sea estrictamente necesario un plazo mayor.
Esta garantia quedara sin efecto cuando personas o establecimientos no autorizados intervengan en la reparation o reemplazo de componentes de fabrication.
TERMINO: Esta garantia tiene vigencia de UN ANO en todas sus panes a partir de que el consumidor reciba de conformidad el aparato.
Agregando a la cobertura base de UN Ati0 esta garantia cubre 10s siguientes componentes por 10s siguientes periodos adicionales:
REFRIGERADORES: 4 aiios para el sistema sellado de refrigeration que se compone del compresor, evaporador, secador, condensador, filtro, tubo de conexion y suction.
23
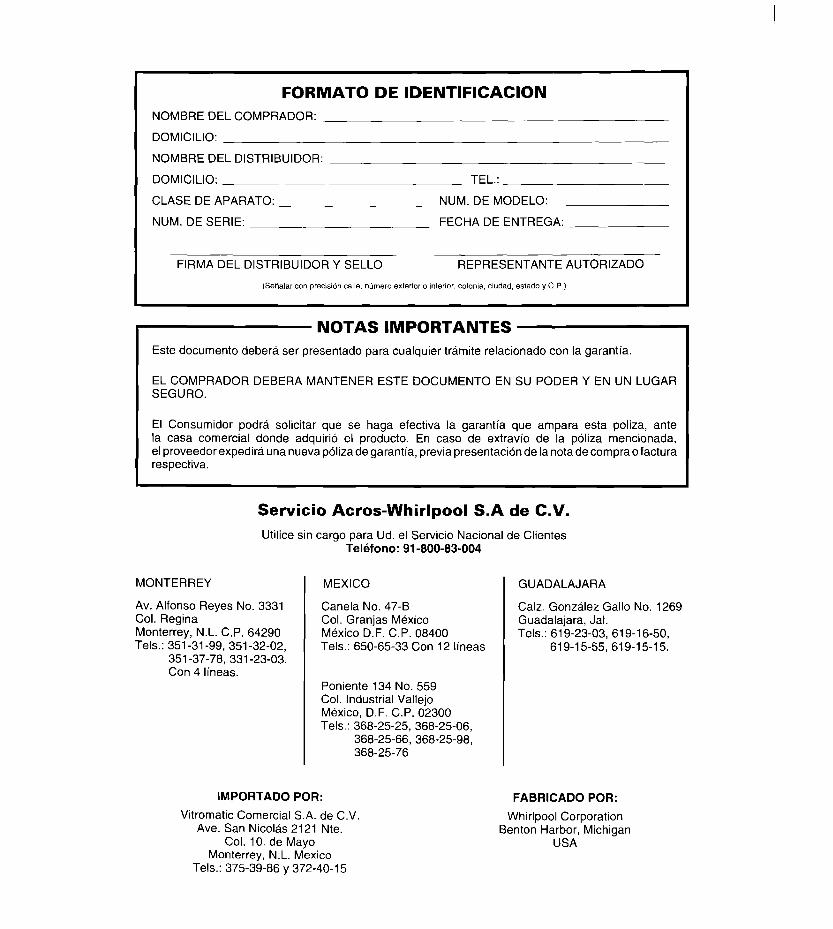
FORMAT0 DE IDENTIFICACION
NOMBRE DEL COMPRADOR:
DOMICILIO:
NOMBRE DEL DISTRIBUIDOR:
DOMICILIO: TEL.:
CLASE DE APARATO: NUM. DE MODELO:
NUM. DE SERIE: FECHA DE ENTREGA:
FIRMA DEL DISTRIBUIDOR Y SELL0 REPRESENTANTE AUTORIZADO
(Seilalar con precisw% calle, ntimero exterior o ~ntenor, colon~a, cludad, estado y C.P.)
NOTAS IMPORTANTES
Este document0 debera ser presentado para cualquier tramite relacionado con la garantia.
EL COMPRADOR DEBERA MANTENER ESTE DOCUMENT0 EN SU PODER Y EN UN LUGAR SEGURO.
El Consumidor podra solicitar que se haga efectiva la garantia que ampara esta poliza, ante la casa comercial donde adquirio el producto. En case de extravio de la poliza mencionada, el proveedor expedira una nueva poliza de garantia, previa presentation de la nota de compra o factura respectiva.
Servicio Acres-Whirlpool S.A de C.V.
Utilice sin cargo para Ud. el Servicio National de Clientes Telkfono: 91-800-83-004
MONTERREY
Av. Alfonso Reyes No. 3331 Col. Regina Monterrey, N.L. C.P. 64290 Tels.: 351-31-99, 351-32-02,
351-37-78, 331-23-03. Con 4 lineas.
MEXICO GUADALAJARA
Canela No. 47-B Calz. Gonzalez Gallo No. 1269 Col. Granjas Mexico Guadalajara, Jal. Mexico D.F. C.P. 08400 Tels.: 61 g-23-03, 619-l 6-50, Tels.: 650-65-33 Con 12 lineas 619-15-55, 619-15-15.
Poniente 134 No. 559 Col. Industrial Vallejo Mexico, D.F. C.P. 02300 Tels.: 368-25-25, 368-25-06,
368-25-66, 368-25-98, 368-25-76
IMPORTADO POR:
Vitromatic Comercial S.A. de C.V. Ave. San Nicolas 2121 Nte.
Col. 10. de Mayo Monterrey, N.L. Mexico
Tels.: 375-39-86 y 372-40-l 5
FABRICADO POR:
Whirlpool Corporation Benton Harbor, Michigan
USA