Embed Size (px)
Citation preview

Not for resale. Permission granted to print and photocopy this document for personal use only.
By Wolfgang Baur and Steve Winter

Not for resale. Permission granted to print and photocopy this document for personal use only.
D&D Encounters2
D&D EncountersWelcome to a special introductory edition of the Hoard of the Dragon Queen™ adventure, designed specifically for D&D Encounters™ (an official in-store play program) and the D&D Adventurers League™ (the official D&D organized play system). This edition of the adventure is designed for 1st- through 3rd-level characters, and is divided up into three episodes of play. Characters who finish all three episodes should reach 3rd or 4th level at the end. Char-acters of 5th level and above cannot play in this D&D Encounters edition of the adventure, though they can pick up with episode 4 of the full adventure of Hoard of the Dragon Queen. Each episode should be played over multiple sessions of play. For D&D Encounters, the recommended session length is two hours. The full adventure contains additional play beyond this edition (see “Additional Play” at the end of the adventure). Playing this adventure in store as a part of D&D Encounters is fun and offers additional benefits to enhance the experience. Folios connecting characters to different factions in the world of the Forgotten Realms® are provided for players, containing information and accessories, along with exclusive rewards. Dungeon Masters (DMs) receive a folio as well, themed to the storyline season (for this season, Tyranny of Dragons™). Check with your store for more details. If you received this adventure and aren’t currently associated with a store, you can find a nearby store by heading to our Store and Event Locator and selecting Dungeons & Dragons® from the top menu.
The D&D Adventurers LeagueThis adventure is official for D&D Adventurers League play. The D&D Adventurers League is the official orga-nized play system for Dungeons & Dragons. Players can create characters and participate in any adventure allowed as a part of the D&D Adventurers League. As they adventure, players track their characters’ experi-ence, treasure, and other rewards, and can take those characters through other adventures that will continue their story. D&D Adventurers League play is broken up into story line seasons. When players create characters, they attach those characters to a storyline season, which determines what rules they’re allowed to use to create and advance their characters. Players can continue
DUNGEONS & DRAGONS, D&D, Wizards of the Coast, Forgotten Realms, the dragon ampersand, Tyranny of Dragons, Hoard of the Dragon Queen, The Rise of Tiamat, Player’s Handbook, Monster Manual, Dungeon Master’s Guide, all other Wizards of the Coast product names, and their respective logos are trademarks of Wizards of the Coast in the USA and other countries. All characters and their distinctive likenesses are property of Wizards of the Coast. This material is protected under the copyright laws of the United States of America. Any reproduction or unauthorized use of the material or artwork contained herein is prohibited without the express written permission of Wizards of the Coast.
The Kobold Press logo is a trademark of Open Design and is used by permission.
©2014 Wizards of the Coast LLC, PO Box 707, Renton, WA 98057-0707, USA.
Kobold PressDesigners: Wolfgang Baur, Steve WinterEditor: Miranda HornerInterior Illustrators: Aaron Hübrich, Tyler Jacobson,
Guido Kuip, Marcel Mercado, Bryan SymeCartographer: Jared BlandoArt Director: Marc RadleProducer: Wolfgang Baur
Wizards of the CoastD&D Encounters Edition: Scott Fitzgerald Gray,
Chris TulachD&D Lead Designers: Mike Mearls, Jeremy CrawfordProducer: Greg BilslandAdventure Contributors: Mike Mearls, Christopher Perkins,
Matthew Sernett, Chris Sims, Rodney ThompsonArt Directors: Kate Irwin, Shauna NarcisoCover Illustrator: Raymond SwanlandGraphic Designers: Bree Heiss, Emi TanjiProject Management: Neil Shinkle, John HayProduction Services: Cynda Callaway, Jefferson Dunlap,
David GershmanBrand and Marketing: Nathan Stewart, Liz Schuh,
Chris Lindsay, Shelly Mazzanoble, Hilary Ross, Laura Tommervik, Kim Lundstrom, Trevor Kidd
Organized Play: Helene Bergeot, Scott Larabee, Bern Menth, Chris Tulach, Joe Yochum
Playtesters: Melissa Bassett, André Bégin, Mik Calow, Mélanie Côté, Manon Crevier, Ben Danderson, Dave Eadie, Frank Foulis, Rodrigo Gorgulho, Pete Griffith, Liam Gulliver, Jon Harvill, Joseph Kauffmann, Yan Lacharité, Renata Landim, Rodrigo Landim, Éric Leroux, Carlos Eduardo Lopes, Julia Lopes, David Muller, Claudio Pozas, Paula Pozas, Count Response, Sara Servin, Robin Stacey, Jaime Thayer, Keoki Young
Disclaimer: The following adventure contains chromatic dragons. Wizards of the Coast cannot be held liable for characters who are incinerated, dissolved, frozen, poisoned, or electrocuted.
Credits
Season LengthThe Tyranny of Dragons storyline season for D&D Encounters runs from Wednesday, August 20, 2014, through Wednesday, March 11, 2015. This D&D Encounters edition of the adventure contains enough play for 16 to 18 sessions. If you start the adventure the first week and play the sessions in the recommended two-hour weekly increments, you will finish this edition well before the end of the D&D Encounters season. To fill out the rest of the season, see “Additional Play” at the end of this adventure.

Not for resale. Permission granted to print and photocopy this document for personal use only.
D&D Encounters3
to play their characters after the storyline season has finished, possibly participating in a second or third sto-ryline with those same characters. A character’s level is the only limitation for adventure play. A player cannot use a character of a level higher or lower than the level range of a D&D Adventurers League adventure. For more information on playing, running games as a Dungeon Master, and organizing games for the D&D Adventurers League, please visit the D&D Adventurers League home.
Preparing the AdventureYou don’t need to prepare this entire adventure for the first session. Simply get to know each episode prior to beginning that episode. As you do so, spend some time familiarizing yourself with the adventure’s locations, events, and characters. You’ll also want to review the relevant statistics for any monsters or nonplayer charac-ters (NPCs). The Hoard of the Dragon Queen monster supplement will be available for download on August 8, 2014, at DungeonsandDragons.com. You’ll also want to have a copy of the basic rules for D&D, available for free on our website. Each episode of the adventure contains a “Designing D&D Encounters Sessions” sidebar that talks about how to divide the episode up into two-hour sessions for D&D Encounters play. This adventure features a wide-open play style that means you will most often be creating sessions based on the characters’ goals and the players’ choices during the game, rather than forcing the characters to adhere to a fixed roster of events and locations. In order to DM the game as a part of the D&D Adven-turers League, you’ll need a DCI number. The DCI number is your official Wizards of the Coast organized play identifier. If you don’t have a number, you can obtain one at a store event. Check with your organizer for details.
Before Each Play SessionThis adventure is designed for three to seven 1st- to 3rd-level characters, and is optimized for four char-acters. Players that have characters outside that level range cannot participate in the adventure with those characters. Players with ineligible characters can make a new 1st-level character or use a pregenerated char-acter. Players can play an adventure they previously played or ran as a DM, but not with the same character (if applicable). Ensure that all players have official Adventure Log-sheets for their characters. Each player will fill out the adventure name, session number, date, and your name and DCI number. In addition, the player also fills in his or her character’s starting values for XP, gold, down-time, renown, and number of permanent magic items. Players will fill in the other values and write notes at the conclusion of the session. Each player is responsible for maintaining an accurate logsheet. You can do a quick scan of a player’s character sheet
to ensure that nothing appears out of order. If you see magic items of very high rarity or strange arrays of ability scores, you can ask a player to provide documen-tation for the irregularities. If a player cannot, feel free to restrict item use or ask the player to use a standard ability score array. Point the player to the D&D Adven-turers League Player’s Guide as a reference.
Downtime and LifestyleAt the beginning of each play session, players must declare whether or not they are spending any days of downtime. The player records the downtime spent on the adventure logsheet. The following options are available to players during downtime (see the D&D basic rules or the D&D Adventurers League Player’s Guide for more information):• Crafting (exception: multiple characters cannot com-
mit to crafting a single item)• Practicing a profession• Recuperating• TrainingOther downtime options might be available during adventures or unlocked through play, including faction-specific activities. In addition, whenever a character spends downtime days, that character also spends the requisite expense for his or her lifestyle. Costs are per day, so that a char-acter who spends ten days of downtime also spends ten
Table of ContentsD&D Encounters 2Introduction 7Background 7Overview 7Map: The Sword Coast 8Episode 1: Greenest in Flames 9 Character Hooks 9 The Approach 9 General Features 10 Designing D&D Encounters Sessions 10 Wandering Encounters 11 Missions 12 Map: Greenest 13 Rewards 16 Developments 16Episode 2: Raiders’ Camp 17 Tracking the Raiders 18 Designing D&D Encounters Sessions 18 The Camp 20 Map: Raider Camp 20 Rewards 24 Developments 24Episode 3: Dragon Hatchery 25 General Features 26 Designing D&D Encounters Sessions 26 Wandering Monsters 27 Map: Dragon Hatchery 28 Rewards 33 Developments 33Additional Play 34Appendix A: Backgrounds 35Appendix B: Monsters 37

Not for resale. Permission granted to print and photocopy this document for personal use only.
D&D Encounters4
from the kit to award to that player. Certificates can be awarded while supplies last. Certified magic items are a fun reminder of play, but they also serve an important purpose: most unlock the ability to trade a magic item to another D&D Adven-turers League character. Magic items earned without certificates cannot be traded to other characters. Other items in the adventure might also be certified, including special rewards. If a special item or other reward has a certificate, it is noted in the adventure.
Character AdvancementA character who earns enough XP to advance a level can do so at the end of a long rest or at the end of a ses-sion. A character who earns enough renown to advance a rank in his or her faction can do so at the end of an episode.
After Each EpisodeOnce the last session of an episode is complete, a few additional awards might need to be given out. Downtime days are awarded at the end of each episode. Characters can spend downtime only at the beginning or end of an episode, or when specified during the adventure, if applicable. Each episode of this D&D Encounters edition of Hoard of the Dragon Queen awards 10 downtime days, which can be spent immedi-ately or saved for later use. Renown for a character’s faction is awarded at the end of an episode. Each episode in Hoard of the Dragon Queen awards 1 renown point in a character’s faction.
Dungeon Mastering TipsAs the DM running this adventure, you have the most important role in facilitating the enjoyment of the game for the players. You help guide the narrative and bring the words on these pages to life. The outcome of a fun game session often creates stories that live well beyond the play at the table. Always follow this golden rule when you run an adventure for a group:
Make decisions and adjudications that enhance the fun of the adventure whenever possible.
To reinforce this rule, keep the following points in mind:• You are empowered to make adjustments to the
adventure and make decisions about how the char-acters interact with the world of the adventure. This
days of expenses maintaining his or her lifestyle. Some downtime activities help with lifestyle expenses or add lifestyle expenses.
Player and DM FoliosAt your first session, check with your store organizer to see if faction-specific player and story-specific DM folios are available. These are complimentary, and contain great game accessories and rewards for DMs and play-ers. Whenever a new player shows up, check with the organizer to see if any more folios are available.
After Each Play SessionAs the characters progress through the adventure, they can earn treasure in the form of valuables such as gold, jewelry, and art objects, as well as magic items. In addition, there might be special rewards that are story focused or intangible. Since a group’s composition might change from one play session to the next, you’ll want to have players update their logsheets before leav-ing the table. Players are responsible for maintaining their own adventure logsheets. At the end of each session, you should give out rewards earned and each player should record that information on his or her logsheet. Experience points (XP) are given out to each player. Divide XP by the number of characters, unless other-wise specified in the adventure. Coin, nonmagical treasure, and other wealth rewards are totaled up in value. That total is then divided by the number of characters, unless otherwise specified in the adventure. Consumable magic items are awarded at the end of each session. Potions, scrolls, and other consumable magic items are divided among the characters. A player notes the item obtained by recording it on his or her logsheet. Players should attempt to ensure an equitable distribution of consumable items. Permanent magic items are awarded at the end of each session. Permanent magic items are rare, and do not appear often. A player notes each item obtained by recording it on his or her logsheet. See the sidebar for guidelines on how to distribute permanent magic items. Other special rewards are awarded when noted in the adventure, usually at the end of a session.
Awarding CertificatesThe D&D Encounters kit contains certificates for all permanent magic items and any rare or higher rarity consumable items found in an adventure. (This D&D Encounters edition of Hoard of the Dragon Queen does not have any magic items that require certificates.) Whenever a character records such a magic item on his or her logsheet, ask the organizer for a certificate
Regalia of BahamutThis season, two special certificates are part of the Regalia of Bahamut. These are both limited-use consumable magic items that are valid throughout the duration of Tyranny of Dragons. The first item, the Scale of Bahamut, is located inside the faction-specific player folio. Players can start their characters with this item. The second item, the Tear of Bahamut, is located inside the DM folio. Please distribute this item on or after the date shown on the certificate to the players present at your table.
Experience and MilestonesD&D Adventurers League play does not use the milestone experience rule. Characters track experience individually and level up when reaching the appropriate amount of XP.

Not for resale. Permission granted to print and photocopy this document for personal use only.
D&D Encounters5
is used, the dead character’s soul must be free and will-ing to be returned to life. A character subject to a raise dead spell also takes a penalty to attack rolls, saving throws, and ability checks that is normally reduced each time the character takes a long rest. In addition, each downtime day spent after a character is subject to raise dead can reduce this penalty by 1, over and above any other benefit the downtime provides. Dead Character Pays for Raise Dead. If a dead char-acter’s body is recoverable and his or her soul is willing to be returned to life, the party can take the body back to civilization and use the dead character’s funds to pay for a raise dead spell. A raise dead spell cast in this manner costs the character 1,000 gp. Character’s Party Pays for Raise Dead. As above, except that some or all of the 1,000 gp cost of the raise dead spell is paid for by the party at the end of the ses-sion. Other party members are under no obligation to spend their funds to bring a dead character back to life. Faction Charity. If the dead character is 1st to 4th level and a member of a faction, the character’s body can be returned to civilization, where a patron from the faction ensures that the character receives a raise dead spell. However, any character invoking this charity for-feits all XP and rewards from the session in which he or she died (even those earned prior to dying during that session), and cannot replay that portion of the adventure with that character again. Once a character reaches 5th level, this option is no longer available. Create a New Character. If a character cannot be brought back from the dead, a player can create a new character. The new character does not have any items or rewards possessed by the dead character. A dead char-acter keeps all his or her items and rewards, in case the player decides to raise the character later. Other char-acters cannot take a dead character’s treasure or magic items, and can use a dead character’s money only to pay for a raise dead spell for that character.
Adjusting the AdventureThis adventure has been designed for optimal play by a party of four characters all starting at 1st level, and who will advance as high as 4th level by the end of the
is especially important and applicable outside of combat, but feel free to also use the guidelines in the “Adjusting the Adventure” section (below) for groups that are having too easy or too hard of a time in an adventure.
• Don’t make the adventure too easy or too difficult for a group. Never being challenged makes for a boring game, and being overwhelmed makes for a frustrating game. Gauge the experience that the players (not the characters) have with the game. Try to get a sense of what each player likes in a game session (or simply ask the players), and try to give all players the experi-ence they’re after when they play D&D. Give everyone a chance to shine.
• Be mindful of pacing, and keep the game session moving along appropriately. Watch for stalling, since play loses momentum when this happens. At the same time, try to provide the players with a full play expe-rience that doesn’t finish too early. D&D Encounters sessions are about two hours long, so try to be aware of when you are running long or short. Adjust the pacing accordingly. Each episode of the adventure provides guidelines for breaking the action up into D&D Encounters sessions.
• Give the players appropriate hints so they can make informed choices about how to proceed. Players should be given clues when necessary so they can tackle puzzles, combat, and interactions without get-ting frustrated over lack of information. This helps to encourage immersion in the adventure and gives players “little victories” for figuring out good choices from clues.
In short, being the DM isn’t about following the adven-ture’s text word for word. It’s about helping to create a fun, challenging game environment for the players. The Dungeon Master’s Guide has more information on the art of running a D&D game.
Character Disease, Death, and RecoveryBad things sometimes happen even to the heroes, and characters might be poisoned, diseased, or killed during an adventure. The following rules can help you manage such events during a D&D Encounters season.
Disease, Poison, and Other Debilitating EffectsA character affected by disease, poison, and other sim-ilar effects can recuperate during downtime to help resolve those effects. (See “Downtime Activities” in the D&D basic rules). If a character doesn’t resolve an effect between game sessions, that character begins the next session still affected by the debilitating effect.
DeathA character who dies during the course of an adventure has a few different options. Party Magic. If a character in the party has access to a raise dead spell, a revivify spell, or similar magic, he or she can choose to raise a dead character. If raise dead
Permanent Magic Item DistributionD&D Adventurers League has a system in place to determine who is awarded permanent magic items at the end of a session. Each character’s logsheet contains a column to record permanent magic items for ease of reference.• If all the players at the table agree on one character taking
possession of a permanent magic item, that character gets the item.
• In the event that one or more characters indicate an interest in possessing a permanent magic item, the character who possesses the fewest permanent magic items gets the item. If there is a tie in the total number of permanent magic items owned by contesting characters, the item’s owner is determined randomly by the DM.

Not for resale. Permission granted to print and photocopy this document for personal use only.
D&D Encounters6
third episode. However, the D&D Encounters format allows for characters of 1st to 4th level, and groups of from three to seven adventurers. If you are playing with a larger or smaller group, or with a group of four char-acters starting the adventure at higher than 1st level, you can make adjustments to the combat encounters to make sure the adventure plays well for your group. (You can make the same sorts of adjustments even for a group of four characters of the optimal level if those characters are having too hard or too easy a time in the adventure.)
Rebuilding EncountersThe Dungeon Master’s Guide and the D&D basic rules provide guidelines for creating balanced combat encounters. If you have time before you play, use these guidelines to calculate the appropriate XP budget for your party and increase the number of monsters in an encounter as appropriate.
Adjusting on the FlyTo make adjustments to encounters while you play, you can increase the number of monsters. This approach works best for encounters with four or more monsters (equal to or greater than the optimal party size of four). Start by adding one monster to an existing group of monsters for each additional character in the party. For example, in the “Seek the Keep” encounter (the first encounter of Episode 1: Greenest in Flames), the characters must face off against a number of groups of foes, each consisting of 1d6 kobolds and 1d4 cultists. Knowing that those numbers are appropriate for four 1st-level characters, you might decide that a party of five 1st-level characters should face 1d6 + 1 kobolds and 1d4 cultists. Likewise, for a party of six or seven characters, you might add two kobolds and an extra cultist, or roll 1d6 kobolds and 2d4 cultists. (For a party of three char-acters, you can subtract monsters in the same way.) For encounters with smaller numbers of more power-ful monsters, you usually can’t add additional monsters without making the encounter too difficult. For example, in area 10 of Episode 3: Dragon Hatchery, the char-acters face off against two guard drakes and a roper. Adding another one of either of those monsters creates a much more difficult encounter. To create an encounter that’s just a little more difficult, have the guard drakes controlled by one or two kobolds or cultists that fight alongside them. Be careful if you find yourself doubling the number of monsters in an encounter. Many creatures—even low-challenge monsters—become much more dangerous in large numbers. In the event that you feel the need to increase the number of monsters in an encounter dras-tically (for example, if you have a large group of 3rd- or 4th-level characters starting the adventure), you should instead use the Dungeon Master’s Guide or the D&D basic rules to calculate XP budgets as you rebuild the encounters.
DragonclawCultist
Noncombat XPNoncombat XP awards are given either on a per char-acter basis or as a lump-sum award to be divided by the party. Where awards are given to each character, you can award the same value to any number of characters in the party. Where an award is given as a lump-sum value, divide the award by 4, then give that amount of XP to each character. For example, a party of four earns 250 XP for each dragon egg destroyed or taken in Epi-sode 3: The Dragon Hatchery. If you are playing with six characters, award each character 250 ÷ 4 = 62 XP (rounding down), for a group total of 372 XP.

7Introduction
Not for resale. Permission granted to print and photocopy this document for personal use only.
Besides his cultists, Severin has forged an alliance with a splinter faction of the Red Wizards of Thay. This small and secretive group, led by an outcast named Rath Modar, plots to unseat the lich Szass Tam from his position over the Red Wizards. Rath believes that in exchange for his help in releasing Tiamat, she will grant him the power he needs to overthrow Szass Tam.
Cult OrganizationThe Cult of the Dragon is organized in cells, which vary in size from just a handful of members to scores. Lead-ers in the cult are known as Wearers of Purple, and they outrank normal cultists, but no formal grades exist within the ranks of the Wearers of Purple. Although the cult uses regalia in its rituals and its distant camps, members who operate in public places dress and act no differently from anyone else. The cult is not above hiring mercenaries when it has special jobs to fulfill. Indeed, many of the “cultists” that characters encounter in the three episodes of this adven-ture are working for pay.
OverviewThe full adventure of Hoard of the Dragon Queen takes place against the backdrop of the cult seeking out and collecting the five dragon masks, and of Severin’s efforts to assemble a treasure hoard worthy of Tiamat. This search for treasure has seen the cult unleash raids across the North of Faerûn, devastating the communi-ties of the Sword Coast and drawing the attention of the adventurers. The action begins when a town comes under attack by a dragon and its allies. Characters can intervene to save townsfolk, but not before attackers carry away an important scholar. While rescuing that captive from the raiders’ camp, characters learn they are up against the Cult of the Dragon, and they have the chance to destroy a subterranean dragon hatchery that the cult guards. These events make up an exciting adventure in their own right, but they can also be used as a springboard to play the full adventure of Hoard of the Dragon Queen or the exciting organized play adventures of D&D Expedi-tions. See “Additional Play” at the end of this adventure for more information.
Tyranny of Dragons is an epic story told across two adventure products—Hoard of the Dragon Queen and The Rise of Tiamat. This D&D Encounters
edition of Hoard of the Dragon Queen presents the first three episodes of that adventure. It is designed for characters of 1st to 3rd level, and with an optimal party size of four. The full adventure of Hoard of the Dragon Queen takes characters to 7th or 8th level, at which point they are ready to continue with The Rise of Tiamat. Tyranny of Dragons is set in the Forgotten Realms on Faerûn’s western shore—the Sword Coast. A thin strip of civilization stretches down this coast, where widely spaced cities are arranged like beads on a string. A com-bination of roads and wagon tracks loosely connect the cities that stretch from Luskan in the north to Calimport in the south, passing through Neverwinter, Waterdeep, Baldur’s Gate, and other great ports along the way. Adventure Supplements. You can play this adventure with just the Dungeons & Dragons basic rules and the Tyranny of Dragons appendix online, which contains all the monsters and magic items not described in this book. Both of these supplements are available as free downloads on DungeonsandDragons.com.
BackgroundThe Cult of the Dragon has been active in Faerûn for centuries. It has focused on making undead dragons to fulfill a prophecy most of that time, but that’s changing.
Dragon MasksThe new leader of the cult is a Calishite named Severin Silrajin, who believes that real draconic knowledge and power belongs to living dragons, not undead ones. Severin’s ambition amused Tiamat, so she revealed the existence of five dragon masks to him—one for each chromatic dragon color. Individually, these ancient masks allow wearers to communicate with dragons. More importantly, a person who is erudite in draconic lore becomes a wyrmspeaker while wearing the mask, which allows the wearer to think like a dragon, gain favor among dragons, and subtly influence their behav-ior. When all five are brought together, they magically merge into a single Mask of the Dragon Queen. With the assembled mask, the cult can release Tiamat from her prison in the Nine Hells. After Severin (subtly guided by Tiamat) discovered that secret, he bent all the cult’s resources to finding the long-lost dragon masks in their secret hiding places. When he recovered the red mask, Severin became the first of the wyrmspeakers, but others soon followed.
SecretsThe Cult of the Dragon has kept secret its goal to bring Tiamat into the world thus far. Many know of the cult’s increased activity along the Sword Coast, especially in the north, but the reasons behind the resurgence are unknown.
Introduction

8Introduction
Not for resale. Permission granted to print and photocopy this document for personal use only.

9Episode 1: Greenest in Flames
Not for resale. Permission granted to print and photocopy this document for personal use only.
The town of Greenest was founded by the halfling Dharva Scatterheart, a rogue who fancied herself the queen of the Greenfields. Scatterheart passed
away without ever achieving that level of eminence, but her town grew into a thriving community. Its success isn’t surprising, since Greenest is the only town of any size astride the Uldoon Trail, the most direct road between the eastern cities of the Dragon Coast, Cormyr, and Sembia with the Coast Way running south to the great cities of Amn, Tethyr, and far Calimshan. The trade caravans that pass through Greenest bring gold to the town’s merchants and craftsfolk, and Governor Nighthill runs the town at the behest of the inhabitants. The adventurers might be on the road from one town to another or returning to their homes after a trip away. Alternatively, they could be accompanying a merchant or wealthy traveler as bodyguards. Many restless young people of Faerûn have had their first taste of travel and adventure as caravan guards. You can adapt this D&D Encounters adventure and the full Tyranny of Dragons campaign to different regions of the Realms or to a different setting with a bit more preparation on your part. Change the names and locations to suit your campaign.
Character HooksTo tie the characters’ backstories to the Tyranny of Dragons campaign more closely, see appendix A.
The ApproachAs characters approach Greenest, they see that a blue dragon and its Cult of the Dragon allies are attacking the town. The cultists seek to collect treasure that they hope to present to Tiamat upon her arrival in the world. The cult has assembled a powerful force for this raid by gathering bandits, kobolds, sellswords, and other mer-cenary types into a small army. A monk named Leosin Erlanthar was also in town. Through diligent research and interviews conducted during his travels between Berdusk and Candlekeep, Leosin became convinced that the cult is engaged in a big operation, but he doesn’t yet know what it is. Leosin uses the raid as an opportu-nity to infiltrate the cult so that he can learn more about the cult’s plans. He is discovered and captured, however, and needs the characters’ help to escape from captivity. Characters can engage in several encounters while cultists and kobolds rampage through Greenest.
Episode 1: Greenest in Flames

10Episode 1: Greenest in Flames
Not for resale. Permission granted to print and photocopy this document for personal use only.
For the past several days, you have been traveling a road
that winds lazily across the rolling grasslands of the
Greenfields. Sundown is approaching when you top a
rise and see the town of Greenest just a few short miles
away. But instead of the pleasant, welcoming town you
expected, you see columns of black smoke rising from
burning buildings, running figures that are little more than
dots at this distance, and a dark, winged shape wheeling
low over the keep that rises above the center of the town.
Greenest is being attacked by a dragon!
The sequence of events that follow is up to you and the characters. You can present them with as many of the encounters as you want, in any order. The only exception is “Seek the Keep,” which should be the first encounter after characters enter Greenest.
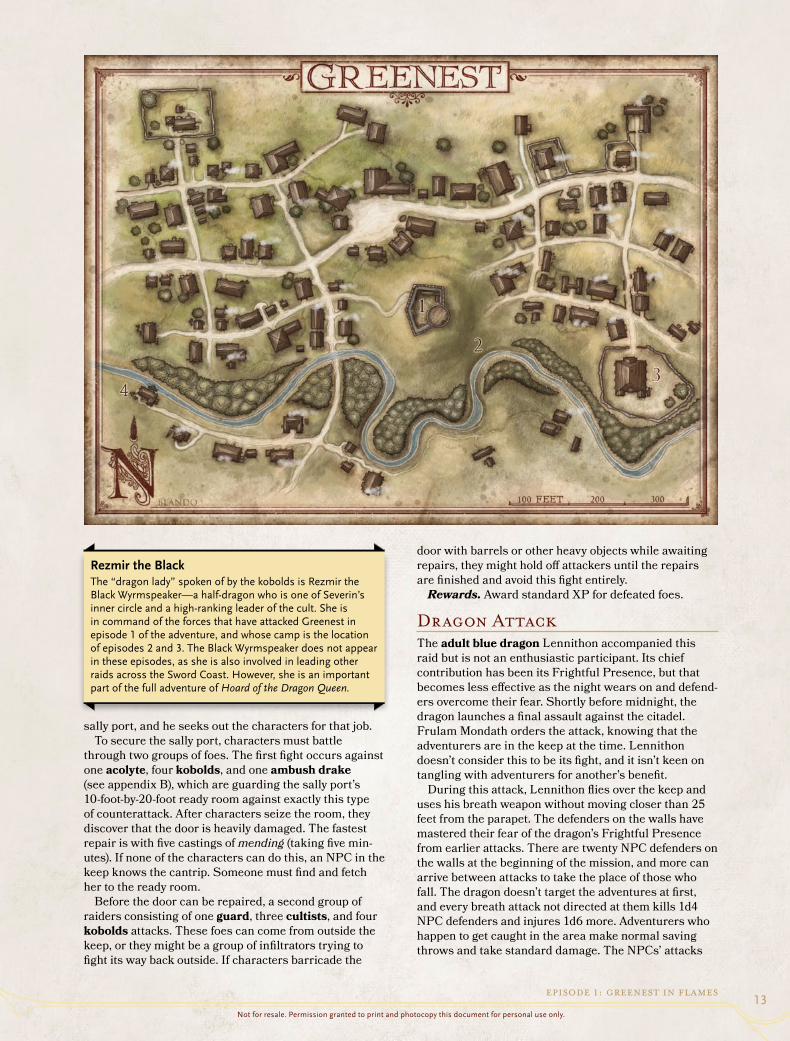
General FeaturesThe sun has set by the time characters reach the edge of town (the area shown on the Greenest map). Light. Burning buildings and a half moon provide dim light throughout the town. The inside of the keep is brightly illuminated. Fires. The cultists tried to set buildings ablaze as they moved through town, but thatch isn’t as flammable as it looks. When characters arrive, most of the flames come from haystacks and barns, not from homes or shops. The Stream. The stream that flows past Greenest is shallow (seldom more than 3 feet deep) with a gravel bottom, so characters can move along it without diffi-culty. Where the banks are clear, the stream is easy to get into or out of. Brush by the stream is dense, and the banks are steep where brush grows. Characters can move only 5 feet per turn through the brush.
Important Characters Governor Nighthill. The man who runs Greenest is Tarbaw Nighthill, a human male of sixty years. If characters ask who’s in charge, they are directed to Nighthill. He is pacing atop the parapet of the keep when the sky is clear, or inside the keep if the dragon is attacking. If the characters don’t seek out the governor when they reach the keep, he finds them. Either way, Nighthill welcomes them and takes them to the parapet. From there, they have the best view of Greenest. The right side of Nighthill’s face and head are ban-daged, his right arm hangs in a sling, and his light blue tunic is stained with his own blood. He received these wounds during the early stages of the attack and hasn’t spared the time for more than cursory first aid. Castellan Escobert the Red. Escobert is a shield dwarf with knotted, tangled, bright red hair. As master of the keep, Escobert is in charge of its defense and is the best source of information on the tunnel and the sally port (see “The Old Tunnel” and “The Sally Port” below). He carries an enormous ring of iron and brass keys to the many locks in the keep.
Designing D&D Encounters Sessions: Greenest in Flames5 to 6 Sessions
The “Seek the Keep” encounter will be part of your first Encounters session for Hoard of the Dragon Queen. After roleplaying the characters meeting the NPCs at the keep and accepting Governor Nighthill’s plea for assistance, you can run a second encounter to complete the session. For subsequent sessions, you can run through the missions and encounters in any order. However, some missions are likely to play out more quickly than others, and you’ll want to keep this timing in mind as you put missions together to create a full two-hour session of play. Use the Greenest Encounter Length table to judge how encounters might come together to create a single session. Depending on the style of play your group enjoys, you should be able to schedule one long encounter or two short encounters in a single session. The playing time indicated for each encounter is only a rough guideline, based on the amount of combat and other activities the characters are likely to undertake during the encounter. Roleplaying, strategizing, and problem solving can take up additional time during a session for players who enjoy those activities. If a short encounter filled with lots of roleplaying, heated discussions about the cult’s plans, and the interrogation of cultists ends up filling an entire encounter session for you, that’s fine. Adjusting Encounters. A random encounter rolled if the characters aren’t using cover and stealth to move through the town is likely to extend a session, so ignore such encounters if you’re worried about a session running long. As well, feel free to use one or more random encounters without rolling if you’ve played your set encounters but still have time to fill in a session. Because this episode does not have an even number of short encounters, you will likely need to use random encounters to create a separate mission to fill out one session. Maximum XP. Each character participating in this episode can earn a maximum of 300 XP (the amount that will take a 1st-level character to 2nd level).
Greenest encounter LenGth
Mission Playing Time (Highlights)Seek the Keep Short (combat, roleplaying)1
The Old Tunnel Long (multiple combats)The Sally Port Long (multiple combats)Dragon Attack Short (combat)Prisoners Short (combat, roleplaying)2
Save the Mill Short (combat)Sanctuary Long (possible multiple
combats, roleplaying)Half-Dragon Champion Short (limited combat,
roleplaying)1 First encounter.
2 Can be combined with the “Save the Mill” or “Sanctuary”
missions.

11Episode 1: Greenest in Flames
Not for resale. Permission granted to print and photocopy this document for personal use only.
encounters, roll a d8 for every 100 feet they move in town. If the roll is 4 or lower, they didn’t attract atten-tion with that move. If the roll is 5 or higher, they run into something; roll a d8 again and check the Episode 1 Encounters table to see what the characters meet.
episode 1 encounters
d8 Encounter1 6 kobolds
2 3 kobolds and 1 ambush drake (see appendix B)
3 6 cultists
4 4 cultists and 1 guard
5 2 cultists and 1 acolyte*
6 3 guards and 1 acolyte*
7 1d6 townsfolk being hunted by raiders (roll a d6 to
determine the raiding group)
8 1d6 townsfolk hiding
* Acolytes have command prepared instead of sanctuary.
Most of the cultists, guards, and acolytes are human. At your option, you can include a few dwarves, half-elves, half-orcs, or halflings without altering any game statistics.
Seek the KeepCharacters have random encounters with raiders when they enter Greenest, but this one should be their first mission of the episode. It begins when a terrified human family (father, mother, and three young children) dash across their path, hounded by eight kobolds.
Without warning, five humans dash out from between two
buildings on your left. A limping man and three young
children race across the street into more shadows, and a
woman carrying a round shield and a broken spear turns
and faces back in the direction from which they came.
Eight kobolds stream out of the alley on the family’s heels
and fan out around the woman, who looks determined to
delay the creatures for as long as possible.
The woman is Linan Swift, and her husband is Cuth. Linan is a commoner but with 8 hit points. Her attack with the spear is +2 to hit for 1d6 piercing damage. Her husband is down to 2 hit points from an earlier fight. The children move at speed 20. They can be carried, but a character carrying a child has disadvantage on attack rolls and cannot wield a two-handed weapon. Unless characters interfere, the kobolds assume the characters are cultists and ignore them to concentrate on killing the woman first, her family second. Assuming characters intervene and save the family, Linan explains that they must make their way to the keep (at area 1); it’s the only safe place in Greenest. The raiders haven’t set up an effective cordon around the keep, so it’s still possi-ble to move through the front gate—but not for long. To reach the keep, the characters must make it past three groups of raiders. A group consists of 1d6 kobolds and 1d4 cultists. If the group contains six kobolds, one is a winged kobold (urd). Characters can fight these enemies, sneak past them,
Wandering EncountersThe streets of Greenest are overrun by forces consisting of cultists and acolytes accompanied by monstrous allies: kobolds with ambush drakes (see appendix B) and giant lizards. These raiders move through town without fear, pillaging as they go. As characters travel through the embattled village, they can run into raiders and townsfolk. Use these guidelines to determine if characters have an encounter. If characters use cover and stealth to avoid encoun-ters, have each character attempt a DC 10 Dexterity (Stealth) check. For every two individual checks that fail, the characters have one encounter on the way to their destination. Roll a d8 on the Episode 1 Encounters table to determine each encounter. If characters use the stream bed for cover for most of the trip, these charac-ters have advantage on their Dexterity checks. If characters don’t use cover and stealth to avoid
Stolen TreasureThe cultists and their kobold lackeys are in the midst of looting Greenest and collecting the spoils for transport back to their camp (see episode 2). Any marauding group that the party encounters has a 50 percent chance of having stolen treasure in its possession. Roll a d6 and multiply the result by 10 to determine the total value of the stolen items, in gold pieces (gp).
Tarbaw Nighthill

12Episode 1: Greenest in Flames
Not for resale. Permission granted to print and photocopy this document for personal use only.
function was as a secret means of collecting water from the stream during a siege, but it can double as a sally port. Since the keep has never been besieged, the old tunnel has never been used. Barrels and crates are piled in front of the door. The keys for the locks are on the ring that Escobert carries with him everywhere. At some point, Escobert recommends the tunnel as a means of sneaking townsfolk into the keep without run-ning the gauntlet of attackers watching the gates. Locks. Characters can clear the cellar door with a few minutes’ work. The lock is stiff but opens with the key; without the key, the character can open the lock with a successful DC 10 Dexterity check and a set of thieves’ tools. The disused tunnel is choked with webs but is oth-erwise clear. A few yards inside the stream end is a nest of two swarms of rats. The rats attack when disturbed, and the surviving rats flee when half their number die. Years of exposure and neglect have corroded the lock on the exit grate. Even with the key, a successful DC 10 Dexterity check is needed to open the lock. Without the key, the DC increases to 20. If the roll misses by 5 or more, the key or thieves’ tools break off in the lock so that unlocking it becomes impossible. Then only a suc-cessful DC 15 Strength check can force the grate open. Foes. A group of cultists is searching the stream banks for hiding townsfolk when the characters emerge from the tunnel. If characters open the lock with the key or with thieves’ tools, the first one to exit notices the raiders approaching without being spotted in return; the characters can keep out of sight in the tunnel or try to ambush the raiders after they pass. If the check fails, the raiders spot the character; roll initiative and proceed with combat. If the grate had to be broken open with a Strength check, the raiders hear the noise and find cover; they wait for the characters to exit the tunnel, then gain a surprise round. The raiders’ group consists of two cultists and six kobolds. If any cultists are still alive at the beginning of the fourth round of the fight, one of them runs to fetch help. Ten minutes later, two cultists, ten kobolds, and one ambush drake (see appendix B) arrive to guard the tunnel. Rewards. Award standard XP for defeated foes. Aside from that, the chief reward for this mission is the tunnel itself. As long as it remains secret, characters can use it to enter and exit the keep safely. Each time they use the tunnel exit, roll a d6. On a roll of 1, raiders see and attack the characters (use the Episode 1 Encounters table). On a roll of 2, they are seen but not attacked. Instead, the raiders set an ambush and attack the next time the characters return to the tunnel exit.
The Sally PortThe keep has a sally port along the west wall for coun-terattacking foes who bring a battering ram against the gates. During the night while characters are in the keep, raiders approach the old gate, force it open, and rush through. Escobert discovers them and races into the courtyard to sound the alarm ahead of the infiltrators. Enough defenders are available to deal with the imme-diate threat from raiders loose in the keep, since it’s more a probe that got out of hand rather than a full-scale assault. Escobert is most concerned about resealing the
retreat to avoid them entirely, or try something clever such as bluffing. If they fight, run the combat normally. When enemies must make a check to notice sneaking or bluffing, make a check with advantage for the group. Each time the characters retreat from an enemy group to avoid it, they run into d6 more townsfolk who are trying to reach the keep. For every four additional townsfolk in tow, the group must move past one more enemy group to reach the keep. At the keep, the characters are the last group through the gate before it is closed and barred. After characters enter the keep, raiders encircle it in increasing numbers. Rewards. Besides earning experience points (XP) for raiders fought on the way to the keep, characters earn a bonus of 50 XP per nonplayer character (NPC) brought alive into the keep. Divide this bonus equally among the party members.
MissionsEvents in Greenest are divided into missions. Missions don’t need to involve combat, but most do. The characters reach the town at sundown, or about 9 p.m. The sun comes up again at 6 a.m. the next morn-ing, but the last of the raiders are gone by 4 a.m. For time-keeping purposes, assume that each mission takes an hour. Time during the hour that isn’t spent fighting or slipping through town is spent tending gear, bandaging minor wounds, patrolling the keep’s walls, briefing Nighthill on the situation, and other mundane tasks. If characters take a short rest, they can’t under-take any other mission that hour. If players need guidance, Governor Nighthill can give the characters a quick briefing on the tactical situation. The raiders have isolated the keep from the town with encircling groups of guards, but they haven’t organized an attack. Nighthill thinks the raiders don’t intend to attack the keep; they seem interested only in loot. The real danger is to the town and to those people who didn’t make it into the keep before it was cut off. Nighthill wants the characters to slip back into the town and help people who are cut off or harass the raiders. A stealthy group can make it out of the keep and back in again without drawing the raiders’ attention.
The Old TunnelA narrow tunnel runs from the cellar beneath the keep to the bank of the stream (area 2). The tunnel is wide enough to allow warriors to pass through it in single file. In the keep, the tunnel is sealed with a locked ironbound door, and the stream exit is covered with a locked iron grate made to look like a sewer outlet. The tunnel’s main
Monster NamesThroughout the adventure, monster names are presented in bold. This is a visual cue pointing you to look up the monster’s stat block in the Monster Manual (or in the free supplement available at DungeonsandDragons.com). Some monsters appear in appendix B of this adventure. A note appears after a monster’s name if that is the case.
13Episode 1: Greenest in Flames
Not for resale. Permission granted to print and photocopy this document for personal use only.
door with barrels or other heavy objects while awaiting repairs, they might hold off attackers until the repairs are finished and avoid this fight entirely. Rewards. Award standard XP for defeated foes.
Dragon AttackThe adult blue dragon Lennithon accompanied this raid but is not an enthusiastic participant. Its chief contribution has been its Frightful Presence, but that becomes less effective as the night wears on and defend-ers overcome their fear. Shortly before midnight, the dragon launches a final assault against the citadel. Frulam Mondath orders the attack, knowing that the adventurers are in the keep at the time. Lennithon doesn’t consider this to be its fight, and it isn’t keen on tangling with adventurers for another’s benefit. During this attack, Lennithon flies over the keep and uses his breath weapon without moving closer than 25 feet from the parapet. The defenders on the walls have mastered their fear of the dragon’s Frightful Presence from earlier attacks. There are twenty NPC defenders on the walls at the beginning of the mission, and more can arrive between attacks to take the place of those who fall. The dragon doesn’t target the adventures at first, and every breath attack not directed at them kills 1d4 NPC defenders and injures 1d6 more. Adventurers who happen to get caught in the area make normal saving throws and take standard damage. The NPCs’ attacks
sally port, and he seeks out the characters for that job. To secure the sally port, characters must battle through two groups of foes. The first fight occurs against one acolyte, four kobolds, and one ambush drake (see appendix B), which are guarding the sally port’s 10-foot-by-20-foot ready room against exactly this type of counterattack. After characters seize the room, they discover that the door is heavily damaged. The fastest repair is with five castings of mending (taking five min-utes). If none of the characters can do this, an NPC in the keep knows the cantrip. Someone must find and fetch her to the ready room. Before the door can be repaired, a second group of raiders consisting of one guard, three cultists, and four kobolds attacks. These foes can come from outside the keep, or they might be a group of infiltrators trying to fight its way back outside. If characters barricade the
Rezmir the BlackThe “dragon lady” spoken of by the kobolds is Rezmir the Black Wyrmspeaker—a half-dragon who is one of Severin’s inner circle and a high-ranking leader of the cult. She is in command of the forces that have attacked Greenest in episode 1 of the adventure, and whose camp is the location of episodes 2 and 3. The Black Wyrmspeaker does not appear in these episodes, as she is also involved in leading other raids across the Sword Coast. However, she is an important part of the full adventure of Hoard of the Dragon Queen.

14Episode 1: Greenest in Flames
Not for resale. Permission granted to print and photocopy this document for personal use only.
of Dragons.” They know that the cult has a clutch of dragon eggs under heavy guard in a cave at the camp.
Rewards. If characters capture a prisoner, award each of them 25 XP. To collect that award, the prisoner must be brought to the governor. Interrogating the prisoner independently and bringing the information to the governor doesn’t count. The characters also receive standard XP for any monsters they defeat along the way.
Save the MillFrom the parapet of the keep, someone spots a group of raiders trying to set fire to the town mill. Governor Nighthill quickly approaches the adventurers.
“The guards have spotted a new threat. Raiders are trying
to set fire to the town’s mill. If it burns, we’ll lose our
stockpile of flour and we won’t be able to grind more for
months. I’m trying to assemble enough defenders from
here in the keep to defend it through the rest of the night,
but that will take time. You’d do us a great service if you
could get to the mill quickly and drive away the raiders
before they can set it aflame. You’ll need to defend it until
our force arrives to take over, but it shouldn’t be more than
fifteen minutes behind you.”
The mill is about 500 feet from the keep. The distance is doubled if characters use the secret tunnel and follow the stream to stay hidden. Roll a d6 on the Episode 1 Encounters table to deter-mine the strength of the raiders that are trying to set fire to the mill. Any kobolds in this force run away as soon as two or more raiders are killed. If characters observe the mill for a minute or more before attacking, allow them to attempt DC 15 Wisdom (Insight) or Charisma (Performance) checks. If successful, a character realizes that the raiders are making a demonstration of starting a fire, but it’s for show. A few fires are burning around the building, but they could be extinguished easily. This act of burning the mill is a ruse. Mondath has been informed that heroes are aiding the town, and she wants to lure them into an ambush. More raiders—one cultist plus one guard per character—are hiding inside the mill, waiting for the characters to show up. The mill is a simple rectangular barn, about 40 feet long and 20 feet wide, with an attached, exterior office. The long side of the building away from the stream has barn doors and a two-part door, and the two short walls have windows. All these openings are closed, but none are locked or barred. Inside, the main floor is dominated by a massive stone grinding wheel driven by a water wheel in the stream. The mill was operating late when the raid began and the millers fled without disengaging the wheel, so it still turns noisily. The upper half of the barn is a loft where milled flour is stored. The loft can be reached by wooden stairs along the east wall or by using the ropes and pulleys that hoist bags of flour up and down through large openings in the loft floor. The ambushers are waiting in the loft for heroes to enter the mill. When the heroes are inside, the guards
are ineffective against Lennithon. Bear in mind that the dragon’s breath weapon will kill a 1st-level character out-right, so be sure to demonstrate its destructive power to the players before turning the dragon against the party. After each attack, Lennithon swoops away until his breath weapon recharges, then swings in for another attack. He repeats this pattern until it has taken 24 damage or more, or a single critical hit. After that hap-pens, Lennithon leaves for good. Rewards. Characters earn 50 XP each for driving away Lennithon, but reduce that award to 25 XP if 10 or more defenders were killed during the attack.
PrisonersGovernor Nighthill would like to interrogate some of the raiders.
“I’d give anything to know what we’re up against, and why.
For that, we need prisoners. A commander, even a low-
ranking one, is best.”
If the characters haven’t run into any cult leaders yet, Nighthill takes them onto the parapet and points out what he means. This is an ideal time for everyone to catch a glimpse of Frulam Mondath (see appendix B)in her purple robes, accompanied by a dozen guards. Even the governor cautions characters against attack-ing such a formidable force, especially when any lower-level officer can answer his questions. Leaving the keep through the front gate is out of the question. By now, too many raiders are watching it, and they would jump the characters as soon as they moved away from the keep. Other options are waiting for a cloud to cover the moon before climbing down ropes tossed over the back wall of the keep, or using the old tunnel that exits into the stream bed. This mission can be combined with another mission, such as saving the mill or rescuing villagers from the temple of Chauntea. All characters need to do is bring a live cultist or Cult of the Dragon initiate back to the keep. Or characters can go into the town hunting for one specifically. Prisoners brought back to the keep are interrogated by Governor Nighthill and a few of his picked guards. Characters can participate if they want to.• Captured kobolds are terrified; they say whatever they
think the questioner wants to hear. They know that they’re working for the Cult of the Dragon and for a “dragon lady”, and that they’re after loot. Captured mercenaries or bandits talk freely; they have no special loyalty to the Cult of the Dragon. They reveal that they’ve been raiding communities around the Greenfields for loot, and they’ve heard rumors in the camp about dragon eggs.
• Cultists and initiates are the most tight-lipped. A successful DC 10 Charisma (Intimidation) or DC 12 Charisma (Persuasion) check is needed to cause cultists to reveal that they are members of the Cult of the Dragon and that they are collecting loot “for the great hoard that will usher in the reign of the Queen

15Episode 1: Greenest in Flames
Not for resale. Permission granted to print and photocopy this document for personal use only.
Arranging a Rescue. The heroes’ best shot at res-cuing the townsfolk is to overpower Group C and take control of the back door. In the temple, they can arrange a distraction to keep Groups A and B occupied at the front while the citizens of Greenest slip out the back and race for the keep or for the old tunnel—if characters have opened it already. That’s only one possibility; clever players can come up with different solutions. The townsfolk in the temple are near panic, however, and they won’t take orders from strangers unless some-one makes a successful DC 15 Charisma (Persuasion) check. Otherwise, characters need to locate the priest of Chauntea, Eadyan Falconmoon, a level-headed half-elf. He’s easy to spot, being the only calm person they can find in the temple, and he is elated to see them. He looks to the characters for a plan. Time is pressing. While characters are inside the temple, remind them of the booming hammer blows of the battering ram against the front doors, the crack-ing timbers, the stones and sputtering torches that fly through the windows intermittently, the smoke rolling below the ceiling, and the frightened townsfolk. How much time you allow before the doors burst open depends on your group; slow thinkers and careful plot-ters need more time than fast movers. What’s important is that players feel pressed. To create a sense of pressure, give the front doors 30 hit points and let each thud of the battering ram deal 1d6 damage. When the doors reach 20 hit points, they have cracks large enough to see through. At 10 hit points, the doors are sagging in their hinges. At 5, they could collapse at the next impact. How frequently you roll the die is up to you! One roll every 15–20 seconds is a good target for an average group. One roll every 30 seconds might be better for a group that needs to debate and reach consensus, while a group containing quick-on-their-feet, take-charge types could deal with a roll every 10 seconds. Be flexible, keep an eye on the play-ers’ level of tension, and don’t let anyone relax. If the doors burst open before the temple is evacuated, this scene turns into an ugly melee against Group A. The kobolds in that group prefer to attack unarmed villagers instead of lethal adventurers. Each kobold automatically kills one villager each round unless characters attack the kobolds, cut them off from their victims, or interfere some other way. If townsfolk have already evacuated the temple through the back door, or that process is well along before the front doors split apart under the ram, then characters can conduct a fighting withdrawal through the temple. After everyone gets into the smoke outside, they can close and brace the back door, then sprint for the keep or the tunnel in the stream bank with enough of a head start to get away safely. Rewards. Rescuing people from the temple earns each character 100 XP in addition to the points for kill-ing monsters. If more than ten villagers died during the rescue, reduce that award to 50 XP.
Half-Dragon ChampionBefore all the raiders depart, their champion challenges the town’s best warrior.
launch a volley of spears from above, then leap down to fight hand-to-hand. The ambushers have a good chance to gain a surprise round for their spear volley; a suc-cessful DC 20 Wisdom (Perception) check is needed to notice them before the attack. Characters who scan the loft for hidden enemies upon entering the mill have advantage on the check. Ten minutes after the second fight ends, a dozen bloody but basically healthy defenders arrive from the keep with orders to relieve the characters and defend the mill. They tell the characters to go back to the keep quietly while they remain behind at the mill. Rewards. Award standard XP for defeated foes. If characters realized they were walking into a trap, give each a 50 XP bonus. If they didn’t deduce that it was a trap but spotted the ambushers in time to prevent a sur-prise round, give each character a 25 XP bonus.
SanctuaryDozens of townsfolk have barricaded themselves inside the temple to Chauntea, but raiders have it surrounded. The attackers tried setting fire to the stout structure but had little success. Now they’ve deployed an improvised battering ram. It’s only a matter of time, possibly min-utes, before the temple’s main doors crumple under the assault, leaving the villagers inside helpless. The temple is a large building, made of fieldstone with a peaked slate roof, and square in shape. It is taller than most other buildings in town. Inside, the altar occupies the middle of the temple, with other worship areas arranged around it. Foes. The force outside the temple is split into three groups. One (A) is battering at the front doors, another (B) is circling the temple in a screeching mob, and the third (C) is heaping burning straw against a rear door. All these groups together would overwhelm 1st-level characters, but characters can devise a plan that gets them inside the temple by dealing with one group. Group A consists of one dragonclaw (see appendix B), two cultists, and six kobolds. The cultists are handling the ram while the kobolds stand guard in case the town militia mounts a counterattack. The dragonclaw is in charge. The kobold guards are alert, but they are dis-tracted when Group B passes in front of the temple. Group B consists of three cultists, ten kobolds, and two ambush drakes (see appendix B) strung out in a mob that stretches 50 feet. This procession with leaping and whirling kobolds completes one circuit around the temple approximately every eight minutes (two minutes per side). Group C consists of two cultists and six kobolds clustered tightly around the temple’s back door. Their meager fire produces little flame, instead creating pro-digious clouds of thick smoke that engulf the back of the temple and blanket the surrounding 30 feet of ground. Everything in the smoke is lightly obscured, and objects or creatures that are seen through more than 15 feet of smoke are heavily obscured. Characters can sneak up on these raiders and gain a surprise round against them, as long as they avoid Group B in the process.

16Episode 1: Greenest in Flames
Not for resale. Permission granted to print and photocopy this document for personal use only.
one-on-one combat. He doesn’t intend any shenanigans, and he won’t allow any from his kobolds. Cyanwrath is the likely winner of this match, whether he’s fighting Sergeant Markguth or a character. When his foe drops, he strikes one more time; the last blow kills Markguth or inflicts one death roll failure on a character. If Cyanwrath loses the fight, the kobolds immediately jump in to protect his body and carry it away. (Cyanwrath will recover from his wounds and be encountered again later.) If by some mischance Cyanwrath is killed or captured, his place in the dragon hatchery (episode 3) is taken by another half-dragon. With the fight over, the last of the raiders retreat en masse from the town into the darkness, marching away toward the southeast. Rewards. If a character steps up to the challenge and fights Cyanwrath, each party member earns 50 XP. If not, characters receive nothing for this encounter. A team of healers with healer’s kits and +4 bonuses to Wisdom (Medicine) checks attend to the wounded or dying character, and Governor Nighthill gratefully offers two potions of healing to the wounded character. If characters do something that costs the life of a hostage, Governor Nighthill is furious with them and offers no more help.
RewardsCharacters earn XP rewards in this episode as indicated in each mission. Each character participating in this epi-sode can earn a maximum of 300 XP (the amount that will take a 1st-level character to 2nd level). At the end of this episode, each character also gains 1 renown point in his or her faction.
DevelopmentsWith the immediate threat to Greenest ended, the char-acters can spend downtime between this episode and the next. In that episode, Governor Nighthill enlists the adventurers to seek out the raiders’ hidden camp and reveal their plans, and to rescue a missing scholar.
From the darkness, a creature strides into the dim light
of the dying fires around the keep. Although it is shaped
roughly like a human, it is at least seven feet tall, its skin
is covered in blue scales, its fingers bear wicked claws,
and its face has the muzzle and reptilian eyes of a dragon.
The creature stops about eighty yards from the main gate
of the keep and scans the walls. A line of kobolds fans
out behind it. With their spears, they prod four human
prisoners into the dim light. You can make out a woman,
a teenage boy in a blood-soaked tunic, and two children.
Then the half-dragon creature hails the keep.
“Defenders of Greenest! This has been a successful
night, and I am feeling generous. Do you see these four
pitiful, useless prisoners? We have no need for them, so I
will trade them back to you. Send out your best warrior to
fight me, and you can have these four in exchange.”
The speaker is Langdedrosa Cyanwrath (see appendix B for statistics) a half-blue dragon who serves the Cult of the Dragon. Cyanwrath has a personal troop of sixteen kobolds. A character who makes a successful DC 15 Intelligence (Arcana) or Intelligence (Nature) check rec-ognizes the creature as a half-dragon from descriptions. One of the defenders in the keep, Sergeant Markguth, recognizes the prisoners as his sister and her children, and he is ready to rush out into battle with the half-dragon. Escobert the Red and a few other defenders restrain him while Nighthill approaches the characters.
“My friends, you’ve demonstrated your prowess all
through this frightful night. I realize this is an awful
burden to ask you to bear, but any of you has a better
chance to defeat that horror than my militia have.”
If no one steps forward, Nighthill is disappointed but says he understands, and their refusal in no way dimin-ishes what they’ve done so far. In that case, the woman’s brother goes out to face the half-dragon. He is a human guard. Select one of the players to control Sergeant Markguth for this fight or just narrate its result. Cyanwrath is pleased to see a champion step forward. He agrees to these terms for the combat: The three chil-dren will be set loose immediately, but his kobolds will continue to stand guard over the woman, and they will kill her if anyone interferes in the fight—for example, if archers in the keep let fly at him. Regardless of who wins, the woman will be released when the fight is over; and the victor will be the last one standing. Governor Nighthill holds his troops in the keep during the combat. Adventurers can go out if they want, but the half-dragon insists that they keep their distance and stay between him and the fortress. If characters try to surround him or to edge into position for an ambush, he warns them that his kobolds won’t hesitate to kill the hostages if they see signs of treachery. The half-dragon is evil, but he has a deep sense of honor about

17Episode 2: Raiders’ Camp
Not for resale. Permission granted to print and photocopy this document for personal use only.
A young man walks up to you, limping heavily on his
bandaged left leg. “I hear that you intend to follow the
raiders and see where they’ve gone. I’d like nothing better
than to come with you, but in this condition, I’d slow you
down. In the midst of all this tragedy, there’s no reason
you would have heard about the fate of my master, Leosin
Erlanthar, but it’s important you know. He is a monk from
Berdusk. He disappeared last night, after we fought a
particularly savage battle against raiders. A few others and
I fought our way to the keep, barely. Leosin didn’t make it
at all. We went back this morning to look for him, but all
we found was his broken staff and this choker, which he
always wore.”
The monk’s name is Nesim Waladra. After introduc-tions are made, he continues.
In the warm light of day, Governor Nighthill and other leaders want to know who was behind the attack on Greenest, and why the town was a target.
The raiders retreated toward the southeast, and their trail is easy to spot. A small, stealthy group could follow the trail to the raiders’ camp and gather information. Governor Nighthill approaches the characters with a proposal: If they locate the raiders’ camp and find out certain information, he offers to pay them 250 gp apiece. He wants to know where the camp is sited, how many raiders are there, who their leaders are, what’s motivating these attacks, and where they plan to strike next. If characters recover valuables that were stolen from the town, he would like them returned, but he does his best to arrange a reward from what’s left of the town treasury. Recovering treasure, however, is a lesser goal when compared to the other objectives he brings up. Any gear or supplies the characters need for the trip are furnished by the town. As characters prepare to set off on this mission (or to leave town if they turn down the mission), though, an injured monk approaches.
Episode 2: Raiders’ Camp

18Episode 2: Raiders’ Camp
Not for resale. Permission granted to print and photocopy this document for personal use only.
boulders have rolled into a loose jumble. In fact, the sur-roundings offer no protection while making it easier for enemies to sneak up on the site. By observing for a few minutes, characters can discern that there are four human cultists and eight kobolds in the group. The kobolds and humans distrust each other, and although the cultists act as if they’re the bosses, their leadership amounts to nothing more than ineffectual bullying. The humans’ weapons are stacked against a rock, out of easy reach. The kobolds have their weapons on their belts. If the group is left alone, the kobolds grab their share of the half-cooked lunch and move about fifty yards away to eat, while the humans continue squabbling over how to cook a hen and the uselessness of kobolds as allies. If characters choose to bypass this group, a detour can get them around it with no difficulty. They could run into these stragglers again on their way back to Greenest. If characters attack, then unless they give away their presence on purpose (by hailing the camp, for example), they gain a surprise round. The humans spend their first turns retrieving their weapons and shields. The kobolds drop their food and scatter, then regroup and counterattack on round four, using their slings as much as possible. They stick around and fight only as long as any of their human allies are still fighting. As soon as the humans are all defeated, the remaining kobolds slink away into the hills and aren’t seen again. Rewards. Award standard XP for defeated foes, including kobolds that ran away. If any cultists are
“Leosin has been investigating these raiders for months. I
fear that he might have tried to infiltrate their group when
they retreated, or worse, was captured and carried away
as a prisoner. No one understands these bandits better
than he does, and his knowledge will be invaluable against
them. When you find their camp, please look for any
sign that Leosin is there. One of my brothers has already
departed for Berdusk to bring back help, but it will be
many days before help arrives. Anything you can do before
then would be a godsend.”
Nesim answers the characters’ questions to the best of his ability, but he also urges them to move quickly. The monks were returning to Berdusk from the great library at Candlekeep, where Leosin was consulting the librarians and researching ancient writings on dragon folklore. Dragon cults are his special interest. The broken staff is nothing special. The choker is a braided leather neckband with a silver dragon design chased into the leather. The ends are ragged, as if it was roughly torn off.
Tracking the RaidersThe raiders’ path is easy to follow across the rolling grassland of the Greenfields. A wide swath of grass is trampled down, but it’s impossible to determine the raiders’ numbers precisely. The path only confirms what characters already know: there were a lot of them, and they were a mix of humans, kobolds, and trained reptiles. One bit of information can be gleaned with a successful DC 15 Wisdom (Perception) check: Many of the beasts’ footprints are deeper on the retreat than they were on the approach march. They were weighed down with loot on the homeward-bound trip, but let players reach that conclusion on their own. It’s not possible to tell from the confusing jumble of prints whether any spe-cific footprints are those of prisoners. The trail leads south about twelve miles, to a more rugged region where steep-sided, rocky plateaus replace the gently rolling hills. The land between the plateaus is largely flat, broken only by outcroppings and wandering streams in steep-sided gullies. The plateaus jut fifty to one hundred feet above their surroundings and are difficult to climb except where rock falls and subsidence created natural ramps. The crumbling sides of the pla-teaus are dotted with caves and tumbled boulder fields. Characters can have two encounters during this trip. The first is with a group of raiders who have straggled behind the main body. They are disorganized and quarrelsome, and they should be easy prey for alert adventurers. The second group is an organized rear-guard watching specifically for pursuers from the town. They present a much graver threat.
StragglersCharacters spot this group’s cooking fire smoke from several miles away, because the stragglers stopped to roast a few prairie hens for a meal. They sought shelter in a low spot between surrounding hills, where tall
Designing D&D Encounters Sessions: Raider’s Camp2 to 3 Sessions
The journey to follow the raiders plays out as two encounters, both of which taken together should fill out a single session of play. Play the “Stragglers” and “Rearguard” encounters in the order presented. Ignore the option in “Rearguard” for the characters to bypass the encounter. If the “Stragglers” encounter runs long, you can finish off the session by using the random encounter table in “Episode 1: Greenest in Flames” to generate additional combat encounters as cult patrols are attracted to the noise of battle. Then set up the “Rearguard” encounter as its own session, using the same random encounter table to create additional combat encounters as new patrols enter the fray. The main encounter of this episode—“The Camp”—can be run as a session on its own. Because this is largely a roleplaying and exploration encounter, the length of time it takes to complete can vary drastically, depending on how your players take to roleplaying. If the session finishes early (or feels as though it might), add a few easy combat encounters using the random encounter table in episode 1. Combat during the session can cover isolated skirmishes with cultists that must be overcome before they can raise the alarm in response to the heroes’ presence in the camp. Combat at the end of the session can cover squads of cultists trying and failing to stop the heroes’ escape. Maximum XP. Each character participating in this episode can earn a maximum of 600 XP (the amount that will take a 2nd-level character to 3rd level).

19Episode 2: Raiders’ Camp
Not for resale. Permission granted to print and photocopy this document for personal use only.
some silver serving dishes, and a few religious carvings of Chauntea taken from a home shrine.
RearguardIf the characters learn of the camp location and proba-ble site of the rearguard from the stragglers, they can use that information to bypass this encounter entirely. In fact, that would be the smart thing to do, both because it negates a damaging fight and because if the rearguard is wiped out, leaders in the cult will wonder why it never reported back. The best result for the characters is if the outpost checks in at the correct time with an “all clear.” The rearguard consists of one guard, six cultists, and two acolytes. The guard and cultists have spears for both ranged and melee combat. They are positioned in an area where the trail winds through a gap between two outcrops. The ambushers are hidden in the rocks, 12 to 15 feet above ground level. Characters might detect the ambush, with the odds depending on what they know and how they approach the area.• If stragglers described the likely ambush spot to char-
acters, it can be recognized from 200 yards away with a successful DC 10 Wisdom (Perception) check.
• If stragglers mentioned the rearguard but didn’t describe the spot, it is recognized as a good spot for an ambush from 100 yards away with a successful DC 15 Wisdom (Perception) check.
• If characters haven’t been warned about the rear-guard, someone spots a face peering down from above with a successful DC 20 Wisdom (Perception) check, but not until the characters are within 20 yards.
• If players state that they’re watching for potential ambush spots, give them advantage when making these checks.
The rearguard has a twofold mission. It must stop any small party of intruders coming up the trail, or harass and delay a larger group while sending word to the camp that trouble approaches. The guard decides that he has enough of an advantage against a party of five or six adventurers to deal with the problem on the
questioned, they refuse to talk unless someone succeeds at a DC 15 Charisma (Intimidation) check. They know it’s standard practice for a raiding party to leave behind a rearguard. They don’t know how strong the rearguard will be, but they expect it is sited about a mile ahead where the path passes between rocky bluffs. They also can describe the raiders’ camp and its location, plus they know some prisoners were taken from the town but not how many or whether they include a half-elf monk. They know the raid was for loot, because they were told to look specifically for gold, gems, and other valuables and were forbidden to do any looting for themselves. Cultists know they are preparing “the great hoard to honor the Dragon Queen.” Captured kobolds talk freely, but most of what they say is lies. That’s not because they try to mislead ene-mies, but because they will say anything, no matter how outlandish, if it might gain them their freedom. The cultists have 28 sp among them, besides their cheap weapons. The kobolds, who looted despite their orders, have a sack containing pewter candlesticks,
Frulam Mondath
Cult of the Dragon RanksThe Cult of the Dragon has an active recruiting process, accepting initiates from a young age. An initiate (use the cultist stat block) trains for months or years before gaining any rank within the organization, and many trainees don’t survive the tests. An initiate who passes the tests must choose an affinity to a particular color of dragon: black, blue, green, red, or white. He or she is then welcomed into the ranks as a dragonclaw. The higher ranks of the cult, in ascending order, are dragonclaw, dragonwing, dragonfang, dragonsoul, and wyrmspeaker. There are only five wyrmspeakers, one per color of chromatic dragon. The current wyrmspeakers are Severin (red), Galvan (blue), Neronvain (green), Rezmir (black), and Varram (white). Most of the cult’s operations are overseen by local leaders called Wearers of Purple for the ceremonial robes that they wear. All of the wyrmspeakers are Wearers of Purple, as are lower-ranking cultists appointed by the wyrmspeakers to preside over cult enclaves.

20Episode 2: Raiders’ Camp
Not for resale. Permission granted to print and photocopy this document for personal use only.
the names of their leaders (Rezmir, Frulam Mondath, and Langdedrosa Cyanwrath), and that the raid on Greenest was to collect treasure for dragons. Rezmir outranks the other leaders. Rewards. Award standard XP for defeated foes. The cultists have no treasure, but their Cult of the Dragon out-fits and weapons could be invaluable when characters try to get into the raiders’ camp.
The CampThe cultists have set up their camp in the hollow of a rocky plateau that’s shaped roughly like a horseshoe. The lower portion of the plateau rises gently from the surrounding land, but it quickly steepens and ascends to a height of 150 feet above the landscape. Boulders form jumbled heaps at the bases of the cliffs. The level shelves and top of the plateau are covered in long grass, and brush and scrubby trees grow in patches.
General Features Boulders. The boulders are difficult terrain and pro-vide three-quarters cover. Brush. The brush around the site grows to a height of 4 to 6 feet. It is tough and dense, making it difficult terrain and providing three-quarters cover to targets sheltering among it. Caves. The steep sides of the plateau are dotted with shallow caves. Boulders or brush conveniently conceals
spot, provided he doesn’t weaken his force by sending a runner to Frulam Mondath. If the adventuring group contains seven or more characters, you can either have the guard harass the enemy and dispatch a runner to the camp, or you can add cultists until they outnumber the characters by two or three, then let the cultists make a stand. If characters walk into the trap, the cultists tumble boulders onto them. Each character must succeed on a DC 11 Dexterity saving throw or take 2d12 bludgeoning damage from falling rocks (half as much damage on a successful save). The boulder attack constitutes the cult-ists’ surprise round. After that, they use ranged attacks until they are out of ammunition or the heroes force them into melee. Because they are positioned in the rocks above the characters, the cultists have three-quar-ters cover against attacks from below (+5 bonus to AC). To reach the foes, characters must scramble up the rocks. The distance is only 10 to 15 feet and no ability check is required, but the rocks are difficult terrain.
DevelopmentsThese raiders are distinctly different from the earlier stragglers. All are dressed in similar (but not identical) black leather tunics with flared, black mantles. These are dedicated cultists. If captured, nothing less than a successful DC 20 Charisma (Intimidation) check can pry any information from them. Even with that, all they reveal is that they are initiates in the Cult of the Dragon,

21Episode 2: Raiders’ Camp
Not for resale. Permission granted to print and photocopy this document for personal use only.
without falling. If characters are concerned about keep-ing quiet, then a successful DC 10 Dexterity (Stealth) check ensures that no rocks break loose and rattle down. Tents. The raiders live in circular huts made from closely spaced wooden or bone poles covered in hide, mud, and sod. Huts vary in diameter from 10 feet to 25 feet, and in height from 5 feet to 10 feet. (Symbols on the map represent clusters of tents.) Those in the mouth of the hollow (level 1 on the map) are crudely built and decorated with animal skulls. These are occupied by kobolds. Cultists occupy the huts on level 2, which are sturdier, cleaner, and decorated with painted designs representing dragons. A few tents on level 2 are set
many of the cave mouths. Characters who need to take a long rest can easily find a secure cave in which to hide. Guard Towers. The cultists have built two guard towers at the camp, one at the entrance to the hollow and one atop the plateau. These towers are 20 feet high and made from rough timbers lashed together with rope. They are large enough for a few lookouts. The tower at the mouth of the hollow is manned by kobolds, while warriors man the one above. The guards have horns to blow when they must sound an alarm. Prisoners. The cultists’ prisoners are kept at area 1. Currently, only eight prisoners are in the camp, not counting Leosin. During the day, they are put to work under guard by four dragonclaws (see appendix B). At night, they are shackled to a post in their hut to prevent escape. The shackles are secured by a single chain and lock that can be opened with a key carried by one of the guards or with thieves’ tools and a successful DC 10 Dexterity check. The chain can be broken with a successful DC 20 Strength check. Five of the prisoners are from Greenest, and the other three are from earlier raids against hamlets and small farming villages to the south and east. There were more prisoners at one time, but many have died from overwork and mistreatment. If a situation develops where released prisoners must fight, use commoner stats for them. Slopes. The sides of the plateau rise sharply, while the floor of the hollow slopes up gradually toward the east. A long ladder is lashed to the cliff so guards can reach the upper guard tower. The cliffs have handholds and footholds for climbing, so no die roll is needed under normal circumstances. If characters are in a hurry, a successful DC 10 Strength (Ath-letics) check is needed to make the climb
Langdedrosa Cyanwrath

22Episode 2: Raiders’ Camp
Not for resale. Permission granted to print and photocopy this document for personal use only.
The whole camp goes on alert if the bodies of mur-dered human sentries or cultists are discovered. One dead kobold won’t cause much alarm, but many dead kobolds will. If the camp goes on alert, every character must make a DC 15 Charisma check. A failure means the character has been spotted as a stranger and an infiltrator. Someone raises the hue and cry, which quickly draws a crowd. A roll of 10 or lower means someone has recognized the character from the fight in Greenest. The characters have a chance to get away if they immediately go on the attack and begin cutting their way out of camp, but if they delay or spin tales, a crowd of cultists that outnumbers them five to one sur-rounds them. If characters try to estimate numbers in the camp, they count roughly one hundred kobolds and a mix of bandits, guards, and cultists totaling about eighty—effec-tively an unlimited supply if characters get the idea of fighting them all.
Captured!If caught, characters are disarmed, their hands are tied, and they are brought before Frulam Mondath for judgment. One by one, she asks them who they are, where they came from, and what they’re doing in her camp.• If anyone was recognized from the fighting in
Greenest, it doesn’t matter what the characters say. Mondath sentences all of them to be executed on the morrow, after spending the night tied to posts along-side the monk Leosin. Characters have one night to escape this fate. They might wriggle out of their bonds, bribe or charm a cultist to set them free, or come up with a clever use for a cantrip. If all else fails, Leosin reveals that he has a hidden knife with which they can cut themselves free.
• If characters admit they came from Greenest and are enemies of the cult, the effect is the same as if they’d been recognized.
• If characters lie to Mondath—claiming they are new recruits and this is all a mistake, for example, or that they are studying the cult before deciding whether to join—then compare their Charisma (Deception) checks to Mondath’s Wisdom check to determine whether she believes them. You can allow advantage or disadvantage on the roll when someone’s lies are especially plausible or implausible. Match die rolls individually for every character. Those who Mondath believes are set free, but watched and stopped if they try to leave the camp. Those who Mondath does not believe are sentenced to die as above.
Exploring the CampCharacters can learn much from poking around in the camp. If the characters pose as cult members, they can speak to other cultists and question them (carefully) about the cult’s plans and long-term goals. Most cultists should be treated as indifferent when determining reac-tions or trying to gain a favor. Kobolds are less helpful and should be considered hostile when characters make Charisma checks to gauge their reaction.
aside for prisoners. The large ten at area 2 is set apart from the others by an open space. It is reserved for Rezmir, Frulam Mon-dath, and Langdedrosa Cyanwrath. An honor guard of four guards and four guard drakes (appendix B) keeps watch around this tent day and night. They don’t sleep at their posts, they don’t fall for tricks, and they don’t listen to stories or pleas. Their job is to keep everyone away from their leaders’ tent, and they are fanatical about it. Only acolytes and adepts the guards know by sight and by voice are allowed to approach.
Camp AlertnessFor the first day following the raid, the cultists are both elated with the outcome and exhausted. Rezmir doesn’t expect a serious challenge from the town, and slower members of the raiding party and walking wounded straggle into camp all through the day after the raid. The situation at the camp is confused and security is lax. Most of these raiders are mercenaries and bandits, and not even the dedicated cultists wear recognizable uniforms on raids. No one challenges latecomers for passwords or security signals. Put simply, the raiders are confident that no enemies followed them this far. Characters can walk straight into the camp without having their identities seriously challenged. In fact, the bolder they are, the more likely they are to blend right in. Players may be tempted to have characters seek cover and observe during the day and not attempt to enter the camp until nightfall. This can work, too, but sneaking around in the dark is more likely to attract suspicion than simply walking in as if they belong in the camp. The chief risk is that someone might recognize the characters from the fighting at Greenest. Have each character make a DC 5 Charisma check. Suc-cess means no one remembers the character’s face, but failure means that at some time (not necessarily immediately, but when recognition would be the most dramatic), someone in the camp recognizes the charac-ter. If characters are wearing Cult of the Dragon regalia taken from the rearguard, the characters have disadvan-tage on this roll because no one returning to camp at this time should be in uniform. The character who faced Cyanwrath one-on-one, however, has a -4 penalty to the roll. If that character ever comes face-to-face with the half-dragon, recognition is automatic. As the day wears on and the commotion winds down, the camp becomes calmer and better organized. Guards resume their normal routines. If characters haven’t entered the camp before sundown of the first day, they find it more difficult, since there’s very little traffic in and out of the camp on a normal day. They’ll need a good story and a successful DC 10 Charisma (Deception) check to walk past a guard station of five guards. This check can be made only once for the group; they can’t talk their way out of a failure. After the initial opportu-nity to enter the camp has passed, characters need to resort to stealth or subterfuge to get in. For example, characters scaling the plateau from the east could use brush for cover right up to where the cliff overlooks the camp. From there, they could observe or climb down the rocks under cover of darkness.

23Episode 2: Raiders’ Camp
Not for resale. Permission granted to print and photocopy this document for personal use only.
• The mother of dragons—praise Tiamat’s glory—shall return, and when that day comes, all the nations of the world shall tremble before her majesty!
• The monk is of special interest to Rezmir. Why else would she keep the creature alive that way? What Rezmir hopes to learn from him is anyone’s guess, but you wouldn’t want to be in that half-elf’s skin—or what’s left of it—when the questioning gets serious.
• The plunder from nearby settlements is stored in the cave. No one but Rezmir knows how much is there altogether, but it must be a big pile by now.
Aside from being recognized, the chief risk of spending time in the cultist camp is getting roped into a work
Characters can learn the following information through observation and questioning. They need to be careful, however, not to attract attention for asking too many questions or poking their noses into things that are none of their business. Any time they come off as “too nosy,” feel free to call for another Charisma check to see whether someone recognizes them from Greenest. • This is a camp of the Cult of the Dragon—praise
Tiamat’s glory! (Some cultists extend their right hand with fingers outstretched to represent the five heads of Tiamat when they praise her glory. Others curl back two fingers, to show that Tiamat’s strength is hidden. This is not man-datory, but adepts and hard-core cultists look favorably on those who do it sincerely.)
• Not everyone here is a full-fledged member of the cult. Many are new initiates working toward full acceptance, and many others are simple mercenaries, hired to flesh out the camp’s strength during raids or if it should come under attack.
• The kobolds are here because their worshipful atti-tude toward dragons makes them easy for Rezmir and other high-ranking cultists to manipulate, but they are not well liked or trusted by the other races.
• Hunters who bring in antelope and other large game from the grasslands feed the camp. The cultists and their allies eat most of it, but some is stored in the cave to feed the hatchlings.
• The cult has been ranging far and wide on small raids to collect treasure. Greenest was the closest target to the camp, the biggest of all the towns they’ve attacked, and the most profitable—praise Tiamat’s glory!
• Prisoners are used for manual labor. In the past, a few have “converted” and become loyal members of the cult, but most die eventually of overwork and under-nourishment. Then they are fed to the drakes or taken into the cave to feed the hatchlings.
• The cave at the back of the camp (area 4) is off-lim-its to all but those who’ve been cleared by Mondath and Rezmir, which includes a handful of guards and kobolds. It’s known around camp as “the nursery,” and it’s an open secret that Rezmir plans to hatch a clutch of dragon eggs there.
• The half-black dragon Rezmir came to the area a few months ago, and she set up the camp. Mondath han-dles everyday operations.
• The half-blue dragon Cyanwrath is Mondath’s right hand and is seldom far from her side. He has a rigid sense of honor, but you don’t want to make him angry.
Leosin Erlanthar

24Episode 2: Raiders’ Camp
Not for resale. Permission granted to print and photocopy this document for personal use only.
overcoming them. The awards listed below are just recommendations; adjust them and add to them as you see fit. • For getting into and out of the cultists’ camp with-
out causing an alarm or being caught: 100 XP per character.
• For getting into and out of the cultists’ camp with-out stirring any suspicion: an additional 100 XP per character.
• For rescuing Leosin: 250 XP per character.• For leaving a dummy or decoy in Leosin’s place: an
additional 50 XP per character.• For rescuing other prisoners: 25 XP for each prisoner
brought out of the camp alive.• For each piece of information listed under “Exploring
the Camp” that characters learn on their own (not from Leosin): 25 XP per character.
Each character participating in this episode can earn a maximum of 600 XP (the amount that will take a 2nd-level character to 3rd level). At the end of this episode, each character also gains 1 renown point in his or her faction.
DevelopmentsWhen the characters arrive safely back at Greenest—presumably with Leosin in tow—he can fill them in on any details they missed during their investigation of the cult’s camp. The monks who accompanied him are delighted to see him alive, and the families of any other released prisoners are equally grateful for the return of their loved ones. Governor Nighthill pays the characters their promised 250 gp each and publicly praises their courage and daring.
detail. Characters might be selected by an officer to spend a few hours helping with food preparation, stand-ing guard in a tower, practicing weapon drill, or even cleaning up after animals (a job usually reserved for prisoners, but currently the number of prisoners in the camp is low).
Leosin ErlantharThe monk is tied to a stake at the back of the camp (area 3). He has been severely beaten, and he has been denied food and water in an effort to break his spirit. Rezmir knows from informants across the Sword Coast that Leosin has been researching the cult’s history and recent activity. The wyrmspeaker wants to know how much Leosin has learned and with whom he shared his information. Rezmir considered it an amazing stroke of luck that Leosin was captured during the raid. In fact, it wasn’t luck at all, at least not for Rezmir. Leosin had studied their previous attacks and concluded that the time was right for the cult to strike a bigger target, and he knew that Greenest was prosperous yet poorly defended, making it the most likely next target. So, when he deemed the time was just about right, he visited the town with the intent of staying until some-thing happened. His observations paid off, and Leosin separated from his people during the night and fell in with the raiders when they retreated, hoping to learn more about the cult’s plans and the location of their camp. Rezmir spotted him after the sun came up, and the monk was quickly overpowered and captured. That portion of Leosin’s scheme has worked reason-ably well. He now knows most of the information listed above under “Exploring the Camp.” Unfortunately for him, captivity has been more brutal than he expected, and although his mind and will are still strong, he’s in a very poor physical state. Despite the danger, Leosin isn’t entirely happy about being rescued if characters come to set him free. He believes he can learn more, and he’s willing to take the risk. He’s too weak to resist, however, so characters can easily take him away against his will if that’s what they want to do. He can move without aid at a speed of 20 feet and fights as a commoner with disadvantage on attack rolls. If characters don’t bring him out of the camp, Leosin breaks away on his own. He refuses to talk about it later. If characters are captured and imprisoned alongside Leosin and their attempts to escape fall through, he reveals that he has a small knife hidden in his boot. They can use it to cut their bonds. Leosin’s absence is noticed within five minutes if he is taken away, and an alarm goes up throughout the camp. Rigging up a dummy in his place delays the discovery by twenty min-utes. Tying up a dead or unconscious cultist (preferably a half-elf) in his place assures the intruders a two-hour head start before the escape is noticed.
RewardsAward standard XP for defeated foes. This episode does not involve many fights, but it does present many challenges, and characters should be rewarded for

Not for resale. Permission granted to print and photocopy this document for personal use only.
25Episode 3: Dragon Hatchery
If the characters were working as caravan guards, Leosin offers to match whatever their previous employer was paying them plus 20 percent. If they are currently unemployed, he offers them 150 gp apiece. He’s willing to haggle; this mission is important, and no one else is available who Leosin believes can handle it. If the characters accept, he tells them to find him at the city of Elturel afterward, both to report and to collect their pay. (If you are not planning to continue with the full Hoard of the Dragon Queen adventure or to use Leosin in adventures of your own, he pays the characters in advance.) The monk doesn’t believe it’s essential that the char-acters head back to the camp immediately. He doesn’t expect the cultists to make any sudden changes in their plans or mode of operation. Leosin is wrong about this, because he doesn’t realize how much his presence in Greenest alarmed the wyrmspeaker. Rezmir knows that Leosin is investigating the Cult of the Dragon, but she doesn’t know whether the monk’s appearance in Greenest was a coincidence, a good guess, or a sign that the cult’s whole plan has been compromised. She isn’t
A fter his experience in captivity, Leosin needs sev-eral days to recover. When he’s healthy again, he intends to travel north to Elturel to convey what
he’s learned to Ontharr Frume, a paladin of Torm who shares his concern over the Cult of the Dragon’s recent surge in activity. He has a favor to ask of the characters.
“After all you’ve done already for me personally and for
the people of Greenest, I hate to ask anything more from
you. But the need is great, and I dare to hope that you can
aid me one time more. I need you to return to the cultists’
camp. You know your way around it now. If the cultists are
preparing to conduct another raid, or a large body of them
marches away, or if anything substantial is carried into or
out of that cave, I need to know. If you have a chance to
get into the camp and look around again, that would be
the ideal way to spot anything that’s changed.
“I don’t recommend letting yourselves get captured,” he
adds with a wry smile.
Episode 3: Dragon Hatchery

Not for resale. Permission granted to print and photocopy this document for personal use only.
26Episode 3: Dragon Hatchery
willing to take chances: she’s heading north with the accumulated treasure immediately.
Abandoned CampWhen characters return to the camp area, they find it mostly abandoned. (If they stayed, they witnessed the rapid packing up and abandonment of the camp.) The stinking huts of the kobolds (those on level 1) have been burned, but the level 2 huts and both guard towers remain. Anyone can determine from tracks that the cultists trekked away in small groups in all directions. A successful DC 10 Wisdom (Perception) check reveals that most of the camp’s wagons and pack animals moved in a train toward the west. Still left in the camp are some hunters, the kobolds who tend the dragon nursery in the caves, Frulam Mon-dath, her guards, and Langdedrosa Cyanwrath. Only the hunters still use the huts. All others live in the hatchery cave. The activity and guards around the cave mouth should be the top draw on the characters’ attention. On most mornings, hunters fan out onto the grassland to hunt for antelope and other large game. They travel on horseback and bring along an extra horse to pack the field-dressed game back to the camp. Hunters don’t nec-essarily return to the camp every evening. They stay out until they have a load of meat to bring back. Hunting on the Greenfields is good, so they seldom need to spend more than a night or two away. Four scouts act as hunt-ers; roll a d4 to determine how many are in the camp when characters arrive. They are not dedicated cultists, so they won’t challenge characters who enter the camp, attack them, or even alert the cultists. They consider standing guard to be beneath them. They are a taciturn bunch, so they won’t be much help to inquisitive characters. They converse more freely with rangers, but to most strangers they merely nod, point, shake their heads, scowl, and utter one- or two-word answers. If characters converse with them, these hunters can relate how the camp dissolved within hours after the discovery of the captured half-elf’s escape. Crates carried from the cave were loaded onto wagons or animals and hauled to the west. A few raiders remain in the cave: the Wearer of Purple (Mondath), the “dragon-man” (Cyanwrath), the better warriors, and the “dragon-dogs” (kobolds). As long as the cultists pay well for fresh meat, the trackers continue hunting for them. Whatever else the cave holds is none of their concern. A thorough search of the camp takes about ten man-hours. Allow characters to make a Wisdom (Perception) check after the first hour. A successful roll means the character realizes that while quite a bit of material has been left behind, it’s all trash: cracked pottery, rusty knives, soiled clothing and bedding, cheap cookware, and wine that’s gone to vinegar. Some of it might be of use to the people of Greenest who lost everything in fires, but it has no value as treasure.
General FeaturesThe only thing of interest remaining in the camp is the cave itself (area 4 on the map of the camp), which char-acters can see from the camp. There, characters find
Designing D&D Encounters Sessions: Dragon Hatchery8 to 9 Sessions
Because the characters can move through the caverns of the dragon hatchery in a number of different ways, you will be creating each session on the fly, based on the choices the players make. The Dragon Hatchery Encounter Length table can provide guidelines for how encounters in specific areas might come together to fill out a session. The characters’ entrance into the camp and possible interaction with the scouts should fill the first half of a session. The second half of that session can then be covered by a short encounter in areas 1 and 2. As the characters continue to explore the caverns, try to build subsequent sessions around one long encounter or two short encounters. However, because you don’t want to limit the players’ ability to move freely through the cavern complex, you might need to adjust encounters for best fit. The playing time indicated for each encounter is only a rough guideline, based on the amount of combat and other activities the characters are likely to undertake during the encounter. Roleplaying, strategizing, and problem solving can take up additional time during a session for players who enjoy those activities. If a short encounter filled with lots of roleplaying, heated discussions about the cult’s plans, and the interrogation of cultists ends up filling an entire encounter session for you, that’s fine. Adjusting Encounters. Instead of rolling for wandering monsters, use the Episode 3 Encounters table to create quick encounters that can help you adjust the pace of a session. For example, you might play a short encounter that takes you just past the halfway point of a session when the players decide to explore area 7—one of the longer encounters, with the possibility of three separate combats. You could decide to end the session early, letting the characters enter the area but stopping before the first combat. Alternatively, you could delay the characters’ entrance into area 7 by creating one or two random encounters consisting of kobold guards sneaking up on the adventurers from behind. The session can then end with an easy fight that leaves the characters primed for the bigger fight in area 7 in the following session. Maximum XP. Each character participating in this episode can earn a maximum of 1,800 XP (the amount that will take a 3rd-level character to 4th level).
draGon hatchery encounter LenGth
Area Playing Time (Highlights)
1 or 2 Short (combat)
3 Short (possible combat, trap)
4 Short (combat)
5 Short (possible combat)
6 Short (trap)
7 Long (multiple combats, trap)
8 Long (combat, trap)
9 Long (combat, trap)
10 Long (multiple combats, roleplaying)
11 Short or long (possible combat, roleplaying)*
12 Short or long (possible combat)*
13 Short (roleplaying)
* Creatures in these areas might fight here, but can also
move to other areas to join the combat there.

Not for resale. Permission granted to print and photocopy this document for personal use only.
27Episode 3: Dragon Hatchery
area 2 in the cave, to set up an ambush. If characters approach the cave quietly from the sides, they won’t be spotted. They then have a chance to surprise the dragon-claws, who have normal readiness.
2. Concealed PassageIf the guards at the entrance spotted the characters’ approach, they wait here until the characters come into view, then try to spring an ambush. Determine surprise normally; the dragonclaws’ readiness is high. The passage at the end of this alcove is deeply shad-owed and hidden by a cleverly cut fold in the rock. It’s obvious to anyone who walks to the end of the alcove, but from elsewhere in the cavern, it can be spotted only with a successful DC 20 Wisdom (Perception) check. The stairs down to area 3 are trapped. See that area’s description for details.
3. Fungus GardenThe kobolds cultivate fungus in this cavern to supplement the meat brought in by the hunters. Mixed in among the mundane fungi are violet fungi. The drop-off from area 2 is 10 feet high. The stairs are trapped; see below.
The entrance to the cave ends here at a 10-foot drop-
off. To your right, broad steps are roughly hewn into a
natural stone ramp. The cavern below is carpeted with
a profusion of fungi ranging from a few inches high to
nearly as tall as a human adult. Two paths lead through
the fungi: one on the right and one on the left.
Nothing distinguishes the paths to casual inspection. The path on the right is flanked by four violet fungi, while the path on the left is free of these dangerous growths. The violet fungi can be spotted among all the other mushrooms with a successful DC 15 Intelligence (Nature) check, but only from the base of the steps, not from atop the ledge. Likewise, a careful inspection of the path reveals that only the left trail sees heavy use.
Trapped StairsThe stairs are constructed so that the lowest steps col-lapse into a ramp that dumps a character right at the base of the violet fungi. Roll any die as each character descends the steps; on an odd roll, the character triggers the trap. A character who is actively looking for a trap on the stairs can find the trapped step with a successful DC 15 Wisdom (Perception) check. The kobolds and guards know where to avoid stepping, of course.
4. Stirge LairSome fungus from area 3 dots this area, but chiefly it is the lair of a colony of bats. Hidden among the bats are ten stirges. The bats are present only from sunrise to sundown, but the stirges are always here. Normally the stirges prey on the plentiful bats and leave the cave’s other residents alone, but not always. Characters notice dead bats on the floor (victims of the stirges). If that causes someone to look up, describe how
the cultists who stayed behind, a clutch of dragon eggs, the special cadre of kobolds who tend the eggs—and the many traps the kobolds set to defend their home. These eggs are important to the cult, but they were deemed too near to hatching to be moved safely. Rezmir left them with what he believed was an adequate guard force under Frulam Mondath and Langdedrosa Cyanwrath. Ceilings. Cavern ceilings are 15 feet high. Ceilings in the humans’ chambers (areas 11, 12, and 13) are 10 feet high. Light. During daytime, areas 1 and 2 are brightly lit, and areas 3 and 4 are dimly lit by outside light. All other areas are in darkness unless the area notes otherwise. Sound. The caverns are filled with faint sounds: dripping water, scratching rodents, scrabbling lizards, wind moaning across the entrance. These normal underground sounds camouflage the clanks, thuds, coughs, and speech of the kobolds and cultists. Sound echoes well along the main chamber (areas 1–5), so a fight in any of these can be heard in the others. Else-where, normal sounds echo confusingly and are lost in the background noise. The sound of a scream carries a long distance, however, and the sound of a fight travels through 30 feet of tunnel and attracts attention if the fight lasts more than 3 rounds.
Wandering MonstersKobolds move freely through the caverns, going about their business. Characters have a chance to randomly encounter these wandering kobolds. Roll a d6 every time characters enter or re-enter areas 3 to 10. On a roll of 1, monsters are present. Roll on the table to determine what they meet. These randomly encoun-tered monsters are added to any creatures mentioned in the area description. Be sure to make this roll before characters enter the area, because both groups have a chance to gain surprise.
episode 3 encounters
d6 Encounter1 4 kobolds
2 6 kobolds, 2 winged kobolds
3 3 winged kobolds
4 5 winged kobolds
5 2 winged kobolds, 1 guard drake (appendix B)
6 2 ambush drakes (appendix B)
1. Cave EntranceThe entrance to the cave is broad and tall, but the ceil-ing quickly lowers to a height of 15 feet. Standing guard inside the entrance are two dragonclaws (see appendix B). They position themselves about 30 feet inside the cave and stay near the walls and the column, so that while they aren’t hidden, they aren’t conspicuous, either. Char-acters who observe the cave from a distance—from the area of the plateau where the steps ascend from level 1 to level 2, for example—spot one of the dragonclaws. If characters approach openly through the camp, the dragonclaws spot them automatically and retreat toward

Not for resale. Permission granted to print and photocopy this document for personal use only.
28Episode 3: Dragon Hatchery
in treasure raids and later deemed to be unworthy of Tiamat. Characters viewing this area from the ledge see tantalizing glints of metal (belt buckles without belts) and parchment (books rendered illegible by water damage). A strong, foul smell hangs in the air. Troglodytes that live deeper beneath the ground have made incursions into the cave through narrow crevices (not displayed on the map). If characters give this area a cursory look and then leave, nothing happens here. If they spend time searching, then four troglodytes attack. The crevices are a potential area for characters to explore if you’d like to expand this dungeon for further adventures. If not, then declare that they’re too tight for characters to squeeze through, or eliminate them and the troglodytes entirely.
TreasureA thorough search of the trash heap, taking 10 minutes, does find one worthwhile item: an overlooked pouch of six ornamental gems worth 10 gp each and eight semi-precious gems worth 50 gp each. The troglodytes have nothing that anyone would want near them.
6. Meat LockerThe curtain across the entrance to this cavern is trapped. See “Trapped Curtain” below for details.
the ceiling is carpeted with bats with a successful DC 10 Wisdom (Perception) check. To avoid startling the bats, characters must proceed very quietly. This requires a successful DC 10 Dexterity (Stealth) check. If three or more characters fail the check, the bats are alarmed by the noise, drop from the ceiling, and fly through the cavern in a blinding cloud of flapping and squeaking rodents. The bats present no danger, but their racket drowns out other noise and makes it impossible to see more than 5 feet. It also alerts the stirges, and the opportunistic bloodsuckers attack in the confusion. The stirges gain a +2 bonus to AC in the bat storm. The bats calm down and return to their roosts on the ceiling after five minutes of quiet in area 4. A spear with a pitted blade lies on the floor near the top of the steps leading to area 6. Kobolds use this to bypass the trap at the bottom of the steps (see area 6).
5. Troglodyte IncursionThe floor drops down 10 feet at each ledge. Kobolds use this portion of the cave as a trash dump. Along with normal sorts of refuse, such as broken pot-tery, rotted baskets, and mouse-chewed rope, they’ve also thrown out items that appear useful from a dis-tance: discarded clothes, worn boots, tattered books, cracked lamps, and so forth. Some of these items came from prisoners who died, and others were taken

Not for resale. Permission granted to print and photocopy this document for personal use only.
29Episode 3: Dragon Hatchery
stairs descend at the right end of the ledge. A stout cage made of iron bars surrounds these steps to a height of 10 feet to prevent untrained drakes from escaping up the steps. A key hangs on a peg at the top of the steps; it opens the locked gate at the bottom. A rack along the southwest wall holds implements used in training the drakes: long poles with lassos at the end, used for snaring and controlling young drakes; leashes and collars; sharp prods; mock weapons made of wood; human-sized dummies stitched out of sailcloth and stuffed with straw, with ridiculous expressions painted on their faces. The lower area is heavily shadowed. Currently it holds three guard drakes that are near the end of their training. Being not quite fully developed, they have the normal stats of a guard drake but only 33 hit points. Spotting these drakes from the ledge requires a suc-cessful DC 15 Wisdom (Perception) check; sweeping the pit with a bullseye lantern grants advantage on this check. If characters bring some raw meat to the ledge, the drakes think they’re about to be fed and advance into the light. If characters enter the pit, either by descending the steps or climbing down the ledge, the drakes attack. If the drakes are spotted and attacked by characters on the ledge, they set up a howl that draws six kobolds and three winged kobolds from area 8. At least one of these try to get past the characters and unlock the gate at the bottom of the steps, letting the guard drakes join the battle as they’ve been trained to do.
Spike TrapA portion of the floor between areas 4 and 7 has been replaced with a sheet of parchment cleverly painted to resemble the surrounding stone. It can be spotted incidentally with a DC 15 Wisdom (Perception) check, or automatically by someone who is systematically tap-ping the floor ahead with a pole or other tool. Beneath the parchment sheet is a shallow pit (about 2 feet deep) lined with poisoned spikes. Each time a character moves between areas 4 and 7, roll a d10. On a roll of 1 or 2, that character’s foot has gone through the trap. The character takes 1d4 piercing damage from the spikes and must make a DC 10 Constitution saving throw against poison. On a failed save, the character is affected as by a confusion spell for one minute (10 rounds). On a successful save, the character is affected as by a confu-sion spell for 1 round. The effect is not magical.
8. Kobold BarracksThe steps down from area 7 are trapped; see “Col-lapsing Trap” below for details. Area 8 is the kobolds’ living quarters. It was a natural cavern, but it has been enlarged and smoothed in a crude manner. Unless they already responded to noise in area 7, this area contains six kobolds and six winged kobolds. They are off duty, so they aren’t being especially alert. Use their passive Wisdom (Perception) scores to determine whether they react to noises. Flickering oil lamps pro-vide dim illumination.
At the base of these steeply descending steps, a curtain
hangs across the passage. It is made from hundreds of
heavy leather strips, each about the width of a human
hand. The strips are fixed to the ceiling and are long
enough to drag on the floor. The curtain extends from wall
to wall. The leather comes from a variety of local animals
and is badly cured. The curtain is several layers thick with
no gaps, so you can’t see through it at all.
This cavern is naturally cold. It hovers a few degrees above freezing year round, regardless of the season. Much of the meat brought in by the hunters feeds the cultists and the kobolds, but the extra is stored here for eventual use when the dragon eggs hatch and the raven-ous hatchlings emerge. The carcasses range from very fresh to several months old. The meat is only cold, not frozen, so the older items are slowly going bad.
The smell of old blood assaults your nose. The floor is
covered with dried puddles of it. Four floor-to-ceiling
columns are spaced across the chamber, and chains
have been strung between them like clothesline. Animal
carcasses hang on hooks from the chains. You see gutted
and skinned antelope, deer, goats, what might be big cats,
and even a few small bears. Some of this meat has been
here for a while if the smell is a reliable indicator.
This cave contains nothing of value.
Trapped CurtainHidden in the patches of fur still clinging to the leather strips of the curtain are hundreds of metal barbs about the size of large fishhooks. The barbs are coated with poison. Anyone who brushes through the curtain must succeed on a DC 10 Dexterity saving throw or take 5 (1d10) poison damage, and the target’s hit point max-imum is reduced by 5. This reduction lasts until the target finishes a long rest. A careful inspection of the leather strips coupled with a successful DC 10 Wisdom (Perception) check finds barbs; they can’t be noticed otherwise. When kobolds use this stairway, they bring the ruined spear that’s kept in area 4. With it, they sweep the leather strips to the left side of the corridor and wedge the end of the spear shaft into an angled socket in the floor just inside area 6. This holds the leather strips safely out of the way while they move in and out of the chamber.
7. Drake NurseryThe short, wide passage between areas 4 and 7 is trapped. See “Spike Trap” below for details. Simple oil lamps provide dim, flickering light. This chamber contains four kobolds and one winged kobold. These creatures are in the upper part of the chamber. The lower area is where cultists conducted the rituals to create their guard drakes and then housed the crea-tures. The ledge is a sharp 10-foot drop-off. Wooden

Not for resale. Permission granted to print and photocopy this document for personal use only.
30Episode 3: Dragon Hatchery
If none of the characters fought Cyanwrath during the raid but spent time in the cultists’ camp, read this.
“You look familiar . . . I’ve seen you around the camp. If
you came looking for trouble, I am the trouble you seek.”
Then he attacks, and his guards join in immediately. The creatures in area 10 are not drawn to this fight. They hide and wait to see who wins. When the fight is over, characters have time to investigate the room.
This chamber has been enlarged and reshaped from its
original form. The floor and three of the walls are smooth,
and stalactites and stalagmites have been polished into
gleaming columns. Every surface glistens with moisture,
and the air is warm and humid. The flat walls of the
chamber are decorated with shallow abstract carvings of
dragons. Dragons’ tails coil into intricate patterns and
knots that flow across the walls. The creature portrayed
in the northwest corner stands out: a five-headed dragon,
rising from an erupting volcano. Other dragons, which
seem dwarfed by the five-headed monstrosity, flock to its
side. A small, wooden chest with silver and mother-of-
pearl inlays sits on the floor in the corner, in front of the
monstrous dragon carving.
The five-headed dragon is Tiamat, and the volcano is the Well of Dragons, where the Cult of the Dragon intends to bring Tiamat into the world. The Well of Dragons is located at the northern extreme of the Sunset Moun-tains. Most characters should recognize Tiamat from folktales and know she was banished to the Nine Hells long ago and remains imprisoned there. There is no way to tell from the carvings where the volcano is located, or to know if it’s meant to be a prediction of events to come or just a birth metaphor for the queen of evil dragons. The chest is locked and trapped; see “Acid Trap” below for details. Characters can open it with the key from area 11, or the lock can be picked with thieves’ tools and a successful DC 10 Dexterity check. Unless the Dexterity roll is 15 or higher, however, it sets off the trap when the chest opens. If characters spend 10 minutes or more studying the carvings, they can learn two things. First, black dragons are overrepresented. Almost half the dragons shown appear to be black dragons. Wyrmspeaker Rezmir favors them over all other types. Second, a detailed search coupled with a successful DC 10 Wisdom (Per-ception) check spots that many of the black dragon carvings have holes in their mouths. A passage in the southwest corner of the shrine cham-ber leads to a chute that rises 30 feet up to area 11. A rope ladder is fixed at the top; a rug covers the opening.
Acid TrapThe holes in the dragons’ mouths are nozzles for a trap that sprays acidic mist. The trap has two triggers. The first is under the chest in the northwest corner. If the
Thin mattresses of straw covered with badly cured furs
form small beds that are haphazardly positioned around
the chamber. Rats and small lizards scurry through the
food scraps and moldy wine skins littering the floor.
A search of the room takes 10 minutes and turns up 38 gp, 152 sp, and 704 cp sorted into eighty-eight stacks of exactly eight copper coins each. Dozens of drag-on-themed talismans and amulets are carved from bone, soapstone, wood, and ivory. The workmanship on most of them is terrible, but four have a unique, if savage, artistic flair. These are worth 50, 60, 70, and 100 gp respectively if sold to a collector of artistic oddities. To any other merchant, they are worth 10 gp each.
Collapsing TrapThe top step is rigged to drop a portion of the ceiling in area 7. As each character enters the staircase, roll any die. On an odd roll, the character steps in the wrong spot and triggers the trap. The ceiling collapses above the next character in line (the one behind the charac-ter who triggered the trap). That character takes 4d4 bludgeoning damage from falling rocks; the damage is halved if the character makes a successful DC 15 Dex-terity saving throw. Every character within 5 feet takes 2d4 bludgeoning damage, or half that with a successful saving throw. A character who is actively looking for a trap on the stairs can find the trapped step with a successful DC 10 Wisdom (Perception) check. The collapsible ceiling is spotted incidentally with a successful DC 15 Wisdom (Perception) check. The kobolds in areas 8 and 9 hear the commotion if the trap is set off.
9. Dragon ShrineThis cave is a shrine to Tiamat, but with an emphasis on her black dragon head and on black dragons in general. It also contains many Cult of the Dragon icons, and a devious trap for the unwary; see “Acid Trap” below. Flickering oil lamps provide dim light. Langdedrosa Cyanwrath occupies the shrine, and he is joined by two human berserkers. (If the adventuring party contains more than four characters, add one more berserker for each additional character. If Langdedrosa was killed, then replace him with another half-dragon with the same statistics.) If Cyanwrath fought any of the characters one-on-one in Greenest, he immediately sin-gles out that person to address as follows.
“You survived! I don’t know whether to be disappointed or
pleased. It’s a mix of both, I think.”
If the character beat the odds in Greenest and won the fight, you can paraphrase to reflect that. As soon as he finishes speaking, he attacks. As long as none of the characters intervene, Cyanwrath’s group knows better than to interfere in his one-on-one matches. If the char-acters gang up on Cyanwrath or one of his guards, or try to leave the chamber, the guards attack.

Not for resale. Permission granted to print and photocopy this document for personal use only.
31Episode 3: Dragon Hatchery
Greenest and would be recognized by anyone from there, but the stones came from elsewhere and would be difficult to identify. If the items from Greenest are returned, their owners will pay a reward worth 25 per-cent of their value (300 gp).
10. Dragon HatcheryThis chamber holds three eggs that Rezmir hoped to hatch into a new brood of dragons. They have not hatched yet but they will very soon, which is why Rezmir was unwilling to move them when the camp packed up and left. Instead, she left them under the care of Mondath and the kobolds. The chamber is dark; the kobolds extinguished their lights when they heard fighting in area 9.
The chamber that opens at the bottom of the stairs is
immense. A wide ledge runs along the left wall and drops
away to a pit on the right. Many stalactites descend
from the ceiling, and the sound of dripping water echoes
continuously.
The lower portion of the room (10A) is 15 feet below the ledge. Wooden steps have been built down to the lower floor. As in room 7, the steps are enclosed in a stout iron cage with a gate at the bottom. The key to the gate hangs on a wall peg opposite the top of the stairs. As soon as characters advance into the room as far as the top of the stairs, they come under attack from the kobolds hiding in 10B. See that description for details. From the ledge, characters can just make out the shapes of large eggs (each egg is nearly three feet tall) in
chest is moved, the trap goes off. The second is in the chest. If it is forced open, or if the lock is inexpertly picked (a Dexterity result of 14 or less), the trap goes off.
You hear a snap from beneath the chest, followed by a
hissing sound like dozens of angry snakes—or like liquid
moving through open tubes. A moment later, liquid
sprays out from dozens of tiny holes in the walls and
ceiling. Wherever it splashes onto the floor, the moisture
on the stone bubbles and smokes. Within moments, the
chamber is filled with acidic mist.
Everyone in the chamber must succeed on a DC 10 Dexterity saving throw or take 2d6 acid damage from the acid sprayed onto them (half as much damage on a successful saving throw). The real danger from the acid is not to the characters’ skin, however, but to their lungs. Everyone must also succeed on a DC 10 Constitution saving throw or take 2d8 extra acid damage. Players who declare immediately that their characters are cover-ing their faces and getting out of the chamber as quickly as possible, and are trying to not inhale the vapor, have advantage on their Constitution saving throws.
TreasureThe chest contains a few of the choicest items seized during the cult’s recent treasure raids. Mondath per-suaded Rezmir to let her keep them, and she promised to bring them with her when she travels north for the ceremony at the Well of Dragons. In truth, she wanted something to fall back on if everything went sour (she never mentioned that last part to Rezmir). Inside are a string of pearls (300 gp), a gold-and-sapphire ring (900 gp), and a pouch containing a half-dozen master-fully cut and polished precious stones (100 gp each). The ring and the pearls were taken from
Guard Drake

Not for resale. Permission granted to print and photocopy this document for personal use only.
32Episode 3: Dragon Hatchery
the darkness below. The cavern extends into darkness beyond the range of their light. They need to go down the stairs and explore the area directly to discover its full extent. Characters standing along the ledge can discern many large, dark stains on the rough floor at the base of the ledge, but what caused them is not apparent.
10A. Black Dragon EggsThis area is warm and humid. After characters look closely at the floor, they can determine that the stains are blood, and some of them are fresh. They come from the meat the kobolds toss down here. Huddled in the shadows at the far edges of the room or behind the natural columns are two guard drakes trained to protect the dragon eggs. They don’t attack as soon as characters come through the gate but wait until the characters have moved into the chamber. The drakes’ first priority is to protect the eggs. Their second priority is to get between the intruders and the steps to prevent them from escaping. Unless characters climb down into 10A without using the stairs, they trigger the kobolds’ attack before exploring this area. Mixed in among the stalactites near the southeast corner of the room is a roper. It doesn’t attack the kobolds or guard drakes because the kobolds feed it spoiled meat that the guard drakes won’t eat. If attacked, it fights back (and it’s very dangerous to 3rd-level characters!). It can reach anywhere in area 10 with its tentacles, and it can also move at speed 10. It is currently full and curious about strangers, however, so it’s not averse to talking. Its only real concern is food. If told about the supply of meat in area 6 and brought some as proof, it lets the characters go about their busi-ness while it creeps away to investigate the larder. A total of three dragon eggs are spread throughout the area. Each is about three feet tall and weighs 150 pounds. Two of them are easy to spot just by walking through the room with a light source. The third is tucked into a pile of similar-colored stones behind one of the columns, making it easy to miss. When characters search the room, have everyone make a Wisdom (Perception) check. Only a character who rolls 15 or higher notices the egg in its camouflaged nest. Looking at a dragon egg, a character can determine the color of dragon with a suc-cessful DC 10 Intelligence (Nature) check. If the eggs are left here, they hatch in less than a week. If they are taken away, whether they hatch depends on how they are stored and treated. Away from a warm, humid environment such as this chamber, their progress halts until they are again in a suitable incubator. The dragons can be killed easily if the eggs are smashed, crushed, or stabbed. If an egg is simply cracked open, the infant dragon struggles for breath, cries and squirms like a human baby for a few minutes, and then dies.
10B. Kobolds in HidingThe floor of this area is about 10 feet below the ledge. The four kobolds who tend the eggs hid in this depres-sion when they heard the fight break out in area 9. When characters approach within 25 feet of the ledge overlooking 10B (when they come in line with the top of
the stairs to 10A), two kobolds toss glue bombs and the other two toss fire bombs. They do the same thing on the next round. Then they wait a round or two, if possi-ble, while the roper in area 10A drags characters into its tentacles, bites them, or drops them 20 feet to the guard drakes. Glue Bomb. Each creature within 10 feet of the bomb’s target point must succeed on a DC 11 Dexterity saving throw or be restrained. The target or another creature within reach of it can use an action to make a DC 11 Strength check; if the check succeeds, the effect on the target ends. Fire Bomb. Each creature within 10 feet of the bomb’s target point must succeed on a DC 11 Dexterity saving throw or take 4 (1d8) fire damage (half as much damage on a successful saving throw). If all else fails, the kobolds scramble up their make-shift ladder and attack with their shortswords.
11. Frulam Mondath’s ChamberFrulam Mondath (see appendix B) moved into this simple but comfortable chamber when the camp was abandoned. If no fight has occurred with the guards in area 12 and characters enter this chamber from area 9, then Mondath is here when they arrive. Guards in area 12 hear whatever happens in this chamber and respond dutifully. The chamber contains a writing desk and stool, sev-eral tables with books and papers, and a mirror on a floor stand. Light comes from two oil lamps. Thick rugs completely cover the floor, including an open chute that drops down to area 9. A rope ladder is fixed in the chute for climbing up and down, but nothing marks the posi-tion of the open, 3-foot-wide hole when it is covered by rugs. The slight depression it causes in the rug can be noticed with a successful DC 10 Wisdom (Perception) check. If someone steps on the chute without knowing it’s there, the character must make a DC 10 Dexterity saving throw. Success means the character hops off the rug before it collapses through the hole, or grabs the top of ladder as he or she falls; failure means the character plunges 30 feet down the chute into area 9, taking 3d6 bludgeoning damage from the fall.
Spread open on one of the tables is a simple map of the
Greenfields area showing the villages the cult attacked
and looted. An arrow is sketched in from the Greenfields
toward the west and the town of Beregost on the Trade
Way, where the arrow turns north. A separate sheet of
paper that is covered with numerals in columns contains
the note, “Everything must be freighted north to Naerytar.
Rezmir allowed us to keep some pearls, a ring, and a
handful of small stones.” Other papers are of less interest;
most of them have bad poetry about dragons.
The smaller chamber off the main one contains a bed, a trunk containing Mondath’s clothes, and a second trunk containing Mondath’s Cult of the Dragon regalia. With this regalia, one person (preferably a human woman,

Not for resale. Permission granted to print and photocopy this document for personal use only.
33Episode 3: Dragon Hatchery
them as you see fit.• For locating and disarming traps: 100 XP per trap.• For offering the roper meat instead of fighting it to the
death: 1,800 XP (the roper’s standard XP value).• For each dragon egg destroyed or taken: 250 XP.• For destroying or taking only two dragon eggs: 500
XP.Each character participating in this episode can earn a maximum of 1,800 XP (the amount that will take a 3rd-level character to 4th level). At the end of this episode, each character also gains 1 renown point in his or her faction.
DevelopmentsWith the dragon hatchery destroyed and the cultists killed or routed, the characters have struck a serious blow against the Cult of the Dragon. You can use these events as a springboard to your own adventures or a lead-in to the exciting adventures of D&D Expeditions, or you can continue the storyline started in this adven-ture in the full adventure of Hoard of the Dragon Queen. See “Additional Play” at the end of this adventure for more information. In the full adventure of Hoard of the Dragon Queen, the characters can head for Elturel and their rendezvous with Leosin Erlanthar and Ontharr Frume, or follow the wagon tracks west to Beregost, then north along the Trade Way. As the characters take up arms against the Cult of the Dragon, they discover conflict among the cult’s leadership that can be turned to their own advan-tage, fight cultists for control of a haunted fortress, face off against the Black Wyrmspeaker Rezmir, and under-take a desperate raid against a flying castle central to the cult’s plans to secure a hoard for the Dragon Queen.
but the clothing can be adjusted to fit a man) can be outfitted as a Wearer of Purple. It’s worth noting that each Wearer of Purple’s regalia is similar but unique, so high-ranking cult members are likely to recognize this regalia as Mondath’s. When they see that the person wearing it is not Mondath, or if they know she is dead, alarm bells are guaranteed to go off.
DevelopmentsIf a fight breaks out in area 12 and four of the guards from that chamber retreat here to defend Mondath, her response is up to you. If the fight in the barracks takes a heavy toll on the characters, she might decide to confront them here. If the attackers plow through her forward guards, Mondath might retreat down the chute to area 9 and join forces with Cyanwrath or even flee from the cave. She has dedicated her life to the Cult of the Dragon, but she isn’t eager to die for the cult. Mon-dath knows that the Cult is amassing treasure in the north and that Rezmir spoke often of Tiamat, but that is the extent of her knowledge of the larger plan.
12. Guard BarracksThe guards who remained behind with Mondath use this chamber as their barracks. At any given time, four of them keep watch in area 1 and the others—three guards and eight cultists—are here, asleep or relaxing. If fighting against the guards from area 1 pushes near the passage to area 12, roll a d20; the guards here inves-tigate the sound on a roll of 12 or higher. Otherwise they stay here, mostly oblivious to what’s going on elsewhere. If characters enter this chamber from area 2, the guards react quickly. Two of the guards and five of the cultists fight the characters here while one guard and three of the cultists retreat to area 11 to protect Frulam Mondath.
TreasureThe guards’ scabbards are decorated with dragon motifs. They are worth about 5 gp each. They are not part of a Cult of the Dragon “uniform,” but wearing one of these scabbards could buy a character credibility when trying to pose as a cultist. For example, you might grant a +1 bonus to Charisma checks made to fool or influence cultists. Aside from their gear, the guards have coins and small gems worth a total of 120 gp.
13. Treasure StorageThis chamber is now mostly empty, except for a few overturned boxes, broken items, scattered coins, small gems that were dropped during the hasty evacuation, and one cultist who is sleeping soundly on the floor after consuming several bottles of wine. He won’t wake up from anything less than vigorous shaking, and it will be several hours before he is coherent. All the dropped items left in this room have a total value of only 16 gp.
RewardsAward standard XP for defeated foes. This episode includes many challenges other than fights, and char-acters should be rewarded for overcoming them. The awards listed below are just recommendations; adjust

Not for resale. Permission granted to print and photocopy this document for personal use only.
What Happens Next?
What Happens Next?
The adventure’s not over yet, for the Cult of the Dragon is not so easily defeated. Already, the cult’s remaining leaders plot to snuff out the adventurers. Meanwhile, at the Well of Dragons, the cult and its dragon allies amass. The unholy chants and roars of
dragons echo through the desolation of the volcanic caldera, vowing Tiamat’s return. And in the Nine Hells, Tiamat rages, demanding her followers gather more tribute before she sets foot in the Forgotten Realms. Hope remains, though, for the wind carries whispers of a great meeting of factions in Waterdeep. If such rumors are true, heroes will be needed to unite these groups against their common enemy. Beyond this book, the Tyranny of Dragons story takes flight. Bring your Tyranny of Dragons game to life with apparel, miniatures, and D&D play accessories. In the Tyranny of Dragons comic, visit Baldur’s Gate and discover how a young wizard schemes to prove his worth as a cult leader. In the Neverwinter video game, create a character to confront the Cult of the Dragon before facing the Queen of Dragons herself. And find a regular D&D game at a store near you. Learn more at DungeonsandDragons.com.
All roads lead to
an epic confrontation with
the Queen of Dragons
and the conclusion of the
Tyranny of Dragons story
in The Rise of Tiamat.
Additional Play
34Additional Play
Once you complete this D&D Encounters edi-tion of Hoard of the Dragon Queen, you have a number of options available to explore more
of the Tyranny of Dragons storyline through the D&D Adventurers League.
Continue the AdventureThe full adventure of Hoard of the Dragon Queen contains many more exciting episodes, and you can continue to play that adventure as an official part of the D&D Adventurers League. The D&D Encounters kit contains certificates for all the permanent magic items in the full version of Hoard of the Dragon Queen to sup-port this continued play. Keep in mind the following as you progress beyond this D&D Encounters edition of the adventure:• Players still track all rewards earned session to ses-
sion on their logsheets.• You should apply all other D&D Adventurers League
rules as presented in this document.• Each character earns 10 downtime days at the end of
each episode.• Each character earns 1 faction renown point in his or
her faction at the end of each episode.
Play D&D ExpeditionsD&D Expeditions adventures are available to select stores and at public play events outside of stores, such as conventions. Most of these adventures are set in the Moonsea region of the Forgotten Realms. Each adventure takes approximately three to four hours to complete, and when played together, can take characters all the way to 20th level. The first few adventures will be available starting in September 2014, and new adven-tures will be released frequently.
More InformationIf you’d like more information on the D&D Adventurers League and want to join in the discussion, check out the following links:• Official Wizards D&D Adventurers League
Announcements • D&D Adventurers League Organizers Page• D&D Adventurers League Official Forums• D&D Adventurers League Twitter• D&D Adventurers League Facebook Group• D&D Adventurers League G+ Community

Not for resale. Permission granted to print and photocopy this document for personal use only.
35Appendix a: backgrounds
by guilt, he begged you to investigate the cult and undo the
evil he may have helped foster. He urged you to begin your
search in a town called Greenest.
8. The dragons destroyed everything you hold dear. They killed
your family and destroyed your home. Now, with nothing
but what you carry on your back and a horrid scar of the near
fatal wounds you sustained in the attack, you seek revenge.
9. You and your family were members of the Cult of the Dragon,
until your rivals in the cult arranged to wipe you out. Though
they slaughtered your kin, you survived, but they think
you’re dead. Now is your chance for vengeance! Your hit
list consists of three names: a human cultist named Frulam
Mondath, a half-orc named Bog Luck, and a half-dragon
named Rezmir. You have arrived in Greenest, knowing it’s
next on the cult’s list of targets.
10. You have a secret. You once were a gold dragon who served
Bahamut. You were too proud and vain, to the point that
Bahamut decided to teach you a lesson. You have been
trapped in a weak, humanoid body, with your memories of
your former life but a dim shadow. You remember only one
thing with perfect clarity: Bahamut’s command to go into the
world and prove your devotion to the cause of good. If you
prove worthy, on your death you will return to his side in your
true form.
Optional Features Below are two optional features that you can choose in place of the feature normally granted by your background.
Optional Feature: Cult of the Dragon InfiltratorYou have infiltrated the ranks of the Cult of the Dragon. Having spied on the organization for quite some time, you are familiar with its inner workings and customs. You have a second identity as an initiate of the cult, enough of a facade to blend in as a simple grunt or servant.
Optional Feature: Dragon ScholarYou have studied dragons and their lore for many years. You can automatically identify locations built or used by dragons and can identify dragon eggs and scales by sight. If you fail an Intelligence check to recall lore relat-ing to dragons, you know someone or some book you can consult for the answer unless the DM rules that the lore is unknown.
This appendix provides players with an easy way to create characters with compelling ties to the events of the Tyranny of Dragons storyline.
Background TemplateBelow is a background template that applies to any background that you select or create. You can replace or augment some or all of the options in your chosen background with one or more of the elements given below. Each section tells you whether it replaces or adds to your background.
The Story Thus Far . . .As the Cult of the Dragon has grown bolder, its actions have drawn attention. Your character has stumbled into the Cult’s scheme in some manner or has a connection to dragons. The following tables provide you with bonds tailored to this campaign. Use them in place of or in addition to the ones you selected from (or created for) your background.
Bond (d10)1. Leosin Erlanthar, a wandering monk, once saved your life.
He’s sent urgent word for you to meet him in a small town
called Greenest. Looks like it’s time to pay off that debt.
2. When an orc raid drove your family from your home, the
people of Greenest took you in. Anyone who threatens
Greenest is your sworn enemy.
3. Every five nights, you have a strange sequence of apocalyptic
dreams. The world is destroyed by cold, choking fumes,
lightning storms, waves of acid, and horrible fire. Each
time, the dream ends with ten evil eyes glaring at you from
the darkness. You feel a strange compulsion to travel to
Greenest. Perhaps the answer to the riddle of your dreams
awaits you there.
4. Ontharr Frume, a crusading warrior and champion of good,
is your friend and mentor. He has asked you to travel to
Greenest in search of rumors of increasing dragon activity.
5. You have heard rumors that your close childhood friend, a
half-elf named Talis, has been kidnapped by a strange group
of dragon cultists. Your investigations into the cult have
led you to the town of Greenest. You must save her! (Talis
appears as a villain in the full Hoard of the Dragon Queen
adventure, so do not use this bond unless you plan on
running the full adventure.)
6. Being the grandchild of a renowned dragon slayer is usually
a good way to impress people, but just last week a gang of
ruffians attack you. You barely escaped with your life, but
as you fled, the ruffians told you that the Cult of the Dragon
never forgets and always avenges. You’re hoping to lie low in
a sleepy little town called Greenest until this blows over.
7. On his deathbed, your father confessed that he had become
involved with a group called the Cult of the Dragon. They
paid him to smuggle goods across the Sword Coast. Wracked
Appendix A: Backgrounds

Not for resale. Permission granted to print and photocopy this document for personal use only.
36Appendix b: monsters
Ambush DrakeMedium dragon, unaligned
Armor Class 13 (natural armor)Hit Points 22 (4d6 + 8)Speed 30 ft.
STR DEX CON INT WIS CHA 13 (+1) 15 (+2) 14 (+2) 4 (–3) 11 (+0) 6 (–2)
Skills Perception +4, Stealth +4Damage Resistances poisonSenses darkvision 60 ft., passive Perception 14Languages understands Draconic but can’t speak itChallenge 1/2 (100 XP)
Pack Tactics. The drake has advantage on an attack roll against a creature if at least one of the drake’s allies is within 5 feet of the creature and the ally isn’t incapacitated.
Surprise Attack. If the drake surprises a creature and hits it with an attack during the first round of combat, the target takes an extra 7 (2d6) damage from the attack.
ActionsBite. Melee Weapon Attack: +4 to hit, reach 5 ft., one target. Hit: 4 (1d6 + 1) piercing damage.
DragonclawMedium humanoid (human), neutral evil
Armor Class 14 (leather armor)Hit Points 16 (3d8 + 3)Speed 30 ft.
STR DEX CON INT WIS CHA 9 (–1) 16 (+3) 13 (+1) 11 (+0) 10 (+0) 12 (+1)
Saving Throws Wis +2Skills Deception +3, Stealth +5Senses passive Perception 10Languages Common, DraconicChallenge 1 (200 XP)
Dragon Fanatic. The dragonclaw has advantage on saving throws against being charmed or frightened. While the dragonclaw can see a dragon or higher-ranking Cult of the Dragon cultist friendly to it, the dragonclaw ignores the effects of being charmed or frightened.
Fanatical Advantage. Once per turn, if the dragonclaw makes a weapon attack with advantage on the attack roll and hits, it deals an extra 7 (2d6) damage.
Pack Tactics. The dragonclaw has advantage on an attack roll against a creature if at least one of the dragonclaw’s allies is within 5 feet of the creature and the ally isn’t incapacitated.
ActionsMultiattack. The dragonclaw attacks twice with its scimitar.
Scimitar. Melee Weapon Attack: +5 to hit, reach 5 ft., one target. Hit: 6 (1d6 + 3) slashing damage.
Ambush Drake
Appendix B: Monsters

Not for resale. Permission granted to print and photocopy this document for personal use only.
37Appendix b: monsters
Langdedrosa CyanwrathMedium humanoid (half-dragon), lawful evil
Armor Class 17 (splint)Hit Points 57 (6d12 + 18)Speed 30 ft.
STR DEX CON INT WIS CHA 19 (+4) 13 (+1) 16 (+3) 10 (+0) 14 (+2) 12 (+1)
Saving Throws Str +6, Con +5Skills Athletics +6, Intimidation +3, Perception +4 Damage Resistances lightningSenses blindsight 10 ft., darkvision 60 ft., passive Perception
14Languages Common, DraconicChallenge 4 (1,100 XP)
Action Surge (Recharges when Langdedrosa Finishes a Short or Long Rest). On his turn, Langdedrosa can take one additional action.
Improved Critical. Langdedrosa’s weapon attacks score a critical hit on a roll of 19 or 20.
ActionsMultiattack. Langdedrosa attacks twice, either with his greatsword or spear.
Greatsword. Melee Weapon Attack: +6 to hit, reach 5 ft., one target. Hit: 11 (2d6 + 4) slashing damage.
Spear. Melee or Ranged Weapon Attack: +6 to hit, reach 5 ft. or ranged 20 ft./60 ft., one target. Hit: 7 (1d6 + 4) piercing damage.
Lightning Breath (Recharge 5–6). Langdedrosa breathes lightning in a 30-foot line that is 5 feet wide. Each creature in the line must make a DC 13 Dexterity saving throw, taking 22 (4d10) lightning damage on a failed save, or half as much damage on a successful one.
Frulam MondathMedium humanoid (human), lawful evil
Armor Class 16 (chain mail)Hit Points 44 (8d8 + 8)Speed 30 ft.
STR DEX CON INT WIS CHA 14 (+2) 10 (+0) 13 (+1) 11 (+0) 18 (+4) 15 (+2)
Saving Throws Wis +6, Cha +4Skills Deception +4, History +2, Religion +2Senses passive Perception 14Languages Common, Draconic, InfernalChallenge 2 (450 XP)
Spellcasting. Frulam is a 5th-level spellcaster that uses Wisdom as her spellcasting ability (spell save DC 14, +6 to hit with spell attacks). Frulam has the following spells prepared from the cleric spell list:Cantrips (at will): light, sacred flame, thaumaturgy1st level (4 slots): command, cure wounds, healing word,
sanctuary2nd level (3 slots): calm emotions, hold person, spiritual
weapon3rd level (2 slots): mass healing word, spirit guardians
ActionsMultiattack. Frulam attacks twice with her halberd.
Halberd. Melee Weapon Attack: +5 to hit, reach 10 ft., one target. Hit: 7 (1d10 + 2) bludgeoning damage.
Guard DrakeMedium dragon, unaligned
Armor Class 14 (natural armor)Hit Points 52 (7d8 + 21)Speed 30 ft.
STR DEX CON INT WIS CHA 16 (+3) 11 (+0) 16 (+3) 4 (–3) 10 (+0) 7 (–2)
Skills Perception +2Damage Resistances lightningSenses darkvision 60 ft., passive Perception 12Languages understands Draconic but can’t speak itChallenge 2 (450 XP)
ActionsMultiattack. The drake attacks twice, once with its bite and once with its tail.
Bite. Melee Weapon Attack: +5 to hit, reach 5 ft., one target. Hit: 7 (1d8 + 3) piercing damage.
Tail. Melee Weapon Attack: +5 to hit, reach 5 ft., one target. Hit: 6 (1d6 + 3) bludgeoning damage.


![Erwin Baur or Carl Correns: Who Really Created the …brusso/BaurCorrens[32,33]sortof.pdf · Erwin Baur or Carl Correns: Who Really Created the Theory of ... that Baur alone deserves](https://img.pdfslide.us/doc/110x75/5b9f1e0209d3f2d7748d761f/erwin-baur-or-carl-correns-who-really-created-the-brussobaurcorrens3233-.jpg)