Embed Size (px)
Citation preview

SMART 4000 Commercial Multi-stage HVAC ControllerInstallation and Operation Manual
www.robertshaw.com©2015 Robertshaw
7/15 – 352-00199-001
by Uni-Line®

2
IMPORTANT SAFETY INFORMATION
WARNING: ELECTRICAL SHOCK HAZARD – Turn off power at the main power source by unscrewing fuse or switching circuit breaker to the OFF position before installing, removing, or cleaning this thermostat.
WARNING: FIRE AND ELECTRIC SHOCK HAZARD – This device should be installed by a qualified service technician with due regard for safety as improper installation could result in a fire and electric shock hazard.
WARNING: FIRE AND ELECTRICAL SHOCK HAZARD – This is a 24V AC low-voltage thermostat. Do not install on voltages higher than 30V AC.
• Do not switch system to cool if the temperature is below 50°F (10°C). This can damage your cooling system and may cause personal injury.
• Do not short (jumper) across terminals on the gas valve or at the system control to test installation. This will damage the thermostat and void the warranty.
• Do not connect ground to any terminal in this unit.
• All wiring must conform to local and national building and electrical codes and ordinances.
• Use this thermostat only as described in the manual.

3
CONTENTS
IMPORTANT SAFETY INFORMATION 2
Installation 5
Wiring Overview 5
Powering the SMART 4000 5EquipmentConnections 5CommunicationsTerminals 60to10VOutputs 60to10VInputs 6RoomSensorInputs(2wire) 6AuxiliaryInputs 6SettingtheTwoDIPSwitchFunctions 7
Commissioning Aids 7Info Window 7Service Override 7Service Mode 7Relay Test Mode 8Economy Test Mode 8
Typical Wiring Diagrams 8Typical Heat Pump System - Four Compressors 8DIPSwitchSettings 8InstallerOptions 8Two Stage Cooling With Drive Open Drive Closed Hot Water Valve 9DIPSwitchSettings 9InstallerOptions 9TwoStageHeatWithModulatingCoolingControl 9DIPSwitchSettings 9InstallerOptions 9Single Stage Water Sourced Heat Pump 10DIPSwitchSettings 10InstallerOptions 100 to 10V Wiring 10
Sensor Wiring 10Two Wire Sensors 10AdditionalFunctionsUsingtheTwoWireSensor 11Four Wire Sensors 12
SettingInstallerPreferences 14
Installer Menu 15
Operation 27
The PIN Prompt 27
SettingtheStartEventorRunTemperatures 27

4
Programming 28SettingtheClock 28SettingDailySchedules 28SettingHolidaySchedules 29SettingDaylightSavingsTimes 31
Advanced Features 31
Economy Cycle 31EconomyChecklist 32Economy Logic 33CO2 Input 33Valve Control 34Output Relay 35Compressor Lead Lag 35
InstallationTips 36
ProgrammingPastMidnight 36
SettingOneThermostatastheMasterTimeClock 36
Auto/On/OffWiring 37
Four Wire Sensors 37
Communications Functions 38
Specifications 40
Troubleshooting 41
Five Year Limited Warranty 42
ThankyouforpurchasingaUni-Line® Smart SenseTM HVAC controller. The SMART 4000 will provide your clients with many years of trouble-free comfort control. Itishighlyrecommendedthatyoutakethetimetoreadandunderstandtheseinstructionssothatyoucantakefulladvantageofthemanyfunctionsandcapabilitiesthatareofferedinthispremium product.The Smart SenseTM SMART 4000 product is under constant revision, upgrade and enhancement tomeetthenewneedsofthemarket.Greatcarehasbeentakeninthepreparationofthismanual.Robertshawtakesnoresponsibilityfor errors or omissions contained in this document. It is the responsibility of the user to ensure thiscontroller,orequipmentconnectedtoit,isoperatingtotheirrespectivespecificationsandin a safe manner.

5
INSTAllATION
Wiring OverviewThe SMART 4000 is a DIN rail-mounted device that has been designed to precisely control a wideselectionofHVACsystemsincommercialapplications.Greatefforthasbeenmadetoensure the thermostat is simple to set up and install, ensuring reliable control of commercial HVAC systems.Abriefinput/outputexplanationisprovidedbelow.Additionalfunction-specificdetailisprovided throughout this manual.
R - 24 Volt ActiveC - 24 Volt CommonB A 0 - 10V output - 10 - 10V Common0 - 10V output - 2S1S2S3S4Room Sensor InputSensor Common0 - 10V inputAux input 1Aux CommonAux input 2
Modbus
Communicating Sensor
100 - 270V AC N
NC
100 - 270V AC A
NC
R-Common
Fan
Compressor 3
Compressor 2
Compressor 1
Cool1 NC
Heat
Neat NC
Aux Com
Aux NO DIP switches
Figure 1
Powering the SMART 4000The SMART 4000 can be powered from 24V AC (± 15%) or from 100 to 270V AC. Use one power input only.The A and N inputs are used for powering the thermostat from line voltage (270V max).TheterminalmarkedRisthe24Vactiveterminal;theCterminalisthe24Vcommonterminal.
Equipment ConnectionsAcommoninputisprovidedforthemainfiveequipmentrelays.Aseparaterelaycommonisprovidedforthesixthauxiliaryrelayinput.Thesixthauxiliaryfunctionrelayhasmultipleinstaller-selectedfunctionssoaseparatevoltagecanbeusedwiththisrelayifnecessary.Seepage20formoreinformationonthisrelayscapabilities.Achangeoverrelayisprovidedforfirststageheatingandcoolingifthethermostatneedstocontrol drive open/drive closed valves. All other relays are single pole normally open.Allrelaysareratedatupto300V,theFanrelayisratedat12Ampsresistive.Allotherrelaysareratedat5Ampsresistivemaximum.Itisrecommendedthatanexternalfusebeusedtoprotectthe thermostat relays or the equipment that the thermostat is controlling.

6
Do not exceed the maximum current handling capacity of any of the thermostat relays.
Communications TerminalsTheSMART4000providesModbusRTUcommunicationscapability.TheAandBterminalsareusedforModbuscommunications.CAUTION: The communications terminals A and B are close to the 24V input. Take extreme
care that 24V is not accidentally applied to the communications terminals or damage to the communications capability of the thermostat will result.
0 to 10V OutputsTwo0to10Voltoutputshavebeenprovided.These0to10Voutputfunctionsaredefinedonpage 23.
0 to 10V InputsOne0to10Voltinputhasbeenprovided.This0to10Vinputfunctionisdefinedonpage23.
Room Sensor Inputs (2 wire)The standard room temperature sensor provided with the thermostat is wired to the Room Sensor Terminal and Sensor Common terminal next to it. It is recommended that 30 AWG (0.25 mm) or larger shielded pair cable is used and the shield wire grounded in a suitable location.Thisisespeciallyimportantwherelongcablerunsof50ft(15m)areexpected,orwhere the sensor cable is run close to other electrical cabling.Itisrecommendedtousethe4-wirecommunicatingroomsensorifyouhaveconcernsaboutproblems associated with long cable runs or interference in the sensor wiring. This sensor is a digital sensor. Shielded cable is required on all cable runs with the shield wire grounded in a suitablelocation.
Auxiliary InputsThethermostathastwodigitalinputs.Theseinputshaveanumberofpre-setfunctionsselectablebytheinstaller.AlistofavailablefunctionsfortheseinputsisprovidedintheadvancedinstalleroptionsinOption16.Theseinputsarevoltfreeandinitiatedbyswitchingthe auxiliary input to the Aux Common terminal next to them.
CAUTION: These inputs are VOLT FREE. Do NOT apply any external voltage to these auxiliary input terminals or damage to the thermostat WILL result. This is NOT covered by warranty.

7
Setting the Two DIP Switch FunctionsTherearetwoDIPswitchesthatareusedtosetthecorefunctionoftheSMART4000,see Table 1.Theseswitchfunctionsdonotrequirethethermostattobepoweredtobeset.
Table 1 Switch Function Off On
1 IfSw2=OffHP-ReversingValveLogicIf Sw2 = On HC - Heat Fan Logic
Energize in HeatElectricHeating
Energize in CoolGasHeating
2 Equipment Control Logic Heat Pump Heat/Cool
Commissioning AidsTo assist commissioning the SMART 4000 there are a number of aids provided.
Info WindowPressandholdbothoftheUP/DOWNbuttonstogethertoopentheStatuswindow.Thiswindowgivesanoverviewofthethermostatfunctions,showingtheoutputsfrombothanalogoutputs, the room and outside air temperature sensor, as well as whether a relay is ON or OFF.AO1 and AO2 show the two Analog output values. RT shows the room temperature. OT shows outside air temperature. D1 and D2 show the two digital inputs' status (0 = Open 1 = Closed). G,Y3,Y2,Y1,OB,andAx(Aux)showtherelaystatus(0=De-energized1=Energized).A1showsthe 0 to 10V input voltage.
Service OverridePressingboththeSetTemperatureandSettings buttonstogetherfortwosecondsbringsuptheServiceOverrideshortcut.Thiswillpermityoutolockthethermostat OFF when you wish to temporarily suspend controlfunctions.UsetheUP/DOWNbuttonstoselecteither Enable or Disable.
CAUTION: This function is NOT intended to replace electrical isolation.
Service ModeServiceModesuspendsallanticycleandminimumruntimersbuiltintothethermostat.SeetheServiceMenuOption24.YoucanactivateServiceModesothatitturnsOFFautomaticallyin15minutes,orstaysONuntilmanuallyturnedoffagain.Towarnyouthatthefunctionisactive,thethermostatwillflashServiceModeontheLCDwhenthismodeisactive.

8
Relay Test ModeUsetheRelayTestModewithcaution.TherelaytestwillcycleallthermostatrelaysandilluminatestheLEDdisplaystoproverelayoperation.ThethermostatshouldNOTbeconnected to the AC equipment while performing this test or damage to the AC system may be caused.SeetheServiceMenuOption22.
Economy Test ModeTotestforcorrectdamperoperationinEconomyMode,entertheInstallerMenuandintheChangeEconomySettingsmenuselectEconomy=TEST.ExittheInstallerMenu.TheeconomyLED will be ON and the LCD will show Economy Test. The fresh air damper will be held at 10V and the return air damper will be held at 0V.
Typical Wiring DiagramsA number of typical wiring diagrams are provided in this manual. This list does not represent all possiblewiringcombinationsandshouldnotbeusedasanindicationofthecompletecontroloptionsprovidedbytheSMART4000.Thewiringinstructionsshowninthissectionindicategenericequipmentconnections.Theyaretobeusedinconjunctionwiththedocumentationprovidedbyyouroriginalequipmentmanufacturer as well as other diagrams within this manual. Carehasbeentakeninthepreparationofthesedrawings,howeverresponsibilityfallsontheinstallertoensurethatthethermostatandHVACsystemisworkingcorrectlyandinasafemanner.
Typical Heat Pump System - Four Compressors
120
- 240
V AC
Neu
tral
120
- 240
V AC
Acti
ve
Cont
rol A
ctive Fan
Com
pres
sor 3
Com
pres
sor 2
Com
pres
sor 1
Reve
rsin
g Va
lue
Com
pres
sor 4
R CFour Wire
In this example the thermostat is running a heat pump system with four compressors providing four stages of heatingandfourstagesofcooling.The thermostat is being powered by 240V AC in this example.
DIP Switch SettingsSw1 OFF – Rev in Heat ON – Rev in CoolSw2 OFF – HP Mode
Installer OptionsFor four compressor systems Set aux relay = Comp 4

9
Two Stage Cooling With Drive Open Drive Closed Hot Water Valve
120
- 240
V AC
Neu
tral
120
- 240
V AC
Acti
ve
Cont
rol A
ctive Fan
Cool
2
Cool
1
Ope
n
Clos
ed
R CFour Wire
Hea
ting
Valv
e
Thefirststageheatingand cooling relays in the thermostat are a changeover type. This allows you to drive aheatingand/orcoolingvalveopen and/or closed.
DIP Switch SettingsSw1 OFF – Fan ON with heatSw2 ON – HC Mode
Installer OptionsNone required.
Two Stage Heat With Modulating Cooling Control
Cont
rol A
ctive Fan
CWP
call
(Opti
onal
)
Heat
1
Heat
2
R CFour Wire
In Valve Mode, both the relays and0to10Voutputsworkintandem,permittingthethermostat to modulate the 0 to 10V valve and also call for thecirculatingwaterpumpona cooling demand if required.Belimovalveterminalnumbersare shown in this example.
DIP Switch SettingsSw1 OFF – Fan ON with heatSw2 ON – HC Mode
Installer OptionsSet aux relay = Aux heatSet Y1= Cool

10
Single Stage Water Sourced Heat Pump
R CFour Wire
Cont
rol A
ctive Fan
Com
pres
sor
R/Va
lve
R - 2
4V A
ctive
C - 2
4V C
omm
on
This is similar to a standard single stage heat pump except that the auxiliary input is set to shut the thermostat down onlossofwater,protectingthesystem.This fault input can be used as a phase fail input or any other safetyinterlock.The thermostat LCD will indicate when a fault (low water) is detected.
DIP Switch SettingsSw1 OFF – Rev in heat ON – Rev in coolSw2 OFF – HP Mode
Installer OptionsSet Aux input 1 to Fault.
0 to 10V WiringThethermostathastwo0to10Voltoutputsthatcanbesettoperformpre-setfunctionsthatareselectablebytheinstaller.Seethe0to10VoptionsdetailedintheInstallerMenu Option18.
Sensor WiringThe thermostat will accept two types of temperature sensors. The standard two wire sensor andthemoreadvancedfourwiresensorthatiscapableofperformingadditionalcontrolfunctions.
Two Wire SensorsThe standard two wire sensors are suitable for room temperature monitoring only. There are a number of types of two wire sensors available, an overview is provided below. Two wire sensors connect to the Room Sensor terminal and the Common terminal next to it on the thermostat. Two wire sensors are not polarity dependent.The SMART-R-02 – Uses two wires to communicate the room temperature to the thermostat. Multipleunitscanbeusedforaveraging.TheSMART-R-02sensorisfittedwithaswitchthatinitiatestheafterhoursruntimerthatisincorporatedintotheSMART4000controller. The SMART-R-02 sensor is supplied as standard in the box with each thermostat controller.
SMART-R-02
After Hours initiate
RoomCom

11
TheSMART-R-05additionallypermitsa±3Fdegrees (± 2 C degrees) adjustment of room temperature from the installerdefinedsetpoint.Thissensorisperfectforpermittingthe room occupants to reduce the room temperature without makinglargeadjustments.Forprojectsthatpresentdifficultyinrunningwiresforsensors,theSMART-R-06wirelessroomtemperaturesensorisavailable(±3Fdegrees(±2Cdegrees)).Thissensorisfittedwithanafterhoursrunswitch.TheSMART-R-06hasa typical indoor range of approximately 100 feet (30 m).Duct sensors (SMART-R-03) are also availablethatpermitadditionaloutdooror duct space temperature monitoring options.
Additional Functions Using the Two Wire SensorAuto Off or Vent ModeYoucanswitchthethermostattoVentilationMode(orOFF)byplacinganinlineswitchinthesensorcable.Thisworkswhetheryouusethestandard(SMART-R-02)roomsensorortheadjustable(SMART-R-05)sensor.Thethermostatautomaticallydetectsthetwowiresensorandwhenitisabsent,thethermostatwilloperatebasedonsettingsshowninthethermostatInstallerMenu.SeetheInstallerMenuOption11foradditionalinformationonthisfunction.Off – An open circuit room sensor turns the thermostat OFF.Vent – An open circuit room sensor will permit the indoor fan only to operate during occupied Start periods.Full Vent - An open circuit room sensor will run the indoor fan for as long as the sensor open circuit exists, regardless of current program.After Hours Run FunctionByplacinganormallyopenmomentarypressbuttonanywhereonthesensorline(orinternallyfittedintheSMART-R-02shownright)thethermostatafterhoursruntimercanbeinitiatedorcancelled.Combinationsoftheoptionsabovearepossible.Forexample,froma single two wire sensor it is possible to:
• measure room temperature
• offset the room temperature, altering comfort levels by ± 30F (± 20C),
• initiate (or cancel) an after hours heating or cooling call,
• shut the thermostat down,
• place the thermostat in fan-only Ventilation Mode.
SMART-R-05
After Hours initiate
RoomCom
After Hours initiate
SMART-R-02
SMART-R-02
After Hours initiate
RoomCom

12
Averaging Room SensorsWhen it is necessary to measure the room temperature in multiplelocationsthethermostatiscapableofusinganetworkof room sensors. The thermostat will control using an average of these temperatures with the two wire sensors.An example of averaging in two, three and four places is shownusingmultipleSMART-R-02sensors.Theseaveragingcombinationscanalsotakeadvantageoftheadvancedsensorfunctions,suchasVentModeorafterhoursStart,ifnecessary.Tousetheafterhoursfunctionwithaveragingsensors,theafterhoursswitchmustbewiredsothatitaffectstheentiresensorinputonthethermostatandnotjustonesensor.SeeFigure2for the three and four averaging sensors example.
SMART-R-02 SMART-R-02SMART-R-02 SMART-R-02 SMART-R-02SMART-R-02 SMART-R-02
After Hours Switch
After Hours Switch
Figure 2
CAUTION: It is recommended to use high quality, shielded, single pair cable on cable runs in excess of 32 feet (10 m) or when the cable is run near high voltage or high frequency cabling.
Four Wire SensorsFourwiresensorsmaybeusedtoinstalltheoutsideeconomyfunctionand/orprovideawallsensor with displays for room temperature, set temperature, and adjustments. Thesefourwireaddressablecommunicatingsensorsavoidlinelossesorotherproblemsthatcan be associated with two wire sensors.NOTE: Anytwowiresensororsensornetworkwiredtothethermostatisautomatically
disabled when the thermostat detects that an indoor four wire sensor is installed. You arenotpermittedtousetwowireandindoorfourwiresensorssimultaneously.
Sensor with Display (SMART-R-02V)Smart Sense four wire sensors measure both humidity and temperature. They are used when economy cooling is required, orwhentheoccupantscanmakelimitedadjustmentstothethermostatoperation.Two versions of four wire sensors are available. The display versionofthesensorisfittedwithabacklitLCDandbuttons.This permits the set temperature to be adjusted within the heatingandcoolingsetlimitsassetwithinthethermostatcontroller(ifenabled).SeeOption4intheInstallerMenu.
SMART-R-02 SMART-R-02

13
Whendisplayed,pressingtheAFTERHOURSbuttonwillstarttheafterhoursruntimerfortheperiodoftimepre-setintheInstallerMenu.SeeOption6.Ifdisplayed,theON/OFFbuttonpermitsyoutoturnthethermostatOFFmanually,overridinganytimeclockschedulesthatmaybeset.PressingtheON/OFFbuttonagainwillreturnthethermostat to its previous state. If the thermostat is set to manual control, the thermostat will beON,ifundertimeclockcontrol,thethermostatwillrunitsscheduleandbeONorOFFbasedon that schedule.Sensor Without DisplayThe standard four wire sensor measures temperature and humidity without permittinglocalsetpointadjustmentordisplay.Thistypeofsensorisdesigned for use as an outside air sensor and can be used for an inside sensor if required. CAUTION: This sensor is NOT water resistant and therefore should be
mounted in such a way that protects the sensor from rain. FourwiresensorshavetheirownsetofTTterminalswhereyouarepermittedtoconnectastandard two wire dry bulb sensor for remote temperature monitoring. This input overrides the internalsensordrybulbsensoronly.Humidityisstillmeasuredatthesensor.NOTE: Manualsareprovidedwiththefourwiresensorsthatprovidedetailonthefunctions
andsettingsofthesensors.
Sensor WiringTerminals 1 and 4 power the sensor (12V DC ± 4V is normal) while terminals 2 and 3 communicate data between each sensor and the thermostat. The sensors must be wired in series only and no two sensors should have the same DIP switch addressonthesensornetwork.Ifmultipleroomsensorsareinstalled,theSMART4000willcontrolusingtheaveragetemperature/humidityofallthesesensors.Alternatively,ifsetundertheInstallerMenuOption7,youareabletoselectHighHeatingandLowCoolingwhenusingmultiplesensors.NOTE: You may power the four wire sensor locally from a 12V DC power supply and connect
the thermostat to the sensor using terminals 2 and 3.
Four Wire
Figure 3

14
Ancillary Input wiringThe thermostat has two digital inputs that have been provided to permit a digital signal (ON/OFF)tooverrideorcomplimentthevariousthermostatfunctions.Anumberofpre-setfunctionscanbeselectedforeitherorbothofthesetwoinputs.TheInstallerMenuOption15providesdetailsonthesefunctions.If two inputs contradict each other, input one has priority. Fireandfaultinputshavepriorityoverallotherfunctionsregardless of what input they are on.
Setting Installer PreferencesGreatconsiderationhasbeengiventoensuretheSMART4000isrightforthejoboutofthebox, however, some adjustment of the standard thermostat parameters may need to be completedtomeetthespecificneedsoftheproject.The thermostat has a comprehensive advanced Installer Menu. This menu permits you to adjust operationalsettingsforthesafeandeffectiveoperationoftheHVACequipmentundercontrolof the thermostat.ToentertheInstallerMenu,presstheSETTINGbutton.Ifthekeylockisenabled,youwillberequestedtoenteryourthree digit PIN before advancing to the next step. Refer to Operation-PINPromptpage27.ThethermostathasthreefunctionbuttonsdirectlyundertheLCD.Thetextabovethebuttonschangesdynamicallytoindicatethefunctionofeachbuttoninthatwindowatthattimeandinconjunctionwithotheroptionsselectedelsewhereinthevariousmenus.A typical Installer Menu window is shown here.SelectingNOwillmovetothenextoptionintheInstallerMenu.SelectingYESwillpermityoutoedittheshownoption,theafterhoursrunperiod,inthisexample.SelectingBACKwillmoveyoutothepreviousmenuitem.IfyoupressandholdtheBACKbuttonfor three seconds, you will immediately leave the Installer Menu.TheSELECTbuttonadvancesyouthroughthevariousfunctionsthatcanbeadjustedasshownbytheblackboxsurrounding the menus, the cool set temperature in this example.SelectingtheUP/DOWNwillpermityoutochangethecurrentlyselectedoption.SelectingtheSAVEwillsavethechangesandexitthiswindow.SelectingtheREJECTwillexitthiswindowdiscardinganychangesmade.

15
AlistoftheBasicandAdvancedInstallerMenuoptionsisprovidedinTable2.NOTE: EnteringtheInstallerMenuwillshutdowntheHVACsystemuntilyouexitthismenu.
TheHVACsystemwillrestartagainafterhavingwaitedforanysettimedelaystoexpireonce you exit this menu.
Toadvancethroughthemenu,presstheSETTEMPERATUREbutton.AnswerNOto“Doyouwanttoenterthecurrentmenuoption"tomovetothenextmenuoption.TheSETTINGbuttonstepsyoubackwardsthroughthemenuoptions.PressandholdtheSETTINGSbuttontoimmediatelyexittheInstallerMenu.AnswerYEStoenterthemenutoadjustthehighlightedoptionwiththeUP/DOWNbuttons.ChooseSELECT(whendisplayed)toadjustotheroptionswithinthecurrentwindow.
INSTAllER MENUTable 2
Basic Menu Advanced Menu
Change Programming Options?Change Auxiliary Relay Functions?Change Auxiliary Input Functions?ChangeEconomySettings?Change Analog Output Settings?ExitInstallerMenu?
ChangeSystemPIN?ChangeButtonLock?ChangeProgrammingOptions?ChangeTemperatureControlLimits?ChangeSetbackTemperature?ChangeAfterHoursRunPeriod?ChangeSensorPerformance?ChangeCompressorStagingLimits?ChangeCompressorControlOptions?ChangeCompressorTimingOptions?ChangeRoomSensorFunctions?ChangeAuxiliaryRelayFunctions?ChangeIndoorFanOptions?ChangeUnoccupiedModeSettings?Change0to10VInputSettings?ChangeAnalogOutputSettings?ChangeDisplaySettings?ChangeAnalogOutputSettings?ChangeEconomySettings?ChangeNightPurgeSettings?ChangePISettings?ChangeNetworkOverrideSettings?EditCommunicationsSettings?EnterServiceSettingMenu?ExitInstallerMenu?

16
1 Change System Pin? Default Value = 021
The thermostat has a three digit PIN from 000 to 199 that is used to access various menu items if enabled by the installer. This menu permits you to see the current PIN and change it.Should you wish to change the PIN, you must enter it twice. If both PINs match, the new PIN is updated and must be used on all future PIN requests.NOTE: If you change and then forget this PIN, the thermostat must be returned to an authorized
serviceagentforunlockingandresetting.Theremaybeafeeforthisservice.
2 Change Button Lock? Default = OFF
Use this menu item to set the security access for the various menus within the controller.
Options
OFF–NomenuitemsarePINprotected-Unrestrictedaccesstoallfunctions.Set Temp Only – The user can alter the set temperatures without requiring a PIN but will be prompted for the PIN before entering the Schedule and Installer menus.Set and Program Only – The user can edit the Set Temperature and Time Schedule menus, butmustuseaPINtoentertheInstallerOptionsmenu.Full Lock – All menu items require a PIN to enter.
3 Change Programming Options? Default = 7 Day 1 EventOptimized Start = OFF
The thermostat can operate as either a programmable controller or manual controller (requiringanexternaltimeclockorswitchtoturnitONorOFF).
Options
Always ON – If selected, the thermostat will turn ON and run 24 hours per day, 7 days per week.Manual – The thermostat relies on an external signal to turn it ON or OFF. This external signal canbeviatheauxiliaryinputs(seeAuxiliaryInputOptions)orthebuilt-inafterhoursrunfunction.Also,seetheoutputrelayfunctionsdescribedonpage31ofthismanual.7 Day 1 Event –ThisoptionpermitsthethermostattoturnONandOFFautomaticallyassetbythebuilt-intimeclock,onceperdayforthesevenweeklydays.TheONeventisnamedStart and the OFF event is named Stop.7 Day 2 Event –Thisoptionissimilartothe7day1eventasdescribedabove,however,youarepermittedtwostartsandtwostopsperday.ThisisusefulshouldyouwanttheairconditioningtobeOFFforpartoftheday(duringalunchbreakforexample)orwhenyouwant the thermostat to start during one day, run past midnight and stop the next day. See InstallationTipsonpage36forhelpondoingthis.365 Day 1 Event–Thisoptionpermitsyoutosetupto30holidayschedulesinthethermostat that will override the normal 7 day 1 event program. This is useful for pre-programming the thermostat to be OFF for common holidays.365 Day 2 Events–Sameas365day1event,butwith2events(startandstops)perday.Optimized StartOFF/ON.ONwillstarttheHVACbeforetheprogrammedstarttimetoensuretheHVACsystemisatthesettemperaturebythestarttime.

17
4 Change Temperature Control Limits? Default = Heat 1200F (490C) and Cool 430F (60C)
Ifpermitted,theusercanhavetheabilitytoadjusttheheatingandcoolingsetpoints.Therangeoftheuseradjustmentcanbelimitedifdesiredbysettingthevaluesbelow.
Options
Heat –Thehighestheatingsetpointthatcanbeadjusted,430F to 1200F(60C to 490C).Cool – The lowest cooling setpoint that can be adjusted, 430F to 1200F(60C to 490C).NOTE: Regardless of the setpoint limits, the thermostat is designed to maintain the cooling
setpointabovetheheatingsetpoint.Ifnecessary,thethermostatwillpushsetpointsapart so the setpoints do not overlap.
5 Change Setback Temperature? Default = Heat OFF and Cool OFF
RatherthanshuttingtheheatingandcoolingsystemcompletelyOFFduringtheSTOPevents,thethermostatcanautomaticallymaintainamoreenergyefficientsetpointduringthistime.ThisvaluecanalsobeusedtosetthetemperatureduringHolidayevents.SeeSettingHoliday Schedule on page 29 of this manual.ThefanrunsinFanAutomodetomaintainanysetbacktemperatures.
Options
Heat–Thesetbackheatingtemperature,RangeOFF–then430F to 1200F(60C to 490C).Cool–Thesetbackcoolingtemperature,RangeOFF–then430F to 1200F(60C to 490C).
6 Change After Hours Run Period? Default = 2 Hours
Thethermostathasabuilt-inafterhourstimerthat,wheninitiated,willreplacethecurrentStoporHolidayEventsetpointswiththeStartheatingandcoolingsetpointsandFanMode.Thisoverrideperiodistimed.Attheconclusionofthistimedperiod,thethermostatwillreturntotheprogrammedsetpointsforthecurrentdateandtime.Informationoninitiatingtheafterhourstimerisonpage34ofthismanual.NOTE: Todisablethisfunction,setthisvaluetoOFF.

18
7 Change Sensor Performance? Default = 0.00 and Normal and SS
The thermostat has 3 temperature sensor inputs. Room – The 2 Wire Room sensor inputO/A – Smart outside air sensor
Options
Calibration – Adjust this value of the selected sensor by ± 80F (± 4.50C). Thisisusedtooffsetanytemperatureaccuracyerrorscausedbylongcablerunswiththetwowiresensors.AdjustingSensorreadingsshouldnotbenecessary.Response Speed – Use this value to select how rapidly the thermostat responds to room temperature changes. OptionsareVFAST/Fast/Nor (Normal)/Slow/VSlOW TheoptionsHigh/Low select(onlyapplicablewithmultipleindoorsensors)SS = Standard HI = High Select LO = Low Select
8 Change Compressor Staging Limits? Default = 20F (1.00C)
Eachofthethermostatprimarythreecompressoroutputshavetheirownsettingstocontrolhow each compressor performs as part of the overall system. The fourth compressor if enabled,usesthesamesettingsthataresetforthethirdcompressor.You can set in 1 degree increments how far away this compressor will start from the previous compressor’s start point. NOTE: Ifenabled,compressorfourusesallofthecompressorthreesettings.
Options
OFF to 50C–WhenselectingOFFforanycompressor,itandsubsequentcompressorsarealsoturned to OFF.NOTE: Compressor one cannot be turned OFF.

19
9 Change Compressor Control Options?
Default = Various
Thismenuitemallowsyoutofinetunethethermostat'scompressorcontrolsettings.
Options
lead/lag–Default=OFF.Thisoptionisdesignedtoeventhewearonairconditioningsystemswithmultiplecompressors.WhenallcompressorsareOFF(eitherduetotheroomtemperaturebeinginthedeadbandorviatimeclockturningthesystemOFF)thecompressornumberswillrotateonevaluesothatnexttimethesystemstarts,compressortwowillstartfirst.IMPORTANT: TheLeadLagFunctionwilluseallcompressorsunderthermostatcontrolas
indicatedintheCompressorControlOptionsmenuasdescribedabove.It’svitalthatthenumberoffittedcompressorsiscorrect.SeemoredetailsontheCompressorLeadLagFunctiononpage35.
Smart Upstaging – Default 5 minutes. The thermostat does more than measure the differencebetweentheroomtemperatureandsettemperaturetobringonvariousstagesofheatingorcooling.Thethermostatwillgivearunningcompressorachancetobringtheroomtotemperatureonitsownbeforestartingadditionalcompressorsinanattempttoreduceenergyconsumption.TheSmartStagingsettingswilldeterminetheminimumtimethethermostatwillwaitbeforebringingonadditionalcompressors.Timed Upstage–Default30mins.Topreventastrugglingcompressorattemptingtobringaroomtosettemperatureonitsown,thissettingwillbringonadditionalcompressorsregardless of how close the room temperature and set temperature are.
10 Change Compressor Timing Options? Default = 3 Minutes and OFF
Anadjustablecompressoranti-cycleandminimumruntimerhasbeenprovidedtoimprovecompressorprotection.Theanti-cycletimerwillpreventthecompressorfromrestartingtoosoonafterithasshutdownandwhenthethermostatfirstpowersup(softstarting).Theminimumruntimerwillkeepthecompressorrunningforaminimumperiodoftimetopreventshortcyclingbutmoresotoreducelongtermenergyconsumptionofthesystem.
Options
Anti-Cycle Delay – Adjust this from OFF to 3, 4 or 5 minutes (Default = 3 Minutes)Minimum Run Time–AdjustthisfromOFFto2,3,4or6minutes(Default=OFF)

20
11 Change Room Sensor Functions? Default = OFF
Theroomtemperaturesensorwiringcanbeusedforfunctionsinadditiontomeasuringtheroom temperature. When this sensor is open circuited (or permanently short circuited) and seenasmissingbythethermostat,additionalfunctionscanbeperformed.
Options
Force Off – When the room temperature sensor is absent, the thermostat will shut down.Ventilation–Whentheroomtemperaturesensorisabsent,thethermostatwillkeeptheindoorfanrunningduringtheStarteventprogrammedtime.Therewillbenoheatingorcooling.Full Vent–Whentheroomtemperaturesensorisabsent,thethermostatwillkeeptheindoorfanrunningregardlessoftimeorsetschedules.Therewillbenoheatingorcooling–usethiswithcaution.NOTE: AfireorfaultinputwillshutdownbothFullVentandVentilationModesinstantly.See
Option15ChangeAuxiliaryInputFunctions.
12 Change Auxiliary Relay Functions? Default = OFF
Thethermostatisfittedwithanauxiliaryvolt-freerelay.Thisrelaycanbeassignedpre-setfunctions.Manyofthesefunctionshaveanadditionalsetting.Forexample,analarmvaluecan be set when the high temperature alarm is selected.Off – This relay is not used.Time and After Hours – The auxiliary relay will CLOSE when the Thermostat is running the Startprogramorwhentheafterhourstimerisactive.SeeInstallationTipsonpage36ofthismanualfordetailsonusingonethermostatasamastertimeclock.After Hours Only–TheauxiliaryrelaywillCLOSEonlywhentheafterhourstimerisrunning.Thiscanbeusedtopasstheafterhoursruninformationtoadditionaldevices.Time Clock Only –TheauxiliaryrelaywillCLOSEwhenthethermostattimeclockisrunningtheStartprogram.Iftheafterhourstimerisinitiated,thisrelaywillremaininactive.Compressor 4 – The auxiliary relay is assigned as compressor four. Compressors one through threemustbeactiveforthisfunctiontooperate.SeeOption8CompressorStagingLimits.Aux Heat – In this mode, the auxiliary relay is assigned as auxiliary heat relay, providing aheatingcallafterallcompressorshavefinishedcallingforheatorasasecondstageofheatinginHeatCoolMode(Sw2OFF).Heat and Cool–TheauxiliaryrelaywillCLOSEwheneverthethermostatiscallingforheatingor cooling.Cool – The auxiliary relay will CLOSE whenever the thermostat is calling for cooling.Heat–TheauxiliaryrelaywillCLOSEwheneverthethermostatiscallingforheating.Continued on next page.

21
#12 continuedLow Alarm – The auxiliary relay will CLOSE when the room temperature falls below the low temperature alarm limit. It will auto reset when the room temperature rises more than 40F (20C) above the alarm setpoint. NOTE: If set, the Low Alarm will operate as long as the thermostat is powered, even when
stopped or OFF.High Alarm – The auxiliary relay will CLOSE when the room temperature exceeds the high temperature alarm limit. It will auto reset when the room temperature falls more than 40F (20C) below the alarm setpoint. NOTE: If set, the High Alarm will operate as long as the thermostat is powered, even when
stopped or OFF.Economy – The auxiliary relay will CLOSE whenever the thermostat calls for economy mode.Humidity–Thisrelayletsthethermostatcontrolahumidifieriftheindoorhumiditybecomes low. An alarm threshold can also be set. Network – The auxiliary relay can be controlled (opened or closed) via Modbus.
13 Change Indoor Fan Options? Default = Locked ON and No Purge
Theindoorfaninthethermostatcanbecontrolledbytheuser.IfpermittedtoselectAutoFanorFanOnMode,thefancanbelockedintoOnorAutoModeinthismenu.
Options
Unlocked – The user can select Fan Auto or Fan On Mode for the Start event without restriction.Locked Auto – The user cannot adjust the Fan Mode. When the Start event is running, the fanwillbeinAutoMode.ThefanwillcycleONandOFFwiththeheatingandcooling.Locked On–WhentheStarteventisrunning,thefanwillbeheldONcontinuously,regardlessoftheneedforheatingorcooling.ThefanwillturnOFFattheStopprogram.Purge – A fan purge period of 0 (OFF) to 10 minutes, in one minute steps, can be set. This willholdthefanONforapurgeperiodoftimeafterthesetpointhasbeenreachedandtheheatingandcoolinghasstopped.

22
14 Change Unoccupied Mode Settings? Default = Heat/Cool OFF/A Fan
ThethermostathasanUnoccupiedMode.WheninUnoccupiedMode,thecurrentactivesetpointsandFanModearereplacedbytheHeat,CoolandFansettingsinthismenu.TheUnoccupiedModecanbeinitiatedviatheauxiliaryinputsOption16orbytheHolidaysFunction(seepage29).
Options
Cool – The cooling setpoint to use during the unoccupied period (Default OFF).Heat –Theheatingsetpointtouseduringtheunoccupiedperiod(DefaultOFF).Fan – The Fan Mode to use during the unoccupied period (Default AUTO).CAUTION: If you set the Fan Mode to ON in this menu and then use the Unoccupied
Mode for a holiday event, the fan will run continuously, 24 hours per day during that holiday event period regardless of the need for heating and cooling. See Set Holiday Schedules on page 29 for more detail.
15 Change Auxiliary Input Functions? Default = Not Used
Two auxiliary inputs have been provided. These are digital inputs. Each of these two inputs hasthesamelistofoptions.Intheeventofaconflict,auxiliaryinputonewillhavepriority.Afireorfaultinputregardlessofwhatinputcallsthemhasabsolutepriorityoverallthermostat inputs.
Options
Not Used – This input is disabled.Fire–Normallyclosedinput.IfthisinputisOPEN,thethermostatshutsdownallfunctions.Inaddition,allrelayswillOPENandboth0to10Vsignalswillbe0volts.Thisisaninstantshutdown.Minimumruntimesandfanpurgeperiodswillbecancelled.TheLCDwillshowFIREtoindicatethismodeisactive.Occupancy–Ifthisfunctionisused,thethermostatreplacesthecurrentsetpointswiththeinstaller set occupancy setpoints and Fan Mode.AH Initiate–AshortON/OFFsignal(Pulse)onthisinputinitiatesorcancelsthethermostat'safterhoursruntimerfunction.Duringtheafterhoursruntime,thethermostatusesthestartsetpointsandFanModeforthetimedafterhoursrunperiod.Force On–Whenthisinputisactive,thethermostatusestheStartprogram’stemperaturesand Fan Mode. Delay Start–TheDelayStartissimilartotheForceOnFunctiondescribedabove.However,itdoesnotstartimmediately.Thethermostatwaitsarandomperiodoftime,upto90seconds,beforestartingtheA/Csystem.Thishelpsprotectthebuilding’spowersystemifmultiplethermostatsarerunningfromasingletimeclock.Fault NC – Close this input to shut the thermostat down. The LCD will show System Fault.Fault NO – Open this input to shut the thermostat down. The LCD will show System Fault.
Continued on next page.

23
#15 continued.Fresh Air–WhenthisinputisactiveandEconomyModeisenabled,thethermostatopensthe fresh air damper and closes the return air damper to introduce fresh air into the building. Typically, this input is connected to an indoor air quality monitor.Auto–WhenAutoModeisused,thethermostatoperatesbasedonitstimescheduleonlywhenthisinputisCLOSEDandstopsoperationwhentheinputisOPEN.
16 Change 0 to 10V Input Settings? Default = OFF
OFF – This input is not used.IAQ Threshold–Thisisthenormalbackgroundlevel.The range is the amount the fresh air damper will open when the 0 to 10V input measures 10V.For example, if a 0 to 2000 ppm CO2 sensor is used, and the damper should open to a maximumof60%whenfullfreshairisrequiredandthedampershouldclosewhentheindoor CO2 is below 500 ppm, then set the threshold for 2.5V (2000/500 ppm = 4, 10V/4=2.5).Settherangeto60%.
17 Change Display Settings? Default = Deg F and 12 Hour
Setthedefaulttemperatureandtimeformatdisplayforthethermostatfromthismenuoption.
Options
Display – Degree F or C format.Clock–12hour(am/pmformat),24hourformatorOffNOTE: SettheclocktoOFFtoforcethethermostatintoManualMode.
18 Change Analog Output Settings? Default = Not Used
Thethermostathastwoanalogoutputswhichcanbeassignedspecificfunctions.Eachofthetwoanalogoutputshasthesamefunctions.
Options
Not Used – The output is not used. Output is 0V.H and C–Selectthisoptionforasingleoutputtomodulateforbothheatingandcooling.ThisisusedbyBMSsystemstoobtainfeedbackabouthowfartheroomtemperatureisfromsetpointforbothheatingandcoolingmodes.Cool – This sets the analog output to control a 0 to 10 cooling valve. When you select Cool, youarethengiventheoptiontoselectthespanforthecoolingvalve,thatis,howfarabovesetpoint the 0 to 10V output is at 10V.Heat–Thissetstheanalogoutputtocontrola0to10heatingvalve.WhenyouselectHeat,youarethengiventheoptiontoselectthespanfortheheatingvalve,thatis,howfarbelowsetpoint the 0 to 10V output is at 10V.Return Air – This assigns the analog output to control the inside economy cycle damper. When economy is used, this damper will modulate closed as more outside air is used.Continued on next page.

24
#18 continued.Fresh Air – This assigns the output to control the outside economy damper. Normally this isat0Vuntileconomyairisused.Itcanbeabove0ViftheDVTfunctionisset(seeChangeEconomySettingsbelow).TheoutsidedamperalsoisalsousedfortheNightPurgeFunctionas described below.Type – 0 to 10V or 2 to 10V type valves. NOTE: ThisappliestoBOTHAnalogoutputs.19 Change Economy Settings? Default = OFF
NOTE: You must assign one of the 0 to 10V analog outputs as described previously before beingpermittedtoadjusttheeconomysettingswithinthismenu.ThethermostatwillautomaticallychangethissettingtoONwhenyouassignatleastoneanalogoutputto fresh or return air.
When using outside air for free cooling (see Economy Cycle on page 31), the suitable temperaturerangeofoutsideaircanbedefined.
Options
DVT–OFFto90%.TheDayVentilationTimeFunctionwillopentheoutsideairdamperbythisfixedamountregardlessofothereconomyfunctionsettings,butonlywhilethebuildingisoccupied.Thisistointroduceafixedamountoffreshairintothebuildingtokeeptheindoor air quality acceptable when the building is occupied. The damper will close when the building is unoccupied to prevent heat loss overnight.OFF – Economy cycle is not used/required.ON – Economy cycle is ready.Test – The thermostat will behave as if 100% outside air is required.RH limit – When the outside sensor is used and the normal two wire sensor is used for room temperaturemeasurement,thethermostatwillpermityoutosetahighoutsiderelativehumidity limit. When the outside air is above this level, outside air will not be used for cooling.Ifbothinsideandoutsidesensorsareused,thentheeconomysettingswindowwillshowEnthalpyBased.Therearenoadjustmentsrequired.Theinsideandoutsideairtemperatureswill be compared and the use of outside air will be based on those values.NOTE: When the outside air cannot adequately cool the room, the thermostat will suspend
the use of outside air and replace it with electric cooling.
25
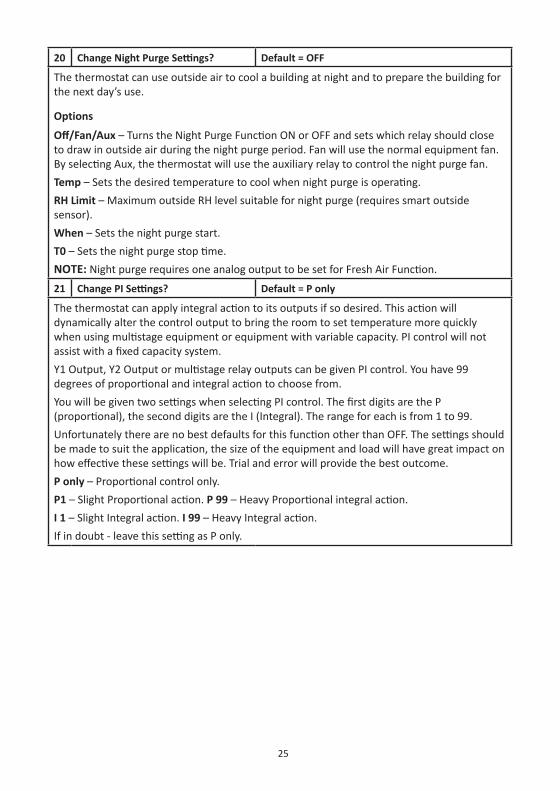
20 Change Night Purge Settings? Default = OFF
The thermostat can use outside air to cool a building at night and to prepare the building for the next day’s use.
Options
Off/Fan/Aux–TurnstheNightPurgeFunctionONorOFFandsetswhichrelayshouldcloseto draw in outside air during the night purge period. Fan will use the normal equipment fan. ByselectingAux,thethermostatwillusetheauxiliaryrelaytocontrolthenightpurgefan.Temp–Setsthedesiredtemperaturetocoolwhennightpurgeisoperating.RH limit – Maximum outside RH level suitable for night purge (requires smart outside sensor).When – Sets the night purge start.T0–Setsthenightpurgestoptime.NOTE: NightpurgerequiresoneanalogoutputtobesetforFreshAirFunction.21 Change PI Settings? Default = P only
Thethermostatcanapplyintegralactiontoitsoutputsifsodesired.Thisactionwilldynamicallyalterthecontroloutputtobringtheroomtosettemperaturemorequicklywhenusingmultistageequipmentorequipmentwithvariablecapacity.PIcontrolwillnotassistwithafixedcapacitysystem.Y1Output,Y2OutputormultistagerelayoutputscanbegivenPIcontrol.Youhave99degreesofproportionalandintegralactiontochoosefrom.YouwillbegiventwosettingswhenselectingPIcontrol.ThefirstdigitsaretheP(proportional),theseconddigitsaretheI(Integral).Therangeforeachisfrom1to99.UnfortunatelytherearenobestdefaultsforthisfunctionotherthanOFF.Thesettingsshouldbemadetosuittheapplication,thesizeoftheequipmentandloadwillhavegreatimpactonhoweffectivethesesettingswillbe.Trialanderrorwillprovidethebestoutcome.P only–Proportionalcontrolonly.P1–SlightProportionalaction.P 99–HeavyProportionalintegralaction.I 1–SlightIntegralaction.I 99–HeavyIntegralaction.Ifindoubt-leavethissettingasPonly.

26
22 Change Network Override Settings? Default = OFF/Auto
The thermostat is a standalone HVAC controller. When connected to a Modbus master (BuildingManagementSystemorBMS),manysettingsorcontrolfunctionscanbemonitoredoroverridden.ThismenupermitsresettingofcriticalcontrolfunctionsshouldtheModbusnetworkfail.
Options
O/Ride Off –Thethermostatinternalclockandscheduleisincontrol. Force On–TheBMSsystemisholdingthethermostatON(inStartMode). Force Off–TheBMSsystemisholdingthethermostatOFF(inStopMode).Relay Auto – The thermostat will control its six relays based on room and set temperature. Network–ThethermostatrelaysarebeingcontrolledbythecontrollingBMS.
23 Edit Communications Settings? Default = 7/9.6K
ThethermostatisfittedwithintegratedModbusRTUcommunicationsdriversandfirmware.Thispermitsthethermostat(ormanythermostat)tobecontrolledremotelyviaaPLCorBMSifrequired.Communicationsinformationisprovidedinaseparatedocument.
Options
Modbus Address–Thissetstheuniqueaddressforthisthermostatonthenetwork.Everydeviceonthenetworkmusthaveauniquenetworkaddress.Range0to255.ZeroisNOTrecommended.Baud Rate–Thissetsthecommunicationsspeed:4.8K,9.6K,19.2Kor38.4baud.Alldevicesonthenetworkmustcommunicateatthesamespeed.
24 Enter Service Settings Menu? Default = OFF (All)
Thismenupermitsyoutoperformsomeminormaintenanceandtestingonthethermostat,aswellasallowyoutoquicklycommissiontheA/Csystemunderthermostatcontrol.
Options
Relay Test–SelectingYEScyclesallthermostatrelays(andLEDs)toverifycorrectoperation.It is recommended that this test is not performed while connected to an A/C system as this may stress the A/C system.Service Mode –Enablingthisfunctionreduces(oreliminates)allofthethermostatanti-cycletimedelays,minimumruntimersandotherprotectivedelays.Selecting15MINwillautomaticallyturntheServiceModeOFFafter15minutes.SelectingONleavesthismenuonuntilmanuallydeactivated.TheLCDwillshowwhentheServiceModeisON.Factory Reset –SelectYESandthenagainintheconfirmationwindow,toresetthethermostatbacktothefactorydefaultsettings.Thiswilleraseallprograms,holidayschedules and all other values. The thermostat will return to the out-of-box state.

27
23 Edit Communications Settings? Default = 7/9.6K
SelectingYESexitstheservicemenu.SelectingNObringsyoutothefirstoptionoftheservicemenu Pin Number Select.NOTE: Ifnobuttonsarepressedafter30seconds,theInstallerMenuisexitedautomatically.IfyoupressandholdtheBACKbuttoninanymainmenuwindow,youareexitedfromtheinstaller Menu.
OPERATION
The PIN PromptThe SMART 4000 has three main menus where various parameters can be set. Some or all of these menus may be protected by a PIN. This PIN can be changed from the factory default of 021 by the installer. The example below assumes this PIN has not changed. IfthePINhaschanged,andyouknowthenewPIN,usethosedigitsratherthantheonesgiveninthisexample.IfthePINhaschanged,andthenewPINisnotknownbyyou,thethermostatmayneedtobereturnedtoanauthorizedserviceagentforunlocking.Theremaybeafeeforthis service.IfthePINisprotectingthemenuyouaretryingtoenter,youwillbeshowntheChangesNotPermittedwindowtowarnyouthatyoumustenteraPINtoproceed.Afterafewmoments,youwill be shown the PIN window where you must correctly enter the PIN before proceeding.PressingtheUP/DOWNbuttonswilladjustthecurrentlyhighlightednumber.ThefirstdigitinthedefaultPINis0(Zero),sopresstheNEXTbuttontoadvancetothenextdigit.Adjusttheseconddigitto2(Two)andagainpresstheNEXTbuttontoadvancetothethirddigit.Adjustthethird digit to 1 (One). You should now have the PIN window showing 021.Ifyouhavemadeanerror,pressingtheBACKbuttonwillpermit you to adjust a previous digit.PresstheENTERbuttontoproceed.IfthePINwasenteredcorrectlyyouwillbepermittedtoproceed,ifnot, you will be ejected from this window. You may try again.
Setting the Start Event or Run TemperaturesWhen the thermostat is running, it will maintain the user/installerdefinedheatingandcoolingsettemperatures. To set the Start event temperatures, press theSETTINGSbutton.UsetheSELECTbuttontoselectFanMode(ifapplicable)andtheheatingandcoolingsetpoints.AdjustwiththeUP/DOWNbuttonstoyourdesiredvalue.WhenthethermostatisrunningtheStopevent,thethermostatwillmaintainthesetbacktemperatures(seesetbackonpage15ofthismanual).

28
ProgrammingThethermostathastheabilitytoautomaticallyturntheHVACsystemONandOFFbasedonitsinternaltimeclockandtheuser/installerdefinedschedule.TherearefouroptionsintheschedulemenuthatcanbeaccessedwiththeClock&Schedulemenu:• Setting the Clock – Will set the current time and date.
• Setting the Daily Schedule – Used to set the seven day start and stop times.
• Setting the Holiday – This sets the date the holiday schedules will start and end.
• Setting the Daylight Savings Time – Used to set the daylight savings start and end date, and time.
If these menus are PIN protected, it is necessary to enter the correct PIN before accessing the various menu items.
Setting the ClockPresstheSCHEDULEbutton.Ifyouarepromptedto enter a PIN, see The PIN Prompt on page 27. Depending on values set within the thermostat Installer Menu,youwillbepresentedwithanumberofoptions.UsetheSELECTbuttontohighlightthewordCLOCKandthenpresstheSETbutton.UsetheSELECTbuttontoadvancethroughthevariousparameterssuchasDate,Month,Year,HourandMinute.AdjustthesevalueswiththeUP/DOWNbuttonstothedesiredvalue.Thethermostatwillcalculatethedayoftheweek.PressSAVEtosavethenewtimeparametersandexitthemenu.TheREJECTbuttonwillexitthismenuwithoutmakingchanges.
Setting Daily SchedulesThe thermostat can be individually programmed to start and stop the building’s HVAC system at aseparatetimeforeachdayoftheweek.When the thermostat is in Start Mode, it will use the Start program set temperatures. See Options4and5.WhenintheStopProgramMode,itwillusetheSetbacksettemperaturesassetbytheinstaller.SeeSettingtheSetbackTemperaturesonpage17.Thisprovidesaroundtheclocktemperaturecontrol.Additionally,thethermostathasabuiltinafterhoursruntimerthatcanbemanuallyinitiated.The Stop program temperatures are temporarily replaced with the Start program temperatures forapredeterminedperiodoftime,typicallytwohours.SeetheAfterHoursFunctiononpage17forsettingtheparametersforthisfunction.NOTE: Each daily schedule must start and end on the same day. You cannot set a schedule to
start at 2 pm Wednesday and end at 3 am Thursday. To program past midnight, see Tips andTricksonpage36ofthismanual.

29
NOTE: SettingaStartscheduletimeandStopscheduletimeatthesametimewillcanceltheschedulefor that day, i.e. 8:00 am start and 8:00 am stop.
PresstheSCHEDULEbuttonforonesecond.Ifyouareprompted to enter a PIN, see The PIN Prompt on page 27. Depending on values set within the thermostat Installer Menu, you will be presented with a number of options.UsetheSELECTbuttontohighlightthewordSchedule.PresstheSETbuttontoentertheSevenDayProgramming menu.Youwillbepresentedwiththeoptiontostart/edittheprogram on Monday or select another day using the UP/DOWNbuttons.PressNEXTtoproceed.Set the start hour and minutes, and the stop hour and minutes for the day previously selected, Monday in this example. If you have two schedules per day,youaregiventheoptiontoswapbackandforthbetweenthefirstandseconddailyStartandStopsbyselecting2NDSCH.PressNEXTtoproceed.You can now copy the previously selected day’s program, Monday in this example, to the other days. UsetheSELECTbuttontochoosethedayyouwishtocopytoandthenpresstheNEXTbuttontobeginthecopying process. The thermostat will show COPYING and then permit you to re-enter the programming menu to program other days or exit to the main menu.
Setting Holiday SchedulesUp to 30 holiday events can be scheduled into the thermostat. These holiday events will overridethetimeandtemperaturesettingsofthenormalsevendayprogramevents.Itwillreplace those event parameters with the holiday event parameters selected.Aholidayeventcanbeusedjustonceandthenexpire;oritcanbeaperpetualeventthatoccursatthesametimeeveryyearuntilcancelledmanually.PresstheSCHEDULEbutton.Ifyouarepromptedto enter a PIN, see The PIN Prompt on page 27. Depending on values set within the thermostat Installer Menu,youwillbepresentedwithanumberofoptions.UsetheSELECTbuttontohighlightthewordHolidayandthenpresstheSETbutton.Thedisplaywillchangeto let holiday events be set or edited.UsetheUP/DOWNbuttonstochooseoneofthe30available holiday event placeholders. The holiday event placeholders will show either 1 EMPTY, if no holiday eventissetinthisplaceholder,oritwillgivethestartingdateofanexistingholidayevent.PressSELECT to enter the desired holiday event placeholder. IftheholidayeventplaceholdershowsDDMMYYindicatinganexpiredevent,youmustdeletethisexpiredeventbeforeproceedingbyselectingDELETE,thenconfirmthateventdeletionisrequired before entering the new event.

30
UsetheSELECTbuttontohighlightthedesiredoptionandusetheUP/DOWNbuttonstoadjusttothedesiredvalue.The thermostat holiday program has a number of options.The top line of text shows the event number. The example above shows Event 1. Next,selectasingledayforthiseventorarangeofconsecutivedays.Eachholidayeventcanbefordifferentlengthsoftimeandcanoccuratvarioustimesoftheyear.Thethermostatletsyouchoosefromanumberofheatingandcoolingsetpointstoapplyto the selected holiday event. In this example, OFF has been selected. Theavailableoptionsare:OFF–TheheatingandcoolingsystemwillbeOFFduringthisevent.SB–(Setback-seepage17)Thethermostatwillusethecurrentsetbacktemperaturesforthedurationoftheholidayevent.Thefanwillcyclewiththeheatingandcooling,i.e.AutoMode. OCC – (Unoccupied setpoint - see page 22) The thermostat will use the current unoccupied settemperaturesandFanModeforthedurationoftheholidayevent.Caution–ThefanwillobeytheFanModesettingsintheunoccupiedsetpointmenu.IfFanONModeisselectedinthismenu,thenthefanwillrun24hoursperdayforthedurationofthisholiday event.Tosetthedatefortheevent,stepthroughthestartandstopdateswiththeSELECTbuttonandadjustingthedatewiththeUP/DOWNbuttons.Toselectaself-expiringonetimeevent,choosethecurrentyearoraselectafutureyearforthisholidayevent.Thethermostatwillshowthisyearinthesetting.Whenthiseventhaspassed,thethermostatwilldeletethiseventautomatically.Tosetaneventthatoccursatthesametimeeveryyearuntilmanuallycancelled,attempttosetayearpriortothecurrentyearasshownbytherealtimeclock.Theyearnumberwillchangetoa P to indicate this event is perpetual or permanent holiday event. A perpetual event will need tobemanuallydeletedbecausetheydon’texpireautomatically.PressSAVEtosavethenewtimeparametersandexitthemenu.TheBACKbuttonwillexitthismenuwithoutmakinganychanges.NOTE: • All holiday events start and stop at midnight on the day(s) selected.
• The after hours run timer will operate during a holiday event if initiated and will use the normal Start Mode temperatures, not the Holiday Heat/Cool or Fan setting.
• The fault or fire inputs will cancel any holiday event for the duration of the fault or fire event.
• All advanced functions such as economy cycle, fan purges and compressor control options operate during the holiday events to maintain any set temperatures that are programmed.

31
Setting Daylight Savings TimesThethermostatcanautomaticallychangeitsclocktimebasedonthecurrentdaylightsavingsparameters set in this menu.PresstheCLOCK&SCHEDULEbutton.Ifyouareprompted to enter a PIN, see The PIN Prompt on page 27. Depending on values set within the thermostat Installer Menu, you will be presented with a number of options.UsetheSELECTbuttontohighlightthetextDSTandthenpresstheSETbutton.UsetheSELECTbuttontoadvancethroughthevariousparameters: the start day and month, the end day and month,whattimetochangetheclockandwhetheryouwanttheDSTfunctionONorOFF.AdjustthehighlightedvalueswiththeUP/DOWNbuttonstothedesiredvalue.PressSAVEtosavethenewtimeparametersandexitthemenu.TheBACKbuttonwillexitthismenuwithmakinganychanges.
ADVANCED FEATURES
Economy CycleA typical economy cycle wiring diagram has been provided below. In this example the SMART 4000iscontrollingasinglestageheatpump.Othercontrolconfigurationscouldalsotakeadvantage of the Economy Cycle Mode of the thermostat.For the economy cycle to operate, you must assign at least one of the analog outputs for economycyclefunctionintheChangeAnalogOutputmenu,seepage23;eitherasfreshairdamper, economy return air damper or both. You must also set economy cycle parameters in theChangeEconomySettingsmenu(seepage24).Theeconomycyclereliesonoutsideairtemperature humidity values being available to the thermostat. You should install both the inside and outside sensors for full enthalpy-based economy control. A less preferred option is to use the outside sensor and set high outside RH limits. Theexampledrawing,Figure4,shows24VBelimobranddamperactuatorsusingthesame24Vsupplythatispoweringthethermostat.Otherpowercombinationsarealsopossible.Ifindoubt,pleasecontactanauthorizeddistributorforapplicationspecificguidance.As some brands of dampers cannot easily operate in reverse (close at 10V), the thermostat providestwo0to10Voutputs,oneforwardactingandonereverseacting.Theseareshownas Fresh Air and Return Air in the analog output menu. The sum of both 0 to 10V outputs is generally10Vunlessthedaytimeventilationfunctionissetwherethereturnairdampermayrestatafixedvoltage while the building is running (intended to introduce fresh air to maintain acceptable indoor air quality).Thethermostatprovidesyouwithinformationonthecurrentstatusoftheeconomycyclefromthemaininformationscreen.PressoneoftheUP/DOWNbuttonstoadvancetotheEconomyMode status window shown above.

32
Figure 4 shows the thermostat using both 0 to 10V outputs. You can use one output if desired andsetonedamperforreverseactingonthedamperitself.
R CFour Wire
RC RC RC
Sensor wiring info: Terminal 1 = 12V DCTerminal 2 = Data ATerminal3=dataBTerminal 4 = 0VIf required, the Sensor can be locally powered from 12V DC, then use a shielded pair to communicate between the Sensor and thermostat terminals 2 and 3.
Figure 4
Economy Checklist1. Wire the fresh, return and relief/spill dampers to the thermostat analog outputs. Note
which thermostat output is controlling which damper. For example, analog output 1 (Y1) can be set to control the return air damper, while analog output 2 (Y2) may be set to control the fresh air and spill damper (as shown in the example above).
2. Wire the room temperature sensor to the thermostat. Two wire or four wire versions of the sensors are acceptable. Wire the four wire sensor to the S1, S2, S3, S4 terminals. Set all four DIP switches in the sensor to ON. This will define the sensor function as outside air sensing. See the manual supplied with the sensor for more details on switch settings and other functions of the sensor.
3. Enter the Installer Menu and set up the analog outputs in the thermostat to match the damper wiring. Enter the Change Analog Output Settings menu and Set AO1 = Return, Set AO2=Fresh.PressCLOCK&SCHEDULESave.Option18detailstheanalogoutputsettingswithin the thermostat.
4. In the Installer Menu, enter the Change Economy Settings menu. Confirm Economy = ON. PressCLOCK&SCHEDULESave.Option19givesmoredetailonthis.
5. PressandholdtheBACKbuttonSETTINGStoexittheInstallerMenu.
6. Economy cycle is now setup.

33
Informationonwiringsensorstothethermostatisprovidedonpage13.NOTE: IfyouwishtotestforcorrectdamperoperationentertheInstallerMenuOption19
ChangeEconomySettings.ChangeEconomyONtoTEST.ExittheInstallerMenu.TheEconomy LED will be ON and the LCD will show Economy Test. The fresh air damper will be held at 10V and the return air damper will be held at 0V. YoumustexitEconomyModetestmodemanuallybysettingEconomyModebacktoEconomy=ON.Ifyouforget,thethermostatwillautomaticallyexiteconomytestmenuafteronehour.
Economy logicThe economy cycle of the thermostat is used before stage one cooling is required and starts 0.2 F degrees (0.1 C degrees) above the cooling setpoint if the outside air is suitable. If the indoorfanisinAutoMode(Cyclicfan)andnotrunningwhentheEconomyFunctionisrequired,thethermostatwillautomaticallystarttheindoorfan.Ifaftersometimethedesiredroomtemperatureisnotreachedorinfactbecomeswarmer,thethermostatwillautomaticallysuspendtheoutsideairfunctionandreplaceitwithnormalA/Ccoolingtobringtheroomtosetpoint.EconomyCyclefunctionwillbesuspended.Inthesecases,theEconomyLEDwillflashtoindicatetheoutsideaironitsownisnotcapableofmaintaining the target temperature.NOTE: EconomyisusedasfirststagecoolingONLYandisdesignedtomaintainacomfortable
temperature in the most economical manner possible. If the cooling setpoint and room temperature are far apart, past stage one limits, then economy will NOT be used and the thermostat will immediately call for electric cooling. UsetheEconomyTESTfunctiontochecktheeconomyfunction.Settingaverylowcoolingsetpointwillforcethethermostattosuspendeconomyfunctioninfavorofelectriccooling.
CO2 InputAs well as controlling Economy cooling, the thermostat allows you to add a 0 to 10V DC CO2 sensorthatregulatestheintroductionofoutsideairbasedontheindoorairqualityofthebuilding.Anauthorizeddistributorisabletooffera0to2,000ppmCO2 sensor with infrared sensor and LCD.
R CFour Wire
Figure 5

34
Asthestandardeconomydampersareused,theIndoorAirQualitysettinginthethermostatcan limit the maximum amount of fresh air introduced into the building. See the Installer Menu Option16-Change0to10VInputSettingsforsettingtheIndoorAirQualitysettings.
Valve Control
R CFour Wire
RCRC
Figure6
TheSMART4000cancontrolheatingand/orcoolingvalvesviaa0to10or2to10Vsignal.Thespanofthevalvescanalsobeindividuallyset.Theheatingvalvecanbefullyopen(at10V)when 50F (30C) from setpoint while the cooling valve can be set to be fully open (at 10V) 20F (10C) from setpoint.ThethermostatwillalsoswitchtheheatingandcoolingrelayswheninValveMode.Thisallowsthethermostattoalsocontrolacirculatingwaterpumporsomeotherdevicewhenheatingorcooling is needed.Youwillneedtoassignthe0to10Voutputstovalvefunctionbyselectingheatingorcoolingmodeforthe0to10Voutputofthethermostat.SeeOption18forsettingthe0to10Voutputfunction.After Hours TimerThethermostathasanAutoOfftimerthatcanbeusedinmultipleways,mosttypicallyasanafterhourstimer.ItcanalsobeusedinManualModeasanautooffruntimer.Placinganormallyopenmomentarypushbutton(BellPress)onthethermostat'sroomsensorinputwillactivateorcancelthistimer.Anti-Bouncelogicisbuiltintothethermostatlogicsothatasingleormultiplepressofthebutton(withina10secondwindow)areseenbythethermostatasasinglecalltostart(orstop)theafterhourstimer.After Hours Timer Logic in Manual ModeIftheSMART4000issettoManualMode(seeProgrammingOption3),thenthethermostatwillstartandrunforthedurationoftheafterhourstimerperiodandthenautomaticallyturnoffagain.SeeAfterHoursTimerPeriodOption6.Thisisusefulfortrainingroomsforexamplethatareusedintermittently.Manuallystarttheruntimerwhenthetrainingroomisinuseknowingthatafterthepre-programmedtimethethermostatwillshutdowntheHVACsystemautomatically.
SMART-R-02
After Hours initiate
RoomCom

35
After Hours Timer Logic in Programmable ModeIfthethermostatissettooneoftheprogrammablemodes(seeProgrammingOption3),thenthethermostatwillautomaticallyalternatebetweentheStartandStopprogramsbasedonthepre-programmedtimes.IfduringtheStopprogramthebuildingbecomesoccupied,initiatetheafterhourstimerandtheStartprogramtemperaturesaretemporarilyusedforthepresentafterhourstimerperiod(default2hours).Initiating/Cancelling the After Hours TimerTheSMART4000roomtemperaturesensorcanbefittedwithanormallyopenswitchacrossthe contacts. Press this switch for one or two seconds to temporarily short the temperature sensor,startingorstoppingtheafterhourstimer.Thethermostatisalsoprovidedwithadigitalauxiliary input. Place a normally open momentary switch across this input to start or cancel the afterhourstimer.SeeOption15-HowtoSettheAuxiliaryInputFunctionformoreinformationonthisfunction.
Output RelayThethermostathasanauxiliaryoutputrelaythatcanbesettodomultipletasksbytheinstaller.Thesecouldbetoprovideanadditionalstageofheating(AuxHeatMode),anadditionalcompressorforareversecyclesystem(Comp4Mode)aswellasotherfunctions,see Option12.Anotherfunctionistousethisrelaytoindicatethethermostatstatusortocontrolauxiliarydevicessuchastoiletexhaustextractionfans,accesscontrolorlightingbasedonthecurrentthermostat status. Amethodofusingasinglethermostat'stimeclocktocontrolmultiplethermostatisdescribedintheInstallationTipssectiononpage36,reducingthecomplexityoftimeclockprogramming and scheduling.
Compressor lead lagWhencontrollingsystemswithmultiplecompressors,theSMART4000canattempttoevencompressorwearbyadvancingthecompressornumberseachtimeallcompressorsareOFF.Forathree-compressorsystem,thefirststartwillcallcompressoroneasstageone,compressortwo as stage two and compressor three as stage three. When setpoint is reached and all compressorsareOFF,thenexttimethesystemstarts,compressortwowillbestageone,compressor three will be stage two and compressor one will be stage three.ItisimportantthattheLeadLagFunctionissetcorrectly.IftheHVACunderthermostatcontrolhas two compressors, then the thermostat must be set for a two-compressor system. Do this by turningoffcompressorthree(andfour)usingthecompressorcontroloptionsintheAdvanceInstallerMenuOption9sothatthethermostatdoesnotcallforabsentcompressors.

36
INSTAllATION TIPSProgramming Past MidnightTheSMART4000usesadailytimeclockforscheduling.TheStarteventandStopeventmustoccuronthesameday.ThethermostatcannotstarttheHVACsystemat4pmoneafternoonandstopitagainat6amthenextmorningwithasingleevent.Tosolvethisproblem,thethermostathastheabilitytohavetwodailyevents.ThisoptionissetupintheInstallerMenuunderOption3-ProgrammingOptions.Usingtwoevents,event#1canstartatmidnightandstopat6amwhileevent#2canstartat4pmandstopatmidnight,toprovideuninterruptedairconditioningcontrolpastmidnight.Table 3 illustrates the following events. The thermostat starts at 10 am and stops at 11 pm Monday through Thursday. It starts at 10 am Friday and stops at 5 am Saturday morning. Then, it starts again at 11 am Saturday morning and stops at 4 am Sunday morning.
Table 3 Day Event 1 Start Event 1 Stop Event 2 Start Event 2 Stop
Monday 10 am 11 pm 11 pm 11 pm
Tuesday 10 am 11 pm 11 pm 11 pm
Wednesday 10 am 11 pm 11 pm 11 pm
Thursday 10 am 11 pm 11 pm 11 pm
Friday 10am 11.59 pm 11.59 pm 11.59 pm
Saturday 12 am 5 am 11 am 11.59 pm
Sunday 12 am 4 am 4 am 4 am
Setting One Thermostat as the Master Time ClockLargebuildingsoftenhavemultipleA/Cunits.IfeachA/Cunitusesaseparatetimeclock,itcanoftenbetroublesomeandtimeconsumingtoprogramandsetup.UseoneSmart4000asamastertimeclockandthebalanceofthethermostatsasslaves.SettherandomdelaystartfunctionactiveonalloftheslavethermostatstopreventalltheA/Csystemsfromwakingupatexactlythesametime.Thiscanreducethepotentialfordamagetothebuilding’selectricalsupplyorincurringhighpeakdemandpowerloadingcharges.Onethermostatistheclockandholdstheprogramsandschedules.Allotherthermostatsmonitor the status of the Master thermostat. When a start command is received, each thermostatwillchoosearandomtimefrom0to90secondstowaitbeforeitstarts.Figure7showshowtowirethiscontrolnetwork.
R C4 Wire
R C4 Wire
R C4 Wire
Figure 7

37
Master SetAuxRelayFunctiontoTimeClock(orTimeClockandAfterHours)ModeintheInstallerMenu,Option12.ThiswillclosetheAuxRelaywheneverthemasterthermostatisrunningtheStartProgram(andafterhoursifselected).
Slave SetProgrammodetoManualModeInstallerMenuOption3andalsosetAuxinputtodelaystart,InstallerMenuOption15-ChangeAuxiliaryInputOptions.
NOTE: If all thermostats are powered from the same 24V supply, ensure all auxiliary input commonsarewiredtogetherasshowninFigure7orfeedbackloopsmayoccur.
Auto/On/Off WiringManybuildingsrequireanAuto/On/OffswitchintheirswitchboardtocontroltheirHVACsystems. The SMART 4000 can accommodate this in a number of ways. One example is shown in Figure 8.
R CFour Wire
Figure 8
Use the Installer Menu to set Aux input 1 as forced ON and Aux input 2 as Auto (see Installer MenuChangeAuxiliaryInputOption15).IntheAutoposition,thethermostatwillrunitsnormalsevendayor365dayschedule.IntheONpositionthethermostatwillusetheStartprogramtemperaturesandFanModeforaslongasthisswitchisclosed.IntheOFFposition,thethermostatwillshutdown.IfoneoftheAuxiliaryinputsisneededforanotherfunction,suchasanoccupancyinput,thenthe thermostat can also be shut down by opening the circuit of the temperature sensor.
Four Wire SensorsTheSMART4000hasacommunicationsportdesignedtoreadandpassinformationtoaselectionoffourwiresensorsthatenhancethethermostat'scontrolcapabilities.Thesesensorsaresetaseitherindoorsensorsoroutdoorsensorsviaswitcheswithinthesensor.Multipleindoor sensors can be wired in parallel with an outdoor sensor if required.Thesesensorsareusefulshouldthedistancebetweenthethermostatandthesensinglocationbeextremelylong,astheyarenotaffectedbythelengthofcablerunsetc.Temp and RH Sensor – This sensor is required as an outdoor sensor when the thermostat is controlling economy based on air enthalpy rather than simply dry bulb temperature. This sensor can be provided withorwithoutatemperaturedisplayandwithrunandfaultindication.ManualON/OFFoperationcanalsobeprovidedifrequired.

38
Adjustable Sensor–ThissensorisalsofittedwithaLCDshowing the current room and set temperature. This provides the ability to adjust the set temperature up to the control limits as set in the thermostat Installer Menu(Option7)ortoinitiate/canceltheafterhourstimer.These sensors override any standard two wire sensors thatmaybefittedtothethermostattoperformthesamefunction.Forexample,fittinganadjustablesensoras a room temperature sensor will disable the standard two wire sensor that maybe wired to the room and com terminals.
COMMUNICATIONS FUNCTIONS
TheSMART4000hasapowerfulRS-485driverchipwithModbusRTUcommunicationsdrivers.Intheory,upto247thermostatscanbeconnectedonasinglenetworknode.Howeverduetoanumberofrealworldlimitations,eachnodeshouldbelimitedtonomorethan100or150thermostatsandonlyinidealconditionswithgoodqualityshieldedcable.Thispermitsallthermostatstobecontrolledfromacentrallocationorviatheinternetifconnected to a suitably equipped master.An animated icon displays on the thermostat LCD whenever a remote device is communicatingwiththethermostat.Itisessentialthathighquality,shielded,single-paircableisusedwhenwiringthethermostatforcommunications.Thisisespeciallyimportantforlongcablerunsorwheresomeelectricalnoisemaybepresent.Theshieldshouldbegroundedinasinglelocation.Thequalityofthecommunicationsreliesongoodcableandwiringpractices.Eachdeviceonanetworknodemusthaveuniquenetworkaddressesandallcommunicateatthe same baud rate and parity. These parameters are set in the InstallerMenuOption2.Figure9showsatypicalModbusRTUnetworkwiththreethermostats, all powered from the same 24V AC supply. Other Modbusdevicessharingthesamebaudrateandwithdifferentaddressescanco-existonthesame node if required.
R CR C R C
Figure 9

39
Eachdevicemusthaveauniquenetworkaddressandoperateatthesamebaudrateasotherdevicesonthenode.ThelastdeviceinthenodemayneedthecommunicationsEndOfLine(EOL) resistor in place. Somerulesapplywithcommunicationswiring:AlldevicesMUSTbeinseries.NoTbranchesorstarwiring(Figure10).Incorrectwiringwillseriouslydegradeorstopcommunications.
Figure 10

40
SPECIFICATIONS
Input Voltage LowVoltageInput-24VAC±15%50/60HzHighVoltageInput-100to270VAC50/60Hz
OperatingTemperature 32°F to 122°F (0°C to 50°C )
OperatingRH 0 - 95% (Noncondensing)
Storage Temperature 32°Fto150°F(0°Cto65°C)
Size 4.3"x4.3"x2.6"(110mmx110mmx65mm)4.3"x7"x2.6"(110mmx180mmx65mm)withTerminalCoversFitted
Control Range 32°F to 122°F (0°C to 50°C)
Maximum Equipment Stages
4 Compressors (HC Mode = 2 Heat/3 Cool)
Anti-CycleTimer Off,2,3,4or5Minutes(InstallerAdjustable)
AfterHoursTimer OffTo12Hours(InstallerAdjustable)
Memory Type NonVolatile128K
Clock 12/24Hour7-DaywithCalendar,Back-upBatteryforClock
Back-upBattery 4to6Years
Holiday Events 30 (Perpetual and/or Self-Expiring)
LCD 32x132Graphical-LEDBacklight
Relays Fan 10A MaxAll Others 5A Max
0 to 10V Output 10mA Max Each
0 to 10V Input 100kW Max Voltage 17V DC
Room and Outside Air Sensor
10KNTCTypeII(2-WireScreened)
CommunicatingSensor 4-Wire-1312ft(400m)MaximumwithControlFunction10KNTCtypeII/RH10to98%RH2%.
OptionalRFSensor TwoAAABatteries,18-MonthLife10KNTCTypeIIRange-492ft(150m),OpenAir130ft(40mIndoorsTypical)Frequency433MHz-2WayWithErrorChecking
Communications BaudRate4.8/9.6/19.2KAddress Range 0 to 255Parity Odd/Even/None

41
TROUBLESHOOTINg
Problem Remedy
Thermostat will not show any informationotherthanroomtemperature on the display. The CLOCK&SCHEDULEbuttondoesnotwork.
Thermostatclockissetto0inInstallerMenu,sothermostatislockedintoManualmode.SeeOption17-ChangeDisplaySettings.
RealTimeClocklosesitstimewhenpower is removed.
Asmalllithiumbatterydesignedtomaintaintherealtimeclockduringpoweroutages.Itmayrequirereplacingonceeverythreetofiveyears.Thisislocatedonthethermostat main printed circuit board and requires the removaloftheplasticenclosuretoreplace.
Economyfunctionisnotworking. Theeconomyfunctionrequiresconfiguringtomeettheneedsoftheprojectbeforeitcanfunction.Detailedguidanceontheeconomyfunctioncanbefoundonpage31 of this manual.
How can I test to see if the Economy Functionisworking?
In the Economy Menu, set Economy Mode from ON to TESTusingtheup/downbuttonsthenselectSave.Seepage 31.
The red heat LED or blue cool LED isflashing-thereisnoheatingorcooling output.
TheHeatingandCoolingLEDswillflashwhenheatingorcoolingisrequiredbutthethermostatcannotsatisfythedemanduntilthecompressoranti-cycledelaytimerhasexpired. WAITING is normally displayed in the LCD during thistimeoutperiod.
The thermostat is running at night when you believe it should be stopped.
Checktobesuretherealtimeclockissetcorrectly,payingspecialattentiontheAM/PMsetting.ChecktheschedulebyusingtheCLOCK&SCHEDULE button.Ensurethestartprogrameventtimeisearlierthanthestopprogrameventtime.Checktoseeifanysetbacktemperaturesareset.SeeOption15.ChecktheauxiliaryinputsettingsOption15,astheremaybeatimeclockoverridewiredintothisinput.

42
FIVE YEAR lIMITED WARRANTYRobertshaw warrants to the original contract installer, or to the original consumer user, that each new Robertshawthermostatwillbefreeofdefectsinmaterialsandworkmanshipundernormaluseandserviceforaperiodoffive(5)yearsfromthedateofpurchase(the“WarrantyPeriod”).IfanyProductfailswithintheapplicableWarrantyPeriod,Robertshawshall,atitsoption,repairorreplacetheProductor credit the purchase price, provided the Product is returned to Robertshaw’s facility or designated agentwithtransportationchargesprepaid,andtheProduct,uponexaminationbyRobertshaw,isfoundnottoconformtotheWarranty.CostofProductremoval,labor,orreinstallationofnewProductarenotcovered under this Warranty and are not the responsibility of Robertshaw. Warranty on Products, parts, componentsand/orsoftwaresold,butnotmanufacturedbyRobertshaw,shallbeexpresslylimitedtothewarrantytermsofthemanufacturerofsuchproducts,components,partsand/orsoftware.Thisabovewarrantydoesnotapplyto:(i)batteries;(ii)anylossesordamagesduetomisuse,useoftheProductsinotherthantheirnormalandcustomermanner,accident,abuse,water,fire,neglect,normalwearandtear,negligence(otherthanRobertshaw's),unauthorizedmodificationoralteration,usebeyondratedcapacity,unsuitablepowersourcesorenvironmentalconditions,strippedthreads,improperinstallation,repair,handling,maintenanceorapplicationoranyothercausenotthefaultofRobertshaw.THEFOREGOINGWARRANTYISINLIEUOFANDEXCLUDESALLOTHERWARRANTIES,WHETHEREXPRESSORIMPLIED,INCLUDINGTHEIMPLIEDWARRANTIESOFMERCHANTABILITY,TITLEANDFITNESSFORAPARTICULARPURPOSE.INNOEVENTSHALLROBERTSHAWBELIABLETOCONSUMER,CONTRACTOR,OR ANY THIRD PARTY FOR ANY SPECIAL, INDIRECT, INCIDENTAL, CONSEQUENTIAL OR PUNITIVE DAMAGES INCLUDING, WITHOUT LIMITATION, LOSS OF USE, LOSS OF PRODUCTION, LOSS OF GOODWILL, LOSS OF CONTRACTS, LOSS OF ANTICIPATED SAVINGS, LOST REVENUES OR PROFITS, OR PROPERTY DAMAGE,REGARDLESSOFWHETHERSUCHLOSSORDAMAGEISBASEDINCONTRACT,WARRANTY,TORT,NEGLIGENCE,STRICTLIABILITY,INDEMNITY,PRODUCTLIABILITY,OROTHERWISE,ANDEVENIFROBERTSHAWHASBEENADVISEDOFTHEPOSSIBILITYOFSUCHDAMAGES.REPAIR, REPLACEMENT OR CREDIT OF THE PURCHASE PRICE SHALL CONSTITUTE THE SOLE REMEDIES WITHRESPECTTODEFECTSINTHEPRODUCTS.THECONSUMERASSUMESALLRISKSANDLIABILITYFOR INCIDENTAL AND CONSEQUENTIAL DAMAGE RESULTING FROM INSTALLATION AND USE OF THE THERMOSTAT.Somestatesdoesnotallowtheexclusionorlimitationofincidentalorconsequentialdamages,orallowlimitationsonhowlonganimpliedwarrantylasts,sotheabovelimitationsorexclusionsmaynotapplytoyou.ThisWarrantygivesyouspecificlegalrights,andyoumayalsohaveotherrightswhichvaryfromstateto state.For Warranty returns, send the thermostat, shipping prepaid and proof of date of purchase to:RobertshawControlsCo.,WarrantyClaimsDepartment,1921AneiCircle,Brownsville,TX78521USAInCanada:RobertshawControlsCo.,WarrantyClaimsDepartment,4060RidgewayDriveUnit14,Mississauga, Ontario L5L 5Y9, CANADA

43

Robertshaw®, Uni-Line® and Smart SenseTM aretrademarksofRobertshaw,itssubsidiariesand/oraffiliatedcompanies.Allotherbrandsmentionedmaybethetrademarksoftheirrespectiveowners.
CustomerServiceTelephone1.800.304.6563 CustomerServiceFacsimile1.800.426.0804 [email protected] Technical Service Telephone 1.800.445.8299 Facsimile1.630.260.7294 [email protected]
www.uni-line.com www.robertshaw.com ©2015 Robertshaw7/15 – 352-00199-001