Embed Size (px)
Citation preview


by the Public Lab community
Help write this booklet
This book is a working draft; we invite you to help expand it, add to it, bring it up to date .
Let's try to keep it focused on "for first timers " --
but we can link to lots of activities on the website for
more advanced techniques!
We welcome:
1. Corrections and edits
2. Additions: provide new text suggestions in
comments, for either (please specify)
a. Guidance and support for new mappers
b. Advanced tips and tricks
3. New diagrams or requests for diagrams (line
drawings only)
4. New sections (thought we may run a subset in
print depending on costs)
Give it a read over and add your stuff! The layout
and design will change.
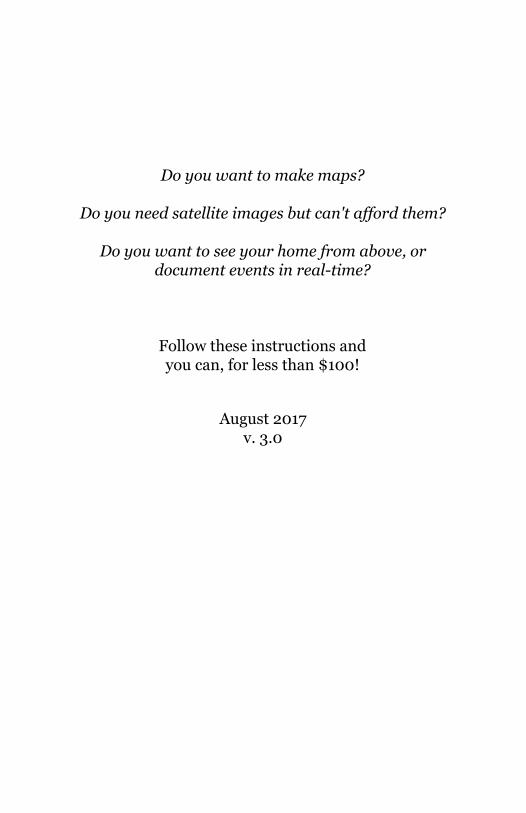
Do you want to make maps?
Do you need satellite images but can't afford them?
Do you want to see your home from above, or
document events in real-time?
Follow these instructions and you can, for less than $100!
August 2017
v. 3.0
This work is licensed under a
Creative Commons Attribution ShareAlike 3.0 License.
To see the latest contributions and updates, see: PublicLab.org/wiki/aerial-mapping
To edit this booklet for the next printing, see:
PublicLab.org/n/14600
Add your name here


Table of Contents
Checklist for a day of mapping 4
Materials list 5
What to do in different wind conditions 6
Working with a group 7
Mapping together 8
Balancing learning with getting images 8
Choosing your launch site and time 8
Choose a launch site 9
Be safe and responsible 9
Consider privacy and safety 9
Rigging a camera & preparing to fly 10
Choose and prepare your camera 10
Build a camera capsule 11
Set up your camera to auto-trigger 12
Build a string or rubber band harness 12
Choose and prepare a balloon 14
Preparing to launch 14
Check the local wind conditions 15
Balloons or kites? 15
Filling, closing, and mooring your balloon16
Build a mooring weight 16

Test the valve 17
Fill your balloon 18
Flying your balloon or kite 20
Attach the string 21
Attach your camera 21
Letting go 22
Logbook 24
Improve this guide 32
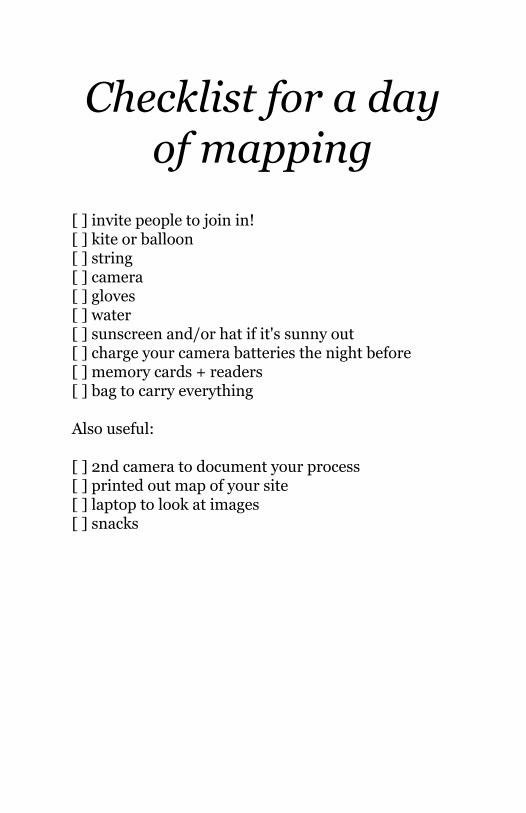
Checklist for a day
of mapping [ ] invite people to join in! [ ] kite or balloon [ ] string [ ] camera [ ] gloves [ ] water [ ] sunscreen and/or hat if it's sunny out [ ] charge your camera batteries the night before [ ] memory cards + readers [ ] bag to carry everything Also useful: [ ] 2nd camera to document your process [ ] printed out map of your site [ ] laptop to look at images [ ] snacks

Materials list
● Plastic soda bottle ● Scissors ● <300g digital camera with continuous
shooting mode (such as a Canon PowerShot)
● 4GB or larger memory card ● Cloth or leather work gloves ● Duct or gaffers tape ● Rubber bands, carabiner, velcro strip
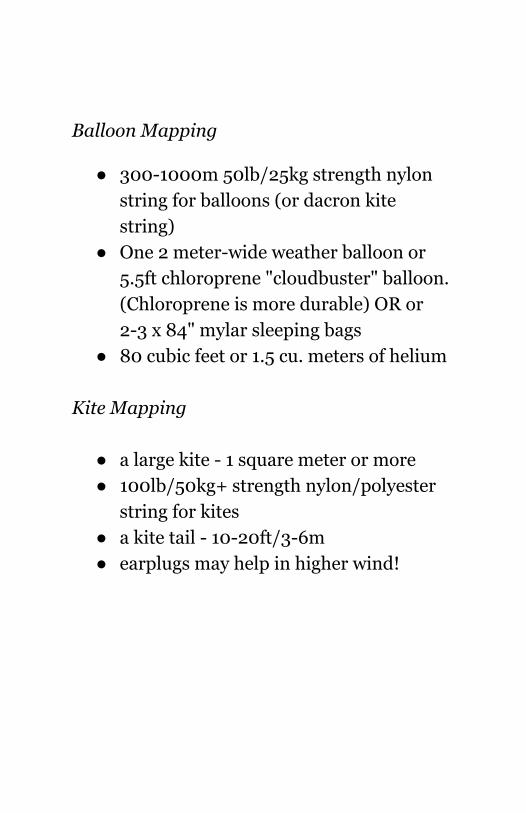
Balloon Mapping
● 300-1000m 50lb/25kg strength nylon
string for balloons (or dacron kite string)
● One 2 meter-wide weather balloon or 5.5ft chloroprene "cloudbuster" balloon. (Chloroprene is more durable) OR or 2-3 x 84" mylar sleeping bags
● 80 cubic feet or 1.5 cu. meters of helium Kite Mapping
● a large kite - 1 square meter or more ● 100lb/50kg+ strength nylon/polyester
string for kites ● a kite tail - 10-20ft/3-6m ● earplugs may help in higher wind!

Mini Balloon or Kite Mapping
Cameras, like GoPro or similar ones, can now be found that weigh as little as 60-100 grams. This means you can downsize the balloons or kites you use -- two 36”/1m mylar party balloons should be enough to carry a 60 gram camera, for example.

What to do in
different wind
conditions
Wind speed How to tell
from your
surroundings
How to fly a
camera in these
conditions
0-3 mph / 0-5kph
Flags hang limp; leaves on tops of trees are still
Mini balloons (36 inch mylar, mylar sleeping bag) or 5.5 foot rubber balloons
3-5 mph / 5-8kph
Flags flutter but do not fully extend, treetops and leaves stir
Rokaku and large (9 foot) delta (basic triangular) kites. 5.5 foot rubber balloons, or mini balloons if doubled/tripled, but balloons increasingly difficult to fly..

5-10 mph / 8-15kph
Flags flap but do not fully extend; treetops stir
Large or medium delta (triangular) kites. Even large balloons difficult to fly.
10-20 mph / 15-30kph
Flags fully extend regularly, treetops sway
Small or medium delta (triangular) kites with tails or parafoil (spar-less) kites.
20-30 mph / 30-45kph
Flags snap in the wind
Smaller, more robust and stable kites. Use 10-20 foot long fuzzy tails for stability.
30+ mph / 45+ kph
Difficulty walking into the wind
Not great flying weather!

Working with a
group
Mapping together The balloon and kite mapping kits designed by the Public Lab community are intended to be used as group techniques -- as a way for a group of people to collaboratively collect information about a place. Working with others is a critical part of building knowledge together; share the many tasks as widely as possible, from reeling in to filling a balloon to preparing and connecting a camera. Ask who hasn’t done a task before and encourage them to give it a try - offer to guide them and reassure them that you’ll help out if they get in trouble.
Balancing learning with getting images Sometimes you may feel it’s more important to get good imagery than it is to teach a group how to map; sometimes the reverse. Welcoming and supporting new mappers builds your capacity as a group, and engages new people in the work. Sharing your skills can support new mappers, but some things have to be learned on one’s own, by making mistakes and trying new things.

Choosing your
launch site and
time
Choose a launch site When selecting a place to fly from, you'll have to be upwind of the site you want to map. With your group, look over a map or drawing of your site, and visit the site ahead of time to scout for power lines, trees, or other obstacles, and get a sense of the wind.
Be safe and responsible Check that you are five miles or more away from the nearest airport. Otherwise, speak with the airport about sending a "Notice to Airmen" or NOTAM. Bring an existing map, and/or print out satellite imagery of where you'll be mapping (Google, USGS, etc) to help in planning.
Consider privacy and safety With a kite or balloon, you’re going to meet people where you’re mapping. If it’s your own neighborhood, great -- you’ll meet your neighbors. Either way, expect to talk with people about what you’re doing. If you’re mapping a pollution site, you may meet the people responsible for polluting. Be prepared and be thoughtful!

Rigging a camera
& preparing to fly

Choose and prepare your camera Any digital camera around 2-300 grams that has a 'continuous shooting mode' can work. You can also use a Canon camera with the CHDK to trigger a photo every 5 seconds.
To fly longer, you may need a newer battery, a larger memory card, or you can set your camera to a lower resolution. An 8 GB card fills up in about 45 minutes, depending on how fast your camera is shooting (every 2-5 seconds is ideal).

Build a camera capsule See updated and refined options at https://publiclab.org/wiki/photo-rig This simple protective cover stops your lens from hitting the ground, and protects your camera from hitting walls and trees. Cut a soda bottle in half and put the camera inside the top with the loop through the bottle neck.
Be sure the camera lens is protected even when it's extended!

Use the rest of the bottle to make 'wings' to stabilize it in the wind. Cut strips and crease them to keep them straight. This will keep your camera from spinning, which blurs the photos.

Set up your camera to auto-trigger
For point and shoot cameras (Canon PowerShot
series):
Set your camera on continuous mode. Wad up a bit of card paper or use a pencil eraser to hold down the camera trigger. A small knot works very well. Use a rubber band to hold it in place and apply pressure. Be sure the button is being pressed - you may have to double or triple the band up.
Move the rubber band to one side until you're ready to start.
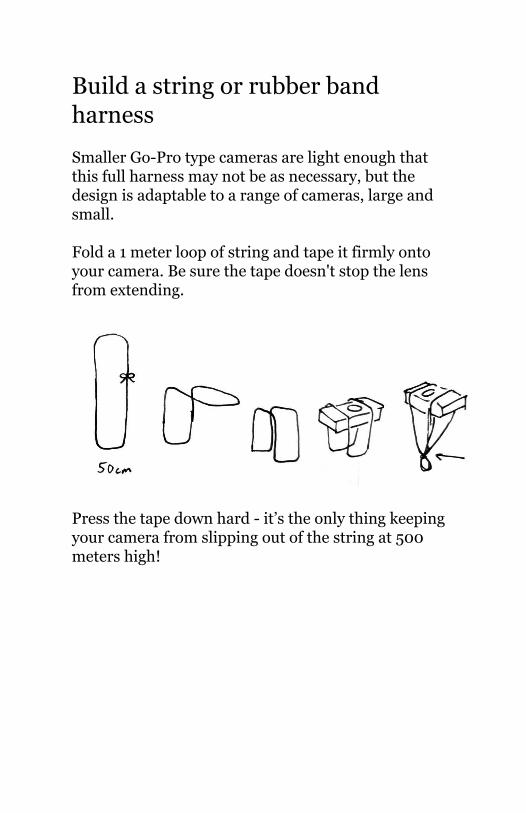
Build a string or rubber band harness Smaller Go-Pro type cameras are light enough that this full harness may not be as necessary, but the design is adaptable to a range of cameras, large and small. Fold a 1 meter loop of string and tape it firmly onto your camera. Be sure the tape doesn't stop the lens from extending.
Press the tape down hard - it’s the only thing keeping your camera from slipping out of the string at 500 meters high!

You can add a second loop or a rubber band and hook it on the bottom of the bottle to hold the camera firmly against the top.
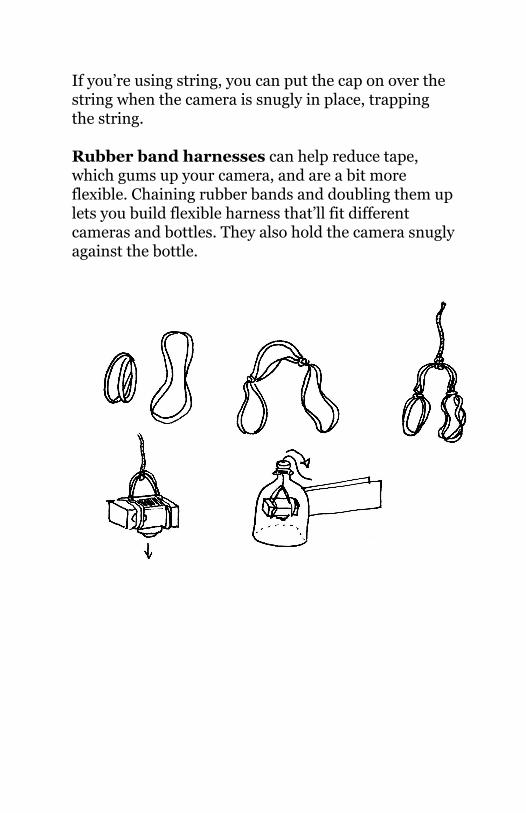
If you’re using string, you can put the cap on over the string when the camera is snugly in place, trapping the string. Rubber band harnesses can help reduce tape, which gums up your camera, and are a bit more flexible. Chaining rubber bands and doubling them up lets you build flexible harness that’ll fit different cameras and bottles. They also hold the camera snugly against the bottle.
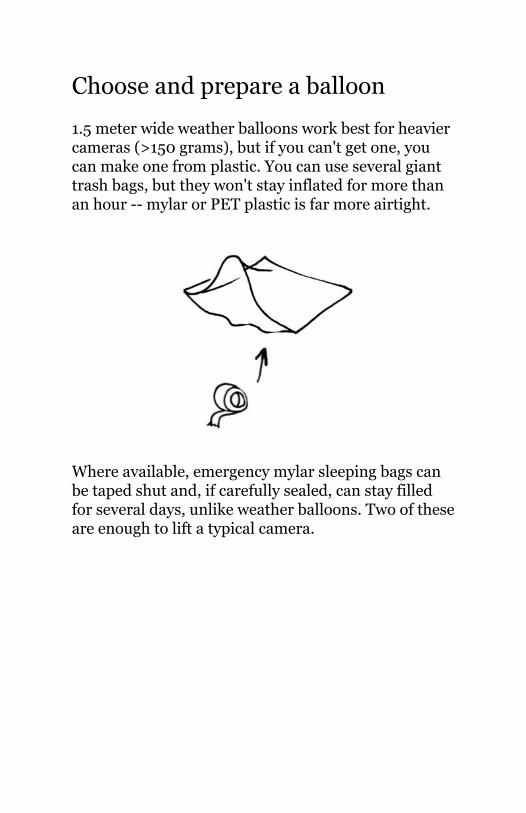
Choose and prepare a balloon 1.5 meter wide weather balloons work best for heavier cameras (>150 grams), but if you can't get one, you can make one from plastic. You can use several giant trash bags, but they won't stay inflated for more than an hour -- mylar or PET plastic is far more airtight.
Where available, emergency mylar sleeping bags can be taped shut and, if carefully sealed, can stay filled for several days, unlike weather balloons. Two of these are enough to lift a typical camera.

Preparing to
launch

Check the local wind conditions
Look around you!
Check treetops, flag poles, clouds. Which way is the wind going on the ground? At tree level? Above in the sky? What obstacles will come up as you launch? Will the balloon change direction while rising? Check again on your satellite map - how far away are those trees, really?` Do a test flight first, without a camera: reel out, then reel in, with about a hundred feet of string. Get to know the wind conditions, especially with a kite. The highest wind is usually around 2pm, and the lowest is at dawn. Check the weather report and plan accordingly.

Balloons or kites? Decide whether to use a balloon or kite based on local wind conditions. While kites are cheaper, they're harder to fly, and you may have to prepare for both: Balloons in <10kph wind; kites in more than that. Look at flags to decide. Also see the Wind Conditions section for more.
Filling, closing, and
mooring your
balloon
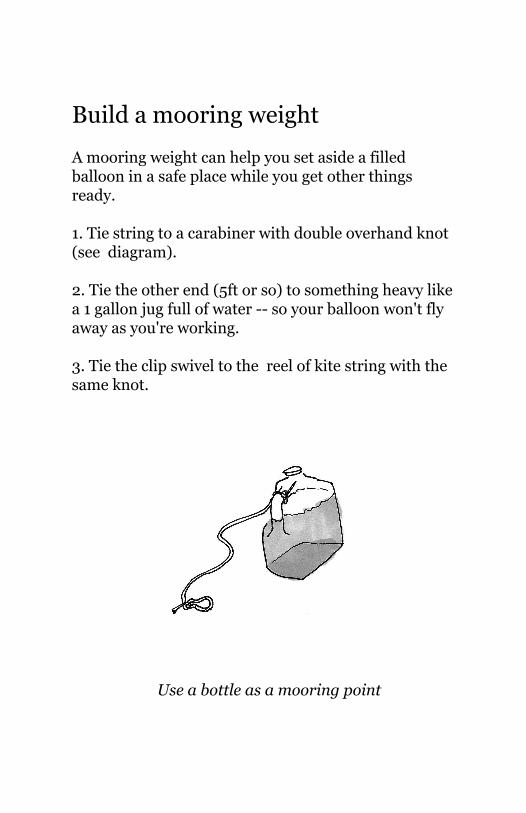
Build a mooring weight A mooring weight can help you set aside a filled balloon in a safe place while you get other things ready. 1. Tie string to a carabiner with double overhand knot (see diagram). 2. Tie the other end (5ft or so) to something heavy like a 1 gallon jug full of water -- so your balloon won't fly away as you're working. 3. Tie the clip swivel to the reel of kite string with the same knot.
Use a bottle as a mooring point
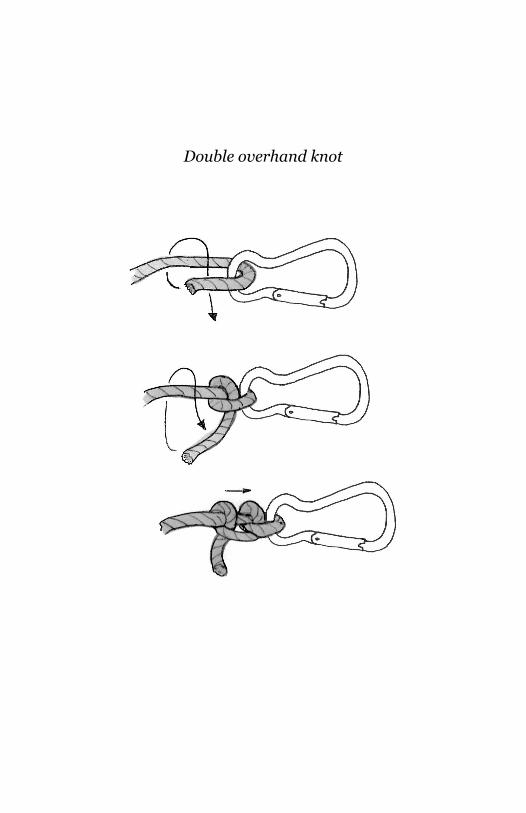
Double overhand knot

Test the valve If you’re filling a large rubber balloon, remove the regulator if one came with your tank (not pictured) -- but small mylar balloons will need a pointy black rubber nozzle. Carefully open the valve a tiny bit and re-close it, to see how quickly gas comes out. Consider pre-filling smaller balloons, even at a party
store or florists shop, since they’re more portable!

Fill slowly, gushing helium can rip your balloon and
make the tank dangerously cold.
Fill your balloon If you’re having trouble keeping the tank stable, lay the tank on the ground (upright is fine on pavement or even ground). For larger rubber balloons, a large rubber O-ring or large carabiner can make a good clipping point for your string, so we’ll seal the balloon and wrap the neck around this ring. 1. Pull the balloon neck through the ring.
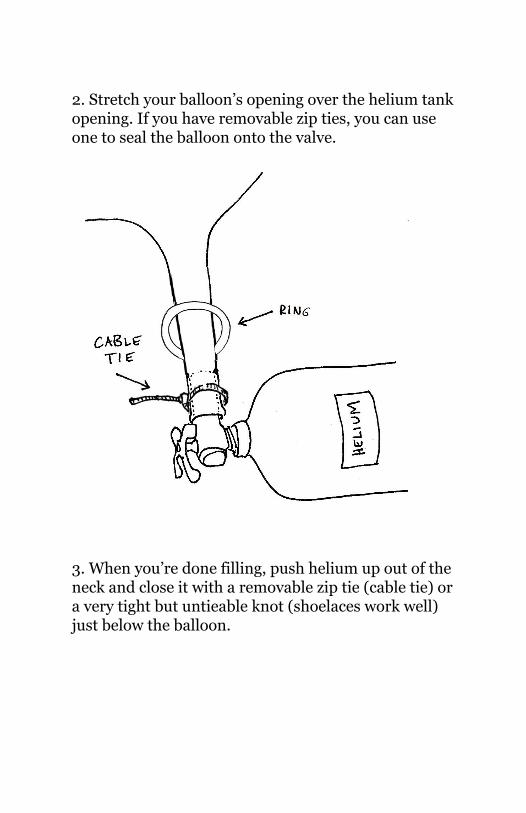
2. Stretch your balloon’s opening over the helium tank opening. If you have removable zip ties, you can use one to seal the balloon onto the valve.
3. When you’re done filling, push helium up out of the neck and close it with a removable zip tie (cable tie) or a very tight but untieable knot (shoelaces work well) just below the balloon.

4. Remove the balloon neck from the helium tank, but BE CAREFUL not to release it -- it’ll fly away!
5. Fold the neck over onto itself (twisting it twice) and around the ring. Tightly wrap with a velcro strip or two zip ties and pull tight.

6. Attach the ring to the mooring point, and be sure the balloon doesn’t brush against anything sharp.
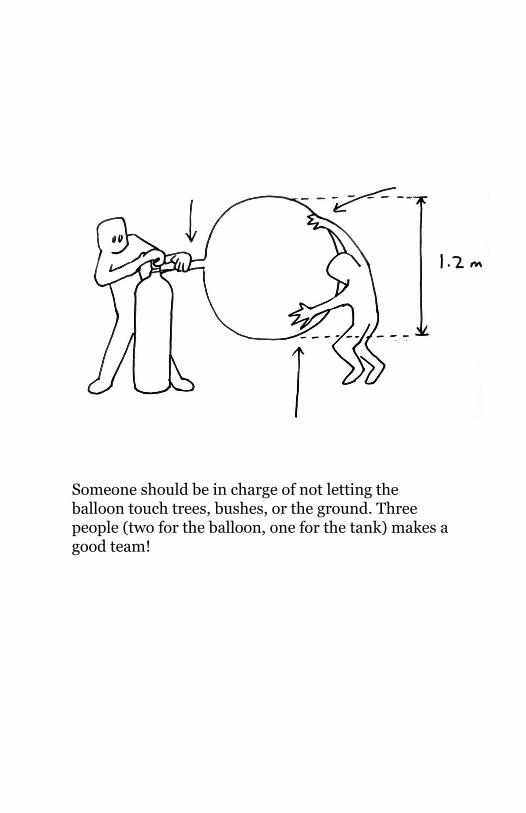
Someone should be in charge of not letting the balloon touch trees, bushes, or the ground. Three people (two for the balloon, one for the tank) makes a good team!
Flying your balloon
or kite
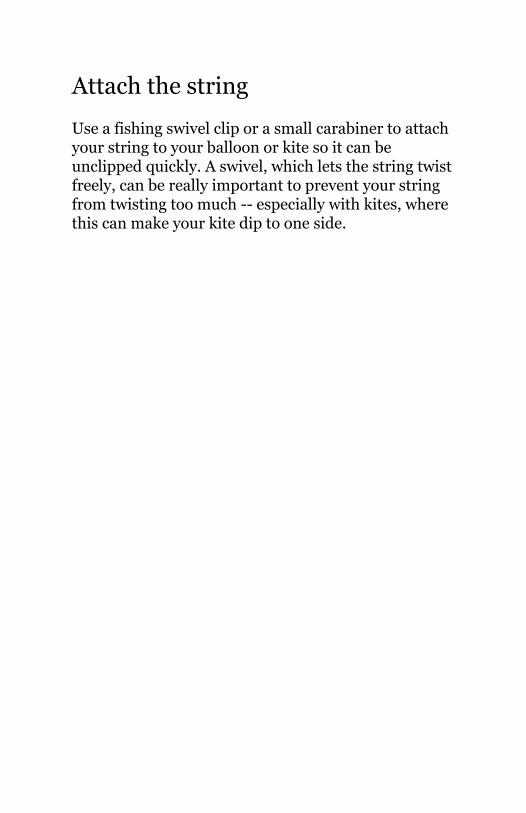
Attach the string Use a fishing swivel clip or a small carabiner to attach your string to your balloon or kite so it can be unclipped quickly. A swivel, which lets the string twist freely, can be really important to prevent your string from twisting too much -- especially with kites, where this can make your kite dip to one side.

Attach your camera When using balloons, attach the camera about 30ft below the balloon. For kites, you may want to get your kite stable in the air before attaching the camera - but try to get it within 50-100 feet of the kite, or you’ve lost all that altitude for your photos! To make a connection point for your carabiner, make a temporary loop by tying an overhand knot on a loop on the string below the balloon: A. Slacken the line below the balloon & gather a loop in your hand
B. Loop it around & through itself and pull taut; attach your camera!
For kites, you don’t need to make a tied loop; the tension of the kite pulling will hold a carabiner on if

you loop the string around it 5 times or more:

Letting go Let balloons rise as fast as you can, but control the speed with your gloves or a shirt sleeve so you don’t get burned. If there’s wind, it will push them down as soon as you stop letting them rise.

Wind the string carefully - don't let it tangle! If it's bad enough you'll have to throw it out. A second person just to wind the string can be very helpful.
Always wear gloves to prevent string burns! Don't fly near power lines or in thunderstorms.

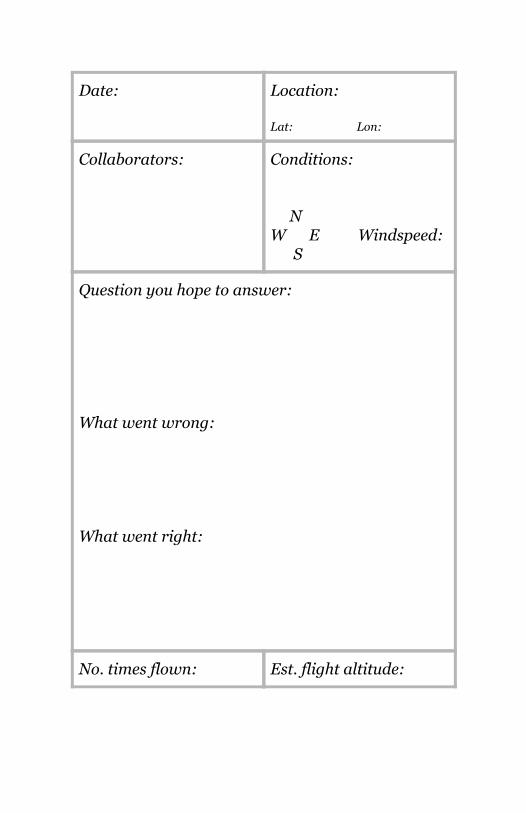
When using kites, be sure there is enough pull to carry the camera (consider a bigger kite or a windier day or launch spot if not), and let out ~20 meters of string before making a loop and attaching the camera. Staying away from buildings or trees will help to fly in clear, consistent wind. Use the logbook pages to take good notes on your flight. Bring a GPS if you have one, and write down the latitude and longitude, or record a track.

Logbook

Date: Location:
Lat: Lon:
Collaborators:
Conditions:
N
W E Windspeed:
S
Question you hope to answer:
What went wrong:
What went right:
No. times flown: Est. flight altitude:

Date: Location:
Lat: Lon:
Collaborators:
Conditions:
N
W E Windspeed:
S
Question you hope to answer:
What went wrong:
What went right:
No. times flown: Est. flight altitude:

Date: Location:
Lat: Lon:
Collaborators:
Conditions:
N
W E Windspeed:
S
Question you hope to answer:
What went wrong:
What went right:
No. times flown: Est. flight altitude:

Date: Location:
Lat: Lon:
Collaborators:
Conditions:
N
W E Windspeed:
S
Question you hope to answer:
What went wrong:
What went right:
No. times flown: Est. flight altitude:

Date: Location:
Lat: Lon:
Collaborators:
Conditions:
N
W E Windspeed:
S
Question you hope to answer:
What went wrong:
What went right:
No. times flown: Est. flight altitude:

Date: Location:
Lat: Lon:
Collaborators:
Conditions:
N
W E Windspeed:
S
Question you hope to answer:
What went wrong:
What went right:
No. times flown: Est. flight altitude:

Date: Location:
Lat: Lon:
Collaborators:
Conditions:
N
W E Windspeed:
S
Question you hope to answer:
What went wrong:
What went right:
No. times flown: Est. flight altitude:
Date: Location:
Lat: Lon:
Collaborators:
Conditions:
N
W E Windspeed:
S
Question you hope to answer:
What went wrong:
What went right:
No. times flown: Est. flight altitude:

Date: Location:
Lat: Lon:
Collaborators:
Conditions:
N
W E Windspeed:
S
Question you hope to answer:
What went wrong:
What went right:
No. times flown: Est. flight altitude:

Date: Location:
Lat: Lon:
Collaborators:
Conditions:
N
W E Windspeed:
S
Question you hope to answer:
What went wrong:
What went right:
No. times flown: Est. flight altitude:

Date: Location:
Lat: Lon:
Collaborators:
Conditions:
N
W E Windspeed:
S
Question you hope to answer:
What went wrong:
What went right:
No. times flown: Est. flight altitude:

Date: Location:
Lat: Lon:
Collaborators:
Conditions:
N
W E Windspeed:
S
Question you hope to answer:
What went wrong:
What went right:
No. times flown: Est. flight altitude:

Date: Location:
Lat: Lon:
Collaborators:
Conditions:
N
W E Windspeed:
S
Question you hope to answer:
What went wrong:
What went right:
No. times flown: Est. flight altitude:

Date: Location:
Lat: Lon:
Collaborators:
Conditions:
N
W E Windspeed:
S
Question you hope to answer:
What went wrong:
What went right:
No. times flown: Est. flight altitude:

Date: Location:
Lat: Lon:
Collaborators:
Conditions:
N
W E Windspeed:
S
Question you hope to answer:
What went wrong:
What went right:
No. times flown: Est. flight altitude:
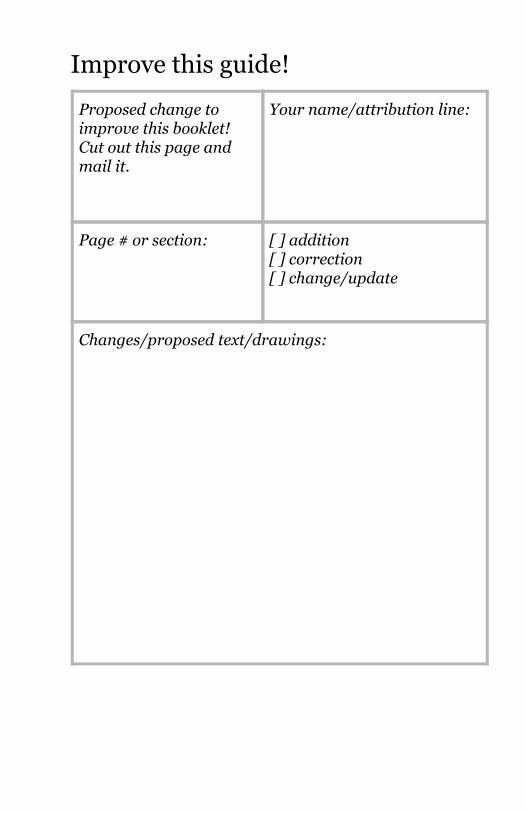
Proposed change to improve this booklet! Cut out this page and mail it.
Your name/attribution line:
Page # or section:
[ ] addition [ ] correction [ ] change/update
Changes/proposed text/drawings:
Improve this guide!

To:
Publ
ic L
ab
55 C
rom
wel
l St 1
D
Prov
iden
ce, R
I 029
07
USA
stam
phe
re


![THE PURSUIT OF AUTOMATED DRIVING - IQPC Corporate · 2017-05-09 · Driverless Car, Google [X]’s Project Loon (Internet Balloon), Google [X]’s Project Makani (Energy Kite), and](https://img.pdfslide.us/doc/110x75/5f2d58f568cde900143d1800/the-pursuit-of-automated-driving-iqpc-corporate-2017-05-09-driverless-car-google.jpg)