Embed Size (px)
Citation preview

3.0
Creating Rich Internet Applications for FreeSecond Edition
by Pascal Echemann-Molinengo
Banana Tree Design White Paper
Update July 2012

Copyright © 2008-2012 Banana Tree Design. All rights reserved.
SPAS, SPAS 3.0, Swing Package fo ActionScript, are trademarks of Banana Tree Design.The information contained in this document represents the opinions of Banana Tree Design on the date of publication. Banana Tree Design cannot be held liable should some information become erroneous or outdated subject to market changes following the publication of this document.
Flash®, Flex®, Flash® CS3, are either trademarks or registered trademarks of Adobe Systems Incorporated.

Sommaire
Preface.........................................................................................................................................................1About the SPAS 3.0 Community ........................................................................................................1SPAS 3.0 Commercial Licenses .........................................................................................................2SPAS 3.0 Coding Conventions ...........................................................................................................2
1 What is a Rich Internet Application (RIA)? ...........................................................................................31.1 About FlashDevelop .....................................................................................................................31.2 Requirements ...............................................................................................................................31.3 The demo application ...................................................................................................................41.4 SPAS 3.0 versions issues ............................................................................................................4
2 Preparing the Project Space...................................................................................................................52.1 Configuring the project template .................................................................................................52.2 The directory structure .................................................................................................................52.3 Adding the SPAS 3.0 library .........................................................................................................52.4 The Resource Files: styles.css .....................................................................................................7
3. Creating the Application ........................................................................................................................83.1 The Application class .............................................................................................................83.2 Integrating CSS styles ..................................................................................................................83.3 Creating the view containers ........................................................................................................93.4 Creating the panel views ............................................................................................................10
3.4.1 Designing the views ......................................................................................................103.4.2 The EventCollector class ........................................................................................ 113.4.3 The createPanel() method ......................................................................................123.4.4 Embedding assets.........................................................................................................123.4.5 Adding drag events .......................................................................................................133.4.6 Go with the interactive elements ...................................................................................13
3.5 Adding interactivity .....................................................................................................................143.5.1 Creating the button controls ..........................................................................................143.5.2 Playing with the CubicView transition effect ...............................................................153.5.3 CSS rocks! ....................................................................................................................163.5.4 Removing and reloading the application .......................................................................18
3.6 Adding forms to the application ..................................................................................................193.6.1 The Form class .............................................................................................................193.6.2 Adding a combobox to a form .......................................................................................203.6.3 Adding ComboBox CSS style ........................................................................................213.6.4 Adding the credit card form ...........................................................................................223.6.5 Introducing the DateField and the DatePicker classes .........................................233.6.6 The confirmation view ...................................................................................................23
4. Advanced techniques .........................................................................................................................264.1 Using embeded styles ................................................................................................................26
4.2 Internationalization in SPAS 3.0 applications .............................................................................264.2.1 Properties files and the ResourceBundle class .........................................................264.2.2 Accessing locale data....................................................................................................28
4.3 Using validators ..........................................................................................................................284.3.1 About validation .............................................................................................................284.3.2 Adding validator objects ................................................................................................284.3.3 Changing validation process at runtime ........................................................................29
4.4 About the Initializator class ..............................................................................................30
5. Conclusion ............................................................................................................................................315.1 Powerful and totally free .............................................................................................................315.2 Where to go from here ...............................................................................................................315.3 Acknowledgements ....................................................................................................................31
Appendix A: CubicForm.as .....................................................................................................................32
Appendix B: style.css ..............................................................................................................................39
Appendix C: cubicform_en.properties ...................................................................................................42
Appendix D: cubicform_fr.properties .....................................................................................................43

1Creating Rich Internet Applications for Free
PrefaceInitially published as an extensible GUI API, SPAS has become a powerful framework, based on the Flash Platform, for creating and completely controlling the entire application development workflow. Even if SPAS 3.0 is still released under alpha versions, it is mature enough to easily deploy strongly MVC-based software applications over the Web and the desktop.
During the year 2008, we published the first version of this white paper, Creating Rich Internet Applications for Free, to help developers and managers focus on the extensive capabilities of SPAS. Because of the extent of the API, we could not cover all of the functionalities provided by its framework. Thus, the classes-based modular implementation and the visual composite architecture, which are both at the core of SPAS, cannot fit within such a document. But the key point of that publication was to give a full approach on how to create impressive applications by using totally Open Source tools.
At the end of 2011, Adobe open-sourced its Flex SDK and turned it over to the Apache Software Foundation. Moreover, some parts of the current document became obsolete because of several changes in the framework. But the fact remains that SPAS is still extremely powerful. In addition, despite its alpha product status, it offers a much improved structure to deploy complex applications on the desktop. So we have decided to update this publication and to add new chapters to show recent functionalities, such as internationalization (i18n), validators and more…
Another important difference between this version and the previous one, is that you no longer have to deal with the Flex SDK installation process, because this is now directly managed by the FlashDevelop editor.
About the SPAS 3.0 Community
Since the first release of this document, we have improved the SPAS Website to really involve developers around a global community. By now, you can:
• submit bugs http://www.flashapi.org/spas-bug-manager/
• ask questions in our forums http://www.flashapi.org/spas-forum/
• have a look at the SPAS 3.0 roadmap http://www.flashapi.org/spas-dev/
Furthermore, you have the opportunity to participate in the project, by publishing recipes in the CookBook section: http://www.flashapi.org/spas-cookbook.php
The more the SPAS Community grows up, the more SPAS 3.0 becomes stable and efficient. So do not hesitate to visit our Website and ask us how to participate to promote and improve the project.
Finally, you can stay in touch with us by registering yourself on our Facebook and Google Plus pages:
• http://www.facebook.com/flashapi
• https://plus.google.com/110499223640299891165

2Creating Rich Internet Applications for Free
SPAS 3.0 Commercial Licenses
SPAS 3.0 is an Open Source project, which means that you can use it for free in personal and commercial projects, but you must release your applications under the terms of GNU-GPL license. For that reason, we provide commercial licenses that let you use SPAS 3.0 without opening your source code.
Currently, SPAS 3.0 is only available in alpha versions. Alpha versions have to be considered as unstable, even if SPAS 3.0 alpha can be used to build robust and stable products. That is why we have decided, in our commercial policies, to not sell commercial licenses until the product is available in a Release Candidate version.
SPAS 3.0 Coding Conventions
The SPAS 3.0 API is organized around a specific set of typographical convention rules. It is highly recommend to use them in order to improve the readability of your code within all of your SPAS 3.0 applications. These conventions are used in this white paper to adhere to the logic of the core API and facilitate your comprehension of the framework’s internal structure:
• the names of variables which are declared as private properties should start with an underscore
• the names of variables declared as protected properties should start with a dollar sign
• the names of variables declared class constants should be all uppercase with words separated by underscores
In addition, a monospaced typeface font is used each time we refer to a code section, or a SPAS 3.0 / AS3 language element.

3Creating Rich Internet Applications for Free
1 What is a Rich Internet Application (RIA)?A few years ago, surfing the Web was a really fantastic but rigid experience. Navigation from page to page was linear, and Web sites consisted only of text and static images.
In 2002, Macromedia coined the term Rich Internet Application (RIA). RIAs provide a new kind of Web experience by introducing a high level of interactivity. RIAs are richer and more spectacular and attractive than all of the other Web concepts. As described on the Adobe®’s web site:
RIAs combine the flexibility, responsiveness, and ease of use of desktop applications with the broad reach of the web.
This tutorial will show you the way to easily build Rich Internet Applications with the “Swing Package for ActionScript 3.0” (SPAS 3.0). SPAS 3.0 is a powerful development solution based on the Adobe® Flash® Platform. It was designed from scratch to be used for the development of online products with:
• creating of Internet sites
• deploying of online RIAs
• deploying of offline applications based on the Adobe® AIR™ technology
All of the technologies discussed and used in this tutorial to create Web or desktop applications are available for free.
1.1 About FlashDevelop
FlashDevelop is a popular open source ActionScript 2/3 and web development environment. FlashDevelop can be used as an external ActionScript editor for the Adobe® Flash® IDE, or as a complete open source development environment. It integrates Adobe® Flex 3™ SDK, MTASC, haXe and swfmill.
For more information about FlashDevelop software, please refer to the project’s Internet page:
• http://www.flashdevelop.org/
1.2 Requirements
Prior experience working with Flash® CS3 ActionScript 3.0 to create applications would be helpful. Some experience using the Flex framework would also be helpful, but it is not required. To successfully complete this tutorial you will need the following software and files:
• SPAS 3.0 API
http://www.flashapi.org/
• FlashDevelop
http://www.flashdevelop.org/

4Creating Rich Internet Applications for Free
1.3 The demo application
The sample application discussed in this article shows you how to create a payment form which displays three different views. The first view allows the user to complete personal information. The second one is used to enter credit card information, and the third displays a simple information message. The payment operation can be cancelled at any time, and the payment form can be displayed by clicking on a button.
Source files of the demo application can be downloaded at the following link:
• http://www.flashapi.org/tutorials/creating-rich-internet-applications-for-free/spas-cubic-form-v2.zip
You can test the application online at:
• http://www.flashapi.org/tutorials/creating-rich-internet-applications-for-free/v2/
1.4 SPAS 3.0 versions issues
The current version of SPAS 3.0 used in this tutorial is alpha 6.3. If you encounter any problem while using the latest version of SPAS 3.0 with this tutorial, please contact us by using the contact form on our Website at:
• http://www.flashapi.org/

5Creating Rich Internet Applications for Free
2 Preparing the Project Space
2.1 Configuring the project template
Once you have downloaded and installed FlashDevelop, open it and create the project template. Go to “Project > New Project” and select the “AS 3 Project” template from the list. Then enter “CubicForm” as project name and click finish.
To finish preparing the workspace, you have to define the project properties. Open the “Project Properties” panel (“Project > Properties”) and enter the properties we need to create the SWF file:
• Target version: “Flash Player 10.1” (default setting),
• Output file: “bin\Cubicform.swf”,
• Dimensions: “800 x 600 px”,
• Background color: “#808080”.
• Framerate: “30 fps” (default setting).
These parameters are reproduced in Figure 1.
2.2 The directory structure
Now, our project can be compiled in ActionScript 3.0 to a SWF file, by the use of the Flex SDK (ctrl+Enter or click the “Build Project” icon of the main tool bar). Next, we have to create a few directories to ease management the project.
Left click on the project name in the “Project panel” and add a new folder, named “assets”, to store external embedded files, such as icons or styles. The directory structure is pretty simple:
• the newly created “assets” folder, to store files to be embedded
• the “bin” folder, where the compiled files are located
• the “lib” folder, where additional Actionscript 3.0 libraries are located
• the “src” folder, for the project classes
The final step involves creating the main ActionScript class: left click on the “src” folder, and select “Add > New Class”. The filename is “CubicForm.as”. Once the main class file is created, we indicate to FlashDevelop and the Flex compiler that this file is the main entry point of the compiled SWF file. Left click on the “CubicForm.as” into the folder structure, and select “Set Document Class”.
2.3 Adding the SPAS 3.0 library
Once the workspace is configured, you must add the SPAS 3.0 library to build your application.

6Creating Rich Internet Applications for Free
Figure 1: CubicForm project properties

7Creating Rich Internet Applications for Free
Go to the “download” section of the SPAS Website and select the latest SWC library from the SPAS 3.0 Download Manager. Click to accept the terms of the selected license agreement and download the file. Then unzip the archive and drop the SWC file into the lib folder of your project.
To include an ActionScript library into a project, left click on the SWC file in the project view and select “Add To Library”. The item color will change from black to blue, which means that the library has been included to the project.
Depending on the SPAS 3.0 version you choose, you can include the source files instead of the precompiled library: click “Classpaths > Edit Global Classpath” and use the “Add Classpath” button to browse the classpath of your SPAS 3.0 API local folder.
2.4 The Resource Files: styles.css
SPAS 3.0 deals really closely with CSS designing. So, in this application we will use external styles to manage the appearance of the visual components. Keep in mind that anything we do with CSS can be done by using SPAS 3.0 ActionScript properties, obtaining an identical result. The advantages of using separate style files are the same as in the XHTML language and the Document Object Model (DOM) structure. Therefore, we show through this example that SPAS 3.0 behaves like the classical DOM structure, which is more pleasant and flexible for web developers.
To create the CSS, left click on the “bin” folder and select “Add > New CSS File”. Type “style.css” as filename for this file.
8Creating Rich Internet Applications for Free
3. Creating the Application
3.1 The Application class
SPAS 3.0 creates its own structure to manage Flash applications. It defines a “default”, or Application, container that lets you start adding content to your program and much more (e.g. setting styles using external CSS files).
To benefit from this structure, your application must extend the SPAS 3.0 Application class. Open the CubicForm class, and use the extends keyword to define CubicForm as a subclass of the Application class. This class is located in the org.flashapi.swing package. When you type the name of the class, FlashDevelop’s auto-completion shows you several possibilities. Choose org.flashapi.swing.Application with the arrow keys on your keyboard and press “Enter”. As you can see, FlashDevelop automatically integrates class paths and simplifies coding processes.
Now you have extended the main class, your file should look like shown below:
CubicForm class extending SPAS 3.0 Application class:package src { import org.flashapi.swing.Application; public class CubicForm extends Application{ public function CubicForm() { super(); } }}
Note: we strongly encourage ActionScript developers to follow the best OOP established coding rules. Hence we recommend that each class developed with SPAS 3.0 should use a super statement in its constructor function.
3.2 Integrating CSS styles
If you compile the CubicForm class and open the newly created SWF file, you will see a wonderful empty SWF file. Not really attractive as a RIA! Fortunately, the SPAS 3.0 CSS implementation can easily help us to change that.
SPAS 3.0 uses the same css selector model as HTML and XHTML. But in addition, many of SPAS 3.0 CSS selector names are the same as XHTML ones; and they behave the same.
For this reason, the main selector tag of an application is body in both systems. The SPAS 3.0 philosophy is to provide RIAs developers with the most easy-to-use tools with a maximum number of functionalities; so, all SPAS 3.0 functionalities are studied in this example case.
Coming back to our application, we want the background to be visible with a color gradient effect.

9Creating Rich Internet Applications for Free
To do this, open the “style.css” file, and write the following CSS properties into a body selector tag:
body { visibility:visible; gradient:true;}
Then, create an init function in the CubicForm class, that will be used to initialize the application, with the following body:
private function init():void { this.styleSheet = “style.css”;}
The styleSheet property of the Application class allows to load and apply styles at runtime; you just have to set the URI of the external style and SPAS 3.0 deals with the rest.
What we have to do is to call the init method directly from the constructor function. SPAS provides a built in mechanism which uses a callback method immediately after the Flash file has been initialized. Simply pass the init method as parameter of the super statement in the constructor function of the main class:
public function CubicForm() { super(init);}
You can compile and run your file to view the changes!
Note: Remember that we can change these parameters directly from ActionScript by using the gradientBackground and bodyVisibility properties of the Application class. Therefore, our goal here is to completely separate code from presentation.
3.3 Creating the view containers
SPAS 3.0 has several container objects to display visual controls. Each container has its own specific properties. For the CubicForm class, we use a CubicView container:
The CubicView class uses a 3D rotating cube effect as transition, to go from the current view to the next selected view of this multiview object. [...] The CubicView class does not define the six sides of a virtual cube. That means you can add as many views as you want to the multiview object, and select the display sequence order.
First, we declare a private property named _cube to store and access the CubicView instance:
private var _cube:CubicView;
Then we can create the CubicView object into the initializing method:
_cube = new CubicView(3);_cube.id = “cube”;_cube.draggable = true;

10Creating Rich Internet Applications for Free
The CubicView instance has “cube” defined as unique identifier and can be “mouse dragged”. The first parameter of the constructor represents the number of views defined by default for this container (we need three views in this project). Use the Application.addElement method to add the CubicView to the application. Now, your init function should be like this:
private function init():void { this.styleSheet = “css/style.css”; _cube = new CubicView(3); _cube.id = “cube”; _cube.draggable = true; this.addElement(_cube);}
Note: Do not forget to import the CubicView class from the following package: org.flashapi.swing.CubicView.
The unique identifier property (_cube.id) can be used to define CSS properties. We use it to set the size and the shadow effect of the container. Open the style file and write the following CSS declaration:
#cube { width:425; height:255; shadow:true;}
3.4 Creating the panel views
To create the views we need, we use the PanelContainer class. Its behavior is similar to that of a Flex panel control (org.flashapi.swing.PanelContainer). As we have done before, we create three private variables, each one representing a view in the application. One for the information form, one for the credit card form and the last one for the final message panel:
private var _formPanel:PanelContainer;private var _paymentPanel:PanelContainer;private var _finalPanel:PanelContainer;
3.4.1 Designing the views
Each view of the application must have the same characteristics:
• the title bar displays an icon and the title of the view
• the title bar dispatches events to start or stop component dragging
• the view uses the CSS class name: panelContainer
• the view has a “footer” container to display either one or two buttons
Since we have three views to create, it is better to write a routine method not to avoid this tedious coding work. Here is the signature of such a method:
private function createPanel(title:String, btn1:Button,
btn2:Button = null):PanelContainer
11Creating Rich Internet Applications for Free
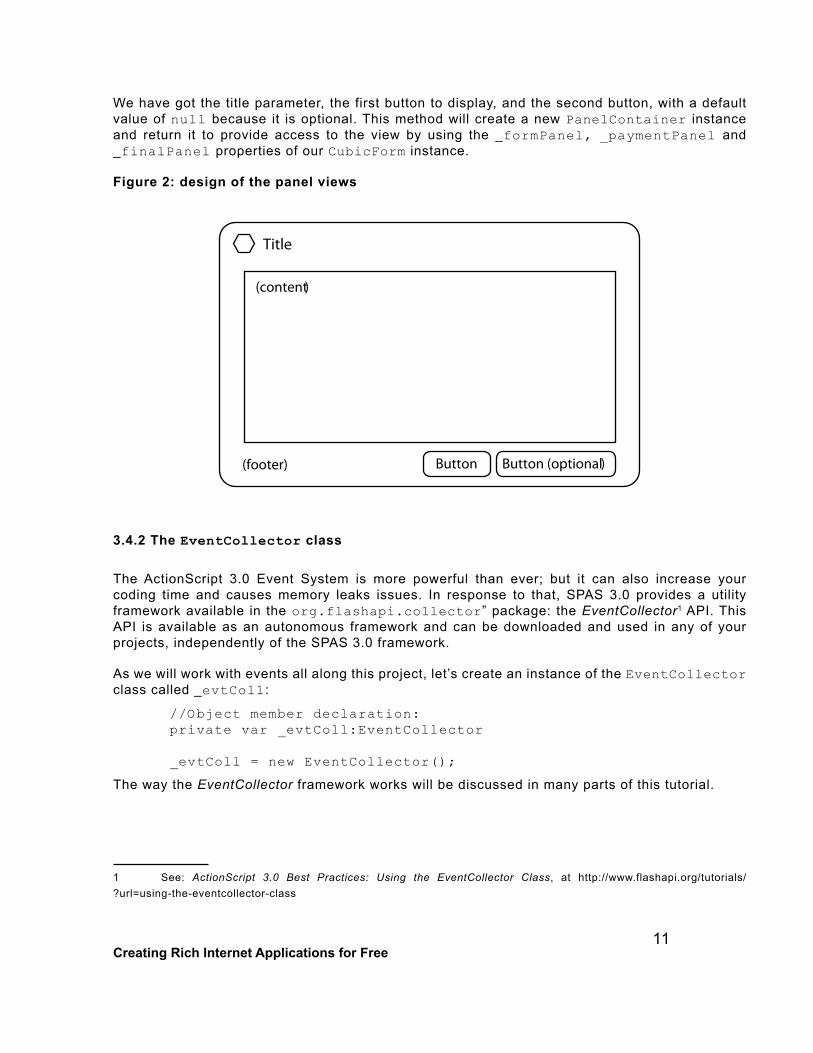
We have got the title parameter, the first button to display, and the second button, with a default value of null because it is optional. This method will create a new PanelContainer instance and return it to provide access to the view by using the _formPanel, _paymentPanel and _finalPanel properties of our CubicForm instance.
Figure 2: design of the panel views
Title
(footer)
(content)
Button Button (optional)
3.4.2 The EventCollector class
The ActionScript 3.0 Event System is more powerful than ever; but it can also increase your coding time and causes memory leaks issues. In response to that, SPAS 3.0 provides a utility framework available in the org.flashapi.collector” package: the EventCollector1 API. This API is available as an autonomous framework and can be downloaded and used in any of your projects, independently of the SPAS 3.0 framework.
As we will work with events all along this project, let’s create an instance of the EventCollector class called _evtColl:
//Object member declaration:private var _evtColl:EventCollector
_evtColl = new EventCollector();
The way the EventCollector framework works will be discussed in many parts of this tutorial.
1 See: ActionScript 3.0 Best Practices: Using the EventCollector Class, at http://www.flashapi.org/tutorials/?url=using-the-eventcollector-class

12Creating Rich Internet Applications for Free
3.4.3 The createPanel() method
Once the createPanel method and the internal algorithm are defined, we can fill the body of the function.
• First, we create a new PanelContainer instance with title as its first parameter:var pc:PanelContainer = new PanelContainer(title);
• Next, we set the className property, used by SPAS 3.0 CSS management sub-system, to “panelContainer”:
pc.className = “panelContainer”;
• Then, if the third parameter is not null, we use the addGraphicElements method to add a second button to the “footer” container of this PanelContainer instance. Or else, we add a single button with the addElement method. Using the addGraphicElements method allows you to save resources if you have to add several controls to a container object at the same time. By default, the footer of PanelContainer object is not added to the Flash Player display list. To show it, use the footer.display method:
btn2 != null ? pc.footer.addGraphicElements(btn1, btn2) : pc.footer.addElement(btn1);pc.footer.display();
• At the end of the statement, the function returns the newly created PanelContainer instance:
return pc;
The following code represents the complete createPanel function:
private function createPanel(title:String, btn1:Button,
btn2:Button = null):PanelContainer { var pc:PanelContainer = new PanelContainer(title); pc.className = “panelContainer”; btn2 != null ? pc.footer.addGraphicElements(btn1, btn2) : pc.footer.addElement(btn1); pc.footer.display(); return pc;}
3.4.4 Embedding assets
As we have seen in part 3.3.1, the title bar must display an icon. The PanelContainer.setIcon method is used to display icons on the face of a PanelContainer. This method accepts one parameter which can be:

13Creating Rich Internet Applications for Free
• a string that represents a URI of an external graphic file
• or an object that is a reference to an embedded graphic object
Here we use the second option. To embed objects into our application, we just use the [Embed] metadata tag. In this example we choose to embed a PNG file, with the name icon.png, and located into the “assets” folder. Reproducing the following two lines of code on the top of the CubicForm class will embed the icon:
[Embed(source=“../assets/icon.png”)]private var IconAsset:Class;
Once the icon file is embedded, we just have to assign a new icon object to each PanelContainer. We do that simply by writing the couple of lines below into the createPanel function:
var icon:DisplayObject = new IconAsset();pc.setIcon(icon);
Note: If you prefer using external files instead of embedded files, you just have to use the setIcon method with the external file’s URI as parameter:
pc.setIcon(“myFileUri.jpg”);
3.4.5 Adding drag events
As we want the views to be draggable into the application when users press the left mouse button over each displayed title bar, we must add “mouse press” and “mouse release” events for each panel. In order to do that, we use events specified by the WindowEvent class and fired by the PanelContainer instance. When the user presses the mouse button over the title bar, the draggable property of the CubicView instance is set to true; when it is released, this property is set to false. First import the org.flashapi.swing.event.WindowEvent class and add both of the following event listeners to the createPanel function:
_evtColl.addEvent(pc, WindowEvent.TITLE_BAR_MOUSE_DOWN, doDrag);_evtColl.addEvent(pc, WindowEvent.TITLE_BAR_MOUSE_UP, undoDrag);
Then, create the doDrag and undoDrag functions corresponding to these events:
private function doDrag(e:WindowEvent):void { _cube.startDrag();}private function undoDrag(e:WindowEvent):void { _cube.stopDrag();}
3.4.6 Go with the interactive elements
By now, we have seen how to create displayable content. But to compile our application and make it “rich” and spectacular, we need to add some interactive elements such as buttons and transitions between the views.

14Creating Rich Internet Applications for Free
3.5 Adding interactivity
3.5.1 Creating the button controls
Our application uses six buttons to navigate through it:
• three buttons allow the user to go from one view to any other one
• one button cancels the operation,
• one is used to remove the views when all operations are performed
• and the last one allows users to display the form again
As we have done before, create five private variables to store each Button instance:
private var _goTo1:Button;private var _goTo2:Button;private var _goTo3:Button;private var _finish:Button;private var _cancel:Button;private var _launch:Button;
Now we can create the buttons into the initializing method:
_goTo1 = new Button(“Previous”);_goTo2 = new Button(“Next”);_goTo3 = new Button(“Validate”);_finish = new Button(“Finish”);_cancel = new Button(“Cancel”);
_launch = new Button(“Show dialog”);
Note: It is better to add SPAS 3.0 elements to the display list after you define their properties. This will prevent elements in the display to be refreshed, due to modification of properties such as colors or resizing, etc.. With this aim in view, you should always place the line of code this.addElement(_cube); at the end of the initializing method body.
Once the Button instances are created, we define all elements of the createPanel method and show the result. So first, add the following lines of code to the previous six button coding lines, then compile and run and your application:
//--> Create all panels by using the predefined createPanel()// method:_formPanel = createPanel(“1. Profile”, _goTo2, _cancel);_paymentPanel = createPanel(“2. Payment”, _goTo1, _goTo3);_finalPanel = createPanel(“3. Command Validation”, _finish);
//--> Adds all created panels to each view of the cube by using // the CubicView.getViewAt method:_cube.getViewAt(0).addElement(_formPanel);_cube.getViewAt(1).addElement(_paymentPanel);_cube.getViewAt(2).addElement(_finalPanel);

15Creating Rich Internet Applications for Free
3.5.2 Playing with the CubicView transition effect
At this stage, we can drag the CubicView container, but there is no possibility to go from one view to another. We have to add “button click” events to set the CubicView.index property. In doing so, the 3D transition effect will automatically be launched.
By using the UIMouseEvent (org.flashapi.swing.event.UIMouseEvent) and the UIMouseEvent target property (inherited from the Event class), we can easily check which button was clicked and has fired the current mouse event. The initTransition function attributes the right index corresponding to this button. The navigation is devoted to the _goTo1, _goTo2 and _goTo3 buttons; add this code into the CubicForm class body:
private function initTransition(e:UIMouseEvent):void { switch(e.target) { case _goTo1 : cube.index = 0; break; case _goTo2 : cube.index = 1; break; case _goTo3 : cube.index = 2; break; }}
Notice that the three buttons work with the same event handler. That is why we can implement the useful addEventCollection method from the EventCollector class. This method allows to add the same event listener to a collection of EventDispatcher objects, as shown below:
_evtColl.addEventCollection([goTo1, goTo2, goTo3], UIMouseEvent.CLICK, initTransition);
The preceding code must be placed into the initializing function. (Do not forget the import statement of the UIMouseEvent class.)
If you run the code, you can see that the effect always turns from bottom to top. But the CubicView class defines a special property to choose the the effect’s direction of movement. This is the direction property, which accepts 4 Direction class constants (org.flashapi.swing.constants.Direction) as parameter:
• Direction.UP,
• Direction.DOWN,
• Direction.LEFT,
• and Direction.RIGHT.
Let’s create a new method to implement this functionality and to visually improve our 3D effect:

16Creating Rich Internet Applications for Free
private function doTransition(id:uint, direction:String):void { //--> If the index (id) has not changed, do nothing: if (_cube.index == id) return; //--> Sets the effect’s direction: _cube.direction = direction; //--> Start the effect using the correct index: _cube.index = id;}
To use the doTransition method, we need to change the initTransition method like this:
private function initTransition(e:UIMouseEvent):void { switch(e.target) { case _goTo1 : doTransition(0, Direction.RIGHT); break; case _goTo2 : doTransition(1, Direction.LEFT); break; case _goTo3 : doTransition(2, Direction.UP); break; }}
After that, the cube object can rotate in three logical directions. But even if the effect is rendering better than before, the visual appearance of the application is not very good. We can edit the CSS file to easily improve the graphical design of the work.
3.5.3 CSS rocks!
As we said before, SPAS is strongly CSS-oriented. The use of CSS to deploy SPAS applications offers the same benefits as using CSS files with HTML documents. So, CSS makes it very easy to change the style of a software built on the top the SPAS framework. In this chapter, we will implement stylesheets in the purpose to easily improve the graphical appearance of our application.
To begin, we apply new gradient colors to the application background. Open the “style.css” file.
Note: SPAS 3.0 loads CSS files at runtime. Thus, to show the impact of the style declaration on your work, you just have to reload the SWF file. In FlashDevelop, this operation can easily be done by double clicking on the generated SWF file.
To apply new background gradient colors, add this line to the body css tag:
gradient-colors: #444444 #EEEEEE;
To hide the CubicView border and background, set the CubicView.backgroundOpacity and CubicView.borderWidth properties to 0.0. Insert the following two lines in the CSS rule defined by the cube identifier:

17Creating Rich Internet Applications for Free
background-opacity: 0;border-width: 0;
This demonstrates how only three CSS style declarations can radically change the appearance of a User Interface!
Now remember that we have declared the same CSS class name for each PanelContainer instance, with the name panelContainer. Let’s define a CSS style for this class ; in addition to color and size properties, the SPAS 3.0 CSS sub-system allows to apply margin, padding, and layout properties:
.panelContainer { width: 400; height: 180; color: #666666; font-color: white; background-color: #444444; padding: 10; layout-orientation: vertical; footer-opacity: 0;}
Note: The footer color and opacity properties are defined by the AWM class.
You probably have noticed that buttons are cropped at their bottom edge. This is not a bug: by default, the height of the footer container is fixed. We can use CSS footer selector to enforce the container to automatically adjust it size to its content’s size. By the way, we decide to align the content of the footer to the right:
footer { layout-alignment: right; height: auto;}
To finish, we can declare CSS properties for all buttons. We want all of them to have a shadow effect; and we decide too that the color of texts and icons is white for all states.
button { font-color: white; icon-color: white; shadow: true;}
You can see that button labels are not easily readable, because they appear in withe on a soft gray background. But SPAS 3.0 CSS sub-system implements CSS pseudo selectors. That means that you can use up, down and over CSS pseudo selectors to define properties for each state of a button:
button:up { color : #666666;}

18Creating Rich Internet Applications for Free
button:over { color : #999999;}
button:down { color: #333333;
}
Quite easy, isn’t it? As we said above: SPAS 3.0 CSS really rocks!
3.5.4 Removing and reloading the application
An Internet form program typically offers to the user the possibility to cancel current operation, or to restart the whole process. That is the reason why we have three other buttons: _finish, _cancel and _launch. To perform the actions attached to these buttons, we create two simple functions, one to remove the application and the second to reload it:
//--> Removes the application:private function removeMultiView(e:UIMouseEvent):void { //--> Removes the cube object from the main application: this.removeElement(_cube); //--> Adds the launch button to the main application: this.addElement(_launch);}
//--> Reloads the application: private function showDialog(e:UIMouseEvent):void { //--> Removes the launch button from the main application: this.removeElement(_launch); //--> Initializes the index of the cube object: _cube.index = 0; //--> Adds the cube object to the main application: this.addElement(_cube);}
To make the process available from the User Interface, we add two event listeners to the initializing method:
_evtColl.addEventCollection([_finish, _cancel], UIMouseEvent.CLICK, removeMultiView);_evtColl.addEvent(_launch, UIMouseEvent.CLICK, showDialog);
Note: In the preceding code, the _finish and _cancel buttons are both registered with the same event. This is not incorrect if you admit that both actions remove the CubicView container. However, these actions should be differentiated, because a “finish” action could process data and a “cancel” action would not. For simplicity, such an algorithm is not reproduced in this book.
If you run the file, the application should work perfectly. At this time, we can go to the final step of this tutorial: “Adding forms to the application”.

19Creating Rich Internet Applications for Free
3.6 Adding forms to the application
3.6.1 The Form class
SPAS 3.0 provides an easy-to-use object to create complex forms: the Form class (org.flashapi.swing.Form). Creating forms is performed using only two operations: creating a form instance and adding items to it. To specify form items, we use constants of the FormItemType class (org.flashapi.swing.constants.FormItemType). So first we import these couple of classes into the CubicForm class body. Then, we define private variables to store internal references of the form instances, similarly to what we did before:
private var _profileForm:Form;private var _cardForm:Form;
Now we create a specific function to manage the form that will display the user’s profile information:
private function createProfileForm():void { //--> Creates the _profileForm object: _profileForm = new Form();}
Next, we add text inputs to get the user’s profile basic information, like their name or location. The Form.addItem method accepts an object as parameter. The properties of this object may change according to the type of object you want to add. But all objects must have a type and a label property. To add text input objects, use the FormItemType.INPUT constant, as shown below:
_profileForm.addItem( { type:FormItemType.INPUT, label:“First name” });_profileForm.addItem( { type:FormItemType.INPUT, label:“Last name” });_profileForm.addItem( { type:FormItemType.INPUT, label:“Street”} );_profileForm.addItem( { type:FormItemType.INPUT, label:“Zip” });_profileForm.addItem( { type:FormItemType.INPUT, label:“City” });
To add the newly created form into the formPanel container, call the createProfileForm function from the initializing method and use the addElement method to add the _profilForm object to the _formPanel container, as follows:
_formPanel = createPanel(“1. Profile”, goTo2, cancel);createProfileForm();_formPanel.addElement(_profileForm);
20Creating Rich Internet Applications for Free
After having compiled the application file, you can set the width of all input text controls by using the input CSS selector tag:
input { width: 250;}
3.6.2 Adding a combobox to a form
To add a ComboBox control to a form, use the FormItemType.COMBOBOX constant. ComboBox objects can store and display complex data. To add data to a ComboBox instance, we need a reference to the object created by the form. The Form.addItem method returns a special kind of object which allows developers to access the added control. This object is an instance of the ListItem class (org.flashapi.swing.list.ListItem). It provides access to an item property, which stores a reference to the added control through its formItem property. Import the ListItem class and add the following line of code into the createProfileForm function, to get a reference of the added combobox:
var li:ListItem = _profileForm.addItem( { type:FormItemType.COMBOBOX, label:“Country” } );
Once we have access to the combobox, we can fill it with a data set. For that, we can use the ComboBox.dataProvider property. The SPAS 3.0 data provider process is a powerful mechanism, shared by all Listable objects, to simplify data statements. Import the DataProvider class (org.flashapi.swing.databinding.DataProvider), and create a new DataProvider object into the createProfileForm function:
var data:DataProvider = new DataProvider();
You use DataProvider objects to inject data into graphical objects that are used to visually represent information as a list, such as listboxes, button bars, or menus, etc..
The DataProvider.addAll method accepts a collection of objects as parameter. These objects must specify a label property; use the selected property to set the state of the item to selected:
data.addAll( { label:“France” }, { label:“United States”, selected:true }, { label:“United Kingdom” }, { label:“Japan” }, { label:“Germany” } );
To finish, define the DataProvider object you have created as parameter of the ComboBox.dataProvider property:
li.item.formItem.dataProvider = data;
Let’s have a look at the lines of code above to understand them. The addItem method returns an object of the type ListItem. The item property of this object refers to the object we have effectively created, a FormItemContainer instance. Each FormItemContainer defines a formItem property which represents the imput object added to the form. Because the input type is a combobox, we can access its dataProvider property to fi l l it.

21Creating Rich Internet Applications for Free
The createProfileForm function you wrote should now look something like this:
private function createProfileForm():void{var data:DataProvider = new DataProvider();data.addAll( { label:“France” }, { label:“United States”, selected:true }, { label:“United Kingdom” }, { label:“Japan” }, { label:“Germany” });_profileForm = new Form();_profileForm.addItem( { type:FormItemType.INPUT, label:“First name” });_profileForm.addItem( { type:FormItemType.INPUT, label:“Last name” });_profileForm.addItem( { type:FormItemType.INPUT, label:“Street” });_profileForm.addItem( { type:FormItemType.INPUT, label:“Zip” });_profileForm.addItem( { type:FormItemType.INPUT, label:“City” });var li:ListItem = _profileForm.addItem( { type:FormItemType.COMBOBOX, label:“Country” });li.item.formItem.dataProvider = data;}
Note: Since SPAS alpha 6.3, it is possible to add a data provider into a Listable instance from the object passed as parameter of the addItem method. So now, you can directly do:
_ p r o f i l e F o r m . a d d I t e m ( { t y p e : F o r m I t e m T y p e . C O M B O B O X , label:“country”, itemLabel:“select”, dataProvider:data});
3.6.3 Adding ComboBox CSS style
The ComboBox button control behaves like buttons. It has the same style properties for each button state. hence we can apply the same styles as used before for the application’s buttons. Fortunately, the SPAS 3.0 CSS sub-system allows to combine multiple tags, as it is commonly used in XHTML:

22Creating Rich Internet Applications for Free
button, combobox { font-color: white; icon-color: white; shadow: true;}
button:up, combobox:up{ color: #666666;}
button:over, combobox:over { color: #999999;}
button:down, combobox:down { color: #333333;}
3.6.4 Adding the credit card form
To create the credit card form, we proceed exactly the same as we have done for the profile form. In the main class, write the following function, used to manage the form that will display credit card information.
Notice that the itemLabel property allows to define the default text for the combobox:
private function createCardForm():void{var data:DataProvider = new DataProvider();data.addAll( { label:“Visa” }, { label:“American Express” }, { label:“MasterCard” }, { label:“Discover” }, { label:“Diner’s Club” });_cardForm = new Form();
var li:ListItem = _cardForm.addItem( { type:FormItemType.COMBOBOX, label:“Credit card”, itemLabel:“Select” });li.item.formItem.dataProvider = data;_cardForm.addItem( {type:FormItemType.INPUT, label:“Card number”});_cardForm.addItem( {type:FormItemType.DATE, label:“Expiration date”});}

23Creating Rich Internet Applications for Free
Note: The last item we add to the form is a type of FormItemType.DATE. The FormItemType.DATE type creates a DateField instance which allows users to select a date from a DatePicker object. These classes will be covered in the next part of this white paper: “3.5.6 Introducing the DateField and the DatePicker classes”.
Then, add the newly created form into the _cardPanel container and call the createCardForm function from the initializing method, as we did before:
_paymentPanel = createPanel(“2. Payment”, goTo1, goTo3);createCardForm();_paymentPanel.addElement(_cardForm);
If you compile the application and run it, you will see that information typed into both forms are persistent, even if you remove or cancel the forms. This behavior is not logical for such an application, that is why we should reset all forms every time the remove function is called due to user action. This can easily be done by using the Form.reset method:
private function removeMultiView(e:UIMouseEvent):void { this.removeElement(_cube); this.addElement(_launch); _profileForm.reset(); _cardForm.reset();}
3.6.5 Introducing the DateField and the DatePicker classes
As we said before, the credit card form contains a DateField object. The SPAS 3.0 online documentation describes this control as follows:
The DateField class provides a Date entry field which is an occurrence of the TextInput class. When the user clicks inside the bounding box of the uiobject it pops up a DatePicker instance. Then users can select a Date using this calendar.
As you can see, the Form class is really easy to use; it automatically deals with SPAS 3.0 components to let developers add several controls without caring about complex code and interactions. So now, we just have to use the datepicker CSS selector to change the appearence of the calendar displayed by the DateField control:
datepicker { background-color: #666666; day-font-color-up: white; shadow: true;}
3.6.6 The confirmation view
Once the user has validated the form, we redirect it to the confirmation view panel. This panel container is composed of a title label, a simple text field to display useful customer information and a button link to access a contact page. (The contact page is not reproduced in this book.) To

24Creating Rich Internet Applications for Free
create this final view, we add a method devoted solely to this task.
Import the Text, Label and ButtonLink classes from the org.flashapi.swing package. Then create the three variables to store the references of the needed controls:
private var _contact:LinkButton;private var _thanksLabel:Label;
private var _info:Text;
The createLastPanel function is very simple. Since we want the _thanksLabel and _info controls to have individual styles, we give each of them a unique CSS identifier:
private function createLastPanel():void {
//--> Creates a new Label object with “thanksLabel” as
// unique identifier: _thanksLabel = new Label(“Your title here.”); _thanksLabel.id = “thanksLabel”;
//--> Creates a new Text object “info” as unique identifier: _info = new Text(); _info.id = “info”;
//--> Adds custom text to the Text object: _info.appendText(“Your text here.”);
//--> Creates a new LinkButton instance _contact = new LinkButton(“Contact Us”); //--> Adds all the preeceding elements into the finalPanel //container: _finalPanel.addGraphicElements( _thanksLabel, _infos, _contact);}
Of course, we must call this method from the initializing function to display these elements into the _finalPanel container.
Finally, we declare the CSS styles corresponding to these elements. Notice that SPAS 3.0 CSS text properties use the same syntax as standard CSS text format properties, except for the color property which is replaced by the font-color property:
#thanksLabel { font-color: #333333; font-size: 16; font-weight: bold;}
#info { width: parent; height: auto;
}
Once you have compiled your application, you should see the final result as shown against:

25Creating Rich Internet Applications for Free

26Creating Rich Internet Applications for Free
4. Advanced techniques
4.1 Using embeded styles
As you have probably noticed, the loading process of CSS files is asynchronous. That is why there is a delay between the creation of the application elements and the applying of styles. Since we have defined panels’ sizes in the CSS file, the first panel appears truncated, in a small square, in the middle of the screen.
To prevent this, in a Web application, you can use the waitForStyleInit method. It calls a callback function once the CSS file is loaded. So, you just have to use the init function we have previously defined, as callback, to apply the loaded styles upon creation of the interface.
Because CSS files are really useful in setting the appearance of any complex softwares built on SPAS 3.0, you can also embed the style directly in the application. The process to embed a CSS file is similar to the one for embeding an image, except that you use “application/octet-stream” as MIME type. First, move the “style.css” from the “bin” to the “assets” folder and add the following lines, after the embeded icon declaration:
[Embed( source=“../assets/style.css”, mimeType=“application/octet-stream”)]private var StyleAsset:Class;
Then use the getEmbededStyle method (org.flashapi.swing.util.getEmbededStyle) to set the styleSheet property:
this.styleSheet = getEmbededStyle(StyleAsset);
4.2 Internationalization in SPAS 3.0 applications
4.2.1 Properties files and the ResourceBundle class
Up until now, we have defined all of the text in the application directly within the code. This is not good practice if you plan to internationalize your work. Fortunately, SPAS 3.0 provides an easy-to-use solution for implementing internationalization (i18n). The ResourceBundle class (org.flashapi.swing.localization.i18n.ResourceBundle) defines a very useful the API for loading and accessing “properties” files, in order to facilitate i18n management. The “properties” file contains the text information according the selected locale.
First of all, create a properties file, named “cubicform_en.properties” into the “bin” folder. Each line in a “properties” file stores a single property declared as a “key/value” pair:
key1=My first valuekey2=My second value
The content of the Property Resource Bundles for the CubicForm application is reproduced in appendices C and D, at the end of this tutorial.

27Creating Rich Internet Applications for Free
Before implementing the ResourceBundle class, we have to do some changes ot our code, due to the fact that we will create the User Interface only after the locale “properties” file is loaded:
• rename the init method to createUI
• create a brand new init method
• move the styleSheet property from the createUI to the newly created init method
By now, your code should look like as shown below:
private function init():void { this.styleSheet = getEmbededStyle(StyleAsset);}
private function createUI():void { //--> Rest of the method here:}
To create a resource bundle for localization, we use the ResourceBundle.createBundle method, which accepts four parameters:
• the id, used to retrieve the resource bundle anywhere in your application
• the scheme, that defines how the path to the “properties” file is constructed
• the locale, which indates what locale file to use
• and the callback method, called immediately after the resource bundle is available to the application
To define our resource bundle, we create a new method, named createBundle and called from the init function. In this method, we initialize the resource bundle with the following parameters:
ResourceBundle.createBundle( “cubicLocale”, new URIScheme(“cubicform”), new Locale(“en”), createUI);
This bundle will load the “properties” file named “cubicform_en.properties”, from the “bin” folder. Notice that we use the createUI method as a callback function. But ResourceBundle callback functions must have a parameter of the type of ResourceBundle. So we need to change the signature of the createUI method, to the following one:
private function createUI(bundle:ResourceBundle):void
This bundle parameter represents the instance of the ResourceBundle object created from the properties fi le specified by the URIScheme and Locale objects. To access this bundle more easilly than using its identifier, declare a private reference to a ResourceBundle object and initialize it by using the bundle parameter:
private function createUI(bundle:ResourceBundle):void {
_bundle = bundle; //--> Rest of the method here:}

28Creating Rich Internet Applications for Free
4.2.2 Accessing locale data
Well now, the resource bundle is created and available from any part of the application. It remains only to replace all texts in our code by the corresponding value in the “properties” file. You simply use the getString method of the _bundle object with the mapped key as parameter:
_goTo1 = new Button(_bundle.getString(“previous”));_goTo2 = new Button(_bundle.getString(“next”));_goTo3 = new Button(_bundle.getString(“validate”));_finish = new Button(_bundle.getString(“finish”));_cancel = new Button(_bundle.getString(“cancel”));_launch = new Button(_bundle.getString(“showDialog”));
Then, reproduce the preceding process anywhere in the application where there it text to be internationalized.
4.3 Using validators
4.3.1 About validation
When you use form objects, you want users to type specific characters into the available fields. To prevent misformatted strings of characters and avoid user information errors, you can use validator objects. SPAS 3.0 forms implement a built-in validation system which simplifies the use of validator objects.
Usually, when a user submits information, the form object performs a validating operation, according to the pre-defined validators and automatically displays errors in tooltips. The test operation can programmatically be launched by using the check or test methods. The first one performs a testing operation and displays errors in tooltips. The second one does the same testing operation as previously, but does not display errors in tooltips.
4.3.2 Adding validator objects
Adding validators to SPAS 3.0 forms is very simple. You define a validator property to the object you pass as parameter of the form addItem method. To indicate that the date field of the _cardForm is required, you just have to reproduce the code below:
_cardForm.addItem( { type:FormItemType.DATE, label:_bundle.getString(“expiration”), validator:new RequiredFieldValidator() });
To test the validation process, we have to make some changes in the initTransition method. Instead of running the last transition when clicking the _goto3 button, we will perform a checking operation on our forms, by calling the new doCheck method:
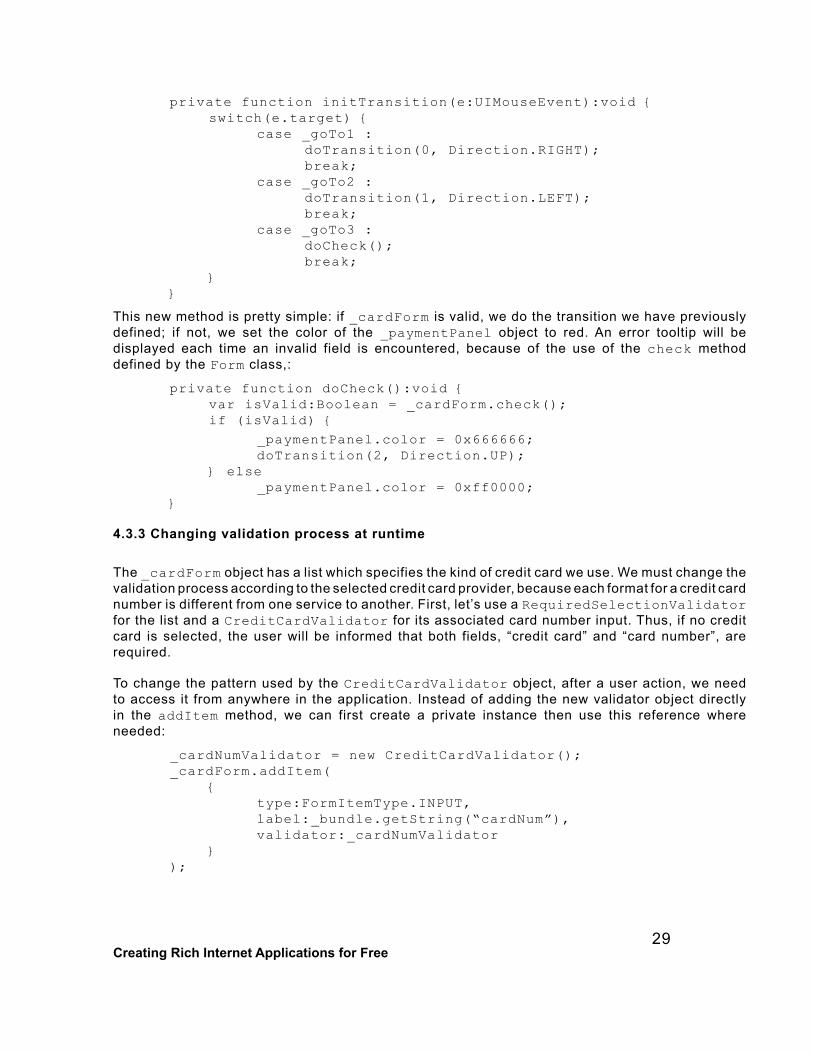
29Creating Rich Internet Applications for Free
private function initTransition(e:UIMouseEvent):void { switch(e.target) { case _goTo1 : doTransition(0, Direction.RIGHT); break; case _goTo2 : doTransition(1, Direction.LEFT); break; case _goTo3 : doCheck(); break; }}
This new method is pretty simple: if _cardForm is valid, we do the transition we have previously defined; if not, we set the color of the _paymentPanel object to red. An error tooltip will be displayed each time an invalid field is encountered, because of the use of the check method defined by the Form class,:
private function doCheck():void { var isValid:Boolean = _cardForm.check(); if (isValid) {
_paymentPanel.color = 0x666666; doTransition(2, Direction.UP); } else _paymentPanel.color = 0xff0000;}
4.3.3 Changing validation process at runtime
The _cardForm object has a list which specifies the kind of credit card we use. We must change the validation process according to the selected credit card provider, because each format for a credit card number is different from one service to another. First, let’s use a RequiredSelectionValidator for the list and a CreditCardValidator for its associated card number input. Thus, if no credit card is selected, the user will be informed that both fields, “credit card” and “card number”, are required.
To change the pattern used by the CreditCardValidator object, after a user action, we need to access it from anywhere in the application. Instead of adding the new validator object directly in the addItem method, we can first create a private instance then use this reference where needed:
_cardNumValidator = new CreditCardValidator();_cardForm.addItem( { type:FormItemType.INPUT, label:_bundle.getString(“cardNum”), validator:_cardNumValidator });

30Creating Rich Internet Applications for Free
We now need a reference to the combobox that specifies the type of credit card, to listen for the user’s changes. Once we have this reference, we can add an event listener to the combobox:
var cb:ComboBox = _cardForm.addItem( { type:FormItemType.COMBOBOX, label:_bundle.getString(“creditCard”), itemLabel:_bundle.getString(“select”), dataProvider:data, validator:new RequiredSelectionValidator() }).item.formItem;_evtColl.addEvent(cb, ListEvent.LIST_CHANGED, creditCardHandler);
Notice that we use the formItem property directly from the value returned by the addItem method.
At this point, we could write lengthy code to set the pattern used by the validator to check the credit card number. But we can modify the data provider a little bit to implement some wily behavior. We pass all appropriate patterns as data values for each item in the data provider:
data.addAll( { label:”Visa”, data:CreditCardValidator.VISA }, { label:”American Express”, data:CreditCardValidator.AMERICAN_EXPRESS },
{ label:”MasterCard”, data:CreditCardValidator.MASTER_CARD }, { label:”Discover”, data:CreditCardValidator.DISCOVER }, { label:”Diner’s Club”, data:CreditCardValidator.DINERS_CLUB });
Now, we set the pattern by using the data property of the _cardForm object; and the magic happens:
private function creditCardHandler(e:ListEvent):void { _cardNumValidator.pattern = e.target.data;}
4.4 About the Initializator class
When you launch the application, there is a lapse of time between the start and the display of the components. This is because all components have to be created and initializated. This behavior is really uncomfortable for users. But SPAS 3.0 provides a built-in mechanism to deal with the creation process and to tell users what is happening during the initialization of the application.
This mechanism is provided by the Initializator class. But because the Initializator class has too many functionalities, it will be covered in detail in another publication.

31Creating Rich Internet Applications for Free
5. Conclusion
5.1 Powerful and totally free
SPAS 3.0 can be used with both Flash CS3 and Flash Builder technologies. But these ones are not free, even if they offer impressive functionalities. All along this tutorial, we have seen that SPAS 3.0 combined with FlashDevelop offers a really powerful alternative to Adobe’s softwares. It allows ActionScript developers to go far with RIA creation and deployment process, all for free.
Another very important point of SPAS 3.0 API is its simplicity. The API is not as verbose as others are. For example, if you want to create a real window, use the new Window statement. No JFrames, no 3rd party code and no obscure methods! It confers to the SPAS 3.0 API great superiority concerning the learning and development phases.
5.2 Where to go from here
We have covered a lot of functionalities in this white paper. However, SPAS 3.0 offers so many possibilities, and its API is regularly growing so much that it is not possible to review them all in detail. To get more information and tutorials about SPAS 3.0 programmatic techniques, go to the SPAS 3.0 online documentation and the tutorial section on the SPAS 3.0 Web site at:
• http://www.flashapi.org/
Of course, you can find and follow us on social networks:
• http://www.facebook.com/flashapi
5.3 Acknowledgements
Thank to Christopher Archer, for his patience and the reviewing of this book.

32Creating Rich Internet Applications for Free
Appendix A: CubicForm.as/*//////////////////////////////////////////////////////////////////// Copyright (C) 2008-2012 BANANATREE DESIGN & Pascal ECHEMANN.// All Rights Reserved.// The following is Sample Code and is subject to all restrictions// on such code as contained in the End User License Agreement// accompanying this product.// If you have received this file from a source other than// BANANATREE DESIGN, then your use, modification, or distribution// of it requires the prior written permission of BANANATREE// DESIGN.//////////////////////////////////////////////////////////////////*/
package { /** * @class CubicForm * @author Pascal ECHEMANN * @date 07/08/2012 13:52 * @version 2.0 */
import flash.display.DisplayObject;import org.flashapi.collector.EventCollector;import org.flashapi.swing.Application;import org.flashapi.swing.Button;import org.flashapi.swing.ComboBox;import org.flashapi.swing.constants.Direction;import org.flashapi.swing.constants.FormItemType;import org.flashapi.swing.CubicView;import org.flashapi.swing.databinding.DataProvider;import org.flashapi.swing.event.ListEvent;import org.flashapi.swing.event.UIMouseEvent;import org.flashapi.swing.event.WindowEvent;import org.flashapi.swing.Form;import org.flashapi.swing.Label;import org.flashapi.swing.LinkButton;import org.flashapi.swing.localization.i18n.Locale;import org.flashapi.swing.localization.i18n.ResourceBundle;import org.flashapi.swing.localization.i18n.URIScheme;import org.flashapi.swing.PanelContainer;import org.flashapi.swing.Text;import org.flashapi.swing.util.getEmbededStyle;import org.flashapi.swing.validators.CreditCardValidator;import org.flashapi.swing.validators.RequiredFieldValidator;import org.flashapi.swing.validators.RequiredSelectionValidator;
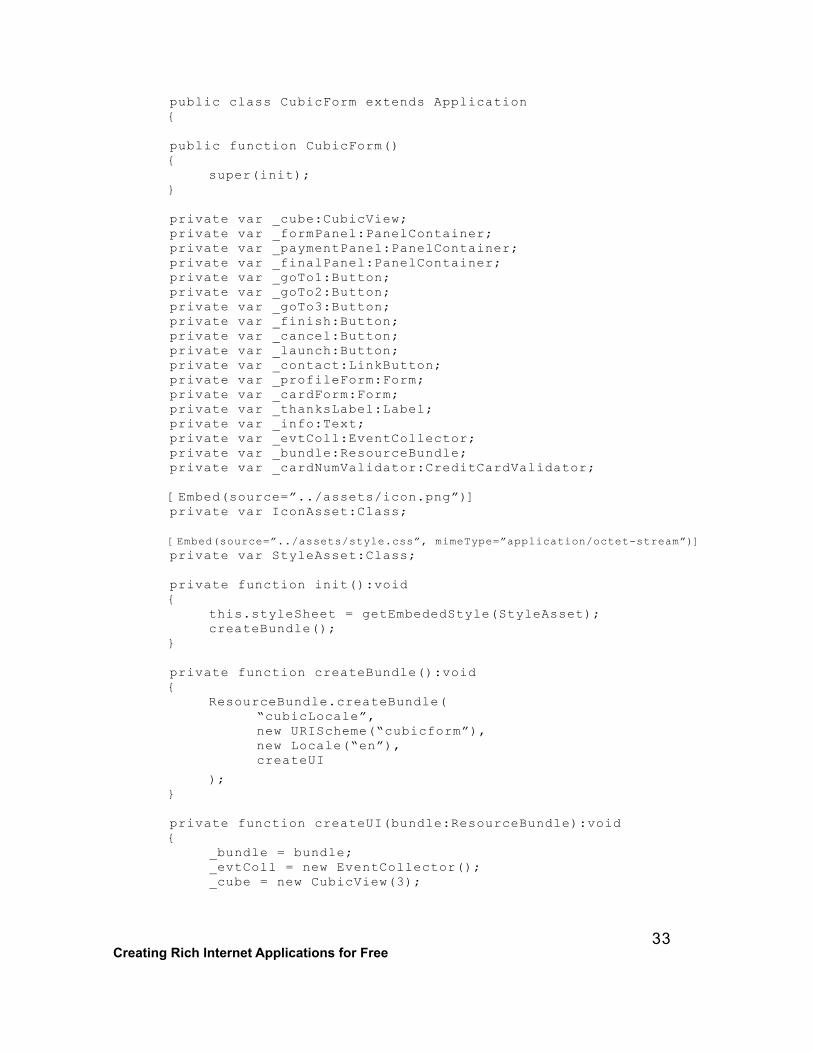
33Creating Rich Internet Applications for Free
public class CubicForm extends Application{ public function CubicForm(){ super(init);} private var _cube:CubicView;private var _formPanel:PanelContainer;private var _paymentPanel:PanelContainer;private var _finalPanel:PanelContainer;private var _goTo1:Button;private var _goTo2:Button;private var _goTo3:Button;private var _finish:Button;private var _cancel:Button;private var _launch:Button;private var _contact:LinkButton;private var _profileForm:Form;private var _cardForm:Form;private var _thanksLabel:Label;private var _info:Text;private var _evtColl:EventCollector;private var _bundle:ResourceBundle;private var _cardNumValidator:CreditCardValidator; [Embed(source=”../assets/icon.png”)]private var IconAsset:Class; [Embed(source=”../assets/style.css”, mimeType=”application/octet-stream”)]private var StyleAsset:Class; private function init():void{ this.styleSheet = getEmbededStyle(StyleAsset); createBundle();} private function createBundle():void{ ResourceBundle.createBundle( “cubicLocale”, new URIScheme(“cubicform”), new Locale(“en”), createUI
);} private function createUI(bundle:ResourceBundle):void{ _bundle = bundle; _evtColl = new EventCollector(); _cube = new CubicView(3);

34Creating Rich Internet Applications for Free
_cube.id = “cube”; _cube.draggable = true; _cancel = new Button(_bundle.getString(“cancel”)); _goTo1 = new Button(_bundle.getString(“previous”)); _goTo2 = new Button(_bundle.getString(“next”)); _goTo3 = new Button(_bundle.getString(“validate”)); _finish = new Button(_bundle.getString(“finish”)); _launch = new Button(_bundle.getString(“showDialog”)); _formPanel = createPanel( _bundle.getString(“profile”), _goTo2, _cancel ); createProfileForm(); _formPanel.addElement(_profileForm); _paymentPanel = createPanel( _bundle.getString(“payment”), _goTo1, _goTo3 ); createCardForm(); _paymentPanel.addElement(_cardForm); _finalPanel = createPanel( _bundle.getString(“command”), _finish ); createLastPanel(); _cube.getViewAt(0).addElement(_formPanel); _cube.getViewAt(1).addElement(_paymentPanel); _cube.getViewAt(2).addElement(_finalPanel); _evtColl.addEventCollection( [_goTo1, _goTo2, _goTo3], UIMouseEvent.CLICK, initTransition ); _evtColl.addEventCollection( [_finish, _cancel], UIMouseEvent.CLICK, removeMultiView ); _evtColl.addEvent(_launch, UIMouseEvent.CLICK, showDialog); this.addElement(_cube);} private function createPanel(title:String, btn1:Button, btn2:Button = null):PanelContainer{ var pc:PanelContainer = new PanelContainer(title); pc.className = “panelContainer”; var icon:DisplayObject = new IconAsset(); pc.setIcon(icon); _evtColl.addEvent(pc, WindowEvent.TITLE_BAR_MOUSE_DOWN, doDrag); _evtColl.addEvent(pc, WindowEvent.TITLE_BAR_MOUSE_UP, undoDrag); btn2 != null ? pc.footer.addGraphicElements(btn1, btn2) : pc.footer.addElement(btn1); pc.footer.display(); return pc;}

35Creating Rich Internet Applications for Free
private function initTransition(e:UIMouseEvent):void{ switch(e.target) { case _goTo1 : doTransition(0, Direction.RIGHT); break; case _goTo2 : doTransition(1, Direction.LEFT); break; case _goTo3 : doCheck(); break; }} private function doCheck():void{ var isValid:Boolean = _cardForm.check(); if (isValid) { resetPanel(); doTransition(2, Direction.UP); } else { _paymentPanel.color = 0xff0000; }} private function doTransition(id:uint, direction:String):void{ if (_cube.index == id) return; _cube.direction = direction; _cube.index = id;} private function createProfileForm():void{ var data:DataProvider = new DataProvider();
data.addAll( { label:”France” , selected:true }, { label:”United States” }, { label:”United Kingdom” }, { label:”Japan” }, { label:”Germany” } );
_profileForm = new Form();
_profileForm.addItem( { type:FormItemType.INPUT, label:_bundle.getString(“fname”) } );

36Creating Rich Internet Applications for Free
_profileForm.addItem( { type:FormItemType.INPUT, label:_bundle.getString(“lname”) } ); _profileForm.addItem( { type:FormItemType.INPUT, label:_bundle.getString(“street”) } ); _profileForm.addItem( { type:FormItemType.INPUT, label:_bundle.getString(“zip”) } ); _profileForm.addItem( { type:FormItemType.INPUT, label:_bundle.getString(“city”) } ); _profileForm.addItem( { type:FormItemType.COMBOBOX, label:_bundle.getString(“country”), dataProvider:data } );} private function createCardForm():void{ var data:DataProvider = new DataProvider(); data.addAll( { label:”Visa”, data:CreditCardValidator.VISA }, { label:”American Express”, data:CreditCardValidator.AMERICAN_EXPRESS }, { label:”MasterCard”, data:CreditCardValidator.MASTER_CARD }, { label:”Discover”, data:CreditCardValidator.DISCOVER }, { label:”Diner’s Club”, data:CreditCardValidator.DINERS_CLUB } ); _cardForm = new Form(); var cb:ComboBox = _cardForm.addItem( { type:FormItemType.COMBOBOX, label:_bundle.getString(“creditCard”), itemLabel:_bundle.getString(“select”), dataProvider:data, validator:new RequiredSelectionValidator() } ).item.formItem;

37Creating Rich Internet Applications for Free
_evtColl.addEvent(cb, ListEvent.LIST_CHANGED, creditCardHandler); _cardNumValidator = new CreditCardValidator(); _cardForm.addItem( { type:FormItemType.INPUT, label:_bundle.getString(“cardNum”), validator:_cardNumValidator } ); _cardForm.addItem( { type:FormItemType.DATE, label:_bundle.getString(“expiration”), validator:new RequiredFieldValidator() } );} private function creditCardHandler(e:ListEvent):void{ _cardNumValidator.pattern = e.target.data;} private function createLastPanel():void{ _thanksLabel = new Label(_bundle.getString(“thanks”)); _thanksLabel.id = “thanksLabel”; _info = new Text(); _info.id = “info”; _info.appendText(_bundle.getString(“info”)); _contact = new LinkButton(_bundle.getString(“contact”)); _finalPanel.addGraphicElements(_thanksLabel, _info, _contact);} private function doDrag(e:WindowEvent):void{ _cube.startDrag();} private function undoDrag(e:WindowEvent):void{ _cube.stopDrag();} private function removeMultiView(e:UIMouseEvent):void{ this.removeElement(_cube); this.addElement(_launch); _profileForm.reset(); _cardForm.reset(); resetPanel();}

38Creating Rich Internet Applications for Free
private function showDialog(e:UIMouseEvent):void{ this.removeElement(_launch); _cube.index = 0; this.addElement(_cube);} private function resetPanel():void { _paymentPanel.color = 0x666666;}
//--> End of class}
//--> End of package}

39Creating Rich Internet Applications for Free
Appendix B: style.cssstyle.css
/*//////////////////////////////////////////////////////////////////// Copyright (C) 2008-2012 BANANATREE DESIGN & Pascal ECHEMANN.// All Rights Reserved.// The following is Sample Code and is subject to all// restrictions on such code as contained in the End User// License Agreement accompanying this product.// If you have received this file from a source other than// BANANATREE DESIGN, then your use, modification, or// distribution of it requires the prior written permission of// BANANATREE DESIGN.//////////////////////////////////////////////////////////////////*/
/*//------------------------------// SPAS 3.0 body selector//------------------------------*/
body { visibility:visible; gradient:true; gradient-colors:#444444 #EEEEEE;}
/*//------------------------------// SPAS 3.0 selectors//------------------------------*/
button, combobox { font-color:white; icon-color:white; shadow:true;}
footer { layout-alignment:right; height:auto;}

40Creating Rich Internet Applications for Free
input { width:250;}
datepicker { background-color:#666666; day-font-color-up:#ffffff; shadow:true;}
/*//------------------------------// SPAS 3.0 pseudo selectors//------------------------------*/
button:up, combobox:up{ color:#666666;}
button:over, combobox:over { color:#999999;}
button:down, combobox:down { color:#333333;}
/*//------------------------------// CSS Class styles//------------------------------*/
.panelContainer { width:400; height:180; color:#666666; font-color:white; background-color:#444444; padding:10; layout-orientation:vertical; footer-opacity:0;}

41Creating Rich Internet Applications for Free
/*//------------------------------// CSS Unique identifier styles//------------------------------*/
#cube { width:425; height:255; border-width:0; background-opacity:0; shadow:true;}
#thanksLabel { font-color:#333333; font-size:16; font-weight:bold;}
#info { width:parent; height:auto;}

42Creating Rich Internet Applications for Free
Appendix C: cubicform_en.propertiescancel=Cancelprevious=Previousnext=Nextvalidate=Validatefinish=FinishshowDialog=Show dialogprofile=1. Profilefname=First name:lname=Last name:street=Street:zip=Zip Code:city=City:country=Country:select=Selectpayment=2. PaymentcreditCard=Credit card:cardNum=Card number:expiration=Expiration date:command=3. Command Validationthanks=Thank you for choosing BananaTree Design.info=If you have another question about BananaTree Design and our products or would like to ask us a question then please click the following link to go to the Help and Contact Us page:contact=Contact Us

43Creating Rich Internet Applications for Free
Appendix D: cubicform_fr.propertiescancel=Annulerprevious=Précédentnext=Suivantvalidate=Validerfinish=TerminershowDialog=Afficher le formulaireprofile=1. Profilefname=Prénom :lname=Nom :street=Rue :zip=Code Postal:city=Ville :country=Pays :select=Sélectionnerpayment=2. PaiementcreditCard=Carte de crédit :cardNum=Numéro de carte:expiration=Date d’expiration:command=3. Validation de la Commandethanks=Merci d’avoir choisit BananaTree Design.info=Si vous avez des questions à propos de BananaTree Design, ou de nos produits, cliquez sur le lien suivant pour aller à notre page de contact:contact=Contactez nous


![X-Ray Shielding 3.6.5 Walls and Ceilings X-… · and compound provide ... 3.6.5 X-Ray Shielding Walls and Ceilings KX1 WALL LINING: [Side 1] ... Day Design 3094-4 Steel 64 0.5 3.72](https://img.pdfslide.us/doc/110x75/5acd4c0c7f8b9a6a678d5910/x-ray-shielding-365-walls-and-x-and-compound-provide-365-x-ray-shielding.jpg)