Embed Size (px)
Citation preview
Tutorial – Building Challenging Custom Encounters
By Deafdumbandblind
Foreword
This is for all of you Brave souls who are new to the NWN Toolset. To all you hardened and wizened Builders out there – don’t argue with me on what I’ve included in this Tutorial. There are some that will argue black is white because they have nothing better to do. I know that you will have your own methods for doing things but I was asked by some n00bs and by some seasoned “Posters” on the Bioware Toolset forum to do this and quite frankly it won’t be worth your while to debate the info below. It comes from my experience of building and from the results of comprehensive testing – neither of which you can gainsay.
DDnB (a trifle defensive? Maybe)
Introduction
What makes a challenging custom encounter? This probably one of the most difficult questions to answer with any real accuracy, given the number of connotations and variations of character classes and builds that can exist. Why? Because although the NWN software considers the level, the statistics, the equipment, the feats and even the shape (Try building a monster with the shape of a wolf, note the CR and then change the shape to that of Mestopheles and then note the CR!) of a monster when calculating its Challenge Rating (CR), it does not consider these factors on a PC.
This presents problems for a lot Persistent Worlds (PWs). Consider a PW that allows up to +5 items and where trading of these items between a User’s own PCs is allowed. A 1st level Fighter PC belonging to a veteran User could have an Armour Class (AC) of over 42! There are currently no 1st level standard NWN toolset monsters which can hit this type of PC on anything less than a roll of 20 (5% chance). This means that higher level monsters have to be used which normally means that too much experience is gained and characters go up levels too quickly and so on.
In this tutorial, I will be looking at the two prime elements that make-up a challenging custom Encounter:
1 – Making a challenging custom Monster/Creature
2 – Designing and Painting the custom Encounter on to your Map
1 – Making a challenging custom Monster/Creature
a. What makes a custom Monster challenging?
When it comes down to it, it’s the toughness of the Monsters and the number of those Monsters in comparison to the PC(s) that ultimately dictates the difficulty of an Encounter.
There are a number of high level factors that affect the actual effort the toughness of a Monster:
1. How often the PC can hit the Monster. I suggest the following rule of thumb:
- PC hits Monster 25% of the time (needs a roll of 15 – 20 on a D20) = Hard
- PC hits Monster 50% of the time (needs a roll of 10 – 20 on a D20) = Average
- PC hits Monster 75% of the time (needs a roll of 5 or over on a D20) = Easy
2. How often the PC is hit by the Monster. I suggest the following rule of thumb:
- Monster hits PC 25% of the time (needs a roll of 15 – 20 on a D20) = Easy
- Monster hits PC 50% of the time (needs a roll of 10 – 20 on a D20) = Average

- Monster hits PC 75% of the time (needs a roll of 5 or over on a D20) = Hard
3. Damage delivered: There are a number of Feats which increase the damage delivered upon a successful Attack. There is no easy way to predict the effect on the amount of damage delivered when combining some of these Feats. Additionally, it is possible to combine such Feats in a Monster that would never be possible when building your own PC. So if you want a predictable Monster build - keep them very simple or leave them out. I have attached a link to a spreadsheet containing a list of Feats that effect Damage.
4. Vulnerabilities – there are two main types of vulnerabilities:
- Statistic-based Vulnerabilities: here are some of the main statistics which can be found on the “Statistics” tab when editing the monster’s properties. By reducing any of these significantly you will introduce a vulnerability:
o Strength – affects Attack Bonus (AB). For every +2 in Strength stat = +1 AB
o Dexterity – affects Armour Class (AC). For every +2 in Dexterity stat = +1 AC. This also affects Reflex saving throws.
o Base Hit Points Adjuster – affects the Maximum Hit Point Total without affecting the Fortitude saves or number of hits per level gained.
o Armour Class adjuster – affects AC without affecting the Dexterity, and hence reflex saves, of the monster.
Any deficiencies in the above will make a monster vulnerable in melee combat. Although a number of Spells also use Reflex saves (Dex).
o Constitution – affects the Hit Point Total AND Fortitude Saves. One key note here is Devastating Criticals use Fortitude saves to resolve effects.
Any deficiency in the Constitution stat will make a monster vulnerable in melee combat, to Death magics and some other spells.
o Intelligence – affects Will Saves, spell level and number of spells
o Wisdom – affects Spell resistances, spell level and number of spells
o Charisma – affects spell level and number of spells.
o Fortitude Adjuster – affects Fortitude Saves WITHOUT increasing Constitution and the Hit Point Total
o Reflex Adjuster - affects Reflex Saves WITHOUT increasing the monster’s Dex or AC.
o Will Adjuster - affects Resistance Saves WITHOUT increasing Wisdom, Maximum spell level or number of spells
Any deficiency in the above will make a monster vulnerable to magical attack.

- Racial Vulnerabilities: Some standard NWN toolset creatures suffer increased damage from certain elements e.g. Fire Giants take 50% extra cold damage. These can be built into custom monsters by adjusting their “Hide/Skin” properties in their Natural Inventory.
5. Immunities and Damage Resistance: Some monsters are either immune or resistant to certain kinds of damage. There are two types of Immunities:
- Statistic-based Immunities: By increasing some of the Statistics or Adjusters above you can make a monster extremely resistant to most Spells and Feats BUT not immune. The monster will still fail a saving throw on a roll of 1.
- Racial Immunities: These can be built into custom monster by adjusting their “Hide/Skin” properties in its Natural Inventory.
6. Self-Healing Abilities – If a monster has “Heals”, in the form of Feats or Spells or Potions then this will prolong combat. Thus making it more difficult for the PC.
7. Equipment – Equipment can add to a monster’s AB, AC, Hits, melee damage, vulnerabilities and immunities. My advice is to keep the creature equipment simple so that the effect AB and AC are predictable.
Note that I did not include the CR adjuster in the list of things that can affect your Monster’s toughness. This is because it doesn’t….not at all. However, it is one of the factors that affect the amount of experience points gained from killing the monster. The other 2 variables that also vary the experience points gained are the Experience Slider (found in the module properties) and the Encounter Difficulty Rating drop box (found in the Encounter properties).
b. Setting the Difficulty
i. Building a Mod-Tester NPC
Why? Well, this Mod-Tester NPC will be representative of your average starting PC. He will be your guinea pig and will set the standard for your module build. Also, he’s quite useful for testing against your custom creatures. Here’s what to do for starters:
1. Decide the intended starting PC level for your module.
2. In the module toolset, build a realistic NPC with the most realistic set of statistics and equipment for this level. This will be your Mod-tester. This is the main “Gate” which will ultimately effect the difficulty of your module so consider these following factors carefully:
a. Character class: I suggest choosing a “Fighter”. Why? Most people like to play the toe-to-toe Hero types and it’s one of the most predictable classes when it comes to estimate level progression in terms of AB and AC (Fighter gets +1 Base Attack Bonus (BAB) per level – that means for every level increase he automatically gets +1 to his AB without adjusting his strength stat). If you were to choose a Mage-type character as your Mod-tester and henceforth adjust all Monster ABs, ACs and resistances according to this then you will end up with monsters that will be easily beaten by similar level fighter PCs, although very resistant to magical attacks.
b. Equipment: Decide what type and enhancement bonuses you will be allowing your PCs because these will determine what you give to your Mod-tester and will affect its AB, AC and possibly its resistance. If your PW does not have Item Level Restrictions (ILR), veterans of your PW will amass the very best equipment to start new characters with so

you need to take this into account. You’re bound to have a spread of enhancement bonuses available in your mod or PW so I suggest the following:
i. For an extremely challenging Module – give your Mod-tester the best equipment available from you PW.
ii. For a reasonably challenging Module – give your Mod-tester equipment that is halfway between normal and the best e.g. if +5 is the maximum then give your Mod-tester +3 equipment.
iii. For a relatively easy Module – give your Mod-tester basic items i.e. no enhancements
c. Now that you’ve got your Mod-tester, load up NWN in DM Client Mode and “possess” your Mod-tester. Note his AB, AC and Hits.
ii. Setting your Custom Monster’s Attributes
a. Firstly, make the creature level the same as your Mod-tester. This is usually a good place to start and it makes things easier if you’re designing Scaleable Creatures (i.e. the same creature at more than one level)
b. With the above information and using the rules of thumb in Section 1a you can set your Monsters AB, AC and Hits depending on how challenging you want them to be.
- E.g. Say your Mod-Tester is a 15th level Fighter with AB = 26, AC = 42 and 160 Hits. For a challenging module, you’ll only want him to hit your monster 25% of the time (on a roll of 15 – 20). Therefore Monster AC = 15 + 26 = 41
- And you’ll want your PC to be hit by the monster 75% of the time (on a roll of 5 or more). Therefore Monster AB = 42 - 5 = 39
- For the Hit Point Total of your monster: Challenging = 2 x number of PC HP = 320 HP, Average = Same as PC HP = 160 HP and for Easy = ½ x PC HP = 80 HP.
c. Bear in mind that creating a monster with the above AB and AC will result in a Monster CR of greater than 15. In order to keep the Experience gained from killing him down to reasonable levels the CR Adjuster may have to be adjusted downwards to the level of the PC.
d. For further interest and challenge, build in to your monster:
- ONE major immunity or resistance e.g. a good one is “immunity to Harm”
- ONE major vulnerability
After following the above advice, you should have yourself a challenging monster to pit against PCs of a specific level. But this really only addresses “fixed-level encounters” i.e. where only one creature type (& CR) is triggered by the PCs.
This is okay for areas which are meant for specific levels but what if you’re designing a full PW wherein you want to cater to the full range of levels i.e. 1st – 40th and where the Encounters spawn creatures that are challenging regardless of the level/CR of the PC party? These are called “Scaleable Encounters”.

Scaleable Encounters contain a creature list with monsters that have a wide range of CRs. In the NWN toolset there are standard scaleable encounters already built in.
Try going to the Encounter menu and selecting the “very hard” encounters and choose the Drow encounter. Click on “Edit” and have a look at the creatures in the creature list and their respective CRs – pretty neat. What is not explained is which creatures and how many of these creatures will be spawned when triggered by a given PC party and you really have to trust NWN design, which is fine.
The difficulty comes when you want to use mostly or entirely ALL custom creatures with scaleable encounters (this is really hard work btw – it takes ages). You will either need to build a Mod-Tester at each of your desired levels or take a stab at the BAB increases for all these weird and wonderful creatures (2da file also has this info).
iii. Testing your challenging Monsters/Creatures
There may be easier ways but here’s how I test them and I thought it quite an efficient way:
- Make an area in your module called “Test Area”, make it small (4x4) and forget putting any placeables, sounds, etc in it.
- When in Monster/Creature build phase of your module (meaning: try to do all similar tasks at the same time i.e. building maps, placeables, linking areas, building creatures, etc). Put the “Start” location in the Test Area.
- Build your custom monsters in related groups i.e. if your designing goblins fighters at CR5, 10, 15, 20, 25, 20, 25 & 40, build them all first and then test them as group. After building your custom monsters, paint them directly into the Test Area (as opposed to making an encounter).
- Save Module!
- Exit Toolset and enter NWN DM Client.
- Use your DM to “possess” each Monster to ensure that the ABs, ACs and Hits are as intended.
- If not, take notes, exit DM client and go back into Toolset and modify accordingly.
- Go back into DM Client and delete all Monsters except the one that is the same level as your Mod-tester.
- Spawn your Mod-tester in front of the remaining Monster and watch the combat. If the monster has some particular feats that you wish to see used, possess it and see how it works.
Using the above method you’ll take the majority of the guesswork out of live testing.
The next Section explains how Encounters work and how to program and paint them into your map.
2 – Designing and Painting the custom Encounter on to your Map
a. Encounter Theory 101
Firstly, some Facts:
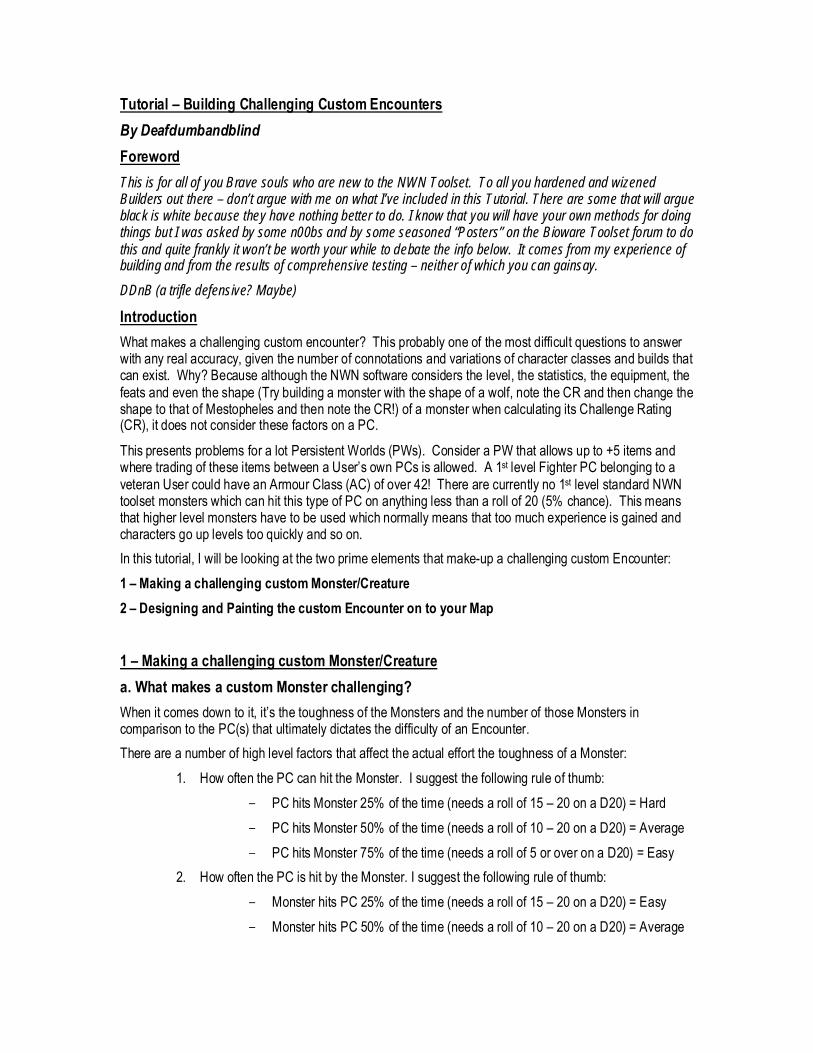
The Challenge Rating (CR) of a single PC is NOT his/her level. It is in fact his/her LEVEL – 3. E.g. A single 15th level PC has a CR 12.
How do I know this? Well, it’s not from any manual or forum that I discovered this. I was told one theory in forum and then someone argued with me when I repeated it and so in the end I did the following:
- I built a map with Axe Murderer’s LevelUp NPC and a couple of item stores so that I could test my PC throughout a range of levels.
- I created 15 x Fighter PCs of Levels 6th – 20th
- I created 9 x Custom Goblinoid fighters with levels & CRs ranging from 6th – 14th
- I then built and painted in Normal, Hard and Imposssible Encounters each containing the ALL 9 Goblinoid fighter types, with a maximum number spawned spread of minimum = 1 and maximum = 4.
- I then observed what happened when each encounter was triggered by each level of my PC from 6th – 20th.
Here are the results:
Single PC Level Encounter Difficulty
Creature(s) Spawned
6 7 8 9 10 11 12 13 14 15 16 17 18 19 20
#1 Goblin CR 6 6 6 7 8 9 10 11 12 13 14 10 12 13 14
#2 Goblin CR - - - - - - - - - - - 12 14 14 14 #3 Goblin CR - - - - - - - - - - - 14 14 14 14
Normal Min = 1 Max = 4
#4 Goblin CR - - - - - - - - - - - - - 14 14
#1 Goblin CR 7 8 9 10 11 12 13 14 10 12 13 14 14 14 14
#2 Goblin CR - - - - - - - - 12 14 14 14 14 14 14 #3 Goblin CR - - - - - - - - 14 14 14 14 14 14 14
Hard Min = 1 Max = 4
#4 Goblin CR - - - - - - - - - - 14 14 14 14 14
#1 Goblin CR 11 12 13 14 10 12 13 14 14 14 14 14 14 14 14
#2 Goblin CR - - - - 12 14 14 14 14 14 14 14 14 14 14 #3 Goblin CR - - - - 14 14 14 14 14 14 14 14 14 14 14
Impossible Min = 1 Max = 4
#4 Goblin CR - - - - - - 14 14 14 14 14 14 14 14 14
Looking at the Normal Encounter above, I originally thought from my experiment that the NWN software calculated a SINGLE PC CR = PC Level – 2. It spawned a creature that had the nearest CR to this number and, in the above case, the lowest CR creature it had on its list was a CR6.
What was interesting was when I got to 17th level and the adjusted CR of my PC exceeded that of the creatures on the encounter lists. It spawned extra Goblinoids to bring the average CR up to as near to my PC CR as possible. By some calculations and by assuming that the Encounter were still trying to match the PC Level – 2 CR, I discovered that for every ONE creature spawned there is an additional +1 added to the average Creature CR.
Therefore my original synopsis was wrong (le gasp!). The CR formula is in fact, CR = PC Level – 3, with a +1 for EACH creature spawned. By the same logic we have to assume that for every PC party member the CR also increases by +1 (you can’t test this unless you have 3 mates who incidentally also have an NWN addiction and who sit at home doing nothing waiting for your call).
Work it out yourself: Calculate the average creature party level in the 17th level case = 12. From previous consistent results this should equal 15 so therefore +3 was been included somewhere unseen. And how many are in the creature party? 3. Coincidence, I think not, as you will find by doing the same exercise for the last 3 scenarios.
Incidentally, you can see the effect on Encounters by making the Difficulty setting (Encounter “edit” properties, see below) “Hard” and “Impossible”. “Hard” adds +1 to CR and “Impossible” adds +5 to CR.

So, now we know how the Encounter will behave when triggered by a given PC Party and given a spread of Creature CRs to spawn.
So how does this help you? It tells you exactly how the Encounter will react in a given situation.
Imagine if you had a “numbers spawned” range of 1 – 8 in your encounter with Creatures with CR15, 25, 30, 25 and 40. A 25th level monk triggers the encounter and what is spawned? Most likely, 4 x CR15 and 1 x CR25. (Average = 17 then +5 for number of creatures = CR22). Is that what you intended? You might have expected only 1 x CR25 creature.
So, now you have your challenging creatures and you know how the Encounter is going to react when a PC party of any given level/CR triggers it.
Now you want to get into the business of actually programming and painting in your Encounters. The next Sub-section covers this.

b. Programming your custom Encounter
This is relatively easy. Follow these steps and you’ll be fine:
- In NWN Toolset, select the “Encounter” icon (crossed-swords). The menu will change to show the standard encounters as an expandable tree with terms like “Very Easy”, “Normal”, “Moderate”, “Hard” and “Impossible”.
- Select the “Custom” tab, this will have the same branches except there will be nothing under them.
- Choose the type of Encounter that you wish to create i.e. “Very Easy”, “Normal”, “Hard”, etc. and then right-click on it.
- Select “new” from the menu, this will bring up the Encounter Wizard dialogue box. (shown below)
- The group that you selected will be highlighted so just click on “Next”
- The next thing you will see is a creature list on the right and a window on the left with standard palette and custom palette. To find your custom monster select the “custom” tab and expand the relevant groups to find your beastie.

- In between the 2 windows are two arrows. 1 pointing right and 1 pointing left, highlight your monster, (one type at a time) and then click the arrow pointing right. You monster will then appear in the creature list on the right.
- After pressing “next” again you will be prompted to enter in a Name for your custom encounter. Use something descriptive like “Drow Magic users”.
- Tick the “launch properties” check box (as shown). Then press “Finish”.
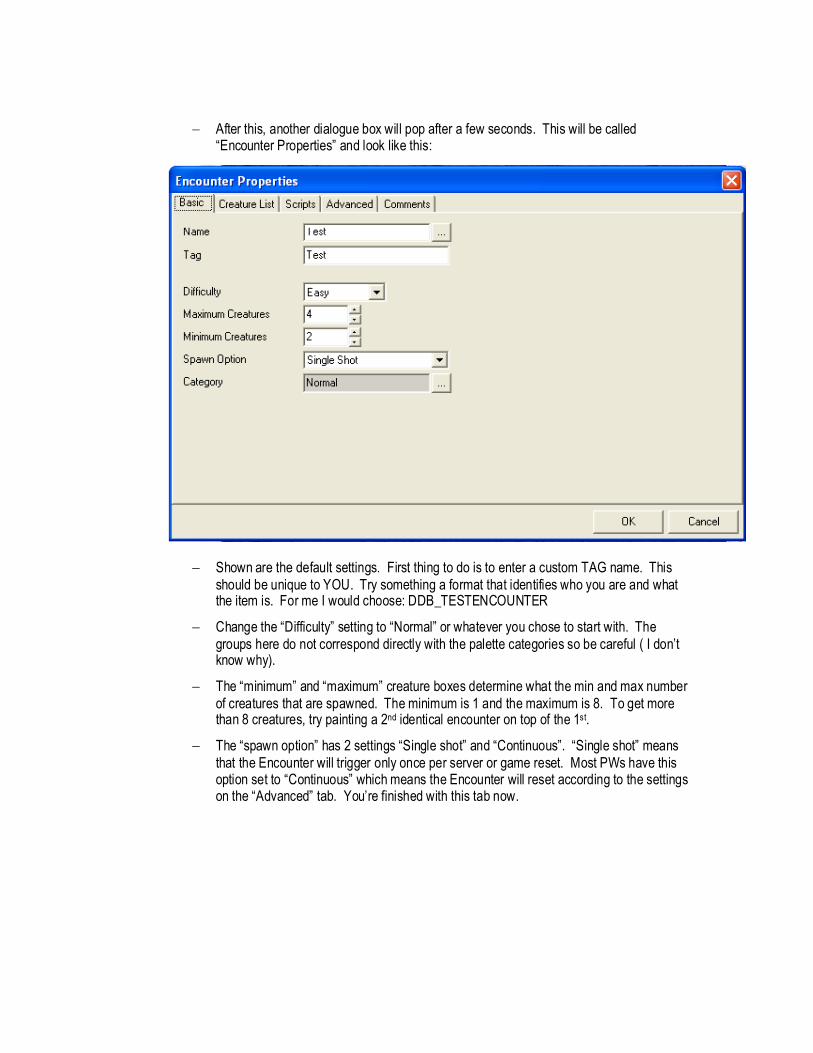
After this, another dialogue box will pop after a few seconds. This will be called “Encounter Properties” and look like this:
Shown are the default settings. First thing to do is to enter a custom TAG name. This should be unique to YOU. Try something a format that identifies who you are and what the item is. For me I would choose: DDB_TESTENCOUNTER
Change the “Difficulty” setting to “Normal” or whatever you chose to start with. The groups here do not correspond directly with the palette categories so be careful ( I don’t know why).
The “minimum” and “maximum” creature boxes determine what the min and max number of creatures that are spawned. The minimum is 1 and the maximum is 8. To get more than 8 creatures, try painting a 2nd identical encounter on top of the 1st.
The “spawn option” has 2 settings “Single shot” and “Continuous”. “Single shot” means that the Encounter will trigger only once per server or game reset. Most PWs have this option set to “Continuous” which means the Encounter will reset according to the settings on the “Advanced” tab. You’re finished with this tab now.
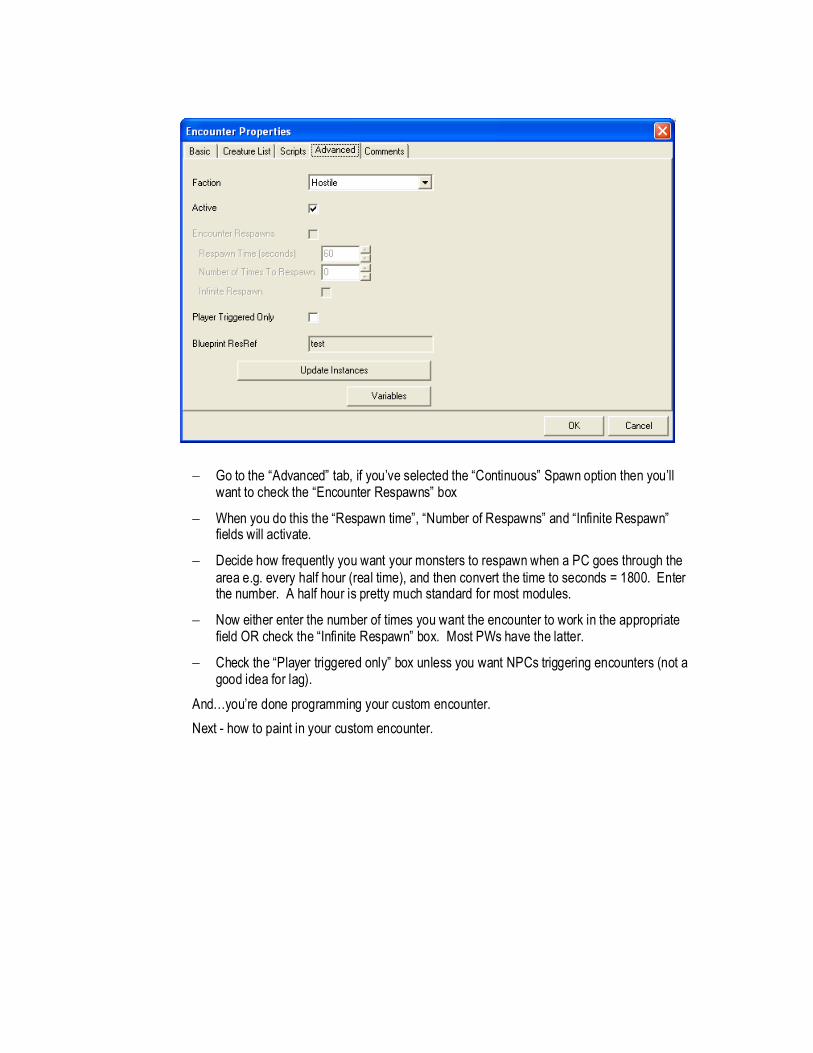
Go to the “Advanced” tab, if you’ve selected the “Continuous” Spawn option then you’ll want to check the “Encounter Respawns” box
When you do this the “Respawn time”, “Number of Respawns” and “Infinite Respawn” fields will activate.
Decide how frequently you want your monsters to respawn when a PC goes through the area e.g. every half hour (real time), and then convert the time to seconds = 1800. Enter the number. A half hour is pretty much standard for most modules.
Now either enter the number of times you want the encounter to work in the appropriate field OR check the “Infinite Respawn” box. Most PWs have the latter.
Check the “Player triggered only” box unless you want NPCs triggering encounters (not a good idea for lag).
And…you’re done programming your custom encounter.
Next - how to paint in your custom encounter.
c. Painting in your custom Encounter
The Easiest bit:
Go to the area you wish to paint in a custom encounter
Select the custom encounter that you want to paint in from the custom encounter menu.
The cursor will change shape to a paint brush, commence drawing a polygon (square or rectangle) by clicking on a start point – a corner – and then left-clicking where you want the other corners to be.
After your 4th corner, the polygon will complete automatically when you double-left click.
There will be a bright green rectangle or square highlighted. Select on this area (or even outside the area) where you want the monsters to appear by right-clicking on your desired point.
This will bring up a menu. Select “Add spawn point” and a huge purple arrow will appear point towards a small grey “wedge” or “arrowhead”. This tells you which way the monsters will be facing when they appear.
To change the direction, select the small grey “wedge” (this will be highlighted in bright green when selected) and then use the red circular arrows on the lower edge of the window to rotate it to the desired direction.
And again, you’re finished.
Summary
So now you have:
1 – A challenging custom monster
2 – The knowledge of how Encounters work
3 – The knowledge to program and paint in custom encounters
So, really, you’re set.
It only remains for me to ask this question: “When would you not use an Encounter to paint in a hostile creature for the PCs to attack?” There are a number of answers to this question but the two main ones are: 1. If you want your creature to drop a specific custom item that you don’t want appearing in random drops
(i.e. in chests, on bodies, etc). When you create a custom item, in the “advanced” tab is an “Undroppable” check box. If this box is not check it will appear randomly in your module or PW as treasure or loot. However, checking this box means that it will NEVER be dropped through a normal encounter or as random loot. By painting in a creature as a creature (select red devil head icon) you are separating it from the palette of items. You can then edit it painted-in creature in any way that you like without affecting your original blueprint. This also goes for the items that it has equipped or is carrying. So you can edit the properties of your special item that you want dropped and uncheck the “Undroppable” check box without fear of the item turning up unexpectedly.
2. The other reason was if you wanted to make a special version of a creature without affecting the blueprint. I explained how to do this in point 1 directly above.
So, go do that Encounter thing. Good luck.