Embed Size (px)
Citation preview
Business BankingUser Guide -
Online Banking
(877) 773-6605 | epnb.comMember FDIC
C ommerci a l User Guide 210-2165-02
Notices
Confidentiality NoticeThis document (including al l rights and attachments) contains confidential information and intel lectual property belonging to Q2 Software, Inc. Unauthorized use or reproduction of this document or of any aspect of Q2 Software, Inc. confidential information and/or intel lectual property as described herein is expressly prohibited without the express wri tten consent of Q2 Software, Inc.
The speci fications and information regarding the products in this guide are subject to change without notice. Al l statements, information, and recommendations in this guide are bel ieved to be accurate but are presented without warranty of any kind, express or impl ied.
Users must take ful l responsibi l i ty for their appl ication of any products. Al l document fi les and software are provided "as is" with al l faults. Q2 Software, Inc. and i ts suppl iers disclaim al l warranties, express or impl ied including, without l imitation, those of merchantabi l i ty, fi tness for a particular purpose, and noninfringement arising from a course of deal ing, usage, or trade practice. In no event shal l Q2 Software, Inc. or i ts suppl iers be l iable for any indirect, special , consequential , or incidental damages, including, without l imitation, lost profi ts or loss or damage to data arising out of their use or inabi l i ty to use this guide, even i f Q2 Software, Inc. or i ts suppl iers have been advised of the possibi l i ty of such damages.
© 2014, Q2 Software Inc., a Q2 Holdings company. Al l rights reserved. Q2 and mark, Q2access, Q2central , Q2clari ty, Q2mobile Web, Q2mobil i ty Apps, Q2mobile RDC, Q2onl ine, Q2securi ty, Q2text, and Q2voice are trademarks. Al l other trademarks are property of their respective owners.
Document: 10-2165-02
C ommerci a l User Guide 310-2165-02
Contents
PREFACE 9Purpose 9
Audience 9
Document conventions 11
CHAPTER 1: OVERVIEW 12About the UUX banking experience 12
Exploring the Home page 13
The Menu 15
Accounts 16
The Sidebar 16
Using the grid and l ist views 17
Hardware and software requirements 18
CHAPTER 2: GETTING STARTED 19Installing the mobile banking app 19
Opening the mobile banking app 19
Accessing the online banking site 20
Logging in 20
Logging in for the fi rst time 21
Logging in after the fi rst time 22
Logging off 22
Voluntary log off 23
Involuntary log off after session timeout 23
Resetting a forgotten password 24
CHAPTER 3: VIEWING ACCOUNTS AND TRANSACTIONS 25Viewing accounts 25
Viewing account details 25
Viewing transactions on the Account Details page 28
Fi l tering transactions 29
Searching transactions 31
C ommerci a l User Guide 410-2165-02
Sorting transactions 31
Exporting transaction records 31
Viewing transaction detai ls 32
Viewing and printing images associated with a transaction 32
Sending a secure message about a transaction 33
CHAPTER 4: QUICK ACTIONS 34Using Quick Actions 34
Transferring funds using Quick Actions 35
Paying a bill using Quick Actions 36
Depositing a check using Quick Actions 38
Approving a transaction using Quick Actions 39
CHAPTER 5: PAYING BILLS 40Enrolling in bill pay 40
Managing bill pay accounts 41
Managing bill payment payees 42
Adding a payee 42
Editing a bi l l payment payee 43
Managing bill payments 43
Paying a bi l l 45
Viewing bi l l payments to a payee 46
Searching for a bi l l payment 46
Cancel ing a bi l l payment 46
CHAPTER 6: MANAGING TRANSACTIONS 48Using transfers 48
Transferring funds 48
Viewing transfers 50
Cancel ing a transfer 51
Setting up external accounts for transfers 52
Depositing a check 53
Viewing check deposits 55
Viewing transactions on the Activity Center page 57
C ommerci a l User Guide 510-2165-02
Sorting transactions 59
Searching for a transaction 59
Viewing transaction detai ls 62
Cancel ing pending transactions 63
Approving transactions 64
Copying a transaction 64
Sending a message about a transaction 65
Viewing E-Statements 65
Veri fying your abi l i ty to view a PDF 67
Reordering checks 68
Sending a check to a payee 69
Creating a stop payment request 70
CHAPTER 7: MANAGING MESSAGES AND ALERTS 71Managing secure messages 71
Creating a secure message 72
Reading a secure message 73
Replying to a secure message 74
Deleting secure message threads 74
Managing alerts 76
Creating an alert 77
Editing alerts 78
Enabl ing and disabl ing alerts 78
Deleting an alert 79
Configuring securi ty alerts 79
CHAPTER 8: COMMERCIAL FEATURES 81Payment and template overview 81
User management overview 82
How user rights control payments and templates 85
Rights to transaction types 86
Limits on transaction approvals 89
Rights to access features 90
Rights to access accounts 92
C ommerci a l User Guide 610-2165-02
Payment recipients overview 92
Recipient information in a payment or a template 93
Subsidiaries overview 96
Subsidiary information in a payment or a template 97
Payment processing times 98
CHAPTER 9: MANAGING USERS 100Adding a user and configuring rights 100
Viewing existing users 104
Editing user rights 105
Configuring rights and l imits for transaction types 105
Configuring feature options 107
Configuring account access 108
Deleting a user 108
CHAPTER 10: MANAGING RECIPIENTS AND SUBSIDIARIES 110Managing recipients 110
Searching for a recipient 111
Adding a recipient 111
Editing a recipient 114
Viewing the templates associated with a recipient 115
Deleting a recipient 117
Managing subsidiaries 117
Searching for a subsidiary 118
Adding a subsidiary 119
Editing a Subsidiary 120
Deleting a subsidiary 121
CHAPTER 11: CREATING AND MANAGING PAYMENTS AND TEMPLATES 122Creating a payment or a template 122
Creating a single-recipient payment or template 122
Creating a multi -recipient payment or template 127
Using imported files with an ACH Batch or ACH Collection 131
Updating recipients and amounts in a payment 131
C ommerci a l User Guide 710-2165-02
Importing recipients and amounts to create a payment 133
Importing a NACHA fi le to create a payment 135
Importing an ACH fi le with ACH Passthru 135
Creating a Tax Payment 137
Managing templates 138
Searching for a template 139
Fi l tering templates 140
Editing a template 140
Copying a template 141
Deleting a template 141
Marking a template as a favori te 141
Creating a payment from a template 142
Viewing or canceling a payment 145
Viewing a payment 146
Cancel ing a payment 147
Sending notifications to approvers 147
Approving payments 148
CHAPTER 12: FINDING BRANCHES OR ATMS AND VIEWING NEWS 151Finding a branch or ATM 151
Viewing news or rates 152
CHAPTER 13: CONFIGURING SETTINGS 153Updating your profile 153
Requesting an address change 154
Configuring account preferences 155
Selecting a theme and a language 156
Changing your security preferences 157
Changing your password 157
Changing your Login ID 158
Changing your phishing protection phrase 158
Configuring a chal lenge code 159
Configuring secure del ivery contact information 159
Configuring a mobile authorization code 161
C ommerci a l User Guide 810-2165-02
Configuring text banking 162
Enrol l ing in text banking 163
Configuring account preferences for text banking 163
Using text banking 164
Updating text banking preferences 165
Configuring statement delivery settings 166
APPENDIX A: STAYING SECURE 167Password tips and recommendations 167
Registering a browser or device 168
APPENDIX B: FREQUENTLY ASKED QUESTIONS 170Getting started 170
Messages and alerts 171
Accounts 172
Transactions 174
Commercial accounts 175
Payments and templates 175
ACH Passthru 175
Wire transfers 176
Tax payment 176
User management 176
C ommerci a l User Guide 910-2165-02
PREFACE
This chapter describes the purpose, audience, and content of the “Commercial User Guide“. It also includes information about the conventions used in the guide.
PurposeThe “Commercial User Guide“ is intended to give you the background information and procedures that you need to use the Unified User Experience (UUX) in onl ine banking and the mobi le banking app. This guide is a complement to the onl ine help avai lable in onl ine banking and the mobi le banking app.
AudienceThe “Commercial User Guide“ is for al l users of the UUX/Treasury Release of onl ine banking and the mobi le banking app. It includes an overview of the major features in the UUX, and tel ls you how to do the fol lowing:
l Log in l Log off l Reset a forgotten password l View your account history l Use quick actions to perform common tasks l Pay bi l ls l Transfer funds l Remotely deposit checks l View payments and transfers on the Activi ty Center page l View account statements l Use messages and alerts l Find branches and ATMs l View news and rates l Configure preferences
For Commercial customers, the guide tel ls you how to do the fol lowing:
l Manage multiple users l Create and edit payment recipients l Create and use subsidiaries
Preface
C ommerci a l User Guide 1010-2165-02
l Create and edit the fol lowing payment and template types: o Domestic Wire Transfers o International Wire Transfers o ACH Payments o ACH Receipts o ACH Batches o ACH Col lections o Tax Payments
l Upload and process complex ACH fi les with ACH Passthru
Preface
C ommerci a l User Guide 1110-2165-02
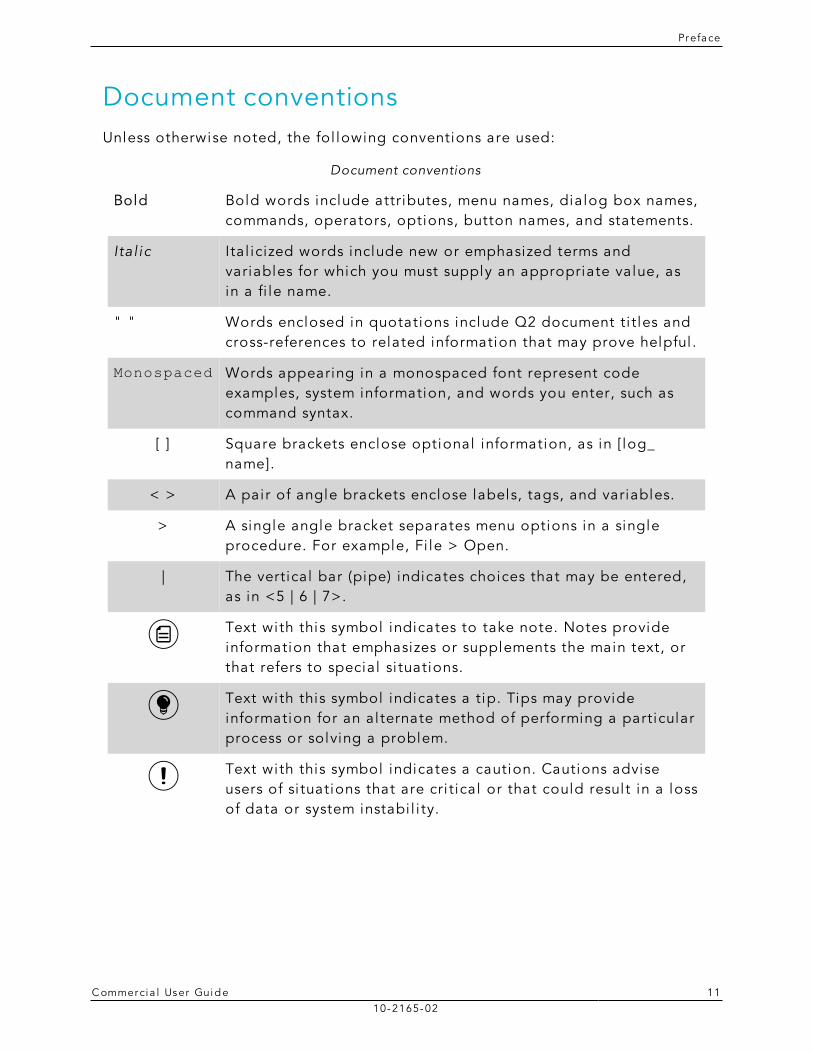
Document conventionsUnless otherwise noted, the fol lowing conventions are used:
Bold Bold words include attributes, menu names, dialog box names, commands, operators, options, button names, and statements.
Ital ic Ital icized words include new or emphasized terms and variables for which you must supply an appropriate value, as in a fi le name.
" " Words enclosed in quotations include Q2 document ti tles and cross-references to related information that may prove helpful .
Monospaced Words appearing in a monospaced font represent code examples, system information, and words you enter, such as command syntax.
[ ] Square brackets enclose optional information, as in [log_name].
< > A pair of angle brackets enclose labels, tags, and variables.
> A single angle bracket separates menu options in a single procedure. For example, Fi le > Open.
| The vertical bar (pipe) indicates choices that may be entered, as in <5 | 6 | 7>.
Text with this symbol indicates to take note. Notes provide information that emphasizes or supplements the main text, or that refers to special si tuations.
Text with this symbol indicates a tip. Tips may provide information for an alternate method of performing a particular process or solving a problem.
Text with this symbol indicates a caution. Cautions advise users of si tuations that are cri tical or that could result in a loss of data or system instabi l i ty.
Document conventions
C ommerci a l User Guide 1210-2165-02
CHAPTER 1: OVERVIEW
This chapter contains the fol lowing:
l "About the UUX banking experience" on page 12 l "Exploring the Home page" on page 13 l "Hardware and software requirements" on page 18
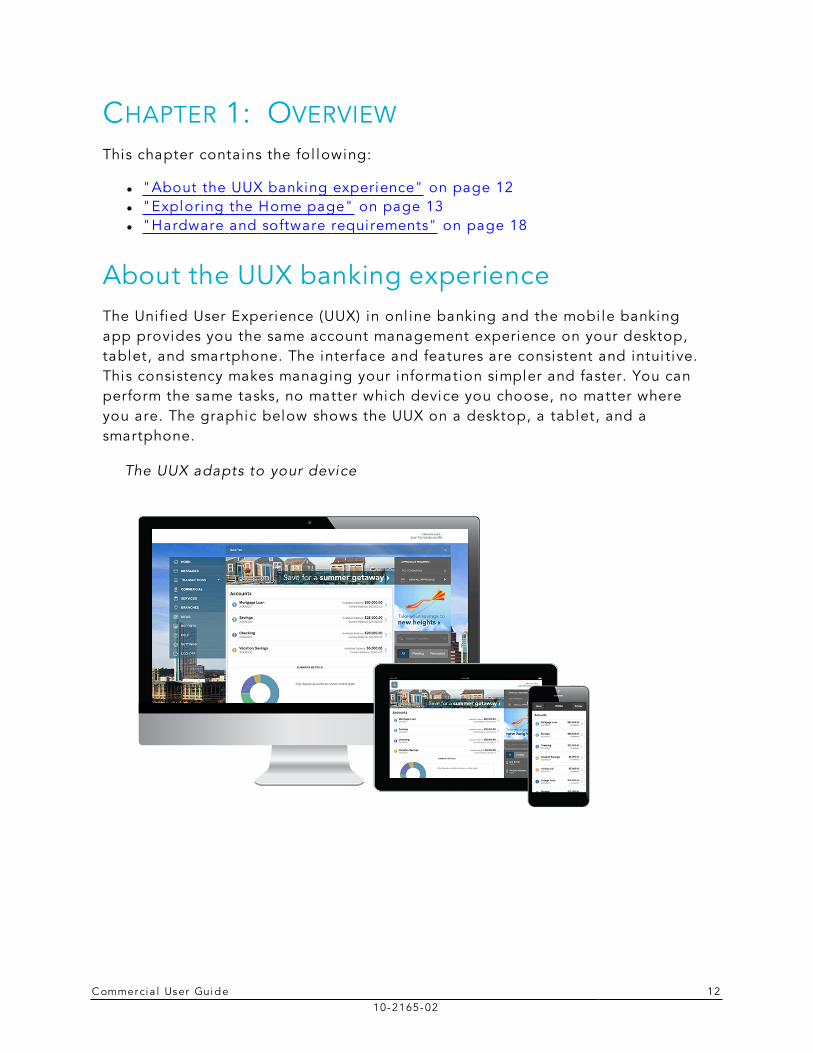
About the UUX banking experienceThe Unified User Experience (UUX) in onl ine banking and the mobi le banking app provides you the same account management experience on your desktop, tablet, and smartphone. The interface and features are consistent and intuitive. This consistency makes managing your information simpler and faster. You can perform the same tasks, no matter which device you choose, no matter where you are. The graphic below shows the UUX on a desktop, a tablet, and a smartphone.
The UUX adapts to your device
C hap ter 1: Overview
C ommerci a l User Guide 1310-2165-02
The UUX in onl ine banking and the mobi le banking app adjusts to the unique needs of each device, including screen size and other hardware di fferences. For example, on tablets and smartphones the Menu is hidden by default. When you need i t, you tap or swipe to display i t. In addition, some navigation tools are simpler on tablets and smartphones.
When you make a change on one device, i t is reflected on another. If you update a setting in onl ine banking, the same setting takes effect in the mobi le banking app the next time that you log in. When you set up a transaction on one device, you can review i t on another.
Exploring the Home pageWhen you log in, the Home page appears. The Home page shares elements no matter which device you use. On any device, the Home page includes the Menu, the Account Overview, and the Sidebar.
The Home page includes some or al l of the fol lowing:
l Menu l Account Overview with the name and balance of each of your accounts l Sidebar l Your last login date and time l A summary metrics graph of the balances in your deposit accounts l Avai lable Quick Actions l Our Facebook feed l System noti fications for onl ine banking or the mobi le banking app
Note: The names of menu i tems, buttons, fields, and pages may vary or may not be avai lable.
To view the Home page
l In the Menu, cl ick or tap Home.
C hap ter 1: Overview
C ommerci a l User Guide 1410-2165-02
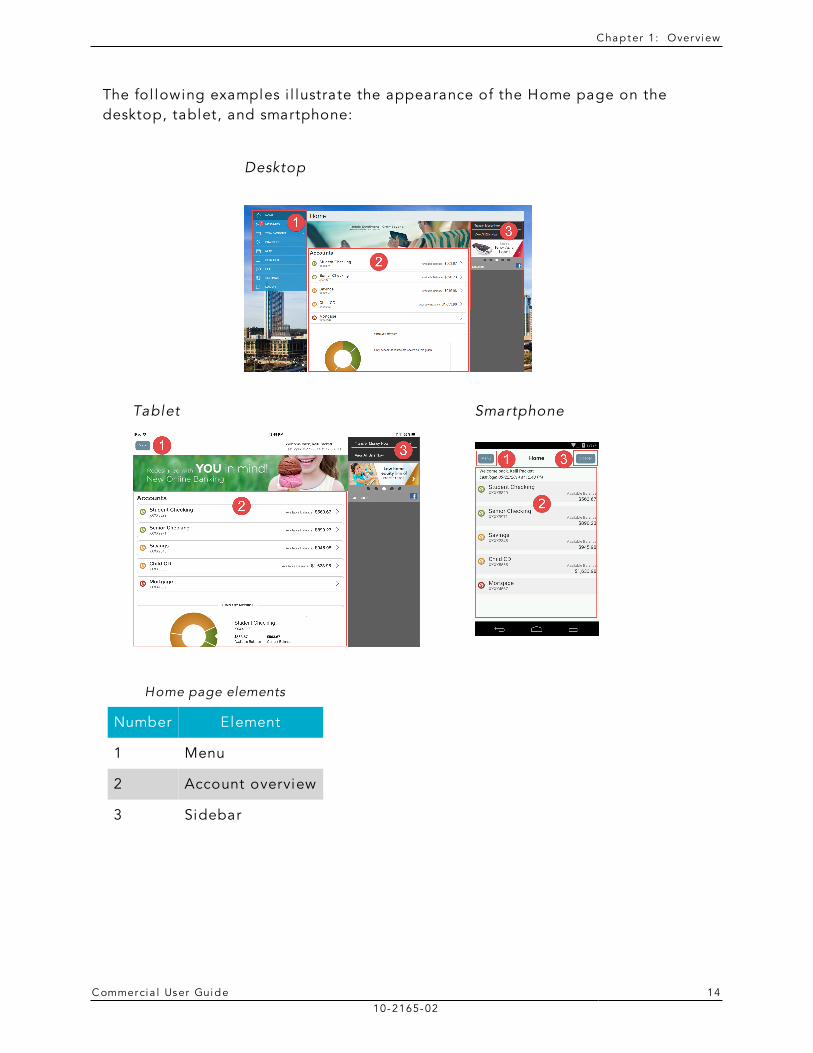
The fol lowing examples i l lustrate the appearance of the Home page on the desktop, tablet, and smartphone:
Desktop
Tablet Smartphone
Number Element
1 Menu
2 Account overview
3 Sidebar
Home page elements
C hap ter 1: Overview
C ommerci a l User Guide 1510-2165-02
The MenuYou can use the options in the Menu to change settings, manage secure messages, review onl ine transactions, search onl ine transactions, pay bi l ls, locate branches and ATMs, view news and rates, send stop payment requests, and use other services. The order of the i tems in the Menu may vary. The fol lowing i tems normal ly appear in the Menu:
Item Notes
Home Review account summaries in the Home page
Messages View and send secure messages
Transactions Transfer funds, pay bi l ls, and view payments and transfers
Commercial Use commercial payments
Branches Find branches and ATMs
News View news and rates
Services Stop payments and use other services
Help Access the help documentation
Settings Edit your profi le and configure alerts
Log Off Securely log off banking
Menu items
In onl ine banking, the Menu is always avai lable to the left of or above the Account Overview.
On a tablet or a smartphone, the Menu does not always appear. Tap the Menu button or swipe from the left edge of the screen to show it. Tap the Menu button again or swipe to the left edge of the screen to hide i t.
C hap ter 1: Overview
C ommerci a l User Guide 1610-2165-02
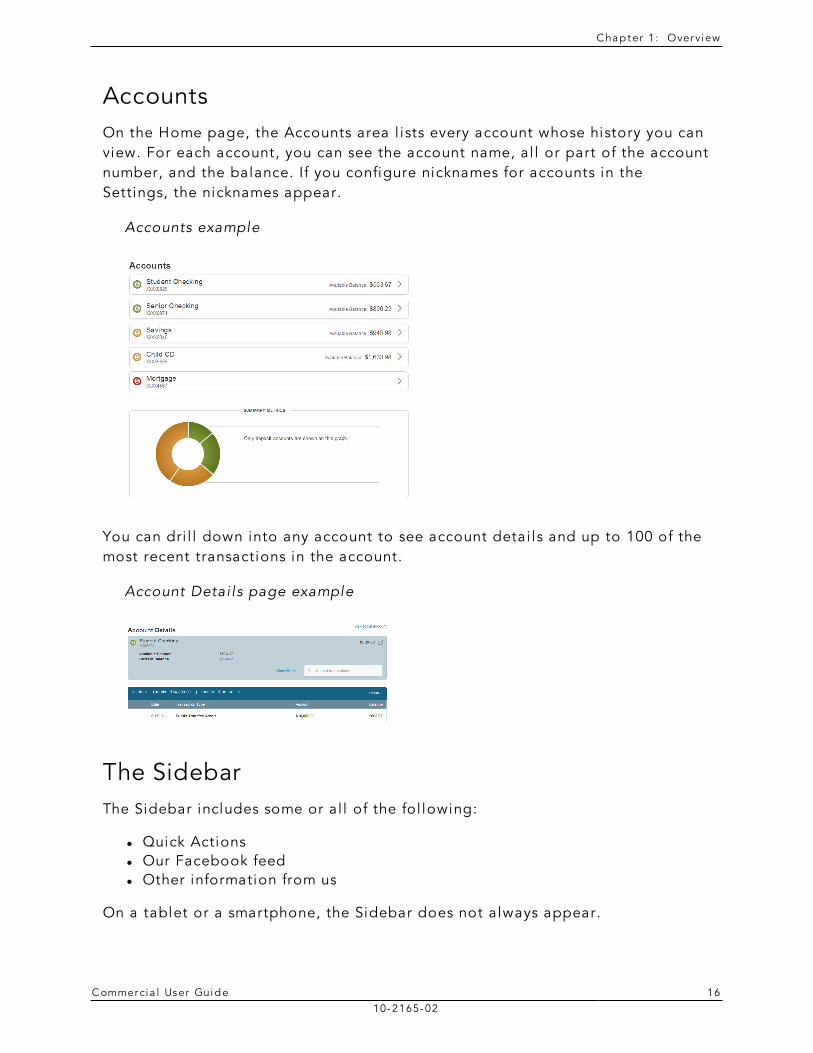
AccountsOn the Home page, the Accounts area l ists every account whose history you can view. For each account, you can see the account name, al l or part of the account number, and the balance. If you configure nicknames for accounts in the Settings, the nicknames appear.
Accounts example
You can dri l l down into any account to see account detai ls and up to 100 of the most recent transactions in the account.
Account Detai ls page example
The SidebarThe Sidebar includes some or al l of the fol lowing:
l Quick Actions l Our Facebook feed l Other information from us
On a tablet or a smartphone, the Sidebar does not always appear.
C hap ter 1: Overview
C ommerci a l User Guide 1710-2165-02
To view the Sidebar in the mobile banking app
l Do one of the fol lowing: o Tap Sidebar on any page. o Swipe from the right edge of the screen.
To hide the Sidebar in the mobile banking app
l Do one of the fol lowing: o While the Sidebar is visible on any page, tap Sidebar. o Swipe to the right edge of the screen.
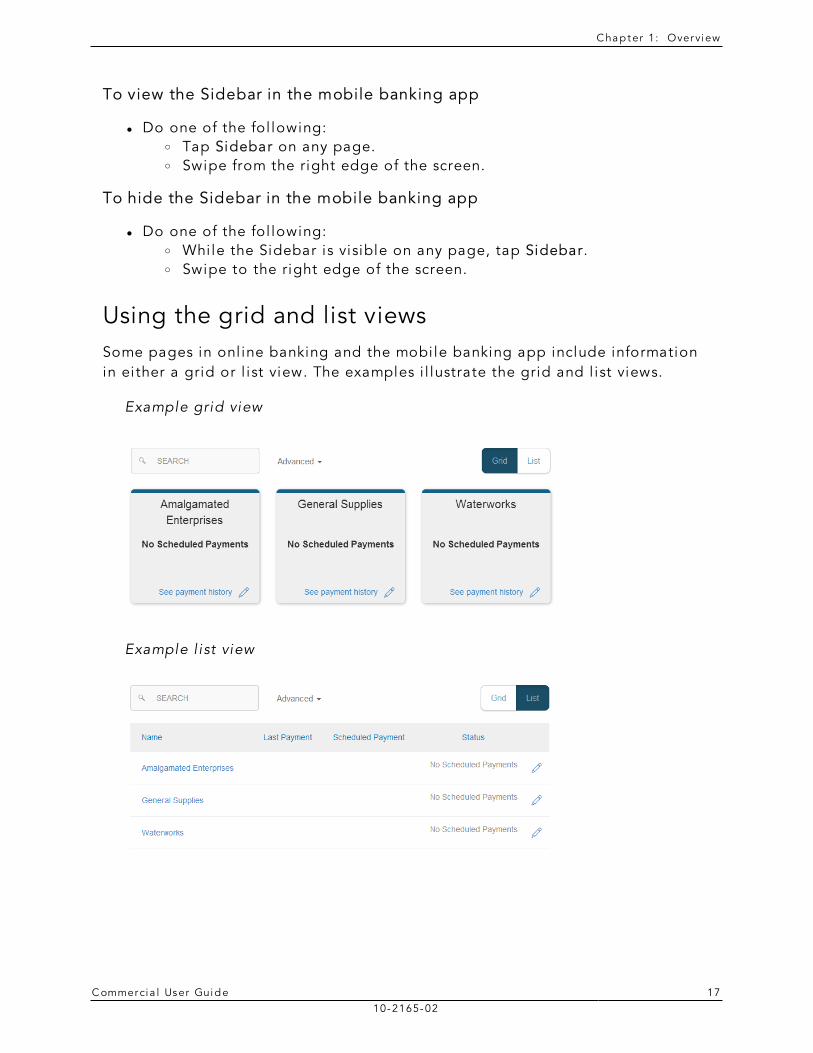
Using the grid and list viewsSome pages in onl ine banking and the mobi le banking app include information in either a grid or l ist view. The examples i l lustrate the grid and l ist views.
Example grid view
Example l ist view
C hap ter 1: Overview
C ommerci a l User Guide 1810-2165-02
You can change between the grid and l ist views at any time. The grid view and l ist view include the same information.
To see the grid view
l Click or tap Grid.
To see the list view
l Click or tap List.
Hardware and software requirementsYou must use speci fic minimum hardware and software to use onl ine banking and the mobi le banking app. For the best experience, you should use the recommended hardware and software.
For the latest information about the hardware and software requirements and recommendations, please contact us.
If you try to log in without the recommended browser, onl ine banking may direct you to either a version of onl ine banking that is compatible with your browser or to a website to download a new browser version.
C ommerci a l User Guide 1910-2165-02
CHAPTER 2: GETTING STARTED
This chapter contains the fol lowing:
l "Instal l ing the mobi le banking app" on page 19 l "Opening the mobi le banking app" on page 19 l "Accessing the onl ine banking si te" on page 20 l "Logging in" on page 20 l "Logging off" on page 22 l "Resetting a forgotten password" on page 24
Installing the mobile banking appYou should instal l the mobi le banking app to use mobi le banking on your iOS or Android device. You can download the mobi le banking app from the Apple App Store or the Google Play Store.
Caution: To help protect the securi ty of your financial information, you should only download and instal l the mobi le banking app from the Apple App Store or the Google Play Store. In the store, veri fy that we are l isted as the sel ler of the app, not a third party. You should also veri fy that our name is spel led correctly.
To install the mobile banking app
1. Do one of the fol lowing: o On an iOS device, open the Apple App Store. o On an Android device, open the Google Play Store.
2. Search for our name and instal l the app.
Opening the mobile banking appTo open the mobile banking app
l Locate the mobi le banking app on your tablet or smartphone and tap i t to open the app.
C hap ter 2: Get t i ng s ta r ted
C ommerci a l User Guide 2010-2165-02
Accessing the online banking siteYou can use a web browser to connect to the onl ine banking si te on a desktop computer or other device with an HTML5 compliant browser. For the best experience with onl ine banking on an iOS or Android tablet or smartphone, please use the mobi le banking app.
Consider enabl ing pop-ups in your browser for the onl ine banking si te. Certain features appear in separate windows in your browser, and may not appear i f you block pop-up windows.
To access the online banking site
l On our website, cl ick the onl ine banking l ink to open onl ine banking.
Logging inWhen you log in to onl ine banking or the mobi le banking app, you enter the fol lowing when prompted:
l Login ID l Password
If you enter an incorrect password too many times, we automatical ly block your account. If your account is blocked, contact us to unblock your account.
See "Password tips and recommendations" on page 167 for tips for creating a secure password.
If you have never used a particular browser or device to log in, you may need to enter a Secure Access Code to use i t. If the browser or device is one that you plan to use again, you can register i t. By registering a browser or a device, you confi rm that i t is under your control and that you intend to use i t to access onl ine banking or the mobi le banking app.
See "Registering a browser or device" on page 168 for more information about registering a browser or device.
Note: Depending on your securi ty needs, we may configure your account to use Symantec™ Val idation and ID Protection (VIP) Service Tokens. If your account uses a token, you enter the code from the token instead of a Secure Access Code every time you log in.
C hap ter 2: Get t i ng s ta r ted
C ommerci a l User Guide 2110-2165-02
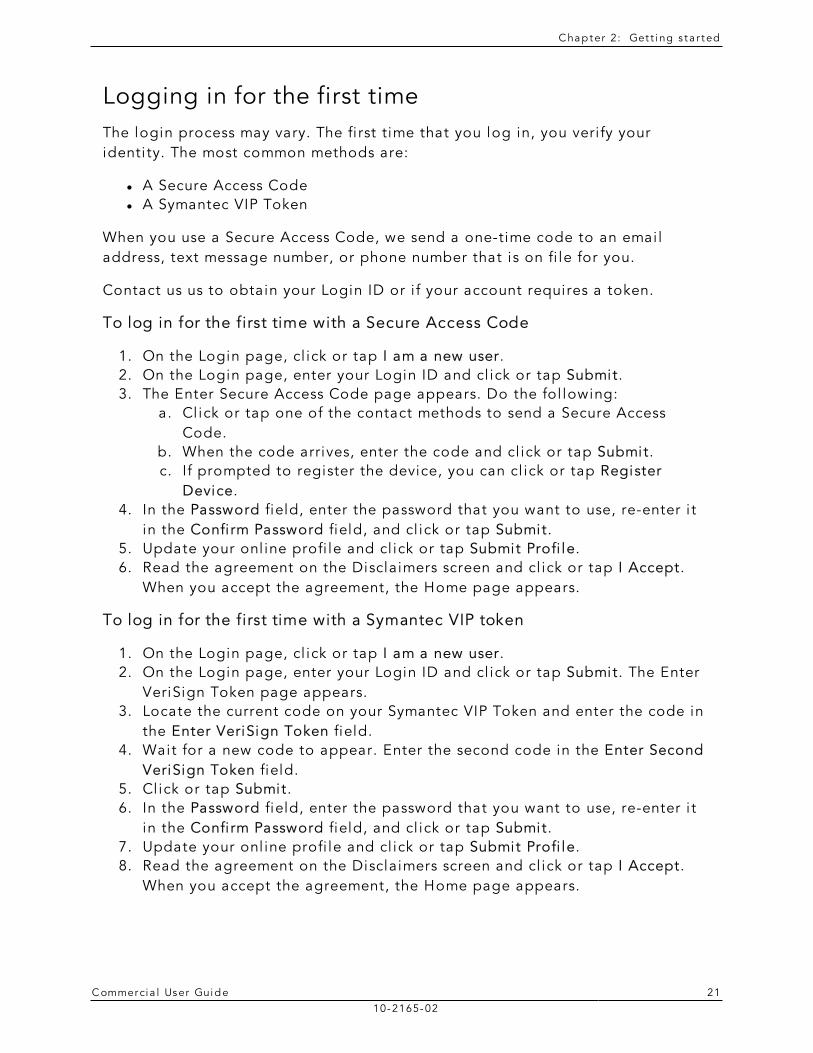
Logging in for the first timeThe login process may vary. The fi rst time that you log in, you veri fy your identi ty. The most common methods are:
l A Secure Access Code l A Symantec VIP Token
When you use a Secure Access Code, we send a one-time code to an emai l address, text message number, or phone number that is on fi le for you.
Contact us us to obtain your Login ID or i f your account requires a token.
To log in for the first time with a Secure Access Code
1. On the Login page, cl ick or tap I am a new user. 2. On the Login page, enter your Login ID and cl ick or tap Submit. 3. The Enter Secure Access Code page appears. Do the fol lowing:
a. Cl ick or tap one of the contact methods to send a Secure Access Code.
b. When the code arrives, enter the code and cl ick or tap Submit. c. If prompted to register the device, you can cl ick or tap Register
Device. 4. In the Password field, enter the password that you want to use, re-enter i t
in the Confi rm Password field, and cl ick or tap Submit. 5. Update your onl ine profi le and cl ick or tap Submit Profi le. 6. Read the agreement on the Disclaimers screen and cl ick or tap I Accept.
When you accept the agreement, the Home page appears.
To log in for the first time with a Symantec VIP token
1. On the Login page, cl ick or tap I am a new user. 2. On the Login page, enter your Login ID and cl ick or tap Submit. The Enter
VeriSign Token page appears. 3. Locate the current code on your Symantec VIP Token and enter the code in
the Enter VeriSign Token field. 4. Wait for a new code to appear. Enter the second code in the Enter Second
VeriSign Token field. 5. Cl ick or tap Submit. 6. In the Password field, enter the password that you want to use, re-enter i t
in the Confi rm Password field, and cl ick or tap Submit. 7. Update your onl ine profi le and cl ick or tap Submit Profi le. 8. Read the agreement on the Disclaimers screen and cl ick or tap I Accept.
When you accept the agreement, the Home page appears.
C hap ter 2: Get t i ng s ta r ted
C ommerci a l User Guide 2210-2165-02
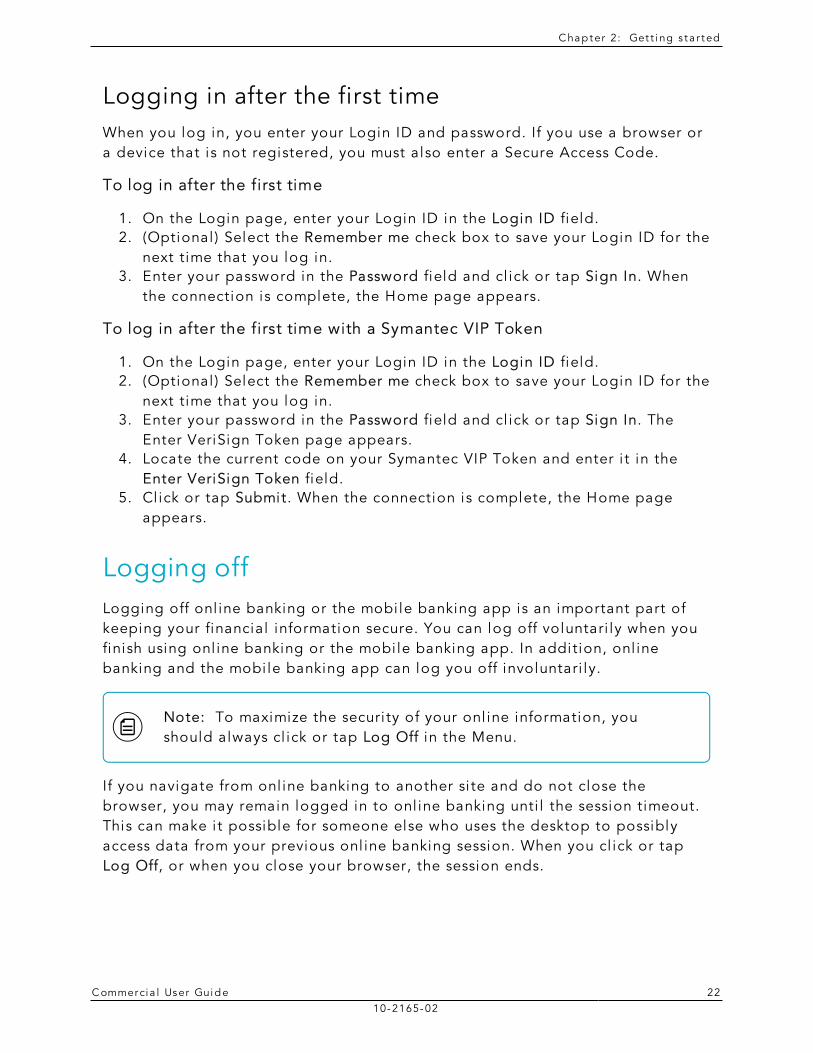
Logging in after the first timeWhen you log in, you enter your Login ID and password. If you use a browser or a device that is not registered, you must also enter a Secure Access Code.
To log in after the first time
1. On the Login page, enter your Login ID in the Login ID field. 2. (Optional ) Select the Remember me check box to save your Login ID for the
next time that you log in. 3. Enter your password in the Password field and cl ick or tap Sign In. When
the connection is complete, the Home page appears.
To log in after the first time with a Symantec VIP Token
1. On the Login page, enter your Login ID in the Login ID field. 2. (Optional ) Select the Remember me check box to save your Login ID for the
next time that you log in. 3. Enter your password in the Password field and cl ick or tap Sign In. The
Enter VeriSign Token page appears. 4. Locate the current code on your Symantec VIP Token and enter i t in the
Enter VeriSign Token field. 5. Cl ick or tap Submit. When the connection is complete, the Home page
appears.
Logging offLogging off onl ine banking or the mobi le banking app is an important part of keeping your financial information secure. You can log off voluntari ly when you finish using onl ine banking or the mobi le banking app. In addition, onl ine banking and the mobi le banking app can log you off involuntari ly.
Note: To maximize the securi ty of your onl ine information, you should always cl ick or tap Log Off in the Menu.
If you navigate from onl ine banking to another si te and do not close the browser, you may remain logged in to onl ine banking unti l the session timeout. This can make i t possible for someone else who uses the desktop to possibly access data from your previous onl ine banking session. When you cl ick or tap Log Off, or when you close your browser, the session ends.
C hap ter 2: Get t i ng s ta r ted
C ommerci a l User Guide 2310-2165-02
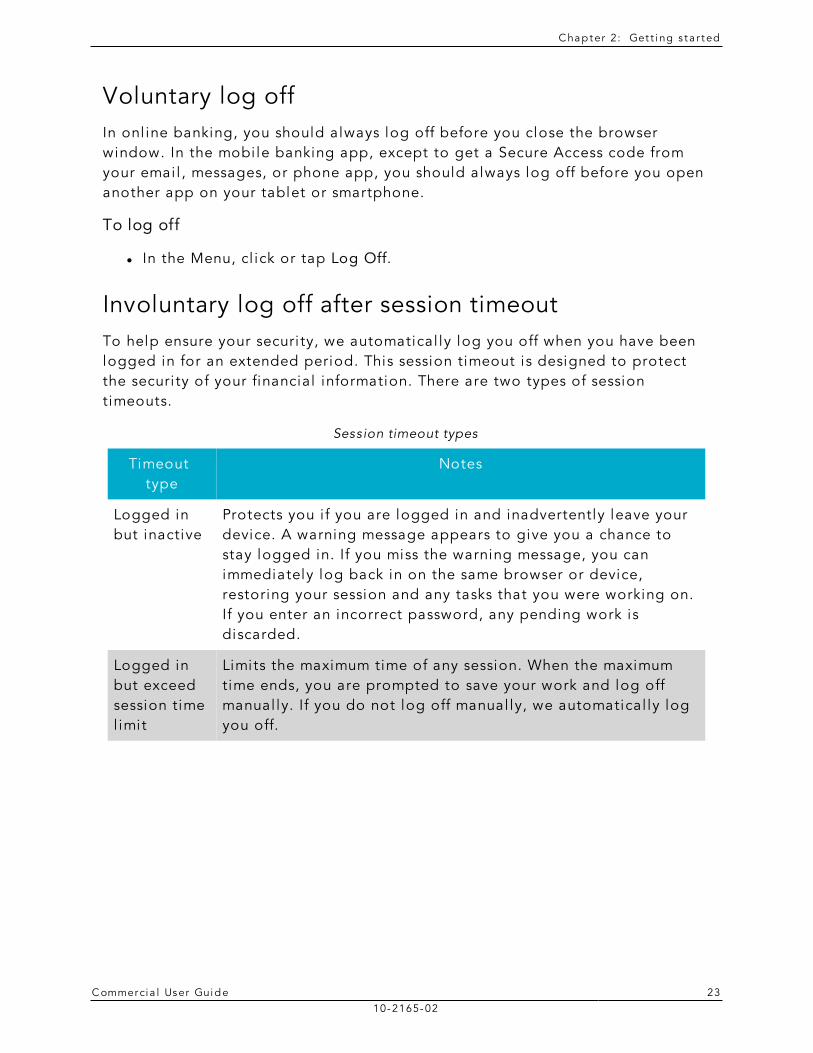
Voluntary log offIn onl ine banking, you should always log off before you close the browser window. In the mobi le banking app, except to get a Secure Access code from your emai l , messages, or phone app, you should always log off before you open another app on your tablet or smartphone.
To log off
l In the Menu, cl ick or tap Log Off.
Involuntary log off after session timeoutTo help ensure your securi ty, we automatical ly log you off when you have been logged in for an extended period. This session timeout is designed to protect the securi ty of your financial information. There are two types of session timeouts.
Timeout type
Notes
Logged in but inactive
Protects you i f you are logged in and inadvertently leave your device. A warning message appears to give you a chance to stay logged in. If you miss the warning message, you can immediately log back in on the same browser or device, restoring your session and any tasks that you were working on. If you enter an incorrect password, any pending work is discarded.
Logged in but exceed session time l imit
Limits the maximum time of any session. When the maximum time ends, you are prompted to save your work and log off manual ly. If you do not log off manual ly, we automatical ly log you off.
Session timeout types
C hap ter 2: Get t i ng s ta r ted
C ommerci a l User Guide 2410-2165-02
Resetting a forgotten passwordIf you forget your password and your account is not locked, you can use the Forgot Password option on the Login page reset your password.
To reset a forgotten password
1. On the Login page, cl ick or tap Forgot your password? 2. Enter your Login ID and cl ick or tap Submit. 3. On the Login page, do one of the fol lowing:
o Click or tap I al ready have a Secure Access Code. o Click or tap one of the contact methods that are on fi le for you. We
send you the code using the contact method that you selected. 4. On the Secure Access Code page, enter the code and cl ick or tap Submit.
The New Password page appears. 5. On the New Password page, do the fol lowing:
a. Enter your new password in the New Password field. b. Re-enter the password in the Confi rm Password field. c. Cl ick or tap Submit.
The Home page appears.
C ommerci a l User Guide 2510-2165-02
CHAPTER 3: VIEWING ACCOUNTS AND TRANSACTIONS
This chapter contains the fol lowing:
l "Viewing accounts" on page 25 l "Viewing account detai ls" on page 25 l "Viewing transactions on the Account Detai ls page" on page 28
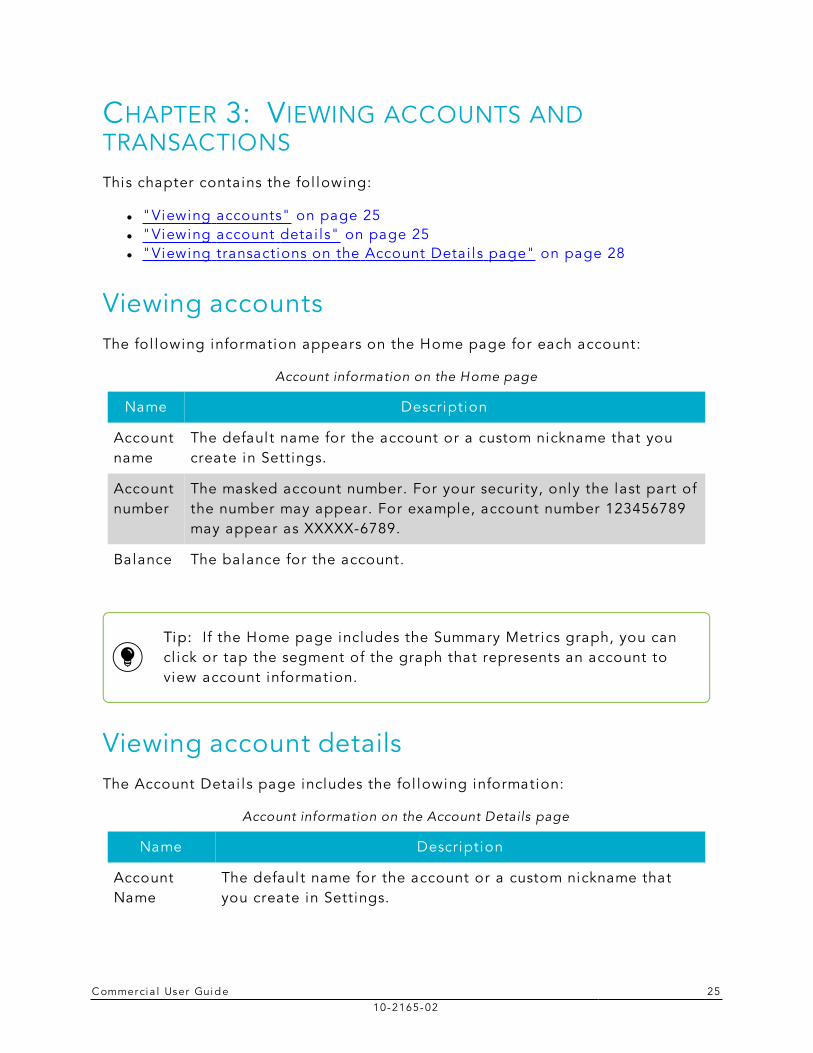
Viewing accountsThe fol lowing information appears on the Home page for each account:
Name Description
Account name
The default name for the account or a custom nickname that you create in Settings.
Account number
The masked account number. For your securi ty, only the last part of the number may appear. For example, account number 123456789 may appear as XXXXX-6789.
Balance The balance for the account.
Account information on the Home page
Tip: If the Home page includes the Summary Metrics graph, you can cl ick or tap the segment of the graph that represents an account to view account information.
Viewing account detailsThe Account Detai ls page includes the fol lowing information:
Name Description
Account Name
The default name for the account or a custom nickname that you create in Settings.
Account information on the Account Details page
C hap ter 3: V iewing account s and t r ansact ions
C ommerci a l User Guide 2610-2165-02
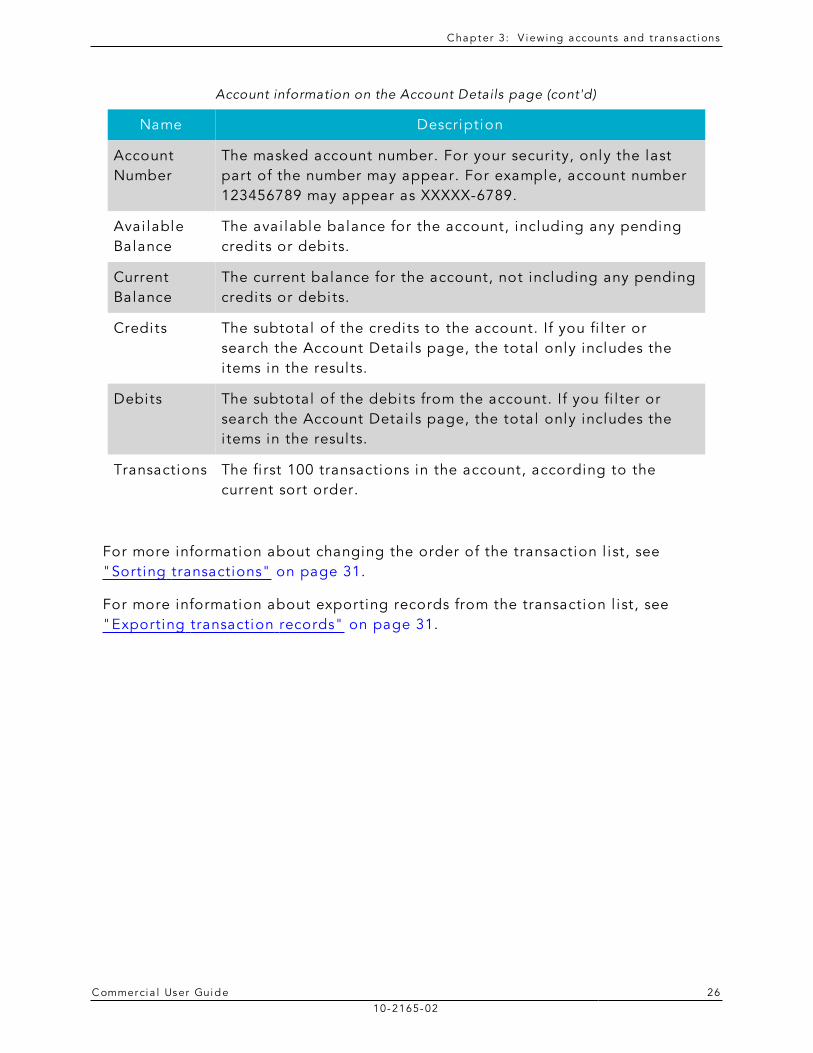
Name Description
Account Number
The masked account number. For your securi ty, only the last part of the number may appear. For example, account number 123456789 may appear as XXXXX-6789.
Avai lable Balance
The avai lable balance for the account, including any pending credits or debits.
Current Balance
The current balance for the account, not including any pending credits or debits.
Credits The subtotal of the credits to the account. If you fi l ter or search the Account Detai ls page, the total only includes the i tems in the results.
Debits The subtotal of the debits from the account. If you fi l ter or search the Account Detai ls page, the total only includes the i tems in the results.
Transactions The fi rst 100 transactions in the account, according to the current sort order.
Account information on the Account Details page (cont'd)
For more information about changing the order of the transaction l ist, see "Sorting transactions" on page 31.
For more information about exporting records from the transaction l ist, see "Exporting transaction records" on page 31.
C hap ter 3: V iewing account s and t r ansact ions
C ommerci a l User Guide 2710-2165-02
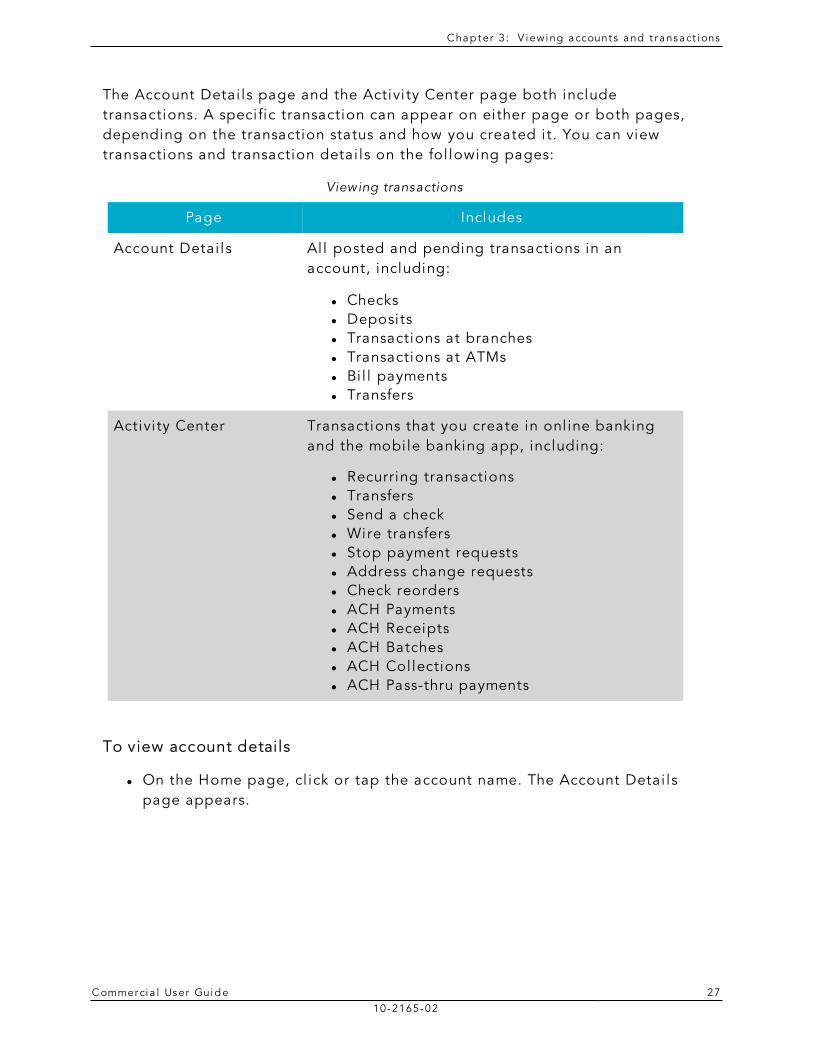
The Account Detai ls page and the Activi ty Center page both include transactions. A speci fic transaction can appear on either page or both pages, depending on the transaction status and how you created i t. You can view transactions and transaction detai ls on the fol lowing pages:
Page Includes
Account Detai ls Al l posted and pending transactions in an account, including:
l Checks l Deposits l Transactions at branches l Transactions at ATMs l Bil l payments l Transfers
Activi ty Center Transactions that you create in onl ine banking and the mobi le banking app, including:
l Recurring transactions l Transfers l Send a check l Wire transfers l Stop payment requests l Address change requests l Check reorders l ACH Payments l ACH Receipts l ACH Batches l ACH Col lections l ACH Pass-thru payments
Viewing transactions
To view account details
l On the Home page, cl ick or tap the account name. The Account Detai ls page appears.
C hap ter 3: V iewing account s and t r ansact ions
C ommerci a l User Guide 2810-2165-02
To view additional transactions
l On the Account Detai ls page, do one of the fol lowing: o Click or tap the next icon ( ) to view the next set of transactions. o Click or tap the previous icon ( ) to view the previous set of
transactions.
To send a secure message about an account
1. On the Account Detai ls page, cl ick or tap Ask about account. The New Message window appears. The message automatical ly includes information about the account.
2. Cl ick or tap the message recipient. The message window appears. 3. Cl ick or tap in the Message field and enter your message. 4. (Optional ) In onl ine banking, cl ick the attach fi le icon ( ). In the Open
dialog box, select a fi le to attach to the message, and cl ick Open. 5. Cl ick or tap Send. The Messages page appears with your new message.
To close the Account Details page
l On the Account Detai ls page, do one of the fol lowing: o Click or tap the back icon ( ) o Click or tap Home.
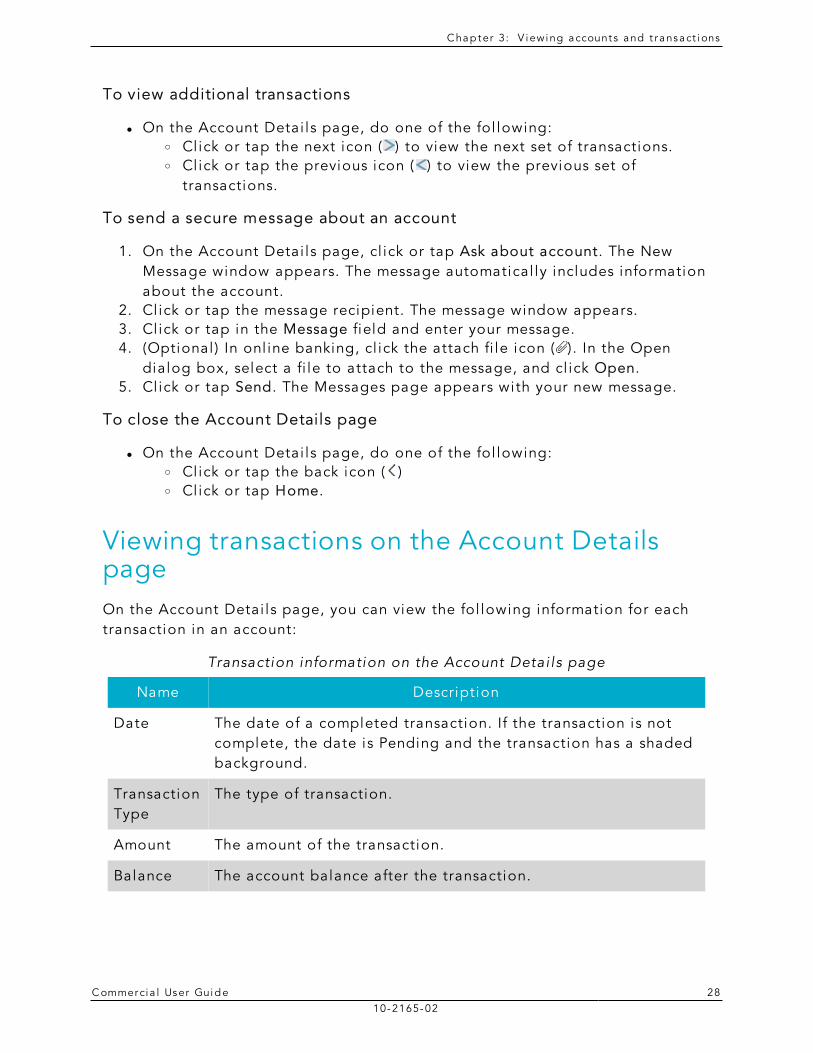
Viewing transactions on the Account Details pageOn the Account Detai ls page, you can view the fol lowing information for each transaction in an account:
Name Description
Date The date of a completed transaction. If the transaction is not complete, the date is Pending and the transaction has a shaded background.
Transaction Type
The type of transaction.
Amount The amount of the transaction.
Balance The account balance after the transaction.
Transaction information on the Account Detai ls page
C hap ter 3: V iewing account s and t r ansact ions
C ommerci a l User Guide 2910-2165-02
Name Description
Image The images associated with the transaction, i f appl icable
Transaction information on the Account Details page (cont'd)
This section includes the fol lowing:
l "Fi l tering transactions" on page 29 l "Searching transactions" on page 31 l "Sorting transactions" on page 31 l "Exporting transaction records" on page 31 l "Viewing transaction detai ls" on page 32 l "Viewing and printing images associated with a transaction" on page 32 l "Sending a secure message about a transaction" on page 33
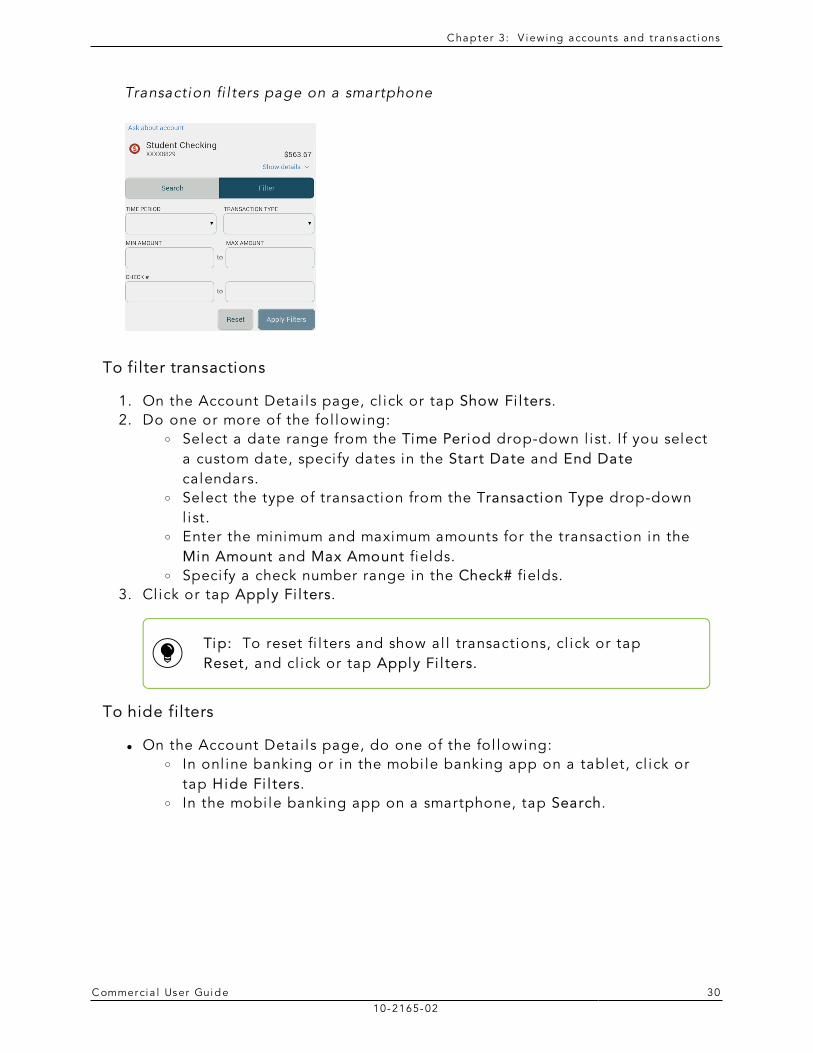
Filtering transactionsOn the Account Detai ls page, you can fi l ter the transactions that appear based on the fol lowing transaction information:
l Date l Type l Amount l Check number, i f appl icable
The fi l ter appearance varies. The fol lowing examples show the appearance of the fi l ters on di fferent devices.
Transaction fi l ters page in onl ine banking and on a tablet
C hap ter 3: V iewing account s and t r ansact ions
C ommerci a l User Guide 3010-2165-02
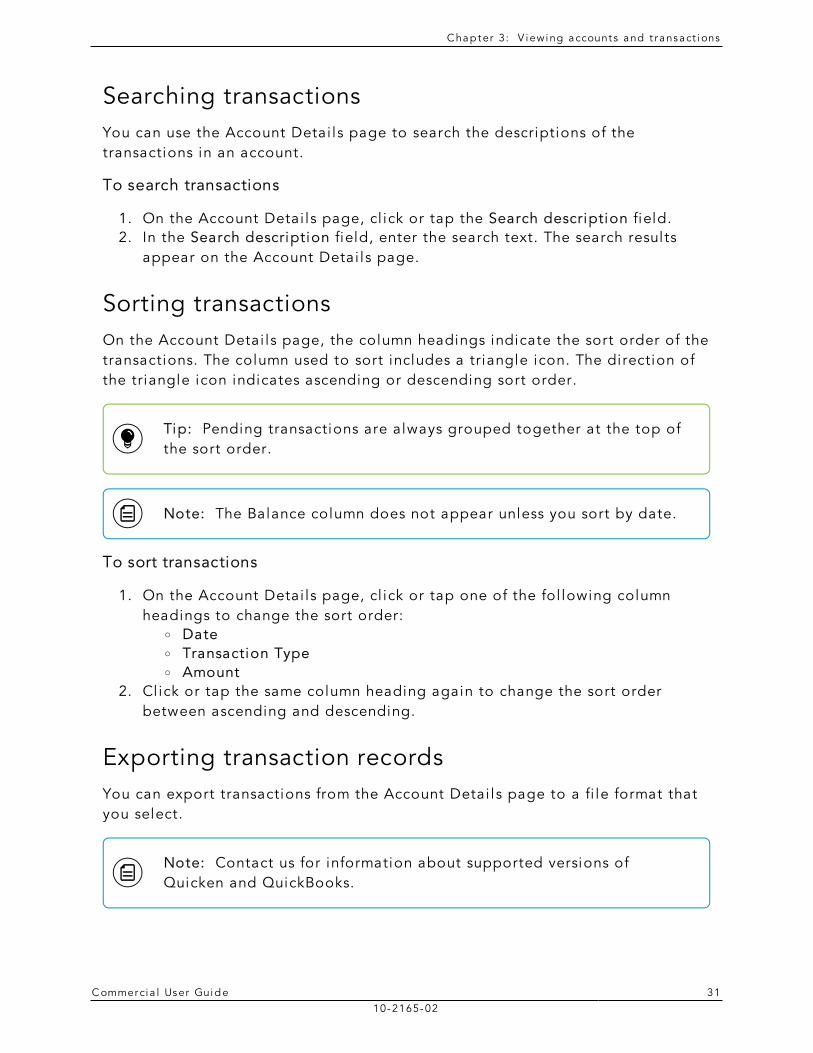
Transaction fi l ters page on a smartphone
To filter transactions
1. On the Account Detai ls page, cl ick or tap Show Fi l ters. 2. Do one or more of the fol lowing:
o Select a date range from the Time Period drop-down l ist. If you select a custom date, speci fy dates in the Start Date and End Date calendars.
o Select the type of transaction from the Transaction Type drop-down l ist.
o Enter the minimum and maximum amounts for the transaction in the Min Amount and Max Amount fields.
o Specify a check number range in the Check# fields. 3. Cl ick or tap Apply Fi l ters.
Tip: To reset fi l ters and show al l transactions, cl ick or tap Reset, and cl ick or tap Apply Fi l ters.
To hide filters
l On the Account Detai ls page, do one of the fol lowing: o In onl ine banking or in the mobi le banking app on a tablet, cl ick or
tap Hide Fi l ters. o In the mobi le banking app on a smartphone, tap Search.
C hap ter 3: V iewing account s and t r ansact ions
C ommerci a l User Guide 3110-2165-02
Searching transactionsYou can use the Account Detai ls page to search the descriptions of the transactions in an account.
To search transactions
1. On the Account Detai ls page, cl ick or tap the Search description field. 2. In the Search description field, enter the search text. The search results
appear on the Account Detai ls page.
Sorting transactionsOn the Account Detai ls page, the column headings indicate the sort order of the transactions. The column used to sort includes a triangle icon. The direction of the triangle icon indicates ascending or descending sort order.
Tip: Pending transactions are always grouped together at the top of the sort order.
Note: The Balance column does not appear unless you sort by date.
To sort transactions
1. On the Account Detai ls page, cl ick or tap one of the fol lowing column headings to change the sort order:
o Date o Transaction Type o Amount
2. Cl ick or tap the same column heading again to change the sort order between ascending and descending.
Exporting transaction recordsYou can export transactions from the Account Detai ls page to a fi le format that you select.
Note: Contact us for information about supported versions of Quicken and QuickBooks.
C hap ter 3: V iewing account s and t r ansact ions
C ommerci a l User Guide 3210-2165-02
Note: Currently, you can only export in onl ine banking.
To export transactions from the Account Details view
1. On the Account Detai ls page, cl ick Export. 2. In the Export drop-down l ist, cl ick one of the fol lowing export formats:
o Spreadsheet (XLS) o Spreadsheet (CSV) o Microsoft OFX (OFX) o Quicken (QFX) o QuickBooks (QBO)
3. Depending on your browser settings, one of the fol lowing happens: o If your browser automatical ly saves fi les to a folder, the fi le is saved
in that folder. Open the folder to view the exported fi le. o If your browser is configured to prompt for the folder for downloaded
fi les, you are prompted to speci fy the location to save the exported fi le.
In the exported fi le, the transactions appear in the current sort order on the Account Detai ls page.
Viewing transaction detailsYou can view the detai ls of any transaction in an account.
To view transaction details
l On the Account Detai ls page, cl ick or tap the transaction. Cl ick or tap the transaction again to hide the detai ls.
Viewing and printing images associated with a transactionYou can view and print any images that are associated with a transaction from Account Detai ls page. On the Account Detai ls page, any transaction that includes images is marked with an icon ( ).
C hap ter 3: V iewing account s and t r ansact ions
C ommerci a l User Guide 3310-2165-02
To view and print the images associated with a transaction
1. On the Home page, cl ick or tap the name of the account that includes the transaction. The Account Detai ls page appears.
2. Cl ick or tap the transaction to view the detai ls. If appl icable, the image appears below the transaction. If the transaction includes multiple images, cl ick or tap Previous and Next to view additional images.
3. (Optional ) In onl ine banking, you can print the images. To print the images, do the fol lowing:
a. On the transaction detai ls, cl ick or tap the Print icon( ). The Print page appears.
b. On the Print page, cl ick or tap Print to print the image.
Sending a secure message about a transactionWhile viewing the detai ls of a transaction, you can send a secure message to us about the transaction.
To send a secure message about a transaction
1. In the transaction detai ls, cl ick or tap Ask about transaction. The New Message window appears.
2. Cl ick or tap the message recipient. The message window appears. The message automatical ly includes information about the transaction.
3. Cl ick or tap in the Message field and enter your message. 4. (Optional ) In onl ine banking, cl ick the attach fi le icon ( ). In the Open
dialog box, select a fi le to attach to the message, and cl ick Open. 5. Cl ick or tap Send. The Messages page appears with your new message.
C ommerci a l User Guide 3410-2165-02
CHAPTER 4: QUICK ACTIONS
This chapter contains the fol lowing:
l "Using Quick Actions" on page 34 l "Transferring funds using Quick Actions" on page 35 l "Paying a bi l l using Quick Actions" on page 36 l "Depositing a check using Quick Actions" on page 38 l "Approving a transaction using Quick Actions" on page 39
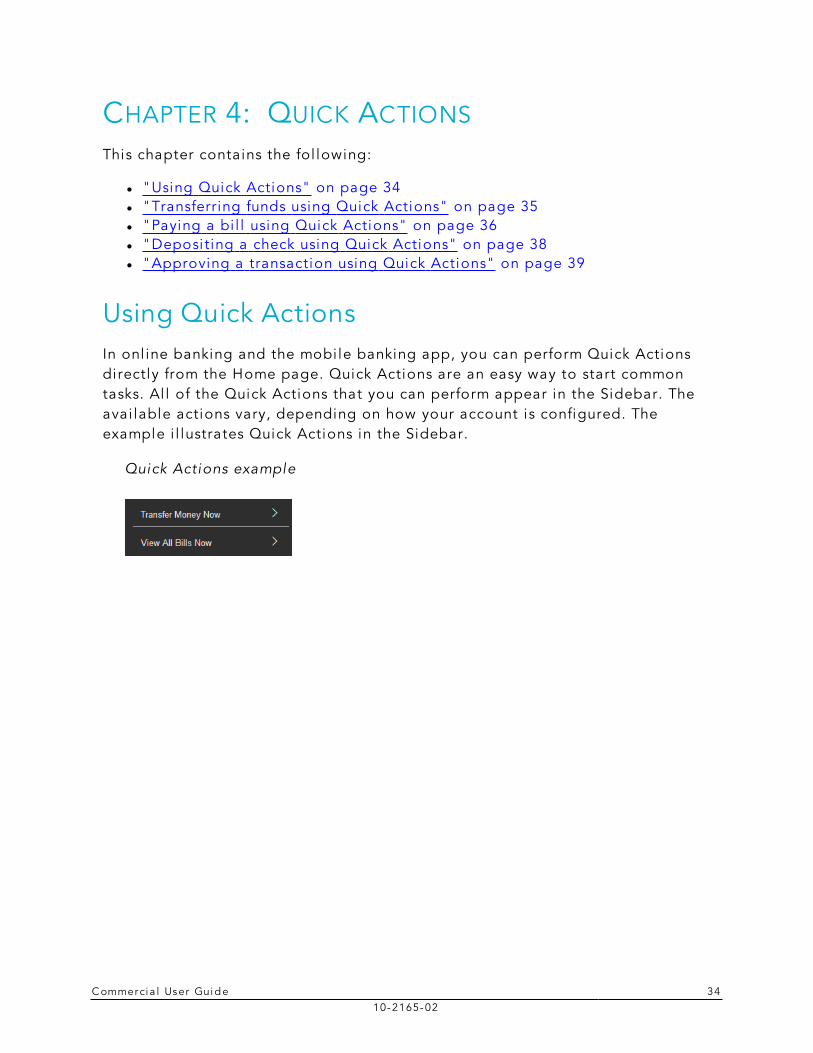
Using Quick ActionsIn onl ine banking and the mobi le banking app, you can perform Quick Actions directly from the Home page. Quick Actions are an easy way to start common tasks. Al l of the Quick Actions that you can perform appear in the Sidebar. The avai lable actions vary, depending on how your account is configured. The example i l lustrates Quick Actions in the Sidebar.
Quick Actions example
C hap ter 4: Qui ck Act ions
C ommerci a l User Guide 3510-2165-02
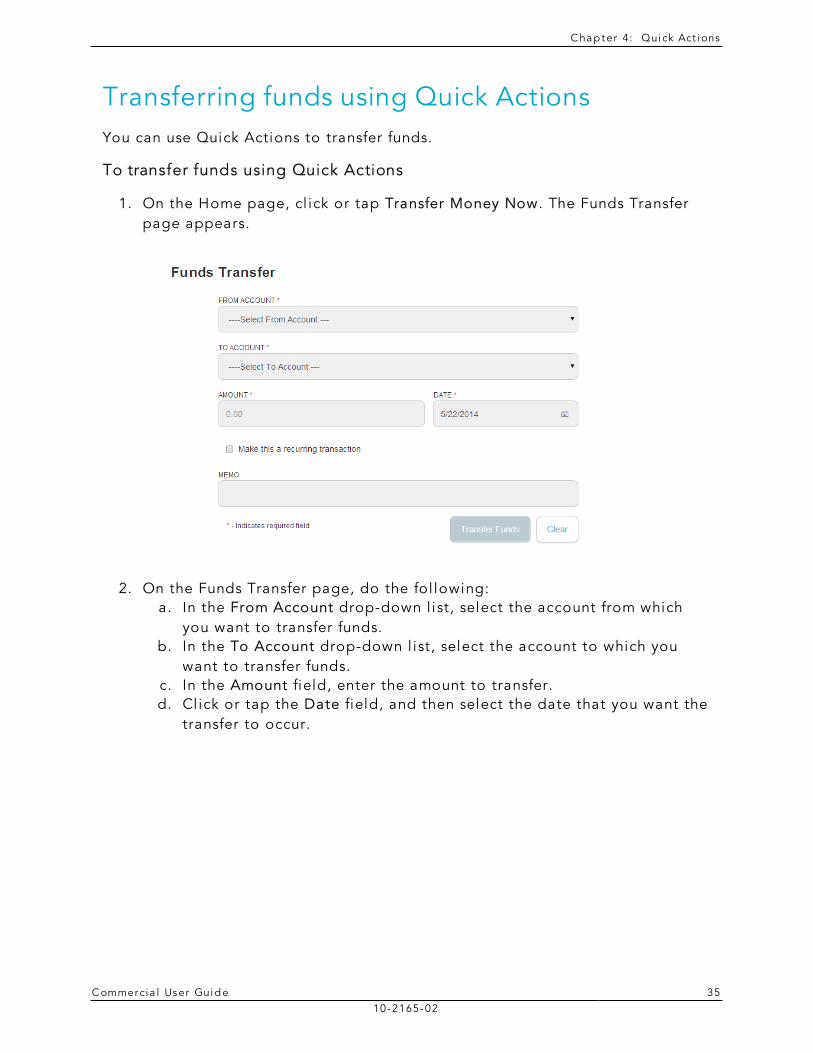
Transferring funds using Quick ActionsYou can use Quick Actions to transfer funds.
To transfer funds using Quick Actions
1. On the Home page, cl ick or tap Transfer Money Now. The Funds Transfer page appears.
2. On the Funds Transfer page, do the fol lowing: a. In the From Account drop-down l ist, select the account from which
you want to transfer funds. b. In the To Account drop-down l ist, select the account to which you
want to transfer funds. c. In the Amount field, enter the amount to transfer. d. Cl ick or tap the Date field, and then select the date that you want the
transfer to occur.
C hap ter 4: Qui ck Act ions
C ommerci a l User Guide 3610-2165-02
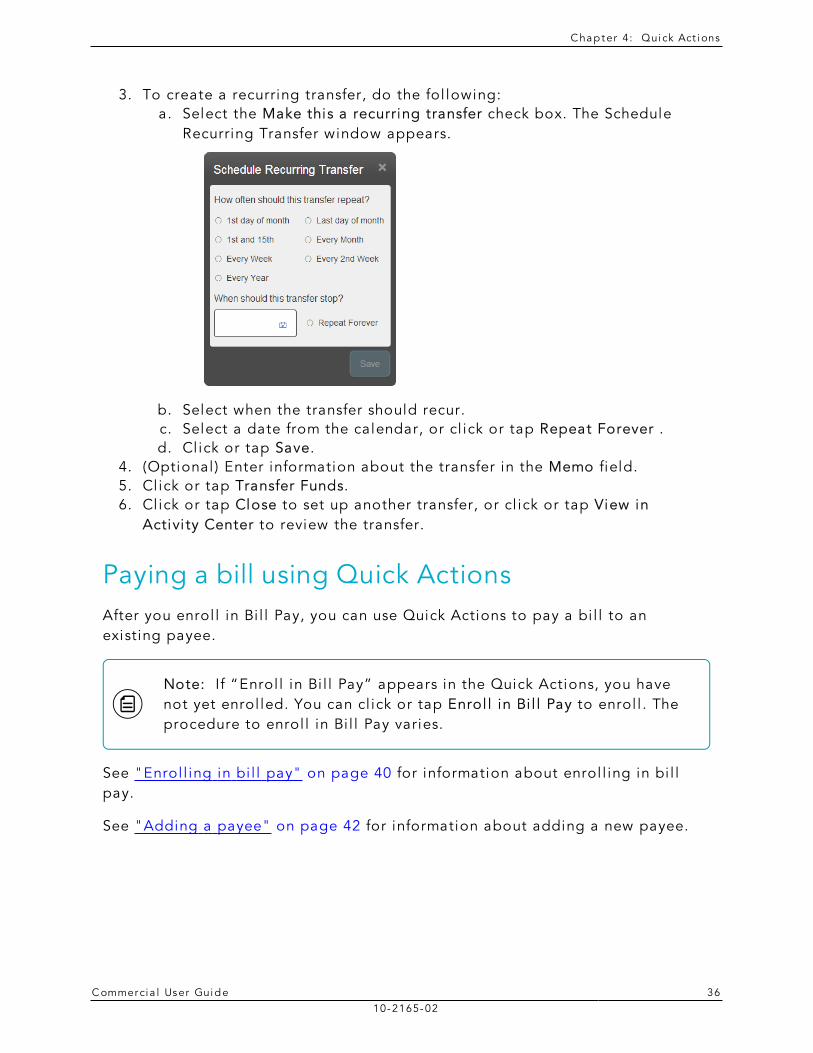
3. To create a recurring transfer, do the fol lowing: a. Select the Make this a recurring transfer check box. The Schedule
Recurring Transfer window appears.
b. Select when the transfer should recur. c. Select a date from the calendar, or cl ick or tap Repeat Forever . d. Cl ick or tap Save.
4. (Optional ) Enter information about the transfer in the Memo field. 5. Cl ick or tap Transfer Funds. 6. Cl ick or tap Close to set up another transfer, or cl ick or tap View in
Activi ty Center to review the transfer.
Paying a bill using Quick ActionsAfter you enrol l in Bi l l Pay, you can use Quick Actions to pay a bi l l to an existing payee.
Note: If “Enrol l in Bi l l Pay” appears in the Quick Actions, you have not yet enrol led. You can cl ick or tap Enrol l in Bi l l Pay to enrol l . The procedure to enrol l in Bi l l Pay varies.
See "Enrol l ing in bi l l pay" on page 40 for information about enrol l ing in bi l l pay.
See "Adding a payee" on page 42 for information about adding a new payee.
C hap ter 4: Qui ck Act ions
C ommerci a l User Guide 3710-2165-02
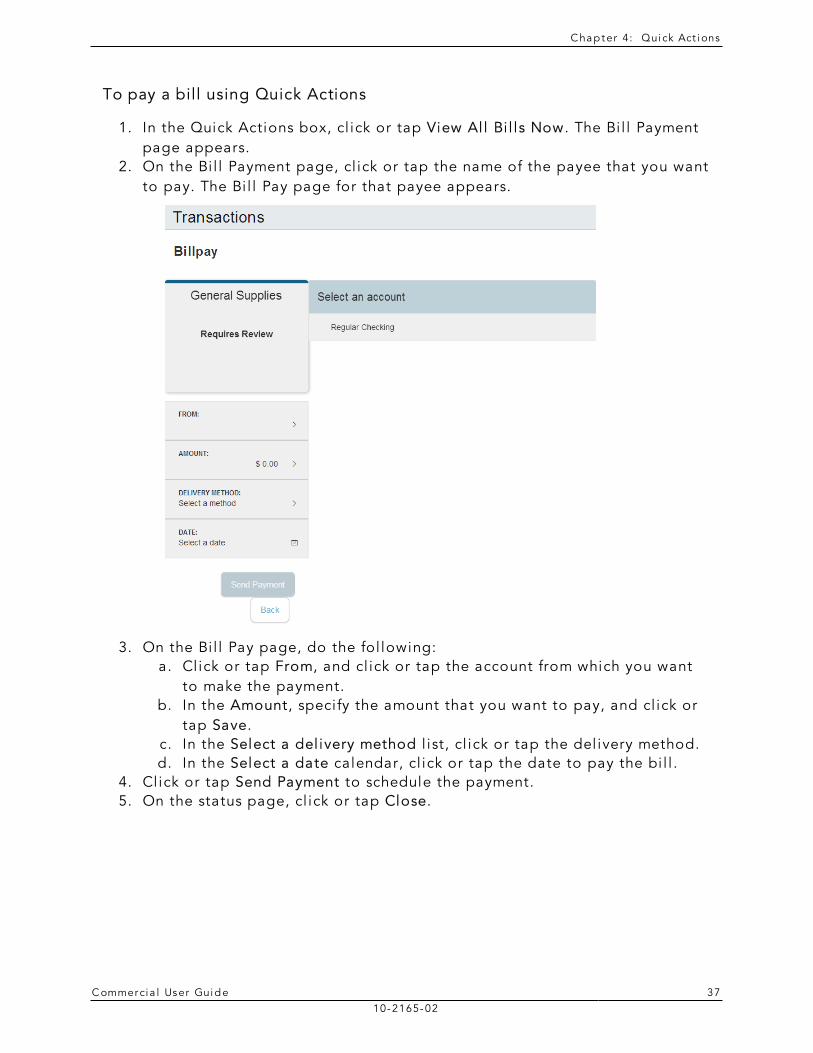
To pay a bill using Quick Actions
1. In the Quick Actions box, cl ick or tap View Al l Bi l ls Now. The Bi l l Payment page appears.
2. On the Bi l l Payment page, cl ick or tap the name of the payee that you want to pay. The Bi l l Pay page for that payee appears.
3. On the Bi l l Pay page, do the fol lowing: a. Cl ick or tap From, and cl ick or tap the account from which you want
to make the payment. b. In the Amount, speci fy the amount that you want to pay, and cl ick or
tap Save. c. In the Select a del ivery method l ist, cl ick or tap the del ivery method. d. In the Select a date calendar, cl ick or tap the date to pay the bi l l .
4. Cl ick or tap Send Payment to schedule the payment. 5. On the status page, cl ick or tap Close.
C hap ter 4: Qui ck Act ions
C ommerci a l User Guide 3810-2165-02
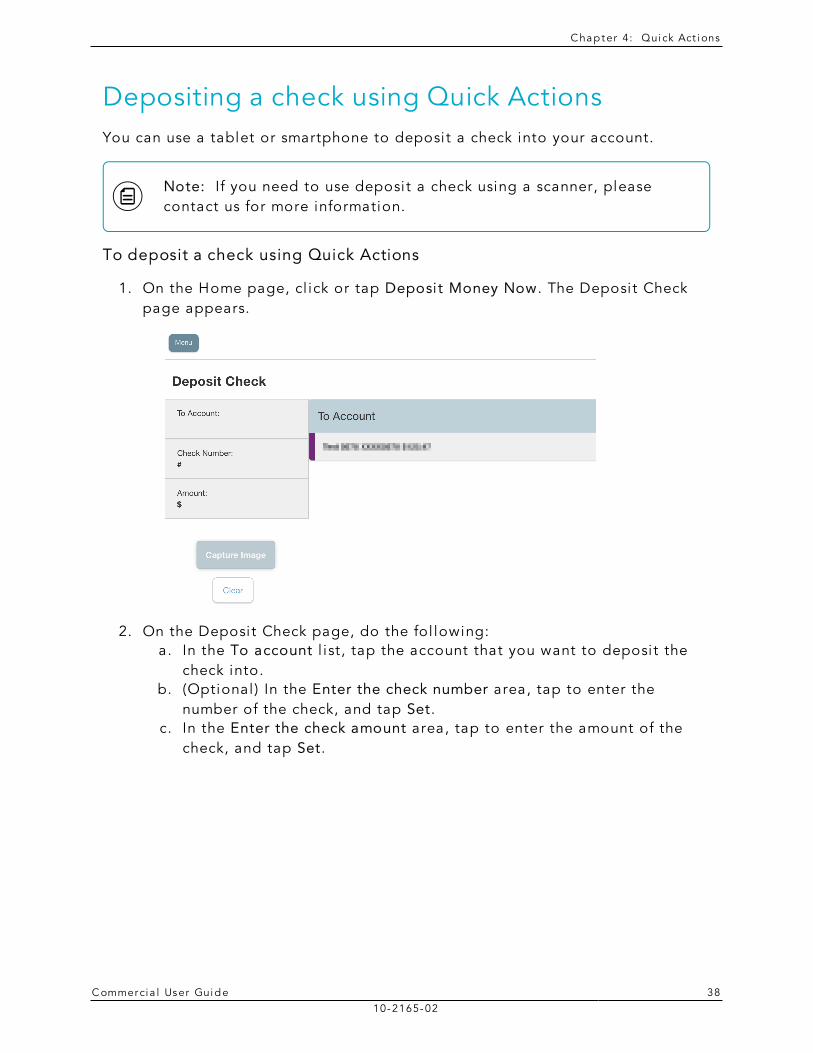
Depositing a check using Quick ActionsYou can use a tablet or smartphone to deposit a check into your account.
Note: If you need to use deposit a check using a scanner, please contact us for more information.
To deposit a check using Quick Actions
1. On the Home page, cl ick or tap Deposit Money Now. The Deposit Check page appears.
2. On the Deposit Check page, do the fol lowing: a. In the To account l ist, tap the account that you want to deposit the
check into. b. (Optional ) In the Enter the check number area, tap to enter the
number of the check, and tap Set. c. In the Enter the check amount area, tap to enter the amount of the
check, and tap Set.
C hap ter 4: Qui ck Act ions
C ommerci a l User Guide 3910-2165-02
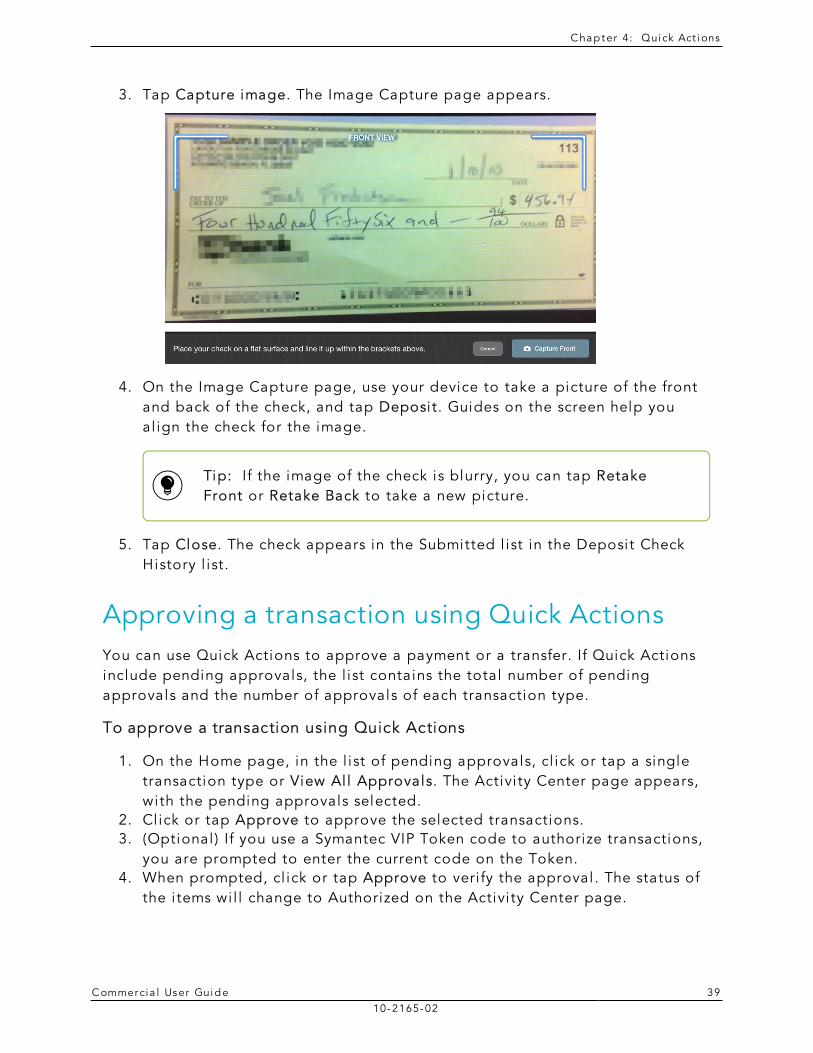
3. Tap Capture image. The Image Capture page appears.
4. On the Image Capture page, use your device to take a picture of the front and back of the check, and tap Deposit. Guides on the screen help you al ign the check for the image.
Tip: If the image of the check is blurry, you can tap Retake Front or Retake Back to take a new picture.
5. Tap Close. The check appears in the Submitted l ist in the Deposit Check History l ist.
Approving a transaction using Quick ActionsYou can use Quick Actions to approve a payment or a transfer. If Quick Actions include pending approvals, the l ist contains the total number of pending approvals and the number of approvals of each transaction type.
To approve a transaction using Quick Actions
1. On the Home page, in the l ist of pending approvals, cl ick or tap a single transaction type or View Al l Approvals. The Activi ty Center page appears, with the pending approvals selected.
2. Cl ick or tap Approve to approve the selected transactions. 3. (Optional ) If you use a Symantec VIP Token code to authorize transactions,
you are prompted to enter the current code on the Token. 4. When prompted, cl ick or tap Approve to veri fy the approval . The status of
the i tems wi l l change to Authorized on the Activi ty Center page.
C ommerci a l User Guide 4010-2165-02
CHAPTER 5: PAYING BILLS
This chapter contains the fol lowing:
l "Enrol l ing in bi l l pay" on page 40 l "Managing bi l l pay accounts" on page 41 l "Managing bi l l payment payees" on page 42 l "Managing bi l l payments" on page 43
Enrolling in bill payYou must enrol l in bi l l pay and select an account before you can add payees or pay bi l ls. After you enrol l , you can add additional accounts from which to pay. You cannot remove the account that you select when you enrol l .
The procedure to enrol l may vary, depending on your account configuration.
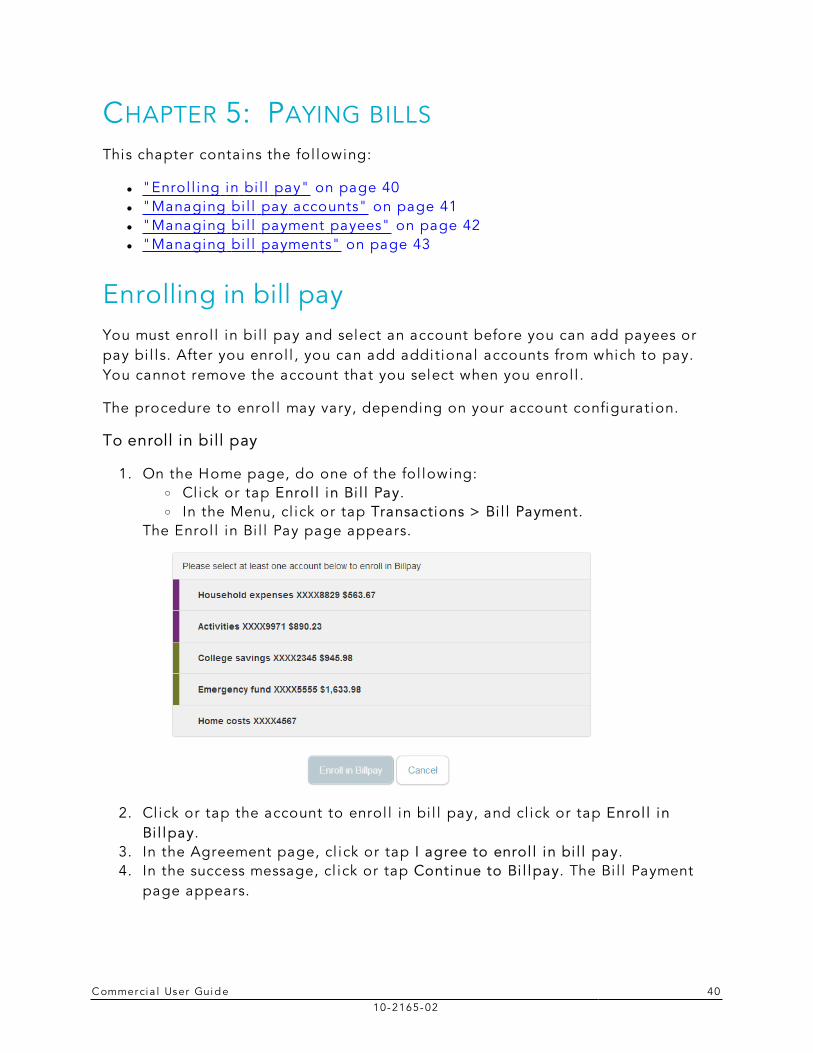
To enroll in bill pay
1. On the Home page, do one of the fol lowing: o Click or tap Enrol l in Bi l l Pay. o In the Menu, cl ick or tap Transactions > Bi l l Payment.
The Enrol l in Bi l l Pay page appears.
2. Cl ick or tap the account to enrol l in bi l l pay, and cl ick or tap Enrol l in Bi l lpay.
3. In the Agreement page, cl ick or tap I agree to enrol l in bi l l pay. 4. In the success message, cl ick or tap Continue to Bi l lpay. The Bi l l Payment
page appears.
C hap ter 5: Paying b i l l s
C ommerci a l User Guide 4110-2165-02
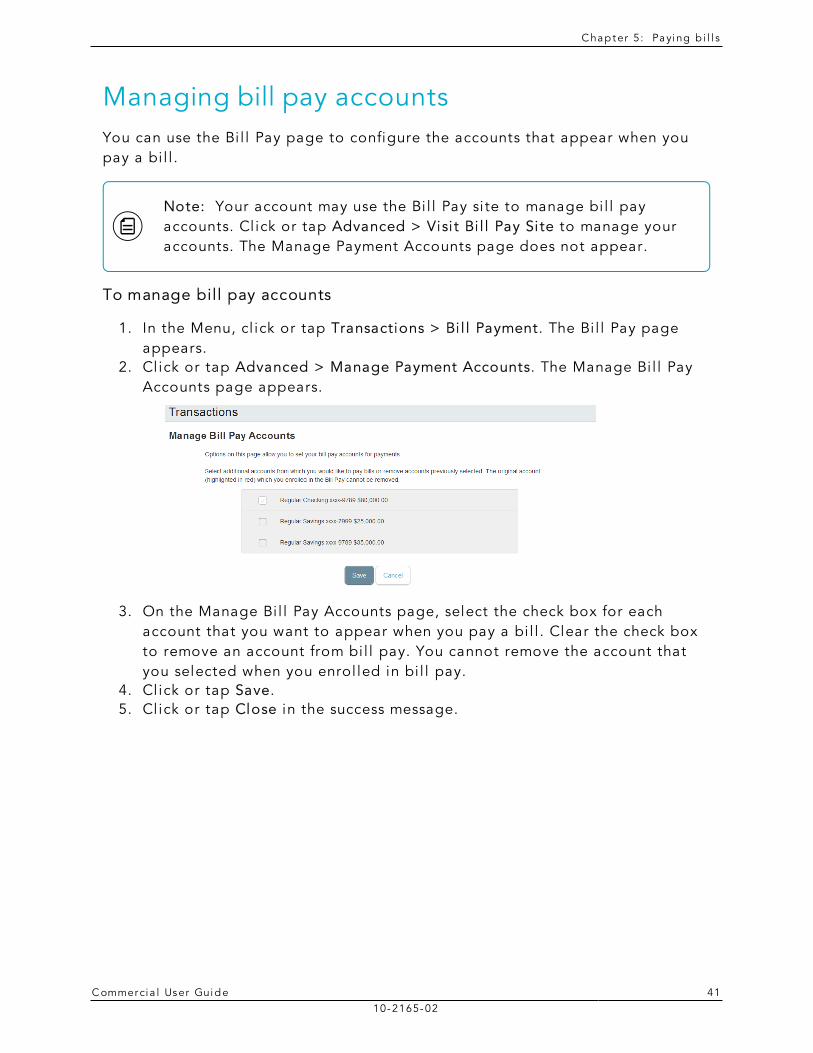
Managing bill pay accountsYou can use the Bi l l Pay page to configure the accounts that appear when you pay a bi l l .
Note: Your account may use the Bi l l Pay si te to manage bi l l pay accounts. Cl ick or tap Advanced > Visi t Bi l l Pay Site to manage your accounts. The Manage Payment Accounts page does not appear.
To manage bill pay accounts
1. In the Menu, cl ick or tap Transactions > Bi l l Payment. The Bi l l Pay page appears.
2. Cl ick or tap Advanced > Manage Payment Accounts. The Manage Bi l l Pay Accounts page appears.
3. On the Manage Bi l l Pay Accounts page, select the check box for each account that you want to appear when you pay a bi l l . Clear the check box to remove an account from bi l l pay. You cannot remove the account that you selected when you enrol led in bi l l pay.
4. Cl ick or tap Save. 5. Cl ick or tap Close in the success message.
C hap ter 5: Paying b i l l s
C ommerci a l User Guide 4210-2165-02
Managing bill payment payeesWhen you pay a bi l l , you select a payee for the payment. You must add a payee in one of the fol lowing before you can send the payee a payment:
l Online banking l Mobile banking app l Bil l Pay si te
Tip: You can also use the Bi l l Pay si te to add, edit, or delete a payee.
This section includes the fol lowing:
l "Adding a payee" on page 42 l "Editing a bi l l payment payee" on page 43
Adding a payeeYou can use the Bi l l Pay page to add a bi l l payment payee.
To add a bill payment payee
1. In the Menu, cl ick or tap Transactions > Bi l l Payment. The Bi l l Pay page appears.
2. Cl ick or tap Advanced > Add a Payee. The Add Payee page appears. 3. On the Add Payee page, do the fol lowing:
a. Enter the name of the payee in the Name field. b. Select the type of payee from the Payee Type drop-down l ist. c. Enter a nickname for the payee in the Payee Nickname field. d. Enter the Postal Address for the payee. The address can include up to
three address l ines, along with the required City, State, and Zip. e. Enter the Area Code and Phone for the payee. f. Enter the account number in the Payee Account Number field.
g. Cl ick or tap Save. 4. When the success message appears, cl ick or tap Close. The Bi l l Pay page
appears with the new payee l isted.
C hap ter 5: Paying b i l l s
C ommerci a l User Guide 4310-2165-02
Editing a bill payment payeeYou can use the Bi l l Pay page to edit an existing bi l l payment payee.
To edit a bill payment payee
1. In the Bi l l Pay page, locate the payee that you want to edit, then cl ick or tap the edit icon ( ) for the payee. The Add Payee page appears.
2. On the Add Payee page, make any needed changes, and cl ick or tap Save. 3. When the success message appears, cl ick or tap Close.
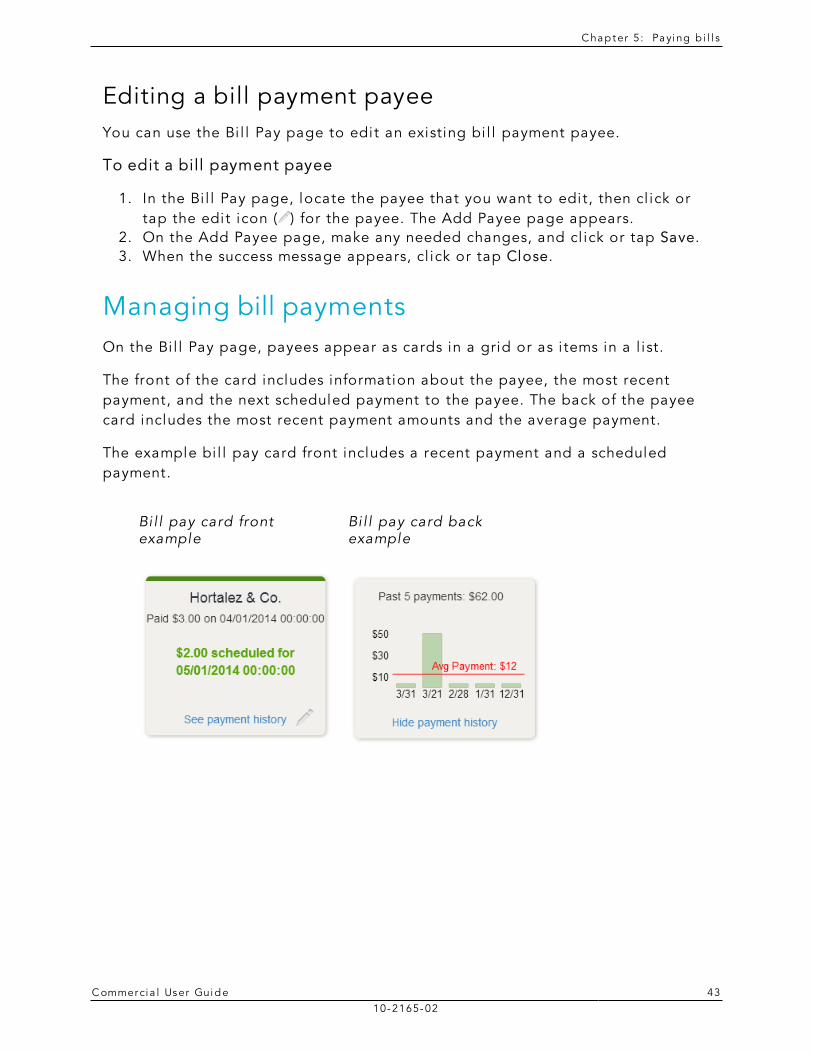
Managing bill paymentsOn the Bi l l Pay page, payees appear as cards in a grid or as i tems in a l ist.
The front of the card includes information about the payee, the most recent payment, and the next scheduled payment to the payee. The back of the payee card includes the most recent payment amounts and the average payment.
The example bi l l pay card front includes a recent payment and a scheduled payment.
Bil l pay card front example
Bi l l pay card back example
C hap ter 5: Paying b i l l s
C ommerci a l User Guide 4410-2165-02
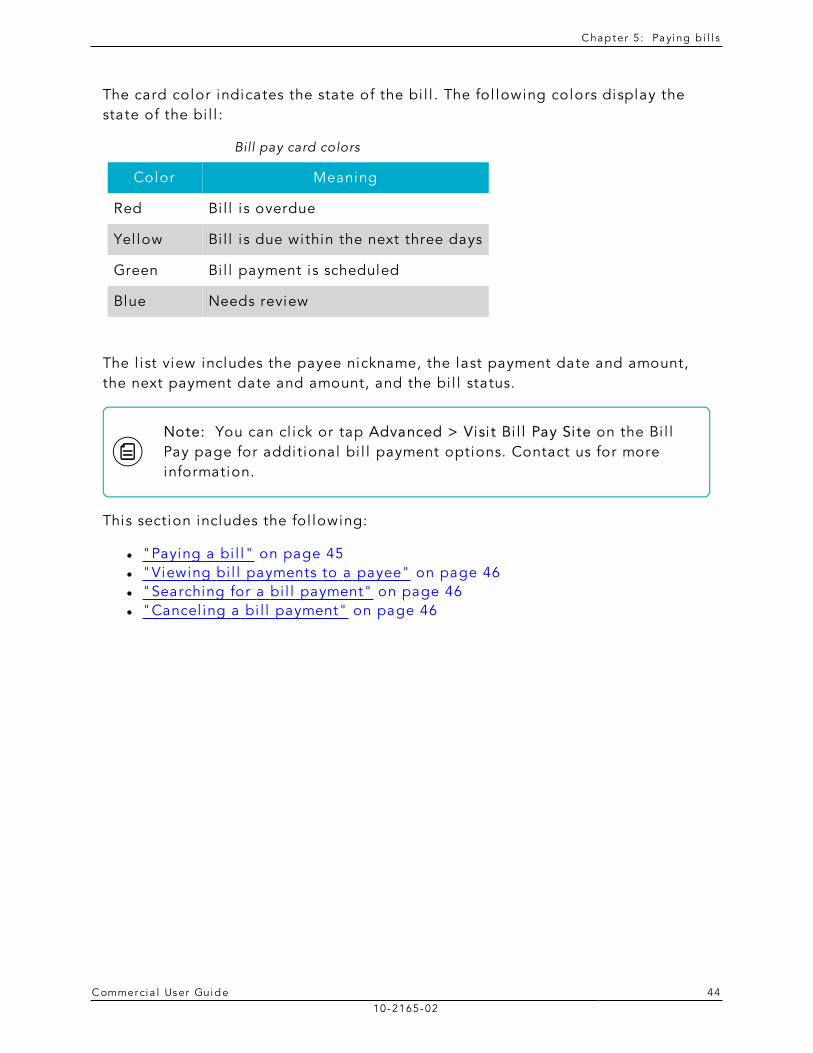
The card color indicates the state of the bi l l . The fol lowing colors display the state of the bi l l :
Color Meaning
Red Bi l l is overdue
Yel low Bi l l is due within the next three days
Green Bi l l payment is scheduled
Blue Needs review
Bill pay card colors
The l ist view includes the payee nickname, the last payment date and amount, the next payment date and amount, and the bi l l status.
Note: You can cl ick or tap Advanced > Visi t Bi l l Pay Site on the Bi l l Pay page for additional bi l l payment options. Contact us for more information.
This section includes the fol lowing:
l "Paying a bi l l" on page 45 l "Viewing bi l l payments to a payee" on page 46 l "Searching for a bi l l payment" on page 46 l "Cancel ing a bi l l payment" on page 46

C hap ter 5: Paying b i l l s
C ommerci a l User Guide 4510-2165-02
Paying a billYou can use the Bi l l Pay page to select a payee and pay a bi l l .
To pay a bill
1. In the Menu, cl ick or tap Transactions > Bi l l Payment. 2. On the Bi l l Pay page, browse or search for the payee that you want to pay
and cl ick or tap the payee name.
3. On the Bi l l Pay page, do the fol lowing: a. Cl ick or tap From, and cl ick or tap the account from which you want
to make the payment. b. In the Amount, speci fy the amount that you want to pay, and cl ick or
tap Save. c. In the Select a del ivery method l ist, cl ick or tap the del ivery method. d. In the Select a date calendar, cl ick or tap the date to pay the bi l l .
4. Cl ick or tap Send Payment to schedule the payment. 5. On the status page, cl ick or tap Close.
C hap ter 5: Paying b i l l s
C ommerci a l User Guide 4610-2165-02
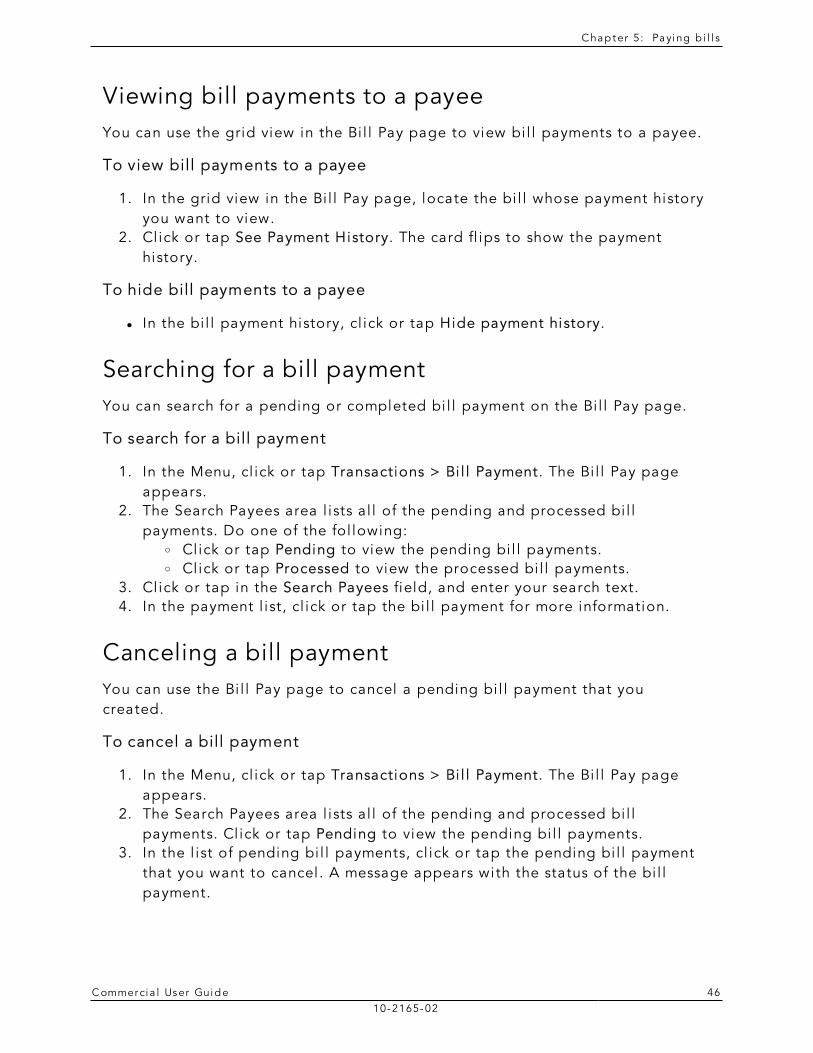
Viewing bill payments to a payeeYou can use the grid view in the Bi l l Pay page to view bi l l payments to a payee.
To view bill payments to a payee
1. In the grid view in the Bi l l Pay page, locate the bi l l whose payment history you want to view.
2. Cl ick or tap See Payment History. The card fl ips to show the payment history.
To hide bill payments to a payee
l In the bi l l payment history, cl ick or tap Hide payment history.
Searching for a bill paymentYou can search for a pending or completed bi l l payment on the Bi l l Pay page.
To search for a bill payment
1. In the Menu, cl ick or tap Transactions > Bi l l Payment. The Bi l l Pay page appears.
2. The Search Payees area l ists al l of the pending and processed bi l l payments. Do one of the fol lowing:
o Click or tap Pending to view the pending bi l l payments. o Click or tap Processed to view the processed bi l l payments.
3. Cl ick or tap in the Search Payees field, and enter your search text. 4. In the payment l ist, cl ick or tap the bi l l payment for more information.
Canceling a bill paymentYou can use the Bi l l Pay page to cancel a pending bi l l payment that you created.
To cancel a bill payment
1. In the Menu, cl ick or tap Transactions > Bi l l Payment. The Bi l l Pay page appears.
2. The Search Payees area l ists al l of the pending and processed bi l l payments. Cl ick or tap Pending to view the pending bi l l payments.
3. In the l ist of pending bi l l payments, cl ick or tap the pending bi l l payment that you want to cancel . A message appears with the status of the bi l l payment.
C hap ter 5: Paying b i l l s
C ommerci a l User Guide 4710-2165-02
4. Cl ick or tap Cancel Payment. When the payment has been canceled successful ly, a message appears.
5. Cl ick or tap Close.
C ommerci a l User Guide 4810-2165-02
CHAPTER 6: MANAGING TRANSACTIONS
This chapter contains the fol lowing:
l "Using transfers" on page 48 l "Depositing a check" on page 53 l "Viewing transactions on the Activi ty Center page" on page 57 l "Viewing E-Statements" on page 65 l "Reordering checks" on page 68 l "Sending a check to a payee" on page 69 l "Creating a stop payment request" on page 70
Using transfersYou can use onl ine banking and the mobi le banking app to transfer funds between your accounts. This section includes the fol lowing:
l "Transferring funds" on page 48 l "Viewing transfers" on page 50 l "Cancel ing a transfer" on page 51 l "Setting up external accounts for transfers" on page 52
Transferring fundsYou can transfer funds between accounts.
Note: You can use the Add External Account option to transfer funds to or from an account at another financial insti tution. See "Setting up external accounts for transfers" on page 52 for more information.
C hap ter 6: Manag ing t r ansact ions
C ommerci a l User Guide 4910-2165-02
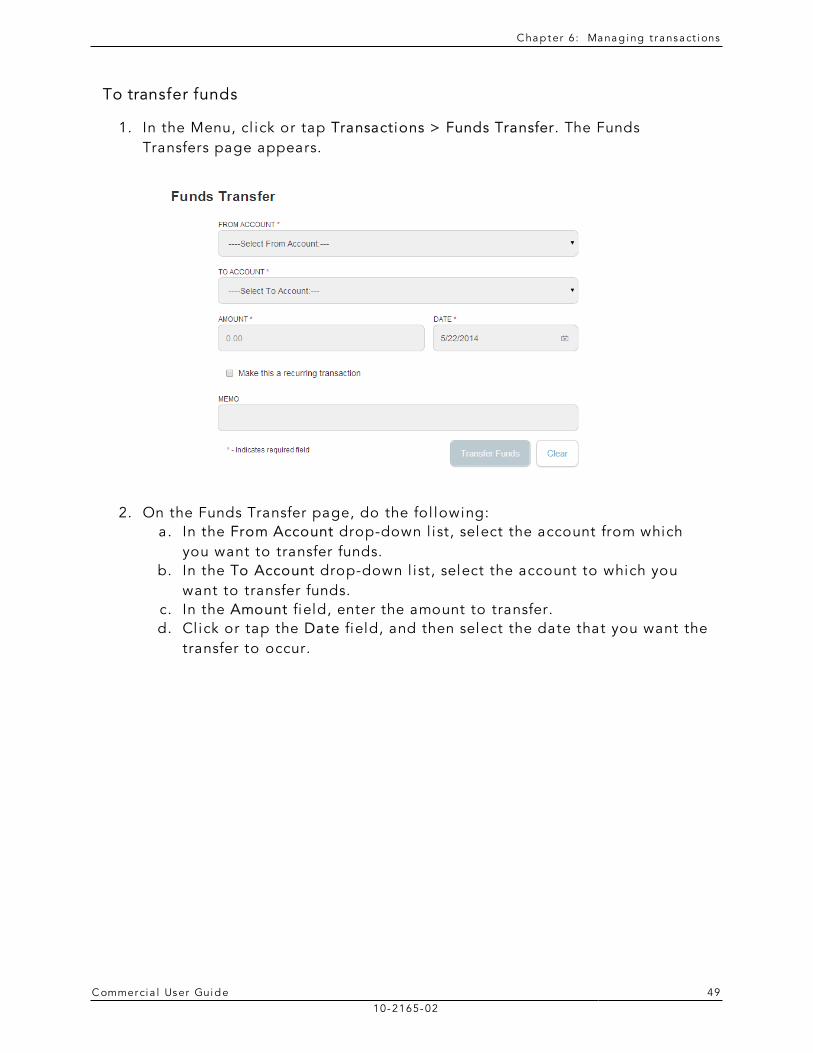
To transfer funds
1. In the Menu, cl ick or tap Transactions > Funds Transfer. The Funds Transfers page appears.
2. On the Funds Transfer page, do the fol lowing: a. In the From Account drop-down l ist, select the account from which
you want to transfer funds. b. In the To Account drop-down l ist, select the account to which you
want to transfer funds. c. In the Amount field, enter the amount to transfer. d. Cl ick or tap the Date field, and then select the date that you want the
transfer to occur.
C hap ter 6: Manag ing t r ansact ions
C ommerci a l User Guide 5010-2165-02
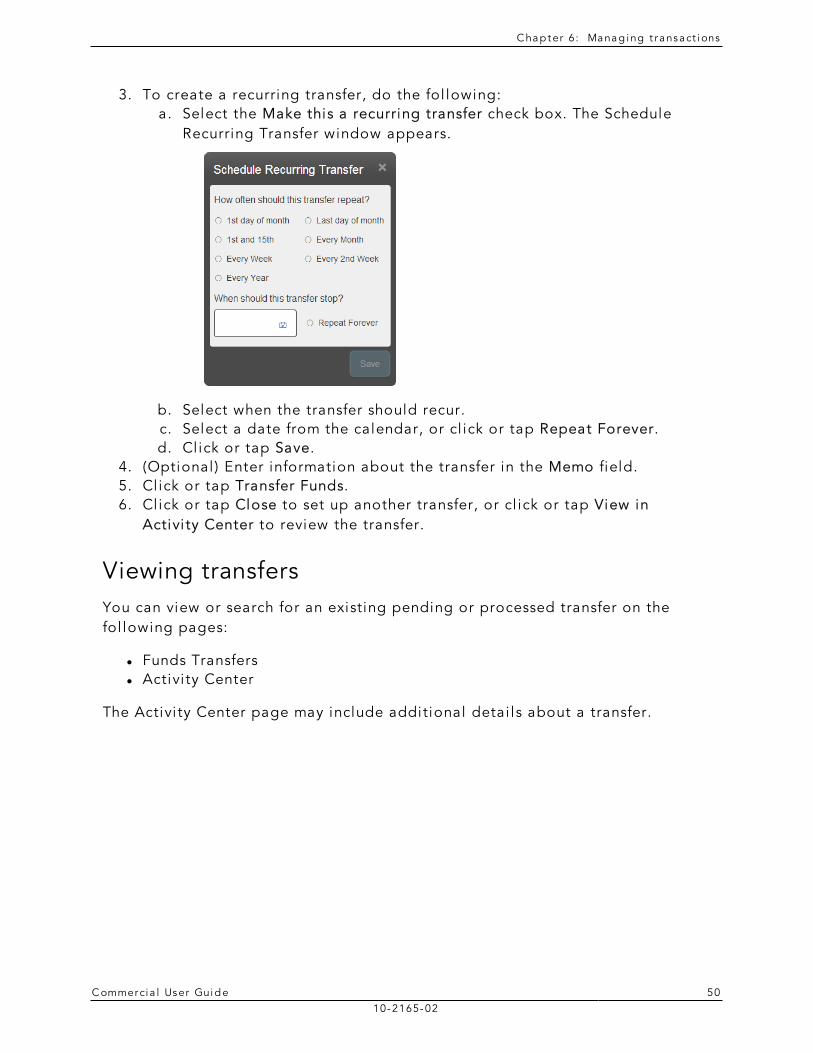
3. To create a recurring transfer, do the fol lowing: a. Select the Make this a recurring transfer check box. The Schedule
Recurring Transfer window appears.
b. Select when the transfer should recur. c. Select a date from the calendar, or cl ick or tap Repeat Forever. d. Cl ick or tap Save.
4. (Optional ) Enter information about the transfer in the Memo field. 5. Cl ick or tap Transfer Funds. 6. Cl ick or tap Close to set up another transfer, or cl ick or tap View in
Activi ty Center to review the transfer.
Viewing transfersYou can view or search for an existing pending or processed transfer on the fol lowing pages:
l Funds Transfers l Activi ty Center
The Activi ty Center page may include additional detai ls about a transfer.
C hap ter 6: Manag ing t r ansact ions
C ommerci a l User Guide 5110-2165-02
To view a transfer on the Funds Transfers page
1. In the Menu, cl ick or tap Transactions > Funds Transfer. The Funds Transfers page appears.
2. The Search transactions area l ists al l of the pending and processed transfers. Do one of the fol lowing:
o Click or tap Pending to browse the transfers that have not yet processed.
o Click or tap Processed to browse the transfers that have been processed.
o Click or tap in the Search transactions field, and enter your search text. You can search for the process date, amount, transaction ID, or the user who created the transfer. The search results appear below the search field.
3. After you locate a transfer, cl ick or tap i t for more detai ls. 4. (Optional ) On the transfer detai ls page, cl ick or tap View in Activi ty
Center. The Activi ty Center page appears, with the transfer selected and the Transaction detai ls visible.
To view details of a transfer on the Activity Center page
1. In the Menu, cl ick or tap Transactions > Activi ty Center. The Activi ty Center page appears.
2. On the Activi ty Center page, do one of the fol lowing: o Click or tap Individual Transactions to view a single transfer. o Click or tap Recurring Transactions to view a recurring series of
transfers. 3. Browse to locate the transfer that you want to view. 4. Cl ick or tap the transfer. The transfer expands to show the detai ls.
Canceling a transferYou can use the Activi ty Center page to cancel a transfer. You can cancel a transfer i f the status is Drafted or Pending.
To cancel a transfer
1. In the Menu, cl ick or tap Transactions > Activi ty Center. The Activi ty Center page appears.
2. Cl ick or tap the transfer that you want to cancel . The Transaction detai ls appear.
3. In the Transaction detai ls, cl ick or tap Cancel to cancel the transfer. You are prompted to confi rm that you want to cancel the transfer.
4. Cl ick or tap Confi rm to cancel the transfer.
C hap ter 6: Manag ing t r ansact ions
C ommerci a l User Guide 5210-2165-02
Setting up external accounts for transfersYou can add accounts at other financial insti tutions, providing you the abi l i ty to transfer funds external ly.
Note: You can only transfer funds to and from domestic (United States) financial insti tutions.
When you connect the account, we make two smal l deposits of random amounts into your account at the other insti tution. When the deposits are complete, you enter and veri fy the amounts in either our onl ine banking or the mobi le banking app. The deposits veri fy that any future funds transfers go to or come from the appropriate external account. The deposits should take less than 5 business days to process.
This section includes the fol lowing:
l "Adding an external account" on page 52 l "Veri fying an external account" on page 53
Adding an external account
You use the Add External Account page to start the process to add an external account.
To add an external account
1. In the Menu, cl ick or tap Services > Add External Account. The Add External Accounts page appears.
2. Do the fol lowing: a. In the Account Number field, enter the account number at the other
financial insi tution. b. In the Routing Number field, enter the routing number of the other
financial insti tution. The image on the screen i l lustrates where the routing number is located on a check. If the account is not a checking account, veri fy the correct routing number with the other financial insti tution.
c. From the Account Type drop-down l ist, select the external account type.
d. Cl ick or tap Submit.
C hap ter 6: Manag ing t r ansact ions
C ommerci a l User Guide 5310-2165-02
Verifying an external account
The Account Veri fication page l ists the external accounts that you have added, along with the status of the l ink.
To verify an external account
1. In the Menu, cl ick or tap Services > Veri fy External Account. The Account Veri fication page appears.
2. Do the fol lowing: a. Cl ick or tap to select the account that you want to veri fy. b. In the Veri fy Deposit Amounts area, enter the amounts of the two
deposits that we made in the external account. c. Cl ick or tap Continue.
After veri fication, the external account appears in the l ist of accounts that you can use in transfers.
Depositing a checkYou can use the mobi le banking app to deposit a check into your account.
Note: If you need to use deposit a check using a scanner, please contact us for more information.
C hap ter 6: Manag ing t r ansact ions
C ommerci a l User Guide 5410-2165-02
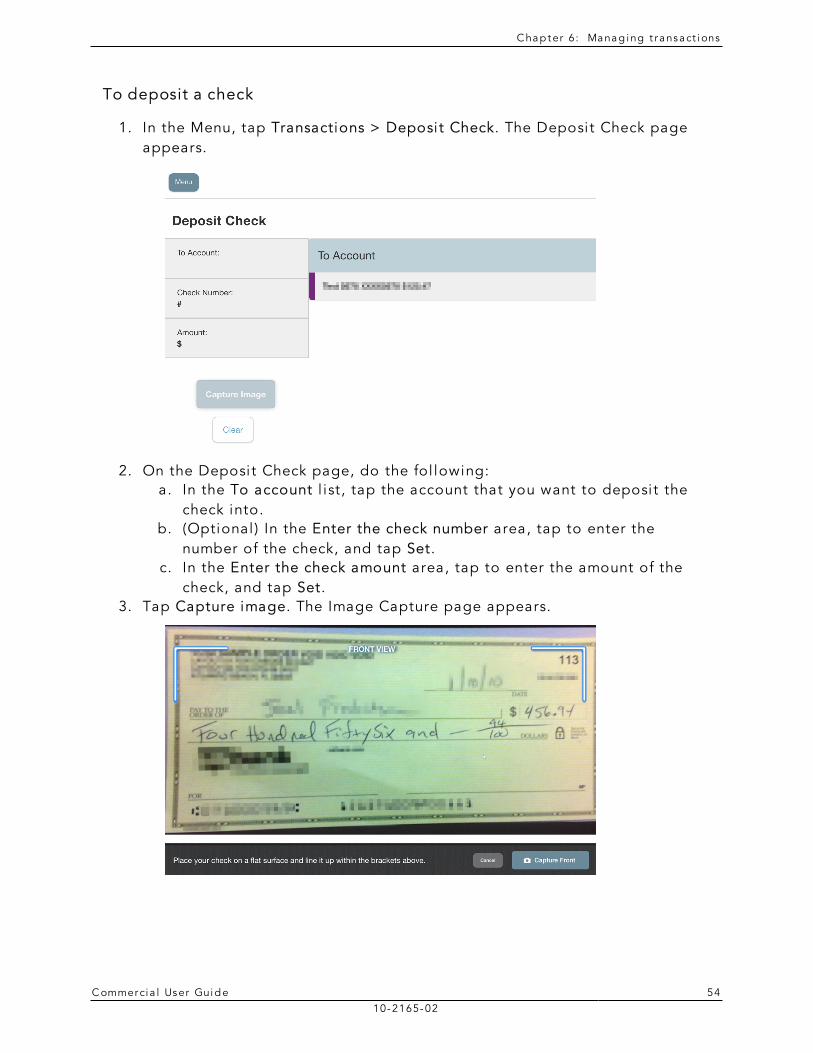
To deposit a check
1. In the Menu, tap Transactions > Deposit Check. The Deposit Check page appears.
2. On the Deposit Check page, do the fol lowing: a. In the To account l ist, tap the account that you want to deposit the
check into. b. (Optional ) In the Enter the check number area, tap to enter the
number of the check, and tap Set. c. In the Enter the check amount area, tap to enter the amount of the
check, and tap Set. 3. Tap Capture image. The Image Capture page appears.
C hap ter 6: Manag ing t r ansact ions
C ommerci a l User Guide 5510-2165-02
4. On the Image Capture page, use your device to take a picture of the front and back of the check, and tap Deposit. Guides on the screen help you al ign the check for the image.
Tip: If the image of the check is blurry, you can tap Retake Front or Retake Back to take a new picture.
5. Tap Close. The check appears in the Submitted tab in the Deposit Check History l ist.
Viewing check depositsYou can view check deposits in the Check Deposit History on the Home page. You can also view check deposits on the Deposit Check page in the mobi le banking app. The l ists include checks that you use the mobi le banking app to deposit, grouped by status. The check status is one of the fol lowing:
Status Description
Submitted Successful ly transmitted to us. Requires additional review before processing.
Accepted Successful ly transmitted and accepted for processing.
Rejected Successful ly transmitted to us, but rejected for processing during review.
Check deposit status
To view a check deposit on the Home page
1. On the Home page, in the Check Deposit History l ist, do one of the fol lowing to view a check deposit:
o Click or tap Submitted to view pending deposits. o Click or tap Accepted to view processed check deposits.
2. Cl ick or tap any transaction to view more information about the deposit or to see the check images.
C hap ter 6: Manag ing t r ansact ions
C ommerci a l User Guide 5610-2165-02
To view a check deposit on the Deposit Check page
1. In the Menu, tap Transactions > Deposit Check. The Deposit Check page appears.
2. In the Deposit Check History, do one of the fol lowing: o Tap Submitted to view pending deposits. o Tap Accepted to view processed check deposits. o Tap the Search transactions field and enter your search text.
3. Tap any transaction to view more information about the deposit or to see the check images.
C hap ter 6: Manag ing t r ansact ions
C ommerci a l User Guide 5710-2165-02
Viewing transactions on the Activity Center pageThe Account Detai ls page and the Activi ty Center page both include transactions. A speci fic transaction can appear on either page or both pages, depending on the transaction status and how you created i t. You can view transactions and transaction detai ls on the fol lowing pages:
Page Includes
Account Detai ls Al l posted and pending transactions in an account, including:
l Checks l Deposits l Transactions at branches l Transactions at ATMs l Bil l payments l Transfers
Activi ty Center Transactions that you create in onl ine banking and the mobi le banking app, including:
l Recurring transactions l Transfers l Send a check l Wire transfers l Stop payment requests l Address change requests l Check reorders l ACH Payments l ACH Receipts l ACH Batches l ACH Col lections l ACH Pass-thru payments
Viewing transactions

C hap ter 6: Manag ing t r ansact ions
C ommerci a l User Guide 5810-2165-02
The fol lowing i l lustrates the appearance of the Activi ty Center page.
Activi ty Center page example
Tip: You can also view transaction detai ls on the page where you create the transaction.
On the Activi ty Center page, al l scheduled recurring transactions appear on the Recurring Transactions tab. You can use the Recurring Transactions tab to view or cancel the recurring series.
The Individual Transactions tab includes transactions that do not recur and any recurring transaction due in the next 7 calendar days. You can use the Individual Transactions tab to view or cancel a speci fic transaction in a recurring series.
When you have pending approvals waiting, the number of pending approvals appears on the tabs.
Activi ty Center page tabs with number of pending approvals
C hap ter 6: Manag ing t r ansact ions
C ommerci a l User Guide 5910-2165-02
This section includes the fol lowing:
l "Sorting transactions" on page 59 l "Searching for a transaction" on page 59 l "Viewing transaction detai ls" on page 62 l "Cancel ing pending transactions" on page 63 l "Approving transactions" on page 64 l "Copying a transaction" on page 64 l "Sending a message about a transaction" on page 65
Sorting transactionsOn the Activi ty Center page, the column headings indicate the sort order. The column used to sort includes a triangle icon. The direction of the triangle icon indicates ascending or descending sort order.
Pending transactions are always grouped together at the top of the sort order.
To sort transactions
l On the Activi ty Center page, cl ick or tap one of the fol lowing column headings to change the sort order:
o Status o Type/ID o Amount o Account o Date
Tip: Cl ick the column again to change the sort order between ascending and descending.
Searching for a transactionOn the Activi ty Center page, you can search for a transaction in the fol lowing ways:
l Search l Basic search on speci fic fields
C hap ter 6: Manag ing t r ansact ions
C ommerci a l User Guide 6010-2165-02
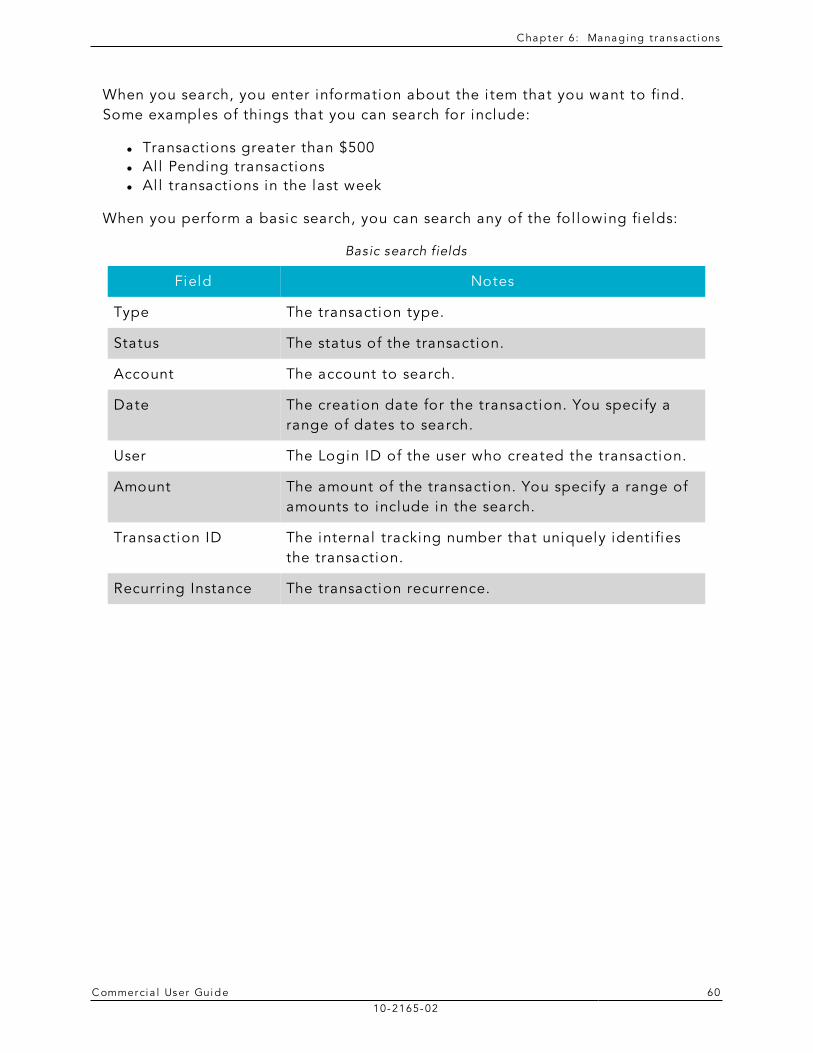
When you search, you enter information about the i tem that you want to find. Some examples of things that you can search for include:
l Transactions greater than $500 l All Pending transactions l All transactions in the last week
When you perform a basic search, you can search any of the fol lowing fields:
Field Notes
Type The transaction type.
Status The status of the transaction.
Account The account to search.
Date The creation date for the transaction. You speci fy a range of dates to search.
User The Login ID of the user who created the transaction.
Amount The amount of the transaction. You speci fy a range of amounts to include in the search.
Transaction ID The internal tracking number that uniquely identi fies the transaction.
Recurring Instance The transaction recurrence.
Basic search fields
C hap ter 6: Manag ing t r ansact ions
C ommerci a l User Guide 6110-2165-02
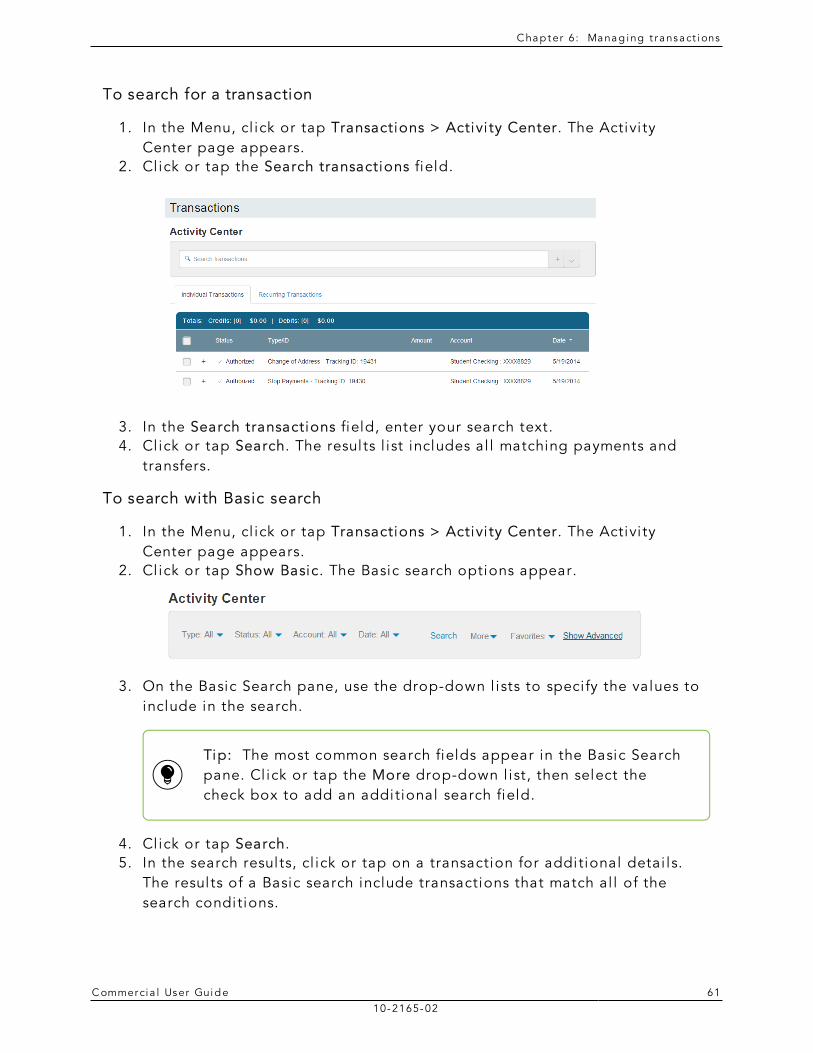
To search for a transaction
1. In the Menu, cl ick or tap Transactions > Activi ty Center. The Activi ty Center page appears.
2. Cl ick or tap the Search transactions field.
3. In the Search transactions field, enter your search text. 4. Cl ick or tap Search. The results l ist includes al l matching payments and
transfers.
To search with Basic search
1. In the Menu, cl ick or tap Transactions > Activi ty Center. The Activi ty Center page appears.
2. Cl ick or tap Show Basic. The Basic search options appear.
3. On the Basic Search pane, use the drop-down l ists to speci fy the values to include in the search.
Tip: The most common search fields appear in the Basic Search pane. Cl ick or tap the More drop-down l ist, then select the check box to add an additional search field.
4. Cl ick or tap Search. 5. In the search results, cl ick or tap on a transaction for additional detai ls.
The results of a Basic search include transactions that match al l of the search conditions.
C hap ter 6: Manag ing t r ansact ions
C ommerci a l User Guide 6210-2165-02
To save a favorite search
1. Create a search. 2. On the Activi ty Center page, cl ick or tap the Favori tes drop-down l ist. 3. Cl ick or tap Save As New. 4. In the Save Search window, enter a name for the favori te and cl ick or tap
Save Search. 5. In the success message, cl ick or tap Close.
To repeat a favorite search
l On the Activi ty Center page, cl ick or tap Favori tes and cl ick or tap the favori te search that you want to use. The search results appear.
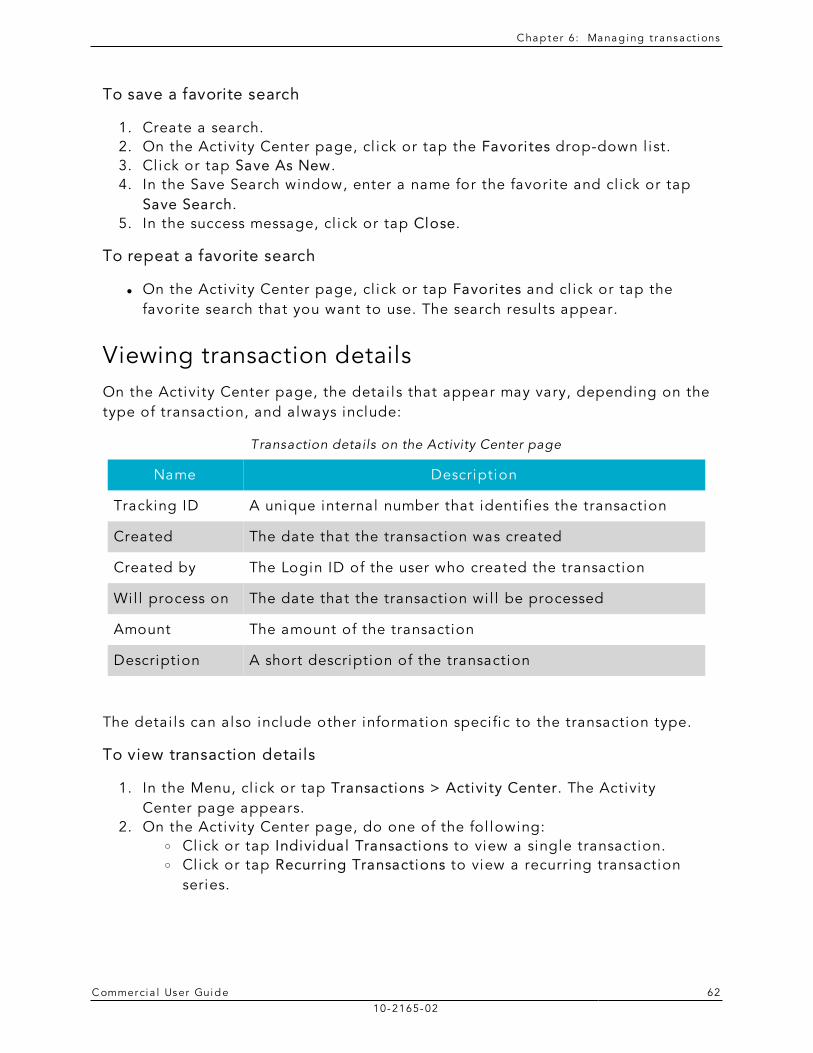
Viewing transaction detailsOn the Activi ty Center page, the detai ls that appear may vary, depending on the type of transaction, and always include:
Name Description
Tracking ID A unique internal number that identi fies the transaction
Created The date that the transaction was created
Created by The Login ID of the user who created the transaction
Wil l process on The date that the transaction wi l l be processed
Amount The amount of the transaction
Description A short description of the transaction
Transaction details on the Activity Center page
The detai ls can also include other information speci fic to the transaction type.
To view transaction details
1. In the Menu, cl ick or tap Transactions > Activi ty Center. The Activi ty Center page appears.
2. On the Activi ty Center page, do one of the fol lowing: o Click or tap Individual Transactions to view a single transaction. o Click or tap Recurring Transactions to view a recurring transaction
series.
C hap ter 6: Manag ing t r ansact ions
C ommerci a l User Guide 6310-2165-02
3. Browse to locate the transaction that you want to view. 4. Cl ick or tap the transaction. The transaction expands to show the detai ls.
Tip: Cl ick or tap the transaction again to hide the detai ls.
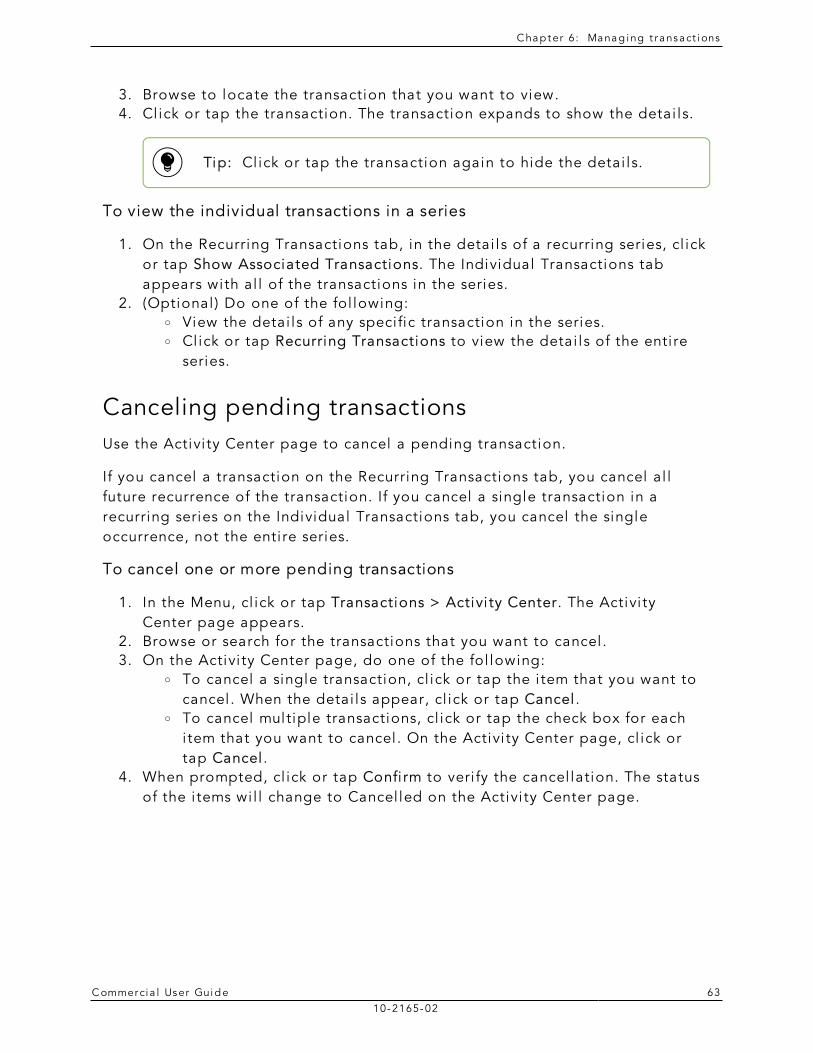
To view the individual transactions in a series
1. On the Recurring Transactions tab, in the detai ls of a recurring series, cl ick or tap Show Associated Transactions. The Individual Transactions tab appears with al l of the transactions in the series.
2. (Optional ) Do one of the fol lowing: o View the detai ls of any speci fic transaction in the series. o Click or tap Recurring Transactions to view the detai ls of the enti re
series.
Canceling pending transactionsUse the Activi ty Center page to cancel a pending transaction.
If you cancel a transaction on the Recurring Transactions tab, you cancel al l future recurrence of the transaction. If you cancel a single transaction in a recurring series on the Individual Transactions tab, you cancel the single occurrence, not the enti re series.
To cancel one or more pending transactions
1. In the Menu, cl ick or tap Transactions > Activi ty Center. The Activi ty Center page appears.
2. Browse or search for the transactions that you want to cancel . 3. On the Activi ty Center page, do one of the fol lowing:
o To cancel a single transaction, cl ick or tap the i tem that you want to cancel . When the detai ls appear, cl ick or tap Cancel .
o To cancel multiple transactions, cl ick or tap the check box for each i tem that you want to cancel . On the Activi ty Center page, cl ick or tap Cancel .
4. When prompted, cl ick or tap Confi rm to veri fy the cancel lation. The status of the i tems wi l l change to Cancel led on the Activi ty Center page.
C hap ter 6: Manag ing t r ansact ions
C ommerci a l User Guide 6410-2165-02
Approving transactionsYou can use the Activi ty Center page to approve a pending transaction.
To approve one or more transactions
1. In the Menu, cl ick or tap Transactions > Activi ty Center. The Activi ty Center page appears.
2. Browse or search for the transactions that you want to approve. 3. On the Activi ty Center page, do one of the fol lowing:
o To approve a single transaction, cl ick or tap the i tem that you want to approve. When the detai ls appear, cl ick or tap Approve.
o To approve multiple transactions, cl ick or tap the check box for each i tem that you want to approve. On the Activi ty Center page, cl ick or tap Approve.
4. (Optional ) If you use a Symantec VIP Token code to authorize transactions, enter the current code from the token when prompted.
5. When prompted, cl ick or tap Approve to veri fy the approval . The status of the i tems wi l l change to Authorized on the Activi ty Center page.
Copying a transactionYou can use the Activi ty Center page to make a copy of an existing transaction. When you copy a transaction, a new transaction of the same type appears, with the fields al ready fi l led.
To copy a transaction
1. In the Menu, cl ick or tap Transactions > Activi ty Center. The Activi ty Center page appears.
2. Browse or search for the transaction that you want to copy. 3. Cl ick or tap the transaction. 4. Cl ick or tap Copy. A new transaction of the same type appears. 5. Make any needed changes to the transaction. The procedure that you use
to make the changes varies, depending on the type of transaction. 6. When you are satisfied with your changes, submit the new transaction.

C hap ter 6: Manag ing t r ansact ions
C ommerci a l User Guide 6510-2165-02
Sending a message about a transactionYou can use the Activi ty Center page to send a message about a transaction.
To send a message about a transaction
1. In the Menu, cl ick or tap Transactions > Activi ty Center. The Activi ty Center page appears.
2. Browse or search for the transaction that you want to send a message about.
3. Cl ick or tap the i tem. 4. When the detai ls appear, cl ick or tap Inquire. 5. Cl ick or tap the message recipient. The message automatical ly includes
information to identi fy the transaction. You do not need to add transaction detai ls to the message.
6. Cl ick or tap in the Message field and enter your message. 7. (Optional ) In onl ine banking, cl ick the attach fi le icon ( ). In the Open
dialog box, select a fi le to attach to the message, and cl ick Open. 8. Cl ick or tap Send.
Viewing E-StatementsDepending on your account configuration, you may be able to view E-Statements, electronic versions of your account statements. The procedure to view an E-Statement may vary.
Note: In onl ine banking, the Statements page may open in a new browser tab or window. You should disable any pop-up blockers for the onl ine banking si te.
C hap ter 6: Manag ing t r ansact ions
C ommerci a l User Guide 6610-2165-02
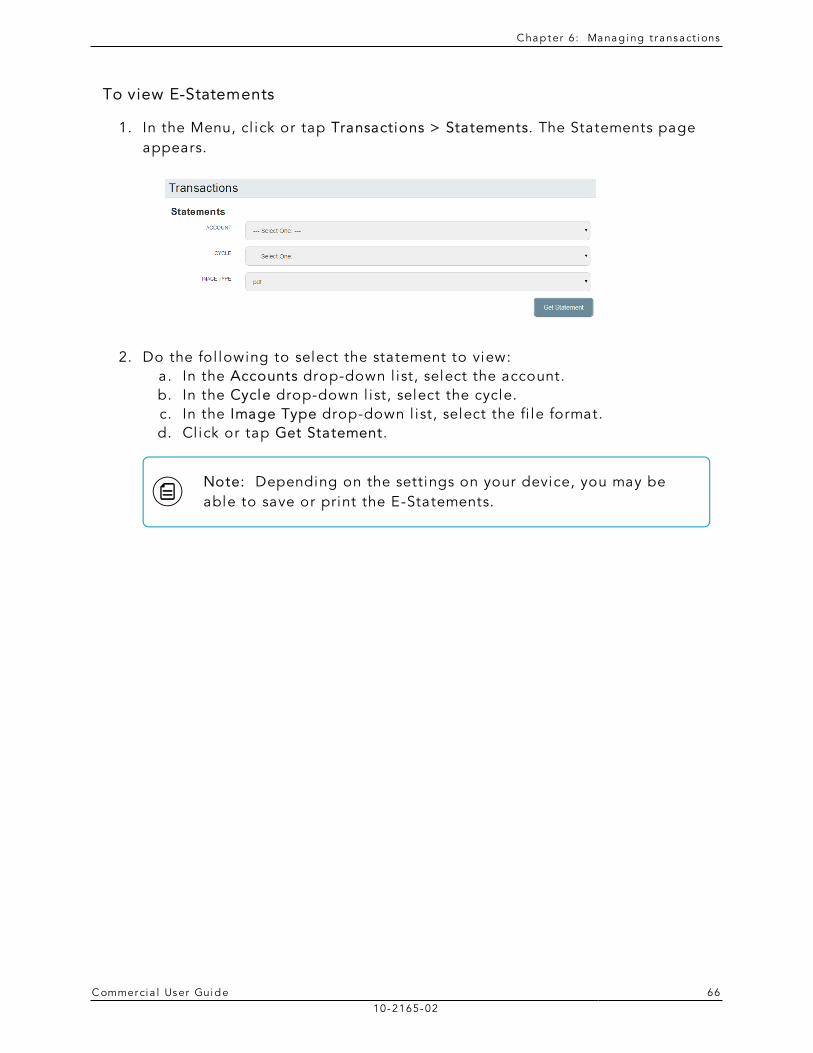
To view E-Statements
1. In the Menu, cl ick or tap Transactions > Statements. The Statements page appears.
2. Do the fol lowing to select the statement to view: a. In the Accounts drop-down l ist, select the account. b. In the Cycle drop-down l ist, select the cycle. c. In the Image Type drop-down l ist, select the fi le format. d. Cl ick or tap Get Statement.
Note: Depending on the settings on your device, you may be able to save or print the E-Statements.
C hap ter 6: Manag ing t r ansact ions
C ommerci a l User Guide 6710-2165-02
Verifying your ability to view a PDFYou may need to veri fy that you can view PDF fi les the fi rst time that you view an E-Statement.
If you are not able to view PDF documents, Adobe Acrobat is avai lable for most operating systems. You can download and instal l Acrobat or a simi lar program to view PDF documents. Adobe Acrobat is avai lable from: http://get.adobe.com/reader/
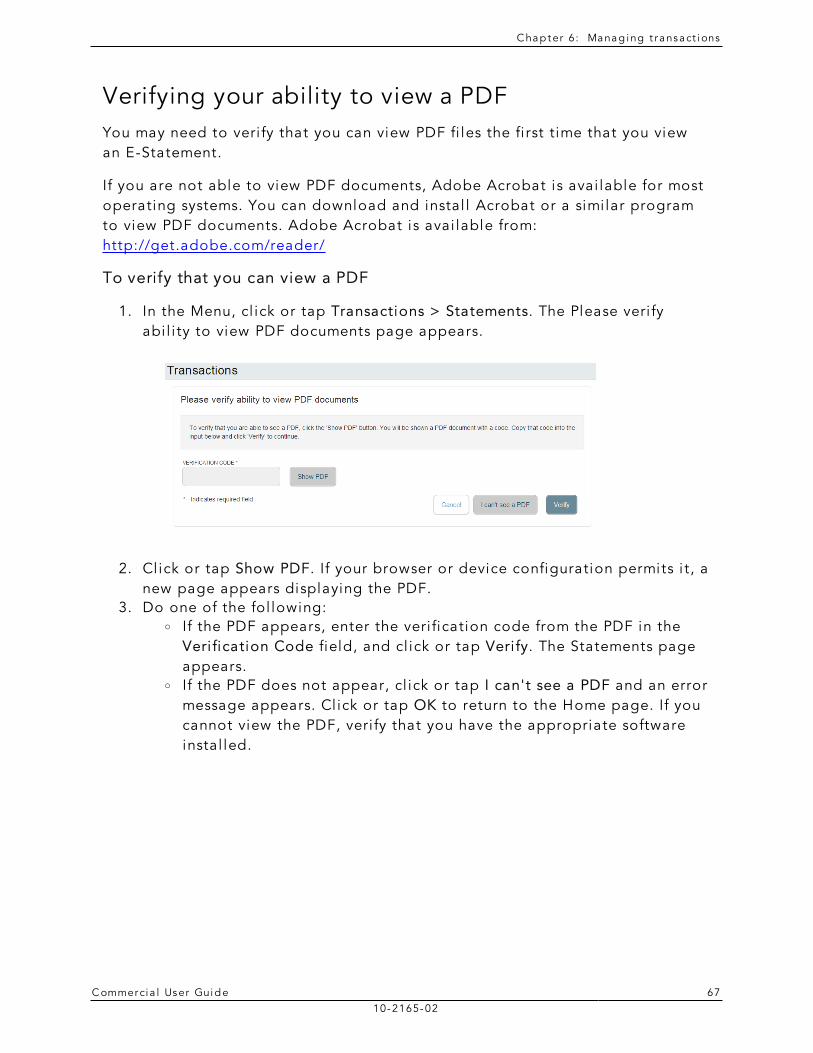
To verify that you can view a PDF
1. In the Menu, cl ick or tap Transactions > Statements. The Please veri fy abi l i ty to view PDF documents page appears.
2. Cl ick or tap Show PDF. If your browser or device configuration permits i t, a new page appears displaying the PDF.
3. Do one of the fol lowing: o If the PDF appears, enter the veri fication code from the PDF in the
Veri fication Code field, and cl ick or tap Veri fy. The Statements page appears.
o If the PDF does not appear, cl ick or tap I can't see a PDF and an error message appears. Cl ick or tap OK to return to the Home page. If you cannot view the PDF, veri fy that you have the appropriate software instal led.
C hap ter 6: Manag ing t r ansact ions
C ommerci a l User Guide 6810-2165-02
Reordering checksYou can use the Check Reorder page to repeat your most recent check order. You can only submit a reorder request for one account at a time.
To make changes to the style, layout, del ivery method, or the check information, contact us.
The procedure to reorder checks may vary.
To reorder checks
1. In the Menu, cl ick or tap Transactions > Check Reorder. The Check Reorder page appears.
2. Do the fol lowing: a. Cl ick or tap the account to include in the reorder request. b. On the Check Number tab, cl ick or tap the starting Check Number,
and cl ick or tap Save. c. On the Number of Boxes tab, cl ick or tap the number of boxes to
order, and cl ick or tap Save. d. Cl ick or tap Send Request.
3. Cl ick or tap Close on the success message.
C hap ter 6: Manag ing t r ansact ions
C ommerci a l User Guide 6910-2165-02
Sending a check to a payeeYou can send a paper check to a single payee that you speci fy.
Note: When you send a check, we do not save the payee information that you enter to reuse later. Use Bi l l Pay to save payees for later reuse. See "Managing bi l l payments" on page 43 for more information about using Bi l l Pay.
To send a check to a payee
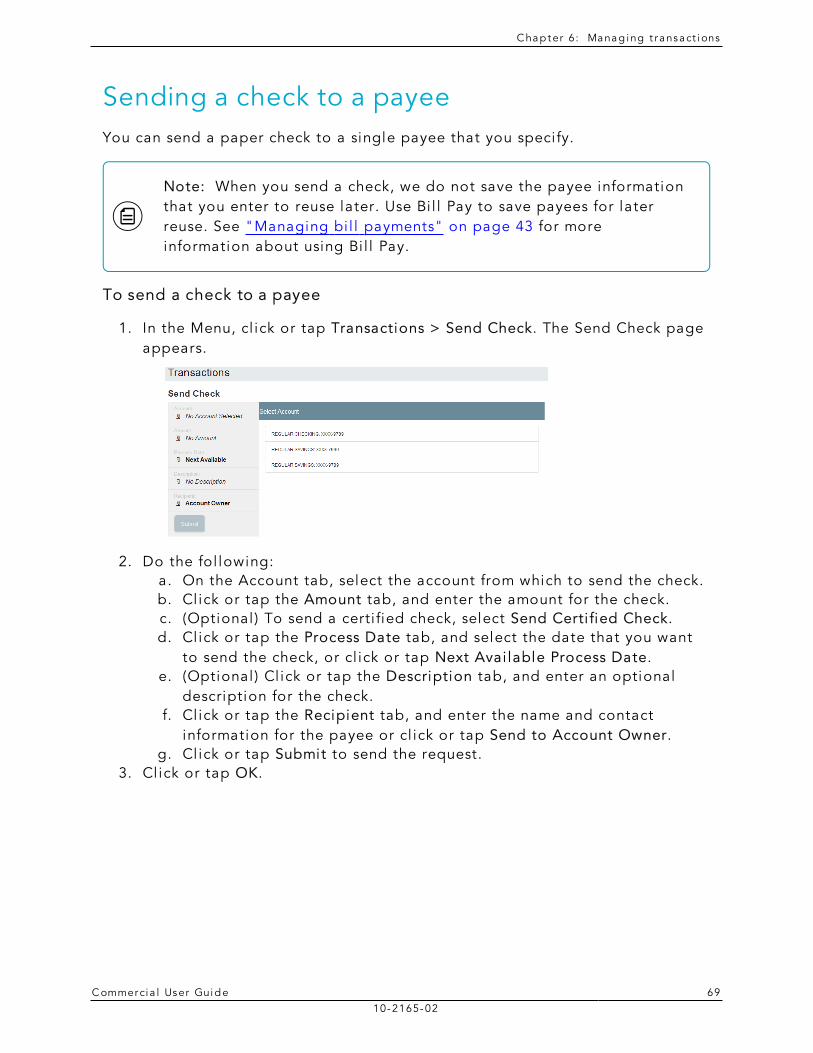
1. In the Menu, cl ick or tap Transactions > Send Check. The Send Check page appears.
2. Do the fol lowing: a. On the Account tab, select the account from which to send the check. b. Cl ick or tap the Amount tab, and enter the amount for the check. c. (Optional ) To send a certi fied check, select Send Certi fied Check. d. Cl ick or tap the Process Date tab, and select the date that you want
to send the check, or cl ick or tap Next Avai lable Process Date. e. (Optional ) Cl ick or tap the Description tab, and enter an optional
description for the check. f. Cl ick or tap the Recipient tab, and enter the name and contact
information for the payee or cl ick or tap Send to Account Owner. g. Cl ick or tap Submit to send the request.
3. Cl ick or tap OK.
C hap ter 6: Manag ing t r ansact ions
C ommerci a l User Guide 7010-2165-02
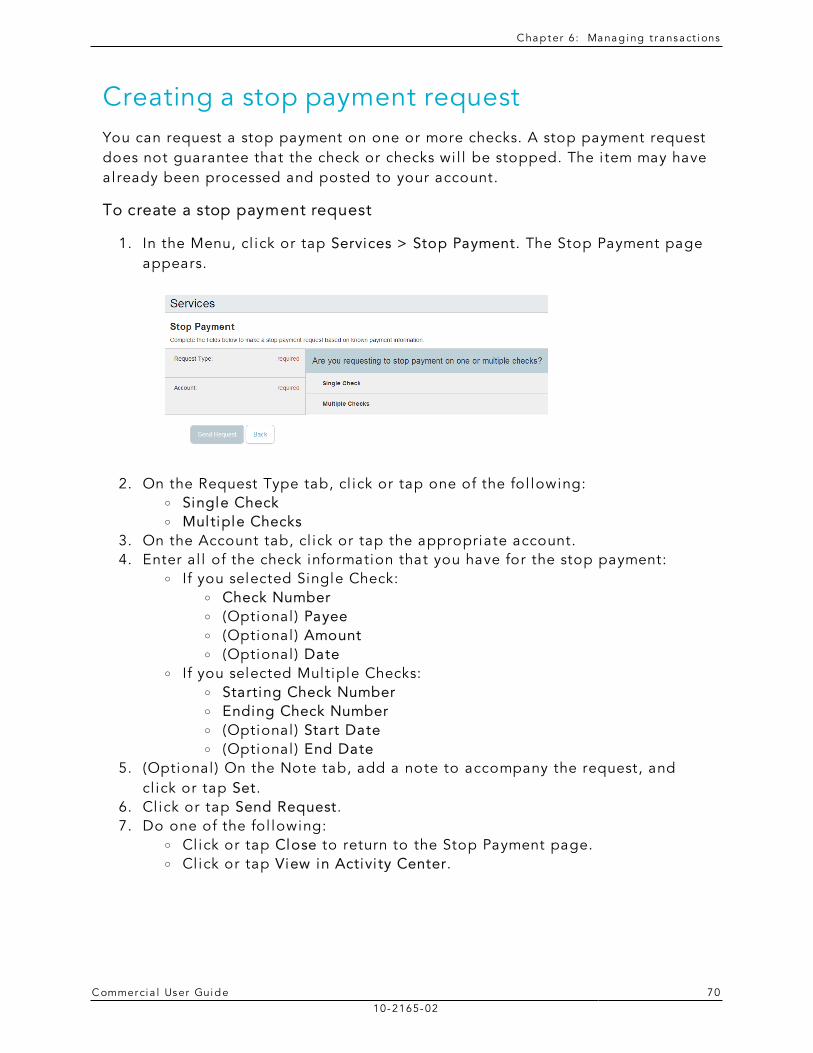
Creating a stop payment requestYou can request a stop payment on one or more checks. A stop payment request does not guarantee that the check or checks wi l l be stopped. The i tem may have already been processed and posted to your account.
To create a stop payment request
1. In the Menu, cl ick or tap Services > Stop Payment. The Stop Payment page appears.
2. On the Request Type tab, cl ick or tap one of the fol lowing: o Single Check o Multiple Checks
3. On the Account tab, cl ick or tap the appropriate account. 4. Enter al l of the check information that you have for the stop payment:
o If you selected Single Check: o Check Number o (Optional ) Payee o (Optional ) Amount o (Optional ) Date
o If you selected Multiple Checks: o Starting Check Number o Ending Check Number o (Optional ) Start Date o (Optional ) End Date
5. (Optional ) On the Note tab, add a note to accompany the request, and cl ick or tap Set.
6. Cl ick or tap Send Request. 7. Do one of the fol lowing:
o Click or tap Close to return to the Stop Payment page. o Click or tap View in Activi ty Center.
C ommerci a l User Guide 7110-2165-02
CHAPTER 7: MANAGING MESSAGES AND ALERTS
This chapter contains the fol lowing:
l "Managing secure messages" on page 71 l "Managing alerts" on page 76
Managing secure messagesSecure messages provide a secure way to communicate with us and are not used to communicate with any outside party. These secure messages appear in both onl ine banking and the mobi le banking app.
This section includes the fol lowing:
l "Creating a secure message" on page 72 l "Reading a secure message" on page 73 l "Replying to a secure message" on page 74 l "Deleting secure message threads" on page 74
C ommerci a l User Guide 7210-2165-02
Creating a secure messageYou can create a secure message in onl ine banking or the mobi le banking app.
In onl ine banking, you can attach a fi le to a message. The fi le can be any of the fol lowing formats:
• ach • doc
• docx • gi f
• jpeg • jpg
• log • pdf
• png • ppt
• rtf • text
• txt • wpd
• xls • xlsx
• zip
To create a secure message
1. In the Menu, cl ick or tap Messages. The Messages page appears. 2. Cl ick or tap New. The New Message window appears. 3. Cl ick or tap the message recipient. The message window appears. 4. In the Subject field, enter a subject. 5. In the Message field, enter the message. 6. (Optional ) In onl ine banking, cl ick the attach fi le icon ( ). In the Open
dialog box, select a fi le to attach to the message, and cl ick Open. 7. When your message is complete, cl ick or tap Send. Your new message
appears on the Messages page.
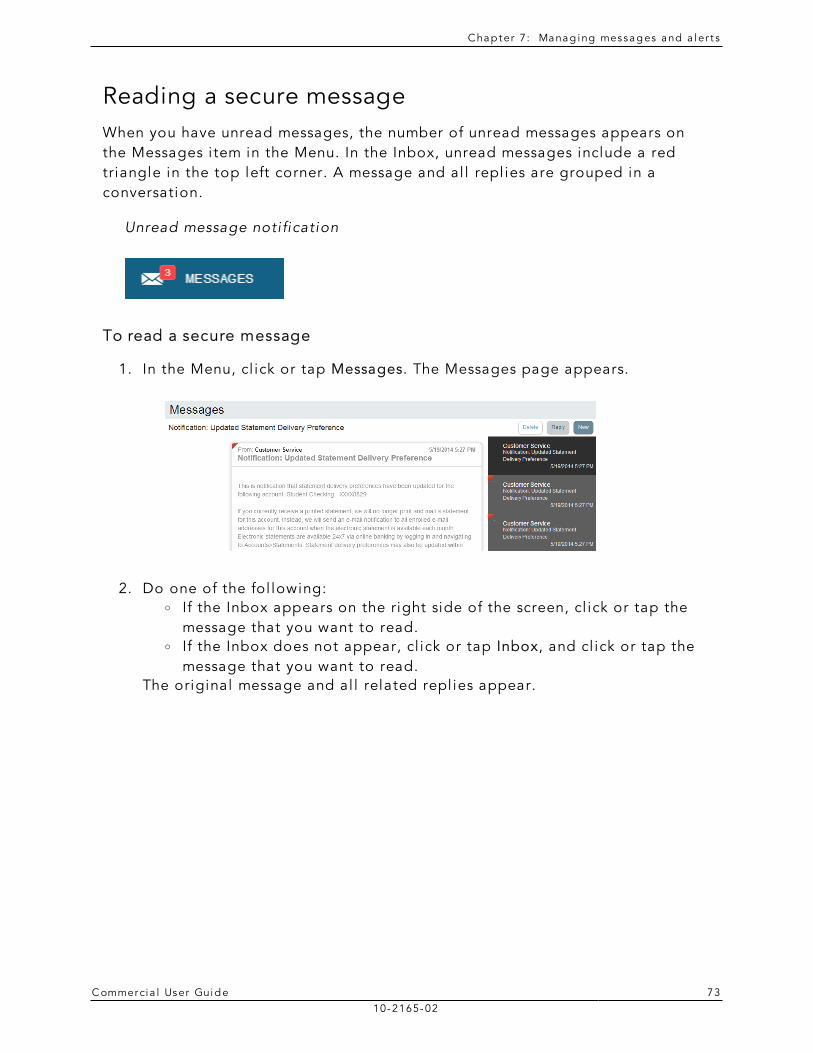
C hap ter 7: Manag ing messag es and a ler t s
C ommerci a l User Guide 7310-2165-02
Reading a secure messageWhen you have unread messages, the number of unread messages appears on the Messages i tem in the Menu. In the Inbox, unread messages include a red triangle in the top left corner. A message and al l repl ies are grouped in a conversation.
Unread message noti fication
To read a secure message
1. In the Menu, cl ick or tap Messages. The Messages page appears.
2. Do one of the fol lowing: o If the Inbox appears on the right side of the screen, cl ick or tap the
message that you want to read. o If the Inbox does not appear, cl ick or tap Inbox, and cl ick or tap the
message that you want to read. The original message and al l related repl ies appear.
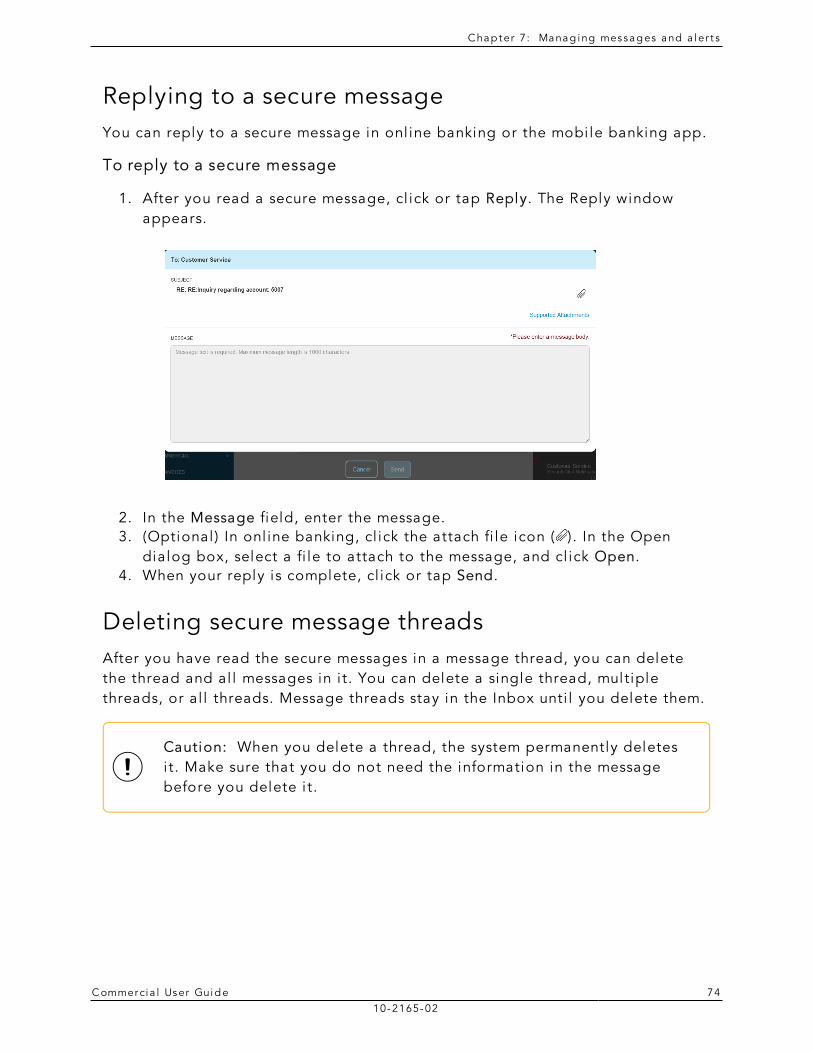
C hap ter 7: Manag ing messag es and a ler t s
C ommerci a l User Guide 7410-2165-02
Replying to a secure messageYou can reply to a secure message in onl ine banking or the mobi le banking app.
To reply to a secure message
1. After you read a secure message, cl ick or tap Reply. The Reply window appears.
2. In the Message field, enter the message. 3. (Optional ) In onl ine banking, cl ick the attach fi le icon ( ). In the Open
dialog box, select a fi le to attach to the message, and cl ick Open. 4. When your reply is complete, cl ick or tap Send.
Deleting secure message threadsAfter you have read the secure messages in a message thread, you can delete the thread and al l messages in i t. You can delete a single thread, multiple threads, or al l threads. Message threads stay in the Inbox unti l you delete them.
Caution: When you delete a thread, the system permanently deletes i t. Make sure that you do not need the information in the message before you delete i t.
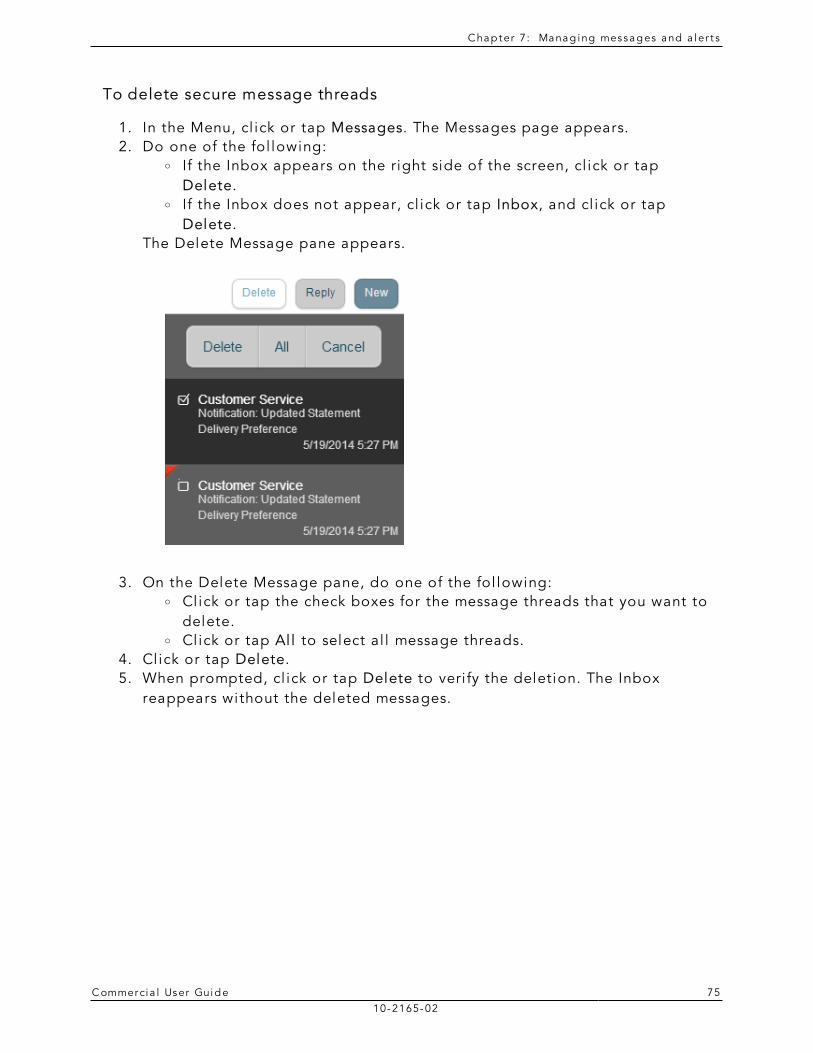
C hap ter 7: Manag ing messag es and a ler t s
C ommerci a l User Guide 7510-2165-02
To delete secure message threads
1. In the Menu, cl ick or tap Messages. The Messages page appears. 2. Do one of the fol lowing:
o If the Inbox appears on the right side of the screen, cl ick or tap Delete.
o If the Inbox does not appear, cl ick or tap Inbox, and cl ick or tap Delete.
The Delete Message pane appears.
3. On the Delete Message pane, do one of the fol lowing: o Click or tap the check boxes for the message threads that you want to
delete. o Click or tap Al l to select al l message threads.
4. Cl ick or tap Delete. 5. When prompted, cl ick or tap Delete to veri fy the deletion. The Inbox
reappears without the deleted messages.
C hap ter 7: Manag ing messag es and a ler t s
C ommerci a l User Guide 7610-2165-02
Managing alertsAlerts remind you of important events, warn you about the status of your accounts, and noti fy you when transactions occur. When you create an alert, you speci fy the conditions that trigger the alert as wel l as the way that you receive the alert. These conditions vary depending on the alert type. Alert types include:
l Date l Account l History l Insufficient Funds l Transactions l Securi ty
You can choose to receive Alerts in any of these ways:
l Secure Message l Emai l l Telephone cal l l Text (SMS) message
You do not need to be logged in for us to send the alert. Secure Message and emai l alerts are sent immediately when they are generated. You speci fy the time to send alerts in a telephone cal l or a text message.
This section includes the fol lowing:
l "Creating an alert" on page 77 l "Editing alerts" on page 78 l "Enabl ing and disabl ing alerts" on page 78 l "Deleting an alert" on page 79 l "Configuring securi ty alerts" on page 79
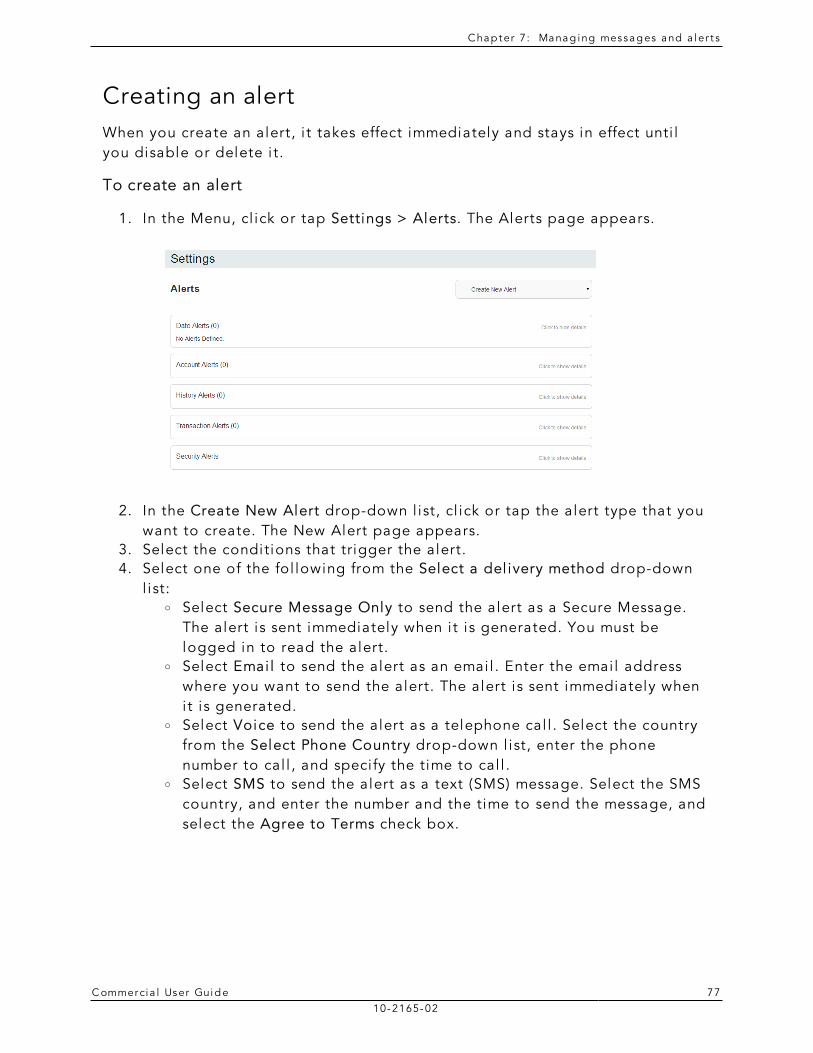
C hap ter 7: Manag ing messag es and a ler t s
C ommerci a l User Guide 7710-2165-02
Creating an alertWhen you create an alert, i t takes effect immediately and stays in effect unti l you disable or delete i t.
To create an alert
1. In the Menu, cl ick or tap Settings > Alerts. The Alerts page appears.
2. In the Create New Alert drop-down l ist, cl ick or tap the alert type that you want to create. The New Alert page appears.
3. Select the conditions that trigger the alert. 4. Select one of the fol lowing from the Select a del ivery method drop-down
l ist: o Select Secure Message Only to send the alert as a Secure Message.
The alert is sent immediately when i t is generated. You must be logged in to read the alert.
o Select Emai l to send the alert as an emai l . Enter the emai l address where you want to send the alert. The alert is sent immediately when i t is generated.
o Select Voice to send the alert as a telephone cal l . Select the country from the Select Phone Country drop-down l ist, enter the phone number to cal l , and speci fy the time to cal l .
o Select SMS to send the alert as a text (SMS) message. Select the SMS country, and enter the number and the time to send the message, and select the Agree to Terms check box.
C hap ter 7: Manag ing messag es and a ler t s
C ommerci a l User Guide 7810-2165-02
5. Select the Every Occurrence check box to repeat the alert every time that the trigger occurs.
Note: When you select Every Occurrence, a Transaction alert is sent every time the conditions match. Account, History, and Insufficient funds alerts are sent once per day.
6. Cl ick or tap Save. 7. In the success message, cl ick or tap Close. The new alert appears on the
Alerts page.
Editing alertsYou can use the Alerts page to edit an existing alert. Any changes take effect immediately.
To edit an existing alert
1. In the Menu, cl ick or tap Settings > Alerts. The Alerts page appears. 2. Cl ick or tap the type of alert that you want to edit. 3. Cl ick or tap the existing alert that you want to edit. The Edit Alert page
appears. 4. Make any needed changes to the alert settings, and cl ick or tap Save. 5. Cl ick or tap Close on the Save Alert message.
Enabling and disabling alertsYou can use the Alerts page to temporari ly disable an existing alert and later enable i t again.
To disable or enable an existing alert
1. In the Menu, cl ick or tap Settings > Alerts. The Alerts page appears. 2. Cl ick or tap the type of alert that you want to disable or enable. 3. On the Alerts page, locate the existing alert, then do one of the fol lowing
in the Enabled column: o Click or tap Off to disable the alert. o Click or tap On to enable the alert.
C hap ter 7: Manag ing messag es and a ler t s
C ommerci a l User Guide 7910-2165-02
Deleting an alertYou can use the Alerts page to delete an alert that you no longer need. Deleting an alert removes i t immediately and permanently.
To delete an alert
1. In the Menu, cl ick or tap Settings > Alerts. The Alerts page appears. 2. Cl ick or tap the type of alert that you want to delete. 3. Cl ick or tap the existing alert that you want to delete. The Edit Alert page
appears. 4. Cl ick or tap Delete. 5. When prompted, cl ick or tap Confi rm to delete the alert. 6. When the delete is complete, a message appears. Cl ick or tap Close.
Configuring security alertsSecuri ty alerts inform you immediately when a securi ty-related event occurs. Some securi ty alerts are required. In the l ist of securi ty alerts, required alerts are dimmed. You can enable or disable optional securi ty alerts. The avai lable securi ty alert types vary, depending on your account type.
When an enabled alert is triggered, we send a securi ty alert message. Securi ty alerts are always sent as secure messages. You can add additional del ivery methods. When a securi ty alert is triggered, the alert is sent to al l of the configured del ivery methods.
You should not rely on emai l alerts alone, since emai l can be delayed or interrupted. Always use a second del ivery method along with emai l for greater securi ty.
To enable or disable optional security alerts
1. In the Menu, cl ick or tap Settings > Alerts. The Alerts page appears. 2. Cl ick or tap Securi ty Alerts. The l ist of avai lable alerts appears. 3. Do one of the fol lowing:
o To enable an alert, cl ick or tap On. o To disable an alert, cl ick or tap Off.
4. On the Save Alert page, cl ick or tap Close.
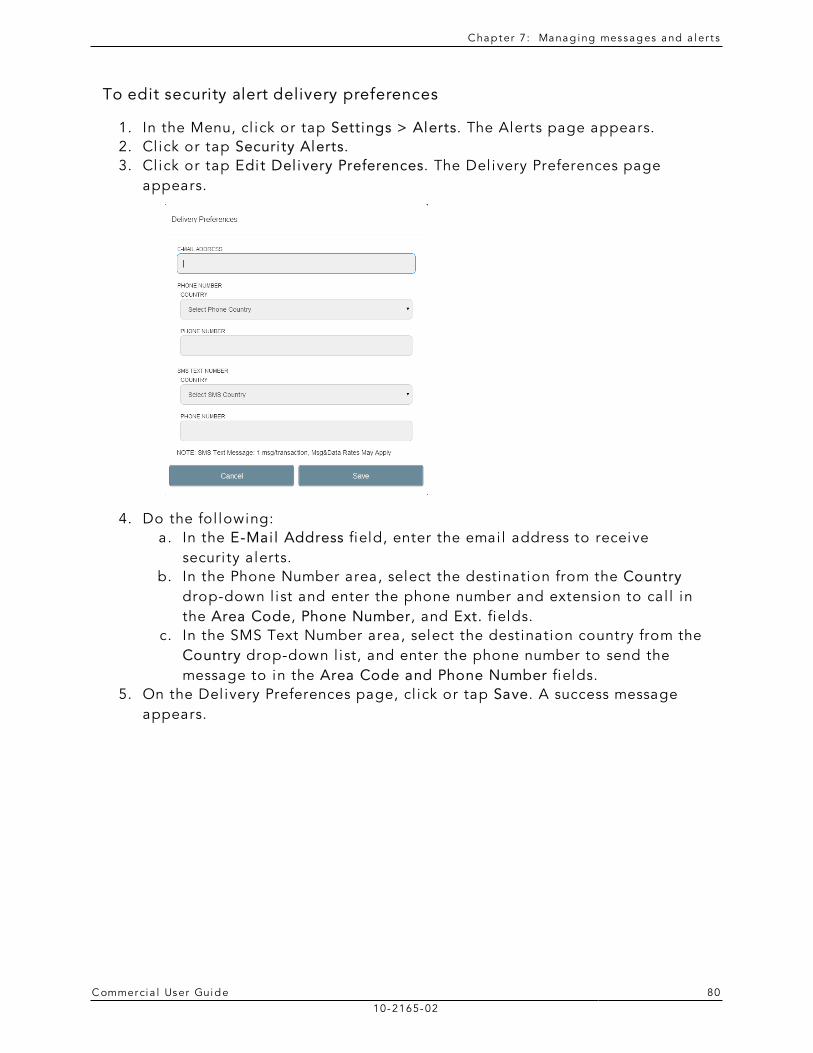
C hap ter 7: Manag ing messag es and a ler t s
C ommerci a l User Guide 8010-2165-02
To edit security alert delivery preferences
1. In the Menu, cl ick or tap Settings > Alerts. The Alerts page appears. 2. Cl ick or tap Securi ty Alerts. 3. Cl ick or tap Edit Del ivery Preferences. The Del ivery Preferences page
appears.
4. Do the fol lowing: a. In the E-Mai l Address field, enter the emai l address to receive
securi ty alerts. b. In the Phone Number area, select the destination from the Country
drop-down l ist and enter the phone number and extension to cal l in the Area Code, Phone Number, and Ext. fields.
c. In the SMS Text Number area, select the destination country from the Country drop-down l ist, and enter the phone number to send the message to in the Area Code and Phone Number fields.
5. On the Del ivery Preferences page, cl ick or tap Save. A success message appears.
C ommerci a l User Guide 8110-2165-02
CHAPTER 8: COMMERCIAL FEATURES
This chapter contains the fol lowing:
l "Payment and template overview" on page 81 l "User management overview" on page 82 l "Payment recipients overview" on page 92 l "Subsidiaries overview" on page 96 l "Payment processing times" on page 98
Payment and template overviewYour business pays and col lects funds every day. You can use Commercial payments and templates in onl ine banking and the mobi le banking app to create one-time payments and to create templates to automate routine payments.
In onl ine banking and the mobi le banking app, a payment is a transaction that you create to pay or col lect funds.
A template is a defined set of instructions that you can use for repeated payments or col lections. Templates make i t easy for you to set up and use repeti tive payments, including the fol lowing:
l Payments to vendors and suppl iers l Collections from customers
Templates help you to do the fol lowing:
l Save time l Reduce error rates l Increase productivi ty l Delegate tasks l Control regular payments
You can create a template and assign i t to another user. User management al lows you to control how that user can access, use, and change the template. Depending on the user’s rights, that user can do some or al l of the fol lowing:
l Create a payment from the template and change only the date, amount, and description
l Create a payment from the template and change any field l Edit the template and save the changes for al l users
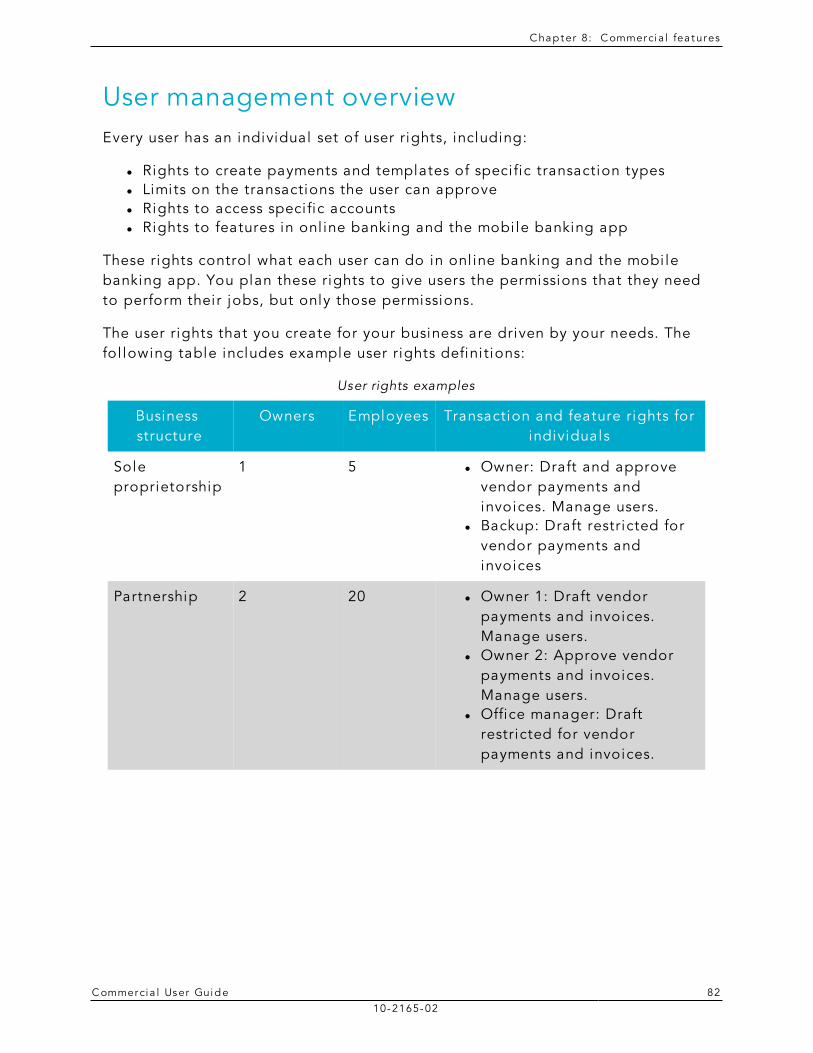
C hap ter 8: C ommerci a l fea tures
C ommerci a l User Guide 8210-2165-02
User management overviewEvery user has an individual set of user rights, including:
l Rights to create payments and templates of speci fic transaction types l Limits on the transactions the user can approve l Rights to access speci fic accounts l Rights to features in onl ine banking and the mobi le banking app
These rights control what each user can do in onl ine banking and the mobi le banking app. You plan these rights to give users the permissions that they need to perform their jobs, but only those permissions.
The user rights that you create for your business are driven by your needs. The fol lowing table includes example user rights defini tions:
Business structure
Owners Employees Transaction and feature rights for individuals
Sole proprietorship
1 5 l Owner: Draft and approve vendor payments and invoices. Manage users.
l Backup: Draft restricted for vendor payments and invoices
Partnership 2 20 l Owner 1: Draft vendor payments and invoices. Manage users.
l Owner 2: Approve vendor payments and invoices. Manage users.
l Office manager: Draft restricted for vendor payments and invoices.
User rights examples
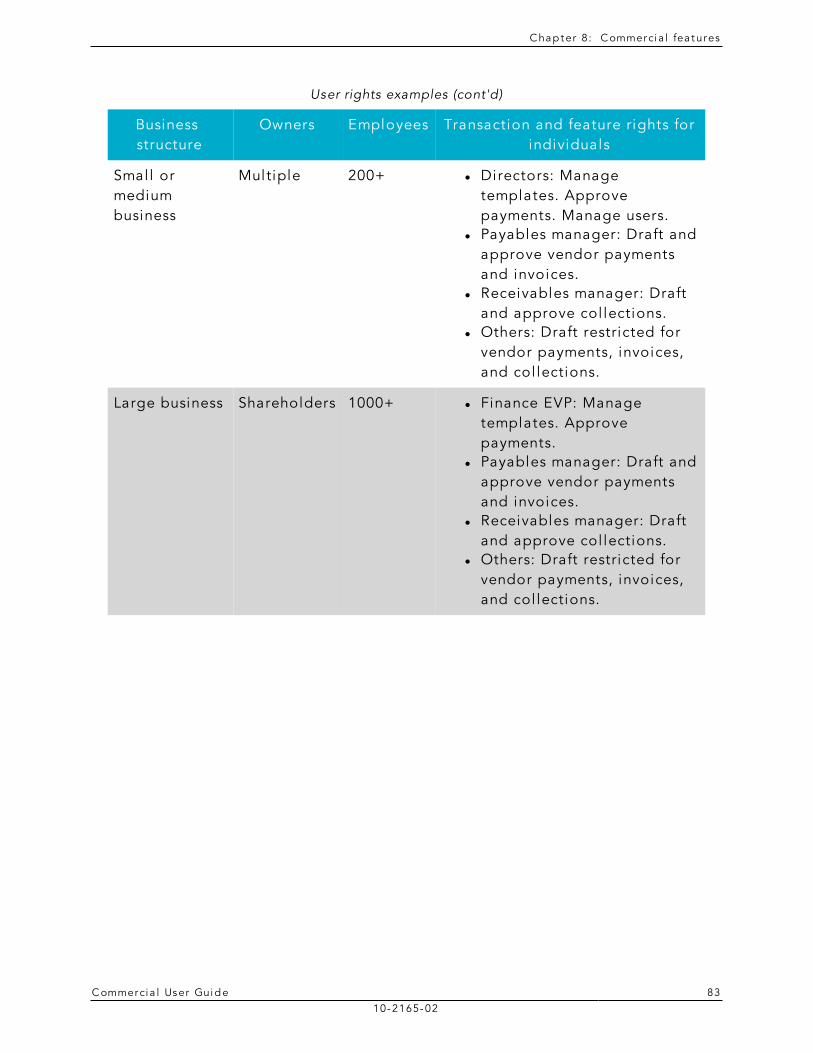
C hap ter 8: C ommerci a l fea tures
C ommerci a l User Guide 8310-2165-02
Business structure
Owners Employees Transaction and feature rights for individuals
Smal l or medium business
Multiple 200+ l Directors: Manage templates. Approve payments. Manage users.
l Payables manager: Draft and approve vendor payments and invoices.
l Receivables manager: Draft and approve col lections.
l Others: Draft restricted for vendor payments, invoices, and col lections.
Large business Shareholders 1000+ l Finance EVP: Manage templates. Approve payments.
l Payables manager: Draft and approve vendor payments and invoices.
l Receivables manager: Draft and approve col lections.
l Others: Draft restricted for vendor payments, invoices, and col lections.
User rights examples (cont'd)
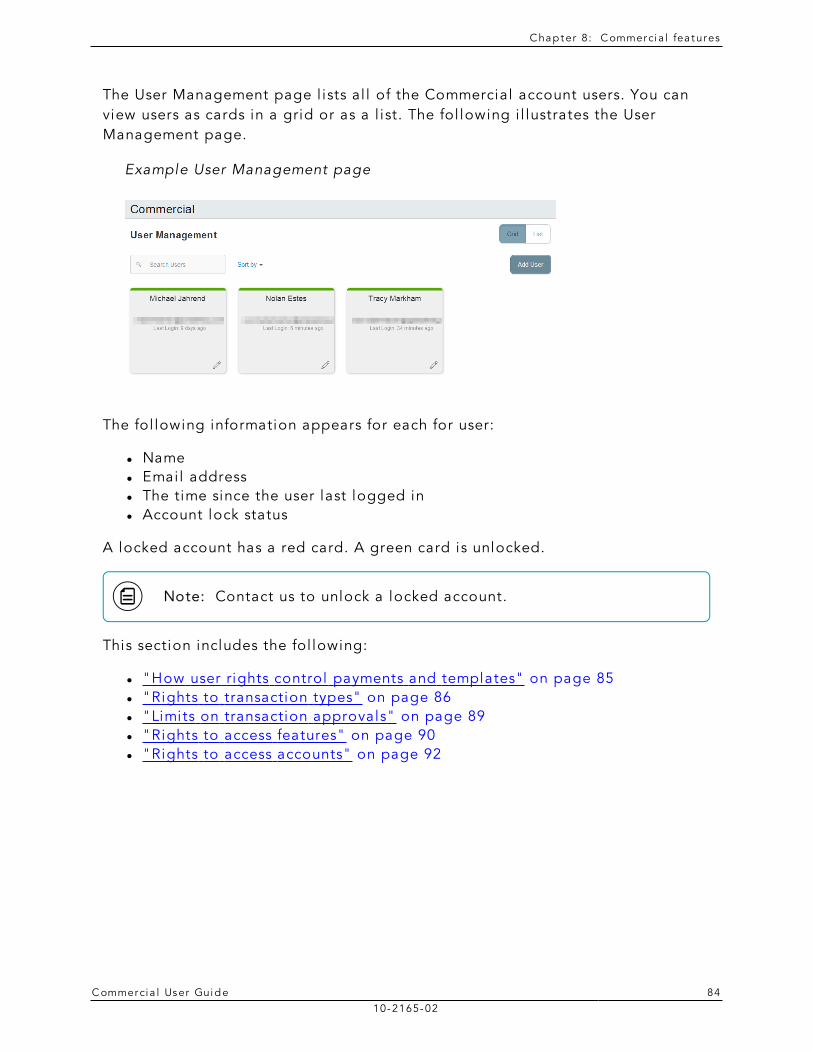
C hap ter 8: C ommerci a l fea tures
C ommerci a l User Guide 8410-2165-02
The User Management page l ists al l of the Commercial account users. You can view users as cards in a grid or as a l ist. The fol lowing i l lustrates the User Management page.
Example User Management page
The fol lowing information appears for each for user:
l Name l Emai l address l The time since the user last logged in l Account lock status
A locked account has a red card. A green card is unlocked.
Note: Contact us to unlock a locked account.
This section includes the fol lowing:
l "How user rights control payments and templates" on page 85 l "Rights to transaction types" on page 86 l "Limits on transaction approvals" on page 89 l "Rights to access features" on page 90 l "Rights to access accounts" on page 92
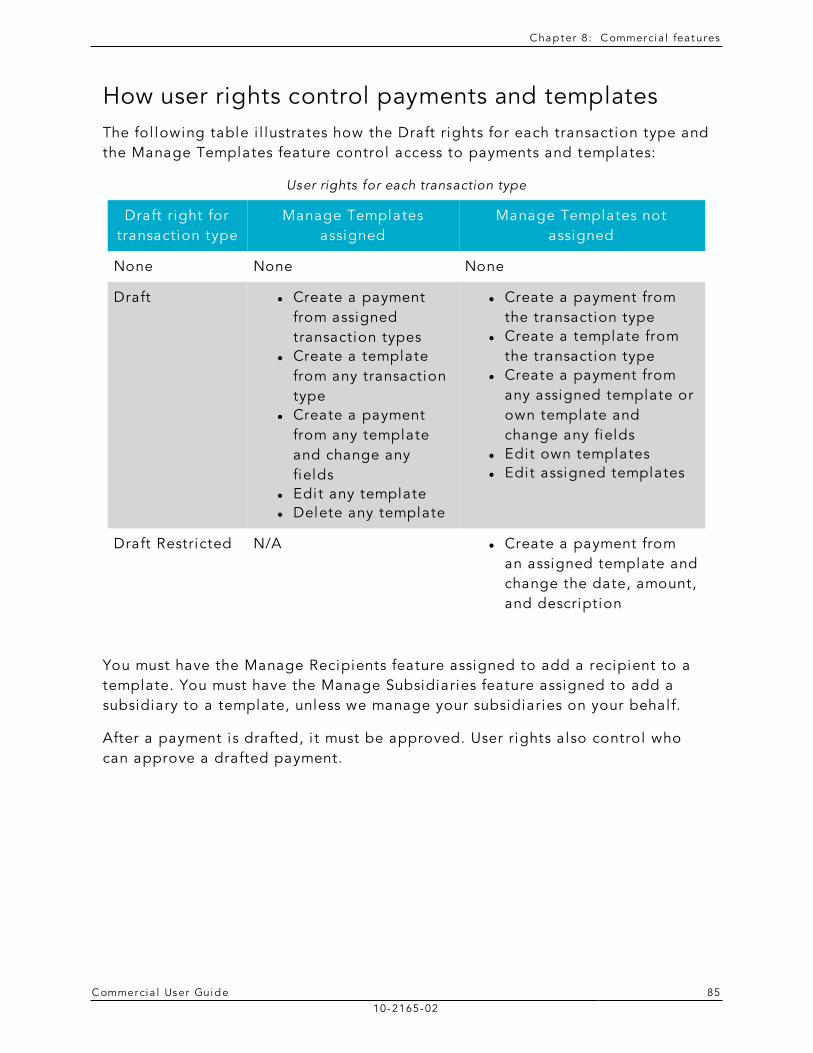
C hap ter 8: C ommerci a l fea tures
C ommerci a l User Guide 8510-2165-02
How user rights control payments and templatesThe fol lowing table i l lustrates how the Draft rights for each transaction type and the Manage Templates feature control access to payments and templates:
Draft right for transaction type
Manage Templates assigned
Manage Templates not assigned
None None None
Draft l Create a payment from assigned transaction types
l Create a template from any transaction type
l Create a payment from any template and change any fields
l Edit any template l Delete any template
l Create a payment from the transaction type
l Create a template from the transaction type
l Create a payment from any assigned template or own template and change any fields
l Edit own templates l Edit assigned templates
Draft Restricted N/A l Create a payment from an assigned template and change the date, amount, and description
User rights for each transaction type
You must have the Manage Recipients feature assigned to add a recipient to a template. You must have the Manage Subsidiaries feature assigned to add a subsidiary to a template, unless we manage your subsidiaries on your behalf.
After a payment is drafted, i t must be approved. User rights also control who can approve a drafted payment.

C hap ter 8: C ommerci a l fea tures
C ommerci a l User Guide 8610-2165-02
You must have rights to an account to include i t in a payment or template. The fol lowing table l ists the payment types and required rights.
Payment type Required account right
l ACH Payment l ACH Batch l Domestic Wire l International Wire l Tax Payment
Withdraw
l ACH Receipt l ACH Col lection
Deposit
Required account rights for payment types
The rights required for an ACH Passthru payment depend on the contents of the fi le.
See "Managing users" on page 100 for information about configuring and using user rights.
Rights to transaction typesThe Overview tab on the User Pol icy page l ists the rights and approval l imits for each transaction type. The fol lowing example i l lustrates the Overview tab:
Overview tab example
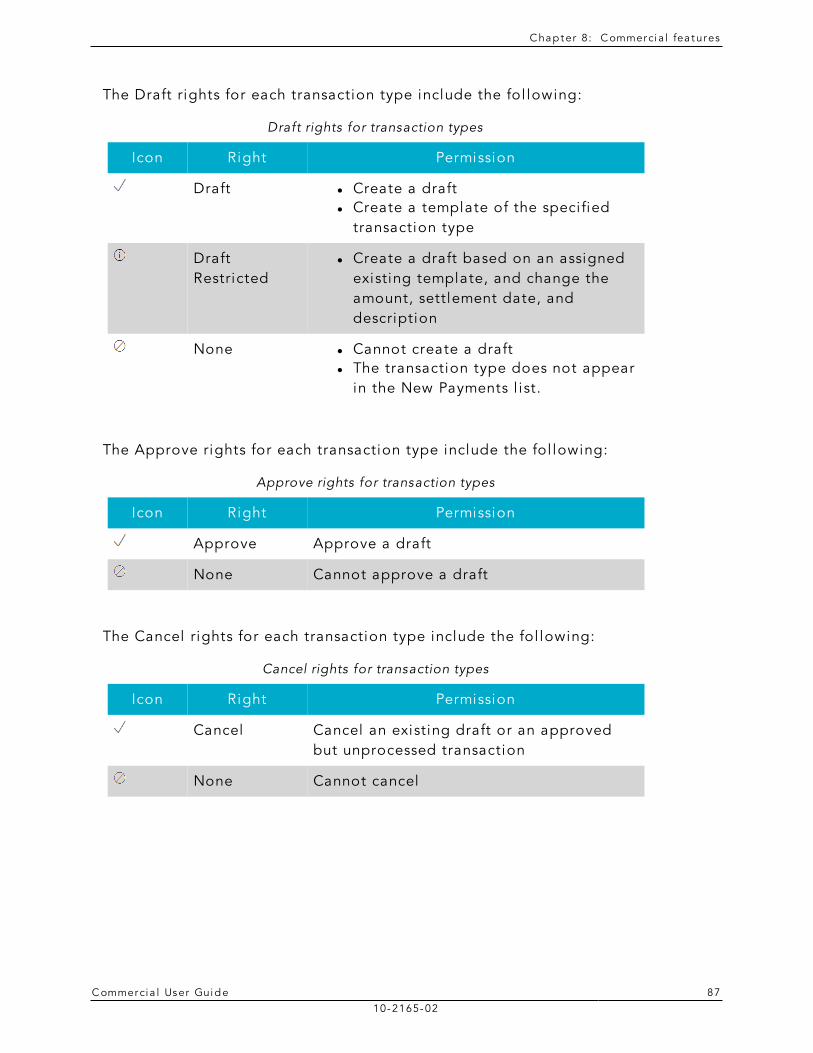
C hap ter 8: C ommerci a l fea tures
C ommerci a l User Guide 8710-2165-02
The Draft rights for each transaction type include the fol lowing:
Icon Right Permission
Draft l Create a draft l Create a template of the speci fied
transaction type
Draft Restricted
l Create a draft based on an assigned existing template, and change the amount, settlement date, and description
None l Cannot create a draft l The transaction type does not appear
in the New Payments l ist.
Draft rights for transaction types
The Approve rights for each transaction type include the fol lowing:
Icon Right Permission
Approve Approve a draft
None Cannot approve a draft
Approve rights for transaction types
The Cancel rights for each transaction type include the fol lowing:
Icon Right Permission
Cancel Cancel an existing draft or an approved but unprocessed transaction
None Cannot cancel
Cancel rights for transaction types
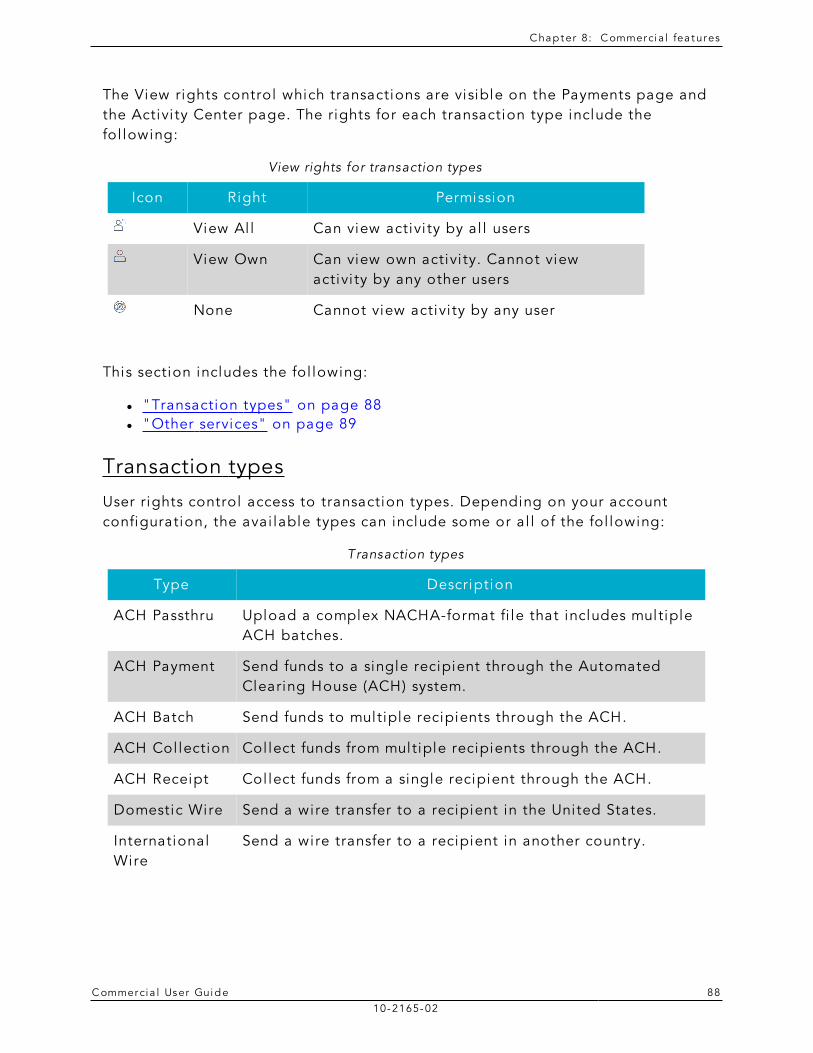
C hap ter 8: C ommerci a l fea tures
C ommerci a l User Guide 8810-2165-02
The View rights control which transactions are visible on the Payments page and the Activi ty Center page. The rights for each transaction type include the fol lowing:
Icon Right Permission
View Al l Can view activi ty by al l users
View Own Can view own activi ty. Cannot view activi ty by any other users
None Cannot view activi ty by any user
View rights for transaction types
This section includes the fol lowing:
l "Transaction types" on page 88 l "Other services" on page 89
Transaction types
User rights control access to transaction types. Depending on your account configuration, the avai lable types can include some or al l of the fol lowing:
Type Description
ACH Passthru Upload a complex NACHA-format fi le that includes multiple ACH batches.
ACH Payment Send funds to a single recipient through the Automated Clearing House (ACH) system.
ACH Batch Send funds to multiple recipients through the ACH.
ACH Col lection Col lect funds from multiple recipients through the ACH.
ACH Receipt Col lect funds from a single recipient through the ACH.
Domestic Wire Send a wire transfer to a recipient in the United States.
International Wire
Send a wire transfer to a recipient in another country.
Transaction types
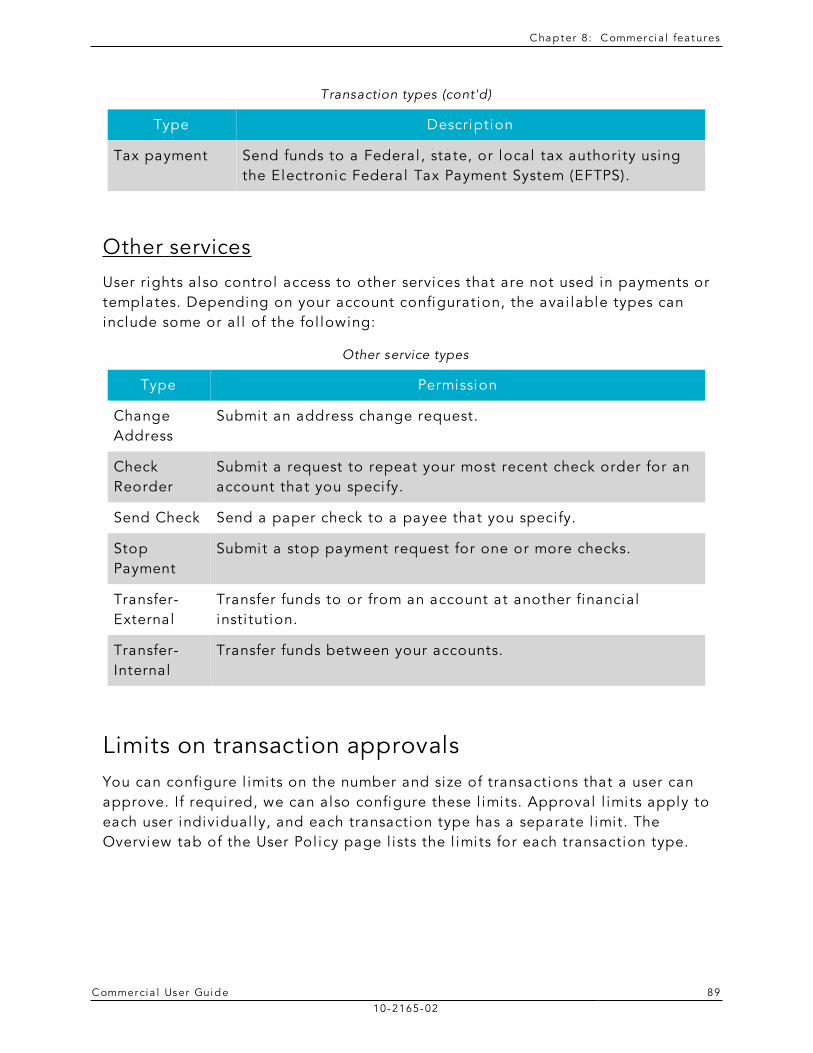
C hap ter 8: C ommerci a l fea tures
C ommerci a l User Guide 8910-2165-02
Type Description
Tax payment Send funds to a Federal , state, or local tax authori ty using the Electronic Federal Tax Payment System (EFTPS).
Transaction types (cont'd)
Other services
User rights also control access to other services that are not used in payments or templates. Depending on your account configuration, the avai lable types can include some or al l of the fol lowing:
Type Permission
Change Address
Submit an address change request.
Check Reorder
Submit a request to repeat your most recent check order for an account that you speci fy.
Send Check Send a paper check to a payee that you speci fy.
Stop Payment
Submit a stop payment request for one or more checks.
Transfer-External
Transfer funds to or from an account at another financial insti tution.
Transfer-Internal
Transfer funds between your accounts.
Other service types
Limits on transaction approvalsYou can configure l imits on the number and size of transactions that a user can approve. If required, we can also configure these l imits. Approval l imits apply to each user individual ly, and each transaction type has a separate l imit. The Overview tab of the User Pol icy page l ists the l imits for each transaction type.
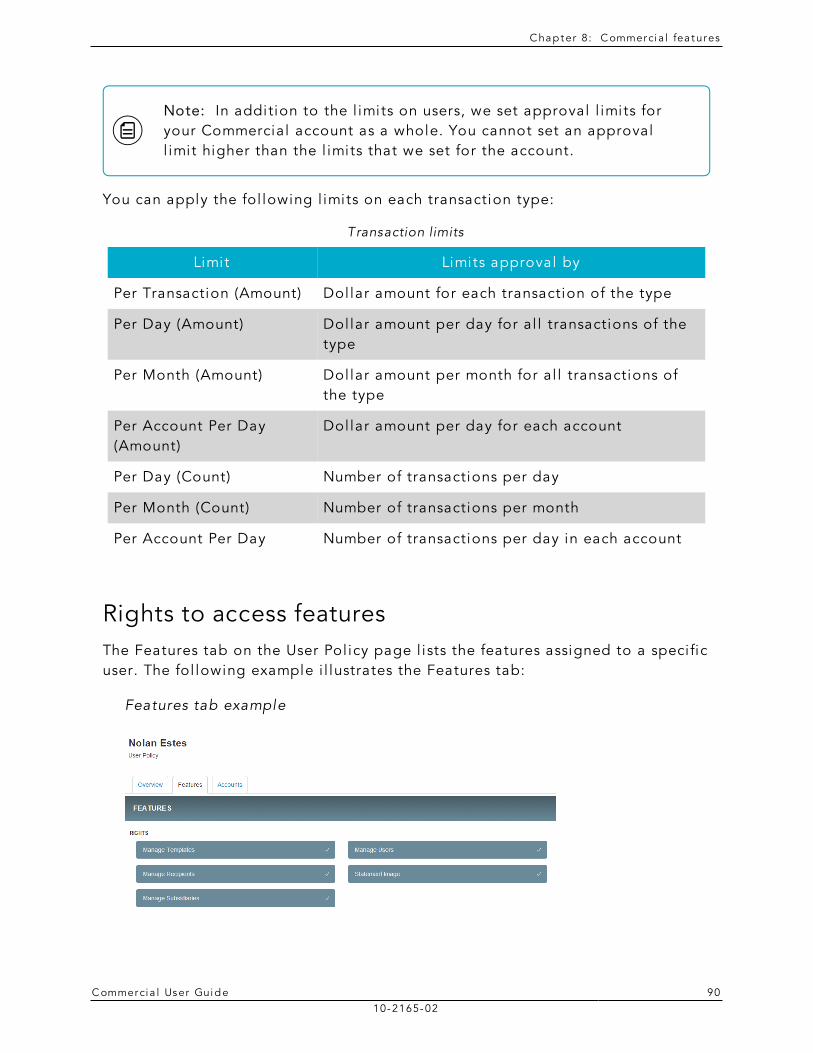
C hap ter 8: C ommerci a l fea tures
C ommerci a l User Guide 9010-2165-02
Note: In addition to the l imits on users, we set approval l imits for your Commercial account as a whole. You cannot set an approval l imit higher than the l imits that we set for the account.
You can apply the fol lowing l imits on each transaction type:
Limit Limits approval by
Per Transaction (Amount) Dol lar amount for each transaction of the type
Per Day (Amount) Dol lar amount per day for al l transactions of the type
Per Month (Amount) Dol lar amount per month for al l transactions of the type
Per Account Per Day (Amount)
Dol lar amount per day for each account
Per Day (Count) Number of transactions per day
Per Month (Count) Number of transactions per month
Per Account Per Day Number of transactions per day in each account
Transaction limits
Rights to access featuresThe Features tab on the User Pol icy page l ists the features assigned to a speci fic user. The fol lowing example i l lustrates the Features tab:
Features tab example
C hap ter 8: C ommerci a l fea tures
C ommerci a l User Guide 9110-2165-02
Depending on your account configuration, the features may include some or al l of the fol lowing:
Feature Name Allows you to
Manage Templates l Create new templates of any transaction type l Edit any existing templates of any transaction
type l Delete any existing templates
Manage Recipients l Create, edit, and delete recipients l Add existing recipients to templates l Remove existing recipients from templates
Manage Subsidiaries l Create, edit, and delete subsidiaries l Add existing subsidiaries to templates l Remove existing subsidiaries from templates
Manage Users l Add and delete users l Edit transaction types, features, and accounts
for any user
Statement Image l View statement images
Mobi le Capture l Use the mobi le banking app to deposit checks
Feature access
Depending on your account configuration, you may be able to access other feature on the Features tab of the User Pol icy page. These features can include custom forms or access to other services that we provide.
Caution: Because a user who has the Manage Users feature assigned can change his or her own rights and l imits, you should l imit the number of users who have the Manage Users feature assigned.
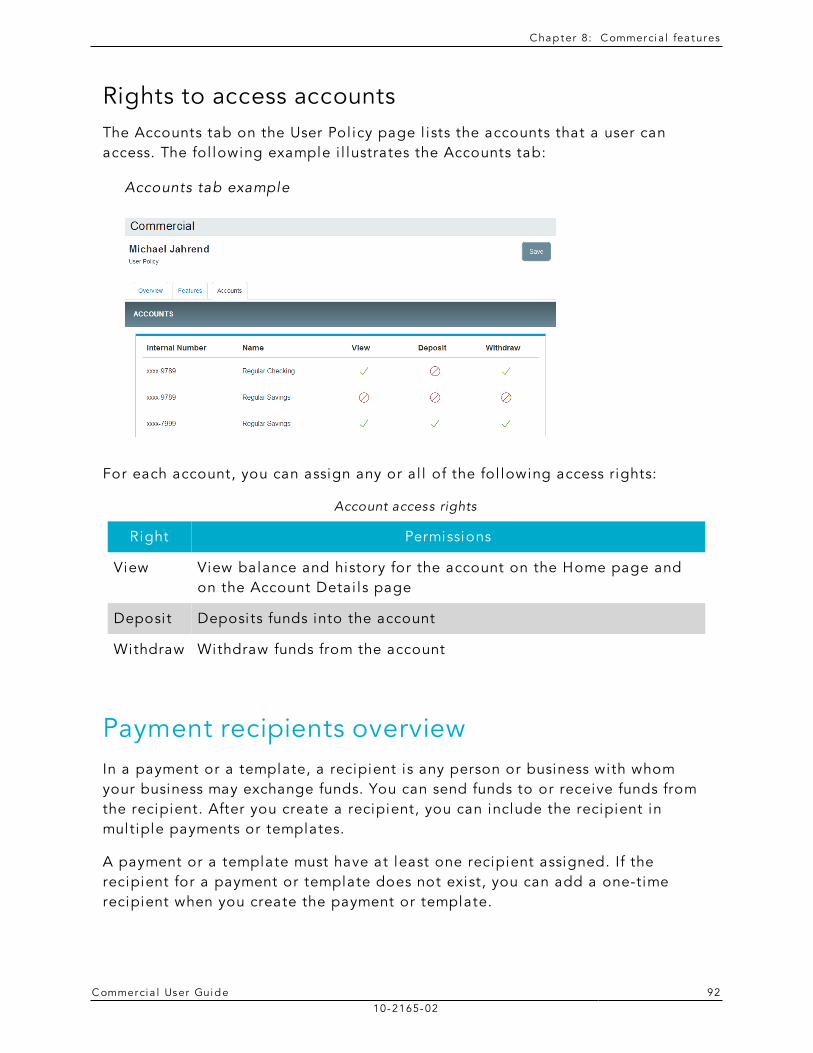
C hap ter 8: C ommerci a l fea tures
C ommerci a l User Guide 9210-2165-02
Rights to access accountsThe Accounts tab on the User Pol icy page l ists the accounts that a user can access. The fol lowing example i l lustrates the Accounts tab:
Accounts tab example
For each account, you can assign any or al l of the fol lowing access rights:
Right Permissions
View View balance and history for the account on the Home page and on the Account Detai ls page
Deposit Deposits funds into the account
Withdraw Withdraw funds from the account
Account access rights
Payment recipients overviewIn a payment or a template, a recipient is any person or business with whom your business may exchange funds. You can send funds to or receive funds from the recipient. After you create a recipient, you can include the recipient in multiple payments or templates.
A payment or a template must have at least one recipient assigned. If the recipient for a payment or template does not exist, you can add a one-time recipient when you create the payment or template.
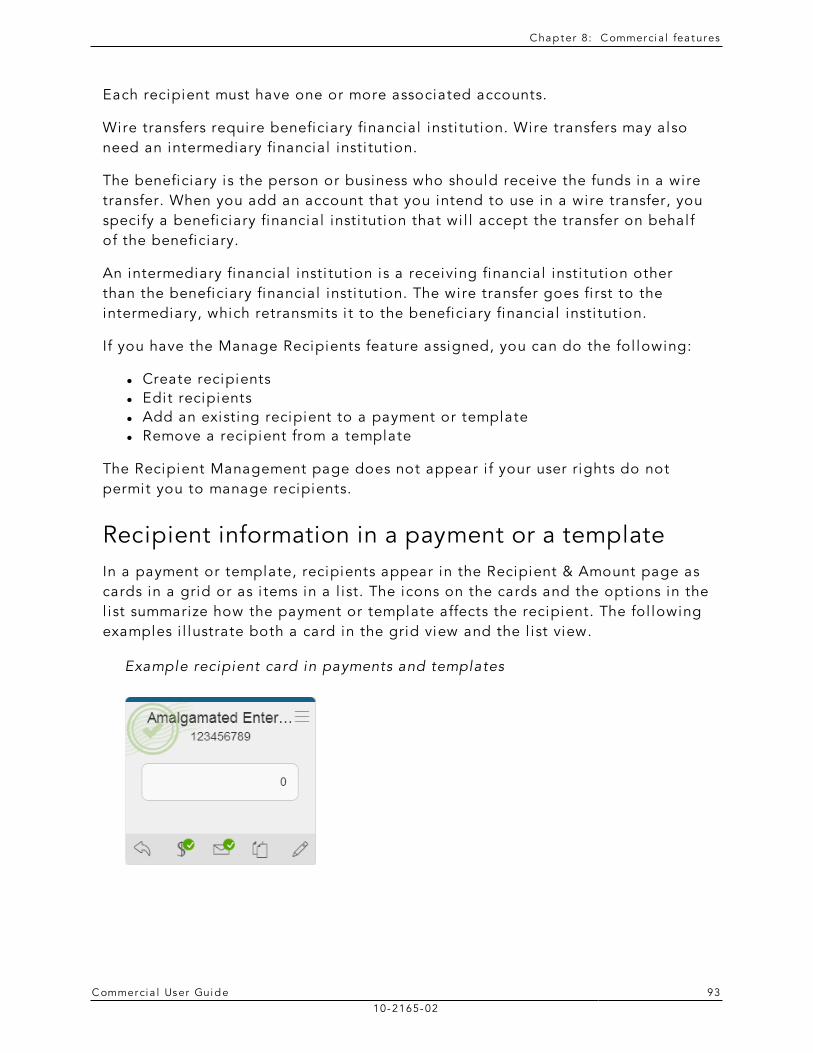
C hap ter 8: C ommerci a l fea tures
C ommerci a l User Guide 9310-2165-02
Each recipient must have one or more associated accounts.
Wire transfers require beneficiary financial insti tution. Wire transfers may also need an intermediary financial insti tution.
The beneficiary is the person or business who should receive the funds in a wire transfer. When you add an account that you intend to use in a wire transfer, you speci fy a beneficiary financial insti tution that wi l l accept the transfer on behalf of the beneficiary.
An intermediary financial insti tution is a receiving financial insti tution other than the beneficiary financial insti tution. The wire transfer goes fi rst to the intermediary, which retransmits i t to the beneficiary financial insti tution.
If you have the Manage Recipients feature assigned, you can do the fol lowing:
l Create recipients l Edit recipients l Add an existing recipient to a payment or template l Remove a recipient from a template
The Recipient Management page does not appear i f your user rights do not permit you to manage recipients.
Recipient information in a payment or a templateIn a payment or template, recipients appear in the Recipient & Amount page as cards in a grid or as i tems in a l ist. The icons on the cards and the options in the l ist summarize how the payment or template affects the recipient. The fol lowing examples i l lustrate both a card in the grid view and the l ist view.
Example recipient card in payments and templates
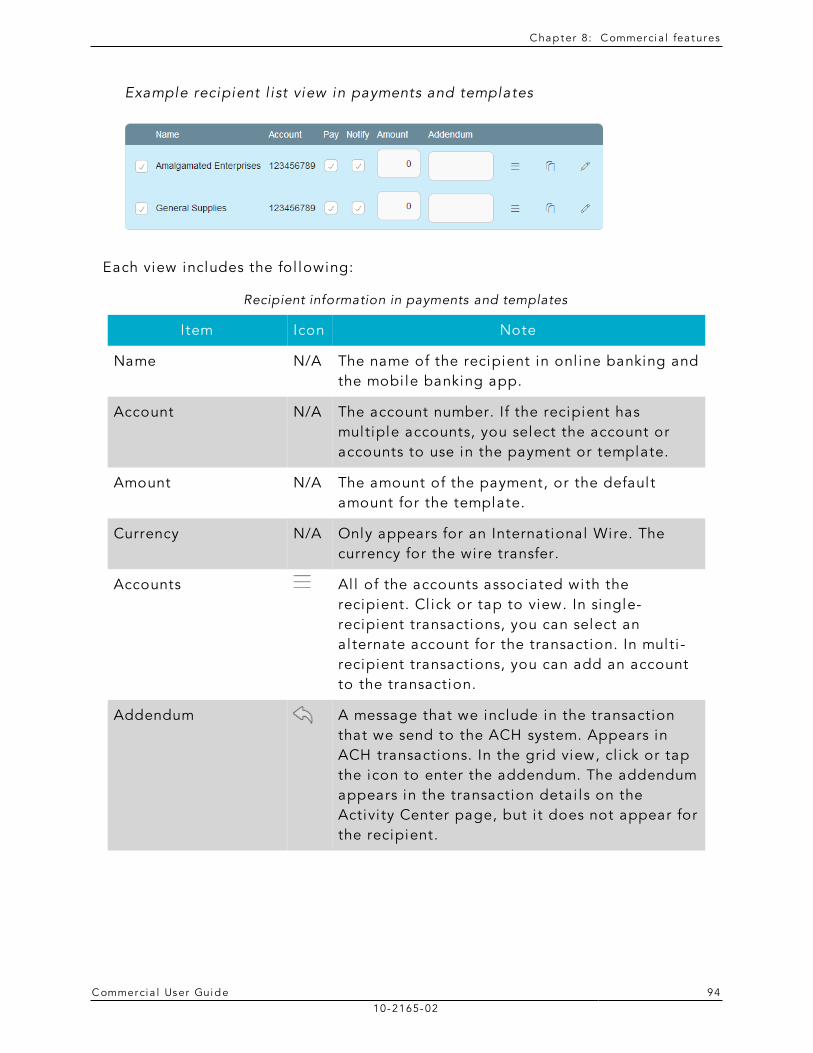
C hap ter 8: C ommerci a l fea tures
C ommerci a l User Guide 9410-2165-02
Example recipient l ist view in payments and templates
Each view includes the fol lowing:
Item Icon Note
Name N/A The name of the recipient in onl ine banking and the mobi le banking app.
Account N/A The account number. If the recipient has multiple accounts, you select the account or accounts to use in the payment or template.
Amount N/A The amount of the payment, or the default amount for the template.
Currency N/A Only appears for an International Wire. The currency for the wire transfer.
Accounts Al l of the accounts associated with the recipient. Cl ick or tap to view. In single-recipient transactions, you can select an alternate account for the transaction. In multi -recipient transactions, you can add an account to the transaction.
Addendum A message that we include in the transaction that we send to the ACH system. Appears in ACH transactions. In the grid view, cl ick or tap the icon to enter the addendum. The addendum appears in the transaction detai ls on the Activi ty Center page, but i t does not appear for the recipient.
Recipient information in payments and templates
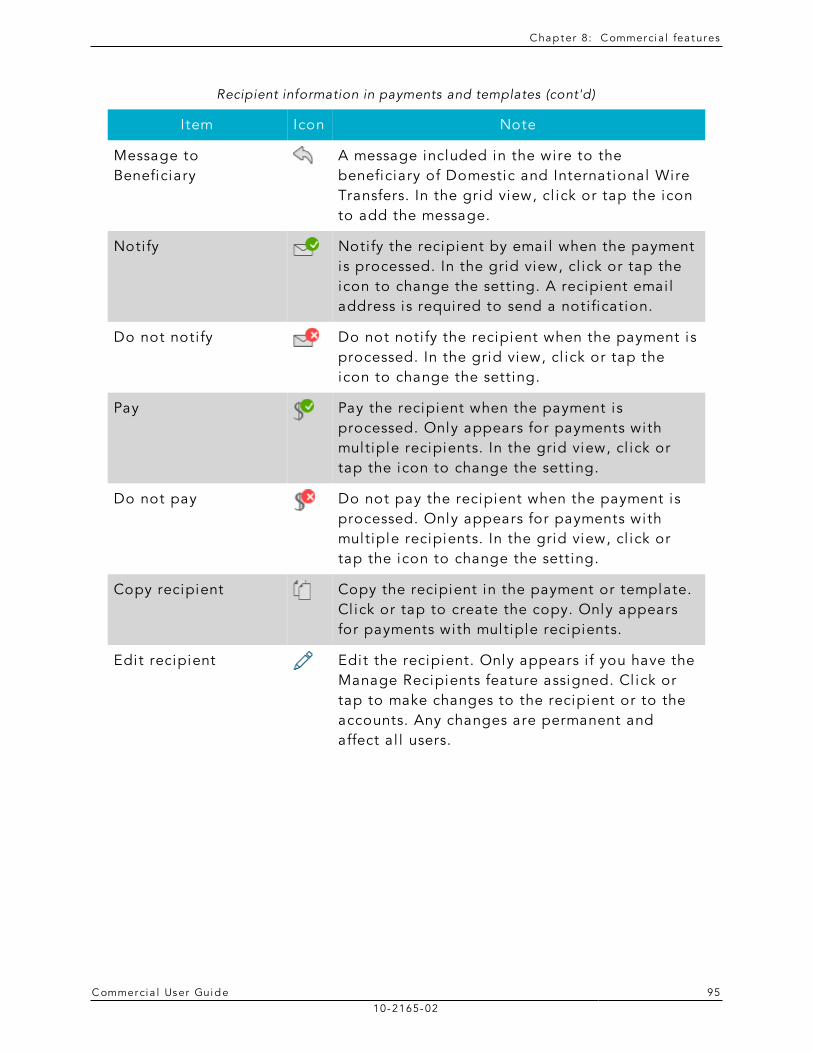
C hap ter 8: C ommerci a l fea tures
C ommerci a l User Guide 9510-2165-02
Item Icon Note
Message to Beneficiary
A message included in the wire to the beneficiary of Domestic and International Wire Transfers. In the grid view, cl ick or tap the icon to add the message.
Noti fy Noti fy the recipient by emai l when the payment is processed. In the grid view, cl ick or tap the icon to change the setting. A recipient emai l address is required to send a noti fication.
Do not noti fy Do not noti fy the recipient when the payment is processed. In the grid view, cl ick or tap the icon to change the setting.
Pay Pay the recipient when the payment is processed. Only appears for payments with multiple recipients. In the grid view, cl ick or tap the icon to change the setting.
Do not pay Do not pay the recipient when the payment is processed. Only appears for payments with multiple recipients. In the grid view, cl ick or tap the icon to change the setting.
Copy recipient Copy the recipient in the payment or template. Cl ick or tap to create the copy. Only appears for payments with multiple recipients.
Edit recipient Edit the recipient. Only appears i f you have the Manage Recipients feature assigned. Cl ick or tap to make changes to the recipient or to the accounts. Any changes are permanent and affect al l users.
Recipient information in payments and templates (cont'd)
C hap ter 8: C ommerci a l fea tures
C ommerci a l User Guide 9610-2165-02
Subsidiaries overviewA subsidiary is a secondary or al ternate company profi le that you can use when you create a payment or template. You can use subsidiaries when your business requires that you create transactions for multiple enti ties. For example, a holding company could create a subsidiary for each of the company’s real subsidiaries. An accountant who pays taxes on behalf of cl ients could create a subsidiary for each cl ient.
When you include a subsidiary in a payment, we substi tute the characteristics of the subsidiary when we send the processed transaction to the receiving financial insti tution. The financial insti tution may or may not pass the information on to the recipient.
A payment or a template can be associated with a single subsidiary.
If you have the Manage Subsidiaries feature assigned, you can do the fol lowing:
l Create subsidiaries l Edit subsidiaries l Add an existing subsidiary to a payment or template l Remove a subsidiary from a template
The Subsidiary Management page does not appear i f your user rights do not permit you to manage subsidiaries.
Note: If we manage subsidiaries on your behalf, the Manage Subsidiaries feature and the Subsidiary Management page do not appear. When you create or edit a template, you can add or remove the subsidiaries that we create for you.
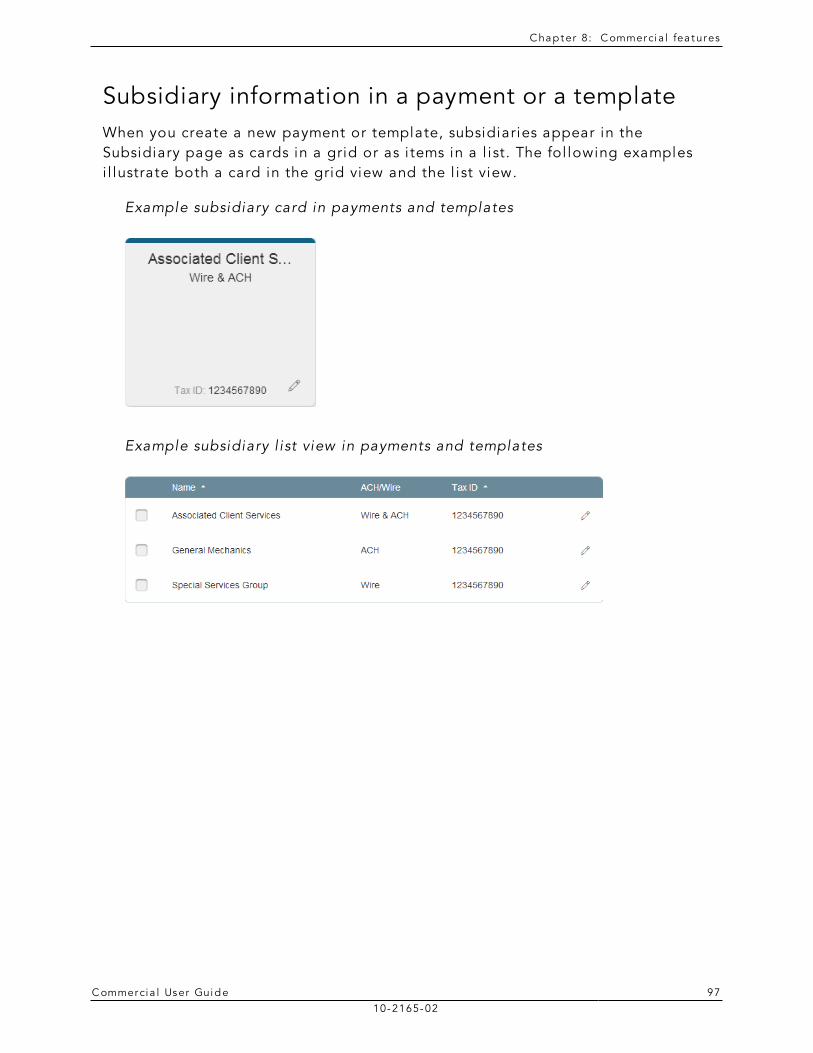
C hap ter 8: C ommerci a l fea tures
C ommerci a l User Guide 9710-2165-02
Subsidiary information in a payment or a templateWhen you create a new payment or template, subsidiaries appear in the Subsidiary page as cards in a grid or as i tems in a l ist. The fol lowing examples i l lustrate both a card in the grid view and the l ist view.
Example subsidiary card in payments and templates
Example subsidiary l ist view in payments and templates
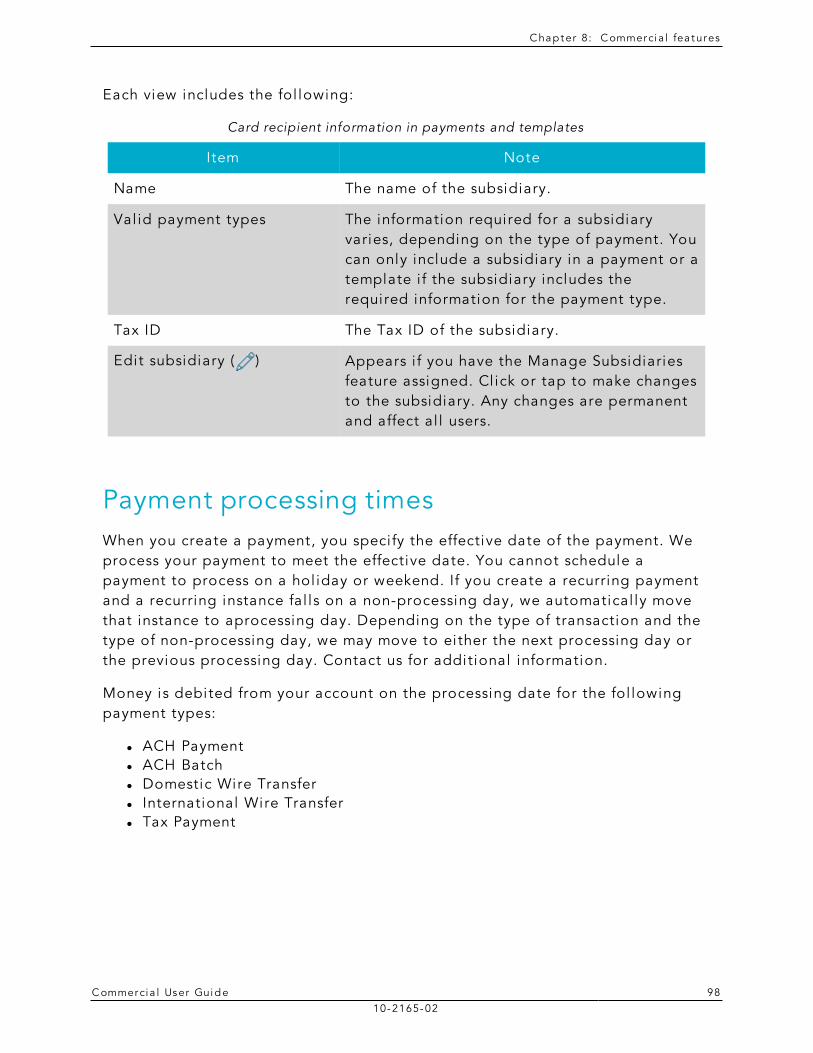
C hap ter 8: C ommerci a l fea tures
C ommerci a l User Guide 9810-2165-02
Each view includes the fol lowing:
Item Note
Name The name of the subsidiary.
Val id payment types The information required for a subsidiary varies, depending on the type of payment. You can only include a subsidiary in a payment or a template i f the subsidiary includes the required information for the payment type.
Tax ID The Tax ID of the subsidiary.
Edit subsidiary ( ) Appears i f you have the Manage Subsidiaries feature assigned. Cl ick or tap to make changes to the subsidiary. Any changes are permanent and affect al l users.
Card recipient information in payments and templates
Payment processing timesWhen you create a payment, you speci fy the effective date of the payment. We process your payment to meet the effective date. You cannot schedule a payment to process on a hol iday or weekend. If you create a recurring payment and a recurring instance fal ls on a non-processing day, we automatical ly move that instance to aprocessing day. Depending on the type of transaction and the type of non-processing day, we may move to either the next processing day or the previous processing day. Contact us for additional information.
Money is debited from your account on the processing date for the fol lowing payment types:
l ACH Payment l ACH Batch l Domestic Wire Transfer l International Wire Transfer l Tax Payment
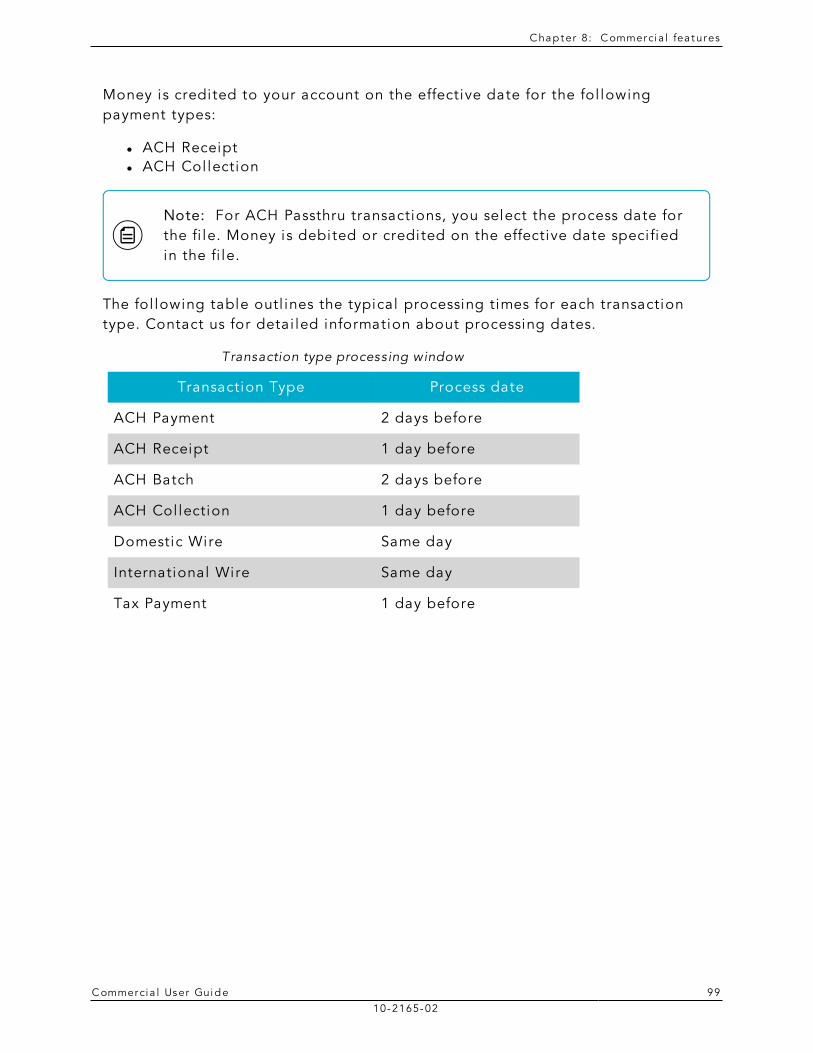
C hap ter 8: C ommerci a l fea tures
C ommerci a l User Guide 9910-2165-02
Money is credited to your account on the effective date for the fol lowing payment types:
l ACH Receipt l ACH Col lection
Note: For ACH Passthru transactions, you select the process date for the fi le. Money is debited or credited on the effective date speci fied in the fi le.
The fol lowing table outl ines the typical processing times for each transaction type. Contact us for detai led information about processing dates.
Transaction Type Process date
ACH Payment 2 days before
ACH Receipt 1 day before
ACH Batch 2 days before
ACH Col lection 1 day before
Domestic Wire Same day
International Wire Same day
Tax Payment 1 day before
Transaction type processing window
C ommerci a l User Guide 10010-2165-02
CHAPTER 9: MANAGING USERS
This chapter contains the fol lowing:
l "Adding a user and configuring rights" on page 100 l "Viewing existing users" on page 104 l "Editing user rights" on page 105 l "Deleting a user" on page 108
Adding a user and configuring rightsA user who has the Manage Users feature assigned can create other users on the User Management page.
Note: If your account requires multi -factor authentication, we can only send Secure Access Codes to the user using the contact information that you speci fy. If you do not supply val id contact information, the user cannot get a val id Secure Access Code and cannot log in.
See "Registering a browser or device" on page 168 for more information about multi -factor authentication.
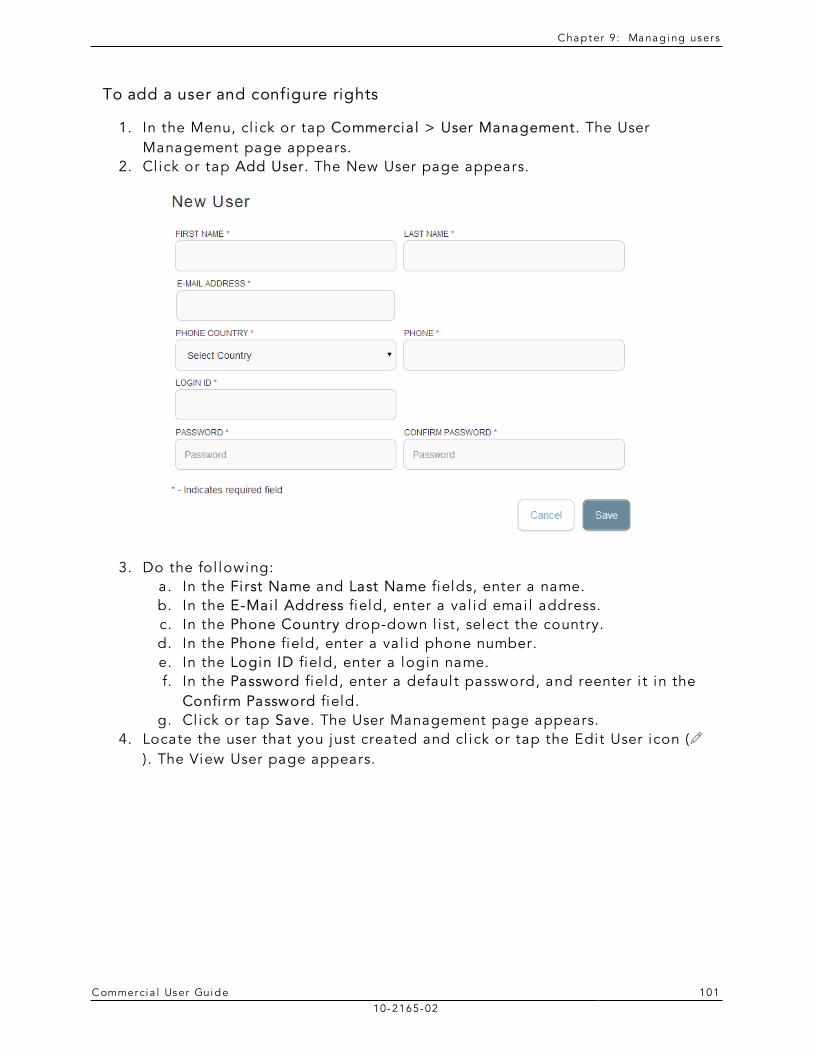
C hap ter 9: Manag ing user s
C ommerci a l User Guide 10110-2165-02
To add a user and configure rights
1. In the Menu, cl ick or tap Commercial > User Management. The User Management page appears.
2. Cl ick or tap Add User. The New User page appears.
3. Do the fol lowing: a. In the First Name and Last Name fields, enter a name. b. In the E-Mai l Address field, enter a val id emai l address. c. In the Phone Country drop-down l ist, select the country. d. In the Phone field, enter a val id phone number. e. In the Login ID field, enter a login name. f. In the Password field, enter a default password, and reenter i t in the
Confi rm Password field. g. Cl ick or tap Save. The User Management page appears.
4. Locate the user that you just created and cl ick or tap the Edit User icon (). The View User page appears.
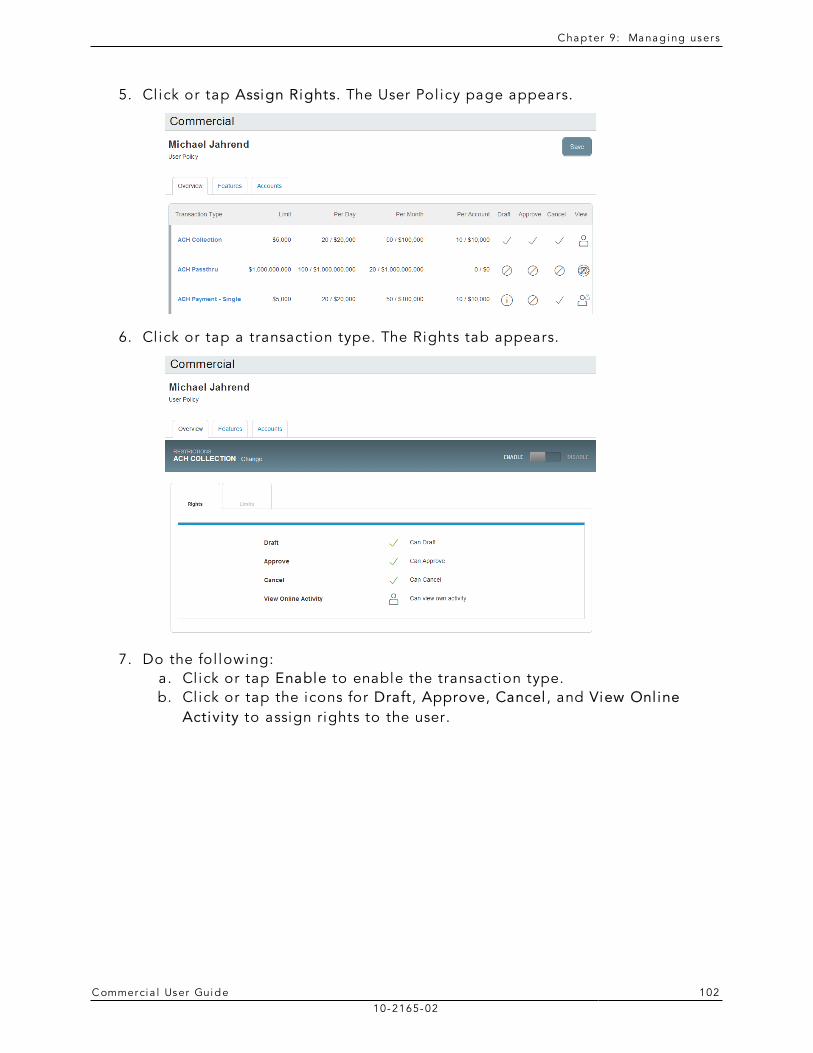
C hap ter 9: Manag ing user s
C ommerci a l User Guide 10210-2165-02
5. Cl ick or tap Assign Rights. The User Pol icy page appears.
6. Cl ick or tap a transaction type. The Rights tab appears.
7. Do the fol lowing: a. Cl ick or tap Enable to enable the transaction type. b. Cl ick or tap the icons for Draft, Approve, Cancel , and View Onl ine
Activi ty to assign rights to the user.
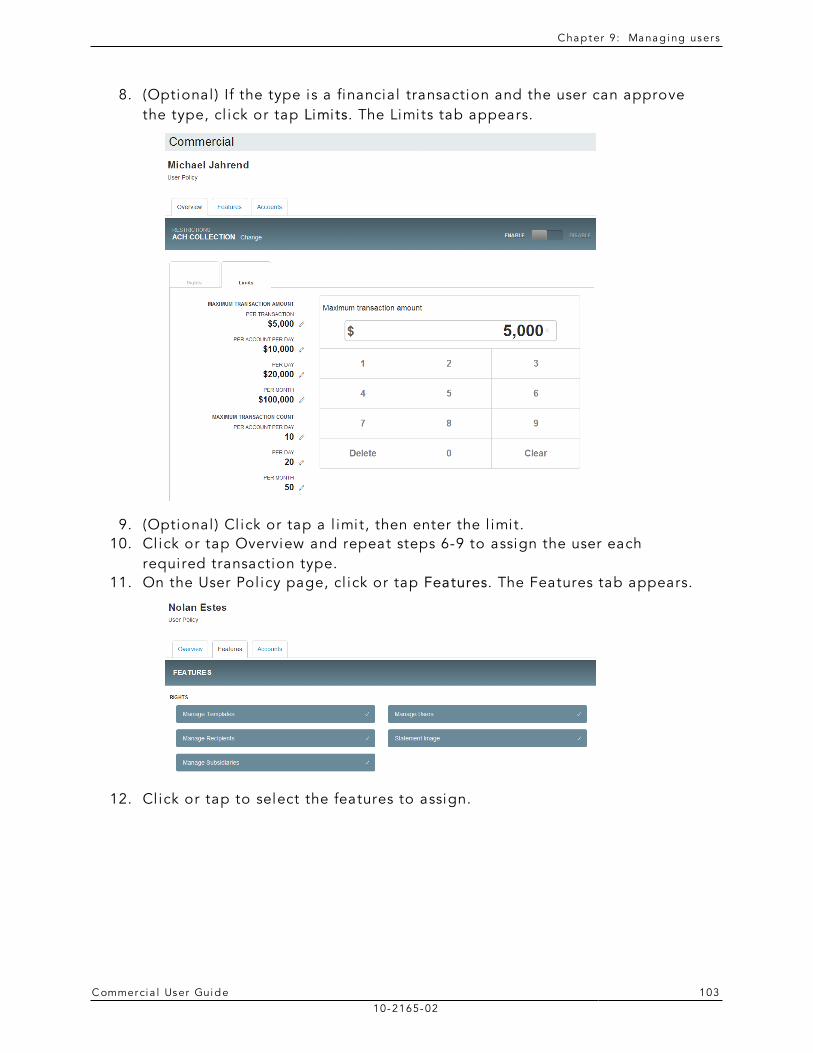
C hap ter 9: Manag ing user s
C ommerci a l User Guide 10310-2165-02
8. (Optional ) If the type is a financial transaction and the user can approve the type, cl ick or tap Limits. The Limits tab appears.
9. (Optional ) Cl ick or tap a l imit, then enter the l imit. 10. Cl ick or tap Overview and repeat steps 6-9 to assign the user each
required transaction type. 11. On the User Pol icy page, cl ick or tap Features. The Features tab appears.
12. Cl ick or tap to select the features to assign.
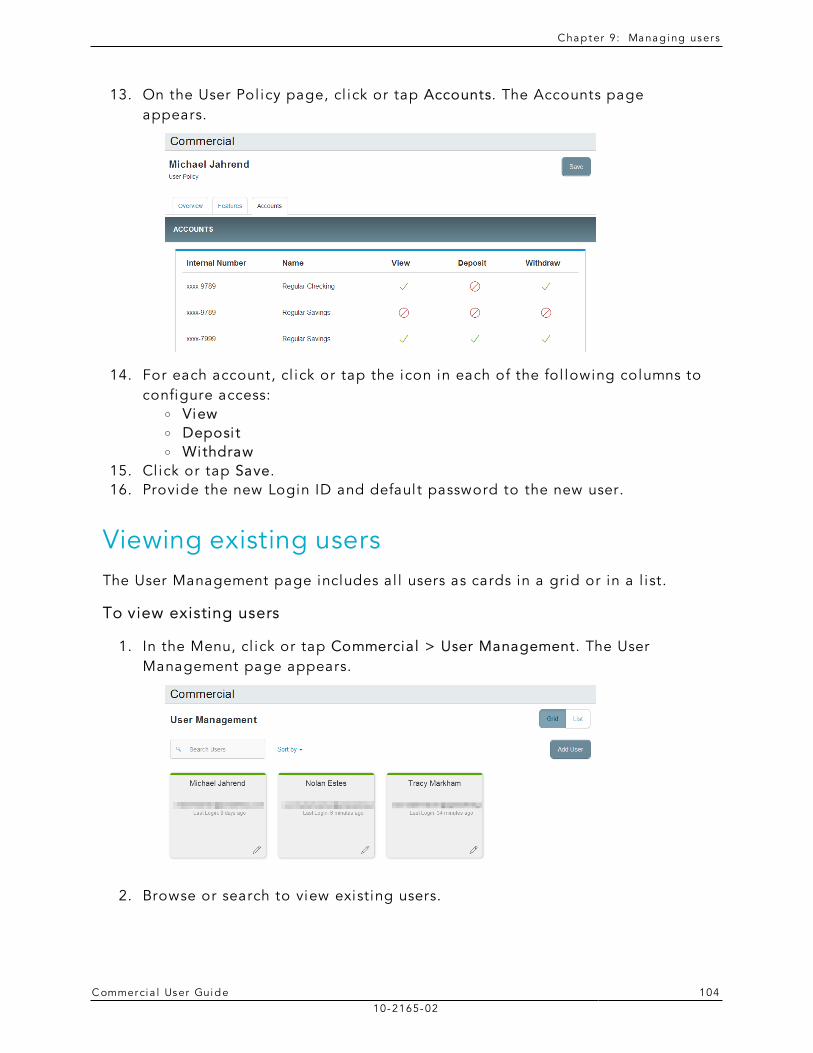
C hap ter 9: Manag ing user s
C ommerci a l User Guide 10410-2165-02
13. On the User Pol icy page, cl ick or tap Accounts. The Accounts page appears.
14. For each account, cl ick or tap the icon in each of the fol lowing columns to configure access:
o View o Deposit o Withdraw
15. Cl ick or tap Save. 16. Provide the new Login ID and default password to the new user.
Viewing existing usersThe User Management page includes al l users as cards in a grid or in a l ist.
To view existing users
1. In the Menu, cl ick or tap Commercial > User Management. The User Management page appears.
2. Browse or search to view existing users.
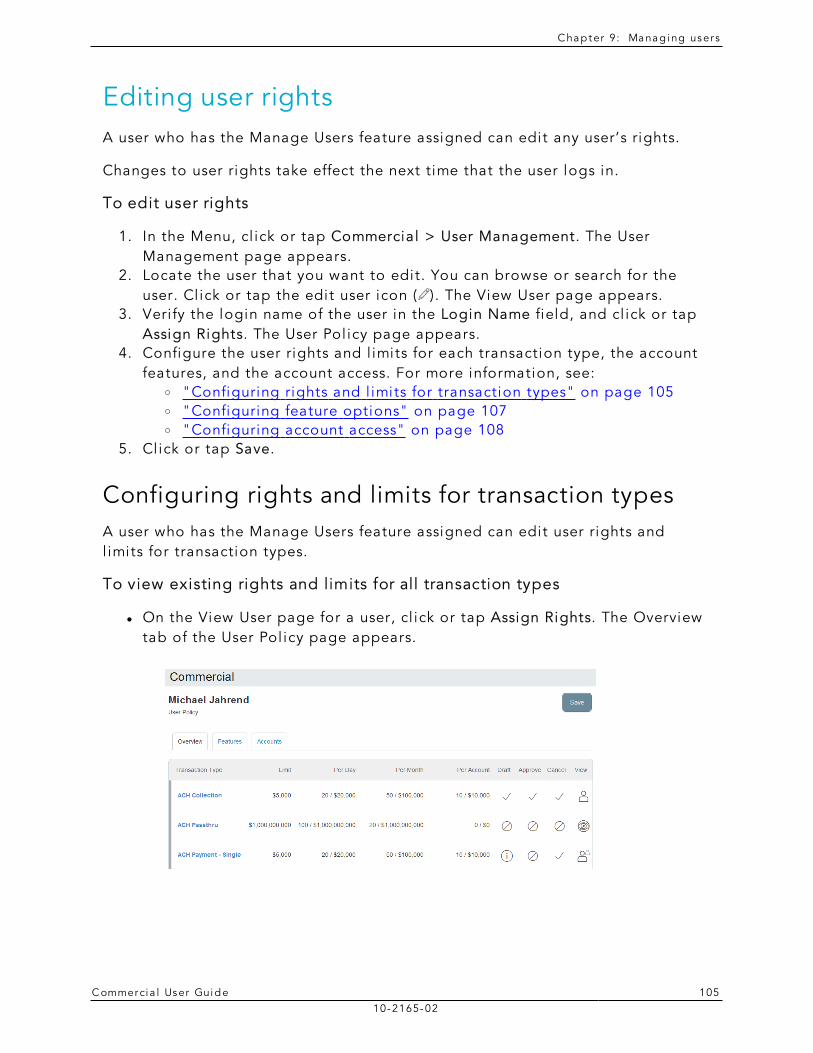
C hap ter 9: Manag ing user s
C ommerci a l User Guide 10510-2165-02
Editing user rightsA user who has the Manage Users feature assigned can edit any user’s rights.
Changes to user rights take effect the next time that the user logs in.
To edit user rights
1. In the Menu, cl ick or tap Commercial > User Management. The User Management page appears.
2. Locate the user that you want to edit. You can browse or search for the user. Cl ick or tap the edit user icon ( ). The View User page appears.
3. Veri fy the login name of the user in the Login Name field, and cl ick or tap Assign Rights. The User Pol icy page appears.
4. Configure the user rights and l imits for each transaction type, the account features, and the account access. For more information, see:
o "Configuring rights and l imits for transaction types" on page 105 o "Configuring feature options" on page 107 o "Configuring account access" on page 108
5. Cl ick or tap Save.
Configuring rights and limits for transaction typesA user who has the Manage Users feature assigned can edit user rights and l imits for transaction types.
To view existing rights and limits for all transaction types
l On the View User page for a user, cl ick or tap Assign Rights. The Overview tab of the User Pol icy page appears.
C hap ter 9: Manag ing user s
C ommerci a l User Guide 10610-2165-02
To configure rights for transaction types
1. On the Overview tab of the User Pol icy page, cl ick or tap the icons for Draft, Approve, Cancel , and View to assign rights to a transaction type.
2. Cl ick or tap Save. 3. Cl ick or tap Close.
To configure rights and limits for a transaction type
1. On the Overview tab of the User Pol icy page, cl ick or tap the transaction type that you want to configure. The Rights tab appears.
2. Do the fol lowing: a. Cl ick or tap Enable to enable the transaction. b. Cl ick or tap the icons for Draft, Approve, Cancel , and View to assign
rights to the user. 3. (Optional ) If the type is a financial transaction and the user can approve
the type, cl ick or tap Limits. The Limits tab appears. 4. (Optional ) Cl ick or tap a l imit, and then cl ick or tap to enter the l imit. 5. Do one of the fol lowing:
o Click or tap Overview to view al l rights. o Click or tap Change to select another transaction type to configure. o Click or tap Save and then cl ick or tap OK.
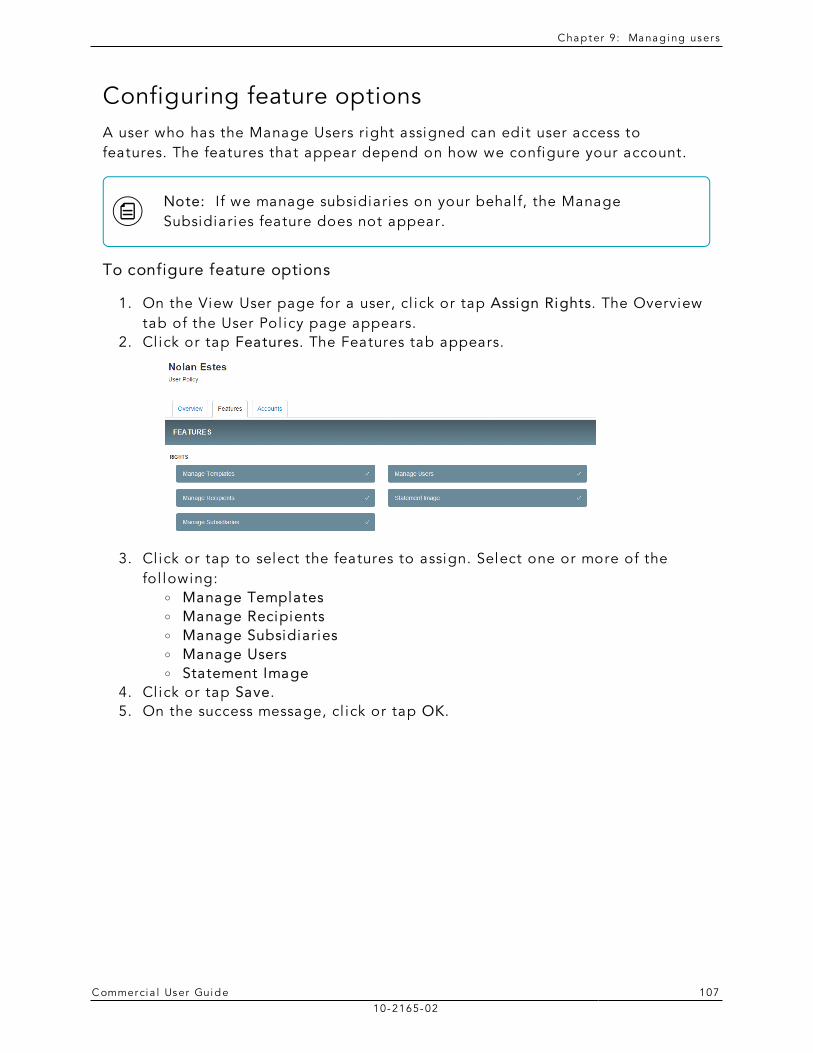
C hap ter 9: Manag ing user s
C ommerci a l User Guide 10710-2165-02
Configuring feature optionsA user who has the Manage Users right assigned can edit user access to features. The features that appear depend on how we configure your account.
Note: If we manage subsidiaries on your behalf, the Manage Subsidiaries feature does not appear.
To configure feature options
1. On the View User page for a user, cl ick or tap Assign Rights. The Overview tab of the User Pol icy page appears.
2. Cl ick or tap Features. The Features tab appears.
3. Cl ick or tap to select the features to assign. Select one or more of the fol lowing:
o Manage Templates o Manage Recipients o Manage Subsidiaries o Manage Users o Statement Image
4. Cl ick or tap Save. 5. On the success message, cl ick or tap OK.
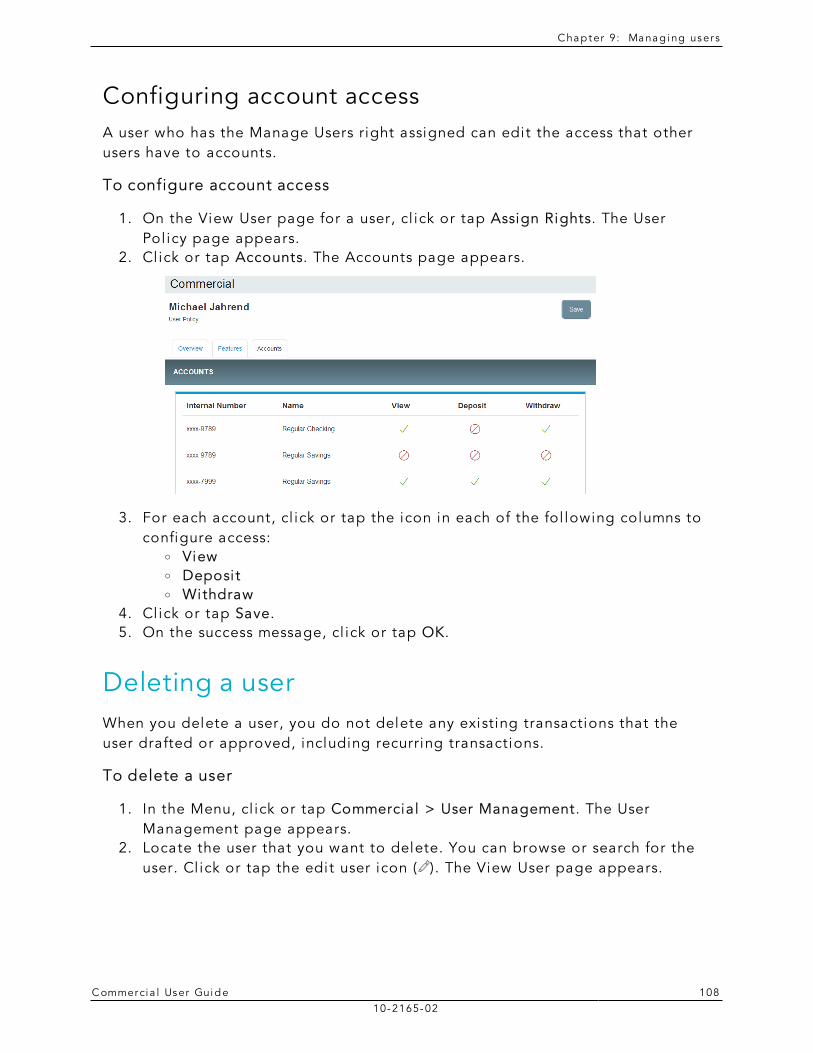
C hap ter 9: Manag ing user s
C ommerci a l User Guide 10810-2165-02
Configuring account accessA user who has the Manage Users right assigned can edit the access that other users have to accounts.
To configure account access
1. On the View User page for a user, cl ick or tap Assign Rights. The User Pol icy page appears.
2. Cl ick or tap Accounts. The Accounts page appears.
3. For each account, cl ick or tap the icon in each of the fol lowing columns to configure access:
o View o Deposit o Withdraw
4. Cl ick or tap Save. 5. On the success message, cl ick or tap OK.
Deleting a userWhen you delete a user, you do not delete any existing transactions that the user drafted or approved, including recurring transactions.
To delete a user
1. In the Menu, cl ick or tap Commercial > User Management. The User Management page appears.
2. Locate the user that you want to delete. You can browse or search for the user. Cl ick or tap the edit user icon ( ). The View User page appears.
C hap ter 9: Manag ing user s
C ommerci a l User Guide 10910-2165-02
3. Cl ick or tap Delete. 4. Cl ick or tap Yes to veri fy the delete. 5. Cl ick or tap Close.

C ommerci a l User Guide 11010-2165-02
CHAPTER 10: MANAGING RECIPIENTS AND SUBSIDIARIES
This chapter contains the fol lowing:
l "Managing recipients" on page 110 l "Managing subsidiaries" on page 117
Managing recipientsOn the Recipient Management page, recipients appear as cards in a grid or as i tems in a l ist. The grid view and the l ist view include the display name, recipient name, number of associated accounts, and emai l address for each recipient.
The fol lowing examples i l lustrate the appearance of the grid view and the l ist view.
Example Recipient Management page grid view
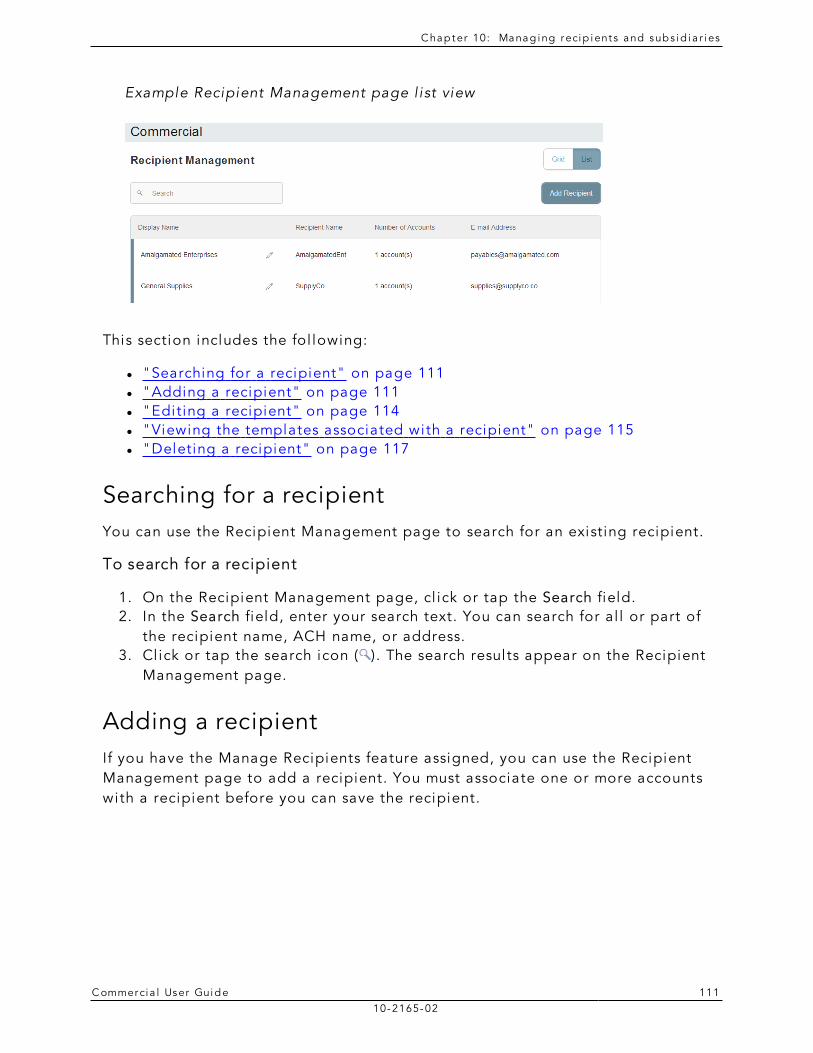
C hap ter 10: Manag ing recip ient s and sub s id i a r i es
C ommerci a l User Guide 11110-2165-02
Example Recipient Management page l ist view
This section includes the fol lowing:
l "Searching for a recipient" on page 111 l "Adding a recipient" on page 111 l "Editing a recipient" on page 114 l "Viewing the templates associated with a recipient" on page 115 l "Deleting a recipient" on page 117
Searching for a recipientYou can use the Recipient Management page to search for an existing recipient.
To search for a recipient
1. On the Recipient Management page, cl ick or tap the Search field. 2. In the Search field, enter your search text. You can search for al l or part of
the recipient name, ACH name, or address. 3. Cl ick or tap the search icon ( ). The search results appear on the Recipient
Management page.
Adding a recipientIf you have the Manage Recipients feature assigned, you can use the Recipient Management page to add a recipient. You must associate one or more accounts with a recipient before you can save the recipient.
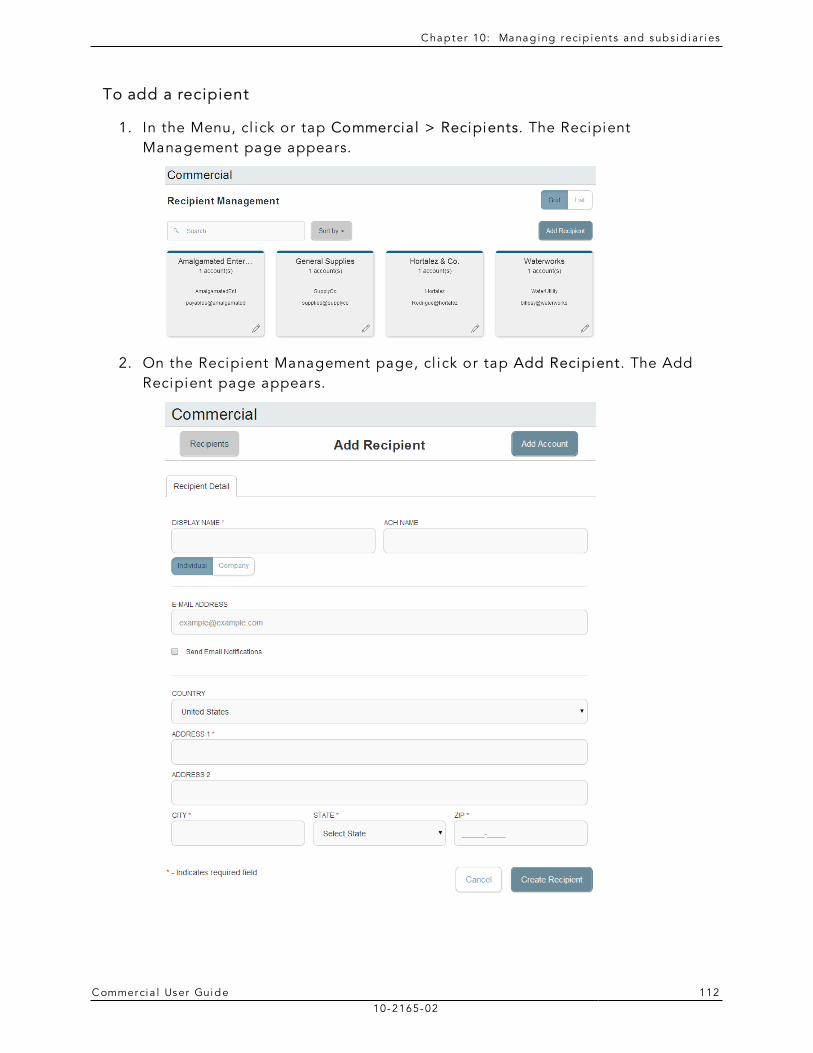
C hap ter 10: Manag ing recip ient s and sub s id i a r i es
C ommerci a l User Guide 11210-2165-02
To add a recipient
1. In the Menu, cl ick or tap Commercial > Recipients. The Recipient Management page appears.
2. On the Recipient Management page, cl ick or tap Add Recipient. The Add Recipient page appears.
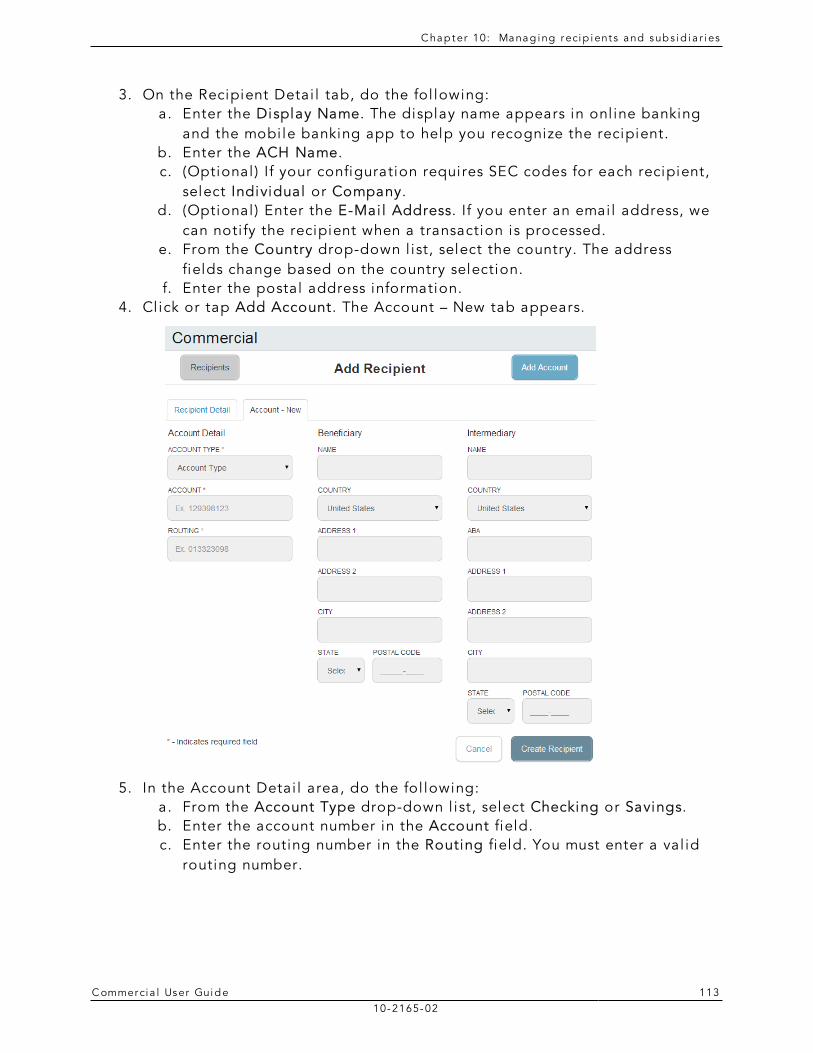
C hap ter 10: Manag ing recip ient s and sub s id i a r i es
C ommerci a l User Guide 11310-2165-02
3. On the Recipient Detai l tab, do the fol lowing: a. Enter the Display Name. The display name appears in onl ine banking
and the mobi le banking app to help you recognize the recipient. b. Enter the ACH Name. c. (Optional ) If your configuration requires SEC codes for each recipient,
select Individual or Company. d. (Optional ) Enter the E-Mai l Address. If you enter an emai l address, we
can noti fy the recipient when a transaction is processed. e. From the Country drop-down l ist, select the country. The address
fields change based on the country selection. f. Enter the postal address information.
4. Cl ick or tap Add Account. The Account – New tab appears.
5. In the Account Detai l area, do the fol lowing: a. From the Account Type drop-down l ist, select Checking or Savings. b. Enter the account number in the Account field. c. Enter the routing number in the Routing field. You must enter a val id
routing number.
C hap ter 10: Manag ing recip ient s and sub s id i a r i es
C ommerci a l User Guide 11410-2165-02
6. (Optional ) If you plan to use the account with wire transfers, do the fol lowing in the Beneficiary area:
a. Enter the Name. b. From the Country drop-down l ist, select the country. c. Enter the postal address information.
7. (Optional ) If you plan to use the account with wire transfers and the beneficiary financial insti tution requires an intermediary financial insti tution, do the fol lowing in the Intermediary area:
a. Enter the Name. b. From the Country drop-down l ist, select the country. c. If the country is United States, enter the ABA number. If the country is
not the United States, enter the IBAN or SWIFT/BIC numbers. d. Enter the postal address information.
8. (Optional ) Repeat Steps 4 through 7 to add additional associated accounts to the recipient.
9. Cl ick or tap Create Recipient. The new recipient appears in the Recipient Management page.
Editing a recipientIf your user rights al low i t, you can make changes to an existing recipient. You can use the User Management page to edit a recipient. You can also edit a recipient when you create a payment or template.
When you make changes to a recipient, the changes do not affect existing transactions. The changes do affect any new payments or transfers.
To edit a recipient on the User Management page
1. In the Menu, cl ick or tap Commercial > Recipients. The Recipient Management page appears.
2. Locate the recipient that you want to edit and cl ick or tap the edit icon ( ) for the recipient. The Edit Recipient page appears.
3. Do one or more of the fol lowing: o To edit contact information, make any required changes on the
Recipient Detai l tab. o To edit account information, on the Edit Recipient page, cl ick or tap
the tab for the account that you want to edit. Make any needed changes to the account data.
4. Cl ick or tap Save Recipient.
C hap ter 10: Manag ing recip ient s and sub s id i a r i es
C ommerci a l User Guide 11510-2165-02
To edit a recipient when you create a payment or template
1. On the Recipients & Accounts page in the new payment or new template, locate the recipient that you want to edit.
2. Cl ick or tap the edit icon ( ) for the recipient. The Edit Recipient page appears.
3. Do one or more of the fol lowing: o To edit contact information, make any required changes on the
Recipient Detai l tab. o To edit account information, on the Edit Recipient page, cl ick or tap
the tab for the account that you want to edit. Make any needed changes to the account data.
4. Cl ick or tap Save Recipient and continue creating the payment or template.
Viewing the templates associated with a recipientThe account tab on the Edit Recipient page l ists al l of the templates that include a particular account. If your rights permit i t, you can edit the template and save your changes. If the recipient has multiple associated accounts, you can select an alternate account to use in the template.
To view the templates associated with a recipient
1. In the Menu, cl ick or tap Commercial > Recipients. The Recipient Management page appears.
2. Locate the recipient that you want to edit and cl ick or tap the edit icon ( ) for the recipient. The Edit Recipient page appears.
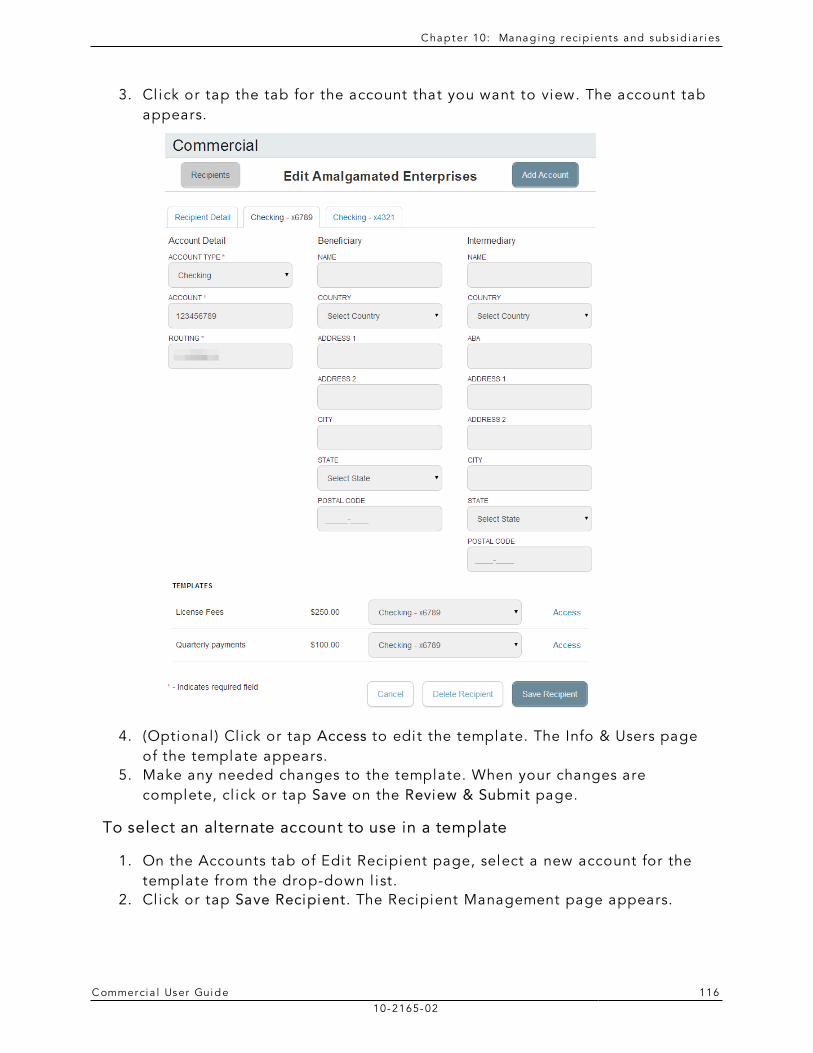
C hap ter 10: Manag ing recip ient s and sub s id i a r i es
C ommerci a l User Guide 11610-2165-02
3. Cl ick or tap the tab for the account that you want to view. The account tab appears.
4. (Optional ) Cl ick or tap Access to edit the template. The Info & Users page of the template appears.
5. Make any needed changes to the template. When your changes are complete, cl ick or tap Save on the Review & Submit page.
To select an alternate account to use in a template
1. On the Accounts tab of Edit Recipient page, select a new account for the template from the drop-down l ist.
2. Cl ick or tap Save Recipient. The Recipient Management page appears.
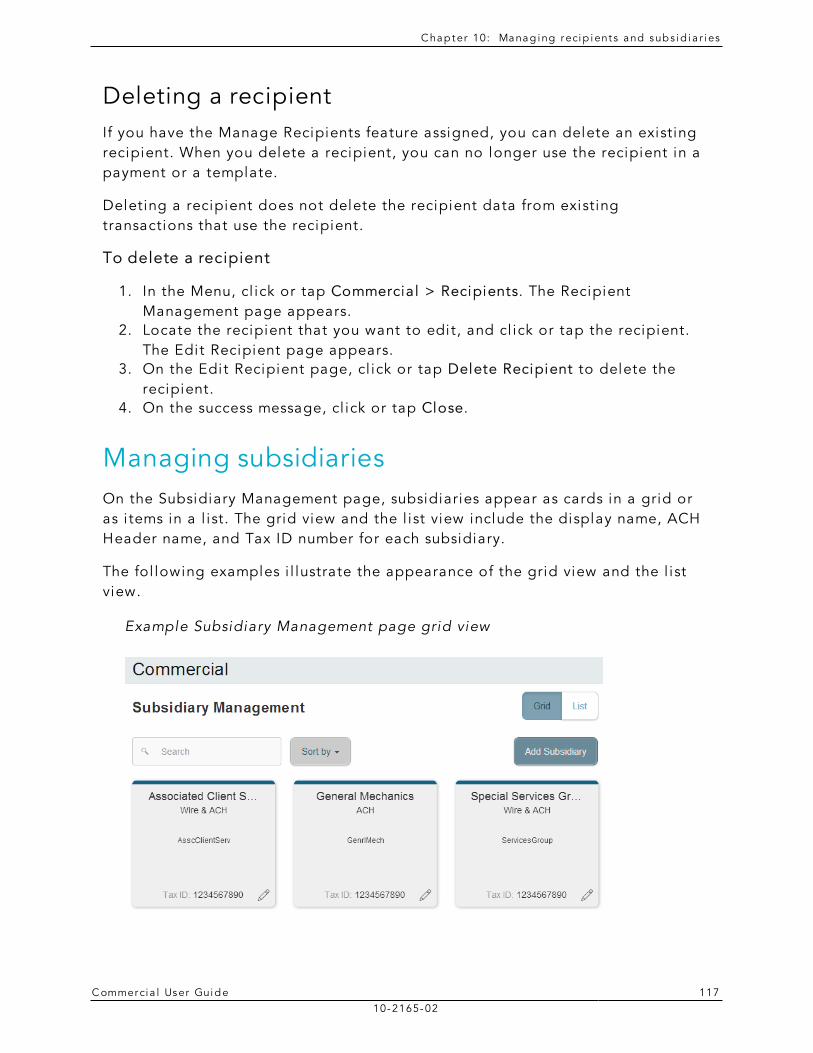
C hap ter 10: Manag ing recip ient s and sub s id i a r i es
C ommerci a l User Guide 11710-2165-02
Deleting a recipientIf you have the Manage Recipients feature assigned, you can delete an existing recipient. When you delete a recipient, you can no longer use the recipient in a payment or a template.
Deleting a recipient does not delete the recipient data from existing transactions that use the recipient.
To delete a recipient
1. In the Menu, cl ick or tap Commercial > Recipients. The Recipient Management page appears.
2. Locate the recipient that you want to edit, and cl ick or tap the recipient. The Edit Recipient page appears.
3. On the Edit Recipient page, cl ick or tap Delete Recipient to delete the recipient.
4. On the success message, cl ick or tap Close.
Managing subsidiariesOn the Subsidiary Management page, subsidiaries appear as cards in a grid or as i tems in a l ist. The grid view and the l ist view include the display name, ACH Header name, and Tax ID number for each subsidiary.
The fol lowing examples i l lustrate the appearance of the grid view and the l ist view.
Example Subsidiary Management page grid view
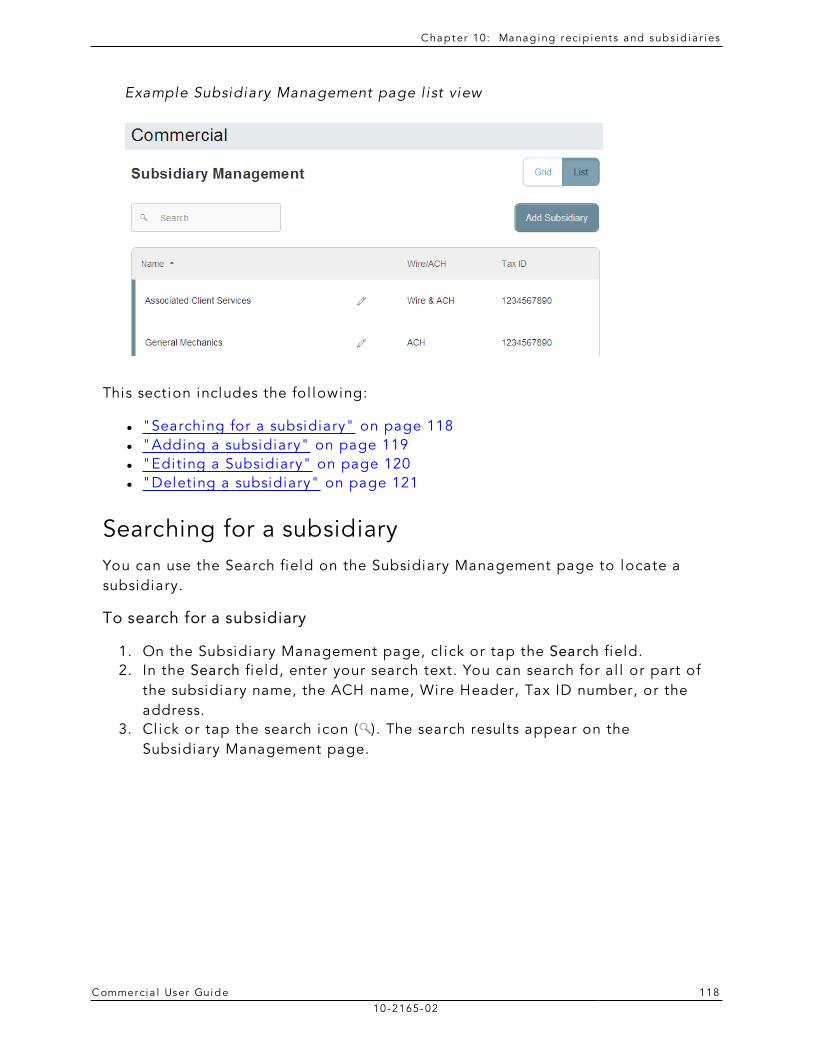
C hap ter 10: Manag ing recip ient s and sub s id i a r i es
C ommerci a l User Guide 11810-2165-02
Example Subsidiary Management page l ist view
This section includes the fol lowing:
l "Searching for a subsidiary" on page 118 l "Adding a subsidiary" on page 119 l "Editing a Subsidiary" on page 120 l "Deleting a subsidiary" on page 121
Searching for a subsidiaryYou can use the Search field on the Subsidiary Management page to locate a subsidiary.
To search for a subsidiary
1. On the Subsidiary Management page, cl ick or tap the Search field. 2. In the Search field, enter your search text. You can search for al l or part of
the subsidiary name, the ACH name, Wire Header, Tax ID number, or the address.
3. Cl ick or tap the search icon ( ). The search results appear on the Subsidiary Management page.
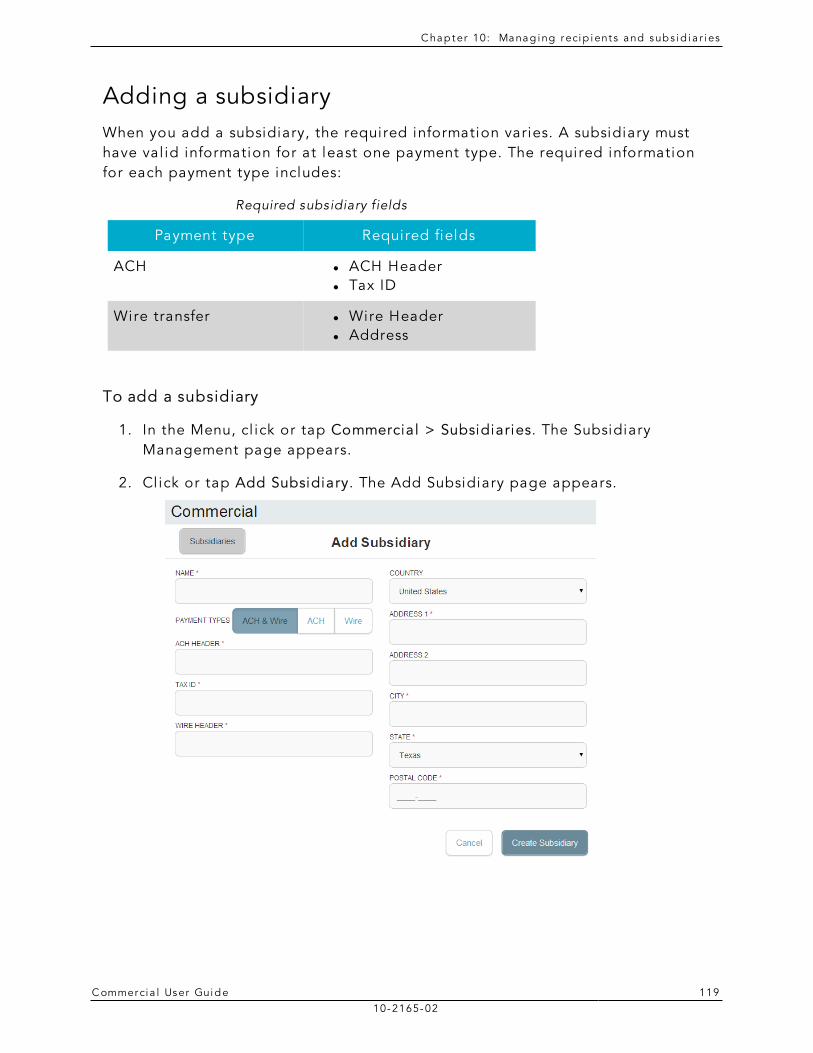
C hap ter 10: Manag ing recip ient s and sub s id i a r i es
C ommerci a l User Guide 11910-2165-02
Adding a subsidiaryWhen you add a subsidiary, the required information varies. A subsidiary must have val id information for at least one payment type. The required information for each payment type includes:
Payment type Required fields
ACH l ACH Header l Tax ID
Wire transfer l Wire Header l Address
Required subsidiary fields
To add a subsidiary
1. In the Menu, cl ick or tap Commercial > Subsidiaries. The Subsidiary Management page appears.
2. Cl ick or tap Add Subsidiary. The Add Subsidiary page appears.
C hap ter 10: Manag ing recip ient s and sub s id i a r i es
C ommerci a l User Guide 12010-2165-02
3. Do the fol lowing: a. In the Name field, enter a name for the subsidiary. b. In the Payment Types, cl ick or tap one of the fol lowing to select the
payment types in which you wi l l include the subsidiary: o ACH & Wire o ACH o Wire
Tip: The required fields in the Add Subsidiary page vary, depending on the payment types that you select.
c. (Optional ) In the ACH Header field, enter the ACH header to use. d. (Optional ) In the Tax ID field, enter the tax ID number to use. e. (Optional ) In the Wire Header field, enter the wire header to use. f. (Optional ) Enter the postal address.
g. Cl ick or tap Create Subsidiary. The Subsidiary Management page appears.
Editing a SubsidiaryIf you have the Manage Subsidiaries feature assigned, you can use the Subsidiary Management page to edit a subsidiary. You can also edit a subsidiary when you create a payment or template.
To edit a subsidiary on the User Management page
1. In the Menu, cl ick or tap Commercial > Subsidiaries. The Subsidiary Management page appears.
2. Locate the subsidiary that you want to edit. You can browse or search to locate the subsidiary. Cl ick or tap the edit icon ( ) for the subsidiary. The Edit Subsidiary page appears.
3. On the Edit Subsidiary page, make any needed changes. 4. Cl ick or tap Save Subsidiary. The Subsidiary Management page appears.
To edit a subsidiary when you create a payment or template
1. On the Subsidiary page in the new payment or new template, locate the subsidiary that you want to edit.
2. Cl ick or tap the edit icon ( ) for the subsidiary. The Edit Subsidiary page appears.
3. On the Edit Subsidiary page, make any needed changes. 4. Cl ick or tap Save Subsidiary and continue creating the payment or
template.
C hap ter 10: Manag ing recip ient s and sub s id i a r i es
C ommerci a l User Guide 12110-2165-02
Deleting a subsidiaryWhen you delete a subsidiary, you can no longer use the subsidiary in a payment or a template. Deleting a subsidiary does not delete the subsidiary data from existing payments that use the subsidiary.
To delete a subsidiary
1. In the Menu, cl ick or tap Commercial > Subsidiaries. The Subsidiary Management page appears.
2. Locate the subsidiary that you want to delete You can browse or search to locate the subsidiary. Cl ick or tap the edit icon ( ) for the subsidiary. The Edit Subsidiary page appears.
3. Cl ick or tap Delete Subsidiary. 4. Cl ick or tap Close. The Subsidiary Management page appears.
C ommerci a l User Guide 12210-2165-02
CHAPTER 11: CREATING AND MANAGING PAYMENTS AND TEMPLATES
This chapter contains the fol lowing:
l "Creating a payment or a template" on page 122 l "Using imported fi les with an ACH Batch or ACH Col lection" on page 131 l "Creating a Tax Payment" on page 137 l "Managing templates" on page 138 l "Creating a payment from a template" on page 142 l "Viewing or cancel ing a payment" on page 145 l "Approving payments" on page 148
Creating a payment or a templateYou can use the Payments page to create payments or templates for any transaction type for which you have the Draft right assigned. If you have the Manage Templates feature assigned, you can create a template for any transaction type. You must save a template before you can draft a payment based on the template.
See "How user rights control payments and templates" on page 85
Tip: When you create a payment or a template, the Pending and Processed l ists on the Payments page only include payments of the same type.
This section includes the fol lowing:
l "Creating a single-recipient payment or template" on page 122 l "Creating a multi -recipient payment or template" on page 127
Creating a single-recipient payment or templateThe fol lowing payment and template types include a single recipient:
l ACH Payment l ACH Receipt l Domestic Wire l International Wire
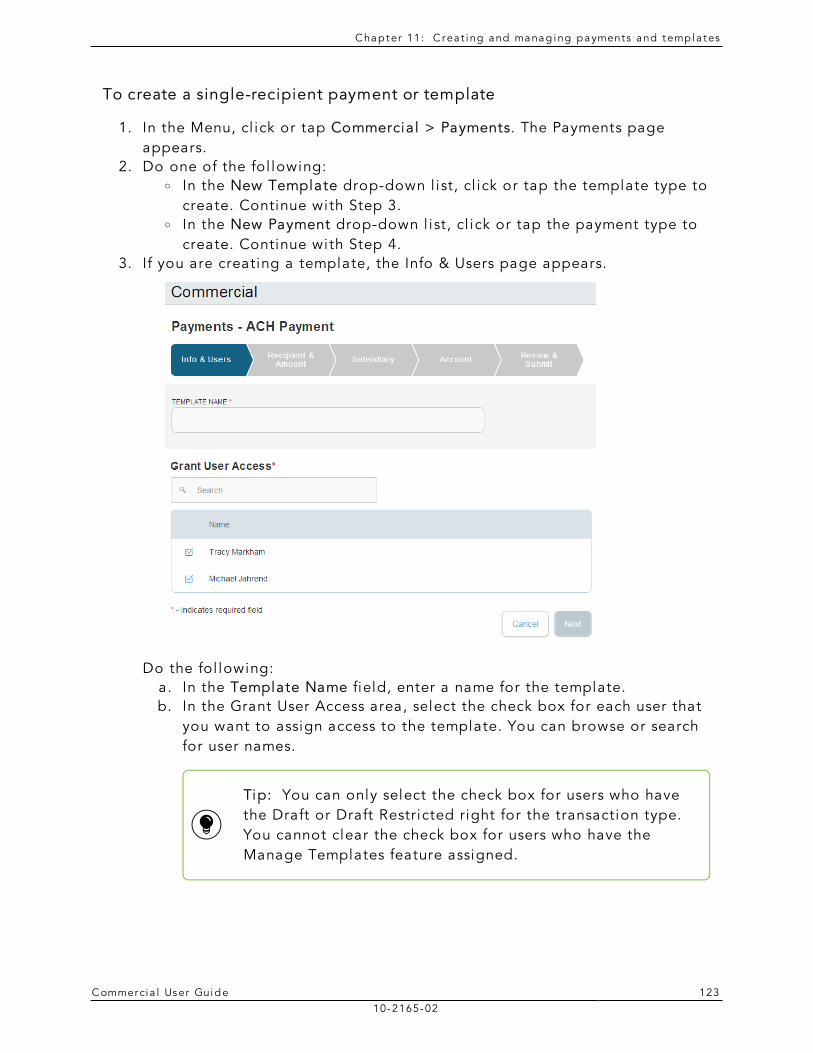
C hap ter 11: C rea t i ng and manag ing p ayment s and temp la tes
C ommerci a l User Guide 12310-2165-02
To create a single-recipient payment or template
1. In the Menu, cl ick or tap Commercial > Payments. The Payments page appears.
2. Do one of the fol lowing: o In the New Template drop-down l ist, cl ick or tap the template type to
create. Continue with Step 3. o In the New Payment drop-down l ist, cl ick or tap the payment type to
create. Continue with Step 4. 3. If you are creating a template, the Info & Users page appears.
Do the fol lowing: a. In the Template Name field, enter a name for the template. b. In the Grant User Access area, select the check box for each user that
you want to assign access to the template. You can browse or search for user names.
Tip: You can only select the check box for users who have the Draft or Draft Restricted right for the transaction type. You cannot clear the check box for users who have the Manage Templates feature assigned.
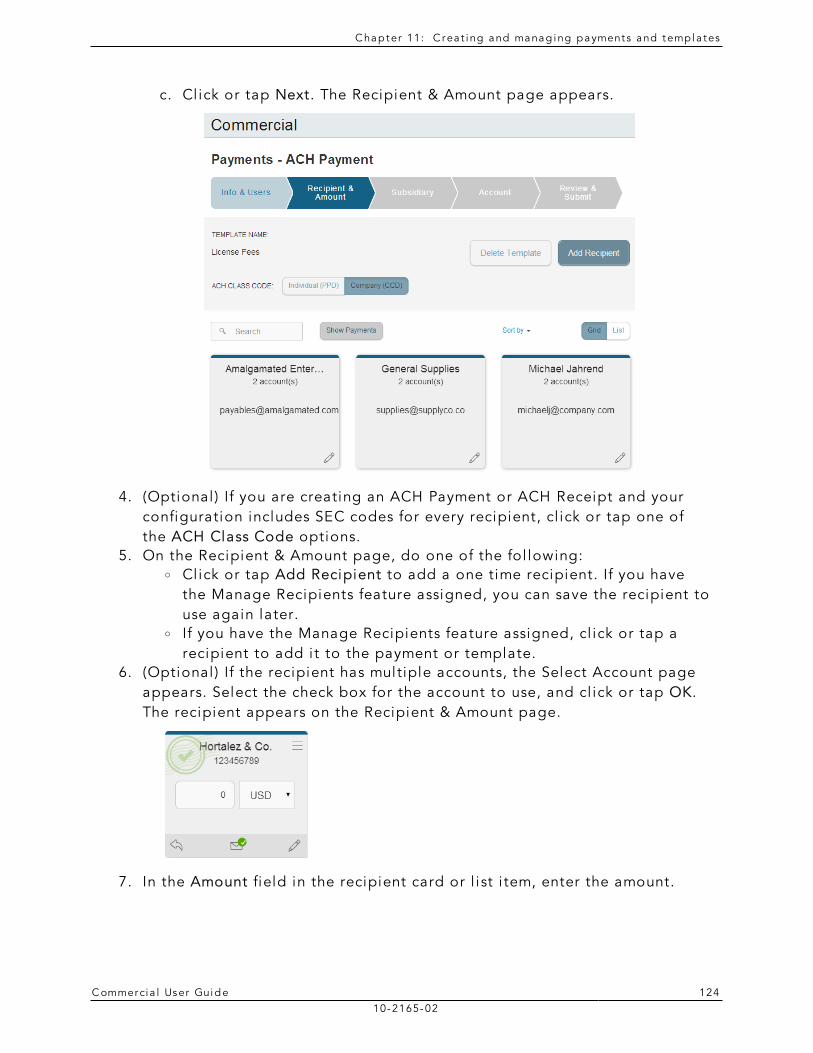
C hap ter 11: C rea t i ng and manag ing p ayment s and temp la tes
C ommerci a l User Guide 12410-2165-02
c. Cl ick or tap Next. The Recipient & Amount page appears.
4. (Optional ) If you are creating an ACH Payment or ACH Receipt and your configuration includes SEC codes for every recipient, cl ick or tap one of the ACH Class Code options.
5. On the Recipient & Amount page, do one of the fol lowing: o Click or tap Add Recipient to add a one time recipient. If you have
the Manage Recipients feature assigned, you can save the recipient to use again later.
o If you have the Manage Recipients feature assigned, cl ick or tap a recipient to add i t to the payment or template.
6. (Optional ) If the recipient has multiple accounts, the Select Account page appears. Select the check box for the account to use, and cl ick or tap OK. The recipient appears on the Recipient & Amount page.
7. In the Amount field in the recipient card or l ist i tem, enter the amount.
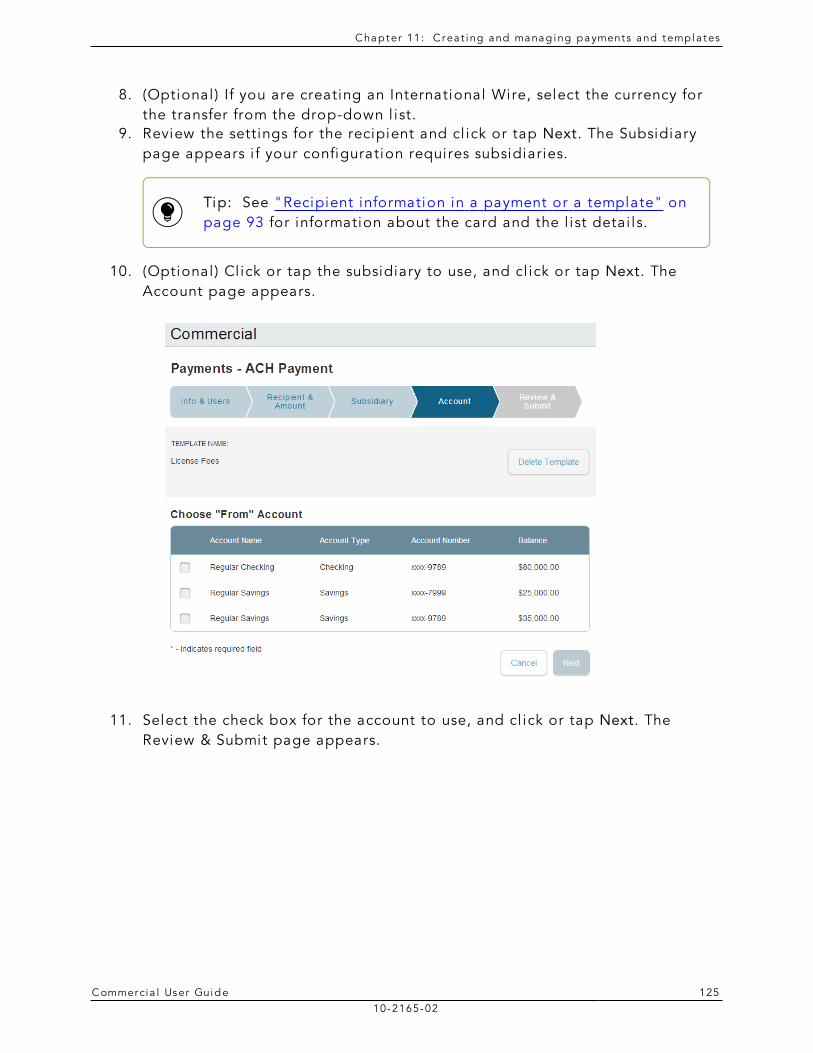
C hap ter 11: C rea t i ng and manag ing p ayment s and temp la tes
C ommerci a l User Guide 12510-2165-02
8. (Optional ) If you are creating an International Wire, select the currency for the transfer from the drop-down l ist.
9. Review the settings for the recipient and cl ick or tap Next. The Subsidiary page appears i f your configuration requires subsidiaries.
Tip: See "Recipient information in a payment or a template" on page 93 for information about the card and the l ist detai ls.
10. (Optional ) Cl ick or tap the subsidiary to use, and cl ick or tap Next. The Account page appears.
11. Select the check box for the account to use, and cl ick or tap Next. The Review & Submit page appears.
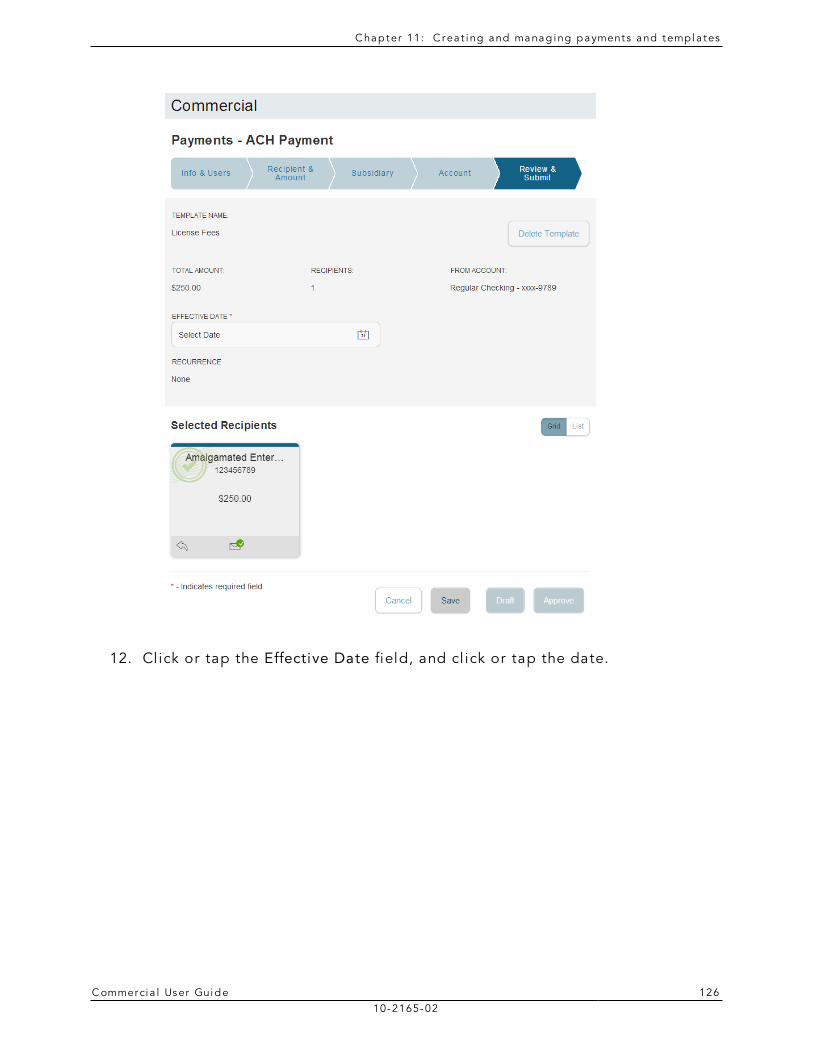
C hap ter 11: C rea t i ng and manag ing p ayment s and temp la tes
C ommerci a l User Guide 12610-2165-02
12. Cl ick or tap the Effective Date field, and cl ick or tap the date.
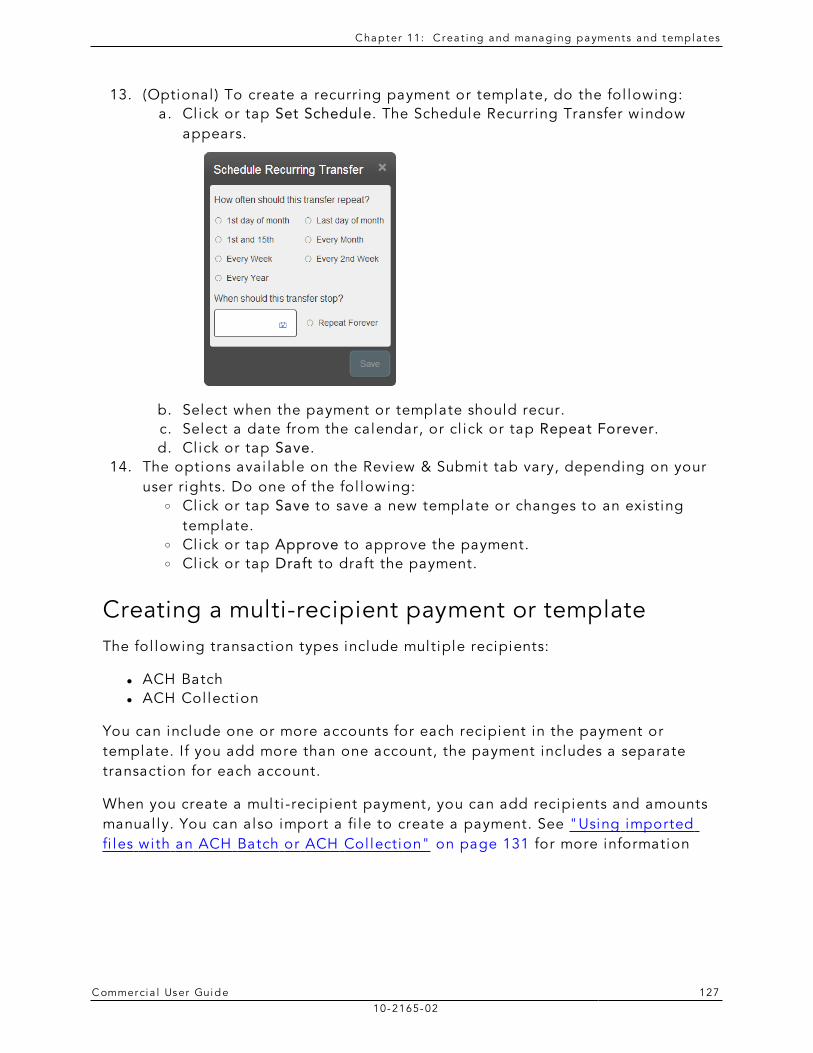
C hap ter 11: C rea t i ng and manag ing p ayment s and temp la tes
C ommerci a l User Guide 12710-2165-02
13. (Optional ) To create a recurring payment or template, do the fol lowing: a. Cl ick or tap Set Schedule. The Schedule Recurring Transfer window
appears.
b. Select when the payment or template should recur. c. Select a date from the calendar, or cl ick or tap Repeat Forever. d. Cl ick or tap Save.
14. The options avai lable on the Review & Submit tab vary, depending on your user rights. Do one of the fol lowing:
o Click or tap Save to save a new template or changes to an existing template.
o Click or tap Approve to approve the payment. o Click or tap Draft to draft the payment.
Creating a multi-recipient payment or templateThe fol lowing transaction types include multiple recipients:
l ACH Batch l ACH Col lection
You can include one or more accounts for each recipient in the payment or template. If you add more than one account, the payment includes a separate transaction for each account.
When you create a multi -recipient payment, you can add recipients and amounts manual ly. You can also import a fi le to create a payment. See "Using imported fi les with an ACH Batch or ACH Col lection" on page 131 for more information
C hap ter 11: C rea t i ng and manag ing p ayment s and temp la tes
C ommerci a l User Guide 12810-2165-02
To create a multi-recipient payment or template
1. In the Menu, cl ick or tap Commercial > Payments. The Payments page appears.
2. Do one of the fol lowing: o In the New Template drop-down l ist, cl ick or tap the template type to
create. Continue with Step 3. o In the New Payment drop-down l ist, cl ick or tap the payment type to
create. Continue with Step 4. 3. If you are creating a template, the Info & Users page appears. Do the
fol lowing: a. In the Template Name field, type a name for the template. b. In the Grant User Access area, select the check box for each user that
you want to assign access to the template. You can browse or search for user names.
Tip: You can only select the check box for users who have the Draft or Draft Restricted right for the transaction type. You cannot clear the check box for users who have the Manage Templates feature assigned.
c. Cl ick or tap Next.
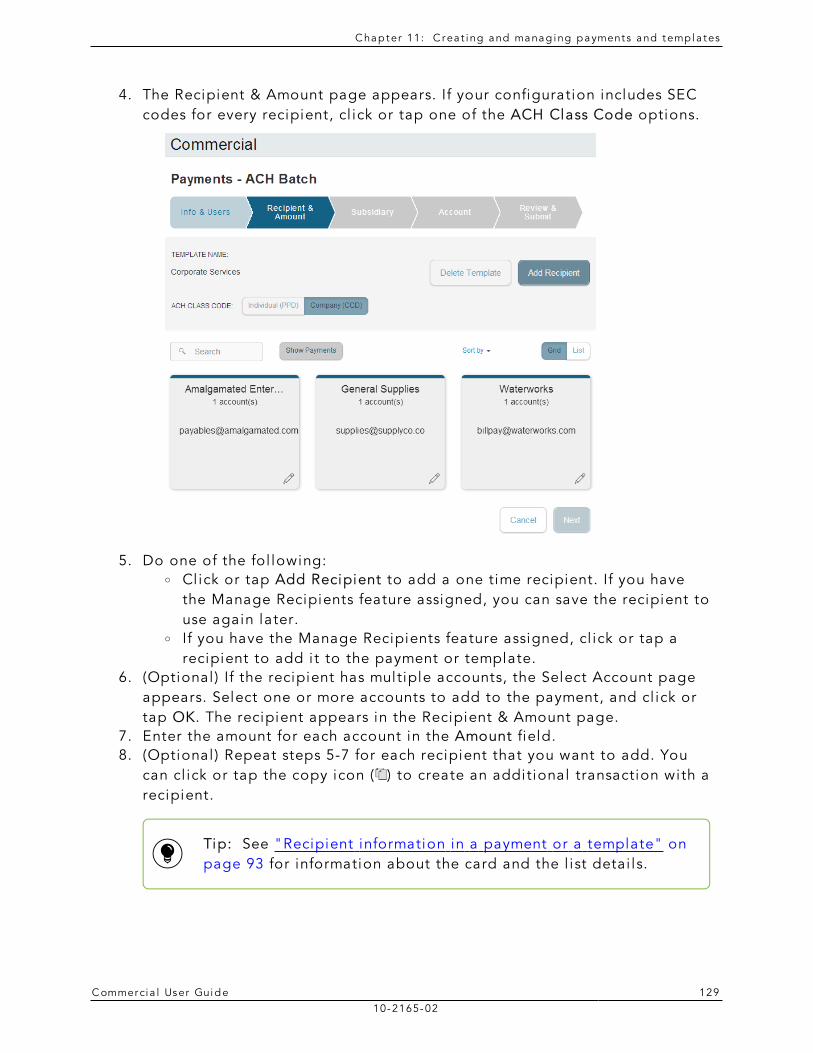
C hap ter 11: C rea t i ng and manag ing p ayment s and temp la tes
C ommerci a l User Guide 12910-2165-02
4. The Recipient & Amount page appears. If your configuration includes SEC codes for every recipient, cl ick or tap one of the ACH Class Code options.
5. Do one of the fol lowing: o Click or tap Add Recipient to add a one time recipient. If you have
the Manage Recipients feature assigned, you can save the recipient to use again later.
o If you have the Manage Recipients feature assigned, cl ick or tap a recipient to add i t to the payment or template.
6. (Optional ) If the recipient has multiple accounts, the Select Account page appears. Select one or more accounts to add to the payment, and cl ick or tap OK. The recipient appears in the Recipient & Amount page.
7. Enter the amount for each account in the Amount field. 8. (Optional ) Repeat steps 5-7 for each recipient that you want to add. You
can cl ick or tap the copy icon ( ) to create an additional transaction with a recipient.
Tip: See "Recipient information in a payment or a template" on page 93 for information about the card and the l ist detai ls.
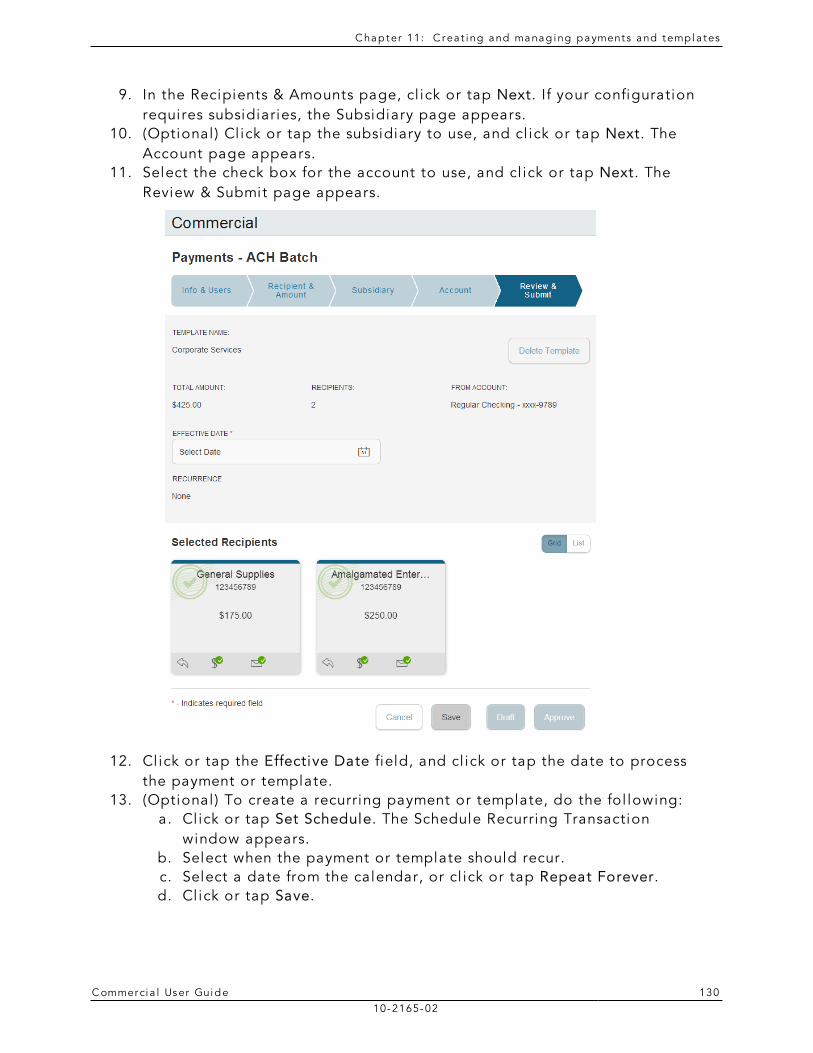
C hap ter 11: C rea t i ng and manag ing p ayment s and temp la tes
C ommerci a l User Guide 13010-2165-02
9. In the Recipients & Amounts page, cl ick or tap Next. If your configuration requires subsidiaries, the Subsidiary page appears.
10. (Optional ) Cl ick or tap the subsidiary to use, and cl ick or tap Next. The Account page appears.
11. Select the check box for the account to use, and cl ick or tap Next. The Review & Submit page appears.
12. Cl ick or tap the Effective Date field, and cl ick or tap the date to process the payment or template.
13. (Optional ) To create a recurring payment or template, do the fol lowing: a. Cl ick or tap Set Schedule. The Schedule Recurring Transaction
window appears. b. Select when the payment or template should recur. c. Select a date from the calendar, or cl ick or tap Repeat Forever. d. Cl ick or tap Save.

C hap ter 11: C rea t i ng and manag ing p ayment s and temp la tes
C ommerci a l User Guide 13110-2165-02
14. The options avai lable on the Review & Submit tab vary, depending on your user rights. Do one of the fol lowing:
o Click or tap Save to save a new template or changes to an existing template. You must save a template before you can draft a payment based on the template.
o Click or tap Approve to approve the payment to each recipient. o Click or tap Draft to draft the payment.
Using imported files with an ACH Batch or ACH CollectionImported fi les help you to automate the process of creating payments, remove dupl icated effort, and reduce errors. Depending on the fi le format, you can do the fol lowing with an imported fi le:
l Update recipients and amounts in a payment l Create a new payment with recipients and amounts l Submit an ACH-format fi le for processing
You import the recipients and amounts from a fi le that you create outside of onl ine banking or the mobi le banking app. The fi le that you upload must be in a speci fied format.
Tip: To use spl i ts in an imported fi le, include each spl i t as separate l ine in the imported fi le.
This section includes the fol lowing:
l "Updating recipients and amounts in a payment" on page 131 l "Importing recipients and amounts to create a payment" on page 133 l "Importing a NACHA fi le to create a payment" on page 135 l "Importing an ACH fi le with ACH Passthru" on page 135
Updating recipients and amounts in a paymentWhen you create an ACH Batch or ACH Col lection, you can import a fi le to update the amounts for the recipients in the payment. You can create the payment from a template or as a new payment. Before you perform the import, you create a two-column Comma-Separated Values (CSV) fi le in your accounting or other software. You do not create the CSV fi le in onl ine banking or the mobi le banking app.
C hap ter 11: C rea t i ng and manag ing p ayment s and temp la tes
C ommerci a l User Guide 13210-2165-02
The two-column CSV fi le must contain the fol lowing columns:
l Recipient name l Amount
The import uses the name and the order of recipients in the fi le to match recipients and update amounts. The l ist of recipients in the fi le should be the same as the l ist in the payment. If the payment includes a recipient more than once, the fi le should include a separate l ine for each transaction with the recipient. For each recipient, the import updates the transaction amounts in the order that they appear in the fi le.
Note: If we cannot match every recipient in the fi le and the payment, the import fai ls.
To update recipients and amounts
1. In the Menu, cl ick or tap Commercial > Payments. The Payments page appears.
2. On the Payments page, do one of the fol lowing: o Click or tap the template that you want to use to create the payment. o In the New Payment drop-down l ist, cl ick the payment type to create.
The Recipient & Amount page appears. 3. Do the fol lowing:
a. Cl ick or tap one of the ACH Class Code options. b. (Optional ) If you are creating a new payment, add recipients to the
payment. You do not need to speci fy amounts. c. Cl ick or tap Import Amounts. The Open dialog box appears.
4. In the Open dialog box, locate the fi le that you want to upload, and cl ick or tap Open. The process to locate the fi le varies, depending on your device.
5. On the Recipient & Amount page, veri fy the recipients, the amounts and the settings, and cl ick or tap Next. If your account uses subsidiaries, the Subsidiary page appears.
Tip: See "Recipient information in a payment or a template" on page 93 for information about the recipient information.
6. (Optional ) Cl ick or tap the subsidiary to use, and cl ick or tap Next. The Account page appears.
C hap ter 11: C rea t i ng and manag ing p ayment s and temp la tes
C ommerci a l User Guide 13310-2165-02
7. On the Account page, select the check box for the account to use, and cl ick or tap Next. The Review & Submit page appears.
8. Cl ick or tap the Effective Date field, and cl ick or tap the date. 9. To create a recurring payment or template, do the fol lowing:
a. Cl ick or tap Set Schedule. The Schedule Recurring Transaction window appears.
b. Select when the payment or template should recur. c. Select a date from the calendar, or cl ick or tap Repeat Forever. d. Cl ick or tap Save.
10. The options avai lable on the Review & Submit tab vary, depending on your user rights. Do one of the fol lowing:
o Click or tap Approve to approve the payment. o Click or tap Draft to draft the payment.
Importing recipients and amounts to create a paymentYou can import a l ist of recipients and amounts from a 5-column Comma-Separated Values (CSV) fi le to add recipients and amounts to a new ACH Batch or ACH Col lection.
The CSV fi le must contain the fol lowing columns:
l Recipient name l Routing transit number l Account number l Account type l Amount
The recipient name does not need to match an existing recipient. The import uses the name and the order of the fi le to create recipients and amounts. You can include a recipient multiple times to create multiple payments. The payments can be to the same account or a di fferent account.
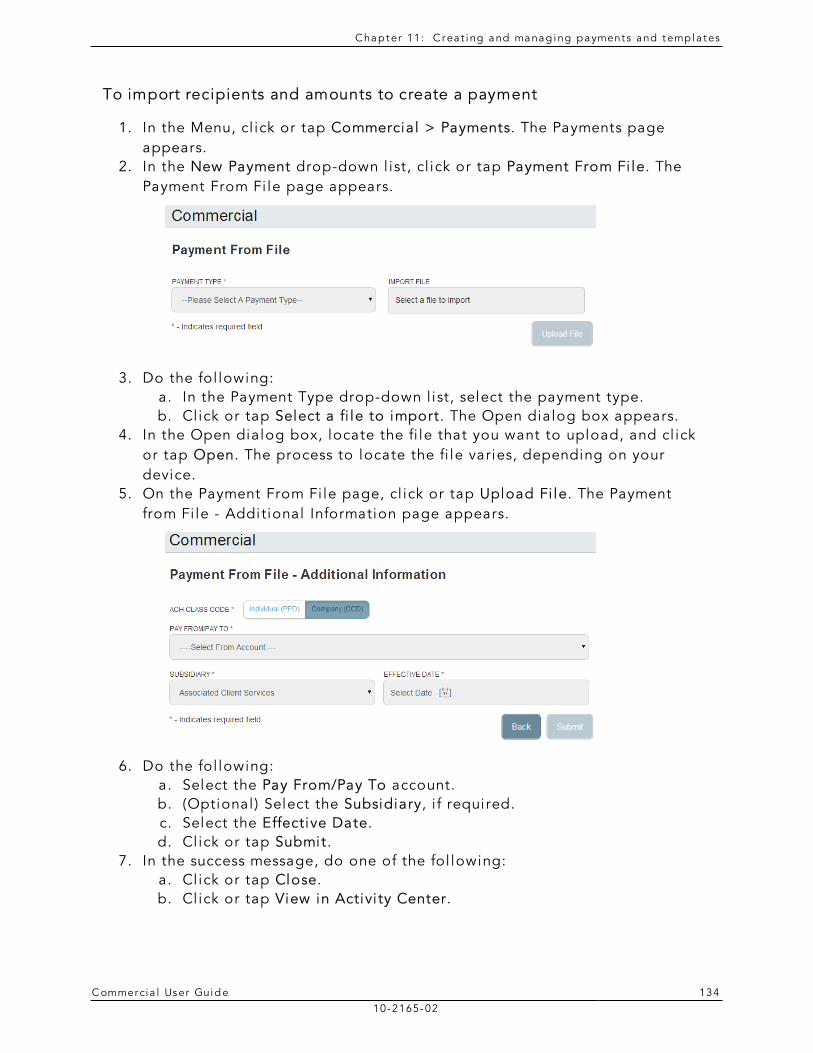
C hap ter 11: C rea t i ng and manag ing p ayment s and temp la tes
C ommerci a l User Guide 13410-2165-02
To import recipients and amounts to create a payment
1. In the Menu, cl ick or tap Commercial > Payments. The Payments page appears.
2. In the New Payment drop-down l ist, cl ick or tap Payment From Fi le. The Payment From Fi le page appears.
3. Do the fol lowing: a. In the Payment Type drop-down l ist, select the payment type. b. Cl ick or tap Select a fi le to import. The Open dialog box appears.
4. In the Open dialog box, locate the fi le that you want to upload, and cl ick or tap Open. The process to locate the fi le varies, depending on your device.
5. On the Payment From Fi le page, cl ick or tap Upload Fi le. The Payment from Fi le - Additional Information page appears.
6. Do the fol lowing: a. Select the Pay From/Pay To account. b. (Optional ) Select the Subsidiary, i f required. c. Select the Effective Date. d. Cl ick or tap Submit.
7. In the success message, do one of the fol lowing: a. Cl ick or tap Close. b. Cl ick or tap View in Activi ty Center.
C hap ter 11: C rea t i ng and manag ing p ayment s and temp la tes
C ommerci a l User Guide 13510-2165-02
Importing a NACHA file to create a paymentYou can import a balanced NACHA format fi le to create an ACH Batch or ACH Col lection. When you import a NACHA format fi le, we veri fy the contents of the fi le before we process i t. If the fi le is missing required information, we prompt you for the information. If the fi le has any errors, we display an error message, and we cannot process the fi le. You can correct the errors in the fi le and upload the corrected fi le.
You create the NACHA-format fi le in your accounting or other software.
To import a NACHA file to create a payment
1. In the Menu, cl ick or tap Commercial > Payments. The Payments page appears.
2. On the Payments page, in the New Payment drop-down l ist, cl ick or tap Payment From Fi le. The Payment From Fi le page appears.
3. Do the fol lowing: a. In the Payment Type drop-down l ist, select the payment type. b. Cl ick or tap Select a fi le to import. The Open dialog box appears.
4. In the Open dialog box, locate the fi le that you want to upload, and cl ick or tap Open. The process to locate the fi le varies, depending on your device.
5. On the Payment From Fi le page, cl ick or tap Upload Fi le. If we need additional information to process the fi le, the Payment from Fi le - Additional Information page appears.
6. (Optional ) On the Payment from Fi le - Additional Information page, the fields that appear depend on the missing information. Do some or al l of the fol lowing:
o Select the Pay From/Pay To account. o Select the Subsidiary. o Select the Effective Date.
7. (Optional ) Cl ick or tap Submit. 8. In the success message, do one of the fol lowing:
a. Cl ick or tap Close. b. Cl ick or tap View in Activi ty Center.
Importing an ACH file with ACH PassthruYou can use ACH Passthru to load and submit complex balanced or unbalanced NACHA-format ACH fi les. The fi le that you select to upload should be a properly formatted NACHA-format fi le. The fi le can contain one or more batches. The fi le can include both debit and credit batches.
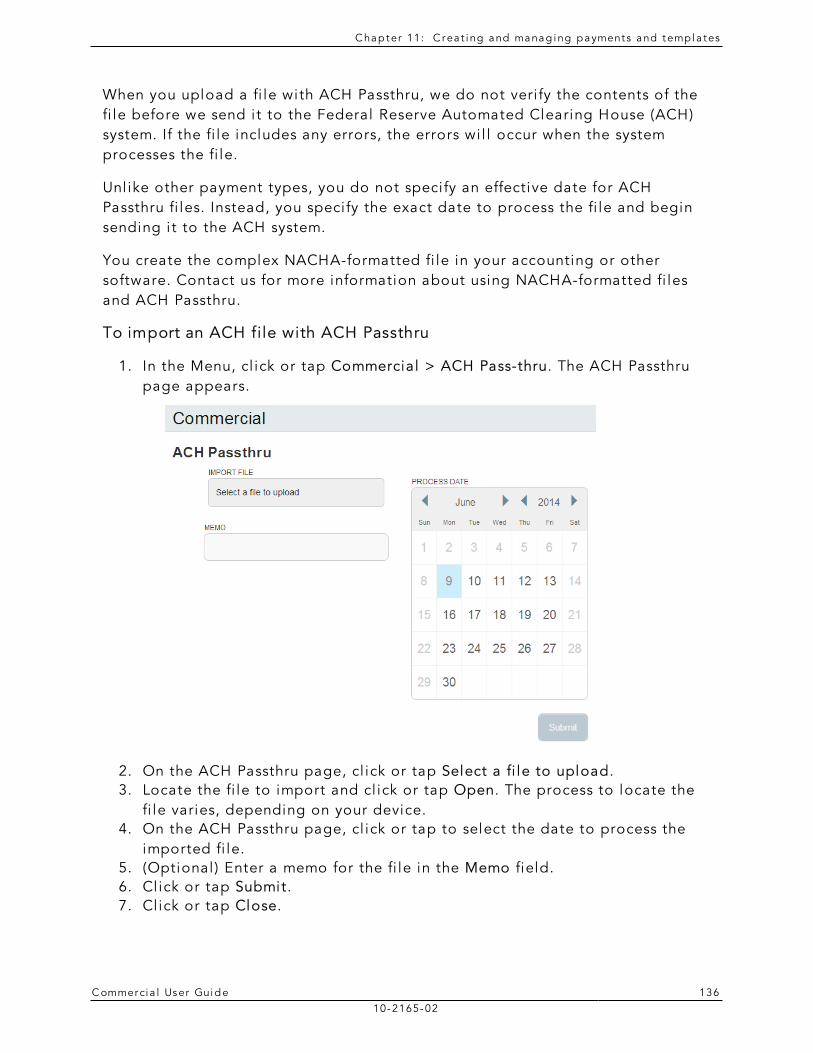
C hap ter 11: C rea t i ng and manag ing p ayment s and temp la tes
C ommerci a l User Guide 13610-2165-02
When you upload a fi le with ACH Passthru, we do not veri fy the contents of the fi le before we send i t to the Federal Reserve Automated Clearing House (ACH) system. If the fi le includes any errors, the errors wi l l occur when the system processes the fi le.
Unl ike other payment types, you do not speci fy an effective date for ACH Passthru fi les. Instead, you speci fy the exact date to process the fi le and begin sending i t to the ACH system.
You create the complex NACHA-formatted fi le in your accounting or other software. Contact us for more information about using NACHA-formatted fi les and ACH Passthru.
To import an ACH file with ACH Passthru
1. In the Menu, cl ick or tap Commercial > ACH Pass-thru. The ACH Passthru page appears.
2. On the ACH Passthru page, cl ick or tap Select a fi le to upload. 3. Locate the fi le to import and cl ick or tap Open. The process to locate the
fi le varies, depending on your device. 4. On the ACH Passthru page, cl ick or tap to select the date to process the
imported fi le. 5. (Optional ) Enter a memo for the fi le in the Memo field. 6. Cl ick or tap Submit. 7. Cl ick or tap Close.
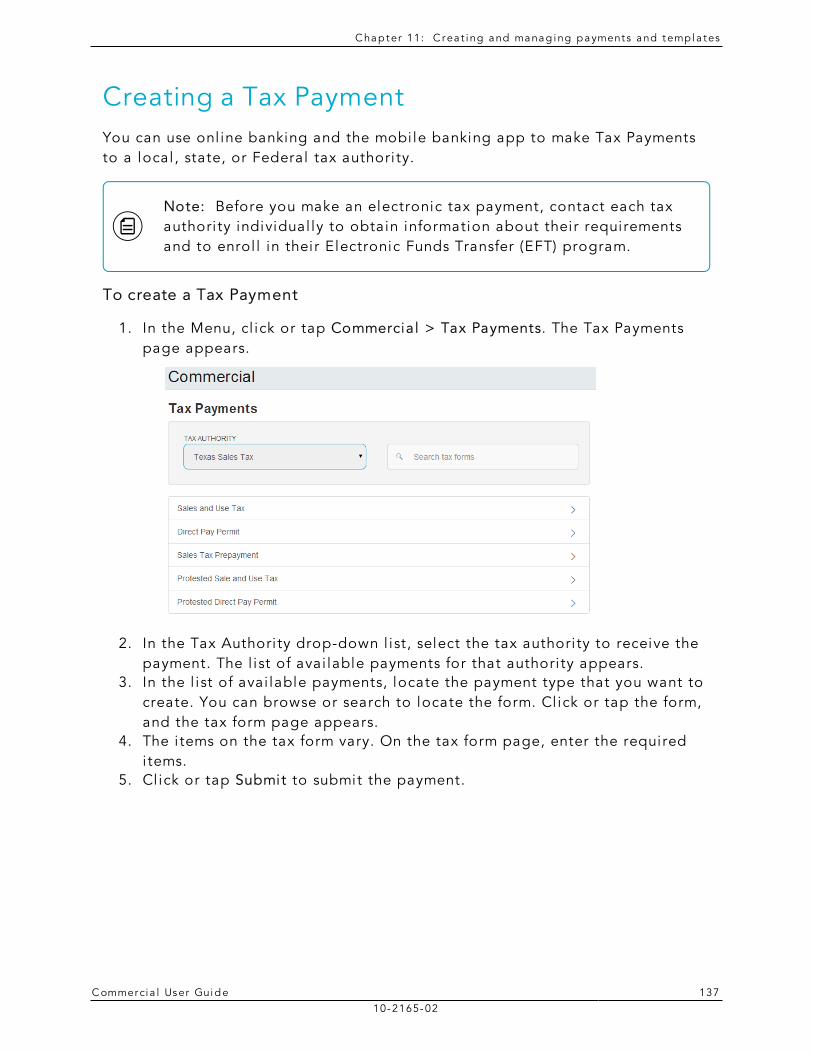
C hap ter 11: C rea t i ng and manag ing p ayment s and temp la tes
C ommerci a l User Guide 13710-2165-02
Creating a Tax PaymentYou can use onl ine banking and the mobi le banking app to make Tax Payments to a local , state, or Federal tax authori ty.
Note: Before you make an electronic tax payment, contact each tax authori ty individual ly to obtain information about their requirements and to enrol l in their Electronic Funds Transfer (EFT) program.
To create a Tax Payment
1. In the Menu, cl ick or tap Commercial > Tax Payments. The Tax Payments page appears.
2. In the Tax Authori ty drop-down l ist, select the tax authori ty to receive the payment. The l ist of avai lable payments for that authori ty appears.
3. In the l ist of avai lable payments, locate the payment type that you want to create. You can browse or search to locate the form. Cl ick or tap the form, and the tax form page appears.
4. The i tems on the tax form vary. On the tax form page, enter the required i tems.
5. Cl ick or tap Submit to submit the payment.
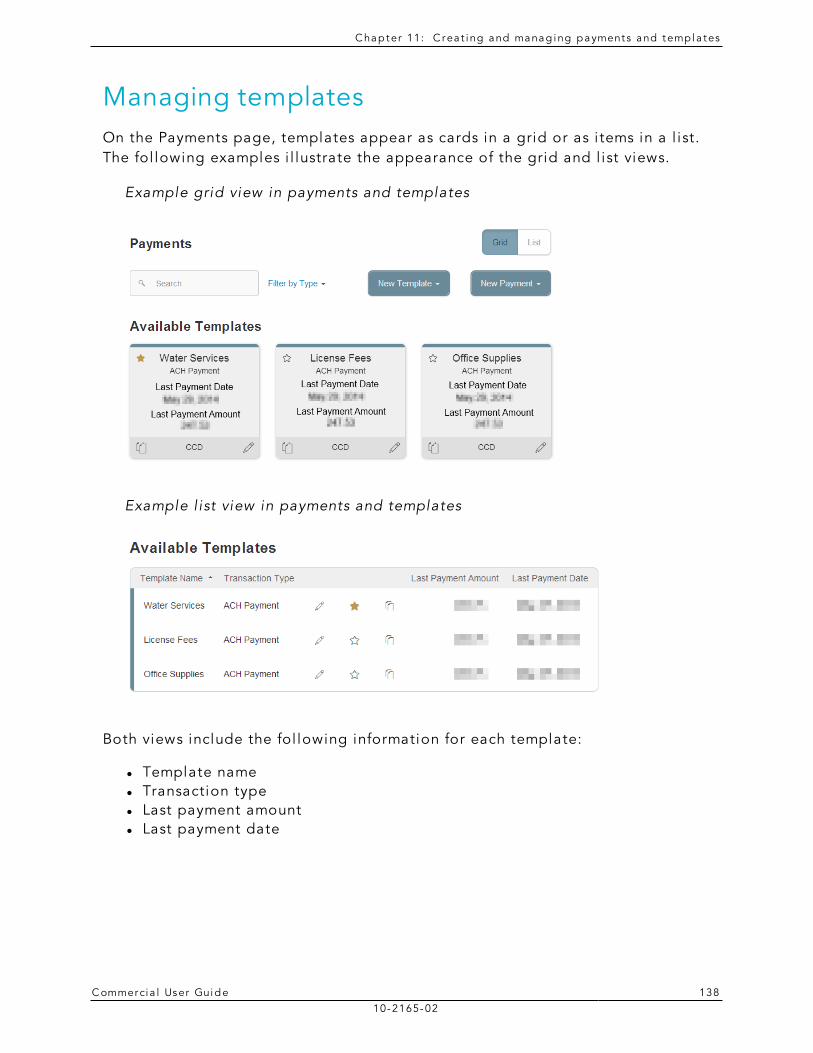
C hap ter 11: C rea t i ng and manag ing p ayment s and temp la tes
C ommerci a l User Guide 13810-2165-02
Managing templatesOn the Payments page, templates appear as cards in a grid or as i tems in a l ist. The fol lowing examples i l lustrate the appearance of the grid and l ist views.
Example grid view in payments and templates
Example l ist view in payments and templates
Both views include the fol lowing information for each template:
l Template name l Transaction type l Last payment amount l Last payment date
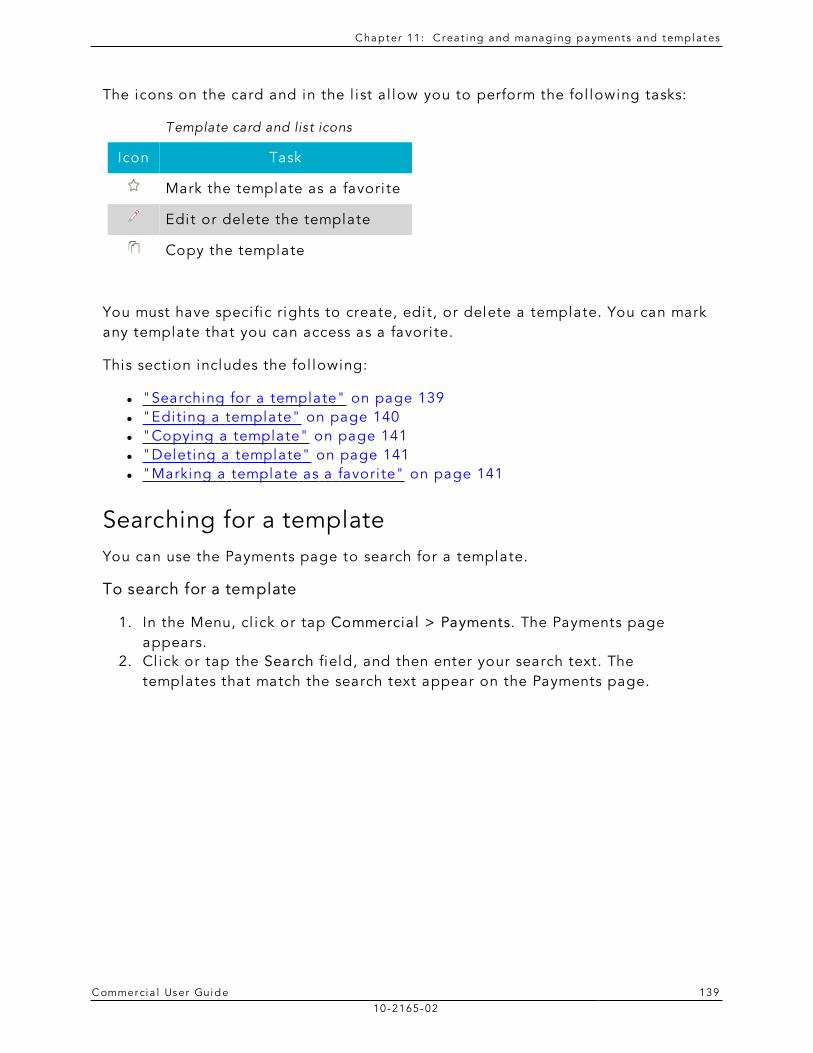
C hap ter 11: C rea t i ng and manag ing p ayment s and temp la tes
C ommerci a l User Guide 13910-2165-02
The icons on the card and in the l ist al low you to perform the fol lowing tasks:
Icon Task
Mark the template as a favori te
Edit or delete the template
Copy the template
Template card and list icons
You must have speci fic rights to create, edit, or delete a template. You can mark any template that you can access as a favori te.
This section includes the fol lowing:
l "Searching for a template" on page 139 l "Editing a template" on page 140 l "Copying a template" on page 141 l "Deleting a template" on page 141 l "Marking a template as a favori te" on page 141
Searching for a templateYou can use the Payments page to search for a template.
To search for a template
1. In the Menu, cl ick or tap Commercial > Payments. The Payments page appears.
2. Cl ick or tap the Search field, and then enter your search text. The templates that match the search text appear on the Payments page.
C hap ter 11: C rea t i ng and manag ing p ayment s and temp la tes
C ommerci a l User Guide 14010-2165-02
Filtering templatesOn the Payments page, you can use a fi l ter to show only templates of a particular type.
To filter templates
1. In the Menu, cl ick or tap Commercial > Payments. The Payments page appears.
2. On the Payments page, in the Fi l ter by Type drop-down l ist, cl ick or tap one of the fol lowing:
o All to show al l templates. o Any transaction type name to show templates of that type.
Templates of the selected type appear on the Payments page.
Editing a templateIf you have the Manage Templates feature assigned, you can use the Payments page to edit any template. If you have the Draft right for a transaction type, you can edit any template that you created or that another user assigned to you.
When you edit a template, existing payments based on the template do not change. Any future payments use the new template settings.
To edit a template
1. In the Menu, cl ick or tap Commercial > Payments. The Payments page appears.
2. Cl ick or tap the template that you want to edit. You can browse or search to locate the template. The Info & Users page for the template appears.
3. Make any needed changes to the template settings. 4. Cl ick or tap Review & Submit. 5. On the Review & Submit page, cl ick or tap Save. 6. Cl ick or tap Close.
C hap ter 11: C rea t i ng and manag ing p ayment s and temp la tes
C ommerci a l User Guide 14110-2165-02
Copying a templateYou can use the Payments page to copy an existing template, make changes, and save the copy .
To copy a template
1. In the Menu, cl ick or tap Commercial > Payments. The Payments page appears.
2. On the Payments page, locate the template that you want to copy. You can browse or search to locate the template.
3. Cl ick or tap the copy icon ( ) for the template. The Info & Users page appears.
4. Make any needed changes to the template settings. 5. Cl ick or tap Review & Submit. 6. On the Review & Submit page, cl ick or tap Save. 7. Cl ick or tap Close.
Deleting a templateYou can use the Payment page in onl ine banking and the mobi le banking app to delete a template. When you delete a template, existing payments based on the template do not change.
To delete a template
1. In the Menu, cl ick or tap Commercial > Payments. The Payments page appears.
2. On the Payments page, cl ick or tap the template that you want to delete. You can browse or search to locate the template. When you cl ick or tap the template, the Info & Users page for the template appears.
3. Cl ick or tap the delete icon ( ). 4. Cl ick or tap Close.
Marking a template as a favoriteFavorite templates are the templates that you use most often. Every user has an individual l ist of favori te templates. Favori te templates are grouped together before any other templates on the Payments page. You can mark any template that you can access as a favori te.
C hap ter 11: C rea t i ng and manag ing p ayment s and temp la tes
C ommerci a l User Guide 14210-2165-02
To mark a template as a favorite
1. In the Menu, cl ick or tap Commercial > Payments. The Payments page appears.
2. Locate the template that you want to mark as a favori te. You can browse or search to locate the template.
3. Cl ick or tap the Favori te icon ( ) for the template.
Creating a payment from a templateA template is a model for a payment. Depending on your user rights, you may be able to change al l of the fields in the payment that you create, or you may only be able to change the date, description, and amount fields.
The templates that you can use appear in the Avai lable Templates area on the Payments page.
If you have the Draft right assigned for a transaction type, you can change any of the values in the template when you create the new payment.
If you have the Draft Restricted right assigned for the transaction type, you can only change the date, description, and amount in the template when you create the new payment.
See "How user rights control payments and templates" on page 85 for more information.
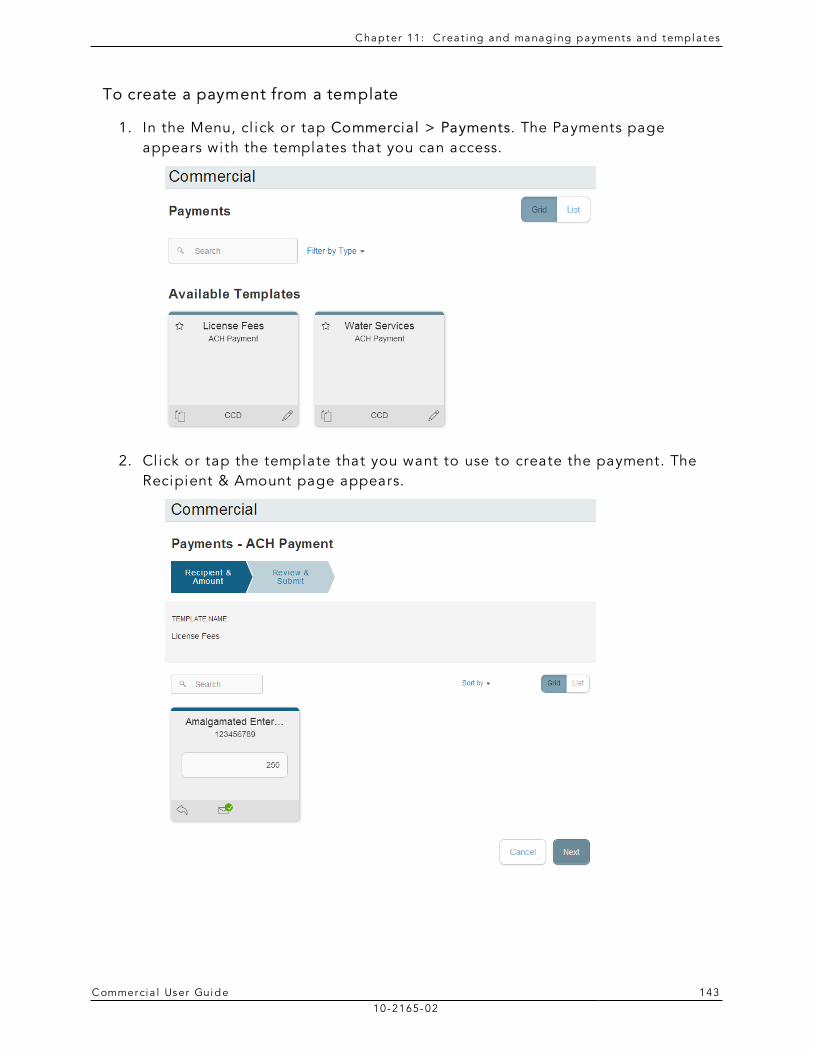
C hap ter 11: C rea t i ng and manag ing p ayment s and temp la tes
C ommerci a l User Guide 14310-2165-02
To create a payment from a template
1. In the Menu, cl ick or tap Commercial > Payments. The Payments page appears with the templates that you can access.
2. Cl ick or tap the template that you want to use to create the payment. The Recipient & Amount page appears.
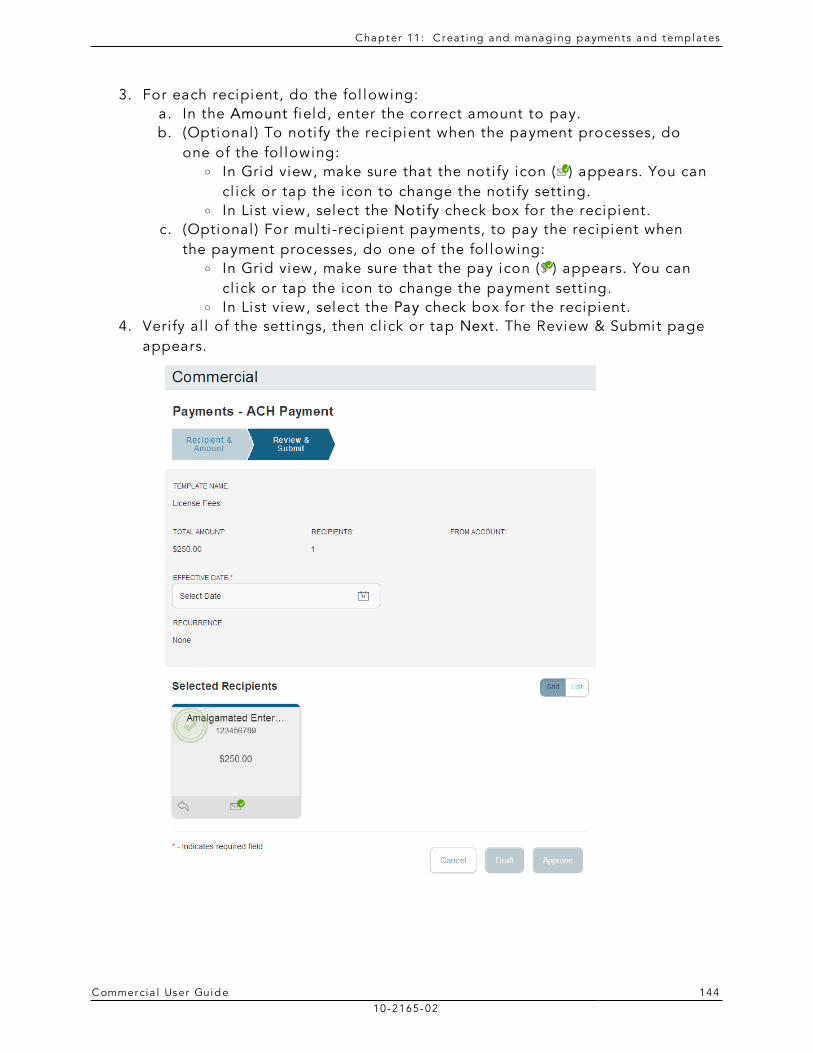
C hap ter 11: C rea t i ng and manag ing p ayment s and temp la tes
C ommerci a l User Guide 14410-2165-02
3. For each recipient, do the fol lowing: a. In the Amount field, enter the correct amount to pay. b. (Optional ) To noti fy the recipient when the payment processes, do
one of the fol lowing: o In Grid view, make sure that the noti fy icon ( ) appears. You can
cl ick or tap the icon to change the noti fy setting. o In List view, select the Noti fy check box for the recipient.
c. (Optional ) For multi -recipient payments, to pay the recipient when the payment processes, do one of the fol lowing:
o In Grid view, make sure that the pay icon ( ) appears. You can cl ick or tap the icon to change the payment setting.
o In List view, select the Pay check box for the recipient. 4. Veri fy al l of the settings, then cl ick or tap Next. The Review & Submit page
appears.
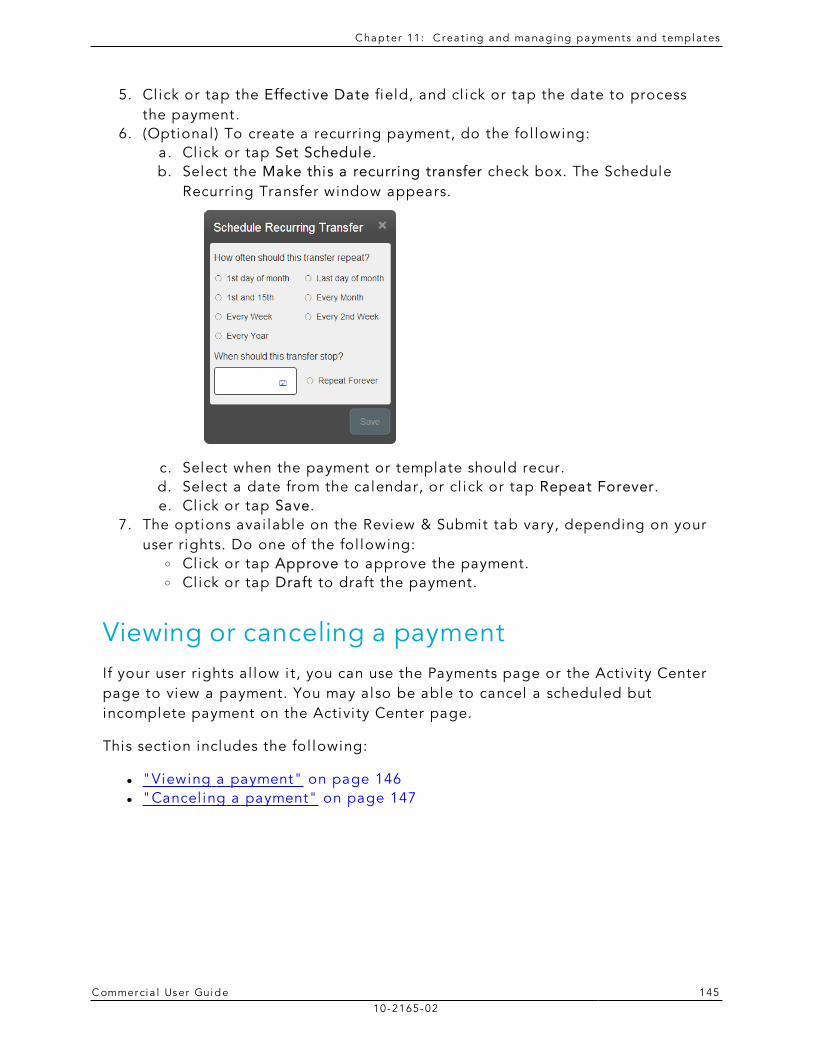
C hap ter 11: C rea t i ng and manag ing p ayment s and temp la tes
C ommerci a l User Guide 14510-2165-02
5. Cl ick or tap the Effective Date field, and cl ick or tap the date to process the payment.
6. (Optional ) To create a recurring payment, do the fol lowing: a. Cl ick or tap Set Schedule. b. Select the Make this a recurring transfer check box. The Schedule
Recurring Transfer window appears.
c. Select when the payment or template should recur. d. Select a date from the calendar, or cl ick or tap Repeat Forever. e. Cl ick or tap Save.
7. The options avai lable on the Review & Submit tab vary, depending on your user rights. Do one of the fol lowing:
o Click or tap Approve to approve the payment. o Click or tap Draft to draft the payment.
Viewing or canceling a paymentIf your user rights al low i t, you can use the Payments page or the Activi ty Center page to view a payment. You may also be able to cancel a scheduled but incomplete payment on the Activi ty Center page.
This section includes the fol lowing:
l "Viewing a payment" on page 146 l "Cancel ing a payment" on page 147
C hap ter 11: C rea t i ng and manag ing p ayment s and temp la tes
C ommerci a l User Guide 14610-2165-02
Viewing a paymentYou can view or search for an existing pending or processed payment on the fol lowing pages:
l Payments l Activi ty Center
The Activi ty Center page may include additional detai ls about a payment.
To view a payment on the Payments page
1. In the Menu, cl ick or tap Commercial > Payments. The Payments page appears.
2. The Search transactions area l ists al l of the pending and processed payments. Do one of the fol lowing:
o Click or tap Pending to browse the pending payments. o Click or tap Processed to browse the processed payments. o Click or tap in the Search transactions field, and enter your search
text. The search results appear on the Payments page. 3. After you locate a payment, cl ick or tap i t for more detai ls. The payment
detai ls page appears. 4. (Optional ) On the payment detai ls page, cl ick or tap View in Activi ty
Center. The Activi ty Center page appears, with the payment selected and the detai ls visible.
To view a payment on the Activity Center page
1. In the Menu, cl ick or tap Transactions > Activi ty Center. The Activi ty Center page appears.
2. On the Activi ty Center page, do one of the fol lowing: o Click or tap Individual Transactions to view a single payment. o Click or tap Recurring Transactions to view a recurring series of
payments. 3. Browse to locate the payment that you want to view. 4. Cl ick or tap the payment. The payment expands to show the detai ls.
C hap ter 11: C rea t i ng and manag ing p ayment s and temp la tes
C ommerci a l User Guide 14710-2165-02
Canceling a paymentYou can use the Activi ty Center page to cancel a payment. You can cancel a payment i f the status is Drafted or Pending.
To cancel a single payment
1. In the Menu, cl ick or tap Transactions > Activi ty Center. The Activi ty Center page appears.
2. Cl ick or tap Individual Transactions. 3. Cl ick or tap the payment that you want to cancel . The Transaction detai ls
appear. 4. In the Transaction detai ls, cl ick or tap Cancel . 5. When prompted, cl ick or tap Confi rm.
To cancel all future occurrences of a recurring payment
1. In the Menu, cl ick or tap Transactions > Activi ty Center. The Activi ty Center page appears.
2. Cl ick or tap Recurring Transactions. 3. Cl ick or tap the recurring series of payments that you want to cancel . The
Transaction detai ls appear. 4. In the Transaction detai ls, cl ick or tap Cancel . 5. When prompted, cl ick or tap Confi rm.
Sending notifications to approversIf your account uses mobi le approval , el igible approvers can configure a mobi le approval code. You can use the Activi ty Center pageto send a noti fication to one or more el igible approvers to request approval .
See "Configuring a mobi le authorization code" on page 161 for information about configuring mobi le approval .
To send notifications to approvers
1. In the Menu, cl ick or tap Transactions > Activi ty Center. The Activi ty Center page appears.
2. Browse or search for the transactions for which you want to send noti fications.
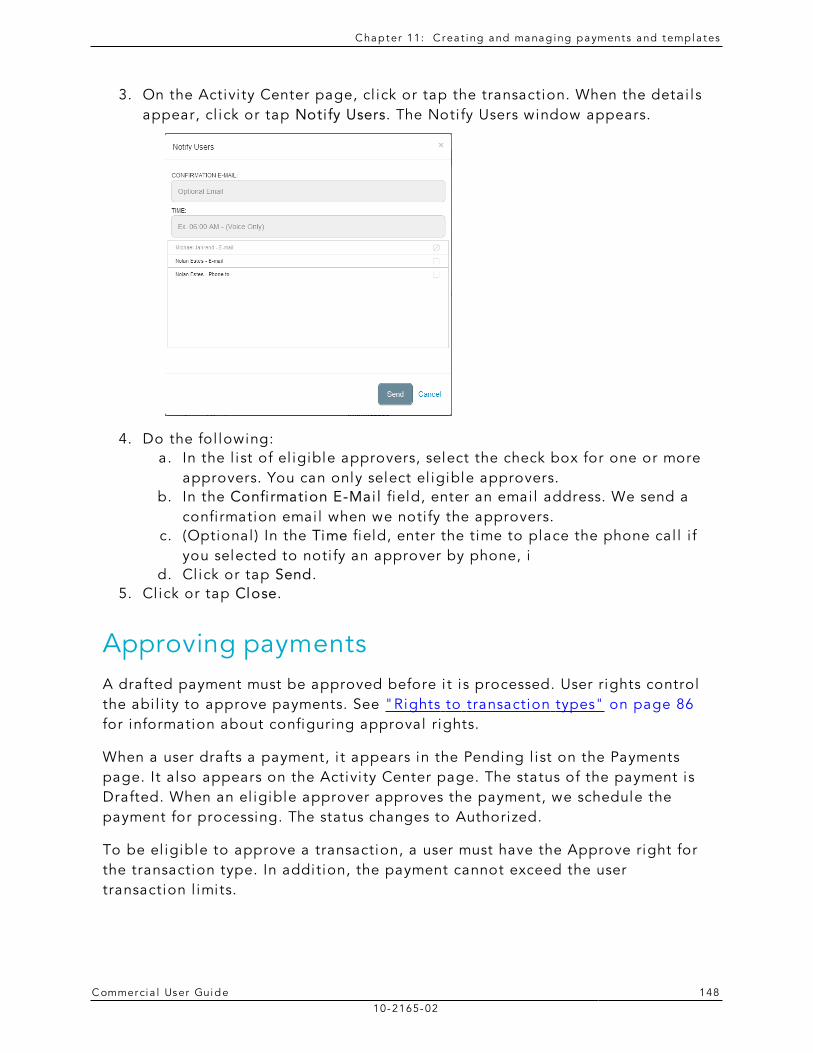
C hap ter 11: C rea t i ng and manag ing p ayment s and temp la tes
C ommerci a l User Guide 14810-2165-02
3. On the Activi ty Center page, cl ick or tap the transaction. When the detai ls appear, cl ick or tap Noti fy Users. The Noti fy Users window appears.
4. Do the fol lowing: a. In the l ist of el igible approvers, select the check box for one or more
approvers. You can only select el igible approvers. b. In the Confi rmation E-Mai l field, enter an emai l address. We send a
confi rmation emai l when we noti fy the approvers. c. (Optional ) In the Time field, enter the time to place the phone cal l i f
you selected to noti fy an approver by phone, i d. Cl ick or tap Send.
5. Cl ick or tap Close.
Approving paymentsA drafted payment must be approved before i t is processed. User rights control the abi l i ty to approve payments. See "Rights to transaction types" on page 86 for information about configuring approval rights.
When a user drafts a payment, i t appears in the Pending l ist on the Payments page. It also appears on the Activi ty Center page. The status of the payment is Drafted. When an el igible approver approves the payment, we schedule the payment for processing. The status changes to Authorized.
To be el igible to approve a transaction, a user must have the Approve right for the transaction type. In addition, the payment cannot exceed the user transaction l imits.
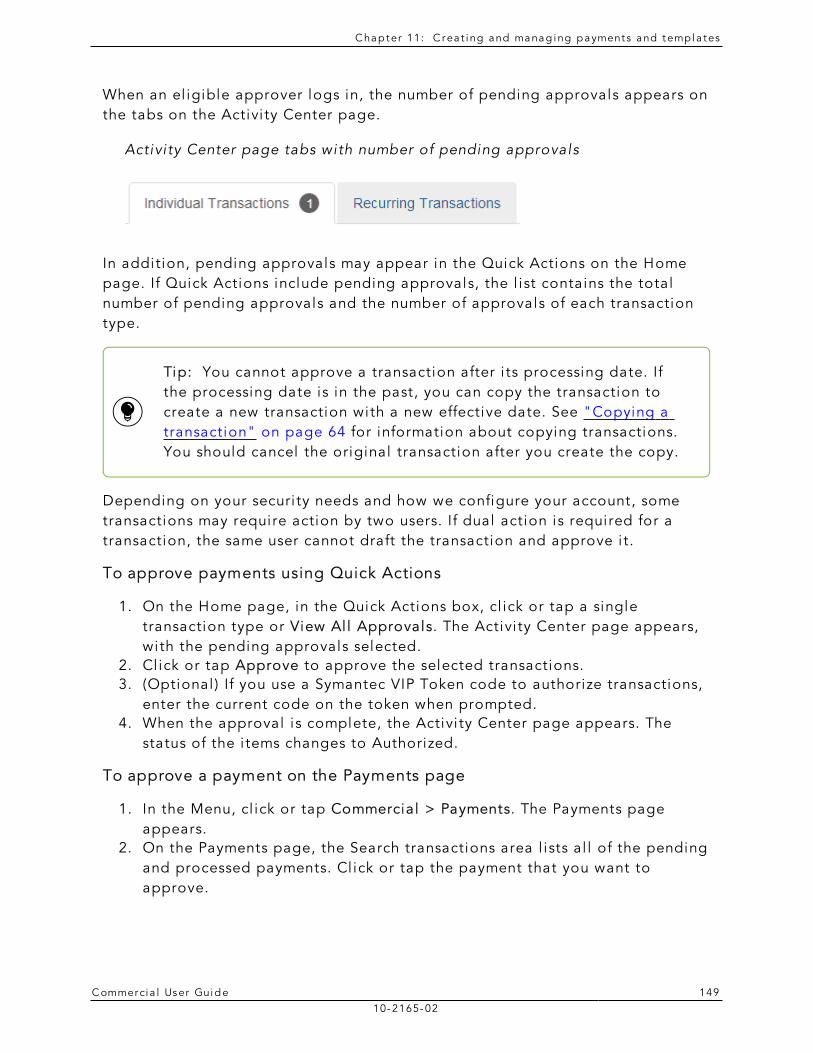
C hap ter 11: C rea t i ng and manag ing p ayment s and temp la tes
C ommerci a l User Guide 14910-2165-02
When an el igible approver logs in, the number of pending approvals appears on the tabs on the Activi ty Center page.
Activi ty Center page tabs with number of pending approvals
In addition, pending approvals may appear in the Quick Actions on the Home page. If Quick Actions include pending approvals, the l ist contains the total number of pending approvals and the number of approvals of each transaction type.
Tip: You cannot approve a transaction after i ts processing date. If the processing date is in the past, you can copy the transaction to create a new transaction with a new effective date. See "Copying a transaction" on page 64 for information about copying transactions. You should cancel the original transaction after you create the copy.
Depending on your securi ty needs and how we configure your account, some transactions may require action by two users. If dual action is required for a transaction, the same user cannot draft the transaction and approve i t.
To approve payments using Quick Actions
1. On the Home page, in the Quick Actions box, cl ick or tap a single transaction type or View Al l Approvals. The Activi ty Center page appears, with the pending approvals selected.
2. Cl ick or tap Approve to approve the selected transactions. 3. (Optional ) If you use a Symantec VIP Token code to authorize transactions,
enter the current code on the token when prompted. 4. When the approval is complete, the Activi ty Center page appears. The
status of the i tems changes to Authorized.
To approve a payment on the Payments page
1. In the Menu, cl ick or tap Commercial > Payments. The Payments page appears.
2. On the Payments page, the Search transactions area l ists al l of the pending and processed payments. Cl ick or tap the payment that you want to approve.
C hap ter 11: C rea t i ng and manag ing p ayment s and temp la tes
C ommerci a l User Guide 15010-2165-02
3. In the status message, cl ick or tap View in Activi ty Center. The Activi ty Center page appears, with the payment detai ls visible.
4. Cl ick or tap Approve. 5. (Optional ) If you use a Symantec VIP Token code to authorize transactions,
enter the current code on the token when prompted. 6. When the approval is complete, the Activi ty Center page appears. The
status of the i tems changes to Authorized.
To approve one or more payments on the Activity Center page
1. In the Menu, cl ick or tap Transactions > Activi ty Center. The Activi ty Center page appears.
2. Browse or search for the payments that you want to approve. 3. On the Activi ty Center page, do one of the fol lowing:
o To approve a single payment, cl ick or tap the i tem that you want to approve. When the detai ls appear, cl ick or tap Approve.
o To approve multiple payments, cl ick or tap the check box for each i tem that you want to approve. On the Activi ty Center page, cl ick or tap Approve.
4. (Optional ) If you use a Symantec VIP Token code to authorize transactions, enter the current code from the token when prompted.
5. When prompted, cl ick or tap Approve to veri fy the approval . The status of the i tems wi l l change to Authorized on the Activi ty Center page.
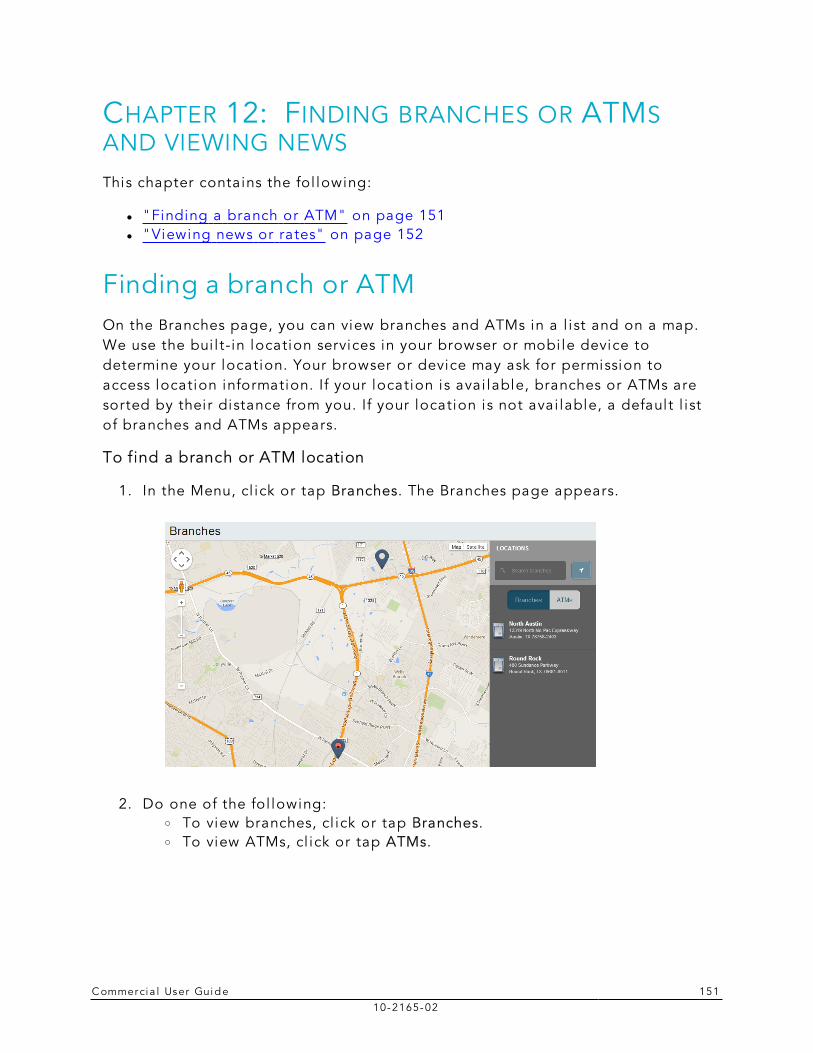
C ommerci a l User Guide 15110-2165-02
CHAPTER 12: FINDING BRANCHES OR ATMS AND VIEWING NEWS
This chapter contains the fol lowing:
l "Finding a branch or ATM" on page 151 l "Viewing news or rates" on page 152
Finding a branch or ATMOn the Branches page, you can view branches and ATMs in a l ist and on a map. We use the bui l t-in location services in your browser or mobi le device to determine your location. Your browser or device may ask for permission to access location information. If your location is avai lable, branches or ATMs are sorted by their distance from you. If your location is not avai lable, a default l ist of branches and ATMs appears.
To find a branch or ATM location
1. In the Menu, cl ick or tap Branches. The Branches page appears.
2. Do one of the fol lowing: o To view branches, cl ick or tap Branches. o To view ATMs, cl ick or tap ATMs.
C hap ter 12: Fi nd ing b ranches or ATMs and viewing news
C ommerci a l User Guide 15210-2165-02
3. On the Branches page, do one or more of the fol lowing: o Tap and drag, or use your mouse to scrol l or zoom the map. o Browse the locations l ist. o Click or tap the Search branches field and enter a ci ty, state, or ZIP
Code to search. o Click or tap a location for more information about the branch or ATM. o (Optional ) In the location detai ls, cl ick or tap Get Directions for
directions to the branch or ATM.
Viewing news or ratesYou can view news and our rates.
To view a news item on the News page
1. In the Menu, cl ick or tap News. The News page appears. 2. Do one or more of the fol lowing:
o Read headl ines or the fi rst part of any story on the news page. o Click or tap More to read the article.
To view rates
l In the Menu, cl ick or tap News. The News page appears. Rates appear in the Sidebar on the News page.
C ommerci a l User Guide 15310-2165-02
CHAPTER 13: CONFIGURING SETTINGS
This chapter contains the fol lowing:
l "Updating your profi le" on page 153 l "Requesting an address change" on page 154 l "Configuring account preferences" on page 155 l "Changing your securi ty preferences" on page 157 l "Configuring a mobi le authorization code" on page 161 l "Configuring text banking" on page 162 l "Selecting a theme and a language" on page 156 l "Configuring statement del ivery settings" on page 166
Updating your profileYou can update your contact information in your profi le. The information in the profi le is used to fi l l out certain forms. We can also use i t i f we need to contact you.
Caution: Updating your onl ine profi le does not update the address on fi le for your account. See "Requesting an address change" on page 154 for information about requesting an address change.
We do not use the contact information in the onl ine profi le to send you Secure Access Codes to log on or to register a browser. We only send a Secure Access Code to your secure del ivery address. See "Configuring secure del ivery contact information" on page 159 for information about configuring the secure del ivery address.
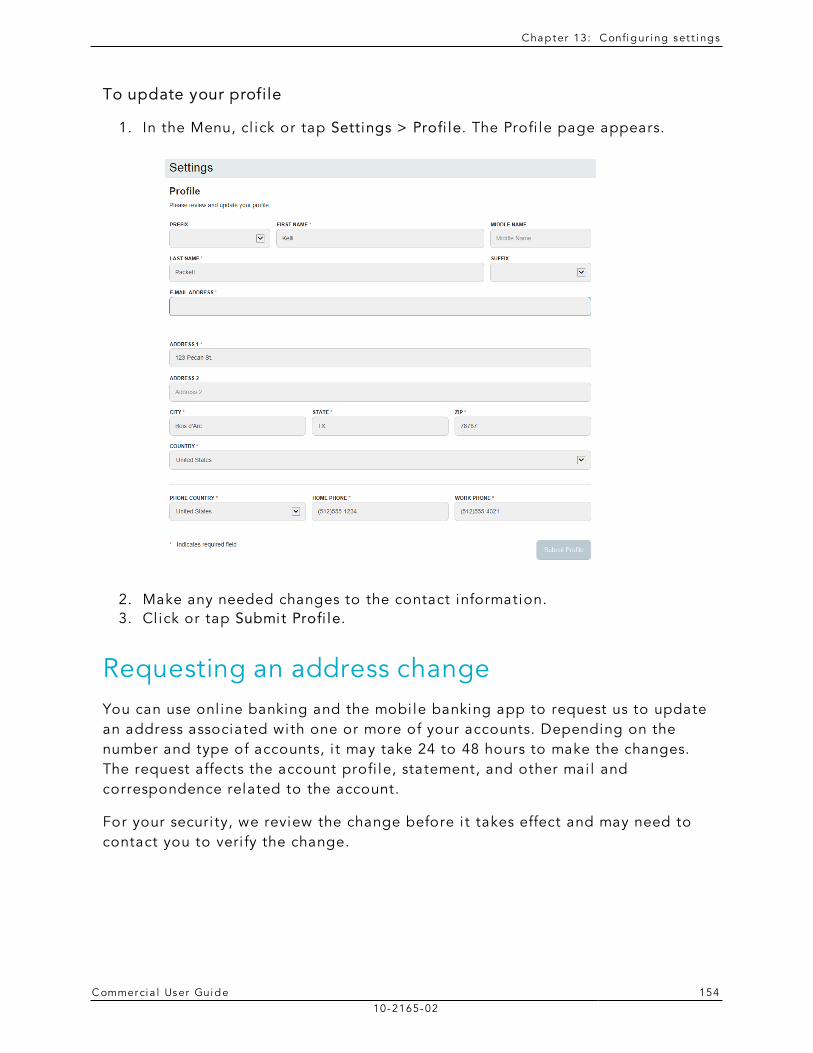
C hap ter 13: C onfig ur i ng set t i ngs
C ommerci a l User Guide 15410-2165-02
To update your profile
1. In the Menu, cl ick or tap Settings > Profi le. The Profi le page appears.
2. Make any needed changes to the contact information. 3. Cl ick or tap Submit Profi le.
Requesting an address changeYou can use onl ine banking and the mobi le banking app to request us to update an address associated with one or more of your accounts. Depending on the number and type of accounts, i t may take 24 to 48 hours to make the changes. The request affects the account profi le, statement, and other mai l and correspondence related to the account.
For your securi ty, we review the change before i t takes effect and may need to contact you to veri fy the change.
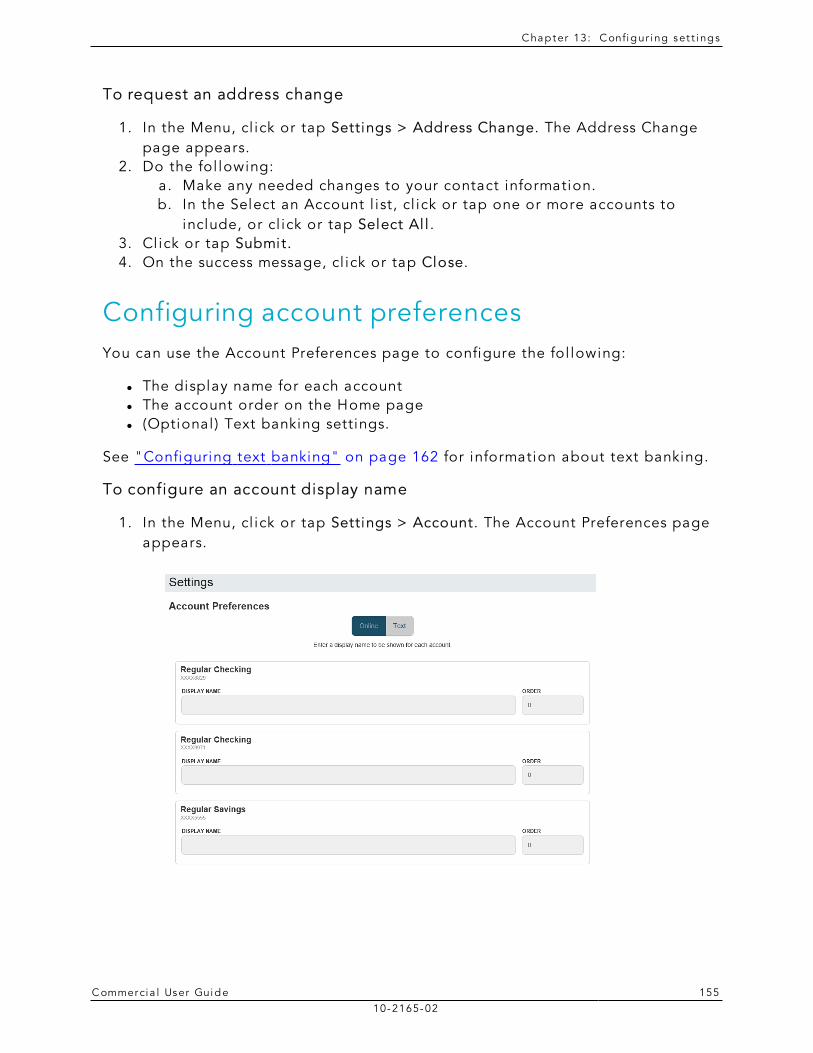
C hap ter 13: C onfig ur i ng set t i ngs
C ommerci a l User Guide 15510-2165-02
To request an address change
1. In the Menu, cl ick or tap Settings > Address Change. The Address Change page appears.
2. Do the fol lowing: a. Make any needed changes to your contact information. b. In the Select an Account l ist, cl ick or tap one or more accounts to
include, or cl ick or tap Select Al l . 3. Cl ick or tap Submit. 4. On the success message, cl ick or tap Close.
Configuring account preferencesYou can use the Account Preferences page to configure the fol lowing:
l The display name for each account l The account order on the Home page l (Optional ) Text banking settings.
See "Configuring text banking" on page 162 for information about text banking.
To configure an account display name
1. In the Menu, cl ick or tap Settings > Account. The Account Preferences page appears.
C hap ter 13: C onfig ur i ng set t i ngs
C ommerci a l User Guide 15610-2165-02
2. Locate the account that you want to assign a display name. In the l ist, accounts are grouped by type. Enter the name in the Display Name field. The display name appears instead of a generic name in onl ine banking and the mobi le banking app.
3. Cl ick or tap Submit to submit the change.
To configure the order that accounts appear in
1. In the Account Preferences page, enter a value in the Order field for each account.
2. Cl ick or tap Submit.
Selecting a theme and a languageA theme changes the arrangement of the elements in onl ine banking and the mobi le banking app, along with the background image, the colors, and the fonts. You can also change the preferred language in onl ine banking and the mobi le banking app.
Note: If no alternate themes or languages are avai lable, the theme and language settings do not appear.
To change the selected theme
1. In the Menu, cl ick or tap Settings > Themes. The Themes page appears. 2. Cl ick or tap the theme that you want to use. The theme changes
immediately across al l of your supported devices.
To change the selected language
1. In the Menu, cl ick or tap Settings > Themes. The Themes page appears. 2. Select the language that you want to use in the Language drop-down l ist.
The language changes immediately across al l of your supported devices.
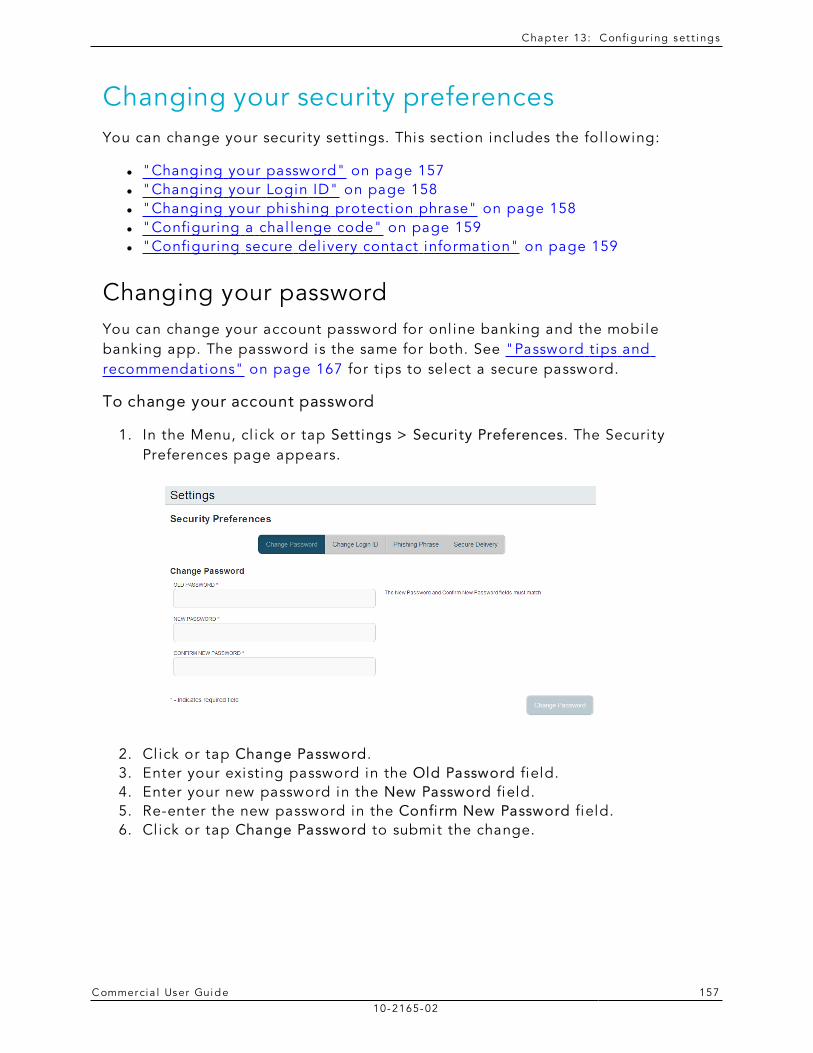
C hap ter 13: C onfig ur i ng set t i ngs
C ommerci a l User Guide 15710-2165-02
Changing your security preferencesYou can change your securi ty settings. This section includes the fol lowing:
l "Changing your password" on page 157 l "Changing your Login ID" on page 158 l "Changing your phishing protection phrase" on page 158 l "Configuring a chal lenge code" on page 159 l "Configuring secure del ivery contact information" on page 159
Changing your passwordYou can change your account password for onl ine banking and the mobi le banking app. The password is the same for both. See "Password tips and recommendations" on page 167 for tips to select a secure password.
To change your account password
1. In the Menu, cl ick or tap Settings > Securi ty Preferences. The Securi ty Preferences page appears.
2. Cl ick or tap Change Password. 3. Enter your existing password in the Old Password field. 4. Enter your new password in the New Password field. 5. Re-enter the new password in the Confi rm New Password field. 6. Cl ick or tap Change Password to submit the change.
C hap ter 13: C onfig ur i ng set t i ngs
C ommerci a l User Guide 15810-2165-02
Changing your Login IDYou can change your Login ID. You use the same Login ID for both onl ine banking and the mobi le banking app.
To change your Login ID
1. In the Menu, cl ick or tap Settings > Securi ty Preferences. The Securi ty Preferences page appears.
2. Cl ick or tap Change Login ID. The Change Login ID tab appears.
Tip: If the Change Login ID tab does not appear on the Securi ty Preferences page, contact us to change your Login ID.
3. Enter the new ID in the New Login ID field. 4. Cl ick or tap Submit.
Changing your phishing protection phraseWhen you configure a phishing protection phrase, the phrase appears when you log in to onl ine banking and the mobi le banking app.
To change your phishing protection phrase
1. In the Menu, cl ick or tap Settings > Securi ty Preferences. The Securi ty Preferences page appears.
2. Cl ick or tap Phishing Phrase. The Phishing Phrase tab appears.
Note: The Phishing Phrase tab does not appear i f your account is not configured to use a phishing protection phrase.
3. Enter the phishing protection phrase in the My Phrase field. 4. Cl ick or tap Submit.
C hap ter 13: C onfig ur i ng set t i ngs
C ommerci a l User Guide 15910-2165-02
Configuring a challenge codeA chal lenge code can be used to temporari ly access onl ine banking or the mobi le banking app when you cannot receive a Secure Access Code. You cannot use a chal lenge code to register a browser or device.
Note: Not al l accounts are configured to use a chal lenge code.
To configure the challenge code
1. In the Menu, cl ick or tap Settings > Securi ty Preferences. The Securi ty Preferences page appears.
2. Cl ick or tap Chal lenge Code. The Chal lenge Code tab appears. 3. Do the fol lowing:
a. Enter the chal lenge code in the Chal lenge Code field. b. Re-enter the code in the Confi rm Chal lenge Code field.
4. Cl ick or tap Submit.
Configuring secure delivery contact informationYou can configure your secure del ivery contact information that we use to send Secure Access Codes. We only send Secure Access Codes to a known secure del ivery contact.
Method Detai ls
Phone The system cal ls the telephone number on fi le. You answer the phone normal ly and make a selection to hear the code. If necessary, you can repeat the code. The system does not leave the code on voice mai l . If you miss the cal l , you can request a new code.
Text (SMS) The system sends a text message with the code. Standard text messaging fees apply.
Emai l The system sends a short emai l with the code. Depending on the configuration of the fi l ters on your mai l server, the message may be in your junk or spam mai lbox.
Secure Access Code delivery methods
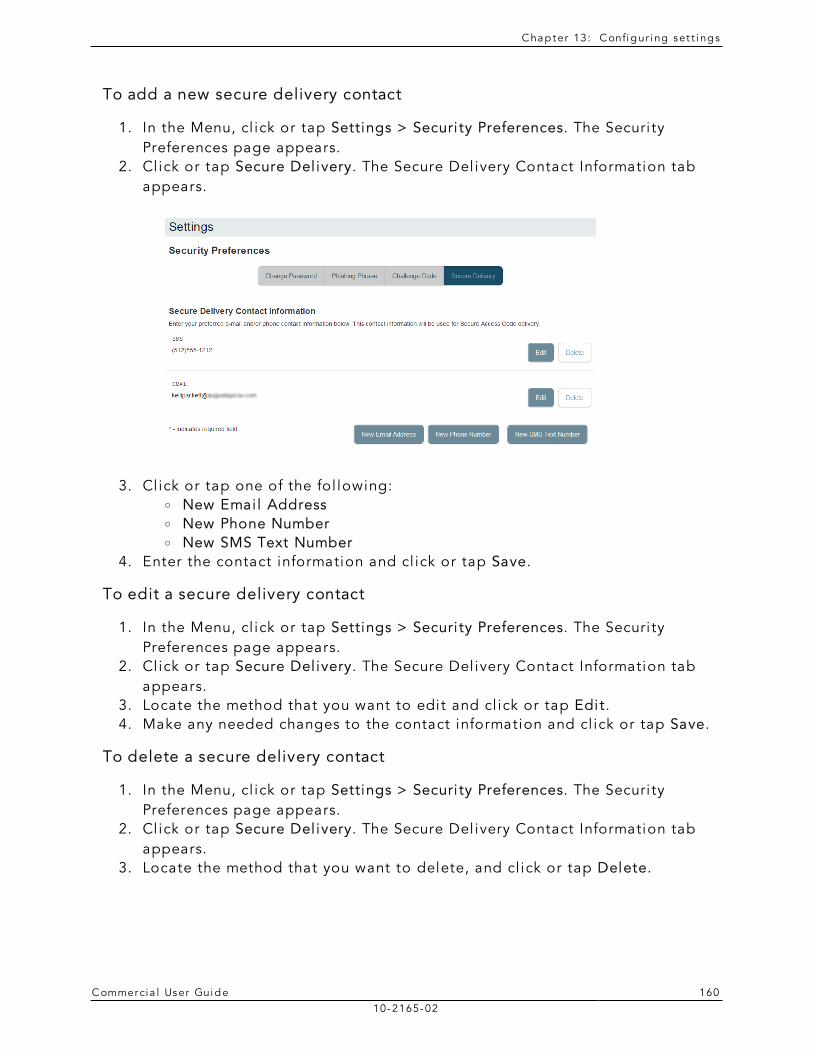
C hap ter 13: C onfig ur i ng set t i ngs
C ommerci a l User Guide 16010-2165-02
To add a new secure delivery contact
1. In the Menu, cl ick or tap Settings > Securi ty Preferences. The Securi ty Preferences page appears.
2. Cl ick or tap Secure Del ivery. The Secure Del ivery Contact Information tab appears.
3. Cl ick or tap one of the fol lowing: o New Emai l Address o New Phone Number o New SMS Text Number
4. Enter the contact information and cl ick or tap Save.
To edit a secure delivery contact
1. In the Menu, cl ick or tap Settings > Securi ty Preferences. The Securi ty Preferences page appears.
2. Cl ick or tap Secure Del ivery. The Secure Del ivery Contact Information tab appears.
3. Locate the method that you want to edit and cl ick or tap Edit. 4. Make any needed changes to the contact information and cl ick or tap Save.
To delete a secure delivery contact
1. In the Menu, cl ick or tap Settings > Securi ty Preferences. The Securi ty Preferences page appears.
2. Cl ick or tap Secure Del ivery. The Secure Del ivery Contact Information tab appears.
3. Locate the method that you want to delete, and cl ick or tap Delete.
C hap ter 13: C onfig ur i ng set t i ngs
C ommerci a l User Guide 16110-2165-02
Configuring a mobile authorization codeYou can use a mobi le authorization code to approve a Commercial transaction in a telephone cal l . We can send authorization requests to you at an Emai l address, a telephone number, or both.
When a user creates a new payment that requires approval , the user can noti fy val id approvers. If your rights permit you to approve the draft and you configure a Mobi le Authorization code, we contact you at the address that you speci fy for approval .
Method Notes
Telephone We place an automated phone cal l to the speci fied number. The cal l prompts you to enter the Mobi le Authorization code that you speci fied. You can enter a val id code on the phone to approve the draft.
Emai l Address
We send an emai l to the address. You can log in to onl ine banking or the mobi le banking app to approve the draft.
Mobile authorization contact methods
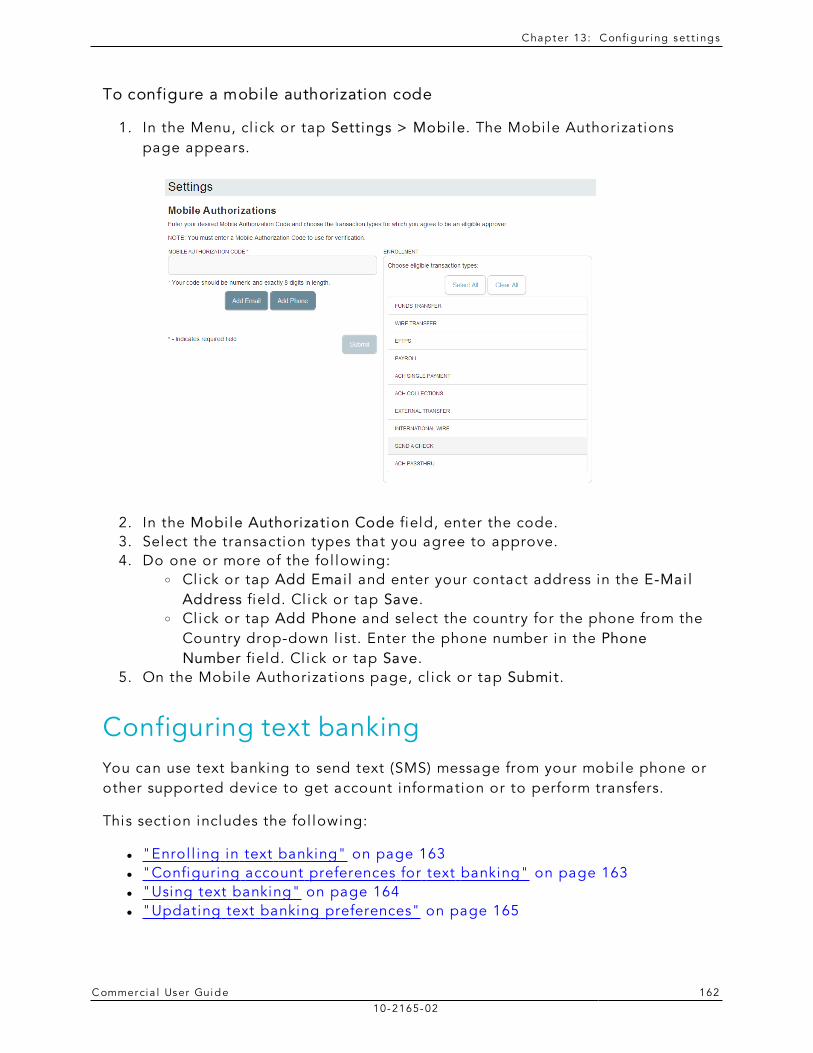
C hap ter 13: C onfig ur i ng set t i ngs
C ommerci a l User Guide 16210-2165-02
To configure a mobile authorization code
1. In the Menu, cl ick or tap Settings > Mobi le. The Mobi le Authorizations page appears.
2. In the Mobi le Authorization Code field, enter the code. 3. Select the transaction types that you agree to approve. 4. Do one or more of the fol lowing:
o Click or tap Add Emai l and enter your contact address in the E-Mai l Address field. Cl ick or tap Save.
o Click or tap Add Phone and select the country for the phone from the Country drop-down l ist. Enter the phone number in the Phone Number field. Cl ick or tap Save.
5. On the Mobi le Authorizations page, cl ick or tap Submit.
Configuring text bankingYou can use text banking to send text (SMS) message from your mobi le phone or other supported device to get account information or to perform transfers.
This section includes the fol lowing:
l "Enrol l ing in text banking" on page 163 l "Configuring account preferences for text banking" on page 163 l "Using text banking" on page 164 l "Updating text banking preferences" on page 165
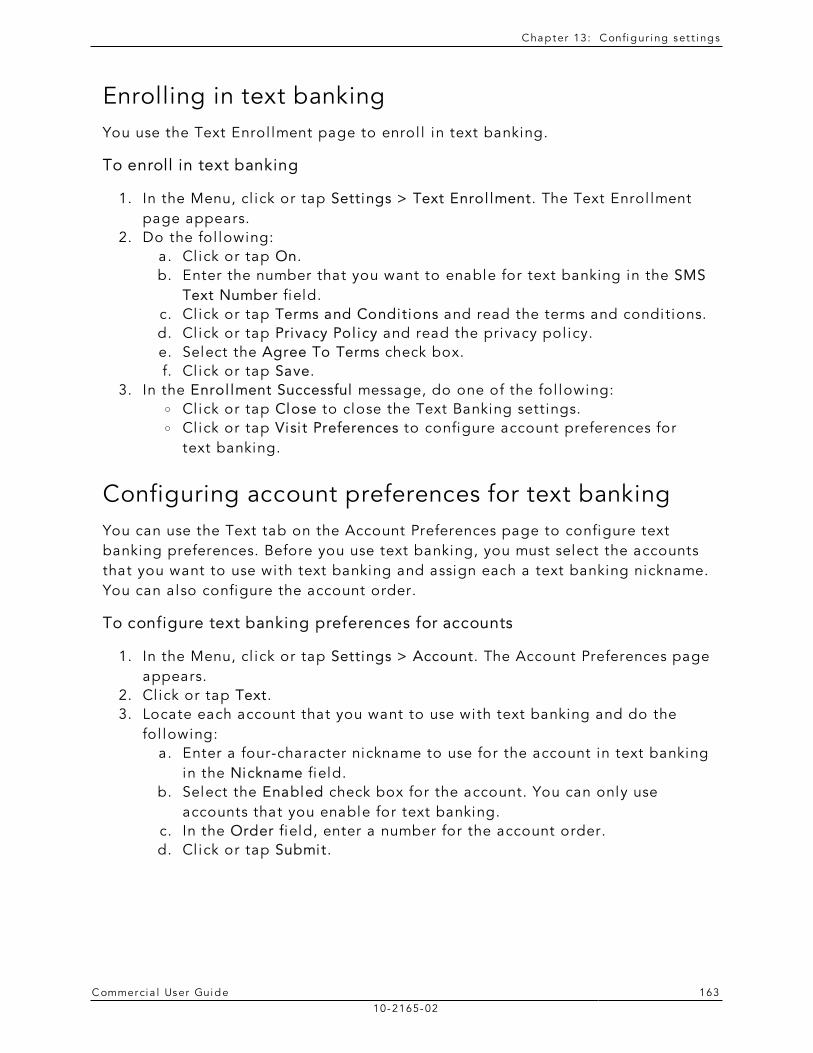
C hap ter 13: C onfig ur i ng set t i ngs
C ommerci a l User Guide 16310-2165-02
Enrolling in text bankingYou use the Text Enrol lment page to enrol l in text banking.
To enroll in text banking
1. In the Menu, cl ick or tap Settings > Text Enrol lment. The Text Enrol lment page appears.
2. Do the fol lowing: a. Cl ick or tap On. b. Enter the number that you want to enable for text banking in the SMS
Text Number field. c. Cl ick or tap Terms and Conditions and read the terms and conditions. d. Cl ick or tap Privacy Pol icy and read the privacy pol icy. e. Select the Agree To Terms check box. f. Cl ick or tap Save.
3. In the Enrol lment Successful message, do one of the fol lowing: o Click or tap Close to close the Text Banking settings. o Click or tap Visi t Preferences to configure account preferences for
text banking.
Configuring account preferences for text bankingYou can use the Text tab on the Account Preferences page to configure text banking preferences. Before you use text banking, you must select the accounts that you want to use with text banking and assign each a text banking nickname. You can also configure the account order.
To configure text banking preferences for accounts
1. In the Menu, cl ick or tap Settings > Account. The Account Preferences page appears.
2. Cl ick or tap Text. 3. Locate each account that you want to use with text banking and do the
fol lowing: a. Enter a four-character nickname to use for the account in text banking
in the Nickname field. b. Select the Enabled check box for the account. You can only use
accounts that you enable for text banking. c. In the Order field, enter a number for the account order. d. Cl ick or tap Submit.
C hap ter 13: C onfig ur i ng set t i ngs
C ommerci a l User Guide 16410-2165-02
Using text bankingTo use text banking, you send a text message to us with a command. When the action is complete, the text message reply includes the information or the results of the action.
Note: A signature or any other text in a text banking message may cause di fficulties processing text banking commands. You should disable any automatic signature or other text when you send a text banking command.
Caution: When you send or receive a text banking message, normal text message and data rates apply.
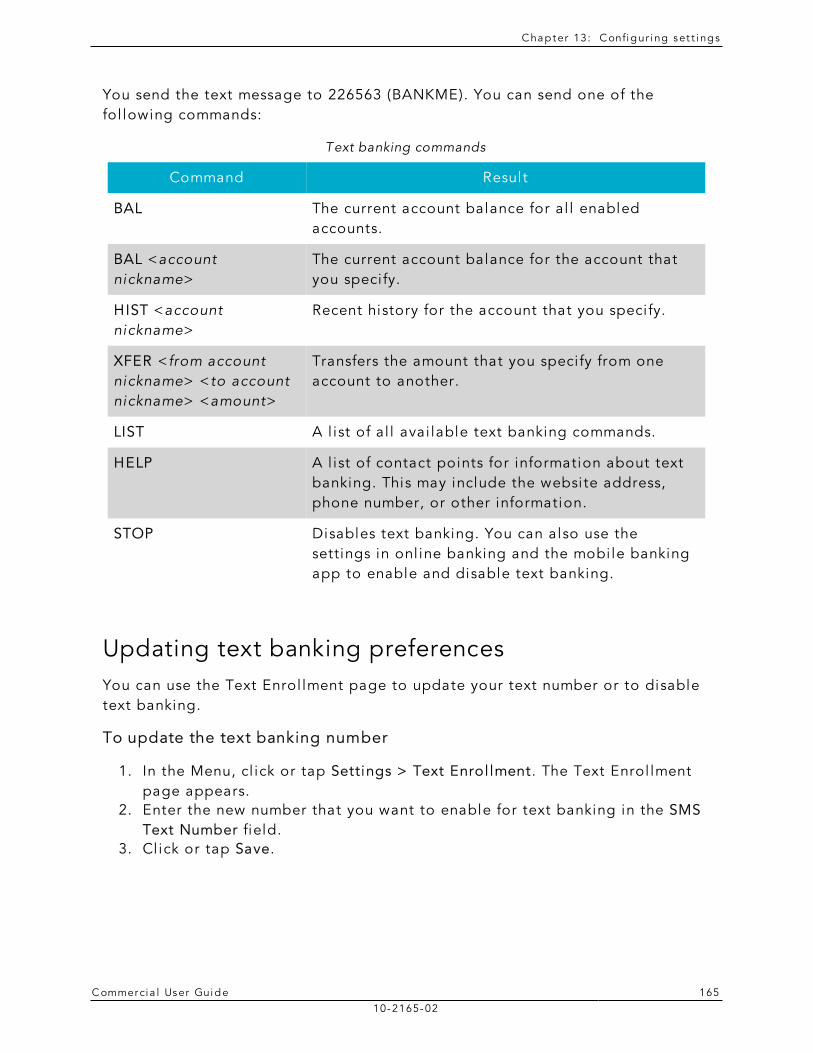
C hap ter 13: C onfig ur i ng set t i ngs
C ommerci a l User Guide 16510-2165-02
You send the text message to 226563 (BANKME). You can send one of the fol lowing commands:
Command Result
BAL The current account balance for al l enabled accounts.
BAL <account nickname>
The current account balance for the account that you speci fy.
HIST <account nickname>
Recent history for the account that you speci fy.
XFER <from account nickname> <to account nickname> <amount>
Transfers the amount that you speci fy from one account to another.
LIST A l ist of al l avai lable text banking commands.
HELP A l ist of contact points for information about text banking. This may include the website address, phone number, or other information.
STOP Disables text banking. You can also use the settings in onl ine banking and the mobi le banking app to enable and disable text banking.
Text banking commands
Updating text banking preferencesYou can use the Text Enrol lment page to update your text number or to disable text banking.
To update the text banking number
1. In the Menu, cl ick or tap Settings > Text Enrol lment. The Text Enrol lment page appears.
2. Enter the new number that you want to enable for text banking in the SMS Text Number field.
3. Cl ick or tap Save.
C hap ter 13: C onfig ur i ng set t i ngs
C ommerci a l User Guide 16610-2165-02
To disable text banking
1. In the Menu, cl ick or tap Settings > Text Enrol lment. The Text Enrol lment page appears.
2. Cl ick or tap Off. 3. Cl ick or tap Save.
Configuring statement delivery settingsYou can configure statement del ivery options for your accounts or review the E-Statement Del ivery Agreement on the Statement Del ivery page.
Note: E-Statement del ivery settings can vary.
To configure the statement delivery method
1. In the Menu, cl ick or tap Settings > Statement Del ivery. The Statement Del ivery page appears.
2. For each account, select a del ivery method in the Del ivery Type drop-down l ist.
3. (Optional ) If you select E-Statement in the Del ivery Type drop-down l ist, the E-Statement Del ivery Agreement window appears. Review the agreement, and cl ick or tap I accept.
4. (Optional ) If you select E-Statement in the Del ivery Type drop-down l ist, in the Address field for an account that receives an E-Statement, cl ick or tap the edit icon ( ). The Select Recipient window appears. Do one of the fol lowing:
o Click or tap the check box for one or more existing del ivery addresses.
o Click or tap in the address field and type a new del ivery address. Cl ick or tap Add.
5. Cl ick or tap Save.
To view the E-Statement Delivery Agreement
1. In the Menu, cl ick or tap Settings > Statement Del ivery. The Statement Del ivery page appears.
2. On the Statement Del ivery page, cl ick or tap View E-Statement Del ivery Agreement. The E-Statement Del ivery Agreement page appears. Review the statement, and cl ick or tap I accept or the close (X) icon.

C ommerci a l User Guide 16710-2165-02
APPENDIX A: STAYING SECURE
This appendix contains the fol lowing:
l "Password tips and recommendations" on page 167 l "Registering a browser or device" on page 168
Password tips and recommendationsA strong password helps you protect your account.
To create a strong password, keep in mind the fol lowing guidel ines:
l Create unique, original passwords l Use the longest practical password l Use a mix of upper and lower case letters l Include one or more numbers l Do not use repeating or adjacent characters l Use at least one of these special characters: `~!@#$%^&()_+={}|[ ]:”?,./\ l Avoid using software or toolbars that store your password l Change your password regularly
Remember to avoid the fol lowing password pitfal ls:
l Do not choose passwords or securi ty codes that others can easi ly guess. l Do not reuse passwords for multiple si tes. l Never use your account numbers. l Do not use personal contact information, such as addresses or phone
numbers. l Do not use personal information, such as your name, birthday, Social
Securi ty Number, passport number, or the names or information for family members or friends.
l Do not use sequences of characters such as 1234567 or abcdefg. l Do not rely on look-al ike substi tutions of numbers or symbols alone.
Passwords l ike P@ssw0rd are easy to guess, but can be effective when you also change the case of the letters, the length of the words, and misspel l ings, or when you use multiple unrelated words in a phrase.
l Do not use dictionary words.
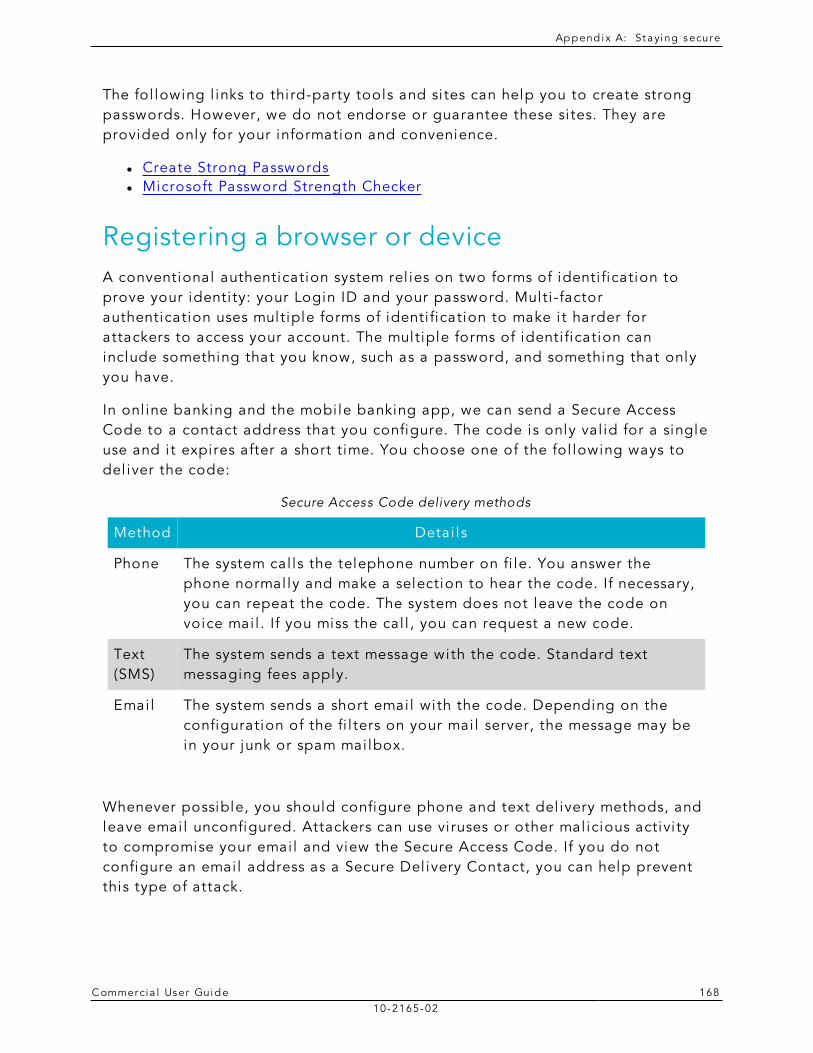
Ap p end i x A: St aying secure
C ommerci a l User Guide 16810-2165-02
The fol lowing l inks to third-party tools and si tes can help you to create strong passwords. However, we do not endorse or guarantee these si tes. They are provided only for your information and convenience.
l Create Strong Passwords l Microsoft Password Strength Checker
Registering a browser or deviceA conventional authentication system rel ies on two forms of identi fication to prove your identi ty: your Login ID and your password. Multi -factor authentication uses multiple forms of identi fication to make i t harder for attackers to access your account. The multiple forms of identi fication can include something that you know, such as a password, and something that only you have.
In onl ine banking and the mobi le banking app, we can send a Secure Access Code to a contact address that you configure. The code is only val id for a single use and i t expires after a short time. You choose one of the fol lowing ways to del iver the code:
Method Detai ls
Phone The system cal ls the telephone number on fi le. You answer the phone normal ly and make a selection to hear the code. If necessary, you can repeat the code. The system does not leave the code on voice mai l . If you miss the cal l , you can request a new code.
Text (SMS)
The system sends a text message with the code. Standard text messaging fees apply.
Emai l The system sends a short emai l with the code. Depending on the configuration of the fi l ters on your mai l server, the message may be in your junk or spam mai lbox.
Secure Access Code delivery methods
Whenever possible, you should configure phone and text del ivery methods, and leave emai l unconfigured. Attackers can use vi ruses or other mal icious activi ty to compromise your emai l and view the Secure Access Code. If you do not configure an emai l address as a Secure Del ivery Contact, you can help prevent this type of attack.
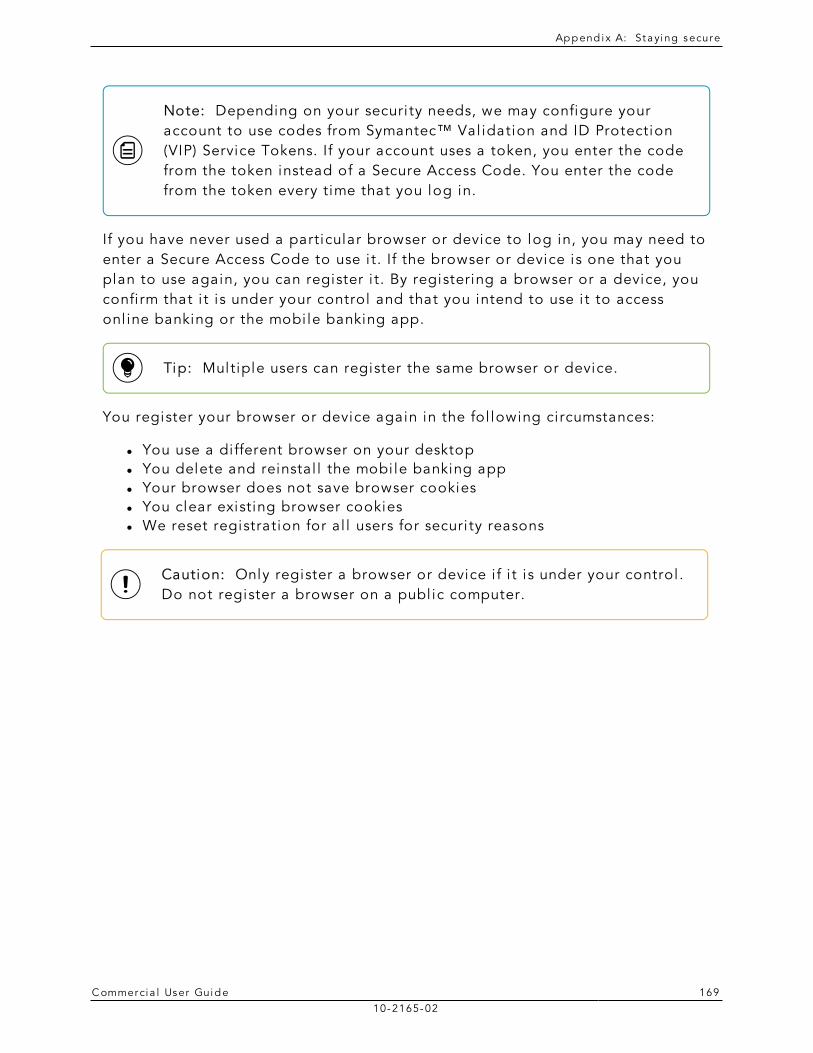
Ap p end i x A: St aying secure
C ommerci a l User Guide 16910-2165-02
Note: Depending on your securi ty needs, we may configure your account to use codes from Symantec™ Val idation and ID Protection (VIP) Service Tokens. If your account uses a token, you enter the code from the token instead of a Secure Access Code. You enter the code from the token every time that you log in.
If you have never used a particular browser or device to log in, you may need to enter a Secure Access Code to use i t. If the browser or device is one that you plan to use again, you can register i t. By registering a browser or a device, you confi rm that i t is under your control and that you intend to use i t to access onl ine banking or the mobi le banking app.
Tip: Multiple users can register the same browser or device.
You register your browser or device again in the fol lowing circumstances:
l You use a di fferent browser on your desktop l You delete and reinstal l the mobi le banking app l Your browser does not save browser cookies l You clear existing browser cookies l We reset registration for al l users for securi ty reasons
Caution: Only register a browser or device i f i t is under your control . Do not register a browser on a publ ic computer.

C ommerci a l User Guide 17010-2165-02
APPENDIX B: FREQUENTLY ASKED QUESTIONS
This appendix contains the fol lowing:
l "Getting started" on page 170 l "Messages and alerts" on page 171 l "Accounts" on page 172 l "Transactions" on page 174
Getting startedThis section includes questions about getting started with onl ine banking and the mobi le banking app, including questions about logging in for the fi rst time.
Logging in for the first time
What if I do not have access to the phone or email account contacts listed?
You must have access to at least one of the l isted contacts to log in for the fi rst time or register a computer. If you need immediate access, contact us. After you veri fy your identi fy, you can add a new contact method.
Registering your computer
I registered my browser or device during a previous login, but now I need to register it again. Why?
There are several possible reasons that you may need to register a browser or device again, including:
l Your browser settings are configured to delete cookies l Your browser cookies for onl ine banking were removed l You use a browser plugin that automatical ly removes browser cookies
when you close the browser l Your account requires a Secure Access Code each time you log in l You use a Symantec VIP Token for a Secure Access Code when you log in l You log in with a di fferent browser on the same registered computer l You deleted and reinstal led the mobi le banking app l For securi ty reasons, we reset al l active registrations for al l users
Append i x B: Freq uent l y Asked Ques t ions
C ommerci a l User Guide 17110-2165-02
How do I remove the registration from a device?
On a computer browser, you delete al l browser cookies or the browser cookies for onl ine banking. See your browser help for information about deleting cookies.
On a tablet or smartphone, the registration information is automatical ly deleted when you delete the mobi le banking app.
Messages and alertsThis section includes frequently asked questions about using messages and alerts.
Secure messages
Are the content of my message and any attachments sent securely?
Yes, the transport of your message is SSL encrypted and is never sent through publ ic, unsecured communication channels l ike emai l communication.
Alerts
When are alerts delivered?
Secure message and emai l alerts are sent when transaction processing completes. Phone and text message alerts are sent at the next avai lable time you speci fied for the alert.
Are alerts real time?
No. Alerts are triggered at processing time each day. For example, i f an alert is triggered during the day on Monday, the alert is generated during the processing cycle Monday night. We send secure message and emai l alerts when the processing cycle finishes. Phone and text message alerts are sent at the time you selected on Tuesday.
Append i x B: Freq uent l y Asked Ques t ions
C ommerci a l User Guide 17210-2165-02
What if I do not receive a phone or email alert?
If you miss an alert via phone cal l , the alert system leaves a message on voice mai l .
For emai l alerts, check your junk mai l or spam folder for the alert. If the alert is in the junk mai l folder, configure your junk mai l settings to al low emai l from us so you do not miss future alerts.
If you bel ieve you did not receive an alert phone cal l or emai l , cl ick or tap Messages in the Menu to check for the alert. If the alert does not appear in the Inbox, confi rm that the alert is enabled. If the alert is enabled and you sti l l bel ieve you did not receive an alert, contact us for assistance.
Note: Emai l , phone, and text message alerts are a convenience, and should not be used to manage cri tical account detai ls or appointments. Due to the nature of the emai l , phone, and text message networks, these networks cannot be 100% rel iable del ivery channels. Secure messages within our system are very rel iable, since they are contained enti rely within the banking system.
Are security alerts real time?
Yes, securi ty alerts are event driven and are sent in real time.
AccountsThis section includes frequently asked questions about your accounts in onl ine banking and the mobi le banking app.
Account details
When I download my history to Quicken or QuickBooks, the application does not launch automatically. Why?
The fi le type is not properly associated with the appl ication. The easiest way to create the association is to save the download fi le to your desktop the fi rst
Append i x B: Freq uent l y Asked Ques t ions
C ommerci a l User Guide 17310-2165-02
time, right-cl ick the fi le and cl ick Open with. In the Open With dialog, select Quicken or QuickBooks. The next time you download your history, the program should launch automatical ly. For more information, check the documentation for your desktop computer.
Can I see transactions from other users in my company?
Yes, i f your rights permit you to see the activi ty of the other users instead of just your own.
What is a Tracking ID?
The Tracking ID is a unique identi fier for each transaction that you create in onl ine banking and the mobi le banking app. It is a rel iable way to reference a transaction. Tracking IDs appear in the transaction detai ls on the Activi ty Center page. When you use secure messages to inquire about an account or a transaction, the message automatical ly includes the tracking ID.
Activity Center page
How is the Activity Center page different from the Account Details page?
The Activi ty Center page contains al l transactions ini tiated in onl ine banking and the mobi le banking app except check deposits. The Activi ty Center page does not include transactions that you make by other means, such as ATM or debit card transactions. The Activi ty Center page also shows the status of each electronic transaction as i t moves from a drafted status to approved, then processed.
The Account Detai ls page is a record of processed and cleared transactions against your account from al l sources. The Account Detai ls page does not include transactions that have been drafted, approved, or canceled in onl ine banking or the mobi le banking app, only those that have already cleared or that wi l l clear your account the next processing day.
Statements
Why are some accounts not in the account drop-down list when I view statements?
Certain account types do not support E-Statements.
Append i x B: Freq uent l y Asked Ques t ions
C ommerci a l User Guide 17410-2165-02
I clicked Get Statement on the Statements page, but nothing happened. Why?
Ensure that you have al lowed pop-ups for the onl ine banking si te in your browser settings. It is l ikely that the pop-up box is being blocked by a pop-up blocker or a toolbar pop-up blocker. You can disable the pop-up blocker or add the onl ine banking si te as an al lowed si te.
Why would I choose to view my statement as an image instead of a PDF?
If you are on a publ ic computer, you may wish to view images. PDF documents are often cached by the browser and stored in a temporary fi les folder. If you select PDF on a publ ic computer, you should delete the cache fi les and other temporary fi les after you log off to ensure your securi ty.
TransactionsThis section includes frequently asked questions about creating, managing, and viewing transactions.
Paying bills
When is my account debited to fund these payments?
Your account is debited when an electronic payment is processed. If the payment is mai led, the account is debited on a day before the date you selected.
How long should I allow for the payment to arrive at the payee?
You should plan the same amount of time you would i f you were mai l ing a check.
What if I do not have an account number at the payee or if the payee is a person not a company?
You can enter N/A or Not Appl icable in the Account Number field.
Append i x B: Freq uent l y Asked Ques t ions
C ommerci a l User Guide 17510-2165-02
Sending a check
If I create a future-dated check, when will the check be processed and effective?
If you create a future-dated check, the check wi l l be processed on the Processing Date. The date that the check arrives at your recipient’s address is dependent on the US mai l system.
Is the description I enter online printed on the check?
No. The description helps you to identi fy the transaction in onl ine banking and the mobi le banking app. The description is not printed on the check.
Commercial accountsThis section includes frequently asked questions for Commercial accounts.
Payments and templates
How can I send a pre-note to a new account?
You can use a payment to send a pre-note to an account. To send a pre-note to a newly establ ished recipient, send a zero dol lar ACH transaction to the recipient account. The pre-note helps confi rm the val idity of a routing number and account at the receiving financial insti tution, without any movement of funds taking place.
ACH Passthru
When should I use ACH Passthru instead of ACH Payments or ACH Collections?
You can import NACHA formatted fi les in ACH Payments or ACH Col lections, but those fi les may only contain one batch each. In addition, those payments can only support PPD and CCD Standard Entry Class (SEC) codes. The ACH Pass-Thru feature al lows you to create fi les with multiple batches and with other SEC codes. In addition, unl ike other ACH payments, the ACH Pass-Thru feature performs minimal val idations before passing the fi le to us.
Append i x B: Freq uent l y Asked Ques t ions
C ommerci a l User Guide 17610-2165-02
The system does not accept some SEC codes. What can I do?
By default, we do not support al l SEC codes. If you encounter unsupported SEC codes that you need to submit, please contact us during regular business hours.
Why do I enter a Process Date instead of an Effective Date?
Because there may be multiple effective dates in the fi le, you enter the date on which you want the fi le to be processed. On the date that you speci fy, we process the transactions according to the effective date or dates in the fi le.
Wire transfers
When might I use an Intermediary Financial Institution?
You may need to use an intermediary financial insti tution i f the financial insti tution for the beneficiary is not a direct Fed Wire participant and cannot receive a wire transfer via the Fed Wire system.
Tax payment
Is registration required to pay via the online banking system?
There is no registration requirement on our system. To make Federal and/or State tax payments, you should register or enrol l in the Electronic Funds Transfer (EFT) program for each tax authori ty that you want to pay. Payment via our onl ine banking system does not enrol l you with the Federal or state agency. Some agencies wi l l not accept electronic tax payments from unregistered parties.
User management
Why is a new user unable to see any accounts?
When you create a user, you must set the account rights, transaction rights and l imits for the user. If your account requires dual approval for new user activation, a CSR must ini tiate final approval for activation.
Append i x B: Freq uent l y Asked Ques t ions
C ommerci a l User Guide 17710-2165-02
If I delete a user, will it delete that user’s activity?
No, i t only removes their access and rights to the onl ine banking system. Al l payments and templates that the user created remain, as doreferences to their onl ine activi ty.
Can I edit user information?
No, for securi ty purposes you can only add or remove users and edit user rights. Users can change their own profi le information, Login ID and password i f they need to do so.