Embed Size (px)
Citation preview

Burning a 5.1 Blu-ray with Adobe Encorerev. 3/29/13
(1)
This guide will help you burn a simple looping Blu-ray disc with no menus and a 5.1 audio track. For more complex authoring, consult the Encore manual, CS6 help menu and/or other resources like lynda.com.
Blu-ray burning via Adobe Encore is possible in all of the FVNMA 3rd floor editing suites (323-5, 328) and in the 9th floor CRIT general access lab as well as rooms 519, 819 and 714 at the computers that are labeled with “BLU-RAY” stickers. External Firewire Blu-ray burners are available for checkout from the Media Center.
This guide covers how to set up and burn a Blu-ray from a ProRes Quicktime file and 5.1 audio exported from Pro Tools. For instructions on burning a standard stereo Blu-ray, see the other Blu-ray guide on our blog.
This guide assumes that you have already exported a ProRes 422 Quicktime of your FINAL EDIT (including leader, slate, countdown, credits, etc)* and that you have edited and mixed your audio in the Mix Suite (room 1413--the only FVNMA room with surround sound capabilities) in a 5.1 Pro Tools session, in sync with the Quicktime. Ideally, your Quicktime would be video-only, but if it contains audio you can easily remove that audio in Adobe Encore.
1. EXPORT 5.1 AUDIO FILES FROM PRO TOOLS
*There’s a bug in Adobe Encore that results in the following situation: if you add any content such as black leader or credits to your Quicktime
movie in an Adobe Encore timeline, Encore will create a new stereo audio stream that will replace your 5.1 audio. It will appear in Encore as if your
audio is in surround, but the disc will actually be in stereo.
Choose Bounce to Disk... from the File menu.
Make sure your Bounce Source is the “5.1” I/O setup preset.
For file type, select WAV or AIFF.
Format MUST BE Multiple mono.
We recommend 48/24 for your sample rate and bit depth. If this requires a conversion, choose “Tweak Head (Slowest)” for Quality.
Choose Convert After Bounce to minimize the chance of glitches and errors during your bounce.
You will end up with six mono audio files, each labeled for their corresponding speaker: left (L), right (R), center (C), left surround (Ls), right surround (Rs) and low-frequency effects or subwoofer (LFE).
Your audio will record to disk in real time. Listen closely to make sure there are no problems with it.

(2)
2. USE COMPRESSOR TO CREATE AN AC3 AUDIO FILE
If your ProRes 422 Quicktime video file is approximately 35 Gb or less, you won’t need to compress it in Com-pressor. However, you will need to use Compressor to turn your mono audio files into a single AC3 file.
Open Compressor 4 in the Final Cut Pro X folder in Applications. If the “Choose a template for your batch” window appears, click Cancel.
Click “Add Surround Sound.” A new window will appear.
Assign each of your mono audio files to its corresponding channel by 1) dragging it from the finder to the channel button or 2) clicking on the channel button and navigating to the file, then clicking OK.
Go to the Settings window (if it’s not visible, open it via the Window menu or Command-3). Navigate to the Apple folder, then Audio Formats. Drag the AC3 File preset onto the Surround icon in the Batch window.
Double-click on the AC3 File preset in the Batch window to edit the preset.
In the Audio tab of the Inspector window, change “Dialog Normalization” from -24 to -31.*
Leave everything else as is and click on the Preprocessing tab.
*see page 3

(3)
Open Adobe Encore CS6. Create a New Project.
Choose “Blu-ray” as your Authoring Mode, name your project, choose a location for it (this is where Encore will create and store media) and then click on “Default Transcode Settings.”
Click on the Compression Preset pop-up menu and change it from “Film Stan-dard Compression” to “None.” Leave everything else as is.
vv*Our recommendations to set Dialog Normalization to -31 and the Compression Preset to None are derived from the Compres-
sor User Manual which states “If you enter –31 dBFS: The attenuation is 0 dB (31 dBFS–31 dBFS), and the source audio levels are not affected at all” and “The default of Film Stan-
dard Compression should only be used when you are encoding an original mix intended for cinema. In almost all cases, you
should choose None.”
Click “Save As...” to save your preset into Compressor’s Custom Settings folder. Choose a destination for your AC3 file or use the default, Source, which will export your file to the same location as your mono audio files.
3. AUTHOR AND BURN A BLU-RAY IN ADOBE ENCORE
Double-click in the Batch Window’s text box to name your AC3, then click Sub-mit. Another window will appear (to give you the option of compressing via a cluster of computers.) Click Submit again.
(4)
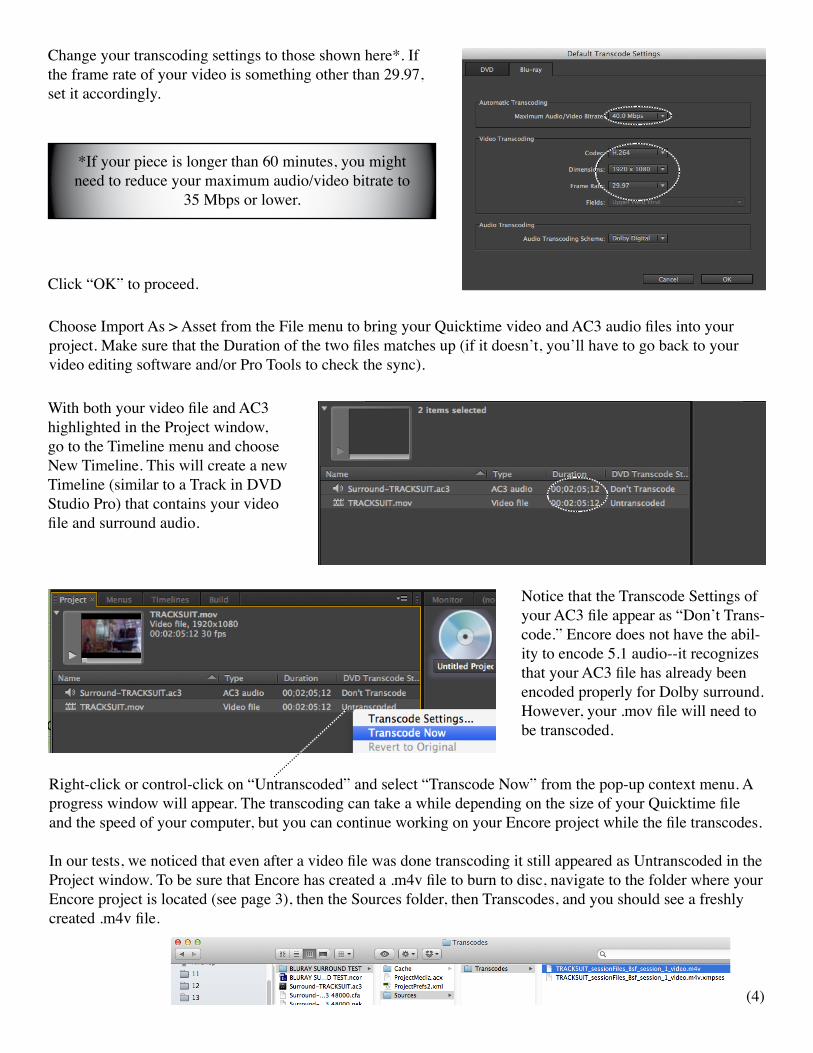
Change your transcoding settings to those shown here*. If the frame rate of your video is something other than 29.97, set it accordingly.
Click “OK” to proceed.
*If your piece is longer than 60 minutes, you might need to reduce your maximum audio/video bitrate to
35 Mbps or lower.
Choose Import As > Asset from the File menu to bring your Quicktime video and AC3 audio files into your project. Make sure that the Duration of the two files matches up (if it doesn’t, you’ll have to go back to your video editing software and/or Pro Tools to check the sync).
With both your video file and AC3 highlighted in the Project window, go to the Timeline menu and choose New Timeline. This will create a new Timeline (similar to a Track in DVD Studio Pro) that contains your video file and surround audio.
Notice that the Transcode Settings of your AC3 file appear as “Don’t Trans-code.” Encore does not have the abil-ity to encode 5.1 audio--it recognizes that your AC3 file has already been encoded properly for Dolby surround. However, your .mov file will need to be transcoded.
Right-click or control-click on “Untranscoded” and select “Transcode Now” from the pop-up context menu. A progress window will appear. The transcoding can take a while depending on the size of your Quicktime file and the speed of your computer, but you can continue working on your Encore project while the file transcodes.
In our tests, we noticed that even after a video file was done transcoding it still appeared as Untranscoded in the Project window. To be sure that Encore has created a .m4v file to burn to disc, navigate to the folder where your Encore project is located (see page 3), then the Sources folder, then Transcodes, and you should see a freshly created .m4v file.

(5)
To make a looping Blu-ray disc, highlight Timeline in the Project Window (at the left side of your screen) then go to End Action in the Properties Window (to the right) and choose Chapter 1 of your video Asset (you can also do this by dragging from the squiggly End Action icon to your Timeline in the Project Window).
*You should connect Menu Remote to your Timeline as well--this way the Menu button will start your video and not take the user to a blank menu screen.
Click in the blank space of the Project window. The Timeline Properties window will become Disc Properties.
Name your Blu-ray disc here, and make sure that your video is designated as “First Play.” You should also set your video to play when the user presses the Title Button by connecting it to the Title Button here (if this action is forbidden, click on the arrow to the right of Title Button and drag down to “Specify Link.”)
We’ve found that Blu-ray discs burned in Encore sometimes end up with no fast-forward/rewind capabilities in Oppo brand Blu-ray players such as the one used at the Gene Siskel Film Center. In order to skip around to different points in your piece (e.g. during a “tech check”) you can create chapter points at regular intervals (30 sec, 5 minutes, etc). A timeline can have up to 99 Chapter Points.
To add Chapter Points manually or at intervals, go to the Timeline menu and choose accordingly.
In the example shown here, Chapter Points will be added every minute.
To burn more discs at other computers, you’ll need your .ncor project file and the project folder contain-ing your Cache & Sources (see page 4). Encore should have given this folder the same name as your project.
In the Project window, click the Build tab. Set Blu-ray as your Format and Output. Click Check Project to make sure that your disc is error-free. Finally, click the Build button and insert a disc to burn a 5.1 Blu-ray.
NOTE: it’s not possible to play a Blu-ray disc in a Mac computer! To check your Blu-ray you will need to use a Blu-ray deck (e.g. the Pioneer or Oppo models in FVNMA classrooms or a Playstation 3).