Embed Size (px)
Citation preview

Built-In Kegerator!
BR7000SSFridge for the KC7000SS Kegerator
Owner's ManualFor more information on other great EdgeStar products on the web, go to http://www, edgestar.com

Important Safety Information
Improper handling can cause serious damage to the EdgeStar kegerator and/or injury to the user. This kegerator isdesigned for domestic indoor use only. Do not use the unit for industrial or commercial use. Any other use mayinvalidate the warranty. Please review the ratings label located on the rear panel of the unit for electrical and othertechnical data related to this unit. The unit must be used in a properly grounded wall outlet.
Please read and follow the safety information listed below to reduce the risk of fire, electric shock or injury.
A AElectrical Safety• Do not exceed the power outlet ratings.• It is recommended the kegerator be connected on
its own circuit.• The unit must be installed in accordance with
state and local electrical codes.
• A standard electrical supply (115 V, 60Hz), that isproperly grounded in accordance with theNational Electrical Code and local codes andordinances is required.
• Use outlets that cannot be turned off by a switchor pull chain.
• Always turn the unit off and unplug it from theoutlet when cleaning.
• Unplug the unit if it is not going to be used for anextended period of time.
• Do not operate the unit with a power plug missingthe ground plug, a damaged cord or a loosesocket.
• Be sure the kegerator is properly grounded.• Never plug or unplug the unit with wet hands.• Do not bypass, cut or remove the grounding plug.• Do not use extension cords or power strips with
this unit. You may need to contact your electricianif it is necessary to use a longer cord or if you donot have a grounded outlet. Do not modify thepower cord's length or share the outlet with otherappliances.
• Do not start or stop the unit by switching thecircuit's power on and off.
• If the power cord is damaged, it must be replacedby the manufacturer or a qualified technician.
• Never repair the unit while it is plugged in.• Immediately unplug the unit if it makes strange
sounds, emits smells or smoke comes out of it,and contact customer service.
• Do not remove any part of the casing unlessinstructed by an authorized technician.
• You should never attempt to repair the unityourself.
• Contact customer service for service options if theunit needs service.
General Safety• To prevent back and other types of injuries, use at
least two people to move and install the kegerator.• This unit is not intended for use by persons,
including children, with reduced physical, sensory ormental capabilities, unless they have been givensupervision or instruction concerning the use of theappliance by the person(s) responsible for theirsafety.
• Install the unit in a well-ventilated area where theambient temperature is above 50°F and below 95°F.
• The temperature range for this kegerator isoptimized for beverage storage. Perishable fooditems may require a different storage environment.
• Do not place hot or warm items into the kegeratorbefore they cool down to room temperature.
• This unit is designed to be installed indoors, andprotected from rain, sleet, snow, and/or moisture.
• This unit is not intended to be used by children.• Children should be supervised to ensure that they
do not play with this product.• Never allow children to crawl inside the kegerator. If
disposing the unit, remove the door.• Do not use this unit near flammable gas or
combustibles, such as gasoline, benzene, thinner,etc.
• Do not place the unit near heat sources such asovens, grills, or direct sunlight.
• Only use in an upright position on a flat, levelsurface and provide proper ventilation.
• Do not pinch or kink the power supply line betweenthe unit and cabinet.
• Do not leave any cleaning solutions in the unit• Do not use solvent-based cleaning agents or
abrasive solutions to clean the unit as they maydamage the interior and exterior.
• Do not place any other appliances on top of the unit.• Do not turn the unit upside down, on its side, or at
an angle off level.• If your model is equipped with a lock, take care to
keep the keys away from children.• Do not move the unit without emptying the contents
and securing the door in a closed position.
Table of Contents
IMPORTANT SAFETY INFORMATION ................................................................. I
INTRODUCTION ................................................................................................... 1
PARTS IDENTIFICATION ..................................................................................... 2
BACK VIEW .......................................................................................................... 2
FRONT VIEW ........................................................................................................ 2ACCESSORIES ..................................................................................................... 3
INSTALLING THE KEGERATOR ......................................................................... 4
ELECTRICAL REQUIREMENTS ................................................................................ 4
Recommended grounding method ................................................................ 4LEVELING THE KEGERATOR .................................................................................. 5
INSTALLING THE DOOR HANDLE ............................................................................ 5
INSTALLING THE CASTERS .................................................................................... 5
REVERSING THE DOOR SWING .............................................................................. 6FREE-STANDING INSTALLATION ............................................................................ 7
Top Cover Installation ................................................................................... 7Guard Rail ..................................................................................................... 7Drip Tray ........................................................................................................ 7
BUILT-IN INSTALLATION ........................................................................................ 8
Installation Requirements .............................................................................. 8
KEG LOADING ...................................................................................................... 9
OPERATION ........................................................................................................ 10
INSTALLATION CHECK LIST BEFORE OPERATION .................................................. 10USING THE TEMPERATURE CONTROL PANEL ....................................................... 10NORMAL SOUNDS .............................................................................................. 11DEFROSTING ..................................................................................................... 11PREPARING THE KEGERATOR FOR STORAGE ....................................................... 11
CLEANING AND MAINTENANCE ...................................................................... 12
EXTERIOR CLEANING ......................................................................................... 12INTERIOR CLEANING ........................................................................................... 12
TROUBLESHOOTING ........................................................................................ 12
TROUBLESHOOTING CONTINUED ......................................................................... 13
SPECIFICATIONS ............................................................................................... 14
First Time Operating Instructions
Before use, make sure all packaging labels and materials are all removed fromthe unit. Be sure to keep track of all included parts and pieces before discardingpackaging materials. It is advised that you keep the original box and packagingmaterials in case you are ever to move or ship the appliance in the future.
Let the unit stand for at least 24 hours before you use it; this allows the coolingcomponents time to settle from transit. The instruction manual should be readbefore use.
This owner's manual is provided for reference use only. Specifications maychange without prior notice. Refer to the product label on the back of yourkegerator for the latest technical information.
EdgeStar Built-in Kegerator ii
Introduction
Thank you for purchasing this EdgeStar kegerator. We are glad you chose us.We believe that your purchase of this product opens a relationship between youand EdgeStar. We will provide the customer support needed to nurture thatrelationship.
This manual contains important information regarding the proper installation, useand maintenance of your kegerator. Following this manual will ensure that yourproduct will work at its peak performance and efficiency.
Please save the original product packaging in case you need to safely transportyour kegerator.
For Your Records:Please write down the model number and serial numberbelow for future reference. Both numbers are located on theratings label on the back of your unit and are needed toobtain warranty service. You may also want to staple yourreceipt to this manual as it is the proof of your purchase, andis also needed for service under your warranty.
Model Number:
Serial Number:
Date of Purchase:
To better serve you, please do the following before contacting customer service:
• If you received a damaged product, immediately contact the retailer ordealer that sold you the product.
• Read and follow this instruction manual carefully to help you install, useand maintain your kegerator.
• Read the troubleshooting section of this manual as it will help youdiagnose and solve common issues.
• Visit us on the web at http://www.edgestar.com to register yourproduct, download product guides, additional troubleshooting resourcesand up-to-date information.
• If you need warranty service, our friendly customer servicerepresentatives are available via email at [email protected] or bytelephone at 1 (866) 319-5473.
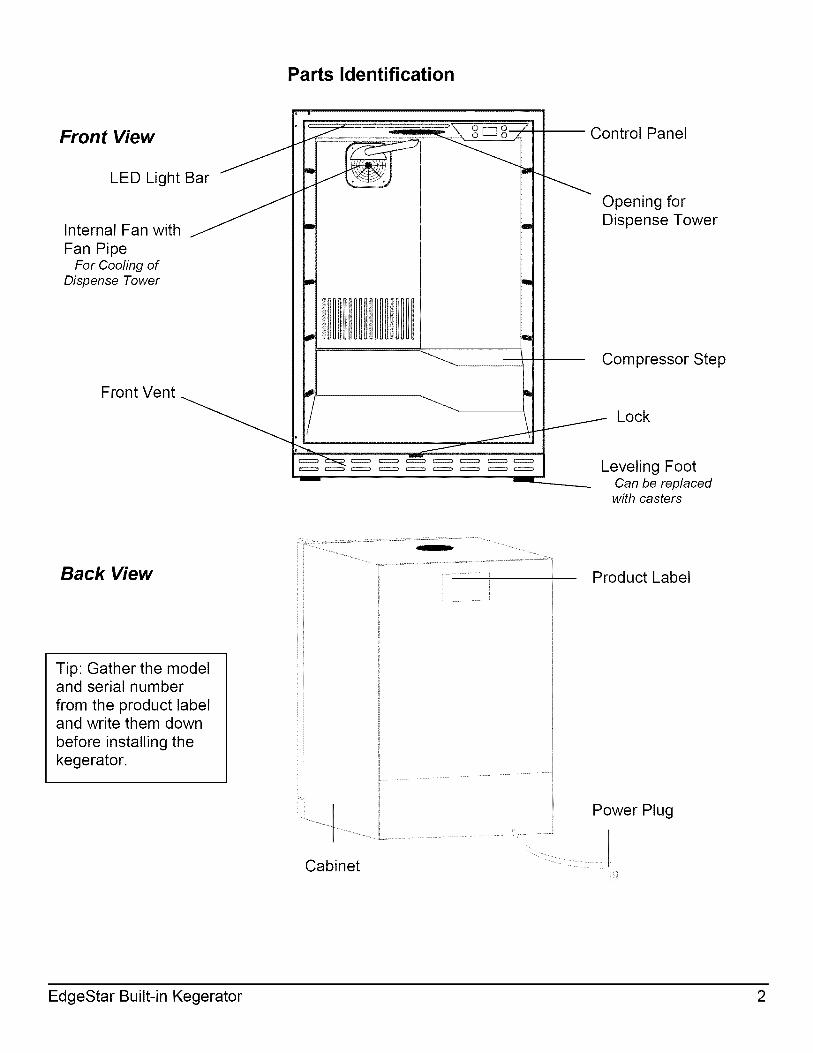
Parts Identification
Front View
LED Light Bar
Internal Fan with
Fan PipeFor Cooling of
Dispense Tower
Front Vent
/
/
im....
m
Control Panel
Opening forDispense Tower
Compressor Step
i Lock
Leveling FootCan be replacedwith casters
Back View
Tip: Gather the modeland serial number
from the product labeland write them down
before installing thekegerator.
Cabinet
Product Label
Power Plug
]ii iiiii iiiiii iiiiii' • i_]
EdgeStar Built-in Kegerator 2
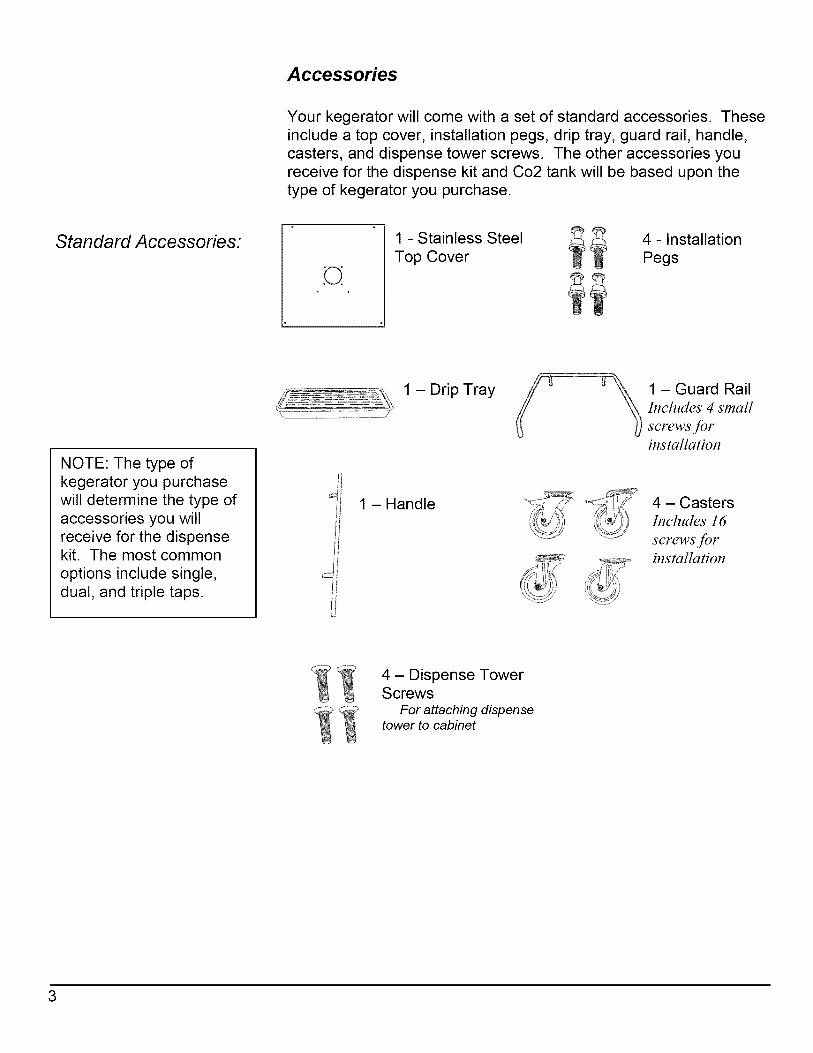
Accessories
Your kegerator will come with a set of standard accessories. Theseinclude a top cover, installation pegs, drip tray, guard rail, handle,casters, and dispense tower screws. The other accessories youreceive for the dispense kit and Co2 tank will be based upon thetype of kegerator you purchase.
Standard Accessories: 1 - Stainless Steel
Top Cover
4 - Installation
Pegs
NOTE: The type ofkegerator you purchasewill determine the type ofaccessories you willreceive for the dispensekit. The most common
options include single,dual, and triple taps.
1 - Drip Tray
1 - Handle
1 - Guard Raillncludes 4 small
SCF_WS fOF
installation
4 - CastersIncludes" 16
screws forinstallation
4 - Dispense TowerScrews
For attaching dispensetower to cabinet
Installing the Kegerator
The kegerator should be installed in accordance with local electrical coderequirements. The kegerator should also be placed in a location that isstrong enough to support its total weight, keeping in mind that it will weighsubstantially more when fully loaded than when empty.
Before you plug the kegerator into a power supply, be sure to let it standupright for at least 24 hours to allow the compressor's oils to settle.
Unpacking the KegeratorWARNING: Use two more people to move and install the kegerator.Failure to do so can result in back or other injury. Carefully remove thepackaging materials. Remove any shipping tape and glue from yourkegerator before using. Do not use sharp instruments, rubbing alcohol,flammable fluids, or abrasive cleaners to remove tape or glue. Theseproducts can damage the surface of your kegerator.
IMPORTANT: Do not remove any safety, warning, or product informationlabels from your kegerator.
Electrical Requirements
ELECTRIC SHOCK HAZARD!
• Plug into a grounded 3-prong outlet.
• Never remove the grounding prong from the plug.
• Never use an adapter to bypass the grounding prong.
• DO NOT use an extension cord.
• Failure to follow these instructions can result in fire,
electrical shock, or death.
Before you move your kegerator into its final location, it is important tomake sure you have the proper electrical connection:A standard electrical supply (115 V, 60Hz), properly grounded inaccordance with the National Electrical Code and local codes and
ordinances, is required.
It is recommended that a separate circuit, serving only your kegerator, beprovided. Use receptacles that cannot be turned off by a switch or pullchain.
The fuse (or circuit breaker) size should be 3 Amps.
Recommended grounding method
For your personal safety, this appliance must be grounded. It is equippedwith a power supply cord having a 3-prong grounding plug. To minimizepossible shock hazard, the cord must be plugged into a mating 3-prongedwall socket, and grounded in accordance with the National ElectricalCode and local codes and ordinances. If a mating wall socket is notavailable, it is the personal responsibility of the customer to have aproperly grounded, 3-prong wall receptacle installed by a qualifiedelectrician.
EdgeStar Built-in Kegerator 4

down
Leveling the KegeratorIt is important for the kegerator to be leveled in order to workproperly. It can be raised or lowered by rotating the plastic sheathsaround each of the feet on the bottom of the machine. If you findthat the surface is not level, rotate the feet until the kegeratorbecomes level .You may need to make several adjustments to levelit. We recommend using a carpenter's level to check the machine.
1. Place a carpenter's level on top of the product to see if thekegerator is level from front to back and side to side.2. Adjust the height of the feet as follows:Turn the leveling feet to the right to lower that side of therefrigerator.Turn the leveling feet to the left to raise that side of the refrigerator.
IMPORTANT: Once you are ready to install it in a cabinet or directlyon the floor, you must adjust the feet to level the kegerator.
Installing the Door Handle
To install the door handle:
1. Remove the four screws from the side of the door. This should
be the side opposite of the door hinge.2. Place and align the openings of the handle hinges over thescrew holes.
3. Insert and tighten the screws to hold the handle in place.
CAUTION: Do not over-tighten the screws as this may causedamage to the handle or to the stainless steel door
® @ Installing the Casters
This unit comes with four casters. These are an optional accessaryto assemble if you would like to make the unit more mobile. Toinstall the casters:
1. Remove the four leveling legs from the bottom of the unit.2. Separate the front casters and back casters. The front castershave a lever for a brake lock.
3. Place the top plate of the caster over the area of the removedleveling leg and align the opening to the screw hole openings.4. Insert the screws to attach the caster to the cabinet.
5. Make sure the screws are tight so the caster is installed firmly.
Reversing the Door Swing
!
Follow the instructions below to reverse the door swing.IMPORTANT: Before you begin, unplug the refrigerator.
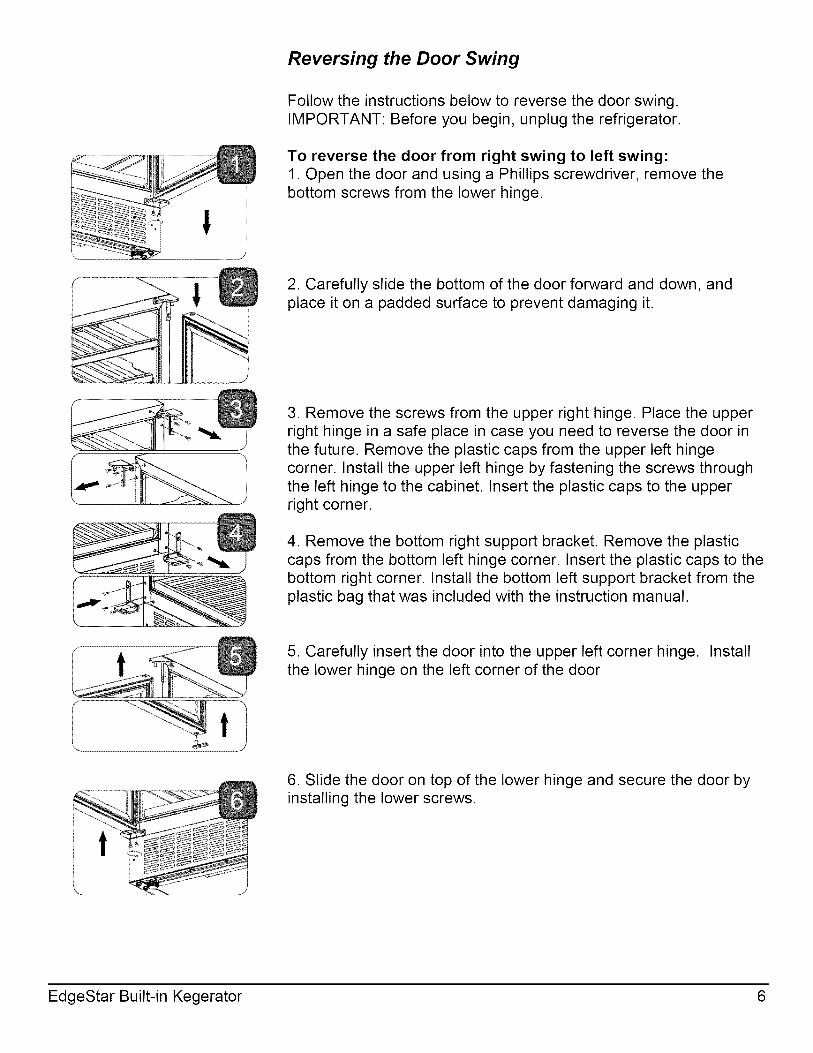
To reverse the door from right swing to left swing:1. Open the door and using a Phillips screwdriver, remove thebottom screws from the lower hinge.
! 2. Carefully slide the bottom of the door forward and down, andplace it on a padded surface to prevent damaging it.
3. Remove the screws from the upper right hinge. Place the upperright hinge in a safe place in case you need to reverse the door inthe future. Remove the plastic caps from the upper left hingecorner. Install the upper left hinge by fastening the screws throughthe left hinge to the cabinet. Insert the plastic caps to the upperright corner.
4. Remove the bottom right support bracket. Remove the plasticcaps from the bottom left hinge corner. Insert the plastic caps to thebottom right corner. Install the bottom left support bracket from theplastic bag that was included with the instruction manual.
5. Carefully insert the door into the upper left corner hinge. Installthe lower hinge on the left corner of the door
6. Slide the door on top of the lower hinge and secure the door byinstalling the lower screws.
EdgeStar Built-in Kegerator 6
Free-Standing Installation
Important Note:
• Please refer to the dispensekit installation guide tocomplete the full assembly ofthe kegerator.
A free-standing installation will allow you to install the kegerator inalmost any place you desire. Please follow the safety informationreferenced on the Important Safety Information page in this manual.
Top Cover Installation
The included stainless steel top cover is an optional accessory foruse with your kegerator. The purpose of the top cover is to add alayer of protection from scratches to the main cabinet. The topcover will use the four installation pegs to hold into place.
1. Place the cover on the top of the cabinet.2. Align the hole openings of the top cover to that of the
cabinet.
3. Twist in the four installation pegs on the outer edges of thecover until tight.
Guard Rail
The guard rail helps to hold glasses on the top of the cabinet inorder to avoid spills or broken glass.
1. Insert the four installation pegs on the outer edges of the topof cabinet. These may already be in place if you haveinstalled the top cover.
2. Place the guard rail onto the four installation pegs. You mayneed to push down on the guard rail to ensure the rail hasclicked into place on the pegs.
3. Screw the four small guard rail screws into the guard rail.This will lock the rail into position.
Drip Tray
The drip tray is a reservoir to collect any runoff liquid from overfilledglasses, leaking faucets, or spills. There are two pieces includedfor this tray. Place it on top of the cabinet and position under thefaucet.
Built-In Installation
Helpful Guide:
• Please visit Kegerator.comto view a detailed video of abuilt-in installation of this
product.
Important Notes:
• Choose a location that has
ambient temperatures above50°F and below 95°F.
Operation outside thesetemperatures may result inlowered efficiency or causeother adverse effects.
° This unit MUST be installed
in an area protected from theelements, e.g., wind, rain,water spray or drips.
° The kegerator should not belocated next to ovens, grills orother high heat sources.
° Do not kink or pinch thepower supply cord betweenthe kegerator and wall orcabinet.
Important Note:
° Please refer to the dispensekit installation guide tocomplete the full assembly ofthe kegerator.
A built-in installation allows the kegerator to be placed undercounter. This installation requires several more steps andconsiderations than a free-standing install.
Countertop Opening For Dispense Kit.
Once the location of the kegerator installation is determined the firststep is to create an opening in the counter for the dispense kit linesto pass through. Mark off a spot on the countertop where theopening will be created. Align that spot so it will be directly abovethe opening of the kegerator that will be placed under the counter.You will need to drill or cut (depending on the material of yourcountertop) an opening into your counter the same size as theopening of the top of the kegerator. Do not cut it larger than thatsize as the dispense tower will be optimized for that size hole.
Installation Requirements
Once an opening is created in the countertop the next step is toinstall the cabinet. When installing the kegerator under a counter,follow the recommended spacing dimensions shown below.
• Make sure the top cover, guard rail, drip tray, and installation pegsare NOT installed on the top of the cabinet. These items will createan obstacle for the cabinet to be installed under counter.
• Move the kegerator so the opening on the top of the cabinet isaligned with the opening in the counter.• The kegerator should be installed on a firm and level surface thatwill be able to support the entire weight of a fully loaded unit. It isimportant for the kegerator to be level in order to work properly. Ifneeded, you can adjust the height of the kegerator by rotating thefeet. See the "Leveling the Kegerator" section.• A standard electrical supply (115 VAC only, 60 Hz), properlygrounded in accordance with National Electrical Code and localcodes and ordinances is required.
Enclose Space Between Cabinet and Countertop
Once the cabinet is installed and the two openings of the cabinetand countertop are aligned you will want to seal off the open spacethat will be created above the kegerator cabinet and under thecountertop. If this open space is not sealed the cabinet will lose itscold air and will not work or cool as efficiently.
To close the opening you will want to run a short connecting tubefrom the cabinet to the countertop. There is not an accessoryincluded for this connection with the unit. Common materials for
this connection include PVC pipe or rubber lining.
EdgeStar Built-in Kegerator 8
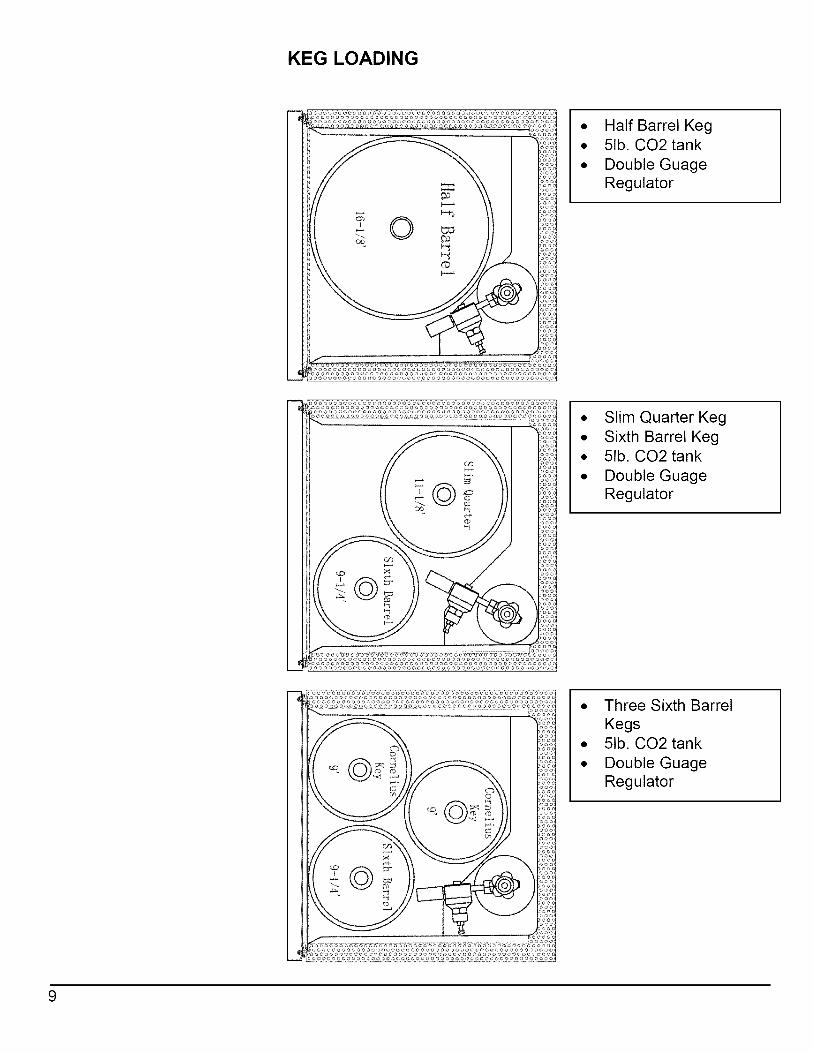
KEG LOADING
_aoooooo_ooeeoo_aoaoooaooogooooeoooooooooooo_ooooo
OS
_ ¢17 @
or>
o ;;;V
;_aA
sl.ii_
W_
:}i):
• Half Barrel Keg• 5lb. CO2tank
• Double GuageRegulator
• Slim Quarter Keg
• Sixth Barrel Keg• 5lb. CO2tank
• Double GuageRegulator
• Three Sixth Barrel
Kegs• 5lb. CO2 tank
• Double GuageRegulator
OPERATION
Installation Check List before Operation
1. Have all packing materials and tape been removed from theinterior and exterior of the kegerator?
2. Have the installation instructions been followed, including
connecting the machine to electricity? And has proper grounding
been installed for the kegerator?3. Has the machine been leveled?
4. Is the kegerator in a site where the ambient temperature is
between 50 ° F and 95 ° F all year round?
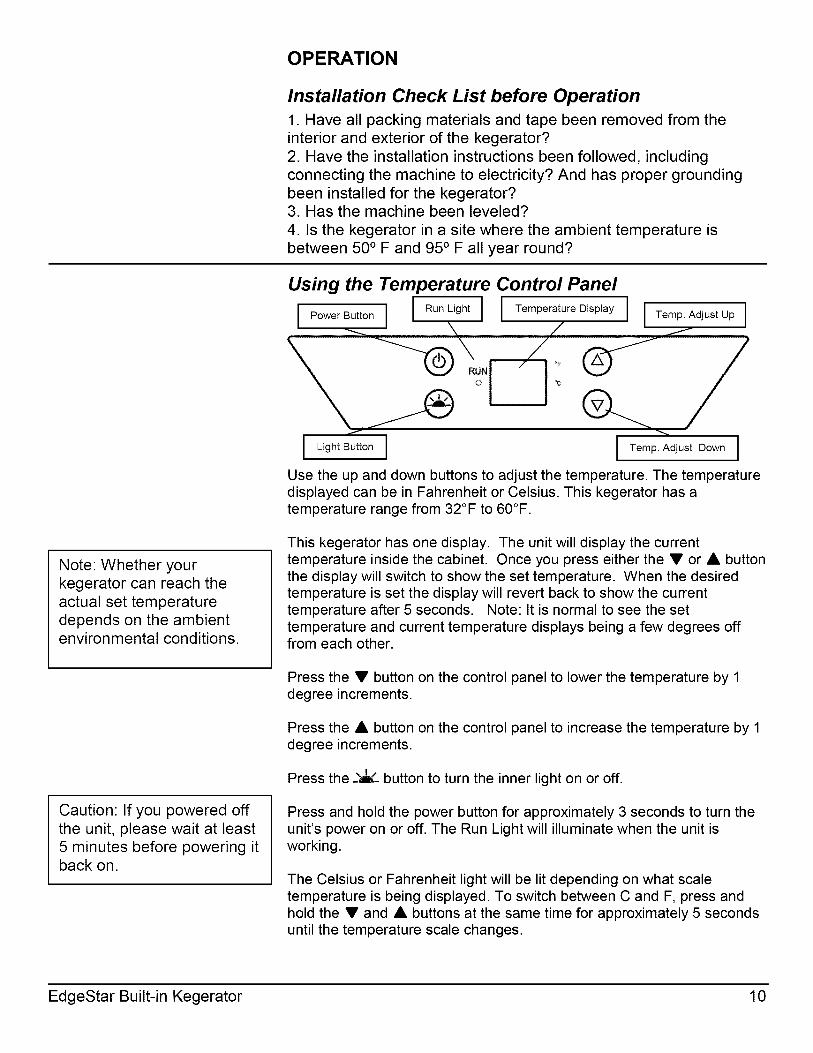
Using the Temperature Control Panel
I Power Button I I RunLight I I Temperature Display---., \ /
%
1 ITemo.AdjustO0IJ
Use the up and down buttons to adjust the temperature. The temperaturedisplayed can be in Fahrenheit or Celsius. This kegerator has atemperature range from 32°F to 60°F.
Note: Whether yourkegerator can reach theactual set temperaturedepends on the ambientenvironmental conditions.
This kegerator has one display. The unit will display the currenttemperature inside the cabinet. Once you press either the • or • buttonthe display will switch to show the set temperature. When the desiredtemperature is set the display will revert back to show the currenttemperature after 5 seconds. Note: It is normal to see the settemperature and current temperature displays being a few degrees offfrom each other.
Caution: If you powered offthe unit, please wait at least5 minutes before powering itback on.
Press the • button on the control panel to lower the temperature by 1degree increments.
Press the • button on the control panel to increase the temperature by 1degree increments.
Press the 2,._t_button to turn the inner light on or off.
Press and hold the power button for approximately 3 seconds to turn theunit's power on or off. The Run Light will illuminate when the unit isworking.
The Celsius or Fahrenheit light will be lit depending on what scaletemperature is being displayed. To switch between C and F, press andhold the • and • buttons at the same time for approximately 5 secondsuntil the temperature scale changes.
EdgeStar Built-in Kegerator 10

Normal Sounds
Your new kegerator may make sounds that are not familiar to you.Most of the new sounds are normal. Hard surfaces like the floor or
walls can make the sounds seem louder than they actually are. Thefollowing describes the kinds of sounds that might be new to youand what may be making them.• Rattling noises may come from the flow of the refrigerant or the
water line. Items stored on top of the kegerator can also makenoises.
• The high efficiency compressor may make a pulsating or high-pitched sound.
• Water running from the evaporator to the water bin may make asplashing sound.
• As each cycle ends, you may hear a gurgling sound due to therefrigerant flowing in your kegerator.
• You may hear air being forced over the condenser by thecondenser fan.
DefrostingNote that under most refrigerating settings, the unit willautomatically defrost under most ambient conditions. However, oncolder settings, some frost may build up. Additionally, the morehumid the ambient conditions, the more frost may build up. Keepthe door closed as much as possible and avoid opening the doorunnecessarily to minimize frost build-up.
If frost is preventing the door from closing properly, you may needto power the unit off until the frost melts. Use a soft absorbent towelto dry the unit.
WARNING: Never attempt to remove frost with a sharp object!
Preparing the Kegerator for StorageIf the kegerator will not be used for a long time, or is to be moved toanother place, it will be necessary to defrost the unit and dry theinterior.
IMPORTANT:
• Do not touch the power plugwhen your hands are wet.• Never unplug the unit bypulling on the plug.
1. Disconnect the unit from the power supply by removing thepower plug from the wall socket.2. Leave the door open to allow for air circulation and to preventmold, mildew and unpleasant smells.
CAUTION: Store the unit out of the reach of children. If you havechildren, you may want to take additional precautions such asremoving the door to prevent a child from being trapped inside theunitt
11
CLEANING AND MAINTENANCE
Periodic cleaning and proper maintenance will ensure efficiency, topperformance, and long life.
Exterior CleaningThe door and cabinet may be cleaned with a mild detergent andlukewarm water solution such as 2 tablespoons of baking soda to 1 quartof water.
Do not use solvent based or abrasive cleaners. Use a soft sponge andrinse with clean water. Wipe with a soft clean towel to prevent waterspotting. If the door panel is stainless steel, it can discolor when exposedto chlorine gas and moisture. Clean stainless steel with a cloth dampenedwith a mild detergent and warm water solution. Never use an abrasive orcaustic cleaning agent.
Interior CleaningThe kegerator's interior should be cleaned occasionally.1. Disconnect power to the unit.2. Open the door and remove the contents.3. Wait until the unit defrosts.
4. With a clean cloth, wipe down the interior of the unit.5. Reconnect power to the unit.
TROUBLESHOOTING
Before Calling for HelpIf the unit appears to be malfunctioning, read through the OPERATIONsection of this manual first. If the problem persists, check theTroubleshooting Guide below and on the following page. The problemcould be something that can easily be solved or explained.
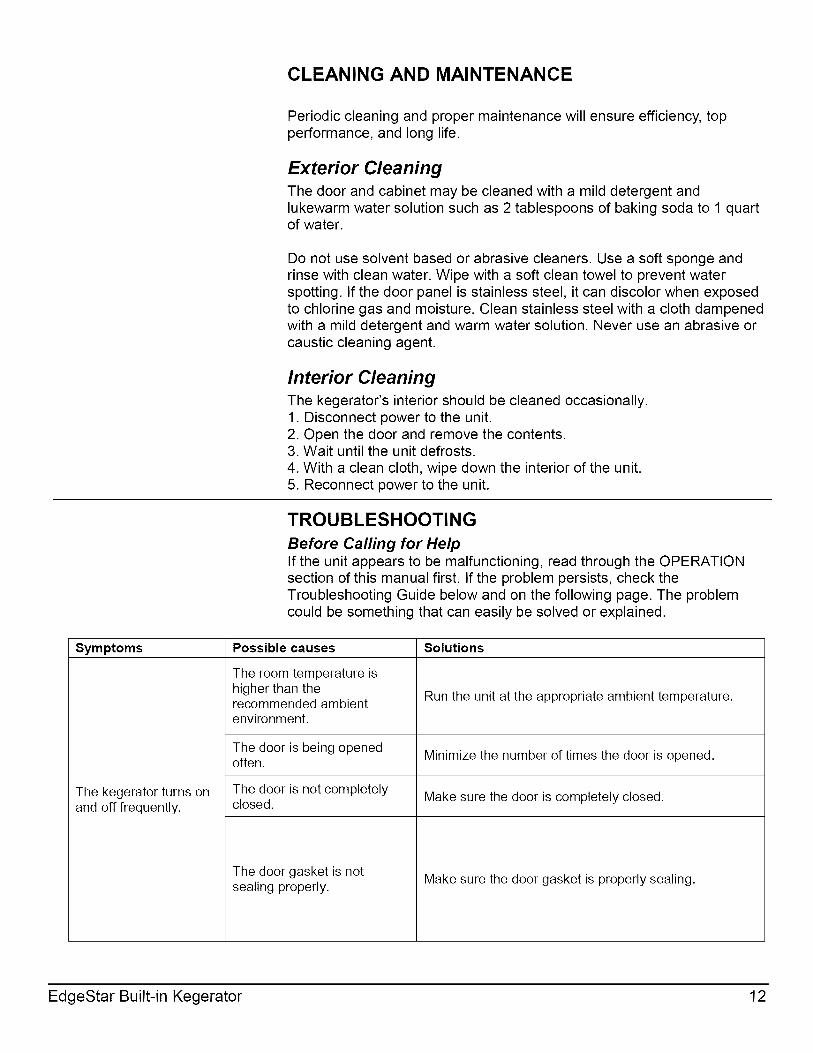
Symptoms Possible causes Solutions
The kegerator turns onand off frequently.
The room temperature ishigher than therecommended ambientenvironment.
Run the unit at the appropriate ambient temperature.
The door is being opened Minimize the number of times the door is openedoften.
The door is not completely Make sure the door is completely closed.closed.
The door gasket is notsealing properly.
Make sure the door gasket is properly sealing.
EdgeStar Built-in Kegerator 12
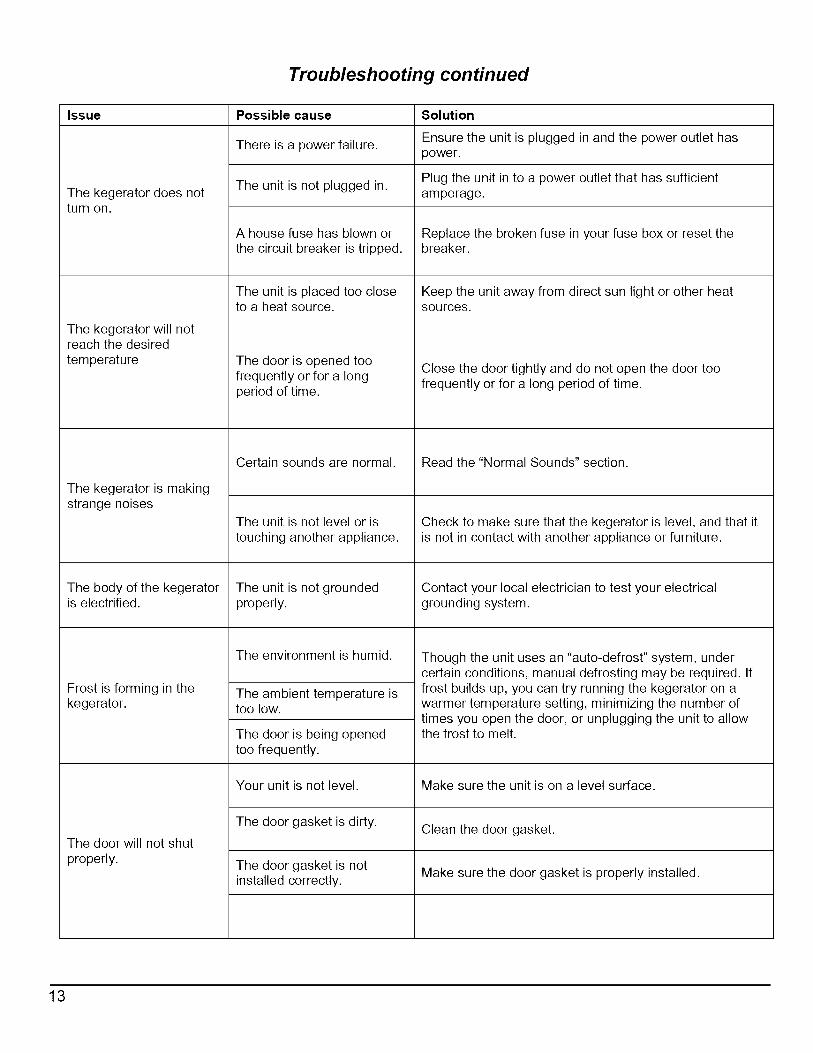
Troubleshooting continued
Issue Possible cause Solution
Ensure the unit is plugged in and the power outlet hasThere is a power failure.
power.
The unit is not plugged in. Plug the unit in to a power outlet that has sufficientThe kegerator does not amperage.turn on.
A house fuse has blown or Replace the broken fuse in your fuse box or reset thethe circuit breaker is tripped, breaker.
The unit is placed too close Keep the unit away from direct sun light or other heatto a heat source, sources.
The kegerator will notreach the desiredtemperature
The kegerator is makingstrange noises
The body of the kegeratoris electrified.
Frost is forming in thekegerator.
The door is opened toofrequently or for a longperiod of time.
Certain sounds are normal.
The unit is not level or istouching another appliance.
The unit is not groundedproperly.
The environment is humid.
The ambient temperature istoo low.
The door is being openedtoo frequently.
Close the door tightly and do not open the door toofrequently or for a long period of time.
Read the "Normal Sounds" section.
Check to make sure that the kegerator is level, and that itis not in contact with another appliance or furniture.
Contact your local electrician to test your electricalgrounding system.
Though the unit uses an "auto-defrost" system, undercertain conditions, manual defrosting may be required. Iffrost builds up, you can try running the kegerator on awarmer temperature setting, minimizing the number oftimes you open the door, or unplugging the unit to allowthe frost to melt.
Your unit is not level. Make sure the unit is on a level surface.
The door gasket is dirty. Clean the door gasket.The door will not shut
properly. The door gasket is notMake sure the door gasket is properly installed.
installed correctly.
13

Specifications
Description of product
Model
Voltage/Frequency
Amperage
Input Power
Color
Storage Capacity Options
Refrigerant
Temperature Range
Dimensions
(Height x Width x Depth )
Weight
Built-in Kegerator
BR7000SSFridge for the KC7000SS Kegerator
AC 115V~60Hz
1.03A
120W
Black Cabinet; Stainless SteelDoor
• 1 Half Barrel Keg
• 1 Half Barrel Oversized Keg
• 1 Quarter Barrel Keg• 1-3 Sixth Barrel Keg(s)
• 1-3 Cornelius Keg(s)• 1 Slim Quarter Keg with
1 Sixth Barrel Keg
R134a, 2.8 oz.
32 - 60°F
34 318" x 23 13/16" x 25 318"
90 pounds
Note: Technical data and performance information is provided forreference only.
Specifications are subject to change. Check the rating label on thekegerator for the most accurate information.
EdgeStar Built-in Kegerator 14
This product is warranted by EdgeStar and is subject to any conditions set forth as follows:
WHAT IS COVERED:
For a period of ONE (1) YEARfrom the date oforiginal retail purchase, EdgeStar will repair orreplace any part free of charge including laborthat fails due to a defect in materials or
workmanship. Labor will be performed free ofcharge at an authorized EdgeStar repair facilityand EdgeStar will supply new, rebuilt, orrefurbished parts free of charge. EdgeStar mayrequest a defective part be returned inexchange for the replacement part. Allreplacement parts or products will be new,remanufactured, or refurbished. All products andparts replaced by EdgeStar under warrantyservice become the property of EdgeStar. Afterthe 12 month period, EdgeStar will no longer beresponsible for labor charges incurred orreplacement parts. All defective products andparts covered by this warranty will be repaired orreplaced on a mail-in basis to an EdgeStarauthorized repair facility.
Thiswarranty applies to the original purchaseronly, and only covers defects in workmanshipexperienced during operation of the productunder normal service, maintenance, and usageconditions. Thiswarranty applies to the purchaseand use of this product in residential settingswithin the United States of America,
Exceptions: Commercial or Rental Use
Warranty
90 days labor and parts from date of original
purchase. No other warranty applies.
WHAT IS NOT COVERED- The following limitations apply to the
coverage of this warranl'y. This warranty does not cover:
-Labor charges for installation, setup or training to use theproduct.-Shipping damage, and any damage caused by improperpackaging for shipment to an authorized service center, and anydamaged caused by improper voltage or any other misuse,including abnormal service, handling, or usage.-Cosmetic damage such as scratches and dents.-Normal wear and tear on parts or replacement of parts designedto be replaced, e.g. filters, cartridges, batteries.-Service trips to deliver, pick-up, or repair, install the product, or toinstruct in proper usage of the product.-Damages or operating problems resulting from misuse, abuse,operation outside environmental specifications, usescontrary toinstructions provided in the owner's manual, accidents, acts ofGod, vermin, fire, flood, improper installation, unauthorizedservice, maintenance negligence, unauthorized installation ormodification, or commercial use.-Labor, service transportation, and shipping charges for theremoval and replacement of defective parts, beyond the initial 12month period.-Products fhaf have been modified fo perform outside ofspecifications without the prior written permission of EdgeSfar.-Products lost in shipment, or theft.-Products sold AS ISor from an unauthorized reseller.-Products fhaf have had their serial numbers removed, defaced,or with serial numbers fhaf have been invalidated.-Damage from of her than normal household use.-Replacement or repair of household fuses, circuit breakers, wiringor plumbing.-Damage fo personal property from use of product.-Damage from service of her than from an authorized EdgeSfarrepair facility.-Hoses, knobs, lint frays and all attachments, accessories anddisposable parts.-Any service charges not specifically identified as normal such asnormal service area or hours.-Any special or consequential damages arising out of the use ofthe product.
OBTAiNiNG WARRANTY SERVICE: If you believe your product is defective, contact EdgeStar Customer Support for
troubleshooting assistance and warranty service at www.edc4estar.com or call 1-866-319-5473. Before contacting
Customer Support you are required to have your model number, serial number and proof of purchase available upon
request. Once an EdgeStar authorized representative has confirmed that your product is defective and eligible for
warranty service, the product must be returned to an EdgeStar authorized repair facility. EdgeStar is not responsible for
damage resulting from shipper mishandling or improper packaging. Do not return a defective product to the place of
purchase. Products received without a return authorization number will be refused.
THIS WARRANTY IS IN LIEU OF ANY OTHER WARRANTY, EXPRESSOR IMPLIED, INCLUDING WITHOUT LIMITATION, ANY WARRANTY OF MERCHANTABILITY OR
FITNESS FOR A PARTICULAR PURPOSE. TO THE EXTENT ANY IMPLIED WARRANTY IS REQUIRED BY LAW, IT IS LIMITED IN DURATION TO THE EXPRESSWARRANTY
PERIOD ABOVE. NEITHER THE MANUFACTURER NOR ITS DISTRIBUTORS SHALL BE LIABLE FOR ANY INCIDENTAL, CONSEQUENTIAL, INDIRECT, SPECIAL, OR
PUNITIVE DAMAGES OF ANY NATURE, INCLUDING WITHOUT LIMITATION, LOST REVENUES OR PROFITS, OR ANY OTHER DAMAGE WHETHER BASED IN
CONTRACT, TORT, OR OTHERWISE. SOME STATES DO NOT ALLOW THE EXCLUSION OF INCIDENTAL OR CONSEQUENTIAL DAMAGES, SO THE ABOVE EXCLUSION
MAY NOT APPLY TO YOU. THIS WARRANTY GIVES YOU SPECIFIC LEGAL RIGHTS. YOU MAY HAVE OTHER RIGHTS THAT VARY FROM STATE TO STATE.

EDGES®
EdgeStar Products
500 N. Capital of TX Hwy, Bldg 5Austin, TX 78746
Toll Free: 1-866-319-5473
Web: http://www.edgestar.comE-mail: [email protected]
Register your product, download owner's manuals, access additional troubleshootingresources, and obtain more information on other great EdgeStar products on the web at:http://www.edgestar.com
Product contents and specifications may change without notice.
Copyright © 2013 Living Direct, Inc. All rights reserved.


![[Nordic Built Challenge 17.12.2013] Trine Pertou Mach, Nordic Built: Nordic Built](https://img.pdfslide.us/doc/110x75/547174dcb4af9f980a8b4ad9/nordic-built-challenge-17122013-trine-pertou-mach-nordic-built-nordic-built.jpg)