Embed Size (px)
Citation preview

Building Curriculum Development & Training Skills Appendixes version 1, revised 5/21/07
©The National Training Institute for Child Care Health Consultants, UNC-CH, 2007 1
BUILDING CURRICULUM DEVELOPMENT AND TRAINING SKILLS APPENDIXES
Appendix A: Developing a Training Session.............................................................................. 2
NEEDS ASSESSMENT LOG.................................................................................................... 3 NEEDS ASSESSMENT SUMMARY ....................................................................................... 4 TASK INVENTORY.................................................................................................................. 6 TASK ANALYSIS QUESTIONS .............................................................................................. 7 GOALS AND OBJECTIVES..................................................................................................... 9 VERBS FOR USE IN STATING TRAINING OBJECTIVES ................................................ 10 AUDIENCE ANALYSIS ......................................................................................................... 11 SAMPLE PRE-TEST................................................................................................................ 12 PREPARATION CHECKLIST................................................................................................ 13 OVERVIEW OF TRAINING SESSION.................................................................................. 14 TRAINER’S OUTLINE ........................................................................................................... 15 EVALUATION OF TRAINER FORM.................................................................................... 16 EVALUATION SUMMARY: INSTRUCTIONS.................................................................... 18 EVALUATION SUMMARY................................................................................................... 20
Appendix B: Training Checklists .............................................................................................. 23
TRAINING IMPLEMENTATION AND LOGISTICS CHECKLIST .................................... 24 FACILITY CHECKLIST ......................................................................................................... 27 SUPPLIES AND EQUIPMENT CHECKLIST........................................................................ 29
Appendix C: Training Techniques - Methods.......................................................................... 30
LECTURE................................................................................................................................. 31 SKILLS DEMONSTRATION.................................................................................................. 34 DISCUSSION........................................................................................................................... 37 CASE SCENARIO ................................................................................................................... 40
Appendix D: Training Techniques - Media and Materials..................................................... 43
FLIPCHARTS: TIPS FOR PREPARING AND USING ......................................................... 44 OVERHEAD TRANSPARENCIES: TIPS FOR PREPARING AND USING ....................... 45 POWERPOINT SLIDES: TIPS FOR PREPARING AND USING......................................... 48 SLIDES (35 MM): TIPS FOR PREPARING AND USING.................................................... 49 PRINT MATERIALS: TIPS FOR PREPARING AND USING.............................................. 50 VIDEO: TIPS FOR PREPARING AND USING..................................................................... 51
Appendix E: Glossary................................................................................................................. 52

Building Curriculum Development & Training Skills Appendixes version 1, revised 5/21/07
©The National Training Institute for Child Care Health Consultants, UNC-CH, 2007 2
APPENDIX A: DEVELOPING A TRAINING SESSION
- Needs Assessment Log - Needs Assessment Summary - Task Inventory - Task Analysis Questions - Goals and Objectives - Verbs for Use in Stating Training Objectives - Sample Pre-test - Audience Analysis - Preparation Checklist - Overview of Training Session - Trainer’s Outline - Evaluation Form - Evaluation Summary
Building Curriculum Development & Training Skills Appendixes version 1, revised 5/21/07
©The National Training Institute for Child Care Health Consultants, UNC-CH, 2007 3
NEEDS ASSESSMENT LOG Instructions: Use this template to document the information you collect during the needs assessment. Enter the name or initials of the respondent providing the information: record the method used to collect the information; and enter the needs identified by each respondent.
ORGANIZATION: DATE:
Respondent Method(s) used to collect
information* Needs identified
*Possible Codes for Methods: B = Brainstorming sessions; C = Casual conversations; FG = Focus groups; I = Interviews; O = Direct observations; RR = Records review (written); S = Surveys; T = Tests; WR= Work review;
Building Curriculum Development & Training Skills Appendixes version 1, revised 5/21/07
©The National Training Institute for Child Care Health Consultants, UNC-CH, 2007 4
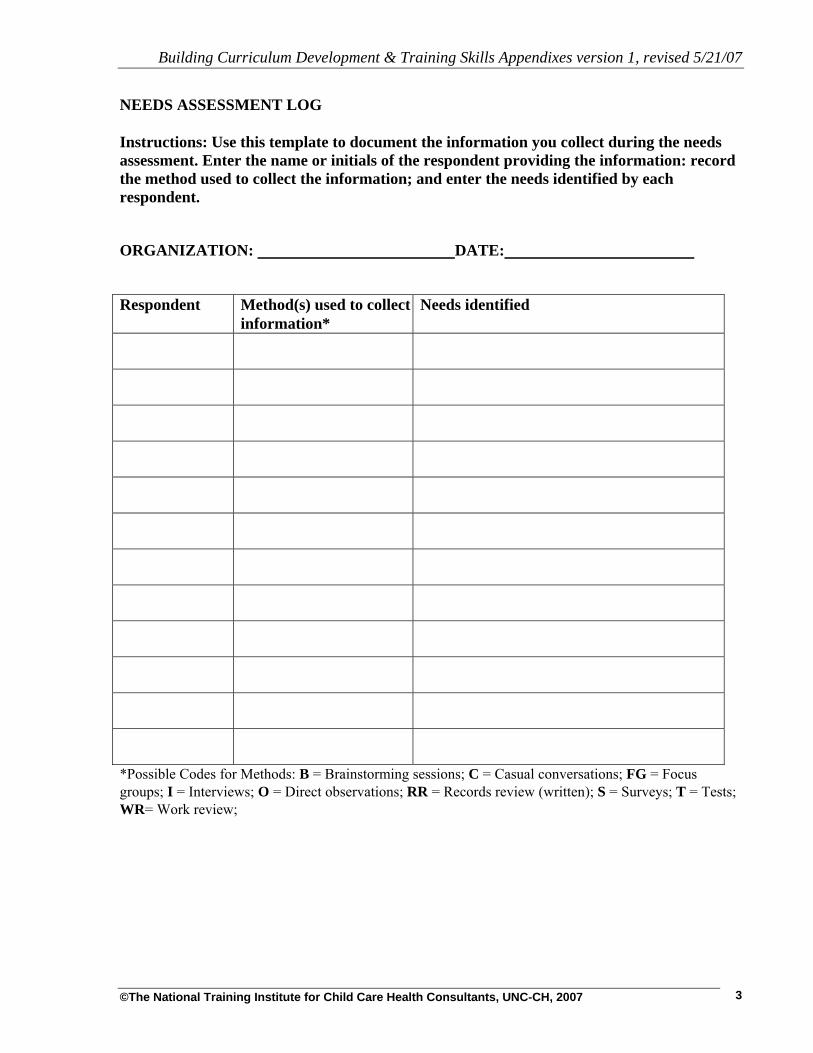
NEEDS ASSESSMENT SUMMARY Instructions: Use this template to document information you collected from the needs assessment. A. Background: Briefly describe the organization, including name, purpose/mission, number of
employees, etc. Describe the rationale for conducting the needs assessment. Was there a specific problem that prompted the needs assessment? Describe any change in equipment, policies and procedures, employee turnover rates, and working conditions that the organization is undergoing, or new initiatives, legislation, etc. that the organization is facing.
B. Needs identified: Describe the training needs you have identified and the employees or
department affected. Briefly describe the process you used to identify needs. C. Needs ranked: List the needs and prioritize them in order of importance. Briefly describe the
process the process you used to rank the needs. (cont’d)

Building Curriculum Development & Training Skills Appendixes version 1, revised 5/21/07
©The National Training Institute for Child Care Health Consultants, UNC-CH, 2007 5
D. Probable causes of needs: Briefly describe the probable causes for the needs. Describe any
motivational or incentive problems uncovered. E. Possible solutions and opportunities: Record preliminary recommendations you have for
addressing needs identified and describe any potential consequences for addressing or not addressing the needs.
Building Curriculum Development & Training Skills Appendixes version 1, revised 5/21/07
©The National Training Institute for Child Care Health Consultants, UNC-CH, 2007 6
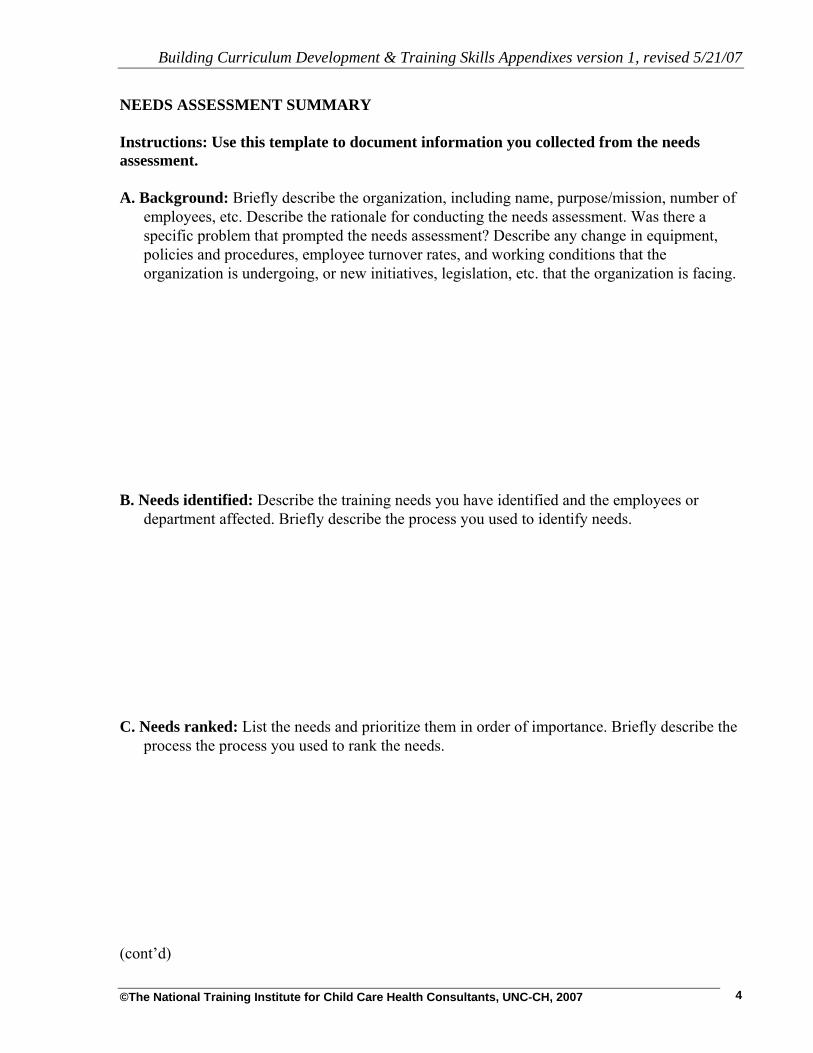
TASK INVENTORY Instructions: Use this template during the task analysis to inventory the tasks needed to successfully accomplish a job. Enter the name of the job (e.g., child care provider) and duty (e.g., diapering) you are analyzing. List the tasks needed to perform the job (in the correct order). List the knowledge, skills, and attitudes needed to accomplish each task, along with any needed supplies and equipment. Add or delete rows as needed. Job: Duty:
Task
Knowledge Skills Attitudes Supplies & Equipment
Needed

Building Curriculum Development & Training Skills Appendixes version 1, revised 5/21/07
©The National Training Institute for Child Care Health Consultants, UNC-CH, 2007 7
TASK ANALYSIS QUESTIONS Instructions: Use this template to collect and document information from the task analysis. Use the provided questions to learn more about trainees' skill levels, experience, special needs and preferences, etc. Record the methods you used to collect the information and write a brief summary of the information you have collected.
Questions Methods used to collect
information
Information collected
1. What prerequisites do trainees need? Psychomotor skills (physical skills or skills)?
Cognitive skills (knowledge)?
Personal or interpersonal skills (attitudes)?
2. What are the trainees’ current skills levels: Psychomotor skills (physical skills or skills)?
Cognitive skills (knowledge)?
Personal or interpersonal skills (attitudes)?
3. What are the characteristics of the most experienced trainee: Length of time doing task?
Extent of formal training?
Types of different experiences related to training topic?
4. What are the characteristics of the least experienced trainee: Length of time doing task?
Extent of formal training?
Types of different experiences related to training topic?
5. What are the characteristics of the average trainee: Length of time doing task?
Extent of formal training?
Types of different experiences related to training topic?
Building Curriculum Development & Training Skills Appendixes version 1, revised 5/21/07
©The National Training Institute for Child Care Health Consultants, UNC-CH, 2007 8
Questions Methods used to collect
information
Information collected
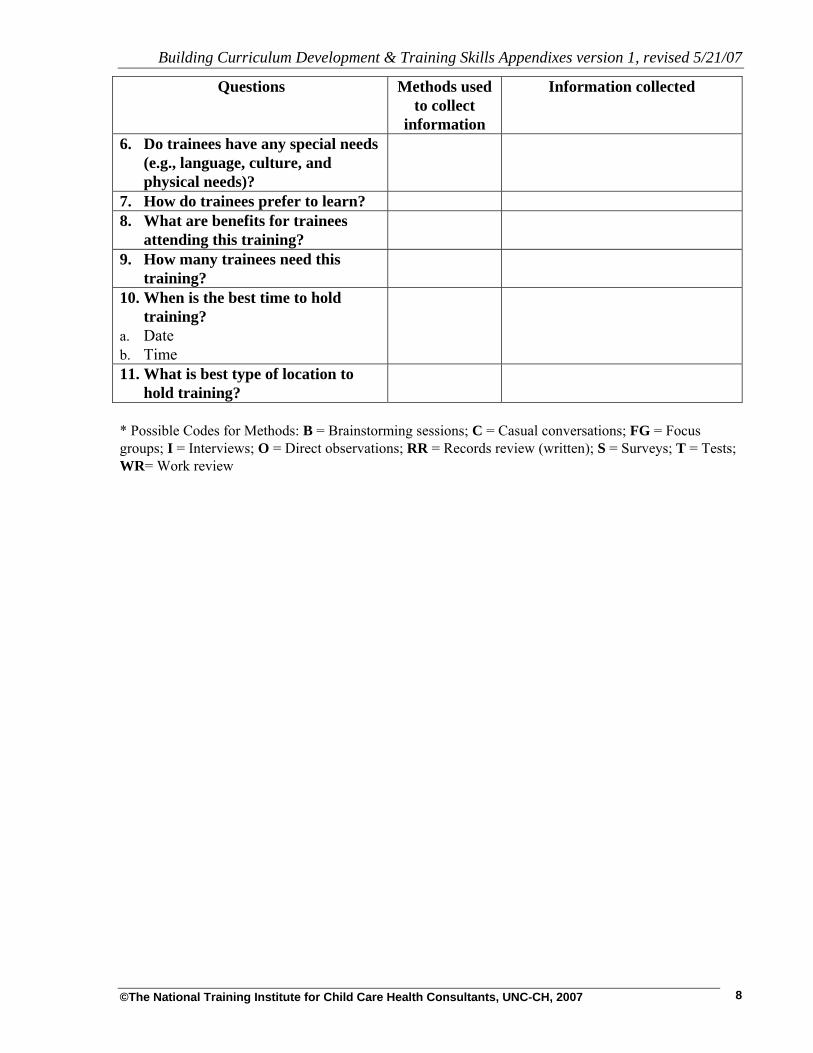
6. Do trainees have any special needs (e.g., language, culture, and physical needs)?
7. How do trainees prefer to learn? 8. What are benefits for trainees
attending this training?
9. How many trainees need this training?
10. When is the best time to hold training?
a. Date b. Time
11. What is best type of location to hold training?
* Possible Codes for Methods: B = Brainstorming sessions; C = Casual conversations; FG = Focus groups; I = Interviews; O = Direct observations; RR = Records review (written); S = Surveys; T = Tests; WR= Work review
Building Curriculum Development & Training Skills Appendixes version 1, revised 5/21/07
©The National Training Institute for Child Care Health Consultants, UNC-CH, 2007 9
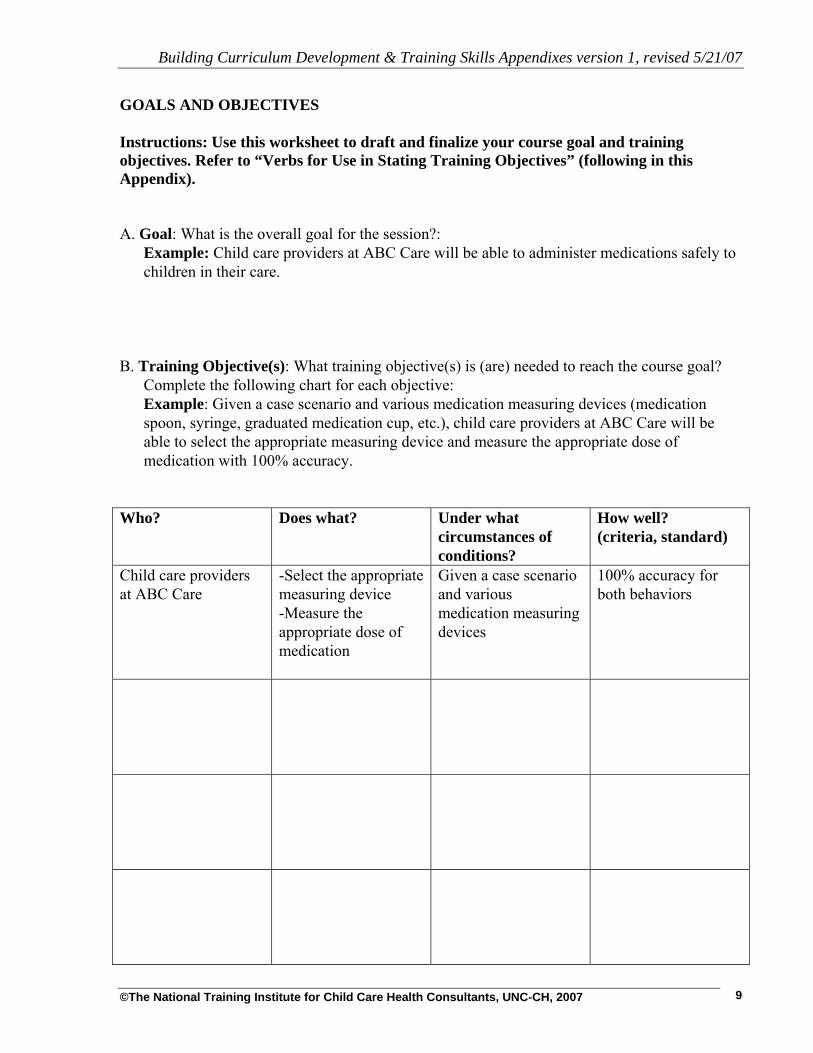
GOALS AND OBJECTIVES Instructions: Use this worksheet to draft and finalize your course goal and training objectives. Refer to “Verbs for Use in Stating Training Objectives” (following in this Appendix). A. Goal: What is the overall goal for the session?:
Example: Child care providers at ABC Care will be able to administer medications safely to children in their care.
B. Training Objective(s): What training objective(s) is (are) needed to reach the course goal?
Complete the following chart for each objective: Example: Given a case scenario and various medication measuring devices (medication spoon, syringe, graduated medication cup, etc.), child care providers at ABC Care will be able to select the appropriate measuring device and measure the appropriate dose of medication with 100% accuracy.
Who? Does what? Under what
circumstances of conditions?
How well? (criteria, standard)
Child care providers at ABC Care
-Select the appropriate measuring device -Measure the appropriate dose of medication
Given a case scenario and various medication measuring devices
100% accuracy for both behaviors
Building Curriculum Development & Training Skills Appendixes version 1, revised 5/21/07
©The National Training Institute for Child Care Health Consultants, UNC-CH, 2007 10
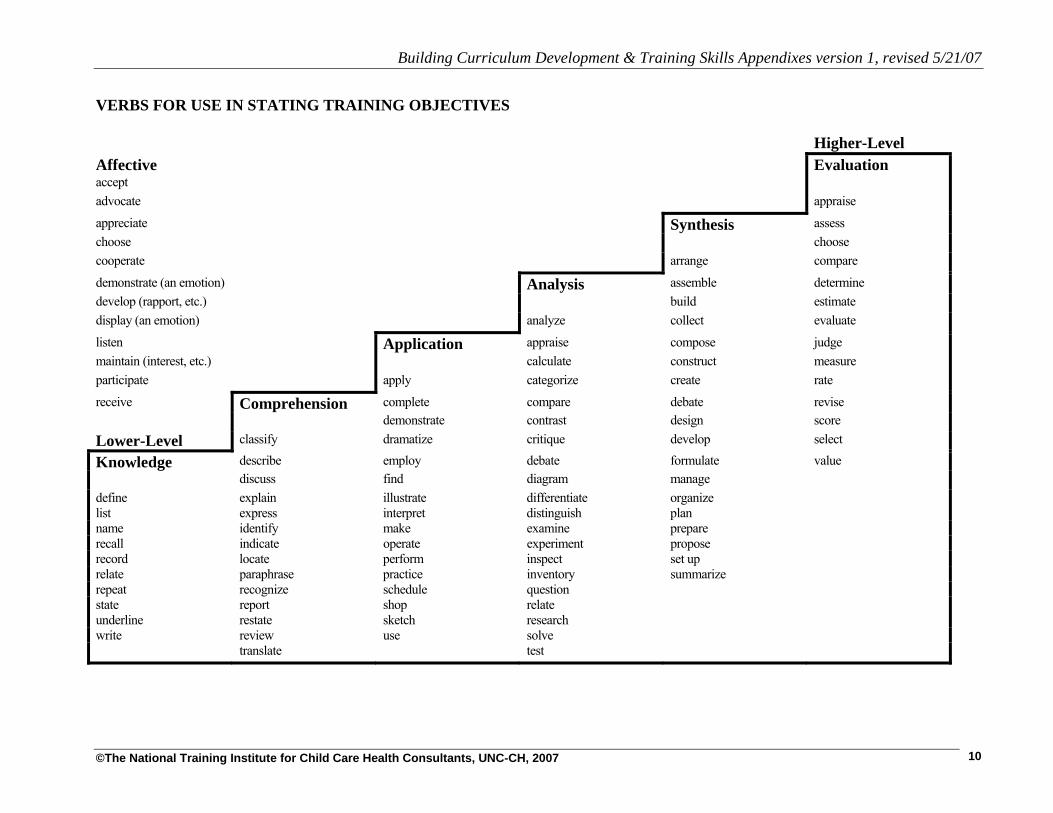
VERBS FOR USE IN STATING TRAINING OBJECTIVES Higher-Level Affective Evaluation accept advocate appraise
appreciate Synthesis assess choose choose cooperate arrange compare
demonstrate (an emotion) Analysis assemble determine develop (rapport, etc.) build estimate display (an emotion) analyze collect evaluate
listen Application appraise compose judge maintain (interest, etc.) calculate construct measure participate apply categorize create rate
receive Comprehension complete compare debate revise demonstrate contrast design score Lower-Level classify dramatize critique develop select
Knowledge describe employ debate formulate value discuss find diagram manage define explain illustrate differentiate organize list express interpret distinguish plan name identify make examine prepare recall indicate operate experiment propose record locate perform inspect set up relate paraphrase practice inventory summarize repeat recognize schedule question state report shop relate underline restate sketch research write review use solve translate test
Building Curriculum Development & Training Skills Appendixes version 1, revised 5/21/07
©The National Training Institute for Child Care Health Consultants, UNC-CH, 2007 11
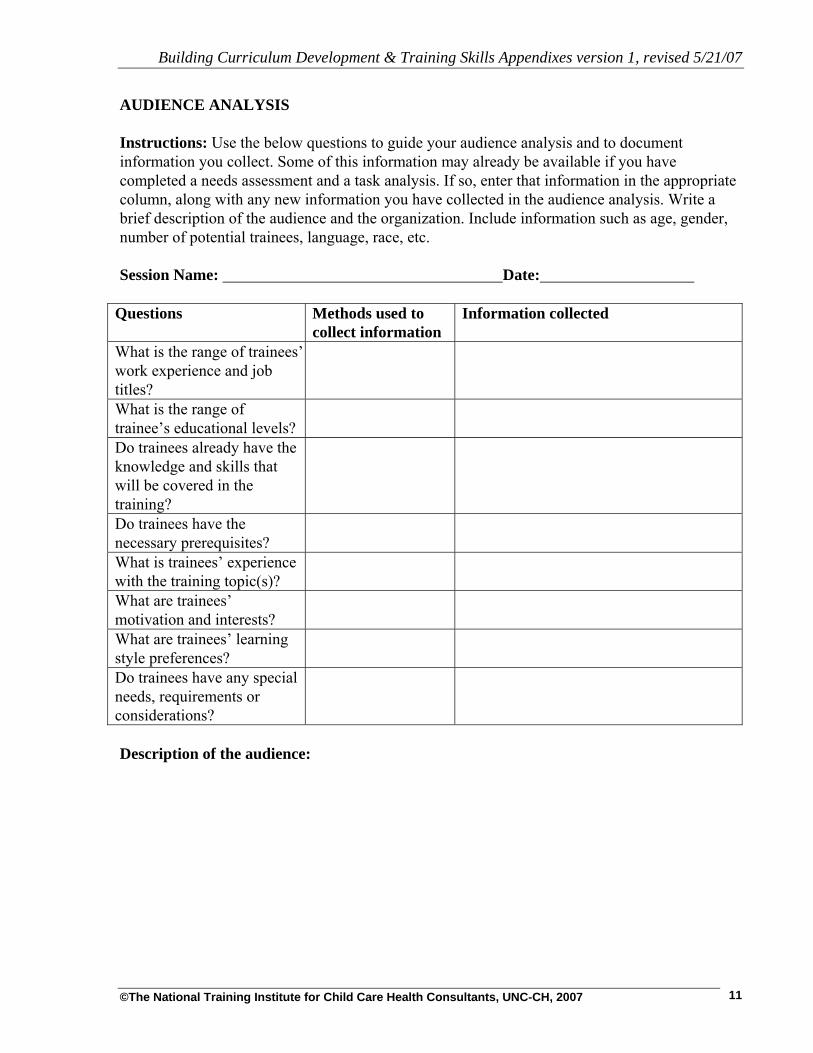
AUDIENCE ANALYSIS Instructions: Use the below questions to guide your audience analysis and to document information you collect. Some of this information may already be available if you have completed a needs assessment and a task analysis. If so, enter that information in the appropriate column, along with any new information you have collected in the audience analysis. Write a brief description of the audience and the organization. Include information such as age, gender, number of potential trainees, language, race, etc. Session Name: Date:
Questions Methods used to collect information
Information collected
What is the range of trainees’ work experience and job titles?
What is the range of trainee’s educational levels?
Do trainees already have the knowledge and skills that will be covered in the training?
Do trainees have the necessary prerequisites?
What is trainees’ experience with the training topic(s)?
What are trainees’ motivation and interests?
What are trainees’ learning style preferences?
Do trainees have any special needs, requirements or considerations?
Description of the audience:
Building Curriculum Development & Training Skills Appendixes version 1, revised 5/21/07
_______________________________________________________________________________________ ©The National Training Institute for Child Care Health Consultants, UNC-CH, 2007 12
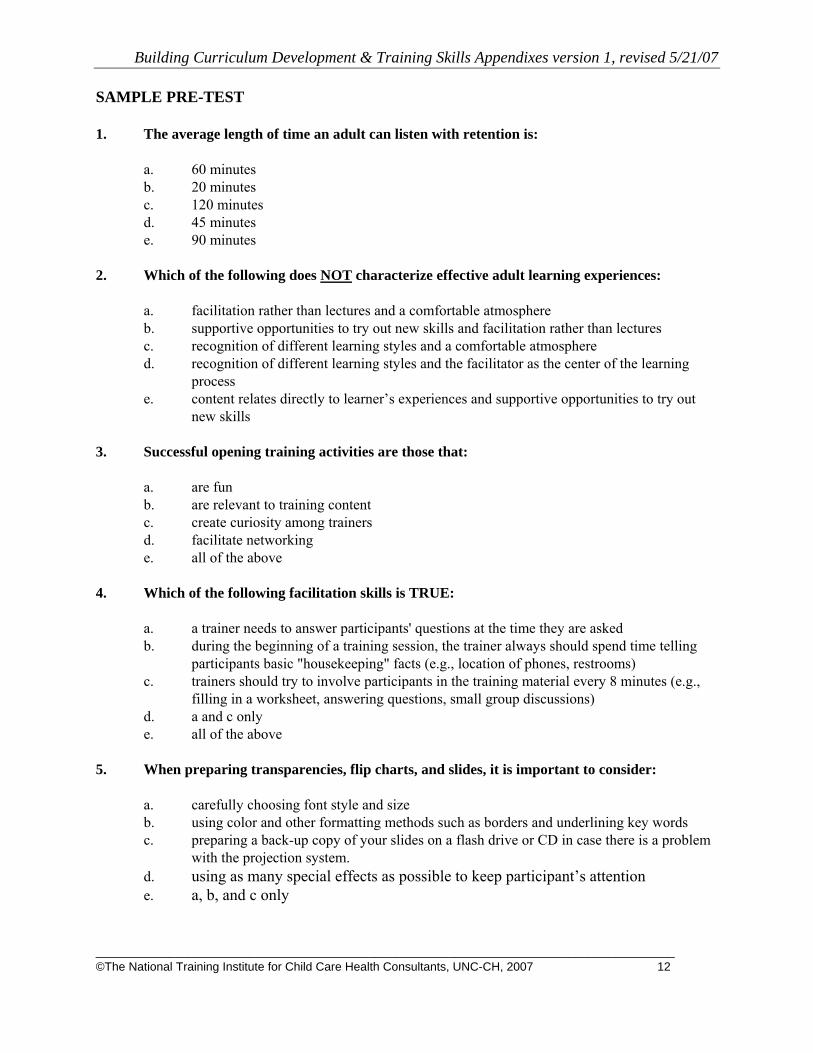
SAMPLE PRE-TEST 1. The average length of time an adult can listen with retention is:
a. 60 minutes b. 20 minutes c. 120 minutes d. 45 minutes e. 90 minutes
2. Which of the following does NOT characterize effective adult learning experiences:
a. facilitation rather than lectures and a comfortable atmosphere b. supportive opportunities to try out new skills and facilitation rather than lectures c. recognition of different learning styles and a comfortable atmosphere d. recognition of different learning styles and the facilitator as the center of the learning
process e. content relates directly to learner’s experiences and supportive opportunities to try out
new skills 3. Successful opening training activities are those that:
a. are fun b. are relevant to training content c. create curiosity among trainers d. facilitate networking e. all of the above
4. Which of the following facilitation skills is TRUE:
a. a trainer needs to answer participants' questions at the time they are asked b. during the beginning of a training session, the trainer always should spend time telling
participants basic "housekeeping" facts (e.g., location of phones, restrooms) c. trainers should try to involve participants in the training material every 8 minutes (e.g.,
filling in a worksheet, answering questions, small group discussions) d. a and c only e. all of the above
5. When preparing transparencies, flip charts, and slides, it is important to consider:
a. carefully choosing font style and size b. using color and other formatting methods such as borders and underlining key words c. preparing a back-up copy of your slides on a flash drive or CD in case there is a problem
with the projection system. d. using as many special effects as possible to keep participant’s attention e. a, b, and c only
Building Curriculum Development & Training Skills Appendixes version 1, revised 5/21/07
_______________________________________________________________________________________ ©The National Training Institute for Child Care Health Consultants, UNC-CH, 2007 13
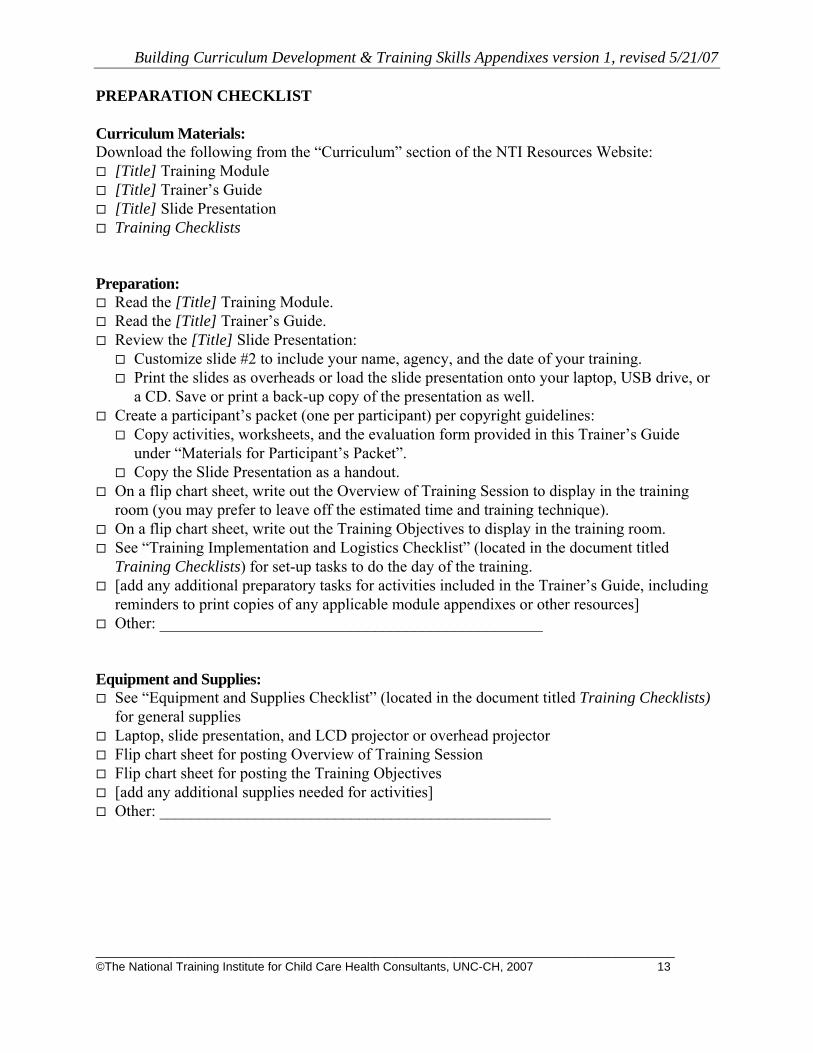
PREPARATION CHECKLIST Curriculum Materials: Download the following from the “Curriculum” section of the NTI Resources Website:
[Title] Training Module [Title] Trainer’s Guide [Title] Slide Presentation Training Checklists
Preparation:
Read the [Title] Training Module. Read the [Title] Trainer’s Guide. Review the [Title] Slide Presentation:
Customize slide #2 to include your name, agency, and the date of your training. Print the slides as overheads or load the slide presentation onto your laptop, USB drive, or
a CD. Save or print a back-up copy of the presentation as well. Create a participant’s packet (one per participant) per copyright guidelines:
Copy activities, worksheets, and the evaluation form provided in this Trainer’s Guide under “Materials for Participant’s Packet”.
Copy the Slide Presentation as a handout. On a flip chart sheet, write out the Overview of Training Session to display in the training
room (you may prefer to leave off the estimated time and training technique). On a flip chart sheet, write out the Training Objectives to display in the training room. See “Training Implementation and Logistics Checklist” (located in the document titled
Training Checklists) for set-up tasks to do the day of the training. [add any additional preparatory tasks for activities included in the Trainer’s Guide, including
reminders to print copies of any applicable module appendixes or other resources] Other: ________________________________________________
Equipment and Supplies:
See “Equipment and Supplies Checklist” (located in the document titled Training Checklists) for general supplies
Laptop, slide presentation, and LCD projector or overhead projector Flip chart sheet for posting Overview of Training Session Flip chart sheet for posting the Training Objectives [add any additional supplies needed for activities] Other: _________________________________________________
Building Curriculum Development & Training Skills Appendixes version 1, revised 5/21/07
_______________________________________________________________________________________ ©The National Training Institute for Child Care Health Consultants, UNC-CH, 2007 14
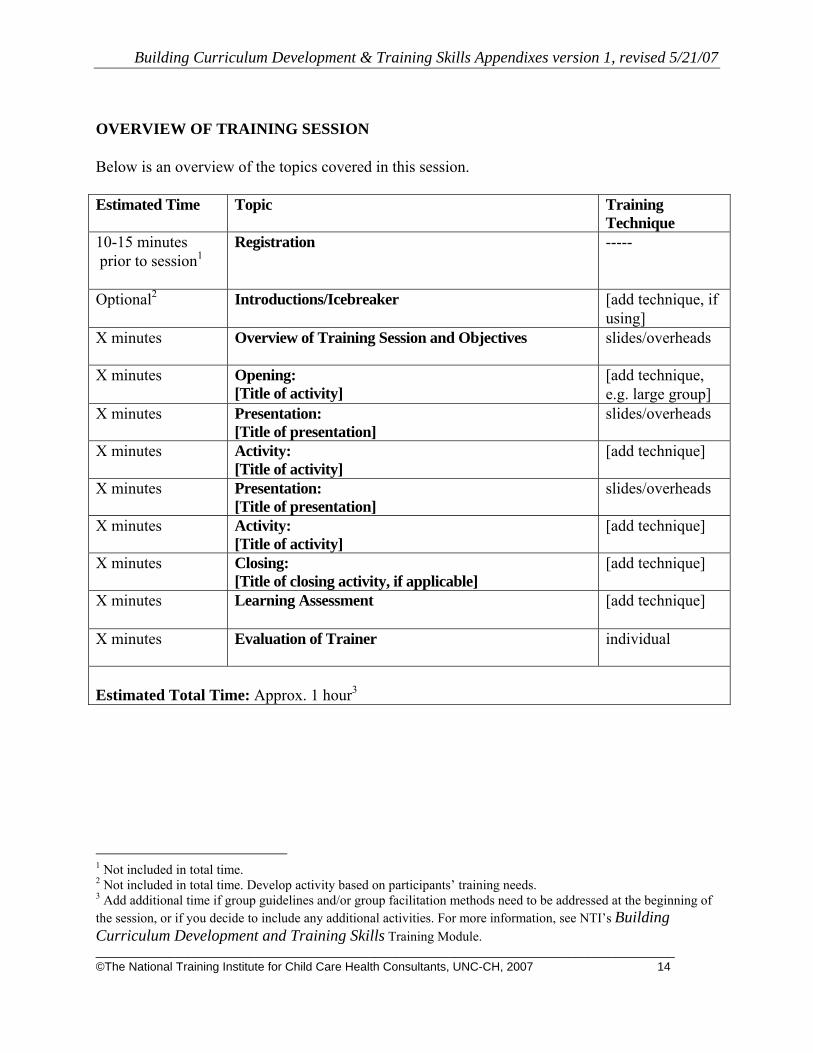
OVERVIEW OF TRAINING SESSION Below is an overview of the topics covered in this session. Estimated Time Topic Training
Technique 10-15 minutes prior to session1
Registration -----
Optional2
Introductions/Icebreaker
[add technique, if using]
X minutes Overview of Training Session and Objectives
slides/overheads
X minutes Opening: [Title of activity]
[add technique, e.g. large group]
X minutes Presentation: [Title of presentation]
slides/overheads
X minutes Activity: [Title of activity]
[add technique]
X minutes Presentation: [Title of presentation]
slides/overheads
X minutes Activity: [Title of activity]
[add technique]
X minutes Closing: [Title of closing activity, if applicable]
[add technique]
X minutes
Learning Assessment [add technique]
X minutes Evaluation of Trainer
individual
Estimated Total Time: Approx. 1 hour3
1 Not included in total time. 2 Not included in total time. Develop activity based on participants’ training needs. 3 Add additional time if group guidelines and/or group facilitation methods need to be addressed at the beginning of the session, or if you decide to include any additional activities. For more information, see NTI’s Building Curriculum Development and Training Skills Training Module.
Building Curriculum Development & Training Skills Appendixes version 1, revised 5/21/07
_______________________________________________________________________________________ ©The National Training Institute for Child Care Health Consultants, UNC-CH, 2007 15
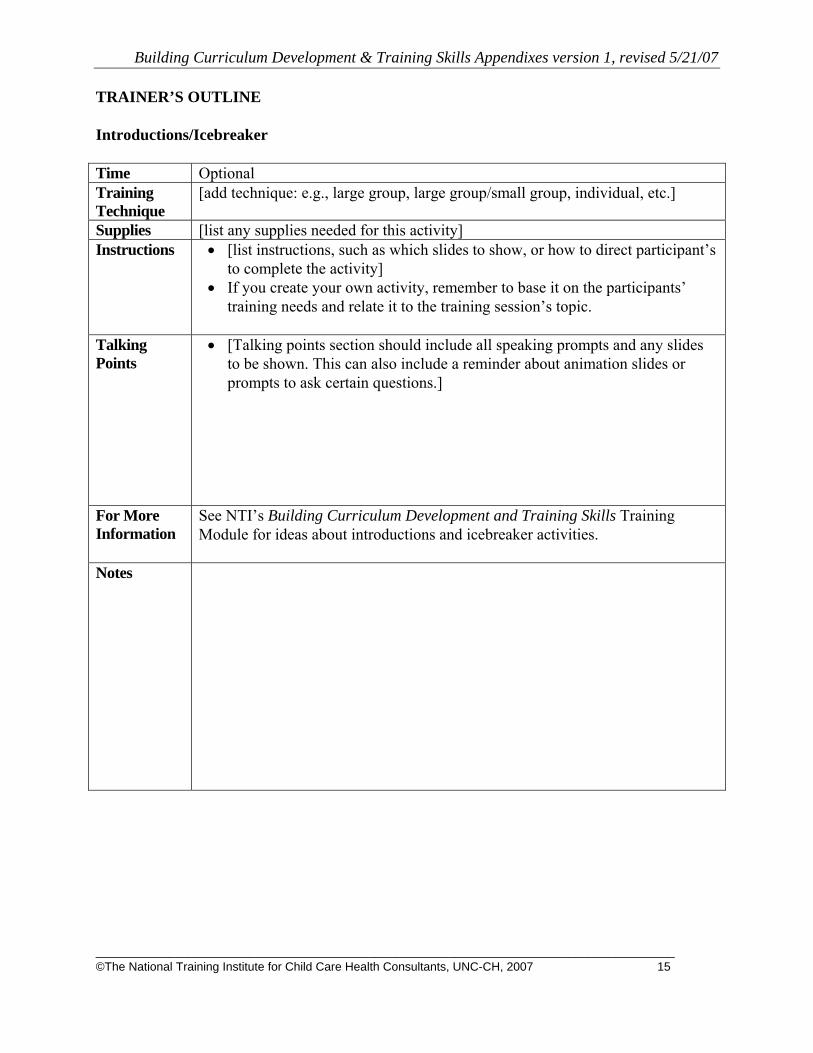
TRAINER’S OUTLINE Introductions/Icebreaker Time Optional Training Technique
[add technique: e.g., large group, large group/small group, individual, etc.]
Supplies [list any supplies needed for this activity] Instructions • [list instructions, such as which slides to show, or how to direct participant’s
to complete the activity] • If you create your own activity, remember to base it on the participants’
training needs and relate it to the training session’s topic.
Talking Points
• [Talking points section should include all speaking prompts and any slides to be shown. This can also include a reminder about animation slides or prompts to ask certain questions.]
For More Information
See NTI’s Building Curriculum Development and Training Skills Training Module for ideas about introductions and icebreaker activities.
Notes
Building Curriculum Development & Training Skills Appendixes version 1, revised 5/21/07
_______________________________________________________________________________________ ©The National Training Institute for Child Care Health Consultants, UNC-CH, 2007 16
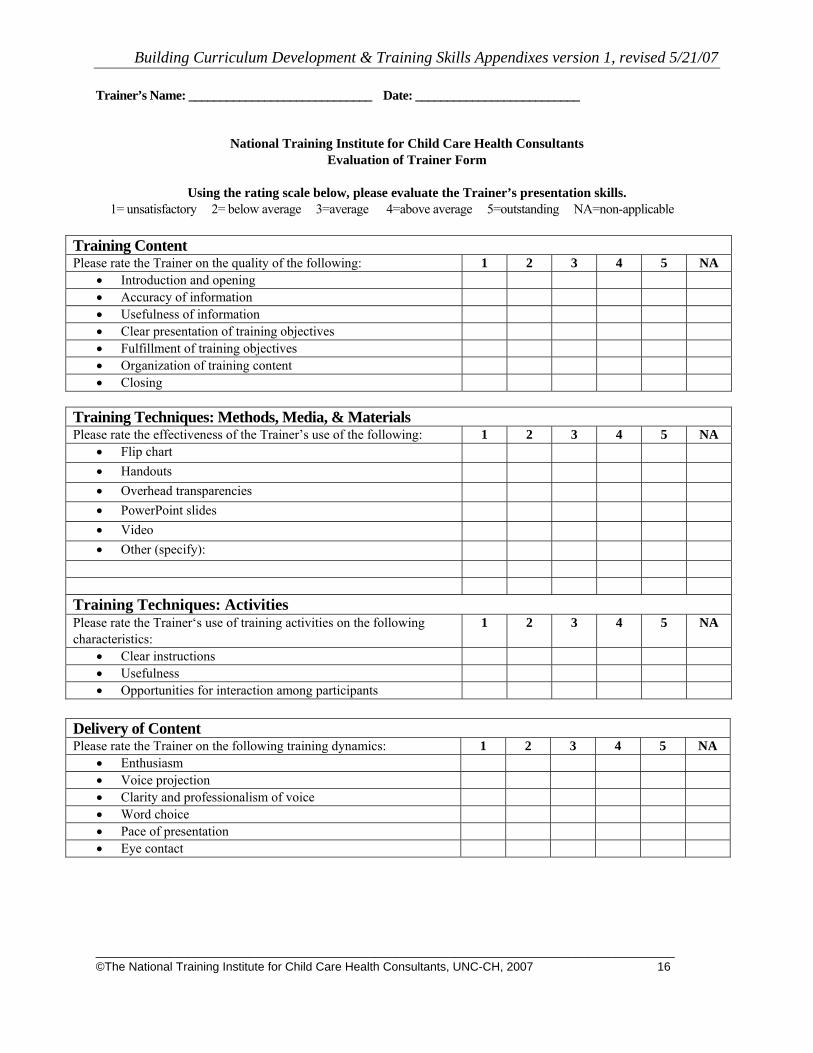
Trainer’s Name: _____________________________ Date: __________________________
National Training Institute for Child Care Health Consultants Evaluation of Trainer Form
Using the rating scale below, please evaluate the Trainer’s presentation skills.
1= unsatisfactory 2= below average 3=average 4=above average 5=outstanding NA=non-applicable
Training Content Please rate the Trainer on the quality of the following: 1 2 3 4 5 NA
• Introduction and opening • Accuracy of information • Usefulness of information • Clear presentation of training objectives • Fulfillment of training objectives • Organization of training content • Closing
Training Techniques: Methods, Media, & Materials Please rate the effectiveness of the Trainer’s use of the following: 1 2 3 4 5 NA
• Flip chart • Handouts • Overhead transparencies • PowerPoint slides • Video • Other (specify):
Training Techniques: Activities Please rate the Trainer‘s use of training activities on the following characteristics:
1 2 3 4 5 NA
• Clear instructions • Usefulness • Opportunities for interaction among participants
Delivery of Content Please rate the Trainer on the following training dynamics: 1 2 3 4 5 NA
• Enthusiasm • Voice projection • Clarity and professionalism of voice • Word choice • Pace of presentation • Eye contact
Building Curriculum Development & Training Skills Appendixes version 1, revised 5/21/07
_______________________________________________________________________________________ ©The National Training Institute for Child Care Health Consultants, UNC-CH, 2007 17
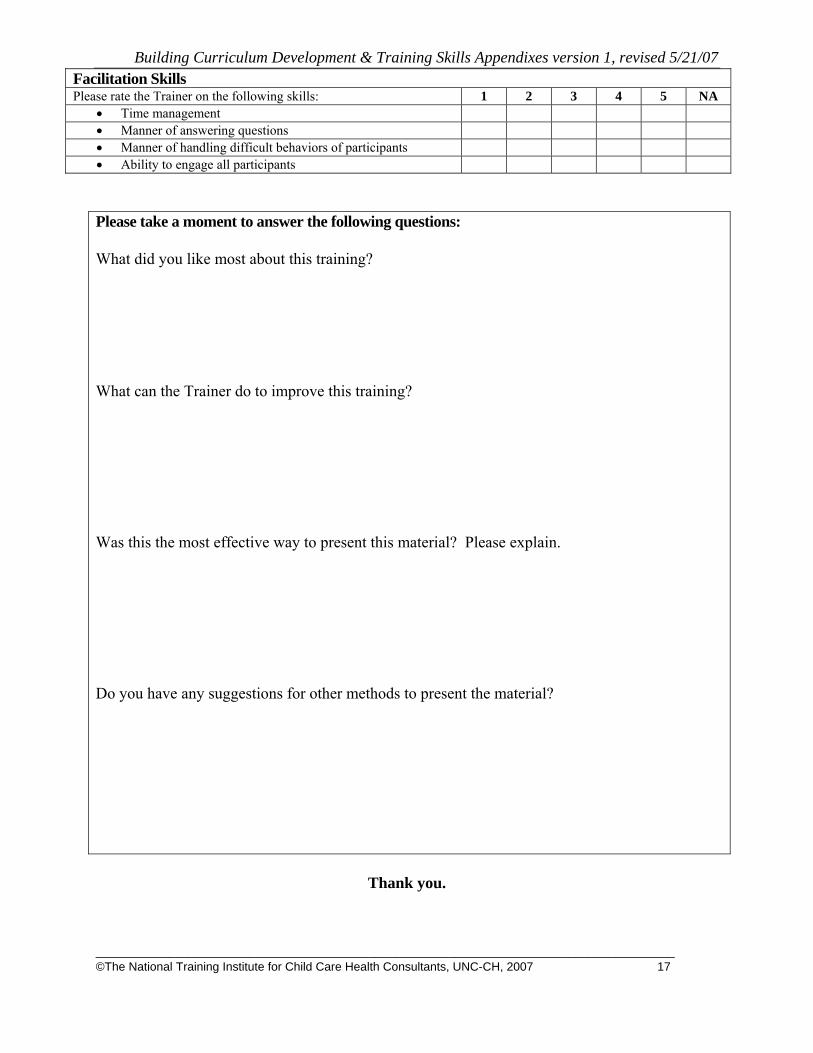
Facilitation Skills Please rate the Trainer on the following skills: 1 2 3 4 5 NA
• Time management • Manner of answering questions • Manner of handling difficult behaviors of participants • Ability to engage all participants Please take a moment to answer the following questions: What did you like most about this training? What can the Trainer do to improve this training? Was this the most effective way to present this material? Please explain. Do you have any suggestions for other methods to present the material?
Thank you.
Building Curriculum Development & Training Skills Appendixes version 1, revised 5/21/07
_______________________________________________________________________________________ ©The National Training Institute for Child Care Health Consultants, UNC-CH, 2007 18
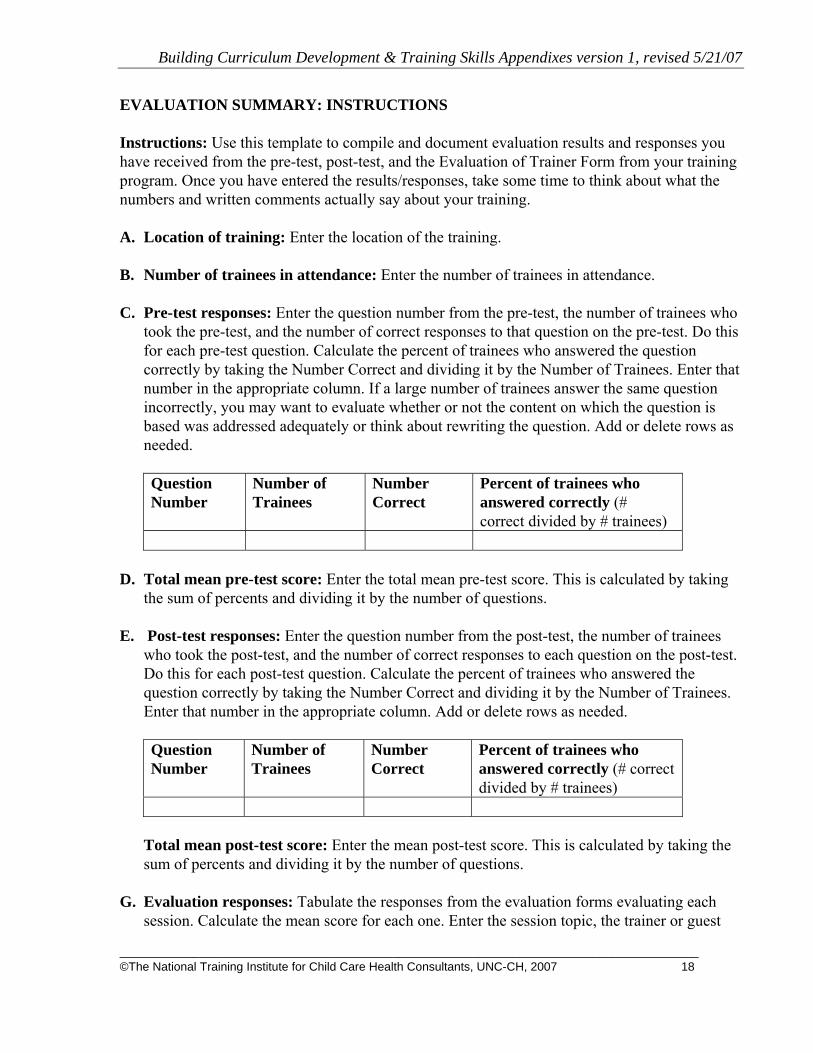
EVALUATION SUMMARY: INSTRUCTIONS Instructions: Use this template to compile and document evaluation results and responses you have received from the pre-test, post-test, and the Evaluation of Trainer Form from your training program. Once you have entered the results/responses, take some time to think about what the numbers and written comments actually say about your training. A. Location of training: Enter the location of the training. B. Number of trainees in attendance: Enter the number of trainees in attendance. C. Pre-test responses: Enter the question number from the pre-test, the number of trainees who
took the pre-test, and the number of correct responses to that question on the pre-test. Do this for each pre-test question. Calculate the percent of trainees who answered the question correctly by taking the Number Correct and dividing it by the Number of Trainees. Enter that number in the appropriate column. If a large number of trainees answer the same question incorrectly, you may want to evaluate whether or not the content on which the question is based was addressed adequately or think about rewriting the question. Add or delete rows as needed.
Question Number
Number of Trainees
Number Correct
Percent of trainees who answered correctly (# correct divided by # trainees)
D. Total mean pre-test score: Enter the total mean pre-test score. This is calculated by taking
the sum of percents and dividing it by the number of questions. E. Post-test responses: Enter the question number from the post-test, the number of trainees
who took the post-test, and the number of correct responses to each question on the post-test. Do this for each post-test question. Calculate the percent of trainees who answered the question correctly by taking the Number Correct and dividing it by the Number of Trainees. Enter that number in the appropriate column. Add or delete rows as needed.
Question Number
Number of Trainees
Number Correct
Percent of trainees who answered correctly (# correct divided by # trainees)
Total mean post-test score: Enter the mean post-test score. This is calculated by taking the
sum of percents and dividing it by the number of questions. G. Evaluation responses: Tabulate the responses from the evaluation forms evaluating each
session. Calculate the mean score for each one. Enter the session topic, the trainer or guest
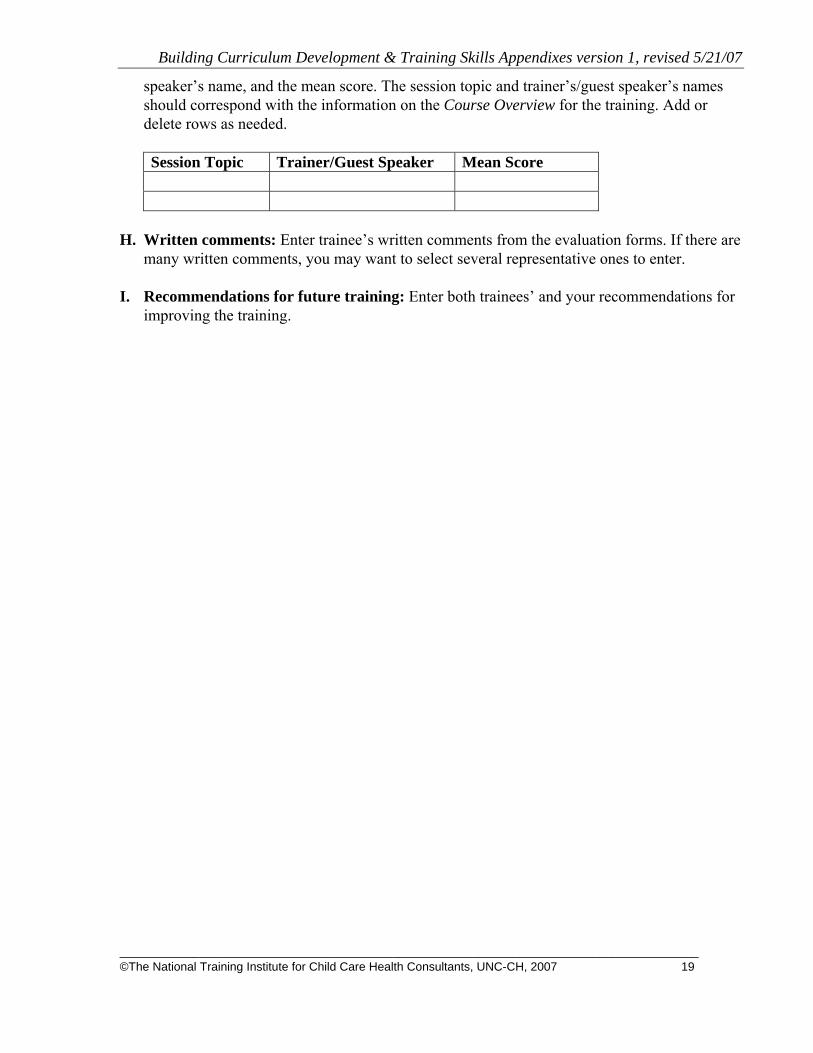
Building Curriculum Development & Training Skills Appendixes version 1, revised 5/21/07
_______________________________________________________________________________________ ©The National Training Institute for Child Care Health Consultants, UNC-CH, 2007 19
speaker’s name, and the mean score. The session topic and trainer’s/guest speaker’s names should correspond with the information on the Course Overview for the training. Add or delete rows as needed.
Session Topic Trainer/Guest Speaker Mean Score
H. Written comments: Enter trainee’s written comments from the evaluation forms. If there are
many written comments, you may want to select several representative ones to enter. I. Recommendations for future training: Enter both trainees’ and your recommendations for
improving the training.
Building Curriculum Development & Training Skills Appendixes version 1, revised 5/21/07
_______________________________________________________________________________________ ©The National Training Institute for Child Care Health Consultants, UNC-CH, 2007 20
EVALUATION SUMMARY Instructions: Use this template to compile and document: 1) evaluation results from any pre-tests/post-tests you used, and 2) responses from the Evaluation of Trainer Form you gave to participants in your training program. Once you have entered the results and responses, take some time to think about what the numbers and written comments actually say about your training and answer the final item about how you might improve your training for future use. NTI Trainer’s Name: ______ Training Session Title: Date of Session: Location of training: Number of trainees in attendance: 1. Pre-test responses (add/delete rows as needed): Question Number
Number of Trainees Who Answered Question
Number of Trainees Who Answered Correctly
Percent of Trainees Who Answered Correctly (# correct divided by # trainees)
Note: If a large number of trainees answered the same question incorrectly, you may want to evaluate whether or not the content on which the question is based was addressed adequately or consider rewriting the question. 2. Total mean pre-test score (sum of percents divided by number of questions): _______%
Building Curriculum Development & Training Skills Appendixes version 1, revised 5/21/07
_______________________________________________________________________________________ ©The National Training Institute for Child Care Health Consultants, UNC-CH, 2007 21
3. Post-test responses (add/delete rows as needed): Question Number
Number of Trainees Who Answered Question
Number of Trainees Who Answered Correctly
Percent of Trainees Who Answered Correctly (# correct divided by # trainees)
Note: If a large number of trainees answered the same question incorrectly, you may want to evaluate whether or not the content on which the question is based was addressed adequately or consider rewriting the question. 4. Total mean post-test score (sum of percents divided by number of questions): _______% 5. Evaluation responses: Use a blank copy of NTI’s “Evaluation of Trainer Form” to record all of the trainees’ evaluation responses. For example, under the first item, “Please rate the Trainer on the quality of the following: Introduction and opening”, record the total number of trainees who marked # 1, 2, 3, 4, 5, or NA. Record only those questions answered using the Likert scale. The trainees’ written comments will be recorded in question #6 below. 6. Written Comments: Enter trainees’ written comments from the evaluation forms. If there are many comments, combine similar ones into one statement and indicate the number of respondents associated with this statement.
Building Curriculum Development & Training Skills Appendixes version 1, revised 5/21/07
_______________________________________________________________________________________ ©The National Training Institute for Child Care Health Consultants, UNC-CH, 2007 22
7. Recommendations for future training: Enter both trainees’ and your recommendations for
improving the training. Please attach the summary of trainees’ responses to NTI’s “Evaluation of Trainer Form” (see #5 above). Thank you.
Building Curriculum Development & Training Skills Appendixes version 1, revised 5/21/07
_______________________________________________________________________________________ ©The National Training Institute for Child Care Health Consultants, UNC-CH, 2007 23
APPENDIX B: TRAINING CHECKLISTS
- Training Implementation and Logistics Checklist - Facility Checklist - Supplies and Equipment Checklist

Building Curriculum Development and Training Skills Appendixes version 1, revised 5/21/07
©The National Training Institute for Child Care Health Consultants, UNC-CH, 2007 24
TRAINING IMPLEMENTATION AND LOGISTICS CHECKLIST Instructions: Use this checklist to begin making arrangements for your training and to guide you through the training process starting at two to six months before training through two weeks after the training. Place a checkmark in the box next to each task after it has been completed. Course Title: Course Date: Time Task Two to Six Months Before Training
� Tour training facility/classroom and rate its suitability using the Facility Checklist.
Two Months Before Training
� Reserve or confirm availability of training facility and/or classroom. � Determine and confirm participation of guest speakers/trainers or other facilitators
(if applicable); review roles and responsibilities and request guests and others provide training materials to you at least two weeks before training date.
� Send marketing materials to potential participants (include information about dates and times, location with directions, tentative agenda, list of topics to be covered, and a short enrollment form to obtain information about participants’ levels of education, experience and current job responsibilities, if not already available).
One Month Before Training
� Make arrangements for refreshments and meals (as necessary). � Supplement Trainer’s Outline, Overview of Training Session, participant’s packet,
and PowerPoint Presentation (as necessary). � Order training materials and reserve supplies and equipment (as necessary). � Develop drafts of any additional audiovisuals and training materials. � Complete Supplies and Equipment Checklist. � Develop and send training materials and audiovisuals to guest speakers or other
trainers (as necessary). Two Weeks Before Training
� Confirm receipt of training materials and audiovisuals from guest speakers or other trainers (as necessary).
� Confirm receipt of training materials, supplies and equipment previously ordered (as necessary).
� Revise and produce any additional training materials. � Review and follow suggested tasks on Preparation Checklist.
One Week Before Training
� Write instructions for training activities on flipchart and/or overhead or slide. � Confirm arrangements for refreshments and meals (as necessary). � Make copies of participant’s packets, including assessments, evaluation forms,
training activities, etc. Be sure to make extra copies. One or Two Days Before Training
� Prepare tent cards (as necessary). � Purchase and pack refreshments (as necessary). � Assemble and pack participant’s packets (including assessments and evaluation
forms) and training materials (e.g., reference materials, training manuals, wall charts, audiovisuals, supplies and equipment according to the Supplies and Equipment Checklist prepared earlier).
Building Curriculum Development and Training Skills Appendixes version 1, revised 5/21/07
©The National Training Institute for Child Care Health Consultants, UNC-CH, 2007 25
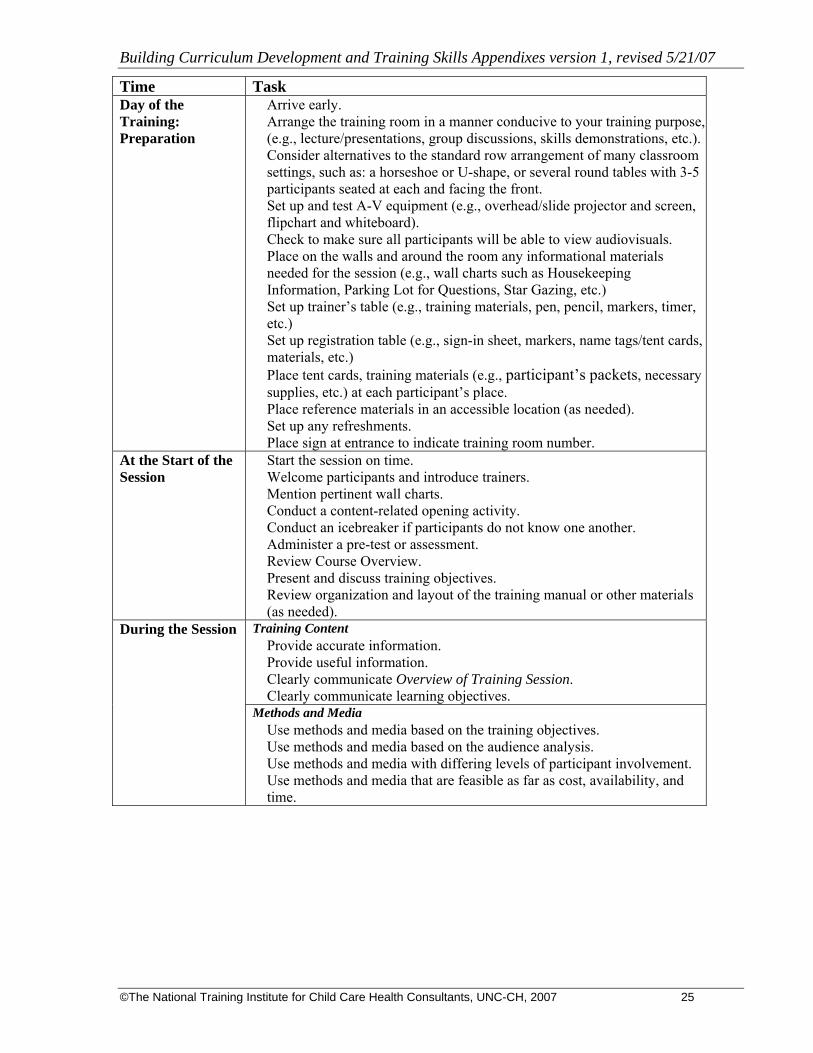
Time Task Day of the Training: Preparation
� Arrive early. � Arrange the training room in a manner conducive to your training purpose,
(e.g., lecture/presentations, group discussions, skills demonstrations, etc.). Consider alternatives to the standard row arrangement of many classroom settings, such as: a horseshoe or U-shape, or several round tables with 3-5 participants seated at each and facing the front.
� Set up and test A-V equipment (e.g., overhead/slide projector and screen, flipchart and whiteboard).
� Check to make sure all participants will be able to view audiovisuals. � Place on the walls and around the room any informational materials
needed for the session (e.g., wall charts such as Housekeeping Information, Parking Lot for Questions, Star Gazing, etc.)
� Set up trainer’s table (e.g., training materials, pen, pencil, markers, timer, etc.)
� Set up registration table (e.g., sign-in sheet, markers, name tags/tent cards, materials, etc.)
� Place tent cards, training materials (e.g., participant’s packets, necessary supplies, etc.) at each participant’s place.
� Place reference materials in an accessible location (as needed). � Set up any refreshments. � Place sign at entrance to indicate training room number.
At the Start of the Session
� Start the session on time. � Welcome participants and introduce trainers. � Mention pertinent wall charts. � Conduct a content-related opening activity. � Conduct an icebreaker if participants do not know one another. � Administer a pre-test or assessment. � Review Course Overview. � Present and discuss training objectives. � Review organization and layout of the training manual or other materials
(as needed). Training Content � Provide accurate information. � Provide useful information. � Clearly communicate Overview of Training Session. � Clearly communicate learning objectives.
During the Session
Methods and Media � Use methods and media based on the training objectives. � Use methods and media based on the audience analysis. � Use methods and media with differing levels of participant involvement. � Use methods and media that are feasible as far as cost, availability, and
time.
Building Curriculum Development & Training Skills Appendixes version 1, revised 5/21/07
_______________________________________________________________________________________ ©The National Training Institute for Child Care Health Consultants, UNC-CH, 2007 26
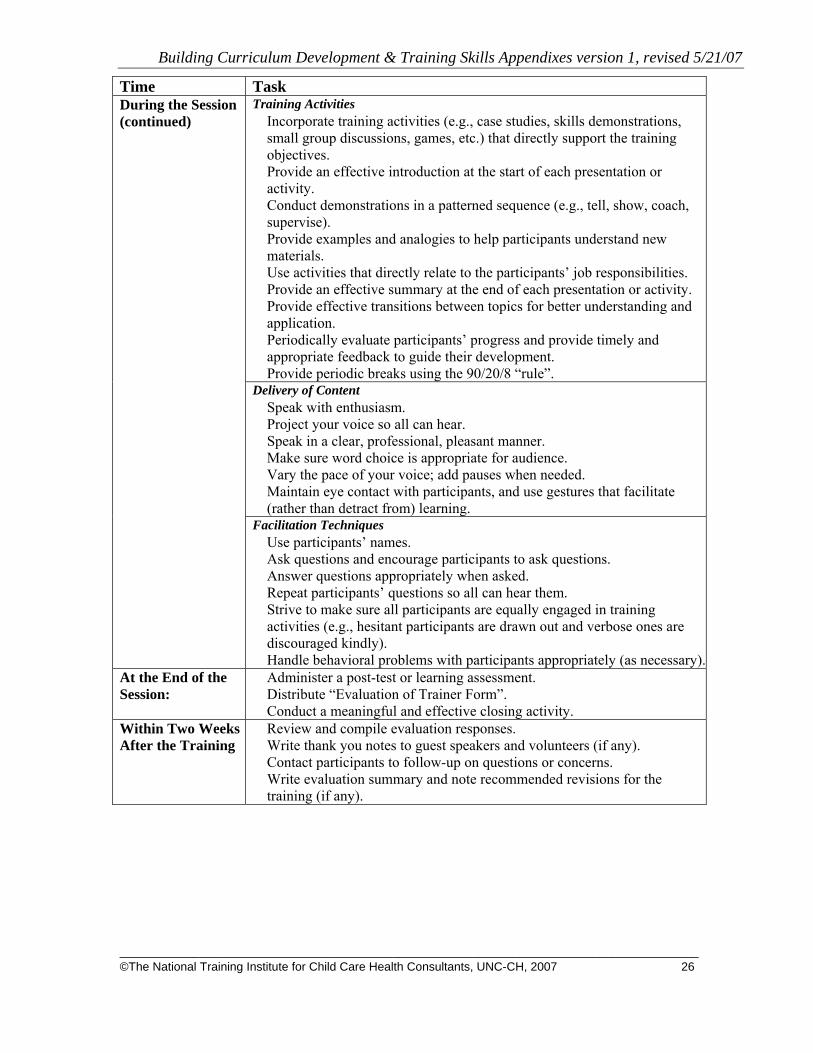
Time Task Training Activities � Incorporate training activities (e.g., case studies, skills demonstrations,
small group discussions, games, etc.) that directly support the training objectives.
� Provide an effective introduction at the start of each presentation or activity.
� Conduct demonstrations in a patterned sequence (e.g., tell, show, coach, supervise).
� Provide examples and analogies to help participants understand new materials.
� Use activities that directly relate to the participants’ job responsibilities. � Provide an effective summary at the end of each presentation or activity. � Provide effective transitions between topics for better understanding and
application. � Periodically evaluate participants’ progress and provide timely and
appropriate feedback to guide their development. � Provide periodic breaks using the 90/20/8 “rule”. Delivery of Content � Speak with enthusiasm. � Project your voice so all can hear. � Speak in a clear, professional, pleasant manner. � Make sure word choice is appropriate for audience. � Vary the pace of your voice; add pauses when needed. � Maintain eye contact with participants, and use gestures that facilitate
(rather than detract from) learning.
During the Session (continued)
Facilitation Techniques � Use participants’ names. � Ask questions and encourage participants to ask questions. � Answer questions appropriately when asked. � Repeat participants’ questions so all can hear them. � Strive to make sure all participants are equally engaged in training
activities (e.g., hesitant participants are drawn out and verbose ones are discouraged kindly).
� Handle behavioral problems with participants appropriately (as necessary).At the End of the Session:
� Administer a post-test or learning assessment. � Distribute “Evaluation of Trainer Form”. � Conduct a meaningful and effective closing activity.
Within Two Weeks After the Training
� Review and compile evaluation responses. � Write thank you notes to guest speakers and volunteers (if any). � Contact participants to follow-up on questions or concerns. � Write evaluation summary and note recommended revisions for the
training (if any).
Building Curriculum Development & Training Skills Appendixes version 1, revised 5/21/07
_______________________________________________________________________________________ ©The National Training Institute for Child Care Health Consultants, UNC-CH, 2007 27
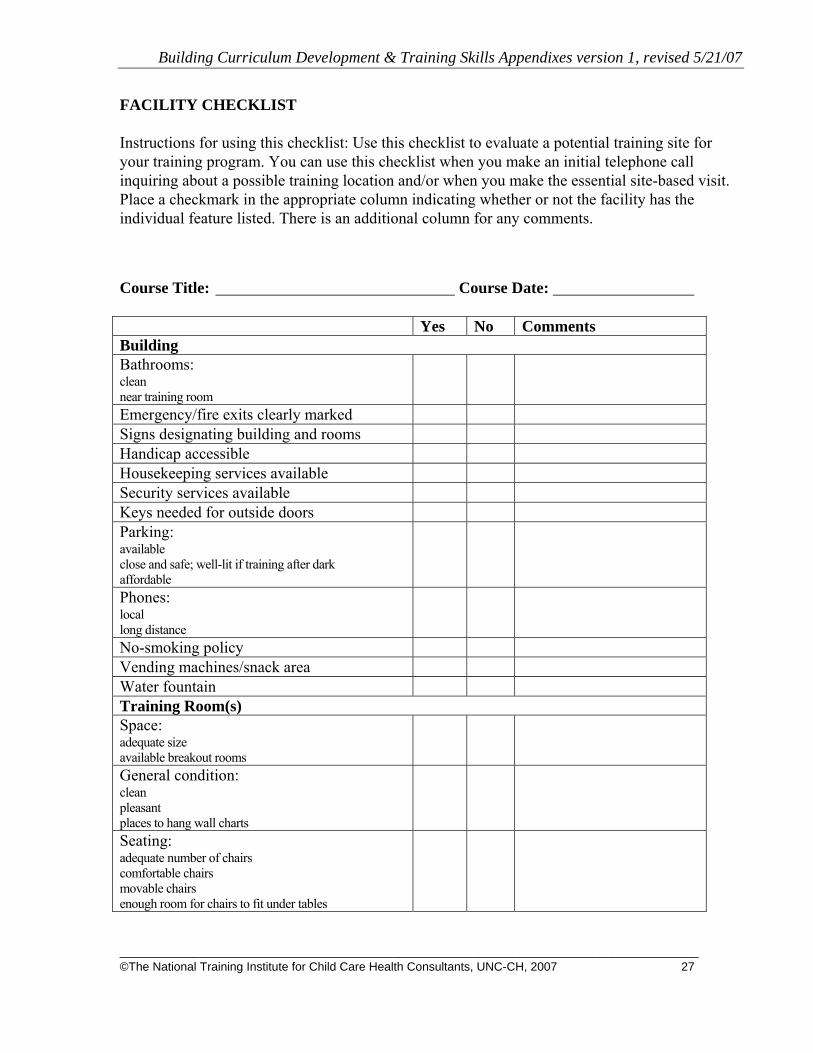
FACILITY CHECKLIST Instructions for using this checklist: Use this checklist to evaluate a potential training site for your training program. You can use this checklist when you make an initial telephone call inquiring about a possible training location and/or when you make the essential site-based visit. Place a checkmark in the appropriate column indicating whether or not the facility has the individual feature listed. There is an additional column for any comments.
Course Title: Course Date: Yes No Comments Building Bathrooms: clean near training room
Emergency/fire exits clearly marked Signs designating building and rooms Handicap accessible Housekeeping services available Security services available Keys needed for outside doors Parking: available close and safe; well-lit if training after dark affordable
Phones: local long distance
No-smoking policy Vending machines/snack area Water fountain Training Room(s) Space: adequate size available breakout rooms
General condition: clean pleasant places to hang wall charts
Seating: adequate number of chairs comfortable chairs movable chairs enough room for chairs to fit under tables
Building Curriculum Development & Training Skills Appendixes version 1, revised 5/21/07
_______________________________________________________________________________________ ©The National Training Institute for Child Care Health Consultants, UNC-CH, 2007 28
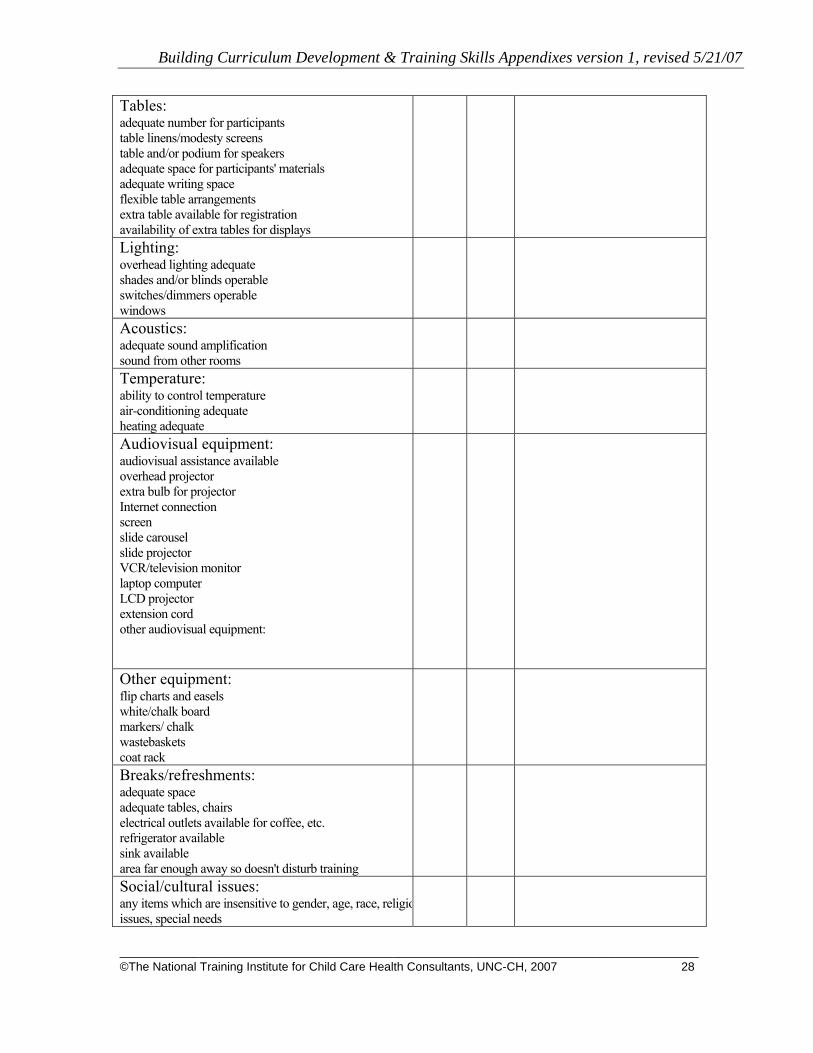
Tables: adequate number for participants table linens/modesty screens table and/or podium for speakers adequate space for participants' materials adequate writing space flexible table arrangements extra table available for registration availability of extra tables for displays
Lighting: overhead lighting adequate shades and/or blinds operable switches/dimmers operable windows
Acoustics: adequate sound amplification sound from other rooms
Temperature: ability to control temperature air-conditioning adequate heating adequate
Audiovisual equipment: audiovisual assistance available overhead projector extra bulb for projector Internet connection screen slide carousel slide projector VCR/television monitor laptop computer LCD projector extension cord other audiovisual equipment:
Other equipment: flip charts and easels white/chalk board markers/ chalk wastebaskets coat rack
Breaks/refreshments: adequate space adequate tables, chairs electrical outlets available for coffee, etc. refrigerator available sink available area far enough away so doesn't disturb training
Social/cultural issues: any items which are insensitive to gender, age, race, religioissues, special needs
Building Curriculum Development & Training Skills Appendixes version 1, revised 5/21/07
_______________________________________________________________________________________ ©The National Training Institute for Child Care Health Consultants, UNC-CH, 2007 29
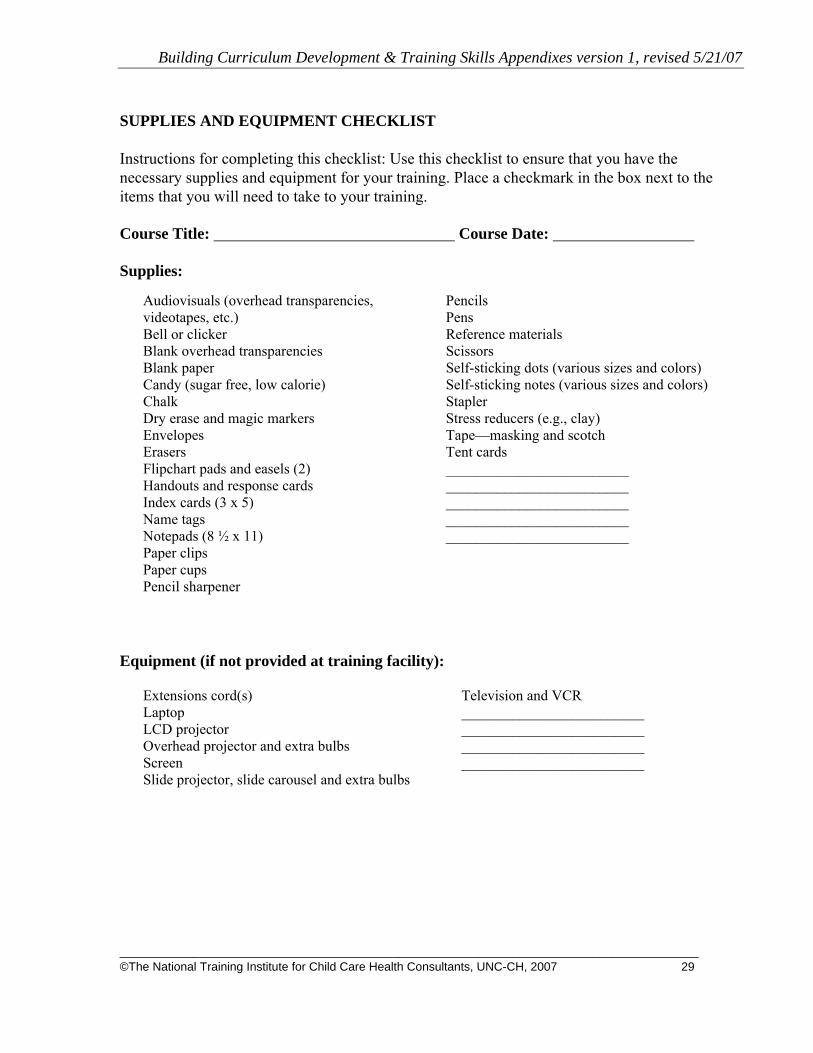
SUPPLIES AND EQUIPMENT CHECKLIST Instructions for completing this checklist: Use this checklist to ensure that you have the necessary supplies and equipment for your training. Place a checkmark in the box next to the items that you will need to take to your training. Course Title: Course Date: Supplies:
Equipment (if not provided at training facility):
� Audiovisuals (overhead transparencies, videotapes, etc.)
� Bell or clicker � Blank overhead transparencies � Blank paper � Candy (sugar free, low calorie) � Chalk � Dry erase and magic markers � Envelopes � Erasers � Flipchart pads and easels (2) � Handouts and response cards � Index cards (3 x 5) � Name tags � Notepads (8 ½ x 11) � Paper clips � Paper cups � Pencil sharpener
� Pencils � Pens � Reference materials � Scissors � Self-sticking dots (various sizes and colors) � Self-sticking notes (various sizes and colors) � Stapler � Stress reducers (e.g., clay) � Tape—masking and scotch � Tent cards � _________________________ � _________________________ � _________________________ � _________________________ � _________________________
� Extensions cord(s) � Laptop � LCD projector � Overhead projector and extra bulbs � Screen � Slide projector, slide carousel and extra bulbs
� Television and VCR � _________________________ � _________________________ � _________________________ � _________________________

Building Curriculum Development & Training Skills Appendixes version 1, revised 5/21/07
_______________________________________________________________________________________ ©The National Training Institute for Child Care Health Consultants, UNC-CH, 2007 30
APPENDIX C: TRAINING TECHNIQUES - METHODS
- Lecture - Skills Demonstration - Discussion - Case Scenario
Building Curriculum Development & Training Skills Appendixes version 1, revised 5/21/07
_______________________________________________________________________________________ ©The National Training Institute for Child Care Health Consultants, UNC-CH, 2007 31
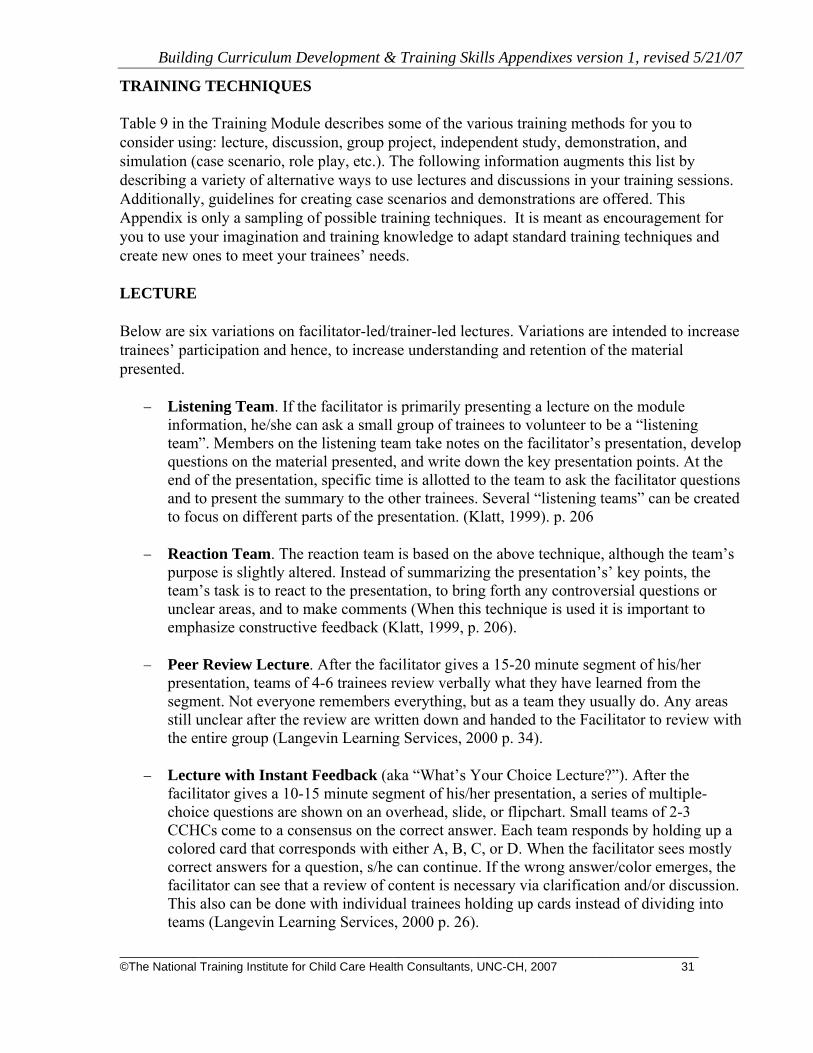
TRAINING TECHNIQUES Table 9 in the Training Module describes some of the various training methods for you to consider using: lecture, discussion, group project, independent study, demonstration, and simulation (case scenario, role play, etc.). The following information augments this list by describing a variety of alternative ways to use lectures and discussions in your training sessions. Additionally, guidelines for creating case scenarios and demonstrations are offered. This Appendix is only a sampling of possible training techniques. It is meant as encouragement for you to use your imagination and training knowledge to adapt standard training techniques and create new ones to meet your trainees’ needs. LECTURE Below are six variations on facilitator-led/trainer-led lectures. Variations are intended to increase trainees’ participation and hence, to increase understanding and retention of the material presented.
− Listening Team. If the facilitator is primarily presenting a lecture on the module information, he/she can ask a small group of trainees to volunteer to be a “listening team”. Members on the listening team take notes on the facilitator’s presentation, develop questions on the material presented, and write down the key presentation points. At the end of the presentation, specific time is allotted to the team to ask the facilitator questions and to present the summary to the other trainees. Several “listening teams” can be created to focus on different parts of the presentation. (Klatt, 1999). p. 206
− Reaction Team. The reaction team is based on the above technique, although the team’s
purpose is slightly altered. Instead of summarizing the presentation’s’ key points, the team’s task is to react to the presentation, to bring forth any controversial questions or unclear areas, and to make comments (When this technique is used it is important to emphasize constructive feedback (Klatt, 1999, p. 206).
− Peer Review Lecture. After the facilitator gives a 15-20 minute segment of his/her
presentation, teams of 4-6 trainees review verbally what they have learned from the segment. Not everyone remembers everything, but as a team they usually do. Any areas still unclear after the review are written down and handed to the Facilitator to review with the entire group (Langevin Learning Services, 2000 p. 34).
− Lecture with Instant Feedback (aka “What’s Your Choice Lecture?”). After the
facilitator gives a 10-15 minute segment of his/her presentation, a series of multiple-choice questions are shown on an overhead, slide, or flipchart. Small teams of 2-3 CCHCs come to a consensus on the correct answer. Each team responds by holding up a colored card that corresponds with either A, B, C, or D. When the facilitator sees mostly correct answers for a question, s/he can continue. If the wrong answer/color emerges, the facilitator can see that a review of content is necessary via clarification and/or discussion. This also can be done with individual trainees holding up cards instead of dividing into teams (Langevin Learning Services, 2000 p. 26).
Building Curriculum Development & Training Skills Appendixes version 1, revised 5/21/07
_______________________________________________________________________________________ ©The National Training Institute for Child Care Health Consultants, UNC-CH, 2007 32
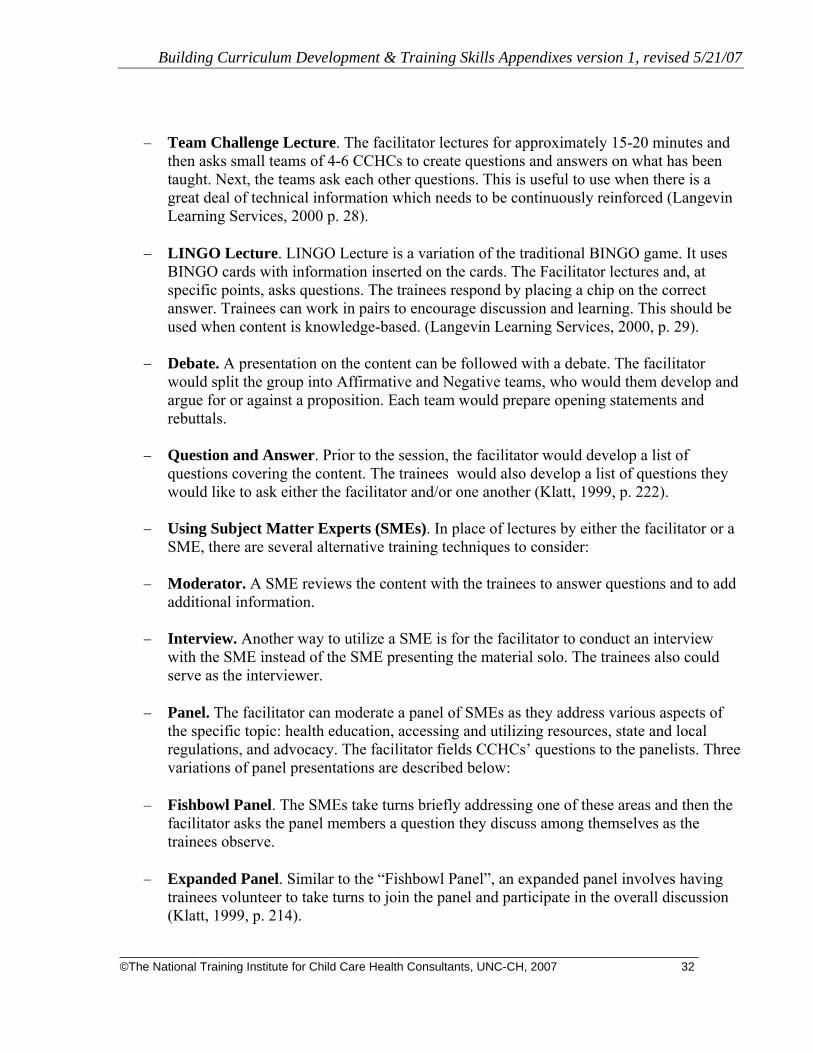
− Team Challenge Lecture. The facilitator lectures for approximately 15-20 minutes and then asks small teams of 4-6 CCHCs to create questions and answers on what has been taught. Next, the teams ask each other questions. This is useful to use when there is a great deal of technical information which needs to be continuously reinforced (Langevin Learning Services, 2000 p. 28).
− LINGO Lecture. LINGO Lecture is a variation of the traditional BINGO game. It uses
BINGO cards with information inserted on the cards. The Facilitator lectures and, at specific points, asks questions. The trainees respond by placing a chip on the correct answer. Trainees can work in pairs to encourage discussion and learning. This should be used when content is knowledge-based. (Langevin Learning Services, 2000, p. 29).
− Debate. A presentation on the content can be followed with a debate. The facilitator
would split the group into Affirmative and Negative teams, who would them develop and argue for or against a proposition. Each team would prepare opening statements and rebuttals.
− Question and Answer. Prior to the session, the facilitator would develop a list of
questions covering the content. The trainees would also develop a list of questions they would like to ask either the facilitator and/or one another (Klatt, 1999, p. 222).
− Using Subject Matter Experts (SMEs). In place of lectures by either the facilitator or a
SME, there are several alternative training techniques to consider:
− Moderator. A SME reviews the content with the trainees to answer questions and to add additional information.
− Interview. Another way to utilize a SME is for the facilitator to conduct an interview
with the SME instead of the SME presenting the material solo. The trainees also could serve as the interviewer.
− Panel. The facilitator can moderate a panel of SMEs as they address various aspects of
the specific topic: health education, accessing and utilizing resources, state and local regulations, and advocacy. The facilitator fields CCHCs’ questions to the panelists. Three variations of panel presentations are described below:
− Fishbowl Panel. The SMEs take turns briefly addressing one of these areas and then the
facilitator asks the panel members a question they discuss among themselves as the trainees observe.
− Expanded Panel. Similar to the “Fishbowl Panel”, an expanded panel involves having
trainees volunteer to take turns to join the panel and participate in the overall discussion (Klatt, 1999, p. 214).

Building Curriculum Development & Training Skills Appendixes version 1, revised 5/21/07
_______________________________________________________________________________________ ©The National Training Institute for Child Care Health Consultants, UNC-CH, 2007 33
− Colloquy. The colloquy is a panel composed of half SMEs and half trainees. The trainees ask questions/concerns of the SMEs. These questions can be from individual trainees on the panel or can be developed by the whole group ahead of time (Klatt, 1999, p. 214).
Building Curriculum Development and Training Skills Appendixes version 1, revised 5/21/07
_______________________________________________________________________________________ ©The National Training Institute for Child Care Health Consultants, UNC-CH, 2007 34
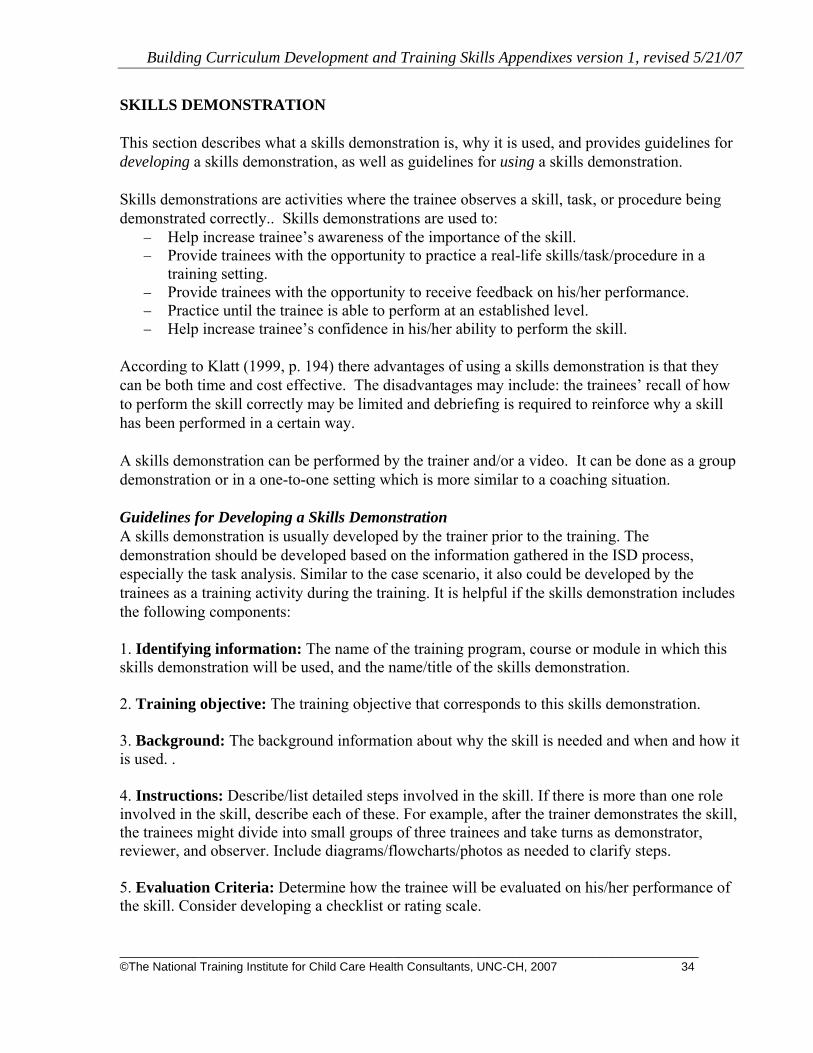
SKILLS DEMONSTRATION This section describes what a skills demonstration is, why it is used, and provides guidelines for developing a skills demonstration, as well as guidelines for using a skills demonstration. Skills demonstrations are activities where the trainee observes a skill, task, or procedure being demonstrated correctly.. Skills demonstrations are used to:
− Help increase trainee’s awareness of the importance of the skill. − Provide trainees with the opportunity to practice a real-life skills/task/procedure in a
training setting. − Provide trainees with the opportunity to receive feedback on his/her performance. − Practice until the trainee is able to perform at an established level. − Help increase trainee’s confidence in his/her ability to perform the skill.
According to Klatt (1999, p. 194) there advantages of using a skills demonstration is that they can be both time and cost effective. The disadvantages may include: the trainees’ recall of how to perform the skill correctly may be limited and debriefing is required to reinforce why a skill has been performed in a certain way. A skills demonstration can be performed by the trainer and/or a video. It can be done as a group demonstration or in a one-to-one setting which is more similar to a coaching situation. Guidelines for Developing a Skills Demonstration A skills demonstration is usually developed by the trainer prior to the training. The demonstration should be developed based on the information gathered in the ISD process, especially the task analysis. Similar to the case scenario, it also could be developed by the trainees as a training activity during the training. It is helpful if the skills demonstration includes the following components: 1. Identifying information: The name of the training program, course or module in which this skills demonstration will be used, and the name/title of the skills demonstration. 2. Training objective: The training objective that corresponds to this skills demonstration. 3. Background: The background information about why the skill is needed and when and how it is used. . 4. Instructions: Describe/list detailed steps involved in the skill. If there is more than one role involved in the skill, describe each of these. For example, after the trainer demonstrates the skill, the trainees might divide into small groups of three trainees and take turns as demonstrator, reviewer, and observer. Include diagrams/flowcharts/photos as needed to clarify steps. 5. Evaluation Criteria: Determine how the trainee will be evaluated on his/her performance of the skill. Consider developing a checklist or rating scale.
Building Curriculum Development and Training Skills Appendixes version 1, revised 5/21/07
_______________________________________________________________________________________ ©The National Training Institute for Child Care Health Consultants, UNC-CH, 2007 35
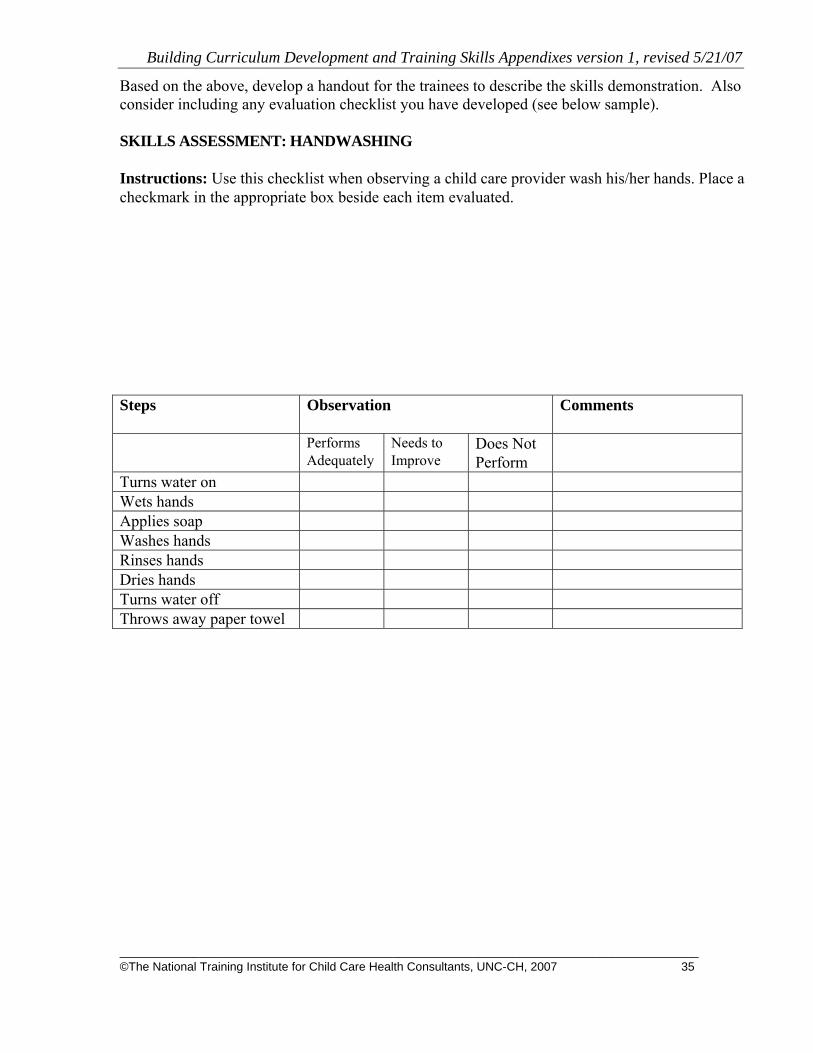
Based on the above, develop a handout for the trainees to describe the skills demonstration. Also consider including any evaluation checklist you have developed (see below sample). SKILLS ASSESSMENT: HANDWASHING Instructions: Use this checklist when observing a child care provider wash his/her hands. Place a checkmark in the appropriate box beside each item evaluated. Steps
Observation Comments
Performs Adequately
Needs to Improve
Does Not Perform
Turns water on Wets hands Applies soap Washes hands Rinses hands Dries hands Turns water off Throws away paper towel
Building Curriculum Development and Training Skills Appendixes version 1, revised 5/21/07
_______________________________________________________________________________________ ©The National Training Institute for Child Care Health Consultants, UNC-CH, 2007 36
Guidelines for Using a Skills Demonstration
1. Especially with a skill demonstration, it is important to create a safe training environment where trainees will feel comfortable practicing or relearning a skill.
2. It is important for the trainer to think through carefully his/her approach to how feedback will be given. If a checklist is used, it is critical to provide specific ways for the trainee to approve.
3. As with other aspects of training, use training techniques which are appropriate to the content being taught and techniques which address the trainees’ learning preferences. A combination of techniques usually works best. For example, the trainer could demonstrate the skill, it could also be reinforced through a video and print materials. Trainees can practice the skill in small groups and finally give a return demonstration for the trainer. Case scenarios also work well in combination with skills demonstration so the skill can be performed in the context of situations very similar to real life.
4. Much of the skills practice can be done in small groups with the trainer circulating among the groups. If there are a large number of trainees, additional trainers may need to assist the smaller groups.
Building Curriculum Development and Training Skills Appendixes version 1, revised 5/21/07
_______________________________________________________________________________________ ©The National Training Institute for Child Care Health Consultants, UNC-CH, 2007 37
DISCUSSION The following techniques for facilitating a group discussion are from “Ten Techniques for Energizing Your Discussions,” written by the Center for Teaching and Learning at Grand Rapids Community College. This resource is available online at: http://web.grcc.edu/CTL/faculty%20resources/ten_techniques_for_energizing.htm Technique #1: Turn to Your Neighbor. This is the easiest structure to implement. A problem or question is posed; students turn to a classmate sitting next to them to discuss their answer. Give your students a specified amount of time to discuss (30 seconds). This method gives students only a brief amount of time to discuss a particular answer or idea. Use this when a problem or question has a simple answer and you want your students to provide a quick response. The purpose is to give every student a chance to respond and to become used to responding to questions or problems. In a pair, one student may dominate the discussion. You may have to prompt students to allow both to have time to discuss. You may feel that allowing students to discuss in pairs may seem to disrupt the flow of the lesson. However, the more you do it the less distracting it will become. Technique # 2: Think-Pair-Share. This technique is similar to “Turn To Your Neighbor”. After the teacher poses a problem or question, students think alone about the question for a specified amount of time (30 seconds). Students then form pairs to discuss the problem or question. The time can vary depending on the question and how the discussion is going within the pairs. In a final step, individuals share their thoughts with the entire class. At the beginning of a semester you may not want to call on students to respond, only those willing to share. The intention of this technique is to foster short class discussion. Pairs share what they have discussed with the entire class. Other students can then respond to what is said or they can share what they discussed with their own partners. Initially, students may be reluctant to share their answers with the whole class. It may be necessary to use this technique several times before they are comfortable with it. You can foster more participation by letting students know that they can share what they said or what their partner said. Technique #3: Think-Pair-Square Shared. This technique is similar to Think-Pair-Share. A step is added before students share with the class. Have student pairs turn to another pair and discuss what they have shared within their first pairs. Then have the pairs share with the class. This technique fosters short discussions. The discussion will lead into a discussion with the entire class as pairs volunteer to share or are randomly called upon to share. It is important for the teacher to make sure that pairs are matched up with other pairs, and that pairs have equal participation and that constructive sharing takes place. If you are concerned about a pair dominating the conversation, give each pair a specified amount of time to share their answer. Remind the pairs that they do not have to accept the other pair’s response, but they do have to show respect for the pair.
Building Curriculum Development and Training Skills Appendixes version 1, revised 5/21/07
_______________________________________________________________________________________ ©The National Training Institute for Child Care Health Consultants, UNC-CH, 2007 38
Technique #4: Round Robin. This technique works best if students are in groups (3-5 students). Pose a problem or question and have the students go around the circle quickly sharing their ideas or answers. This technique is a good one to use to elicit quick responses from students. Allow the students to offer answers until you tell them to stop. Give the students one opportunity to pass on answering. At the end have the group share their answers and ideas with the class. You can randomly call on individuals to share and allow the others in the group to clarify what was said. This technique is great for brain-storming discussions. The purpose is for students to generate as many answers or ideas as possible in a given amount of time. After asking a question or posing a problem, the teacher monitors the students to determine if equal participation is taking place. The teacher also monitors to see that students do not criticize answers or ideas that are given. Critique of answers or ideas could follow if the teacher wanted to extend the technique. The greatest challenge is making sure that every student is involved in the sharing and that answers and ideas are not criticized while the technique is in process. Getting students into groups also can be a slight challenge. If you first have students work in pairs using the other techniques, then they will be better prepared for this technique. Technique #5: Line-Ups. This technique requires more time than Turn-to-Your-Neighbor, Think-Pair-Share, Think-Pair-Share-Square. Participants line up to some criterion, such as height, birthdays or alphabetical order. The teacher poses a question or problem. At this point have the line "fold"—that is, the ends move together to form two lines facing each other (if you have an uneven number of students then three students can discuss together). If you had your students lining up by height the tallest person would be talking to the shortest person. Students then discuss with the person in front of them. The discussion can go on as long as you feel it is productive. You can then have volunteers share with the entire class or you can randomly call on students. This technique can foster great discussions. It allows students to move out of their seats and forces them to talk with a variety of students. You will need to make sure you have enough room to have your students form a line and then fold the line. Monitoring for equal participation is important as well. The first time you use this technique allow your students enough time to form a line and then fold the line. As with the other techniques, it can also be a challenge getting equal participation. Technique #6: Value Lines. This technique takes the longest to conduct. It is used when you want students to take a stance on an issue. The instructor reads a statement and then each student stands on one side or the other of an imaginary line. One side of the line is for those agreeing with the statement and the other side is for those disagreeing with it. Then have the students Turn-to Their-Neighbor (on their side of the line) to discuss why they agreed or disagreed with the statement. Then each pair turns to another pair across the line and discusses why they believe the way they do. You can randomly call on an individual to share with the class. Students can also share what they heard from individuals with different opinions from theirs. This technique can lead to lengthy, involved, and often hotly debated discussions. Students have the opportunity to move out of their seats and are exposed to a variety of different opinions. It is important to make sure that you have room for the imaginary line. You may also need to facilitate the discussion when pairs with opposing opinions face off. The greatest challenge is monitoring how students interact with other students having the opposite opinion. Students need to discuss rather than argue. Another challenge is finding interesting topics that will bring about opposing opinions.
Building Curriculum Development and Training Skills Appendixes version 1, revised 5/21/07
_______________________________________________________________________________________ ©The National Training Institute for Child Care Health Consultants, UNC-CH, 2007 39
Technique #7: Jigsaw. Refers to dividing up the work or materials so that each group member does a part. No one has everything that is needed to complete the task. Each student has a portion of some set of needed information. In research students could be assigned a part of a famous person’s life, an aspect of war, or the events leading to a discovery. Jigsawing can also be used to divide an assignment so that each group member does a part. The group can then split and find other class members who are going to research the same topic. After they have acquired information, they go back to their "home" group, and provide them with the details that have learned. No one has the complete piece of information, so this strategy builds interdependency. Group members need each other to obtain the full experience. Technique #8: Sharing Limited Resources. Sharing limited resources is another way to create positive interdependence. Giving one paper/book/quiz/poster/markers/assignment/ to a group helps draw group members together to complete an assignment. Limiting resources is important not only in light of budget constraints but is also the best way to increase the chances that cooperation will occur within the group. Technique #9: Question and Answer Pairs. Question and answer pairs alternate asking and answering questions on assigned reading or as a great review activity before a test. Students are seated in a large circle. They number off 1 – 2 – 1- 2 etc… The "1’s" are told that they will not be moving. The "2’s" are told that they will be moving throughout the activity. The questions that can be asked may be the end of chapter review questions, or something more developed like a fun worksheet that asks a series of questions pertinent to your curriculum. A 1 & 2 person pair up, and try to decide what the best answer for the question is. Instructors need to gauge the amount of time before the "2’s" are told to move to their left, and meet the next 1. They then answer the next question on the review sheet. This continues as the 2’s circle around the room until they are back at their own original seat. Students should be encouraged to place a check/asterisk by any questions that they are sure of. Those that they do not feel confident on, they can revisit on their own studies. The students receive the benefit of being able to talk to each other one on one, but also to meet half of the class this way. It works! Technique #10: Advanced Preparation Pairs. Students are to write a short analysis paper summarizing the vents/relevancy/opinion of an assigned reading for class. Students bring copies of the paper to the class. The members of their base group or discussion pair will listen to the team member read the paper, then edit, and evaluate the paper. Criteria for review can be predetermined by instructor, class, or peer group. Each group can select the "outstanding" paper as they deem it, then in large group it can be discussed as to why it stood out from the others.
Source: “Ten Techniques for Energizing Your Classroom Discussions,” 2004. Available at: http://web.grcc.edu/CTL/faculty%20resources/ten_techniques_for_energizing.htm
Building Curriculum Development and Training Skills Appendixes version 1, revised 5/21/07
_______________________________________________________________________________________ ©The National Training Institute for Child Care Health Consultants, UNC-CH, 2007 40
CASE SCENARIO This section describes what a case scenario is, why it is used, and provides guidelines for developing a case scenario, as well as guidelines for using a case scenario. A case scenario is a training technique that uses realistic scenarios and focuses on a specific issue, topic or problem. Trainees typically read, study and react to a case scenario either individually in writing, or verbally through a small group discussion. Case studies are used because they:
− Actively involve trainees and encourage them to interact with each other. − Provide trainees with the opportunity to react to realistic and relevant situations related to
their work environment. − Provide trainees with the opportunity to view a situation from a variety of perspectives
and consider different solutions to problems − Help trainees to develop problem solving skills.
Guidelines for Developing a Case Scenario A case scenario can be developed by the trainer prior to the training or by the trainees as a training activity during the training. It is helpful if the case scenario includes the following components: 1. Training Objective: Decide what you want trainees to learn and define the issues to be
addressed or the problems to be solved in the case scenario. Draw upon skills and knowledge from as many areas of the training content as are possible and realistic.
2. Background: Describe the background information for the case scenario. A common method
is to tell a story in chronological order. Who does what? When? Where? Under what circumstances? Why is this a problem? What is the desired goal or end state? The case must be closely related to the trainees’ experience. The best cases are drawn from real life and altered slightly to incorporate the specific learning needed. Situations for case studies can be found in one or more of the following sources:
▪ Client records or medical histories/records ▪ Reference manuals ▪ Journals, magazines or newspaper articles, etc. ▪ Experiences from staff, trainees or clients
3. Questions: Determine the questions that you will ask. Types of questions include:
▪ Analysis of the problem: Trainees are asked to analyze the situation presented in the case scenario and determine the source of the problem. Example: What do you think the key issues are?
Building Curriculum Development and Training Skills Appendixes version 1, revised 5/21/07
_______________________________________________________________________________________ ©The National Training Institute for Child Care Health Consultants, UNC-CH, 2007 41
▪ Solution(s) to the problem: Trainees are asked to recommend solutions or offer suggestions regarding the situation and problem presented in the case scenario. Example: How could this problem have been avoided?
▪ Specific: Trainees are asked to respond to a specific set of questions concerning the case scenario. Example: What are two observations suggesting that the parent/guardian was not counseled properly? Example: What are some of the consequences of failing to counsel a parent/guardian properly about recommended child care procedures? ▪
4. Instructions: Determine the instructions that trainees will need to complete the case scenario. How much time will trainees need to read and discuss the case? Will they respond to the case scenario individually or divide up into small groups and if so, how and what size? What will happen after groups have reviewed and discussed the case scenario? Will they be asked to report back to the class? Should the group select a person as recorder and one as reporter? Will they be required to complete and submit their responses to the trainer?
After completing steps 1-4, prepare a case scenario handout for your training program using the above headings in the following order: Instructions; Training Objective: Background and Questions. Guidelines for Using a Case Scenario 1. Provide trainees with handouts about the case scenario. 2. Explain the purpose of the case scenario and how it relates to the training objective. Stress
that there is rarely one right solution to a case scenario. As in real life, sometimes the solution chosen is the best possible under the circumstances. Make sure trainees understand that this is not about finding the right answer, but rather in thinking about the options, weighing the costs and benefits, and making the best possible choice given all the variables impacting the case.
3. Provide instructions for completing the case scenario (instructions should also be provided on the handout). Inform trainees of the amount of time they have to read and discuss the case and provide them with guidelines for managing their time. For example, if they have 20 minutes to discuss two questions, you might suggest that they move on to the second question after 10 minutes, even if they feel unready to do so. If the case scenario is to be completed as a small group activity, assign trainees to groups.
4. Establish ground rules for discussion to ensure that all trainees have an opportunity to be heard and that disagreements are handled courteously.
5. After trainees have read the case scenario and either written individual responses to the questions or discussed them in their small groups, provide them with the opportunity to share their reactions. This sharing can be accomplished through one or more of the following:
▪ Reports on possible solutions and recommendations from individuals or small groups. ▪ Skills demonstrations or role plays presented by individuals or small groups. ▪ Summarize the case scenario activity prior to moving on to the next topic in the training session by asking trainees to respond to questions such as: What do you think about the possible solutions? Is there anything missing? How is the case relevant to your own situation/environment?

Building Curriculum Development and Training Skills Appendixes version 1, revised 5/21/07
_______________________________________________________________________________________ ©The National Training Institute for Child Care Health Consultants, UNC-CH, 2007 42
What have you learned from the case scenario? How will you use what you have learned back on the job?
(Adapted from Sullivan, 1995)
Building Curriculum Development and Training Skills Appendixes version 1, revised 5/21/07
_______________________________________________________________________________________ ©The National Training Institute for Child Care Health Consultants, UNC-CH, 2007 43
APPENDIX D: TRAINING TECHNIQUES - MEDIA AND MATERIALS
Media: - Flipcharts - Overhead Transparencies - PowerPoint Slides - Slides
Materials: - Video - Print
Building Curriculum Development and Training Skills Appendixes version 1, revised 5/21/07
_______________________________________________________________________________________ ©The National Training Institute for Child Care Health Consultants, UNC-CH, 2007 44
FLIPCHARTS: TIPS FOR PREPARING AND USING
− Only use flipcharts in front of a room with groups of fewer than 20 people.
− Similar to transparencies, some flipcharts can be prepared ahead of time while others are best left for development during the session.
− Leave a blank sheet between charts so images will not show through.
− Use flipcharts with lines or grids. Use the lines as guides for writing.
− You can lightly pencil in notes on the flipcharts. You can see them, but participants will
not.
− Use colors. Although markers in the red family are sometimes difficult for some people to read, consider using them among a wide variety of colors.
− Use only key words or concepts.
− Similar to transparencies, remember to leave the lower third of the flipchart blank.
− Consider using two flipcharts.
− Try to write on the flipchart yourself as little as possible. Instead, involve others by asking
them to record responses during large group discussions and/or activities. Two participants can be doing this and this helps to keep the conversation and recording moving at an interesting pace.
− Letters should be at least 1 ½” high. Leave 2” between lines.
− Make flipcharts visually interesting by adding borders, underlining, or adding boxes around
key words.
− Consider looking into computer generated flipcharts, although flipcharts written spontaneously during a session can still be quite effective.
− Put flipcharts in strategic places where they can be viewed before, during, and after the
sessions. − Post flipcharts around the room to reinforce key points made during the presentation.
(Adapted from Minnesota Western, 1999; Pike RW, 1992; Pike RW 1994) Note: Please also refer to “Tips for Preparing and Using Overhead Transparencies” and “Tips for Preparing and Using PowerPoint Slides.”
Building Curriculum Development and Training Skills Appendixes version 1, revised 5/21/07
_______________________________________________________________________________________ ©The National Training Institute for Child Care Health Consultants, UNC-CH, 2007 45
OVERHEAD TRANSPARENCIES: TIPS FOR PREPARING AND USING
− Follow the 6 x 6 rule: Use a maximum of six lines per transparency and a maximum of 6 words on a line. This includes any titles or sub titles.
o Set margins at ½” or more on all edges so text will not be cut off when shown.
− Have letters at least ½” high on transparencies and ¼” high on slides. This will avoid your
having to say, “You probably cannot read this overhead, but…”
− If possible, consider: • 72 points for titles • 48 points for subtitles • 36 points for text
− Each transparency should have no more than two types of fonts. Use the same one or two
fonts throughout the presentation.
− Try to use short phrases, not long sentences.
− Use bullets to make it easier for the viewer to follow.
− Color can enhance transparencies, but use no more than 2-3 colors for text.
− Use light colored text and graphics on a dark background if the room will be totally darkened. Use dark colored text and graphics on a light background if the room will be partial lighted.
− Use solid colors to fill an object, not patterned fills, cross hatching, lines, dots, etc.
− Consider marking on overheads with colored pen(s) as information is presented. A clear
background is needed for this.
− Use only horizontal lettering.
− Use upper case and lower case. ALL UPPER CASE IS MORE DIFFICULT TO READ. Shadowed letters also be difficult. Using all caps and shadows can make letters look as if they are running together.
− Use graphics to illustrate the point—graphs, maps, illustrations, scanned images.
− Real objects can be placed on the projector to display their silhouettes. Smaller, flatter
objects work best.
Building Curriculum Development and Training Skills Appendixes version 1, revised 5/21/07
_______________________________________________________________________________________ ©The National Training Institute for Child Care Health Consultants, UNC-CH, 2007 46
− Put the transparency as high up on the overhead glass as possible so participants in the back can see.
− After you put the transparency on the projector, look at the wall/screen briefly to make sure
the image is straight. The rest of the time, look at the audience. If you need to refer to the text, look at the transparency on the projector, not the projected image.
− If you need to point to the transparency, do so on the transparency itself not the screen. If
you use an object to point with, consider placing it on the overhead. Any shaking of your hand can become magnified to the audience. A flat object is best so it does not roll.
− If the overhead projector needs to be moved, mark its floor position with masking tape so
you will know where to reposition it.
− Opaque or translucent material may be placed over the transparency. With opaque materials, the object will appear as a black silhouette on the screen. Construction paper can be used as opaque material. Translucent materials (projectable colored films) work even better.
− When the overhead is not being used, turn it off to eliminate glare. You may want to turn
off the overhead when a point on the transparency is being discussed or someone has asked a question. Turning the overhead back on serves as a signal to return to the next point.
− Use felt tip pen or grease pencil to write on transparencies. Not all pencils work, so try
them out prior to the session.
− Consider numbering your transparencies or keeping them in a 3 ring binder.
− Turn the projector off before removing the last overhead. This way participants will not have a blank glaring screen as their last visual image.
− Always know where a spare bulb for the overhead is and how to change it.
− Don’t put words too close to the bottom. It is difficult for those in the back to see. − Use the same or similar design theme throughout the presentation.
− Number each transparency in case they get out of order or you lose your place.
− Monitor the lighting in the room. Turn on lights after using overheads or slides.
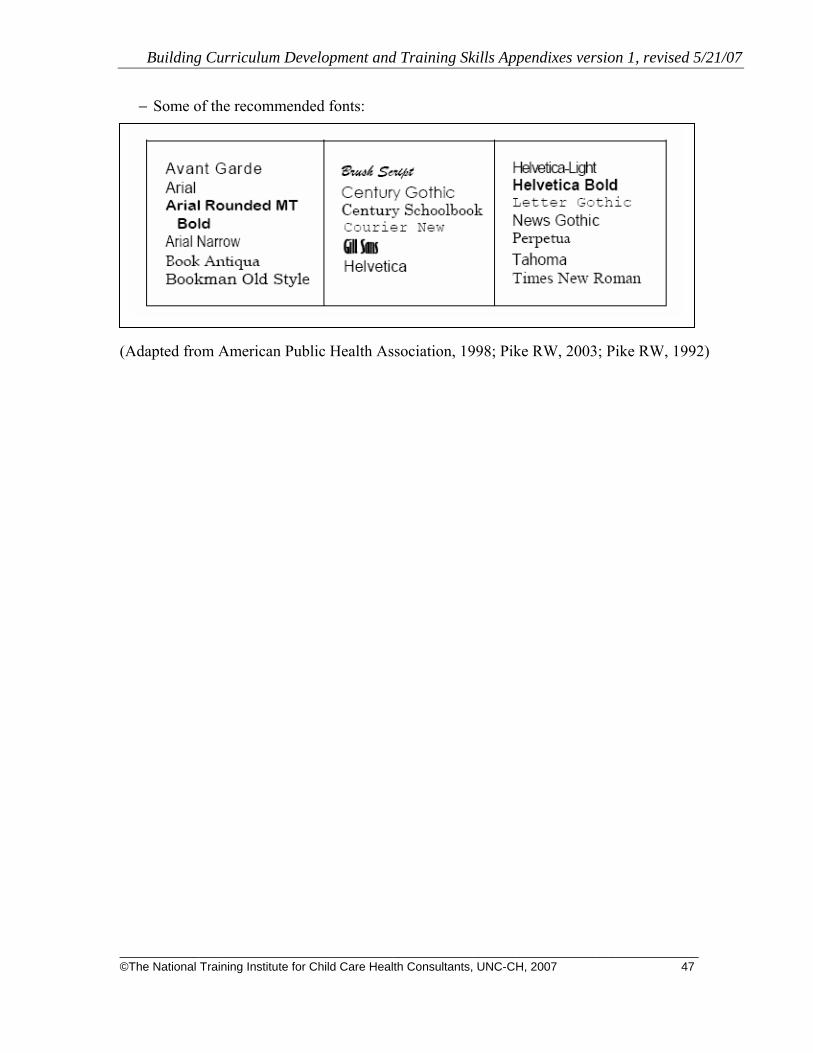
Building Curriculum Development and Training Skills Appendixes version 1, revised 5/21/07
_______________________________________________________________________________________ ©The National Training Institute for Child Care Health Consultants, UNC-CH, 2007 47
− Some of the recommended fonts:
(Adapted from American Public Health Association, 1998; Pike RW, 2003; Pike RW, 1992)
Building Curriculum Development and Training Skills Appendixes version 1, revised 5/21/07
_______________________________________________________________________________________ ©The National Training Institute for Child Care Health Consultants, UNC-CH, 2007 48
POWERPOINT SLIDES: TIPS FOR PREPARING AND USING
− Even if you do not plan to use the PowerPoint slides with a computer, you can use PowerPoint to create overhead transparencies.
− Have back-up of your slides on a flash drive or a CD-ROM in case there are problems with
the projection system. Also consider having overhead transparencies to use in place of slides or have hard copies of slides to use as handouts.
− Use the slide sorter to view the entire presentation. Check all of the slides for consistency,
flow, and clarity.
− Before presenting, save the presentation to the computer’s hard drive instead of using a floppy disk. Using the hard drive will be more reliable and will increase speed.
− Increase the amount of time before the screen saver appears so it does not interrupt the
presentation.
− Include a “cover page” as the first slide and show this while your audience is getting seated or have a blank solid colored slide at the beginning and end.
− Have ample margins on all of the slides’ sides. This allows for differences in projection
systems and software and helps ensure that portions of the slides will not be cut off from view.
− Limit the number of special effects used in each presentation, otherwise they can distract
from the presentation’s content. Also, use only one or two different types of transitions between slides.
− Be consistent in the type of graphics used in the presentation. For example, do not use stick
figures in one slide and a color photo in another.
− Make sure graphics are sensitive to issues such as race, culture, gender, and disability.
− Incorporate breaks if the presentation is lengthy. Intersperse participatory activities into the PowerPoint presentation so the session is not completely passive.
− Remember that PowerPoint includes an organizational chart maker. Once created, the
charts can be pasted into a word processing program. Look under “Insert” “Picture” “Organizational Chart”
Note: The technical aspects of PowerPoint are included in software manuals. These tips focus on facilitation/training techniques. Please also refer to “Tips for Preparing and Using Overhead Transparencies”.
Building Curriculum Development and Training Skills Appendixes version 1, revised 5/21/07
_______________________________________________________________________________________ ©The National Training Institute for Child Care Health Consultants, UNC-CH, 2007 49
SLIDES (35 MM): TIPS FOR PREPARING AND USING
− Count on each slide taking approximately 15 20 seconds.
− Have an opaque slide at the beginning and end of your presentation so Trainers don’t experience a glare of lights.
− “If you can read your slide when you hold it at arm’s length, your Trainers will be able to
read it when it’s projected.” (Pike, 1994, p. 74)
− Put small circular stickers on each slide to indicate which way it should be placed into a projector.
− Arrange slides in order of presentation and number them.
• Hold each slide the way it is supposed to be viewed on the screen, right side up, with lettering going left to right
• Place spot on bottom left hand corner. • When slide is turned upside down and put in the projector, right-handed people
will use their thumb to hold the slide at the “thumb spot”. • Spot should be toward the outer edge of the carousel.
− Consider using a felt tip pen to make a light diagonal line running across the tops of the
slides. This visual cue will help you see quickly if any slides are missing. When one is missing, it is easier to put it back in place.
Note: Please also refer to “Tips for Preparing and Using Overhead Transparencies”.
Building Curriculum Development and Training Skills Appendixes version 1, revised 5/21/07
_______________________________________________________________________________________ ©The National Training Institute for Child Care Health Consultants, UNC-CH, 2007 50
PRINT MATERIALS: TIPS FOR PREPARING AND USING What to include and what to avoid
− Include three to five main messages that stand out to the reader − Include short lists at the beginning of the document or beginning of each section − Use examples to reinforce important points and explain difficult concepts − Repeat important information more than once − Avoid technical terms and jargon; if you must use them, explain them within the text − Avoid glossaries − Use simple pen and ink drawings to reinforce text and draw attention to key points − Avoid drawings and photographs that do not photocopy well − Avoid complicated charts and graphs
How to organize the material
− “Grab” the reader on the cover page or title page − Think and write like a reader or a “regular person,” not like a professional − Keep the steps in order when describing a process − Put most important information first, and least important information last − Make sure readers can go back and easily locate important information − Use headers and summaries to introduce new material, and reinforce and highlight key points
Writing style
− Use short words and sentences − Use words and phrases your readers use − Use conversational style: active voice, vivid nouns and verbs, personal pronouns − Include dialogue or story format, or testimonials − Pose questions or use checklists to encourage interaction with the material
How the document should look
− Use 13 or 14 point serif type − Use simple letter styles; avoid fancy print that’s difficult to read − Use capital and lowercase letters − Emphasize important point by putting them in a box, using bold print, increasing font size or
underlining short phrases − Use bullets and dingbats to make lists stand out − Leave ample white space and margins − Make columns no more than 5 inches across
Assess materials
− Get feedback from target audience and service providers − Use at least one analytical assessment method: an established checklist, print or
computerized readability formulas, and/or the Suitability Assessment of Materials (SAM) − Field test materials to get feedback from target audience and service providers − Revise materials if necessary and check again with target audience − Revise if necessary and check again with target audience
(Adapted from Center for Medicare Education, Checklist for easy-to-read materials)
Building Curriculum Development and Training Skills Appendixes version 1, revised 5/21/07
_______________________________________________________________________________________ ©The National Training Institute for Child Care Health Consultants, UNC-CH, 2007 51
VIDEO: TIPS FOR PREPARING AND USING Before showing a video
− Determine which training objective you want to address by using a video. − Preview the video and decide whether to use all of the video or just segments. − If only segments will be used, make sure to cue the video. − When previewing the video, look at the video’s organization, presentation style, graphic,
and audience level. Also make sure the video is sensitive to issues of race, gender, culture, religion, etc.
− Make sure all needed equipment is available, the monitor is adequate for the size of your audience and the training room can accommodate a video being shown.
− To increase trainee’s involvement in the video and to address several different learning styles, prepare materials such as a learning guide, checklist, or a “fill in the blanks” form to accompany the video. Review these materials prior to showing the video and assign trainees specific tasks. All trainees do not need to do the same task.
− Prepare questions for trainees to answer and/or discuss after they view the video. Let trainees know there will be a post-viewing discussion and/or activity and all are encouraged to participate.
During the video
− Keep the room as bright as possible so trainees can see to work on the accompanying checklists, worksheets, etc.
− After major points are emphasized or questions arise in the video, consider stopping the video to lead a short group discussion. Ask trainees how they would have handled a situation, what their reactions and/or suggestions are to what is being shown, etc.
− If the video is going to last more than 45 minutes, stop the video for a break or have trainees do a related activity such as a role play which relates to and reinforces the video’s main points.
After showing the video:
− Review the tasks assigned to the trainees. − If a role play was not used during the video viewing, consider using one now or consider
having a debate if the video presented issues where there are varying opinions/attitudes. − After the video and related activities are completed, review key points.
(Adapted from: Charles CL, Clarke-Epstein C. The instant trainer. (Quick tips on how to teach others what you know). New York: McGraw-Hill; 1998.)

Building Curriculum Development and Training Skills Appendixes version 1, revised 5/21/07
©The National Training Institute for Child Care Health Consultants, UNC-CH, 2007 52
APPENDIX E: GLOSSARY
Building Curriculum Development and Training Skills Appendixes version 1, revised 5/21/07
©The National Training Institute for Child Care Health Consultants, UNC-CH, 2007 53
GLOSSARY Audience analysis: A technique for collecting and using information about trainees (e.g., age, gender, educational level, job responsibilities, and learning style preferences) from the target audience for the purpose of developing a training program. Evaluation: The systematic collection and analysis of data and information to make decisions. Information collected about training a program includes: how well trainees achieved a training goal and training objectives; how well the training program met the stated goals and objectives: and how well trainees liked the training program. This information can then be used to revise training programs Information can be collected in a variety of ways: a “smile sheet”, a pre-test/post-test, or a follow-up survey. Feedback: A communication technique in which the trainer (or facilitator) provides information to trainees about their progress in mastering a new skill or activity or in achieving the training objectives. It is most effective when it is timely (provided immediately, positive, and descriptive. Goal (training): Broad, general statements about what behavior or performance a trainee will exhibit or demonstrate after successfully completing a training program. Instructional Systems Development (ISD) process: A step-by-step, systematic approach to creating effective training and materials. Each step builds on information gathered and materials produced in the previous steps. Use of this process will speed and enhance learning, cut training time and cost, and reduce the time it takes you to develop training. Learning styles: The learning variation between individuals in the way they approach learning tasks. Examples include: Aural (Auditory), Print-Oriented, Visual, Haptic (Tactile), Interactive, Kinesthetic and Olfactory Learners. Media: The various ways in which the content and methods in a training program can be delivered. Examples include: print, graphics, audio, video, and computer-based and web-based training / multimedia. Methods: The various ways a trainer uses to convey the content of a training program. Examples include: lecture, discussion, demonstration, and simulation (e.g., role play, case scenario, games, etc.). Needs assessment: The process of gathering information from a variety of sources about a perceived problem or gap between what is and what ought to be to have a better idea of what the gaps (problems) are and, in fact, if there are any. Objective (training): Clear, precise statements describing exactly what the trainee will be able to do after the training, specified in terms of the conditions and criteria under which a trainee is expected to demonstrate the desired behavior or performance. Rapid Instructional Development (RID) process: A collection of strategies for quickly producing instructional packages that enable a specific group of trainees to achieve a set of
Building Curriculum Development and Training Skills Appendixes version 1, revised 5/21/07
©The National Training Institute for Child Care Health Consultants, UNC-CH, 2007 54
specific instructional objectives. The process involves alternatives, enhancements, and modifications to the instructional systems development (ISD) model. Task analysis: A technique for breaking down a job into its components—duties or responsibilities and tasks and then analyzing the components to determine the knowledge, skills, and attitudes that an employee would need to be able to do, know or have, in order to perform the job successfully. Training techniques: A term used interchangeably with instructional strategies, teaching methods, training methods, or training activities; and also at times, includes training media and materials. In this Training Module, training techniques includes: training methods, media, activities, and materials.