Embed Size (px)
Citation preview
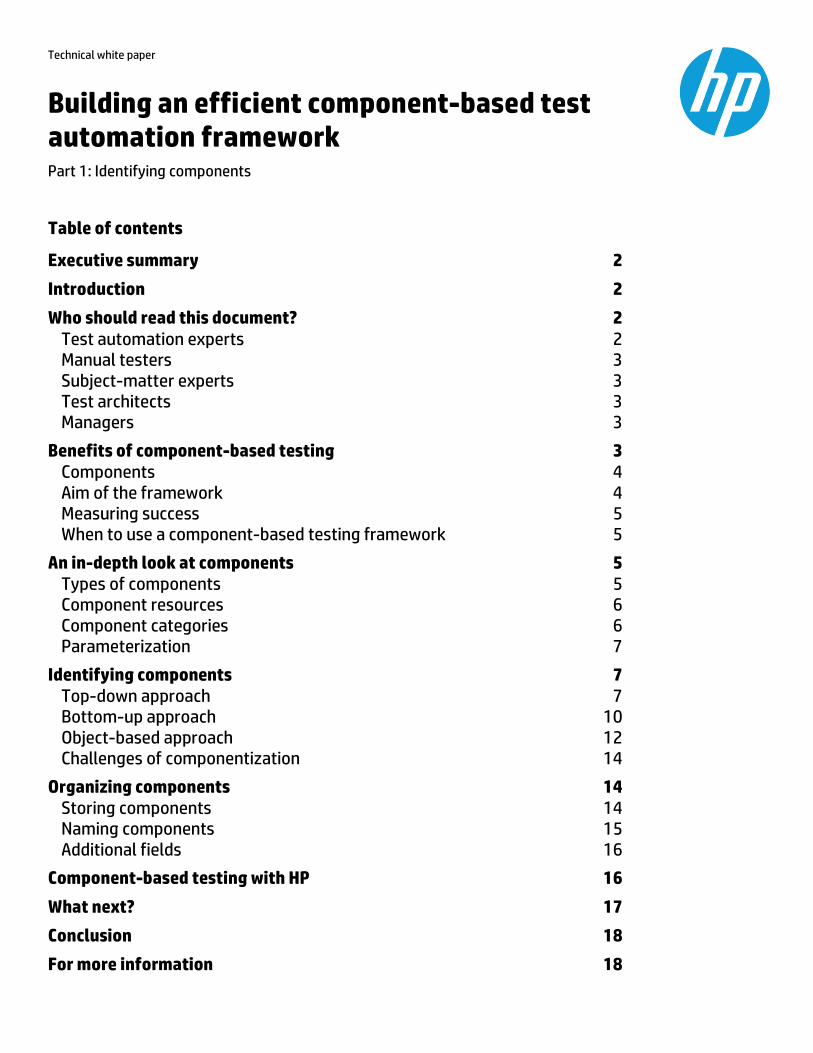
Technical white paper
Building an efficient component-based test automation framework Part 1: Identifying components
Table of contents
Executive summary 2
Introduction 2
Who should read this document? 2 Test automation experts 2 Manual testers 3 Subject-matter experts 3 Test architects 3 Managers 3
Benefits of component-based testing 3 Components 4 Aim of the framework 4 Measuring success 5 When to use a component-based testing framework 5
An in-depth look at components 5 Types of components 5 Component resources 6 Component categories 6 Parameterization 7
Identifying components 7 Top-down approach 7 Bottom-up approach 10 Object-based approach 12 Challenges of componentization 14
Organizing components 14 Storing components 14 Naming components 15 Additional fields 16
Component-based testing with HP 16
What next? 17
Conclusion 18
For more information 18
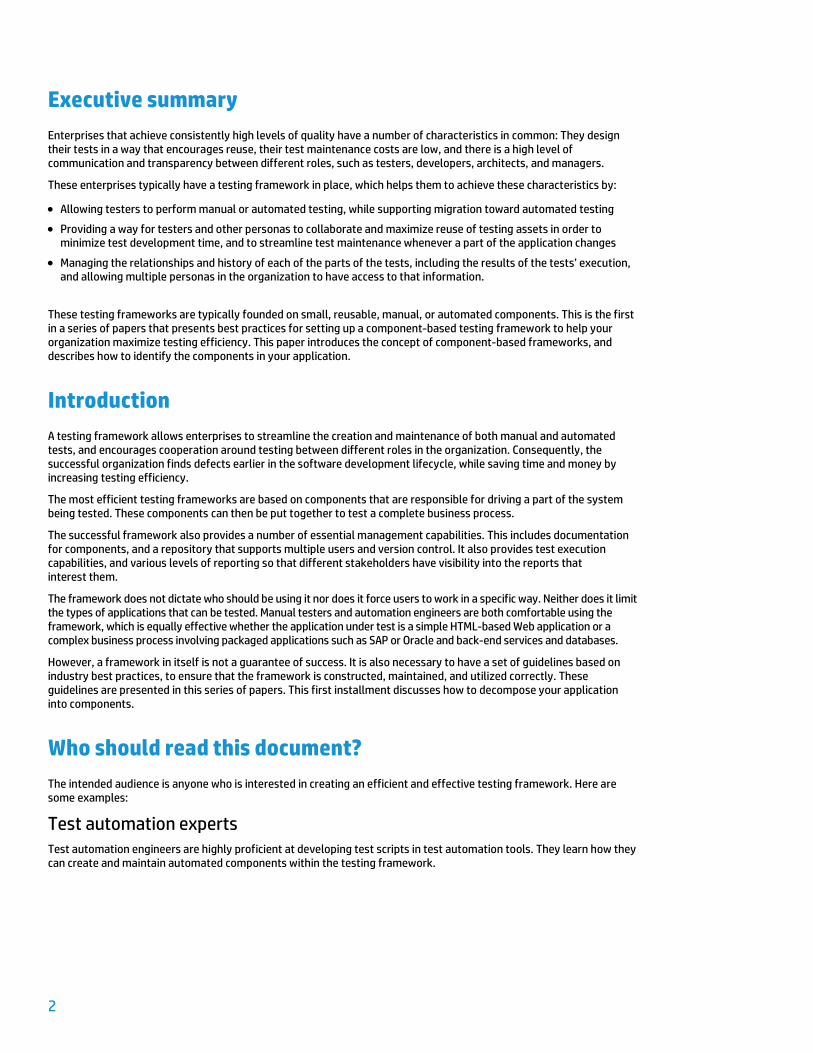
Executive summary Enterprises that achieve consistently high levels of quality have a number of characteristics in common: They design their tests in a way that encourages reuse, their test maintenance costs are low, and there is a high level of communication and transparency between different roles, such as testers, developers, architects, and managers.
These enterprises typically have a testing framework in place, which helps them to achieve these characteristics by:
• Allowing testers to perform manual or automated testing, while supporting migration toward automated testing
• Providing a way for testers and other personas to collaborate and maximize reuse of testing assets in order to minimize test development time, and to streamline test maintenance whenever a part of the application changes
• Managing the relationships and history of each of the parts of the tests, including the results of the tests’ execution, and allowing multiple personas in the organization to have access to that information.
These testing frameworks are typically founded on small, reusable, manual, or automated components. This is the first in a series of papers that presents best practices for setting up a component-based testing framework to help your organization maximize testing efficiency. This paper introduces the concept of component-based frameworks, and describes how to identify the components in your application.
Introduction A testing framework allows enterprises to streamline the creation and maintenance of both manual and automated tests, and encourages cooperation around testing between different roles in the organization. Consequently, the successful organization finds defects earlier in the software development lifecycle, while saving time and money by increasing testing efficiency.
The most efficient testing frameworks are based on components that are responsible for driving a part of the system being tested. These components can then be put together to test a complete business process.
The successful framework also provides a number of essential management capabilities. This includes documentation for components, and a repository that supports multiple users and version control. It also provides test execution capabilities, and various levels of reporting so that different stakeholders have visibility into the reports that interest them.
The framework does not dictate who should be using it nor does it force users to work in a specific way. Neither does it limit the types of applications that can be tested. Manual testers and automation engineers are both comfortable using the framework, which is equally effective whether the application under test is a simple HTML-based Web application or a complex business process involving packaged applications such as SAP or Oracle and back-end services and databases.
However, a framework in itself is not a guarantee of success. It is also necessary to have a set of guidelines based on industry best practices, to ensure that the framework is constructed, maintained, and utilized correctly. These guidelines are presented in this series of papers. This first installment discusses how to decompose your application into components.
Who should read this document? The intended audience is anyone who is interested in creating an efficient and effective testing framework. Here are some examples:
Test automation experts Test automation engineers are highly proficient at developing test scripts in test automation tools. They learn how they can create and maintain automated components within the testing framework.
2
Manual testers Manual testers discover how they can achieve a quick return on investment by creating and using manual components to create tests, or even by using automated components prepared by a test automation expert. They learn how to plan for reuse, to ensure maximum efficiency.
Subject-matter experts This role requires a deep knowledge of the system under test, and the business processes that it is expected to support. These systems may be proprietary to the enterprise, or they could be packaged applications, such as SAP or Oracle. Either way, this persona is highly skilled in the system. They learn how to break down their system and business processes into documented components, and how they can recombine the components and associate them with data to form tests.
Test architects The test architect is typically responsible for designing and implementing the testing framework. Test architects learn how to streamline and simplify the test automation process.
Managers As the most senior stakeholders, managers must have visibility into the framework and its metrics. They learn how to monitor key performance indicators to get product testing finished sooner and at high quality.
Benefits of component-based testing
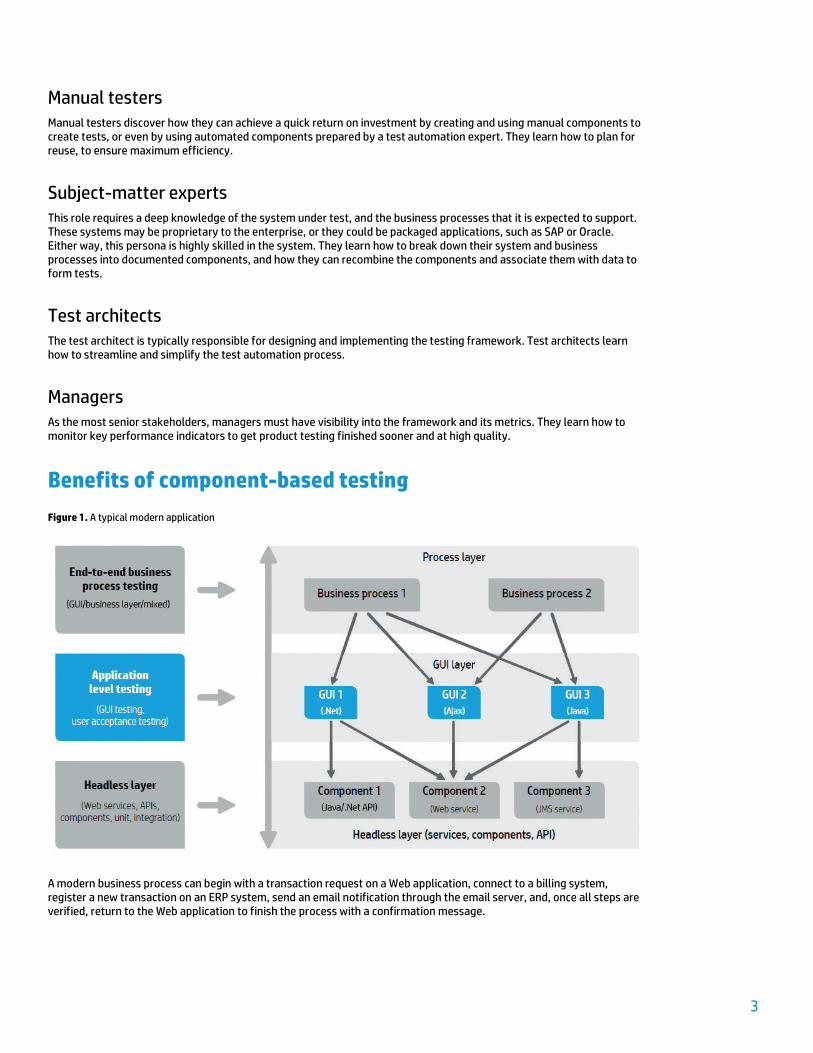
Figure 1. A typical modern application
A modern business process can begin with a transaction request on a Web application, connect to a billing system, register a new transaction on an ERP system, send an email notification through the email server, and, once all steps are verified, return to the Web application to finish the process with a confirmation message.
3
These end-to-end processes not only span multiple applications, but also perform complex steps below the GUI layer within what is sometimes called the “headless layer.” The headless layer contains any number of services, message queues, database abstraction layers, and other GUI-less entities, which are typically accessed through API calls. In this example, we have a business process, which uses an Oracle application and an SAP application as well as a proprietary application. Each of these applications has a GUI, which communicates with various services on the back end. These services in the back end, or headless layer, use many different technologies such as .NET, Web services, REST, JMS, and others.
Components An essential capability of a testing framework is the ability to assemble business processes on the fly via components. Components are simply modules of a business process. Using components, you can create multiple user scenarios, validate each one of them, and streamline the business flow without having to deal with code or keywords.
For example, many applications require the user to log in before they can do anything else. With the component-based testing approach, the “login” capability can be made available as a component, which can be dragged and dropped into a test script. The login component could include the various user steps in the login process, such as entering the username, entering a password, and clicking the “login button.”
Within a framework, each component can be used in multiple tests, and can be developed for manual testing. If desired, the manual components can be migrated for automated testing when resources become available. Because the framework keeps track of which tests are using each component, communication and collaboration between different personas is encouraged, and simplifies component and test maintenance.
Aim of the framework Reuse and Maintenance By reusing components, you continue to reduce the development costs of test each time a component is reused. Let’s say the cost of creating a component is $x. If a component is only used once, it will only cost $x. But if it’s reused 5 times, the cost of the test is only $ x 5. The same calculation applies to component maintenance, since the cost of fixing a defect in a component is reduced by a factor of how many tests are using the component.
Communication Another benefit of a component-based framework includes an improvement in communication between different levels of an organization. First and foremost, a component-based framework in many senses is asking the tester and the business to build a domain specific language (DSL) on which they can communicate. Testers may be building scripts and the business may be supplying the necessary steps to complete a test, but this level of abstraction is a shared initiative that brings the two groups together to form a common language on which to communicate.
As an example, a subject-matter expert (SME) may refer to the steps required to login as “login”, but when a tester attempts to automate this he’s confronted with a screen that has user name, password, and submit. All of which have nothing to do with login (this is highly simplified, but this happens on more complex systems very frequently). The essence is forcing the question for each component creation to be “what explicitly are the steps to complete this action.”
Moving from manual to automated tests Improved communication, reuse, and a structured componentized approach to building components facilitate the move from manual tests to automated tests. A tester now knows what to automate in an atomic fashion and then, when building a fully automated test the tester can easily string together tests that are already automated and just automate the new pieces.
Better focus Another benefit of a component-based framework is it enables full end-to-end tests without expecting the tester to be knowledgeable of an entire system. As an example, a tester may be building a test that includes making some modifications in an external system. This particular tester doesn’t gain any benefits to testing the part of the process that involves the external system; he simply expects to give the system some data (have some process run) and get back some data. In a component-based framework, he doesn’t need to have knowledge of this system; he can just grab a precreated component from this system and include it as part of his test flow.
4
Measuring success Measuring success in a component-based framework is not quite like the age-old goal of number of automated tests. The reason is because the number of scripts is drastically decreased because of the reusability. The best way to look at success in a component-based test framework can best be described as efficiency.
Increased reuse First, after establishing a component-based framework, the time to create new tests should be drastically decreased as a library of components is available for re-use. One way to measure this success criterion is to monitor the number of times a component is re-used.
Reduced maintenance A second way of measuring success is with decreased maintenance costs. When the application under test (AUT) is changed, the time it takes to update the test suite is dramatically lower compared to a non-component based test framework.
Increased participation The third way you can measure success is that it opens the ability to participate in the test automation process to more people including those with skill sets that are less technical.
Increased manual to automation conversion rate A fourth way to measure success is how many manual-based components are moved into the automation suite.
When to use a component-based testing framework Ask yourself the following questions:
• Do you need to test your applications earlier in the software development lifecycle?
• Do you want to test your applications more quickly?
• Are you spending too much time on maintaining tests?
• Do you have both manual and automated tests?
• Are you moving from manual to automated tests?
• Do your testers spend time on tasks that are not in their areas of expertise?
If the answer to any of these questions is “yes”, then a component-based framework may be right for you.
An in-depth look at components
Types of components There are a number of different component types available in a component-based testing framework. However, any component type can be used in a test, and the developer of the test doesn’t need to know or care about how the component was actually implemented. The two main categories are “manual” components, and “automated” components, of which there are a few variants. Let’s take a look at them.
Manual A manual component contains a textual description of a list of steps, with a description of the expected result, if applicable, of performing each step. When the component is executed as part of the test, the tester performs the steps defined in the component, and checks the expected results.
5
Automated GUI keyword driven GUI keyword-driven components also contain a list of steps, but each step is made up of an item in the application’s user interface (for example, a text field or a button) and an operation is automatically performed on that item when the component is run. The available items are taken from a repository of these objects, which is typically created by an automation engineer at the beginning of the automation process. The repository is then made available for component developers to use in the creation of the GUI keyword-driven components.
GUI scripted A GUI scripted component is defined using a scripted programming language and automatically performs operations on the GUI according to the logic defined in the component, when the component is run. These components are generally developed by an automation engineer, and can also take advantage of object repositories.
API An API component is designed to perform operations automatically on services and other parts of the application’s headless layer when the component is run. They are usually developed by an automation engineer who specializes in the headless layer.
Component resources A further level of re-use is introduced into automated components by sharing common resources that are used by different components.
User interface object properties Each item in the user interface has a set of properties that serve to uniquely identify it. Components use these properties in order to communicate with the object in the AUT. These properties can be associated with several components, which use the same parts of the user interface. If the GUI changes, only these properties need to be changed, without having to update all of the components. For example, there might be a button on the user interface with the caption “OK”, and a number of components might have to click that button. If the caption was changed to “Submit”, only the “Caption” property needs to be changed in the object repository, and the components themselves do not have to be changed.
Code An automation engineer can write functions, in the scripting language of choice, which perform some logical sequence of operations. These functions can then be reused where necessary, in multiple components.
An example of a function might be “CalculateCost”, which can be used in multiple components. If the CalculateCost implementation changes, for example, if there is a change in tax, the CalculateCost function only needs to be updated once, and all components using the function can automatically use the updated version.
Component categories Components fall into a number of different categories. Some components perform operations on a screen or a part of a screen. Others might perform operations on an object belonging to the application under test. Yet others might be required to perform operations outside of the context of the application under test.
Logical component A logical component represents a part of the screen with one or more controls, or a set of API calls which combine to perform some application logic. An example of this might be a component that represents a login screen by entering a username and password and pressed the login button. This category of component works against a specific context in the application under test.
Application object component An application object component might represent an object on the screen, or a call to a single API. An example might be a component representing the “button” object, or one that interrogates the application under test’s backend database.
6
This category of component is usually independent of context within the application under test, and can be used in many situations.
Generic component A generic component performs actions outside of the context of the application under text, such as launching a browser. It can be reused in tests of different applications.
Flow component A flow component is a “compound component” that comprises a set of components in a fixed sequence in order to perform a specific task. It can be part of a test just like any other component, but when it runs, it executes the components that it contains. Flows should not contain other flows.
Parameterization To get the most out of components, they should be written as generically as possible. Consider, for example, a component that creates a loan in a banking application. If the component was written to create a loan for a particular customer, its usefulness is limited, as a new component would have to be written for each individual customer. To make it more useful and reusable, the component should be written so that the customer is passed in as a parameter. This process is known a parameterization. Whenever the “Create Loan” component is used, all that needs to be done is to provide the name of the customer as the value of the parameter. To make it even more useful, the component should be able to return the ID of the loan. The ID can then be passed into other parameterized components to create a data-driven business process test. Parameterization will be addressed in depth in another paper in this series.
Identifying components There are a number of approaches to decomposing the application to be tested into discrete components, which we can explore here. More than one approach can be used in a single application.
Top-down approach The top-down approach starts with a business process. As a test of the business process is designed, the components required for that test are identified. If there is already a suitable component available, it can be used in the test. If not, a new component is created, and is made available for future use.
The framework should support this approach by allowing testers to define a placeholder for a component, so that they can continue breaking down the whole business process test, designing and developing it, and even manually running and debugging it. At a later stage, the tester can provide a manual implementation of the components, which is then used the next time the test is run, instead of the placeholder.
It is also possible for an automation engineer to implement these components, thus allowing a test designer to design a test, define a manual implementation for the component, and then automate it at a later stage.
7
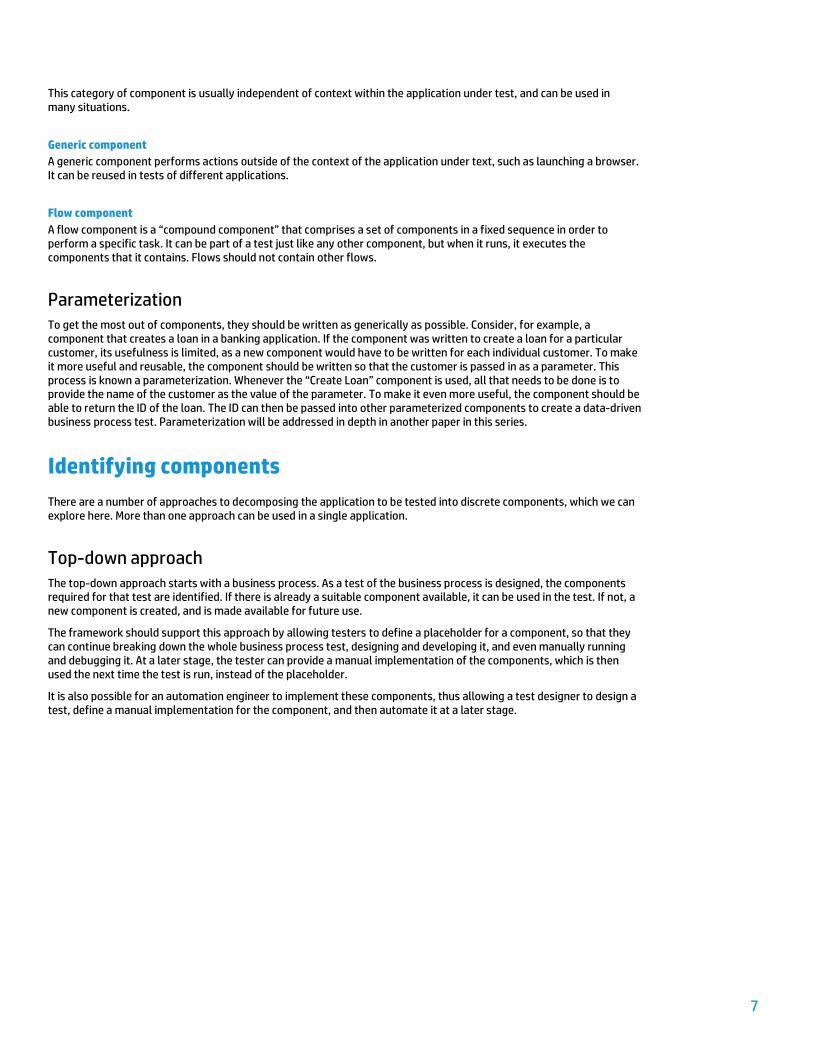
For example, consider the “Money Transfer” business process from a banking application:
Step 1. Login
Step 2. Select Money Transfer
Step 3. Select accounts
Login
Menu
Transfer Accounts
8
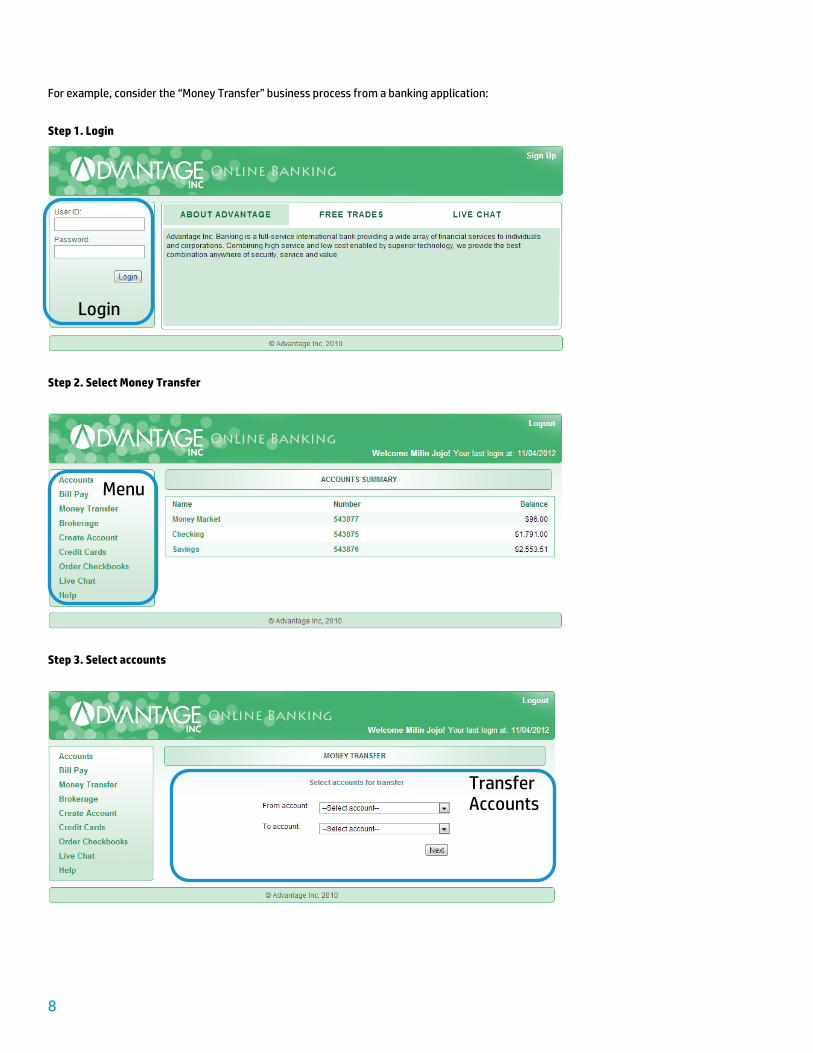
Step 4. Select transfer amount and date
Step 5. Confirm
Step 6. Result of transfer
Transfer Amount and Date
Confirm Transfer
Result of Transfer
9
Components Once we’ve gone through the top-down process, we have the following components:
• Login—allows a specific-user access into the system
• Menu—is the list of selections that can be made
• Transfer accounts—has source and destination accounts, only applicable in the context of the money transfer operation
• Transfer amount and date—is the amount to transfer, and when to transfer it, also only applicable to the money transfer operation
• Confirm transfer—confirms the transaction, again applicable only to the money transfer operation
• Result of transfer—shows the results of the money transfer operation
Using the top-down method, we have identified a number of components, such as Login and Menu, which can be re-used by other tests.
Of course, as we perform our top-down decomposition, we might identify other useful components along the way. For example, we might decide that after our login, we should really check the top part of the screen to check if the user was really logged in, even though we’re testing Money Transfer, and not the login functionality. This would justify the creation of the header component, which can be used in every business process.
The components created as part of this process usually belong to the logical component category, and may be manual or automated.
When to use the top-down approach Use the top-down approach when automation experts are available to work on components, with manual testers working on the tests. This allows a separation of concerns, and means that the tester and the component developer can continue working independently for as long as possible. The tester, who is concentrating primarily on the flow of the test, can identify the components required for the flow, and the component developer can then supply the implementation for these components. Once all of the components have been implemented, the test can be run.
The top-down approach is also suitable when manual testers are working on both the tests and components. It is typically more effective for manual testers to work on each flow at a time.
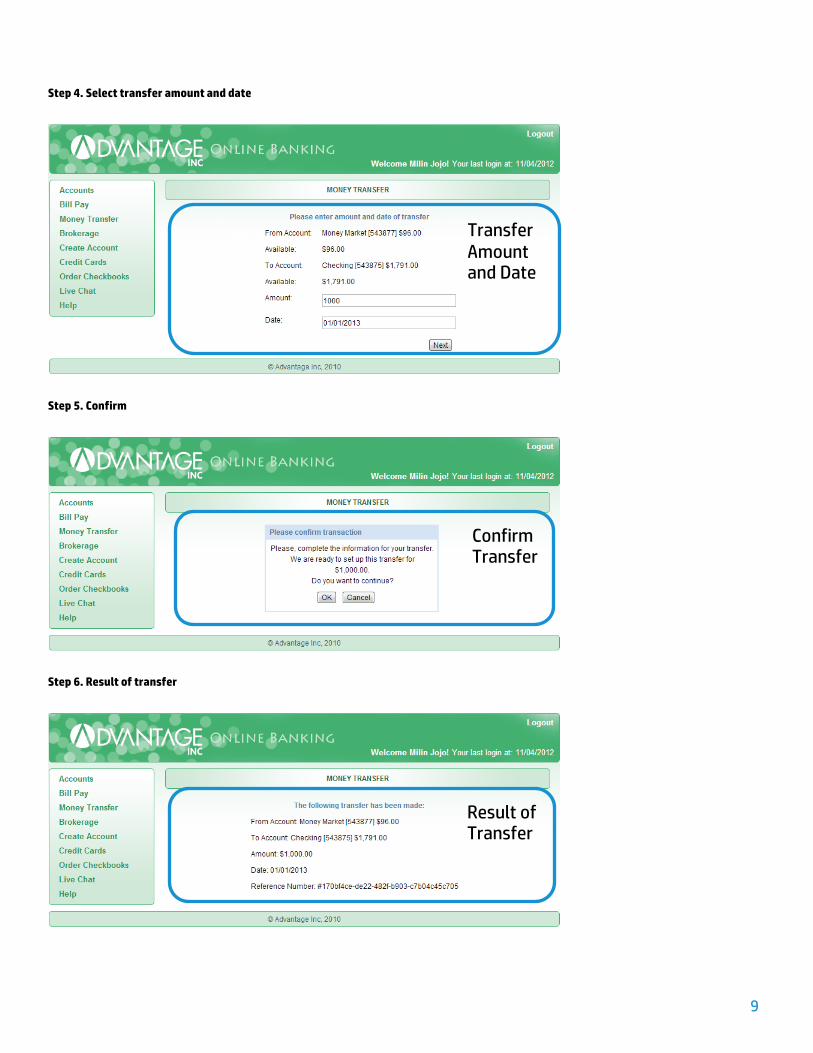
Bottom-up approach The bottom-up approach involves looking at each part of the application, such as a screen, and identifying sections that can be considered self-contained.
Again using our banking application, consider the first screen of the money transfer business process:
10
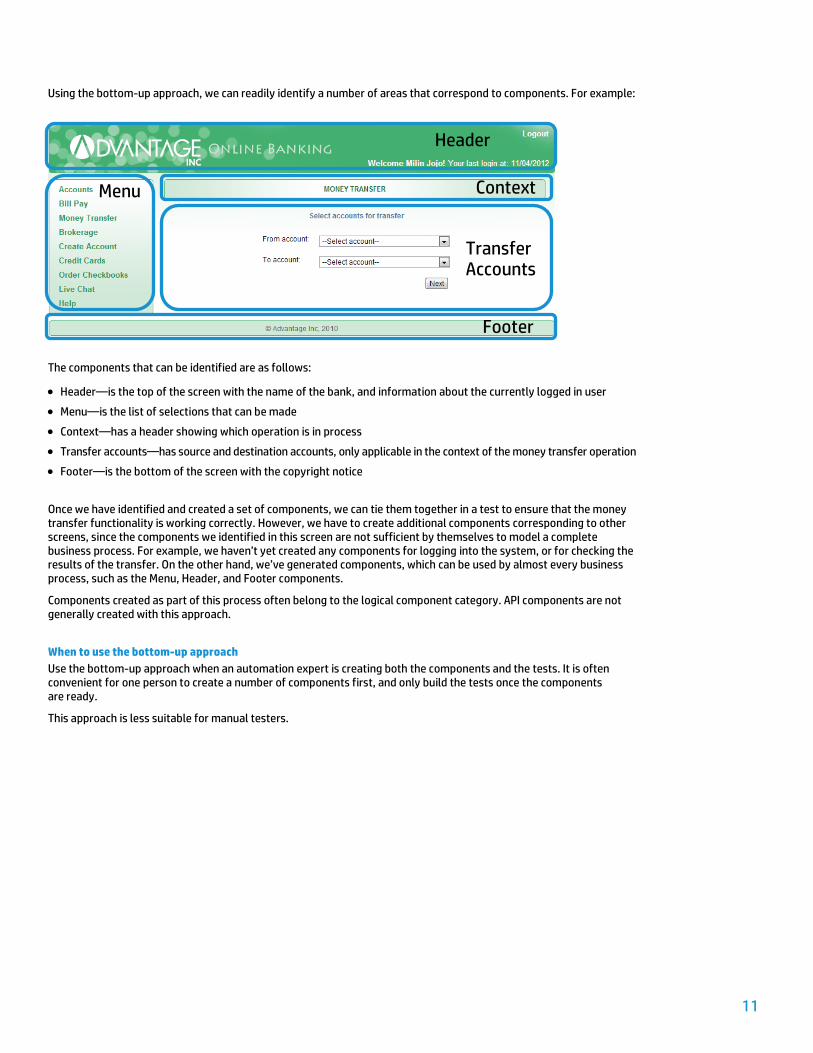
Using the bottom-up approach, we can readily identify a number of areas that correspond to components. For example:
The components that can be identified are as follows:
• Header—is the top of the screen with the name of the bank, and information about the currently logged in user
• Menu—is the list of selections that can be made
• Context—has a header showing which operation is in process
• Transfer accounts—has source and destination accounts, only applicable in the context of the money transfer operation
• Footer—is the bottom of the screen with the copyright notice
Once we have identified and created a set of components, we can tie them together in a test to ensure that the money transfer functionality is working correctly. However, we have to create additional components corresponding to other screens, since the components we identified in this screen are not sufficient by themselves to model a complete business process. For example, we haven’t yet created any components for logging into the system, or for checking the results of the transfer. On the other hand, we’ve generated components, which can be used by almost every business process, such as the Menu, Header, and Footer components.
Components created as part of this process often belong to the logical component category. API components are not generally created with this approach.
When to use the bottom-up approach Use the bottom-up approach when an automation expert is creating both the components and the tests. It is often convenient for one person to create a number of components first, and only build the tests once the components are ready.
This approach is less suitable for manual testers.
Header
Context
Transfer Accounts
Footer
Menu
11
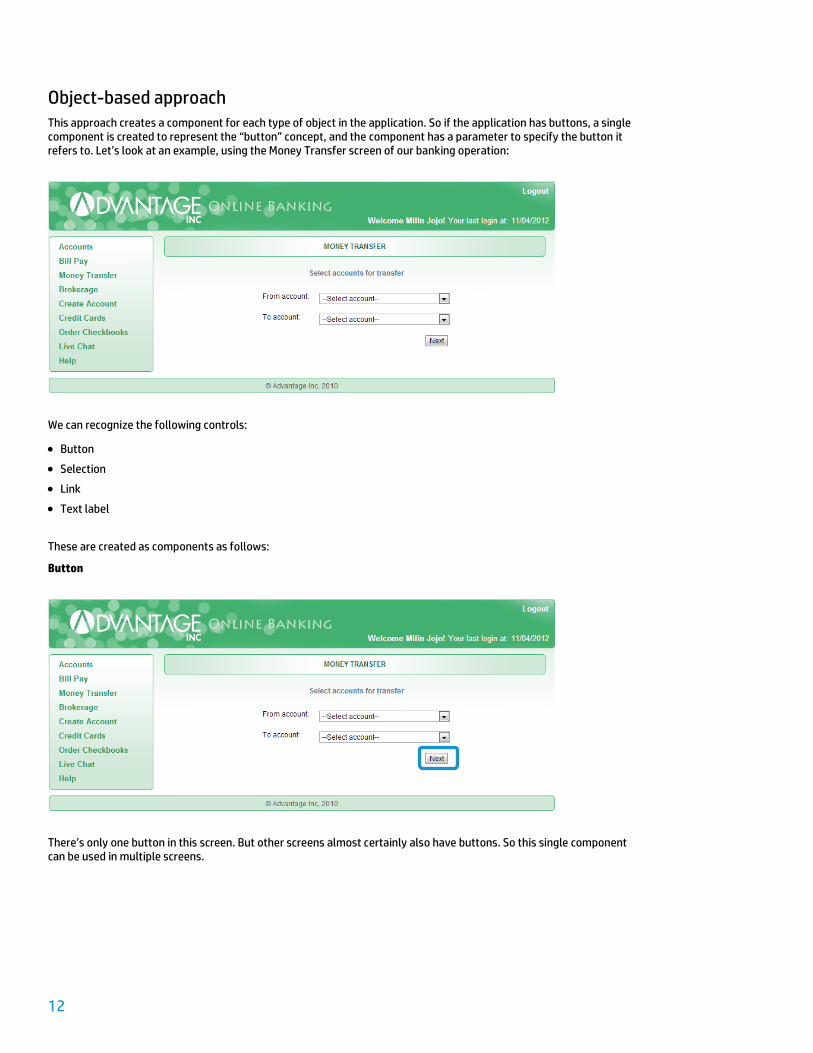
Object-based approach This approach creates a component for each type of object in the application. So if the application has buttons, a single component is created to represent the “button” concept, and the component has a parameter to specify the button it refers to. Let’s look at an example, using the Money Transfer screen of our banking operation:
We can recognize the following controls:
• Button
• Selection
• Link
• Text label
These are created as components as follows:
Button
There’s only one button in this screen. But other screens almost certainly also have buttons. So this single component can be used in multiple screens.
12
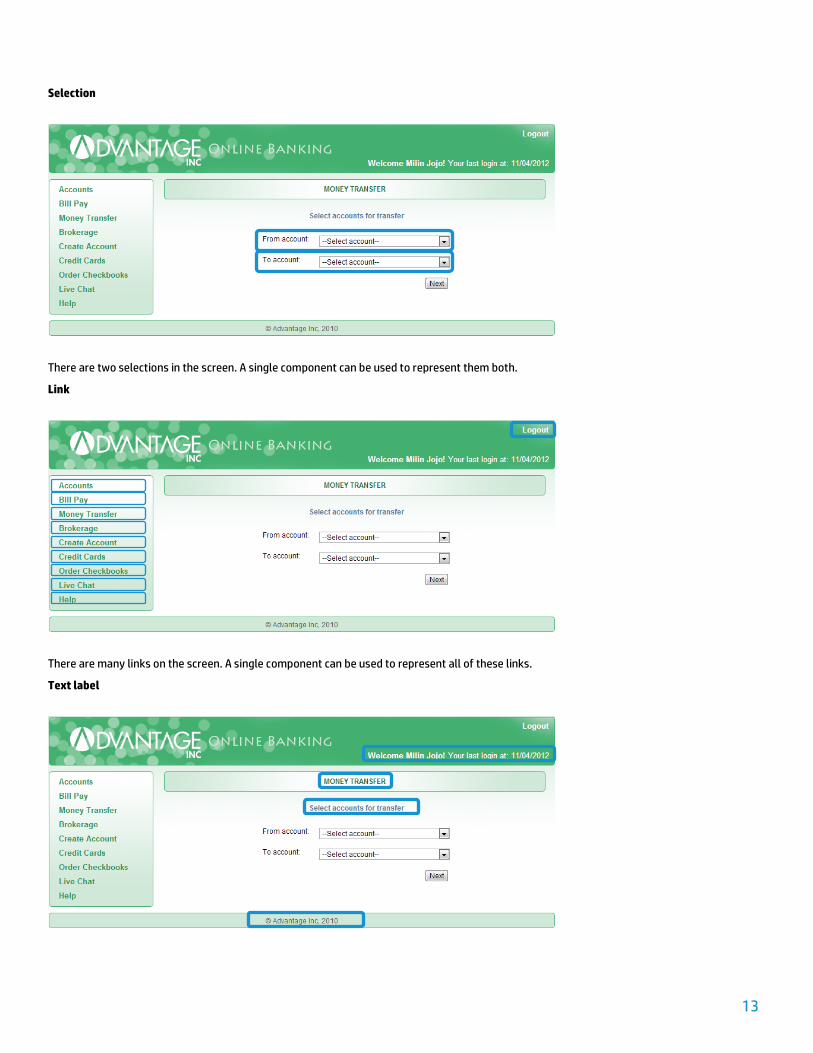
Selection
There are two selections in the screen. A single component can be used to represent them both.
Link
There are many links on the screen. A single component can be used to represent all of these links.
Text label
13
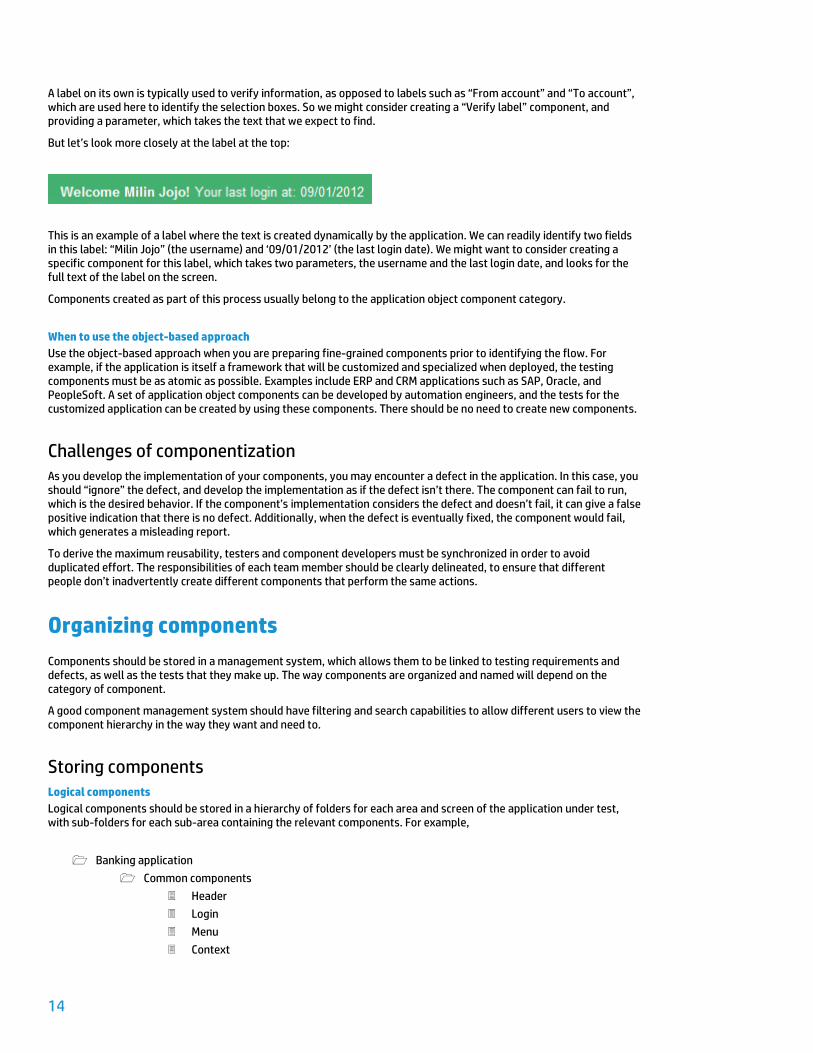
A label on its own is typically used to verify information, as opposed to labels such as “From account” and “To account”, which are used here to identify the selection boxes. So we might consider creating a “Verify label” component, and providing a parameter, which takes the text that we expect to find.
But let’s look more closely at the label at the top:
This is an example of a label where the text is created dynamically by the application. We can readily identify two fields in this label: “Milin Jojo” (the username) and ‘09/01/2012’ (the last login date). We might want to consider creating a specific component for this label, which takes two parameters, the username and the last login date, and looks for the full text of the label on the screen.
Components created as part of this process usually belong to the application object component category.
When to use the object-based approach Use the object-based approach when you are preparing fine-grained components prior to identifying the flow. For example, if the application is itself a framework that will be customized and specialized when deployed, the testing components must be as atomic as possible. Examples include ERP and CRM applications such as SAP, Oracle, and PeopleSoft. A set of application object components can be developed by automation engineers, and the tests for the customized application can be created by using these components. There should be no need to create new components.
Challenges of componentization As you develop the implementation of your components, you may encounter a defect in the application. In this case, you should “ignore” the defect, and develop the implementation as if the defect isn’t there. The component can fail to run, which is the desired behavior. If the component’s implementation considers the defect and doesn’t fail, it can give a false positive indication that there is no defect. Additionally, when the defect is eventually fixed, the component would fail, which generates a misleading report.
To derive the maximum reusability, testers and component developers must be synchronized in order to avoid duplicated effort. The responsibilities of each team member should be clearly delineated, to ensure that different people don’t inadvertently create different components that perform the same actions.
Organizing components Components should be stored in a management system, which allows them to be linked to testing requirements and defects, as well as the tests that they make up. The way components are organized and named will depend on the category of component.
A good component management system should have filtering and search capabilities to allow different users to view the component hierarchy in the way they want and need to.
Storing components Logical components Logical components should be stored in a hierarchy of folders for each area and screen of the application under test, with sub-folders for each sub-area containing the relevant components. For example,
Banking application
Common components
Header
Login
Menu
Context
14
Footer
Money transfer
Transfer accounts
Transfer amount and data
Confirm transfer
Result of transfer
To keep the hierarchy manageable, you should try to keep to 5 levels or less.
Application object components Application object components should be stored in a hierarchy of folders, with each folder containing components related to the type of objects they operate on. For example:
Enter data
Enter text into text box
Select data
Select combo box value
Select list box value
Change context
Button
Link
Read data
Get text
Generic components Generic components should be stored in set of folders, which call out the nature of the component’s behavior.
Naming components All components and folders should be created and named according to an agreed standard within the enterprise. This makes it easier to understand what each component does, and thereby encourages reuse by other team members.
Logical components Logical components should have the following elements in its name:
• Verb—for example, “Input on”, “Select from”, “Navigate to”, “Verify”
• Area of screen it operates on—for example, “Login Pane”, “Transfer Accounts”
• Relevant screen (if necessary)—for example, “Home Page”
– This is only required if there are similar areas in different screens, each of which have different components. It is easier to understand the test if the relevant screen is part of the component’s name.
For example:
• “Input on Login Pane in Home Page”
• “Select from Transfer Accounts”
15
Application object components Application components act on objects on the screen, or the application under test’s API. Either way, the name should reflect the operation that the component performs. For example:
• Press Button
• Enter Text
In general, every component’s name should start with a verb (that is, the operation it performs), followed by the subject (that is, the area or item on which the operation is performed).
Generic components Generic components are usually named in a similar way to the application object component. For example:
• Open Browser
Examples of badly named components
• “Component 1”—doesn’t give any information about what it does
• “Button press on login screen”—difficult to read when the verb is not first
• “Press button”—fine for an application object component but not for a logical component, as it doesn’t say which button, or on what screen
Additional fields In addition to the component’s name, there are a number of other fields that a component should have:
Description Describes what the component does, and what parameters it takes. This helps others understand how to use the component. The description should also contain any preconditions that the component assumes to be in place, as well as any other conditions.
If the component operates on the GUI, a screenshot showing that part of the GUI should be added.
Status When a component has just been created, it is not ready for re-use until it has been tested and approved. Such a component would be marked as “New.” When it’s ready, it can be assigned the status “Ready.” But if it needs to be updated, other users should know that it cannot currently be relied on, and should be given a status indicating that it requires maintenance.
Author or Maintainer There should be a record of the person who wrote the component and to whom questions should be addressed.
History The modification history of the component should be accessible.
Component-based testing with HP HP Business Process Testing (BPT) software provides component-based testing with both manual and automated functional testing capabilities. HP BPT software works hand-in-hand with HP Unified Functional Testing (UFT) and HP Sprinter to bring non-technical subject-matter experts and automation engineers into the quality process early. HP BPT allows you to start your test automation even before the application is available. It empowers your entire testing team to create sophisticated test suites with less training. And it reduces test cycle times and test maintenance costs.
16
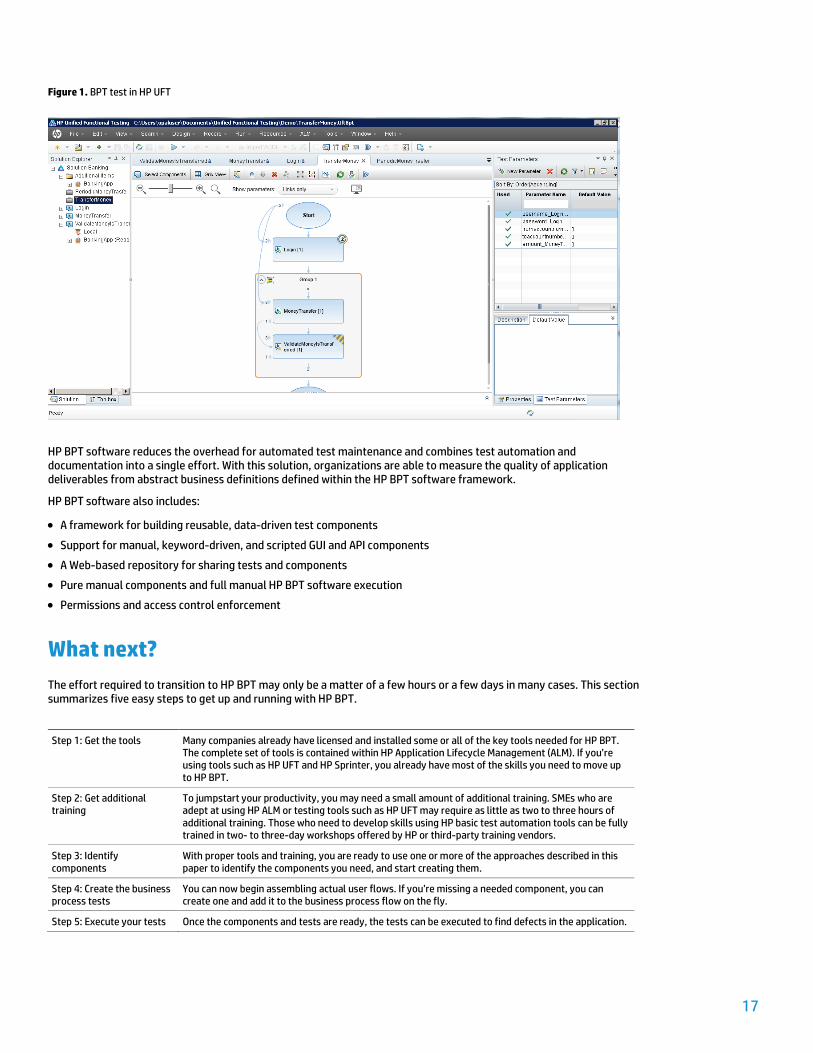
Figure 1. BPT test in HP UFT
HP BPT software reduces the overhead for automated test maintenance and combines test automation and documentation into a single effort. With this solution, organizations are able to measure the quality of application deliverables from abstract business definitions defined within the HP BPT software framework.
HP BPT software also includes:
• A framework for building reusable, data-driven test components
• Support for manual, keyword-driven, and scripted GUI and API components
• A Web-based repository for sharing tests and components
• Pure manual components and full manual HP BPT software execution
• Permissions and access control enforcement
What next? The effort required to transition to HP BPT may only be a matter of a few hours or a few days in many cases. This section summarizes five easy steps to get up and running with HP BPT.
Step 1: Get the tools Many companies already have licensed and installed some or all of the key tools needed for HP BPT. The complete set of tools is contained within HP Application Lifecycle Management (ALM). If you’re using tools such as HP UFT and HP Sprinter, you already have most of the skills you need to move up to HP BPT.
Step 2: Get additional training
To jumpstart your productivity, you may need a small amount of additional training. SMEs who are adept at using HP ALM or testing tools such as HP UFT may require as little as two to three hours of additional training. Those who need to develop skills using HP basic test automation tools can be fully trained in two- to three-day workshops offered by HP or third-party training vendors.
Step 3: Identify components
With proper tools and training, you are ready to use one or more of the approaches described in this paper to identify the components you need, and start creating them.
Step 4: Create the business process tests
You can now begin assembling actual user flows. If you’re missing a needed component, you can create one and add it to the business process flow on the fly.
Step 5: Execute your tests Once the components and tests are ready, the tests can be executed to find defects in the application.
17
Conclusion This is the first in a series of papers on building a component-based test automation framework. In future installments of this series, we will discuss issues such as:
• Choosing the right componentization methodology for you
• How to decide which parameters your components should expose
• Executing tests and analyzing the results
• Maintaining components and tests
• And other essential topics
For more information To read more about HP Business Process Testing and HP Unified Functional Testing, go to: hp.com/go/uft and hp.com/go/functionaltesting
Also visit
QTP LinkedIn group
“The Future of Testing” blog
Get connected hp.com/go/getconnected
Current HP driver, support, and security alerts delivered directly to your desktop
© Copyright 2012 Hewlett-Packard Development Company, L.P. The information contained herein is subject to change without notice. The only warranties for HP products and services are set forth in the express warranty statements accompanying such products and services. Nothing herein should be construed as constituting an additional warranty. HP shall not be liable for technical or editorial errors or omissions contained herein.
Oracle and Java are registered trademarks of Oracle and/or its affiliates.
4AA4-4175ENW, Created December 2012