Embed Size (px)
Citation preview

Farmers are inventive people. When faced with a problem, their creative minds fire up and come up with solutions. This
project is the result of discussions with farmers about food safety on their wash lines. Many farms work with a harvest
volume that doesn’t warrant automated washing and packing equipment, but these famers still need a system to
transform field harvested produce into saleable product. We designed this wash-line plan for small-scale farmers who
wish to increase their efficiency and minimize microbial risk in post-harvest handling. The modular wash line plan shows
that incorporating food safety practices can be affordable. Farmers can creatively minimize microbial risk cost
effectively.
Farm Food Safety:
Building an Easy Clean Produce Wash Table
Challenges and Goals:
Although common on small farms, wooden
surfaces are hard to clean and can harbor
bacterial pathogens. Our plan for effective
wash equipment uses materials that are:
non-porous
easy to clean
inexpensive
locally available
These qualities minimize microbial risk on
small farms. The design also features:
Sealed joints so water & debris
cannot seep in
A table surface that won’t allow
water to pool.
A modular design allows for easy
expansion and reorganization as the
farm grows and changes.
A simple design: coated aluminum sawhorses table for the legs, PVC pipes
and fittings for the frame and vinyl coated metal fencing for the tabletop.
Small Farm Wash Line: Planning
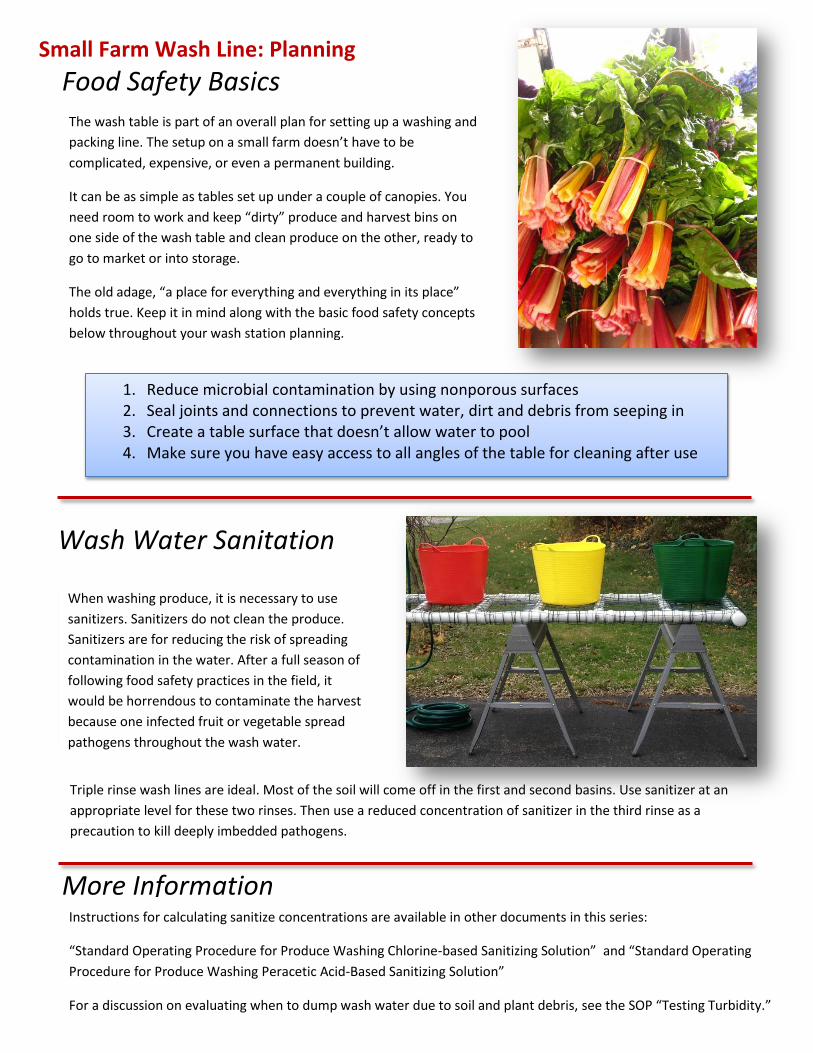
When washing produce, it is necessary to use
sanitizers. Sanitizers do not clean the produce.
Sanitizers are for reducing the risk of spreading
contamination in the water. After a full season of
following food safety practices in the field, it
would be horrendous to contaminate the harvest
because one infected fruit or vegetable spread
pathogens throughout the wash water.
The wash table is part of an overall plan for setting up a washing and
packing line. The setup on a small farm doesn’t have to be
complicated, expensive, or even a permanent building.
It can be as simple as tables set up under a couple of canopies. You
need room to work and keep “dirty” produce and harvest bins on
one side of the wash table and clean produce on the other, ready to
go to market or into storage.
The old adage, “a place for everything and everything in its place”
holds true. Keep it in mind along with the basic food safety concepts
below throughout your wash station planning.
Wash Water Sanitation
Triple rinse wash lines are ideal. Most of the soil will come off in the first and second basins. Use sanitizer at an
appropriate level for these two rinses. Then use a reduced concentration of sanitizer in the third rinse as a
precaution to kill deeply imbedded pathogens.
1. Reduce microbial contamination by using nonporous surfaces 2. Seal joints and connections to prevent water, dirt and debris from seeping in 3. Create a table surface that doesn’t allow water to pool 4. Make sure you have easy access to all angles of the table for cleaning after use
Instructions for calculating sanitize concentrations are available in other documents in this series:
“Standard Operating Procedure for Produce Washing Chlorine-based Sanitizing Solution” and “Standard Operating
Procedure for Produce Washing Peracetic Acid-Based Sanitizing Solution”
For a discussion on evaluating when to dump wash water due to soil and plant debris, see the SOP “Testing Turbidity.”
Food Safety Basics
More Information

Materials: Quantity
2" Schedule 40 PVC pipe:*
Cross pieces Eight 20” pieces (160”)
Outside frame pieces Twelve 9.5” pieces (114”)
Outside frame pieces for end of table for use with shelf
Two 14” pieces (28”)
2" 4-way PVC joint (Schedule 40 cross) 4
2" PVC 3-way T-joint 16
Cable Ties - 14” Three packs of 20
2" x 3" 16 gauge vinyl coated wire fencing** 18’
PVC cement One 8 ounce can
DAP Alex Ultra 230 Indoor/Outdoor sealant 1 tube
Metal folding sawhorses 3
3/4" x 72" iron pipe*** 2
3/4" x 24" iron pipe*** 2
3/4" iron couplers 2
For a list of costs, see the attached spreadsheets.
*The 2” schedule 40 pipes comes in 10' lengths. We purchased three and
used about 25 feet for the table frame. We used the remainder for other
parts of the project.
**2" x 3" 16 gauge vinyl coated wire fencing comes in a 3' x 50' roll, so
we used in a double layer for strength. We used the rest of the roll for
other parts of the project.
***The iron pipe provides internal support for the PVC frame.
Small Farm Wash Line: Planning
We worked with small-scale vegetable growers to
determine the dimensions of our demonstration
table. The table is long enough for three washtubs
with space at the end for letting the washed produce
“drip dry” before packing. The size of your washtubs
will dictate the width and length of your table. The
frame must support the tubs on both sides to bear
the weight of the tubs when filled with water and
produce. We decided it should be at least 8ft long
and about 24” wide. The completed table is 8.5 feet
long and 26 inches wide.
Dimensions
PVC joints add length:
When planning the
dimensions of your
table and lengths of
each piece of PVC,
include the size of each
connecting joint.
Materials
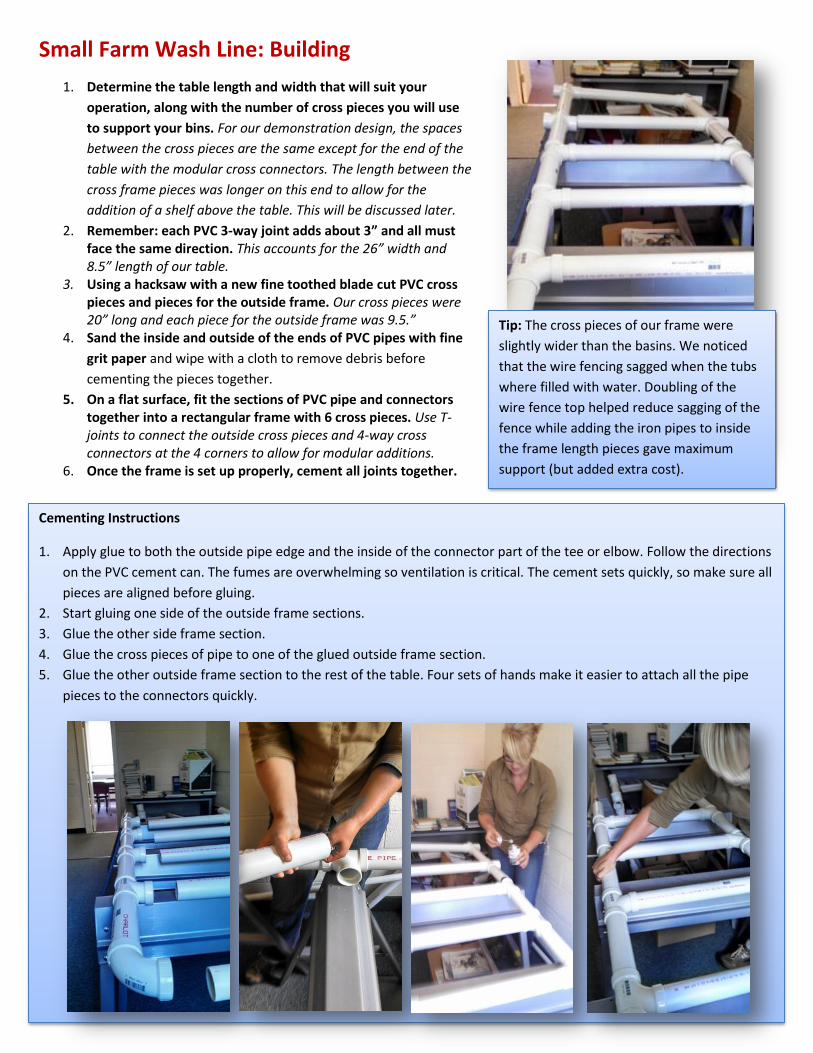
1. Determine the table length and width that will suit your
operation, along with the number of cross pieces you will use
to support your bins. For our demonstration design, the spaces
between the cross pieces are the same except for the end of the
table with the modular cross connectors. The length between the
cross frame pieces was longer on this end to allow for the
addition of a shelf above the table. This will be discussed later.
2. Remember: each PVC 3-way joint adds about 3” and all must face the same direction. This accounts for the 26” width and 8.5” length of our table.
3. Using a hacksaw with a new fine toothed blade cut PVC cross pieces and pieces for the outside frame. Our cross pieces were 20” long and each piece for the outside frame was 9.5.”
4. Sand the inside and outside of the ends of PVC pipes with fine
grit paper and wipe with a cloth to remove debris before
cementing the pieces together.
5. On a flat surface, fit the sections of PVC pipe and connectors together into a rectangular frame with 6 cross pieces. Use T-joints to connect the outside cross pieces and 4-way cross connectors at the 4 corners to allow for modular additions.
6. Once the frame is set up properly, cement all joints together.
Small Farm Wash Line: Building
Tip: The cross pieces of our frame were
slightly wider than the basins. We noticed
that the wire fencing sagged when the tubs
where filled with water. Doubling of the
wire fence top helped reduce sagging of the
fence while adding the iron pipes to inside
the frame length pieces gave maximum
support (but added extra cost).
Cementing Instructions
1. Apply glue to both the outside pipe edge and the inside of the connector part of the tee or elbow. Follow the directions
on the PVC cement can. The fumes are overwhelming so ventilation is critical. The cement sets quickly, so make sure all
pieces are aligned before gluing.
2. Start gluing one side of the outside frame sections.
3. Glue the other side frame section.
4. Glue the cross pieces of pipe to one of the glued outside frame section.
5. Glue the other outside frame section to the rest of the table. Four sets of hands make it easier to attach all the pipe
pieces to the connectors quickly.
Small Farm Wash Line: Building
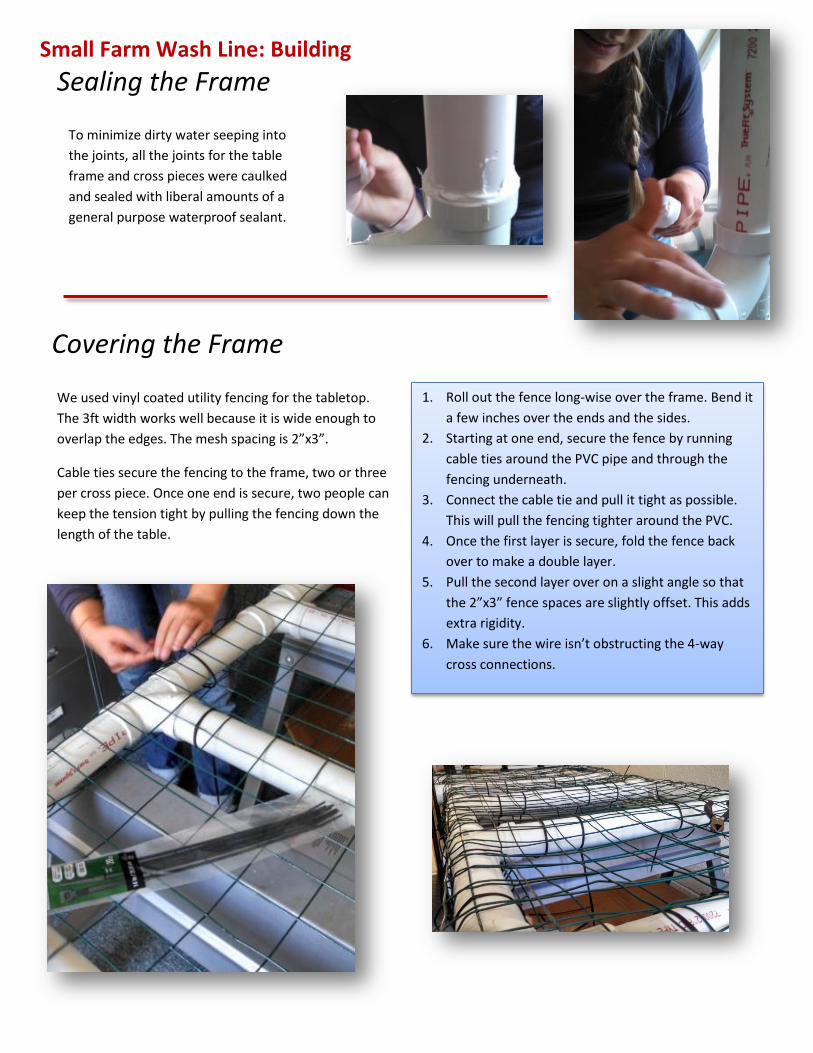
To minimize dirty water seeping into
the joints, all the joints for the table
frame and cross pieces were caulked
and sealed with liberal amounts of a
general purpose waterproof sealant.
Sealing the Frame
Covering the Frame
We used vinyl coated utility fencing for the tabletop.
The 3ft width works well because it is wide enough to
overlap the edges. The mesh spacing is 2”x3”.
Cable ties secure the fencing to the frame, two or three
per cross piece. Once one end is secure, two people can
keep the tension tight by pulling the fencing down the
length of the table.
1. Roll out the fence long-wise over the frame. Bend it
a few inches over the ends and the sides.
2. Starting at one end, secure the fence by running
cable ties around the PVC pipe and through the
fencing underneath.
3. Connect the cable tie and pull it tight as possible.
This will pull the fencing tighter around the PVC.
4. Once the first layer is secure, fold the fence back
over to make a double layer.
5. Pull the second layer over on a slight angle so that
the 2”x3” fence spaces are slightly offset. This adds
extra rigidity.
6. Make sure the wire isn’t obstructing the 4-way
cross connections.
Materials
Sawhorse brackets (pack of 2) 2
Wood for sawhorses 2"x4"x 8' 3
Wood for table 2"x3"x8' 3
2" Corner brackets (packs of 4) 3
Cable Ties (pack of 20) 1
2" x 3" 16 gauge vinyl coated wire fencing (feet) 9
Paint 0
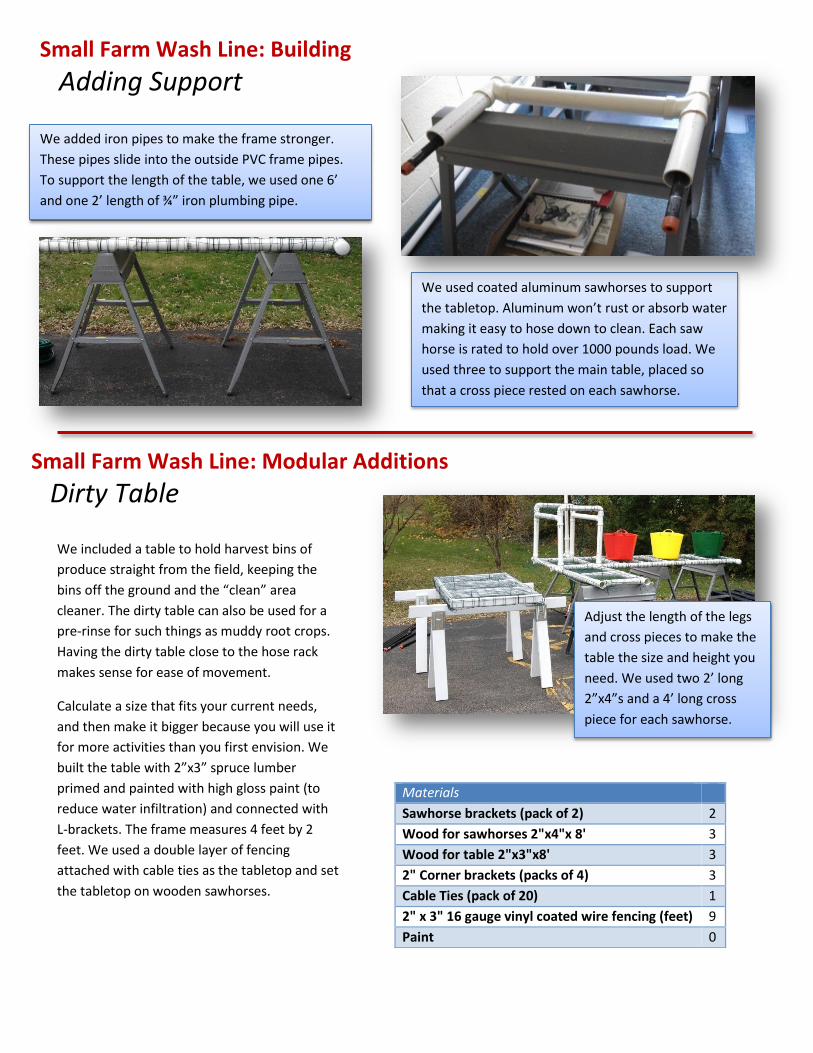
We used coated aluminum sawhorses to support
the tabletop. Aluminum won’t rust or absorb water
making it easy to hose down to clean. Each saw
horse is rated to hold over 1000 pounds load. We
used three to support the main table, placed so
that a cross piece rested on each sawhorse.
Small Farm Wash Line: Building
Adding Support
Dirty Table
We added iron pipes to make the frame stronger.
These pipes slide into the outside PVC frame pipes.
To support the length of the table, we used one 6’
and one 2’ length of ¾” iron plumbing pipe.
Small Farm Wash Line: Modular Additions
We included a table to hold harvest bins of
produce straight from the field, keeping the
bins off the ground and the “clean” area
cleaner. The dirty table can also be used for a
pre-rinse for such things as muddy root crops.
Having the dirty table close to the hose rack
makes sense for ease of movement.
Calculate a size that fits your current needs,
and then make it bigger because you will use it
for more activities than you first envision. We
built the table with 2”x3” spruce lumber
primed and painted with high gloss paint (to
reduce water infiltration) and connected with
L-brackets. The frame measures 4 feet by 2
feet. We used a double layer of fencing
attached with cable ties as the tabletop and set
the tabletop on wooden sawhorses.
Adjust the length of the legs
and cross pieces to make the
table the size and height you
need. We used two 2’ long
2”x4”s and a 4’ long cross
piece for each sawhorse.

Materials (units) Units
2" Schedule 40 PVC pipe:
Cross pieces (2 x 16.5") 33 in
Uprights (4 x 18") 72 in
Side pieces (2 x 28") 56 in
2" PVC T-joint 4
2" PVC Elbows 4
Cable Ties (pack of 20) 1 pack
2" x 3" 16 gauge vinyl coated wire fencing 6 ft
PVC cement 8 oz can
DAP Alex Ultra 230 Indoor/Outdoor sealant 1 tube
Not washing may be safer than washing produce in
terms of food safety. Customer demand influences how
you handle this, especially with greens or heads of
lettuce. Spraying produce with a hose to rinse off soil
and debris can reduce the cross contamination that
dunking poses. Spraying produce requires potable
water, but since the water only touches produce once,
sanitizer is not necessary.
1. 1. Connect T-joints to the 4-way cross connectors using
a 2” length of PVC pipe into 4-1” pieces and insert them
into the ends of the 4-way cross connectors and the
tees as shown in the picture above.
2. 2. Insert the 18” PVC pipe sections into each tee. Attach
tees to these sections then connect the 2-28” side
pieces into the tees. Cut 4-1”PVC pipe pieces as above
to insert into each T-joint’s top opening.
3. 3. Connect 2” elbows and insert a 16” cross piece into
the elbows.
4. 4. Seal all joints and cover rack with vinyl coated fencing
as detailed in table instructions.
Small Farm Wash Line: Modular Additions
Spray Rack
Cross connectors allow modular
additions off three sides.
We built a modular rack to add on to the end of the table.
As mentioned earlier, the last section of the table was 14”
rather than the 9.5” & tee segment. This created a slightly
deeper section on this end. Rather than using tees for the
last four connections, we used four 4-way cross
connectors.
Using the rack, heads of lettuce may be spray cleaned
rather than dunked if soil load is light. To a hold the lettuce
in place, use a wire bin set up on the rack. This allows you
to spray from all sides with ease.
The rack attaches to the table with T-joints that insert
into 4-way crosses. This end of the table is wider than
the other sections to accommodate the rack.
Modular Table Extension Units
2" Schedule 40 PVC pipe:
Frame side pieces (4 x 16") 64 in
Side cross pieces (2 x 14") 28 in
2" PVC tees 4
Cable Ties (pack of 20) 1
2" x 3" 16 gauge vinyl coated wire fencing 7 ft
PVC cement 8 oz can
DAP Alex Ultra 230 Indoor/Outdoor sealant 1 tube
Metal folding sawhorses 1
3/4" x 5' iron pipe 1
3/4" x 3' iron pipe 1
Small Farm Wash Line: Modular Additions
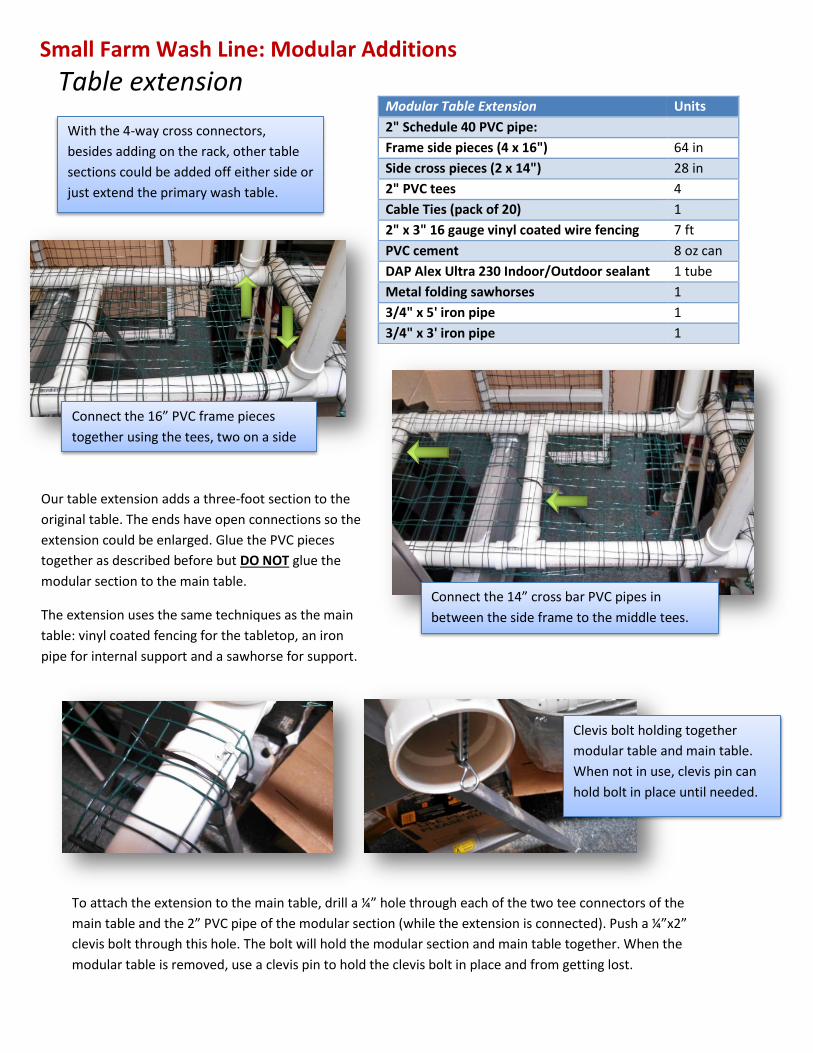
Table extension
With the 4-way cross connectors,
besides adding on the rack, other table
sections could be added off either side or
just extend the primary wash table.
Connect the 16” PVC frame pieces
together using the tees, two on a side
Our table extension adds a three-foot section to the
original table. The ends have open connections so the
extension could be enlarged. Glue the PVC pieces
together as described before but DO NOT glue the
modular section to the main table.
The extension uses the same techniques as the main
table: vinyl coated fencing for the tabletop, an iron
pipe for internal support and a sawhorse for support.
Connect the 14” cross bar PVC pipes in
between the side frame to the middle tees.
To attach the extension to the main table, drill a ¼” hole through each of the two tee connectors of the
main table and the 2” PVC pipe of the modular section (while the extension is connected). Push a ¼”x2”
clevis bolt through this hole. The bolt will hold the modular section and main table together. When the
modular table is removed, use a clevis pin to hold the clevis bolt in place and from getting lost.
Clevis bolt holding together
modular table and main table.
When not in use, clevis pin can
hold bolt in place until needed.
Hose Support Materials
2" Schedule 40 PVC pipe:
Upright (1 x 32") 32 in
2" PVC Tee 1
Garden hose 50ft 1
Hose holder 1
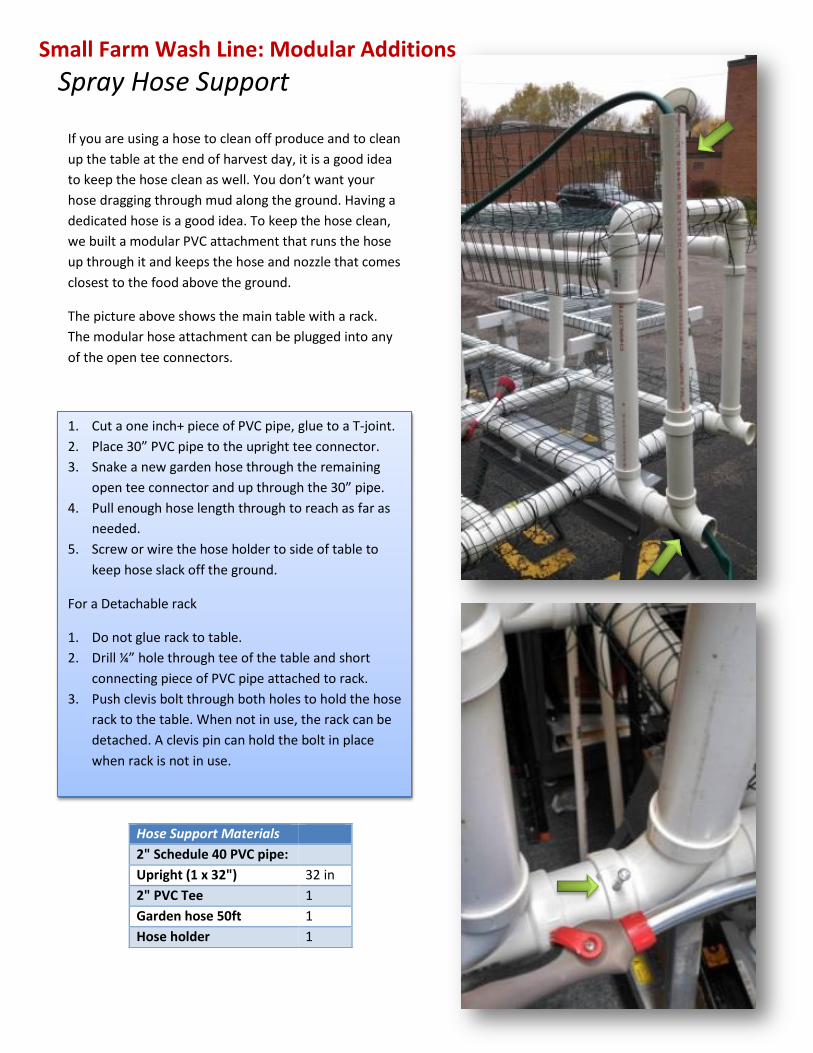
Small Farm Wash Line: Modular Additions
Spray Hose Support
If you are using a hose to clean off produce and to clean
up the table at the end of harvest day, it is a good idea
to keep the hose clean as well. You don’t want your
hose dragging through mud along the ground. Having a
dedicated hose is a good idea. To keep the hose clean,
we built a modular PVC attachment that runs the hose
up through it and keeps the hose and nozzle that comes
closest to the food above the ground.
The picture above shows the main table with a rack.
The modular hose attachment can be plugged into any
of the open tee connectors.
1. Cut a one inch+ piece of PVC pipe, glue to a T-joint.
2. Place 30” PVC pipe to the upright tee connector.
3. Snake a new garden hose through the remaining
open tee connector and up through the 30” pipe.
4. Pull enough hose length through to reach as far as
needed.
5. Screw or wire the hose holder to side of table to
keep hose slack off the ground.
For a Detachable rack
1. Do not glue rack to table.
2. Drill ¼” hole through tee of the table and short
connecting piece of PVC pipe attached to rack.
3. Push clevis bolt through both holes to hold the hose
rack to the table. When not in use, the rack can be
detached. A clevis pin can hold the bolt in place
when rack is not in use.
Small Farm Wash Line
Product Flow
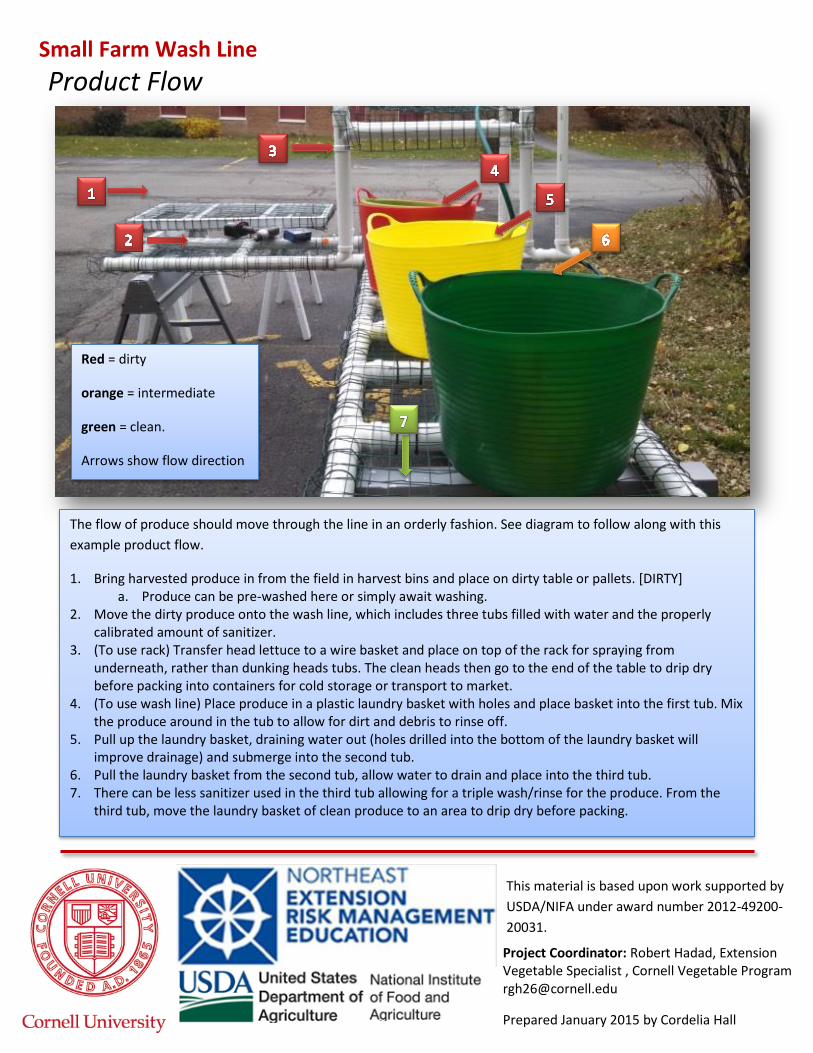
Red = dirty
orange = intermediate
green = clean.
Arrows show flow direction
The flow of produce should move through the line in an orderly fashion. See diagram to follow along with this
example product flow.
1. Bring harvested produce in from the field in harvest bins and place on dirty table or pallets. [DIRTY] a. Produce can be pre-washed here or simply await washing.
2. Move the dirty produce onto the wash line, which includes three tubs filled with water and the properly calibrated amount of sanitizer.
3. (To use rack) Transfer head lettuce to a wire basket and place on top of the rack for spraying from underneath, rather than dunking heads tubs. The clean heads then go to the end of the table to drip dry before packing into containers for cold storage or transport to market.
4. (To use wash line) Place produce in a plastic laundry basket with holes and place basket into the first tub. Mix the produce around in the tub to allow for dirt and debris to rinse off.
5. Pull up the laundry basket, draining water out (holes drilled into the bottom of the laundry basket will improve drainage) and submerge into the second tub.
6. Pull the laundry basket from the second tub, allow water to drain and place into the third tub. 7. There can be less sanitizer used in the third tub allowing for a triple wash/rinse for the produce. From the
third tub, move the laundry basket of clean produce to an area to drip dry before packing.
This material is based upon work supported by
USDA/NIFA under award number 2012-49200-
20031.
Project Coordinator: Robert Hadad, Extension Vegetable Specialist , Cornell Vegetable Program [email protected]
Prepared January 2015 by Cordelia Hall