Embed Size (px)
Citation preview
7/28/2019 Building a Simple Android App
http://slidepdf.com/reader/full/building-a-simple-android-app 1/9
Building a simple Android app
In Chapter two of our masterclass on building your own Android app, we move beyond basic concepts and built a
very simple app.
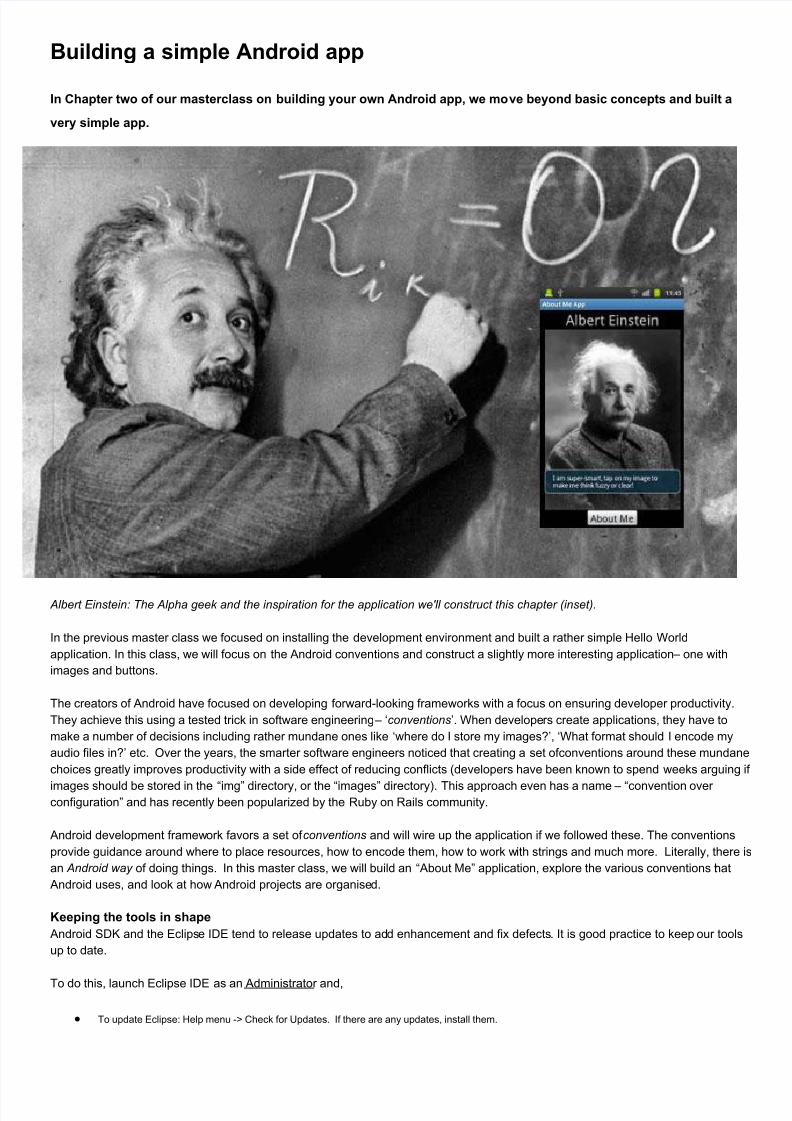
Albert Einstein: The Alpha geek and the inspiration for the application we'll construct this chapter (inset).
In the previous master class we focused on installing the development environment and built a rather simple Hello World
application. In this class, we will focus on the Android conventions and construct a slightly more interesting application – one with
images and buttons.
The creators of Android have focused on developing forward-looking frameworks with a focus on ensuring developer productivity.
They achieve this using a tested trick in software engineering – ‘conventions’. When developers create applications, they have to
make a number of decisions including rather mundane ones like ‘where do I store my images?’, ‘What format should I encode my
audio files in?’ etc. Over the years, the smarter software engineers noticed that creating a set ofconventions around these mundane
choices greatly improves productivity with a side effect of reducing conflicts (developers have been known to spend weeks arguing if
images should be stored in the “img” directory, or the “images” directory). This approach even has a name – “convention over configuration” and has recently been popularized by the Ruby on Rails community.
Android development framework favors a set of conventions and will wire up the application if we followed these. The conventions
provide guidance around where to place resources, how to encode them, how to work with strings and much more. Literally, there is
an Android way of doing things. In this master class, we will build an “About Me” application, explore the various conventions that
Android uses, and look at how Android projects are organised.
Keeping the tools in shape
Android SDK and the Eclipse IDE tend to release updates to add enhancement and fix defects. It is good practice to keep our tools
up to date.
To do this, launch Eclipse IDE as an Administrator and,
To update Eclipse: Help menu -> Check for Updates. If there are any updates, install them.
7/28/2019 Building a Simple Android App
http://slidepdf.com/reader/full/building-a-simple-android-app 2/9
To update Android SDK: Window -> Android SDK and AVD Manager. Select Installed Packages (in the list on left), Click “Update
All…” button and accept all updates that are shown to be available. This will update only the Android packages that you have
installed earlier. This process often takes many minutes to complete. If you experience any errors in the update process, check to
make sure that you are running the update as an administrator (esp. in Windows Vista/7).
Exploring an Android Project
Convention in Android are enforced via naming and folder organization. The best way to understand these is by walking through a
project. Open the Hello Android project from the last Master Class to view the previous master class. If you haven't already done so,download the relevant project files:
Files
Images folder
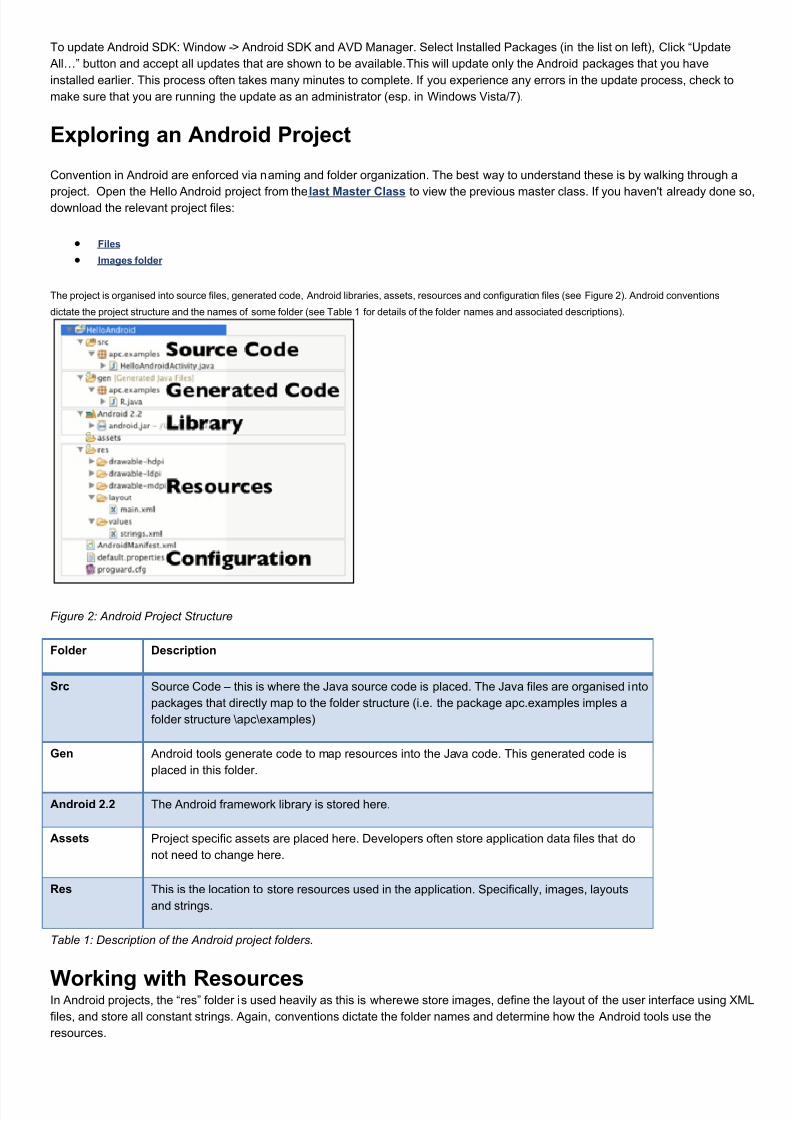
The project is organised into source files, generated code, Android libraries, assets, resources and configuration files (see Figure 2). Android conventions
dictate the project structure and the names of some folder (see Table 1 for details of the folder names and associated descriptions).
Figure 2: Android Project Structure
Folder Description Src Source Code – this is where the Java source code is placed. The Java files are organised into
packages that directly map to the folder structure (i.e. the package apc.examples imples a
folder structure \apc\examples)
Gen Android tools generate code to map resources into the Java code. This generated code is
placed in this folder.
Android 2.2 The Android framework library is stored here.
Assets Project specific assets are placed here. Developers often store application data files that do
not need to change here.
Res This is the location to store resources used in the application. Specifically, images, layouts
and strings.
Table 1: Description of the Android project folders.
Working with ResourcesIn Android projects, the “res” folder is used heavily as this is where we store images, define the layout of the user interface using XML
files, and store all constant strings. Again, conventions dictate the folder names and determine how the Android tools use the
resources.
7/28/2019 Building a Simple Android App
http://slidepdf.com/reader/full/building-a-simple-android-app 3/9
Images are stored in the folder names starting with “drawable”, and by default we have three different drawable folders:drawable-
hdpi , drawable-mdpi , and drawable-ldpi . Why do we need so many different folders? The key reason is that Android devices come in
different screen sizes and form factors. We can get Android phones with screen sizes ranging from ~ 2” to a little over 4” offering a
range of pixel densities (tablets are in the 7” – 10” range). Given the range of pixel densities, the best way to achieve an optimal and
elegant UI is to havethe ability to use images created for different densities. Application designers prefer to use a simple icon
optimised for 160dpi, and an icon with additional detail for a 240 dpi screen. This is essentially the core reason for multiple drawable
folders.
The conventions allow us to place images for low-density screens in drawable-ldpi, and similarly the mdpi folder allows us to place
medium-density images, while the hdpi folder is where we place the high-density images. The convention dictates that the file nameis identical in all three folders. The Android runtime will then select the most appropriate image based on the pixel density supported
by the device that runs the application. There are other extensions as well for the drawable folder, for example resources targetting
TV screens are placed in drawable-tvdpi (see http://bit.ly/cqFZNM for a full list of the supported screen densities and their post-fix
notation). Interestingly, we do not need to provide resources at every pixel density. The Android runtime will work with the highest
resolution resources available and scale-down (or up) to map to the pixel density of the screen. In most cases, this works reasonably
well, but auto-scaled images do not provide an optimal look – especially icons.
Separation of Concerns
Just like the use of conventions, another proven principle in software engineering is the “seperation of concerns”. This principle
recommends keeping related concepts and abstractions together. A common use of this principle is applied by seperating the layoutof user interface and the functional code as it greatly improves maintainability and makes changes easier to undertake.On the web,
we see this in action with layout management handled by CSS, and complex interactions provided by Javascript with the content
coded in HTML.
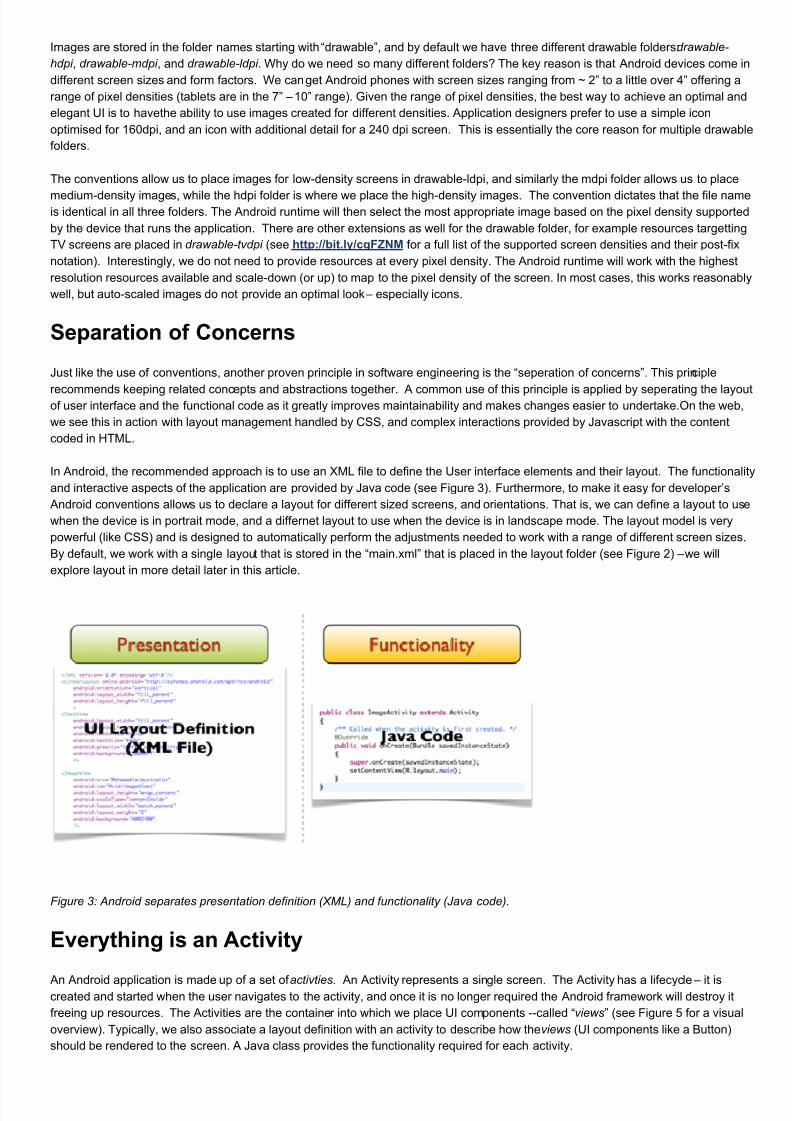
In Android, the recommended approach is to use an XML file to define the User interface elements and their layout. The functionality
and interactive aspects of the application are provided by Java code (see Figure 3). Furthermore, to make it easy for developer’s
Android conventions allows us to declare a layout for different sized screens, and orientations. That is, we can define a layout to use
when the device is in portrait mode, and a differnet layout to use when the device is in landscape mode. The layout model is very
powerful (like CSS) and is designed to automatically perform the adjustments needed to work with a range of different screen sizes.
By default, we work with a single layout that is stored in the “main.xml” that is placed in the layout folder (see Figure 2) – we will
explore layout in more detail later in this article.
Figure 3: Android separates presentation definition (XML) and functionality (Java code).
Everything is an Activity
An Android application is made up of a set of activties. An Activity represents a single screen. The Activity has a lifecycle – it iscreated and started when the user navigates to the activity, and once it is no longer required the Android framework will destroy it
freeing up resources. The Activities are the container into which we place UI components -- called “views” (see Figure 5 for a visual
overview). Typically, we also associate a layout definition with an activity to describe how the views (UI components like a Button)
should be rendered to the screen. A Java class provides the functionality required for each activity.

7/28/2019 Building a Simple Android App
http://slidepdf.com/reader/full/building-a-simple-android-app 4/9
The Android SDK provides a number of built-in views (UI components) to greatly increase developer productivity. We have access to
the standard widgets like Buttons, Text fields, labels, Radio buttons and much much more. There is a graphical editor in Eclipse to
help layout the views in an Activity (see Figure 5). The framework provides a number of different “layout managers” to help layout the
views. The simplest of these is the Linear Layout that allows us to place components either horizontally (next to each other), or
vertically (under each other). Thelayout managers offer control over alignment, proportional width/height management, and have a
concept of gravity that will provide additional control. We will explore layout management and working with views in further detail as
we start to construct the application in this and subsequent classes.
Figure 4: Android apps are made of activities that contain views
Figure 5: Eclipse IDE has a powerful and graphical layout editor to help construct the UI
7/28/2019 Building a Simple Android App
http://slidepdf.com/reader/full/building-a-simple-android-app 5/9
The About Me Application
In this master class we have covered the “Android way” so far. Specifically how a project is organised via the use of conventions, and
the seperation of concerns. Now, lets get our feet wet and build a simple application. The application that we construct will make use
of images of Einstein -- the alpha geek. You can substitute with images of yourself, a friend or any PNG file. Keep image files under 1
Mb since many older generation Android devices do not work with larger resources.
Our application will contain a single button (About Me) that will display a short toast message. Toast messages are short text
messages that show up for a few seconds allowing the user to read it and then they fade away. We will make the application
interesting, by changing the image when the user taps the image. To keep things simple, we will use two images of the good
professor – one that is fuzzy and another that is sharp. When the user touches the screen, the application will flip between the fuzzy
image and the sharp image.
Creating the “About Me” Project
We will create a default Android project, and then customise it for our requirements. Open Eclipse IDE and follow these steps to
create the project:
1. File Menu -> New Project. Select Android Project. This will open the New Project dialog.
2. In the New Project dialog, type in “AboutMe” for the project name.
3. Select “Android 2.2” for the build target.
4. Application name is also “AboutMe” (this will be filled in by default, so you do not need to change it).
5. Type in “apc.examples” for the package name.
6. Click “Finish”. This will create the project structure and populateit with default values.
7. Once the project has been created, using the package explorer open “AboutMeActivity.java” (this is under src/apc.examples). This Java file provides
the interactive functionality of activity.
8. Also open, main.xml (this is under res/layout). This XML file defines the layout of the views. The layout XML file will open in the graphical layout
editor view (see Figure 5). If the view you get does not look similar to this, look at the tabs in the bottom – you may have to select the graphical
layout view. If the graphical view still does not look like Figure 5, then you may have to update the tooling as described in the “Keeping your tools in
shape section earlier in this article).
The AboutMeActivity.java file contains the Activity class and by default it has one method (onCreate) that is called by the Androidframework when this Activity is launched – which is triggered when we start the Application (see Code Snippet 1).
public void onCreate(Bundle savedInstanceState) {
super.onCreate(savedInstanceState);
setContentView(R.layout.main);
}
Code Snippet 1: The method (function) that is called when an Activity is launched
References to Resources
The most important part of this onCreate method is the line where we connect the Activity to the layout. This is done by the call
to setContentView and we tell it to use the “main” layout. When we create any layout XML file and place it in res/layout folder
the Android tools will compile the XML and generate a reference to it in the R class. Hence, we get the reference to the main.xml file
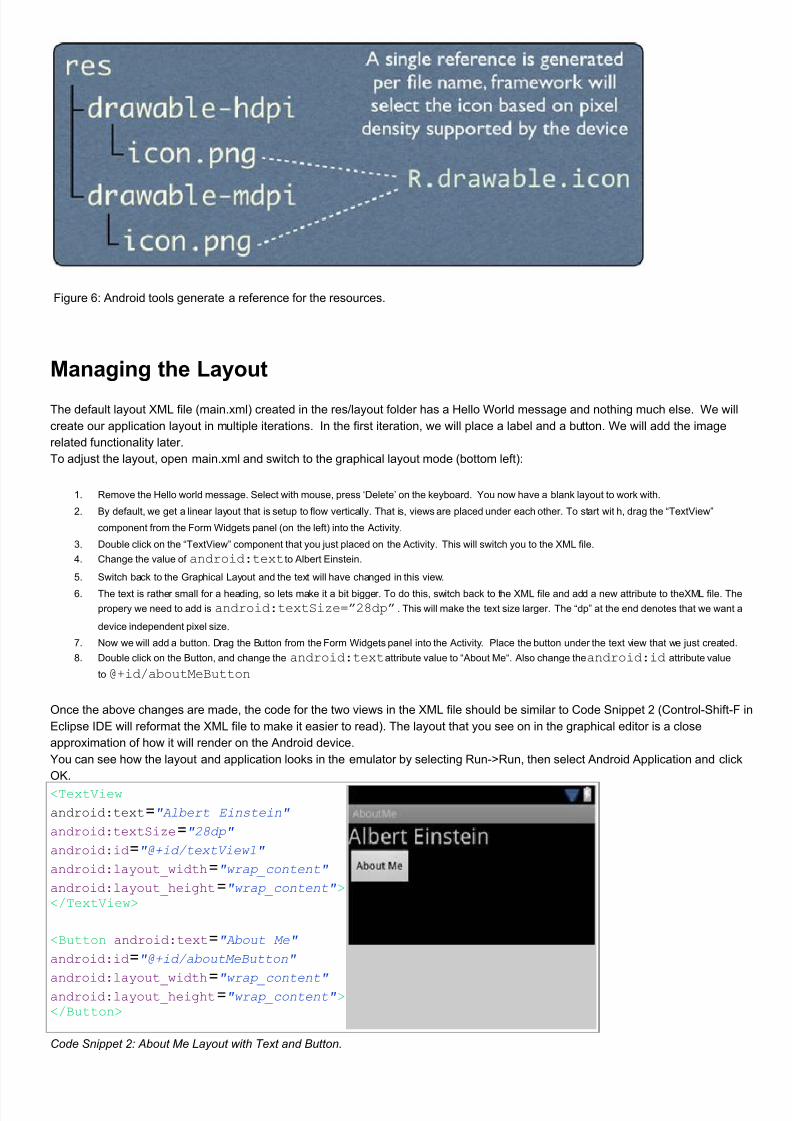
as R.layout.main. Similarly, when we place images in res/drawable, we get references to them as R.drawable.<image-name> -- for
example, R.drawable.icon.
Android framework will generate a single reference name per image name. The best part is we do not have to worry about dealing if
different pixel densities. That is, if we generate medium-density and high-density icons, as long as they are called the same name
and placed in drawable-mdpi and drawable-hdpi folders respectively the framework will generate a single reference and willautomatically use the best resource for the device (see Figure 6).
7/28/2019 Building a Simple Android App
http://slidepdf.com/reader/full/building-a-simple-android-app 6/9
Figure 6: Android tools generate a reference for the resources.
Managing the Layout
The default layout XML file (main.xml) created in the res/layout folder has a Hello World message and nothing much else. We will
create our application layout in multiple iterations. In the first iteration, we will place a label and a button. We will add the image
related functionality later.
To adjust the layout, open main.xml and switch to the graphical layout mode (bottom left):
1. Remove the Hello world message. Select with mouse, press ‘Delete’ on the keyboard. You now have a blank layout to work with.
2. By default, we get a linear layout that is setup to flow vertically. That is, views are placed under each other. To start with, drag the “TextView”
component from the Form Widgets panel (on the left) into the Activity.
3. Double click on the “TextView” component that you just placed on the Activity. This will switch you to the XML file.
4. Change the value of android:textto Albert Einstein.
5. Switch back to the Graphical Layout and the text will have changed in this view.
6. The text is rather small for a heading, so lets make it a bit bigger. To do this, switch back to the XML file and add a new attribute to theXML file. The
propery we need to add is android:textSize=”28dp” . This will make the text size larger. The “dp” at the end denotes that we want a
device independent pixel size.
7. Now we will add a button. Drag the Button from the Form Widgets panel into the Activity. Place the button under the text view that we just created.
8. Double click on the Button, and change the android:textattribute value to “About Me“. Also change theandroid:id attribute value
to @+id/aboutMeButton
Once the above changes are made, the code for the two views in the XML file should be similar to Code Snippet 2 (Control-Shift-F in
Eclipse IDE will reformat the XML file to make it easier to read). The layout that you see on in the graphical editor is a close
approximation of how it will render on the Android device.
You can see how the layout and application looks in the emulator by selecting Run->Run, then select Android Application and click
OK.
<TextView
android:text="Albert Einstein"
android:textSize="28dp"
android:id="@+id/textView1"
android:layout_width="wrap_content"
android:layout_height="wrap_content"></TextView>
<Button android:text="About Me"
android:id="@+id/aboutMeButton"
android:layout_width="wrap_content" android:layout_height="wrap_content"></Button>
Code Snippet 2: About Me Layout with Text and Button.
7/28/2019 Building a Simple Android App
http://slidepdf.com/reader/full/building-a-simple-android-app 7/9
Deploying the Application to your Android Phone
If you have an Android phone and it is running Android 2.2 (or higher) then you can deploy the application to your phone. However,
first you have to set your phone to development mode by going to Settings -> Applications -> Development and Enable USB
Debugging. Now, connect your device to the computer and Eclipse will show it as a potential target when you attempt to run the
application (Run menu -> Run). Eclipse IDE will sign the application; deploy to the phone, and then launch it. You will even see this
app as part of the applications installed on your phone after your disconnect the phone from your computer. One more thing, disable
USB debugging once you are done otherwise the phone often will not sync with any other software.
Making the Button FunctionalWe add the functionality for the button in the Java code file (AboutMeActivity.java) and wire up the code to run when the button is
clicked. First follow these steps and get the functionality to work, we will then go over how the magic works.
Make the following changes:
1. Open the main.xml layout file, and add the following attribute:
android:onClick="showAboutMessage"
2. Now open AboutMeActivity.java code file and add the following block of code (make sure it is before the closing brace. When you copy this code,
Eclipse will underline View, and Toast in red. This is because there is no reference to these classes. To fix, click on the light-bulb icon in the leftmargin, select the first option “Import View”. Similary, select “Import Toast”. This will import the functionality (or create an appropriate reference) of
these classes.
public void showAboutMessage(View v)
{
Toast.makeText(this, "I am super-smart!",
Toast.LENGTH_LONG).show();
}
3. Save the file, and Run it. This will deploy the new code, with a functional button. The application will display a Toast message that will stay on the
screen for a little while (see Figure 7).
Figure 7: Toast message displayed on the application, when button is clicked.
7/28/2019 Building a Simple Android App
http://slidepdf.com/reader/full/building-a-simple-android-app 8/9
If you have programmed before, you probably can guess how this block of code works. In Step 1, we added an attribute to the button
to tell it the function to execute when the button is clicked. The function itself is provided as a block of Java code in the Activity. The
Toast message is created using a class that is provided by Android framework – we provide the text and the length of time to show it
-- can be Toast.LENGTH_LONG, or Toast.LENGTH_SHORT.
Here is something we made earlier The rest of this master class will require typing in around 20 lines of code. However, if you wish, you can
download the entire project code and walk through that. Delete the project that you have created (including thefiles on the disk) and then follow these steps:
1. Download AboutMe.zip – this file contains the Eclipse project.2. Open Eclipse IDE,then File -> Import...3. General > ExistingProjects into Workspace4. Select the archive file radio button option5. Browse and select the AboutMe.zip file that you downloaded.6. Run -> Run (or Ctrl-F11) to launch the application.
Working with Images
Android SDK provides a built-in component to help us display images. The first step is to place the images that we want to work with
in the drawable folder. Do this by downloading the images from here. Uncompress the file into a temporary location, and move these
images into res/drawable-hdpi folder of the Android project. You can do this by dragging the files, directly into the folder in Eclipse
IDE – when it prompts you, select the copy option and confirm.
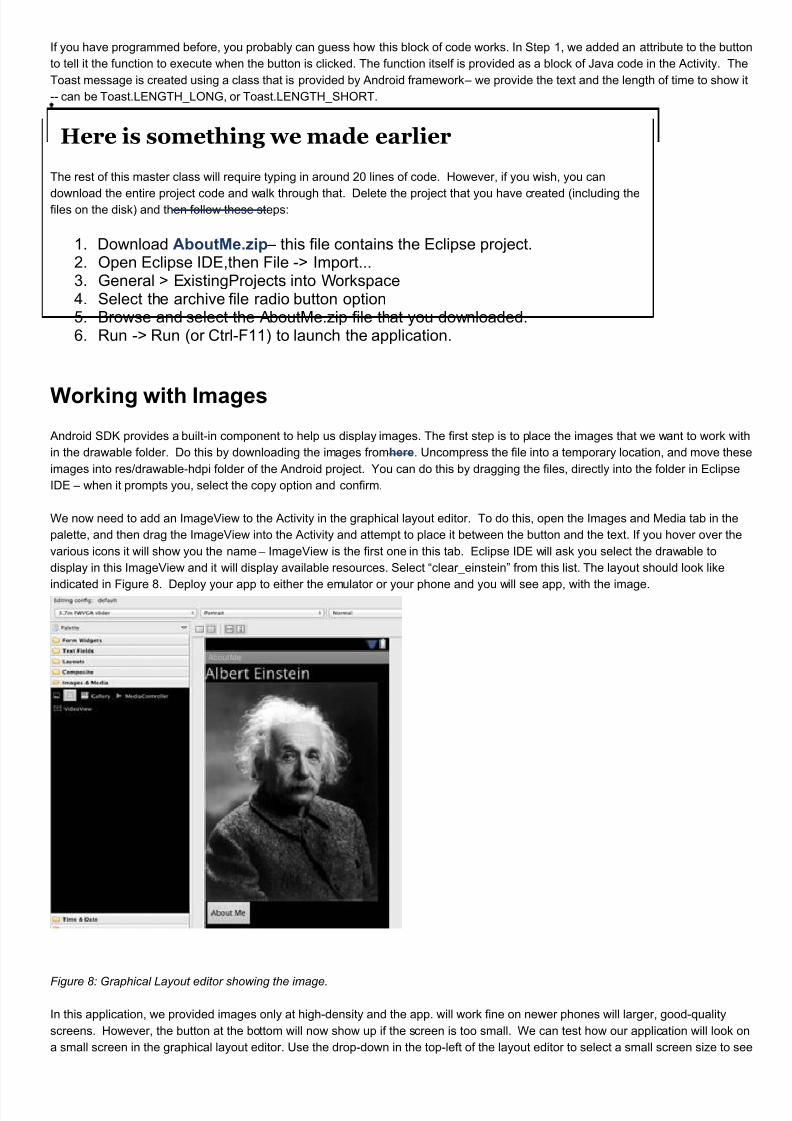
We now need to add an ImageView to the Activity in the graphical layout editor. To do this, open the Images and Media tab in the
palette, and then drag the ImageView into the Activity and attempt to place it between the button and the text. If you hover over the
various icons it will show you the name – ImageView is the first one in this tab. Eclipse IDE will ask you select the drawable to
display in this ImageView and it will display available resources. Select “clear_einstein” from this list. The layout should look like
indicated in Figure 8. Deploy your app to either the emulator or your phone and you will see app, with the image.
Figure 8: Graphical Layout editor showing the image.
In this application, we provided images only at high-density and the app. will work fine on newer phones will larger, good-quality
screens. However, the button at the bottom will now show up if the screen is too small. We can test how our application will look on
a small screen in the graphical layout editor. Use the drop-down in the top-left of the layout editor to select a small screen size to see
7/28/2019 Building a Simple Android App
http://slidepdf.com/reader/full/building-a-simple-android-app 9/9
how the application will look. If you select a 2.7” QVGA screen, the button at the bottom will dissapear. Thankfully, we can correct
this using a simple layout trick rather than by providing a lower-density image. We achieve this by providing a weighting for the
image that forces it to resize. Navigate to the layout XML file, and add the layout_weight attribute as shown in Code Snippet 3. Once
the weighting is provided, the application will show all of the UI properly in different devices. For a detailed description of how
weights work and other common layout tricks seehttp://bit.ly/cxgmzG.
<ImageView android:id="@+id/imageView1"
android:src="@drawable/clear_einstein"
android:layout_weight="1"
android:layout_height="wrap_content"
android:layout_width="wrap_content"
</ImageView>
Code Snippet 3: Image View updated with the layout weight attribute
Interacting with the Image
To make the application a little bit more interesting, lets add some code that allows us to interact with the image. When the user taps
the image, lets make it fuzzy (and vice-versa). To do this, we need to add an onClick attribute to the ImageView, and then add a
method in the Activity class that provides the logic needed.
Step 1: Make the following changes to the ImageView in the main.xml layout file:
android:id=@id/faceImageView"
android:onClick="flipImage"
The first change, gives the ImageView a better name as we can then identify it later from the Java Code. The second change, tells
the ImageView to call the flipImage method when the user taps on the image.
Step 2: Add the following code to AboutMeAcitivity.java, making sure that it is before the closing brace of the class.
private boolean fuzzyImage = false;
public void flipImage(View v) {
ImageView portrait = (ImageView) findViewById(R.id.faceImageView);
if (fuzzyImage) {
portrait.setImageResource(R.drawable. clear_einstein);
}else {portrait.setImageResource(R.drawable.fuzzy_einstein);
}
fuzzyImage = !fuzzyImage; // flip the state for next time
}
When you add the above code, Eclipse IDE will show some errors by underlining the ImageView in red. To correct this, click on the
light bulb (left margin) and select the very first import option. This will create a reference to the ImageView class from the SDK and
remove that error. You can run the fully working application now (Run -> Run). Feel free to change the images, and the Toast
message to your liking. The flipImage function above uses the “id” attribute of the Image (provided in the layout file) to find the view
and then we change the image based on the current state. If you are not familiar with Java, the code will seem a little obscure, but
we will cover some Java fundamentals in the next master class.