Embed Size (px)
Citation preview
If you have access to a few basic tools, building your own mink raft is a cost-effective and relatively simple task. If you don’t have the power tools we recommend, equivalent hand-tools will be fine. Using power tools, one person should be able to make five rafts in a standard working day. The dimensions of a mink raft allow for economical cutting of standard, off-the-shelf sheet materials. The material list (below) lists the standard products you’ll need, and in brackets, we list the quantity required to build one mink raft. All tools and materials are available from good builders merchants. Please follow the safety instructions provided by tool manufacturers. We recommend you read this guide, in conjunction with our GWCT Mink Raft guidelines (www.gwct.org.uk/minkraftguidelines), before purchasing new tools or materials, and before you start work.
www.gwct.org.uk
Building a GWCT Mink Raft
A step-by-step guide
Contents
- Recommended tool list- Materials and fixing- Step-by-step
construction guide- Where to go for
more information
ContactGame & Wildlife Conservation Trust’s Advisory Service, Fordingbridge, Hampshire, SP6 1EFTel: 01425 651013, Fax: 01425 655848Scottish HQ: 01828 650543Email: [email protected]
www.gwct.org.uk
The Game & Wildlife Conservation Trust
For over 75 years our scientists have been doing field research on declining wildlife species like grey partridge, black grouse and corn bunting. We are continually developing practical management techniques to reverse these declines, and the GWCT Mink Raft is one example with immediate value in water vole conservation.
Our aim is simple - a thriving countryside rich in game and other wildlife.
We are an independent charity reliant on voluntary donations and the support of people who care about the survival of our natural heritage.
Recommended tool list Circular saw with plywood cutting blade Jigsaw with fine-toothed or plywood blade Cordless drill Extension lead Appropriate safety wear Long straight edge Tape measure and ruler Two cramps (or G clamps) Tin-snips or wire-cutters 8mm wood drill bit Hand stapler and 12mm staples Sandpaper Sharp long-bladed knife Portable work bench and trestle
support Pencil and felt-pen
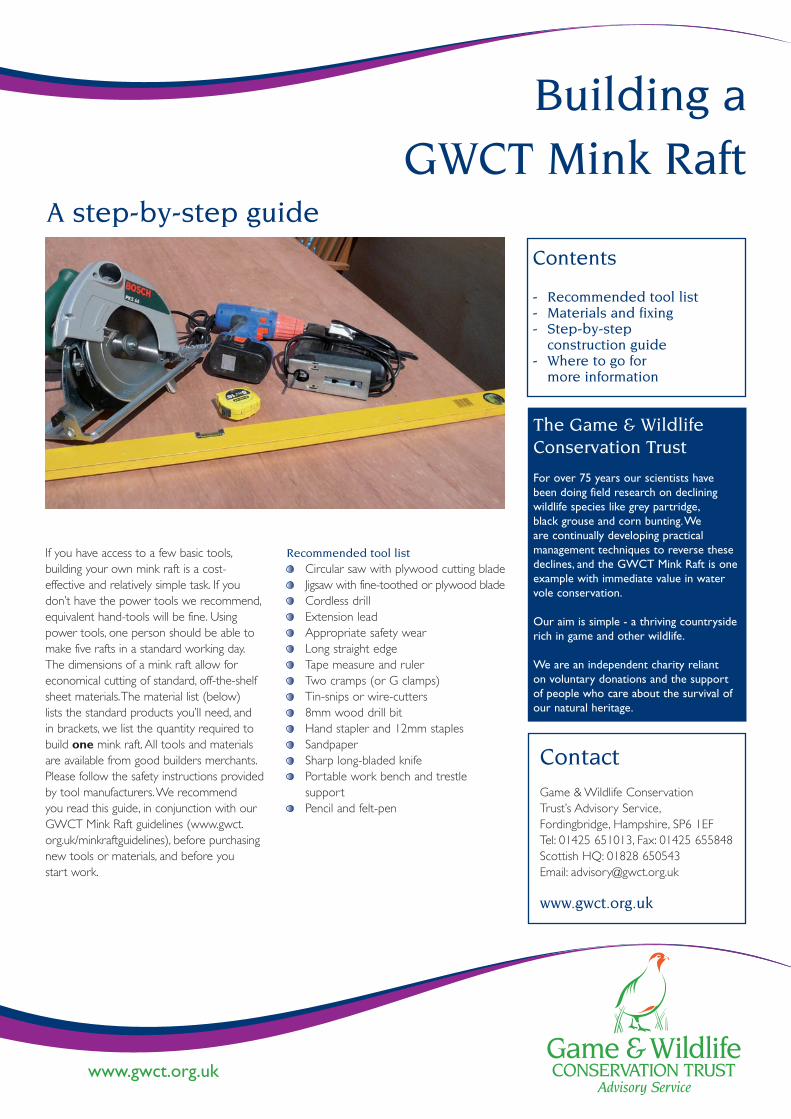
Material list Amount required to build one mink raftWood: Sheet of 6mm x 2440mm x 1220mm exterior plywood (2 pieces @ 1220mm x 610mm).Amount of 10mm x 2440mm x 1220mm exterior plywood (1 piece @ 660mm x 250mm).Amount of 25mm x 175mm tanalised gravel board (2 @ 660mm long).
NB. The cheapest plywood sheets are often of poor quality so use sheets that contain hardwood all the way through, rather than sheets which just have hardwood on the exterior faces. The better quality sheet may cost more, but your raft will last considerably longer! Note that one 6mm ply sheet will make two rafts, so double up on all other materials if you want to make two rafts and make best use of this sheet. 10mm plywood (of which you only need a small amount per raft) is often available in quarter sheets from major DIY stores.
Fixings80mm long M6 eye bolts, washers and wing nuts (2 bolts, 4 washers and 2 wing nuts).80mm long M6 roofing bolts, washers and wing nuts (4 bolts, 4 washers and 4 wing nuts).Quantity of 4mm x 25mm woodscrews (x 14).50mm metal corner brackets (4 brackets or 4 pieces of fixing band @ 100mm long).or (if building many rafts) a roll of 20mm x 1mm galvanised steel fixing band
OtherSheet of 50mm x 2400mm x 1200mm polystyrene insulation (1 piece @ 1200mm x 600mm).25mm x 25mm (approx) plastic garden or wire aviary mesh (2 pieces @ 500mm x 250mm).
Material list
The material list above is all you need to make your own GWCT Mink Raft.

Rest your sheet of 6mm plywood across a stable work-station. Unless your work-station is large, you will need to support the sheet at either end. Using a straight-edge, measure and mark cut-lines on the sheet, splitting it into four equal quarters. Each quarter should measure 1220mm x 610mm. Using your cramps, fasten the sheet of plywood to your work-station. Before you saw through them, check that your cut-lines are sufficiently proud of the work-station and away from any electric cables. Cut the sheet into four quarters. (If you plan only to make one raft, you will only need to cut two quarters.)
Step 1
Split your sheet into four equal quarters
1220mm x 610mm.
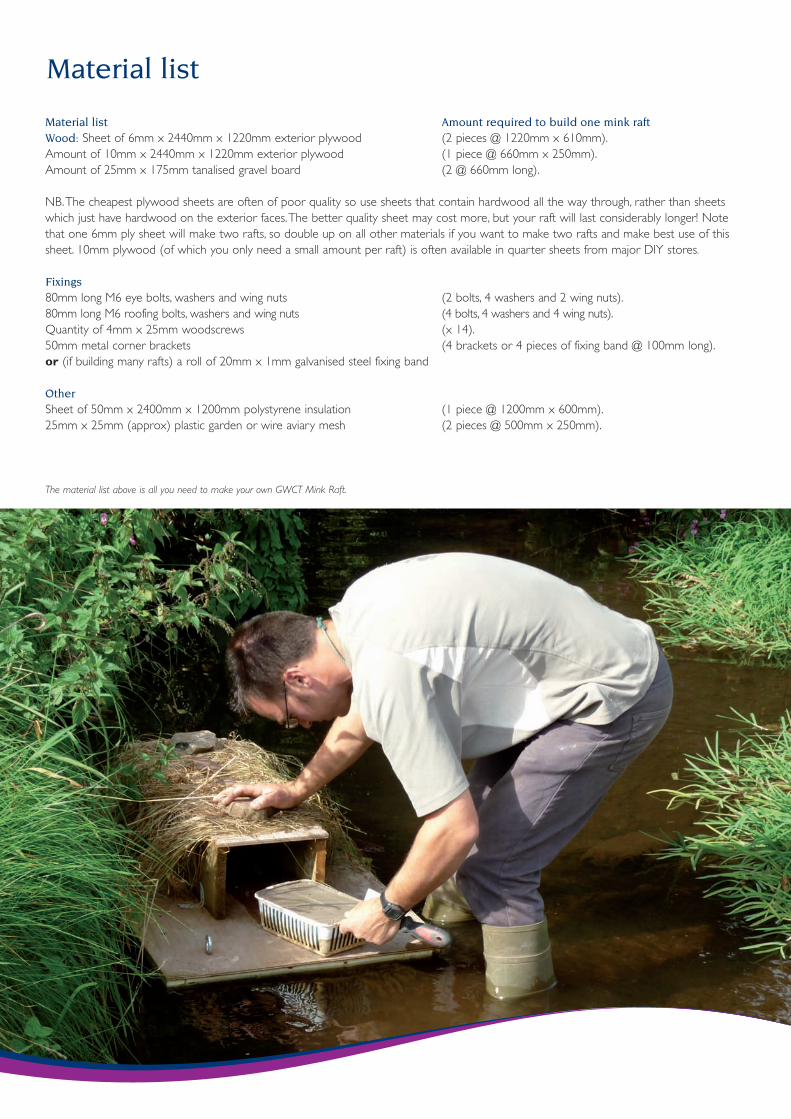
Step 2Take one of your quarter pieces. Align a straight-edge across opposite corners and draw a cross in the middle of the sheet to locate the centre point. Place your handy basket, upside down, over the top of your cross. Align the centre of the cross on the bottom-surface of the basket, with the centre of the cross on the plywood. Use a tape measure to check the sides of the basket are equidistant, and square with the sides of the plywood. Draw a line around the up-turned basket to form a rectangle with rounded corners. (See next page.)
Locate the centre point and draw a line round the
up-turned basket.
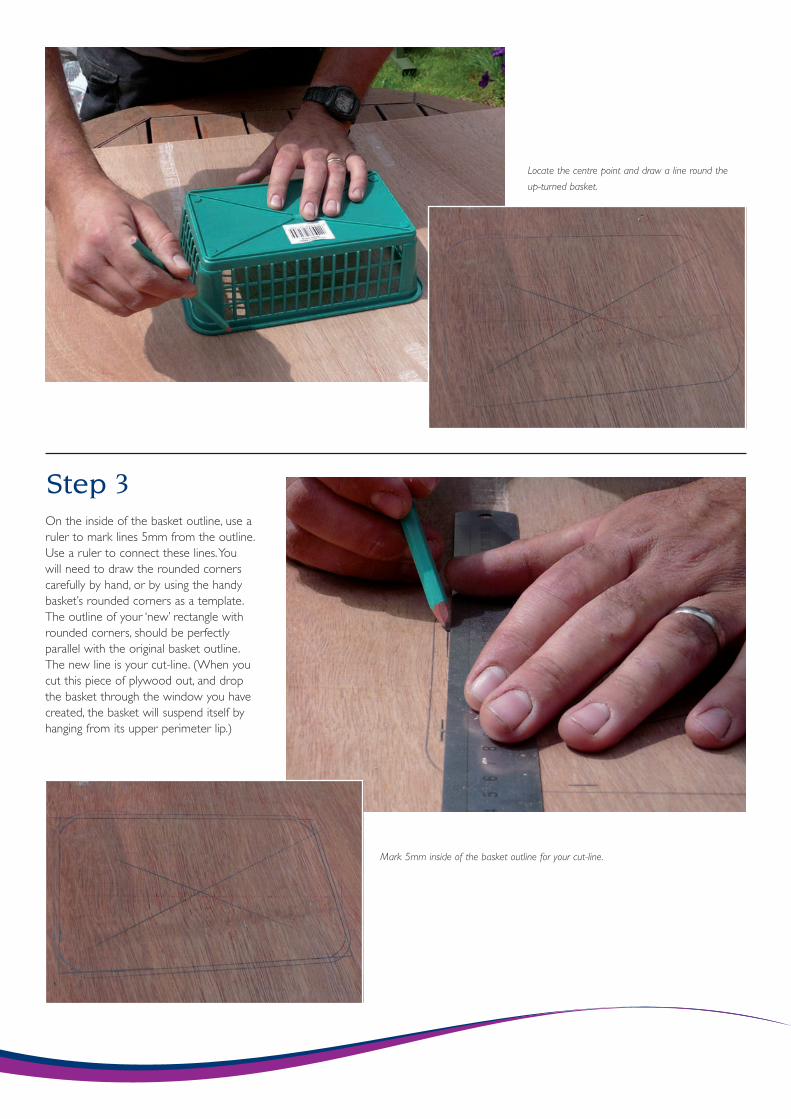
Step 3On the inside of the basket outline, use a ruler to mark lines 5mm from the outline. Use a ruler to connect these lines. You will need to draw the rounded corners carefully by hand, or by using the handy basket’s rounded corners as a template. The outline of your ‘new’ rectangle with rounded corners, should be perfectly parallel with the original basket outline. The new line is your cut-line. (When you cut this piece of plywood out, and drop the basket through the window you have created, the basket will suspend itself by hanging from its upper perimeter lip.)
Mark 5mm inside of the basket outline for your cut-line.
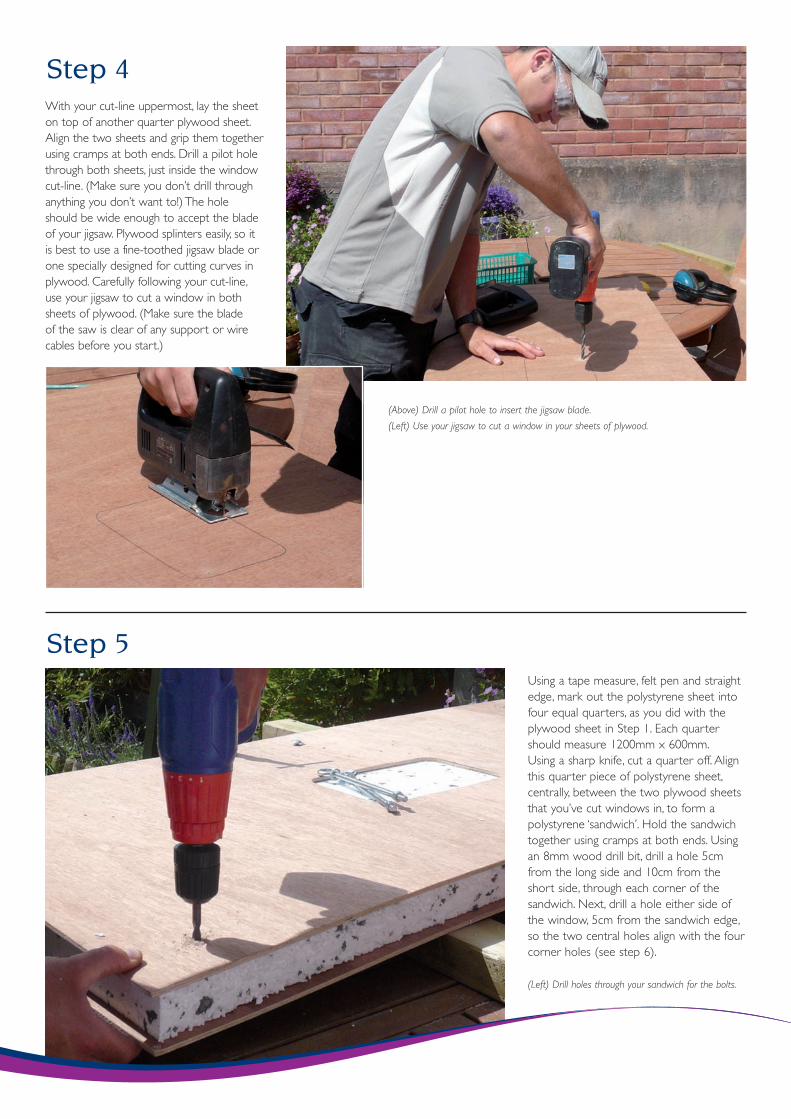
Using a tape measure, felt pen and straight edge, mark out the polystyrene sheet into four equal quarters, as you did with the plywood sheet in Step 1. Each quarter should measure 1200mm x 600mm. Using a sharp knife, cut a quarter off. Align this quarter piece of polystyrene sheet, centrally, between the two plywood sheets that you’ve cut windows in, to form a polystyrene ‘sandwich’. Hold the sandwich together using cramps at both ends. Using an 8mm wood drill bit, drill a hole 5cm from the long side and 10cm from the short side, through each corner of the sandwich. Next, drill a hole either side of the window, 5cm from the sandwich edge, so the two central holes align with the four corner holes (see step 6).
Step 5
With your cut-line uppermost, lay the sheet on top of another quarter plywood sheet. Align the two sheets and grip them together using cramps at both ends. Drill a pilot hole through both sheets, just inside the window cut-line. (Make sure you don’t drill through anything you don’t want to!) The hole should be wide enough to accept the blade of your jigsaw. Plywood splinters easily, so it is best to use a fine-toothed jigsaw blade or one specially designed for cutting curves in plywood. Carefully following your cut-line, use your jigsaw to cut a window in both sheets of plywood. (Make sure the blade of the saw is clear of any support or wire cables before you start.)
Step 4
(Above) Drill a pilot hole to insert the jigsaw blade.
(Left) Use your jigsaw to cut a window in your sheets of plywood.
(Left) Drill holes through your sandwich for the bolts.
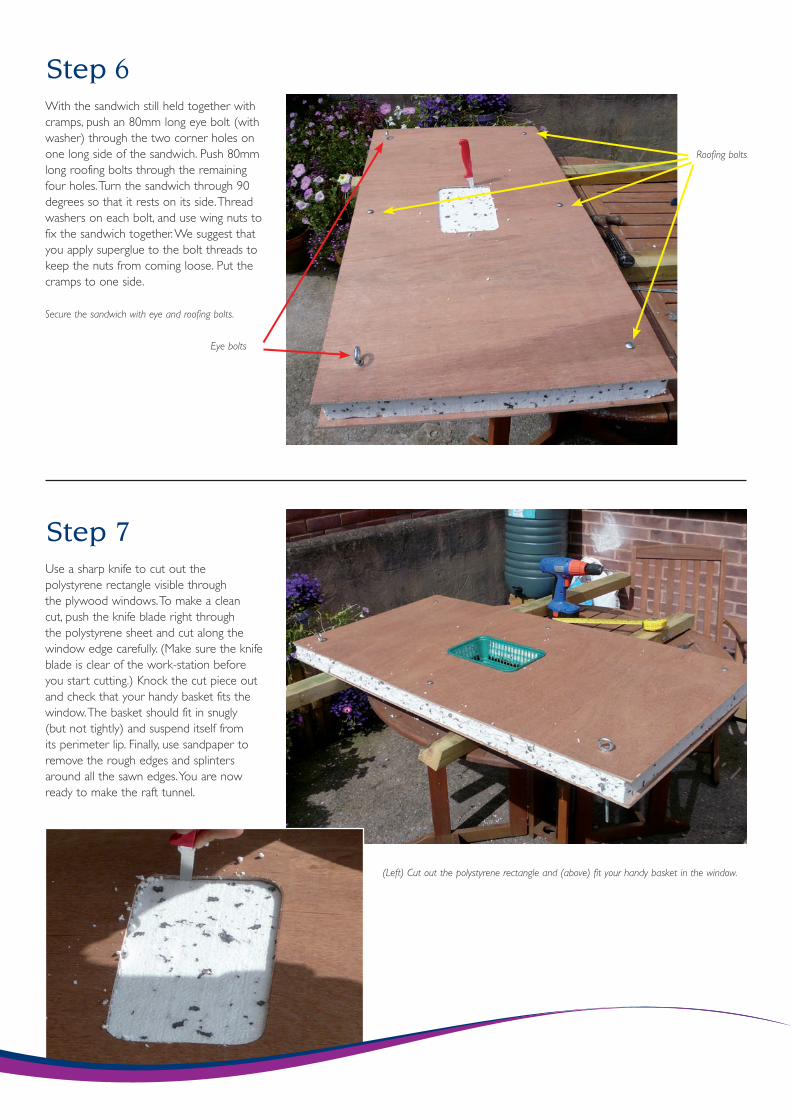
Secure the sandwich with eye and roofing bolts.
With the sandwich still held together with cramps, push an 80mm long eye bolt (with washer) through the two corner holes on one long side of the sandwich. Push 80mm long roofing bolts through the remaining four holes. Turn the sandwich through 90 degrees so that it rests on its side. Thread washers on each bolt, and use wing nuts to fix the sandwich together. We suggest that you apply superglue to the bolt threads to keep the nuts from coming loose. Put the cramps to one side.
Step 6
Roofing bolts
Eye bolts
Use a sharp knife to cut out the polystyrene rectangle visible through the plywood windows. To make a clean cut, push the knife blade right through the polystyrene sheet and cut along the window edge carefully. (Make sure the knife blade is clear of the work-station before you start cutting.) Knock the cut piece out and check that your handy basket fits the window. The basket should fit in snugly (but not tightly) and suspend itself from its perimeter lip. Finally, use sandpaper to remove the rough edges and splinters around all the sawn edges. You are now ready to make the raft tunnel.
Step 7
(Left) Cut out the polystyrene rectangle and (above) fit your handy basket in the window.

Step 9
Take the plywood roof and draw a pencil line 12mm from, and parallel to, one long edge. On this line, mark two corner screw points 40mm from the short edge. Mark a central hole between these two points. Repeat this procedure along the other side. Align the roof piece with the two tunnel sides, and using your six screw points attach the roof using 25mm long screws.
Attach the roof using six screw points.
Recent trials, using rafts without mesh, suggest that fixing mesh to the raft ends to help visiting mink and other wildlife board the raft, may not be necessary, but it was part of the original design. Using tin-snips cut two pieces of 500mm x 250mm mesh. Wrap a piece, centrally, around either end of the raft and secure the mesh with a staple gun. Use staples with a depth of at least 12mm. If you don’t have a staple gun, use a hammer and small galvanised staples instead.
Step 10 (optional)
Attaching mesh to your mink raft is optional.
The tunnel’s dimensions need to take account of the type of trap you intend to use. This guide assumes the raft operator will be using a Rhemo Products live catch cage trap. (The dimensions of a Rhemo trap are 600mm long x 180mm wide x 160mm high.) Cut two 660mm lengths of 25mm x 75mm gravel board. These two pieces will form the tunnel sides. Next cut a sheet of 10mm plywood to give you a piece 660mm long x 250mm wide. This will form the tunnel roof. To attach the tunnel to the raft use off-the-shelf right-angle brackets, or if you’re making a large batch of rafts consider making your own. If the latter, using a pair of tin-snips, cut four 100mm lengths of fixing strap. Bend each strap across the middle so that the two ends align. Open the straps back out to form right angles.
Step 8
Cut four 100mm lengths of fixing strap and bend each strap then open back out to form right angles.
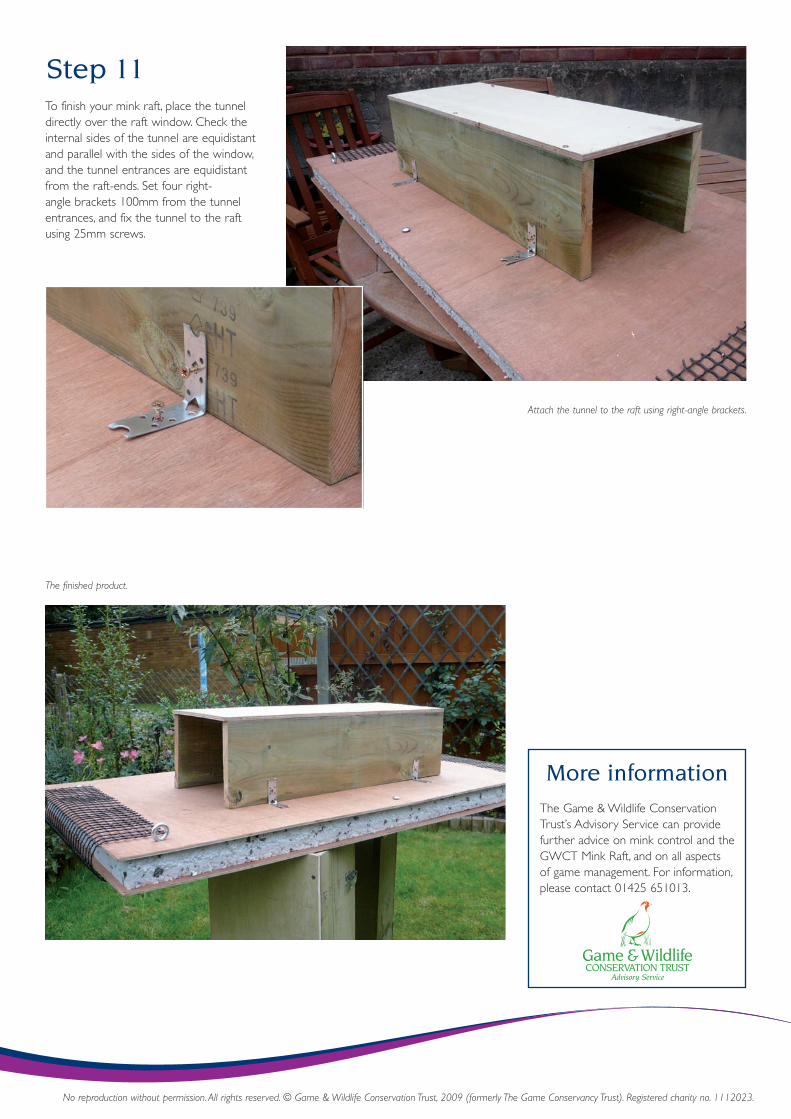
Step 11To finish your mink raft, place the tunnel directly over the raft window. Check the internal sides of the tunnel are equidistant and parallel with the sides of the window, and the tunnel entrances are equidistant from the raft-ends. Set four right-angle brackets 100mm from the tunnel entrances, and fix the tunnel to the raft using 25mm screws.
Attach the tunnel to the raft using right-angle brackets.
The finished product.
No reproduction without permission. All rights reserved. © Game & Wildlife Conservation Trust, 2009 (formerly The Game Conservancy Trust). Registered charity no. 1112023.
More informationThe Game & Wildlife Conservation Trust’s Advisory Service can provide further advice on mink control and the GWCT Mink Raft, and on all aspects of game management. For information, please contact 01425 651013.