Embed Size (px)
Citation preview

Building a Composite Business Process from Scratch with SAP NetWeaver BPM – Guide 1
Applies to: SAP enhancement package 1 for SAP NetWeaver Composition Environment 7.1 For more information, visit the Business Process Modeling homepage.
Summary Within this document in exercise A, you are going to sketch the process diagram for the Investment Approval Process within process composer. This process contains human activities, automated activities, events, gateways. Later on you are going to maintain the technical properties and make this process run in exercise B. Download the source files from here.
Author: Jie Deng
Company: SAP AG
Created on: 28 November 2008
Author Bio
Jie Deng is a Product Manager in SAP AG Germany. In this role, Jie focuses on the area of Business Process Management, Business Activity Monitoring as well as process monitoring and reporting . She is responsible for the rollout to customers as well as roll-out within the organizations. Jie has been working for the SAP organization for eight years and has been part of the Product Management Group in the SAP NetWeaver BI area for six years. In 2006, Jie joined the Product Management Group in the BPM area.
SAP COMMUNITY NETWORK SDN - sdn.sap.com | BPX - bpx.sap.com | BOC - boc.sap.com © 2008 SAP AG 1
Building a Composite Business Process from Scratch with SAP NetWeaver BPM – Guide 1
Table of Contents Exercise A: Sketching a Composite Business Process within Process Composer ........................................3 Exercise B: Modeling, Build, Deploy and Run the Composite Business Process with SAP NetWeaver BPM..............................................................15
Step 1 — Configurations............................................................................................................................................15 Step 2 — Edit properties of Process/Pool ..................................................................................................................28 Step 3 — Edit Human Activities .................................................................................................................................30 Step 4 —Edit Automated Activities ............................................................................................................................36 Step 5 —Edit Start and End Events ...........................................................................................................................39 Step 6 —Edit Data Objects ........................................................................................................................................39 Step 7 —Edit Mapping ...............................................................................................................................................41 Step 8 —Edit Condition line .......................................................................................................................................46 Step 9 —Build and Deploy.........................................................................................................................................48 Step 10 —Start the Process.......................................................................................................................................50 Step 11 -- Execute the Process as end user..............................................................................................................52
Related Content................................................................................................................................................56 Copyright...........................................................................................................................................................57
SAP COMMUNITY NETWORK SDN - sdn.sap.com | BPX - bpx.sap.com | BOC - boc.sap.com © 2008 SAP AG 2

Building a Composite Business Process from Scratch with SAP NetWeaver BPM – Guide 1
Exercise A: Sketching a Composite Business Process within Process Composer
Within this exercise you are going to sketch the process diagram for the Investment Approval Process within process composer. This process contains human activities, automated activities, events, gateways. You are going to maintain the technical properties and make this process run in the Exercise B: Modeling, Build, Deploy and Run the Composite Business Process with SAP NetWeaver BPM.
1. The goal of this exercise is to model
the process flow of the “Investment Approval Process”. The final result will look like the one depicted in the figure to the right.
2. As the first step please open the SAP
NetWeaver Developer Studio.
SAP COMMUNITY NETWORK SDN - sdn.sap.com | BPX - bpx.sap.com | BOC - boc.sap.com © 2008 SAP AG 3

Building a Composite Business Process from Scratch with SAP NetWeaver BPM – Guide 1
3. Once you open the SAP NetWeaver Developer Studio, and then please switch to the ‘Process Composer’ perspective (Window Open Perspective Other…; next select ‘Process Composer’ and click ‘OK’).
4. Now you are going to create a process composer project. Please Navigate to “File New Project”.
SAP COMMUNITY NETWORK SDN - sdn.sap.com | BPX - bpx.sap.com | BOC - boc.sap.com © 2008 SAP AG 4

Building a Composite Business Process from Scratch with SAP NetWeaver BPM – Guide 1
5. Now a Wizard for creating the project is opening. Please select ‘Process Composer Development Component’ and then click on ‘Next’.
6. Select ‘MyComponents’ as Development component for process modeling project. Please click ‘Next’ to continue.
SAP COMMUNITY NETWORK SDN - sdn.sap.com | BPX - bpx.sap.com | BOC - boc.sap.com © 2008 SAP AG 5

Building a Composite Business Process from Scratch with SAP NetWeaver BPM – Guide 1
SAP COMMUNITY NETWORK SDN - sdn.sap.com | BPX - bpx.sap.com | BOC - boc.sap.com © 2008 SAP AG 6
7. Now please enter the name ‘bpm160exercise’ for Process Composer Development Component. Click ‘Next’ to continue.
8. Leave the setting as it is in this step and click on ‘Finish’ to complete creating process composer development component.
9. Once you finished step 8, please navigate to Project Explorer. You’ll see that the project “bpm160exercise” is visible there. Expand the appropriate node.

Building a Composite Business Process from Scratch with SAP NetWeaver BPM – Guide 1
SAP COMMUNITY NETWORK SDN - sdn.sap.com | BPX - bpx.sap.com | BOC - boc.sap.com © 2008 SAP AG 7
10. Now you can create a processright-clicking on the “Processes” node and choosing “
by
New…” from the context menu.
11. Enter the name “Investment Approval Process” for the process and click on ‘Next’.

Building a Composite Business Process from Scratch with SAP NetWeaver BPM – Guide 1
SAP COMMUNITY NETWORK SDN - sdn.sap.com | BPX - bpx.sap.com | BOC - boc.sap.com © 2008 SAP AG 8
12. Now you are able to create start/end events from service operations. You can also create a pool and define torientation in the diagram. For our exercise please select ‘Create staand en
he
rt d event from a service
operation’ and ‘Create a new pool’. As orientation of the pools we choose ‘Top to bottom’. Click on ‘Finish’.
13. Now you have created a pool and you
can model your process there. On the right side you can find the palette where all the elements which you can use for modelling processes are listed.

Building a Composite Business Process from Scratch with SAP NetWeaver BPM – Guide 1
SAP COMMUNITY NETWORK SDN - sdn.sap.com | BPX - bpx.sap.com | BOC - boc.sap.com © 2008 SAP AG 9
14. Right-click on the connection bestart and end event and select ‘Delete’ from the context menu. Wewill create new connections
tween
soon.
15. Assign the name ‘Investment
Approval Process’ to the created pool (just click once into the name
field and adjust the name).
16. Add 2 more lanes to the pool by
either right clicking into the “Investment Approval Process” header area of the process diagram and choosing “Create Lane” from the context menu or by choosing the appropriate speed button, which appears while moving the mouse pointer into the same header area. Name the three lines ‘Purchase Requester’, ‘Purchase Manager’, and ‘ERP’ respectively.

Building a Composite Business Process from Scratch with SAP NetWeaver BPM – Guide 1
SAP COMMUNITY NETWORK SDN - sdn.sap.com | BPX - bpx.sap.com | BOC - boc.sap.com © 2008 SAP AG 10
17. Model the first human activity ‘Enter Purchase Request’ by dragging the ‘Activity’ speed button for the ‘Start’ event into the “Purchase Requester” lane and choosing “Human” from the context menu that pops up once you
ing have released the mouse button. Speed buttons appear while movthe mouse pointer over the appropriate icon (in our case the ‘Start’ event) in the diagram.

Building a Composite Business Process from Scratch with SAP NetWeaver BPM – Guide 1
SAP COMMUNITY NETWORK SDN - sdn.sap.com | BPX - bpx.sap.com | BOC - boc.sap.com © 2008 SAP AG 11
18. Model another human activity, connected from the just created activity, in the “Purchase Manager” lane and name it ‘Approve Purchase Request’. In order to achieve this,
drag the ‘Activity’ speed button ( ) into the Purchase Manager’s lane and select “Human Activity” from the context menu that pops up once you’ve released the mouse button.
19. Model a gateway for ‘exclusive
choice’. In order to achieve this, drag the ‘Gateway’ speed button into the ‘Purchase Manager’s lane and select “Exclusive Choice” from the context menu that pops up once you’ve released the mouse button.

Building a Composite Business Process from Scratch with SAP NetWeaver BPM – Guide 1
SAP COMMUNITY NETWORK SDN - sdn.sap.com | BPX - bpx.sap.com | BOC - boc.sap.com © 2008 SAP AG 12
20. Create a new connection from thgateway
e back to the “Enter Purchase
Request” step by utilizing the “Connection” speed button. Drag the speed button to the node you want a connection to.

Building a Composite Business Process from Scratch with SAP NetWeaver BPM – Guide 1
SAP COMMUNITY NETWORK SDN - sdn.sap.com | BPX - bpx.sap.com | BOC - boc.sap.com © 2008 SAP AG 13
21. From the gateway create a new automated activity in the “ERP” lane and name it “Create Purchase Order”.
22. Move the two automatically created labels “Alternative 1” and “Alternative 2” close to the connections they are representing (see screenshot).

Building a Composite Business Process from Scratch with SAP NetWeaver BPM – Guide 1
SAP COMMUNITY NETWORK SDN - sdn.sap.com | BPX - bpx.sap.com | BOC - boc.sap.com © 2008 SAP AG 14
23. Rename the alternatives as follows:
odelling environment, click on the
the second label and name it
select the “Alternative 1” label in the m“Properties” tab strip in the window below and overwrite the label’s name with “Resubmit”. Repeat the step for
“Approved”
24. Finally connect the automated activity
with the End event.
25. The final result should look like the screenshot to the right.

Building a Composite Business Process from Scratch with SAP NetWeaver BPM – Guide 1
SAP COMMUNITY NETWORK SDN - sdn.sap.com | BPX - bpx.sap.com | BOC - boc.sap.com © 2008 SAP AG 15
EB
xercise B: Modeling, Build, Deploy and Run the Composite Business Process with SAP NetWeaver
iness process. In this chapter you are going to bring all process elements siness process as well as execute this process as an end user.
1. In exercise A you modeled the
investment approval process. The result is shown on the right side. This is the starting point for exercise B.
PM
In exercise A, you sketched the bustogether to a running composite bu
Step 1 — Configurations
A. Define portal user ‘bpm160user’ with appropriate authorizations.

Building a Composite Business Process from Scratch with SAP NetWeaver BPM – Guide 1
SAP COMMUNITY NETWORK SDN - sdn.sap.com | BPX - bpx.sap.com | BOC - boc.sap.com © 2008 SAP AG 16
B. Define AS Java Server an
1. Open SAP NetWeaver Developer Studio a
d Service Registry.
nd go to Window Preferences.
2. Select ‘SAP AS Java’ and add
the system name as the Java server. In this exercise we’ll use localhost as the AS Java Server.

Building a Composite Business Process from Scratch with SAP NetWeaver BPM – Guide 1
SAP COMMUNITY NETWORK SDN - sdn.sap.com | BPX - bpx.sap.com | BOC - boc.sap.com © 2008 SAP AG 17
3. Select ‘Service Registry’ and add ‘localhost’ and port number. Click on Apply to save the change.
C. Create Web Dynpro Projec ssign the dependency to the process modeling development component.
kspace
NetWeaver Developer Studio:
1. (e.g: C:\workspace_beta20.jdi\LocalDevelopment\DCs\demo.sap.com)
t and a
• Extract Web
Dynpro Project into the corresponding folder:
• Extract file
‘purchaserequest4.zip’ to the path of the worof your

Building a Composite Business Process from Scratch with SAP NetWeaver BPM – Guide 1
SAP COMMUNITY NETWORK SDN - sdn.sap.com | BPX - bpx.sap.com | BOC - boc.sap.com © 2008 SAP AG 18
2. Create Web Dynpro project in SAP NetWeaver DeveloStudio:
3. In NetWeav
per
er Developer Studio choose window Open Perspective Development Infrastructure.
4. In the Component Browser View expand Local Development node and MyComponents. Select the node ‘purchaserequest4’ and with right mouse click to select ‘Sync/Create Project’ ‘Create Project’.
5. After the project is created, you’ll be asked to switch to the Web Dynrpo perspective to view the Web Dynpro project. Please click on ‘Yes’ to switch to the Web Dynpro Perspective. You can also go to Windows Open Perspective Web Dynpro to open Web Dynpro perspective directly.

Building a Composite Business Process from Scratch with SAP NetWeaver BPM – Guide 1
SAP COMMUNITY NETWORK SDN - sdn.sap.com | BPX - bpx.sap.com | BOC - boc.sap.com © 2008 SAP AG 19
6. Now you can see that proje‘purchaserecreated. You can expand thenote to see the ComponenViews etc.
ct quest4’ is
ts,
7. Build and Deploy this Web
ynpro Project on the Server. D
Building a Composite Business Process from Scratch with SAP NetWeaver BPM – Guide 1
SAP COMMUNITY NETWORK SDN - sdn.sap.com | BPX - bpx.sap.com | BOC - boc.sap.com © 2008 SAP AG 20
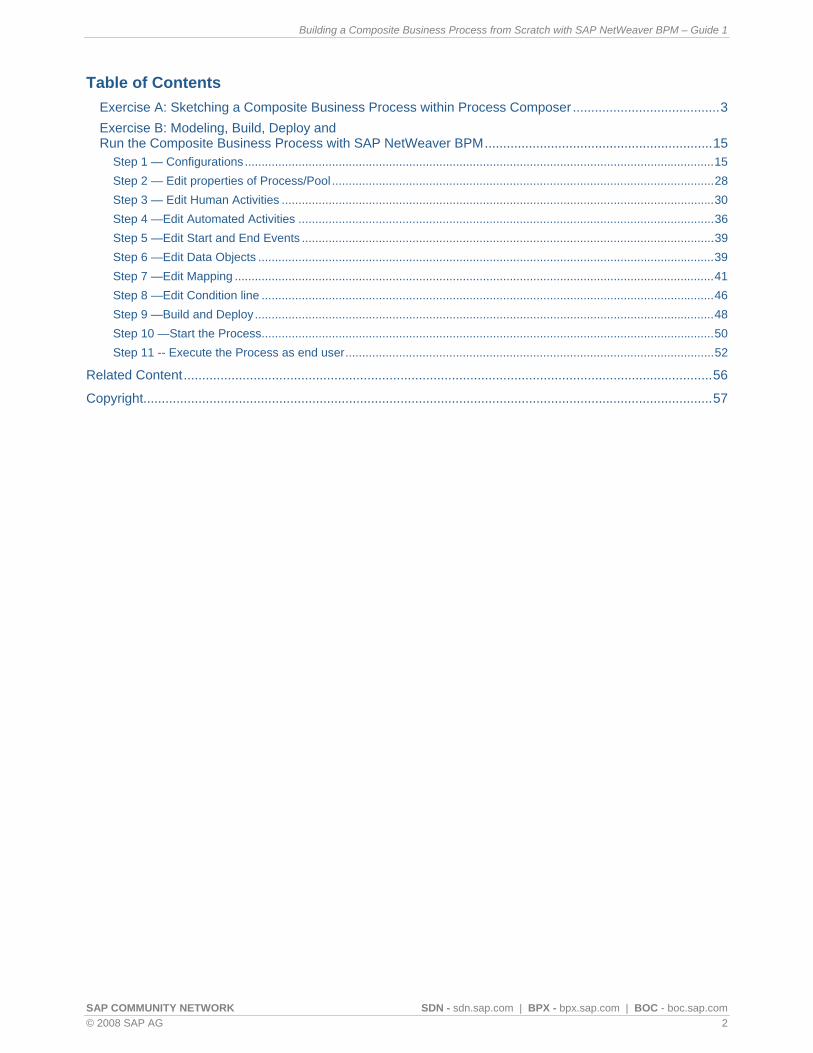
8. Assign Web Dynpro Java component ‘purchaserequest4’ as the dependent project for the process modeling development component ‘bpm160exercise’. Details please refer to exercise c step 9.
D. Prepare the Enterprise Service which we’ll use for our scenario.
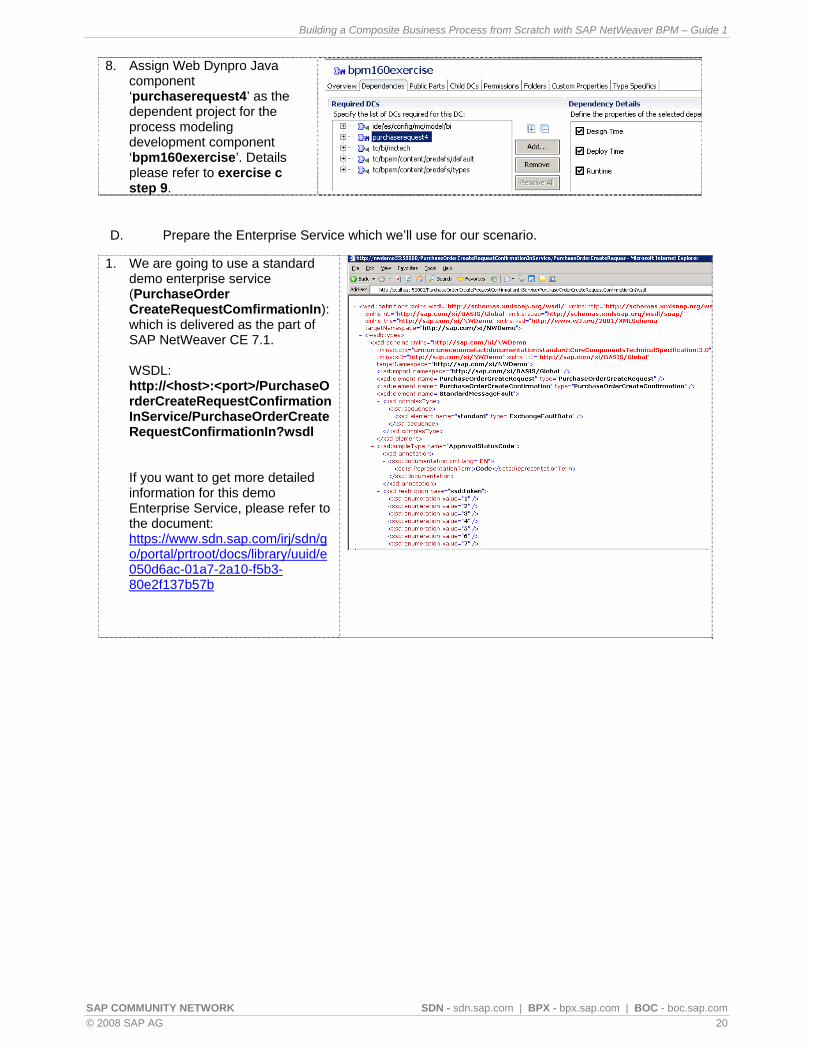
1. We are going to use a standard demo enterprise service (PurchaseOrder CreateRequestComfirmationIn): which is delivered as the part of SAP NetWeaver CE 7.1.
WSDL: http://<host>:<port>/PurchaseOrderCreateRequestConfirmationInService/PurchaseOrderCreateRequestConfirmationIn?wsdl If you want to get more detailed information for this demo Enterprise Service, please refer to the document: https://www.sdn.sap.com/irj/sdn/go/portal/prtroot/docs/library/uuid/e050d6ac-01a7-2a10-f5b3-80e2f137b57b
Building a Composite Business Process from Scratch with SAP NetWeaver BPM – Guide 1
SAP COMMUNITY NETWORK SDN - sdn.sap.com | BPX - bpx.sap.com | BOC - boc.sap.com © 2008 SAP AG 21
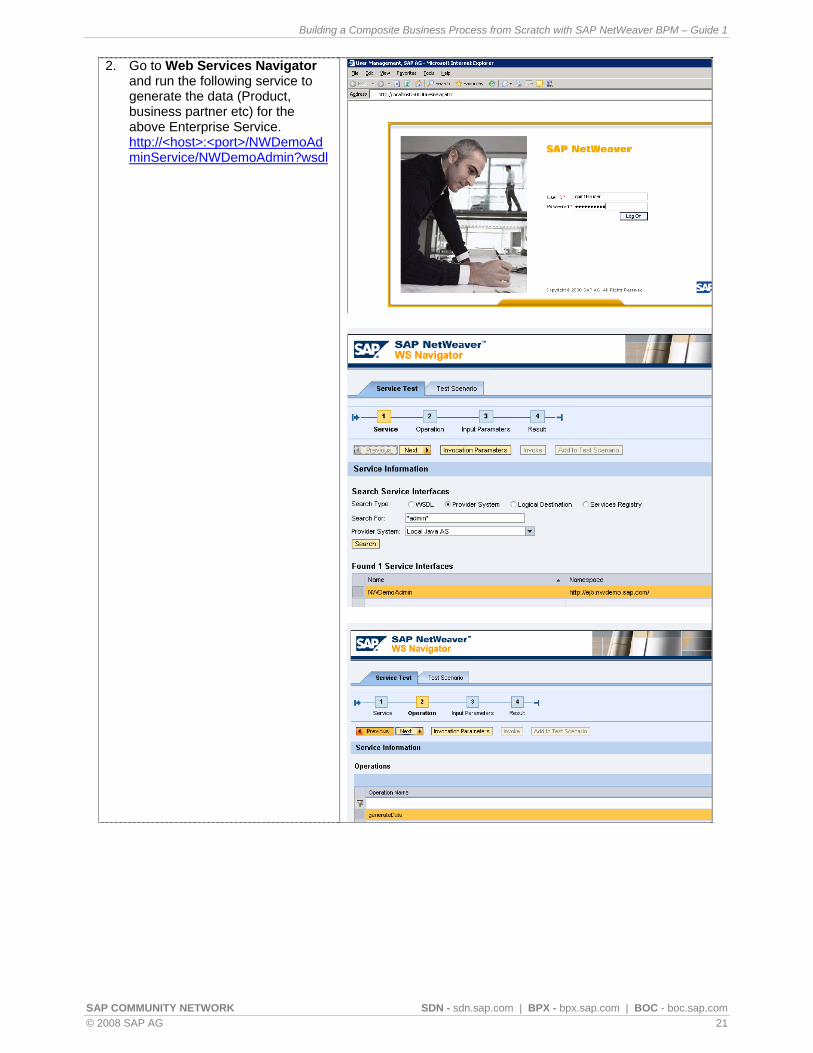
2. Go to Web Services Navigator and run the following service to generate the data (Product, business partner etc) for the above Enterprise Service. ttp://<host>:<port>/NWDemoAdh
minService/NWDemoAdmin?wsdl

Building a Composite Business Process from Scratch with SAP NetWeaver BPM – Guide 1
SAP COMMUNITY NETWORK SDN - sdn.sap.com | BPX - bpx.sap.com | BOC - boc.sap.com © 2008 SAP AG 22
1” for SellerID 2” for BuyID
“USD” for CurrencyCode “10” for ItemID “PR” for TypeCode “1” for Schedule line Event TypeCode “001” for UnitCode
)
3. Now you can test whether this web service does work. Please run this service within WebService Navigator.
Please enter the value as listed below: ““
“HT-1000” for SellerID (Product) “10” for simple content (Quantity

Building a Composite Business Process from Scratch with SAP NetWeaver BPM – Guide 1
SAP COMMUNITY NETWORK SDN - sdn.sap.com | BPX - bpx.sap.com | BOC - boc.sap.com © 2008 SAP AG 23
If you can see the purchase order number is available within the Result as the screenshot shown on the right side, that means the web service does work!
E. Check the Service into Service Registry.
In general this step is optional. Since in Exercise B step 4 we’ll learn how to import the Enterprise Service from Service Registry to SAP NetWeaver Developer Studio, we need to first publish this Service into Service Registry.
1. Enter the URL
http://localhost:50000/rep in your browser to launch the Enterprise Services RepositorThen click on Services Registryand logon as user bpm160user with pa
y.
ssword welcome123
2. On the next screen click on Publish.

Building a Composite Business Process from Scratch with SAP NetWeaver BPM – Guide 1
SAP COMMUNITY NETWORK SDN - sdn.sap.com | BPX - bpx.sap.com | BOC - boc.sap.com © 2008 SAP AG 24
3. Enter http://localhost:50000/PurchaseOrderCreateRequestConfirmationInService/PurchaseOrderCreateRequestConfirmationIn?wsdl
as WSDL URL.
4. Enter PurchaseOrderCreateConfirmationIn as Internal Name and Description. Continue with a click on Next.
5. At the Physical System step select the Existing System option and choose the System Name (the system name which you are operating). Then click on Next.

Building a Composite Business Process from Scratch with SAP NetWeaver BPM – Guide 1
SAP COMMUNITY NETWORK SDN - sdn.sap.com | BPX - bpx.sap.com | BOC - boc.sap.com © 2008 SAP AG 25
6. As service state seConfigured and go on with aon the Next button.
lect click
7. On the next screen select LifecycleStatus from the dropdown menu.
8. Then choose released and click
on the Add button. Complete the creation with a click on Finish.
9. Confirm the operation with a click on Ok.
10. Now you should get a message which indicates that the service was successfully published to the Services Registry.

Building a Composite Business Process from Scratch with SAP NetWeaver BPM – Guide 1
SAP COMMUNITY NETWORK SDN - sdn.sap.com | BPX - bpx.sap.com | BOC - boc.sap.com © 2008 SAP AG 26
11. Finally search for *purchaseorder*, the result
s ide.
should look like the screenshot ashown on the right s
F. Define Logical Destination.
1. Enter the URL http://localhost:50000/nwa in your browser to launch the
NetWeaver Administrator.
2. Select SOA Management and click on Destination Template Management to start define the destination for web service.
3. Select New to create a Logical Destination for ServicePurchaseOrderRequestCon
firm
ationIn.

Building a Composite Business Process from Scratch with SAP NetWeaver BPM – Guide 1
SAP COMMUNITY NETWORK SDN - sdn.sap.com | BPX - bpx.sap.com | BOC - boc.sap.com © 2008 SAP AG 27
4. Type the following data into the wizard and then click Next: Destination Type: WSDL Destination Name: BPM160_Destination (this is example. You can write any here. Later on you will use thisname to define the properties automated activity please see Step 4
an name
of
5. tion and Select HTTP Authenticachoose the option ‘User ID/Password(Basic)’. Click on button Details to continue.
6. enter d password (any
user which has the administration authorization on the server. In our example we can use BPM160user/welcome123).
In the Details window pleasethe user name an
7. Leave other settings as they are and click on ‘Finish’ to complete creating the logical destination.

Building a Composite Business Process from Scratch with SAP NetWeaver BPM – Guide 1
SAP COMMUNITY NETWORK SDN - sdn.sap.com | BPX - bpx.sap.com | BOC - boc.sap.com © 2008 SAP AG 28
Step s/Pool 1. the
and you are able to edit its properties. With the tab ‘Appearance’ you can hide e.g. data object in the graphical process representation. In this example, select all of the ‘Level of Detail’ options.
2 — Edit properties of ProcesMaintain the properties of pool: Click anywhere on the white space of the process
2. Maintain the properties of the process: Focus on the process (by clicking on it in the header section containing the process title ‘Investment Approval Process’. Right click and select ‘Properties’ from the context
which is modeled within this pool, select the option ‘Make this pool active’.
menu. Now you are able to see the properties window of the process. As you are going to deploy/execute the process
3. Define the Administrators for this process: Select tab ‘Administrators’ in the ‘Properties’ window. Press Button ‘Choose’ to select an administrator.
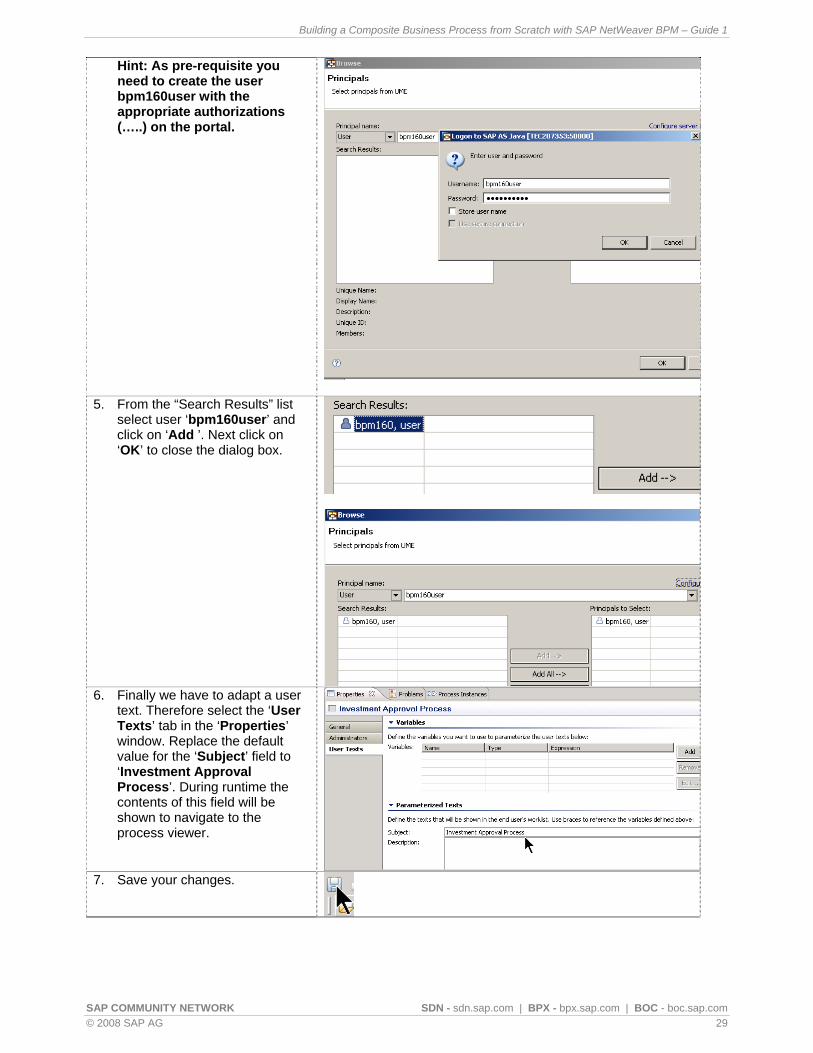
4. In the dropdown box on the upper left side select “User”.
Enter username “bpm160usein the appropriate input field and press the “Search” button in the upper right corne
r”
r of the dialog box.
bpm160user/welcome123 to log on to the Java server).
(Use
Building a Composite Business Process from Scratch with SAP NetWeaver BPM – Guide 1
SAP COMMUNITY NETWORK SDN - sdn.sap.com | BPX - bpx.sap.com | BOC - boc.sap.com © 2008 SAP AG 29
Hint: As pre-requisite you need to create the user bpm160user with the appropriate authorizations (…..) on the portal.
5. From the “Search Results” list
select user ‘bpm160user’ and click on ‘Add ’. Next click on ‘OK’ to close the dialog box.
6. Finally we have to adapt a user text. Therefore select the ‘User Texts’ tab in the ‘Properties’ window. Replace the default value for the ‘Subject’ field to ‘Investment Approval Process’. During runtime the contents of this field will be shown to navigate to the process viewer.
7. Save your changes.

Building a Composite Business Process from Scratch with SAP NetWeaver BPM – Guide 1
SAP COMMUNITY NETWORK SDN - sdn.sap.com | BPX - bpx.sap.com | BOC - boc.sap.com © 2008 SAP AG 30
Step 3 — Edit Human Activities 1. Next we want to maintain the
properties of the human activity‘Enter Purchase R
equest’.
Select the appropriate step in the process flow and choose the ‘Properties’ tab in the pane below the process flow. The properties tab has itself tabs at the left side.
o the rom tab
log
As we want to assign a task tstep, click on the ‘Task’ tab. Fthe drop-down list of the ‘Task’ select ‘New…’. The ‘New Task’ dialog pops up. As name assign ‘Enter Purchase Request’ and click on ‘Finish’ to close the diabox.
Building a Composite Business Process from Scratch with SAP NetWeaver BPM – Guide 1
SAP COMMUNITY NETWORK SDN - sdn.sap.com | BPX - bpx.sap.com | BOC - boc.sap.com © 2008 SAP AG 31
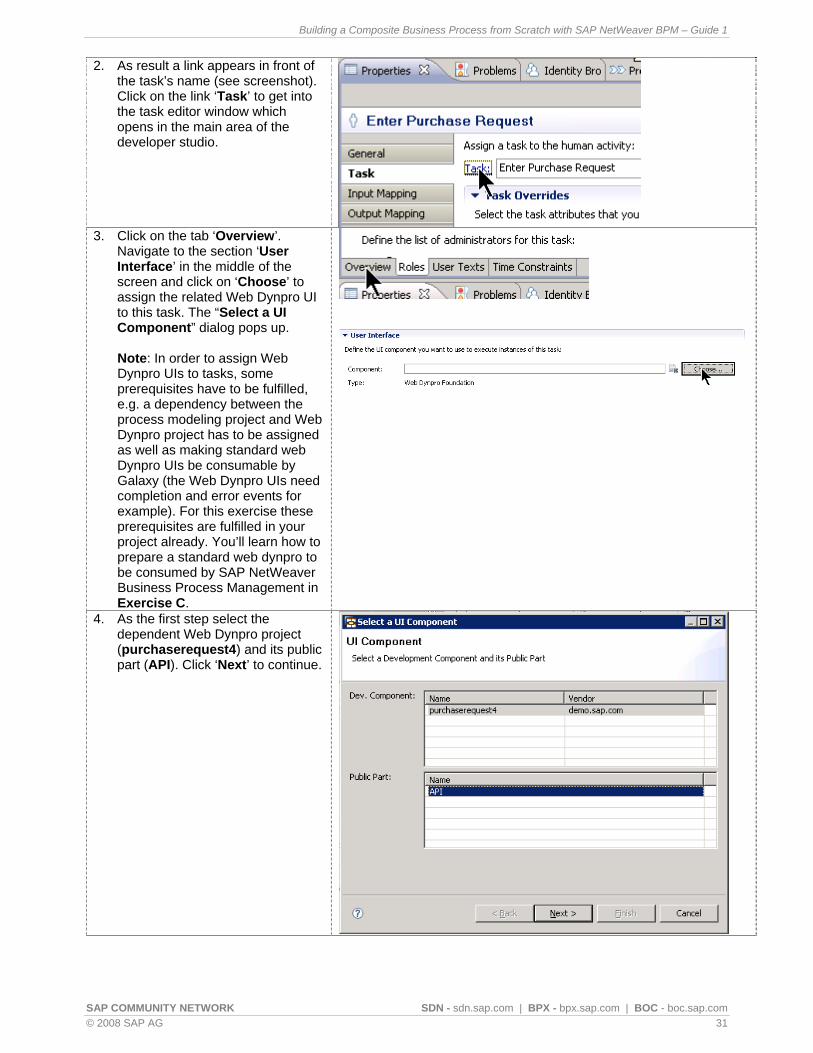
2. As result a link appears in front of the task’s name (sClick on the link ‘Task’ tothe task editor winopens in the main area of the developer studio.
ee screenshot). get into
dow which
3. Click on the tab ‘Overview’.
Navigate to the section ‘User Interface’ in the middle of the screen and click on ‘Choose’ to assign the related Web Dynpro UI to this task. The “Select a UI Component” dialog pops up.
Note: In order to assign Web Dynpro UIs to tasks, some
b ned
example). For this exercise these prerequisites are fulfilled in your project already. You’ll learn how to prepare a standard web dynpro to be consumed by SAP NetWeaver Business Process Management in Exercise C.
prerequisites have to be fulfilled, e.g. a dependency between the process modeling project and WeDynpro project has to be assigas well as making standard web Dynpro UIs be consumable by Galaxy (the Web Dynpro UIs need completion and error events for
4. As the first step select the dependent Web Dynpro project (purchaserequest4) and its public part (API). Click ‘Next’ to continue.
Building a Composite Business Process from Scratch with SAP NetWeaver BPM – Guide 1
SAP COMMUNITY NETWORK SDN - sdn.sap.com | BPX - bpx.sap.com | BOC - boc.sap.com © 2008 SAP AG 32
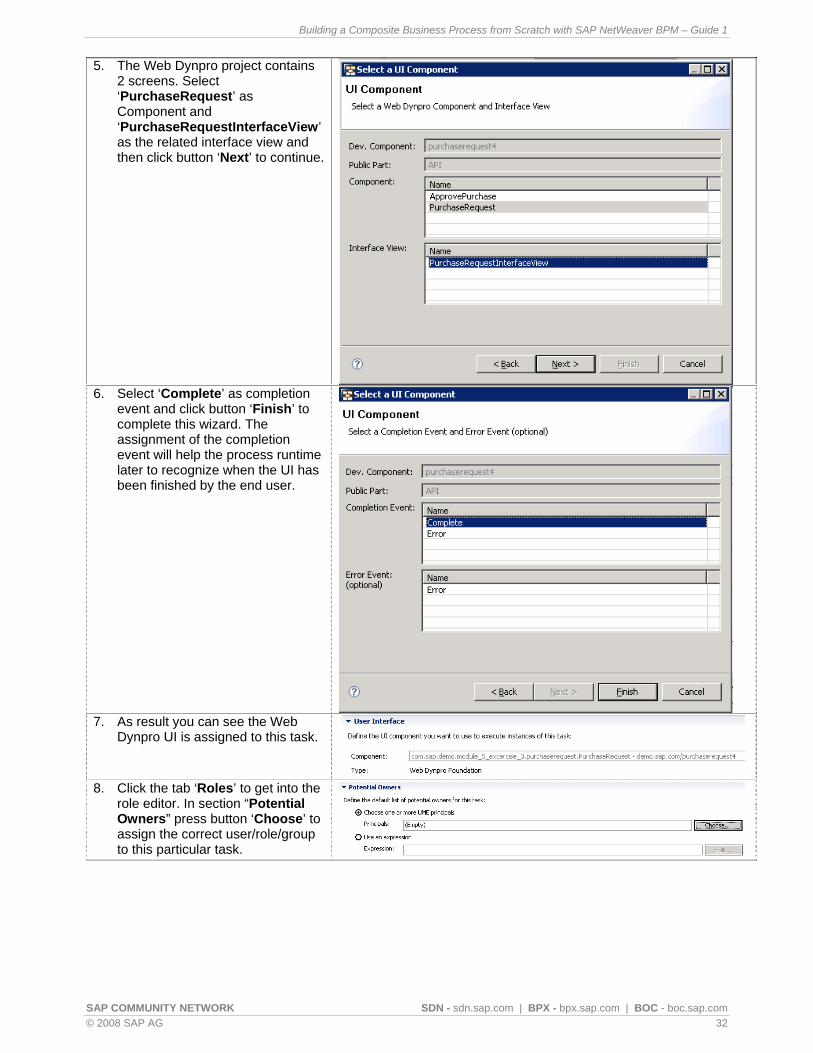
5. The Web Dynpro project contains 2 screens. Select ‘PurchaseRequest’ as Component and ‘PurchaseRequestInterfaceVieas the related interface view and then click butt
w’
on ‘Next’ to continue.
6.
has
Select ‘Complete’ as completion event and click button ‘Finish’ to complete this wizard. The assignment of the completion event will help the process runtime later to recognize when the UI been finished by the end user.
7. As result you can see the Web
Dynpro UI is assigned to this task.
8. Click the tab ‘Roles’ to get into th
role editor. In se” press
e ction “Potential
Owners button ‘Choose’ to assign the correct user/role/group to this particular task.
Building a Composite Business Process from Scratch with SAP NetWeaver BPM – Guide 1
SAP COMMUNITY NETWORK SDN - sdn.sap.com | BPX - bpx.sap.com | BOC - boc.sap.com © 2008 SAP AG 33
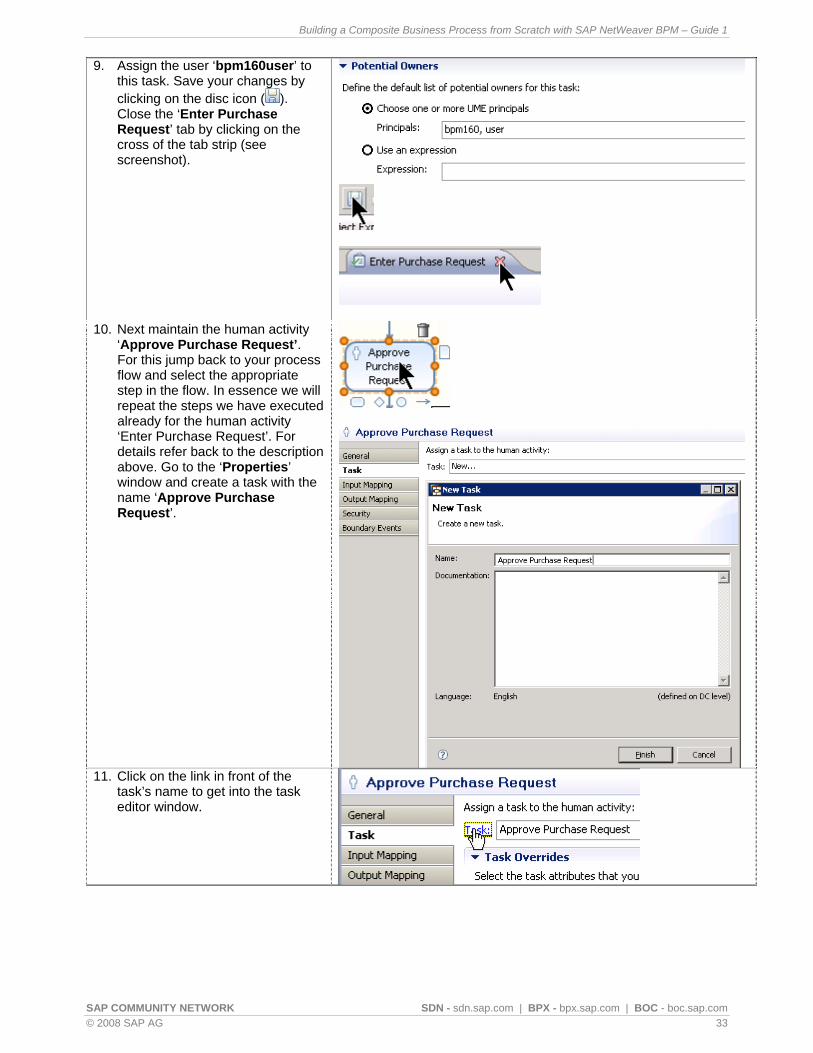
9. Assign the user ‘bpm160user’ this task. Save your changes by clicking on the disc icon (
to
). Close the ‘Enter Purchase Request’ tab by clicking on the cross of the tab strip (see screenshot).
10. Next maintain the human activity ‘Approve Purchase Request’. For this jump back to your process flow and select the appropriate step in the flow. In essence we will repeat the steps we have executed already for the human activity ‘Enter Purchase Request’. For details refer back to the description above. Go to the ‘Properties’ window and create a task with the name ‘Approve Purchase Request’.
11. Click on the link in front of the
task’s name to get into the task editor window.
Building a Composite Business Process from Scratch with SAP NetWeaver BPM – Guide 1
SAP COMMUNITY NETWORK SDN - sdn.sap.com | BPX - bpx.sap.com | BOC - boc.sap.com © 2008 SAP AG 34
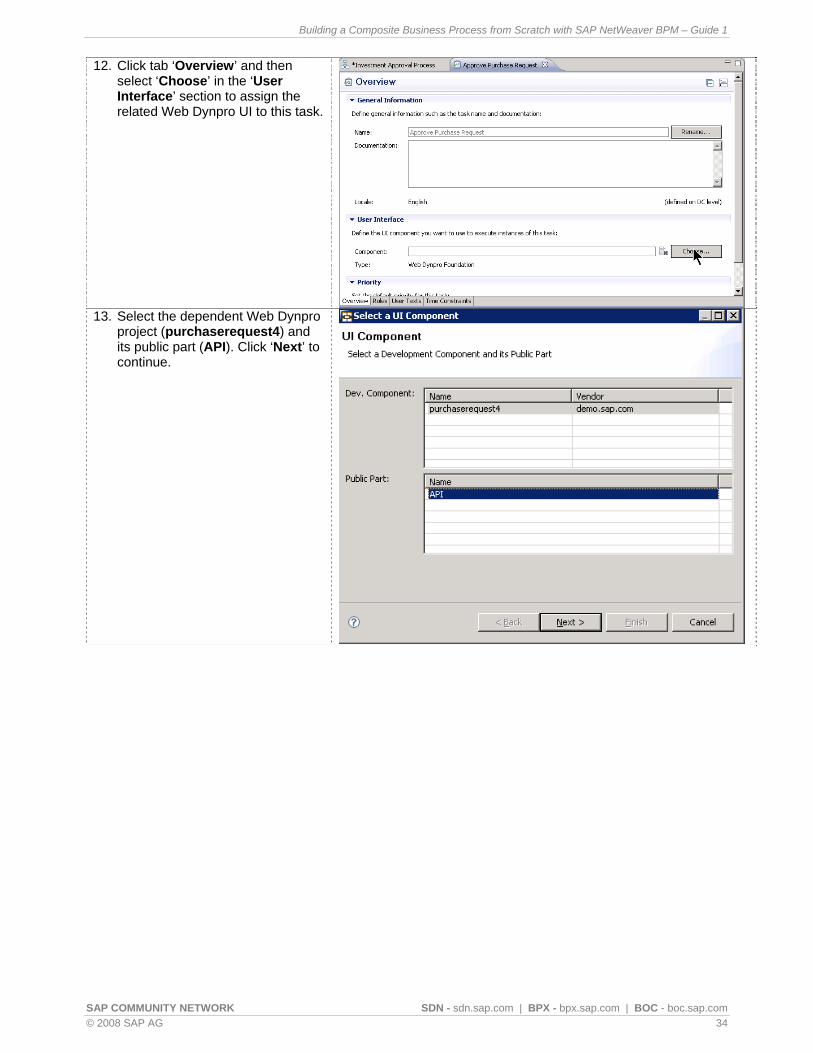
12. Click tab ‘Overview’ anselect ‘Choose’ in the ‘User Interface’ sectrelated Web Dynpro UI to this task.
d then
ion to assign the
13. Select the dependent Web Dynpro
project (purchaserequest4) and its public part (API). Click ‘Next’ to continue.

Building a Composite Business Process from Scratch with SAP NetWeaver BPM – Guide 1
SAP COMMUNITY NETWORK SDN - sdn.sap.com | BPX - bpx.sap.com | BOC - boc.sap.com © 2008 SAP AG 35
14.
‘ApprovePurchaseInterfaceView’. Click on button ‘Next’ to continue.
Select the component ‘ApprovePurchase’ and theinterface view
15. Select ‘Complete’ as the
completion event and press button ‘Finish’ for completing this wizard.
16. As result you can see that the
correct Web Dynpro UI is to this task
assigned .
17. Repeat steps 5 and 6 to assign
user ‘bpm160user’ to this task.
Note: Based on the business scenario this task should be assigned to the purchase manager, but in this exercise all tasks will be assigned to the same user to simplify the runtime execution.

Building a Composite Business Process from Scratch with SAP NetWeaver BPM – Guide 1
SAP COMMUNITY NETWORK SDN - sdn.sap.com | BPX - bpx.sap.com | BOC - boc.sap.com © 2008 SAP AG 36
Save your changes by clickinthe disc icon (
g on ).Close the
‘Approve Purchase Request’ tab.
Step 4 —Edit Automated Activities
. This step is about assigning a service to the automated activity. Before we are able to do so, we need first import this service into SAP NetWeaver Developer Studio.
Navigate to ‘Project Explorer’ and expand node ‘process modeling’ ‘service
1
interfaces’ ‘WSDL Files’ and right mouse click to select the context menu ‘Import WSDL’.
2. In this exercise an Enterprise
‘Next’ to
continue.
Service which is available in Service Registry should be imported into SAP
NetWeaver Developer Studio. Therefore please select the option ‘Service Registry’ in thewizard and click on
3. Log into the Service Registry with bpm160user/welcome123 and then click on ‘OK’ to continue.
Building a Composite Business Process from Scratch with SAP NetWeaver BPM – Guide 1
SAP COMMUNITY NETWORK SDN - sdn.sap.com | BPX - bpx.sap.com | BOC - boc.sap.com © 2008 SAP AG 37
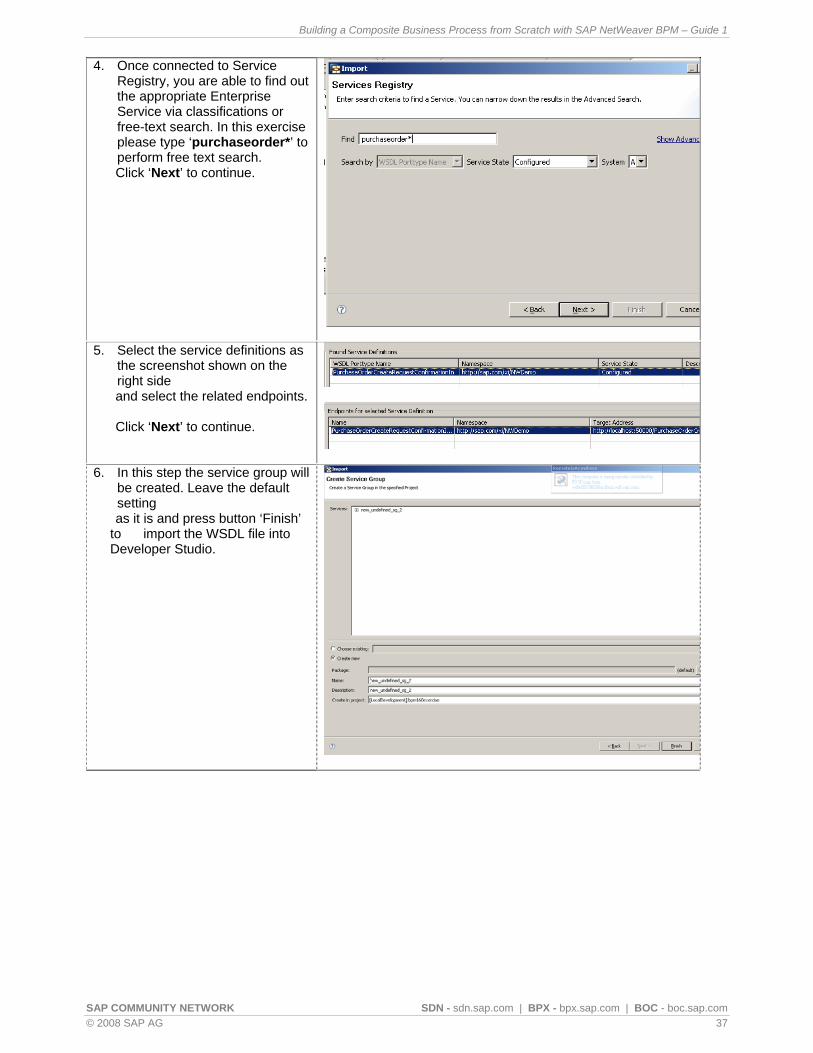
4. Once connected to Service
perform free text search. Click ‘Next’ to continue.
Registry, you are able to find outthe appropriate Enterprise Service via classifications or free-text search. In this exercise please type ‘purchaseorder*’ to
5. Select the service definitions as
the screenshot shown on the right side
and select the related endpo Click ‘Next’ to continue.
ints.
6. In this step the service group will
be created. Leave the default setting
as it is and press button ‘Finish’ to import the WSDL file into Developer Studio.

Building a Composite Business Process from Scratch with SAP NetWeaver BPM – Guide 1
SAP COMMUNITY NETWORK SDN - sdn.sap.com | BPX - bpx.sap.com | BOC - boc.sap.com © 2008 SAP AG 38
7. Once the WSDL is successfully
imported, you will see the
’.
service definition and operationunder node ‘Service Interface
8. Once the service is available in
the SAP NetWeaver Developer Studio, you are able to assign this service to the automated activity. Use a right mouse click to focus on the automated activity ‘Create Purchase Order’ and select ‘Properties’ from the context menu to access
. the ‘Properties’ window
9. Select the ‘Interface’ tab on the left side of the ‘Properties’ window. Click on the ‘Service Interface’ drop-down list and select ‘PurchaseOrderCreateService’
om the list. This entry appears frdue to the fact that the service was imported to the project before!
10. utton destination’ and cal destination
‘BPM160_Destination’ into the associated field. For this exercise the logical destination has already been predefined for you in the SAP NetWeaver Administrator.
Don’t forget to save all your
changes!
Next select the radio b‘Use logical enter the logi

Building a Composite Business Process from Scratch with SAP NetWeaver BPM – Guide 1
SAP COMMUNITY NETWORK SDN - sdn.sap.com | BPX - bpx.sap.com | BOC - boc.sap.com © 2008 SAP AG 39
Step 5 —Edit Start and End Events 1. Make sure that the interfaces
for the Start and End event of your process are assigned to the ‘DefaultService’. You can verify this by selecting the Start (End) event in the process flow and switching to the ‘Properties’ window below.
Hint: you have already done this setting in exercise A.
Step 6 —Edit Data Objects
structure defined in an XSD file. XSD files are imported by right-clicking on node ‘Process Modeling Data Types XSD Files’ in the Project Explorer and selecting ‘Import XSD…’ from the context menu. An appropriate wizard will open which guides you through the next import steps. For this exercise please import file ‘processcontext’ which is already provided to you.
1. Defining Data Types:
During the execution of a process datacan be stored in the so-called processcontext. In the modeling environment of SAP NetWeaver BPM the process context is represented by a data

Building a Composite Business Process from Scratch with SAP NetWeaver BPM – Guide 1
SAP COMMUNITY NETWORK SDN - sdn.sap.com | BPX - bpx.sap.com | BOC - boc.sap.com © 2008 SAP AG 40
2. After you imported the XSD file to this development
component, you’ll see that under Data process modeling
Type http://www.example.org/approvalprocess
3. o see the data definition you can Tdouble click on the Data type ‘InvestmentApprovalProcess’. The window shown in the screenshot will open. Once finished with investigating this window, you can close it to continue modeling within the process flow.
4. Now drag and drop the dat
‘InvestmentApproa type
valProcess’ from the Project Explorer view (left panel) into the process diagram. In this way you add the process context (data type) to our Investment Approval Process.

Building a Composite Business Process from Scratch with SAP NetWeaver BPM – Guide 1
SAP COMMUNITY NETWORK SDN - sdn.sap.com | BPX - bpx.sap.com | BOC - boc.sap.com © 2008 SAP AG 41
Step 7 —Edit Mapping 1. Open the Properties of the first huma
activity ‘Enter Purchase Request’. AInput Mapping is not necessary in this example because no parameters will be transferred between start event and the first human activity. Therefore
n n
start with Output Mapping to map the output of the first UI (on the left side) to the process context (on the right side).
2. You can/should use the functionality of ‘Automated Mapping’ to map fields which have same names. e.g. you can drag and drop the node ‘TaskOutput UIResponse Requester’ pemouse click (!!) from the left s
r right ide
(Outputs of Enter Purchase Request) to the right side (Process context) and then select the menu ‘Map automatically’.

Building a Composite Business Process from Scratch with SAP NetWeaver BPM – Guide 1
SAP COMMUNITY NETWORK SDN - sdn.sap.com | BPX - bpx.sap.com | BOC - boc.sap.com © 2008 SAP AG 42
3. If you want to map manually, either you
do the same procedure as was explained in step 4
1 and then select menu ‘Create mapping’, or you can directly drag and drop a particular field name from the left side to the right side with the left mouse button.
4. Complete the output mapping for ‘Requester’ and ‘Product’. The result is shown as screenshot (Leverage
s will save a lot of time and effort for your implementation project.).
automated mapping functionality as much as you can because thi
5. Now we would like to assign the actual
date to the ‘orderDate’. To do so,
please double click on the sign which is in front of ‘orderDate’.
Now the editor window opens.

Building a Composite Business Process from Scratch with SAP NetWeaver BPM – Guide 1
SAP COMMUNITY NETWORK SDN - sdn.sap.com | BPX - bpx.sap.com | BOC - boc.sap.com © 2008 SAP AG 43
6. Open the folder ‘Rules and Functions’ and you can find the function ‘current-dateTime()’ as the screenshot shown on the right side.
7. Drag and Drop this function from left window to the right window.
8. After the function appears in the
function editor, add the bracket ‘()’ after the current-dateTime. Now you will see that the red cross disappears which means that the syntax for this function now is correct.
With 5-8 we assigned the current date
ess
and time to the ‘orderDate’ in proccontext.
9. inue with the input
’. For this the human
est.
Mapping.
Next we will contmapping of the next human activity
se Request‘Approve Purchaopen the properties ofactivity ‘Approve Purchase Requ
Navigate to tab Input
Edit the input mapping as is shown in the screen shot on the right side.

Building a Composite Business Process from Scratch with SAP NetWeaver BPM – Guide 1
SAP COMMUNITY NETWORK SDN - sdn.sap.com | BPX - bpx.sap.com | BOC - boc.sap.com © 2008 SAP AG 44
10. Navigate to tab Output Mapping.
Edit the output mapping for the human activity ‘Approve Purchase Request’ as is shown in the screen shot on the right side.
11. Open the property window for the automated activity ‘Create Purchase Order’.
Navigate to tab Input Mapping. Please map the following fields from process context to Input fields for Create Purchase Order (see screen shots on the right side).
12. For other mandatory input fields, please
add the constant via double click on the
object sign (e.g. )and then type “” and a particular value.
Please do the following constant mapping: “1” for SellerID “2” for BuyID “USD” for CurrencyCode “10” for ItemID “PR” for TypeCode “1” for Schedule line Event TypeCode “001” for UnitCode Don’t forget to save all your changes!

Building a Composite Business Process from Scratch with SAP NetWeaver BPM – Guide 1
SAP COMMUNITY NETWORK SDN - sdn.sap.com | BPX - bpx.sap.com | BOC - boc.sap.com © 2008 SAP AG 45

Building a Composite Business Process from Scratch with SAP NetWeaver BPM – Guide 1
SAP COMMUNITY NETWORK SDN - sdn.sap.com | BPX - bpx.sap.com | BOC - boc.sap.com © 2008 SAP AG 46
13. Navigate to tab Output Mapping. to the
ID in context in Exercise C.
Return the purchase order ID process context. We’ll need the purchase orderprocess
Step 8 —Edit Condition line 1. Next we want to specify the
details of the gateway. During
e gate with ect it in
ated
ose ontext
menu. On the ‘Properties’ tab click on the ‘Condition’ label.
the process modeling phase, two gates were defined for our gateway: Resubmit and Approved. Now we have to define when which gate will beexecuted. For this we have to adapt the properties of thaccordingly. We will start the ‘Approved’ gate. Selthe process flow (e.g. click on the label or the associconnection) and jump to the ‘Properties’ window below or right click on the label/connection and cho‘Properties’ from the c
2. On the Condition tab switch on
the check box for making this gate ‘Approved’ the default one (every gateway needs one default gate).

Building a Composite Business Process from Scratch with SAP NetWeaver BPM – Guide 1
SAP COMMUNITY NETWORK SDN - sdn.sap.com | BPX - bpx.sap.com | BOC - boc.sap.com © 2008 SAP AG 47
3. Next we move to the second
on ext
gate ‘Resubmit’. Right clickthe connection and select‘Properties’ from the contmenu.
4. On the ‘Condition’ tab edit the condition line for the ‘Resubmit’ gate as follows: Open the folder ‘Rules and Functions’ on the right side. Drag and drop the function ‘not’ (it’s located in the package ‘sap.com/bpem/glx/built-in/boolean’) to the left side (into the editor) for editing
t ‘(‘ after the
conditions. After the functionappears in the editor, add an opening brackefunction’s name (seescreenshot).
5. Next drag and drop the context data ‘orderApproved’ into the condition editor and place it after the opening bracket. Finally add the closing bracket ‘)’ (see screenshot). Don’t forget to always click on ‘save’ to save your condition.
In essence this condition means: if the ‘orderApproved’ variable coming from the process context is false, then the ‘Resubmit’ connection has to be executed. Negating it via the “NOT” function makes the condition of the gate to “true” and therefore it fires. Save your changes!

Building a Composite Business Process from Scratch with SAP NetWeaver BPM – Guide 1
SAP COMMUNITY NETWORK SDN - sdn.sap.com | BPX - bpx.sap.com | BOC - boc.sap.com © 2008 SAP AG 48
Step 9 —Build and Deploy 1. Now you are going to bu
and deploy the proSwitch to the perspectiv‘Development Infrastructure’.
ild cess.
e
2. In the Component Browser pane on the far left right-click on the project ‘bpm160exercise’ (underneath the ‘Local Development MyComponents’ node) and select ‘Build…’ from the context menu.

Building a Composite Business Process from Scratch with SAP NetWeaver BPM – Guide 1
SAP COMMUNITY NETWORK SDN - sdn.sap.com | BPX - bpx.sap.com | BOC - boc.sap.com © 2008 SAP AG 49
3. In the dialog box that pops up all related projects are listed. Select only the process modeling project ‘bpm160exerciser’ for building. The Web Dynpro project is already built and deployed on your server. Click on ‘OK’ to continue.
4. A dialog will popup and show you the status of the build. At the end you’ll get the
s message that the build isuccessfully running through.
5. After the successful Build
can start to deploy the project on the Java server (once again right click on the project and select ‘Deplo
, you
y’ from the
quest4 project is NOT checked in the upcoming ‘Deploy DCs’ dialog box! Confirm the dialog box by clicking on ‘OK’.
Use ‘bpm160user/welcome123’ to logon to the Java server in case you are requested to enter the credentials.
context menu).
Double check that the purchasere

Building a Composite Business Process from Scratch with SAP NetWeaver BPM – Guide 1
SAP COMMUNITY NETWORK SDN - sdn.sap.com | BPX - bpx.sap.com | BOC - boc.sap.com © 2008 SAP AG 50
Step 10 —Start the Process In this section you’ll learn how an admini trator starts the process. In the real business scenario you will hav
e form, Visual Composer UI or any Java Web Dynpro UI) to start the
er Administrator (Favorites BPM160 SAP NetWeaver Administrator) and logon with the credentials ‘bpm160user/welcome123’.
s ea particular user interface (Adobprocess. 1. Once the deployment has been
finished successfully, open your browser and make use of the predefined favorite to call the SAP NetWeav
2. Click on ‘Configuration Management’ in the first level navigation and ‘Processes and Tasks’ in the second level navigation.
3. Follow the link ‘Process Repository’ to get a list of all successfully deployed processes.

Building a Composite Business Process from Scratch with SAP NetWeaver BPM – Guide 1
SAP COMMUNITY NETWORK SDN - sdn.sap.com | BPX - bpx.sap.com | BOC - boc.sap.com © 2008 SAP AG 51
4. Select the deployed process
‘bpm160exercise’ and its latest version (it is marked as active inthe ‘Component Versions’ section – 2nd table). Select the row of type ‘Process Definition’ in the third table (Processes, Tasks and Rules) on that screen and click on the ‘Start Process’ button. A new browser window opens containing the BPM Process Start dialog (see nextstep).
5. Select the first row in the rt
particular id has been started successfully.
process table and click on ‘StaProcess’. As result you will seea message at the bottom that a process instance with a

Building a Composite Business Process from Scratch with SAP NetWeaver BPM – Guide 1
SAP COMMUNITY NETWORK SDN - sdn.sap.com | BPX - bpx.sap.com | BOC - boc.sap.com © 2008 SAP AG 52
Step 11 -- Execute the Process as e 6. In order to execute the process
we have to wait for work itembeing sent out by the process runtime. They will show-up in the Universal Worklist (UWL) whiccan be accessed via the portal. Therefore login to the portal via a
nd user
s
h
the second level navigation to actually display the Universal Worklist.
predefined favorite Favorites BPM160 SAP NetWeaver Portal. As usual enter bpm160user/welcome123 as credentials.
Click on ‘Work’ in
7. The first task ‘Enter Purchase Request’ appears in the Universal Worklist. If not, please click on the refresh button in Universal Worklist.
8. Click on the task and you are
guided to the user interface for ‘Enter Purchase Request’.

Building a Composite Business Process from Scratch with SAP NetWeaver BPM – Guide 1
SAP COMMUNITY NETWORK SDN - sdn.sap.com | BPX - bpx.sap.com | BOC - boc.sap.com © 2008 SAP AG 53
9. Click on the link ‘Investment
Approval Process’ in the headarea of the ‘Enter Purchase Request’ screen to open the process viewer in a new bro
er
wser window, which displays the graphical representation of the running process together with the runtime information.
10. ut
e running process instance
Here you are able to see the actual process information aboth(processor, status, my tasks etc). Close the window to jump back to the step.

Building a Composite Business Process from Scratch with SAP NetWeaver BPM – Guide 1
SAP COMMUNITY NETWORK SDN - sdn.sap.com | BPX - bpx.sap.com | BOC - boc.sap.com © 2008 SAP AG 54
11. Enter ’HT*’ in the ‘Product ID’
field and ‘*’ in the ‘Description’ field of the ‘Product Search’ section. Click on ‘Search’ to
e
A confirmation dialog pops up telling you that the task has been finished successfully. Click on ‘Close’ to close the dialog box
initiate the product search.
From the result table select any product which is listed in the tabland fill the mandatory fields ‘Quantity’ and ‘Comment’. Click on ‘Submit’ to finish this task.
12. Refresh the UWL: click on the -button and select ‘Refresh’ from the menu.
Building a Composite Business Process from Scratch with SAP NetWeaver BPM – Guide 1
SAP COMMUNITY NETWORK SDN - sdn.sap.com | BPX - bpx.sap.com | BOC - boc.sap.com © 2008 SAP AG 55
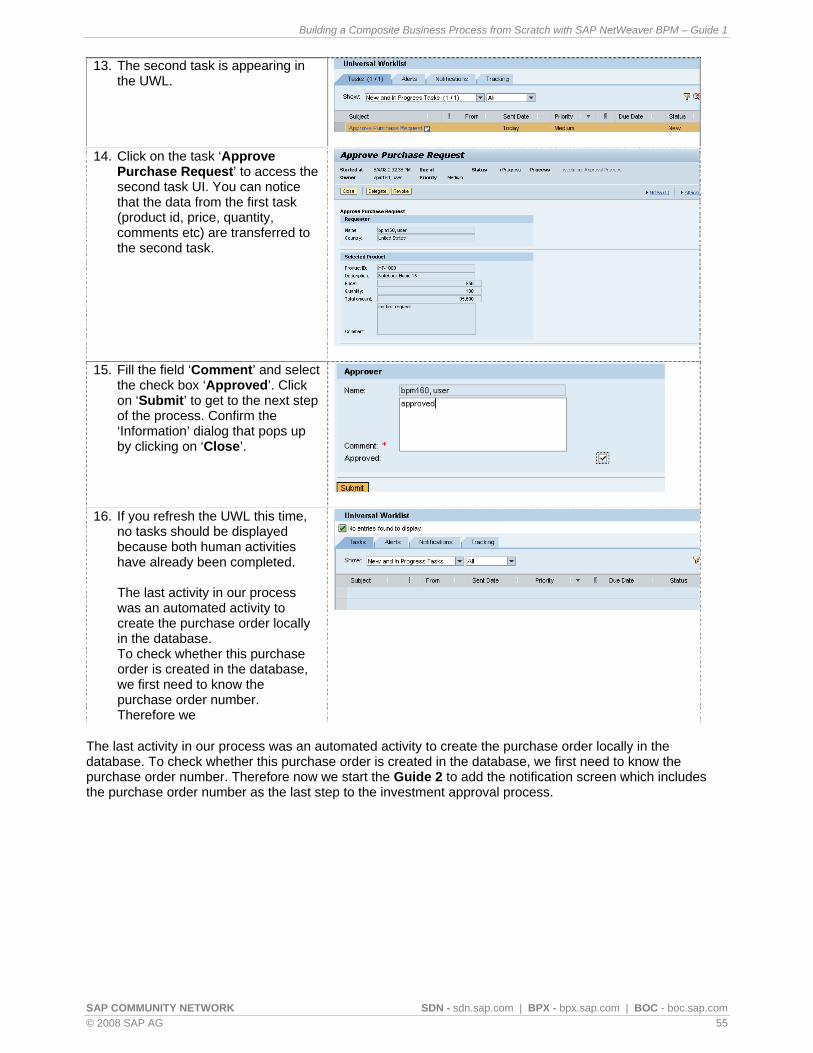
13. The second task is appearing in the UWL.
14. Click on the task ‘Approve
Purchase Request’ to access the second task UI. You can notice that the data from the first task (product id, price, quantity, comments etc) are transferred to the second task.
15. Fill the field ‘Comment’ and select
the check box ‘Approved’. Click on ‘Submit’ to get to the next step of the process. Confirm the ‘Information’ dialog that pops up by clicking on ‘Close’.
16. If you refresh the UWL this time, no tasks should be displayed because both human activities have already been completed.
The last activity in our process was an automated activity to create the purchase order locally in the database. To check whether this purchase order is created in the database, we first need to know the purchase order number. Therefore we
The last activity in our process was an automated activity to create the purchase order locally in the database. To check whether this purchase order is created in the database, we first need to know the purchase order number. Therefore now we start the Guide 2 to add the notification screen which includes the purchase order number as the last step to the investment approval process.

Building a Composite Business Process from Scratch with SAP NetWeaver BPM – Guide 1
SAP COMMUNITY NETWORK SDN - sdn.sap.com | BPX - bpx.sap.com | BOC - boc.sap.com © 2008 SAP AG 56
Related Content is series, in the Business Process Modeling articles areaSee Guide 2 and Guide 3 of th .
For more information, visit the Business Process Modeling homepage.
Building a Composite Business Process from Scratch with SAP NetWeaver BPM – Guide 1
SAP COMMUNITY NETWORK SDN - sdn.sap.com | BPX - bpx.sap.com | BOC - boc.sap.com © 2008 SAP AG 57
5BCopyright © 2008 SAP AG. All rights reserved.
No part of this publication may be reproduced or transmitted in any form or for any purpose without the express permission of SAP AG. The information contained herein may be changed without prior notice.
Some software products marketed by SAP AG and its distributors contain proprietary software components of other software vendors.
Microsoft, Windows, Outlook, and PowerPoint are registered trademarks of Microsoft Corporation.
IBM, DB2, DB2 Universal Database, OS/2, Parallel Sysplex, MVS/ESA, AIX, S/390, AS/400, OS/390, OS/400, iSeries, pSeries, xSeries, zSeries, System i, System i5, System p, System p5, System x, System z, System z9, z/OS, AFP, Intelligent Miner, WebSphere, Netfinity, Tivoli, Informix, i5/OS, POWER, POWER5, POWER5+, OpenPower and PowerPC are trademarks or registered trademarks of IBM Corporation.
Adobe, the Adobe logo, Acrobat, PostScript, and Reader are either trademarks or registered trademarks of Adobe Systems Incorporated in the United States and/or other countries.
Oracle is a registered trademark of Oracle Corporation.
UNIX, X/Open, OSF/1, and Motif are registered trademarks of the Open Group.
Citrix, ICA, Program Neighborhood, MetaFrame, WinFrame, VideoFrame, and MultiWin are trademarks or registered trademarks of Citrix Systems, Inc.
HTML, XML, XHTML and W3C are trademarks or registered trademarks of W3C®, World Wide Web Consortium, Massachusetts Institute of Technology.
Java is a registered trademark of Sun Microsystems, Inc.
JavaScript is a registered trademark of Sun Microsystems, Inc., used under license for technology invented and implemented by Netscape.
MaxDB is a trademark of MySQL AB, Sweden.
SAP, R/3, mySAP, mySAP.com, xApps, xApp, SAP NetWeaver, and other SAP products and services mentioned herein as well as their respective logos are trademarks or registered trademarks of SAP AG in Germany and in several other countries all over the world. All other product and service names mentioned are the trademarks of their respective companies. Data contained in this document serves informational purposes only. National product specifications may vary.
These materials are subject to change without notice. These materials are provided by SAP AG and its affiliated companies ("SAP Group") for informational purposes only, without representation or warranty of any kind, and SAP Group shall not be liable for errors or omissions with respect to the materials. The only warranties for SAP Group products and services are those that are set forth in the express warranty statements accompanying such products and services, if any. Nothing herein should be construed as constituting an additional warranty.
These materials are provided “as is” without a warranty of any kind, either express or implied, including but not limited to, the implied warranties of merchantability, fitness for a particular purpose, or non-infringement.
SAP shall not be liable for damages of any kind including without limitation direct, special, indirect, or consequential damages that may result from the use of these materials.
SAP does not warrant the accuracy or completeness of the information, text, graphics, links or other items contained within these materials. SAP has no control over the information that you may access through the use of hot links contained in these materials and does not endorse your use of third party web pages nor provide any warranty whatsoever relating to third party web pages.
Any software coding and/or code lines/strings (“Code”) included in this documentation are only examples and are not intended to be used in a productive system environment. The Code is only intended better explain and visualize the syntax and phrasing rules of certain coding. SAP does not warrant the correctness and completeness of the Code given herein, and SAP shall not be liable for errors or damages caused by the usage of the Code, except if such damages were caused by SAP intentionally or grossly negligent.