Embed Size (px)
Citation preview

Build Rich Client Forms with ADF Swing and ADF Business Components Tutorial
09/29/07
Shuang Hao
1. Open JDeveloper and make a database connection:
Then input the username and password that the systems administer assigned to you.
3 select “new database conncetion”
1 Select connections
2 right click database
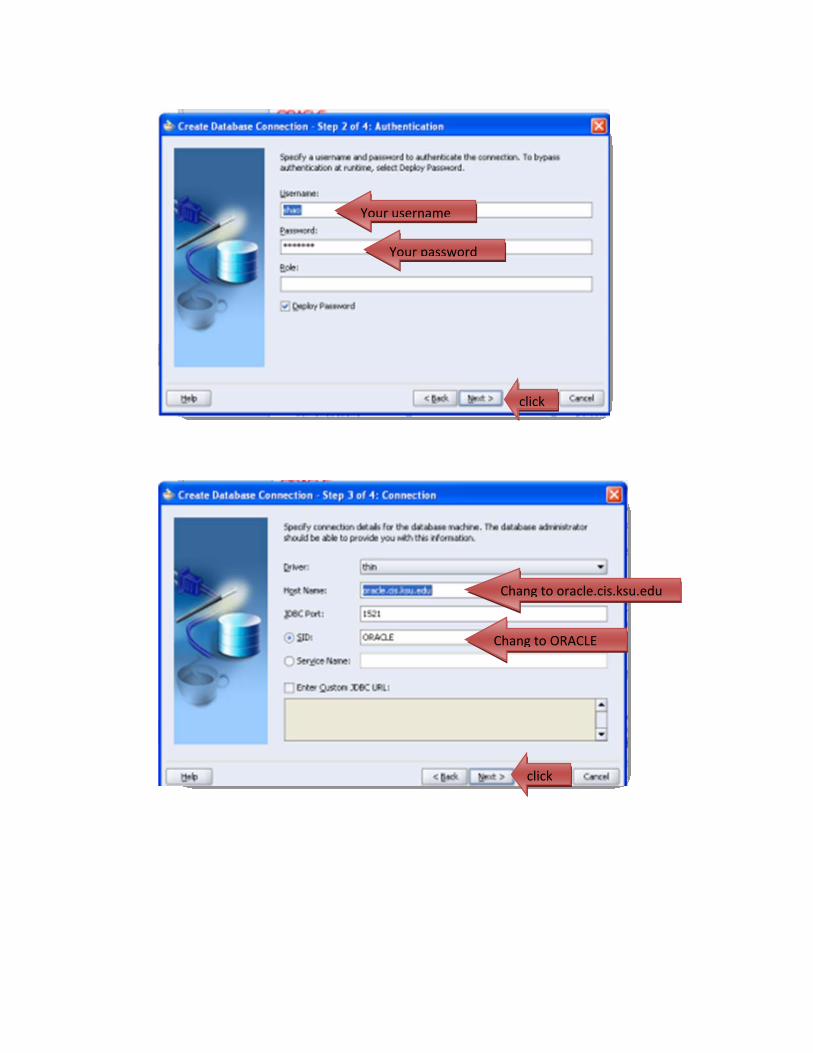
Your password
Your username
click
Chang to oracle.cis.ksu.edu
Chang to ORACLE
click
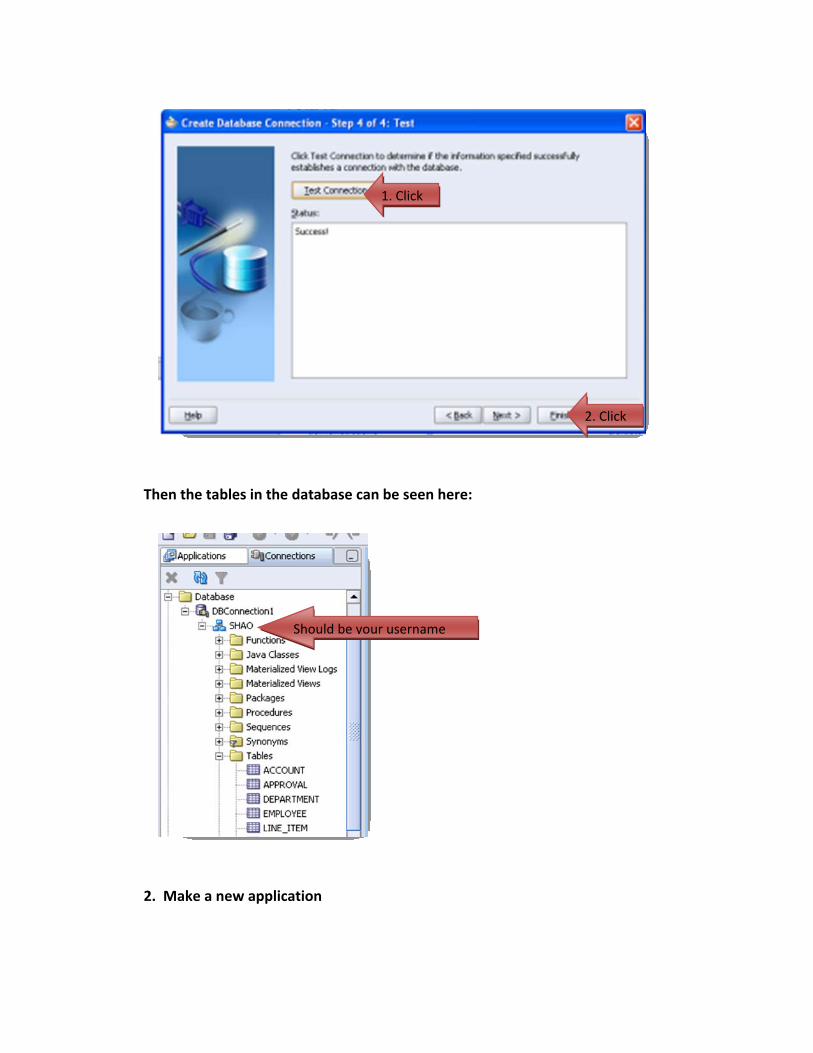
1. Click
2. Click
Then the tables in the database can be seen here:
Should be your username
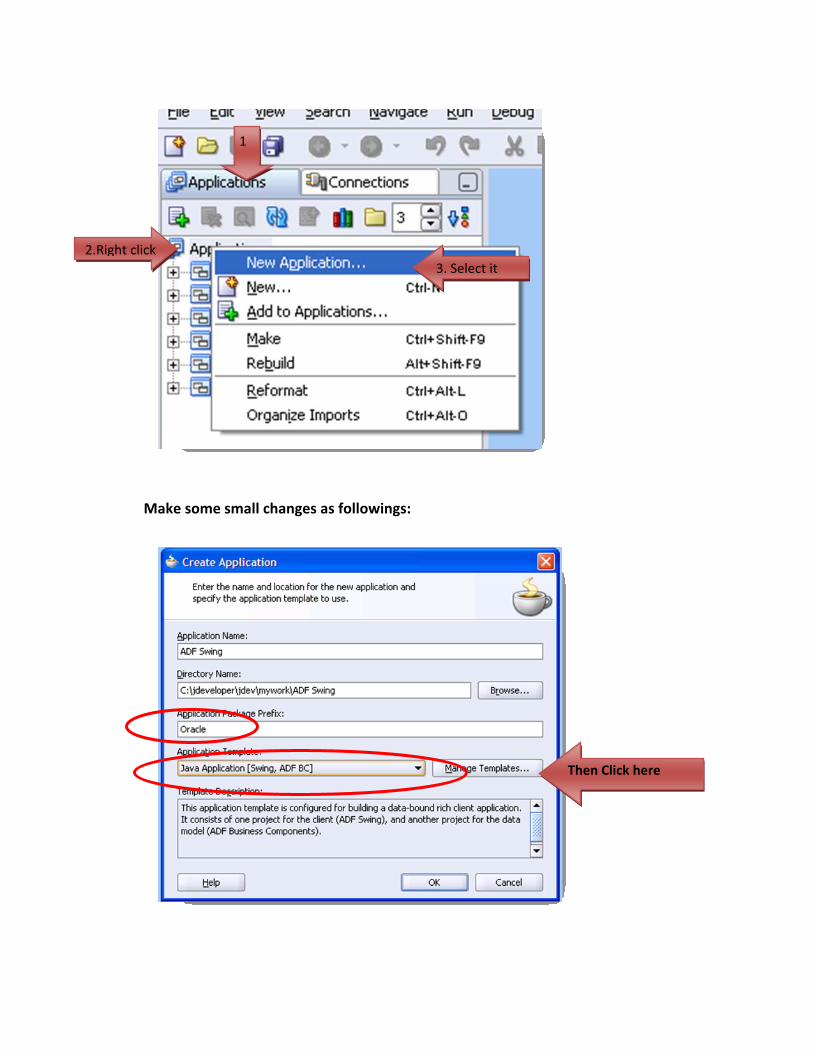
2. Make a new application
1
2.Right click 3. Select it
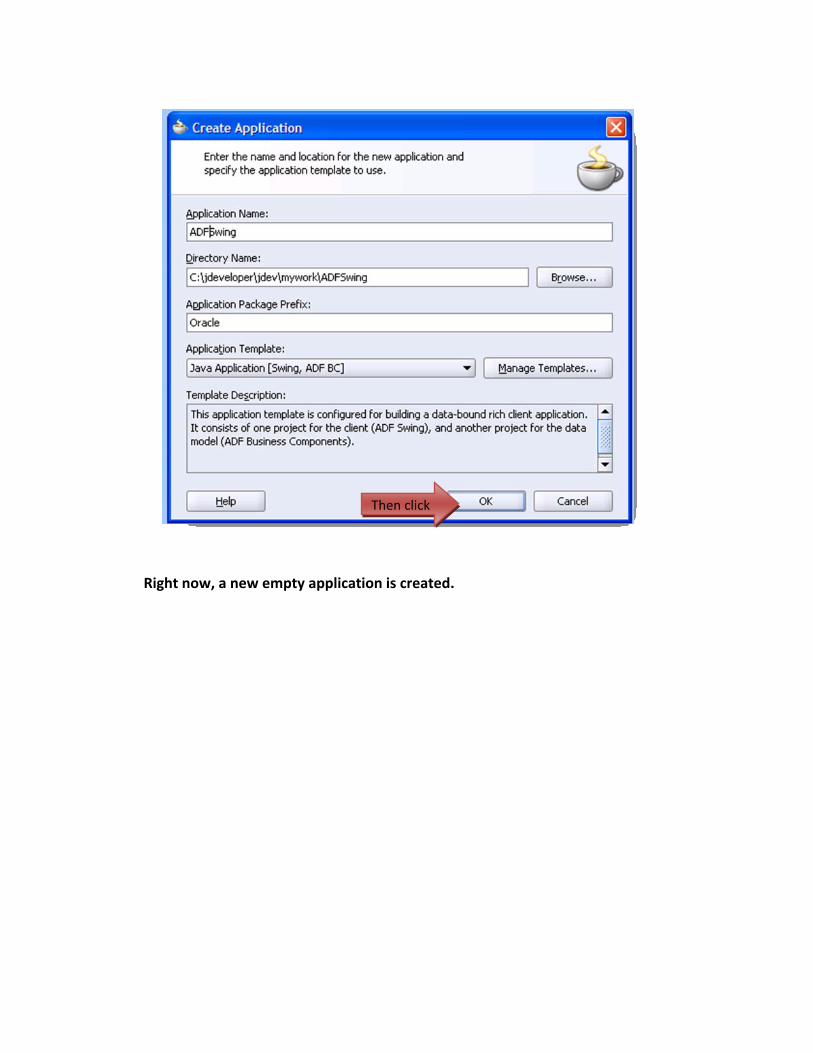
Make some small changes as followings:
Then Click here
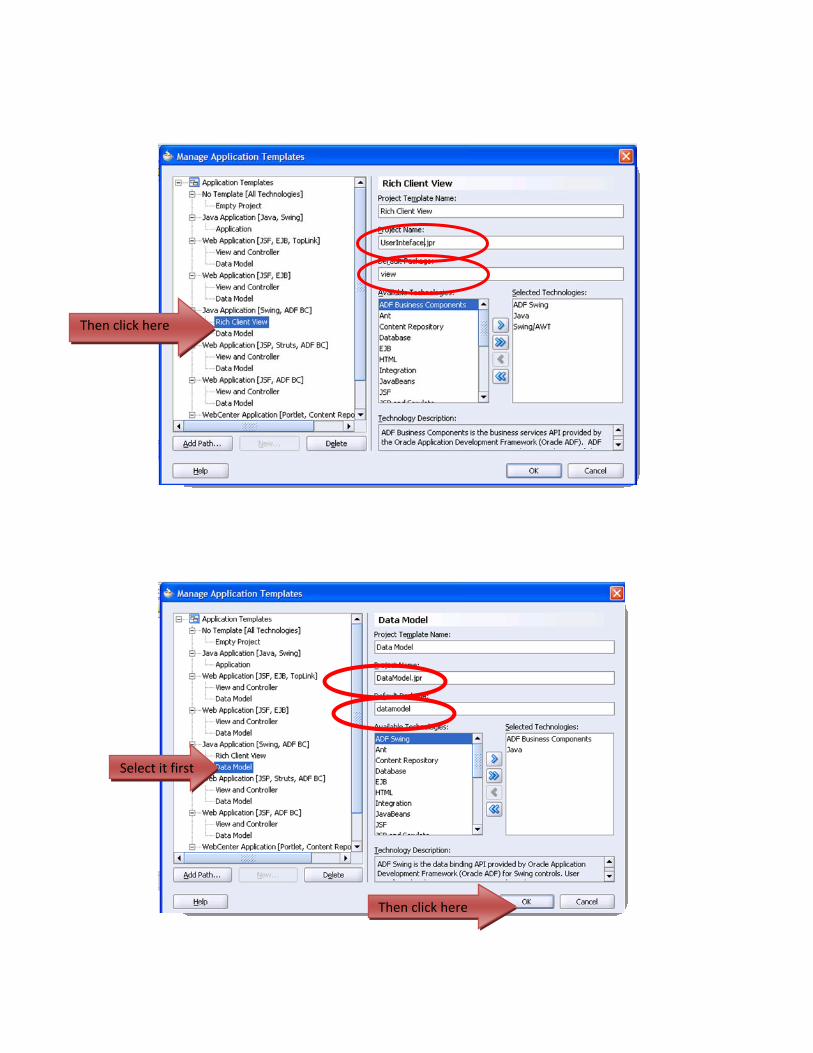
Then click here
Then click here
Select it first
Then click
Right now, a new empty application is created.

1 Right click 2 Select it
In the following window,
Then Select
Select it first
Last, click it
In the next window, just click “OK”.
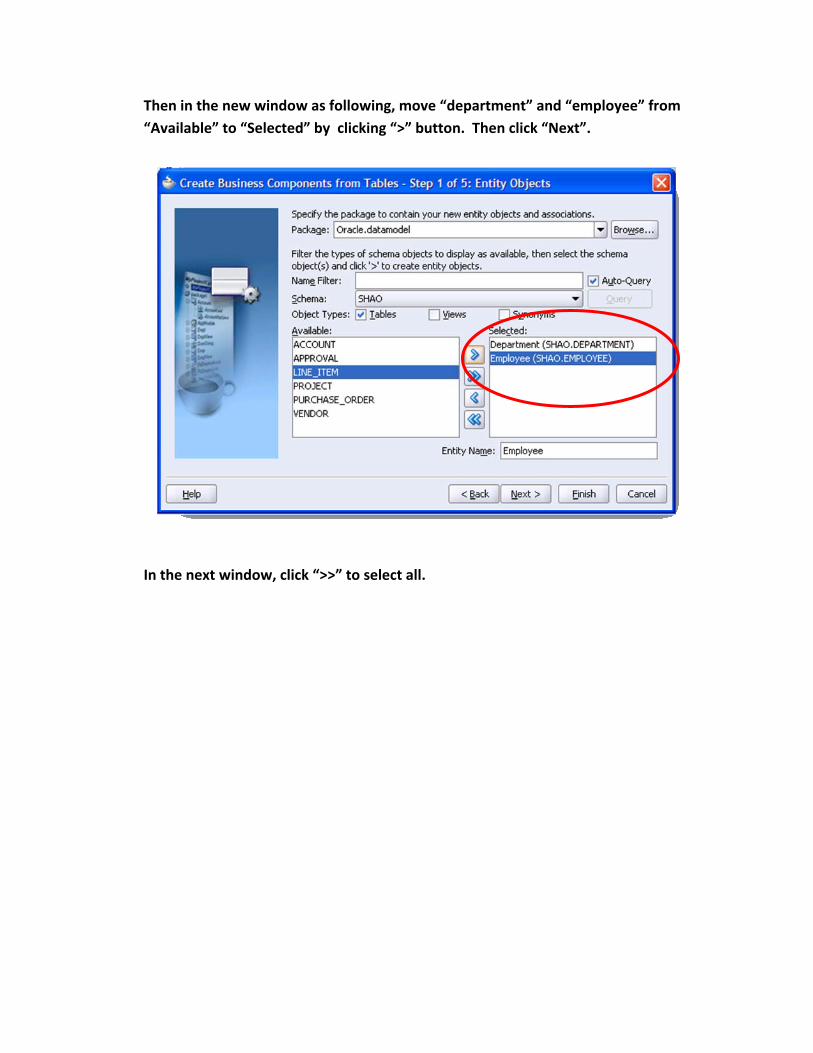
Then in the new window as following, move “department” and “employee” from “Available” to “Selected” by clicking “>” button. Then click “Next”.
In the next window, click “>>” to select all.
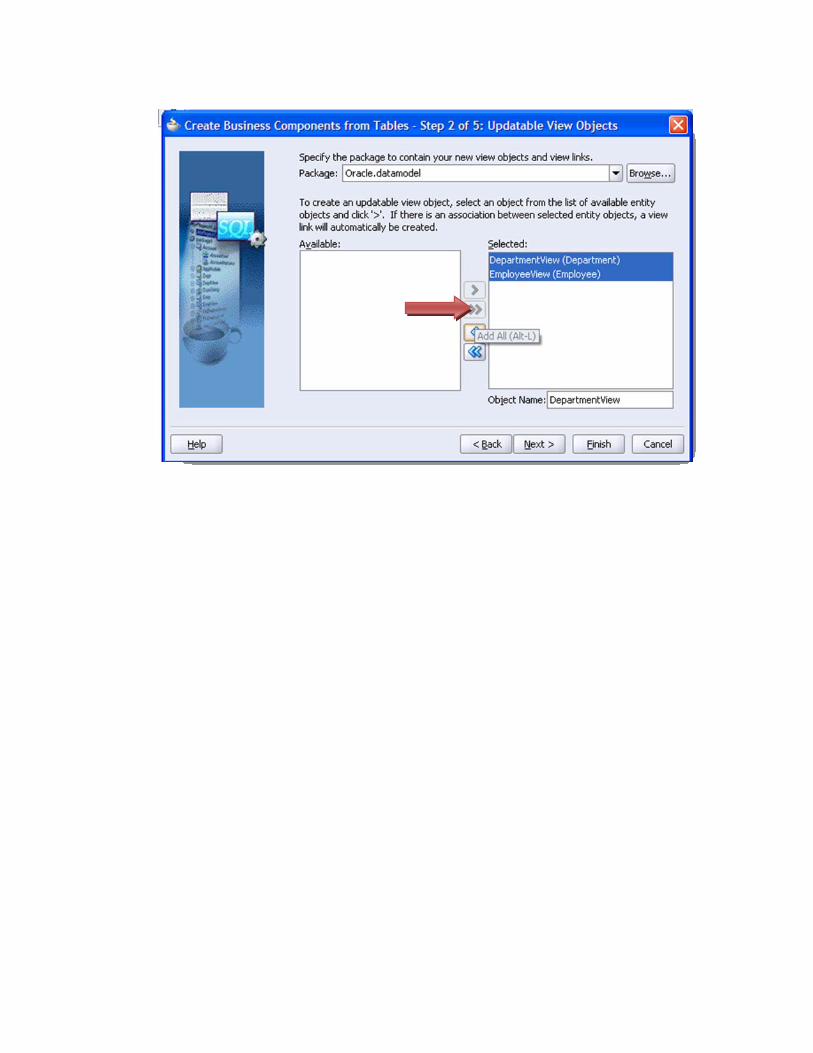
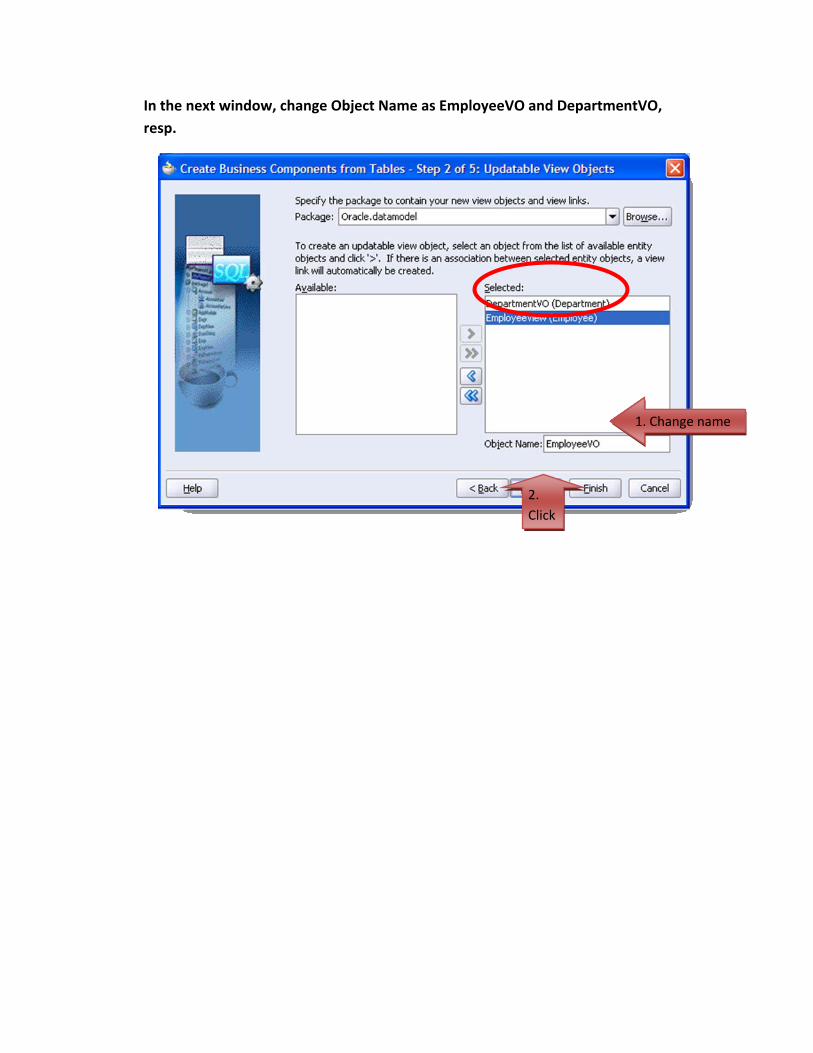
In the next window, change Object Name as EmployeeVO and DepartmentVO, resp.
1. Change name
2. Click
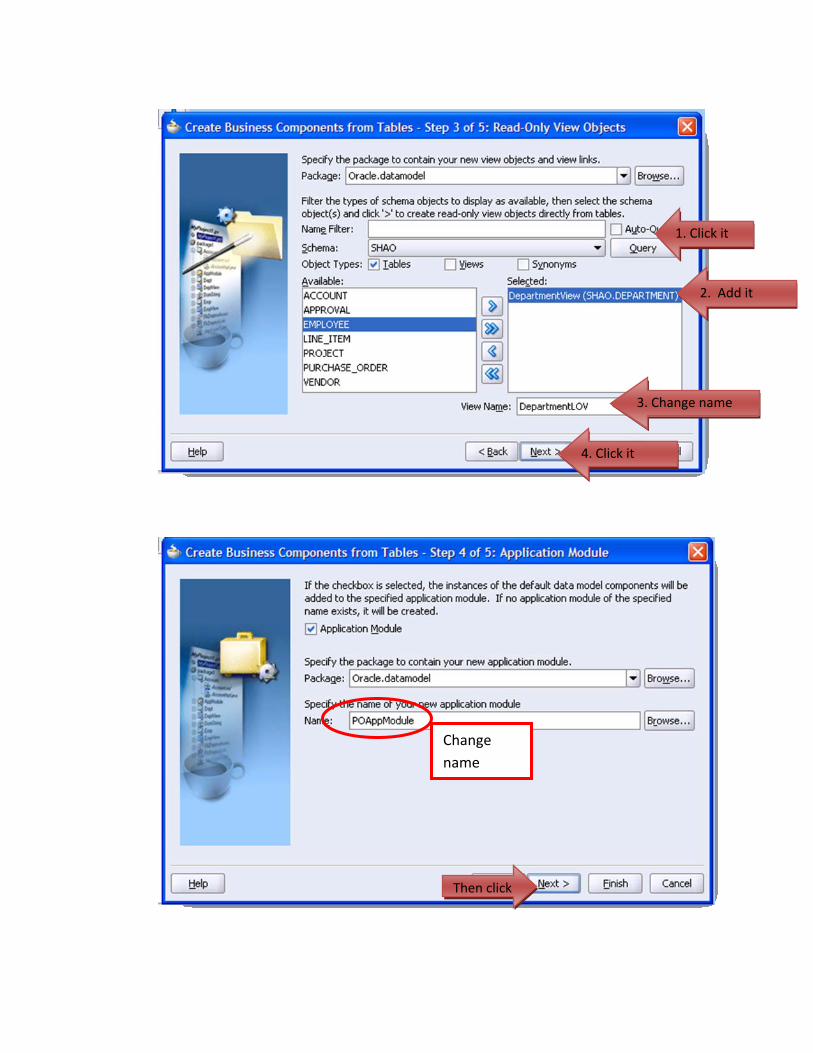
1. Click it
2. Add it
4. Click it
3. Change name
Change name
Then click
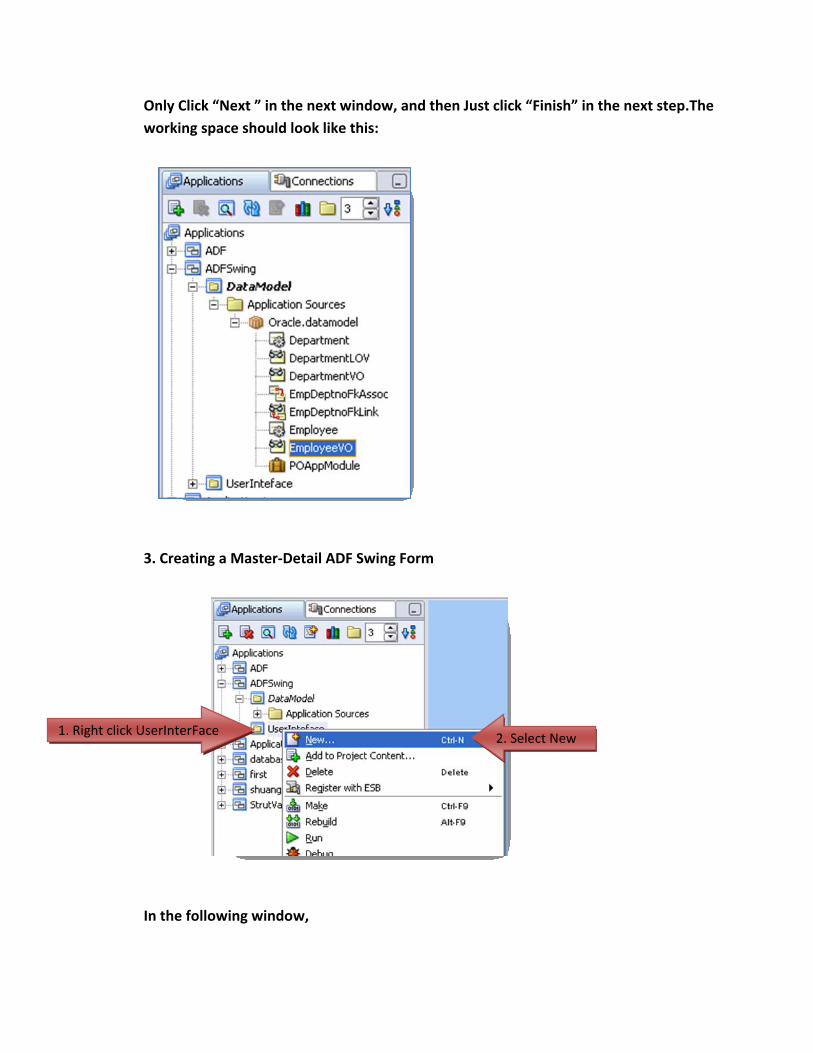
Only Click “Next ” in the next window, and then Just click “Finish” in the next step.The working space should look like this:
3. Creating a Master‐Detail ADF Swing Form
1. Right click UserInterFace 2. Select New
In the following window,
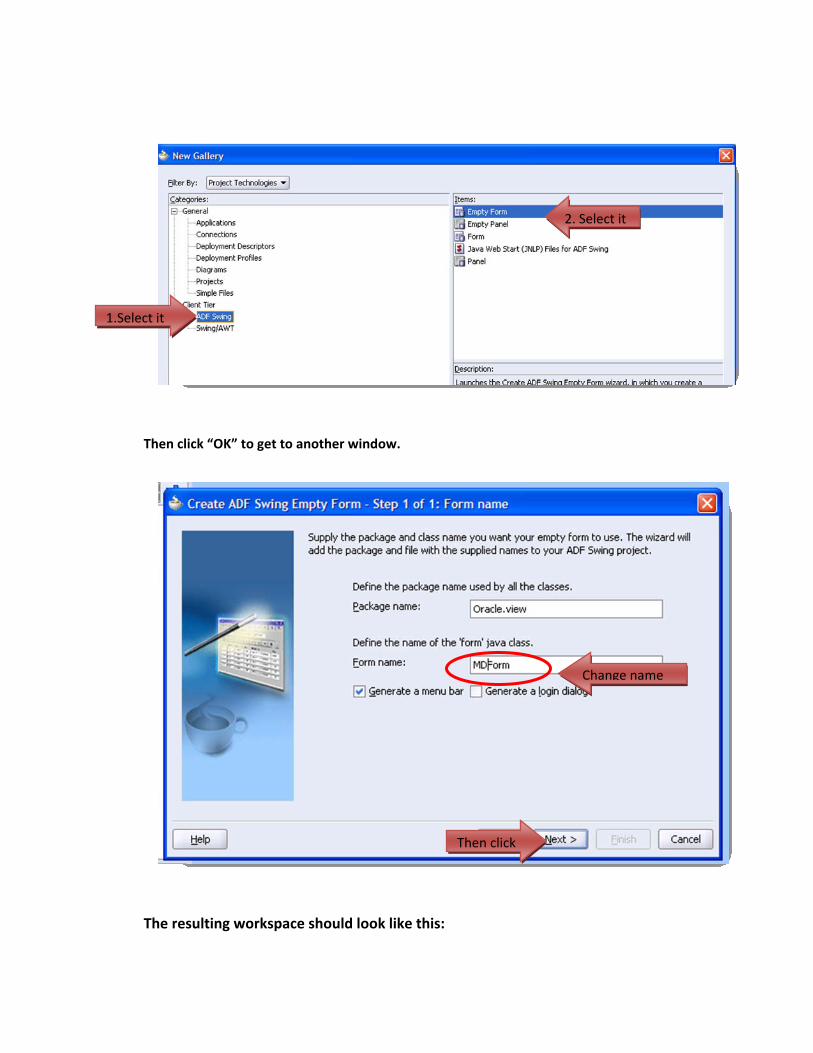
2. Select it
1.Select it
Then click “OK” to get to another window.
Change name
Then click
The resulting workspace should look like this:
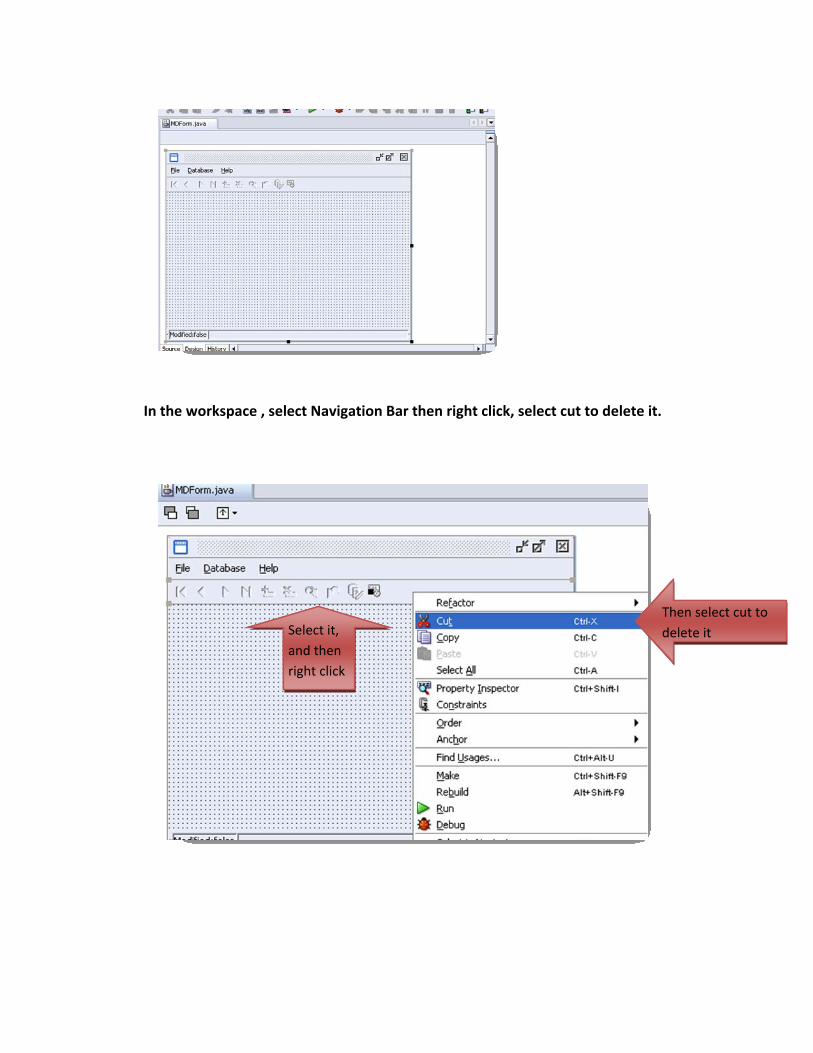
In the workspace , select Navigation Bar then right click, select cut to delete it.
Then select cut to delete itSelect it,
and then right click
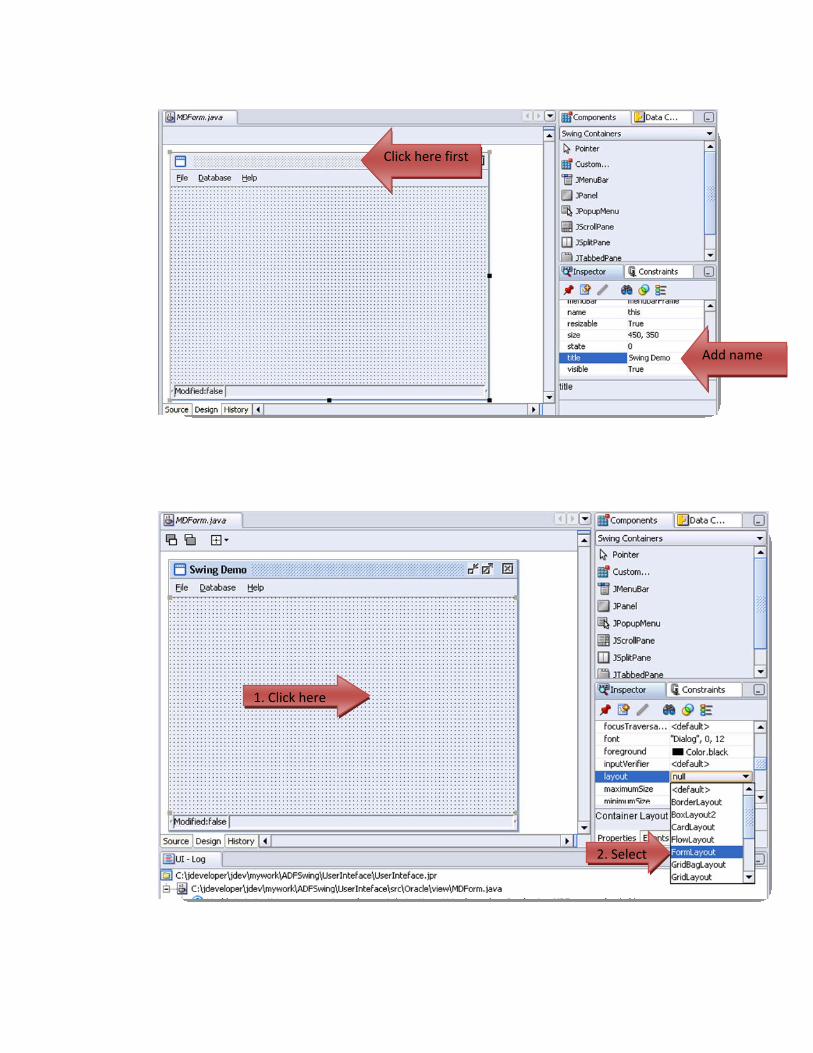
Click here first
Add name
1. Click here
2. Select
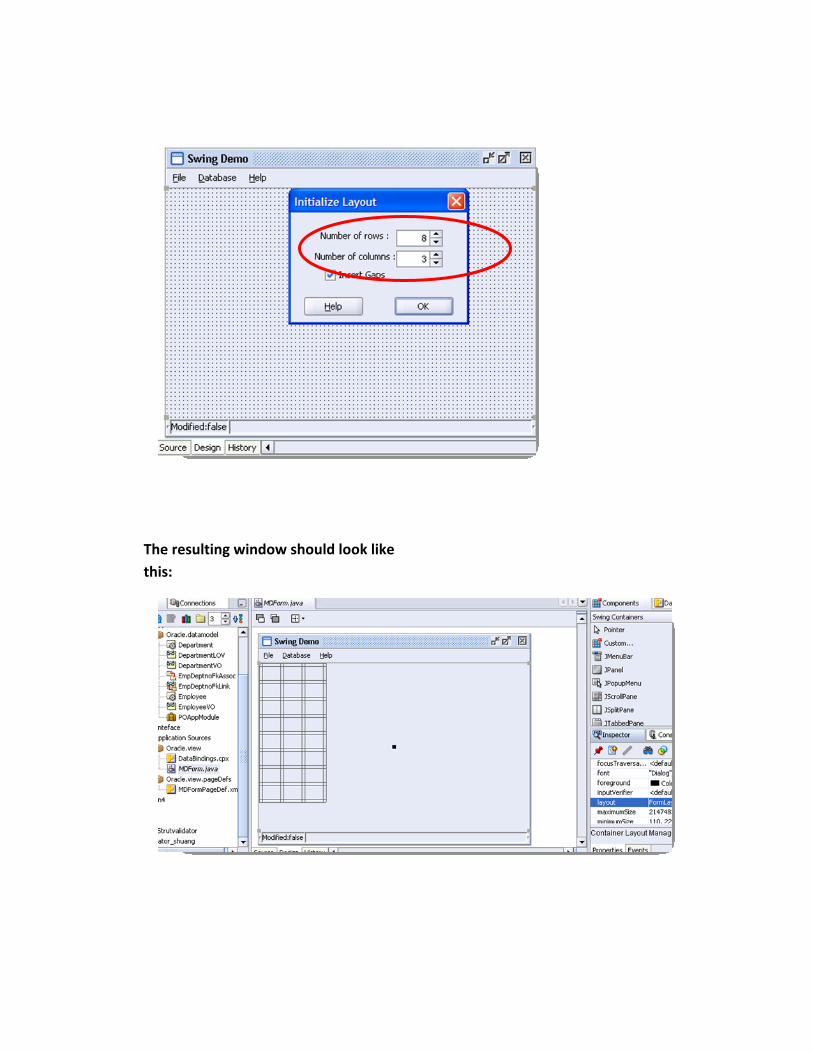
The resulting window should look like this:
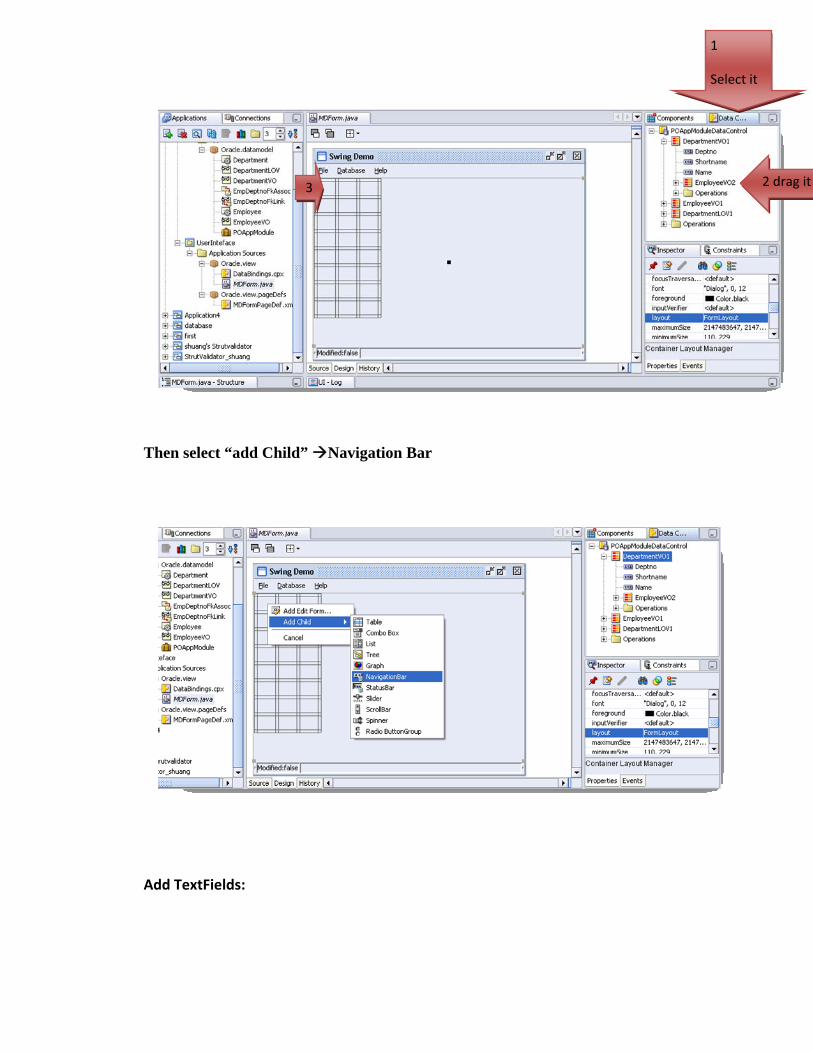
Select it
1
2 drag it 3
Then select “add Child” Navigation Bar
Add TextFields:

Select it
1
2 drag it to 3
3 4 Select TextField
Repeat the same 1.2.3.4 steps for “shortname” and “name”. And then add labels for each of them as following:
1 Select ADF Swing Controls
3 2 Drag it to 3
Repeat the same steps for another two, the resulting is as following picture, then right click each label, select “create binding”—>“Label for”:
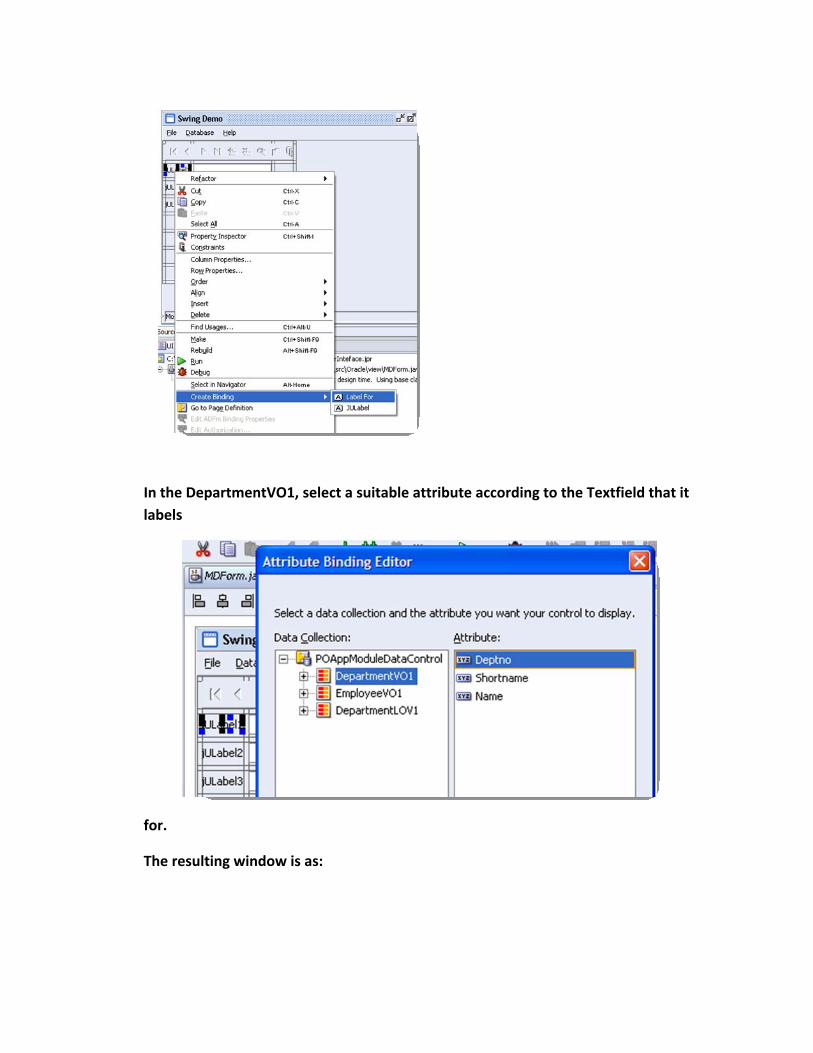
In the DepartmentVO1, select a suitable attribute according to the Textfield that it labels
for.
The resulting window is as:
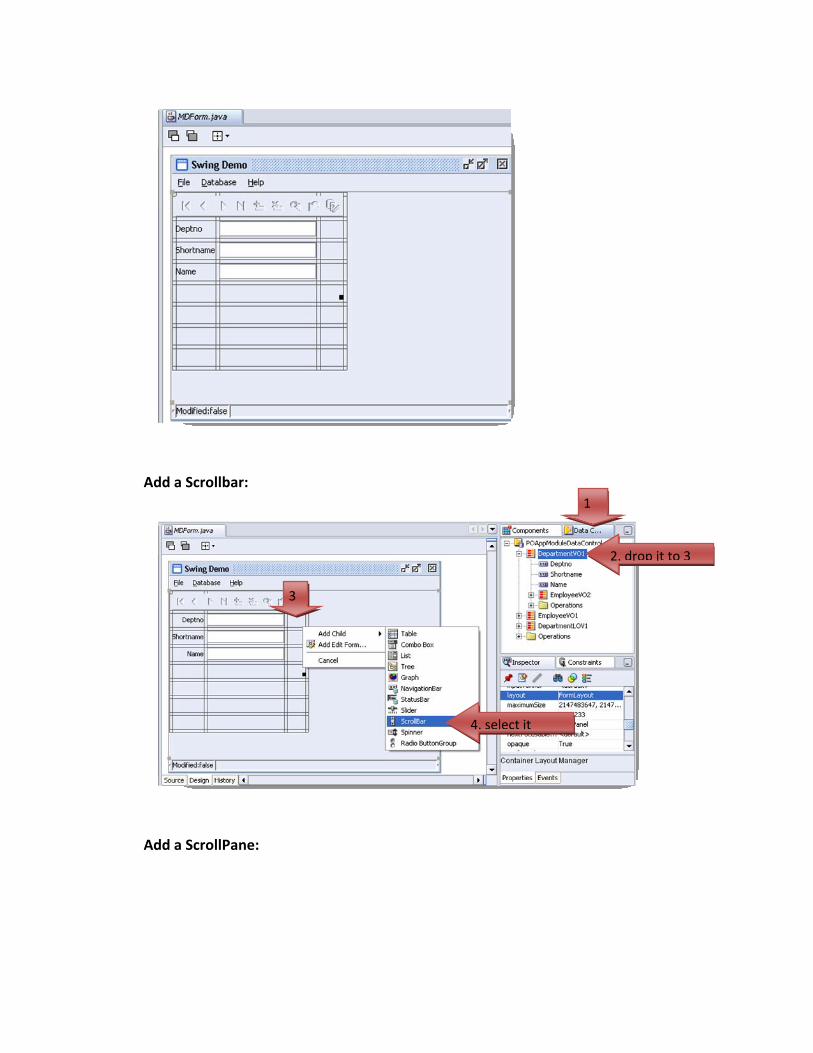
Add a Scrollbar:
1
2. drop it to 3
3
4. select it
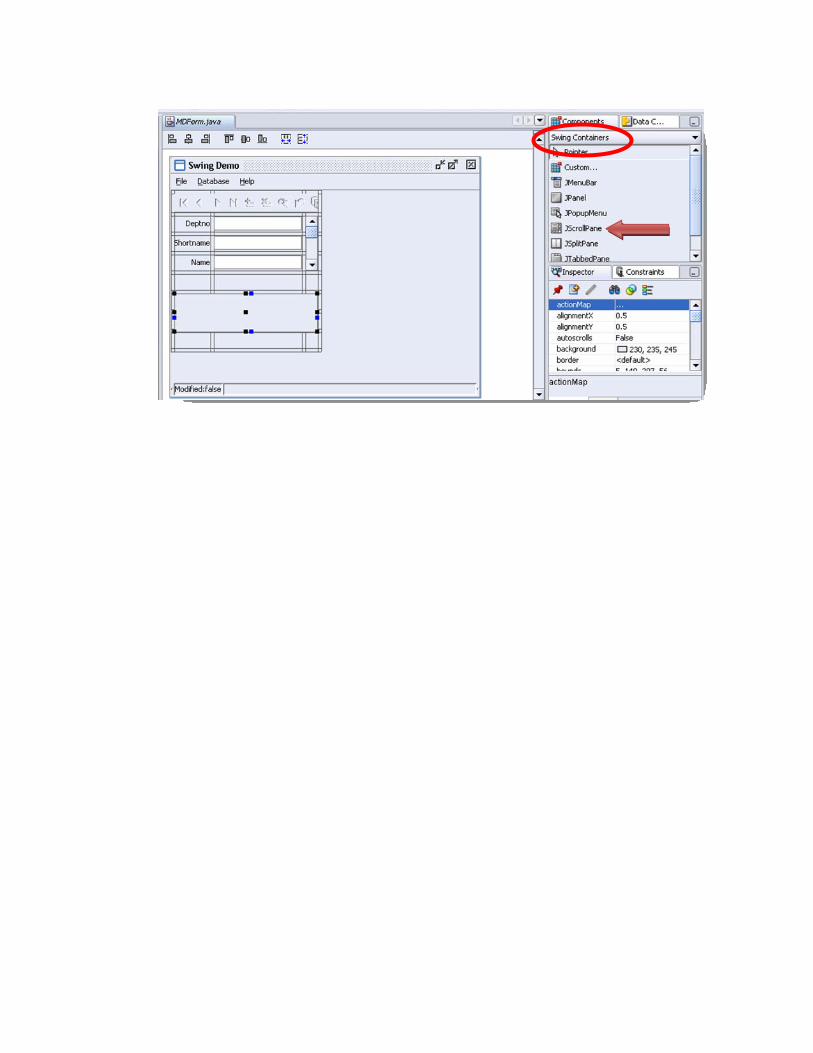
Add a ScrollPane:
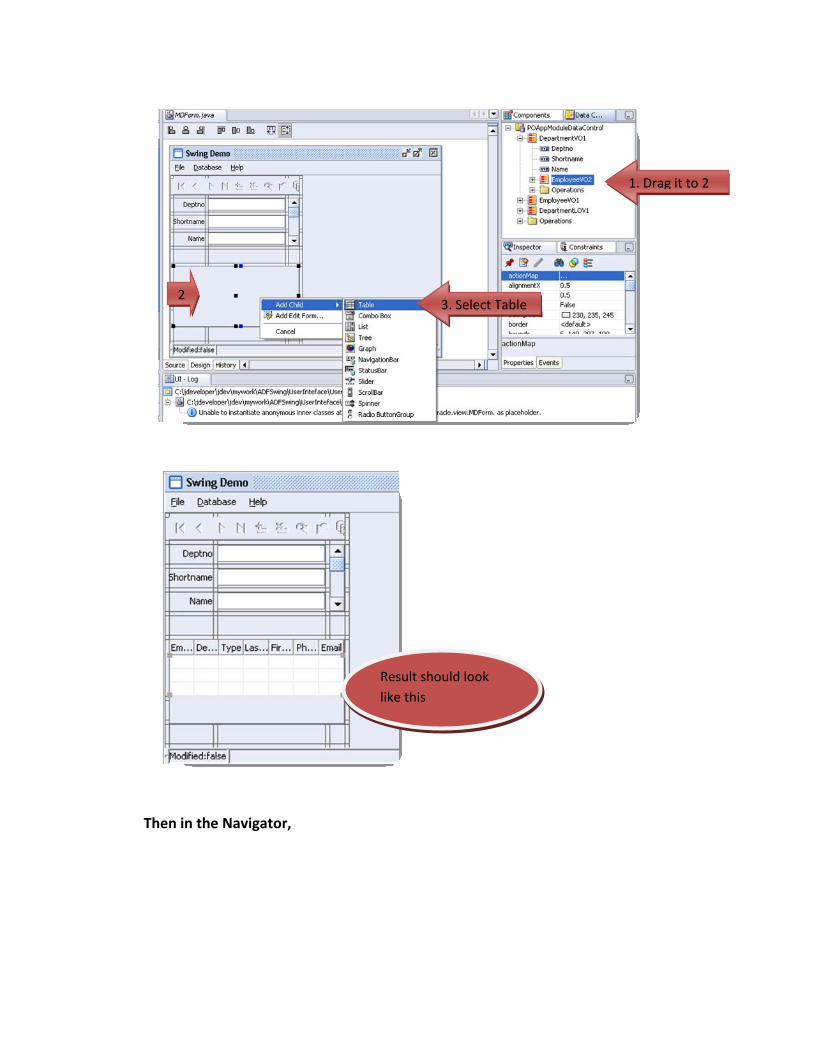
1. Drag it to 2
2 3. Select Table
Result should look like this
Then in the Navigator,
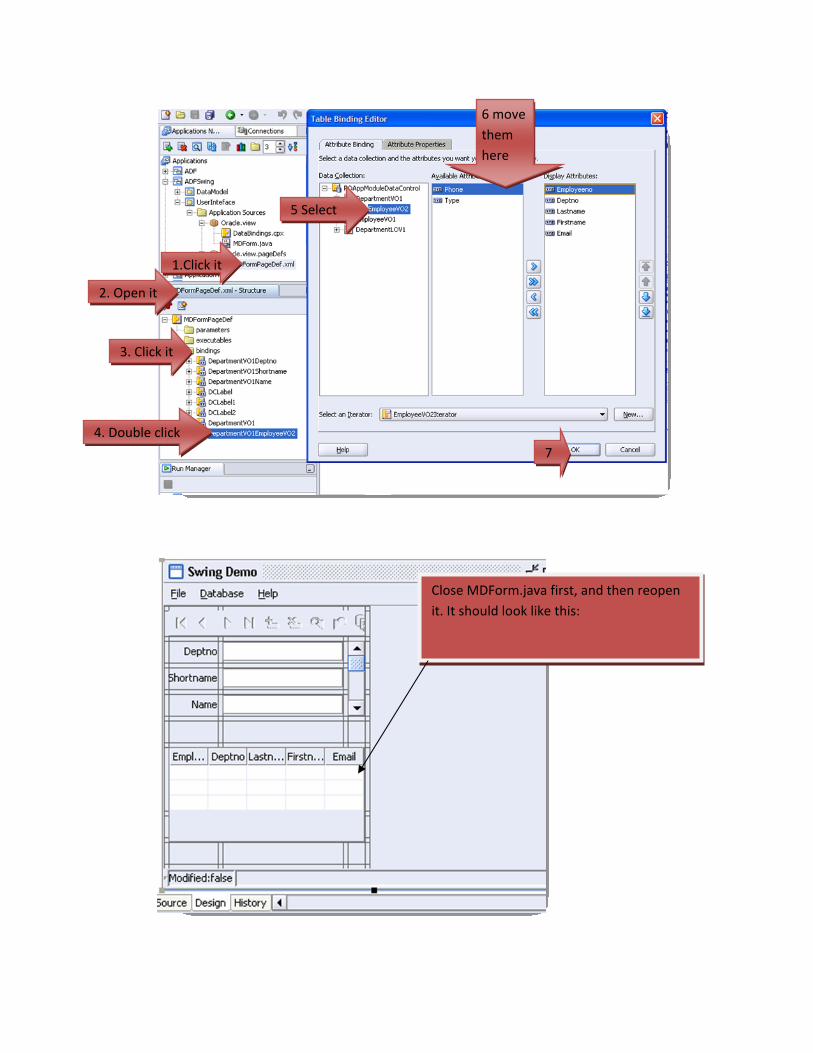
6 move them here
5 Select
1.Click it
2. Open it
4. Double click 7
3. Click it
Close MDForm.java first, and then reopen it. It should look like this:
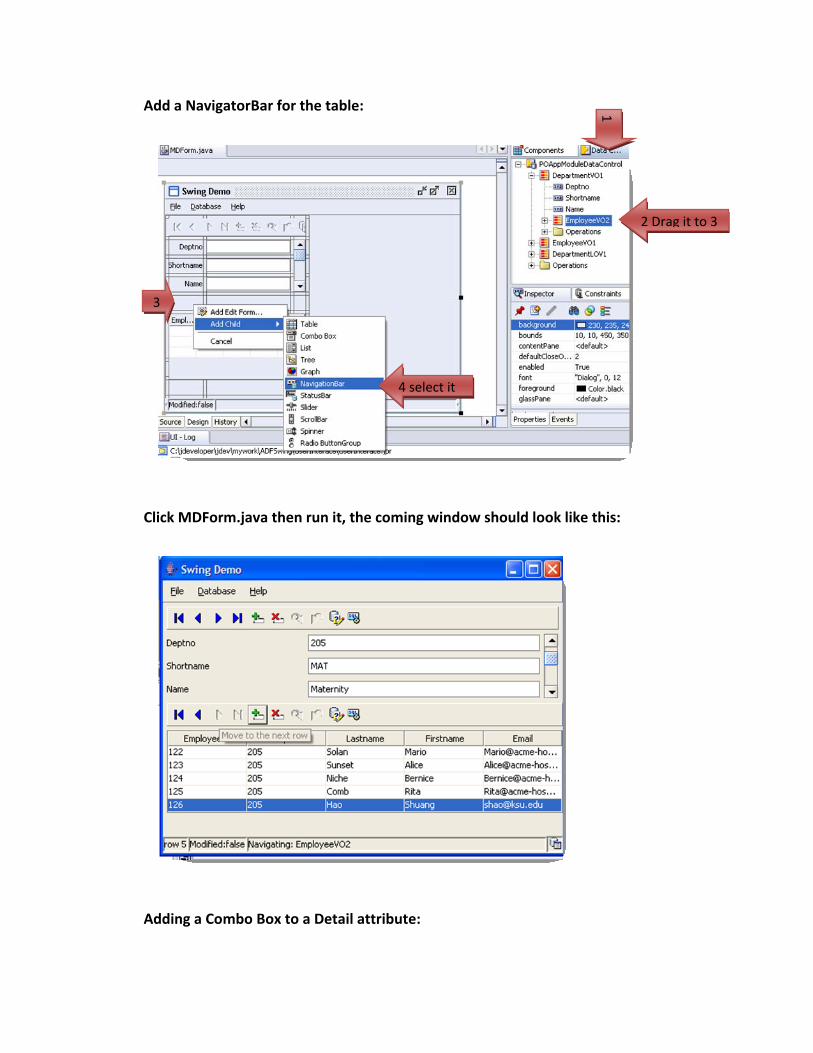
Add a NavigatorBar for the table:
1 2 Drag it to 3
3
4 select it
Click MDForm.java then run it, the coming window should look like this:
Adding a Combo Box to a Detail attribute:
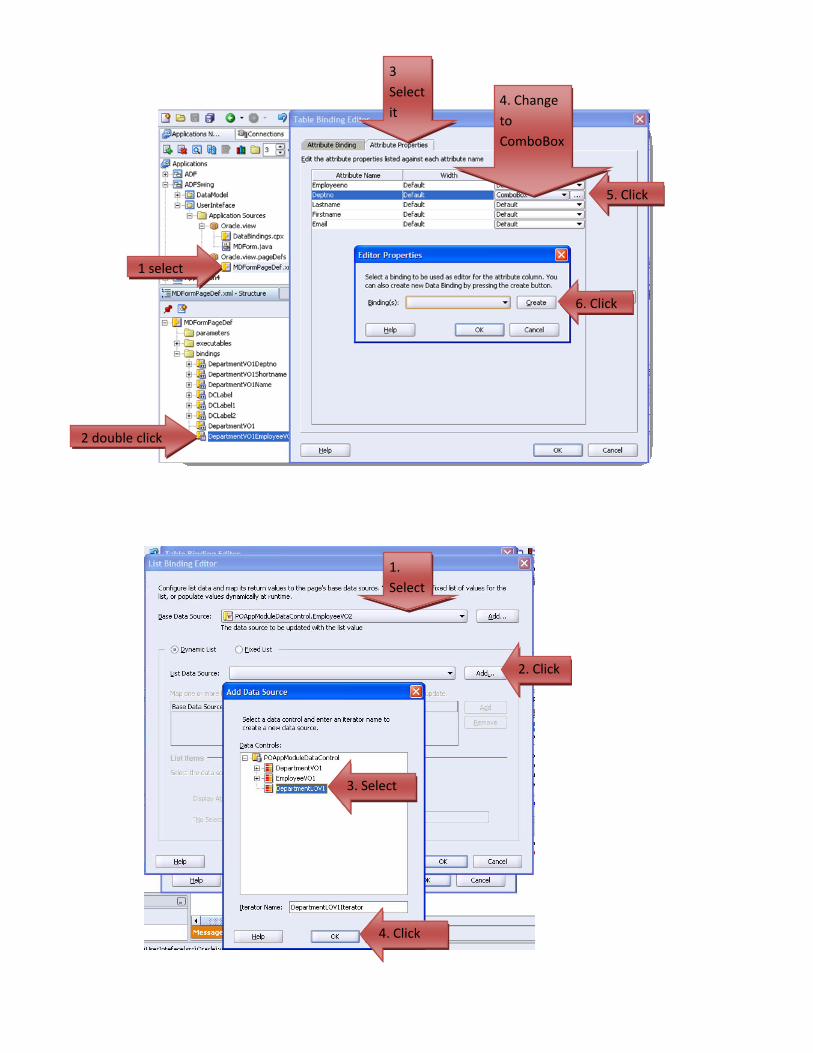
5. Click
4. Change to ComboBox
3 Select it
1 select
2 double click
6. Click
1. Select
2. Click
3. Select
4. Click
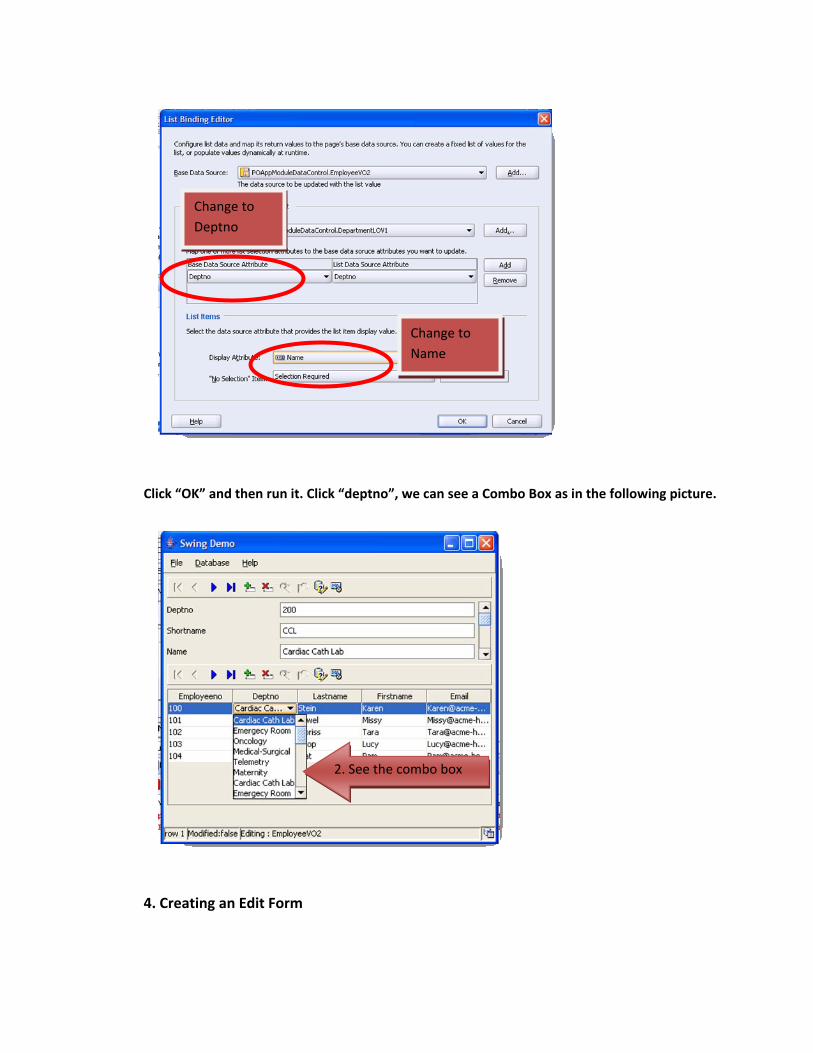
Change to Name
Change to Deptno
Click “OK” and then run it. Click “deptno”, we can see a Combo Box as in the following picture.
2. See the combo box
4. Creating an Edit Form
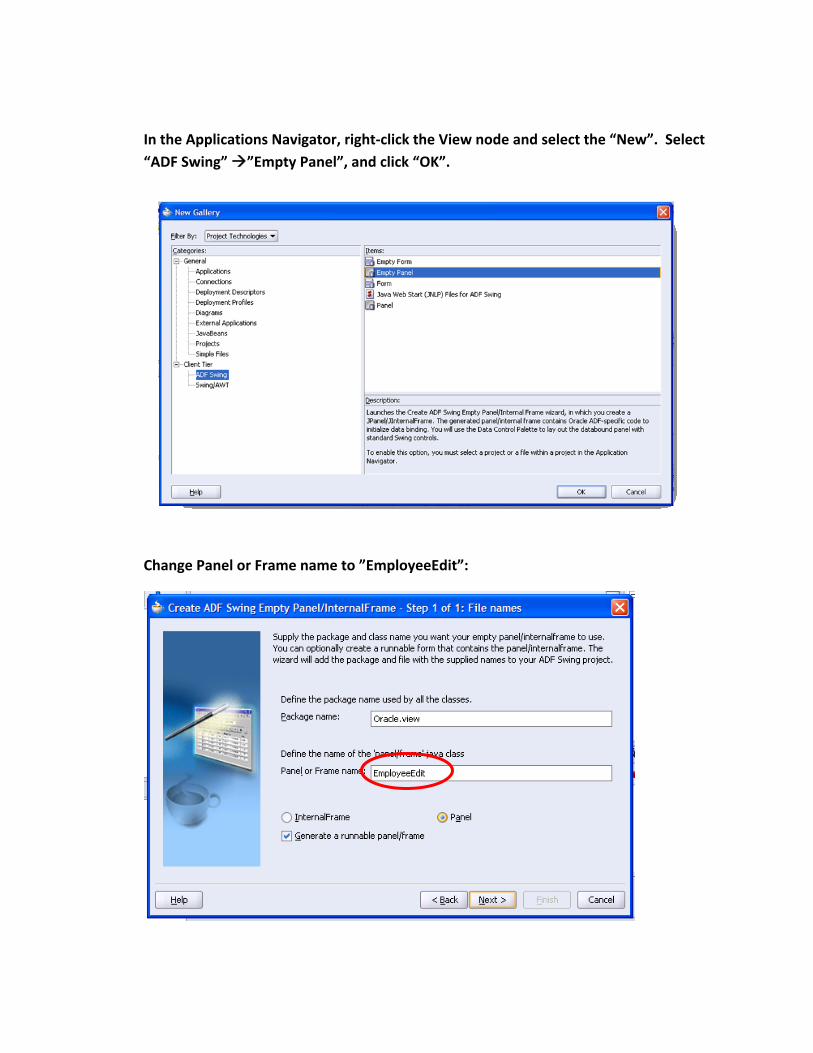
In the Applications Navigator, right‐click the View node and select the “New”. Select “ADF Swing” ”Empty Panel”, and click “OK”.
Change Panel or Frame name to ”EmployeeEdit”:
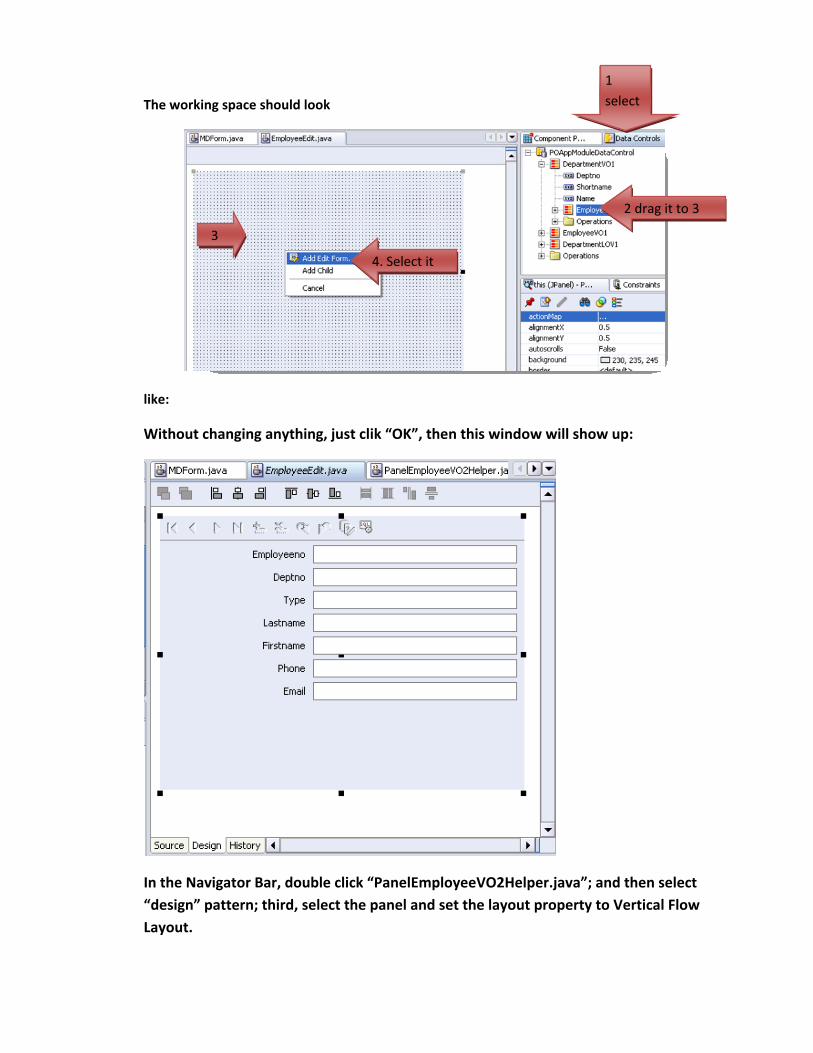
The working space should look
like:
1 select
2 drag it to 3
3
4. Select it
Without changing anything, just clik “OK”, then this window will show up:
In the Navigator Bar, double click “PanelEmployeeVO2Helper.java”; and then select “design” pattern; third, select the panel and set the layout property to Vertical Flow Layout.
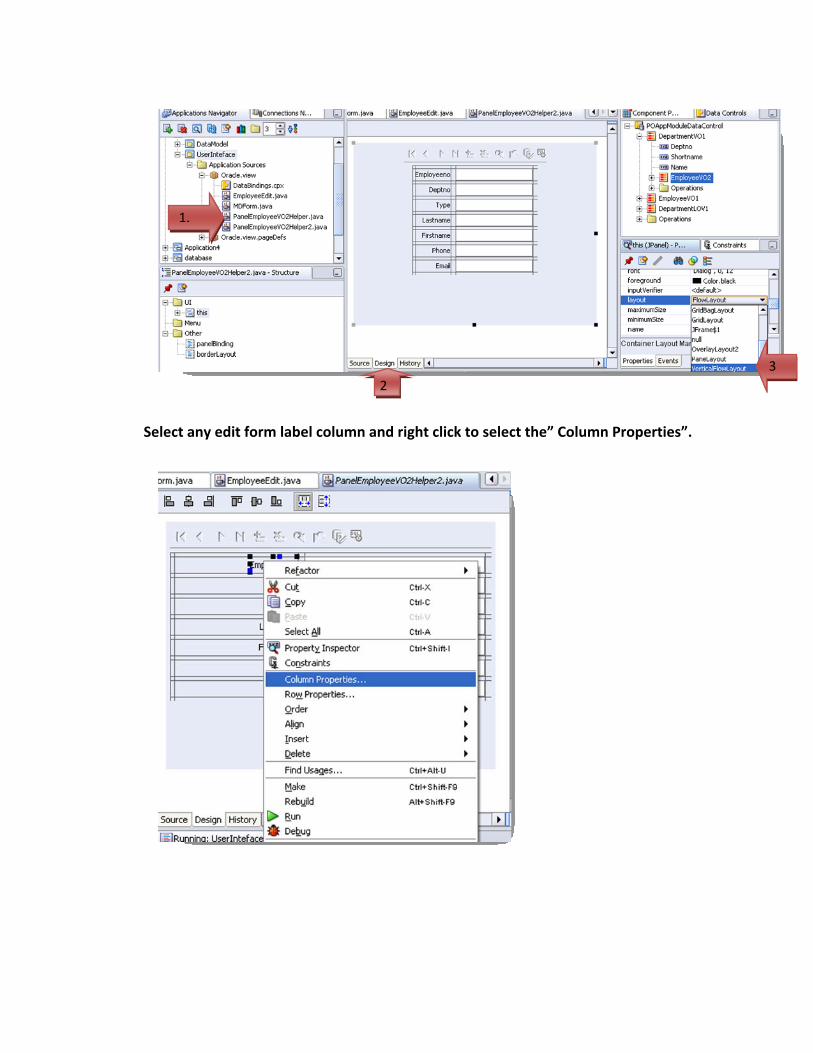
1.
3 2
Select any edit form label column and right click to select the” Column Properties”.
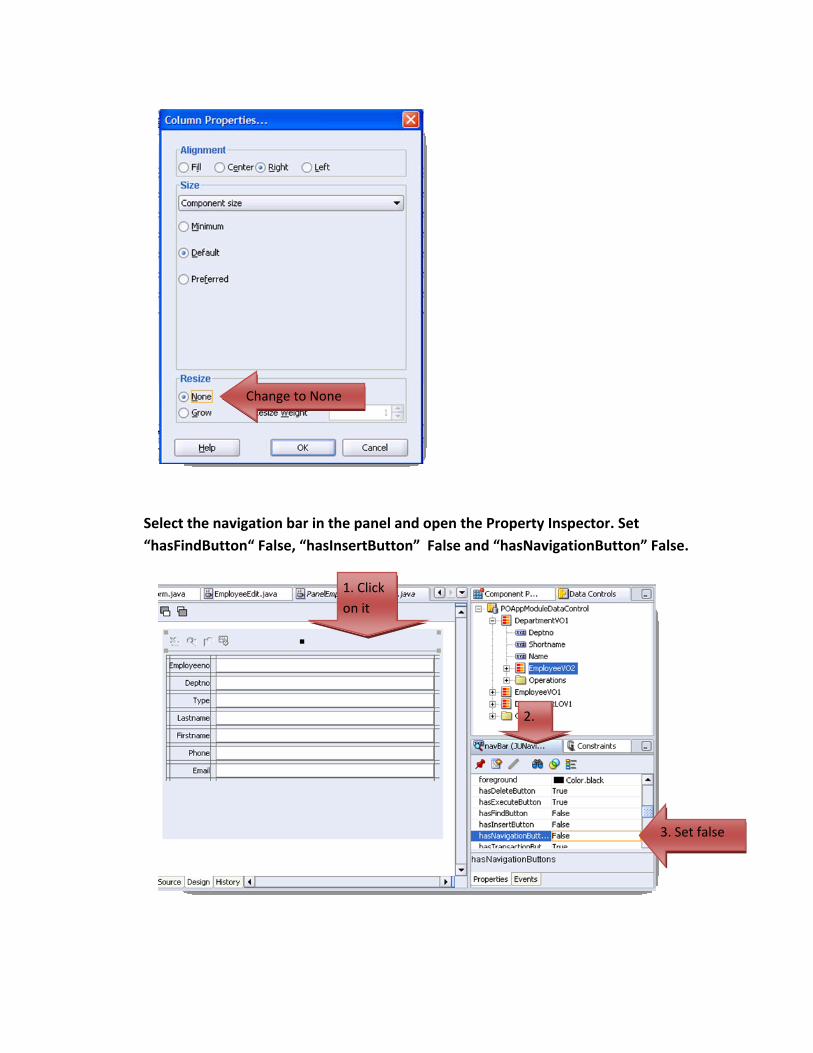
Change to None
Select the navigation bar in the panel and open the Property Inspector. Set “hasFindButton“ False, “hasInsertButton” False and “hasNavigationButton” False.
1. Click on it
2.
3. Set false
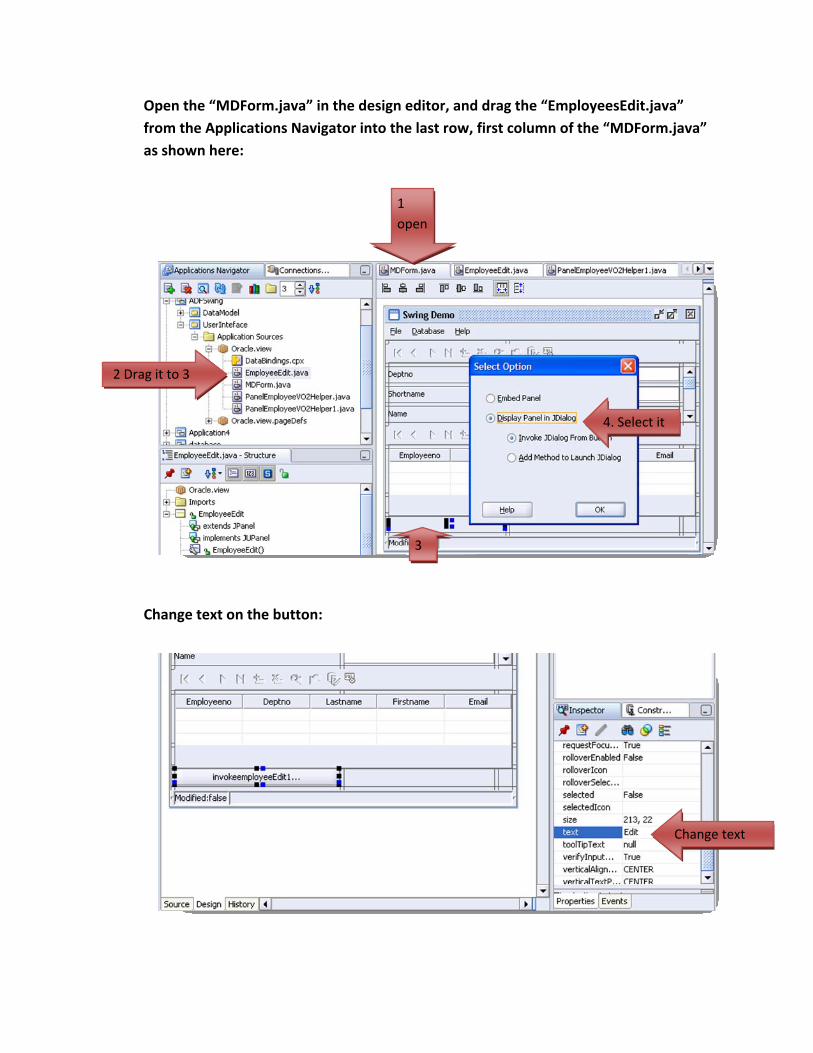
Open the “MDForm.java” in the design editor, and drag the “EmployeesEdit.java” from the Applications Navigator into the last row, first column of the “MDForm.java” as shown here:
Change text on the button:
1 open
2 Drag it to 3
4. Select it
3
Change text
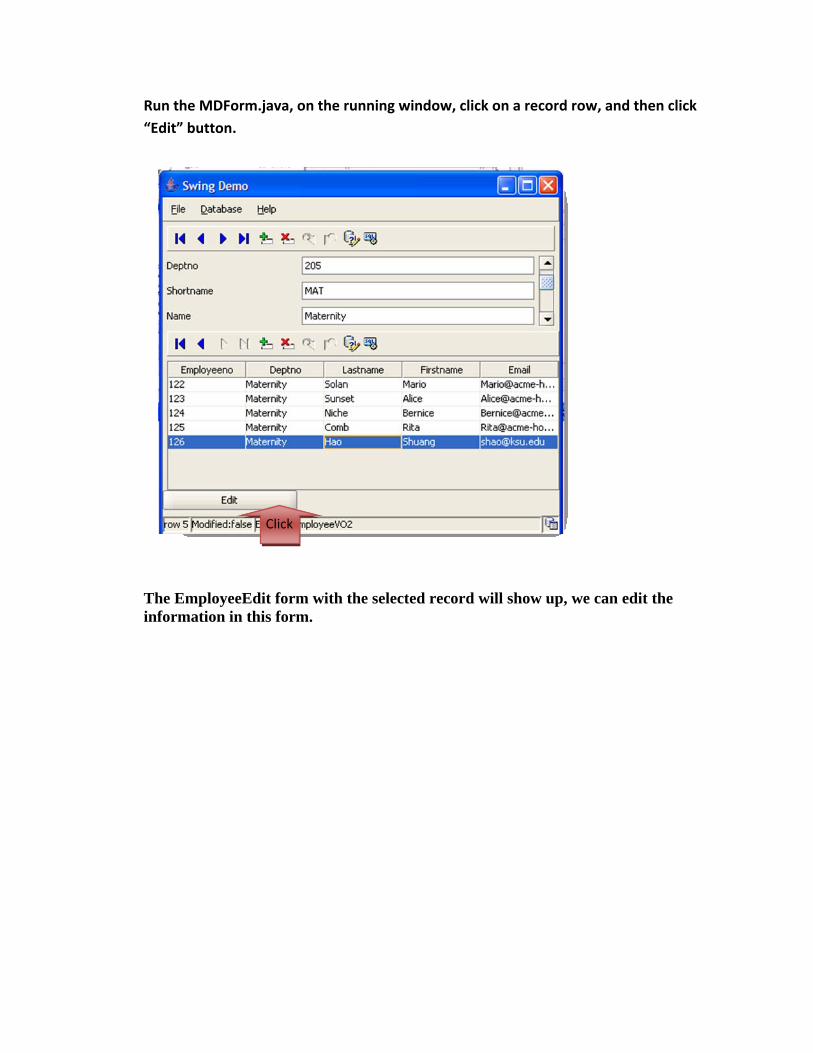
Run the MDForm.java, on the running window, click on a record row, and then click “Edit” button.
Click
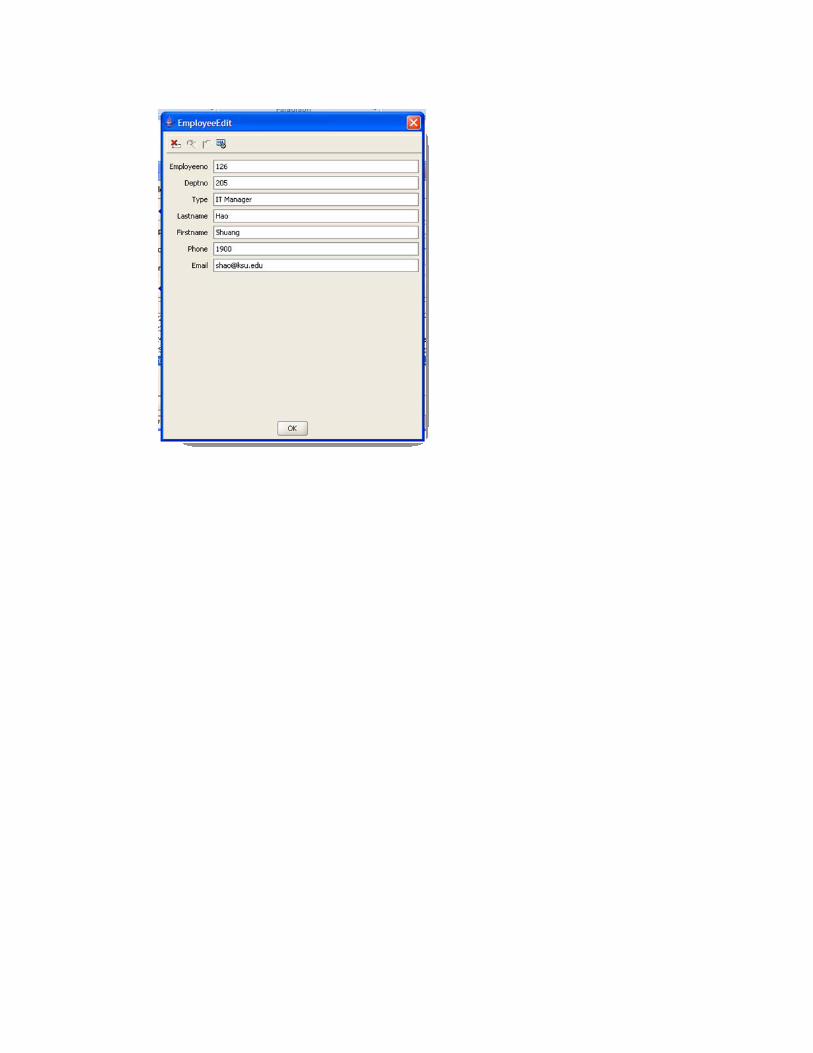
The EmployeeEdit form with the selected record will show up, we can edit the information in this form.


![[ A ] SPIRITS ADF [ADF] VODKA - BASIC](https://img.pdfslide.us/doc/110x75/6169d8c211a7b741a34c063e/-a-spirits-adf-adf-vodka-basic.jpg)