Embed Size (px)
Citation preview
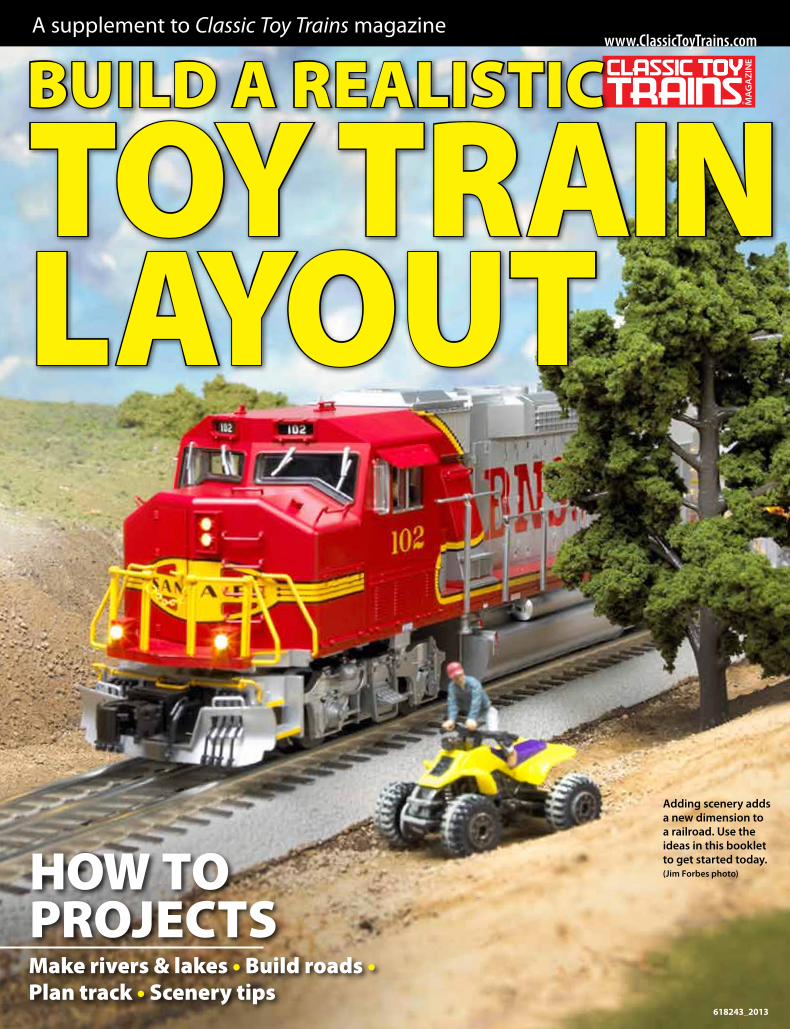
A supplement to Classic Toy Trains magazine
618243_2013
BUILD A REALISTIC
Toy TRAInLAyoUT
www.ClassicToyTrains.com
Adding scenery adds a new dimension to a railroad. Use the ideas in this booklet to get started today. (Jim Forbes photo)How To
pRojECTSMake rivers & lakes • Build roads • plan track • Scenery tips

Just add waterThree ways To make rivers and lakes
story and photos by Kent Johnson
W ater, water everywhere – and it’s never been easier to create a realistic body of water on your layout.
Modeling water can be as easy as using varying shades of green, brown, or blue paint to simulate a river or stream. To make this type of water even more authentic, you need only to blend dirt and sand with the wet paint.
If it’s a glossy, yet highly durable body of water you want to create, then you’ll likely find clear or tinted acrylic sheets quite useful. When laid over the top of a painted area, this material can give your water a greater sense of depth.
Lastly, if you want water that flows over your layout terrain, companies such as Woodland Scenics offer easy-to-use liq-uid materials. Unlike two-part epoxy-
resin that requires mixing, new products pour straight from a bottle or squeeze out of a tube. As these materials set, it’s even possible to add natural-looking water effects, such as waves and rapids.
Use these three techniques indepen-dently, in progression, or in combina-tion to vary the color and dimension of your layout scenery. But most importantly, just add water!
Latex paint and organic materials
Sheet of clear or tinted acrylic

www.ClassicToyTrains.com 3
Swamps, ponds, and backwater bogs are commonly found along the railroad right-of-way. It’s quite easy to re-create this type of water using little more than latex paints and natural materials from your own back yard.
I: Latex paint and organic materiaL Supply liSt
• Earth-colored latex paint – a light brown or tan shade (flat fin-ish) provides a transition from the shoreline to the water.
• Water-colored latex paint – a dark brown, green, blue, or black shade (gloss finish) will work for most waterways.
• Organic materials – use dirt or fine sand to form silt deposits and add texture along shores. Other useful materials include lichen, peat moss, pea gravel, rocks, twigs, and dead leaves or plants. Make sure they’re thoroughly dried and filtered.
• Tools – you’ll need a few paint-brushes (½ to 1½ inches wide) and a spoon to evenly apply the organic material. Use airtight con-tainers to store the dry materials you’ve filtered with a tea strainer or flour sifter.
Before you Begin
YOu’ll WanT to keep track, trains, and accessories “high and dry” and away from any paint or scenery materials. After removing train equipment from the layout, cover the rails of your track with a 2-inch-wide strip of painter’s masking tape.
Most of the organic scenery mate-rials will leave behind a fine dust, so keep a handheld or shop vacuum ready for quick cleanup. Addition-ally, have a supply of paper towels or rags available to remove any paint spills.
1 To help visualize the scene and guide your work, use a permanent marking
pen to outline a border for the body of water. You may even find it helpful to mark locations for other scenic details.
2 Use a narrow-width brush to apply a thick coat of earth-colored latex paint
to the area that surrounds the water. The object is to create a natural-looking transi-tion from ground to water.
5 Use white glue to attach shredded lichen, tree branches, and various dried
plants along the edge of the bog. Lastly, insert sprigs of straw to represent reeds and then allow the scene to dry.
4 Sprinkle a thin covering of fine sand, peat moss, and dried tea leaves along
the edges of the shore to create a murky bog. You can even add a few sand bars to the water-colored paint.
3 While the earth-colored paint is still wet, apply water-colored latex paint to
define the flow of your water. Paint down the center of the waterway before blend-ing the colors at the perimeter.
Lionel no. 12038 FasTrack elevated trestle (lionel.com)
NZG no. N544 Liebherr A900C excavator (dhsmodels.com)
Arttista no. 1348 beaver
Arttista no. 1234 road worker (arttista.com)
Walthers no. 933-2710 speeder (walthers.com)
© 2013, Kalmbach Publishing Co. All rights reserved. This publication may not be reproduced in part or in whole without written permission from the publisher, except in the case of brief quotations used in reviews. Published by Kalmbach Publishing Co., 21027 Crossroads Circle, Waukesha, WI 53187-1612. Printed in U.S.A.

4 Build a Realistic Toy Train Layout
Lakes or deepwater seaports are readily created using clear or tinted acrylic sheets. This type of flat waterway is quite durable and can be easily dusted and cleaned, making it ideal for placement along the edges of your layout.
II: plexiglas sheets or panels Supply liSt
• Acrylic sheets or panels – offered in a variety of tints and dimensions. This material is com-monly called “Plexiglas” and is often found at hardware stores. It can be cut, sawed, and drilled without breaking.
• Plastic wrap or film – the same material used to keep food fresh can also be used to make waves under an acrylic sheet.
• Water-based spray paint – safe for use on wood, plastic, and foam board. Alternatively, use a paint roller to apply a thin, smooth coat of latex paint.
• Tools – you’ll need a plastic-cut-ting knife or fine-tooth saw to trim the acrylic panels to fit. Plastic-compatible adhesive can be used to attach acrylic.
2 Position the acrylic panel over the scene to determine what needs to be
trimmed. Use a plastic-cutting knife to first score the panel, and then cut or snap the panel to fit. Use a straightedge and clamps to ensure safe cuts.
3 Use a paint roller or spray cans to apply dark blue, green, or black latex paint
over the entire water scene. Your goal is to apply a thin covering-coat of paint that shows beneath the acrylic.
6 Place the cut acrylic panel over the film and then drill pilot holes for small
screws that will hold the panel in place. Lastly, glue landscape forms and scenery details at the perimeter to hide the edges of the panel and screws.
5 Most acrylic panels are sold with a pro-tective film covering both sides.
Remove the film before you use the pan-els. To simulate rippling waves, wad the film or a piece of plastic wrap into a ball and then spread the crinkled material over the painted water.
4 While the water-colored latex paint is still wet, add earth-colored paint along
the perimeter. Use spray paint to keep the coat light and provide a subtle transition from water to land. Allow all the paint to dry overnight.
1 Unlike other layout landscapes, large bodies of water are best modeled flat.
If your layout framework doesn’t have a solid level tabletop, install a uniform sur-face made from plywood, hardboard, or thick insulation foam board.
Woodland Scenics no. A2737 black bears (woodlandscenics.com)
MTH no. 2560-3 CP Dash-9 (mth-railking.com)
Arttista nos. 1192 and 1198 figures
Extreme Marine no. 99400 bass boat (toyzoneinc.com)
Arttista no. 1327 fish and frog

www.ClassicToyTrains.com 5
Bubbling brooks and wild rivers make intriguing water features. Using ready-mixed Woodland Scenics Realistic Water and Water Effects liquids, you can easily pour a natural-looking waterway for your layout.
III: woodland scenics realistic water Supply liSt
• Woodland Scenics water – Woodland Scenics no. C1211 Real-istic Water solution pours straight from a bottle. Allow the liquid to harden, and then add no. C1212 Water Effects.
• Woodland Scenics talus – Woodland Scenics nos. C1274 Fine Brown Talus and C1275 Medium Brown Talus can be used to line a streambed.
• Adhesive – Woodland Scenics no. S191 Scenic Cement holds the scenery materials. Mist the scene with 70 percent isopropyl alcohol, and then drizzle out the matte medium.
• Latex paint – earth-colored paint provides the base color.
• Tools – gather a few paintbrushes and a spoon.
2 While the earth-colored paint is still wet, add a few large stones first, fol-
lowed by various sizes of Woodland Scenics Talus. To create a more natural look, avoid applying a uniform layer of talus or stone.
3 Randomly sprinkle fine gravel, sand, and dirt to cover the painted stream-
bed. You’ll also want to add a rough course of scenery material along the banks of the stream. Allow the paint to dry thoroughly.
5 Fill the streambed with Realistic Water and then allow the liquid to cure 24
hours before repeating the process to add depth. To create rapids, apply Water Effects on top of the cured water and shape with a paintbrush.
4 Use an old dishwashing liquid bottle to drizzle Scenic Cement over the scene.
Be sure to saturate the entire area, includ-ing the scenery along the streambed. Allow the material to dry thoroughly over-night.
1 Outline where the stream will flow, and then create a 1- to 2-inch-deep channel
down the middle of the path. When you’re satisfied with the path, seal any gaps and then paint the area with a thick coat of earth-colored latex paint.
Make a SplaShy SceneA WATER SCEnE opens up your layout to intriguing details.• Add fishermen, swimmers, and
aquatic wildlife near the water. • Place a buoy on the surface to
enhance the illusion of depth.• Find O scale boats and recre-
ational watercraft in discount stores. Sand a rounded hull flat.
Arttista no. 1192 figure
Lionel no. 8854 CP Rail GP9Weaver no. U2300LD
70-ton hoppers (weavermodels.com)
Lionel no. 17640 CP Rail caboose
K-Line no. K-94204 Ford F-100 pickup
Go to classictoytrains.com and click on “Downloadable articles” to purchase other scenery features like this.

6 Build a Realistic Toy Train Layout
We’ve all driven, ridden, or walked over railroad grade crossings, but have you ever looked closely at how
they’re constructed? Today, grade cross-ings are made from many different materials, including gravel, concrete, asphalt, steel grates, rubber, and wood.
Once you understand how grade crossings are constructed for real rail-roads, you’ll find it’s fairly easy to make a realistic wood grade crossing for your O gauge layout.
Close-up on crossingsWood grade crossings are made from
standard 8-inch-wide by 8-foot-long rail-road ties that are spiked directly to the track ties. In a typical arrangement, you’ll find six ties placed side by side between the rails and two ties posi-tioned outside of each rail. The inset
photo above shows these details.The biggest variation in a crossing is
the length. In order to span the full width of a roadway, one or more sets of ties are placed end to end. A two-lane road that’s wide enough to allow park-ing on either side (about 32 feet) requires four sets of ties. There’s rarely that much real estate on an O gauge layout, so I place three sets of ties end to end for a scale 24-foot-wide street.
To hold the ties in place, real rail-roads use either dome-head or square-head drive spikes. Two or three spikes are set into each tie – one in the middle and the other two spaced about 12 inches in from each end. Also the out-side ties don’t actually touch the rails. There’s usually about a 1½-inch gap. Inside each rail, the gap is 3 inches wide to accommodate wheel flanges.
Now that you know the basics, you
can start making a realistic crossing for your Atlas O or GarGraves track.
Making chopsticksThe first step is to cut 5⁄32-inch bass-
wood strips into 2-inch-long pieces that you’ll use to model wood ties (8 scale feet). Before cutting the square 5⁄32-inch stock that abuts the rail on GarGraves track, use a file or sanding block to bevel the edge of one corner. This helps to keep the tie level and flush with the adjacent ties. For Atlas O sectional or flexible track, the 1⁄8-inch-square strips need no modification.
Since the shim material won’t be visi-ble, you just need to cut it the width of your grade crossing – 6 inches long (24 scale feet) in this case.
To cut several pieces the same size, use a razor saw and a miter box with a stopping block. The advantage to using a stopping block is that you’ll have to measure only the first piece you cut. After cutting the first tie, cleaning the cut with a file and verifying the accuracy
Wood planks pave the Way over o gauge track
story and photos by Dennis Brennan
Prototype grade crossings can be made from a wide variety of materials. As shown here, crossings assembled from wood rail-road ties are fairly common.
Street running is a common sight in this busy industrial area on Dennis Brennan’s O gauge layout. A custom-crafted grade crossing makes it easier for vehicles to cross the tracks once the train clears.
Four ties laid end to end span 32 feet
Six ties between rails
Two ties outside each rail
ROADWAYCROSSING
Make a realistic

Outer rail1⁄8" gap
Outer railWood tieCenter rail
Bevel edge Bevel edge Bevel edge Bevel edge1⁄8" gap
www.ClassicToyTrains.com 7
of the initial cut, you can use this piece to position the block for additional cuts.
In a similar fashion, a cutting tool from Northwest Short Line (nwsl.com), called the Chopper also makes it easy to trim pieces to the same length. How-ever, don’t try to sever the ties with one cut. The thickness of the basswood strip will deflect the blade, causing it to cut at a slant. Instead, cut about one-quar-ter of the way through each side.
Stain the woodAfter you’ve cut all the strips
required, you’ll want to stain the bass-wood before assembling your crossing. Mix 1 drop of black India ink, 1 table-spoon of brown drawing ink, and 1 tablespoon of alcohol in an old coffee cup. This mixture yields a brownish-gray stain that matches the color of a weathered wood tie.
Drop the ties into the cup of stain, swish them around a bit, and then
remove them to dry. Stain the uncut shim stock by drawing it through a stain-soaked rag. Even though this stock won’t be visible, it doesn’t hurt to finish all the wood.
Now is a good time to paint your rails (I used brown spray paint). Decant a little paint into a disposable cup or container and then load a small brush with paint. To simulate rusty and grimy steel rails, drag the brush along the web (side) of the rail. Keep paint thinner handy for cleaning up.
Crossing constructionTo build a crossing over GarGraves
track, start by gluing the shim pieces along each side of the center rail and the outer rails, as shown in Photo 1. I found it was best to apply carpenter’s wood glue directly to shims, rather than the track ties.
Next, glue the square 5⁄32-inch ties adjacent to the center and outer rails.
Be sure to maintain a 1⁄8-inch space between the outer rail and the ties placed closest to it. This gap is designed to accommodate the wide wheel flanges found on most O gauge trains. Also, remember to place the beveled edge along the base of the rail.
Press the ties into position and remove any excess glue with a toothpick. Allow the glue to set completely before adding the 5⁄32- by 3⁄16-inch crossties.
While waiting for the glue to dry, you can test-fit the remaining ties. It’s also a good idea to roll a railcar back and forth through the crossing after you temporarily position the ties.
When you’re certain everything fits properly, remove the loose pieces. Squeeze a bit of glue on a piece of wax paper, and then use a toothpick to transfer a small drop to each track tie. Start at one end and work your way across, one row at a time. See Photo 2.
If you’re using Atlas O track, start by gluing the 1⁄8-inch-square strips adjacent to the center and outer rails, as shown in Photo 3. I applied all-purpose adhesive along the bottom of the rail to bond the wood to the rail and the plastic tie plates. To keep the ties from getting too messy, use a small dab of adhesive.
Because the 1⁄8-inch strip doesn’t completely cover the tie plate, the adja-cent row of 5⁄32- by 3⁄16-inch ties will need a beveled edge to sit flush. Here again, use a small file or sanding block to angle one corner and then check the fit. As previously suggested, temporarily position the remaining ties before glu-ing them in place.
If you want to detail your crossing, use Tichy Train Group O scale no. 8035 square bolt and washer castings to add square-head drive spikes (tichytrain-group.com). To represent dome-head spikes, I use sequin pins.
Once you get started, the process goes fast. In one evening you can easily add several realistic grade crossings to your layout.
1⁄32- by 3⁄32- inch shims 1⁄8-inch flangeway for O gauge wheels
1For a crossing over GarGraves track, you’ll need to glue shims to both sides of the center rail and along the outer rails. Use pins to hold the shims against the rail until the wood glue has set.
After installing the square 5⁄32-inch ties, glue the remaining rows of 5⁄32- by 3⁄16-inch ties. The unstained ties shown here have a staggered alignment to accommodate a slight curve in the track.
Shims aren’t needed on Atlas O track. Attach the 1⁄8-inch-square ties directly to the plastic ties using all-purpose adhesive. After these have dried, add the remaining 5⁄32- by 3⁄16-inch ties.
Depending on which track you use, you’ll need the following Northeastern Scale Lumber Company basswood strips to build an O gauge grade crossing that’s 24 scale feet long (northeasternscalelumber.com):
ParTS fOr aTLaS O TraCk: 18STr18, 1⁄8 by 1⁄8 by 24 inch (1), 18STr532, 1⁄8 by 5⁄32 by 24 inch (1), 532STr316, 5⁄32 by 3⁄16 by 24 inch (2)
ParTS fOr GarGraveS TraCk132STr532 1⁄32 by 3⁄32 by 24 inch (1)532STr316 5⁄32 by 3⁄16 by 24 inch (2)532STr532 5⁄32 by 5⁄32 by 24 inch (1)
Track cross-secTion
1⁄8-inch square ties on Atlas O track
Ilustr
ation
by Th
eo Co
bb
2 3

8 Build a Realistic Toy Train Layout
Hints for creating an impressive layout setting
by Kent Johnson
A dding scenery to your toy train layout is one of the simplest ways to enhance its overall appear-ance. For me, it’s also one of the most enjoyable aspects of the hobby. While that’s not always true
for every layout builder, there are certainly a number of steps you can take to help make the process much less intimidating and far more rewarding. Here are 20 of my favorites tips for creating effective scenery on any toy train layout. 2Sketch a scenery plan. You
already know how essential a good track plan is to building an
entertaining and trouble-free layout, right? The same can be said of a plan that references where and how you’ll add terrain to your layout.
On a photocopy of your track plan, use colored pencils, markers, or cray-ons to sketch where you’ll place mountains, trees, rivers, roads, towns, and other scenic features. Addition-ally, you can use this plan to estimate the materials required and help you budget accordingly.
1Work from photos. Before you start making scenery, it’s best to have a clear mental image of
the scene you’d like to create. Since my mind often fails me, I like to have plenty of digital images, color prints, or slides on hand to help guide construction and use of color.
3Add a photo backdrop. In addition to working from photos, you can work with photos to quickly create the illusion of expansive layout scenery. A wide variety of
printed photo backdrops featuring natural settings or cityscapes is available from manufacturers such as Backdrop Warehouse (backdropwarehouse.com). You can also try tak-ing your own image to a photo processor, who can generate oversized color prints.
Make sure that the photo backdrop is one of the first scenery elements you install. It may be all the “scenery” your layout needs, plus you’ll find that it’s much tougher to add a backdrop after you’ve completed other areas.
20 easy scenery tips

www.ClassicToyTrains.com 9
4Scenery in a spray can. Peter Riddle, a frequent CTT contribu-tor, turned me on to this fast and
easy tip for ballasting track. In loca-tions where the track is subject to close inspection, Pete uses rock ballast. But where it’s more distant from visitors’ eyes, he sprays his cork roadbed with a gray-colored textured paint (Krylon no. 18201 Black Granite or Rust-Oleum no. 7995830 Pebble) pur-chased at home-improvement outlets or paint stores.
5Paint the rails with pens. One of my favorite scenery tasks takes only a few seconds to complete but will make your trackwork look spectac-ular. Even on days when I don’t have much time or motivation to
complete a big project, I can always grab a set of Floquil (testors.com) no. F3801 track weathering markers and use them to paint both sides of all three rails. Best of all, no preparation or clean-up is required here.
6Use dirt to make dirt. The cost of commercial materials is one reason
some layout operators choose not to add scenery. Thanks to my friend Lou Sassi, author of Basic Scenery for Model Railroad-ers (kalmbachbooks.com), I’ve found that combining raw materi-
als, such as dirt, rocks, and twigs, with earth-toned latex paint yields realistic ground covering. Because I can find much of what I need in my own backyard, the expense is, well, dirt cheap!
7Just add water. Water covers most of the earth’s surface, so why not try modeling some
form of it on your layout? Aside from applying a coat of blue, green, or brown latex paint over bare ply-wood, I like to use brown-tinted acrylic sheets to represent deep bodies of water. I prefer acrylic with a smooth surface, but some sheets have subtle textures that look a bit like rippling water. This material is commonly called “Plexiglas” and is often sold at hardware stores for use in replacing broken window glass.
8Dense forest alternative. Buying or making enough trees to fill even a small O
or S scale forest can cost a for-tune and take days to complete. A less costly and time-consum-ing alternative is to make a for-est that’s thinned as a result of fire, disease, or harvesting. Manufacturers such as Wood-land Scenics (woodlandscenics.com) offer bare tree armatures (no. TR1125) in bulk, along with a variety of stumps (nos. S31 and S32) and dead fall (no. S30).

10 Build a Realistic Toy Train Layout
9Sunken signals. Dick Christianson, CTT’s founding editor,
showed me a trick he used to reduce the height of the oversized Lionel signals and accessories on his O gauge layout. Start by placing a 1⁄2-inch-thick layer of foam board or Homasote over your tabletop. Determine the position of the accessory, and then trace the outline of the base with a pen-cil. Use a sharp util-ity knife to cut the outlined area down to the plywood base. Finally, remove the foam plug and place the signal into the ½-inch-deep hole. The signal may still look oversized, but this tip helps minimize the effect.
10Use sound to enhance scenes. Com-plete, full-featured sound systems have become an integral part of most
toy train locomotives made today. While these engines offer an ideal entry point for adding sound to a layout, there are many other ways you can bring a scene on your layout to life using electronic sound effects.
Consider installing accessories, such as an MTH no. 30-9102 operating firehouse with fire truck and alarm sounds or a Lionel no. 24110 PRR tugboat with harbor sounds. Z-Stuff for Trains (z-stuff.net) also offers easy-to-install sound circuits for reproducing station announcements, water tower operations, locomotive refueling, and even warning-bell sounds from a simple crossing gate.
11Paved streets and buried tracks. A layout with paved streets and highways included in the scenery
makes for a great place to display O scale vehicles. Unfortunately, not all layouts have room for train tracks and wide roads. In the May 2005 issue of CTT, Peter Riddle demon-strated how to accommodate both by routing a railroad down the middle of a street – an authentic practice called “in-street running.”
Pete cut ½-inch-wide strips of black foam-core poster board to fit between the rails of his O gauge track. He then placed wider por-tions of foam core against the outside rails (on top of the track ties) to represent asphalt roadway. To keep the roadway surface stable and level, Pete installed shims in various loca-tions under the wide foam-core sections.
12Driver behind the wheel.
Most locomotives manufactured these days include an engi-
neer positioned at the throttle. You can easily maintain the same level of realistic detail on city streets by adding a figure behind the wheel of your cars and trucks. Most of my O scale drivers began as seated figures. Use a fine-tooth razor saw or rail nippers to trim the figure’s legs to fit under the steering wheel.
13Scenery safety net. Position scenery and terrain elements, including clumps of ground
foam, trees, and earthen berms, near track curves and along the edges of a layout. These elements will help beau-
tify the scene, mask the hard edges of the table, and pre-vent a derailed train from plummeting to the floor.
14Display track with a purpose. Peter Riddle has come up with an interesting alternative to displaying his favorite or collectible toy trains on a shelf or in a case.
Many small towns and cities in North America honor their railroad heri-tage by displaying a veteran locomotive or caboose in a municipal park. Pete does the same on his layout using older or whimsical locomotives.
Even better, the display track also serves a practical purpose. Pete has wired it to an unused throttle on one of his transformers and uses the track for charging MTH ProtoSound locomotives made without an external charging jack (see page 60 in the September 2007 issue of CTT).

www.ClassicToyTrains.com 11
15Dogs, frogs, and other details. People make the world go round. The same holds true on a layout.
Along with adding appropriately scaled fig-ures engaged in common activities, be sure to include animals, small fixtures, and fine details to help draw a visitor’s attention to a particular scene.
17Keep a clean scene. Many sce-nic projects on a layout can be accomplished with paint and
masking tape. I like to use 2-inch-wide blue painter’s masking tape to protect track rails and ties as I add paint and scen-ery along the right-of-way.
Peter Riddle uses masking tape to define green-painted yards and to create straight edges along painted-on concrete patios, driveways, and sidewalks. When removing tape from delicate foam-core surfaces, he enlists the aid of a heat gun or hair dryer. With a bit of direct heat, the tape will release without leaving any adhe-sive residue behind.
16Attractive table edges. Even if you
are not a skilled car-penter, you can still give your layout a pro-fessional appearance using pre-finished lam-inate flooring. These hardwood panels mea-sure 50½ inches long by approximately 7½ inches wide and come
in a variety of wood-grained patterns. They’re grooved for easy assem-bly and are extremely tough, resisting virtually any type of damage that might accidentally occur in a train room. Despite their durability, they are easily cut with a power saw and can be drilled to accommodate control-panel switches. You can cover the edges with L-shaped wooden or PVC outside corner molding, as shown on Peter Riddle’s layout.
18Structures as scen-ery. CTT contribu-tor Dennis Brennan
is a master at enhancing the appearance of even the sim-plest Plasticville structures (see page 48 in the July 2006 issue of CTT). Try adding weathering effects, interior lighting, and printed signs to your buildings. They’ll help visitors relate to the scene you’ve created and bring the layout to life.
19Dark tunnels. In the lat-est edition of Dave Frary’s classic book, How to Build
Realistic Model Railroad Scenery (kalmbachbooks.com), he makes a good suggestion on how to prevent light or exposed benchwork and wiring from showing through the end of a tunnel. Dave uses corru-gated cardboard and dark-painted rock-wall castings to create a tunnel liner that extends from one portal to the other. He has also used sheets of Styrofoam insulation, sty-rene, and plywood to form a liner, but I prefer using 8-inch-diameter culvert pipe.
20Go ahead and make “mis-takes.” I can’t begin to tell you how many people I’ve
heard say, “I’m not an artist, so I don’t do scenery on my layout.” With all the materials and publications available today, you’ll be amazed at what you can accomplish without much skill. And once you do try your hand at a bit of layout scenery, don’t be afraid to make a goof or two. After all, scenery in the real world features many natural imperfections.
To purchase more information about adding scenery to your layout, go to ClassicToyTrains.com and click on “Downloads.”

1
12 Build a Realistic Toy Train Layout
Few of us can draw a perfect track plan on our first attempt. Most of us use up dozens of sheets of scrap paper before creating anything that resem-
bles a workable plan. Here’s a look at part of the process I
used, from a rough pencil sketch, to an initial computer-drawn plan that didn’t quite work, to the final plan (or close to it) for my 15- by 17-foot O gauge layout. Following the same path could save you time and effort when designing your next layout, and result in a track plan that better fits your individual needs.
I had five goals in mind before I ever picked up a pencil. The goals were shaped by two elements: the strengths and weaknesses of my previous layout, and the manner in which I preferred to operate trains on that layout (primarily sit back and watch them go around).
For example, my old layout con-tained a pair of reverse loops, a big sid-ing, and several spur tracks. As it turned out, I almost always ran my trains in the same direction (never using the reverse loops) and, since I overwhelmingly favor passenger trains, I never switched freight cars on the spurs. So while reverse loops and multiple spurs are important elements in many track plans, for me they were near the bottom of the list.
Here were my five goals:1. A walk-in layout with separate
loops for modern and prewar passenger trains. The modern loop needed to be able to handle an O-72 locomotive, and the prewar loop couldn’t have track switches or crossings that might trip up some of my “flange-challenged” tinplate trains.
2. A waterway to justify the two bas-cule bridges that I kept from my old lay-out. Scenery-wise, the waterway needed to divide the layout into town and mountainous sections.
Step-by-step track plan
Moving froM pencil sketch to coMpleted drawing
by Neil Besougloff • illustrations by kellie Jaeger
3. Enough space on the layout for a Lionel no. 115 city station and an Ace Trains passenger station canopy, both removed from my old layout. Ideally, passenger trains would continuously run through the glass canopy. However, the canopy’s footprint – 18 by 24 inches – makes positioning it a challenge.
4. No part of the layout could be more than 3 feet away from an aisle. That’s as far as I can reasonably reach. No climbing on top of the layout and
no pop-up hatches, either.5. The layout would have to fit within
a 14- by 16-foot corner space of my base-ment, defined by two exterior walls and an interior support column. The layout couldn’t encroach on the adjacent TV/game/playroom area (wife’s orders), as defined by an imaginary line between the support column and the wall.
Follow along to see how I put these goals into my initial sketch, which evolved into a finished track plan.
▲ This is my original pencil sketch. The different loops are highlighted with colored mark-ers. To be accurate, I used the bottom of a coffee mug as a measuring tool for the O-72 curves of the modern loop (in yellow) and then made the O-31 and O-42 curves of the pre-war loop (in blue) proportionately smaller. Note the green track, which started off as a loop-and-spur trolley line. In the subsequent drawings, it was split into an additional loop for prewar trains and a long siding for the O-72 loop.
Two bascule bridges are side-by-side and wired together to open at the same time.
Overpass bridge held up with masonry supports.
A river splits the layout into two dis-tinct parts.
Lionel no. 115 sta-tion rests on a 1½-inch-raised base to give it more prom-inence, since it will be adjacent to the massive train canopy.
Ace Trains passenger station canopy is a large but see-through struc-ture, with a glass-panel roof and open-air sides.
Overpass bridge held up with masonry supports.
Short tunnel emphasizes rugged nature of terrain.
Trolley line to station canopy.
Lionel no. 435 power station, salvaged from my old layout, provides power for future catenary lines.
Spur tracks for operating gantry crane to load scrap for river barges.
Walk-in aisle offers access and 270-degree view of train action.
Second short tunnel.

17'-0"
15'-0"
2
3www.ClassicToyTrains.com 13
▶ My attempt to convert the pencil sketch to a real plan came out reasonably close. I used RR-Track software (rrtrack.com). Since I already owned a pair of Ross curved O-72/O-54 turnouts, I incorporated them into the design and proceeded to use Ross sectional curves throughout the entire design.This plan, however, fails to meet two of my goals. First, the interi-or of the central area is more than 3 feet away from an aisle. Second, by moving the layout away from the back wall to gain better access to that central area, the front edge of the lay-out significantly encroaches on the TV/game/playroom area.
0 inches
5½ inches
5½ inches (entire loop)
23⁄4 inches
0 inches
0 inches
0 inches
5½ inches
23⁄4 inches
Pushing the layout away from the basement wall to gain access to this stretch of track means that the front of the layout pushes out beyond the allotted floor space.
The ceiling support post almost touches the layout, becoming a visu-al distraction.
Not much space for a spur track with my gantry crane.If the layout doesn’t touch a
wall, an extension cord will have to cross the aisle to reach the wall outlet, creating a hazard.
The bend in the main line to the left of the overpass was removed to shift this loop out-ward and make the cen-tral aisle wider.
This return loop doesn’t end before the canopy plat-form begins, but it is an acceptable compromise.
Part of the former trolley line is now a long siding that pass-es through the passenger sta-tion canopy.
Prewar loop is level with no switches to trip up the opera-tion of occasion-ally fussy tin-plate trains.
Grades on the O-72 loop come out to an acceptable amount, 4 percent and 3.5 percent.
Trying to avoid a geometric shape, this loop that was part of the original trolley line now has become need-lessly complicated.
O-72 trains can bypass the O-54 section of both curved track switches.
The results of my second effort using RR-Track software met all five goals.

38 14.5-inch straight (020)15 custom-cut straight6 O-31 curve (031)15 O-42 curve (042)2 O-42 custom-cut curve1 O-54 curve (054)3 O-64 curve (064)1 O-64 custom-cut curve38 O-72 curve (072)5 O-72 custom-cut curve1 O-42 right-hand track switch (110)1 O-72/54 curved left-hand track switch (161)1 O-72/54 curved right-hand track switch (160)1 O-72 left-hand track switch (126)1 GarGraves track bumper (GG300B)
ROSS CUSTOM SWITCHES TRACK COMPONENTSQuantity Description/Number
R
R
L
L
R
R
L
L
14 Build a Realistic Toy Train Layout
▲ Rotating the entire track plan 45 degrees clockwise allows most of the layout to fit in the allotted space. Although the outer edges of the two O-72 curves extend slightly beyond my floor-space limit (defined by the support column and the basement walls), my wife said she could live with the overhang.To restore my 3-foot access goal, I brought the rear-most stretch of track closer to the rest of the layout by removing straight sections at both overpasses. On the downside, after shifting the layout 45 degrees, I now need to crawl under the layout to reach a triangular opening at the corner of the room to lay track and build scenery on the “backstretch” of the layout. I decided that was an acceptable compromise, because once the layout was built, I rarely would need to use that area.
Straight sections removed to bring rearmost track closer, although it now means I’ll have to improvise to create a bridge on a curve.
Straight sections removed to bring rear-most track closer.
Former trolley loop is simplified and also elevat-ed to the same height as the overpass, adding visu-al interest and more close-ly following the contour of the mountain ridge.
Longer tunnels create visual interest since trains are no longer in full sight, leaving visitors guessing which portal connects to which line.
Series of hinged doors in fascia to reach tracks in tunnels.
Shared portal suggests these two lines are connected.
Steep mountains with rocky cliffs add drama.
Town side of layout.
Sky backdrop along train room wall. Access to build rear-most section of layout, unfortu-nately, requires ducking under the layout.
Support pole is away from the front edge of the layout and no longer a distraction.
Future expansion
Mountain ridge built high enough to block view of the other side.
Lionel F3 diesels:3 of the best
NEW: Pennsylvania RR old-time steam from MTHOperating • Collec ting • Fun classictoytrains.com • SEPTEMBER 2005
MTH’s Mike Wolf on trains, technology, & the lawsuit
How do you say “Lie-oh-NELL?” page 71
Got LIONEL FasTrack? Plans & layout inside!
THE SCOOP on paint, details, & more
Lionel postwar no. 2355 diesel, page 38ke Wolf onke Wolf onke Wolf
rains, technology, & the law
oh-NELL?”
Lionel postwar no. 2355 diesel, page 38ke Wolf onke Wolf diesel, page 38
Layout advice from a train engineer
LIONEL FasTrack5x9 track plan page 44
Two-transfomer WIRING DIAGRAMS page 75
Breaking the LIONELsu� x code page 68
SPECIAL O GAUGE TRACK GUIDE10 pages of brands, types, cleaners and more
Layouts • News • Projects classictoytrains.com • OCTOBER 2006O GAUGE STEAM in theSmoky Mountains page 58
Visit an O gauge pike built by a real railroader page 36
◗◗QUICK & SIMPLE
How to build a TALL trestle
A Lionel Milwaukee Road F3 diesel crosses a trestle built from ready-made parts. Turn to page 36 to learn more.
Vol. 20 • Issue 5
3 walk-in layouts in O and S
Layouts • News • Projects classictoytrains.com • JULY 2007
DESERT DOGBONE5-by-15 O gauge track plan Page 58
ELECTRICAL TIPSTroubleshoot your layout with a multimeter Page 56
S & O GAUGE CROSSINGHow to build 1 crossing track for 2 sizes of trains Page 72
LIONEL’S HIAWATHA ON OUR TEST TRACK Page 78
TUNE UP A POSTWAR-STYLE LIONEL ‘J’ STEAMER Page 46
◗◗Use ready-made wooden
components Page 36
A Lionel Milwaukee Road F3 diesel crosses a trestle built from ready-made parts. Turn to page 36 to learn more.
Vol. 20 • Issue 5A POSTWAR-STYLE LIONELPage 46
trestle trestle
TUNE UPA POSTWAR-STYLE LIONEL ‘J’ STEAMER Page 46
TUNE UPA POSTWAR-STYLE LIONEL
Page 46
layout morerealisticWITH TIPS FROM TODAY’STOP BUILDERS• Visit three super-detailed layouts in O and S p.42, 52, 62
• Where to � nd the layout essentials you need p.66
• Why Lionel embraced realism – 60 years ago! p.72
PLUS!
HOW TO RUN LIKE A REAL RAILROAD p.60
Norm Charbonneau’s stunning O gauge vision of 1940s America. p.52
Layouts • News • Projects www.ClassicToyTrains.com • NOVEMBER 2008
HOT REVIEWSLIONEL’S LEGACY GP7MTH’S NEW 2100 p.78
Great looking track made EASY p.50
« HI-RAIL SPECIAL »
layout layout
NOVEMBER 2008
HOT REVIEWSLIONEL’S LEGACY GP7MTH’S NEW 2100 p.78NOVEMBER 2008
HOT REVIEWS
Layouts • News • Projects www.ClassicToyTrains.com • deCember 2009
REVIEWEDMP15AC switcher from MTH p.84
GREAT TRAINS
Great memories
Gordon Peterson crafted this winter scene on an O gauge diorama.
• Building Christmas layouts past & present p.56
• Removable winter scenery p.46
• Visit a 1950s Lionel department store layout p.72
• Photo Album: Trains of the season p.16
HOW TOPROJECTS READY trains for the holidays p.78
MAKE easy landscapes and roads p.40
BUILD a cardstock structure p.62
Plus
SPECIAL HOLIDAY HOW TO ISSUE
REVIEWEDMP15AC switcher from MTH p.84
Gordon Peterson crafted this winter scene on an O gauge diorama.
ember 2009
Layouts • News • Projects www.ClassicToyTrains.com • July 2010
Reviewed» New Haven set from Lionel Plus » Atlas Trainman passenger cars
Angelo Lautazi’s O gauge layout blends scenery, trains – and fun! p.34
BUILDER’S SPECIAL
POSTWARLIONELTUNE-UP!How to return a classic postwar diesel to peak condition p.48
LEARN FROM THEEXPERTS• Scenic a tall
timber trestle p.42
• Install hidden switch motors p.56 • Plan a logging layout p.40 • Improve a Plasticville
station p.54
LAYOUT VISITS 3 GREAT O & S GAUGERAILROADS p.32, 34, 60
LIONEL’S POSTWAR THUNDERBIRD SET p.64 FOCUS on CLASSICS
LIONELTUNE-UP!How to return a classic postwar diesel to peak condition p.48
www.ClassicToyTrains.com November 2011O and S gauge for the operator and collector
Guide to Lionel’s postwar quad hoppers p.62
P.50CHOO CHOO BARN MARKS 50 YEARS OFTOY TRAINFUN
O gauge Premier line Alco RS-11 by MTH reviewed p.74
TRACKSPECIAL• Detail your track p.33 • Compare today’s
hi-tech switches p.36
• 2 track plansdeliver maximumtrain action p.42
• PLUS: Design a complete scene p.40
4 HOWTO STORIES
Rare American Flyer trains from 1958 p.66
Visit two scenic O gauge layouts p.44, 56
Missing an issue of Classic Toy Trains?
Browse through 22 years of Classic Toy Trains’ back-issue archives. Each issue off ers a table of contents and online ordering for your convenience.
Every issue of Classic Toy Trains includes: • How to build and operate toy train layouts • Detailed profi les of collectable pre/postwar trains • Helpful tips on repair and maintenance • And more!
Complete your collection TODAY!www.ClassicToyTrains.com/BackIssues • Call 1-800-533-6644Mon-Fri., 8:30 a.m. - 4:30 p.m. Central Time • Outside the U.S. and Canada, call 262-796-8776, ext. 661
20112010
20092008
20072006
2005
2004
2003
2002
2001
2000
P17089
Back issues available from1990 –present