Embed Size (px)
Citation preview
1
Building Science Digest 135 Ice Dams 2006-10-30 by John Straube Abstract:
Ice dams are a common roof performance problem in buildings that experience snowfall and at least a month of below freezing temperatures. The combination of sufficient roof pitch, adequate insulation just above the exterior wall, and air sealing at the wall-roof assemblies transition are all essential to prevent ice dams. But ice dams can occur even in properly detailed roof assemblies from differential solar snow melt. This digest outlines both the causes and solutions to ice dam problems.
The Problem The more snowfall, the more likely the problem. If the climate is very cold, there are less likely to be problems. Hence, ski resorts tend to be perfect areas for ice dams.
Simply put, ice damns are ridges of ice and icicles caused by meltwater from further up the roof re-freezing lower on the roof. The “dam” created by the ridge of ice along the eaves can trap further meltwater and result in significant leakage under and through the roofing, especially shingles and metal roofing. This leakage can cause damage to the sheathing, the roof structure, or the ceiling and walls below. Large icicles along the eaves can become a danger to people below if they fall.
building science.com © 2006 Building Science Press All rights of reproduction in any form reserved.
2 Building Science Digest 135
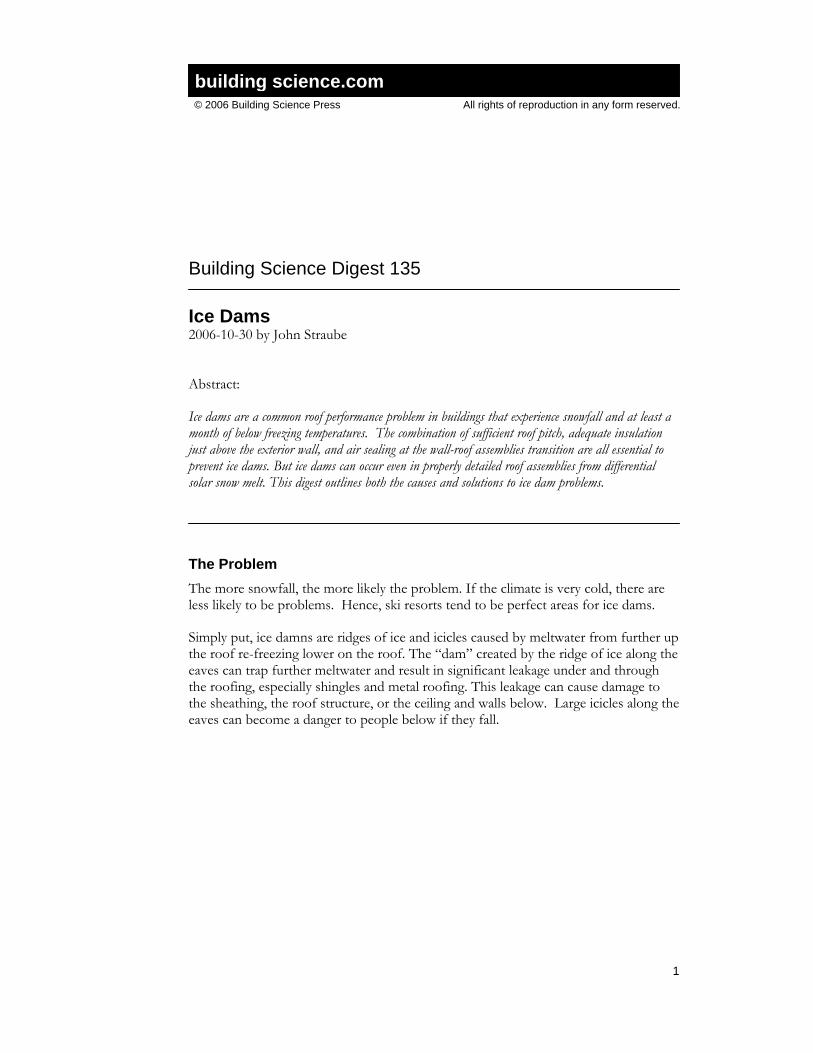
Figure 1: Ice Dam at a Typical Roof
The Causes The fundamental causes of ice dams are well understood. If part of a roof becomes warm enough to melt snow that is lying on the roof, the snow will melt, and water will run down a sloped roof. If the water subsequently encounters a cold surface, the water will revert to ice. Therefore it can be said that the cause of ice dams is a difference in temperature on the roof surface where the upper part of the roof is warmer than the lower.
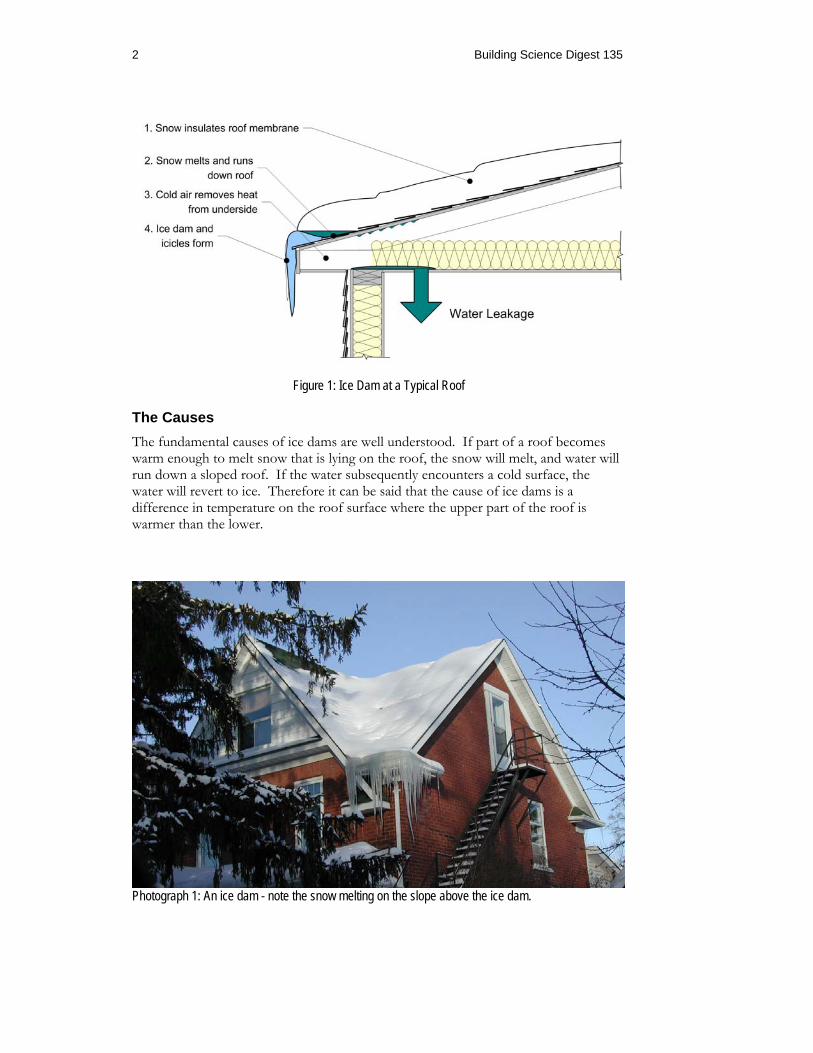
Photograph 1: An ice dam - note the snow melting on the slope above the ice dam.
Ice Dams 3
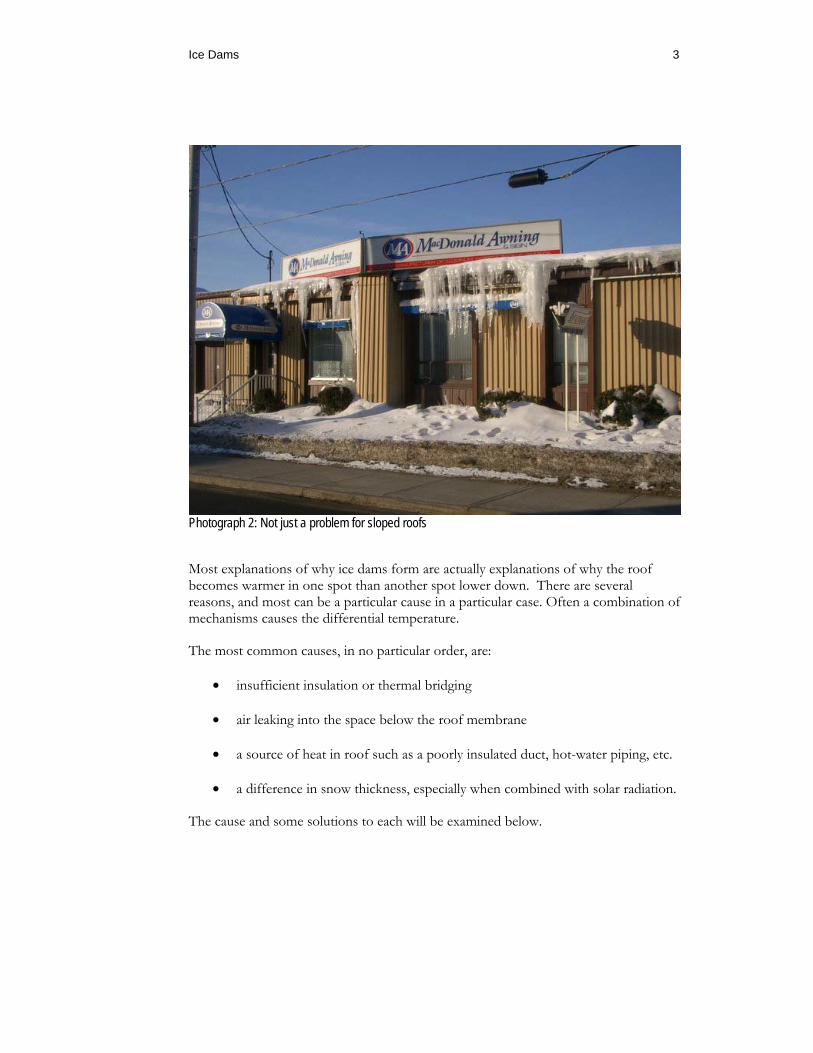
Photograph 2: Not just a problem for sloped roofs Most explanations of why ice dams form are actually explanations of why the roof becomes warmer in one spot than another spot lower down. There are several reasons, and most can be a particular cause in a particular case. Often a combination of mechanisms causes the differential temperature.
The most common causes, in no particular order, are:
• insufficient insulation or thermal bridging
• air leaking into the space below the roof membrane
• a source of heat in roof such as a poorly insulated duct, hot-water piping, etc.
• a difference in snow thickness, especially when combined with solar radiation.
The cause and some solutions to each will be examined below.
4 Building Science Digest 135
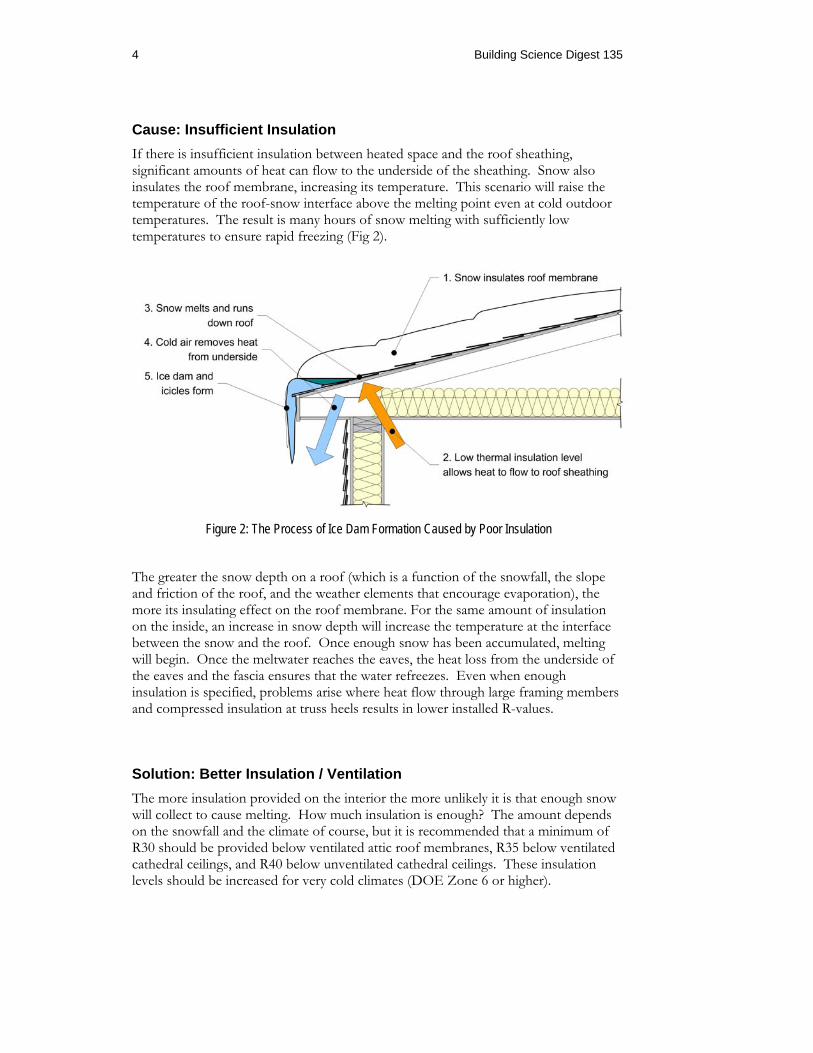
Cause: Insufficient Insulation If there is insufficient insulation between heated space and the roof sheathing, significant amounts of heat can flow to the underside of the sheathing. Snow also insulates the roof membrane, increasing its temperature. This scenario will raise the temperature of the roof-snow interface above the melting point even at cold outdoor temperatures. The result is many hours of snow melting with sufficiently low temperatures to ensure rapid freezing (Fig 2).
Figure 2: The Process of Ice Dam Formation Caused by Poor Insulation
The greater the snow depth on a roof (which is a function of the snowfall, the slope and friction of the roof, and the weather elements that encourage evaporation), the more its insulating effect on the roof membrane. For the same amount of insulation on the inside, an increase in snow depth will increase the temperature at the interface between the snow and the roof. Once enough snow has been accumulated, melting will begin. Once the meltwater reaches the eaves, the heat loss from the underside of the eaves and the fascia ensures that the water refreezes. Even when enough insulation is specified, problems arise where heat flow through large framing members and compressed insulation at truss heels results in lower installed R-values.
Solution: Better Insulation / Ventilation The more insulation provided on the interior the more unlikely it is that enough snow will collect to cause melting. How much insulation is enough? The amount depends on the snowfall and the climate of course, but it is recommended that a minimum of R30 should be provided below ventilated attic roof membranes, R35 below ventilated cathedral ceilings, and R40 below unventilated cathedral ceilings. These insulation levels should be increased for very cold climates (DOE Zone 6 or higher).
Ice Dams 5
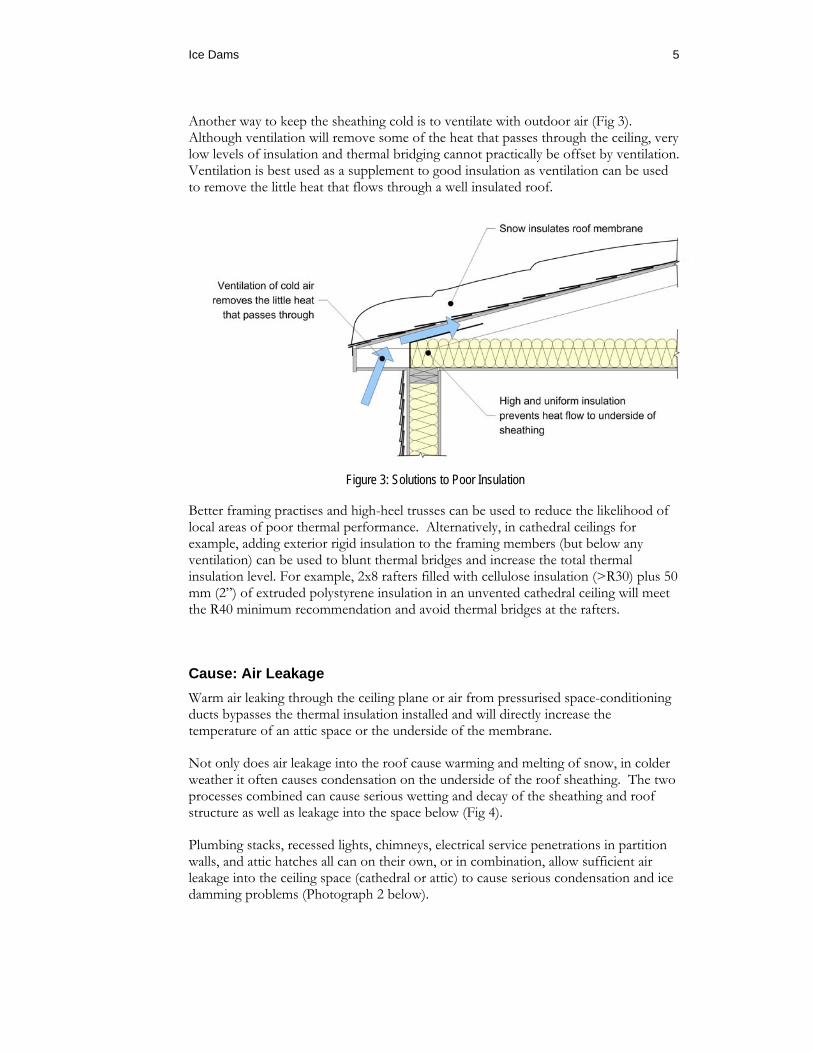
Another way to keep the sheathing cold is to ventilate with outdoor air (Fig 3). Although ventilation will remove some of the heat that passes through the ceiling, very low levels of insulation and thermal bridging cannot practically be offset by ventilation. Ventilation is best used as a supplement to good insulation as ventilation can be used to remove the little heat that flows through a well insulated roof.
Figure 3: Solutions to Poor Insulation
Better framing practises and high-heel trusses can be used to reduce the likelihood of local areas of poor thermal performance. Alternatively, in cathedral ceilings for example, adding exterior rigid insulation to the framing members (but below any ventilation) can be used to blunt thermal bridges and increase the total thermal insulation level. For example, 2x8 rafters filled with cellulose insulation (>R30) plus 50 mm (2”) of extruded polystyrene insulation in an unvented cathedral ceiling will meet the R40 minimum recommendation and avoid thermal bridges at the rafters.
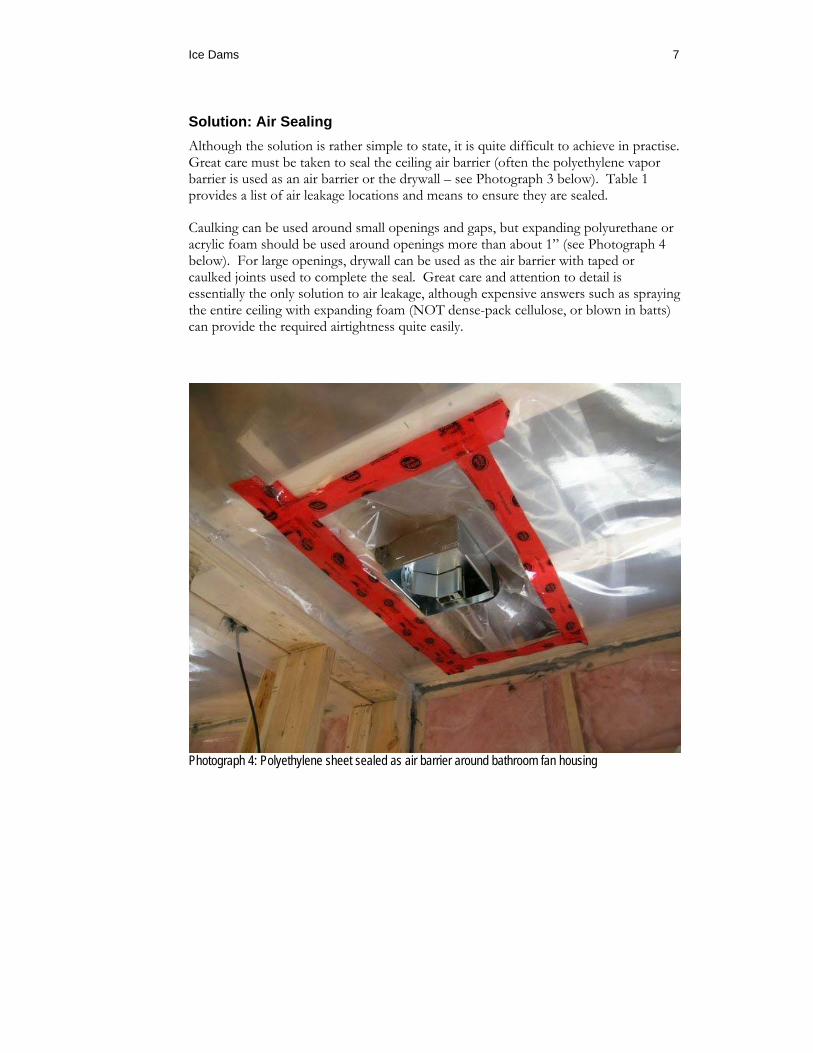
Cause: Air Leakage Warm air leaking through the ceiling plane or air from pressurised space-conditioning ducts bypasses the thermal insulation installed and will directly increase the temperature of an attic space or the underside of the membrane.
Not only does air leakage into the roof cause warming and melting of snow, in colder weather it often causes condensation on the underside of the roof sheathing. The two processes combined can cause serious wetting and decay of the sheathing and roof structure as well as leakage into the space below (Fig 4).
Plumbing stacks, recessed lights, chimneys, electrical service penetrations in partition walls, and attic hatches all can on their own, or in combination, allow sufficient air leakage into the ceiling space (cathedral or attic) to cause serious condensation and ice damming problems (Photograph 2 below).
6 Building Science Digest 135
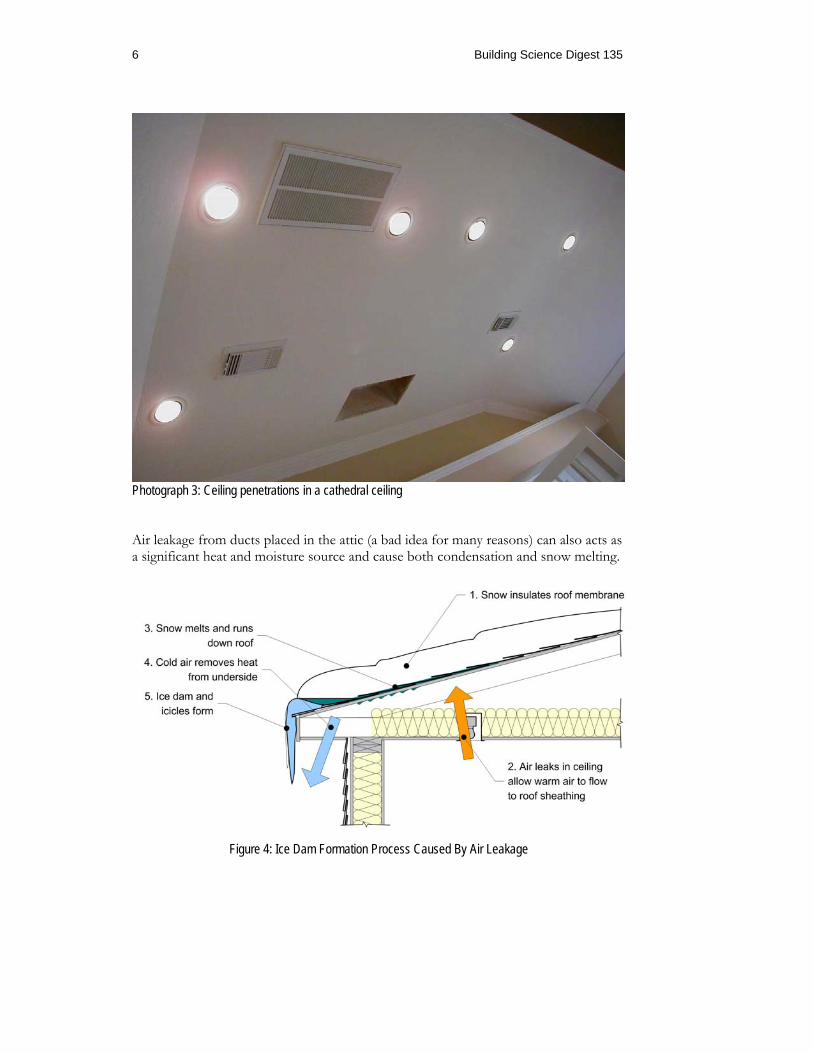
Photograph 3: Ceiling penetrations in a cathedral ceiling
Air leakage from ducts placed in the attic (a bad idea for many reasons) can also acts as a significant heat and moisture source and cause both condensation and snow melting.
Figure 4: Ice Dam Formation Process Caused By Air Leakage
Ice Dams 7
Solution: Air Sealing Although the solution is rather simple to state, it is quite difficult to achieve in practise. Great care must be taken to seal the ceiling air barrier (often the polyethylene vapor barrier is used as an air barrier or the drywall – see Photograph 3 below). Table 1 provides a list of air leakage locations and means to ensure they are sealed.
Caulking can be used around small openings and gaps, but expanding polyurethane or acrylic foam should be used around openings more than about 1” (see Photograph 4 below). For large openings, drywall can be used as the air barrier with taped or caulked joints used to complete the seal. Great care and attention to detail is essentially the only solution to air leakage, although expensive answers such as spraying the entire ceiling with expanding foam (NOT dense-pack cellulose, or blown in batts) can provide the required airtightness quite easily.
Photograph 4: Polyethylene sheet sealed as air barrier around bathroom fan housing
8 Building Science Digest 135
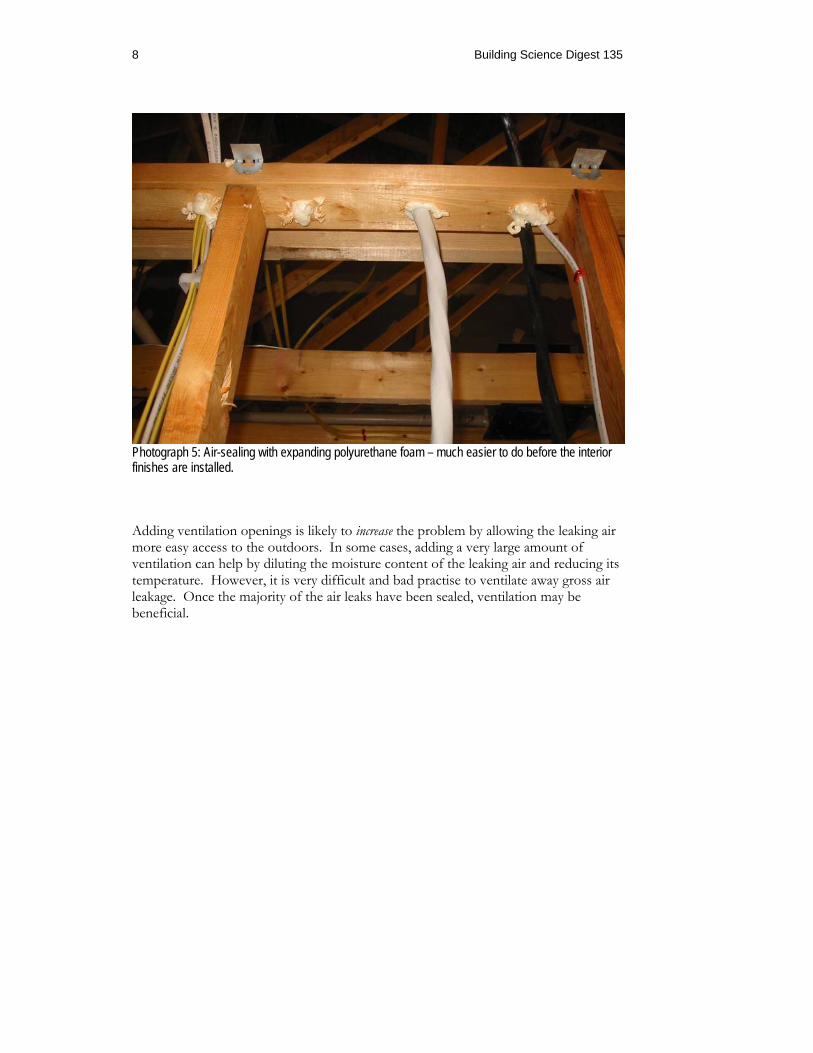
Photograph 5: Air-sealing with expanding polyurethane foam – much easier to do before the interior finishes are installed.
Adding ventilation openings is likely to increase the problem by allowing the leaking air more easy access to the outdoors. In some cases, adding a very large amount of ventilation can help by diluting the moisture content of the leaking air and reducing its temperature. However, it is very difficult and bad practise to ventilate away gross air leakage. Once the majority of the air leaks have been sealed, ventilation may be beneficial.
Ice Dams 9
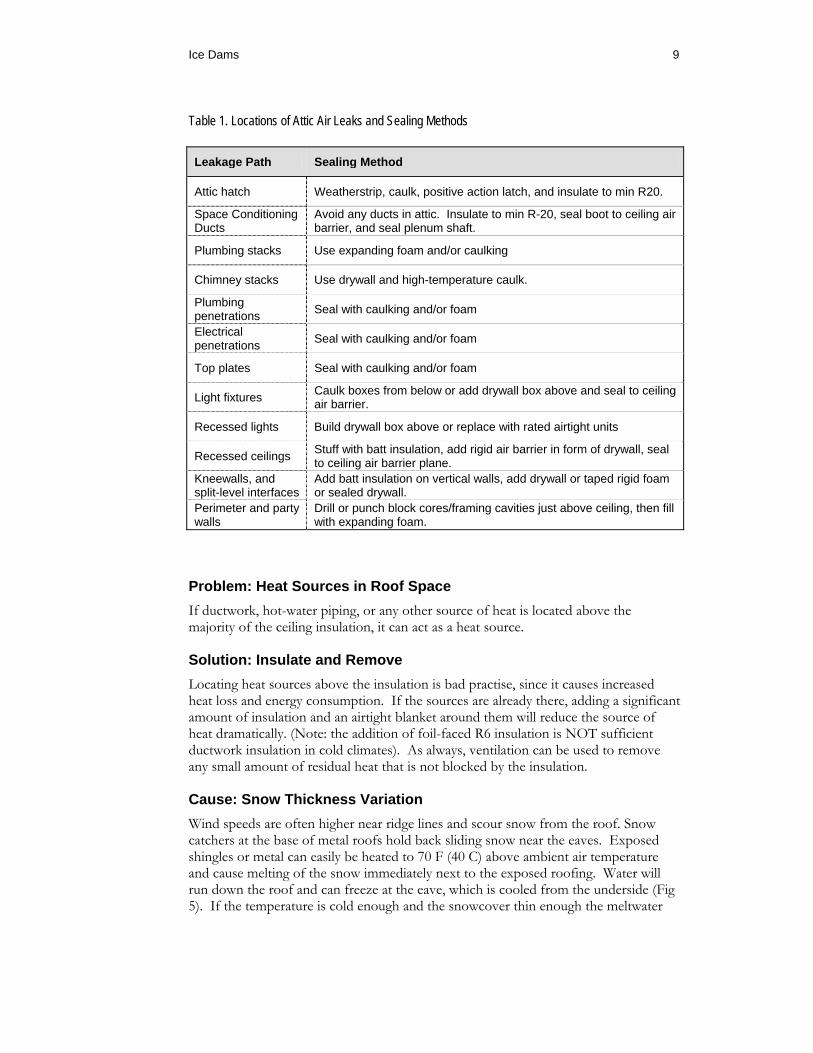
Table 1. Locations of Attic Air Leaks and Sealing Methods Leakage Path Sealing Method
Attic hatch Weatherstrip, caulk, positive action latch, and insulate to min R20.
Space Conditioning Ducts
Avoid any ducts in attic. Insulate to min R-20, seal boot to ceiling air barrier, and seal plenum shaft.
Plumbing stacks Use expanding foam and/or caulking
Chimney stacks Use drywall and high-temperature caulk.
Plumbing penetrations Seal with caulking and/or foam
Electrical penetrations Seal with caulking and/or foam
Top plates Seal with caulking and/or foam
Light fixtures Caulk boxes from below or add drywall box above and seal to ceiling air barrier.
Recessed lights Build drywall box above or replace with rated airtight units
Recessed ceilings Stuff with batt insulation, add rigid air barrier in form of drywall, seal to ceiling air barrier plane.
Kneewalls, and split-level interfaces
Add batt insulation on vertical walls, add drywall or taped rigid foam or sealed drywall.
Perimeter and party walls
Drill or punch block cores/framing cavities just above ceiling, then fill with expanding foam.
Problem: Heat Sources in Roof Space If ductwork, hot-water piping, or any other source of heat is located above the majority of the ceiling insulation, it can act as a heat source.
Solution: Insulate and Remove Locating heat sources above the insulation is bad practise, since it causes increased heat loss and energy consumption. If the sources are already there, adding a significant amount of insulation and an airtight blanket around them will reduce the source of heat dramatically. (Note: the addition of foil-faced R6 insulation is NOT sufficient ductwork insulation in cold climates). As always, ventilation can be used to remove any small amount of residual heat that is not blocked by the insulation.
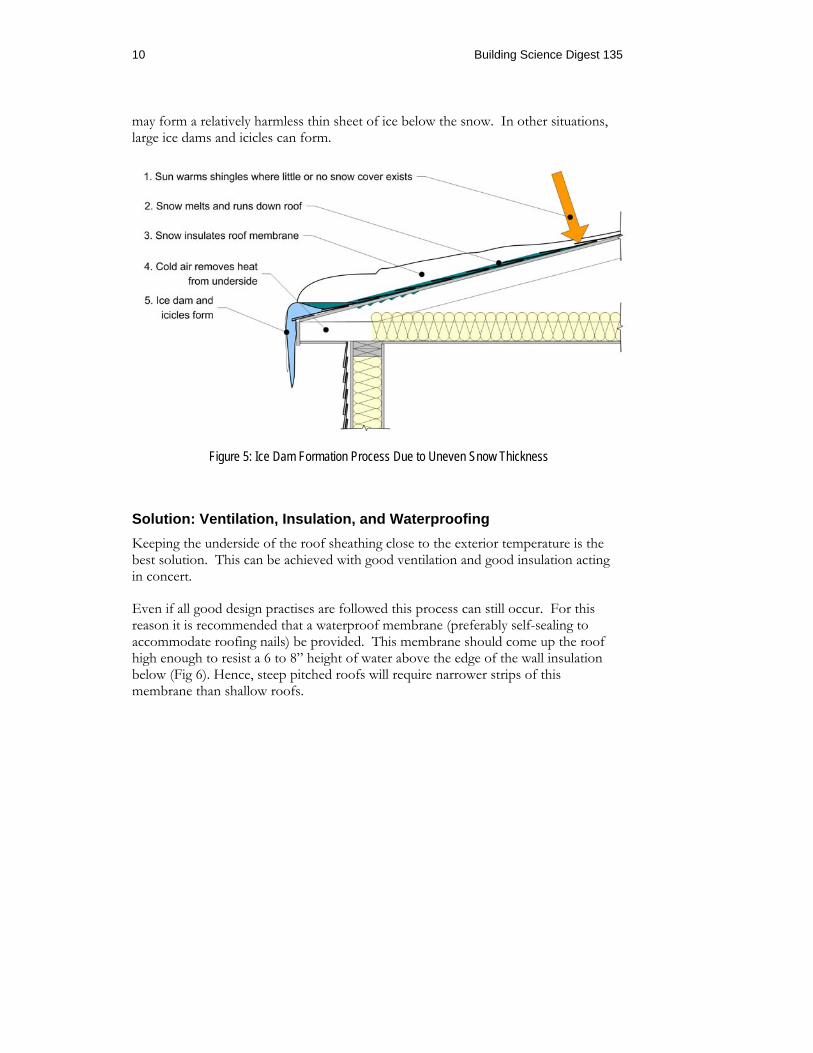
Cause: Snow Thickness Variation Wind speeds are often higher near ridge lines and scour snow from the roof. Snow catchers at the base of metal roofs hold back sliding snow near the eaves. Exposed shingles or metal can easily be heated to 70 F (40 C) above ambient air temperature and cause melting of the snow immediately next to the exposed roofing. Water will run down the roof and can freeze at the eave, which is cooled from the underside (Fig 5). If the temperature is cold enough and the snowcover thin enough the meltwater
10 Building Science Digest 135
may form a relatively harmless thin sheet of ice below the snow. In other situations, large ice dams and icicles can form.
Figure 5: Ice Dam Formation Process Due to Uneven Snow Thickness
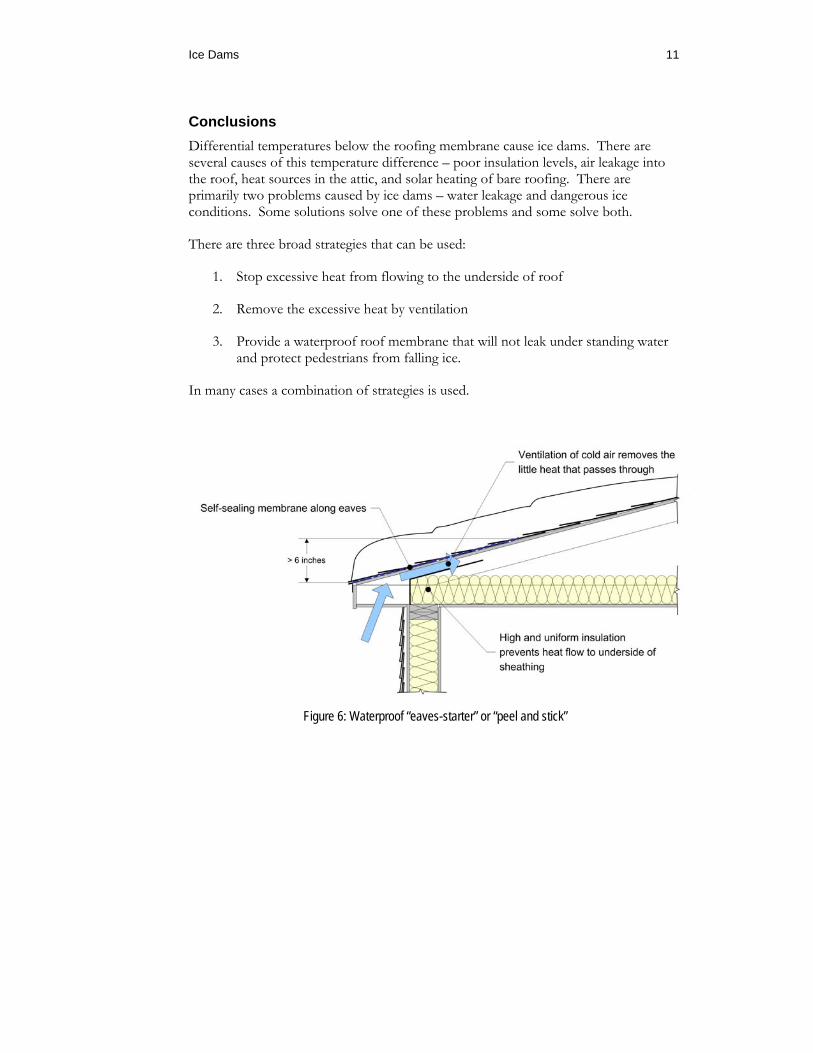
Solution: Ventilation, Insulation, and Waterproofing Keeping the underside of the roof sheathing close to the exterior temperature is the best solution. This can be achieved with good ventilation and good insulation acting in concert.
Even if all good design practises are followed this process can still occur. For this reason it is recommended that a waterproof membrane (preferably self-sealing to accommodate roofing nails) be provided. This membrane should come up the roof high enough to resist a 6 to 8” height of water above the edge of the wall insulation below (Fig 6). Hence, steep pitched roofs will require narrower strips of this membrane than shallow roofs.
Ice Dams 11
Conclusions Differential temperatures below the roofing membrane cause ice dams. There are several causes of this temperature difference – poor insulation levels, air leakage into the roof, heat sources in the attic, and solar heating of bare roofing. There are primarily two problems caused by ice dams – water leakage and dangerous ice conditions. Some solutions solve one of these problems and some solve both.
There are three broad strategies that can be used:
1. Stop excessive heat from flowing to the underside of roof
2. Remove the excessive heat by ventilation
3. Provide a waterproof roof membrane that will not leak under standing water and protect pedestrians from falling ice.
In many cases a combination of strategies is used.
Figure 6: Waterproof “eaves-starter” or “peel and stick”
12 Building Science Digest 135
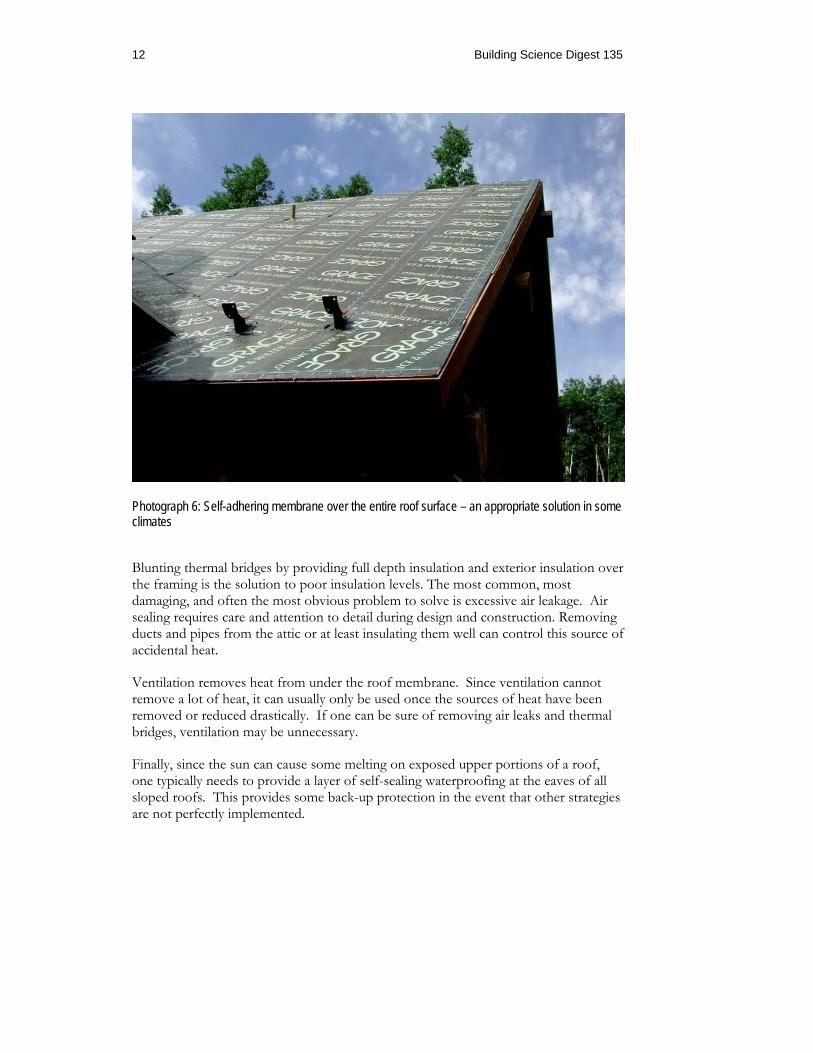
Photograph 6: Self-adhering membrane over the entire roof surface – an appropriate solution in some climates Blunting thermal bridges by providing full depth insulation and exterior insulation over the framing is the solution to poor insulation levels. The most common, most damaging, and often the most obvious problem to solve is excessive air leakage. Air sealing requires care and attention to detail during design and construction. Removing ducts and pipes from the attic or at least insulating them well can control this source of accidental heat.
Ventilation removes heat from under the roof membrane. Since ventilation cannot remove a lot of heat, it can usually only be used once the sources of heat have been removed or reduced drastically. If one can be sure of removing air leaks and thermal bridges, ventilation may be unnecessary.
Finally, since the sun can cause some melting on exposed upper portions of a roof, one typically needs to provide a layer of self-sealing waterproofing at the eaves of all sloped roofs. This provides some back-up protection in the event that other strategies are not perfectly implemented.
Ice Dams 13
Limits of Liability and Disclaimer of Warranty: Building Science Digests are information articles intended for professionals. The author and the publisher of this article have used their best efforts to provide accurate and authoritative information in regard to the subject matter covered. The author and publisher make no warranty of any kind, expressed or implied, with regard to the information contained in this article. The information presented in this article must be used with care by professionals who understand the implications of what they are doing. If professional advice or other expert assistance is required, the services of a competent professional shall be sought. The author and publisher shall not be liable in the event of incidental or consequential damages in connection with, or arising from, the use of the information contained within this Building Science Digest.
John Straube teaches in the Department of Civil Engineering and the School of Architecture at the University of Waterloo. More information about John Straube can be found at www.johnstraube.com Direct all correspondence to: J.F. Straube, Department of Civil Engineering, University of Waterloo, Waterloo, Ontario, Canada N2L 3G1