Embed Size (px)
Citation preview
. POSTED 6-27-'�04
This manual is for reference and historical purposes, all rights reserved.This page is copyright @ by M. Butkus. NJ.
This page may not be sold or distributed without the expressed permission ofthe producet
I have no connection with any camera company
OnJine camera manual libraryThis is the fu l l text and images f rom the manual .
This may take 3 full minutes for this PDF document to download.
The rpain page is located at www.butkus.orglchinon
If you fmd this manual useful, how about a donation of $3 to:M. Butkus, 29 Lake Ave., High Bridge, NJ 08829-1701
and send your e-mail address so I can thank you.Most other places would charge you $7.50 for a electronic copy or
$18.00 for a hard to read Xerox copy.
This will allow me to continue to buy new manuals and pay their shipping costs.It'll make you feel better, won't it?
If you use Pay Pal or wish to use your credit card, use the Pay Pal Link on my page.
If you found this page from any other location (other then a link)please notify me at [email protected]
www.orphancameras.com
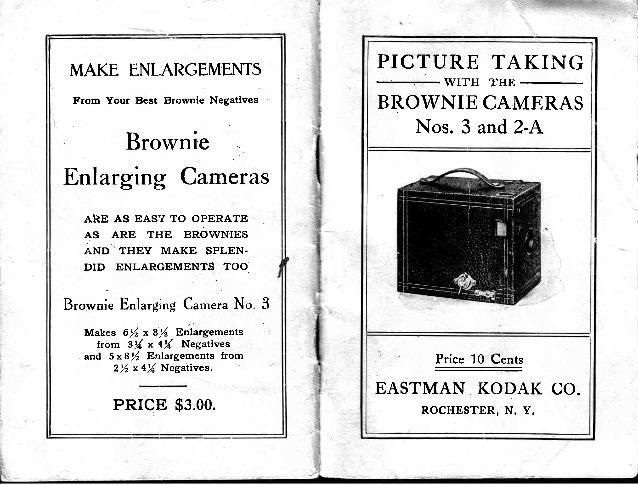
MAKE ENLARGEMENTS
From Your Best Brownie Negatives
BrownieT : \ l ' / i - l
Lnlarglng L/ameras
ARE AS EASY TO OPERATE
AS ARE TTIE BROWNIES
.A,ND' THEY MAKE SPLEN-
DID ENLARCIEMENTS TOO
Brownie Enlarging C"*"t" No. 3
Makes 6ft x 8l EniargementsIrom 3r/4 x 4r7{ Negatives
and 5 x8ft Enlargements fromZl x a/ Negatives.
PRICE $3,00.
PICTURE TAKINGWITH THE
BROWNIE CAMERASNos. 3 and 2-A
Price 10 Cents. --
EASTMAN KODAK CO.ROCHESTER, N. Y.
@ltlFtlrFs,
KODAI(;Irade Mark, 1E88
EasrMAN Kooar Co.ROCHESTER. N. Y.
Me.xopactuRERs oF
Kodaks
Browaie Cameras
Kodak Fi lm Tanks
Kodak Dry }{ountiug ' l ' issue
' Velox Paper
Eastman So l io Paper
Eastntan Ferro-Prussiate PaPer
. l lastman Velvet Bromide PaPer
IJastman Royal Bromide Paper
Eastman Standard Bromide I 'aPer
Eastman Enameled Bromide PaPer
Eastman Matte-Enameled Bromide Paper
Eastman Plat ino Bromide Paper
Eastman Non-Cuding Fi lm
Tested Chemicals'I'ripods and
Otber Specialt les
Traile Mad.s Reg. U. S. Patent O6ca
/l4ay, tgre.
PICTURE TAKING\)I/ITH THE
B R O W N I E C A M E R A SNos. 3 and 2-A
Price Ten Cents
E A S T M A N K O D A K C O . ,ROCHESTER, N. y.
www.orphancameras.com

ORDER FILMBY NUMBER
All Kodak Films may be distinguished bythe numbers on the ends of the cartons.
124is the number for film for No. 3 Brownie.
1 1 6is the number for film for the 2-A Brownie.The number appears on both carton andcartridge.
NOTICEThe Duplex paper (black on one side, red
on the other) now used in Kodak cartridgesis superior to black paper in that it has nodeleterious effect upon the keeping qualit iesof the fi lm and absolutely does away withnumber markings.
In watching for numbers through the redwindow, one should now look for b lack num-bers on red paper, instead of, as formerly,white numbers on black paper.
Wherever the term "duplex paper', is usedin this manual, reference is made of course,to this black and red paper.
BEFORE LOADING.Before taking any pictures with either the No. B or
2-A Brownie Camera read the following instruction.gcarefully, and make yourself perfecily familiar *,iththe instrument, taking especial care to learn how tooperate the shutter. Work it for both time anct .r.stantaneous exposures several times before threadi4gup the flim.
The flrst and most important thing for the amateu.rto bear in mind is that the light which serves ro im-press the photographic image upon the sensitive f.lmin.a small fraction of a second when it comes throushthe lens, ean destroy the film as quickly as it makesthe picture. A_fter the fi.lm has been d.eveloped and alldeoeloper thoroughly uashed out, ib may be quicklytransferred in subdued white light to the fixing bathwithout injury. Throughout all the operations ofloading and unloading, be extremely c"""fol to keepthe duplex paper wound tighily around. the fllm toprevent the admission of light.
EASTMAN KODAK COMPANY.
Roc\ester, N. y.
CONTENTS.
Prnr I-Loading'
P.lnr Il-Making the ExPosure.
Prnr Ill-Removing the Film.
Penr lY-Developing rvith the Kodak
P.lnr V-Dark trloom DeveloPment.
P.l,nn Vl-Printing on Yelox Paper'
P.rnr Vll-Mounting.
Penr YIII-X'ormula.
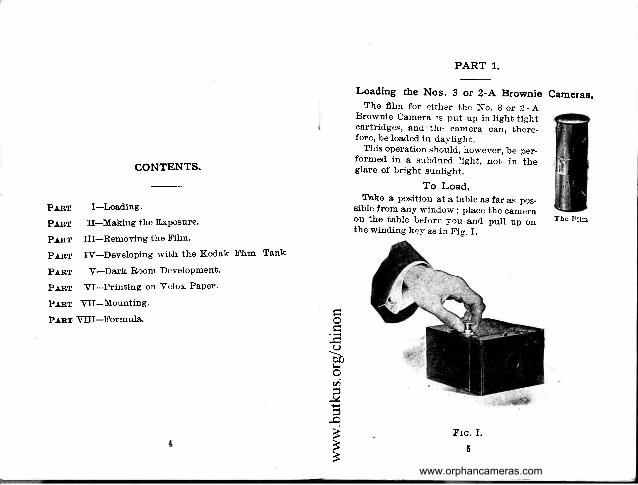
To Load.Take a position at a table as far as pos-
sible from any.n-indow; place the camerao_n the table before you and. pull up onthe winding key as in F.ig. I.
PART 1.
Loading the Nos. 3 or Z-A Brownie
The fllm for either the No. B or p - ABrownie Camera is pu.t up in light tightcartridges, and the camera can, there_fore, be loaded in daylight.
This operation should, hotvever, be per-formed in a suMued light, not in theglare of bright sunlight.
X.ra. f.
6
Cameras.
The Fi lm
Ffrrn Tank
o
Ba
-\(
.o
FFB
www.orphancameras.com
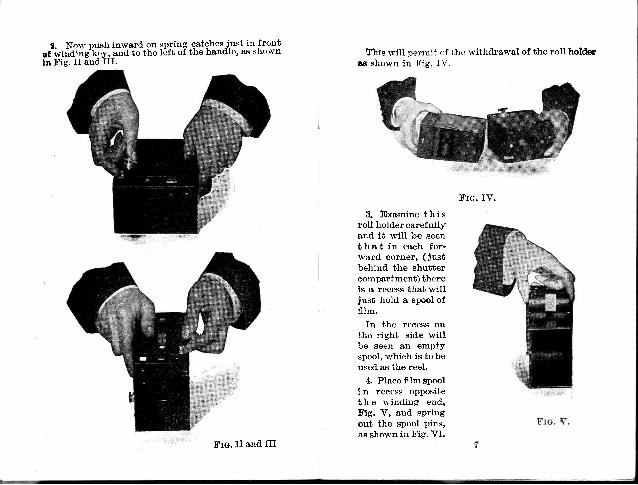
l. Norl'push inward. on spTing catches i-ust in front
ef?i"ifi"S-k*i, ""4 to tne left of the hand.Ie, as shoqr:lin n''is. II and III.
This will permit of the withdrawal of tho roll holde
as shown in tr'ig. IY.
FtG. IY.
8. Examine thisroll holder carefullyand, it will be seentha t in each fo r -tvard. corner, ( just
behind. the shuttereompartment) thereis a recess that willjust hold. a spool offrIm.
fn the recess onthe right sid"e willbe seen an emptyspool, which is to beused as the reel.
4. Plaee f.lm spoolln recess oppositethe winding end,Fig. Y, and. springout the spool pins,
as shown in Fig. VI.Src. II and III
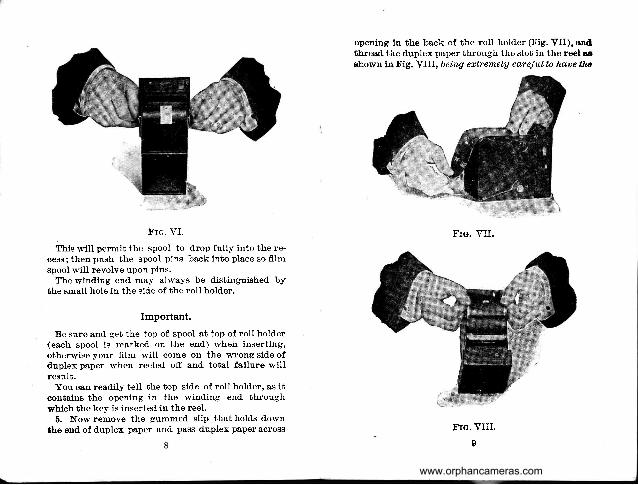
Fre. VI.
This will permit the spool to drop fully into the re-eess; then push the spool pins baek into plaee so filmspool will revolve upon pins.
The wind.ing end may always be distinguished bythe small hole in the side of the roll holder.
Important.
Be sure and get the top of spool at top of rolL holder(each spool is marked on the end.) when inserting,otherwise your fllm N'ill eome on the wrong sid.e ofduplex paper lt'hen reeled off and. total failure willresult.
You can readily tell the top side of roll hold.er, as iteontains the opening in the wind.ing end. through
which the key is inserted in the reel.
5. Now remove the gummed slip that holds d.own
the end. of d.uplex paper and pass d.uplex pa,per across
opening in the back of the roll hold.er (X'ig. VII), and.thread. the duplex paper through the slot in the reel asshown in n'ig. YIII, bei,ng ertremely careful,to haae the
Flc. YIf.
FTO, VItrI.
I
www.orphancameras.com
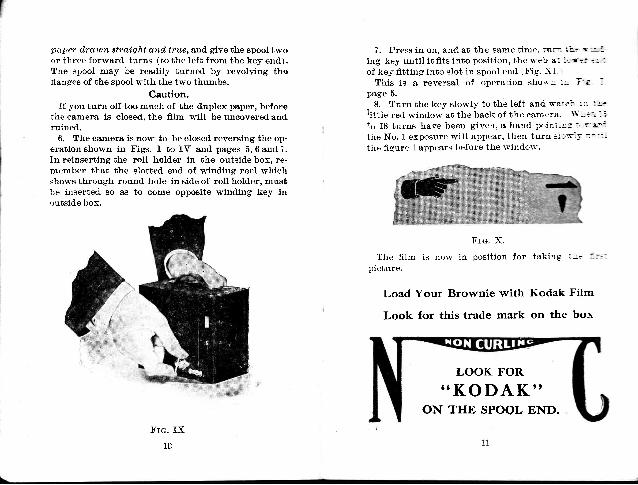
p$per clrctusn straight and true, and. give the spool twoor three forward. turns (to the left from the key end ).The spool may be readily turned by revolving theflanges of the spool ntth the two thumbs.
Caution.If you turn off too much of the duplex paper, before
the eamera is closed, the film will be uncovered. and.ruined.
6" The camera is norl- to be closed. reversing the op-eration shown in tr*igs" I to IV and pages 5, 6 and 7.fn reinserting the roll hold.er in the outside box, re-member that the slotted end. of winding reel whichshows through round hole in side of roll hold.er, mustbe inserteti so as to come opposite winding key inotrtside box.
Frc. IX
10
7, Press in on, atrd at the sarne time" ru.rxl t-ft* 'qr''::':
ing key unti l i t f i ts into position, the lr-eb 6i l ' ; 'm';: ' : 1
of l<ey fi"tting into slot in spool end (Fig. XL
This is a reversal of operation shou-ll :* F:s :page 5.
8. Turn the key slowly to the lef t and rn-a:oeb : - i '4littt* red. wind.ow at the baek of the camera. tr:el -frto 18 turns have been given, a hand p,rint:r"i :."$s,6,ln
the No. 1 exposure wil l appear' then tur. 'r sl-w-y :- -:-
the fi"gure l appears before the windos'.
Frc. X.
The fiim is norv in position for taking the
pict'ure.
Load Your Brownie with Kodak Fitrm
Look for this trade mark on the box
LOOK FOR. . K O D A K ' '
ON THE SPOOL END.

PART II.
Making the Exposures.
Sncttorv l.-Instantaneous Exposures.
tt Shap Shots."
The shutter of No. 3 or 2-A Brownie Camera is
always set and. is operated by pushing the lever alter-
nately to right or left rvith the thumb.
If the lever stand.s at the right hand. sid.e of slot
simply push it to the left and. vice versa.
If the spring should. be pushed. the wrong way, the
shutter would. simply remain unmoved, and no "click"
would. be heard, thus indicating that it should. be
pushed. in the opposite direction.
To tako instantaneous pietures the object should. be
in the broad. open sunlight, but the camera should
not. The sun should. be behind. the back or over the
should.er of the operator.
Use the Largest Stop.
Snap shots should only be made when 'uhe largest
stop is before the lens. If a smaller stop be used., thelight will be so much reduced. that it will not suffi'eiently impress the image on the fi.lm and failure willresult. trn making snap shots both of the slid.es shownin Fig. II, page 16, should be pushed down to the limi$
of motion.
X're. II.
Slid.e A controls the time and instantaneous expos-
ures. X'or snap shots this slide must be d-own.
, Slid.e B controls the stops, of which there are three.'When
it is elear down the largest stop is in place. This
is the one to use for all snap shots, except where the
suntight is unusually strong, and. there are no heavy
shad.ows, such as views on the water or in tropieal or
semi-tropical climates, when the mid'd.Ie stop may be
used.. The smallest stop must never be used. for snap
shots. (See Fig. II, Page 16. )
Aim the camera at the objeet to be photographed'
and. Iocate the lmage in the flnder. There are two
13
www.orphancameras.com
6.nders, one for vertical and the other for horizontal
€xposures.For a vertical exposure the camera should be held as
ahorn'n in X'ig I, page 12.
For a horizontal exposure the camera should. be held..gr,s shown in X'ig II, Page 13.
Any object that does not show in the flnder will not.strorv in the picture.
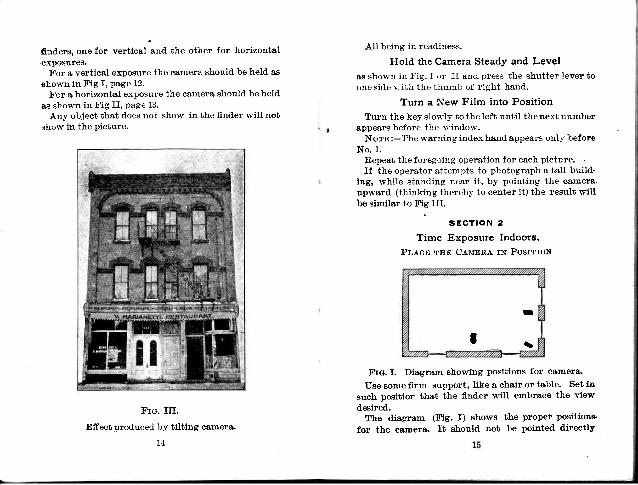
Fra. III.
Effect produeed by tilting camer&.
All being in readiness.
Hold the Camera Steady and Level
a^s sho'w'n in X'ig. I or II and press the shutter lever to,one side l. ith the thumb of right hand.
Turn a New Film into Position
Turn the key slolvly to the left until the next number
appears before the rvindow.Norn :-The warning index hand. appears only before,
N o . 1 .Repeat the foregoing operation for each picture.
If the operator attempts to photograph a tall build'ing, while standing near it, by pointing the camera.upward (thinking thereby to center it) the result wiltr.
be similar to Fig III.
s E c T l o N 2
Time Exposure Indoors.
Pr,-Ecr tsr Clurnl rN Postrrox
Fte. I. Diagram showing positions for eamela.
IJse some flrm support, like a chair or table. Set'tn
such positior: that the fi.nd.er will embrace the view
desired.The diagram tX'ig. I) shows the propef positions
for the c&mer&. It should not be pointed direotly
f :
14
at a wind.ow as the glare of light will blur the pie'
ture. If all the u'ind.on's cannot be avoid-ed' puII
,Jown the shades of sttch as come within range of
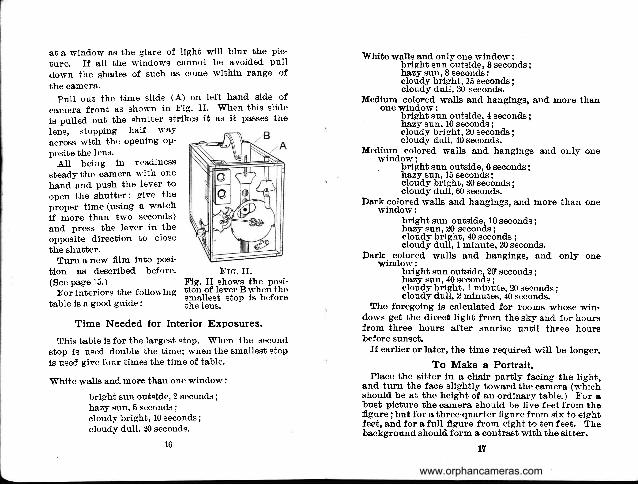
the camera.pull out the time slide ( A) on left hand. sid.e of
carnera fron6 as shorvn in Fig. II. When this slid.e
is pulled. out the shutter strikes it as it passes the
lens, stopPing half \I'aY
across with the oPening oP'
posite the lens.All being in readiness
stead.y the camera rriih one
hand. and. Push the lever to
open the shutter; give the
proper time (using a wat'ch
if more than two second's)
and. press the lever in the
opposite direction to close
the shutter.Turn a new fllm into Posi'
tion &s deseribed. before.(See page 16.)
n'or interiors the follorving
table is a good. guide:
\Mhite walls and. only one wind.ow ;bright sun outsid.e, 3 seconds;bazy sun, 8 seconds:cloud.y bright, 15 seeond.s;cloudy dull, 30 seeonds.
Med.ium eolored walls and hangings, and, more thanone wind.ow:
bright sun outside, 4 second.s;hazy sun, 10 seconds 'iir,iay"u "i ght ; io s"6 6nd"s ;cloudy du[, 40 seconds.
Medium eolored. walls and. hangings and only onewind.ow;. bright sun outsid.e, 6 seconds;
hazy sun, 15 seconds;cloud.y bright, 30 seconds;cloudy dull, 60 seconds.
Dark eolored. walls and hangings, and. more than onewind.ow:
bright sun outside, 10 seconds;ha,zy sun, 20 seeonds;eloudy bright, 40 seeond.s ;cloudf dull, l minute, 20 seconds.
Dark - e_olored walls and hangings, and. only onewindow:
bright sun outside, 20 seeonds;hazy sun, 40 seeond.s;cloudy b"t_gh!, l rninute. 20 seeonds;cloudy dull, 2 minutes, 40 seconds.
The foregoing is calculated. for rooms whose win.dows get the direct tight from the sky and for hoursfrom three hours after sunrise until three hour"sbefore sunset.
ff earlier or later, the time required. will be longer.
To Make a Portrait,Place the sitter in a chair partly facing the light,
and. turn the face slightly toward, the camera (n-hiebshould be at the height of an ordinary table. ) For abust picture the eamera should be f.ve feet from thefigure; but for a three-quarter flgure from six to eighbfeet, and. for a full figure from eight to ten feet. Thebackground should. form a contrast with the sitter.
X'is. II shows the posi-tio-n of lever B wheri thesmallest stop is beforethe lens.
Time Needed for Interior Exposures.
This tabte is for the largest stop. 'When
the seeond.
stop is used. double the time; when the smallest stop
is used. give four times the time of table.
White walls and more than one wind'ow:
bright sun outsid.e, 2 second.s;hazy sunr 5 seeond.s ;cloud.y bright, 10 seeond.s;cloudy dull. 20 second.s.
X'ra. II.
16 fI
www.orphancameras.com
In making portraits tvhere the subject is less thsn
cight feet from the camera, use the smallest stop and,
tlme accord.ingly. (See page 16). As a general rule
else the middle stop fol portraits.
Kodak Portrait Attachment.
By the use of a Kodak Portrait Attachment this in'gtrument may be used.'s'ith the sitter at a distance of
only three and one half f eet, thus enabling the amateur
to obtain large head and should.er pictures equaling in
size those of an ordinary Mantello photograph.
The attachment is simply an extra lens to be slipped.
lnlensopeningin front-board, and. in no way"affects
the operation of the camer& except to change the
focus. Price 50 centb. Be sure and specify what c&mer&
the attachment is to be used lvith when ordering.
Time Exposures in the OPen Air.
When the smallest stop is before the lens the light
,admitted. is so much reduced that time exposures out.of d.oors may be made the same as interiors, but tho
erposure must be much shorter.'Wrtn
Suxsnrxr-The shutter can hardly be opened..and closed quickly enough to avoid. oYer exposrrre.
\N'rrs Lrcrrr Cr,ouos-n'rom one-half to one second
n'ili be sufficient.Wrrn Ilnlvv Cr,ouns-X'rom two to fve second's
rr-ill be required.The above is calculated for hours from three hours
.after sunrise until three hours before sunset and. for
objects inthe open air. For other hours, or for objects
in the shad.ow, und.er porches or under trees, no accu'-rate directions can be given ; experience only can teach
the proper exposure to give.
Time erposures cq,nnot be rnctde uthile the cctmera, is
held, in the ha,nd,. Alwa,ys pla'ce it upon sonxe fr'rm,|upport, sueh as a' chqir or table.
18
s T o P s .
I Tnr LrneEsr-For a,ll, ord,inary instcr,ntaneousetposu/eE.
i Tnn ]Iloor.r - For instantaneous exposureswhen the sunlight is unusually strong and there areno heavy shado*-s;such as i:r views on th.e seashore,in extremell high, dry climates or on the wateror in tropical or semi-tropical climates; also for in-terior time exposures, the time for which is given inthe table on pages 16 and 1?.
3 Tsn Sullr n3t-For time exposures out doorsin cloudy u'eather. s:ot for instq,ntdneous erposures,The time required for time exposures on cloudy dayswith smallest stop rvill range from one-half second toflve seconds according to the light. The smaller thestop the sharper the picture.
When setting the stops alr,vays see that the one to beused is brottght to the center of the Zens where itcatches,
If you use the smallest stop for instantaneous ex-posures absolute failure will result.
t9
s E c r r o N 3 .
Flash Light Pictures.
By the introd.uction of Eastman X'lash Sheets, pic-ture taking at night has been wonderfully simplif.ed.A package of flash sheets, a piece of cardboard., a pinand a match complete the list of essential extras,although an Eastman 8lash Sheet Holder is a greatconvenience.
With flash sheets, no lamp is necessary, there is aminimum of smoke and they are far safer than anyother self-burning flash medium, besides giving asofter light that is less trying to the eyes.
Many interiors can be taken with the flash sheetsthat are impracticable by daylight, either by reason ofa lack of illumination or because there are windowsin a direct line of viery which cannot be d.arkenedsuffi.ciently to prevent the blurring of the picture.
Evening parties, groups around adinner or card. tableor single portraits lnay be readily made by the use ofour flashsheets, thus enabling the arnateur to obtainsouvenirs of many occasions which, but for the flash-light, would be quite beyond. the range of the art.
Pnrp;.p"ltroN FoR rnn X'r,Asn.-The camera shouldbe prepared for time exposures, as directed. on page 1bof this manual (except that the largest stop must beused,) and. placed on some level support where it willtake in the view d.esired.
Pinaflash sheet by one corner to a piece of eard-hoard. which has previously been ff.xed. in a perpen-d.icular position. If the cardboard is white it wiII actas a reflector and increase the strength of the flash.
The flash sheet should. a,lu'ctys be placed two feet be-hind. and. two or three feet to one side of the camera.If placed in front, or on a line with front of Camera.theflash would. strike the lens and. blur the picture. It
n
should i:e placed at one side as well as behind, so as tothron'a shadorv and give a little relief in the lighting.The fla-qh should be at the same height or a littlehigher than the camera. The support upon which theflash is to be made should not project far enough infront of it t'o cast a shadow in front of the Camera. Aoextra piece of cardboard a foot square placed underthe flash sheet'wiil prevent, any sparks from t'he flashdoing damage. Ilowevern by using the Eastman FlashSheet Eolder, all these contingencies are taken careof, and we strongly advise its use,
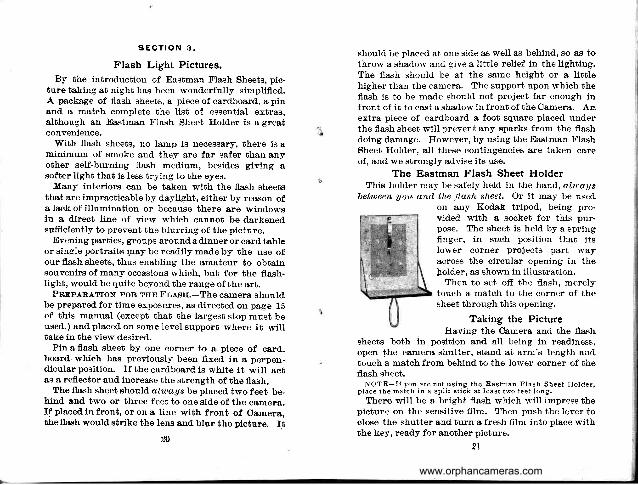
Tbe Eastman Flash Sheet HolderThis holder may be safely held in the hand, aluags
bettpeen you oncl the f lash sheet. Or i t may be usedon any Kodats tripod, being pro-vided with a socket for this pur.pose. The sheet is held by a springf.nger, in such position that itslower corner projects part rvayacross the circular opening in the
bolder, as shown in illustration.Then to set off the flash, merely
touch a match to the corner of thesheet through this opening.
Taking the PictureIlaving the Camera and the flash
sheets both in position and. all being in readiness,open the camera shutter, stand at arm's length and.touch a match from behind to the loler corner of theflash sheet.
N O T E - l l y o u a r e n o t u s i n g t h e E a s t m a n F l a s h S h e e t H o l d e r ,p l ace t be ma tch i n a sp l i t s t i c k a t l eas t two f ee t l ong .
There will be a bright flash which rvill impress thepicture on the sensitive film. Then push the lever toclose the shutter and turn a fresh f.lm into place withthe key, ready for another picture.
2l
www.orphancameras.com
The Flash SheetThe number of sheets required to light a room varies
with the distance of the object fart'hest from the
camera, and lhe color of 'the
walls and. hangings.
When two or more sheets are to be used they should.
be pinned to the cardboard, one above the other, the
corners only very slightly overlapping.
TABLEX'or ten feet distance and. light walls and. hangings use
one No. 1 sheet.x.or ten feet distance and d-ark walls and. hangings use
one No. 2 sheet.n'or flfteen feet distance and light walls and hangings
use one No, 2 sheet.X'or flfteen feet d.istance and dark walls and hangings
use one No. 3 sheeb.NOTE-Neve r use more t ban one shee t a t a t ime , i n t he Eas t -
man F lash Shee t Ho lde r .
To Mlxn I Ponrn.a.rr.-Place the sitter in a chairpartly facing the Camera (which should be at the height
of an ordinary table) and turn the face slightly towards
the instrument. The proper distance from the camerato the subject can be ascertained by looking at the im-
age in the flnder. X'or a three quarter picture this willbe from 6 to 8 feet. and for a full flgure from 8 to l0 feet.
The flash should be on the side of the Camera awayfrom the face, that is, the sitter should not face it.
The flash should. not be higher than the head. of the
sitter.X'or using the portrait attachment, see page 18.
To Marrn -E. Gnoup.-Arrange the chairs in theform
of an arc, facing the Camera so that each chair wiIIbe exactly the same distance from the camer&' Ilalf
the persons composing the group should be seated.
and. the rest should stand behind the chairs. If thegroup is large any number of chairs may be used, but
nonc of the subjects should- be seated on the floor,I t
as sometlmes seen in large pictures, because the per-
spective rrortld be too violent.
B-lcrcnou.Nt-fn making single portraits or groups,
care should be taken to have a suitable background"
against which the figures will show irr relief ; a light
background is better than a dark one, and often a
single fgure or t'lvo will show up well against a lace
curtain. X'or larger groups a medium wall light r,villbe suitable.
The fi,nd,er on the camera will aid the operator in
composingthdgroupssoasto get the best effect. In
ordel to make the image visible in the flnder the roorn
will have to be well lighted with ord-inary lamplight,
which may be lefb on while the picture is being made,provided none of the lights are placed so that they
show in the flnd-er.Eastman Flash Sheets burn more slowly than flash,
powders, producing a much softer light and. are, there'
fore, far preferallle in portrait work; the subject, horv-
ever, should be warned not to move, as the picture is.
not taken insta,ntct'neowsly, a"boat one second being re-quired to burn one sheet.
Eastman Flash Cartridges
Eastman X'lash Cartridges may be substitutedfor thesheets, if desired.
'We recommend the sheets, ,hot"
ever, as more convenient, safer, eheaper and capable ofproducing the best results. Thecartridgesareortly su-lerior when absolutely insta,'nt<t'neous work is essential.
Keep Dust Out of the Camera
' Defective negatives are often caused by particles ofdust which have collected on the inside of the c&mera.and settle upon the film in particles that produce smallwhite spots upon the prints.
It is therefbre well to wine out the insid.e of cameraoccasionallv. with a slishtly damp cloth. In summerweather or-dfter t'he cainera has riemained id.le for anylength of time, this neecls special attention.
,l\
PART III.
nemo.ringle Film.No dark room is required in changing the spools in
the Brolvnie Camera.The operation can be performed. in the open air, but
to avoid all liability of fogging the edges of the fiIm, ithad best be performed in a subdued light.
2. Provide an extra spool of fllm to flt this camera,taking a position at a table as far as possible from anywildorv.
3. Remove the roll holder as shown on page 7,F ig . IV .
4. IIoId ends of duplex paper and. sticker together
to prevent paper from loosening on reel. Epring out
spool pin and lift out roll of film. X'ig. I.
NorE- I f s t i c ke r has been wound unde r ree l , r evo l vc spoo l
t o b r i n g i t u P '
5. X'old" over half inch at end. of d-uplex paper (so as
to make subsequent breaking of the seal easy) and,
then seal with sticker.
6. Wrap up exposed. flIm immed.iately to prevent
the possibility of light being admitted.
7. Norv take t'he empty spool from the recess on the
left side of the camera and transfer to the lvind'ing side
bringing the slotted end into which the key is to fi.t
opposite the key hole.Load. as described in Part f, Page 7.
The roll of exposures can now be mailed to us for '
finishing or you can do the d.eveloping and printing
yourself.ttCinch Marks."
If theflm atrd paper loosen up a trlflewhen taken
from the ca,mer&' many amateurs are likely totake the
cartridge in the hancL and. wind it as closely as possible'
cinching it tightly with a twisting motion. There's
nothing more likely to injure the negative than this
tight drawing of the film, as it abrades the surface,
makiug flne parallel scratches running lengthwise
of the f.Im, which, in some cases, will ruin the negative.
Do not "cinch" the cartridge. It simply needs to be
wound. tightty enough so that the duplex paper keepe
laside the flanges.
4
q
Frc. I .
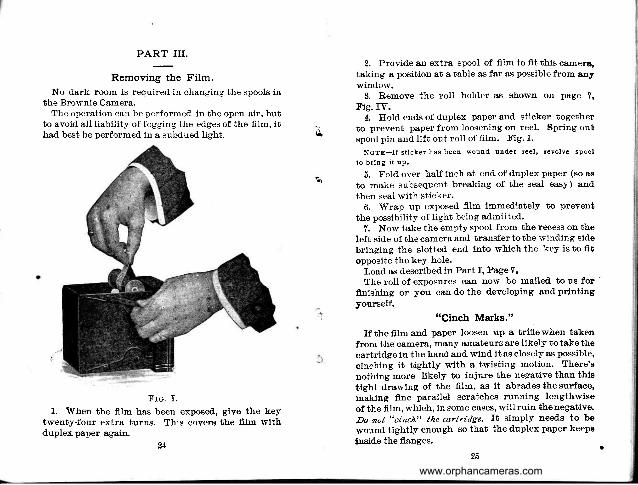
1. 'W'hen
the film has been exposed,twenty-four extra turns. This coversduplexpaper again.
ZL
give the keythe film with
25
www.orphancameras.com
PART IV.
Developing.
There is no necessity of working in a dark room orwaiting until night to develop fllm. It can be done indaylight at any time and place. And the daylightmethods of developing fllm give better results thanthe dark room way.
Film may be developed in daylight by the KodakX'ilm Tank method. Detailed directions for d.evelopingwill be found in the manual which accompanies thegoods.
'W'e recommend the koAat FiIm Tank method. par-
ticularly for its simpleness, and. the uniformly goodnegatives whieh it gives.
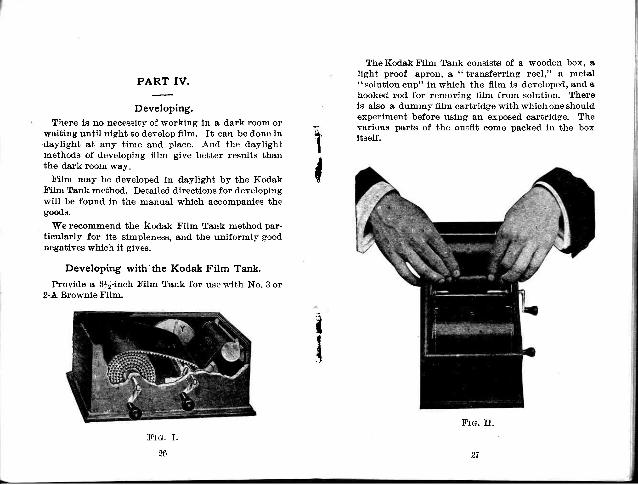
Developing with'the Kodak Film Tank.
Provide a Tft-inch n'ilm Tank for use .with No. 3 or2-A Brownie X'iIm.
3'rc. I.
26
TheKodakX'ilm Tank consists of a wooden box, alight proof apron, a t'trangferring reel," a metal" solution cup" in which the flIm is developed., and ahooked. rod for removing f.lm from solution. Thereis also a d.ummy fllm cartridge with whichoneshouldexperiment before using an exposed cartridge. Thevarioug parts of the outflt como packed in the boxitself.
Fra. I I .
27
Tt
tI