Embed Size (px)
Citation preview
Installation Instruction
Widespread Lavatory Set BRITANI COLLECTION
Please read the instructions completely before beginning the installation.
Britani CollectionModel Number: 4120BL
Flush both supply lines before installation, then shut off both supply lines.Minimum hole size for the spout and handle trim is 1-1/4” and maximum of 1-1/2”
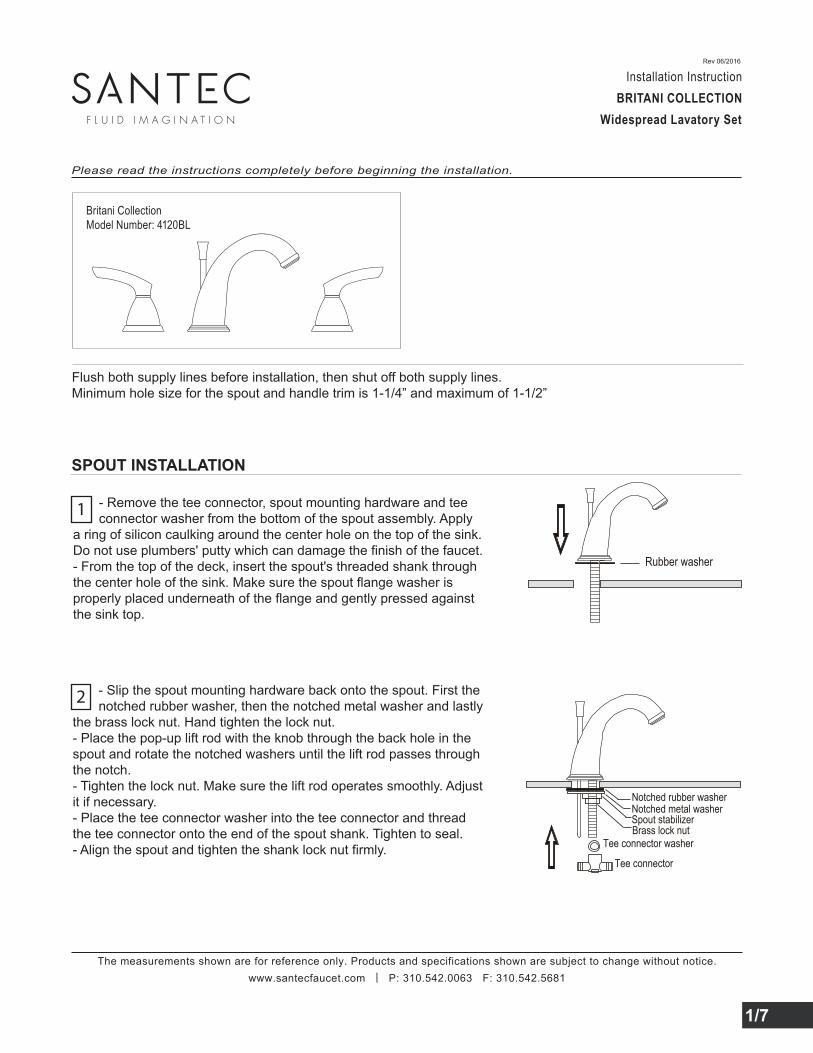
- Remove the tee connector, spout mounting hardware and tee connector washer from the bottom of the spout assembly. Applya ring of silicon caulking around the center hole on the top of the sink.Do not use plumbers' putty which can damage the finish of the faucet.- From the top of the deck, insert the spout's threaded shank throughthe center hole of the sink. Make sure the spout flange washer isproperly placed underneath of the flange and gently pressed againstthe sink top.
1
Rev 06/2016
The measurements shown are for reference only. Products and specifications shown are subject to change without notice.www.santecfaucet.com | P: 310.542.0063 F: 310.542.5681
SPOUT INSTALLATION
- Slip the spout mounting hardware back onto the spout. First the notched rubber washer, then the notched metal washer and lastlythe brass lock nut. Hand tighten the lock nut.- Place the pop-up lift rod with the knob through the back hole in thespout and rotate the notched washers until the lift rod passes throughthe notch.- Tighten the lock nut. Make sure the lift rod operates smoothly. Adjustit if necessary.- Place the tee connector washer into the tee connector and threadthe tee connector onto the end of the spout shank. Tighten to seal.- Align the spout and tighten the shank lock nut firmly.
2
Rubber washer
1/7
Notched rubber washerNotched metal washerSpout stabilizerBrass lock nut
Tee connector
Tee connector washer
HANDLE TRIM INSTALLATION
The measurements shown are for reference only. Products and specifications shown are subject to change without notice.www.santecfaucet.com | P: 310.542.0063 F: 310.542.5681
COMPLETE ASSEMBLY
DO NOT DISASSEMBLE HANDLE ASSEMBLY - DROP-IN VALVES
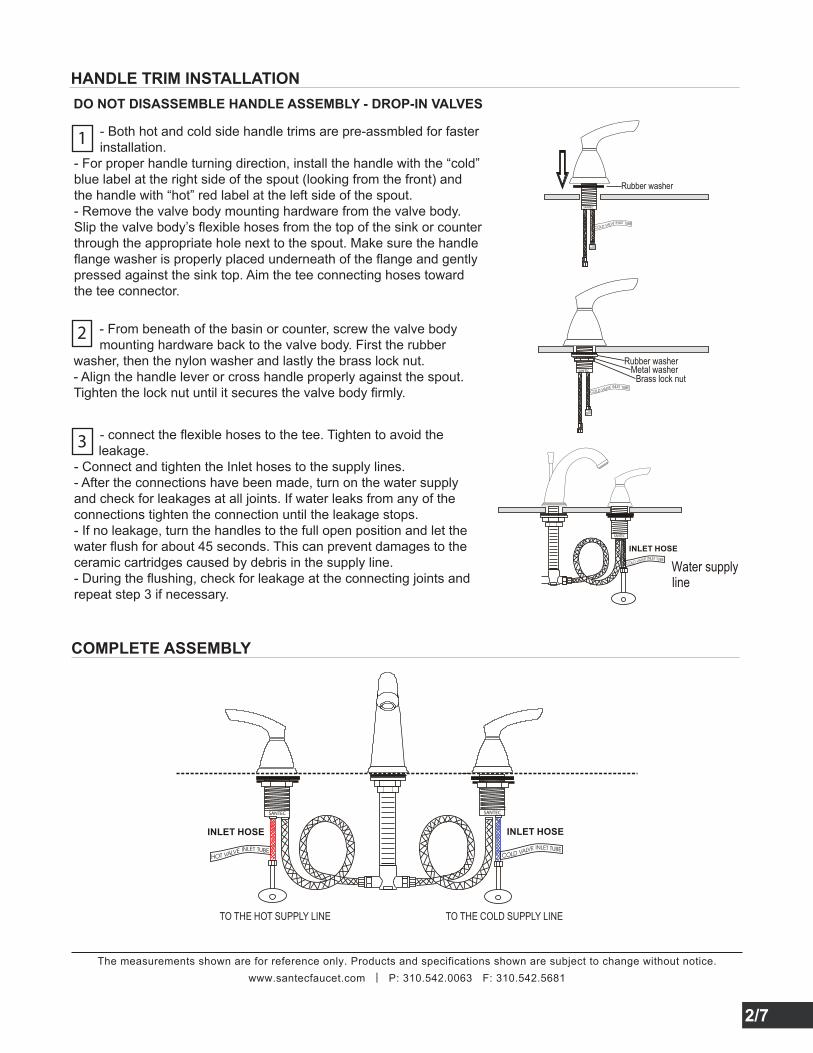
Rubber washer
Rubber washerMetal washer
Brass lock nut
2/7
- Both hot and cold side handle trims are pre-assmbled for faster installation.- For proper handle turning direction, install the handle with the “cold”blue label at the right side of the spout (looking from the front) andthe handle with “hot” red label at the left side of the spout.- Remove the valve body mounting hardware from the valve body.Slip the valve body’s flexible hoses from the top of the sink or counter through the appropriate hole next to the spout. Make sure the handle flange washer is properly placed underneath of the flange and gentlypressed against the sink top. Aim the tee connecting hoses towardthe tee connector.
1
- From beneath of the basin or counter, screw the valve body mounting hardware back to the valve body. First the rubberwasher, then the nylon washer and lastly the brass lock nut.- Align the handle lever or cross handle properly against the spout.Tighten the lock nut until it secures the valve body firmly.
2
- connect the flexible hoses to the tee. Tighten to avoid the leakage.- Connect and tighten the Inlet hoses to the supply lines.- After the connections have been made, turn on the water supply and check for leakages at all joints. If water leaks from any of theconnections tighten the connection until the leakage stops.- If no leakage, turn the handles to the full open position and let the water flush for about 45 seconds. This can prevent damages to theceramic cartridges caused by debris in the supply line.- During the flushing, check for leakage at the connecting joints andrepeat step 3 if necessary.
3
Water supplyINLET HOSE
line
TO THE HOT SUPPLY LINE TO THE COLD SUPPLY LINE
INLET HOSE INLET HOSE
POP-UP INSTALLATION
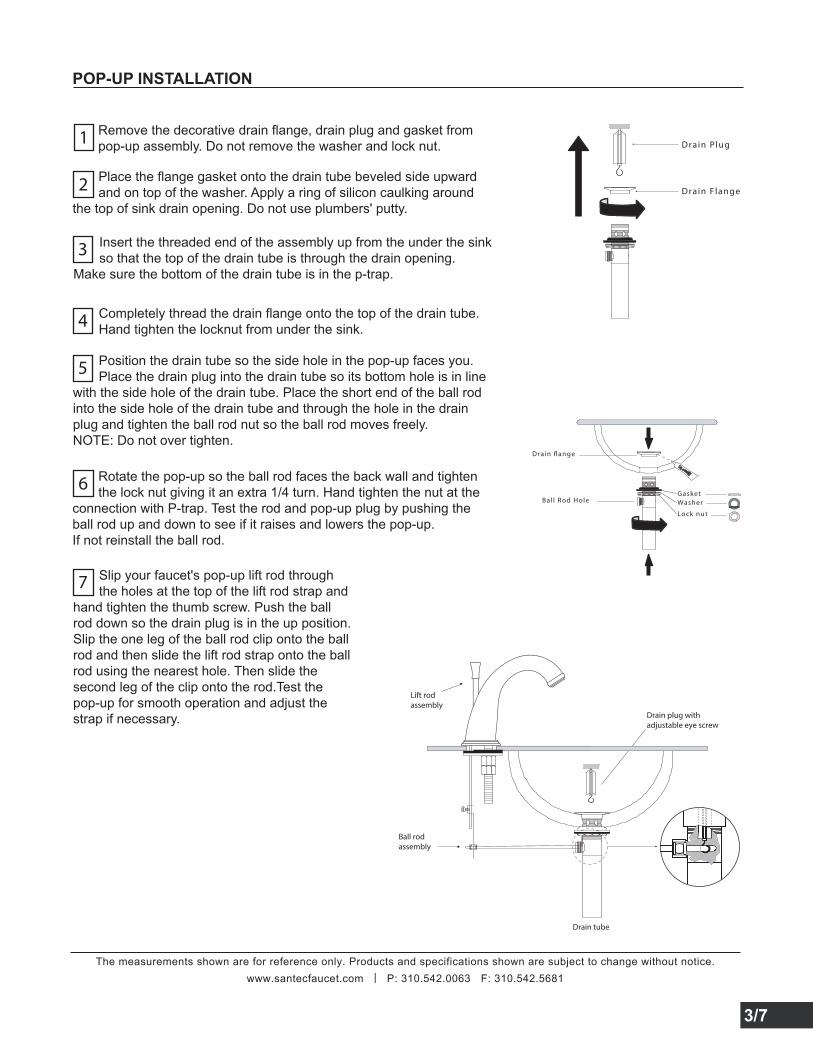
1 Remove the decorative drain flange, drain plug and gasket from pop-up assembly. Do not remove the washer and lock nut.
2 Place the flange gasket onto the drain tube beveled side upward and on top of the washer. Apply a ring of silicon caulking around the top of sink drain opening. Do not use plumbers' putty.
3 Insert the threaded end of the assembly up from the under the sink so that the top of the drain tube is through the drain opening. Make sure the bottom of the drain tube is in the p-trap.
4 Completely thread the drain flange onto the top of the drain tube. Hand tighten the locknut from under the sink.
5 Position the drain tube so the side hole in the pop-up faces you. Place the drain plug into the drain tube so its bottom hole is in linewith the side hole of the drain tube. Place the short end of the ball rodinto the side hole of the drain tube and through the hole in the drainplug and tighten the ball rod nut so the ball rod moves freely.NOTE: Do not over tighten.
6 Rotate the pop-up so the ball rod faces the back wall and tighten the lock nut giving it an extra 1/4 turn. Hand tighten the nut at the connection with P-trap. Test the rod and pop-up plug by pushing the ball rod up and down to see if it raises and lowers the pop-up.If not reinstall the ball rod.
7 Slip your faucet's pop-up lift rod through the holes at the top of the lift rod strap andhand tighten the thumb screw. Push the ballrod down so the drain plug is in the up position.Slip the one leg of the ball rod clip onto the ballrod and then slide the lift rod strap onto the ballrod using the nearest hole. Then slide thesecond leg of the clip onto the rod.Test thepop-up for smooth operation and adjust thestrap if necessary.
The measurements shown are for reference only. Products and specifications shown are subject to change without notice.www.santecfaucet.com | P: 310.542.0063 F: 310.542.5681
3/7
The measurements shown are for reference only. Products and specifications shown are subject to change without notice.www.santecfaucet.com | P: 310.542.0063 F: 310.542.5681
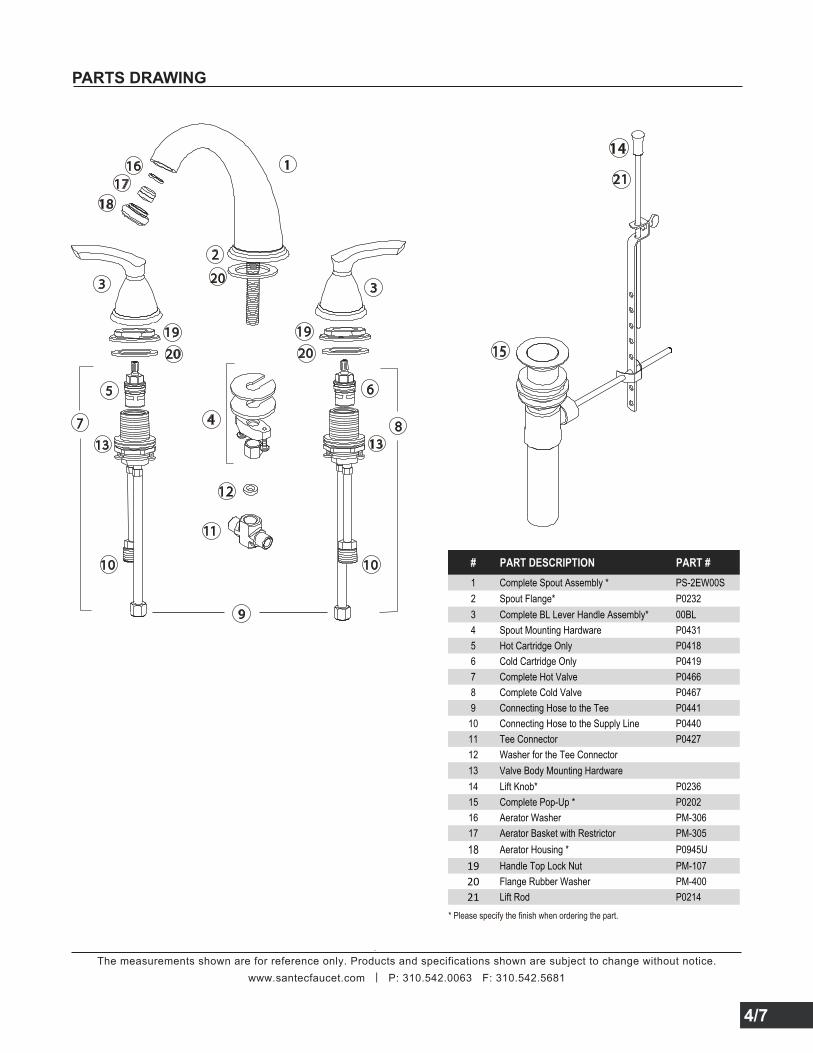
PARTS DRAWING
* Please specify the finish when ordering the part.
4/7
# PART DESCRIPTION PART #1 Complete Spout Assembly * PS-2EW00S2 Spout Flange* P02323 Complete BL Lever Handle Assembly* 00BL4 Spout Mounting Hardware P04315 Hot Cartridge Only P04186 Cold Cartridge Only P04197 Complete Hot Valve P04668 Complete Cold Valve P04679 Connecting Hose to the Tee P0441
10 Connecting Hose to the Supply Line P044011 Tee Connector P042712 Washer for the Tee Connector13 Valve Body Mounting Hardware14 Lift Knob* P023615 Complete Pop-Up * P020216 Aerator Washer PM-30617 Aerator Basket with Restrictor PM-30518 Aerator Housing * P0945U19 Handle Top Lock Nut PM-10720 Flange Rubber Washer PM-40021 Lift Rod P0214
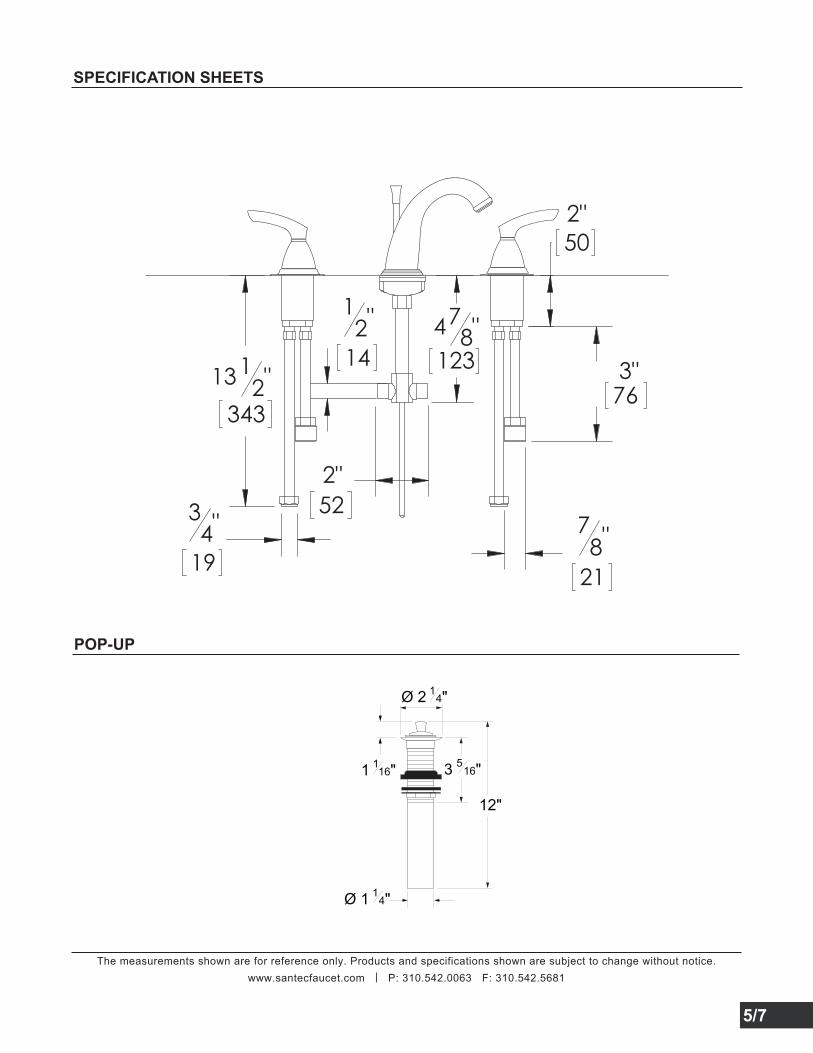
SPECIFICATION SHEETS
The measurements shown are for reference only. Products and specifications shown are subject to change without notice.www.santecfaucet.com | P: 310.542.0063 F: 310.542.5681
Ø 2 14"
1 116" 3 5
16"
12"
Ø 1 14"
5/7
POP-UP
34"
1978"
21
76
12"
14
2"52
478"
123
2"
3"
50
1312"
343
We recommend that all faucets, drains, etc., be gently wiped dry with a soft cloth after use to avoid water spotting and water deposit build-up. A mild liquid hand soap may be used occasionally if desired. Use of a non-abrasive carnauba wax will add protection to the finish and should be used if the faucets will not be dried after use. For clear coated finishes, it is recommended to clean your product weekly with a soft moist cloth.
WARNING: Do not clean your SANTEC product with ammonia (Window cleaner), bleach, soap, acids, abrasives, harsh polish, harsh cleaners, a coarse surfaced cloth, coarse sponge, or any type of scouring pad. Doing so may ruin your faucet finish and/or void the warranty.
Thank you for making SANTEC a part of your lifestyle and luxury spa experience. Our products have been created as works of enduring quality and sophisticated design.
Luxurious finishes need proper care and attention, so in order to understand how to properly clean your distinctive luxury finish, please refer to the finish care information below:
Your SANTEC product can be identified in one of two categories: clear coated finishes or non-clear coated finishes. Clear coated finishes are more scratch-sensitive and are more reactant to harsh cleaning chemicals than non-clear coated finishes. Once you have identified the specific luxury finish of your SANTEC product, please follow the important corresponding care instructions.
We recommend that all faucets, drains, etc., be gently wiped dry with a soft cloth after use to avoid water spotting and water deposit build-up. A mild liquid hand soap may be used occasionally if desired. Use of a non-abrasive carnauba wax is occasionally required and will add protection to the finish if the faucets will not be dried after use.
FINISH CARE INFORMATION
CLEAR COATED FINISHES
NON-CLEAR COATED FINISHES
TO OBTAIN WARRANTY SERVICE
Please read ‘WHAT IS COVERED BY OUR WARRANTY’ and ‘EXCLUSIONS AND LIMITATIONS OF WARRANTY’ sections to understand what is and what is not covered. Please have ready the proof of purchase (original sales receipt), description of the problem, and carefully package the product or defective part with postage prepaid. Then, please contact your local SANTEC Showroom or write to SANTEC Technical Services.
The measurements shown are for reference only. Products and specifications shown are subject to change without notice.www.santecfaucet.com | P: 310.542.0063 F: 310.542.5681
6/7
LIFETIME LIMITED WARRANTY
SANTEC is committed to enhancing your bathroom experience by creating luxury products that will provide enduring satisfaction. Every effort has been made to satisfy the highest standards of design and production,to create lasting peace of mind for our customers. We provide the following limited warranties on our products:
LENGH OF WARRANTY & WHO IS COVERED BY OUR WARRANTY
This warranty extends to the original consumer purchaser only and extends for as long as the original purchaser owns the product and the home in which the product is installed.
WHAT IS COVERED BY OUR WARRANTY
FINISHES: SANTEC Polished Chrome, Polished Nickel and Satin Nickel finishes carry a Lifetime Limitedwarranty against manufacturing defects and tarnish to the original purchaser. All other finishes carry a ten (10) year limited warranty against manufacturing defects and tarnish to the original puchaser only.
CARTRIDGES: Santec cartridges carry a lifetime limited warranty, with the exception of thermostatic and pressure balanced cartridges, which carry a three (3) year limited warranty against manufacturing defects to the original purchaser.
PARTS: Santec parts carry a 10-year limited warranty against manufacturing defects, to the original purchaser.
EXCLUSIONS & LIMITATIONS OF WARRANTY
Damage due to negligence, accident, abuse, improper installation, or improper maintenance such as, but not limited to: heat from soldering during installation, the use of plumber’s putty, damage from tools used during installation, the use or exposure to chemicals or cleaning products either abrasive or non-abrasive, or the use of any cleaning tool or product other than a soft, clean cloth. Reverse osmosis may also shorten the life of the finish.
Changes in the finish or in the product due to normal wear or aging does not cover any products or partswhich have been altered or used in a manner not typical for the product.
Loss, damages, or expense, incidental or consequential whatsoever, originating from the purchase, installation, use, repair, failure, or replacement of any SANTEC product or part, allowed by law.
This warranty does not cover:
Commercial and/or Industrial installations and use of the product.
This warranty does not include labor, travel charges, or any costs incurred for repair, removal, installation, servicing, diagnosing, or handling of either defective or replacement parts.
SANTEC reserves the product components of the covered product will be repaired, refinished, or replaced at the sole discretion of SANTEC. SANTEC reserves the right to examine any product claimed defective prior to any warranty claim being accepted or processed, at its sole discretion. This warranty gives you specific legal rights and you may have other rights which may vary from state to state.
The measurements shown are for reference only. Products and specifications shown are subject to change without notice.www.santecfaucet.com | P: 310.542.0063 F: 310.542.5681
Damage or deterioration caused by environmental impacts.
7/7


![Gaviota - California FaucetsGaviota WIDESPREAD LAVATORY FAUCET 7502 DIMENSIONS SHOWN TO NEAREST 1/16" [DIMENSIONS SHOWN TO NEAREST 1mm] TM Features • Over 28 finishes including 13](https://img.pdfslide.us/doc/110x75/609eb19ca517cd62b66cbec6/gaviota-california-faucets-gaviota-widespread-lavatory-faucet-7502-dimensions.jpg)