Embed Size (px)
Citation preview

4980 Great America ParkwaySanta Clara, CA 95054 USA+1(408)496-7400
Brio IntelligenceAdministrator’s Guide
Version 6.6

Brio Intelligence Administrator’s Guide — Version 6.6
Part Number 1209913
© Copyright 2002 Brio Software
All rights reserved. Printed in the USA.
This product and related products and documentation are protected by copyright and
are distributed under licenses restricting their use, copying, distribution, and
decompilation. No part of this product or related documentation may be reproduced
in any form by any means without prior written permission of Brio Software and its
licensors.
Brio Software
4980 Great America Parkway
Santa Clara, CA 95054
+1(408)496-7400
www.Brio.com
Refer to the Brio Software License Agreement in this package before installing or using
the product.
If you find any errors or problems with this documentation, please notify Brio
Software. Brio Software does not guarantee that this document is without error. The
information in this document is subject to change without notice.
Trademarks
Brio®, Brio Inform™, Brio Intelligence™, Brio Performance Applications™, Brio
Performance Builder™, Brio Performance Suite™, Brio Performance Platform™, Brio
Portal™, Brio Reports™, Brio Software™, Personal SQR™, and SQR™ are trademarks
or registered trademarks of Brio Software in the United States and other countries. All
other marks are the trademarks or servicemarks of Brio’s suppliers or partners and are
the property of such third parties.s.

Contents in Brief
About This Book
CHAPTER 1 Understanding Connectivity
CHAPTER 2 Data Modeling
CHAPTER 3 Using Metatopics and Metadata
CHAPTER 4 Managing the Brio Intelligence Repository
CHAPTER 5 Auditing Brio Intelligence Activities
CHAPTER 6 Scheduling Documents
CHAPTER A IBM Information Catalog
CHAPTER B Brio Intelligence Troubleshooting
Glossary
Index

iv Contents in Brief

Contents
About This BookAudience . . . . . . . . . . . . . . . . . . . . . . . . . . . . . . . . . . . . . . . . . . . . . . . . 1-ix
In This Book . . . . . . . . . . . . . . . . . . . . . . . . . . . . . . . . . . . . . . . . . . . . 1-ix
Typographic Conventions . . . . . . . . . . . . . . . . . . . . . . . . . . . . . . . . . . . 1-x
Related Documents . . . . . . . . . . . . . . . . . . . . . . . . . . . . . . . . . . . . . . . 1-xii
Help . . . . . . . . . . . . . . . . . . . . . . . . . . . . . . . . . . . . . . . . . . . . . . . . . . . 1-xii
CHAPTER 1 Understanding ConnectivityAbout Connection Files . . . . . . . . . . . . . . . . . . . . . . . . . . . . . . . . . . . . 1-2
Working with OCEs . . . . . . . . . . . . . . . . . . . . . . . . . . . . . . . . . . . . . . . 1-4Creating OCEs . . . . . . . . . . . . . . . . . . . . . . . . . . . . . . . . . . . . . . . . . 1-4Setting Connection Preferences . . . . . . . . . . . . . . . . . . . . . . . . . . . 1-5
Filtering Tables . . . . . . . . . . . . . . . . . . . . . . . . . . . . . . . . . . . 1-5Modifying Server Date Formats . . . . . . . . . . . . . . . . . . . . . 1-7
Creating an OLAP Connection File . . . . . . . . . . . . . . . . . . . . . . . . 1-8Connecting to Essbase or DB2 OLAP . . . . . . . . . . . . . . . . 1-9Connecting to an OLE DB Provider . . . . . . . . . . . . . . . . . 1-9Connecting to MetaCube . . . . . . . . . . . . . . . . . . . . . . . . . . 1-9
Modifying OCEs . . . . . . . . . . . . . . . . . . . . . . . . . . . . . . . . . . . . . . 1-11
Connecting to Databases . . . . . . . . . . . . . . . . . . . . . . . . . . . . . . . . . . 1-12Monitoring Connections . . . . . . . . . . . . . . . . . . . . . . . . . . . . . . . 1-12Connecting with a Data Model . . . . . . . . . . . . . . . . . . . . . . . . . . 1-13Connecting without a Data Model . . . . . . . . . . . . . . . . . . . . . . . 1-13Setting a Default OCE . . . . . . . . . . . . . . . . . . . . . . . . . . . . . . . . . . 1-15Automatically Logging On . . . . . . . . . . . . . . . . . . . . . . . . . . . . . . 1-16
Using the Connections Manager . . . . . . . . . . . . . . . . . . . . . . . . . . . . 1-17Logging On to a Database . . . . . . . . . . . . . . . . . . . . . . . . . . . . . . 1-17Logging Off of a Database . . . . . . . . . . . . . . . . . . . . . . . . . . . . . . 1-18Modifying an OCE Using the Connections Manager . . . . . . . . 1-18Changing Your Database Password . . . . . . . . . . . . . . . . . . . . . . . 1-19

CHAPTER 2 Data ModelingAbout Data Models . . . . . . . . . . . . . . . . . . . . . . . . . . . . . . . . . . . . . . . . 2-2
Building a Data Model . . . . . . . . . . . . . . . . . . . . . . . . . . . . . . . . . . . . . . 2-2Adding Topics to a Data Model . . . . . . . . . . . . . . . . . . . . . . . . . . . 2-2Removing Topics from a Data Model . . . . . . . . . . . . . . . . . . . . . . 2-3
Understanding Joins . . . . . . . . . . . . . . . . . . . . . . . . . . . . . . . . . . . . . . . 2-4Automatically Joining Topics . . . . . . . . . . . . . . . . . . . . . . . . . . . . . 2-5Specifying an Automatic Join Strategy . . . . . . . . . . . . . . . . . . . . . . 2-6Manually Joining Topics . . . . . . . . . . . . . . . . . . . . . . . . . . . . . . . . . 2-7Showing Icon Joins . . . . . . . . . . . . . . . . . . . . . . . . . . . . . . . . . . . . . 2-7Specifying Join Types . . . . . . . . . . . . . . . . . . . . . . . . . . . . . . . . . . . . 2-8Removing Joins . . . . . . . . . . . . . . . . . . . . . . . . . . . . . . . . . . . . . . . . 2-9Using Defined Join Paths . . . . . . . . . . . . . . . . . . . . . . . . . . . . . . . . . 2-9Using Local Joins . . . . . . . . . . . . . . . . . . . . . . . . . . . . . . . . . . . . . . 2-11
Creating Local Joins . . . . . . . . . . . . . . . . . . . . . . . . . . . . . . 2-12Using Local Joins as Limits . . . . . . . . . . . . . . . . . . . . . . . . 2-13Limitations of Local Results and Local Joins . . . . . . . . . . 2-15
Working with Topics . . . . . . . . . . . . . . . . . . . . . . . . . . . . . . . . . . . . . . 2-17Changing Topic Views . . . . . . . . . . . . . . . . . . . . . . . . . . . . . . . . . . 2-17Modifying Topic Properties . . . . . . . . . . . . . . . . . . . . . . . . . . . . . 2-19Modifying Topic Item Properties . . . . . . . . . . . . . . . . . . . . . . . . . 2-20Restricting Topic Views . . . . . . . . . . . . . . . . . . . . . . . . . . . . . . . . . 2-21
Working with Data Models . . . . . . . . . . . . . . . . . . . . . . . . . . . . . . . . . 2-22Changing Data Model Views . . . . . . . . . . . . . . . . . . . . . . . . . . . . 2-22Setting Data Model Options . . . . . . . . . . . . . . . . . . . . . . . . . . . . . 2-23
Saving Data Model Options as User Preferences . . . . . . . 2-24Data Model Options: General . . . . . . . . . . . . . . . . . . . . . . 2-26Data Model Options: Limits . . . . . . . . . . . . . . . . . . . . . . . 2-28Data Model Options: Joins . . . . . . . . . . . . . . . . . . . . . . . . 2-30Data Model Options: Topic Priority . . . . . . . . . . . . . . . . . 2-31Data Model Options: Auditing . . . . . . . . . . . . . . . . . . . . . 2-32
Automatically Processing Queries . . . . . . . . . . . . . . . . . . . . . . . . 2-33Promoting a Query to a Master Data Model . . . . . . . . . . . . . . . . 2-34Synchronizing a Data Model . . . . . . . . . . . . . . . . . . . . . . . . . . . . . 2-35
Data Model Menu Command Reference . . . . . . . . . . . . . . . . . . . . . . 2-36
vi Contents

CHAPTER 3 Using Metatopics and MetadataAbout Metatopics and Metadata . . . . . . . . . . . . . . . . . . . . . . . . . . . . . 3-2
Data Modeling with Metatopics . . . . . . . . . . . . . . . . . . . . . . . . . . . . . . 3-3Creating Metatopics . . . . . . . . . . . . . . . . . . . . . . . . . . . . . . . . . . . . 3-3Copying Topic Items to a Metatopic . . . . . . . . . . . . . . . . . . . . . . . 3-4Creating Computed Metatopic Items . . . . . . . . . . . . . . . . . . . . . . 3-5Customizing or Removing Metatopics and Metatopic Items . . . 3-6Viewing Metatopics . . . . . . . . . . . . . . . . . . . . . . . . . . . . . . . . . . . . . 3-6
MetaData in Brio Intelligence . . . . . . . . . . . . . . . . . . . . . . . . . . . . . . . 3-7
Using the Open Metadata Interpreter . . . . . . . . . . . . . . . . . . . . . . . . . 3-8Accessing the Open Metadata Interpreter . . . . . . . . . . . . . . . . . . . 3-8Configuring the Open Metadata Interpreter . . . . . . . . . . . . . . . 3-10
Metadata Definition: SQL Entry Fields . . . . . . . . . . . . . . 3-11Metadata Definition: Tables . . . . . . . . . . . . . . . . . . . . . . . 3-12Metadata Definition: Columns . . . . . . . . . . . . . . . . . . . . . 3-14Metadata Definition: Joins . . . . . . . . . . . . . . . . . . . . . . . . 3-16Metadata Definition: Lookup . . . . . . . . . . . . . . . . . . . . . . 3-18Metadata Definition: Remarks . . . . . . . . . . . . . . . . . . . . . 3-20
CHAPTER 4 Managing the Brio Intelligence RepositoryAbout the Brio Intelligence Repository . . . . . . . . . . . . . . . . . . . . . . . . 4-2
Administering a Brio Intelligence Repository . . . . . . . . . . . . . . . . . . . 4-3Creating Repository Tables . . . . . . . . . . . . . . . . . . . . . . . . . . . . . . . 4-3Confirming Repository Table Creation . . . . . . . . . . . . . . . . . . . . . 4-5Updating Repository Object Descriptions . . . . . . . . . . . . . . . . . . 4-6Deleting Repository Objects . . . . . . . . . . . . . . . . . . . . . . . . . . . . . . 4-7Administering Repository Groups . . . . . . . . . . . . . . . . . . . . . . . . . 4-8
Working with Repository Objects . . . . . . . . . . . . . . . . . . . . . . . . . . . 4-10Uploading Documents to the Repository . . . . . . . . . . . . . . . . . . 4-10Modifying Repository Objects . . . . . . . . . . . . . . . . . . . . . . . . . . . 4-12Controlling Document Versions . . . . . . . . . . . . . . . . . . . . . . . . . 4-15
CHAPTER 5 Auditing Brio Intelligence ActivitiesAbout Auditing . . . . . . . . . . . . . . . . . . . . . . . . . . . . . . . . . . . . . . . . . . . 5-2
Creating an Audit Table . . . . . . . . . . . . . . . . . . . . . . . . . . . . . . . . . . . . 5-3Defining Audit Events . . . . . . . . . . . . . . . . . . . . . . . . . . . . . . . . . . . 5-4
Auditing Keyword Variables . . . . . . . . . . . . . . . . . . . . . . . . . . . . . . . . . 5-6
Sample Audit Events . . . . . . . . . . . . . . . . . . . . . . . . . . . . . . . . . . . . . . . 5-7
Contents vii

CHAPTER 6 Scheduling DocumentsAbout Brio Broadcast Server . . . . . . . . . . . . . . . . . . . . . . . . . . . . . . . . . 6-2
Broadcast Server Features . . . . . . . . . . . . . . . . . . . . . . . . . . . . . . . . 6-2Documents, Jobs, and Scheduling . . . . . . . . . . . . . . . . . . . . . . . . . 6-2
Connecting to Job Repositories . . . . . . . . . . . . . . . . . . . . . . . . . . . . . . 6-3
Working with Jobs . . . . . . . . . . . . . . . . . . . . . . . . . . . . . . . . . . . . . . . . . 6-5Scheduling Open Documents as Jobs . . . . . . . . . . . . . . . . . . . . . . 6-5Viewing the Broadcast Server Job List . . . . . . . . . . . . . . . . . . . . . . 6-6
Adding Jobs Using the BroadCast Server Job List . . . . . . . 6-7Modifying Jobs in the Broadcast Server Job List . . . . . . . . 6-8Deleting Jobs from the Broadcast Server Job List . . . . . . . 6-8
Processing Scheduled Jobs to Database Tables . . . . . . . . . . . . . . . 6-8
Specifying Job Details . . . . . . . . . . . . . . . . . . . . . . . . . . . . . . . . . . . . . 6-10Entering General Information . . . . . . . . . . . . . . . . . . . . . . . . . . . 6-10Including Queries . . . . . . . . . . . . . . . . . . . . . . . . . . . . . . . . . . . . . 6-12Defining Actions . . . . . . . . . . . . . . . . . . . . . . . . . . . . . . . . . . . . . . 6-13
Run Cycles . . . . . . . . . . . . . . . . . . . . . . . . . . . . . . . . . . . . . . 6-14Variable Limits . . . . . . . . . . . . . . . . . . . . . . . . . . . . . . . . . . 6-16Job Actions . . . . . . . . . . . . . . . . . . . . . . . . . . . . . . . . . . . . . 6-18
Specifying Job Timing and Frequency . . . . . . . . . . . . . . . . . . . . . 6-22
Using Multiple Job Connections . . . . . . . . . . . . . . . . . . . . . . . . . . . . . 6-24
CHAPTER A IBM Information CatalogAbout the IBM Information Catalog . . . . . . . . . . . . . . . . . . . . . . . . . A-2
Registering Documents to the IBM Information Catalog . . . . . . . . A-2Defining Properties . . . . . . . . . . . . . . . . . . . . . . . . . . . . . . . . . . . . A-4Selecting Subject Areas . . . . . . . . . . . . . . . . . . . . . . . . . . . . . . . . . A-4
Administering the IBM Information Catalog . . . . . . . . . . . . . . . . . . A-5Creating Object Type Properties . . . . . . . . . . . . . . . . . . . . . . . . . A-5Deleting Object Types and Properties . . . . . . . . . . . . . . . . . . . . . A-6Administering Documents . . . . . . . . . . . . . . . . . . . . . . . . . . . . . . A-7Setting Up Object Types . . . . . . . . . . . . . . . . . . . . . . . . . . . . . . . . A-8
CHAPTER B Brio Intelligence TroubleshootingConnectivity Troubleshooting with dbgprint . . . . . . . . . . . . . . . . . . B-2
dbgprint and Brio Intelligence . . . . . . . . . . . . . . . . . . . . . . . . . . . . . . B-2
dbgprint and Broadcast Server . . . . . . . . . . . . . . . . . . . . . . . . . . . . . . B-4
dbgprint and OnDemand Server . . . . . . . . . . . . . . . . . . . . . . . . . . . . B-5
dbgprint and Insight/Quickview . . . . . . . . . . . . . . . . . . . . . . . . . . . . B-6
viii Contents

Glossary
Index
Contents -ix

-x Contents

About This Book
Welcome to the Brio Intelligence Administrator’s Guide. This book is designed to help you administer the Brio Intelligence application, part of the suite of powerful and easy-to-use business intelligence tools for query, OLAP analysis, and analytical reporting across the extended enterprise.
AudienceThe Brio Intelligence Administrator’s Guide is written for Explorer and Designer users who have access to more advanced features and who may have responsibility for implementing the Brio Intelligence application in an enterprise environment.
In This BookBrio Intelligence Administrator’s Guide Version 6.6, one of four books that explain how to use Brio Intelligence (see “Related Documents” on page xii), describes administrative features such as how to build and customize data models and how to manage the Brio Intelligence repository. It also discusses metadata definitions, database connectivity, and document scheduling.
■ Chapter 1, “Understanding Connectivity,” describes how to connect to relational and multidimensional databases using connection files, including how to set up connection files and connection preferences, and how to manage connections.
■ Chapter 2, “Data Modeling,” provides detailed information about data models, including join types and strategies, synchronization, metatopic creation and views, and data model properties and options.

■ Chapter 3, “Using Metatopics and Metadata,” explains how to use metadata definitions to link Brio Intelligence to information about your database.
■ Chapter 4, “Managing the Brio Intelligence Repository,” describes how to create and manage a Brio Intelligence repository, including how to upload documents to and open documents from a repository.
■ Chapter 5, “Auditing Brio Intelligence Activities,” explains how to use auditing features to collect information about data models downloaded from the Brio Intelligence repository, including query processing time and most often used tables and columns.
■ Chapter 6, “Scheduling Documents,” describes the Brio Broadcast Server and explains how to schedule and distribute Brio Intelligence documents using the Broadcast Server.
■ Appendix A, “IBM Information Catalog,” provides instructions for registering and managing Brio objects in the IBM Visual Warehouse Information Catalog.
■ Appendix B, “Brio Intelligence Troubleshooting,” describes how to use the dbgprint tool to diagnose Brio Intelligence connectivity problems.
In addition, a glossary and index provide definitions and easy access to information contained in the book.
Typographic ConventionsThis book uses the following type conventions:
■ Options, buttons, or tabs that you need to choose and text that you need to type are indicated in bold.
Select Typical Install. Type 1234.
■ Key names are shown in square brackets.
Press [Down Arrow]
■ Two key names joined with a plus sign (+) are consecutive keystrokes. Press and hold down the first key while pressing the second key.
Press [Ctrl+Z].
x About This Book

■ Options in a menu command path are separated with an arrow. The example indicates that you are to open the File menu and choose the Open menu item.
Choose File→Open. [Ctrl+O]
Note When an instruction includes a menu command, the toolbar icon (if one exists) for the command appears in the left margin. The keyboard shortcut (if one exists) for the command is listed in brackets at the end of the line.
■ Variables you replace with specific information are shown in italics.
sp_adduser login_id
■ Files, directories, and paths are shown in a monospace font.
Sample1.bqy is located in the BrioQuery/Samples directory.
■ A Note, Tip, or Caution is a brief side-note that deserves special attention or does not fit within the normal flow of text. These types of information are set off in the text by an icon in the margin.
Tip This is an example tip.
Caution This is an example caution.
✏
✰
!
Typographic Conventions xi
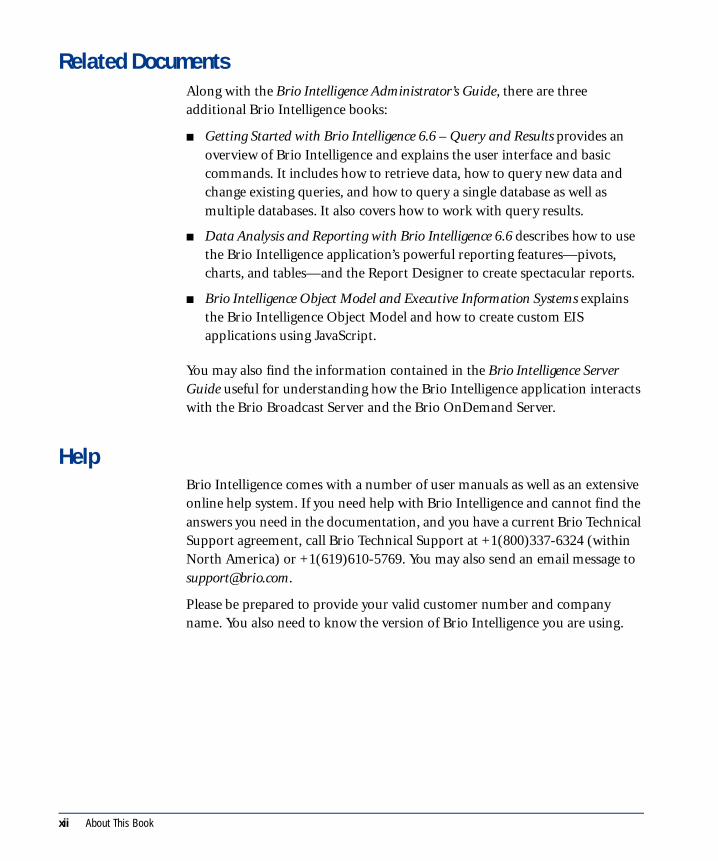
Related DocumentsAlong with the Brio Intelligence Administrator’s Guide, there are three additional Brio Intelligence books:
■ Getting Started with Brio Intelligence 6.6 – Query and Results provides an overview of Brio Intelligence and explains the user interface and basic commands. It includes how to retrieve data, how to query new data and change existing queries, and how to query a single database as well as multiple databases. It also covers how to work with query results.
■ Data Analysis and Reporting with Brio Intelligence 6.6 describes how to use the Brio Intelligence application’s powerful reporting features—pivots, charts, and tables—and the Report Designer to create spectacular reports.
■ Brio Intelligence Object Model and Executive Information Systems explains the Brio Intelligence Object Model and how to create custom EIS applications using JavaScript.
You may also find the information contained in the Brio Intelligence Server Guide useful for understanding how the Brio Intelligence application interacts with the Brio Broadcast Server and the Brio OnDemand Server.
HelpBrio Intelligence comes with a number of user manuals as well as an extensive online help system. If you need help with Brio Intelligence and cannot find the answers you need in the documentation, and you have a current Brio Technical Support agreement, call Brio Technical Support at +1(800)337-6324 (within North America) or +1(619)610-5769. You may also send an email message to [email protected].
Please be prepared to provide your valid customer number and company name. You also need to know the version of Brio Intelligence you are using.
xii About This Book

1 Understanding Connectivity
This chapter describes how to connect to relational and multidimensional databases using connection files, including how to set up connection files and connection preferences, and how to manage connections. It contains:
■ About Connection Files
■ Working with OCEs
■ Connecting to Databases
■ Using the Connections Manager
1-1

About Connection FilesConnectivity is generally one of the most difficult aspects of querying for end users to master. Client/server database applications rely on a complicated web of listeners, network addresses, and preferences that are difficult for anyone but a database administrator to troubleshoot.
Fortunately, Brio Intelligence users can sidestep these potential difficulties by using a connection file or Open Catalog Extension (OCE). Brio Intelligence uses OCEs to manage database connections and connect to data sources.
With an administrator’s assistance, OCEs enable a stable connection to be set up once and then distributed and reused. End users need only supply a database user name and password each time they log on to query a database.
OCEs retain all the information necessary to log on to a specific configuration of database and connection API software. In addition, OCEs retain DBMS-specific connection preferences as well as specifications for automatic access to metadata (see Chapter 3, “Using Metatopics and Metadata”).
OCEs store complete sets of connection parameters about:
■ Connection software
■ Database software
■ Database server hosts
■ Database user names (optional)
Note For security reasons, user passwords are not saved with OCEs.✏
1-2 Understanding Connectivity

OCEs have significant advantages in network environments with many database users. One connection can be created for each database connection in the environment and shared with each end user.
OCEs simplify the connection process for company personnel by transparently handling host and configuration information. Each user can substitute his or hew own database user name when using the OCE, which enforces security measures and privileges that are centralized at the database server.
Because passwords are not saved with OCEs, there is no danger that distribution will provide unauthorized access to any user who receives the wrong OCE or acquires it from other sources.
Note It is to your advantage to create and distribute OCEs to facilitate the logon process when storing Brio Intelligence data models in a repository.
✏
About Connection Files 1-3

Working with OCEsBrio Intelligence provides a Database Connection Wizard to help you create new OCEs. Before you create a new OCE, make sure to collect and verify the following connection information:
■ Connection API software and version (for example, Essbase, SQL*Net for Windows NT, and so on)
■ Database software and version (for example, MetaCube 4, Oracle 8, and so on)
■ IP address, database alias, or ODBC data source name for you database server
■ Database user name
Creating OCEsTo create an OCE:
1 Choose Tools→Connection→Create.
The Database Connection Wizard appears.
1-4 Understanding Connectivity

2 Specify the information requested and then save the OCE when prompted.
The Database Connection Wizard steps you through the OCE creation process and captures the connection parameters in a file that enables you to connect to a data source. Brio Intelligence saves the connection file in the default OCE directory.
See the online help for information on connection parameters.
Setting Connection PreferencesConnection preferences enable you to specify the way certain aspects of the database connection are managed. The preferences are saved with an OCE and are applied each time you use the connection.
For example, you can use connection preferences to filter extraneous tables from the Table catalog or change the way your connection software handles SQL transaction statements.
Connection preferences differ depending on your Brio Intelligence edition, connection API, and DBMS.
Connection preferences are accessed by selecting the Show Advanced Options check box in the Database Connection Wizard. The options available to you depend on your connection configuration. See the online help for information on connection preferences.
Filtering TablesFor databases with many tables, it can help to filter out tables you do not need from the Table catalog. The table filter allows you to specify filter conditions based on table name, owner name, or table type (table or virtual views).
Note The table filter works with all database server connections except ODBC. If you are working with
a Sybase or Microsoft SQL Server database, modify the connection and specify that Brio Intelligence use SQL statements to retrieve the Table catalog before filtering tables.
Typically, you filter tables when creating a connection file, although you can modify an existing connection file later to filter tables.
✏
Working with OCEs 1-5

To filter tables from the Table catalog when creating a connection file:
1 Choose Tools→Connection→Create.
The Database Connection Wizard appears.
2 Select Show Advanced Options and click Next.
3 Connect to the data source and click Next.
The dialog box varies according to the connection software you are using. In most cases, you need to specify a user name, password and host name. Click Next.
4 Click Define next to a filter check box to filter tables by table name, table owner, or table type.
The Limit:Filter Table dialog box appears.
5 Select a comparison operator from the drop-down list. Your filter constraints determine which tables are included in the Table catalog.
Complete a filter definition by doing one of the following:
■ Enter constraining values in the edit field and click the check mark.
■ Click Show Values to display a list of potential database values and select values from the list.
■ If you are comfortable writing your own SQL statements, click Custom SQL to directly code table filters that have greater flexibility and detail.
6 Click OK.
Brio Intelligence prompts you to save the filter settings. Once saved, a check mark appears in the appropriate filter check box, which you can use to toggle the filter on and off.
Note After you complete the Data Connection Wizard, verify that your filter conditions screen out the correct tables. In the Catalog pane, choose Refresh on the shortcut menu.
✏
1-6 Understanding Connectivity

Modifying Server Date FormatsBrio Intelligence uses the default formats specified by the database server when handling date, time, and timestamp values. If the server’s default formats have been changed, you can adjust preferences to ensure that Brio Intelligence interprets date/time values.
To modify server date formats:
1 Choose Tools→Connection→Create.
The Database Connection Wizard appears.
2 Select Show Advanced Options and click Next.
1 Click Server Dates.
The Server Date Formats dialog appears.
■ To Server Formats – Date and time formats submitted to the server (such as limit values for a date or time field).
■ From Server Formats – Formats Brio Intelligence expects for date/time values retrieved from the server.
The default values displayed in the To and From areas are usually identical.
2 If the server defaults have changed, select the date, time, and timestamp formats that match the new server defaults from the To and From format drop-down lists.
If desired, click Default to restore all values to the server defaults stored in the connection file.
Working with OCEs 1-7

3 If you cannot find a format that matches the database format, click Custom.
The Custom Format dialog appears.
4 Select a data type from the Type drop-down list.
5 Select a format from the Format drop-down list or type a custom format in the Format field.
6 Click OK.
The new format appears as a menu choice in the Server Date Formats dialog box.
Creating an OLAP Connection FileTo create an OLAP connection file:
1 Choose Tools→Connection→Create.
The Database Connection Wizard appears.
2 Select the connection software you want to use to connect to the OLAP database server from the drop-down list.
3 Select the OLAP database server you want to use from the drop-down list and click Next.
Depending on the database you select in this field, you may have to specify a password to connect to the database. Enter your name, password, and host address information.
The sequence of dialog boxes that appear depend on the multidimensional database server to which you are connecting. The following sections provide connection information for these multidimensional databases:
■ Connecting to Essbase or DB2 OLAP
■ Connecting to an OLE DB Provider
■ Connecting to MetaCube
1-8 Understanding Connectivity

Connecting to Essbase or DB2 OLAPTo connect to an Essbase or a DB2 OLAP database:
1 Follow the instructions for “Creating an OLAP Connection File” on page 1-8.
2 Select the application/database name to which you want to connect and click Next.
This is the cube from which you want to retrieve values.
3 Select the measures dimension for the cube in the Dimension Name field and click Next.
This is the specific measure group from which you want to retrieve values.
4 Click Finish to save your connection file.
Connecting to an OLE DB ProviderTo connect to an OLE DB provider:
1 Follow the instructions in “Creating an OLAP Connection File” on page 1-8.
2 Select the database to which you want to connect.
3 If your OLE DB for OLAP database provides the ability to retrieve dimension properties and you want to work with them, click Enable Retrieval Of Dimension Properties and click Next.
4 Select the name of the Provider from the drop-down list and click Next.
For more information about the remaining dialogs, consult your database provider’s documentation.
Connecting to MetaCubeTo connect to a MetaCube database:
1 Follow the instructions in “Creating an OLAP Connection File” on page 1-8.
■ For MetaCube 3.x, the host name is the MetaCube configuration name.
■ For MetaCube 4.x, the host name is the ODBC data source name of the MetaCube back-end relational store. If you are using MetaCube 4.0.2, it is strongly recommended that you upgrade to at least MetaCube 4.1.
Working with OCEs 1-9

2 Enter the DSS system name and click Next.
This is the server on which the DSS system resides. The DSS system is a representation of the data warehouse, which parallels that of a selected business.
3 Select the name of the Fact table.
The Fact table stores measure data for reporting and tracking.
4 Enter the name of the Public Filters folder and click Next.
This is the name of the Public Filters folder for MetaCube filters.
Note Brio Intelligence supports only a single Public Filter Folder.
5 Click Finish to save your connection file.
Note The metalib.dll file must be in the same directory as brioquery.exe or no connection
will be made. The Brio Intelligence installation program automatically copies the metalib.dll to the same directory as the brioquery.exe. If you delete or move the metalib.dll, you must place another copy in the same directory that holds the
brioquery.exe before you can connect to MetaCube.
✏
✏
1-10 Understanding Connectivity

Modifying OCEsWhen you create an OCE, you establish a working database connection for data modeling and querying. You may need to modify an OCE to reflect changes in your network or hardware configuration, or to manage other connection information.
Note Changes to basic connection configuration, such as new database or host name, require you
to log off and rebuild the OCE.
To modify an OCE:
1 Close any open Brio Intelligence documents.
2 Choose Tools→Connection→Modify.
The Modify Connection dialog box appears.
3 Select the connection file you want to modify and click Open.
The Database Connection Wizard appears and displays the information for the OCE you selected.
4 Make any desired changes and then save the OCE when prompted.
✏
Working with OCEs 1-11
Connecting to DatabasesIn Brio Intelligence, you use an OCE whenever you perform tasks that require you to connect to a database, such as:
■ Downloading a data model
■ Processing a query to retrieve a data set
■ Showing values for a server limit
■ Using server functions to create computed items
■ Scheduling a document
The way you choose an OCE depends on which edition of Brio Intelligence you are using and the data model or document with which you are working.
If a data model is present in the Query section workspace, Brio Intelligence automatically prompts you with the correct OCE when your actions require a database connection.
When you open Brio Intelligence to begin a work session (for example, by downloading a data model from a Brio Intelligence repository, or creating a data model from scratch) you must select the correct OCE for the targeted database.
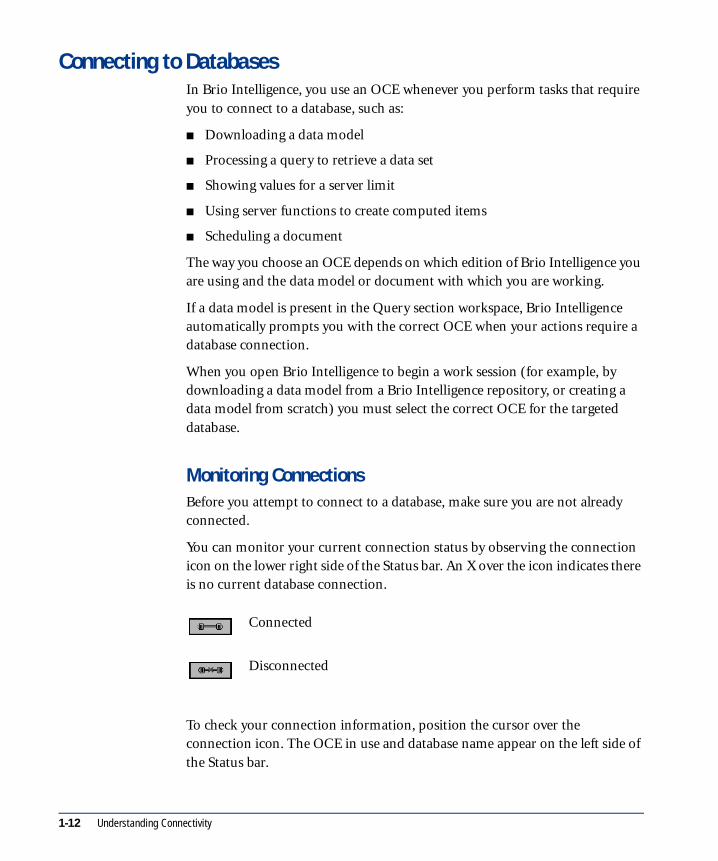
Monitoring ConnectionsBefore you attempt to connect to a database, make sure you are not already connected.
You can monitor your current connection status by observing the connection icon on the lower right side of the Status bar. An X over the icon indicates there is no current database connection.
To check your connection information, position the cursor over the connection icon. The OCE in use and database name appear on the left side of the Status bar.
Connected
Disconnected
1-12 Understanding Connectivity
Connecting with a Data ModelOnce a data model is downloaded to or created in your Brio Intelligence document, the document is associated with the OCE used to create the data model. Brio Intelligence documents store a reference that calls the associated OCE whenever you need to log on to the database to build or process a query.
To log on to a database from an existing document:
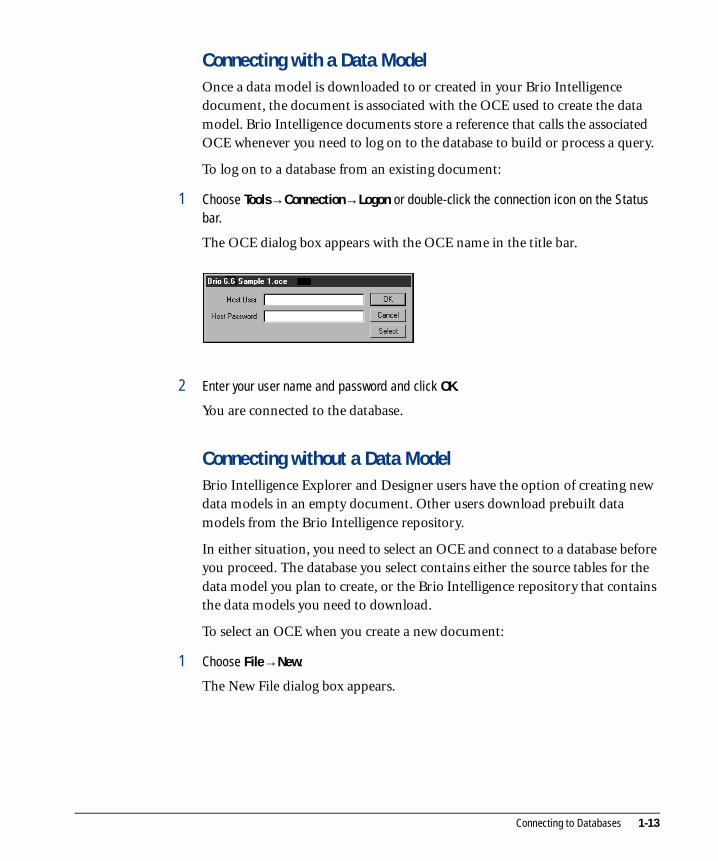
1 Choose Tools→Connection→Logon or double-click the connection icon on the Status bar.
The OCE dialog box appears with the OCE name in the title bar.
2 Enter your user name and password and click OK.
You are connected to the database.
Connecting without a Data ModelBrio Intelligence Explorer and Designer users have the option of creating new data models in an empty document. Other users download prebuilt data models from the Brio Intelligence repository.
In either situation, you need to select an OCE and connect to a database before you proceed. The database you select contains either the source tables for the data model you plan to create, or the Brio Intelligence repository that contains the data models you need to download.
To select an OCE when you create a new document:
1 Choose File→New.
The New File dialog box appears.
Connecting to Databases 1-13
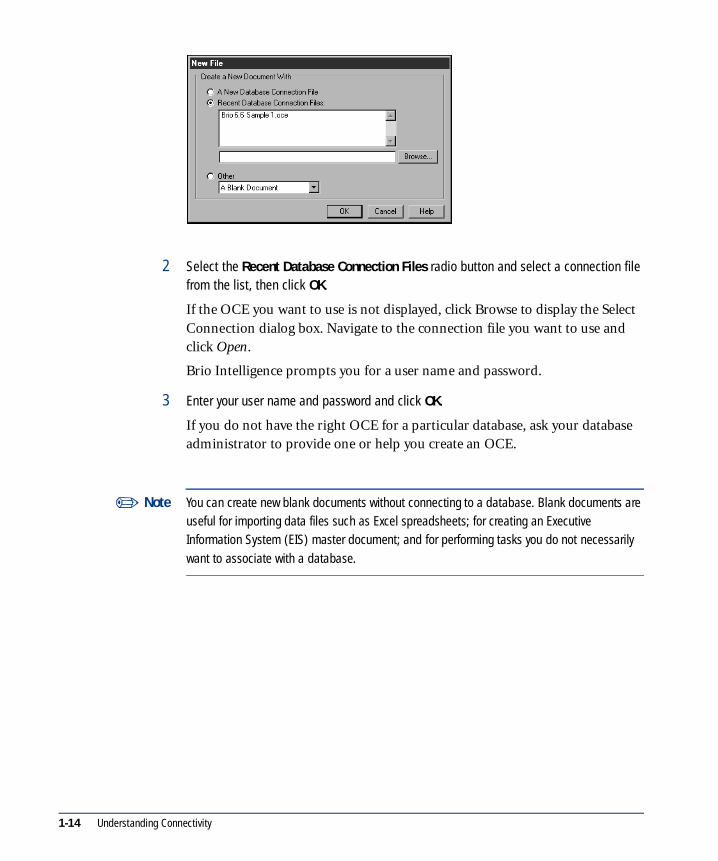
2 Select the Recent Database Connection Files radio button and select a connection file from the list, then click OK.
If the OCE you want to use is not displayed, click Browse to display the Select Connection dialog box. Navigate to the connection file you want to use and click Open.
Brio Intelligence prompts you for a user name and password.
3 Enter your user name and password and click OK.
If you do not have the right OCE for a particular database, ask your database administrator to provide one or help you create an OCE.
Note You can create new blank documents without connecting to a database. Blank documents are useful for importing data files such as Excel spreadsheets; for creating an Executive Information System (EIS) master document; and for performing tasks you do not necessarily
want to associate with a database.
✏
1-14 Understanding Connectivity

Setting a Default OCEIf you log on to one database more frequently than others, you should set the OCE for that particular database as your default connection. Whenever you log on to create a new data model, the default OCE will load automatically.
If you frequently use different databases in your work, you may not want to set a default OCE. If you leave the default OCE preference blank, Brio Intelligence will prompt you to select an OCE each time you log on.
To set a default OCE:
1 Choose Tools→Options→Program Options.
The Brio Intelligence Options dialog appears (see Getting Started with Brio Intelligence 6.6 for more information).
2 Click the File Locations tab to display the File Locations page.
3 Under Connections Directory, enter the default connection directory that contains the OCE files you use to connect to different databases and click OK.
4 Under Default Connection, enter the full path and file name of the OCE you want to use as your default connection.
The next time you log on (and create a new document), the default connection is automatically used.
Be sure to store your default OCE in your connections directory so that Brio Intelligence can find them when you or users of your distributed documents attempt to log on.
Connecting to Databases 1-15

Automatically Logging On Brio Intelligence provides an Auto Logon feature that maintains the current database connection when you create a new document. Auto Logon is enabled by default.
To toggle Auto Logon:
1 Choose Tools→Options→Program Options.
The Brio Intelligence Options dialog appears (see Getting Started with Brio Intelligence 6.6 for more information).
2 Click the General tab to display the General page.
3 Select the Auto Logon check box and click OK.
To use Auto Logon when creating a new document:
1 Check the connection icon on the Status bar to verify that Brio Intelligence is connected to the database.
2 Choose File→New.
The Auto Logon dialog box appears.
3 Click Yes to accept the existing connection.
Brio Intelligence opens the new document and if Auto Logon was accepted, automatically connects to the database server. Otherwise, you can choose a different OCE.
1-16 Understanding Connectivity
Using the Connections Manager 1-17
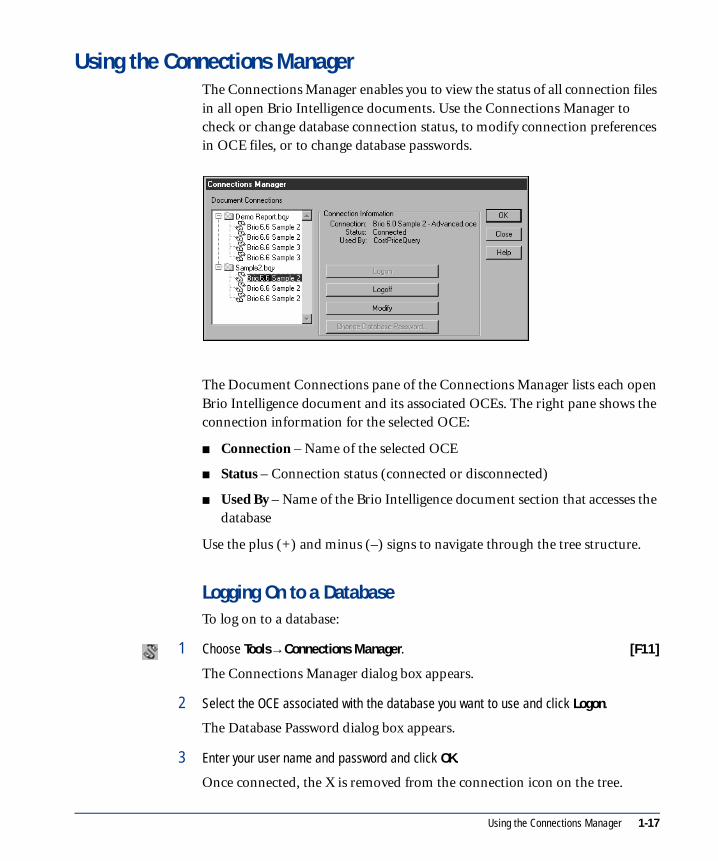
Using the Connections ManagerThe Connections Manager enables you to view the status of all connection files in all open Brio Intelligence documents. Use the Connections Manager to check or change database connection status, to modify connection preferences in OCE files, or to change database passwords.
The Document Connections pane of the Connections Manager lists each open Brio Intelligence document and its associated OCEs. The right pane shows the connection information for the selected OCE:
■ Connection – Name of the selected OCE
■ Status – Connection status (connected or disconnected)
■ Used By – Name of the Brio Intelligence document section that accesses the database
Use the plus (+) and minus (–) signs to navigate through the tree structure.
Logging On to a DatabaseTo log on to a database:
1 Choose Tools→Connections Manager. [F11]
The Connections Manager dialog box appears.
2 Select the OCE associated with the database you want to use and click Logon.
The Database Password dialog box appears.
3 Enter your user name and password and click OK.
Once connected, the X is removed from the connection icon on the tree.

Logging Off of a DatabaseTo log off of a database:
1 Choose Tools→Connections Manager. [F11]
The Connections Manager dialog box appears.
2 Select the OCE associated with the database you want to log off of and click Logoff.
Modifying an OCE Using the Connections ManagerYou can use the Connections Manager to change your connection file preferences, depending on your database and connection software.
Note If you are not familiar with the preferences and their effects, ask your administrator for assistance before changing the default settings.
To modify an OCE:
1 Choose Tools→Connections Manager. [F11]
The Connections Manager dialog box appears.
2 Select the connection file that you want to modify and click Modify.
The Database Connection Wizard appears and displays the information for the OCE you selected.
3 Make any desired changes and then save the OCE when prompted.
✏
1-18 Understanding Connectivity
Changing Your Database PasswordYou can change your database password if you are connected to any of these database servers: Essbase, Oracle, Red Brick Warehouse, Microsoft SQL Server, or Sybase.
To change your password:
1 Choose Tools→Connections Manager. [F11]
The Connections Manager dialog box appears.
2 Select the connection file associated with the database whose passwords you want to change and click Change Database Password.
3 Type the requested information and click OK.
Note Some database servers support case-sensitive passwords and/or require a minimum password length. For more information, see the documentation for your database server.
✏
Using the Connections Manager 1-19

1-20 Understanding Connectivity

2 Data Modeling
This chapter describes how to create Brio Intelligence data models from your server’s database tables. It provides detailed information on joins, topics, and views, and data model properties and options. It contains:
■ About Data Models
■ Building a Data Model
■ Understanding Joins
■ Working with Data Models
■ Data Model Menu Command Reference
2-1

2-2 Data Modeling
About Data ModelsWhen you use Brio Intelligence to query a relational database and retrieve information, you work with a data model: a representation of a portion of the actual database.
Explorer and Designer users can create data models, selectively viewing and packaging the contents of a database for querying or distribution. Distributed or shared data models are beneficial for several reasons:
■ They allow users to concentrate on the information, rather than the data retrieval.
■ They are customized for users’ needs. Some kinds of data models include prebuilt queries that are ready to process, and may even include reports that are formatted and ready to use. Other data models may automatically deliver data to a user’s computer.
■ They are standardized and up-to-date. A data model stored in a Brio Intelligence repository can be used throughout your company and is easily updated by the database administrator to reflect changes in the database structure.
Building a Data ModelData models are the building blocks of queries. In a data model, database tables are represented by topics. A topic is a list of items, each corresponding to a column in the database tables.
Adding Topics to a Data ModelYou create data models by choosing database tables from the Table catalog and assembling them as topics in the Brio Intelligence Content pane. The Table catalog is a listing of the tables available in your database. Once connected to a database, you can display the Table catalog and drag the topics you want to include in the data model to the Content pane.
To add a topic to a data model:
1 In the Query section, choose DataModel→Table Catalog. [F9]
If you are not connected to the database, Brio Intelligence prompts you to log on. Once connected, the Table catalog appears and lists the available database tables.
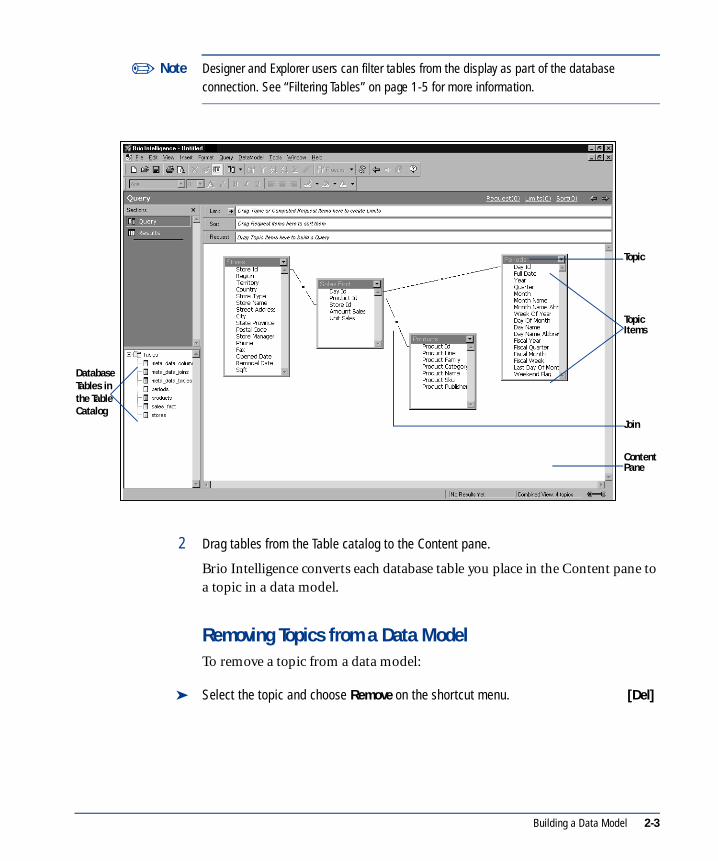
Note Designer and Explorer users can filter tables from the display as part of the database connection. See “Filtering Tables” on page 1-5 for more information.
2 Drag tables from the Table catalog to the Content pane.
Brio Intelligence converts each database table you place in the Content pane to a topic in a data model.
Removing Topics from a Data ModelTo remove a topic from a data model:
➤ Select the topic and choose Remove on the shortcut menu. [Del]
✏
DatabaseTables in the Table Catalog
Topic
TopicItems
Join
ContentPane
Building a Data Model 2-3

Understanding JoinsTables in relational databases share information through conceptual links, or joins, between related columns in different tables. Brio Intelligence displays these relationships in your data model through visual join lines between topic items.
Joins enable you to connect or link records in two tables by way of a shared data field. Once a data field is shared, other data contained in the joined tables can be accessed. In this way, each record can share data with another record, but does not store and duplicate the same kind of information.
Brio Intelligence can automatically create joins for you, or you can manually join topics.
Simple Join between Identical Item ID Fields in Two Topics
Manually Created Join between Two Related Data Items in Two Topics
2-4 Data Modeling

Automatically Joining TopicsThe Auto Join Tables option enables Brio Intelligence to automatically join database tables as they are added to the Content pane using one of three different join strategies. If Auto Join Tables is not selected, you can manually create joins between topics in the Content pane.
To automatically join topics as they are added to the Content pane:
1 Choose DataModel→Data Model Options.
The Data Model Options dialog box appears.
2 Click the General tab.
3 Select the Auto Join Tables check box and then click OK.
When you add tables from the Table catalog to the Content pane, joins automatically appear between topics.
Clear the Auto Join Tables check box to turn off this feature and manually create joins yourself.
Note JJoins are not added for topics that are in the Content pane before you select the Auto Join Tables option.
✏
Understanding Joins 2-5

Specifying an Automatic Join StrategyYou can instruct Brio Intelligence to use one of three different strategies when automatically joining topics. The strategy chosen is employed with a particular connection and saved with the OCE.
To choose an automatic join strategy for a database connection:
1 If you are not currently connected to the database, select an OCE and log on.
2 Choose Tools→Connections→Modify.
The Meta Connection Wizard appears with the On The Current Connection option selected.
Note For information on metatopics and metadata, see Chapter 3, “Using Metatopics and
Metadata.”
3 Click Next.
The Meta Connection Wizard displays the repository where your meta settings are stored.
4 Click Edit.
The Metadata Definition dialog box appears.
5 Click the Joins tab.
✏
2-6 Data Modeling

6 Select a join strategy. Join strategy options are:
■ Best Guess – Joins topics through two items that share the same name and data type.
■ Custom – Joins topics according to specified schema coded in SQL in the Metadata Join Definitions area.
■ Server-Defined – Joins topics based on primary and foreign keys established in the underlying relational database.
7 When you have completed your selection, click OK.
Manually Joining TopicsYou can create relationships between topics by manually joining topic items in the Content pane.
To manually join two topics:
A join line appears, connecting the items in the different topics.
Showing Icon JoinsWhen a topic is iconized, you can toggle the display of joins to other topics in the Content pane.
To show icon joins:
1 Choose DataModel→Data Model Options.
The Data Model Options dialog box appears.
2 Click the General tab to display the General page.
3 Select the Show Icon Joins check box and click OK.
Clear the Show Icon Joins check box to turn off this feature and hide joins of iconized topics.
➤ Select a topic item, drag it over a topic item in another topic, and release.
Understanding Joins 2-7

Specifying Join TypesJoin types determine how data is retrieved from a database.
To specify a join type:
1 Select a join line and choose View→Properties.
The Join Properties dialog box appears.
2 Select a join type and click OK.
Brio Intelligence supports four types of joins:
■ Simple – A simple (linear) join retrieves the records in both tables that have an identical data in the joined columns.
You can change the default join setting for simple joins by choosing an operator from the drop-down list. The default setting, Equal, is preferred in most situations.
■ Left – A left join retrieves all rows from the topic on the left and any rows from the topic on the right that have matching values in the join column.
■ Right – A right join retrieves all rows from the topic on the right and any rows from the topic on the left that have matching values in the join column.
■ Outer – An outer join retrieves all rows from both tables matching joined column values, if found, or retrieves nulls for non-matching values.
Note A fifth join type, Limit Local Join, is available for use with local Results sets. See “Using Local
Joins as Limits” on page 2-13 for more information.✏
2-8 Data Modeling

Caution Not all database servers support all join types. If a join type is not available for the database to which you are connected, it is unavailable for selection in the Join Properties dialog box.
Removing JoinsYou can remove unwanted joins from your data model. Removing a join has no effect on the underlying database tables or any server-defined joins between them. A deleted join is removed from consideration only within the data model.
To remove a join from a data model:
Select the join and choose Remove on the shortcut menu. [Del]
Brio Intelligence deletes the join from the data model.
Using Defined Join PathsDefined Join Paths are customized join preferences that enable Brio Intelligence to include or exclude appropriate tables based on the items referenced on the Request and Limit lines. “Bridge tables,” which are not explicitly referenced in the query, are transparently added to the SQL From clause. The net effect limits the query to all referenced tables based on available table groupings, which generate the most efficient SQL for queries off the data model.
To use defined join paths:
1 Choose DataModel→Data Model Options.
The Data Model Options dialog box appears.
2 Click the Joins tab to display the Joins page.
!
Understanding Joins 2-9

3 Select the Use Defined Join Paths option and click Configure.
The Define Join Paths dialog box appears.
4 In the Define Join Paths dialog box, click New Join Path to name and add a join path.
The New Join Path dialog box appears.
2-10 Data Modeling
5 In the New Join Path dialog box, enter a descriptive name for the join path and click OK.
The join path name is highlighted in the Defined Join Paths box.
6 Select a topic in the Available topics list and use the button to move it to the Topics In Join Path list.
7 Use the button to remove join paths from the Topics In Join Path list.
8 When join paths are completely defined for the data model, click OK.
Tip Join paths are not additive; Brio Intelligence cannot determine which tables are common among several paths and link them on that basis. Join paths are not linear, and if selected, the simplest join between all tables in the path is included when processing a query.
Using Local JoinsYou can add the results of one query to the results of another query in a Brio Intelligence document. Brio Intelligence joins rows from your data sources in the Results section.
For example, you might want to see budget figures drawn from MS SQL server and sales figure drawn from an Oracle database combined in one Results set.
Note No aggregation can be applied to local result tables and the local results data set cannot be processed to a table.
Insight users need to have a blank OCE file on the OnDemandServer to work with local joins.
Caution Local joins are memory and CPU intensive operations. When using this feature, please limit the local joins by using a moderate number of rows.
✰
✏
!
Understanding Joins 2-11
Creating Local JoinsTo create a local join:
1 Choose Insert→Insert New Query to create the first query that you want to include in your document:
a. Verify item data types and associated data values in source documents so you will know how to join them in the document.
b. Build the Request line, and add server and local limits, data functions, and computations to the query as needed.
c. Process the query, which will fill the Results section.
Tip For consistent results, queries that use local joins should be placed after queries that generate the needed results.
2 Choose Insert→Insert New Query to create your second query.
Add topics from the Table catalog to the Content pane, and build the Request line.
3 In the Table catalog, choose Local Results on the shortcut menu.
4 In the Table catalog of the second query, choose Local Results on the shortcut menu.
A Local Results icon appears in the Catalog pane.
5 Expand the Local Results icon to display the Results table icon .
6 Double-click a Results set or drag it to the Content pane.
The Results set from the first query that you built appears as a topic in the Content pane.
7 In the Content pane, manually create a join between the Results set and another topic.
8 Build the Request line and click Process.
Local joins are processed on your client machine.
✰
2-12 Data Modeling

Note You can use Process All to process the queries, in which case the queries are processed in the order in which they appear in the Section catalog. For example, in a document with three queries, Query1, Query2, and Query3, the queries are executed in the order shown.
In the above example, if Query1 is a local join of the results of Query2 and Query3, it will still be processed first. If Query2 and Query3 have existing Results sets, then the local join in Query1 will occur first, before processing Query2 or Query3. If the Results sets for either
Query2 or Query3 are not available, then one or both of those queries will be processed first, in order to get the required results.
Using Local Joins as LimitsA limit local join is a variation of a local join. Instead of independently running two queries then locally joining the data on the desktop, a limit local join runs the first query to retrieve a list of values, then uses those values to limit a column in the second query.
For example, a query may be run from an inventory table in an Oracle database to retrieve a list of part numbers that are out of stock. The resulting part number list may be used as a limit join to define the list of values retrieved from a work_in_process table in another database to determine the status of the stock replenishment.
Note The second query could potentially be a very long SQL statement since using limit local joins generates an SQL Having clause for each item.
To use the values retrieved from one query as limit values for another query:
1 Build the first query you want to include as a limit in your second query:
a. Verify item data types and associated data values in source documents so you will know how to join them in the second query.
b. Build the Request line, and add server limits, data functions and computations to the query as needed.
c. Click Process.
2 Choose Insert→Insert New Query.
✏
✏
Understanding Joins 2-13

3 Build the second query.
a. Verify item data types and associated data values in source documents so you will know how to join them to the first query.
b. Build the Request line, and add server and local limits, data functions, and computations to the query as needed.
4 In the Table catalog of the second query, choose Local Results on the shortcut menu.
A Local Results icon appears in the Catalog pane.
5 Expand the Local Results icon to display the Results table icon .
6 Double-click the Results icon or drag it to the Content pane.
The Results set from the first query that you built appears as a topic in the Content pane.
Note The purpose of embedding the Results is to obtain a list of values. Do not include and Results
set topic items on the Request line. Also, do not place any limits on topic items in this Results set. must not include any fields from the embedded Results section. If you do add a topic item from or set a limit on this Results set, you will not be able to set a Limit Local join.
7 In the Content pane, manually join the Results set to a another topic in the second query.
A join line appears, connecting the different topics.
8 Double-click the join line that was created by joining the Results set and other topic.
The Join Properties dialog box appears.
9 Select Limit Local Join and click OK.
Note If the Limit Local Join option does not appear in the Join Properties dialog box, make sure that
no Results set topic items are included in the Request line and that no limits have been placed on any Results set topic item.
10 Click Process to build the query and apply the limit constraint.
✏
✏
2-14 Data Modeling

Limitations of Local Results and Local JoinsThe following limitations apply to local results and local joins in Brio Intelligence.
1. You cannot use any governors with local results topics as part of your query. The following are governors accessed from the Query Options dialog box:
❑ Returning Unique Rows
❑ Row limit
❑ Time limit
❑ Auto-Process
❑ Custom Group by
2. You cannot have more than one local join per local results topic. When setting up a query using a local results topic, you cannot have more than one local join between the local results topic and another topic/local results topic.
3. You cannot set query limits on local results topic items. Limits must be set in the query/result sections of the query that produces the local results. Attempting to set a query limit on a local results topic Item invokes the following error message: “Unable to retrieve value list for a computed or aggregate request item”.
4. You cannot aggregate local results tables.
5. You cannot process local results data to a table.
6. You cannot have more than one limit local join. A limit local join involves two topics, one of which is a local results topics. A local results item is used as a limit to the other topic. Attempting to define more than one limit local join invokes the following error message: “This query contains a local results object involved in a join limit. It is not possible to have other local results objects when you have a local join limit”.
7. You cannot combine limit local joins with local joins. Attempting to combine a limit local join and local join invokes the following error message: “This query contains a local results object involved in a join limit. It is not possible to have other local results objects when you have a local join limit”.
Understanding Joins 2-15

8. You should expect compromised performance when a query is associated with large local results sets. This is expected behavior since Brio Intelligence is not a database.
9. You cannot use metatopics with local results. You cannot promote a local results topic to a metatopic or add a local results topic item as a metatopic item. The Promote To Meta Topic and Add Meta Topic Item DataModel menu options are not available for local results topics and topic items.
10.You cannot access or change properties for local results topic items. Properties include remarks, number formatting, aggregate/date/string functions, data types, and name.
11.You cannot have query request line computed columns from local results topic items. The Add Computed Item menu option is not available for local results topic items.
12.You cannot use Append Query features of unions or intersections with local results topic items. The Append Query menu option is not available when a local result topic is part of a query.
2-16 Data Modeling

Working with TopicsBrio Intelligence offers several features that allow you to customize the appearance of topics to make them easier for end users to work with. Working with topics involves:
■ Changing Topic Views
■ Modifying Topic Properties
■ Modifying Topic Item Properties
■ Restricting Topic Views
Changing Topic ViewsYou can change how you view topics in the Content pane. There are three ways to view topics:
■ Structure view – displays a topic as a simple list of component data items. This is the default setting.
Structure view allows you to see and quickly select individual data items to include in a query. This is the easiest view to use if you are familiar with the information that a data model, topics, and topic items represent.
F igu re 2 -1 Structure, Detail, and Icon Topic Views
Detail View
Icon View
Structure View (default)
Working with Topics 2-17

■ Detail View – Presents a topic in actual database view with a sample of the underlying data. When you change to Detail view, Brio Intelligence runs a small query and loads a selection of data from the database server. The topic appears as a database table with each topic item displayed as a database column field.
Detail view is useful when you are unfamiliar with a topic. You can browse the first few rows of data to see exactly what is available before adding a topic item to the query.
Note Detail view is not available for special items such as metatopics or computed data items.
■ Icon View – Deactivates a topic and reduces it to an icon in the Content pane. When a topic appears in Icon view, associated items are removed from the Request and Limit lines. The topic is not recognized as being joined to other topics, and is temporarily removed from the data model and the Brio Intelligence SQL statement.
If no items from a topic are needed for a particular query and the topic does not link together other topics which are in use, reduce the topic temporarily to Icon view to make large queries run faster and to consume fewer database resources.
To change a topic view:
1 Select a topic in the Content pane.
2 Choose DataModel→Topic View→View.
The topic is displayed in the chosen view.
In Icon view, you can restore the topic view by double-clicking the topic icon.
Note If you cannot switch views within a data model, this feature is not available. For information on
managing user access to Icon and Detail view, see the Brio Intelligence 6.6 Administrator’s Guide.
✏
✏
2-18 Data Modeling

Modifying Topic PropertiesUse the Topic Properties dialog box to customize the way a topic and associated items are displayed in the data model. By default, Brio Intelligence displays items in the order in which they are defined in the underlying table, or the order in which they are added to a metatopic. You can change the way items are ordered or restrict the display of items within a topic.
To modify topic properties:
1 In the Catalog pane, select the topic and choose View→Properties.
The Topic Properties dialog box appears.
2 Change the properties to the desired setting and click OK.
Available options include:
■ Topic Name – The name of the topic that appears in the catalog pane. You can change this field to display a more user-friendly name in the Content pane.
■ Physical Name – Full name of the underlying database table.
■ Items To Display – The topic items available for the selected topic.
❑ Hide/Show All – Hides or actively displays all topic items.
❑ Up/Down – Moves selected item up or down one space in the topic display.
❑ Sort – Alphabetically sorts listed items.
Working with Topics 2-19
■ Set As Dimension – Defines the drill-down path or hierarchy for dimensional analysis as shown in the data model. This feature is used in conjunction with the Set As Fact field in the Topic Item Properties dialog box.
■ Allow Icon View – Enables the Icon view option for the topic
■ Allow Detail View – Enables the Detail view option for the topic.
■ Cause Reload – Specifies automatic reloading of server values the next time Detail View is activated.
■ Rows to Load – Specifies the number of rows to be loaded and displayed in Detail View.
Modifying Topic Item PropertiesTopic items are discrete informational attributes of topics, such as Customer ID, Street Address, or Sales Revenue, and are the basic building blocks of a query. Topic items are organized within topics and represent the columns of data in database tables.
You can modify the names of topic items to make them easier for users to understand and set drill-down path information.
To modify a topic item:
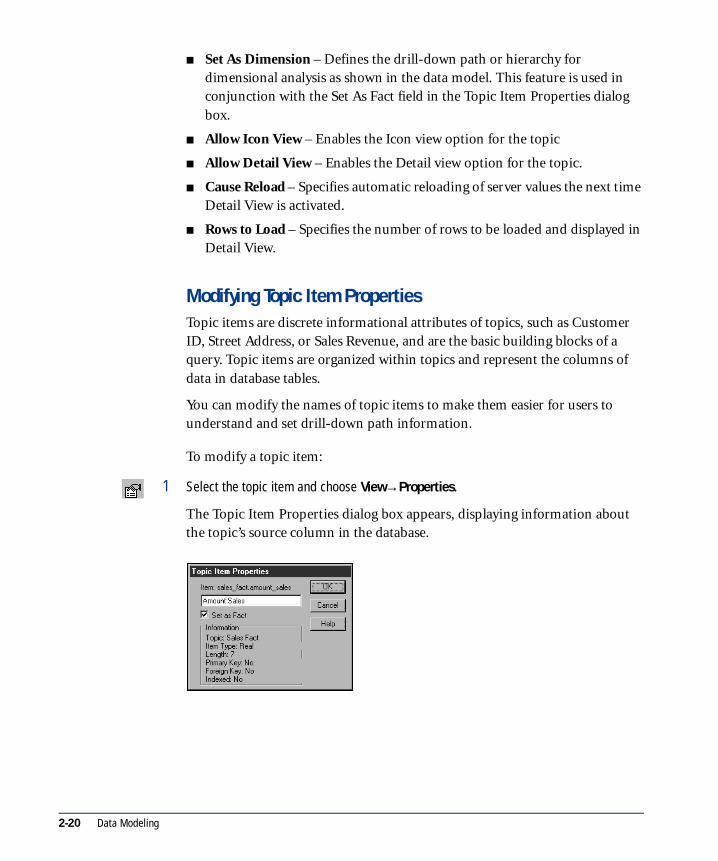
1 Select the topic item and choose View→Properties.
The Topic Item Properties dialog box appears, displaying information about the topic’s source column in the database.
2-20 Data Modeling

2 Change the topic item properties to the desired setting and click OK.
Available options include:
■ Item Name – Displays the name of the item.
■ Set As Fact – Eliminates items with integer or real values from a drill-down path. This feature is used in conjunction with the Set As Dimension field in the Topic Properties dialog box.
■ Information – Additional column information from the database. Information about keys appears only when server-defined joins are enabled.
Restricting Topic ViewsIndividual topics within a data model can be restricted to control the availability of the Icon view and Detail view, or to limit the number of rows retrieved (which can consume network and server resources) for Detail view.
To set access to Icon or Detail views:
1 Double-click a topic to be view-restricted.
The Topic Properties dialog box appears, with the view options displayed toward the bottom of the dialog. The dialog also contains options for customizing topics.
2 Click the Allow Icon View or Allow Detail View check boxes to toggle the availability of either view.
3 If necessary, click Cause Reload to specify loading from the server when Detail View is selected.
Brio Intelligence will retrieve new data the next time Detail View is activated for the topic, after which Cause Reload will be toggled off automatically.
4 If desired in Detail View, enter the number of rows to be returned from the server for Detail View, and click OK.
By default Brio Intelligence retrieves the first ten rows of a table for preview in Detail View.
Working with Topics 2-21
Working with Data ModelsBrio Intelligence offers a number of ways for you to customize data models. You can change how data models appear in the Content pane. You also can define other data model options, such as user access, feature availability, and query governors. Review the following sections for information on:
■ Changing Data Model Views
■ Setting Data Model Options
■ Automatically Processing Queries
■ Promoting a Query to a Master Data Model
■ Synchronizing a Data Model
Changing Data Model ViewsThere are a number of ways to view a data model. By default, Brio Intelligence displays database-derived source topics and any metatopics you have created together in the Content pane in Combined view.
To change the data model view:
Options include:
■ Combined – Displays both original (database-derived) and metatopics in the Content pane.
■ Original – Displays only database-derived topics in the Content pane.
■ Meta – Displays only metatopics in the Content pane.
Caution If an original topic contains items that have been copied to a metatopic, do not iconize or remove the original topic from the Content pane in Combined view. Metatopic items are based on original items and remain linked to them. If an original topic is iconized or removed, any metatopic items based on its contents become inaccessible.
➤ Choose DataModel→Data Model View→Option.
!
2-22 Data Modeling
Setting Data Model OptionsTo set data model options:
1 Choose DataModel→Data Model Options.
The Data Model Options dialog box appears.
2 Set the desired options for the data model and click OK.
Note Explorers have access to the join preferences, but not to the limit, query governor, or auditing features, which are designed to customize data models stored for distribution in the Brio
Intelligence repository.
Before applying any new features, be aware that:
■ Designers must allow one of the first three limit options (Show Values, Custom Values, or Custom SQL) to enable users to apply limits in the Query section.
■ Changing join usage usually changes the number of rows retrieved from the database. It also introduces the possibility that novice users may create improperly joined queries.
■ If Designers set query governors as part of a data model, and end users set query governors on a query built from the data model, the more restrictive governor takes precedence.
✏
Working with Data Models 2-23

Saving Data Model Options as User PreferencesYou can save the data model options you specify as default user preferences by clicking the Save as Defaults button on any of the tabs in the Data Model options dialog box.
To change the defaults without affecting any existing data models (including the current one):
To change the defaults and apply them to the current data model:
➤ Click Save as Defaults and then click Cancel.
➤ Click Save as Defaults and then click OK.
Click Save as Defaults to save data model options as default user preferences.
2-24 Data Modeling

Note The following data model options apply to the current data model only and cannot be saved as defaults:
■ Topic Priority information (see “Data Model Options: Topic Priority” on page 2-31)
■ The Use Defined Join Paths option on the General tab (see “Data Model Options: General” on page 2-26)
■ The enabled/disabled state of specific audit events (see “Data Model Options: Auditing”
on page 2-32)
Tip When you save data model options as default user preferences and apply them to a data model, you can save the document for use as a profile. Over time, you can build a set of profile documents. By opening a profile document and saving the options from the profile document’s data model as defaults, users can switch between proven data model options appropriate to the task at hand.
A first time profile document, created from a blank data model before saving any changes to the default settings, can be used to restore the data model options to the Brio client programmatic defaults. A more complete profile document, appropriately populated with topics, can be used to promulgate data model options for the “Use Defined Join Path” feature.
✏
✰
Working with Data Models 2-25

Data Model Options: GeneralUse the General page to select design options for your tables and the governors for the data model.
■ Design Options
❑ Auto Alias Tables – Allows Brio Intelligence to replace underscores with spaces and display item names in mixed upper/lower case when a table is added to the Content pane from the Table catalog.
❑ Auto Join Tables – Instructs Brio Intelligence to automatically join database tables based on one of three different join strategies as they are added to the Content pane if their names and data types are identical. If Auto Join Tables is not selected, you must manually create joins between topics in the Content pane.
❑ Show Icon Joins – Shows topic joins when a topic is in icon view (minimized). It is recommended that you activate this feature.
2-26 Data Modeling

❑ Allow Drill Anywhere – Activates the Drill Anywhere menu item on the menus within the Pivot and Chart sections. This option allows users to drill to any field.
❑ Allow Drill To Detail – Activates the Drill To Detail menu item on the menus within the Pivot and Chart sections. This option allows users to requery the database once they have reached the lowest level of detail; it only works if the Allow Drill Anywhere option is selected.
■ Governors (Designer Only)
❑ Return First ____ Rows – Specifies a cap on the number of rows retrieved by a query against the data model, regardless of the size of the potential Results set.
Note Explorer and Navigator users can also set query governors, but data model options
automatically override governors set at the query level. If row limits are also set at the query level, the lower number is enforced.
❑ Time Limit ____ Minutes – Specifies a cap on the total processing time of a query against the data model. Seconds are entered as a decimal number. Available for asynchronous connection API software (for example, Open Client) that support this feature.
✏
Working with Data Models 2-27

Data Model Options: LimitsUse the Limits page to specify limit browse level preferences and to select global limit options.
When you use Show Values to set limits, you may sometimes need to sift through a lot of data to find the particular values you need. Limit preferences enable you to dictate the way existing limits reduce the values available through the Show Values command.
For example, you want to retrieve customer information only from selected cities in Ohio. However, the database table of customer addresses is very large. Because Brio Intelligence applies a default limit preference, once you place the initial limit on State, the Show Values set returned for City is automatically narrowed to those cities located in Ohio. This saves you from returning thousands of customers, states, and from all sales regions.
You can adjust this preference so that the initial limit selection has no effect on the potential values returned for the second limit (all cities are returned regardless of state).
2-28 Data Modeling

■ Limit Options
❑ Show Minimum Value Set – Displays only values that are applicable given all existing limits. This preference takes into account limits on all tables and related through all joins in the data model (which could be potentially a very large and long running query).
❑ Show Values Within Topic – Displays values applicable given existing limits in the same topic. This preference does not take into account limits associated by joins in the data model.
❑ Show All Values – Displays all values associated with an item, regardless of any established limits.
Tip When setting these preferences for metatopics, be sure to display the data model in Original view.
■ Global Limit Options (Designer Only)
❑ Show Values – Globally restricts use of the Show Values command in the Limit dialog box, which is used to retrieve values from the server.
❑ Custom Values – Globally restricts use of the Custom Values command in the Limit dialog box, which is used to access a custom values list saved with the document or in a flat file.
❑ Custom SQL – Enables the user to code a limit directly using SQL.
✰
Working with Data Models 2-29

Data Model Options: JoinsUse the Joins page to select join usage preferences.
■ Use All Joined Topics – Specifies the use of all joined (non-iconized) topics in the data model.
■ Use The Minimum Number Of Topics – Specifies the use only of topics represented by items on the Request line.
■ Use All Referenced Topics – Specifies the use only of topics represented by items on the Request or Limit lines. Changing join usage usually changes the number of rows retrieved from the database. It also introduces the possibility that novice users may create improperly joined queries.
■ Use Defined Join Paths – Specifies the use of a user predefined join path that groups the joins necessary to query from the data model. Click Configure to create a custom join path.
Note that since most data models do not have the same predefined join paths, you cannot save the Use Defined Join Paths option as a default user preference. (For more information on default user preferences, see “Saving Data Model Options as User Preferences” on page 2-24.)
■ Use Automatic Join Path Generation – Instructs Brio Intelligence to dynamically generate joins based on the context of user selections on the Request and Limit lines.
2-30 Data Modeling

Data Model Options: Topic PriorityUse the Topic Priority page to define the order that tables are included in the Brio Intelligence SQL statement. Defining a topic prirority can significantly speed up large queries.
When defining topic priorities, remember that the centralized fact topic in your data model is the largest and receives the most use during a query. By prioritizing this topic first, followed by the remaining topics in descending order of magnitude, the database server can more efficiently use the internal join logic between tables.
To set topic priorities in a data model:
1 Choose Data Model→Data Model Options.
The Data Model Option dialog boxes appear.
2 Click the Topic Priority tab to view the Topic Priority page.
Topics in the data model appear listed in the Tables list in the order they were placed in the Content pane.
3 Rank the topics in the desired order. Click the arrow to move selected topics up or down in the list.
Working with Data Models 2-31
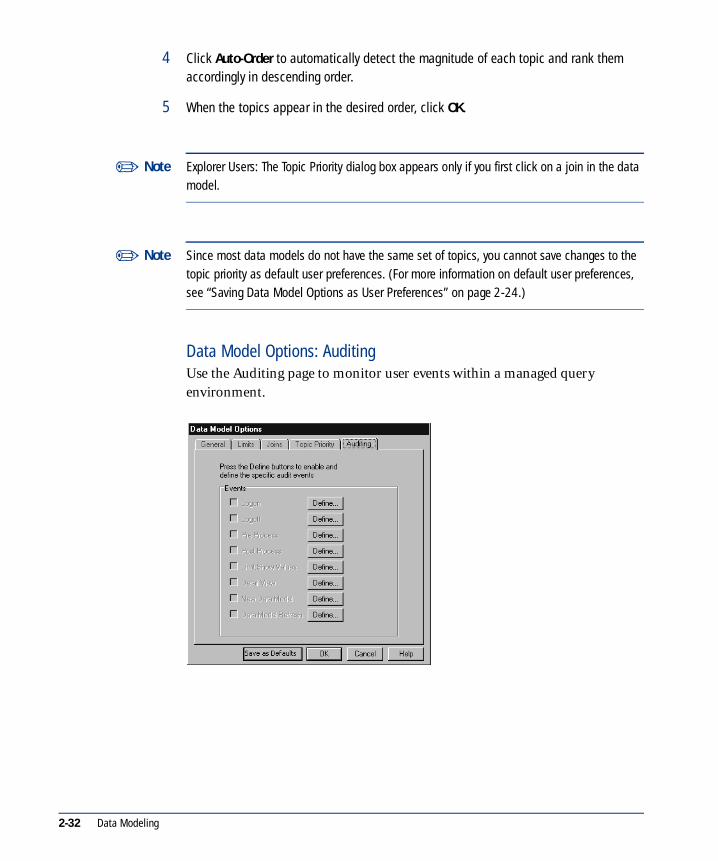
4 Click Auto-Order to automatically detect the magnitude of each topic and rank them accordingly in descending order.
5 When the topics appear in the desired order, click OK.
Note Explorer Users: The Topic Priority dialog box appears only if you first click on a join in the data model.
Note Since most data models do not have the same set of topics, you cannot save changes to the topic priority as default user preferences. (For more information on default user preferences, see “Saving Data Model Options as User Preferences” on page 2-24.)
Data Model Options: AuditingUse the Auditing page to monitor user events within a managed query environment.
✏
✏✏
2-32 Data Modeling

By attaching SQL statements to specific document events, an administrator can record how Brio Intelligence, a database server, and network resources are being used. When triggered, the SQL statements update an audit log table, which the administrator can query independently to track and analyze usage data.
Note Although you can save the definitions of specific audit events as default user preferences, you
cannot save the enabled/disabled state of the audit events as defaults. (For more information on default user preferences, see “Saving Data Model Options as User Preferences” on page 2-24.)
For detailed information about auditing, see Chapter 5, “Auditing Brio Intelligence Activities.”
Automatically Processing QueriesBrio Intelligence Designers can use the Auto-Process feature to have a Standard Query document automatically process when the document is downloaded from the repository.
To set Auto-Process:
1 With a Standard Query document open in the Content pane, choose Query→Query Options.
The Query Properties dialog box appears.
2 Select the Auto-Process check box, and then click OK.
3 Choose File→Save To Repository to upload the document to the repository.
The query automatically processes when a user opens the document from the repository.
✏
Working with Data Models 2-33

Promoting a Query to a Master Data ModelA query may be promoted to a master data model. This essentially separates the data model from the query, allows multiple queries to be based on a single master data model, and creates a new data model-only section in the document. Master data models do not contain Request lines.
The benefit is that any changes to the master data model get propagated to all dependent queries that are based on the master data model. Each time a new query is inserted into a document that contains a master data model, you are prompted to link the new query to the master data model.
Note When a query is promoted to a master data model, it is added to the Section pane as a new section. Once you promote a query to a master data model, you cannot undo it.
To promote a query to a master data model:
1 In the Query section, select or build a data model.
2 Choose DataModel→Promote To Master Data Model.
Data models in Query sections that are linked to the master data model are locked and cannot be changed. They appear with a gray background and the message: “Locked Data Model.”
✏
2-34 Data Modeling

Synchronizing a Data ModelIf data models are distributed to company personnel, it is important to keep them updated to reflect system changes. Data models provide visual understanding of the database; if they are corrupted, users can become lost and frustrated.
For example, consider the situation when a database administrator structurally alters a database table by adding columns, modifying data, or renaming a field. If the changes are not registered to data models, then EIS sections, metatopics, or intranet-distributed reports become obsolete.
Administrators can ensure data model integrity using the Sync With Database command, a one-step integrity check and update. Sync With Database detects inconsistencies with the database, updates the data model, and provides an itemized list of the changes made. The list can use be used to update metatopics and report sections quickly and without interrupting workflow.
To synchronize a data model:
1 Open the data model and log on to the database.
2 Choose DataModel→Sync With Database.
Brio Intelligence compares original topics with their corresponding database tables. If the structure of the tables has changed, Brio Intelligence modifies data model topics to reflect the changes. The Data Model Synchronization dialog box appears, describing changes to the database. Select the Show Detail Information check box for an itemized list.
Tip Because metatopics are a separate logical layer constructed from original topics, they are not automatically updated. The Sync With Database feature removes any altered items from metatopics, but preserves the remaining structure so that repairs are minor. Sync With Database works transparently with most other customized attributes of a data model.
✰
Working with Data Models 2-35

Data Model Menu Command ReferenceTable 2-1 provides a quick reference to the commands available on the Data Model menu and lists any related shortcuts.
Tab le 2 -1 Data Model Menu Commands
Command DescriptionKeyboardShortcut
ShortcutMenu
Table Catalog Expands the Table catalog in the Catalog pane. [F9]
Data Model View Allows you to select combined, original (database-derived), or metaviews of topics.
Topic View Allows you to select structure, detail, or icon views of topics.
✔
Promote to Metatopic Creates a metatopic from an existing topic. ✔
Add Metatopic Adds a metatopic to the data model.
Add Metatopic Item Allows you to add either a server or local metatopic item.
Sync With Database Detects inconsistencies with the database, updates the data model, and provides an itemized list of the changes.
Promote To Master Data Model
Promotes the current query to a master data model.
Data Model Options Allows you to specify options for General, Limits, Joins, Topic Priority, and Auditing.
2-36 Data Modeling
3 Using Metatopics and Metadata
This chapter explains how to use metatopics and metadata to simplify data models for Brio Intelligence users. It contains:
■ About Metatopics and Metadata
■ Data Modeling with Metatopics
■ MetaData in Brio Intelligence
■ Using the Open Metadata Interpreter
3-1

About Metatopics and MetadataMetatopics and metadata enable Brio Intelligence Designers and Explorers to mask the more confusing technical aspects of databases for non-technical users. While Brio Intelligence data models are already simplified views of the database, they sometimes still present a challenge to novice users. This is especially true when confusing database names and complicated join strategies are visible in the data model.
For most end users, the confusing aspects of query building stem from two sources:
■ Data model topic and join structures
■ Database naming conventions
Brio Intelligence provides two solutions to deal with each of these problems. These complementary solutions can be integrated to shield company personnel from the technical aspects of the query process and make end-user querying completely intuitive:
■ Metatopics – Topics created from items in other topics. Metatopics are higher level topics, or “virtual topics” that simplify the data model structure and make joins transparent. A metatopic looks and behaves like any other topic and can accept modifications and metadata.
■ Metadata – Data about data. Typically stored in database tables, and often associated with data warehousing, metadata describes the history, content, and function of database tables, columns, and joins in understandable business terms.
Metadata is useful for overcoming the awkward names or ambiguous abbreviations often used in a database. For example, for a database table named CUST_OLD, metadata can substitute a description business name for the table, such as “Inactive Customers,” when it is viewed by the end user. Metadata may also include longer comments.
Because most business maintain their metadata on a database server, it is a potentially useful guide to the contents of the database, if it can be synchronized and used in conjunction with the data it describes.
3-2 Using Metatopics and Metadata

Data Modeling with MetatopicsAs noted earlier, Brio Intelligence metatopics allow you to create higher level topics that can greatly simplify the appearance of a data model.
Unlike other topics, metatopics are independent of actual database tables. You can use metatopics to make the column and join structure of an underlying database transparent. You can substitute instead streamlined and intuitive topics adapted to the way users conceptualize information.
For example, you can replace a data model of joined topics with a single meta topics that contains only the items business personnel need in their queries. The joins are completely transparent.
Tip Metatopics do not support Detail view.
Creating Metatopics You can create a new, empty metatopic or copy an existing topic to use as the basis for a metatopic.
To create a new, empty metatopic:
1 Choose DataModel→Add Metatopic.
2 Type the name of the new topic in the Topic Properties dialog box and click OK.
To create a metatopic from an existing topic:
1 Select a topic in the Content pane.
2 Choose DataModel→Promote To Metatopic.
A new metatopic appears in the Content pane with the default name: Meta_TopicName. The new topic contains the same items defined in the source topic.
✰
Data Modeling with Metatopics 3-3
Copying Topic Items to a MetatopicAfter you create a metatopic, you can rebuild its structure by copying topic items from other topics. Once the topic items are in place, you can view the data model solely at the metatopic level, excluding the original topics in favor of a single metatopic or multiple unjoined metatopics.
To copy items from other topics to a metatopic:
To select and drag multiple topic items from the same topic, press and hold down the modifier key (Windows [Alt], Mac [Option], Motif [Ctrl+Alt]) while using your mouse.
Note You can select items from only one topic at a time.
Caution If a metatopic contains items copied from an original source topic, do not remove the original topic from the workspace or use the icon view. Because metatopic items model data through the original source topics, removing the original source topics or using an icon view also removes the copied topic items from the metatopic.
➤ Select the item that you want to add from an existing topic and drag it to the metatopic.
✏
!
3-4 Using Metatopics and Metadata
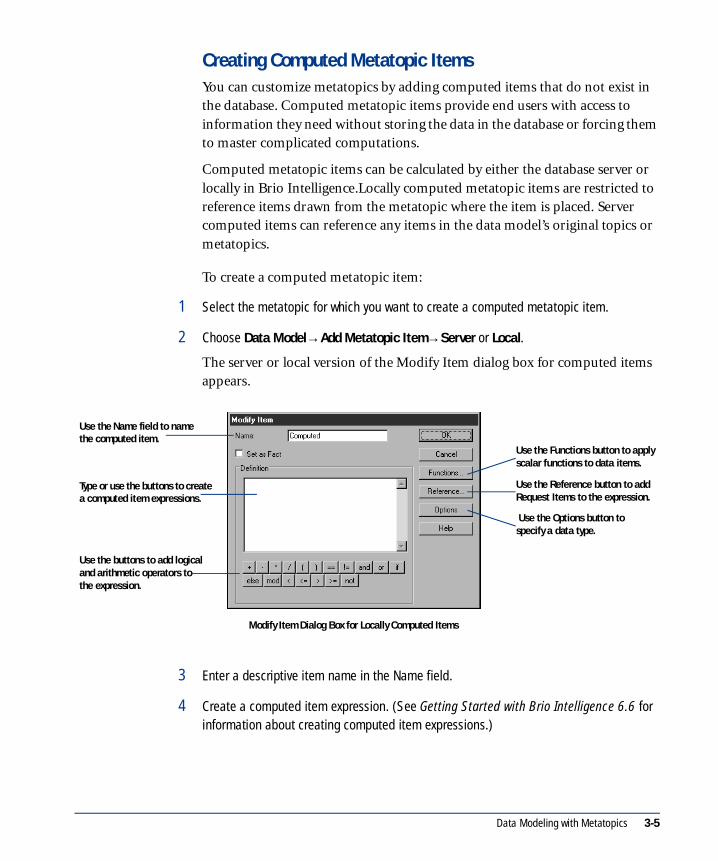
Creating Computed Metatopic ItemsYou can customize metatopics by adding computed items that do not exist in the database. Computed metatopic items provide end users with access to information they need without storing the data in the database or forcing them to master complicated computations.
Computed metatopic items can be calculated by either the database server or locally in Brio Intelligence.Locally computed metatopic items are restricted to reference items drawn from the metatopic where the item is placed. Server computed items can reference any items in the data model’s original topics or metatopics.
To create a computed metatopic item:
1 Select the metatopic for which you want to create a computed metatopic item.
2 Choose Data Model→Add Metatopic Item→Server or Local.
The server or local version of the Modify Item dialog box for computed items appears.
3 Enter a descriptive item name in the Name field.
4 Create a computed item expression. (See Getting Started with Brio Intelligence 6.6 for information about creating computed item expressions.)
Use the buttons to add logical and arithmetic operators to the expression.
Use the Reference button to add Request Items to the expression.
Use the Name field to name the computed item.
Use the Functions button to apply scalar functions to data items.
Use the Options button to specify a data type.
Type or use the buttons to create a computed item expressions.
Modify Item Dialog Box for Locally Computed Items
Data Modeling with Metatopics 3-5
Customizing or Removing Metatopics and Metatopic ItemsYou can apply the same customization options that you use to make original topics and items more intuitive to metatopics and metatopic items. For more information on customizing topics, see “Modifying Topic Properties” on page 2-19 and “Modifying Topic Item Properties” on page 2-20.
To remove a metatopic or metatopic item, use one of the following options:
■ Select the metatopic or topic item you want to remove and choose Remove on the shortcut menu.
■ Press [Del]
■ Press the Delete button.
Caution. If you remove a metatopic item, it cannot be restored to the metatopic. You must copy the item back to the metatopic or recreate it.
Viewing MetatopicsThere are a number of ways to view a data model. By default, Brio Intelligence displays database-derived source topics and any metatopics you have created together in the Content pane in Combined view.
To change the data model view:
Options include:
■ Combined – Displays both original (database-derived) and metatopics in the Content pane.
■ Original – Displays only database-derived topics in the Content pane.
■ Meta – Displays only metatopics in the Content pane.
Caution If an original topic contains items that have been copied to a metatopic, do not iconize or remove the original topic from the Content pane in Combined view. Metatopic items are based on original items and remain linked to them. If an original topic is iconized or removed, any metatopic items based on its contents become inaccessible.
➤ .Choose DataModel→Data Model View→Option.
!
!
3-6 Using Metatopics and Metadata

MetaData in Brio IntelligenceBrio Intelligence utilizes available metadata to simplify data models. By applying metadata naming conventions and descriptive information, metadata makes the information locked away in database tables and columns more accessible.
Metadata can be applied in several ways in Brio Intelligence. If you have a source of metadata stored on a database server, Explorer and Designer users can use the Open Metadata Interpreter to link it to data models and automatically apply the metadata information.
Brio Intelligence’s own data modelling features provide ways to add the benefits of metadata if you don’t have a centralized metadata source. Brio Intelligence automatically makes topic and item names more intelligible, and enables you to customize and change the appearance of these entities on the workspace.
MetaData in Brio Intelligence 3-7
Using the Open Metadata InterpreterThe Open Metadata Interpreter is a powerful tool you can use to link Brio Intelligence to metadata, or information about your database. By modifying the SQL Brio Intelligence sends to your database server, you can dictate where Brio Intelligence finds the information it uses to create a data model from database tables.
The Open Metadata Interpreter enables Designer and Explorer users to draw this information from an enterprise source of business metadata.
The Open Metadata Interpreter reads metadata from tables on a database and applies it to data models through a live database connection. The specifications for reading these tables are stores in OCEs. Once configured, metadata definitions are available to anyone who uses the OCE.
Accessing the Open Metadata InterpreterThe Open Metadata Interpreter is a feature of the Open Catalog Extension (OCE)—files that enable Brio Intelligence to manage database connectivity. OMI is implemented using the Metadata Definition dialog box of the Database Connection Wizard.
To open the Metadata Definition dialog box:
1 If Brio Intelligence is not connected to a database, select the OCE you want to direct to the metadata source and log on.
2 Choose Tools→Connection→Modify.
The Database Connection Wizard appears with the Meta Connection Wizard displayed.
3 Select whether to run the Meta Connection Wizard on the current connection or on a different connection.
If you select a different connection, the Select Metadata OCE field becomes active.
a. Enter the full path and file name of the connection file you want to use. You can also click Browse to navigate to the location of the connection file.
3-8 Using Metatopics and Metadata

b. Click Next. The Password dialog box appears.
c. Enter your database name in the Host Name field and your database password in the Host Password field and click OK.
d. Select to use your current database name and password to make the metadata connection or to specify an alternate name and password.
If you choose to specify an alternate user name and password, enter the name and password you want to use for the metadata connection.
4 Click Next.
5 Select the metadata schema where your meta settings are stored from the drop-down list.
Metadata schema are provided by third party vendors and saved in the bqmeta0.ini file. When you select a metadata schema, the predefined schema populates the fields in the Metadata Definition dialog box and is saved to the connection file. If you select another schema, the metadata definitions are overwritten in the connection file.
If you want to customize your metadata settings, select Custom from the drop-down list and click Edit. The Metadata Definition dialog box appears, which contains tabs for tables, columns, joins, lookup, and remarks.
For detailed explanations of the metadata definitions, see “Configuring the Open Metadata Interpreter” on page 3-10.
6 Enter the schema name or owner of the metadata repository table (for custom settings) or click Next to complete the Meta Connection Wizard and return to the Data Connection WIzard.
Using the Open Metadata Interpreter 3-9

Configuring the Open Metadata InterpreterThe Open Metadata Interpreter is implemented using the Metadata Definitions dialog box. You add metadata definitions in the Metadata Definition dialog box, which contains five tabbed pages.
The pages can be independently configured and are designed to assist you in creating SQL Select statements to extract and apply metadata from predefined source tables or provided by third party vendors.
Radio buttons at the top of the certain pages enable you to specify naming based on actual default table and column names, or a custom metadata source. When the custom option is selected, the SQL entry fields on the tab are activated, and you can enter SQL statements into the separate metadata definition areas.
Tabbed Pages
Naming Selection
SQL Entry Fields
3-10 Using Metatopics and Metadata
Metadata Definition: SQL Entry FieldsEach Metadata Definition page has up to three Metadata Table Definition SQL entry fields:
■ Select – Generates SQL Select statements, and is divided into distinct fields which specify the columns that store the metadata. The columns are located in the database table described in the From field. If necessary, you can use aliases in the Select fields to distinguish between multiple tables.
■ From – Generates an SQL From clause, and specify the table(s) that contains metadata that applies to the database item described by the tab. You can also enter SQL to access system tables when necessary. If you need to reference more than one table in the From field, you can use table aliases in the SQL.
■ Where – Generates SQL Where clauses and is used on the Columns and Joins pages to indicate which topic needs to be populated with item names or joined to another topic. It can also be used to establish relationships between multiple tables or filter tables.
Notes on Entering SQL■ Entries are required in all From entry fields, and in all fields marked with an
asterisk (*).
■ Under default settings, Metadata Definition fields specify your system-managed directory tables (except when using ODBC). You cannot modify field values when the Default radio button is selected.
■ Clicking Reset at any time when defining a custom source populates the entry fields with the database default values. It may be helpful to start with the defaults when setting up metadata definitions.
■ You may sometimes use database variables when entering a Where clause. Brio Intelligence provides :OWNER, :TABLE, :COLUMN, :LOOKUPID, :TABALIAS, and :COLALIAS variables which temporarily store a database owner, table, column, or domain ID number and aliases of the active topic or item. Each variable must be entered in all caps with a leading colon.
Using the Open Metadata Interpreter 3-11

Metadata Definition: TablesExtracting and applying metadata to topics is the simplest metadata configuration. When metadata is defined for database tables, they appear in the Table catalog with the names supplied in an alternate “table of tables,” and topics drawn from the tables are renamed to reflect the metadata as well.
Once the Table page is configured, all data models using the connection apply metadata names instead of the default server name to topics in the Content pane.
To apply metadata names to data model topics:
1 On the Tables page, select Custom Definition.
The SQL entry fields activate and the system-managed information clears. Click Reset if you want to use the database default as a starting point.
2 In the Select fields, enter the appropriate column names as they appear in the alternate table of tables.
■ Owner Name – Name of the owner column in the alternate table of tables.
■ Physical Table Name – Name of the column of physical table names in the alternate table of tables.
3-12 Using Metatopics and Metadata

■ Table Alias – Name of the column of metadata table aliases in the alternate table of tables.
■ Table Type – Name of the column of physical table descriptions in the alternate table of tables
3 In the From field, enter the physical name of the alternate table of tables.
4 Use the Where fields to filter selected topics (for example, to limit the metadata mapping to include only certain owners).
Note If multiple folders exist in the repository, the following modifications are necessary to the BrioQuery bqmeta0.ini file in order to filter the list of tables by folder:
To filter Informatica tables:
■ Under the heading labeled [Informatica], change the TableWhere property as follows (do not include brackets):
TableWhere=SUBJECT_AREA=’<folder name>’
■ Change the ColumnWhere property as follows (do not include brackets):
ColumnWhere=table_name = ’:TABLE’ and SUBJECT_AREA=’<folder name>’
✏
Using the Open Metadata Interpreter 3-13
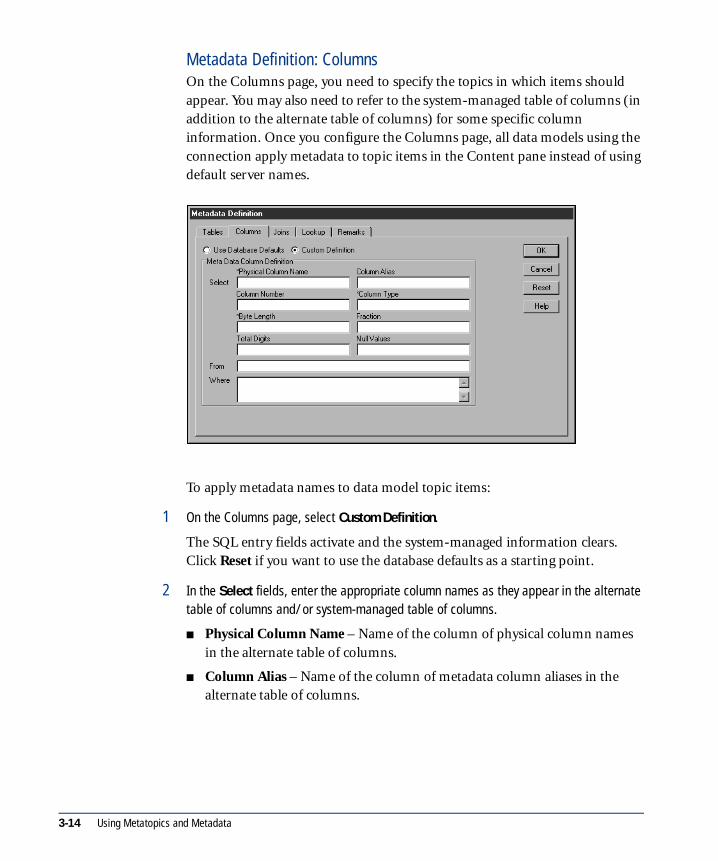
Metadata Definition: ColumnsOn the Columns page, you need to specify the topics in which items should appear. You may also need to refer to the system-managed table of columns (in addition to the alternate table of columns) for some specific column information. Once you configure the Columns page, all data models using the connection apply metadata to topic items in the Content pane instead of using default server names.
To apply metadata names to data model topic items:
1 On the Columns page, select Custom Definition.
The SQL entry fields activate and the system-managed information clears. Click Reset if you want to use the database defaults as a starting point.
2 In the Select fields, enter the appropriate column names as they appear in the alternate table of columns and/or system-managed table of columns.
■ Physical Column Name – Name of the column of physical column names in the alternate table of columns.
■ Column Alias – Name of the column of metadata column aliases in the alternate table of columns.
3-14 Using Metatopics and Metadata

■ Column Type – Name of the column of column data types.
■ Byte Length – Name of the column of column data lengths.
■ Fraction – Name of the column of column data scales.
■ Total Digits – Name of the column of column precision values.
■ Null Values – Name of the column of column null indicators.
If you use more than one table in the From field, enter the full column name preceded by a table name in the Select field.
table_name.column_name
3 In the From field, enter the physical names of the alternate table of columns (and system-managed table of tables, if necessary).
If you are using both tables in the From field, you can simplify SQL entry by using table aliases.
4 Use the Where field to relate columns in the alternate and system-managed tables of tables to ensure metadata is applied to the correct columns.
Use the following syntax in the Where field (do not include brackets):
<table of columns>.<tables column>=’:TABLE’ and <table of columns>.<owners column>=’:OWNER’.
Brio Intelligence automatically populates a topic added to the Content pane with the metadata item names when it finds rows in the alternate table of columns that match the names temporarily stored in :TABLE and :OWNER. Use also the variables :TABALIAS and :COLALIAS to specify table and column aliases in SQL.
Note The database variables must be entered in upper case and preceded with a colon.✏
Using the Open Metadata Interpreter 3-15

Metadata Definition: JoinsYou can automatically join topics based not only on Brio Intelligence’s best guess (see “Automatically Joining Topics” on page 2-5), but also on primary and foreign key information stored in an alternative table of joins. Join strategies include:
■ Best Guess – Automatically joins columns of similar name and data type.
■ Custom – Selects joins defined in a custom metadata source.
■ Server-Defined – Uses joins that have been established on the database server.
The Joins page uses your SQL instructions to employ a custom join strategy stored in metadata. Once Brio Intelligence is directed to the metadata source, all data models using the connection apply specified join logic between topics.
To automatically join topics using metadata join information:
1 On the Joins page, select Custom.
The SQL entry fields activate. (There are no system defaults for the Joins page.) Click Clear to clear the entry fields if you make a mistake and want to start over.
2 In the Select fields, enter the appropriate column names as they appear in the alternate table of joins. Brio Intelligence requires data in the Primary Table and Primary Column fields to find the primary keys.
3-16 Using Metatopics and Metadata

■ Primary Database Name – Sets the name of the column of databases for primary key tables in the alternate table of joins.
■ Primary Owner – Sets the name of the column of owners belonging to primary key tables in the table of joins.
■ Primary Table – Sets the name of the column of primary key tables in the table of joins.
■ Primary Column – Sets the name of the column of primary key items in the table of joins.
■ Foreign Database Name – Sets the name of the column of databases for foreign key tables in the alternate table of joins.
■ Foreign Owner – Sets the name of the column of owners belonging to foreign key tables in the table of joins.
■ Foreign Table – Sets the name of the column of foreign key tables in the table of joins.
■ Foreign Column – Sets the name of the column of foreign key items in the table of joins.
If you use more than one table in the From field, enter the full column name preceded by a table name in the Select fields.
table_name.column_name
3 In the From field, enter the physical name of the alternate table of joins.
4 Use the Where field to tell Brio Intelligence which topics to auto-join.
Use the following syntax in the Where field (do not include brackets):
<owners column>=’:OWNER’ and <tables column>=’:TABLE’
If Auto-Join is enabled, Brio Intelligence automatically joins topics added to the Content pane when it finds rows in the alternate table of joins that match the names temporarily stored in :TABLE and :OWNER. You can also use the variables :TABALIAS and :COLALIAS to specify table and column aliases in the SQL.
Note The database variables must be entered in upper case and preceded with a colon.✏
Using the Open Metadata Interpreter 3-17
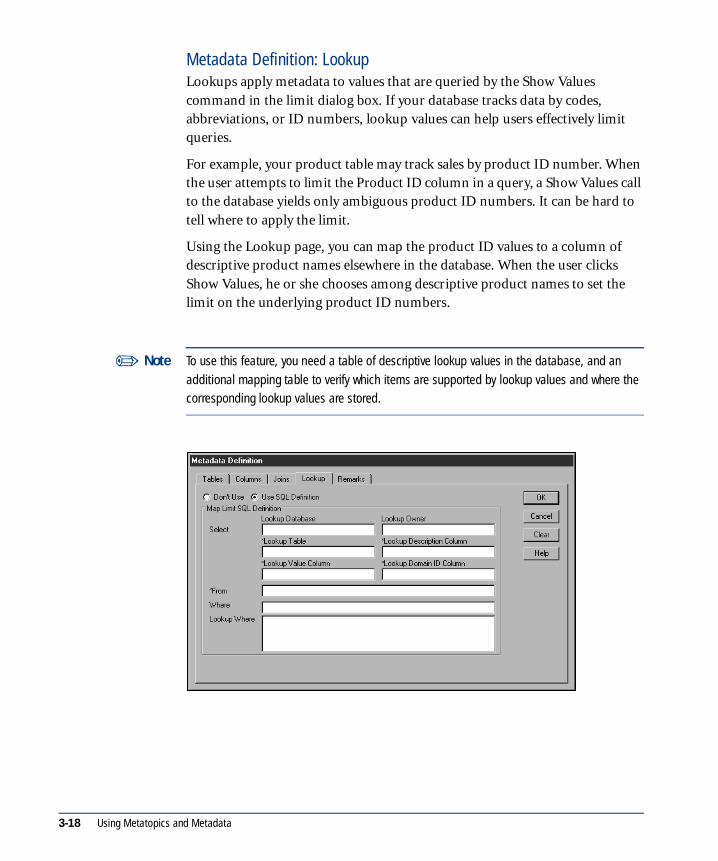
Metadata Definition: LookupLookups apply metadata to values that are queried by the Show Values command in the limit dialog box. If your database tracks data by codes, abbreviations, or ID numbers, lookup values can help users effectively limit queries.
For example, your product table may track sales by product ID number. When the user attempts to limit the Product ID column in a query, a Show Values call to the database yields only ambiguous product ID numbers. It can be hard to tell where to apply the limit.
Using the Lookup page, you can map the product ID values to a column of descriptive product names elsewhere in the database. When the user clicks Show Values, he or she chooses among descriptive product names to set the limit on the underlying product ID numbers.
Note To use this feature, you need a table of descriptive lookup values in the database, and an
additional mapping table to verify which items are supported by lookup values and where the corresponding lookup values are stored.
✏
3-18 Using Metatopics and Metadata

To apply metadata to limit lookup values:
1 On the Lookup page, select Use SQL Definition.
The SQL entry fields activate. Click Clear to clear the entry fields if you make a mistake and want to start over.
2 In the Select fields, enter the appropriate column names as they appear in the domain registry table. The Lookup Table, Lookup Value Column, Lookup Description Column, and Lookup Domain ID Column are required for Brio Intelligence to locate lookup values.
■ Lookup Database – Name of the column of databases in the domain registry table.
■ Lookup Owner – Name of the column of owners in the domain registry table.
■ Lookup Table – Name of the column of tables containing lookup domain description values in the domain registry table.
■ Lookup Description Column – Name of the column of columns containing descriptive lookup values in the domain registry table.
■ Lookup Value Column – Name of the column of columns of original column values in the domain registry table.
■ Lookup Domain ID Column – Name of the column of domain ID’s in the domain registry table.
3 In the From field, enter the physical name of the domain registry table.
Brio Intelligence first sends SQL to the domain registry table to see if lookup values are available for a given item.
4 Use the Where field to identify which items have lookup values.
Use the following format (do not include brackets):
<tables column>=’:TABLE’ and <columns column>=’:COLUMN’
When you limit an item and show values, Brio Intelligence stores the item’s physical table and column names in the variables, :TABLE and :COLUMN.
Brio Intelligence searches the domain registry table for a row that matches the values temporarily stored in :TABLE and :COLUMN. When it finds a row that matches, it pulls lookup values from the specified columns in the domain descriptions table. You can also use the :LOOKUPID variable to store the lookup domain ID value.
Using the Open Metadata Interpreter 3-19

Note The database variables must be entered in upper case and preceded with a colon.
5 Use the Lookup Where field to sync the values in the domain registry and domain description tables.
Metadata Definition: RemarksIf database remarks already exist for your database, you can configure your OCE to retrieve and display them as part of your data model.
Database remarks function like context-sensitive help by providing detailed contextual information about a table or column, and can be very helpful to users when navigating through a large data model.
The Remarks page uses SQL instructions to direct Brio Intelligence toward your unified server source of remarks for tables and columns. Once the Remarks page is configured, all data models using the connection have access to remarks (Query→Show Remarks).
✏
3-20 Using Metatopics and Metadata
To add remarks from stored metadata:
1 On the Remarks page, select Table Remarks to set up remarks for tables or select Column Remarks to set up remarks for columns.
Click Clear to clear the entry fields if you make a mistake and want to start over.
2 In the Tab Name field, type the name of the tab you want to appear in the Brio Intelligence Show Remarks dialog box.
3 In the Select field, enter the name of the column of table or column remarks.
4 In the From field, enter the physical name of the table containing table or column remarks.
5 Use Where to link the selected topic to its corresponding remark.
Use the following syntax in the Where field:
Name of the Remarks Table = :TABLE
and
Name of the Remarks Column=:COLUMN
The dynamic variable automatically inserts the physical name of the object from which the user is requesting data in the application. Brio Intelligence displays remarks when it finds rows in the remarks tables which match the names temporarily stored in :TABLE and :COLUMN. You can also use the variables :TABALIAS (displays name of a table) and :COLALIAS (displays name of a column) to specify table and column aliases in the SQL.
Note The database variables must be entered in upper case and preceded with a colon.
6 Click Add to add the tab to the Remarks Tabs list.
The Remarks Tabs list shows all of the tabs you entered in the order in which you entered them. The first tab in the lists is the default or first tab to appear in the Brio Intelligence Show Remarks dialog box.
✏
Using the Open Metadata Interpreter 3-21

Use the following buttons to reorder the appearance of Remarks tabs:
■ Up – Moves a tab up one position (toward the front of the Brio Intelligence Show Remarks dialog box).
■ Down – Moves a tab down one position (toward the back of the Brio Intelligence Show Remarks dialog box).
To update a Remarks tab:
1 On the Remarks page, select the tab from the Remarks tabs list.
The information for the selected tab appears in Remarks SQL fields.
2 Enter the desired changes in the Select, From, and Where fields, then click Update.
To delete a Remarks tab:
➤ On the Remarks page, select the tab from the Remarks tabs list and click Delete.
3-22 Using Metatopics and Metadata
4 Managing the Brio Intelligence Repository
This chapter describes how to create and manage the Brio Intelligence repository, including how to upload documents to, and open documents from, the repository, and how to control document versions. It contains:
■ About the Brio Intelligence Repository
■ Administering a Brio Intelligence Repository
■ Working with Repository Objects
4-1

About the Brio Intelligence RepositoryThe Brio Intelligence repository provides an efficient way to manage and distribute Brio Intelligence data model objects for end-user querying. By storing standardized objects in a Brio Intelligence repository located on the database server, administrators can provide version-controlled data models for entire workgroups to access as needed.
Objects that can be stored in a Brio Intelligence repository are:
■ Data model – A basic data model that is a group of related topics designed as a starting point for building a query. A basic data model opens in the Query section’s Content pane, where a group of joined topics appears.
■ Standard query – A data model with a query already assembled. After the query is downloaded, you simply process the query to retrieve data. Standard queries are ideal for users who use the same data on a regular basis; for example, to get inventory updates that fluctuate from day to day. A standard query opens in the Results section.
If a standard query has the Auto-Process feature enabled, the query automatically runs when it is downloaded and populates the Results and report sections with data.
■ Standard query with reports – A standard query that includes preformed reports which enable you to process the query and view the data using customized report sections. A formatted standard query with reports appears in the Pivot, Chart, EIS, or Report sections.
4-2 Managing the Brio Intelligence Repository

Administering a Brio Intelligence RepositoryUse the Administer Repository dialog box as an access point to create and maintain repositories and the objects stored inside the repositories. You can use this dialog box to inventory the contents of all repositories on a database server, and update the descriptions of the stored contents.
Note Repository administration is the province of the Brio Intelligence Designer. The data model
contents of a Brio Intelligence repository are available to Explorer and Navigator users, but only an administrator running Brio Intelligence Designer can store and manage shared Brio
Intelligence repository objects.
Creating Repository TablesA repository is a central place in which an aggregation of data is kept and maintained in an organized way. A Brio Intelligence repository is a group of specialized database tables used to store different kinds of Brio Intelligence data models.
A Brio Intelligence repository can be located on any database in your Brio Intelligence network environment, and can even store data models associated with any other database in the environment.
✏
Administering a Brio Intelligence Repository 4-3

To create repository tables:
1 Choose Tools→Administer Repository→Option.
Choose Select to open the Select Connection dialog box and choose the OCE for the database on which you want to create repository table, or choose the OCE for the active document.
The Administer Repository dialog box appears.
2 Click Create to open the Create Repository Tables dialog box.
3 Change the default configuration.
■ Enter the database and owner names (if applicable) under which you want to create the tables.
■ Check Grant Tables to Public to grant general access to the repository tables at the database level.
You must grant access to the repository tables in order for users to download data models. If you do not grant public access, you need to manually grant access to all authorized users using a database administration tool.
Note If table creation fails, make sure the server’s database logon ID has been granted Table Create privileges.
✏
4-4 Managing the Brio Intelligence Repository

■ Change default data types for column fields to match data types of your database server. If your DBMS and middleware support a large binary data type, use it for VarData columns. If not, use the largest character data type.
4 Click Create All to create the repository tables under the specified user. The All Tables Created dialog box appears.
5 Click OK, and then click Close to close the Create All dialog box.
Confirming Repository Table CreationRepository tables are hidden in the Table catalog by default. To confirm that the repository tables were created (or if you would prefer to display the tables), you can modify the OCE’s connection preferences and include Brio Intelligence repository tables in the Table catalog.
To include repository tables in the Table catalog:
1 Choose Tools→Connection→Modify.
The Database Connection Wizard appears.
2 Select the Show Advanced Options check box, and then click Next.
3 Enter a user name and password to connect to the data source, and then click Next.
4 Clear the Exclude Brio Intelligence Repository Tables check box and click Next.
5 Click Next through the rest of the wizard dialog boxes, and then click Finish.
6 Save your OCE file.
7 Choose DataModel→Table Catalog to view the Table catalog including the Brio Intelligence repository tables. [F9]
Administering a Brio Intelligence Repository 4-5

Updating Repository Object DescriptionsTo update a repository object description:
1 Choose Tools→Administer Repository, and select the connection file associated with the repository object with which you want to work.
The Administer Repository dialog box appears.
2 Click the Inventory tab.
Brio Intelligence Repository Tables in the Table Catalog
4-6 Managing the Brio Intelligence Repository
3 Choose a model type from the Model Type drop-down list.
The Model Type drop-down list shows the model type folders that contain the repository objects. Brio Intelligence supports three types of repository objects: data models, standard queries, and standard queries with reports.
4 Edit the description in the Description panel of the BRIOCAT2 area.
The BRIOCAT2 area displays catalog details of the selected model.
5 Click Update.
To modify the attributes of a document object itself, download the object, alter the document and upload it to the repository. For more information, see “Modifying Repository Objects” on page 4-12.
Deleting Repository Objects
To delete a repository object:
1 Choose Tools→Administer Repository, and select the connection file associated with the repository object with which you want to work.
The Administer Repository dialog box appears.
2 On the Inventory page, select the model type to be deleted from the Model Type drop-down list.
3 Select a repository object from the Model List and click Delete.
The object is deleted from the repository.
Administering a Brio Intelligence Repository 4-7

Administering Repository GroupsThe repository group feature allows you to classify stored objects by their availability to distinct workgroups that you define. Users can download repository objects provided that they have access privileges in an authorized workgroup.
This feature complements the open repository by adding a security layer which allows you to consolidate objects into a single repository while selectively restricting access to certain objects as needed.
For example, you are the database administrator at a software firm. Ellen needs access to sales and marketing data models to complete a customer survey presentation. Gavin, a product manager, uses these and product management data models to complete his competitive analyses. Jason, a salesperson, needs access only to the standard query with reports for sales.
The solution is to create groups: Product Management, Marketing, and Sales, and give each group access to the objects that they need. Then assign users to appropriate groups: Ellen would have access to both sales and marketing, Jason to sales, and Gavin to all three.
To set up a repository group:
1 Choose Tools→Administer Repository, and select the connection file associated with the repository group with which you want to work.
The Administer Repository dialog box appears.
2 Click the Groups Setup tab to display the Groups Setup page.
4-8 Managing the Brio Intelligence Repository

3 Enter the group name you want to add the repository structure in the Groups field and click Add.
Tip If you enabled Grant Tables To Public when creating the repository, the default group, Public, is in the Groups list.
4 Select the group for which you want to associate a user name or names.
5 Enter the user name(s) in the Users field, and click Add to add them to the group.
Add multiple users by delimiting with commas in the edit field, for example: user1, user2, and user3.
6 All users with access to the repository, regardless of other grouping affiliations, have default access to documents placed in the Public group.
To remove a user group or user:
➤ Select the user name in the Users list and click Remove.
✰
Administering a Brio Intelligence Repository 4-9

4-10 Managing the Brio Intelligence Repository
Working with Repository ObjectsThis section discusses how to create and modify repository objects, and how to use Brio Intelligence’s Automatic Distributed Refresh (ADR), a sophisticated version control feature, to control document versions.
Uploading Documents to the RepositoryOnce you’ve created a repository, you can upload repository objects (data models, standard queries, and standard queries with reports) for version-controlled distribution to networked Brio Intelligence users.
Note When you store objects in the Brio Intelligence repository for user access, make the connection
file available to users as well.
To upload an object to the repository:
1 With the repository object you want to upload open in the Content pane, choose File→Save To Repository and select the connection file you want to associate with the object.
If necessary, click Select to launch the Select Connection File dialog box, navigate to the connection file you want to use, and click OK.
The Save To Repository dialog box appears and displays the Model page.
✏

2 In the Model Type area, select the type of object you are saving to the repository.
Choose between Data Model, Standard Query, and Standard Query with Reports.
3 In the Model Info area, enter information about the repository object.
■ Unique Name – Name of the object as it will appear in the repository.
■ Creator – Name of the person who created the object. This information is useful in tracing the document source for updates and so on.
■ Created – Date on which the object was saved to the repository defaults.
■ Register For Ondemand Server – Registers the repository object for OnDemand Server. Registered repository objects are available for both client/server and OnDemand Server access, based on the group privileges assigned to them.
■ Locked/Linked Object (Required For ADR) – Toggles repository object locking. Previously, repository models were locked to maintain versioning (see “Controlling Document Versions” on page 4-15), and could not be modified by the end user. Unlocked data models can be downloaded as usual and the query modified. However, once saved outside the repository, the unlocked model loses its automatic version-control.
■ Prompt For Sync On Download – Prompts users with the request: “A newer version of the object exists in the repository, downloading the changes may overwrite changes you have made to the local file. Would you like to make a copy of the current document before proceeding?”
If the user clicks Yes, a copy of the locally saved object is made, Automatic Distributed Refresh is disabled for the copy, and the object is synchronized with the newer version of the object
■ Description – Enter a 255 maximum character description of the repository object and what it can be used for.
4 Click the Groups tab to display the Groups page.
Groups associated with the owned repository appear in the Groups list. The PUBLIC group is included by default.
Working with Repository Objects 4-11

5 Use the arrow buttons to grant access to repository groups by adding them from the Available Groups list to the Selected Groups List.
■ Available Groups – Available user groups from which access can be granted.
■ Selected Groups – Groups added to the granted access list for the stored object.
Tip You must move the PUBLIC group to the Selected Groups list if you want to provide general, unrestricted access to the repository object.
6 Click OK to save the object to the repository.
7 Distribute the connection file to end users as needed to access both the object source database, and if necessary, the Brio Intelligence repository used to store the object.
Modifying Repository ObjectsYou can make modifications to document objects stored in the repository by downloading, modifying, and uploading them again. You can choose to save the object under a new name, but if the object is not significantly altered, it’s best to retain consistency by reloading the document under the same name. This ensures that linked documents are automatically updated.
Caution Modifications made to repository objects propagate throughout the user environment via Automatic Distributed Refresh (ADR), which track objects by unique ID and version number. Each time the object is uploaded to the repository, it is also assigned a new version number. For ADR to work properly, you must upload a modified repository object with the same name as the original.
To modify a repository object:
1 Choose File→Open From Repository→Select.
The Select Connection dialog box appears.
✰
!
4-12 Managing the Brio Intelligence Repository

Working with Repository Objects 4-13
Note You can also choose to use the connection file currently in use, if there is one. Current OCEs are listed below the Select menu item.
2 Select the connection file you want to use and click OK.
3 In the Password dialog box, type your user name and password and click OK.
The Open From Repository dialog box appears.
4 Navigate through the repository tree and select the repository object you want to use
The Open From Repository dialog box displays information about the selected object.
■ Unique Name – Name of repository object
■ Creator – Creator of the repository object
■ Created – Date on which the repository object was created
■ Description – General description of the repository object, its contents, and the type of information that can be queried
5 Click Open.
Brio Intelligence downloads the repository object to the appropriate section.
6 Make the desired changes to the object, and then choose File→Save To Repository.
✏
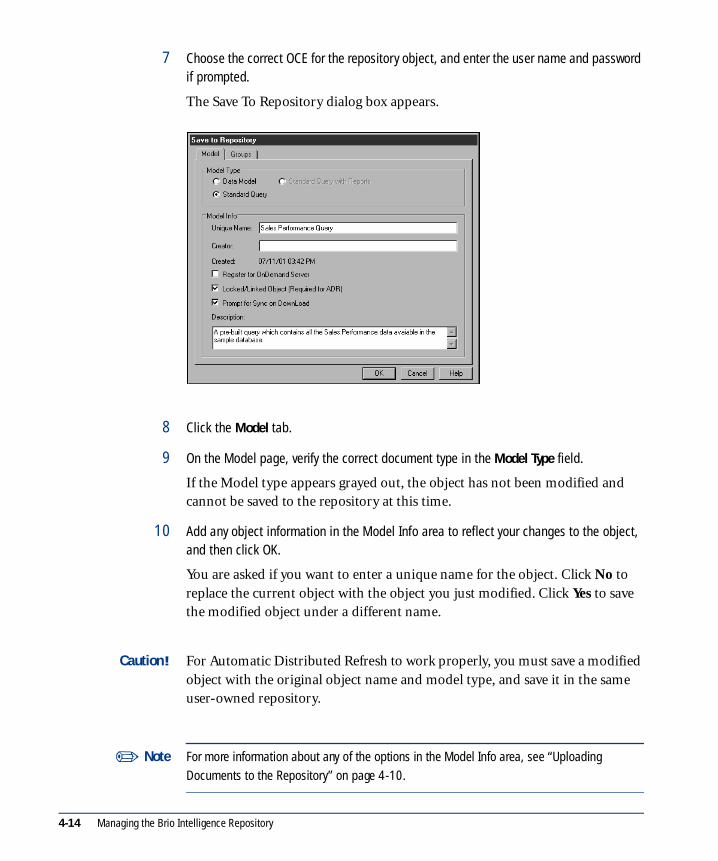
4-14 Managing the Brio Intelligence Repository
7 Choose the correct OCE for the repository object, and enter the user name and password if prompted.
The Save To Repository dialog box appears.
8 Click the Model tab.
9 On the Model page, verify the correct document type in the Model Type field.
If the Model type appears grayed out, the object has not been modified and cannot be saved to the repository at this time.
10 Add any object information in the Model Info area to reflect your changes to the object, and then click OK.
You are asked if you want to enter a unique name for the object. Click No to replace the current object with the object you just modified. Click Yes to save the modified object under a different name.
Caution For Automatic Distributed Refresh to work properly, you must save a modified object with the original object name and model type, and save it in the same user-owned repository.
Note For more information about any of the options in the Model Info area, see “Uploading
Documents to the Repository” on page 4-10.
!
✏
Working with Repository Objects 4-15
11 If you assigned another name to the object, you will be prompted to associate the modified object with a group. Click OK.
Brio Intelligence automatically displays the Group page so that you can associate the object with a group.
12 Use the arrow buttons to grant access to repository groups by adding them from the Available Groups list to the Selected Groups List.
13 Click OK.
Controlling Document VersionsAutomatic Distributed Refresh (ADR) is a sophisticated version control feature that transparently updates your users’ Brio Intelligence documents when the data model or standard query is changed in the Brio Intelligence repository. ADR operates completely in the background without any user interaction
ADR assumes that:
■ Each object in the BRIOOBJ table has a unique ID number.
■ Each object is assigned an iterative version number each time it is altered and uploaded.
Data model objects are typically downloaded from the Brio Intelligence repository into documents that are used to analyze data through pivots, charts, and other reports. When a user saves work to a document on disk (either a local hard disk or file server), Brio Intelligence stores both a link to the source object (which was downloaded from the Brio Intelligence repository) and the connection information needed to reconnect to the repository.
When the document is reopened, Brio Intelligence reads the link information, connects to the repository, checks to see if the object exists, and checks if it has the same version number stored in the document file. If the object in the repository has been modified, it will have a new version number, which indicates that Brio Intelligence should update the old version saved in the document.
Caution For ADR to work properly, you must save a modified object with the original object name and model type, and save it in the same user-owned repository. Data models and standard queries (with or without reports) are synchronized using ADR.
!

4-16 Managing the Brio Intelligence Repository

5 Auditing Brio Intelligence Activities
This chapter provides information on Brio Intelligence’s auditing features, including how to track and log who uses data model, how database resources are allocated, how database resources are consumed, and how to optimize the allocation and availability of data models. It contains:
■ About Auditing
■ Creating an Audit Table
■ Auditing Keyword Variables
■ Sample Audit Events
5-1

About AuditingAuditing allows Brio Intelligence Designers to collect information about data models downloaded from the repository. You can use auditing features to track how long queries take to process, which tables and columns are used most often, and even record the full SQL statement that is sent to the database.
Audit information can help the database administrator monitor not only the effectiveness of each distributed data model, but also the weaknesses and stress points within a database. The results are useful for performing impact analysis to better plan changes to the database.
Auditing requires minimal additional setup and can be implemented entirely within Brio Intelligence. The steps required for auditing data models are:
■ Create a Brio Intelligence repository with an inventory of distributed data models.
■ Create a database table in which to log audit events.
■ Use data model options to define events that you want to audit for each data model.
■ Save the audited data models to the Brio Intelligence repository.
■ Use Brio Intelligence to query the audit table and to analyze the data it contains.
Special Considerations■ The Audit log may fill up. Monitor it regularly and delete any entries that
are no longer used.
■ Before uploading your audited data model to the Brio Intelligence repository, log in as a user and test each auditing event to verify that your SQL statements are not generating any errors.
■ Auditing is not supported for the Process Results To Database Table feature, nor for Essbase data models. However, scheduled documents containing linked data models are audited normally.
5-2 Auditing Brio Intelligence Activities
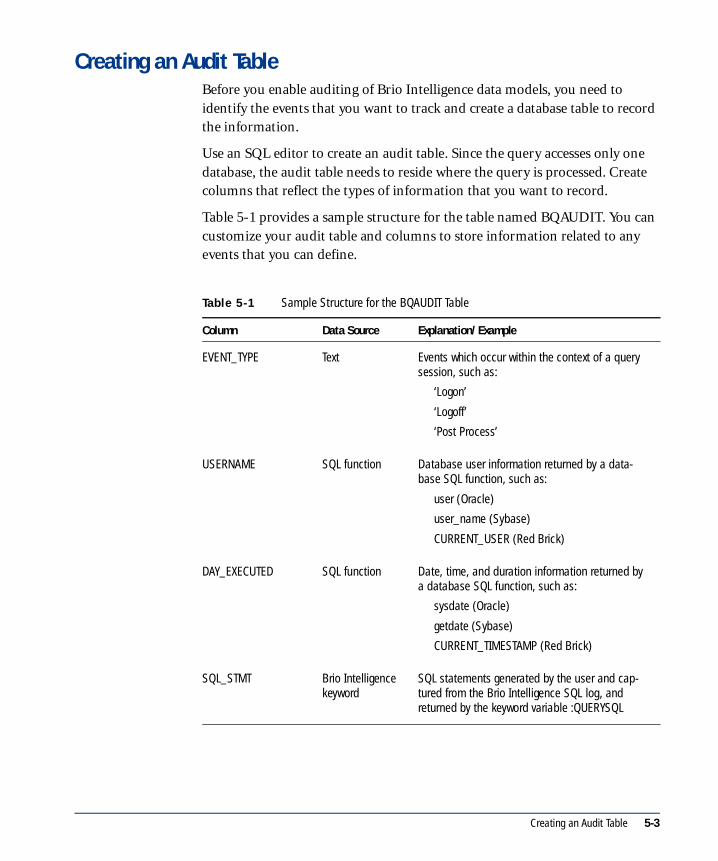
Creating an Audit TableBefore you enable auditing of Brio Intelligence data models, you need to identify the events that you want to track and create a database table to record the information.
Use an SQL editor to create an audit table. Since the query accesses only one database, the audit table needs to reside where the query is processed. Create columns that reflect the types of information that you want to record.
Table 5-1 provides a sample structure for the table named BQAUDIT. You can customize your audit table and columns to store information related to any events that you can define.
Tab le 5 -1 Sample Structure for the BQAUDIT Table
Column Data Source Explanation/Example
EVENT_TYPE Text Events which occur within the context of a query session, such as:
‘Logon’
‘Logoff’
‘Post Process’
USERNAME SQL function Database user information returned by a data-base SQL function, such as:
user (Oracle)
user_name (Sybase)
CURRENT_USER (Red Brick)
DAY_EXECUTED SQL function Date, time, and duration information returned by a database SQL function, such as:
sysdate (Oracle)
getdate (Sybase)
CURRENT_TIMESTAMP (Red Brick)
SQL_STMT Brio Intelligence keyword
SQL statements generated by the user and cap-tured from the Brio Intelligence SQL log, and returned by the keyword variable :QUERYSQL
Creating an Audit Table 5-3

Defining Audit EventsAfter you create the audit table on the database, you can begin defining the events you want to track for each data model.
Note To log audit data, you must provide Brio Intelligence users the database authority to execute each SQL statement you define for auditing events. For example, all users must have insert or
update authority to the Audit table that you create.
To define audit events:
1 Download an existing data model you want to track from the Brio Intelligence repository, or create a new data model in the Content pane using the Table catalog.
For more information about creating a new data model, see “Building a Data Model” on page 2-2.
2 In the Query section, choose DataModel→Data Model Options.
The Data Model Options dialog box appears.
3 Click the Auditing tab to display the Auditing page.
The Auditing page displays the events you can audit.
DATAMODEL Brio Intelligence keyword
Data models accessed by the user and returned by the keyword variable :REPOSITORYNAME
NUM_ROWS Brio Intelligence keyword
Query information returned by the keyword vari-able :ROWSRETRIEVED
Tab le 5 -1 Sample Structure for the BQAUDIT Table (Continued)
Column Data Source Explanation/Example
✏
5-4 Auditing Brio Intelligence Activities

4 Click the Define button to define the way in which an event is audited.
The SQL For Event dialog box appears.
5 Enter one or more SQL statements to update the audit table when the event occurs, and click OK.
A check mark appears next to the event on the Auditing page in the Data Model Options dialog box. You can use the check box to enable or disable the event definition without re-entering the SQL statement. You can also click Define again at any time to modify the SQL statement.
6 Choose File→Save to Repository to save the audited data model to the Brio Intelligence repository.
For more information on saving to the repository, see “Uploading Documents to the Repository” on page 4-10.
The SQL statement is sent to the database whenever a user triggers the event while using the data model.
Creating an Audit Table 5-5

Auditing Keyword VariablesBrio Intelligence provides keyword variables (see Table 5-2) that can be used to help define audit events. The keywords can be inserted into audit event SQL statements to return specific data each time the event is triggered.
Tip When entering an auditing keyword variable, always precede it with a colon (:) and enter all keyword text in uppercase. Other items in the SQL statement may also be case sensitive, depending on your database software.
Tab le 5 -2 Keyword Variables
Keyword Variable Description
:ROWSRETRIEVED Number of rows retrieved by the most recently executed query.
:REPOSITORYNAME Name of the repository object in use (data model or standard query with reports).
:QUERYSQL (Pre Process, Limit: Show Values, and Detail View only) Complete SQL text of the most recently executed query statement.
Tip: Consider the maximum column length when using :QUERYSQL. You may want to use a substring function to limit the length of the SQL being logged. For example: SUBSTR(:QUERYSQL,200)
:SILENT Restricts display of the audit-generated SQL statement within the user’s SQL Log. When the :SILENT keyword variable is included in the audit statement, the SQL Log output reads “Silent SQL sent to server…” instead of the SQL statement.
This keyword variable provides a security feature when the triggered SQL statement is sensitive or should remain undetected.
✰
5-6 Auditing Brio Intelligence Activities
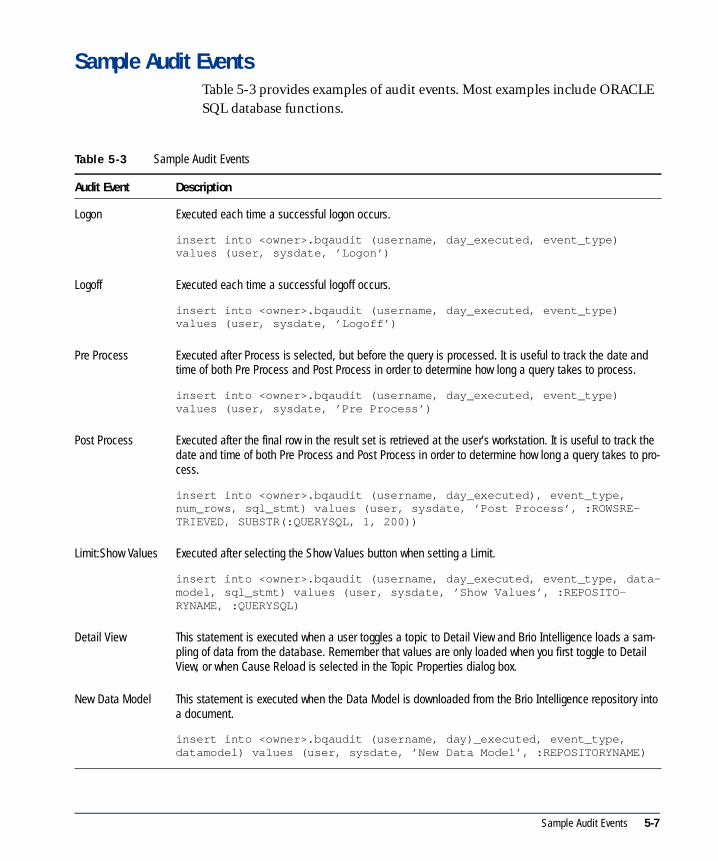
Sample Audit EventsTable 5-3 provides examples of audit events. Most examples include ORACLE SQL database functions.
Tab le 5 -3 Sample Audit Events
Audit Event Description
Logon Executed each time a successful logon occurs.
insert into <owner>.bqaudit (username, day_executed, event_type) values (user, sysdate, ’Logon’)
Logoff Executed each time a successful logoff occurs.
insert into <owner>.bqaudit (username, day_executed, event_type) values (user, sysdate, ’Logoff’)
Pre Process Executed after Process is selected, but before the query is processed. It is useful to track the date and time of both Pre Process and Post Process in order to determine how long a query takes to process.
insert into <owner>.bqaudit (username, day_executed, event_type) values (user, sysdate, ’Pre Process’)
Post Process Executed after the final row in the result set is retrieved at the user’s workstation. It is useful to track the date and time of both Pre Process and Post Process in order to determine how long a query takes to pro-cess.
insert into <owner>.bqaudit (username, day_executed), event_type, num_rows, sql_stmt) values (user, sysdate, ’Post Process’, :ROWSRE-TRIEVED, SUBSTR(:QUERYSQL, 1, 200))
Limit:Show Values Executed after selecting the Show Values button when setting a Limit.
insert into <owner>.bqaudit (username, day_executed, event_type, data-model, sql_stmt) values (user, sysdate, ’Show Values’, :REPOSITO-RYNAME, :QUERYSQL)
Detail View This statement is executed when a user toggles a topic to Detail View and Brio Intelligence loads a sam-pling of data from the database. Remember that values are only loaded when you first toggle to Detail View, or when Cause Reload is selected in the Topic Properties dialog box.
New Data Model This statement is executed when the Data Model is downloaded from the Brio Intelligence repository into a document.
insert into <owner>.bqaudit (username, day)_executed, event_type, datamodel) values (user, sysdate, ’New Data Model’, :REPOSITORYNAME)
Sample Audit Events 5-7

Data Model Refresh This statement is executed after a Data Model is refreshed through ADR.
insert into <owner>.bqaudit (username, day_executed, event_type, data-model) values (user, sysdate, ’Data Model Refresh’, :REPOSITORYNAME)
Tab le 5 -3 Sample Audit Events (Continued)
Audit Event Description
5-8 Auditing Brio Intelligence Activities

6 Scheduling Documents
This chapter explains how to schedule and distribute Brio Intelligence documents using the Brio Broadcast Server. It contains:
■ About Brio Broadcast Server
■ Connecting to Job Repositories
■ Working with Jobs
■ Specifying Job Details
■ Using Multiple Job Connections
6-1
About Brio Broadcast ServerBrio Broadcast Server is a batch-processing server that automates information processing and delivery. It is the base model of Brio Enterprise Server. Broadcast Server runs documents at off hours, pushing the results through various distribution channels. It reduces and redistributes the network traffic of client/server data warehousing.
Broadcast Server FeaturesBroadcast Server features include:
■ Centralized processing – Routes query processing to a central server. This eliminates the need to maintain redundant middleware connections on the user desktop.
■ Off-hours processing – Runs scheduled queries automatically, at appointed times and at intervals, keeping published reports up to date. Frequently-run queries can be off-loaded to Broadcast Server to reduce hits to the database and conserve network bandwidth during peak periods.
■ Report bursting – Leverages processes to retrieve data sets based on different needs or access privileges. Scheduled documents can run in multiple cycles, each constrained to receive a specific data set. Documents that require wide distribution can be scheduled once and deliver the correct information to diverse audiences from different regions or divisions.
■ Enterprise distribution – Delivers reports through a wide variety of network resources. Printers, email, network, FTP, and Internet file servers can all be configured as distribution options for reports and data sets in multiple file formats.
Documents, Jobs, and SchedulingWith Broadcast Server, you can run Brio Intelligence documents on a regular basis and during non-business hours. For example, you can request that your query document be processed tonight, at the beginning of the next fiscal quarter, or every Tuesday at 8:30 a.m. for the next 12 months.
You can also use Broadcast Server to distribute information, saving the results of a query with the document or exporting them to a spreadsheet. You can send reports to a network printer or email copies to yourself and a coworker. You can even publish your query data to an intranet.
6-2 Scheduling Documents

Brio Intelligence and Broadcast Server make this automation easy. You can schedule your document simply by logging on to your scheduling database and defining details of the job, such as when the document should be processed and how reports should be distributed. Then just add the job to the job list stored on the database.
Broadcast Server takes care of the rest, running your job for as long as you specify, and delivering data and reports exactly as instructed.
Connecting to Job RepositoriesA job repository is a set of database tables that store a queue of scheduled jobs. Job repositories are periodically polled by the Broadcast Server, which downloads and processes the jobs when they are due to run.
Note Check with your database or Brio Intelligence administrator to see which Broadcast Server and
job repositories you are authorized to use for job scheduling.
To submit a document to the Broadcast Server for scheduling, or to view a job list (see “Viewing the Broadcast Server Job List” on page 6-6), you first must connect to a database that contains a job repository:
■ If you choose File→Schedule, you can schedule an open document to the database the document is processed against, or to an alternate database.
■ If you choose Tools→View Job List, your default connection file (see “Setting a Default OCE” on page 1-15) is used to access the job list on your default database. If you work with multiple job repositories, you may want to select a connection file each time (see “Using Multiple Job Connections” on page 6-24).
Your job repository may be located on any database in your Brio Intelligence environment, and need not be the same database that serves as the document’s “home” processing database. If more than one instance of Broadcast Server is active in your computing environment, each server may poll the same job repository, or there may be several different job repositories.
✏
Connecting to Job Repositories 6-3
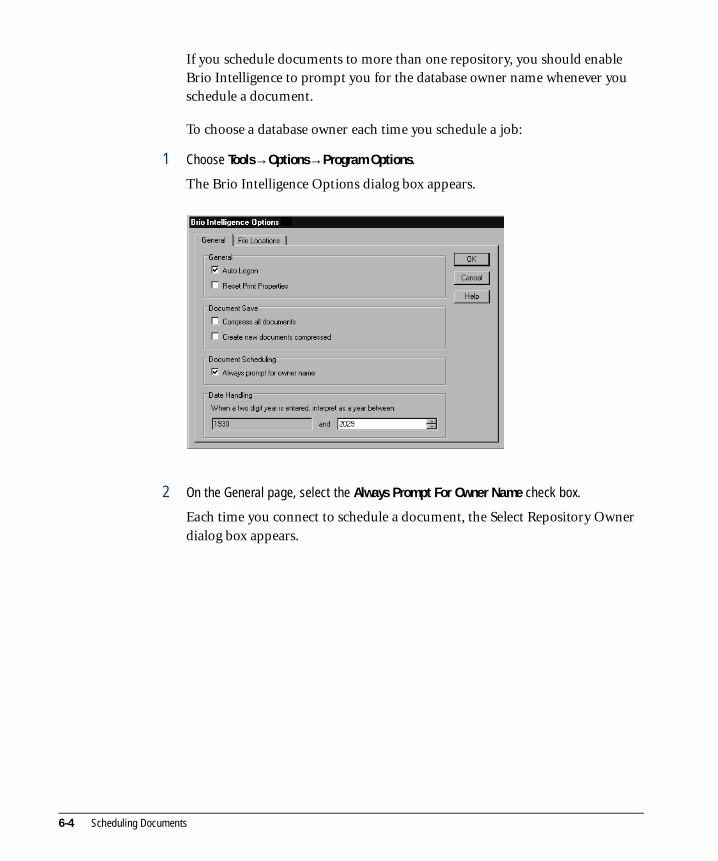
If you schedule documents to more than one repository, you should enable Brio Intelligence to prompt you for the database owner name whenever you schedule a document.
To choose a database owner each time you schedule a job:
1 Choose Tools→Options→Program Options.
The Brio Intelligence Options dialog box appears.
2 On the General page, select the Always Prompt For Owner Name check box.
Each time you connect to schedule a document, the Select Repository Owner dialog box appears.
6-4 Scheduling Documents

Working with JobsBegin scheduling documents by loading them into the job repository tables on your database.
Scheduling Open Documents as JobsYou can directly schedule an open document to the job repository of your choice.
To schedule an open document:
1 Choose File→Schedule→Option.
■ Choose Select to schedule to a job repository located on a different database server. You are prompted to select a connection file to log on to the database that contains the repository tables.
■ Choose the default connection file to schedule to a job repository located on the same database server used to process the open document. If the current database contains no job repository tables, Brio Intelligence returns a message indicating that the job repository tables do not exist on the database.
Once connected, the Job Detail dialog box appears with the General page displayed.
2 On the General page, enter basic information about the job.
3 On the Queries page, select one or more queries to process in a job.
You can include all the queries displayed in this dialog box. If you have modified a document after scheduling it to the Broadcast Server, you can reload the latest version of the document.
4 On the Actions page, define how to process and distribute the job.
5 On the Schedule page, specify when and how many times to run the job.
6 When you are finished defining the job details, click OK to add the job to the queue.
Working with Jobs 6-5
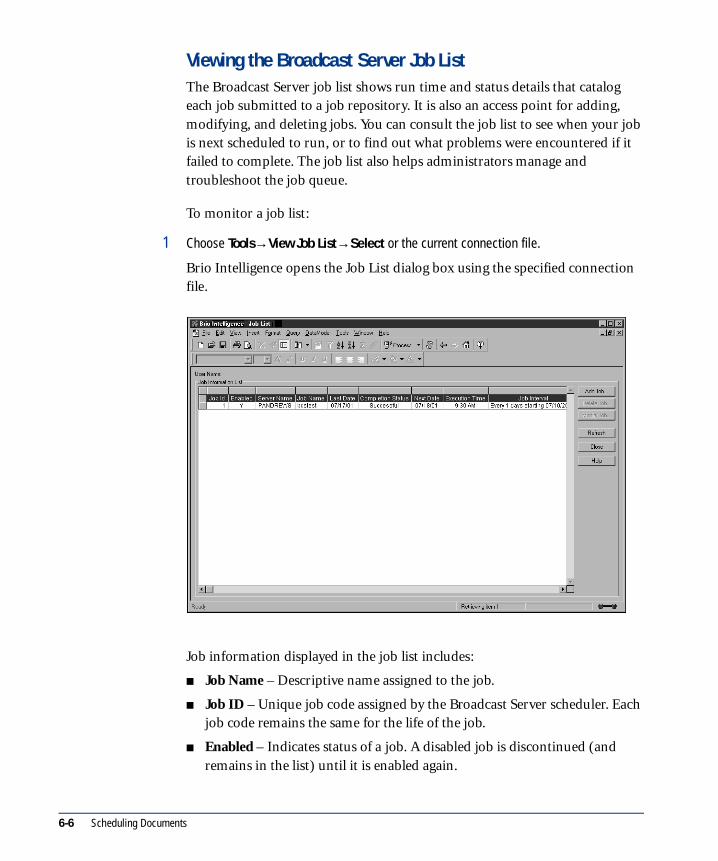
Viewing the Broadcast Server Job ListThe Broadcast Server job list shows run time and status details that catalog each job submitted to a job repository. It is also an access point for adding, modifying, and deleting jobs. You can consult the job list to see when your job is next scheduled to run, or to find out what problems were encountered if it failed to complete. The job list also helps administrators manage and troubleshoot the job queue.
To monitor a job list:
1 Choose Tools→View Job List→Select or the current connection file.
Brio Intelligence opens the Job List dialog box using the specified connection file.
Job information displayed in the job list includes:
■ Job Name – Descriptive name assigned to the job.
■ Job ID – Unique job code assigned by the Broadcast Server scheduler. Each job code remains the same for the life of the job.
■ Enabled – Indicates status of a job. A disabled job is discontinued (and remains in the list) until it is enabled again.
6-6 Scheduling Documents
■ Server Name – ID name of the Broadcast Server instance processing the job.
■ Last Date – Date of the last previous iterative run.
■ Completion Status – Status of the previous (or current) job run.
■ Next Date – Date of the next iterative run.
■ Execution Time – Scheduled run time for each iteration.
■ Job Interval – Time between iterative runs.
■ Job Repetitions– Number of iterative run cycles assigned.
You can use the job list to add, modify, or delete jobs.
Caution Job lists display only jobs scheduled under your own database user account. If you are a Broadcast Server administrator and are included in the server’s Administrators group, use a job list to monitor all jobs scheduled to a given job repository.
Adding Jobs Using the BroadCast Server Job ListYou can schedule any Brio Intelligence document using an open Broadcast Server job list.
To add a job to an open job list:
1 Choose Tools→View Job List→Select or the current connection file.
Brio Intelligence opens the Job List dialog box using the specified connection file.
2 Click Add Job.
The Open File dialog box appears.
3 Navigate through the file system to your BrioQuery directory, select a document to schedule, and click OK.
The Job Detail dialog box appears with the General page active.
4 Describe the attributes of the job using the General, Queries, Actions, and Schedule pages in the Job Detail dialog box.
For more information, see “Specifying Job Details” on page 6-10.
5 When the job details have been defined, click OK to add the job to the job list.
!
Working with Jobs 6-7
Modifying Jobs in the Broadcast Server Job ListYou can modify an existing job to change any of its parameters, including output destinations, scheduling times, or the values used to resolve a variable limit.
To modify a job:
1 Choose Tools→View Job List→Select (or the current connection file) to open the Broadcast Server job list.
2 Select the job in the Job List dialog box and click Modify Job.
3 Make the desired changes to the job parameters and click OK.
The job, along with your changes, is re-saved to the job list.
Deleting Jobs from the Broadcast Server Job ListYou can delete jobs that have become obsolete.
To delete a job:
1 Choose Tools→View Job List→Select (or the current connection file) to open the Broadcast Server job list.
2 Select the job in the Job List dialog box and click Delete.
Processing Scheduled Jobs to Database TablesYou can modify a scheduled job so that it processes to a database table. In most respects, processing to a database table is the same regardless of whether a file is scheduled or directly processed.
Note “Process Query File To Table is supported by the BRIOSTBL database table, which logs
information about table creations and updates by Broadcast Server. An instance of this table must exist on the processing database, and you must also have database write privileges on the database to use this feature.
✏
6-8 Scheduling Documents

RestrictionsA few restrictions apply when a Process Query File To Table action is specified for a scheduled document:
■ Broadcast Server can create a new table or update a table it has already created. To avoid conflicts, Broadcast Server checks both the database and the BRIOSTBL table before processing to see if a table name is in use, and if it is registered as created by Broadcast Server. If the name is not available the job will fail on process.
■ Tables created through Broadcast Server cannot be maintained or deleted in Brio Intelligence. Query the BRIOSTBL table using Brio Intelligence in the job repository to monitor tables created by Broadcast Server.
To schedule a document to a database table:
1 Schedule a document, and enter the required information on the General page of the Job Detail dialog box.
2 Click the Actions tab to display the Actions page.
3 Select the Process item from the tree control and click Modify.
The Process Query File dialog box appears.
4 Click the Process To Table field to activate the fields on the dialog box.
5 Enter a name for the table in the Table Name field.
The table can be written to any database and owner name in the RDBMS, provided you include the correct syntax in the field. You can also add the date of process to the table name.
6 If applicable, specify whether Broadcast Server should recreate or append rows to the table on each process.
7 Grant table privileges as desired, separating database user IDs with commas if necessary.
8 Click OK.
The Process Query File To Table action appears in the tree control.
Working with Jobs 6-9

Specifying Job DetailsAfter a job is added to the Broadcast server repository tables, use the Job Detail dialog box to define parameters that describe how and when a job is run.
You can reload the newest version of a document at any time. Note that if one or more sections in the older version of the document have job actions defined for them and the same sections are not included in the newer version of the document, the job action definitions are erased when the document is processed.
Entering General InformationUse the Job Detail General page to enter basic information about the job.
■ Enabled – Toggles the running of the job. If this box is not selected, the job is disabled and does not run until the box is selected again. A disabled job remains in the job list.
■ Job ID – Unique job code assigned by Broadcast Server. A job code remains the same for the life of the job.
6-10 Scheduling Documents

■ Job Name – Descriptive job name which describes the job in the Job List.
■ Document – Name of the scheduled document.
■ Last Date – Date of the last scheduled run of a job.
■ Next Date – Date of the next scheduled run of a job.
■ Calendar – Custom-created calendar for use in scheduling the job. Calendars are provided by your administrator and can be used to schedule a job by alternate or fiscal calendars.
■ Server Name – Name of the Broadcast Server instance that runs the job. All servers that poll the selected job repository are listed in the drop-down list.
■ Send email notification upon completion? – Requests an email confirmation on completion of each job run. If the client and server machines use different email systems, the email address string entered in the field must match the mail protocol used by Broadcast Server, not the addressee.
Before you can use this feature, the administrator must enable email on Broadcast Server.
■ Address Book – Displays the email address book (MAPI-compliant email systems only).
■ Check Name – Pings the email address to check a name. There is no reply if the address checks (MAPI-compliant email systems only).
Specifying Job Details 6-11
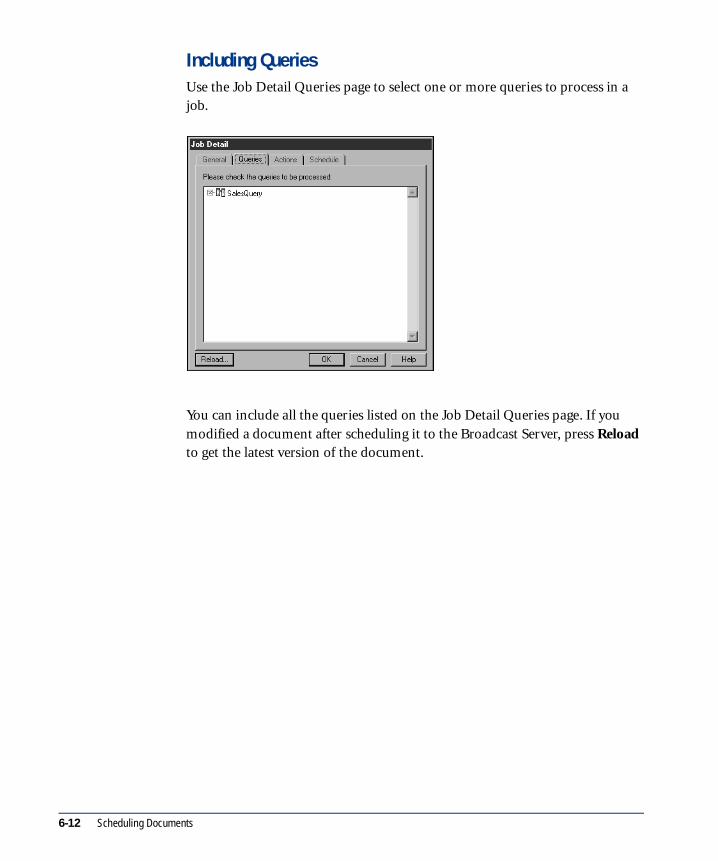
Including QueriesUse the Job Detail Queries page to select one or more queries to process in a job.
You can include all the queries listed on the Job Detail Queries page. If you modified a document after scheduling it to the Broadcast Server, press Reload to get the latest version of the document.
6-12 Scheduling Documents

Defining Actions
Use the Job Detail Actions page to define how to process and distribute the document.
You can assign iterative run cycles, resolve variable limits, and add distribution actions for jobs. Broadcast Server uses network resources including printers, directories, email systems, and intranets to funnel job output.
The scheduling tree control on the Actions page indicates what actions are necessary to schedule the job, and what are the available resources. By choosing from these options, you tell Broadcast Server how to process variable limits in the document, and which output actions should be completed.
You can also add different run cycles, resolving variable limits in different ways to funnel output selectively.
Note Network resources are available to you based on privileges assigned by the Broadcast Server
administrator. Check with your administrator to verify which resources are available or to gain access to additional resources.
Variable limits appear in the tree control only if they have been set in the underlying document.
✏
Specifying Job Details 6-13

To define a job action:
1 Select a job run cycle.
You can also click Add Cycle to display the Run Cycle window so that you can add a new run cycle and choose different variable limit values and output actions for each cycle.
2 Select a variable limit and click Modify.
If the scheduled document contains variable limits, you must resolve them before adding job actions.
3 If you want to process the scheduled job to a database table, select the Process object for the run cycle and click Modify.
4 Select a job cycle and click Add Action to define new job output actions using the Actions dialog box.
You can also click Modify to redefine a selected action, or click Delete to remove an action from the Actions page.
5 When all limits are resolved and actions added for each run cycle, click OK.
Run CyclesBrio Intelligence’s report bursting capability enables you to schedule a document with separate run cycles. You can process the document as many times as needed at each scheduled run, and with many different limits and distribution options each time. The job tree control displays the job’s default run cycle (Cycle 1) along with any variable limits the document contains.
For example, your document queries sales transactions within a certain region. The region is specified through a variable limit on the query to make the appropriate data available to each sales manager on Monday mornings.
When scheduling the job, you can add a job run cycle for each region. By resolving the variable limit for each run to retrieve numbers only for one region, you can then email the numbers from that run directly to the appropriate regional manager. The individual job is easier to track and update, and all run cycles complete simultaneously.
6-14 Scheduling Documents
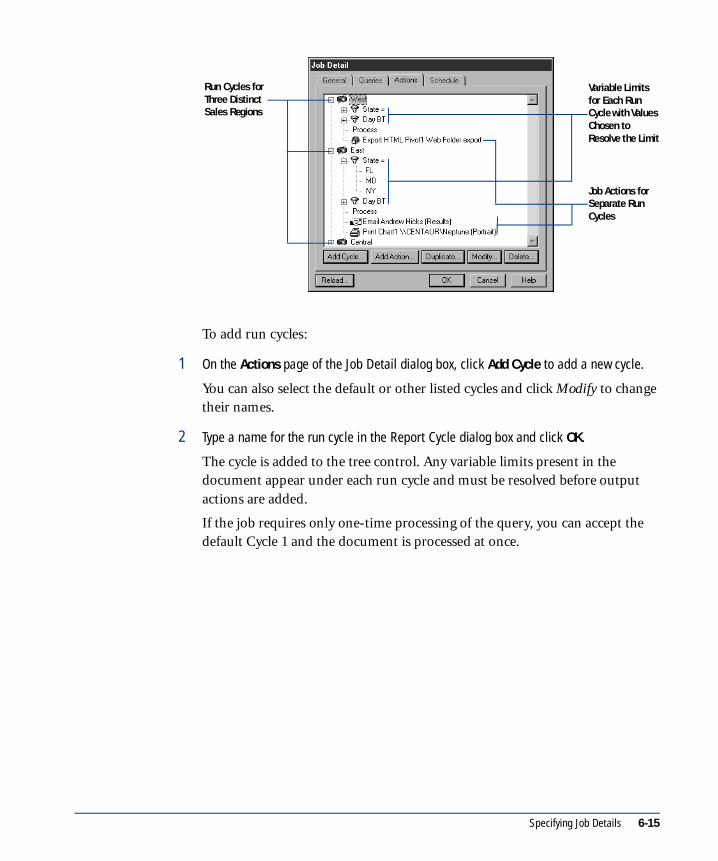
To add run cycles:
1 On the Actions page of the Job Detail dialog box, click Add Cycle to add a new cycle.
You can also select the default or other listed cycles and click Modify to change their names.
2 Type a name for the run cycle in the Report Cycle dialog box and click OK.
The cycle is added to the tree control. Any variable limits present in the document appear under each run cycle and must be resolved before output actions are added.
If the job requires only one-time processing of the query, you can accept the default Cycle 1 and the document is processed at once.
Run Cycles for Three Distinct Sales Regions
Variable Limits for Each Run Cycle with Values Chosen to Resolve the Limit
Job Actions for Separate Run Cycles
Specifying Job Details 6-15

Variable LimitsA variable limit prompts a user to supply constraining limit values each time a query is processed (see Getting Started with Brio Intelligence 6.6). When you schedule a document that contains variable limits, you can input values to resolve the limits for each processing cycle.
Note Variable limits appear in the tree control on the Actions page only if they have been set in the underlying document.
Variable limits in scheduled documents are slightly different than those in Brio Intelligence:
■ Since scheduled jobs run without user intervention, you are not prompted for variable limit values between runs. Instead, users supply values on submission of the job. Additionally, you cannot modify the comparison operator of a variable limit when scheduling. You can change custom values or a limit operator at any time by modifying the original limit and rescheduling the job.
■ Ordinal limit variables (1st, last, nth) enable you to apply limits relative to the time a job is run. For example, you can schedule a job to run yesterday, or to run the third day of every month without having to specify actual dates as limit values. If you are scheduling based on a custom calendar, the ordinal variables apply relative to that calendar.
To resolve a variable limit:
1 On the Actions page of the Job Detail dialog box, select a variable limit in the tree control and click Modify.
The Variable Limit dialog box appears. The Name and Operator fields display the name and operator used in the limit and cannot be modified.
✏
6-16 Scheduling Documents

Note You can resolve a variable limit differently for each job cycle.
If the variable limit is set on an item of date data types, ordinal limit values are added to the values panel and can be used to set limits relative to calendar dates.
2 Choose whether to include null values.
3 Define the potential limit values by clicking one of the following options:
■ Show Values – Shows database values associated with the item.
■ Custom Values – Supplies an empty field for inputting custom values. Click the check mark to add a value to the list of values. You can also display values from a previously saved custom list or values loaded from a file.
■ Custom SQL – Supplies an empty text box for typing an SQL clause to be included in the query statement. Choose View→Custom SQL to check the complete statement logic.
4 Select the values to include in the limit definition in the Values list.
Individually select values or click Select all and deselect the values you do not want to include. To create a snapshot of the values, click Select All and then click Transfer to move the variables to the Custom Values.
5 When the correct values are highlighted in the Values list, click OK.
The values selected in the panel when you submit the job are used to resolve the limit.
✏
Specifying Job Details 6-17

Job ActionsJob actions define where and how to deliver the results of the job query. Broadcast Server can utilize network resources including printers, directories, company and internet email systems, and intranets to funnel job output.
To add a job action:
1 On the Actions page, click Add Action.
The Action dialog box appears.
2 Define the action (output type) that you want for your document.
Available actions are:
■ Export HTML
■ Export Section
■ Print Section
■ Save Document
■ Email Document
■ Email Section
■ Export Document As Web Page
The parameters within the Action dialog box vary depending on the chosen action.
3 Define parameters for the job action, and then click OK.
Possible fields are listed in Table 6-1.
6-18 Scheduling Documents

Tab le 6 -1 Possible Job Action Parameters
Field Description Included with Action
Additional Message Email message text. Email Document, Email Section
Append Date To File Name
Appends the current date (year, month, and date) to the saved document or exported file to indicate when it was processed.
Export HTML, Export Section, Save Document, Email Section, Export Document As Web Page
Append Job ID And Report Cycle Name To File Name To Ensure Uniqueness
Appends both the job’s ID and report cycle name to the saved document or export file. This ensures that the file is recognizable if similar files are saved to the same directory.
Export HTML, Export Section, Save Document, Email Section, Export Document As Web Page
Bcc Email addresses of those people who should receive the message while their names are hidden from other recipients of the message.
Email Document, Email Section
Cc Email addresses for those who should receive a copy of the message.
Email Document, Email Section
Directory Sets the directory where the export file or Brio Intelligence document is saved.
Export HTML, Export Section, Save Document, Export Document As Web Page
File Name Name of the exported, saved, or emailed file. Export HTML, Export Section, Save Document, Email Section, Export Document As Web Page
Format File format of the exported or emailed section. Export Section, Email Section
Orientation Page orientation of the printed section. Print Section
Printer Output printer used to print the section. Print Section
Register For OnDemand Server
Registers the document for use with OnDemand Server for users to query over the Web, copying the file to the OnDemand Server registry and displaying group and default privilege settings.
Save Document
Save Computed Columns Values
Saves computed columns as snapshots. (See Note.)
Save Document
Save In Compressed Format
Saves the Brio Intelligence file using the Brio Intelligence compressed file format.
Save Document
Save Results With Docu-ment
Saves data contents of the Results section with the saved document. (See Note.)
Save Document
Section Sets the document section to be saved, printed, mailed, or exported.
Export HTML, Export Section, Print Section
Send File Sends a copy of the file with the email message. Email Document
Specifying Job Details 6-19

Note When saving a document, you have the option to save the results set with the document. You also have the option to save any computed column expressions as a snapshot. Your decision in this selection depends largely on how you want to use the information in the document, and
on what information needs to be recalculated.
Saving results with your query allows you to analyze and generate reports without being connected to the database. Results are saved for an individual query or for multiple queries for which results have been generated. You also can specify whether to save any computed
columns in the results set as a snapshot with the document.
If you intend to work with a document which includes a Report Designer section, you must save your results with the document. If you do not save results with the document, the Report Designer section is not available.
Saving your results set makes sense if you cannot connect to a database, for example, when
traveling or working remotely, or if you are scheduling or forwarding documents for someone else’s use.
Computed values saved as snapshots are not recalculated when the document is opened. Not even dynamic expressions (for example, values that reference the sysdate function such as
date or time) are recalculated. They are recalculated only when the query is reprocessed. Documents that are saved with computed columns as snapshots tend to be larger in size than documents that do not contain shapshots, but they take less time to open.
Send Results Sends saved Results section data with the emailed document.
Email Document
Send Compressed Sends the Brio Intelligence file in compressed format.
Email Document
Subject Subject of the email message. Email Document, Email Section
To Email addresses for the message recipient. Email Document, Email Section
Tab le 6 -1 Possible Job Action Parameters (Continued)
Field Description Included with Action
✏
6-20 Scheduling Documents
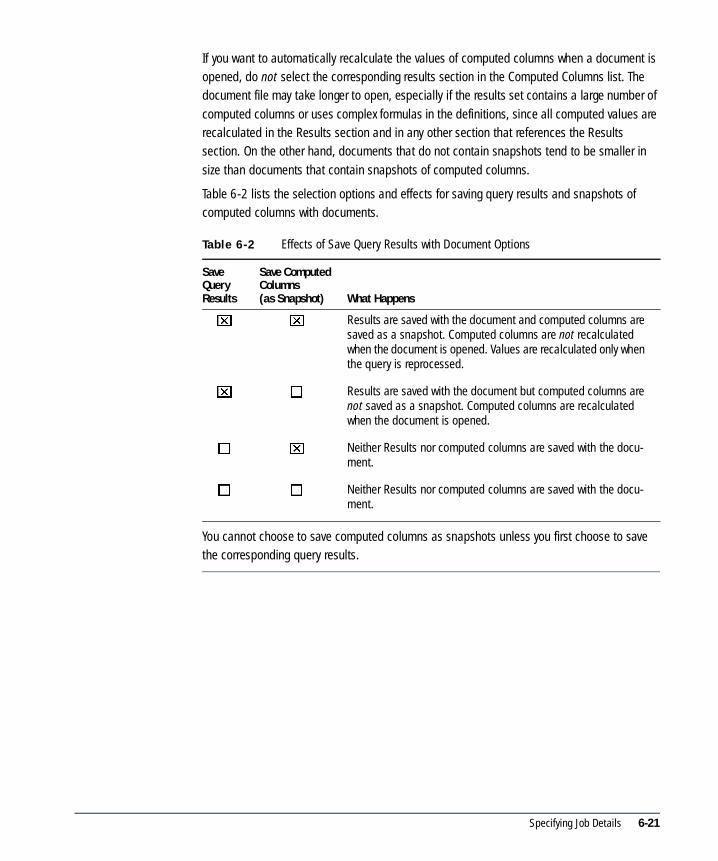
If you want to automatically recalculate the values of computed columns when a document is opened, do not select the corresponding results section in the Computed Columns list. The document file may take longer to open, especially if the results set contains a large number of
computed columns or uses complex formulas in the definitions, since all computed values are recalculated in the Results section and in any other section that references the Results section. On the other hand, documents that do not contain snapshots tend to be smaller in
size than documents that contain snapshots of computed columns.
Table 6-2 lists the selection options and effects for saving query results and snapshots of computed columns with documents.
You cannot choose to save computed columns as snapshots unless you first choose to save the corresponding query results.
Tab le 6 -2 Effects of Save Query Results with Document Options
SaveQueryResults
Save Computed Columns(as Snapshot) What Happens
x x Results are saved with the document and computed columns are saved as a snapshot. Computed columns are not recalculated when the document is opened. Values are recalculated only when the query is reprocessed.
x � Results are saved with the document but computed columns are not saved as a snapshot. Computed columns are recalculated when the document is opened.
� x Neither Results nor computed columns are saved with the docu-ment.
� � Neither Results nor computed columns are saved with the docu-ment.
Specifying Job Details 6-21
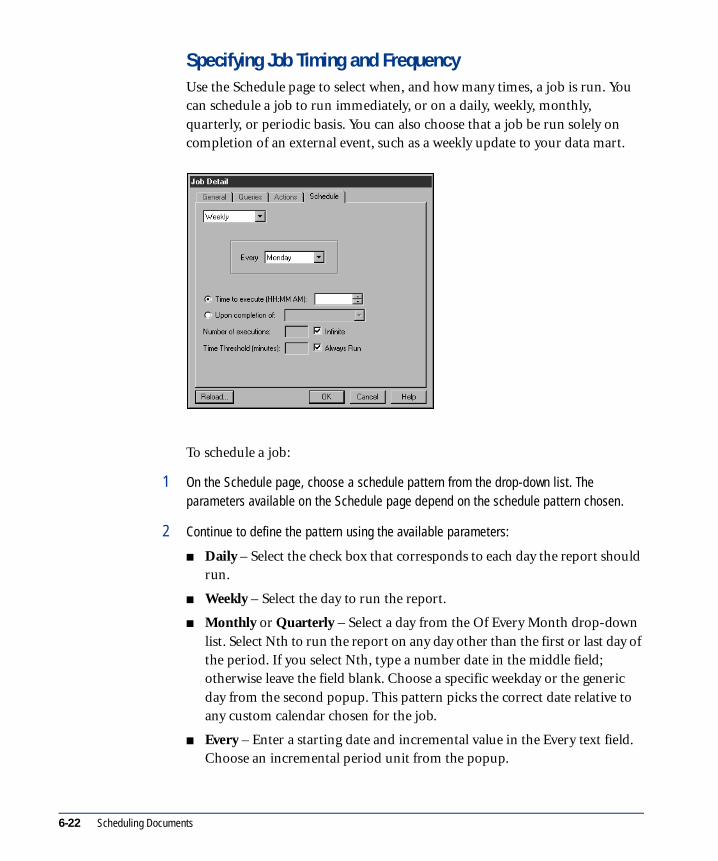
Specifying Job Timing and FrequencyUse the Schedule page to select when, and how many times, a job is run. You can schedule a job to run immediately, or on a daily, weekly, monthly, quarterly, or periodic basis. You can also choose that a job be run solely on completion of an external event, such as a weekly update to your data mart.
To schedule a job:
1 On the Schedule page, choose a schedule pattern from the drop-down list. The parameters available on the Schedule page depend on the schedule pattern chosen.
2 Continue to define the pattern using the available parameters:
■ Daily – Select the check box that corresponds to each day the report should run.
■ Weekly – Select the day to run the report.
■ Monthly or Quarterly – Select a day from the Of Every Month drop-down list. Select Nth to run the report on any day other than the first or last day of the period. If you select Nth, type a number date in the middle field; otherwise leave the field blank. Choose a specific weekday or the generic day from the second popup. This pattern picks the correct date relative to any custom calendar chosen for the job.
■ Every – Enter a starting date and incremental value in the Every text field. Choose an incremental period unit from the popup.
6-22 Scheduling Documents

■ Event-Based – If the scheduler is to run based on a predefined event, select this field. The job is run on the specified day if the event has been completed, or simply on completion of the event if the event-based pattern is selected. Completion is signified by an update to the BRIOEVNT table.
■ ASAP – Executes the job the next time the Broadcast server polls the job repository.
■ Time to Execute (HH:MM AM) – Enter a run time (colon delimited) for the job and a time of day. This field is not available if you select an event in the Upon Completion Of field.
■ Upon Completion Of – Select the predefined event that prompts the scheduler to run the job. (Your Administrator defines the fields that appear in this list.) The job is run on the specified day if the event has been complete, or on completion of the event if the event-based pattern is selected.
If a run time has been selected in the Time To Execute field, then you cannot select this field.
■ Number of Executions – Enter the number of times the job should run. Select the Infinite check box to run the job indefinitely.
■ Time Threshold – The time threshold is a grace period that follows the scheduled run time. If the job does not run within the time allotted by the threshold (because of conflicts or limited server capacity), it is shelved until the next scheduled run. Select the Always Run check box to always run the job, regardless of how long the server may have to postpone.
3 Click OK when the schedule is complete.
Specifying Job Details 6-23

Using Multiple Job ConnectionsIn most user environments, job repository tables are located on the same database used to process scheduled documents. Under this scenario, the connection information supplied when you connect to the scheduling database is sufficient to both schedule the document, and for Broadcast Server to process the document when the job is run.
In certain situations, however, scheduling may require more than one database connection, depending on the system architecture in your workplace and the type of document selected. Scheduling requires multiple connections if:
■ The Job list (job repository tables) resides on one database server, and the document is processed against another database server.
■ The document contains a data model stored in a Brio Intelligence repository that is not located on the same database the job is processed against.
■ The document includes imported Brio Intelligence files that require connections to more than one database server.
In each of these situations, once the job is scheduled, you need to supply additional information for each OCE the Broadcast Server needs to run the job.
To supply additional connection information:
1 Add or modify a job on the Job list.
2 Define job parameters in the Job Detail dialog box and click OK.
The Setup Job Connections dialog box appears and prompts for information to resolve a particular connection needed to run the job (for example, to refresh a data model or process an imported Brio Intelligence file).
6-24 Scheduling Documents

3 From the Connection drop-down list, select the correct OCE for the item specified on the Connection For line.
4 Enter standard connection information including database user name and password, and the database name if applicable, and click OK.
5 If prompted, select a job database owner. (See Getting Started with Brio Intelligence 6.6 for more information.)
If further connections are required, the Setup Job Connections dialog box reappears and prompts for another connection.
Using Multiple Job Connections 6-25

6-26 Scheduling Documents

A IBM Information Catalog
This chapter provides instructions for registering and managing Brio objects in the IBM Visual Warehouse Information Catalog. It contains:
■ About the IBM Information Catalog
■ Registering Documents to the IBM Information Catalog
■ Administering the IBM Information Catalog
A-1

About the IBM Information CatalogIBM’s Visual Warehouse (VW) is a family of products that design, load, manage, and retrieve information from data warehouses. Brio Intelligence is a component for the IBM VW solution, and is resold by IBM as part of VW bundles. To further extend the capabilities of the solution, Brio Intelligence supports the ability to register and manage Brio objects in the VW Information Catalog. The Information Catalog is a repository of document information with pointers to the physical objects.
DataGuide is the IBM end-user tool that accesses the Information Catalog. Users search the Information Catalog by subject area or keywords to locate the information they need. Clicking on a Brio Intelligence document link from inside DataGuide launches the appropriate Brio product on the users desktop to access the document. The Brio Intelligence document types that may be registered to the Information Catalog are BQY files and pointers to OnDemand Server documents (.bqyods objects).
Registering Documents to the IBM Information CatalogThe IBM Information Catalog is an IBM document repository that has been integrated with Brio Intelligence. It allows you to register, administer, and distribute Brio Intelligence (.bqy) and OnDemand Server (.bqyods) documents. The Catalog stores metadata about documents, but not the actual physical documents.
Another feature of the Catalog is that it allows you to categorize content stored in documents by specific subject area. A full-search engine in the repository enables you to search for information stored in the documents. For example, you could search on all documents associated with “sales.” In this case, the search results could yield Word files, Excel files, and Brio Intelligence documents. When you find a document that you want to work with, the IBM Information Catalog launches the appropriate application and opens the document.
Note Visual Warehouse must already be installed before you can register or administer this feature.✏
A-2 IBM Information Catalog

Note The Brio Intelligence and OnDemand Server document object types must already exist before completing the following steps. For more information see “Creating Object Type Properties” on page A-5.
To register a Brio Intelligence document:
1 With the repository object you want to upload open in the Content pane, choose File→Register To IBM Information Catalog.
The Save File dialog box appears.
2 Type the name of the Brio Intelligence document in the File Name field.
3 In the Save As Type field, leave the default .bqy file type and click Save.
The Connect To Information Catalog Repository dialog box appears.
4 Type your user identification in the User field.
5 Type your password in the Password field.
6 Type the ODBC data source name in the Database Alias field if it is different than the default database alias value.
The Register To Information Catalog dialog box appears, showing the Properties and Subject Area tabs. Use these corresponding pages to describe the properties and subject matter of the documents.
7 Click the Properties tab to go to the Properties page.
8 In the Available Properties list, select a property of the document to which you want to add a value.
9 In the Enter Value for Selected Property edit box, type a value for the property.
10 Repeat Step 8 through Step 9 for all properties.
11 Click the Subject Areas tab.
✏
Registering Documents to the IBM Information Catalog A-3

12 In the Specify The Subject Area list, use the plus (+) and minus (–) signs to navigate through the Subject area structure (Grouping Category) and select the subject area folder to which you want to add the document.
The Subject Area displays a tree view of eligible subject area folders in which you can add the document.
13 Click Add to add the document or instance to the Subject Area specified in Step 12.
14 Click OK.
Defining PropertiesYou can define the values of selected properties for a document when registering to the catalog. Use the Properties page to show and edit properties, data types, and lengths.
Selecting Subject AreasUse the Subject Area page to display and select a subject area for the document that you are registering. By including the document in a Subject Area folder, you can later search for the document by topic.
Tab le A -1 Properties Page Field Definitions
Field Description
Available Properties Displays a list of available properties that you can specify.
Enter Value Edit any available value by typing the information in this edit box. For a description of eligible values for the properties, see the Description field.
Tab le A -2 Subject Area Page Field Definitions
Field Definition
Specify The Subject Area Displays a tree view of eligible subject area folders in which you can add the document. Use the plus (+) and minus (–) signs to navigate through the folders. To add a document to folder, select the subject area folder and click Add.
Subject Areas Containing Displays the subject area folder to which the document has been added.
A-4 IBM Information Catalog

Administering the IBM Information CatalogThis section explains how to administer the IBM information catalog, including:
■ Creating Object Type Properties
■ Deleting Object Types and Properties
■ Administering Documents
■ Setting Up Object Types
Creating Object Type PropertiesUse the Setup Objects Types under Administer IBM Information Catalog to create an object type and specify its properties. An object type shows a category of business information, for example, a Brio document or an image. An object type property describes an attribute of the object type, for example, its name or data type.
Once an object type has been created, you cannot modify its existing properties or add new properties. You can, however, delete the entire object type, but not the individual properties of a selected object type.
Brio Intelligence allows you to create two object types:
■ .bqy –Brio Intelligence document
■ .bqyods – OnDemand Server document
To set up the Brio Enterprise or OnDemand Server object type and properties:
1 Choose File→Administer IBM Information Catalog.
The Connect To Information Catalog Repository dialog box appears.
2 Type your user identification in the User field.
3 Type your password in the Password field.
4 Type the ODBC data source name in the Database Alias field if it is different than the default database alias value.
5 Click OK.
The Administer Information Catalog dialog box appears.
Administering the IBM Information Catalog A-5
6 Click the Setup Object Types tab.
7 In the Object Type drop-down list, select either Brio Intelligence Document or OnDemand Server Document.
8 In the Name field, type the name of the property you want to associate with the object type.
9 In the Short Name field, type an abbreviated version of the property name.
10 In the Datatype list, select the data type classification of the property (for example, character-based) from the drop-down list.
11 In the Length field, type the maximum length character of the property.
12 To require that the property be completed when a user registers a document, click the Entry Required check box.
13 To add the object type property to the Properties for Object Type list box, click Set.
14 Repeat Step 8 through Step 12 for each property that you want to associate with the selected object type.
15 To create the object type, click Create Object Type.
Deleting Object Types and PropertiesYou can delete the entire object type, but not the individual properties of a selected object type once an object type has been created.
To delete a Brio Intelligence or OnDemand Server object type and properties:
1 Choose File→Administer IBM Information Catalog.
2 The Connect To Information Catalog Repository dialog box appears.
3 Type your user identification in the User field.
4 Type your password in the Password field.
5 Type the ODBC data source name in the Database Alias field if it is different than the default database alias value.
6 Click OK.
The Administer Information Catalog dialog box appears.
A-6 IBM Information Catalog
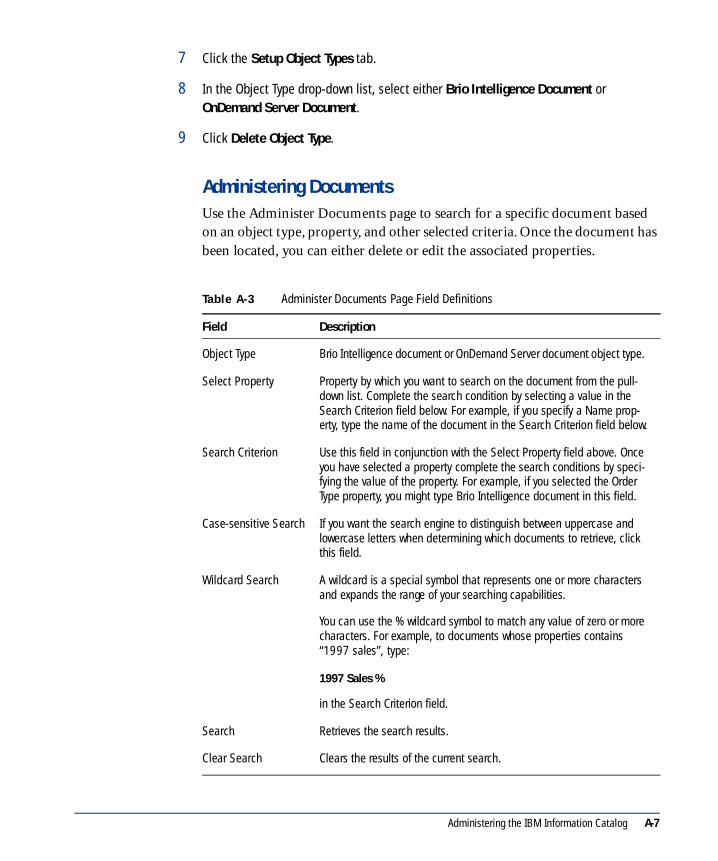
7 Click the Setup Object Types tab.
8 In the Object Type drop-down list, select either Brio Intelligence Document or OnDemand Server Document.
9 Click Delete Object Type.
Administering DocumentsUse the Administer Documents page to search for a specific document based on an object type, property, and other selected criteria. Once the document has been located, you can either delete or edit the associated properties.
Tab le A -3 Administer Documents Page Field Definitions
Field Description
Object Type Brio Intelligence document or OnDemand Server document object type.
Select Property Property by which you want to search on the document from the pull-down list. Complete the search condition by selecting a value in the Search Criterion field below. For example, if you specify a Name prop-erty, type the name of the document in the Search Criterion field below.
Search Criterion Use this field in conjunction with the Select Property field above. Once you have selected a property complete the search conditions by speci-fying the value of the property. For example, if you selected the Order Type property, you might type Brio Intelligence document in this field.
Case-sensitive Search If you want the search engine to distinguish between uppercase and lowercase letters when determining which documents to retrieve, click this field.
Wildcard Search A wildcard is a special symbol that represents one or more characters and expands the range of your searching capabilities.
You can use the % wildcard symbol to match any value of zero or more characters. For example, to documents whose properties contains “1997 sales”, type:
1997 Sales %
in the Search Criterion field.
Search Retrieves the search results.
Clear Search Clears the results of the current search.
Administering the IBM Information Catalog A-7

Setting Up Object TypesUse the Set Up Object Types page to set up object types and their properties. An object type shows a category of business information, for example, a document or an image. An object type property describes an attribute of the object type, for example, its name or data type.
Note Brio Intelligence allows you to create and delete only the Brio Enterprise document and OnDemand Server document object types and properties through the Brio Intelligence Setup
Object Types features. For more information see “Creating Object Type Properties” on page A-5.
Search Results Results of the search.
Delete Deletes a selected document from the repository.
Edit Allows you to edit the value properties of a document through the Prop-erties page of the Register To IBM Information Catalog option.
Tab le A -4 Setup Object Types and Properties Field Definitions
Field Description
Object Type Brio Intelligence document and OnDemand Server document objects types.
Name Name of the property that you want to associate with the object type.
Short Name Short name of the property that you want to associate with the object type.
Datatype Data type of the property.
Length Length of the property.
Entry Required Requires a user to select a property when registering a document to the DataGuide repository.
Tab le A -3 Administer Documents Page Field Definitions (Continued)
Field Description
✏
A-8 IBM Information Catalog
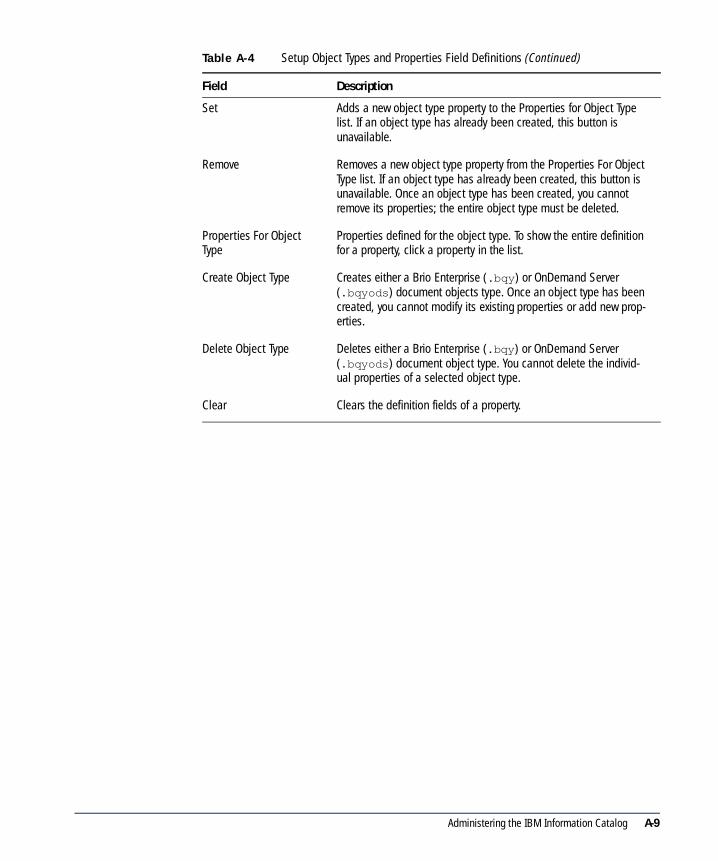
Set Adds a new object type property to the Properties for Object Type list. If an object type has already been created, this button is unavailable.
Remove Removes a new object type property from the Properties For Object Type list. If an object type has already been created, this button is unavailable. Once an object type has been created, you cannot remove its properties; the entire object type must be deleted.
Properties For Object Type
Properties defined for the object type. To show the entire definition for a property, click a property in the list.
Create Object Type Creates either a Brio Enterprise (.bqy) or OnDemand Server (.bqyods) document objects type. Once an object type has been created, you cannot modify its existing properties or add new prop-erties.
Delete Object Type Deletes either a Brio Enterprise (.bqy) or OnDemand Server (.bqyods) document object type. You cannot delete the individ-ual properties of a selected object type.
Clear Clears the definition fields of a property.
Tab le A -4 Setup Object Types and Properties Field Definitions (Continued)
Field Description
Administering the IBM Information Catalog A-9

A-10 IBM Information Catalog

B Brio Intelligence Troubleshooting
This chapter describes how to use the dbgprint tool to diagnose Brio Intelligence connectivity problems. It includes:
■ Connectivity Troubleshooting with dbgprint
■ dbgprint and Brio Intelligence
■ dbgprint and Broadcast Server
■ dbgprint and OnDemand Server
■ dbgprint and Insight/Quickview
B-1
Connectivity Troubleshooting with dbgprintIf you are experiencing difficulties logging on to or querying a database, you may be able to solve the problem with the help of a dbgprint (debug print) file. The dbgprint file automatically logs detailed Brio Intelligence status information which can assist you when troubleshooting platform configuration and connectivity problems. A dbgprint file will usually be requested by Brio’s technical support personnel if they help you to solve a connectivity-related problem.
Although this topic is written with reference to Brio Intelligence, the dbgprint instructions apply to other Brio tools as well, including Brio’s server applications and Insight. If you experience continued connectivity problems with any of these tools, or have difficulty understanding the contents of a dbgprint file, you can forward the contents of your dbgprint file to Brio Technical Support for assistance.
Note dbgprint is strictly a diagnostic tool, and the information contained is useful only for troubleshooting. Because Brio Intelligence and other Brio tools repeatedly log information to the file, dbgprint considerably slows application performance and should only be used if
you encounter connectivity problems.
dbgprint and Brio Intelligencedbgprint is a text file. When placed in a directory containing the Brioqry.exe file, Brio Intelligence automatically writes internal status information to the dbgprint file.
To use dbgprint with Brio Intelligence:
1 Exit Brio Intelligence if it is still running.
2 Start a text editor (that is, Notepad, Simple Text, WordPad, and so on).
3 Save an empty file as dbgprint (with no file extension) to the directory which contains your Brio Intelligence application executable (brioqry.exe (Windows) or Brio IntelligenceBrio Intelligence4.0 (Macintosh)) file.
Typically the brioqry.exe is saved to some variant of c:\ or d:\Program Files\Brio\BrioQuery\Program\brioqry.exe.
✏
B-2 Brio Intelligence Troubleshooting
If you are using Notepad, you first have to type a space or character before you can save the file. Do not save the file with a file extension.
In the Unix environment you need to create a file named DbgPrint. Please note the capitalization. This file will be placed in the bin directory for Brio Query.
If you are operating in a Windows environment, make sure that no extensions are appended to the end of the file name. If you are using Notepad as your text editor, the .txt extension will automatically be appended to the saved file. Make sure you remove any extension before you proceed to the next step.
4 Close the text editor and start Brio Intelligence by opening the actual application file.
In some instances dbgprint will not log information if started through an alias or shortcut. Instead, start Brio Intelligence using the Finder (Macintosh), or Windows Explorer (Windows 95/98/NT). Clicking a shortcut will only open if the Start In field on the Shortcut page of the Properties dialog box shows the path to your brioqry.exe file.
5 Once Brio Intelligence is running, recreate the steps which resulted in the previous error problem, or follow any instructions given to you by a Brio technical support representative.
Typical things you may be asked to do are:
■ Connect to the database
■ Retrieve a list of tables
■ Add tables to your work space
■ Create and process a query
■ Set a limit
6 Once you have completed the above tasks, quit Brio Intelligence. and open the dbgprint file.
7 View the contents of the dbgprint file.
The file should contain status information detailing your Brio Intelligence logon session. You will probably be asked to either fax or email the contents of the dbgprint file to Brio.
If the file is blank, review the previous steps and repeat the process.
Note If you need to run another dbgprint file, save the contents of the file with a unique name.
Each time you run the brioqry.exe file, the existing dbgprint file is overwritten.✏
dbgprint and Brio Intelligence B-3
dbgprint and Broadcast Server Capturing debug information on the Broadcast server works a little differently than Brio Intelligence. When you place the dbgPrint file in the same directory as the Broadcast server executable it logs the transactions to the database from the Broadcast Server as well as the Brio Intelligence daemon processes which are running the jobs.
To use dbgprint with Broadcast Server:
1 Stop the Broadcast Server if it is still running using the services control panel on WinNT or bqs.stop script on UNIX.
2 Start a text editor (that is, Notepad, Simple Text, WordPad, and so on) or use the touch command on UNIX (touch dbgPrint creates an empty file).
3 Save an empty file as dbgprint to the directory that contains your Bqserver.exe application executable file.
If you are using Notepad, you first have to type a space or character before you can save the file.
If using touch on UNIX, make sure you use it in the [BrioInstallDir]/bin directory where the Broadcast Server executable is found.
Typically the BQserver.exe is installed in a variant of c:\ or d:\Program Files\Brio\BrioQuery6\Program\brioqury.exe .
4 Start the Broadcast Server using the services control panel on WinNT or bqs.start script on UNIX.
Each corresponding BQ process that is spawned to run a job writes its dbgprint file to the working directory you specified in your Broadcast Server preferences in a file called dbgprint-<Job ID>. The job ID is added to dbgprint to produce a unique file name for each job.
B-4 Brio Intelligence Troubleshooting

dbgprint and OnDemand Server The DbgPrint setting is controlled by two existing ODS.ini file attributes, BQ_LOG_DIRECTORY and BQ_START_LOG. The location of DbgPrint files is determined by BQ_LOG_DIRECTORY setting. The default directory on NT is c:\Program Files\Brio\Brio Enterprise Server\Server and on UNIX it is [BrioInstallDir]/server. The key for starting logging is BQ_START_LOG=debug. The debug files created are named dbgprint-<bq process name>, for example:
dbgprint-BQServer_1
To use dbgprint for OnDemand Server:
1 Stop the OnDemand Server if it is still running using the services control panel on WinNT or ods.stop script on UNIX.
2 Edit the ODS.ini file which is found by default on NT in c:\Program Files\Brio\Brio Enterprise Server\Server and on UNIX it is [BrioInstallDir]/server. Change the setting BQ_START_LOG=debug and save the file.
3 Restart the OnDemand Server running using the services control panel on WinNT or ods.start script on UNIX.
Note If you need to run another dbgprint file, save the contents of the file with a unique name. Each time you restart the ODS service, the existing dbgprint file is overwritten.
✏
dbgprint and OnDemand Server B-5

dbgprint and Insight/Quickview DbgPrint files can also be used with Insight and Quickview.
To use dbgprint with Insight and Quickview:
1 Shut down your Web browser.
2 Start a text editor (for example, Notepad, Simple Text, MS-WordPad, and so on).
3 Save an empty file as dbgprint to the plugins directory of your Web browser, for example, C:\Program Files\Netscape\Communicator\Program\Plugins; C:\Program Files\Plus!\Microsoft Internet\PLUGINS.
If you are using Notepad, you first have to type a space or character before you can save the file.
4 Start your Web browser.
The DbgPrint file starts collecting debug information about the processing of your queries.
B-6 Brio Intelligence Troubleshooting

Glossary
Adaptive Report Level The level of privilege that a user can interact with a Brio Intelligence document. The adaptive report levels are View; View and Process; Analyze; Analyze and Process; Query and Analyze; and Data Model, Query, and Analyze. When a document is registered to the OnDemand Server, groups of users are granted access to it with specific Adaptive Report level privileges.
ADR (also called as sync) See Automatic Distributed Refresh.
Aggregate Limit Limits placed on aggregated request line items or aggregated meta topic items.
API Application Programmer Interface
API Socket (DaAPISock) The API (such as ODBC, SQL Net, and so on) or protocol level information used when connecting to a database that has been abstracted in an API Socket. Brio has one API socket for each supported API/communication protocols.
Application Server A framework for developing applications that provides fundamental capabilities required by many applications such as session and resource management, and security.
Auditing The monitoring of Brio Intelligence repository objects to determine usage patterns.
Automatic Distributed Refresh The process of synchronizing locally saved documents and the version in the repository.
Auto-Join An administrator can configure a connection file to cause joins to occur automatically for users using the Auto-Join feature. Auto-Join can be configured one of three ways: Best Guess, Custom, and Server-Defined.
Auto-Process The automatic processing of a query.
Axes Straight lines on a chart used for measurement and categorization. Typically the X-axis and the Z-axis are both used for categories while the Y-axis is used for quantification (for example, Facts/Values). Pie charts only use the X-axis for its categories and the Y-axis for its Facts/Values.
BCS See Broadcast Server.
Brio Repository, Brio Intelligence Repository A specific group of tables created using Brio Intelligence on a database server and used to store Brio Intelligence document objects, including data models and standard queries. Administrators can use Brio Intelligence Designer to upload these objects to the repository for end users to download, providing a template for query and report building. Documents built from repository objects can be version-controlled or audited through a link to the repository.
Brio Intelligence Designer A client/server-based tool that delivers query, analysis, and reporting capabilities and centralized solution administration for developers, database administrators, and system administrators.

Brio Intelligence Explorer A client/server-based tool that delivers query, analysis, and reporting capabilities for power users who need to directly access data sources—or to explore the information organized in prebuilt data models stored in the repository.
Brio Intelligence Navigator A client/server-based tool that provides simplified query, analysis, and reporting for analysts who need more structured access to the data stored in the repository, but need full analysis and reporting functionality.
Broadcast Server A Brio application, residing on a server, that enables users to schedule queries to process on a regular basis or during convenient off-hours, and then distribute the results across a network or to an intranet.
Business Intelligence Organizations utilize information from various operational systems, data marts and/or data warehouses in order to improve business processes, enhance customer service, accelerate sales and increase profitability.
Catalog A collection of database tables and local results. This is the information the user can use in his/her data model or query.
Catalog Pane Shows a list of elements available to the active section. For example, if Query is the active section, the Catalog pane displays a list of database tables. If Pivot is the active section, the Catalog pane displays a list of results columns. If EIS is the active section, the Catalog pane displays a list of embeddable sections, graphic tools, and control tools.
Categories Groupings by which the data is organized (for example, month).
CGI See Common Gateway Interface.
Chart A graphical representation of data. Users create charts to convert raw data into eloquent, visual information.
Chart Section With a varied selection of chart types, and a complete arsenal of OLAP tools like group and drill-down, the Chart section is built to support simultaneous graphic reporting and ad-hoc analysis.
Client/Server A network architecture in which each computer or process on the network is either a client (requests information) or a server (delivers requested information).
Clustered Bar Charts Occurs when the categories are viewed side by side within a given category, useful for side by side category analysis. Clustering is only done with vertical bar charts.
Common Facilities One of the four categories of objects defined by the Object Management Architecture (OMA). The Common Facilities is a collection of services that many applications may share, but the services are not as fundamental as Object Services. For example, Print Facility and Mobile Agent Facility.
Common Gateway Interface A native executable launched by the Web server. The role of our CGI is to pass requests from Web clients to ODS and results from ODS back to Web clients.
Computed Item A virtual column (as opposed to a column that is physically stored in the database or cube) that can be calculated by the database during a query, or by Brio Intelligence in the Results section. They are calculations of new data based on functions, data items and operators provided in the dialog box. They can be included in reports or reused to calculate other data.
Connection File See Open Catalog Extension Files.
Controls Folder Contains prebuilt items that can be added to your EIS section, such as list boxes, radio buttons, and command buttons. You can then attach scripts to the controls embedded in the EIS section to execute actions.
2 Glossary

Correlated SubQueries Subqueries that are evaluated once for every row in the parent query. A correlated sub query is created by joining a topic item in the subquery with one of the topic items in the parent query.
Cross Join Creates a query where none of the tables is joined. Every row in one table is joined to every row in another table.
Cube The data in OLAP databases (MS Plato, Essbase, MetaCube) is stored in 3-dimensional cubes, which is different from standard relational databases (2-dimensional). Cubes are made up of dimensions and measures. A cube may have dozens of dimensions.
DaConnect (aka DaConn) Brio Intelligence’s main connectivity class. Contains all the connectivity specific information. Instance of a connection class is made whenever Brio Intelligence needs to connect to any database.
Daemon-mode BQ The Brio client/server executable. It is spawned in daemon mode by node JREs. The role of the daemon-mode BQ is simply to execute database queries and return results.
DaSession When a client needs to perform an operation such as select, insert, update on a database, a session is created. The life time of a session synchronizes with the operation’s duration. Sessions are created when a client needs to perform operations on the database and are destroyed when the operation is considered complete.
Data Function Compute aggregate values, including averages, maximums, counts and other statistics, which summarize groupings of data. You can use data functions to aggregate and compute data from the server before it reaches the Results section, or compute different statistics for aggregated totals and items in the other analysis sections.
Data Model A representation of a subset of actual database tables that acts as a menu for the query builder. Data models are the sources for building the Request, Limit, and Sort lines in a query section. You create a data model by dragging database tables from the Table catalog to the Content pane. The data model graphically displays database tables as topics in the Content pane.
Data models can be distributed through the Brio repository and used by end users to create their own queries.
Database Function A predefined formula in a database.
Database Server A computer that stores database management system software (DBMS, for example, Oracle, Sybase, Essbase), and a database shared by a network of computer clients. Most databases are used in a client/server environment.
By storing data on a single, powerful machine on a network, the data is centralized and accessible to many users. The server ensures that the data is maintained correctly and serves as a traffic cop to regulate client machine access to the data. The server’s computing power is also useful in computing and filtering data from the database before it reaches your workstation. For small or localized databases, your own computer can act as both database server and client.
Datatype The type of data stored in a specific column in a database. For example, data can be stored as a numeric datatype.
Date Group A feature in the Results and Table sections that separates a date into Year, Quarter and Month columns. The display format for the new Month column is automatically set to mmm so that the month names sort chronologically (as opposed to alphabetically) in the report sections. Quarters are based on the calendar year, beginning January 1.
Design Mode A toggled environment used to build and modify EIS sections. In Design mode, you build EIS sections with an array of prebuilt control items and graphic items.
Glossary 3

Designers can switch out of design mode to test EIS features and deploy them to end users. Design mode is only available in EIS sections. Brio Intelligence Navigator users cannot switch to EIS Design mode.
Detail View Displays a topic as a database table. When Detail view is selected by the user, the database returns ten sample rows from the associated table. Each topic item is displayed as a database field. Detail view enables users to browse a sample of the raw data, which is useful when unfamiliar with the data model or the underlying data. Users cannot view a meta topic in Detail view.
Dimension In an OLAP database cube, categories of information are called dimensions. Examples of dimensions may be Location, Products, Stores, and Time.
In Brio, related, nonquantifiable items in a topic are also referred to as dimensions, such as Contact or Store Name.
Dimension (Legend Dimension) The current axis categorization or grouping method. This can be set to the X, Y, or Z-axis for most chart types. For line and area charts it can only be set to the Y or Z-axis. For pie charts it is always set to the X-axis. When you change the Legend Dimension the color is distributed along the new axis you change to.
Dimension Tab In the Pivot section, the tab that enables you to pivot data between rows and columns.
Dimension Table Consists of numerous attributes about a specific business process. Each row in a dimension table is unique.
Drill Anywhere This feature enables a user to drill into and add items to pivot reports residing in the Results section, without having to return to the Query section or trying to locate the item in the Catalog pane. Drill Anywhere items are broken out as new pivot label items.
Drill to Detail This feature enables a user to retrieve items from a data model that are not in the Results section, without having to rerun the original query. This feature provides the ability to interactively query the database and filter the data that is returned. Drill to Detail sets a limit on the query based on the user’s selection and adds the returned value as a new pivot label item automatically.
Drilldown Allows you to progressively narrow your focus on a selected chart category. Very useful when you have too many categories on a particular axis.
EIS See Executive Information System.
EIS Home This button returns you to the EIS section that has been designated as the EIS Home section. If you have only one EIS section, then EIS Home will return to that section. If you have several EIS sections, the default EIS Home will be the top EIS section in the Catalog pane. In Design mode you can specify another EIS section to be the EIS Home section.
Embedded Section A Brio Intelligence section that is embedded in a Smart report or other Brio Intelligence section. All embedded sections maintain live data content and formatting from the original section. Reprocessing the query, or modifying the original section will automatically update the display of that embedded section.
Executive Information System Allows users to build and deploy analytic applications. Analytical applications focus on delivering significant prepackaged business content that is encapsulated within an application. With Brio Intelligence, customers and independent software vendors can leverage their knowledge of industry specific best practices and assemble their own analytical applications for deployment to end users using the Web. Combining embeddable Report sections with enhanced EIS controls into a visual workspace and hooking up interactivity between these controls and the native Brio Technology application, an application designer can quickly create a variety of robust applications.
4 Glossary

Expression Line Displays displays the JavaScript syntax for each item displayed in a report. Use this line to build equations in the Report section. For ease of use, it can be undocked and resized.
Extranet An intranet that is partially accessible to authorized outsiders. Extranets are secured by user names and passwords.
Fact Table Created to store business activity measures. Most fact tables are extremely large. Each row in a fact table contains numeric measures (fully additive measures, nonadditive measures and/or semiadditive measures) and foreign keys to each dimension table.
Facts The numeric values that are broken up in the body of the Pivot section. To add facts to the Pivot, put Results columns from the Catalog pane into the Outliner’s Facts pane. Facts are the numeric values in a relational database that are available to analyze. In an OLAP Query, they are called measures.
Facts/Values The data that is being visually represented, usually a numeric amount (for example, $15,000)
File Server A computer and storage device dedicated to storing files.
Filters In the OLAPQuery section, filters enable you to define and apply limits to the query once Top or Side Labels have been added to the query. You set a filter by applying comparison operators on the values for a specific member. Additional server-specific functions are available based on the selected OLAP database cube. Filters are built to include or exclude data according to specific criteria. Filters can be set on any level in a dimension. However, they must be one of the labels in the Outliner. Filters can be made of members of one of the dimensions or selected by a measure. OLE DB for OLAP has other filter operator types (Top N, Top Sum, Top N %, Bottom N, Bottom N %, Bottom Sum.) Essbase and MetaCube have their own operator types. In Essbase and MetaCube, filters can be done on measures. In OLE DB for OLAP, filters cannot be placed on measures.
Foreign Key A database column or set of columns included in the definition of a referential integrity constraint.
Fully Additive Measure Attributes in a table that can have their values added together across any dimension.
Grain The level of detail at which measures in a table are recorded is referred to as the grain.
Grouping Columns This feature, in the Results and Table sections, creates a new column in a dataset by grouping data from an already existing column. Grouping columns consolidate nonnumeric data values into more general group values and map the group values to a new column in the dataset.
Hardwire Mode In hardwire mode whenever the OLAP Query is changed, the database is queried to fetch new cube data. In contrast, process mode is manually controlled. You add or remove several items to the Outliner, and then press Process to query the database. When determining whether to use hardwire mode or process mode, consider the size of the cube in which you are working.
Hierarchy In an OLAP database cube, a hierarchy organizes a dimension’s levels and corresponding members into parent and child relationships. For the levels in a Location dimension, the hierarchy would have Country as the parent of the child City and City as the parent of the child Address.
Home Abstract base interface that some Lightning interfaces derive from. Provides basic methods to manipulate and create Bean objects.
HTML See Hypertext Markup Language.
Hypertext Markup Language A programming language used to create World Wide Web pages, with hyperlinks and tags that explain how to format the information on the screen.
Glossary 5

Icon View Icon View shrinks a selected topic to an icon in the Content pane. The topic remains part of the data model, but is deactivated and can not be accessed by the query. Associated items are removed from the Request line when a topic is made into an icon, and the topic is not recognized as joined to other topics. Icon view is helpful in restricting the use of server time when a topic is infrequently used, and does not have to be active at all times.
Imported Files Excel, Text, or CSV files imported into Brio Intelligence. The information in the file goes into a table or a results object. Imported results can be used in other queries (like regular results) for local join purposes.
Indexes Indexes are created in a database to increase the performance of data retrieval. Just as book indexes help to locate specific information faster, database indexes provide a faster access path to table data. Indexes are created on one or more columns of a table.
Insight A Web plug-in that delivers query, analysis, and reporting functionality for intranet, Internet, or extranet access to information. Based on user profiles or report-level security, the client environment adapts in six stages from full query, analysis, and reporting with data refresh to static report viewing.
Integrity Constraints Constraints on tables that guarantee the data adheres to certain business rules. Integrity constraints are defined with a table and are stored as part of the table definition, central to the database data dictionary, so that all database applications adhere to the same set of rules.
Internal Function Internal functions are built-in formulas, defined in the Brio application.
Internet A global network connecting millions of computers. Unlike online services, which are centrally controlled, the Internet is decentralized by design. Each Internet computer, called a host, is independent.
Interval Equal subdivisions within a given scale. The interval can be set manually or to best fit.
Intranet A network belonging to an organization, usually a corporation, accessible only by organization members, employees or other authorization users. Intranet Web sites look and act just like any other Web site, but the firewall surrounding an intranet fends off unauthorized access.
ISAPI This is a shared library that implements HTTP using Microsoft’s Web server plug-in API (ISAPI). Thus it is appropriate for customers with Microsoft Web servers. Functionally it is equivalent to our CGI. Its advantage is that it is far more scalable than a CGI executable.
Item An item is a visual representation of a database column and is a member of a topic in the Query section. Items are used to create queries and reports. For example, the Customer Topic may have items including Name, Address, and Phone. You select items from data model topics to build the Request, Limit, and Sort lines in the query section.
Java Server The OnDemand server classes packaged in a single JAR file (ODSClasses.jar). This component is responsible for managing, routing, and queuing client requests.
JavaScript The scripting language for Brio Intelligence products. Brio Intelligence 6.x includes the Netscape JavaScript interpreter (version 1.4.) JavaScript and Brio’s Object Model allow application developers to use the full functionality of the industry-standard scripting language to control Brio Intelligence applications.
Job Repository A set of database tables which store a queue of scheduled jobs. There can be multiple job repositories in an organization. Job repositories are polled periodically by a Broadcast Server, which downloads and processes jobs when they are due to run.
6 Glossary

Join A relational database concept indicating a link between two topics. A join typically occurs between identical or similar items within different topics. Joins allow row records in different tables to be linked on the basis of shared information in a column field. For example, a row record in the Customer table is joined to a related record in the Orders table when the Customer ID value for the record is the same in each table. This allows the order record to be linked with the record of the customer who placed the order. If you request items from unjoined topics, the database server has no way to correlate the information between the two tables and leads to awkward datasets and run-on queries.
Brio displays joins visually in the workspace between topics to indicate joins between database tables. Users can also create new joins which are not already specified in the database.
Join Path A predetermined join configuration for a data model. Administrators create join paths for users to simply select the type of data model needed, in a user-friendly prompt, upon processing a query. Join paths ensure that the correct tables in a complex data model are being used in a query.
JRE (Java Runtime Environment) This is the Java interpreter used to run the Java Server. We ship this as part of our ODS product. Internally we often use the term “JRE” to refer to a running instance of our Java Server.
Legend Box An informative box containing color-keyed labels to identify the data categories of a given dimension.
Level Similar types of members in an OLAP database cube are grouped at the same level. For example, using the members listed in a Location dimension, France, the USA, and Japan belong to the Country level. Paris, Palo Alto, and Tokyo belong to the City level. 35 Main Street belongs to the Address level.
Limit Constraints placed on topic items or request line items to limit them to a certain set of values. Limits appear on the limit line in Brio Intelligence. For example, although the database may display worldwide sales figures for all stores, you may only want to see sales for stores in Germany. Limits make data sets retrieved through a query more efficient and manageable by filtering out unnecessary information.
Limit Joins Joins that are created between a database table and a local results object. The topic item being joined is limited by the values of the column being joined in of the local results object. A limit join is one of the options that can be chosen in a Modify Join operation between a topic item and a local results item.
Linked Data Model Documents that are linked to a master copy in a repository. When changes are made to the master, users are automatically updated with the changes when they connect their duplicate copy to the database.
Load Balancing A technique used to improve the scalability of the OnDemand Server.
Local Computed Meta Topic Items Computed item definitions evaluated by Brio Intelligence results engine. Local computed items are created to be meta topic items. They can be dragged to the request line like regular topic items. The only difference is that the results engine evaluates these items as opposed to the database.
Local Joins A join between a local results object and a database table or another local results object. Brio Intelligence performs the actual join in this case.
Local limits Limits placed on the local dataset in the Results section, as opposed to the Query section. Limits in the query section restrict the data retrieved by the query to the desktop. Local limits screen data from view in the Results set; although it’s still there, you cannot see the data that has been excluded or use it in reports unless the limit is removed.
Glossary 7

Local Results Results of other queries within the same data model. These results can be dragged into the data model to be used in local joins. Local results are displayed in the catalog when requested.
Locked Data Model Data Models that are locked cannot be modified by a user.
Manager See server.
Master Data Model A Data Model that exists independently and has multiple queries that reference it as a source. When using a master data model, the text “Locked Data Model” appears in the Content pane of the Query section. This means that the data model is linked to the master data model displayed in the Data Model section, which may be hidden by an administrator.
MDX Multi Dimensional eXpressions is the language used to give instructions to OLE DB for OLAP- compliant databases (MS Plato), as SQL is the language used for relational databases. When you build the OLAP query section’s Outliner, Brio Intelligence translates your requests into MDX instructions. When you process the query, MDX is sent to the database server. The server returns a collection of records to your desktop that answer your query. See SQL.
Measures Numeric values in an OLAP database cube that are available for analysis. Measures may be margin, cost of goods sold, unit sales, budget amount, and so on. See Facts.
Members In an OLAP database cube, members are the content values for a dimension. In the location dimension, they could be Palo Alto, Paris, Tokyo, 35 Main Street, USA, France, Japan, and so on. These are all member values for the location dimension.
Metatopic A customized, virtual topic, built from regular topics that reflects the exact topic and item structure of database tables. Metatopics allow items from disparate topics to be consolidated in a single topic, simplifying its appearance and reducing its conceptual resemblance to the underlying database structure. You can choose to view a data model in terms of its original topics, metatopics, or a combination of both.
Metadata Data about data. Stored in database tables, metadata describes the history, content, and function of database tables, columns and joins in understandable business terms. Metadata can overcome the awkward names or ambiguous abbreviations often used in a database. For example, in a table named CUST_OLD, metadata may use a descriptive business name, such as Inactive Customers.
Mime Type A browser mapping of a file type to either a helper application or a plug-in. When a browser attempts to open a file of a particular mime type, it either loads the associated plug-in or launches the associated helper application. A file’s mime type is determined either by a) the file extension or b) the HTTP header. Plug-ins tell browsers what mime types they support and what file extensions correspond to that mime type.
Brio Web clients support the following mime types: application/x-brioquery mime type (for .bqy files). This is the default mime type our Web clients support and are ordinary Brio files. application/x-brioquerydata (for .bqd files). These are data files in text or Excel format, whose extension has been changed to .bqd. When a Brio Web client is launched to open a BQD file, it imports the data and executes any JavaScript the file contains.
Morphing Mechanism by which Brio Web clients provide document security. See Adaptive Report Level.
Multidimensional Database A database that stores data in a format often referred to as a cube, such Essbase, MS OLAP, MetaCube, and so on. See also Relational database and OLAP database.
8 Glossary

Nonadditive Measure Attributes in a table that cannot be added across any dimension, such as a percentage value (for example, margin rate).
NSAPI This is a shared library that implements HTTP using Netscape’s Web server plug-in API (NSAPI). It is equivalent to our CGI. Its advantage is that it is far more scalable than a CGI executable.
Null Value A null value is absent of data.
OCE See Open Catalog Extension Files.
OCE Wizard Wizard or set of screens used to create a new OCE or modify an existing OCE.
ODS See OnDemand Server.
OLAP Database A database that stores its information in cubes. Cubes contain dimensions and measures. A cube may have dozens of dimensions. Cubes are built to hold aggregated data, which anticipate how users think about business models. Cubes deliver this information efficiently and quickly.
OLAPQuery Section Analyzes and interacts with data stored in an OLAP cube. When you use Brio Intelligence to connect to an OLAP cube, the document immediately opens an OLAP Query section. The OLAPQuery section displays the structure of the cube as a hierarchical tree in the Catalog pane. Queries are built by dragging measures and dimension levels or members directly into the Outliner panes.
OnDemand Server A Brio server application that enables users to view and select from a list of available documents over the Web, as well as to build and process new queries.
OOA Object Oriented Analysis.
OOA&D Object-Oriented Analysis & Design.
Open Catalog Extension Files Encapsulate and store connection information used to connect Brio applications to a database. OCE files specify the database API (ODBC, SQL*Net, etc.), database software, the network address of the database server, and your database user name. Once created, a user can specify the OCE file and database password and logon. An OCE file is required for a Brio Intelligence document to use a database. the file extension is .oce.
Open Client DBLib API to connect to Sybase, Redbrick, SQL Server, and so on.
Open Metadata Interpreter The Tables, Columns, Joins, Lookups and Remarks tabs available in the connection wizard when you edit a custom metadata source. These tabs allow Brio administrators to specify a customer source of metadata that can be accessed through SQL statements, and provided to end users with data models.
Outliners Drag-and-drop command lines used in the Pivot, Chart, OLAPQuery and Report sections. Each Outliner pane corresponds to a specific layout element of the report. When an item is dragged to an Outliner pane, the item assumes the layout attributes of the respective report element. Data appears simultaneously in the Content pane with the appropriate formatting.
Pivot Dimension A row or column of labels that corresponds to an item in the Catalog pane.
Pivot Section The Pivot section is used to create crosstab reports and analyze data.
Pivot Table Analytical tools that resemble spreadsheets or crosstabular reports. A pivot table overlays a dynamic datacube, which allows data to be sliced and diced for ad-hoc, interactive, and multidimensional analysis.
Pivoting In the Pivot section, pivoting is the ability to change a label from a top to a side (or a side to a top) orientation with a simple click and swing of the label’s Dimension tab.
Glossary 9

Plot Area The area bounded by the X-, Y-, and Z-axis. For pie charts, it is the rectangular area immediately surrounding the pie.
Plug-in A special application file placed in the browser Plug-in directory. Plug-ins add seamless functionality to a Web browser, enabling the browser to open particular plug-in file types.
Plug-in / Helper The two implementations we support for our Web clients. The terms are short for browser plug-in and helper application respectively. The plug-in implementation is a shared library which the browser loads when the user requests a document of the application/x-brioquery mime type. The helper implementation is an application launched by the browser when that same mime type is requested. The plug-in is generally considered a better implementation because it runs within the browser. Brio provides helper applications on all platforms (Windows, Mac and Unix) and plug-ins on Windows only.
Predefined Drill Paths Enables a user to drill directly to the next level of detail, as defined in the data model.
Primary Key A database column or set of columns included in the table definition of the PRIMARY KEY constraint. Primary key values uniquely identify the rows in a table. Only one primary key is defined per table.
Query A query is set of database instructions to return an answer set to a specific question. Each row returned in the Results section of a document is an answer to the question posed in the Query section.
Query Computed Items Item definitions created by the user. This can include other request line items or topic items and or database functions. The definition is sent to the database and the database evaluates them.
Query Log Log of all SQL statements sent to the database (also referred to as SQL Log).
Quickview A Web plug-in that offers simplified report viewing and data refresh for users who need to view published, formatted reports within their browser.
Relational Database A database that stores its information in tables that are related or joined to each other by common pieces of information called keys. Relational databases store information in tables. A table is subdivided into column fields. Related information is grouped in column fields. Column fields have parents and children. For example, the Customer table may have columns including Name, Address, and ID number. Each table contains row records that describe information about a singular entity, object, or event, such as a person, product, or transaction. Row records are segmented by column fields. Rows contain the data that you retrieve from the database. Database tables are linked by Joins. (See also Join)
Report Group In the report section, embedded reports and tables are grouped by other data items. Items placed in the Groups Outliner break information into these dimensional groupings. For example, your table may include the name, contact information, and sales for each of your distributors. This table gains in clarity when broken into groupings that classify the stores by geographical region, year, or both.
Report Section A dynamic, analytical report writer, that provides users with complex report layouts and easy to use report building tools. Pivot tables, tables, and charts can be embedded in a report. The report structure is divided into group headers and body areas, with each body area containing a table of data. Tables are created with dimension columns and fact columns. These tables are elastic structures. Multiple tables can be ported into each band, each originating from the same or different result sets.
Repository Central location used to store data models, queries and queries with reports. Repository is usually a database chosen by the user.
10 Glossary

Request Line Holds the list of items requested from the database server and that will appear in the user’s results.
Request Line Items Columns listed in the request line.
Results Section A section in a Brio Intelligence document that contains the dataset derived from a query. Data is massaged in the Results section for use in the report sections.
Run Mode A toggled environment used to test EIS sections. It simulates a Navigator user’s view of the section. In Run mode, you can not add any features, but you can use features that are part of the deployed EIS sections. See also Executive Information System and Design Mode.
Scale The range of values that allows one to gauge how much each category represents. This range can be either at equal intervals or at logarithmic interval. The scale can be set manually or to best fit.
Script A series of instructions for a computer. Scripts are activated when an event occurs, such as clicking a button or selecting an item from a drop down list. Brio Intelligence’s scripting language is JavaScript.
Section Pane Lists all the sections that are available in the current Brio Intelligence document.
Section Title Bar A navigational aid under the toolbars that provides a means of moving between sections and toggling section-specific tools and gadgets, such as the outliner.
Semiadditive Measure Attributes in a table that can be summarized across some dimensions, but not all.
Server Administrator A stand-alone executable for administering the Brio OnDemand Server and the Brio Broadcast Server.
Server Components The components that make up the OnDemand Server. These include the Web Broker, the ODS Manager, the ODS Node(s), and the ODS repository (ies).
Server Computed Meta Topic Items Metatopic item definitions created by the user. These can use any of the database functions available. These items can also use any of the other topic items in the data model. These items are evaluated by the database.
Session Socket (DaSessionSocket) Session information specific to each database or API is abstracted in a session socket. We have session sockets for each of the APIs we support.
Simple Join Retrieves rows to create a query where the values in joined columns match.
Slicer An axis that filters the data in an OLAPQuery. Only individual members can be used in a slicer. A slicer can be thought of as a third axis in a OLAP Query. The other axis are the Side Labels and the Top Labels. Every dimension folder contains a members subfolder named “Values for…” that dimension. This subfolder contains the members that are eligible for the slicer.
Snapshot A read-only table snapshot is a local copy of table data that originates from one or more remote master tables.
Sort Conditions placed on request line items to sort the results in ascending or descending order. These are displayed in the sort line in Brio Intelligence.
SQL See Structured Query Language.
SQL Net Oracle’s native API to connect to an Oracle database.
Stacked Charts A chart where the categories are viewed on top of one another for visual comparison. This type of chart is useful for subcategorizing within the current category. Stacking can be used from the Y- and Z-axis in all chart types except pie and line. When stacking charts the Z-axis is used as the Fact/Values axis.
Stored Procedure Precoded queries in languages other than SQL. This is a feature available in some database software. Brio Intelligence can run stored procedures and retrieve the Results.
Glossary 11

Structure View Displays a topic as a list of component items allowing users to see and quickly select individual data items. Structure view is the default view setting.
Structured Query Language The language used to give instructions to relational databases. When you build the query section’s Request, Limit, and Sort lines, Brio Intelligence translates your requests into SQL instructions. When you process the query, the SQL instructions are sent to the database server. The server returns a collection of records to your desktop that answers your query. This reply is displayed as the Results section. You can look at the SQL generated by a query in the Query Log, or code a query directly in SQL using the Custom SQL window.
Subquery A query embedded within another query.
Surface Values A setting in the Pivot section to base aggregate calculations on the values in the report, rather than the values in the Results section.
Synonym An alias for a database table or view. It is a direct reference to a table view.
Table The basic unit of data storage in a database. Database tables hold all of the user-accessible data. Table data is stored in rows and columns.
Table Catalog Displays tables, views, and synonyms to which users have access. Users drag tables from the Table catalog to the Content pane to create data models in the Query section.
Table Section Used to create tabular-style reports. It is identical in functionality to the Results section, including grain level (table reports are not aggregated). Other reports can stem from a Table section.
Top and Side Labels In the Pivot section, labels are the column and row headings on the top and sides of the pivot. These define categories by which the numeric values are organized.
Topic A topic is a visual representation of a database table in the Content pane. Topics are part of data models displayed in the Query section and can contain one or more items.
Topic Items Individual items in a topic or metatopic.
Topics Visual representation of tables in the database, related by joins that link certain items in each topic. Each topic title bar displays the topic’s name. The topic shows a list of items, one for each column in the database table.
Underlying Values Another name for Results values. When Use Surface Values is disabled in a Pivot section, aggregate calculations are based on values in the Results section.
Union/Intersection/Minus Queries Queries created to perform set operations such as Union, Intersection, and Minus. These queries are created by the Append Query option.
Variable Limits Limits that prompt users to enter or select limit values before the queries are processed on the database.
View A custom-tailored presentation of the data in one or more database tables. Views do not actually contain or store data; rather, they derive their data from the tables on which they are based, referred to as the base tables of the views.
Web Clients The Web-enabled counterparts of our client/server application (Brio Query). See Insight and Brio Intelligence Designer.
Web Components Web server components of the OnDemand Server are Web Broker, HTML pages without ODS tags, and the Zero Administration Web client installers. See OnDemand Server.
World Wide Web A system of Internet servers that support specially formatted documents. The documents are formatted in a language called HTML (HyperText Markup Language) that supports links to other documents, as well as graphics, audio, and video files.
WWW See World Wide Web.
Zero Administration Installs Brio Web applications (Insight and Quickview) automatically without the help of an administrator when a user logs on to the OnDemand Server.
12 Glossary

Index
Symbols
.bqy, A-2, A-5
.bqyods, A-2, A-5
:COLALIAS, 3-11, 3-15, 3-17, 3-21
:COLUMN, 3-11
:LOOKUPID, 3-11, 3-19
:OWNER, 3-11, 3-15, 3-17, 3-21
:QUERYSQL, 5-6
:REPOSITORYNAME, 5-6
:ROWSRETRIEVED, 5-6
:SILENT, 5-6
:TABALIAS, 3-11, 3-15, 3-17, 3-21
:TABLE, 3-11, 3-15, 3-17, 3-21
A
access, setting topic view, 2-21
accessing Open Metadata Interpreter, 3-8
actions
defining for jobs, 6-13
defining job, 6-18
Add Meta Topic Item command, 2-36
adding
iterative job run cycles, 6-15
jobs, 6-7
metatdata definitions, 3-10
remarks from stored metadata, 3-21
topics to data models, 2-2
addresses, email, checking, 6-11
Administer Documents page, field definitions for, A-7
Administer Repository dialog box, 4-3
administering
Brio Intelligence repositories, 4-3
documents, in IBM Information Catalog, A-7
IBM Information Catalog, A-5
repository groups, 4-8
aggregating local results tables, 2-15
aliases, specifying table and column in SQL, 3-11, 3-15, 3-17, 3-21
Allow Drill Anywhere option, 2-27
Allow Drill To Detail option, 2-27
Always Prompt For Owner Name option, 6-4
API software, 1-4
Append Query command, local results and, 2-16
applying
metadata to limit values, 3-18
metatdata names to data model topic items, 3-14
metatdata names to data model topics, 3-12
metatdata to limit lookup values, 3-19
relative limits in scheduled documents, 6-16
audit events
defining, 5-4
examples, 5-7
samples, 5-7
testing, 5-2
audit log, monitoring, 5-2
audit table
creating, 5-3
sample structure, 5-3
auditing
data, 2-32
definition, 5-2
keyword variables, 5-6
where not supported, 5-2
Auto Alias Tables option, 2-26
Auto Join Tables option, 2-5, 2-26
Auto Logon command, 1-16
automatically
joining topics, 2-5
joining topics using metadata join information, 3-16
logging on, 1-16
processing queries, 2-33
Auto-Process command, 2-33
B
benefits of data models, 2-2
Best Guess join strategy, 2-7
blank documents, 1-14
BQAUDIT table, sample structure, 5-3
bqmeta0.ini, 3-9, 3-13
bqs.start, B-4
bqs.stop, B-4
BQserver.exe, installation location, B-4
BQY documents, A-5
BQYODS documents, A-5
bridge tables, 2-9
Brio Ingtelligence repository
uploading documents to, 4-10
Brio Intelligence
dbgprint and, B-2
logging database transactions and daemon processes, B-4
object types, A-5
troubleshooting connectivity, B-2
Brio Intelligence document type, A-5
Brio Intelligence repository
administering, 4-3
administering groups, 4-8
definition, 4-3
BRIOEVNT, 6-23
brioqry.exe, installation location, B-2
BRIOSTBL, 6-8 – 6-9
Broadcast Server
adding jobs, 6-7
dbgprint and, B-4
deleting jobs, 6-8
features, 6-2
modifying jobs, 6-8
scheduling documents, 6-1
viewing job lists, 6-6
building
data models, 2-2
queries, confusing aspects, 3-2
C
calendars, 6-11
centralized processing, 6-2
changing
data model views, 2-22
database passwords, 1-19
join types, 2-8
topic views, 2-17
checking email addresses, 6-11
choosing database owners, 6-4
COLALIAS, 3-11, 3-15, 3-17, 3-21
COLUMN, 3-11
column aliases, specifying in SQL, 3-11, 3-15, 3-17, 3-21
columns, usage statistics, 5-2
combined view, of data models, 2-22, 3-6
combining limit local joins with local joins, 2-15
commands, DataModel menu, 2-36
completion status, of job runs, 6-7
2 Index

computed
columns, saving as snapshots, 6-19
items, and local results, 2-16
metatopic items, creating, 3-5
values saved as snapshots, recalculating, 6-20
configuring Open Metadata Interpreter, 3-10
confirming repository table creation, 4-5
connecting
databases, 1-12
Essbase or DB2 OLAP, 1-9
job repositories, 6-3
MetaCube, 1-9
OLE DB Provider, 1-9
with data model, 1-13
without data model, 1-13
connection files
creating OLAP, 1-8
default directory, 1-5
definition, 1-2
modifying, 1-18
connection information, 1-4
connection parameters, 1-2, 1-5
connection preferences
modifying, 1-11
setting, 1-5
connections
directory, accessing, 1-15
job, 6-24
monitoring, 1-12
multiple job, 6-24
Connections Manager, 1-17
connectivity-related problems, troubleshooting, B-2
controlling document versions, 4-15
copying topic items to metatopics, 3-4
creating
data models, 2-2
local joins, 2-12
log tables, 5-3
metatopics, 3-3
object type properties, A-5
OCEs, 1-4
OLAP connection file, 1-8
repository objects, 4-10
repository tables, 4-3
custom formats, server date, 1-8
custom join strategy, 2-7
Custom Values limit option, 2-29
customizing metatopics, 3-6
cycles, job run, 6-14
D
daemon processes, logging, B-4
data model governors, 2-27
data model integrety, ensuring, 2-35
Data Model menu commands, 2-36
data model options
auditing, 2-32
design, 2-26
general, 2-26
joins, 2-30
limits, 2-28
topic priority, 2-31
Data Model Refresh audit event, 5-8
Data Model Synchronization dialog box, 2-35
data models
adding topics to, 2-2
automaticall processing, 2-33
automatically processing, 2-33
benefits, 2-2
building, 2-2
changing topic views, 2-17
connecting with or without, 1-13
definition, 4-2
joins, 2-4
looking up metadata definitions, 3-18
master, 2-34
metatopics and, 3-3
removing topics from, 2-3
Index 3

simplifying, 3-3
synchronizing, 2-35
uploading to repository, 4-10
version-controlled, 4-2
viewing at metatopic level, 3-4
data sources, ODBC, 1-4
database aliases, 1-4
Database Connection Wizard, 1-4 – 1-5
database joins, 2-4
database owners, choosing, 6-4
database tables
in data models, 2-2
metadata definitions, 3-12
database tables and columns, usage statistcs, 5-2
database transactions, logging, B-4
database variables, 3-11, 3-15, 3-17, 3-19, 3-21
databases
changing password, 1-19
connecting, 1-12
logging off, 1-18
logging on, 1-17
planning changes, 5-2
user name, 1-4
using joins in, 2-4
DATAMODEL column, in sample BQAUDIT table, 5-4
DAY_EXECUTED column, in sample BQAUDIT table, 5-3
DB2 OLAP, connecting to, 1-9
dbgprint
Brio Intelligence and, B-2
Broadcast Server and, B-4
Insight/Quickview and, B-6
OnDemand Server and, B-5
dbgprint files, overwriting, B-3
dbgprint, connectivity troubleshooting with, B-2
default OCEs, setting, 1-15
default settings, simple joins, 2-8
defined join paths, using, 2-9
defining
actions, 6-13
audit events, 5-4
job actions, 6-18
joins, 3-16
metadata, 3-10
properties in IBM Information Catalog, A-4
deleting
jobs from Broadcast Server, 6-8
joins, 2-9
object types and properties in IBM Information Catalog, A-6
Remarks tabs, 3-22
repository objects, 4-7
design options, data model, 2-26
Detail view, 2-17
Detail View audit event, 5-7
dgbprint, B-2
dimension name, Essbase, 1-9
dimensions, setting topics as, 2-20
displaying icon joins, 2-7
distributing
information, 6-2
OCEs, 1-3
document versions, controlling, 4-15
documents
administering, A-7
applying relative limits in scheduled, 6-16
blank, 1-14
registering to the IBM information catalog, A-2
saving results with, 6-19
scheduling, 6-3, 6-5
scheduling to broadcast server, 6-1
uploading to repository, 4-10
documents and jobs, scheduling, 6-2
drill anywhere, allowing, 2-27
drill to detail, allowing, 2-27
drill-down paths, defining, 2-20
DSS system name, MetaCube, 1-10
4 Index

E
effects of Save Query Results With Document options , 6-21
email addresses, checking, 6-11
email notifications confirming job completion, sending, 6-11
enabled job status, 6-6
enabling users to apply limits, 2-23
ensuring data model integrity, 2-35
entering general information, 6-10
enterprise distribution, 6-2
Essbase
auditing, 5-2
connecting to, 1-9
EVENT_TYPE column, in sample BQAUDIT table, 5-3
events
defining audit, 5-4
predefined for scheduling, 6-23
execution time, of job runs, 6-7
F
fact table, MetaCube, 1-10
facts, setting topic items as, 2-21
files
creating OLAP connection, 1-8
modifying connection, 1-18
filtering
Informatica tables, 3-13
tables, 1-5
foreign key tables, in table of joins, 3-17
From Server data formats, 1-7
G
general properties, job details, 6-5, 6-10
generating automatic join paths, 2-30
global limit options, 2-29
governors
data model, 2-27
in local results, 2-15
precedence, 2-23
Grant Tables To Public option, 4-4
groups, administering repository, 4-8
H
hiding icon joins, 2-7
host name, MetaCube, 1-9
I
IBM Information Catalog
administering documents, A-7
creating an object type, A-5
definition, A-2
registering documents to, A-2
setting up object types, A-8
icon joins, showing, 2-7
Icon view
definition, 2-18
metatopics and, 3-4, 3-6
impact analysis, data, 5-2
including queries when processing jobs, 6-12
Informatica tables, filtering, 3-13
information, distributing, 6-2
Insight/Quickview, dbgprint and, B-6
interpreter, open metadata, 3-18
IP addresses, 1-4
items, creating computed metatopic, 3-5
iterative job run cycles
adding, 6-15
J
job actions, 6-18
job connections, 6-24
Job Detail dialog box, opening, 6-7
Index 5

job details
actions, 6-13
general information, 6-5, 6-10
queries, 6-12
schedule, 6-22
specifying, 6-10
job ID, 6-6
job intervals, 6-7
job lists, 6-6, 6-24
job name, 6-6
job repetitions, 6-7
job repositories
connecting to, 6-3
definition, 6-3
job repository owners, selecting, 6-25
job repository tables, 6-24
job run cycles, 6-14
jobs
adding, 6-7
deleting, 6-8
email notifications confirming completion, 6-11
fail to process, 6-9
modifying, 6-8
running indefinitely, 6-23
scheduling, 6-5, 6-16, 6-22
supplementary connections for, 6-24
variable limits in, 6-16
join paths, using defined, 2-9
join strategies, 2-6
join types, specifying, 2-8
joining topics
automatically, 2-5
manually, 2-7
using metadata join information, 3-16
joins
definition, 2-4
hiding from users, 3-3
limit local, 2-13
limitations of local, 2-15
local, 2-11
manual, 2-7
metadata definitions, 3-16
removing, 2-9
showing in icon view, 2-7
specifying strategies, 2-6
usage preferences, 2-30
using defined paths, 2-9
K
keys, modifier, 3-4
keyword variables, 5-6
L
last date, in job lists, 6-7
left joins, 2-8
limit browse level preferencs, 2-28
limit local joins, 2-13
combining with local joins, 2-15
number allowed, 2-15
limit lookup values
applying metatdata to, 3-19
limit options, 2-29
Limit Show Values audit event, 5-7
limitations of local results and local joins, 2-15
limiting values, 2-28
limits
enabling users to apply, 2-23
variable, 6-16
Limits page, 2-28
linear joins, 2-8
lists, viewing job, 6-6
local joins, 2-11 – 2-15
log files, for troubleshooting, B-2
log tables, 5-3
logging
database transactions and daemon processes, B-4
on and off databases, 1-18
on to databases, troubleshooting difficulties, B-2
6 Index
Logoff audit event, 5-7
Logon audit event, 5-7
LOOKUPID, 3-11, 3-19
M
managing Brio Intelligence repositories, 4-1
manually joining topics, 2-7
master data models, promoting to, 2-34
menu commands, DataModel, 2-36
Meta Connection Wizard
automatic join strategies and, 2-6
meta view, of data models, 2-22, 3-6
MetaCube, connecting to, 1-9
metadata
adding remarks from, 3-21
applying, 3-18
defining, 3-10
definition, 3-2
in Brio Intelligence, 3-7
Metadata Definition dialog box, 3-8
metadata definitions
adding, 3-10
columns, 3-14 – 3-15
joins, 3-16 – 3-17
limit lookup values, 3-18 – 3-19
remarks, 3-20
SQL entry fields, 3-11
tables, 3-12
metadata interpreter, open, 3-18
metadata join information, joining topics using, 3-16
metadata names, applying to data model topic items, 3-14
metadata names, applying to data model topics, 3-12
metadata remarks, adding, 3-20
metadata, applying to limit lookup values, 3-19
metatdata
SQL entry fields, 3-11
metatopic items
creating, 3-5
metatopics
copying items to, 3-4
creating, 3-3
definition, 3-2
in local results, 2-16
viewing, 3-6
modifier keys, 3-4
modifying
connection files, 1-18
connection preferences, 1-11
jobs, 6-8
join types, 2-8
metatopics, 3-3
OCEs, 1-11
OCEs with Connections Manager, 1-18
repository objects, 4-12
request dialog, 2-33
server date formats, 1-7
topic item properties, 2-20
topic properties, 2-19
monitoring connections, 1-12
multiple job repositories, working with, 6-3
N
naming topics using stored metadata, 3-12
New Data Model audit event, 5-7
next date, in job lists, 6-7
null values, in scheduled jobs, 6-17
NUM_ROWS column, in sample BQAUDIT table, 5-4
O
object descriptions, updating repository, 4-6
object type properties, creating, A-5
object types, setting up, A-8
objects
deleting repository, 4-7
modifying repository, 4-12
Index 7

OCE options, 1-5
OCEs
choosing, 1-12
creating, 1-14
default directory, 1-5
distributing, 1-3
modifying, 1-11
See also connection files.
setting default, 1-15
ODBC
data sources, 1-4
table filters and, 1-5
ODS.ini, installation location, B-5
ods.start, B-5
ods.stop, B-5
off-hours processing, 6-2
OLAP connection file, creating, 1-8
OLE DB provider, connecting, 1-9
OnDemand Server document type, A-5
OnDemand Server, dbgprint and, B-5
Open Catalog Extension. See OCE, connection files.
Open Metadata Interpreter, 3-18
options
data model, 2-22
OCE, 1-5
ordinal limit variables, 6-16
original view, of data models, 2-22, 3-6
outer joins, 2-8
output types, for job actions, 6-18
OWNER, 3-11, 3-15, 3-17, 3-21
P
parameters, possible job action, 6-19
passwords
changing database, 1-19
OCEs and, 1-2
paths, using defined join, 2-9
Post Process audit event, 5-7
Pre Process audit event, 5-7
predefined events, scheduling to, 6-23
preferences
join usage, 2-30
limit browse level, 2-28
setting connection, 1-5
primary key items and tables, in table of joins, 3-17
priorities, topics, 2-31
processing
centralized, 6-2
queries automatically, 2-33
scheduled jobs to tables, 6-8
Promote To Master Data Model command, 2-34
Promote To Meta Topic command, 2-36
promoting
queries to master data models, 2-34
topics to metatopics, 3-3
properties
creating object type, A-5
defining, A-4
topic, 2-19
Properties page field definitions, in IBM Information Catalog, A-4
public filters folder, MetaCube, 1-10
Q
queries
automatically processing, 2-33
in scheduled jobs, 6-12
job detail, 6-12
promoting to master data models, 2-34
standard with reports, definition, 4-2
standard, definition, 4-2
tracking processing time, 5-2
query building, confusing aspects of, 3-2
query files, processing to table, 6-8
query limits, local results and, 2-15
querying databases, troubleshooting difficulties, B-2
query-processing time, tracking, 5-2
QUERYSQL, 5-6
8 Index

R
ranking topics, 2-31
recalculating computed values saved as snapshots, 6-20
reducing available values, 2-28
registering documents to IBM Information Catalog, A-2
remarks
adding from stored metadata, 3-21
showing in Query section, 3-20
Remarks tabs, reordering, 3-22
removing
joins, 2-9
metatopics and metatopic items, 3-6
topics, 2-3
reordering Remarks tabs, 3-22
report bursting, 6-2
Report Designer section, availability, 6-20
repositories
administering, 4-3
connecting to, 6-3
definition, 4-3
scheduling jobs, 6-5
uploading documents, 4-10
working with multiple job, 6-3
repository groups, administering, 4-8
repository objects
collecting download data, 5-2
creating, 4-10
deleting, 4-7
modifying, 4-12
updating descriptions, 4-6
repository tables
confirming creation, 4-5
creating, 4-4
creation failure, 4-4
granting access to, 4-4
REPOSITORYNAME, 5-6
request lines, in master data models, 2-34
resolving variable limits, 6-16
restricting topic views, 2-21
results
limitations of local, 2-15
save options, 6-21
results, saving with documents, 6-19
Return First __Rows governor, 2-27
right joins, 2-8
ROWSRETRIEVED, 5-6
ROWSRETRIEVED keyword variable, 5-6
run cycles, 6-14
run cycles, iterative, adding, 6-15
running jobs indefinitely, 6-23
S
samples
audit events, 5-7
audit log structure for BQAUDIT table , 5-3
Save To Repository dialog box, 4-10
saving computed columns as snapshots, 6-19
saving results with documents, 6-19
schedule patterns, 6-22
scheduled documents, applying relative limits in, 6-16
scheduling
documents to Broadcast Server, 6-1
jobs, 6-16
open documents as jobs, 6-5
scheduling documents, 6-3
scheduling jobs, 6-22
See also OCEs.
selecting
job repository owners, 6-25
subject areas, in IBM Information Catalog, A-4
sending email notifications confirming job completion, 6-11
server name, in job lists, 6-7
Server-Defined join strategy, 2-7
setting
Index 9

connection preferences, 1-5
data model options, 2-23
default OCEs, 1-15
object types up in IBM Information Catalog, A-8
setting time thresholds, for running jobs, 6-23
setting topic priorities, 2-31
Setup Job Connections dialog box, 6-24
Setup Object Types And Properties field definitions , A-8
Show All Values limit option, 2-29
Show Icon Joins option, 2-26
Show Minimum Value Set limit option, 2-29
Show Values limit option, 2-29
Show Values Within Topic limit option, 2-29
showing
icon joins, 2-7
remarks in Query section, 3-20
SILENT, 5-6
SILENT keyword variable, 5-6
simple joins, 2-8
snapshots, saving computed columns as, 6-19
specifying
automatic join strategies, 2-6
job details, 6-10
job timing and frequency, 6-22
join strategies, 2-6
join types, 2-8
join usage preferences, 2-30
SQL
coding limits withCustom SQL limit option, 2-29
database variables in Where clauses, 3-11, 3-15, 3-17, 3-19, 3-21
default values in metadata, 3-11
specifying table and column aliases, 3-11, 3-15, 3-17, 3-21
table filters and, 1-5
topic priorities and, 2-31
SQL From clauses
in metadata, 3-11
SQL functions
in audit log, 5-3
SQL Select statements
in metadata, 3-11
SQL statements
recording, 5-2
testing for errors, 5-2
SQL Where clauses
in metatdata, 3-11
SQL, entering, 3-11
SQL_STMT column, in sample BQAUDIT table, 5-3
standard query with reports, definition, 4-2
standard query, definition, 4-2
stored metadata, 3-18
strategies, join, 2-6
Structure view, of topics, 2-17
structure, BQAUDIT sample audit log, 5-3
Subject Area Page field definitions , A-4
subject areas, selecting, A-4
Sybase, table filters and, 1-5
Sync With Database command, 2-35 – 2-36
synchronizing data models, 2-35
T
TABALIAS, 3-11, 3-15, 3-17, 3-21
TABLE, 3-11, 3-15, 3-17, 3-21
table aliases, specifying in SQL, 3-11, 3-15, 3-17, 3-21
Table catalog
definition, 2-2
filtering tables from, 1-6
refreshing, 1-6
repository tables in, 4-5
Table Catalog command, 2-36
tables
bridge, 2-9
filtering, 1-5
filtering Informatica, 3-13
log, 5-3
metadata definitions, 3-12
10 Index

processing query files to, 6-8
usage statistics, 5-2
testing auditing events, 5-2
time formats, 1-7
Time Limit ___Minutes governor, 2-27
time thresholds, job run, 6-23
timestamp formats, 1-7
To Server date formats, 1-7
topic items, 2-20
applying metatdata names to, 3-14
topic priorities, 2-31
topic properties, 2-19
in local results, 2-16
Topic View command, 2-36
topic views
changing, 2-17
restricting, 2-21
topics
adding to data models, 2-2
applying metatdata names to, 3-12
definition, 2-2
joining
automatically, 2-5
manually, 2-7
promoting to metatopics, 3-3
ranking, 2-31
removing from data models, 2-3
specifying join strategies for, 2-6
tracking query-processing time, 5-2
troubleshooting, B-1 – B-2
types
setting up object, A-8
U
updating
distributed data models, 2-35
Remarks tabs, 3-22
repository object descriptions, 4-6
uploading documents to the repository, 4-10
usage statistics, tables and columns, 5-2
Use All Joined Topics option, 2-30
Use All Referenced Topics join option, 2-30
Use Automatic Join Path Generation option, 2-30
Use Defined Join Paths option, 2-30
Use The Minimum Number Of Topics join option, 2-30
user name, 1-4
USERNAME column, in sample BQAUDIT table, 5-3
using
Broadcast Server, 6-2
Connections Manager, 1-17
defined join paths, 2-9
local joins, 2-11
local joins as limits, 2-13
metatopics and metadata, 3-1
multiple job connections, 6-24
Open Metadata Interpreter, 3-8
V
values limiting, 2-28
variable limits, 6-16
variables, database, 3-11, 3-15, 3-17, 3-19, 3-21
variables, keyword, 5-6
version-controlled data models, 4-2
versions, controlling document, 4-15
viewing
job lists, 6-6
metatopics, 3-6
views
metatopic, 3-6
restricting topic, 2-21
views, topic, 2-17 – 2-18
Visual Warehouse, IBM, A-2
W
Where clauses, SQL, 3-11, 3-15, 3-17, 3-19, 3-21
Index 11

12 Index