Embed Size (px)
Citation preview

Bright Light Feather Wing
I am still finding little time at the vise, but the new fly tying room is coming along great. My
wife just finished painting the trim around the window and door, next comes flooring. I can’t
wait. This fly is another one of my favorites for both summer and winter fish. Pretty much all I
do is change the hook size to match the fishing conditions. Size 3 for the Columbia tributaries,
size 1.5 to 3/0 for the Skeena fish and 3/0 for the coastal winter run. I tie an equal selection of
both dark color combos and bright color combos. As you will see in the step by step, I favor a
bladed wing. The bladed wing produces a much broader silhouette and adds more movement to
the fly. I have also found it to be easier to set the wing on top of the hook compared to setting the
wing low on the shoulders of the hook. You will also find securing materials for this pattern a bit
simpler than some of the more fancy styles - another plus. Have fun with this one and thanks for
looking.
Bright Light Feather Wing

Hook: Whatever you have handy. I tied this one on a TMC 202SP 1/0 (I am pretty sure they do
not make this hook anymore), but for the most part I use an Alec Jackson.
Thread: Hot orange 6/0 Danville.
Tip: Small silver oval tinsel.
Tag: Orange silk floss.
Tail: Golden Pheasant tippet dyed pink.
Body: Hot pink Seal or sub.
Ribbing: Flat pearl Mylar followed by med. Silver oval tinsel.
Hackle: Dyed yellow saddle hackle.
Collar: Dyed orange schlappen.
Wing: Two pink saddle hackle tips enveloped by two dyed orange saddle hackle tips.

Start the tying thread at the bend of the hook. Secure in a length of small oval tinsel. Wrap the
tying thread down the bend of the hook, trapping the tinsel as you go. Take three to four turns
with the tinsel and secure. Wrap the tying thread back to the starting point. Secure in a length of
floss and wrap the floss down the bend of the hook to the tip, then back to the tie-in point and
secure.

Clip a clump of barbs from a tippet feather and secure in as a tail. I like the length of the tail to
be in line with the bend of the hook.

At the tail joint, secure in the hackle, followed by the oval tinsel, followed by the flat Mylar
tinsel, followed by a dubbing loop. The order is important. Easy rule to remember is the first
material to be wrapped forward is the last to be secured in. The dubbing loop is created using the
tying thread. Load the dubbing loop with dubbing and give it a spin.

Bring the dubbing loop forward and secure. Follow the dubbing with the five open wraps of the
Mylar tinsel. Tease out the dubbing with Velcro before bringing the oval tinsel forward. The oval
tinsel is butted up against the trailing edge of the Mylar.
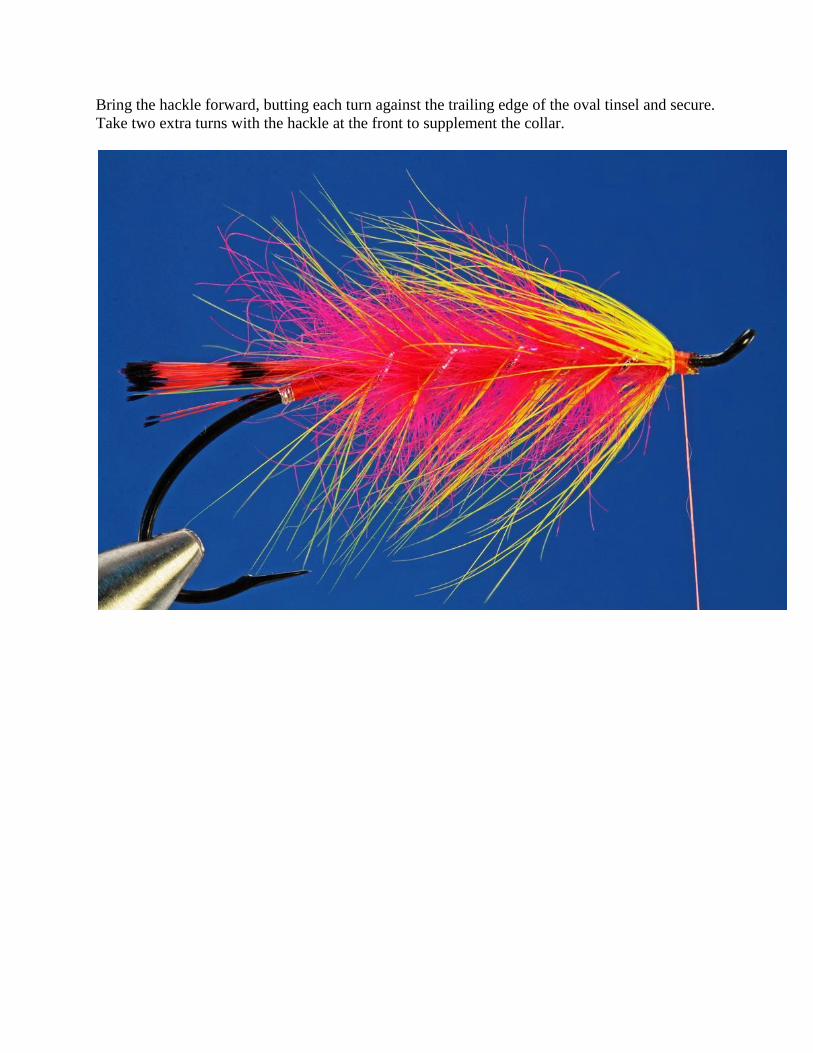
Bring the hackle forward, butting each turn against the trailing edge of the oval tinsel and secure.
Take two extra turns with the hackle at the front to supplement the collar.

Secure in an orange schlappen hackle and wrap as a collar. Secure with two to three turns of the
tying thread and do not clip the tag end of the stem. Only stem should be secured under the tying
thread and the last turn of the hackle should end on the bottom of the hook.

Prepare the four hackle tips for the wing. Measure to length and strip all the excess barbs from
the stem. Pair the hackle tips (all four) and push the hackle stems through the eye of the fly.
Secure with a number of firm wraps. I have pushed the stems back out for this photo. Not the
greatest shot, I was trying to show how the wing is bladed over the top of the fly.

This is a close-up of the four hackle stems of the wing and the stem from the body hackle. Note
the two pink stems are enveloped by the two orange stems. The four stems sit flat on top of the
hook and the body hackle stem sits on the bottom of the hook. The key is in pinching the wing
firmly while supplying a number of firm securing wraps. Let go too soon, and the wing will
twist. It takes a little bit of work, but once it clicks, its game on. Once the wing is secured clipped
the tag ends. Build up a small head, whip finish the tying thread and add a few drops of head
cement.

Good tying and better fishing.