Embed Size (px)
Citation preview

Version 3.2
BridgeTalkApplication
User�s Guide

Copyright 2003 Spectel Operations Limited. All rights reserved.
Spectel makes no representations or warranties regarding the contents of this document. Information contained herein is subject to change without notice. The software described in this document is furnished under a license agreement and may be used only in accordance with the terms of the agreement. It is against the law to copy the software on any medium except as specifically allowed in the license agreement. No part of this manual may be reproduced or transmitted in any form or by any means, electronic or mechanical, including photocopying, without the express written permission of Spectel Operations Limited.
The trademarks AT&T, Austel, Bellcore, Compaq, CrossTalk, Dell, Domino, Ericsson, Excel, Exchange, HostAccess, HyperAccess, IBMX-Series, Informix, Internet Explorer, Internet Information Server, InstallAnywhere, InstallShield, ITU-T, JATE, Java, Javadoc, JRE, JRun, Lotus Notes, Microsoft, Microsoft Foundation Class (MFC), Microsoft SQL, Microsoft SQL Server 2000, Microsoft Virtual Machine (VM), NetMeeting, Netscape, Net_5, Nortel, Oracle, Outlook, Pentium, PowerPoint, Prairie, puTTY, Siemens, TR6, UNIX, Unixware, Visual Basic, Visual C++, VN3, WebEx, Windows, Windows 98, Windows NT, Windows XP, and Windows 2000 are the property of their respective owners.
Spectel Operations Limited is the owner of all other trademarks, copyrighted work, and all other intellectual property appearing in this manual.
Document Number 81100153 Rev A

Contents
Preface . . . . . . . . . . . . . . . . . . . . . . . . . . . . . . . . . . . . . . . . . . . . . . . . . . . . . . . . . . . . . . xiIntended audience . . . . . . . . . . . . . . . . . . . . . . . . . . . . . . . . . . . . . . . . . . . . . . . . . . xiRelated documents . . . . . . . . . . . . . . . . . . . . . . . . . . . . . . . . . . . . . . . . . . . . . . . . . . xiConventions . . . . . . . . . . . . . . . . . . . . . . . . . . . . . . . . . . . . . . . . . . . . . . . . . . . . . . . xiiContacting Spectel . . . . . . . . . . . . . . . . . . . . . . . . . . . . . . . . . . . . . . . . . . . . . . . . . xiii
Chapter 1: Getting Started . . . . . . . . . . . . . . . . . . . . . . . . . . . . . . . . . . . . . . . . . . . . . . . . . . . . . . 1-1
System requirements. . . . . . . . . . . . . . . . . . . . . . . . . . . . . . . . . . . . . . . . . . . . . . . . 1-2Pre-installation procedures . . . . . . . . . . . . . . . . . . . . . . . . . . . . . . . . . . . . . . . . . . . 1-2Installing BridgeTalk. . . . . . . . . . . . . . . . . . . . . . . . . . . . . . . . . . . . . . . . . . . . . . . . . 1-3
Uninstalling BridgeTalk . . . . . . . . . . . . . . . . . . . . . . . . . . . . . . . . . . . . . . . . . . . 1-5Configuring BridgeTalk . . . . . . . . . . . . . . . . . . . . . . . . . . . . . . . . . . . . . . . . . . . . . . 1-6Overview of the BridgeTalk bridge.properties file . . . . . . . . . . . . . . . . . . . . . . . . . . 1-7
Multicasting and delta messaging . . . . . . . . . . . . . . . . . . . . . . . . . . . . . . . . . . . 1-7Starting BridgeTalk. . . . . . . . . . . . . . . . . . . . . . . . . . . . . . . . . . . . . . . . . . . . . . . . . . 1-8
Sign-in privileges. . . . . . . . . . . . . . . . . . . . . . . . . . . . . . . . . . . . . . . . . . . . . . . 1-10Establishing an operator audio path . . . . . . . . . . . . . . . . . . . . . . . . . . . . . . . . 1-11Setting up auxiliary audio paths . . . . . . . . . . . . . . . . . . . . . . . . . . . . . . . . . . . 1-12
Exiting from BridgeTalk . . . . . . . . . . . . . . . . . . . . . . . . . . . . . . . . . . . . . . . . . . . . . 1-15
Chapter 2: Understanding the User Interface . . . . . . . . . . . . . . . . . . . . . . . . . . . . . . . . . . . . . . . 2-1
Overview of the BridgeTalk interface . . . . . . . . . . . . . . . . . . . . . . . . . . . . . . . . . . . . 2-2Keyboard command keys . . . . . . . . . . . . . . . . . . . . . . . . . . . . . . . . . . . . . . . . . 2-8
Modifying BridgeTalk windows. . . . . . . . . . . . . . . . . . . . . . . . . . . . . . . . . . . . . . . . 2-10Changing the size of a window or a field. . . . . . . . . . . . . . . . . . . . . . . . . . . . . 2-10Displaying or hiding fields . . . . . . . . . . . . . . . . . . . . . . . . . . . . . . . . . . . . . . . . 2-11
iii

Administrator and maintenance options . . . . . . . . . . . . . . . . . . . . . . . . . . . . . . . . 2-13Starting a system administrator or maintenance session . . . . . . . . . . . . . . . . 2-14Setting lines per column in All Lines dialog box . . . . . . . . . . . . . . . . . . . . . . . 2-15Using the ACS option . . . . . . . . . . . . . . . . . . . . . . . . . . . . . . . . . . . . . . . . . . . 2-16Lock and release of BridgeTalk areas . . . . . . . . . . . . . . . . . . . . . . . . . . . . . . . 2-16
Chapter 3: Creating a Conference . . . . . . . . . . . . . . . . . . . . . . . . . . . . . . . . . . . . . . . . . . . . . . . . 3-1
Creating a new conference . . . . . . . . . . . . . . . . . . . . . . . . . . . . . . . . . . . . . . . . . . . 3-2Naming a conference . . . . . . . . . . . . . . . . . . . . . . . . . . . . . . . . . . . . . . . . . . . . 3-3Specifying a conference ID . . . . . . . . . . . . . . . . . . . . . . . . . . . . . . . . . . . . . . . . 3-4Setting entry or exit tones and messages . . . . . . . . . . . . . . . . . . . . . . . . . . . . . 3-5Adding a voice roster . . . . . . . . . . . . . . . . . . . . . . . . . . . . . . . . . . . . . . . . . . . . 3-6Locking a conference . . . . . . . . . . . . . . . . . . . . . . . . . . . . . . . . . . . . . . . . . . . . 3-6Securing a conference . . . . . . . . . . . . . . . . . . . . . . . . . . . . . . . . . . . . . . . . . . . 3-7Setting up a lectured conference . . . . . . . . . . . . . . . . . . . . . . . . . . . . . . . . . . . 3-8
Using annunciator messages . . . . . . . . . . . . . . . . . . . . . . . . . . . . . . . . . . . . . . . . . 3-9Providing music for a conference . . . . . . . . . . . . . . . . . . . . . . . . . . . . . . . . . . . . . 3-11
Adding an analog or digital music channel . . . . . . . . . . . . . . . . . . . . . . . . . . . 3-11Linking conferences. . . . . . . . . . . . . . . . . . . . . . . . . . . . . . . . . . . . . . . . . . . . . . . . 3-14
Adding a virtual link line . . . . . . . . . . . . . . . . . . . . . . . . . . . . . . . . . . . . . . . . . 3-15Adding a dedicated link line . . . . . . . . . . . . . . . . . . . . . . . . . . . . . . . . . . . . . . 3-17Using virtual and dedicated link lines in a conference . . . . . . . . . . . . . . . . . . 3-17
Chapter 4: Dialing In . . . . . . . . . . . . . . . . . . . . . . . . . . . . . . . . . . . . . . . . . . . . . . . . . . . . . . . . . . . 4-1
Overview of dialing in . . . . . . . . . . . . . . . . . . . . . . . . . . . . . . . . . . . . . . . . . . . . . . . 4-2Creating a Filtered DNIS/DDI Enter queue . . . . . . . . . . . . . . . . . . . . . . . . . . . . 4-2Placing incoming lines into a conference . . . . . . . . . . . . . . . . . . . . . . . . . . . . . 4-5
Chapter 5: Using Dial Lists and Dialing Out . . . . . . . . . . . . . . . . . . . . . . . . . . . . . . . . . . . . . . . . 5-1
Working with dial lists . . . . . . . . . . . . . . . . . . . . . . . . . . . . . . . . . . . . . . . . . . . . . . . 5-2Creating a new dial list . . . . . . . . . . . . . . . . . . . . . . . . . . . . . . . . . . . . . . . . . . . 5-3Modifying a dial list . . . . . . . . . . . . . . . . . . . . . . . . . . . . . . . . . . . . . . . . . . . . . . 5-6Changing entries in a dial list . . . . . . . . . . . . . . . . . . . . . . . . . . . . . . . . . . . . . . 5-7
iv BridgeTalk Application 3.2 User�s Guide

Overview of dialing out . . . . . . . . . . . . . . . . . . . . . . . . . . . . . . . . . . . . . . . . . . . . . . 5-8Using FastDial. . . . . . . . . . . . . . . . . . . . . . . . . . . . . . . . . . . . . . . . . . . . . . . . . . 5-9Using BlastDial . . . . . . . . . . . . . . . . . . . . . . . . . . . . . . . . . . . . . . . . . . . . . . . . 5-14Using a DNIS/DDI BlastDial . . . . . . . . . . . . . . . . . . . . . . . . . . . . . . . . . . . . . . 5-18Using manual (one-time) dial . . . . . . . . . . . . . . . . . . . . . . . . . . . . . . . . . . . . . 5-18
Chapter 6: Recording Conferences . . . . . . . . . . . . . . . . . . . . . . . . . . . . . . . . . . . . . . . . . . . . . . . 6-1
Overview of recording . . . . . . . . . . . . . . . . . . . . . . . . . . . . . . . . . . . . . . . . . . . . . . . 6-2Creating an analog recording . . . . . . . . . . . . . . . . . . . . . . . . . . . . . . . . . . . . . . 6-3Creating a digital recording . . . . . . . . . . . . . . . . . . . . . . . . . . . . . . . . . . . . . . . . 6-5
Chapter 7: Conducting Polling and Q&A Sessions . . . . . . . . . . . . . . . . . . . . . . . . . . . . . . . . . . 7-1
Conducting polling sessions . . . . . . . . . . . . . . . . . . . . . . . . . . . . . . . . . . . . . . . . . . 7-2Starting a polling session . . . . . . . . . . . . . . . . . . . . . . . . . . . . . . . . . . . . . . . . . 7-3Performing operator polling tasks . . . . . . . . . . . . . . . . . . . . . . . . . . . . . . . . . . . 7-4Allowing a participant to change a vote. . . . . . . . . . . . . . . . . . . . . . . . . . . . . . . 7-6Clearing all votes. . . . . . . . . . . . . . . . . . . . . . . . . . . . . . . . . . . . . . . . . . . . . . . . 7-7Ending a polling session . . . . . . . . . . . . . . . . . . . . . . . . . . . . . . . . . . . . . . . . . . 7-7Creating a tag digit list. . . . . . . . . . . . . . . . . . . . . . . . . . . . . . . . . . . . . . . . . . . . 7-8
Conducting Question and Answer (Q&A) sessions . . . . . . . . . . . . . . . . . . . . . . . . 7-10Starting a Q&A session . . . . . . . . . . . . . . . . . . . . . . . . . . . . . . . . . . . . . . . . . . 7-11Assisting callers during a Q&A session. . . . . . . . . . . . . . . . . . . . . . . . . . . . . . 7-13
Chapter 8: Transferring Calls . . . . . . . . . . . . . . . . . . . . . . . . . . . . . . . . . . . . . . . . . . . . . . . . . . . . 8-1
Overview of the transfer process. . . . . . . . . . . . . . . . . . . . . . . . . . . . . . . . . . . . . . . 8-2Transferring a call within your phone system . . . . . . . . . . . . . . . . . . . . . . . . . . 8-2Transferring one or more participants . . . . . . . . . . . . . . . . . . . . . . . . . . . . . . . . 8-3Transferring an entire conference to another conference . . . . . . . . . . . . . . . . . 8-4Transferring a dedicated link line . . . . . . . . . . . . . . . . . . . . . . . . . . . . . . . . . . . 8-5
Contents v

Chapter 9: Assisting an Active Conference . . . . . . . . . . . . . . . . . . . . . . . . . . . . . . . . . . . . . . . . 9-1
Overview of managing active conferences . . . . . . . . . . . . . . . . . . . . . . . . . . . . . . . 9-2Responding to help requests . . . . . . . . . . . . . . . . . . . . . . . . . . . . . . . . . . . . . . 9-2Modifying conference information . . . . . . . . . . . . . . . . . . . . . . . . . . . . . . . . . . . 9-3Modifying participant information . . . . . . . . . . . . . . . . . . . . . . . . . . . . . . . . . . . 9-4Muting a line . . . . . . . . . . . . . . . . . . . . . . . . . . . . . . . . . . . . . . . . . . . . . . . . . . . 9-5Listening to (auditing) a conference . . . . . . . . . . . . . . . . . . . . . . . . . . . . . . . . . 9-5Speaking to the entire conference . . . . . . . . . . . . . . . . . . . . . . . . . . . . . . . . . . 9-5Sending messages to other operators . . . . . . . . . . . . . . . . . . . . . . . . . . . . . . . 9-6Sending messages to other operators using the Conference Viewer . . . . . . . . 9-7Adding a note to a conference report . . . . . . . . . . . . . . . . . . . . . . . . . . . . . . . . 9-8
Monitoring subconferences . . . . . . . . . . . . . . . . . . . . . . . . . . . . . . . . . . . . . . . . . . . 9-9
Chapter 10: Using the Listening Commands . . . . . . . . . . . . . . . . . . . . . . . . . . . . . . . . . . . . . . . 10-1
Overview of listening . . . . . . . . . . . . . . . . . . . . . . . . . . . . . . . . . . . . . . . . . . . . . . . 10-2Listening to specific lines . . . . . . . . . . . . . . . . . . . . . . . . . . . . . . . . . . . . . . . . 10-3Listening to all lines in a conference . . . . . . . . . . . . . . . . . . . . . . . . . . . . . . . . 10-5Listening to an auxiliary channel . . . . . . . . . . . . . . . . . . . . . . . . . . . . . . . . . . . 10-6
Scanning conferences . . . . . . . . . . . . . . . . . . . . . . . . . . . . . . . . . . . . . . . . . . . . . . 10-7Scanning multiple conferences . . . . . . . . . . . . . . . . . . . . . . . . . . . . . . . . . . . . 10-8Specifying a scanning interval. . . . . . . . . . . . . . . . . . . . . . . . . . . . . . . . . . . . . 10-8
Applying gain to a conference . . . . . . . . . . . . . . . . . . . . . . . . . . . . . . . . . . . . . . . . 10-8Faulting a line . . . . . . . . . . . . . . . . . . . . . . . . . . . . . . . . . . . . . . . . . . . . . . . . . . . . 10-9Adding an audio prompt . . . . . . . . . . . . . . . . . . . . . . . . . . . . . . . . . . . . . . . . . . . 10-10
Chapter 11: Scheduling a Conference . . . . . . . . . . . . . . . . . . . . . . . . . . . . . . . . . . . . . . . . . . . . . 11-1
Overview of the Conference Scheduler. . . . . . . . . . . . . . . . . . . . . . . . . . . . . . . . . 11-2Scheduling an attended conference . . . . . . . . . . . . . . . . . . . . . . . . . . . . . . . 11-11Scheduling an unattended conference . . . . . . . . . . . . . . . . . . . . . . . . . . . . . 11-12Scheduling an on-demand conference . . . . . . . . . . . . . . . . . . . . . . . . . . . . . 11-13Scheduling a flex conference . . . . . . . . . . . . . . . . . . . . . . . . . . . . . . . . . . . . 11-16About Name Record/Playback . . . . . . . . . . . . . . . . . . . . . . . . . . . . . . . . . . . 11-20
vi BridgeTalk Application 3.2 User�s Guide

Defining a one-time or on-going conference . . . . . . . . . . . . . . . . . . . . . . . . . 11-21Defining conference features . . . . . . . . . . . . . . . . . . . . . . . . . . . . . . . . . . . . 11-25
Viewing or printing conference information . . . . . . . . . . . . . . . . . . . . . . . . . . . . . 11-29Using the View Schedule option . . . . . . . . . . . . . . . . . . . . . . . . . . . . . . . . . . 11-30Using the View Expanded Schedule option . . . . . . . . . . . . . . . . . . . . . . . . . 11-30
Viewing or modifying scheduled conferences . . . . . . . . . . . . . . . . . . . . . . . . . . . 11-31Accessing the Scheduler directly. . . . . . . . . . . . . . . . . . . . . . . . . . . . . . . . . . . . . 11-35
Chapter 12: Performing Post-Conference Tasks . . . . . . . . . . . . . . . . . . . . . . . . . . . . . . . . . . . . 12-1
Overview of post-conference tasks . . . . . . . . . . . . . . . . . . . . . . . . . . . . . . . . . . . . 12-2Hanging up lines . . . . . . . . . . . . . . . . . . . . . . . . . . . . . . . . . . . . . . . . . . . . . . . 12-2Hanging up a conference . . . . . . . . . . . . . . . . . . . . . . . . . . . . . . . . . . . . . . . . 12-3Clearing conference information . . . . . . . . . . . . . . . . . . . . . . . . . . . . . . . . . . . 12-3Clearing all features from a conference . . . . . . . . . . . . . . . . . . . . . . . . . . . . . 12-5Deleting expired reservations . . . . . . . . . . . . . . . . . . . . . . . . . . . . . . . . . . . . . 12-6
Working with status information and reports . . . . . . . . . . . . . . . . . . . . . . . . . . . . . 12-9Types of reports . . . . . . . . . . . . . . . . . . . . . . . . . . . . . . . . . . . . . . . . . . . . . . . 12-9Displaying status information . . . . . . . . . . . . . . . . . . . . . . . . . . . . . . . . . . . . 12-11Printing or viewing a conference status report . . . . . . . . . . . . . . . . . . . . . . . 12-12Printing past conference reports . . . . . . . . . . . . . . . . . . . . . . . . . . . . . . . . . . 12-12
Chapter 13: Using Automatic Conference Select . . . . . . . . . . . . . . . . . . . . . . . . . . . . . . . . . . . . 13-1
Setting the system to automatically handle calls . . . . . . . . . . . . . . . . . . . . . . . . . . 13-2Placing callers automatically in a specified conference . . . . . . . . . . . . . . . . . 13-2Setting lines to not answer incoming calls . . . . . . . . . . . . . . . . . . . . . . . . . . . 13-2Setting the system to not answer incoming calls . . . . . . . . . . . . . . . . . . . . . . 13-3
Appendix A: Moderator and Participant DTMF Commands . . . . . . . . . . . . . . . . . . . . . . . . . . . . . A-1
Managing conferences using DTMF star commands . . . . . . . . . . . . . . . . . . . . . . . A-2Using Flex DTMF commands . . . . . . . . . . . . . . . . . . . . . . . . . . . . . . . . . . . . . . . . . A-6
Modifying Flex conference settings. . . . . . . . . . . . . . . . . . . . . . . . . . . . . . . . . . A-6Managing conferences using Flex DTMF star commands . . . . . . . . . . . . . . . . A-8
Contents vii

Appendix B: Menu Bar and Main Toolbar . . . . . . . . . . . . . . . . . . . . . . . . . . . . . . . . . . . . . . . . . . . . B-1
Menu bar overview . . . . . . . . . . . . . . . . . . . . . . . . . . . . . . . . . . . . . . . . . . . . . . . . . B-2Choosing Menu bar commands . . . . . . . . . . . . . . . . . . . . . . . . . . . . . . . . . . . . B-2
Main Toolbar overview. . . . . . . . . . . . . . . . . . . . . . . . . . . . . . . . . . . . . . . . . . . . . . B-11Using the toolbar . . . . . . . . . . . . . . . . . . . . . . . . . . . . . . . . . . . . . . . . . . . . . . . B-11
Appendix C: Predefining Login and Operator Information . . . . . . . . . . . . . . . . . . . . . . . . . . . . . . C-1
Creating a BridgeTalk shortcut . . . . . . . . . . . . . . . . . . . . . . . . . . . . . . . . . . . . . . . . C-2Predefining login information . . . . . . . . . . . . . . . . . . . . . . . . . . . . . . . . . . . . . . . . . . C-3
Creating a customized BridgeTalk shortcut. . . . . . . . . . . . . . . . . . . . . . . . . . . . C-3Using a batch script. . . . . . . . . . . . . . . . . . . . . . . . . . . . . . . . . . . . . . . . . . . . . . C-4
Index . . . . . . . . . . . . . . . . . . . . . . . . . . . . . . . . . . . . . . . . . . . . . . . . . . . . . . . . . . . . . . . IX-1
viii BridgeTalk Application 3.2 User�s Guide

List of TablesTable 1-1: System requirements . . . . . . . . . . . . . . . . . . . . . . . . . . . . . . . . . . . . . . . 1-2Table 1-2: Multicasting and delta messages features . . . . . . . . . . . . . . . . . . . . . . . 1-7Table 1-3: Sign-in privileges . . . . . . . . . . . . . . . . . . . . . . . . . . . . . . . . . . . . . . . . . 1-10Table 1-4: Audio path options . . . . . . . . . . . . . . . . . . . . . . . . . . . . . . . . . . . . . . . . 1-12Table 2-1: BridgeTalk task areas. . . . . . . . . . . . . . . . . . . . . . . . . . . . . . . . . . . . . . . 2-3Table 2-2: Keyboard command keys. . . . . . . . . . . . . . . . . . . . . . . . . . . . . . . . . . . . 2-8Table 2-3: Administrator-level features . . . . . . . . . . . . . . . . . . . . . . . . . . . . . . . . . 2-13Table 2-4: BridgeTalk locked window attributes . . . . . . . . . . . . . . . . . . . . . . . . . . 2-16Table 3-1: Methods of creating conferences . . . . . . . . . . . . . . . . . . . . . . . . . . . . . . 3-2Table 3-2: Music channels. . . . . . . . . . . . . . . . . . . . . . . . . . . . . . . . . . . . . . . . . . . 3-12Table 3-3: Link line types. . . . . . . . . . . . . . . . . . . . . . . . . . . . . . . . . . . . . . . . . . . . 3-14Table 4-1: Caller information in the Line Detail dialog box . . . . . . . . . . . . . . . . . . . 4-7Table 5-1: Optional Access Code options . . . . . . . . . . . . . . . . . . . . . . . . . . . . . . . . 5-5Table 5-2: Types of dial-out operations . . . . . . . . . . . . . . . . . . . . . . . . . . . . . . . . . . 5-9Table 5-3: Dial options. . . . . . . . . . . . . . . . . . . . . . . . . . . . . . . . . . . . . . . . . . . . . . 5-12Table 5-4: Default BlastDial messages . . . . . . . . . . . . . . . . . . . . . . . . . . . . . . . . . 5-16Table 7-1: Saving or printing polling results . . . . . . . . . . . . . . . . . . . . . . . . . . . . . . 7-6Table 7-2: Setting caller priorities in Q&A . . . . . . . . . . . . . . . . . . . . . . . . . . . . . . . 7-10Table 7-3: Q&A dialog box command buttons. . . . . . . . . . . . . . . . . . . . . . . . . . . . 7-12Table 7-4: Moderator help request options during Q&A . . . . . . . . . . . . . . . . . . . . 7-14Table 7-5: Participant help request options during Q&A . . . . . . . . . . . . . . . . . . . . 7-16Table 7-6: Participant Ask? options during Q&A . . . . . . . . . . . . . . . . . . . . . . . . . . 7-17Table 8-1: Call transfer options . . . . . . . . . . . . . . . . . . . . . . . . . . . . . . . . . . . . . . . . 8-3Table 9-1: Subconference - inherited conference features . . . . . . . . . . . . . . . . . . 9-10Table 9-2: Subconference - optional conference features. . . . . . . . . . . . . . . . . . . 9-11Table 10-1: Listen Line options . . . . . . . . . . . . . . . . . . . . . . . . . . . . . . . . . . . . . . . 10-6Table 11-1: Conference Scheduler toolbar buttons. . . . . . . . . . . . . . . . . . . . . . . . 11-2Table 11-2: Scheduler fields in alphabetical order . . . . . . . . . . . . . . . . . . . . . . . . 11-4Table 11-3: On-demand conference settings . . . . . . . . . . . . . . . . . . . . . . . . . . . 11-14Table 11-4: Flex conference settings . . . . . . . . . . . . . . . . . . . . . . . . . . . . . . . . . 11-18Table 11-5: Name Record/Playback - option interaction . . . . . . . . . . . . . . . . . . . 11-20Table 11-6: Conference Scheduler date and time options . . . . . . . . . . . . . . . . . 11-21Table 11-7: Start/End times, Code duration, Entry/Exit tones . . . . . . . . . . . . . . . 11-25Table 11-8: Conference Features . . . . . . . . . . . . . . . . . . . . . . . . . . . . . . . . . . . . 11-26Table 11-9: Search results options . . . . . . . . . . . . . . . . . . . . . . . . . . . . . . . . . . . 11-32Table 11-10: Printing scheduled conferences . . . . . . . . . . . . . . . . . . . . . . . . . . . 11-33Table 12-1: Report types . . . . . . . . . . . . . . . . . . . . . . . . . . . . . . . . . . . . . . . . . . . . 12-9Table 12-2: Display submenu toolbar . . . . . . . . . . . . . . . . . . . . . . . . . . . . . . . . . 12-11Table A-1: Standard Spectel DTMF settings . . . . . . . . . . . . . . . . . . . . . . . . . . . . . . A-2Table A-2: Flex DTMF modify conference settings . . . . . . . . . . . . . . . . . . . . . . . . . A-6Table A-3: Standard Flex DTMF settings . . . . . . . . . . . . . . . . . . . . . . . . . . . . . . . . A-8Table B-1: File Menu . . . . . . . . . . . . . . . . . . . . . . . . . . . . . . . . . . . . . . . . . . . . . . . . B-2
Contents ix

Table B-2: View menu . . . . . . . . . . . . . . . . . . . . . . . . . . . . . . . . . . . . . . . . . . . . . . . B-3Table B-3: Line menu . . . . . . . . . . . . . . . . . . . . . . . . . . . . . . . . . . . . . . . . . . . . . . . B-6Table B-4: Conference menu . . . . . . . . . . . . . . . . . . . . . . . . . . . . . . . . . . . . . . . . . B-7Table B-5: FastDial menu . . . . . . . . . . . . . . . . . . . . . . . . . . . . . . . . . . . . . . . . . . . . B-8Table B-6: Tools menu . . . . . . . . . . . . . . . . . . . . . . . . . . . . . . . . . . . . . . . . . . . . . . B-9Table B-7: Windows menu . . . . . . . . . . . . . . . . . . . . . . . . . . . . . . . . . . . . . . . . . . B-10Table B-8: Help menu . . . . . . . . . . . . . . . . . . . . . . . . . . . . . . . . . . . . . . . . . . . . . . B-10Table B-9: Main Toolbar . . . . . . . . . . . . . . . . . . . . . . . . . . . . . . . . . . . . . . . . . . . . B-12Table C-1: Command line - login variables . . . . . . . . . . . . . . . . . . . . . . . . . . . . . . . C-3
x BridgeTalk Application 3.2 User�s Guide

Preface xi
PrefaceBridgeTalk is a Windows-based application that allows you to create, schedule, and manage teleconferences on an audioconferencing system. In addition, BridgeTalk lets you assist moderators and participants during Question and Answer (Q&A) and polling sessions.
Note: This guide refers to the BridgeTalk software as BridgeTalk.
Intended audienceUse this guide if you want to manage or schedule a conference using BridgeTalk.
Related documentsThis guide is designed for use with the following:
� For information about administration and maintenance of your Spectel audioconferencing system, see the 700/780 Platform Administration and Maintenance Guide.
� For information on using BridgeTalk, see the BridgeTalk online help.
Tip: Use Internet Explorer 5.5 or later for optimum BridgeTalk online help performance.

xii BridgeTalk Application 3.2 User�s Guide
ConventionsThe following table describes conventions commonly used in this book.
Note: This guide uses the star-number system for participant and moderator commands. Before proceeding, you should verify the configuration your system uses. For example, your administrator might configure your system so that participants request help by pressing 0 instead of *0.
For a list of telephone keypad commands that participants and moderators can use, see Appendix A, �Moderator and Participant DTMF Commands.�
Term Description
Choose To choose a command from the Menu bar. For example, �Choose File > Exit� means to move the cursor to �File� in the Menu bar, hold down the left mouse button, then move the cursor to �Exit,� and finally release the left mouse button.
Click To select an item by placing the cursor over the named object and then pressing the left mouse button. For example, if the manual says �Click OK,� select OK using the mouse.
Enter To enter text using a keyboard. For example, if the manual says �enter a filename,� type the name of a file that you want to use.
KEYNAME Text displayed in SMALL CAPS is a keyname, for example ESC or ENTER. In certain cases, the guide refers to a combination of keys, such as CTRL+ENTER. This means that you must simultaneously press the CTRL and ENTER keys (hold down the CTRL key, and then press ENTER).
Press To input a specific key or key sequence. (See KEYNAME in this table.)
Select To highlight, for example, a row in a display or a list item, or select a check box or a radio button.
Edit entry To modify text displayed in a table.
Tip: After entering the text, click outside the text box to apply changes.

Preface xiii
Contacting SpectelYou can contact Spectel at:
Corporate Headquarters
Spectel Operations Limited21 Stillorgan Industrial Park. Co. Dublin, IrelandTel: +353-1-207-5600 US Toll Free: +1-877-535-9290Fax: +353-1-295-3740
US Headquarters
Spectel Operations Limited200 Minuteman Road Andover, MA 01810 USATel: +1-800-685-8454Fax: +1-978-552-6250
Technical Support
US and Canada:Tel: +1-800-366-5469 or +1-978-552-6300E-mail: [email protected]: +1-978-552-6220
International:Tel: +353-1-207-5667 (700/780)Tel: +353-1-207-5666 (7000)E-mail:[email protected]
Web Site www.spectel.com

xiv BridgeTalk Application 3.2 User�s Guide

Chapter 1Getting StartedThis chapter provides the following information on:
� System requirements
� Pre-installation procedures
� Installing BridgeTalk
� Configuring BridgeTalk
� Overview of the BridgeTalk bridge.properties file
� Starting BridgeTalk
� Exiting from BridgeTalk
1-1

System requirementsUse BridgeTalk with the necessary components outlined in Table 1-1.
Tip: For Windows NT and 2K machines, make sure that you have administrator-level access before installing or uninstalling the BridgeTalk software.
Pre-installation proceduresBefore you install BridgeTalk, use the Add/Remove Programs located in the Control Panel folder to uninstall any previous version of BridgeTalk. In addition, you should manually delete the BridgeTalk icon from your desktop.
Table 1-1: System requirements
Component Description
PC The minimum requirements are:� Pentium 166 MHz� 64 MB RAM (128 MB RAM recommended)� 1.62 GB hard drive space� A CD-ROM drive� SVGA monitor, keyboard, and mouse
Operating system � Use one of the following operating systems:� Windows 98� Windows NT 4.0� Windows 2000� Windows XP
Scheduler Use only one of the following schedulers:
� Default Scheduler (SchAPI)� Client Registration Server (CRS)� External Passcode Validation (EPV)
Browser Internet Explorer 5.5 or later is recommended for optimum BridgeTalk online help performance.
1-2 BridgeTalk Application 3.2 User�s Guide

Installing BridgeTalkYou can run the Install Anywhere installation from your BridgeTalk media or a network device.
Note: Spectel requires that you uninstall your previous version of BridgeTalk and copy any additional files created during previous BridgeTalk sessions to the new installation directory. (The uninstall utility only deletes files in the BridgeTalk folder that were originally installed.)
Tip: If you customized your BridgeTalk console, make sure that you copy the existing bridge.properties file to another location before proceeding with the installation. After installation is complete, you can move the bridge.properties file to the new installation directory.
Follow these steps to install BridgeTalk:
1. Choose one of the following:
� If you are installing BridgeTalk from a CD, insert the CD-ROM in the drive of your machine.
� If you are installing BridgeTalk from a network device, select the network that contains the distribution software.
2. Double-click on setup.exe.
The installation program displays the Installer dialog box.
3. Click Next.
Getting Started 1-3

4. The installation program prompts you to select the folder location in which to install BridgeTalk.
5. Do one of the following:
� To use the folder currently displayed, click Next.
� To use a folder other than the default folder or currently displayed folder:
a. Click Choose.
b. Select the folder you want and click Next.
6. Click Next to confirm the installation path.
1-4 BridgeTalk Application 3.2 User�s Guide

The Pre-Installation Summary dialog box lists the selections for intended installation.
7. Click Install.
The installation program displays a progress bar.
8. Click Done to complete the installation.
The installation is complete.
Uninstalling BridgeTalkUse the Add/Remove Programs located in the Control Panel folder to uninstall BridgeTalk. In addition, you should manually delete the BridgeTalk icon from your desktop.
Getting Started 1-5

Configuring BridgeTalkTo use your computer with a Spectel 70, Version 2.5.06 or earlier, you must add the IP address of your computer to that system�s host file. The next section describes how you can identify the bridges to which BridgeTalk will be connecting.
Determining your computer�s name and IP addressFollow these steps to determine your computer�s name and IP address:
1. From the Start Menu, choose Settings > Control Panel.
2. Double-click the Network Icon in the Control Panel window.
3. In the Network dialog box, click the Identification tab if it is not already selected.
4. Write down the name of your computer, which is displayed in the Computer Name field.
5. Click Cancel to close the Network dialog box.
6. Choose File > Close to close the Control Panel.
7. Open an MS-DOS window by choosing Start > Programs > MS-DOS Prompt.
8. At the command prompt, type the following:
ipconfig
9. Type exit to close the MS-DOS Command window.
To create a BridgeTalk shortcut, see Appendix C, �Predefining Login and Operator Information.�
1-6 BridgeTalk Application 3.2 User�s Guide

Overview of the BridgeTalk bridge.properties fileSimilar to an INI file, the bridge.properties file allows a system administrator to configure key BridgeTalk options on each workstation. The bridge.properties file is located in the BridgeTalk install path. Only an administrator should configure these options.
Tip: After installing BridgeTalk, launch and then immediately close BridgeTalk to populate this file.
Multicasting and delta messagingBy default, BridgeTalk automatically enables the multicasting and delta messages features. Table 1-2 describes these features.
Tip: When you log on to BridgeTalk, the splash screen displays text informing you if delta messages and/or multicasting are enabled on the bridge to which you are connecting.
For more information on delta messages and multicasting, see the 700/780 Platform Administration and Maintenance Guide.
Table 1-2: Multicasting and delta messages features
Status Description
By default, multicasting is:Enabled and controlled in the BridgeTalk bridge.properties file as:MultiStatusEnabled=trueDisabled on Platform 700 and Platform 780 bridges.
Multicasting enables the system to transmit system status information to BridgeTalk over local or wide-area networks.
Note: Multicasting remains disabled in BridgeTalk until you connect to a bridge that has enabled multicasting also.
By default, delta messages are:Enabled and controlled in the BridgeTalk bridge.properties file as:useDeltaMessages=true
Delta messages provide a more efficient way of updating system status information to BridgeTalk.
Note: You can use delta messages on all PCs running BridgeTalk 1.2 or later that connect to bridges running Version 1.1.06 or later.
Getting Started 1-7

Starting BridgeTalkTo launch BridgeTalk, you need to have a user name (sign-in), password, and the name of the bridge to which you want to connect.
Tip: If you do not know one or more of these items, contact your administrator.
Choose one of the following methods to start BridgeTalk:
BridgeTalk displays the Login dialog box:
Follow these steps to log on:
1. Enter your sign-in name, for example, �andrews�.
2. Enter your password.
You can enter a password (up to 8 alphanumeric characters).
Tip: Do not use underscores (_), hyphens (-), spaces, or other special characters in the sign-in name or password fields.
3. Click the down arrow and select a bridge.
If the bridge is not listed, enter the system name or IP address in the Bridge field.
4. Click the down arrow and select the operator station number that you want or select Next Available if you want the system to assign an operator number to you.
Use Navigate to Icon
Start Programs > Spectel> BridgeTalk > Launch BridgeTalk from the desktop.
Windows Explorer
The <BridgeTalk install path> and double-click on the BridgeTalk icon, for example: C:\Program Files\Spectel\BridgeTalk\setup.exe.
1-8 BridgeTalk Application 3.2 User�s Guide

Tip: You can type a number over Next Available if you want to enter a particular operator number that is not listed.
5. Click OK.
If the logon is successful, a BridgeTalk splash screen displays.
If the logon is unsuccessful, BridgeTalk displays an error message. An unsuccessful logon might be due to any of the following reasons:
� You entered an invalid sign-in or password.
� You entered an operator number or sign-in that is currently in use.
� Your network connect was lost and the system is not receiving status channel information.
� The bridge is offline.
For more information on sign-ins, see the next section, �Sign-in privileges.�
Getting Started 1-9

Sign-in privilegesSign-ins determine what system features a particular user can access. Table 1-3 describes the available sign-ins for the system.
You can log on automatically to BridgeTalk by predefining your sign-in and operator number information. For more information on presetting your sign-in, see Appendix C, �Predefining Login and Operator Information.�
Table 1-3: Sign-in privileges
Sign-in Description of Privileges
Scheduler You can schedule attended, unattended, on-demand, and Flex reservations.
Operator You can schedule and manage conferences, handle incoming and outgoing calls, monitor audio quality, print reports, and so forth.
System administrator
You can configure system software settings, manage files and reports, and configure the system for unattended conferences, and so forth. In addition, this sign-in can perform operator tasks.
System maintenance
You can configure trunk lines and system hardware, start up and shut down the system, and so forth. In addition, this sign-in can perform administrator and operator tasks.For detailed information about administrator and maintenance tasks, see the 700/780 Platform Administration and Maintenance Guide.
1-10 BridgeTalk Application 3.2 User�s Guide

Establishing an operator audio pathAn audio path is a software and hardware connection providing incoming and outgoing audio for operator and participant use.
Follow these steps to set up an audio path:
1. From the Menu bar, choose Line > Audio Path...
2. Under Line, verify that the default operator option is selected.
See Table 1-4, �Audio path options,� on page 1-12 for additional information.
3. In the Audio Path dialog box, enter your telephone number in the Phone field.
4. Click Dial.
When the system dials the number and establishes the audio path, a dialog box informs you that the line was dialed successfully. If the system is configured to dial, your phone will ring.
5. Pick up your telephone receiver and click OK in the Dial Status dialog box.
6. Click Close in the Audio Path dialog box.
The Operator Status bar shows that your audio path is placed automatically in Confer-ence Room one.
Tip: To move your operator audio path from room to room in the Conference Navigator, place your cursor to the left of the conference room that you want to enter and click once.
7. Press ALT + SPACEBAR to toggle your operator audio path on or off.
For information on setting up link line, music, or record/playback audio paths, see the next section, �Setting up auxiliary audio paths.�
Getting Started 1-11

Setting up auxiliary audio pathsYou must establish a separate audio path for an auxiliary line, such as music or record/playback, before you can add the channel to a conference.
Tip: Make sure that you have established an operator audio path first.
Use this procedure to set up an auxiliary audio path:
1. From the Menu bar, choose Line > Audio Path...
2. Under Line, click a non-operator line option, as shown.
See Table 1-4 for information on setting up auxiliary audio path options.
Table 1-4: Audio path options
Line option To
Operator Establish an operator audio path by dialing your telephone number. You must have an audio path before you can perform operator tasks.
Link Line Set up a link line audio path by dialing a telephone number assigned as a link line channel. For more information on using link lines, see �Linking conferences� on page 3-14.
1-12 BridgeTalk Application 3.2 User�s Guide

3. Click Dial.
When the system dials the number and establishes the audio path, a dialog box informs you that the line was dialed successfully.
4. Click OK in the Dial Status dialog box and click Close in the Audio Path dialog box.
Additional information about operator audio pathHere are some important reminders:
� If the system does not establish an operator audio path successfully, the Link Line, Music, Record/Playback, and operator number fields under Line remain unavailable. If this occurs, click Hang up and repeat Steps 3-6 of �Establishing an operator audio path� on page 1-11 using a valid telephone number.
� You can establish operator audio paths other than you own. However, if you select another operator�s line, the Hang up button is unavailable. If you switch to another operator�s line and click Hang up, an error message appears. This feature prevents unintentional hangups.
Music Establish a music audio path by dialing a telephone number assigned as a music channel. To insert a music channel into a conference before participants join:1. Right-click on the conference in the Conference Navigator and
choose Details... 2. Select a music source (M1-M4) and click OK. For more information on adding music, see �Providing music for a conference� on page 3-11.
Record/Playback(Analog)
Set up a recording audio path by dialing a telephone number assigned as a record/playback channel.To add a Record/Playback channel into a conference before participants join:1. Choose Conference > Record/Playback from the Menu bar. 2. Click Analog and select the conference.3. Choose an assigned analog music channel and click OK. You can pause the Record/Playback feature until you are ready to record. For instructions on using Record/Playback, see Chapter 6, �Recording Conferences.�
Table 1-4: Audio path options (Continued)
Line option To
Getting Started 1-13

Establishing multiple BridgeTalk sessions on different bridgesYou can set up several BridgeTalk sessions with a separate audio path on several bridges from a single PC with a multiple-line telephone, as shown.
Note: Spectel recommends that you dismantle any voice mail application on the telephone first.
Use this procedure to set up several BridgeTalk sessions using a multiple-line telephone:
1. Launch BridgeTalk (session 1) on bridge X, establish an audio path on the first extension, and place the extension on hold.
2. Launch BridgeTalk (session 2) on bridge Y, establish an audio path on the second extension, and place the extension on hold, and so on.
3. If BridgeTalk and its connecting bridge are running Multicasting, you can use command-line variables to create a Windows shortcut or batch script to give each session a separate bridge.properties file.
For information on command-line variables, see Appendix C, �Predefining Login and Operator Information.�
Tip: Use a different bridge.properties� file for each BridgeTalk session. For more information, see �Multicasting and delta messaging� on page 1-7.
Operator console session 2, bridge Y, on Extension 2
Operator console session 3, bridge Z, on Extension 3
Operator console session 1, bridge X, on Extension 1
1-14 BridgeTalk Application 3.2 User�s Guide

Exiting from BridgeTalkChoose one of the following methods to exit from BridgeTalk:
� To use another sign-in while BridgeTalk is still running:
1. Choose File > Logout from the Main menu.
2. Click Yes.
3. In the Login dialog box, choose one of the following sign-ins:
� To close BridgeTalk, choose File > Exit from the Main menu.
Tip: Remember to hang up your audio path.
Sign-in To
Operator session Log on again using a different sign-in or if another operator wants to log on from your machine.
Administrator or maintenance session
Log on with an administrator or maintenance sign-in to configure or manage the system.
Getting Started 1-15

1-16 BridgeTalk Application 3.2 User�s Guide

Chapter 2Understanding the User InterfaceThis chapter includes information on the following:
� Overview of the BridgeTalk interface
� Modifying BridgeTalk windows
� Administrator and maintenance options
2-1

Overview of the BridgeTalk interfaceBridgeTalk is a Windows-based application that allows you to create, schedule, and manage attended, unattended, and on-demand teleconferences on an audioconferencing system. There are specific task-based areas in the BridgeTalk interface, as shown in the following example:
Tip: You can re-arrange the BridgeTalk console to suit your preferences. For more information on changing the size or content of various windows and dialog boxes, see �Modifying BridgeTalk windows� on page 2-10.
Note: Certain non-standard cursors, such as an animated cursor, might cause a disruption of the BridgeTalk display.
Menu bar
Main toolbar
Title bar
Operator status bar
System Message area
Conference Navigator
Help Requests queue
Conference Room
Pending queue
Enter queue
2-2 BridgeTalk Application 3.2 User�s Guide

Table 2-1 gives an overview of the main BridgeTalk task areas.
Table 2-1: BridgeTalk task areas
Section Description
Title bar Displays the system name, your operator channel number, as well as date and time information.
You can set BridgeTalk to display either a 12-hour or 24-hour time format. Your particular BridgeTalk time format may vary from one bridge to another. However, BridgeTalk converts the time format internally to match that of the bridge, when necessary.For example, you can schedule a conference for 1:30 PM (12-hour) on a bridge that is configured for a 24-hour format. Internally, the bridge converts the time to 13:30. To display a different time format for your BridgeTalk session, double-click the Regional Settings icon located in the Control Panel of your machine.
Tip: To convert to a 24-hour format, select a European country, such as the United Kingdom or France.
Menu bar Includes pull-down menus for both BridgeTalk-specific and Windows-based commands.
For more information on the individual Menu bar commands, see Appendix B, �Menu Bar and Main Toolbar.�
Main toolbar
Includes buttons that you can use for entering command line text. You can activate commands by clicking on a button or pressing a hot key.
For more information on each toolbar button or instructions on using hot keys, see Appendix B, �Menu Bar and Main Toolbar.�
Understanding the User Interface 2-3

Conference Navigator
Displays a portion of the conferences on the system and their attributes or features. You may have to use the scroll bars to see all of the conferences on the system.
Tip: After entering a conference name or other data, click outside the field to apply changes.
By default, BridgeTalk displays the Conference Navigator on the left-hand side of the console. To change the size or the location of the Conference Navigator, see �Modifying BridgeTalk windows� on page 2-10.
Pending queue
Lists all lines that have dialed in and are not in a conference or Enter queue, for example, ODO, Scan, CLPG, and so on. The Pending queue does not include a Get Next button.To access a line, right-click and select Access (or double-click on the line if this functionality is available on your system). Depending upon the items you select in the Customize User Interface dialog box, the Pending queue may display:� Talk: An asterisk (*) in the column means that the caller is talking.� Line: The line number.� Name: The caller�s name, if available.� Progress: The status of the call. For example, �Op7� if the caller is
currently speaking with Operator 7, �Ann10� if the caller is currently listening to Annunciator message 10.
� Company: The caller�s company name, if available.� Caller ID: The DNIS telephone number (ANI, CLI).� Phone: The caller�s telephone number, if available.� PIN: The PIN code that the caller entered, if any.� Status: Additional information about the line, for example, if the caller is
a moderator.� Network. View the caller�s line type, such as Voice over Internet
Protocol (VoIP) or PSTN/ISDN.
Table 2-1: BridgeTalk task areas (Continued)
Section Description
2-4 BridgeTalk Application 3.2 User�s Guide

Enter queue
Displays lines that are in Enter status.
Depending upon the items you select in the Customize User Interface dialog box, the Enter queue may display:� Talk: An asterisk (*) in the column means that the caller is talking.� Line: The line number.� Name: The caller�s name, if available.� Progress: The status of the call. For example, �Op7� if the caller is
currently speaking with Operator 7, �Ann10� if the caller is currently listening to Annunciator message 10.
� Company: The caller�s company name, if available.� Caller ID: The DNIS telephone number (ANI, CLI).� Phone: The caller�s telephone number, if available.� Passcode. You can view but not edit the last-entered DTMF passcode
(moderator or participant code). The system logs only the last-entered passcode in the Call Detail Record (CDR).
� PIN: The PIN code that the caller entered, if any.� Status: Additional information about the line, for example, moderator.� Network. View the caller�s line type, such as Voice over Internet
Protocol (VoIP) or PSTN/ISDN.
Note: If DNIS filtering is set, the Enter queue includes a Show Filtered/Show All toggle button. If you click Show All, the Enter queue displays all lines in Enter status. If you click Show Filtered, the Enter queue lists only those lines that meet your search criteria.
For information about handling incoming calls and using the Filtered Enter queue feature, see Chapter 4, �Dialing In.�
Table 2-1: BridgeTalk task areas (Continued)
Section Description
Understanding the User Interface 2-5

Conference Room
Shows information about features and attributes for individual conferences; and lists participants, moderators, and their status depending on what items you select in the Customize User Interface dialog box. To open the Conference Room window for any conference, double-click on the line in the Conference Navigator.
You should note the following:� If you sort a Conference Room window by Status, BridgeTalk lists
muted moderators between moderators and participants.� An AUTOVL (audio) line appears in the Conference Room of an active
global conference.� If external recording is enabled on the system, a Conference Record
line appears in the Conference Room when a moderator presses *2 (or uses a Web-based interface) to start an external digital recording.
� Right-click on a line to view line options, such as Mute and Moderator. If you select both Mute and Moderator, the moderator will be a muted moderator (visible only if you connect to 2.1x or later bridge).
� You can start a Conference Viewer chat session by clicking on CV Chat (if configured on the system). For more information, see �Sending messages to other operators using the Conference Viewer� on page 9-7.
Tip: Do not interfere with or modify the Conference Record or AutoVL line.
Note: By default, the Hang up button in the Conference Room window is now unavailable. To make this command available, please contact Spectel Support.
Table 2-1: BridgeTalk task areas (Continued)
Section Description
2-6 BridgeTalk Application 3.2 User�s Guide

Help Requests queue
Lists participants who are requesting help.
Note: Participants temporarily enter the Help Requests queue but remain in the conference. The lines display in yellow in the Conference Room window.
For information about handling help requests, see �Responding to help requests� on page 9-2.
System Message
Displays operator chat and system alarm messages.
Operator status bar
Located at bottom of the BridgeTalk display, the operator status line includes the following information:� AVL: Number of lines available, not including disconnects.� DC: Number of disconnected lines.� ENT: Number of callers in the Enter queue. This field is highlighted with
a blue outline when callers are in the queue.� DNIS ENT: Number of callers in the DNIS-filtered Enter queue.� FLT: Number of faulted lines, including those that are out of service.� HLP: Number of callers in the Help Requests queue.� OPR: The conference to which the operator is currently connected.� TLK: Talk toggle (On or Off). When this switch is set to On, you can
speak to participants. The text changes from black (Off) to pink (On). � ACCESSED LINE: The line number you are currently accessing.When the BridgeTalk console is locked, you will see a �Workstation Locked.� message on the status bar, as shown.
Tip: You can place your operator channel in a conference by clicking on the conference in the Conference Navigator.
Operator conference
The operator conference area is a behind-the-scenes conference room reserved for operator use only.
Table 2-1: BridgeTalk task areas (Continued)
Section Description
Understanding the User Interface 2-7

Keyboard command keys BridgeTalk lets you use special key sequences to enter certain commands. Table 2-2 describes these command keys.
Table 2-2: Keyboard command keys
Command Press To
Menu bar Display the File menu.
Show the View menu.
View the Line menu.
Activate the Conference menu.
Display the Fast Dial menu.
Show the Tools menu.
Activate the Windows menu.
Display the Help menu.
Main Toolbarwhen active (green)
Activate the Access command line.
Display the Conference command line.
Show the Display command line.
Activate the Enter command line.
Alt F
Alt V
Alt L
Alt C
Alt S
Alt T
Alt W
Alt H
Shift A
Shift C
Shift D
Shift E
2-8 BridgeTalk Application 3.2 User�s Guide

Main Toolbar(Continued)
Display the Fastdial command line.
Show the Help Requests command line.
Activate the Line command line.
View the Music command line.
Display the Options command line.
Show the Purge command line.
View the Set command line.
Display the Transfer command line.
Show the Retrieve command line.
Activate the Update command line.
Voice path Toggle your operator voice path on/off.
Access Specify a line or access the next available line.
Table 2-2: Keyboard command keys (Continued)
Command Press To
Shift F
Shift Q
Shift L
Shift M
Shift O
Shift P
Shift S
Shift T
Shift V
Shift U
SpacebarAlt
EnterCtrl
Understanding the User Interface 2-9

Modifying BridgeTalk windowsYou can modify many BridgeTalk visual properties to suit your preferences (unless a system administrator has locked the console). For more information on the locking feature, see �Lock and release of BridgeTalk areas� on page 2-16.
Changing the size of a window or a fieldYou can change the size of most BridgeTalk windows or fields using the following standard Windows method:
1. Move the cursor to an edge of the window or the heading of a field that you want to expand or contract.
The cursor changes from its default shape to a double-headed arrow.
2. Keep the left mouse button pressed down, and move the cursor to a new position, changing the border of the window.
Tip: Use this method to change the relative size of the conference information, chat, and alarm portions of the Conference Navigator.
Enter Access a selected line and display the Line Detail dialog box. This is identical to clicking the Enter button from the toolbar.
Help Access the line of a participant requesting help. This is identical to clicking the help reQuests button from the toolbar.
Table 2-2: Keyboard command keys (Continued)
Command Press To
Ctrl E
Ctrl H
2-10 BridgeTalk Application 3.2 User�s Guide

Displaying or hiding fieldsYou can customize the Conference Navigator, Enter or Pending queues, and Conference Room windows by display or hiding a field, or changing the field order.
Displaying a fieldFollow these steps to display a field:
1. Open (double-click on) a conference room in the Conference Navigator if you want the Conference Room tab to appear in the Customize User Inference dialog box.
2. Choose Tools > Customize from the Menu bar.
3. Select a tab, such as the Navigator.
4. In Available Properties, select the field that you want to add to the selected window.
Note: Some fields in the Enter and Pending tabs cannot be deleted (hidden), such as Name and Line.
5. Click Add.
BridgeTalk moves the item to Visible Properties, which means that BridgeTalk displays this field in the selected window.
Tip: You can also move a field from Available Properties to Visible Properties by double-clicking on the field name.
Conference Room tab
Understanding the User Interface 2-11

Hiding a fieldFollow these steps to remove a field:
1. Choose Tools > Customize from the Menu bar.
2. Select a tab.
3. In Visible Properties, select the field that you want to remove from the selected window.
4. Click Delete.
BridgeTalk moves the item to Available Properties, which means that BridgeTalk does not display this field in the selected window.
Tip: You can also move a field from Visible Properties to Available Properties by double-clicking on the field name.
Changing the field orderUse this procedure to change the current field order:
1. Choose Tools > Customize from the Menu bar.
2. Select a tab.
Be sure that the fields you want to display are in Visible Properties. If you need to add or remove fields, follow the procedures described in �Displaying a field� or �Hiding a field�, earlier in this section.
3. Select a field item in Visible Properties.
4. Click one of the following to change the display order for this field:
� Up arrow to move the field one place to the left
� Down arrow to move the field one place to the right
As you click the up or down arrow, BridgeTalk shows the current field order.
2-12 BridgeTalk Application 3.2 User�s Guide

Administrator and maintenance optionsIf you have an administrator- or maintenance-level sign-in, you can configure several advanced BridgeTalk features, as well as modify settings on the connecting bridge. Table 2-3 describes advanced options that are available to BridgeTalk administrators.
Table 2-3: Administrator-level features
Option Description
Set the number of lines per column in View > All Lines dialog box
Select the number of lines per column that you want displayed in the View > All Lines dialog box. See �Setting lines per column in All Lines dialog box� on page 2-15. For more information, see the Options table entry on page B-17.
Set Automatic Conference Select (ACS)
Automatically places a caller directly into a specified conference without operator intervention or security codes.See �Using the ACS option� on page 2-16.
Lock or release BridgeTalk task areas
Determines the size and location of the Help, Enter, or Pending queues, and the Conference Room window.See �Lock and release of BridgeTalk areas� on page 2-16.
View or modify settings on the connecting bridge through BridgeTalk
Access the system administrator software while BridgeTalk is running.See the next section, �Starting a system administrator or maintenance session� on page 2-14.
Understanding the User Interface 2-13

Starting a system administrator or maintenance sessionWith a BridgeTalk administrator- or maintenance-level sign-in, you can access the system administrator software while BridgeTalk is running.
Follow these steps to start a telnet session from BridgeTalk:
1. Choose File > Session from the Menu bar.
2. Select the task you want, Administrator or Maintenance.
BridgeTalk temporarily closes during the telnet session.
Select the type of telnet session you want to start.
The default is puTTY, which provides VT220 emulation over TCP/IP. However, Hyper-Access provides Wyse 60 and dial-up connectivity, and is the preferred emulator for the Spectel 70.
Note: You will see the Console Application dialog box only once. After you select a telnet application, BridgeTalk stores your selection in the Bridge.properties file for subsequent, automatic access.
Tip: If you installed Crosstalk or Hostaccess previously on your workstation, you can select the telnet application that you prefer. If this is the first time that you are launching a telnet session from BridgeTalk, ask your System Administrator which application to use.
2-14 BridgeTalk Application 3.2 User�s Guide

The following table describes the conditions used for creating sessions.
Follow these steps to close a telnet session:
1. Use the arrow keys to select Exit (or press E) in the Main menu.
2. Press ENTER.
Tip: After you close your telnet session, you might be prompted to close other active sessions. Use caution before closing any current sessions.
The telnet application closes. BridgeTalk restarts automatically.
Setting lines per column in All Lines dialog boxFrom the User Interface Options dialog box, you can set the number of lines per column that appear in the View > All Lines dialog box. For example, if you are using a NA ISDN system, you can select 23 lines per column.
Follow these steps to set the number of lines per column:
1. Choose Tools > Options from the Menu bar.
2. From the Number of Lines per Column list, select the number of lines per column that you want displayed in the View > All Lines dialog box.
3. Click OK.
Session status Description
Running A session is currently running.
Not currently running The application launches immediately, then creates and starts a new session.
Administrators can select:� 23 lines for NA ISDN� 24 lines for T1� 30 for E1 (Euro ISDN)
Understanding the User Interface 2-15

Using the ACS optionYou can use the Automatic Conference Select (ACS) to set certain lines to place callers in a specific conference automatically.
Follow these steps to place callers in a specified conference:
1. From the Main toolbar, click Set.
2. From the Set submenu toolbar, click Acs.
3. In the prompt area, enter a conference number followed by a space, and a range of lines that you want to place, and press ENTER.
For more information on ACS, see Chapter 13, �Using Automatic Conference Select.�
Lock and release of BridgeTalk areasBridgeTalk allows an administrator to set and lock the size and location of key task areas to prevent an operator from customizing the BridgeTalk interface. If an operator tries to move a locked window, the window instantly reverts to its former position. Table 2-4 describes what happens when your workstation is locked.
Table 2-4: BridgeTalk locked window attributes
User Interface Area Operators
Help, Enter, or Pending queues, Chat, Conference Navigator, and Conference Room windows
Cannot customize, minimize, resize, or close these windows.
Conference Room Can open only one Conference Room window at a time.
View Menu commands Cannot access the Enter or Pending queues, Help Requests, Toolbar, and Conference Navigator commands from View Menu.
Window Menu Cannot access the Windows menu.
2-16 BridgeTalk Application 3.2 User�s Guide

Follow these steps to lock BridgeTalk windows:
1. Log in to BridgeTalk with an administrator- or maintenance-level sign-in.
2. Arrange windows to suit your preferences.
Tip: Be sure to open and position a single Conference Room window.
3. Select Tools > Options on the Main menu.
4. Select Lock in the User Interface Options dialog box and click OK.
The Operator Status bar displays a �Workstation Locked.� message. If you want to lock multiple BridgeTalk sessions, you can copy the bridge.properties file of the �locked� BridgeTalk to each additional workstation.
Use this procedure to unlock BridgeTalk windows:
1. Log in to BridgeTalk with an administrator- or maintenance-level sign-in.
2. Select Tools > Options from the Main menu.
3. Clear Lock in the User Interface Options dialog box, and click OK.
Tools Menu commands Cannot access the Annunciator or Customize commands.
Tip: The Options command is available only if you have an administrator- or maintenance-level sign-in.
Table 2-4: BridgeTalk locked window attributes (Continued)
User Interface Area Operators
When you select Lock, the other Option Selections� commands like Multiple Conference Room Windows, become unavailable.
Understanding the User Interface 2-17

2-18 BridgeTalk Application 3.2 User�s Guide

Chapter 3Creating a ConferenceThis chapter provides instructions on the following:
� Creating a new conference
� Using annunciator messages
� Providing music for a conference
� Linking conferences
3-1

Creating a new conferenceYou can create conferences immediately during a dial-in or dial-out procedure or you can schedule conferences ahead of time. Table 3-1 describes the various ways of creating conferences.
Table 3-1: Methods of creating conferences
Option Description
FastDial or BlastDial
Choose Select Conference > Next Available.For more information on FastDial or BlastDial, see Chapter 5, �Using Dial Lists and Dialing Out.�
Place Place an incoming caller in a conference room that is not currently in use.
Line Detail From the Line Detail dialog box, click on the Start Conf button and enter the conference passcode in the Start Conference dialog box to start a previously scheduled unattended, on-demand, or Flex conference immediately.
Conference Scheduler
Schedule an attended, unattended, on-demand, or Flex conference.Using the information supplied by the Conference Scheduler, the system automatically creates a conference when a caller is actually placed into the conference. For information about using the Conference Scheduler, see Chapter 11, �Scheduling a Conference.�
3-2 BridgeTalk Application 3.2 User�s Guide

Naming a conferenceA conference name is an optional 12-character label used to identify a conference during various conference activities. Associating a name with a conference helps you to easily identify the conference in the Conference Navigator and in reports, such as a Call Detail Record (CDR).
Tip: When you name your conference, you prevent another operator from accidentally overwriting your conference room information.
In the Conference Navigator window:
1. Highlight a conference number that is not in use.
2. Press TAB to move to the conference name field and enter a name for the conference, for example, �Sales Mtg�.
The conference name registers on the system when the first person enters the conference.
Tip: Assign conference names to scheduled, attended conferences if you want conference name to appear in the Conference > Startup List before the first caller is placed into a conference. Startup List must be enabled by an administrator.
Click outside the conference name field to view the name you entered.
Creating a Conference 3-3

Specifying a conference IDA conference ID is an optional 12-character conference number used for generating reports. You can determine a conference by its ID number even if several conferences have the same name.
If a conference ID is entered during scheduling or if your system is configured for Automatic Conference ID, the conference ID displays in reports, such as the Call Detail Record (CDR) or Conference Detail Record (CODR).
Note: Use a conference ID if you want to generate a CODR or conference report. The system does not generate a CODR if the conference ID is left blank.
If your system is not configured to assign IDs automatically, you can set a conference ID by following these steps:
1. From the Main toolbar, click Conference.
2. From the Conference submenu toolbar, click ID.
3. In the prompt area, enter a conference number, followed by a space and an ID.
4. Press ENTER.
Additional information about conference IDHere are some important reminders:
� If your system is configured for Automatic Conference ID, the system automatically generates a unique ID for each conference when the first caller is placed in the conference. To determine if your system is configured for Automatic Conference ID, see the system configuration printout or ask your administrator.
� If you schedule an unattended conference and do not specify a Conference ID number, the system uses the Confirmation number as the Conference ID.
� You can assign an ID number to associate a conference with a cost center or customer identifier.
For information about configuring or printing of CDRs and CODRs, see the 700/780 Platform Administration and Maintenance Guide.
3-4 BridgeTalk Application 3.2 User�s Guide

Setting entry or exit tones and messagesAn entry or exit tone or message is a tone or recorded voice message that participants hear whenever someone enters or leaves a conference. Entry tones and exit tones have different sounds, which lets participants distinguish between someone entering or leaving the conference. Voice messages can be used to inform participants that a PIN code is required or a conference is about to end.
To set an entry or exit tone for a conference, select the Entry or Exit Tone box in the Conference Room window, as shown.
The Entry or Exit Tone feature toggles on and off.
Additional information about entry and exit tonesEntry and exit tones can be used singly or combined; for example, you can just use entry tones. Here are some important reminders:
� Entry tone-specific:
� You can use entry tones for the entire duration of a conference or you can remove them at some point after a conference begins.
� Moderators might ask you to introduce incoming participants after the entry tone sounds or remove entry tones after the first few minutes of a conference to avoid disruptions.
� Exit tone-specific:
� Check with the moderator before the conference begins to see whether an exit tone is desired.
� You can remove exit tones at some point after a conference begins.
Conference-specific entry or exit tones or messages can be set up when scheduling a conference. For information, see �Scheduling an on-demand conference� on page 11-13. For information about configuring the system for entry or exit tones and recorded messages, see the 700/780 Platform Administration and Maintenance Guide.
Creating a Conference 3-5

Adding a voice rosterIf the Name Record/Playback feature is enabled, moderators or participants can initiate a voice roster (roll call) of participants at any time during an unattended conference. If the voice roster request is conference wide, all conference participants can hear the roll call. If the voice roster is individual only, the requesting participant is temporarily removed from the conference to hear the roll call.
Tip: To hear a current conference voice roster, enter *8 from a telephone keypad.
For more information on the Name Record/Playback feature, see Name Record/ Playback (NRP) and Caller Detail table entry on page 11-9.
Locking a conferenceThe system displays a warning message, which prevents you from accidentally placing participants into the wrong conference when the lock feature is enabled. You can click Yes to place the participant in the locked conference or click No to cancel.
To lock a conference, click Lock in the Conference Room window.
The Lock feature toggles on and off.
Tip: If you access a line from a locked conference, you can return the line to the conference by clicking Release, which prevents BridgeTalk from displaying the verification prompt.
Additional information about lockingHere are some important reminders:
� Any operator can gain access to a locked conference. To prevent an operator from accessing a conference, a moderator can secure the conference. For more information, see �Securing a conference� on page 3-7.
� You cannot change the name of a locked conference. However, you can provide a name for a locked conference that does not yet have a name.
3-6 BridgeTalk Application 3.2 User�s Guide

Securing a conferenceIn a secured conference a moderator can prevent anyone from listening to or joining the conference. Specifically, operators cannot enter, record, scan, or listen to the conference.
Moderators must press *7 on their telephone keypads during the conference to activate this feature. Moderators hear a tone or voice message to indicate that the conference is secured or unsecured.
Tip: A secured conference displays as a red line in the Conference Navigator.
Follow these steps to enable security for a conference:
1. Designate one or more conference participants as moderators.
2. Click SecAllowed in the Conference Room window, as shown.
The Security feature toggles on and off.
3. Remind the moderator to secure the conference by pressing *7 on the phone.
Note: A moderator can secure a conference once security is enabled and scheduled on the system. When a moderator has turned on security, you cannot disable security for that conference until the moderator turns security off.
Additional information about securityHere are some important reminders:
� A moderator must turn off security before conducting a Q&A or polling session or asking for operator assistance.
� If an operator is present in a conference in which the moderator turns on security, the operator is moved to the operator conference.
Creating a Conference 3-7

Setting up a lectured conferenceA lectured conference mutes all lines except moderator lines. Lecture prevents background noise from interfering with the conference and ensures that only the moderator�s voice is heard.
To set up a lecture conference, click Lecture in the Conference Room window, as shown.
The Lecture feature toggles lecture on and off.
Additional information about lectureHere are some important reminders:
� You can apply Lecture before or during a conference.
� Moderators can apply Lecture by pressing *5 (if enabled on the system).
� Muted participant lines can request operator help in a lectured conference. When you access a line that requests help, you temporarily remove the line from the conference.
� A muted moderator retains moderator status and can still use moderator-based DTMF commands. Moderators can mute and unmute themselves using the *6 command.
However, you can override the *6 command by toggling Moderator Mute on or off. For example, in a lectured conference that includes several moderators, you can mute all but one moderator. (This feature is visible only if you connect to a 2.1x or later bridge).
Tip: BridgeTalk lists muted moderators between moderators and participants if an operator resorts a Conference Room window by Status.
Note: Lecturing a conference will not automatically mute moderator lines.
To determine if lecture or moderator mute options are available on your system, see the system configuration printout or ask your administrator.
3-8 BridgeTalk Application 3.2 User�s Guide

Using annunciator messagesAnnunciator messages are prerecorded system messages played to participants who dial into a system or who answer the phone during a dial out. You can customize these messages to include specific company information or translate the messages into other languages.
Note: The Platform 700 and Platform 780 include several prerecorded annunciator messages. Contact your system administrator before recording over any prerecorded messages.
Tip: Make sure that you have established your operator audio path before recording messages.
Recording an annunciator messageYou can record messages that apply to individual callers or entire conferences. BridgeTalk provides up to 60 seconds for any message.
Tip: Write down the text of the annunciator message that you want to record prior to recording.
To record an annunciator message:
1. From the Main toolbar, click Options.
2. From the Options submenu toolbar, click Annunciator.
Creating a Conference 3-9

BridgeTalk displays the Annunciator Message window similar to the following:
3. Scroll up or down and select the number of the annunciator message that you want to record.
4. Click Edit Text.
5. With the same annunciator message selected, enter a summary of the message text.
6. Click Save Text and click Record.
7. In the Record window, speak slowly and clearly into your headpiece.
8. Click Stop to finish the recording.
9. Click Playback to review your recording.
Playing back an annunciator messageYou can replay an annunciator message that you just recorded to verify that it is correct.
To replay an annunciator message:
1. From the Main toolbar, click Options.
2. From the Options submenu toolbar, click Annunciator.
3. In the Annunciator Message window, select the message you want to play back.
4. Click Playback.
BridgeTalk displays the Playback dialog box while the system plays the message to your headphone. If you need to re-record the message, repeat steps 3-9 on page 3-10.
3-10 BridgeTalk Application 3.2 User�s Guide

Additional information about annunciator messagesHere are some important reminders:
� You can use an annunciator message to inform callers of the currently scheduled, available conferences.
� You can use an annunciator message to provide instructions to called parties on a BlastDial.
For information about prerecorded annunciator messages, see the 700/780 Platform Administration and Maintenance Guide for your audioconferencing system.
Providing music for a conferenceWhen you add a music channel to a conference, the system automatically mutes all lines in the conference so that participants can listen to music before the conference begins. There are two types of music channels, digital and analog.
Tip: Make sure that you establish a music audio path first. See �Setting up auxiliary audio paths� on page 1-12.
Adding an analog or digital music channelIf there is an external RCA jack installed on your bridge, participants can listen to music piped in from a radio, tape recorder, or CD player.
The system plays music from the M1 channel in the Enter, Pending, or Help queues; however, you can use channels M1-4 to add music to individual conference rooms.
Creating a Conference 3-11

Use the following procedure to place a music channel into a conference:
1. Choose Conference > Details... from the Menu bar.
2. In the Input dialog box, enter a conference number, and click OK.
3. Under Features in the Conference Detail dialog box, choose one of the following music options listed in Table 3-2.
Table 3-2: Music channels
Channel Type Description
M1 Analog or Digital
Participants hear music selected for the Enter, Pending, and Help queues. This channel can be either analog or digital.
Tip: Do not establish an audio path on the M1 channel. An external music source is always mapped to M1 and cannot be hung up.
� M1 - Analog or Digital
� M2 - Digital
� M3 - Digital
� M4 - Digital
3-12 BridgeTalk Application 3.2 User�s Guide

The music channels (M1-M4) are defined by the system administrator as all digital or a combination (one analog and three digital). Check with your administrator to find out how the bridge is configured.
4. Click OK.
Note: For an attended conference, turn the music off manually when the conference begins. For unattended and on-demand conferences, the system automatically turns the music off when a moderator joins the conference.
To remove music from a conference:
1. From the Conference Navigator, right-click on the conference.
2. Select Details.
3. Choose Music Source: Off.
4. Click OK.
M2 Digital Participants hear music selected for conferences.
M3 Digital
M4 Digital
Table 3-2: Music channels (Continued)
Channel Type Description
Creating a Conference 3-13

Linking conferencesLink lines are used to join several active conferences running on different bridges. You can use a link line to dial in to or dial out from a bridge. An operator assigned to a particular bridge adds the link line to the specific conference.
Tip: Make sure that you establish a link line audio path first. See �Setting up auxiliary audio paths� on page 1-12.
The following table provides a brief comparison of the two types of link lines:
For detailed instructions, see:
� �Adding a virtual link line� on page 3-15.
� �Adding a dedicated link line� on page 3-17.
� �Using virtual and dedicated link lines in a conference� on page 3-17.
Table 3-3: Link line types
Virtual Link Dedicated Link
Select this link type if your bridge does not have a dedicated link line or if you want to link two or more conferences.
An additional link can be added at either end of the chain.
Select this link type if your bridge is set up with a dedicated link line and you want to link two conferences.
Unlimited number of lines. Limited number of lines (up to 48 on a Platform 700 or Platform 780; up to 4 on a System 70 with DAPI).
Uses any participant line temporarily defined as a link line and then released.
Requires a dedicated link line with a telephone number assigned by a service provider.
Requires a revenue line. Uses a non-revenue line.
Add link using Place command. Add link using Transfer function.
Remove link with Hang Up function. Remove link with Remove Link Line function.
3-14 BridgeTalk Application 3.2 User�s Guide

Tip: If a bridge is rebooted or shut down, you must re-establish any link line connections.
For more information on configuring link lines, see the 700/780 Platform Administration and Maintenance Guide.
Adding a virtual link lineBridgeTalk allows you to join several active conferences running on different bridges by adding one or more Virtual Link Lines (VLLs). To accomplish this, you define an available participant line as a VLL and link the line to another bridge. The system treats a virtual link line much like any participant line; however, you should apply moderator status to the line.
Note: Only the number of available participant lines on the bridge limits the amount of virtual lines that you can use.
Choose one of the following methods to place a VLL into a conference:
� If you are dialing out a VLL to another system, use this procedure:
1. From the Main toolbar, click Access.
2. In the prompt area, enter an available participant line number and press ENTER.
3. From the Access toolbar, click Moderator and then click Virtual Link.
The system names the line as a Virtual Link Line and assigns it VL status.
4. Choose Line > Details to display the Line Detail dialog box.
You can change the VLL line to another name, such as �Acme Sales�, as shown.
5. Enter the phone number of the bridge you want to link to and click Dial.
Creating a Conference 3-15

6. When the other bridge�s operator answers, ask the operator to place the VLL in the appropriate conference.
7. The other bridge�s operator defines the line as a virtual link line with moderator status and places the VLL in the conference.
8. Click Place to place the VLL in the appropriate conference on your bridge.
The two conferences on the two systems are now combined into one conference.
� If you receive a VLL dialed out from another system, use this procedure:
1. Select the VLL from the Enter or Pending queues.
2. Click Enter on the Main toolbar or press SHIFT+E to access the line.
3. In the Line Detail dialog box, name the link line, for example, Link to Bridge B.
4. Select both the VLL and Moderator features.
The system assigns the line a VLL status.
5. Under Find Conference, select the conference that you want to link and click Place.
The VLL remains linked to the other bridge until it is hung up or disconnected. When disconnected, the line returns to its previous status. To remove a virtual link line, see the next section, �Removing a virtual link line from a conference.�
Tip: Be sure to assign moderator status to a VLL to prevent BridgeTalk from automatically muting the line during lecture, Q&A, polling, and so on.
Removing a virtual link line from a conferenceTo remove a virtual link line:
1. Right-click on the link line in the Conference Room window and choose Details...
2. In the Line Details dialog box, click Hang Up and then click OK.
Additional information about virtual link linesHere are some important reminders:
� VLLs appear on Polling and Q&A windows. In polling printouts, a VLL counts as one line in the total participants� category.
� A VLL appears as one line in conference reports. For billing purposes, you can set up two conferences on separate systems with identical conference names and IDs.
3-16 BridgeTalk Application 3.2 User�s Guide

Adding a dedicated link lineYou can use a dedicated link line to join two active conferences running on different bridges.
Follow these steps to set up a dedicated link line:
1. Choose Line > Audio Path...
2. Select the Link Line option.
3. Dial out using the assigned telephone number.
Once you establish the connection, the link line is available for use.
Removing a dedicated link line from a conferenceTo remove a dedicated link line:
1. From the Main toolbar, click Transfer.
2. From the Transfer submenu toolbar, click Link Lines.
3. In the prompt area, type R, followed by a space and the number of the link line that you want to remove from the conference.
4. Press ENTER.
Using virtual and dedicated link lines in a conferenceYou can use a virtual or a dedicated link line or a combination of the two to link several conferences, as shown.
Conference Room 8
Conference Room 14
Conference Room 12
Bridge B
Dedicated link line Virtual link line
Bridge CBridge A
<2> VLL
<2> VLL
Creating a Conference 3-17

3-18 BridgeTalk Application 3.2 User�s Guide

Chapter 4Dialing InThis chapter includes the following topics:
� Overview of dialing in
� Creating a Filtered DNIS/DDI Enter queue
� Placing incoming lines into a conference
4-1

Overview of dialing inWhen a caller dials into a system, the bridge plays a prerecorded welcome message based on the DNIS/DDI number. In addition, the system may prompt callers to state their names and company-related information, which the system records and associates with the line.
The bridge displays lines that are in transition (ODO, Scan, or CLPG) in the Pending queue, and then transfers them into the Enter queue or conference room. Operators can access a line from the Enter queue, speak to the caller, and place the line into a conference using the Line Detail dialog box. For more information, see �Placing incoming lines into a conference� on page 4-5.
If you set up a filtered DNIS/DDI Enter queue, the bridge displays DNIS/DDI lines in your customized Enter queue and displays a �DNIS ENT� status with the current line count on the Operator Status bar. You can toggle back and forth between the Enter queue and the DNIS Enter queue. The Operator status bar displays both Filtered and All Enter totals. For more information, see the next section, �Creating a Filtered DNIS/DDI Enter queue.�
Creating a Filtered DNIS/DDI Enter queueYou can create a filtered Enter queue if the connecting bridge supports DNIS/DDI and your administrator activates the DNIS/DDI option in the BridgeTalk bridge.properties file.
Note: Each BridgeTalk session maintains its own list.
For example, if you set up a specific Enter queue for Front Runner, Inc., you can greet the participants with, �Welcome to the Front Runner Conference. May I have your name, please?� before placing them into the conference.
You can set up a filtered Enter queue for a particular company, group, or conference based on the Dialed Number Identification Service (DNIS) or Direct Dial In (DDI) process.
Depending upon the DNIS/DDI system configuration, a bridge collects digits entered by callers dialing into the bridge, plays conference-specific messages, brands incoming lines with a conference or company name, and places lines directly into the Enter queue.
Specifically, the bridge matches the DNIS/DDI digits to a Call Branding table and listed in ascending order by the system administrator. Depending on the number of digits specified from 1 to 16, the bridge performs a Short Collection Search (if activated) from right to left.
4-2 BridgeTalk Application 3.2 User�s Guide

For example, if a caller dials 011-333-5555 into a bridge that collects only the last four digits, the system matches 5555 to the first entry in the Call Branding table, which contains DNIS patterns matched to annunciator messages, as shown.
Note: Make sure that the DNIS/DDI digits are valid for the connecting bridge.
When the bridge is collecting digits, lines display in SCAN mode in the Pending queue. However, DNIS filtering does not affect the Pending queue.
Tip: If you do not use DNIS filtering, you should turn this feature off. The system maintains both lists whether you show or hide the filtered list, and may slow down Enter queue processing.
Follow these steps to create a filtered DNIS/DDI Enter queue:
1. Choose Tools > Set DNIS filter.
2. In the Set DNIS Filter dialog box, select Use DNIS filter, as shown.
CallBrandingTable
555355545555 - Front Runner5556555755585559
The Set DNIS Filter dialog box displays the minimum DNIS filter setting on the connecting bridge, for example, four digits.
Dialing In 4-3

3. Enter search criteria as follows:
� The wildcard character (?) is always last in a series.
� If the number of DNIS/DDI digits is set to four, the default (last) entry in the table is ????. The system uses this entry for any line that does not match specified DNIS/DDI numbers.
For every wildcard that you enter, the system displays 0 through 9 for that placeholder. For example, if you enter 555?, the system displays, 5551, 5552, 5553, and so on.
4. Click Add to add the DNIS/DDI digits to your DNIS Filter List.
5. Click OK to create a filtered Enter queue.
The Enter queue only displays lines that are in Enter status, and includes a Show Fil-tered/Show All toggle button. If you click Show All, the Enter queue displays all lines in Enter status. If you click Show Filtered, the Enter queue lists only those lines that meet your DNIS/DDI search criteria.
If a bridge brands incoming lines as �DNIS Direct�, operators cannot place callers into the DNIS conference until the bridge places the first DNIS caller into the conference room, which officially starts the conference. This feature prevents operators from using DNIS-reserved conference rooms.
Note: The bridge.properties file stores your DNIS/DDI numbers from session to session. However, if your system administrator turns the short search feature off and changes the number of collected digits on a bridge, you must reconfigure your DNIS Filter List. For example, if the bridge doubles the number of collected digits, then you must update your DNIS digits from 5555 (four) to 03335555 (eight) and restart BridgeTalk.
For information on the bridge.properties file, see �Overview of the BridgeTalk bridge.properties file� on page 1-7.
4-4 BridgeTalk Application 3.2 User�s Guide

Placing incoming lines into a conferenceDepending on how your system is set up, you may hear an audio prompt (one beep or a continuous beep) alerting you that participants are in the Enter or Pending queues.
Tip: Before you can access a line, speak to a caller, and place the line into a conference, you must first establish an audio path. If you did not set an audio path, see �Establishing an operator audio path� on page 1-11.
Follow these steps to place the caller in a conference:
1. Choose one of the following methods of accessing incoming lines:
2. Complete the Line Detail dialog box either by filling in the fields in the dialog box or by using a dial list (roster) to supply information.
See the next section, �Using the Line Detail dialog box.�
To Click Description
Access the next line
The Get Next Enter button in the Enter queue accesses the next line and displays the Line Detail dialog box for the line. (Get Next Enter is available only if one or more callers are in the Enter queue.)You cannot use the Get Next Enter button if you are currently accessing another line or if you have not yet established an audio path.
Specify a line number
The Access button on the Main toolbar prompts you to enter a specific line number. Type in the line number and press ENTER to display the Line Detail dialog box for the line.
Create a filtered Enter queue
Sets up an Enter queue for a particular company or group based on DNIS/DDI digits.
Select a line
Double-click on a Line (if enabled on the system)
If activated in the bridge.properties file, double-click on a line in the Enter queue to display the Line Detail dialog box for the line.
Dialing In 4-5

Note: If you use a dial list, you can skip over the following procedure that describes how to enter line detail information. For information about using a dial list, see �Using a dial list to supply caller information� on page 4-13.
Using the Line Detail dialog boxYou can complete the Line Detail dialog box by entering caller information, such as the name, company, and telephone number.
Note: When you access a line using the Line Detail dialog box, BridgeTalk displays your operator number in the Progress column of the Enter queue and unmutes the line so that you can speak to the caller.
Figure 4-1: Line Detail dialog box
Muted Moderator
Network type
Start Conference
Passcode
Dial Extension
LineAux fields
4-6 BridgeTalk Application 3.2 User�s Guide

Follow these steps in the Line Detail dialog box:
1. Under Caller Information, press TAB or click the mouse to fill in the following optional information, which is tracked in the Call Detail Record (CDR).
2. Click Hide/Find to locate the exact name or number of the conference.
The Hide/Find button toggles to show or hide the find function.
Under Find Conference, choose one of the following search options to locate the exact name or number of a conference:
Table 4-1: Caller information in the Line Detail dialog box
Information Description
Name The first and last names of the caller (up to 20 alphanumeric characters).
Company The company name of the caller (up to 20 alphanumeric characters).
Phone The caller�s telephone number (up to 40 alphanumeric characters).
LineAux1 Optional caller information (up to 60 alphanumeric characters), such as the caller�s E-mail address.
LineAux2 Optional caller information (up to 60 alphanumeric characters).
LineAux3 Optional caller information (up to 60 alphanumeric characters).
Conference Name or the number of the conference (up to 12 alphanumeric characters) in which you want to place the caller.
Caller ID A telephone number automatically displays if caller ID is available on an incoming line. This information is non-editable.
Passcode The last DTMF passcode that a moderator or participant enters displays in the Line Detail dialog box when you access a line (orwhen you right-click on a line and select Details). You can view but not edit this code. The system logs only the last-entered passcode in the CDR.
Note: This is an optional field that you can select and then view from the Enter and Pending queues.
Dialing In 4-7

� Search For field. To enter a few letters or numbers in any of the following fields:
� Show All Conferences. To browse through a list of all currently running conferences.
3. Enter a phone number and click Dial to dial the number. If you do not need to dial an extension, go to step 5.
4. To dial an extension for a main number that you are dialing:
a. Click Dial Ext.
b. In the Dial Extension dialog box, enter the digits in the Phone Extension field, and click Dial.
The system dials the number. The CDR will include both the main phone number and the extension.
c. Click Close.
5. If there is a caller waiting in the Enter queue, you can start a scheduled unattended or on-demand conference immediately by following these steps:
a. Click on the Start Conf button.
Search For Field Procedure
Conference number
Enter the first few letters or numbers of the conference in any of the appropriate Search For fields.
Tip: The name of the conference is case sensitive.
Conference name
Conference ID
Confirmation code
Moderator code
Conferee code
4-8 BridgeTalk Application 3.2 User�s Guide

b. Enter the alphanumeric Conference Code (moderator or participant passcode) in the Start Conference dialog box, as shown.
c. Click OK.
If the passcode is valid, the bridge finds the corresponding schedule and starts the conference (or if the conference has already started, finds the active conference). BridgeTalk highlights the conference in the Find Conference area and activates the Place button so you can place the line into the conference.
Note: If you are connected to a 2.0x bridge, enter only a numeric conference code like 1234. If you enter alpha code, such as ABCD, BridgeTalk displays an error message.
6. Under Status, select one of the following:
Status To designate a line as
Normal A regular participant. (Default)
Mute A muted participant.
Moderator A moderator.
Dialing In 4-9

7. Under Q&A Priority, select one of the following:
For information about setting caller priority during a Q&A session, see �Conducting Question and Answer (Q&A) sessions� on page 7-10.
8. Select one or more of these options:
Muted Mod A muted moderator. A muted moderator retains moderator status and can still use moderator-based DTMF commands. (This feature is visible only if you connect to a 2.1x or later bridge).
Note: Moderators can mute and unmute themselves using the *6 command. However, you can override the *6 command by toggling Moderator Mute on or off.
Q&A To
Top Place participants at the beginning of the queue, in the order in which they pressed 1 (or *1).
Note: Moderators always precede callers in the queue.
Normal Place participants after Top priority participants, in the order in which they pressed 1 or *1. (Default)
Excluded Prevent participants from asking questions during a Q&A session. Excluded participants are not shown in the Q&A queue; however, they can request and receive operator help.
Option To
VLL Define this line as a virtual link line. (The default is clear.)
Call Type Identify what kind of line is in use. Accept the default value unless you want to enter a new call type, such as dial_in or ODO. (The default is dial_out.)
Network(Telephony)
View the caller�s line type, such as Voice over Internet Protocol (VoIP) or PSTN/ISDN. The telephony network type is tracked in CDR and CODR reports.
Status To designate a line as (Continued)
4-10 BridgeTalk Application 3.2 User�s Guide

9. Click one or more of the following related functions:
10. Click Place.
The system closes the Line Detail dialog box and places the caller in the conference.
Release on Close
Automatically release the line back to its previous location when you close the Line Detail dialog box.
Tip: Clear Release on Close if you want to continue talking with a participant while opening other BridgeTalk windows. The line remains accessed until you select Line > Release from the Menu bar.
Button To
Roster Enter dial-in caller information from a preset dial list that automatically fills in the Line Detail dialog box.
Release/Access
Release an accessed line back to its previous location, such as a conference or help queue. The Release/Access button toggles to release or access the line.
Tip: The Accessed Line field in the Operator status bar indicates what line you are accessing.
Hang Up Hang up the line.
Fault Fault the line. For instructions on removing lines, see �Faulting a line� on page 10-9.
Option To (Continued)
Dialing In 4-11

Adding caller information without accessing the lineIf you need to modify caller information without accessing the line, you can select Details.
To modify the information or status of a caller who is already in a conference:
1. Right-click on the participant�s line in the Conference Room and select Details.
An abbreviated Line Detail dialog box appears.
Note: The Play and StopX buttons appear if NRP is scheduled for the conference and the line is not accessed.
2. If NRP (INDVL, CONF, or OPER) is scheduled for the conference and the caller responded to the name prompt, click:
a. Play to hear what the caller recorded.
b. Stop to stop the recording.
3. Edit the information in the Line Detail dialog box.
4. Click OK.
4-12 BridgeTalk Application 3.2 User�s Guide

Using a dial list to supply caller informationYou can use a dial list (roster) to display caller information in the Line Detail dialog box or if you need to dial out to participants on different dial lists. If your company has several frequent callers who attend a variety of conferences, you can create a roster of recurring names.
Follow these steps to use the roster function:
1. From the Line Detail dialog box, click Roster.
BridgeTalk highlights the last dial list used.
2. In the Roster List dialog box, click the down-arrow and select the correct dial list.
3. Under Conferee List, click an entry on the dial list.
BridgeTalk highlights that entry.
Tip: To sort a dial list column in ascending or descending order, click on the header of the column that you want to sort. To display the dial list in the order that you entered the names, turn on the Display As Entered check box.
4. Click Associate.
BridgeTalk automatically fills in the Line Detail dialog box with information from the dial list entry.
For more information on using the Display As Entered check box, see �Creating a new dial list� on page 5-3.
Display As Entered
Dialing In 4-13

4-14 BridgeTalk Application 3.2 User�s Guide

Chapter 5Using Dial Lists and Dialing OutThis chapter provides information on:
� Working with dial lists
� Overview of dialing out
5-1

Working with dial listsA dial list is a phone list created by operators to use during BlastDial, FastDial, or Roster tasks. Individual dial list entries include a participant name, phone number, and optional company name.
Select one of the following methods:
� To create a new dial list or edit an existing dial list:
1. Fastdial > Edit from the Main toolbar.
2. In the Dial List Navigator dialog box, select one of the following:
� New to create a new dial list. For more information, see the next section, �Creating a new dial list.�
� Edit or Duplicate to modify or copy an existing dial list. For more information, see �Modifying a dial list� on page 5-6.
-Or-
� To use an existing dial list stored on your system:
1. Choose Fastdial > Dial from the Main toolbar.
2. In the Dial dialog box, select the dial list that you want to use.
Note: You should not use certain characters in front of participant names in a dial list since these characters may be used by the system as flags. For example, on the Spectel 70 text-based interface, you can place characters in front of caller names to designate line status during dial operations:
� Moderator Status. Spectel 70 places an �@� sign at the beginning of a person�s name to designate that line as a moderator. The system automatically assigns that line moderator status when it is included in a FastDial or BlastDial.
� Q&A Priority. You may assign Q&A priority to participants when you create a dial list. Enter a �+� before the conferee name to specify top priority; these lines always go to the beginning of the question queue, directly beneath moderators on the display, regardless of when they enter the queue chronologically. Enter an �=� before the name to exclude the conferee from asking questions during Q&A.
By contrast, BridgeTalk masks special characters in the console but includes them in CDRs.
5-2 BridgeTalk Application 3.2 User�s Guide

Creating a new dial listUse this procedure to create a new dial list:
1. From the Main toolbar, click Fastdial.
2. From the Fastdial submenu toolbar, click Edit.
BridgeTalk displays the Dial List Navigator dialog box.
3. In the Dial List Navigator dialog box, click New.
The New Dial List dialog box might look similar to this:
4. Enter a dial list name (up to 8 alphanumeric characters).
5. Click Add to add an entry to the list.
BridgeTalk adds a blank line to the bottom of the list.
Note: Once you create a name, you cannot change the position of the name in the dial list.
Dial list name
Display As Entered
Directly to Conf
Using Dial Lists and Dialing Out 5-3

6. Complete the following dial list line information:
7. To delete an entry, select the entry and click Remove.
8. To sort entries, choose one of the following sort options under Conferee List:
� Click Display As Entered to display the dial list in the order that you entered the names.
� Clear this option to display the list in alphabetical order.
Click To
Name Enter a caller�s name that you want to include on the list.
Company Enter the name of the caller�s company (up to 20 alphanumeric characters).
Moderator Set up the caller as a Moderator; otherwise, leave the Moderator field blank.
Q&A Priority Select the appropriate priority level from the shortcut menu:� Top. To give a caller priority over other callers during a Q&A
session.� Excluded. To prevent a caller from asking questions during a
Q&A session.� Normal. (Default) To give a caller that same priority level as
other callers.
Telephone Enter the person�s telephone number in the field.
5-4 BridgeTalk Application 3.2 User�s Guide

9. To use the dial list for a BlastDial, choose one of the following options in the Optional Access Code field:
10. Click one of the following:
� Save to save the dial list. The system saves the dial list using the list name that you specified in step 4.
� Print to print out the dial list.
Table 5-1: Optional Access Code options
Choose To
With access codes
Enter a passcode in the field. The called parties are required to enter a passcode (up to 16 characters) before they can join the conference.
Tip: For BlastDials, you can use the same passcode for several conferences because the system places the participants directly into the specified conferences.
Without access codes
Leave the field blank if you want the called parties to enter the conference without a special passcode. The called parties can enter the conference by pressing �1� (unless the system is set up to place blast-dialed participants directly into a conference as soon as they answer their phones).
Direct to Conf Place callers directly into the conference without entering any DTMF commands. When you select Directly to Conf, the system disables the called party�s voice mail filter. Any device that automatically answers the telephone is placed into the conference, including voice mail, modem, fax, and so on.
Note: When you select Direct to Conf, the Optional Access Code field is overwritten with 16 zeros and is deactivated. This directs the bridge to allow automatic entry. If you deselect Direct to Conf, the Optional Access Code field clears and is re-activated.
Using Dial Lists and Dialing Out 5-5

Modifying a dial listFollow these steps to modify a dial list:
1. From the Main toolbar, click Fastdial.
2. From the Fastdial submenu toolbar, click Edit.
3. In the Dial List Navigator dialog box, select one of these options:
4. Click Close.
To Procedure
Create a new dial list Click Add. For detailed instructions, see �Creating a new dial list� on page 5-3.
Edit an existing dial list
Select the dial list and click Edit. For more information, see �Changing entries in a dial list� on page 5-7.
Duplicate an existing dial list
Use this procedure:a. Select the dial list and click Duplicate.
b. In the name field, replace the name of the existing dial list with the name of the new dial list that you want to create.
c. Modify the entries within the dial list that you want to change and click Save.
Delete a dial list Follow these steps:a. Select the dial list and click Delete.
b. Click Yes in the confirmation dialog box.
Print a dial list Do the following:a. Select the dial list and click Print.
b. In the Dial List Reports dialog box, click Print again.
5-6 BridgeTalk Application 3.2 User�s Guide

Changing entries in a dial listComplete the following steps to modify a dial list:
1. From the Main toolbar, click Fastdial.
2. From the Fastdial submenu toolbar, click Edit.
3. In the Dial List Navigator dialog box, select the dial list you want to modify.
4. Click Edit.
BridgeTalk displays the selected dial list:
5. Choose one of the following:
To Procedure
Add a new entry Click Add. BridgeTalk displays a new blank line at the bottom of the list.
Modify an existing entry
Select the entry and then modify the fields that you want to change.
Delete an entry Select the entry and then click Remove.
Create a passcode for a BlastDial
Move the cursor to the optional Access Code field and enter a passcode.
Change an existing passcode
Select the code in the optional Access Code field and enter a new passcode.
Note: BridgeTalk automatically selects Message 243 as the default Blast Dial message when you enter a code in the Optional Access Code field. See Table 5-4, �Default BlastDial messages,� on page 5-16.
Using Dial Lists and Dialing Out 5-7

6. Click Save.
Overview of dialing outUse dial out when you want to call and place individuals into a conference either before a conference begins or during a conference.
In addition, you can restrict dial outs using these features:
� RESTRICT DIALOUT. A bridge can filter all dial outs using a utility customized by the system administrator. For example, the filtering process can block long-distance calls. Administrators can allow or prevent operators from dialing out specified numbers through BridgeTalk. For more information, contact Spectel Technical Support.
� MODERATOR BLOCK DIALOUT. On a per-conference basis, schedulers can allow or prevent moderators from using Moderator Originator Dial Out (ODO) or Auto Blast. However, this option does not affect operator functions. See the Block Dialout table entry on page 11-6 or the Auto Blast table entry on page 11-4.
Direct to Conf Place callers directly into the conference without entering any DTMF commands. When you select Directly to Conf, the system disables the called party�s voice mail filter. Any device that automatically answers the telephone is placed into the conference, including voice mail, modem, fax, and so on.
Note: When you select Direct to Conf, the Optional Access Code field is overwritten with 16 zeros and is deactivated. This directs the bridge to allow automatic entry. If you deselect Direct to Conf, the Optional Access Code field clears and is re-activated.
Display the dial list in as-entered order
Leave the Display As Entered check box turned on. (Default) For more information, see step 8 on page 5-4.
Print Click Print. In the Dial List Reports dialog box, click Print again.
To Procedure (Continued)
5-8 BridgeTalk Application 3.2 User�s Guide

Choose one of the dial-out operations described in Table 5-2.
Using FastDialFastDial allows you to dial out to participants using a previously created dial list. When the participant answers the phone, you can place the person in the appropriate conference.
Follow these steps to dial out to participants:
1. From the Main toolbar, click Fastdial.
2. From the Fastdial submenu toolbar, click Dial.
Table 5-2: Types of dial-out operations
Type Description
FastDial Allows you to dial out to participants using a previously created dial list. When a participant answers the phone, place the person in the appropriate conference.
BlastDial Sets the system up to dial out to a list of pre-programmed numbers. As each participant answers the telephone, the system automatically plays an annunciator message that provides conference instructions.
Tip: Be sure to create and save the dial list before you begin the BlastDial procedure.
One-time dial-out(manual)
Allows you to dial phone numbers from the Dial dialog box that are not on your list (or if you reached an automated system and must enter additional digits to continue processing the call). For more information on manual dialing, see �Using manual (one-time) dial� on page 5-18.
Tip: Use this dial type to dial extra digits for a phone number without overwriting the existing dial list entry.
Using Dial Lists and Dialing Out 5-9

BridgeTalk displays the Dial window similar to the following:
3. In the Dial dialog box, select a dial list from the Select Dial List.
4. Choose the conference in which you want to place the participants that you are calling by selecting one of the following:
Conference Name Description
New(Default)
Follow these steps to create a new conference:a. Select <Next available> in the Select Conference list.
BridgeTalk displays the Conference Name dialog box and asks you to enter a name for the conference.
b. Enter the conference name and click OK.
Existing Select an existing conference by using the drop-down list in the Select Conference field.
Select Dial List
Select Conference
Saves your position in the dial list if you need to perform another task
Dial out to a person who is not on the dial list
Display As Entered
� 1 - Analog or Digital� 2 - Digital� 3 - Digital� 4 - Digital
5-10 BridgeTalk Application 3.2 User�s Guide

For example, if you select the SalesQ dial list, and you want to place the people you call into the SalesQ conference, the top portion of the Dial window might look like the following:
As an option, you can enter a line number that the system will use as a starting point for the dial out. If you leave this field blank, the system starts at line number 1 (or first available).
5. To set a music channel, select one of the following:
� 1 - Analog or Digital
� 2 - Digital
� 3 - Digital
� 4 - Digital
6. Select a name in the Dial List Contents window and click Dial/Access. If you do not need to dial an extension, go to step 8.
7. To dial an extension for a main number that you are dialing:
a. Click Dial Ext.
b. In the Dial Extension dialog box, enter the digits in the Phone Extension field, and click Dial.
Starting line
Using Dial Lists and Dialing Out 5-11

The system dials the number. (If you do not enter a telephone number, a dialog box appears prompting you to enter a number.) The CDR will include both the main phone number and the extension.
c. Click Close.
8. Under Dial, choose one of the following options described in Table 5-3.
Table 5-3: Dial options
Click To
Dial/Access Dial a line or re-accesses a line placed on hold.
Place Place the party into the conference you selected in step 4. The system places the party into the conference, displays an asterisk (*) in the status column of the dial list, and returns you to the Fastdial list.
Hold Line! Place the line on hold. When you click Hold Line! in the Dial dialog box, you can perform other operations.
Tip: To reaccess the line that you placed on hold, select the line and click Dial/Access. When you place a line on hold, BridgeTalk displays the exclamation point symbol (!) in the Status column of the Dial list.
Hang up Hang up the line. Use hang up if the called party does not want to be placed in a conference or if no one answers.
Music/Music On Toggle music on or off.
Manual Dial out to a person who is not on the dial list.
5-12 BridgeTalk Application 3.2 User�s Guide

9. Repeat steps 6-8 for each name in the dial list.
Note: If you close the dial list while you are accessing a line, you remain accessed to that line even after the dial list closes.
Additional information about FastDialHere are a few important reminders:
� Click Music On from the Dial List dialog box to:
� Add music to a conference in which no music is playing (if available)
� Stop music in a conference in which music is already playing
� Users familiar with the Spectel 70 system should note that it is not necessary to create a blank entry (no telephone number) in a dial list. If you need to dial out to a telephone number that is not on the dial list, you can use the manual dial feature.
Display As Entered
Display the dial list in as-entered order. (Default) For more information, see step 8 on page 5-4.
Hold Dial List Exit out of the FastDial temporarily and save your position in the dial list. To place a dial list on hold:
1. Click Hold Dial List in the Dial dialog box.2. Click Yes.The application closes the Dial List window so that you can perform other tasks. To resume the FastDial, click Hold Dial List from the Fastdial submenu toolbar.
Note: You can hold your position only in one dial list at a time.
Table 5-3: Dial options (Continued)
Click To
Using Dial Lists and Dialing Out 5-13

Using BlastDialDuring a BlastDial, the system dials out using a dial list of pre-programed telephone numbers. As each participant answers the telephone, the system automatically plays an annunciator message that provides instructions to the participants being called.
You can use more than one dial list for each blast when blast dialing to the same conference; however, you must specify the conference number when starting the blast to assure that participants join the same conference.
Tip: If you want to add a level of security by requiring the called parties to use a specific passcode to enter the conference, be sure to specify that passcode when creating a new dial list. For more information, see �Creating a new dial list� on page 5-3.
Follow these steps to use BlastDial:
1. From the Main toolbar, click Fastdial.
2. From the Fastdial submenu toolbar, click Blast.
3. In the Blast Dial dialog box, select a dial list from the Select Dial List field.
4. In the Select Conference field, choose the conference in which you want to place the individuals whom you call.
Select Dial List
Select Conference
Display As Entered
� 1 - Analog or Digital� 2 - Digital� 3 - Digital� 4 - Digital
5-14 BridgeTalk Application 3.2 User�s Guide

Tip: If you want to place the conferees in a new conference, select <Next available>.
For example, if you select the SalesQ dial list, and you want the called parties to enter the SalesQ conference, the top portion of the Blast Dial dialog box might look like the following:
Tip: You can enter a line number that the system can use as a starting point for the dial out. If you leave this field blank, the system starts at line number 1.
5. To set a music channel, select one of the following:
� 1 - Analog or Digital
� 2 - Digital
� 3 - Digital
� 4 - Digital
6. Click the Annunciator Message Browse button.
7. In the Annunciator Messages dialog box, click one of the following options.
Note: If you are using Direct to Conf to place callers directly into the conference, the system does not play any annunciator message (even if a message was selected previously).
Click Description
Use Selected Message
To specify an annunciator message, select the message you want and then click Use Selected Message.
Tip: Browse the list to locate and highlight the message you want to use.
Use Default Message
See Table 5-4 for a detailed description of the available default BlastDial messages.
Starting line
Using Dial Lists and Dialing Out 5-15

Table 5-4 lists the default BlastDial messages.
For general information about annunciator messages, see �Using annunciator mes-sages� on page 3-9.
8. Click Exclude to omit certain telephone numbers from the BlastDial.
To re-enable dialing for an excluded entry, clear the Exclude check box for that entry.
9. Click Blast/reBlast to begin the BlastDial.
As the called parties answer their telephones and join the conference, the BridgeTalk Status column displays the following:
Note: If not enough lines are available for the blast, BridgeTalk displays an error message.
Table 5-4: Default BlastDial messages
Bridge Message
1.3x and 3.0x
Message 8. �Hello. Your conference call is about to begin. To join the conference, please enter 1 on your touch-tone keypad. Thank you.�
2.0x, 2.1x, and 3.1x
BridgeTalk automatically selects Message 242 if you do not enter a code (or Message 243 if you do enter a code) in the Optional Access Code field. See the Create a passcode for a BlastDial entry in the table on page 5-7.Message 242. �Hello. Your conference call is about to begin. To join the conference, please enter 1 on your touch-tone keypad. Thank you.�-Or-Message 243. �Hello. Your conference call is about to begin. To join the conference, please enter your security code followed by the pound key. Thank you.�
* Called party has been placed in the conference.
CLPG Call is in progress.
5-16 BridgeTalk Application 3.2 User�s Guide

10. Under Blast, browse through the following optional BlastDial actions:
11. To end the blast session, click Close.
BridgeTalk asks you to confirm that you want to close the BlastDial session. When you close the BlastDial, the system hangs up all lines in CLPG state and closes the Blast Dial dialog box.
For information on scheduling a moderator-initiated, unattended BlastDial, see the Auto Blast table entry on page 11-4.
Additional information about BlastDialHere are a few important reminders:
� If you want to create a new dial list for a BlastDial, be sure to create and save the dial list before you begin the BlastDial.
� Participants must press 1 to enter the conference if no passcode is assigned (unless the system is set up to place blast-dialed participants directly into a conference as soon as they answer their phones).
Click To
Display As Entered Display the dial list in as-entered order. (Default) For more information, see step 8 on page 5-4.
Blast/reBlast Redial any participants (except for those you excluded in step 7). Blast and reBlast is a toggle.
Clear CLPG Clear all lines that the system used for dialing that were not placed in the conference. The Blast Dial dialog box remains open as system hangs up all lines in CLPG status.
Next/Place Access the next line in CLPG state from the Enter queue. After speaking with the caller, place the line into the conference by clicking Place. Next and Place is a toggle.
Music Play Music in the conference. Music toggles On or Off.
Using Dial Lists and Dialing Out 5-17

Using a DNIS/DDI BlastDialUsually operators launch a BlastDial. However, you can set up moderator-initiated blast dials for unattended and on-demand conferences (if configured on the connecting bridge).
For more information on how to schedule this feature, see the Auto Blast table entry on page 11-4.
Using manual (one-time) dialIn a one-time dial out operation, you dial out to a specific number during a conference. You do not need to use a dial list.
1. From the Dial dialog box, click Manual.
2. In the Conference Name dialog box, enter the conference name in which you want to place the caller and click OK.
The Manual Dial dialog box appears.
3. In the Manual Dial dialog box, enter the caller information.
4. Enter a phone number and click Dial to dial the number. If you do not need to dial an extension, go to step 6.
Tip: You must click Dial first to make the Dial Ext button available.
5. To dial an extension for a main number that you are dialing:
a. Click Dial Ext.
5-18 BridgeTalk Application 3.2 User�s Guide

b. In the Dial Extension dialog box, enter the digits in the Phone Extension field, and click Dial.
The system dials the number. For example, if your system is set up to include a 9 and wait for a dial tone before dialing the telephone number, you could enter 9,6665555. Contact your system administrator to find out how your telephone system is configured for dialing. The CDR will include both the main phone number and the extension.
c. Click Close.
6. In the Manual Dial dialog box, click:
� Place. To place the called party into the conference, enter the conference name in the prompt area in the Line Detail dialog box. If you do not know the exact name of the conference, click Hide Find and locate the conference under Find Conference.
For more information on using the Find function, see �Using the Line Detail dialog box� on page 4-6.
� Hangup. To hang up the line without placing the caller in a conference (or if there is no answer).
Additional information about manual dialHere are a few important reminders:
� Phone numbers can contain up to 40 characters that include the digits 0�9 and star (*) or pound sign (#).
� If you access a disconnected line and click Dial, the system displays a dial prompt with the line name and phone number (if this information was entered previously). Click OK to dial the phone number and re-establish the connection.
Using Dial Lists and Dialing Out 5-19

5-20 BridgeTalk Application 3.2 User�s Guide

Chapter 6Recording ConferencesThis chapter includes instructions on the following:
� Overview of recording
� Creating an analog recording
� Creating a digital recording
6-1

Overview of recordingOperators can start, stop, and play back conference recordings that they initiate through BridgeTalk, as well as those initiated by moderators who use DTMF commands.
Note: Moderators can record and play back a conference that they secure. By contrast, operators cannot record a secured conference. If an operator starts recording a conference that switches to secured, the system immediately stops the recording.
You can record an entire conference or only a part of a conference using the following recording types, if configured on the connecting bridge:
� Analog. This process lets operators or moderators record to an analog device, such as a tape recorder. See the next section, �Creating an analog recording.�
� Digital. This process lets operators or moderators record digitally to a file on the system. For more information, see �Creating a digital recording� on page 6-5.
� External Digital Recording. This process allows moderators (leaders) to dial out and record a conference digitally using an external recording device.
A Conference Record line appears in the Conference Room window.
Note: Do not tamper with or modify the properties of this line. Remember, external recordings are not stored on the bridge so you cannot play back a file through BridgeTalk.
You can use up to four record-playback combinations within a single conference:
� Analog record with digital record
� Analog playback with digital record
� Digital playback with analog record
� Analog, digital, and external record
Tip: If desired, you can record a conference twice using the analog or digital functions of BridgeTalk and an external recording device.
6-2 BridgeTalk Application 3.2 User�s Guide

In certain locations, including the United States, you are required by law to notify all participants when a conference call will be recorded. To accomplish this, you can:
� Notify participants individually before placing them into the conference.
� Notify participants in the annunciator message.
� Begin the conference by announcing that the conference call will be recorded.
Note: When an external recording or Digital Record Playback (DRP) starts, the system plays a message into the conference.
Creating an analog recordingAnalog recording is the process of recording to an analog device that is connected to a PBX utility. Analog channels are available on all systems.
Tip: Make sure that you establish a record/playback audio path first. If you did not set an audio path, see �Setting up auxiliary audio paths� on page 1-12.
Follow these steps to record a conference:
1. From the Main menu toolbar, click Conference.
2. From the Conference submenu toolbar, click Record.
3. In the Record/Playback dialog box, click Record in the Analog box.
4. In the Select Channel dialog box, click the down arrow to select a channel, and click OK.
Recording begins and the record button switches from gray to red.
5. Press the Record/Play button on your recording device.
6. To stop the recording, click Stop in the Analog box.
The recording stops and the Record button switches from red to gray.
7. Press Stop on your recording device.
For information about playing back the recording, see the next section, �Playing back an analog recording.�
Recording Conferences 6-3

Playing back an analog recordingYou can play back an entire conference or part of a conference. Before playing back an analog recording, be sure the system displays the Record/Playback dialog box.
Here are some important reminders:
� Do not rewind a tape while the record channel is installed because this can add noise to the conference.
� You cannot apply gain while playing back an analog tape.
Follow these steps to play back an analog recording:
1. In the Record/Playback dialog box, click Play in the Analog box.
2. In the Select Channel dialog box, click the down arrow, and select the channel you want to use and click OK.
Playback begins and the Play button switches from gray to green.
3. Press the Play button on your recording device.
4. To stop the playback, click Stop in the Analog box.
The playback stops and the Play button switches from green to gray.
Note: BridgeTalk displays the record/playback channel number in the conference status area of the Conference Room window.
Channels Description
0 to 48 On a Platform 700 or Platform 780, up to 48 channels appear in the Select Channel dialog box (if configured and available for Record/Playback).
Channels Description
1 to 3 On a Spectel 70, up to 3 analog channels appear in the Select Channel dialog box (if configured and available for Record/Playback).
6-4 BridgeTalk Application 3.2 User�s Guide

Creating a digital recordingDigital recording is the process of recording a conference to a file stored on the bridge. Digital channels are available on systems that have an installed removable hard drive.
The system can store digitally recorded conferences up to 12 hours per conference or up to 293 hours on the system's removable hard drive or a RAID 5 disk drive (depending upon how the system is configured). For example, if you use the removable hard drive to back up your system or save voice rosters, the number of available hours decreases.
Tip: You can insert a record channel into a conference before participants join the conference. However, digital playback for an attended conference will not begin until a participant enters the conference.
Use this procedure to create a digital recording:
1. From the Main toolbar, click Conference.
2. From the Conference submenu toolbar, click Record.
The system displays the Record/Playback dialog box.
3. In the Record/Playback list, select the conference that you want to record.
4. Click Record .
5. In the Digital Record dialog box, enter a filename (up to 8 characters with no extension).
The Digital Record dialog box displays the amount of time available for recording.
6. Click the down arrow to select a recording channel and click OK.
Note: Recording channels that are in use do not appear.
The recording begins and the record button switches from gray to red.
7. To stop the recording, click Stop .
The recording stops and the Record button switches from red to gray.
Record/Playback list
Recording Conferences 6-5

For information about playing back the recording, see the next section, �Playing back a digital recording� or �Deleting a digital conference recording� on page 6-7.
Playing back a digital recordingYou can play back an entire conference or part of a conference. Before playing back a digital recording, be sure the system displays the Record/Playback dialog box.
Follow these steps to play back a digital recording:
1. In the Record/Playback dialog box, click Play in the Digital box.
2. In the Digital Play dialog box, click the Recorded Files down arrow and select the file you want to play.
3. Click the Channel down arrow, select the channel you want to use.
Tip: If you want the playback to begin at a specific point after the recording began, enter the amount of time that you want to skip (expressed in the number of minutes and seconds). Note that the system increments in 8 second intervals. If you enter 9 seconds, the system skips 8 seconds; if you enter 17 seconds, the system skips 16 seconds, and so on.
4. Click OK.
Playback begins and the Play button switches from gray to green. Note that all lines are in listen-only mode.
5. To stop the playback, click Stop in the Digital box.
The playback stops and the Play button switches from green to gray.
Note: BridgeTalk displays the record/playback channel number in the conference status area of the Conference Room window.
Channels Description
A to V
A to H
On a Platform 700 or Platform 780, 22 channels appear in alphabetical order in the Select Channel dialog box (if configured and available for Record/Playback).On a Spectel 70, up to 8 digital channels appear in alphabetical order in the Select Channel dialog box (if configured and available for Record/Playback).
6-6 BridgeTalk Application 3.2 User�s Guide

Deleting a digital conference recordingUse this procedure to delete a digital recording:
1. Click Delete .
The system displays the Delete File dialog box.
2. Click the down arrow, select the file, and click OK.
3. Click Yes in the Confirmation dialog box to delete the file.
Note: Before deleting a digital recording, be sure BridgeTalk displays the Record/Playback dialog box.
For more information the record/playback feature, see the700/780 Platform Administration and Maintenance Guide.
Recording Conferences 6-7

6-8 BridgeTalk Application 3.2 User�s Guide

Chapter 7Conducting Polling and Q&A Sessions� This chapter covers the following topics:
� Conducting polling sessions
� Conducting Question and Answer (Q&A) sessions
7-1

Conducting polling sessionsYou can conduct a polling session that lets participants cast votes or express opinions based on a predefined tag digit list.
Before polling, make sure that you:
1. Select at least one participant to be a moderator to ask questions during the polling session.
During a polling session, all lines are muted except for moderators� lines.
Moderators can mute and unmute themselves using the *6 command. A muted moderator retains moderator status and can still use moderator-based DTMF commands.
Note: You can override the *6 command by toggling Moderator Mute on or off. For example, in a lectured conference that includes several moderators, you can mute all but one moderator. (This feature is visible only if you connect to 2.1x or later bridge).
2. Save time by preparing a unique tag digit list file in advance or you can use an existing tag digit list and temporarily change the information.
3. Prompt participants how to vote on a set of choices using the touch-tone keypad on their telephones.
4. Set up and then display voting options in the Polling dialog box.
For polling instructions, see the next section, �Starting a polling session.�
Tip: You can save or print the results when each individual poll ends. For more information, see �Saving or printing the polling results� on page 7-5.
7-2 BridgeTalk Application 3.2 User�s Guide

Starting a polling sessionOnce you have prepared for a polling session, you can begin polling.
Follow these steps to start a polling session:
1. From the Conference Room window of the conference that you want to poll, click Poll.
The Polling dialog box appears and the system mutes all participant lines.
2. Click on a line and click Caller Detail to hear caller information without accessing the line.
An abbreviated Line Detail dialog box appears.
Note: The Play and StopX buttons appear if NRP is scheduled for the conference and the caller responds to the name prompt.
3. Click Play to hear what the caller recorded.
Tag digit area
Conducting Polling and Q&A Sessions 7-3

4. Choose one of the following tag digit options:
5. Click Start Polling to begin polling.
The polling session begins. BridgeTalk clears all previous votes and totals.
Note: When you click Start Polling, you temporarily mute all participant lines. Moderators in a lectured conference are not muted; however, you can select a moderator line and click Mute to mute the line.
6. Ask a polling question and list the possible responses.
7. Prompt participants to press a key on their keypads corresponding to their selection.
As participants vote, the system displays the votes in the Polling dialog box.
8. Click Save Results to save or print the polling results.
Note: Participants can request help from the operator by pressing 0 or *0.
Performing operator polling tasksYou might perform one or more of the following tasks during a polling session:
� Excluding certain lines from the vote count
� Providing help to a participant
� Saving or printing the polling results
Option Procedure
Use an existing tag digit list
Click the down arrow in the Tag Files field and select the tag digit list file you want to use. BridgeTalk displays the tag digit list associated with that file. For information about creating tag digit list files, see �Creating a tag digit list� on page 7-8.
Create a temporary tag digit list
Click in the Tag field of a digit and enter the label text you want to use for that tag. Repeat this for each digit that you want to use.
Tip: After entering the text, click outside the text box to apply changes.
7-4 BridgeTalk Application 3.2 User�s Guide

Excluding certain lines from the vote countBy default, all moderators and participants vote during a poll and the system includes all votes in the tag digit totals. However, you can exclude moderators and specific participants from voting.
To exclude moderators or certain participants from having their votes included in the totals:
1. Click Start Polling in the Polling dialog box.
2. Select the participants and moderators whose votes should not be tabulated.
3. Click Mute Line.
The Status for each of these participants changes from �Normal� to �Muted.�
4. Clear the Include Moderator/Mute Votes check box, as shown.
The Moderator/Mute Votes check box toggles on and off.
Providing help to a participantA participant can request help during a polling session by pressing 0 or *0. When this occurs, BridgeTalk turns on the �Help Req� check box for that participant.
Follow these steps to provide help to participants during a polling session:
1. From the Polling dialog box, click Help Line.
The bridge automatically accesses the line of the first participant who requested help.
2. Click Release Line when you have finished assisting the participant.
The system returns the participant to the polling session.
Note: You can access only those lines requesting help from the polled conference.
Saving or printing the polling resultsDuring a polling session, BridgeTalk displays the tag digit vote total and how each participant voted.
Tip: You cannot save the polling results of an unnamed conference to a file.
Note: If a participant votes but hangs up before you display or save the results to a file, the vote is not included in the total participants count. However, the tag digit totals and total responses do include the participants� participation.
Conducting Polling and Q&A Sessions 7-5

After the polling session ends, you can save or print the results of a single vote by following the instructions described in Table 7-1.
Note: Do not include a pathname with a slash (/) when you save polling results. Instead, use a filename, such as ACMEpol2. The system stores polling files in the <bridge installation> /usr/dcb/dbase/polprnts directory or another location specified in your bridge.properties file.
Allowing a participant to change a voteIf a participant asks to change a vote (for example, if the participant pressed the wrong digit), you must first clear the participant�s original vote.
Follow these steps to let a participant to change a vote:
1. From the Polling dialog box, select the participant who wants to change a vote. 2. Click Clear Vote.
BridgeTalk clears the vote so that the participant can make a new selection.
Table 7-1: Saving or printing polling results
To Procedure
Print the vote total that each tag digit received. (Individual participant votes are not included.)
To print the vote total:
1. Click Print Results. 2. In the Print dialog box, select Summary.3. Enter optional descriptive text and click OK.
Print the vote total that each tag digit received and how each individual voted.
To print individual votes and the vote total:
1. Click Print Results. 2. Select Complete in the Print dialog box.3. Enter optional descriptive text and click OK.
Save the vote total that each tag digit received to a file. (Individual participant votes are not included.)
To save the vote total to a file:
1. Click Save Results. 2. Select Summary in the Print dialog box.3. Enter a filename and click OK.
Save the vote total that each tag digit received and how each individual voted to a file.
To save individual votes and the vote total to a file:
1. Click Save Results. 2. Select Complete in the Print dialog box.3. Enter a filename and click OK.
7-6 BridgeTalk Application 3.2 User�s Guide

Clearing all votesFollow these steps to clear votes on all conference participate lines:
1. Make sure that you have saved or printed any vote information that you need.
2. Click Clear All Votes.
Ending a polling sessionWhen the polling session is complete, do the following:
1. Be sure that you have saved or printed any vote information that you need.
For information, see �Saving or printing the polling results� on page 7-5.
2. Click Clear All Votes to remove all votes.
3. To edit or remove labels that are not from a saved tag digit file, you can:
4. Click Clear Tags and select a different list in the Tag File list to start a new poll.
5. When finished, click Stop Polling.
The system unmutes all participant lines (except for any lines that you explicitly muted) and ends the current polling session. Other operators viewing the Polling dia-log box should note that the Stop Polling button switches back to Start Polling.
6. Click Close and choose one of the following options to end the polling session:
� Yes to stop conference polling after you exit.
� No to allow conference polling to resume after you exit. If you are the only active operator in the conference, the polling session ends; however, if there are other operators currently polling the conference, the polling sessions continue.
� Cancel to return to the Polling dialog box.
Tip: If you muted any lines during polling to exclude from voting, remember to unmute them.
Click To
On the tag you want to change Remove or retype the label text for a digit or digits.
Clear Tags Remove all of the labels.
Conducting Polling and Q&A Sessions 7-7

Creating a tag digit listHere are some important reminders on tag digits:
� Operators can access all tag digit lists stored on a bridge, regardless of who created them. More than one operator can use the same tag digit list at the same time.
� If several operators are polling a single conference, make sure that all the operators use the same tag digit list.
Follow these steps to create a tag digit list:
1. From the Main toolbar, click Conference.
2. From the Conference submenu toolbar, click Poll.
3. In the prompt area, enter the number of your conference, and press ENTER.
The bridge uses tag digits to match participants� votes to the items they vote on. A tag digit includes a tag (descriptive text) and a digit (from 1 to 9 up to a maximum of nine digits).
Tip: After entering the text, click outside the text box to apply changes.
4. Click on a digit in the Digit field.
5. In the Tag field, select one of these numbering conventions:
You can create a standard tag digit list for the most common responses, such as:
Description Example
Use a tag with an underscore (_) or an ellipsis (...) to specify a range.
Option_2 or Option 1...3
Use a tag with a colon. Option 2:
Use a tag with double digits. Option 12
Tip: Do not use single digits. Option 2
Tip: Do not use hyphens (-). Option -1
Digit Tag Label1 Yes2 No3 Undecided
7-8 BridgeTalk Application 3.2 User�s Guide

If you want to create the tag digits for mixers, the tags might like this example:
During a polling session, participants who want to vote for Supremo Mixer can press 1 on their telephone keypads, those who want to vote for Mix-o-Matic can press 2, and so on.
As participants vote, BridgeTalk displays the votes in the Polling dialog box, as shown.
6. Repeat this step for each digit that you want to use.
7. Click Save As...
8. In the Save As dialog box, enter a filename for the tag digit list file (up to 8 characters), and click OK.
Tip: When a conference requires many polls, you can assign the tag digit list files sequential names that correspond to the number of the question. For example, the ACME conference might use tag digit list files named ACME1, ACME2, ACME3, ACME4, and so on.
9. Click Close to exit from the Polling dialog box and then confirm that you want to leave polling.
Digit Tag1 Supremo Mixer2 Mix-o-Matic3 Mixing Master
Conducting Polling and Q&A Sessions 7-9

Conducting Question and Answer (Q&A) sessionsQuestion and Answer (Q&A) sessions provide an orderly method of letting participants ask questions or make comments during a lecture or large conference.
During a Q&A session, all lines are muted except:
� A participant asking a question
� Moderators
Moderators can mute and unmute themselves using the *6 command. A muted moderator retains moderator status and can still use moderator-based DTMF commands.
Tip: Set participant priorities before starting a Q&A session and verify that there is at least one moderator line in the conference.
To change the priority of a participant:
1. Click the Q&A column of the participant�s line in the Conference Room window.
2. Select the new priority that you want to assign to the caller:
Note: The bridge can be configured to require either one or two digits for help 1 (or *1) and one or two digits for operator 0 or *0.
Table 7-2: Setting caller priorities in Q&A
Option To
Top Place callers at the beginning of the queue, in the order in which they pressed 1 (or *1). Moderators are placed at the beginning of the caller queue. For more information on setting priorities, see step 7 on page 4-10.
Excluded Prevent callers from asking questions during a Q&A session and are not shown in the Q&A queue. (However, excluded callers can request and receive operator help.)
Normal Place the caller after Top priority participants, in the order in which they pressed 1 (or *1). (Default)
7-10 BridgeTalk Application 3.2 User�s Guide

Starting a Q&A session During a Q&A session, a participant who wants to ask a question presses 1 (or *1) on a touch-tone telephone. The system then places the participant in the Q&A queue but the line remains muted. When an operator selects a line and clicks Ask?, the operator allows a participant who has a question to speak to the conference.
Note: Be sure to set caller priorities before starting a Q&A session. For more information, see Table 7-2 on page 7-10.
The basic steps to start a Q&A session are:
1. From the Conference Room window, click Q&A.
The Q&A dialog box appears.
Tip: When opened, the Q&A dialog box remains prominent in BridgeTalk until you click Close; therefore, exit out of Q&A before accessing other dialog boxes.
2. Click on a line and click Caller Detail to hear caller information without accessing the line.
Note: Caller detail appears only if you schedule an unattended conference with the NRP set to OPER. For more information, see the Name Record/Playback table entry on page 11-9.
Conducting Polling and Q&A Sessions 7-11

An abbreviated Line Detail dialog box displays.
3. Click Play to hear what the caller recorded.
The system plays caller information only to the operator. The conference does not hear the recording.
Note: The Play and StopX buttons appear if NRP is scheduled for the conference and the caller responds to the name prompt.
4. When finished, click OK to close the Line Detail dialog box.
5. Select any of the following commands from Table 7-3.
Table 7-3: Q&A dialog box command buttons
Button To
Op Help Select a line and click Op Help to speak privately with participants or moderators who press *0 or 0.
Ask? Choose a line and click Ask? to let participants or moderators, who press *1, ask a question to the entire conference.
Caller Detail Select a line and click Caller Detail to hear and update caller information without accessing the line.
Retrieve Retrieve a line that was released back into a conference. The system places the line at the end of the Q&A queue.
7-12 BridgeTalk Application 3.2 User�s Guide

6. When finished, click Close.
7. Choose one of the following options to end the Q&A session:
� Yes to stop Q&A after you exit. The system unmutes all participant lines (except for any lines that you explicitly muted) and ends the current Q&A session.
� No to allow Q&A to resume after you exit. If you are the only active operator in the conference, the Q&A session ends; however, if there are other operators currently answering questions during the conference, the Q&A sessions can continue.
� Cancel to return to the Q&A dialog box.
Assisting callers during a Q&A sessionYou can respond to participants and moderators who ask for help during a Q&A session in three ways:
� Moderator help. For instructions, see the next section, �Responding to moderators who request help.�
� Participant help. See �Responding to participants who request help� on page 7-15.
� Participant questions during conference. See �Allowing participants to ask a question� on page 7-16.
Print Display, print, or save Q&A questions or comments.Follow these steps to print comments or questions:
a. Click Print.
b. In the Input dialog box, enter comments up to 76 characters. (Optional)
c. Click OK.
d. In the Q&A Results dialog box, click Print.
Clear Clear all lines from the Q&A Help queue.
CV Chat Start a Conference Viewer chat session. For instructions on setting up BridgeTalk to use the Conference Viewer Chat, see �Sending messages to other operators using the Conference Viewer� on page 9-7.
Close End the Q&A session for the conference.
Table 7-3: Q&A dialog box command buttons (Continued)
Button To
Conducting Polling and Q&A Sessions 7-13

Responding to moderators who request helpWhen a moderator requests help during Q&A, the system displays check mark in the �Help Req� column.
Follow these steps to speak to a moderator privately:
1. In the Q&A dialog box, select the line of a moderator.
The system deactivates the Ask? button.
2. Click Op Help.
The Operator Help dialog box appears.
3. Choose any of the moderator help options listed in Table 7-4.
Table 7-4: Moderator help request options during Q&A
Click Description
Access/Release
Choose one of the following:� Access. To access the line so you can speak privately with the
moderator. The system deactivates the Mute button and turns on the operator�s audio path.
� Release. To release the line back into the conference.
Tip: You can toggle the Mute status on or off or toggle your talk path on or off.
Muted Moderator line Moderator line
7-14 BridgeTalk Application 3.2 User�s Guide

4. Click Close when finished.
Responding to participants who request helpIf a participant requests help, the system displays a check mark in the �Help Req� column.
Use this procedure to speak to a participant who requests help:
1. In the Q&A dialog box, select the line of a participant who requests help.
The system deactivates the Ask? button.
2. Click Op Help.
The Operator Help dialog box appears.
Mute/Unmute Mutes or unmutes a moderator.This button only appears when the line is a moderator.
Op Talk To speak with a moderator who requests help or toggle your talk path on or off.
Note: Click Op Talk to ensure that all participants can hear your comments. Check to see if your talk path indicator is on or off in the Operator Status bar.
Table 7-4: Moderator help request options during Q&A (Continued)
Click Description
Conducting Polling and Q&A Sessions 7-15

3. Choose any of the help options described in Table 7-5.
4. Click Close when finished.
Allowing participants to ask a questionFollow these steps to allow participants to present a question to the conference:
1. In the Q&A dialog box, select the line of a participant who asked for help.
The system deactivates the Op Help button.
2. Click Ask?.
The Ask? dialog box appears and BridgeTalk unmutes the line.
Table 7-5: Participant help request options during Q&A
Click Description
Access/Release
Choose one of the following:� Access. To access the line so you can speak privately with the
participant. � Release. To release the line back into the conference or toggle
your talk path on or off.
Tip: Click Retrieve if the participant wants to ask another question. The system places the line at the end of the Q&A queue.
Op Talk To speak with a participant who requests help or toggle your talk path on or off.
Note: Click Op Talk to ensure that all participants can hear your comments. Check to see if your talk path indicator is on or off in the Operator Status bar.
7-16 BridgeTalk Application 3.2 User�s Guide

3. Choose any of the following options listed in Table 7-6.
Table 7-6: Participant Ask? options during Q&A
Click Description
Op Talk To speak with participant who wants to ask a question, or toggle your talk path on or off.
Note: Click Op Talk to ensure that all participants can hear your comments. Check to see if your talk path indicator is on or off in the Operator Status bar.
Release Return the participant to the conference and mute the line again.
Resume Return the participant to the same position in the Q&A queue and mute the line again.
Tip: Click Resume if the participant wants to ask another question or if you inadvertently selected the wrong line.
Conducting Polling and Q&A Sessions 7-17

7-18 BridgeTalk Application 3.2 User�s Guide

Chapter 8Transferring CallsThis chapter provides instructions on:
� Overview of the transfer process
� Transferring a call within your phone system
� Transferring one or more participants
� Transferring an entire conference to another conference
� Transferring a dedicated link line
8-1

Overview of the transfer processYou can do the following type of transfers:
� Transferring a call within your phone system
� Transferring one or more participants
� Transferring an entire conference to another conference
Note: You can transfer a link line into conferences to join one or more active conferences running on different audioconferencing systems. For instructions on transferring link lines, see �Transferring a dedicated link line� on page 8-5.
Transferring a call within your phone systemYou can transfer a call to another number within your own telephone system, if enabled on the bridge.
Follow these steps to transfer a call:
1. From the Main toolbar, click Access.
2. Enter the line numbers (one at a time) that you want to transfer and press ENTER.
3. From the Access submenu toolbar, click Transfer.
4. Enter the telephone number to which you want to transfer the caller and press ENTER.
The system connects the line and dials the number.
Additional information on call transfersHere are some important reminders:
� To use the transfer feature, your system must use a switch that supports flash-hook transfer. To find out if your system has this feature, contact you system administrator.
8-2 BridgeTalk Application 3.2 User�s Guide

� The call transfer feature provides the following options:
Transferring one or more participantsYou can transfer some of the participants in a conference to another conference. For example, participants in a large conference may want to break into small groups or subconferences.
If you turn on the Confirm Transfer check box, BridgeTalk displays an �Are you sure?� message before allowing you to transfer lines using the Menu bar or Toolbar.
Table 8-1: Call transfer options
Option Description
Pre-conference instructions
Use this feature to review special conference instructions, such as conference security procedures. If a system administrator wants to speak with a moderator before the conference to review special instructions, you can access a line, dial out to the moderator, and then transfer the call to the administrator�s extension.
Reservation center
Use this feature to transfer a participant to a reservation center.For example, if a moderator wants to schedule another conference, you can access the line and transfer the moderator to the reservation center to make the proper arrangements.
Confirm Transfer check box
Transferring Calls 8-3

Choose one of the following methods to move participants from one conference to another:
� From the Menu bar:
1. Choose Line > Transfer Line.
2. Under Select Transfer Line(s), select the lines that you want to transfer.
3. Under To Conference Selection, choose the conference destination.
4. Click Transfer.
-Or-
� From the Main toolbar:
1. Click Transfer.
2. From the Transfer submenu toolbar, click Conferees.
3. In the prompt area, enter the conference to which you want to transfer the participant(s).
4. Add a space, enter the line numbers of the participant(s) you want to transfer, and press ENTER.
Transferring an entire conference to another conferenceYou can transfer an entire conference to another conference room. For example, participants in one conference may want to join another conference.
Confirm Transfer check box
8-4 BridgeTalk Application 3.2 User�s Guide

If you turn on the Confirm Transfer check box, BridgeTalk displays an �Are you sure?� message before allowing you to transfer conferences using the Menu bar or Toolbar.
Choose one of these methods to move all participants from one conference to another:
� From the Menu bar:
1. Choose Conference > Transfer.
2. Under From Conference Selection, select the conference that you want to transfer.
3. Under To Conference Selection, select the number for the targeted conference.
4. Click Transfer.
-Or-
� From the Main toolbar:
1. Click Transfer.
2. From the Transfer submenu toolbar, click Conference.
3. In the prompt area, enter the number of the conference that you want to transfer.
4. Add a space, enter the number for the targeted conference, and press ENTER.
Transferring a dedicated link lineOperators working on different bridges can add a dedicated link line to separate conferences to link the two conferences together. Specifically, both operators transfer the same numbered link into the respective conferences, as shown.
Follow these steps to transfer a dedicated link line:
1. From the Main toolbar, click Transfer.
Conference Room 8Conference Room 12
Bridge BBridge A
Dedicated link line
<2><2>
Transferring Calls 8-5

2. From the Transfer submenu toolbar, click Link Lines.
3. In the prompt area, enter a link line number from 1-48, (for example, 2) and a space.
4. Enter a conference room number and press ENTER.
As shown in the previous example, the operator on bridge <A> transfers a link line into Conference 12. Operator on bridge <B> transfers the link line into Conference 8 using the same procedure and line number. The two conferences on the two systems are now combined into one conference.
8-6 BridgeTalk Application 3.2 User�s Guide

Chapter 9Assisting an Active ConferenceThis chapter includes the following:
� Overview of managing active conferences
� Responding to help requests
� Modifying conference information
� Modifying participant information
� Muting a line
� Listening to (auditing) a conference
� Speaking to the entire conference
� Sending messages to other operators
� Sending messages to other operators using the Conference Viewer
� Adding a note to a conference report
� Monitoring subconferences
9-1

Overview of managing active conferencesYou can manage a conference that is in progress by responding to help requests, modifying conference or participant information, listening to or speaking to conferences, and sending messages to other operators, or adding notes about the conference.
Responding to help requestsDuring a conference, participants can request operator help by pressing 0 (or *0) on their telephones. The system places the participant�s line in the Help Requests queue.
Tip: For information on how participants can request help or enter commands from a telephone keypad, see Appendix A, �Moderator and Participant DTMF Commands.�
Follow these steps to access the line to assist a participant who requests help:
1. Choose one of the following:
BridgeTalk displays the Line Detail dialog box for the participant.
2. After speaking with the participant, click Release to return the participant to the conference.
Note: If a muted moderator or muted participant requests help, BridgeTalk lets you speak privately with the requestor (even if the system is set to conference-wide help).
Click Location To access
Help Requests queue
The next participant who requests help.
Note: The Get Next Help button is available only if one or more callers are in the Help Requests queue. You cannot use the Get Next Help button if you are currently accessing another line or if you have not yet established an audio path.
Main toolbar
A specific participant who requests help. Enter the line number of the participant and press ENTER.
9-2 BridgeTalk Application 3.2 User�s Guide

Additional information on providing helpDepending on the system configuration, you can use one of the these methods of providing help:
� Individual help. When you access the participant�s line, BridgeTalk displays the Line Detail dialog box. The system temporarily removes that participant from the conference so that you may speak privately without disrupting the conference.If enabled, entry tones will sound after you release the line back into the conference.
� Conference-wide help. BridgeTalk displays the Conference Detail dialog box. This system setting lets you speak to all of the participants in the conference.
Modifying conference informationFrom the Conference Navigator, you can view or modify conference details by accessing the Conference Details dialog box. In addition, you can view but not edit the Global ID, Cross-reference, or Billing Code data displayed at the top of the dialog box.
Follow these steps to view the Conference Details dialog box:
1. In Conference Navigator, click on a conference.
2. Right-click and choose Details.
The Conference Details dialog box appears.
Assisting an Active Conference 9-3

3. Under Features, select the options that you want for your conference:
� Click Clear All to clear all conference features.
� Select an optional music source using the drop-down arrow.
4. Click OK to save your changes.
Modifying participant informationTo modify participant information during a conference without accessing the line:
1. From the Conference Room window, select a participant�s line.
2. Right-click and choose Details.
Note: The Play and StopX buttons appear if NRP is scheduled for the conference, the caller responds to the name prompt, and the line is not accessed.
3. If NRP (INDVL, CONF, or OPER) is scheduled for the conference and the caller responded to the name prompt, click:
a. Play to hear what the caller recorded.
b. Stop to stop the recording.
4. Edit the appropriate fields and click OK.
9-4 BridgeTalk Application 3.2 User�s Guide

Muting a lineParticipants on muted lines can listen to a conference without being heard.
Follow these steps to mute a line without accessing the line:
1. From the Main toolbar, click Line.2. In the Line submenu, click Mute.3. Enter the line number and press ENTER.The Mute option toggles on or off.
Additional information on muting a lineHere are some important reminders:
� BridgeTalk identifies muted lines in the Conference Room window.� Moderators can mute and unmute themselves using the *6 command. A muted
moderator retains moderator status and can still use DTMF commands.You can override the *6 command by toggling Moderator Mute on or off. (This feature is visible only if you connect to a 2.1x or later bridge).
Listening to (auditing) a conferenceYou can use auditing to listen in on a conference or speak to an entire conference.
Use this procedure to audit a conference:
1. Choose Conference > Audit from the Menu bar.2. Enter the conference number and click OK.
Tip: To use the listen and scan features to audit individual lines or entire conferences for audio quality, see Chapter 10, �Using the Listening Commands.�
Speaking to the entire conferenceTo speak to all the participants in a conference:
1. Select the conference from the Conference Navigator.
2. Turn on your Operator Talk path by choosing one of the following:
� From the keyboard, press ALT+SPACEBAR.� From the Menu bar, choose Line > Operator Talk.
Tip: The Operator status bar displays �TLK - on� when you turn on your talk path. The Operator Talk function toggles on and off.
Assisting an Active Conference 9-5

Sending messages to other operatorsYou can send messages to another operator, to all other operators, or to an auxiliary terminal. The chat messages appear at the lower portion of the Conference Navigator window. Chat text appears in the operator transaction logs.
Use this procedure to send a message:
1. From the Main toolbar, click Options.
2. From the Options submenu toolbar, click Chat.
3. In the Send to Selection field of the Chat Message dialog box, choose one of these options:
4. Enter the message you want to send in the Message Entry field and click Send.
The audioconferencing system displays the message in the Chat window of the termi-nals that you specified. If you send a message to an operator or auxiliary terminal not using BridgeTalk software, the system displays the message in the message area.
Option To send a message to
Operator A specific operator. Enter the operator number in the Operator Number field.
Global All operators.
Auxiliary terminal An auxiliary terminal.
9-6 BridgeTalk Application 3.2 User�s Guide

Sending messages to other operators using the Conference ViewerYou can start a Conference Viewer chat session from the Conference Room and the Q&A windows.
Note: Make sure that you are not running any pop-up blocking application.
Follow these steps to launch the Conference Viewer:
1. After you install BridgeTalk, open and immediately close BridgeTalk to populate the bridge.properties file.
2. Locate and open the bridge.properties file in your <installation directory>.
3. In the CVServerPath field, enter the IP address of the Conference Viewer server.
See your system administrator if you do not know the IP address.
4. Save and close the bridge.properties file and relaunch BridgeTalk.
5. In the Conference Room or Q&A window, click CV Chat.
Conference Room
Q&A window
Assisting an Active Conference 9-7

6. In the CV Chat dialog box, enter your message and click Send.
The CV Chat dialog box displays your message in black text.
Adding a note to a conference reportIf you want to make notes during a conference, you can enter a text message (up to 60 characters). This note displays in the Conference Detail dialog box and appears in conference reports.
To add a conference note, choose one of the following methods:
� From the Main toolbar:
1. Click Conference.
2. From the Conference submenu toolbar, click Note.
3. In the prompt area, enter the number of the conference.
4. Enter the text and press ENTER.
9-8 BridgeTalk Application 3.2 User�s Guide

-Or-
� From the Conference Navigator:
1. Select a conference.
2. Click the right mouse button and select Details...
3. The Conference Details dialog appears.
4. Enter the text and click OK.
Monitoring subconferencesAny participant or moderator can initiate an unattended subconference at any time during a conference call by entering *93 (if configured on the connecting bridge). The system transfers a line into an available conference room, designates the subconference with a cross-reference number that is similar to the main conference number. BridgeTalk displays the subconference cross-reference number in the Conference Navigator.
Subconferences are useful for small group discussions or private meetings.
Note: The system displays subconference data in conference reports, such as Conference Activity, Conference Status, CDR, and CODR. BridgeTalk tracks lines that join subconferences (or rejoin main conferences) as transferred lines.
Important considerationsPlease note the following:
� Only moderators can secure a subconference.
� Moderators or participants can exit a subconference at any time by pressing *93 to return to the main conference.
� A conference can have many subconferences; however, one subconference cannot spin off into another subconference.
� The subconference ends when the last moderator or participant presses *93.
� BridgeTalk carries over line status from the main conference to a subconference.
For example, if the operator mutes a line entering a subconference, the line remains muted. However, if a participant mutes his/her own line before entering a subconfer-ence; the participant can unmute the line manually.
Assisting an Active Conference 9-9

Subconferences inherit many of the main conference features, as listed in Table 9-1.
Table 9-1: Subconference - inherited conference features
Main conference feature Effect on subconference
Moderator hang up If hang up is activated on the bridge, the last moderator can end a subconference by pressing *93 to return to the main conference. However, a main conference and its subconferences can share moderators so that the main conference does not end.
Billing code prompt If billing code is activated on the bridge, a moderator in a subconference can view the current billing code of the main conference.
Entry Tones/Exit Tones If Entry Tones/Exit Tones are activated on the bridge, the system only plays an entry tone when a participant re-enters the main conference but not when a participant leaves the main conference to enter a subconference.
Auto Extend Duration If auto extend duration is activated on the bridge, BridgeTalk extends the main conference and extends the subconference also.
Auto Extend Ports If auto extend ports is activated on the bridge, BridgeTalk does not extend additional ports to the subconference. New participants can join the main conference first, then press *93 to join the subconference.
9-10 BridgeTalk Application 3.2 User�s Guide

Subconferences may also include optional conference features, as described in Table 9-2.
For more information, see Appendix A, �Moderator and Participant DTMF Commands.�
Table 9-2: Subconference - optional conference features
Feature Effect in main conference Effect in subconference
Roll call If Name Record/Playback (NRP) is activated, the system plays a roll call and participant count in main conference only.If NRP is de-activated, the system plays a participant count in the main conference only.
Note: A roll call in a main conference does not affect subconferences.
If NRP is activated, the system plays a roll call and participant count in subconference only.If NRP is not activated, the system plays a participant count in the subconference only.
Note: A roll call in a subconference does not affect the main conference.
Security Moderator secures the main conference only.If a main conference is secured and:
� A participant in a subconference tries to rejoin the main conference, the moderator must clear security after hearing message (#251).
� The last (or only) moderator presses *93 to join the subconference, the system plays a �Last Moderator in Conference.� message (#253) to remind the moderator to unsecure the conference.
Moderator secures the subconference only. If a subconference is secured and:� A participant tries to rejoin a secured
main conference, the system plays a �Secured Conference� message (#250). The participant must wait until the moderator clears security before rejoining.
� The last (or only) moderator presses *93, the moderator returns to the main conference.
� The last (or only) moderator leaves a secured subconference, participants can continue the secured discussion until the last participant hangs up or returns to the main conference.
Q&A Activates Q&A.BridgeTalk amends the Q&A queue when a line returns to the main conference.
If a participant in a subconference presses *1 and then *93, the system returns the line to the main conference and adds the line to the Q&A queue.
Assisting an Active Conference 9-11

9-12 BridgeTalk Application 3.2 User�s Guide

Chapter 10Using the Listening CommandsThis chapter describes the following:
� Overview of listening
� Scanning conferences
� Applying gain to a conference
� Faulting a line
� Adding an audio prompt
10-1

Overview of listeningThe listening commands let you assess the audio quality of participant lines in a conference without disturbing the conference. In addition, you can locate noise to mute or fault the disruptive lines. However, you cannot listen to lines in a secured conference. If you specify a range of lines in secured conferences, the system plays music for these lines.
Unlike the Access Line command, participants are unaware that you are listening on the lines.
Tip: It is good practice to listen to lines in the Hold conference before you place them in active conferences to ensure that only quality audio lines are used.
Follow these steps to listen to one or more lines:
1. From the Main toolbar, click Options.
2. From the Options submenu toolbar, click Listen.
3. Choose one of the following buttons:
In addition, you can determine and maintain audio quality using any of the these options:
Item Description
Line Lets you listen to a specific line or range of lines.
Conference Allows you to listen sequentially to each line in a conference.
Aux Lets you listen to an auxiliary channel, such as a music channel or link line.
Choose Description
Scan Choose Conference > Scan from the Menu bar to determine the sound quality in each individual conference.
Gain Right-click on the conference in the Conference Navigator and select Gain in the Conference Details dialog box to equalize the voice levels.
10-2 BridgeTalk Application 3.2 User�s Guide

Additional information on listening commandsHere are some important reminders:
� You cannot hang up or mute auxiliary or operator lines. If an operator line is noisy, immediately send an explanatory message to that operator.
� When listening to a line, you may faintly hear parts of the conference. This is a limitation of the standard 2-wire telephone that most people use and is not an indication of noise.
� You can listen to a line that is muted. (If you attempt to mute a line that is already muted, you will actually unmute the line.)
� If you do mute a noisy listen line, you should follow up by accessing the line and informing the participant. If the problem is the line itself, you can ask the participant to call in on another line. You should also fault the suspect line to prevent other participants from calling in on that line. For information about faulting a line, see �Faulting a line� on page 10-9.
� If the participant on the line you are currently listening to leaves the conference; you continue hearing that line, with no display update, until you select Next Line or Previous Line.
Listening to specific linesThe listen option lets you listen to a specific line or a range of lines.
To listen to a specific line or a range of lines:
1. Choose Line > Listen > Listen Line from the Menu bar.
Fault Right-click on the line and select Fault in the Line Details dialog box to take noisy or non-functioning lines temporarily out of service (off hook) to prevent other participants from calling in on those lines.
Audio prompt
Choose Tools > Continuous Beep from the Menu bar to add a continuous audio prompt, if enabled.
Choose Description (Continued)
Using the Listening Commands 10-3

2. Under Line Selection in the Line Listen dialog box, choose one of these options:
� Select a single line that you want to listen in on.
� Enter a range of sequential line numbers, for example, 3-12.
� Enter non-sequential line numbers separated by a single space, such as, 6 8 1 5.
3. Click Apply.
4. Under Listen Line Selection/Actions, choose one of the following options:
Option Description
Next Line Lets you listen to the next line.
Previous Line Lets you listen to the previous line.
Hang Up Line Use the hang up command only when absolutely necessary. You cannot warn a participant that you are about to hang up the line when you are in listening mode.
Enter multiple line numbers or a range of numbers
10-4 BridgeTalk Application 3.2 User�s Guide

Listening to all lines in a conferenceThe Conference Listen option lets you listen sequentially to each line (including muted) of an active conference so that you can detect any noisy or defective lines. This way you can alert an operator or participant who may be unaware of the audio problem.
To listen sequentially to each line in the conference:
1. Choose Conference > Listen Line from the Menu bar.
2. In the Conference Listen dialog box, select a conference.
3. Select a line in the conference.
4. Click Next Line.
Mute Line Mutes the line.
Tip: If you know a moderator's line number, you can toggle Moderator Mute on or off.
Option Description (Continued)
Using the Listening Commands 10-5

5. Under Listen Line Selection/Actions, choose one of the following options listed in Table 10-1.
Listening to an auxiliary channelYou can listen to an auxiliary channel to debug and troubleshoot a music channel or a link line.
To listen to an auxiliary channel:
1. Choose Line > Listen > Listen Aux from the Menu bar.2. Under Channel type in the Listen Auxiliary Channels dialog box, select one of these
options:
3. Click Next Line or Previous Line to navigate up or down in the Channel Selection box.4. When finished, click Close.
Table 10-1: Listen Line options
Option Description
Next Line Lets you listen to the next line.
Previous Line Lets you listen to the previous line.
Hang Up Line Use the hang up command only when absolutely necessary. You cannot warn a participant that you are about to hang up the line when you are in listening mode.
Mute Line Mutes the line.
Tip: If you know a moderator's line number, you can toggle Moderator Mute on or off.
Option To listen to
OPERATOR Operator channels
MUSIC Music channels
LINKCHAN Link channels
RPCHAN Record/Playback channels
10-6 BridgeTalk Application 3.2 User�s Guide

Tip: If you detect noise on an auxiliary (Aux) line, you should remove the line from the conference. To remove a link line, see �Removing a dedicated link line from a conference� on page 3-17.
Scanning conferencesScanning allows you to access all conferences (except secured) on the entire system for a specified time interval (1-59 seconds). BridgeTalk displays a message that you are in scan mode and the Operator status window displays the number of the conference to which you are listening.
Tip: Use scan to determine the sound quality in each individual conference quickly.
Choose one of the following methods to scan conferences:
� From the Menu bar:
1. Choose Conference > Scan.
2. In the Conference Scan dialog box, select the conferences that you want to scan.
3. Click Apply.
The selected conferences are listed under Conference Listen List.
4. Select the number of seconds that you want to scan and click Set.
5. Click OK in the Scan Time dialog box.
6. Click Start Scan.
-Or-
� From the Main toolbar:
1. Click Options.
2. From the Options submenu toolbar, click Scan.
3. Follow steps 2 to 6 in the Menu bar procedure.
To stop the scan operation, press any key.
Using the Listening Commands 10-7

Scanning multiple conferencesFollow this Windows-based procedure to listen to multiple conferences:
1. Press CTRL or SHIFT on your keyboard.
2. Click on several conferences in the Conference Selection list of the Scan dialog box and click Apply.
Specifying a scanning intervalThe scan interval is the length of time that you listen to each conference before moving to the next conference.
To set or modify the scan time interval, do the following:
1. From the Main toolbar, click Set.
2. From the Set submenu toolbar, click Scan.
3. In the prompt area, enter the scan interval and press ENTER.
Tip: You can enter any scan interval value from 1 to 59 seconds.
Applying gain to a conferenceYou can apply gain to a conference to equalize the voice levels in a conference.
From the Main toolbar, click Conference, then:
1. From the Conference submenu toolbar, click Gain.
2. Enter the number for one or more conferences in the prompt area and press ENTER.
The Gain option toggles on and off.
Additional information about gainHere is an important reminder:
Your system might let moderators apply gain by pressing *4 on their telephones. To determine if this is available on your system, see the system configuration printout or ask your administrator.
10-8 BridgeTalk Application 3.2 User�s Guide

Faulting a lineFault a line when you want to take a line out of service (off hook). For example, you can fault a noisy line to prevent other participants from using that line. A faulted line is not the same as an �out of service� line, which is absolutely unusable and cannot be made available by the operator.
Choose one of the following methods to fault a line:
� To fault a single line:
1. From the Conference Room window, right-click on the line, and select Details.
2. In the Line Details dialog box, click Fault, and click OK.
To restore a single line, right-click on the line, select Details, and choose Fault from the Line Details dialog box. The Fault option toggles on and off.
-Or-
� To fault a range of lines:
1. From the Main toolbar, choose Line.
2. Select Fault and choose one of these options:
� Enter a range of sequential line numbers, for example, 3-12.
� Enter non-sequential line numbers separated by a single space, such as, 6 8 1 5.
3. Press ENTER.
To restore a range of lines, repeat steps 1-3.
Additional information on faulting a lineHere are some important reminders:
� You cannot access or hang up a faulted line. To perform any function on a line that has been faulted, first unfault the line.
� Calls coming in on faulted lines receive a busy signal or a ring-no-answer (RNA) depending on your system�s configuration.
Using the Listening Commands 10-9

Adding an audio promptThe Continuous Beep prompt warns you that:
� Participants are in the Enter or Pending queues (not only on arrival)
� Participants are in the Help Requests queue
� Lines are in Disconnect Mode (DC)
When enabled on the system, you can select Continuous Beep from the Tools item on the Menu bar. If this feature is unavailable (grayed out), contact your system administrator.
For more information on the continuous beep option, see the operator configuration section in the 700/780 Platform Administration and Maintenance Guide.
10-10 BridgeTalk Application 3.2 User�s Guide

Chapter 11Scheduling a ConferenceThis chapter provides detailed instructions on:
� Overview of the Conference Scheduler
� Accessing the Scheduler directly
� Viewing or printing conference information
11-1

Overview of the Conference SchedulerBy setting up a conference in advance, you can reserve a conference room for a specified time. The Conference Scheduler allows you to schedule conferences, modify scheduled conference settings, display and print scheduled conference reports, and purge expired conference records.
The Platform 700 or Platform 780 Scheduler supports up to 75,000 end-user conference records or profiles. (This feature is available only if you connect to a 2.1x or later bridge). The Spectel 70 Scheduler supports up to 3,000 conference records.
Note: If you log on with Scheduler-only privileges, the Conference Scheduler appears. The Scheduler allows you to schedule unattended conferences and modify or delete only the conferences created by your sign-in. If the BridgeTalk Scheduler is unavailable, check with the system administrator to find out what Scheduler to use.
Follow these steps to schedule a conference:
1. From the Menu bar, choose View > Conference Scheduler.
Table 11-1 describes the Conference Scheduler toolbar buttons.
Table 11-1: Conference Scheduler toolbar buttons
Button Description Button Description
Schedule a conference View schedule
Exit from the Conference Scheduler
View expanded schedule
Modify a scheduled conference
Print options
Modify a conference in progress
To temporarily remove the Conference Scheduler toolbar.To display the toolbar again, choose View > Toolbar.
11-2 BridgeTalk Application 3.2 User�s Guide

2. Specify the conference as a one-time or on-going (repeat) conference. For more information, see �Defining a one-time or on-going conference� on page 11-21.
3. Define the conference mode.
For more information, see:
� �Scheduling an attended conference� in the next section.
� �Scheduling an unattended conference� on page 11-12.
� �Scheduling an on-demand conference� on page 11-13.
� �Scheduling a flex conference� on page 11-16.
When your conference is scheduled, BridgeTalk displays a confirmation number.
Notes: If you select attended, unattended, or on-demand mode, moderators and participants can use the default keypad commands. For more information, see �Managing conferences using DTMF star commands� on page A-2.
Tip: Do not close (exit from) the main BridgeTalk window because the Conference Scheduler will close also.
Purge expired conferences View online help
Table 11-1: Conference Scheduler toolbar buttons (Continued)
Button Description Button Description
Scheduling a Conference 11-3

Table 11-2 lists the following fields in alphabetical order that may apply when scheduling a conference.
Table 11-2: Scheduler fields in alphabetical order
Option Description
Accounting Code Similar to a Billing code, moderators can enter accounting codes using DTMF commands or a Web-based interface. This field can contain up to 20 characters and appears in the moderator�s CDR.
Note: Moderators can enter up to 40 characters from a Web-based interface.
The settings are:� ON. The system prompts moderators to enter a code upon
entering the conference.� OFF. (Default) Moderators do not enter a code.
Auto Blast When moderator dials a phone number, the system automatically dials the list without additional commands.Select one of the following unattended Auto Blast settings:� OFF. (Default) Disables the automatic BlastDial feature.
The system disables the Dial List and Browse buttons.� Manual. Initiates an unattended Auto Blast when a
moderator presses *92.
Once the blast operation is in progress, a moderator can press *92 again to initiate a reblast, which hangs up the lines in CLPG mode, and reblasts only the lines that are not yet in the conference.
� Automatic. Triggers an unattended Auto Blast when the first moderator enters the conference.The system activates the Dial List and Blast Annunciator Browse buttons if you select Manual or Automatic.For information on selecting a specific blast annunciator message, see the Dial List table entry on page 11-7.
11-4 BridgeTalk Application 3.2 User�s Guide

Billing Code Prompt Select one of the following settings:� ENABLED. To track billing codes for unattended and
on-demand conferences. The system prompts the moderator to enter a billing code upon entering the conference. Moderators can press *91 to modify codes at any time during the conference, however, only the last code entered appears in various system reports.
� DISABLED. (Default) Does not prompt a moderator to enter a billing code; however, moderators can press *91 to modify codes at any time during the conference.
Blast Annunciator Follow these steps to select an annunciator message for an automatic, unattended BlastDial:1. Click Browse.
2. In the Annunciator Messages dialog box, you can:� Select a message from the list and click Use Selected
Message.-Or-� Select Use Default Message.
(Continue on next page.)
Table 11-2: Scheduler fields in alphabetical order (Continued)
Option Description
Scheduling a Conference 11-5

Blast Annunciator(Continued)
To select a specific annunciator message with the BlastDial, use the default annunciator message (242 or 243) or use a customized annunciator message recorded for each conference.
Tip: You cannot change the default Blast Annunciator when using a Scheduler-only login.
Block Dialout You can block or permit moderator ODO on a per conference basis. If Block Dialout is selected, the bridge does not initiate dialing when the moderator tries to dial out during the conference. The settings are:� ON. A moderator cannot dial out during the conference using
either DTMF commands or Auto Blast.� OFF. (Default) A moderator can dial out during the
conference.
Change Conf Opt You can block or allow modification of Flex conference options on a per conference basis. The settings are:� ON. (Default) A leader can press 1 to start the conference or
2 to modify conference options before the conference starts.� OFF. The system does not prompt the leader to press 1 to
start the conference after the leader enters the Leader PIN. The system automatically proceeds to the next step.
Conferee code Add a code (up to 16 alphanumeric characters) that a caller must input to join the conference as a regular participant.If the system is set for Automatic Security Codes, this field is filled in automatically; however, you can change the code.
Conference ID(Optional)
Add an optional, non-unique conference ID (up to 12 alphanumeric characters, spaces, or underscores). The conference ID appears in the Conference Detail Report that the system generates at the end of the conference.
Table 11-2: Scheduler fields in alphabetical order (Continued)
Option Description
11-6 BridgeTalk Application 3.2 User�s Guide

Conference Name Enter a name by which you want to refer to the conference. The name can have a length of up 12 characters using letters, numbers, spaces, and underscores (_).
Conference Type Select a one-time or series conference. For more information, see �Defining a one-time or on-going conference� on page 11-21.
Confirmation No. Enter an optional confirmation number (up to 12 digits) to identify the conference. The confirmation number appears in various displays and system reports, including Conference Detail Records (CODRs).The confirmation number you specify must be unique. If you specify a confirmation number that another conference uses, BridgeTalk displays a warning message and requires you to change the number. If you do not specify a confirmation number, the system automatically assigns one for you.
Dial List Associate a dial list that operators can use to dial out during an attended conference. If you do not want to use a dial list, leave this field blank.Follow these steps to assign a dial list:1. Click on the Dial List button to view the dial lists stored on the
system.2. Select a dial list in the Create, Select, or Edit Dial List dialog
box.3. To edit the dial list, click Edit, designate moderators for the
conference, and click Save.4. Click Select in the Create, Select, or Edit Dial List dialog box.
Tip: Make sure to enter enough lines in the Maximum Lines field to cover the dial list.
For more information about dial lists, see Chapter 5, �Using Dial Lists and Dialing Out.�
Table 11-2: Scheduler fields in alphabetical order (Continued)
Option Description
Scheduling a Conference 11-7

Mode Choose one of the following scheduling modes:� ATTENDED. An operator places callers into the conference
and remains available to participants and moderators for the duration of the conference.
� UNATTENDED. Callers dial into the system and enter a passcode to join the conference that is managed by a moderator.
� ON DEMAND. Callers dial into the system and enter a passcode to join the conference on a first-come, first-served basis.
� FLEX. Callers dial into the system and enter a passcode to join the reservationless conference, which is managed by a leader.
Moderator code Add a code (up to 16 alphanumeric characters) that a caller can input to join the conference as a moderator. The moderator code must be different from the conferee code.If the system is set for Automatic Security Codes, this field is filled in automatically; however, you can change the code.
Name and Telephone (Optional)
Enter contact information or other pertinent information for the conference, for example, the moderator�s name and telephone number. The system does not process the information in the name and telephone fields. However, this information does appear in the Contact Name and Contact Telephone number fields in conference reports generated by a system administrator.
Table 11-2: Scheduler fields in alphabetical order (Continued)
Option Description
11-8 BridgeTalk Application 3.2 User�s Guide

Name Record/Playback (NRP) and Caller Detail
Use the NRP feature to schedule annunciator messages that prompt callers to record their names and other relevant information when dialing in.Caller Detail. Schedule NRP for a conference to allow an operator to listen to a participant�s recorded information without accessing the line. When you select INDVL, CONF, or OPER, a Caller Details button displays in the Polling or Q&A dialog boxes, and the Line Detail dialog box displays Play and StopX buttons (if the line is not accessed.Follow these steps to schedule a message or activate Caller Detail:1. Select one of the following NRP settings:
� INDVL. The system plays a recording only to the individual.
� CONF. The system plays a recording to the conference.
� OPER. The system plays a recording to the operator.
� OFF. (Default) The system does not play any NRP recording.
2. Select OPER to activate the NRP Annunciator Browse button and click Browse to select a specific annunciator message for the scheduled conference; otherwise, the system plays the default annunciator (Message 179).
To see how the NRP options interact with other feature settings, see Table 11-5, �Name Record/Playback - option interaction,� on page 11-20.Here are some important reminders:
� Operators can add caller information without accessing the line by right-clicking on the line and selecting Details.
� BridgeTalk supports non-English languages for participant count and annunciator messages. For more information, see the 700/780 Platform Administration and Maintenance Guide.
Table 11-2: Scheduler fields in alphabetical order (Continued)
Option Description
Scheduling a Conference 11-9

Op Help Available The system allows or blocks help requests on a per conference basis.The settings are:� On. (Default) When moderators or participants press *0 or
0, their line appears in the Help Requests window.
� Off. When moderators or participants press *0 or 0, the system plays a user-defined annunciator message, such as �Operator Assistance is not available.�
PIN List If you select Conf PIN, enter a PIN list name that is stored onthe bridge.
PIN Mode If selected, participants must enter a PIN as well as a passcode before joining the conference.Choose one of the following PIN list settings on systems that have the PIN code option installed:� Sys PIN. To allow all PIN codes in the system-wide PIN code
database.� Conf PIN. To allow only the PIN codes in a specified PIN list.� OFF. (Default) To omit a PIN code.
Note: Message 247 and 247a are the default PIN code messages for 3.1x systems.
PIN code information is included in various system reports. For more information, see �Working with status information and reports� on page 12-9.
Security Passcode Participants can be required to enter a security passcode before they can enter a conference. The leader adds the second passcode using DTMF commands prior to conference start.The settings are:� ON. A leader can add a second security code.� OFF. (Default) A leader cannot add a second security code.
Table 11-2: Scheduler fields in alphabetical order (Continued)
Option Description
11-10 BridgeTalk Application 3.2 User�s Guide

Scheduling an attended conferenceFor attended conferences, an operator places callers into the conference and remains available to participants and moderators for the duration of the conference.
Follow these steps to define settings for an attended conference:
1. Under Conference Information, select ATTENDED mode.
2. Under Conference Information, select the appropriate conference settings.
Sign-In Name The system displays the sign-in that you used. You cannot modify this field.
Status The settings are:� ENABLED. To schedule a conference. � DISABLED. (Default) To retain the scheduling information
without actually scheduling the conference.
Table 11-2: Scheduler fields in alphabetical order (Continued)
Option Description
Scheduling a Conference 11-11
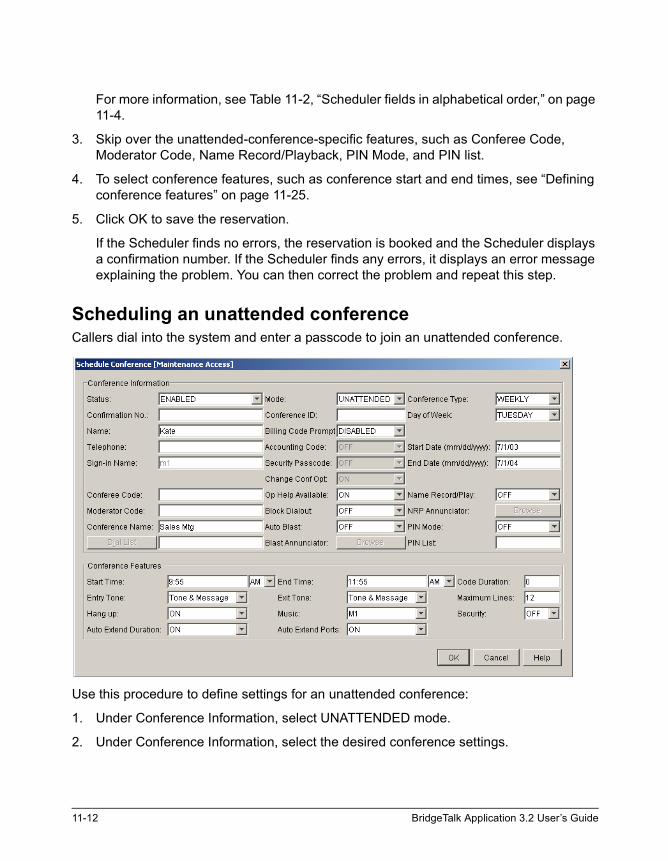
For more information, see Table 11-2, �Scheduler fields in alphabetical order,� on page 11-4.
3. Skip over the unattended-conference-specific features, such as Conferee Code, Moderator Code, Name Record/Playback, PIN Mode, and PIN list.
4. To select conference features, such as conference start and end times, see �Defining conference features� on page 11-25.
5. Click OK to save the reservation.
If the Scheduler finds no errors, the reservation is booked and the Scheduler displays a confirmation number. If the Scheduler finds any errors, it displays an error message explaining the problem. You can then correct the problem and repeat this step.
Scheduling an unattended conferenceCallers dial into the system and enter a passcode to join an unattended conference.
Use this procedure to define settings for an unattended conference:
1. Under Conference Information, select UNATTENDED mode.
2. Under Conference Information, select the desired conference settings.
11-12 BridgeTalk Application 3.2 User�s Guide

For more information, see Table 11-2, �Scheduler fields in alphabetical order,� on page 11-4.
3. Enter unattended-conference-specific features, such as Conferee Code, Moderator Code, Name Record/Playback, PIN Mode, and PIN list.
4. To select conference features, such as conference start and end times, see �Defining conference features� on page 11-25.
5. Click OK to save the reservation.
If the Scheduler finds no errors, the reservation is booked and the Scheduler displays a confirmation number. If the Scheduler finds any errors, it displays an error message explaining the problem. You can then correct the problem and repeat this step.
Scheduling an on-demand conferenceAn on-demand conference uses a profile, rather than a scheduled reservation, that callers use to join a voice and data conference at any time. A profile is a non-reserved conference that is always available, on a first-come, first-served basis.
Note: Your system administrator must set up the necessary port allocation to support on-demand conferences for your system.
Scheduling a Conference 11-13

Follow these steps to schedule an on-demand conference using the Conference Scheduler:
1. Under Conference Information, select ON DEMAND mode.
Tip: Set up a separate conference for each desired scheduling profile.
2. Under Conference Information, select the appropriate conference settings listed in Table 11-3.
Table 11-3: On-demand conference settings
Option Description
Conference Type Select DAILY, which includes the Weekend option. For more information, see �Defining a one-time or on-going conference� on page 11-21.
Weekend Select YES.
Confirmation No. Enter an optional confirmation number (up to 12 digits) to identify the conference. The confirmation number appears in various displays and system reports, including Conference Detail Records (CODRs).The confirmation number you specify must be unique. If you specify a confirmation number that another conference uses, BridgeTalk displays a warning message and requires you to change the number. If you do not specify a number, the system automatically assigns one for you.
Billing Code Prompt Select one of the following settings:� ENABLED. To track billing codes for unattended and
on-demand conferences. The system prompts the moderator to enter a billing code upon entering the conference.Moderators can press *91 to modify codes at any time during the conference, however, only the last code entered appears in various system reports.
� DISABLED (Default). Does not prompt a moderator to enter a billing code; however, moderators can press *91 to modify codes at any time during the conference.
11-14 BridgeTalk Application 3.2 User�s Guide

For more information, see:
� Table 11-2, �Scheduler fields in alphabetical order,� on page 11-4.� Table 11-8, �Conference Features,� on page 11-26.
3. Click OK to save the profile.
Tip: To enable customized greetings based on the number dialed for the conference; use dedicated telephone numbers and the Dialed Number Identification Service (DNIS).
Conferee Code and Moderator Code
Assign a participant code and a moderator code.
Note: If you going to run the conference on a 2.0x bridge, enter only a numeric conference code like 1234. If you enter alpha code, such as ABCD, BridgeTalk displays an error message.
Tip: Give this information to the customer or end-user.
Start Date <Today�s date.>
End Date Leave blank.
Start Time 12:00 AM. Note that AM starts immediately after Midnight.
End Time 12:00 AM. Use this end time to activate the schedule from midnight to midnight.
Maximum Lines Define the number of lines required, for example, 12.
Hang up Select ON. The system will end the meeting when the last moderator hangs up.
Table 11-3: On-demand conference settings (Continued)
Option Description
Scheduling a Conference 11-15

Scheduling a flex conferenceFlex (Flex Flow) is a type of unattended, on-demand conference in which participants can join a conference directly. This �reservationless� conference uses a profile to keep track of all the selected conference features, such as Hang up or Name Record/Playback. Flex conference participants do not participate in Polling or Q&A sessions.
Note: Flex only appears in the Conference Mode selection list when you connect BridgeTalk to a 3.0x or later bridge, which is configured to enable Flex.
Once the system administrator has defined the settings in a profile, participants can join Flex conferences on a first-come, first-served basis. However, there can be only one moderator (leader).
The system automatically prompts callers dialing into the conference to press star (*) if they are a leader, and, if so, to enter a Leader PIN code. When the first caller enters a valid Leader PIN, the system defines the caller as a moderator or �leader� of the conference. After the leader joins the conference, the system only prompts for participant passcodes and registers all subsequent callers as participants.
Leaders can change profile settings before a conference begins, and create, control, and end a conference call using DTMF telephone commands. For example, leaders can:
� SPECIFY A CONFERENCE PASSWORD. If scheduled previously, leaders can add another layer of security by specifying a optional passcode that participants must enter before they can join the conference. This password is valid only for the duration of the conference and is not stored on the system.
Note: If music is turned on for the conference, participants who arrive early wait on standby. If the moderator specifies a passcode upon arrival, the waiting participants must enter the passcode before they are allowed into the conference. However, if music is turned off, participants who arrive before the moderator can enter the conference without the passcode.
� CHANGE CONFERENCE OPTIONS. When a participant enters a leader PIN code and assumes moderator status, the system immediately prompts the leader to press 1 to start the conference. However, the leader can press 2 to change several conference options before the conference starts. After changing options, the leader can press 1 to start the conference.
Tip: If you select Flex mode, moderators and participants can use special keypad commands. For details, see �Using Flex DTMF commands� on page A-6.
11-16 BridgeTalk Application 3.2 User�s Guide

� USE SPECIAL STAR COMMANDS. Flex conferences require that leaders and participants use special DTMF commands during the conference. A leader can create, control, and end a conference call using keypad star commands.
For more information on using star commands for Flex conferences, see �Using Flex DTMF commands� on page A-6.
Note: An administrator must first set up Flex conference profiles with reserved lines on each bridge that you plan to use. For more information on configuring Flex profiles on your system, see the 700/780 Platform Administration and Maintenance Guide.
Use this procedure to schedule a Flex conference using the Conference Scheduler:
1. Under Conference Information, select FLEX mode.
Scheduling a Conference 11-17

2. Under Conference Information, select the desired daily conference settings described in Table 11-4.
Table 11-4: Flex conference settings
Option Description
Conference Type Select DAILY, which includes the Weekend option. For more information, see �Defining a one-time or on-going conference� on page 11-21.
Weekend Select YES.
Accounting Code Similar to a Billing code, moderators can enter accounting codes using DTMF commands or a Web-based interface. This field can contain up to 20 characters and appears in the moderator�s CDR.
Note: Moderators can enter up to 40 characters from a Web-based interface.
The settings are:� ON. The system prompts moderators to enter a code upon
entering the conference.� OFF. (Default) Moderators do not enter a code.
Change Conf Opt You can block or allow modification of Flex conference options on a per conference basis. The settings are:� ON. (Default) A leader can press 1 to start the conference
or 2 to modify conference options before the conference starts.
� OFF. The system does not prompt the leader to press 1 to start the conference after the leader enters the Leader PIN. The system automatically proceeds to the next step.
11-18 BridgeTalk Application 3.2 User�s Guide

For more information, see:
� Table 11-2, �Scheduler fields in alphabetical order,� on page 11-4.� Table 11-8, �Conference Features,� on page 11-26.
3. Click OK to save the profile.
Tip: Set up a separate conference for each desired scheduling profile.
Block Dialout You can block or allow moderator ODO on a per-conference basis. If Block Dialout is selected, the bridge does not initiate dialing when the moderator tries to dial out during the conference.The settings are:� ON. A moderator cannot dial out during the conference
using either DTMF commands or Auto Blast.� OFF (Default). A moderator can dial out during the
conference.
Name Record/Play(NRP)
Select INDVL. Do not set NRP to CONF; this feature does not apply.
PIN Mode Select OFF.
Start Date Leave blank.
End Date Leave blank.
Start Time 12:00 AM. Note that AM starts immediately after Midnight.
End Time 12:00 AM. Use this end time to activate the schedule from midnight to midnight.
Hang up Select ON. The system will end the meeting when the last moderator hangs up.
Security Select ON.
Note: A leader can record a secured conference digitally by pressing *2 to dial out to an external recording device, if enabled on the system.
Table 11-4: Flex conference settings (Continued)
Option Description
Scheduling a Conference 11-19

Note: To enable customized greetings based on the number dialed for the conference, use dedicated telephone numbers and the Dialed Number Identification Service (DNIS).
About Name Record/PlaybackParticipants or moderators can press *8, for example, on their phones to hear a roster that includes the recorded names of all participants, at any time during the conference. Participants can stop the roll call at any time by pressing any key.
Table 11-5 describes how NRP options interact with other Conference Features� settings.
Table 11-5: Name Record/Playback - option interaction
The sections that follow describe the how to set up on-going conferences.
OptionEntry/Exit Tones Off
Entry/Exit Tones On
Entry/Exit Messages On
Annunciator message Press *8
INDVL Silence Plays tone Plays �Someone has entered/left the conference.� <Name>
Plays default message
Plays roll call
CONF Silence Plays tone Plays �Someone has entered/left the conference.�<Name>
Plays default message
To play roll call to conference (if moderator)
OPER Silence Plays tone to operator
Plays �Someone has entered/left the conference.� to operator.
Plays default message or allows browse
Plays current participant count
OFF Silence Plays tone Plays �Someone has entered/left the conference.�
None Plays current participant count
11-20 BridgeTalk Application 3.2 User�s Guide

Defining a one-time or on-going conferenceYou can schedule a conference that occurs only once or you can schedule a daily, weekly or monthly conference for a predefined time period. Table 11-6 describes the available time and date options for on-going conferences. Table 11-6: Conference Scheduler date and time options
Option Procedure
DAILY(includes Weekend option)
When you schedule a daily conference, the system schedules the conference for the same time for each day in the date range that you specify.
Choose a weekend option:� NO to schedule the conference only Monday through Friday
(Default)� YES to schedule a conference seven days each week.For example, if you schedule a conference that occurs each day from October 3, 2003 until October 3, 2005 but not including weekends, the start date would look like this:
Tip: Select Weekend: YES for on-demand conferences.
ONE-TIME Enter the date in the Date field. (Default)For example, to schedule a conference for December 3, 2003, the conference type and date would look like this:
Scheduling a Conference 11-21

WEEKLY(includes Day of Week option)
Select the day of the week that you want to schedule a conference.For example, if you schedule a conference that occurs each Monday from October 3, 2003 until October 3, 2005, the conference type and date would look like this:
MONTHLY(includes Day of Week and Week of Month options)
When you schedule a monthly conference, the system schedules the conference for the same week, day, and time for each month in the date range that you specify.For example, if you schedule a conference that occurs on the first Friday of every month from October 3, 2003 until October 3, 2005, the start date would look like this:
Table 11-6: Conference Scheduler date and time options (Continued)
Option Procedure
11-22 BridgeTalk Application 3.2 User�s Guide

Start Date Enter the date that you want to start the conference in mm/dd/yyyy format.For example, if you schedule a conference that occurs each day from October 3, 2003 until October 3, 2005, the start date would look like this:
Tip: If you leave the Start Date field blank, the system schedules the conference for the first day and time that meets your other scheduling criteria.
End Date Enter the date that you want to end the conference in mm/dd/yyyy format.For example, if you schedule a conference that occurs each day from October 3, 2003 until October 3, 2005, the conference end date would look like this:
Tip: If you want to schedule the conference for an indefinite period, leave the End Date field blank. The conference automatically schedules the conference to occur daily, weekly, or monthly for the next 12 months.
Table 11-6: Conference Scheduler date and time options (Continued)
Option Procedure
Scheduling a Conference 11-23

Setting up a daily conferenceWhen you schedule a daily conference, the system schedules the conference for the same time for each day in the date range that you specify. See Table 11-6, �Conference Scheduler date and time options,� on page 11-21 for more information.
Follow these steps to schedule a daily conference:
1. Select DAILY for Conference Type.
2. Choose a Weekend option.
3. In the Start Date field, enter the date to schedule the first conference.
4. In the End Date field, enter the date to schedule the last conference.
5. Select the conference mode, for example, ATTENDED or UNATTENDED.
Setting up a weekly conferenceWhen you schedule a weekly conference, the system schedules the conference for the same day and time in each week in the date range that you specify.
To set up a weekly conference:
1. Select WEEKLY for Conference Type.
2. Select the day of the week that you want to schedule a conference.
3. In the Start Date field, enter the date to schedule the first conference.
4. In the End Date field, enter the date to schedule the last conference.
5. Select the conference mode, for example, ATTENDED or UNATTENDED.
Setting up a monthly conferenceChoose the day of the week and the starting week that you want to schedule a conference.
Follow these steps to schedule a monthly conference:
1. Select MONTHLY for Conference Type.
2. Select the day of the week that you want.
3. Select the week that you want.
4. In the Start Date field, enter the date to schedule the first conference.
5. In the End Date field, enter the date to schedule the last conference.
6. Select the conference mode, for example, ATTENDED or UNATTENDED.
11-24 BridgeTalk Application 3.2 User�s Guide

Defining conference featuresThe basic steps to select conference features are:
1. Under Conference Features, choose from the conference settings listed in Table 11-7.
Table 11-7: Start/End times, Code duration, Entry/Exit tones
Option Procedure
Start Time Set the time that the conference starts and select AM or PM.The time you specify is the local time of the system. Remember to adjust the time accordingly if you are calling from a different time zone.
End Time Set the time that the conference ends and select AM or PM. If the end time is earlier than the start time, the system assumes the conference ends on the day after the conference begins.
Tip: If Hangup is activated for a Scheduler code group, the conference cannot extend beyond the specified time unless you modify the conference while it is in progress or if Auto Extend is enabled on the bridge.
Code Duration (unattended only)
After the conference starts, the number of minutes that the conferee and moderator codes remain valid. If set to 0, the PINs are always valid. (Default is 0.)You can set code duration to any value between 0 and 1440 (1440 = 24 hours) but less than the length of the conference.
Entry Tone/Exit Tones
For Entry Tones or Exit Tones, choose one of the following options for participants entering the conference:� OFF. (Default) Omit tones or voice messages. � System. Use the pre-configured default setting.� Tone. Sound a tone.� Message. Play a voice message.� Tone & Message. Sound a tone and play a voice message.
Scheduling a Conference 11-25

2. Select Maximum Lines, Hang up, Music, Security, or Auto Extend options, which are described in Table 11-8.
Table 11-8: Conference Features
Option Procedure
Maximum Lines
Enter the number of lines that you want to reserve for the conference. The system does not let you schedule more lines than are available, unless overbooking is allowed on your system. (Default is 2 lines.)
Tip: Reserve a few extra lines for your conference to accommodate any dial-out or external conference recording operations. To check the number of reserved lines for any time period on any day, see �Viewing or printing conference information� on page 11-29.
Hang up (Moderator)
Select one of these options to end the conference:� Choose ON to end the conference as soon as the moderator
hangs up.� Choose OFF to extend the conference after the moderator hangs
up. (Default)If the conference has more than one moderator, this option disconnects all lines when the last moderator hangs up. However, moderators can press *98 to toggle the Hang up option On or Off.For example, if a conference is scheduled with Hang up activated, a moderator can press *98, leave the conference, and the conference will continue.
Tip: Use Moderator hang up to ensure that all lines become immediately available for subsequent conferences and to avoid excessive charges to a moderator.
11-26 BridgeTalk Application 3.2 User�s Guide

Music Adding music to a conference mutes all lines and minimizes random discussion and awkward introductions. The music stops when the moderator joins the conference, which lets participants know that the conference is about to begin.Select one of these options:� Choose the following music channels, if available:
� M1 - Analog or Digital� M2 - Digital� M3 - Digital� M4 - Digital
� Off. (Default) The system does not play music prior to the conference.
Note: For attended conferences, the operator turns off the music manually. (For unattended and on-demand conferences, the system automatically turns the music off when a moderator joins the conference. If there is no moderator, the system does not allow music.)
For more information on selecting a music channel, see �Providing music for a conference� on page 3-11.
Table 11-8: Conference Features (Continued)
Option Procedure
Scheduling a Conference 11-27

Security In a secured conference a moderator can prevent outsiders from listening to or joining the conference. Specifically, operators cannot enter, record, scan, or listen to the conference. The moderator hears a tone or voice message to indicate that the conference is secured or unsecured.Choose one of these options:� Select ON to let the moderator secure the conference. � Select OFF to make security unavailable for the conference.
(Default)For more information, see �Securing a conference� on page 3-7.
Auto Extend Duration
Choose one of these options:
� Select ON to extend the conference beyond the end time if scheduled ports and security codes are available in the next 25 minutes and this feature is configured on the connecting bridge. (Default)Just before the conference is scheduled to end, the system plays a �Your conference will be extended 25 minutes.� message.
� Select OFF to end the conference at the scheduled time.
Auto Extend Ports
Choose one of these options:
� Select ON to allow additional participants to enter a conference if ports are available for the duration of the conference and this feature is configured on the connecting bridge. (Default)
� Select OFF to prevent new participants from entering the conference.
Table 11-8: Conference Features (Continued)
Option Procedure
11-28 BridgeTalk Application 3.2 User�s Guide

Viewing or printing conference informationYou can use the Conference Scheduler to view or print conference schedules and lines that are available for use. You can use the Conference Scheduler to determine the number of lines that have been reserved as well as lines that are available for use for any specified date within the next year.
1. In the Conference Scheduler, choose one of the following:
The Conference Scheduler displays the Date dialog box:
2. Enter the date for which you want to check available lines. For example, enter 12/12 for December 12, 2003.
Click Procedure
Display the total number of reserved, available, and on-demand lines for a specific date. See �Using the View Schedule option� on page 11-30.
Display the total number of reserved, available, and on-demand lines including the percentage of line use for a specific date. For more information, see �Using the View Expanded Schedule option� on page 11-30.
Scheduling a Conference 11-29

Using the View Schedule optionThe View Schedule option displays the total line and on-demand line availability including the number of time intervals and reserved lines for 24 hours of a specified date. The number and length of the intervals depend on the conferences that have been scheduled for that date.
Note: The system subtracts FDAPI lines from the total number of available lines. For example, on an 1152-port bridge, if there are 13 FDAPI ports which cannot be scheduled, the total is 1139.
In this example, the View Schedule window displays a total of 1139 available lines, of which 57 on-demand lines are available:
Using the View Expanded Schedule optionThe View Expanded Schedule option displays the total line availability including on-demand lines. You can view the time intervals and reserved lines for 24 hours of a specified date including the number of available lines for each interval, as shown.
11-30 BridgeTalk Application 3.2 User�s Guide

Viewing or modifying scheduled conferencesYou can use the Conference Scheduler to view or modify conference reservations. You can click Next or Prev to loop around from the first found record to the last record and back to the first again.You can change the settings for a conference reservation that you scheduled (or a conference that someone else scheduled). However, you may need to modify conference information while the conference currently taking place or �in progress.�
Follow these steps to modify a conference reservation:
1. In the Conference Scheduler, choose one of the following options:
2. In the Modify Type dialog box (for prescheduled conferences only), select Change Conference and click OK, as shown.
Option Click Procedure
Modify conference Modify a prescheduled conference reservation.
Modify-in-progress Change the settings for any scheduled conference that is currently running.
Note: While an unattended conference is in progress, you can change only the End Time, Code Duration, and Maximum Lines.
Scheduling a Conference 11-31

3. In the Conference Search dialog box, search for an existing conference using one of these options:
Tip: Make sure to narrow your conference search by including several criteria such as Conference Name and Date.
4. Click OK.
The Conference Scheduler displays a conference that meets the search criteria you entered. If more than one conference meets your search criteria, the Conference Scheduler indicates the number of matches in the top line.
5. Choose one of the options listed in Table 11-9.
Search Criteria Enter
Conferee/Moderator code
The passcode. For example, if you want to search for a conference that has a conferee code of 1357, enter that code in the Conferee/Moderator Code box and click OK.
Conference Name The conference name.
Conference Type ALL, DAILY, ONE-TIME, WEEKLY, or MONTHLY.
Confirmation No. The confirmation number.
Conference ID The conference ID.
Date (mm/dd) The date.
Mode ALL, UNATTENDED, ON DEMAND, ATTENDED, or FLEX.
Sign-in Name The sign-in name.
Table 11-9: Search results options
Option Procedure
Save Make the necessary changes if the displayed conference is the conference you want to modify. The Conference Scheduler saves the modified conference and displays a confirmation number.
Note: While an unattended conference is in progress, you can change only the End Time, Code Duration, and Maximum Lines.
11-32 BridgeTalk Application 3.2 User�s Guide

Printing scheduled conference informationThe Conference Scheduler lets you print information about scheduled conferences on the default print device for your workstation.
Follow these steps to print the complete conference reservation form for a specific conference:
1. From the Conference Scheduler, click the Print options button.
The Conference Scheduler displays the Print Options dialog box.
2. Choose one of the following options described in Table 11-10.
Previous Display the previous conference.
Next Display the next conference that meets your search criteria if the displayed conference is not the one you want to modify.
Cancel Return to Step 1 to start a new search.
Table 11-10: Printing scheduled conferences
Click Procedure
Print Schedule
Use this procedure to print the total number of lines that have been reserved for a specific date or a range of dates: 1. From the Conference Scheduler, choose View > Print Options.2. Click Print Schedule and click OK.3. In the Date Range dialog box, enter date criteria.4. Click Print to print the report.5. In the Print dialog box, click OK.
Table 11-9: Search results options (Continued)
Option Procedure
Scheduling a Conference 11-33

Print Expanded Schedule
Follow these steps to print both the total number of lines that have been reserved and the number of available lines for a specific date or a range of dates: 1. From the Conference Scheduler, choose View > Print Options.2. Select Print Expanded Schedule and click OK.3. In the Date Range dialog box, enter date criteria.4. Click Print to print the report.5. In the Print dialog box, click OK.
Print Conference
Follow these steps to print the complete conference reservation for a specific conference to the default print device for your workstation: 1. From the Conference Scheduler, choose View > Print Options.2. Choose Print Conference and click OK.3. In the Conference Search dialog box, enter search criteria to find
the conference.If the Conference Scheduler finds one or more conferences that meet your criteria, the Scheduler displays a confirmation dialog box.
4. In the confirmation dialog box, click one of the following:� Yes to view each matching conference in sequential order
before printing. The Scheduler displays each conference that matches your criteria.
Tip: Click Next to go to the next matching conference without printing the currently displayed conference.
� No to print all matching conferences automatically.
� Cancel to view (but not print) any conferences.
Table 11-10: Printing scheduled conferences (Continued)
Click Procedure
11-34 BridgeTalk Application 3.2 User�s Guide

Accessing the Scheduler directlyNormally, you access the Scheduler during your BridgeTalk session. If you cannot launch BridgeTalk for any reason, you can still access the Scheduler with a Scheduler-only sign-in. Schedulers can modify Attended, Unattended, On-demand, and Flex reservations created by their sign-in.
See your system administrator to set up a Scheduler sign-in if you want to launch only the Scheduler.
Print Daily Conferences
Follow these steps to print a list of conferences scheduled for a specific date or a range of dates to the default print device for your workstation:1. From the Conference Scheduler, choose View > Print Options.2. Select Print Daily Conferences and click OK.3. In the Date Range dialog box, enter date criteria, and click OK.4. In the Print Daily Conferences dialog box, click Yes if you want to
sort the conferences by start time. 5. Click Print to print the report.6. In the Print dialog box, click OK.
Table 11-10: Printing scheduled conferences (Continued)
Click Procedure
Scheduling a Conference 11-35

11-36 BridgeTalk Application 3.2 User�s Guide

Chapter 12Performing Post-Conference TasksThis chapter discusses the following topics:
� Overview of post-conference tasks
� Working with status information and reports
12-1

Overview of post-conference tasksClearing all system information and conference features prevents over billing and makes cleared lines available. After a conference ends, you can free up system resources by:
� Hanging up lines
� Hanging up a conference
� Clearing conference information
� Deleting expired reservations
Hanging up linesYou can hang up one or more specified lines.
To hang up one or more lines:
1. Click Line on the Main tool bar.
2. In the Line submenu toolbar, click Hangup.
3. Enter the line number in the text box and press ENTER.
To hang up sequential lines:
1. Click Line on the Main tool bar.
2. In the Line submenu toolbar, click Hangup.
3. Enter a range of line numbers, for example, 3-12 in the text box.
4. Press ENTER.
To hang up non-sequential lines:
1. Click Line on the Main tool bar.
2. In the Line submenu toolbar, click Hangup.
3. Enter line numbers separated by a single space, such as, 6 8 1 5.
4. Press ENTER.
12-2 BridgeTalk Application 3.2 User�s Guide

Hanging up a conferenceUse hang up when you want to simultaneously disconnect all lines that are connected to a conference.
Choose one of the following methods to hang up a conference:
� From the Main toolbar, choose Conference > Hang up.
-Or-
� From the Main toolbar:
1. Click Conference.
2. From the Conference submenu toolbar, click Hang up.
3. In the prompt area, enter the number of the conference that you want to hang up.
4. Click Yes in the Confirmation dialog box to hang up the conference.
Clearing conference informationYou can prepare a conference room for the next conference by:
� Clearing call counts
� Clearing disconnected lines
� Clearing minutes-per-conference statistics
� Clearing total time statistics
� Clearing all features from a conference
Clearing call countsFollow these steps to clear the call counts to reset the accumulated calls for each line to zero:
1. From the Main toolbar, click Purge.
2. From the Purge submenu toolbar, click Call Counts.
Performing Post-Conference Tasks 12-3

Clearing disconnected linesDisconnect mode is essential for freeing up disconnecting lines immediately for new calls. This mode is primarily used for attended conferencing where operators continually monitor bridge activity. By contrast, disconnect is rarely used for unattended conferencing, where there are no operators to purge the disconnects.
Use this procedure to clear a disconnected line:
1. From the Main toolbar, click Purge.
2. From the Purge submenu toolbar, click Disconnect.
3. In the prompt area, enter a number to purge a specific disconnected line (or type A to purge all disconnected lines).
Tip: You can use this procedure only on systems on which disconnect mode is enabled.
Clearing minutes-per-conference statisticsClearing the minutes-per-conference statistics resets the total minutes for a conference to zero. Since the system starts tracking conference minutes as soon as the first person joins the conference, the tracked minutes may not match the actual conference minutes and may lead to overbilling.
Tip: To prevent overbilling, run Purge Mins/conf when the moderator officially begins the conference. The system resets the conference minutes to zero, and the Conference Report and CDRs reflect the actual conference minutes.
Follow these steps to reset the total minutes for a conference to zero:
1. From the Main toolbar, click Purge.
2. From the Purge submenu toolbar, click Minutes per Conference.
3. In the prompt area, enter the number of one or more conferences.
Note: You do not need to run this procedure for completed conferences if your system uses Automatic Conference Clear or if you run Conference Clear_all for completed conferences.
12-4 BridgeTalk Application 3.2 User�s Guide

Clearing total time statisticsYou can clear the total time statistics to reset all line times on the system to zero.
Use this method to reset the total time statistics for a conference to zero:
1. Click Purge from the Main toolbar.
2. From the Purge submenu toolbar, click Total times.
Clearing all features from a conferenceChoose one of the following methods to clear all features from a conference:
� Click Clear All in the Conference Room window.
-Or-
� From the Main toolbar:
1. Click Conference.
2. From the Conference submenu toolbar, click Clear all.
3. In the prompt area, enter the conference number.
4. Press ENTER.
Tip: To clear the features from more than one conference, enter the conference numbers in the prompt area.
Additional information about clearing all featuresHere are some important reminders:
� If your system uses Automatic Conference Clear, you do not need to clear the features manually. The audioconferencing system automatically clears the conference room when all participants disconnect. Check with your system administrator to determine if your system uses Automatic Conference Clear.
� If you attempt to use this feature for a conference that has not ended (that is, a conference in which one or more of the participants are still connected), BridgeTalk displays an error message.
Performing Post-Conference Tasks 12-5

� You can clear all of the following features from a conference that has ended using the Clear All command:
Deleting expired reservations After conferences have ended, you might want to delete (purge) those records from the Conference Scheduler.
Use this procedure to delete conferences that are no longer needed and keep a limited amount of recently expired conferences:
1. From the Conference Scheduler, click Purge .
BridgeTalk displays a Purge Expired Conferences dialog box:
2. In the Purge Expired Conferences dialog box, enter a number (in weeks) to preserve only recently expired conference scheduling records, and click OK.
For example, if you want to delete conference-scheduling records covering the past three months and retain only the previous two weeks, enter 2.
� To delete the scheduling records of all conferences previous to the time period you specified in Step 2, select Purge All and click OK. The audioconferencing system deletes all of the records and returns you to the Conference Scheduler.
� To individually delete the conference-scheduling records previous to the time period you specified in Step 2, select Purge with Verify and click OK.
Tip: Enter zero (0) if you want the system to purge all reservations that have expired as of midnight of the previous day.
Entry toneExit toneGainIDLectureLinksLock
MusicNameNotePlaybackRecordSecurityTime information
12-6 BridgeTalk Application 3.2 User�s Guide

3. The system prompts you to purge the conferences with or without verification.
Choose one of the options described in the following table.
Click Option Description
Purge All Without verification
To delete all conference scheduling records previous to the time period you specified:1. Select Purge All.2. Click OK.The system deletes all of the records and returns you to the Conference Scheduler.
Purge with Verify
With verification
To individually delete conference scheduling records previous to the time period you specified:1. Select Purge with Verify. 2. Click OK.3. BridgeTalk displays the first scheduling record.4. Choose one of the following:
� Click Delete to delete the scheduling record. The system deletes the record, and BridgeTalk displays the next record.
� Click Next to display the next record.
� Click Cancel to return to the Conference Scheduler.
Performing Post-Conference Tasks 12-7

If you selected Purge with Verify, BridgeTalk displays the first scheduling record of a conference previous to the time period you specified, as shown.
4. Choose one of the following:
� To delete the scheduling record, click Delete. The audioconferencing system deletes the record, and BridgeTalk displays the next record that meets your criteria.
� To display (not delete) the next record that meets your criteria, click Next.
� To return to the Conference Scheduler, click Cancel.
12-8 BridgeTalk Application 3.2 User�s Guide

Working with status information and reportsThis section includes instructions on:
� Types of reports
� Displaying status information
� Printing or viewing a conference status report
Types of reportsBridgeTalk generates the following reports listed in Table 12-1.
Table 12-1: Report types
Report Description
ACS Shows what lines are set as Automatic Conference Select (ACS).
Answer Displays the lines that are set to Answer or No Answer.
Call Counts Shows the number of calls dialed on each line.
Note: The bridge records the total number of calls per line. The number is reset when you purge call counts (or when an administrator reboots or restarts bridge).
Line Connect Times Displays the number of minutes each line was active.
Note: Each time a new call uses a line, the bridge resets the line connect time to zero (0), and restarts the count.
Conference Minutes Lists the total number of minutes for an active conference.
Operator Status Displays information on operators; specifically which operators are logged in, what conferences they are in, and whether their talk path is on or off.
Total Line Times Shows the accumulated minutes total for each line as well as the system time total.
Note: The bridge increments this value for every minute that a line is in use. The number is reset when you purge total line times (or when an administrator reboots or restarts bridge).
Performing Post-Conference Tasks 12-9

Note: BridgeTalk records the time that you print the report on your PC (not the time that the conference takes place on a remote bridge).
System administrators can provide the following reports directly from the bridge:
� Call Detail Record (CDR). Contains information about a particular phone line, which is generated and stored on the bridge after a line disconnects.
� Conference Detail Record (CODR). Provides conference statistics that are generated and stored on the bridge when a conference ends.
For more information on CDRs or CODRs, see the 700/780 Platform Administration and Maintenance Guide. For directions on viewing or printing BridgeTalk reports, see the Reports table entry on page B-5.
Conference Status Lists the participant lines as well as enabled and disabled features selected for the conference. In addition, this report includes Global Conference IDs, Billing codes, Auxiliary fields, and Cross-reference IDs.
Conference Activity Displays enabled and disabled features selected for the conference. In addition, this report lists Global Conference IDs, Billing codes, Auxiliary fields, Cross-reference IDs, and all participants who were in the conference including their start and end times.
Past Conference Provides Conference Detail Record (CODR) information for non-current conferences. See �Printing past conference reports� on page 12-12.
Table 12-1: Report types (Continued)
Report Description
12-10 BridgeTalk Application 3.2 User�s Guide

Displaying status informationClick Display from the Main toolbar and then choose one of the options described in Table 12-2.
Table 12-2: Display submenu toolbar
Option Click Description
ACS Lists lines that are set as Automatic Conference Select (ACS), which automatically places a caller directly into a conference without operator intervention or security codes.
ansWer Sets individual lines to Answer or No Answer. (When No Answer is enabled, the system ignores incoming calls.)
Call counts Shows the number of calls dialed on each line.
Line connect times Records the number of minutes each line was active.
Mins/conf Tabulates the number of minutes for every person in an active conference. For example, if a conference includes ten participants for 20 minutes each, the Minutes per Conference total is 10 x 20 or 200.
Op stat Displays information on operators, specifically which operators are logged in, what conferences they are in, and whether their talk path is on or off.
Total line times Shows the accumulated minutes for each line as well as the system time total.
Performing Post-Conference Tasks 12-11

Printing or viewing a conference status reportTo print or view a conference status report, do the following:
1. From the Main toolbar, click Options.
2. From the Options submenu toolbar, click Print.
BridgeTalk opens the Conference Status Report window.
3. Enter the conference number for which you want to print a report and click View.
4. Click Print to print the report.
Printing past conference reportsYou can use Past Conference Reports, which are conference reports (CODR and CDRs), to print out reports for non-current conferences. You can search for past conferences by entering the date.
Follow these steps to search for past conferences:
1. Choose View > Reports from the Menu bar.
2. Select Past Conferences.
3. Select a conference date in the Past Conference Reports dialog box and click OK.
12-12 BridgeTalk Application 3.2 User�s Guide

4. Browse the list of conferences scheduled on the selected date.
The system lists conferences chronologically by disconnect time.
5. Select one date at a time from the list and click View.
Note: This process make take several minutes.
6. Click Print to print the report.
The report is similar in content to Conference Activity reports.
7. Click OK in the Print dialog box.
8. Click Close and Cancel to close the Past Conferences Reports dialog box.
Performing Post-Conference Tasks 12-13

12-14 BridgeTalk Application 3.2 User�s Guide

Chapter 13Using Automatic Conference SelectThis chapter discusses the following topics:
� Setting the system to automatically handle calls
� Placing callers automatically in a specified conference
� Setting lines to not answer incoming calls
� Setting the system to not answer incoming calls
13-1

Setting the system to automatically handle callsYou can set the system to automatically do any of the following:
� Place callers in a specific conference
� Set specific lines to not answer incoming calls
� Set the entire system to not answer incoming calls
Placing callers automatically in a specified conferenceYou can use the Automatic Conference Select (ACS) to set certain lines to place callers in a specific conference automatically.
Follow these steps to place callers in a specified conference:
1. From the Main toolbar, click Set.
2. From the Set submenu toolbar, click Acs.
3. In the prompt area, enter a conference number followed by a space, and a range of lines that you want to place.
4. Press ENTER.
Setting lines to not answer incoming callsBy default the system answers all incoming calls. However, you can change specific lines to No Answer if you want to reserve certain lines for dialing out. All incoming calls on these lines receive a �ring-no-answer�.
To specify that specific lines ignore incoming calls, do the following:
1. From the Main toolbar, click Set.
2. From the Set submenu toolbar, click Answer.
Tip: If you do not know the answer status of a line, use Display Answer before running Set Answer.
3. To change the answer state of one or more lines, enter a line number or a range of line numbers, and press ENTER.
13-2 BridgeTalk Application 3.2 User�s Guide

Setting the system to not answer incoming callsUse the Set Nighttime command to prevent the system from answering any calls. This command places all channels in �No Answer� mode and prevents access to operator menus and commands.
Using this command does not affect active conferences, but does prevent operators from viewing and assisting participants in those conferences. When the system is in no-answer mode, incoming callers receive the ring-no-answer (RNA) signal.
Choose one of the following methods to set a system to Nighttime mode:
� Set the system to no-answer mode by choosing File > Night Time.
-Or-
� From the Main toolbar:
1. Click Set.
2. From the Set submenu toolbar, click Nighttime.
Additional information on ACSWhen you use ACS, the change that you make to the Automatic Conference Select status remains in effect until one of the following occurs:
� You or another operator changes the Automatic Conference Select status.
� The system administrator changes any setting for any channel and saves the changes.
� The system administrator reinitializes or shuts down the system or resets the power on the system.
Tip: Use No Answer carefully because callers receive a ring-no-answer on telephone systems lacking a hunt group setup, which uses the next available line. Check with your system administrator to determine whether your telephone system hunts beyond a ring-no-answer (RNA) signal.
Using Automatic Conference Select 13-3

13-4 BridgeTalk Application 3.2 User�s Guide

Appendix AModerator and Participant DTMF Commands
This appendix lists Dual Tone Multifrequency Dialing (DTMF) commands that moderators can enter from a telephone keypad to manage a conference. Participants can use a subset of these commands.
This appendix includes instructions on:
� Managing conferences using DTMF star commands
� Using Flex DTMF commands
Some 700/780 Platform v2.1x or later systems may be set up to ignore DTMF star (*) commands. Check with your system administrator to see if your particular system supports star commands.
Note: Some system administrators, with root access to 700/780 Platform bridges, can modify the default DTMF command settings. If your system administrator does not have root access, contact Spectel Customer Support personnel for assistance.
A-1

Managing conferences using DTMF star commandsModerators and participants can enter DTMF star commands from a telephone keypad during a conference to request help from an operator, hear a roll call, and so on. Table A-1 lists the following default in-conference keypad commands. You can toggle these commands on and off.
Table A-1: Standard Spectel DTMF settings
Press To Feature Description
or 0
Request Help Help Available to both moderators and participants.Places the caller in the Help Requests queue.
Dial out by accessing an open line
Moderator Dial Out
Used only by a moderator.(The moderator is temporarily removed from the conference while dialing out.)Available only after the moderator has used *1 to access a line and dial out.Your administrator must configure dialout commands for your system.
Return both moderator and caller to the conference
Return moderator to the conference and hang up the called party
1ABC2
* 0
DEF3
GHI4
JKL5
MNO6
PQRS7
TUV8
XYZ9
#
* 0
* 1
* 2
* 3
Hard telephone keypad. Available for use with all bridge versions.
Soft telephone keypad (online IP only). Available only if you connect BridgeTalk to a 2.1x, 3.0x, or 3.1x bridge.
A-2 BridgeTalk Application 3.2 User�s Guide

Start or stop an unattended conference recording
Unattended Digital Record/Playback
External Digital Record/Playback
Used only by a moderator.The moderator starts an unattended conference recording for unattended Conference Digital Record/Playback.
Note: Moderators can record the conference digitally by pressing *2 to dial out to an external recording device, if enabled on the system.
However, the files are not stored on the system so you cannot access or playback these recordings from BridgeTalk.
Start or stop an unattended playback of the conference
Unattended Digital Record/Playback
Any moderator or participant starts the unattended playback function for unattended Conference Digital Record/Playback.
Equalize voice levels on all conference lines
Gain Available to both moderators and participants. For example, if there are no moderators attending the call, participants can increase the volume.
Toggles lecture on or off
Lecture Used only by a moderator.The system plays a tone and then places all participant lines (except moderators) in listen-only mode.
Toggles self mute on or off
Mute Available to both moderators and participants (if moderator self-mute is configured on the bridge).
Table A-1: Standard Spectel DTMF settings (Continued)
Press To Feature Description
* 2
* 3
* 4
* 5
* 6
Moderator and Participant DTMF Commands A-3

Toggles conference security on or off
Secure Used only by a moderator. A moderator can prevent anyone from listening to or joining the conference; however, the moderator can record a secured conference. Moderators hear a tone or voice message indicating that the conference is secured or unsecured.You can activate security only if this feature is enabled and scheduled on the system.Operators cannot enter, record, scan, or listen to a secured conference.
Play a roster of participant names during a conference
Roster Available to both moderators and participants. The command temporarily removes the requester from the conference.
Stop playing the roster.
Roster Available to both moderators and participants.
Track billing codes for unattended or on-demand conferences
Billing code prompt
Used only by a moderator.Prompts moderators to enter a billing code. Moderators can modify codes during the conference but only the last code entered appears in the Billing Code field of the Conference Detail Record (CODR). See the Billing Code Prompt table entry on page 11-14.
Trigger an unattended, automatic BlastDial or reblast (if configured on the connecting bridge)
BlastDial Used only by a moderator. See the Auto Blast table entry on page 11-4.
Table A-1: Standard Spectel DTMF settings (Continued)
Press To Feature Description
* 7
* 8
* 9
* 9 1
* 9 2
A-4 BridgeTalk Application 3.2 User�s Guide

Start or join a subconference
Rejoin a main conference
UnattendedSubconference
A participant or a moderator presses *93 on the telephone keypad from a main conference.See �Monitoring subconferences� on page 9-9.
Hang up and leave the conference
Moderator hang up
Used only by a moderator.See the Hang up (Moderator) table entry on page 11-26.
Table A-1: Standard Spectel DTMF settings (Continued)
Press To Feature Description
* 9 3
* 9 8
Moderator and Participant DTMF Commands A-5

Using Flex DTMF commandsFlex (Flex Flow) is a reservation-less conference that uses a profile, instead of a scheduled reservation, to keep track of all the selected conference features, such as roll call or PIN codes.
Modifying Flex conference settingsWhen a participant enters a leader PIN code and assumes leader (moderator) status, the system immediately prompts the leader to press 1 to start the conference. However, the leader can press 2 to change several conference options before the conference starts. After changing options, the leader can press 1 to start the conference. The following table describes the available DTMF commands.
Table A-2: Flex DTMF modify conference settings
Press Feature To
-Or-
Conference Start
Conference Passcode
Start the conference.After pressing 1, the leader can select from the following options:Press star (*) to omit an additional conference passcode requirement.If the leader presses *, the system places the leader into the conference and plays an �A conference passcode will not be required for this conference.� message.A leader who does not press star (*) can enter an optional participant passcode (from 4 to 9 digits) followed by the pound sign (#). The system plays the following messages: �Please enter the conference passcode followed by the # sign.� message to participants dialing in.If participants enter the wrong code, the system plays an �I'm sorry, the entry is invalid. Please re-enter your passcode followed by the # sign.� message.�Your conference passcode is <entered code>. To change this entry, press * now.� message. This message confirms your passcode.If no keys are pressed, the system places the leader into the conference.Adding a conference passcode affects only the current conference but does carry over to future conferences.
Edit options Change options conference options.
1
*
2
A-6 BridgeTalk Application 3.2 User�s Guide

Note: Changing the default conference options affect both current and future conferences scheduled for the profile (except for music, which only affects future conferences).
Leader PIN Allow the moderator to change one Leader PIN for the conference. This passcode is stored in the conference record.
Record/Playback forEntry/Exitannouncements
Prompt participants to state their names upon entering the conference.Choose ON to allow participants to hear a roll call.Choose OFF to disable the roll call feature.
Music Start the conference in one of two ways:Choose ON to turn music off and allow the conference to begin when the first caller enters the conference.Choose OFF to place music into the conference until the leader arrives.
Auto Continuation (Moderator Hang up)
End the conference in one of two ways: Choose ON to extend the conference after the leader hangs up.Choose OFF to end the conference when the leader hangs up.
Options menu Play a list of the available DTMF commands.
Return to previous menu
Cancels current menu option.
Table A-2: Flex DTMF modify conference settings (Continued)
Press Feature To
1
2
3
4
9
*
Moderator and Participant DTMF Commands A-7

Managing conferences using Flex DTMF star commandsFlex conferences require that moderators and participants use non-default keypad commands during the conference. Table A-3 lists the available Flex star commands that you can toggle on and off.
Table A-3: Standard Flex DTMF settings
Press To Feature Description
Request an operator to join your conference
Help An operator can speak to all participants at the same time. This command toggles on and off.The line name does not display in the Help queue window; however, the line number and conference name do appear.
Request an operator to speak with you individually
An operator speaks to the leader only. This command toggles on and off. The line color changes to yellow in the Help queue indicating individual help.
Dial out by accessing an open line (ODO)
Moderator Dial Out
The leader is temporarily removed from the conference while dialing out.
Note: An administrator must configure dialout commands for your system.
Place the participant into the conference
Options 1-4 are available only after the leader has used *1 to access a line and dial out.
Join the participant and continue dialing
Disconnect the line and return to conference
Disconnect the line continue dialing out
Cancel request and return to conference
* 0
0 0
* 1
1*
2*
3*
* 4
*
A-8 BridgeTalk Application 3.2 User�s Guide

Record the conference
Unattended Digital Record/Playback
External Digital Record/Playback
The leader starts an unattended conference recording for unattended Conference Digital Record/Playback.
Note: A leader can record the conference digitally by pressing *2 to dial out to an external recording device, if enabled on the system.
However, the files are not stored on the system so you cannot access or playback these recordings from BridgeTalk.
Change Conference Entry Tone & Exit announcement options
Entry Tones/Exit Tones
The leader can change both tones to one setting, such as Tones (or Message). Do not select Tone & Message; this feature does not apply.
Hear a private roll call of participants
Roster Available to both the leader and participants.
unmute:
Mute all lines except the leader (Lecture)
Lecture The system plays a tone and then places all participant lines (except leaders) in listen-only mode.
unmute:
Mute your individual line (Self mute)
Mute Available to both the leader and participants.
Table A-3: Standard Flex DTMF settings (Continued)
Press To Feature Description
* 2
* 3
* 4
* 5
5#
* 6
6#
Moderator and Participant DTMF Commands A-9

Note: The Billing Code DTMF command is not available for Flex conferences.
unlock:
Lock the conference (Secure)
Secure Used only by a leader. A leader can prevent anyone from listening to or joining the conference; however, the leader can record a secured conference. Leaders hear a tone or voice message indicating that the conference is secured or unsecured.You can activate security only if this feature is enabled and scheduled on the system.Operators cannot enter, record, scan, or listen to a secured conference.
Note: A leader can record a secured conference digitally by pressing *2 to dial out to an external recording device, if enabled on the system.
However, the files are not stored on the system so you cannot access or play back these recordings from BridgeTalk.
Extend or end the conference (Moderator Hang up/Auto Continuation)
Auto Continuation (Moderator Hang Up)
Ends the conference is one of two ways: Choose ON to extend the conference after the leader hangs up.Choose OFF to end the conference when the leader hangs up.This command toggles on and off.
Hear a private participant count
Participant Count
Available to both the leader and participants.
Hear a list of available DTMF commands
DTMF Help Leader hears help commands that are available to leaders and participants.Press any key to cancel.
Table A-3: Standard Flex DTMF settings (Continued)
Press To Feature Description
* 7
7#
* 8
* #
* *
A-10 BridgeTalk Application 3.2 User�s Guide

Appendix BMenu Bar and Main Toolbar
This appendix provides detailed descriptions of the following:
� Menu bar overview
� Main Toolbar overview
B-1

Menu bar overviewThe Menu bar includes pull-down menus for both BridgeTalk-specific and Windows-based commands.
Tip: Some commands may become unavailable if an administrator locks the size and location of the windows.
Choosing Menu bar commandsChoosing a command by clicking on the name or pressing ALT + underlined letter.
File menuThe File menu lists system administrator or maintenance sessions, nighttime mode, log off, and exit commands as shown in Table B-1.
Table B-1: File Menu
Item Description
Session. Allows you to start an administrator or maintenance session if you have administrative- or maintenance-based privileges associated with your sign-in.For more information on what system features you can access, see �Sign-in privileges� on page 1-10.
Nighttime. Makes the system unavailable to any new callers but does not disturb conferences that are already active.
Open. To open a new session.
Print Setup. To set up print options.
Logout. Permits you to log off as one user and log on again using a different sign-in.
Exit. Closes BridgeTalk.
B-2 BridgeTalk Application 3.2 User�s Guide

View menuThe View menu displays or hides the Enter or Pending queues, Help Requests queue, and the toolbar. You can view all lines on the system, generate reports, and launch the Conference Scheduler. In addition, there are docking options for the Conference Navigator. Table B-2 lists the available commands.
Table B-2: View menu
Item Command
Enter Queue. Displays/Hides the Enter queue, which displays lines that are in Enter status and includes a Show Filtered/Show All toggle button. If you click Show All, the Enter queue displays all lines in Enter status. If you click Show Filtered, the Enter queue lists only those lines that meet your search criteria.
Pending Queue. Displays/Hides the Pending queue, which lists all callers who have dialed in and have not been placed in a conference, for example, ODO, Scan, CLPG, and so on.
Note: The Pending queue does not include a Get Next Enter button.
Help Requests. Displays/Hides Help Requests, which lists caller lines requesting help.
Toolbar. Displays/Hides the Toolbar, which comprises all the commands in the Menu bar but uses a command line format for entering keyboard commands.
Conference Navigator. Docks the Conference Navigator on the top, bottom, left, or right.
Update. Refreshes all BridgeTalk status information. BridgeTalk displays a progress bar while an update is in progress.
(See next page.)
Menu Bar and Main Toolbar B-3

All Lines. Shows the status of all lines on the audioconferencing system.The basic steps to view commands for a single line are:1. Choose View > All Lines from the Menu bar and select the line.
Line status key:
2. Right-click and choose one of the following commands from the shortcut menu: Access, Fault, Hang up, Mute, or Line Detail.
Follow these steps to view commands for a group of lines:1. Choose View > All Lines from the Menu bar.2. Using standard Windows command keys, press SHIFT to select
the first and last line in a sequential range (or press CONTROL to select non-sequential lines).
3. Right-click and choose one of the following commands from the shortcut menu: Fault, Hang up, or Mute
To select the number of lines per column that you want displayed in the View > All Lines dialog box, see the Options table entry on page B-9.
Table B-2: View menu (Continued)
Item Command
(See next page for more information on Reports.)
DC = disconnected lineFL = faultedMS = musicOS = out of serviceMO = moderatorMU = mutedMM = muted moderatorPO = pollingVL = virtual link line
B-4 BridgeTalk Application 3.2 User�s Guide

Reports. Generates several different report types, including:� ACS. Shows what lines are set as Automatic Conference Select
(ACS).� Answer. Displays the lines that are set to Answer or No Answer.� Call Counts. Shows the number of calls dialed on each line.� Line Connect Times. Displays the number of minutes each line
was active.� Minute per Conference. Lists the total number of minutes for an
active conference.� Operator Status. Displays information on operators; specifically
which operators are logged in, what conferences they are in, and whether their talk path is on or off.
� Total Line Times. Shows the accumulated minutes total for each line as well as the system time total.
� Conference Status. Lists the participant lines as well as enabled and disabled features selected for the conference. In addition, this report includes Global Conference IDs, Billing codes, Auxiliary fields, and Cross-reference IDs.
� Conference Activity. Displays enabled and disabled features selected for the conference. In addition, this report lists Global Conference IDs, Billing codes, Auxiliary fields, Cross-reference IDs, and all participants who were in the conference including their start and end times.
� Past Conference. Provides conference reports (CODR and CDRs) for non-current conferences. See �Printing past conference reports� on page 12-12.
Conference Scheduler. Displays the Conference Scheduler.
Table B-2: View menu (Continued)
Item Command
Reports
Menu Bar and Main Toolbar B-5

Line menuThe Line menu lists line-related commands as shown in Table B-3.
Tip: You can establish your audio path from this menu.
Table B-3: Line menu
Item Description
Access. Displays the Line Detail dialog box for a specified line.
Enter. Gets the next available line in the Enter queue.
Help. Accesses one line in the Help Requests queue.
Retrieve. Retrieves a line that was released back into a conference or re-accesses a line placed in the wrong conference.
Details. Displays the Line Detail dialog box for a specified line.
Release. Releases an accessed line back into the originating conference.
Transfer. Transfers a caller or link line into a conference.
Listen. Allows you to listen to a caller line or an auxiliary line (music channel) to determine audio quality.
Operator Talk. Toggles operator talk path on or off.
Audio Path. Establishes an operator audio path.
B-6 BridgeTalk Application 3.2 User�s Guide

Conference menuThe Conference menu lists conference-related commands. Table B-4 lists the commands.
Table B-4: Conference menu
Item Description
Audit. Allows you to audit (listen) to a specific conference to determine audio quality.
New. Creates a new conference.
Help. If enabled, lets you access all lines in a conference that request help (pre-configured option).
Details. The Conference Detail dialog box includes information for a specific conference, such as Name, ID, Lecture, Lock, and Note.
Polling. Starts a polling session.
Q&A. Starts a Q&A session.
Listen. Provides a way for you to listen to individual lines within a conference to assess audio quality. This option is very useful for troubleshooting noisy lines.
Scan. Provides a way for you to listen to each active conference on the system (bridge) for a specified time period. This option is very useful for quickly determining the system-wide sound quality.
Record/Playback. Starts a recording or a playback into a conference. Analog channels are available on all systems; Digital channels are available on systems that have Record/Playback hard drives.
Transfer. Transfers entire conferences from one conference room to another.
Startup List. Displays a list of attended conferences reserved through the Conference Scheduler that are set up shortly before scheduled startup time.
Hang up. Simultaneously disconnects all lines in a specified conference when the conference ends.
Menu Bar and Main Toolbar B-7

FastDial menuThe FastDial menu provides commands for creating new dial lists, editing dial lists, and dialing out options as shown in Table B-5.
Table B-5: FastDial menu
Item Description
New. Creates a new dial list for FastDial or BlastDial operations.
Edit. Modifies an existing dial list.
Dial. Dials out using a FastDial list.
Blast. Dials out a pre-programmed list of telephone numbers simultaneously.
Hold Dial. Holds your position in a dial list when you must temporarily interrupt the dial-out process.
B-8 BridgeTalk Application 3.2 User�s Guide

Tools menuThe Tools menu contains commands for recording greetings, sending chat messages to other operators, purging system settings, customizing your BridgeTalk software, and adding audio prompts. Table B-6 describes the available commands.
Table B-6: Tools menu
Item Description
Annunciator. Records and plays back greetings and audio prompts.
Chat. Allows you to send messages to other operators on the system.
Set ACS. Sends lines into a predetermined conference room without operator intervention or security codes.
Set Answer. Sets individual lines to Answer or No Answer. When the No Answer option is enabled, the system ignores incoming calls.
Set DNIS Filter. Allows you to filter the Enter queue with specific DNIS digits. If you set the DNIS filter, the system maintains both lists whether you show or hide the filtered list, which may slow down Enter queue processing.
Purge. Resets Call Count, Disconnects, Minutes per Conference, and Total Line Time settings to zero (0) on the system.
Customize. Changes the visual properties of the Conference Navigator, Enter or Pending queues, Help Requests queue, and Conference Room windows.
Options. Sets user interface options for BridgeTalk.Select:
� 23 lines for NA ISDN� 24 lines for T1� 30 for E1 (Euro ISDN)From a drop-down list, you can select the number of lines per column that you want displayed in the View > All Lines dialog box. This option must be set by a system administrator.
Continuous Beep. An audio prompt warning you that a participant is in the Enter, Help Requests, or Pending queues, or if a line is in disconnect mode (DC). This option must be enabled on your audioconferencing system by an administrator.
Options
Menu Bar and Main Toolbar B-9

Windows menuThe Windows menu lists commands for arranging multiple BridgeTalk windows as described in Table B-7.
Help menuThe Help menu provides BridgeTalk Help access as well as release and copyright information as shown in Table B-8.
Table B-7: Windows menu
Item Description
Cascade. Overlaps all running windows in BridgeTalk.
Tile Horizontal. Arranges all running windows side by side.
Tile Vertical. Arranges all running windows vertically.
Docked. Places all running windows in the same position in BridgeTalk after reboot.
Table B-8: Help menu
Item Description
Topics. Launches BridgeTalk Help.
About. Displays BridgeTalk version, release, and copyright information.
B-10 BridgeTalk Application 3.2 User�s Guide

Main Toolbar overviewThe Main toolbar comprises all the commands in the Menu bar but uses a command line format for entering keyboard commands. You can activate the Toolbar commands by clicking on the command button or pressing the capital letter of the command name (hot key). For example, enter A to launch the Access window.
Main Toolbar hot keysHot keys let you enter Toolbar commands from the keyboard. BridgeTalk displays a capitalized letter (hot key) in the button name. You can activate the commands by pressing the capital letter of the command name.
Hot keys let operators use many of the same keystrokes in BridgeTalk as in the Spectel 70 character cell interface.
Using the toolbarThe basic steps to use the toolbar are:
1. Click on a button.
One of the following options appears:
� Command line text box for entering keyboard commands.
-Or-
� Submenu toolbar, which is a set of subcommands specific to the chosen command. If you click a button that has a set of subcommands, BridgeTalk switches to the subcommand and displays submenu commands. For more detailed descriptions, see Table B-9, �Main Toolbar,� on page B-12.
Tip: Note that the status level text changes to Main plus the selected submenu. The status level text displays green when the focus is on the toolbar. If focus is placed elsewhere, this text displays red.
For example, if you click the Line button, the Line command level commands appear. Note that the current command level displays in the status line just above the toolbar.
2. Enter information in the command line text box (or click on a submenu button).
To cancel, press ESC (or click Back on a submenu toolbar).
Menu Bar and Main Toolbar B-11

Table B-9 describes the command line commands and how to use them.Table B-9: Main Toolbar
Button Description
Allows you to dial out, change the status of a line, or speak to a caller.Follow these steps to access a line:1. Click Access (or press A if status line is green).2. Enter the line number and press ENTER.
The Access submenu appears.
3. Click on one of the following Access submenu commands:� Dial. Displays the conference name and dials the telephone number
of the accessed line.� Call type. Shows whether the call is a dial-in or dial-out.� cO name. Records the caller�s company name.� Fault. Makes the line unavailable to participants if a problem is
detected.� Hangup. Hangs up the accessed line. � Moderator. Switches the moderator toggle on or off.� mUte. Switches the participant�s audio toggle on or off.
Tip: You can change the status of a Normal line by toggling the Moderator or Mute buttons to Muted, Moderator, or a combined status, Muted moderator. (This feature is visible only if you connect to 2.1x or later bridge).
� Name. Identifies the person who is on the accessed line.� Place. Places callers into conferences.� Release. Returns an accessed line back into the conference room.� roSter. Lets you enter line information for dial-in callers from a
preset dial list.� Transfer. Transfers a line to another extension within your
company's phone system.� Virtual link. Uses a participant line to link two systems.� Back. Returns you to the toolbar.� Help. Launches BridgeTalk Help.
Access
B-12 BridgeTalk Application 3.2 User�s Guide

Lets you add features to a conference.
Use this procedure to add or change conference features:
1. Click Conference (or press C if status line is green).The Conference submenu appears.
2. Click on one of the following Conference submenu commands:� Clear all. Clears features from a conference, such as lecture,
entry/exit tones, or music.� Entry tone. Adds entry tones to a conference.� Exit tone. Adds exit tones to a conference.� Gain. Equalizes the audio (volume) of all lines in a conference.� Hangup. Disconnects an entire conference.� Id. Creates a unique identification number to the conference.� Lecture. Mutes all participants except moderators (listen-only
mode).� locK. Warns you about placing a participant in a locked conference.� Name. Adds a conference name made up of 12 alphanumeric
characters, spaces, or underscores.� noTe. Associates a text message with the conference.� Play. Starts a playback into a conference.� pOll. Initiates a polling session.� Q&a. Starts a Q&A session.� Record. Places a record channel into a conference so that the
operator can record the conference.� Security. Allows moderator to prevent all operators from listening to
a conference or new participants from entering a conference.
Table B-9: Main Toolbar (Continued)
Button Description
Conference
Menu Bar and Main Toolbar B-13

Allows you to display conference or system statistics.
The basic steps to view or print reports are:
1. Click Display (or press D if status line is green).The Display submenu appears.
2. Click on one of the Display submenu commands.� Acs. Lists lines that are set as Automatic Conference Select (ACS),
which automatically places a caller directly into a conference without operator intervention or security codes.
� ansWer. Sets individual lines to Answer or No Answer. (When No Answer is enabled, the system ignores incoming calls.)
� Call counts. Shows the number of calls dialed on each line.� Line connect times. Records the number of minutes each line was
active.� Mins/conf. Tabulates the number of minutes for every person in an
active conference. For example, if a conference includes ten participants for 20 minutes each, the Minutes per Conference total is 10 x 20 or 200.
� Op stat. Displays information on operators, specifically which operators are logged in, what conferences they are in, and whether their talk path is on or off.
� Total line times. Shows the accumulated minutes for each line as well as the system time total.
3. In the Report Line Information dialog box, make your selection, and click View Report.
4. Click Print to view or print the report.
Table B-9: Main Toolbar (Continued)
Button Description
Display
B-14 BridgeTalk Application 3.2 User�s Guide

Lets you access a line in the Enter queue that has dialed in but not yet placed into a conference.
Use this procedure to access a line in the Enter queue:
1. Click Enter (or press E if status line is green).2. Speak with the caller and enter the appropriate information in the Line
Detail dialog box.3. Click Place.
Allows you to dial out to participants using a previously created dial list.
Follow these steps to dial out to conferees:
1. Click Fastdial (or press F if status line is green).The Fastdial submenu appears.
2. Click on one of the Fastdial submenu commands:� Edit. Displays available dial lists.� Dial. Shows dial list information.� Blast. Displays BlastDial list information.� hoLd dial. Toggles between pause or resume on a FastDial.
Enables you to provide help to a participant.
The basic steps to provide help to a participant are:
1. Click help reQuests (or press Q if status line is green).2. Click on a line in the Help Requests queue. 3. Press ENTER to access the line and speak with the caller.
The Access submenu appears. For more information, see the Access table entry on page B-12.
Table B-9: Main Toolbar (Continued)
Button Description
Enter
FastDial
Help Requests
Menu Bar and Main Toolbar B-15

Allows you to change line information without actually accessing a line.
Follow these steps to modify line information:
1. Click Line (or press L if status line is green).The Line submenu appears.
2. Click on one of the following Line submenu commands:� Call type. Shows whether the call is a dial-in or dial-out.� cO name. Identifies the caller's company name.� Fault. Makes the line unavailable to callers if a problem is detected.
For more information, see �Faulting a line� on page 10-9.� Hangup. Allows operator to hang up specified lines. To hang up
lines, see �Hanging up lines� on page 12-2.� Moderator. Designates a line as moderator.� mUte. Lets operator toggle the listen mode on or off.� Name. Allows operator to populate the name field.� Reconnect. Flags a line as �reconnected� when reconnected by the
operator.� Virtual link. Lets operator dial a participant line to link two systems.
Turns music on or off manually for a conference.
Use this procedure to turn on music:
1. Click Music (or press M if status line is green).2. Enter a music channel that has been set up for your system (M1-M4), a
space, and the conference room number.3. Press ENTER.Follow these steps to turn off music:
1. Click Music (or press M if status line is green).2. Type R, a space, and the conference room number.3. Press ENTER.
Table B-9: Main Toolbar (Continued)
Button Description
Line
Music
B-16 BridgeTalk Application 3.2 User�s Guide

Lets you record greetings, listen to audio quality, or exit from BridgeTalk.
The basic steps to view BridgeTalk options are:
1. Click Options (or press O if status line is green).The Options submenu appears.
2. Click on one of the following Options submenu commands:� Annunciator. Lets you record and play back greetings that
participants hear when they call into the system.� Chat. Allows you to send messages to other operators on the
system.� cOnf activity. Displays the Conference Activity window.� Exit. Ends your BridgeTalk session.� Listen. Provides a way for you to listen to individual lines or
conferences to assess audio quality.� Print. Lets you print the current status for a specific conference.� Scan. Provides a way for you to listen to the audio quality of
conferences system-wide.� scHeduler. Opens the Conference Scheduler so you can schedule
or modify conferences.
Table B-9: Main Toolbar (Continued)
Button Description
Options
Menu Bar and Main Toolbar B-17

Lets you purge (reset) submenu values to zero.
Use this procedure to reset certain system values:
1. Click Purge (or press P if status line is green).The Purge submenu appears.
2. Click on one of the following Purge submenu commands:� Call counts. Shows the number of calls dialed on each line.� Disconnects. Removes disconnected lines from a single conference
or from the entire system. � Mins/conf. Resets the total minutes for a particular conference back
to zero.� Total line times. Resets all the line times on the entire system back
to zero.
Sets conference scan times or switches the system to nighttime mode.
Follow these steps to set options:
1. Click Set (or press S if status line is green).The Set submenu appears.
2. In the Set submenu, click on one of the following submenu commands:� Acs. Configures selected lines to enter a conference automatically
upon dialing in. (This option appears only with an administrator or maintenance sign-in.)
� ansWer. Sets specific lines to ignore incoming calls.� Nighttime. Places the system in a �no answer� mode and prevents
access to operator-based commands.� Scan time. Specifies the interval (in seconds) between conference
switches during a scan.
Table B-9: Main Toolbar (Continued)
Button Description
Purge
Set
B-18 BridgeTalk Application 3.2 User�s Guide

Transfers participants from one conference to another conference or establishes link lines.
Use this procedure to transfer participants or to set up a link line:
1. Click Transfer (or press T if status line is green).The Transfer submenu appears.
2. In the Transfer submenu, click on one of the following submenu commands:� Conferees. Moves one or more participants from one conference to
another.� Link lines. Creates a physical connection between two conferences
on two or more systems.� coNference. Moves all participants from one conference to another.
Retrieves a line that was released back into a conference or re-accesses a line placed in the wrong conference.
The basic steps to retrieve a line are:
1. Click Retrieve (or press V if status line is green). The Access submenu appears. For more information, see the Access table entry on page B-12.
2. Click Place, enter the correct conference name, and press ENTER.
Refreshes all BridgeTalk status information. BridgeTalk displays a progress bar while an update is in progress.
Note: BridgeTalk may take several minutes to refresh depending on bridge activity. Once underway, you cannot cancel the update process.
To update, click Update (or press U if status line is green).
Launches BridgeTalk help.
To launch BridgeTalk help, click Help (or press H if status line is green).
Table B-9: Main Toolbar (Continued)
Button Description
Transfer
Retrieve
Update
Menu Bar and Main Toolbar B-19

B-20 BridgeTalk Application 3.2 User�s Guide

Appendix CPredefining Login and Operator Information
This appendix provides instructions on:
� Creating a customized BridgeTalk shortcut
� Predefining login information
C-1

Creating a BridgeTalk shortcutYou can create your own customized BridgeTalk shortcut for your desktop.
Tip: Before adding a new shortcut, you should delete any previous BridgeTalk shortcuts from your desktop.
To add a BridgeTalk shortcut on the desktop:
1. In My Computer or in the right pane of Windows Explorer and navigate to the BridgeTalk installation path.
2. Select the BridgeTalk.exe
3. On the File menu, click Create Shortcut.
4. Drag the BridgeTalk shortcut icon onto the desktop.
If the BridgeTalk icon does not display:
1. Right-click on the generic shortcut icon and select Properties.
2. Click Change Icon and click Browse.
3. Navigate to the BridgeTalk installation directory and select the BridgeTalk.exe.
4. Click Finish.
5. The BridgeTalk icon appears on your desktop.
To change any settings for the BridgeTalk shortcut:
1. On the desktop, right-click the BridgeTalk icon, and click Properties.
2. Enter the new installation path in the Target field of the Shortcut window.
3. Click OK.
To delete a shortcut, drag it to the Recycle Bin. The BridgeTalk program still exists on the disk.
C-2 BridgeTalk Application 3.2 User�s Guide

Predefining login informationIf you want to use the same sign-in information each time you start BridgeTalk, you can create a shortcut or batch script using one or more of the predefined command-line variables described in Table C-1.
Creating a customized BridgeTalk shortcutFollow these steps to create a customized BridgeTalk shortcut for your desktop:
1. From your desktop, right-click and select New > Shortcut.
2. Click Browse and navigate to the BridgeTalk installation directory.
The default BridgeTalk installation path is C:\Program Files\Spectel\BridgeTalk.
3. Locate and select BridgeTalk.exe.
Table C-1: Command line - login variables
Value Description
-login Use the following comma-delimited format:-login name, password, bridgeFor example, enter: -login m7,xyzzy,bridge34where: Login is a sign-in based on a predefined set of user privileges, for example, maintenance, administrator, or operator. Password is the password for that user name. Bridge is the name of the bridge that you want to use. Operator-number is a number between 1 and the number of operators that your bridge can accommodate.
-operator Enter an operator number or zero (0) for next available:-operator nFor example, enter: -operator 12
-noscheduler To disable the BridgeTalk Scheduler, use:-noscheduler
-properties Use this option if you want to use an alternate bridge.properties file. Specify a full path to the bridge.properties file using a valid filename and extension:-properties <BridgeTalk installation path>For example, enter: -properties �C:\Program Files\Spectel\BridgeTalk\C:\Program Files\Spectel\BT-XYZ.properties�
Predefining Login and Operator Information C-3

4. Click OK and Next.
5. Enter a shortcut name and click Finish.
Windows Explorer adds the BridgeTalk shortcut to the desktop.
6. Right-click on the BridgeTalk shortcut and select Properties.
7. In the Shortcut dialog box, select the Shortcut tab.
8. In the Target field, add a space, and then add the following to the end of the line:
-login name password, bridge
For example enter: �C:\Program Files\Spectel\BridgeTalk.exe� -login m7,xyzzy,bridge34
If you want to disable the Scheduler, add a space, then add the following to the end of the line:
-noscheduler
For example enter: �c:\Program Files\Spectel\BridgeTalk.exe� -noscheduler
9. Click Apply and OK to save the changes.
Using a batch scriptYou can use a batch script similar to the following:
�c:\Program Files\Spectel\BridgeTalk.exe� -operator 0 -login m7,xyz,bridge34
Target field
C-4 BridgeTalk Application 3.2 User�s Guide

Index
AAccess
description of B-12line hang up B-12
Access a lineby entering a line number 4-5from a locked conference 3-6in operator status line 2-7in progress column, Pending 4-6operator status 2-7to mute a noisy line 10-3to transfer a call 8-2using line access command 2-9when line is disconnected 5-19
Access codein dial list 5-5option in BlastDial 5-7
Accounting Codescheduling, for flex conference 11-18
ACS (Automatic Conference Select)command for, in Display submenu B-14hunt group, problems with 13-3lines 13-2report B-5report, Menu bar B-5
Additional information onannunciator messages 3-11applying gain 10-8audio path 1-13
BlastDial 5-17call transfers 8-2clearing all features 12-5conference IDs 3-4dialing in 4-13entry tones 3-5exit tones 3-5FastDial 5-13faulting a line 10-9Get Next Enter 4-5lecture 3-8listening commands 10-3locking 3-6manual dial 5-19muting a line 9-5Name Record/Playback 11-9placing callers automatically 13-3providing help 9-3Q&A 7-15security 3-7setting lines to no answer 13-3virtual links 3-16
Administratoropening a telnet session B-2privileges for 1-10
Alarm messages 2-7AM
scheduling start or end times 11-19scheduling start, end times 11-15
IX-1

Analogcreating a recording 6-3moderator keypad commands A-3music channel, adding to conference
3-11Animated
cursor, problems with 2-2Annunciator
command, in Options submenu B-17Annunciator messages 3-10
additional information 3-11non-English, support for 11-9playing back 3-10recording 3-10
Answercommand for, in Display submenu B-14reports, Menu bar B-5
Applicationclosing a telnet session from 2-15copying bridge.properties file to
multiple workstations 2-17exiting from 1-15keyboard command keys 2-8locking down windows 2-16modifying windows 2-10operator conference, description of 2-7setting up several sessions, on
different bridges 1-14starting an administrator session from
1-15table describing sections of 2-2table listing Conference commands
B-7
table listing FastDial commands B-8table listing Line commands B-6table listing Menu bar options B-2table listing Tools commands B-9table listing View commands B-3table of sign-in privileges 1-10using the Main toolbar B-11
Ask?button, in Q&A 7-16
Associatein Roster List dialog 4-13
Attended conferencestartup list option B-7
Audioassessing quality 10-2link line, establishing 1-12music, establishing path for 1-13operator, establishing 1-12prompt in Enter or Pending 4-5record/playback, establishing path for
1-13setting paths, for multiple sessions
1-14Audioconferencing system name
in title bar 1-8, 2-3Audit
a conference 9-5Auto
blast, scheduling, for moderator 11-4Auto Extend Duration
conference duration, when scheduling 11-28
in subconferences 9-10
IX-2 BridgeTalk Application 3.2 User�s Guide

Auto Extend Portsin subconferences 9-10
Auto Extend Ports, scheduling for 11-28Automatic Conference
clear option 12-5ID 3-4
AUTOVLLVLL (audio) line, in global conferences,
description of 2-6Available lines
(AVL) on operator status bar 2-7AVL
available lines 2-7
BBack
command, from Access submenu B-12Beep
audio prompt, in Enter, Pending queue 4-5
continuous 10-10Billing Code
display, in Conference Details dialog 9-3
for VoIP 2-4, 2-5, 4-10in subconferences 9-10telephone keypad command for A-4
Blastcommand, FastDial submenu B-15
BlastDialaccessing lines 5-17additional information 5-17automatic, triggered by moderator 5-18
clearing all lines 5-17placing callers 5-17starting line number 5-15using pre-programed lists 5-14using reBlast 5-17
Block Dialoutscheduling, for Flex conference 11-19scheduling, for unattended conference
11-6Bridge
setting up several sessions 1-14Bridge.properties file
copying to multiple workstation 2-17definition of 1-7DNIS/DDI filter option 4-2
Browsersystem requirements 1-2
CCall counts
command for, in Display submenu B-14command, in Purge submenu B-18report, Menu bar B-5
Call transfers 8-2additional information 8-2
Call typecommand, from Access submenu B-12command, Line submenu B-16in Line Detail dialog 4-10
CallersSee also Conferees or Participantsdetails, adding information from audio,
during Polling 7-3
IX-3

handling dial ins from 4-1ID, displayed in Line Detail dialog 4-7listening to NRP, Line Detail 4-12listening to recorded audio 4-8modifying information 4-12placing into conferences 4-5, 13-2
Callsanswering 4-5automatically answering 13-2blast dialing all conferees 5-14clearing counts 12-3FastDial (dialing one at a time) 5-18ignoring 13-2placing 5-1setting no answer mode 13-3transferring 8-2
CDRdefinition of 12-10used with conference ID 3-4VoIP call data 2-4, 2-5, 4-10
Change Conf Optscheduling option 11-6, 11-18
Channelplacing, to record a conference B-13setting up recording audio path 1-13
Chatcommand, in Options submenu B-17messages, displayed 2-7messages, how to send 9-6messages, using Conference Viewer
9-7Clearing
all features, command button B-13
all features, from Conference Room 12-5
CLPG, definition of 5-17features, additional information 12-5
Clocksetting 12-hour or 24-hour 2-3
Codesnon-unique 11-10optional 11-10unique 11-10
CODRdefinition of 12-10used with conference ID 3-4VoIP call data 2-4, 2-5, 4-10
Columnschanging in UI windows 2-10
Command keysspecial 2-8
Command linemode, using the Main toolbar B-11
CommandsAccess, on Main toolbar B-12Clear CLPG 5-17Conference - Audit B-7Conference - Details B-7Conference - Hang up B-7Conference - Help B-7Conference - Listen B-7Conference - New B-7Conference - Polling B-7Conference - Q&A B-7Conference - Record/Playback B-7Conference - Scan B-7
IX-4 BridgeTalk Application 3.2 User�s Guide

Conference - Startup List B-7Conference - Transfer B-7Conference, on Main toolbar B-13Details, modifying participant
information 9-4Display, description of toolbar
commands 12-11DTMF, for default conferences A-2DTMF, for Flex conferences A-6Enter, on Main toolbar B-15FastDial - Blast B-8FastDial - Dial B-8FastDial - Edit B-8FastDial - Hold Dial B-8FastDial - New B-8Fastdial, on Main toolbar B-15File - Exit B-2File - Logout B-2File - Nighttime B-2File - Open B-2File - Print Setup B-2File - Session B-2Help - About B-10Help - Topics B-10Hold Dial List 5-13Hold Line! 5-12Line - Access B-6Line - Audio Path B-6Line - Details B-6Line - Enter B-6Line - Help B-6Line - Listen B-6Line - Operator Talk B-6
Line - Release B-6Line - Retrieve B-6Line - Transfer B-6Line, on Main toolbar B-16Moderator A-1Moderator toggle B-12Music, on Main toolbar B-16Mute B-12Options, on Main toolbar B-17Participant A-1Purge, on Main toolbar B-18Retrieve, on Main toolbar B-19set nighttime 13-3Set, on Main toolbar B-18star (*), commands, description of A-2Tools - Annunciator B-9Tools - Chat B-9Tools - Continuous Beep B-9Tools - Customize B-9Tools - Options B-9Tools - Purge B-9Tools - Set ACS B-9Tools - Set Answer B-9using hot keys B-11View - All Lines B-4View - Conference Navigator B-3View - Conference Scheduler B-5View - Enter queue B-3View - Help Requests B-3View - Pending queue B-3View - Reports B-5View - Toolbar B-3Windows - Cascade B-10
IX-5

Windows - Docked B-10Windows - Tile Horizontal B-10Windows - Tile Vertical B-10
Companyname, command in Access submenu
B-12name, in submenu command B-16
Conf PINconference PIN list, definition of 11-10
ConfereesSee also Callers or Participantsassisting 7-5, 9-2blast dialing all simultaneously 5-14changing votes of 7-5FastDial (dialing one at a time) 5-18helping 7-5, 9-2listening on muted lines 9-5modifying caller information 9-4modifying information 4-12questions from 7-10, 7-11questions from during Q&A 7-13voting in conferences 7-2
Conference Activitydisplay command, Options submenu
B-17report, Menu bar B-5
Conference cannot extend beyond fixed time 11-25
Conference Detail dialogaccessing or modifying 9-3adding music 3-11billing code display 9-3cross reference display 9-3
global ID display 9-3menu item B-7
Conference IDsadditional information 3-4setting 3-4
Conference Navigator window 2-4changing location of 2-4modifying conference information 9-3viewing subconferences 9-9
Conference note 9-8Conference Recording
line, in Conference Room, description of 2-6
Conference Schedulertable listing commands 11-2
Conference Viewerusing 9-7
Conferencesadding callers 4-5, 13-2adding gain to voice levels 10-8adding operator channel 2-7attended 11-11automatically placing callers in 13-2checking line audio quality 10-2clearing 12-3deleting records 12-6description of B-13dial lists 5-14dialing a single number during 5-18for operators only 2-7hang up lines in B-13hanging up all lines B-7IDs 3-4
IX-6 BridgeTalk Application 3.2 User�s Guide

including a note 9-8linked by VL lines 3-15locking 3-6managing 12-1, 13-1menu, description of B-7modifying lines for 11-31modifying schedules of 11-31music, during FastDial 5-13naming 3-3on-demand 11-11placing callers in 4-5polling during 7-2preventing entry (locking) 3-6printing schedule information 11-33providing music, before conference
starts 3-11report, Menu bar B-5reports 12-9retrieving lines from B-19scanning 10-7scheduling attended 11-11, 11-12scheduling on-demand 11-13scheduling unattended 11-12scheduling, a Flex conference 11-16scheduling, a Flex conference call
11-16scheduling, a flow conference call
11-13securing from outside listeners 3-7setting up music audio path 1-13speaking to all participants 9-5tag digit list files 7-3that operator is connected to 2-7
tones for 3-5transferring link lines to 8-5transferring, procedure for 8-4transferring, using toolbar B-19unattended 11-11using Conference Scheduler 11-1, 11-2viewing information about 2-4viewing schedules of 11-29voting during 7-2
Confirmation numberadditional information on 3-4
Contact information xiiiContinuous beep
description of 10-10Cost center
associating with conference 3-4Counts
changing vote 7-5clearing call 12-3non-English language support for 11-9participants, Name Record/Playback
11-9Cross-reference
display in Conference Detail 9-3number, for subconferences 9-9
Crosstalktelnet session, opening 2-14
CRSscheduler, system requirement 1-2
Cursoranimated, problems with 2-2
Customer identifierassociating with conference 3-4
IX-7

CV Chatstarting Conference Viewer session,
from Q&A 7-13
DDC
disconnected line status 2-7See also Disconnect
DDIfiltered Enter queue 4-2
Dedicatedlink line, defining 3-17
Default Conference OptionsFlex, modifying A-6
Detailsconference, accessing or modifying
9-3listening to caller NRP, Line Detail 4-12modifying caller information 9-4
Dialcommand, FastDial submenu B-15command, from Access submenu B-12
Dial inadditional information 4-13placing callers into conferences 4-2
Dial listscreating 5-3deleting 5-6duplicating 5-6modifying 5-6naming, character limitation on 5-2printing 5-6using a 70 with 5-13
using multiple 5-14Dial out
a single number 5-18adding 9 to a phone number 5-19blast 5-14FastDial (dialing one at a time) 5-18overview 5-8table that lists types of 5-9using keypad, moderator A-2
Digitalcreating a recording 6-5deleting a recording 6-7moderator keypad commands A-3moderator keypad commands, third
party A-9music channel, adding to conference
3-11recording, external, DTMF commands
A-3recording, external, Flex DTMF
commands A-9recording, external, overview 6-2recording, external, reserving lines
11-26Disconnect
a VL line 3-16all lines, from Menu bar B-7an entire conference B-13audio prompt, on Menu bar B-9clearing lines from 12-4hangup, all lines in a conference 12-3hangup, one or more lines 12-2manually re-establishing a
disconnected line 5-19
IX-8 BridgeTalk Application 3.2 User�s Guide

mode, audio prompt for 10-10number of lines, on status bar 2-7purge lines, from Menu bar B-9removing disconnect mode B-18when moderator hangs up 11-26
DisplayAs Entered, check box 5-13description of toolbar commands 12-11
DNISfiltered Enter queue 4-2using with on-demand conferences
11-15, 11-20DNIS Direct
mode, in Pending queue, definition 4-2DNIS ENT
caller status 2-7DTMF
billing code command A-4creating subconferences, using A-5moderator hang up command A-5passcode, last-entered, Line Detail 4-7telephone keypad commands A-1using, in subconferences 9-9
Duplicatea dial list 5-6
DurationAuto Extend, scheduling for 11-28
EEdit
command, FastDial submenu B-15ENT
caller status 2-7
Entercommand, description of B-15using keyboard command 2-10
Enter queueaudio prompt heard in 4-5continuous beep 10-10DNIS, number of callers 2-7DNIS/DDI filtered 4-2DNIS/DDI, using Show All toggle 4-4DNIS/DDI, using Show Filtered toggle
4-4number of callers 2-7Show All toggle, description of, Enter
queue 2-5Show Filtered button, description of 2-5
Entry tones 3-5additional information 3-5command for, Conference submenu
B-13in subconferences 9-10system 11-25
EPVscheduler, system requirement 1-2
Excludingin Dial list, Q&A priority 5-4in Line Detail, Q&A priority 4-10votes during poll 7-5
Exit B-17command, in Options submenu B-17
Exit tones 3-5additional information 3-5command, in Conference submenu
B-13in subconferences 9-10
IX-9

Extensiondialing, during Fast Dial 5-11dialing, during Manual Dial 5-18dialing, from Line Detail 4-8
External 6-2digital recording, DTMF commands A-3digital recording, Flex DTMF
commands A-9digital recording, overview 6-2digital recording, reserving lines for
11-26passcode validation, system
requirement 1-2
FFastDial
additional information 5-13Blast command B-15calls 5-18description of B-15description of menu items B-8Dial command B-15Edit command B-15Hold dial command B-15Starting line number 5-11
Faultcommand, from Access submenu B-12command, Line menu B-16
Faultedline, in Line Detail 4-11lines, additional information 10-9lines, procedure for 10-9number of lines displayed 2-7
Featuresclearing from conference 12-5
File menudescription of B-2
FilteredDNIS/DDI Enter queue 4-2
Find Conferencefunction, in Line Detail 4-7
Flexconference, how to schedule 11-16DTMF commands A-6DTMF commands, for Flex A-6scheduling options 11-16scheduling, accounting code 11-18scheduling, security passcode 11-10
Flowconference, definition of 11-13
FLTfaulted line status 2-7
GGain
adding to conference voice levels 10-8additional information 10-8command, in Conference submenu
B-13Generate
command, report types B-5status information and reports 12-9
Get Next Enteradditional information on 4-5description of 4-5
IX-10 BridgeTalk Application 3.2 User�s Guide

Get Next Helpdescription of 9-2
Globalconferences, AUTOVLL line,
description of 2-6Global ID
display in Conference Detail dialog 9-3Groups
transferring participants into subconferences 8-3
HHang up
conference lines B-7, B-13conference, when moderator leaves
11-26line using Access button B-12
Hangupduring a dial in 4-11faulted line, removing 10-9in Dial List dialog box 5-12in subconferences 9-10line, using Line button 12-2, B-16operator line 1-13scheduler code group 11-25virtual link line 3-16
Help Requests queueadditional information 9-3description 2-7number of callers 2-7providing assistance 9-2when to use 9-2
Hide/Findfunction, in Line Detail dialog 4-7
HLPcaller status in Help 2-7
Hold Dial Listcommand 5-13command, FastDial submenu B-15
Hold Line!command 5-12
Hostaccesstelnet session, opening 2-14
Hot keysusing B-11
Hunt groupACS, potential problems with 13-3workaround, for link lines 3-11
IID
command, in Conference submenu B-13
IDssetting conference 3-4
KKeyboard
command keys 2-8Keypad
billing code command for A-4commands A-1moderator hang up command A-5
IX-11

LLeader
modifying conference options A-6scheduling a conference 11-16
Lectureadditional information 3-8command, in Conference submenu
B-13muted lines, during polling 7-4setting up 3-8
Linecall type, in Line submenu B-16command, flags lines as reconnected
B-16command, for virtual link line B-16command, naming a line B-16company name, Line submenu B-16description of B-16Hangup submenu command B-16hangup, using Line button 12-2, B-16moderator command, Line submenu
B-16mute toggle command B-16starting point during BlastDial 5-15starting point during FastDial 5-11
Line Connect Timescommand, on Display submenu B-14report, Menu bar B-5
Line Detail dialogCaller ID 4-7choosing call type 4-10defining a virtual link line 4-10dialing an extension 4-8
DTMF passcode, description of 4-7faulting a line in 4-11Find Conference function 4-7Hide/Find function 4-7listening to caller NRP 4-12modifying caller information 9-4placing a caller 4-11Release button 4-11Release on Close option 4-11Release on Close, definition of 4-11using Associate button to fill in fields
4-13Line menu
description of B-6Lines
accessed line status 2-7ACS 13-3audio quality 10-2blast dialing 5-14clearing disconnected 12-4dialing out 5-18establishing an operator audio path
1-11excluding from vote counts 7-5faulting 10-9ignoring calls 13-2linking, using toolbar for B-19listening to 10-7muting 9-5number of available 11-30number of disconnected 2-7number of faulted 2-7reserved within a 24-hour period 11-30
IX-12 BridgeTalk Application 3.2 User�s Guide

resetting times to zero 12-5retrieving B-19setting up auxiliary audio paths 1-12status, key to B-4transferring link lines 8-5viewing usage of 11-29virtual, linking to other systems 3-16
Link linesdefining a dedicated 3-17defining a virtual 3-15hunt group workaround for 3-11setting up audio path for 1-12using toolbar B-19
Listencommand, in Options submenu B-17
Listeningcommands, additional information 10-3overview of commands 10-2to a conference 10-5, 10-6to an auxiliary channel 10-6to music in a conference 3-11to recorded audio 4-8to specific lines 10-3
ListsSee also Dial Liststag digit 7-3
Lockconference, additional information 3-6conference, command for, Conference
submenu B-13conference, preventing entry to 3-6of application windows 2-16
Logins 1-8Look up
scheduled conferences 11-31
MMain toolbar
description of 2-3using buttons B-11
Maintenanceopening a telnet session B-2privileges 1-10
Manual dialadditional information 5-19in Fastdial dialog box 5-12
Menu barusing Menu bar options 2-3, B-2
Messagesalarm 2-4annunciator 3-10chat 2-7displayed by system 2-7sending to operators 9-6sending, using Conference Viewer 9-7using default 5-15using selected 5-15
Midnightscheduling conferences, spanning 24
hours 11-15, 11-19Minutes-per-conference
clearing statistics 12-4command, in Purge submenu B-18command, on Display submenu B-14report, Menu bar B-5
IX-13

Modecommands, entering from keyboard
B-11no-answer 13-3Scan, in Pending queue 4-2
Moderatorcommand, from Access submenu B-12command, Line submenu B-16dial out A-2DTMF, for Flex conferences A-6hang up, from keypad A-5hang up, of conference 11-26line, when muted 9-5muting, by operator 4-10setting up automatic BlastDial for 5-18table listing commands A-1
Modifyinga dial list 5-6a scheduled reservation 11-31conference in progress 11-31conference information 9-3dial list entries 5-7participant information without
accessing the line 9-4Multiple Conference Window
in Tools - Options B-9option, limitation on 2-16
Musicadding music, during FastDial 5-13adding to conference 3-11description of, Main toolbar B-16in BlastDial 5-17
setting up audio path for 1-13turning on or off manually B-16
Mutelines, additional information 9-5lines, definition of 9-5moderator, by operator 4-10participant, command from Access
submenu B-12toggle command, Line submenu B-16
NName
command, from Access submenu B-12command, in Conference submenu
B-13command, Line submenu B-16
Name Record/Playbackadditional information 11-9participant count 11-9
Naminga conference 3-3
Nextaccessing lines during BlastDial 5-17
Nighttime command 13-3No answer
additional information 13-3reports B-5setting 13-3setting individual lines B-14
Normalpriority, in dial list 5-4priority, in Q&A 4-10
IX-14 BridgeTalk Application 3.2 User�s Guide

Notecommand, in Conference submenu
B-13Notes
adding, during a conference 9-8
OODO (Originator Dial Out)
moderator keypad commands A-2On-demand
creating scheduling profiles 11-13number of supported profiles 11-2scheduling a conference call 11-13
One-timedialout 5-18
Op Help Availablescheduling option 11-10
Op Talkuse of, during Q&A 7-15
Operating systemsystem requirements 1-2
Operatorsadding channel to conference 2-7available lines (AVL) 2-7checking line audio quality 10-2checking line schedules 11-29clearing conference rooms 12-3components of UI window for 2-2, 2-4conference area 3-7conference connection to 2-7conference room, description of 2-7deleting scheduling records 12-6hanging up a line 1-13
linking virtual lines 3-16modifying caller information 9-4muting moderator, Line Detail 4-10naming conferences 3-3printing schedule information 11-33privileges 1-10report, Menu bar B-5scanning conferences 10-7sending messages to 9-6sending messages, Conference
Viewer 9-7statistics for, command, on Display
submenu B-14status bar 2-7talk path B-6transferring callers 8-2turning talk function on/off 9-5voice path (toggle on/off) 2-9
OPRoperator connection status 2-7
Optionsannunciator submenu command B-17Chat command in submenu B-17description of, on toolbar B-17displaying Conference Activity B-17exiting using Options submenu B-17Listen command, in submenu B-17moderator lines displayed first B-9modifying, predefined Flex conference
A-6number of lines per column B-9opening multiple conference rooms
B-9
IX-15

opening Scheduler from the Toolbar B-17
printing conference status, submenu B-17
Scan command, in submenu B-17Out of service lines, handling 10-9Overbilling
preventing, using purge 12-4Overbooking
in unattended conferences 11-26
PParameters, setting system 13-2Participants
assisting 9-1table listing commands A-1talking to 2-7transferring into smaller groups,
subconferences 8-3transferring one or more B-19virtual link, two conferences 3-16See also Callers or Conferees
Passcodelast-entered, description of 4-7second level, scheduling for 11-10
Past Conferencereports, from Menu bar B-5reports, viewing and printing 12-12
Pathsof default installation C-3
PCsystem requirements 1-2
Pending queueaudio prompt heard in 4-5continuous beep 10-10number of callers 2-7
Phoneextension, dialing during Fast Dial 5-11extension, dialing during Manual Dial
5-18extension, dialing from Line Detail 4-8
Phone numberscharacters used in 5-19
PINcodes and lists, definition of 11-10
Placecommand, from Access submenu B-12
Placingcallers during Blast 5-17callers using Get Next Enter 4-5callers, additional information 13-3callers, automatically in conferences
13-2incoming callers, into a conference 4-5
Playplayback command, analog 6-4playback command, Conference
submenu B-13playback command, digital 6-6playback, annunciator messages 3-10
Pollcommand, in Conference submenu
B-13Polling
adding caller details from audio 7-3muted lines, in lectured conference 7-4
IX-16 BridgeTalk Application 3.2 User�s Guide

Polling sessionschanging a vote 7-6clearing all votes 7-4conducting 7-2ending 7-7results 7-5starting 7-3viewing or printing results 7-5
Populationof Line Detail dialog box from roster
4-11Ports
Auto Extend, scheduling for 11-28Predefined
application executable C-3Print
command, in Options submenu B-17Printing
CDRs, CODRs 3-4Conference Activity report B-5Conference Status report B-5past conference reports 12-12polling results 7-5scheduled conferences information
11-33Privileges
for administrator-related tasks 1-10for operator-related tasks 1-10for scheduler-related tasks 1-10for system administrator-related tasks
1-10Profiles
number of supported 11-2
setting up, for a Flex 11-16setting up, for Flex 11-16setting up, for on-demand or flow 11-14
PurgeCall counts, submenu command B-18description of B-9, B-18disconnect lines, submenu command
B-18expired reservations 12-6Minutes-per-conference, submenu
command B-18Total Line Times command B-18
puTTYtelnet application, using 2-14
QQ&A
starting a Conference Viewer session 7-13
Q&A (Question-and-Answer) 7-10additional information 7-15Ask? button 7-16command, in Conference submenu
B-13in Dial list 5-4Op Talk, button, use of 7-15pressing *1 during subconferences
9-11Release button, use of 7-17Resume button, use of 7-17sessions 7-11setting caller priority 4-10
IX-17

RReconnect
command, Line submenu B-16Record/Playback
additional information 11-9setting up recording audio path 1-13
Recordinganalog 6-3conferences, chapter on 6-1digital 6-5moderator keypad commands A-3moderator keypad commands, third
party A-9placing a record channel B-13setting up audio path for 1-13standard (analog) recording 6-3
Regionalsetting time display 2-3
Releasebutton, operator help option 7-14, 7-16button, questions during Q&A, 7-17button, use of in Line Detail dialog 4-11command, from Access submenu B-12on Close, option, in Line Detail dialog
4-11Release on Close
using Line Detail dialog with 4-11Removing
fault on a line 10-9Replay
annunciator messages 3-10
ReportsACS B-5adding a conference note to 9-8Conference Activity B-5Conference Status B-5how values increment 12-9line connect times B-5minutes per conference B-5operator status B-5printing and viewing status 12-9total line times B-5
Resultsconference name requirement 3-3polling 7-5
Resumebutton, in Q&A 7-17
Retrievedescription of B-19line from wrong conference B-19scheduled conferences 11-31
Ring no answer (RNA)setting up 13-2
Roll callin subconferences 9-11using voice roster 3-6
Rostercommand, from Access submenu B-12for voice roll call 3-6populating in Line Detail dialog box
4-11using to supply information to dial list
4-13
IX-18 BridgeTalk Application 3.2 User�s Guide

SScan
command, in Options submenu B-17mode, in Pending queue, definition 4-2
Scanningconferences 10-7
SchAPIdefault scheduler, system
requirements 1-2Scheduler
accessing reservations, during emergencies 11-35
command, in Options submenu B-17CRS, system requirement 1-2default, system requirements 1-2EPV, system requirement 1-2privileges 1-10system requirements 1-2
Scheduler code grouphangup, conference cannot extend
beyond fixed time 11-25Scheduling
a daily conference 11-24a Flex call 11-16a Flex conference call 11-16a Flow conference call 11-13a monthly conference 11-24a one-time conference 11-21a weekly conference 11-24an on-demand conference 11-13an on-going conference 11-21an operator-attended conference 11-11an unattended conference 11-12
Flex conferences 11-16for Auto Extend Duration 11-28for Auto Extend of ports 11-28setting up profiles, for Flex 11-16setting up profiles, for on-demand or
flow 11-14Search For field
in Line Detail 4-8Security
adding to a conference 3-7additional information 3-7command, in Conference submenu
B-13in subconferences 9-11operator conference 3-7
Security Passcodescheduling for 11-10
Sessionspolling 7-2, 7-3polling, ending 7-7polling, starting 7-2Q&A, description of 7-11Q&A, starting 7-10questions during Q&A 7-13
Set12-hour or 24-hour format 2-3button, on Main toolbar B-18Nighttime command 13-3
Show Alltoggle, description of, Enter queue 2-5toggle, in DNIS/DDI Enter queue 4-4
Show All Conferencesin Line Detail 4-8
IX-19

Show Filtereddescription of, Enter queue 2-5toggle, in DNIS/DDI Enter queue 4-4
Sign-inas administrator or maintenance 1-15exiting from current login 1-15invalid sign-in or password 1-9login procedure 1-8operator session 1-15table of privileges 1-10
Sortdial list entries, alphabetically or as
entered 4-13Speaking
to an entire conference 9-5Speed dialing
table that lists types of 5-9Standard
(analog) recording 6-3Star
commands, description of A-2Starting line
during BlastDial 5-15during FastDial 5-11
Startupitem, on Conference Menu B-7
Statistics 12-4clearing, preventing overbilling 12-4
Statusbar, operator 2-7of line when viewing, letters B-4reports, printing and viewing 12-9
Subconferencesaffecting Q&A in main conference 9-11applying moderator hang up 9-10applying security 9-11Auto Extend Duration, non -supported
feature 9-10Auto Extend Ports, non -supported
feature 9-10cross reference number 9-9line status 9-9roll call 9-11starting, using DTMF commands A-5transferring participants into 8-3using entry tones in 9-10using exit tones in 9-10viewing a billing code 9-10viewing from Conference Navigator 9-9
Supported profilesfor on-demand conferences 11-2
Sys PINsystem-wide PIN codes, definition
11-10System
70, dial list entries 5-13browser requirements 1-2clearing features 12-3clearing information 12-4displayed messages 2-7message area, on display 2-2OS requirements 1-2PC requirements 1-2Scheduler requirements 1-2setting parameters 13-2
IX-20 BridgeTalk Application 3.2 User�s Guide

TTag digit list files
polling 7-3Talk (to participants) 2-7Technical support
contact information xiiiTelephone
extension, dialing during Fast Dial 5-11extension, dialing during Manual Dial
5-18extension, dialing from Line Detail 4-8keypad commands A-1keypad commands, DTMF A-1using multiple-line, setting up audio
paths 1-14Telnet
accessing bridge, as administrator 2-14
Time intervalsdisplayed within a 24-hour period 11-30in Expanded Schedule 11-30setting 12-hour, 24-hour format 2-3
Title bardescription of 2-3
TLKoperator talk toggle 2-7
Tonesentry 3-5exit 3-5
Toolbar 2-3using hot keys B-11
Tools menudescription of B-9
Top priorityin dial list 5-4in Q&A 4-10
TotalLine Times report, Menu bar B-5Line Times, command, in Display
submenu B-14Line Times, resetting to zero B-18time statistics, clearing 12-5
Transfercommand, from Access submenu B-12
Transferringan entire conference 8-4calls 8-2conference, using toolbar B-19definition of B-7link lines, using toolbar B-19one or more participants B-19participants, into smaller groups 8-3
UUI (User Interface) 2-4
application, sections of 2-4changing window or column size 2-10components of 2-2locking application windows 2-16logging in 1-8Main toolbar, description of 2-3modifying windows 2-10starting 1-8
Unattended conferencetable listing conference features 11-25
IX-21

VView
conference schedules 11-29expanded schedule, time intervals, line
use 11-30line status, key to B-4line usage 11-29menu, description of B-3Past Conference reports 12-12polling results 7-5scheduled conferences 11-31time intervals and reserved lines 11-30
Virtual link lines 3-16additional information 3-16command, from Access submenu B-12command, from Line submenu B-16selecting in Line Detail 4-10
VLSee also virtual link lines
Voicemail, setting up multiple sessions,
impact on 1-14path, toggling (on/off) 2-9roster, using during conferences 3-6
VoIPdescription of, billing 2-4, 2-5, 4-10
Voteschanging, during polling 7-6clearing, during polling 7-4
WWindows
changing UI columns 2-10Conference Navigator 2-4locking UI 2-16modifying display 2-10polling 7-2resizing 2-10sizing 2-10
IX-22 BridgeTalk Application 3.2 User�s Guide