Embed Size (px)
Citation preview

♠♥ ♦ ♣
♠♥ ♦ ♣
♠♥ ♦ ♣
♠♥ ♦ ♣
♠♥ ♦ ♣
♠♥ ♦ ♣
♠♥ ♦ ♣
♠♥ ♦ ♣
♠♥ ♦ ♣
♠♥ ♦ ♣
♠♥ ♦ ♣
♠♥ ♦ ♣
♠♥ ♦ ♣
♠♥ ♦ ♣
♠♥ ♦ ♣
♠♥ ♦ ♣
Intermediate Hands for Revision. Inga & Neil Aiston 2008
1
1. CONTENTS 2. REBIDS BY OPENER 3. BIDDING AFTER INTERVENTION 4. WHEN TO COMPETE 5. DANGER HAND 6. THE FINESSE 7. TRANSFER BIDS 1. 8. TRANSFER BIDS 2. 9. WRIGGLE IN DIRECT POSITION 10. TAKEOUT DOUBLES 11. MORE DOUBLES 12 WHAT TO LEAD 13 STOP BIDS (WEAK OR STRONG) 14 RESPONDER TAKES CONTROL 15 ENTRY PROBLEMS 16 VULNERABILITY & SCORING 17 COVER AN HONOUR WITH AN HONOUR? 18 WHEN DUMMY GOES DOWN 1. 19 WHEN DUMMY GOES DOWN 2. 20 WHEN DUMMY GOES DOWN 3. 21 FINDING SAFE EXIT CARDS 22. WATCHING DISCARDS 23. LEADS LESS OBVIOUS 24. COSTLY ERRORS 1. 25. COSTLY ERRORS 2.
2008 INTERMEDIATE THEMES
BRIDGE INTERMEDIATE DUPLICATE BRIDGE
Having covered most of the aspects of the game in UNITS 1-12 and then examined some standard conventional bids in the CONVENTIONS UNIT we explore some less obvious decisions that players may have to make in our CREATIVE APPROACHES UNIT.
It is hoped that students will keep handouts from these intermediate lessons into a UNIT that re-visits and illustrates principles previously covered.

♠♥ ♦ ♣
♠♥ ♦ ♣
♠♥ ♦ ♣
♠♥ ♦ ♣
♠♥ ♦ ♣
♠♥ ♦ ♣
♠♥ ♦ ♣
♠♥ ♦ ♣
♠♥ ♦ ♣
♠♥ ♦ ♣
♠♥ ♦ ♣
♠♥ ♦ ♣
♠♥ ♦ ♣
♠♥ ♦ ♣
♠♥ ♦ ♣
♠♥ ♦ ♣
Intermediate Hands for Revision. Inga & Neil Aiston 2008
2
732AK65J73285
KQ873295410642
S N 1♥ 1♠1NT 3NT
AJ9J1098K86AQJ
10654Q4AQ10K973
The 1NT rebid shows 15+pts. (balanced)
North therefore must bid game with 10+ pts.
15+ Balanced Lead ♣2 (4th highest)
Declarer can count 1 spade, 3 diamonds and 4 clubs.Two more tricks are required and they can be made in the heart suit. Declarer wins ♣A and plays a heart to the ♥Q. East will return ♣5.
Win and play another heart. East wins again and may switch to a spade. Win ♠A Cash ♥10 and ♥9, unblock ♣J. +430
J5QJ653529874
Q10828AKQ943A2974
AK42J108KJ6 AK63
109776Q1053
N S 1♦ 1♠ 3♠ 4♠
NOTES: Again the singleton adds strength (3pts.) when a fit is shown.3♠ is a jump bid to show 17+ pts.
Strong Rebid Two suited 17+ Lead ♥A (Anything else would be silly!)
Declarer should recognise that the eight card diamond fit should produce six winners once trumps are drawn.
So, ruff the ♥K, play a low trump to ♠A, cash ♠K and draw the last trump.
Now play your diamond winners, throwing dummy’s clubs. Cash ♣A. Ruff ♣2 for 12 tricks +480
REBIDS BY OPENER
963J10962K3A85A54
AQ74A108KJ7
J82K5Q7652963
KQ10783J94Q1042
S N 1♥ 1♠2NT 3NT
NOTE: The jump bid of 2NT again shows 17+ pts.but this time the hand is balanced.
Strong Rebid Balanced 17+Lead ♦5 (4th highest)
Dummy plays ♦4, ♦K from east. Win with ♦A. Your top tricks are: 3 spades, 1 heart and 1 diamond.
Play ♣K, to establish three club winners. (Honour from the short suit first). East will win and return a diamond for partner.Win the next diamond and you should make ten tricks because spades break 3/3. +430
N S 1♥ 1♠2♣ 3NT
963J10962K3A85
A5AQ743108K1072J82
K5Q7652963 KQ1074
8AJ94QJ4 NOTE:
The rebid of 2♣ shows five hearts & four clubs. 12-16 pts.
12-16 Two suited Lead ♦5 (4th highest)
When south hears north’s rebid of 2♣, it is time to take responsibility. Holding the unbid diamond suit, & 13 pts. south bids game in 3NT.
The east/west hands are identical to the last hand and the play will follow a similar pattern. +430
♠♥ ♦ ♣
♠♥ ♦ ♣
♠♥ ♦ ♣
♠♥ ♦ ♣
♠♥ ♦ ♣
♠♥ ♦ ♣
♠♥ ♦ ♣
♠♥ ♦ ♣
♠♥ ♦ ♣
♠♥ ♦ ♣
♠♥ ♦ ♣
♠♥ ♦ ♣
♠♥ ♦ ♣
♠♥ ♦ ♣
♠♥ ♦ ♣
♠♥ ♦ ♣
Intermediate Hands for Revision. Inga & Neil Aiston 2008
3
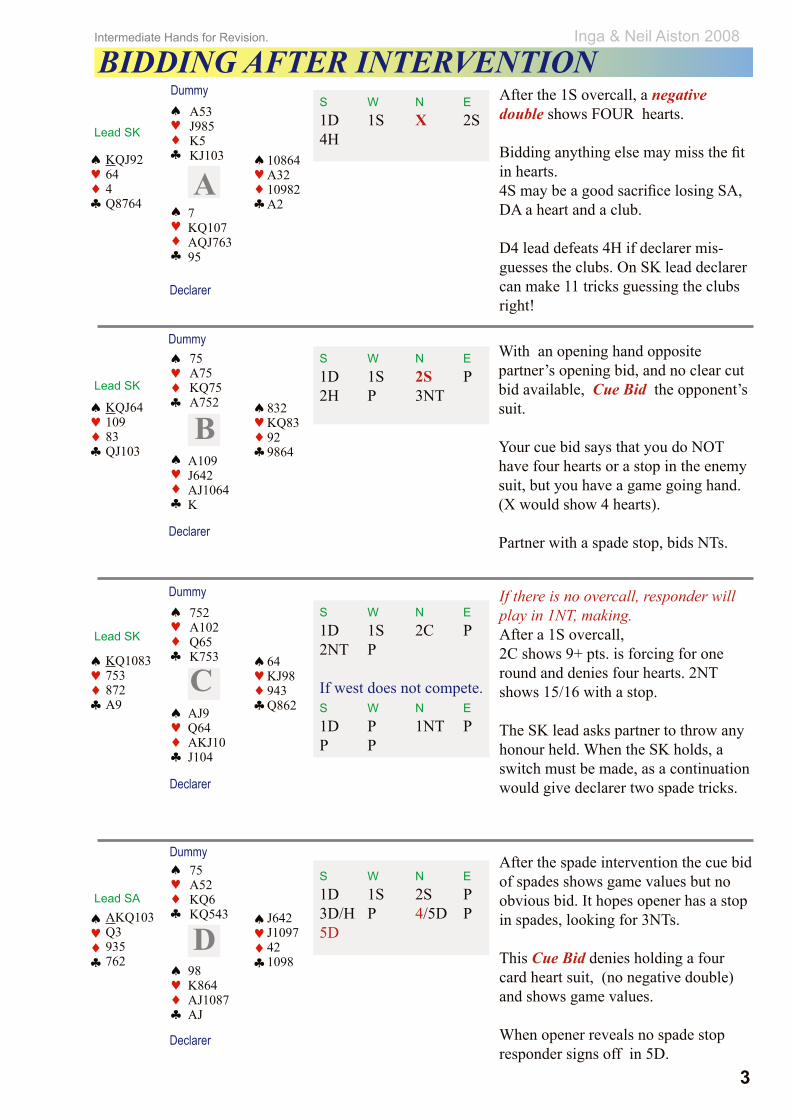
S W N E1D 1S X 2S 4H
After the 1S overcall, a negative double shows FOUR hearts.
Bidding anything else may miss the fit in hearts. 4S may be a good sacrifice losing SA, DA a heart and a club.
D4 lead defeats 4H if declarer mis-guesses the clubs. On SK lead declarer can make 11 tricks guessing the clubs right!
BIDDING AFTER INTERVENTIONA53J985K5KJ103 10864
A3210982A2
7KQ107AQJ76395
KQJ92644Q8764
75A75KQ75A752 832
KQ83929864
A109J642AJ1064K
KQJ6410983QJ103
752A102Q65K753 64
KJ98943Q862AJ9
Q64AKJ10J104
KQ1083753872A9
75A52KQ6KQ543 J642
J1097421098
98K864AJ1087AJ
AKQ103Q3935762
Dummy
Dummy
Dummy
Dummy
A
B
C
D
Lead SK
S W N E1D 1S 2S P2H P 3NT
With an opening hand opposite partner’s opening bid, and no clear cut bid available, Cue Bid the opponent’s suit.
Your cue bid says that you do NOT have four hearts or a stop in the enemy suit, but you have a game going hand. (X would show 4 hearts).
Partner with a spade stop, bids NTs.
S W N E1D 1S 2C P2NT P If west does not compete. S W N E1D P 1NT PP P
S W N E1D 1S 2S P 3D/H P 4/5D P5D
After the spade intervention the cue bid of spades shows game values but no obvious bid. It hopes opener has a stop in spades, looking for 3NTs.
This Cue Bid denies holding a four card heart suit, (no negative double) and shows game values.
When opener reveals no spade stop responder signs off in 5D.
If there is no overcall, responder will play in 1NT, making. After a 1S overcall, 2C shows 9+ pts. is forcing for one round and denies four hearts. 2NT shows 15/16 with a stop.
The SK lead asks partner to throw any honour held. When the SK holds, a switch must be made, as a continuation would give declarer two spade tricks.
Declarer
Lead SK
Lead SK
Lead SA
Declarer
Declarer
Declarer

♠♥ ♦ ♣
♠♥ ♦ ♣
♠♥ ♦ ♣
♠♥ ♦ ♣
♠♥ ♦ ♣
♠♥ ♦ ♣
♠♥ ♦ ♣
♠♥ ♦ ♣
♠♥ ♦ ♣
♠♥ ♦ ♣
♠♥ ♦ ♣
♠♥ ♦ ♣
♠♥ ♦ ♣
♠♥ ♦ ♣
♠♥ ♦ ♣
♠♥ ♦ ♣
Intermediate Hands for Revision. Inga & Neil Aiston 2008
4
S W N E1S P 2S PP ?orS W N E1S P 2S PP X P 3C
OPPONENTS WILL NEVER BE ALLOWED TO PLAY IN A FIT AT THE 2 LEVEL
Typical sequence where N/S play comfortably in 2S. This is west’s fault. N/S have a fit and 20ish pts.
In protective position, west with 10+ pts. should make a TO double. 2S making = -110 or3C minus one = -100 or3C making = +110 ormost likely3S minus one = +100COMPETE!
TO COMPETE OR NOT TO COMPETEKQ1078652J74Q3 95
Q74Q1095AJ105AJ862
AJK83864
43K1093A62K972
Q10765K42767432 AJ84
51085AQ85K9
10987AQ932KJ
32AQJ63KJ41096
AQJ543642QK64
10KJ9108652J752 2
AQ83974A10983K9876
1075AKJ3Q
Dummy
Dummy
Dummy
S W N E1D 1H 1S P2D P P P
RECOGNISE THE MIS-FIT
West overcalls in hearts(East’s singleton.) Then sees RHO overcall in east’s card suit. The hand looks like a mis-fit. DON’T COMPETE! S3 to SA. S9 return (asking for heart switch) HA.- then HQ - HK ruff.S8 ruff and over-ruff etc. Down 3for +300.Note - North should have bid 2S to play in the long trump suit of the weaker hand!
S W N E1S P P XP P PA hand from Brunton Sept 07
THE PROTECTIVE DOUBLE
South opens 1S west and north pass. East doubles, south, west AND north pass!? -500
1. North should have bid 1NT2. South should give partner two choices by bidding diamonds.3. East would be wrong to simply overcall 2C. We recommend that a double in protective position shows 10+ pts.
A
B
C
Lead HJ
Declarer
Lead S2
Lead C6
Declarer
Declarer
74K653293A765
AQJ62J9104KQJ9
98AQ74KJ86284
E S W N 1S P 1NT P2C P P XP 2D 3C 3D
TAKEOUT DOUBLE (EVEN THOUGH YOU HAVE ORIGINALLY PASSED).
East shows 5/4 in the black suits (10-16). West agrees clubs by passing (6-9). With shortages in clubs and spades, and both red suits, a Takeout Double asking partner to bid one of the other two suits is a fair risk.3D makes +110 3C goes off +1002C makes - 90
Lead CA
DK1053108AQ751032

♠♥ ♦ ♣
♠♥ ♦ ♣
♠♥ ♦ ♣
♠♥ ♦ ♣
♠♥ ♦ ♣
♠♥ ♦ ♣
♠♥ ♦ ♣
♠♥ ♦ ♣
♠♥ ♦ ♣
♠♥ ♦ ♣
♠♥ ♦ ♣
♠♥ ♦ ♣
♠♥ ♦ ♣
♠♥ ♦ ♣
♠♥ ♦ ♣
♠♥ ♦ ♣
Intermediate Hands for Revision. Inga & Neil Aiston 2008
5
DANGER HAND (AVOIDANCE PLAY)Dummy
Dummy
Dummy
A
B
D
3NT by South
Lead ♣J
3NT by South
Lead ♠10
3NT by South
Lead ♠7
3NT by South
Lead ♥Q
A10972KJ1076A32 J83
Q1095Q52654K752
K64A984KQ
Q64AJ833J10987
S W N E1S P 2D P2NT P 3S P3NT
54A87KQ62AJ83 Q73
Q10J8743Q104KJ2
K542A5K652
A10986J96310997
S W N E1NT P 3NT
When the dummy is faced you need to recognise that ♥K is vulnerable to an attack by east! The club lead is no problem.
You have 7 winners.2 spades 2 diamonds and 3 clubs
Win ♣K. Play ♦4 to ♦K and run the ♦J. IF this loses, west cannot damage your heart holding.
You must stop east getting on lead.
Recognise immediately that you need to finesse clubs into east.
You must duck ♠Q at trick 1.When spades are returned, play the ♠K and hope that west wins with ♠A and plays a 3rd spade.Now when your club finesse fails, east does not have a spade to play.
West with no outside entry should duck ♠K. Now when east gets in he can lead his 3rd spade to west.
43A862KQ2AJ105 Q96
QJ710876Q76KJ2
K43A43K943
A108751095J9582
S W N E1NT P 2C P2D P 3NT
Unlike the last hand, here you can finesse clubs into either hand.(A two way finesse.) So as long as you finesse into west, the safe hand, you do not need to duck the ♠Q. Win and lead to ♣A. then play ♣J from dummy and let it run.
IF it loses your Jx of spades is safe.
832AK7K5KJ1086
974QJ109Q743Q5
KJ432AJ1062A73 AQ1065
86598942
S W N E1NT P 3NT
Phew, you didn’t get a spade lead!You MUST recognise the danger to your spade suit, and keep west off lead.
Win with ♥A. Play ♦K.Then finesse ♦J into the safe hand that cannot damage you in spades. When diamonds don’t break - play ♣3 to ♣K.
Then run ♣J into east. The ♣Q drops and your’e home.
C

♠♥ ♦ ♣
♠♥ ♦ ♣
♠♥ ♦ ♣
♠♥ ♦ ♣
♠♥ ♦ ♣
♠♥ ♦ ♣
♠♥ ♦ ♣
♠♥ ♦ ♣
♠♥ ♦ ♣
♠♥ ♦ ♣
♠♥ ♦ ♣
♠♥ ♦ ♣
♠♥ ♦ ♣
♠♥ ♦ ♣
♠♥ ♦ ♣
♠♥ ♦ ♣
Intermediate Hands for Revision. Inga & Neil Aiston 2008
6
FOUR VARIATIONS ON THE FINESSEDummy
Dummy
Dummy
A43J6AJ1032K74 K7
10943Q98Q1052Q62
AK5264A863
J10985Q87K75J9
SPLIT HONOURS
When there are TWO honours missing you should mentally place ONE with each of your opponents.
Play low on ♠J lead. ♠K wins and ♠7 returnedWin ♠Q and finesse ♦J losing to ♦Q.
Win the heart switch and finesse ♦10, playing for west to hold the other honour (♦K) When diamonds also break 3-3, you’re home.
S W N E1NT P 3NT
A765872Q84KJ4
98AK63J1028765KQ1043
94A53AQ2
J2QJ105K9761093
ACE & QUEEN IN OPPOSITE HANDS
Unfortunately the 3-3 mirror image in clubs mean wasted values. You have 5 top spades 3 clubs and a diamond.
One trick needed!
The diamond finesse is your only chance for the 10th trick.
Play ♦A and then low to the queen.
The ♦K with west gets you home.
Lead ♠J
E S W NP 1S P 3SP 4S
Lead ♥Q ♥J3rd heart ruffed
521064AKJ2K652
A1074KJ92107494KQ63
A83Q863A8
J98Q7595QJ1073
LEAD TOWARDS HONOURS
You have 7 top tricks. IF ♠A is with east you will make ♠K AND ♠Q.
Play ♠5 immediately to ♠K. If it holds, use diamond entry to play towards your ♠Q.There is no other play available! If east rises with the ♠A immediately it takes all the pressure off declarer.How kind!
S W N E1S P 2C P2NT* P 3NT
*Forcing to game
Lead ♣QWin with ♣K(because you cannot afford a heart switch!)
AQJ101083975K64
K8759721082QJ104
AKQJ6643A982
963254AKQJ753
W N E SP P P 1HP 1S P 2CP 3H P 4H
RUFFING FINESSE.
West originally passed and has shown up with 10 pts.
West CANNOT have ♠K.
After drawing trumps, play ♠A and then ♠Q. If east plays ♠K, ruff and return to dummy with ♣A. throw losing clubson ♠J & ♠10. If east doesn’t cover, throw losing clubs.
Lead ♦A ♦K ♦Q

♠♥ ♦ ♣
♠♥ ♦ ♣
♠♥ ♦ ♣
♠♥ ♦ ♣
♠♥ ♦ ♣
♠♥ ♦ ♣
♠♥ ♦ ♣
♠♥ ♦ ♣
♠♥ ♦ ♣
♠♥ ♦ ♣
♠♥ ♦ ♣
♠♥ ♦ ♣
♠♥ ♦ ♣
♠♥ ♦ ♣
♠♥ ♦ ♣
♠♥ ♦ ♣
Intermediate Hands for Revision. Inga & Neil Aiston 2008
7
TRANSFERS
4Q10862K83A1075 Q9863
J5J1076QJA72
K743A4K943
KJ105A9Q952862
Q542J854376104 963
A106KJ5QJ98
KJ87K2AQ43743
A10Q9710982AK65
Dummy
Dummy
Dummy
Lead CQ
S W N E1NT P 2D P3H P 4H
Leads might be SJ or HA or C6 or D2
S W N E1NT P 2C P2S P P P
Lead CA
KQ96Q93K7A752
J8J4A1082QJ1098
102AK10765Q9654 A7543
82J43K63
S W N E1NT P 2D P2H P 3H P4H
INVITATION ONLY
After the completion of the transfer, responder’s rebid in the suit invites game ONLY IN HEARTS.
South’s options are to bid 4H or PASS !3NT is not an option.
Play to ruff a diamond but also make sure that you lead twice TOWARDS king queen of spades.
AKQ108KQ9K3282
96752A97J9653
J32A1083108AKQ7 754
J64QJ654104
MILD SLAM TRY
No transfer here.
3H is a mild slam try in spades.
North accepts the invitation by cue bidding CA.
4NT checks for aces and the slam is bid. Two diamond losers go on the CQ and H3.
N E S W1NT P 3S P4C P 4NT P5H 6S
SUPER ACCEPT
When partner makes a transfer, and you have four of that suit AND a maximum 14 pts. you can make what is called a super accept. Bid one level higher than necessary.
IF partner had a weak hand it might pre-empt opponents out of their fit.
On this occasion it allows north to add 3pts. for the singleton spade, and bid game.
STAYMAN WITH 3 PTS. Remember that responder controls the auction after a 1NT open.
Although you could simply transfer to hearts, 2C allows you to find the better 4-4 fit in spades
IF partner had rebid 2D, you would sign off in 2H.
When responder does not rebid NTs after 2D, opener must pass!
Lead ? Lay down on DA lead.Trump lead best!
♠♥ ♦ ♣
♠♥ ♦ ♣
♠♥ ♦ ♣
♠♥ ♦ ♣
♠♥ ♦ ♣
♠♥ ♦ ♣
♠♥ ♦ ♣
♠♥ ♦ ♣
♠♥ ♦ ♣
♠♥ ♦ ♣
♠♥ ♦ ♣
♠♥ ♦ ♣
♠♥ ♦ ♣
♠♥ ♦ ♣
♠♥ ♦ ♣
♠♥ ♦ ♣
Intermediate Hands for Revision. Inga & Neil Aiston 2008
8
MORE TRANSFERS Dummy
Dummy
AJ9KQJ2Q3J843
8431065K102KQ651075
973AJ98649
KQ62A8475A1072
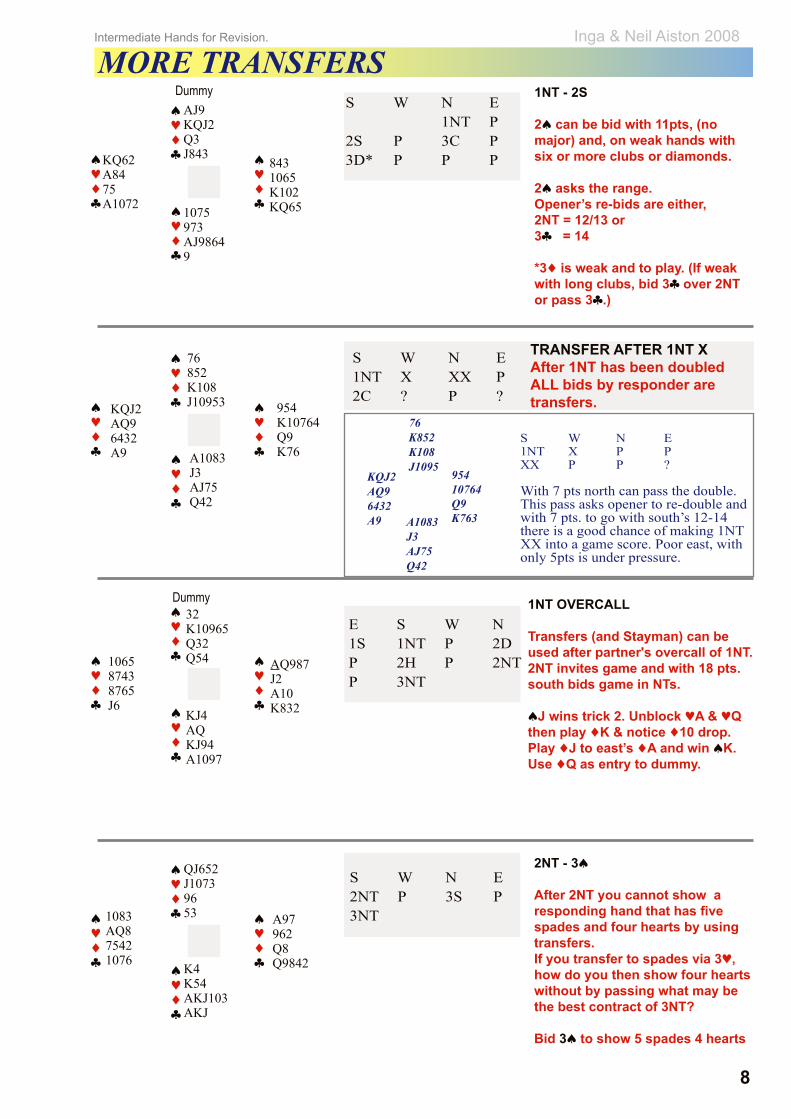
S W N E 1NT P2S P 3C P3D* P P P
1NT - 2S
2♠ can be bid with 11pts, (no major) and, on weak hands with six or more clubs or diamonds.
2♠ asks the range. Opener’s re-bids are either,2NT = 12/13 or3♣ = 14
*3♦ is weak and to play. (If weak with long clubs, bid 3♣ over 2NT or pass 3♣.)
QJ652J10739653 A97
962Q8Q9842K4
K54AKJ103AKJ
1083AQ875421076
S W N E2NT P 3S P3NT
2NT - 3♠
After 2NT you cannot show a responding hand that has five spades and four hearts by using transfers.If you transfer to spades via 3♥, how do you then show four hearts without by passing what may be the best contract of 3NT?
Bid 3♠ to show 5 spades 4 hearts
KJ4AQKJ94A1097
106587438765J6
32K10965Q32Q54 AQ987
J2A10K832
E S W N1S 1NT P 2DP 2H P 2NTP 3NT
1NT OVERCALL
Transfers (and Stayman) can be used after partner's overcall of 1NT.2NT invites game and with 18 pts.south bids game in NTs. ♠J wins trick 2. Unblock ♥A & ♥Qthen play ♦K & notice ♦10 drop.Play ♦J to east’s ♦A and win ♠K.Use ♦Q as entry to dummy.
A1083J3AJ75Q42
KQJ2AQ96432A9
76852K108J10953 954
K10764Q9K76
S W N E1NT X XX P2C ? P ?
TRANSFER AFTER 1NT XAfter 1NT has been doubled ALL bids by responder are transfers.
A1083J3AJ75Q42
KQJ2AQ96432A9
76K852K108J1095
95410764Q9K763
S W N E1NT X P PXX P P ?
With 7 pts north can pass the double. This pass asks opener to re-double and with 7 pts. to go with south’s 12-14 there is a good chance of making 1NT XX into a game score. Poor east, with only 5pts is under pressure.

♠♥ ♦ ♣
♠♥ ♦ ♣
♠♥ ♦ ♣
♠♥ ♦ ♣
♠♥ ♦ ♣
♠♥ ♦ ♣
♠♥ ♦ ♣
♠♥ ♦ ♣
♠♥ ♦ ♣
♠♥ ♦ ♣
♠♥ ♦ ♣
♠♥ ♦ ♣
♠♥ ♦ ♣
♠♥ ♦ ♣
♠♥ ♦ ♣
♠♥ ♦ ♣
Intermediate Hands for Revision. Inga & Neil Aiston 2008
9
North’s pass after the double requires south to REDOUBLE. South at this point doesn’t know why.
When North bids 2♥ he is now showing four hearts and four of a higher ranking suit. (Here spades) AND north is weak! South chooses spades.
THE WRIGGLE IN DIRECT POSITION
932843K10A10752 107
A9752J64394A865
KQ6982QJ8
KQJ4J10AQ75K63
93284326541097 107
A975KJ10A542
A865KQ6982QJ8
KQJ4J10AQ73K63
Dummy
Dummy
Dummy
Dummy
S W N E1NT X 2D X2H ?
106439732J6232 A8
A105498J10987KJ72
86KQ105A64
Q95KQJA743KQ5
S W N E1NT X P PXX P 2H X2S ? - ?
62K97698641084 QJ109
854J1073K9843
QJ2A5AQJ76
AK75A103KQ2532
S W N E1NT X P P2C ? - ?
As before, north’s pass after the double requires south to redouble.
BUT because south has a five card suit he can SHOW IT instead of redoubling. North will now pass.
S W N E1NT X P PXX P P ?
As before, north’s pass after the double requires south to redouble.
With no five card suit south redoubles as requested. West passes and even though north has a five card suit he CAN and should PASS with 7 HCPs.
Now the pressure is on east with only 5 pts. IF west passes, south will make 1NT XX easily for a big score.
WORST SCENARIO -With a 4-3-3-3 hand and 0-3 pts. you ARE in trouble. Responder, who is in control must think ahead.
North’s best option might be to transfer into the FOUR card suit.
Now when east doubles, will west think that it’s a double of diamonds
It is important to look confident in these situations!?!
♠♥ ♦ ♣
♠♥ ♦ ♣
♠♥ ♦ ♣
♠♥ ♦ ♣
♠♥ ♦ ♣
♠♥ ♦ ♣
♠♥ ♦ ♣
♠♥ ♦ ♣
♠♥ ♦ ♣
♠♥ ♦ ♣
♠♥ ♦ ♣
♠♥ ♦ ♣
♠♥ ♦ ♣
♠♥ ♦ ♣
♠♥ ♦ ♣
♠♥ ♦ ♣
Intermediate Hands for Revision. Inga & Neil Aiston 2008
10
TAKEOUT DOUBLES
A9AJ10972KQ674
1083KQ855210653
KJ644J108743Q8
Q75263A9AKJ92
Dummy
Lead DA
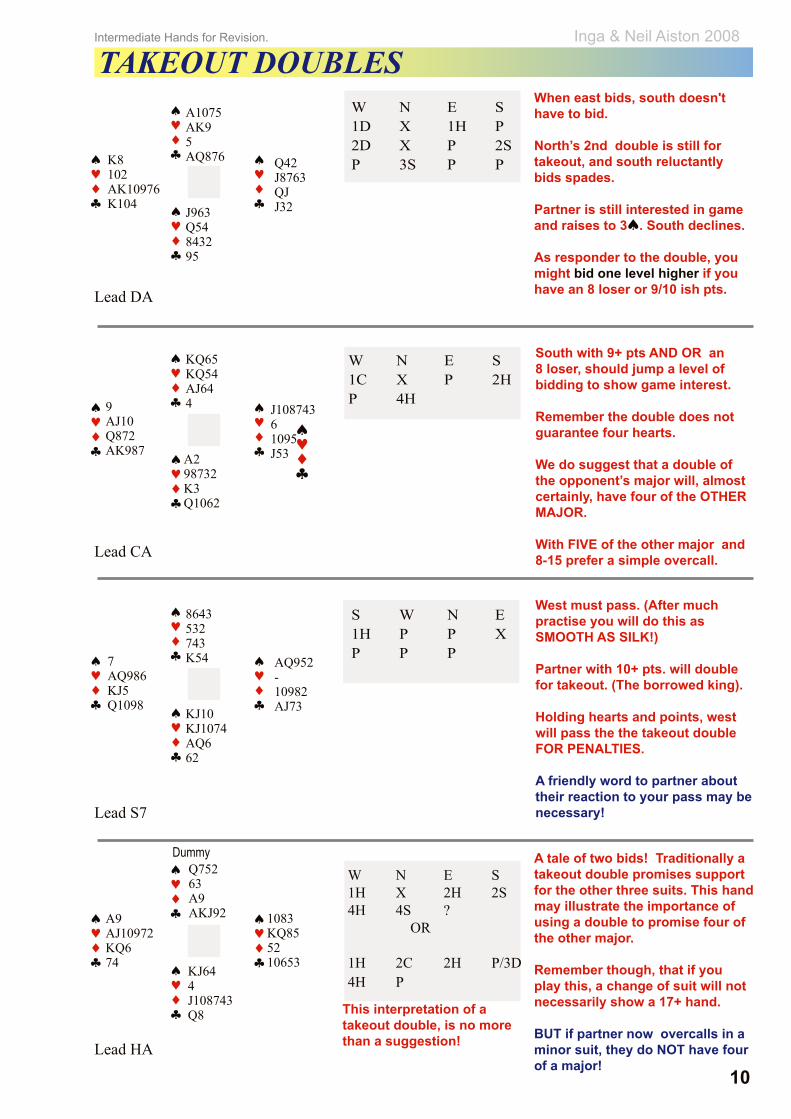
W N E S1H X 2H 2S4H 4S ? OR
1H 2C 2H P/3D4H P
A tale of two bids! Traditionally a takeout double promises support for the other three suits. This hand may illustrate the importance of using a double to promise four of the other major.
Remember though, that if you play this, a change of suit will not necessarily show a 17+ hand.
BUT if partner now overcalls in a minor suit, they do NOT have four of a major!
Lead HA
A1075AK95AQ876 Q42
J8763QJJ32J963
Q54843295
K8102AK10976K104
W N E S1D X 1H P2D X P 2SP 3S P P
When east bids, south doesn't have to bid.
North’s 2nd double is still for takeout, and south reluctantly bids spades.
Partner is still interested in game and raises to 3♠. South declines.
As responder to the double, you might bid one level higher if you have an 8 loser or 9/10 ish pts.
8643532743K54 AQ952
-10982AJ73KJ10
KJ1074AQ662
7AQ986KJ5Q1098
West must pass. (After much practise you will do this as SMOOTH AS SILK!) Partner with 10+ pts. will double for takeout. (The borrowed king).
Holding hearts and points, west will pass the the takeout double FOR PENALTIES.
A friendly word to partner about their reaction to your pass may be necessary!
S W N E1H P P XP P P
KQ65KQ54AJ644 J108743
61095J53A2
98732K3Q1062
9AJ10Q872AK987
W N E S1C X P 2H P 4H
South with 9+ pts AND OR an 8 loser, should jump a level of bidding to show game interest.
Remember the double does not guarantee four hearts.
We do suggest that a double of the opponent’s major will, almost certainly, have four of the OTHER MAJOR.
With FIVE of the other major and 8-15 prefer a simple overcall.
Lead S7
Lead CA
This interpretation of a takeout double, is no more than a suggestion!
♠♥ ♦ ♣
♠♥ ♦ ♣
♠♥ ♦ ♣
♠♥ ♦ ♣
♠♥ ♦ ♣
♠♥ ♦ ♣
♠♥ ♦ ♣
♠♥ ♦ ♣
♠♥ ♦ ♣
♠♥ ♦ ♣
♠♥ ♦ ♣
♠♥ ♦ ♣
♠♥ ♦ ♣
♠♥ ♦ ♣
♠♥ ♦ ♣
♠♥ ♦ ♣
♠♥ ♦ ♣
Intermediate Hands for Revision. Inga & Neil Aiston 2008
11
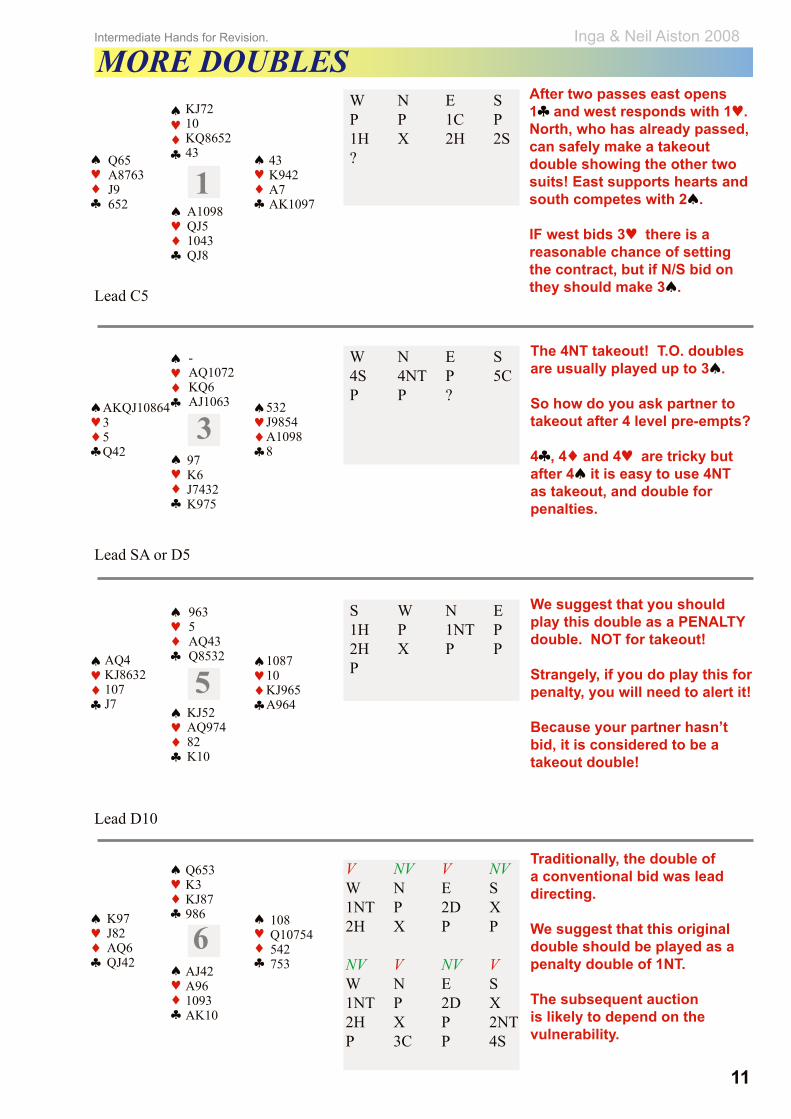
W N E SP P 1C P 1H X 2H 2S?
After two passes east opens 1♣ and west responds with 1♥. North, who has already passed, can safely make a takeout double showing the other two suits! East supports hearts and south competes with 2♠.
IF west bids 3♥ there is a reasonable chance of setting the contract, but if N/S bid on they should make 3♠.
MORE DOUBLESKJ7210KQ865243Q65
A8763J9652 A1098
QJ51043QJ8
43K942A7AK1097
-AQ1072KQ6AJ1063 532
J9854A10988
97K6J7432K975
AKQJ1086435Q42
9635AQ43Q8532 1087
10KJ965A964KJ52
AQ97482K10
AQ4KJ8632107J7
AJ42A961093AK10
K97J82AQ6QJ42
Q653K3KJ87986 108
Q10754542753
Lead C5
W N E S4S 4NT P 5CP P ?
Lead SA or D5
S W N E1H P 1NT P2H X P PP
Lead D10
V NV V NVW N E S1NT P 2D X 2H X P P
NV V NV VW N E S1NT P 2D X2H X P 2NTP 3C P 4S
The 4NT takeout! T.O. doubles are usually played up to 3♠.
So how do you ask partner to takeout after 4 level pre-empts?
4♣, 4♦ and 4♥ are tricky but after 4♠ it is easy to use 4NT as takeout, and double for penalties.
We suggest that you should play this double as a PENALTY double. NOT for takeout!
Strangely, if you do play this for penalty, you will need to alert it!
Because your partner hasn’t bid, it is considered to be a takeout double!
Traditionally, the double of a conventional bid was lead directing.
We suggest that this original double should be played as a penalty double of 1NT. The subsequent auction is likely to depend on the vulnerability.
1
3
5
6
♠♥ ♦ ♣
♠♥ ♦ ♣
♠♥ ♦ ♣
♠♥ ♦ ♣
♠♥ ♦ ♣
♠♥ ♦ ♣
♠♥ ♦ ♣
♠♥ ♦ ♣
♠♥ ♦ ♣
♠♥ ♦ ♣
♠♥ ♦ ♣
♠♥ ♦ ♣
♠♥ ♦ ♣
♠♥ ♦ ♣
♠♥ ♦ ♣
♠♥ ♦ ♣
Intermediate Hands for Revision. Inga & Neil Aiston 2008
12
A7252843KQJ72 943
8764375A83J6
AQJ10AKQ61064
KQ1085K9J109295
S W N E1H P 2C P2NT P 3NT
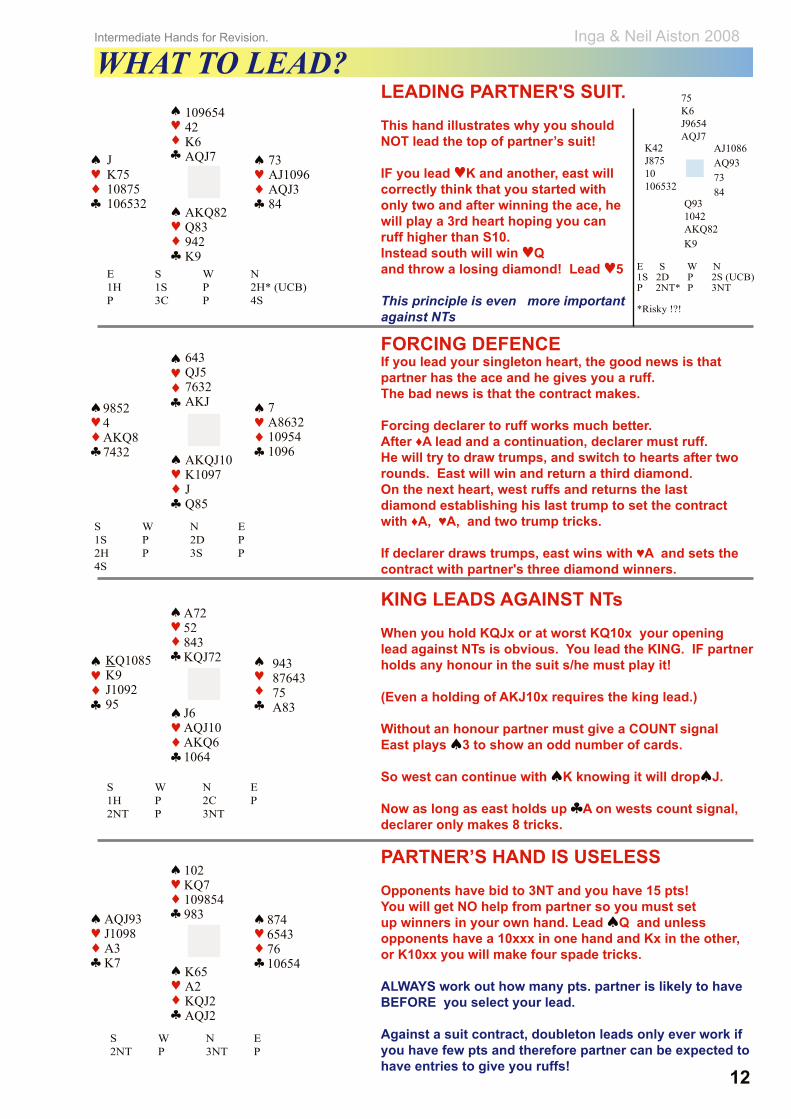
KING LEADS AGAINST NTsWhen you hold KQJx or at worst KQ10x your opening lead against NTs is obvious. You lead the KING. IF partner holds any honour in the suit s/he must play it!
(Even a holding of AKJ10x requires the king lead.)
Without an honour partner must give a COUNT signalEast plays ♠3 to show an odd number of cards.
So west can continue with ♠K knowing it will drop♠J. Now as long as east holds up ♣A on wests count signal, declarer only makes 8 tricks.
10965442K6AQJ7 73
AJ1096AQJ384AKQ82
Q83942K9
J K7510875106532
E S W N1H 1S P 2H* (UCB) P 3C P 4S
LEADING PARTNER'S SUIT. This hand illustrates why you should NOT lead the top of partner’s suit!
IF you lead ♥K and another, east will correctly think that you started with only two and after winning the ace, he will play a 3rd heart hoping you can ruff higher than S10. Instead south will win ♥Q and throw a losing diamond! Lead ♥5 This principle is even more important against NTs
WHAT TO LEAD?
643QJ57632AKJ
AKQJ10 K1097 JQ85
7A8632 109541096
9852 4AKQ87432
FORCING DEFENCE If you lead your singleton heart, the good news is that partner has the ace and he gives you a ruff. The bad news is that the contract makes. Forcing declarer to ruff works much better. After ♦A lead and a continuation, declarer must ruff. He will try to draw trumps, and switch to hearts after two rounds. East will win and return a third diamond.On the next heart, west ruffs and returns the last diamond establishing his last trump to set the contract with ♦A, ♥A, and two trump tricks.
If declarer draws trumps, east wins with ♥A and sets the contract with partner's three diamond winners.
S W N E1S P 2D P 2H P 3S P4S
102KQ7 109854 983
K65 A2 KQJ2 AQJ2
AQJ93 J1098 A3K7
874 654376 10654
PARTNER’S HAND IS USELESSOpponents have bid to 3NT and you have 15 pts!You will get NO help from partner so you must set up winners in your own hand. Lead ♠Q and unless opponents have a 10xxx in one hand and Kx in the other, or K10xx you will make four spade tricks.
ALWAYS work out how many pts. partner is likely to have BEFORE you select your lead.
Against a suit contract, doubleton leads only ever work if you have few pts and therefore partner can be expected to have entries to give you ruffs!
S W N E2NT P 3NT P
75K6J9654 AQJ7
AJ1086AQ9373 84
Q931042AKQ82 K9
K42J87510 106532
E S W N1S 2D P 2S (UCB) P 2NT* P 3NT
*Risky !?!

♠♥ ♦ ♣
♠♥ ♦ ♣
♠♥ ♦ ♣
♠♥ ♦ ♣
♠♥ ♦ ♣
♠♥ ♦ ♣
♠♥ ♦ ♣
♠♥ ♦ ♣
♠♥ ♦ ♣
♠♥ ♦ ♣
♠♥ ♦ ♣
♠♥ ♦ ♣
♠♥ ♦ ♣
♠♥ ♦ ♣
♠♥ ♦ ♣
♠♥ ♦ ♣
Intermediate Hands for Revision. Inga & Neil Aiston 2008
13
“STOP” BIDS
KJ107382AKQ872 42
AJ7543K9766
AQ9869QJ10A1094
5KQ10685432J53
KQ829AK965496
J107J61072Q10842
A943AKQ754Q3J65
10832J8AK753
Dummy
Dummy
Dummy
6
7
Lead - ♥J or S6
S W N E1S P 2NT P3H P 4NT* P5S P 6S
Lead ♥K
S W N E1D P 2H P2S P 4NT* P5S P 6S
Lead ♣A
S W N E1S P 1NT P3D P 4S
Lead ♠8
Q975QJ9754KQ2 A3
AQ83262A754K108654
K9108396
J2J10764AKJ1083
WEAK JUMP OVERCALL
REMEMBER that you must agree with your partner how you play jump overcalls. They could be WEAK 6-10INTERMEDIATE 11-15 or STRONG 16+Here, N/S have a good sacrifice in 4♠. Losing 5 tricks doubled is only -300
West's raise to game is based on 5 card support and a 7.5 loser.
E S W N1H 2S 4H 4S? ? ?
JACOBY 2NT
North’s 2NT shows an opening hand with four card trump support.
South’s 3♥ shows a singleton or voidwhich improves north’s hand. *4NT is RKCB. 5♠ shows two key cards AND the spade queen.
NON-JACOBY2♣ is a delayed game raise.3♣ guarantees five spades.North SHOULD now use Blackwood with a double fit.
S N S N1S 4S 1S 2C ? 3C 4S ?
JUMP SHIFT (invitation to slam)
ONLY jump shift as responder when you hold 17ish pts., a solid six card suit and secondary support for opener. In other words - RARELY! because it takes up your bidding space.
When the 4/4 spade fit is known, RKCB gets you to a good 70% slam.
Using ordinary Blackwood you are unsure about the ♠Q.
764A10753K6J96 Q2
J648543K1073AKJ105
KQAJ9752
983982Q102AQ84
REVERSE BIDSWhen your 2nd suit is lower ranking than your 1st suit you need tojump a level of bidding to show a hand of 17+ pts.
When you rebid below your barrier you limit your hand to 11 to a poor 16
Remember 1♦ - 1♠ 2♥ is ABOVE your barrier even though you did not jump.This also shows 17+!
8
5

♠♥ ♦ ♣
♠♥ ♦ ♣
♠♥ ♦ ♣
♠♥ ♦ ♣
♠♥ ♦ ♣
♠♥ ♦ ♣
♠♥ ♦ ♣
♠♥ ♦ ♣
♠♥ ♦ ♣
♠♥ ♦ ♣
♠♥ ♦ ♣
♠♥ ♦ ♣
♠♥ ♦ ♣
♠♥ ♦ ♣
♠♥ ♦ ♣
♠♥ ♦ ♣
Intermediate Hands for Revision. Inga & Neil Aiston 2008
14
S W N E1NT P 2C P 2D P
Swap south’s ♣7 for west’s ♠9 INT 2C 2S P
Swap north’s ♦3 for west’s ♥10INT 2C 2S P
Do not use transfer you may miss your 4/4 spade fit
RESPONDER TAKES CONTROL7532J752Q8532 QJ4
843K72AJ105
1086AKAJ109Q974
AK9Q109664K863
K642QJ7538274 975
K109643AKQ5
QJ10862AKQ5J109
A3A84J10978632
K7KQJAQJA10987 1092
9726432432QJ43
1086K109KQJ
A865A54387565
A987108AQJ3J98 43
A4329766543
KQJ10KQJ97K102A
65265854KQ1072
Dummy
Dummy
Dummy
Dummy
1
2
3
4
Dealer North /Declarer N
S W N EINT P 2C P 2S P P
Swap south’s ♠8 for east’s ♥10INT 2C2D 2H
2H is weak and to playIf responder held a stronger hand he would transfer then bid a gain.
Dealer East/declarer E
S W N E1NT P 4NT
This is not Blackwood.Just like 1NT 2NT asks partner to bid the game on a maximum 1NT 4NT asks partner to bid 6NT on a maximum.You need a minimum of 33 HCPs to bid a slam in NT
If you use 4NT asking you can’t sign off in 5NT when partner shows no aces as that would be asking for kings.Dealer south/declarer S
N E S WINT P 2D P 2H P 2S P 4S P 4NT P 5H P 6S
No need to jump the bidding, you control the auction. Simply transfer then bid your four card spades suit.
4NT is Blackwood
Dealer East/ declarer W

♠♥ ♦ ♣
♠♥ ♦ ♣
♠♥ ♦ ♣
♠♥ ♦ ♣
♠♥ ♦ ♣
♠♥ ♦ ♣
♠♥ ♦ ♣
♠♥ ♦ ♣
♠♥ ♦ ♣
♠♥ ♦ ♣
♠♥ ♦ ♣
♠♥ ♦ ♣
♠♥ ♦ ♣
♠♥ ♦ ♣
♠♥ ♦ ♣
♠♥ ♦ ♣
Intermediate Hands for Revision. Inga & Neil Aiston 2008
15
AK653753273Q8
949864A8410976
N E S W1♦ 1♠ X P 2♣ P 3NT Lead ♠9 (Hi-lo = even)
1♠ overcall with a good five card suit.
South makes negative double showing 4 hearts.
QJ10AKJ10Q65J43
872QKJ1092AK52
Defender needs to think!Top tricks = 6 (After the lead = 7)
With no entry back to his hand, east should duck the spade lead and hope partner can regain the lead to play a 2nd spade. Now the ace, king will drop souths remaining spades.
The defence take four spade tricks and the ♦A
Q7410653263A95
K983J8KJ97482
AJ102AKQA108Q63
65974Q52KJ1074
Declarer needs to think!Top tricks = 5 (After the lead = 6)Clubs is the suit on which you should focus.Problem. Limited entries to dummy.
Solution 4th highest lead places all high diamonds with west. Do not try for a cheap trick by winning with ♦10Win trick 1 with ♦A. This will create ♦Q as entry even when east correctly holds up ♣A until 3rd round.
S W N E2NT P 3NT Lead ♦7 (4th highest.)
(Ask RHO “What is your lead style”?)
DO NOT ASSUME that it is 4th highest.
OOPS! DID YOU SEE THE ENTRY PROBLEMS?
K96Q85K842642
Q87107432J96A5
52K6753QJ10983
AJ1043AJ9AQ10K7
Declarer needs to think!
Top tricks = 4Clubs is again the suit on which you should focus.Problem. As before -Limited entries to dummy.
Solution Do not try for a cheap trick by playing ♥J or ♥9. IF you do, your only entry to the clubs is removed and you cannot make your contract!
N E S W1S P 1NT P3NT Lead ♥3 (Ask RHO “What is your lead style”?)
DO NOT ASSUME that it is 4th highest.
Dummy
Lead ♠7
(Ask RHO “What is your lead style”?)
DO NOT ASSUME that it is 4th highest.
54A87KQ62AJ83 Q93
Q10J8743Q104KJ2
K542A5K652
A10876J96310997
S W N E1NT P 3NT
Declarer & defender need to think! Recognise immediately that you need to finesse clubs into east.You must duck ♠Q at trick 1.
When spades are returned, play the ♠K and hope that west wins with ♠A and plays a 3rd spade.Now when your club finesse fails, east does not have a spade to play.
West with no outside entry should duck ♠K. Now when east gets in he can lead his 3rd spade to west.

♠♥ ♦ ♣
♠♥ ♦ ♣
♠♥ ♦ ♣
♠♥ ♦ ♣
♠♥ ♦ ♣
♠♥ ♦ ♣
♠♥ ♦ ♣
♠♥ ♦ ♣
♠♥ ♦ ♣
♠♥ ♦ ♣
♠♥ ♦ ♣
♠♥ ♦ ♣
♠♥ ♦ ♣
♠♥ ♦ ♣
♠♥ ♦ ♣
♠♥ ♦ ♣
Intermediate Hands for Revision. Inga & Neil Aiston 2008
16
S W N E1NT X P 3NT
S W N E1NT X P Pass
A1096Q942AQKJ2
742873 K63AQ104
J85365 J1098 653
KQ AKJ107542987
VULNERABILITY
East's bid /pass depends on the vulnerability.
With N/S non-vulnerable even -3 only scores +500.
Bidding game at this vulnerability scores +600.
At equal vulnerability, east will pass.
K1097Q6521073Q6 85
J87QJ65AJ105AQJ62
A4K94843
43K1093A82K972
S W N E1S P 2S PP P/X
I am always relieved when the opponent in protective position passes without thought. Almost relieved not to have to bid!
Never pass automatically in protective position
THEY HAVE A FIT & 20ish POINTSSO DO WE. LETS FIND IT!
West's pass would close the auction allowing N/S to play comfortably in 2♠.
West must compete with a X.2♠ scores -1103♣ +110
On another day, when 3♣ goes down, even -50 /-100 is better than -110
KQJ10293K8J1054
8510754J106KQ93
A974K29743286 63
AQJ86AQ5A72
E S W N1H 1S 2H 2S3H ?/3S ?
Generally if you can push the opponents to the 3 level or the 5 level you have done your work and should pass.
DON’T PUSH THEM TO GAME
IF south now bids 3♠, he should have already decided what to do if E/W bid 4♥. If they do now bid on, you may have pushed them into a makeable game that they weren’t going to bid.
You now would bid 4♠ which is likely to be doubled for -300. Not as good as -170 when E/W don’t bid the game.Sometimes you should wait until they bid game before sacrificing.
E/W Vuln.
LA or GA or E/W Vuln.
8Q98432Q98659 AQ9743
7103Q642J65
AKJ106AJ283
K1025K74AKJ1075
S W N E1H 2C 4H ?
This pre-emptive raise would have little effect if the overcall had been in spades.
*Opponents are more likely to bid on, to save against a Vuln. game. You are less likely to be doubled than if you creep there.
PRE-EMPTIVE RAISE TO GAME
North should ask, "Where are the spades" and bid a pre-emptive 4♥ to try and stop E/W finding their spade fit.Undetered by the 4♥ bid, east should bid on to 4♠ with the possibility of a double fit.
Equal or favourable vuln.
Any vulnerability*
Any vulnerability
VULNERABILITY & SCORING

♠♥ ♦ ♣
♠♥ ♦ ♣
♠♥ ♦ ♣
♠♥ ♦ ♣
♠♥ ♦ ♣
♠♥ ♦ ♣
♠♥ ♦ ♣
♠♥ ♦ ♣
♠♥ ♦ ♣
♠♥ ♦ ♣
♠♥ ♦ ♣
♠♥ ♦ ♣
♠♥ ♦ ♣
♠♥ ♦ ♣
♠♥ ♦ ♣
♠♥ ♦ ♣
Intermediate Hands for Revision. Inga & Neil Aiston 2008
17
COVER AN HONOUR WITH AN HONOUR!?
C10 LEAD East’s 1st double of 2H should be taken as a penalty X of 1NT.When east doubles a 2nd time, this is confirmation of the 16-18 range. (Not merely lead directing)West with only 3 pts. takes out the double to 3D and thankfully north bids on to an unmakeable contract.
AQ943J92J9743 1065
AQ62Q84AKQJ8
K1054AKJ6862
K72873109753105
OF COURSE YOU COVER!
Three clubs cashed and then the ace of hearts.
Declarer wins the heart continuation with HK, and leads SJ. IF west does not cover this, declarer makes the contract - and shouldn’t! West MUST cover!
Brunton 02 / 08
S W N E1NT P 2H X2S P P XP 3D 3S
AQJ6532QJ9K74 876
K87K54Q1085K104
QJA732A632
9532A10941086J9
S W N E1NT P 3NT
DON’T COVER TOUCHING HONOURS
E/W take the 1st four heart tricks. West switches to CJ won in dummy with CK.
Now DQ is played. East must NOT cover. If you do, west’s D10 is trapped by north’s J9 and a finesse will bring in the contract. When north plays the DJ, you can POUNCE, setting up a a win-ner for west.
H4 LEAD
No sequences or any other reason not to lead 4th highest when you have two honours in the suit.
S W N E1NT P 3NT
Q2Q97K72AJ1085
K1091086J94K742
A8753AJ43Q5Q3J64
K52A1086396
EAST MUST DECIDE IN CLUBS.WEST MUST DECIDE IN HEARTS
Declarer plays DQ which holds the trick. CQ is next. IF you cover, declarer makes 5 clubs, 2 hearts,1 spade, 1 diamond.Declarer can never catch your CK so keep ducking. - Now he tries the HQ. IF west doesn’t cover with HK, declarer makes 4 hearts and the contract.On best defence, only 7 tricks are possible.
S W N E1NT P 3NT
D6 LEAD
North transfers to show five spades, and then bids 3H to show a four card heart suit with enough points for game.
S W N E1NT P 2H P2S P 3H P3NT
DECLARER IS FISHING!DON’T BE CAUGHT!
After cashing HA & HK,east plays H5 & H7 (showing three)West switches to D8, won by south’s DA.Now SJ is led. (Declarer is trying to find your SQ - Don’t tell him!)Partner has only 2 trumps. If you don’t play S5 as smooth as silk you have given declarer the contract!
KJ97Q92AQ43Q9
641075976AJ1072
A1083J3KJ105K65Q52
AK86482843
S W N E1NT P 3NT
HA LEAD
Stayman and then an invitational 3S is raised to 4S on south’s 14 count.
S W N E1NT P 2C P2S P 3S P 4S
As soon as dummy is faced, you should have decided which spade you are going to play!!

♠♥ ♦ ♣
♠♥ ♦ ♣
♠♥ ♦ ♣
♠♥ ♦ ♣
♠♥ ♦ ♣
♠♥ ♦ ♣
♠♥ ♦ ♣
♠♥ ♦ ♣
♠♥ ♦ ♣
♠♥ ♦ ♣
♠♥ ♦ ♣
♠♥ ♦ ♣
♠♥ ♦ ♣
♠♥ ♦ ♣
♠♥ ♦ ♣
♠♥ ♦ ♣
Intermediate Hands for Revision. Inga & Neil Aiston 2008
18
WHEN DUMMY GOES DOWN - -A4AK32A943KJ7 K8652
J10872A43J107
954K6Q10986
Q93Q76QJ108582
S W N EP P 1H P 1NT P 3NT
DQ LEAD 5 top tricks - 4 to establish.Clubs is the suit. BUT there is a shortage of entries!?! We only need to lose the lead once to set up clubs
Win DA (Not DK) Lead KC (Honour from the short hand).Defenders can defeat 3NT by holding up the CA if the DK entry had been used at trick 1.
1
43A862KQ2AJ105
KJ2K43A43K943
A108751095J9582
S W N E1NT P 2C P2D P 3NT
S7 LEAD8 top tricks - 1 needed.Clubs will provide an extra winner. BUT enemy spades is the problem. If you take trick 1 you will have only J2 in your hand.If east gets on lead, you will lose 4 spade tricks
DON’T DUCK. Simply finesse C9 into the west hand. Did you recognise the 2 way finesse??
A63K1082Q4A1074 J2
Q769865Q962
K104J93AKJ2J53
Q9875A541073K8
S7 LEAD7 top tricks - 2 needed. Hearts is the suit. BUT spades is the problem. We are likely to lose the lead twice! Use rule of 7!
DUCK 1st trick. Win 2nd.JH finesse loses to QHnow east has no spade to return. Win the diamond or club switch and play another heart. When west wins AH, it is too late!
2
S W N E1NT P 2C P 2D P 3NT
32876AKQJK985 9874
K54984Q104AK
QJ1097652A32
QJ1065A32103J76
S W N E1NT P 3NT
SQ LEAD8 top tricks - 1 needed.Unfortunately you would need to give the lead away twice to establish a heart winner. E/W would win the race and cash spade winners to set your contract.
Your ONLY chance is a 3-3 club break establishing a long club and only giving the lead away ONCE.
3Q96QJ710876Q76
4
WE WILL NOT PLAY - UNTIL WE HAVE : 1. Counted top tricks and know how many more tricks we must establish.
2. Decided on the suit to establish.
3. Decided on the technique to establish them.
4. Recognised potential dangers.
WE WILL NOT MAKE IT UP AS WE GO ALONG - WILL WE?!

♠♥ ♦ ♣
♠♥ ♦ ♣
♠♥ ♦ ♣
♠♥ ♦ ♣
♠♥ ♦ ♣
♠♥ ♦ ♣
♠♥ ♦ ♣
♠♥ ♦ ♣
♠♥ ♦ ♣
♠♥ ♦ ♣
♠♥ ♦ ♣
♠♥ ♦ ♣
♠♥ ♦ ♣
♠♥ ♦ ♣
♠♥ ♦ ♣
♠♥ ♦ ♣
Intermediate Hands for Revision. Inga & Neil Aiston 2008
19
S W N E1D P 2C P 2S P 3C P 3NT
PLEASE do NOT make it up as you go along !
AK2A7543KJ3A5 Q109
QJ108A62973J65
92Q10854KJ4
8743K697Q10862
N E S W1H P 1NT P 3NT
2♣ LEAD
1. 5 TOP TRICKS2. DIAMONDS3. DRIVE OUT ACE4. ENTRY PROBLEMS Only entry to the long diamond suit is the ♣K.Win with ♣A not ♣J.Play diamond honours from the short hand 1st.When defender holds up ♦A for 2 rounds, you still have ♣A as an entry!
J53A785AJ10983 Q9
432QJ106Q765A762
K65AK742K
K1084QJ10989342
♥Q LEAD
1. 7 TOP TRICKS2. CLUBS3. OVERTAKING4. ENTRY PROBLEMS
An easier hand. Win in hand with ♥K.Overtake ♣K with ♣A. Keep playing clubs until ♣Q appears.Win whatever east returns.♥A is entry to your established clubs.
Q1062102AQ1076A7 9754
J54K5QJ63KJ
AQ3J983K1082
A83K987642954
S W N E1NT P 2C P2D P 3NT
♥7 LEAD
1. ONLY 4 TOP TRICKS2. DIAMONDS & SPADES3. TIMING4. 5 HEARTS WITH WEST
WHICH SUIT FIRST?Because you can do nothing about where ♠A is, play spades 1st. West will win and play ♥K. DUCK. Win 3rd heart and finesse ♦J into east who now has no hearts to return.
K3A32854AJ973 J10654
1098QJ6K2AQ8
KJ54A721065
972Q76K1093Q84
WHEN DUMMY GOES DOWN - - 2.DO NOT PLAY - UNTIL YOU HAVE : 1. Counted top tricks and KNOW how many more tricks you must establish.
2. Decided on the suit to establish.
3. Decided on the technique/s to use.
4. Recognised potential dangers.
DIFFICULT - but instructive
♦3 LEAD
1. 7 TOP TRICKS2. CLUBS3. HOLD UP & DOUBLE FINESSE4. LOSING 3 DIAMONDS & 2 CLUBS
Rule of 7 is NOT enough here.Hold up 2 rounds of diamonds.Run ♣10, losing to ♣K. Win east’s return finesse ♣J.Even if this loses you only lose 4 tricks. Without the 2nd finesse, you lose 5 tricks!
2♣ LEAD
♥Q LEAD
♥7 LEAD
♦3 LEAD
S W N E1NT P 2NT P3NT

♠♥ ♦ ♣
♠♥ ♦ ♣
♠♥ ♦ ♣
♠♥ ♦ ♣
♠♥ ♦ ♣
♠♥ ♦ ♣
♠♥ ♦ ♣
♠♥ ♦ ♣
♠♥ ♦ ♣
♠♥ ♦ ♣
♠♥ ♦ ♣
♠♥ ♦ ♣
♠♥ ♦ ♣
♠♥ ♦ ♣
♠♥ ♦ ♣
♠♥ ♦ ♣
Intermediate Hands for Revision. Inga & Neil Aiston 2008
20
WHEN DUMMY GOES DOWN - - 3.A86410764A8543 J
KJ7542Q1098K6KQ109532
AKJ5J7
7Q9863A32Q1092
1
QJ7K1087764AQJ
K86QJ932AK265A92
64QJ103K432
2
S W N E1S 2H 4S 5H 5S P P P
SUIT ESTABLISHMENTHand played on 13th June 2008 at Cramlington. Strong bidding pushes south to 5S. - Top tricks = 9 Losers = 1 club 3 diamonds.
PLAN - A successful diamond finesse will provide 1 extra trick. WHERE can the 11th trick come from? - What about establishing a club winner?! A 3-3 break would be nice, but even a 4-2 is OK.
Win HA. Draw trumps in one round. NOW C7 to CA. and low to CJ, won by east’s CK.D10 is returned. Try DJ. and when west wins with DA you are home.
Win west’s diamond return with DK. S10 to SA and ruff C4 high.S5 to S6 and ruff C5 with S9. Now C8 is a winner on which you throw D5! Get to it with a 4th trump.
10543A598510987
S W N E1NT P 2D P 2H P 3NT P4H
32AQ75753KQ93 95
KJ99862J1075
AKQJ10432A10464
87610864KQJA82
S W N E1S P 2C P2S P 3H P4S
TIMING - A CHOICE OF FINESSES
FAST LOSERS - 2 diamonds, 1 club. SLOW LOSER - 1 heart.
PLAN - Maybe HK is with west, or CA is with west. Either would see us home. but - -Do we draw trumps first and which finesse do we try first?If we try the heart finesse, and it loses, there is no recovery.So the club finesse should be tried 1st. Suppose CK holds!If we have drawn trumps, how do we get to hand to lead again to-wards CQ. We can’t! Therefore we must not draw trumps yet. Win DA. Lead C6 IF west wins CA your problems are over.If the CK holds return to hand with a trump. Lead C4. West takes CA and cashes two diamonds. Your H2 loser vanishes on CQ!
AQJ10J83975K64
K8759721082QJ104
AKQ106653A982
963254AKQJ753
W N E SP P P 1H P 1S P 2C P 3H P 4H
FAST LOSERS - 3 diamonds. SLOW LOSERS - 2 clubs.
Sometimes the PLAN becomes obvious after defenders have grabbed some early tricks and revealed their points.West has revealed 10 pts. by trick 3, yet passed originally. West CANNOT have SK. so a normal finesse is pointless.
After drawing trumps, play SA and run SQ for discards of clubs. If east covers SQ ruff, return to dummy with CK and discard club losers on SJ & S10.Lead DA
SLOW LOSERS / FAST LOSERSYou have two fast losers (HA & SA) and two slow losers in the minors. IF you attempt to draw trumps, another diamond lead will set up a diamond winner for the defence when your club finesse fails.PLAN - Get rid of that diamond loser by creating a winning club on which you can throw D2 Win with DA, and finesse CQ immediately. It loses but you now have a winning CJ on which to throw the losing D2. Now draw trumps.
Lead DK
Lead DQ
Lead H3
REMEMBER THE BIDDING - RUFFING FINESSE.
♠♥ ♦ ♣
♠♥ ♦ ♣
♠♥ ♦ ♣
♠♥ ♦ ♣
♠♥ ♦ ♣
♠♥ ♦ ♣
♠♥ ♦ ♣
♠♥ ♦ ♣
♠♥ ♦ ♣
♠♥ ♦ ♣
♠♥ ♦ ♣
♠♥ ♦ ♣
♠♥ ♦ ♣
♠♥ ♦ ♣
♠♥ ♦ ♣
♠♥ ♦ ♣
Intermediate Hands for Revision. Inga & Neil Aiston 2008
21
N E S W1H P 1S P2H P 3S* P3NT P 4S
* A bit too pushy but is it 100% forcing after a mini-mum rebid by opener?
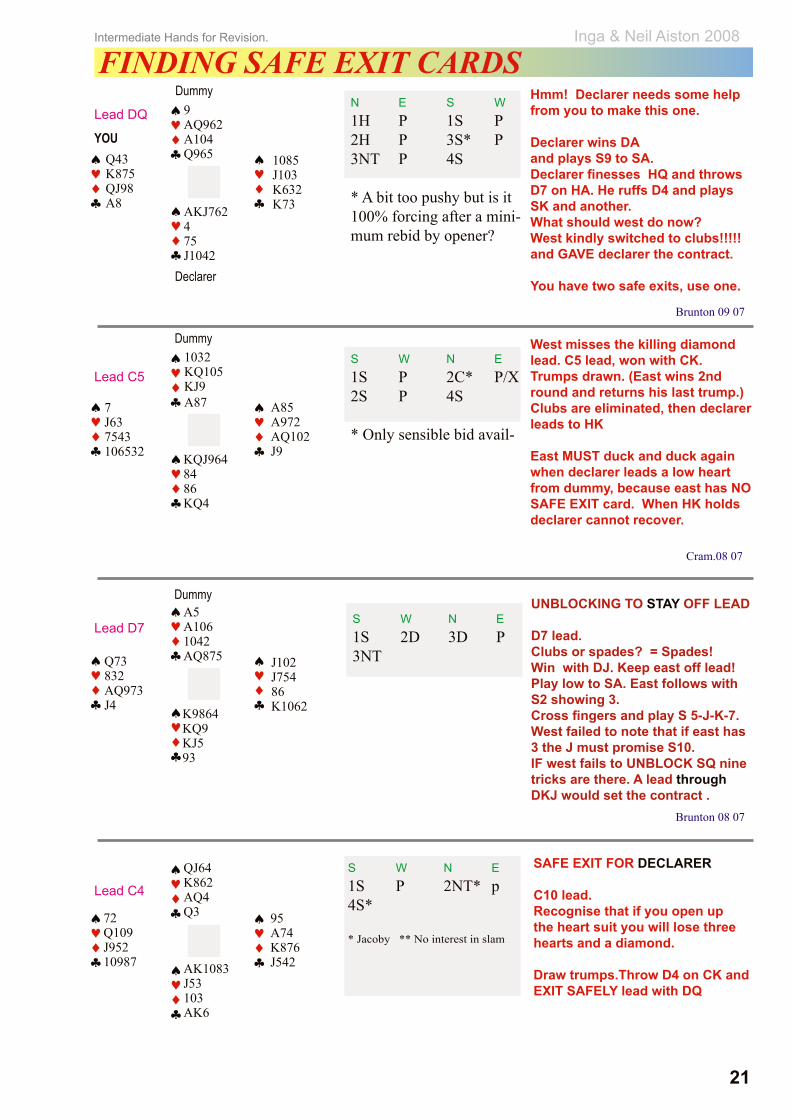
Hmm! Declarer needs some help from you to make this one.
Declarer wins DA and plays S9 to SA.Declarer finesses HQ and throws D7 on HA. He ruffs D4 and plays SK and another. What should west do now?West kindly switched to clubs!!!!!and GAVE declarer the contract.
You have two safe exits, use one.
FINDING SAFE EXIT CARDSDummy
Dummy
Dummy
Lead DQ
S W N E1S P 2C* P/X 2S P 4S
* Only sensible bid avail-
West misses the killing diamond lead. C5 lead, won with CK. Trumps drawn. (East wins 2nd round and returns his last trump.)Clubs are eliminated, then declarer leads to HK
East MUST duck and duck again when declarer leads a low heart from dummy, because east has NO SAFE EXIT card. When HK holds declarer cannot recover.
S W N E1S 2D 3D P3NT
9AQ962A104Q965 1085
J103K632K73AKJ762
475J1042
Q43K875QJ98A8
Brunton 09 07
KQJ9648486KQ4
1032KQ105KJ9A877
J637543106532
A85A972AQ102J9
Cram.08 07
YOU
A5A1061042AQ875 J102
J75486K1062K9864
KQ9KJ593
Q73832AQ973J4
UNBLOCKING TO STAY OFF LEAD
D7 lead.Clubs or spades? = Spades!Win with DJ. Keep east off lead! Play low to SA. East follows with S2 showing 3.Cross fingers and play S 5-J-K-7. West failed to note that if east has 3 the J must promise S10. IF west fails to UNBLOCK SQ nine tricks are there. A lead through DKJ would set the contract .
Brunton 08 07
QJ64K862AQ4Q3 95
A74K876J542AK1083
J53103AK6
72Q109J95210987
SAFE EXIT FOR DECLARER
C10 lead.Recognise that if you open up the heart suit you will lose three hearts and a diamond.
Draw trumps.Throw D4 on CK and EXIT SAFELY lead with DQ
S W N E1S P 2NT* p4S*
* Jacoby ** No interest in slam
Declarer
Lead C5
Lead D7
Lead C4

♠♥ ♦ ♣
♠♥ ♦ ♣
♠♥ ♦ ♣
♠♥ ♦ ♣
♠♥ ♦ ♣
♠♥ ♦ ♣
♠♥ ♦ ♣
♠♥ ♦ ♣
♠♥ ♦ ♣
♠♥ ♦ ♣
♠♥ ♦ ♣
♠♥ ♦ ♣
♠♥ ♦ ♣
♠♥ ♦ ♣
♠♥ ♦ ♣
♠♥ ♦ ♣
Intermediate Hands for Revision. Inga & Neil Aiston 2008
22
6532AJ7J1074105AKJ1084
96Q8592
-Q108543K3QJ763
Q97K2A962AK84
W N E S2H P P 2S3C 4S
West leads ♥3. East does well to play ♥J, then ♥A.Delarer play five rounds of trumps and notices that west has refused to discard a diamond. WHY?
Bidding reveals six hearts & four (probably five) clubs. West must be protecting ♦K!Winning line is ♦5 to ♦A and then ♦6 to ♦8.
OR, if west throws two clubs, you could set up a club winner.After trumps, play ♣9 to ace and king, ruff ♣4. Return to ♦A and throw a diamond on ♣8
WATCHING OPPONENT’S DISCARDS
3NT862QJ10525K1052
Q739643K98343
AJ105KJ1072AQ96
K94A87AQ64J87
4S
Against 3NT you lead Q♥ and dummy wins with ♥K. ♦J is covered with ♦K and south wins with ♦A.♦4 is returned to dummy’s ♦10! What does west discard? IF west discards from the worthless spade you can reasonably guess that west is not protecting ♠Q.
Play ♠5 from table and finesse the ♠9.Without this careless discard you are likely to finesse ♠J, giving east a trick. West needs to protect the spades and clubs and must discard two low hearts to hold you to 11 tricks.
KJ98610497A972Q3
AKQ75KJ8343
10542862Q52QJ6
A7J93A1064K1085
S W N E1NT P 2CP 2D P 3NT
S W N E1H P 2D P2H P 4H
West gets off to a good start by leading trumps. ♥6 lead.Declarer wins with ♥A. Mirror image in diamonds and spades is unfortunate. (Where is ♦Q?) A 2nd trump would be better, but - -♣4 - ♣J - ♣K - ♣A and a trump return (good defence) to ♥K.♣3 to ♣10 is won by west who switches to ♠5 won with ♠A.♠Q is now thrown on ♣10.
Now all we have to do is find the ♦Q! and guess what?On the play of the 3rd trump - - east discards - - a diamond!
Would she discard from Qxx? Unlikely. So cash ♦K. Finesse ♦10.As a defender, would you be as helpful? +450
AKQ108652A9763
9832J54AQ97104
KJ64A863KJ43J Q1075
97210KQ852
S W N E1C P 1D P2D P 2S P2NT P 3NT P
S3 lead. ♠4 - ♠10 - ♠A.South plays ♦2 - ♦7 - ♦J - ♦10Then south mis-guesses. ♦3 and then east errs - ♥2 - ♦8 - ♦9This discard sows doubt in west's mind. (West has been taught to trust partner, and switches to ♣10, as the ♥2 requests).DISASTER! ♣2 might have worked but ♣2 says “Please continue clubs .” A ♠9 continuation could set the contract.SJ - SQ. Then CK- ducked. Then spade return! (Declarer can always make the contract by entering hand with ♥K at trick three and leading towards ♦K43)
SUIT PREFERENCE ERROR CANCELS DECLARER ERROR
4H
3NT

♠♥ ♦ ♣
♠♥ ♦ ♣
♠♥ ♦ ♣
♠♥ ♦ ♣
♠♥ ♦ ♣
♠♥ ♦ ♣
♠♥ ♦ ♣
♠♥ ♦ ♣
♠♥ ♦ ♣
♠♥ ♦ ♣
♠♥ ♦ ♣
♠♥ ♦ ♣
♠♥ ♦ ♣
♠♥ ♦ ♣
♠♥ ♦ ♣
♠♥ ♦ ♣
Intermediate Hands for Revision. Inga & Neil Aiston 2008
23
LEADS LESS OBVIOUS
KJ9Q73286A764
AQ510AK9753953
86AKJ5104KQJ82 107432
9864QJ210
N E S W1C P 1H 3D3H P 4H
ON THE LEAD OF AN ACE
with QJ, QJx or Q bare, play queen.With Qx Do not play queen. This allows partner to underlead his king when he needs to get you on lead. Here unless east plays DQ (to show DJ)There is no defence.
Seeing all the clubs on table, west continues DK, cashes SA Cramlington 09 07
10542982A1097J8 Q8
Q543KQ310964AK
AK6J8652KQ5
J9763J1074A732
S W N E1C 1S 2D P2NT P 3NT
After an artificial 1C (16+) west overcalled 1S (poor but disruptive.)
E/W bid confidently to 3NT. with no attempt to find a heart fit.
S6 would be the normal lead but you have an alternative. HJ lead sets the contract for a top!
A1054A8362AK82
Q9862KQ9J9433
K3102AQ875QJ54 J7
J7654K1010976
S W N E1S P 2D P2NT P 3NT
KING LEAD
West led HK!Although it is usual to unblock honours opposite king leads to NTs, east obviously must NOT unblock, here.Declarer holds off for three rounds and then finesses diamonds into what is thought to be, the SAFE hand.
Cramlington 10/07
Q72Q762Q5K1042 KJ1064
853AJ846A3
AJ10K762AQ73
985K941093J985
S W N E1C P 1H P2NT P 3NT
MUD LEAD (S8)
Short suit MUD lead worked well. Note the correct way to play clubs is to play off a top honour from the hand with two top honours. IF east held the four clubs, south would always lose one.
Cramlington 10/07
Cramlington 09 07

♠♥ ♦ ♣
♠♥ ♦ ♣
♠♥ ♦ ♣
♠♥ ♦ ♣
♠♥ ♦ ♣
♠♥ ♦ ♣
♠♥ ♦ ♣
♠♥ ♦ ♣
♠♥ ♦ ♣
♠♥ ♦ ♣
♠♥ ♦ ♣
♠♥ ♦ ♣
♠♥ ♦ ♣
♠♥ ♦ ♣
♠♥ ♦ ♣
♠♥ ♦ ♣
Intermediate Hands for Revision. Inga & Neil Aiston 2008
24
A1053QJ10KJ8Q62
8952Q764A10943
KQJ72A76103287964
K843A95KJ5
S W N E1NT P 2H P3S P 4S
COVER AN HONOUR WITH AN HONOUR
S6 Lead. Trumps are drawn and declarer plays a successful heart finesse and strips the suit.
D10 lead from table. - East MUST cover or declarer will make TWO diamond tricks and the contract.
Kempson Cup 2007
COSTLY ERRORS
10J982AKQ4AJ43 Q8653
Q43109651097
K6J87KQ9652
AKJ42A10753287
W N E S1S X 4S 5CP P 5S PP X
FAILURE TO SACRIFICE
With five spades and two queens east bids a pre-emptive 4S which would silence most south's.
But, after south bids 5C, west should leave the decision to east and 5S looks clear cut with NO defensive tricks.
With an ace east would double.
N/S Vul.
Cramlington 09 07
Q106AJQ97410753 432
986A1065KJ6K75
KQ10754J2A4
AJ9832K83Q982
S W N E1H P 1NT P3H P 4H
DON’T RETURN PARTNER’S SUIT?!
D3 lead, taken with DA.
East must not simply play back a diamond which sets up a winner for declarer. A club switch required.
If you play back a diamond you provide declarer with a ditch for his losing C4.
AQ64985A6A765
KJ97Q731097432-
5K64KQJ8KQ1094 10832
AJ1025J832
N E S W1C P 1S P2C p 3NT
WHEN IT LOOKS TOO EASY - - !
D10 lead won with DADeclarer thoughtlessly played CA, guaranteeing a club loser!And worse! The spade switch to SJ and east’s SKresulted in another switch to HQ.
10 tricks became 9 and then 8!

♠♥ ♦ ♣
♠♥ ♦ ♣
♠♥ ♦ ♣
♠♥ ♦ ♣
♠♥ ♦ ♣
♠♥ ♦ ♣
♠♥ ♦ ♣
♠♥ ♦ ♣
♠♥ ♦ ♣
♠♥ ♦ ♣
♠♥ ♦ ♣
♠♥ ♦ ♣
♠♥ ♦ ♣
♠♥ ♦ ♣
♠♥ ♦ ♣
♠♥ ♦ ♣
Intermediate Hands for Revision. Inga & Neil Aiston 2008
25
-A9652AJ98Q874
95473Q10742A93
AQ102J10865K1065
KJ8763KQ4K3J2
N E S W1S P 2H P3H P 4H
2ND HAND PLAYS LOW
West does well not to try to cash SA, but the D6 is a poor choice too. D3-DQ-DA(HJ is best when you hold spades!)Declarer can never make a high card club trick, and is heading for only one off IF he can ruff a club with H4
BUT THEN when south leads C4 to CJ west plays KC!! and returns another diamond!
8 tricks (on a trump lead) has become 10 with a club ruff and the now established CQ
Cramlington 10 07
MORE COSTLY ERRORS
Cramlington 10 07
754Q10752AJ976
AK10896K1052853
QAKJ3764KQJ109 J9632
84Q83A42
N E S W1C P 1H X3H p 4H
1073652QJ95AK4 5
KQJ7A732Q1062KQJ9862
3K8675
A4A10984104J983
S W N E3S P P XP 4H 4S PP ?
WEST HAS A PLAN - BUT CHANGES HIS MIND
1. After the auction it is reasonable to assume that partner (east) has values in diamonds. Even D KQ would work BECAUSE west has SA. So D10 looking for a ruff is led.
2. East (in case it is a singleton) rises with DA and returns D9This is won by declarer in hand with DK.
3. Declarer leads S2 towards dummy. West is caught off guard and foolishly plays low in case the ace drops partner’s singleton SK. GAME OVER.
West’s original plan was excellent. Win with SA and underlead HA to east’s HJ and ruff the diamond return.
Q109Q874210A984 753
JAK9632J63AKJ8
AK10953742
6426QJ85KQ1075
S W N E1H P 3H P3S P 4C P4S P 4NT P5C P 6H
CHICKEN BIDDING
After 3H from north south should be interested in slam and cue bid the SA.
South confirms some interest with 4C and now south must decide whether to go past game.with no help in diamonds north could sign off in 5H, but with a singleton slam is on.
The crucial bid here is 4S showing SK.
If you bid 4H to show you haven't got the DA north is likely to sign off.
Brunton 11 07
SPOT THE DANGER
West leads SA. East could signal the club ace! but would partner think it was a void and lead clubs?!East wisely plays a neutral S6.West reads this as no interest in anything and switches to a trump. Presumably to cut down ruffs?Declarer draws trumps and sets up the clubs on which to throw losers.West should be fearful of this and must attempt to set up winners in diamonds before it’s too late!