Embed Size (px)
Citation preview
- 1 - INTERMEDIATE BRIDGE COURSE
PLAY OF THE HAND
LESSON 1-B
MAKING A PLAN - We previously discussed, although in general terms, that the objective for declarer play in a Suit Contract centered around focusing upon potential losing tricks and their elimination, and around potential winning tricks in a No Trump contract and their possible supplementation. Before a declarer initiates his/her declarer play, however, it is essential to organize the play of the hand. Four basic steps are indicated and necessary to accomplish these goals:
Pause To Consider The Objectives - What is the contract, who are my opponents, what card was led and what is its significance to me and to my opponents need I play conservatively or aggressively as a result of the lead. What is the number of acceptable winners or losers in order to fulfill the contract.
Look At The Projected Winners Or Losers - Dependent upon either a No Trump or suit contract respectively. (A) In a No Trump Contract, playing techniques include: (1) Promotion of high cards (Developing a sure trick when holding a suited KQ)
(2) Suit establishment (Developing tricks through length) (3) Finessing (Attempting to develop a second trick when holding a tenace (B) In a Suit Contract all of the above apply plus: (1) Trumping Losers (2) Discarding losers on extra winners
Analyze The Alternatives - Need you play conservatively or aggressively based upon such variables as; the skill of the opponents, the quality of your game so far that event, what you believe the rest of the field is likely to have been faced as to their suspected contract and its probability of success.
Now Put It All Together - Using the above information along with factors such as being aware of entries, avoiding the dangerous opponent, using the hold-up-play, inferences and probable placement of missing high cards, trump pieces and suit distribution all deduced from previous bidding or lack of same Exercise 1: Counting Objective of Winners/Losers
3C (4 Losers) 6NT (12 Winners) 4S (3 Losers) 1NT (7 Winners) 2D (5 Losers)
Exercise 2: Counting Sure Winners (Sure Tricks = ones capable of being taken without giving up the lead to the opponents. N - AKQ (3) AK (2) JX (5) KQX (0) AXXXX (5) AKQ (3) AXXX (2) S - XXX QX AKQ10X JXX KQXXX XX KXX
- 2 -

Conclusion: Winners are counted by looking at the combined holding in each suit. A winner is a card that will take a trick without giving up the lead to the opponents. The maximum number of winners one can count is the number of cards in the longer hand. If one have enough cards in the suit such that the opponents will have none left after your top cards are played, you do not need all the honors in order to run the suit.
Exercise 3: Counting Losers - defined as the number of tricks the opponents are likely to take. N (Dummy) KQ KQ QJ10 XXXXX AK XXX KJ10
S (Declarer) AXX (2/0) XX (2/1) XX (2/2) AK (O) XXXXX (5/3) AQJ (1/1) XXX (3/2)
There are two basic typos of losers; quick losers, and slow losers. Quick losers are those that the opponents can take immediately if they have the lead. Slow losers are those which the opponents can never take immediately because they must first give one the lead back first.
Exercise 4: Counting both quick and slow losers:
DUMMY KQJX J1098 XXXX AX KXK QX
DECLARER XX (1 Quick) XXXX (3 Quick) AX (1 Slow) XXXX (3 Slow) XX (2 Quick XXX (lQ,lS) If the cards in the dummy and declarer's hand are unevenly divided, the order in which the cards are played; the first trick(s) should be won by the high card(s) from the short side.
Exercise 5: Which high card would you win the first trick with in each following combination:
DUMMY AQJ1OX AX AJX QX KQX
DECLARER KX (King) KQX (Ace) KQXX (Ace/Jack) AKJX (Queen) AJX (Any)

INTERMEDIATE BRIDGE COURSE - 3 - PLAY OF THE HAND
LESSON 2 - B
THE DEVELOPMENT OF TRICKS - There are numerous ways of developing tricks that would otherwise not be there as quick winners. These methods include but are not limited to the following: A. THE PROMOTION OF HIGH CARDS - Giving up of one's high card(s), especially when a
sequence of high cards is present, is one of the most certain methods of developing additional tricks. One must consider the losing of such a promotional trick to the opponents as early as is possible in the play of the cards before controls are expended in other outside suits.
Exercise 1: How many times would you have to give up the lead in order to promote otherwise unavailable tricks, and how many winners would be produced in the following holdings? DUMMY: KQJ10 J1098 Q1OX KX JXX DECLARER: XXXX XXXX JXX QX lO9X
1-3 3-1 2-1 1-1 0 Notice that in the above examples, the more high cards you have in the suit, the more potential the suit has for the development of tricks - even though the opponents have one or two higher cards. Patience is required and one must not be afraid of losing the lead to the opponents if, in the end, tricks are promoted.
Exercise 2: Assuming an outside entry in another suit in dummy, how many tricks would you expect to develop through promotion, and which card would you play first in the following suit combinations? DUMMY: KJ109X QJX KQlOX J1OX Q1098X DECLARERER: QX KX JX QX KJ
4-Q 2-K 3-J 1-Q 4-K Notice that by starting with the high card from the short side when promoting winners, you lessen the chance you will become stranded wondering how to return to the promoted winners across the table.
B. THE DEVELOPMENT OF TRICKS THROUGH LENGTH - One can statistically conclude (in all but the most unusual circumstance) that the division of missing cards within any suit amongst the opponents is as follows: (1) If there are an even number of cards outstanding in a suit (2, 4, 6) - then the cards tend to be unevenly divided. For example, if there are six cards held by the opposition, they would probably be divided 4-2 rather than 3-3 (2) If there are an odd number of cards outstanding in a suit (3, 5, 7) - then the cards tend to be divided as evenly as possible. For example, if there are five cards held by the opposition, they would likely be divided 3 2 rather than 4-1.

- 4 - Exercise 1: If the opponents hold the number of cards shown below, how would you likely find the Cards distributed between the two opponent's hands?
3 4 5 6 7 8 9
2-1 3-1 3-2 4-2 4-3 5-3 5-4 Exercise 2: When deciding how many tricks you can expect to develop from a long suit holding, it helps to estimate how the opponents holding is likely to be divided. In the following examples, how many tricks would you get if the suit were to be divided as favorably as possible? DUMMY: AKXX AXXX AXXXX KXXXXX AKXXX DECLARER: XXXX KQX KXX AX XXXX
3 3 4 5 4 Exercise 3: Giving of a trick to the opponents which you otherwise could have won is called
DUCKING. The ducking of a trick(s) can be very useful when trying to establish a long suit. Assuming there are no outside high card entries in the dummy other than the ones in the suit shown, how would you play the following holdings? How would you expect the opponent's cards to be divided, how many tricks would you expect to take, and how many times should you duck in order not to strand the established winners?
DUMMY: AKXXX AXXXX AKXXXX AXXXX AXXX DECLARER: XXX KXX XX XXX KXX 3-2, 4 3-2, 4 3-2, 5 3-2, 3 4-2, 2 Duck Once Duck Once Duck Once Duck Twice - 0 - When you have a limited number of winners in the dummy, it is oft times necessary to take your losses early in a suit so that you have enough cards left in declarer's hand to enable you to get to the winners you worked so hard to establish. In conclusion, developing long suits, in order to promote winning tricks, works in no trump and in trump contracts. In a No Trump contract, you are attempting to develop extra winners. In suit contracts, however, you are trying to eliminate extra losers. Often all that is required is a normal division of the missing cards and the ability of declarer to play the cards in the proper sequence in order to take advantage of the distribution of the missing cards held by the opponents. - 5 -
INTERMEDIATE BRIDGE COURSE PLAY OF THE HAND
LESSON 3-B
THE DEVELOPMENT OF TRICKS: (Cont.) C. THE FINESSE : The attempt to gain power for lower ranking cards by taking advantage of a
presumed favorable position of higher ranking cards held by the opponents. The process is based upon the idea of leading toward the card(s) you hope will take a trick. It will be successful 50% of the time.
Exercise 1: To avoid losing a trick to an honor missing from a tenace holding.
DUMMY: AQX AKJ KJX AKJXX (8 Ever - 9 Never)
DECLARER: XXX XXX AX XXX
Exercise 2: To gain a trick with lower ranking cards. DUMMY: XX QXX XXX DECLARER: KX AXX QXX
Exercise 3: To prepare for a second finesse in the same suit.
DUMMY: AJ10 AK109 AJ9 DECLARER: XXX XXX XXXX Exercise 4: Repeated finesses. If successful will yield more tricks than via a simple promotion.
DUMMY: KQX AQJ DECLARER: XXX XXX Exercise 5: The development of a long suit via a combined promotion of high cards and the simple finesse. Combining these ideas, how many tricks might be developed in each of the following combinations, assuming the location of the missing high card(s) and the division of the missing cards are as favorable as possible.
DUMMY: QXX KQXX KXXXX AQJXX XXXX DECLARER: AXXXX XXXX XXX XXX AKJXX 4 3 3 5 4 Conclusion: Extra tricks can be developed by combining the finesse with the development of long suits. Just how many tricks capable of being taken is dependent upon the location of the high cards and the division of the missing cards of the suit between the opponents.
- 6 -

Exercise 6: The choice of leading towards the high card or of leading the high card itself. In each of the following combinations, how would you play each of the following card combinations so as to achieve the maximum number of tricks? DUMMY: AXX J109 QX QJXX JX
DECLARER: QJ10 AKXX AXX AXX AQ109 Conclusion: One should lead the high card itself instead of leading toward the high card only when you have most of the high card strength and when you don't mind if the opponent COVERS your high card with a higher card. To do so will have the effect of attempting to trap the missing high card held by the opposition. Otherwise, lead toward the higher card.
Exercise 7: The deep finesse - a finessing technique used when two or more high cards are missing higher in rank than the card finessed. DUMMY: AQ10 XXX AJ9
DECLARER: XXX KJ10 XXX Finesse the 10 Finesse the 10 Finesse the 9 and presume the and presume the and presume the K or K/J on the left Q or Q/A on the right K/10 or Q/10 on the left
Conclusion: When you are leading towards high cards, two of the honors are missing, and you have a choice of cards to play, play the lower card first.
- 7 - INTERMEDIATE BRIDGE COURSE
PLAY OF THE HAND
LESSON 4-B
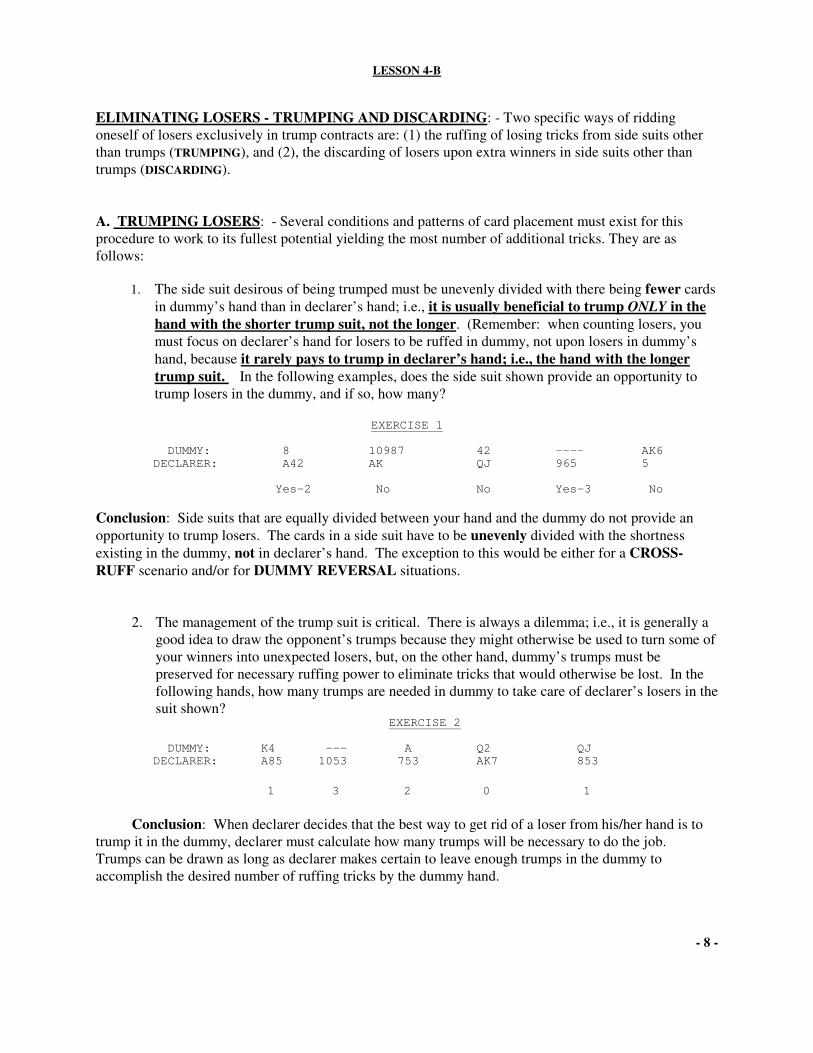
ELIMINATING LOSERS - TRUMPING AND DISCARDING: - Two specific ways of ridding oneself of losers exclusively in trump contracts are: (1) the ruffing of losing tricks from side suits other than trumps (TRUMPING), and (2), the discarding of losers upon extra winners in side suits other than trumps (DISCARDING). A. TRUMPING LOSERS: - Several conditions and patterns of card placement must exist for this procedure to work to its fullest potential yielding the most number of additional tricks. They are as follows:
1. The side suit desirous of being trumped must be unevenly divided with there being fewer cards in dummy’s hand than in declarer’s hand; i.e., it is usually beneficial to trump ONLY in the hand with the shorter trump suit, not the longer. (Remember: when counting losers, you must focus on declarer’s hand for losers to be ruffed in dummy, not upon losers in dummy’s hand, because it rarely pays to trump in declarer’s hand; i.e., the hand with the longer trump suit. In the following examples, does the side suit shown provide an opportunity to trump losers in the dummy, and if so, how many?
EXERCISE 1
DUMMY: 8 10987 42 ---- AK6 DECLARER: A42 AK QJ 965 5 Yes-2 No No Yes-3 No
Conclusion: Side suits that are equally divided between your hand and the dummy do not provide an opportunity to trump losers. The cards in a side suit have to be unevenly divided with the shortness existing in the dummy, not in declarer’s hand. The exception to this would be either for a CROSS-RUFF scenario and/or for DUMMY REVERSAL situations.
2. The management of the trump suit is critical. There is always a dilemma; i.e., it is generally a good idea to draw the opponent’s trumps because they might otherwise be used to turn some of your winners into unexpected losers, but, on the other hand, dummy’s trumps must be preserved for necessary ruffing power to eliminate tricks that would otherwise be lost. In the following hands, how many trumps are needed in dummy to take care of declarer’s losers in the suit shown?
EXERCISE 2
DUMMY: K4 --- A Q2 QJ DECLARER: A85 1053 753 AK7 853
1 3 2 0 1
Conclusion: When declarer decides that the best way to get rid of a loser from his/her hand is to
trump it in the dummy, declarer must calculate how many trumps will be necessary to do the job. Trumps can be drawn as long as declarer makes certain to leave enough trumps in the dummy to accomplish the desired number of ruffing tricks by the dummy hand.
- 8 -

3. Sometimes declarer can start to trump losing tricks in the dummy without giving up the lead to the Opponents. However, it is sometimes necessary to relinquish the lead once or even several times before the conditions are right to trump a loser in dummy. In each of the following example, how many times must one forfeit the lead before losers in declarer’s hand can be trumped in the dummy hand?
EXERCISE 3
DUMMY: A5 Q 65 ---- 7 DECLARER: 986 1098 1072 J78 A92 1 1 2 0 0
Conclusion: At times, the only way to promote an extra trick in order to make a contract is to give up the lead to the opponents before declare has the ability to trump a loser in the dummy hand.
B. DISCARDING LOSERS: - An alternative to trumping a loser in dummy is to throw away a loser from declarer’s hand upon one of dummy’s extra winners. The pattern of card distribution, this time, is that dummy has more cards in the suit than does declarer. In the following exercise, how many losers can be discarded on extra winners in the dummy, and what does declarer have to do in order to prepare the side suit shown for discarding losers?
EXERCISE 4
DUMMY: AKQ KQJ AKXXX AQJ QJ109 DECLARER: 98 64 932 74 86 1 1 2 1 2 Nothing Promote Duck 1 Trick Finesse Twice Promote
Conclusion: When searching for alternative ways of disposing of losers in a trump contract, look to see if dummy has additional winners in a side suit (other than the trump suit) on which to throw your losers.
- 9 -
INTERMEDIATE BRIDGE COURSE PLAY OF THE HAND

LESSON 5-B
ENTRIES: - An entry is a conveyance which allows you access from one hand (Declarer’s) to the other (Dummy’s) or vice versa. When one is developing extra tricks or getting rid of losers, entries, by virtue of their making it capable of access from one hand to the other, facilitate the development of tricks. Entries can be either high or low cards. In the following examples, how many entries to the dummy are there in each suit holding shown?
EXERCISE 1
DUMMY: AQ7 AK3 104 K109 KQJ DECLARER: K92 7 AKQJ3 AQJ65 A 2 1 1 3 0
Conclusion: A sure entry is a winner on one side of the table combined with a smaller card on the other side of the table necessary for communication with the entry. Several considerations dealing with entries and their usage are important. They are as follows:
1. Creating Entries: When there is no quick entry from one hand to the other, it may oft times be possible to create one by ( a ) promoting a card into a winner, ( b ) establishing a winner through length, ( c ) using the finesse, or ( d ) trumping a card in a suit contract. Whether or not one is successful in these hypothetical endeavors depends upon several possible variables. In (a), attempting to promote a card through length, success will depend upon what happens when the lead is forfeited to the opponents in order to promote the entry. In (b), attempting to establish an entry through length, success will be dependent upon the division of the opponent’s holdings in the suit in question. In (c), the success of any finesse necessary to establish an entry is, of course, dependent upon the favorable location of the missing card. Finally, in (d), establishing an entry by trumping a card is, of course, dependent upon the shortness in an outside suit other than trump, and the availability of a trump with which to accomplish the attempt. In the following examples, how might one create an entry to dummy in the suit holdings shown?
EXERCISE 2
DUMMY: KQ8 K9 Q83 QJ10 9864 DECLARER: 732 84 A64 732 AK53 Drive out Lead Toward Lead Toward Drive Out Give Up A K Q A & K One Trick
Conclusion: - Don’t be discouraged if you require an entry and do not see an immediate solution. With a little effort and patience you can often create an entry using the techniques previously discussed; i.e., by promotion, by establishment through length, with the help of a finesse, or by trumping outside shortness.
- 10 -

2. Preserving Entries : Because entries are so very important in the play of the hand, they can be preserved when needed by using the guidelines spoken of earlier; i.e., winning the high card from the short side first, and taking one’s losses early. Suppose, for example, there are no entries in any other suit other than the ones shown in the examples below, how would you play each suit in order to take all of the tricks to which you were entitled?
EXERCISE 3
DUMMY: K6 K8754 AK63 A8732 AKJ10 DECLARER: AQJ5 A32 QJ4 954 Q Play K Duck Play Q,J Duck Overtake First 1 Trick First Twice Q With A
3. Estimating the Number of Entries Needed : In order to take a finesse, one or more entries are needed from the side from which the finesse originates, depending on how many times the finesse has to be taken. In the following examples, how many entries would be needed in outside suits other than the ones shown in the dummy in order to try the finesse(s) necessary to maximize the number of tricks taken?
EXERCISE 4
DUMMY: 85 863 652 963 A63 DECLARER: AQ6 AQJ KQ7 AQ10 Q92
1 2 2 2 0(Use A)
- 11 - INTERMEDIATE BRIDGE COURSE
PLAY OF THE HAND
LESSON 6-B
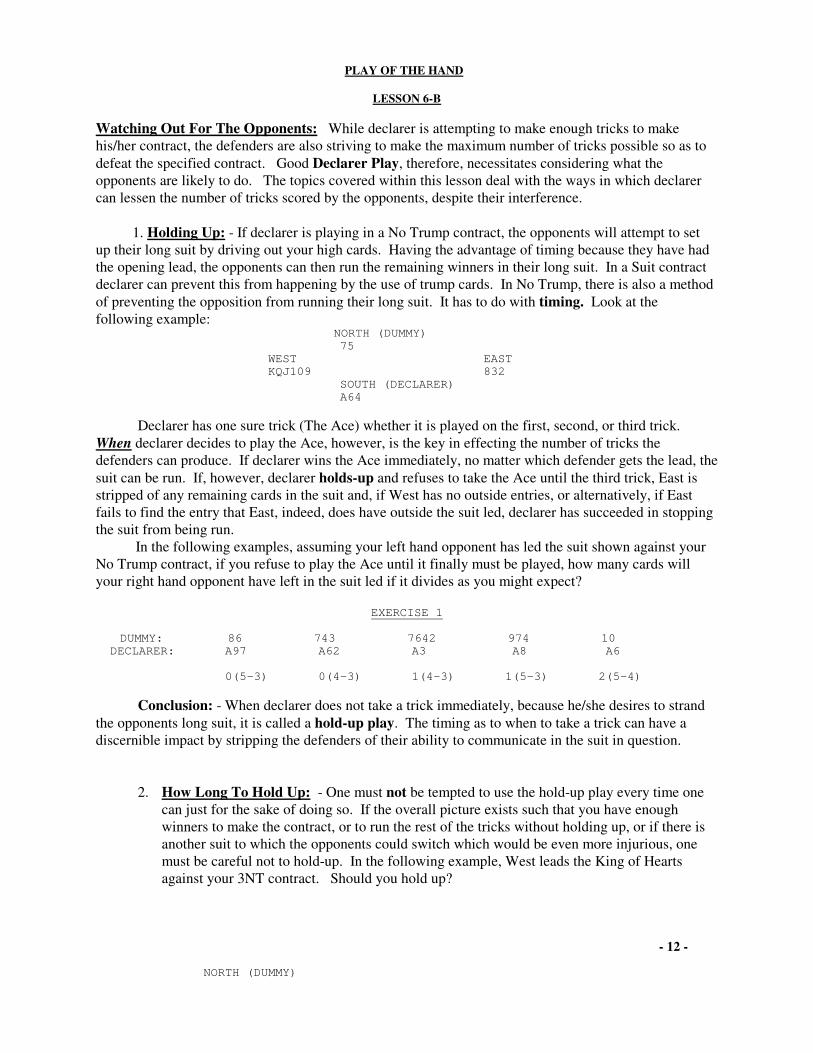
Watching Out For The Opponents: While declarer is attempting to make enough tricks to make his/her contract, the defenders are also striving to make the maximum number of tricks possible so as to defeat the specified contract. Good Declarer Play, therefore, necessitates considering what the opponents are likely to do. The topics covered within this lesson deal with the ways in which declarer can lessen the number of tricks scored by the opponents, despite their interference. 1. Holding Up: - If declarer is playing in a No Trump contract, the opponents will attempt to set up their long suit by driving out your high cards. Having the advantage of timing because they have had the opening lead, the opponents can then run the remaining winners in their long suit. In a Suit contract declarer can prevent this from happening by the use of trump cards. In No Trump, there is also a method of preventing the opposition from running their long suit. It has to do with timing. Look at the following example: NORTH (DUMMY) 75 WEST EAST KQJ109 832 SOUTH (DECLARER) A64
Declarer has one sure trick (The Ace) whether it is played on the first, second, or third trick. When declarer decides to play the Ace, however, is the key in effecting the number of tricks the defenders can produce. If declarer wins the Ace immediately, no matter which defender gets the lead, the suit can be run. If, however, declarer holds-up and refuses to take the Ace until the third trick, East is stripped of any remaining cards in the suit and, if West has no outside entries, or alternatively, if East fails to find the entry that East, indeed, does have outside the suit led, declarer has succeeded in stopping the suit from being run. In the following examples, assuming your left hand opponent has led the suit shown against your No Trump contract, if you refuse to play the Ace until it finally must be played, how many cards will your right hand opponent have left in the suit led if it divides as you might expect?
EXERCISE 1
DUMMY: 86 743 7642 974 10 DECLARER: A97 A62 A3 A8 A6 0(5-3) 0(4-3) 1(4-3) 1(5-3) 2(5-4)
Conclusion: - When declarer does not take a trick immediately, because he/she desires to strand the opponents long suit, it is called a hold-up play. The timing as to when to take a trick can have a discernible impact by stripping the defenders of their ability to communicate in the suit in question.
2. How Long To Hold Up: - One must not be tempted to use the hold-up play every time one
can just for the sake of doing so. If the overall picture exists such that you have enough winners to make the contract, or to run the rest of the tricks without holding up, or if there is another suit to which the opponents could switch which would be even more injurious, one must be careful not to hold-up. In the following example, West leads the King of Hearts against your 3NT contract. Should you hold up?
- 12 -
NORTH (DUMMY)

862 Consult your plan. You need nine tricks 74 and you have nine tricks. There is no need to K973 put the contract at risk by holding up. If AQJ5 you do not take the trick, the opponents could switch to Spades and your contract would be K (Hearts) defeated. SOUTH (DECLARER) Q3 A65 AQJ10 K942
Conclusion: Only use the hold-up play when you must give up the lead later in order to promote the number of tricks needed. Always remember to consult your plan first before playing.
3. The Dangerous Opponent: - Since the opponents are always trying to capture your high
cards, it is universal that one of your two opponents is always more dangerous than the other in this regard. It is, therefore, critical for declarer to be alert so as to identify which of the opponents is the the more perilous. In the following examples, which opponent is the dangerous one?
EXERCISE 2
DUMMY: K84 984 DECLARER: 653 K32 Left-Handed Right-Handed
Conclusion: Not only do the opponents interfere with your plans by playing their suit(s) before you can play yours, but they also attempt to defeat you by trapping your high cards. In both instances, one of the opponents is likely to be the more dangerous and declarer’s ability to identify the more perilous opponent is most useful and important.
4. Avoiding the Dangerous Opponent: - Taking a proposed finesse in the proper direction is
one way to avoid letting the suspected dangerous opponent get the lead. In the following examples, if your opponent to your right is the dangerous opponent, how would you play each of the following suit combinations?
EXERCISE 3
DUMMY: AJ105 10753 J103 A9752 AQJ83 DECLARER: K983 AQJ8 AK872 KJ3 10764 A Then J Finesse 10 Finesse J Finesse J Play A
- 13 -

INTERMEDIATE BRIDGE COURSE PLAY OF THE HAND
LESSON 7-B
Managing The Trump Suit - When playing in a suit contract, Declarer’s most important task is the management of the trump suit. The trump cards are all powerful and give both the defenders and the declarer control of the opponent’s long suits. The trump suit, in many respects, is like any other suit; i.e., winners can be developed through promotion, length or finessing. As declarer, if you decide to draw all of the missing trumps, how would you proceed with each of the following trump suits (With High Cards, Promotion, Length, Finesse), how many times would you have to draw trumps so as to take out all of the missing cards assuming an expected division of those outstanding, and how many losers would you anticipate?
EXERCISE 1
DUMMY: KQ6 J985 A95 QJ10 K963 DECLARER: AJ9542 Q1074 87642 A9876 A752 METHOD: High Cards Promotion Length Finesse Length # LOSERS: 0 2 2 0 1 # ROUNDS: 3 (3-1) 3 (3-2) 3 (3-2) 3 (3-2) 3 (3-2)
Conclusion: When drawing trumps, winners can be established through promotion, length and the finesse. Keep track of the trumps, and draw only enough rounds to eliminate any outstanding pieces.
1. Looking At Quick Losers And Slow Losers: - Before deciding whether or not to draw trumps immediately, declarer must first determine how many quick losers and how many slow losers are present. Remember, a quick loser is one that the opponents can take immediately as soon as they secure the lead, and a slow loser is one they cannot take unless and until they give the lead back to you. In the following holdings, how many quick and slow losers would declarer have in a final contract of 4-Spades?
EXERCISE 2
DUMMY DUMMY DUMMY AQ86 Q1082 J964 A95 AK3 A84 742 J8 AQ3 K54 KQJ5 Q74 DECLARER DECLARER DECLARER KJ754 KJ976 Q10873 1083 984 762 Q Q10 K5 AQJ2 A82 AK8 Quick Losers: 1 3 2 Slow Losers: 2 1 2
- 14 -

2. Drawing Trumps Immediately - Yes or No: Deciding whether or not to draw trumps immediately, involves three considerations:
a. Whether or not trumps are needed for some other purposes. Example: If declarer is planning to trump losers in dummy, he/she cannot afford to leave fewer trumps in dummy than is required to ruff losers.
b. Whether or not declare must give up the lead to the opponents while drawing trump. c. Whether too many quick losers exist such that the lead cannot afford to be relinquished
until the number of quick losers is first reduced.
EXERCISE 3
In the following examples, the Q-Hearts has been led against your final contract of 4-Spades. In each case, will declarer have to lose the lead in order to draw trumps, should drawing trumps be the first priority, if not, why? DUMMY DUMMY DUMMY AQ86 Q1082 J964 A95 AK3 A84 742 J8 AQ3 K54 KQJ5 Q74 DECLARER DECLARER DECLARER KJ754 KJ976 Q10873 1083 984 762 Q Q10 K5 AQJ2 A82 AK8 Draw Trumps?: Yes Yes No Reason: Only 3 Losers One Loser is Slow Quick Losers
Conclusion: It is difficult to draw hard and fast rules as to when to draw trumps, and in some minor cases, even if to draw them at all. One must plan carefully. Are trumps needed for more pressing purposes? Must the lead be forfeited if trumps were to be drawn immediately, and if so, are too many quick losers present to be able to give up the lead?
3. Side Suit Establishment: In a No Trump contract, in order to establish a particular suit, one sometimes needs to give up a trick or two to the opponents in that suit depending upon the number of outstanding cards held by the defenders and the distribution of same. In a suit contract, however, such a side suit can be established without losing the lead simply by utilizing the trump suit. In the following examples, how would you expect the missing cards to be divided in the side suits shown, and how many trumps would declarer need to establish the suit assuming the missing cards were to be divided as expected?
EXERCISE 4
DUMMY: AK864 AK964 A97632 AK9842 AQ742 DECLARER: 32 2 5 53 K5 DIVISION: 4-2 4-3 4-2 3-2 4-2 TRUMPS REQUIRED: 2 2 3 1 1
Conclusion: Trump cards work well to establish a side suit thereby establishing winners without giving up the lead to the opponents.
- 15 -

INTERMEDIATE BRIDGE COURSE PLAY OF THE HAND
LESSON 8-B
Combining Techniques: - All the techniques, previously discussed, can be combined in various ways, depending upon the circumstances. Many of these techniques work synergistically in powerful combination. In the following suit holdings, assuming sufficient entries between the two hands, how would you play the following (Promotion, Finesse, or Length), and how many tricks would you expect if the missing high cards lie favorably and the suit divides as expected?
EXERCISE 1
DUMMY: QJ1052 762 KQ862 AQ932 Q1032 DECLARER: 843 AQJ83 75 6 K654 METHOD: P & L F & L F(P)& L F & L P & F & L # TRICKS: 3 5 (2)3(4) 3 3
Conclusion: Often a suit requires the use of a combination of techniques in order to develop the maximum number of winning tricks. 1. Choosing A Technique: - Most technique application for winning tricks requires a combination of alternatives in order to give declarer the maximum number chance of success resulting in the maximum number of winning tricks. What is the maximum number of possible tricks, and via which combination of techniques, for the following examples?
EXAMPLE 2
DUMMY: AJ63 A842 AKJ3 842 K9532 DECLARER: K942 KJ753 862 KQ6 874 METHOD: Finesse A/K Drop Finesse Finesse Finesse “Eight Ever” “Nine Never” MAX.# TRICKS 4 5 4 2 3
Conclusion: The best way to play a particular suit may depend upon such things as how many tricks are needed to guarantee the contract. Inferences from the bidding are oft times helpful, but usually declarer desires the maximum number of tricks. A useful guideline when you are missing the Queen of a suit is: “Eight (or Less) Ever, Nine Never”. When no other information is available, this is a good axiom to follow. 2. Combining Alternatives: When playing two or more suits in order to develop tricks, one must often be careful to play the suits in the proper sequence making maximum use and careful conservation of entries. If the first plan does not work, a back-up alternative should be pre-planned. On the following hands, assuming a 3NT contract, the lead of a Jack of Hearts, and no other available information; which suit, Clubs or Diamonds, should be played first, and why?
- 16 - EXERCISE 3

DUMMY DUMMY DUMMY 742 K4 KQ8 7642 752 73 KQ KQ4 962 KJ72 J10832 AQ842 DECLARER DECLARER DECLARER A863 A862 A42 A83 AK8 A2 A985 862 AKQ5 AQ KQ5 7653 CLUBS CLUBS DIAMONDS
Conclusion: When putting your declarer play plan into action, try and combine the best possibilities in the various suits in order to give you the maximum opportunity to make the contract, and within that context, the most number of tricks. Never loose sight of the objective! It is the contract and any inherent entry problems which might be present. The best suit to play first may not always be the one that looks the most attractive. 3. Choosing An Alternative: When more than one suit can provide the number of tricks necessary,
you will oft times not be able to try everything. One must choose the plan which has the greatest possibility for success. Don’t go after a suit because it looks easy, if it does not provide you with the number of necessary tricks for your stated contract. If you need a favorable lie of the cards, try to pick the suit with the greatest odds. Remember, if you need a suit to divide, an odd number of cards tends to divide evenly, and an even number, oddly. If your choice is between any finesse in one suit (50% chance of success), and a 3-3 division in another suit, choose the finesse. A 4-2 division is more likely than a 3-3, and so the chances of any 3-3 split occurring is less than 50%. Finally, if the opponents force you into a position where there is only one suit which will give you the tricks you will need, go for it. Go with your only alternative. In the following, finding yourself in a 3NT contract, and a Queen of Spade opening lead, which suit, and why, should you attack?
EXERCISE 4
DUMMY DUMMY DUMMY K82 642 73 963 QJ3 Q103 AQJ7 KQJ AKQ3 QJ4 Q1053 J1043 DECLARER DECLARER DECLARER A93 AK3 A2 AKQ AK82 AKJ7 985 862 642 K1095 KJ8 KQ82 CLUBS CLUBS DIAMONDS
Conclusion: Although there seems to be much to consider, knowing what you are trying to accomplish solves most of the problems. EVEN IF YOU DO NOT MAKE THE RIGHT DECISION, AFTER MAKING A PLAN, YOU ARE ALWAYS IN A POSITION TO LEARN THE NEXT TIME. ALTERNATIVELY, IF YOU NEVER PLAN OUT THE PLAY OF THE HAND, BUT MERELY PLAY THE FIRST CARD THAT LOOKS ATTRACTIVE, YOU MAY PLAY FOR YEARS AND NEVER IMPROVE.
- 17 - INTERMEDIATE BRIDGE COURSE

DEFENSIVE PLAY OF THE HAND
LESSON 9-B
1. The Defensive Hold-Up: Declarer is not the only player who has the ability to use the hold-up play in order to prevent the opponents from enjoying otherwise established tricks. The defenders can also use this technique in an attempt to strand declarer’s suit. Suppose you are defending against a No Trump contract and there are no other entries into dummy other than the suit shown in the following example:
NORTH (DUMMY) QJ10875 WEST EAST 4 A93 SOUTH (DECLARER) K62
Declarer plays the K, partner plays the 4. It is obvious that declarer is attempting to establish the suit. East should duck. South then continues with the 6, partner discards and dummy plays the Queen. What should East do at trick 2? Conclusion: When declarer is attempting to establish a long suit in No Trump, defenders should hold-up as long as it takes to strand the suit. A count of the suit in question can be assisted by the partner of the defender deciding how long to hold-up by means of playing high-low from an even number of a holding in the suit, and low-high from an odd number. Even in circumstances where declarer has other outside entries, or even in the case of suit contracts, it still may be advantageous to hold-up until declarer be forced to use up an additional entry in order to continue running the suit. In the following example, assuming declarer has no outside entries in a No Trump contract, when should you win the Ace, and how many times should you as defender hold-up?
EXERCISE 1 DUMMY You can see nine (9) cards between yourself and the YOU KQJ109 Dummy. If partner has only one card, he/she will show A752 out on the second round of the suit; declarer then, has three and you should win the third round holding up for two rounds. If partner follows suit on the second trick, declarer has only two of the suit and You can take the second trick with your Ace.
- 18 -

2. Defender’s Plan: We will discuss in future lessons some specific guidelines for defender play such as: Opening Leads against No Trump and Suit Contracts, Third-hand and Second-hand play, Defensive signals, Developing Defensive Tricks, and How to Interfere with Declarer. In general, however, the Defender’s must first learn to establish a Plan for the Defense. They must each consider how many tricks do we need to defeat the contract, How many do we already have, from whence can we establish more, and how do we put it all together?
EXERCISE 2
In the following hand, you are defending a contract of 4H and your partner leads the Queen of Spades. Declarer wins the trick with the Ace of Spades, and draws two rounds of trumps with the Ace and King. Declarer then finesses for the King of Diamonds and loses to your King. How many tricks do you have, how many more do you need to defeat the contract, where might they be gotten, and what do you lead after winning the Diamond King to make it happen?
DUMMY K5 Q1073 AQJ10 Q73 YOU 9643 QS 86 K84 KJ62 Notice: Defender must not wait to switch to the Clubs, since declarer can throw off Club losers on the now-established Diamond suit. Defender must play the Clubs immediately.
Conclusion: By looking at the overall picture, one can often see how a specific contract might be defeated. Make a plan and try to imagine what your partner might need to have for your side to defeat the contract. Then play the cards as if they existed in that way.
- 19 -

INTERMEDIATE BRIDGE COURSE DEFENSIVE PLAY OF THE HAND
LESSON 10-B
Leads against No Trump Contracts: Opening leads can make or break either declarer or the defense. Unfortunately, the card selection must come before the dummy has been tabled. Even without seeing the dummy, however, the opening lead can be selected, both as to the best suit and the actual specific card within that suit, based upon preferential standard guidelines for opening leads.
1. Choosing the Proper Suit: One of the most well-known maxims in leading against a No Trump contract is to lead fourth highest from one’s longest and strongest suit holding. Although this is generally a good idea, it must be exercised at the right time and place, and is not always the most appropriate lead. Many times, the bidding itself can, will, and indeed, should influence one’s choice. If partner has bid, his/her suit is likely to be the most productive of the possible choices, especially if it represents the defending teams longest combined suit holding. Finally, the level of the final contract may, and, oft times, does influence the selection for the best card to lead. Which card from the following example hand should a defender lead against a No Trump contract under each of the listed conditions?
EXERCISE 1
109762 1) The contract is 3NT and your partner has bid Hearts. 86 2) The contract is 1NT and no bidding on your side has occurred. A943 3) The contract is 3NT after one of the opponents opened 1 Spade. KQ 4) The contract is 6NT.
1) 8 Hearts 2) 10 Spades 3) 3 Diamonds 4) K Clubs
Conclusion: The opening lead is defender’s chance to get a head start in establishing winners in order to either defeat the specified contract or to minimize the number of overtricks to which declarer is entitled. It is critical to start with the suit offering the greatest potential for your side. One must pick from a suit bid by either or both defenders, longest and strongest from amongst the suits not bid by the opponents, or from tricks easily seen as being winners.
2. Choosing the Card in Partner’s Suit: Once a defender has selected the specific suit from which to lead, the actual card from within that suit must be chosen. This specific selection is important for two reasons. (A) The disadvantageous fact that the defenders cannot see each others hands must be overcome as quickly as is possible. Thus, they must send each other messages about their hands by means of the specific cards they choose to play beginning with the opening lead. (B) They must facilitate and maximize the opportunity of taking the maximum number of tricks to which they might be entitled. In each of the following hands, you are leading your partners bid suit. Which is the best card to lead and why?
EXERCISE 2
1) DUMMY 2) DUMMY 3) DUMMY YOU 962 PARTNER YOU K85 PARTNER YOU 96 PARTNER J3 KQ875 QJ3 A10962 Q75 A10842 DECLARER DECLARER DECLARER A104 74 KJ3
- 20 -

In 1), you should lead the Jack, the top of a doubleton. You are essentially starting the suit by playing the high card from two from the short side. In 2), the Queen is the choice, the top of touching cards in partner’s suit. This tells partner that you do not have the next higher card but do have the next lower, unless you are leading from a doubleton. The lead of the Queen will trap dummy’s King. If you had alternatively led the 3, Partner could win the first trick with the ten, but would be incapable of trapping the King from Dummy unless partner can get back to you hand, and this is not always possible. In 3), the 5 is the preferred choice, lowest from three or more cards headed by a non-touching honor. Partner can win the Ace and then lead back through declarer’s K-J promoting your Queen. If you were to have led the Queen, declarer would have gotten two tricks, one with the King and one with the Jack.
Conclusion: When leading partner’s suit, one should choose the top of a doubleton, the top of touching honors, or low from three or more card headed by an honor.
3. Leading the Top of a Sequence: When leading against a No Trump contract under circumstances where partner has not bid, and no further information about the Opponent’s suits is available, you choose your longest suit. One normally leads the fourth best unless one of the following holdings exists. If the suit has a 3-card or longer sequence, you lead the top card (J109X, QJ10X, etc.). If you hold a broken sequence, a sequence of two touching cards with a lower ranking card following a break in the sequence, (QJ9, J108, KQ10, 875, etc.) you lead the top of the two touching cards from the broken sequence. If you hold an internal sequence, a sequence of two or more touching cards with a higher ranking card in the suit (AQJX, KJ10X, Q109X, 10876, etc.) you lead the top of the two or more touching cards. In the following examples, you are leading your own suit against a No Trump contract. Which is the best card to lead, and how many tricks can the defense develop? What must the defense do to ensure they take their maximum number of tricks?
EXERCISE 3
1) DUMMY 2) DUMMY 3) DUMMY 4) DUMMY YOU K3 PARTNER YOU A7 PARTNER YOU K2 PARTNER YOU 74 PARTNER J1096 A752 QJ963 842 AJ1043 876 KQJ83 A62 DECLARER DECLARER DECLARER DECLARER Q84 K105 Q95 1095 1) Jack; 3 2) Queen; 3 3) Jack; 4 4) King; 5
Conclusion: When you are leading your own suit or an unbid suit, your first preference is to lead the top of a sequence, or the top of a broken sequence, or the inside top of an interior sequence.
4. Leading a Low Card: When you look at your long suit, you may not have a long, a broken, or even an internal sequence within the suit that you desire to lead. Instead, you have a suit containing one, or even two, honors not in sequence. You will likely require some help from partner in order to establish winners in the suit, and so the best opportunity will develop if you lead a low card over to the hoped-for high card(s) of partner. In the following suit holdings, and once again, against a No Trump contract, which card should you lead, how many tricks can the defenders take, and what should they do to ensure that they take the maximum number of tricks available to them?
- 21 -
1) DUMMY 2) DUMMY 3) DUMMY YOU 65 PARTNER YOU A2 PARTNER YOU 875 PARTNER K9872 J43 Q763 K854 AQ432 KJ
DECLARER DECLARER DECLARER AQ10 J109 1096 1) Low(7); 3 2) Low(3); 3 3) Low(3); 5
Conclusion: When leading your long suit against a No Trump contract, lead a low card (fourth highest) if you do not have a 3-card sequence, or a broken or interior sequence.
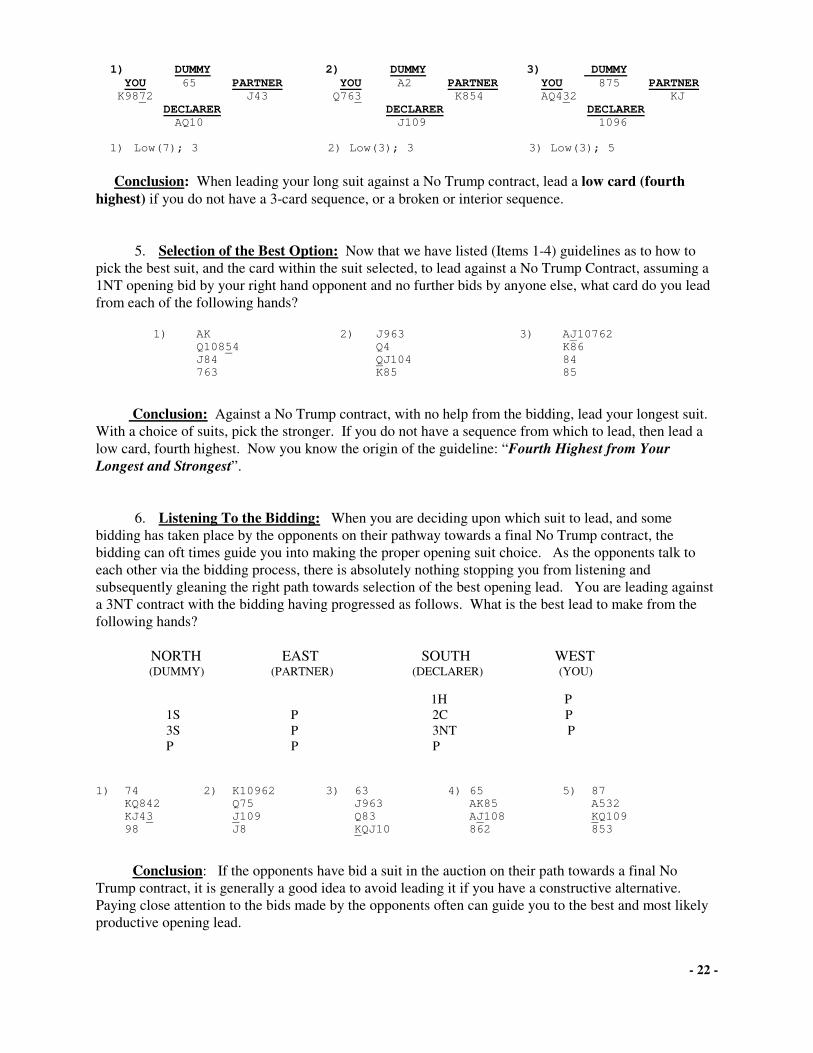
5. Selection of the Best Option: Now that we have listed (Items 1-4) guidelines as to how to pick the best suit, and the card within the suit selected, to lead against a No Trump Contract, assuming a 1NT opening bid by your right hand opponent and no further bids by anyone else, what card do you lead from each of the following hands? 1) AK 2) J963 3) AJ10762 Q10854 Q4 K86 J84 QJ104 84 763 K85 85
Conclusion: Against a No Trump contract, with no help from the bidding, lead your longest suit. With a choice of suits, pick the stronger. If you do not have a sequence from which to lead, then lead a low card, fourth highest. Now you know the origin of the guideline: “Fourth Highest from Your Longest and Strongest”.
6. Listening To the Bidding: When you are deciding upon which suit to lead, and some bidding has taken place by the opponents on their pathway towards a final No Trump contract, the bidding can oft times guide you into making the proper opening suit choice. As the opponents talk to each other via the bidding process, there is absolutely nothing stopping you from listening and subsequently gleaning the right path towards selection of the best opening lead. You are leading against a 3NT contract with the bidding having progressed as follows. What is the best lead to make from the following hands?
NORTH EAST SOUTH WEST (DUMMY) (PARTNER) (DECLARER) (YOU)
1H P 1S P 2C P 3S P 3NT P P P P 1) 74 2) K10962 3) 63 4) 65 5) 87 KQ842 Q75 J963 AK85 A532 KJ43 J109 Q83 AJ108 KQ109 98 J8 KQJ10 862 853
Conclusion: If the opponents have bid a suit in the auction on their path towards a final No Trump contract, it is generally a good idea to avoid leading it if you have a constructive alternative. Paying close attention to the bids made by the opponents often can guide you to the best and most likely productive opening lead.
- 22 -

INTERMEDIATE BRIDGE COURSE DEFENSIVE PLAY OF THE HAND
LESSON 11-B
Leads Against Suit Contracts: Many of the guidelines for selection of the actual card to lead against a suit contract are the same as those for appropriate leads against a No Trump contract. When selecting the actual suit itself to lead, however, there are some new considerations. One’s attention, for example, is no longer focused entirely on long suits. After all, declarer has chosen to play in a trump suit specifically so that the defense could not enjoy winners in their long suits. The presence of a trump suit, thus has , not only a strong influence on how declarer proceeds to play the hand, but it, likewise, also influences the way the defenders attempt to defeat the contract. The focus of the defenders must now shift to the strength of their suits; i.e., the high cards they hold. They must attempt to secure the tricks to which they are entitled before declarer can trump or discard losers on winners in a side suit. Remember, declarer’s focus is upon losers and how he/she can eliminate them. Naturally, both sides can utilize these principals, and so the defenders, likewise, may attempt to trump declarer’s winners, and thus, short suits can become a source of tricks for the defending team as well.
1. Strength Versus Length: Against a No Trump contract, since you are attempting to establish a long suit in order to promote one or more small cards which can be developed, you gladly do so, even if you sacrifice a trick in the process, for you are likely to be compensated by the increased number of tricks which are subsequently developed. In a trump suit contract, however, leading a long suit, especially away from high cards within that suit, may cost a trick. In the following hands, notice the difference in leading each of the suits against a No Trump contract and against a suit contract (assuming another suit is trump). Look at the number of winners you are likely to develop versus the number of tricks you sacrifice. Would you normally lead the suit shown against a No Trump contract, a suit contract, or both, and if yes, which card would you lead?
EXERCISE 1
1) DUMMY 2) DUMMY 3) DUMMY 4) DUMMY YOU 754 PARTNER YOU 743 PARTNER YOU 985 PARTNER YOU K95 PARTNER K10862 J93 KQJ 1065 AQ742 1063 QJ108 642 DECLARER DECLARER DECLARER DECLARER AQ A982 KJ A73 Vs. NT 1)3;1;Yes(6) 2)2;0;No 3)4;1;Yes(4) 4)2;0;Yes(Q) Vs. Suit 1)0;1;No 2)2;0;Yes(K) 3)1;1;No 4)1;0;Yes(Q)
Conclusion: Against a suit contract, the emphasis is upon developing tricks from your strong suits rather than long suits. In doing so, however, one would want to avoid leading a suit which sacrifices a trick. Since you cannot see your partner’s hand, if partner has not bid, suits in which you have a strong sequence are usually safe to lead.
2. Utilizing the Trump Suit: The defenders can often utilize their trumps by ruffing declarer’s winners. The lead of a singleton or doubleton by the defense, in order to establish a ruff involves some risk, especially if partner has not bid the suit. There are, however, certain conditions that increase the likelihood of making such a lead effective, and others in which such a lead offers a poor rate of success. In the following hands, defending against a 4 Spade contract, and with no other suits bid during the auction, should one attempt to establish a ruff or not?
- 23 -
EXERCISE 2

1) 865 2) QJ98 3) 86543 4) A74 J94 J942 J94 Q987 4 QJ109 AKQJ9 62 Q97643 6 3 J1096 1) Yes 2) No 3) No 4) Yes
Partner Marked Natural Trump You Have Long You Have a With Honors Tricks Present Trumps and So Trump Control
Make Declarer Trump
Conclusion: Often, a Singleton or a Doubleton is an excellent lead against a suit contract. They are strongly likely to succeed if, (1) Partner has bid your short suit, (2) Partner likely marked with honors, (3) You have a trump control such that you can access partner on a second attempt, if necessary, even if declarer attempts to draw trumps. A singleton or doubleton leads are poor leads if none of the above three conditions exist or if you have a natural trump trick thereby negating the advantage of attempting to trump.
3. Leading Trumps: One often hears the maxim: “When in doubt, lead trumps”. In reality, the opposite is more likely to be true; i.e., one should avoid leading trumps unless one of two specific reasons is present making the lead of trumps a likely fruitful endeavor. The first is to diminish dummy’s trump holding so as to reduce or eliminate dummy’s ruffing capacity. The second reason for leading a trump is when all other suits appear to be unsafe. In most other circumstances one should avoid leading trump since declarer will usually begin by drawing trumps himself/herself before going about declarer’s business of taking winners and discarding losers. The sharp defender will fine tune his/her listening to the bidding of the opponents such that it will usually be clear when a trump lead id likely to be in order. In which of the following bidding sequences by the opponents would a trump lead be in order by the defense because of its likelihood of effectively reducing the ruffing capacity of dummy?
Exercise 3
1) DECLARER DUMMY 2) DECLARER DUMMY 3) DECLARER DUMMY P 1H 1D 1S 1S 2C 1NT 2D 2C 2H 3C 3S P 3H 4H 4S P P
YES YES NO
Conclusion: As you begin to pay increasing attention to the bidding of your opponents, you will start to recognize opportune circumstances for choosing to lead trumps to prevent declarer from ruffing losers. Otherwise, lead a trump only if everything else appears too dangerous. Try not to be “in doubt” when leading a trump. Note: Never lead from a JX, JXX, QX or QXX of trump since it will always forfeit a trick if your partner has the mirror holding; i.e., QXX, QX, JXX or JX.
4. Choosing the Suit To Lead: Clues about which suit to lead against a suit contract include, (1) the bidding by the opponents, (2) whether or not partner has entered the bidding, (3) an unbid suit, and (4) a suit with a strong sequence. All offer a strong chance to promote winners for the defense. Any of the above offers a better likelihood for success than leading away from an honor. If nothing else looks attractive, than lead a trump. You are on lead against a contract of 4H with the following hand. Which is the best suit and the preferred card to lead in each of the listed conditions?
- 24 - EXERCISE 4

Q92 1) Your partner overcalled in Clubs during the auction. 863 2) The only suit bid during the auction was Hearts. KQ82 3) The opponents bid all four suits during the auction. Q72 4) The opponents bid both Hearts and Diamonds during the auction. 1) 2 Clubs 2) K Diamonds 3) 3 Hearts 4) 2 Clubs or 2 Spades
Conclusion: When leading against a suit contract, try and let the bidding help you as to the most likely preferred suit to lead. If partner has bid a suit, lead that. Otherwise you might choose an unbid suit, (preferably one with touching high cards), a singleton or doubleton, or even trumps, if appropriate.
5. Choosing the Card Within a Chosen Suit: Once you have chosen the best suit to lead, you are now in a position to select the actual card itself. There are two main differences when leading against a suit contract over that for a No Trump contract. Against a No Trump contract one leads the top of a 3-card sequence, otherwise fourth best. Against a suit contract, in contrast, you lead the top of a 2-card or longer sequence, and rarely away from an Ace or a King, If you must lead a suit headed by the Ace, lead the Ace itself. In each of the following holdings which would be the preferred choice for lead against both a No Trump contract and then against a suit contract with an identical holding?
EXERCISE 5
1) DUMMY 2) DUMMY 3) DUMMY YOU 753 PARTNER YOU 8 PARTNER YOU 64 PARTNER AK842 106 AJ1093 7542 KQ973 105 DECLARER DECLARER DECLARER QJ9 KQ6 AJ82 1) 4; KING 2) Jack; Ace 3) 7; King
Conclusion: When leading against a suit contract, choose the top card of a 2-card or longer sequence. If your suit selected is headed by the Ace, lead the Ace rather than away from it. 6. Putting it Together: When making an opening lead always review the auction to see if there are any clues available to guide you. In the absence of a suit bid by the defense, one usually selects an unbid suit. It then only remains to select the appropriate card within the chosen suit.
EXERCISE 6
The Auction has proceeded as follows: North East South West (Dummy) (Partner) (Declarer) (You) 1C p Which card would you lead in each of the 1H P 1S P following hands? 2S P 4S P P P 1) QJ4 2) J92 3) K8 4) A93 5) 864 6) 753 J83 J75 Q97 108532 J932 A105 QJ62 AJ975 Q10832 6 K5 AQ10 J108 Q4 Q54 J865 Q874 K1042
Conclusion: When leading, always use the information that the bidding affords you. Generally it is well to lead your partner’s suit and to avoid leading suits bid by the opponents. Favor strong sequences, with a singleton or trump leads being constructive alternatives. Remember that choosing the best card to lead is simply an educated guess, at best, all of the time.
- 25 -
INTERMEDIATE BRIDGE COURSE
DEFENSIVE PLAY OF THE HAND
LESSON 12-B
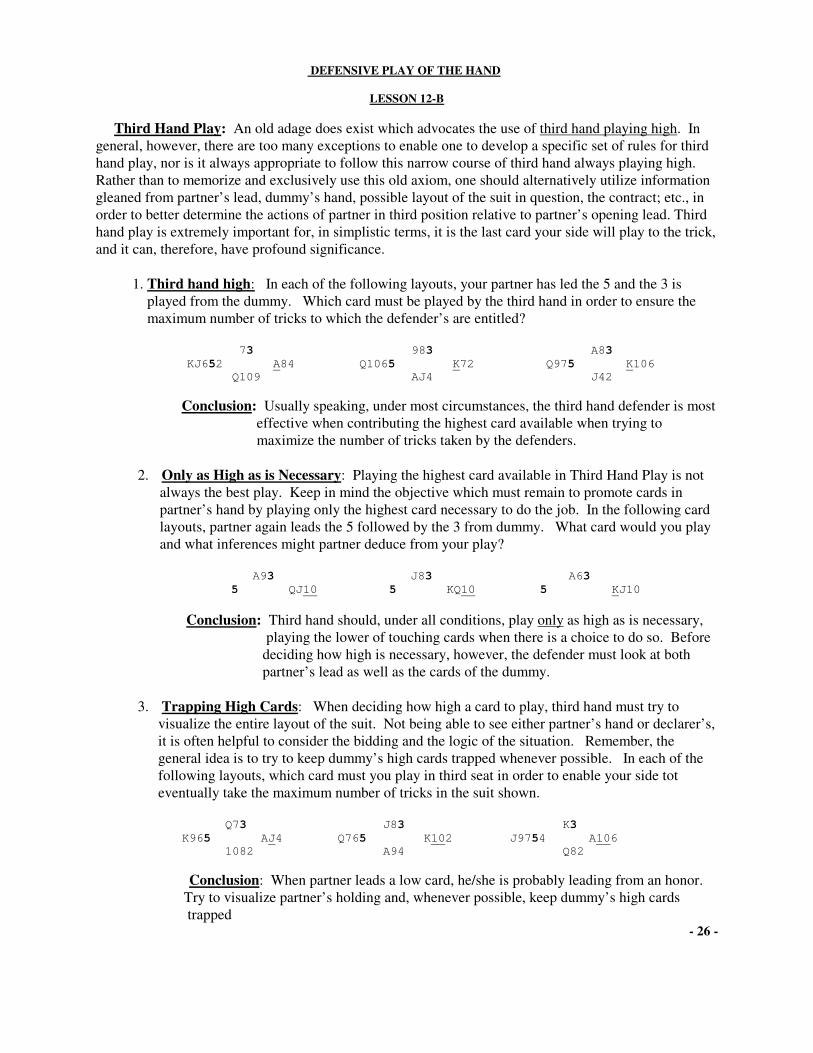
Third Hand Play: An old adage does exist which advocates the use of third hand playing high. In general, however, there are too many exceptions to enable one to develop a specific set of rules for third hand play, nor is it always appropriate to follow this narrow course of third hand always playing high. Rather than to memorize and exclusively use this old axiom, one should alternatively utilize information gleaned from partner’s lead, dummy’s hand, possible layout of the suit in question, the contract; etc., in order to better determine the actions of partner in third position relative to partner’s opening lead. Third hand play is extremely important for, in simplistic terms, it is the last card your side will play to the trick, and it can, therefore, have profound significance. 1. Third hand high: In each of the following layouts, your partner has led the 5 and the 3 is played from the dummy. Which card must be played by the third hand in order to ensure the maximum number of tricks to which the defender’s are entitled? 73 983 A83 KJ652 A84 Q1065 K72 Q975 K106 Q109 AJ4 J42
Conclusion: Usually speaking, under most circumstances, the third hand defender is most effective when contributing the highest card available when trying to maximize the number of tricks taken by the defenders.
2. Only as High as is Necessary: Playing the highest card available in Third Hand Play is not always the best play. Keep in mind the objective which must remain to promote cards in partner’s hand by playing only the highest card necessary to do the job. In the following card layouts, partner again leads the 5 followed by the 3 from dummy. What card would you play and what inferences might partner deduce from your play? A93 J83 A63 5 QJ10 5 KQ10 5 KJ10 Conclusion: Third hand should, under all conditions, play only as high as is necessary, playing the lower of touching cards when there is a choice to do so. Before deciding how high is necessary, however, the defender must look at both partner’s lead as well as the cards of the dummy. 3. Trapping High Cards: When deciding how high a card to play, third hand must try to
visualize the entire layout of the suit. Not being able to see either partner’s hand or declarer’s, it is often helpful to consider the bidding and the logic of the situation. Remember, the general idea is to try to keep dummy’s high cards trapped whenever possible. In each of the following layouts, which card must you play in third seat in order to enable your side tot eventually take the maximum number of tricks in the suit shown. Q73 J83 K3 K965 AJ4 Q765 K102 J9754 A106 1082 A94 Q82
Conclusion: When partner leads a low card, he/she is probably leading from an honor. Try to visualize partner’s holding and, whenever possible, keep dummy’s high cards trapped
- 26 -
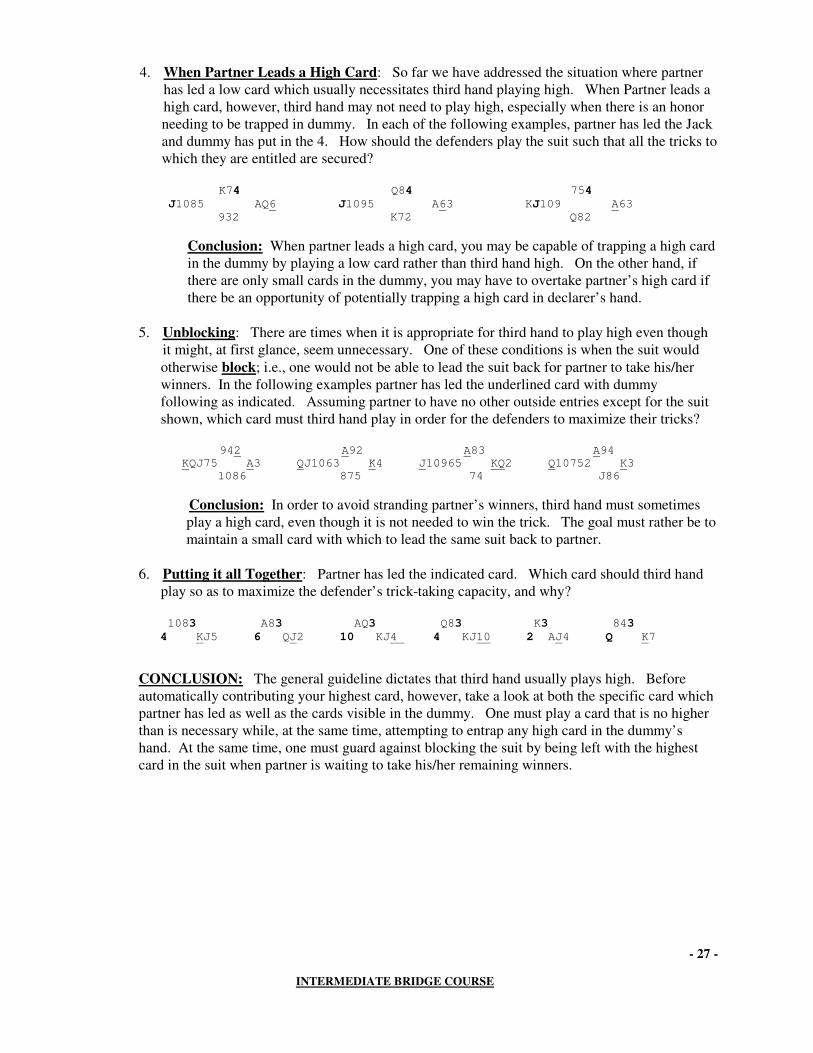
4. When Partner Leads a High Card: So far we have addressed the situation where partner has led a low card which usually necessitates third hand playing high. When Partner leads a high card, however, third hand may not need to play high, especially when there is an honor
needing to be trapped in dummy. In each of the following examples, partner has led the Jack and dummy has put in the 4. How should the defenders play the suit such that all the tricks to which they are entitled are secured? K74 Q84 754 J1085 AQ6 J1095 A63 KJ109 A63
932 K72 Q82
Conclusion: When partner leads a high card, you may be capable of trapping a high card in the dummy by playing a low card rather than third hand high. On the other hand, if there are only small cards in the dummy, you may have to overtake partner’s high card if there be an opportunity of potentially trapping a high card in declarer’s hand.
5. Unblocking: There are times when it is appropriate for third hand to play high even though it might, at first glance, seem unnecessary. One of these conditions is when the suit would
otherwise block; i.e., one would not be able to lead the suit back for partner to take his/her winners. In the following examples partner has led the underlined card with dummy following as indicated. Assuming partner to have no other outside entries except for the suit shown, which card must third hand play in order for the defenders to maximize their tricks? 942 A92 A83 A94 KQJ75 A3 QJ1063 K4 J10965 KQ2 Q10752 K3 1086 875 74 J86
Conclusion: In order to avoid stranding partner’s winners, third hand must sometimes play a high card, even though it is not needed to win the trick. The goal must rather be to maintain a small card with which to lead the same suit back to partner. 6. Putting it all Together: Partner has led the indicated card. Which card should third hand play so as to maximize the defender’s trick-taking capacity, and why? 1083 A83 AQ3 Q83 K3 843 4 KJ5 6 QJ2 10 KJ4 4 KJ10 2 AJ4 Q K7
CONCLUSION: The general guideline dictates that third hand usually plays high. Before automatically contributing your highest card, however, take a look at both the specific card which partner has led as well as the cards visible in the dummy. One must play a card that is no higher than is necessary while, at the same time, attempting to entrap any high card in the dummy’s hand. At the same time, one must guard against blocking the suit by being left with the highest card in the suit when partner is waiting to take his/her remaining winners.
- 27 - INTERMEDIATE BRIDGE COURSE

DEFENSIVE PLAY OF THE HAND
LESSON 13-B
Second Hand Play: Declarer has led a card from his/her hand or from dummy. You, second in position to the lead must decide whether to play high or low. Most of the time, the second hand player plays low allowing his/her partner, who plays last to the trick, to try to win the trick as cheaply as is possible. A popular maxim, “Second hand plays low”, sets forth the idea that there is no need to waste your high card on one of declarer’s low cards, better to wait until declarer plays a high card which you can then capture. On the other hand, if declarer plays an honor, another maxim, “cover an honor with an honor”, more likely applies. When to administer these principals is most useful when considering second hand play. One must consider the conditions under which they arise as well as their exceptions.
1. When Declarer Leads a Small Card: Defender’s high cards are best utilized not only when they take a trick, but additionally when they can be preserved to capture one of declarer’s high cards at the same time. An old bridge adage proclaims, “Aces are meant to take Kings, Kings to take Queens; etc.” For this reason, if declarer plays a small card, it usually works out best for the player in second position to also play a small card. In the following examples, declarer leads the 2 towards dummy. How many tricks will declarer take if you, in second position, play low, versus those likely taken should you mistakenly play high?
DUMMY DUMMY DUMMY
Q75 AQJ A109 YOU PARTNER YOU PARTNER YOU PARTNER K84 A1093 K84 1097653 K84 J753 DECLARER DECLARER DECLARER J62 2 Q62 0;1 2;3 2;3
Conclusion: By playing second hand low, you usually make your side’s best effort to conserve its high cards so that they not only take tricks but also capture the opponent’s high cards at the same time.
2. When Dummy Leads a Small Card: In the first exercise, the second hand had the advantage of seeing the cards in the dummy such that the decision as to what to play was assisted by this advantage. When a small card is led from dummy, this advantage does not exist for the second hand player since declarer’s hand is concealed. The concept of second hand playing low, however, is still applicable and, indeed, still effective. Look at the following examples! Notice the one trick difference (added for the defense, subtracted from declarer) by playing low in the second seat.
DUMMY DUMMY DUMMY 8732 J82 A82 PARTNER YOU PARTNER YOU PARTNER YOU
6 Q95 A1064 Q95 K76 Q95 DECLARER DECLARER DECLARER AKJ104 K73 J1043
Conclusion: Whether a small card is led from declarer’s hand or from dummy, it is usually best for second hand to play low thus conserving the defenders’ high cards. Partner plays last so you usually do not have to worry about declarer winning the trick too cheaply.
- 28 -
3. Splitting Honors: Previously we have observed that when declarer leads a small card, it is
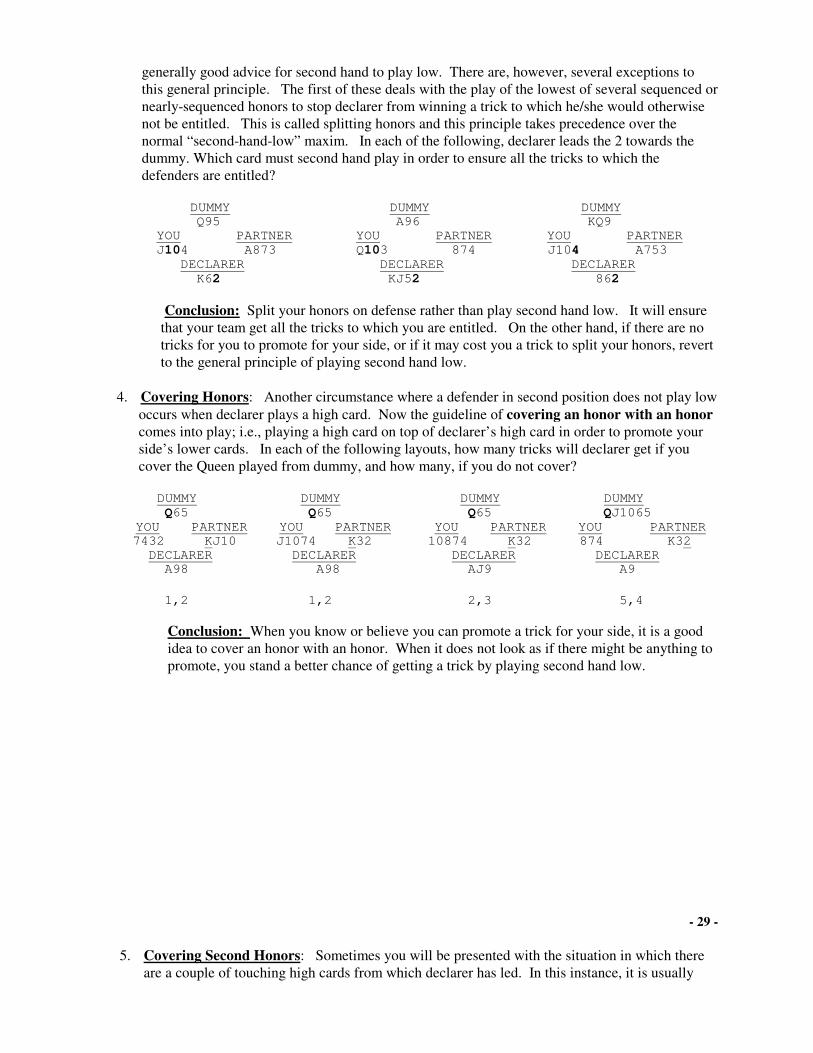
generally good advice for second hand to play low. There are, however, several exceptions to this general principle. The first of these deals with the play of the lowest of several sequenced or nearly-sequenced honors to stop declarer from winning a trick to which he/she would otherwise not be entitled. This is called splitting honors and this principle takes precedence over the normal “second-hand-low” maxim. In each of the following, declarer leads the 2 towards the dummy. Which card must second hand play in order to ensure all the tricks to which the defenders are entitled? DUMMY DUMMY DUMMY Q95 A96 KQ9 YOU PARTNER YOU PARTNER YOU PARTNER J104 A873 Q103 874 J104 A753 DECLARER DECLARER DECLARER K62 KJ52 862 Conclusion: Split your honors on defense rather than play second hand low. It will ensure that your team get all the tricks to which you are entitled. On the other hand, if there are no tricks for you to promote for your side, or if it may cost you a trick to split your honors, revert to the general principle of playing second hand low. 4. Covering Honors: Another circumstance where a defender in second position does not play low occurs when declarer plays a high card. Now the guideline of covering an honor with an honor comes into play; i.e., playing a high card on top of declarer’s high card in order to promote your side’s lower cards. In each of the following layouts, how many tricks will declarer get if you cover the Queen played from dummy, and how many, if you do not cover? DUMMY DUMMY DUMMY DUMMY Q65 Q65 Q65 QJ1065
YOU PARTNER YOU PARTNER YOU PARTNER YOU PARTNER 7432 KJ10 J1074 K32 10874 K32 874 K32 DECLARER DECLARER DECLARER DECLARER A98 A98 AJ9 A9 1,2 1,2 2,3 5,4
Conclusion: When you know or believe you can promote a trick for your side, it is a good idea to cover an honor with an honor. When it does not look as if there might be anything to promote, you stand a better chance of getting a trick by playing second hand low.
- 29 -
5. Covering Second Honors: Sometimes you will be presented with the situation in which there
are a couple of touching high cards from which declarer has led. In this instance, it is usually

best to wait until the last high card is led before covering. In the following examples should you cover the first honor led from dummy or not?
DUMMY DUMMY DUMMY J108 J103 J103 PARTNER YOU PARTNER YOU PARTNER YOU Q97 K642 K762 Q95 7654 KQ9 DECLARER DECLARER DECLARER A53 A84 A82 No No Yes
Conclusion: When there are two or more honors, it is usually best to wait to cover the last honor, unless you can afford to cover more than one of them. 6. Putting it all Together: When you are second hand to play, and a small card is led, it is generally best to play a low card. When a high card is led, it usually works out best to cover with a higher card. In the following examples, which card do you play when declarer leads the indicated card?
1) DUMMY 2) DUMMY 3) DUMMY Q83 KJ4 J84 YOU YOU YOU AJ5 Q73 K62
DECLARER DECLARER DECLARER 6 5 3 5 (low) 3 (low) 2 (low) 4) DUMMY 5) DUMMY 6) DUMMY Q83 K A103 YOU YOU YOU J1097 A642 K75 DECLARER DECLARER DECLARER 4 9 J 9 (Split) Ace (Take King) King (Cover)
Conclusion: Defenders afford themselves the best chance in situations in which they are uncertain what to do by playing a low card as second hand if a low card is led, and by covering an honor with an honor if a high card is led.
- 30 - INTERMEDIATE BRIDGE COURSE
DEFENSIVE PLAY OF THE HAND LESSON 14-B

DEFENSIVE SIGNALS
“Signaling” is the language of defensive play. It is the method by which Defenders legitimately exchange information about the make-up of their hands. It is central and crucial to the defense being able to collect the greatest number of tricks to which they are entitled, to limit Declarer’s tricks, and to potentially even set the contract at hand. Defenders are normally disadvantaged because they lack the ability to make decisions based upon seeing each others cards. The ability, therefore, of each Defender to be capable of describing his/her hand through specific carding becomes paramount. Defenders have the ability to utilize one from any number of various methods of Signaling. Standard, Upside-Down, Odd-Even, and Laventhal Discards are amongst the major systems used today. Each partnership must choose from amongst these various available systems, and Declarer, at the start of any hand, may inquire from the Defenders as to which of the various systems of signaling they employ. No matter which system Defenders use, however, they share with each other, via the cards they play, the following four main categories of information during the signaling process:
Four Categories of Standard Defensive Signaling:
(1) Attitude Signals Regarding a Specific Suit: (The signaling which evidences whether Partner wishes to encourage a continuation of that suit already led, or, conversely, to discourage a continuation of the suit referenced),
(2) Count Signals Regarding a Particular Suit: (The signaling as to the number of actual cards one holds in a specific suit referenced),
(3) Suit Preference Signals for a Particular Suit: (The preferential signaling as to which suit you desire partner to lead at his/her next available opportunity),
(4) The Play of Specific Cards at Specific Times: (Specific Carding which have unambiguous messaging under Specific Circumstances when played at specific times).
The planning and sharing of such information as outlined above is central to the ability of the Defenders to properly decide which suits to play, and which suits to avoid playing; which suits to keep, and which suits to discard; whether or not to continue a suit already played, or to switch. There are times, however, when a Defender may not wish to signal when he/she feels that Partner cannot use such information to the team’s advantage, or when he/she feels that the information be better withheld from Declarer. When it is advantageous to share such information between Defenders, however, the standard techniques employed to accomplish these goals are herein presented as follows:
1. Attitude Signals
1. The Lead by Partner of any New Suit when that suit is First Played: (Whether at the start of the hand on the first card led at the start of the play of the hand, or at anytime during the extended play of the hand subsequent to the opening lead) When Partner first makes the lead of any new, as-yet-unled suit, whether against a Suit Contract or a No Trump Contract, it is important that the Partner of the one who leads do one of two things:
- 30a -
a) When the card led is other than an honor: One’s Partner must be cognizant of playing 3rd hand high; i.e., the highest card necessary to beat Dummy, or to take the

trick if one is capable of doing so without, potentially, giving up a future trick. Such play of 3rd hand high is normal and customary.
b) When the card led is an honor: Here Partner must give an attitude signal (a preference or a dislike) as to whether or not he/she, from his/her personal perspective, desires a continuation of that suit just selected by Partner. The play of an unnecessarily high card (the highest that one can afford without potentially giving up a future trick) shows a desire for that suit to be continued. (Example: Playing the 8 on Opener’s Ace when holding K862). A High Card by played Partner is Encouraging! (One should never use a potential trick-taking card for such a signal.) (Example: Do not play the J from KJ82; rather, alternatively, the Eight) Once given a positive attitude come-on, Opener may, of course, exercise his/her own prerogative and refuse to continue the suit if he/she thinks there is a better alternative, or if the lead of that suit may be trumped by Declarer or by Dummy, and, therefore, a continuance be worthless.
Possible Reasons Why Partner may wish a Continuance of Opener’s Choice of Suits Led
a) Partner may wish to signal the capacity to trump a subsequent round of that suit. b) Partner may wish to signal the ability to take a subsequent trick in that same suit (Ex. QXX). c) Partner may wish to force Declarer to trump producing a so-called “uppercut” in Trumps in order to promote a later trump trick for the Defenders, or to shorten the numbers of Trump cards in either Declarer’s or Dummy’s hand.
Alternatively, the play, by partner, of the lowest possible card to the trick shows a desire for Partner not to continue leading that suit which he/she previously played. A Low card played by Partner is Discouraging! Naturally, here too, Partner’s attempted dissuasion can be over-ruled if the original Partner who has led the suit feels an advantage for a continuance, notwithstanding any discouragement by his/her Partner.
2. When first Discarding (“Sluffing”) when showing out of any suit led: - The play of a high card as one’s first discard shows an interest (encouragement) in the suit discarded; and, alternatively, the play of a low card evidences a lack of interest (discouragement) in the particular suit discarded.
2. Count Signals
1. When Declarer first Leads a Suit, either from the Dummy or from Declarer’s hand: - When Declarer leads a suit, either from Dummy’s hand or from Declarer’s, each defender should give the other Count, which reflects the number of cards each possesses in the suit led by Declarer. They each evidence an even number of cards (2, 4, 6, etc.) with a High-Low Signal; or an odd number of cards (1, 3, 5, etc.) with a Low-High Signal. In this manner, each partner of the defending team is given information possibly important in the management of that suit in the later play of the hand. Each Defender, receiving this count signal, may then calculate how many cards Declarer has in the suit deduced from the information received coupled with that which can be seen by him in Dummy and what he/she holds personally.
2. When a Trump suit is played by Declarer in a suit Contract: - A Trump Echo: - In order to give an accurate count in the trump suit, the defenders should give a count signal, whenever possible as, occasionally, although, it is important not to play a card which might, otherwise, give up a trick. The play of High-Low by either Defender evidences, specifically, three (3) pieces of trumps. The play of Low-High by either Defender shows any number of Trumps other than three.
- 31 -
3. When Partner is following suit to a suit led by his/her Partner, but when he/she cannot beat the card played by Dummy – Normally, when Partner leads a suit and you are

playing third to the trick, it is customary for third hand to play high. When the third hand player cannot beat a card played from Dummy, however, Partner should give a count as to the number of cards he/she holds: a High-Low Signal shows an even number of cards held within that suit, a Low-High Signal evidences an odd number of cards held.
2a. Combined Attitude/Count Signals
1. The Second Card with which one Plays to the Suit which Partner has Led: - The first card played to Partner’s lead of any suit gives an attitude signal as suggested above. A high card encourages, a low card discourages. If Partner chooses to continue with, or even without, your encouragement, however, it is important for you to then give count as to the number of cards remaining in the suit with which partners continues to play. The second card which one follows to any suit led by Partner shows a count as to the remaining cards held, at that moment, within that suit led. When one signals a High-Low Signal, it signifies an even number of cards remaining (2, 4, 6, etc.) when one signals a Low-High Signal, it signifies an odd number of cards remaining (1, 3, 5, etc.). In this manner, partner is given information possibly important in the management of that suit in the later play of the hand.
3. Suit Preference Signals
Sometimes situations exist which call for neither attitude nor count signals. Under these circumstances, one alternatively has a need to direct his/her Partner to lead a specific suit. This is accomplished by a Suit Preference Signal. There are two (2) circumstances where this type of signal has usage:
1. When following suit to partner’s led suit but when it is clear to both you and to Partner that it would be useless for Partner to continue the suit. – There are occasions when Partner has led a suit where Dummy will be void in the suit Partner has led if it be led once again. It is then therefore obvious that to continue leading that suit would be fruitless and a switch of attack is, therefore, appropriate. When continuation of any suit led by Partner appears fruitless, the play to Partner’s trick of a high card asks for a switch to the higher-ranking of the two remaining suits (the two suits exclusive of the Trump suit), and the play of a low card asks for a switch to the lower-ranking of the two remaining suits.
2. When Leading a Card that you know will be trumped by your Partner: - Such a signal is called a Suit Preference Signal or a “Laventhal” or a Secondary Suit Signal. The assumption is that there are two suits from which to choose. When giving a suit preference signal, a high card signals a preference for the higher of the two remaining suits, a low card signals a preference for the lower of the two remaining suits.
The suit in which the signal is given does not count nor does a second suit (usually obvious), usually the trump suit. One very useful opportunity to put the suit preference signal to work is in the situation where you are leading a suit for partner to ruff and desire to signal how Partner can re-enter your hand so as to proceed with yet an additional ruff. In the following examples, partner has led what you have reason to believe is a singleton Club against a 4H contract. After winning the Ace of Clubs which card do you return for partner to ruff from each of the subsequent hands?
- 31a -
1) A964 2) 765 3) 1064 104 104 A43 765 A964 765
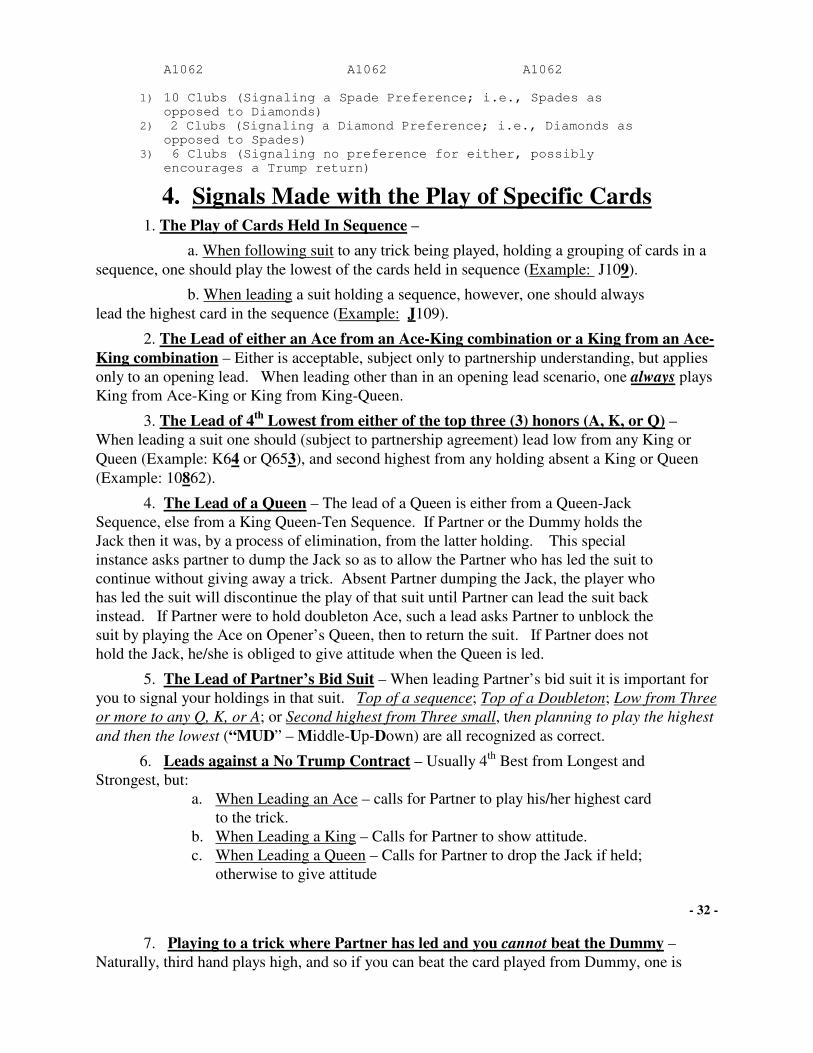
A1062 A1062 A1062 1) 10 Clubs (Signaling a Spade Preference; i.e., Spades as
opposed to Diamonds) 2) 2 Clubs (Signaling a Diamond Preference; i.e., Diamonds as
opposed to Spades) 3) 6 Clubs (Signaling no preference for either, possibly
encourages a Trump return)
4. Signals Made with the Play of Specific Cards
1. The Play of Cards Held In Sequence –
a. When following suit to any trick being played, holding a grouping of cards in a sequence, one should play the lowest of the cards held in sequence (Example: J109).
b. When leading a suit holding a sequence, however, one should always lead the highest card in the sequence (Example: J109).
2. The Lead of either an Ace from an Ace-King combination or a King from an Ace-King combination – Either is acceptable, subject only to partnership understanding, but applies only to an opening lead. When leading other than in an opening lead scenario, one always plays King from Ace-King or King from King-Queen.
3. The Lead of 4th Lowest from either of the top three (3) honors (A, K, or Q) – When leading a suit one should (subject to partnership agreement) lead low from any King or Queen (Example: K64 or Q653), and second highest from any holding absent a King or Queen (Example: 10862).
4. The Lead of a Queen – The lead of a Queen is either from a Queen-Jack Sequence, else from a King Queen-Ten Sequence. If Partner or the Dummy holds the Jack then it was, by a process of elimination, from the latter holding. This special instance asks partner to dump the Jack so as to allow the Partner who has led the suit to continue without giving away a trick. Absent Partner dumping the Jack, the player who has led the suit will discontinue the play of that suit until Partner can lead the suit back instead. If Partner were to hold doubleton Ace, such a lead asks Partner to unblock the suit by playing the Ace on Opener’s Queen, then to return the suit. If Partner does not hold the Jack, he/she is obliged to give attitude when the Queen is led.
5. The Lead of Partner’s Bid Suit – When leading Partner’s bid suit it is important for you to signal your holdings in that suit. Top of a sequence; Top of a Doubleton; Low from Three or more to any Q, K, or A; or Second highest from Three small, then planning to play the highest and then the lowest (“MUD” – Middle-Up-Down) are all recognized as correct.
6. Leads against a No Trump Contract – Usually 4th Best from Longest and Strongest, but:
a. When Leading an Ace – calls for Partner to play his/her highest card to the trick.
b. When Leading a King – Calls for Partner to show attitude. c. When Leading a Queen – Calls for Partner to drop the Jack if held;
otherwise to give attitude
- 32 - 7. Playing to a trick where Partner has led and you cannot beat the Dummy –
Naturally, third hand plays high, and so if you can beat the card played from Dummy, one is

expected to do so, and even to normally play one’s highest card. If, however, the third hand player cannot beat the Dummy he/she is expected to:
a. In a Suit Contract – To give Attitude
b. In a No Trump Contract – To give Count
8. When Breaking (Leading) a New Suit (Against either a suit or a NT contract) – Lead low from a Q, K, or A; else lead second highest, top of sequence, or top of any internal sequence:
Q764 (or) J83 (or) QJ10X (or) KJ10X
9. The Opening Lead of a Singleton or a Doubleton against a Suit Contract – Under certain optimum conditions, a lead of a Singleton (or, rarely, a Doubleton) can, oft times, produce a trick or more through a ruffing process. Such plays work best when:
a) When one holds a Trump Control b) When Partner has bid the suit in which one is short
If on is short in a side suit, however, but holds four (4) or more trumps, it is, oft times, best not to attempt to ruff; rather to go for a forcing attack in order to play the defending teams long suit(s) so as to make Declarer ruff instead thereby causing him/her shorten Declarer’s trump holding and, as a result, to loose control of the hand. 10. The Lead of Ace from any A-K combination – Dependent upon partnership agreement, most teams on opening lead to any contract will play Ace from A-K and then King from A-K at any other time other than opening lead. (Naturally, if only a doubleton A-K is held, the presence of a Doubleton is evidenced by total reversal of the above-mentioned sequences.)
------------------------------------------------------
- 33 - INTERMEDIATE BRIDGE COURSE
DEFENSIVE PLAY OF THE HAND

LESSON 15-B
DEVELOPING DEFENSIVE TRICKS: The methods by which defenders are able to secure all of the tricks in a suit to which they are entitled requires a cooperative and imaginative effort between the defenders since they are not capable of directly seeing their combined holdings in the suit in question. They need, therefore, the ability to visualize what their partner holds from the bidding, the play, and partner’s signals. Ultimately, defenders secure any tricks feasible by way of the same techniques as Declarer; namely, taking sure-tricks, and the promotion of additional winners through establishment of long suits, finessing, and trumping declarer’s winners. 1. Taking Sure Tricks: Similar techniques used by declarer; namely, playing a high card from the
short side first, and unblocking, and the added techniques of attitude and count signaling, comprise the methods by which a defending team can maximize the sure tricks to which they are entitled. In each of the following holdings which card would be led by your partner against a No Trump contract, and how would you work along with partner in a cooperative effort to take all of the tricks in the suit?
1) DUMMY 2) DUMMY 3) DUMMY 73 64 87 PARTNER YOU PARTNER YOU PARTNER YOU QJ104 AK2 KQ105 A72 AQJ92 K4 DECLARER DECLARER DECLARER 9865 J983 10653 1) Q; Overtake with the 2) Q; Encourage with 3) Q; Overtake with the K
A or K, lead the the 7 leading back the 4 second honor followed by a low card
Conclusion: Careful teamwork must be exhibited by the defenders in order to maximize their sure trick capabilities. This especially includes avoidance in blocking of a suit via overtaking partner’s honor, or giving an encouraging signal so that partner can lead a small card over to partner’s high card. 2. Promoting Tricks: Usually the defenders do not have enough sure tricks to defeat a contract
immediately from the outset but must, alternatively, develop additional tricks through promotion. In the following holdings, against a No Trump contact, Partner leads the card indicated. Which card will you play opposite Partner’s lead, and assuming that declarer wins trick one with the Ace, which card will Partner lead when he/she once again, regains the lead; and why?
1) DUMMY 2) DUMMY 3) DUMMY 54 A32 75 PARTNER YOU PARTNER YOU PARTNER YOU QJ93 1072 QJ1065 K7 Q9832 J104 DECLARER DECLARER DECLARER AK86 984 AK6 1) 7;3 2) K;J(or 10) 3) 10;2
Conclusion: Defenders must work together in order to promote as many tricks feasible. Each must attempt to imagine what his/her partner holds from the cars played and the signals given. Only then can they maximize promotion of their potential winners.
- 34 -
3. Establishing Long Suits: Long suits are a wonderful source of tricks for both declarer and defenders, especially in No Trump contracts. The following through with a continuation of the long

suit led oft times leads to the development of the suit. Towards this endeavor, it is many times necessary for the partnership to maintain an entry in their combined long suit so as to preserve communication between their two hands. You are defending against a No Trump contract and partner leads the card indicated in the suit you have bid. Assuming no outside entries, which card do you play to the first trick, and which card do you play to the second time the suit is led?
1) DUMMY 2) DUMMY 3) DUMMY QJ10 QJ10 KQJ PARTNER YOU PARTNER YOU PARTNER YOU 94 AK8632 A53 K9642 1082 A943 DECLARER DECLARER DECLARER 75 87 765 1) 8;K (or A) 2) 9;2 3) 9;3
Conclusion: Long suits provide an excellent source of tricks for defenders if (a) they be persistent in promotion of the suit, and (b) they attempt to visualize the complete layout of the suit , maintaining entries between the two hands, ducking when necessary, taking losses early, and, in general, keeping the lines of communication open.
4. The Defensive Finesse: The thrill of success when taking a finesse can be just as rewarding to the defense as to declarer, because the two defenders cannot see each other’s hand, however, as declarer can see Dummy’s, they must exhibit some degree of optimism, watch each other’s signals, and constantly look for clues to guide their attempts to entrap declarer’s high card(s). Against a suit contract, which card would you lead in each of the example layouts? Which card would partner play to the first trick assuming a low card is played from dummy, and which defender must lead the suit next if the defenders are to take all the tricks to which they are entitled? 1) DUMMY 2) DUMMY 3) DUMMY A54 732 K65
YOU PARTNER YOU PARTNER YOU PARTNER KQ10 8762 QJ95 864 QJ107 A83 DECLARER DECLARER DECLARER J93 AK10 942
1) K;2;Partner 2) Q;4;Partner 3) Q;8;You
Conclusion: The defenders are capable of utilization of finessing techniques just as effectively as declarer. To be most effective, however, they must both be alert to each other’s signals and attempt to imagine what cards partner might have that would have prevented him from continuing the suit if your signal prevents him/her from continuation of the suit, even though you know he/she would like the suit continued.
- 35 -
5. Leading Through Strength: In order to maximize the number of defensive tricks available in finessing situations, the defense must have the partner lead which is the singular one of the partnership which allows the lead to pass through the strength of declarer or Dummy. In the

following examples, will you or your partner need to lead the suit in order for the defense to secure all the tricks to which they would be entitled?
1) DUMMY 2) DUMMY 3) DUMMY 753 AJ10 872
YOU PARTNER YOU PARTNER YOU PARTNER K842 J109 973 KQ64 AQ94 1063 DECLARER DECLARER DECLARER
AQ6 852 KJ5
1) Partner 2) You 3) Partner
Conclusion: To help visualizing finessing situations on defense, it helps to keep the guideline of leading through strength and up to weakness in mind.
6. Trumping Declarer’s Winners: Another way the defenders can produce tricks is to trump declarer’s winners. Cooperation between the two defenders is essential so as to get more than one ruff. In order to accomplish this, cooperation coupled with a suit preference signal is critical. In the following hand notice which card partner returns after taking the opening lead of 3D against a 4-Spade contract.
YOU PARTNER J85 3 10752 J84 3 A10962 Q9865 A432
Conclusion: Defenders oft times need to cooperate when trying to ruff declarer’s winners. Both need to remain aware as to what is going on and must effectively work together using entries available between the two hands.
- 36 - INTERMEDIATE BRIDGE COURSE
DEFENSIVE PLAY OF THE HAND
LESSON 16-B

INTERFERING WITH DECLARER: In previous lessons we have seen how Defenders work together in order to take the maximum number of tricks through promotion, suit establishment, finessing, and trumping. Other techniques are available to the defenders which, when they work together as a partnership, assist them in preventing declarer from getting tricks to which he/she are not entitled. 1. The Defensive Holdup: Declarer often needs to establish tricks in his/her long suit. Once he/she
has established winners in a suit, he/she requires an entry in order to get to them. Defenders cannot alter the cards declarer has been dealt; but they can try to prevent declarer from using the cards to best advantage. In each of the following examples, declarer has no other entries to dummy other than the cards in the suit shown. To limit declarer to the minimum number of tricks, which cards would you and your partner play on the first trick assuming declarer were to lead the 10? Which cards would you and partner play on the second trick if declarer were to lead a small card to dummy’s Queen?
1) DUMMY 2) DUMMY 3) DUMMY PARTNER KQJ98 YOU PARTNER KQJ98 YOU PARTNER AQJ92 YOU 73 A42 A42 763 86 K743 DECLARER DECLARER DECLARER 1065 105 105
1) 7&2; 3&4 2) 2&3; A&6 3) 8&3; 6&K
Conclusion: The defensive holdup play is one method the defenders can use in order to prevent declarer from getting any undeserved tricks. Success of operation of this method depends upon cooperation between the defenders; i.e., one of them giving count while the other rejects his/her winner until declarer is playing his last card in the suit. If no other outside entries are available to declarer, his established additional winners are, thus, stranded. 2. Attacking Entries: If, unlike as in exercise 1, declarer holds an outside entry which will eventually
serve as transportation to winners that are being developed, defenders must work together so as to eliminate the outside entry before declarer is ready to use it. In each of the following, you are on lead. Which card would you lead to prevent declarer from later using the suit shown as an entry to the dummy?
1) DUMMY 2) DUMMY 3) DUMMY PARTNER A7 YOU PARTNER K73 YOU PARTNER KQ2 YOU 1083 KJ42 10984 A62 875 AJ104 DECLARER DECLARER DECLARER Q965 QJ5 963
1) King 2) 2 (or 6) 3) Jack (or 10)
Conclusion: When you can see that declarer is planning to develop a long suit and may have some entry problems, it is often a good idea to drive out any entries in the hand with the long suit before Declarer has established his/her winners.
- 37 -
3. Watching Your Discards: Small cards in any suit are usually assumed to be of no value. The unwary defender, thus, unthinkingly may tend to throw them away, preferring to hold on to higher cards in other suits instead. Sometimes, however, these, seemingly inconsequential small cards,

make the difference between success and failure for the defenders. How do the defenders know which suits to guard? Often it is obvious when you see the cards held in dummy. In each of the following layouts, how many tricks does declarer get if you unwittingly discard a small card in the suit shown, and how many does declarer get if you do not?
1) DUMMY 2) DUMMY 3) DUMMY PARTNER AK73 YOU PARTNER A972 YOU PARTNER KQ4 YOU J9 10642 QJ 1063 62 J10953 DECLARER DECLARER DECLARER Q85 K854 A87
1) 4;3 2) 4;3 3) 3;3
Conclusion: A card as low as a 2 can have as much power as an Ace. When discarding, try and keep the same length in a suit as you can see in the dummy or as you imagine might be held by declarer. The defending partners must share the responsibility for guarding all of the suits. You never want, as a defender, to be left with high cards in one suit while declarer is taking tricks with small cards in another suit in which you have made discards. 4 Defending Against Finesses: One of the methods by which Declarer gets the extra tricks he/she needs is by finessing. Many times the defenders can do something about this. In each of the following layouts, you are defending against a No Trump contract. Declarer leads a small card toward Dummy’s Jack. Which card should partner play and which card should you play in order to give declarer the most difficulty?
1) DUMMY 2) DUMMY 3) DUMMY PARTNER KQJ7 YOU PARTNER AQJ2 YOU PARTNER AJ1094 YOU A943 1062 1087 K63 85 KQ DECLARER DECLARER DECLARER 85 954 7632
1) 3;2 2) 7;3 3) 5;Q (OR K)
Conclusion: Keep declarer guessing as to how to play a suit. Do not reveal any information that will assist declarer in deciding how to play the cards in a particular suit unless you have to. The more guesses you give declarer, the more opportunities declarer has to go wrong.
- 38 -
INTERMEDIATE BRIDGE COURSE DEFENSIVE PLAY OF THE HAND
LESSON 17-B

MAKING A PLAN - Defender’s plan is similar in structure to Declarer’s plan. The same four steps of: (1) Pausing to consider one’s objective, (2) Looking at winners and losers, (3) Analyzing alternatives, and (4) Now putting it together, (PLAN) all apply.
(1) Defender’s Objectives: Obviously, to take enough tricks in order to defeat the contract, or at least to limit Declarer to the minimum number of tricks; i.e., the fewest overtricks.
(2) Looking at Winners and Losers: Since the defenders cannot see each others hands and thus do not have an exact knowledge of the combined holdings of the defense, the exact number of winners and losers is difficult to assess. They can, however, start by making an estimate and then revise it as more information is gleaned. Remember, Aces in suits other than trump can, sometimes, not take a trick.
(3) Analyzing Alternatives: Here the defense must use its collective imagination. Oft times they will have to visualize the possible layout of the suits to see opportunities to develop tricks through promotion, finesse, etc. As the play progresses, alternatives for the defenders should become clearer.
(4) Putting It All Together: Here the defending team must learn to work together to insure that they are both headed in the same direction. While the defender’s initial plans may differ, they should eventually merge into a common pathway as the hand is played out. The defenders must be more flexible than declarer. They must be prepared to change their collective plans as the play progresses and more information is shared between them.
1. Before the Dummy Comes Down: Having little to go on, other than the bidding just concluded and
the thirteen cards held, the defender on lead must make some preliminary assessment as to where tricks might eventually come from and then make the best initial estimate as to the best lead.
Exercise 1: You (West) are on lead YOU 2C/2H/P against a 4H contract P/P/P P/P/P with the bidding having 1H/2D/4H proceeded as shown. 10983 You are not exactly sure where your tricks will come K5 from. Your KH will win a trick if declarer holds the A. AQ3 Since declarer has bid diamonds, you hope the K is held J642 by declarer and either partner will eventually be on lead so to trap the King or perhaps declarer will take
the losing finesse. Your best lead, therefore, is to lead the 10S in hopes of either developing a Spade trick, or at the very least, of not giving a trick away.
Conclusion: Although your plan may be very rough until you have seen the dummy, it is still worthwhile developing an interim plan by beginning to form a picture of the missing hands in an effort to avoid stepping off in the wrong direction with the opening lead. The details of the best defense will likely come from seeing the dummy coupled with partner’s signals. At least you will be starting on a sound basis.
- 39 -
2. After Dummy Comes Down: Once the dummy has been tabled, and partner has played to the first trick, the defenders now have additional information on which to base their collective plan. There will likely still be some unknowns, and the defense must be alert so as to be prepared and flexible enough to modify its plan, but as the play progresses, the individual presumed plans of the two

defenders must merge into a single unified collectively orchestrated strategy. Exercise 2: You (East) hold the 1D/1NT/P following against a 4S P/P P/P/P contract with the bidding 1S/4S as shown. Partner leads the 2H. DUMMY You would plan the defense as K5 follows. Partner has led the KH from 1075 YOU a presumed KQ??? holding. Desirous KQJ7 842 of a diamond lead you would overtake AJ73 A964 partner’s K with the A, play your KH A singleton AD then return to partner’s 108652 QH awaiting partner to give you a ruff by returning a diamond for you to trump.
Conclusion: After dummy appears and partner plays, more information is available to the defenders. Be sure to look at the whole picture before automatically following any preconceived guideline such as automatically returning your partner’s lead.