Embed Size (px)
Citation preview
Bradford Technologies, Inc. • 302 Piercy Road • San Jose, CA 95138 • 800-622-8727 • www.BradfordSoftware.com

© Bradford Technologies, Inc. • 302 Piercy Road • San Jose, CA 95138 • 800-622-8727 • www.BradfordSoftware.com
Instructions for the NEW Automated ClickFORMS Data Import Wizard These instructions assume that your Multiple Listing Service account is setup to export data for use with this product. NOTE: If your MLS is setup for use with Redstone or CompCruncher, the same export format will work with the new ClickFORMS Data Import Wizard. If you need assistance to setup your MLS, please call 800-622-8727.
Using the Automated Data Import Wizard
1. By default, ClickFORMS is installed to use the Manual
Data Mapping capability. The new ClickFORMS Data
Wizard requires the “Automated Data Mapping”
option. To change this option, click on the “Edit” tab
from the main menu, then select “Preferences”.
2. From the left side of the window, scroll down to the
“Tools” category and click on the “Built-In” link.

© Bradford Technologies, Inc. • 302 Piercy Road • San Jose, CA 95138 • 800-622-8727 • www.BradfordSoftware.com
3. From the right side of the window, scroll to the bottom
until you see the “Data Import Wizard” radio button
box. Select the “Use automated data mapping” radio
button. Click the “Apply” button, then click “OK”.
Your ClickFORMS software is now setup to use the new
ClickFORMS Data Import Wizard.
Importing Your Data
To use the Data Import Wizard, you must first export a CSV or TXT file of the data you want to use. For example, if your data is coming from your MLS, you need an export of all the data fields from your MLS. Once you have this export, save the file to your computer. ClickFORMS prefers you save your MLS Export file to the: Documents/My ClickFORMS/MLS Imports folder. However, you may save your file to another location on your hard drive as long as you know where to browse to locate your file.
4. In ClickFORMS, open your report or template that
you will be using to import your data. IMPORTANT:
Include the number of necessary Sold and Listing
forms necessary to complete your appraisal report.
The ClickFORMS Data Import Wizard will not work
unless you have a report or template open with the
necessary sold or listing forms included before using
this service.
© Bradford Technologies, Inc. • 302 Piercy Road • San Jose, CA 95138 • 800-622-8727 • www.BradfordSoftware.com
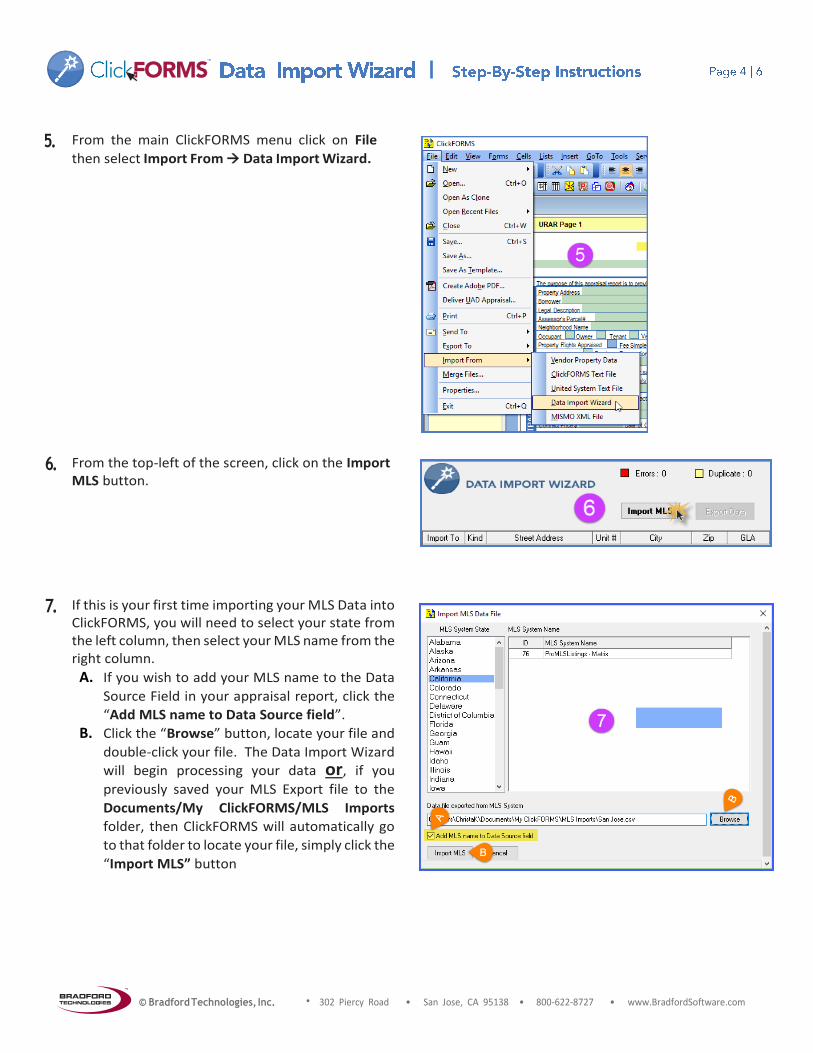
5. From the main ClickFORMS menu click on File
then select Import From Data Import Wizard.
6. From the top-left of the screen, click on the Import MLS button.
7. If this is your first time importing your MLS Data into ClickFORMS, you will need to select your state from the left column, then select your MLS name from the right column.
A. If you wish to add your MLS name to the Data
Source Field in your appraisal report, click the
“Add MLS name to Data Source field”.
B. Click the “Browse” button, locate your file and
double-click your file. The Data Import Wizard
will begin processing your data or, if you
previously saved your MLS Export file to the
Documents/My ClickFORMS/MLS Imports
folder, then ClickFORMS will automatically go
to that folder to locate your file, simply click the
“Import MLS” button
© Bradford Technologies, Inc. • 302 Piercy Road • San Jose, CA 95138 • 800-622-8727 • www.BradfordSoftware.com
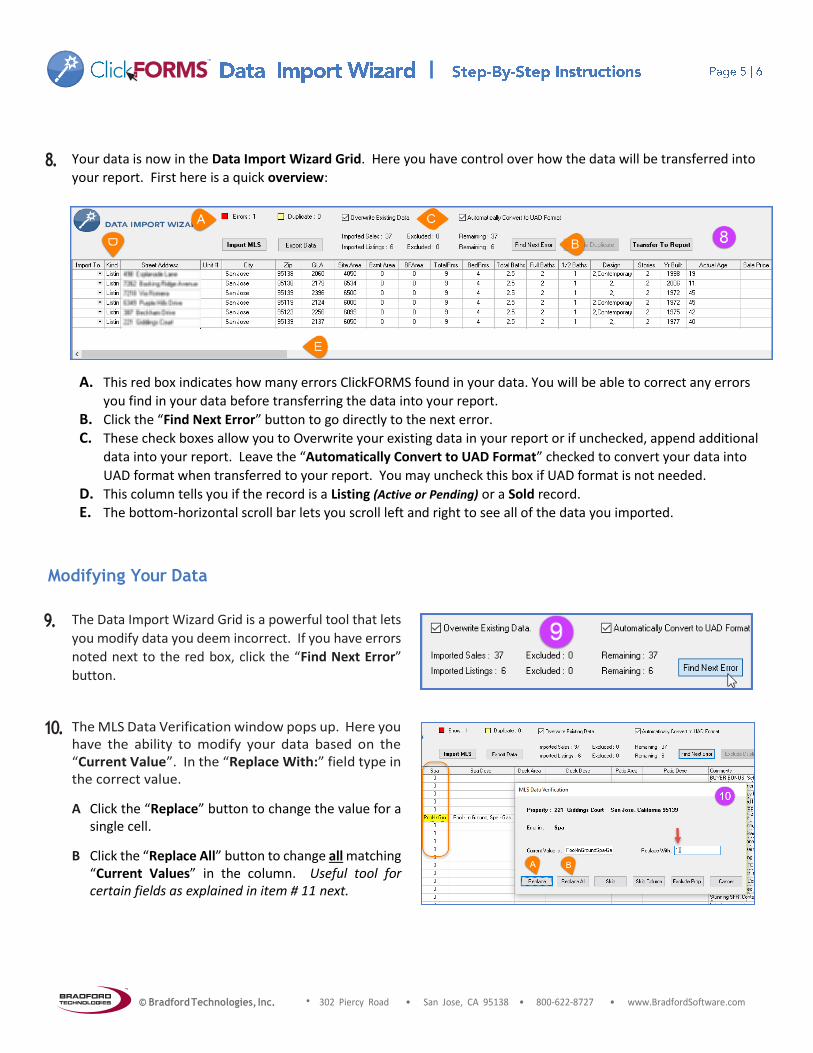
8. Your data is now in the Data Import Wizard Grid. Here you have control over how the data will be transferred into
your report. First here is a quick overview:
A. This red box indicates how many errors ClickFORMS found in your data. You will be able to correct any errors
you find in your data before transferring the data into your report.
B. Click the “Find Next Error” button to go directly to the next error.
C. These check boxes allow you to Overwrite your existing data in your report or if unchecked, append additional
data into your report. Leave the “Automatically Convert to UAD Format” checked to convert your data into
UAD format when transferred to your report. You may uncheck this box if UAD format is not needed.
D. This column tells you if the record is a Listing (Active or Pending) or a Sold record.
E. The bottom-horizontal scroll bar lets you scroll left and right to see all of the data you imported.
Modifying Your Data
9. The Data Import Wizard Grid is a powerful tool that lets
you modify data you deem incorrect. If you have errors
noted next to the red box, click the “Find Next Error”
button.
10. The MLS Data Verification window pops up. Here you have the ability to modify your data based on the “Current Value”. In the “Replace With:” field type in the correct value.
A Click the “Replace” button to change the value for a single cell.
B Click the “Replace All” button to change all matching “Current Values” in the column. Useful tool for certain fields as explained in item # 11 next.
© Bradford Technologies, Inc. • 302 Piercy Road • San Jose, CA 95138 • 800-622-8727 • www.BradfordSoftware.com
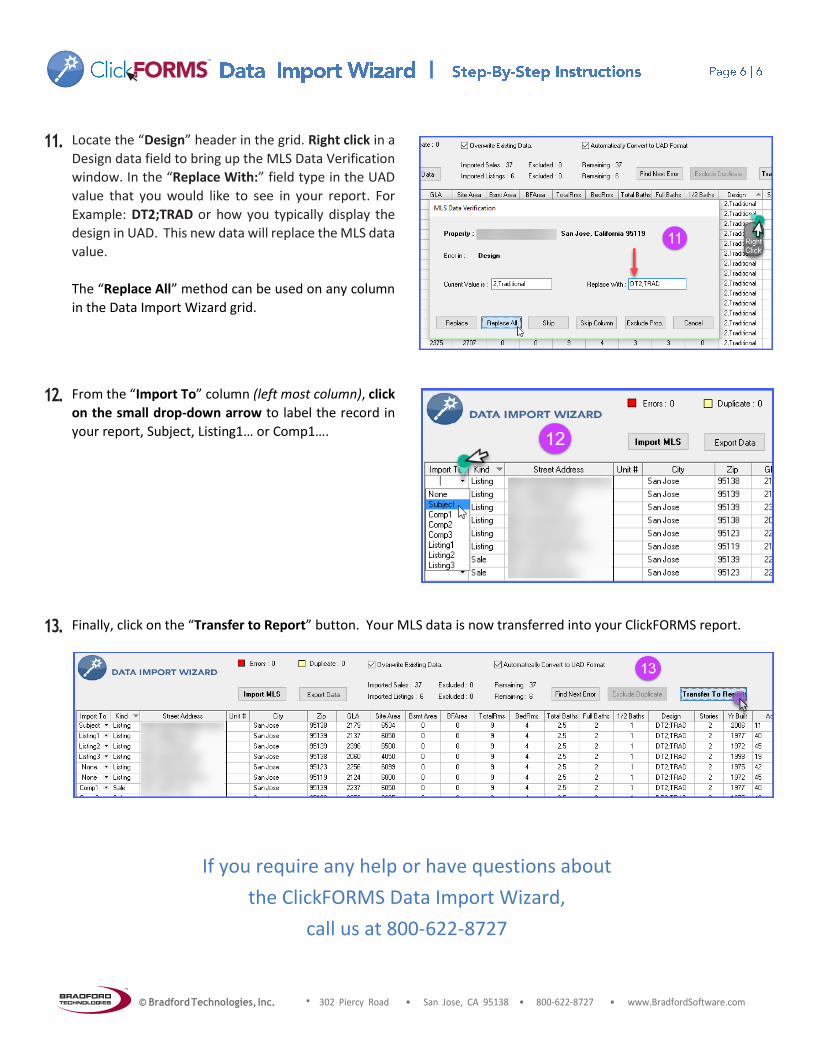
11. Locate the “Design” header in the grid. Right click in a
Design data field to bring up the MLS Data Verification
window. In the “Replace With:” field type in the UAD
value that you would like to see in your report. For
Example: DT2;TRAD or how you typically display the
design in UAD. This new data will replace the MLS data
value.
The “Replace All” method can be used on any column
in the Data Import Wizard grid.
12. From the “Import To” column (left most column), click
on the small drop-down arrow to label the record in
your report, Subject, Listing1… or Comp1….
13. Finally, click on the “Transfer to Report” button. Your MLS data is now transferred into your ClickFORMS report.
If you require any help or have questions about
the ClickFORMS Data Import Wizard,
call us at 800-622-8727