Embed Size (px)
Citation preview

BounceBack User Guide

BounceBack User Guide
1
Table Of Contents 1. Table of Contents............................................................................................................................ 2
2. 1-0 Introduction.............................................................................................................................. 3
2.1 1-0: Introduction ....................................................................................................................... 4
2.2 1-1: BounceBack Software Overview ......................................................................................... 6
3. 2-0 Navigating the BounceBack Control Center ............................................................................... 9
3.1 2-0: Navigating the BounceBack Control Center ...................................................................... 10
4. 3-0 Backup and Restore ................................................................................................................ 13
4.1 3-1: Create a New Backup Set ................................................................................................. 14
4.2 3-2: Launch a Backup .............................................................................................................. 19
4.3 3-3: Schedule a Backup ........................................................................................................... 20
4.4 3-4: Restore Data with QuickRestore ....................................................................................... 23
4.5 3-5: Change CDP Settings ........................................................................................................ 26
5. 4-0 Managing Your Data ............................................................................................................... 29
5.1 4-1: Remove Deleted Files from the Backup ............................................................................ 30
5.2 4-2: Change the Drive Letter Assigned to the Backup Device ................................................... 33
5.3 4-3: Create a Spare System Drive (Not Available in Express) .................................................... 35
5.4 4-4: Password Protect the Backup Drive (BounceBack Pro Only).............................................. 37
5.5 4-5: Restore Previous File Versions (Not Available in Express) ................................................. 41
6. 5-0 Advanced Backup Options....................................................................................................... 43
6.1 5-1: Multiple Backup Destinations in a Backup Set .................................................................. 44
6.2 5-2: Changing BounceBack’s Screen Resolution ....................................................................... 46

BounceBack User Guide
2
1. Table of Contents
Section 1: Introduction 1-0: Introduction 1-1: BounceBack Software Overview
Section 2: Navigating the BounceBack Control Center 2-1: Navigating
the BounceBack Control Center
Section 3: Backup and Restore - How Do I... 3-1: Create a New Backup Set
3-2: Launch a Backup 3-3: Schedule a Backup 3-4: Restore Data With
QuickRestore 3-5: Change CDP Settings
Section 4: Managing Your Data - How Do I... 4-1: Remove Deleted Files
from the Backup 4-2: Change the Drive Letter Assigned to the Backup Device 4-
3: Create a Spare System Drive 4-4: Password Protect the Backup Drive
(BounceBack Ultimate) 4-5: Restore Previous File Versions (Not Available in
Express)
Section 5: Advanced Backup Types - How Do I... 5-1: Multiple Backup
Destinations in a Backup Set 5-2: Changing BounceBack's Screen Resolution

BounceBack User Guide
3
2. 1-0 Introduction

BounceBack User Guide
4
2.1 1-0: Introduction
Thank you for purchasing BounceBack Ultimate software, truly the Ultimate in backup software.
BounceBack Ultimate is software designed to backup the entire contents of your PC to a USB backup device called the Instant PC
Recovery Drive. This backup will include all of your data files, the operating system, and anything else required by Windows to start your
system. If the hard drive in your PC fails at any time after BounceBack is installed, you will be able to start your system directly off the
connected USB backup device. All of your programs and data will work the same from the backup drive and allow you to continue using your
system. Once a replacement hard drive is installed in your system, BounceBack Ultimate will make it easy to restore the system from the
Recovery Drive back to the newly installed hard drive in the PC. If your system is a desktop PC, or a laptop that remains on your desk
during the day, then BounceBack will assume that your USB backup device is always connected and will continuously update the backup with all
the files that change on your system. If you are constantly on the go and can’t always have your backup device connected, then the backup process
will automatically launch each time you connect the device. It is HIGHLY recommended that you connect the backup drive at least
once a day to keep the important documents on your system backed up.
Please don't forget to register your software on our website. Doing so will
allow you to get support for your new software. Here are several ways to contact CMS Products Inc. should you have any need to:
US Contact Information Internet
http://www.cmsproducts.com/
Technical Support: [email protected] Sales/More Info: [email protected] or [email protected]
Note: Product returns need a Return Material Authorization (RMA) number. Contact Tech Support first to arrange for your RMA number.
Product returned without a RMA number will be refused and returned to customer.
European Sales Contact Information
Office Phone: +44 (0) 1256 766692

BounceBack User Guide
6
2.2 1-1: BounceBack Software Overview
BounceBack software has many features that can be tailored to individual user needs. Here is a brief overview of these features.
BounceBack Features

BounceBack User Guide
7

BounceBack User Guide
8

BounceBack User Guide
9
3. 2-0 Navigating the BounceBack Control Center

BounceBack User Guide
10
3.1 2-0: Navigating the BounceBack Control Center
If you are having trouble starting from you Instant PC Recovery
please review the BBDisasterRecovery manual located on your CD.
Section 2: Navigating the BounceBack
Control Center
Once BounceBack Ultimate has been installed on your computer, you can
change how your backups are setup by clicking on the BounceBack Launcher icon in the system tray in the lower right corner of the task bar -
. Single clicking and selecting BounceBack Control Center will launch the Control Center. Once open, the Control Center contains the following
options:
Backup - Click here to launch a Backup Set. If you have
created more than one Backup Set, you can select the Set
you wish to launch.
Restore - Click here to launch QuickRestore. QuickRestore
allows you to restore data files and folders from your backup
to either their original location or a location you specify.
Note: QuickRestore cannot be used to do a Full System
Restore.

BounceBack User Guide
11
Add New Backup - Click here to create a new Backup Set.
Gives complete control of the backup process and allows the
backup configuration to be defined by the user.
Edit - Click here to launch the Backup Set Editor. This Editor
will allow you to change settings for your backups, including
setting or changing a Schedule for each Backup Set.
Options - Click here to access backup options including
performing a Full System Backup. Use with Caution! This
process will erase all data on the drive you select.
Help - Click this icon to access the interactive BounceBack Ultimate
Help menu. This feature provides detailed information concerning
the use and operation of BounceBack Ultimate. Accessing these
menus will help you to effectively utilize the full power of
BounceBack Ultimate.
Information - Click this button to access important information
about BounceBack Ultimate including the current version number.
Register - Click this button to Register your BounceBack Ultimate
application with CMS Products. By registering BounceBack Ultimate,
you will receive continuing information about new features and
upgrades as they become available.
Security (BounceBack Ultimate FDE Only) - Clicking this button
will allow you to set and remove passwords on supported backup
devices. Once a password is set, your drive will be inaccessible,
even on another computer. The Backup Device will remain hidden
from the Operating System until it is unlocked.

BounceBack User Guide
12

BounceBack User Guide
13
4. 3-0 Backup and Restore

BounceBack User Guide
14
4.1 3-1: Create a New Backup Set
Section 3: Backup and Restore - How Do I...
In this section we will guide you step by step through the creation of a Backup Set. The following procedure will describe creating Let Me Choose
type backups on installation or for creating a new Backup Set. For creating a Full System Backup (recommended) upon installation, please refer to
the Quick Start Guide.
3-1: Create a New Backup Set
Following the steps below, will walk you through the process of creating a
Normal Data Backup Set or a Let Me Choose type.
Step 1
Click on the BounceBack
Launcher icon - in the system tray.
Select BounceBack Control Center.
Click on the Add New Backup tab to open the Backup Set Editor menu.
Step 2
BounceBack User Guide
15
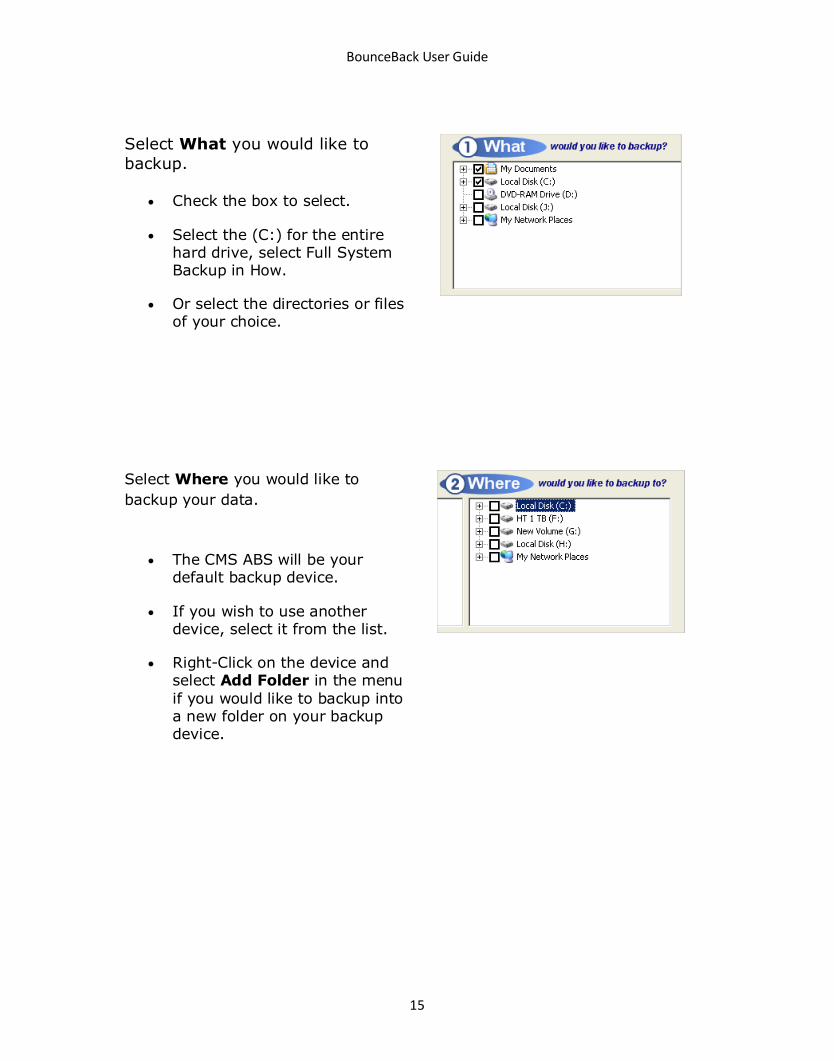
Select What you would like to
backup.
Check the box to select.
Select the (C:) for the entire hard drive, select Full System Backup in How.
Or select the directories or files of your choice.
Step 3
Select Where you would like to
backup your data.
The CMS ABS will be your default backup device.
If you wish to use another device, select it from the list.
Right-Click on the device and select Add Folder in the menu
if you would like to backup into a new folder on your backup device.
Step 4

BounceBack User Guide
16
Next you choose How to run the
backup and any options to include.
Some features may not be available depending on selections made and version of the software being used.
Backup Type
System Backup - Perform a Full System Backup. In the event of a system disk failure or other error, you have a direct replacement for your computer. (Express does not create a spare System drive)
NOTE: If you have already run a Full System Backup this
option will not be available.
Data Only - Default setting, backup all data files selected.
Synchronized - (Ulimate only) Synchronizes two computers, see Advanced Options.
Versioned - (Ultimate only) Creates multiple versions of data files, see
Advanced Options.
Encrypted - (Ultimate, Ultimate FDE and Server only) This backup option encrypts the data files in a backup set, protecting the data files from being accessed by an unauthorized user. BounceBack Ultimate
software and the correct decryption key are needed to restore files from
an encrypted data set. Without the correct decryption key, encrypted files cannot be restored.
Backup Options
Verify Data - Configures BounceBack to Verify your backed up data after it has written it to your backup device
NOTE: Verify will cause a significant increase to your backup times.
BounceBack User Guide
17
Exit Program on Completion - When you need to run your backups unattended, this closes BounceBack when the backup process
completes.
Shutdown System on Completion - This works in conjunction with Exit Program, to turn Off your computer once the backup finishes.
Step 5
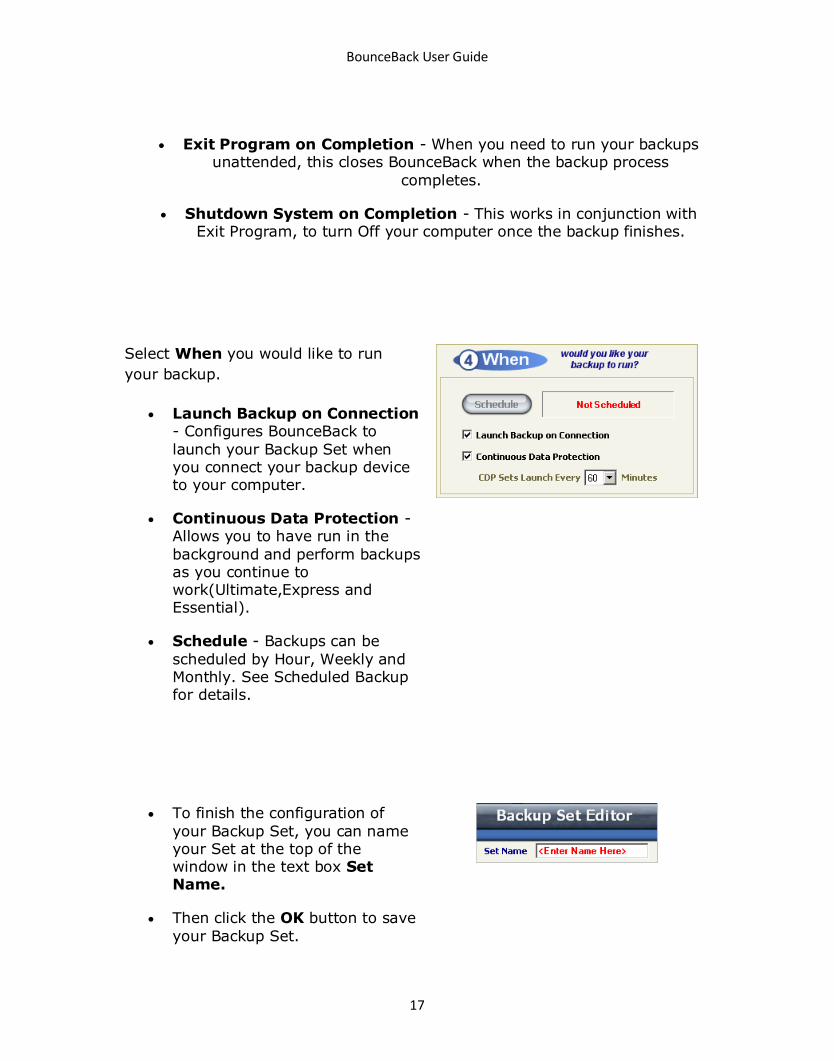
Select When you would like to run
your backup.
Launch Backup on Connection - Configures BounceBack to
launch your Backup Set when you connect your backup device to your computer.
Continuous Data Protection - Allows you to have run in the
background and perform backups as you continue to work(Ultimate,Express and Essential).
Schedule - Backups can be
scheduled by Hour, Weekly and Monthly. See Scheduled Backup for details.
Step 6
To finish the configuration of
your Backup Set, you can name your Set at the top of the window in the text box Set Name.
Then click the OK button to save
your Backup Set.

BounceBack User Guide
18

BounceBack User Guide
19
4.2 3-2: Launch a Backup
Step 1
Click on the BounceBack Launcher icon - in the system tray.
Select either Run Incremental Backup Now or Run Full System Backup Now.

BounceBack User Guide
20
4.3 3-3: Schedule a Backup
Step 1
Click on the BounceBack Launcher icon - in the system tray
Select BounceBack Control Center
Click the Edit Tab on the BounceBack Control Center to open the Backup Set List.
Step 2
Select your Backup Set in the list that you would like to Edit.
Click the Edit button to open the Backup Set Editor.

BounceBack User Guide
21
Step 3
Click on the Schedule button in the lower right corner of the Backup Set Editor window.
This will bring up the Backup Schedule Editor.
Step 4
Determine which one of the three choices on the left side of
the Editor screen you would like to use.
The options are Not Scheduled, Weekly and Monthly.
Step 5
Underneath the time, is where you can select which days of the week you would like to schedule
your backup.
Selecting the check boxes
enables that day of the week for

BounceBack User Guide
22
your backup to be performed.
At the top, use the pull down menus to select what time of
day you would like your Backup Set launched.
Step 6
Next, click the OK button at the bottom of the Backup Schedule Editor to save your setting.
You have now configured your Backup Set to launch at a predetermined time.
NOTE: A scheduled backup can ONLY be performed when your
computer is powered On, and you are Logged in to the Operating
System. BounceBack cannot launch a backup when the computer is
in hibernation or sleep mode, or when a screen saver is configured
to Prompt for a Password to continue. All of these modes will put the
computer into a standby state and log the user off the system.

BounceBack User Guide
23
4.4 3-4: Restore Data with QuickRestore
Step 1
Click on the BounceBack Launcher icon - in the system
tray.
Select BounceBack Control Center.
Select the Restore Tab to open QuickRestore.
Step 2
Click the [+] to expand a directory in the Left Hand column.
Navigate to the desired location
of the file(s) you wish to restore.

BounceBack User Guide
24
Click to Enlarge
Step 3
To select your data single click on the item.
If you need to restore multiple directories or files, you can hold down the Control key on your keyboard while selecting your items.
Step 4
When your data selection is complete, click on the Restore button at the top.
Follow the on screen dialog boxes, to restore your data to its original location on your system disk.

BounceBack User Guide
25

BounceBack User Guide
26
4.5 3-5: Change CDP Settings
To Change How Often CDP Backups Occur
Click on the BounceBack Launcher icon - in the
system tray.
Select Change CDP Interval.
Click the drop down arrow and select the number of minutes you want for the CDP interval.
To Disable CDP Backups
Click on the BounceBack
Launcher icon - in the system tray.
Select Suspend CDP Backup

BounceBack User Guide
27
To Re-Enable CDP Backups
Click on the BounceBack
Launcher icon - in the system tray.
Select Enable CDP Backup
To Change the Time That CDP Performs a Registry
Backup
Click on the BounceBack Launcher icon - in the system tray.
Select Change CDP Interval.
Click the drop down arrow and select the number of minutes you want for the CDP interval.
Next click the AM/PM drop
down arrow and select AM or PM.

BounceBack User Guide
28

BounceBack User Guide
29
5. 4-0 Managing Your Data
BounceBack User Guide
30
5.1 4-1: Remove Deleted Files from the Backup
Section 4: Managing Your Data - How Do I...
In this section we will show you how to free up space when your backup drive is getting full and how to change the drive letter that Windows
assigns to the Backup Drive. We will also show you how to create a spare system drive for disaster recovery.
4-1: Remove Deleted Files from the Backup
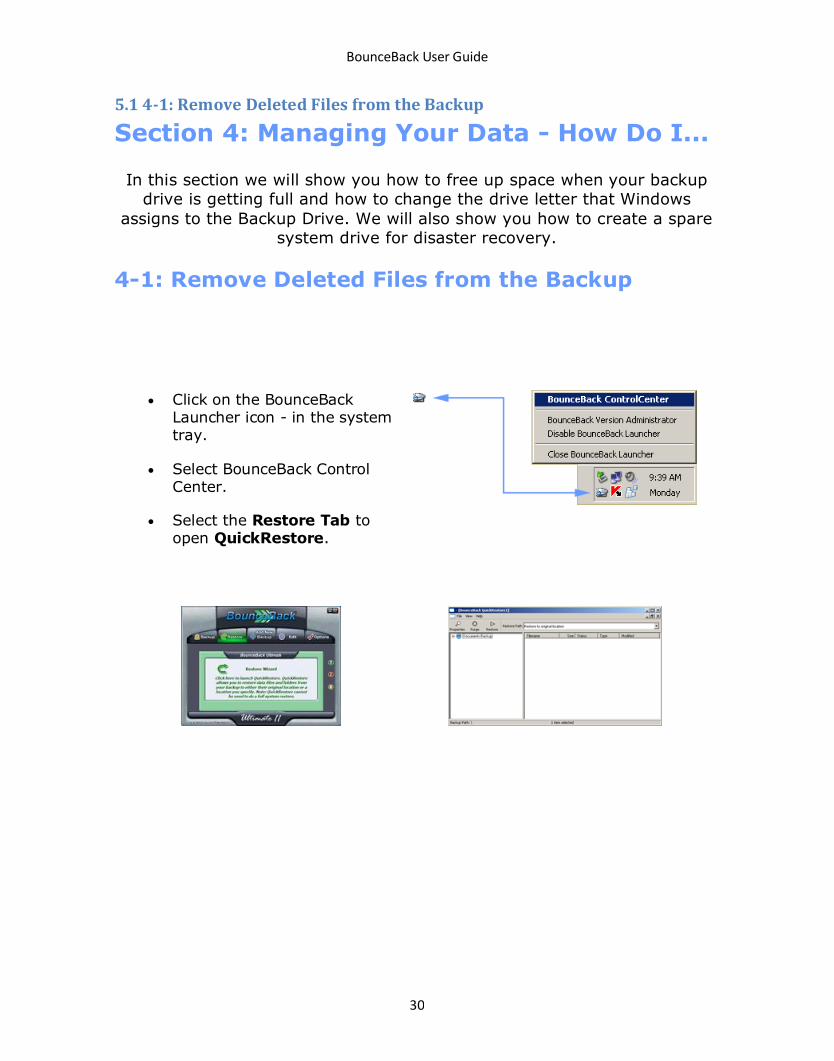
Step 1
Click on the BounceBack Launcher icon - in the system tray.
Select BounceBack Control Center.
Select the Restore Tab to open QuickRestore.
Step 2

BounceBack User Guide
31
Any item (data) with a red X
on its icon, means that the original file no longer resides on your system disk.
Start by navigating to the
data you wish to delete, and select it by clicking on the item.
Hold the Control Key down on your keyboard while clicking
on the data allows you to select multiple items.
NOTE: If you wish to Purge all the deleted data off the Backup
Device at once, clicking the Purge button with nothing selected in
the Right column will remove it in one step.
Step 3
Finish selecting your data to
remove.
Click on the Purge button at the top of the QuickRestore application to Permenently DELETE the selected data off the backup
device.
Step 4
Follow the on screen dialog boxes to continue with the Purge
process.

BounceBack User Guide
32
NOTE: Use the Purge function with Caution! Once data has been
Purged (removed) from the backup device, that data is no longer
available to Restore!

BounceBack User Guide
33
5.2 4-2: Change the Drive Letter Assigned to the Backup Device
Step 1
Click on the BounceBack Launcher icon - in the system tray.
Select BounceBack Control Center.
Click the Options Tab to open the Backup Options.
Step 2
Click the Next button in the lower right corner to access the Backup Device List.
Single click to select the desired device in the list.
Step 3

BounceBack User Guide
34
Click the Change Drive
Letter button to display the list of available device letters.
Select the New drive letter to be assigned to the device.
Click OK.
Click Done.

BounceBack User Guide
35
5.3 4-3: Create a Spare System Drive (Not Available in Express)
Step 1
Click on the BounceBack Launcher
icon - in the system tray.
Select BounceBack Control Center.
Click the Options Tab.
Step 2
Click on the Full System Backup button.
WARNING: Use this feature with caution, as all the data on the backup device will be erased!
Step 3

BounceBack User Guide
36
Follow the on screen dialogs to complete.

BounceBack User Guide
37
5.4 4-4: Password Protect the Backup Drive (BounceBack Pro Only)
BounceBack Security - This feature of BounceBack allows you to enter a password to lock and unlock your backup device.
NOTE: Password Protection is supported on selected CMS Products'
devices only! If a combo interface device (USB and eSATA) is in use,
the USB interface MUST be used if password protection is to be
implemented. Unsupported devices will NOT be listed in the
supported Device List.
Step 1
Click on the BounceBack Launcher icon - in the system tray.
Select BounceBack Control
Center.
Click the Blue Padlock in the lower right hand corner to open the Security Device List.
Step 2

BounceBack User Guide
38
Supported devices will be
listed here.
Select your backup device and click the Next button.
Step 3
If you do not want to select any Password Options proceed to step 4.
Click the Options button to take you to the Password Options screen.
There are 2 options available here:
Always Prompt for Password Before Backing Up
If enabled, and a backup is requested by any method, you will have to enter your password manually before the backup process can continue.
If left unchecked, BounceBack will manage your password and unlock the drive for you when a backup needs to run if your device is password
protected.

BounceBack User Guide
39
Ask Me a Security Question if I Forget My Password
If checked when you password protect your device, the software will provide you with a secondary opportunity to remind you should you
ever forget your password. When you answer the question correctly, BounceBack will then provide you with your password.
Click OK when finished to go back to the Password
Selection screen.
Step 4
Input your password into the Enter Password and Verify Password text fields.
Passwords ARE case sensitive, if the BIOS supports case sensitive passwords.
WARNING! Do not forget your password! Once a device is locked,
and the password is lost or forgotten, the drive password cannot be
reset and the drive will no longer be accessible.
Step 5
To lock your device click
the Lock Device button.
Then unplug your device, wait 15 seconds and then plug the device

BounceBack User Guide
40
back in.
NOTE: If you are unlocking your device, enter your password into
the Enter Password and Verify Password fields and click the Unlock
Device button.

BounceBack User Guide
41
5.5 4-5: Restore Previous File Versions (Not Available in Express)
Versioned File Restore - This section will walk you through how to Restore a file(s) from a Versioned Backup that you have performed.
Step 1
Click on the BounceBack Launcher icon - in the system tray.
Click BounceBack Version Administrator to open the application.
Step 2
Click the appropriate Date
Tab at the top of the Left Column.
Click on the [+] to expand a directory in the Left Hand column.
Navigate to the desired location of the file(s) you wish to restore.

BounceBack User Guide
42
Step 3
To select your data, single
click on the item.
If you need to restore multiple directories or files, you can hold down the Control Key on your keyboard while selecting
your items.
Step 4
Click the Restore button to start the restore process.
Follow the on screen dialog
boxes to continue with the Restore process.

BounceBack User Guide
43
6. 5-0 Advanced Backup Options

BounceBack User Guide
44
6.1 5-1: Multiple Backup Destinations in a Backup Set
Disabled by default. When this feature is enabled, this allows you to select multiple backup items in the Backup Set Editor. This is helpful when you
would like to have the ability to have a Backup Set backup your data to multiple devices or locations.
Step 1
Click on the BounceBack Launcher icon - in the system tray.
Select BounceBack Control Center.
Click the Options Tab to
open the Backup Options.
Step 2
Click the check box next to Allow Access to Multiple Backup Destinations to enable this option.
Click the Accept button to save your changes.

BounceBack User Guide
45
Step 3
Open the Backup Set Editor. (See Section 3-1: Create a New Backup Set for instructions)
Click the “New” tab to create
a new backup location for your backup set.
Select what you want to backup and where you want it to backup to.
Click OK to complete your backup set.

BounceBack User Guide
46
6.2 5-2: Changing BounceBack’s Screen Resolution
Default setting is 100%. With todays modern hi-resolution monitors, BounceBack allows you to scale its resolution to fit your screen to your
liking. BounceBack has 4 settings, 100%, 125%, 150% and 200% to fit any screen resolution that you may use.
Step 1
Click on the BounceBack Launcher icon - in the system tray.
Select BounceBack Control Center.
Click the Options Tab to
open the Backup Options.
Step 2

BounceBack User Guide
47
Use the Set Screen
Resolution pull down to select one of the 4 settings.
Click the Accept button to save your changes.