Embed Size (px)
Citation preview

BOSS BRAKESInstalling Wilwood four-wheel disc brakes on a ’69 Boss 429 Mustang
The Wilwood Engineering disc brake kit 140-10219 comes with all of the parts needed to com-plete the installation and that includes theE-coated rotors, the aluminum hub assembly, thepowder coated Dynapro calipers, the mountingbrackets, and all of the hardware required to fin-ish the installation.
The Wilwood Engineering rear disc brake kit 140-7142 comes with a right and left bracket kit that in-cludes an internal parking brake setup, E-coatedrotors, bearing retainers, powder coated Dynaprocalipers and all of the hardware required to finishthe installation.
If you are a Ford enthusiast you know that Boss429 Mustangs have become a priceless com-modity, and most of the remaining cars are mu-seum pieces that are occasionally driven toshows and events. The big twisted-hemi pow-ered Mustangs were built in extremely limitednumbers to qualify the engine for NASCAR rac-ing with 867 built in 1969 and 499 built in 1970.The 1969 Boss 429 that we will show you is cer-tainly show worthy, even though it has been aweekend driver since it was new. In an effort toget this Mustang running great, it was deliveredto Holman & Moody for an engine rebuild andthe big NASCAR engine was equipped with in-ternal upgrades, a rare dual-quad intake mani-fold and a high performance exhaust system.This engine was under-rated at 375 horsepowerwhen it was new, and this performance modifiedone is delivering much more.
This Boss has been running the OEM front disc /rear drum brakes since it left the factory, so theowner felt that it was long overdue for a change.
The owner contacted a Wilwood Engineeringdealer and ordered a Wilwood part number 140-10219 front disc brake kit and a part number 140-7142 rear disc brake kit that features BilletDynapro 6 calipers on the front and Billet Dynapro4 calipers on the rear. In addition to ordering thebrake kits, a new Wilwood brake hose set partnumber 220-9195 was ordered for the frontcalipers and a new universal parking brake cableset part number 330-9371 was ordered for the rearbrakes. Mustang enthusiasts will tell you that thesame factory disc brake setup was used on all ofthe performance Mustangs such as the Boss 302,the Mach I, the Shelby and it was optional on all ofthe other Mustangs. If you are currently driving orworking on a ’68 or ’69 Mustang and were thinkingabout upgrading the brakes for your family’s safetyand improving your driving pleasure, the kits wewill show you are perfect for your Mustang.Wilwood also makes similar kits for ’70 to ’73 Mus-tangs, but since there was a small spindle change,the part numbers for those kits are different. If youown a ’68 or ‘69 Mustang, you can order part
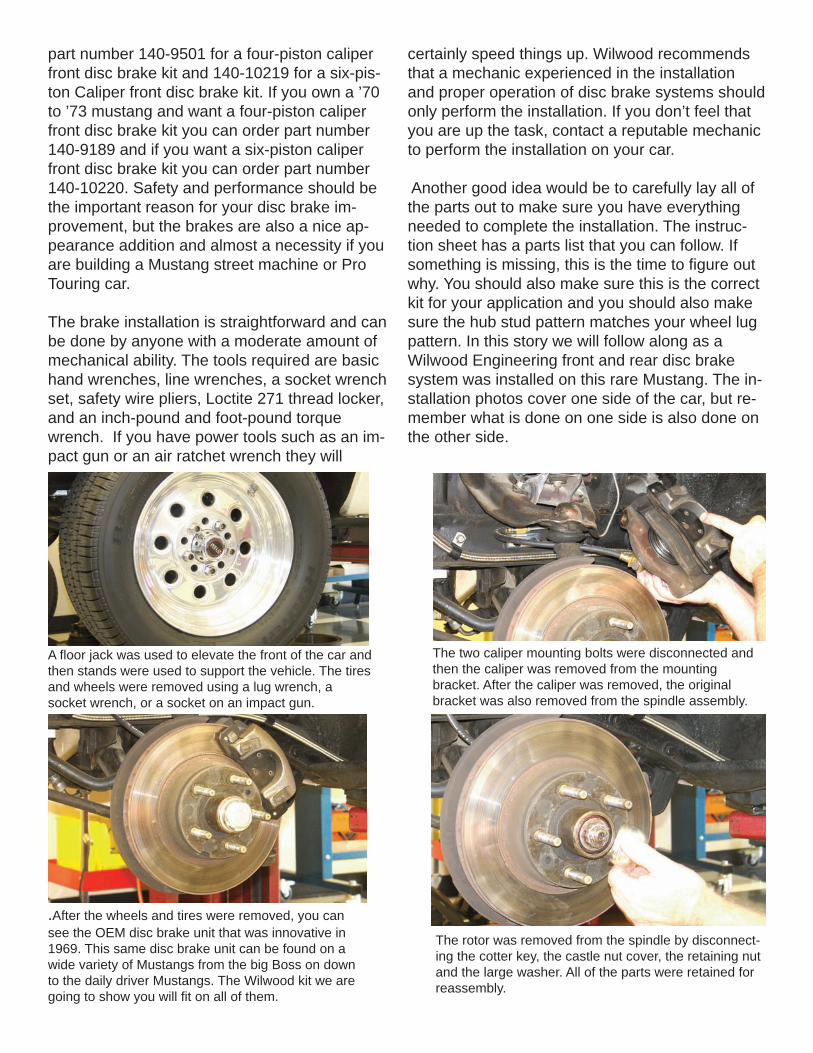
.After the wheels and tires were removed, you cansee the OEM disc brake unit that was innovative in1969. This same disc brake unit can be found on awide variety of Mustangs from the big Boss on downto the daily driver Mustangs. The Wilwood kit we aregoing to show you will fit on all of them.
part number 140-9501 for a four-piston caliperfront disc brake kit and 140-10219 for a six-pis-ton Caliper front disc brake kit. If you own a ’70to ’73 mustang and want a four-piston caliperfront disc brake kit you can order part number140-9189 and if you want a six-piston caliperfront disc brake kit you can order part number140-10220. Safety and performance should bethe important reason for your disc brake im-provement, but the brakes are also a nice ap-pearance addition and almost a necessity if youare building a Mustang street machine or ProTouring car.
The brake installation is straightforward and canbe done by anyone with a moderate amount ofmechanical ability. The tools required are basichand wrenches, line wrenches, a socket wrenchset, safety wire pliers, Loctite 271 thread locker,and an inch-pound and foot-pound torquewrench. If you have power tools such as an im-pact gun or an air ratchet wrench they will
certainly speed things up. Wilwood recommendsthat a mechanic experienced in the installationand proper operation of disc brake systems shouldonly perform the installation. If you don’t feel thatyou are up the task, contact a reputable mechanicto perform the installation on your car.
Another good idea would be to carefully lay all ofthe parts out to make sure you have everythingneeded to complete the installation. The instruc-tion sheet has a parts list that you can follow. Ifsomething is missing, this is the time to figure outwhy. You should also make sure this is the correctkit for your application and you should also makesure the hub stud pattern matches your wheel lugpattern. In this story we will follow along as aWilwood Engineering front and rear disc brakesystem was installed on this rare Mustang. The in-stallation photos cover one side of the car, but re-member what is done on one side is also done onthe other side.
A floor jack was used to elevate the front of the car andthen stands were used to support the vehicle. The tiresand wheels were removed using a lug wrench, asocket wrench, or a socket on an impact gun.
The two caliper mounting bolts were disconnected andthen the caliper was removed from the mountingbracket. After the caliper was removed, the originalbracket was also removed from the spindle assembly.
The rotor was removed from the spindle by disconnect-ing the cotter key, the castle nut cover, the retaining nutand the large washer. All of the parts were retained forreassembly.

The spindle nut was loosened with a large crescentwrench and then it was disconnected by hand as seenhere.
After the retaining nut was disconnected, the old rotorassembly was removed from the car. It is heavy so careshould be taken when it disengages.
After the rotor was removed, the three small bolts thatsecure the dust plate to the spindle could be reached.Using a socket wrench and the appropriate size socket,the dust cover was removed and it was set aside.
The dust cover will not be used in this installation so itwas placed in the swap meet pile. This was a good timeto clean the spindle prior to installing the new hub as-sembly.
The strong mounting bracket for the caliper was in-stalled to the spindle and was secured with an open-end wrench. This was a good time to inspect forinterference from casting irregularities, machiningridges and burrs.
After the caliper pad and rotor alignment have beenchecked, the mounting bolts were coated with Loctite271 and were tightened with a torque wrench to 65 ft-lbs.
The adapter rotor was secured to the hub assemblyusing the mounting bolts supplied in the kit. The boltswere coated with Loctite 271 and were tightened to 22ft-lbs.

The rotor was connected to the hub assembly with thebolts supplied in the kit. The bolts were tightened to 180in-lbs. The bolts should be safety wired following the il-lustration in the instruction sheet.
The hub bearings, large and small, were packed withhigh temperature disc brake bearing grease. The largebearing was loaded into the hub assembly and then theseal was installed as seen here.
The rotor was placed on the spindle and the small frontbearing was installed. A large washer followed by thenut was installed and after the nut was snug, it wascovered with a castle nut cover. The nut and the coverwere aligned with the hole in the spindle and then acotter key was installed to eliminate any chance of thenut loosening.
The caliper assembly was connected to the mountingbracket making sure the rotor was centered inside of thecaliper. Adjustments can be made with the small shimsthat come with the kit.
After the caliper was installed on the bracket and wasperfectly centered, the pads were installed from the top.After they were installed the retaining clip was installed.
After everything was aligned perfectly, the Caliper boltswere removed one-by-one and were coated with Loctite271. The bolts were connected again and then theywere tightened to 42 ft-lbs.
Using the specified brake hose assembly, it was con-nected between the original steel brake line and thecaliper fitting as seen here. When the brake line was in-stalled, care should be taken to ensure the line does notinterfere with moving parts.

The front of the Mustang was lowered back on theground and then the rear was elevated with a floorjack. Jack stands were placed under the axle hous-ing for safety before the wheels and tires were re-moved. All of the early Mustangs were equippedwith rear drum brakes.
The brake drum was removed to access the back-ing plate and brakes. Four bolts secure the back-ing plate and the bearing retainer to the axlehousing.
Using a line wrench, the original brake line was re-moved from the wheel cylinder that is mounted tothe backing plate.
Using an impact gun and the correct size socket,the four backing plate mounting bolts were re-moved from the axle housing flange. The boltswere accessed through the hole in the axle flange.
After the backing plate mounting bolts were removed,the axle was taken out. The bearings tend to stick tothe inside of the axle housing, so a slide-hammer-styleaxle puller was used to get the axles out. After theaxles were removed, the drum brakes and backingplates were removed as an assembly.
Before the backing plates were totally removed fromthe car, the parking brake cables were disconnectedfrom the parking brake bracket. The original parkingbrake cables will not be used, so they were removedfrom the car, but the brackets and hooks will be usedwith the new cables.
The original axle flange bolts were reinstalled in theflange, and then the internal parking brake and caliperbracket was connected to the axle as seen here.
We made sure the axle flange diameter was smallerthan 6.61-inches so that it will fit inside of the hat. Wealso examined the axle bearings to make sure theywere still in good condition. This is the time to changethem if not. After everything looked good, the axle wasreinstalled into the housing, the Wilwood bearing re-tainer was installed over the four bolts, and then thenuts were installed on the bolts and were tightened tohold everything in place.

After the axle was installed in the housing, the rotorassembly was installed and it was secured with threemounting bolts. The caliper was installed with thebleed screws up and it was centered over the rotorusing the washers and shims in the kit. When thecenter was determined, the bolts were removed one-by-one, they were coated with Loctite 271, then theywere reinstalled and tightened.
Here is the rear disc brake mounted to the axle as-sembly, and ready for the installation of the wheelsand tires. Before that was done, the brake lines andemergency brake cable were installed.
Here is the rear disc brake mounted to the axle as-sembly, and ready for the installation of the wheelsand tires. Before that was done, the brake lines andemergency brake cable were installed.This also pro-vides a good look at the quick clip pad retainer.
Following the routing of the original parking brake ca-bles, the new lines were run from the front of the car to-wards the rear. All of the original cable hardware wasretained.
Here is a close look at the parking brake attachment.The parking brake assembly comes with the handymounting bracket for the cable.
The front and rear brakes were finished and they areready for action. Before taking a test ride, the brakeswere bled to get the air out of the line and then the padswere bedded. When that was done the owner took thecar for a ride and he was extremely pleased with thebraking improvement.
Wilwood Engineering4700 Calle BoleroCamarillo, CA 93012(805) 388-1188
www.wilwood.comCopyright © 2010 Wilwood Engineering, Inc. -
All Rights Reserved