Embed Size (px)
Citation preview


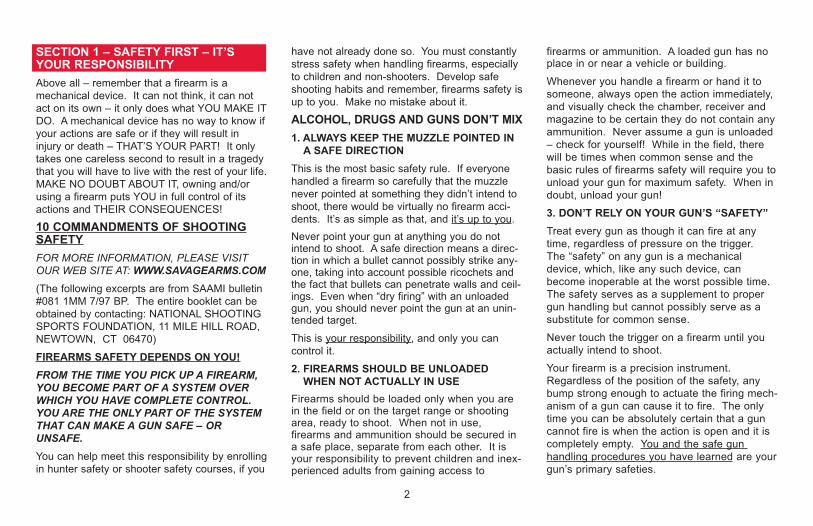
BOLT ACTION SHOTGUNSBOLT ACTION SHOTGUNSModel 212 and Model 220Model 212 and Model 220Congratulations on the purchase of your newfirearm. You are now part of the Savage SportsCorporation family of quality firearms and acces-sories, which includes Savage Arms, Inc.,Savage Arms (Canada), Stevens and Fox. Withreasonable care, your firearm should deliveryears of reliable service and perform to our “defi-nition of accuracy”.
THIS MANUAL IS EXTREMELY IMPORTANT. The safety warnings and instructions in thismanual are very important. By understandingthe dangers involved in the use of any firearmand by taking the necessary precautions, youcan use your Savage firearm in complete safety.However, failure to read, understand, and obeyany of the warnings may result in serious injuryor death to you or others, as well as severedamage to the firearm or other property.
This manual should always accompany yourfirearm and be transferred with it upon changeof ownership. This is your responsibility andmay protect you from future liability.
Savage Arms offers firearms designed in twoways: SIDE BOLT RELEASE and BOTTOMBOLT RELEASE. It is important to identifywhich firearm you have purchased and fol-low the appropriate section in the INSTRUC-TION MANUAL. There are major differencesbetween the two (i.e. bolt installation, stockremoval/installation, etc) and it is the user’sresponsibility to read and understand them
in their entirety. IF YOU USE IT IMPROPERLY– IT WILL NOT WORK. MORE IMPORTANT-LY, IF YOU USE IT IMPROPERLY – SOME-ONE MAY BE SERIOUSLY INJURED. INBOTH CASES, THE KEY WORD IS YOU!For your convenience, SECTION 3 describesthe bottom bolt release on the Model 212 andSECTION 4 describes the side bolt release onthe Model 220. All of the other sections arecommon for both shotguns.
SECTION 1: Safety First – It’s YourResponsibility! p. 2
SECTION 2: Three Position Safety p. 4SECTION 3:MODEL 212 (BOTTOM BOLT
RELEASE) p. 6- Installing and Removing
the Bolt Assembly- Cocking Indicator- Removing/Installing the
StockSECTION 4: MODEL 220 (SIDE BOLT
RELEASE) p. 8- Installing and Removing the
Bolt Assembly- Cocking Indicator- Removing/Installing the
StockSECTION 5: Loading / Unloading / Firing p. 10SECTION 6: AccuTrigger Adjustment p. 13SECTION 7: PARTS LIST AND DIAGRAM p. 14
- Model 212- Model 220
SECTION 8: Ammunition Bullet Weights /Magazine Capacities p. 19
SECTION 9: Rings and Bases for Mountinga Scope p. 19
SECTION 10: Maintenance p. 20- Routine Maintenance- Cleaning
SECTION 11: Statement of Limited Warranty p. 21
Although considerable time and effort were putinto assuring the accuracy of the informationcontained herein, human errors do occur. If anerror is found, please let us know. As a ‘cus-tomer driven’ company, we appreciate andencourage feedback.
The following patents apply to the firearms con-tained in this manual: AccuTrigger™ - patentnumber US 6,553,706B1.
1
SECTION 1 – SAFETY FIRST – IT’SYOUR RESPONSIBILITYAbove all – remember that a firearm is amechanical device. It can not think, it can notact on its own – it only does what YOU MAKE ITDO. A mechanical device has no way to know ifyour actions are safe or if they will result ininjury or death – THAT’S YOUR PART! It onlytakes one careless second to result in a tragedythat you will have to live with the rest of your life.MAKE NO DOUBT ABOUT IT, owning and/orusing a firearm puts YOU in full control of itsactions and THEIR CONSEQUENCES!
10 COMMANDMENTS OF SHOOTINGSAFETYFOR MORE INFORMATION, PLEASE VISITOUR WEB SITE AT: WWW.SAVAGEARMS.COM(The following excerpts are from SAAMI bulletin#081 1MM 7/97 BP. The entire booklet can beobtained by contacting: NATIONAL SHOOTINGSPORTS FOUNDATION, 11 MILE HILL ROAD,NEWTOWN, CT 06470)
FIREARMS SAFETY DEPENDS ON YOU!FROM THE TIME YOU PICK UP A FIREARM,YOU BECOME PART OF A SYSTEM OVERWHICH YOU HAVE COMPLETE CONTROL.YOU ARE THE ONLY PART OF THE SYSTEMTHAT CAN MAKE A GUN SAFE – ORUNSAFE.You can help meet this responsibility by enrollingin hunter safety or shooter safety courses, if you
have not already done so. You must constantlystress safety when handling firearms, especiallyto children and non-shooters. Develop safeshooting habits and remember, firearms safety isup to you. Make no mistake about it.
ALCOHOL, DRUGS AND GUNS DON’T MIX1. ALWAYS KEEP THE MUZZLE POINTED IN
A SAFE DIRECTIONThis is the most basic safety rule. If everyonehandled a firearm so carefully that the muzzlenever pointed at something they didn’t intend toshoot, there would be virtually no firearm acci-dents. It’s as simple as that, and it’s up to you.Never point your gun at anything you do notintend to shoot. A safe direction means a direc-tion in which a bullet cannot possibly strike any-one, taking into account possible ricochets andthe fact that bullets can penetrate walls and ceil-ings. Even when “dry firing” with an unloadedgun, you should never point the gun at an unin-tended target.
This is your responsibility, and only you can control it.
2. FIREARMS SHOULD BE UNLOADEDWHEN NOT ACTUALLY IN USE
Firearms should be loaded only when you arein the field or on the target range or shootingarea, ready to shoot. When not in use,firearms and ammunition should be secured ina safe place, separate from each other. It isyour responsibility to prevent children and inex-perienced adults from gaining access to
firearms or ammunition. A loaded gun has noplace in or near a vehicle or building.
Whenever you handle a firearm or hand it tosomeone, always open the action immediately,and visually check the chamber, receiver andmagazine to be certain they do not contain anyammunition. Never assume a gun is unloaded– check for yourself! While in the field, therewill be times when common sense and thebasic rules of firearms safety will require you tounload your gun for maximum safety. When indoubt, unload your gun!
3. DON’T RELY ON YOUR GUN’S “SAFETY”Treat every gun as though it can fire at anytime, regardless of pressure on the trigger.The “safety” on any gun is a mechanicaldevice, which, like any such device, canbecome inoperable at the worst possible time.The safety serves as a supplement to propergun handling but cannot possibly serve as asubstitute for common sense.
Never touch the trigger on a firearm until youactually intend to shoot.
Your firearm is a precision instrument.Regardless of the position of the safety, anybump strong enough to actuate the firing mech-anism of a gun can cause it to fire. The onlytime you can be absolutely certain that a guncannot fire is when the action is open and it iscompletely empty. You and the safe gun handling procedures you have learned are yourgun’s primary safeties.
2
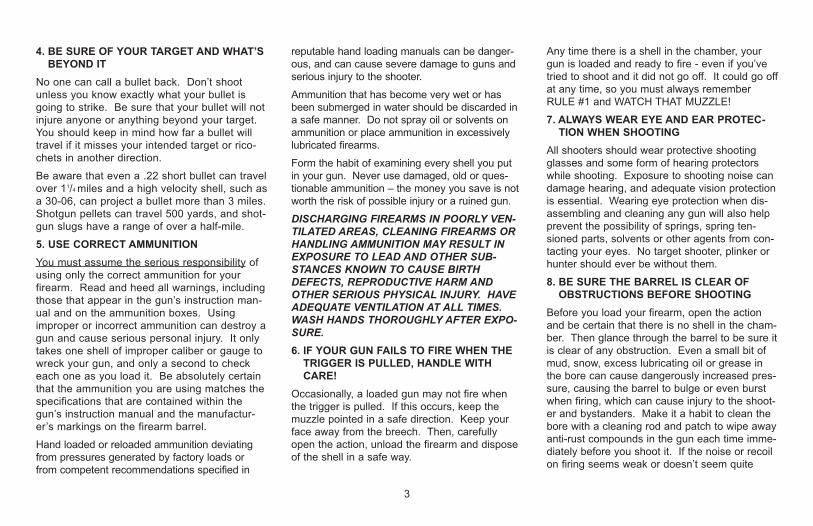
4. BE SURE OF YOUR TARGET AND WHAT’SBEYOND IT
No one can call a bullet back. Don’t shootunless you know exactly what your bullet isgoing to strike. Be sure that your bullet will notinjure anyone or anything beyond your target.You should keep in mind how far a bullet willtravel if it misses your intended target or rico-chets in another direction.
Be aware that even a .22 short bullet can travelover 11/4 miles and a high velocity shell, such asa 30-06, can project a bullet more than 3 miles.Shotgun pellets can travel 500 yards, and shot-gun slugs have a range of over a half-mile.
5. USE CORRECT AMMUNITIONYou must assume the serious responsibility ofusing only the correct ammunition for yourfirearm. Read and heed all warnings, includingthose that appear in the gun’s instruction man-ual and on the ammunition boxes. Usingimproper or incorrect ammunition can destroy agun and cause serious personal injury. It onlytakes one shell of improper caliber or gauge towreck your gun, and only a second to checkeach one as you load it. Be absolutely certainthat the ammunition you are using matches thespecifications that are contained within thegun’s instruction manual and the manufactur-er’s markings on the firearm barrel.
Hand loaded or reloaded ammunition deviatingfrom pressures generated by factory loads orfrom competent recommendations specified in
reputable hand loading manuals can be danger-ous, and can cause severe damage to guns andserious injury to the shooter.
Ammunition that has become very wet or hasbeen submerged in water should be discarded ina safe manner. Do not spray oil or solvents onammunition or place ammunition in excessivelylubricated firearms.
Form the habit of examining every shell you putin your gun. Never use damaged, old or ques-tionable ammunition – the money you save is notworth the risk of possible injury or a ruined gun.
DISCHARGING FIREARMS IN POORLY VEN-TILATED AREAS, CLEANING FIREARMS ORHANDLING AMMUNITION MAY RESULT INEXPOSURE TO LEAD AND OTHER SUB-STANCES KNOWN TO CAUSE BIRTHDEFECTS, REPRODUCTIVE HARM ANDOTHER SERIOUS PHYSICAL INJURY. HAVEADEQUATE VENTILATION AT ALL TIMES.WASH HANDS THOROUGHLY AFTER EXPO-SURE.6. IF YOUR GUN FAILS TO FIRE WHEN THE
TRIGGER IS PULLED, HANDLE WITHCARE!
Occasionally, a loaded gun may not fire whenthe trigger is pulled. If this occurs, keep themuzzle pointed in a safe direction. Keep yourface away from the breech. Then, carefullyopen the action, unload the firearm and disposeof the shell in a safe way.
Any time there is a shell in the chamber, yourgun is loaded and ready to fire - even if you’vetried to shoot and it did not go off. It could go offat any time, so you must always rememberRULE #1 and WATCH THAT MUZZLE!
7. ALWAYS WEAR EYE AND EAR PROTEC-TION WHEN SHOOTING
All shooters should wear protective shootingglasses and some form of hearing protectorswhile shooting. Exposure to shooting noise candamage hearing, and adequate vision protectionis essential. Wearing eye protection when dis-assembling and cleaning any gun will also helpprevent the possibility of springs, spring ten-sioned parts, solvents or other agents from con-tacting your eyes. No target shooter, plinker orhunter should ever be without them.
8. BE SURE THE BARREL IS CLEAR OF OBSTRUCTIONS BEFORE SHOOTING
Before you load your firearm, open the actionand be certain that there is no shell in the cham-ber. Then glance through the barrel to be sure itis clear of any obstruction. Even a small bit ofmud, snow, excess lubricating oil or grease inthe bore can cause dangerously increased pres-sure, causing the barrel to bulge or even burstwhen firing, which can cause injury to the shoot-er and bystanders. Make it a habit to clean thebore with a cleaning rod and patch to wipe awayanti-rust compounds in the gun each time imme-diately before you shoot it. If the noise or recoilon firing seems weak or doesn’t seem quite
3
“right”, cease firing immediately and be sure tocheck that no obstruction or projectile hasbecome lodged in the barrel.
9. DON’T ALTER OR MODIFY YOUR GUN,AND HAVE GUNS SERVICED REGULARLY
Firearms are complicated mechanisms, whichare designed by experts to function properly intheir original condition. Any alteration or change(other than adjusting the AccuTrigger™) madeto a firearm after manufacture can make the gundangerous and will usually void any factory war-ranties. Do not jeopardize your safety or thesafety of others by altering the trigger, safety orother mechanism of any firearm or allowingunqualified person’s to repair or modify a gun.
Your gun is a mechanical device, which will notlast forever and is subject to wear. As such, itrequires periodic inspection, adjustment andservice.
10. LEARN THE MECHANISM AND HAN-DLING CHARACTERISTICS OF THEFIREARM YOU ARE USING
Not all firearms are the same. Consequently,never handle any firearm without first havingthoroughly familiarized yourself with the particu-lar type of firearm you are using, the safe gunhandling rules for loading, unloading, carryingand handling that firearm, and the rules of safegun handling in general. Locate the firearm’smechanical safety device and get familiar withthe feel and “on/off” positions.
You should always read and refer to the instruc-tion manual you received with your gun, or if youhave misplaced the manual, simply contact themanufacturer for a free copy.
Having a gun in your possession is a full-timejob. You cannot guess; you cannot forget. Youmust know how to use, handle, and store yourfirearm safely. Do not use any firearm withouthaving a complete understanding of its particularcharacteristics and safe use. There is no suchthing as a foolproof gun.
SECTION 2 – THREE POSITION SAFETYFOR MORE INFORMATION, PLEASE VISITOUR WEB SITE AT: WWW.SAVAGEARMS.COMPRIOR TO LOADING OR OPERATING, FAMIL-IARIZE YOURSELF THOROUGHLY WITHTHESE OPERATING INSTRUCTIONS ANDTHE MAIN PARTS OF YOUR FIREARM. YOUR GUN IS A MECHANICAL DEVICEWHICH WILL NOT LAST FOREVER AND ISSUBJECT TO WEAR. WHEN SOMETHINGDOES NOT SOUND, FEEL, OR LOOK RIGHT,SEEK THE ADVICE OF A PROFESSIONALGUNSMITH IMMEDIATELY. NEVER TAKE ACHANCE.FAILURE TO OBEY A SAFETY WARNING MAYRESULT IN INJURY TO YOU OR OTHERS.KNOW HOW TO LOCATE AND OPERATE THESAFETY MECHANISM.THOROUGHLY CLEAN THE INSIDE OF THEBARREL AND CHAMBER PRIOR TO LOAD-ING WITH AMMUNITION.THE USE OF RELOADS, HANDLOADS, MILI-TARY SURPLUS, OR ANY OTHER COMMER-CIAL/ NONCOMMERCIAL AMMUNITION NOTMANUFACTURED TO SAAMI (SPORTINGARMS AND AMMUNITION MANUFACTUR-ERS’ INSTITUTE, INC.)/ ANSI (AMERICAN NATIONAL STANDARDS INSTITUTE) SPECI-FICATIONS WILL VOID THE WARRANTY.
4
ALWAYS BE SURE THE FIREARM (ESPE-CIALLY THE END OF THE BARREL) IS FREEAND CLEAR OF ANY OBSTRUCTIONS THATMAY RESTRICT (OR SLOW DOWN) THE BUL-LET FROM LEAVING THE MUZZLE AT ITSNORMAL RATE OF SPEED. THIS INCLUDESSNOW, WATER, BRUSH, SHRUBS, STICKS,LEAVES AND DEBRIS TO NAME A FEW.NEVER PLACE THE END OF A BARREL ORSUBMERGE A FIREARM UNDER WATER.RESTRICTING, SLOWING, OR STOPPINGTHE BULLET FROM LEAVING THE MUZZLEWILL CREATE AN EXCESSIVE AMOUNT OFPRESSURE TO BUILD UP BEHIND IT ANDMAY LEAD TO EXTENSIVE DAMAGE TO THEFIREARM AND PERSONAL INJURY TO THESHOOTER AND/OR BYSTANDERS. SAFEOPERATION IS YOUR RESPONSIBILITY ANDCAN ONLY BE CONTROLLED BY YOU! KNOW EXACTLY WHERE YOU ARE POINT-ING THE BARREL OF A FIREARM AND WHY! IT IS SO IMPORTANT TO STRESS THAT AFIREARM IS NO MORE THAN AN ASSEMBLYOF MANY DIFFERENT COMPONENTS – AMECHANICAL DEVICE. AS SUCH, YOU ARETHE ONLY SAFETY MECHANISM THAT CANPREVENT AN ACCIDENT.The safety on your Savage Arms shotgun has 3positions:
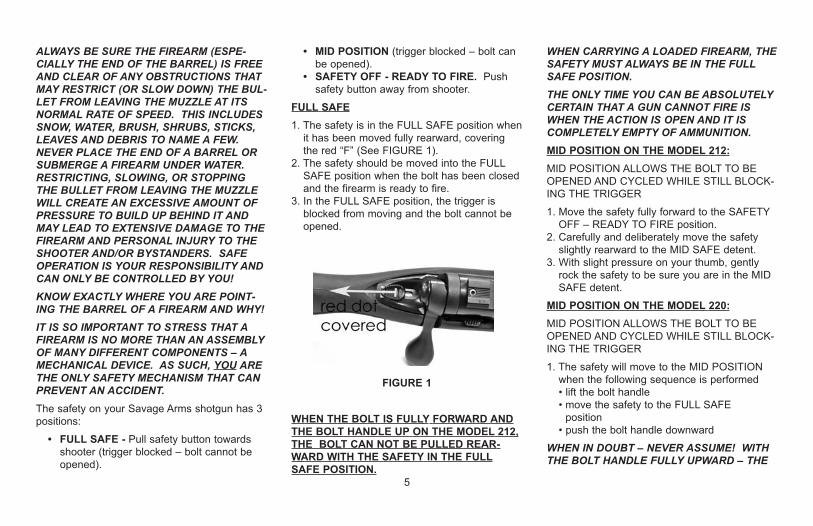
• FULL SAFE - Pull safety button towardsshooter (trigger blocked – bolt cannot beopened).
• MID POSITION (trigger blocked – bolt canbe opened).
• SAFETY OFF - READY TO FIRE. Pushsafety button away from shooter.
FULL SAFE1. The safety is in the FULL SAFE position when
it has been moved fully rearward, coveringthe red “F” (See FIGURE 1).
2. The safety should be moved into the FULLSAFE position when the bolt has been closedand the firearm is ready to fire.
3. In the FULL SAFE position, the trigger isblocked from moving and the bolt cannot beopened.
FIGURE 1
WHEN THE BOLT IS FULLY FORWARD ANDTHE BOLT HANDLE UP ON THE MODEL 212,THE BOLT CAN NOT BE PULLED REAR-WARD WITH THE SAFETY IN THE FULLSAFE POSITION.
WHEN CARRYING A LOADED FIREARM, THESAFETY MUST ALWAYS BE IN THE FULLSAFE POSITION.THE ONLY TIME YOU CAN BE ABSOLUTELYCERTAIN THAT A GUN CANNOT FIRE ISWHEN THE ACTION IS OPEN AND IT IS COMPLETELY EMPTY OF AMMUNITION.MID POSITION ON THE MODEL 212:MID POSITION ALLOWS THE BOLT TO BEOPENED AND CYCLED WHILE STILL BLOCK-ING THE TRIGGER
1. Move the safety fully forward to the SAFETYOFF – READY TO FIRE position.
2. Carefully and deliberately move the safetyslightly rearward to the MID SAFE detent.
3. With slight pressure on your thumb, gentlyrock the safety to be sure you are in the MIDSAFE detent.
MID POSITION ON THE MODEL 220:MID POSITION ALLOWS THE BOLT TO BEOPENED AND CYCLED WHILE STILL BLOCK-ING THE TRIGGER
1. The safety will move to the MID POSITIONwhen the following sequence is performed• lift the bolt handle• move the safety to the FULL SAFE
position• push the bolt handle downward
WHEN IN DOUBT – NEVER ASSUME! WITHTHE BOLT HANDLE FULLY UPWARD – THE
5
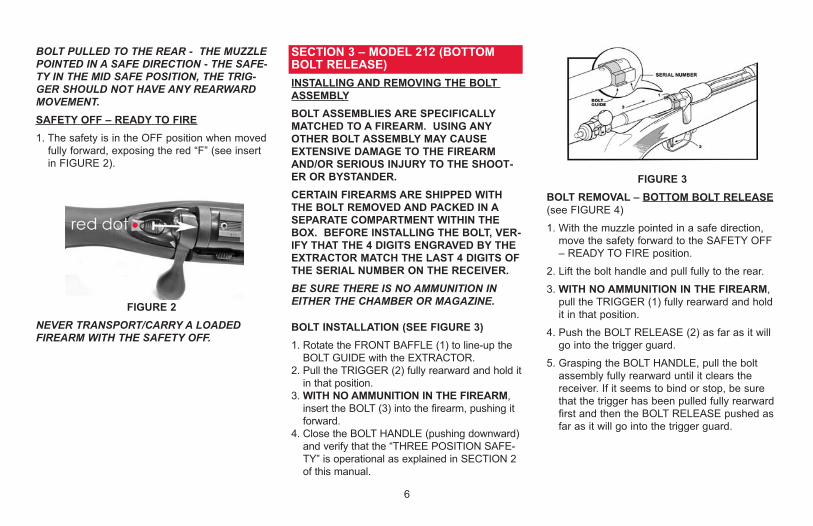
BOLT PULLED TO THE REAR - THE MUZZLEPOINTED IN A SAFE DIRECTION - THE SAFE-TY IN THE MID SAFE POSITION, THE TRIG-GER SHOULD NOT HAVE ANY REARWARDMOVEMENT.SAFETY OFF – READY TO FIRE1. The safety is in the OFF position when moved
fully forward, exposing the red “F” (see insertin FIGURE 2).
FIGURE 2NEVER TRANSPORT/CARRY A LOADEDFIREARM WITH THE SAFETY OFF.
SECTION 3 – MODEL 212 (BOTTOMBOLT RELEASE)INSTALLING AND REMOVING THE BOLT ASSEMBLYBOLT ASSEMBLIES ARE SPECIFICALLYMATCHED TO A FIREARM. USING ANYOTHER BOLT ASSEMBLY MAY CAUSEEXTENSIVE DAMAGE TO THE FIREARMAND/OR SERIOUS INJURY TO THE SHOOT-ER OR BYSTANDER.CERTAIN FIREARMS ARE SHIPPED WITHTHE BOLT REMOVED AND PACKED IN ASEPARATE COMPARTMENT WITHIN THEBOX. BEFORE INSTALLING THE BOLT, VER-IFY THAT THE 4 DIGITS ENGRAVED BY THEEXTRACTOR MATCH THE LAST 4 DIGITS OFTHE SERIAL NUMBER ON THE RECEIVER.BE SURE THERE IS NO AMMUNITION INEITHER THE CHAMBER OR MAGAZINE.
BOLT INSTALLATION (SEE FIGURE 3)1. Rotate the FRONT BAFFLE (1) to line-up the
BOLT GUIDE with the EXTRACTOR.2. Pull the TRIGGER (2) fully rearward and hold it
in that position.3. WITH NO AMMUNITION IN THE FIREARM,
insert the BOLT (3) into the firearm, pushing itforward.
4. Close the BOLT HANDLE (pushing downward)and verify that the “THREE POSITION SAFE-TY” is operational as explained in SECTION 2of this manual.
FIGURE 3BOLT REMOVAL – BOTTOM BOLT RELEASE(see FIGURE 4)
1. With the muzzle pointed in a safe direction,move the safety forward to the SAFETY OFF– READY TO FIRE position.
2. Lift the bolt handle and pull fully to the rear.
3. WITH NO AMMUNITION IN THE FIREARM,pull the TRIGGER (1) fully rearward and holdit in that position.
4. Push the BOLT RELEASE (2) as far as it willgo into the trigger guard.
5. Grasping the BOLT HANDLE, pull the boltassembly fully rearward until it clears thereceiver. If it seems to bind or stop, be surethat the trigger has been pulled fully rearwardfirst and then the BOLT RELEASE pushed asfar as it will go into the trigger guard.
6
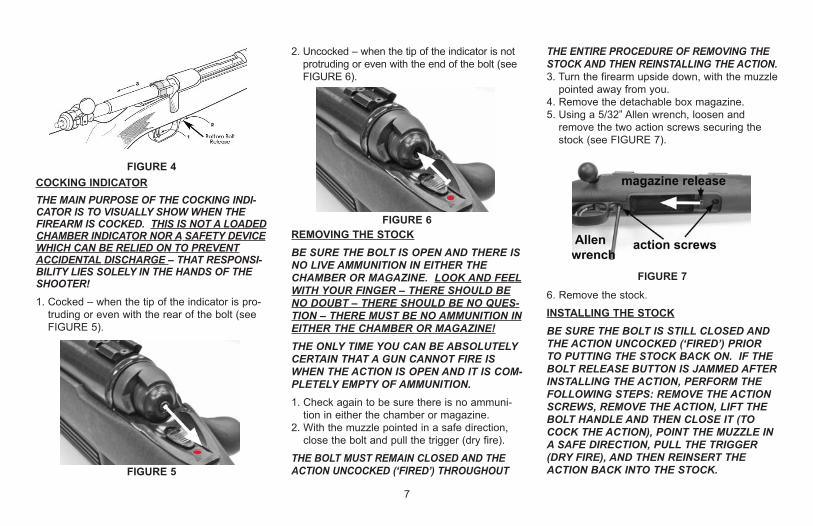
FIGURE 4COCKING INDICATORTHE MAIN PURPOSE OF THE COCKING INDI-CATOR IS TO VISUALLY SHOW WHEN THEFIREARM IS COCKED. THIS IS NOT A LOADEDCHAMBER INDICATOR NOR A SAFETY DEVICEWHICH CAN BE RELIED ON TO PREVENTACCIDENTAL DISCHARGE – THAT RESPONSI-BILITY LIES SOLELY IN THE HANDS OF THESHOOTER!1. Cocked – when the tip of the indicator is pro-
truding or even with the rear of the bolt (seeFIGURE 5).
FIGURE 5
2. Uncocked – when the tip of the indicator is notprotruding or even with the end of the bolt (seeFIGURE 6).
FIGURE 6REMOVING THE STOCKBE SURE THE BOLT IS OPEN AND THERE ISNO LIVE AMMUNITION IN EITHER THECHAMBER OR MAGAZINE. LOOK AND FEELWITH YOUR FINGER – THERE SHOULD BENO DOUBT – THERE SHOULD BE NO QUES-TION – THERE MUST BE NO AMMUNITION INEITHER THE CHAMBER OR MAGAZINE!THE ONLY TIME YOU CAN BE ABSOLUTELYCERTAIN THAT A GUN CANNOT FIRE ISWHEN THE ACTION IS OPEN AND IT IS COM-PLETELY EMPTY OF AMMUNITION. 1. Check again to be sure there is no ammuni-
tion in either the chamber or magazine.2. With the muzzle pointed in a safe direction,
close the bolt and pull the trigger (dry fire).
THE BOLT MUST REMAIN CLOSED AND THEACTION UNCOCKED (‘FIRED’) THROUGHOUT
THE ENTIRE PROCEDURE OF REMOVING THESTOCK AND THEN REINSTALLING THE ACTION.3. Turn the firearm upside down, with the muzzle
pointed away from you.4. Remove the detachable box magazine.5. Using a 5/32” Allen wrench, loosen and
remove the two action screws securing thestock (see FIGURE 7).
FIGURE 7
6. Remove the stock.
INSTALLING THE STOCKBE SURE THE BOLT IS STILL CLOSED ANDTHE ACTION UNCOCKED (‘FIRED’) PRIORTO PUTTING THE STOCK BACK ON. IF THEBOLT RELEASE BUTTON IS JAMMED AFTERINSTALLING THE ACTION, PERFORM THEFOLLOWING STEPS: REMOVE THE ACTIONSCREWS, REMOVE THE ACTION, LIFT THEBOLT HANDLE AND THEN CLOSE IT (TOCOCK THE ACTION), POINT THE MUZZLE INA SAFE DIRECTION, PULL THE TRIGGER(DRY FIRE), AND THEN REINSERT THEACTION BACK INTO THE STOCK.
7
1. Remove the magazine prior to reassemblingthe stock.
2. Place the action onto the stock, being careful toalign the trigger with the trigger slot in the stock.
3. Install the action screws (longer screw is tothe rear and the shorter screw is to the front)into the stock and turn the wrench clockwiseuntil the threads of the screws just engageinto the receiver. DO NOT OVER TIGHTEN– the stock must be loose at this step!
4. Carefully lift the firearm up so that the recoilpad is sitting on a solid surface and the barrelis pointing upward.
5. Putting downward pressure on the barrel toseat the recoil lug firmly in the stock, tightenthe front action screw first and then the rearaction screw securely.
KNOW YOUR GUN! IF ANYTHING ‘FEELS’OR SOUNDS DIFFERENT - STOP - AND HAVEA QUALIFIED GUNSMITH TAKE A LOOK!NEVER TAKE A CHANCE WITH SOMETHINGTHAT YOU ARE UNSURE OF ... ALWAYS ASKA PROFESSIONAL.6. Cycle the bolt several times to be sure that it
functions properly. If you are unable to closethe bolt handle completely, the action screwsare reversed.
AFTER REASSEMBLING THE STOCK, VERI-FY THAT THE SAFETY OPERATES COR-RECTLY IN ALL 3 POSITIONS AS DEFINED INSECTION 2 – ‘THREE POSITION SAFETY’ OFTHIS MANUAL. SAFE OWNERSHIP IS YOURRESPONSIBILITY!
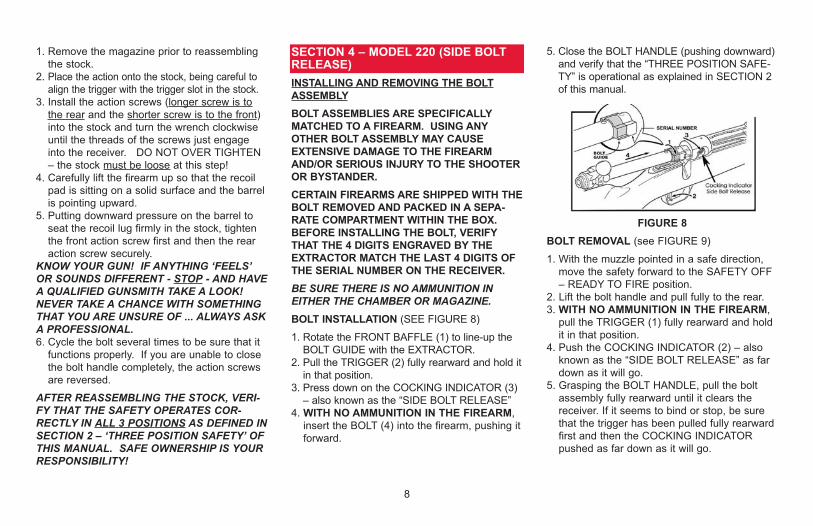
SECTION 4 – MODEL 220 (SIDE BOLTRELEASE)INSTALLING AND REMOVING THE BOLTASSEMBLYBOLT ASSEMBLIES ARE SPECIFICALLYMATCHED TO A FIREARM. USING ANYOTHER BOLT ASSEMBLY MAY CAUSEEXTENSIVE DAMAGE TO THE FIREARMAND/OR SERIOUS INJURY TO THE SHOOTEROR BYSTANDER.CERTAIN FIREARMS ARE SHIPPED WITH THEBOLT REMOVED AND PACKED IN A SEPA-RATE COMPARTMENT WITHIN THE BOX.BEFORE INSTALLING THE BOLT, VERIFYTHAT THE 4 DIGITS ENGRAVED BY THEEXTRACTOR MATCH THE LAST 4 DIGITS OFTHE SERIAL NUMBER ON THE RECEIVER.BE SURE THERE IS NO AMMUNITION INEITHER THE CHAMBER OR MAGAZINE.BOLT INSTALLATION (SEE FIGURE 8)
1. Rotate the FRONT BAFFLE (1) to line-up theBOLT GUIDE with the EXTRACTOR.
2. Pull the TRIGGER (2) fully rearward and hold itin that position.
3. Press down on the COCKING INDICATOR (3)– also known as the “SIDE BOLT RELEASE”
4. WITH NO AMMUNITION IN THE FIREARM,insert the BOLT (4) into the firearm, pushing itforward.
5. Close the BOLT HANDLE (pushing downward)and verify that the “THREE POSITION SAFE-TY” is operational as explained in SECTION 2of this manual.
FIGURE 8BOLT REMOVAL (see FIGURE 9)
1. With the muzzle pointed in a safe direction,move the safety forward to the SAFETY OFF– READY TO FIRE position.
2. Lift the bolt handle and pull fully to the rear.3. WITH NO AMMUNITION IN THE FIREARM,
pull the TRIGGER (1) fully rearward and holdit in that position.
4. Push the COCKING INDICATOR (2) – alsoknown as the “SIDE BOLT RELEASE” as fardown as it will go.
5. Grasping the BOLT HANDLE, pull the boltassembly fully rearward until it clears thereceiver. If it seems to bind or stop, be surethat the trigger has been pulled fully rearwardfirst and then the COCKING INDICATORpushed as far down as it will go.
8
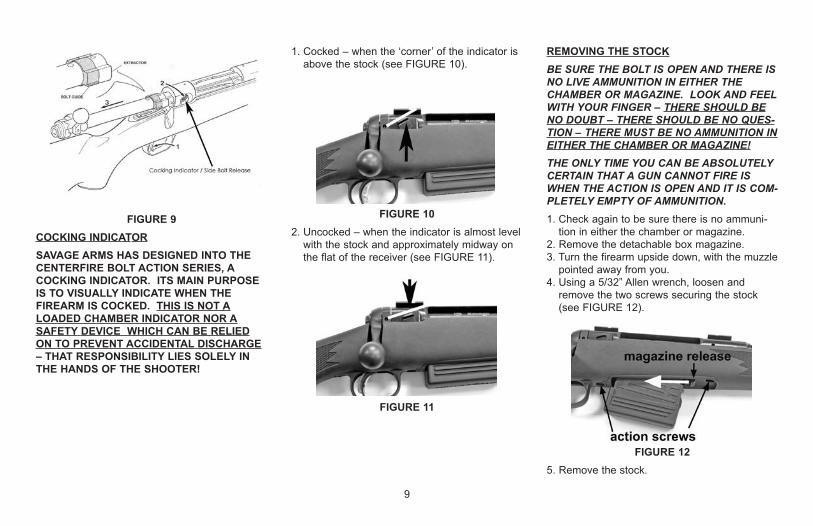
FIGURE 9COCKING INDICATORSAVAGE ARMS HAS DESIGNED INTO THECENTERFIRE BOLT ACTION SERIES, ACOCKING INDICATOR. ITS MAIN PURPOSEIS TO VISUALLY INDICATE WHEN THEFIREARM IS COCKED. THIS IS NOT ALOADED CHAMBER INDICATOR NOR ASAFETY DEVICE WHICH CAN BE RELIEDON TO PREVENT ACCIDENTAL DISCHARGE– THAT RESPONSIBILITY LIES SOLELY INTHE HANDS OF THE SHOOTER!
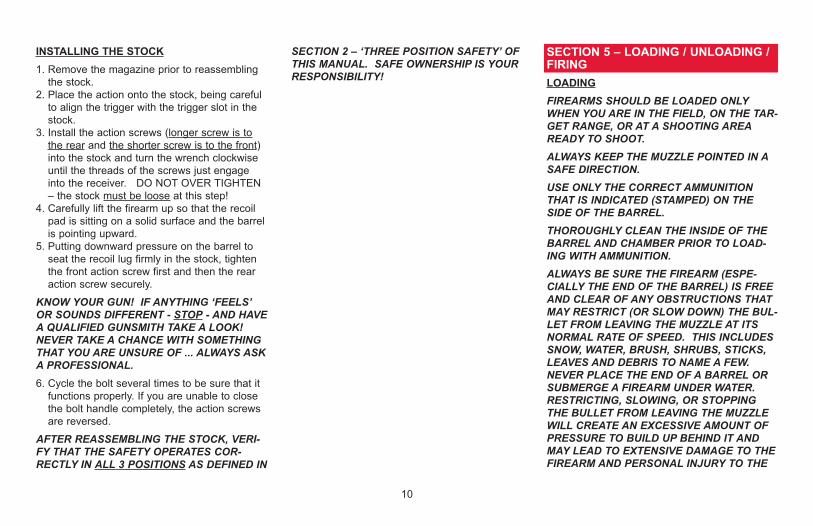
1. Cocked – when the ‘corner’ of the indicator isabove the stock (see FIGURE 10).
FIGURE 102. Uncocked – when the indicator is almost level
with the stock and approximately midway onthe flat of the receiver (see FIGURE 11).
FIGURE 11
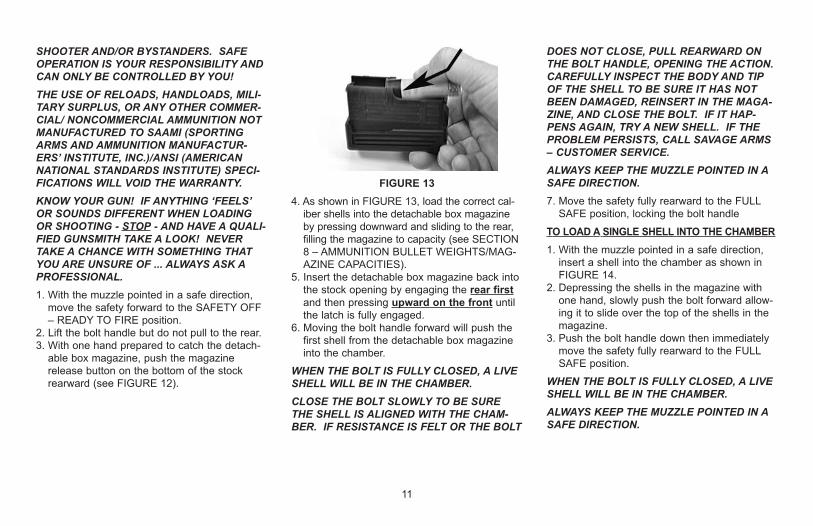
REMOVING THE STOCKBE SURE THE BOLT IS OPEN AND THERE ISNO LIVE AMMUNITION IN EITHER THECHAMBER OR MAGAZINE. LOOK AND FEELWITH YOUR FINGER – THERE SHOULD BENO DOUBT – THERE SHOULD BE NO QUES-TION – THERE MUST BE NO AMMUNITION INEITHER THE CHAMBER OR MAGAZINE!THE ONLY TIME YOU CAN BE ABSOLUTELYCERTAIN THAT A GUN CANNOT FIRE ISWHEN THE ACTION IS OPEN AND IT IS COM-PLETELY EMPTY OF AMMUNITION. 1. Check again to be sure there is no ammuni-
tion in either the chamber or magazine.2. Remove the detachable box magazine.3. Turn the firearm upside down, with the muzzle
pointed away from you.4. Using a 5/32” Allen wrench, loosen and
remove the two screws securing the stock(see FIGURE 12).
FIGURE 125. Remove the stock.
9
INSTALLING THE STOCK1. Remove the magazine prior to reassembling
the stock.2. Place the action onto the stock, being careful
to align the trigger with the trigger slot in thestock.
3. Install the action screws (longer screw is tothe rear and the shorter screw is to the front)into the stock and turn the wrench clockwiseuntil the threads of the screws just engageinto the receiver. DO NOT OVER TIGHTEN– the stock must be loose at this step!
4. Carefully lift the firearm up so that the recoilpad is sitting on a solid surface and the barrelis pointing upward.
5. Putting downward pressure on the barrel toseat the recoil lug firmly in the stock, tightenthe front action screw first and then the rearaction screw securely.
KNOW YOUR GUN! IF ANYTHING ‘FEELS’OR SOUNDS DIFFERENT - STOP - AND HAVEA QUALIFIED GUNSMITH TAKE A LOOK!NEVER TAKE A CHANCE WITH SOMETHINGTHAT YOU ARE UNSURE OF ... ALWAYS ASKA PROFESSIONAL.6. Cycle the bolt several times to be sure that it
functions properly. If you are unable to closethe bolt handle completely, the action screwsare reversed.
AFTER REASSEMBLING THE STOCK, VERI-FY THAT THE SAFETY OPERATES COR-RECTLY IN ALL 3 POSITIONS AS DEFINED IN
SECTION 2 – ‘THREE POSITION SAFETY’ OFTHIS MANUAL. SAFE OWNERSHIP IS YOURRESPONSIBILITY!
SECTION 5 – LOADING / UNLOADING /FIRINGLOADINGFIREARMS SHOULD BE LOADED ONLYWHEN YOU ARE IN THE FIELD, ON THE TAR-GET RANGE, OR AT A SHOOTING AREAREADY TO SHOOT.ALWAYS KEEP THE MUZZLE POINTED IN ASAFE DIRECTION.USE ONLY THE CORRECT AMMUNITIONTHAT IS INDICATED (STAMPED) ON THESIDE OF THE BARREL.THOROUGHLY CLEAN THE INSIDE OF THEBARREL AND CHAMBER PRIOR TO LOAD-ING WITH AMMUNITION.ALWAYS BE SURE THE FIREARM (ESPE-CIALLY THE END OF THE BARREL) IS FREEAND CLEAR OF ANY OBSTRUCTIONS THATMAY RESTRICT (OR SLOW DOWN) THE BUL-LET FROM LEAVING THE MUZZLE AT ITSNORMAL RATE OF SPEED. THIS INCLUDESSNOW, WATER, BRUSH, SHRUBS, STICKS,LEAVES AND DEBRIS TO NAME A FEW.NEVER PLACE THE END OF A BARREL ORSUBMERGE A FIREARM UNDER WATER.RESTRICTING, SLOWING, OR STOPPINGTHE BULLET FROM LEAVING THE MUZZLEWILL CREATE AN EXCESSIVE AMOUNT OFPRESSURE TO BUILD UP BEHIND IT ANDMAY LEAD TO EXTENSIVE DAMAGE TO THEFIREARM AND PERSONAL INJURY TO THE
10
SHOOTER AND/OR BYSTANDERS. SAFEOPERATION IS YOUR RESPONSIBILITY ANDCAN ONLY BE CONTROLLED BY YOU! THE USE OF RELOADS, HANDLOADS, MILI-TARY SURPLUS, OR ANY OTHER COMMER-CIAL/ NONCOMMERCIAL AMMUNITION NOTMANUFACTURED TO SAAMI (SPORTINGARMS AND AMMUNITION MANUFACTUR-ERS’ INSTITUTE, INC.)/ANSI (AMERICANNATIONAL STANDARDS INSTITUTE) SPECI-FICATIONS WILL VOID THE WARRANTY.KNOW YOUR GUN! IF ANYTHING ‘FEELS’OR SOUNDS DIFFERENT WHEN LOADINGOR SHOOTING - STOP - AND HAVE A QUALI-FIED GUNSMITH TAKE A LOOK! NEVERTAKE A CHANCE WITH SOMETHING THATYOU ARE UNSURE OF ... ALWAYS ASK APROFESSIONAL.1. With the muzzle pointed in a safe direction,
move the safety forward to the SAFETY OFF– READY TO FIRE position.
2. Lift the bolt handle but do not pull to the rear.3. With one hand prepared to catch the detach-
able box magazine, push the magazinerelease button on the bottom of the stockrearward (see FIGURE 12).
FIGURE 134. As shown in FIGURE 13, load the correct cal-
iber shells into the detachable box magazineby pressing downward and sliding to the rear,filling the magazine to capacity (see SECTION8 – AMMUNITION BULLET WEIGHTS/MAG-AZINE CAPACITIES).
5. Insert the detachable box magazine back intothe stock opening by engaging the rear firstand then pressing upward on the front untilthe latch is fully engaged.
6. Moving the bolt handle forward will push thefirst shell from the detachable box magazineinto the chamber.
WHEN THE BOLT IS FULLY CLOSED, A LIVESHELL WILL BE IN THE CHAMBER.CLOSE THE BOLT SLOWLY TO BE SURETHE SHELL IS ALIGNED WITH THE CHAM-BER. IF RESISTANCE IS FELT OR THE BOLT
DOES NOT CLOSE, PULL REARWARD ONTHE BOLT HANDLE, OPENING THE ACTION.CAREFULLY INSPECT THE BODY AND TIPOF THE SHELL TO BE SURE IT HAS NOTBEEN DAMAGED, REINSERT IN THE MAGA-ZINE, AND CLOSE THE BOLT. IF IT HAP-PENS AGAIN, TRY A NEW SHELL. IF THEPROBLEM PERSISTS, CALL SAVAGE ARMS– CUSTOMER SERVICE.ALWAYS KEEP THE MUZZLE POINTED IN ASAFE DIRECTION.7. Move the safety fully rearward to the FULL
SAFE position, locking the bolt handle
TO LOAD A SINGLE SHELL INTO THE CHAMBER1. With the muzzle pointed in a safe direction,
insert a shell into the chamber as shown in FIGURE 14.
2. Depressing the shells in the magazine withone hand, slowly push the bolt forward allow-ing it to slide over the top of the shells in themagazine.
3. Push the bolt handle down then immediatelymove the safety fully rearward to the FULLSAFE position.
WHEN THE BOLT IS FULLY CLOSED, A LIVESHELL WILL BE IN THE CHAMBER.ALWAYS KEEP THE MUZZLE POINTED IN ASAFE DIRECTION.
11
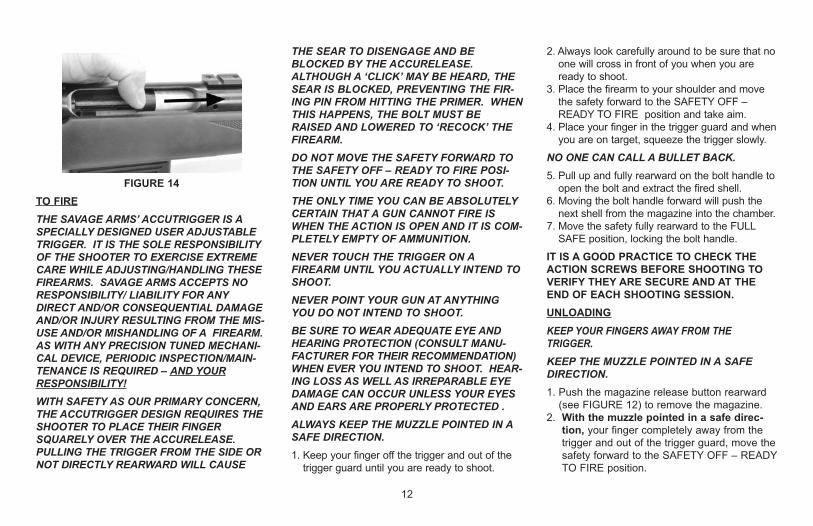
FIGURE 14TO FIRETHE SAVAGE ARMS’ ACCUTRIGGER IS ASPECIALLY DESIGNED USER ADJUSTABLETRIGGER. IT IS THE SOLE RESPONSIBILITYOF THE SHOOTER TO EXERCISE EXTREMECARE WHILE ADJUSTING/HANDLING THESEFIREARMS. SAVAGE ARMS ACCEPTS NORESPONSIBILITY/ LIABILITY FOR ANYDIRECT AND/OR CONSEQUENTIAL DAMAGEAND/OR INJURY RESULTING FROM THE MIS-USE AND/OR MISHANDLING OF A FIREARM.AS WITH ANY PRECISION TUNED MECHANI-CAL DEVICE, PERIODIC INSPECTION/MAIN-TENANCE IS REQUIRED – AND YOURRESPONSIBILITY!WITH SAFETY AS OUR PRIMARY CONCERN,THE ACCUTRIGGER DESIGN REQUIRES THESHOOTER TO PLACE THEIR FINGERSQUARELY OVER THE ACCURELEASE.PULLING THE TRIGGER FROM THE SIDE ORNOT DIRECTLY REARWARD WILL CAUSE
THE SEAR TO DISENGAGE AND BEBLOCKED BY THE ACCURELEASE.ALTHOUGH A ‘CLICK’ MAY BE HEARD, THESEAR IS BLOCKED, PREVENTING THE FIR-ING PIN FROM HITTING THE PRIMER. WHENTHIS HAPPENS, THE BOLT MUST BERAISED AND LOWERED TO ‘RECOCK’ THEFIREARM.DO NOT MOVE THE SAFETY FORWARD TOTHE SAFETY OFF – READY TO FIRE POSI-TION UNTIL YOU ARE READY TO SHOOT.THE ONLY TIME YOU CAN BE ABSOLUTELYCERTAIN THAT A GUN CANNOT FIRE ISWHEN THE ACTION IS OPEN AND IT IS COM-PLETELY EMPTY OF AMMUNITION. NEVER TOUCH THE TRIGGER ON AFIREARM UNTIL YOU ACTUALLY INTEND TOSHOOT. NEVER POINT YOUR GUN AT ANYTHINGYOU DO NOT INTEND TO SHOOT.BE SURE TO WEAR ADEQUATE EYE ANDHEARING PROTECTION (CONSULT MANU-FACTURER FOR THEIR RECOMMENDATION)WHEN EVER YOU INTEND TO SHOOT. HEAR-ING LOSS AS WELL AS IRREPARABLE EYEDAMAGE CAN OCCUR UNLESS YOUR EYESAND EARS ARE PROPERLY PROTECTED .ALWAYS KEEP THE MUZZLE POINTED IN ASAFE DIRECTION.1. Keep your finger off the trigger and out of the
trigger guard until you are ready to shoot.
2. Always look carefully around to be sure that noone will cross in front of you when you areready to shoot.
3. Place the firearm to your shoulder and movethe safety forward to the SAFETY OFF –READY TO FIRE position and take aim.
4. Place your finger in the trigger guard and whenyou are on target, squeeze the trigger slowly.
NO ONE CAN CALL A BULLET BACK. 5. Pull up and fully rearward on the bolt handle to
open the bolt and extract the fired shell.6. Moving the bolt handle forward will push the
next shell from the magazine into the chamber.7. Move the safety fully rearward to the FULL
SAFE position, locking the bolt handle.
IT IS A GOOD PRACTICE TO CHECK THEACTION SCREWS BEFORE SHOOTING TOVERIFY THEY ARE SECURE AND AT THEEND OF EACH SHOOTING SESSION. UNLOADINGKEEP YOUR FINGERS AWAY FROM THE TRIGGER.KEEP THE MUZZLE POINTED IN A SAFEDIRECTION.1. Push the magazine release button rearward
(see FIGURE 12) to remove the magazine.2. With the muzzle pointed in a safe direc-
tion, your finger completely away from thetrigger and out of the trigger guard, move thesafety forward to the SAFETY OFF – READYTO FIRE position.
12
KEEP YOUR FINGERS AWAY FROM THE TRIGGER.3. Placing one hand over the ejection port, your
finger completely away from the trigger andout of the trigger guard, lift the bolt handleand slowly pull to the rear to extract the shellfrom the chamber.
LOOK AND FEEL! BE SURE THE CHAMBERAND MAGAZINE ARE COMPLETELY EMPTY-- DO NOT ASSUME!A LOADED GUN HAS NO PLACE IN ORNEAR A VEHICLE OR BUILDING.
SECTION 6 – ACCUTRIGGER ADJUSTMENTSACCUTRIGGER Pull AdjustmentSAFE OWNERSHIP IS YOUR RESPONSIBILITY.PRIOR TO ADJUSTING THE ACCUTRIGGERPLEASE THOROUGHLY READ AND UNDER-STAND THE INSTRUCTION MANUAL IN ITSENTIRETY.MAKE SURE THE FIREARM IS UNLOADEDAND THE BOLT IS OPEN BEFORE REMOV-ING THE STOCK AND ADJUSTING THEACCUTRIGGER.ADJUSTING THE ACCUTRIGGER1. Remove the stock (see applicable section
above).2. Insert the ACCUTRIGGER supplied tool into
the bottom of the trigger return spring asshown, to engage the spring-tail with the sloton the tool. Turn the trigger return spring (A)with the trigger adjustment tool (B) as shownin FIGURE 15 and FIGURE 16.
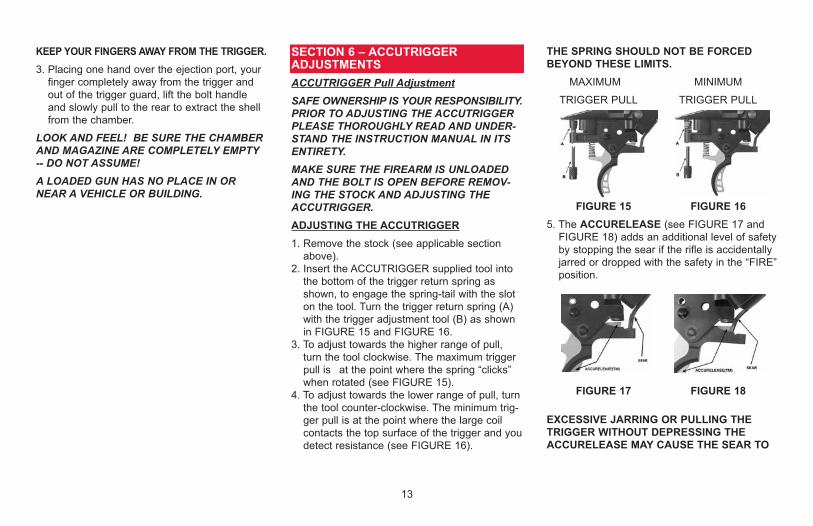
3. To adjust towards the higher range of pull,turn the tool clockwise. The maximum triggerpull is at the point where the spring “clicks”when rotated (see FIGURE 15).
4. To adjust towards the lower range of pull, turnthe tool counter-clockwise. The minimum trig-ger pull is at the point where the large coilcontacts the top surface of the trigger and youdetect resistance (see FIGURE 16).
THE SPRING SHOULD NOT BE FORCEDBEYOND THESE LIMITS.
MAXIMUM MINIMUM
TRIGGER PULL TRIGGER PULL
FIGURE 15 FIGURE 165. The ACCURELEASE (see FIGURE 17 and
FIGURE 18) adds an additional level of safetyby stopping the sear if the rifle is accidentallyjarred or dropped with the safety in the “FIRE”position.
FIGURE 17 FIGURE 18
EXCESSIVE JARRING OR PULLING THETRIGGER WITHOUT DEPRESSING THEACCURELEASE MAY CAUSE THE SEAR TO
13
MOVE (SEE FIGURE 18). AS DESIGNED,THE ACCURELEASE WILL PREVENT ACCI-DENTAL DISCHARGE BY ‘LOCKING’ THETRIGGER WHEN USED PROPERLY, MAIN-TAINED AND SERVICED REGULARLY. INTHIS EVENT, THE BOLT MUST BE RE-COCKED IN ORDER TO RESET THE SEAR.WHEN THE SEAR IS BLOCKED BY THEACCURELEASE (SEE FIGURE 18), THE FIR-ING PIN IS RESTRAINED WITHIN THE BOLTASSEMBLY, PREVENTING IT FROM HITTINGTHE PRIMER. THE ‘CLICK’ THAT IS HEARDIS THE ACTUAL SEAR BEING BLOCKED BYTHE ACCURELEASE, NOT THE FIRING PIN!
SECTION 7 – PARTS LIST ANDDIAGRAMFOR MORE INFORMATION, PLEASE VISITOUR WEB SITE AT: WWW.SAVAGEARMS.COMAs a ‘customer driven’ company, some partsmay now be ordered directly from our web site(WWW.SAVAGEARMS.COM) twenty four hoursa day, needing only your serial number andcredit card. For accessing our part finder viayour Smartphone, please use the QR Codebelow. Should you not have access to our website, parts can be ordered directly from SavageArms [413-568-7001] between the hours of 9:00and 4:00 (Eastern Time). There is a minimumorder and please allow 2 weeks for delivery.Only the parts indicated may be purchased byan individual. All other parts/subassemblies areeither ‘factory fit’ or available to qualified gun-smiths only.
Please be advised that some parts may requirefitting. Savage Arms bears no responsibility forthe function or performance of any firearm thathas been repaired or modified by other thanSavage Arms Service Department. As such,Savage Arms accepts no responsibility/liabilityfor any direct and/or consequential damageand/or injury resulting from the use of a firearmrepaired or modified by other than the SavageArms Service Department.
QR Code for your Smartphone for purchas-ing parts directly from our website - no calls- no waiting - 24 hours a day.
14
15
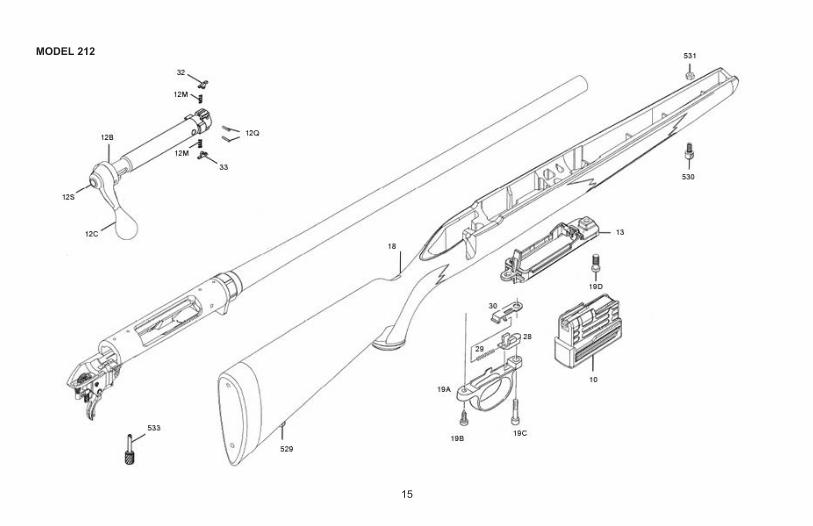
MODEL 212

MODEL 212
16
Item # Description10 Detachable box magazine12B Rear baffle assembly12C Bolt handle12M Extractor spring12Q Retaining pin12S Bolt assembly screw13 Frame assembly
Item # Description18 Stock assembly19A Trigger guard19B Rear trigger guard screw19C Rear action screw19D Front action screw28 Bolt release button29 Button spring
Item # Description30 Button retainer32 Left hand extractor33 Right hand extractor529 Swivel stud530 Swivel stud531 10-32 Lock nut533 Tension adjustment tool
17
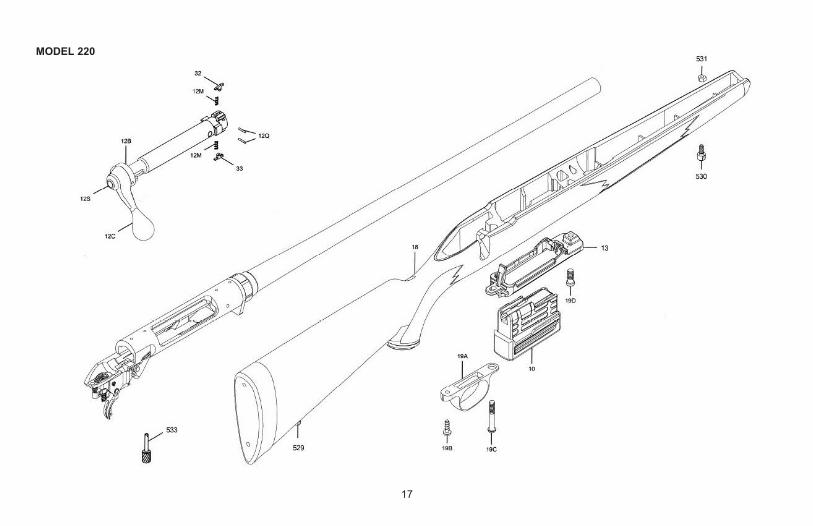
MODEL 220
MODEL 220
18
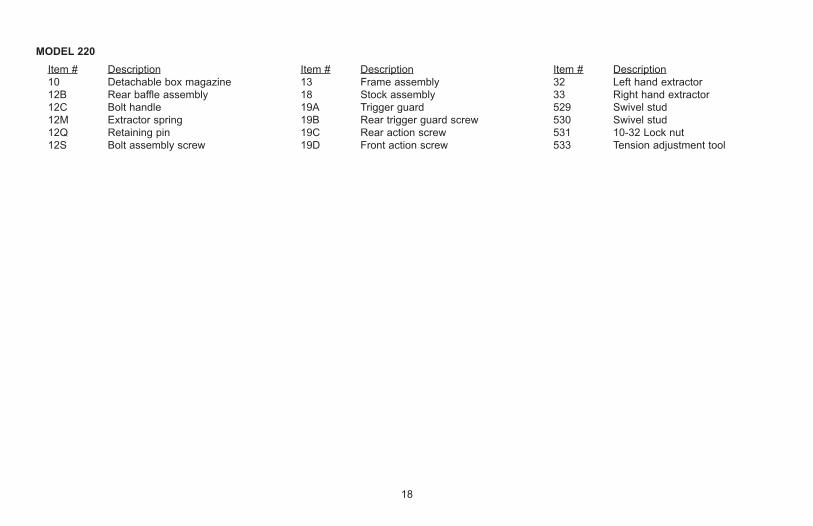
Item # Description10 Detachable box magazine12B Rear baffle assembly12C Bolt handle12M Extractor spring12Q Retaining pin12S Bolt assembly screw
Item # Description13 Frame assembly18 Stock assembly19A Trigger guard19B Rear trigger guard screw19C Rear action screw19D Front action screw
Item # Description32 Left hand extractor33 Right hand extractor529 Swivel stud530 Swivel stud531 10-32 Lock nut533 Tension adjustment tool
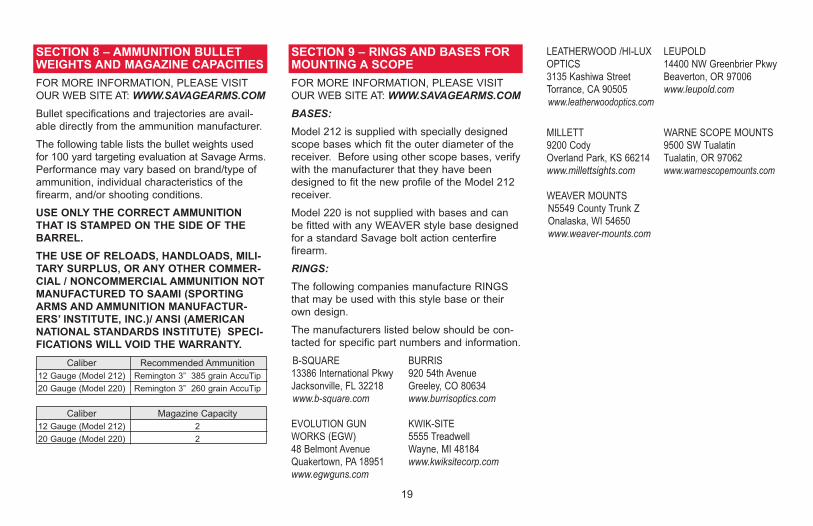
SECTION 8 – AMMUNITION BULLETWEIGHTS AND MAGAZINE CAPACITIESFOR MORE INFORMATION, PLEASE VISITOUR WEB SITE AT: WWW.SAVAGEARMS.COMBullet specifications and trajectories are avail-able directly from the ammunition manufacturer.
The following table lists the bullet weights usedfor 100 yard targeting evaluation at Savage Arms.Performance may vary based on brand/type ofammunition, individual characteristics of thefirearm, and/or shooting conditions.
USE ONLY THE CORRECT AMMUNITIONTHAT IS STAMPED ON THE SIDE OF THEBARREL.THE USE OF RELOADS, HANDLOADS, MILI-TARY SURPLUS, OR ANY OTHER COMMER-CIAL / NONCOMMERCIAL AMMUNITION NOTMANUFACTURED TO SAAMI (SPORTINGARMS AND AMMUNITION MANUFACTUR-ERS’ INSTITUTE, INC.)/ ANSI (AMERICANNATIONAL STANDARDS INSTITUTE) SPECI-FICATIONS WILL VOID THE WARRANTY.
Caliber Recommended Ammunition12 Gauge (Model 212) Remington 3” 385 grain AccuTip20 Gauge (Model 220) Remington 3” 260 grain AccuTip
Caliber Magazine Capacity12 Gauge (Model 212) 220 Gauge (Model 220) 2
SECTION 9 – RINGS AND BASES FORMOUNTING A SCOPEFOR MORE INFORMATION, PLEASE VISITOUR WEB SITE AT: WWW.SAVAGEARMS.COMBASES:Model 212 is supplied with specially designedscope bases which fit the outer diameter of thereceiver. Before using other scope bases, verifywith the manufacturer that they have beendesigned to fit the new profile of the Model 212receiver.
Model 220 is not supplied with bases and canbe fitted with any WEAVER style base designedfor a standard Savage bolt action centerfirefirearm.
RINGS:The following companies manufacture RINGSthat may be used with this style base or theirown design.
The manufacturers listed below should be con-tacted for specific part numbers and information.
B-SQUARE BURRIS13386 International Pkwy 920 54th AvenueJacksonville, FL 32218 Greeley, CO 80634www.b-square.com www.burrisoptics.com
EVOLUTION GUN KWIK-SITEWORKS (EGW) 5555 Treadwell48 Belmont Avenue Wayne, MI 48184Quakertown, PA 18951 www.kwiksitecorp.comwww.egwguns.com
LEATHERWOOD /HI-LUX LEUPOLDOPTICS 14400 NW Greenbrier Pkwy3135 Kashiwa Street Beaverton, OR 97006Torrance, CA 90505 www.leupold.comwww.leatherwoodoptics.com
MILLETT WARNE SCOPE MOUNTS9200 Cody 9500 SW TualatinOverland Park, KS 66214 Tualatin, OR 97062www.millettsights.com www.warnescopemounts.com
WEAVER MOUNTSN5549 County Trunk ZOnalaska, WI 54650www.weaver-mounts.com
SEC
19
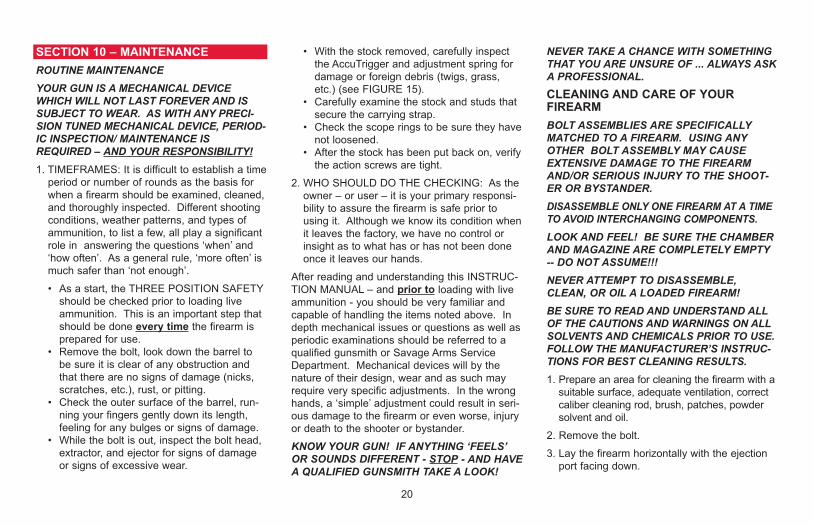
SECTION 10 – MAINTENANCEROUTINE MAINTENANCEYOUR GUN IS A MECHANICAL DEVICEWHICH WILL NOT LAST FOREVER AND ISSUBJECT TO WEAR. AS WITH ANY PRECI-SION TUNED MECHANICAL DEVICE, PERIOD-IC INSPECTION/ MAINTENANCE ISREQUIRED – AND YOUR RESPONSIBILITY!1. TIMEFRAMES: It is difficult to establish a time
period or number of rounds as the basis forwhen a firearm should be examined, cleaned,and thoroughly inspected. Different shootingconditions, weather patterns, and types ofammunition, to list a few, all play a significantrole in answering the questions ‘when’ and‘how often’. As a general rule, ‘more often’ ismuch safer than ‘not enough’.
• As a start, the THREE POSITION SAFETYshould be checked prior to loading liveammunition. This is an important step thatshould be done every time the firearm isprepared for use.
• Remove the bolt, look down the barrel tobe sure it is clear of any obstruction andthat there are no signs of damage (nicks,scratches, etc.), rust, or pitting.
• Check the outer surface of the barrel, run-ning your fingers gently down its length,feeling for any bulges or signs of damage.
• While the bolt is out, inspect the bolt head,extractor, and ejector for signs of damageor signs of excessive wear.
• With the stock removed, carefully inspectthe AccuTrigger and adjustment spring fordamage or foreign debris (twigs, grass,etc.) (see FIGURE 15).
• Carefully examine the stock and studs thatsecure the carrying strap.
• Check the scope rings to be sure they havenot loosened.
• After the stock has been put back on, verifythe action screws are tight.
2. WHO SHOULD DO THE CHECKING: As theowner – or user – it is your primary responsi-bility to assure the firearm is safe prior tousing it. Although we know its condition whenit leaves the factory, we have no control orinsight as to what has or has not been doneonce it leaves our hands.
After reading and understanding this INSTRUC-TION MANUAL – and prior to loading with liveammunition - you should be very familiar andcapable of handling the items noted above. Indepth mechanical issues or questions as well asperiodic examinations should be referred to aqualified gunsmith or Savage Arms ServiceDepartment. Mechanical devices will by thenature of their design, wear and as such mayrequire very specific adjustments. In the wronghands, a ‘simple’ adjustment could result in seri-ous damage to the firearm or even worse, injuryor death to the shooter or bystander.
KNOW YOUR GUN! IF ANYTHING ‘FEELS’OR SOUNDS DIFFERENT - STOP - AND HAVEA QUALIFIED GUNSMITH TAKE A LOOK!
NEVER TAKE A CHANCE WITH SOMETHINGTHAT YOU ARE UNSURE OF ... ALWAYS ASKA PROFESSIONAL.CLEANING AND CARE OF YOURFIREARMBOLT ASSEMBLIES ARE SPECIFICALLYMATCHED TO A FIREARM. USING ANYOTHER BOLT ASSEMBLY MAY CAUSEEXTENSIVE DAMAGE TO THE FIREARMAND/OR SERIOUS INJURY TO THE SHOOT-ER OR BYSTANDER.DISASSEMBLE ONLY ONE FIREARM AT A TIMETO AVOID INTERCHANGING COMPONENTS.LOOK AND FEEL! BE SURE THE CHAMBERAND MAGAZINE ARE COMPLETELY EMPTY-- DO NOT ASSUME!!!NEVER ATTEMPT TO DISASSEMBLE,CLEAN, OR OIL A LOADED FIREARM!BE SURE TO READ AND UNDERSTAND ALLOF THE CAUTIONS AND WARNINGS ON ALLSOLVENTS AND CHEMICALS PRIOR TO USE.FOLLOW THE MANUFACTURER’S INSTRUC-TIONS FOR BEST CLEANING RESULTS.1. Prepare an area for cleaning the firearm with a
suitable surface, adequate ventilation, correctcaliber cleaning rod, brush, patches, powdersolvent and oil.
2. Remove the bolt.
3. Lay the firearm horizontally with the ejectionport facing down.
20
ALWAYS STARTING FROM THE CHAMBEREND, PUSH THE CLEANING ROD THROUGHTHE BORE AND OUT THE MUZZLE END.4. Using a small amount of powder solvent on
the brush, push the cleaning rod through thebarrel several times.
5. Unscrew the brush from the cleaning rod andreplace it with a patch tip.
6. Push a new patch through the bore startingfrom the chamber end and out the muzzle.
7. Repeat the prior step (# 6) several times.8. Push a new patch saturated with gun oil
through the bore.9. Push a new dry patch through the bore to
remove the excess oil.10. When done, always verify that the “THREE
POSITION SAFETY” is operational asexplained in the beginning of SECTION 2.
CHECK THE BORE CAREFULLY WHENDONE TO BE SURE THERE ARE NOOBSTRUCTIONS (I.E. PIECES OF CLEANINGPATCH, ETC.).A VERY THIN FILM OF OIL IS SUFFICIENTPROTECTION – DO NOT OVER OIL!!!FAILURE TO PROPERLY MAINTAIN YOURFIREARM MAY LEAD TO DAMAGE AND/ORSERIOUS INJURY TO THE SHOOTER ORBYSTANDER.
PROTECTING METAL SURFACES1. In order to be able to reach all surfaces,
remove the bolt prior to cleaning and oiling.2. With a soft cloth, remove any foreign matter
(i.e. mud, twigs, grass).3. Apply a thin coat of gun oil on all cleaned
metal surfaces. Rubbing may be necessaryto remove any signs of rust.
4. Where accessible, clean and lightly oil interiormetal surfaces.
5. When done, always verify that the “THREEPOSITION SAFETY” is operational asexplained in the beginning of SECTION 2.
DO NOT DISASSEMBLE THE BOLT ASSEMBLY.CHECK THE BORE CAREFULLY WHENDONE TO BE SURE THERE ARE NOOBSTRUCTIONS (I.E. PIECES OF CLEANINGPATCH, ETC.).
SECTION 11 – STATEMENT OF LIMITEDWARRANTYFOR MORE INFORMATION, PLEASE VISITOUR WEB SITE AT: WWW.SAVAGEARMS.COMSTATEMENT OF LIMITED WARRANTYFor your convenience, registration may now becompleted directly from our web site (WWW.SAV-AGEARMS.COM) twenty four hours a day (QRCODE provided for your Smartphone next to thewarranty card). Should you not have access toour web site, please complete the WARRANTYREGISTRATION CARD and return it to SavageArms, Inc. within ten (10) days from the date ofpurchase.
WHO IS COVERED? • The original owner (with proof of purchase).
WHAT IS COVERED?• Any defect in materials or workmanship (per-
formed by Savage Arms) encountered dur-ing normal use.
HOW LONG IS THE WARRANTY PERIOD?• One (1) year from the date of purchase.
WHAT IS NOT COVERED?PERSONAL INJURY, PROPERTY DAMAGE,AND/OR DAMAGE TO THE FIREARMCAUSED BY:
• Improper maintenance or negligence to pro-vide proper care and maintenance.
• Alterations/modifications performed withoutthe written authorization of Savage Arms,
21
Inc. Service Department.• Normal wear; tear; and/or corrosion.• Accidental discharge, careless handling,
and/or misuse.• Barrel obstructions.
EXCLUSIONS AND LIMITATIONS:This WARRANTY and the remedies set forthherein are exclusive and take the place of allother expressed or implied WARRANTIES(including any implied WARRANTY of mer-chantability or fitness for any particular purposewhich are disclaimed). No other representationsor claims of any nature shall be binding on orobligate Savage Arms, Inc.
Savage Arms, Inc. excludes any incidental andconsequential damages under this warranty.Some states do not allow exclusions or limita-tions on how long an implied warranty lasts, sothe above limitations may not apply to you.
This WARRANTY gives you specific legal rights.You may have other rights, which will vary fromstate to state.
RETURNING A FIREARM:For WARRANTY claims, proof of purchase mustaccompany the firearm.
It is a violation of Federal Law to ship a firearmwith live ammunition either in the detachablebox magazine, chamber, or placed in the box.For the safety of all involved PLEASE be surethere is no ammunition in either the chamber,detachable box magazine, or box.
Savage Arms, Inc. is not responsible for the lossor damage to any accessories shipped with thefirearm.
If there is a question whether the firearm shouldbe returned or parts could be purchased, pleasecall 1-413-568-7001 between 9:00 am and 4:00p.m. Eastern Time and ask for the Service/War-ranty Department.
All firearms are to be sent to Savage Arms, Inc.at the owner’s expense. Warranty repairs will bereturned to the owner at Savage Arms’ expense.
1. Pack the firearm in its original box if possible.If a similar suitable box is used, care shouldbe taken to protect the barrel/muzzle frombreaking through. Always pack with theassumption that the firearm will undergorough handling during transit to Savage Arms.
2. Enclose a brief note including:
• name, address and phone number of thesender
• serial number of the firearm• description of the problem you are having• bullet weight, bullet type, and manufacturer
of the ammunition you are using• any other information which you feel may
be helpful.
3. Return to:
Savage Arms, Inc.100 Springdale RoadWestfield, MA 01085Attn: Service Department
4. If there will be a charge involved for therepair, a quote will be sent within fourteen(14) working days.
• If there is no response from the quote withinthirty (30) days, the firearm will be returnedCOD ($20.00 Shipping/Handling).
Firearms will be repaired typically 3 weeks afterreceipt of payment in the order they werereceived.
22

WA
RR
AN
TY R
EGIS
TRAT
ION
CA
RD
Plea
se c
ompl
ete
and
retu
rn th
is c
ard
with
in 1
0 da
ys fr
om th
e da
te y
ou p
urch
ased
you
r fire
arm
.
Nam
e___
____
____
____
____
____
____
____
____
____
____
____
____
____
____
____
____
____
____
Add
ress
____
____
____
____
____
____
____
____
____
____
____
____
____
____
____
____
____
____
_
City
____
____
____
____
____
____
____
____
____
____
____
____
Stat
e __
____
_ Z
ip__
____
____
__
Dat
e of
Pur
chas
e___
____
____
____
____
____
____
____
____
____
____
____
____
____
____
____
___
Emai
l___
____
____
____
____
____
____
____
____
____
____
____
____
____
____
____
____
____
____
Mod
el N
umbe
r__
____
____
____
____
____
____
____
____
____
____
____
____
____
____
____
____
_
Cal
iber
/Gau
ge__
____
____
____
____
____
____
____
____
____
____
____
____
____
____
____
____
__
Seria
l Num
ber_
____
____
____
____
____
____
____
____
____
____
____
____
____
____
____
____
___
Pric
e Pa
id__
____
____
____
____
____
____
____
____
____
____
____
Your
Age
____
____
____
____
To h
elp
us b
ette
r und
erst
and
our c
usto
mer
s and
enh
ance
our
pro
duct
s and
serv
ice,
we
wou
ld
appr
ecia
te a
nsw
ers t
o th
e fo
llow
ing
ques
tions
:W
here
pur
chas
ed:
G
un S
hop
Spo
rting
Goo
ds S
tore
Dis
coun
t Spo
rting
Goo
ds S
tore
D
isco
unt/C
hain
Sto
reTh
e pr
imar
y us
e of
this
fire
arm
is:
Va
rmin
t Sho
otin
g T
arge
t Sho
otin
g P
linki
ng
Big
Gam
e H
untin
g L
aw E
nfor
cem
ent/S
ecur
ity H
ow m
any
do y
ou o
wn:
___
____
___
Rifl
es
____
____
__ S
hotg
uns
___
____
___
Han
dgun
sIs
this
you
r firs
t Sav
age:
Ye
s
No
You
sele
cted
a S
avag
e be
caus
e (r
ank
1-10
, with
10
bein
g m
ost i
mpo
rtant
)__
___
Dur
abili
ty
____
_ C
ompa
ny R
eput
atio
n __
___
Pric
e__
___
Cat
alog
__
___
Frie
nd’s
Rec
omm
enda
tion
____
_ D
eale
r/loc
al S
how
____
_ Fu
nctio
n __
___
Acc
urac
y __
___
Mag
azin
e Ad
____
_ TV
Sho
w
____
_ D
eale
r Rec
omm
enda
tion
____
_ O
ther
Whi
ch g
roup
des
crib
es y
our f
amily
inco
me:
U
nder
$20
,000
$2
0,00
0-$3
9,99
9 $4
0,00
0-$5
9,99
9
$60,
000-
$74,
999
$
75,0
00-$
99,9
99
$1
00,0
00+
Estim
ated
num
ber o
f she
lls/c
artri
dges
you
will
use
this
yea
r with
this
gun
? __
____
____
____
____
_D
o yo
u re
ad g
un o
r hun
ting
mag
azin
es?
Y
es
No
List
: __
____
____
____
____
____
____
____
____
____
____
____
____
____
____
____
____
____
____
_D
o yo
u w
atch
gun
or h
untin
g sh
ows?
Y
es
No
List
:___
____
____
____
____
____
____
____
____
____
____
____
____
____
____
____
____
____
____
_
Dur
ing
wha
t mon
th d
id y
ou in
vest
igat
e an
d de
cide
on
the
mod
el to
buy
? __
____
____
____
____
___
Did
you
r dea
ler:
Hav
e th
e fir
earm
in st
ock
N
eed
to o
rder
it
Com
men
ts:
____
____
____
____
____
____
____
____
____
____
____
____
____
____
____
____
____
__
____
____
____
____
____
____
____
____
____
____
____
____
____
____
____
____
____
____
____
___
1047
96

108829 (11/18) Rev. 3
WARNINGFirearms must be handled responsibly and securely stored to prevent access by children and other unauthorized users. California has strict laws pertaining to firearms, and you may be fined or imprisoned if you fail to comply with them. Visit the Web site of the California Attorney General at https://oag.ca.gov/firearms for information on firearm laws applicable to you and how you can comply. Prevent child access by always keeping guns locked away and unloaded when not in use. If you keep a loaded firearm where a child obtains and improperly uses it, you may be fined or sent to prison.
WARNINGThis product can expose you to chemicals including lead, which is known to the State of California to cause cancer and reproductive harm. For more information go to www.P65Warnings.ca.gov
ADVERTENCIALas armas de fuego requieren de manejo responsable y almacenamiento seguro para evitar que niños u otros usuarios no autorizados tengan acceso a estas. California cuenta con leyes estrictas sobre las armas de fuego, y usted puede ser multado o sentenciado a prisión si no las cumple. Visite la página web del fiscal general de California en https://oag.ca.gov/firearms para obtener más información sobre las leyes de armas de fuego quele apliquen y cómo cumplirlas.Evite que los niños tengan acceso a las armas, manteniéndolas guardadas bajo llave y descargadas siempre que no estén en uso. Si mantiene un arma cargada en un lugar donde un niño tiene acceso a ella y la utiliza de forma indebida, puede ser multado y enviado a prisión.
ADVERTENCIAEste producto puede exponerle a sustancias químicas que incluyen el plomo, que el estado de California reconoce como causante de cáncer y daños al sistema reproductivo. Para más información, visite www.P65Warnings.ca.gov
AVERTISSEMENTLes armes à feu doivent être manipulées de manière responsable et entreposées de façon sécuritaire, hors de la portée des enfants et d’autres personnes non autorisées. Les lois californiennes relatives aux armes à feu sont strictes, et le non-respect de ces lois peut entraîner une amende ou une peine d’emprisonnement. Consultez le site Web du Procureur général de Californie au https://oag.ca.gov/firearms pour de l’information sur les lois touchant les armes à feu applicables et sur les moyensde s’y conformer.Pour empêcher les enfants d’accéder aux armes à feu, celles-ci doivent toujours être enfermées dans un lieu sûr et déchargées, lorsqu’elles ne sont pas utilisées. Toute personne qui entrepose une arme à feu chargée à un endroit où un enfant peut l’obtenir et en faire une mauvaise utilisation est passible d’une amende ou d’emprisonnement.
AVERTISSEMENTCe produit peut exposer l’utilisateur à des produits chimiques, comme le plomb, que l’État de Californie reconnaît comme étant cancérigène et nocif pour la reproduction. Pour plus d’information, consultez le www.P65Warnings.ca.gov