Embed Size (px)
Citation preview

External
BMC Support Central User Guide
BMC Customer Care
22 March 2018
BMC Customer Care
22 March 2018

1 | P A G E
Contents
BMC Support Central User Guide ...................................... 1
Getting Started with Support Central ................................ 2
Web browser compatibility ....................................................................................... 2 Register your account .............................................................................................. 2 Log into Support Central .......................................................................................... 3
Overview of the Support Central dashboard ........................................................... 3
Manage Your Support Account .......................................... 5
View and edit your support profile ........................................................................... 5 Customer Administrators ......................................................................................... 7
Request product licenses ........................................................................................ 7 Additional My Support links ..................................................................................... 8
Find Detailed Product Info .................................................. 9
Search the Knowledge Base ................................................................................... 9 Find product documentation .................................................................................. 10
Look up product compatibility ................................................................................ 11 Check product status ............................................................................................. 13
Download parameter references ........................................................................... 14
Submit & Track Support Cases ........................................ 16
Submit a new Case ................................................................................................ 16 View or update existing Cases .............................................................................. 17 View Historical Cases ............................................................................................ 19
View Defects/RFEs/CARs ..................................................................................... 20
Additional Case and Defect Management links .................................................... 20
Download Products & Updates ........................................ 22
Use the Product Downloads tool ........................................................................... 22 Profiles ................................................................................................................................................ 23 Licensed Products (Component View/Licensed Products View)...................................................... 23 Product patches ................................................................................................................................. 26 Trial Products ..................................................................................................................................... 26
Patch older Remedy products ............................................................................... 27 Download Mainframe PTFs ................................................................................... 29
Additional Support Resources ......................................... 31
Other BMC resources (SDE, Remedyforce, Communities, etc.) .......................... 31 Contact BMC .......................................................................................................... 31 Provide Feedback .................................................................................................. 32
Speak To A Support Manager ............................................................................... 32 Customer Care Chat .............................................................................................. 32

2 | P A G E
Getting Started with Support Central
BMC Support Central is designed to make it as easy as possible to get help with your BMC products. This user guide will introduce you to the Support Central interface, walk you through the different resources available, and provide detailed step-by-step instructions for completing common support tasks.
This page will get you started with Support Central. You'll first need to check your web browser compatibility and create a user account and then log into the site. From there, you'll have access to Support Central's features.
See below for detailed instructions, or refer to the Table of Contents for help with other support tasks.
Web browser compatibility
For the best experience with BMC Support Central, we recommend using one of the browsers listed below. While aspects of Support Central may function correctly with other browsers, the site has been tested with, and is fully supported for a specific set of browsers. Click here to see the list of supported browsers.
Register your account
Before you get started, you’ll need to have a copy of your BMC Order Detail document in front of you.
NOTE: You should have received this via email when you ordered your product(s).
To register on the Support Central site:
1. Go to http://www.bmc.com/support. You’ll see a light grey menu bar with two links on the right. Click Register.
2. On the next page, check the box next to ’Are you a current/future BMC Customer? NOTE: If your company is a BMC partner, you can select the second checkbox to request access to partner-specific resources.
3. A registration form will appear. Fill out the top section of the form with your name, phone number, email, and a password to use for the Support Central site.
4. At the bottom of the section, check the ‘Access to BMC Support’ box. Another section of the form will appear.
5. This is where you’ll need your Order Detail document. Figure 2 below shows the location in the table with your product information, you should see two columns off to the right that say ‘Support ID’ and ‘Support ID Password.’
6. In the ‘Support Contract ID’ text box, enter the number from the ‘Support ID’ column on your Order Detail sheet.
7. In the ‘Contract Password (PIN)’ text box, enter the number from the ‘Support ID Password’ column.
8. Click the Validate button to check if your support credentials are current. 9. Fill out the ‘Job Function,’ ‘Primary Role,’ and ‘Support Language’ fields.
NOTE: You can also click the ‘Access to BMC Academy’ and ‘Yes, BMC Software Inc.
Figure 1
3 | P A G E
may send me email’ checkboxes, if you’d like to request access to these additional resources.
10. Enter the text that appears in the Captcha image for verification. 11. Read the Legal Disclaimer for details on how we use your personal information. 12. Check the ‘I agree to BMC Privacy Policy’ checkbox. 13. Click the Submit button to complete the registration process.
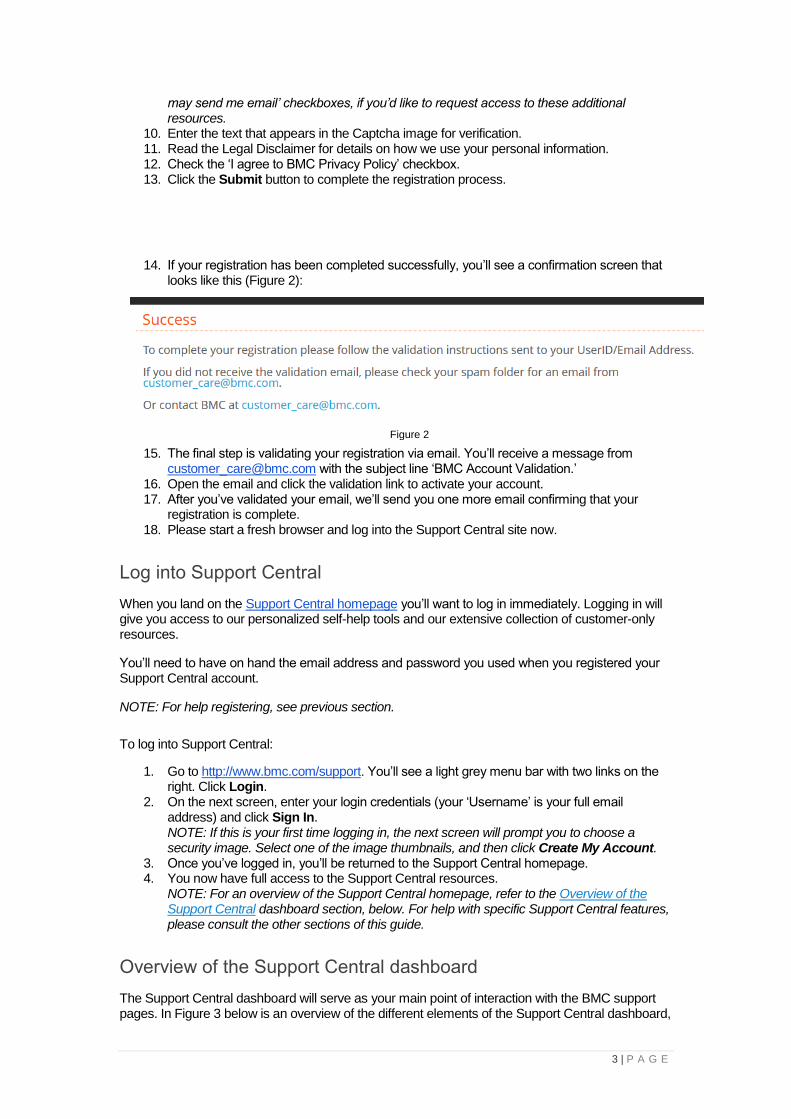
14. If your registration has been completed successfully, you’ll see a confirmation screen that looks like this (Figure 2):
15. The final step is validating your registration via email. You’ll receive a message from [email protected] with the subject line ‘BMC Account Validation.’
16. Open the email and click the validation link to activate your account. 17. After you’ve validated your email, we’ll send you one more email confirming that your
registration is complete. 18. Please start a fresh browser and log into the Support Central site now.
Log into Support Central
When you land on the Support Central homepage you’ll want to log in immediately. Logging in will give you access to our personalized self-help tools and our extensive collection of customer-only resources.
You’ll need to have on hand the email address and password you used when you registered your Support Central account.
NOTE: For help registering, see previous section.
To log into Support Central:
1. Go to http://www.bmc.com/support. You’ll see a light grey menu bar with two links on the right. Click Login.
2. On the next screen, enter your login credentials (your ‘Username’ is your full email address) and click Sign In. NOTE: If this is your first time logging in, the next screen will prompt you to choose a security image. Select one of the image thumbnails, and then click Create My Account.
3. Once you’ve logged in, you’ll be returned to the Support Central homepage. 4. You now have full access to the Support Central resources.
NOTE: For an overview of the Support Central homepage, refer to the Overview of the Support Central dashboard section, below. For help with specific Support Central features, please consult the other sections of this guide.
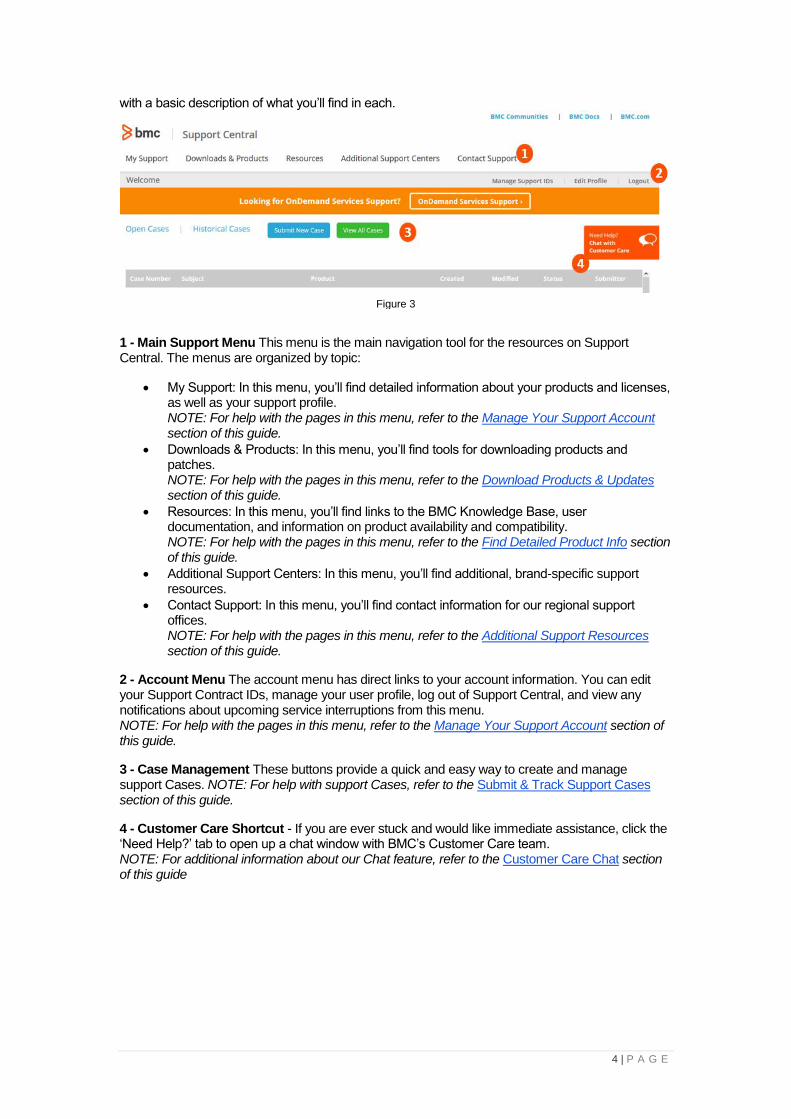
Overview of the Support Central dashboard
The Support Central dashboard will serve as your main point of interaction with the BMC support pages. In Figure 3 below is an overview of the different elements of the Support Central dashboard,
Figure 2
4 | P A G E
with a basic description of what you’ll find in each.
1 - Main Support Menu This menu is the main navigation tool for the resources on Support Central. The menus are organized by topic:
• My Support: In this menu, you’ll find detailed information about your products and licenses, as well as your support profile. NOTE: For help with the pages in this menu, refer to the Manage Your Support Account section of this guide.
• Downloads & Products: In this menu, you’ll find tools for downloading products and patches. NOTE: For help with the pages in this menu, refer to the Download Products & Updates section of this guide.
• Resources: In this menu, you’ll find links to the BMC Knowledge Base, user documentation, and information on product availability and compatibility. NOTE: For help with the pages in this menu, refer to the Find Detailed Product Info section of this guide.
• Additional Support Centers: In this menu, you’ll find additional, brand-specific support resources.
• Contact Support: In this menu, you’ll find contact information for our regional support offices. NOTE: For help with the pages in this menu, refer to the Additional Support Resources section of this guide.
2 - Account Menu The account menu has direct links to your account information. You can edit your Support Contract IDs, manage your user profile, log out of Support Central, and view any notifications about upcoming service interruptions from this menu. NOTE: For help with the pages in this menu, refer to the Manage Your Support Account section of this guide.
3 - Case Management These buttons provide a quick and easy way to create and manage support Cases. NOTE: For help with support Cases, refer to the Submit & Track Support Cases section of this guide.
4 - Customer Care Shortcut - If you are ever stuck and would like immediate assistance, click the ‘Need Help?’ tab to open up a chat window with BMC’s Customer Care team. NOTE: For additional information about our Chat feature, refer to the Customer Care Chat section of this guide
Figure 3

5 | P A G E
Manage Your Support Account
Your Support Central account helps us tailor your support experience according to the BMC products you use. Keeping your account up to date with contact information, current product licenses and support contract ID details makes it easier for our Customer Care team to serve you.
Tools for managing your Support Central Account can be found under the first menu item on the Support Central Page (Figure 4):
Below you'll find detailed instructions for editing your support profile, managing your product licenses and passwords, and exploring the other resources available from the 'My Support' menu.
NOTE: If you're looking for help with the first link on this menu, ‘Case and Defect Management,' please refer to the Submit & Track Support Cases section of this guide.
View and edit your support profile
Most of your account information is accessible from the ‘My Support’ menu, by clicking the My Support Profile link. Figure 5 below is tour of the different features of your Support Profile, including instructions for how to manage each aspect of it.
Figure 4

6 | P A G E
1 - My Login Profile
Clicking on this link will take you to a page (Figure 6) where you can modify your contact information and login credentials.
You’ll use this page anytime you need to update the name and phone number on the account, change your login password, or review your support contract status. If your organization is a BMC
Figure 5
Figure 6

7 | P A G E
partner, you can enter your partner credentials for access to partner-specific resources. Also, you can request access to BMC Academy trainings from this page, as well.
2 - Manage Support IDs
Clicking on this link will take you to a page (Figure 7) where you can add or edit Support Contract IDs, as well as view other users registered with the same contract ID.
At the top of the page, you can remove support IDs from your profile, and add additional Support IDs to your account. From the table below, you can review the Support Contract IDs associated with your account. To edit an existing Support Contract, tick the Action box in the table and click on of the buttons on top:
1. Remove Support ID/User - Click this button to remove Support IDs associated with your account. Customer Admins are able to remove users from their support ID.
2. Allow to Create Case – This is only available for Customer Admins. Allow or disable access to open Cases directly with BMC Software by clicking this button.
3. Add Support IDs - Click this button to add additional Support IDs to your account. 4. Select Support ID – This dropdown menu allows you to view a list of every user that is
registered with the selected Support ID. Customer Admins can use this list to remove users from the support ID, and restrict access to open Case with BMC Software.
NOTE: Customer Administrators will have access to remove users from their Support ID,
restrict access to open Cases with BMC Software and change the pin associated with the
Support ID to prevent other users from registering with it. If a Customer Admin changes
the pin associated with a Support ID, the admin will then be the gatekeeper for that
support ID, and all requests for the support ID and pin will be routed through them. You
can request administrative privileges by emailing [email protected].
3 – Proactive Notification Subscriptions
The links beneath this heading will enable you to subscribe to notifications for any BMC products you choose. NOTE: For more help with this, refer to the Additional My Support links section, below.
Request product licenses
You can find help for requesting product licenses in the ‘My Support’ menu, by clicking the Licensing and Passwords link.
On the top of the page you’ll find instructions for requesting license information for Remedy products. Follow the links to request new or trial licenses, purge existing licenses, or upgrade your license files.
Figure 7
8 | P A G E
NOTE: For help with Remedy license requests, please refer to the instructions found here.
Further down the page, under the ‘Product Password Requests’ you can follow the instructions to request passwords for other BMC products.
Additional My Support links
Aside from the topics we’ve covered above, there are a number of other useful resources linked to from the ‘My Support’ menu. Below you’ll find a brief description of what each of the other menu links is useful for.
• Case and Defect Management: Click this link if you’re looking to submit or manage support Cases for your account. NOTE: Remember, you can find help with these tools in the in the Submit & Track Support Cases section of this guide.
• Support Offerings: Click this link to read an overview of the different types of support contracts BMC offers. This page is useful if you have any questions about the service level that your Support Contract entitles you to.
• Maintenance & Invoices Queries: Click this link to make requests about invoices, your customer account, or maintenance agreements for your products.
• Customer Support Policies: Click this link to review, in detail, the policies governing your BMC Support Contracts.
• Product Alerts (Proactive Notifications): Click this link to set up (or modify) subscriptions to BMC product alerts. On the page, you’ll see a search window and two sections listing products. Use the search box to find products that you want to add a subscription for your current product alert subscriptions appear in the 'Your BMC product alert subscription' section. You can also look in the ‘Your supported BMC products’ section to find products that you are eligible to download and might want to add a subscription for. Click the ‘Add to subscription’ buttons to add a subscription. If you believe that a product is missing from the ‘Your supported BMC products’ section you should review the Support IDs added to your account. To unsubscribe, slide the sliders in the ’Your BMC product subscriptions’ section to the off position. If you need help click the chat icon to chat with our Customer Care team. You can see a description of the various product alert types here.

9 | P A G E
Find Detailed Product Info
The Support Central dashboard is home to a number of useful resources for tracking down information to help you troubleshoot and resolve problems you might run into with your BMC products. The majority of these can be found under the ‘Resources’ heading on the Support Central navigation menu (Figure 8):
Below, you’ll find a description of what each resource can be used for, as well as detailed instructions for how to use them.
Search the Knowledge Base
The BMC Knowledge Base is a comprehensive collection of answers to questions about BMC Products. It's a great first stop when trying to diagnose a problem.
When you click on the 'Knowledge Base' link under 'Resources', you'll be taken to a page with a simple text box (Figure 9).
Type your question into the text box. The Knowledge Base is designed to return results to specific product-related questions written in plain, conversational English. Essentially, you want to write your question the same way you would if you were asking someone in person.
Also, be as specific as possible. For example, don’t just ask about the product; ask about the specific version of the product. The clearer and more concise your question is, the better your results will be
Figure 8
Figure 9
10 | P A G E
NOTE: For more help with phrasing Knowledge Base questions, refer to our Knowledge Base Search Tips page.
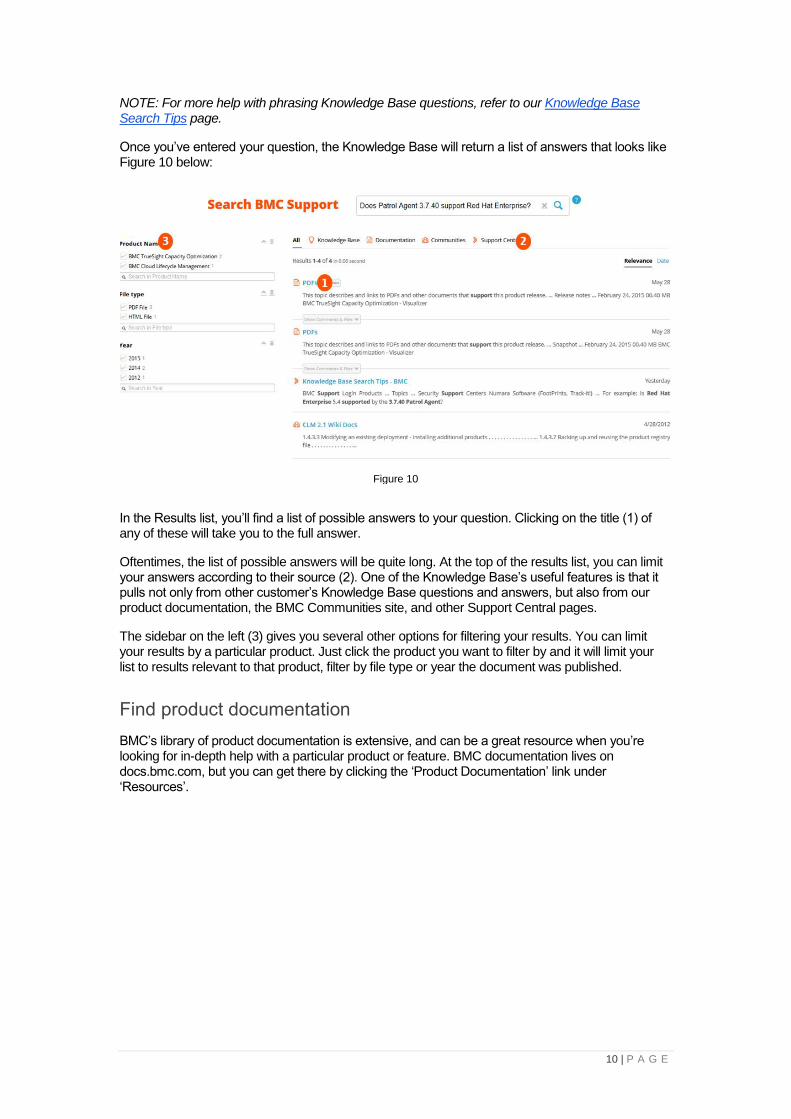
Once you’ve entered your question, the Knowledge Base will return a list of answers that looks like Figure 10 below:
In the Results list, you’ll find a list of possible answers to your question. Clicking on the title (1) of any of these will take you to the full answer.
Oftentimes, the list of possible answers will be quite long. At the top of the results list, you can limit your answers according to their source (2). One of the Knowledge Base’s useful features is that it pulls not only from other customer’s Knowledge Base questions and answers, but also from our product documentation, the BMC Communities site, and other Support Central pages.
The sidebar on the left (3) gives you several other options for filtering your results. You can limit your results by a particular product. Just click the product you want to filter by and it will limit your list to results relevant to that product, filter by file type or year the document was published.
Find product documentation
BMC’s library of product documentation is extensive, and can be a great resource when you’re looking for in-depth help with a particular product or feature. BMC documentation lives on docs.bmc.com, but you can get there by clicking the ‘Product Documentation’ link under ‘Resources’.
Figure 10

11 | P A G E
The Documentation homepage looks like Figure 11 below:
1 - Log Into Docs Interface - The first step you’ll need to take before you can access any BMC documentation is to log into the docs interface. If you’re already logged into Support Central you’ll simply need to click the Login button in the upper-right corner. Your Support Central credentials should automatically grant you access to the docs interface.
2 - Select from Popular Docs - Under the ‘Popular Documentation’ heading you’ll see a collection of links to some of the most commonly used product docs. If you see your product suite on this list, just click the tile to view the relevant docs.
3 - Search Docs by Product Name - If your product name doesn’t appear on one of the ‘Popular Documentation’ tiles, then you can type your product name into the ‘Find online documentation by product name’ text box below. To improve your search results, it’s useful to include your product’s version number as well.
4 - Find Docs for Older Products - Documentation for some of our older products still lives elsewhere on the site. If you’re not able to find documentation for an older BMC product, click the large blue button to go to the Supported Products A-Z list. On that page you’ll be able to check whether your product and version is still supported, and sometimes find links to legacy documentation, as well.
Look up product compatibility
Many times, software Cases stem from compatibility problems between different elements of our IT environments. To help pinpoint such problems, BMC Support offers the Solution Product Availability and Compatibility (SPAC) utility.
Figure 11
12 | P A G E
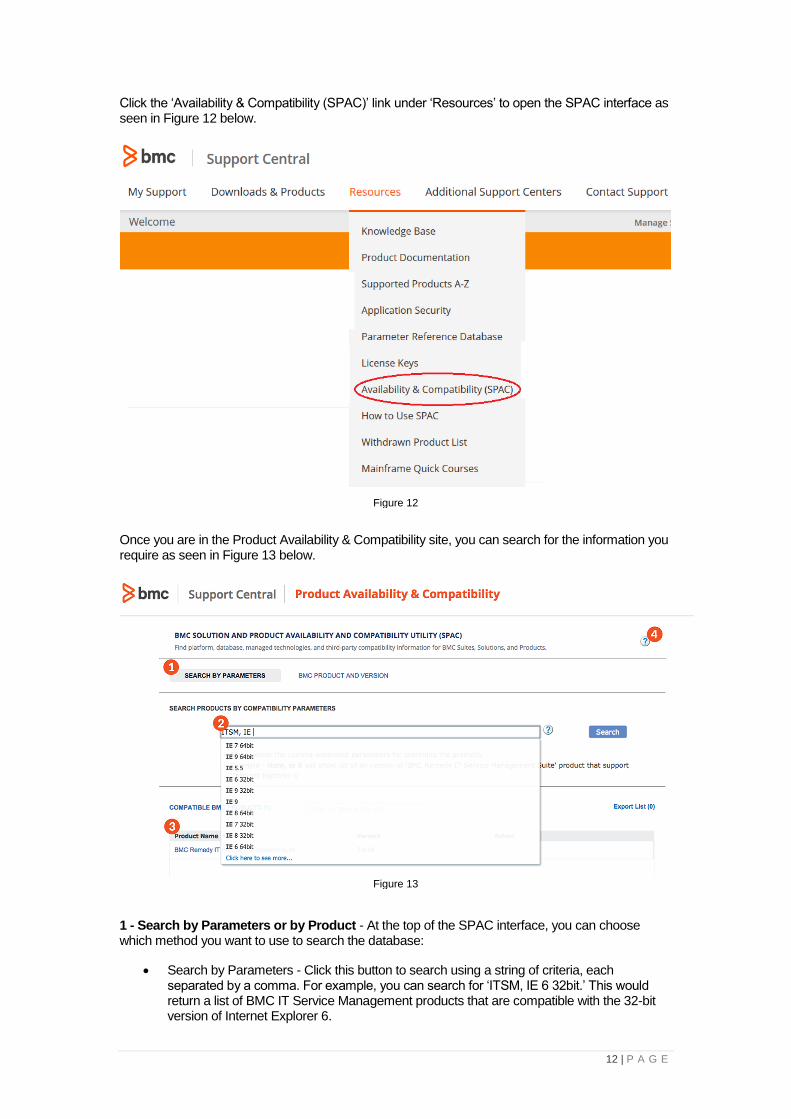
Click the ‘Availability & Compatibility (SPAC)’ link under ‘Resources’ to open the SPAC interface as seen in Figure 12 below.
Once you are in the Product Availability & Compatibility site, you can search for the information you require as seen in Figure 13 below.
1 - Search by Parameters or by Product - At the top of the SPAC interface, you can choose which method you want to use to search the database:
• Search by Parameters - Click this button to search using a string of criteria, each separated by a comma. For example, you can search for ‘ITSM, IE 6 32bit.’ This would return a list of BMC IT Service Management products that are compatible with the 32-bit version of Internet Explorer 6.
Figure 12
Figure 13

13 | P A G E
• BMC Product and Version - Click this button to search by a specific BMC product and version. Using this method, you can view a full list of products and platforms with which your selected product and version is compatible.
2 - Enter Search Variables - When searching by parameter, you’ll notice that the search bar will automatically pop up a list of search criteria as you type. Selecting your criteria from these selections will ensure that your results are more accurate and make the process of search much faster.
3 - Locate your Product on the List - The list below the search bar (which will become lists, when searching by Product and Version) will display any products that meet your search criteria. Click on any product to see a list of its core components as well as a list of compatible platforms and products.
4 - Click Help for SPAC User Guide - If you need additional help using the SPAC utility, click the “?” button in the upper-right corner. This will take you to a full set of documentation for using the SPAC utility.
Check product status
If you’re having trouble locating resources to support an older BMC product, it’s often useful to double-check the product’s current status. The ‘Resources’ menu has two very simple links to help you do that.
The first, is the ‘Supported Products A-Z’ list under ‘Resources’ (Figure 14).
On this screen, you can review all of the products that BMC currently offers. Search for a particular product in the search bar above, or just scroll down the list alphabetically. You can also choose to organize the list either by current product names or by their former names, in case the product name has changed.
Click on a current product name to view a list of versions, and which of them are still actively supported. You can also click on a version number to view technical documentation for that product version.
Figure 14

14 | P A G E
The second resource to check is the ‘Withdrawn Product List,’ also under ‘Resources’ (Figure 15).
This page lists all of the products BMC no longer supports. The far right column for each product links to detailed information about the withdrawal, as well as migration instructions, when available.
Download parameter references
The BMC Parameter Reference Database (PRD) allows you to download parameter data for certain products. These parameter reports are useful not only for gathering information on default product settings, but also for planning out installation and customization projects.
When you click the ‘Parameter Reference Database’ link under ‘Resources’ you’ll arrive at the tool’s homepage, but it won’t look like much at first–you’ll need to log in.
Click the Login button in the upper right corner. If you’re already logged into Support Central, you should be automatically logged into the PRD interface, which will look like Figure 16 below:
1 - Filter By Product Name - Search for the product you want by typing its name into the ‘Product Name’ search box. The product list below will be filtered according to your search criteria.
Figure 15
Figure 16

15 | P A G E
2 - Find Your Version - In the list below, locate your product, as well as the specific version you’re running.
3 - Select Download Format - To the right, you can choose which format you’d like to download the parameter report in. Simply click the icon for your desired format to download the parameter report.
16 | P A G E
Submit & Track Support Cases
If you have a problem with one of your BMC products, you can submit a Case directly to our Technical Support team. Submitting a Case from Support Central will make it easy to track the status of your Case as it gets resolved.
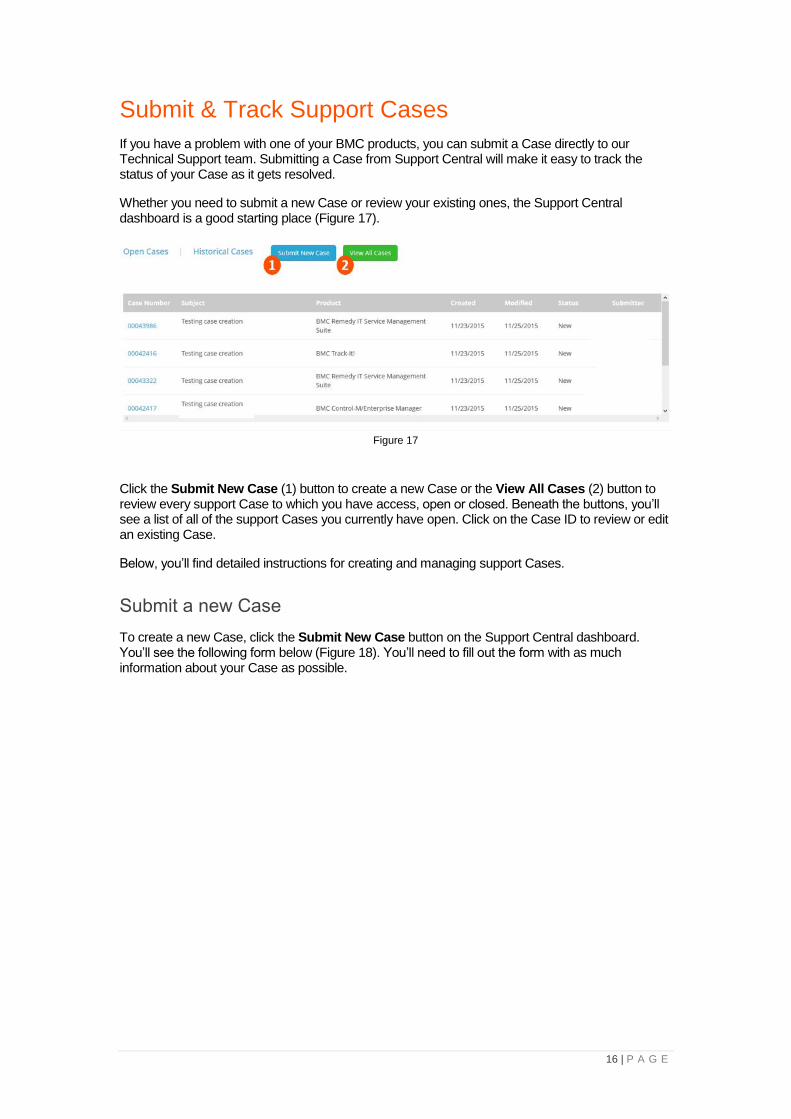
Whether you need to submit a new Case or review your existing ones, the Support Central dashboard is a good starting place (Figure 17).
Click the Submit New Case (1) button to create a new Case or the View All Cases (2) button to review every support Case to which you have access, open or closed. Beneath the buttons, you’ll see a list of all of the support Cases you currently have open. Click on the Case ID to review or edit an existing Case.
Below, you’ll find detailed instructions for creating and managing support Cases.
Submit a new Case
To create a new Case, click the Submit New Case button on the Support Central dashboard. You’ll see the following form below (Figure 18). You’ll need to fill out the form with as much information about your Case as possible.
Figure 17

17 | P A G E
You’ll see a handful of the fields are mandatory (marked with an *), but it’s useful to fill in as much information as you can, to help our team resolve the Case. Here are a couple of things to note:
1. To locate your product, start typing the name of the product in the field, and you will see a list of matching products. If your product name does not appear, click on the link “Cannot find your product?” for possible reasons, or contact support.
2. If there’s a particular component of the product that’s causing your Case, be sure to select that from the ‘Component’ drop down. Even though it’s not mandatory, it’s very useful for diagnosing the problem.
3. The ‘Severity’ field is your chance to communicate how big an impact this Case is having on your business. The default value is ‘3-Medium,’ but you can adjust according to the urgency of the problem.
4. In the ‘Contact Method’ field you can specify the method of communication you’d prefer to be contacted at for this Case. You can also leave any notes about contacting you in the ‘Contact Instructions’ field.
5. If you’re having trouble with your product license or password, make sure to tick the check box beside “Please check here if this is a problem with your products license or password”. That will help route your Case to the appropriate people faster.
6. Choose a support ID from the dropdown list. If you only have one support ID in your profile it will default to this ID.
7. Finally, if you don’t have all of the details you need in order to submit your Case, you can click the Save as Draft button to save your Case without submitting it. Later, when you’ve collected the additional information you need, you can come back, finish filling out the form, and submit the completed Case.
Once you have filled in all of the details on your Case, hit the SUBMIT button at the bottom of the form to send your Case to our support team.
View or update existing Cases
To view or update existing support Cases, click on the View All Cases button. This will bring you to the Case Management section seen in Figure 19 below.
Figure 18

18 | P A G E
If it’s a recent Case, it will likely show up on the list on your Support Central dashboard. If that’s the case, just click the Case ID, which will take to a page where you can view and edit that Case directly.
If, however, the Case you want to modify doesn’t appear on the dashboard list, click the View All Cases button instead. On this page, you can choose to view only Cases opened by you, or all Cases opened for the support IDs in your profile. You can search for Cases, Defects/RFEs/Cars or Historical Cases. If you have any Cases in Draft status, you will also see Draft Cases.
When searching Cases, you can filter by My Cases, All Cases, Status (Open, Closed or All) or by the items listed under the Search By dropdown menu (Account Name, Case ID, Product, Subject, Support ID) as seen in Figure 20.
To edit a Case, click on the Case number from the results list to open it. NOTE: You cannot update a Closed Case. Should you need to re-open a closed Case, please call the support line and explain why the Case needs to be re-opened.
To update your Case, scroll down to the Case Updates section (Figure 21) of the Case and enter your update in field, and click Share. You can also post files to your Case, or links to relevant sites or documentation.
Figure 19
Figure 20

19 | P A G E
NOTE: Some customer network rules block the technology BMC uses to update Cases via
the web. Customers are able to create a Case, just not update it. The fix is to have the
customer’s network team remove the authentication requirements for *.bmc.com and
*.eloqua.com. Updating a Case as seen as the same as a social media posting by the
network rules.
View Historical Cases
To view your older Cases, click on the Historical Cases link (Figure 22).
This will bring you to our Legacy search page (Figure 23) where you can search by the Case number in the Search by ID field, or by your Support ID, Category, Product or date range in the Detailed Search section.
Figure 21
Figure 22
Figure 23

20 | P A G E
View Defects/RFEs/CARs
You can view any defects, RFEs or CARs associated with your issues by clicking on the Defects/RFEs/CARs link under Case Management. This will bring you to a page that will display all your defects, RFEs or CARs. To view a defect, click on the Defect number, and it will display the details for you like in Figure 24 below.
Additional Case and Defect Management links
In the sections above, we’ve covered the most common support Case management tasks – creating and editing Cases. But there are several other Case management tools that can be useful. You can find these under the ‘My Support’ menu, by clicking Case and Defect Management.
Below (Figure 25) is a guide to the additional Case management tools available from this page.
Figure 24
Figure 25

21 | P A G E
1 - Open your Case using Email
Clicking on this link will take you to a set of instructions for creating new support Cases via email, rather than via Support Central.
2 - Product Defects
Clicking on this link will take you a page where you can search for any known problems with a particular product (which can be useful when troubleshooting problems). You can search for a specific defect, if you know its ID. Otherwise, you can search by product name and version, as well as by keyword. Any defects matching your search will appear in the table below. Select a defect to display the details in the ‘Details’ tab below (Figure 26).
Figure 26
22 | P A G E
Download Products & Updates
Once you've purchased a license for a BMC product, you can download patches, updates, as well as the product itself directly from the BMC website.
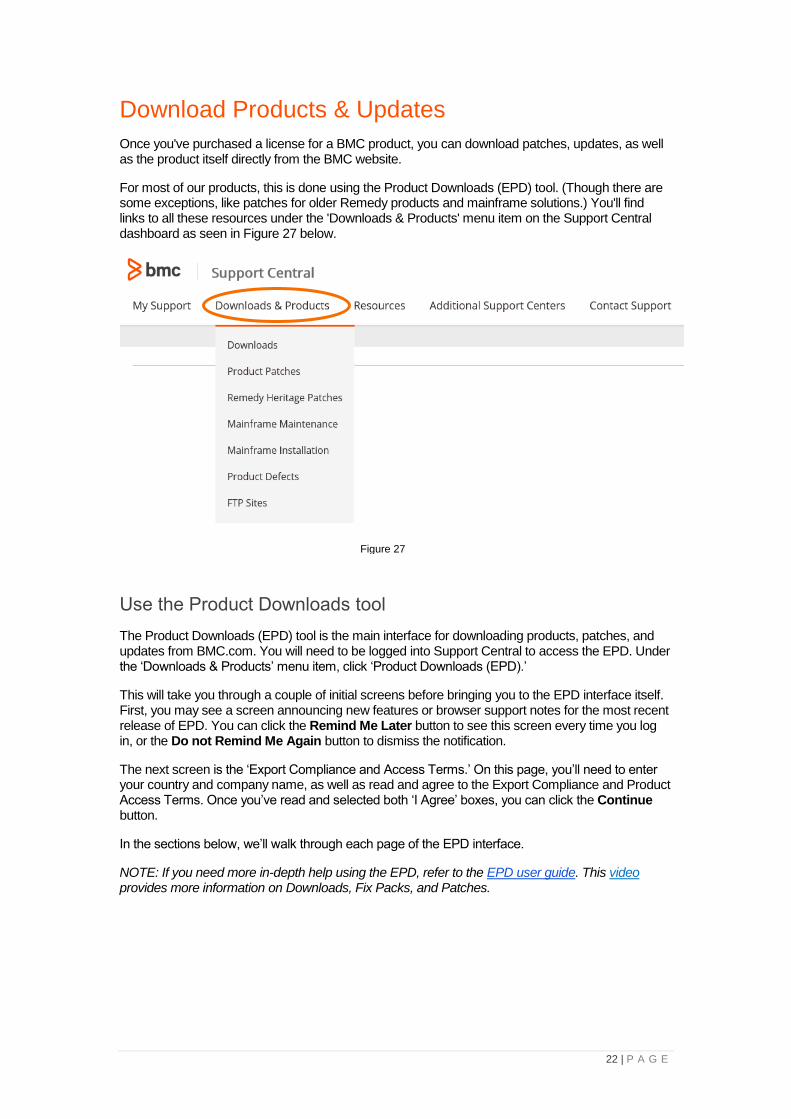
For most of our products, this is done using the Product Downloads (EPD) tool. (Though there are some exceptions, like patches for older Remedy products and mainframe solutions.) You'll find links to all these resources under the 'Downloads & Products' menu item on the Support Central dashboard as seen in Figure 27 below.
Use the Product Downloads tool
The Product Downloads (EPD) tool is the main interface for downloading products, patches, and updates from BMC.com. You will need to be logged into Support Central to access the EPD. Under the ‘Downloads & Products’ menu item, click ‘Product Downloads (EPD).’
This will take you through a couple of initial screens before bringing you to the EPD interface itself. First, you may see a screen announcing new features or browser support notes for the most recent release of EPD. You can click the Remind Me Later button to see this screen every time you log in, or the Do not Remind Me Again button to dismiss the notification.
The next screen is the ‘Export Compliance and Access Terms.’ On this page, you’ll need to enter your country and company name, as well as read and agree to the Export Compliance and Product Access Terms. Once you’ve read and selected both ‘I Agree’ boxes, you can click the Continue button.
In the sections below, we’ll walk through each page of the EPD interface.
NOTE: If you need more in-depth help using the EPD, refer to the EPD user guide. This video provides more information on Downloads, Fix Packs, and Patches.
Figure 27

23 | P A G E
Profiles
If this is your first time logging into the EPD, you’ll be automatically taken to the EPD Profiles page (Figure 28). (You can always click the ‘Profiles’ menu link in the navigation bar to come back to this page.)
On this page you’ll need to set up at least one profile for your environment, by selecting your platform preferences.
First time users will start by creating a Master Profile. Leave ‘Master’ in the ‘Profile Name’ text box (1), and scroll down to the ‘Profile Filter Preferences’ list (2). Check all of the platforms (3) you use in your IT environment, and click the Save Profile button (4).
You can always come back to this page to create additional profiles. Simply enter a name for the new profile, click the Create New Profile button, select the platforms, and click the Save Profile button.
Once you have at least one profile set up, click the ‘Licensed Products’ menu link to start using the EPD.
Licensed Products (Component View/Licensed Products View)
Once you’ve set up a profile, you’ll be taken to the ‘Licensed Products’ page. From now on, when you log in to the EPD, this page will come up first, serving as the EPD homepage.
You have two options for how you view this page - ‘Component View’ or ‘Licensed Product View.’ You can switch between them by selecting one or the other from the ‘View’ drop down.
Figure 28

24 | P A G E
Since ‘Component View’ is the default, we’ll start there (Figure 29).
Using ‘Component View’ allows you to search all of your BMC products by component. Since many of our product suites contain many components, this view makes it easy to track down the precise product you’re looking for as quickly as possible.
Using the tabs in the left-hand sidebar (1), you can filter your list either by product name and category (2), or by support contract ID (useful if you have more than one). Select your filter criteria, and then click the Go button (3) to filter your list.
Click on any product name to open up a product detail window like in Figure 30 below.
Figure 29
Figure 30

25 | P A G E
At the top of this window you can filter your results by product version or by the platform (1) you’re running it on. The tabs below are home to the different types (2) of downloads available for the selected product:
• Products - Click this tab if you need to download the product itself.
• Patches - Click this tab to download any patches available for the product.
• License Information - Click this tab to download a Word document with licensing information for the product.
• Documentation - Click this tab to download offline versions of the product’s documentation.
• Product Compatibility - Click this tab to be taken to the product’s page in the Solution and Product Available and Compatibility (SPAC) utility.
You can click on a single item to begin the download immediately. Otherwise, click the ‘Select’ checkbox in the left-hand column and click one of the two buttons at the bottom of the window:
• The Download (FTP) button (3) will send an email containing download information to the address associated with your Support Central account.
• The Download Manager button (4) will open up a web-based application that will assist you in downloading your selected files to a specific location.
As an alternative to the ‘Component View’, you can switch to the ‘Licensed Products View’ by selecting ‘Licensed Product’ from the ‘View’ drop down. Figure 31 below shows the License Products View.
This page lists the same information as the ‘Component View,’ but it’s all organized into a single, expandable file tree. Type the product name into the ‘Find’ text box (1) and click the Go button (2).
Find the product you want in the list, and click the + button to expand it. You’ll see a list of available versions. Expand the version you want, and click the check box next to the items you want to
Figure 31

26 | P A G E
download. With the boxes checked, click either the Download (FTP) button (3) or the Download Manager button (4), same as above.
Product patches
If you’ve come to the EPD site looking for product patches, you don’t have to wade through the ‘Licensed Products’ tab to find them. Instead, just click the ‘Product Patches’ menu link as seen in Figure 32 below.
This page works exactly the same as the ‘Licensed Product’ view, but it will only show you patches available for each product suite.
Select a patch from the table to see a summary of the patch and details on the problems it resolves at the bottom of the page. You can search for a specific patch on this page using the ‘Find’ text box.
Trial Products
The last tab on the EPD site, allows you to request a trial for certain products. Click on the ‘Trial Products’ menu link, and then click on the Request a Trial button.
Figure 32

27 | P A G E
From here (Figure 33 above), you can search for the product you’d like to try out. Just check the box next to it and click the Continue button. On the next screen you can review your selections and then click the Submit Trial Request button.
It may take up to 72 hours for your request to be processed. Once it is processed, you’ll need to add your Trial Support ID to your Support Central user profile, and then return to the ‘Trial Products’ page. At that point, a ‘Download Approved Trial Products’ link will appear. Click it to begin your product download. If you do not heard from your Account Manager about your Trial, please go to http://www.bmc.com/contacts-locations/worldwide.html to find Sales contact information.
Patch older Remedy products
Most product patches are accessible using the EPD (as described in the section above), but the patches for older Remedy products are only available from the ‘Remedy Heritage Patches’ link under ‘Downloads & Products.’ Figure 34 below shows the Remedy Heritage Patches page.
Figure 34
Figure 33

28 | P A G E
If you know the number of the patch you’re looking for, type it into the ‘Patch #’ text box (1). Otherwise, search for patches by entering the product name and version you’re trying to patch (2), and clicking the Search button (3).
Your results will appear in the table. Scroll until you find the patch you’re after, select it from the list, and click the Download Patch button at the bottom of the screen.
29 | P A G E
Download Mainframe PTFs
For several of our product lines for mainframe and distributed systems, we have Product Temporary Fixes (PTFs) available. Clicking on the ‘Mainframe Maintenance’ link under ‘Downloads & Products’ will take you to a page from which you can access these and other fixes.
Using Internet Service Retrieval (ISR)
Use this recommended maintenance method for RSLs (or PUTs), batches of PTFs, or individual PTFs. You can use BMC ISR to schedule maintenance, or use BMC ISR on Demand.
BMC ISR simplifies ordering and retrieving service updates, either on demand or through your scheduler. You can use BMC ISR to inventory your target libraries and generate a single request, or schedule a request on a recurring basis to retrieve maintenance updates.
You can use BMC ISR to:
• Request a corrective or preventive service that encompasses any of the following areas:
o Critical fixes
o Recommended fixes
o Authorized program analysis reports (APARs)
o Program temporary fixes (PTFs)
o Verified PTFs
o Enhanced HOLDDATA
o A specific RSL level
o All fixes
• Automate a service request (through your scheduler) by running JCL on a recurring basis to identify service needs
• Receive e-mail notification when your service package is ready
• Download the service package to your mainframe or to a personal computer
• Apply the service system modifications (SYSMODs) to the appropriate library
In contrast, eFix does not offer scheduling. It accommodates downloading individual corrective maintenance, corequisites, and prerequisites on an ad-hoc basis (for example, when you receive a flash). You can query eFix to locate specific PTFs, groups of PTFs, APARs, or elements and then select any that you need to apply to your environment. However, BMC ISR offers the same functionality.
To prepare BMC ISR
1. Review the BMC ISR requirements discussed in Requirements for using BMC ISR.
2. Install BMC ISR by using the Installation System.
BMC ISR is automatically installed with any product that you install, or you can install it as a separate product independent of a product installation.
For information about installing a product, see Starting an installation. BMC ISR is listed as the BMC Internet Service Retrieval product. BMC ISR does not require any customization.

30 | P A G E
3. Start BMC ISR and set up initial values to accommodate BMC ISR file processing for the following items:
• Job card
• Data sets
• Firewall
• Hierarchical file system (HFS) or zSeries file system (zFS)
For more information, see Setting up initial values for the BMC ISR jobs
eFIX PTF Distribution
A link on the Mainframe Maintenance web page, ‘eFix PTF Distribution Services’ will take you to the eFix interface (Figure 35).
From the eFix interface, you can search for the fix you need according to your server environment (1), the type of fix you’re after (2), or the product name and version (in the ‘Search Arguments’ text box (3)).
Leave the ‘Browser’ option (4) selected to have your search results appear in your browser window, and click the Search button. Select your fix from the list and click the Download selected PTFs on this page button to download it.
If your PTF is not available via the eFix interface, you may be able to access it from our secure FTP sites. Go back to the ‘Mainframe PTFs’ landing page and click the link to the FTP site instructions. You can also just click on the ‘FTP Sites’ link under ’Downloads & Products'.
Not all products are installed via EPD. Go to http://www.bmc.com/support/downloads-patches/mainframe-installation.html for more info.
Figure 35

31 | P A G E
Additional Support Resources
In addition to the Support Central tools covered in the other sections of this guide, there are lots of other ways to get help with your BMC products. Below, you’ll find a collection of links to other useful BMC assets, as well as a run-down of methods you can use to contact the support team directly.
Other BMC resources (SDE, Remedyforce, Communities, etc.)
• Branded Support Centers - Several BMC product lines have dedicated support centers that service those products exclusively. They are:
o BladeLogic products o Service Desk Express o BMC Boundary Enterprise o BMC Truesight Pulse o BMC OnDemand
If you need assistance with any of these products, we can serve you better if you reach out through that product’s dedicated support center. To access these branded support centers, click the ‘Additional Support Centers’ link on the Support Central menu, and select your product from the drop down.
• BMC Communities - BMC Communities is a social communication hub where you can start or join discussions about products with other BMC customers. You can find a user group on the Communities site that relies on the same products you do–and has likely run into some of the same challenges. In addition, you can browse a wealth of useful content in the Communities pages, including blogs, forums, white papers, release notes, and more. Registering on the Web site automatically gives you a login for Communities. When you log into Support Central and go to the Communities tab, click login and you will be automatically logged in. The first time you go to Communities, you will be prompted to add a User Name.
• BMC Academy - Through BMC Academy, our Education Services team offers a wide range of training resources, both online and off. Head over to the BMC Academy homepage to find the training that’s right for you.
• Consulting Services - If you’re looking for hands-on help with installing, updating, or configuring your BMC products, then our Global Services team has got you covered. Check out their consulting services offerings and let them help you get the most out of your BMC products.
Contact BMC
While we do our best to design our Support Central resources so you can easily track down the answers to your questions, you can always reach out to our Customer Care team directly, for one-on-one support.
You have several options for reaching customer support:
• From the Support Central dashboard, click the ‘Contact Support’ menu link and then select your region from the drop down menu to access contact information for your region.
• You can also simply email [email protected] at any time with your website support query.
32 | P A G E
Provide Feedback
In an effort to improve customer satisfaction, BMC has implemented an online survey to allow you
to provide feedback about your recent experiences with Customer Support. BMC appreciates your
feedback and we will use your comments to implement improvements to our products and
services.
Every week an email is sent to all customers that have closed Issues to participate in a survey. The
only exception is if the customer has been surveyed in the last 7 days or have requested not to
receive a survey. BMC managers review the surveys in an effort to improve the service BMC
provides its customers.
Speak To A Support Manager
If you would like to speak to a support manager, please call the Contact Center and ask to speak to
the manager responsible for your issue and they will put you in touch with the appropriate person.
Customer Care Chat
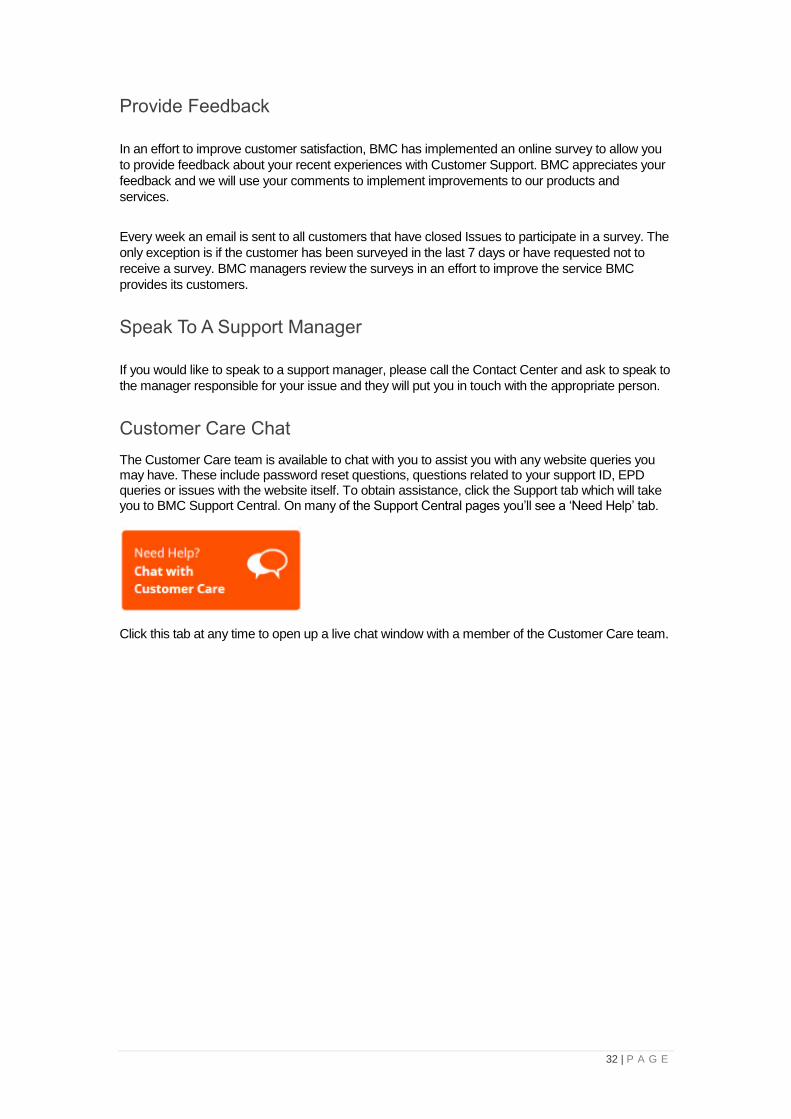
The Customer Care team is available to chat with you to assist you with any website queries you may have. These include password reset questions, questions related to your support ID, EPD queries or issues with the website itself. To obtain assistance, click the Support tab which will take you to BMC Support Central. On many of the Support Central pages you’ll see a ‘Need Help’ tab.
Click this tab at any time to open up a live chat window with a member of the Customer Care team.
33 | P A G E
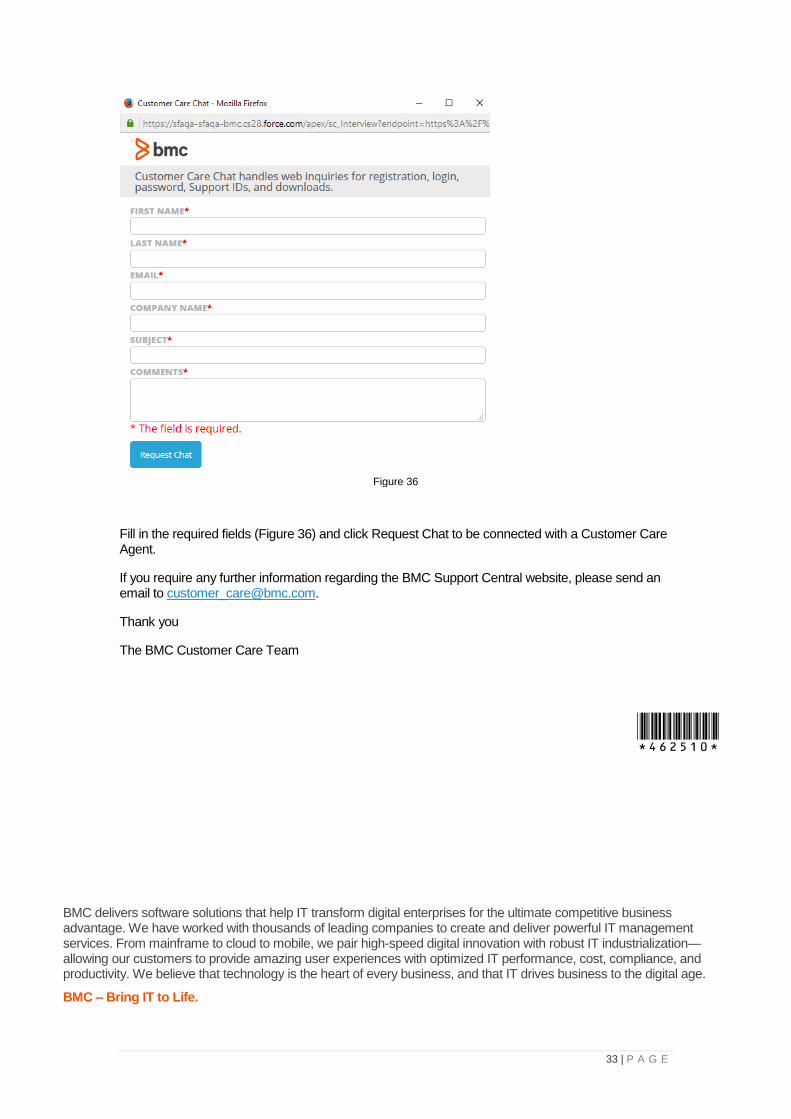
Fill in the required fields (Figure 36) and click Request Chat to be connected with a Customer Care Agent.
If you require any further information regarding the BMC Support Central website, please send an email to [email protected].
Thank you
The BMC Customer Care Team
BMC delivers software solutions that help IT transform digital enterprises for the ultimate competitive business advantage. We have worked with thousands of leading companies to create and deliver powerful IT management services. From mainframe to cloud to mobile, we pair high-speed digital innovation with robust IT industrialization—allowing our customers to provide amazing user experiences with optimized IT performance, cost, compliance, and productivity. We believe that technology is the heart of every business, and that IT drives business to the digital age.
BMC – Bring IT to Life.
BMC delivers software solutions that help IT transform digital enterprises for the ultimate competitive business advantage. We have worked with thousands of leading companies to create and deliver powerful IT management services. From mainframe to cloud to mobile, we pair high-speed digital innovation with robust IT industrialization—allowing our customers to provide amazing user experiences with optimized IT performance, cost, compliance, and
Figure 36