Embed Size (px)
Citation preview

64 X 64
Classic & Elegant
Quilt Designs
#239
Blueberry Hill


General Instructions **Please read all directions completely before beginning**
Welcome to Blueberry Hill. We are so excited you have decided to stitch with us. On this quilting
journey we will be exploring simple appliqué leaves and berries. Blocks adorned with one easy embroidery
stitch, creating beautiful curved stems and flourishes.
I’ve had the thrill of working with RJR fabrics and two of their Thimbleberries lines, Garden
Sketchbook & Shades Apart. We have included the layout and cutting directions for the background, borders and entire quilt. As-
semble the quilt when all of the appliqué and embroidery is finished.
Both spray starch and needle turn appliqué are fabulous methods. The pattern will work great with
any preferred method you choose. The design needs no reversing for fusible appliqué.
Cut your appliqué blocks a bit bigger, if you have a tendency to appliqué with a tighter tension. Trim
to fit to size after your appliqué is completed. If you are a beginner, a beginner appliqué class or good “how-
to” book will help get you started.
Be as accurate as you can when cutting your fabric. The entire pattern uses a 1/4” inch seam allow-
ance throughout.
Embroidery: All of the embroidery is worked with 4 strands of thread. There is only one embroidery stitch to
learn, the backstitch.
A bit of practice on a piece of extra cloth, before you work on you blocks, will get the best results.
Transfer all embroidery lines to your fabric before starting the appliqué. Complete the appliqué before start-
ing the embroidery. It is easier to add another stitch if needed, instead of lining up your appliqué next to the
stitching.
A window, some tape and sunny day can be used to transfer the appliqué and embroidery pattern to
your fabric. Transfer your details with a fine point erasable marker or fabric pencil.
We are not pulling weeds, so be sure to not pull the thread too tight or it will create puckers in your
fabric and distort the block.
Happy stitching!
1. Matching sewing thread
2. Sewing machine
3. Freezer paper-applicable to freezer paper appliqué method
4. Scissors, fabric and paper
5. Pen
6. Pins
7. Needles
8. Seam ripper
9. Glue stick
10. Washable pencil or pen
11. Embroidery thread, Precensia color #5156-6 skeins
12. Embroidery hoop
13. Embroidery needles
14. Ruler
15. Cutting mat
16. Rotary cutter Blueberry Hill©2011Bobbie Ashley Designs

16.50” x 16.50”
Quilt Center
8.50” x 8.50
Basket
8.50” x 8.50
Basket
8.50” x 8.50
Basket
8.50” x 8.50
Basket
8.50” x 8.50
Corner
Block
8.50” x 8.50
Corner
Block
8.50” x 8.50
Corner
Block
8.50” x 8.50
Corner
Block
E
E E
E
J
J
J J
J
J
J J
H
H
H H H H
H
H
H
H
H
H
H
H H H
L
L
L L
L
L L Half Square
Block
Half Square
Block
Half Square
Block
Half Square
Block
Blueberry Hill©2011Bobbie Ashley Designs
Cutting sizes shown
2-1/2” x 64-1/2”
2-1
/2” x
64
-1/2
”
2 -1
/2” x
64
-1/2
”
2-1/2” x 64-1/2”
5 1/2” 5 1/2” 5 1/2” 5 1/2”
5 1/2”
5 1/2”
5 1/2”
5 1/2”
5 1/2”
5 1/2”
5 1/2”
5 1/2”
5 1/2”
5 1/2”
5 1/2”
5 1/2”
5 1/2”
5 1/2” 5 1/2” 5 1/2” 5 1/2” 5 1/2”
**Small inner border is cut 1.50” x 52.5”
L

Appliqué Fabric
Cutting Instructions General guidelines
Prepare the berries and leaves using your favor-ite method of appliqué. Before you appliqué the leaves and berries, place pattern right side up over a light box or window. Tracing all of the em-broidery lines and placement lines for each berry and leaf, using a fabric pencil or water washable marker.
Complete the embroidery after your appliqué. Using 4 strands of Presencia stranded cotton thread, color#5156 in a back-stitch.
Block Center
Fabric L (Background)
Cut one 16-1/2” x 16-1/2” square.
Fabric D (Center Ring)
Cut one 6-1/2” x 6-1/2” square for the center ring.
Fabric F (Dark berries)
Cut one, 1-1/2” x 44” long strip, transfer circle
pattern and create 9 berries.
Fabric A (Lt. berries)
Cut one, 1-1/2” x 44” long strip, create 9 berries.
Leaves Cut three leaves from fabric C.
Cut four leaves from fabric K.
Cut two leaves from fabric G.
Half Square Block Appliqué
Fabric L (Background)
Cut one, 17-3/4“ x 17–3/4” square. Cut diago-
nally from corner to corner, twice, creating 4 tri-
angles.
Fabric H (Side triangles)
Cut one, 9-1/8” x 44”long strip. Sub-cut, four, 9-1/8” x 9-1/8” squares, cut each square once diagonally, creating eight 1/2 triangles.
Attach the long side of triangle (H) to the short side of background triangle (L). Cre-ate four total sets.
Complete your appliqué and trim all four block sets to 8-1/2 wide by 16-1/2 long.
Fabric F (Dark berries)
Cut one, 1-1/2” x 44” long strip, transfer circle pattern and create 12 berries.
Fabric A (Lt. berries)
Cut one, 1-1/2” x 44” long strip, create 8 berries.
Leaves Cut two leaves from fabric C.
Cut four leaves from fabric K.
Cut two leaves from fabric G.
Square corner Blocks
Fabric L (Background)
Cut one, 8-1/2” x 44” strip, sub-cut into four
8-1/2” x 8-1/2” wide blocks.
Fabric F (Dark berries)
Cut one, 1-1/2” x 44” long strip, transfer circle
pattern and create 24 berries.
Fabric A (Lt. berries)
Cut one, 1-1/2” x 44” long strip, create 24 berries.
Leaves Cut four leaves from fabric C.
Cut eight leaves from fabric K.
Cut four leaves from fabric G.
Blueberry Hill©2011Bobbie Ashley Designs www.bobbieashley.com

2
Appliqué
Block Center Appliqué
1. Complete the embroidery after your appliqué.
2. Make one.
Pattern placement diagram
Half Triangle Appliqué
1. Complete the embroidery after your appliqué.
2. Make four.
Blueberry Hill©2011Bobbie Ashley Designs Full Size Pattern
A B
C D

3
Corner Block Appliqué
1. Complete the embroidery after your appliqué.
2. Make four.
Blu
eber
ry H
ill©
20
11
Bo
bb
ie A
shle
y D
esi
gns
Full Size Pattern

4
Full Size Pattern
Blueberry Hill©2011Bobbie Ashley Designs
Section
A

5
Full Size Pattern
Blueberry Hill©2011Bobbie Ashley Designs
Section
B

6
Blueberry Hill©2011Bobbie Ashley Designs
Section
C
Full Size Pattern
7
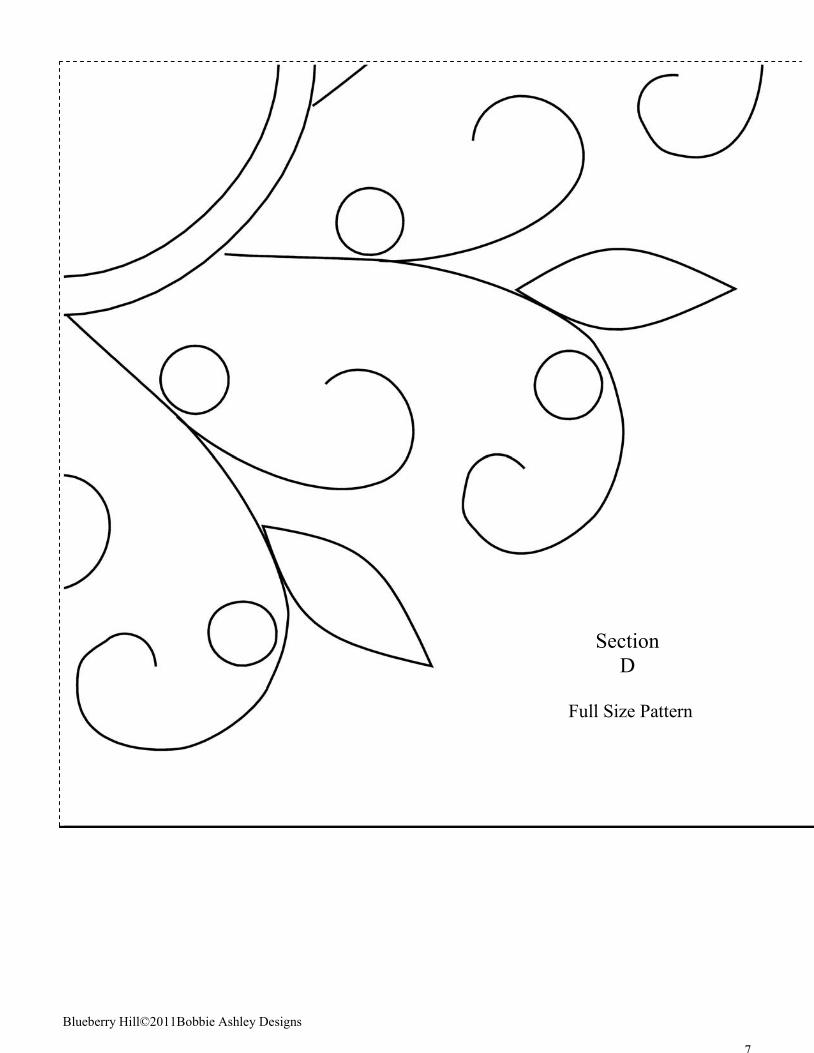
Blueberry Hill©2011Bobbie Ashley Designs
Section
D
Full Size Pattern

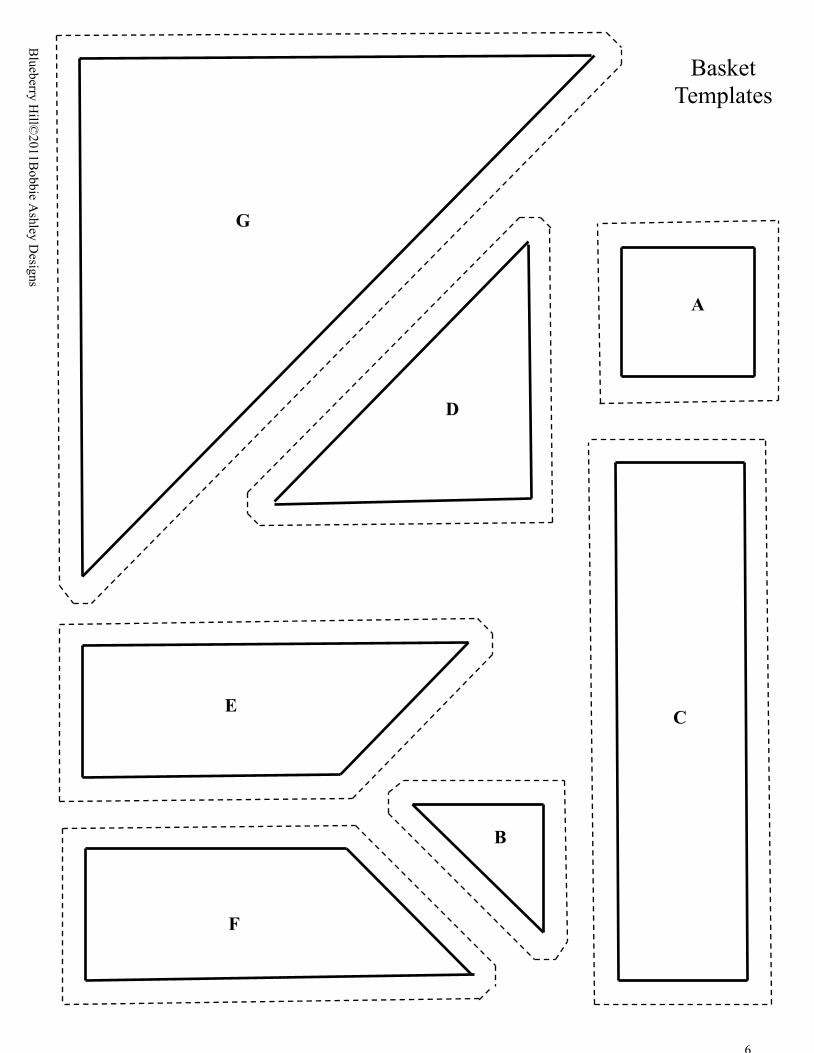
Basket Construction These instructions for your basket are a combi-
nation of rotary cutting instructions and tem-
plates. Be sure to pin fabric together as you
piece the units together. Using these techniques
will ensure a perfect basket every time!
These cutting directions will complete four bas-kets.
Fabric L (background)
Cut one 6-1/8 x 44 inch strip. Sub-cut two 6-1/8 x 6-1/8 inch squares, cut diagonally, creating four triangles.
Using template G, trace, cut and remove the triangle points.
Cut two 3-1/2 x 3-1/2 inch squares, cut di-agonally, creating four triangles.
Using template D, trace, cut and remove the triangle points.
Cut four, 1-7/8 x 1-7/8 squares.
Cut eight, 5-7/8 x 1-7/8 wide rectangles.
Cut one, 2-1/8 x 44 inch long strip, sub-cut sixteen, 2-1/8 x 2-1/8 inch squares, cut di-agonally, creating 32 triangles.
Using template B, trace, cut and remove tri-angle points.
Fabric G
Cut four 1-7/8 x 1-7/8 inch squares.
Fabric C
Cut one 3-3/8 x 44 inch long strip, sub-cut two 3-3/8 x 3-3/8 inch squares, cut diago-nally, creating four triangles.
Fabric I
Cut one, 1-7/8 x 44 inch long strip, sub-cut eight, 1-7/8 x 4-7/8 inch strips.
Using template E, trace four rectangles, cut and remove excess fabric.
Repeat previous step, using template F, trace four rectangles, cut and remove excess fabric.
Cut one, 2-1/8 x 44 inch long strip, sub-cut twenty, 2-1/8 x 2-1/8 inch squares, cut di-agonally, creating 40 triangles.
Basket sewing instructions
1. Combine 32 triangles from fabric L and fab-ric I, creating 32, squares. Press open seams after each step. Chain piecing works great for this step.
2. Join four sets of triangle/squares together. Create four strip sets.
Strip set #1.
3. Join 4 sets of reverse triangle/squares together. Create four strip
sets. Strip set #2.
L
I
Blu
eber
ry H
ill©
20
11
Bo
bb
ie A
shle
y D
esi
gns
I
L

2
Basket Construction Cont.
4. Add one background, 1-7/8 x 1-7/8 square to the left hand side of strip set #2, repeat for a total of four.
5. Join strip set #1 to the short side of the 6-1/8 half square triangle (G). Repeat for a total of four.
6. Join strip set #2 to the top side of the 6-1/8 half square triangle (G). Repeat for a total of four.
7. Sew together, 1-7/8 inch green square (A) to piece (F). Repeat for a total of four.
8. Attach (E), to the half square Tri-angle (D). Repeat for a total of four.
9. Combine D/E section to F/A section. Repeat for a total of four. This is your basket center.
10. Attach basket center to basket handle/background. Repeat for a total of four.
Blu
eber
ry H
ill©
20
11
Bo
bb
ie A
shle
y D
esi
gns
#1
#2
#1
G
G
F A
E
D
F
A E
D
1-7/8
x
1-7/8

3
Basket sewing instructions cont.
11. Add the half square Blue triangles (B) to the rectangle (C). Take note half of the finished B/C combos are worked in reverse. Creating four each for a total of eight legs.
12. Attach the legs to the sides of the basket cen-ter.
13. We are almost there. Sew the last piece (D), to the finish the basket bottom.
So, let’s work on putting our quilt center together. Then we will tackle the border.
Center Construction
First, let’s create the wonderful triangle units attached to each side of our finished center block. See the picture for placement.
Fabric E (Blue triangles)
Cut one, 17-3/4” x 17-3/4” Square, cut in half diagonally, twice, making 4 triangles.
Fabric J (Background)
Cut one, 9-1/8”x 44” strip, sub-cut into four, 9-1/8”x 9-1/8” squares, cut in half diago-nally once, to make 8 triangles.
1. Sew the long side of the small triangle to the short side of the blue triangle. Press. Trim down to measure 8-1/2 wide by 16-1/2 long.
2. Attach one triangle set to the top and bot-tom of our center block. See the diagram for placement.
3. Working with the colored picture for place-ment, sew a finished basket to both ends of the remaining 2 triangle sets. Attach to the center block sides.
Now we need to make a few H/L squares to complete our center.
Fabric H (Peach floral)
Cut one, 9-1/8”x 44” strip, sub-cut into four, 9-1/8”x 9-1/8” squares, cut in half diago-nally once, to make 8 triangles.
Fabric L (Background)
Cut one, 9-1/8”x 44” strip, sub-cut into four, 9-1/8”x 9-1/8” squares, cut in half diago-nally once, to make 8 triangles.
1. Sew both H and L triangles together, creat-ing a square. Make eight H/L combos. Trim down to 8-1/2 x 8-1/2 squares.
2. Using the picture as a guide, sew one H/L square to either side of each completed ap-pliquéd half triangle/H combos. Creating four.
3. Attach one triangle set to the top and bottom of our quilt center.
Blu
eber
ry H
ill©
20
11
Bo
bb
ie A
shle
y D
esi
gns
C CR
D

4
Blu
eber
ry H
ill©
20
11
Bo
bb
ie A
shle
y D
esi
gns
www.bobbieashley.com
Center Construction Cont.
Now is it just me, or are we getting somewhere?
1. It doesn’t really matter which way you turn em’, choose what makes you happy. Let’s sew a finished corner to both ends of the remaining 2 triangle sets. Attach to the quilt center sides.
2. Wow! We have a beautiful quilt center. How about a border to tie it all together?
Inner Border
Fabric I (Blue plaid)
Cut five, 1-1/2”x 44” strips, remove the sel-vage form the edge, sew together as one long strip and press.
Out of that long border, measure and cut four, 1-1/2”x 51-1/2 inch long borders. Pin and attach to the quilt center. Sew in place.
Border Blocks
Diamond In A Square
Fabric A (Blue Center)
Cut three, 4”x 44” strips. Sub-cut, twenty-two, 4”x 4” squares.
Fabric G
Cut one, 3-3/8”x 44” strips. Sub-cut, eleven, 3-3/8”x 3-3/8” squares. Cut in half diago-nally, creating 22 half-square triangles.
Repeat for Fabrics, K,C and N.
1. Sew the triangles onto the center square in the following order, see the diagram below. Chain piecing works wonderfully well. Press after each triangle addition.
Border Blocks Cont.
Double Irish Chain
We are going to be using rotary cutting and strip piecing. Fast and fabulous!
**It is important to press seams open after each new strip, this ensures your strip will lay nice and flat for the final cutting.
Fabric A (Light Blue)
Cut 12, 1-1/2”x 44” strips.
Fabric L (Cream)
Cut 4, 1-1/2”x 44” strips.
Fabric F (Dark Blue)
Cut 9, 1-1/2”x 44” strips.
1. Using the diagram below for placement, sew sets of strips together.
A
G K
N C
Strip Set #1
Strip Set #2
Strip Set #3
Strip Set #4
Strip Set #5
A A
A A A
A A
A A
A A A
B
B
B B
F
F F
F
F F
F
F F

5
Blu
eber
ry H
ill©
20
11
Bo
bb
ie A
shle
y D
esi
gns
Border Blocks Cont.
2. Turn each finished strip set horizontally and cut twenty-two, 1-1/2” x 5-1/2” strips. Cut one strip set at a time. Do not stack the strips to-gether, it would be disastrous.
3. Sew your strip set together, creating 22 blocks.
4. Using the colored picture diagram for place-ment arrange the blocks to your pleasure. Sew them together in two sets of 10 (top & bottom) blocks and two sets of 11(sides), attach to the quilt center.
Outside Border
Well, we are almost there!
Fabric I (Blue plaid)
Cut six, 2-1/2”x 44” strips, remove the sel-vage form the edge, sew together as one long strip and press.
Out of that long border, measure and cut six, 2-1/2”x 65-1/2 inch long borders. Pin and attach to the quilt center.
Ta-da! Sit back and enjoy your beautiful crea-tion. I hope that everyone has enjoyed the jour-ney. Thanks ever so much for joining me. I would love to hear from you, any comments can be sent to:
www.bobbieashley.com
Cheers,
Bobbie
1-1/2”
6
Blu
eberry
Hill©
20
11
Bo
bb
ie Ash
ley D
esig
ns
F
E
A
G
D
C
B
Basket
Templates