Embed Size (px)
Citation preview
USER’S MANUAL
BIONIME CORPORATIONNo. 100, Sec. 2, Daqing St., South Dist., Taichung City 40242, TaiwanTel: +886 4 23692388 Fax: +886 4 22617586http: //www.bionime.comE-mail: [email protected]
101-
3GM
700-
022
ENRe
v. D
ate:
Feb
ruar
y/20
17BIONIME GmbHTramstrasse 16, 9442 BerneckSwitzerlandE-mail: [email protected]
GM700Blood Glucose Monitoring System GM700

TMThank you for selecting the Rightest Blood Glucose Monitoring System GM700. Please read this manual thoroughly before testing. This User Manual provides all the necessary information needed to obtain correct test results.
TM TM The Rightest Blood Glucose Meter GM700 must only be used with Rightest Blood Glucose Test TMStrip GS700 and Rightest Control Solution GC700. The application of other Test Strips or control
solutions can lead to inaccurate test results.
TM TMWe hereafter call Rightest Blood Glucose Monitoring System GM700 as Rightest GM700 BGMS, TM TM TMRightest Blood Glucose Meter GM700 as Rightest GM700 Meter, and Rightest Blood Glucose
TM Test Strip GS700 as Rightest GS700 Test Strip for short.
It is recommended to monitor blood glucose regularly. By testing accurately and frequently, TM complications can be reduced. The Rightest GM700 BGMS, combines simple instruction and
design with accurate testing results to provide a more reliable, user-friendly diabetes management system.
Preface
32
Preface
The Blood Glucose Monitoring System GM700 is intended for in vitro diagnostic use (outside the body only). It is to be used for self-testing in the home or professional, clinical use. The system is used for monitoring of blood glucose levels. Venous, arterial, and neonatal blood testing is limited to healthcare professional use only.
GM700 Meters, Lancing Device, and Lancets are suggested to be used by personal monitoring blood glucose use at home, but not suggested by multiple users.The testing result is calibrated to be plasma equivalent for test with fresh capillary, venous, arterial and neonatal whole blood samples. Capillary samples may be drawn from the fingertip, palm and forearm, and in the case of neonates, the heel. You may consult your healthcare professional for instructions on how to use the system correctly. Our customer support staff is available to assist you as well.
The Blood Glucose Monitoring System GM700 is manufactured by Bionime Corporation. If you have any question or concern, please contact your local Bionime Customer Service or call us at 886 0800 371 688 GMT+08:00, 08:30~17:30.
TMRightest
TMRightest
TM Rightest
- Before using the GM700 BGMS to test your blood glucose, read all the instructions in this user's manual and practice the tests including the quality control test. (Read all notes and precautions carefully)
- Please do the quality control test regularly to make sure the test results are accurate.
- The GM700 Meter can only be used with GS700 Test Strips. The use of other brands of strips is not advised and may result in inaccurate testing.
- The GM700 BGMS is intended for in vitro diagnostic use only. The testing result is calibrated to be plasma equivalent for test with fresh capillary whole blood samples from the fingertip, palm and forearm.
- The GM700 BGMS is intended for self-testing or professional use. It should not be used to diagnose diabetes mellitus. It should also not be used to diagnose neonate hypoglycemia.
- Wait to test at least 30 minutes after entering another location of a different ambient temperature.
- Pay attention to the environment protection policy when disposing of batteries.
TMRightest
TM TMRightest Rightest
TMRightest
TMRightest
4
Precaution Precaution
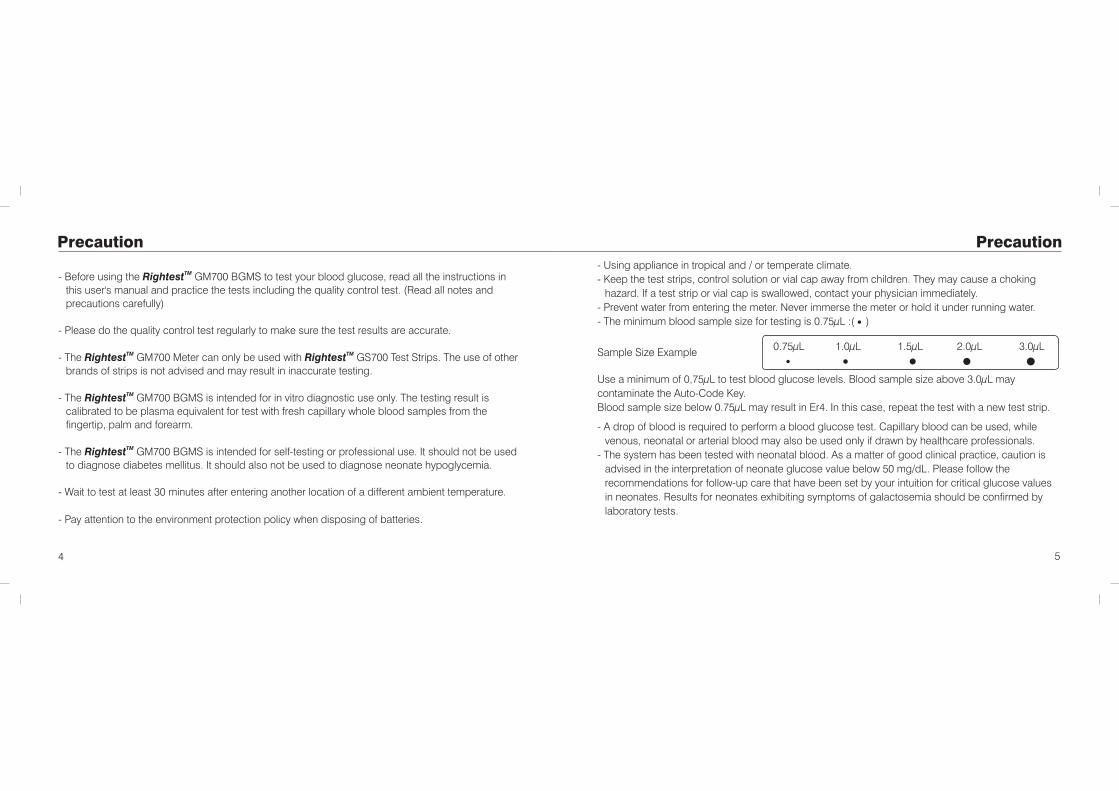
Use a minimum of 0,75µL to test blood glucose levels. Blood sample size above 3.0µL may
contaminate the Auto-Code Key.
Blood sample size below 0.75µL may result in Er4. In this case, repeat the test with a new test strip.
Sample Size Example 0.75µL 1.0µL 1.5µL 2.0 µL 3.0µL
- Using appliance in tropical and / or temperate climate.- Keep the test strips, control solution or vial cap away from children. They may cause a choking
hazard. If a test strip or vial cap is swallowed, contact your physician immediately.- Prevent water from entering the meter. Never immerse the meter or hold it under running water.- The minimum blood sample size for testing is 0.75µL :( )
- A drop of blood is required to perform a blood glucose test. Capillary blood can be used, while venous, neonatal or arterial blood may also be used only if drawn by healthcare professionals.
- The system has been tested with neonatal blood. As a matter of good clinical practice, caution is advised in the interpretation of neonate glucose value below 50 mg/dL. Please follow the recommendations for follow-up care that have been set by your intuition for critical glucose values in neonates. Results for neonates exhibiting symptoms of galactosemia should be confirmed by laboratory tests.
5
76
Table of Contents Table of Contents
Caring for Your MeterError Messages and Trouble shootingLimitationsSpecificationsWarrantyCustomer ServiceExpected ValuesParts of Critical Component
48
5456575859
4953
Quality Control
About Quality Control TestingPerforming a Quality Control TestUnderstanding Control Test ResultsRecalling Test ResultsRecalling Average Test ResultsCaring for Your Meter
3942444547
2829333537
8101416
About the Blood Glucose Monitoring SystemTMRightest Blood Glucose Monitoring System GM700TMRightest GM700 MeterTMRightest GS700 Test Strip
TMThe Rightest GM700 Auto Code Key
TMRightest
Testing Procedure
Preparing for TestingPerforming a Blood TestAlternative Site Testing (AST)View Window appearanceComprehending Test Results and Messages
17
19
23
24
26
Preparing to test
Battery InstallationSetting Up the Meter
Turning On/Off the MeterFunction Screens and Button OperationsHandling the GS700 Test StripTMRightest
9 *
2 *
5 * 6 * 8 *
7 *
98
431
GM550
GM550
GM550
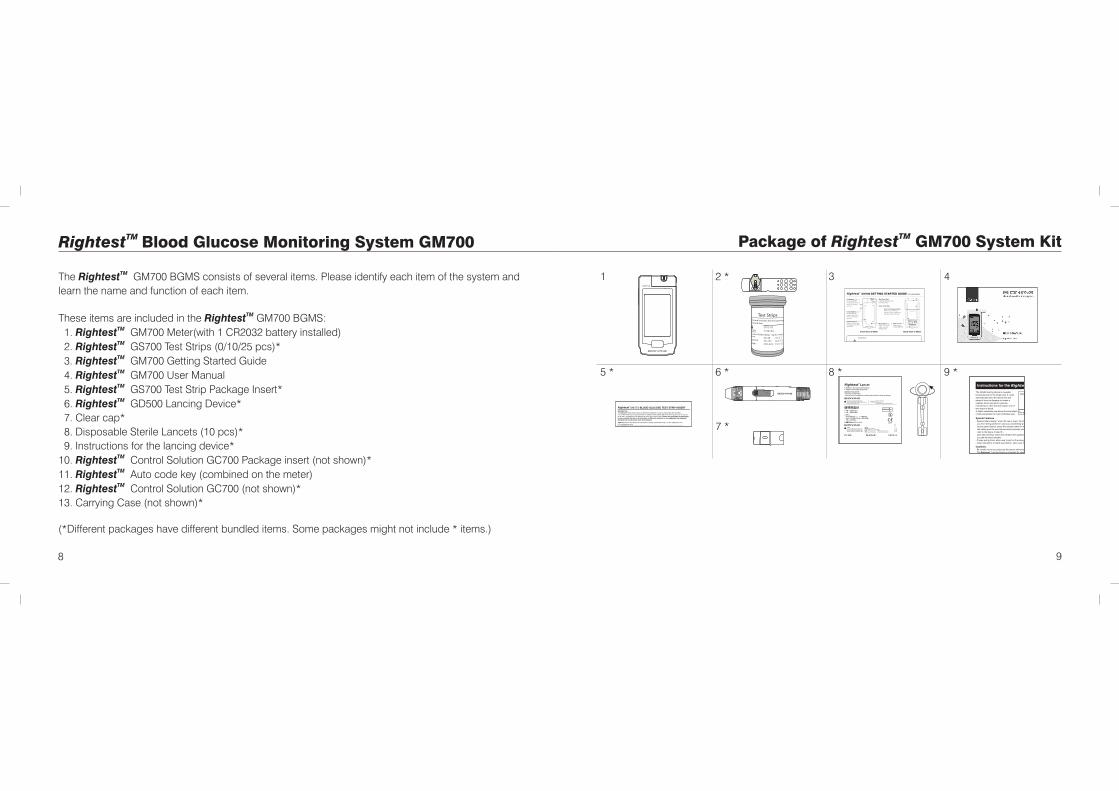
(*Different packages have different bundled items. Some packages might not include * items.)
The GM700 BGMS consists of several items. Please identify each item of the system and learn the name and function of each item.
TMRightest
TMRightest Blood Glucose Monitoring System GM700 Package of System KitTMRightest GM700
These items are included in the GM700 BGMS:TM1. Rightest GM700 Meter(with 1 CR2032 battery installed)TM2. Rightest GS700 Test Strips (0/10/25 pcs)*TM3. Rightest GM700 Getting Started GuideTM4. Rightest GM700 User ManualTM5. Rightest GS700 Test Strip Package Insert*TM6. Rightest GD500 Lancing Device*
7. Clear cap*8. Disposable Sterile Lancets (10 pcs)*9. Instructions for the lancing device*
TM10. Rightest Control Solution GC700 Package insert (not shown)*TM11. Rightest Auto code key (combined on the meter) TM12. Rightest Control Solution GC700 (not shown)*
13. Carrying Case (not shown)*
TMRightest
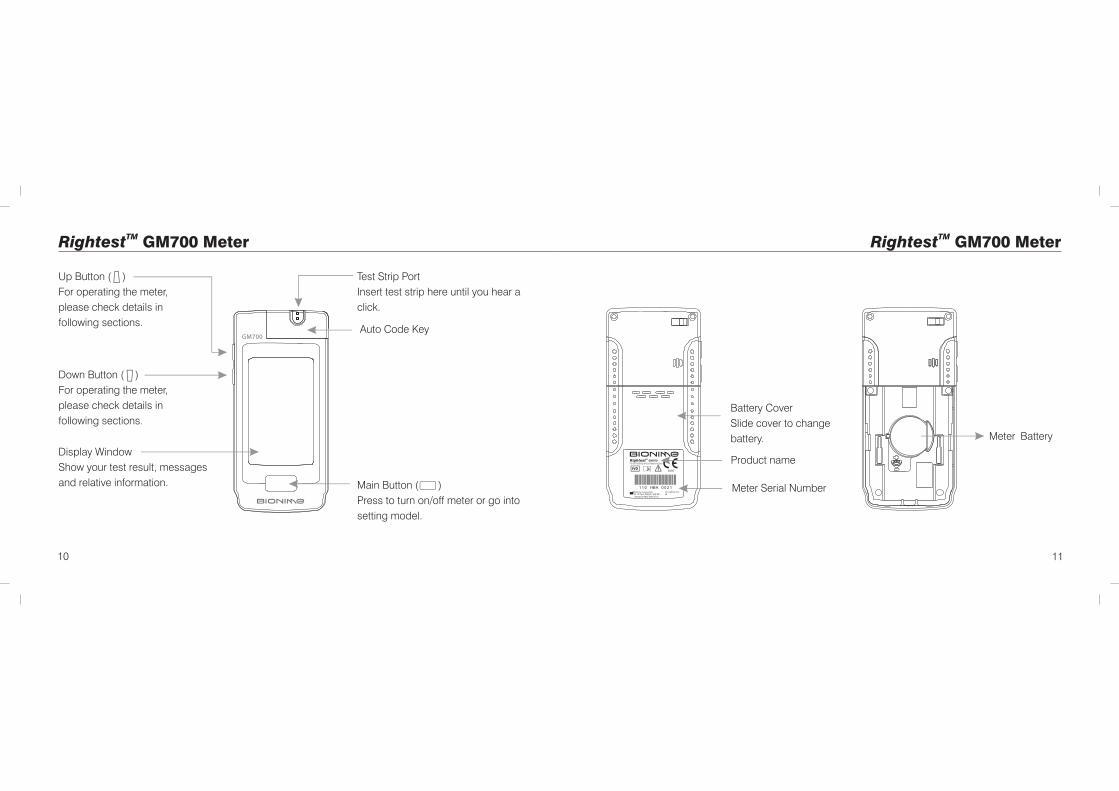
Battery CoverSlide cover to change battery.
1110
TMRightest GM700 Meter
Display WindowShow your test result, messages and relative information.
Test Strip PortInsert test strip here until you hear a click.
Product name
Meter Serial Number
TMRightest GM700 Meter
Meter Battery
Down Button ( )For operating the meter, please check details in following sections.
Up Button ( )For operating the meter, please check details in following sections.
Main Button ( )Press to turn on/off meter or go into setting model.
Auto Code Key
®
1312
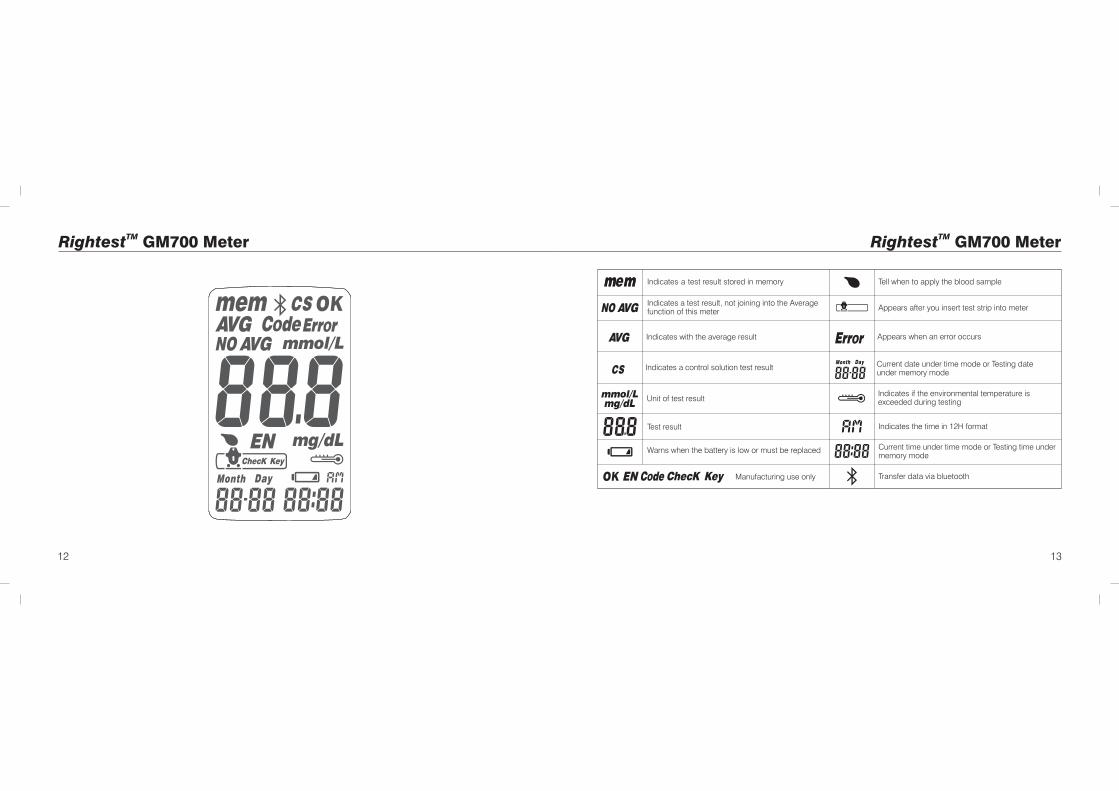
Indicates a test result stored in memory
Indicates a test result, not joining into the Average function of this meter
Indicates with the average result
Indicates a control solution test result
Unit of test result
Test result
Warns when the battery is low or must be replaced
Tell when to apply the blood sample
Appears after you insert test strip into meter
Appears when an error occurs
Current date under time mode or Testing date under memory mode
Indicates if the environmental temperature is exceeded during testing
Indicates the time in 12H format
Current time or Testing time under memory mode
under time mode
Manufacturing use only
TMRightest GM700 Meter TMRightest GM700 Meter
Transfer data via bluetooth
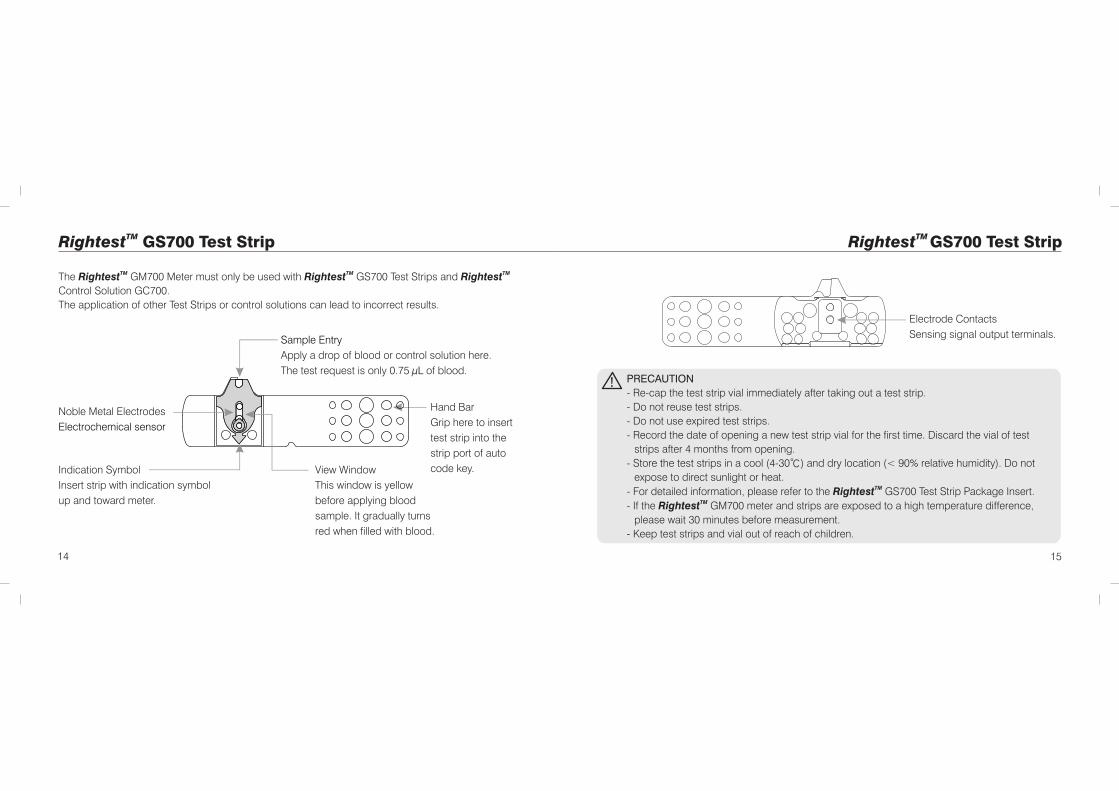
PRECAUTION
- Re-cap the test strip vial immediately after taking out a test strip.- Do not reuse test strips.- Do not use expired test strips.- Record the date of opening a new test strip vial for the first time. Discard the vial of test
strips after 4 months from opening.- Store the test strips in a cool (4-30℃) and dry location (< 90% relative humidity). Do not
expose to direct sunlight or heat.TM- For detailed information, please refer to the Rightest GS700 Test Strip Package Insert.
TM- If the Rightest GM700 meter and strips are exposed to a high temperature difference, please wait 30 minutes before measurement.
- Keep test strips and vial out of reach of children.
1514
View WindowThis window is yellow before applying blood sample. It gradually turns red when filled with blood.
Hand BarGrip here to insert test strip into the strip port of auto code key.
Sample Entry
µLApply a drop of blood or control solution here. The test request is only 0.75 of blood.
Electrode ContactsSensing signal output terminals.
Noble Metal ElectrodesElectrochemical sensor
Indication SymbolInsert strip with indication symbol up and toward meter.
TM TM TM The Rightest GM700 Meter must only be used with Rightest GS700 Test Strips and Rightest Control Solution GC700.The application of other Test Strips or control solutions can lead to incorrect results.
TM Rightest GS700 Test StripTM Rightest GS700 Test Strip
1716
The GM700Auto Code KeyTMRightest
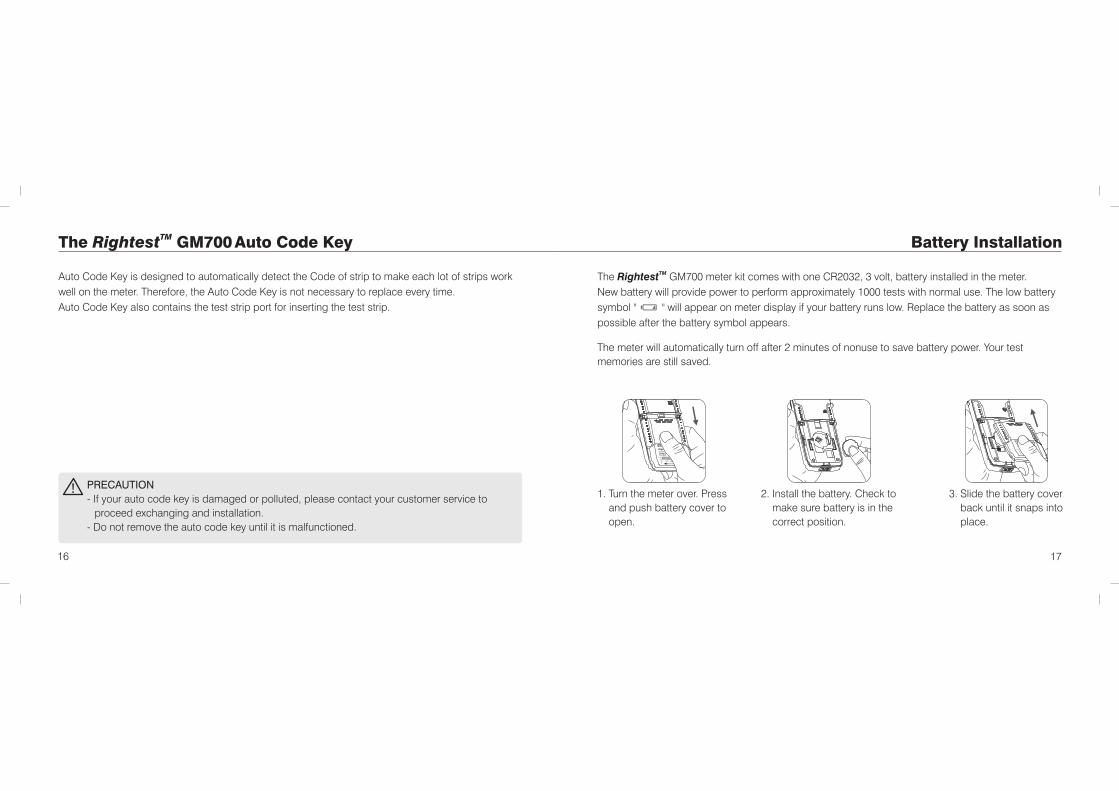
Auto Code Key is designed to automatically detect the Code of strip to make each lot of strips work well on the meter. Therefore, the Auto Code Key is not necessary to replace every time.Auto Code Key also contains the test strip port for inserting the test strip.
Battery Installation
The meter will automatically turn off after 2 minutes of nonuse to save battery power. Your test memories are still saved.
1. Turn the meter over. Press
and push battery cover to open.
3. Slide the battery cover back until it snaps into place.
PRECAUTION
- If your auto code key is damaged or polluted, please contact your customer service to proceed exchanging and installation.
- Do not remove the auto code key until it is malfunctioned.
TM The Rightest GM700 meter kit comes with one CR2032, 3 volt, battery installed in the meter. New battery will provide power to perform approximately 1000 tests with normal use. The low battery symbol " " will appear on meter display if your battery runs low. Replace the battery as soon as possible after the battery symbol appears.
2. Install the battery. Check to make sure battery is in the correct position.
4. The meter will then do an electronic test immediately. The screen will begin flashing as soon as the battery is installed.
5. Press the Main button to close the electronic test of the meter, and enter the setting mode.
6. To set the time and date, see “Setting Up the Meter” chapter.
1918
Battery Installation
PRECAUTION
- Check to ensure the batteries are properly installed to decrease the danger of explosion.- Replace only with the same or equivalent type of battery.- Please follow the local regulation and discard a used battery properly.
NOTE
- When you keep pressing the main button for 3 seconds, the display on screen will turn off. Please don't care it. Keep pressing the main button till entering setting data.
- Quick press the main button allows you to change setting. However, if you want to return to the time mode, you need to go through all the settings first by pressing quickly the main button.
Setting Up the Meter
You can enter the setting mode by below two ways:
1. Reload battery After removing the battery, please press the main button for several times until no signal on screen,
then follow the battery installation steps to load battery. The meter will do self test. Press the main button to exit the electronic test and enter Setting Mode.
2. With Battery inserted Press the main button first to turn on the meter. Then press and hold the main button for 7 seconds
(the meter will be turned off during this period, please keep pressing) until you hear a beep, indicating you have successfully entered Setting Mode. The display screen will show setting data.

2120
Setting Up the Meter
1. Year setting With the year format blinking, press the Up or Down button until the current
year appears. Then press the Main button to confirm it and move to Month setting.
2. Month setting With the month blinking, press the Up or Down button until the current month
appears. Then press the Main button to confirm it and move to Day setting.
3. Day setting With the day blinking, press the Up or Down button until the current day
appears. Then press the Main button to confirm it and move to Time format setting.
1)
2)
3)
4a) 4b)
5) 6)
7a) 7b)
Setting Up the Meter
4. Time format 12/24H selection With the time format blinking, press the Up or Down
button to adjust it. Then press the Main button to confirm it and move to hour setting.
5. Hour setting With the hour blinking, press the Up or Down button until
the current hour appears. Then press the Main button to confirm it and move to minute setting.
6. Minute setting With the minute blinking, press the Up or Down button
until current minute appears. Then press the Main button to confirm it and move to volume setting.
7. Volume setting With the volume blinking, press the Up or Down button to
turn it on or off. Then press the Main button to confirm and move to measurement of unit setting.
2322
NOTE
- When you do not do any settings of meter for over 2 minutes, the meter will leave setting mode and power off automatically.
TM - Your Rightest GM700Meter is ready to use at the first time. The meter default is set according to your local preference.
Setting Up the Meter
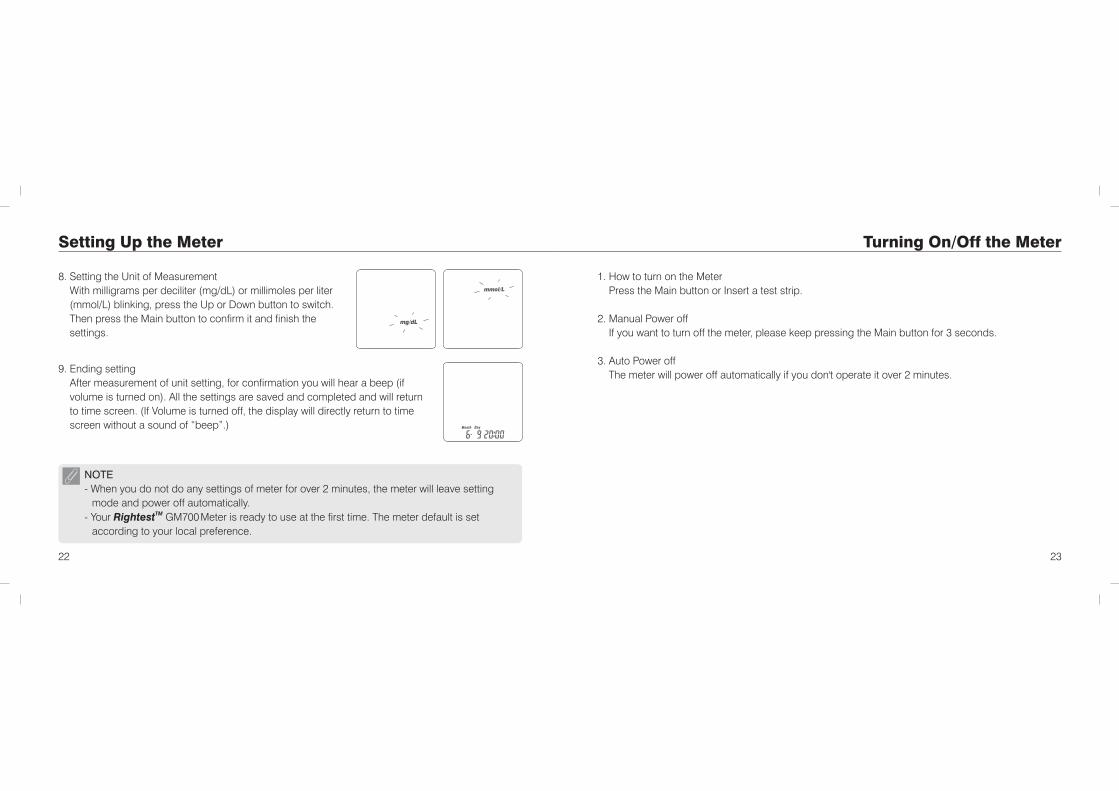
1. How to turn on the Meter Press the Main button or Insert a test strip.
2. Manual Power off If you want to turn off the meter, please keep pressing the Main button for 3 seconds.
3. Auto Power off The meter will power off automatically if you don't operate it over 2 minutes.
Turning On/Off the Meter
9. Ending setting After measurement of unit setting, for confirmation you will hear a beep (if
volume is turned on). All the settings are saved and completed and will return to time screen. (If Volume is turned off, the display will directly return to time screen without a sound of “beep”.)
8. Setting the Unit of Measurement With milligrams per deciliter (mg/dL) or millimoles per liter
(mmol/L) blinking, press the Up or Down button to switch. Then press the Main button to confirm it and finish the settings.
2524
Function Screens and Button Operations
4. Non-Averaging set and canceled: You may select the unwanted or doubtful test results, to exclude them from the average
calculation, after your every test. After you finished your test in the test mode, you can exclude the unwanted result. Keep pressing
the Down button until you see the symbol “NO AVG” in the top left corner of the screen. By keeping the Down button pressed and pressing the Main button simultaneously to confirm the value as “Non average”. Now this value is flagged by the symbol “NO AVG” in the upper left corner of the screen.
If you want to cancel this non-averaging setting, you have to stay in the test mode. First keep pressing the Down button until the “NO AVG” symbol changes to “AVG” in the upper left corner of the screen. To confirm this original status, you again simultaneously press the main button to confirm the “AVG” status. Now the value will be stored as a regular value and included in the average values.
Function Screens and Button Operations
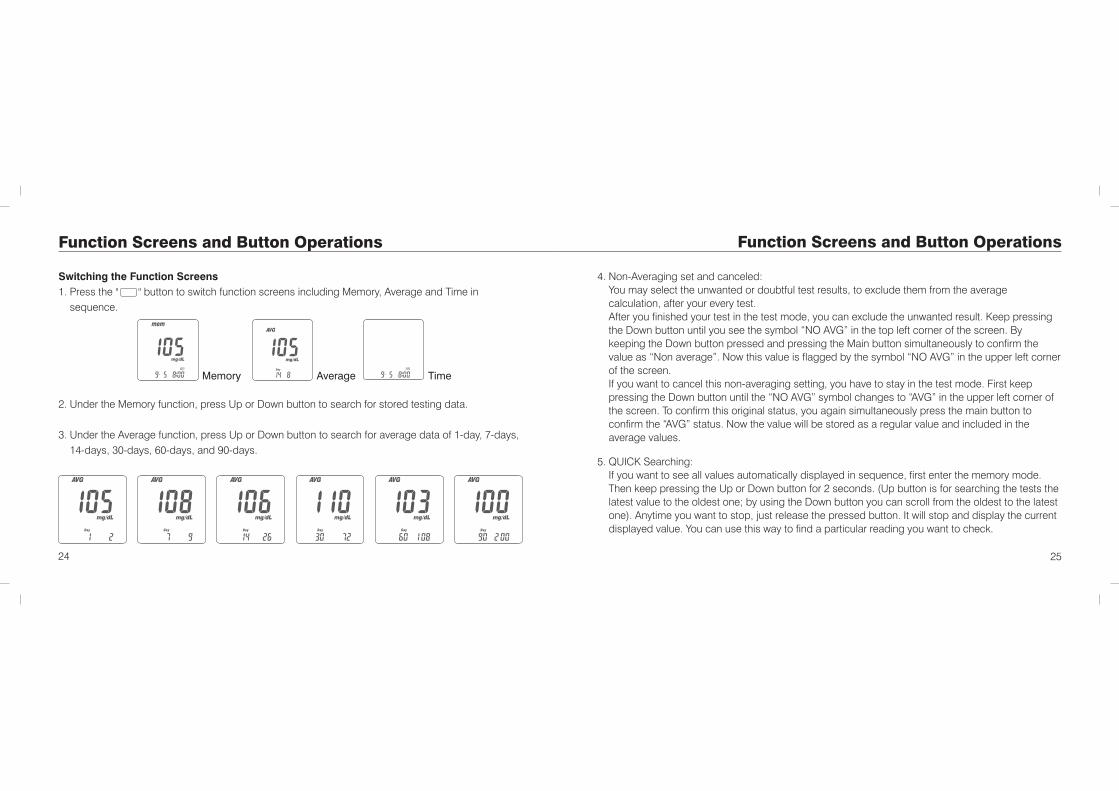
Switching the Function Screens
1. Press the " " button to switch function screens including Memory, Average and Time in sequence.
Memory Average Time
5. QUICK Searching: If you want to see all values automatically displayed in sequence, first enter the memory mode.
Then keep pressing the Up or Down button for 2 seconds. (Up button is for searching the tests the latest value to the oldest one; by using the Down button you can scroll from the oldest to the latest one). Anytime you want to stop, just release the pressed button. It will stop and display the current displayed value. You can use this way to find a particular reading you want to check.
2. Under the Memory function, press Up or Down button to search for stored testing data.
3. Under the Average function, press Up or Down button to search for average data of 1-day, 7-days, 14-days, 30-days, 60-days, and 90-days.
2726
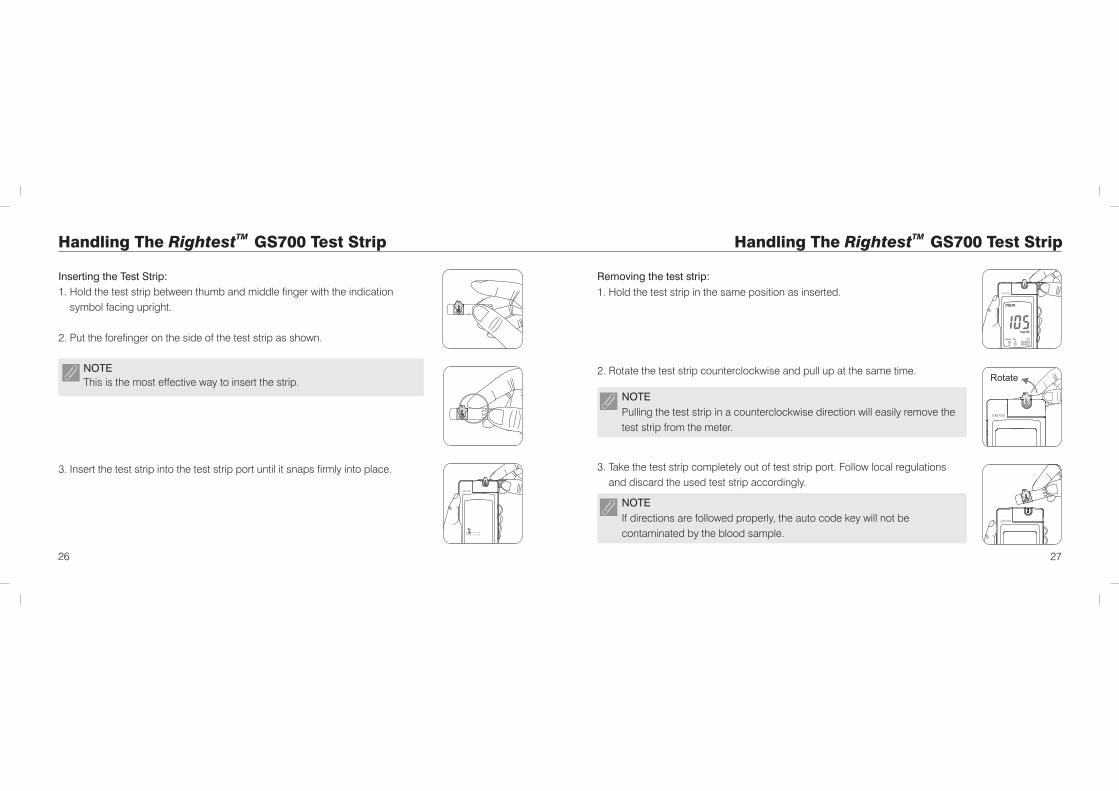
TM Handling The Rightest GS700 Test Strip
Inserting the Test Strip:
1. Hold the test strip between thumb and middle finger with the indication symbol facing upright.
2. Put the forefinger on the side of the test strip as shown.
NOTE This is the most effective way to insert the strip.
3. Insert the test strip into the test strip port until it snaps firmly into place.
Removing the test strip:
1. Hold the test strip in the same position as inserted.
2. Rotate the test strip counterclockwise and pull up at the same time.
NOTE
Pulling the test strip in a counterclockwise direction will easily remove the test strip from the meter.
TM Handling The Rightest GS700 Test Strip
3. Take the test strip completely out of test strip port. Follow local regulations and discard the used test strip accordingly.
NOTE
If directions are followed properly, the auto code key will not be contaminated by the blood sample.
2928
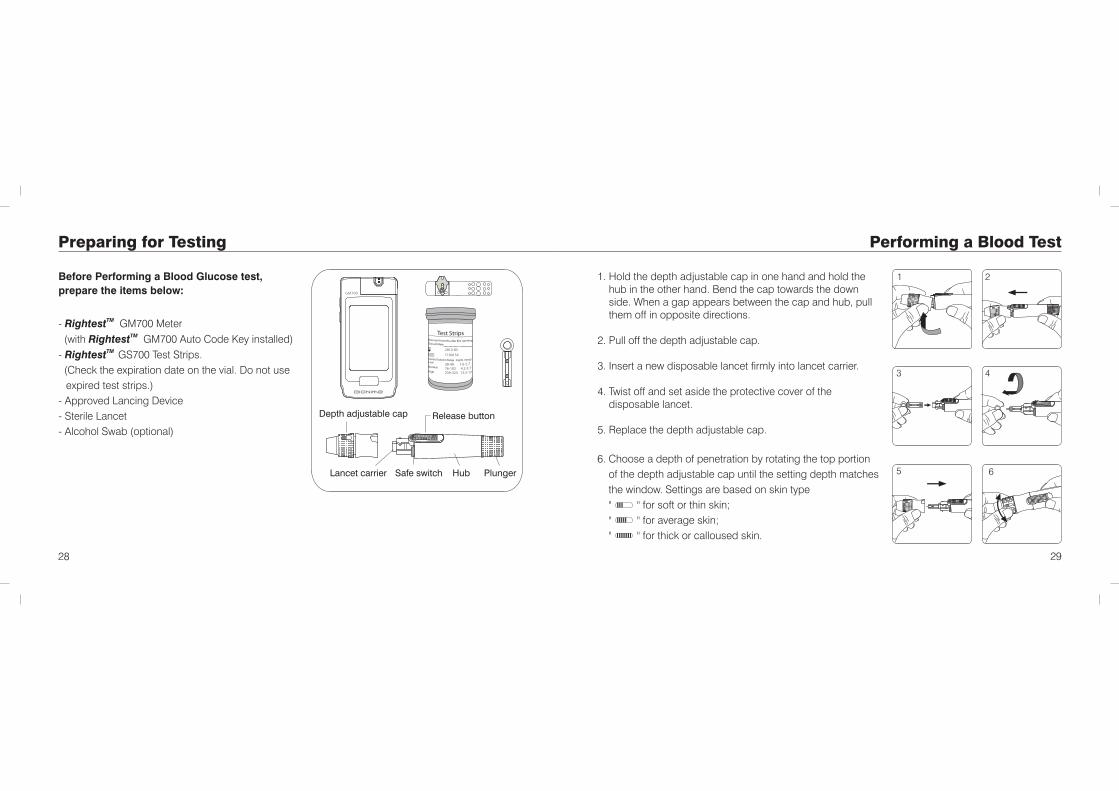
Preparing for Testing
Before Performing a Blood Glucose test,
prepare the items below:
TM- Rightest GM700 MeterTM (with Rightest GM700 Auto Code Key installed)
TM - Rightest GS700 Test Strips. (Check the expiration date on the vial. Do not use
expired test strips.)- Approved Lancing Device- Sterile Lancet- Alcohol Swab (optional)
PlungerHubLancet carrier
Release button
Safe switch
Depth adjustable cap
Performing a Blood Test
1. Hold the adjustable cap in one hand and hold the hub in the other hand. Bend the cap towards the down side. When a gap appears between the cap and hub, pull them off in opposite directions.
2. Pull off the depth adjustable cap.
3. Insert a new disposable lancet firmly into lancet carrier.
4. Twist off and set aside the protective cover of the disposable lancet.
5. Replace the depth adjustable cap.
depth 1 2
3 4
5 66. Choose a depth of penetration by rotating the top portion
of the depth adjustable cap until the setting depth matches the window. Settings are based on skin type
" " for soft or thin skin; " " for average skin; " " for thick or calloused skin.
3130
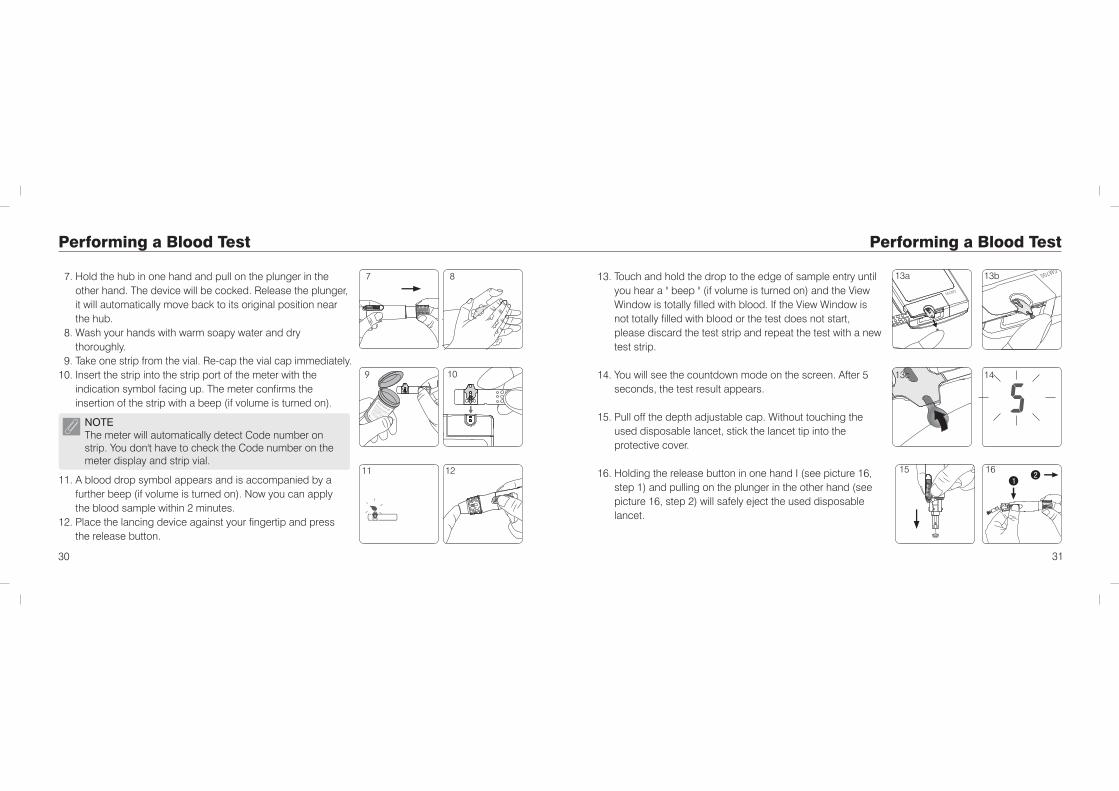
Performing a Blood Test
7. Hold the hub in one hand and pull on the plunger in the other hand. The device will be cocked. Release the plunger, it will automatically move back to its original position near the hub.
8. Wash your hands with warm soapy water and dry thoroughly.
9. Take one strip from the vial. Re-cap the vial cap immediately.10. Insert the strip into the strip port of the meter with the
indication symbol facing up. The meter confirms the insertion of the strip with a beep (if volume is turned on).
7 8
9
NOTEThe meter will automatically detect Code number on strip. You don't have to check the Code number on the meter display and strip vial.
10
11. A blood drop symbol appears and is accompanied by a further beep (if volume is turned on). Now you can apply the blood sample within 2 minutes.
12. Place the lancing device against your fingertip and press the release button.
13. Touch and hold the drop to the edge of sample entry until you hear a " beep " (if volume is turned on) and the View Window is totally filled with blood. If the View Window is not totally filled with blood or the test does not start, please discard the test strip and repeat the test with a new test strip.
14. You will see the countdown mode on the screen. After 5 seconds, the test result appears.
15. Pull off the depth adjustable cap. Without touching the used disposable lancet, stick the lancet tip into the protective cover.
16. Holding the release button in one hand I (see picture 16, step 1) and pulling on the plunger in the other hand (see
picture 16, step 2) will safely eject the used disposable lancet.
12
Performing a Blood Test
13a
14
13b
13c
151
21611
3332
Performing a Blood Test
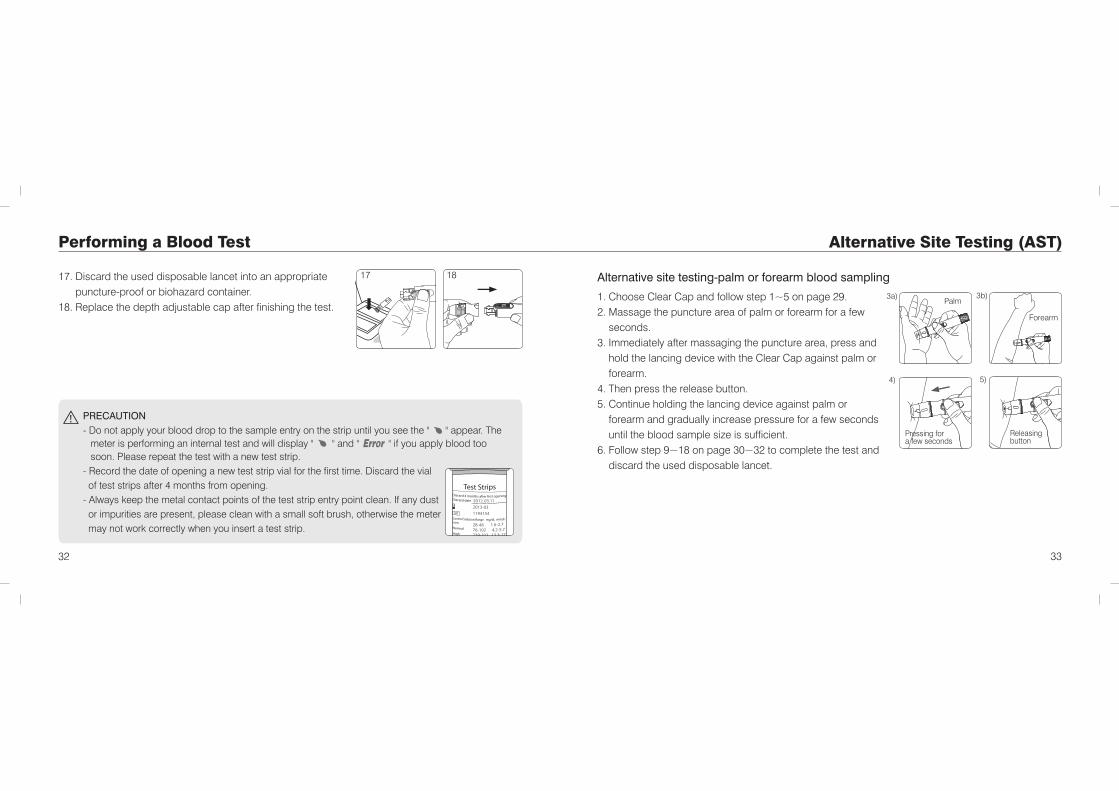
17. Discard the used disposable lancet into an appropriate puncture-proof or biohazard container.
18. Replace the depth adjustable cap after finishing the test.
17
PRECAUTION
- Do not apply your blood drop to the sample entry on the strip until you see the " appear. The meter is performing an internal test and will display " " and if you apply blood too soon. Please repeat the test with a new test strip.
- Record the date of opening a new test strip vial for the first time. Discard the vial of test strips after 4 months from opening.
"" "
- Always keep the metal contact points of the test strip entry point clean. If any dust or impurities are present, please clean with a small soft brush, otherwise the meter may not work correctly when you insert a test strip.
18
Alternative Site Testing (AST)
Alternative site testing-palm or forearm blood sampling
Pressing fora few seconds
Releasing button
1. Choose Clear Cap and follow step 1~5 on page 29. 2. Massage the puncture area of palm or forearm for a few
seconds. 3.
Clear Cap
4. Then press the release button.5. Continue holding the lancing device against palm or
forearm and gradually increase pressure for a few seconds until the blood sample size is sufficient.
6.
Immediately after massaging the puncture area, press and hold the lancing device with the against palm or forearm.
Follow step 9~18 on page 30~32 to complete the test and discard the used disposable lancet.
3a) 3b)
4) 5)
Palm
Forearm

Alternative Site Testing (AST) View Window appearance
Make sure your blood sample covers the whole area of the View Window to get an accurate test result. An insufficient blood sample will result in an error message ("Er4"). If this occurs, repeat the test with a new test strip.
Insufficient blood sample Enough blood sample
PRECAUTION
- Check the expiration date printed on the strip vial every time you use a test strip. Do not use expired test strips.
- Use each test strip immediately after removing from the vial.- Do not reuse test strips.- If moving to a location with a different ambient temperature, wait at least 30 minutes before
testing.- Apply the blood drop only on the sample entry of the test strip.- Please don't drip or inject the blood sample directly by syringe to the sample entry of test strip. Doing this might contaminate the meter or cause damages and is not recommended.
3534
PRECAUTION
- DO NOT test on the palm or forearm if you are testing for hypoglycemia (Low blood glucose).
- Fingertip samples can show the rapid change of glucose faster than palm or forearm samples.
- As the blood flow taken from forearm is slower than fingertip or palm, we recommend using the GD500 lancing device with Clear Cap for testing sites other than fingertip.TMRightest
View Window appearance Comprehending Test Results and Messages
Blood glucose test results are shown on the meters as your preset measurement unit.If obtained blood glucose results are unusually high or low or results are of a questionable nature, repeat the test with a new test strip.
TMIf problems or questions persist, run a Quality Control Test with the Rightest Control Solutions GC700.If the test result still remains unusually high or low, contact a healthcare professional immediately.
If experiencing symptoms that are not consistent with blood glucose test results, and directions have been followed properly, contact a healthcare professional immediately.
3736
PRECAUTION
- Place the blood sample only to the sample entry of the test strip.- Keep the Auto Code Key dry and clean. If excessive sample is obtained, clean the Auto Code
Key immediately to prevent contamination.- Pose the finger and the test strip in a comfortable position.- Follow local regulations and discard the used test strip and lancet properly.- If the meter is idle for over a 2 minute span, it will automatically power off. Manual power
down can be achieved by pressing the Main button for 3 seconds.
Comprehending Test Results and Messages About Quality Control Testing
Example of Control Solution Rangeprinted on your test strip vial label.
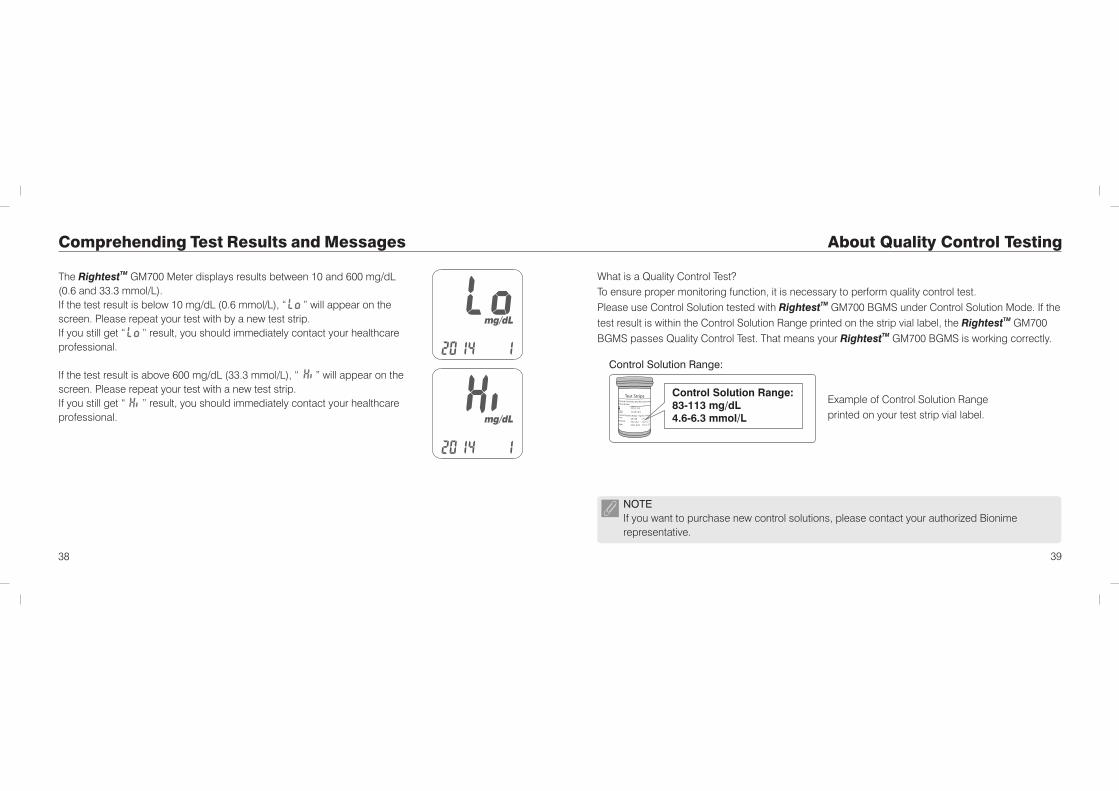
Control Solution Range:
Control Solution Range:83-113 mg/dL4.6-6.3 mmol/L
NOTE
If you want to purchase new control solutions, please contact your authorized Bionime representative.
3938
The GM700 Meter displays results between 10 and 600 mg/dL (0.6 and 33.3 mmol/L).If the test result is below 10 mg/dL (0.6 mmol/L), “ ” will appear on the screen. Please repeat your test with by a new test strip.If you still get “ ” result, you should immediately contact your healthcare professional.
If the test result is above 600 mg/dL (33.3 mmol/L), “ ” will appear on the screen. Please repeat your test with a new test strip. If you still get “ ” result, you should immediately contact your healthcare professional.
TMRightest What is a Quality Control Test?To ensure proper monitoring function, it is necessary to perform quality control test.
TMPlease use Control Solution tested with Rightest GM700 BGMS under Control Solution Mode. If the TMtest result is within the Control Solution Range printed on the strip vial label, the Rightest GM700
TMBGMS passes Quality Control Test. That means your Rightest GM700 BGMS is working correctly.
When should a Quality Control Test Be Performed?- Whenever checking if the system is working properly.- Whenever practicing testing and checking correct procedure.
About Quality Control Testing About Quality Control Testing
PRECAUTION
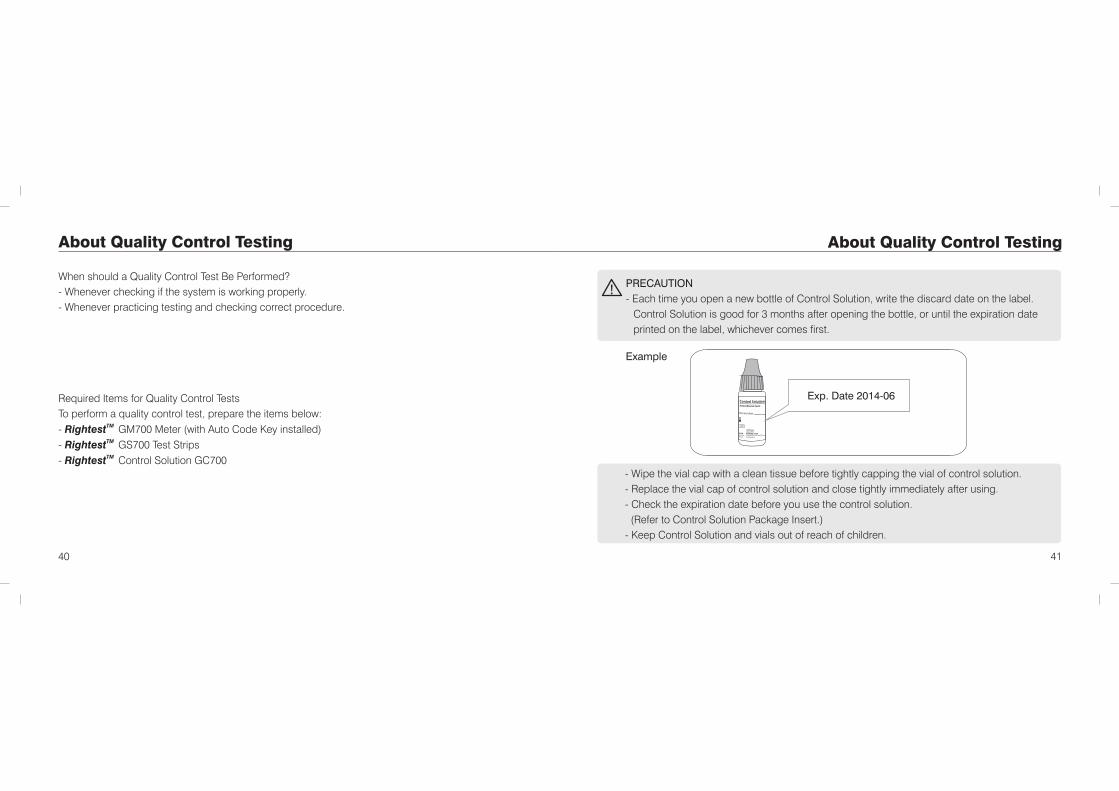
- Each time you open a new bottle of Control Solution, write the discard date on the label. Control Solution is good for 3 months after opening the bottle, or until the expiration date printed on the label, whichever comes first.
- Wipe the vial cap with a clean tissue before tightly capping the vial of control solution.- Replace the vial cap of control solution and close tightly immediately after using.- Check the expiration date before you use the control solution. (Refer to Control Solution Package Insert.)- Keep Control Solution and vials out of reach of children.
Example
Exp. Date 2014-06
4140
Required Items for Quality Control TestsTo perform a quality control test, prepare the items below:
TM - Rightest GM700 Meter (with Auto Code Key installed)TM - Rightest GS700 Test StripsTM - Rightest Control Solution GC700
4342
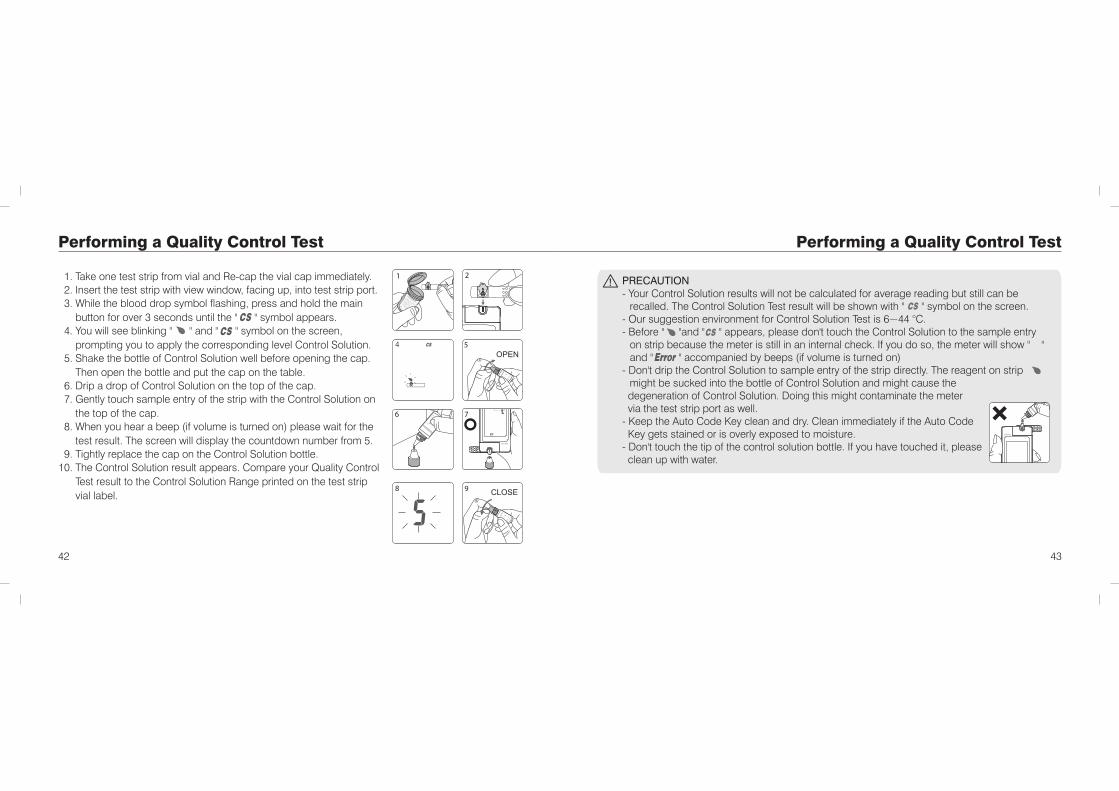
1. Take one test strip from vial and Re-cap the vial cap immediately. 2. Insert the test strip with view window, facing up, into test strip port.3. While the blood drop symbol flashing, press and hold the main
button for over 3 seconds until the " " symbol appears.4. You will see blinking " " and " " symbol on the screen,
prompting you to apply the corresponding level Control Solution.5. Shake the bottle of Control Solution well before opening the cap.
Then open the bottle and put the cap on the table.6. Drip a drop of Control Solution on the top of the cap.7. Gently touch sample entry of the strip with the Control Solution on
the top of the cap. 8. When you hear a beep (if volume is turned on) please wait for the
test result. The screen will display the countdown number from 5. 9. Tightly replace the cap on the Control Solution bottle.10. The Control Solution result appears. Compare your Quality Control
Test result to the Control Solution Range printed on the test strip vial label.
Performing a Quality Control Test
OPEN
1 2
5
6
8
Performing a Quality Control Test
CLOSE9
4
PRECAUTION- Your Control Solution results will not be calculated for average reading but still can be
recalled. The Control Solution Test result will be shown with " " symbol on the screen.- Our suggestion environment for Control Solution Test is 6~44 °C.- Before " "and " " appears, please don't touch the Control Solution to the sample entry
on strip because the meter is still in an internal check. If you do so, the meter will show " " and " " accompanied by beeps (if volume is turned on)
- Don't drip the Control Solution to sample entry of the strip directly. The reagent on strip might be sucked into the bottle of Control Solution and might cause the
degeneration of Control Solution. Doing this might contaminate the meter via the test strip port as well.- Keep the Auto Code Key clean and dry. Clean immediately if the Auto Code Key gets stained or is overly exposed to moisture.- Don't touch the tip of the control solution bottle. If you have touched it, please clean up with water.
7
4544
Understanding Control Test Results Recalling Test Results
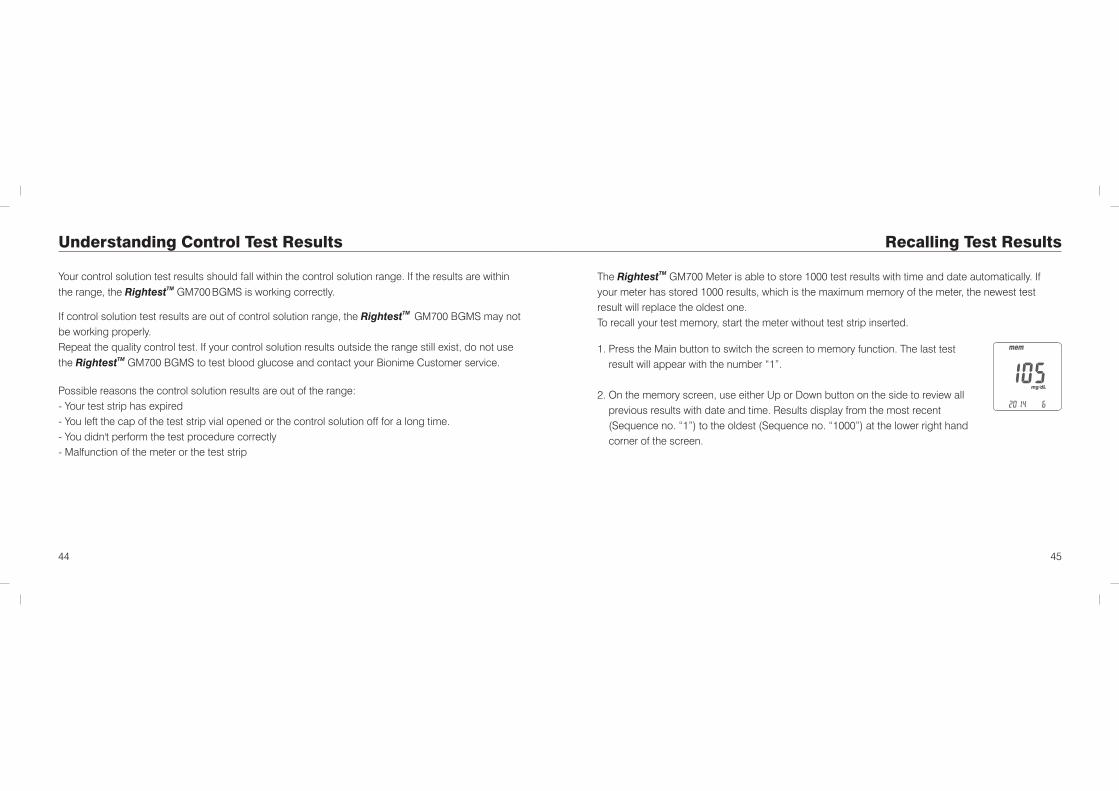
TMThe Rightest GM700 Meter is able to store 1000 test results with time and date automatically. If your meter has stored 1000 results, which is the maximum memory of the meter, the newest test result will replace the oldest one. To recall your test memory, start the meter without test strip inserted.
1. Press the Main button to switch the screen to memory function. The last test result will appear with the number “1”.
2. On the memory screen, use either Up or Down button on the side to review all previous results with date and time. Results display from the most recent (Sequence no. “1”) to the oldest (Sequence no. “1000”) at the lower right hand corner of the screen.
Your control solution test results should fall within the control solution range. If the results are within TMthe range, the Rightest GM700BGMS is working correctly.
If control solution test results are out of control solution range, the GM700 BGMS may not be working properly. Repeat the quality control test. If your control solution results outside the range still exist, do not use
TMthe Rightest GM700 BGMS to test blood glucose and contact your Bionime Customer service.
Possible reasons the control solution results are out of the range:- Your test strip has expired- You left the cap of the test strip vial opened or the control solution off for a long time.- You didn't perform the test procedure correctly- Malfunction of the meter or the test strip
TMRightest
4746
Recalling Test Results
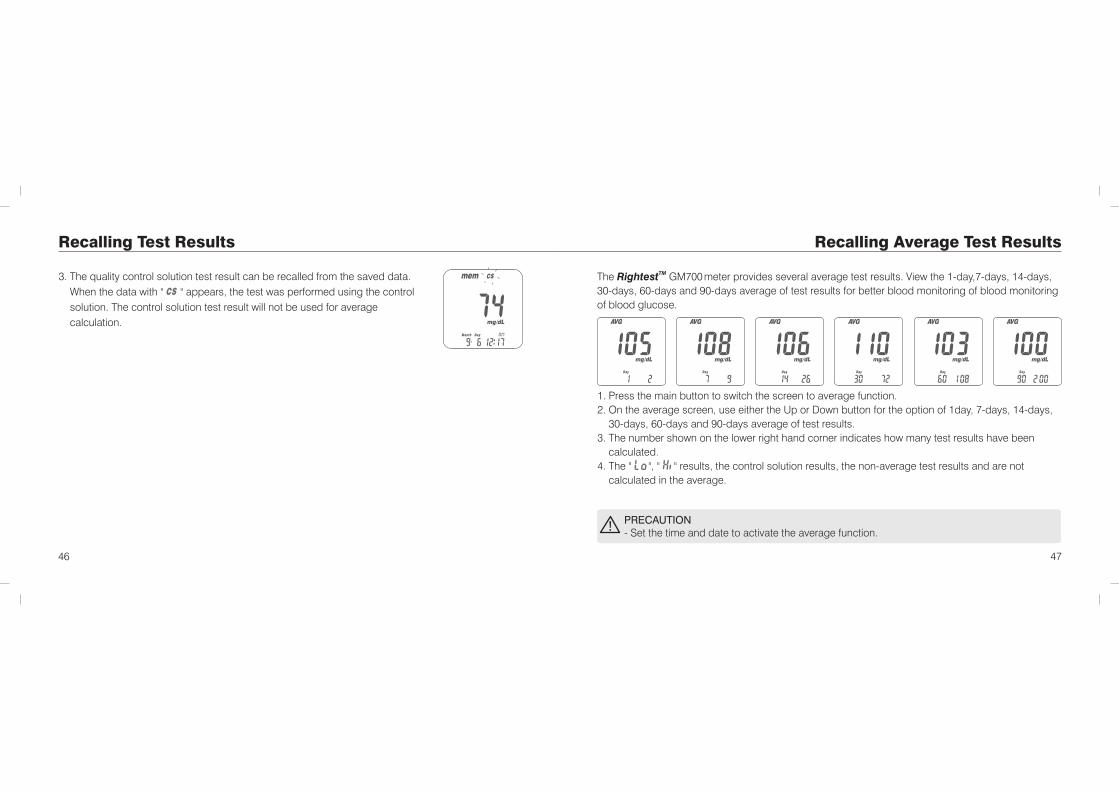
3. The quality control solution test result can be recalled from the saved data. When the data with " " appears, the test was performed using the control solution. The control solution test result will not be used for average calculation.
1. Press the main button to switch the screen to average function.2. On the average screen, use either the Up or Down button for the option of 1day, 7-days, 14-days,
30-days, 60-days and 90-days average of test results.3. The number shown on the lower right hand corner indicates how many test results have been
calculated.4. The " ", " " results, the control solution results, the non-average test results and are not
calculated in the average.
Recalling Average Test Results
TM The Rightest GM700meter provides several average test results. View the 1-day,7-days, 14-days, 30-days, 60-days and 90-days average of test results for better blood monitoring of blood monitoring of blood glucose.
PRECAUTION- Set the time and date to activate the average function.
4948
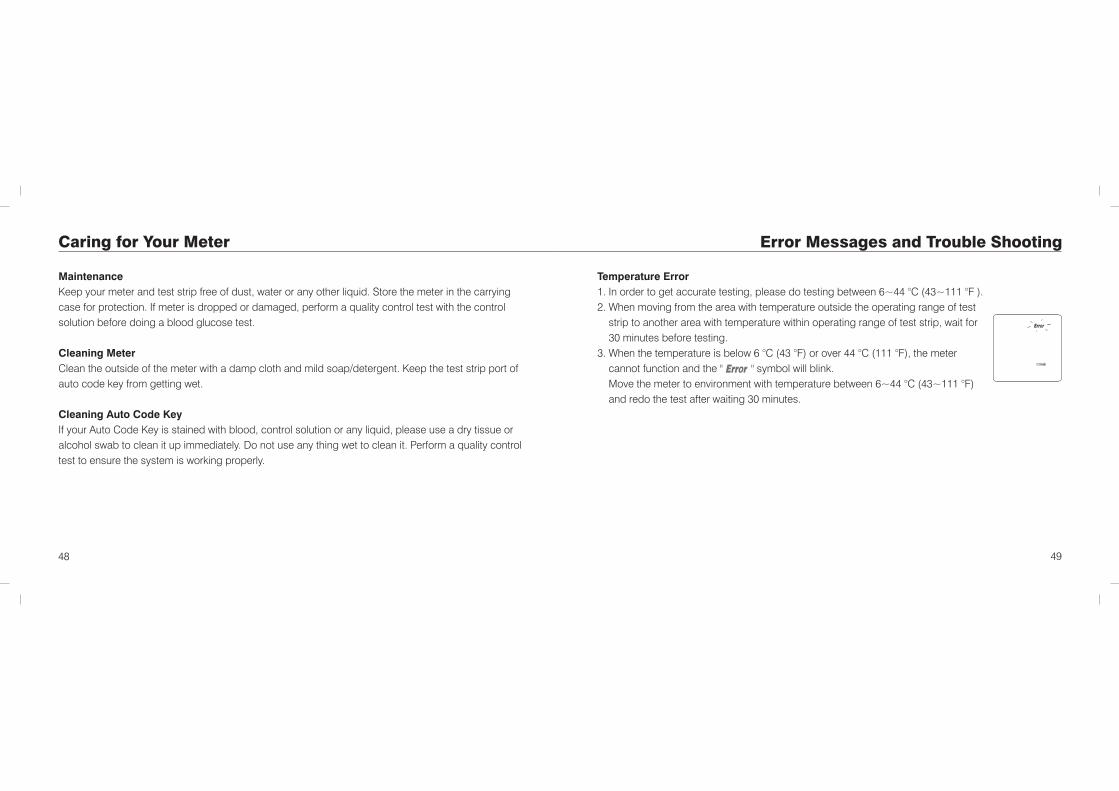
Temperature Error
1. In order to get accurate testing, please do testing between 2. When moving from the area with temperature outside the operating range of test
strip to another area with temperature within operating range of test strip, wait for 30 minutes before testing.
3. When the temperature is below 6 °C (43 °F) or over 44 °C (111 °F), the meter cannot function and the " " symbol will blink.
Move the meter to environment with temperature between 6~44 °C (43~111 °F) and redo the test after waiting 30 minutes.
6~44 °C (43~111 °F ).
Caring for Your Meter
Maintenance
Keep your meter and test strip free of dust, water or any other liquid. Store the meter in the carrying case for protection. If meter is dropped or damaged, perform a quality control test with the control solution before doing a blood glucose test.
Cleaning Meter
Clean the outside of the meter with a damp cloth and mild soap/detergent. Keep the test strip port of auto code key from getting wet.
Cleaning Auto Code Key
If your Auto Code Key is stained with blood, control solution or any liquid, please use a dry tissue or alcohol swab to clean it up immediately. Do not use any thing wet to clean it. Perform a quality control test to ensure the system is working properly.
Error Messages and Trouble Shooting
5150
Error Messages and Trouble Shooting Error Messages and Trouble Shooting
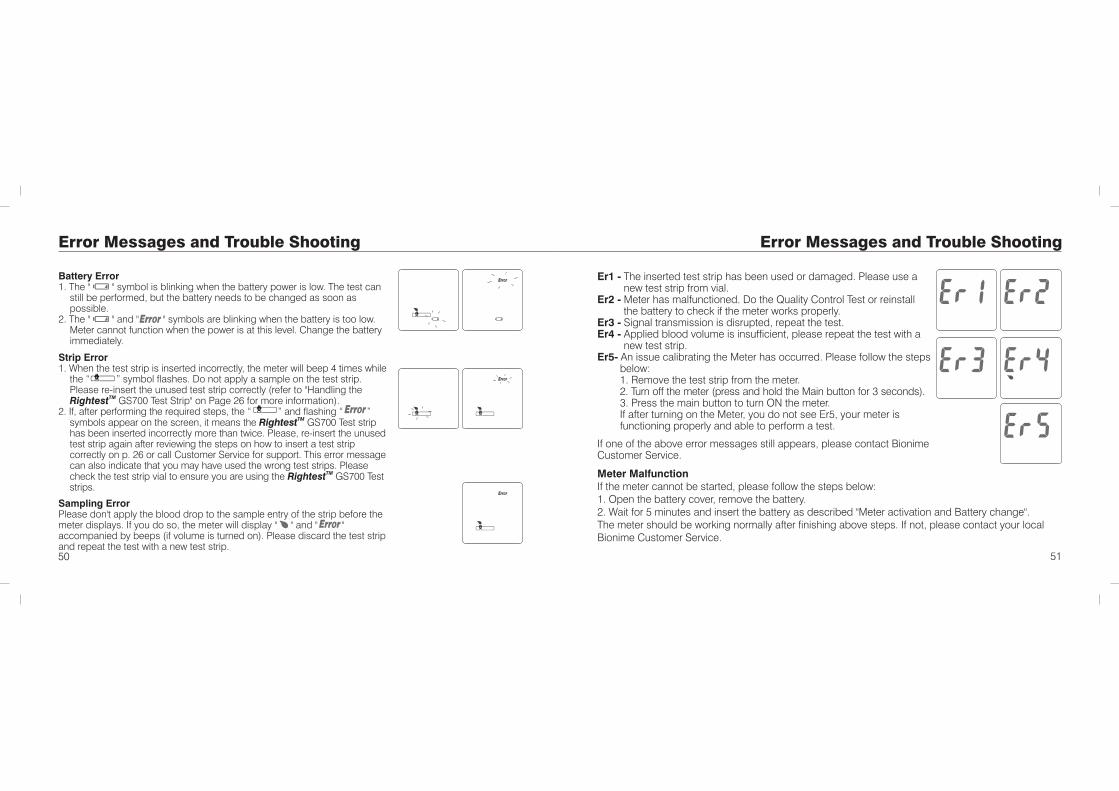
Battery Error1. The " " symbol is blinking when the battery power is low. The test can
still be performed, but the battery needs to be changed as soon as possible.
2. The " " and " " symbols are blinking when the battery is too low. Meter cannot function when the power is at this level. Change the battery immediately.
Strip Error1. When the test strip is inserted incorrectly, the meter will beep 4 times while
the “ ” symbol flashes. Do not apply a sample on the test strip. Please re-insert the unused test strip correctly (refer to "Handling the
TMRightest GS700 Test Strip" on Page 26 for more information).2. If, after performing the required steps, the “ ” and flashing “ ”
TMsymbols appear on the screen, it means the Rightest GS700 Test strip has been inserted incorrectly more than twice. Please, re-insert the unused test strip again after reviewing the steps on how to insert a test strip correctly on p. 26 or call Customer Service for support. This error message can also indicate that you may have used the wrong test strips. Please
TMcheck the test strip vial to ensure you are using the Rightest GS700 Test strips.
Sampling ErrorPlease don't apply the blood drop to the sample entry of the strip before the meter displays. If you do so, the meter will display " " and " " accompanied by beeps (if volume is turned on). Please discard the test strip and repeat the test with a new test strip.
Er1 - new test strip from vial.
Er2 - Meter has malfunctioned. Do the Quality Control Test or reinstall the battery to check if the meter works properly.
Er3 - Signal transmission is disrupted, repeat the test.Er4 - Applied blood volume is insufficient, please repeat the test with a
new test strip.Er5- An issue calibrating the Meter has occurred. Please follow the steps
below:1. Remove the test strip from the meter.2. Turn off the meter (press and hold the Main button for 3 seconds).3. Press the main button to turn ON the meter. If after turning on the Meter, you do not see Er5, your meter is functioning properly and able to perform a test.
If one of the above error messages still appears, please contact Bionime Customer Service.
The inserted test strip has been used or damaged. Please use a
Meter MalfunctionIf the meter cannot be started, please follow the steps below:1. Open the battery cover, remove the battery.2. Wait for 5 minutes and insert the battery as described "Meter activation and Battery change".The meter should be working normally after finishing above steps. If not, please contact your local Bionime Customer Service.
5352
Error Messages and Trouble Shooting Limitations
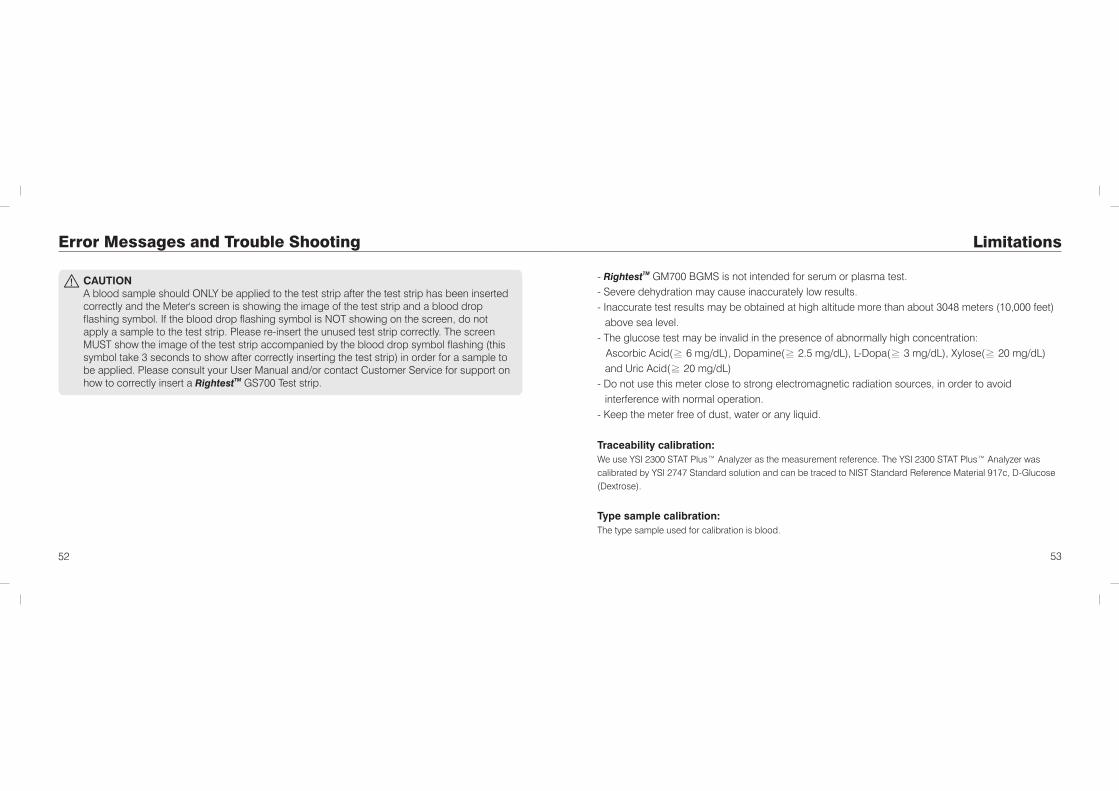
- GM700 BGMS is not intended for serum or plasma test.- Severe dehydration may cause inaccurately low results.- Inaccurate test results may be obtained at high altitude more than about 3048 meters (10,000 feet)
above sea level.- The glucose test may be invalid in the presence of abnormally high concentration: Ascorbic Acid(≧ 6 mg/dL), Dopamine(≧ 2.5 mg/dL), L-Dopa(≧ 3 mg/dL), Xylose(≧ 20 mg/dL)
and Uric Acid(≧ 20 mg/dL)- Do not use this meter close to strong electromagnetic radiation sources, in order to avoid
interference with normal operation.- Keep the meter free of dust, water or any liquid.
Traceability calibration:
We use YSI 2300 STAT Plus™ Analyzer as the measurement reference. The YSI 2300 STAT Plus™ Analyzer was calibrated by YSI 2747 Standard solution and can be traced to NIST Standard Reference Material 917c, D-Glucose (Dextrose).
Type sample calibration:
The type sample used for calibration is blood.
TMRightestCAUTIONA blood sample should ONLY be applied to the test strip after the test strip has been inserted correctly and the Meter's screen is showing the image of the test strip and a blood drop flashing symbol. If the blood drop flashing symbol is NOT showing on the screen, do not apply a sample to the test strip. Please re-insert the unused test strip correctly. The screen MUST show the image of the test strip accompanied by the blood drop symbol flashing (this symbol take 3 seconds to show after correctly inserting the test strip) in order for a sample to be applied. Please consult your User Manual and/or contact Customer Service for support on
TMhow to correctly insert a Rightest GS700 Test strip.

5554
Hematocrit
Power Supply
Battery Life
Meter Dimension
Meter Weight
Monitor
Display Area
Meter Storage Conditions
Test Strip Storage Conditions
10~70%
One CR2032 Battery
About 1000 tests
99 mm x 46 mm x 17.5 mm
57 ± 5g with batteries
LCD display
52.6 mm x 32.0 mm
-10 ~ 60℃ ( 14 ~ 140℉ )
4 ~ 30℃ ( 39 ~ 86℉ ),< 90% relative humidity
Specification Specification
Measurement Technology
Sample
Minimum Sample Volume
Measuring Range
Test Time
Memory Capacity
Power Saving
Operating Temperature
Operating Relative Humidity
6 ~ 44℃ ( 43 ~ 111℉ )
10 - 90%
1000 blood glucose test results with date and time
Turn off automatically after 2 minutes no usePress the " " button for 3 seconds.
10-600 mg/dL ( 0.6-33.3 mmol/L )
5 seconds
Dehydrogenase Electrochemical Sensor
Capillary, Venous, Arterial and Neonatal Whole Blood0.75 microliters
5756
Warranty
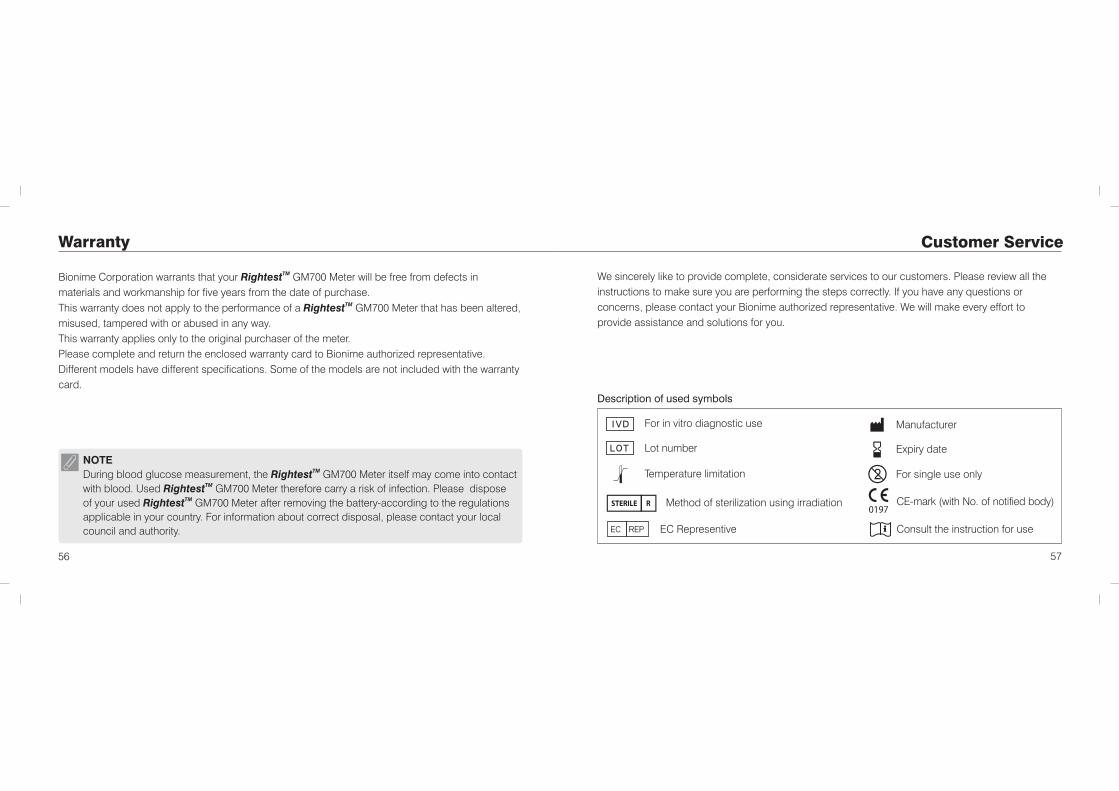
We sincerely like to provide complete, considerate services to our customers. Please review all theinstructions to make sure you are performing the steps correctly. If you have any questions or concerns, please contact your Bionime authorized representative. We will make every effort to provide assistance and solutions for you.
For in vitro diagnostic use
Temperature limitation
Manufacturer
LOT
IVD
Lot number Expiry date
For single use only
Method of sterilization using irradiation
EC REP
Description of used symbols
Customer Service
CE-mark (with No. of notified body)
Consult the instruction for useEC Representive
TMBionime Corporation warrants that your Rightest GM700 Meter will be free from defects in materials and workmanship for five years from the date of purchase.
TMThis warranty does not apply to the performance of a Rightest GM700 Meter that has been altered, misused, tampered with or abused in any way.This warranty applies only to the original purchaser of the meter.Please complete and return the enclosed warranty card to Bionime authorized representative.Different models have different specifications. Some of the models are not included with the warranty card.
NOTETMDuring blood glucose measurement, the Rightest GM700 Meter itself may come into contact
TMwith blood. Used Rightest GM700 Meter therefore carry a risk of infection. Please dispose TMof your used Rightest GM700 Meter after removing the battery-according to the regulations
applicable in your country. For information about correct disposal, please contact your local council and authority.
58
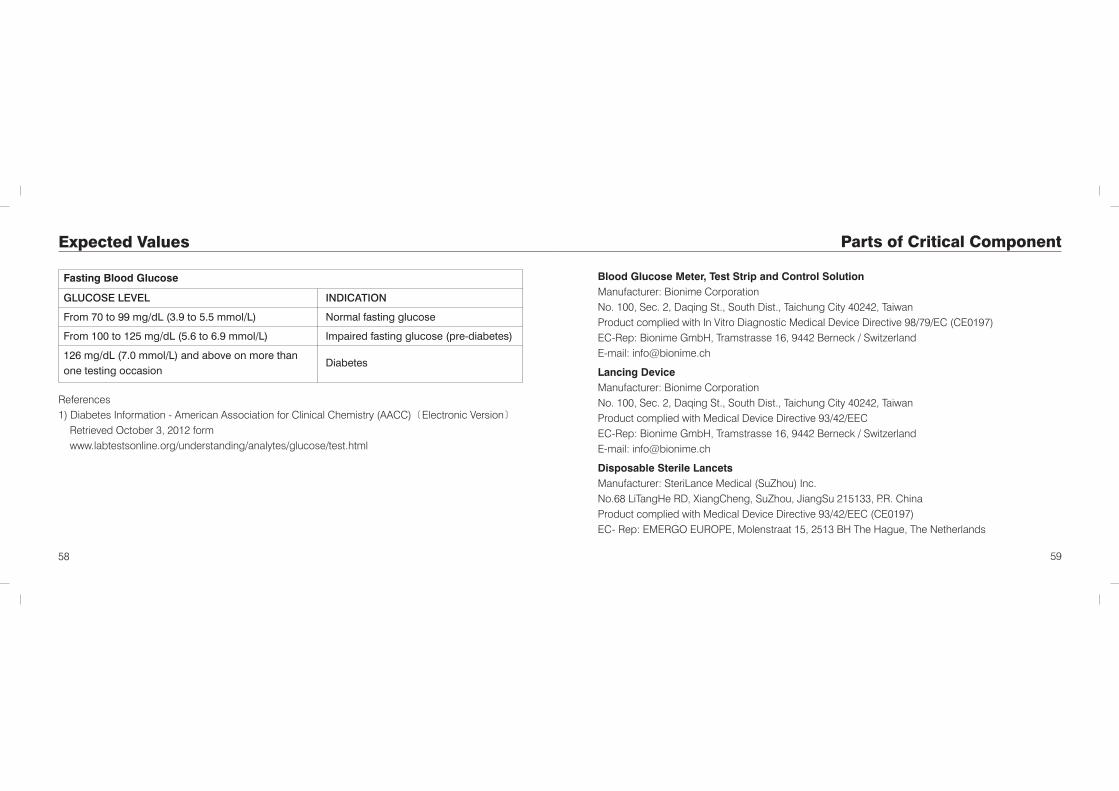
Expected Values
Blood Glucose Meter,
Manufacturer: Bionime Corporation No. 100, Sec. 2, Daqing St., South Dist., Taichung City 40242, TaiwanProduct complied with In Vitro Diagnostic Medical Device Directive EC-Rep: Bionime GmbH, Tramstrasse 16, 9442 Berneck / SwitzerlandE-mail: [email protected]
Lancing Device
Manufacturer: Bionime Corporation No. 100, Sec. 2, Daqing St., South Dist., Taichung City 40242, TaiwanProduct complied with Medical Device Directive 93/42/EECEC-Rep: Bionime GmbH, Tramstrasse 16, 9442 Berneck / SwitzerlandE-mail: [email protected]
Disposable Sterile Lancets
Manufacturer:
Product complied with Medical Device Directive EC- Rep:
Test Strip and Control Solution
98/79/EC (CE0197)
SteriLance Medical (SuZhou) Inc.No.68 LiTangHe RD, XiangCheng, SuZhou, JiangSu 215133, P.R. China
93/42/EEC (CE0197)EMERGO EUROPE, Molenstraat 15, 2513 BH The Hague, The Netherlands
59
Parts of Critical Component
GLUCOSE LEVEL
From 70 to 99 mg/dL (3.9 to 5.5 mmol/L)
From 100 to 125 mg/dL (5.6 to 6.9 mmol/L)
INDICATION
Normal fasting glucose
Impaired fasting glucose (pre-diabetes)
Fasting Blood Glucose
126 mg/dL (7.0 mmol/L) and above on more than
one testing occasionDiabetes
References1) Diabetes Information - American Association for Clinical Chemistry (AACC)〔Electronic Version〕
Retrieved October 3, 2012 form www.labtestsonline.org/understanding/analytes/glucose/test.html