Embed Size (px)
Citation preview
9
English
Blood DNA 200 Extraction Kit
Blood DNA 500 Extraction Kit
Instructions For Use (IFU)
English
Page 2
12.07.02-537-08,EN 03/13
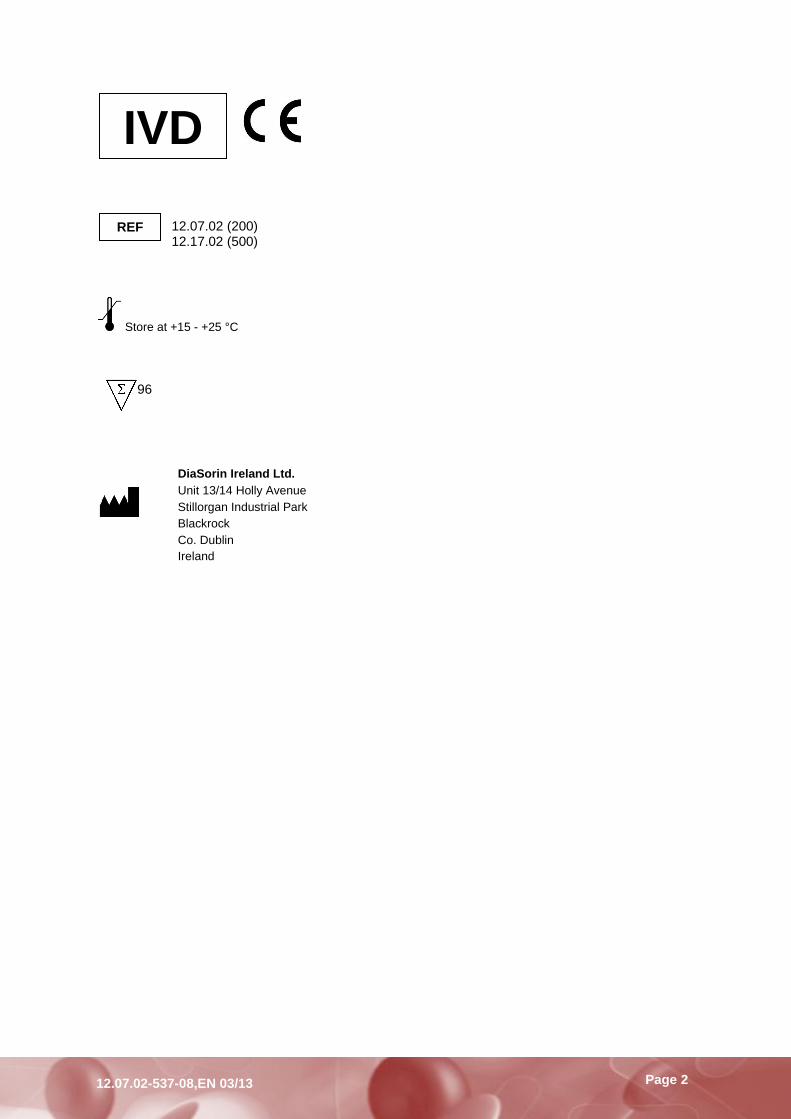
Store at +15 - +25 °C
96
IVD
REF 12.07.02 (200) 12.17.02 (500)
DiaSorin Ireland Ltd.
Unit 13/14 Holly Avenue
Stillorgan Industrial Park
Blackrock
Co. Dublin
Ireland
Page 3
12.07.02-537-08,EN 03/13
INDEX
1 SYMBOLS AND ABBREVIATIONS ..................................................................... 4
2 INTENDED USE ................................................................................................. 5
3 SUMMARY AND EXPLANATION ....................................................................... 5
4 BLOOD DNA PROCEDURE ................................................................................ 5
5 REAGENTS ....................................................................................................... 6
6 INSTRUMENT FOR AUTOMATION OF THE PROCEDURE ................................. 8
6.1 Arrow /LIAISON® IXT .................................................................................................................. 8
6.2 Use of Instrument ........................................................................................................................ 8 6.3 Installation Procedures and Principle of Operation ..................................................................... 8 6.4 Operating Instructions ................................................................................................................. 8 6.5 Calibration Procedures................................................................................................................ 8 6.6 Operational Precautions and Limitations .................................................................................... 8 6.7 Hazards ....................................................................................................................................... 9 6.8 Service and Maintenance Information ........................................................................................ 9 6.8.1 Contamination ............................................................................................................................. 9 6.8.2 Controls ....................................................................................................................................... 9 6.8.3 Technical Support ....................................................................................................................... 9
7 SAMPLE COLLECTION AND PREPARATION ................................................... 10
8 PROCEDURE ................................................................................................... 10
8.1 Procedure Blood DNA Isolation ................................................................................................. 10 8.1.1 Select protocol and elution volume ........................................................................................... 10 8.1.2 Load pump with tip .................................................................................................................... 11 8.1.3 Load cartridge ............................................................................................................................ 13 8.1.4 Pierce cartridge ......................................................................................................................... 14 8.1.5 Load sample .............................................................................................................................. 16 8.1.6 Load elution tube ....................................................................................................................... 16 8.1.7 Start the protocol ....................................................................................................................... 16 8.1.8 Remove the eluate from the instrument .................................................................................... 16 8.1.9 Cleaning after the run ................................................................................................................ 17 8.2 Arrow /LIAISON
® IXT Waste Handling ....................................................................................... 17
8.3 Sample waste Handling ............................................................................................................. 17 8.4 Shutting Down the Arrow/LIAISON
® IXT at the End of a Working Day ..................................... 17
8.5 Troubleshooting ......................................................................................................................... 18
9 PERFORMANCE DATA .................................................................................... 19
9.1 Introduction ................................................................................................................................ 19 9.2 Clinical Validation Data .............................................................................................................. 21
10 LIMITATIONS OF THE PROCEDURE ............................................................... 23
11 EXPECTED VALUES ........................................................................................ 23
12 QUALITY CONTROL ........................................................................................ 23
13 PRODUCT LIST ............................................................................................... 24
14 NOTES ............................................................................................................ 24
Page 4
12.07.02-537-08,EN 03/13
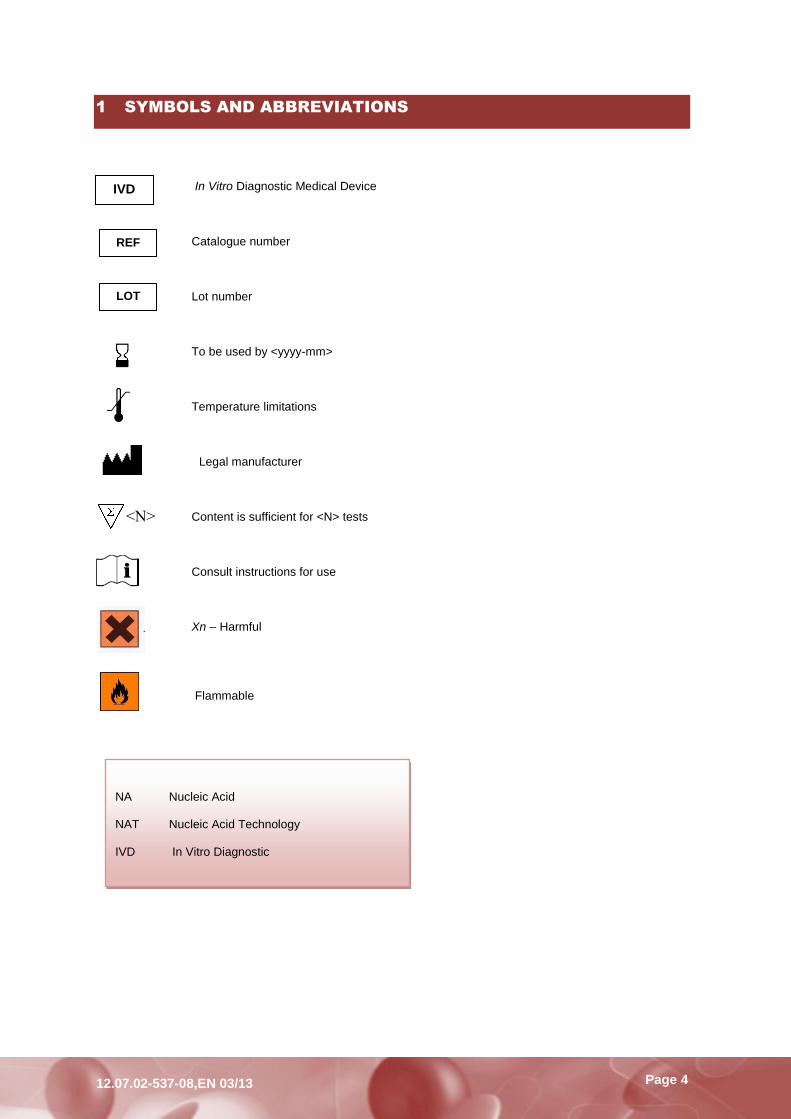
1 SYMBOLS AND ABBREVIATIONS
In Vitro Diagnostic Medical Device
Catalogue number
Lot number
To be used by <yyyy-mm>
Temperature limitations
Legal manufacturer
Content is sufficient for <N> tests
Consult instructions for use Xn – Harmful
Flammable
<N>
NA NAT IVD
Nucleic Acid Nucleic Acid Technology In Vitro Diagnostic
REF
LOT
IVD
Page 5
12.07.02-537-08,EN 03/13
2 INTENDED USE
The Blood DNA kits and the Arrow/ LIAISON
® IXT instrument automate the procedure for the purification of
genomic DNA from up to 12 whole blood samples. The kits and instrument uses magnetic bead technology for purification of genomic DNA from blood intended for use in diagnostic applications. Performance data for the Blood DNA kits have been established for EDTA whole blood samples (see section 9). It can be used on both the NorDiag Arrow instrument and LIAISON
® IXT instrument.
The product is intended used by professional users that are trained in molecular techniques and in the use of Arrow/LIAISON
® IXT and respective kits. Any diagnostic result following purification with the Blood DNA kits
should be interpreted with regards to other laboratory or clinical findings.
3 SUMMARY AND EXPLANATION
The Blood DNA kits are a generic system based on the binding of sample DNA to magnetic beads. The kits automate the DNA purification for downstream detection systems by separating the DNA from cells in the blood samples. The automation of this process reduces the hands-on time and enables greater sample throughput as well as reducing inhibition for the downstream analysis systems. The isolated DNA is intended for qualitative analyses.
4 BLOOD DNA PROCEDURE
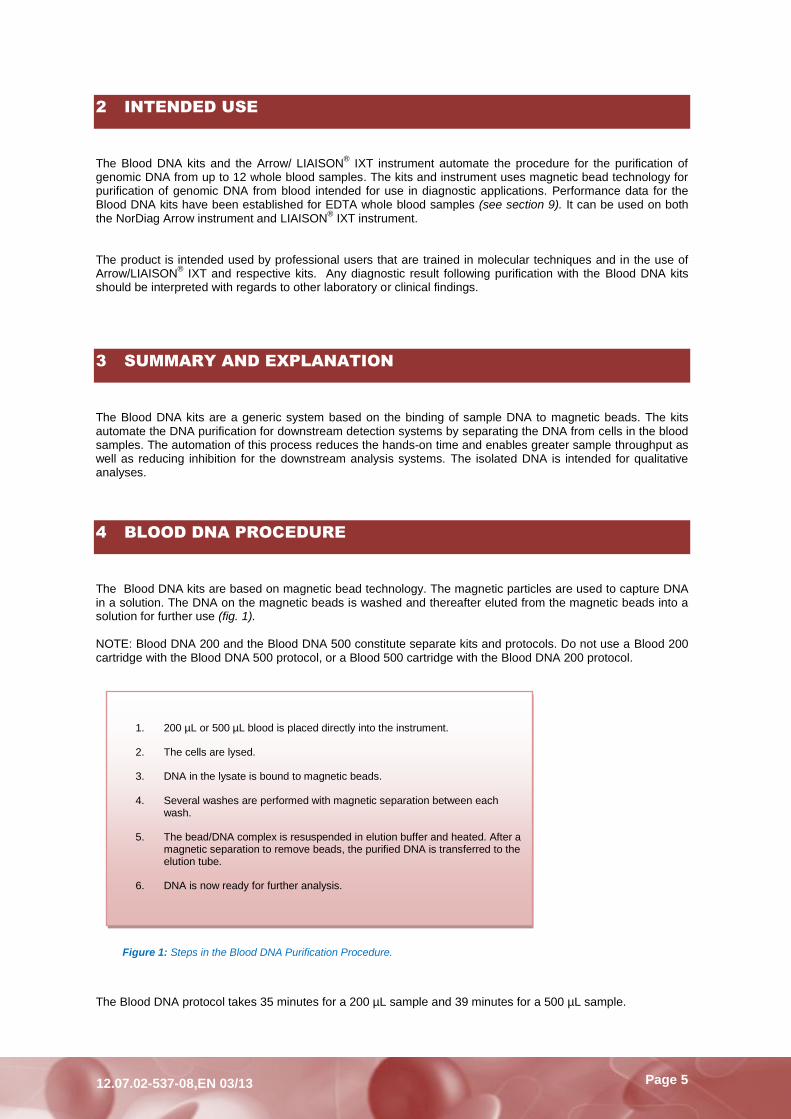
The Blood DNA kits are based on magnetic bead technology. The magnetic particles are used to capture DNA in a solution. The DNA on the magnetic beads is washed and thereafter eluted from the magnetic beads into a solution for further use (fig. 1). NOTE: Blood DNA 200 and the Blood DNA 500 constitute separate kits and protocols. Do not use a Blood 200 cartridge with the Blood DNA 500 protocol, or a Blood 500 cartridge with the Blood DNA 200 protocol. The Blood DNA protocol takes 35 minutes for a 200 µL sample and 39 minutes for a 500 µL sample.
Figure 1: Steps in the Blood DNA Purification Procedure.
1. 200 µL or 500 µL blood is placed directly into the instrument.
2. The cells are lysed.
3. DNA in the lysate is bound to magnetic beads.
4. Several washes are performed with magnetic separation between each wash.
5. The bead/DNA complex is resuspended in elution buffer and heated. After a magnetic separation to remove beads, the purified DNA is transferred to the elution tube.
6. DNA is now ready for further analysis.

Page 6
12.07.02-537-08,EN 03/13
5 REAGENTS
Contents of Blood DNA Extraction kits:
o 96 Cartridges for the Blood DNA isolation procedure o 98 Pumps o 96 Tips o 1 Instructions for use
Table 1: Contents of Blood DNA 200 and 500 cartridges.
Each Cartridge contains:
200 500
Magnetic Beads in Binding Buffer 1 x 750 µL 1 x 780 µL
Lysis Buffer 1 x 450 µL 1 x 650 µL
Guanidine Hydrochloride (<30%)
Binding Buffer 1 x 750 µL 1 x 2000 µL
Perchlorate (<30%)
Ethanol (<50%)
Wash Buffer I 1 x 1000 µL 1 x1200 µL
Guanidine Hydrochloride (<10%)
Perchlorate (<30%)
Ethanol (<50%)
Wash Buffer II 1 x 1000 µL 1 x1200 µL
Perchlorate (<30%)
Ethanol (<50%)
Elution Buffer 1 x 600 µL 1 x 600 µL
10 mM Tris-HCl pH 8.0
Materials required but not provided Sample tubes (see Table 2)
Elution tubes (optional brand)
Piercing tool
NAT detection system
Gloves and goggles
Pipettes with filter tips
Commercial liquid household bleach, 5.25% hypochlorite solutions or equivalent for sterilization of instrument.
Page 7
12.07.02-537-08,EN 03/13
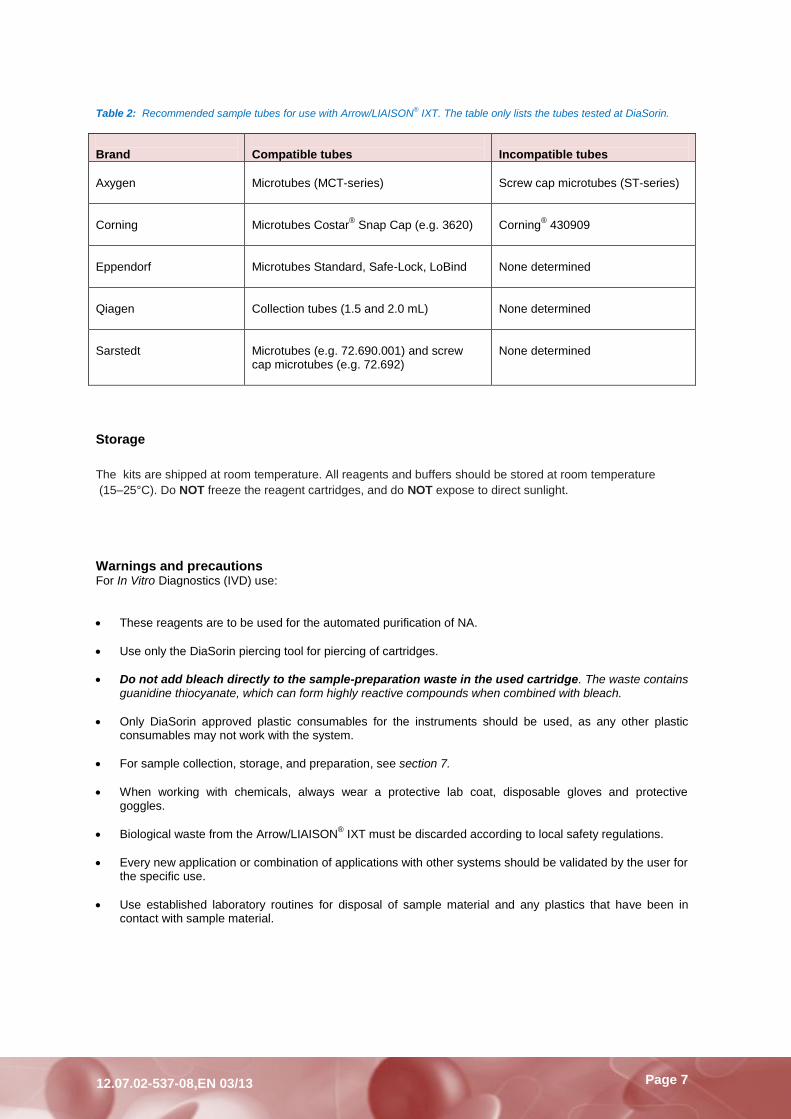
Table 2: Recommended sample tubes for use with Arrow/LIAISON
® IXT. The table only lists the tubes tested at DiaSorin.
Brand
Compatible tubes
Incompatible tubes
Axygen
Microtubes (MCT-series)
Screw cap microtubes (ST-series)
Corning
Microtubes Costar
® Snap Cap (e.g. 3620)
Corning
® 430909
Eppendorf
Microtubes Standard, Safe-Lock, LoBind
None determined
Qiagen
Collection tubes (1.5 and 2.0 mL)
None determined
Sarstedt
Microtubes (e.g. 72.690.001) and screw cap microtubes (e.g. 72.692)
None determined
Storage
The kits are shipped at room temperature. All reagents and buffers should be stored at room temperature
(15–25°C). Do NOT freeze the reagent cartridges, and do NOT expose to direct sunlight.
Warnings and precautions For In Vitro Diagnostics (IVD) use:
These reagents are to be used for the automated purification of NA.
Use only the DiaSorin piercing tool for piercing of cartridges.
Do not add bleach directly to the sample-preparation waste in the used cartridge. The waste contains guanidine thiocyanate, which can form highly reactive compounds when combined with bleach.
Only DiaSorin approved plastic consumables for the instruments should be used, as any other plastic consumables may not work with the system.
For sample collection, storage, and preparation, see section 7.
When working with chemicals, always wear a protective lab coat, disposable gloves and protective goggles.
Biological waste from the Arrow/LIAISON® IXT must be discarded according to local safety regulations.
Every new application or combination of applications with other systems should be validated by the user for the specific use.
Use established laboratory routines for disposal of sample material and any plastics that have been in contact with sample material.

Page 8
12.07.02-537-08,EN 03/13
6 INSTRUMENT FOR AUTOMATION OF THE PROCEDURE
6.1 Arrow/LIAISON® IXT
The pipetting instrument (fig. 2) is an IVD approved NA isolation device with protocol for the Blood DNA kit. A piercing tool for opening of cartridges is required and provided with the instrument. Sample tubes and elution tubes are required but not provided (see Section 5 Reagents and Table 2: Recommended sample tubes for use with Arrow/LIAISON
® IXT).
6.2 Use of Instrument
The instrument is to be used by professionals that are trained in molecular techniques and specifically on the use of the Arrow /LIAISON
® IXT instrument.
6.3 Installation Procedures and Principle of Operation
Please refer to the Installation Manual and the Operator’s Manual of the instrument for information.
6.4 Operating Instructions
See Section 8, and Operator’s Manual for Arrow/LIAISON
® IXT.
6.5 Calibration Procedures
The instrument can be calibrated by qualified personnel when appropriate (see the Installation Manual).
6.6 Operational Precautions and Limitations
This product is intended for use by professionals, trained in molecular biological techniques and in operating this automated instrument.
The user is responsible for checking that any new application; new sample types, new targets or new downstream detection gives satisfactory performance prior to use.
Specimen collection, transport and storage should be performed according to the NAT systems specifications.
Figure 2: The Arrow instrument and LIAISON® IXT instrument (the colour of the Arrow instrument may vary from that
shown in the picture)
Page 9
12.07.02-537-08,EN 03/13
Diagnostic results generated using this sample purification procedure as a sample concentrator in conjunction with any downstream diagnostic assay should be interpreted with regard to other clinical or laboratory findings.
Verify that all components, e.g. cartridges, pumps and tips, sample tubes and elution tubes are correctly positioned in the rack. Take care to choose the correct protocol for the cartridge that is used in your run.
If the instrument was moved, please refer to the Installation Manual and the Operator`s Manual for information about the installation checks that need to be performed.
Keep the instrument clean (see Section 8.1.9 Cleaning after the run).
Regular preventative maintenance is necessary to ensure that the instrument is working properly, and to avoid unnecessary stops during testing. This must be performed by trained personnel.
6.7 Hazards
Always wear protective clothing according to laboratory regulations, such as gloves and safety goggles,
when using the kit.
Do not add bleach directly to the sample-preparation waste in the used cartridge. The waste
contains guanidine hydrochloride, which can form highly reactive compounds when combined with bleach. A separate MSDS is available on request.
Do not wash the piercing tool with bleach directly after piercing (see section 8.1.4 for cleaning of the piercing tool). The piercing tool could contain guanidine hydrochloride, which can form highly reactive compounds when combined with bleach.
Do not pierce cartridges outside of theinstrument (see section 8.1.4).
Remove used cartridges, pump-tips, samples, and elution tubes after each run.
Treat all sample material (including waste from the instrument) as hazardous, and handle in accordance with laboratory guidelines.
6.8 Service and Maintenance Information
Annual service is recommended for the instrument to function properly. The surface on the instrument should always be kept clean. Clean the surface with either a detergent or alcohol depending on what has been spilt. Please refer to the Operators’ Manual for further information on cleaning and decontamination of the instrument.
6.8.1 Contamination
Wear gloves when placing and piercing the cartridges. Make sure that the piercing tool is clean, and free of RNase if required (see Section 8.1.4. Pierce cartridge). Always use filter tips when pipetting sample.
6.8.2 Controls
To control the sample preparation process, it is recommended to prepare a confirmed positive sample and include it in the purification process along with the other samples. To detect and minimize irregularities in diagnostic results, adequate controls should also be used according to the instruction for use for the applicable downstream detection method.
6.8.3 Technical Support
If an instrument problem occurs, first consult Section 8.5 Troubleshooting. Make notes of any unusual observations or error messages, prior to mailing support. Please use [email protected] as your first line of reporting support issues. The instrument should be connected to an uninterruptible power supply (UPS) to prevent sudden stops of the instrument during a run (in case of a power failure in the electrical system in the building where it is located).

Page 10
12.07.02-537-08,EN 03/13
7 SAMPLE COLLECTION AND PREPARATION
The collected blood samples should be frozen in aliquots at -80°C, if not used fresh at the day of collection or shortly thereafter. Mix samples to homogeneity by inverting the collection tubes several times immediately prior to aliquoting. The frozen blood samples may be thawed at room temperature or in heating block at 25°C for 5-10 minutes.
8 PROCEDURE
8.1 Procedure Blood DNA Isolation
The running and cleaning procedures on the instrument are as follows:
1. Select protocol and elution volume
2. Load pump with tip
3. Load cartridge
4. Pierce cartridge
5. Load sample
6. Load elution tube
7. Start the protocol
8. Remove the eluate from the instrument.
9. Cleaning after the run
Loading instructions 2, 3, 5, and 6 appear on the instrument screen after the protocol has been selected. Details
of all steps are given below:
8.1.1 Select protocol and elution volume
a. Turn the Arrow /LIAISON
® IXT power button at the left back side on,
and then push the ON button on the front left side
(See Operator`s Manual for further instructions).
b. Press `Continue` on the first screen to let the instrument initialize.
c. Press `START PROTOCOL` on the main menu.
d. Select the Blood DNA 200 or 500 protocol.
e. Choose elution volume.
Page 11
12.07.02-537-08,EN 03/13
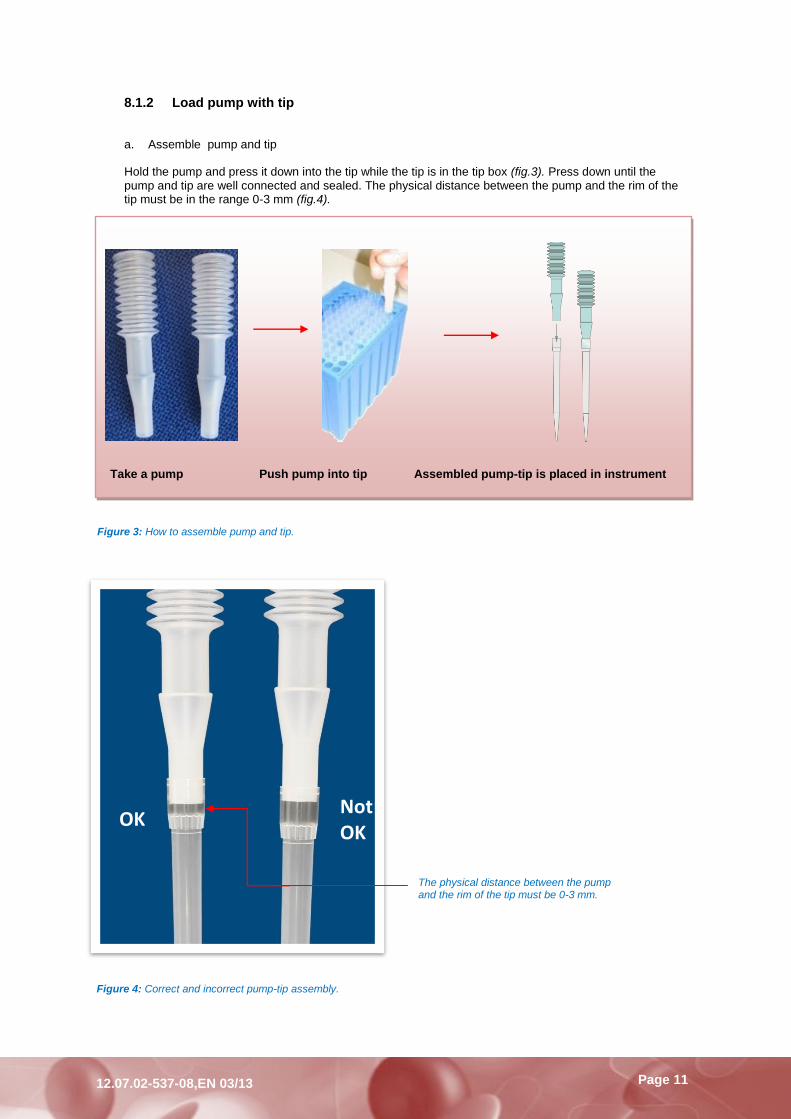
8.1.2 Load pump with tip
a. Assemble pump and tip
Hold the pump and press it down into the tip while the tip is in the tip box (fig.3). Press down until the pump and tip are well connected and sealed. The physical distance between the pump and the rim of the tip must be in the range 0-3 mm (fig.4).
Take a pump Push pump into tip Assembled pump-tip is placed in instrument
Figure 3: How to assemble pump and tip.
Figure 4: Correct and incorrect pump-tip assembly.
The physical distance between the pump and the rim of the tip must be 0-3 mm.
OK Not OK
Page 12
12.07.02-537-08,EN 03/13
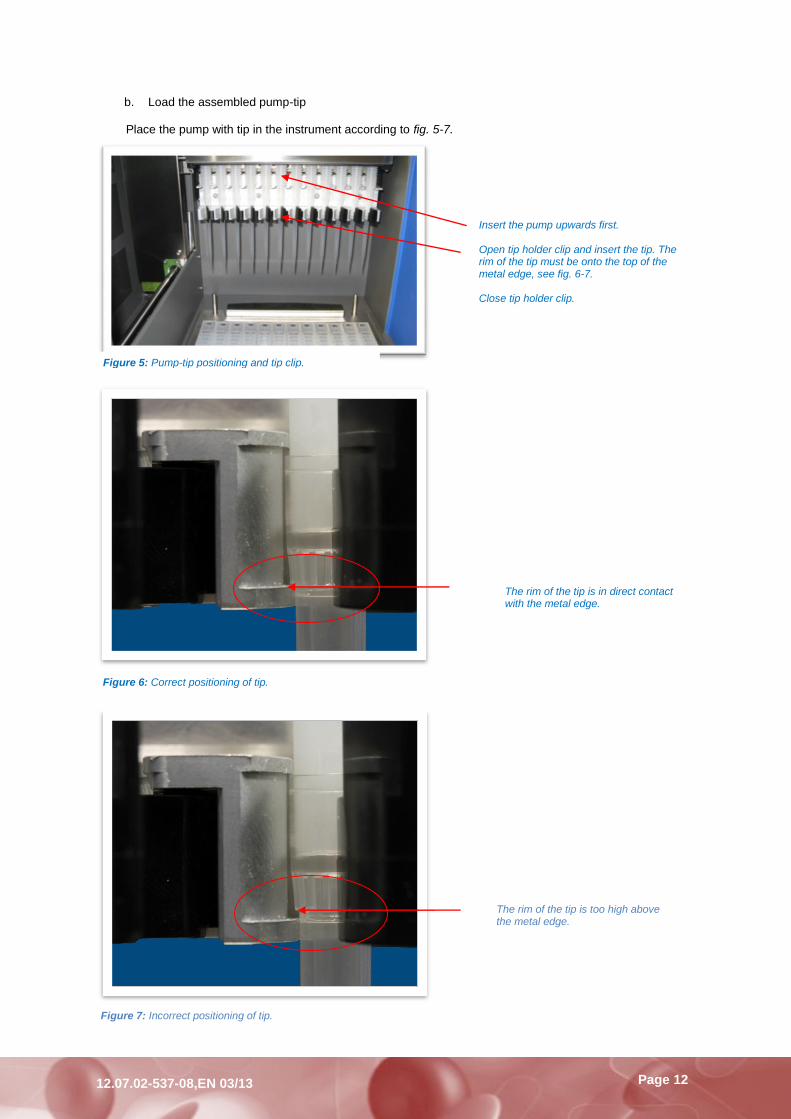
b. Load the assembled pump-tip
Place the pump with tip in the instrument according to fig. 5-7.
Insert the pump upwards first.
Open tip holder clip and insert the tip. The rim of the tip must be onto the top of the metal edge, see fig. 6-7. Close tip holder clip.
Figure 5: Pump-tip positioning and tip clip.
Figure 6: Correct positioning of tip.
Figure 7: Incorrect positioning of tip.
The rim of the tip is in direct contact with the metal edge.
The rim of the tip is too high above the metal edge.
Page 13
12.07.02-537-08,EN 03/13
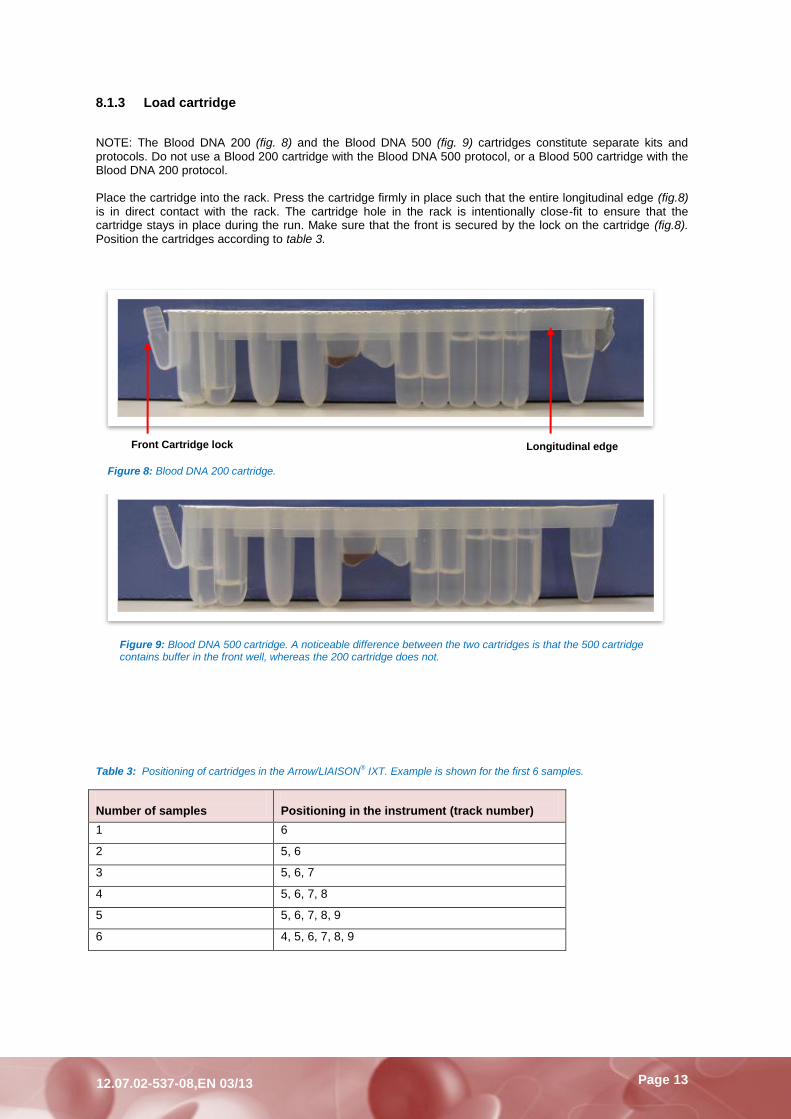
8.1.3 Load cartridge
NOTE: The Blood DNA 200 (fig. 8) and the Blood DNA 500 (fig. 9) cartridges constitute separate kits and protocols. Do not use a Blood 200 cartridge with the Blood DNA 500 protocol, or a Blood 500 cartridge with the Blood DNA 200 protocol. Place the cartridge into the rack. Press the cartridge firmly in place such that the entire longitudinal edge (fig.8) is in direct contact with the rack. The cartridge hole in the rack is intentionally close-fit to ensure that the cartridge stays in place during the run. Make sure that the front is secured by the lock on the cartridge (fig.8). Position the cartridges according to table 3.
Table 3: Positioning of cartridges in the Arrow/LIAISON
® IXT. Example is shown for the first 6 samples.
Number of samples
Positioning in the instrument (track number)
1 6
2 5, 6
3 5, 6, 7
4 5, 6, 7, 8
5 5, 6, 7, 8, 9
6 4, 5, 6, 7, 8, 9
Figure 8: Blood DNA 200 cartridge.
Front Cartridge lock
Longitudinal edge
Figure 9: Blood DNA 500 cartridge. A noticeable difference between the two cartridges is that the 500 cartridge contains buffer in the front well, whereas the 200 cartridge does not.
Page 14
12.07.02-537-08,EN 03/13
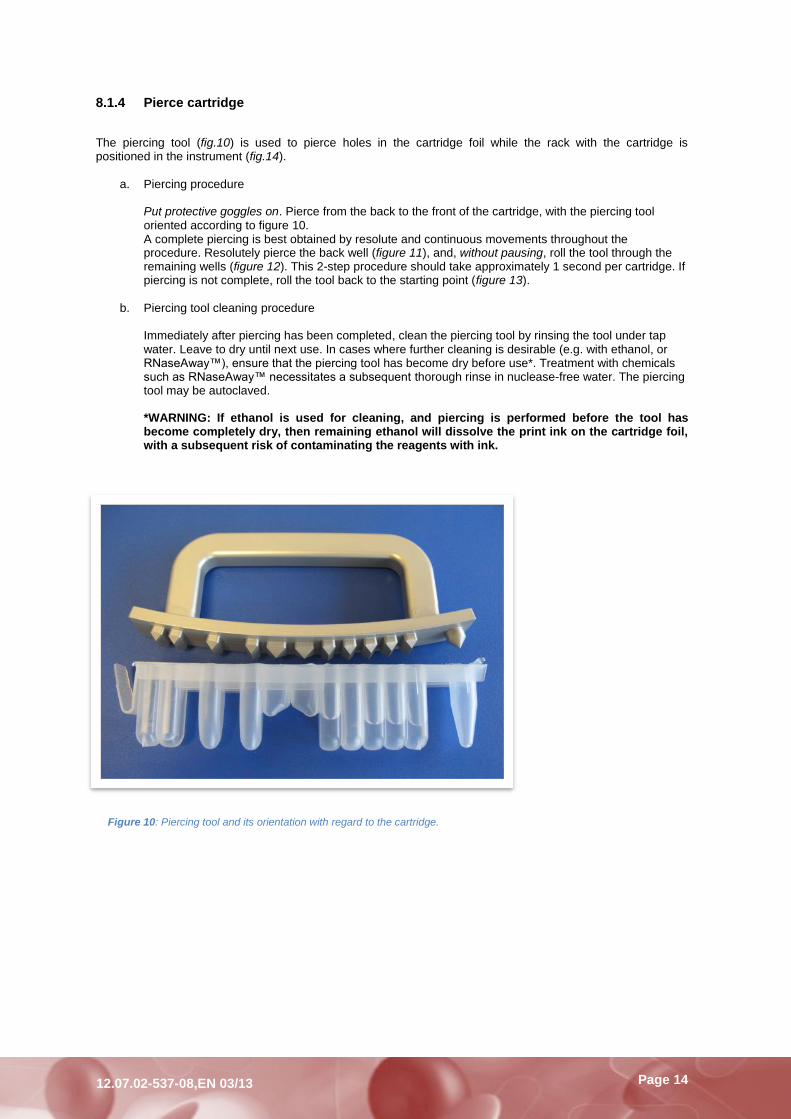
8.1.4 Pierce cartridge
The piercing tool (fig.10) is used to pierce holes in the cartridge foil while the rack with the cartridge is positioned in the instrument (fig.14).
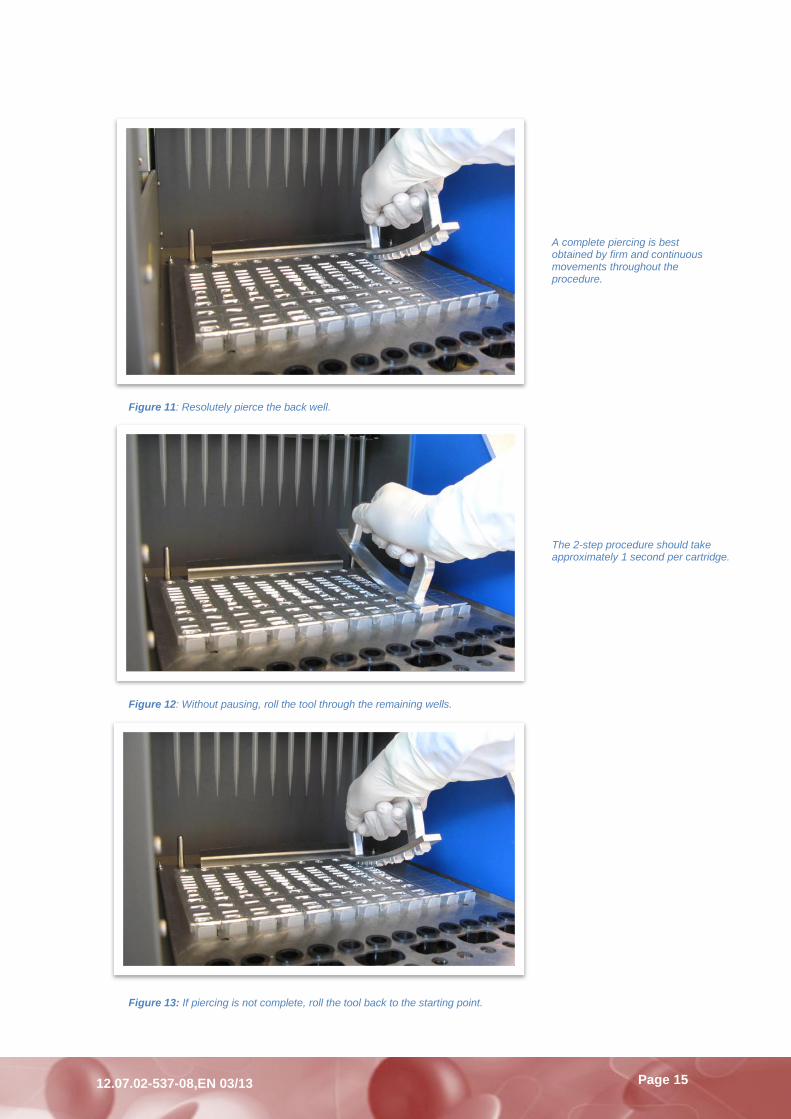
a. Piercing procedure Put protective goggles on. Pierce from the back to the front of the cartridge, with the piercing tool oriented according to figure 10. A complete piercing is best obtained by resolute and continuous movements throughout the procedure. Resolutely pierce the back well (figure 11), and, without pausing, roll the tool through the remaining wells (figure 12). This 2-step procedure should take approximately 1 second per cartridge. If piercing is not complete, roll the tool back to the starting point (figure 13).
b. Piercing tool cleaning procedure
Immediately after piercing has been completed, clean the piercing tool by rinsing the tool under tap water. Leave to dry until next use. In cases where further cleaning is desirable (e.g. with ethanol, or RNaseAway™), ensure that the piercing tool has become dry before use*. Treatment with chemicals such as RNaseAway™ necessitates a subsequent thorough rinse in nuclease-free water. The piercing tool may be autoclaved.
*WARNING: If ethanol is used for cleaning, and piercing is performed before the tool has become completely dry, then remaining ethanol will dissolve the print ink on the cartridge foil, with a subsequent risk of contaminating the reagents with ink.
Figure 10: Piercing tool and its orientation with regard to the cartridge.
Page 15
12.07.02-537-08,EN 03/13
Figure 13: If piercing is not complete, roll the tool back to the starting point.
A complete piercing is best obtained by firm and continuous movements throughout the procedure.
The 2-step procedure should take approximately 1 second per cartridge.
Figure 11: Resolutely pierce the back well.
Figure 12: Without pausing, roll the tool through the remaining wells.
Page 16
12.07.02-537-08,EN 03/13
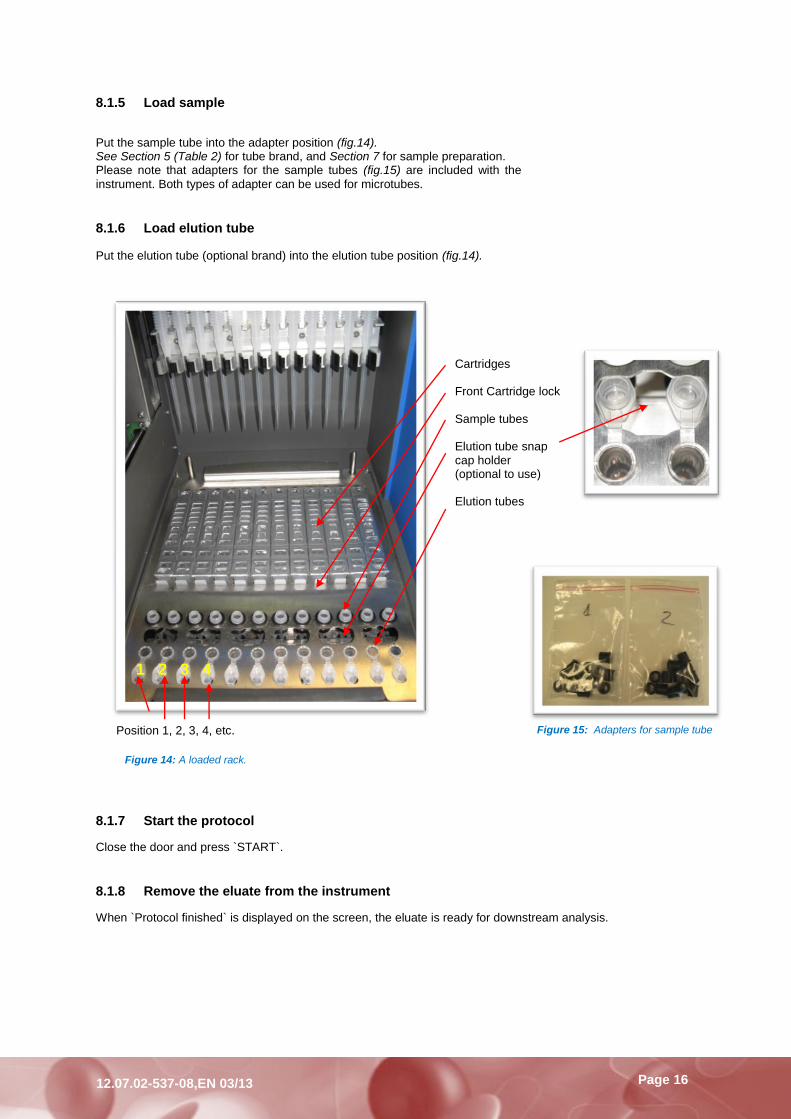
8.1.5 Load sample
Put the sample tube into the adapter position (fig.14). See Section 5 (Table 2) for tube brand, and Section 7 for sample preparation. Please note that adapters for the sample tubes (fig.15) are included with the
instrument. Both types of adapter can be used for microtubes.
8.1.6 Load elution tube
Put the elution tube (optional brand) into the elution tube position (fig.14).
8.1.7 Start the protocol
Close the door and press `START`.
8.1.8 Remove the eluate from the instrument
When `Protocol finished` is displayed on the screen, the eluate is ready for downstream analysis.
Figure 15: Adapters for sample tube
Figure 14: A loaded rack.
Cartridges Front Cartridge lock Sample tubes Elution tube snap cap holder (optional to use) Elution tubes
Position 1, 2, 3, 4, etc.
1 2 3 4
Page 17
12.07.02-537-08,EN 03/13
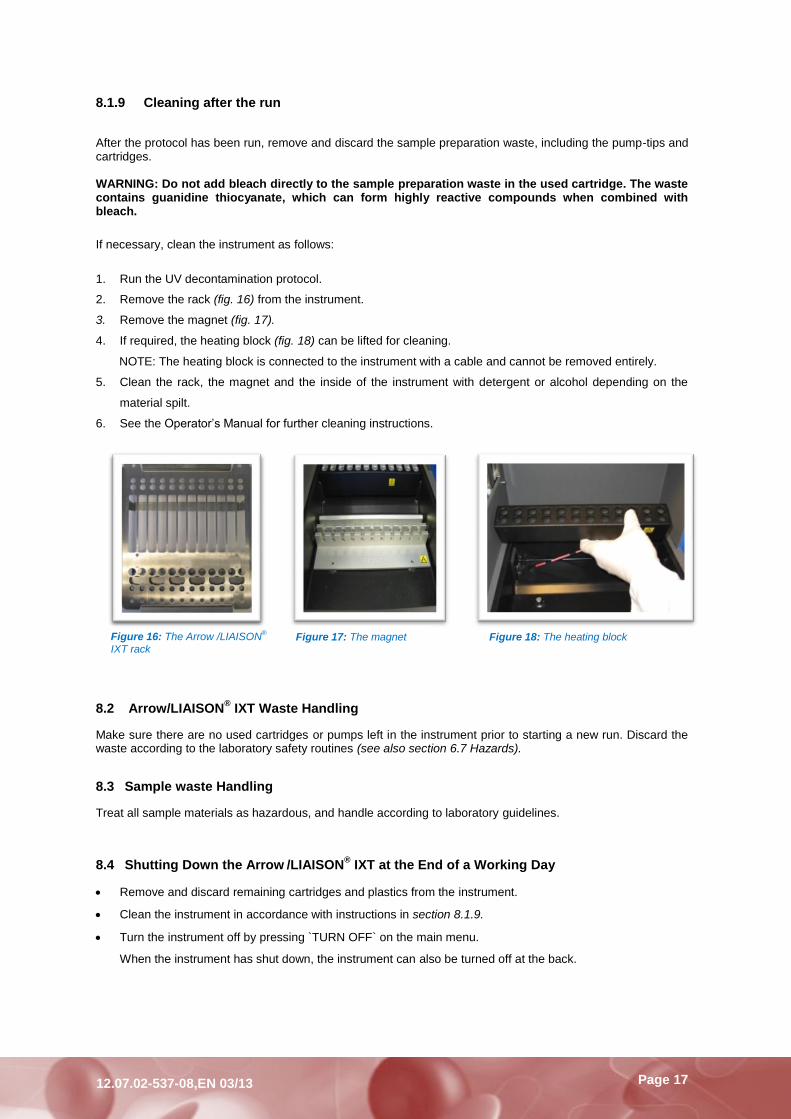
8.1.9 Cleaning after the run
After the protocol has been run, remove and discard the sample preparation waste, including the pump-tips and cartridges. WARNING: Do not add bleach directly to the sample preparation waste in the used cartridge. The waste contains guanidine thiocyanate, which can form highly reactive compounds when combined with bleach.
If necessary, clean the instrument as follows:
1. Run the UV decontamination protocol.
2. Remove the rack (fig. 16) from the instrument.
3. Remove the magnet (fig. 17).
4. If required, the heating block (fig. 18) can be lifted for cleaning.
NOTE: The heating block is connected to the instrument with a cable and cannot be removed entirely.
5. Clean the rack, the magnet and the inside of the instrument with detergent or alcohol depending on the
material spilt.
6. See the Operator’s Manual for further cleaning instructions.
8.2 Arrow/LIAISON® IXT Waste Handling
Make sure there are no used cartridges or pumps left in the instrument prior to starting a new run. Discard the waste according to the laboratory safety routines (see also section 6.7 Hazards).
8.3 Sample waste Handling
Treat all sample materials as hazardous, and handle according to laboratory guidelines.
8.4 Shutting Down the Arrow /LIAISON
® IXT at the End of a Working Day
Remove and discard remaining cartridges and plastics from the instrument.
Clean the instrument in accordance with instructions in section 8.1.9.
Turn the instrument off by pressing `TURN OFF` on the main menu.
When the instrument has shut down, the instrument can also be turned off at the back.
Figure 16: The Arrow /LIAISON®
IXT rack Figure 17: The magnet Figure 18: The heating block
Page 18
12.07.02-537-08,EN 03/13
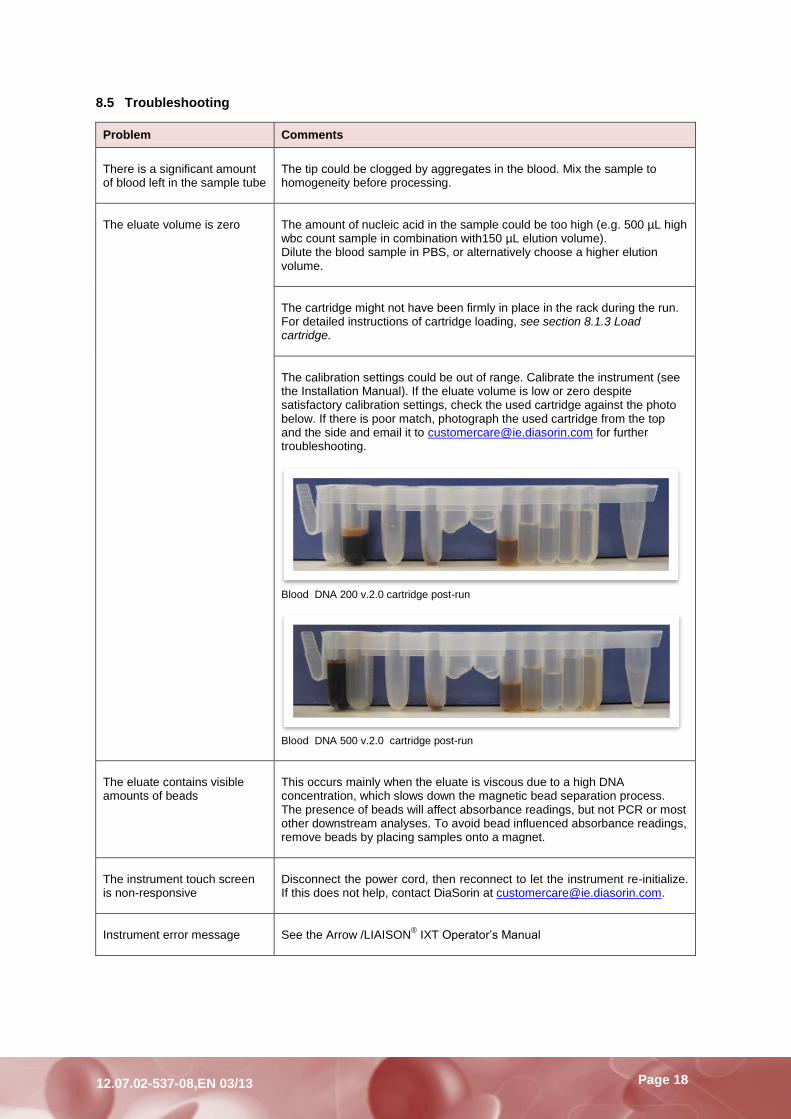
8.5 Troubleshooting
Problem Comments
There is a significant amount of blood left in the sample tube
The tip could be clogged by aggregates in the blood. Mix the sample to homogeneity before processing.
The eluate volume is zero
The amount of nucleic acid in the sample could be too high (e.g. 500 µL high wbc count sample in combination with150 µL elution volume). Dilute the blood sample in PBS, or alternatively choose a higher elution volume.
The cartridge might not have been firmly in place in the rack during the run. For detailed instructions of cartridge loading, see section 8.1.3 Load cartridge.
The calibration settings could be out of range. Calibrate the instrument (see the Installation Manual). If the eluate volume is low or zero despite satisfactory calibration settings, check the used cartridge against the photo below. If there is poor match, photograph the used cartridge from the top and the side and email it to [email protected] for further troubleshooting.
Blood DNA 200 v.2.0 cartridge post-run
Blood DNA 500 v.2.0 cartridge post-run
The eluate contains visible amounts of beads
This occurs mainly when the eluate is viscous due to a high DNA concentration, which slows down the magnetic bead separation process. The presence of beads will affect absorbance readings, but not PCR or most other downstream analyses. To avoid bead influenced absorbance readings, remove beads by placing samples onto a magnet.
The instrument touch screen is non-responsive
Disconnect the power cord, then reconnect to let the instrument re-initialize. If this does not help, contact DiaSorin at [email protected].
Instrument error message
See the Arrow /LIAISON
® IXT Operator’s Manual
Page 19
12.07.02-537-08,EN 03/13
9 PERFORMANCE DATA
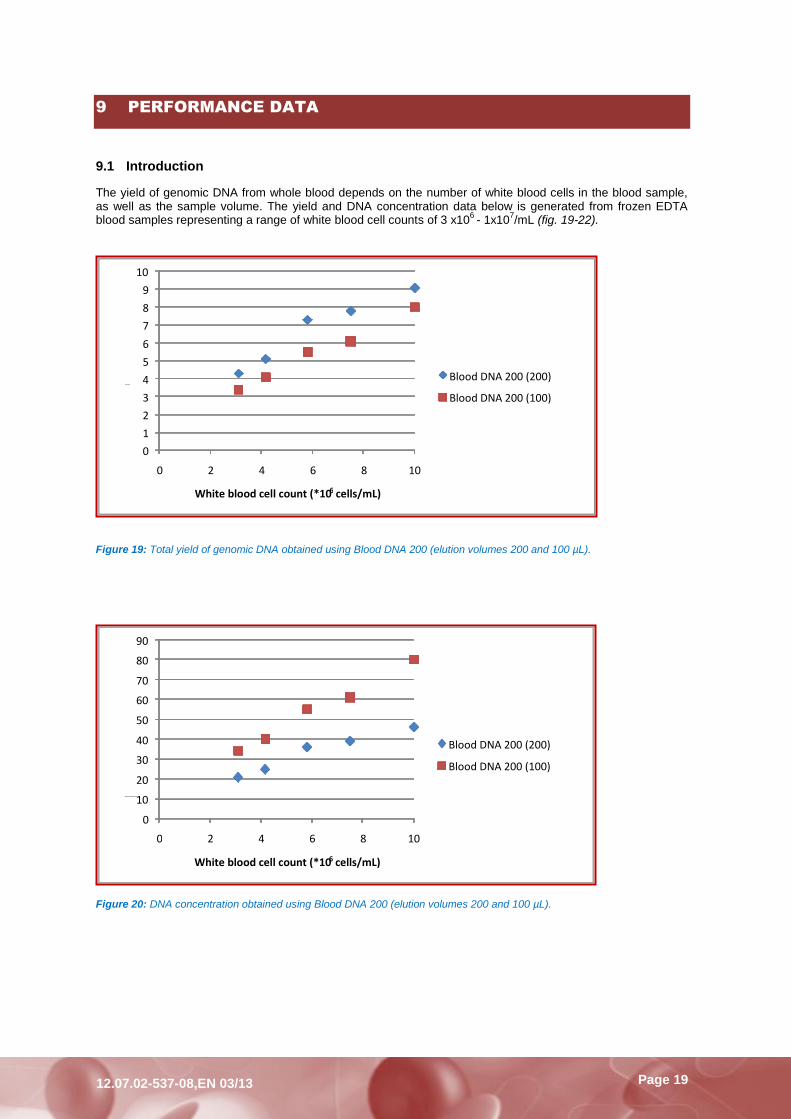
9.1 Introduction
The yield of genomic DNA from whole blood depends on the number of white blood cells in the blood sample, as well as the sample volume. The yield and DNA concentration data below is generated from frozen EDTA blood samples representing a range of white blood cell counts of 3 x10
6 - 1x10
7/mL (fig. 19-22).
Figure 19: Total yield of genomic DNA obtained using Blood DNA 200 (elution volumes 200 and 100 µL).
Figure 20: DNA concentration obtained using Blood DNA 200 (elution volumes 200 and 100 µL).
0
10
20
30
40
50
60
70
80
90
0 2 4 6 8 10
DNA concentrati on (ng /µL)
White blood cell count (*10 6 cells/mL)
Blood DNA 200 (200)
Blood DNA 200 (100)
0 1 2 3 4 5 6
7 8 9
10
0 2 4 6 8 10
Yield (µg)
White blood cell count (*10 6 cells/mL)
Blood DNA 200 (200)
Blood DNA 200 (100)

Page 20
12.07.02-537-08,EN 03/13
Figure 21: Total yield of genomic DNA obtained using Blood DNA 500 (elution volumes 400 and 150 µL).
Figure 22: DNA concentration obtained using Blood DNA 500 (elution volumes 400 and 150 µL).
0
20
40
60
80
100
120
140
160
180
0 2 4 6 8 10
DNA concentrati on (ng /µL)
White blood cell count (*10 6 cells/mL)
Blood DNA 500 (400)
Blood DNA 500 (150)
0
5
10
15
20
25
30
35
0 2 4 6 8 10
Yield (µg)
White blood cell count (*10 6 cells/mL)
Blood DNA 500 (400)
Blood DNA 500 (150)
Page 21
12.07.02-537-08,EN 03/13
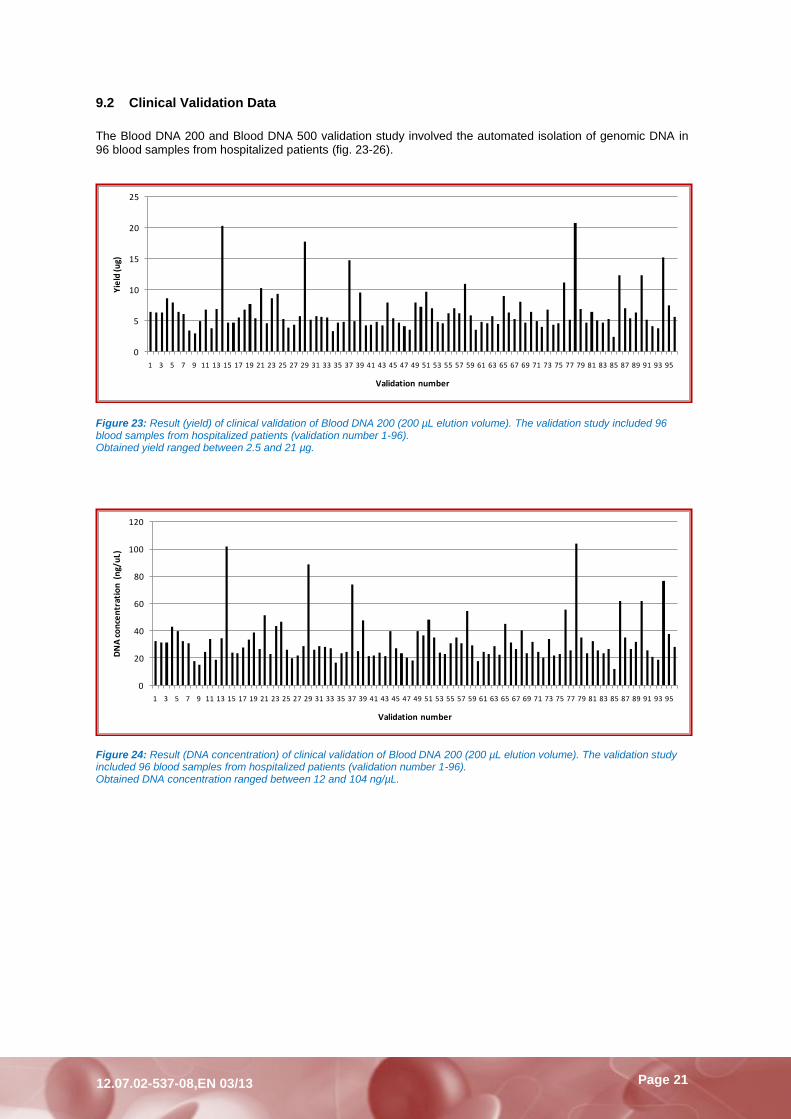
9.2 Clinical Validation Data
The Blood DNA 200 and Blood DNA 500 validation study involved the automated isolation of genomic DNA in 96 blood samples from hospitalized patients (fig. 23-26).
Figure 23: Result (yield) of clinical validation of Blood DNA 200 (200 µL elution volume). The validation study included 96 blood samples from hospitalized patients (validation number 1-96). Obtained yield ranged between 2.5 and 21 µg.
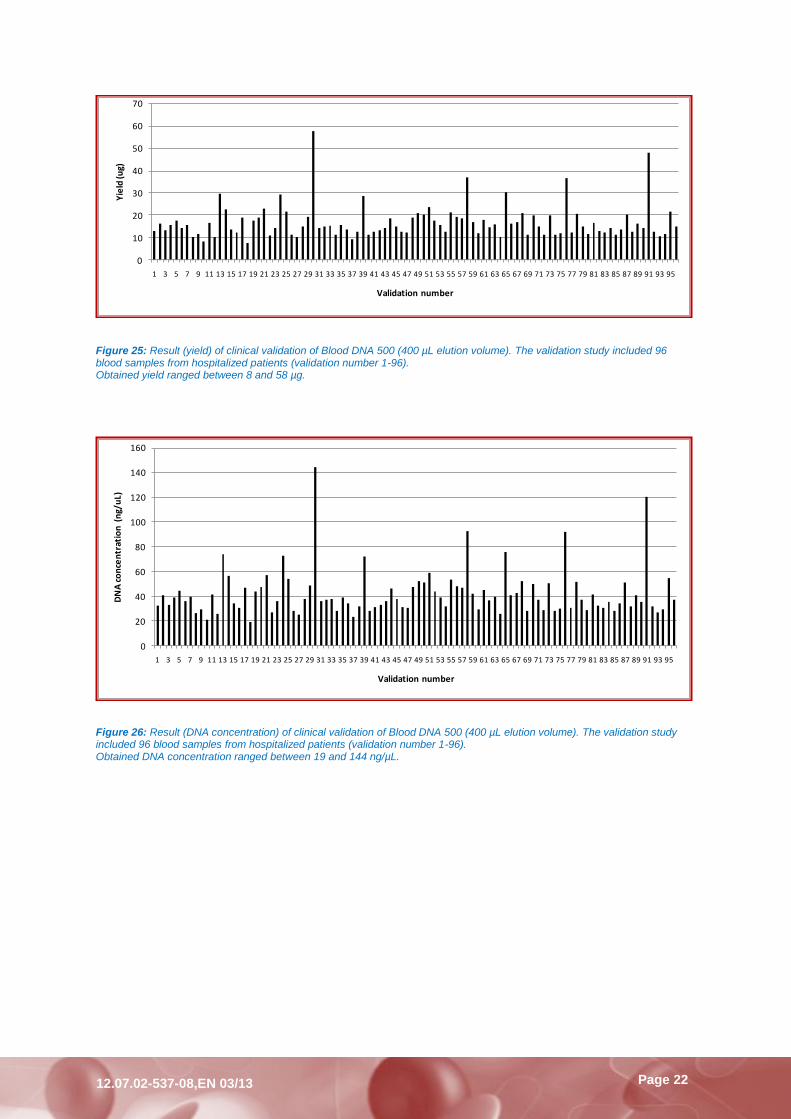
Figure 24: Result (DNA concentration) of clinical validation of Blood DNA 200 (200 µL elution volume). The validation study included 96 blood samples from hospitalized patients (validation number 1-96). Obtained DNA concentration ranged between 12 and 104 ng/µL.
0
5
10
15
20
25
1 3 5 7 9 11 13 15 17 19 21 23 25 27 29 31 33 35 37 39 41 43 45 47 49 51 53 55 57 59 61 63 65 67 69 71 73 75 77 79 81 83 85 87 89 91 93 95
Yie
ld (u
g)
Validation number
0
20
40
60
80
100
120
1 3 5 7 9 11 13 15 17 19 21 23 25 27 29 31 33 35 37 39 41 43 45 47 49 51 53 55 57 59 61 63 65 67 69 71 73 75 77 79 81 83 85 87 89 91 93 95
DN
A c
on
cen
trat
ion
(n
g/u
L)
Validation number
Page 22
12.07.02-537-08,EN 03/13
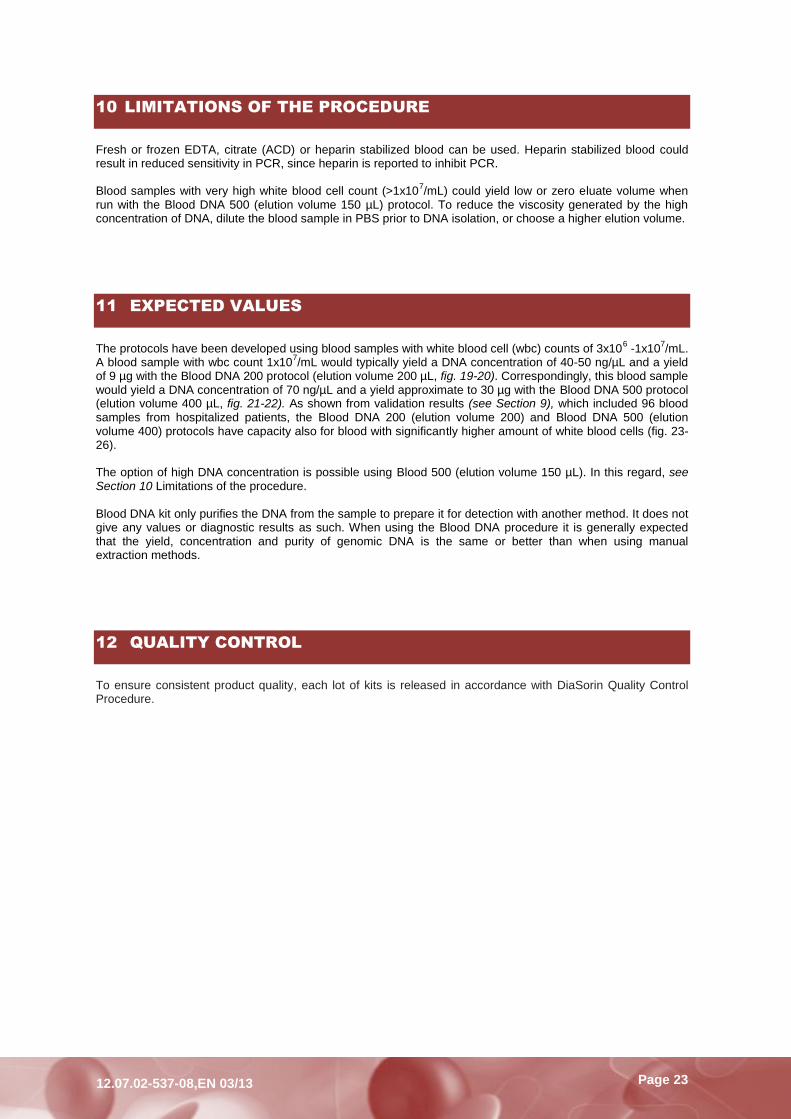
Figure 25: Result (yield) of clinical validation of Blood DNA 500 (400 µL elution volume). The validation study included 96 blood samples from hospitalized patients (validation number 1-96). Obtained yield ranged between 8 and 58 µg.
Figure 26: Result (DNA concentration) of clinical validation of Blood DNA 500 (400 µL elution volume). The validation study included 96 blood samples from hospitalized patients (validation number 1-96). Obtained DNA concentration ranged between 19 and 144 ng/µL.
0
10
20
30
40
50
60
70
1 3 5 7 9 11 13 15 17 19 21 23 25 27 29 31 33 35 37 39 41 43 45 47 49 51 53 55 57 59 61 63 65 67 69 71 73 75 77 79 81 83 85 87 89 91 93 95
Yie
ld (u
g)
Validation number
0
20
40
60
80
100
120
140
160
1 3 5 7 9 11 13 15 17 19 21 23 25 27 29 31 33 35 37 39 41 43 45 47 49 51 53 55 57 59 61 63 65 67 69 71 73 75 77 79 81 83 85 87 89 91 93 95
DN
A c
on
cen
trat
ion
(n
g/u
L)
Validation number
Page 23
12.07.02-537-08,EN 03/13
10 LIMITATIONS OF THE PROCEDURE
Fresh or frozen EDTA, citrate (ACD) or heparin stabilized blood can be used. Heparin stabilized blood could result in reduced sensitivity in PCR, since heparin is reported to inhibit PCR. Blood samples with very high white blood cell count (>1x10
7/mL) could yield low or zero eluate volume when
run with the Blood DNA 500 (elution volume 150 µL) protocol. To reduce the viscosity generated by the high concentration of DNA, dilute the blood sample in PBS prior to DNA isolation, or choose a higher elution volume.
11 EXPECTED VALUES
The protocols have been developed using blood samples with white blood cell (wbc) counts of 3x10
6 -1x10
7/mL.
A blood sample with wbc count 1x10⁷/mL would typically yield a DNA concentration of 40-50 ng/µL and a yield
of 9 µg with the Blood DNA 200 protocol (elution volume 200 µL, fig. 19-20). Correspondingly, this blood sample would yield a DNA concentration of 70 ng/µL and a yield approximate to 30 µg with the Blood DNA 500 protocol (elution volume 400 µL, fig. 21-22). As shown from validation results (see Section 9), which included 96 blood samples from hospitalized patients, the Blood DNA 200 (elution volume 200) and Blood DNA 500 (elution volume 400) protocols have capacity also for blood with significantly higher amount of white blood cells (fig. 23-26). The option of high DNA concentration is possible using Blood 500 (elution volume 150 µL). In this regard, see Section 10 Limitations of the procedure. Blood DNA kit only purifies the DNA from the sample to prepare it for detection with another method. It does not give any values or diagnostic results as such. When using the Blood DNA procedure it is generally expected that the yield, concentration and purity of genomic DNA is the same or better than when using manual extraction methods.
12 QUALITY CONTROL
To ensure consistent product quality, each lot of kits is released in accordance with DiaSorin Quality Control Procedure.
Page 24
12.07.02-537-08,EN 03/13
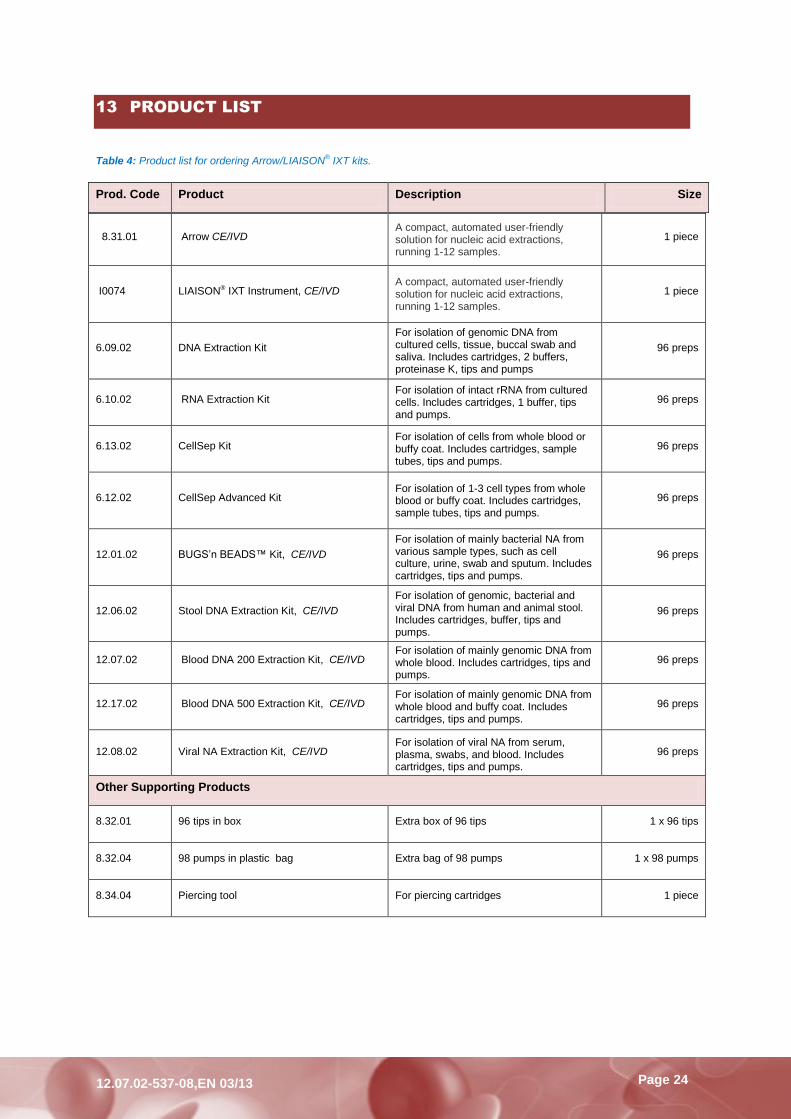
13 PRODUCT LIST
Table 4: Product list for ordering Arrow/LIAISON
® IXT kits.
Prod. Code Product Description Size
8.31.01 Arrow CE/IVD A compact, automated user-friendly solution for nucleic acid extractions, running 1-12 samples.
1 piece
I0074 LIAISON® IXT Instrument, CE/IVD A compact, automated user-friendly solution for nucleic acid extractions, running 1-12 samples.
1 piece
6.09.02 DNA Extraction Kit
For isolation of genomic DNA from cultured cells, tissue, buccal swab and saliva. Includes cartridges, 2 buffers, proteinase K, tips and pumps
96 preps
6.10.02 RNA Extraction Kit For isolation of intact rRNA from cultured cells. Includes cartridges, 1 buffer, tips and pumps.
96 preps
6.13.02 CellSep Kit For isolation of cells from whole blood or buffy coat. Includes cartridges, sample tubes, tips and pumps.
96 preps
6.12.02 CellSep Advanced Kit For isolation of 1-3 cell types from whole blood or buffy coat. Includes cartridges, sample tubes, tips and pumps.
96 preps
12.01.02 BUGS’n BEADS™ Kit, CE/IVD
For isolation of mainly bacterial NA from various sample types, such as cell culture, urine, swab and sputum. Includes cartridges, tips and pumps.
96 preps
12.06.02 Stool DNA Extraction Kit, CE/IVD
For isolation of genomic, bacterial and viral DNA from human and animal stool. Includes cartridges, buffer, tips and pumps.
96 preps
12.07.02 Blood DNA 200 Extraction Kit, CE/IVD For isolation of mainly genomic DNA from whole blood. Includes cartridges, tips and pumps.
96 preps
12.17.02 Blood DNA 500 Extraction Kit, CE/IVD For isolation of mainly genomic DNA from whole blood and buffy coat. Includes cartridges, tips and pumps.
96 preps
12.08.02 Viral NA Extraction Kit, CE/IVD For isolation of viral NA from serum, plasma, swabs, and blood. Includes cartridges, tips and pumps.
96 preps
Other Supporting Products
8.32.01 96 tips in box Extra box of 96 tips 1 x 96 tips
8.32.04 98 pumps in plastic bag Extra bag of 98 pumps 1 x 98 pumps
8.34.04 Piercing tool For piercing cartridges 1 piece

Page 25
12.07.02-537-08,EN 03/13
14 NOTES

Page 26
12.07.02-537-08,EN 03/13

Page 27
12.07.02-537-08,EN 03/13
Page 28
12.07.02-537-08,EN 03/13
DiaSorin Ireland Ltd.
Unit 13/14 Holly Avenue,
Stillorgan Industrial Park,
Blackrock,
Co. Dublin,
Ireland.
Tel: +353 1 2831166
Fax: +353 1 2831232
Email: [email protected]
[email protected] www.diasorin.com