Embed Size (px)
Citation preview

Blockchain on Kubernetes By VMware
Introduction Blockchain is an emerging technology which has been gaining traction globally during the past few years.
Industries like finance, logistics, IoT, are actively working on research and pilot projects using blockchain.
Despite the attention to blockchain, the installation and management of a blockchain service is very
complicated and requires sophisticated domain knowledge. Blockchain on Kubernetes (BoK) is a tool for
users to deploy Hyperledger Fabric v1.0.5 in Kubernetes. With only a few commands, a cluster of Fabric
node is up and running on Kubernetes. The blockchain developers can focus on the implementation of the
business logic.
Hyperledger is an open source project hosted by Linux Foundation. It was created to advance cross-
industry blockchain technologies. It is by far the most mature open source project for enterprise to try and
use distributed ledger technology (DLT).
Use Case There are three personas of a blockchain service: Cloud Admin, Blockchain Admin, Blockchain Developer.
They collaborate at different levels of the system. The Cloud Admin provisions and monitor the
infrastructure such as Kubernetes and vSphere. The Blockchain Admin manages the blockchain platform
(Hyperledger Fabric). The Blockchain Developer focuses on application development by using the
blockchain platform.
Figure 1
Architecture
Hyperledger Fabric is a distributed system implemented using containers. It can be deployed on the platform that
support OCI container standard. Kubernetes will be used here to manage the Fabric containers. We have used
the below architecture for Fabric v1.0:
▪ Use namespaces to maintain different Fabric organizations.

▪ Customizable number of peers in an organization.
▪ Isolation through Persistent Volume.
Figure 2
Deployment Instructions
Prerequisites:
1) (Optional) vCenter 6.0+, with at least one ESXi host.
2) An NFS server for storing configuration files of the Fabric cluster.
3) Internet connection is required during installation.
4) A Linux host with Docker 1.11+ installed.
5) Python 3.5 installed on the Linux host (with PyYAML module, jinja2 module).
If you are running BoK on Ubuntu, you can install the two modules with the following command:
$ sudo apt-get install python3-yaml python3-jinja2 -y
After you download the package of BoK, you can follow the steps below to install Fabric 1.0.5 on
Kubernetes.
Note: If you choose to use an existing Kubernetes cluster, you can start from step 3.
1. Preparing vSphere environment
In vCenter, configure or create the below resources for Kubernetes:
❖ Create a Datacenter in the vCenter, such as Datacenter; ❖ Create a cluster in the Datacenter, such as Compute; ❖ Add a ESXi host into the cluster, the host better have more than 20G Storage, which will be shared
by the kub pool, Linux host and NFS server; ❖ Create a resource pool for the Kubernetes, such as kub-pool;

❖ Select a datastore used by the Kubernetes, such as datastore1; ❖ Select a network for the Kubernetes nodes such as VM Network. The network must have DHCP
service to provide dynamic IP address and can connect to internet.
2. Deploying Kubernetes
There are many approaches to set up a Kubernetes instance. We will introduce two approaches by using
Kubernetes Anywhere or PKS (https://cloud.vmware.com/pivotal-container-service).
2.1 Deploying Kubernetes by Kubernetes Anywhere
We will deploy Kubernetes by using open source project Kubernetes Anywhere (https://github.com/kubernetes/kubernetes-anywhere).
❖ Download this OVA template file and import it into vCenter. You will get a VM template named "KubernetesAnywhereTemplatePhotonOS". More information about importing the OVA can be found here: https://github.com/kubernetes/kubernetes-anywhere/blob/master/phase1/vsphere/README.md
Figure 3
❖ On the Linux host, run the deployment container of Kubernetes Anywhere , you will stay inside the container's command prompt after the commands:
$ docker pull cnastorage/kubernetes-anywhere:v1
$ docker run -it --rm --env="PS1=[container]:\w> " --net=host cnastorage/kubernetes-
anywhere:v1 /bin/bash
❖ Inside the container start to deploy Kubernetes: ➢ [container]:/opt/kubernetes-anywhere> make deploy
➢ Input parameters according to the prompts. The following is an example:( to accept the
default value, just press the enter key.) ▪ number of nodes (phase1.num_nodes) [4] (NEW) 4
▪ cluster name (phase1.cluster_name) [kubernetes] (NEW) kubernetes
▪ cloud provider: gce, azure or vsphere (phase1.cloud_provider) [gce] (NEW) vsphere
▪ vCenter URL Ex: 10.192.10.30 or myvcenter.io (phase1.vSphere.url) [] (NEW) 10.112.123.52
▪ vCenter port (phase1.vSphere.port) [443] (NEW) 443
▪ vCenter username (phase1.vSphere.username) [] (NEW) [email protected]
▪ vCenter password (phase1.vSphere.password) [] (NEW) MyPassword#3
▪ Does host use self-signed cert (phase1.vSphere.insecure) [Y/n/?] (NEW) Y
Please note only input Y when your VC use a self-singed certificate(Please aware that use self-signed
certificate are prone to the man in the middle attack).

▪ Datacenter (phase1.vSphere.datacenter) [datacenter] (NEW) Datacenter
▪ Datastore (phase1.vSphere.datastore) [datastore] (NEW) datastore1
▪ Deploy Kubernetes Cluster on 'host' or 'cluster' (phase1.vSphere.placement) [cluster] (NEW) cluster
▪ vspherecluster (phase1.vSphere.cluster) [] (NEW) compute
▪ Do you want to use the resource pool created on the host or cluster? [yes, no]
(phase1.vSphere.useresourcepool) [no] (NEW) yes
▪ Name of the Resource Pool. If Resource pool is enclosed within another Resource pool, specify pool
hierarchy as ParentResourcePool/ChildResourcePool (phase1.vSphere.resourcepool) (NEW) kub-pool
▪ Number of vCPUs for each VM (phase1.vSphere.vcpu) [1] (NEW) 4
▪ Memory for each VM (phase1.vSphere.memory) [2048] (NEW) 4096
▪ Network for each VM (phase1.vSphere.network) [VM Network] (NEW)VM Network
▪ Name of the template VM imported from OVA. If Template file is not available at the destination
location specify vm path (phase1.vSphere.template) [KubernetesAnywhereTemplatePhotonOS.ova]
(NEW) KubernetesAnywhereTemplatePhotonOS
▪ Flannel Network (phase1.vSphere.flannel_net) [172.1.0.0/16] (NEW)
▪ ** Phase 2: Node Bootstrapping*
▪ installer container (phase2.installer_container) [docker.io/cnastorage/k8s-ignition:v2] (NEW)
▪ docker registry (phase2.docker_registry) [gcr.io/google-containers] (NEW)
▪ kubernetes version (phase2.kubernetes_version) [v1.6.5] (NEW)
▪ bootstrap provider (phase2.provider) [ignition] (NEW)
▪ ** Phase 3: Deploying Addons.*
▪ Run the addon manager? (phase3.run_addons) [Y/n/?] (NEW)
▪ Run kube-proxy? (phase3.kube_proxy) [Y/n/?] (NEW)
▪ Run the dashboard? (phase3.dashboard) [Y/n/?] (NEW)
▪ Run heapster? (phase3.heapster) [Y/n/?] (NEW)
▪ Run kube-dns? (phase3.kube_dns) [Y/n/?] (NEW)
▪ Run weave-net? (phase3.weave_net) [N/y/?] (NEW) N
➢ Wait for the Kubernetes cluster to be created. Use the following two commands to check
Kubernetes cluster status:
$ export KUBECONFIG=phase1/vsphere/.tmp/kubeconfig.json
$ kubectl cluster-info
It will display the cluster information similar to the below:
Figure 4
➢ Copy the content of the file phase1/vsphere/.tmp/kubeconfig.json to your Linux host and
save the content to the ~/.kube/config . You may need to create .kube directory if it does
not exist on the Linux host Note: if you exit the container by mistake you can also find the kubeconfig.json on the kubernetes master server.
(You can find the master server's IP from vSphere Web Client)
$ scp root@master_ip:/var/srv/kubernetes/kubeconfig.json ~/.kube/config
The default password is "kubernetes"
➢ Exit the container and return to the Linux host.
➢ Download kubectl on your Linux host Please make sure the kubectl version in the Linux host complies with the kubectl version
in the kub-pool. Currently the kubectl version in kub-pool from
KubernetesAnywhereTemplatePhotonOS is 1.6.5. To install kubectl, run

$ curl -LO https://storage.googleapis.com/kubernetes-
release/release/v1.6.5/bin/linux/amd64/kubectl
$ chmod +x kubectl
$ sudo mv kubectl /usr/local/bin/kubectl
Or you can just copy it from /usr/local/bin/kubectl in the master node of the kub-pool.
Also do not forget to execute “export KUBECONFIG=’’…/.kube/config” or configure it in /etc/profile
$ kubectl cluster-info
You will get the same result as Figure 4 shows.
➢ Make sure the Kubernetes cluster runs correctly. On your Linux host execute:
$ kubectl get pods –all-namespaces
make sure all the pods are ready and running.
❖ Configure the DNS of Docker daemon on all Kubernetes workers.
The Fabric creates a Docker container to run chaincode which is out of the Kubernetes' control.
Therefore, Docker daemon needs to include the correct DNS information of the Kubernetes
network. It should include both the Kubernetes' DNS and the worker node's DNS that used to
reach the internet.
To get the DNS for the kubernetes system, execute command in Linux host:
$ kubectl get services --all-namespaces
To get the DNS for the working node in the kub-pool, execute command in the kube node:
$ cat /etc/resolv.conf
Usually all the nodes got the same DNS.
Make the following changes on all Kubernetes worker nodes. (In this example, it includes node1,
node2, node3 and node4)
1) Edit the /etc/default/docker file and change its content similar to the following:
DOCKER_OPTS=" --bip=172.1.42.1/24 --ip-masq=false --mtu=1472 --dns=10.0.0.10 --dns=10.162.204.1 --dns-
search default.svc.cluster.local --dns-search svc.cluster.local --dns-opt ndots:2 --dns-opt timeout:2 --dns-opt
attempts:2 "
NOTE: As the above example shows, IP address 10.0.0.10 is the DNS of Kubernetes network, and IP
address 10.162.204.1 is the DNS of the workers local network. Please modify DOCKER_OPTS
according to your network configuration, relative bip information can be found in the
/etc/default/docker file for each node.
If you have a proxy server for Docker to pull images, please also add them in the
/etc/default/docker file, e.g. :
HTTP_PROXY=http://yourproxyserver:3128
HTTPS_PROXY=https://yourproxyserver:3128
2) Restart the Docker service to allow the changes to take effect:
$ systemctl restart docker-containerd
$ systemctl restart docker
Please make sure the restart correctly otherwise the nodes status is not correct.
Now the Kubernetes installation has been completed.
The default login info for the worker node is: root/kubernetes and you are strongly recommended to
change the default password to a more secure one.
2.2 Using PKS as container service platform
PKS is a product that enables enterprises and service providers to deliver production-ready
Kubernetes on VMware vSphere and Google Cloud Platform (GCP), with constant compatibility to
Google Container Engine (GKE). BoK support running on PKS, please refer to the PKS installation
guide on how to deployment PKS.
3. Deploying Fabric (blockchain platform)
❖ You need to set up an NFS service and export a shared directory (e.g. /opt/share). You can check the settings on your NFS server (10.112.122.9 in this example)
# showmount -e 10.112.122.9
Export list for 10.112.122.9:
/opt/share *
The NFS client needs to have read/write access to the /opt/share folder. If there is no authentication required by NFS (i.e. anonymous access), the folder's owner and group needs to be changed to nobody:nogroup. Otherwise the Kubernetes pods will encounter permission error. You can simply run the below command on the NFS server:

$ chown -R nobody:nogroup /opt/share
❖ Mount the /opt/share to your Linux host:
$ mount 10.112.122.9:/opt/share /opt/share
❖ Download the BoK package file Baas.tar and extract the files. ❖ Change the current directory to baas and run the following commands to download tools required
by Fabric. Two tools, cryptogen and configtxgen, will be saved in bin directory. Due to an issue in pdf software, it may have an extra space between "hyperledger- fabric" if you copy the command. You need to remove it manually.
$ cd baas $ curl https://nexus.hyperledger.org/content/repositories/releases/org/hyperledger/fabric/hyperledger-fabric/linux-amd64-1.0.5/hyperledger-fabric-linux-amd64-1.0.5.tar.gz | tar xz
$ chmod +x bin/*
❖ In the setupCluster/templates directory, update the following two template files with your NFS
server's IP address: 1) fabric_1_0_template_cli.yaml
Figure 5
2) fabric_1_0_template_namespace.yaml

Figure 6
❖ In the setupCluster/resources/explorer-artifacts directory, update fabric_1_0_explorer.yaml files with your NFS server's IP address:
1)fabric_1_0_explorer.yaml
Figure 7
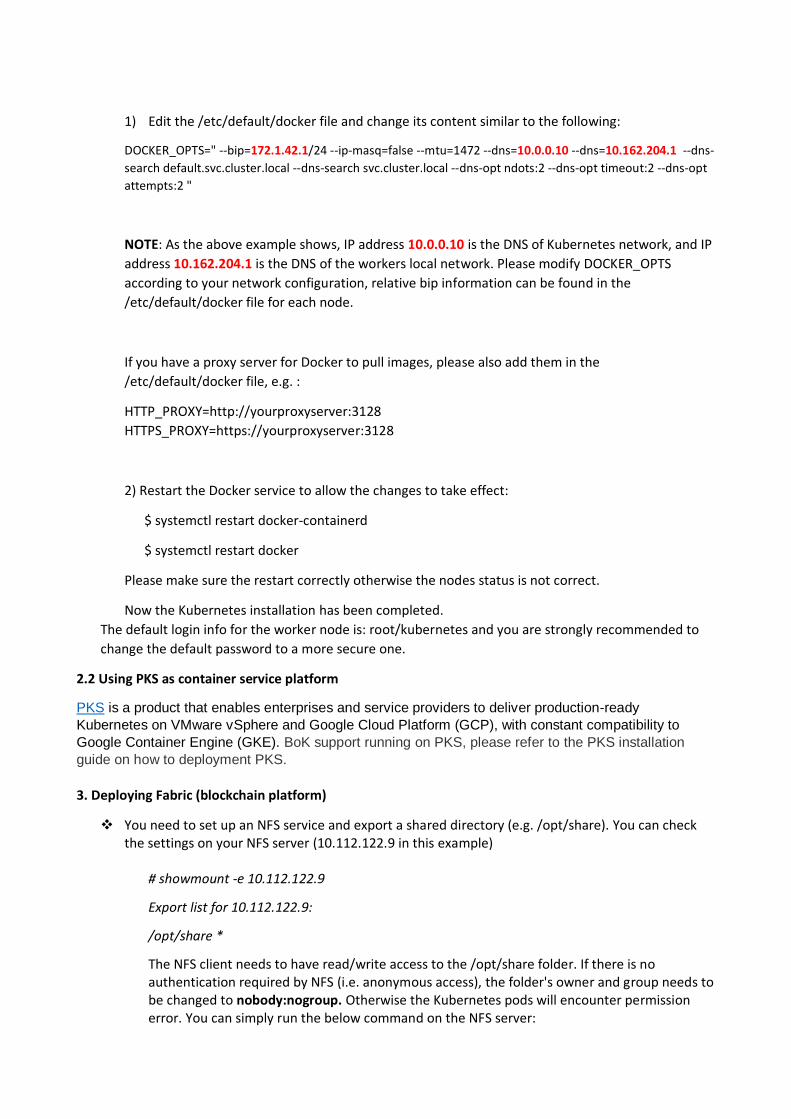
❖ (Optional) If you are running BoK on PKS platform, the following two places need to be changed in the setupCluster/templates/fabric_1_0_template_peer.yaml file
1) change the value of CORE_VM_DOCKER_HOSTCONFIG_NETWORKMODE from "bridge" to "host"
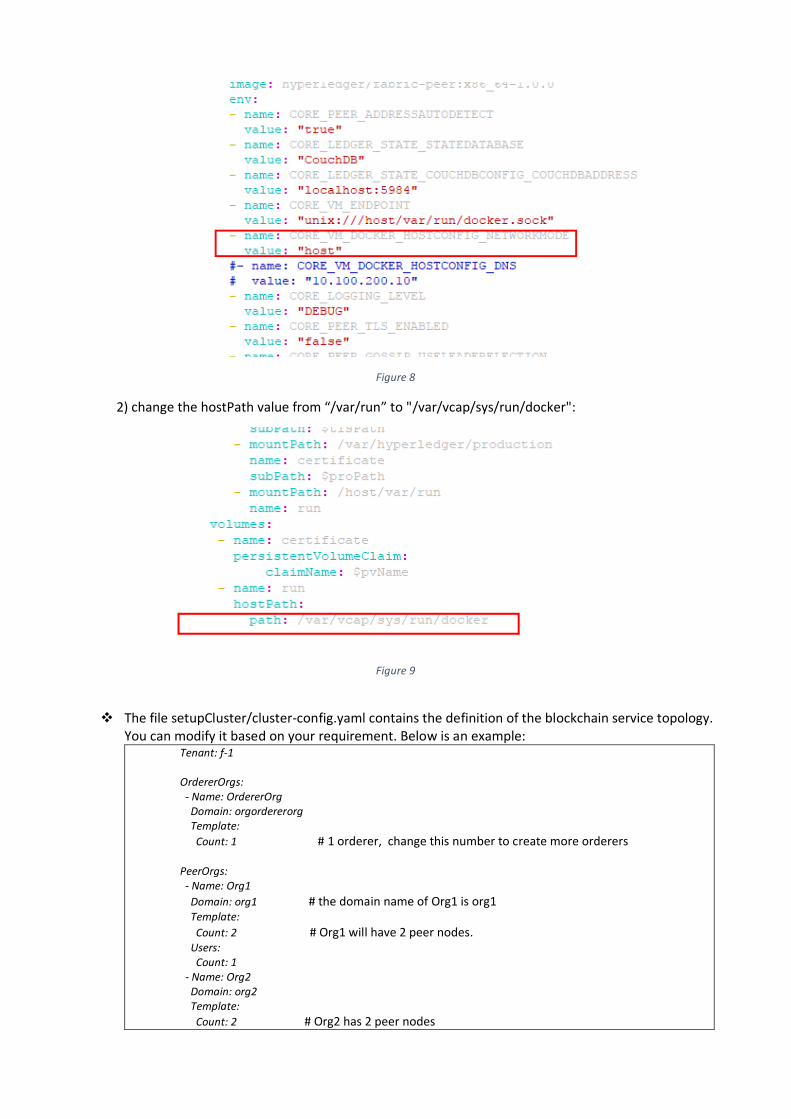
Figure 8
2) change the hostPath value from “/var/run” to "/var/vcap/sys/run/docker":
Figure 9
❖ The file setupCluster/cluster-config.yaml contains the definition of the blockchain service topology.
You can modify it based on your requirement. Below is an example: Tenant: f-1 OrdererOrgs: - Name: OrdererOrg Domain: orgordererorg Template:
Count: 1 # 1 orderer, change this number to create more orderers
PeerOrgs: - Name: Org1
Domain: org1 # the domain name of Org1 is org1 Template:
Count: 2 # Org1 will have 2 peer nodes. Users: Count: 1 - Name: Org2 Domain: org2 Template:
Count: 2 # Org2 has 2 peer nodes

Users: Count: 1
❖ Now we are ready to install BoK.
$ cd setupCluster
$ bash install.sh
When you see the following output it means BoK has been installed and started successfully.
Figure 10
❖ You can view the Fabric pods through kubectl command:
$ kubectl get pods --all-namespaces
Figure 11
❖ You can also view them through the Kubernetes dashboard UI (see Figure 13).
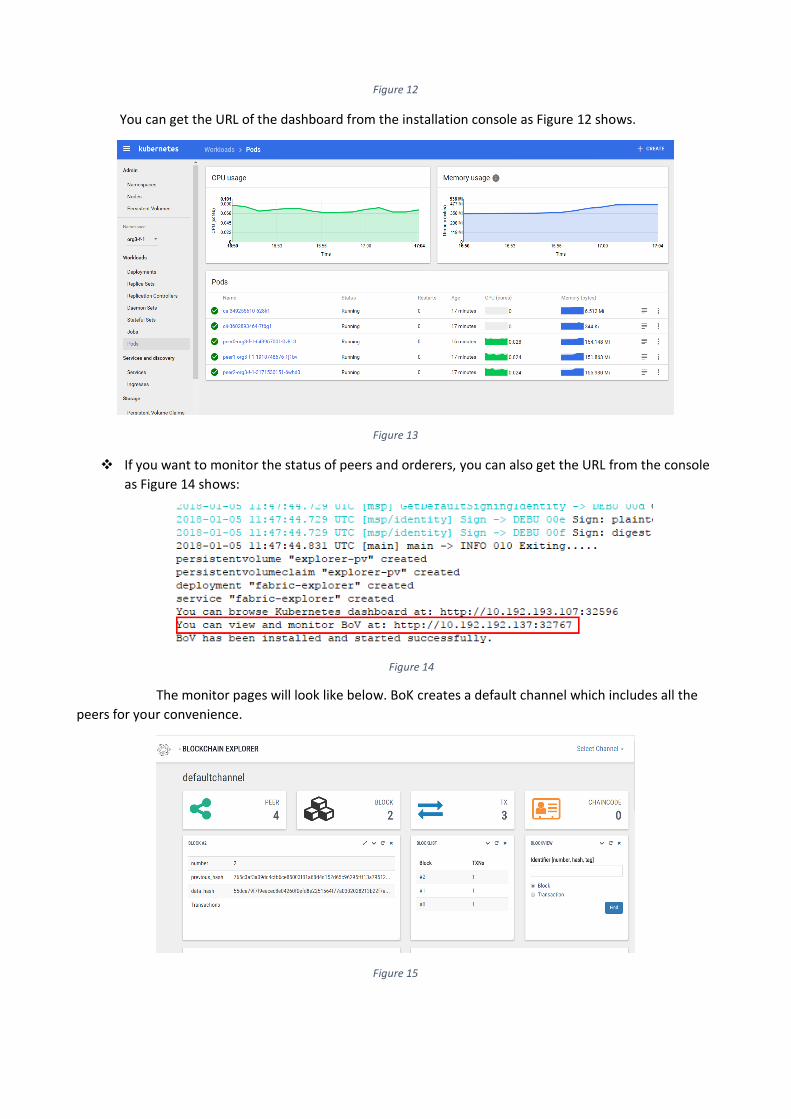
Figure 12
You can get the URL of the dashboard from the installation console as Figure 12 shows.
Figure 13
❖ If you want to monitor the status of peers and orderers, you can also get the URL from the console
as Figure 14 shows:
Figure 14
The monitor pages will look like below. BoK creates a default channel which includes all the
peers for your convenience.
Figure 15

❖ You can stop or start BoK using the commands "bash stop.sh" or "bash start.sh".
Miscellaneous:
BoK supports creating a customized Blockchain Explorer for your own channel. You can refer to the
"Create_customized_Explorer.pdf" for more detail.


![Design of Anonymous Endorsement System in Hyperledger Fabric · Hyperledger Fabric is one of the most popular open-source permissioned blockchain frameworks[3]. It is quite scalable](https://img.pdfslide.us/doc/110x75/5ec65e753964fa287365d579/design-of-anonymous-endorsement-system-in-hyperledger-fabric-hyperledger-fabric.jpg)


![Blockchain and Trusted Computing: Problems, Pitfalls, and a Solution for Hyperledger … · Hyperledger Fabric [3], or Fabric for short, a flexible and modular platform for consortium](https://img.pdfslide.us/doc/110x75/5ec656274faae761ee4db67f/blockchain-and-trusted-computing-problems-pitfalls-and-a-solution-for-hyperledger.jpg)


![FastFabric: Scaling Hyperledger Fabric to 20,000 ... · ledger Fabric 1.2 since it is reported to be the fastest available open-source permissioned blockchain [5]. While there has](https://img.pdfslide.us/doc/110x75/5e72dbe79b2046590114f019/fastfabric-scaling-hyperledger-fabric-to-20000-ledger-fabric-12-since-it.jpg)