Embed Size (px)
Citation preview

Bleaching Beeswax: A Look into the Methods Used
for the Last 2000 Years
By Sawbina Fahy
Cover Photo: Final beeswax samples. Photo by Mary Agee‐Harris

Introduction Beeswax has been an essential part of many cultures throughout time. From household to medicinal to artistic purposes, the use of beeswax can be seen in a variety of ways, and it is still used today, even in some of its original purposes. Often times, pigments were added to beeswax to denote special significance. Colored sealing wax for official government documents and tinted sacramental candles for rituals are two of many possible examples. One question that has been asked is “How do the colors in the wax become so vibrant?” With modern techniques, dying is relatively easy; however, in the middle Ages, how was this accomplished without the use of machinery or chemicals? This paper and accompanying experimentation will focus on the different uses of beeswax, how to render wax from the comb, and how to bleach wax to prepare for tinting. How Beeswax Is Made A honey bee has an eight‐part segmented underbelly, and “beeswax is secreted by [the] worker bees…on abdominal segments four through seven” (Sanford and Dietz, 197) in small clear platelets. These platelets (Figure 1) are then scraped off and chewed by the bee to add enzymes and saliva to make them more pliable when constructing the hexagonal cells (Krell 4.1). This mastication and adulteration process turns the platelets from clear to white. Figure 2 shows a newly formed comb with “virgin wax” that is ready for use for either honey containment or brood rearing (Krell 4.2).
Colors of Hive Wax Unbleached wax ranges from a pastel gold to dark amber depending upon its use within the hive. Typically, lighter yellows to soft golds were for honey, while deep golds to dark browns were for brood rearing. In honeycomb, when forager bees collect nectar from flowers, they place it into a special honey stomach (or crop) where enzymes breakdown the “combination of amino and other acids, proteins, lipids, minerals and vitamins…that plants need to survive” (Binkley). The forager bees then return to the hive and regurgitate the nectar residue to house bees. The house bees then ingest and regurgitate it again and again adding more enzymes until the complex polysaccharides (sugars) have broken down into simpler ones. The end result is then placed in the individual cells of the comb and fanned to evaporate the excess water. Through this entire process, the enzymes and different “combinations of sucrose, fructose and glucose…affect [the] finished honey’s color and flavor” (Birkley). Furthermore, the type of nectar equally affects the honey’s color and flavor – “honey made from Orange Blossom nectar might be light in color, whereas honey from Avocado or Wildflowers might have a dark amber color” (“Learn about Honey”). These changes will also account for the varying degrees of yellows seen in the surrounding beeswax.
Figure 1: Fresh wax scales. Photo by Waugsberg.
Figure 2: Newly constructed white comb in a traditional log hive. Photo by R. Krell.

In brood comb, each of the cells is lined with propolis – a mixture of beeswax and plant resins – before each egg is laid. This is significant because the “antibacterial and antifungal effects of propolis [are] protecting the colony against diseases” (Krell 5.1). Then the egg is laid, and soon after, royal jelly is distributed inside the cell for food. When the larva has developed enough, it is continually fed pollen and honey until it is mature (Figure 3). After the bee exits the cell, the pupal lining is left behind and many times the nurse bees cannot remove all of its traces. Between the leftover sticky lining catching pollen and hive debris, a propolis dusting every 21 days for the new brood, and constant activity through feedings up to a thousand times a day, the brood comb’s wax becomes significantly darker within a very short time (Burlew, Figure 4).
History of Beeswax Use Bees and those who keep them have been around for many centuries. One of the earliest depictions is approximately 8000 years old from the Cuevas de la Araña, or Spider Caves, in Bicorp, Spain (Figure 5). Although it does not specifically show the use of the beeswax, it still shows that beekeepers existed, and thus the assumption can be that the wax itself was used in some fashion.
One of the first known uses of beeswax was the candle. The Chi Chu Phiem dictionary of the Han Dynasty (circa 40 BCE) mentions candles that are “specifically of beeswax” (Needham, 79‐80), even though whale fat candles were found in a mausoleum from the earlier Qin Dynasty. Additional archeological evidence found
Figure 3: Fresh Brood Comb with Capped Brood. Photo by Chris Severn.
Figure 4: Older Darker Brood Comb (~4 months old). Photo by Chris Severn.
Figure 5: Man gathering honey. Photo by Valencia International.

from an Alemannic graveyard in Oberflacht confirms that pure beeswax candles were used as early as the 7th century in Europe (Figure 6). Despite the fact that many other forms of wax were cheaper and more readily available throughout the Middle Ages, many people still chose to use beeswax when they could acquire it because “beeswax burned pure and cleanly, without producing a smoky flame” (“History of Candles”). Even to this day, the Catholic Church will only use pure beeswax candles in their Masses stating that “the pure wax extracted by bees from flowers symbolizes the pure flesh of Christ received from His Virgin Mother, the wick signifies the soul of Christ, and the flame represents His divinity” (Schulte).
The second greatest use of beeswax was material preservation. Many of the tradesmen of the Middle Ages would preserve and polish wood, steel, iron, bronze, bow strings, and various leather products (shoes, horse tack, and saddles) with wax for long term use. Cowan dedicated an entire chapter in his book – called “Technical Uses” – to recipes for polishes, pastes, creams, oils, and varnishes that are used for this purpose (134‐145). These recipes were used at the turn of the 20th century, but most of them can be derived from period knowledge and methods. Not only was the preservation of materials important, the preservation of images was just as significant. Roman magistrates had wax profiles made so that they could be available on “occasions on which every member of the family that had ever existed was always present” (Cowan 20). Also wax representations of deities for home altars or travelling as well as temple offerings by the lower classes were used regularly. Even if not physically available, the wax figurines represented the spirit of the person, deity, or offering.
Communication became another favorite use of beeswax. Tablets with wax “sheets” were used to communicate notes or temporary correspondence rather than use marble, brass, or leaden sheets. (Cowan 19). Figure 7 shows a tablet recovered with Mycenaean Greek writing that is estimated to be from 16th–12th centuries BCE. As communications became more developed, sealing wax was used to keep prying eyes from knowing the contents denoting significance through pigmentation of the wax – “The mixture varied at different epochs, and the colours were also changed according to the dignity of the persons and the nature of the deeds to which they were affixed” (Cowan 37‐38). Artists began to use beeswax in a variety of ways as a medium. Certainly the aforementioned artists making wax figures, but also metal casters used it to get more detail on their images. However, no artistry is more famous for its use of beeswax than encaustic painting – heated wax with a variety of pigments on wood or canvas. The Fayum mummy portraits are the most notable in history. These were used during the Coptic period (3rd–7th centuries) to cover the faces of the mummies buried and showed the head and/or upper chest of the individual with full committal detail (Figure 8). According
Figure 6: Beeswax candles from Alemannic graveyard. Photo by Bullenwächter
Figure 7: Wax tablet with inscription.Photo by Gautier Poupeau.

to the contributors of the Wikipedia article “Fayum Mummy Portraits”:
The encaustic images are striking because of the contrast between vivid and rich colours, and comparatively large brush‐strokes, producing an "Impressionistic" effect…
The Fayum portraits reveal a wide range of painterly expertise and skill in presenting a lifelike appearance. The naturalism of the portraits is often revealed in knowledge of anatomic structure and in skilled modelling of the form by the use of light and shade, which gives an appearance of three‐dimensionality to most of the figures. The graded flesh tones are enhanced with shadows and highlights indicative of directional lighting (Section 2.2).
Such great detail was attributed to how the wax layered on and helped increase the dimensions to create realness versus the egg‐based tempura painting that was found on other portraits in the same region.
Cuirboilli, embalming, cosmetics, resist for batiks, salves/balms/pill coating in medicine, and cements for repairs or embellishments on homes/temples/ships are just a few of the additional ways that beeswax was used throughout history. Pliny said it best when he stated, “wax, an article that is useful for a thousand purposes of life” (Pliny, bk XI, ch 4). Rendering Beeswax In order to use beeswax, the combs have to be extracted from the hive and all honey removed. This can be done by uncapping the combs and letting them naturally drain, crushing the combs and sifting the honey through cloth, or the more modern day, centrifuge method of slinging off the honey in a basin. This latter is used when the combs need to be preserved and refilled by the hive. Once the honey is gone, there are three main ways wax is rendered: “1. Those depending only upon heat. 2. Those employing both water and heat. 3. Those dependent on presses and hot water” (Cowan 57). The method used in this experiment will focus on heat and water, as described in The Natural History. The questions being examined in this experiment are: 1) Can the process be replicated as close to the oldest documentation possible – Pliny’s original manuscript? 2) Through evaluating the process, is it still accurate given the modern technology of the 21st century? 3) Is this feasible both in terms of ease and cost efficiency for future teaching purposes.
Pliny describes wax preparation as follows:
“[Combs] are first cleaned with water, and then dried three days in the shade: on the fourth day they are melted on the fire in a new earthen vessel, with sufficient water to cover them, after which the liquor is strained off in a wicker basket. The wax is then boiled again with the same water and in the same pot, and poured into vessels of cold water, the interior of which has been well rubbed with honey” (bk XXI, ch 49).
1800 years later, Pliny’s core process is still used; Cowan talks of the method that is common practice, mainly among indigenous peoples of third‐world countries:
Figure 8: Encaustic painting on wood. Photo by the Metropolitan Museum of Art.

“Break up the combs and strain the honey from them, after which they are placed in a cauldron of water. As the combs generally contain pollen and brood, they are allowed to soak for a time in order to soften the pollen and cast off skins of the cocoons. A fire is then lighted under the cauldron and the mass boiled, being stirred meanwhile with a stick to cause the combs to go to pieces. When the wax is all melted that which floats on the top is ladled out on to a canvas or other strainer placed over a pan containing a little water. More combs are put into the cauldron, and the process continued so long as there are any combs to melt. When cool enough the refuse is squeezed with the hands to remove what wax remains, the debris being thrown away” (53‐54).
Regardless of present‐day solar extractors and steam presses, even Bradbear describes in 2009 a version of Pliny’s method that is considered the traditional way to render beeswax. He states that “most beekeepers do not own such equipment and achieve excellent results [with this method]” (108):
1. Remove as much honey as possible from the honeycombs and soften them by soaking in warm water: pollen and any honey remaining in the combs will dissolve in the water. Repeat this process three times.
2. Use clean rainwater if possible. If the water is very alkaline, add a little vinegar (1 part vinegar to 1,000 parts water).
3. After washing the combs, break them up into small pieces. 4. Place the pieces of comb in a pan and add clean water to the level of the combs or a little above. 5. Heat the mixture gently and keep stirring all the time, especially when the mixture starts to
reach high temperatures. Wax is highly flammable. 6. After the combs have melted fully, pour the mixture into a long bag made of sacking, woven
rush, nylon, jute or other heavy cloth, and tie it tightly. Holding the whole thing over a basin or bucket, squeeze the bag with two pieces of wood, to make sure that all the wax is squeezed out of the bag into the bucket underneath. Brood, pieces of wood, grass and other large particles will be removed by this process.
7. Leave the bucket with the mixture of hot water and molten wax to cool, placing it in an area sheltered from high winds and dust: preferably a corner in a clean and cool room. The wax solidifies as it cools, forming a disc of wax on the surface of the water. Any particles that have escaped through the bag will settle below the wax layer.
8. When the mixture is completely cool, remove the wax layer. Scrape off any material stuck to the underside of the wax disc, and re‐melt the wax in an equal volume of clean water. This time use a finer cotton cloth to strain small impurities out of the wax. After filtering through the cloth, collect the hot mixture of wax and water in a bowl, preferably enamel, which has been smeared with a film of soapy water – only a very small amount to cover the surface. The bowl should not hold more than about two kilograms of wax. Even bowls made from wood or calabashes can also be used as moulds for beeswax. Do not use fat or oil instead of soap, as these would contaminate the wax. Do not use heavily scented soap.
9. Place the mixture in a cool place free from dust and wind. When the water and wax have completely cooled down i.e. about 12 hours after pouring the mixture into the enamel bowl, a mould of beeswax can be easily shaken out. Any impurities adhering to the bottom of the cake can be scraped off with a knife.
10. Do not disturb the wax until it has cooled for 12 hours…you may spoil the wax. 11. Beeswax purified carefully by this method should be in a suitable state for sale and export and
does not require any other processing. 12. Store refined beeswax in a clean place, away from any strong‐smelling substances. (109)
As Krell said, “Several methods of rendering wax are possible and may be adapted to various circumstances” (Section 4.6), but there is no additional mention of any specific process – traditional or current.

There were notable differences between the aforementioned methods. Even though Cowan’s and Bradbear’s were derived from Pliny’s, the changes and assumptions as to why should be explored:
Cleaning the combs – Cowan mentions soaking “for a time”; Pliny says to wash them in water and let them dry in the shade for three days; Bradbear says to soak the combs three separate times.
o Cowan’s technique could save more wax by skimming the pollen, cocoons and other debris off the top after soaking; anything else would boil off or be strained out of the mixture later.
o Pliny may assume the sun is breaking down the pollen and other debris trapped in the wax. o Bradbear presumably uses three times as a way of completely dissolving the remaining
pollen and honey.
Containers – Pliny says “new earthen vessel”; Cowan says “cauldron”; Bradbear says “pan.” o Pots of Pliny’s era were possibly destroyed through the rendering process or when used
repeatedly. The wax could get burned and become worthless if the integrity of the pot was compromised through multiple uses. Metal cauldrons were not treated or lined which would cause metal poisoning to seep into the wax.
o In Cowan’s time, cauldrons were used to do most major cooking and rendering of materials since metal lasts longer when heated and reheated continually.
o Bradbear is likely speaking of non‐stick pans seen today and which would allow wax extraction to be easier; however, since there are many types of “pans” available, there is no guarantee of what type it is.
Straining – Bradbear says to use “sacking, woven rush, nylon, jute or other heavy cloth” in conjunction with pieces of wood to compress the bag; Cowan mentions canvas or “other strainer”; Pliny mentions “wicker basket.”
o Many synthetic materials are available to today that could resist wax adhesion which could account for Bradbear naming several types. Either way, he does denote a heavier cloth that would better suit the high temperatures of the wax. Also, his method is the only one saying to apply pressure with boards to force additional wax through the straining cloth instead of letting gravity do it. This reasoning would be so that the wax doesn’t start hardening quickly on the outside of the straining device and cause it to be reheated repeatedly to render all of the wax and discolor it.
o Cowan is most likely making use of the better techniques developed as the canvas would be much less porous that earlier substances used and catch more debris when straining off the wax/water mixture. However, he does not state if the canvas is pretreated or not; if it is pretreated, the dried wax tidbits may be easier to remove later.
o In Pliny’s time, baskets were used regularly for all sorts of projects because of their cost effectiveness; it would have been expensive to use muslin, linen, or cotton to strain wax because it would be ruined for any other use later.
Further differences – Bradbear talks of several improvements on Pliny’s and Cowan’s method that are mainly possible through the materials and research that is available today.
o Removal of excess debris attached to the underside of the wax. Since the particles are heavier than the wax, their settlement makes it easier to remove and discard them. Cowan does talk debris removal later in his book under “Refining Wax,” but this process includes the treatment of chemicals, and therefore was discarded (83).
o Using proper space for cooling to reduce and/or eliminate the potential for dust. o Using a “step down” method of less porous straining cloths. The series of renderings would
make for cleaner, more refined wax that could be sold easier. o Coating containers to make easier extraction of wax blocks. Bradbear specifies coated
enamel with a layer of soap on the inside to keep the wax from sticking. Soap is preferable because the fat/oil from non‐stick sprays or other lubricants would contaminate the wax.
o Not expediting the cooling process, so the wax does not spoil. Cooling the wax in a freezer or using liquid nitrate would either contaminate the wax or cause it to be full of water. Both could damage the wax and make it useless.
o Storage area should exclude strong‐smelling substances because the wax will absorb them.

Based on the writings and analysis of the differences, the process for rendering the wax during this experiment is outlined below. Any complications or variations are noted in a later section.
1. Acquire combs (Figure 9 & 10). A local beekeeper had replaced the foundations within their hives and had no intention of rendering the wax for further use.
Figure 9: Raw, unprocessed comb. Photo by Mary Agee‐Harris.
Figure 10: Piece of unprocessed comb up‐close. Photo by Mary Agee‐Harris.

2. Boil combs in water (Figure 11). The combs were placed into a pot with approximately two cups of tap water. Fresh tap water was used for each new batch processed.
3. Debris removed (Figures 12 & 13). The slumgum – “the residue consisting chiefly of propolis, cocoons, bits of wax, and honey that remains [in the wax]” (Merriam‐Webster) – was removed by use of a cheesecloth strainer. The remaining wax was poured into another container to cool.
Figure 11: Combination of wax and water boiling in pot. Photo by Mary Agee‐Harris.
Figure 12: Examples of slumgum. Photo by Mary Agee‐Harris.
Figure 13: Hot rendered wax in storage container with extracted slumgum/debris in cheesecloth. Photo by Mary Agee‐Harris.
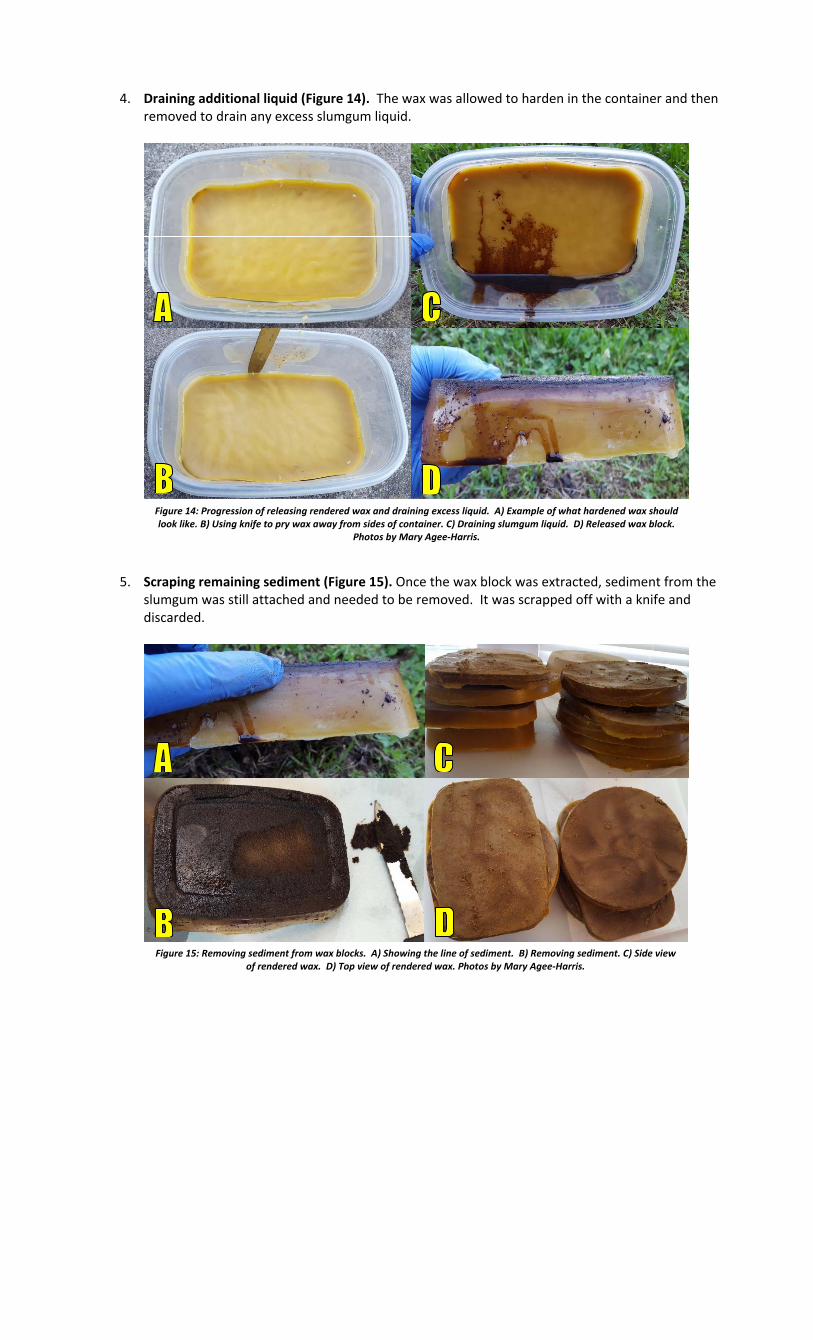
4. Draining additional liquid (Figure 14). The wax was allowed to harden in the container and then
removed to drain any excess slumgum liquid.
5. Scraping remaining sediment (Figure 15). Once the wax block was extracted, sediment from the slumgum was still attached and needed to be removed. It was scrapped off with a knife and discarded.
Figure 14: Progression of releasing rendered wax and draining excess liquid. A) Example of what hardened wax should look like. B) Using knife to pry wax away from sides of container. C) Draining slumgum liquid. D) Released wax block.
Photos by Mary Agee‐Harris.
Figure 15: Removing sediment from wax blocks. A) Showing the line of sediment. B) Removing sediment. C) Side view of rendered wax. D) Top view of rendered wax. Photos by Mary Agee‐Harris.

6. Repeat process (Figures 16 ‐ 18). The first rendering eliminated most of the slumgum and sediment; however, due to the excessive debris, additional renderings were needed.
Figure 16: Second rendering with sediment and slumgum still visible. Photo by Mary Agee‐Harris.
Figure 17: Third rendering with visibly less sediment. A) Bottom view. B) Side view.
Photos by Mary Agee‐Harris.
Figure 18: Fourth rendering with little sediment remaining. A) Bottom view. B) Side view.
Photos by Mary Agee‐Harris.

After the fourth rendering of the wax, enough sediment was removed sufficiently to continue to the bleaching process. In Figure 19, it can be seen that wax rendered twice versus four times have no difference in color.
Bleaching Beeswax Lighter color waxes are more coveted than the darker ones because many associate quality with color. This is both true and untrue for beeswax; it depends on the use. Using a lighter color would allow pigments to adhere for better color in cosmetics and painting, or it could let original woodwork and medicinal ingredients to be seen. Yet, if the wax is being burned, the color should not affect the perception of quality, with exception to specific religious significance. Regardless of use, bleached beeswax does thrive as a commercial product now, just as much as in ancient times. Pliny writes about “Punic wax” being the best available – the Punics were from Carthage, or modern day Tunisia. Here is how it is prepared:
“The Punic wax is prepared in the following manner: yellow wax is first blanched in the open air, after which it is boiled in water from the open sea…the whitest part of it [the wax], is then skimmed off with spoons, and poured into a vessel containing a little cold water. After this, it is again boiled in sea‐water by itself, which done, the vessel is left to cool. When this operation has been three times repeated, the wax is left in the open air upon a mat of rushes, to dry in the light of the sun and moon; for while the latter adds to its whiteness, the sun helps to dry it. In order, however, that it may not melt, it is the practice to cover it with a linen cloth: if, when it has been thus refined, it is boiled once more, the result is a wax of the greatest possible whiteness” (bk XXI, ch 49).
Before talking at length of various chemical bleaching techniques used today, Krell sums up Pliny’s method in this way:
“The beeswax is flaked and bleached in the sun, then boiled in clean, clear sea water. The scum layer floating on top is skimmed off and the heating repeated. The cooled wax is flaked again and bleached once more in the sun. A final melting in soft fresh water may be necessary to rinse out the salt residues” (Section 4.11.1)
Cowan even says that “all bleaching is done in the open air by subjecting it [the wax] to the rays of the sun” (79) and that whole factories were dedicated to this endeavor in 1908. The technique used in the factories
Figure 19: Color comparison of rendered wax. Left rendered four times; right rendered twice.
Photos by Mary Agee‐Harris.

was to melt refined wax using steam and run them through a strainer with small holes into cold water thus creating long, cylindrical sticks of wax “about the size of a quill” called ribbons. The ribbons were dried then laid on canvas webs that were raised off the ground and exposed to direct sunlight. After a period of time, the ribbons were collected, melted again, and exposed once more to get every possible inch of the wax. “The whole operation occupies from ten to sixty days, according to the season, the weather, and the colour of the wax” (79‐80). Bradbear only says that “the finest beeswax is considered to be from wax cappings…because this fresh ‘virgin wax’ is pure and white coloured. In the past, it was common to bleach wax (using bleaches such as sulphuric acid or hydrogen peroxide), but this practice is now considered unnecessary and damaging” (105). As with the rendering process, there were notable differences between Pliny’s and Cowan’s methods (and Krell’s interpretation, if needed):
Size of wax – Pliny doesn’t mention any particular size; Krell’s interpretation says “flaked”; Cowan’s method employs “ribbons.”
o Pliny is assuming it was customary to shave or flake the wax in order to blanch correctly. o Krell is likely pointing out the obvious flaking rather than leaving it up to interpretation. o Cowan’s method is using machinery, but still using the original process making the wax thin
enough to have the sun easily penetrate through.
Melting the Wax – Pliny talks of boiling the sun bleached wax in sea water; Cowan says water. o Pliny uses sea water; this borders on imprudent, considering the many times that hard
water has been specifically prohibited; however, there may be minerals that add to the bleaching process that are only found in salt water.
o Cowan’s method will most likely use soft water, as he had stated earlier in the book.
Number of renderings – Cowan states “several repetitions”; Pliny states three times. o Cowan’s method is based on a standard color assessed by the industry of his time. In order
to reach a level that is acceptable, the wax would need to be melted, ribboned, blanched, re‐melted, and so on; thus the manner of renderings in this method are unknown.
o Three seems to be consistent for many things in the early Roman era. Pliny’s use of the number is not necessarily of importance, except that re‐melting the wax multiple times could have an effect on the final color.
Covering wax – Pliny discusses using linen; Cowan’s method uses nets. o Pliny’s method of using linen to cover the fully bleached wax is so that “it may not melt”; it
could also be to keep dust and atmospheric debris from sticking to the surface. o Cowan says that the factories use nets on “sheltered fields” so that the small ribbons are not
blown away or contaminated.
Further differences – Pliny’s process includes a few variances from Cowan’s; they are listed below. o Skimming off the scum layer after melting in the sea water. This is possibly the minerals
that were boiled out. o Wax left to dry for a full day and night after processing thrice. This part could be negligible
because the moonbeams would offer little in the way of bleaching; the main detail is that Pliny explains “the sun helps to dry it [out]” so there is not excessive moisture trapped in the wax.
o Krell’s interpretation says one final rendering with clean water is needed to fully remove any salt particles or residue within the finished wax.
The process for bleaching wax during this experiment is outlined below. Any complications or variations are noted in a later section.
1. Prepare rendered wax (Figure 20). The wax blocks were taken and prepared in various forms for bleaching. Honeycomb and brood wax were prepared in the following manner on both wax paper and foil foundations: raw comb, variable size chunks, thin shavings, 1.25 ounce blocks, course grated, fine grated, and melted.

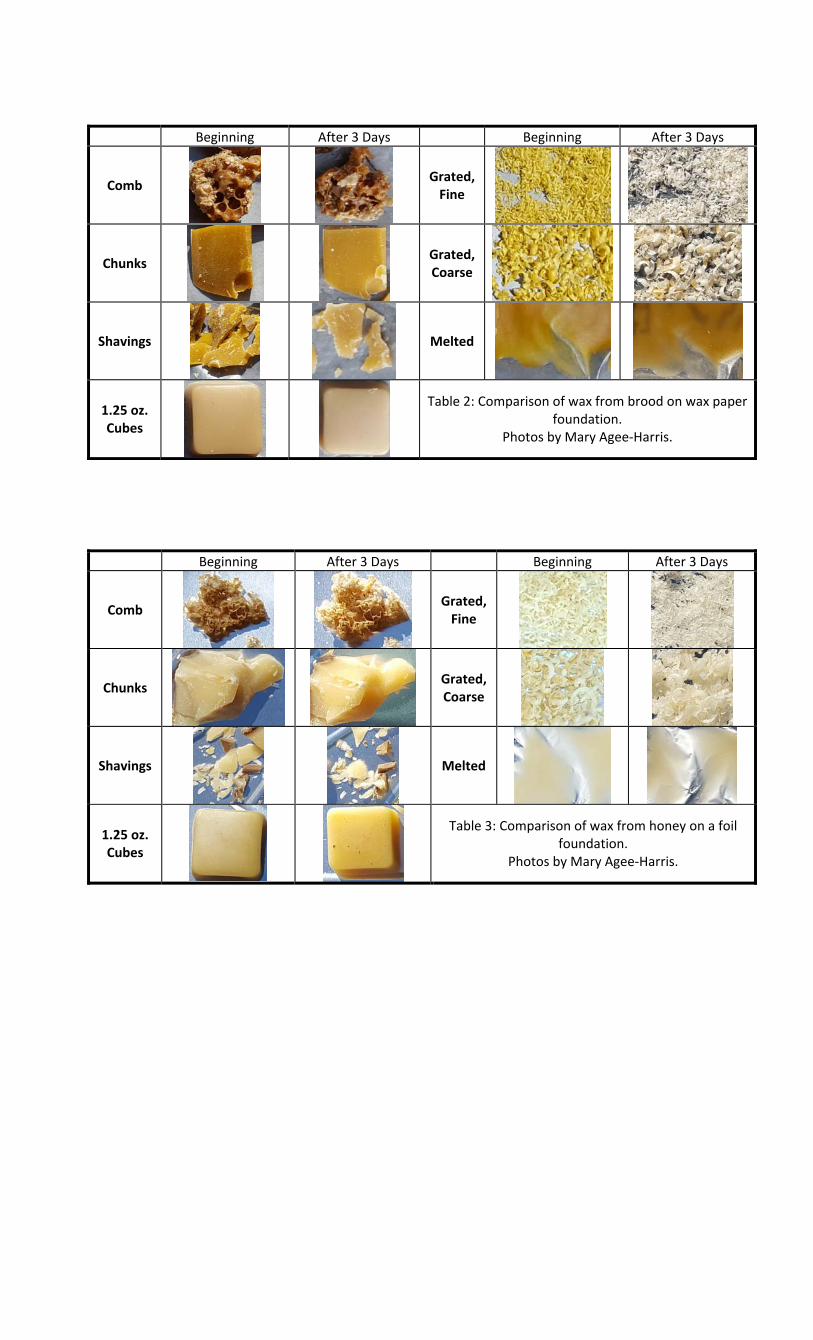
2. Positioned wax to access direct sunlight (Table 1‐4). The trays of wax were then placed on the ground, in direct sunlight for a period of eight (8) hours per day for three (3) days. Pictures were taken every two (2) hours, and sample every eight (8) for comparison.
Beginning After 3 Days Beginning After 3 Days
Comb
Grated, Fine
Chunks
Grated, Coarse
Shavings
Melted
1.25 oz. Cubes
Table 1: Comparison of wax from honeycomb on wax paper foundation.
Photos by Mary Agee‐Harris.
Figure 20: Various sizes of wax prepared for experiment. A) From the left – chunks and shavings, 1.25 ounce blocks, comb.
B) Melted wax. C) Fine grated. D) Coarse graded. Photos by Mary Agee‐Harris.
Beginning After 3 Days Beginning After 3 Days
Comb
Grated, Fine
Chunks
Grated, Coarse
Shavings
Melted
1.25 oz. Cubes
Table 2: Comparison of wax from brood on wax paper foundation.
Photos by Mary Agee‐Harris.
Beginning After 3 Days Beginning After 3 Days
Comb
Grated, Fine
Chunks
Grated, Coarse
Shavings
Melted
1.25 oz. Cubes
Table 3: Comparison of wax from honey on a foil foundation.
Photos by Mary Agee‐Harris.

Beginning After 3 Days Beginning After 3 Days
Comb
Grated, Fine
Chunks
Grated, Coarse
Shavings
Melted
1.25 oz. Cubes
Table 4: Comparison of wax from brood on a foil foundation.
Photos by Mary Agee‐Harris.
3. Re‐melt wax (Figure??). After the last samples were taken, the grated and melted waxes were then
re‐melted to blocks to analyze the overall color of the remaining portions. A silicone mold was placed in the oven set on 150oF for approximately 35 minutes, with spot checks at increments of 5 minutes apart.
Figure 21: Bleached waxes re‐melted into blocks for color examination. C1 – HCWP, Melted; HCWP, Coarse x2;
HCWP, Fine (already melted). C2 – BCWP, Melted; BCWP, Coarse x2; BCWP, Fine. C3 – HCFF, Coarse x2; HCFF, Fine
x2. C4 – BCFF Coarse x2; BCFF, Fine; HCFF, Melted. C4 – BCFF, Melted.
Photo by Mary Agee‐Harris.

Experiment Complications and Variations This section outlines the difficulties encountered and modern concessions made during the experiment – both in the rendering and bleaching processes. The listing corresponds with the step followed with the denotation of C = Complication and V = variation. Rendering Process
1. C1 = The wax acquired for the experiment was communicated as “recently changed,” but it had been sitting for some time because there was a significant amount of debris and slumgum than anticipated (Figure 10). This was most likely due to wax moths eating the unsecure combs. There were plenty of combs available, so this detail may be negligible.
2. V1 = The pot used was aluminum, coated with a non‐stick substance (most likely polytetrafluoroethylene, known as Teflon). The reasoning for this is two‐fold: 1) “earthen vessels” not properly coated have the potential to contain high amounts of lead; therefore, if the wax was used for medicinal or other purposes that would be ingested or absorbed, the potential for heavy metal poisoning would be greater. 2) When wax is processed in “unprotected steel, iron, or copper containers… it will discolour from reaction with these metals” (Krell 4.6). To minimize potential damage and/or coloration of the wax before bleaching, it was decided that this was the best option. V2 = An indoor electric stove was used to heat the wax and water, rather than an outdoor fire, to keep the temperature of the mixture consistent while extracting the slumgum. V3 = Cowan and Krell both stated in their research that rain water, river water, or soft water only should be used because the minerals (namely calcium and lime) will cause the wax to saponify – turn into soap(56, 4.6). Regular tap water was used since it was filtered, and thus, soft.
3. V1 = Cheesecloth was used instead because it is less porous than the wicker basket in Pliny’s work and more so than the canvas mentioned by Cowan; therefore more wax was able to be preserved. V2 = Plastic tubs were used as cooling containers due to their ease of availability and cost effectiveness (ruined in rendering process or needed to be cut off wax blocks). V3 = Cold water was not already in the container when wax was poured into it. The containers used are designed to resist higher temperatures than used since beeswax has a melting point of 62°C to 66°C or 144°F to 147°F (Krell 4.2).
4. V3 = There is no mention from Pliny of draining excess liquid. Cowan does mention that “a good deal of pollen with small particles of rubbish passes through the strainer” (54) before the wax is cooled. This would infer that the same wax would need to be refined again depending on the amount of debris was in the original comb.
5. V1 = There is no mention from Pliny or Cowan of removing excess sediment left of the wax block(s). 6. V1 = Pliny does not specifically state repeating the process, but it is implied when he talks of boiling
the wax again. Cowan specifically states that “in dealing with best samples the wax is re‐melted in clean water and strained again” (54). Due to the amount of debris, it was essential to clean the wax multiple times. This is not negligible because the sediment content could affect the bleaching process.
Bleaching Process
1. V1 = Considering Pliny does not specify a size of the wax, so various forms were set out at once. Cowan mentioned ribbons, but did not specify length, width, and depth. In order to account for as many of these variables as possible, the wax was prepared in enough ways that it could be examined afterward to determine if the size was facilitating or hindering factor in the bleaching process. V2 = Cowan mentions that “long webs of canvas stretched horizontally between standards” (86) for the ribbons to be placed upon to bleach, but Pliny does not mention any foundations. Since wax adheres quickly to untreated fabric, alternate foundations were chosen. Wax paper was chosen since its primary use in cooking is to keep substances from adhering to it. Two types of foil were also used – heavy duty sheets for the oven and standard wrap – because its mirrored would allow the sun to reflect on as many surfaces as possible.

C1 = Cross contamination occurred with the paraffin from the wax paper when it melted from the heat of the sun. C2 = The wrap’s inconsistency could be a potential issue, but it was used for the pre‐melted wax, so this may be negligible.
2. V1 = Pliny and Cowan both mention to cover the wax from contamination; however no coverings were used. This was so the wax received the most direct sunlight to cause the color change and not waste any of the limited time available to try to seep through a linen or netted covering. C1 = One of the biggest complications for this experiment was time. There only a limited amount of sunlight available that would truly blanch the wax (not including the hours just after sunrise and before sunset); approximately 8‐10 hours per day. In addition, the mundane requirements of the experimenter were such that the time available to dedicate to the many facets that this research covered was limited. C2 = Weather was the second complication. Many of the times set aside for the experiment were disrupted due to rain or excessive heat warnings throughout the summer months. Although the heat warnings were not as much of a deterrent, the wax would have melted beyond what would have been reasonable to truly explore the size factor during the bleaching process.
3. V1 = Stopping the experiment without the sea water seems prudent in two ways: First, hardness factor of the salt water could discolor the bleached wax, which would defeat the purpose of the experiment; Second, with time constraints already being a factor, the additional time it would take for the multiple renderings and the potential of re‐bleaching wax, if needed, could not transpire. V2 = Grated and pre‐melted waxes were the only re‐melted and made into blocks. This would make it easier for analysis of overall color instead of looking at individual pieces. The other samples were taken “as is” for hands on analysis and comparison. V3 = The use of a modern silicone mold was essential for ensuring that the wax did not adhere to the surfaces and potentially be destroyed in the final stages. It also was easier to keep the waxes separate and re‐melt them at once. C1 = When first attempting to re‐melt, the process was going to be heating each sample individually then place in the mold. However, some of the remnants of the first wax attempted that way started to scorch onto the pan. It was thought to just move the samples to the silicon mold so that potential contamination or discoloration would be eliminated.
Conclusions Rendering the wax was not an initial part of the experiment; however, it was a crucial step. As seen through the honey and brood combs that were placed on both the wax paper and foil foundations, the combs did not bleach well, with the exception of a few very thin pieces. The amount of propolis, honey residue, pupal linings, and hive debris still in the comb obstructed the sun’s rays from penetrating the wax. The foil foundations were found to be the best for bleaching. With the reflective surface, many more angles of the wax – despite the form – were able to get the sun’s rays. In some cases, the wax foundation seemed to discolor the wax due to cross contamination of the paraffin. The best forms were those that were thinner – the shavings, coarse grated, and fine grated. The shavings of the honey wax on both foundations were significantly lighter than the brood. The coarse and fine grated brood wax on both foundations was the best example of the bleaching process due their significant progress from dark yellow to an off‐white shade. The brightest of all the samples was the fine grated honey wax on the foil foundation; it became almost stark white. Aside from the interest in ancient techniques, the questions that spawned this research have generated sufficient results to be satisfied. They were:
1. Can the process be replicated as close to the oldest documentation possible – Pliny’s original manuscript?

a. Yes, with some variations. As mentioned above, it was unsafe to use an “earthen vessel” that was not coated to eliminate the possibility of lead poisoning. Use of plastic containers and cheesecloth can be eliminated upon replication next time as well as soaking of combs prior to rendering.
2. Through evaluating the process, is it still accurate given the modern technology of the 21st century? a. Yes, this method is still used; from Pliny in 79 AD to Bradbear in 2009, it has been
unchanged for 1900 years. However, more people use its evolved form – “bag method” – which combines the boiling and straining into one step. Cowan describes that the combs are put into canvas bags and weighted to keep just below the water line. The wax then boils out of the bags and only the debris is left (60).
3. Is this feasible both in terms of ease and cost efficiency for future teaching purposes. a. Yes, this process was easily replicated and was cost effective. Other than the disposable
materials purchased specifically for the project, the few pots, spatulas, and molds used additionally are reusable for further wax‐based experimentation. The cost was approximately $25‐$30, not including combs as those were given freely. If used for teaching purposes, a simple outline of the process with hands on experimentation could be facilitated for participants as young as ten years of age.
Next Steps Some research ends with sufficient results to account for potential variables; some reveal more avenues that warrant further experimentation. This experiment generated several hypotheses that could develop into a series of derivative experiments involving beeswax rendering and/or bleaching.
What is the difference in soaking the combs for a period of time before rendering versus no soaking? Observe the amount of debris released during soaking, the amount of slumgum removed from both sets of wax, and color of wax after rendered.
Would there be a difference in using an “earthen vessel” versus a “cauldron”? Observing the color of the rendered wax using a lined ceramic pot over a fire, on a gas stove with consistent heat, and on an electric stove with consistent heat versus the color using a non‐stick pot with the same three heat sources.
What type of material would a “cauldron” be made of, according to Cowan? Knowing that the wax will discolor using metal pots, observe the variations of color that occur in different metal pots – using a non‐stick as the control. If bleaching followed, observe the time differences for each vessel. “Beeswax is slightly acidic and containers made of aluminum, brass, copper, zinc, pewter, tinplate or iron must never be used with beeswax, as they will react with the beeswax and the wax will be stained. Suitable materials to use when working with beeswax are containers made from enamel, stainless steel, nickel, or plastic” (Bradbear, 108).
What would different types of water do to the wax’s color? Observing wax color when using rain water, river water, spring water, soft tap water, and distilled water. Further experimentation could include various types of bottled water to see differences that occurred.
How much saponification happens and alternative methods to neutralize hard water? Observe color and amount of saponification using plain hard water and hard water with vinegar solution (Krell).
Would using cold water in the container the rendered wax get poured do anything of note or is it a negligible part of the process? Observing color and variations in slumgum content as well as number of additional renderings that might be needed.
Exploring the “bag” method of rendering wax. Difference in the color and amount of wax preserved when using canvas, linen, muslin, cotton, and cheesecloth. Number of additional renderings needed to extract excess slumgum/debris.
Would using the sea water after bleaching discolor the wax or add to the whiteness? Using the traditional method of bleaching and comparing to Pliny’s method with real sea water and simulated versions of sea water (“Practices of Science”).

Does chemical adulteration actually speed up the bleaching process? Using various chemicals talked about in Cowan’s, Krell’s, and Bradbear’s works to see if the process is faster versus traditional sunlight method.
Does bleached wax actually have less weight than the rendered wax? Analyzing the weight before and after the bleaching process to determine the validity.
Does the bleaching process actually destroy the natural smells? Find a way to analyze smells and apply it to rendered versus bleached wax.
Exploring more of these questions could show the process of evolution and commercialization of the beeswax industry to the modern day. It can also give insights as to why certain processes were discarded and new ones adopted, regardless of the fact that many of their core practices have been unchanged for almost two thousand years.

Works Cited Binkley, Dominic. “How Bees Make Honey Is Complex Process.” The Columbus Dispatch. 31 August 2014. www.dispatch.com/content/stories/science/2014/08/31/how‐bees‐make‐honey‐is‐complex‐process.html. Accessed 31 August 2016. Bradbear, Nicola. Bees and Their Role in Forest Livelihoods. Food and Agriculture Organization of the United Nations. 2009. www.fao.org/3/a‐i0842e/index.html. Accessed 4 September 2016. Burlew, Rusty. “Why Do Brood Combs Turn Black?” Honey Bee Suite. 25 March 2012. honeybeesuite.com/why‐do‐brood‐combs‐turn‐black. Accessed 30 August 2016. Cowan, T.C. Wax Craft. Sampson Low, Marston & Co., LTD. 1908 “Fayum Mummy Portraits.” Wikipedia. 16 August 2016. en.wikipedia.org/w/index.php?title=Fayum_mummy_portraits&action=history. 2 September 2016. “History of Candles.” National Candle Association. candles.org/history. Accessed 1 September 2016. Krell, Rainer. Value‐added Products from Beekeeping. FAO Agricultural Services Bulletin, no. 124, 1996. Food and Agriculture Organization of the United Nations. www.fao.org/docrep/w0076e/w0076e00.htm#con. Accessed 26 August 2016. “Learn about Honey.” National Honey Board. www.honey.com/honey‐at‐home/learn‐about‐honey. Accessed 30 August 2016. Needham, Joseph. Science and Civilsation in China. Vol 4, Physics and Physical Technology, Part 1: Physics. 1962. Cambridge University Press. 2004. Pp 79–80. Pliny the Elder. The Natural History. 77‐79 AD. Translated by John Bostock and H.T. Riley. Taylor and Francis. 1855. www.perseus.tufts.edu/hopper/text?doc=Perseus%3Atext%3A1999.02.0137%3Abook%3D1%3Achapter%3Ddedication. Accessed 2 September 2016. “Practices of Science: Making Simulated Seawater.” Exploring Our Fluid Earth. University of Hawai’i at
Mānoa. manoa.hawaii.edu/exploringourfluidearth/physical/density‐effects/density‐temperature‐and‐
salinity/practices‐science‐making‐simulated‐seawater. Accessed 5 September 2016.
Sanford, Malcom T. and Alfred Dietz. “The Fine Structure of the Wax Gland of the Honey Bee (Apis Mellifera L.).” Apidologie, vol 7, issue 3, 1976, pp. 197–203. Doi: dx.doi.org/10.1051/apido:19760301. Schulte, Augustin Joseph. "Altar Candles." The Catholic Encyclopedia. Vol. 1. New York: Robert Appleton Company, 1907. www.newadvent.org/cathen/01347a.htm. Accessed 31 Aug. 2016.
“Slumgum.” Merriam‐Webster.com, www.merriam‐webster.com/dictionary/slumgum. Accessed 3
September 2016.

Media Citations Cover Photo. Agee‐Harris, Mary. “Final Beeswax Samples. jpg.” 8 September 2016. Personal JPG Image. Figure 1. Waugsberg. “Bienenvolk‐Gemuell.jpg.” 25 July 2006. commons.wikimedia.org/w/index.php?curid=986042%3C/a. Accessed 28 August 2016. Figure 2. Krell, R. “Figure 4.2: Newly constructed white comb in a traditional log hive.” FAO Agricultural Services Bulletin, no. 124, 1996. www.fao.org/docrep/w0076e/w0076e12.htm. Accessed 26 August 2016. Figure 3. Severn, Chris. “Fresh Brood Comb with Capped Brood.jpg.” 28 April 2012. commons.wikimedia.org/wiki/File:Newly_Created_Brood_Comb_with_Capped_Brood_and_Larva.JPG. Accessed 31 August 2016. Figure 4. Severn, Chris. “Older Darker Brood Comb (~4 months old).jpg.” 22 June 2012. commons.wikimedia.org/wiki/File:Brood_Comb_that_has_been_used_several_times.JPG. Accessed 31 August 2016. Figure 5. Yareham, Bob, editor. “A (Pre‐historic) Taste for Honey.” Valencia International. 31 March 2014. valencia‐international.com/pre‐historic‐taste‐honey. Accessed 31 August 2016. Figure 6. Bullenwächter. “Candles Oberflacht.jpg.” 19 July 2007. commons.wikimedia.org/wiki/File:Candles_Oberflacht.jpg. Accessed 1 September 2016. Figure 7. Poupeau, Gautier. “Linear B Musée archéologique de Mycènes.jpg.” 25 September 2006. commons.wikimedia.org/wiki/File:Linear_B_Mus%C3%A9e_arch%C3%A9ologique_de_Myc%C3%A8nes.jpg. Accessed 2 September 2016. Figure 8. “Portrait of the Boy Eutyches ‐ Metmuseum 18.9.2.jpg.” Metropolitan Museum of Art. 14 May 2014. commons.wikimedia.org/wiki/File:Portrait_of_the_Boy_Eutyches_‐_Metmuseum_18.9.2.jpg. Accessed 2 September 2016. Figure 9. Agee‐Harris, Mary. “Raw, unprocessed comb.jpg.” 8 May 2016. Personal JPG Image. Figure 10. Agee‐Harris, Mary. “Piece of unprocessed comb up‐close.jpg.” 8 May 2016. Personal JPG Image. Figure 11. Agee‐Harris, Mary. “Combination of wax and water boiling in pot.jpg.” 8 May 2016. Personal JPG Image. Figure 12. Agee‐Harris, Mary. “Examples of slumgum.jpg.” 8 May 2016. Personal JPG Image. Figure 13. Agee‐Harris, Mary. “Hot rendered wax in storage container with extracted slumgum/debris in cheesecloth.jpg.” 8 May 2016. Personal JPG Image. Figure 14. Agee‐Harris, Mary. “Progression of releasing rendered wax and draining excess liquid.jpg.” 8 May 2016. Personal JPG Image. Figure 15. Agee‐Harris, Mary. “Removing sediment from wax blocks.jpg.” 8 May 2016. Personal JPG Image. Figure 16. Agee‐Harris, Mary. “Second rendering with sediment and slumgum still visible.jpg.” 10 June 2016. Personal JPG Image.

Figure 17. Agee‐Harris, Mary. “Third rendering with visibly less sediment.jpg.” 13 June 2016. Personal JPG Image. Figure 18. Agee‐Harris, Mary. “Fourth rendering with little sediment remaining.jpg.” 14 June 2016. Personal JPG Image. Figure 19. Agee‐Harris, Mary. “Color comparison of rendered wax.jpg.” 14 June 2016. Personal JPG Image. Figure 20. Agee‐Harris, Mary. “Various sizes of wax prepared for experiment.jpg.” 30 August 2016. Personal JPG Image. Table 1. Agee‐Harris, Mary. “Comparison of wax from honeycomb on wax paper foundation.” 30 August 2016. Multiple Personal JPG Images. Table 2. Agee‐Harris, Mary. “Comparison of wax from brood on wax paper foundation.” 30 August 2016. Multiple Personal JPG Images. Table 3. Agee‐Harris, Mary. “Comparison of wax from honeycomb on foil foundation.” 30 August 2016. Multiple Personal JPG Images. Table 4. Agee‐Harris, Mary. “Comparison of wax from brood on foil foundation.” 30 August 2016. Multiple Personal JPG Images. Figure 21. Agee‐Harris, Mary. “Bleached waxes re‐melted into blocks for color examination.jpg.” 8 September 2016. Personal JPG Image.