Embed Size (px)
Citation preview
User Manual of Blazer Express Control Client
1
Blazer Express Control Client
User Manual UD02105B
User Manual of Blazer Express Control Client
2
User Manual
COPYRIGHT © 2016 Hangzhou Hikvision Digital Technology Co., Ltd.
ALL RIGHTS RESERVED.
Any and all information, including, among others, wordings, pictures, graphs are the properties of
Hangzhou Hikvision Digital Technology Co., Ltd. or its subsidiaries (hereinafter referred to be
“Hikvision”). This user manual (hereinafter referred to be “the Manual”) cannot be reproduced,
changed, translated, or distributed, partially or wholly, by any means, without the prior written
permission of Hikvision. Unless otherwise stipulated, Hikvision does not make any warranties,
guarantees or representations, express or implied, regarding to the Manual.
About this Manual
This Manual is applicable to Blazer Express Control Client.
The Manual includes instructions for using and managing the product. Pictures, charts, images and
all other information hereinafter are for description and explanation only. The information
contained in the Manual is subject to change, without notice, due to firmware updates or other
reasons. Please find the latest version in the company website (http://overseas.hikvision.com/en/).
Please use this user manual under the guidance of professionals.
Trademarks Acknowledgement
and other Hikvision’s trademarks and logos are the properties of Hikvision in
various jurisdictions. Other trademarks and logos mentioned below are the properties of their
respective owners.
Legal Disclaimer
TO THE MAXIMUM EXTENT PERMITTED BY APPLICABLE LAW, THE PRODUCT DESCRIBED, WITH ITS
HARDWARE, SOFTWARE AND FIRMWARE, IS PROVIDED “AS IS”, WITH ALL FAULTS AND ERRORS,
AND HIKVISION MAKES NO WARRANTIES, EXPRESS OR IMPLIED, INCLUDING WITHOUT LIMITATION,
MERCHANTABILITY, SATISFACTORY QUALITY, FITNESS FOR A PARTICULAR PURPOSE, AND
NON-INFRINGEMENT OF THIRD PARTY. IN NO EVENT WILL HIKVISION, ITS DIRECTORS, OFFICERS,
EMPLOYEES, OR AGENTS BE LIABLE TO YOU FOR ANY SPECIAL, CONSEQUENTIAL, INCIDENTAL, OR
INDIRECT DAMAGES, INCLUDING, AMONG OTHERS, DAMAGES FOR LOSS OF BUSINESS PROFITS,

User Manual of Blazer Express Control Client
3
BUSINESS INTERRUPTION, OR LOSS OF DATA OR DOCUMENTATION, IN CONNECTION WITH THE USE
OF THIS PRODUCT, EVEN IF HIKVISION HAS BEEN ADVISED OF THE POSSIBILITY OF SUCH DAMAGES.
REGARDING TO THE PRODUCT WITH INTERNET ACCESS, THE USE OF PRODUCT SHALL BE WHOLLY AT
YOUR OWN RISKS. HIKVISION SHALL NOT TAKE ANY RESPONSIBILITES FOR ABNORMAL OPERATION,
PRIVACY LEAKAGE OR OTHER DAMAGES RESULTING FROM CYBER ATTACK, HACKER ATTACK, VIRUS
INSPECTION, OR OTHER INTERNET SECURITY RISKS; HOWEVER, HIKVISION WILL PROVIDE TIMELY
TECHNICAL SUPPORT IF REQUIRED.
SURVEILLANCE LAWS VARY BY JURISDICTION. PLEASE CHECK ALL RELEVANT LAWS IN YOUR
JURISDICTION BEFORE USING THIS PRODUCT IN ORDER TO ENSURE THAT YOUR USE CONFORMS THE
APPLICABLE LAW. HIKVISION SHALL NOT BE LIABLE IN THE EVENT THAT THIS PRODUCT IS USED WITH
ILLEGITIMATE PURPOSES.
IN THE EVENT OF ANY CONFLICTS BETWEEN THIS MANUAL AND THE APPLICABLE LAW, THE LATER
PREVAILS.
User Manual of Blazer Express Control Client
4
Contents Chapter 1 Overview.......................................................................................................................... 6
1.1 Description ...................................................................................................................... 6
1.2 Function Modules ............................................................................................................ 6
Chapter 2 Installing and Uninstalling the Client ............................................................................... 9
Chapter 3 Login the Control Client ................................................................................................. 11
3.1 Login .............................................................................................................................. 11
3.2 Download the Mobile Client .......................................................................................... 14
3.3 Changing Password ........................................................................................................ 14
Chapter 4 Live View ........................................................................................................................ 16
4.1 Starting and Stopping the Live View .............................................................................. 17
4.2 Auto-switch in Live View ................................................................................................ 19
4.2.1 Camera Auto-switch .............................................................................................. 19
4.2.2 View Auto-switch .................................................................................................. 19
4.3 PTZ Control in Live View ................................................................................................ 19
4.4 Manual Recording and Capture ..................................................................................... 22
4.5 Instant Playback ............................................................................................................. 24
4.6 Custom Window Division............................................................................................... 25
4.7 Live View in Fisheye Mode ............................................................................................ 26
4.8 Other Functions in Live View ......................................................................................... 28
Chapter 5 Remote Playback ........................................................................................................... 29
5.1 Normal Playback ............................................................................................................ 29
5.2 Synchronous Playback ................................................................................................... 32
5.3 VCA Playback ................................................................................................................. 32
5.4 Fisheye Playback ............................................................................................................ 33
Chapter 6 Map ............................................................................................................................... 34
6.1 Previewing Hot Spots..................................................................................................... 35
6.2 Previewing the Hot Regions ........................................................................................... 37
6.3 Previewing Map ............................................................................................................. 37
Chapter 7 Transaction .................................................................................................................... 39
7.1 POS Live View ................................................................................................................ 39
7.1.1 Starting POS Live View .......................................................................................... 39
7.1.2 Viewing Transaction Information .......................................................................... 40
7.1.3 Recording and Capture .......................................................................................... 41
7.1.4 Stopping the Live View .......................................................................................... 42
7.2 POS Search ..................................................................................................................... 42
Chapter 8 ANPR .............................................................................................................................. 45
8.1 ANPR Camera Live View ................................................................................................ 45
8.2 Vehicle Search................................................................................................................ 46
8.3 Traffic Flow Report ......................................................................................................... 48
Chapter 9 Video Search .................................................................................................................. 49
9.1 Video Clip Search ........................................................................................................... 49
9.2 VCA Playback ................................................................................................................. 50
User Manual of Blazer Express Control Client
5
Chapter 10 People Counting Statistics ............................................................................................. 51
Chapter 11 Heat Map ....................................................................................................................... 52
Chapter 12 Alarm Center ................................................................................................................. 54
12.1 Alarm Information of Resources .................................................................................... 55
12.2 Searching Event/Alarm Logs .......................................................................................... 56
12.3 Viewing Alarm Triggered Pop-up Window ..................................................................... 57
Chapter 13 Health Status ................................................................................................................. 59
Chapter 14 Tools ............................................................................................................................... 60
Chapter 15 Cascading Function ........................................................................................................ 61
Chapter 16 Download Center ........................................................................................................... 63
Chapter 17 Log Search ..................................................................................................................... 64
Chapter 18 System Settings .............................................................................................................. 66
18.1 General Settings ............................................................................................................ 66
18.2 Image Parameters .......................................................................................................... 67
18.3 File Saving Path Settings ................................................................................................ 68
18.4 Keyboard and Joystick Settings ...................................................................................... 69
18.5 Live View Settings .......................................................................................................... 70
18.6 Playback Settings ........................................................................................................... 71
18.7 Alarm Sound Settings .................................................................................................... 72
User Manual of Blazer Express Control Client
6
Chapter 1 Overview
1.1 Description
As one of the key components of the Blazer Express, Control Client provides multiple operating
functionalities, including real-time live view, PTZ control, video playback and download, alarm
receiving, log query, and so on.
This user manual describes the function, configuration and operation steps of Blazer Express Control
Client. To ensure the proper usage and stability of the client, please refer to the contents below and
read the manual carefully before operation.
1.2 Function Modules
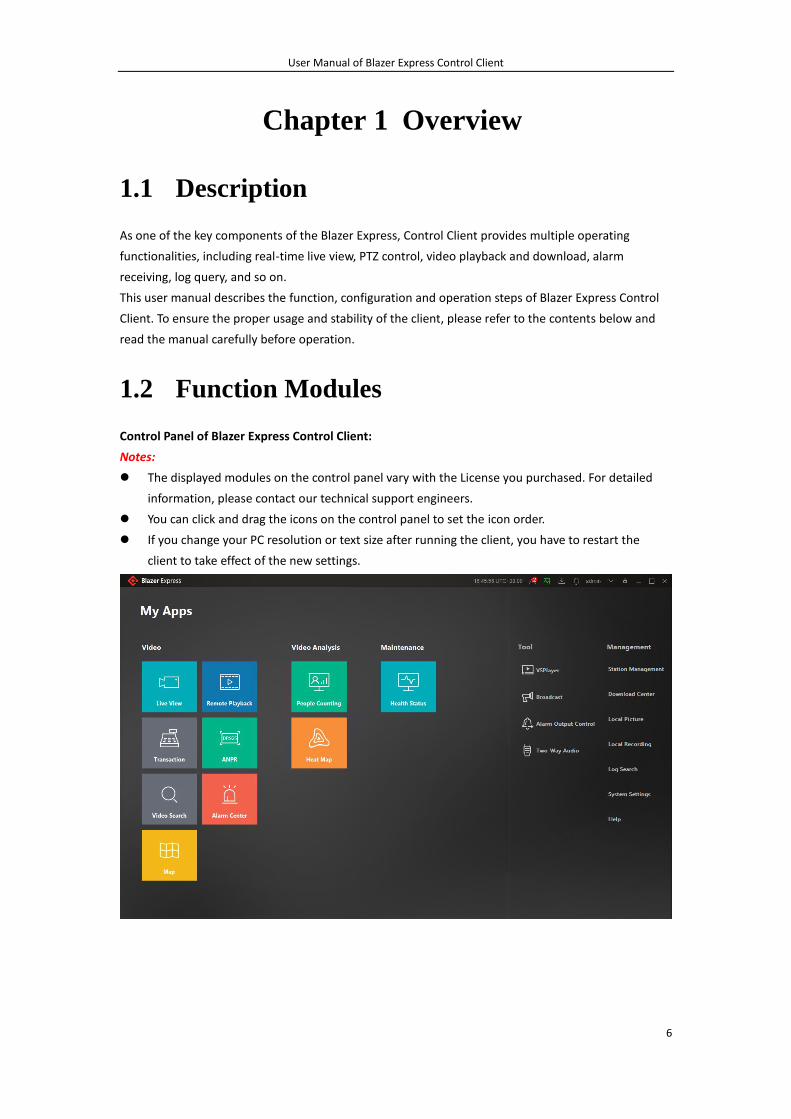
Control Panel of Blazer Express Control Client:
Notes:
The displayed modules on the control panel vary with the License you purchased. For detailed
information, please contact our technical support engineers.
You can click and drag the icons on the control panel to set the icon order.
If you change your PC resolution or text size after running the client, you have to restart the
client to take effect of the new settings.
User Manual of Blazer Express Control Client
7
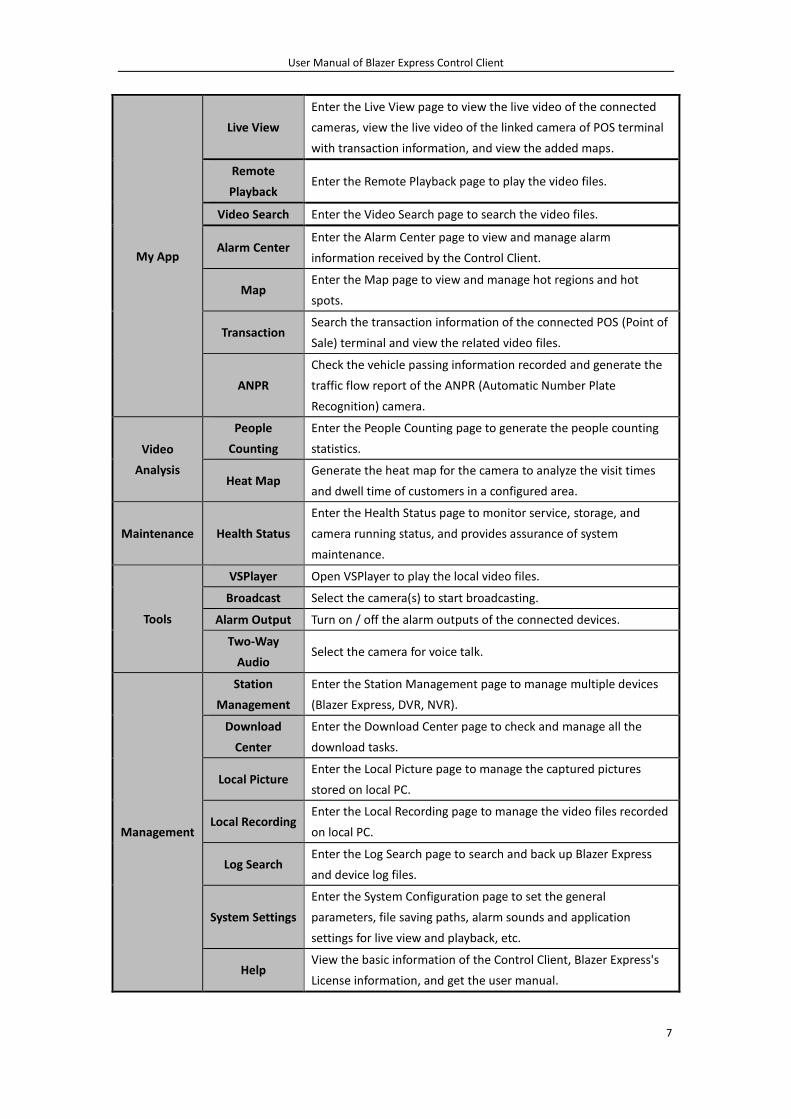
My App
Live View
Enter the Live View page to view the live video of the connected
cameras, view the live video of the linked camera of POS terminal
with transaction information, and view the added maps.
Remote
Playback Enter the Remote Playback page to play the video files.
Video Search Enter the Video Search page to search the video files.
Alarm Center Enter the Alarm Center page to view and manage alarm
information received by the Control Client.
Map Enter the Map page to view and manage hot regions and hot
spots.
Transaction Search the transaction information of the connected POS (Point of
Sale) terminal and view the related video files.
ANPR
Check the vehicle passing information recorded and generate the
traffic flow report of the ANPR (Automatic Number Plate
Recognition) camera.
Video
Analysis
People
Counting
Enter the People Counting page to generate the people counting
statistics.
Heat Map Generate the heat map for the camera to analyze the visit times
and dwell time of customers in a configured area.
Maintenance Health Status
Enter the Health Status page to monitor service, storage, and
camera running status, and provides assurance of system
maintenance.
Tools
VSPlayer Open VSPlayer to play the local video files.
Broadcast Select the camera(s) to start broadcasting.
Alarm Output Turn on / off the alarm outputs of the connected devices.
Two-Way
Audio Select the camera for voice talk.
Management
Station
Management
Enter the Station Management page to manage multiple devices
(Blazer Express, DVR, NVR).
Download
Center
Enter the Download Center page to check and manage all the
download tasks.
Local Picture Enter the Local Picture page to manage the captured pictures
stored on local PC.
Local Recording Enter the Local Recording page to manage the video files recorded
on local PC.
Log Search Enter the Log Search page to search and back up Blazer Express
and device log files.
System Settings
Enter the System Configuration page to set the general
parameters, file saving paths, alarm sounds and application
settings for live view and playback, etc.
Help View the basic information of the Control Client, Blazer Express's
License information, and get the user manual.
User Manual of Blazer Express Control Client
8
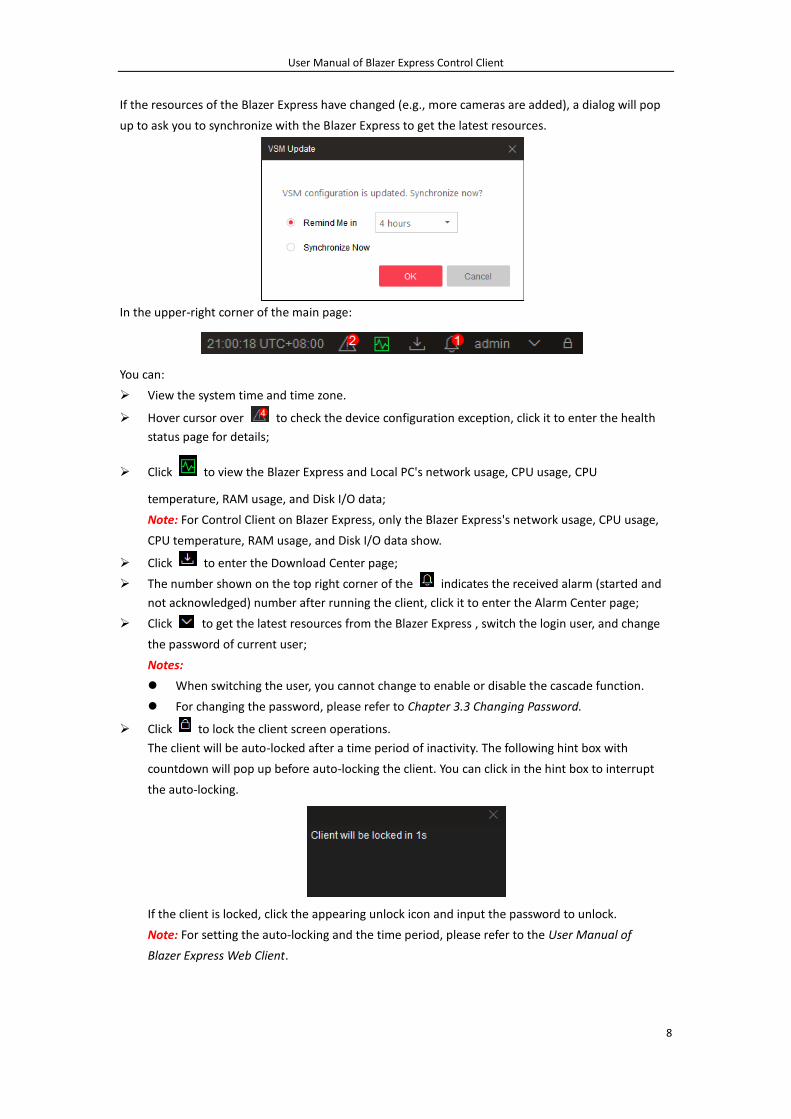
If the resources of the Blazer Express have changed (e.g., more cameras are added), a dialog will pop
up to ask you to synchronize with the Blazer Express to get the latest resources.
In the upper-right corner of the main page:
You can:
View the system time and time zone.
Hover cursor over to check the device configuration exception, click it to enter the health
status page for details;
Click to view the Blazer Express and Local PC's network usage, CPU usage, CPU
temperature, RAM usage, and Disk I/O data;
Note: For Control Client on Blazer Express, only the Blazer Express's network usage, CPU usage,
CPU temperature, RAM usage, and Disk I/O data show.
Click to enter the Download Center page;
The number shown on the top right corner of the indicates the received alarm (started and
not acknowledged) number after running the client, click it to enter the Alarm Center page;
Click to get the latest resources from the Blazer Express , switch the login user, and change
the password of current user;
Notes:
When switching the user, you cannot change to enable or disable the cascade function.
For changing the password, please refer to Chapter 3.3 Changing Password.
Click to lock the client screen operations.
The client will be auto-locked after a time period of inactivity. The following hint box with
countdown will pop up before auto-locking the client. You can click in the hint box to interrupt
the auto-locking.
If the client is locked, click the appearing unlock icon and input the password to unlock.
Note: For setting the auto-locking and the time period, please refer to the User Manual of
Blazer Express Web Client.
User Manual of Blazer Express Control Client
9
Chapter 2 Installing and Uninstalling the
Client
If you need to access Blazer Express via Control Client over the network, you should install the
Control Client on your PC.
Installing the Control Client
Recommended Running Environment CPU: Intel(R) Core(TM) i3-4150 @3.50 GHz and above
Memory: 4 GB and above
Video Card: Inter(R) HD Graphics 4400 and above
Perform the following steps to install the Blazer Express Control Client.
Steps:
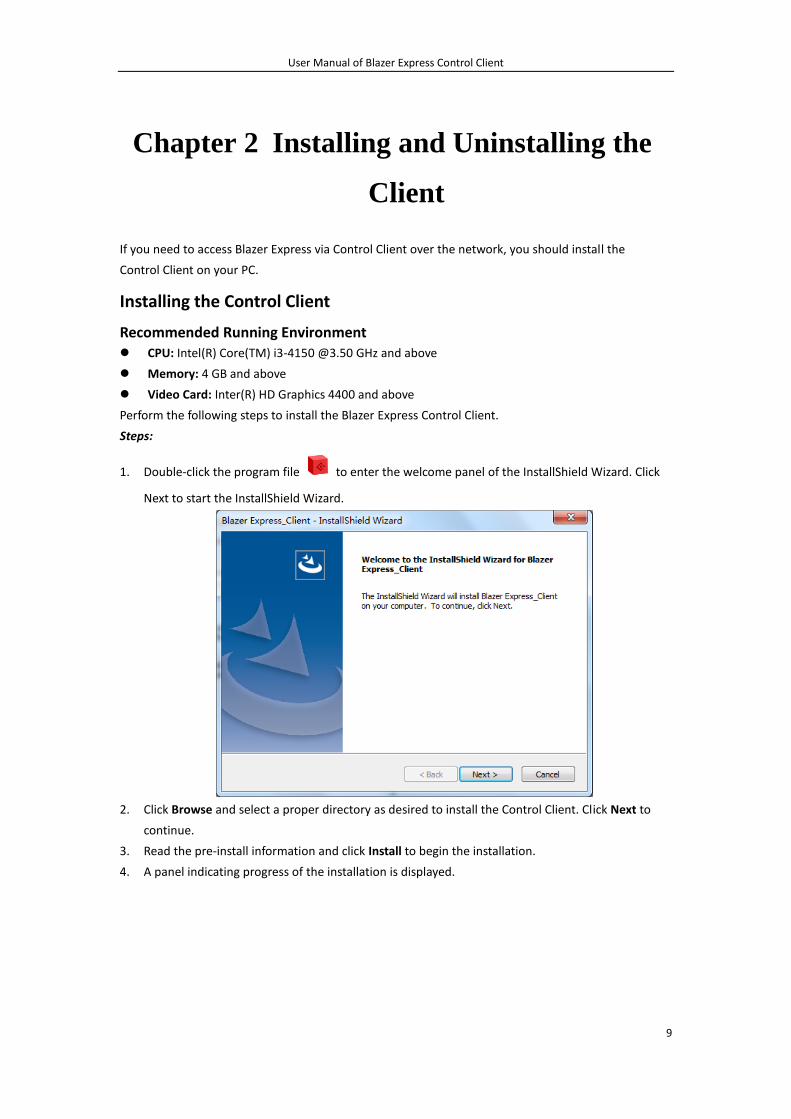
1. Double-click the program file to enter the welcome panel of the InstallShield Wizard. Click
Next to start the InstallShield Wizard.
2. Click Browse and select a proper directory as desired to install the Control Client. Click Next to
continue.
3. Read the pre-install information and click Install to begin the installation.
4. A panel indicating progress of the installation is displayed.

User Manual of Blazer Express Control Client
10
5. Read the post-install information and click Finish to complete the installation.
Uninstalling the Control Client Steps:
1. Exit the Control Client.
Note: The following procedure of standard system module removal may be slightly different
according to the different OS versions.
2. In Windows' Start menu, select Control Panel.
If using Category view, find the Programs category, and click Uninstall a program.
If using Small icons or Large icons view, select Programs and Features.
3. In the list of currently installed programs, right-click the Blazer Express-Client.
4. Select Uninstall and follow the removal instructions.
User Manual of Blazer Express Control Client
11
Chapter 3 Login the Control Client
When opening Blazer Express Control Client, you can login with the user name and password of
Blazer Express.
3.1 Login
Steps:
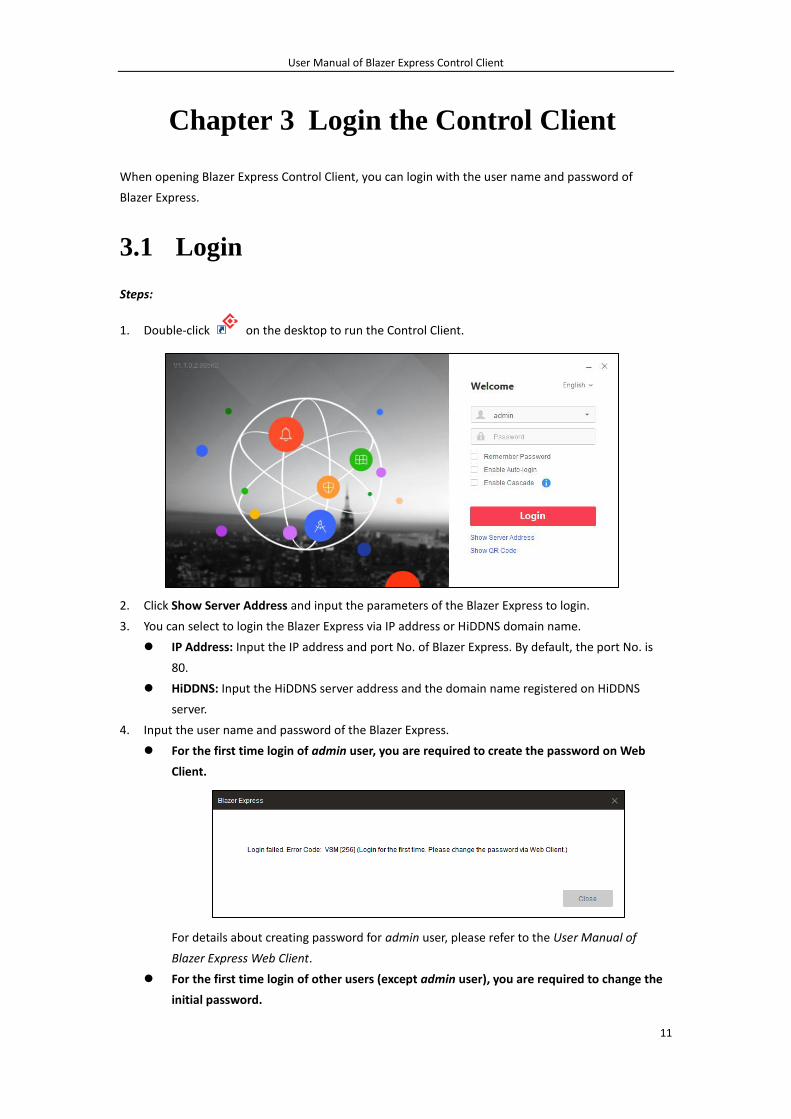
1. Double-click on the desktop to run the Control Client.
2. Click Show Server Address and input the parameters of the Blazer Express to login.
3. You can select to login the Blazer Express via IP address or HiDDNS domain name.
IP Address: Input the IP address and port No. of Blazer Express. By default, the port No. is
80.
HiDDNS: Input the HiDDNS server address and the domain name registered on HiDDNS
server.
4. Input the user name and password of the Blazer Express.
For the first time login of admin user, you are required to create the password on Web
Client.
For details about creating password for admin user, please refer to the User Manual of
Blazer Express Web Client.
For the first time login of other users (except admin user), you are required to change the
initial password.
User Manual of Blazer Express Control Client
12
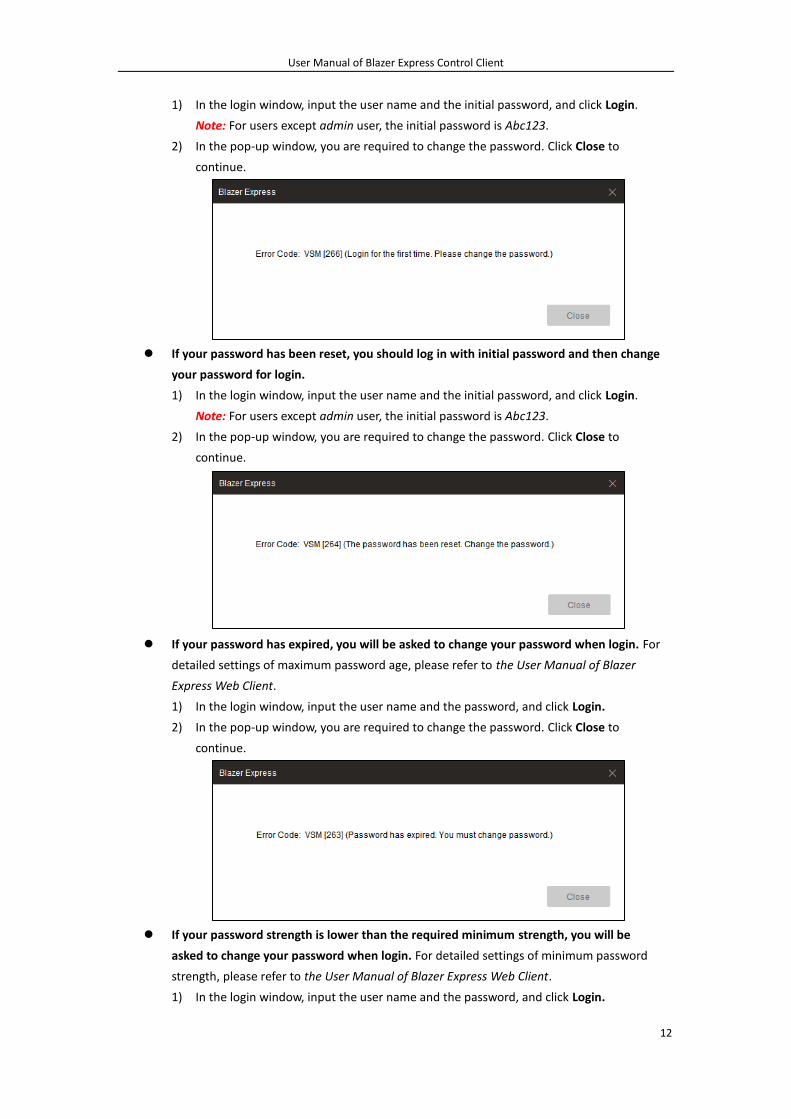
1) In the login window, input the user name and the initial password, and click Login.
Note: For users except admin user, the initial password is Abc123.
2) In the pop-up window, you are required to change the password. Click Close to
continue.
If your password has been reset, you should log in with initial password and then change
your password for login.
1) In the login window, input the user name and the initial password, and click Login.
Note: For users except admin user, the initial password is Abc123.
2) In the pop-up window, you are required to change the password. Click Close to
continue.
If your password has expired, you will be asked to change your password when login. For
detailed settings of maximum password age, please refer to the User Manual of Blazer
Express Web Client.
1) In the login window, input the user name and the password, and click Login.
2) In the pop-up window, you are required to change the password. Click Close to
continue.
If your password strength is lower than the required minimum strength, you will be
asked to change your password when login. For detailed settings of minimum password
strength, please refer to the User Manual of Blazer Express Web Client.
1) In the login window, input the user name and the password, and click Login.
User Manual of Blazer Express Control Client
13
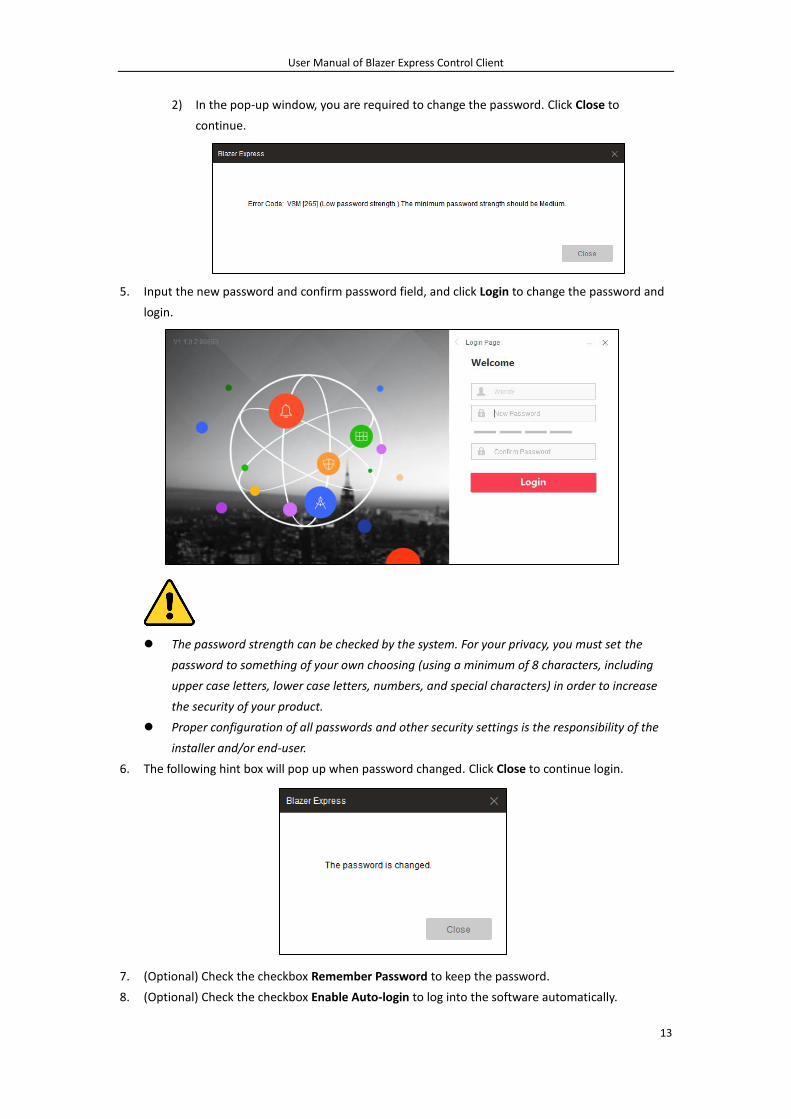
2) In the pop-up window, you are required to change the password. Click Close to
continue.
5. Input the new password and confirm password field, and click Login to change the password and
login.
The password strength can be checked by the system. For your privacy, you must set the
password to something of your own choosing (using a minimum of 8 characters, including
upper case letters, lower case letters, numbers, and special characters) in order to increase
the security of your product.
Proper configuration of all passwords and other security settings is the responsibility of the
installer and/or end-user.
6. The following hint box will pop up when password changed. Click Close to continue login.
7. (Optional) Check the checkbox Remember Password to keep the password.
8. (Optional) Check the checkbox Enable Auto-login to log into the software automatically.
User Manual of Blazer Express Control Client
14
9. (Optional) Check the checkbox Enable Cascade if you want to use the cascading function.
Note: After enabling the cascading function, the Station Management will be shown on the
control panel. You can manage up to 15 stations (Blazer Express, DVR, NVR) to view their live
video, video files, alarm information, health status and log information. For details, refer to
Chapter 15 Cascading Function
10. Click Login to enter the Control Client.
Notes:
If failed password attempt of current user is detected, you are required to input the verification
code before you can log in. The failed password attempt from current client, other client and
other address will all require the verification code.
The failed password attempt from current client, other client (e.g., Control Client) and other
address will all be accumulated. Your IP address will be locked for a specified period of time
after specific number of failed password or verification code attempts. For detailed settings of
failed login attempts and locking duration, refer to the User Manual of Blazer Express Web
Client.
The account will be frozen for 30 minutes after 5 failed password attempts. The failed password
attempt from current client, other client (e.g., Control Client) and other address will all be
accumulated.
3.2 Download the Mobile Client
The QR code for downloading the Mobile Client is also available on the login interface. Click Show QR
Code to show the QR code and scan the corresponding QR code with your mobile terminal (phone or
tablet) to download the Mobile Client. For detailed introduction about the Mobile Client, refer to the
User Manual of iVMS-5200 Mobile Client.
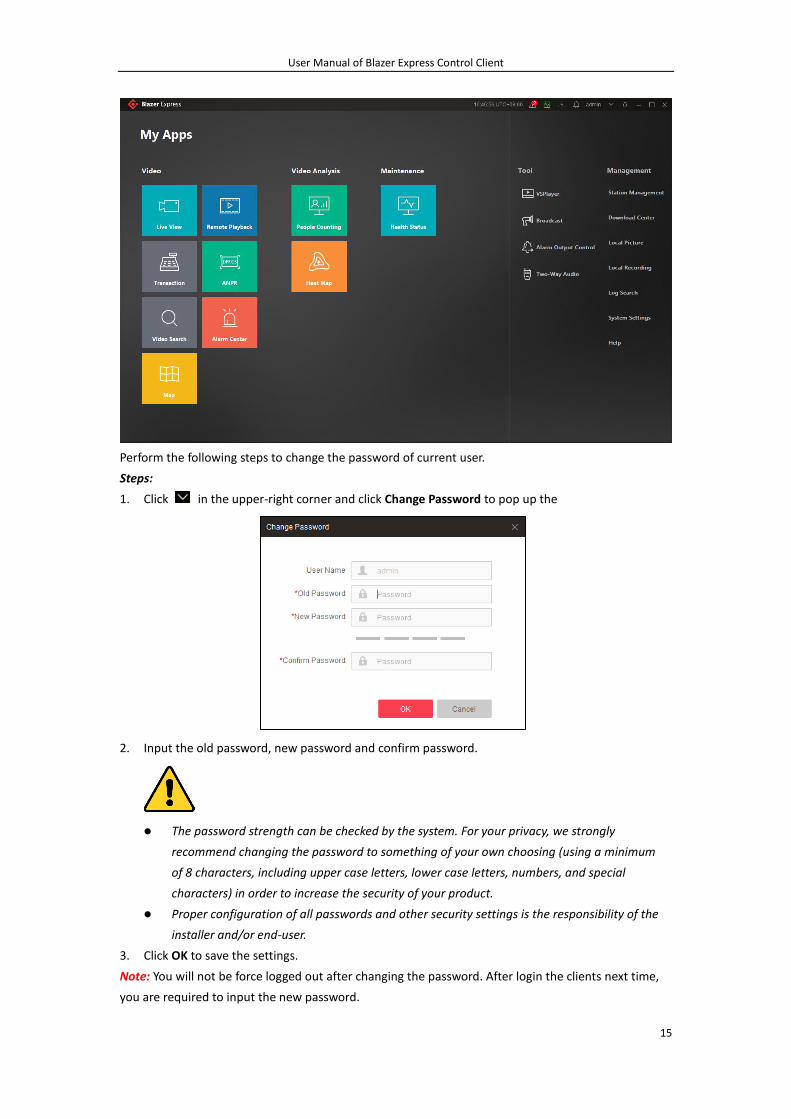
3.3 Changing Password
After login, the interface is shown as follows:
User Manual of Blazer Express Control Client
15
Perform the following steps to change the password of current user.
Steps:
1. Click in the upper-right corner and click Change Password to pop up the
2. Input the old password, new password and confirm password.
The password strength can be checked by the system. For your privacy, we strongly
recommend changing the password to something of your own choosing (using a minimum
of 8 characters, including upper case letters, lower case letters, numbers, and special
characters) in order to increase the security of your product.
Proper configuration of all passwords and other security settings is the responsibility of the
installer and/or end-user.
3. Click OK to save the settings.
Note: You will not be force logged out after changing the password. After login the clients next time,
you are required to input the new password.
User Manual of Blazer Express Control Client
16
Chapter 4 Live View
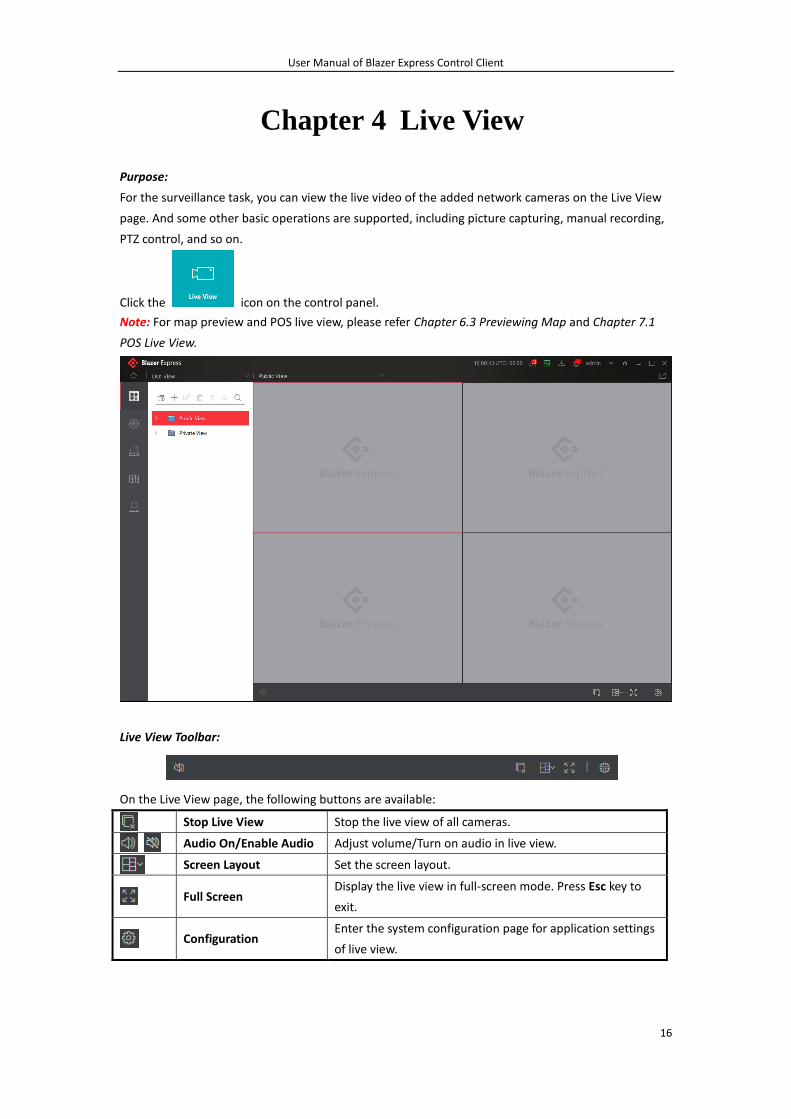
Purpose:
For the surveillance task, you can view the live video of the added network cameras on the Live View
page. And some other basic operations are supported, including picture capturing, manual recording,
PTZ control, and so on.
Click the icon on the control panel.
Note: For map preview and POS live view, please refer Chapter 6.3 Previewing Map and Chapter 7.1
POS Live View.
Live View Toolbar:
On the Live View page, the following buttons are available:
Stop Live View Stop the live view of all cameras.
Audio On/Enable Audio Adjust volume/Turn on audio in live view.
Screen Layout Set the screen layout.
Full Screen Display the live view in full-screen mode. Press Esc key to
exit.
Configuration Enter the system configuration page for application settings
of live view.
User Manual of Blazer Express Control Client
17
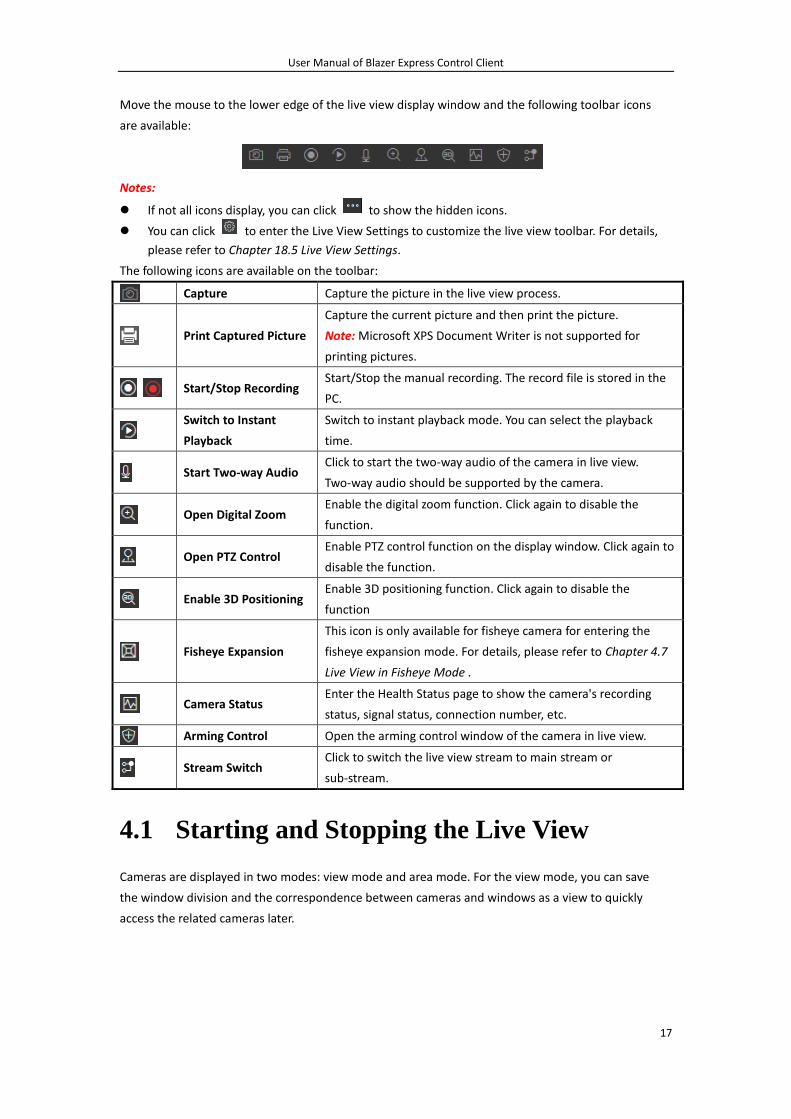
Move the mouse to the lower edge of the live view display window and the following toolbar icons
are available:
Notes:
If not all icons display, you can click to show the hidden icons.
You can click to enter the Live View Settings to customize the live view toolbar. For details,
please refer to Chapter 18.5 Live View Settings.
The following icons are available on the toolbar:
Capture Capture the picture in the live view process.
Print Captured Picture
Capture the current picture and then print the picture.
Note: Microsoft XPS Document Writer is not supported for
printing pictures.
Start/Stop Recording Start/Stop the manual recording. The record file is stored in the
PC.
Switch to Instant
Playback
Switch to instant playback mode. You can select the playback
time.
Start Two-way Audio Click to start the two-way audio of the camera in live view.
Two-way audio should be supported by the camera.
Open Digital Zoom Enable the digital zoom function. Click again to disable the
function.
Open PTZ Control Enable PTZ control function on the display window. Click again to
disable the function.
Enable 3D Positioning Enable 3D positioning function. Click again to disable the
function
Fisheye Expansion
This icon is only available for fisheye camera for entering the
fisheye expansion mode. For details, please refer to Chapter 4.7
Live View in Fisheye Mode .
Camera Status Enter the Health Status page to show the camera's recording
status, signal status, connection number, etc.
Arming Control Open the arming control window of the camera in live view.
Stream Switch Click to switch the live view stream to main stream or
sub-stream.
4.1 Starting and Stopping the Live View
Cameras are displayed in two modes: view mode and area mode. For the view mode, you can save
the window division and the correspondence between cameras and windows as a view to quickly
access the related cameras later.
User Manual of Blazer Express Control Client
18
Starting Live View in Custom View Mode
Steps:
1. Open the Live View page and click to enter the view mode.
2. (Optional) Click and the adding view group dialog pops up. Set a name and click OK to add
a view group. In this way, you can manage the views by group.
3. Select a view group (optional), click the to activate the view adding dialog.
4. Input the view name and click OK. The new view is of 4-window mode by default.
5. (Optional) Click the and select the window division mode for the new view.
6. Click to enter the area mode.
7. Click-and-drag the camera to the display window, or double-click the camera name after
selecting the display window to start the live view.
8. Click the Save to save the new view.
After setting the view, you can click the view to call it.
The following icons are also available on View Mode page:
Edit View Edit the settings the custom view or save the current view as
another view.
Delete View/View Group Delete the custom view or view group.
Adjust View Position Move the custom view or view group up or down to adjust its
position.
Starting Live View for One Camera
Steps:
1. Open the Live View page and click to enter the area mode.
2. (Optional) Click and select the window division mode for live view.
3. Click to list the cameras of the area.
4. Click-and-drag the camera to the display window, or double-click the camera name after
selecting the display window to start the live view.
Note: You can click-and-drag the video of the camera in live view to another display window if
needed.
Starting Live View for Area
Steps:
1. Open the Live View page and click to enter the area mode.
2. Click-and-drag the area to the display window, or double-click the area name after selecting the
display window, click Live View in Batch to start the live view.

User Manual of Blazer Express Control Client
19
Note: You can also select Single-Window Auto-Switch for the area live view. Refer to Chapter
4.2 Auto-Switch in Live View for detailed operation.
Note: The display window number is self-adaptive to the camera number of the area.
Stopping the Live View
Steps:
1. Select the display window.
2. Click the icon that appears in the upper-right corner when the mouse pointer is over the
display window. You can also click the button in live view toolbar to stop all the live view.
4.2 Auto-switch in Live View
4.2.1 Camera Auto-switch
Purpose:
The video stream of the cameras from the same area will switch automatically in one selected
display window in camera auto-switch.
Steps:
1. Open the Live View page and click to enter the area mode.
2. Select a display window for camera auto-switch.
3. Click-and-drag the area to the display window, or double-click the area name after selecting the
display window, click Single-Window Auto-Switch.
4. Move the mouse to the auto-switch window, click or to adjust the switching interval,
click or to view the previous or next camera, click to pause the auto-switch.
4.2.2 View Auto-switch
Purpose:
The custom views belonging to the same view group will switch automatically in view auto-switch.
The custom views need to be added before proceeding.
Steps:
1. In Live View page, click to enter the view mode.
2. Click-and-drag a custom view group to the display window, and the views belongs to the view
group will start switching automatically.
3. On the live view toolbar, click or to adjust the switching interval, click or to
view the previous or next camera, click to pause the auto-switch.
4.3 PTZ Control in Live View
Control Client provides PTZ control for cameras with pan/tilt/zoom functionality. You can set the
preset, patrol and pattern for the cameras on the PTZ Control panel.
User Manual of Blazer Express Control Client
20
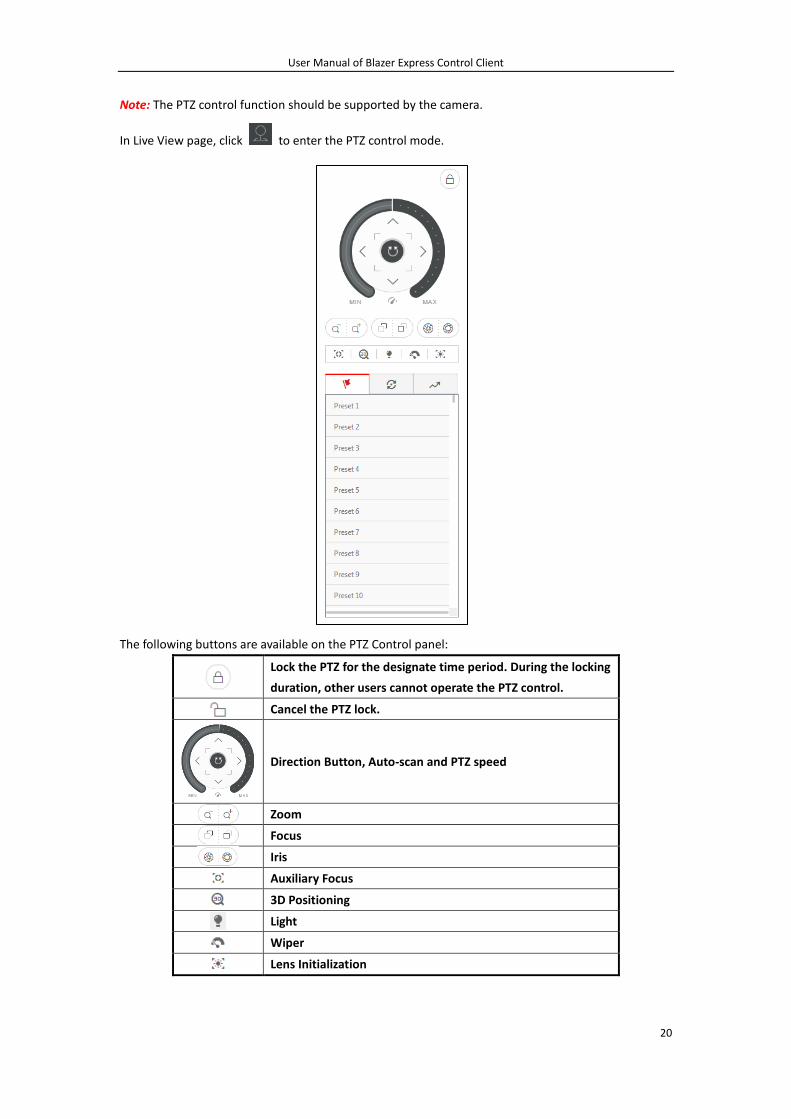
Note: The PTZ control function should be supported by the camera.
In Live View page, click to enter the PTZ control mode.
The following buttons are available on the PTZ Control panel:
Lock the PTZ for the designate time period. During the locking
duration, other users cannot operate the PTZ control.
Cancel the PTZ lock.
Direction Button, Auto-scan and PTZ speed
Zoom
Focus
Iris
Auxiliary Focus
3D Positioning
Light
Wiper
Lens Initialization
User Manual of Blazer Express Control Client
21
Configuring the Preset
A preset is a predefined image position which contains information of pan, tilt, zoom, focus and
other parameters.
Perform the following steps to add a preset:
1. Click the tab to enter the PTZ preset configuration panel.
2. Click the direction buttons on the PTZ control panel to move the camera to the desired view.
3. Select a PTZ preset No. from the preset list and click .
4. Input the name of the preset in the pop-up dialog box.
5. Click Confirm to save the settings.
To call a configured preset, double-click the preset, or select the preset and click the icon .
To edit a configured preset, select the preset from the list and click the icon .
To delete a configured preset, select the preset from the list and click the icon .
Configuring the Patrol
A patrol is a scanning track specified by a group of user-defined presets, with the scanning speed
between two presets and the dwell time at the preset separately programmable.
Before you start:
Two or more presets for one PTZ camera need to be added.
Perform the following steps to add and call a patrol:
1. Click the button to enter the PTZ patrol configuration panel.
2. Select a path No. from the drop-down list and click .
3. Click to add a preset, and set the dwell time and patrol speed.
4. Repeat the above operation to add other presets to the patrol.
5. Optionally, you can click double click the corresponding field of the preset to edit the settings,
or click to remove the preset, or click to adjust the preset position.
6. Click OK to save the patrol settings.
7. Click the icon to call the patrol. To stop calling the patrol, click .
Notes:
Up to 16 patrols can be configured.
The preset dwell time can be set to 1 to 30 seconds, and the patrol speed can be set to level 1
to 40.
Configuring the Pattern
Patterns can be set to record the movement of the PTZ.
Perform the following steps to add a pattern:
1. Click the button to enter the PTZ pattern configuration panel.
2. Click to start recording of this pattern path.
3. Use the direction buttons and other buttons to control the PTZ movement.
4. Click to stop and save the pattern recording.
5. Click the icon to call the pattern. To stop calling the pattern, click .
Note: Only one pattern can be configured, and the newly-defined pattern will overwrite the previous
one.
User Manual of Blazer Express Control Client
22
4.4 Manual Recording and Capture
Manual Recording in Live View
Purpose:
Manual Recording function allows you to record the live video on the Live View page manually and
the video files are stored in the local PC.
Steps:
1. Move the mouse to the live view display window to show the toolbar.
2. Click in the toolbar of the display window to start the manual recording. The icon turns to
.
3. Click the icon to stop the manual recording.
A dialog with the saving path of the video files you just recorded will pop up, and you can click
Open Folder to check the video file.
Notes:
During the manual recording, Recording will display in the upper-right corner of the display
window.
The saving path of video files can be set on the Local Configuration interface. For details, see
Chapter 14.3 File Saving Path Settings.
For the Control Client on Blazer Express, the video cannot be stored if the stored video or
picture size reaches 500 MB.
Viewing Local Record Files
Purpose:
The manually recorded files in live view are stored in the PC on which the Control Client is running.
You can view the record files if needed.
Steps:
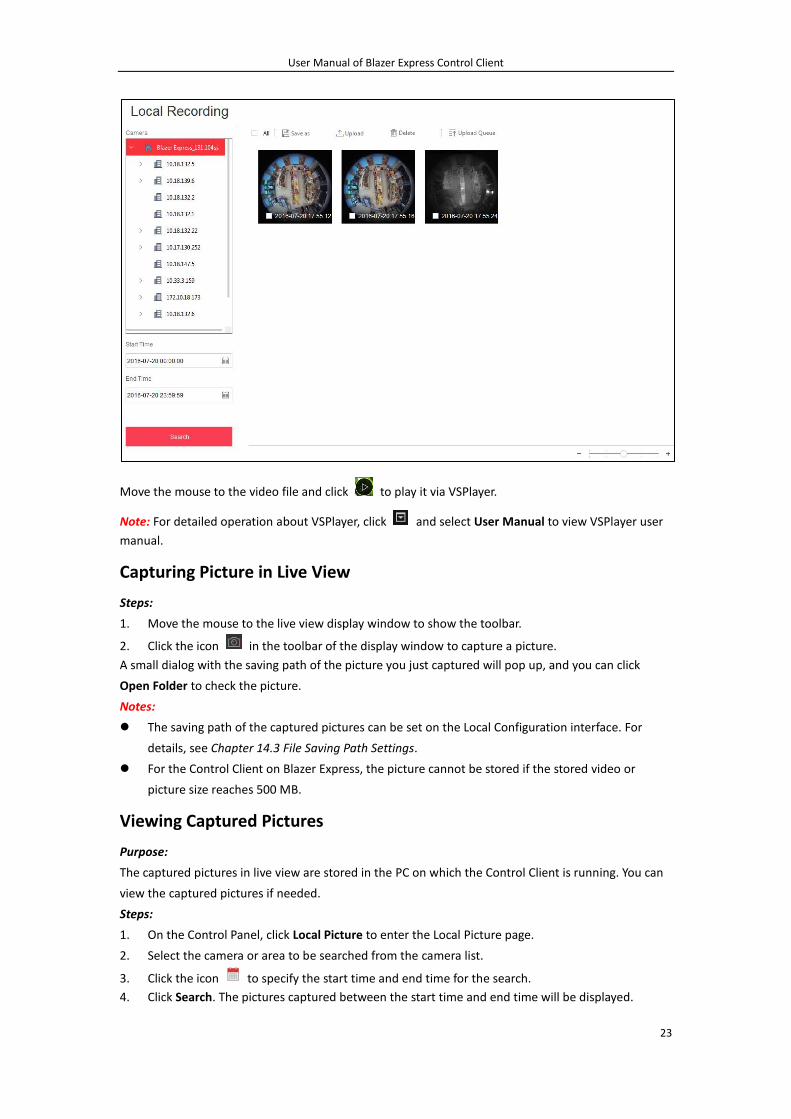
1. On the Control Panel, click Local Recording to enter the Local Recording page.
2. Select the camera or area to be searched from the camera list.
3. Click the icon to specify the start time and end time for the search.
4. Click Search. The video files recorded between the start time and end time will display.
Check the checkbox(es) to select the files or check All checkbox to select all the found
video file(s), and click Upload to upload the video file to the configured FTP server. Click
Start All to start uploading the selected files. You can also click Upload Queue to check the
uploading status.
Check the checkbox(es) to select the files or check All checkbox to select all the found
video file(s), and click Save As to save a new copy of the video file in local PC.
Check the checkbox(es) to select the files or check All checkbox to select all the found
video file(s), and click Delete to delete the video file.
Note: To upload the video files to FTP server, the FTP settings need to be configured before
proceeding. For details, see Chapter 14.3 File Saving Path Settings.
User Manual of Blazer Express Control Client
23
Move the mouse to the video file and click to play it via VSPlayer.
Note: For detailed operation about VSPlayer, click and select User Manual to view VSPlayer user
manual.
Capturing Picture in Live View
Steps:
1. Move the mouse to the live view display window to show the toolbar.
2. Click the icon in the toolbar of the display window to capture a picture.
A small dialog with the saving path of the picture you just captured will pop up, and you can click
Open Folder to check the picture.
Notes:
The saving path of the captured pictures can be set on the Local Configuration interface. For
details, see Chapter 14.3 File Saving Path Settings.
For the Control Client on Blazer Express, the picture cannot be stored if the stored video or
picture size reaches 500 MB.
Viewing Captured Pictures
Purpose:
The captured pictures in live view are stored in the PC on which the Control Client is running. You can
view the captured pictures if needed.
Steps:
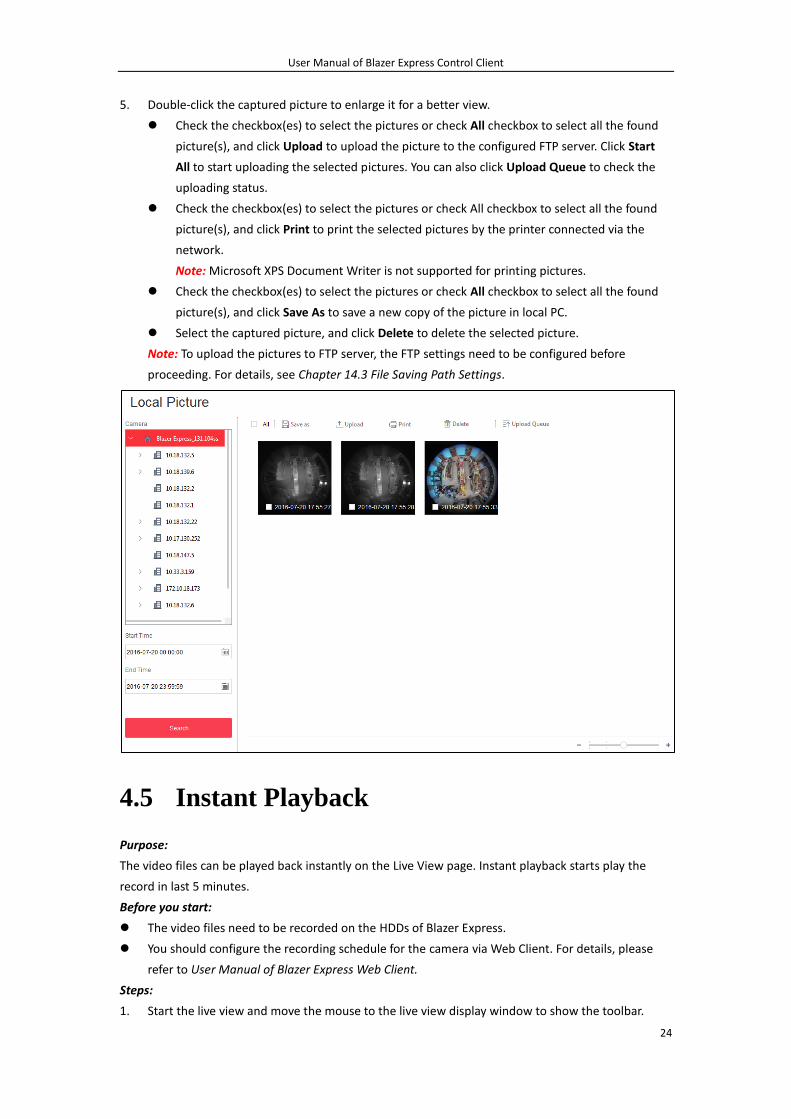
1. On the Control Panel, click Local Picture to enter the Local Picture page.
2. Select the camera or area to be searched from the camera list.
3. Click the icon to specify the start time and end time for the search.
4. Click Search. The pictures captured between the start time and end time will be displayed.
User Manual of Blazer Express Control Client
24
5. Double-click the captured picture to enlarge it for a better view.
Check the checkbox(es) to select the pictures or check All checkbox to select all the found
picture(s), and click Upload to upload the picture to the configured FTP server. Click Start
All to start uploading the selected pictures. You can also click Upload Queue to check the
uploading status.
Check the checkbox(es) to select the pictures or check All checkbox to select all the found
picture(s), and click Print to print the selected pictures by the printer connected via the
network.
Note: Microsoft XPS Document Writer is not supported for printing pictures.
Check the checkbox(es) to select the pictures or check All checkbox to select all the found
picture(s), and click Save As to save a new copy of the picture in local PC.
Select the captured picture, and click Delete to delete the selected picture.
Note: To upload the pictures to FTP server, the FTP settings need to be configured before
proceeding. For details, see Chapter 14.3 File Saving Path Settings.
4.5 Instant Playback
Purpose:
The video files can be played back instantly on the Live View page. Instant playback starts play the
record in last 5 minutes.
Before you start:
The video files need to be recorded on the HDDs of Blazer Express.
You should configure the recording schedule for the camera via Web Client. For details, please
refer to User Manual of Blazer Express Web Client.
Steps:
1. Start the live view and move the mouse to the live view display window to show the toolbar.
User Manual of Blazer Express Control Client
25
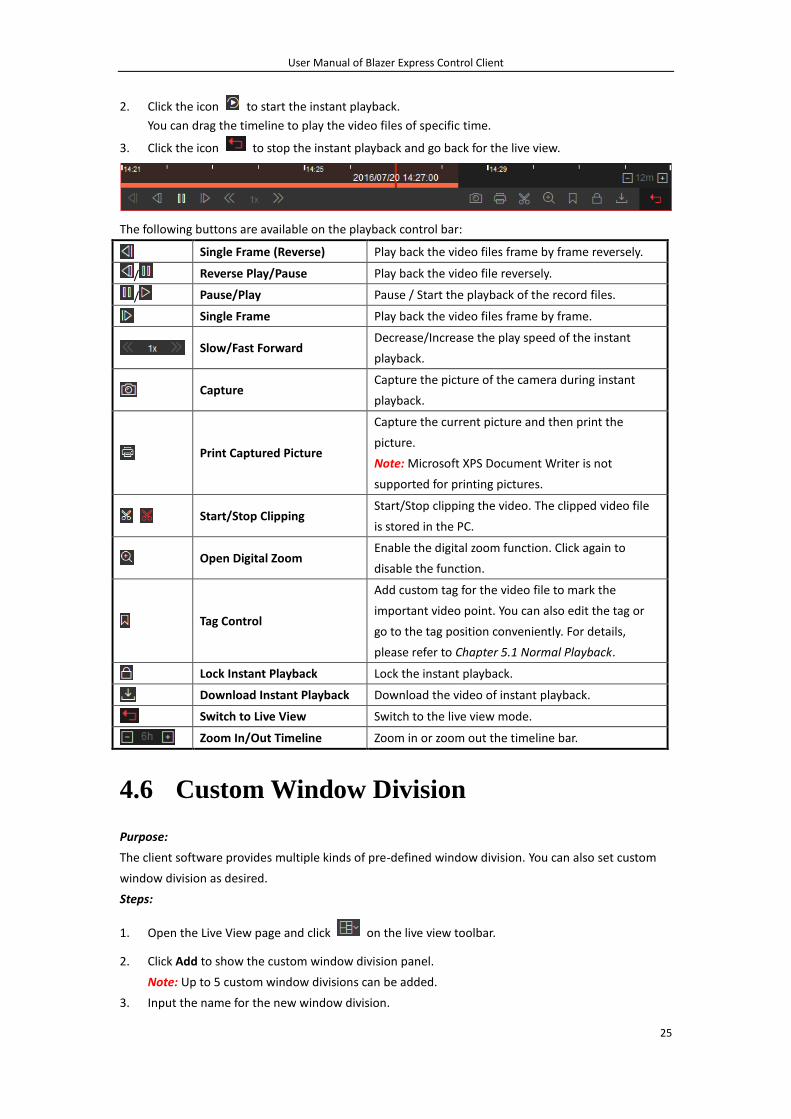
2. Click the icon to start the instant playback.
You can drag the timeline to play the video files of specific time.
3. Click the icon to stop the instant playback and go back for the live view.
The following buttons are available on the playback control bar:
Single Frame (Reverse) Play back the video files frame by frame reversely.
/ Reverse Play/Pause Play back the video file reversely.
/ Pause/Play Pause / Start the playback of the record files.
Single Frame Play back the video files frame by frame.
Slow/Fast Forward Decrease/Increase the play speed of the instant
playback.
Capture Capture the picture of the camera during instant
playback.
Print Captured Picture
Capture the current picture and then print the
picture.
Note: Microsoft XPS Document Writer is not
supported for printing pictures.
Start/Stop Clipping Start/Stop clipping the video. The clipped video file
is stored in the PC.
Open Digital Zoom Enable the digital zoom function. Click again to
disable the function.
Tag Control
Add custom tag for the video file to mark the
important video point. You can also edit the tag or
go to the tag position conveniently. For details,
please refer to Chapter 5.1 Normal Playback.
Lock Instant Playback Lock the instant playback.
Download Instant Playback Download the video of instant playback.
Switch to Live View Switch to the live view mode.
Zoom In/Out Timeline Zoom in or zoom out the timeline bar.
4.6 Custom Window Division
Purpose:
The client software provides multiple kinds of pre-defined window division. You can also set custom
window division as desired.
Steps:
1. Open the Live View page and click on the live view toolbar.
2. Click Add to show the custom window division panel.
Note: Up to 5 custom window divisions can be added.
3. Input the name for the new window division.

User Manual of Blazer Express Control Client
26
4. Select the window division for it.
5. Click-and-drag you mouse to select the adjacent windows, and click Joint to joint them as a
whole window. You can also click Cancel to cancel the jointing.
6. Click Save to confirm the settings and exit. Then you can click and select the custom
window division for playing live video.
Notes:
You can also enter the Remote Playback page and perform the steps above to configure the
custom window division.
For remote playback, up to 16 windows (for Control Client on Blazer Express, 9 windows) can be
played back at the same time. The custom window division with more than 16 windows (for
Control Client on Blazer Express, 9 windows) is invalid for playback.
4.7 Live View in Fisheye Mode
Starting Live View for One Camera
Purpose:
The live video of the fisheye camera can be played in fisheye expansion mode.
Steps:
1. Open the Main View page and start the live view (refer to Chapter 4.1 Starting and Stopping the
Live View).
2. Move the mouse to the live view display window and click to enter the fisheye expansion
mode.
3. Click to enter the PTZ control mode.
4. Select the mounting type of the fisheye camera.
5. You can select the expand mode for live view as desired.
Note: For the Control Client on Blazer Express, the available expand mode can contain up to 4
windows.
Fisheye: In the Fisheye view mode, the whole wide-angle view of the camera is displayed.
This view mode is called Fisheye because it approximates the vision of a fish's convex eye.
The lens produces curvilinear images of a large area, while distorting the perspective and
angles of objects in the image.
Panorama: In the Panorama view mode, the distorted fisheye image is transformed to
normal perspective image by some calibration methods.
PTZ: The PTZ view is the close-up view of some defined area in the Fisheye view or
Panorama view, and it supports the electronic PTZ function, which is also called e-PTZ.
Note: Each PTZ view is marked on the Fisheye view and Panorama view with a specific
navigation box. You can drag the navigation box on the Fisheye view or Panorama view adjust the
PTZ view, or drag the PTZ view to adjust the view to the desired angle.
PTZ Control
In PTZ mode, you can use the PTZ control to adjust the PTZ window.
User Manual of Blazer Express Control Client
27
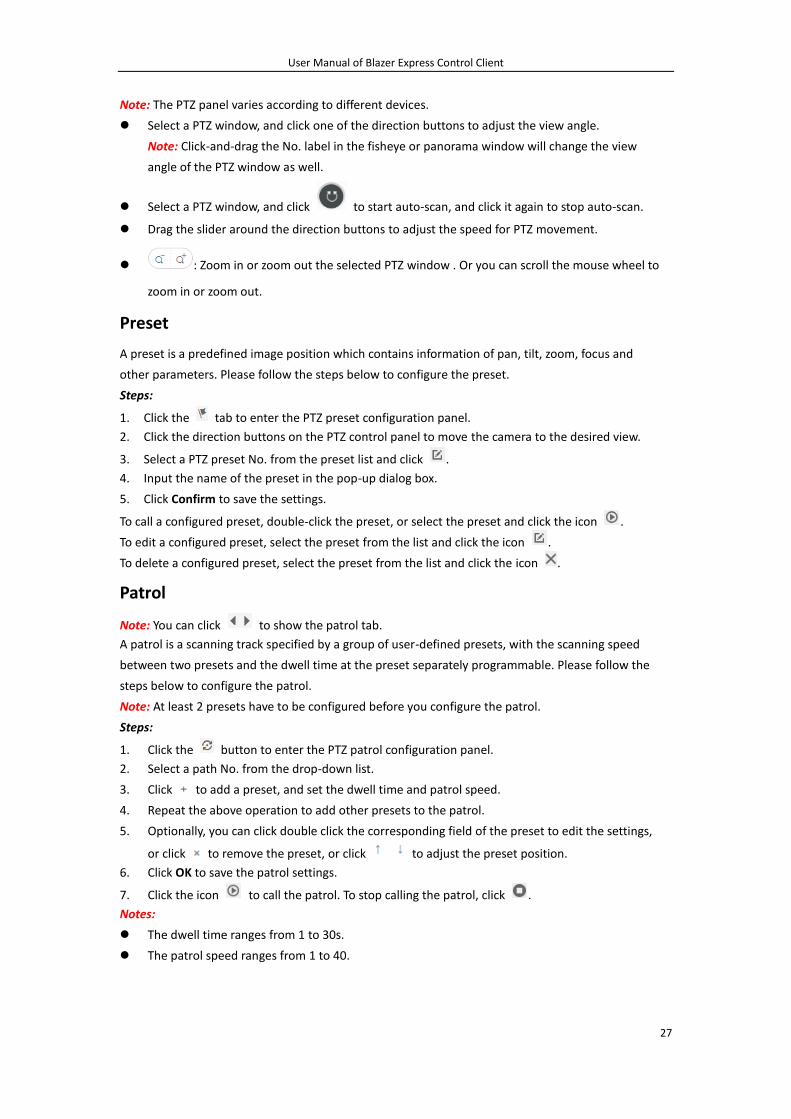
Note: The PTZ panel varies according to different devices.
Select a PTZ window, and click one of the direction buttons to adjust the view angle.
Note: Click-and-drag the No. label in the fisheye or panorama window will change the view
angle of the PTZ window as well.
Select a PTZ window, and click to start auto-scan, and click it again to stop auto-scan.
Drag the slider around the direction buttons to adjust the speed for PTZ movement.
: Zoom in or zoom out the selected PTZ window . Or you can scroll the mouse wheel to
zoom in or zoom out.
Preset
A preset is a predefined image position which contains information of pan, tilt, zoom, focus and
other parameters. Please follow the steps below to configure the preset.
Steps:
1. Click the tab to enter the PTZ preset configuration panel.
2. Click the direction buttons on the PTZ control panel to move the camera to the desired view.
3. Select a PTZ preset No. from the preset list and click .
4. Input the name of the preset in the pop-up dialog box.
5. Click Confirm to save the settings.
To call a configured preset, double-click the preset, or select the preset and click the icon .
To edit a configured preset, select the preset from the list and click the icon .
To delete a configured preset, select the preset from the list and click the icon .
Patrol
Note: You can click to show the patrol tab.
A patrol is a scanning track specified by a group of user-defined presets, with the scanning speed
between two presets and the dwell time at the preset separately programmable. Please follow the
steps below to configure the patrol.
Note: At least 2 presets have to be configured before you configure the patrol.
Steps:
1. Click the button to enter the PTZ patrol configuration panel.
2. Select a path No. from the drop-down list.
3. Click to add a preset, and set the dwell time and patrol speed.
4. Repeat the above operation to add other presets to the patrol.
5. Optionally, you can click double click the corresponding field of the preset to edit the settings,
or click to remove the preset, or click to adjust the preset position.
6. Click OK to save the patrol settings.
7. Click the icon to call the patrol. To stop calling the patrol, click .
Notes:
The dwell time ranges from 1 to 30s.
The patrol speed ranges from 1 to 40.
User Manual of Blazer Express Control Client
28
4.8 Other Functions in Live View
There are some other functions supported in the live view, such as digital zoom, two-way audio, and
camera status.
Auxiliary Screen Preview
The live video can be displayed on different auxiliary screens for the convenient preview of multiple
monitoring scenes. Click above the display window area to open an auxiliary screen. Up to 3
auxiliary screens are supported.
Notes: For the Control Client on the Blazer Express, 1 auxiliary screen is available.
Digital Zoom
Move the mouse to the live view display window and click . Use the left key of mouse to drag a
rectangle area in the lower-right/upper-left direction, and then the rectangle area will zoom in/out.
Two-way Audio
Move the mouse to the live view display window and click . Two-way audio function enables the
voice talk of the camera. You can get not only the live video but also the real-time audio from the
camera. For other operations, refer to Chapter 14 Tools.
Camera Status
Move the mouse to the live view display window and click . The camera status, such as recording
status, signal status, connection number, etc., can be detected and displayed for check. The
inspection interval for camera status is 3 minutes.
Arming Control
Move the mouse to the live view display window and click . The status of the enabled event
detection (e.g., motion detection, video loss) of the camera displays, such as arming status, alarm
name and alarm type. You can set the switch as OFF or click Disarm All to disable the event detection
and set the disarming duration. You can also set the switch as ON or click Arm All to enable the event
detection.
User Manual of Blazer Express Control Client
29
Chapter 5 Remote Playback
Purpose:
The video files can be searched by area, camera or event, and then can be played back remotely.
Before you start:
You should set the record settings for the camera via the Web Client. For details, please refer to the
User Manual of Blazer Express Web Client.
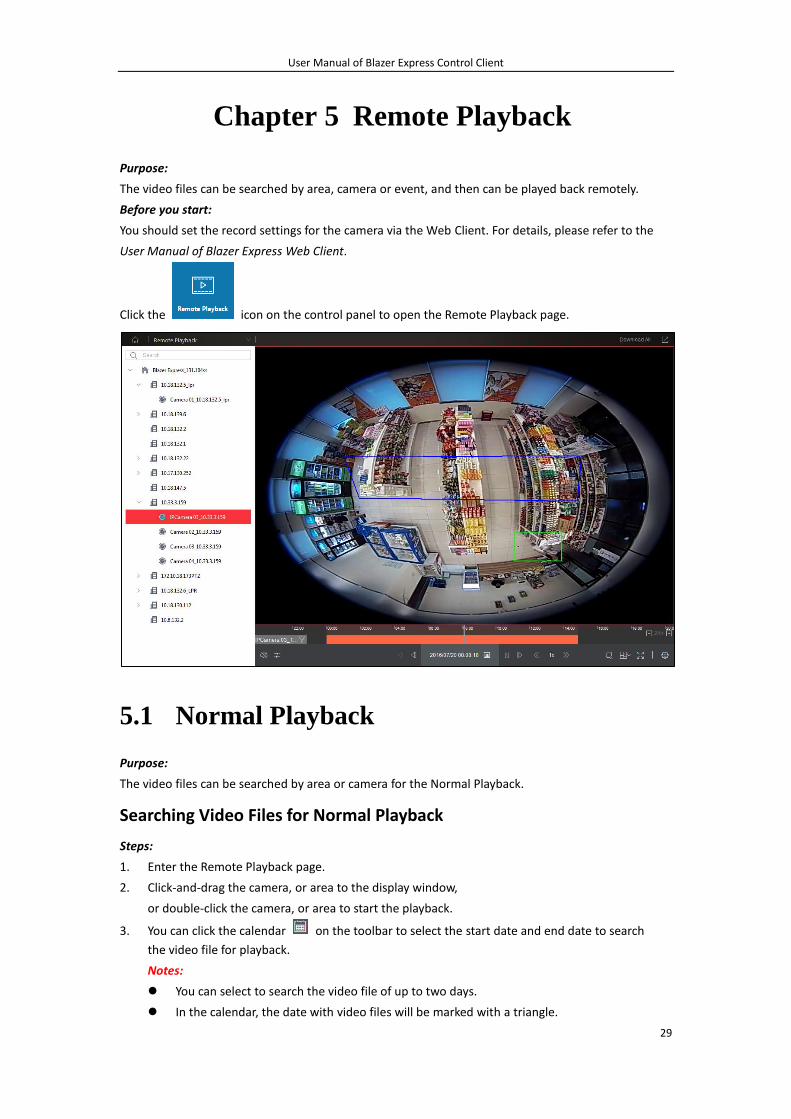
Click the icon on the control panel to open the Remote Playback page.
5.1 Normal Playback
Purpose:
The video files can be searched by area or camera for the Normal Playback.
Searching Video Files for Normal Playback
Steps:
1. Enter the Remote Playback page.
2. Click-and-drag the camera, or area to the display window,
or double-click the camera, or area to start the playback.
3. You can click the calendar on the toolbar to select the start date and end date to search
the video file for playback.
Notes:
You can select to search the video file of up to two days.
In the calendar, the date with video files will be marked with a triangle.
User Manual of Blazer Express Control Client
30
Playing Video Files
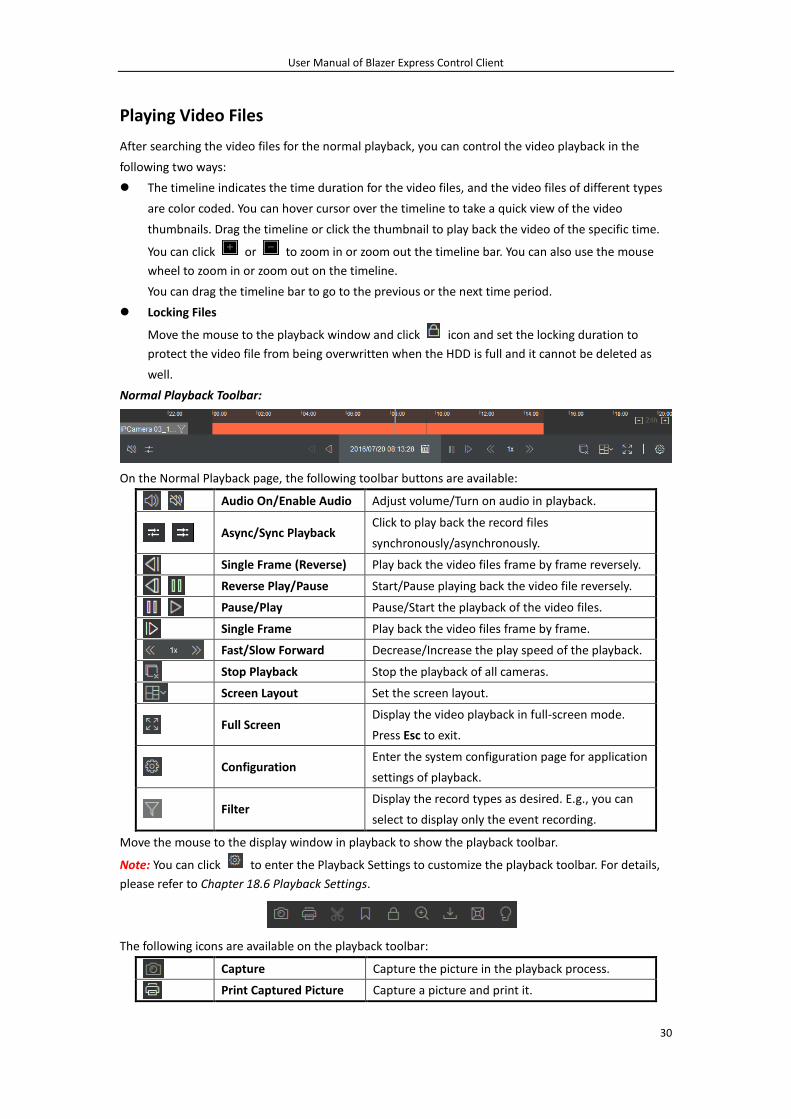
After searching the video files for the normal playback, you can control the video playback in the
following two ways:
The timeline indicates the time duration for the video files, and the video files of different types
are color coded. You can hover cursor over the timeline to take a quick view of the video
thumbnails. Drag the timeline or click the thumbnail to play back the video of the specific time.
You can click or to zoom in or zoom out the timeline bar. You can also use the mouse
wheel to zoom in or zoom out on the timeline.
You can drag the timeline bar to go to the previous or the next time period.
Locking Files
Move the mouse to the playback window and click icon and set the locking duration to
protect the video file from being overwritten when the HDD is full and it cannot be deleted as
well.
Normal Playback Toolbar:
On the Normal Playback page, the following toolbar buttons are available:
Audio On/Enable Audio Adjust volume/Turn on audio in playback.
Async/Sync Playback Click to play back the record files
synchronously/asynchronously.
Single Frame (Reverse) Play back the video files frame by frame reversely.
Reverse Play/Pause Start/Pause playing back the video file reversely.
Pause/Play Pause/Start the playback of the video files.
Single Frame Play back the video files frame by frame.
Fast/Slow Forward Decrease/Increase the play speed of the playback.
Stop Playback Stop the playback of all cameras.
Screen Layout Set the screen layout.
Full Screen Display the video playback in full-screen mode.
Press Esc to exit.
Configuration Enter the system configuration page for application
settings of playback.
Filter Display the record types as desired. E.g., you can
select to display only the event recording.
Move the mouse to the display window in playback to show the playback toolbar.
Note: You can click to enter the Playback Settings to customize the playback toolbar. For details,
please refer to Chapter 18.6 Playback Settings.
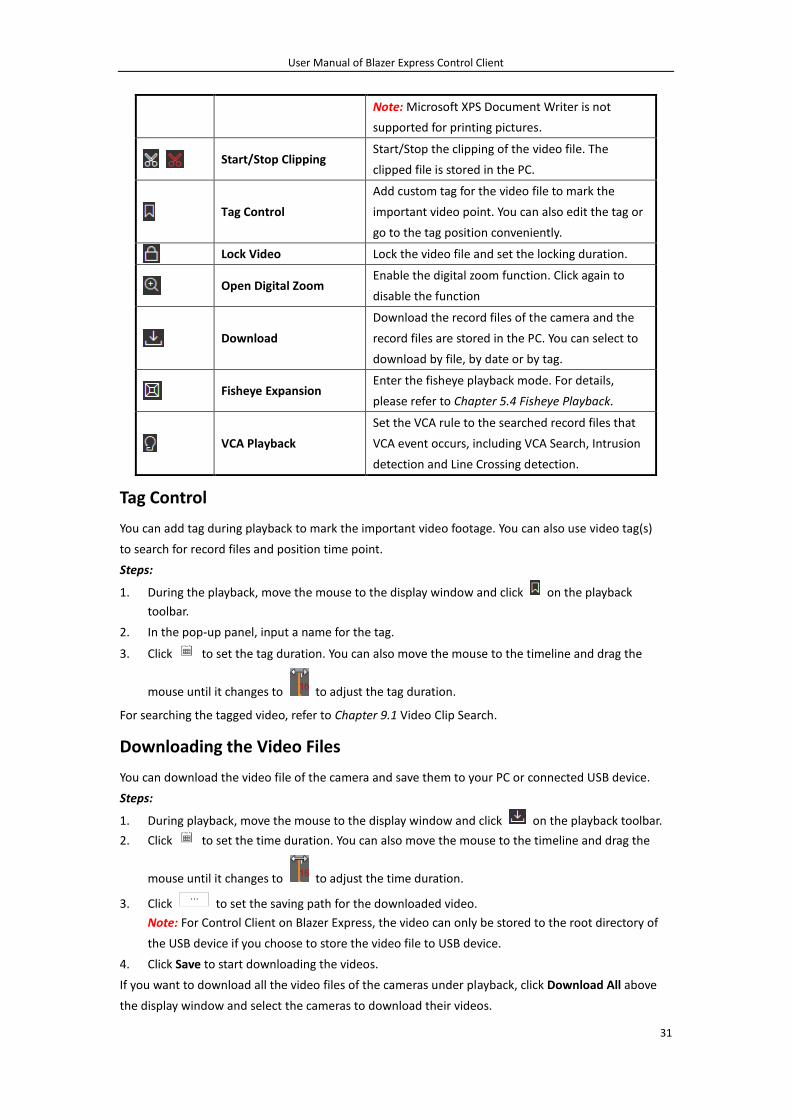
The following icons are available on the playback toolbar:
Capture Capture the picture in the playback process.
Print Captured Picture Capture a picture and print it.
User Manual of Blazer Express Control Client
31
Note: Microsoft XPS Document Writer is not
supported for printing pictures.
Start/Stop Clipping Start/Stop the clipping of the video file. The
clipped file is stored in the PC.
Tag Control
Add custom tag for the video file to mark the
important video point. You can also edit the tag or
go to the tag position conveniently.
Lock Video Lock the video file and set the locking duration.
Open Digital Zoom Enable the digital zoom function. Click again to
disable the function
Download
Download the record files of the camera and the
record files are stored in the PC. You can select to
download by file, by date or by tag.
Fisheye Expansion Enter the fisheye playback mode. For details,
please refer to Chapter 5.4 Fisheye Playback.
VCA Playback
Set the VCA rule to the searched record files that
VCA event occurs, including VCA Search, Intrusion
detection and Line Crossing detection.
Tag Control
You can add tag during playback to mark the important video footage. You can also use video tag(s)
to search for record files and position time point.
Steps:
1. During the playback, move the mouse to the display window and click on the playback
toolbar.
2. In the pop-up panel, input a name for the tag.
3. Click to set the tag duration. You can also move the mouse to the timeline and drag the
mouse until it changes to to adjust the tag duration.
For searching the tagged video, refer to Chapter 9.1 Video Clip Search.
Downloading the Video Files
You can download the video file of the camera and save them to your PC or connected USB device.
Steps:
1. During playback, move the mouse to the display window and click on the playback toolbar.
2. Click to set the time duration. You can also move the mouse to the timeline and drag the
mouse until it changes to to adjust the time duration.
3. Click to set the saving path for the downloaded video.
Note: For Control Client on Blazer Express, the video can only be stored to the root directory of
the USB device if you choose to store the video file to USB device.
4. Click Save to start downloading the videos.
If you want to download all the video files of the cameras under playback, click Download All above
the display window and select the cameras to download their videos.
User Manual of Blazer Express Control Client
32
To view the download process, refer to Chapter 16 Download Center.
5.2 Synchronous Playback
Purpose:
In synchronous playback, the record files can be played back in synchronization.
Note: Video files from up to 16 cameras can be played back simultaneously.
Steps:
1. Enter the Remote Playback page.
2. Start normal playback of the video files (refer to Chapter 5.1 Normal Playback). At least two
cameras are during playback.
3. Click in the toolbar to enable the synchronous playback. The camera under playback will
start synchronous playback.
4. To disable the synchronous playback, click the icon .
For other playback control instruction, refer to Chapter 5.1 Normal Playback. Some icons may not be
available for synchronous playback.
5.3 VCA Playback
Purpose:
You can set VCA rule to the searched video files and find the video that VCA event occurs, including
VCA Search, Intrusion and Line Crossing. This function helps to search out the video that you may be
more concerned, mark it with red color, and set the playback speed of the concerned video as 1X
while the unconcerned video as 8X.
VCA Search: Get all the related motion detection events that occurred in the pre-defined
region.
Intrusion Detection: Detect whether there are people, vehicles and other moving objects
intruding into the pre-defined region.
Line Crossing Detection: Bi-directionally detect people, vehicles and other moving objects that
cross a virtual line.
Note: This function should be supported by the device.
Steps:
1. Enter the Remote Playback page.
2. Select the camera and start the normal playback (refer to Chapter 5.1 Normal Playback).
3. Move the mouse to the display window and click to enter the VCA playback interface.
4. Click to set the start time and end time.
5. Click to pop up the rule settings dialog.
6. Select the VCA Type, and draw the detection region.
Notes:
For VCA Search, click , and then click and drag on the playback window to set the grid
rectangle as the detection region. Or you can click to set all the area shot by the
camera as the detection region.
For Intrusion Detection, click and then click on the playback window to set the vertex
User Manual of Blazer Express Control Client
33
for the detection region.
For Line Crossing Detection, click and then click on the playback window to set the
beginning point in the area and move the mouse and click again to set the end of the line.
To delete the drawn region, click to remove it.
7. Click OK to save the settings.
8. Drag the slider to set the sensitivity.
9. Click Search and the VCA events occurred in the defined area will list.
For other playback control instruction, refer to Chapter 5.1 Normal Playback. Some icons may not be
available for VCA playback.
5.4 Fisheye Playback
Purpose:
The video files of fisheye camera can be played in fisheye expansion mode.
Steps:
1. Enter the Remote Playback page.
2. Select the camera and start the normal playback. For detailed configuration about normal
playback and playback control, refer to Chapter 5.1 Normal Playback.
3. Move the mouse to the display window and click to enter the Fisheye Expansion Mode.
You can select the expand mode for playback as desired.
Notes:
For the Control Client on Blazer Express, you cannot enter the fisheye playback mode if
you start reverse playback of the fisheye camera.
For the Control Client on Blazer Express, the available expand mode can contain up to 4
windows.
You can select the mounting type of the device and the related expand mode will be listed.
Fisheye: In the Fisheye view mode, the whole wide-angle view of the camera is
displayed. This view mode is called Fisheye because it approximates the vision of a
fish’s convex eye. The lens produces curvilinear images of a large area, while
distorting the perspective and angles of objects in the image.
Panorama / Dual-180° Panorama / 360° Panorama: In the Panorama view mode, the
distorted fisheye image is transformed to normal perspective image by some
calibration methods.
PTZ: The PTZ view is the close-up view of some defined area in the Fisheye view or
Panorama view, and it supports the electronic PTZ function, which is also called
e-PTZ.
Note: Each PTZ view is marked on the Fisheye view and Panorama view with a
specific navigation box. You can drag the navigation box on the Fisheye view or
Panorama view to adjust the PTZ view, or drag the PTZ view to adjust the view to the
desired angle.
For other playback control instruction, refer to Chapter 5.1 Normal Playback. Some icons may not be
available for fisheye playback.
User Manual of Blazer Express Control Client
34
Chapter 6 Map
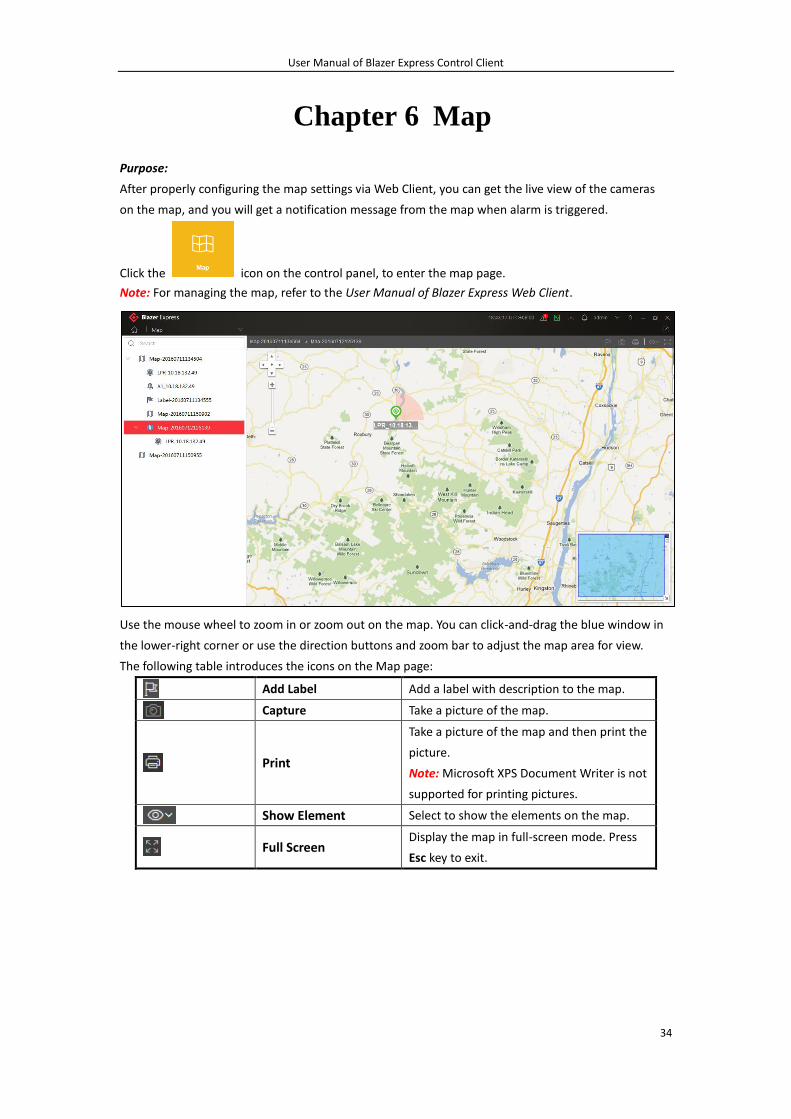
Purpose:
After properly configuring the map settings via Web Client, you can get the live view of the cameras
on the map, and you will get a notification message from the map when alarm is triggered.
Click the icon on the control panel, to enter the map page.
Note: For managing the map, refer to the User Manual of Blazer Express Web Client.
Use the mouse wheel to zoom in or zoom out on the map. You can click-and-drag the blue window in
the lower-right corner or use the direction buttons and zoom bar to adjust the map area for view.
The following table introduces the icons on the Map page:
Add Label Add a label with description to the map.
Capture Take a picture of the map.
Take a picture of the map and then print the
picture.
Note: Microsoft XPS Document Writer is not
supported for printing pictures.
Show Element Select to show the elements on the map.
Full Screen Display the map in full-screen mode. Press
Esc key to exit.
User Manual of Blazer Express Control Client
35
6.1 Previewing Hot Spots
Purpose:
The cameras, alarm inputs, and alarm outputs added on the map are called the hot spots. The hot
spots show the locations of the cameras, alarm inputs, and alarm outputs, and you can also get the
alarm information of the surveillance scenarios through the hot spots.
Steps:
1. Click the hot spot on the map and a dialog pops up on which the related functions of the hot
spot display.
For camera hot spot: You can select to check the live view and playback of the camera,
view its status, area, remark, set the arming control, view and save the log information of
the history alarm.
For alarm input hot spot: You can view its status, area, remark, set the arming control,
view and save the log information of the history alarm.
For alarm output hot spot: You can view its status, area, remark, and turn on or off the
linked alarm output.
2. If there is any alarm triggered, the hot spot icon changes its color to red , the map icon
displays as . You can click the hot spot to check the alarm information.
Arming Control
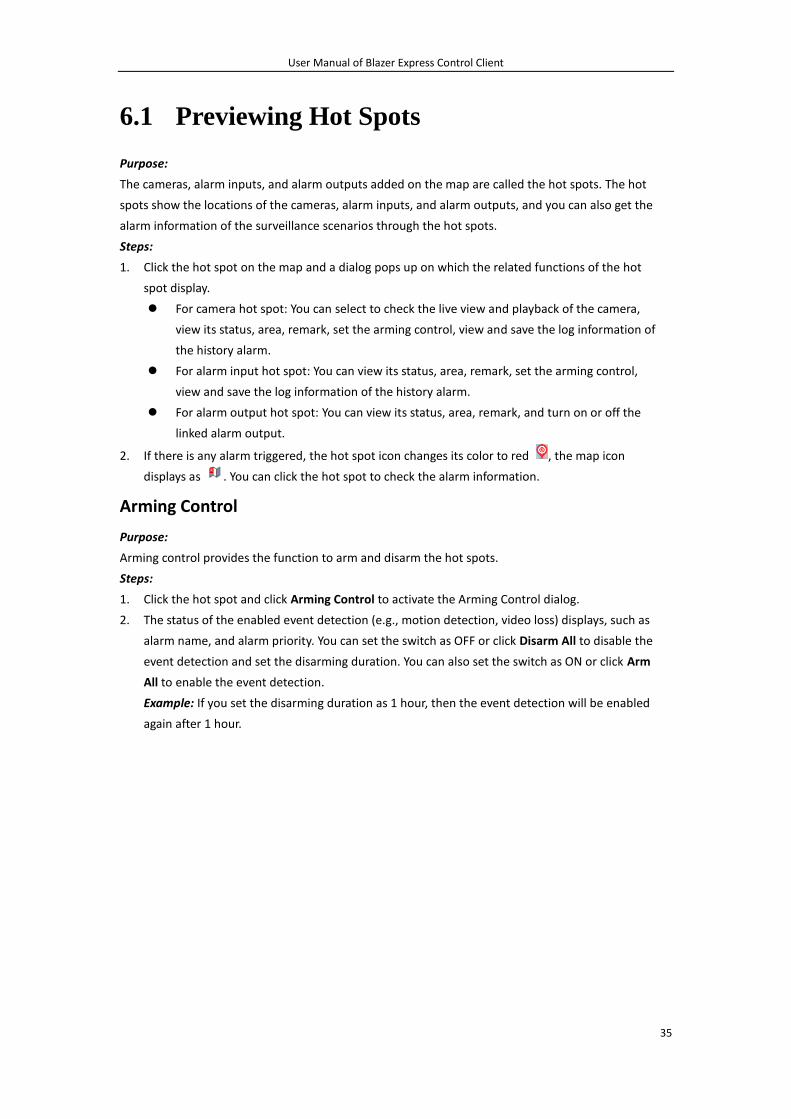
Purpose:
Arming control provides the function to arm and disarm the hot spots.
Steps:
1. Click the hot spot and click Arming Control to activate the Arming Control dialog.
2. The status of the enabled event detection (e.g., motion detection, video loss) displays, such as
alarm name, and alarm priority. You can set the switch as OFF or click Disarm All to disable the
event detection and set the disarming duration. You can also set the switch as ON or click Arm
All to enable the event detection.
Example: If you set the disarming duration as 1 hour, then the event detection will be enabled
again after 1 hour.
User Manual of Blazer Express Control Client
36
History Alarm
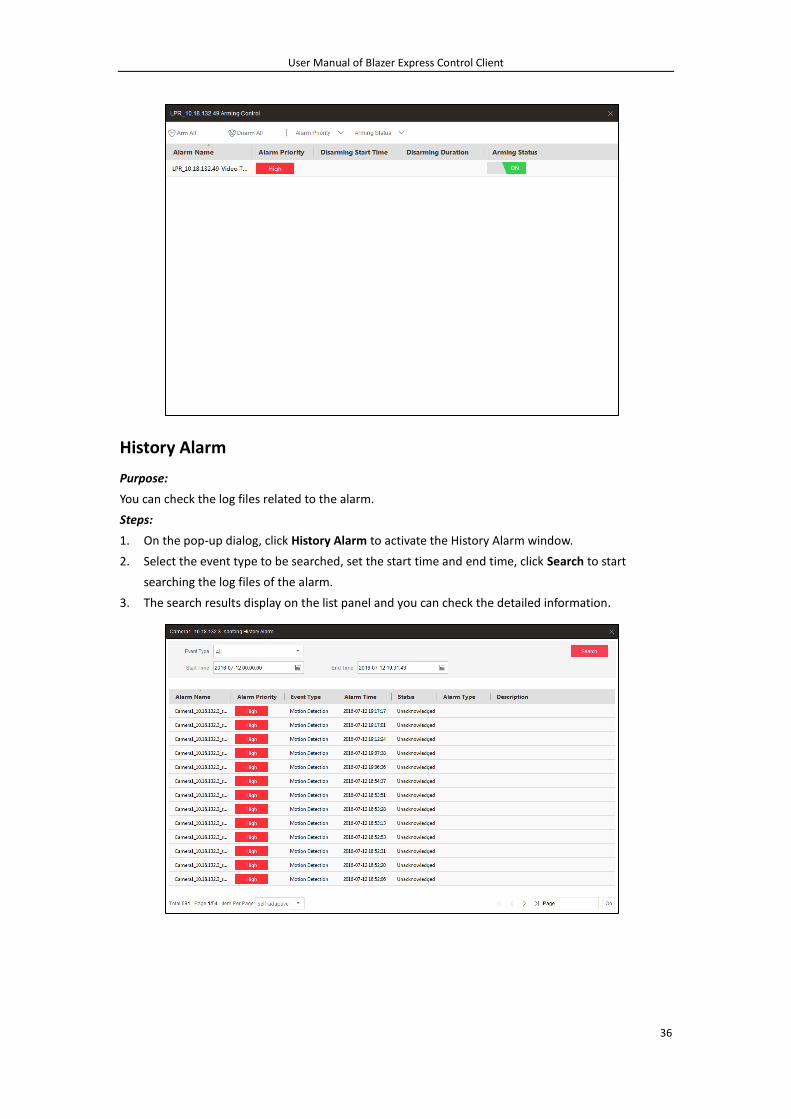
Purpose:
You can check the log files related to the alarm.
Steps:
1. On the pop-up dialog, click History Alarm to activate the History Alarm window.
2. Select the event type to be searched, set the start time and end time, click Search to start
searching the log files of the alarm.
3. The search results display on the list panel and you can check the detailed information.
User Manual of Blazer Express Control Client
37
6.2 Previewing the Hot Regions
Purpose:
The hot region function links a map to another map. When you add a map to another map as a hot
region, an icon of the link to the added map is shown on the main map. The added map is called
child map while the map to which you add the hot region is the parent map.
Steps:
1. Click the hot region and a dialog pops up on which the related functions display.
2. You can view its status, name remark, and go to the linked child map.
3. Click Go to Hot Region to jump to the child map and you can check the elements added on the
hot region.
4. If there is any alarm triggered in the hot region, the hot region icon changes its color to red .
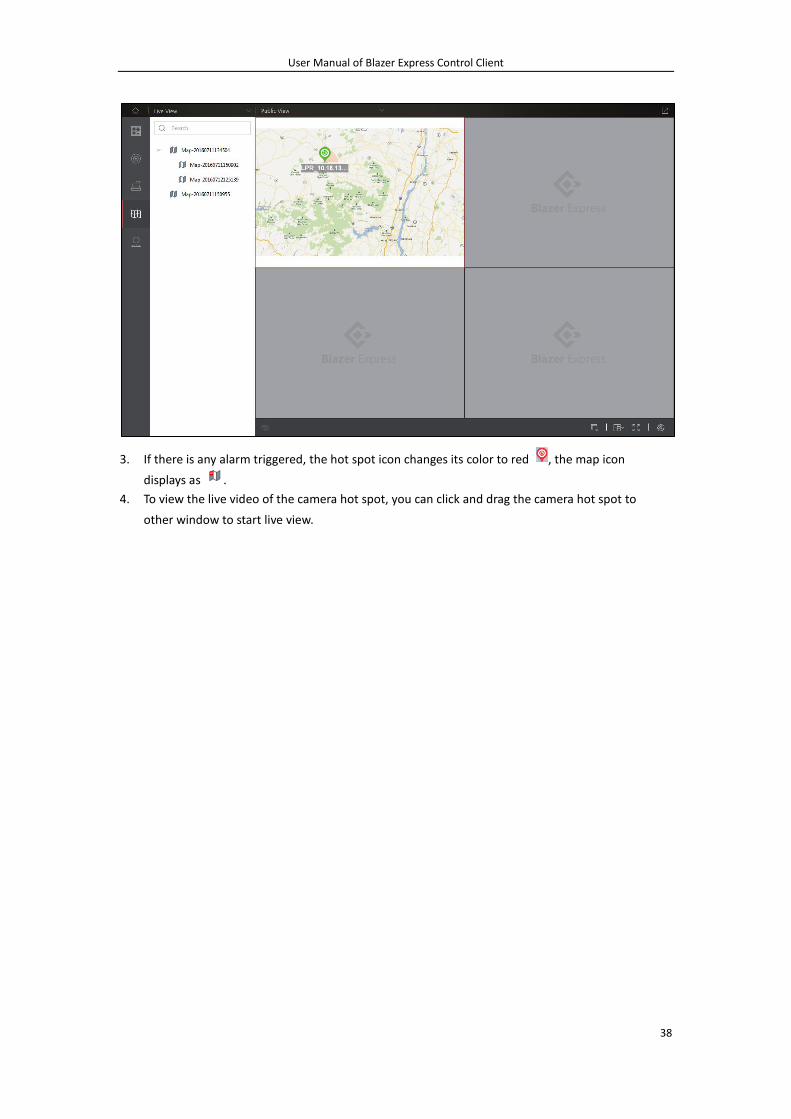
6.3 Previewing Map
Purpose:
You can preview the map including its hot spots and hot region in Live View mode, and the alarm will
be displayed when the alarm is triggered. You can also view the live video of the camera hot spot.
Click the icon on the control panel to enter the Live View page.
In Live View page, click to enter the Map Preview mode.
Steps:
1. Open the Live View page and click to enter the Map Preview mode.
The added maps will be displayed in the resource list on the left. The map’s child maps will also
be listed under the parent map node.
2. Click-and-drag the map to the display window, or double-click the map name after selecting the
display window to start the previewing the map.
Note: There is not live view toolbar in the display window of map preview.
User Manual of Blazer Express Control Client
38
3. If there is any alarm triggered, the hot spot icon changes its color to red , the map icon
displays as .
4. To view the live video of the camera hot spot, you can click and drag the camera hot spot to
other window to start live view.
User Manual of Blazer Express Control Client
39
Chapter 7 Transaction
Purpose:
You can view the live video of the linked camera of the POS terminal, and the transaction information
will be displayed on the live view image. You can also search the POS information of the connected
POS terminal and view the related video files.
7.1 POS Live View
Purpose:
For the camera which is linked with the POS (Point of Sale) terminal, you can view the live video and
the POS information of the transaction. When live viewing with the POS information of a specified
camera, you can also view the normal live view of other cameras. And some other basic operations
are supported, including picture capturing, manual recording, instant playback, and so on.
Click the icon on the control panel to enter the Live View page.
In Live View page, click to enter the POS Live View mode.
7.1.1 Starting POS Live View
Note: For details about the icons on live view toolbar, please refer to Chapter 4 Live View. The Open
PTZ Control and Enable 3D Positioning icons are not available for POS live view.
Starting POS Live View in Custom View Mode
Steps:
1. Open the Live View page and click to enter the view mode.
2. (Optional) Click and the adding view group dialog pops up. Set a name and click OK to add a
view group. In this way, you can manage the views by group.
3. Select a view group (optional), click the to activate the view adding dialog.
4. Input the view name and click OK. The new view is of 4-window mode by default.
5. (Optional) Click the and select the window division mode for the new view.
6. Click to enter the POS Live View mode.
7. Click-and-drag the camera which is linked with the POS terminal to the display window, or
double-click the camera name after selecting the display window to start the live view.
8. Click the Save to save the new view.
Starting Live View for One Camera
Steps:
User Manual of Blazer Express Control Client
40
1. Open the Live View page and click to enter the POS Live View mode.
2. (Optional) Click and select the window division mode for live view.
3. Click-and-drag the camera which is linked with the POS terminal to the display window, or
double-click the camera name after selecting the display window to start the live view.
Starting Live View for Area
Steps:
1. Open the Live View page and click to enter the area mode.
2. Click-and-drag the area to the display window, or double-click the area name after selecting the
display window, click Live View in Batch to start the live view.
Note: You can also select Auto-Switch for the area live view. Refer to Chapter 4.2 Auto-Switch in
Live View for detailed operation.
Note: The display window number is self-adaptive to the camera number of the area.
7.1.2 Viewing Transaction Information
During live view, the transaction information will be displayed on the live view image.
Before you start:
You should enable to display the transaction information in POS live view in System Settings.
Steps:
1. Click on the toolbar,
or click System Settings->Application Settings->Live View to enter the Live View Settings
interface.
2. In the Display Settings, switch the Overlay Transaction Information in POS Live View as
to enable this function.
3. Set the Dwell Time of the overlaid transaction information.
4. Click Save to save the settings.
Perform the following steps to view the transaction information:
Steps:
1. Start live view of the camera which is linked with the POS terminal.
2. After enabling the transaction information display, you can view the transaction details in the
live view window.
For single-window layout, the transaction details will be displayed on the right of the live
view window.
For two-window layout, the transaction details will be displayed on the right or at the
bottom of the live view window.
For multiple-window layout (more than two windows), the transaction details will be
overlaid on the live view image.
Note: For setting the window division, please refer to Chapter 4.6 Custom Window Division.
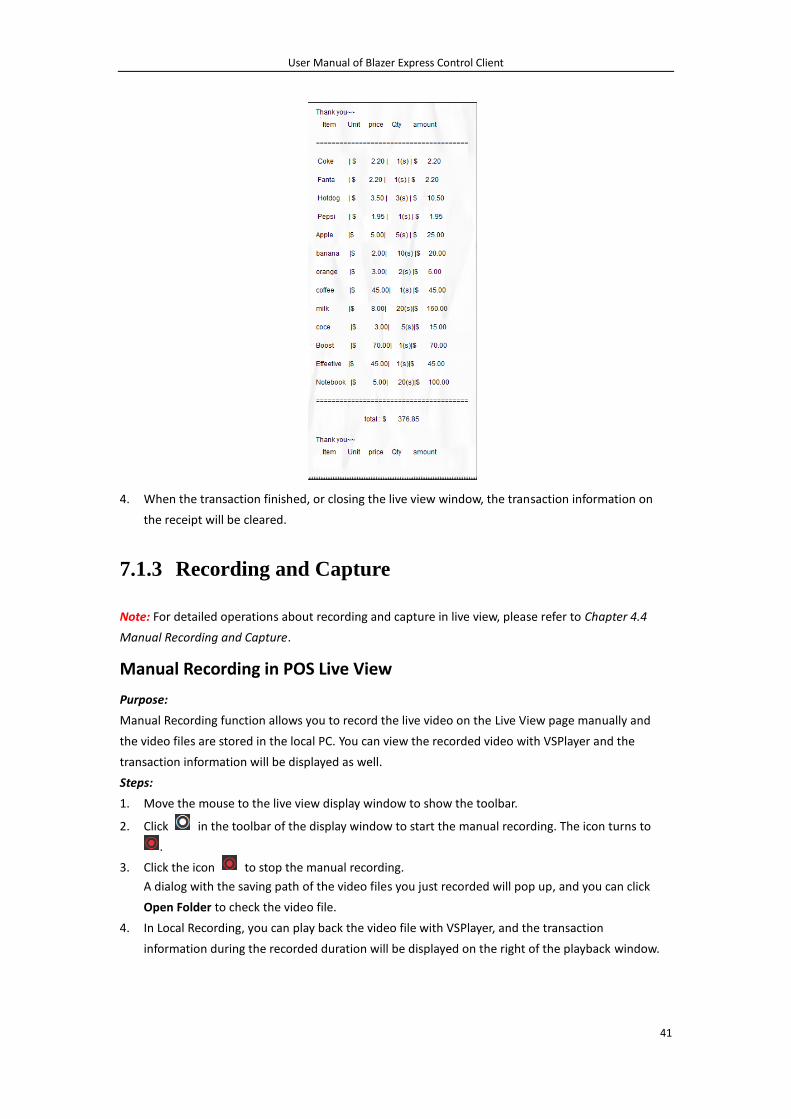
3. The real-time transaction information is shown on the receipt as follows:
User Manual of Blazer Express Control Client
41
4. When the transaction finished, or closing the live view window, the transaction information on
the receipt will be cleared.
7.1.3 Recording and Capture
Note: For detailed operations about recording and capture in live view, please refer to Chapter 4.4
Manual Recording and Capture.
Manual Recording in POS Live View
Purpose:
Manual Recording function allows you to record the live video on the Live View page manually and
the video files are stored in the local PC. You can view the recorded video with VSPlayer and the
transaction information will be displayed as well.
Steps:
1. Move the mouse to the live view display window to show the toolbar.
2. Click in the toolbar of the display window to start the manual recording. The icon turns to
.
3. Click the icon to stop the manual recording.
A dialog with the saving path of the video files you just recorded will pop up, and you can click
Open Folder to check the video file.
4. In Local Recording, you can play back the video file with VSPlayer, and the transaction
information during the recorded duration will be displayed on the right of the playback window.
User Manual of Blazer Express Control Client
42
Capturing Picture in POS Live View
Steps:
1. Move the mouse to the live view display window to show the toolbar.
2. Click the icon in the toolbar of the display window to capture a picture.
A small dialog with the saving path of the picture you just captured will pop up, and you can
click Open Folder to check the picture.
3. In Local Picture, you can view the captured pictures. The transaction information will be
displayed on the right of the playback window as well.
7.1.4 Stopping the Live View
Steps:
1. Select the display window.
2. Click the icon that appears in the upper-right corner when the mouse pointer is over the
display window. You can also click the button in live view toolbar to stop all the live view.
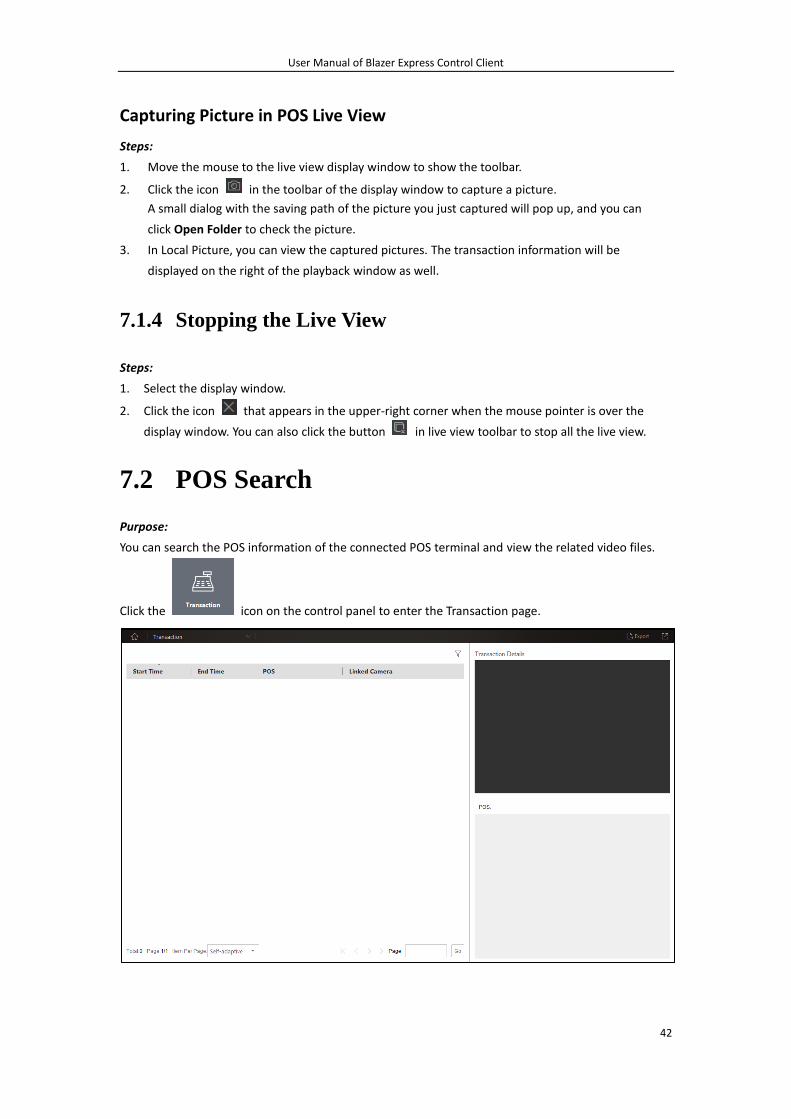
7.2 POS Search
Purpose:
You can search the POS information of the connected POS terminal and view the related video files.
Click the icon on the control panel to enter the Transaction page.
User Manual of Blazer Express Control Client
43
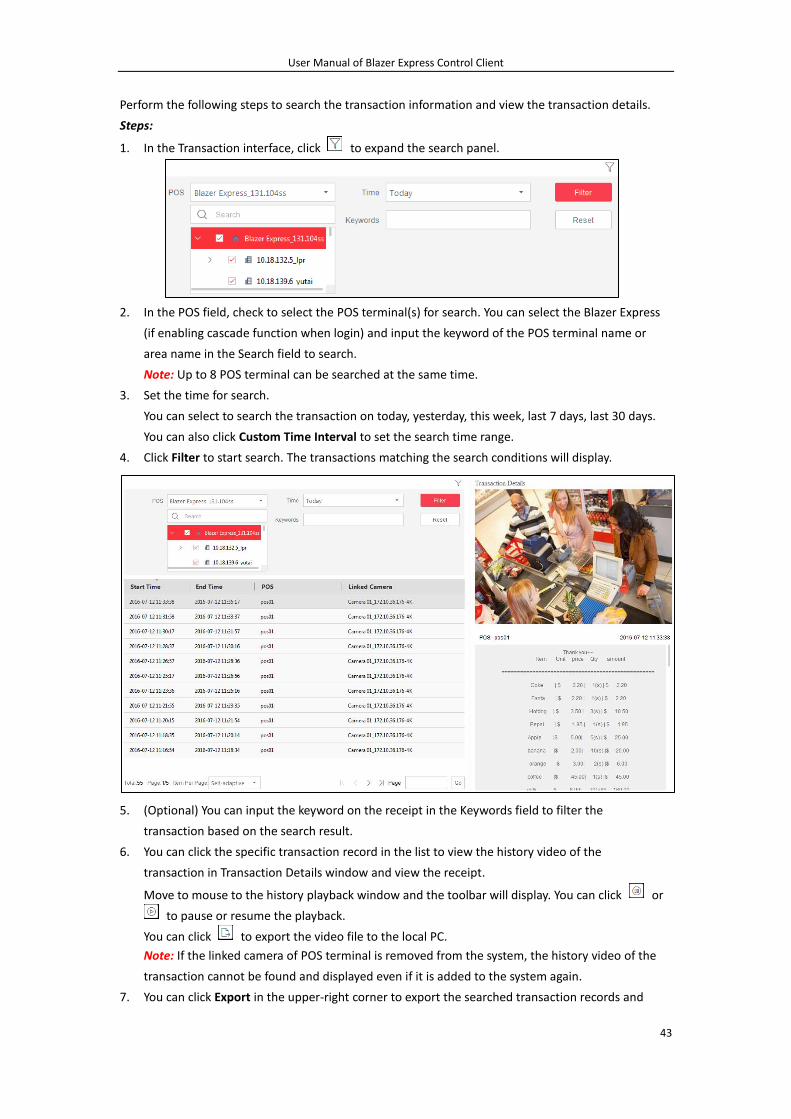
Perform the following steps to search the transaction information and view the transaction details.
Steps:
1. In the Transaction interface, click to expand the search panel.
2. In the POS field, check to select the POS terminal(s) for search. You can select the Blazer Express
(if enabling cascade function when login) and input the keyword of the POS terminal name or
area name in the Search field to search.
Note: Up to 8 POS terminal can be searched at the same time.
3. Set the time for search.
You can select to search the transaction on today, yesterday, this week, last 7 days, last 30 days.
You can also click Custom Time Interval to set the search time range.
4. Click Filter to start search. The transactions matching the search conditions will display.
5. (Optional) You can input the keyword on the receipt in the Keywords field to filter the
transaction based on the search result.
6. You can click the specific transaction record in the list to view the history video of the
transaction in Transaction Details window and view the receipt.
Move to mouse to the history playback window and the toolbar will display. You can click or
to pause or resume the playback.
You can click to export the video file to the local PC.
Note: If the linked camera of POS terminal is removed from the system, the history video of the
transaction cannot be found and displayed even if it is added to the system again.
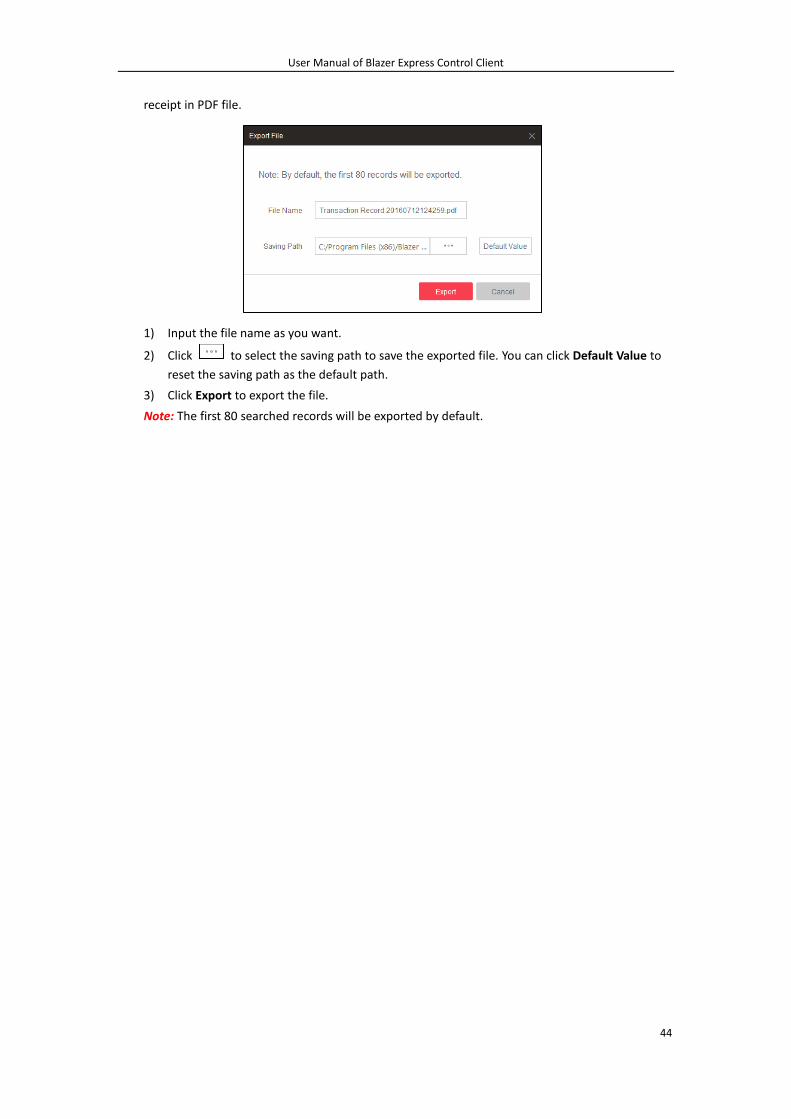
7. You can click Export in the upper-right corner to export the searched transaction records and
User Manual of Blazer Express Control Client
44
receipt in PDF file.
1) Input the file name as you want.
2) Click to select the saving path to save the exported file. You can click Default Value to
reset the saving path as the default path.
3) Click Export to export the file.
Note: The first 80 searched records will be exported by default.
User Manual of Blazer Express Control Client
45
Chapter 8 ANPR
For automatic number plate recognition camera, the license plate recognized by the camera shows in
the left part of the live view window. You can move your mouse to the license plate and click to
enter the ANPR page to check the related vehicle passing information recorded by the camera.
You can also view the traffic flow report of the ANPR (Automatic Number Plate Recognition) camera.
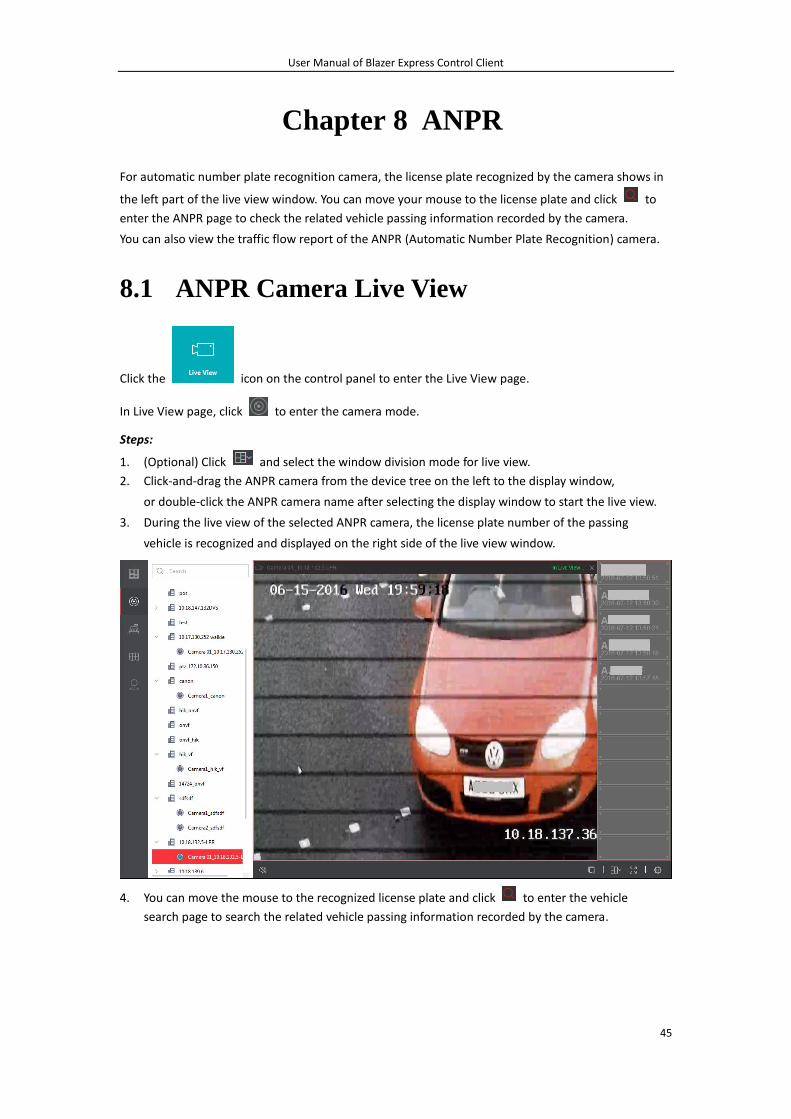
8.1 ANPR Camera Live View
Click the icon on the control panel to enter the Live View page.
In Live View page, click to enter the camera mode.
Steps:
1. (Optional) Click and select the window division mode for live view.
2. Click-and-drag the ANPR camera from the device tree on the left to the display window,
or double-click the ANPR camera name after selecting the display window to start the live view.
3. During the live view of the selected ANPR camera, the license plate number of the passing
vehicle is recognized and displayed on the right side of the live view window.
4. You can move the mouse to the recognized license plate and click to enter the vehicle
search page to search the related vehicle passing information recorded by the camera.
User Manual of Blazer Express Control Client
46
8.2 Vehicle Search
Purpose:
If the added camera is an automatic number plate recognition camera and is set with proper number
plate recognition rules, the information of the vehicle license plate recognized by the camera and
the related vehicle passing information recorded by the camera can be checked.
Notes:
The camera should be added as automatic number plate recognition unit when adding to
Blazer Express. For detailed operation, refer to the User Manual of Blazer Express Web Client.
For configuring number plate recognition rules, please refer to the user manual of the camera.
Click the icon on the control panel, and click tab on the left to enter the vehicle
search page.
Or during the live view of ANPR camera, you can move the mouse to the recognized license plate and
click to enter the vehicle search page.
Perform the follow steps to search the vehicle.
Steps:
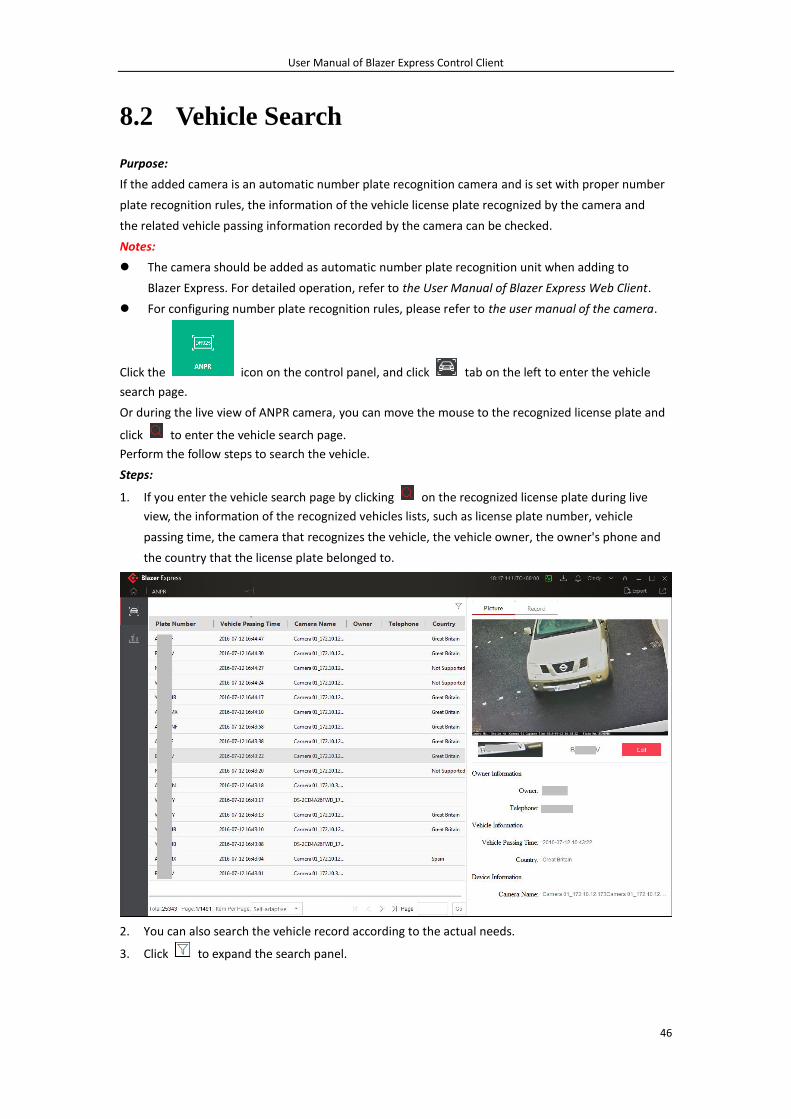
1. If you enter the vehicle search page by clicking on the recognized license plate during live
view, the information of the recognized vehicles lists, such as license plate number, vehicle
passing time, the camera that recognizes the vehicle, the vehicle owner, the owner's phone and
the country that the license plate belonged to.
2. You can also search the vehicle record according to the actual needs.
3. Click to expand the search panel.
User Manual of Blazer Express Control Client
47
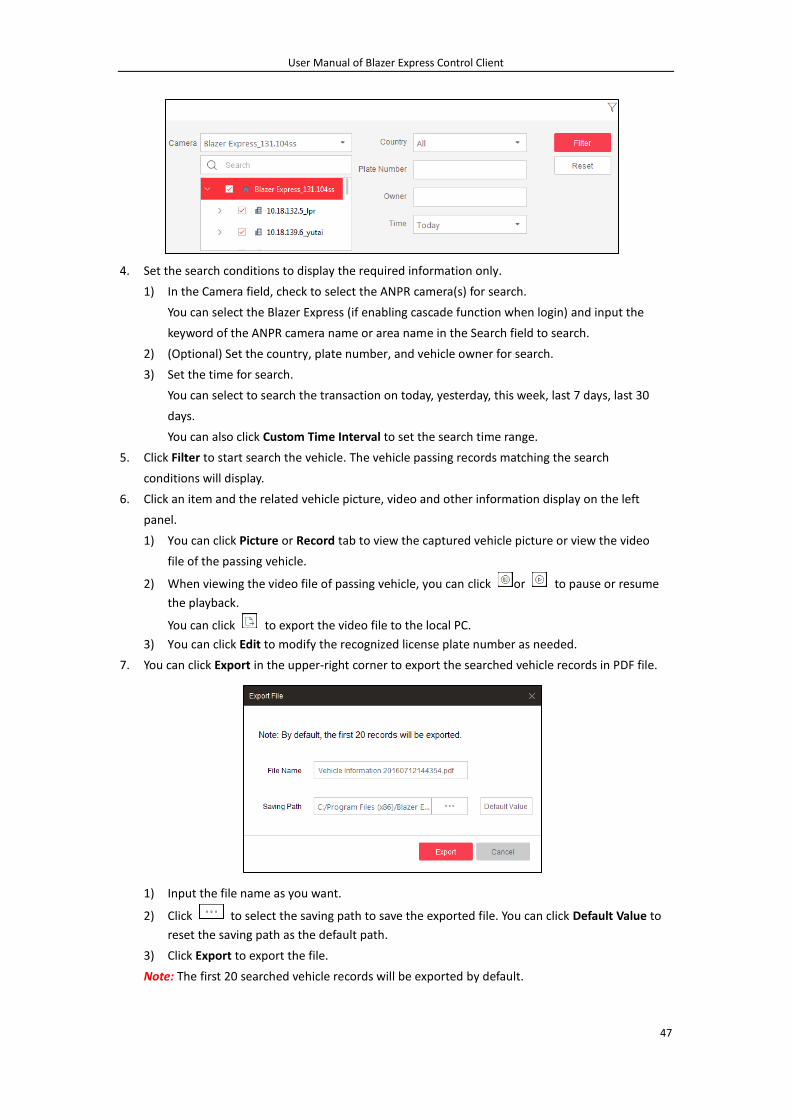
4. Set the search conditions to display the required information only.
1) In the Camera field, check to select the ANPR camera(s) for search.
You can select the Blazer Express (if enabling cascade function when login) and input the
keyword of the ANPR camera name or area name in the Search field to search.
2) (Optional) Set the country, plate number, and vehicle owner for search.
3) Set the time for search.
You can select to search the transaction on today, yesterday, this week, last 7 days, last 30
days.
You can also click Custom Time Interval to set the search time range.
5. Click Filter to start search the vehicle. The vehicle passing records matching the search
conditions will display.
6. Click an item and the related vehicle picture, video and other information display on the left
panel.
1) You can click Picture or Record tab to view the captured vehicle picture or view the video
file of the passing vehicle.
2) When viewing the video file of passing vehicle, you can click or to pause or resume
the playback.
You can click to export the video file to the local PC.
3) You can click Edit to modify the recognized license plate number as needed.
7. You can click Export in the upper-right corner to export the searched vehicle records in PDF file.
1) Input the file name as you want.
2) Click to select the saving path to save the exported file. You can click Default Value to
reset the saving path as the default path.
3) Click Export to export the file.
Note: The first 20 searched vehicle records will be exported by default.
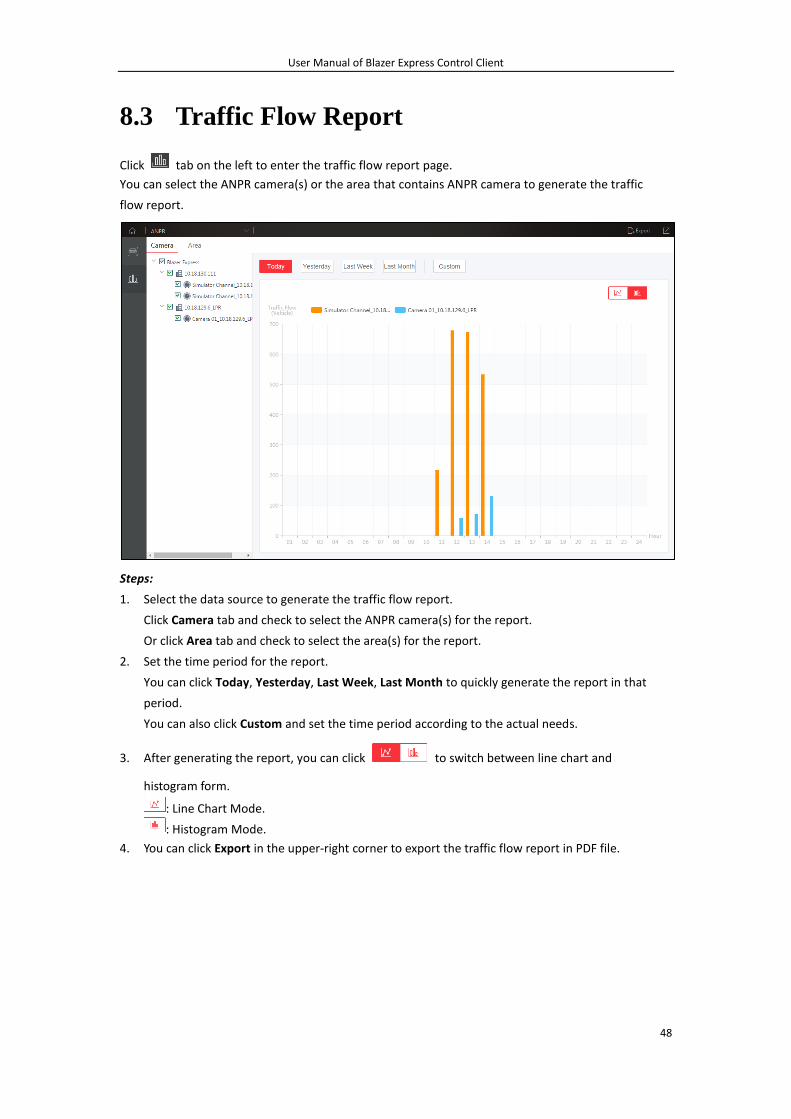
User Manual of Blazer Express Control Client
48
8.3 Traffic Flow Report
Click tab on the left to enter the traffic flow report page.
You can select the ANPR camera(s) or the area that contains ANPR camera to generate the traffic
flow report.
Steps:
1. Select the data source to generate the traffic flow report.
Click Camera tab and check to select the ANPR camera(s) for the report.
Or click Area tab and check to select the area(s) for the report.
2. Set the time period for the report.
You can click Today, Yesterday, Last Week, Last Month to quickly generate the report in that
period.
You can also click Custom and set the time period according to the actual needs.
3. After generating the report, you can click to switch between line chart and
histogram form.
: Line Chart Mode.
: Histogram Mode.
4. You can click Export in the upper-right corner to export the traffic flow report in PDF file.
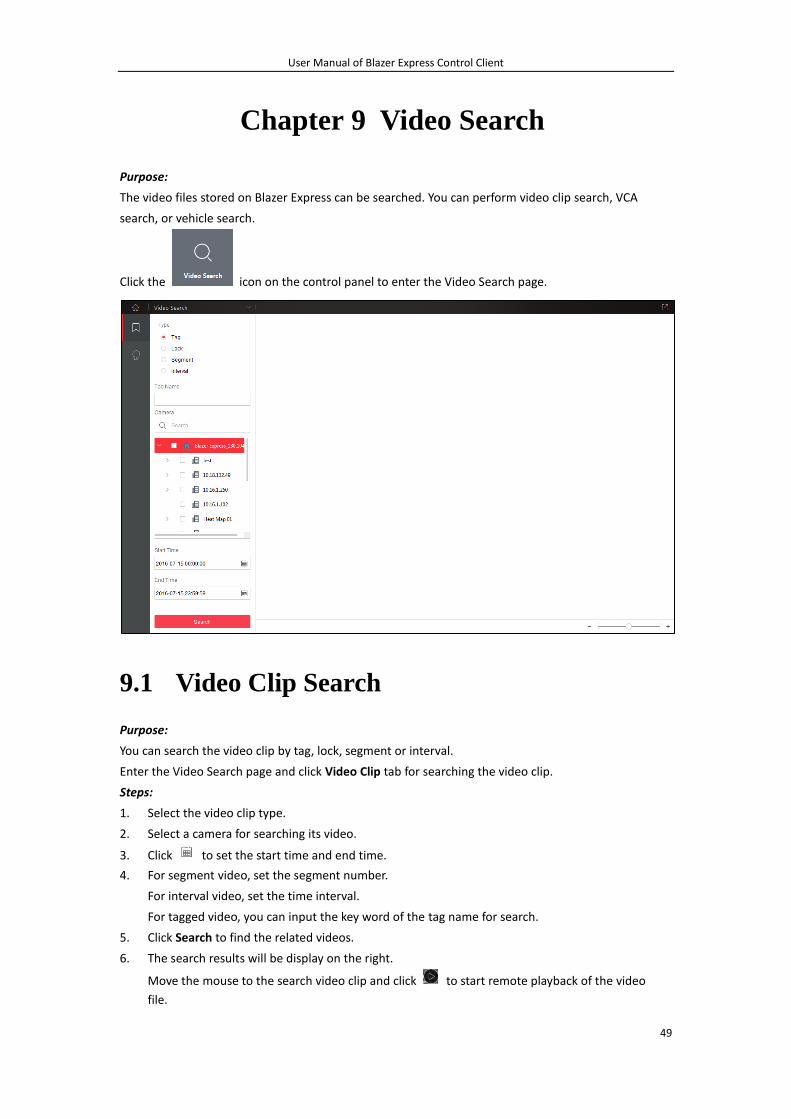
User Manual of Blazer Express Control Client
49
Chapter 9 Video Search
Purpose:
The video files stored on Blazer Express can be searched. You can perform video clip search, VCA
search, or vehicle search.
Click the icon on the control panel to enter the Video Search page.
9.1 Video Clip Search
Purpose:
You can search the video clip by tag, lock, segment or interval.
Enter the Video Search page and click Video Clip tab for searching the video clip.
Steps:
1. Select the video clip type.
2. Select a camera for searching its video.
3. Click to set the start time and end time.
4. For segment video, set the segment number.
For interval video, set the time interval.
For tagged video, you can input the key word of the tag name for search.
5. Click Search to find the related videos.
6. The search results will be display on the right.
Move the mouse to the search video clip and click to start remote playback of the video
file.
User Manual of Blazer Express Control Client
50
Click to download the selected video clip.
7. You can click Download All to download all the searched video clips.
Click Remote Playback to play back all the searched video clips of the selected camera from the
first clip.
9.2 VCA Playback
Purpose:
You can set VCA rule to the searched video files and find the video that VCA event occurs, including
VCA Search, Intrusion and Line Crossing. This function helps to search out the video that you may be
more concerned, mark it with red color, and set the playback speed of the concerned video as 1X
while the unconcerned video as 8X.
VCA Search: Get all the related motion detection events that occurred in the pre-defined
region.
Intrusion Detection: Detect whether there are people, vehicles and other moving objects
intruding into the pre-defined region.
Line Crossing Detection: Bi-directionally detect people, vehicles and other moving objects that
cross a virtual line.
Note: This function should be supported by the device.
Steps:
1. Enter the Remote Playback page.
2. Select the camera and start the normal playback (refer to Chapter 5.1 Normal Playback).
3. Move the mouse to the display window and click to enter the VCA playback interface.
4. Click to set the start time and end time.
5. Click to pop up the rule settings dialog.
6. Select the VCA Type, and draw the detection region.
Notes:
For VCA Search, click , and then click and drag on the playback window to set the grid
rectangle as the detection region. Or you can click to set all the area shot by the
camera as the detection region.
For Intrusion Detection, click and then click on the playback window to set the vertex
for the detection region.
For Line Crossing Detection, click and then click on the playback window to set the
beginning point in the area and move the mouse and click again to set the end of the line.
To delete the drawn region, click to remove it.
7. Click OK to save the settings.
8. Drag the slider to set the sensitivity.
9. Click Search and the VCA events occurred in the defined area will list.
For other playback control instruction, refer to Chapter 5.1 Normal Playback. Some icons may not be
available for VCA playback.
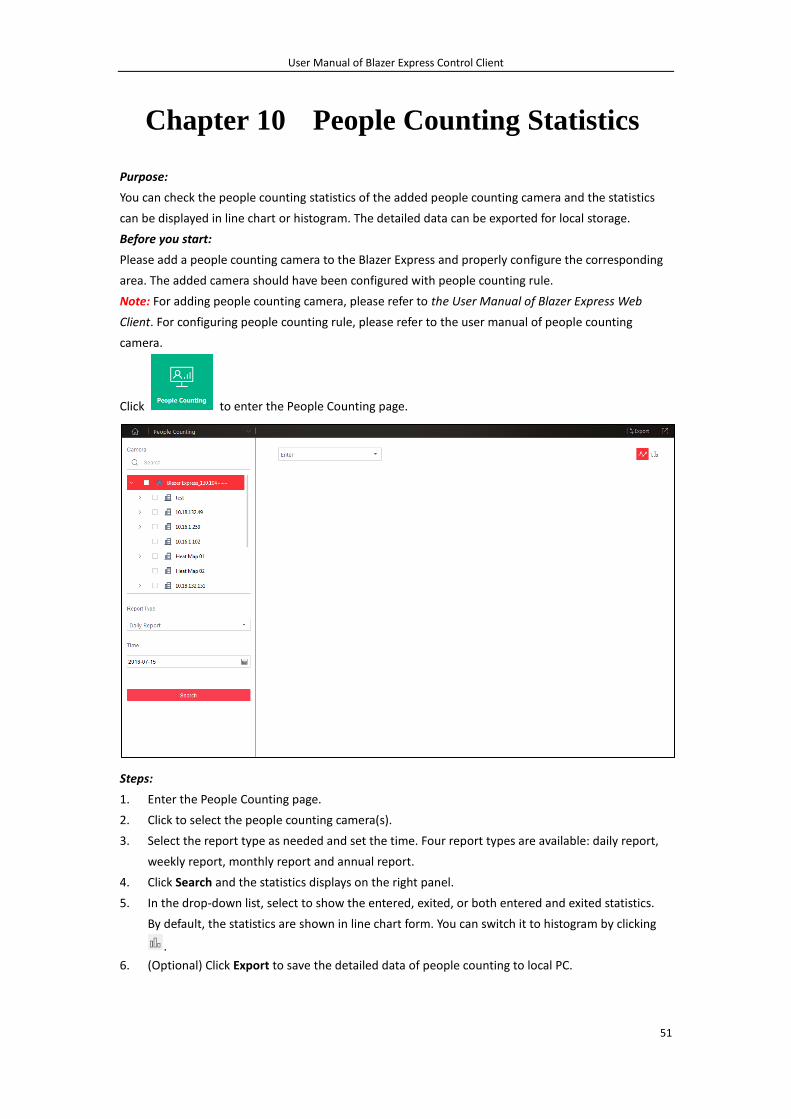
User Manual of Blazer Express Control Client
51
Chapter 10 People Counting Statistics
Purpose:
You can check the people counting statistics of the added people counting camera and the statistics
can be displayed in line chart or histogram. The detailed data can be exported for local storage.
Before you start:
Please add a people counting camera to the Blazer Express and properly configure the corresponding
area. The added camera should have been configured with people counting rule.
Note: For adding people counting camera, please refer to the User Manual of Blazer Express Web
Client. For configuring people counting rule, please refer to the user manual of people counting
camera.
Click to enter the People Counting page.
Steps:
1. Enter the People Counting page.
2. Click to select the people counting camera(s).
3. Select the report type as needed and set the time. Four report types are available: daily report,
weekly report, monthly report and annual report.
4. Click Search and the statistics displays on the right panel.
5. In the drop-down list, select to show the entered, exited, or both entered and exited statistics.
By default, the statistics are shown in line chart form. You can switch it to histogram by clicking
.
6. (Optional) Click Export to save the detailed data of people counting to local PC.
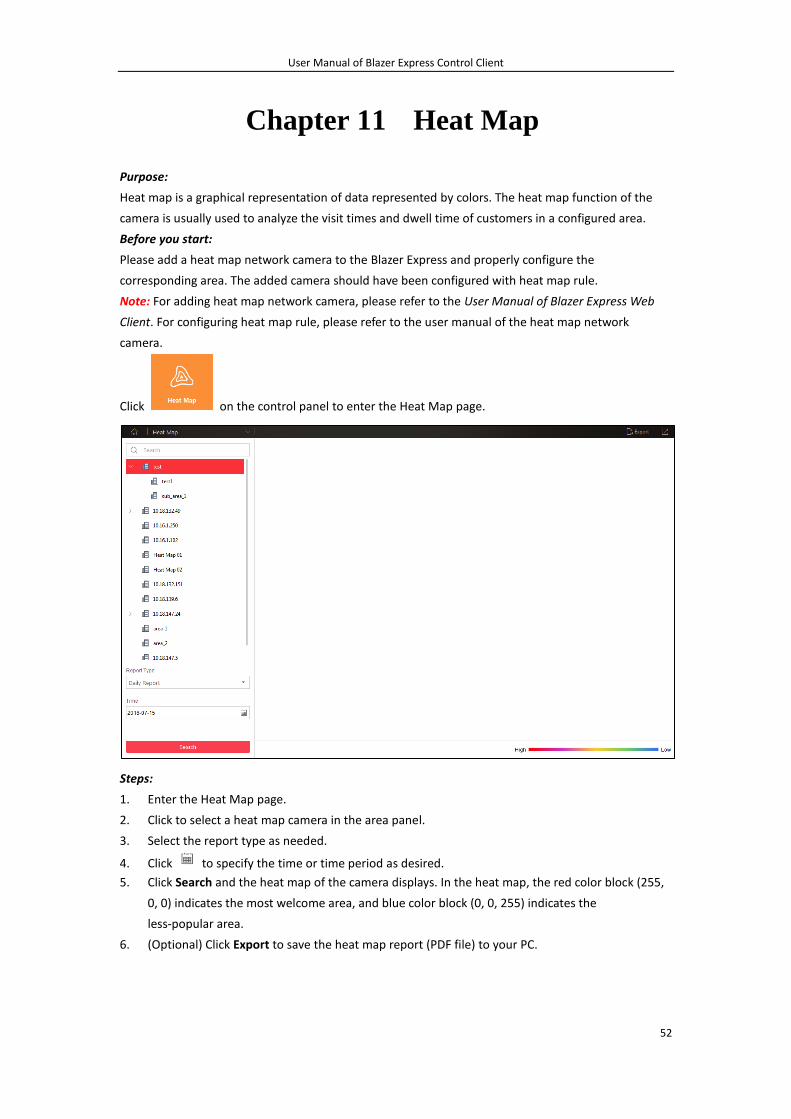
User Manual of Blazer Express Control Client
52
Chapter 11 Heat Map
Purpose:
Heat map is a graphical representation of data represented by colors. The heat map function of the
camera is usually used to analyze the visit times and dwell time of customers in a configured area.
Before you start:
Please add a heat map network camera to the Blazer Express and properly configure the
corresponding area. The added camera should have been configured with heat map rule.
Note: For adding heat map network camera, please refer to the User Manual of Blazer Express Web
Client. For configuring heat map rule, please refer to the user manual of the heat map network
camera.
Click on the control panel to enter the Heat Map page.
Steps:
1. Enter the Heat Map page.
2. Click to select a heat map camera in the area panel.
3. Select the report type as needed.
4. Click to specify the time or time period as desired.
5. Click Search and the heat map of the camera displays. In the heat map, the red color block (255,
0, 0) indicates the most welcome area, and blue color block (0, 0, 255) indicates the
less-popular area.
6. (Optional) Click Export to save the heat map report (PDF file) to your PC.
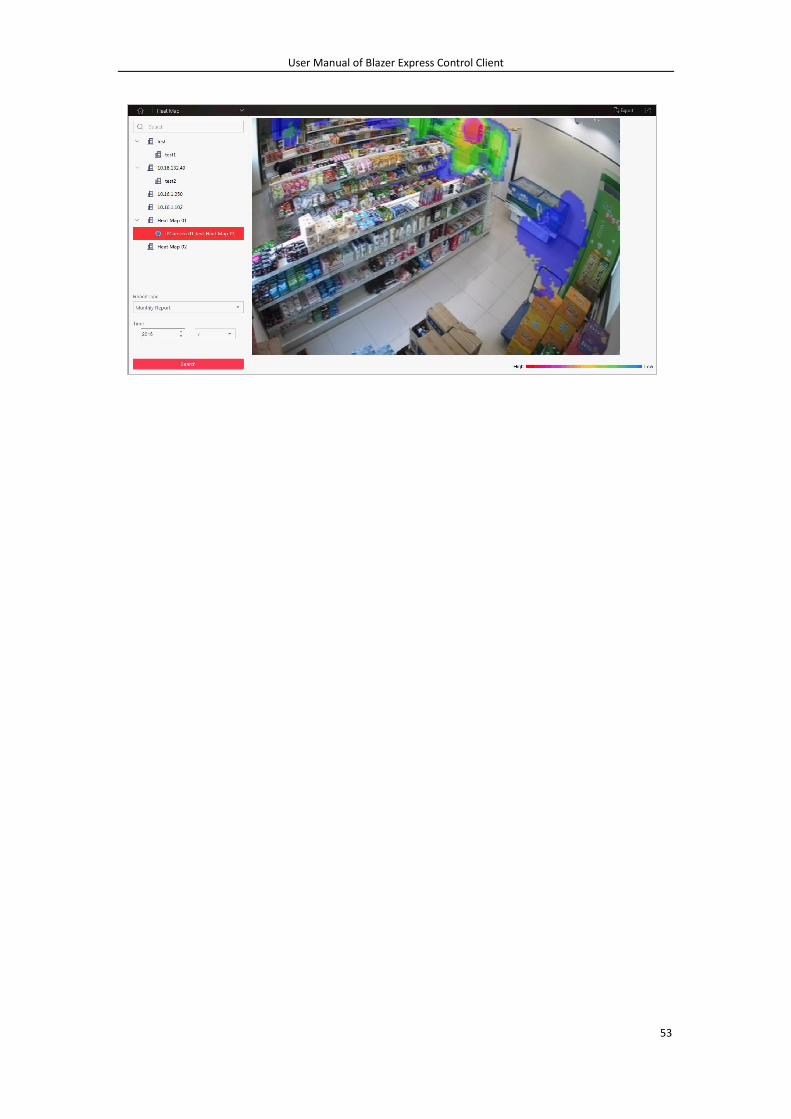
User Manual of Blazer Express Control Client
53
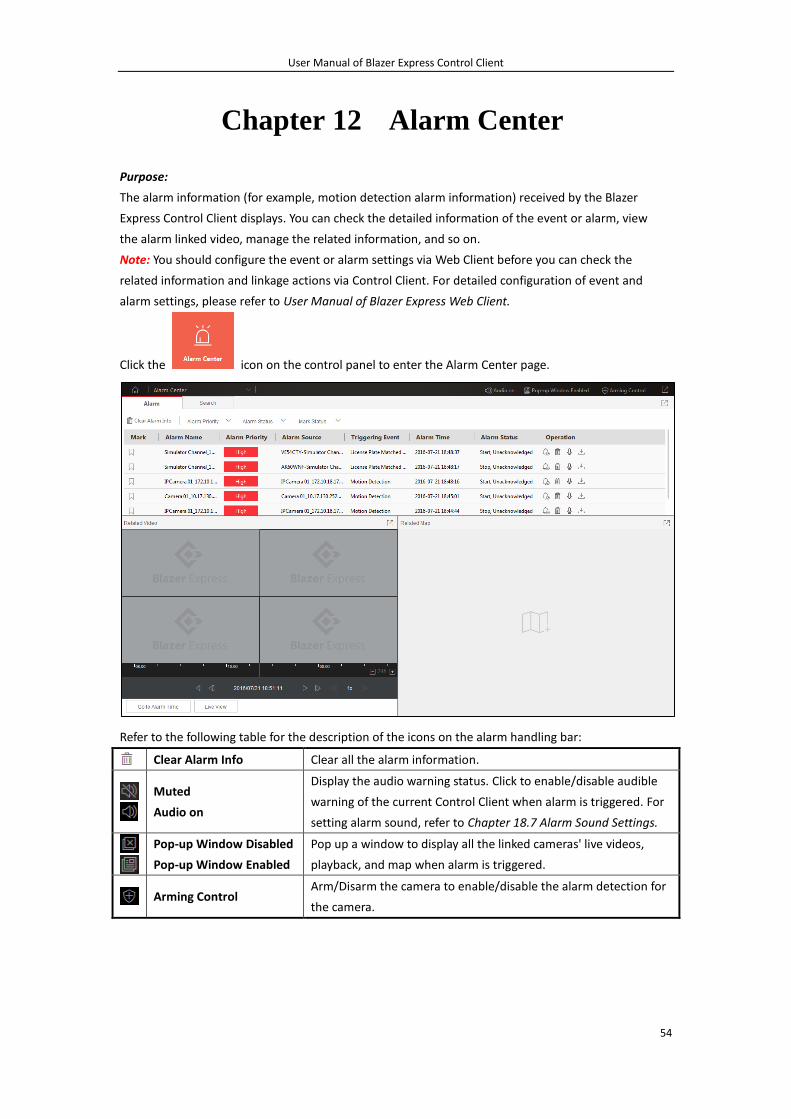
User Manual of Blazer Express Control Client
54
Chapter 12 Alarm Center
Purpose:
The alarm information (for example, motion detection alarm information) received by the Blazer
Express Control Client displays. You can check the detailed information of the event or alarm, view
the alarm linked video, manage the related information, and so on.
Note: You should configure the event or alarm settings via Web Client before you can check the
related information and linkage actions via Control Client. For detailed configuration of event and
alarm settings, please refer to User Manual of Blazer Express Web Client.
Click the icon on the control panel to enter the Alarm Center page.
Refer to the following table for the description of the icons on the alarm handling bar:
Clear Alarm Info Clear all the alarm information.
Muted
Audio on
Display the audio warning status. Click to enable/disable audible
warning of the current Control Client when alarm is triggered. For
setting alarm sound, refer to Chapter 18.7 Alarm Sound Settings.
Pop-up Window Disabled
Pop-up Window Enabled
Pop up a window to display all the linked cameras' live videos,
playback, and map when alarm is triggered.
Arming Control Arm/Disarm the camera to enable/disable the alarm detection for
the camera.
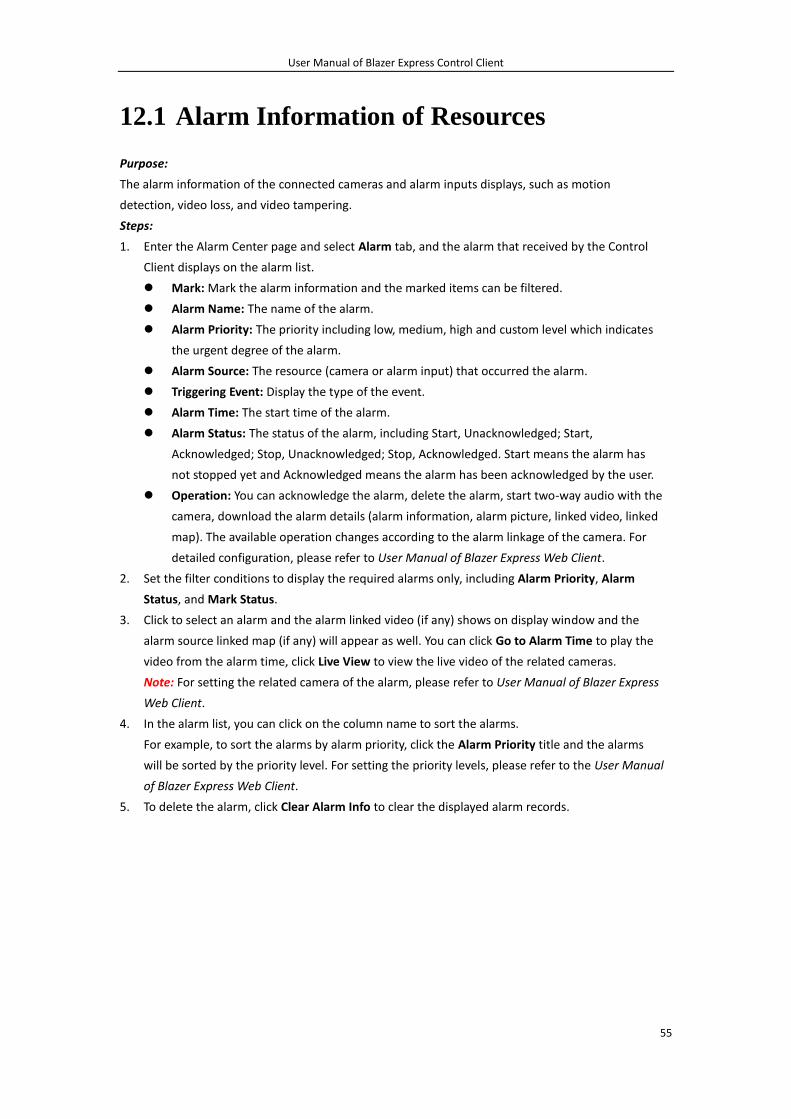
User Manual of Blazer Express Control Client
55
12.1 Alarm Information of Resources
Purpose:
The alarm information of the connected cameras and alarm inputs displays, such as motion
detection, video loss, and video tampering.
Steps:
1. Enter the Alarm Center page and select Alarm tab, and the alarm that received by the Control
Client displays on the alarm list.
Mark: Mark the alarm information and the marked items can be filtered.
Alarm Name: The name of the alarm.
Alarm Priority: The priority including low, medium, high and custom level which indicates
the urgent degree of the alarm.
Alarm Source: The resource (camera or alarm input) that occurred the alarm.
Triggering Event: Display the type of the event.
Alarm Time: The start time of the alarm.
Alarm Status: The status of the alarm, including Start, Unacknowledged; Start,
Acknowledged; Stop, Unacknowledged; Stop, Acknowledged. Start means the alarm has
not stopped yet and Acknowledged means the alarm has been acknowledged by the user.
Operation: You can acknowledge the alarm, delete the alarm, start two-way audio with the
camera, download the alarm details (alarm information, alarm picture, linked video, linked
map). The available operation changes according to the alarm linkage of the camera. For
detailed configuration, please refer to User Manual of Blazer Express Web Client.
2. Set the filter conditions to display the required alarms only, including Alarm Priority, Alarm
Status, and Mark Status.
3. Click to select an alarm and the alarm linked video (if any) shows on display window and the
alarm source linked map (if any) will appear as well. You can click Go to Alarm Time to play the
video from the alarm time, click Live View to view the live video of the related cameras.
Note: For setting the related camera of the alarm, please refer to User Manual of Blazer Express
Web Client.
4. In the alarm list, you can click on the column name to sort the alarms.
For example, to sort the alarms by alarm priority, click the Alarm Priority title and the alarms
will be sorted by the priority level. For setting the priority levels, please refer to the User Manual
of Blazer Express Web Client.
5. To delete the alarm, click Clear Alarm Info to clear the displayed alarm records.
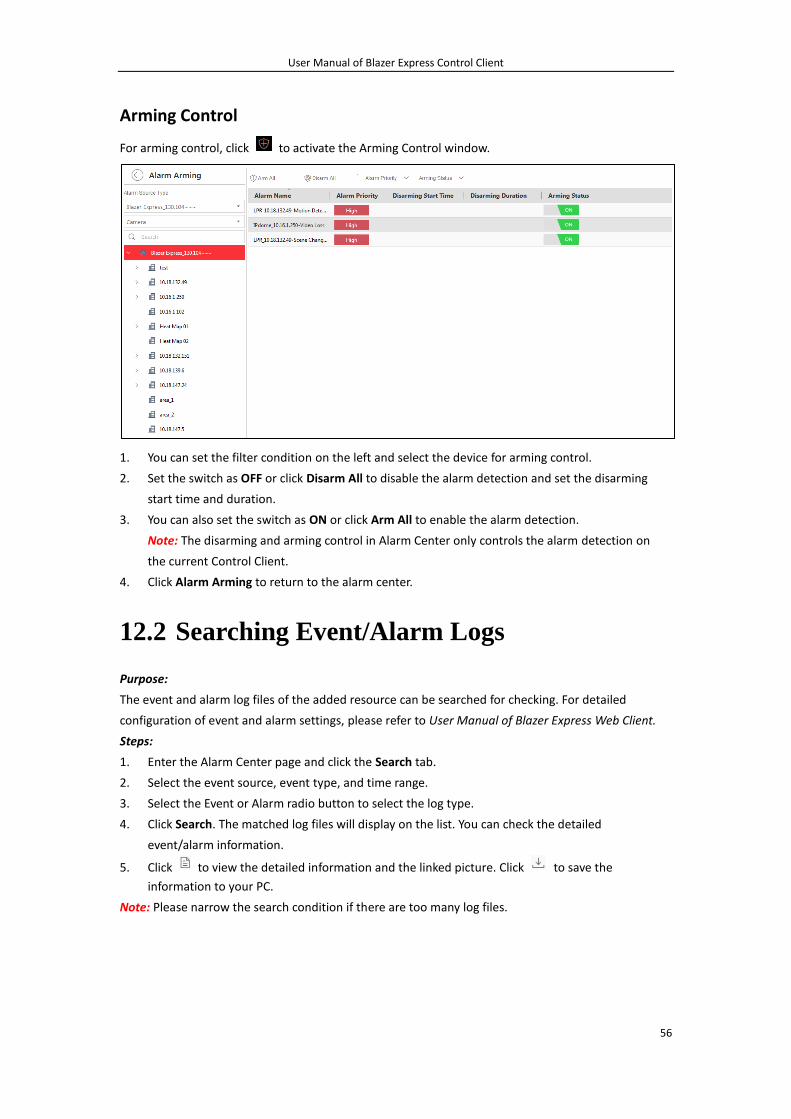
User Manual of Blazer Express Control Client
56
Arming Control
For arming control, click to activate the Arming Control window.
1. You can set the filter condition on the left and select the device for arming control.
2. Set the switch as OFF or click Disarm All to disable the alarm detection and set the disarming
start time and duration.
3. You can also set the switch as ON or click Arm All to enable the alarm detection.
Note: The disarming and arming control in Alarm Center only controls the alarm detection on
the current Control Client.
4. Click Alarm Arming to return to the alarm center.
12.2 Searching Event/Alarm Logs
Purpose:
The event and alarm log files of the added resource can be searched for checking. For detailed
configuration of event and alarm settings, please refer to User Manual of Blazer Express Web Client.
Steps:
1. Enter the Alarm Center page and click the Search tab.
2. Select the event source, event type, and time range.
3. Select the Event or Alarm radio button to select the log type.
4. Click Search. The matched log files will display on the list. You can check the detailed
event/alarm information.
5. Click to view the detailed information and the linked picture. Click to save the
information to your PC.
Note: Please narrow the search condition if there are too many log files.
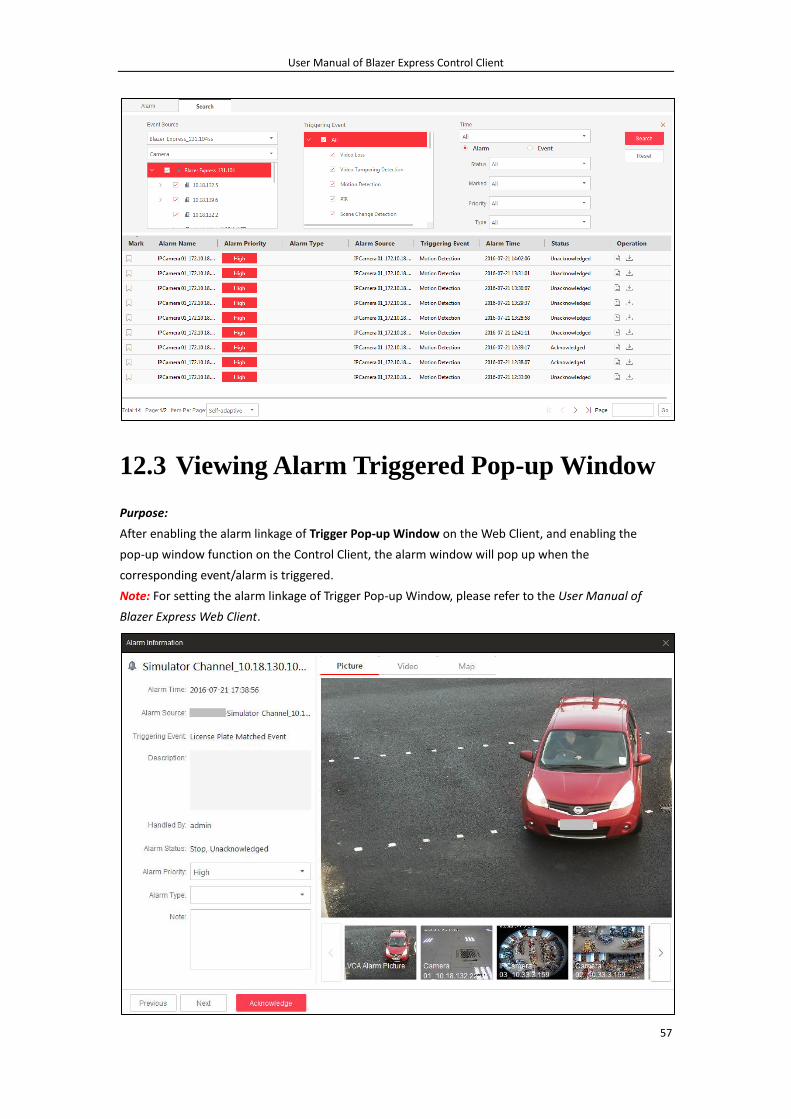
User Manual of Blazer Express Control Client
57
12.3 Viewing Alarm Triggered Pop-up Window
Purpose:
After enabling the alarm linkage of Trigger Pop-up Window on the Web Client, and enabling the
pop-up window function on the Control Client, the alarm window will pop up when the
corresponding event/alarm is triggered.
Note: For setting the alarm linkage of Trigger Pop-up Window, please refer to the User Manual of
Blazer Express Web Client.
User Manual of Blazer Express Control Client
58
Steps:
1. In the pop-up alarm window, you can view the alarm details including alarm source, alarm time,
triggered event type, alarm status, and so on.
2. You can set the alarm priority, the alarm type, and input the note for the alarm according to
actual needs.
3. You can click Picture/Video/Map tab to view the alarm related cameras' captured pictures, the
playback when alarm occurs, and view the camera/alarm input location on the map (if
configured).
Note: For setting the related camera of the alarm, please refer to User Manual of Blazer Express
Web Client.
4. To acknowledge the alarm, click the Acknowledge button and the alarm status becomes
Acknowledged.
5. You can click Previous or Next button to view the previous or next alarm information.
Note: When the popped up alarm window remains open, the later alarm, if priority level is higher,
will be displayed in the popped up alarm window, replacing the earlier one.
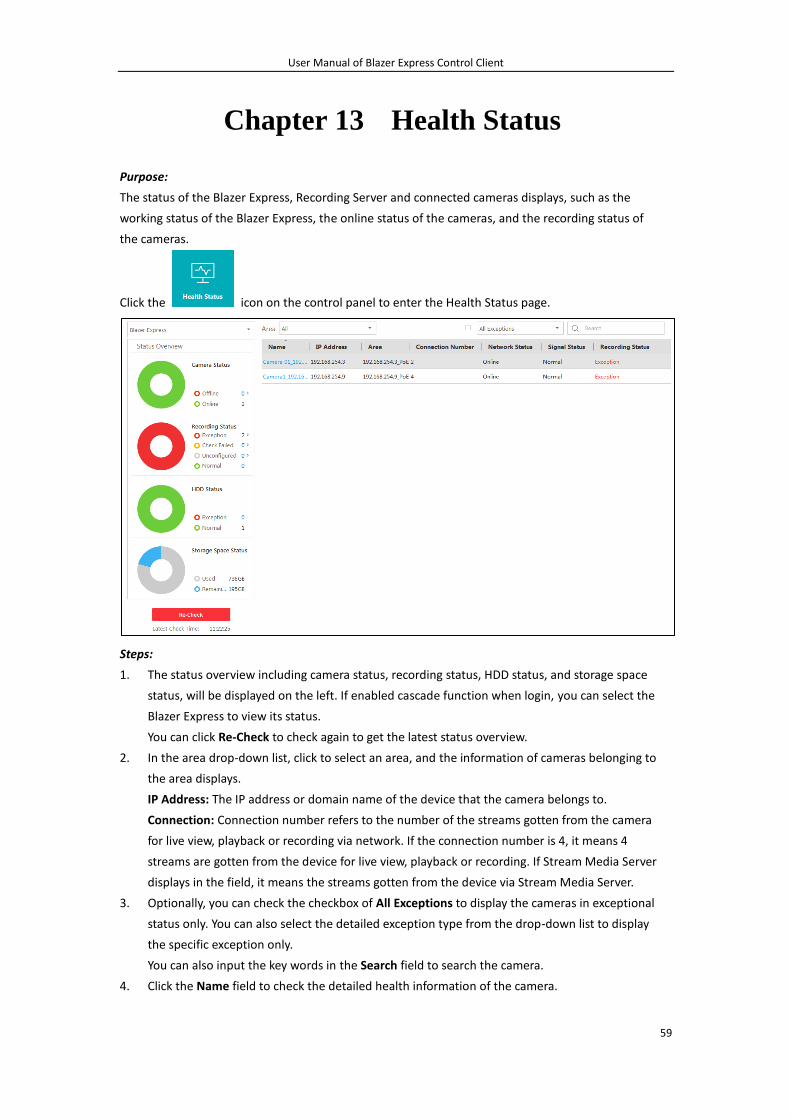
User Manual of Blazer Express Control Client
59
Chapter 13 Health Status
Purpose:
The status of the Blazer Express, Recording Server and connected cameras displays, such as the
working status of the Blazer Express, the online status of the cameras, and the recording status of
the cameras.
Click the icon on the control panel to enter the Health Status page.
Steps:
1. The status overview including camera status, recording status, HDD status, and storage space
status, will be displayed on the left. If enabled cascade function when login, you can select the
Blazer Express to view its status.
You can click Re-Check to check again to get the latest status overview.
2. In the area drop-down list, click to select an area, and the information of cameras belonging to
the area displays.
IP Address: The IP address or domain name of the device that the camera belongs to.
Connection: Connection number refers to the number of the streams gotten from the camera
for live view, playback or recording via network. If the connection number is 4, it means 4
streams are gotten from the device for live view, playback or recording. If Stream Media Server
displays in the field, it means the streams gotten from the device via Stream Media Server.
3. Optionally, you can check the checkbox of All Exceptions to display the cameras in exceptional
status only. You can also select the detailed exception type from the drop-down list to display
the specific exception only.
You can also input the key words in the Search field to search the camera.
4. Click the Name field to check the detailed health information of the camera.
User Manual of Blazer Express Control Client
60
Chapter 14 Tools
Purpose:
Blazer Express Control Client provides multiple tools to offer you powerful functions.
VSPlayer: Play the video files stored on your PC.
Broadcast: Broadcast messages to the selected areas.
Alarm Output: Turn on/off the alarm outputs of the connected camera.
Two-Way Audio: Start talking to the selected camera.
VSPlayer
On the control panel, click VSPlayer to run the VSPlayer. The available video files display on the
playlist and you can double-click the video to play it.
For detailed operation about VSPlayer, click in the upper-right corner of the VSPlayer interface
and select User Manual to view the VSPlayer's user manual.
Broadcast
On the control panel, click Broadcast to pop up the broadcast window.
You can click Start Broadcasting to broadcast messages to the specific device and click Stop
Broadcasting to stop. You can also click Start All to broadcast messages to the all the added devices,
and click Stop All to cancel all the broadcast.
Alarm Output
On the control panel, click Alarm Output to pop up the alarm output control window.
You can click Turn On to turn the specific device's alarm output on and click Turn Off to turn the
alarm output off. You can also click Turn On All to turn all devices' alarm outputs on, and click Turn
Off All to turn all alarm outputs off.
Two-Way Audio
Steps:
1. On the control panel, click Two-Way Audio to pop up the two-way audio window.
2. Click Select Camera to pop up the select camera dialog.
3. Select a camera and click OK.
4. Click Start and you can talk to the selected camera or device. Click Stop to finish two-way audio.
5. Optionally, you can click to adjust the microphone volume, and click to adjust the
speaker volume.
User Manual of Blazer Express Control Client
61
Chapter 15 Cascading Function
Purpose:
With the cascading function, you can manage up to multiple devices (Blazer Express, DVR, NVR) to
view their live video, video files, alarm information, health status and log information.
Before you start:
You must check Enable Cascade checkbox on the login dialog to enable the cascading function for
display the Station Management page.
Steps:
1. On the control panel, click Station Management. By default, the current Blazer Express displays.
2. Click Add and to pop up the add station dialog.
3. Input the required settings.
Station Type: Select the station to add as Blazer Express, DVR, or NVR.
Station Address: Input the IP address of the station. If you check HiDDNS checkbox, input
the HiDDNS server address (by default, www.hik-online.com).
Station Port/Domain Name: Input the port No. of the station. For Blazer Express, the
default value is 80, and for DVR or NVR, the default value is 8000. If you check HiDDNS
checkbox, input the domain name registered on HiDDNS server.
Alias: Edit a name for the station as desired.
Note: When the station type is Blazer Express, you can also check Synchronize Name to
synchronize the alias with Blazer Express name. For setting the Blazer Express name,
please refer to the User Manual of Blazer Express Web Client.
User Name: Input the user name of the station.
Password: Input the password of the station.
4. Click Add Station to save the settings.
The added station will display on the list. You can go to the Live View, Remote Playback, Alarm
Center and Log Search page to check its live video, playback, alarm information, and log files.
For the added Blazer Express, you can go to the Health Status page to check its working status.
5. Check the checkbox to select the added stations, and click Refresh to get the stations' latest
resources.
Note: For the added Blazer Express, if its resources have changed (e.g., more cameras are
added), a dialog will pop up to ask you to synchronize with the Blazer Express to get the latest
resources.
6. Click and edit the parameters in the pop-up dialog to edit the settings of the station.
Note: If the resources of the station to delete are under live view, playback or video download,
editing the station will stop all the operation of the station.
7. Check the checkbox to select the added stations, and click Remove to delete the stations.
Note: If the resources of the station to delete are under live view, playback or video download,
deleting the station will stop all the operation of the station.
8. Click Data tab to enter the data import and export page.
9. Click Export to save the added stations' information, view, history login and system
configuration information to your PC. The exported information can be imported to other
Control Clients for configuring with the same parameters.

User Manual of Blazer Express Control Client
62
10. You can also click Import and select the configuration file stored on your PC to get the settings
of other Control Client.
Note: You must restart the Control Client after importing the configuration file to take effect of
the settings.
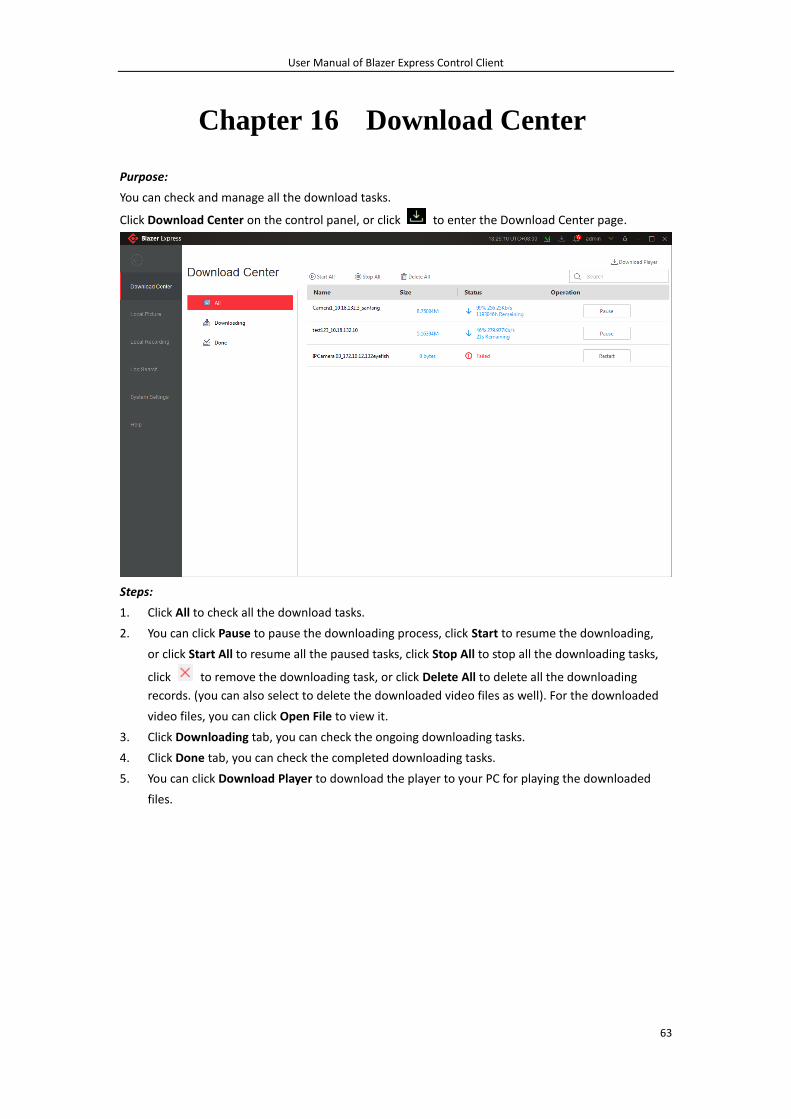
User Manual of Blazer Express Control Client
63
Chapter 16 Download Center
Purpose:
You can check and manage all the download tasks.
Click Download Center on the control panel, or click to enter the Download Center page.
Steps:
1. Click All to check all the download tasks.
2. You can click Pause to pause the downloading process, click Start to resume the downloading,
or click Start All to resume all the paused tasks, click Stop All to stop all the downloading tasks,
click to remove the downloading task, or click Delete All to delete all the downloading
records. (you can also select to delete the downloaded video files as well). For the downloaded
video files, you can click Open File to view it.
3. Click Downloading tab, you can check the ongoing downloading tasks.
4. Click Done tab, you can check the completed downloading tasks.
5. You can click Download Player to download the player to your PC for playing the downloaded
files.
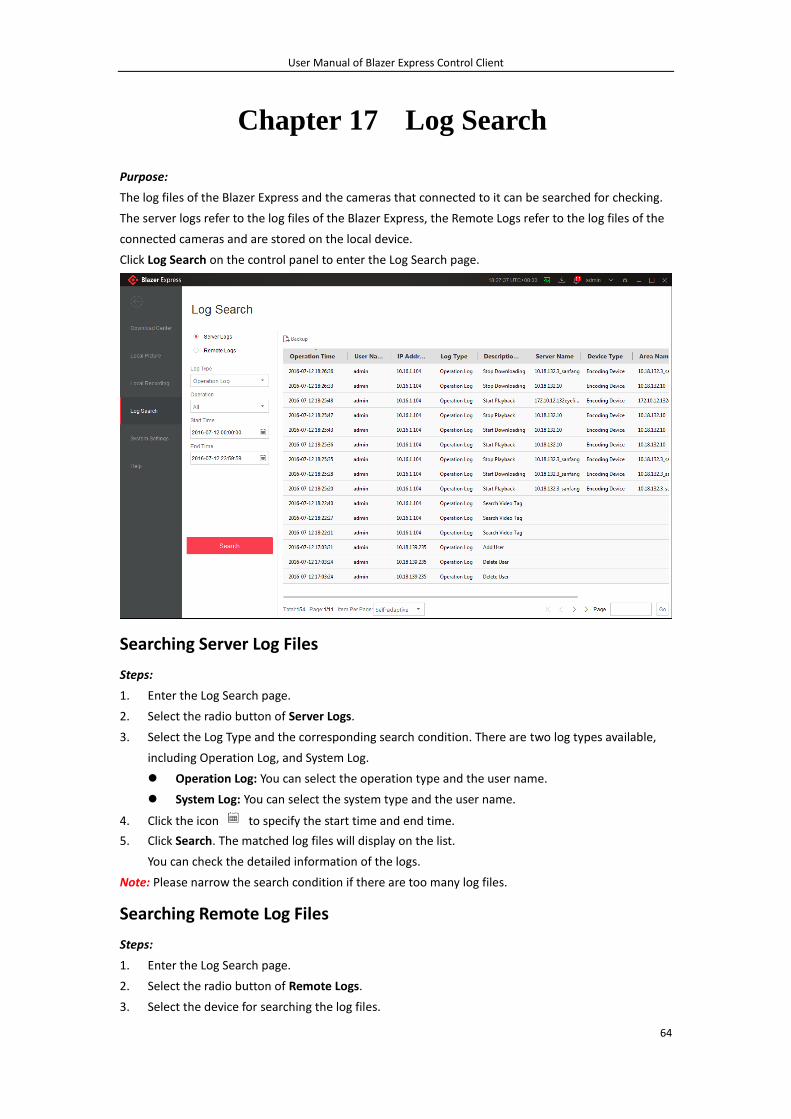
User Manual of Blazer Express Control Client
64
Chapter 17 Log Search
Purpose:
The log files of the Blazer Express and the cameras that connected to it can be searched for checking.
The server logs refer to the log files of the Blazer Express, the Remote Logs refer to the log files of the
connected cameras and are stored on the local device.
Click Log Search on the control panel to enter the Log Search page.
Searching Server Log Files
Steps:
1. Enter the Log Search page.
2. Select the radio button of Server Logs.
3. Select the Log Type and the corresponding search condition. There are two log types available,
including Operation Log, and System Log.
Operation Log: You can select the operation type and the user name.
System Log: You can select the system type and the user name.
4. Click the icon to specify the start time and end time.
5. Click Search. The matched log files will display on the list.
You can check the detailed information of the logs.
Note: Please narrow the search condition if there are too many log files.
Searching Remote Log Files
Steps:
1. Enter the Log Search page.
2. Select the radio button of Remote Logs.
3. Select the device for searching the log files.
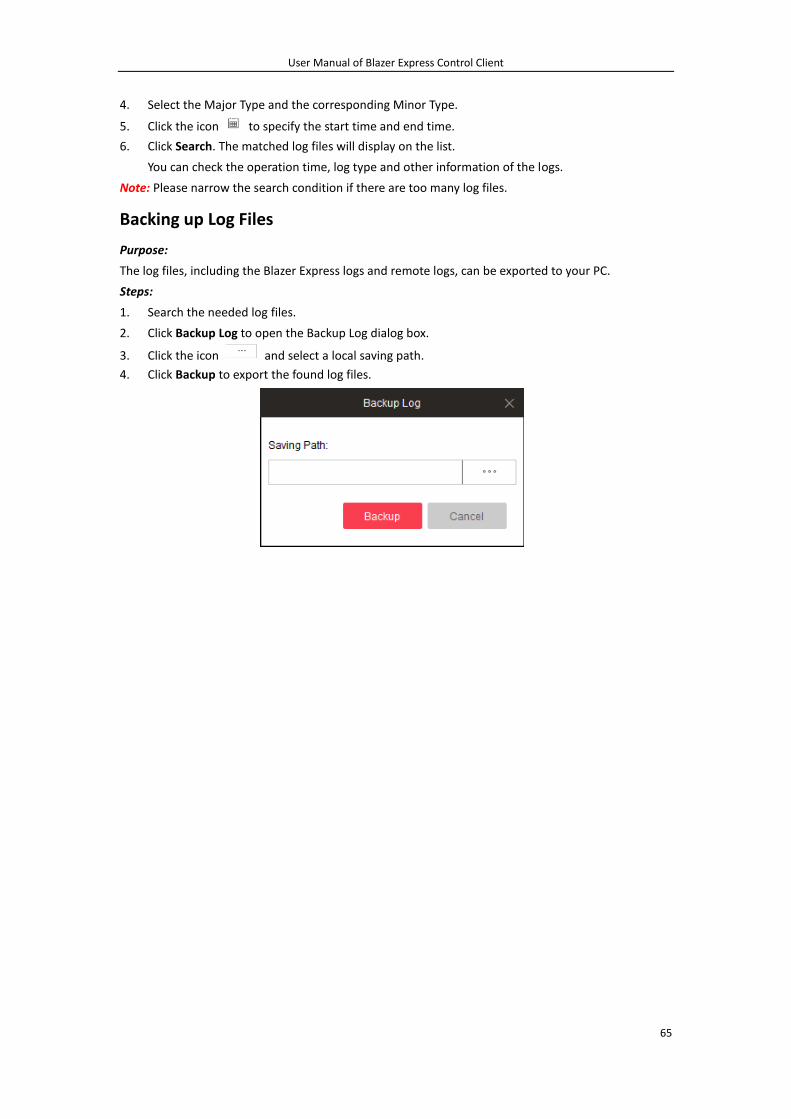
User Manual of Blazer Express Control Client
65
4. Select the Major Type and the corresponding Minor Type.
5. Click the icon to specify the start time and end time.
6. Click Search. The matched log files will display on the list.
You can check the operation time, log type and other information of the logs.
Note: Please narrow the search condition if there are too many log files.
Backing up Log Files
Purpose:
The log files, including the Blazer Express logs and remote logs, can be exported to your PC.
Steps:
1. Search the needed log files.
2. Click Backup Log to open the Backup Log dialog box.
3. Click the icon and select a local saving path.
4. Click Backup to export the found log files.
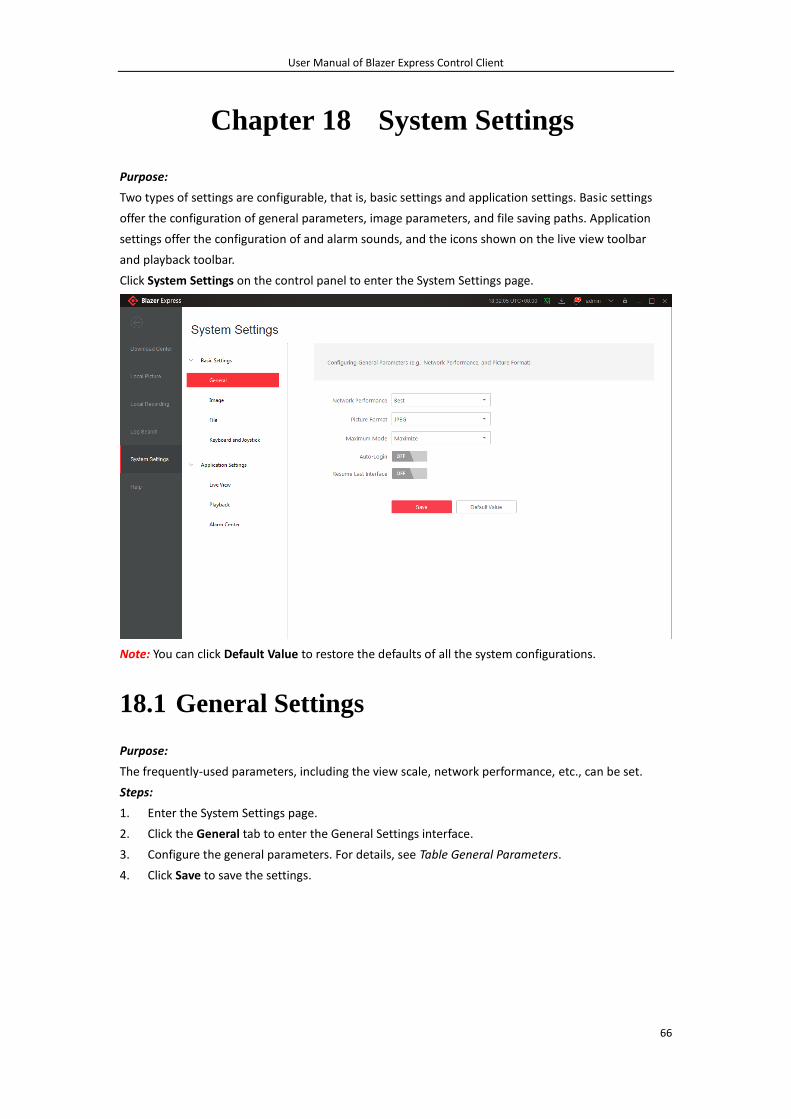
User Manual of Blazer Express Control Client
66
Chapter 18 System Settings
Purpose:
Two types of settings are configurable, that is, basic settings and application settings. Basic settings
offer the configuration of general parameters, image parameters, and file saving paths. Application
settings offer the configuration of and alarm sounds, and the icons shown on the live view toolbar
and playback toolbar.
Click System Settings on the control panel to enter the System Settings page.
Note: You can click Default Value to restore the defaults of all the system configurations.
18.1 General Settings
Purpose:
The frequently-used parameters, including the view scale, network performance, etc., can be set.
Steps:
1. Enter the System Settings page.
2. Click the General tab to enter the General Settings interface.
3. Configure the general parameters. For details, see Table General Parameters.
4. Click Save to save the settings.
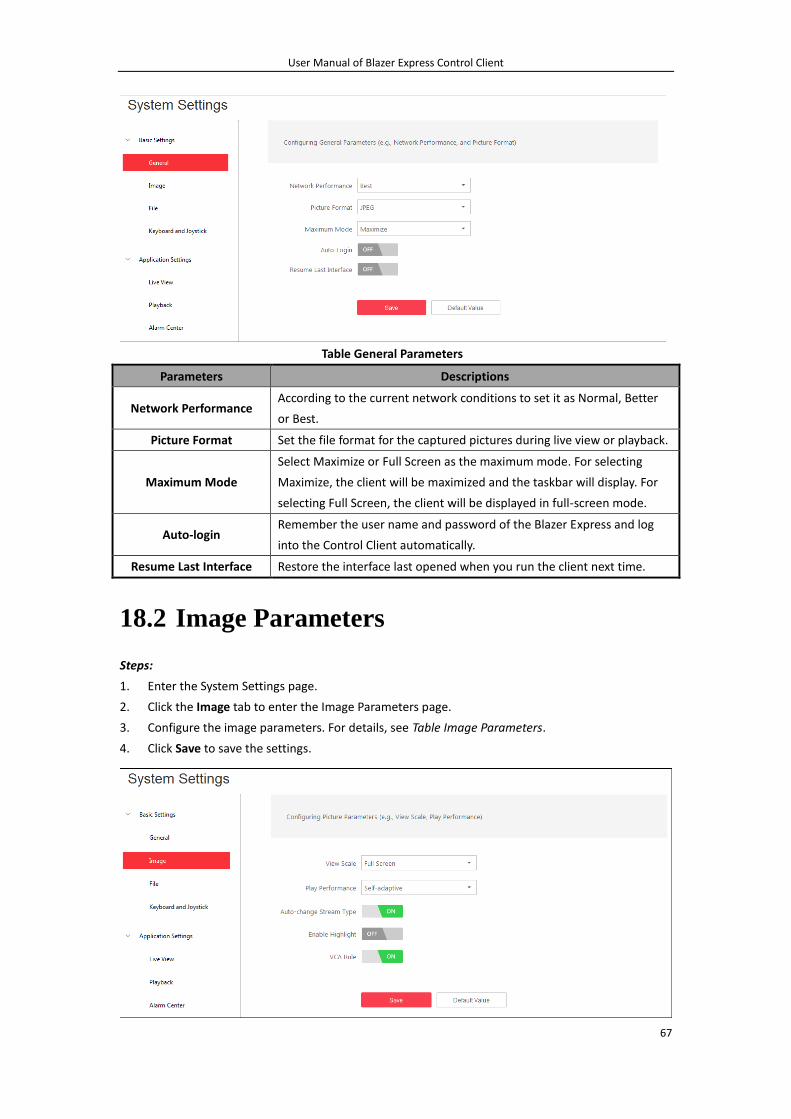
User Manual of Blazer Express Control Client
67
Table General Parameters
Parameters Descriptions
Network Performance According to the current network conditions to set it as Normal, Better
or Best.
Picture Format Set the file format for the captured pictures during live view or playback.
Maximum Mode
Select Maximize or Full Screen as the maximum mode. For selecting
Maximize, the client will be maximized and the taskbar will display. For
selecting Full Screen, the client will be displayed in full-screen mode.
Auto-login Remember the user name and password of the Blazer Express and log
into the Control Client automatically.
Resume Last Interface Restore the interface last opened when you run the client next time.
18.2 Image Parameters
Steps:
1. Enter the System Settings page.
2. Click the Image tab to enter the Image Parameters page.
3. Configure the image parameters. For details, see Table Image Parameters.
4. Click Save to save the settings.
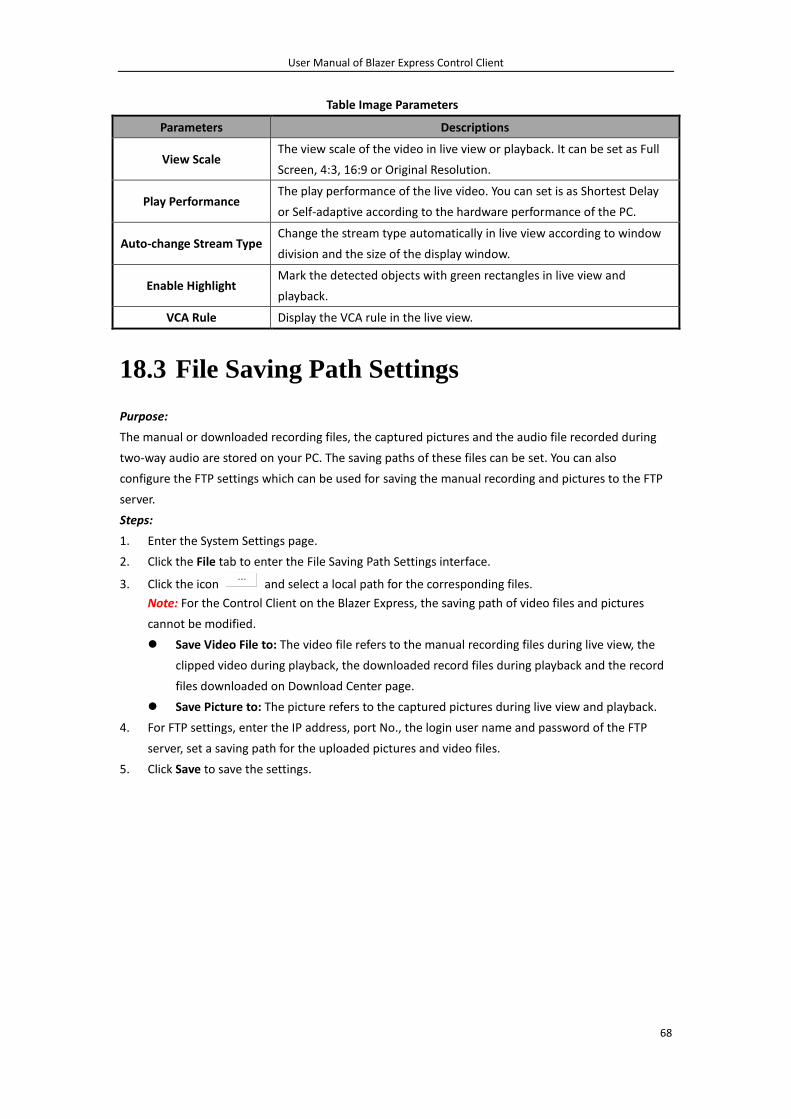
User Manual of Blazer Express Control Client
68
Table Image Parameters
Parameters Descriptions
View Scale The view scale of the video in live view or playback. It can be set as Full
Screen, 4:3, 16:9 or Original Resolution.
Play Performance The play performance of the live video. You can set is as Shortest Delay
or Self-adaptive according to the hardware performance of the PC.
Auto-change Stream Type Change the stream type automatically in live view according to window
division and the size of the display window.
Enable Highlight Mark the detected objects with green rectangles in live view and
playback.
VCA Rule Display the VCA rule in the live view.
18.3 File Saving Path Settings
Purpose:
The manual or downloaded recording files, the captured pictures and the audio file recorded during
two-way audio are stored on your PC. The saving paths of these files can be set. You can also
configure the FTP settings which can be used for saving the manual recording and pictures to the FTP
server.
Steps:
1. Enter the System Settings page.
2. Click the File tab to enter the File Saving Path Settings interface.
3. Click the icon and select a local path for the corresponding files.
Note: For the Control Client on the Blazer Express, the saving path of video files and pictures
cannot be modified.
Save Video File to: The video file refers to the manual recording files during live view, the
clipped video during playback, the downloaded record files during playback and the record
files downloaded on Download Center page.
Save Picture to: The picture refers to the captured pictures during live view and playback.
4. For FTP settings, enter the IP address, port No., the login user name and password of the FTP
server, set a saving path for the uploaded pictures and video files.
5. Click Save to save the settings.
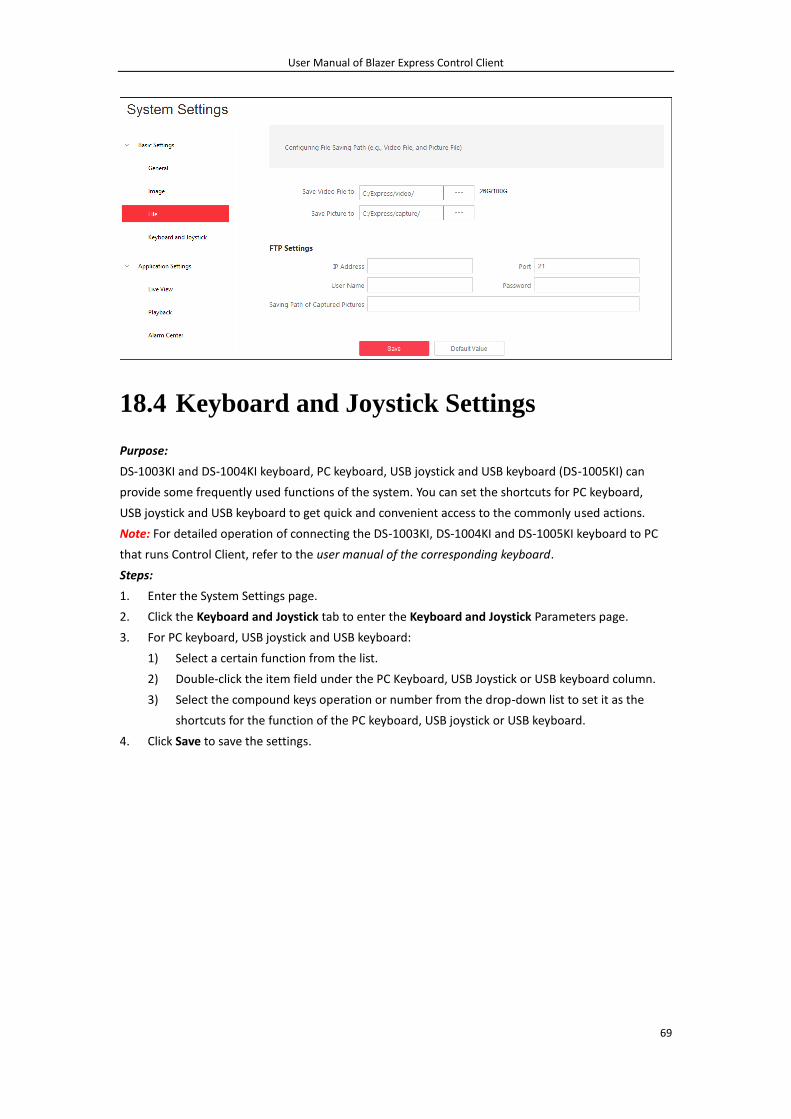
User Manual of Blazer Express Control Client
69
18.4 Keyboard and Joystick Settings
Purpose:
DS-1003KI and DS-1004KI keyboard, PC keyboard, USB joystick and USB keyboard (DS-1005KI) can
provide some frequently used functions of the system. You can set the shortcuts for PC keyboard,
USB joystick and USB keyboard to get quick and convenient access to the commonly used actions.
Note: For detailed operation of connecting the DS-1003KI, DS-1004KI and DS-1005KI keyboard to PC
that runs Control Client, refer to the user manual of the corresponding keyboard.
Steps:
1. Enter the System Settings page.
2. Click the Keyboard and Joystick tab to enter the Keyboard and Joystick Parameters page.
3. For PC keyboard, USB joystick and USB keyboard:
1) Select a certain function from the list.
2) Double-click the item field under the PC Keyboard, USB Joystick or USB keyboard column.
3) Select the compound keys operation or number from the drop-down list to set it as the
shortcuts for the function of the PC keyboard, USB joystick or USB keyboard.
4. Click Save to save the settings.
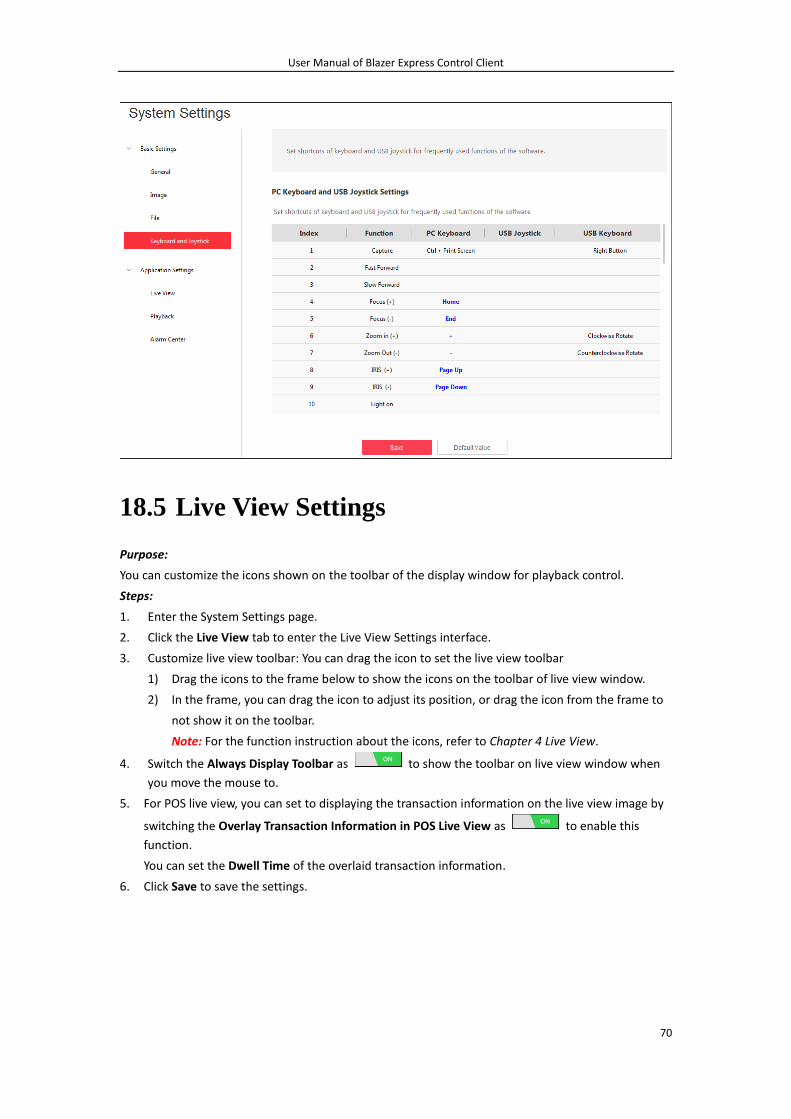
User Manual of Blazer Express Control Client
70
18.5 Live View Settings
Purpose:
You can customize the icons shown on the toolbar of the display window for playback control.
Steps:
1. Enter the System Settings page.
2. Click the Live View tab to enter the Live View Settings interface.
3. Customize live view toolbar: You can drag the icon to set the live view toolbar
1) Drag the icons to the frame below to show the icons on the toolbar of live view window.
2) In the frame, you can drag the icon to adjust its position, or drag the icon from the frame to
not show it on the toolbar.
Note: For the function instruction about the icons, refer to Chapter 4 Live View.
4. Switch the Always Display Toolbar as to show the toolbar on live view window when
you move the mouse to.
5. For POS live view, you can set to displaying the transaction information on the live view image by
switching the Overlay Transaction Information in POS Live View as to enable this
function.
You can set the Dwell Time of the overlaid transaction information.
6. Click Save to save the settings.
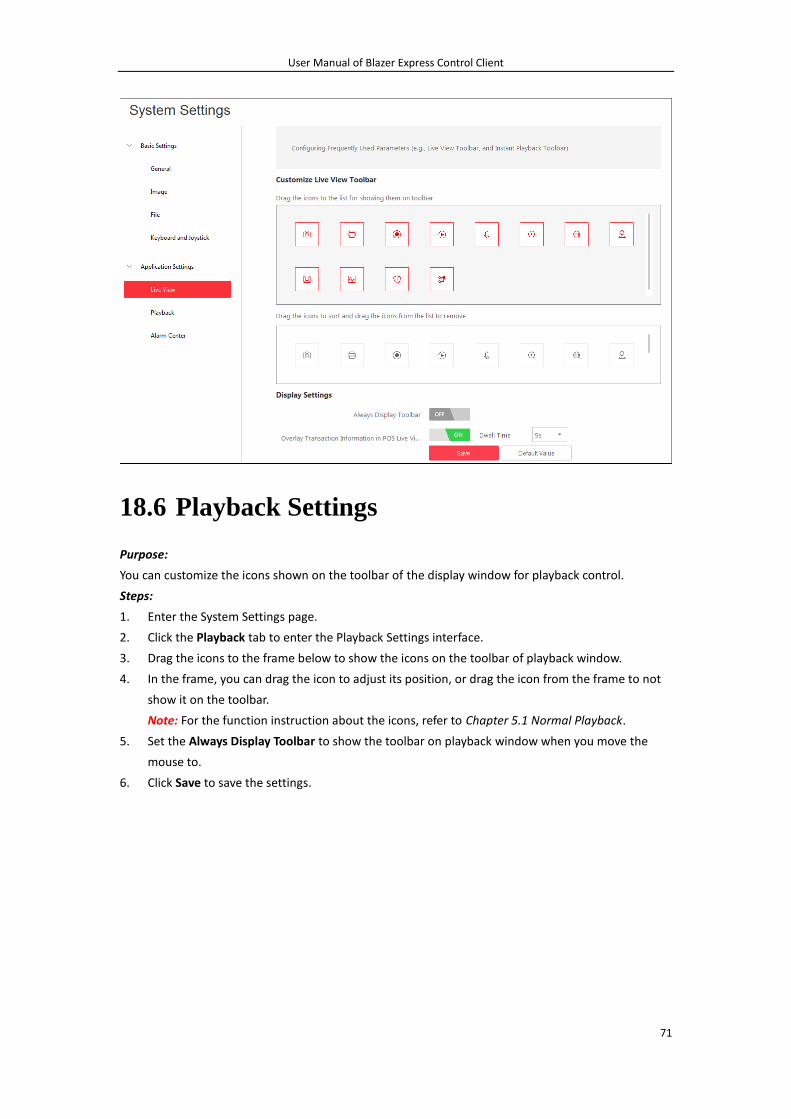
User Manual of Blazer Express Control Client
71
18.6 Playback Settings
Purpose:
You can customize the icons shown on the toolbar of the display window for playback control.
Steps:
1. Enter the System Settings page.
2. Click the Playback tab to enter the Playback Settings interface.
3. Drag the icons to the frame below to show the icons on the toolbar of playback window.
4. In the frame, you can drag the icon to adjust its position, or drag the icon from the frame to not
show it on the toolbar.
Note: For the function instruction about the icons, refer to Chapter 5.1 Normal Playback.
5. Set the Always Display Toolbar to show the toolbar on playback window when you move the
mouse to.
6. Click Save to save the settings.
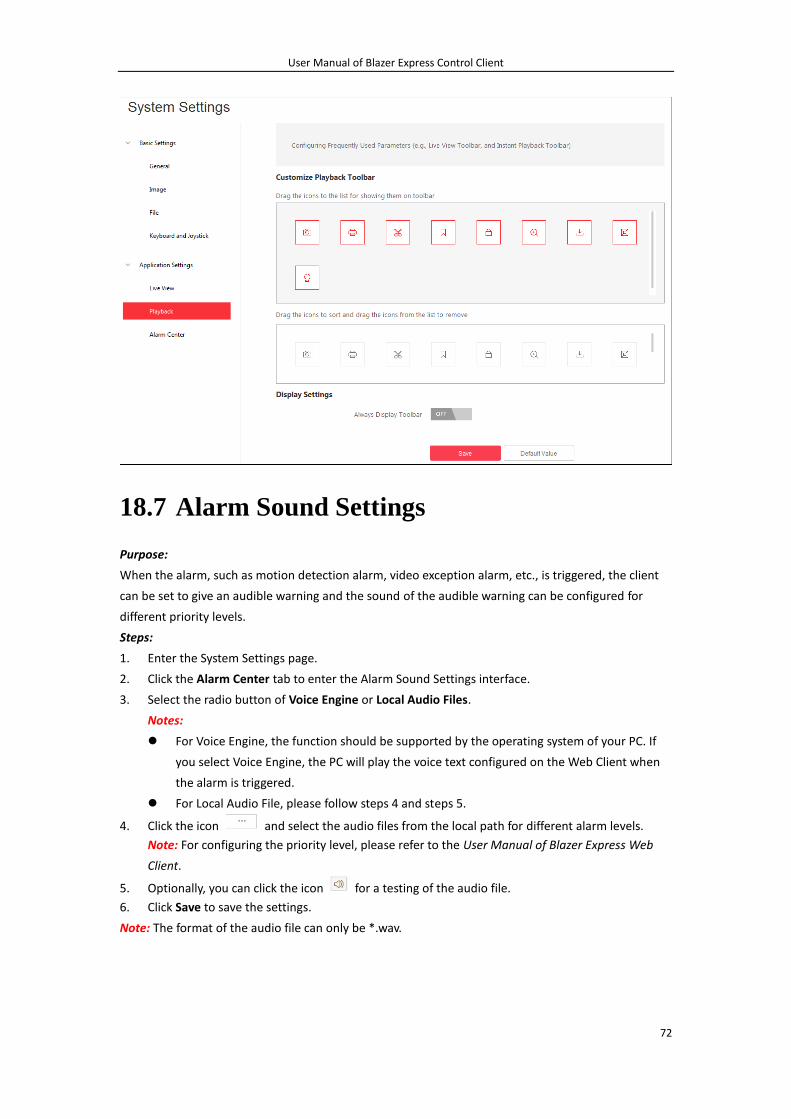
User Manual of Blazer Express Control Client
72
18.7 Alarm Sound Settings
Purpose:
When the alarm, such as motion detection alarm, video exception alarm, etc., is triggered, the client
can be set to give an audible warning and the sound of the audible warning can be configured for
different priority levels.
Steps:
1. Enter the System Settings page.
2. Click the Alarm Center tab to enter the Alarm Sound Settings interface.
3. Select the radio button of Voice Engine or Local Audio Files.
Notes:
For Voice Engine, the function should be supported by the operating system of your PC. If
you select Voice Engine, the PC will play the voice text configured on the Web Client when
the alarm is triggered.
For Local Audio File, please follow steps 4 and steps 5.
4. Click the icon and select the audio files from the local path for different alarm levels.
Note: For configuring the priority level, please refer to the User Manual of Blazer Express Web
Client.
5. Optionally, you can click the icon for a testing of the audio file.
6. Click Save to save the settings.
Note: The format of the audio file can only be *.wav.
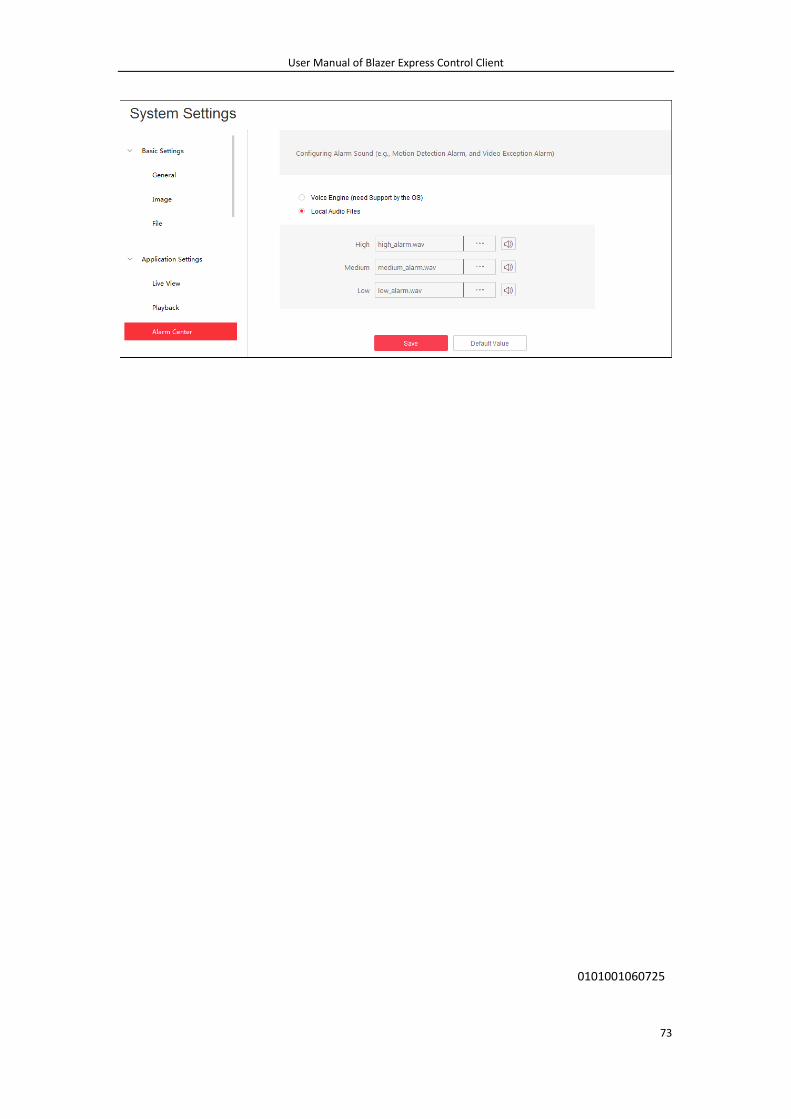
User Manual of Blazer Express Control Client
73
0101001060725
User Manual of Blazer Express Control Client
74